
Инструкция и руководство для
Panasonic KX-TG6421
46 страниц подробных инструкций и пользовательских руководств по эксплуатации на русском
03:28
Panasonic DECT регистрация трубки
04:55
Радиотелефон DECT Panasonic KX-TG2511RUM
08:04
Чистка кнопок радио телефона Panasonic KX-TG2511
11:44
Радиотелефон Panasonic KX TG6821
07:07
Panasonic KX TG1611RUH распаковка и обзор
07:39
DECT-телефон Panasonic с WiFi и приемом звонков на смартфонах
08:02
Радиотелефон PANASONIC KX TG6821RUM Видеоотзыв (обзор) Андрея
16:33
Panasonic KX-TGA640 Button Repair KX-TGA641 KX-TGA642 KX-TGA106
Нажмите на кнопку для помощи
— Что занимает последние 6 страниц инструкции по эксплуатации автомобиля «Таврия»?
— Расписания электричек и поездов.

Installation Manual
Additional Digital Cordless Handset
Model No.
Thank you for purchasing a Panasonic product.
This unit is an additional handset compatible with the following
series of Panasonic Digital Cordless Phone:
KX-TG6411/KX-TG6421/KX-TG6431/KX-TG6441/
KX-TG7431
Y ou must register this handset with your base unit before it can
be used. This installation manual describes only the steps
needed to register and begin using the handset. Please read
the base unit’s operating instructions for further details.
Charge the batteries for about 7 hours before initial use.
Please read this installa ti on man u al be fo re using the unit and
save it for future reference.
For assistance, visit our website:
http://www.panasonic.com/help
for customers in the U.S.A. or
Puerto Rico.
KX-TGA740
PNQX1650ZA DM1108DW0
Accessory information
Supplied accessories
Accessory item/Order number Quantity
Charger/PNWETGA740B 1
AC adaptor/PQLV219Z 1
Rechargeable batteries/HHR-4DPA
(Part No. HHR-65AAABU or N4DHYYY00002)
*1
Handset cover
Belt clip/PNKE1029Z1 1
*1 The handset cover comes attached to the handset.
Note:
LPlease read the base unit’s operating instructions for additional/
replacement accessories.
/PNYNTGA641TR 1
2
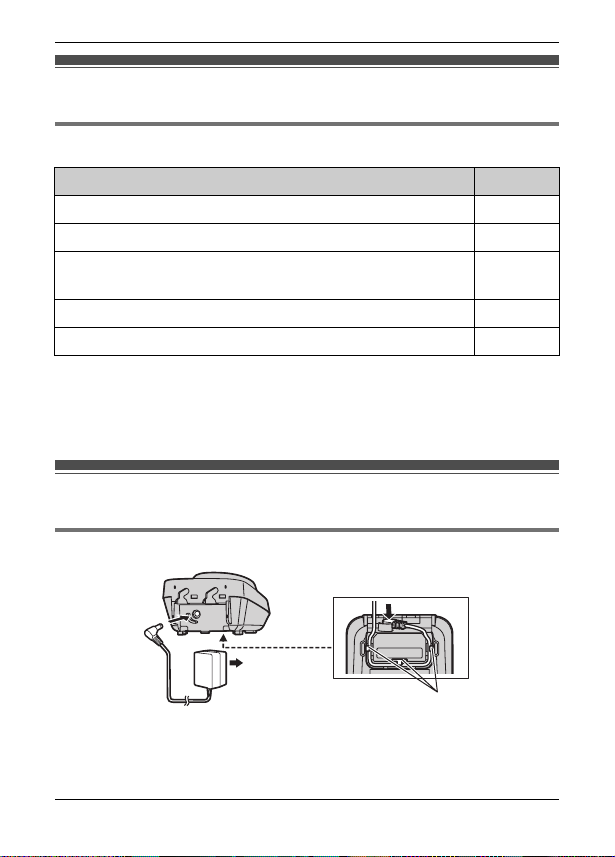
Setting up
Connections
(120 V AC,
60 Hz)
Note:
LUse only the supplied Panasonic AC adaptor PQLV219.
LThe AC adaptor must remain connected at all times. (It is normal for
the adaptor to feel warm during use.)
2 For assistance, please visit http://www.panasonic.com/help
Hooks

Battery installation/Battery charge
Important:
LUse the supplied rechargeable batteries. For replacement, we
recommend using the Panasonic rechargeable batteries noted on
page 2.
LWipe the battery ends (S, T) with a dry cloth.
LAvoid touching the battery ends (S, T) or the unit contacts.
LConfirm correct polarities (S, T).
LUSE ONLY Ni-MH batteries AAA (R03) size.
LDo NOT use Alkaline/Manganese/Ni-Cd batteries.
Charge for about 7 hours.
LWhen the batteries are fully charged, the charge indicator goes off.
Confirm “Charging”
Rechargeable Ni-MH
ONLY
Note:
LIf the batteries are fully charged, but the operating time seems to be
shorter, clean the battery ends (S, T) and the charge cont acts with a
dry cloth and charge again.
is displayed.
For assistance, please visit http://www.panasonic.com/help 3
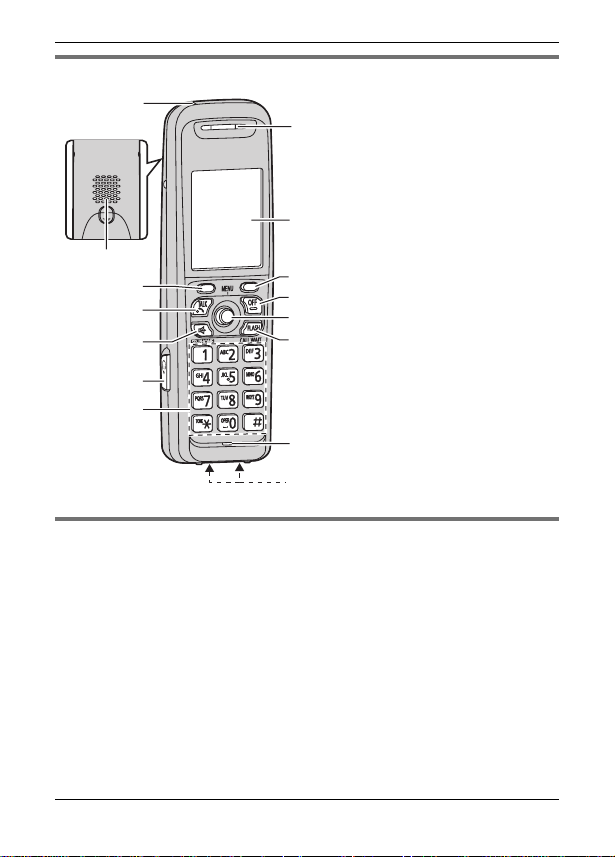
Controls
A Charge indicator
Ringer indicator
Message indicator
B Speaker
C Soft keys
D {C} (TALK)
E {s} (SP-PHONE:
Speakerphone)
F Headset jack
G Dial keypad
({*}: TONE)
H Receiver
I Display
J {OFF}
K Joystick
L {FLASH} {CALL WAIT}
M Microphone
N Charge contacts
B
C
D
E
F
G
H
I
C
J
K
L
M
Registering a handset to a base unit
1
Base unit:
NKX-TG6411 series
Press and hold {LOCATOR} for about 4 seconds. (No registration
tone)
NKX-TG6421/KX-TG6431/KX-TG6441/KX-TG7431 series
Press and hold {LOCATOR} for about 4 seconds until the
registration tone sounds.
LIf all registered handsets start ringing, press the same button to
stop. Then repeat this step.
LThe next step must be completed within 90 seconds.
4 For assistance, please visit http://www.panasonic.com/help
2 Handset:
Press {OK}, then wait until a long beep sounds.
Note:
LIf an error tone sounds, or if _ is still displayed, register the handset
according to the base unit’s operating instructions.
Display language
{MENU} (center of joystick) i {#}{1}{1}{0}
1
2 {V}/{^}: Select the desired setting.
3 Press down the center of the joystick to save. i {OFF}
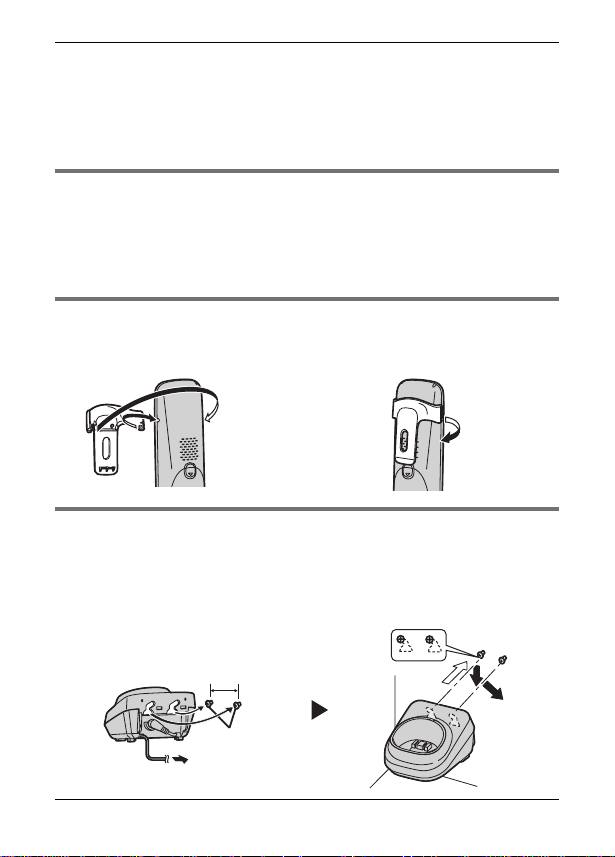
Belt clip
NTo attach N To remove
Wall mounting
Drive the screws (not supplied) into the wall.
1
2 Mount the charger (A), then slide it down (B) and to the right (C)
until it is secure.
25.4 mm
(1 inch)
Screws
(120 V AC, 60 Hz)
For assistance, please visit http://www.panasonic.com/help 5
A
B
C
Loading…
Panasonic KX-TG6421
Thank you for purchasing a Panasonic product.
This unit is compatible with Caller ID. You must subscribe to the appropriate
service offered by your service provider/telephone company.
Please read these operating instructions before using the unit and save
them for future reference.
Charge the batteries for about 7 hours before initial use.
Operating Instructions
Model No. KX-TG6421E
KX-TG6422E
Digital Cordless Answering System
Model No. KX-TG6411E
KX-TG6412E
KX-TG6413E
Digital Cordless Phone
KX-TG6423E
KX-TG6424E
Model shown is KX-TG6411.
TG6411-6421E(e).book Page 1 Tuesday, December 16, 2008 7:54 AM
View the manual for the Panasonic KX-TG6421 here, for free. This user manual comes under the category phones and has been rated by 4 people with an average of a 8. This manual is available in the following languages: English. Do you have a question about the Panasonic KX-TG6421?
Ask your question here
Index
- Table of Contents
- Introduction
- Important Information
- Getting Started
- Making/Answering Calls
- Phonebook
- Programming
- Caller ID Service
- Answering System
- Voice Mail Service
- Intercom/Locator
- Useful Information
- Index
Product Images (4)

Panasonic KX-TG6421 specifications
Below you will find the product specifications and the manual specifications of the Panasonic KX-TG6421.
The Panasonic KX-TG6421 is a DECT phone that comes equipped with a range of basic features. It features an alarm clock and a clock with calendar to help keep you on track throughout your day. The multi-handset capability makes it perfect for larger households, as up to six handsets can be added. This phone also has multi-base capability, up to four bases can be used which improves coverage and flexibility. The phone comes with ten different melodies to choose from, and offers a redialing function for your convenience. The phone also features caller ID and speed dialing to further enhance its usability. The backlight buttons and navigation key ensure the phone is optimized for ease of use, while the 100 entry phone book capacity makes it easy to keep all your important contacts in one place. The answering machine can record messages for up to 20 minutes, making it an ideal choice for people who frequently receive long voice messages. The phone boasts an easy-to-read LCD display screen, making it simple to navigate settings, read messages, and view caller information. Overall, the Panasonic KX-TG6421 offers a solid set of functions, but some users may find that it lacks more advanced features commonly found in newer phone systems.
Multi handset capability
6
General
| Brand | Panasonic |
| Model | KX-TG6421 | KX-TG6421JTS |
| Product | phone |
| EAN | 5025232507290, 5025232507276 |
| Language | English |
| Filetype | Manual (PDF) |
Performance
| Type | DECT telephone |
| Number of melodies | 10 |
| Recording time | 20 min |
| Answering machine | Yes |
Management features
| Alarm clock | Yes |
| Clock with calendar | Yes |
| Navigation key | Yes |
Phone features
| Multi handset capability | 6 |
| Multi base capability | 4 |
| Phonebook capacity | 100 entries |
Call management
| Redialing | Yes |
| Caller ID | Yes |
| Speed dialling | Yes |
Design
| Backlight buttons | Yes |
| Product colour | Silver |
Display
| Display | LCD |
| Display resolution | 103 x 65 pixels |
| Display diagonal | 1.8 « |
Ports & interfaces
Other features
| Wall mountable | Yes |
| Mac compatibility | No |
Weight & dimensions
| Base dimensions | 126 x 126 x 55 mm |
| Handset dimensions (WxDxH) | 48 x 30 x 158 mm |
| Handset weight | 130 g |
| Base weight | 170 g |
Power
| Talk time | 18 h |
| Standby time | 170 h |
| Battery technology | Nickel-Metal Hydride (NiMH) |
| Number of batteries supported | 2 |
| Battery recharge time | 7 h |
show more
Frequently asked questions
Can’t find the answer to your question in the manual? You may find the answer to your question in the FAQs about the Panasonic KX-TG6421 below.
What is the screen size of the Panasonic KX-TG6421?
The screen size of the Panasonic KX-TG6421 is 1.8 «.
What is the screen resolution of the display of the Panasonic KX-TG6421?
The screen resolution of the Panasonic KX-TG6421 is 103 x 65 pixels.
How long does it take to charge the battery of the Panasonic KX-TG6421?
It takes 7 h to charge the battery of the Panasonic KX-TG6421.
Is the manual of the Panasonic KX-TG6421 available in English?
Yes, the manual of the Panasonic KX-TG6421 is available in English .
Is your question not listed? Ask your question here
Просмотр
Доступно к просмотру 56 страниц. Рекомендуем вам скачать файл инструкции, поскольку онлайн просмотр документа может сильно отличаться от оригинала.
-
TG6411-6421RU(ru-ru).book  Page 1  Wednesday, February 25, 2009  2:21 PM
Инструкция по эксплуатации
Цифровой беспроводной телефон
Модель № KX-TG6411RU
KX-TG6412RU
Цифровой беспроводной телефон
с автоответчиком
Модель № KX-TG6421RU
KX-TG6422RU
Показана модель KX-TG6411.
Благодарим вас за приобретение изделия производства компании
Panasonic.
Этот аппарат поддерживает услуги АОН и Caller ID. Для того, чтобы аппарат
отображал номер вызывающего абонента, необходимо подключить
соответствующую услугу у оператора связи.
Перед первым включением заряжайте аккумуляторные батареи не
менее 7 часов.
Прежде чем использовать телефон, изучите эту инструкцию по эксплуатации и
сохраните ее для справок.
-
TG6411-6421RU(ru-ru).book  Page 2  Wednesday, February 25, 2009  2:21 PM
Содеpжание
Введение                       Дистанционное управление . . . . . . . . .  34
Различия между моделями . . . . . . . . . . . 3  Настройки автоответчика . . . . . . . . . . .  36
Информация об аксессуарах  . . . . . . . . . 3  Услуга голосовой почты
Важная информация              Сервис голосовой почты . . . . . . . . . . . .  38
Для вашей безопасности . . . . . . . . . . . . . 5  Внутренняя связь/Поиск
Важные инструкции по безопасности . . . 6  Внутренняя связь. . . . . . . . . . . . . . . . . .  39
Для наилучшей эксплуатации . . . . . . . . . 6  Поиск трубки  . . . . . . . . . . . . . . . . . . . . .  39
Технические характеристики . . . . . . . . . . 7  Передача вызовов, конференц-связь  .  39
Начало работы                  Полезная информация
Установка  . . . . . . . . . . . . . . . . . . . . . . . . . 8  Ввод знаков . . . . . . . . . . . . . . . . . . . . . .  40
Примечание об установке . . . . . . . . . . . . 9  Сообщения об ошибках. . . . . . . . . . . . .  42
Органы управления . . . . . . . . . . . . . . . . 10  Устранение неполадок  . . . . . . . . . . . . .  43
Дисплей. . . . . . . . . . . . . . . . . . . . . . . . . . 11  Установка на стене  . . . . . . . . . . . . . . . .  50
Включение/выключение питания  . . . . . 13  Срок службы аппарата . . . . . . . . . . . . .  51
Исходные настройки  . . . . . . . . . . . . . . . 13  Указатель
Как делать/отвечать на вызовы  Указатель . . . . . . . . . . . . . . . . . . . . . . . .  52
Как делать вызовы . . . . . . . . . . . . . . . . . 15
Ответ на вызов . . . . . . . . . . . . . . . . . . . . 15
Полезные функции во время вызова . . 16
Блокировка клавиатуры. . . . . . . . . . . . . 17
Телефонная книга
Телефонная книга трубки  . . . . . . . . . . . 18
Копирование записей телефонной книги
. . . . . . . . . . . . . . . . . . . . . . . . . . . . . . . . . 19
Программирование
Программируемые настройки . . . . . . . . 20
Специальное программирование . . . . . 23
Регистрация аппарата . . . . . . . . . . . . . . 25
Идентификация вызывающего
абонента
Сервис идентификации вызывающего
абонента (АОН и Caller ID)  . . . . . . . . . . 27
Список вызывавших абонентов  . . . . . . 28
Настройки идентификации вызывающего
абонента для пользователей АОН . . . . 29
Автоответчик
Автоответчик. . . . . . . . . . . . . . . . . . . . . . 31
Включение/выключение автоответчика 31
Приветственное сообщение . . . . . . . . . 32
Прослушивание сообщений с помощью
базового блока . . . . . . . . . . . . . . . . . . . . 33
Прослушивание сообщений с помощью
трубки . . . . . . . . . . . . . . . . . . . . . . . . . . . 33
2
-
TG6411-6421RU(ru-ru).book  Page 3  Wednesday, February 25, 2009  2:21 PM
Введение
Различия между моделями
Базовый     Трубка
Серия       Модель №    блок
Модель №    Модель №   Количество
Серия       KX-TG6411   KX-TG6411   KX-TGA641       1
KX-TG6411   KX-TG6412   KX-TG6411   KX-TGA641       2
Серия       KX-TG6421   KX-TG6421   KX-TGA641       1
KX-TG6421   KX-TG6422   KX-TG6421   KX-TGA641       2
L В данной инструкции суффикс (RU) опущен для следующих моделей:
KX-TG6411RU/KX-TG6412RU/KX-TG6421RU/KX-TG6422RU
Функциональные различия
Внутренняя связь
Серия            Автоответчик
Между трубками
Серия KX-TG6411           –                   r *1
Серия KX-TG6421          r                    r *1
*1 Внутренние вызовы можно делать между трубками, приобретя заранее и
зарегистрировав одну или более дополнительных трубок (стр. 4).
Информация об аксессуарах
Поставляемые аксессуары
Количество
Номер  Аксессуар/Артикул                KX-TG6411  KX-TG6412
KX-TG6421  KX-TG6422
Адаптер для сети переменного тока/  1         2
1
PQLV219CE
Телефонный кабель                   1         1
2
*1
Аккумуляторные батареи /            2         4
3
HHR-55AAAB или N4DHYYY00001
Крышка беспроводной трубки *2       1         2
4
Зарядное устройство                 —         1
5
*1 Сведения о замене батарей см. на стр. 4.
*2 Крышка трубки поставляется прикрепленной к трубке.
3
- 1
- 2
- 3
- 4
- 56