
Перед пользованием прочтите,
пожалуйста, эту инструкцию
полностью.
VQT0S04
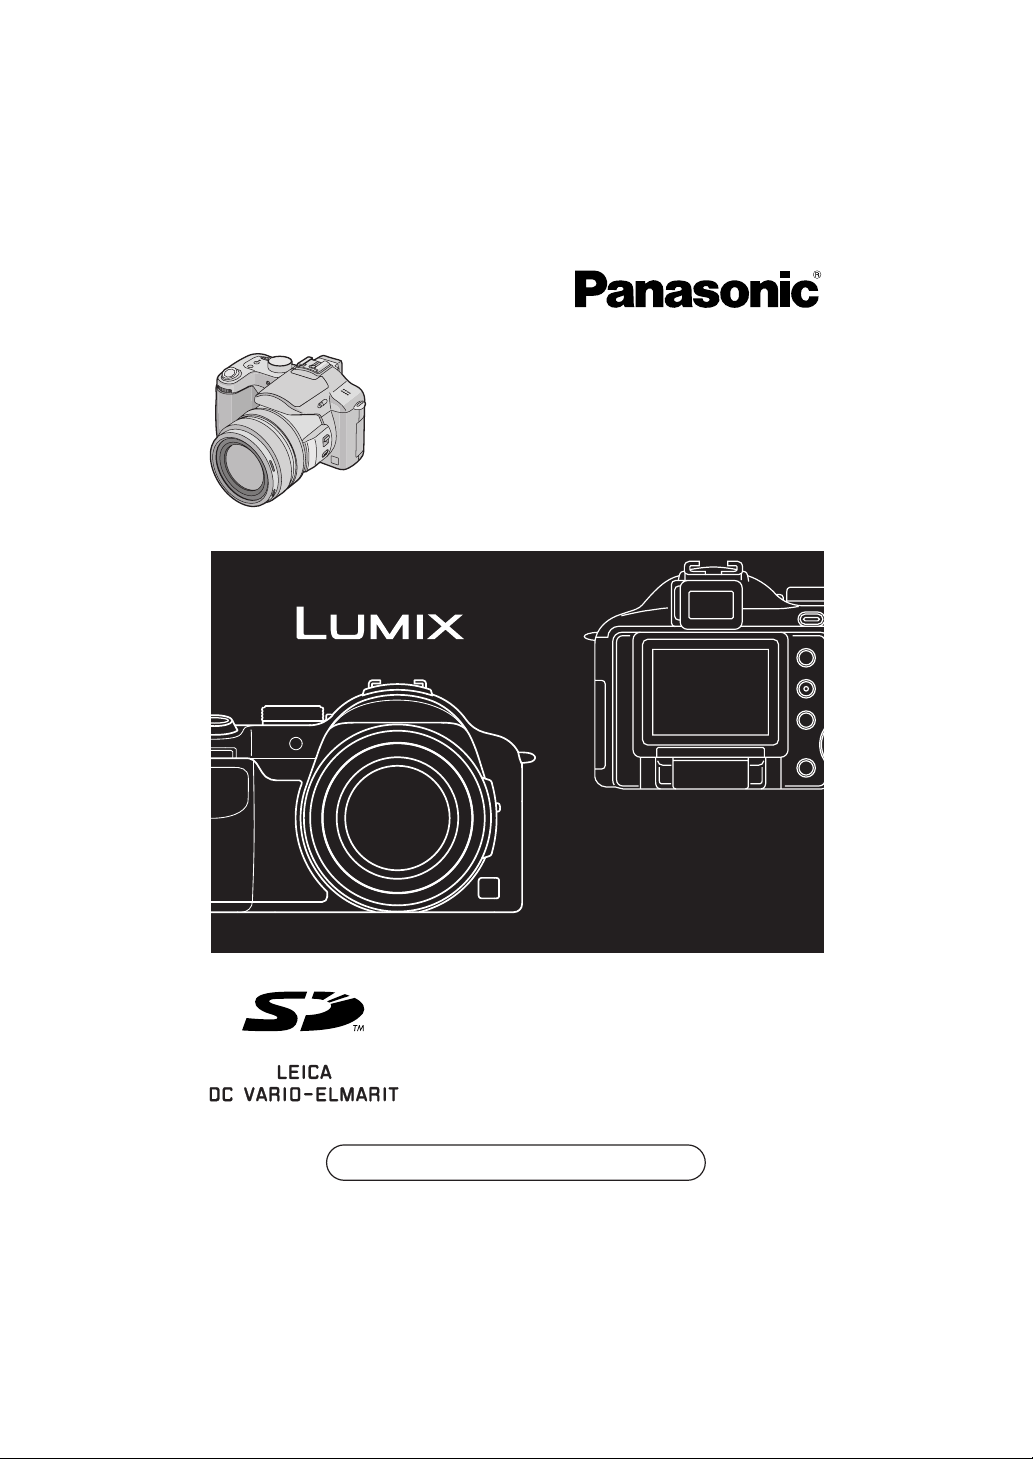
Инструкция по эксплуатации
Цифровая фотокамера
Модель №.
DMC-FZ30GC
DMC-
FZ30SG
Перед использованием
2
VQT0S04
Перед использованием
Уважаемый пользователь!
Благодарим Вас за приобретение этой
цифровой фотокамеры Panasonic.
Прочитайте, пожалуйста, внимательно
это руководство по эксплуатации и
держите его всегда под рукой.
Информация для
Вашей безопасности
Помните о соблюдении авторских
прав.
Запись с предварительно
записанных магнитных лент или
дисков, а также печатных или теле-
радио материалов с целью, отличной
от Вашего личного пользования,
может быть нарушением закона об
авторских правах. Даже с целью
Вашего личного пользования запись
определённого материала может
быть ограничена.
•Просьба обратить внимание, что
органы управления, составные части и
меню Вашей цифровой фотокамеры
могут несколько отличаться от тех, что
представлены на рисунках этой
инструкции.
•Логотип SD является торговым знаком.
•Другие имена, названия фирм и
изделий, упоминаемые в данной
инструкции, являются торговыми
знаками или зарегистрированными
товарными знаками.
ПРЕДУПРЕЖДЕНИЕ
ДЛЯ УМЕНЬШЕНИЯ ОПАСНОСТИ
ПОЖАРА ИЛИ ПОРАЖЕНИЯ
ЭЛЕКТРИЧЕСКИМ ТОКОМ И
ДРУГИХ НЕПРИЯТНЫХ
ПОСЛЕДСТВИЙ ИСПОЛЬЗОВАТЬ
ТОЛЬКО РЕКОМЕНДУЕМОЕ
ДОПОЛНИТЕЛЬНОЕ
ОБОРУДОВАНИЕ. НЕ ПОДВЕРГАТЬ
ЭТОТ АППАРАТ ВОЗДЕЙСТВИЮ
ДОЖДЯ ИЛИ ВЛАГИ. НЕ СНИМАТЬ
НАРУЖНУЮ КРЫШКУ (ИЛИ
ЗАДНЮЮ ПАНЕЛЬ) ЗАПРЕЩАЕТСЯ
ПРОИЗВОДИТЬ РЕМОНТ
САМОСТОЯТЕЛЬНО. ОБРАЩАТЬСЯ
К КВАЛИФИЦИРОВАННЫМ
СПЕЦИАЛИСТАМ ПО
ТЕХОБСЛУЖИВАНИЮ.
РАЗЪЕМ ДОЛЖЕН НАХОДИТЬСЯ
ВБЛИЗИ АППАРАТУРЫ И ДОСТУП К
НЕМУ НЕ ДОЛЖЕН БЫТЬ
ЗАТРУДНЕН.
ПРЕДУПРЕЖДЕНИЕ
При неправильной замене
аккумулятора возникает опасность
взрыва. Производить замену,
используя только тот же тип
аккумулятора, или равноценный ему,
рекомендуемый производителем.
Размещение в отходы
использованных аккумуляторов
производить согласно инструкциям
производителя.
Перед использованием
3
VQT0S04
-Если Вы увидите такой символ-
∫ Уход за камерой
•Беречь фотокамеру от сотрясений и
ударов. Они могут вызвать сбои в
работе фотокамеры, повреждения
объектива или сделать невозможной
запись снимков.
•Песок или пыль могут вызвать сбои
в работе фотокамеры. Если вы
пользуетесь фотокамерой на пляже
и т.п., будьте внимательны, чтобы в
нее не попали песок или пыль.
•Если вы пользуетесь фотокамерой в
дождливый день или на пляже, будьте
внимательны, чтобы в нее не попала
вода.
•Если на фотокамеру попали брызги
морской воды, смочить мягкую
тряпочку в водопроводной воде,
хорошо отжать ее и тщательно
протереть корпус фотокамеры.
Затем повторно протереть сухой
тканью.
∫ О мониторе ЖКД/Видоискателе
•Не нажимать с силой на монитор
ЖКД. Это может вызвать появление
на нем неправильных цветов или
сбои в его работе.
•В местах с сильными перепадами
температуры на мониторе ЖКД может
образоваться конденсат. Вытереть его
мягкой сухой тряпочкой.
•Если фотокамера переохлаждена, при
ее включении изображение на
мониторе ЖКД/Видоискателе будет
несколько темнее обычного. Однако по
мере повышения внутренней
температуры фотокамеры
восстановится обычная яркость.
•Будьте осторожны, поворачивая
монитор ЖКД: не прилагайте
излишних усилий, т.к. они могут
привести к повреждению.
•При использовании некоторых
штативов может оказаться
невозможно повернуть монитор
ЖКД.
•Когда используется Видоискатель и в
других случаях, когда монитор ЖКД не
используется, рекомендуется
закрывать его экраном внутрь, во
избежание загрязнений и царапин.
Информация по обращению с
отходами для стран, не входящих в
Европейский Союз
Действие этого символа
распространяется только на
Европейский Союз.
Если Вы собираетесь выбросить
данный продукт, узнайте в местных
органах власти или у дилера, как
следует поступать с отходами такого
типа.
Для производства экрана монитора
ЖКД/Видоискателя используется
высокоточная технология.
Результатом являются более 99,99%
рабочих пикселей и лишь 0,01%
неактивных или негаснущих
пикселей. Последнее, однако, не
отражается на записи снимков на
карту.
Перед использованием
4
VQT0S04
∫ Об объективе
•Не направлять объектив на солнце или
на источники сильного света. Это
может не только вызвать
неисправности в работе фотокамеры,
но и нанести непоправимый ущерб
вашим глазам.
•Не нажимать с силой на объектив.
•Если оставить фотокамеру
обращенной объективом к солнцу, это
может вызвать сбои в ее работе.
Будьте внимательны, когда вы кладете
фотокамеру за окно или вблизи окна.
•Наличие загрязнений (воды, масла,
отпечатков пальцев и т.п.) на
поверхности объектива может
отразиться на качестве снимка. Перед
и после съемки слегка протрите
поверхность объектива мягкой, сухой
тканью.
∫ О конденсации (замутнении
объектива или видоискателя)
Конденсация возникает, когда
температура или влажность
окружающей среды изменяется, как
описано ниже:
Остерегайтесь конденсации, поскольку
она вызывает появление пятен на
объективе, плесени и сбоев в работе
фотокамеры.
•Когда фотокамера с холода заносится
в теплое помещение.
•Когда фотокамера с улицы заносится в
автомобиль с включенной системой
кондиционирования.
•Когда холодный воздух из
кондиционера или т.п. направлен
прямо на фотокамеру.
•Во влажных местах
Поместите камеру в полиэтиленовый
мешок и дождитесь приближения ее
температуры к температуре
окружающей среды, во избежание
конденсации. При возникновении
конденсации выключите камеру и
выждите примерно 2 часа.
Когда температура камеры
приближается к температуре
окружающей среды, дымка исчезает
сама по себе.
∫ Если вы не собираетесь
пользоваться фотокамерой
длительное время
•Следует хранить аккумулятор в
прохладном сухом месте с
относительно устойчивой
температурой.
(Рекомендуемая температура:
15
oC до 25 oC, Рекомендуемая
влажность: 40% до 60%)
•Не забудьте вынуть аккумулятор и
карту из фотокамеры.
•Если оставить аккумулятор в
фотокамере на длительное время,
произойдет его разрядка, даже если
фотокамера будет выключена. Если
оставить аккумулятор в фотокамере
еще на более длительное время, он
переразрядится и может стать
непригодным к работе, даже после
подзарядки.
•Для хранения аккумулятора в течение
длительного периода времени
рекомендуется заряжать его раз в год
и снова класть на хранение после того,
как заряд будет полностью
израсходован.
•Если вы держите фотокамеру в
стенном шкафу или в футляре,
рекомендуется хранить ее с
десикантом (силикагелем).
•Рекомендуется, кладя камеру на
длительное хранение, закрывать
монитор ЖКД экраном внутрь.
Перед использованием
5
VQT0S04
Информация о данных инструкциях по
эксплуатации
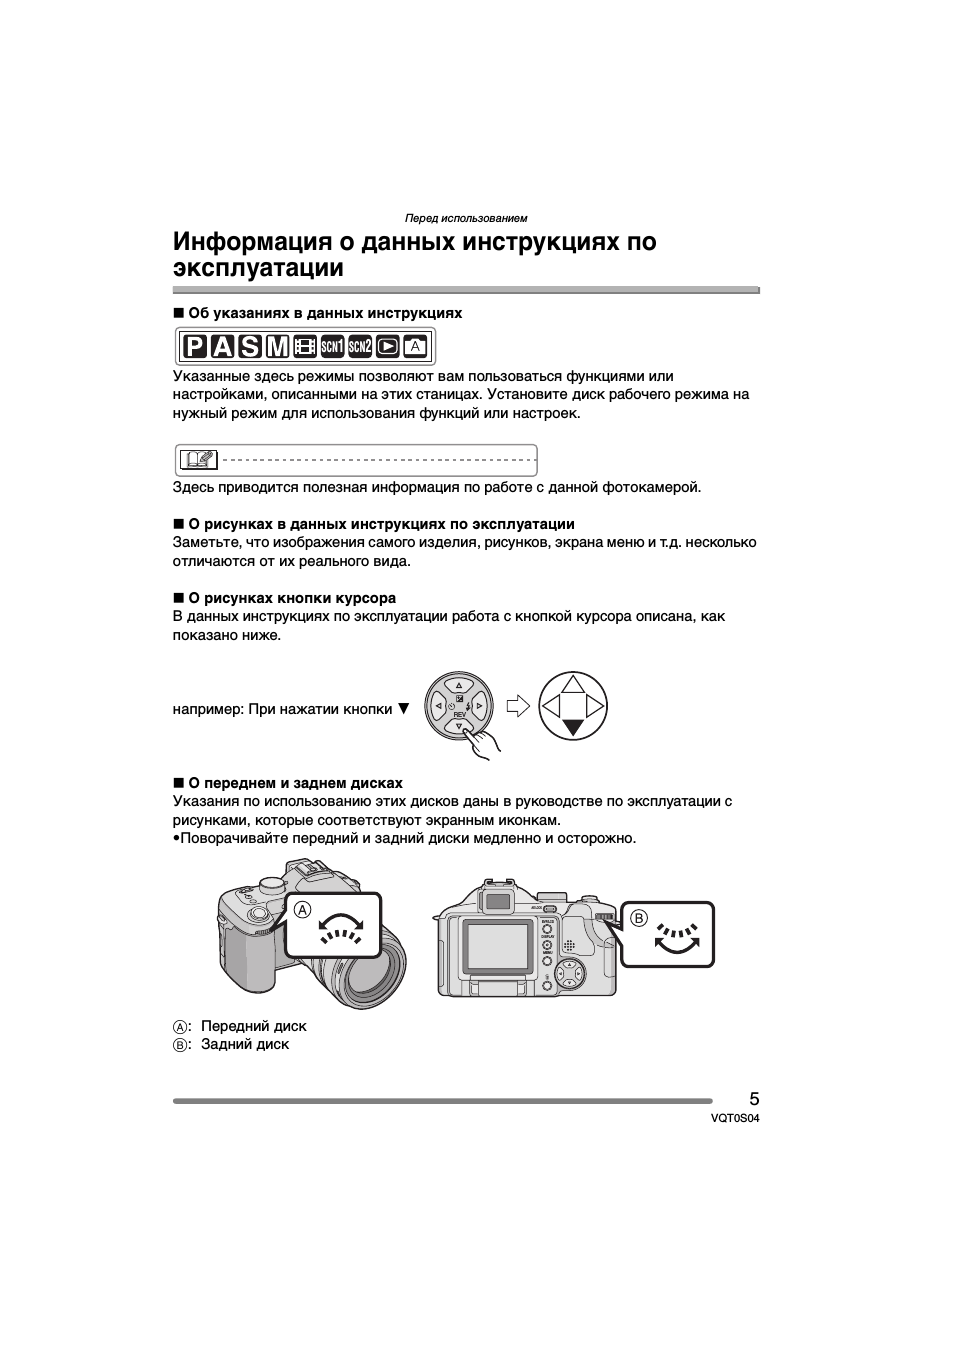
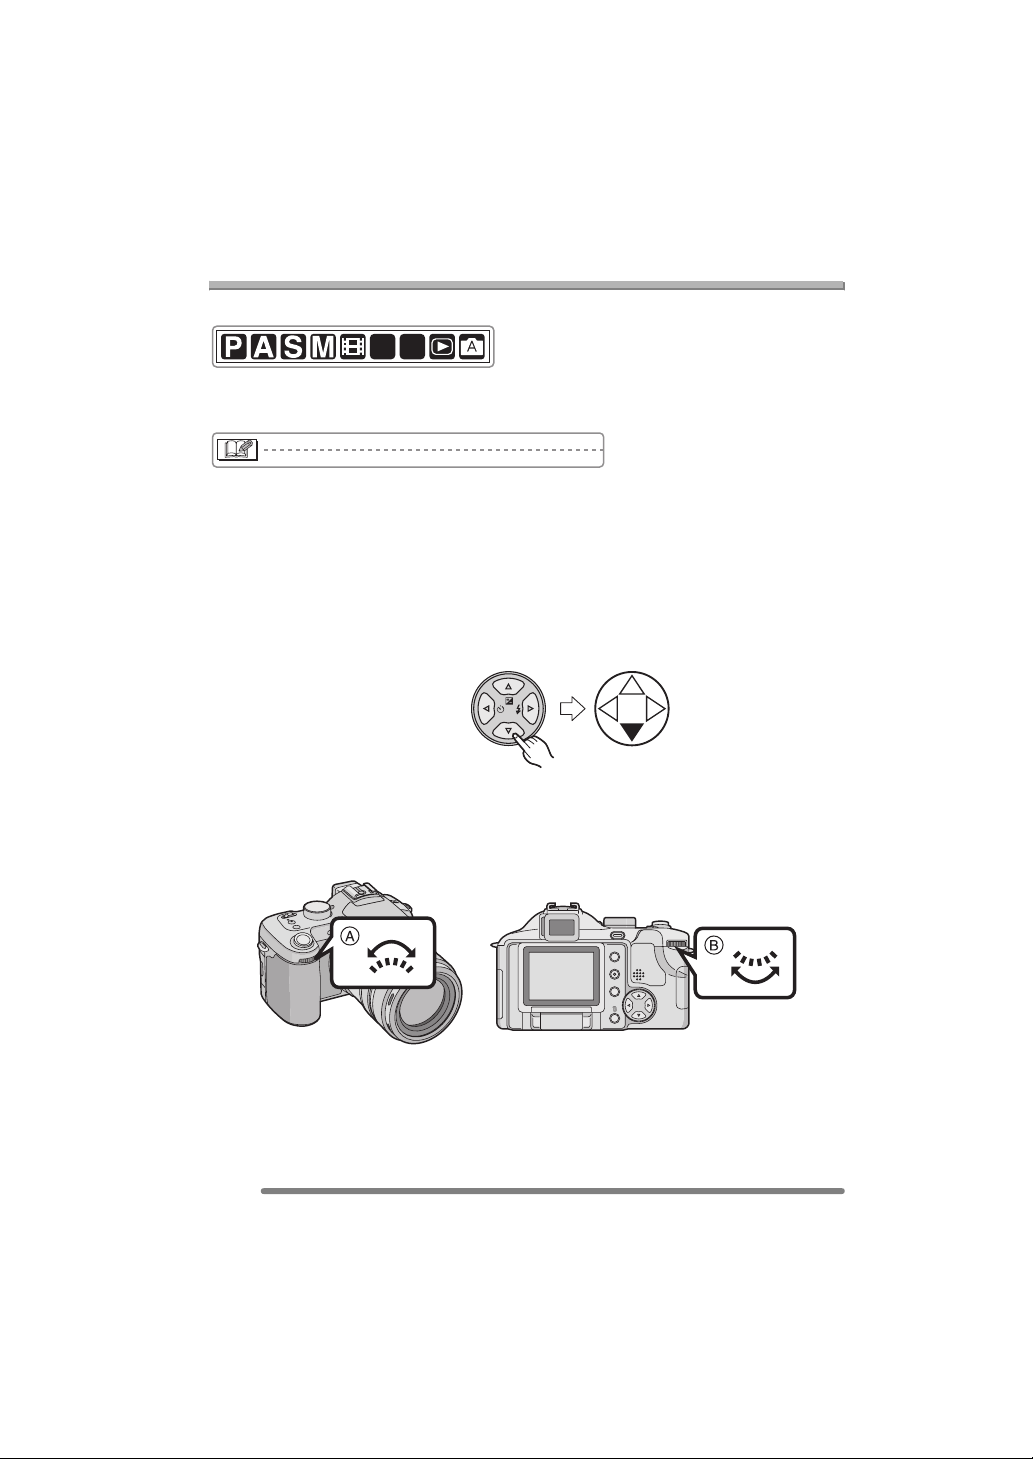
∫ Об указаниях в данных инструкциях
Указанные здесь режимы позволяют вам пользоваться функциями или
настройками, описанными на этих станицах. Установите диск рабочего режима на
нужный режим для использования функций или настроек.
Здесь приводится полезная информация по работе с данной фотокамерой.
∫ О рисунках в данных инструкциях по эксплуатации
Заметьте, что изображения самого изделия, рисунков, экрана меню и т.д. несколько
отличаются от их реального вида.
∫ О рисунках кнопки курсора
В данных инструкциях по эксплуатации работа с кнопкой курсора описана, как
показано ниже.
например: При нажатии кнопки
4
∫ О переднем и заднем дисках
Указания по использованию этих дисков даны в руководстве по эксплуатации с
рисунками, которые соответствуют экранным иконкам.
•Поворачивайте передний и задний диски медленно и осторожно.
A: Передний диск
B: Задний диск
SCN
1
SCN
2
REV
DISPLAY
MENU
EVF/LCD
AE LOCK
6
VQT0S04
Содержание
Перед использованием
Информация для Вашей
безопасности ………………………………… 2
Информация о данных инструкциях
по эксплуатации ……………………………. 5
Подготовка
Стандартные принадлежности …………. 8
Названия составных частей ……………… 9
Подзарядка аккумулятора при
помощи зарядного устройства……… 11
Об аккумуляторе
(Подзарядка/Количество
записываемых снимков)………………. 12
Установка/Изъятие аккумулятора ….. 13
Установка/Изъятие карты ………………. 14
О карте ………………………………………….. 15
Снятие крышки
объектива/Прикрепление
ремешка ……………………………………… 16
Установка/Снятие бленды
объектива …………………………………… 17
Настройка даты/времени
(Настройка часов)……………………….. 19
О меню настроек ……………………………. 20
О мониторе ЖКД/Видоискателе ……… 24
Приближенное количество
записываемых снимков и
разрешение…………………………………. 30
О трансфокации …………………………….. 32
• Использование оптического
увеличения……………………………….. 32
• Функция цифрового
увеличения……………………………….. 33
• Использование дополнительного
оптического увеличения (EZ)…….. 33
Запись изображений (основа)
Диск рабочего режима ……………………. 35
Выполнение снимков ……………………… 36
Съемка в автоматическом
режиме ……………………………………….. 41
Проверка сделанного снимка
(Просмотр) ………………………………….. 43
Съемка крупным
планом — [АФ МАКРО] ………………….. 44
Съемка с ручной фокусировкой ……… 45
Съемка со встроенной вспышкой ……. 48
Съемка с автоматическим
таймером…………………………………….. 52
Компенсация экспозиции………………… 53
Съемка с автоматическим
бракетингом………………………………… 54
Оптический стабилизатор
изображения……………………………….. 55
Съемка в многократном режиме …….. 56
Воспроизведение (основы)
Воспроизведение снимков ……………… 58
Мульти-воспроизведение
(9 экранов, 16 экранов и
25 экранов) …………………………………. 59
Использование функции увеличения
при воспроизведении ………………….. 60
Удаление снимков ………………………….. 61
Запись изображений
(подробно)
Использование диска рабочего
режима ……………………………………….. 63
• Приоритет диафрагмы в АЭ ……… 63
• Приоритет затвора в АЭ …………… 63
• Ручная экспозиция……………………. 64
• Режим движущегося
изображения…………………………….. 67
• Режим сцены ……………………………. 69
– Режим “портрет” ……………………. 70
– Режим “спорт” ……………………….. 70
– Режим “еда”…………………………… 71
– Режим “пейзаж” …………………….. 71
– Режим “ночной портрет” ………… 71
– Режим “ночной пейзаж” …………. 72
– Режим “ребенок”……………………. 72
– Режим “ровная кожа” …………….. 73
– Режим “света свечи” ……………… 74
– Режим “вечеринка” ………………… 74
– Режим “фейерверк”……………….. 75
7
VQT0S04
– Режим “снег”………………………….. 75
– Режим “звездное небо” ………….. 76
– Режим “панорамирование” …….. 77
Настройки режима записи
Использование меню режима
записи [ЗАП.] ………………………………. 78
• Баланс белого [БАЛ. БЕЛ.] ………… 79
• Светочувствительность ISO
[СВЕТОЧУВСТ.] ………………………… 81
• Форматное соотношение
[ФОРМАТ] …………………………………. 81
• Разрешение фотоснимка
[РАЗР. КАДРА] ………………………….. 82
• Качество [КАЧЕСТВО]………………. 83
• Запись звука [ЗАП. ЗВУКА] ……….. 84
• Режим измерения
[РЕЖИМ ЗАМЕРА]…………………….. 84
• Режим АФ [РЕЖИМ АФ] ……………. 85
• Постоянная AФ [НЕПРЕР. АФ] …… 87
• Вспомогательная лампочка AФ
[ВСП. ЛАМП. АФ] ………………………. 87
• Цифровое увеличение
[ЦИФР. УВЕЛ]……………………………. 88
• Цветовой эффект
[ЦВЕТ. ЭФФЕКТ]……………………….. 88
• Настройка снимка
[НАСТР. ИЗОБР.] ………………………. 89
• Краткая анимация
[АНИМАЦИЯ]…………………………….. 89
• Кинообъектив
[ПРЕОБ. ЛИНЗА]……………………….. 92
• Внешней вспышки
[BHEШ. BCПЫШKA]…………………… 94
• Режим внешней вспышки
[CK.C. BH. BCП. ] ………………………. 96
Воспроизведение (подробно)
Воспроизведение снимков со
звуком/движущихся
изображений……………………………….. 97
Использование меню режима
[ВОСП.]……………………………………….. 98
• Воспроизведение с показом
слайдов [ПОК. СЛАЙД.] …………….. 99
• Задание фаворитов
[ИЗБPАННOЕ] …………………………. 100
• Изображения будут показаны в
том виде, в котором они были
записаны [ПОВЕРН. ЖКД]……….. 101
• Поворачивание снимка
[ПОВЕРН.] ………………………………. 102
• Задание фотоснимка для
печати и количества распечаток
[DPOF ПЕЧ.] ……………………………. 103
• Предотвращение случайного
стирания фотоснимка
[ЗАЩИТИТЬ]……………………………. 105
• Добавление звука к записанным
снимкам [ДУБЛ. ЗВУК.] ……………. 106
• Изменение разрешения снимков
[ИЗМ. РАЗР.] …………………………… 107
• Подрезка фотоснимков
[ПОДРЕЗКА] ……………………………. 108
• Преобразование форматного
соотношения
[ПРЕОБР. ФОРМ.]……………………. 110
• Очистка [ОЧИСТИТЬ] ……………… 111
• Инициализация карты
[ФОРМАТИР.] ………………………….. 112
Воспроизведение фотоснимков на
экране телевизора…………………….. 113
Подключение к
персональному компьютеру
или принтеру
Перед подключением к
персональному компьютеру или
принтеру [РЕЖИМ USB] ……………..114
Подключение к ПК ……………………….. 115
Подключение к принтеру,
совместимому с PictBridge………….. 118
Другое
Использование дистанционного
затвора……………………………………… 122
Использование защитного
устройства MC/Фильтра ND ………..123
Экран дисплея ………………………………124
Предосторожности при
использовании фотокамеры ………. 126
Отображение сообщений ……………….128
Устранение неисправностей ………….130
Технические характеристики ………… 134
Подготовка
8
VQT0S04
Подготовка
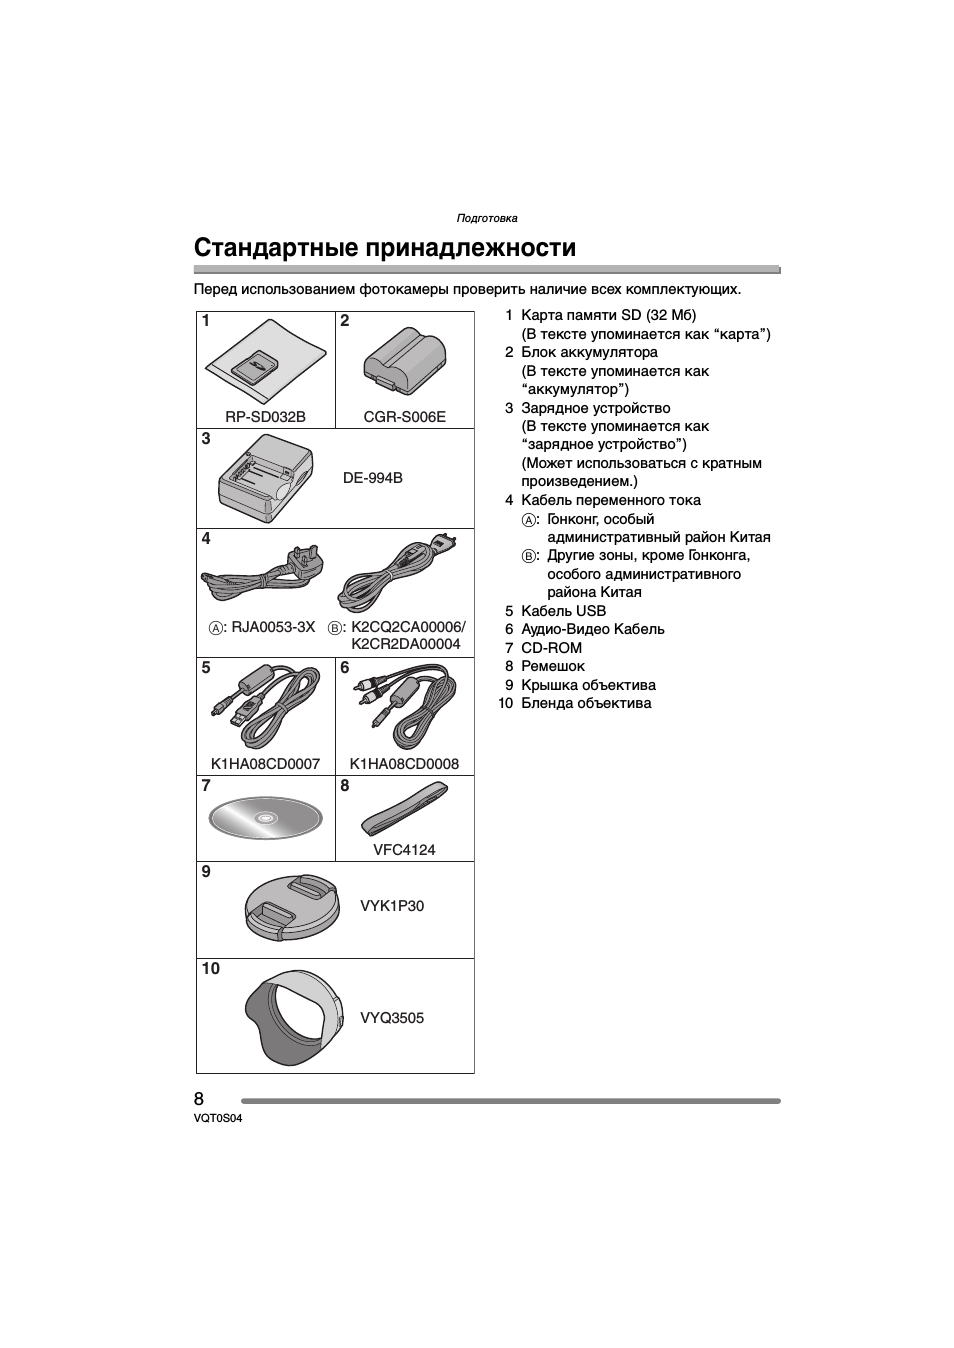
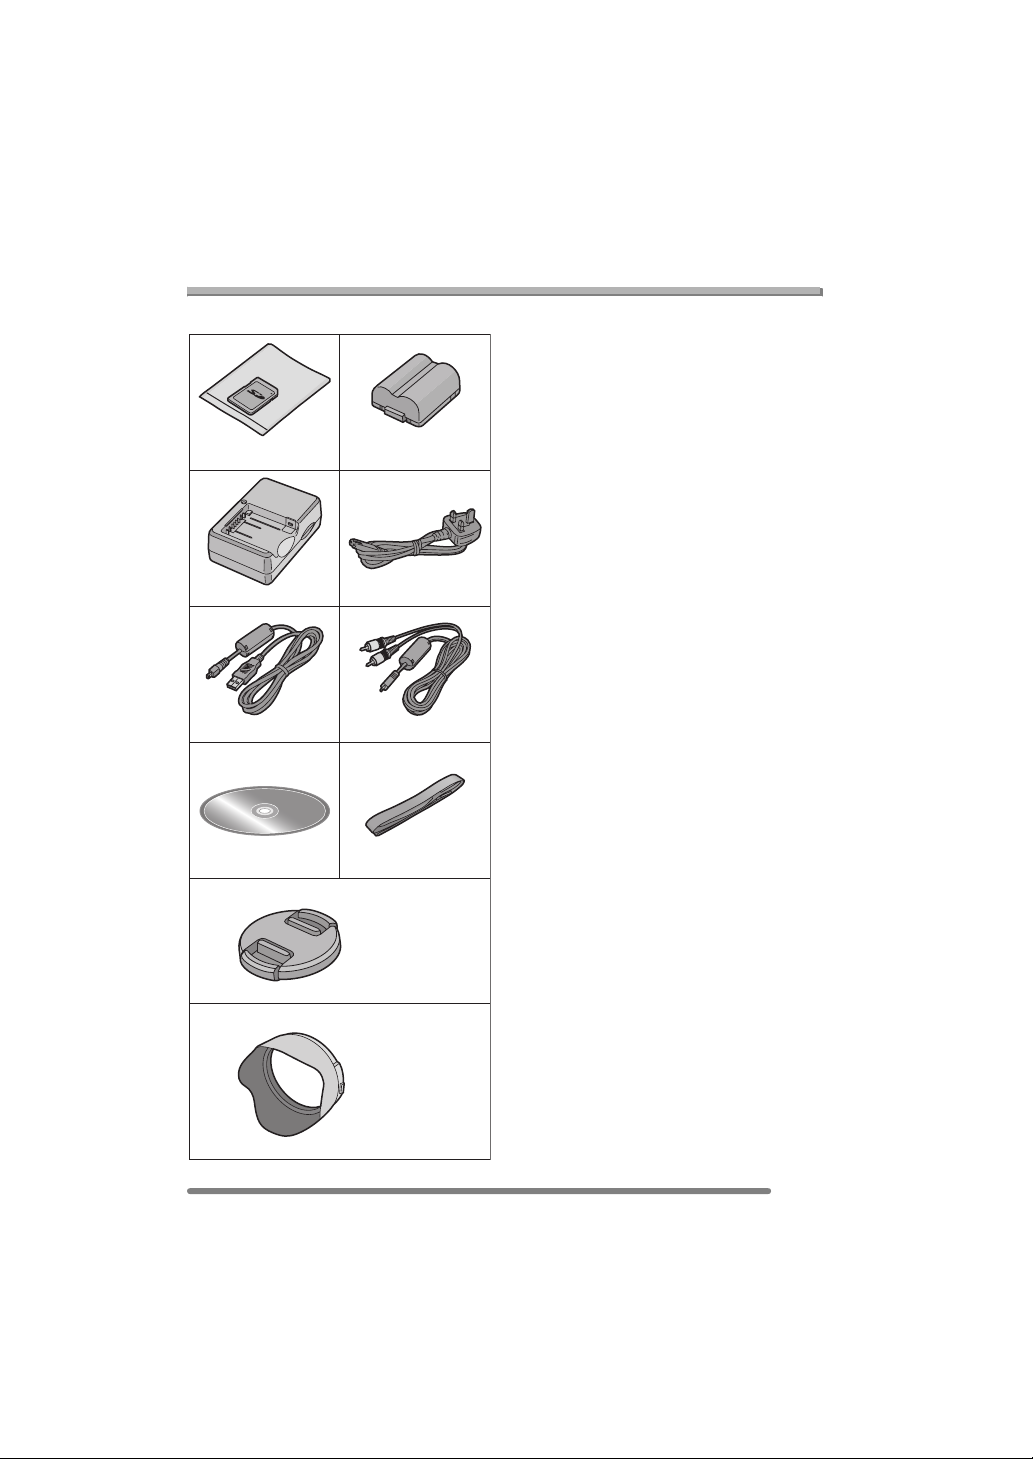
Стандартные принадлежности
Перед использованием фотокамеры проверить наличие всех комплектующих.
1 Карта памяти SD (32 Mб)
(В тексте упоминается как “карта”)
2 Блок аккумулятора
(В тексте упоминается как
“аккумулятор”)
3 Зарядное устройство
(В тексте упоминается как
“зарядное устройство”)
(Может использоваться с кратным
произведением.)
4 Кабель переменного тока
A: Гонконг, особый
административный район Китая
B: Другие зоны, кроме Гонконга,
особого административного
района Китая
5 Кабель USB
6 Аудио-Видео Кабель
7 CD-ROM
8 Ремешок
9 Крышка объектива
10 Бленда объектива
3
4
1
2
5
6
7
8
RP-SD032B
DE-994B
K1HA08CD0007
K1HA08CD0008
9
10
A: RJA0053-3X
CGR-S006E
VFC4124
VYK1P30
VYQ3505
B: K2CQ2CA00006/
K2CR2DA00004
Подготовка
9
VQT0S04
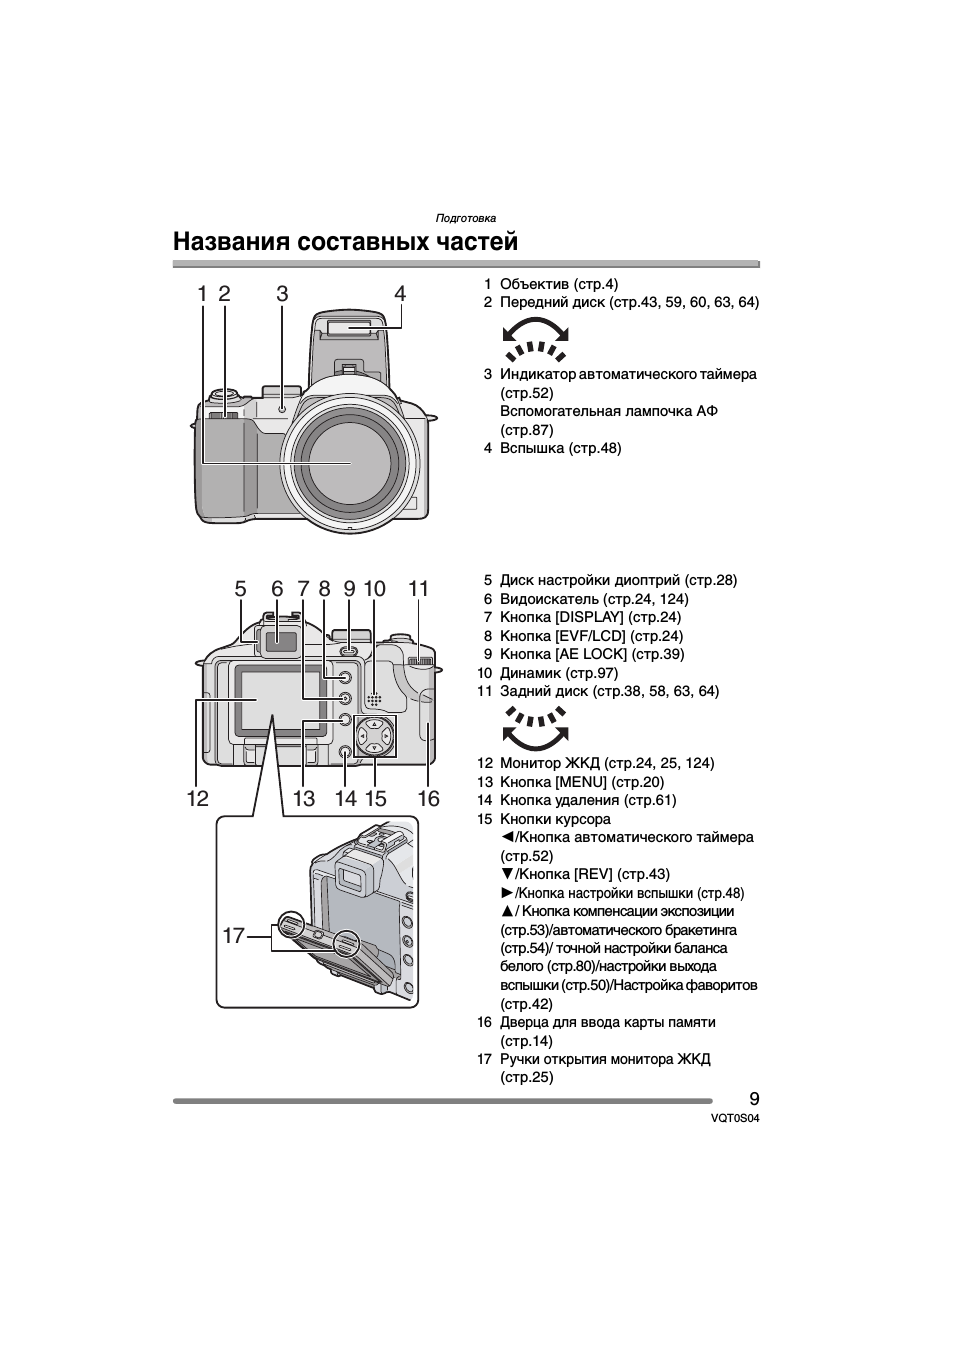
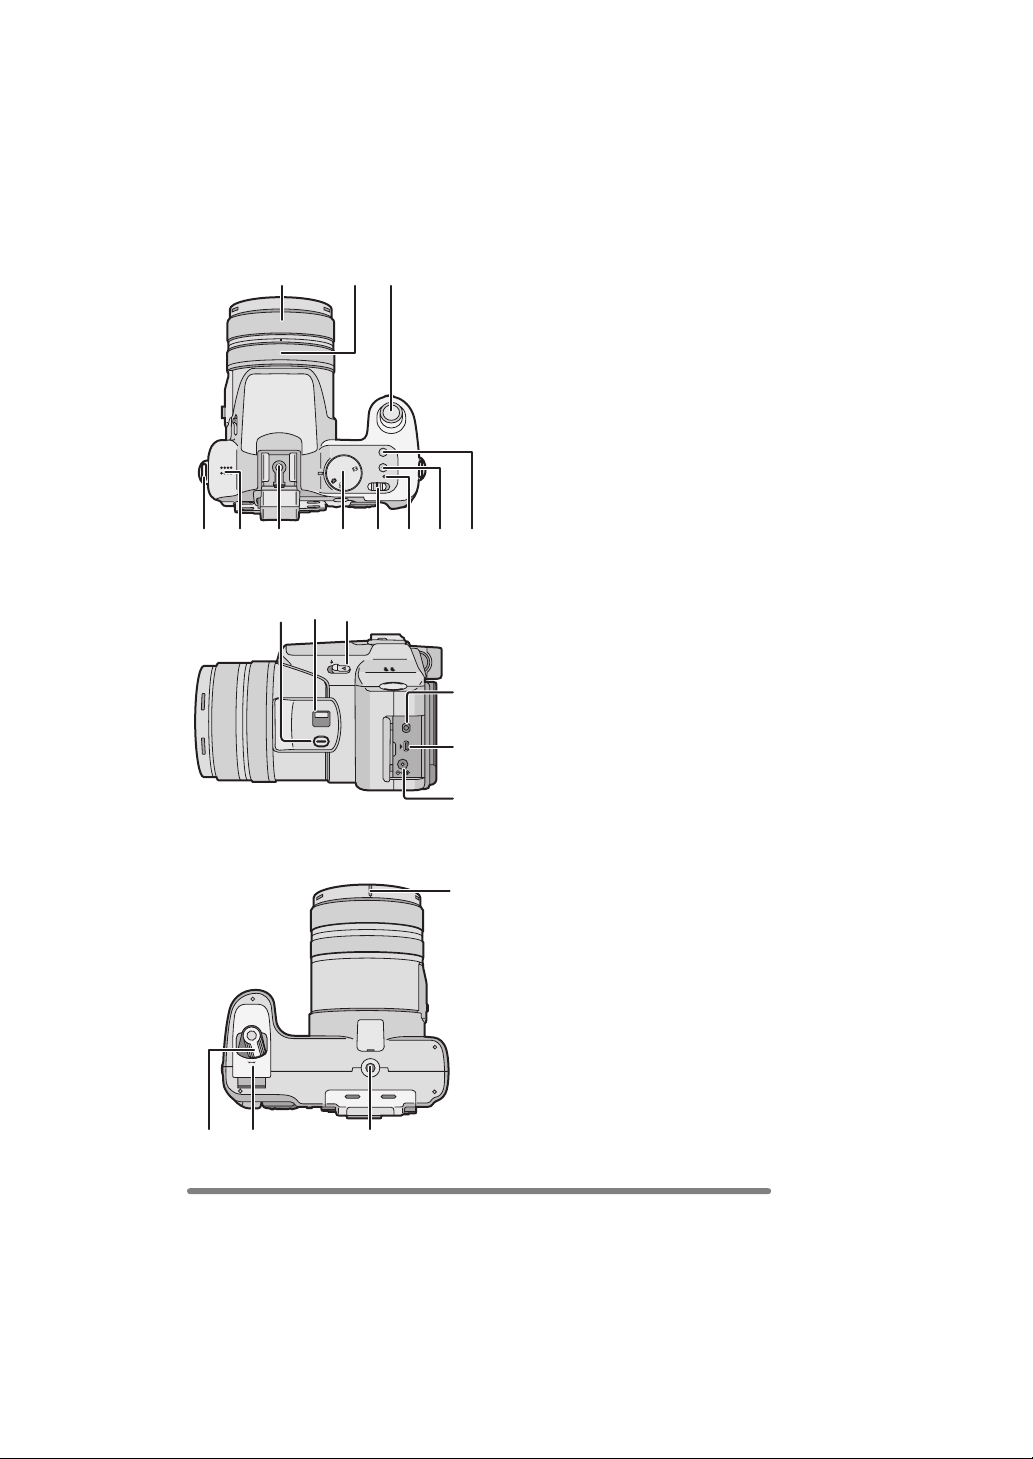
Названия составных частей
1 Объектив (cтр.4)
2
Передний диск (cтр.43, 59, 60, 63, 64)
3 Индикатор автоматического таймера
(cтр.52)
Вспомогательная лампочка AФ
(cтр.87)
4 Вспышка (cтр.48)
5 Диск настройки диоптрий (cтр.28)
6
Видоискатель (cтр.24, 124)
7 Кнопка [DISPLAY] (cтр.24)
8 Кнопка [EVF/LCD] (cтр.24)
9 Кнопка [AE LOCK] (cтр.39)
10 Динамик (cтр.97)
11
Задний диск (cтр.38, 58, 63, 64)
12
Монитор ЖКД (cтр.24, 25, 124)
13
Кнопка [MENU] (cтр.20)
14 Кнопка удаления (cтр.61)
15 Кнопки курсора
2/Кнопка автоматического таймера
(cтр.52)
4/Кнопка [REV] (cтр.43)
1/Кнопка настройки вспышки (cтр.48)
3/ Кнопка компенсации экспозиции
(cтр.53)/автоматического бракетинга
(cтр.54)/ точной настройки баланса
белого (cтр.80)/настройки выхода
вспышки (cтр.50)/Настройка фаворитов
(cтр.42)
16 Дверца для ввода карты памяти
(cтр.14)
17 Ручки открытия монитора ЖКД
(
cтр.25)
1 2
3
4
8
14
13
15
16
11
9
5
6 7
10
12
17
Подготовка
10
VQT0S04
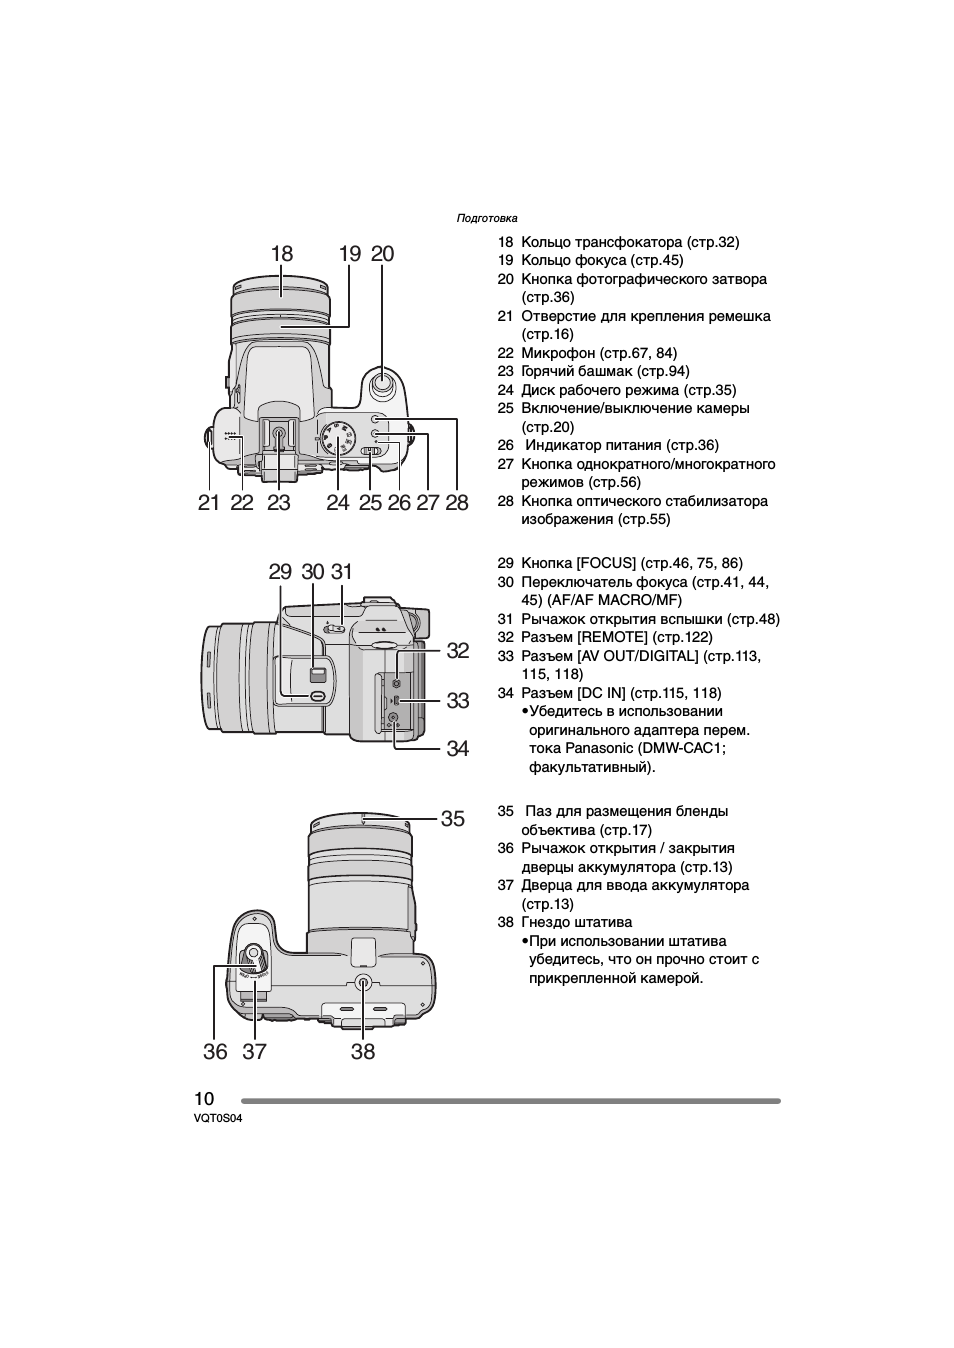
18 Кольцо трансфокатора (cтр.32)
19 Кольцо фокуса (cтр.45)
20 Кнопка фотографического затвора
(cтр.36)
21 Отверстие для крепления ремешка
(cтр.16)
22
Микрофон (cтр.67, 84)
23 Горячий башмак (cтр.94)
24 Диск рабочего режима (cтр.35)
25 Включение/выключение камеры
(cтр.20)
26 Индикатор питания (cтр.36)
27 Кнопка однократного/многократного
режимов (cтр.56)
28 Кнопка оптического стабилизатора
изображения (cтр.55)
29
Кнопка [FOCUS] (cтр.46, 75, 86)
30 Переключатель фокуса (cтр.41, 44,
45) (AF/AF MACRO/MF)
31 Рычажок открытия вспышки (cтр.48)
32 Разъем [REMOTE] (cтр.122)
33
Разъем [AV OUT/DIGITAL] (cтр.113,
115
, 118)
34
Разъем [DC IN] (cтр.115, 118)
•Убедитесь в использовании
оригинального адаптера перем.
тока Panasonic (DMW-CAC1;
факультативный).
35 Паз для размещения бленды
объектива (cтр.17)
36 Рычажок открытия / закрытия
дверцы аккумулятора (cтр.13)
37 Дверца для ввода аккумулятора
(cтр.13)
38 Гнездо штатива
•При использовании штатива
убедитесь, что он прочно стоит с
прикрепленной камерой.
P
A
S
M
SCAN2
SCAN
1
P
24 25 26
20
23
18
19
27 28
21 22
29 30 31
32
33
34
OP
EN
CLO
SE
36 37
38
35
03:41
Фотоаппарат Panasonic Lumix DMC-FS16
07:05
Фотоаппарат Panasonic Lumix DMC-GF5
08:24
Panasonic Lumix DMC-FZ72: обзор 60-кратного суперзума
11:02
Panasonic Lumix DMC-LX100: обзор фотоаппарата
08:04
Разборка Panasonic DMC-FX8
08:51
Видеообзор Panasonic Lumix DMC-FZ45
13:21
ПОЛГОДА С КАМЕРОЙ LUMIX FZ300 от Panasonic. Видеоотзыв
04:59
Panasonic LUMIX DMC-FZ1000 — обзор ультразум камеры, пишущей видео в 4К
Нажмите на кнопку для помощи
Operating Instructions
Digital Camera
Model No. DMC-FZ30EB
Before connecting, operating or
adjusting this product, please read
the instructions completely.
Web Site: http://www.panasonic-europe.com
VQT0S00

Before Use
Dear Customer,
We would like to take this opportunity to
thank you for purchasing this Panasonic
Digital Camera. Please read these
Operating Instructions carefully and keep
them handy for future reference.
Information for Your
Safety
Before Use
• Please note that the actual controls and
components, menu items, etc. of your
Digital Camera may look somewhat
different from those shown in the
illustrations in these Operating
Instructions.
• SD Logo is a trademark.
• Other names, company names, and
product names printed in these
instructions are trademarks or registered
trademarks of the companies concerned.
WARNING
TO REDUCE THE RISK OF FIRE OR
SHOCK HAZARD AND ANNOYING
INTERFERENCE, USE ONLY THE
RECOMMENDED ACCESSORIES
AND DO NOT EXPOSE THIS
EQUIPMENT TO RAIN OR
MOISTURE. DO NOT REMOVE THE
COVER (OR BACK); THERE ARE NO
USER SERVICEABLE PARTS INSIDE.
REFER SERVICING TO QUALIFIED
SERVICE PERSONNEL.
Carefully observe copyright laws.
Recording of pre-recorded tapes or
discs or other published or broadcast
material for purposes other than your
own private use may infringe copyright
laws. Even for the purpose of private
use, recording of certain material may
be restricted.
THE SOCKET OUTLET SHALL BE
INSTALLED NEAR THE EQUIPMENT
AND SHALL BE EASILY ACCESSIBLE.
CAUTION
Danger of explosion if battery is
incorrectly replaced. Replace only with
the same or equivalent type
recommended by the manufacturer.
Dispose of used batteries according to
the manufacturer’s instructions.
2
VQT0S00
Before Use
Digital Camera
The rating plate is on the underside of the
Digital Camera.
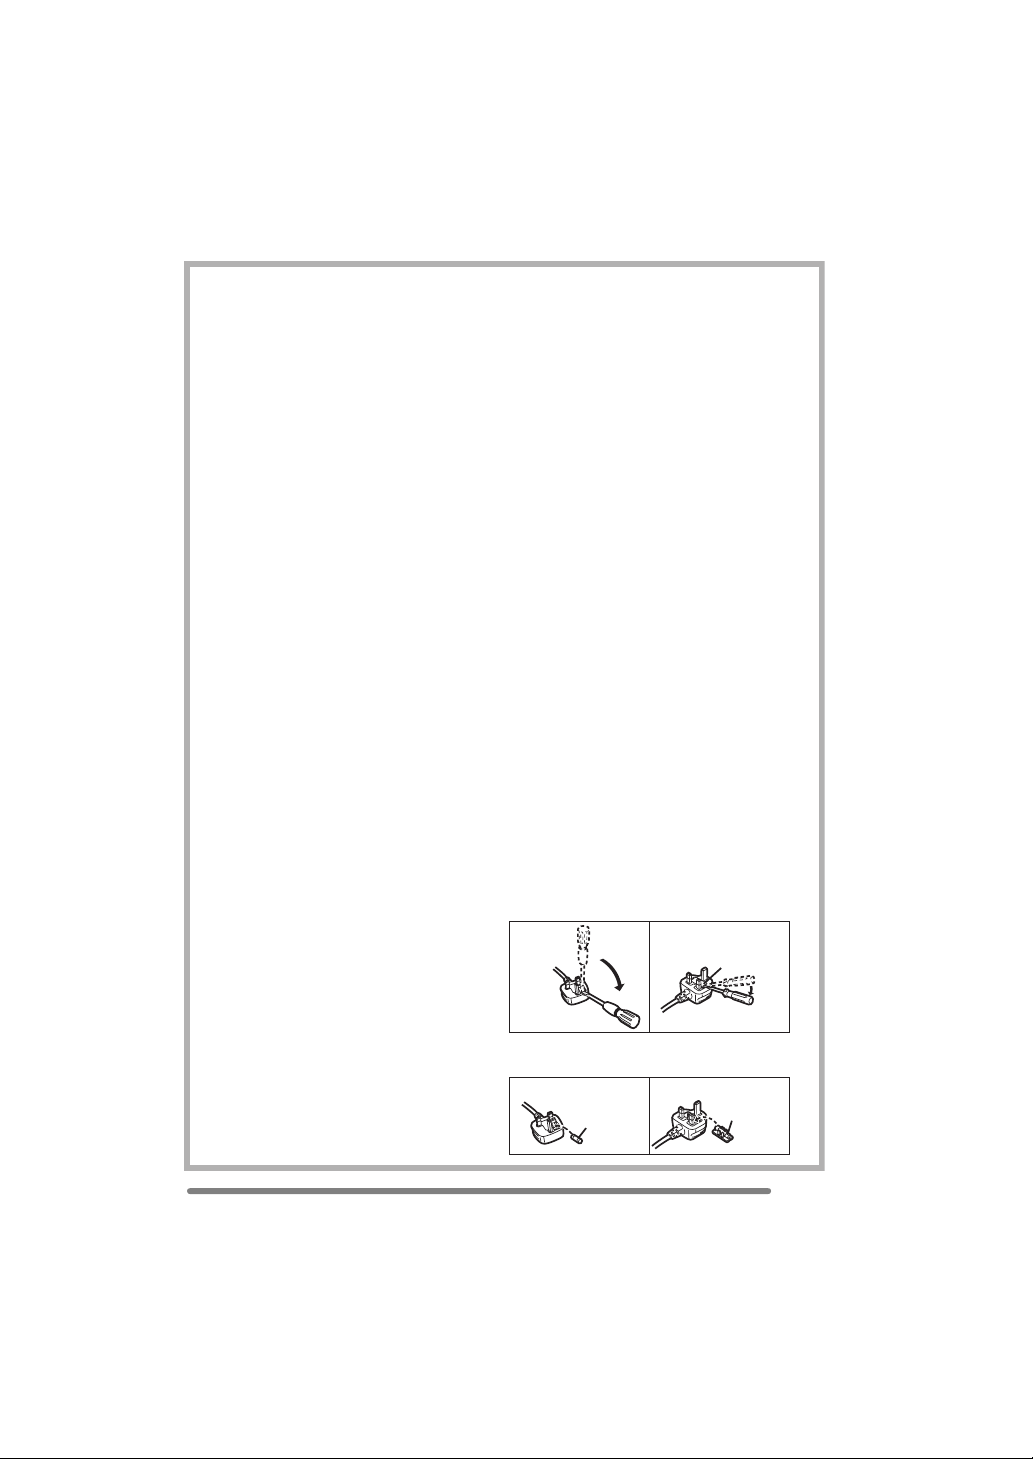
Caution for AC mains lead
For your safety, please read the following
text carefully.
This appliance is supplied with a moulded
three-pin mains plug for your safety and
convenience. A 5-ampere fuse is fitted in
this plug.
Should the fuse need to be replaced,
please ensure that the replacement fuse
has a rating of 5-amperes and it is
approved by ASTA or BSI to BS1362.
Check for the ASTA mark Ï or the BSI
mark Ì on the body of the fuse.
If the plug contains a removable fuse
cover you must ensure that it is refitted
when the fuse is replaced. If you lose the
fuse cover, the plug must not be used
until a replacement cover is obtained.
A replacement fuse cover can be
purchased from your local Panasonic
Dealer.
IF THE FITTED MOULDED PLUG IS
UNSUITABLE FOR THE SOCKET
OUTLET IN YOUR HOME THEN THE
FUSE SHOULD BE REMOVED AND
THE PLUG CUT OFF AND DISPOSED
OF SAFELY.
THERE IS A DANGER OF SEVERE
ELECTRICAL SHOCK IF THE CUT OFF
PLUG IS INSERTED INTO ANY 13AMPERE SOCKET.
If a new plug is to be fitted, please
observe the wiring code as shown below.
If in any doubt, please consult a qualified
electrician.
∫ IMPORTANT
The wires in this mains lead are coloured
in accordance with the following code:
Blue: Neutral
Brown: Live
As the colours of the wires in the mains
lead of this appliance may not correspond
with the coloured markings identifying the
terminals in your plug, proceed as follows:
The wire which is coloured BLUE must be
connected to the terminal in the plug
which is marked with the letter N or
coloured BLACK.
The wire which is coloured BROWN must
be connected to the terminal in the plug
which is marked with the letter L or
coloured RED.
Under no circumstances should either of
these wires be connected to the earth
terminal of the three-pin plug, marked
with the letter E or the Earth Symbol Ó.
∫ Before Use
Remove the Connector Cover.
∫ How to replace the Fuse
The location of the fuse differ according to
the type of AC mains plug (figures A and B).
Confirm the AC mains plug fitted and
follow the instructions below.
Illustrations may differ from actual AC
mains plug.
1) Open the fuse cover with a screwdriver.
Figure A Figure B
Fuse cover
2) Replace the fuse and close or attach
the fuse cover.
Figure A Figure B
Fuse
(5 ampere)
Fuse
(5 ampere)
VQT0S00
3

Before Use
Information on Disposal for Users of Waste Electrical & Electronic Equipment
(private households)
This symbol on the products and/or accompanying documents
means that used electrical and electronic products should not be
mixed with general household waste.
For proper treatment, recovery and recycling, please take these
products to designated collection points, where they will be accepted
on a free of charge basis. Alternatively, in some countries you may be
able to return your products to your local retailer upon the purchase
of an equivalent new product.
Disposing of this product correctly will help to save valuable
resources and prevent any potential negative effects on human
health and the environment which could otherwise arise from inappropriate waste
handling. Please contact your local authority for further details of your nearest
designated collection point.
Penalties may be applicable for incorrect disposal of this waste, in accordance with
national legislation.
For business users in the European Union
If you wish to discard electrical and electronic equipment, please contact your dealer or
supplier for further information.
Information on Disposal in other Countries outside the European Union
This symbol is only valid in the European Union.
If you wish to discard this product, please contact your local authorities or dealer and ask
for the correct method of disposal.
∫ Care for the camera
• Do not shake or cause impact to the
camera. The camera may not be
operated normally or recording of pictures
may be disabled, or the lens may be
damaged.
• Sand or dust may cause a malfunction
of the camera. When you use the
∫ About the LCD monitor/Viewfinder
• Do not press the LCD monitor strongly.
It may cause uneven colors on the LCD
monitor or a malfunction of the LCD
monitor.
• In a place with drastic temperature
changes, condensation may form on the
LCD monitor. Wipe it with a soft, dry cloth.
camera on a beach etc., take care so
that sand or dust does not get into the
camera.
• When you use the camera on a rainy day
or on a beach, take care so that water
does not get into the camera.
• If seawater splashes onto the camera,
wet a soft cloth with tap water, wring it
well, and use it to wipe the camera
body carefully. Then, wipe it again with
a dry cloth.
4
VQT0S00

Before Use
• If the camera is extremely cold when you
turn the camera on, the image on the LCD
monitor/Viewfinder is slightly darker than
usual at first. However, as the internal
temperature increases, it goes back to the
normal brightness.
• When rotating the LCD monitor, be
careful not to use excessive force. This
may result in damage.
• Depending on the tripod you are using,
you may not be able to rotate the LCD
monitor.
• When not using the LCD monitor or when
using the Viewfinder, it is recommended
that you close the LCD monitor with the
screen facing inwards to prevent dirt and
scratches.
Extremely high precision technology is
employed to produce the LCD monitor/
Viewfinder screen. The result is more
than 99.99% effective pixels with a
mere 0.01% of the pixels inactive or
always lit. However, this will not be
recorded on the pictures in the card.
∫ About the Lens
• Do not direct the lens to the sun or strong
light sources. It may cause not only a
malfunction of the camera but irreversible
damage to your eye.
• Do not press the lens strongly.
• Leaving the camera with the lens facing
the sun may cause a malfunction. Be
careful when you put the camera outside
or near a window.
• When there is dirt (water, oil, and
fingerprints, etc.) on the surface of the
lens, the picture may be affected. Lightly
wipe the surface of the lens with a soft,
dry cloth before and after taking pictures.
∫ About Condensation (When the lens
or the Viewfinder is fogged up)
Condensation takes place when the
ambient temperature or humidity is
changed as follows:
Be careful of condensation since it causes
stains on the lens, fungus or malfunction.
• When the camera is brought inside from
the cold to a warm room.
• When the camera is moved from outside
to an air-conditioned car.
• When cool wind from an air conditioner or
other is directly blown onto the camera.
• In humid places
Put the camera into plastic bag until the
temperature of the camera is close to the
ambient temperature to avoid
condensation. In case of condensation,
turn the camera off and then leave it for
about 2 hours.
When the camera becomes close to the
ambient temperature, the fog disappears
naturally.
∫ If you will not be using the camera for
a long time
• Store the battery in a cool and dry place
with a relatively stable temperature.
(Recommended temperature: 15 oC to
25 oC, Recommended humidity: 40% to
60%)
• Be sure to remove the battery and the
card from the camera.
• When the battery is left inserted in the
camera for a long time, discharge takes
place even if the camera is turned off. If
you leave the battery inserted for an
extended period of time, it will be
excessively discharged and it may
become unusable even after it is charged.
• To store the battery for a long period of
time, we recommend charging it once
every year and storing it again after you
completely use up the charged capacity.
• When you keep the camera in a closet or
a cabinet, we recommend storing it with
the desiccant (silica gel).
• When storing the camera for long periods
of time, it is recommended that you close
the LCD monitor with the screen facing
inwards.
VQT0S00
5
Before Use
About These Operating Instructions
∫ About indications in these operating instructions
SCN
2
SCN
1
Modes indicated here allow you to use the functions or settings described on this page.
Set the Mode dial to any of the modes to use the functions or settings.
Convenient or helpful information for use of the camera is described.
∫ About illustrations in these operating instructions
Please note that the appearance of the product, the illustration or the menu screen are a
little different from those in actual use.
∫ About illustrations of the cursor button
In these operating instructions, the operations on the cursor button are described as
illustrated below.
e.g.: When you press the 4 button
REV
∫ About the front dial and rear dial
Instructions for using these dials in the operating instructions are given with illustrations
that match the screen icons.
• Rotate the front dial and rear dial slowly but surely.
AE LOCK
EVF/LCD
DISPLAY
MENU
A: Front dial
B: Rear dial
6
VQT0S00

Contents
Before Use
Information for Your Safety…………………..2
About These Operating Instructions ………6
Preparation
Accessories ……………………………………….9
Names of the Components …………………10
Charging the Battery with the Charger … 12
About the Battery (Charging/
number of recordable pictures) ………..13
Inserting/Removing the Battery …………..14
Inserting/Removing the Card ………………15
About the Card………………………………….16
Removing the Lens Cap/
Attaching the Strap…………………………17
Attaching/Removing the Lens Hood …….18
Setting Date/Time (Clock Set) …………….20
About the Setup Menu ……………………….21
About the LCD Monitor/Viewfinder ……… 25
Approximate number of
recordable pictures and the size ………31
About the zoom…………………………………33
• Using the Optical Zoom ……………….. 33
• Using the Digital Zoom …………………34
• Using the Extra Optical Zoom (EZ) … 34
Recording pictures (basic)
The Mode Dial ………………………………….36
Taking Pictures…………………………………37
Taking Pictures in Auto Mode…………….. 42
Checking the Recorded Picture
(Review) ……………………………………….44
Taking Close-up Pictures
[AF MACRO] …………………………………45
Taking Pictures with Manual Focus ……..46
Taking Pictures using the
Built-in Flash …………………………………49
Taking Pictures with the Self-timer ………53
Compensating the Exposure ………………54
Taking Pictures using Auto Bracket …….. 55
Optical Image Stabilizer……………………..56
Taking Pictures using Burst Mode ………. 57
Playback (basic)
Playing Back Pictures ………………………..59
Multi Playback (9 screens,
16 screens, and 25 screens) ……………60
Using the Playback Zoom…………………..61
Deleting Pictures……………………………….62
Recording pictures (advanced)
Using the Mode Dial ………………………….64
• Aperture-priority AE …………………….. 64
• Shutter-priority AE ………………………. 65
• Manual exposure ………………………… 66
• Motion picture mode …………………….69
• Scene mode……………………………….. 71
– Portrait mode……………………………72
– Sports mode ……………………………. 72
– Food mode ………………………………73
– Scenery mode ………………………….73
– Night portrait mode …………………… 74
– Night scenery mode………………….. 74
– Baby mode ………………………………75
– Soft skin mode…………………………. 76
– Candle light mode…………………….. 76
– Party mode ………………………………77
– Fireworks mode………………………..77
– Snow mode………………………………78
– Starry sky mode……………………….. 79
– Panning mode …………………………. 80
Recording Menu Settings
Using the [REC] mode menu ……………… 81
• White Balance [W.BALANCE] ………. 82
• ISO Sensitivity [SENSITIVITY] ……… 84
• Aspect Ratio [ASPECT RATIO]…….. 84
• Picture Size [PICT.SIZE] ………………85
• Quality [QUALITY] ………………………. 86
• Audio Recording [AUDIO REC.] …….87
• Metering Mode
[METERING MODE]…………………….87
• AF Mode [AF MODE] …………………… 88
• Continuous AF [CONT.AF] ……………90
• AF Assist Lamp
[AF ASSIST LAMP] …………………….. 90
• Digital Zoom [D.ZOOM] ………………..91
7
VQT0S00

• Colour Effect [COL.EFFECT] ………..91
• Picture Adjustment [PICT.ADJ.] ……. 92
• Flip Animation [FLIP ANIM.] ………….92
• Conversion Lens [CONVERSION] … 95
• Extra Flash [EXT.FLASH] …………….. 97
• Extra Flash Burst Mode
[EX.FLASH BURST]……………………. 99
Playback (advanced)
Playing Back Pictures with Audio/
Motion Pictures ……………………………100
Using the [PLAY] mode menu ………….. 101
• Playing Back with Slide Show
[SLIDE SHOW]………………………….102
• Setting Favourites [FAVORITE]…… 103
• Displaying pictures in a direction
at the time of recording
[ROTATE DISP.] ……………………….104
• Rotating the Picture [ROTATE] …… 105
• Setting the Picture to be Printed
and the Number of Prints [DPOF
PRINT]…………………………………….. 106
• Preventing Accidental Erasure of
the Picture [PROTECT]………………108
• Adding Audio to Recorded Pictures
[AUDIO DUB.] …………………………..109
• Resizing the Pictures [RESIZE] …… 110
• Trimming the Pictures
[TRIMMING] ……………………………..111
• Aspect ratio conversion
[ASPECT CONV.]……………………… 113
• Clean-up [CLEAN UP] ……………….. 114
• Initializing the Card [FORMAT]……. 115
Playing Back Pictures on a
TV Screen …………………………………..116
Connecting to a PC or Printer
Before Connecting to the PC or
the Printer [USB MODE] ………………. 117
Connecting to a PC………………………….118
Connecting to a PictBridge-compliant
Printer…………………………………………121
Screen Display………………………………..127
Cautions for Use……………………………..129
Message Display …………………………….131
Troubleshooting ……………………………… 133
Specifications………………………………….137
Sales and Support Information
Customer Care Centre
• For customers within the UK:
08705 357357
• For customers within the Republic of
Ireland: 01 289 8333
• Visit our website for product information
• E-mail: customer.care@panasonic.co.uk
Technical Support for AV Software
• For UK, ROI: 08701 505610
Direct Sales at Panasonic UK
• Order accessory and consumable items
for your product with ease and confidence
by phoning our Customer Care Centre
Monday– Thursday 9.00 a.m. – 5.30 p.m.,
Friday 9.30 a.m.– 5.30 p.m.
(Excluding public holidays)
• Or go on line through our Internet
Accessory ordering application at
www.panasonic.co.uk.
• Most major credit and debit cards
accepted.
• All enquiries transactions and distribution
facilities are provided directly by
Panasonic UK Ltd.
• It couldn’t be simpler!
• Also available through our Internet is
direct shopping for a wide range of
finished products, take a browse on our
website for further details.
Others
Using the Remote Shutter ………………..125
Using the MC Protector/ND Filter ………126
8
VQT0S00
Preparation
Preparation
Accessories
Before using your camera, check the contents.
12
RP-SD032B
3
DE-994A
56
K1HA08CD0007 K1HA08CD0008
78
9
10
CGR-S006E
4
RJA0053-3X
VFC4124
VYK1P30
VYQ3505
∫ Standard Accessories
1 SD Memory Card (32 MB)
(In the text, it is called the “Card”)
2Battery Pack
(In the text, it is called the “Battery”)
3 Battery Charger
(In the text, it is indicated as “Charger”)
(This can be used with multiple
product.)
4 AC Mains Lead
5 USB Connection Cable
6AV Cable
7 CD-ROM
8Strap
9 Lens Cap
10 Lens hood
∫ Optional Accessories
• Lithium Ion Battery
CGR-S006E
• Battery Charger/AC Adaptor
DMW-CAC1
• ND Filter
DMW-LND55
• MC Protector
DMW-LMC55
• SD Memory Card
2 GB: RP-SDK02
1 GB: RP-SDK01
512 MB: RP-SDK512/RP-SD512
256 MB: RP-SDH256/RP-SD256
128 MB: RP-SD128
64 MB: RP-SD064
32 MB: RP-SD032
• SD USB Reader/Writer (compatible with
MultiMediaCard)
BN-SDCAPU/1B
• SD PC Card Adaptor (compatible with
MultiMediaCard)
BN-SDABPU/1B
• Some optional accessories may not be
available in some countries.
VQT0S00
9

Preparation
Names of the Components
12 3 4
8
12
1413 15 16
1Lens (P5)
2 Front dial (P44, 60, 61, 64, 66)
3 Self-timer Indicator (P53)
AF Assist Lamp (P90)
4 Flash (P49)
119567 10
5 Diopter Adjustment Dial (P29)
6 Viewfinder (P25, 127)
7 [DISPLAY] Button (P25)
8 [EVF/LCD] Button (P25)
9 [AE LOCK] Button (P40)
10 Speaker (P100)
11 Rear dial (P39, 59, 65, 66)
12 LCD Monitor (P25, 26, 127)
13 [MENU] Button (P21)
14 Delete Button (P62)
15 Cursor Buttons
2/Self-timer Button (P53)
4/[REV] Button (P44)
1/Flash Setting Button (P49)
3/Exposure Compensation (P54)/Auto
Bracket (P55)/White Balance Fine
Adjustment (P83)/Flash Output
Adjustment (P51)/Backlight
Compensation in auto mode (P43)
Button
16 Card Door (P15)
17 LCD Monitor open knobs (P26)
10
VQT0S00
18 19
S
M
A
P
P
1
Preparation
20
18 Zoom ring (P33)
19 Focus ring (P46)
20 Shutter Button (P37)
21 Strap Eyelet (P17)
22 Microphone (P69, 87)
23 Hot Shoe (P97)
24 Mode Dial (P36)
25 Camera ON/OFF Switch (P21)
26 Power Indicator (P37)
27 Single or Burst Mode Button (P57)
2
SCAN
SCAN
28 Optical Image Stabilizer Button (P56)
23
29 30 31
C
L
N
O
E
S
P
E
O
24 25 26
27 2821 22
29 [FOCUS] Button (P47,77, 89)
30 Focus Switch (P42, 45, 46)
(AF/AF MACRO/MF)
31 Flash Open Lever (P49)
32 [REMOTE] Socket (P125)
3
33 [AV OUT/DIGITAL] Socket
(P116, 118, 121)
34 [DC IN] Socket (P118, 121)
3
3
35
• Please be sure to use genuine
Panasonic AC adaptor (DMW-CAC1;
optional).
35 Lens hood positioning groove (P18)
36 Battery Door Open/Close Lever (P14)
37 Battery Door (P14)
38 Tripod Receptacle
• When you use a tripod, make sure the
tripod is stable with the camera
attached to it.
36 37 38
11
VQT0S00
Preparation
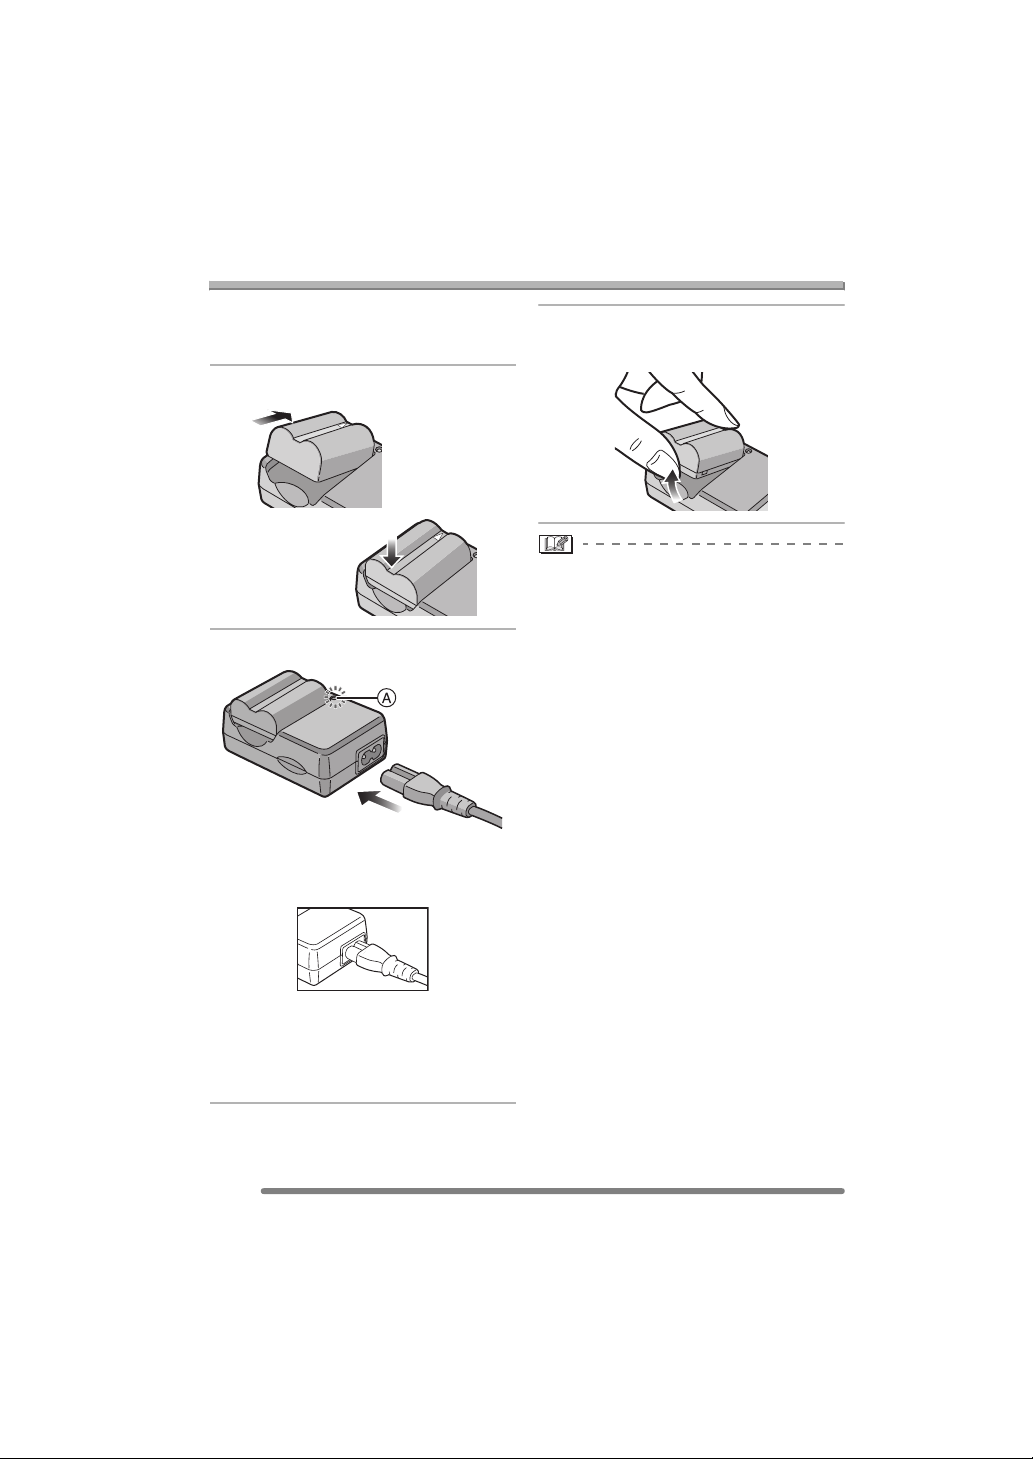
Charging the Battery with the Charger
When the camera is shipped, the battery is
not charged. Charge the battery before
use.
1 Attach the battery to the charger.
2 Connect the AC mains lead.
• The AC mains lead does not fit entirely
into the AC input terminal. A gap will
remain as shown below.
3 Detach the battery after charging
is completed.
• After charging is completed, be sure to
disconnect the AC mains lead from the
electrical outlet.
• The battery becomes warm after use/
charge or during charge. The camera also
becomes warm during use. However, it is
not a malfunction.
• The battery is exhausted when it is left for
a long period of time after being charged.
Recharge the battery when it is
exhausted.
• Use the dedicated charger and battery.
• Charge the battery with the charger
indoors.
• Do not disassemble or modify the
charger.
• When the [CHARGE] indicator A lights
in green, charging starts.
• When the [CHARGE] indicator A turns
off (in about 120 minutes), charging is
completed.
12
VQT0S00
About the Battery
Preparation
(Charging/number of recordable pictures)
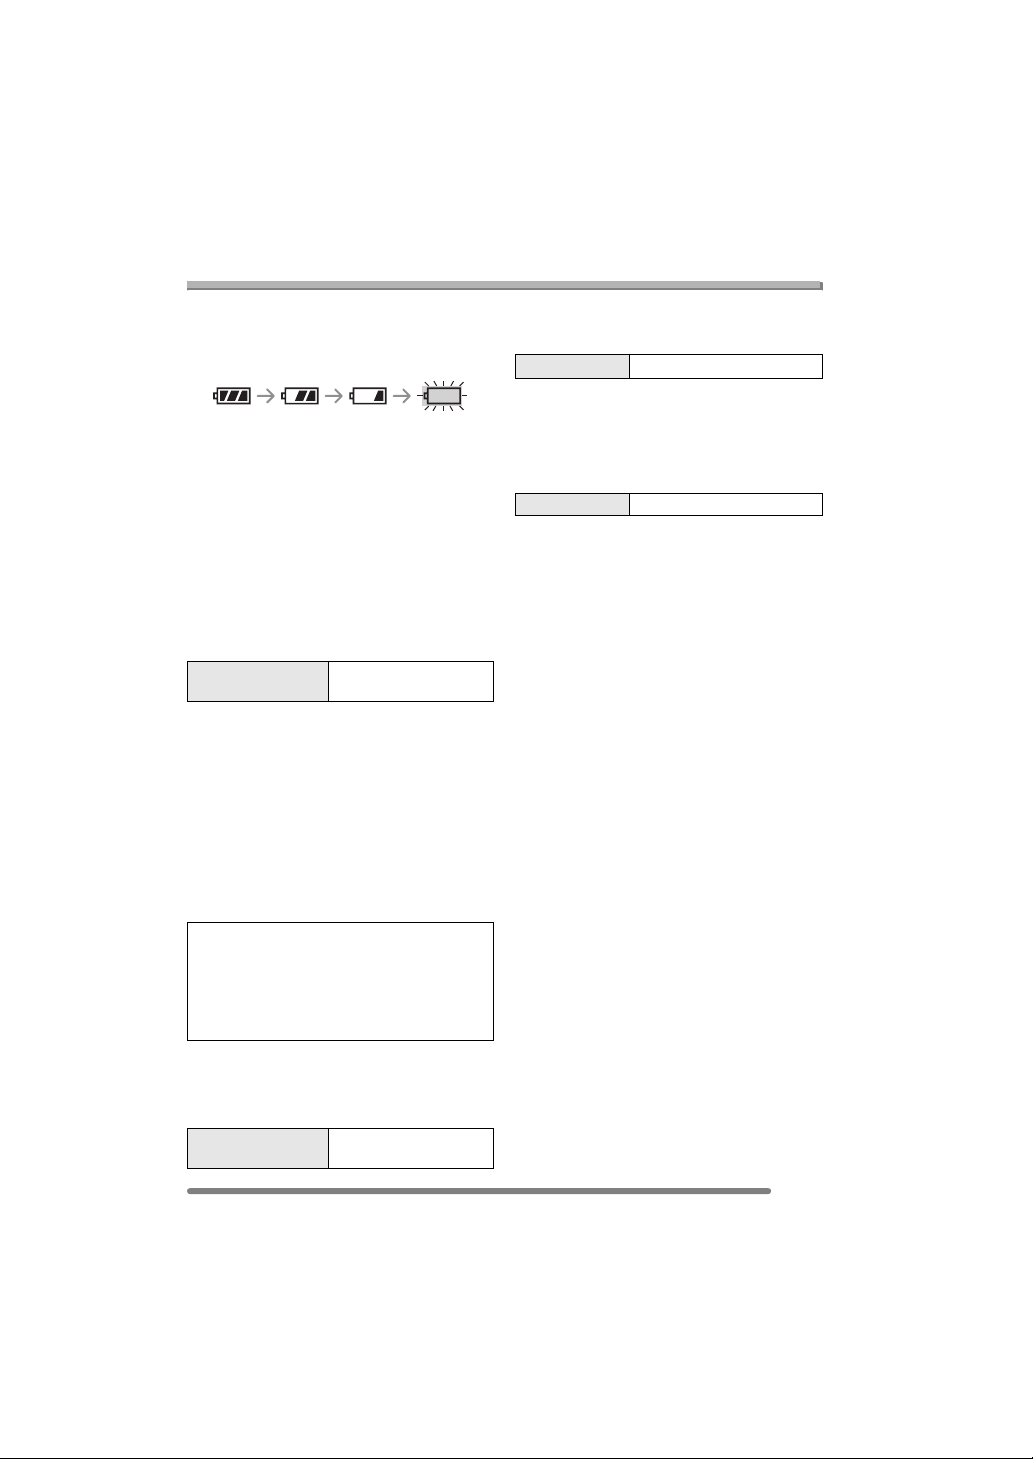
∫ Battery indication
The remaining battery power appears on
the screen.
• The battery indication turns red and
blinks.
• Recharge the battery or replace it with
fully charged battery.
[It does not appear when you use the
camera along with the AC adaptor
(DMW-CAC1; optional).]
∫ The battery life
The number of recordable pictures by
CIPA standard (In programme AE mode)
• CIPA is an abbreviation of
[Camera & Imaging Products Association].
Number of
recordable pictures
Approx. 280 pictures
(Approx. 140 min)
Recording conditions by CIPA standard
• Temperature: 23 °C/
Humidity: 50
% when LCD monitor is on.
• Using the supplied SD Memory Card
(32 MB).
• Using the supplied battery.
• Recording starts 30 seconds after the
camera is turned on.
• Recording once every 30 seconds, with
full flash every other recording.
• Turn the camera off every 10 recordings.
The number of recordable pictures varies
depending on the recording interval time.
If the recording interval time becomes
longer, the number of recordable pictures
decreases.
(When taking a picture every
2 minutes: Approx. 75)
The number of recordable pictures
when using the Viewfinder
(Recording conditions comply with CIPA
standard.)
Number of
recordable pictures
Approx. 300 pictures
(Approx. 150 min)
Playback time when using the LCD
monitor
Playback time Approx. 300 min
The number of recordable pictures and
playback time will vary depending on the
operating conditions and storing condition
of the battery.
∫ Charging
Charging time Approx. 120 min
Charging time and the number of
recordable pictures with the optional
battery pack (CGR-S006E) are the same
as above.
• When charging starts, the [CHARGE]
indicator lights.
∫ Charging error
• If a charging error occurs, the [CHARGE]
indicator blinks in about 1 second cycles.
In this case, disconnect the AC mains lead
from the electrical outlet, remove the
battery and make sure that both room and
battery temperature are not too low or
high and then charge it again. If the
[CHARGE] indicator still blinks even if you
charge the battery for a while, consult the
dealer or your nearest servicentre.
• When the operating time of the camera
becomes extremely short even if the
battery is properly charged, the life of the
battery may have expired. Buy a new
battery.
∫ Charging conditions
• Charge the battery under temperature of
10 oC to 35 oC. (Battery temperature
should be the same.)
• The performance of the battery may be
temporarily deteriorated and the operating
time may become shorter in low
temperature conditions (e.g. skiing/
snowboarding).
13
VQT0S00
Preparation
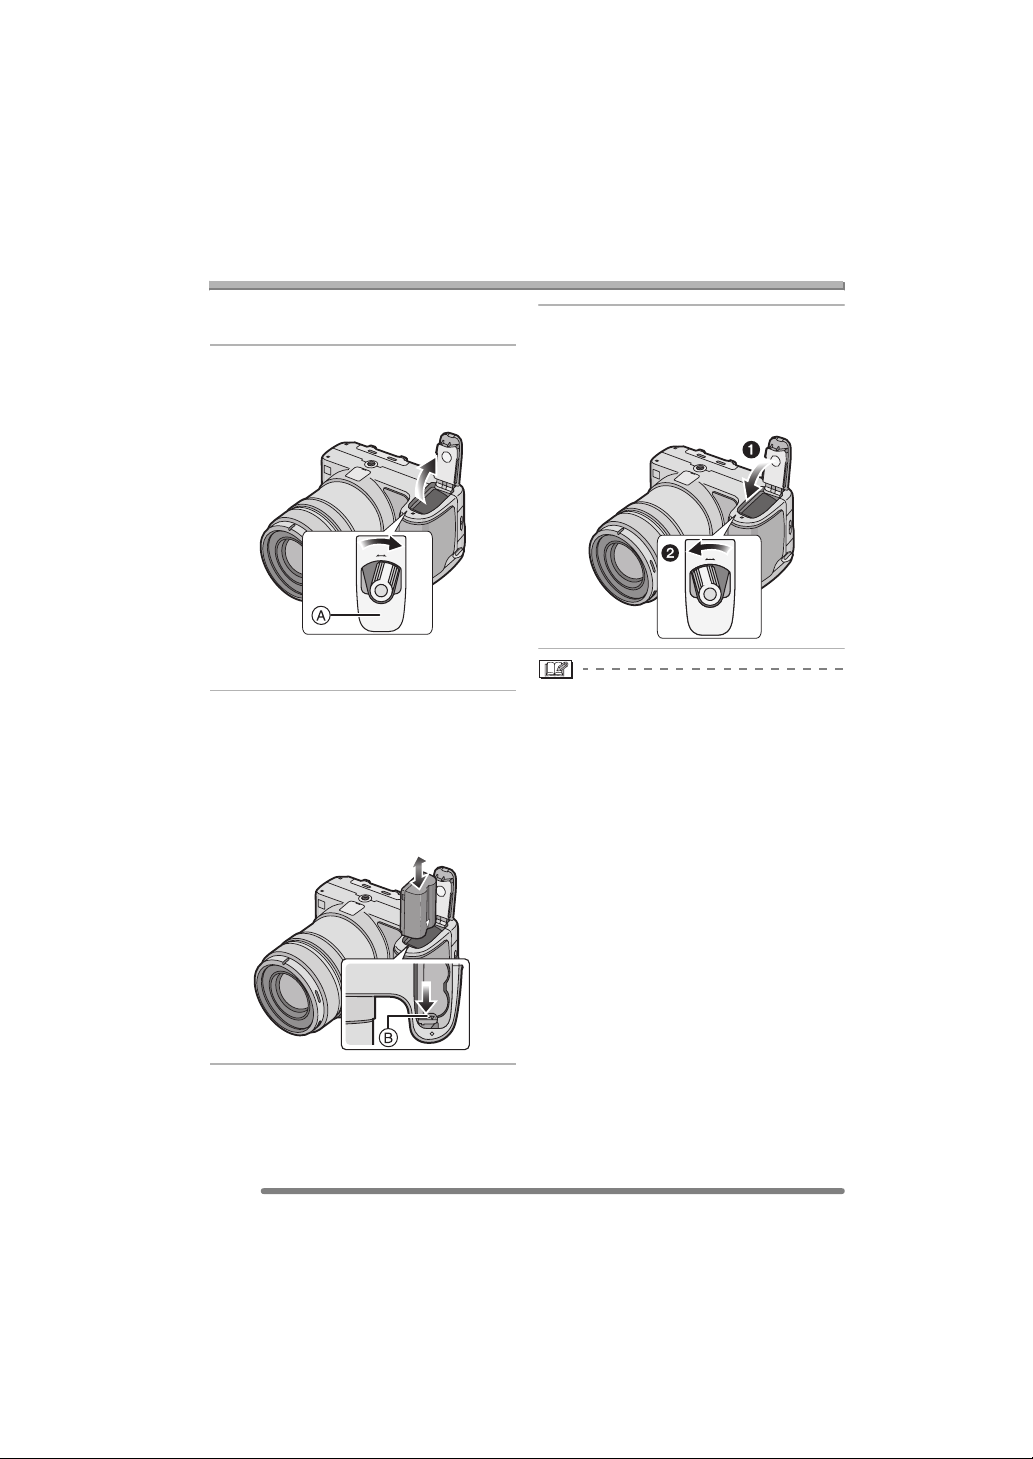
Inserting/Removing the Battery
• Check that the camera is turned off.
• Close the flash.
1 Slide the release lever in the
direction of the arrow to open the
battery door A.
O
E
P
S
E
O
N
L
C
• Please be sure to use genuine
Panasonic batteries (CGR-S006E).
2 Insert:
Insert the charged battery until it
clicks.
Remove:
Slide the lock B to remove the
battery.
3 1 Close the battery door.
2 Slide the release lever as far as
it will go in the direction of the
arrow to close the battery door
firmly.
O
O
E
E
P
P
S
S
E
E
O
O
N
N
L
L
C
C
• If you will not be using the camera for a
long time, remove the battery.
• When a fully charged battery has been
inserted for more than 24 hours, the clock
setting is stored (in the camera) for at
least 3 months even if the battery is
removed. (The storing time may be
shorter if the battery is not charged
sufficiently.)
If more than 3 months has passed, the
clock setting will be lost. In this case, set
the clock again. (P20)
• Do not remove the card and the battery
while the card is being accessed. The
data on the card may be damaged.
(P16)
• Do not remove the battery with the
camera turned on since the settings on
the camera may not be stored properly.
• The supplied battery is designed only
for the camera. Do not use it with any
other equipment.
14
VQT0S00
Preparation
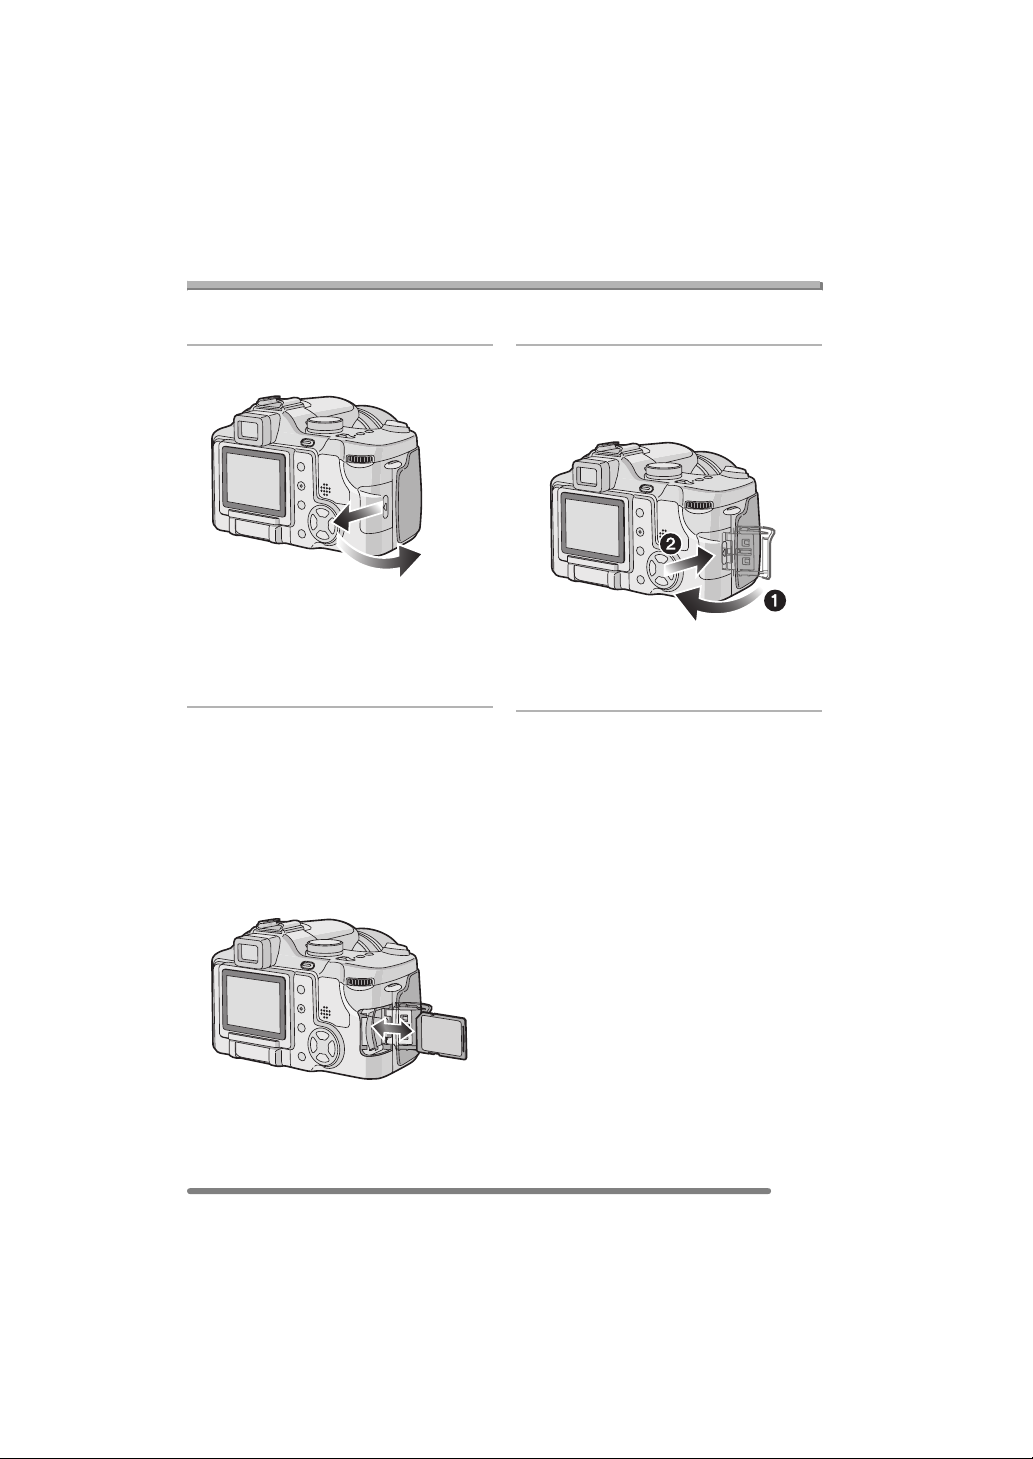
Inserting/Removing the Card
• Check that the camera is turned off.
• Close the flash.
1 Slide the card door to open it.
• The card and the data may be
damaged if it is inserted or removed
while the camera is on.
• We recommend using Panasonic’s
SD Memory Card.
2 Insert:
Insert the card fully until it clicks
and it is locked with the label
facing the front of the camera.
Remove:
Push the card until it clicks, then
pull the card out upright.
• The card may be damaged if it is not
fully inserted.
3 1 Close the card door.
2 Slide the card door to the end
to close it firmly.
• If the card door cannot be completely
closed, remove the card and insert it
again.
• Check the direction of the card.
• Do not touch the connection terminals
on the back side of the card.
15
VQT0S00

About the Card
Preparation
∫ Access to the card
When pictures are being recorded onto the
card, the card access indication
When the card access indication lights,
pictures are being read or deleted or the
card is cleaned up (P114) or formatted
(P115). do not:
• turn the camera off.
• remove the battery or the card.
• shake or impact the camera.
The card and the data may be damaged
and the camera may not operate normally.
∫ About handling a card
Transfer important pictures/motion pictures
from your card to your PC periodically
(P118). The data on the card may be
damaged or lost due to electromagnetic
wave, static electricity, breakdown of the
camera or a defective card.
• Do not format the card on your PC or
other equipment, format it with the camera
only to ensure proper operation. (P115)
∫ SD Memory Card (supplied) and
MultiMediaCard (optional)
• The SD Memory Card and
MultiMediaCard are small, lightweight,
removable external cards. The reading/
writing speed of an SD Memory Card is
fast. The SD Memory Card is equipped
with a Write-Protect switch B that can
inhibit writing and formatting a card.
(When the switch is slid to the [LOCK]
side, it is not possible to write or delete
data on the card and format it. When the
5
A
lights red.
switch is unlocked, these functions
become available.)
SD Memory Card
• On this unit, you can use SD Memory
Cards of the following capacity (from 8 MB
to 2 GB).
8 MB, 16 MB, 32 MB, 64 MB, 128 MB,
256MB, 512MB, 1GB,
2GB (Maximum)
Please confirm the latest information on the
following website.
http://panasonic.
(This Site is English only.)
• This unit supports SD Memory Cards
formatted in FAT12 system and FAT16
system based on SD Memory Card
Specifications.
• This unit does not support
MultiMediaCard for recording motion
pictures.
• The reading/writing speed of a
MultiMediaCard is slower than an SD
Memory Card. When a MultiMediaCard is
used, the performance of certain features
may be slightly slower than advertised.
• After recording motion pictures using the
MultiMediaCard, the card access
indication may appear for a while, but this
is not a malfunction.
• Keep the Memory Card out of reach of
children to prevent swallowing.
co.jp/pavc/global/cs
16
VQT0S00

Preparation
Removing the Lens Cap/Attaching the Strap
∫ Remove the lens cap
1 Pinch the lens cap and remove it.
• When you turn the camera off, carry the
camera or play back the pictures, attach
the lens cap to protect the surface of the
lens.
• Detach the lens cap before taking
pictures.
• Be careful not to lose the lens cap.
∫ Attaching the strap (supplied)
1 Pass the strap through the hole at
the Strap Eyelet.
2 Pass the strap through the
stopper and fasten the strap.
A: Pull the strap 2 cm or more.
• Attach the strap to the other side of the
camera being careful not to twist it.
• Check that the strap is firmly attached to
the camera.
• Attach the strap so that you can see
UMIX” logo.
“L
17
VQT0S00
Preparation
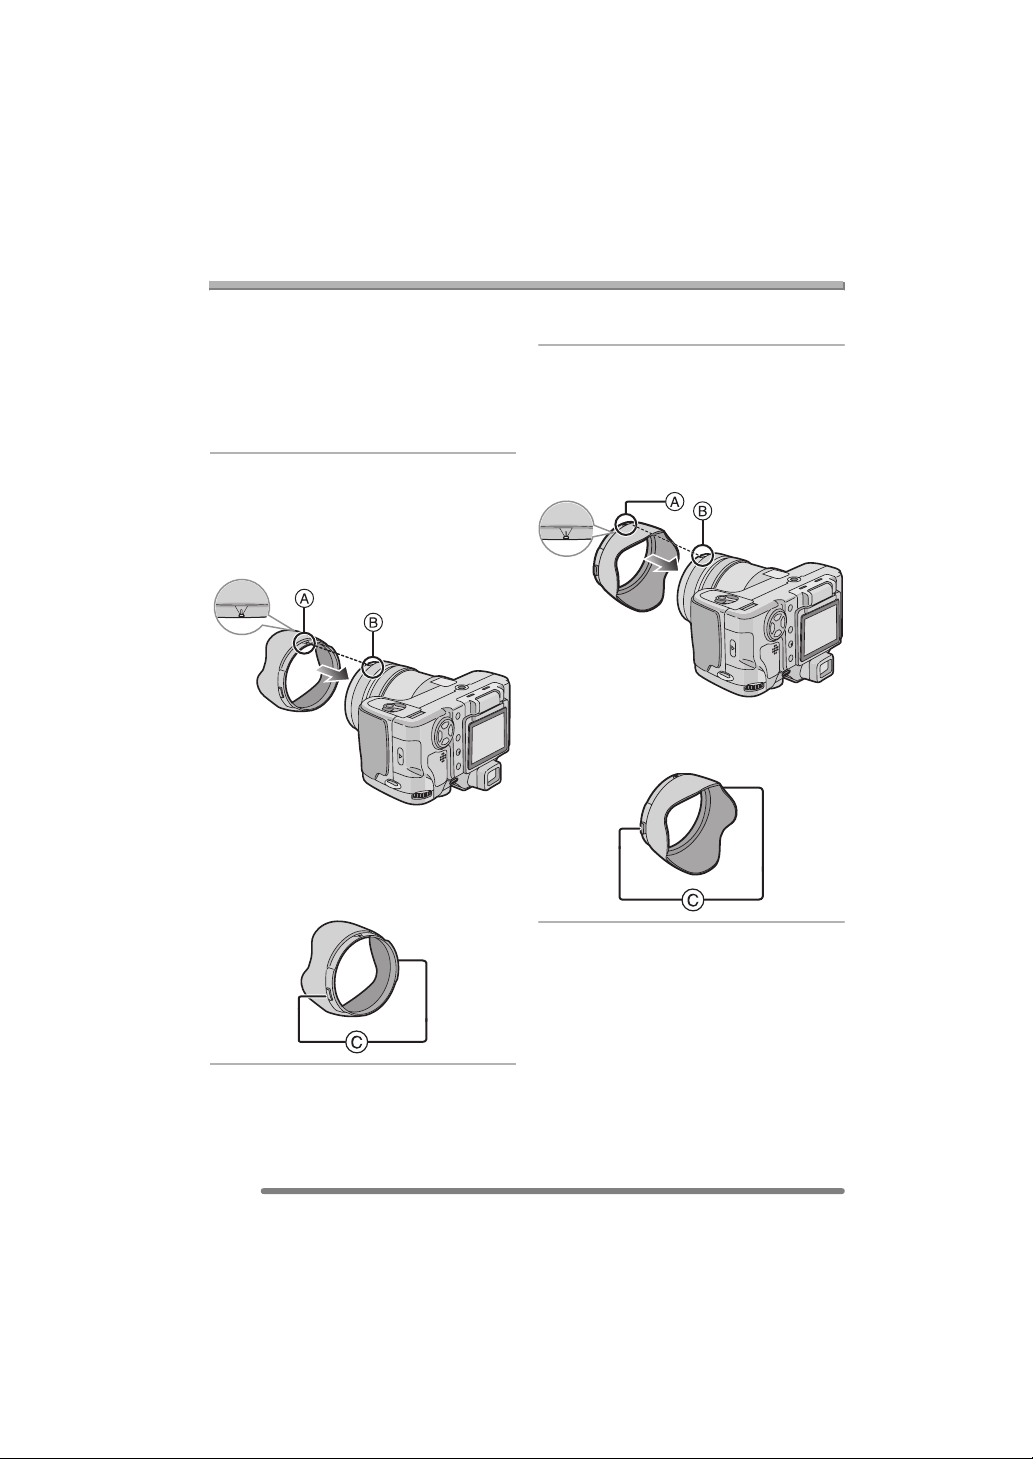
Attaching/Removing the Lens Hood
In bright sunlight or backlight, the lens hood
will minimise lens flare and ghosting.
The lens hood cuts out excess light and
improves the picture quality.
• Check that the camera is turned off.
• Close the flash.
∫ When attaching the lens hood
1 1 Place the camera upside down.
2 Align lens hood mark A with
lens hood positioning groove
B on the unit and insert it
straight in.
• Make sure the lens hood is properly
attached.
∫ When removing the lens hood
Press lock release button C and remove
the lens hood.
∫ Temporarily storing the lens hood
(Temporary storage)
1 1 Place the camera upside down.
2 Remove the lens hood and turn
it around, aligning lens hood
mark A with lens hood
positioning groove B on the
unit, and insert it straight in.
∫ When removing the lens hood
Press lock release button C and remove
the lens hood.
18
VQT0S00

Preparation
2 Attach the lens cap.
• Ensure that the lens cap is firmly
attached.
• When temporarily storing the lens
hood, ensure that it is firmly attached
and that it is not reflected in the picture.
• When temporarily storing the lens
hood, you can detach the lens cap and
take pictures. However you cannot use
the zoom ring, focus ring, [FOCUS]
button or focus switch.
• If you use a flash when the lens hood is
attached, the light from the flash is
blocked by the lens hood. The bottom of
the screen becomes dark (vignetting) and
you cannot adjust the flash setting. We
recommend removing the lens hood
before taking pictures with a flash.
• When using the AF assist lamp in the
dark, detach the lens hood.
• For details on how to attach the MC
protector and the ND filter, refer to P126.
• When the lens hood is attached, you
cannot attach conversion lenses.
• Consult the dealer or your nearest service
centre if you lose the supplied
accessories. (You can purchase the
accessories separately.)
19
VQT0S00
Preparation
Setting Date/Time (Clock Set)
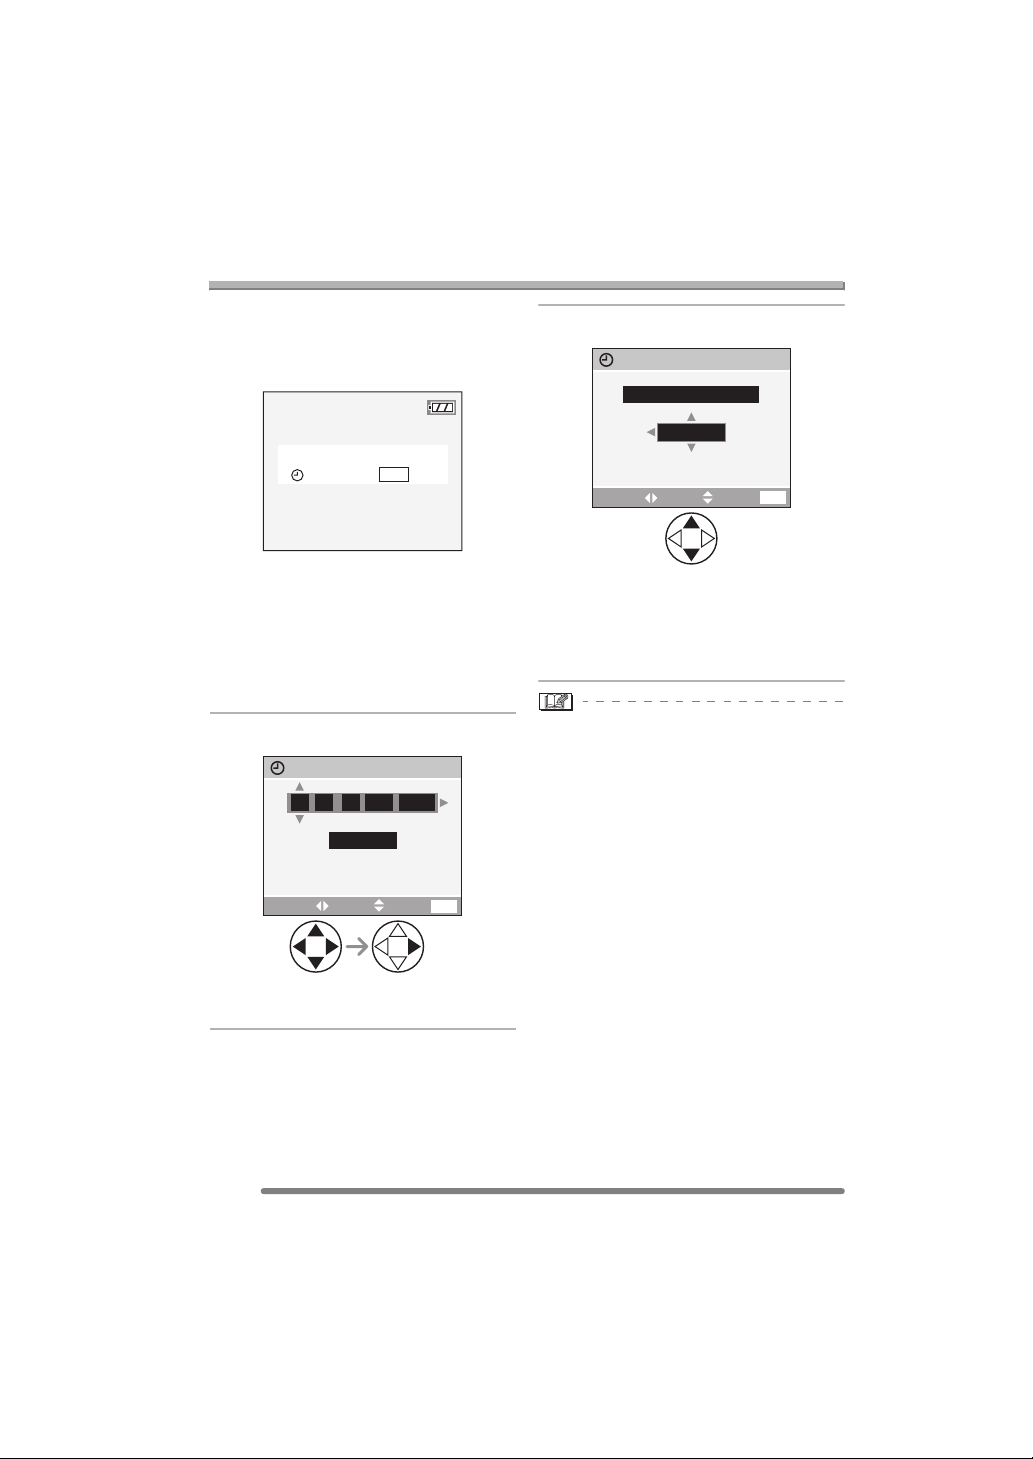
∫ Initial setting
The clock is not set when the camera is
shipped. When you turn the camera on, the
following screen appears.
PLEASE SET THE CLOCK
CLOCK SET
MENU
• When pressing the [MENU] button, the
screen shown in step 1 appears.
• The screen disappears after about
5 seconds. Turn the camera on again or
press the [MENU] button, select [CLOCK
SET] in page 2/4 of the [SETUP] menu
(P23) and set the clock in steps 1 and 2.
1 Set date and time.
CLOCK SET
11
JAN
00 00
:
• 2/1: Select the desired item.
• 3/4: Set date and time.
..
D/M/Y
SETSELECT
2005
EXIT
MENU
2 Select [D/M/Y], [M/D/Y] or [Y/M/D].
CLOCK SET
10:00111.
• Close the menu by pressing the
[MENU] button 2 times after finishing
the setting.
• Check if the clock setting is correct,
after turning the camera off and on.
• When a fully charged battery has been
inserted for more than 24 hours, the clock
setting is stored (in the camera) for at
least 3 months even if the battery is
removed. (The storing time may be
shorter if the battery is not charged
sufficiently.)
If more than 3 months has passed, the
clock setting will be lost. In this case, set
the clock again.
• You can set the year from 2000 to 2099.
The 24-hour system is used.
• When you use a photo printing service, if
the date is not set in the camera, it will not
be printed, even if the store provides a
date printing option to your photo.
• For the date print setting, refer to P107.
DEC
D/M/Y
SETSELECT
.2005
EXIT
MENU
20
VQT0S00

About the Setup Menu
Preparation
• Set the items if necessary. (Refer to P22
to 24 for each menu item.)
1 Turn the camera on.
OFF ON
• The menu items depend on the mode
selected with the mode dial (P36). In
this page, the setup menu
[MONITOR] settings in programme
AE mode [ ] are shown as an
example.
2 Press the [MENU] button.
1
SETUP
/
3
AUTO
AUTO
MENU
REC
W.BALANCE
SENSITIVITY
ASPECT RATIO
8
PICT.SIZE
M
QUALITY
MENU
SELECT
EXIT
3 Select the [SETUP] Menu.
4 Select the desired item.
SETUP
MONITOR
AUTO REVIEW
PLAY ON LCD
POWER SAVE
MF ASSIST
SELECT
SET
EXIT
5 Select the desired value.
SETUP
MONITOR
AUTO REVIEW
PLAY ON LCD
POWER SAVE
MF ASSIST
SELECT
Be sure to press 1 at the end to
store the setting.
• Close the menu by pressing the
[MENU] button after finishing the
setting. In recording mode, you can also
close the menu by pressing the shutter
button halfway.
SET
EXIT
1
MENU
1
MENU
/
4
/
4
REC
SETUP
MONITOR
AUTO REVIEW
1SEC.
PLAY ON LCD
POWER SAVE
2MIN.
MF ASSIST
SELECT
EXIT
• Rotate the front dial A to switch
between pages 1/4, 2/4, 3/4 and 4/4.
n
OFF
MF1
1
0
MENU
/
4
21
VQT0S00

Preparation
[SETUP] menu (Refer to P21 for the setting method.)
[MONITOR/VIEWFINDER]
Adjust the brightness of the LCD monitor
(when pictures appear on the LCD monitor)
or Viewfinder (when pictures appear on the
Viewfinder) in 7 steps.
[AUTO REVIEW]
[OFF]: The recorded picture does not
automatically appear.
[1SEC.]: The recorded picture
automatically appears on the
screen for about 1 second.
[3SEC.]: The recorded picture
automatically appears on the
screen for about 3 seconds.
[ZOOM]: The recorded picture
automatically appears on the
screen for about 1 second. Then
it is enlarged 4 times and appears
• When using pictures with audio, the auto
review function works while recording the
audio or the data into the card regardless
of the setting on the auto review function.
(The picture is not enlarged.)
• When the quality is set to [TIFF] or [RAW],
the auto review function works until the
end of recording onto the card. (The
picture is not enlarged.)
• The setting for the auto review function is
disabled in auto bracket, burst mode,
motion picture mode, or when
[AUDIO REC.] is set to [ON].
[PLAY ON LCD]
When Viewfinder is selected in the
recording mode while setting [PLAY ON
LCD] to [ON], the picture automatically
appears on the LCD monitor in review or
playback. (P29)
for about 1 second. This mode is
useful for confirming focus.
Pictures in auto bracket, burst
mode or pictures with audio are
not enlarged even if [ZOOM] is
selected.
• In motion picture mode [ ], auto review
function is not activated.
• When pictures are recorded in auto
bracket [ ] (P55) or any speed ([ ],
[ ] and [ ]) on burst mode (P57),
the auto review function is activated
regardless of the setting on the auto
review function. (The picture is not
enlarged.)
22
VQT0S00

Preparation
[SETUP] menu (Refer to P21 for the setting method.)
[POWER SAVE]
[1MIN.]/[2MIN.]/[5MIN.]/[10MIN.]:
The power save mode is activated
(the camera is automatically turned
off to save the battery life) if the
camera has not been used for the
time selected on the setting.
[OFF]:The power save mode is not
activated.
• Press the shutter button halfway or turn
the camera off and on to cancel the power
save mode.
• When using the AC adaptor (DMW-CAC1;
optional)/connecting to a PC or a printer/
recording motion pictures/playing back
motion pictures/during Slide Show, the
power save mode is not activated.
(However, during a manual Slide Show,
the setting for the power save mode is
fixed to [10MIN.])
[MF ASSIST]
(Recording mode only)
In manual focus, assistance screen
appears on the centre of the screen to
facilitate focusing on the subject. (P46)
[MF1]:The centre of the screen is
enlarged. You can adjust the focus
while determining the composition
of the whole of the screen.
[MF2]:The whole of the screen is enlarged.
It is convenient for adjusting the
focus in Wide.
[OFF]:The screen is not enlarged.
[BEEP]
[]:No operational sound
[]:Soft operational sound
[]:Loud operational sound
[SHUTTER]
Set to select the volume of shutter sound.
[]:No shutter sound
[]:Soft shutter sound
[]:Loud shutter sound
[VOLUME]
The volume of speakers can be adjusted in
7 steps. (LEVEL 6 to 0)
• When you connect the camera to a TV,
the volume of the speakers of the TV is
not changed.
[CLOCK SET]
Change date and time. (P20)
[NO.RESET]
Set this when you want to start the file
number of the picture from 0001 on the
next recording. (The folder number is
updated, and the file number starts from
0001.)
• The folder number can be assigned from
100 to 999.
When the folder number reaches 999, you
cannot reset the file number. We
recommend formatting the card after
saving the data on a PC or elsewhere.
• To reset the folder number to 100, format
the card first and then use this function to
reset the file number.
After that, the reset screen for the folder
number appears. Select [YES] to reset the
folder number.
• Refer to P119 for detailed information
about the file number and the folder
number.
23
VQT0S00

Preparation
[SETUP] menu (Refer to P21 for the setting method.)
[RESET]
The settings on the [REC] or the [SETUP]
menu are reset to the initial settings.
• The birthday setting for [BABY] (P75) in
the scene mode is also reset when the
settings in the [SETUP] menu are reset.
[ROTATE DISP.] (P104) in the [PLAY]
mode menu is also reset to [ON].
• The folder number and the clock setting
are not changed.
[USB MODE]
Set the USB communication system.
• Set before connecting to a PC or a printer.
(P117)
[HIGHLIGHT]
When the auto review or review function is
activated, a white saturated area appears
blinking in black and white. (P29)
[VIDEO OUT]
(Playback mode only) (P116)
[NTSC]: Video output is set to NTSC
system.
[PAL]: Video output is set to PAL
system.
[SCENE MENU]
[OFF]: [SCENE MODE] menu does not
appear when setting the mode
dial to [ ] or [ ] and the
camera is operated in the scene
mode currently selected. If you
change the scene mode, Press
the [MENU] button to display the
[SCENE MODE] menu and then
select the desired scene mode.
[AUTO]: [SCENE MODE] menu appears
automatically when setting the
mode dial to [ ] or [ ].
Select the desired scene mode.
[LANGUAGE]
Set to the language on the menu screen
from the following languages.
Set to the desired language with 3/4 and
store it with 1.
[ENGLISH]: English
[DEUTSCH]: German
[FRANÇAIS]: French
[ESPAÑOL]: Spanish
[ITALIANO]: Italian
[]:Japanese
• When you set to other language by
mistake, select [ ] from the menu icons
to set the desired language.
24
VQT0S00
Preparation
About the LCD Monitor/Viewfinder
DISPLAYEVF/LCD
1 Switching the LCD monitor/
Viewfinder
Press the [EVF/LCD] button to switch the
monitor screen. (When the LCD monitor is
closed with the screen facing outwards)
A LCD monitor (LCD)
B Viewfinder (EVF)
• When the LCD monitor turns on, the
Viewfinder turns off (and vice versa).
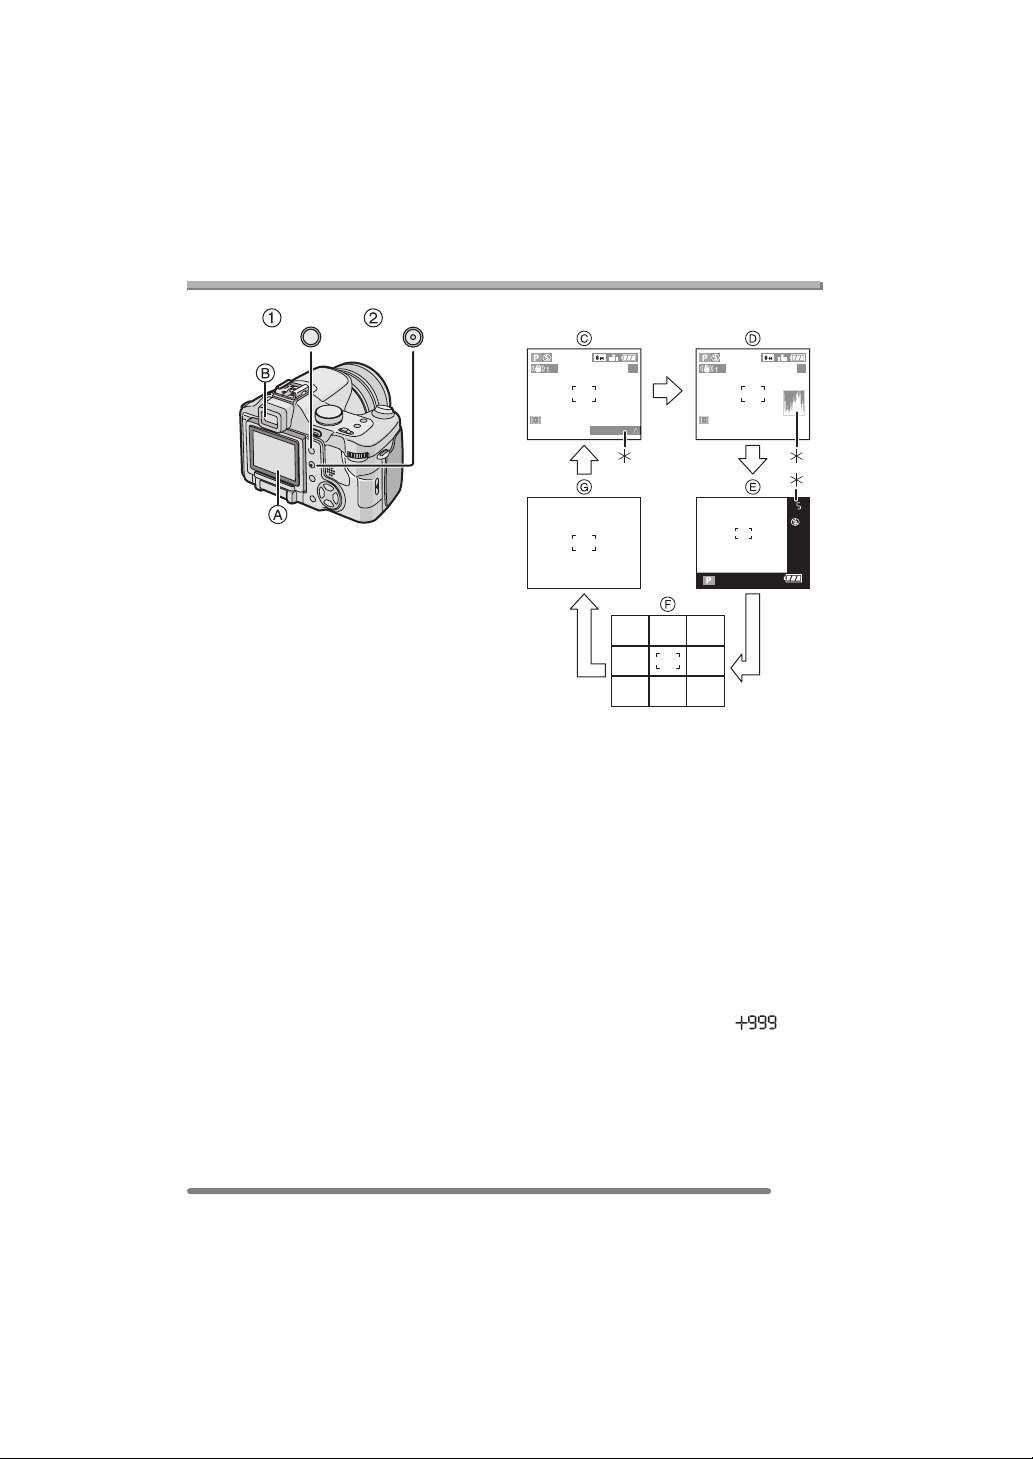
2 Selecting the screen to be used
Press the [DISPLAY] button to change the
display.
• When the menu screen appears, the
[DISPLAY] button is not activated. During
multi playback (P60) or playback zoom
(P61) and when playing back with Slide
Show (P102), the indications on the
screen can be turned on and off.
In recording mode (P37)
5 5
BACKLIGHT
1
2
3
C Normal display
D Display with histogram
E Out-of-frame display
F No display (Recording guide line)
•In [NIGHT PORTRAIT] (P74), [NIGHT
SCENERY] (P74), [FIREWORKS]
(P77) and [STARRY SKY] (P79) in
scene mode, the lines are grey.
G No display
¢1 Backlight Compensation
(Appears only in auto mode)
¢2 Histogram
¢3 When the number of pictures remaining
is more than 1000 or the time
remaining in motion picture mode is
more than 1000 seconds, [ ] is
displayed.
25
VQT0S00

In playback mode (P59)
100_0001
Preparation
∫ LCD Monitor
Adjusting the LCD monitor makes it
possible to take pictures from various
1/5
angles.
9
months
10
10:00 1.DEC.2005
4
100_0001
ISO
F2.8 1/25
H Normal display
I Display with recorded information and
histogram
J No display
¢4 Displayed when you set birthday
setting for [BABY] (P75) in the scene
mode, and [WITH AGE] is selected at
taking pictures.
100
10:00 1.DEC.2005
∫ Taking pictures at a normal angle.
• You can switch between the LCD monitor
and the Viewfinder.
1/5
AUTO
∫ Taking pictures at a high angle
Open the LCD monitor with one of the
LCD monitor open knobs.
• You can use the LCD monitor only.
A:LCD Monitor open knobs
• This is convenient when there is someone
in front of you and you cannot get close to
the subject.
26
VQT0S00
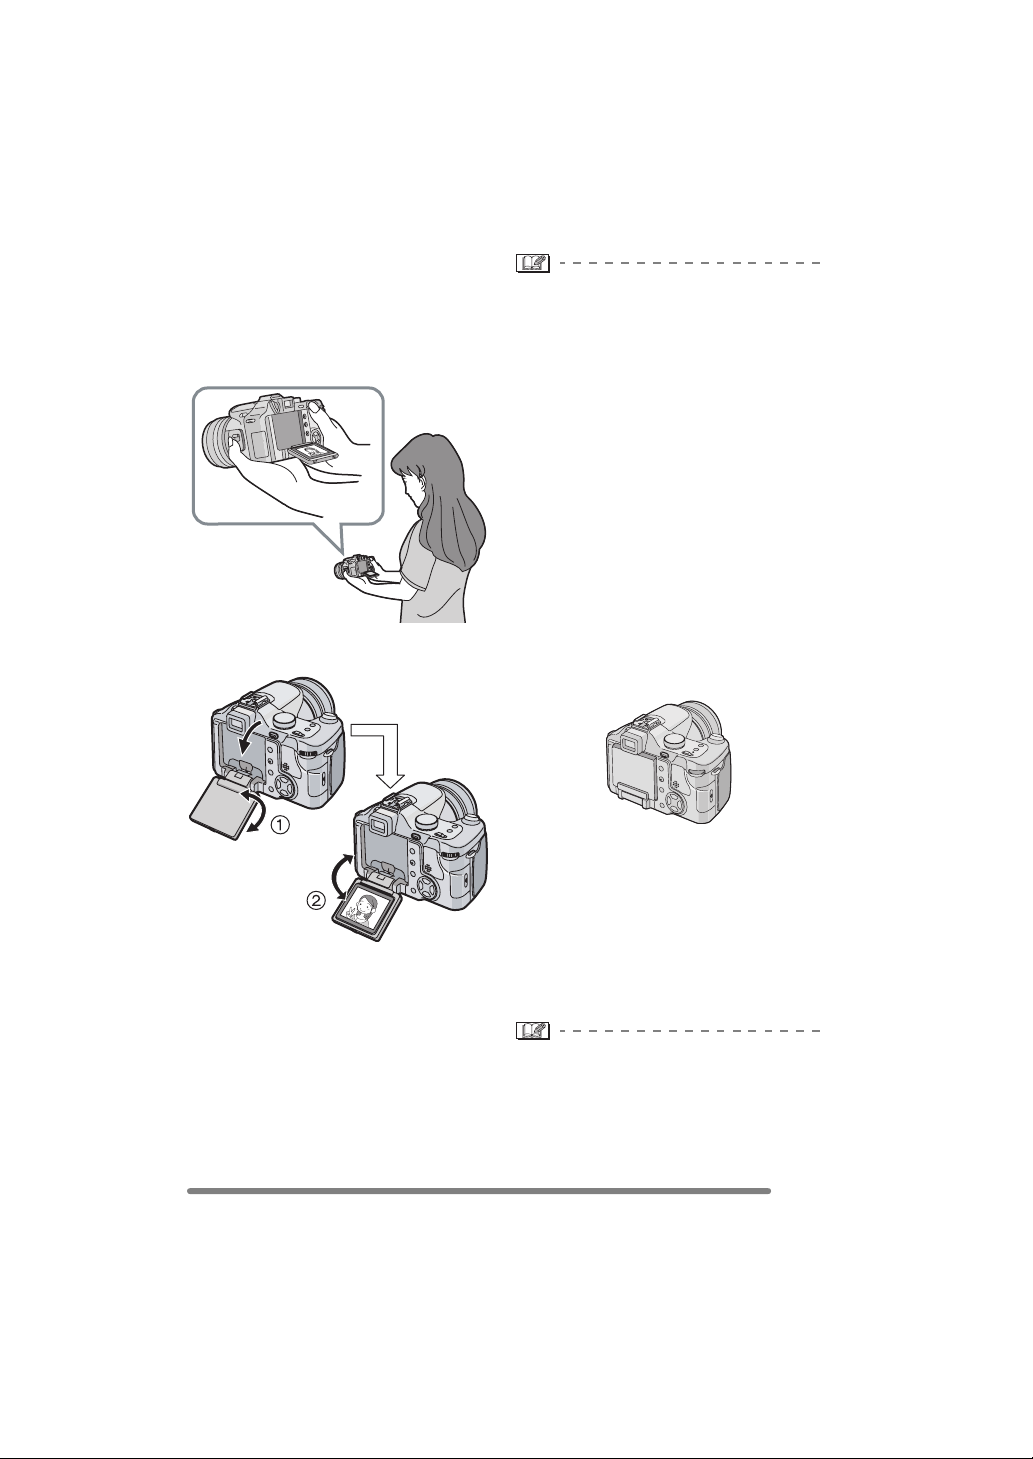
∫ Taking pictures at a low angle
Open the LCD monitor with one of the
LCD monitor open knobs, pull the LCD
monitor fully open (approximately 120o)
and rotate it 180o.
• You can use the LCD monitor only.
LCD monitor rotation direction
Preparation
• If the LCD monitor turns on when it is
closed with the screen facing inwards, the
camera automatically switches to the
Viewfinder.
• If the LCD monitor is opened when the
Viewfinder is turned on, the camera
automatically switches to the LCD
monitor.
• Only rotate the LCD monitor after
opening it wide enough, and be careful
not to use excessive force as it may be
damaged.
• When holding the edge of the LCD
monitor, there may be some distortion,
however this is not a malfunction.
Moreover, this has no affect on the taken
pictures or playback.
• When not using the LCD monitor it is
recommended that you close it with the
screen facing inwards to prevent dirt and
scratches.
1: Maximum 180o
2: Maximum 120o
• This is convenient when taking pictures of
flowers etc. that are in a low position.
• When using a tripod, depending on the
kind of tripod the LCD monitor may not
rotate.
∫ About the Viewfinder
The Viewfinder is convenient when you
want to take pictures of a moving subject or
outdoors.
• Refer to page 29 for information about
diopter adjustment.
• When using the Viewfinder, close the LCD
monitor.
• When the LCD monitor is open, the
Viewfinder cannot be used.
27
VQT0S00
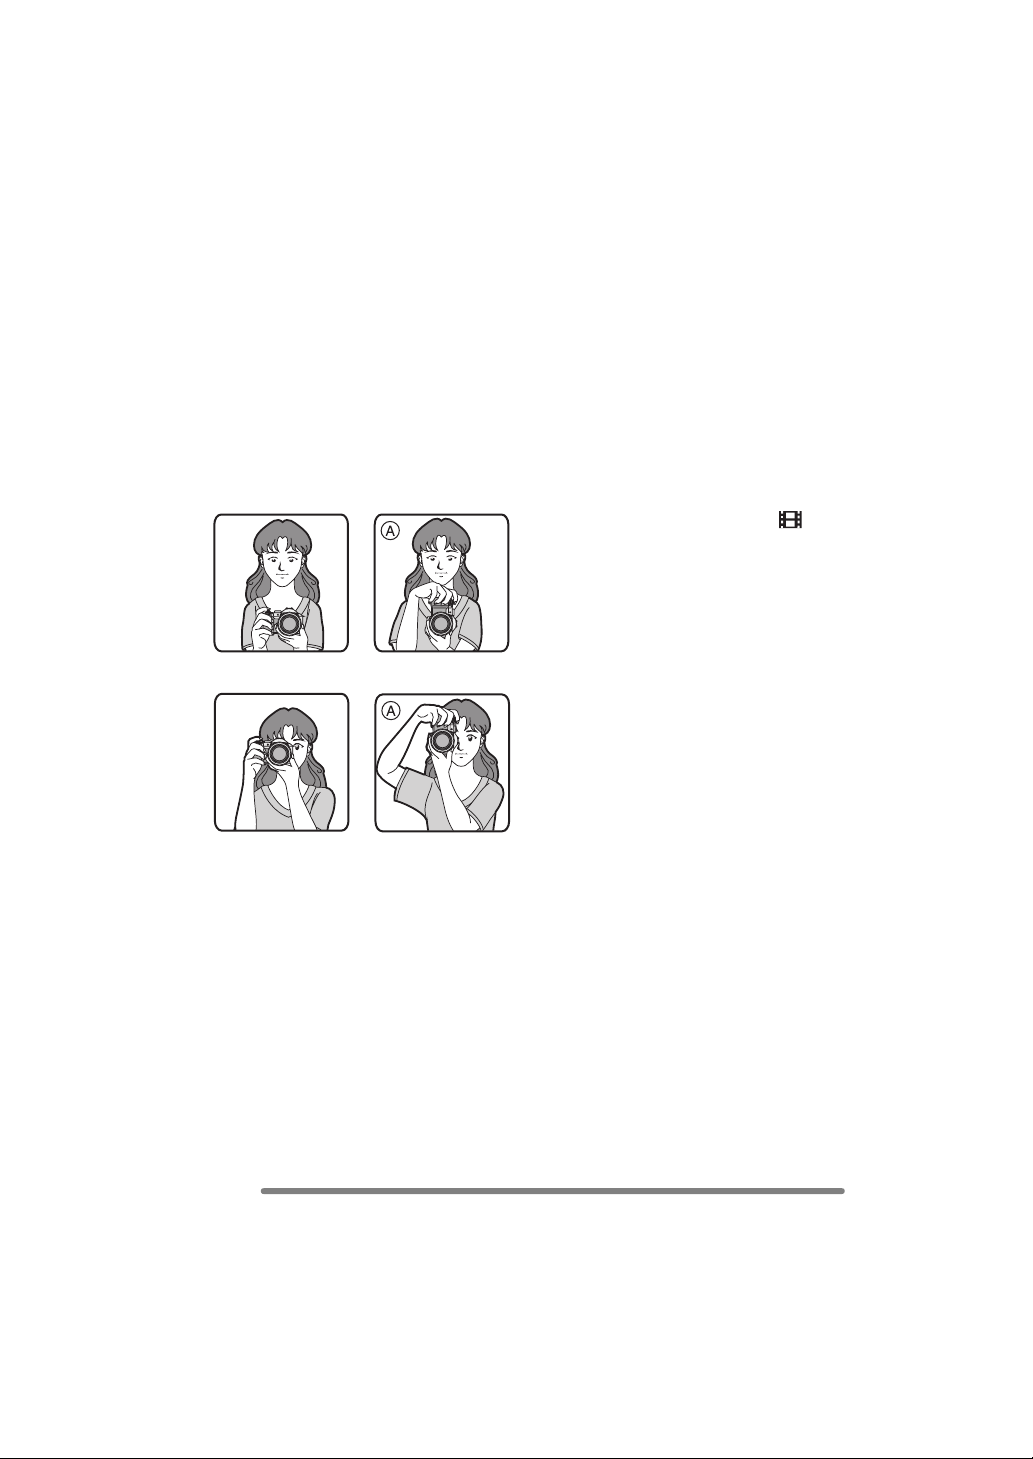
∫ Tips for taking good pictures
To take pictures without blurring:
• Hold the camera gently with both hands,
keep arms stationary at your side and
stand with your feet slightly apart.
• Make sure that camera shake does not
occur when you press the shutter button.
• Do not cover the microphone or the AF
assist lamp with your finger or other
objects.
• Do not touch the front of the lens.
When recording with LCD Monitor
When recording with Viewfinder
Preparation
∫ Direction detection function
• If you take pictures by holding the camera
vertically, the information of the rotation on
the pictures is automatically added and
recorded to the pictures.
When [ROTATE DISP.] (P104) is set to
[ON], you can rotate and display pictures
on the screen or the TV according to the
information of the rotation on the pictures.
• This function may not work properly on
pictures recorded by aiming the camera
up or down.
• You cannot use the direction detection
function in motion picture mode [ ] and
when you create flip animation.
A: When holding the camera vertically
• If you take pictures by holding the camera
vertically, use the LCD monitor at the
normal angle.
• Refer to P39 for information about jitter
(camera shake).
28
VQT0S00
Preparation
∫ Out-of-frame display
The recording information is displayed out
of the recording screen, therefore, you can
take pictures without obstruction from icons
or others on the monitor, except the zoom
and important warning indicators.
∫ Diopter adjustment
This feature is handy for users who wear
corrective lenses and prefer to use the
Viewfinder.
• Close the LCD monitor and press the
[EVF/LCD] button to display the
viewfinder.
Adjust the diopter, rotating the diopter
adjustment dial.
5
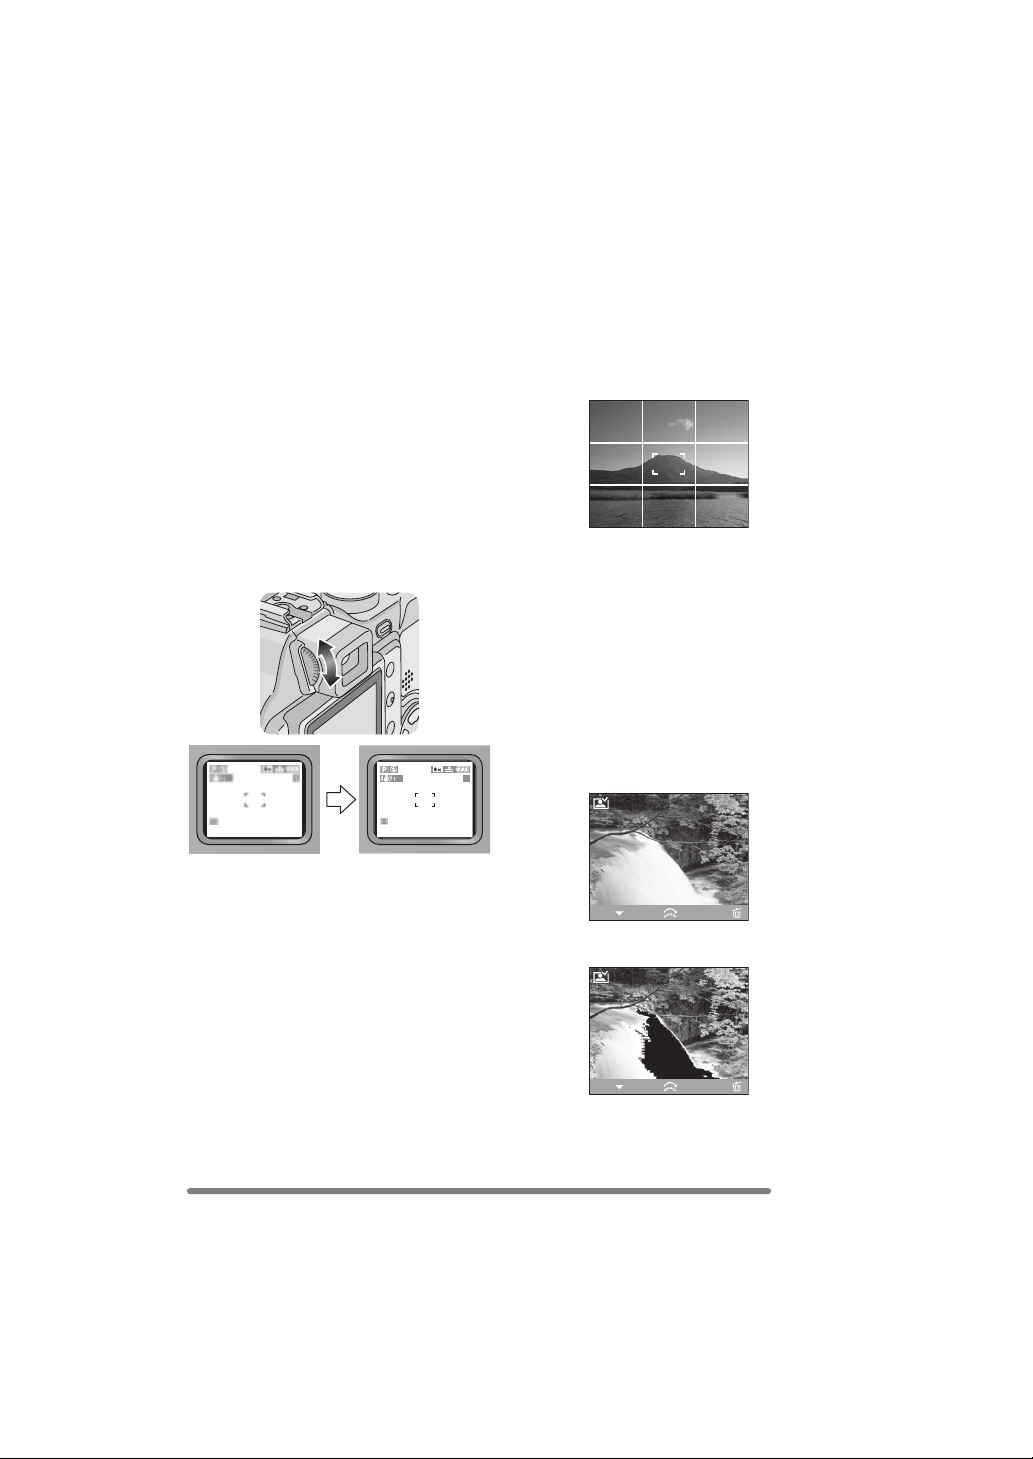
∫ Recording guide line
When you align the subject on the
horizontal and vertical guide lines or the
cross point of these lines, you can take
pictures with well-designed composition by
viewing the size, the slope and the balance
of the subject.
∫ Highlight display
When setting [HIGHLIGHT] to [ON] on the
[SETUP] menu (P24) while the auto review
or review function is activated, any white
saturated area (extremely bright or
glistening part) on the picture appears
blinking in black and white.
• If you compensate the exposure to minus,
referring to the histogram and then take a
picture again, it may result in a good
picture.
No highlight display
REVIEW1X
∫ Monitor priority
When setting [PLAY ON LCD] to [ON] on
the [SETUP] menu (P22), the LCD monitor
is turned on in the following cases.
You can save the time it takes to switch the
display to the LCD monitor even when
using the Viewfinder in recording.
• When the recording mode is switched to
playback mode.
• When reviewing pictures. (P44)
• When turning the camera on in playback
mode.
4X
DELETEEXIT
With highlight display
REVIEW1X
4X
DELETEEXIT
29
VQT0S00
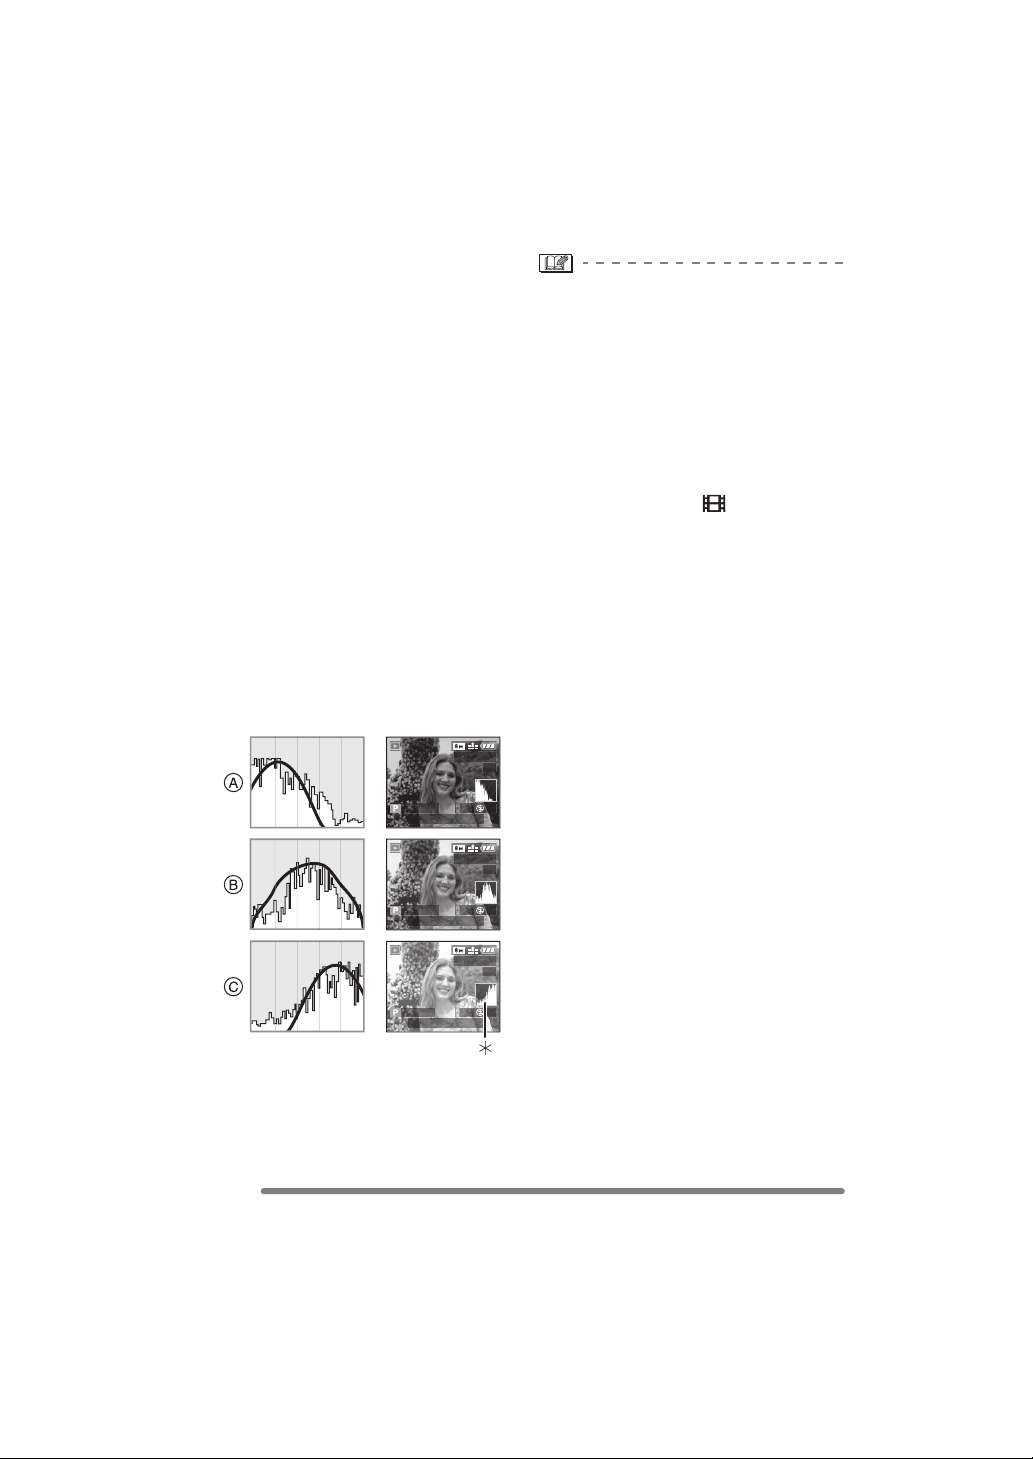
∫ Histogram
• A histogram is a graph that displays
brightness along the horizontal axis (black
to white) and the number of pixels at each
brightness level on the vertical axis.
• It allows the camera user to easily check
the way a picture is being exposed.
• It is very useful if manual adjustments of
the lens aperture and shutter speed are
available, especially in those situations
where automatic exposure may be difficult
due to uneven lighting. Using the
histogram feature will allow you to get the
best performance from the camera.
A When the values are concentrated to
the left, the picture is under exposed.
B When the values in the histogram are
distributed evenly, the exposure is
adequate and the brightness is
well-balanced.
C When the values are concentrated to
the right, the picture is over exposed.
Example of histogram
100_0001
1/5
ISO
AUTO
F2.8 1/200
100
10:00 1.DEC.2005
Preparation
• When the recorded picture and the
histogram do not match each other
under the following conditions, the
histogram is displayed in orange.
– When the flash is activated
– When the flash is closed
1 When the brightness of the screen is
not correctly displayed in dark places
2 When the exposure is not
adequately adjusted
• The histogram does not appear when in
motion picture mode [ ], during multi
playback and playback zoom.
• The histogram in the recording mode is an
approximation.
• The histogram in recording and playback
may not match each other.
• The histogram in the camera does not
match the one displayed in image editing
software used with a PC, etc.
• Check white saturated areas with the
highlight display in the auto review
function or the review function. (P29)
A Under Exposed
B Properly Exposed
C Over Exposed
¢Histogram
30
VQT0S00
100_0001
F2.8 1/100
10:00 1.DEC.2005
100_0001
F2.8 1/50
10:00 1.DEC.2005
1/5
ISO
AUTO
100
1/5
ISO
AUTO
100
Loading…

Инструкция по эксплуатации
Цифровая фотокамера
Модель №. DMC-FZ30GC
DMC-FZ30SG
Перед пользованием прочтите,
пожалуйста, эту инструкцию
полностью.
VQT0S04

Перед использованием
Перед использованием
Уважаемый пользователь!
•Просьба обратить внимание, что
Благодарим Вас за приобретение этой
органы управления, составные части и
цифровой фотокамеры Panasonic.
меню Вашей цифровой фотокамеры
Прочитайте, пожалуйста, внимательно
могут несколько отличаться от тех, что
это руководство по эксплуатации и
представлены на рисунках этой
держите его всегда под рукой.
инструкции.
•Логотип SD является торговым знаком.
•Другие имена, названия фирм и
Информация для
изделий, упоминаемые в данной
Вашей безопасности
инструкции, являются торговыми
знаками или зарегистрированными
товарными знаками.
ПРЕДУПРЕЖДЕНИЕ
ДЛЯ УМЕНЬШЕНИЯ ОПАСНОСТИ
РАЗЪЕМ ДОЛЖЕН НАХОДИТЬСЯ
ПОЖАРА ИЛИ ПОРАЖЕНИЯ
ВБЛИЗИ АППАРАТУРЫ И ДОСТУП К
ЭЛЕКТРИЧЕСКИМ ТОКОМ И
НЕМУ НЕ ДОЛЖЕН БЫТЬ
ДРУГИХ НЕПРИЯТНЫХ
ЗАТРУДНЕН.
ПОСЛЕДСТВИЙ ИСПОЛЬЗОВАТЬ
ТОЛЬКО РЕКОМЕНДУЕМОЕ
ДОПОЛНИТЕЛЬНОЕ
ПРЕДУПРЕЖДЕНИЕ
ОБОРУДОВАНИЕ. НЕ ПОДВЕРГАТЬ
При неправильной замене
ЭТОТ АППАРАТ ВОЗДЕЙСТВИЮ
аккумулятора возникает опасность
ДОЖДЯ ИЛИ ВЛАГИ. НЕ СНИМАТЬ
взрыва. Производить замену,
НАРУЖНУЮ КРЫШКУ (ИЛИ
используя только тот же тип
ЗАДНЮЮ ПАНЕЛЬ) ЗАПРЕЩАЕТСЯ
аккумулятора, или равноценный ему,
ПРОИЗВОДИТЬ РЕМОНТ
рекомендуемый производителем.
САМОСТОЯТЕЛЬНО. ОБРАЩАТЬСЯ
Размещение в отходы
К КВАЛИФИЦИРОВАННЫМ
использованных аккумуляторов
СПЕЦИАЛИСТАМ ПО
производить согласно инструкциям
ТЕХОБСЛУЖИВАНИЮ.
производителя.
Помните о соблюдении авторских
прав.
Запись с предварительно
записанных магнитных лент или
дисков, а также печатных или теле-
радио материалов с целью, отличной
от Вашего личного пользования,
может быть нарушением закона об
авторских правах. Даже с целью
Вашего личного пользования запись
определённого материала может
быть ограничена.
2
VQT0S04
Перед использованием
-Если Вы увидите такой символ-
∫ О мониторе ЖКД/Видоискателе
•Не нажимать с силой на монитор
Информация по обращению с
ЖКД. Это может вызвать появление
отходами для стран, не входящих в
на нем неправильных цветов или
Европейский Союз
сбои в его работе.
Действие этого символа
•В местах с сильными перепадами
распространяется только на
температуры на мониторе ЖКД может
Европейский Союз.
образоваться конденсат. Вытереть его
Если Вы собираетесь выбросить
мягкой сухой тряпочкой.
данный продукт, узнайте в местных
•Если фотокамера переохлаждена, при
органах власти или у дилера, как
ее включении изображение на
следует поступать с отходами такого
мониторе ЖКД/Видоискателе будет
типа.
несколько темнее обычного. Однако по
мере повышения внутренней
температуры фотокамеры
восстановится обычная яркость.
•Будьте осторожны, поворачивая
монитор ЖКД: не прилагайте
излишних усилий, т.к. они могут
привести к повреждению.
•При использовании некоторых
штативов может оказаться
невозможно повернуть монитор
∫ Уход за камерой
ЖКД.
•Беречь фотокамеру от сотрясений и
•Когда используется Видоискатель и в
ударов. Они могут вызвать сбои в
других случаях, когда монитор ЖКД не
работе фотокамеры, повреждения
используется, рекомендуется
объектива или сделать невозможной
закрывать его экраном внутрь, во
запись снимков.
избежание загрязнений и царапин.
•Песок или пыль могут вызвать сбои
в работе фотокамеры. Если вы
Для производства экрана монитора
пользуетесь фотокамерой на пляже
ЖКД/Видоискателя используется
и т.п., будьте внимательны, чтобы в
высокоточная технология.
нее не попали песок или пыль.
Результатом являются более 99,99%
•Если вы пользуетесь фотокамерой в
рабочих пикселей и лишь 0,01%
дождливый день или на пляже, будьте
неактивных или негаснущих
внимательны, чтобы в нее не попала
пикселей. Последнее, однако, не
вода.
отражается на записи снимков на
•Если на фотокамеру попали брызги
карту.
морской воды, смочить мягкую
тряпочку в водопроводной воде,
хорошо отжать ее и тщательно
протереть корпус фотокамеры.
Затем повторно протереть сухой
тканью.
3
VQT0S04

Перед использованием
∫ Об объективе
Когда температура камеры
•Не направлять объектив на солнце или
приближается к температуре
на источники сильного света. Это
окружающей среды, дымка исчезает
может не только вызвать
сама по себе.
неисправности в работе фотокамеры,
∫ Если вы не собираетесь
но и нанести непоправимый ущерб
пользоваться фотокамерой
вашим глазам.
длительное время
•Не нажимать с силой на объектив.
•Следует хранить аккумулятор в
•Если оставить фотокамеру
прохладном сухом месте с
обращенной объективом к солнцу, это
относительно устойчивой
может вызвать сбои в ее работе.
температурой.
Будьте внимательны, когда вы кладете
(Рекомендуемая температура:
фотокамеру за окно или вблизи окна.
15 oC до 25 oC, Рекомендуемая
•Наличие загрязнений (воды, масла,
влажность: 40% до 60%)
отпечатков пальцев и т.п.) на
•Не забудьте вынуть аккумулятор и
поверхности объектива может
карту из фотокамеры.
отразиться на качестве снимка. Перед
•Если оставить аккумулятор в
и после съемки слегка протрите
фотокамере на длительное время,
поверхность объектива мягкой, сухой
произойдет его разрядка, даже если
тканью.
фотокамера будет выключена. Если
∫ О конденсации (замутнении
оставить аккумулятор в фотокамере
объектива или видоискателя)
еще на более длительное время, он
Конденсация возникает, когда
переразрядится и может стать
температура или влажность
непригодным к работе, даже после
окружающей среды изменяется, как
подзарядки.
описано ниже:
•Для хранения аккумулятора в течение
Остерегайтесь конденсации, поскольку
длительного периода времени
она вызывает появление пятен на
рекомендуется заряжать его раз в год
объективе, плесени и сбоев в работе
и снова класть на хранение после того,
фотокамеры.
как заряд будет полностью
•Когда фотокамера с холода заносится
израсходован.
в теплое помещение.
•Если вы держите фотокамеру в
•Когда фотокамера с улицы заносится в
стенном шкафу или в футляре,
автомобиль с включенной системой
рекомендуется хранить ее с
кондиционирования.
десикантом (силикагелем).
•Когда холодный воздух из
•Рекомендуется, кладя камеру на
кондиционера или т.п. направлен
длительное хранение, закрывать
прямо на фотокамеру.
монитор ЖКД экраном внутрь.
•Во влажных местах
Поместите камеру в полиэтиленовый
мешок и дождитесь приближения ее
температуры к температуре
окружающей среды, во избежание
конденсации. При возникновении
конденсации выключите камеру и
выждите примерно 2 часа.
4
VQT0S04
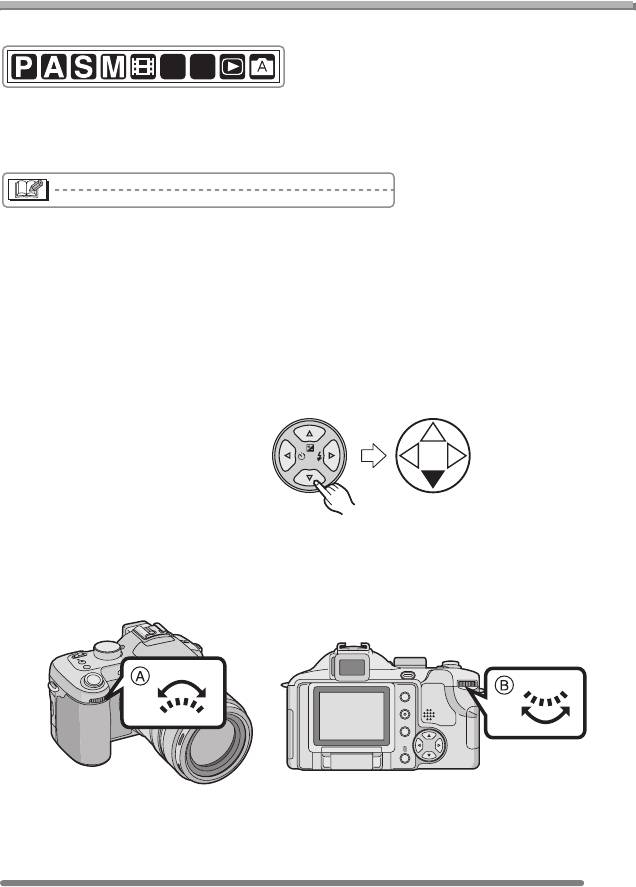
Перед использованием
Информация о данных инструкциях по
эксплуатации
∫ Об указаниях в данных инструкциях
SCN
1
SCN
2
Указанные здесь режимы позволяют вам пользоваться функциями или
настройками, описанными на этих станицах. Установите диск рабочего режима на
нужный режим для использования функций или настроек.
Здесь приводится полезная информация по работе с данной фотокамерой.
∫ О рисунках в данных инструкциях по эксплуатации
Заметьте, что изображения самого изделия, рисунков, экрана меню и т.д. несколько
отличаются от их реального вида.
∫ О рисунках кнопки курсора
В данных инструкциях по эксплуатации работа с кнопкой курсора описана, как
показано ниже.
например: При нажатии кнопки 4
REV
∫ О переднем и заднем дисках
Указания по использованию этих дисков даны в руководстве по эксплуатации с
рисунками, которые соответствуют экранным иконкам.
•Поворачивайте передний и задний диски медленно и осторожно.
AE LOCK
EVF/LCD
DISPLAY
MENU
A: Передний диск
B: Задний диск
5
VQT0S04

Содержание
Проверка сделанного снимка
Перед использованием
(Просмотр) …….…………………………….43
Съемка крупным
Информация для Вашей
планом — [АФ МАКРО] …..……………… 44
безопасности ………………………………… 2
Съемка с ручной фокусировкой ………45
Информация о данных инструкциях
Съемка со встроенной вспышкой …….48
по эксплуатации .………………..…………. 5
Съемка с автоматическим
таймером……………………………………..52
Компенсация экспозиции…………………53
Подготовка
Съемка с автоматическим
бракетингом…………………………………54
Стандартные принадлежности …………. 8
Оптический стабилизатор
Названия составных частей ……………… 9
изображения………………………….……. 55
Подзарядка аккумулятора при
Съемка в многократном режиме …..… 56
помощи зарядного устройства……… 11
Об аккумуляторе
(Подзарядка/Количество
Воспроизведение (основы)
записываемых снимков)……………….12
Установка/Изъятие аккумулятора …..13
Воспроизведение снимков ………………58
Установка/Изъятие карты ……………….14
Мульти-воспроизведение
О карте …………..…………………….……….. 15
(9 экранов, 16 экранов и
Снятие крышки
25 экранов) ……………………………….… 59
объектива/Прикрепление
Использование функции увеличения
ремешка…….………………………………..16
при воспроизведении ………………….. 60
Установка/Снятие бленды
Удаление снимков .………………………….61
объектива ……..……..…….……………….17
Настройка даты/времени
Запись изображений
(Настройка часов)………………………..19
О меню настроек .…………..……………….20
(подробно)
О мониторе ЖКД/Видоискателе ………24
Приближенное количество
Использование диска рабочего
записываемых снимков и
режима………….…………………………….63
разрешение…………..……………………..30
• Приоритет диафрагмы в АЭ ………63
О трансфокации …………………………….. 32
• Приоритет затвора в АЭ …………… 63
• Использование оптического
• Ручная экспозиция………..………….. 64
увеличения……………….………………. 32
• Режим движущегося
• Функция цифрового
изображения………..…………………… 67
увеличения……………….………………. 33
• Режим сцены ………………………..….. 69
• Использование дополнительного
– Режим “портрет” ……………………. 70
оптического увеличения (EZ)…….. 33
– Режим “спорт” ……………………….. 70
– Режим “еда”…………………………… 71
– Режим “пейзаж” ……………………..71
Запись изображений (основа)
– Режим “ночной портрет” ………… 71
– Режим “ночной пейзаж” …………. 72
Диск рабочего режима ………….………... 35
– Режим “ребенок”……………………. 72
Выполнение снимков .…………………….. 36
– Режим “ровная кожа”…………….. 73
Съемка в автоматическом
– Режим “света свечи” ..……………. 74
режиме………………………………………..41
– Режим “вечеринка”………………… 74
– Режим “фейерверк”……………….. 75
6
VQT0S04

– Режим “снег”…..………………………75
• Изображения будут показаны в
– Режим “звездное небо” …………..76
том виде, в котором они были
– Режим “панорамирование” ……..77
записаны [ПОВЕРН. ЖКД]….…….101
• Поворачивание снимка
[ПОВЕРН.] ……….…………..…….……102
Настройки режима записи
• Задание фотоснимка для
печати и количества распечаток
Использование меню режима
[DPOF ПЕЧ.] ….…………………………103
записи [ЗАП.] ….……………….……..……78
• Предотвращение случайного
• Баланс белого [БАЛ. БЕЛ.] …….….. 79
стирания фотоснимка
• Светочувствительность ISO
[ЗАЩИТИТЬ]………..…………………..105
[СВЕТОЧУВСТ.] …..…….……..……….81
• Добавление звука к записанным
• Форматное соотношение
снимкам [ДУБЛ. ЗВУК.] ….…..…….106
[ФОРМАТ]……………..…….…………….81
• Изменение разрешения снимков
• Разрешение фотоснимка
[ИЗМ. РАЗР.] ……..…………………….107
[РАЗР. КАДРА] …….…….……..……….82
• Подрезка фотоснимков
• Качество [КАЧЕСТВО]..……….……. 83
[ПОДРЕЗКА]…….………………………108
• Запись звука [ЗАП. ЗВУКА]……….. 84
• Преобразование форматного
• Режим измерения
соотношения
[РЕЖИМ ЗАМЕРА]…..…………………84
[ПРЕОБР. ФОРМ.]….………………...110
• Режим АФ [РЕЖИМ АФ] .…………… 85
• Очистка [ОЧИСТИТЬ] …..…….……111
• Постоянная AФ [НЕПРЕР. АФ]…… 87
• Инициализация карты
• Вспомогательная лампочка AФ
[ФОРМАТИР.]…….…………………….112
[ВСП. ЛАМП. АФ] ……….…………..….87
Воспроизведение фотоснимков на
• Цифровое увеличение
экране телевизора……………………..113
[ЦИФР. УВЕЛ]…..……..…….………….. 88
• Цветовой эффект
[ЦВЕТ. ЭФФЕКТ]….…….…………..….88
Подключение к
• Настройка снимка
персональному компьютеру
[НАСТР. ИЗОБР.]…..…….…………….89
или принтеру
• Краткая анимация
[АНИМАЦИЯ]……………………………..89
Перед подключением к
• Кинообъектив
персональному компьютеру или
[ПРЕОБ. ЛИНЗА]……..…….…………..92
принтеру [РЕЖИМ USB] ……………..114
• Внешней вспышки
Подключение к ПК ………………………..115
[BHEШ. BCПЫШKA]……………………94
Подключение к принтеру,
• Режим внешней вспышки
совместимому с PictBridge…………..118
[CK.C. BH. BCП. ] …….…….……..……96
Другое
Воспроизведение (подробно)
Использование дистанционного
Воспроизведение снимков со
затвора……………………….……………..122
звуком/движущихся
Использование защитного
изображений…………………………..……97
устройства MC/Фильтра ND .……….123
Использование меню режима
Экран дисплея .……………………………..124
[ВОСП.]……..……..………….…………..….98
Предосторожности при
• Воспроизведение с показом
использовании фотокамеры ……….126
слайдов [ПОК. СЛАЙД.] …..……..….99
Отображение сообщений……………….128
• Задание фаворитов
Устранение неисправностей ………….130
[ИЗБPАННOЕ]……..…….…………....100
Технические характеристики …………134
7
VQT0S04
- Addeddate
- 2021-03-18 05:36:31
- Identifier
- manualzilla-id-5873348
- Identifier-ark
- ark:/13960/t0107vt6r
- Ocr
- tesseract 5.0.0-alpha-20201231-10-g1236
- Ocr_autonomous
- true
- Ocr_detected_lang
- en
- Ocr_detected_lang_conf
- 1.0000
- Ocr_detected_script
- Latin
- Ocr_detected_script_conf
- 1.0000
- Ocr_module_version
- 0.0.13
- Ocr_parameters
- -l eng+Latin
- Page_number_confidence
- 99.32
comment
Reviews
There are no reviews yet. Be the first one to
write a review.
256
Views
DOWNLOAD OPTIONS
Temporarily Unavailable
DAISY
For users with print-disabilities
Temporarily Unavailable
EPUB
Uploaded by
chris85
on