
Инструкция и руководство для
Tefal VS 4001
11 страниц подробных инструкций и пользовательских руководств по эксплуатации на русском
RU
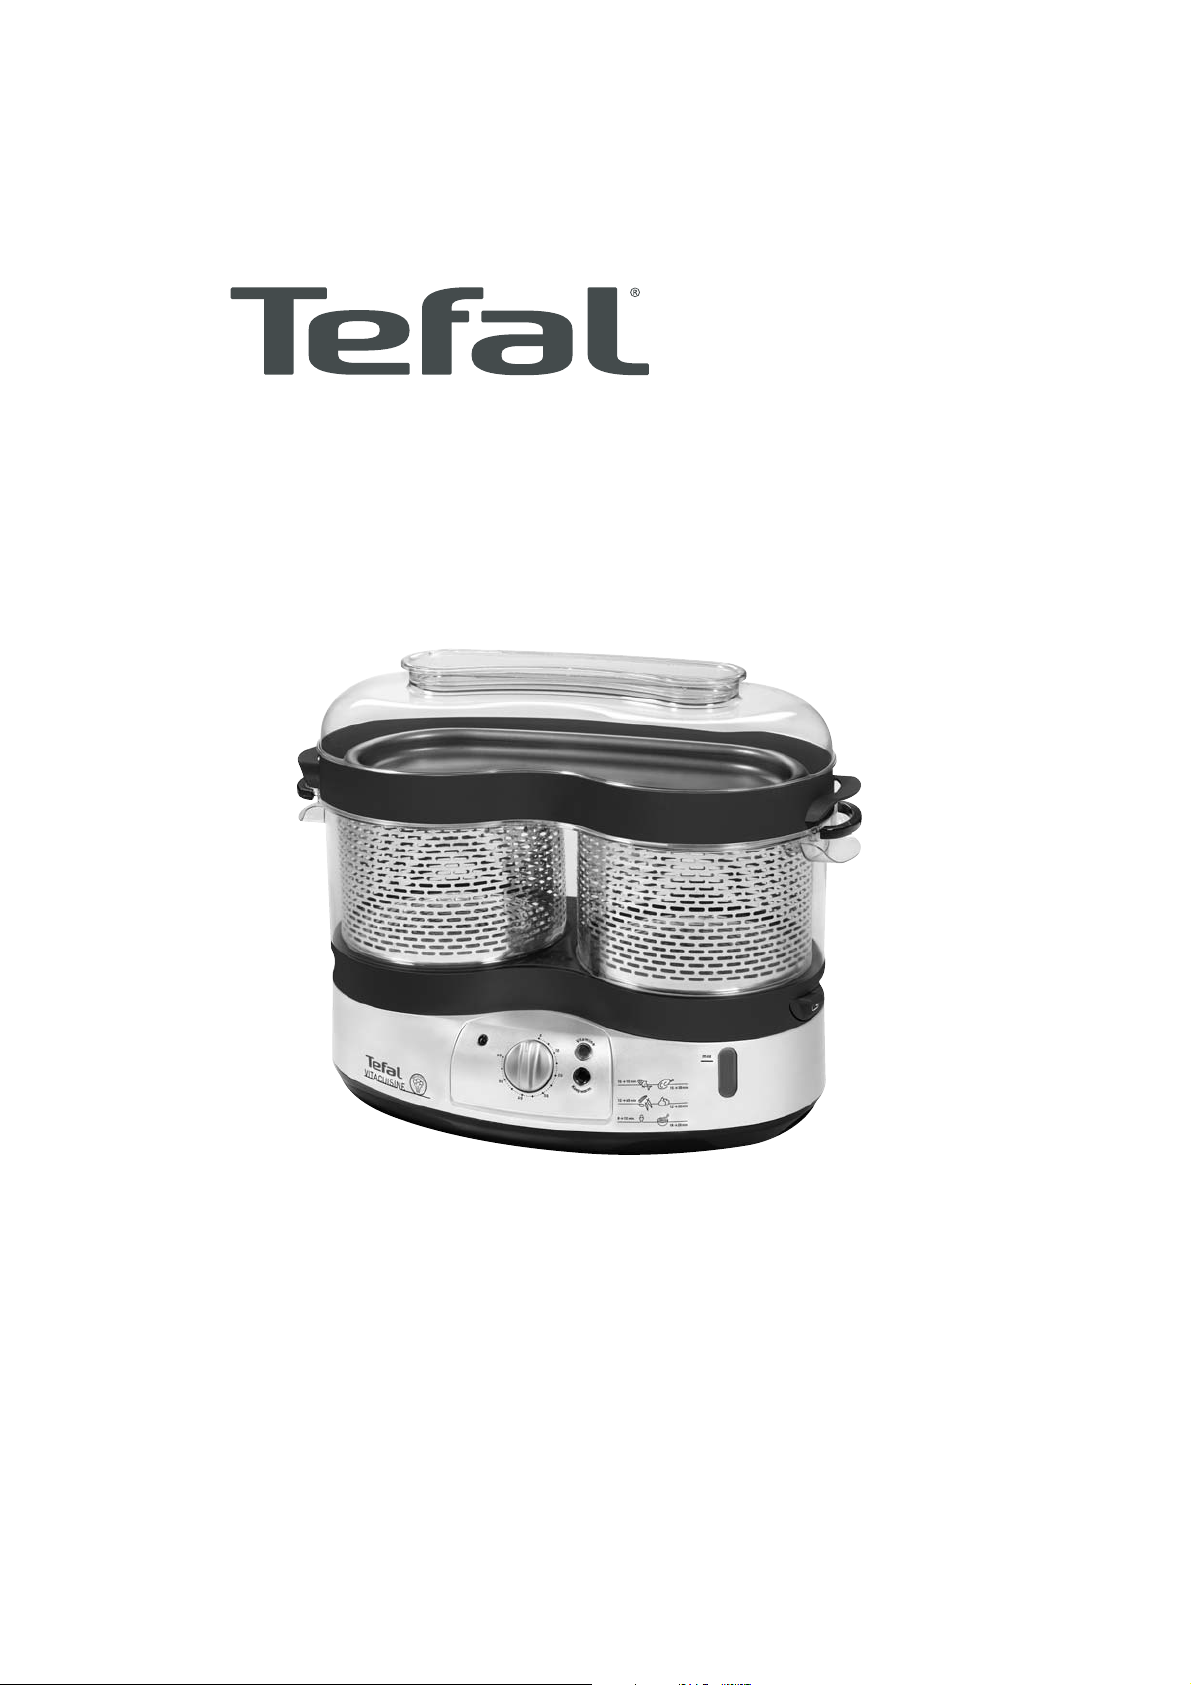
VITACUISINE
steamer 3 in 1
UA
PL
www.groupeseb.com

if I, г;
¡k’i’- ‘ ‘ «■
’ ■’V t’.v
Щ
J
■ -U t «^yf
¡1 »■*
í»
|l
í
ii /
ifi‘fr’fff»’f»»‘
V ■

Важные рекомендации
Внимательно прочитайте и следуйте инструкциям по эксплуатации. Держите их под рукой при
последующих приготовлениях пищи.
Инструкции по безопасности
Данное устройство соответствует правилам безопасности и инструкциям,
действительным на время изготовления.
Убедитесь, что напряжение в электросети соответствует напряжению,
указанному на корпусе устройства (переменный ток).
В случае применения других стандартов или если устройство
эксплуатируется не в той стране, в которой оно было приобретено,
проверьте его на соответствие в уполномоченном сервисном центре.
Устройство предназначено только для бытового использования. В случае
применения устройства для других специальных целей, неправильного
применения или несоблюдения инструкций по эксплуатации, изготовитель
не должен нести ответственность, а гарантия становится неприменимой.
Подключение к источнику электропитания
• Не используйте неисправные устройство или сетевой шнур, в случае падения
устройства или при явных признаках повреждений, или при его
ненадлежащей работе. В каждом из перечисленных выше случаев устройство
следует отправить в уполномоченный сервисный центр. Не пытайтесь
самостоятельно разобрать устройство.
• Подключайте устройство только к заземленной розетке.
• Не используйте удлинители. Если вы отвечаете за подобные действия,
применяйте только исправные удлинители с заземленными вилками,
соответствующие мощности бытового устройства.
• Если сетевой шнур поврежден, он должен быть заменен изготовителем,
уполномоченным сервисным центром или другим квалифицированным
специалистом.
• Не оставляйте сетевой шнур свободно висящим.
• При отключении устройства от сети не тяните за шнур.
• Подключайте устройство только к заземленной розетке.
• Всегда отсоединяйте устройство сразу после использования, при его
перемещении, до начала его очистки или технического обслуживания.
Эксплуатация
Используйте плоскую и стабильную термоустойчивую рабочую
поверхность, подальше от водяных брызг.
Не оставляйте работающее устройство без присмотра. Держите подальше
от детей.
При соприкосновении с горячей поверхностью устройства, горячей водой,
паром или едой могут появиться ожоги.
Не прикасайтесь к устройству во время генерации пара, для снятия
крышки, контейнера для риса или парового котла используйте ткань или
специальные термостойкие перчатки.
Не передвигайте устройство, когда оно заполнено жидкостями или
горячей едой.
Не размещайте устройство рядом с источником тепла или в горячей печи
— это может привести к серьезному повреждению.
Никогда не погружайте устройство в воду!
Не размещайте устройство рядом со стенкой или кухонным шкафом — пар,
генерируемый устройством, может привести к повреждению.
Преимущества приготовления еды на пару, Добро пожаловать в мир пароварочного, Оборудования tefal
Описание, Начинайте, Пару, Tefal, Рецептов, Готовить еду на Чат поддержки
- Изображение
- Текст
Преимущества приготовления еды на пару
<s
Добро пожаловать в мир пароварочного———————————-
оборудования
Tefal!
На пару совсем не сложно приготовить более здоровую и питательную еду и сохранить при этом ее
естественные цвет и запах. Ниже мы более подробно остановимся на подлинной универсальности
и преимуществах приготовления еды на пару.
Ваша пароварка Tefal пригодна для приготовления
любых блюд с использованием удивительно
————————————- — большого количества
рецептов
СБАЛАНСИРОВАННОЕ ПИТАНИЕ
Пароварка VitaCuisìne позволит вам приготовить вкусную и сбалансированную еду с помощью всего
одного простого действия. С помощью индивидуальных контейнеров и лотка можно одновременно
приготовить блюда из овощей, риса, фруктов и десерты.
БОЛЬШЕ ВИТАМИНОВ
Нежная, но быстрая система приготовления еды позволяет сохранить больше витаминов и
питательных микроэлементов.
МЕНЬШЕ ЖИРА
Пар идеально подходит для приготовления рыбы, цыплят и нежирного мяса. Специальный лоток
для приготовления позволяет сохранить необходимое количество жира Omega 3 в более сочных
видах рыб, например в лососевых, сардинах, макрели, форели, селедке и свежем тунце.
^> БОЛЬШЕ ФРУКТОВ И ОВОЩЕЙ
Процесс приготовления еды на пару прост и эффективен. Пар способствует увеличению
количества фруктов и овощей, потребляемых за день.
Теперь вы готовы приготовить одновременно очень вкусное и хорошо сбалансированное блюдо.
Начинайте
готовить еду на
пару!
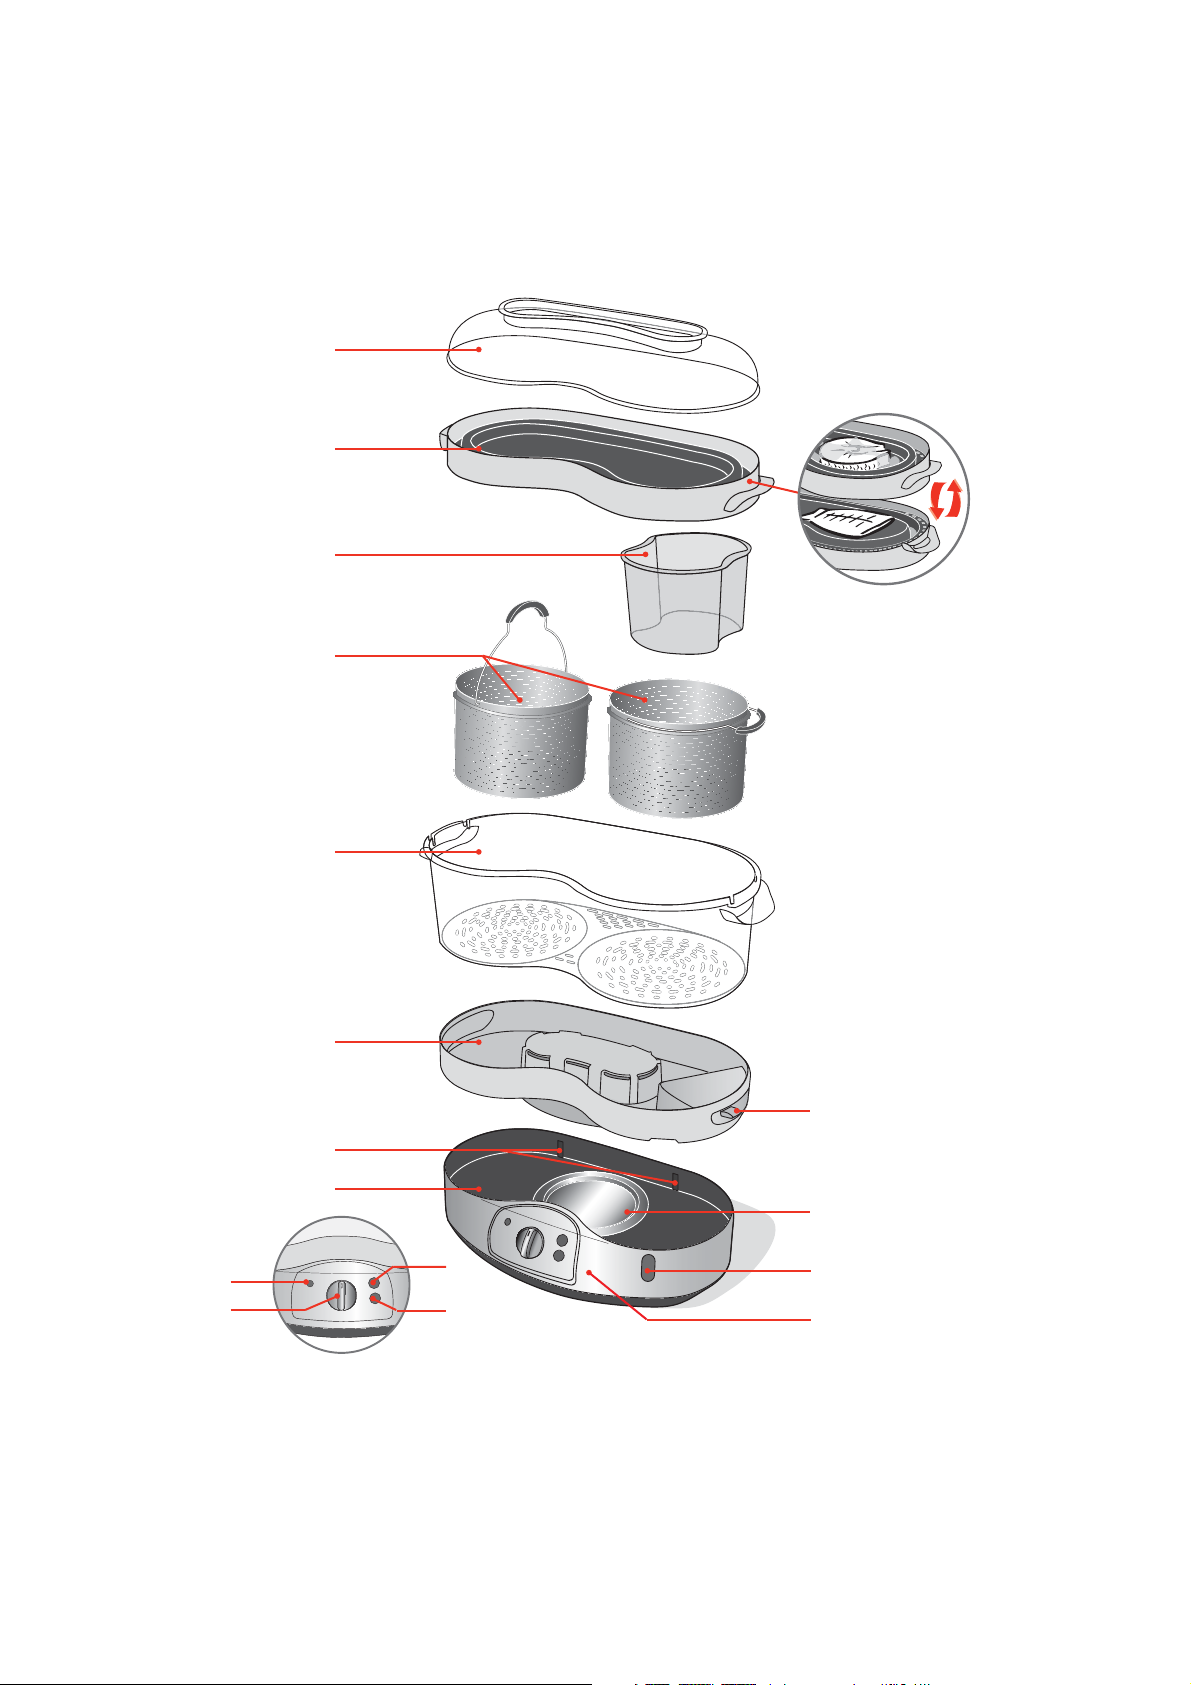
ОПИСАНИЕ
1.
Крышка
8.
Максимальный внутренний уровень воды
2.
Двусторонняя сковорода*
9,
Водяной контейнер
а. сторона для приготовления соусов или
10.
Нагревающий элемент
напитков (соков)
11.
Внешний датчик уровня воды
Ь. сторона для приготовления паром
12.
Блок питания
3.
Контейнер для риса*
13.
Индикатор включения / выключения
Ц.
Паровые котлы
. 1^.
Таймер для диапазона 60 минут
5.
Самый большой контейнер
15.
Сенсорная панель Vitamin +
6.
Контейнер для сока (влаги)
(для увеличения количества витаминов)
7.
Внешнее отверстие для добавления воды
во время приготовления еды
16.
Сенсорная панель для сохранения еды
теплой*
^ в зависимости от модели
Эксплуатация оборудования vítacu¡sine, Установка двойной сковороды, Приготовление риса
Приготовление еды без котлов, Приготовление, Перед началом работы, Заполнение контейнера для воды, Установка парового котла (котлов), Риса Чат поддержки
- Изображение
- Текст
Эксплуатация оборудования Vítacu¡sine
Перед началом работы
Очистите контейнер для воды влажной и мягкой тканью — Рис, 1.
Не погружайте
Вымойте все съемные части губкой, смоченной в теплой воде с
контейнер в воду во
добавлением жидкого моющего средства, прополощите и тщательно время его очистки,
высушите.
Не используйте приправы •
или другие жидкости,
отличающиеся от водь; в ,
соответствующем
’
контейнере.
Перед включением
*
пароварки убедитесь, что •
Б контейнере есть вода.
— Заполнение контейнера для воды
Налейте воду непосредственно в контейнер для воды до достижения
максимального уровня — Рис.2,
Поместите контейнер для сока (влаги) на контейнер для воды и
укрепите его.
Поместите самый большой контейнер на лоток для сока — Рис.З.
При каждом применении наливайте холодную свежую воду и следите,
чтобы ее уровень оставался максимальным
Установка парового котла (котлов)
• Поместите продукт в паровой котел (котлы).
• Установите паровой котел (котлы) в самый большой контейнер и
нажмите на рукоятку так, чтобы она вошла в паз — Рис.4.
• Закройте крышку.
Чтобы не обжечься
паром, выходящим из
крышки, проследите,
чтобы отверстия для
пара находились с
противоположной от вас
стороны.
Двойную сковороду
(только сторону А)
можно использовать
без самого большого
контейнера. Поместите
ее непосредственно в
контейнер для сока
(влаги) — Рис.7,
———- Установка двойной сковороды*
Используйте сторону А двойной сковороды для приготовления блюд с
соусом или очень сочных блюд, используйте сторону В для
приготовления менее сочных блюд — Рис.5.
Поместите сковороду в контейнер с наибольшим объемом — Рис.6.
Закройте крышку.
Приготовление
риса
в пароварке можно готовить рис.
• Положите рис и налейте воду в контейнер для риса (см таблицу со
временем приготовления блюд) — Рис.8.
• Поместите контейнер для риса в паровой котел или в самый большой
контейнер.
————- Приготовление еды без котлов
При приготовлении больших объемов еды можно обойтись без паровых
котлов.
.
• Отсоедините котлы.
• Поместите еду в самый большой контейнер.
.
• Поставьте самый большой контейнер на контейнер для сока (влаги)
— Рис.9.
,
• Поместите сверху сковороду и крышку — Рис. 1 О или только крышку
-Рис.11.
‘
.
в зависимости от модели
Приготовление блюд, Как достать, Выберите время приготовления: блюд
Во время приготовления блюд, Сохранение блюда теплым, Блюдо из пароварки Чат поддержки
- Изображение
- Текст
Приготовление блюд
Выберите время приготовления: блюд
• Подключите устройство к сети.
• Установите таймер на время, рекомендованное для приготовления
блюд’ Рис. 1 2.
• Индикатор включения / выключения и сенсорная панель VITAMIN^
активизируются и начинается процесс приготовления еды на пару.
Не прикасайтесь к
устройстЕу или к еде во
время приготовления —
они очень горячие.
Вы можете вручную
остановить программу
УНАМШ*; нажав на
включенную сенсорную
панель. Во время
приготовления не
прикасайтесь к котлам
без специальнь!Х
термостойких перчаток.
— — С е н с о р к а й па не ль ¥I TA fv
1
ll^ +
Дополнительная опция: ваша пароварка имеет дополнительную
сенсорную панель «VITAMIN+», сокращаюидую время приготовления
еды, что позволяет сохранить большее количество витаминов.
Сенсорная панель подключается автоматически в начале процесса
приготовления еды — Рис, 13. В результате увеличения количества пара
процесс приготовления начинается скорее.
Сенсорная панель VITAM1N+ отключается автоматически, как только
пара становится достаточно для приготовления блюда.
Если вы откроете крышку (например, чтобы добавить продукты), вы
можете еще раз нажать на сенсорную панель VITAMIN + для быстрого
возврата к идеальной температуре внутри пароварки — Рис. 4.
Во время приготовления блюд
Проверяйте уровень воды в пароварке во время приготовления блюде Пароварка перестанет
помощью внешнего индикатора уровня воды.
работать, когда
еодз
в
При необходимости медленно добавьте холодной воды через
наружный лоток — Рис, 1 5.
Если вы хотите выключить устройство раньше установленного
времени, установите таймер в положение О — Рис, 1 6.
соответствуюш,ем
контейнере закончится.
Следите, чтобь: в
процессе сохранения
блюда теплым в
контейнере всегда была
вода.
— — ^ ^ » Сохранение блюда теплым*
в конце приготовления блюда раздается сигнал, означающий, что еда
готова.
Функция сохранения блюда теплым подключается автоматически
— Рис, 17.
Устройство позволяет сохранить блюдо теплым до 60 минут.
Нажмите на сенсорную панель сохранения блюда теплым, если вы
хотите остановить пароварку.
Как достать
блюдо из пароварки
• Поднимите крышку за рукоятку.
.
• Поставьте сковороду на перевернутую крышку — Рис.1 8.
• Удалите паровые котлы с помощью рукояток ■ Рис. 1 Э.
• Достаньте блюдо из пароварки — Рис.20,
Во
время
приготовления
еды не прикасайтесь к
котлам без
термостойких перчаток.
в зависимости от модели
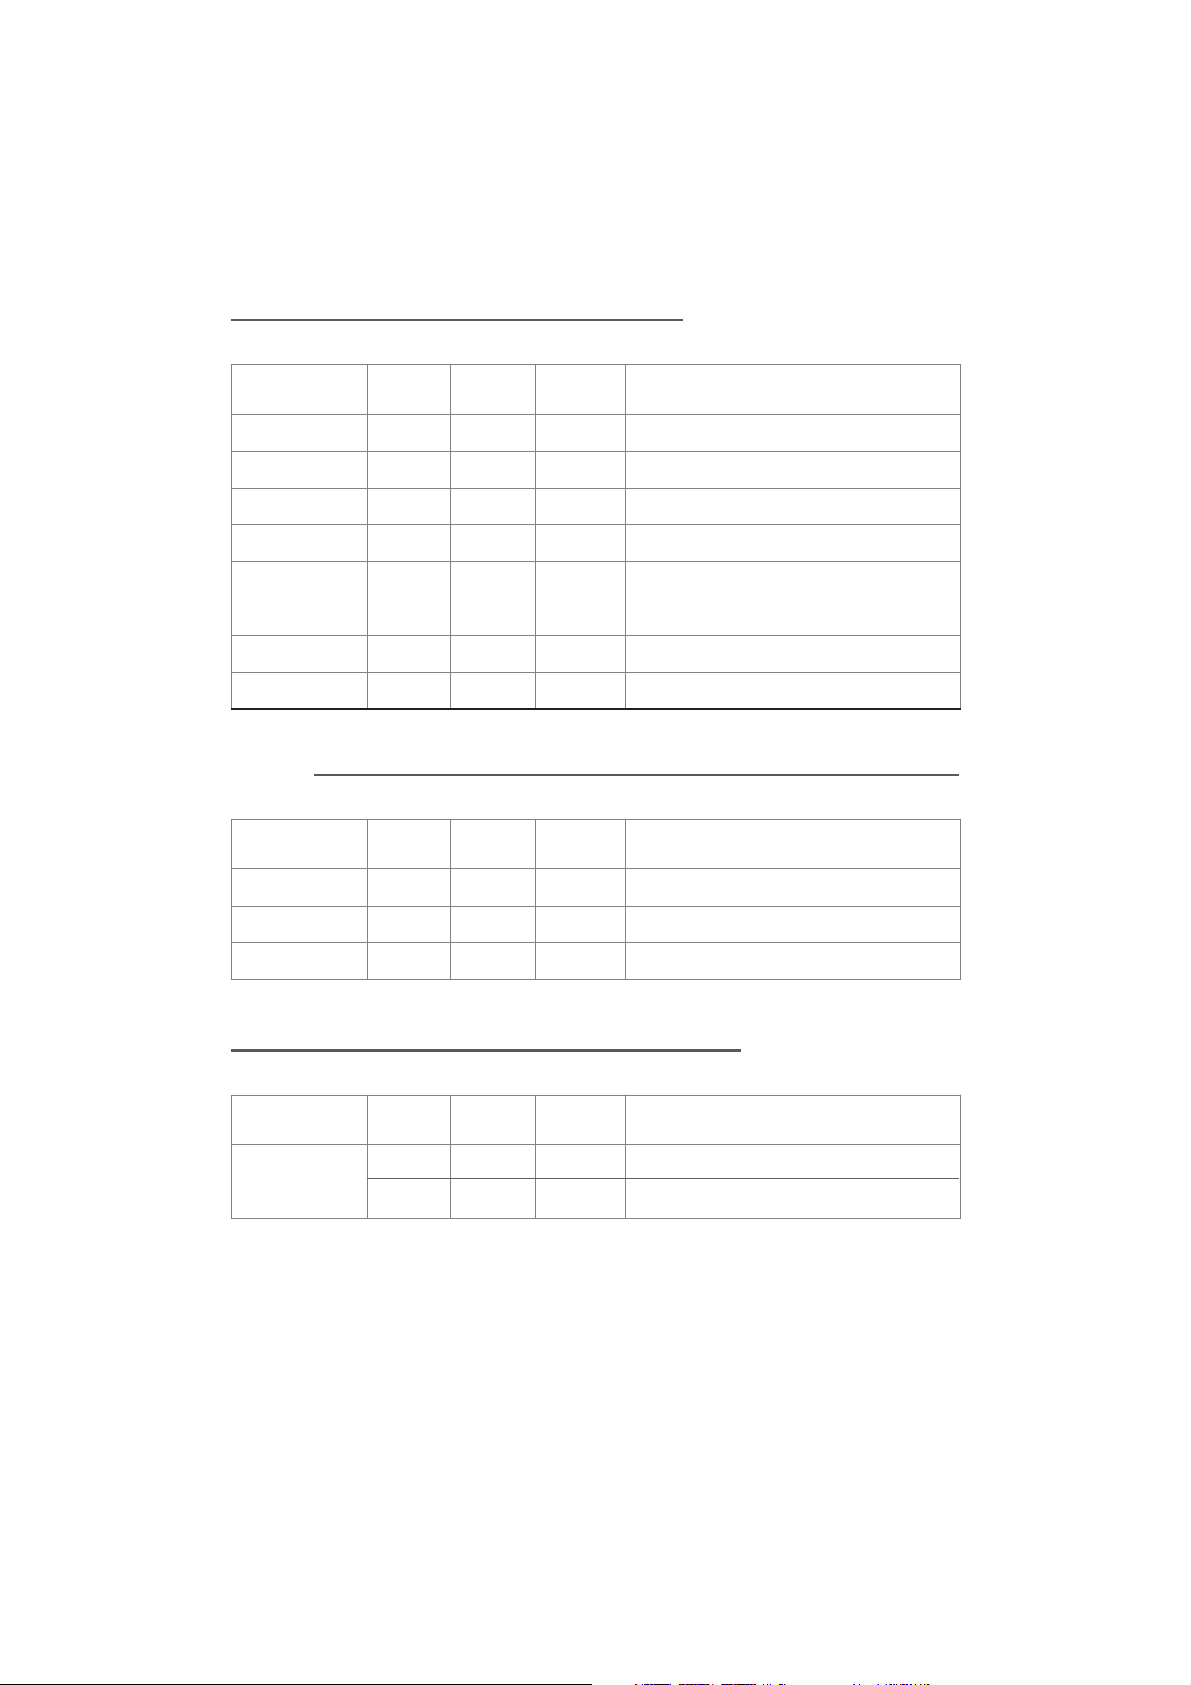
Таблица времен приготовления блюд
Время приготовления блюд устанавливается приблизительно и может
варьироваться в зависимости от объема еды, расстояния между ^
продуктами, количества продуктов, индивидуальных предпочтении и
напряжения в сети.
Мясо — Куры———————————————
Во время приготовления
еды не прикасайтесь к
котлам без
термостойких перчаток.
Продукт
Тип
Кол-во
Время
приготовления
,
Рекомендации ,
; Нарезана
! Грудка столбиками
500 г
15 мин.
■
цыпленка
(без костей)
Целиком ;
450 г
17 мин.
;
■ :
Куриные ножки
Свежие
4
36 мин.
Эскалоп из ^
индейки
Свежие :
600 г
24 мин.
Свиное филе
Свежее
700 г
38 мин. Толщина 1
СМ :
Баранья
отбивная
Свежая
500 г
14 мин.
!
Сардельки
Свежие
10
6-8 мин.
;
Рыбз
— морепродукты
Продукт
Тип
Кол-во
Время
приготовления
:
Рекомендации
!
: Тонкое рыбное
Свежие
450 г
. . . .
10 мин.
1
филе
Заморож.
450 г
: 18
МИН.
Толстое рыбное
филе или
стейки
Свежее
400 г
15 мин.
’ Целая рыба
Свежая
600 г
25 мин.
:
Мидии
! Свежие
; 1 кг
:
1 5 — 2 0 мин.
Креветки
‘ Свежие
^ 200 г
5 мин.
Устрицы
; Свежие
100 г
5 мин. :
Овощи
«<Я
Продукт
Тип
1
Кол-во
Время
приготовления
: Рекомендации
Артишоки
Свежие
:
3
‘
43 мин.
;
1
Спаржа
Свежая
600 г
17 мин.
Брокколи
Свежая
400 г
18 мин.
‘
Разделена на головки
Заморож.
:
400 г
12 мин.
Сельдерей
Свежий ,
350 г
22 мин.
В кубиках или дольках
Грибы
Свежие
;
500 г
)
12 мин.
Небольшие целиковые или четвертинки
Цветная капуста
Свежая
1 кочан
19 мин.
’
Разделена на головки
Капуста
(красная,
зеленая)
Свежая
600 г
22 мин.
Нарезана ломтиками
Цукини
Свежий
600 г
12 мин.
■
Шпинат
Свежий
300 г
13 мин.
1
Слегка подбрасывайте во время
приготовления
Заморож.
300 г
15 мин.
Тонкая зеленая
Свежие
500 г
30 мин.
фасоль
Заморож.
500 г
25 мин.
Морковь
Свежая
500 г
15 мин.
Тонко нарезанная
Кукуруза в
початках
Свежая )
500 г
40 мин.
■
:
Бобы
1
Свежие
’
500 г
15 мин.
■
■
Побеги
Свежие
;
500 г
30 мин.
Тонко нарезанные
Сладкий перец
Свежий
:
300 г
15 мин.
Горох
Свежий
;
400 г
:
20 мин.
:
Заморож.
)
400 г
20 мин.
:
Молодой
картофель
(целиком)
Свежий
600 г
4 0 — 4 5 мин.
: _
Картофель
Свежий 1
600 г
20 мин.
; Нарезанный ломтиками или кубиками
Рис — макароны — каши
Продукт
Кол-во
Кол-во
воды
Время
:
„
1
^
Рекомендации
;
приготовления:
;
1 !
Белый рис
Американский
длиннозерни
стый рис
150 г
300 мл
30 — 35 мин.
; !
Белый рис
«Басмати»
150 г
300 мл
30 — 35 мин.
Белый рис
быстрого
приготовления
150 г
300 мл
28 — 33 мин.
Цельный
(неочищенный
рис)
150 г
300 мл
33 — 38 мин.
Кускус
200 г
350 мл
1 Перед приготовлением подержать 5
ц мин. минут в кипящей воде
Макароны
(спагетти)
200 г ’
400 мл
‘
__ Готовить в кипящей воде, слегка
и —
0 мин. помещивать во время приготовления
Фрукты
‘
Продукт
Тип
Кол-во
Время _
Рекомендации
приготовления
Бананы
Свежие
3
: 10
МИН.
¡Целые
Яблоки
Свежие
4
‘ 12 мин. ¡Четвертинки
Г руши
Свежие
5
: 20 мин. ; Целые или половинки
Лг^%1Г1>Ю ГШГк
;
Продукт
Тип
Кол-во
Время _
Рекомендации
приготовления
Яйца
Сваренны
е вкрутую
6
i
12 мин. i
‘
Сваренны
е всмятку
6
8 мин.
8
04:01
Утюг Tefal — разочарование года!
07:11
Пароварка Tefal VS7001 VitaСuisine. Купить пароварку Тефаль, видео-обзор Tefal VS7001.
00:58
Пароварка Tefal VS 4001 VitaCuisine baraholka rasprodaga lugansk 3klmn movies
02:18
Пароварка Tefal VS 7001 — Видео обзор
01:00
VS4001 Tefal VitaCuisine Dampfgarer
08:54
Shop & Show (Кухня). [050-758] TEFAL Пароварка «Витаминное меню» (050758)
01:05
Пароварка Tefal VS 4003
Нажмите на кнопку для помощи
Перейти к контенту
9.93 Мб
3.32 Мб
7.99 Мб
3.60 Мб
492.25 kB
2.43 Мб
-
Consumer services
>
-
User manual, instruction for use
>
-
Electrical Cooking
>
-
Steam cooker
>
User manual and frequently asked questions Vitacuisine VS400116
Cook fish or meat, vegetables and dessert all in one go without transferring the flavours
Vita Cuisine VS400116 Steamer : Extra large 10 litre total capacity with convenient external water refill — add water during cooking, fill any time
— Reversible non stick fish plate, to cook food in sauce or natural juices one side, the other side drains juices off
— Vitamin Plus booster button cooks faster and retains up to 50% more vitamins
Reference : VS400116
Frequent questions
Yes, indeed you can reheat food. Set the timer around 10 minutes (it depends on the food) and make sure that there is enough water in the tank.
Over time, the strong coloured natural juices from foods such as carrots and beetroot may stain the juice collector. This is normal. It may be cleaned with lemon juice straight after cooking.
We recommend that you put the largest pieces of food, requiring the longest cooking time in the lowest basket.
The ingredients are very dense and have a different cooking time: try to prolong the cooking time.
Too many ingredients are cooked together: put the larger sized ingredients and the ingredients with a longer cooking time in the lower bowl.
Try to not overload the steam bowls.
Descale your appliance.
Cut the ingredients into small pieces.
The flavour of food is much better in a steamer and therefore any seasoning should be used sparingly.
If required, you can sprinkle it lightly on the food, or add herbs to the steam water to add flavour to your food.
Yes. You should never leave a small electrical appliance unattended whilst in operation. However, you do not have to watch the steamer all the time. Simply set the timer and the bell will let you know when your food is ready to eat. There are no risks of burning the food and no need to stir it.
Caution: Do not forget to put water in the tank.
All the juices of the steamed food are collected in the juice collector. This can be used as a basic ingredient for stocks and sauces.
If the cooking times are different for the food in each of the bowls, start cooking the food that requires the most time in the lower bowl and then add the upper bowl(s) while cooking is in progress to complete the cooking cycle.
All frozen vegetables can be steamed from frozen.
We only recommend using canned or precooked pulses and beans in the steamer. They should be drained and rinsed and then placed in the steamer basket. They do not need to be soaked or boiled first.
Yes, you can steam them in a steamer. They take the same time as if you were steaming/simmering in a saucepan. Just keep checking the water level and topping it up.
Yes — if your steamer baskets have removal bases, then you will be able to remove the bases from baskets 2 and 3 and place a small whole chicken inside the lower of the steam baskets ready for steam cooking.
Yes, to give meat, chicken and fish a delicious moist flavour you can marinate them a few hours before steaming.
For recipes with a long cooking time you will need to refill the water tank during the cooking period. To refill the water tank, you should use oven gloves to lift the lid and steamer basket. Carefully lift and empty any water that has collected in the juice collector, then refill the water tank using cold untreated tap water.
The cooking time is the same whether you use one or two levels. Please be careful to not pack food too tightly on the first level to ensure that the steam can reach the second level.
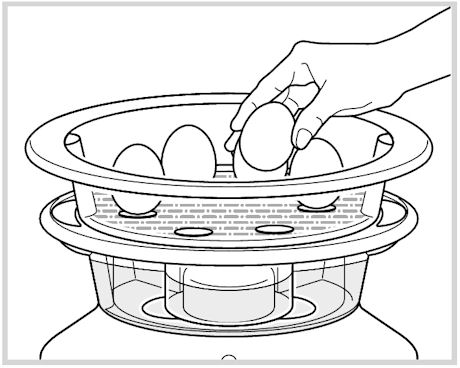
You simply place the eggs in the steamer basket. The cooking time is 12 minutes for 6 hard-boiled eggs, 8 minutes for 6 soft-boiled eggs.
Don’t handle the bowls and verrines during cooking and don’t touch the device when producing steam; always stop it before.
Do not move the appliance when it contains hot liquids or food.
Always use protective gloves to handle the bowls or verrines after cooking.
Try adding fresh herbs, lemon, garlic, oranges or even onion directly to the foods.
To add flavour to chicken, meat and fish made with marinades, use barbecue sauce or spice mixtures.
Yes, especially for recipes with long cooking times.
Also monitor the water level during cooking in case it needs refilling.
Some recipes require the use of cling film for protection, to prevent condensation and protect delicate foods.
Choose a special cling film for cooking, or microwave-safe cling film.
Avoid aluminium foil which tends to increase cooking time.
Put the rice in the rice bowl and fill it with water.
Put the rice bowl in the steam basket or in the largest bowl and start cooking.
Yes, they are dishwasher safe but it is preferable to wash on the lowest heat setting or prewash setting.
Yes, it must be descaled every 7 to 10 uses. To do this, simply fill the water tank with 1/3 white vinegar and 2/3 water.
Leave to act cold for 1 night.
Rinse the inside of the water tank several times with warm water.
Never use abrasive cleaning products.
On average, we recommend descaling your appliance every 7 to 10 uses to maintain an effective flow of steam and extend the life of your appliance.
To do this, simply fill the water tank with 1/3 white vinegar and 2/3 water.
Leave to act cold for 1 night.
Rinse the inside of the water tank several times with warm water.
Never use abrasive cleaning products.
The appliance has not been descaled after 7 to 10 uses: descale it.
[Check 1] Have you put the water in the right place?
Please put the water in the water tank with the grey part in the middle (the heater).
[Check 2] Did you put enough water in the water tank?
If there is not enough water in the water tank, it won’t be able to create steam. Even if just cooking for a short time, you should ensure that the water reaches at least the top of the heater (the grey part). Even if you have put in enough water, it will take some time before it starts steaming.
[Check 3] Is the heater (grey part) dirty?
If there are minerals from the water adhered to the heater, it may not transmit heat correctly and steam may not be created. If there are changes such as discolouration of the heater — brown, black or white — or peeling of the surface, care of the heater will be necessary. Please carry out a descaling.
This is working correctly. The turbo ring surrounds the heater so that the water inside is effectively heated. It is designed so that it doesn’t fit flush and the water from the space in between is used to make the steam. Please make sure that the turbo ring is orientated correctly so the notch is facing down.
The surface of the heater isn’t peeling. It is probably a film that has attached itself to the surface of the heater. Carry out a descaling.
When there’s not enough water in the tank, the device no longer heats.
Fill it again up to the maximum height mark and the device will automatically restart the cooking programme.
Use gloves and be careful not to touch hot surfaces, or foods being cooked, when refilling the tank.
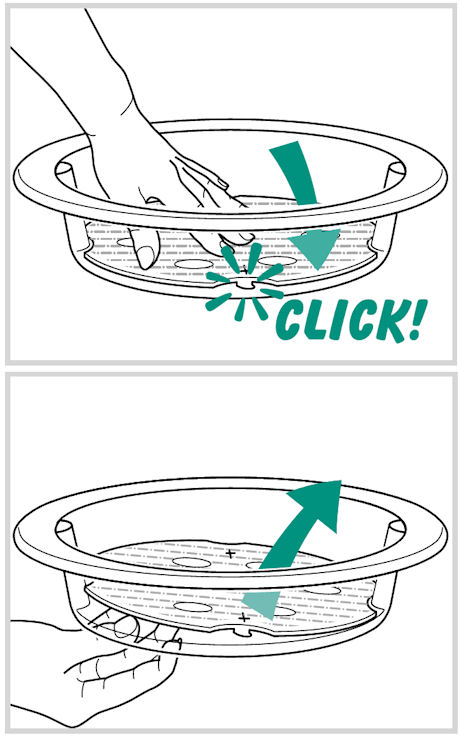
The bowls are equipped with detachable grills, except the drip tray which must always keep its grills.
By removing the grills, you increase the cooking zone to cook bulky foods (whole chickens, artichokes, lobster, cauliflower, broccoli, etc).
To put the grills into position:
• Keep the grill on the correct side (the clip facing down).
• Put the grill into the bowl.
• Press on the clip zone to attach the bowl.
To remove the grills, press on the top of the grill.
After following the instructions in the user manual for starting the appliance, make sure that your electrical socket is working by plugging another appliance. If it still does not work, do not try to dismantle or repair the appliance yourself, instead, take it to an approved repair centre
Do not use your appliance. To avoid any danger, have it replaced by an approved repair centre.
No, you can steam all types of food: meat, fish, eggs, potatoes, desserts rice, couscous etc.
No, the advantage of steam cooking lies in the fact that the flavours of the vegetables are not transmitted to each other, even when they are mixed.
The steam cooker doesn’t cook under pressure, it instead uses the ambient pressure.
The steam in the steam cooker is water boiling temperature, approximately 100°C.
Yes, but not too often, because this results in a drop in temperature and a loss of steam which can slow down the cooking.
Your appliance contains valuable materials which can be recovered or recycled. Leave it at a local civic waste collection point.
Please go to the “Accessories” section of the website to easily find whatever you need for your product.
Find more detailed information in the Guarantee section of this website.
If you believe that one part is missing, please call Consumer Services Center and we will help you find a suitable solution.
Страницы и текст этой инструкции
Инструкция пароварки Tefal VS4003 VitaCuisine Compact
Информация отображена на картинке
Информация отображена на картинке
Информация отображена на картинке
Информация отображена на картинке
Как использовать наш сайт инструкций OnlineManuals.ru
Наша цель состоит в том, чтобы предоставить вам быстрый доступ к содержанию инструкции для пароварки Tefal VS4003 VitaCuisine Compact.
С помощью онлайн просмотра, Вы можете быстро просмотреть содержимое инструкции и найти решение проблемы с пароварки Tefal VS4003 VitaCuisine Compact.
Для Вашего удобства
Если листать руководство пользователя пароварки Tefal VS4003 VitaCuisine Compact прямо на сайте, не очень удобно для Вас, есть два возможных решения:
• Просмотр в полноэкранном режиме — легко просмотреть руководство пользователя (без загрузки его на свой компьютер), Вы можете использовать режим полноэкранного просмотра.
Для просмотра инструкции пользователя пароварки Tefal VS4003 VitaCuisine Compact на полном экране, используйте кнопку «Открыть в Pdf-viewer».
• Загрузка на компьютер — Вы можете также скачать Инструкция пароварки Tefal VS4003 VitaCuisine Compact на свой компьютер и сохранить его в файлах.
Многие люди предпочитают читать документы не на экране, а в печатной версии.
Возможность печати руководства пользователя также была предусмотрена на нашем сайте,
и вы можете использовать ее, нажав на иконку «печать» в Pdf-viewer.
Нет необходимости печатать все руководство пароварки Tefal VS4003 VitaCuisine Compact, можно выбрать только нужные страницы инструкции.
VITACUISINE
cuiseur vapeur
stoomkoker
Dampfkocher
vaporiera
www.tefal.com
1
2
3
4
5
A
B
13
14
6
7
8
9
10
15
16
11
12
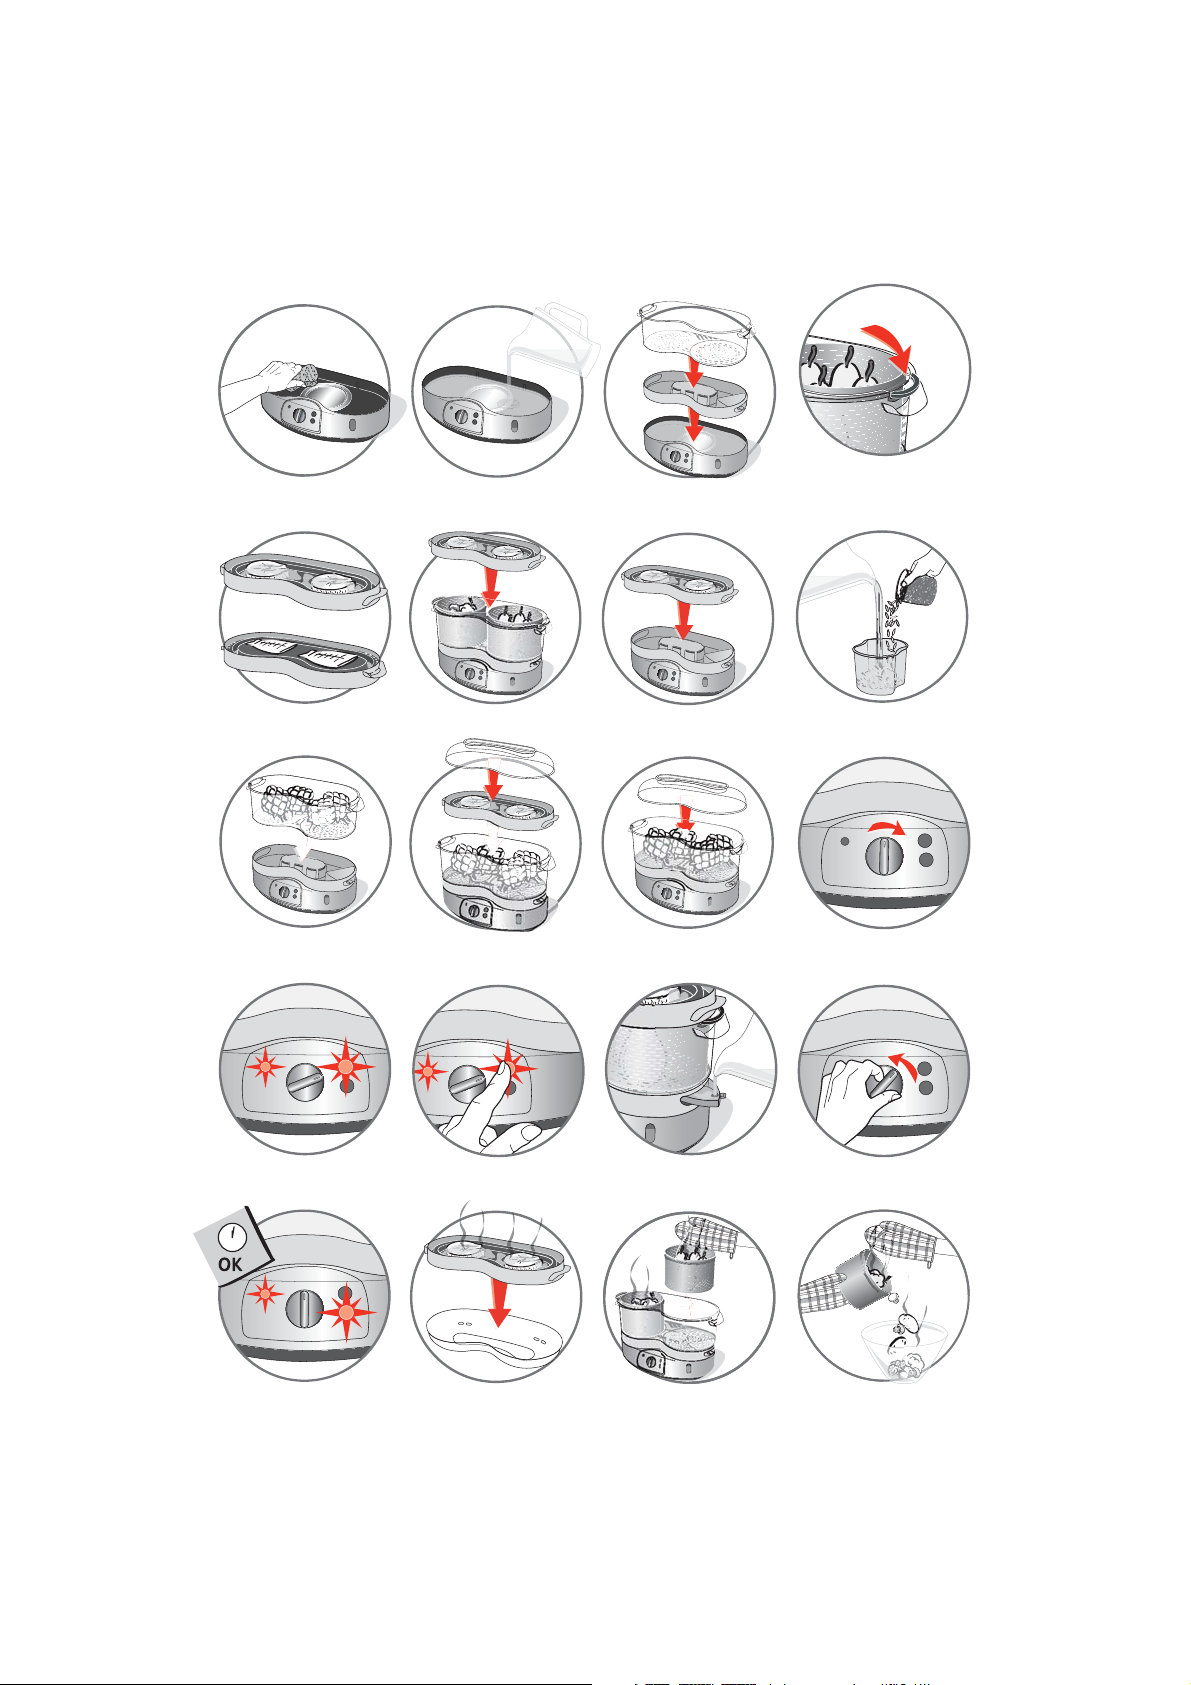
fig. 1 fig. 2 fig. 3 fig. 4
A
B
fig. 5 fig. 6 fig. 7 fig. 8
fig. 9 fig. 10 fig. 11 fig. 12
fig. 13 fig. 14 fig. 15 fig. 16
fig. 17 fig. 18 fig. 19 fig. 20

Recommandations importantes
Lisez attentivement ces instructions et conservez-les soigneusement.
Consignes de sécurité
• Pour votre sécurité, cet appareil est conforme aux normes et réglementations
applicables (Directives Basse Tension, Compatibilité Electromagnétique,
Matériaux en contact des aliments, Environnement, …).
• Vérifiez que la tension du réseau correspond bien à celle indiquée sur l’appareil
(courant alternatif).
• Compte tenu de la diversité des normes en vigueur, si l’appareil est utilisé dans
un autre pays que celui de l’achat, faites-le vérifier par un Centre Service Agréé.
• Cet appareil a été conçu pour un usage domestique uniquement, toute
utilisation professionnelle, non appropriée ou non conforme au mode d’emploi
n’engage ni la responsabilité, ni la garantie du constructeur.
• N’utilisez pas l’appareil si celui-ci ou son cordon est défectueux, si l’appareil est
tombé et présente des détériorations visibles ou des anomalies de
fonctionnement. Dans ces cas, l’appareil doit être envoyé à un Centre Service
Agréé le plus proche de votre domicile.
• Branchez toujours l’appareil sur une prise reliée à la terre.
• N’utilisez pas de rallonge. Si vous en prenez la responsabilité, utiliser une
rallonge en bon état reliée à la terre et adaptée à la puissance de l’appareil.
• Si le câble d’alimentation est endommagé, il doit être remplacé par le fabricant,
son Centre Service Agréé ou une personne de qualification similaire afin d’éviter
tout danger. Ne démontez jamais l’appareil vous-même.
• Ne laissez pas pendre le cordon.
• Ne débranchez pas l’appareil en tirant sur le cordon.
• Débranchez toujours l’appareil : après utilisation, pour le déplacer ou pour le
nettoyer.
Branchement
Fonctionnement
• Utilisez une surface de travail stable, plane, à l’abri des projections d’eau.
• Cet appareil n’est pas prévu pour être utilisé par des personnes (y compris les
enfants) dont les capacités physiques, sensorielles ou mentales sont réduites, ou
des personnes dénuées d’expérience ou de connaissance, sauf si elles ont pu
bénéficier, par l’intermédiaire d’une personne responsable de leur sécurité, d’une
surveillance ou d’instructions préalables concernant l’utilisation de l’appareil.
• Il convient de surveiller les enfants pour s’assurer qu’ils ne jouent pas avec
l’appareil.
• Des brûlures peuvent être occasionnées si l’on touche les surfaces chaudes de
l’appareil, l’eau chaude, la vapeur ou les aliments.
• Ne touchez pas l’appareil lorsqu’il produit de la vapeur et utilisez un torchon ou
un gant pour manipuler les surfaces chaudes.
• Ne déplacez pas l’appareil contenant des liquides ou des aliments chauds.
• Ne placez pas l’appareil près d’une source de chaleur ou dans un four chaud
sous peine de le détériorer gravement.
• Ne plongez jamais l’appareil dans l’eau !
• Ne placez pas l’appareil près d’un mur ou d’un placard : la vapeur produite
pouvant endommager les éléments.
2

Bienvenue dans l’univers de la cuisson vapeur !
Notre priorité étant de répondre au mieux aux nouvelles attentes de nos consommateurs, nous avons créé la
gamme Vitacuisine.
Cette gamme de produits complémentaires vous aidera à préserver votre santé et votre alimentation, tout en
gardant le plaisir de cuisiner et de manger.
Ainsi, votre cuiseur vapeur VitaCuisine et son système de cuisson douce préservent les vitamines et les
micronutriments de vos aliments.
EQUILIBRE ALIMENTAIRE
Le cuiseur vapeur VitaCuisine vous permet de préparer un repas complet et savoureux en une seule cuisson.
Grâce à ses paniers vapeurs individuels et au plateau cuisson, les légumes, le riz, les poissons, les viandes, les
fruits et les desserts peuvent être cuisinés simultanément.
DES VITAMINES PRESERVEES
Un système exclusif de cuisson rapide qui préserve mieux les vitamines, jusqu’à 100% de vitamine B9 (acides
folates), 86 % de vitamine C et 91% de polyphénol (antioxydant) dans 500g de brocolis.
MOINS GRAS, MIEUX GRAS
Idéal pour les poissons, les volailles et les viandes. Plateau de cuisson aide à retenir les acides gras essentiels type
Omega 3.
PLUS DE FRUITS ET LEGUMES
Le système de cuisson vapeur est facile à utiliser et cuit sans surveillance. La cuisson vapeur peut vous aider à
augmenter votre consommation journalière de fruits et légumes.
Maintenant créez votre repas savoureux et équilibré en une seule cuisson !
Description
1. Couvercle
2. Plateau réversible*
a. cuisson court bouillon / sauce
b. cuisson vapeur
3. Bol à riz*
4. Paniers vapeur
5. Bol maxi capacité
6. Récupérateur à jus
7. Trappe de remplissage d’eau en cours de
cuisson
8. Indicateur de niveau d’eau intérieur
9. Réservoir à eau
* selon modèle
10. Elément chauffant
11. Indicateur de niveau d’eau extérieur
12. Base électrique
13. Voyant de fonctionnement
14. Minuterie 60 min
15. Touche Vitamin +
16. Touche maintien au chaud*
3

Préparation
Avant utilisation
• Passez une éponge non abrasive humidifiée pour nettoyer le réservoir à eau —
fig.1.
• Lavez toutes les pièces amovibles à l’eau tiède avec du liquide vaisselle, rincez et
séchez.
Remplissez le réservoir à eau
N’utilisez pas
d’assaisonnement ou de
liquide autre que l’eau
dans le réservoir.
Assurez-vous de la
présence d’eau dans le
réservoir avant la mise en
marche.
• Versez de l’eau directement dans le réservoir à eau jusqu’au niveau maximum —
fig.2.
• Placez le récupérateur à jus sur le réservoir.
• Placez le bol maxi capacité sur le récupérateur à jus —
• Renouvelez l’eau avant chaque utilisation et vérifiez que le réservoir est empli
jusqu’au niveau maximum.
Placez le(s) panier(s) vapeur
• Placez les aliments dans le(s) panier(s).
• Posez le(s) panier(s) dans le bol maxi capacité. Rabattez les poignées dans les
encoches prévues à cet effet — fig.4.
• Posez le couvercle.
Placez le plateau cuisson réversible*
Le plateau cuisson (face
A) peut-être utilisé sans
le bol. Placez-le
directement sur le
récupérateur à jus — fig.7.
• Utilisez la face A du plateau cuisson pour les plats en sauce et la cuisson des
aliments dans leur jus, et la face B pour une cuisson vapeur — fig.5.
• Placez le plateau cuisson réversible sur le bol maxi capacité — fig.6.
• Posez le couvercle.
N’immergez pas la base
électrique.
fig.3.
Préparez du riz
Vous avez la possibilité de cuire du riz
• Mettez le riz et l’eau dans le bol à riz (cf. tableau de cuisson) — fig.8.
• Placez le bol à riz dans un panier vapeur ou dans le bol maxi capacité.
Cuisinez sans les paniers
Pour une maxi capacité, vous pouvez cuisiner sans les paniers
• Enlevez les paniers.
• Placez vos aliments dans le bol maxi capacité.
• Posez le bol maxi capacité sur le récupérateur à jus —
• Mettez soit le plateau cuisson et le couvercle couvercle — fig.11.
4
fig.9.
fig.10, soit directement le
* selon modèle

Cuisson
Sélectionnez le temps de cuisson
• Branchez l’appareil.
• Réglez la minuterie selon les temps recommandés (cf. tableau de cuisson) —
fig.12.
• Le voyant de fonctionnement rouge et la touche VITAMIN+ s’allument et la
cuisson vapeur commence.
Utilisez la touche VITAMIN +
Vous pouvez arrêter
manuellement le
programme Vitamin+ en
appuyant sur le voyant
allumé.
• Exclusif : votre appareil est équipé d’une touche VITAMIN + qui réduit le
temps de cuisson et préserve parfaitement toutes les vitamines.
• En début de cuisson la touche s’allume — fig.13. Cette fonction permet un
démarrage plus rapide de la cuisson grâce à un débit vapeur plus important.
• La touche VITAMIN + s’éteint automatiquement lorsque la quantité de vapeur
est suffisante pour la cuisson.
• Si vous avez ouvert le produit pendant la cuisson, appuyez sur la touche
VITAMIN + — fig.14.
Pendant la cuisson
• Vérifiez le niveau d’eau pendant la cuisson grâce à l’indicateur de niveau d’eau
extérieur.
• Si nécessaire, remettez de l’eau par l’ouverture de remplissage — fig.15.
• Pour arrêter volontairement l’appareil, tournez la minuterie sur la position O —
fig.16.
L’appareil doit être
branché avant
d’actionner la minuterie.
Ne touchez pas les
surfaces chaudes ni les
aliments en cours de
cuisson.
S’il n’y a plus d’eau,
l’appareil ne cuit plus.
Vérifiez pendant le
maintien au chaud qu’il y
a toujours de l’eau dans
le réservoir.
• Un signal sonore retentit.
• Le maintien au chaud se met en marche automatiquement — fig.17.
• L’appareil garde les aliments au chaud pendant 60 minutes.
• Appuyez sur la touche maintien au chaud allumé pour arrêter l’appareil.
Retirez les aliments des paniers
• Retirez le couvercle par sa poignée.
• Posez le plateau cuisson sur le couvercle retourné — fig.18.
• Retirez les paniers à l’aide des poignées — fig.19.
• Servez les aliments — fig.20.
* selon modèle
Maintien au chaud*
Utilisez des gants de
protection pour
manipuler les bols, la
poignée et le couvercle.
5
Table des temps de cuisson
Les temps sont donnés à titre indicatif, ils peuvent varier en fonction de la taille des
aliments, de l’espace laissé entre les aliments, des quantités, du goût de chacun et
de la tension du réseau électrique.
Viandes — Volailles
Utilisez des gants de
protection pour
manipuler les bols en
cours de cuisson.
10
10
Temps de
cuisson
15 min
17 min
10 min
10 min
Recommandations
Préparation Type Quantité
Petits
Blanc de poulet
Cuisses de poulet Entières 4 36 min
Escalope de dinde Fines 600 g 24 min
Filets de porc 700 g 38 min Coupez en tranches de 1 cm d’épaisseur
Tranches d’agneau 500 g 14 min
Saucisses
morceaux
En entier
Knack
Francfort
500 g
450 g
Poissons — Crustacés
Préparation Type Quantité
Filets de poisson
Frais
Surgelés
450 g
450 g
Temps de
cuisson
10 min
18 min
Recommandations
Steaks de poisson Frais 400 g 15 min Selon l’épaisseur
Poisson entier Frais 600 g 25 min Selon l’épaisseur
Moules Fraîches 1 kg 15 — 20 min
Crevettes Fraîches 200 g 5 min
Coquilles SaintJacques
Fraîches 100 g 5 min
6

Légumes
Préparation Type Quantité
Artichauts Frais 3 43 min Coupez la base
Asperges Fraîches 600 g 17 min Coupez les plus grosses en 2
Brocolis
Frais
Surgelés
Céleri Frais 350 g 22 min
Champignons Frais 500 g 12 min Coupez les pieds et bien nettoyer
Choux fleur Frais 1 moyen 19 min En petits morceaux
Choux (rouge ou vert) Frais 600 g 22 min En petits morceaux
Courgettes Fraîches 600 g 12 min Emincer
Frais
Epinards
Surgelés
Frais
Haricots verts
Surgelés
Petites carottes Fraîches 500 g 15 min Emincez finement
Maïs entier Frais 500 g 40 min
400 g
400 g
300 g
300 g
500 g
500 g
Temps de
cuisson
18 min
12 min
13 min
15 min
30 min
25 min
Recommandations
Mange tout Frais 500 g 15 min
Poireaux Frais 500 g 30 min Emincez finement
Poivrons Frais 300 g 15 min
Petits pois
Pommes de terre
Binje
Pommes de terre
charlottes
Pommes de terre
rattes
Petits oignons
grelots
Frais
Surgelés
Fraîches 600 g 20 min Coupez en morceaux de 30g
Fraîches 600 g 20 min Emincez ou coupez en cubes
Fraîches Entières 20 min
Frais 400 g 12 min Couper les tiges vertes
400 g
400 g
20 min
20 min
Coupez en larges
bandes
7
Riz — Pâtes — Céréales
Préparation
Riz blanc long grain 150 g 300 ml 30 — 35 min Lavez le riz avant cuisson
Riz basmati 150 g 300 ml 30 — 35 min Mettez dans l’eau bouillante
Riz cuisson rapide 150 g 300 ml 28 — 33 min Egrenez en fin de cuisson avec une fourchette
Riz complet 150 g 300 ml 33 — 38 min Egrenez en fin de cuisson avec une fourchette
Semoule de
couscous
Blé bulgare 150 g 300 ml 15 min Mettez dans l’eau bouillante
Pâte (spaghettis) 200 g 400 ml 20 — 25 min Mettez dans l’eau bouillante
Quantité
de riz
200 g 350 ml 23 min
Quantité
d’eau
Temps de
cuisson
Recommandations
Laisser reposer la semoule 5 min. dans l’eau bouillante avant de cuire
Fruits
Préparation Type Quantité
Bananes Fraîches 3 10 min
Pommes Fraîches 4 12 min
Temps de
cuisson
Recommandations
Poires Fraîches 5 20 min
Préparation Type Quantité
Oeufs
Durs
Mollets
6
6
8
Temps de
cuisson
12 min
8 min
Autres aliments
Recommandations

Entretien et nettoyage
Nettoyez l’appareil
• Après chaque utilisation, débranchez l’appareil.
• Laissez-le refroidir complètement avant le nettoyage.
• Vérifiez que l’appareil a suffisamment refroidi avant de vider le récupérateur à
jus et le bac à eau.
• Lavez toutes les pièces amovibles à l’eau tiède avec du liquide vaisselle, rincez et
séchez.
N’immergez pas la base
électrique.
N’utilisez pas de produits
d’entretien abrasifs.
Détartrez votre appareil
Détartrez toujours votre
appareil à froid.
N’utilisez pas d’autres
produits détartrants.
• Pour un fonctionnement optimal de votre appareil, détartrez-le toutes les 8
utilisations.
• Retirez le récupérateur à jus.
• Versez 3 cuillères à soupe de vinaigre blanc dans la partie creuse de l’élément
chauffant.
• Laissez agir à froid pendant une nuit.
• Rincez l’intérieur du réservoir à eau plusieurs fois avec de l’eau tiède.
Participons à la protection de l’environnement !
Votre appareil contient de nombreux matériaux valorisables ou recyclables.
Confiez celui-ci dans un point de collecte ou à défaut dans un centre service
agréé pour que son traitement soit effectué.
9
Loading…