
Manual
View the manual for the Pfaff hobby 1142 here, for free. This user manual comes under the category sewing machines and has been rated by 18 people with an average of a 9. This manual is available in the following languages: English. Do you have a question about the Pfaff hobby 1142?
Ask your question here
Pfaff hobby 1142 specifications
Below you will find the product specifications and the manual specifications of the Pfaff hobby 1142.
The Pfaff Hobby 1142 is a sewing machine that is designed to be user-friendly, reliable, and durable. It comes equipped with a range of features to make sewing easier and more efficient. This machine is suitable for beginners and intermediate sewers who want to create their own clothing, home decor, or other sewing projects.
The Pfaff Hobby 1142 has 23 different stitches to choose from, including utility stitches, decorative stitches, and stretch stitches. It also has adjustable stitch length and width settings, allowing the user to customize their stitches as needed. The machine comes with a range of accessories, including several different presser feet, bobbins, and needles.
One of the standout features of the Pfaff Hobby 1142 is its built-in needle threader, which makes threading the needle quick and easy. The machine also has a drop feed function, which allows for free-motion quilting and embroidery. The motor is powerful, but quiet, and the machine is designed to be easy to maintain for years of trouble-free sewing.
Overall, the Pfaff Hobby 1142 is a reliable and well-designed sewing machine that offers a range of features for sewers of all skill levels. Its sturdy construction and user-friendly features make it a great choice for those who want to take their sewing to the next level.
General
Frequently asked questions
Can’t find the answer to your question in the manual? You may find the answer to your question in the FAQs about the Pfaff hobby 1142 below.
What size needle should I use?
Which size of needle you can best use depends on the thickness of the fabric you use. With a thick fabric you should use a thick needle. The packaging of your needle states for which substances your needle is suitable.
Why does the needle break while sewing?
There can be several causes for needle breakage:
— Not using the right needle for the right fabric
— The needle is set too low
— The fabric is not properly guided
— The bobbin case is not inserted correctly
How long does a sewing needle last?
Generally, a sewing needle lasts about 7 to 9 hours.
Is the manual of the Pfaff hobby 1142 available in English?
Yes, the manual of the Pfaff hobby 1142 is available in English .
Is your question not listed? Ask your question here
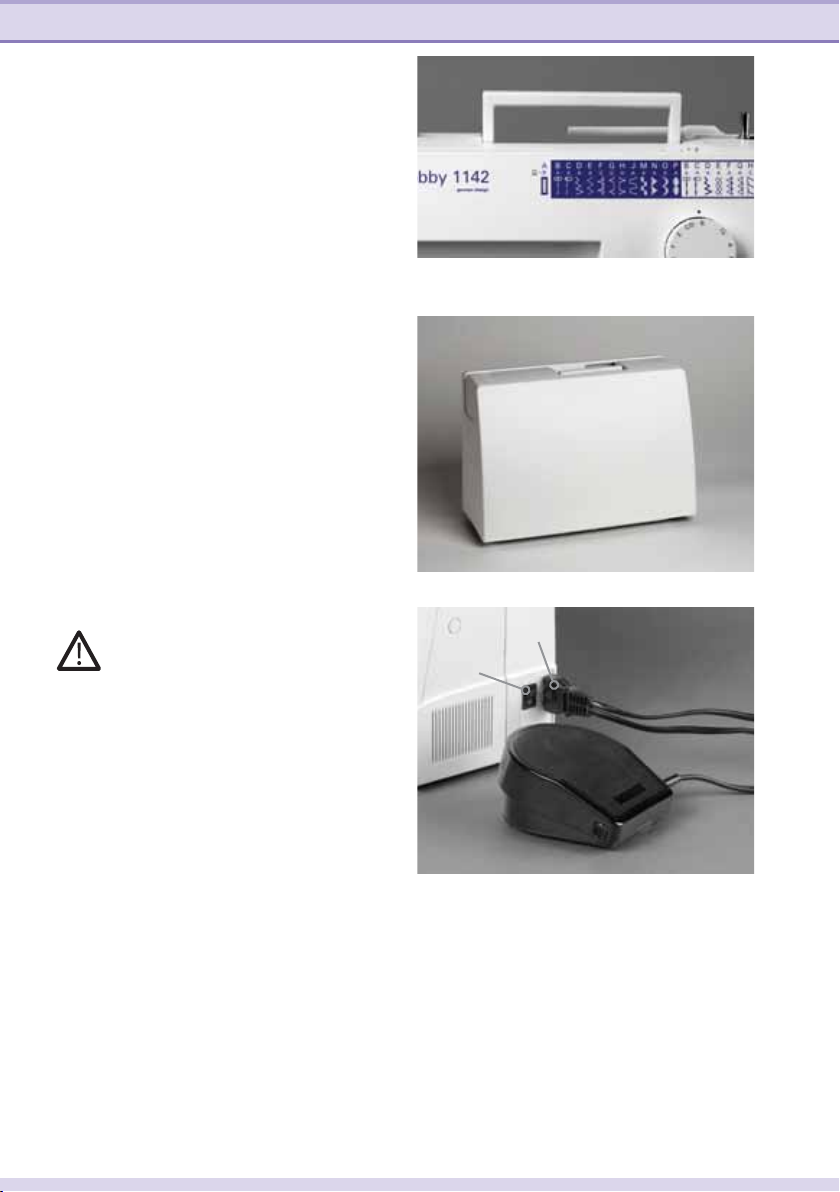
hobby
Owner´s manual
114 2
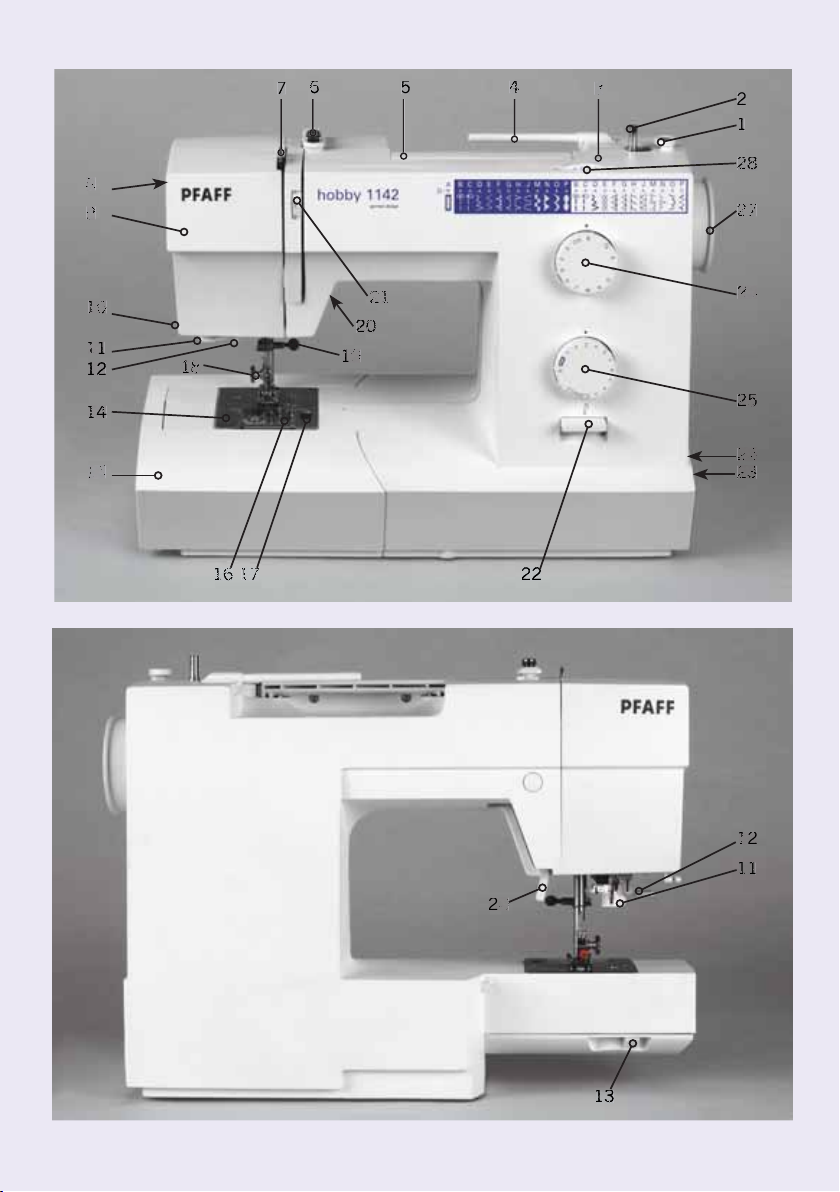

Parts of your hobby™ 1142 sewing machine
1 Bobbin winder stop
2 Bobbin winder spindle
3 Hole for extra spool pin
4 Spool pin
5 Carrying handle
6 Bobbin thread guide
7 Take-up lever
8 Foot pressure dial
9 Face plate
10 Thread cutter
11 Buttonhole lever
12 Needle threader
13 Slide for lowering the feed dog
14 Needle plate
15 Accessory tray
16 Throat plate
17 Throat plate release button
18 Thumbscrew
19 Needle screw
20 Presser foot lifter
21 Thread tension dial
22 Reverse stitch lever
23 Power switch
24 Connecting socket
25 Stitch length dial
26 Stitch selector dial
27 Handwheel
28 Stitch width dial

Congratulations on purchasing
your new PFAFF® hobby!
Your hobby is so easy to use and offers a
whole range of features and accessories
for you to explore. Please spend some time
reading these operating instructions as it is
a great way to learn the machine and also to
make full use of the features.
Your Pfaff dealer will be at your service
with any help or advice you need.
We wish you many enjoyable
hours of sewing !
Some fabrics have excess dye which can cause
discoloration on other fabric but also on your sewing
impossible to remove.
Fleece and denim fabric in especially red and blue often contain a
lot of excess dye.
If you suspect that your fabric/ready-to-wear garment
contains a lot of excess dye, always pre-wash it before sewing/
embroidering to avoid the discoloring.
machine. This discoloring may be very difÀ cult or

This houshold sewing machine is designed to comply with IEC/EN 60335-2-28 and UL1594
IMPORTANT SAFETY INSTRUCTIONS
When using an electrical appliance, basic safety precautions should always be followed, including
the following:
Read all instructions before using this household sewing machine.
DANGER — To reduce the risk of electric shock:
• A sewing machine should never be left unattended when plugged in. Always unplug this sewing
machine from the electric outlet immediately after using and before cleaning.
• Always unplug before relamping. Replace bulb with same type rated 15 Watt.
WARNING — To reduce the risk of burns, À re,
electric shock, or injury to persons:
• This sewing machine is not intended for use by persons (including children) with reduced
physical, sensory or mental capabilities, or lack of experience and knowledge, unless they
have been given supervision or instruction concerning use of the sewing machine by a person
responsible for their safety.
• Children should be supervised to ensure that they do not play with the sewing machine.
• Use this sewing machine only for its intended use as described in this manual. Use only
attachments recommended by the manufacturer as contained in this manual.
• Never operate this sewing machine if it has a damaged cord or plug, if it is not working properly,
if it has been dropped or damaged, or dropped into water. Return the sewing machine to the
nearest authorised dealer or service center for examination, repair, electrical or mechanical
adjustment.
• Never operate the sewing machine with any air openings blocked. Keep ventilation openings of
the Sewing machine and foot controller free from the accumulation of lint, dust, and loose cloth.
• Keep À ngers away from all moving parts. Special care is required around the Sewing machine
needle.
• Always use the proper needle plate. The wrong plate can cause the needle to break.
• Do not use bent needles.
• Do not pull or push fabric while stitching. It may deÁ ect the needle causing it to break.
• Wear safety glasses.
• Switch the sewing machine off (“0”) when making any adjustment in the needle area, such as
threading needle, changing needle, threading bobbin, or changing presser foot, etc.
• Always unplug the sewing machine from the electrical outlet when removing covers, lubricating,
or when making any other user servicing adjustments mentioned in the instruction manual.
• Never drop or insert any object into any opening.
• Do not use outdoors.
• Do not operate where aerosol (spray) products are being used or where oxygen is being
administrated.
• To disconnect, turn all controls to the off (“0”) position, then remove plug from outlet.
• Do not unplug by pulling on cord. To unplug, grasp the plug, not the cord.
SAVE THESE INSTRUCTIONS

II
Introduction
TABLE OF CONTENTS
Introduction
Standard accessories IV
Optional accessories V
Accessory tray V
Stitch table VI
1. Operate your hobby 1142
Carrying handle, carrying case 1:2
Connecting the foot control 1:2
Foot preassure dial 1:3
Dropping the feed dog 1:3
Presser foot lifter 1:4
Changing the presser foot 1:4
Removing and attaching
the foot holder 1:5
Changing the needle 1:5
Bobbin winding 1:6
Inserting the bobbin 1:8
Threading the machine 1:9
Needle threader 1:10
Threading for twin needle 1:11
Bringing up the bobbin thread 1:12
Stitch selection 1:13
Stitch length dial 1:13
Adjusting stretch stitch balance 1:14
Stitch width dial 1:14
Variable needle position 1:15
Reverse sewing 1:15
Balancing needle thread tension 1:16
2. Utility stitches and practical
sewing
Basic sewing 2:2
Free arm sewing 2:4
Seam guides on the needle plate 2:5
Turning a square corner 2:5
Explanation of the sewing chart 2:6
Straight stitch 2:7
Stretch triple straight stitch 2:8
Zigzag stitch 2:8
Tricot stitch (Triple zigzag stitch) 2:9
Honeycomb stitch 2:9
Open overlock stitch (Knit stitch) 2:10
Closed overlock stitch 2:10
Blindhem 2:11
Blindhem stitch (elastic) 2:11
Automatic buttonhole 2:12
Buttonhole with gimp thread 2:14
Manual buttonhole 2:14
Button sewing 2:15
Sewing on zippers 2:16
Sewing on patches 2:18
Darning with the elastic stitch 2:18
Repairing tears 2:18

3. Maintenance and
trouble-shooting
Cleaning 3:2
Changing the light bulb 3:3
Trouble-shooting 3:4
Index 3:6
Technical data 3:8
Introduction
III
IV
Introduction
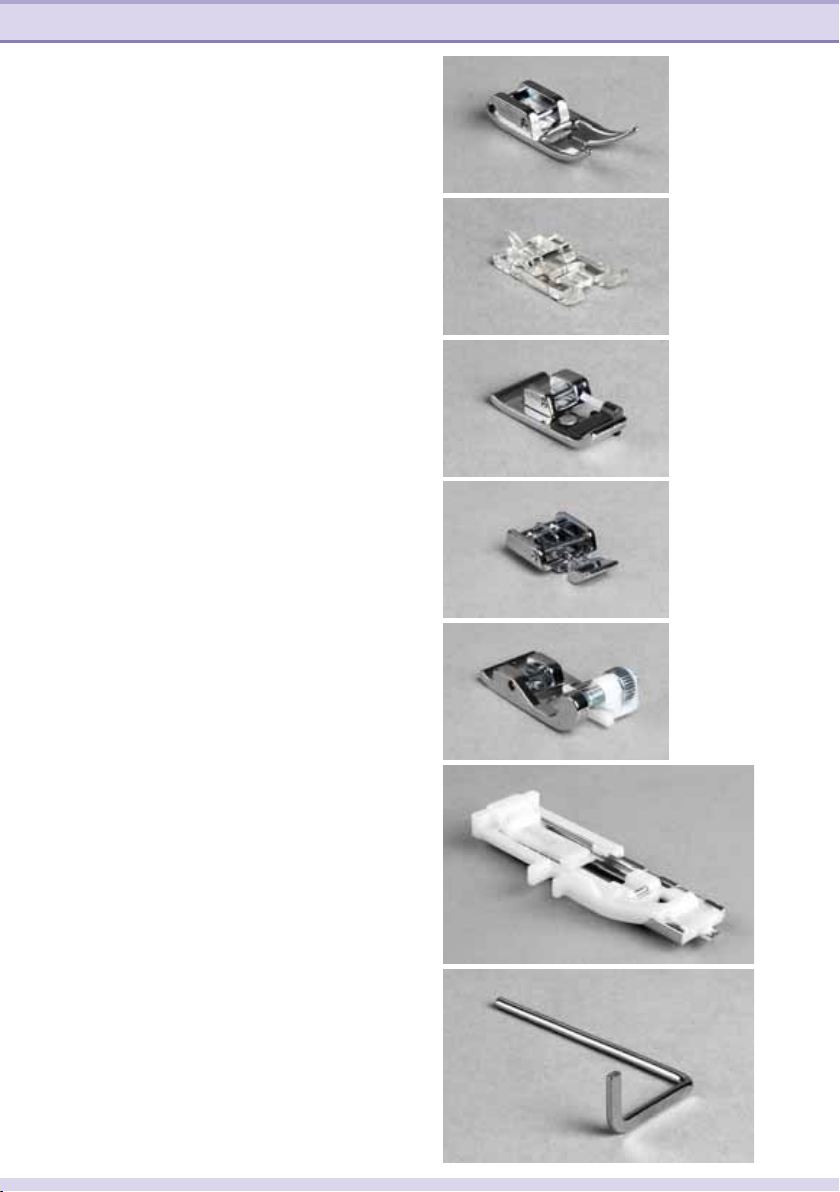
Standard accessories
1 Standard presser foot A
Part No. 820 546-096
2 Buttonhole foot B
Part No. 820 547-096
3 Overcasting foot C
Part No. 820 548-096
4 Zipper foot E
Part No. 820 549-096
5 Blindhem foot G
Part No. 820 550-096
1
2
3
4
5
6 Automatic buttonhole foot R
Part No. 820 551-096
7 Edge Guide/Quilting Guide
Part No. 820 552-096
6
7

Introduction
V
8-9 Spool cap
Part No. 4160424-01
10 Cushion felt
Part No. 4160234-01
11 Brush
Part No. 4160409-01
12 Seam ripper
Part No. 4160304-01
13 Extra spool pin
Part No. 4160292-01
14 Screwdriver
Part No. 4160422-01
15 Bobbins
Part No. 4160233-01
16 Needles
Part No. 4160471-01
910
13 14 15 16
11
128
Optional accessories — available from your dealer
Bias binder foot 820 554-096 Makes it easier to put bias tape on your projects, pre-
Dual feeder with
quilting guide
Gathering foot 820 556-096 When you want to have a nice gathering on a single
Pintuck foot deep
groove with yarn guide
Piping foot 820 558-096 The foot has grooves to make it easier to sew perfect
Ribbon sewing foot 820 559-096 Your ribbon is hold perfectly in place while you sew it
Roller foot 820 560-096 For a better feed on material like vinyl plastic and
820 555-096 This foot will help the fabric move more smoothly,
820 557-096 Make nice even rows of pintucks, with or without
fabricated or hand made
feeding from both top and bottom
layer of fabric
cording
piping
onto your project
leather
Accessory tray
Your sewing machine has a removable
accessory tray which is also used as an
extended work support. The enclosed
accessories are numbered.
VI
Introduction
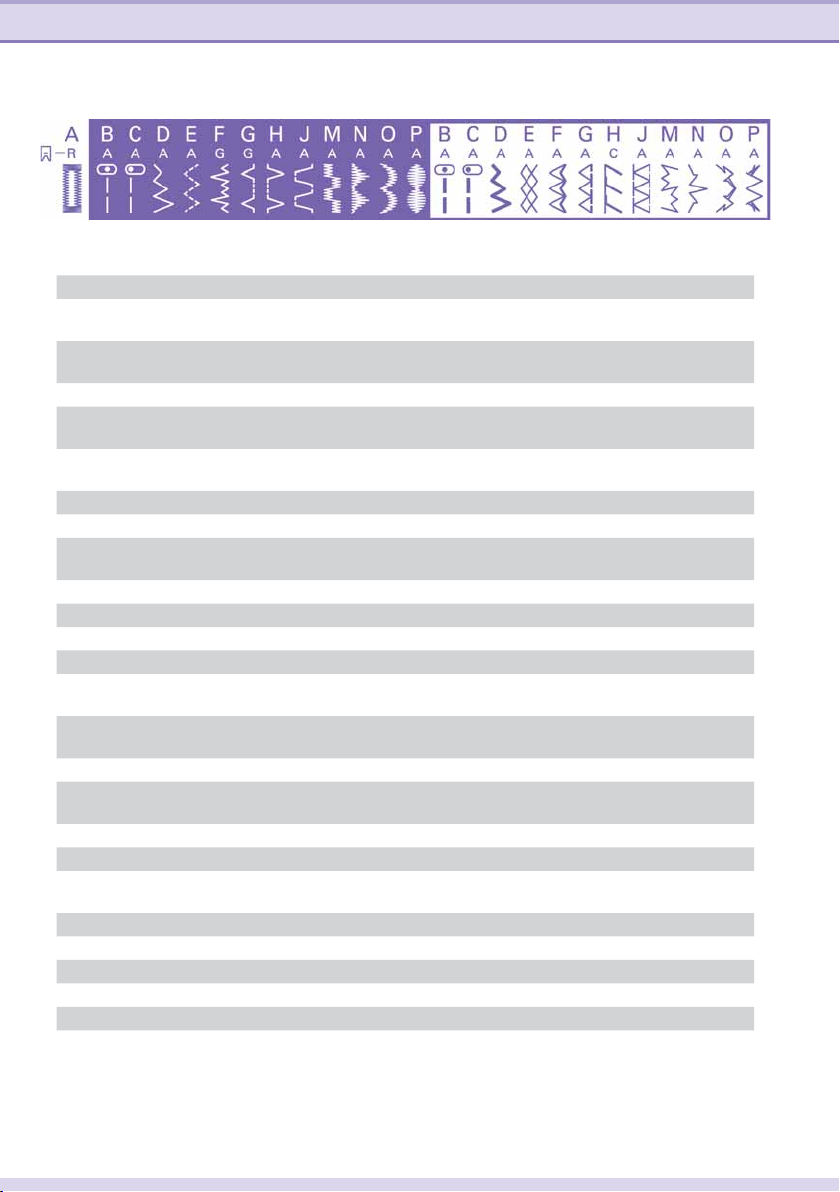
Stitch table hobby 1142
Stitch Description
Buttonhole Standard buttonhole for blouses or bed linens
A
Straight stitch, needle position
B
middle
Straight stitch, needle position left For all sewing and topstitching work requiring a
C
Zigzag stitch For serging and appliqué
D
Triple zigzag stitch For stitching on elastic band, darning tears and
E
Elastic blindhem stitch For invisible hem attachment and simultaneous
F
Blindhem stitch For invisible hem attachment
G
Shell-edging stitch For decorative hems on À ne materials, e.g. linen
H
Greek stitch A traditional decorative stitch e.g. for borders and
J
Checker satin stitch Satin decorative stitch
M
Triangle satin stitch Satin decorative stitch
N
Open scallop Satin decorative stitch
O
Oval satin stitch Satin decorative stitch
P
Stretch triple straight stitch, needle
B
position middle
Stretch triple straight stitch, needle
C
position left
Stretch triple zigzag stitch For attaching elastic tape on elastic materials
D
Honeycomb stitch For sewing on elastic threads, overlocking
E
Edge stitch wide For closing and serging one or more fabric layers
F
Edge stitch narrow For closing and serging one or more fabric layers
G
Open overlock stitch A closing and serging seam for stronger or non-
H
Closed overlock stitch A closing and serging seam for fraying materials
J
Decorative stitch A decorative stretch stitch
M
Decorative stitch A decorative stretch stitch
N
Decorative stitch A decorative stretch stitch
O
Decorative stitch A decorative stretch stitch
P
For all straight stitching and topstitching work up
to 4 mm
left needle position
patches
serging. Also for stretch fabrics
towels
For stretch seams, e.g. crotch seams on sports- and
workwear
For stretch seams requiring a left needle position
towelling and for decorative hem seams
fraying materials

1. Operate your hobby 1142
Operate your hobby 1142
1:2
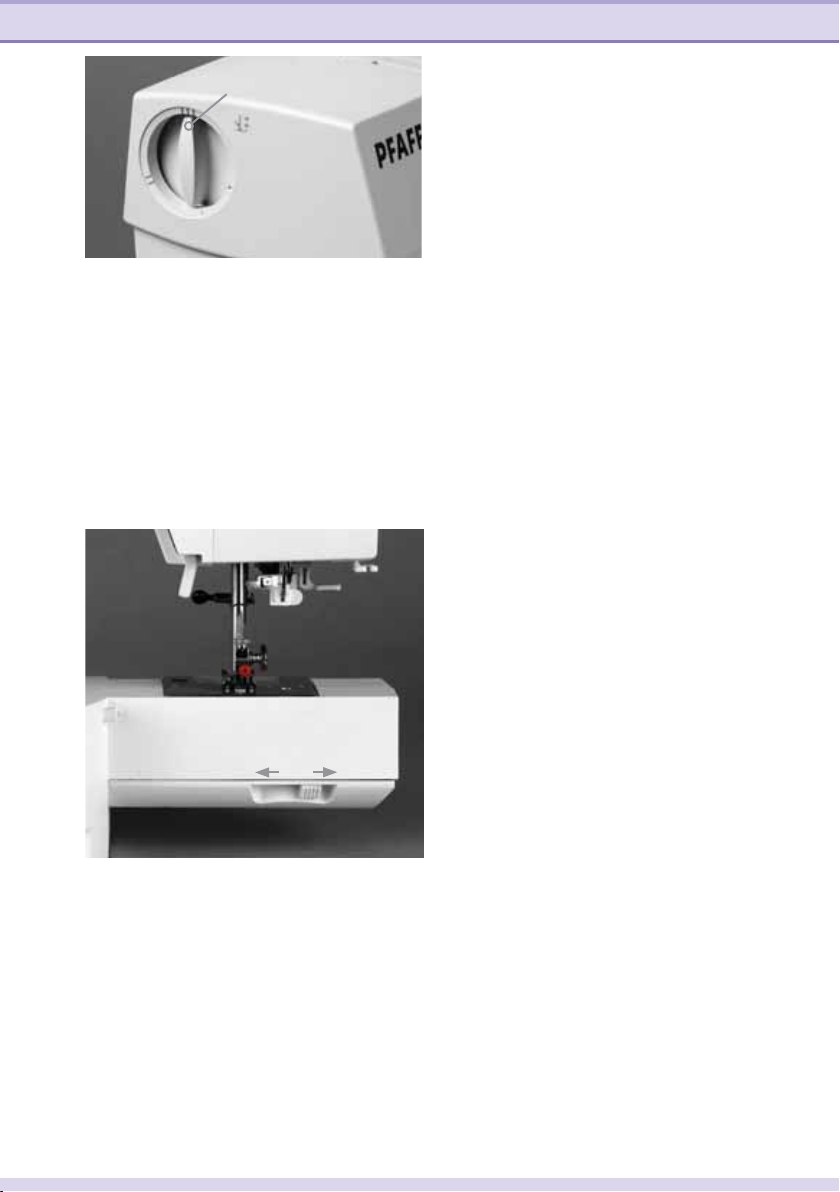
Carrying handle
Lift up the carrying handle of the sewing
machine from behind.
Carrying case
The carrying case, which is part of the
basic equipment, protects your sewing
machine from dust and damage while
transporting.
Before putting on the carrying case, lift up
the carrying handle.
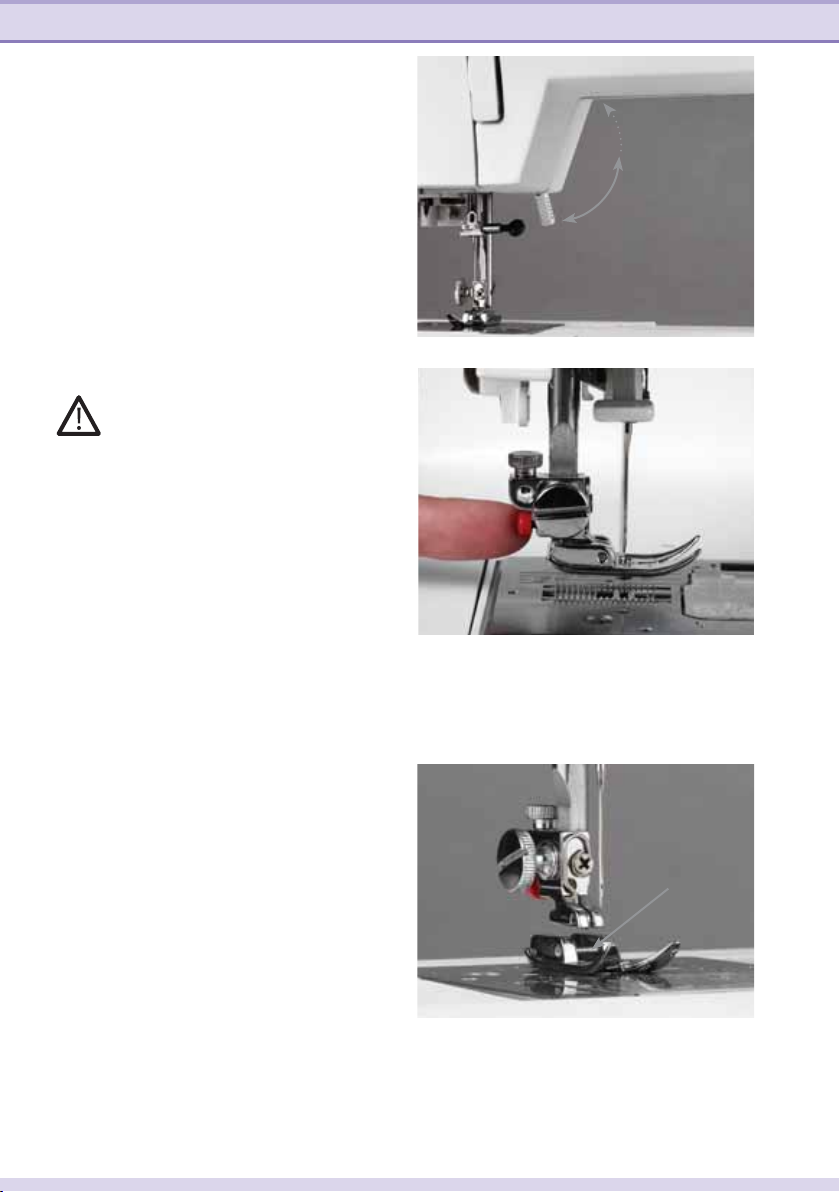
Connecting the foot control
Before connecting to the power supply,
make sure the voltage shown on the
machine conforms to your electrical power.
Connect the plug of the foot control to
the connecting socket (A) of the sewing
machine and to the wall socket. The
sewing speed is regulated by pressing the
foot control.
Make sure that you have the right type of
foot control:
For USA and Canada, 120V — YC-482J
(not shown)
For Europe, 230V — YC-190
For Australia, 240V — YC-190A
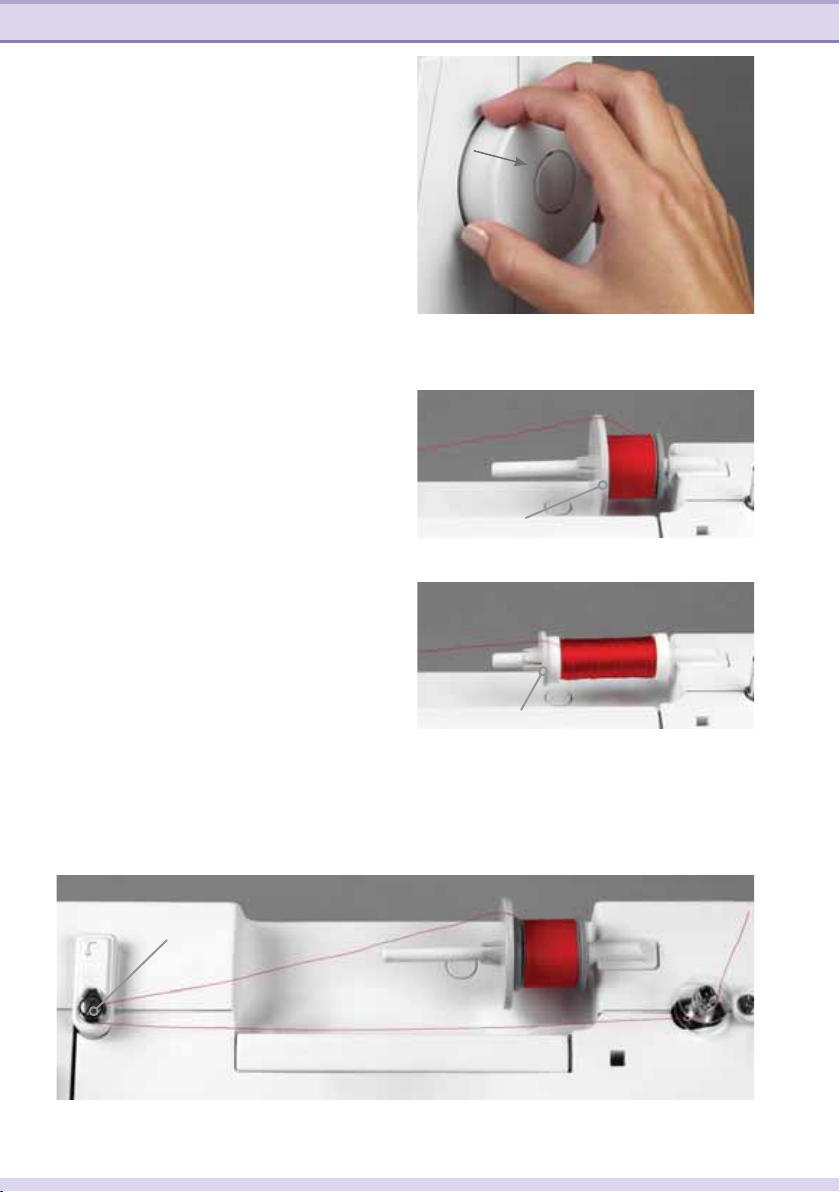
Main switch
When the main switch (B) is turned on,
the sewing light bulb lights up. The
sewing machine is now ready to use.
A
B
For the USA and Canada
This appliance has a polarized plug (one
blade wider than the other). To reduce the
risk of electric shock, this plug is intended
to À t in a polarized outlet only one way.
If the plug does not À t fully in the outlet,
reverse the plug. If it still does not À t,
contact a qualiÀ ed electrician to install the
proper outlet.
DO NOT modify the plug in any way.
C
DE
Operate your hobby 1142
Foot pressure dial
Turn the foot pressure dial to adjust the
foot pressure.
The foot pressure dial should be set at
“III” for regular sewing.
Reduce the pressure to “II” for appliqué,
cutwork, drawn work and basting.
Set the setting mark (C) at “I” when
sewing chiffon, lace, organdy and other
À ne fabrics.
Dropping the feed dog
For certain sewing work, e.g. darning the
feed dog has to be dropped.
The slide for lowering the feed dog is
located underneath the free-arm bed on
the backside of the machine.
To drop the feed dog, push the slide in
the direction of the arrow, as shown in the
picture (D).
To raise the feed dog, push the silde in
the direction of the arrow, as shown in
the picture (E), and turn the handwheel
toward you.
The feed dog must be up for regular
sewing.
1:3
Operate your hobby 1142
1:4
Presser foot lifter
The presser foot is raised or lowered with
the presser foot lifter.
You can raise the foot about 1/4″ (6 mm)
higher than the normal up position for
easy removal of the presser foot, or to
help you place heavy fabric under the
foot.
A Lowered position
B Normal up position
C Extra lift position
Changing the presser foot
Turn off the main switch.
Removing the presser foot
Raise the needle to its highest position by
turning the handwheel.
Raise the presser foot, and press the red
button on the back of the foot holder.
C
B
A
Engaging the presser foot
Place the desired presser foot, so that
when the presser foot lifter is lowered, the
pins (D) of the foot engage in the presser
foot holder.
Note: Check that the presser foot is properly
engaged by raising the presser foot lifter.
D
Operate your hobby 1142
Removing and attaching the foot
holder
1:5
E
Turn off the main switch.
To remove the foot holder
Remove the thumbscrew (E) by turning it
counterclockwise with a screwdriver and
remove the foot holder.
To attach the foot holder
Match the hole in the foot holder with
the threaded hole in the presser bar. Fit
the thumbscrew into the hole. Tighten
the screw by turning it clockwise with a
screwdriver.
Changing the needle
Turn off the main switch.
To remove the needle
Lower the presser foot and
move the needle to its highest
point. Now loosen the needle
screw (F) and pull the needle
F
downwards.
To insert the needle
The Á at side of the needle
must face to the rear. Lower
the presser foot and insert the
needle, pushing it up as far as
it goes. Hold the needle and tighten the
needle screw À rmly.
To check for a good needle:
Put the Á at side of the needle onto
something Á at (needle plate, glass etc.).
The gap between the needle and the Á at
surface should be consistent.
Never use a bent or blunt needle.
Note: Check the needle frequently for barbed
or blunted points.
A damaged needle can cause permanent
snaps or runs in knits, À ne silks and silk-
like fabrics.
Operate your hobby 1142
1:6
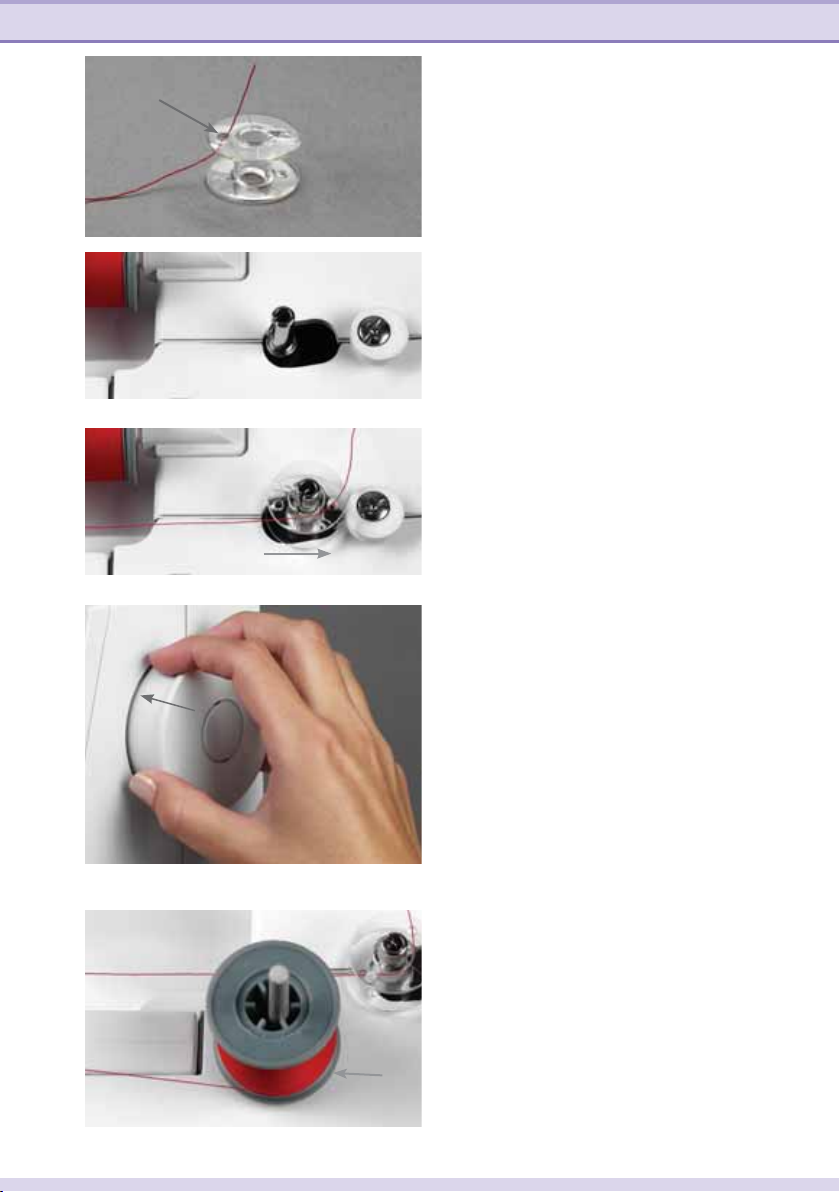
Bobbin winding
Preparing the machine for bobbin
winding
Pull out the handwheel to disengage the
clutch.
Setting the spool
Place a spool of thread on the spool pin
with the thread coming off the spool as
shown in the picture.
Press the large spool cap (A) À rmly
against the spool of thread.
For a small spool, use the small spool cap
(B).
A
Pull the thread around the bobbin thread
guide(C).
C
B
Operate your hobby 1142
1:7
Thread through the hole in the bobbin (D)
D
from the inside to the outside as shown in
the picture.
Place the bobbin on the bobbin winder
spindle with the free end of the thread at
the top.
Push the bobbin to the right.
Note: The bobbin can only be wound when it
is moved fully to the right. Do not move the
bobbin winder spindle while the machine is
running.
Hold the end of the thread À rmly and
press the foot control. Stop the machine
when the bobbin has made several turns,
and cut the free thread end close to the
bobbin.
Press the foot control again. When
the bobbin is fully wound, it will stop
automatically.
Push the bobbin to the left, remove it and
cut the thread.
Push in the handwheel to engage the
clutch.
Extra spool pin
If the machine is already threaded, you
can easily wind thread from the second
spool pin without unthreading the
machine.
Insert the extra spool pin into the hole (E).
Place the felt and a spool on the pin.
E
Thread the machine for winding in the
same way as before.
Loading…
Pfaff hobby 1142 Sewing Machine PDF User Guides and Manuals for Free Download: Found (4) Manuals for Pfaff hobby 1142 Device Model (Manual , Technical Specifications, Brochure)
The Pfaff Hobby 1142 is a versatile sewing machine that promises to meet the needs of both beginners and experienced sewists. This machine is engineered to deliver a smooth sewing experience while incorporating several user-friendly features. From its robust build to a wide variety of stitch options, the Hobby 1142 stands out in the market, making it a solid choice for anyone looking to invest in a reliable sewing machine.
One of the notable characteristics of the Pfaff Hobby 1142 is its intuitive design. The control panel is straightforward, allowing for easy navigation through the various stitch selections. Users can quickly switch between utility stitches and decorative options, promoting creativity in sewing projects. Furthermore, the adjustable stitch width and length provide greater flexibility, making it an excellent choice for diverse fabrics.
This sewing machine boasts a range of features that enhance its functionality:
- Stitch Variety: With over 30 different stitches to choose from, the Hobby 1142 allows users to explore various sewing techniques, from basic to intricate designs.
- Automatic Buttonhole: The machine includes an easy-to-use automatic buttonhole feature, ensuring accurate and consistent results with every project.
- Built-in Needle Threader: This convenient feature saves time and reduces frustration, especially for those who might struggle with threading needles manually.
- Free Arm Capability: The free arm allows for easy sewing of cylindrical items like sleeves and pant hems, making it a practical addition to any sewing setup.
- Variable Speed Control: The adjustable speed settings provide control over the sewing pace, accommodating both beginners and advanced users.
Another impressive aspect of the Pfaff Hobby 1142 is its robust motor. This sewing machine can handle a variety of fabrics, including denim, cotton, and knits, without compromising performance. The steady power of the machine ensures consistent stitch formation, granting sewists the confidence to tackle demanding projects. This durability is complemented by a well-constructed body, contributing to the longevity of the Hobby 1142.
Moreover, the machine’s maintenance is user-friendly. The accessible bobbin area allows for easy threading and cleaning, while the needle plate can be removed for quick access to the feed dogs. Proper maintenance ensures that the hobby 1142 continues to deliver excellent performance over the years.
Beyond functionality, the design of the Pfaff Hobby 1142 deserves recognition. Its sleek look and compact form make it easy to store or transport, appealing to both home sewists and those who attend sewing classes or workshops. The machine weighs just the right amount to be portable while still remaining sturdy, making it a practical choice for a variety of sewing environments.
In summary, the Pfaff Hobby 1142 is an outstanding sewing machine that strikes a balance between functionality and user-friendliness. Its wide range of features, coupled with an easy-to-navigate interface, makes it an excellent option for individuals looking to expand their sewing skills. Whether you’re crafting clothing, home decor, or quilts, the Hobby 1142 can handle the task with precision and ease. This machine not only caters to beginners but also provides experienced seamstresses with the tools needed to create beautiful, professional-grade projects. Overall, the Pfaff Hobby 1142 is a commendable choice that will serve you well in your sewing endeavors.
-
Страница 1
hobby 11 4 2 Owner´s manual[…]
-
Страница 2
25 25 25 25 24 24 27 27 27 27 27 27 28 28 28 28 28 1 1 4 4 4 4 4 4 4 4 8 8 8 8 9 9 10 10 10 10 0 12 12 12 12 2 14 14 14 14 14 1 15 15 15 1 15 15 19 19 19 19 1 19 1 22 22 22 22 22 16 16 16 16 16 16 16 2 2 21 21 21 21 21 1 3 3 3 3 7 7 7 7 7 7 7 7 17 17 17 1 17 17 18 18 8 18 8 18 18 18 18 26 26 26 26 2 6 26 23 23 23 3 6 6 6 6 6 6 6 6 5 5 5 5 5 5 5 20 […]
-
Страница 3
P arts of your hobby™ 1 1 42 sewing machine 1 Bobbin winder stop 2 Bobbin winder spindle 3 Hole for extra spool pin 4 Spool pin 5 Carrying handle 6 Bobbin thread guide 7 Take-up lever 8 Foot pressure dial 9 Face plate 10 Thread cutter 11 Buttonhole lever 12 Needle threader 13 Slide for lowering the feed dog 14 Needle plate 15 Accessory tray 16 Th[…]
-
Страница 4
Congr atulations on purchasing your new PF AFF® hobby! Your hobby is so easy to use and offers a whole range of features and accessories for you to explore. Please spend some time reading these operating instructions as it is a great way to learn the machine and also to make full use of the features. Your Pfaff dealer will be at your service with […]
-
Страница 5
This houshold sewing machine is designed to comply with IEC/EN 60335-2-28 and UL1594 IMPORT ANT SAFETY INS TRUCTIONS When using an electrical appliance, basic safety precautions should always be followed, including the following: Read all instructions before using this household sewing machine. D ANGER — T o r educe the risk of electric shock: • […]
-
Страница 6
II Introduction T ABLE OF CONTENTS Introduction Standard accessories IV Optional accessories V Accessory tray V Stitch table VI 1. Oper ate your hobby 1142 Carrying handle, carrying case 1:2 Connecting the foot control 1:2 Foot preassure dial 1:3 Dropping the feed dog 1:3 Presser foot lifter 1:4 Changing the presser foot 1:4 Removing and attaching […]
-
Страница 7
III Introduction 3. Maintenance and trouble-shooting Cleaning 3:2 Changing the light bulb 3:3 Trouble-shooting 3:4 Index 3:6 Technical data 3:8[…]
-
Страница 8
IV 2 7 6 5 4 3 1 Introduction Standard accessories 1 Standard presser foot A Part No. 820 546-096 2 Buttonhole foot B Part No. 820 547-096 3 Overcasting foot C Part No. 820 548-096 4 Zipper foot E Part No. 820 549-096 5 Blindhem foot G Part No. 820 550-096 6 Automatic buttonhole foot R Part No. 820 551-096 7 Edge Guide/Quilting Guide Part No. 820 5[…]
-
Страница 9
V 12 8 13 14 15 16 11 91 0 Introduction Accessory tray Your sewing machine has a removable accessory tray which is also used as an extended work support. The enclosed accessories are numbered. 8-9 Spool cap Part No. 4160424-01 10 Cushion felt Part No. 4160234-01 11 Brush Part No. 4160409-01 12 Seam ripper Part No. 4160304-01 13 Extra spool pin Part[…]
-
Страница 10
VI Introduction Stitch table hobby 1142 Stitch Description A Buttonhole Standard buttonhole for blouses or bed linens B Straight stitch, needle position middle For all straight stitching and topstitching work up to 4 mm C Straight stitch, needle position left For all sewing and topstitching work requiring a left needle position D Zigzag stitch For […]
-
Страница 11
1. Oper ate your hobby 1142[…]
-
Страница 12
1:2 A B Operate your hobby 1142 Connecting the foot control Before connecting to the power supply, make sure the voltage shown on the machine conforms to your electrical power . Connect the plug of the foot control to the connecting socket (A) of the sewing machine and to the wall socket. The sewing speed is regulated by pressing the foot control. […]
-
Страница 13
1:3 C DE Operate your hobby 1142 Dropping the feed dog For certain sewing work, e.g. darning the feed dog has to be dropped. The slide for lowering the feed dog is located underneath the free-arm bed on the backside of the machine. To drop the feed dog, push the slide in the direction of the arrow, as shown in the picture (D). To raise the feed dog[…]
-
Страница 14
1:4 B C A D Operate your hobby 1142 Presser foot lifter The presser foot is raised or lowered with the presser foot lifter. You can raise the foot about 1/4″ (6 mm) higher than the normal up position for easy removal of the presser foot, or to help you place heavy fabric under the foot. A Lowered position B Normal up position C Extra lift posi[…]
-
Страница 15
1:5 E F Operate your hobby 1142 Removing and attaching the foot holder Turn off the main switch. To remove the foot holder Remove the thumbscrew (E) by turning it counterclockwise with a screwdriver and remove the foot holder. To attach the foot holder Match the hole in the foot holder with the threaded hole in the presser bar. Fit the thumbscrew i[…]
-
Страница 16
1:6 A B C Operate your hobby 1142 Bobbin winding Preparing the machine for bobbin winding Pull out the handwheel to disengage the clutch. Setting the spool Place a spool of thread on the spool pin with the thread coming off the spool as shown in the picture. Press the large spool cap (A) À rmly against the spool of thread. For a small spool, use t[…]
-
Страница 17
1:7 D E Operate your hobby 1142 Thread through the hole in the bobbin (D) from the inside to the outside as shown in the picture. Place the bobbin on the bobbin winder spindle with the free end of the thread at the top. Push the bobbin to the right. Note : The bobbin can only be wound when it is moved fully to the right. Do not move the bobbin wind[…]
-
Страница 18
1:8 A B D E C Operate your hobby 1142 Inserting the bobbin Turn off the main switch. Place the bobbin in the bobbin holder with the thread running off as shown in the picture. Pull the thread into the front notch (A) on the front side of the bobbin holder. Pull the thread to the left, sliding it between the tension spring blades. Continue to pull t[…]
-
Страница 19
1:9 G H F I F Operate your hobby 1142 Threading the machine Turn off the main switch. Raise the presser foot and turn the handwheel towards you until the take-up lever (F) is in it’s highest position. Pull the thread from the spool and pass it under the thread guide (G). Then pull it down along the right threading slot. Pull the thread up arou[…]
-
Страница 20
1:10 A B Operate your hobby 1142 Needle threader Turn off the main switch. To make threading the needle easier and quicker, you have been provided with a needle threader. Lower the presser foot. Turn the handwheel until the needle is at its highest position. Move the needle threader (A) completely downwards and turn it towards the needle so that th[…]
-
Страница 21
1:11 C E D Operate your hobby 1142 Threading the twin needle Turn off the main switch Insert the twin needle. Insert the extra spool pin into its hole (C). Place a piece of felt and a spool on the extra spool pin. The threading path is the same as single needle threading. Slide one of the threads through the needle bar thread guide (D) on the left,[…]
-
Страница 22
1:12 A B Operate your hobby 1142 Bringing up the bobbin thread Turn off the main switch. Raise the presser foot. Hold the needle thread and turn the handwheel towards you until the needle is at the top again and the bobbin thread has formed a loop. Bring the bobbin thread (B) up by pulling the needle thread (A) as shown in the picture. Pull 10 cm ([…]
-
Страница 23
1:13 C D E F 0 1 2 3 4 Operate your hobby 1142 Stitch selection Raise the needle to its highest position. Turn the stitch selector dial (C) to set the desired stitch at the setting mark (D). Note: Do not turn the stitch selector dial while the needle is in the fabric, otherwise the needle may bend or break. Stretch stitches Stitch length dial With […]
-
Страница 24
1:14 A B 5 4 3 2 1 0 Operate your hobby 1142 Adjusting stretch stitch balance If the stretch stitches are uneven when you sew on a particular fabric, correct them by turning the stitch length dial. Balancing stitches: If the stitches are drawn out, correct them by turning the dial in the “–” direction. If the stitches are compressed, correct […]
-
Страница 25
1:15 Operate your hobby 1142 V ariable needle position The needle drop position of the straight stitches can be moved between the center (5) and left (0) with the stitch width dial. Note: Do not turn the stitch width dial while the needle is in the fabric, otherwise the needle may bend or break Reverse sewing Push the reverse stitch lever down to s[…]
-
Страница 26
1:16 Operate your hobby 1142 Balancing needle thread tension The thread tension should be adjusted depending on the sewing materials, layers of fabric and sewing method. To ensure perfect sewing results, the needle thread tensions must be perfectly tuned. Balanced tension: The ideal straight stitch has threads locked between two layers of fabric, a[…]
-
Страница 27
2. Utility stitches and pr actical sewing[…]
-
Страница 28
2:2 Utility stitches and practical sewing Basic sewing Starting to sew Raise the presser foot and place the fabric under the foot. Lower the needle into the fabric. Lower the presser foot and smooth the threads toward the back. Depress the foot control. Gently guide the fabric along the seam guide letting the fabric feed by itself. Note : Pull the […]
-
Страница 29
2:3 Utility stitches and practical sewing Finishing sewing Press the reverse stitch lever and sew several stitches in reverse at the end of the seam. Raise the presser foot and remove the fabric, pulling the threads to the back. Pull the threads up and into the thread cutter. The threads are cut the proper length for starting the next seam.[…]
-
Страница 30
2:4 B A Utility stitches and practical sewing Free arm sewing For stitching sleeves, waistbands, pant legs or any other tubular garments. In order to sew with the free arm, you must remove the accessory tray. Hook your À ngers on the bottom left of the accessory tray and pull it to the left. When replacing the accessory tray to its proper position[…]
-
Страница 31
2:5 C Utility stitches and practical sewing Seam guides on the needle plate The seam guides on the needle plate help you to measure seam allowance. The numbers indicate the distance between the center needle position and the seam guide. Turning a square corner When the fabric edge facing you lines up with the cornering guide (C) as shown in the pic[…]
-
Страница 32
2:6 Utility stitches and practical sewing Explanation of the sewing chart The following charts show the recommended settings for each stitch or technique. These charts also provide you with further instructions that are necessary when sewing the selected stitches. The choice of the sewing foot, the setting of the needle thread tension and recomende[…]
-
Страница 33
2:7 A B Utility stitches and practical sewing Straight stitch Straight stitch B/C is the basic straight stitch. The stitch length can be increased up to 4 mm. It is easier to do some sewing jobs by changing the needle position, e.g. top- stitching a collar or sewing in a zipper. The needle position is determined by the stitch width dial. (5 is cent[…]
-
Страница 34
2:8 A B Utility stitches and practical sewing Stretch triple str aight stitch This stitch is used for sewing all seams where great strength is needed, e.g. inside trouser seams, crotch and armhole seams. The stitch is sewn with two stitches forward and one stitch backward, forming a seam that does not rip easily. Also use it when constructing items[…]
-
Страница 35
2:9 Utility stitches and practical sewing T ricot stitch (T riple zigzag stitch) This stitch is used to À nish the seam allowance on synthetics and other fabrics that tend to pucker. Place the fabric to leave a 1.6 cm (5/8″) seam allowance. Trim the extra allowance after sewing. It is also used for mending tears. Elastic stitch Because of its[…]
-
Страница 36
2:10 A Utility stitches and practical sewing What is an overlock stitch? For elastic materials and knits, the hobby 1142 offers an overlock stitch which sews two fabric layers together and overcasts simultaneously. It is more elastic than normal seams, very durable and quickly sewn. When sewing overlock seams, use overcasting foot C. It guides part[…]
-
Страница 37
2:11 Utility stitches and practical sewing Blindhem stitch (elastic) Stitch F is a blindhem stitch for woven or elastic materials. The hem is sewn and overcast at the same time. Stitch G Stitch F Blindhem Blindhem foot G is best suited for invisible hems; sewing by hand is no longer necessary. Note : On heavy weight fabrics that ravel, the raw edge[…]
-
Страница 38
2:12 C D E A B F Utility stitches and practical sewing Automatic Buttonhole Buttonholes are generally sewn onto a piece of doubled fabric. However, for some materials, e.g. silk, organza and viscose, it is necessary to use stabilizer to prevent the material from puckering. To produce beautiful buttonholes, embroidering or darning threads are ideall[…]
-
Страница 39
2:13 G Utility stitches and practical sewing The machine sews the front bartack and left row À rst, then the back bartack and right row. Sew slowly and stop the machine when a buttonhole is completed. Raise the foot and remove the fabric. Cut both needle and bobbin threads leaving about 10 cm (4″) thread ends. Pull the needle thread to wrong […]
-
Страница 40
2:14 A C B Utility stitches and practical sewing Buttonhole with gimp thread To sew strong durable buttonholes, on heavy fabrics, knits or sportswear, using a gimp thread is recommended. On knits the gimp thread is important to prevent the buttonhole from stretching. With the buttonhole foot raised, hook the gimp thread on the spur (A) at the back […]
-
Страница 41
2:15 Utility stitches and practical sewing Button sewing With zigzag stitch D you can sew on two- and four-hole buttons. Note : Lower the feed dog when sewing on buttons. Adjust the stitch width to match it with the span of the holes in the button. Turn the handwheel to check if the needle enters into each hole in the button. Lower the foot to hold[…]
-
Страница 42
2:16 B A Utility stitches and practical sewing B 5 1.5-4 3-6 E Sewing on zippers There are various methods of sewing on zippers. For skirts, we recommend the fully concealed zipper, for men’s and ladies’ trousers the semi concealed zipper. Various zippers are available. We recommend using a metal zipper for strong fabrics such as denim. For all[…]
-
Страница 43
2:17 Utility stitches and practical sewing Fully concealed, sew-in zipper • Insert the zipper foot on the right side (A) to sew on the left side of the zipper. • Baste in the zipper and lay it underneath the presser foot so that the teeth of the zipper run alongside the foot. • Stitch in half of the zipper, leave the needle in the fabric, rai[…]
-
Страница 44
2:18 Utility stitches and practical sewing Darning with the elastic stitch Darning with the elastic stitch is suitable for repairing damaged areas. • Sew over the damaged area in rows until it is well covered. Make sure that the rows overlap. Sewing on patches To cover large holes it is necessary to sew a new piece of fabric onto the damaged area[…]
-
Страница 45
3. Maintenance and trouble-shooting[…]
-
Страница 46
3:2 A B C D A E E Maintenance and trouble-shooting Cleaning: Turn off the main switch It is very important to clean your sewing machine, because it will reward you with a longer service life. The more often you use the machine, the more care it needs. Do not dismantle the machine other than as explained in this section. Clean the outside of the mac[…]
-
Страница 47
3:3 Maintenance and trouble-shooting Changing the light bulb Turn off the main switch • Disconnect the main plug and the foot control plug from the machine. • If you have used the machine, wait for the lamp to cool before touching it. Removal • Remove the cap and screw. Remove the face plate. • Push and turn the bulb counterclockwise, seen […]
-
Страница 48
3:4 Maintenance and trouble-shooting T rouble-shooting The needle thread break s. The needle thread is not threaded properly. Page 1:9 The needle thread tension is too tight. Page 1:16 The needle is bent or blunt. Page 1:5 The needle is incorrectly inserted. Page 1:5 The needle thread and the bobbin thread are not set under the presser foot when st[…]
-
Страница 49
3:5 Maintenance and trouble-shooting The cloth is not fed smoothly The feed dog is packed with lint. Page 3:2 The stitches are too À ne. Page 1:13 The feed dog is not raised after ”drop feed” sewing. Page 1:3 Loops on the seams The needle thread tension is too loose. Page 1:16 The machine does not sew or run The machine is not plugged in. Page[…]
-
Страница 50
3:6 Maintenance and trouble-shooting F Foot preassure dial 1:3 Free arm sewing 2:4 H Honeycomb stitch 2:9 I Inserting the bobbin 1:8 M Manual buttonhole 2:14 N Needle threader 1:10 O Open overlock stitch 2:10 Optional accessories V P Presser foot lifter 1:4 Presser foot holder — remove and attach 1:5 R Repairing tears 2:18 Reverse sewing 1:15 Index[…]
-
Страница 51
3:7 Maintenance and trouble-shooting S Seam guides on the needle plate 2:5 Sewing chart — explanation 2:6 Sewing on patches 2:18 Sewing on zippers 2:16 Special accessories V Straight stitch 2:7 Stretch stitch balance — adjust 1:14 Stretch triple straight stitch 2:8 Standard accessories IV Stitch length dial 1:13 Stitch selection 1:13 Stitch table V[…]
-
Страница 52
T echnical data Dimensions (w x h x d) 385 x 280 x 170 Weight 8 kg Nominal voltage (Europe) 230 V Nominal voltage (USA/Canada) 120 V Nominal voltage (Australia) 240 V Power consumption 75 W Sewing lamp 15 W Sewing speed Max 800 stitches/minute Stitching width 0…5 mm Stitching length 0…4 mm Presser foot lift 6 mm Max. presser foot height 13 mm N[…]
-
Страница 53
[…]
-
Страница 54
[…]
-
Страница 55
We reserve the right to change the machine equipment and the ass ort ment of accessories without prior notice, or make modi À cations to the performance or design. Such modi À cations, however, will always be to the bene À t of the user and the product. Intellectual Property PFAFF and HOBBY are trademarks of KSIN Luxembourg II, S.ar.l. All trade[…]
-
Страница 56
VSM Group AB • SE-561 84 Huskv arna • S WEDEN www .pfaff.com 412 90 10 — 26H • English • Inhouse • © 2009 KSIN Lux embourg II, S.ar .l. • All rights reserved • Printed in Sweden on environmentally-friendly paper[…]
Содержание:
- Размеры
- Операции
- Комплектация
- Надежность
- Удобство использования
- Прошиваемость материалов
- Шум
Размеры

Операции
Количество операции швейной машины Pfaff Hobby 1142 — 24 шт. Но видов строчек меньше — всего 23 шт.

Универсальный сектор
- A. Петля автомат
- B/C. Прямая строчка
- C/D. Зигзаг
- E. Пунктирный зиг-заг
- F. Потайная эластичная строчка
- G/H. Потайная строчка
- J. Эластичная шаговая строчка
- M/N/O/P. Декоративно-отделочные строчки
Эластичный сектор S.S.
- B/C. Эластичная тройная прямая строчка
- D. Усиленный зигзаг
- E. Строчка соты
- F/G/H/J Оверлочная строчка
- M/N/O/P. Декоративно-отделочные строчки
Pfaff Hobby 1142 имеет все возможные регуляторы и настройки в данном классе швейных машин.
Регулируется
- длина стежка
- ширина строчки
- натяжение нити
- давление лапки на ткань
Единственным ограничением будет ширина строчки 5 мм, вместо желаемых 7 мм. Этот факт говорит о том, что петлю, хотя она и выполняется за один прием (автоматически), нет возможности отрегулировать по ширине!
За то есть авто-сброс для петли (на регуляторе операций «загнутая по полам стрелочка»).
Комплектация
В стандартную комплектацию входят все самые необходимые лапки и аксессуары, которые могут понадобится на первое время.
В стандартную комплектацию входят
- Лапка универсальная (установлена изначально)
- Лапка для декоративных строчек
- Лапка оверлочная
- Лапка для вшивания молнии
- Лапка для потайной строчки
- Лапка для выметывания петли
- Направитель для параллельных строчек
- Катушкодержатель большой
- Катушкодержатель маленький
- Фетровая прокладка 2 шт
- Щеточка для чистки
- Вспариватель
- Стержень для второй катушки
- Отвертка
- Шпульки 4 шт
- Набор игл универсальных 5 шт
- Чехол жесткий пластик
- Педаль
- Инструкция на русском языке
Для плотных тканей рекомендую приобрести иглы для джинса и кожи, а для эластичных — иглы стрейч или джерси.
Сейчас достаточно много производителей игл, но я отдаю предпочтение Organ и Schmetz.
Если будет необходимость работать с эластичными тканями, то лапка для трикотажа или верхний транспортер будет просто необходим.
Комплектация может отличаться в зависимости от поставок
Надежность
Стоимость и заявленный премиум класс бренда PFAFF обязывают модель hobby 1142 иметь металлический каркас, держатель лапки(адаптер) и пластиковый корпус, который превосходно изолирует нас от шума и тока.

Надежность конструкции челнока то же не вызывает подозрений. Он усилен металлическим кольцом и прочно закреплен на каркасе.

Но при внимательном осмотре можно обнаружить маленькие дефекты сборки.
Не все детали соединены ровно и встык. Зазор в 1 миллиметр был замечен возле намотки шпульки.

Возле челнока опять корпус дышит сквозь прорезь.

Может быть по этому челночная пластина то же отказалась лежать «по швам»?

А вот этот волнообразный стык на рабочей зоне мне напомнил отдых, пляж и серфинг.

Очень хотелось бы думать, что временные ошибки на производстве, которые привели к снижению качества сборки и ровности материалов корпуса испытуемой модели, были исправлены вовремя.
Нам на тест была предоставлена абсолютно новая швейная машина, упаковка не была нарушена и до обзора не вскрывалась!
Металлический каркас и мощный мотор 75 Вт утяжеляют машинку до 7,2 кг. Даже педаль швейной машины тяжелая и выглядит внушительно.

Удобство использования
Начнем описание всех удобств с регулятора давления лапки на ткань. Регулятор 3-х ступенчатый.
Диапазон давления достаточно большой, но в большей степени рассчитан на ослабление давления прижима.

На корпусе слева выступает нож для обрезки нити. Есть нитевдеватель, который заправляет нить в ручном режиме.
Нить попадает в ушко иголки после того, как пользователь накинет нить на 2 крючка нитевдевателя. Освещение рабочей зоны стандартное — лампа накаливания (двухконтактная), мощность 15 Вт. В комплектацию Pfaff Hobby 1142 входит дополнительный катушкодержатель (вертикальный). Он устанавливается в паре с основным горизонтальный катушкодержателем для шитья двойной иглой.

С обратной стороны швейной машины есть рычаг отключения нижнего транспортера, опускающий нижний транспортер ткани ниже уровня челночной пластины.
Отключение подачи ткани используется для выполнения штопки, вышивки и и т.п. операций.

Поразительно удобный футляр для аксессуаров расширяет рабочую зону до 18 см!
Откидная крышка футляра для аксессуаров позволяет помещать дополнительные принадлежности без снятия самого футляра.

Мало кто заглядывает под швейную машину. В данной конструкции мы видим, что половина швейной машины, а точнее рабочая часть, не на что не опирается.
Нажав на левую верхнюю точку машины, можно убедиться на сколько она не устойчивая. Но замечу, что на обычном шитье это не заметно из-за смещенного вправо центра тяжести.

Жесткий чехол лаконичен и плотно прилегает к корпусу машины, что экономит место для хранения.

Прошиваемость материалов
Классическая зубчатая рейка из 4 сегментов используется для современных машин с горизонтальным челноком позволяет без труда справляться со всеми видами ткани.

Видео обзор прошиваемости Pfaff Hobby 1142
Результаты проверки
- Органза в 2 сложения — Хорошо
- Джинс в 4 сложения — Хорошо
- Кожа 2 мм— Хорошо
- Трикотаж — Отлично
- Ремень 3-х слойный — Отлично


Проверка производилась на лапке универсальной и без дополнительных материалов и приспособлений.
Шум
Видимо, за счет увеличения рабочей поверхности появилось больше свободного пространства внутри швейной машины, что позволило корпусу резонировать с большей силой на нашем тесте. Результат все же не плохой — 73 Дба.
Измерения проводились в домашних условиях. Швейная машина располагалось на деревянном столе. Шумомер MS 6708 установлен на расстоянии 40 см от швейной машины. Погрешность шумомера ± 1,5 ДбА. Наше измерение не следует сравнивать с таблицами усредненный значений, т.к. измерения производилось исключительно по нашим ТУ.
8.7
Итоговая экспертная оценка
Эксперт не сотрудничает с рекламодателями и выставляет оценку, основываясь только на собственном мнении, ценовой категории и действует исключительно в интересах посетителей сайта Швейный Советник.