
Вес:
7 кг
Корпус:
пластик
Нитевдеватель:
отсутствует
Виды петель:
бельевая
Виды швейных строчек:
оверлочная, прямая, прямая строчка со смещением влево, потайная подшивка низа
Выполнение петель:
полуавтоматически
Кол-во выполняемых петель:
1
Количество операций:
19
Линейка на корпусе:
отсутствует
Максимальная высота подъема лапки:
12 мм
Максимальная длина стежка:
4 мм
Максимальная скорость шитья:
400 ст/мин
Максимальная ширина стежка:
5 мм
Нижний транспортер:
4
Освещение рабочей поверхности:
лампа накаливания
Потребляемая мощность:
80 Вт
Регулировка давления лапки на ткань:
есть
Тип машины:
электромеханическая
Тип смазки :
силиконовая
Тип челнока:
горизонтальный ротационный
Устройство обрезки нити:
ручное
Прошиваемые материалы:
легкие средние
Характеристики
Автоматическая намотка шпульки
есть
Вес:
6.3 кг
Виды петель:
бельевая
Виды швейных строчек:
оверлочная, прямая, прямая строчка со смещением влево, потайная подшивка низа
Выполнение петель:
полуавтоматически
Год выпуска модели:
2013
Кол-во выполняемых петель:
1
Количество операций:
19
Корпус:
пластик
Линейка на корпусе:
отсутствует
Максимальная высота подъема лапки:
11 мм
Максимальная длина стежка:
4 мм
Максимальная скорость шитья:
400 ст/мин
Максимальная ширина стежка:
5 мм
Нижний транспортер:
4
Нитевдеватель:
отсутствует
Освещение рабочей поверхности:
лампа накаливания
Позиционирование иглы
отсутствует
Поле шитья:
стандартное
Потребляемая мощность:
60 Вт
Регулировка баланса петли:
отсутствует
Регулировка давления лапки на ткань:
есть
Регулировка скорости на корпусе
отсутствует
Стандарт игл:
Съемная рукавная платформа:
есть
Тип машины:
электромеханическая
Тип смазки :
силиконовая
Тип челнока:
горизонтальный ротационный
Точечная закрепка
отсутствует
Устройство обрезки нити:
ручное
Функция штопки
есть
Шитье двойной иглой:
есть
Ergo-мотор
отсутствует
Прошиваемые материалы:
легкие, средние
-
Страница 1
hobb y 1 1 32,1 1 22 Owner´s manual[…]
-
Страница 2
23 23 23 23 22 22 2 25 25 25 25 25 5 26 26 26 26 2 2 1 1 4 4 4 4 4 4 4 4 8 8 8 8 9 9 10 10 10 10 10 0 12 12 12 12 12 1 13 13 13 13 3 13 17 17 17 17 17 7 7 20 20 20 20 20 20 14 14 14 14 14 1 1 2 2 19 19 19 19 9 9 3 3 7 7 7 7 7 7 7 15 15 15 15 15 5 1 5 16 16 16 16 24 24 24 24 24 24 4 21 21 21 6 6 6 6 6 6 6 6 5 5 5 5 5 5 5 5 18 18 18 18 8 11 11 11 11 […]
-
Страница 3
9 9 9 10 10 10 0 10 12 12 12 12 12 1 13 13 13 13 13 13 16 16 16 6 6 1 16 6 6 1 1 1 1 6 6 6 6 16 16 6 1 14 14 14 14 14 14 1 1 15 15 15 15 15 15 5 1 1 1 1 1 4 4 4 4 4 4 4 4 2 2 3 3 7 7 7 7 7 7 7 7 6 6 6 6 6 6 6 6 5 5 5 5 5 5 5 5 23 23 3 23 22 22 25 25 25 25 25 5 20 20 20 20 20 20 2 24 24 24 4 4 2 2 21 21 21 17 17 1 17 7 1 19 19 19 19 19 9 18 18 18 18[…]
-
Страница 4
Congr atulations on purchasing your new PF AFF® hobb y ! Your hobby is so easy to use and offers a whole range of features and accessories for you to explore. Please spend some time reading these operating instructions as it is a great way to learn the machine and also to make full use of the features. Your Pfaff dealer will be at your service wit[…]
-
Страница 5
This houshold sewing machine is designed to comply with IEC/EN 60335-2-28 and UL1594 IMPORT ANT SAFETY INS TRUCTIONS When using an electrical appliance, basic safety precautions should always be followed, including the following: Read all instructions before using this household sewing machine. D ANGER — T o reduce the risk of electric shock: • A[…]
-
Страница 6
II Introduction T ABLE OF CONTENTS Introduction Standard accessories IV Optional accessories V Accessory tray V Stitch table VI 1. Oper ate your hobby 1132/ 1122 Carrying handle, carrying case 1:2 Connecting the foot control 1:2 Foot preassure dial 1:3 Dropping the feed dog 1:3 Presser foot lifter 1:4 Changing the presser foot 1:4 Removing and atta[…]
-
Страница 7
III Introduction 3. Maintenance and trouble-shooting Cleaning 3:2 Changing the light bulb 3:3 Trouble-shooting 3:4 Index 3:6 Technical data 3:8[…]
-
Страница 8
IV 2 5 4 3 1 Introduction Standard accessories 1 Standard presser foot A Part No. 820 546-096 2 Buttonhole foot B (only at 1132) Part No. 820 547-096 3 Zipper foot E Part No. 820 549-096 4 Blindhem foot G Part No. 820 550-096 5 Sliding buttonhole foot J Part No. 820 553-096[…]
-
Страница 9
V 10 6 11 12 13 14 9 78 Introduction Accessory tray Your sewing machine has a removable accessory tray which is also used as an extended work support. The enclosed accessories are numbered. 6-7 Spool cap Part No. 4160424-01 8 Cushion felt Part No. 4160234-01 9 Brush Part No. 4160409-01 10 Seam ripper Part No. 4160304-01 Optional accessories — avail[…]
-
Страница 10
VI Introduction Stitch table hobby 1132 1132/1122 Description A Buttonhole Standard buttonhole for blouses or bed linens B Straight stitch, needle position middle For all straight stitching and topstitching work up to 4 mm C Straight stitch, needle position left For all sewing and topstitching work requiring a left needle position D Zigzag stitch F[…]
-
Страница 11
1. Oper ate your hobby 1132/1122[…]
-
Страница 12
1:2 A B Operate your hobby 1132/1122 Connecting the foot control Before connecting to the power supply, make sure the voltage shown on the machine conforms to your electrical power . Connect the plug of the foot control to the connecting socket (A) of the sewing machine and to the wall socket. The sewing speed is regulated by pressing the foot cont[…]
-
Страница 13
1:3 C DE Operate your hobby 1132/1122 Dropping the feed dog For certain sewing work, e.g. darning the feed dog has to be dropped. The slide for lowering the feed dog is located underneath the free-arm bed on the backside of the machine. To drop the feed dog, push the slide in the direction of the arrow, as shown in the picture (D). To raise the fee[…]
-
Страница 14
1:4 B C A D Operate your hobby 1132/1122 Presser foot lifter The presser foot is raised or lowered with the presser foot lifter. You can raise the foot about 1/4″ (6 mm) higher than the normal up position for easy removal of the presser foot, or to help you place heavy fabric under the foot. A Lowered position B Normal up position C Extra lift[…]
-
Страница 15
1:5 E F Operate your hobby 1132/1122 Removing and attaching the foot holder Turn off the main switch. To remove the foot holder Remove the thumbscrew (E) by turning it counterclockwise with a screwdriver and remove the foot holder. To attach the foot holder Match the hole in the foot holder with the threaded hole in the presser bar. Fit the thumbsc[…]
-
Страница 16
1:6 A B C Operate your hobby 1132/1122 Bobbin winding Preparing the machine for bobbin winding Pull out the handwheel to disengage the clutch. Setting the spool Place a spool of thread on the spool pin with the thread coming off the spool as shown in the picture. Press the large spool cap (A) À rmly against the spool of thread. For a small spool, […]
-
Страница 17
1:7 D E Operate your hobby 1132/1122 Thread through the hole in the bobbin (D) from the inside to the outside as shown in the picture. Place the bobbin on the bobbin winder spindle with the free end of the thread at the top. Push the bobbin to the right. Note : The bobbin can only be wound when it is moved fully to the right. Do not move the bobbin[…]
-
Страница 18
1:8 A B D E C Operate your hobby 1132/1122 Inserting the bobbin Turn off the main switch. Place the bobbin in the bobbin holder with the thread running off as shown in the picture. Pull the thread into the front notch (A) on the front side of the bobbin holder. Pull the thread to the left, sliding it between the tension spring blades. Continue to p[…]
-
Страница 19
1:9 G H F I F Operate your hobby 1132/1122 Threading the machine Turn off the main switch. Raise the presser foot and turn the handwheel towards you until the take-up lever (F) is in it’s highest position. Pull the thread from the spool and pass it under the thread guide (G). Then pull it down along the right threading slot. Pull the thread up[…]
-
Страница 20
1:10 C E D Operate your hobby 1132/1122 Threading the twin needle Turn off the main switch Insert the twin needle. Insert the extra spool pin into its hole (C). Place a piece of felt and a spool on the extra spool pin. The threading path is the same as single needle threading. Slide one of the threads through the needle bar thread guide (D) on the […]
-
Страница 21
1:11 A B Operate your hobby 1132/1122 Bringing up the bobbin thread Turn off the main switch. Raise the presser foot. Hold the needle thread and turn the handwheel towards you until the needle is at the top again and the bobbin thread has formed a loop. Pull 10 cm (4”) of both threads back and under the presser foot. Bring the bobbin thread (B) u[…]
-
Страница 22
1:12 C D E F 0 1 2 3 4 Operate your hobby 1132/1122 Stitch length dial With the stitch length dial(E) you can adjust the stitch length to the required length, between 0 and 4 mm, by turning the dial to the setting mark (F). The higher the number, the longer the stitch The buttonhole marking shows the adjustment range when sewing the buttonhole. The[…]
-
Страница 23
1:13 A B 5 4 3 2 1 0 Operate your hobby 1132/1122 Adjusting stretch stitch balance (only at 1132) If the stretch stitches are uneven when you sew on a particular fabric, correct them by turning the stitch length dial. Balancing stitches: If the stitches are drawn out, correct them by turning the dial in the “–” direction. If the stitches are […]
-
Страница 24
1:14 V ariable needle position (only at 1132) The needle drop position of the straight stitches can be moved between the center (5) and left (0) with the stitch width dial. Note: Do not turn the stitch width dial while the needle is in the fabric, otherwise the needle may bend or break Operate your hobby 1132/1122 Reverse sewing Push the reverse st[…]
-
Страница 25
1:15 Operate your hobby 1132/1122 Balancing needle thread tension The thread tension should be adjusted depending on the sewing materials, layers of fabric and sewing method. To ensure perfect sewing results, the needle thread tensions must be perfectly tuned. Balanced tension: The ideal straight stitch has threads locked between two layers of fabr[…]
-
Страница 26
1:16 Operate your hobby 1132/1122[…]
-
Страница 27
2. Utility stitches and pr actical sewing[…]
-
Страница 28
2:2 Utility stitches and practical sewing Basic sewing Starting to sew Raise the presser foot and place the fabric under the foot. Lower the needle into the fabric. Lower the presser foot and smooth the threads toward the back. Depress the foot control. Gently guide the fabric along the seam guide letting the fabric feed by itself. Note : Pull the […]
-
Страница 29
2:3 Utility stitches and practical sewing Finishing sewing Press the reverse stitch lever and sew several stitches in reverse at the end of the seam. Raise the presser foot and remove the fabric, pulling the threads to the back. Pull the threads up and into the thread cutter. The threads are cut the proper length for starting the next seam.[…]
-
Страница 30
2:4 B A Utility stitches and practical sewing Free arm sewing For stitching sleeves, waistbands, pant legs or any other tubular garments. In order to sew with the free arm, you must remove the accessory tray. Hook your À ngers on the bottom left of the accessory tray and pull it to the left. When replacing the accessory tray to its proper position[…]
-
Страница 31
2:5 C Utility stitches and practical sewing Seam guides on the needle plate The seam guides on the needle plate help you to measure seam allowance. The numbers indicate the distance between the center needle position and the seam guide. Turning a square corner When the fabric edge facing you lines up with the cornering guide (C) as shown in the pic[…]
-
Страница 32
2:6 Utility stitches and practical sewing Explanation of the sewing chart The following charts show the recommended settings for each stitch or technique. These charts also provide you with further instructions that are necessary when sewing the selected stitches. The choice of the sewing foot, the setting of the needle thread tension and recomende[…]
-
Страница 33
2:7 Utility stitches and practical sewing Straight stitch Straight stitch B/C is the basic straight stitch. The stitch length can be increased up to 4 mm. It is easier to do some sewing jobs by changing the needle position, e.g. top- stitching a collar or sewing in a zipper. The needle position is determined by the stitch width dial. (5 is center, […]
-
Страница 34
2:8 Utility stitches and practical sewing Stretch triple str aight stitch (only at 1132) This stitch is used for sewing all seams where great strength is needed, e.g. inside trouser seams, crotch and armhole seams. The stitch is sewn with two stitches forward and one stitch backward, forming a seam that does not rip easily. Also use it when constru[…]
-
Страница 35
2:9 Utility stitches and practical sewing T ricot stitch (T riple zigzag stitch) This stitch is used to À nish the seam allowance on synthetics and other fabrics that tend to pucker. Place the fabric to leave a 1.6 cm (5/8″) seam allowance. Trim the extra allowance after sewing. It is also used for mending tears. Elastic stitch Because of its[…]
-
Страница 36
2:10 Utility stitches and practical sewing What is an overlock stitch? For elastic materials and knits, the hobby 1132 offers an overlock stitch which sews two fabric layers together and overcasts simultaneously. It is more elastic than normal seams, very durable and quickly sewn. Open overlock stitch (only at 1132) With this stitch, thicker materi[…]
-
Страница 37
2:11 Utility stitches and practical sewing Blindhem stitch (elastic) Stitch F is a blindhem stitch for woven or elastic materials. The hem is sewn and overcast at the same time. Stitch G Stitch F Blindhem Blindhem foot G is best suited for invisible hems; sewing by hand is no longer necessary. Note : On heavy weight fabrics that ravel, the raw edge[…]
-
Страница 38
2:12 A B C D E F G A1 A4/2 A3 A4/2 Utility stitches and practical sewing Buttonholes Note : Make a test buttonhole on a sample duplicating the fabric, stabilizer and seams of the actual garment to check the settings. Use a stabilizer on stretch fabrics. Turn the handwheel toward you to raise the needle to its highest position. Carefully mark the le[…]
-
Страница 39
2:13 I H Utility stitches and practical sewing Buttonhole with a gimp thread With the buttonhole foot raised, hook the cord on the cord spur (H) at the back of the buttonhole foot. Bring the ends toward you under the buttonhole foot until they clear the front end. Hook the À ller cord into the forks (I) on the front of foot to hold them tight. Low[…]
-
Страница 40
2:14 A E D C B A1 A4/2 A3 A4/2 Utility stitches and practical sewing Sew 5 stitches. Stop sewing at a right stitch (C). Set the stitch selector dial at (A3). Sew until you reach the back marking of the buttonhole (D). Stop sewing at a right stitch. Set the stitch selector dial at (A4/2). Sew a few bartacks (E) and raise the needle from the fabric. […]
-
Страница 41
2:15 Utility stitches and practical sewing Button sewing With zigzag stitch D you can sew on two- and four-hole buttons. Note : Lower the feed dog when sewing on buttons. Adjust the stitch width to match it with the span of the holes in the button. Turn the handwheel to check if the needle enters into each hole in the button. Lower the foot to hold[…]
-
Страница 42
2:16 B A Utility stitches and practical sewing B 5 1.5-4 3-6 E Sewing on zippers There are various methods of sewing on zippers. For skirts, we recommend the fully concealed zipper, for men’s and ladies’ trousers the semi concealed zipper. Various zippers are available. We recommend using a metal zipper for strong fabrics such as denim. For all[…]
-
Страница 43
2:17 Utility stitches and practical sewing Fully concealed, sew-in zipper • Insert the zipper foot on the right side (A) to sew on the left side of the zipper. • Baste in the zipper and lay it underneath the presser foot so that the teeth of the zipper run alongside the foot. • Stitch in half of the zipper, leave the needle in the fabric, rai[…]
-
Страница 44
2:18 Utility stitches and practical sewing Darning with the elastic stitch Darning with the elastic stitch is suitable for repairing damaged areas. • Sew over the damaged area in rows until it is well covered. Make sure that the rows overlap. Sewing on patches To cover large holes it is necessary to sew a new piece of fabric onto the damaged area[…]
-
Страница 45
3. Maintenance and trouble-shooting[…]
-
Страница 46
3:2 A B C D A E E Maintenance and trouble-shooting Cleaning: Turn off the main switch It is very important to clean your sewing machine, because it will reward you with a longer service life. The more often you use the machine, the more care it needs. Do not dismantle the machine other than as explained in this section. Clean the outside of the mac[…]
-
Страница 47
3:3 Maintenance and trouble-shooting Changing the light bulb Turn off the main switch • Disconnect the main plug and the foot control plug from the machine. • If you have used the machine, wait for the lamp to cool before touching it. Removal • Remove the cap and screw. Remove the face plate. • Push and turn the bulb counterclockwise, seen […]
-
Страница 48
3:4 Maintenance and trouble-shooting T rouble-shooting The needle thread break s. The needle thread is not threaded properly. Page 1:9 The needle thread tension is too tight. Page 1:15 The needle is bent or blunt. Page 1:5 The needle is incorrectly inserted. Page 1:5 The needle thread and the bobbin thread are not set under the presser foot when st[…]
-
Страница 49
3:5 Maintenance and trouble-shooting The cloth is not fed smoothly The feed dog is packed with lint. Page 3:2 The stitches are too À ne. Page 1:12 The feed dog is not raised after ”drop feed” sewing. Page 1:3 Loops on the seams The needle thread tension is too loose. Page 1:15 The machine does not sew or run The machine is not plugged in. Page[…]
-
Страница 50
3:6 Maintenance and trouble-shooting E Extra spool pin 1:7 F Foot preassure dial 1:3 Free arm sewing 2:4 H Honeycomb stitch 2:9 I Inserting the bobbin 1:8 O Open overlock stitch 2:10 Optional accessories V P Presser foot lifter 1:4 Presser foot holder — remove and attach 1:5 R Repairing tears 2:18 Reverse sewing 1:14 S Seam guides on the needle pla[…]
-
Страница 51
3:7 Maintenance and trouble-shooting Sewing on patches 2:18 Sewing on zippers 2:16 Special accessories V Straight stitch 2:7 Stretch stitch balance — adjust 1:13 Stretch triple straight stitch 2:8 Standard accessories IV Stitch length dial 1:12 Stitch selection 1:12 Stitch table VI Stitch width dial 1:13 T Thread tension 1:15 Threading for twin nee[…]
-
Страница 52
T echnical data Dimensions (w x h x d) 385 x 280 x 170 Weight 8 kg Nominal voltage (Europe) 230 V Nominal voltage (USA/Canada) 120 V Nominal voltage (Australia) 240 V Power consumption 75 W Sewing lamp 15 W Sewing speed Max 800 stitches/minute Stitching width 0…5 mm Stitching length 0…4 mm Presser foot lift 6 mm Max. presser foot height 13 mm N[…]
-
Страница 53
[…]
-
Страница 54
[…]
-
Страница 55
We reserve the right to change the machine equipment and the ass ort ment of accessories without prior notice, or make modi À cations to the performance or design. Such modi À cations, however, will always be to the bene À t of the user and the product. Intellectual property PFAFF and HOBBY are trademarks of KSIN Luxembourg II, S.ar.l. All trade[…]
-
Страница 56
VSM Group AB • SE-561 84 Huskv arna • SWEDEN www .pfaff.com 412 90 09 — 26I • English • Inhouse • © 2009 KSIN Lux embourg II, S.ar .l. • All rights reserved • Printed in Sweden on environmentally-friendly paper[…]
Производитель: Pfaff
Электромеханическая швейная машина Пфафф Хобби 1132
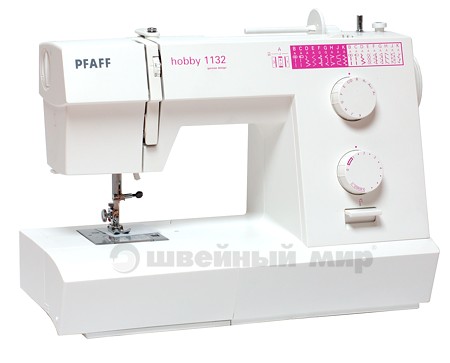
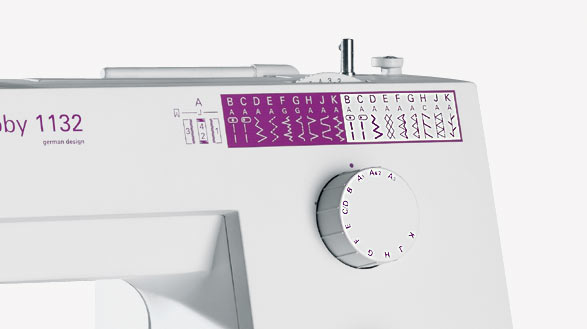
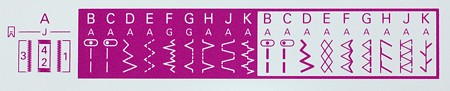
Все строчки отображаются на передней панели машины с рекомендациями по выбору нужной лапки.
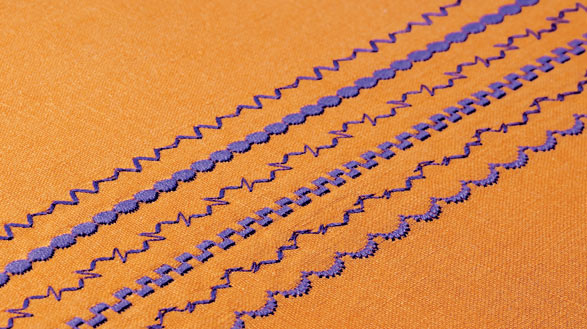
Набор из 19 швов, включая декоративные строчки, позволяет достичь прекрасных эффектов.
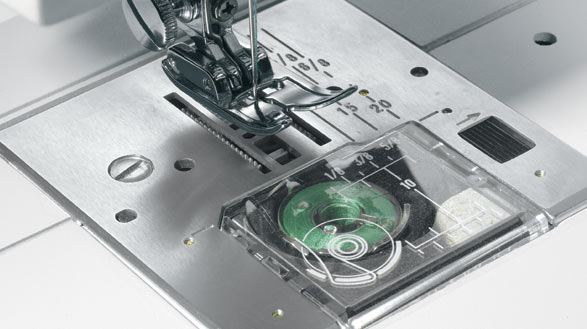
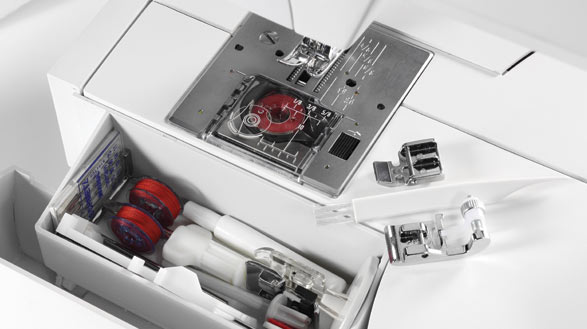
Специальная маркировка облегчает заправку нити и намотку на шпульку! Нижняя нить вытягивается наверх автоматически!
В комплект к машине входят: лапка зигзаг, лапка для невидимого шва, лапка для петли, шпульки, иглы и т.п.
Необходимость периодической смазки машины отсутствует. Вы можете шить, не опасаясь загрязнения ткани.
Описание Pfaff Hobby 1132 на сайте производителя (eng)
Характеристики Pfaff Hobby 1132:
- Диапазон прошиваемых материалов
- Очень легкие – 4
Легкие – 5
Средние и умеренно тяжелые – 5
Тяжелые – 4
Трикотаж – 3 - Тип челнока
- горизонтальный вращающийся челнок
- Максимальная ширина строчки
- 5 мм
- Максимальная длина стежка
- 4 мм
- Количество строчек
- 16
- Режим вымётывания петли
- Полуавтоматическое выметывание бельевой петли за 4 переключения без поворота ткани.
- Верхний транспортёр
- нет
- Электронный стабилизатор усилия прокола
- нет
- Регулятор (ограничитель) максимальной скорости
- нет
- Программируемая остановка иглы в верхнем/нижнем положении
- нет
- Нитевдеватель
- нет
- Горизонтальное расположение катушки
- есть
- Регулятор давления лапки
- есть
- Потребляемая мощность
- 75 Вт
- Тип освещения
- Лампа накаливания 220v 15w
- Автостоп при намотке нитки на шпульку
- есть
- Чехол
- Жесткий
- Стандарт игл
- 130/705H
- Гарантия
- 3 года
Строчки Pfaff Hobby 1132:
Комплектация
- Лапка стандартная
- Лапка для декоративных строчек
- Лапка для невидимой подгибки
- Лапка для вшивания молнии
- Лапка для выметывания петли
- Вспарыватель
- Набор игл
- Стержень для второй катушки
- Фетровая прокладка и пластинки для катушки
- Кисточка
- Отвертка
- Шпульки
Популярные аксессуары для Pfaff Hobby 1132
Наличие:
есть
Наличие:
есть
Обратите внимание!
«Швейный Мир» является официальным дистрибьютором швейных машин фирмы Pfaff. Покупая Pfaff в наших магазинах, Вы получите качественную машину обеспеченную гарантийным и сервисным обслуживанием.
Опубликуйте ваш отзыв
Отзывы о товаре могут оставлять только зарегистрированные покупатели.
Содержание
- Pfaff hobby 1132 инструкция обслуживания
- Поделится URL
- Похожие инструкции
- Поделится URL
- Похожие инструкции
- Краткое содержание очередных страниц инструкции
- Страница 1
- Страница 2
- Страница 3
- Страница 4
- Страница 5
- Страница 6
- Страница 7
- Страница 8
- Страница 9
- Страница 10
- Страница 11
- Страница 12
- Страница 13
- Страница 14
- Страница 15
- Страница 16
- Страница 17
- Страница 18
- Страница 19
- Страница 20
- Страница 21
- Страница 22
- Страница 23
- Страница 24
- Страница 25
- Страница 26
- Страница 27
- Страница 28
- Страница 29
- Страница 30
- Страница 31
- Страница 32
- Страница 33
- Страница 34
- Страница 35
- Страница 36
- Страница 37
- Страница 38
- Страница 39
- Страница 40
- Страница 41
- Страница 42
- Страница 43
- Страница 44
- Страница 45
- Страница 46
- Страница 47
- Страница 48
- Страница 49
- Страница 50
- Страница 51
- Страница 52
- Страница 53
- Страница 54
- Страница 55
- Страница 56
- Прочитайте инструкцию Pfaff hobby 1132 — избегайте проблем
- Инструкция для pfaff hobby 1132
- Швейная машина Pfaff Hobby 1132
- Pfaff Hobby 1132
- 15 800 руб.
- ДОСТАВКА ПО МОСКВЕ И САНКТ-ПЕТЕРБУРГУ
- ПОДЪЁМ ТОВАРА
- СТОИМОСТЬ ДОСТАВКИ ПО МОСКВЕ И САНКТ-ПЕТЕРБУРГУ (В ПРЕДЕЛАХ МКАД И КАД)
- ДОСТАВКА ПО МОСКОВСКОЙ ОБЛАСТИ И ЛЕНИНГРАДСКОЙ ОБЛАСТИ (ЗА МКАД И КАД)
Pfaff hobby 1132 инструкция обслуживания
Инструкция использования / обслуживания изделия hobby 1132 производителя Pfaff
- Размер файла: N/A
- Количество страниц: 56
Идти на страницу of 56 Идти
Поделится URL
Похожие инструкции
Поделится URL
Похожие инструкции
Краткое содержание очередных страниц инструкции
Страница 1
hobb y 1 1 32,1 1 22 Owner´s manual.
Страница 2
23 23 23 23 22 22 2 25 25 25 25 25 5 26 26 26 26 2 2 1 1 4 4 4 4 4 4 4 4 8 8 8 8 9 9 10 10 10 10 10 0 12 12 12 12 12 1 13 13 13 13 3 13 17 17 17 17 17 7 7 20 20 20 20 20 20 14 14 14 14 14 1 1 2 2 19 1.
Страница 3
9 9 9 10 10 10 0 10 12 12 12 12 12 1 13 13 13 13 13 13 16 16 16 6 6 1 16 6 6 1 1 1 1 6 6 6 6 16 16 6 1 14 14 14 14 14 14 1 1 15 15 15 15 15 15 5 1 1 1 1 1 4 4 4 4 4 4 4 4 2 2 3 3 7 7 7 7 7 7 7 7 6 6 6.
Страница 4
Congr atulations on purchasing your new PF AFF® hobb y ! Your hobby is so easy to use and offers a whole range of features and accessories for you to explore. Please spend some time reading these operating instructions as it is a great way to learn the machine and also to make full use of the features.
Страница 5
This houshold sewing machine is designed to comply with IEC/EN 60335-2-28 and UL1594 IMPORT ANT SAFETY INS TRUCTIONS When using an electrical appliance, basic safety precautions should always be followed, including the following: Read all instructions before using this household sewing machine.
Страница 6
II Introduction T ABLE OF CONTENTS Introduction Standard accessories IV Optional accessories V Accessory tray V Stitch table VI 1. Oper ate your hobby 1132/ 1122 Carrying handle, carrying case 1:2 Con.
Страница 7
III Introduction 3. Maintenance and trouble-shooting Cleaning 3:2 Changing the light bulb 3:3 Trouble-shooting 3:4 Index 3:6 Technical data 3:8.
Страница 8
IV 2 5 4 3 1 Introduction Standard accessories 1 Standard presser foot A Part No. 820 546-096 2 Buttonhole foot B (only at 1132) Part No. 820 547-096 3 Zipper foot E Part No. 820 549-096 4 Blindhem foot G Part No. 820 550-096 5 Sliding buttonhole foot J Part No.
Страница 9
V 10 6 11 12 13 14 9 78 Introduction Accessory tray Your sewing machine has a removable accessory tray which is also used as an extended work support. The enclosed accessories are numbered. 6-7 Spool cap Part No. 4160424-01 8 Cushion felt Part No. 4160234-01 9 Brush Part No.
Страница 10
VI Introduction Stitch table hobby 1132 1132/1122 Description A Buttonhole Standard buttonhole for blouses or bed linens B Straight stitch, needle position middle For all straight stitching and topsti.
Страница 11
1. Oper ate your hobby 1132/1122.
Страница 12
1:2 A B Operate your hobby 1132/1122 Connecting the foot control Before connecting to the power supply, make sure the voltage shown on the machine conforms to your electrical power . Connect the plug of the foot control to the connecting socket (A) of the sewing machine and to the wall socket.
Страница 13
1:3 C DE Operate your hobby 1132/1122 Dropping the feed dog For certain sewing work, e.g. darning the feed dog has to be dropped. The slide for lowering the feed dog is located underneath the free-arm bed on the backside of the machine. To drop the feed dog, push the slide in the direction of the arrow, as shown in the picture (D).
Страница 14
1:4 B C A D Operate your hobby 1132/1122 Presser foot lifter The presser foot is raised or lowered with the presser foot lifter. You can raise the foot about 1/4″ (6 mm) higher than the normal up position for easy removal of the presser foot, or to help you place heavy fabric under the foot.
Страница 15
1:5 E F Operate your hobby 1132/1122 Removing and attaching the foot holder Turn off the main switch. To remove the foot holder Remove the thumbscrew (E) by turning it counterclockwise with a screwdriver and remove the foot holder. To attach the foot holder Match the hole in the foot holder with the threaded hole in the presser bar.
Страница 16
1:6 A B C Operate your hobby 1132/1122 Bobbin winding Preparing the machine for bobbin winding Pull out the handwheel to disengage the clutch. Setting the spool Place a spool of thread on the spool pin with the thread coming off the spool as shown in the picture.
Страница 17
1:7 D E Operate your hobby 1132/1122 Thread through the hole in the bobbin (D) from the inside to the outside as shown in the picture. Place the bobbin on the bobbin winder spindle with the free end of the thread at the top. Push the bobbin to the right.
Страница 18
1:8 A B D E C Operate your hobby 1132/1122 Inserting the bobbin Turn off the main switch. Place the bobbin in the bobbin holder with the thread running off as shown in the picture. Pull the thread into the front notch (A) on the front side of the bobbin holder.
Страница 19
1:9 G H F I F Operate your hobby 1132/1122 Threading the machine Turn off the main switch. Raise the presser foot and turn the handwheel towards you until the take-up lever (F) is in it’s highest position. Pull the thread from the spool and pass it under the thread guide (G).
Страница 20
1:10 C E D Operate your hobby 1132/1122 Threading the twin needle Turn off the main switch Insert the twin needle. Insert the extra spool pin into its hole (C). Place a piece of felt and a spool on the extra spool pin. The threading path is the same as single needle threading.
Страница 21
1:11 A B Operate your hobby 1132/1122 Bringing up the bobbin thread Turn off the main switch. Raise the presser foot. Hold the needle thread and turn the handwheel towards you until the needle is at the top again and the bobbin thread has formed a loop.
Страница 22
1:12 C D E F 0 1 2 3 4 Operate your hobby 1132/1122 Stitch length dial With the stitch length dial(E) you can adjust the stitch length to the required length, between 0 and 4 mm, by turning the dial to the setting mark (F). The higher the number, the longer the stitch The buttonhole marking shows the adjustment range when sewing the buttonhole.
Страница 23
1:13 A B 5 4 3 2 1 0 Operate your hobby 1132/1122 Adjusting stretch stitch balance (only at 1132) If the stretch stitches are uneven when you sew on a particular fabric, correct them by turning the stitch length dial. Balancing stitches: If the stitches are drawn out, correct them by turning the dial in the “–” direction.
Страница 24
1:14 V ariable needle position (only at 1132) The needle drop position of the straight stitches can be moved between the center (5) and left (0) with the stitch width dial.
Страница 25
1:15 Operate your hobby 1132/1122 Balancing needle thread tension The thread tension should be adjusted depending on the sewing materials, layers of fabric and sewing method. To ensure perfect sewing results, the needle thread tensions must be perfectly tuned.
Страница 26
1:16 Operate your hobby 1132/1122.
Страница 27
2. Utility stitches and pr actical sewing.
Страница 28
2:2 Utility stitches and practical sewing Basic sewing Starting to sew Raise the presser foot and place the fabric under the foot. Lower the needle into the fabric. Lower the presser foot and smooth the threads toward the back. Depress the foot control.
Страница 29
2:3 Utility stitches and practical sewing Finishing sewing Press the reverse stitch lever and sew several stitches in reverse at the end of the seam. Raise the presser foot and remove the fabric, pulling the threads to the back. Pull the threads up and into the thread cutter.
Страница 30
2:4 B A Utility stitches and practical sewing Free arm sewing For stitching sleeves, waistbands, pant legs or any other tubular garments. In order to sew with the free arm, you must remove the accessory tray. Hook your À ngers on the bottom left of the accessory tray and pull it to the left.
Страница 31
2:5 C Utility stitches and practical sewing Seam guides on the needle plate The seam guides on the needle plate help you to measure seam allowance. The numbers indicate the distance between the center needle position and the seam guide.
Страница 32
2:6 Utility stitches and practical sewing Explanation of the sewing chart The following charts show the recommended settings for each stitch or technique. These charts also provide you with further instructions that are necessary when sewing the selected stitches.
Страница 33
2:7 Utility stitches and practical sewing Straight stitch Straight stitch B/C is the basic straight stitch. The stitch length can be increased up to 4 mm. It is easier to do some sewing jobs by changing the needle position, e.g. top- stitching a collar or sewing in a zipper.
Страница 34
2:8 Utility stitches and practical sewing Stretch triple str aight stitch (only at 1132) This stitch is used for sewing all seams where great strength is needed, e.g. inside trouser seams, crotch and armhole seams. The stitch is sewn with two stitches forward and one stitch backward, forming a seam that does not rip easily.
Страница 35
2:9 Utility stitches and practical sewing T ricot stitch (T riple zigzag stitch) This stitch is used to À nish the seam allowance on synthetics and other fabrics that tend to pucker. Place the fabric to leave a 1.6 cm (5/8″) seam allowance. Trim the extra allowance after sewing.
Страница 36
2:10 Utility stitches and practical sewing What is an overlock stitch? For elastic materials and knits, the hobby 1132 offers an overlock stitch which sews two fabric layers together and overcasts simultaneously. It is more elastic than normal seams, very durable and quickly sewn.
Страница 37
2:11 Utility stitches and practical sewing Blindhem stitch (elastic) Stitch F is a blindhem stitch for woven or elastic materials. The hem is sewn and overcast at the same time. Stitch G Stitch F Blindhem Blindhem foot G is best suited for invisible hems; sewing by hand is no longer necessary.
Страница 38
2:12 A B C D E F G A1 A4/2 A3 A4/2 Utility stitches and practical sewing Buttonholes Note : Make a test buttonhole on a sample duplicating the fabric, stabilizer and seams of the actual garment to check the settings. Use a stabilizer on stretch fabrics.
Страница 39
2:13 I H Utility stitches and practical sewing Buttonhole with a gimp thread With the buttonhole foot raised, hook the cord on the cord spur (H) at the back of the buttonhole foot. Bring the ends toward you under the buttonhole foot until they clear the front end.
Страница 40
2:14 A E D C B A1 A4/2 A3 A4/2 Utility stitches and practical sewing Sew 5 stitches. Stop sewing at a right stitch (C). Set the stitch selector dial at (A3). Sew until you reach the back marking of the buttonhole (D). Stop sewing at a right stitch. Set the stitch selector dial at (A4/2).
Страница 41
2:15 Utility stitches and practical sewing Button sewing With zigzag stitch D you can sew on two- and four-hole buttons. Note : Lower the feed dog when sewing on buttons. Adjust the stitch width to match it with the span of the holes in the button. Turn the handwheel to check if the needle enters into each hole in the button.
Страница 42
2:16 B A Utility stitches and practical sewing B 5 1.5-4 3-6 E Sewing on zippers There are various methods of sewing on zippers. For skirts, we recommend the fully concealed zipper, for men’s and ladies’ trousers the semi concealed zipper. Various zippers are available.
Страница 43
2:17 Utility stitches and practical sewing Fully concealed, sew-in zipper • Insert the zipper foot on the right side (A) to sew on the left side of the zipper. • Baste in the zipper and lay it underneath the presser foot so that the teeth of the zipper run alongside the foot.
Страница 44
2:18 Utility stitches and practical sewing Darning with the elastic stitch Darning with the elastic stitch is suitable for repairing damaged areas. • Sew over the damaged area in rows until it is well covered.
Страница 45
3. Maintenance and trouble-shooting.
Страница 46
3:2 A B C D A E E Maintenance and trouble-shooting Cleaning: Turn off the main switch It is very important to clean your sewing machine, because it will reward you with a longer service life. The more often you use the machine, the more care it needs.
Страница 47
3:3 Maintenance and trouble-shooting Changing the light bulb Turn off the main switch • Disconnect the main plug and the foot control plug from the machine. • If you have used the machine, wait for the lamp to cool before touching it. Removal • Remove the cap and screw.
Страница 48
3:4 Maintenance and trouble-shooting T rouble-shooting The needle thread break s. The needle thread is not threaded properly. Page 1:9 The needle thread tension is too tight. Page 1:15 The needle is bent or blunt. Page 1:5 The needle is incorrectly inserted.
Страница 49
3:5 Maintenance and trouble-shooting The cloth is not fed smoothly The feed dog is packed with lint. Page 3:2 The stitches are too À ne. Page 1:12 The feed dog is not raised after ”drop feed” sewing. Page 1:3 Loops on the seams The needle thread tension is too loose.
Страница 50
3:6 Maintenance and trouble-shooting E Extra spool pin 1:7 F Foot preassure dial 1:3 Free arm sewing 2:4 H Honeycomb stitch 2:9 I Inserting the bobbin 1:8 O Open overlock stitch 2:10 Optional accessor.
Страница 51
3:7 Maintenance and trouble-shooting Sewing on patches 2:18 Sewing on zippers 2:16 Special accessories V Straight stitch 2:7 Stretch stitch balance — adjust 1:13 Stretch triple straight stitch 2:8 Sta.
Страница 52
T echnical data Dimensions (w x h x d) 385 x 280 x 170 Weight 8 kg Nominal voltage (Europe) 230 V Nominal voltage (USA/Canada) 120 V Nominal voltage (Australia) 240 V Power consumption 75 W Sewing lamp 15 W Sewing speed Max 800 stitches/minute Stitching width 0.
Страница 53
Страница 54
Страница 55
We reserve the right to change the machine equipment and the ass ort ment of accessories without prior notice, or make modi À cations to the performance or design. Such modi À cations, however, will always be to the bene À t of the user and the product.
Страница 56
VSM Group AB • SE-561 84 Huskv arna • SWEDEN www .pfaff.com 412 90 09 — 26I • English • Inhouse • © 2009 KSIN Lux embourg II, S.ar .l. • All rights reserved • Printed in Sweden on envir.
Прочитайте инструкцию Pfaff hobby 1132 — избегайте проблем
Важным пунктом после покупки устройства Pfaff hobby 1132 (или даже перед его покупкой) является прочтение его инструкции обслуживания. Это необходимо сделать о нескольким простым причинам:
- чтобы знать, как правильно пользоваться устройством
- чтобы знать, как обслуживать / проводить периодический контроль правильности работы изделия Pfaff hobby 1132
- чтобы знать, как вести себя в случае аварии Pfaff hobby 1132
Если вы еще не купил Pfaff hobby 1132 то сейчас хороший момент, чтобы ознакомиться с основными данными, касающимися изделия. Сначала просмотрите первые страницы инструкции, которую вы найдете выше. Вы должны там найти самые важные технические данные Pfaff hobby 1132 — таким образом вы проверите, выполняет ли оборудование Ваши требования. Углубившись в следующие страницы инструкции пользователя Pfaff hobby 1132 вы ознакомитесь со всеми доступными функциями изделия и информацией, касающейся его эксплуатации. Информация, которую вы получите о Pfaff hobby 1132 несомненно поможет Вам принять решение, касающееся покупки.
В ситуации, если вы уже являетесь владельцем Pfaff hobby 1132, но вы еще не прочитали инструкцию, вам необходимо стелать это в связи с вышеуказанным. Тогда вы узнаете, правильно ли вы использовали доступные функции, а также не допускали ли ошибок, которые могут сократить период эксплуатации Pfaff hobby 1132.
Однако одна из самых важных ролей, которую выполняет инструкция обслуживания для пользователя, является помощь в решении проблем с Pfaff hobby 1132. Почти всегда вы найдете там Troubleshooting, самые частые поломки и неполадки устройства Pfaff hobby 1132 вместе с рекомендациями, касающимися методов их решения. Даже если вам не удастся самостоятельно решить проблему, инструкция подскажет дальнейшие шаги — контакт с центром обслуживания клиента или ближайший сервисный центр.
Источник
Инструкция для pfaff hobby 1132
Полезные ссылки любезно предоставленные пользователем sandr
РАЗМЕЩАЮ ФАЙЛЫ С ДОКУМЕНТАЦИЕЙ НА ШВЕЙНЫЕ МАШИНКИ PFAFF ДЛЯ ОБЩЕГО ПОЛЬЗОВАНИЯ.
СКАЧИВАЙТЕ, ОЧЕНЬ ПОЛЕЗНЫЙ И ВСЕОБЪЕМНЫЙ МАТЕРИАЛ ТУТ:
Эксплуатация PFAFF 1213, 1214, 1222
http://ifolder.ru/16463564
Каталог деталей и составных частей PPFAF 2010-2040 (2010, 2014, 2020,2022, 2024,2026, 2027, 2029, 2030, 2034, 2036, 2040, 2042, 2044, 2046):
http://ifolder.ru/16463544
PFAFF 2010-2040 Руководство механика:
http://ifolder.ru/16464003
PFAFF Select 1520, 1530, 1540 Service Manual (руководство механика):
http://ifolder.ru/16463777
Книга PFAFF 1010, 1011, 1014, 1015, 1019, 1025, 1027, 1029, 1035, 1037, 1047, 1067, 1069, 1071, 1118, 1119, (905-947) Руководство механика:
http://ifolder.ru/16463669
Принесли домой мальчика Прошила на нем несколько прямых строчек, подрегулировала натяжение, почитала мануал- машина очень много чего могущая, очень. По ощущениям- стОит тех денег, которые отданы, после плотного льна перешла на тонкий шелк- без напряга. И очень удобная в использовании машина, кажется, что в ней все предусмотрено- все манипуляции совершаются минимумом движений и усилий. Пока впечатления самые радужные!
Если не сложно, поделитесь впечатлениями о машине. Хочу приобрести ее в субботу и вся в сомнениях. Стоит ли менять экспрешен на перфоманс? Хорошие ли петли и декоративные широкие строчки? Буду благодарна за ответ!
Мартовский заяц, у меня не было экспрешна, к сожалению. Стояла промка, Джуки F600, нужна до зарезу была машина со встроенным верхним транспортером. Экземпляр Пфаффа попался удачный( продавщица в ШМ шепнула, чтобы брала эту машину, потому что она хорошо отлажена). Качество строчек великолепное, петли тоже, алфавитом побаловалась- очень здОрово! В общем, все, что касается дополнительных функций, на высоте. После промки я придираюсь к качеству прямой строчки, но здесь уж так — машины, которая делала бы ТАКУЮ декоративную часть, как Пфаффик, да ещё строчила бы по прямой как промка, нету. Поставила пластину для тонких тканей- вроде получше стало, но все равно желания продать промку не появилось. Но шью все на Пфаффе. Мне очень нравится его » продвинутость»- все кнопочками, наличие коленоподъемника, съёмный столик ( купила отдельно, таким криворуким ,как я, да ещё любящим шелк шить, самое то!). Машина ОЧЕНЬ удобная в использовании. Покупкой совершенно не разочарована, в шитье я не профи, но сесть за эту машинку после работы такое счастье! Постепенно подкармливаю его лапками, Хотя того, что идёт в комплекте, достаточно вполне, но у вас, наверное, эта коллекция уже собралась
Umas, огромное спасибо! Меня как раз интересовали впечатления об алфавите и декоративке. Значит надо брать!
Лапок у меня и правда уже море)).
добрый день. Хочу купить швейную машинку марки ПФАФФ но бюджет всего 20 тыс. рублей. Подскажите какую выбрать. Прочила здесь что смартер не рекомендуют, а почему? хочется петлю автомат, а по цене только хобби 1132 еще подходит, но у них петля полуавтомат. Благодарю за ответ.
Хочу купить швейную машинку марки ПФАФФ но бюджет всего 20 тыс. рублей.
Швейных машин Пфафф в бюджете 20 тыс. не бывает. Есть чужие разработки, которым фирма дописывает «для Пфафф», они не имеют никакого отношения к качеству и технологиям Пфафф, нужны чисто из маркетинговых соображений. Имя стоит дорого, поэтому и не хватает 20 тыс. на петлю-автомат с именем Пфафф на корпусе (имя весь бюджет съедает). В этом ценовом диапазоне лучшее соотношение цена-качество-функционал все таки у Джаноме. Остальные фирмы или дороже за тот же функционал, или не гарантированного качества.
flymammy, Так Хоббик 1132 и есть Джаноме-518 ,только корпус другой.
flymammy, Так Хоббик 1132 и есть Джаноме-518 ,только корпус другой.
На это я и намекала, зачем платить больше?
а что не так со смартером? не увидела разницы между хобби 1132 и смартером 160.
Про джаномы читала много, не хвалят их. Раньше, лет 5-7 назад, их машины были лучше,а сейчас типа ширпотреб. Сама я не знаю, читаю отзывы, мнение специалистов и не очень на разных форумах, в поиске подходящей машинки. А как на счет хускварны эмеральд 116? что скажете. Цена ее до 25 тыс. руб.
KovalevaES , по хускварне есть отдельная тема. И там есть отзывы о Вашей машине. А в теме пфаффа вряд ли кто ответит.
ой,верно, не туда написала. Спасибо за подсказку
. читала много, не хвалят их. Раньше, лет 5-7 назад, их машины были лучше,а сейчас типа ширпотреб.
Вы немного смысл этих фраз переиначили. Речь идет не об одной и той же модели (любой фирмы), что 5-7 лет назад она лучше собиралась, а сегодня- хуже. Здесь имеется в виду, что модели, разработанные 5-7 и более лет назад (но выпускающиеся и сегодня) более железные, надежные и долгоживущие, чем модели, которые выходят на рынок сегодня. Это в той или иной мере касается любой фирмы, не только джаноме. Поэтому на форуме и советуют не какую-то фирму целиком, а отдельные конкретные модели, которые достаточно надежны и работопригодны. Кроме того сегодня в нижнем ценовом сегменте один и тот же по сути конструктив продается разными фирмами в чуть разных корпусах за очень разные деньги. Это тоже учитывается в советах. Но продолжать эту тему лучше в теме Выбор. здесь все разговоры должны быть про Пфафф.
Источник
Швейная машина Pfaff Hobby 1132
Для того чтобы принять решение и купить швейную машину Pfaff Hobby 1132, достаточно ознакомиться с отзывами пользователей. На сегодняшний день очень трудно найти швейный агрегат, не имеющий недостатков, однако швейная машина Pfaff Hobby 1132 является исключением. Будучи электромеханической машиной, где все регулировки производятся вручную, Pfaff Hobby 1132 работает со всеми видами тканей, только необходим правильный подбор игл. Учитывая количество выполняемых операций, а их всего семнадцать: восемь рабочих, восемь эластичных строчек и одна полуавтоматическая петля, определяется бытовой приоритет пользования. Практика показывает, что функциональный набор швейной машины Pfaff Hobby 1132 вполне достаточен для пошива и ремонта одежды и соответствует цене.
Для того чтобы принять решение и купить швейную машину Pfaff Hobby 1132, достаточно ознакомиться с отзывами пользователей. На сегодняшний день очень трудно найти швейный агрегат, не имеющий недостатков, однако швейная машина Pfaff Hobby 1132 является исключением. Будучи электромеханической машиной, где все регулировки производятся вручную, Pfaff Hobby 1132 работает со всеми видами тканей, только необходим правильный подбор игл. Учитывая количество выполняемых операций, а их всего семнадцать: восемь рабочих, восемь эластичных строчек и одна полуавтоматическая петля, определяется бытовой приоритет пользования. Практика показывает, что функциональный набор швейной машины Pfaff Hobby 1132 вполне достаточен для пошива и ремонта одежды и соответствует цене.
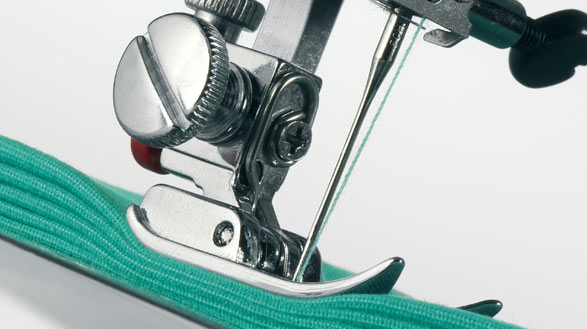
Машина снабжена кнопкой реверса, что дает возможность без особых усилий, в любой момент закрепить строчку. С целью получения качественной строчки, и предостережения смещения сложенной в несколько слоев материи, в процессе пошива тонких или толстых тканей необходим правильный прижим лапки к нижнему транспортеру, в зависимости от толщины ткани регулируется давление. Как и большинство современных швейных машин, швейная машина Pfaff Hobby 1132, также оснащена рукавной платформой. При необходимости можно воспользоваться освещением рабочей поверхности. Наличие подробной цветной иллюстрированной инструкции на русском языке, облегчит процесс шитья.
Технические характеристики швейной машины Pfaff Hobby 1132:
- Электромеханическая швейная машина.
- Тип челнока: горизонтальный вращающийся челнок
- Максимальная ширина строчки: 5 мм
- Максимальная длина стежка: 4 мм
- Количество строчек: 16
- Режим вымётывания петли: Полуавтоматическое выметывание бельевой петли за 4 переключения без поворота ткани.
- Верхний транспортёр: нет
- Электронный стабилизатор усилия прокола: нет
- Регулятор (ограничитель) максимальной скорости: нет
- Программируемая остановка иглы в верхнем/нижнем положении: нет
- Нитевдеватель: нет
- Горизонтальное расположение катушки: да
- Регулятор давления лапки: да
- Потребляемая мощность (общая/лампы): 75/15 вт
- Органайзер: нет
- Автостоп при намотке нитки на шпульку: да
- Чехол: Жесткий
- Стандарт игл: 130/705H
- Страна производитель: Тайвань
- Гарантия: 2 года
Комплектация Pfaff Hobby 1132:
Строчки Pfaff Hobby 1132:
A. Прямая строчка
C. Зигзаг
D. Трехступенчатый зигзаг. Может использоваться, например, для пришивания резинки
E. Потайная строчка для эластичных тканей. Используется для подшивания кромки изделия, например брюк, если строчка не должна быть видна.
F. Потайная строчка для обычных тканей. Используется для подшивания кромки изделия, например брюк, если строчка не должна быть видна.
G. Краеобметочный шов. Используется для декоративной обработки кромки ткани
H. Эластичная шаговая строчка. Используется для сшивания двух полотен, например лоскутной работы.
I. Фестонный шов. Для декоративной отделки и обработки края
J. Стреловидная сатиновая строчка для декоративной отделки
K. Ромбовидная сатиновая строчка для декоративной отделки
L. Декоративная строчка. Часто используется для пришивания шнура или декоративных нитей
A. Усиленная прямая строчка. Рекомендуется для шитья эластичных тканей или толстого трикотажа. Также этот стежок применяется там, где нужна крепость и надежность шва. Используйте его для усиления таких деталей как крючки и проймы, для пошива рюкзаков и т.п. Строчка шьется двумя стежками вперед и одним стежком назад, образуя шов, который нелегко порвать
C. Усиленный зигзаг. Может использоваться для сшивания тяжелых эластичных тканей и всех типов работ, для которых используется зигзаг. Его можно также использовать как декоративную строчку
D. Сотовый стежок. Может использоваться как декоративный шов или для пришивания шнура, декоративных нитей или резинки
E. Пуловерный стежок с усиленным краем. Эластичные и отделочные и краеобметочные швы на вязанных деталях, сшивание деталей
F. Декоративная строчка
G. Оверлочная строчка. Используется для одновременного сшивания и обметки края не очень склонных к осыпанию материалов
H. Закрытый оверлочный шов. Применяется при обработке тканей типа джерси, пришивании манжет и трикотажных воротничков
I. Декоративная строчка
J. Декоративная строчка
K. Декоративная строчка
L. Декоративная строчка
Доставка по Москве бесплатно, ежедневно с 9.00 утро до 00.00 ночи, в том числе в выходные и праздничные дни.
Бесплатная доставка действует при заказе от 5000р. и выше, в пределах Московской кольцевой автодороги (МКАД).
Доставка за пределы МКАД, а также в города Московской области рассчитываются по схеме 1км = 20р. в сторону Покупателя.
Доставка по городам России.
Мы осуществляем доставку по всем городам России бесплатно при помощи Транспортных компаний и Курьерских служб.
Срок зависит от отдалённости населённых пунктов.
Бесплатная доставка действует при заказе от 5000р. и выше, и только в городах присутствия представительств транспортных компаний.
С 1 июля 2017 года вступил закон о защите, хранении и использовании персональных данных клиентов! Формируя заказ на сайте или передавай Ваши данные любым другим способом Вы соглашаетесь с политикой конфиденциальности нашей компании!
Источник
Pfaff Hobby 1132
15 800 руб.
Pfaff Hobby 1132 – электромеханическая швейная машина для только начинающих познавать швейное дело.
В PFAFF Hobby 1132 включены:
- Базовые виды строчек;
- Автоматическая петля;
- Лапка для вшивания потайных молний или выполнения декоративных строчек.
Швейная машина имеет плавный ход, работа PFAFF Hobby 1132 практически бесшумная, благодаря горизонтальному расположению ротационного челнока. Также присутствует возможность отключить нижний транспортер, и подача ткани остановится.
Скорость регулируется педалью, на панели расположены все виды строчек с выбором подходящей лапки.


ДОСТАВКА ПО МОСКВЕ И САНКТ-ПЕТЕРБУРГУ
- В стандартном режиме доставка выполняется на следующий день после заказа
- Курьер свяжется с вами за 1 час до отправки
- При заказе от 3 000 рублей доставка осуществляется бесплатно
- При заказе меньше 3 000 рублей — 350 рублей
- Возможна доставка «день в день»:
при заказе до 10 000 рублей — 600 рублей
при заказе выше 10 000 рублей — бесплатно - Мы осуществим доставку в любой день недели
Доставка товаров по Москве и России осуществляется при сумме заказа не менее 1500 рублей
Возможность доставки «день в день» уточняйте по телефону:
8 (499) 653-66-18 Москва
8 (812) 407-19-95 Санкт-Петербург
ПОДЪЁМ ТОВАРА
Весом до 10 кг осуществляется бесплатно до квартиры клиента
Весом более 10 кг осуществляется платно по тарифам
СТОИМОСТЬ ДОСТАВКИ ПО МОСКВЕ И САНКТ-ПЕТЕРБУРГУ (В ПРЕДЕЛАХ МКАД И КАД)
ДОСТАВКА ПО МОСКОВСКОЙ ОБЛАСТИ И ЛЕНИНГРАДСКОЙ ОБЛАСТИ (ЗА МКАД И КАД)
Стоимость доставки за чертой города осуществляется по тарифу 30 рублей/1км от МКАД и КАД
Источник