

Operation Manual
DVD RDS AV RECEIVER
AVH-X8600BT
English
Contents
Thank you for buying this Pioneer product.
Please read through these instructions so you will know how to operate your model
properly. After you have finished r eading the instructions, keep this document in a
safe place for future reference.
Important
The screens shown in the examples may differ
from actual screens, which may be changed
without notice for performance and function
improvements.
Precaution
Important safety information 8
Handbrake interlock 9
– To ensure safe driving 9
When using a display connected to V
OUT 10
To avoid battery exhaustion 10
Rear view camera 10
Handling the SD card slot 10
Handling the USB connector 10
In case of trouble 11
Visit our website 11
About this product 11
Protecting the LCD panel and screen 11
Notes on internal memory 11
– Before removing the vehicle
battery 11
– Data subject to erasure 11
– Resetting the microprocessor 11
About this manual 12
Basic operation
Checking part names and functions 13
Remote control 13
Protecting your product against theft 13
– Removing the front panel 14
– Attaching the front panel 14
Notes on using the LCD panel 14
Adjusting the LCD panel angle 15
Inserting/ejecting/connecting media 15
– Inserting and ejecting a disc 15
2
Engb
– Inserting and ejecting an SD memory
card 15
– Connecting and disconnecting an
iPod 16
– Plugging and unplugging a USB
storage device 16
Startup and termination 16
On first-time startup 16
Regular startup 17
Turning off the display 17
How to use the screens 18
– Switching screens using the touch
panel keys 18
– Switching screens using the hardware
buttons 19
Supported AV source 19
Displaying the AV operation screen 20
– Selecting a front source on the AV
source selection screen 20
– Selecting a front source on the source
list 20
– Selecting a rear source 21
Turning off the AV source 21
Changing the display order of source
icons 21
Changing the display order of source
keys 21
Using the touch panel 21
– Using the common touch panel
keys 22
– Operating list screens 22
– Operating the time bar 22
– Operating the on-screen keyboard 22
Registering and connecting a Bluetooth
device
Preparing communication devices 23
Registering your Bluetooth devices 23
– Searching for nearby Bluetooth
devices 23

Contents
– Pairing from your Bluetooth
devices 24
– Connecting to a Bluetooth device
automatically 24
– Deleting a registered device 25
Connecting a registered Bluetooth device
manually 25
Switching visibility 26
Entering the PIN code for Bluetooth wireless
connection 26
Displaying the Bluetooth device address 26
Clearing the Bluetooth memory 26
Updating Bluetooth software 27
Displaying the Bluetooth software
version 27
Using hands-free phoning
Displaying the phone menu 28
– Touch panel keys 28
– Reading the screen 28
Making a phone call 29
– Direct dialling 29
– Calling a number in the phone
book 29
– Dialling from the history 30
– Using the preset dial lists 31
Receiving a phone call 31
– Answering an incoming call 32
Minimising the dial confirmation screen 32
Changing the phone settings 32
– Answering a call automatically 32
– Switching the ring tone 32
– Inverting names in the phone book 33
– Setting the private mode 33
– Adjusting the other party’s listening
volume 33
Using the voice recognition function (for
iPhone) 33
Notes for hands-free phoning 34
iPod / iPhone or smartphone setup
operation
The basic flow of iPod / iPhone or
smartphone setup 36
Setting the device connection method 36
iPod compatibility 36
Android™ device compatibility 37
MirrorLink device compatibility 37
Information on the connections and
functions for each device 38
Using the radio
Using the touch panel keys 40
Reading the screen 40
Starting procedure 41
Selecting a band 41
Manual tuning 41
Seek tuning 41
Selecting a preset channel from the preset
channel list 42
Storing broadcast frequencies 42
Storing the strongest broadcast
frequencies 42
Tuning into strong frequencies 42
Receiving traffic announcements 43
Using news programme interruption 44
Tuning into alternative frequencies 44
Limiting stations to regional
programming 45
Switching Auto PI seek 45
– Activating the Auto PI seek for preset
stations 45
Switching the sound quality of the FM
tuner 45
Storing song information to an iPod (iTunes
Tagging) 46
Operating with the hardware buttons 46
Playing a disc
Using the touch panel keys (for audio) 47
Engb
3

Contents
Using the touch panel keys (for video) 47
Reading the screen (for audio) 48
Reading the screen (for video) 49
Starting procedure 49
Selecting files from the file name list 50
Playing tracks in random order 50
Setting a repeat play range 50
Switching the media file type 50
Searching for the part you want to play 51
Operating the DVD menu 51
Switching the subtitle language 51
Switching the audio language 52
Frame-by-frame playback 52
Slow motion playback 52
Returning to a specified scene 52
Resuming playback (Bookmark) 52
Operating the DVD menu using touch panel
keys 52
Switching the multi-angle DVD display 53
Selecting the audio output 53
Operating with the hardware buttons 53
Playing compressed audio files
Using the touch panel keys 54
Reading the screen 55
Starting procedure (for Disc) 56
Starting procedure (for USB/SD) 56
Switching the browse mode 56
Selecting files from the file name list 57
Selecting a file from the list related to the
song currently playing (link search) 57
Playing files in random order 57
Setting a repeat play range 57
Switching the media file type 58
Operating with the hardware buttons 58
Playing compressed video files
Using the touch panel keys 59
Reading the screen 60
Starting procedure (for Disc) 60
Starting procedure (for USB/SD) 60
Selecting files from the file name list 60
Setting a repeat play range 61
Frame-by-frame playback 61
Slow motion playback 61
Switching the media file type 61
Operating with the hardware buttons 61
Playing compressed still image files
Using the touch panel keys 62
Reading the screen 62
Starting procedure 62
Selecting files from the file name list 63
Playing files in random order 63
Setting a repeat play range 63
Switching the media file type 63
Setting the slideshow interval 63
Operating with the hardware buttons 64
Using an iPod
Using the touch panel keys (for audio) 65
Using the touch panel keys (for video) 65
Reading the screen (for audio) 66
Reading the screen (for video) 66
Starting procedure 67
Setting the shuffle play 67
Setting a repeat play range 67
Selecting song or video sources from the
playlist screen 68
Using this product’s iPod function from your
iPod 69
Changing the speed of audiobook
playback 69
Displaying lists related to the song currently
playing (link search) 69
Operating with the hardware buttons 69
Playing back music from a music app other
than iPod music, as the iPod source 70
– Using the touch panel keys 70
– Reading the screen 70
4
Engb

Contents
Using your iPhone or smartphone
applications
Using AppRadio Mode 71
– Using the touch panel keys (App
control side bar) 71
– Starting procedure 72
– Using the keyboard 73
– Adjusting the image size (For
smartphone users) 74
– Displaying the image of your
application (iPhone with 30-pin
connector) 74
– Displaying the image of your
application (iPhone with Lightning
connector) 75
– Displaying the image of your
application (smartphone) 75
Using MirrorLink 76
– Using the touch panel keys (App
control side bar) 76
– Starting procedure 76
Using the audio mix function 77
Using Aha Radio
Using the touch panel keys 78
Reading the screen 79
Starting procedure 79
– For iPhone with a 30-pin connector
users 79
– For iPhone with a Lightning connector
users 80
– For smartphone users 80
Operating with the hardware buttons 80
Using a Bluetooth audio player
Using the touch panel keys 81
Reading the screen 82
Starting procedure 82
Selecting files from the file name list 83
Playing files in random order 83
Setting a repeat play range 83
Operating with the hardware buttons 83
Using an HDMI source
Using the touch panel keys 84
Reading the screen 84
Starting procedure 84
Using an AUX source
Using the touch panel keys 85
Reading the screen 85
Starting procedure 85
Setting the video signal 86
Switching the operation screen 86
Using AV input
Using the touch panel keys 87
Reading the screen 87
Starting procedure 87
Setting the video signal 88
Using MIXTRAX
MIXTRAX operation 89
Touch panel keys 89
Selecting an item to play songs 89
Selecting songs not to be played 90
Specifying the playback portion 90
Setting the flash pattern 90
System settings
Setting the FM tuning step 91
Activating the Bluetooth audio source 91
Setting the ever scroll 91
Setting AV input 91
Setting the rear view camera 92
– Setting rear view camera
activation 92
– Setting the polarity of the rear view
camera 93
Setting the camera for Camera View
mode 93
Engb
5

Contents
Displaying the parking assist guidelines 93
Setting guidelines on the rear view
image 94
Setting the safe mode 95
Turning off the demo screen 95
Selecting the system language 95
Reversing the climate control status
display 96
Setting the keyboard language with the
application for iPhone 96
Setting the beep sound 96
Adjusting the response positions of the
touch panel (touch panel calibration) 97
Adjusting the picture 97
Displaying the firmware version 98
Updating firmware 98
Checking the connections of leads 99
Audio adjustments
Using fader/balance adjustment 100
Using balance adjustment 100
Switching sound muting/attenuation 101
Adjusting source levels 101
Adjusting the filter 103
– Adjusting the front and rear speaker
output 103
– Using the subwoofer output 103
Selecting the listening position 104
Adjusting the speaker output levels
finely 104
Adjusting the time alignment 105
Using the equaliser 106
– Recalling equaliser curves 106
– Customising the equaliser curves 107
– Using the auto-adjusted equaliser 107
Adjusting the equaliser curve automatically
(Auto EQ) 108
– Before operating the Auto EQ
function 108
– Performing Auto EQ 109
6
Engb
Theme menu
Setting the illumination colour 111
– Selecting the colour from the preset
colours 111
– Creating a user-defined colour 111
Selecting the background display 112
– Changing to the background display
image stored on the external device
(USB/SD) 112
Selecting the theme colour 113
Selecting the clock image 113
Changing the preinstalled splash
screen 113
– Changing to the splash screen stored
on the external device (USB/SD) 114
Replicating the settings 114
– Exporting “Theme” settings 114
– Importing “Theme” settings 114
Setting up the video player
Setting the top-priority languages 116
– Setting the subtitle language 116
– Setting the audio language 116
– Setting the menu language 116
Setting the angle icon display 117
Setting the aspect ratio 117
Setting parental lock 118
– Setting the code number and
level 118
Displaying your DivX VOD registration
code 119
Displaying your DivX VOD deregistration
code 119
Automatic playback of DVDs 119
Setting the video signal for the rear view
camera 120
Setting the video output format 120
Language code chart for DVDs 121

Contents
Favourite menu
Selecting a shortcut 122
Removing a shortcut 122
Displaying the operation status of
vehicle equipment
Displaying obstacle detection
information 123
Displaying the operating status of the climate
control panel 123
Common operations
Setting the time and date 125
Storing song information to an iPod (iTunes
Tagging) 125
Setting the “Sound Retriever” function 126
Changing the wide screen mode 126
Other functions
Selecting the video for the rear display 128
Setting the anti-theft function 128
– Setting the password 128
– Entering the password 129
– Deleting the password 129
– Forgotten password 130
Restoring this product to the default
settings 130
– Restoring the default settings 130
Appendix
Troubleshooting 131
Error messages 133
Handling and care of discs 137
– Built-in drive and care 137
– Ambient conditions for playing a
disc 137
Playable discs 138
– DVD-Video and CD 138
– AVCHD recorded discs 138
– Playing DualDisc 138
– Dolby Digital 138
Detailed information for playable media 138
– Compatibility 138
– Media compatibility chart 142
Bluetooth 146
SDHC 146
WMA/WMV 146
DivX 146
AAC 147
Android™ 147
MirrorLink 147
Detailed information regarding connected
iPod devices 147
– iPod and iPhone 147
– Lightning 147
– App Store 147
– iOS 148
– iTunes 148
Using app-based connected content 148
– Aha Radio 148
HDMI 148
MHL 148
Notice regarding video viewing 149
Notice regarding DVD-Video viewing 149
Notice regarding MP3 file usage 149
Using the LCD screen correctly 149
– Handling the LCD screen 149
– Liquid crystal display (LCD)
screen 149
– Maintaining the LCD screen 149
– LED (light-emitting diode)
backlight 150
Specifications 151
Engb
7
Chapter
01
Precaution
Certain country and government laws may prohibit or restrict the placement and use of this
product in your vehicle. Please comply with all
applicable laws and regulations regarding the
use, installation and operation of this product.
If you want to dispose this product, do not mix
it with general household waste. There is a separate collection system for used electronic
products in accordance with legislation that requires proper treatment, recovery and recycling.
Private households in the member states of
the EU, in Switzerland and Norway may return
their used electronic products free of charge
to designated collection facilities or to a retailer (if you purchase a similar new one). For
countries not mentioned above, please contact your local authorities for the correct method of disposal. By doing so you will ensure
that your disposed product undergoes the necessary treatment, recovery and recycling and
thus prevent potential negative effects on the
environment and human health.
CAUTION
This product is a Class 1 laser product classified under the Safety of laser products, IEC
60825-1:2007, and contains a class 1M laser
module. To ensure continued safety, do not remove any covers or attempt to gain access to
the inside of the product. Refer all servicing to
qualified personnel.
CAUTION—CLASS 1M VISIBLE AND INVISIBLE
LASER RADIATION WHEN OPEN, DO NOT VIEW
DIRECTLY WITH OPTICAL INSTRUMENTS.
Important safety information
WARNING
! Do not attempt to install or service this pro-
duct by yourself. Installation or servicing of
this product by persons without training and
experience in electronic equipment and automotive accessories may be dangerous and
could expose you to the risk of electric shock,
injury or other hazards.
! Do not allow this product to come into contact
with liquids. Electrical shock could result.
Also, damage to the product, smoke, and overheating could result from contact with liquids.
! If liquid or foreign matter should get inside
this product, park your vehicle in a safe place,
turn the ignition switch off (ACC OFF) immediately and consult your dealer or the nearest
authorised Pioneer Service Station. Do not
use this product in this condition because
doing so may result in a fire, electric shock, or
other failure.
8
Engb
Precaution
Chapter
01
! If you notice smoke, a strange noise or odour
from this product, or any other abnormal
signs on the LCD screen, turn off the power
immediately and consult your dealer or the
nearest authorised Pioneer Service Station.
Using this product in this condition may result
in permanent damage to the system.
! Do not disassemble or modify this product, as
there are high-voltage components inside
which may cause an electric shock. Be sure
to consult your dealer or the nearest
authorised Pioneer Service Station for internal
inspection, adjustments or repairs.
Before using this product, be sure to read and
fully understand the following safety information:
! Do not operate this product, any applica-
tions, or the rear view camera option (if purchased) if doing so will divert your attention
in any way from the safe operation of your
vehicle. Always observe safe driving rules
and follow all existing traffic regulations. If
you experience difficulty in operating this
product or reading the display, park your
vehicle in a safe location and apply the
handbrake before making the necessary
adjustments.
! Never set the volume of this product so
high that you cannot hear outside traffic
and emergency vehicles.
! To promote safety, certain functions are dis-
abled unless the vehicle is stopped and/or
the handbrake is applied.
! Keep this manual handy as a reference for
operating procedures and safety information.
! Do not install this product where it may (i)
obstruct the driver’s vision, (ii) impair the
performance of any of the vehicle’s operating systems or safety features, including air
bags or hazard lamp buttons or (iii) impair
the driver’s ability to safely operate the vehicle.
! Please remember to fasten your seat belt at
all times while operating your vehicle. If
you are ever in an accident, your injuries
can be considerably more severe if your
seat belt is not properly buckled.
! Never use headphones while driving.
Handbrake interlock
Certain functions (such as viewing of video
image and certain touch panel key operations)
offered by this product could be dangerous
(possibly resulting in serious injury or death)
and/or unlawful if used while driving. To prevent such functions from being used while the
vehicle is in motion, there is an interlock system that senses when the handbrake is set
and when the vehicle is moving. If you attempt
to use the functions described above while
driving, they will become disabled until you
stop the vehicle in a safe place, and apply the
handbrake. Please keep the brake pedal
pushed down before releasing the handbrake.
To ensure safe driving
WARNING
! LIGHT GREEN LEAD AT POWER CON-
NECTOR IS DESIGNED TO DETECT
PARKED STATUS AND MUST BE CONNECTED TO THE POWER SUPPLY SIDE
OF THE HANDBRAKE SWITCH. IMPROPER CONNECTION OR USE OF THIS
LEAD MAY VIOLATE APPLICABLE LAW
AND MAY RESULT IN SERIOUS INJURY
OR DAMAGE.
! Do not take any steps to tamper with or
disable the handbrake interlock system
which is in place for your protection. Tampering with or disabling the handbrake interlock system could result in serious
injury or death.
! To avoid the risk of damage and injury and the
potential violation of applicable laws, this product is not for use with a video image that is
visible to the driver.
Precaution
Engb
9
Chapter
01
Precaution
! In some countries the viewing of video image
on a display inside a vehicle even by persons
other than the driver may be illegal. Where
such regulations apply, they must be obeyed.
If you attempt to watch video image while driving, the warning “Viewing of front seat
video source while driving is strictly prohibited.” will appear on the screen. To watch
video image on this display, stop the vehicle in
a safe place and apply the handbrake. Please
keep the brake pedal pushed down before releasing the handbrake.
When using a display
connected to V OUT
The video output terminal (V OUT) is for connection of a display to enable passengers in
the rear seats to watch video images.
WARNING
NEVER install the rear display in a location that
enables the driver to watch video images while
driving.
To avoid battery exhaustion
Be sure to run the vehicle engine while using
this product. Using this product without running the engine can drain the battery.
WARNING
! SCREEN IMAGE MAY APPEAR REVERSED.
! USE INPUT ONLY FOR REVERSE OR MIRROR
IMAGE REAR VIEW CAMERA. OTHER USE
MAY RESULT IN INJURY OR DAMAGE.
CAUTION
The rear view mode is to use this product as an
aid to keep an eye on the trailers, or while backing up. Do not use this function for entertainment
purposes.
Handling the SD card slot
CAUTION
! Keep the SD memory card out of the reach of
small children to prevent them from accidentally swallowing it.
! To prevent data loss and damage to the sto-
rage device, never remove it from this product
while data is being transferred.
! If data loss or corruption occurs on the sto-
rage device for any reason, it is usually not
possible to recover the data. Pioneer accepts
no liability for damages, costs or expenses
arising from data loss or corruption.
! Never insert or eject an SD memory card
while driving.
Handling the USB connector
WARNING
Do not install this product in a vehicle that does
not have an ACC wire or circuitry available.
Rear view camera
With an optional rear view camera, you are
able to use this product as an aid to keep an
eye on trailers, or backing into a tight parking
spot.
10
Engb
CAUTION
! To prevent data loss and damage to the sto-
rage device, never remove it from this product
while data is being transferred.
! Pioneer cannot guarantee compatibility with
all USB mass storage devices and assumes
no responsibility for any loss of data on media
players, iPhone, smartphone, or other devices
while using this product.

Precaution
Chapter
01
In case of trouble
Should this product fail to operate properly,
contact your dealer or nearest authorised
Pioneer Service Station.
Visit our website
Visit us at the following site:
http://www.pioneer.eu
! Register your product. We will keep the de-
tails of your purchase on file to help you
refer to this information in the event of an
insurance claim such as loss or theft.
! We offer the latest information about
PIONEER CORPORATION on our website.
! Pioneer regularly provides software up-
dates to further improve it’s products.
Please check the support section of the
Pioneer website for all available software
updates.
About this product
! This product does not work correctly in
areas other than Europe. The RDS (Radio
Data System) function operates only in
areas with FM stations broadcasting RDS
signals. The RDS-TMC service can also be
used in the area where there is a station
that broadcasts the RDS-TMC signal.
! The Pioneer CarStereo-Pass is for use only
in Germany.
Protecting the LCD panel
and screen
p Do not expose the LCD screen to direct
sunlight when this product is not used.
This may result in LCD screen malfunction
due to the resulting high temperatures.
p When using a mobile phone, keep the aer-
ial of the mobile phone away from the LCD
screen to prevent disruption of the video in
the form of spots, coloured stripes, etc.
p To protect the LCD screen from damage, be
sure to touch the touch panel keys only
with your finger and do so gently.
Notes on internal memory
Before removing the vehicle
battery
If the battery is disconnected or discharged,
the memory will be erased and must be reprogrammed.
p Some of the settings and recorded con-
tents will not be reset.
Data subject to erasure
The information is erased by disconnecting
the yellow lead from the battery (or removing
the battery itself).
p Some of the settings and recorded con-
tents will not be reset.
Resetting the microprocessor
CAUTION
Pressing the RESET button resets settings and recorded contents to the factory settings.
p Do not perform this operation when a device
is connected to this product.
p Some of the settings and recorded contents
will not be reset.
The microprocessor must be reset under the
following conditions:
! Prior to using this product for the first time
after installation.
! If this product fails to operate properly.
! If there appears to be problems with the op-
eration of the system.
! If your vehicle position is shown on the
map with a significant positioning error.
1 Turn the ignition switch OFF.
Precaution
Engb
11
Chapter
01
Precaution
2 Press the RESET button with a pen tip
or other pointed implement.
Settings and recorded contents are reset to
the factory settings.
1 RESET button
About this manual
This manual uses diagrams of actual screens
to describe operations. However, the screens
on some units may not match those shown in
this manual depending on the model used.
1
12
Engb

Basic operation
Chapter
02
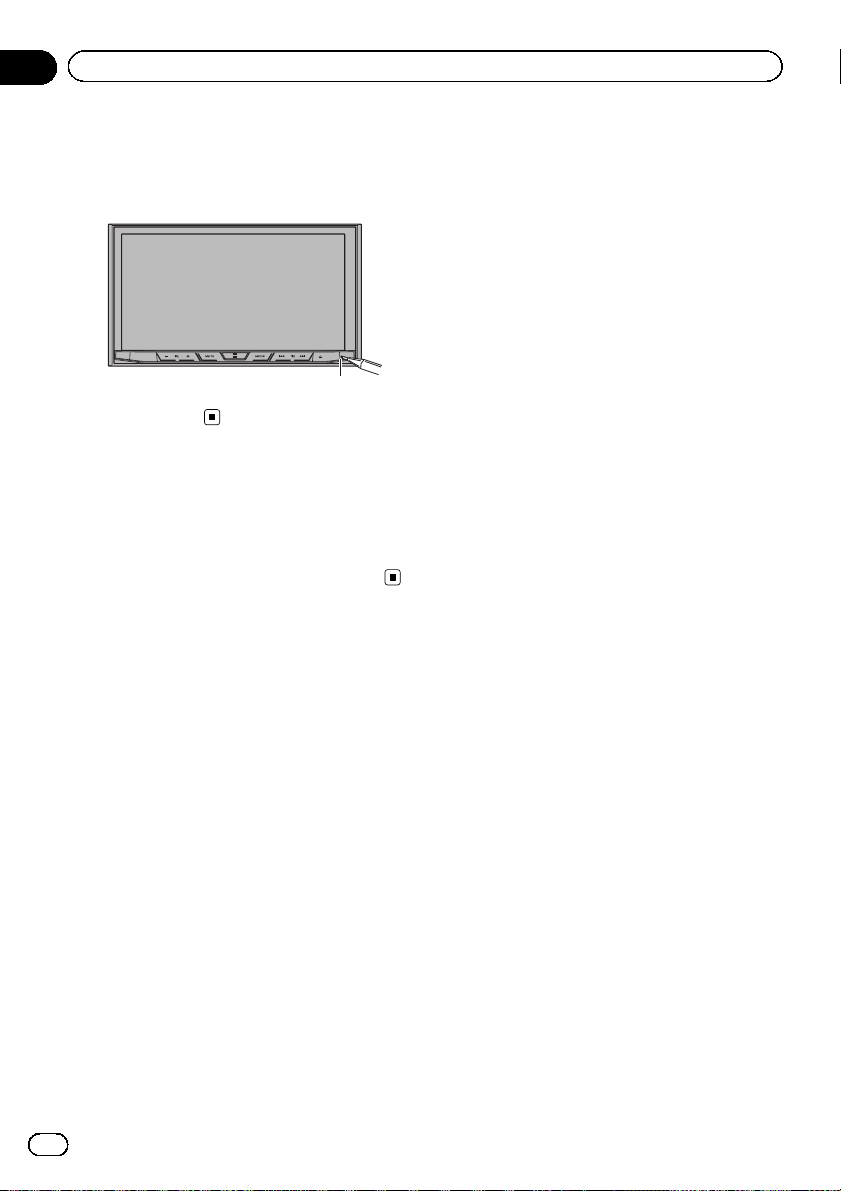
Checking part names and
functions
This chapter gives information about the names
of the parts and the main features using the buttons.
1 2 345 6 7 8
9
1 LCD screen
2 VOL (+/–) button
Press to adjust the AV (Audio and Video)
source volume.
3 MUTE button
Press to mute. Press again to unmute.
4 HOME button
! Press to display the Top menu screen.
= For details of the operations, refer to
How to use the screens on page 18.
! Press and hold the HOME button to acti-
vate the voice recognition function.
= For details, refer to Using the voice re-
cognition function (for iPhone) on
page 33.
5 MODE button
! Press to switch between the Application
screen and the AV operation screen.
p If the display cannot switch from the
AV operation screen to the Application screen when the MODE button is
pressed, the display will turn off.
= For details of the operations, refer to
How to use the screens on page 18.
! Press and hold to turn the display off.
= For details, refer to Turning off the dis-
play on page 17.
6 TRK button
Press to perform manual seek tuning, fast
forward, reverse and track search controls.
7 h button
8 RESET button
= For details of the operations, refer to Re-
setting the microprocessor on page 11.
9 Auto EQ microphone input jack
Use to connect a microphone for acoustical
a
b
measurement (sold separately).
a Disc-loading slot
Insert a disc to play.
= For details, refer to Inserting and ejecting
a disc on page 15.
b SD card slot
= For details, refer to Inserting and ejecting
an SD memory card on page 15.
Remote control
The remote control CD-R33 is sold separately.
For details concerning operations, see the remote control manual.
Protecting your product
against theft
CAUTION
! Do not attempt to detach the front panel while
DISC/SD is in the eject position.
! Do not attempt to detach the front panel while
data is being written to USB/SD.
Doing so may cause the data to become corrupted.
! After the front panel has been detached, the
attaching plate will move back to its original
position automatically.
Be careful not to let hands or other objects
get caught behind the monitor as it is moving
back.
Basic operation
Engb
13
Chapter
02
Basic operation
! Please make sure that the front panel is in its
original position while the vehicle is in motion.
It is dangerous to drive with the front panel
sticking out.
! Do not place beverages or other objects on
top of the front panel while it is fully open.
Important
! Handle the front panel with care when remov-
ing or attaching it.
! Avoid subjecting the front panel to excessive
shock.
! Keep the front panel out of direct sunlight and
high temperatures.
! If removed, replace the front panel on the unit
before starting up your vehicle.
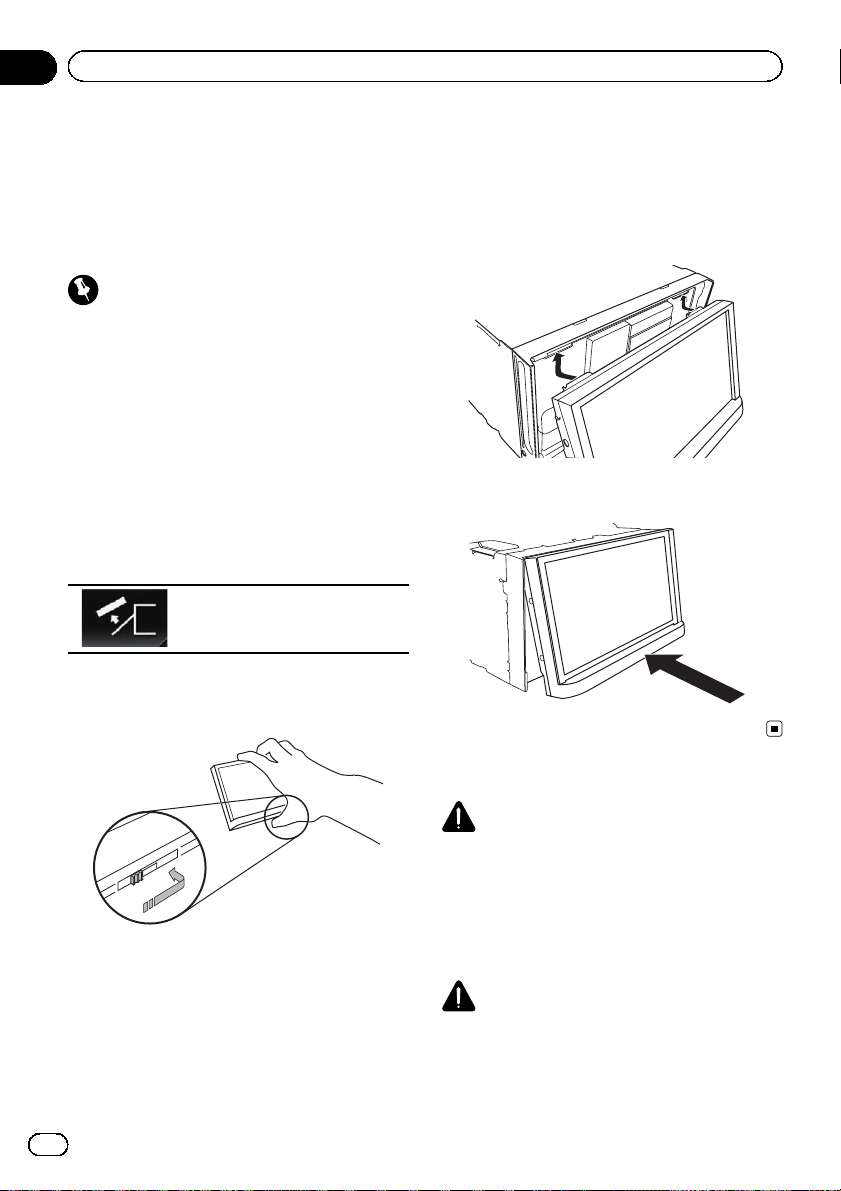
Removing the front panel
1 Press the h button.
2 Touch the following key.
The front panel automatically
slides toward you.
3 Slide the dial at the bottom of the front
panel to the right, and lift up the front
panel while pushing down on the dial.
Attaching the front panel
1 Slide the front panel into the top of the
unit and push it into place.
Slide the inserter on the front panel into the insertion slot on top of the unit and push it into
place.
2 Push on the bottom of the front panel
until it clicks into place.
4 Put the front panel into the provided
protective case for safe keeping.
14
Engb
Notes on using the LCD panel
WARNING
! Keep hands and fingers clear of this product
when opening, closing, or adjusting the LCD
panel. Be especially cautious of children’s
hands and fingers.
! Do not use with the LCD panel left open. If the
LCD panel is left open, it may result in injury
in the event of an accident.
CAUTION
! Do not open or close the LCD panel by force.
This may cause a malfunction.
Basic operation
Chapter
02
! Do not operate this product until the LCD
panel has completely opened or closed. If this
product is operated while the LCD panel is
opening or closing, the LCD panel may stop at
that angle for safety.
! Do not place a glass or can on the open LCD
panel. Doing so may break this product.
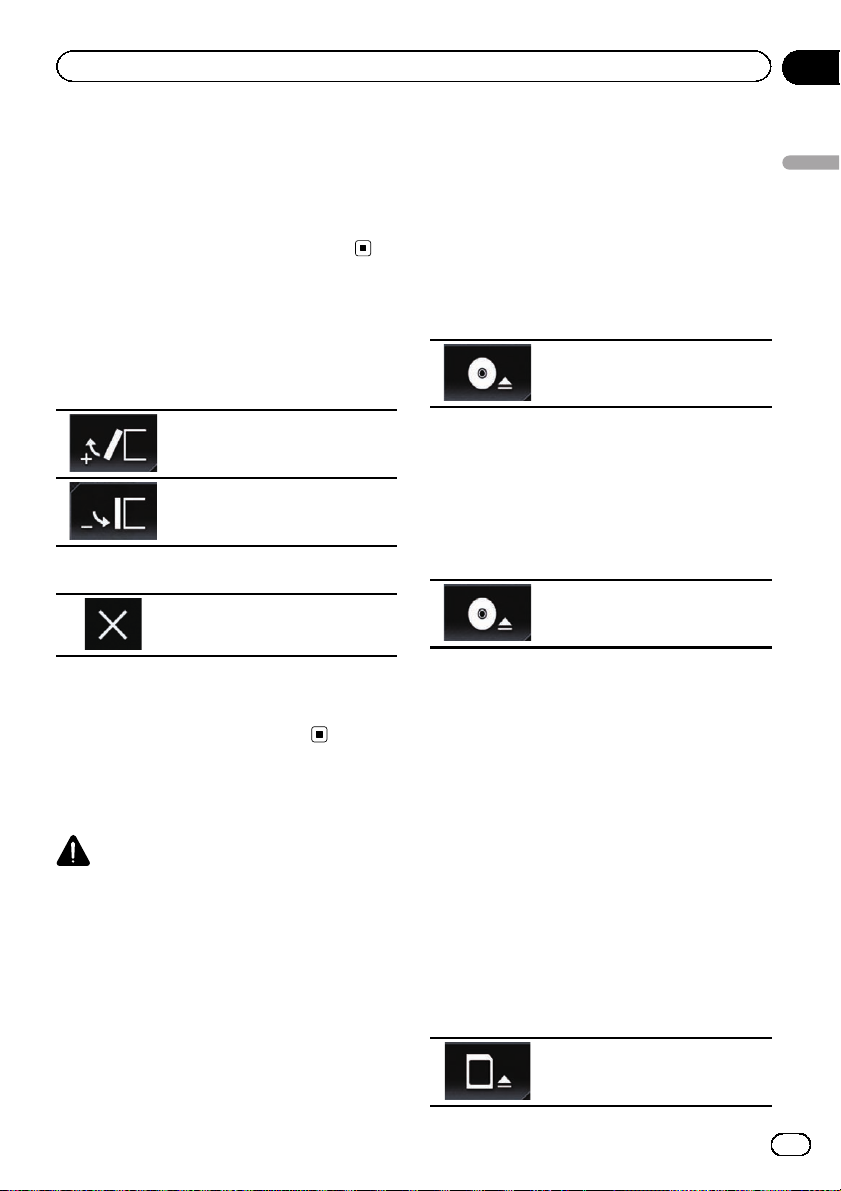
Adjusting the LCD panel angle
1 Press the h button.
2 Touch the following keys to adjust the
angle of the LCD panel.
Laying the panel down.
Returning the panel to the upright
position.
3 Touch the following key.
Returns to the previous screen.
p The adjusted angle of the LCD panel will be
memorised and the LCD panel will automatically return to that angle the next time the
LCD panel is opened or closed.
Inserting/ejecting/
connecting media
CAUTION
! Do not insert anything other than a disc into
the disc-loading slot.
! Do not insert anything other than SD memory
cards into the SD card slot.
! Ejecting an SD memory card during data
transfer can damage the SD memory card. Be
sure to eject the SD memory card by the procedure described in this manual.
! Do not press the h button when an SD mem-
ory card is not fully inserted. Doing so may damage the card.
! Do not press the h button before an SD mem-
ory card has been completely removed. Doing
so may damage the card.
Inserting and ejecting a disc
Inserting a disc
1 Press the h button.
2 Touch the following key.
Opens the LCD panel.
3 Insert a disc into the disc-loading slot.
The disc is loaded, and the LCD panel closes.
Ejecting a disc
1 Press the h button.
2 Touch the following key.
The LCD panel opens, and the disc
is ejected.
3 Remove the disc, and press the h button.
The LCD panel closes.
Inserting and ejecting an SD
memory card
p This system is not compatible with the
Multi Media Card (MMC).
p Compatibility with all SD memory cards is
not guaranteed.
p This product may not achieve optimum per-
formance with some SD memory cards.
Inserting an SD memory card
1 Press the h button.
2 Touch the following key.
Opens the LCD panel.
Basic operation
Engb
15
Chapter
02
Basic operation
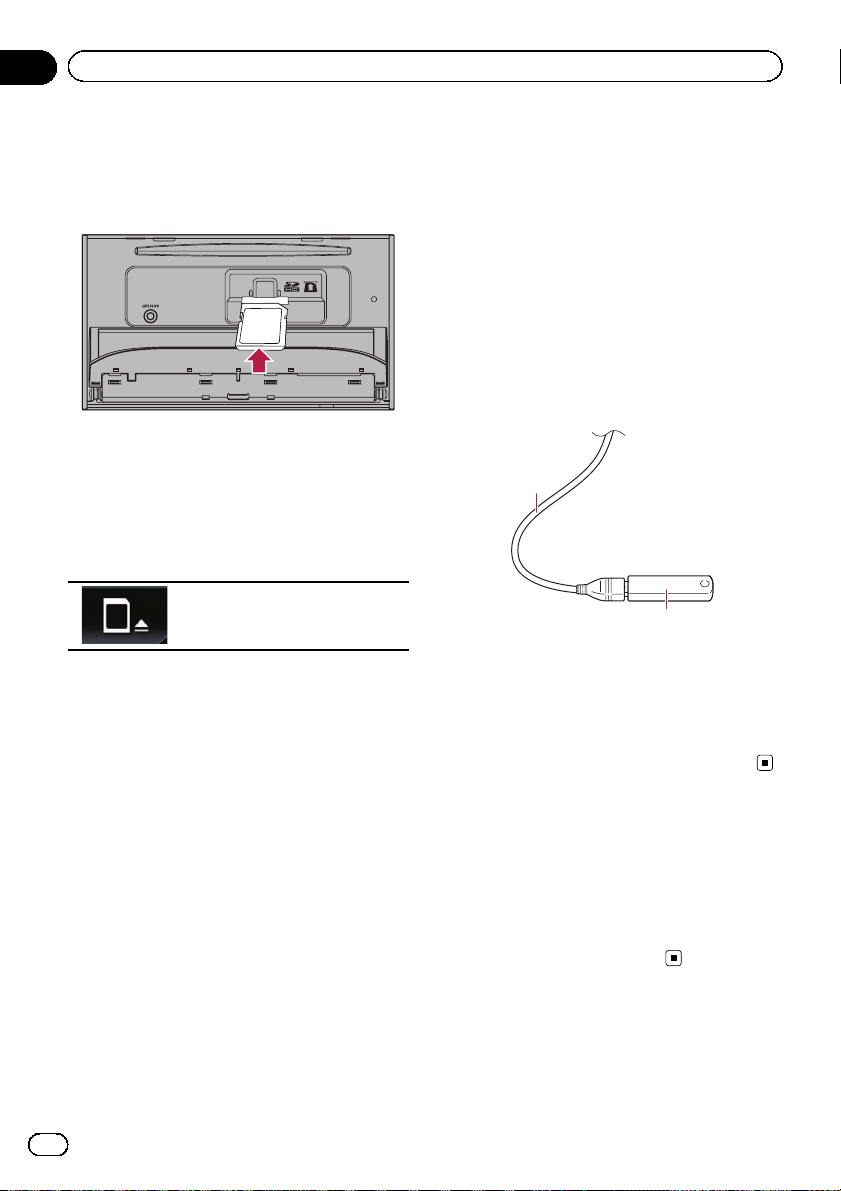
3 Insert an SD memory card into the SD
card slot.
Insert it with the label surface face-up and
press the card until it clicks and completely
locks.
4 Press the h button.
The LCD panel closes.
Ejecting an SD memory card
1 Press the h button.
2 Touch the following key.
Opens the LCD panel.
3 Press the middle of the SD memory
card gently until it clicks.
4 Pull the SD memory card out straight.
5 Press the h button.
The LCD panel closes.
Plugging and unplugging a USB
storage device
p This product may not achieve optimum per-
formance with some USB storage devices.
p Connection via a USB hub is not possible.
p A USB cable is required for connection.
Plugging in a USB storage device
1 Pull out the plug from the USB port of
the USB cable.
2 Plug a USB storage device into the USB
cable.
1
1 USB cable
2 USB storage device
Unplugging a USB storage device
% Pull out the USB storage device after
checking that no data is being accessed.
Connecting and disconnecting
an iPod
Connecting your iPod
= For details of the connections, refer to the
Installation Manual.
Disconnecting your iPod
% Pull out the cables after confirming
that no data is being accessed.
16
Engb
Startup and termination
1 Start the engine to boot up the system.
After a short pause, the splash screen comes
on for a few seconds.
2 Turn off the vehicle engine to terminate the system.
This product is also turned off.
On first-time startup
When you use this product for the first time,
select the language that you want to use.
Basic operation
1 Start the engine to boot up the system.
After a short pause, the splash screen comes
on for a few seconds.
The “Select Program Language” screen appears.
2 Touch the language that you want to
use on screen.
3 Touch the following key.
Displays the “Smartphone Setup”
screen.
4 Touch the item you want to set.
= For details, refer to Information on the con-
nections and functions for each device on
page 38.
5 Touch the following key.
Displays the Top menu screen.
# If you touch , the display returns to the pre-
vious screen.
Chapter
02
Basic operation
Regular startup
% Start the engine to boot up the system.
After a short pause, the splash screen comes
on for a few seconds.
p The screen shown will differ depending on
the previous conditions.
p If the anti-theft function is activated, you
must enter your password.
Turning off the display
You can turn off the display at night or when
the screen is too bright.
% Press and hold the MODE button.
The display turns off.
p If you touch the screen when the display is
off, it reverts to the original screen.
Engb
17
Chapter
02
Basic operation
How to use the screens
Switching screens using the touch panel keys
9
2
8
1
6
7
5
3
4
18
Engb
Basic operation
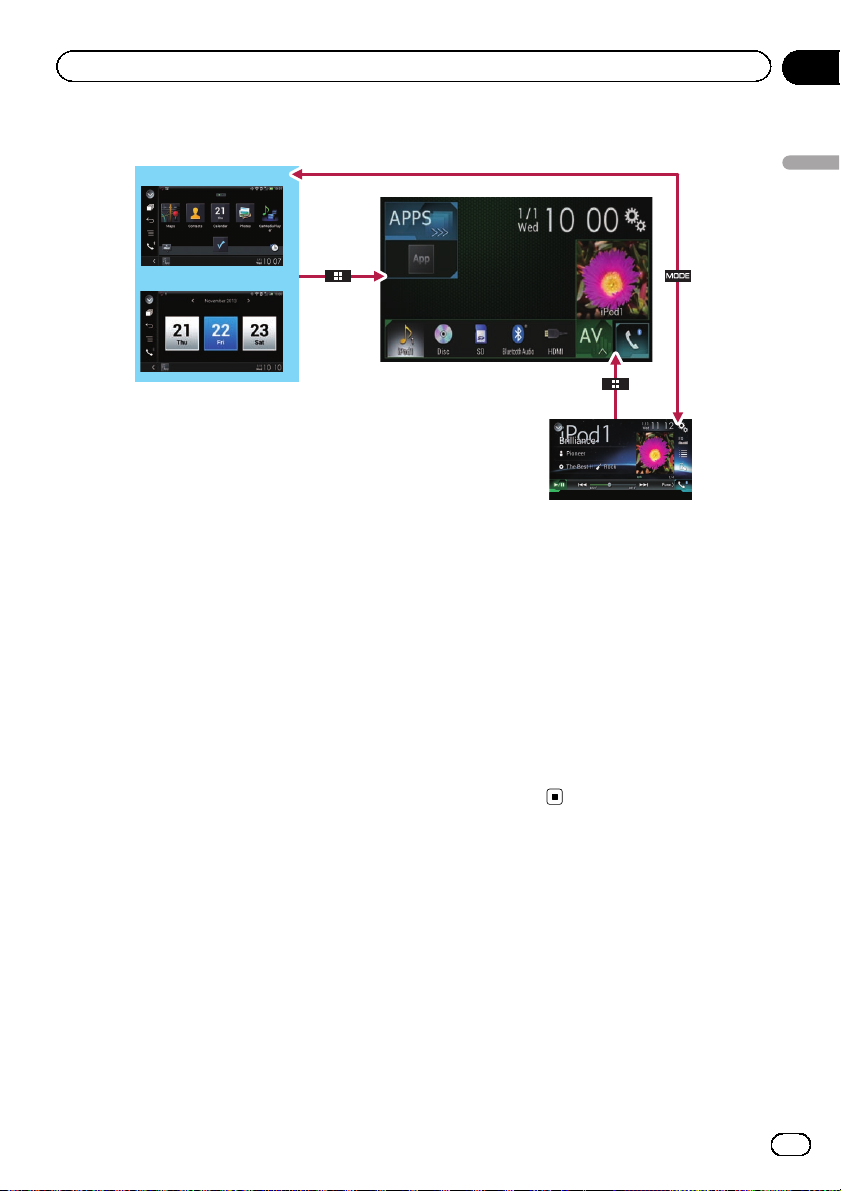
Switching screens using the hardware buttons
Chapter
02
9
8
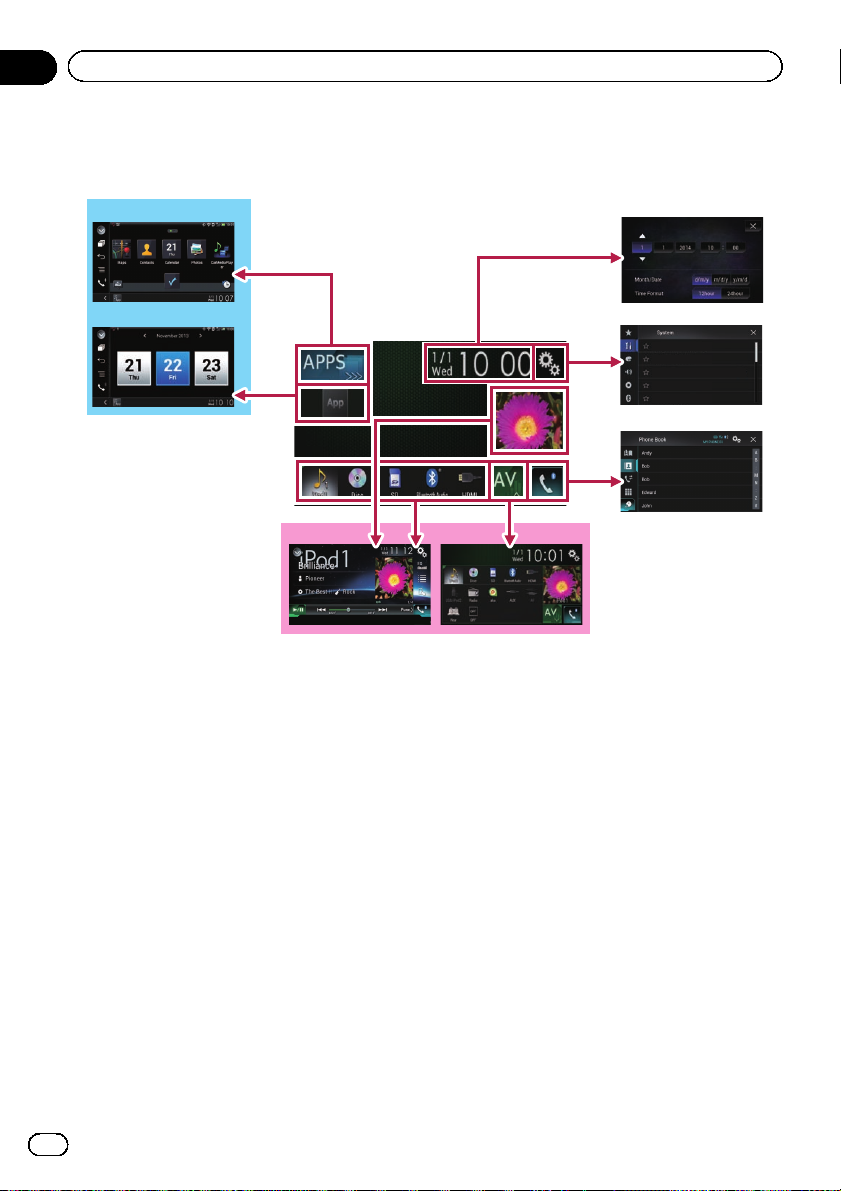
1 Top menu screen
This is the starting menu to access the desired screens and operate the various functions.
p If you press the HOME button, the Top
menu screen is displayed.
2 Time and date setting screen
You can set the time and date settings.
3 Setting menu screen
You can customise the system and audio
settings, etc.
4 Phone menu screen
You can access the screen that is related to
hands-free phoning.
5 AV source selection screen
You can select the AV source.
6 Favourite source icons
You can display the icons of frequently used
sources by dragging the icons to the display
area.
= For details of the operation, refer to
Changing the display order of source
icons on page 21.
7 AV operation screen
You can customise the settings for each
source.
1
7
8 Application operation screen
You can control the iPhone or smartphone
applications directly on this product.
p If applications are not available, the Ap-
plication operation screen will not be displayed.
9 Application menu screen
This product can switch to the application
menu, on which you can display and operate the application for an iPhone or a smartphone on the screen.
p If application menus are not available,
the Application menu screen will not be
displayed.
Supported AV source
You can play or use the following sources with
this product.
! Radio (FM, MW/LW)
! CD
! ROM (compressed audio files)
! DVD-Video
! USB
! SD
The following sources can be played back or
used by connecting an auxiliary device.
! iPod
Basic operation
Engb
19
Chapter
02
Basic operation
! Aha Radio
! Bluetooth audio
! AV input (AV)
! AUX
! HDMI
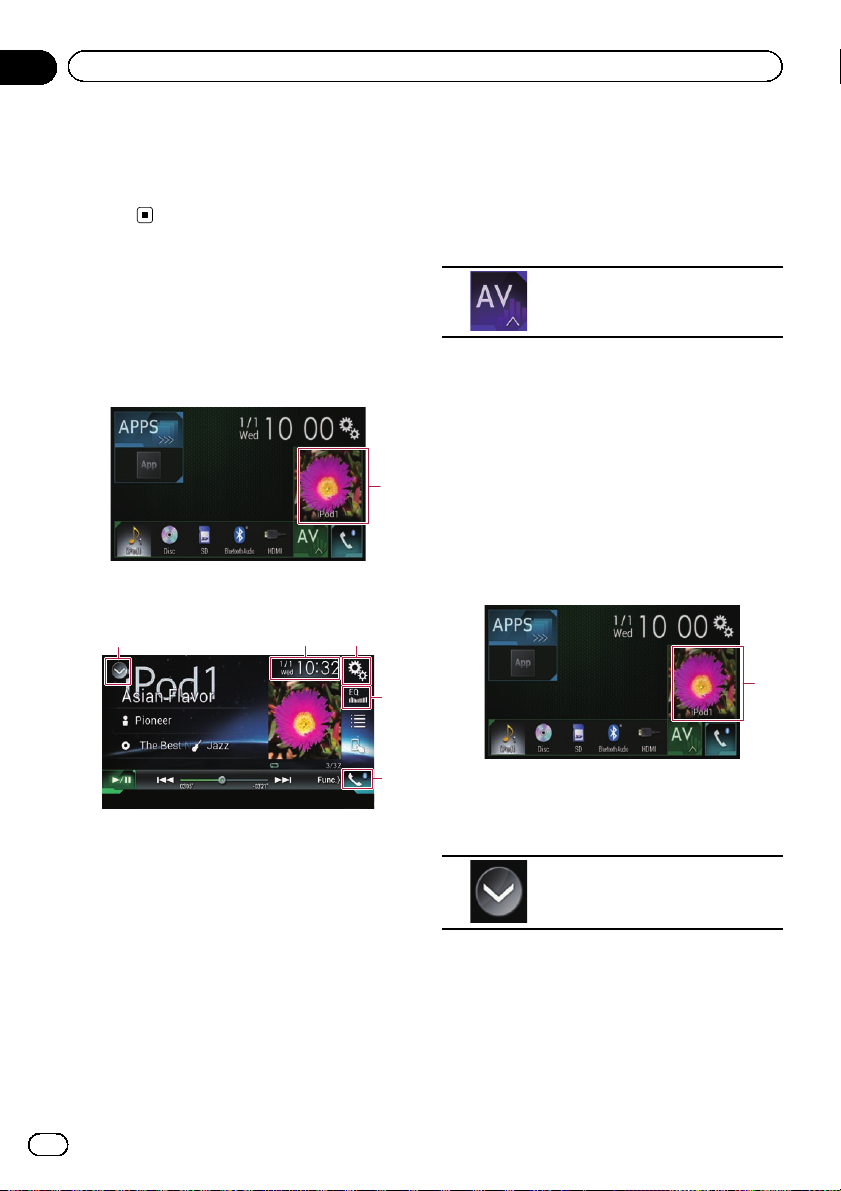
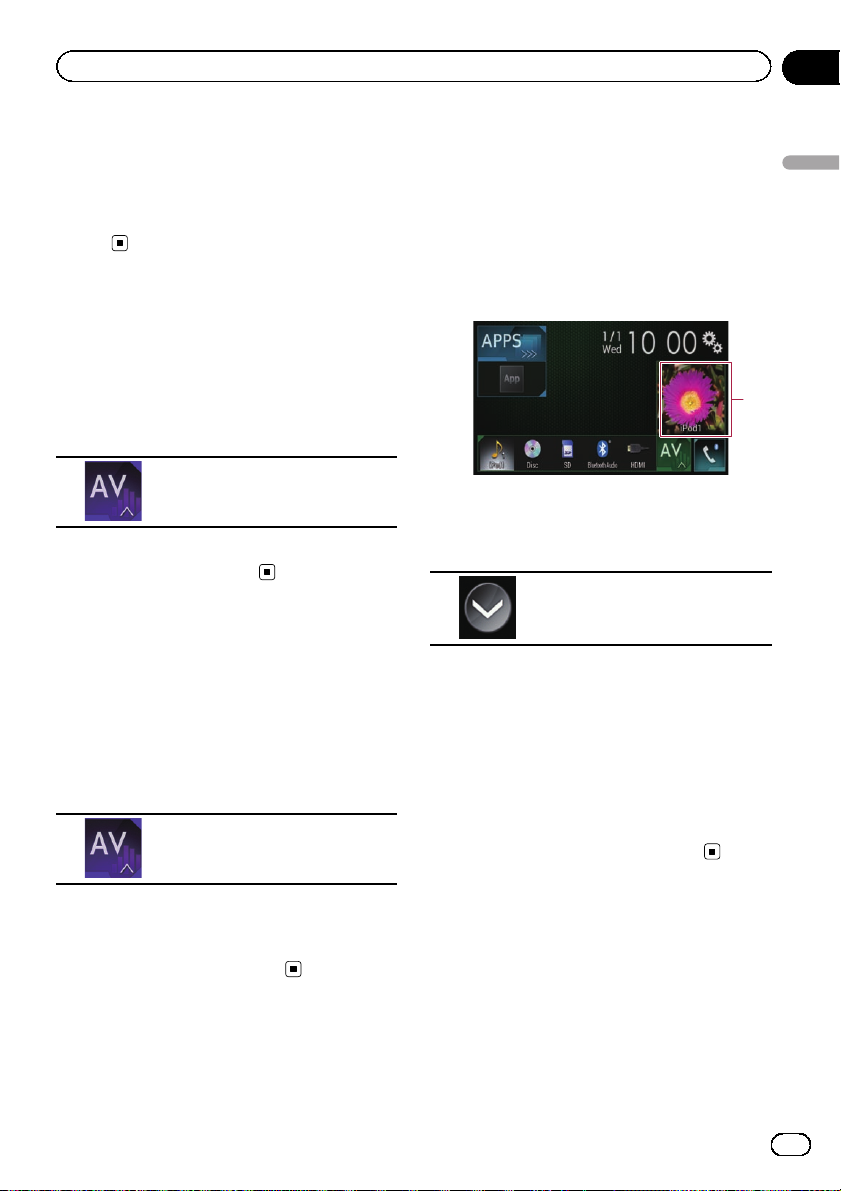
Displaying the AV
operation screen
1 Press the HOME button to display the
Top menu screen.
2 Touch the AV operation key.
1 AV operation key
The AV operation screen appears.
132
Selecting a front source on the
AV source selection screen
1 Press the HOME button to display the
Top menu screen.
2 Touch the following key.
Displays the AV source selection
screen.
3 Touch the source icon you want to select.
The AV operation screen of the selected
source appears.
Selecting a front source on the
1
source list
1 Press the HOME button to display the
Top menu screen.
2 Touch the AV operation key.
4
1
1 Displays the source list.
= For details, refer to Selecting a front
source on the source list on page 20.
2 Displays the Time and date setting
screen.
= For details, refer to Setting the time and
date on page 125.
3 Displays the Setting menu screen.
4 Recalls equaliser curves.
= For details, refer to Using the equaliser
on page 106.
5 Displays the Phone menu screen.
= For details, refer to Displaying the phone
menu on page 28.
20
Engb
5
1 AV operation key
The AV operation screen appears.
3 Touch the following key.
Displays the source list.
4 Touch the source key you want to select.
The AV operation screen of the selected
source appears.
Basic operation
Chapter
02
Selecting a rear source
You can select a source output to the rear display.
= For details of the operations, refer to Select-
ing the video for the rear display on page
128.
Turning off the AV source
Turn off the AV source to stop playing or receiving the AV source.
1 Press the HOME button to display the
Top menu screen.
2 Touch the following key.
Displays the AV source selection
screen.
3 Touch [OFF].
The AV source is turned off.
Changing the display order
of source icons
You can change the display order of source
icons on the AV source selection screen.
1 Press the HOME button to display the
Top menu screen.
2 Touch the following key.
Displays the AV source selection
screen.
Changing the display order
of source keys
You can change the display order of source
keys on the source list.
1 Press the HOME button to display the
Top menu screen.
2 Touch the AV operation key.
1
1 AV operation key
The AV operation screen appears.
3 Touch the following key.
Displays the source list.
4 Touch [Open].
The source keys can be moved.
5 Drag the source key to the desired position.
6 Touch [Close].
Returns to the previous screen.
p If the source key is moved, the source icons
displayed on the Top menu screen and the
AV source screen are also moved.
Basic operation
3 Touch and hold a source icon, and drag
the icon to the desired position.
p If the source icon is moved, the order of the
source list is also changed.
Using the touch panel
You can operate this product by touching the
marks and items (touch panel keys) displayed
on the screen directly with your fingers.
p To protect the LCD screen from damage, be
sure to touch the touch panel keys only
with your finger and do so gently.
Engb
21
Chapter
02
Basic operation
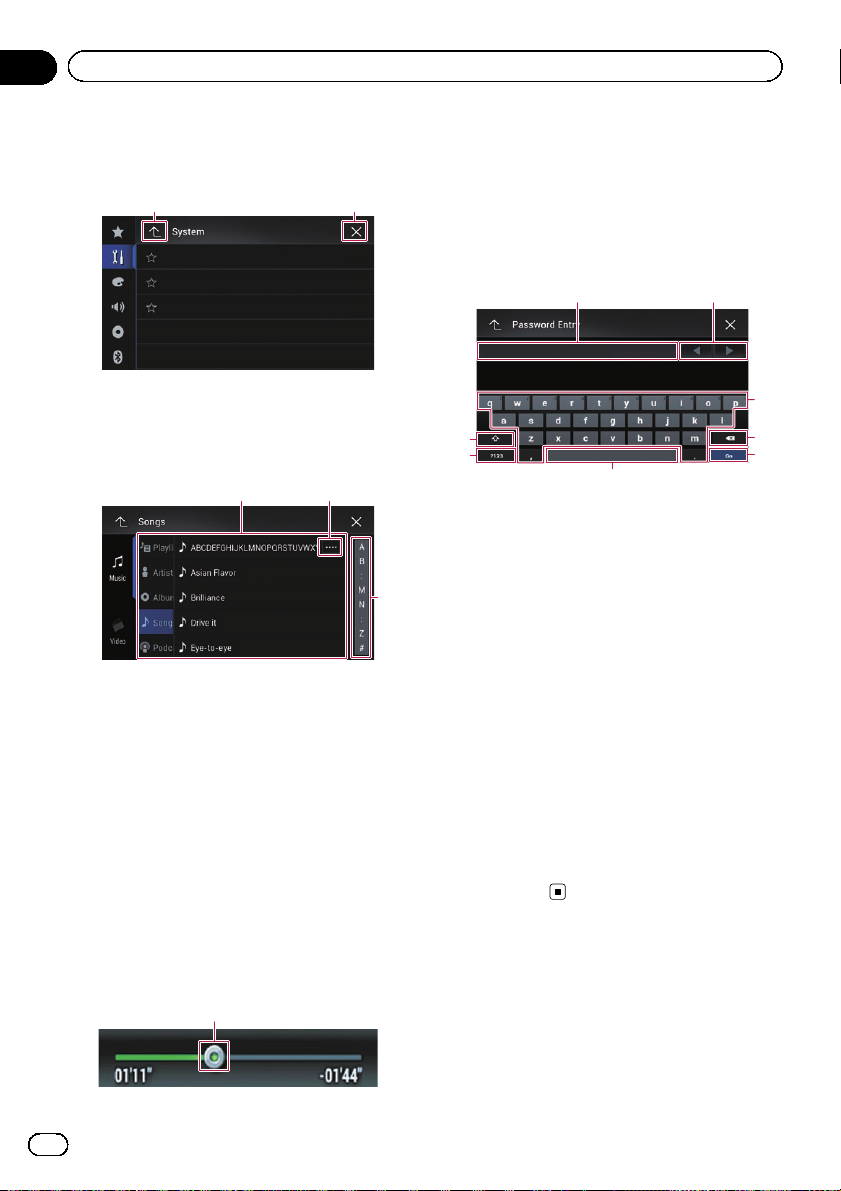
Using the common touch panel
keys
1 2
1 Returns to the previous screen.
2 Closes the screen.
Operating list screens
1
1 Touching an item on the list allows you to nar-
row down the options and proceed to the next
operation.
2 Appears when all characters are not displayed
on the display area.
If you touch the key, the rest of the characters
are scrolled for display.
3 Appears when items cannot be displayed on a
single page only.
Drag the scrubber bar to view any hidden
items.
Also, you can drag the list to view any hidden
items.
2
3
1 You can change the playback point by drag-
ging the key.
p Playback time corresponding to the po-
sition of the key is displayed while dragging the key.
Operating the on-screen keyboard
21
3
8
7
6
1 Displays the characters that are entered. If
there is no text in the box, an informative
guide with text appears.
2 Allows you to move the cursor to the right or
left for a number of characters equivalent to
the number of touches.
3 Touching the keys enters the characters in the
text box.
4 Deletes the input text one letter at a time, be-
ginning at the end of the text. Continuing to
touch the key deletes all of the text.
5 Confirms the entry and allows you to proceed
to the next step.
6 You can leave spaces.
A space equivalent to the number of touches
is inserted.
7 Switches between alphabet and numbers/
symbols.
8 You can switch between capital and lower
case letters.
4
5
Operating the time bar
1
22
Engb
Registering and connecting a Bluetooth device
Chapter
03
If your devices feature Bluetooth®technology,
this product can be connected to your devices
wirelessly. This section describes how to set
up a Bluetooth connection.
For details about connectivity with the devices
featuring Bluetooth wireless technology, refer
to the information on our website.
Preparing communication
devices
This product has a built-in function that enables using devices featuring Bluetooth wireless technology.
= For details, refer to Notes for hands-free
phoning on page 34.
You can register and use devices that feature
the following profiles with this product.
! HFP (Hands-Free Profile)
! A2DP (Advanced Audio Distribution Pro-
file)
! SPP (Serial Port Profile)
p When this product is turned off, the
Bluetooth connection is also disconnected.
When the system restarts, the system auto-
matically attempts to reconnect the pre-
viously-connected device. Even when the
connection is severed for some reason, the
system automatically reconnects the speci-
fied device (except when the connection is
severed due to device operation).
be performed. In such cases, delete a
paired device first.
= For details, refer to Deleting a registered
device on page 25.
Registering and connecting a Bluetooth device
Searching for nearby Bluetooth
devices
The system searches for available Bluetooth
devices near this product, displays them in a
list, and registers them for connection.
p When the device is already connected, this
function is inactive.
1 Activate the Bluetooth wireless technology on your devices.
p For some Bluetooth devices, no specific ac-
tion is necessary to activate Bluetooth wireless technology. For details, refer to the
instruction manual of your devices.
2 Press the HOME button to display the
Top menu screen.
3 Touch the following keys in the following order.
The “Bluetooth” screen appears.
4 Touch [Connection].
5 Touch the following key.
Registering your Bluetooth
devices
You need to register your devices featuring
Bluetooth wireless technology when you connect it to this product for the first time. A total
of three devices can be registered. Two registration methods are available:
! Searching for nearby Bluetooth devices
! Pairing from your Bluetooth devices
p If three devices are already paired, “Mem-
ory Full” is displayed and pairing cannot
Starts searching.
The system searches for Bluetooth devices
waiting for a connection and displays them in
the list if a device is found.
p Up to 30 devices will be listed in the order
that the devices are found.
Engb
23
Chapter
03
Registering and connecting a Bluetooth device
6 Wait until your Bluetooth device appears in the list.
p If you cannot find the Bluetooth device that
you want to connect, check that the device
is waiting for a Bluetooth wireless technology connection.
7 Touch the Bluetooth device name you
want to register.
While connecting, “Pairing… Please wait.” is
displayed. If the connection is established,
“Paired.” is displayed.
p If your device supports SSP (Secure Simple
Pairing), a six-digit number appears on the
display of this product. Touch [Yes ] to pairing the device.
p If the connection fails, “Error” is displayed.
In such cases, try again from the beginning.
p The PIN code is set to “0000” as the default,
but can be changed.
= For details, refer to Entering the PIN code
for Bluetooth wireless connection on
page 26.
p Once the connection is established, the de-
vice name is displayed. Touch the device
name to disconnect.
After the device is successfully registered, a
Bluetooth connection is established from the
system.
The profile icons in the registered device list
screen are displayed and illuminated as follows.
Illuminates when your mobile device is successfully connected with
the HFP (Hands-Free Profile).
Illuminates when your audio device is successfully connected with
the A2DP (Advanced Audio Distribution Profile)/AVRCP (Audio/
Video Remote Control Profile).
Illuminates when the Bluetooth
connection is established with the
SPP (Serial Port Profile).
p After pairing, the phone book registered in
the device may be automatically transmitted to this product.
# If you touch the following key, you can switch
the display between the device names and
Bluetooth device addresses.
Switches between the device
names and Bluetooth device addresses.
Pairing from your Bluetooth
devices
You can register a Bluetooth device by setting
this product to standby mode and requesting
a connection from the Bluetooth device.
p Before registration, make sure that “Visibi-
lity” in the “Bluetooth” menu is set to
“On”.
= For details, refer to Switching visibility on
page 26.
1 Activate the Bluetooth wireless technology on your devices.
p For some Bluetooth devices, no specific ac-
tion is necessary to activate Bluetooth wireless technology. For details, refer to the
instruction manual of your devices.
2 Use the Bluetooth setting in the device
to pair this product with the device.
p If a PIN code input is required, enter a PIN
code. (The default PIN code is “0000”.)
When the device is successfully registered,
the connection settings are made from the
device.
p If registration fails, repeat the procedure
from the beginning.
Connecting to a Bluetooth
device automatically
If this function is set to on, a connection between your Bluetooth device and this product
will take place automatically as soon as the
two devices are less than a few metres apart.
Initially, this function is set to on.
p If this function is set to on, a connection
with the last connected Bluetooth device
will be established automatically when the
ignition switch is turned on.
24
Engb
Registering and connecting a Bluetooth device
Chapter
03
1 Press the HOME button to display the
Top menu screen.
2 Touch the following keys in the following order.
The “Bluetooth” screen appears.
3 Touch [Auto Connect] repeatedly until
the desired setting appears.
! On (default):
Turns the automatic connection on.
! Off:
Turns the automatic connection off.
If your Bluetooth device is ready for a
Bluetooth wireless connection, a connection
to this product will automatically be established.
If connection fails, “Auto connection failed.
Retry?” appears.
Touch [Yes] to reconnect.
# To turn automatic connection off, touch [Auto
Connect] again.
p Once the connection is established for the
first time, the connection with the device
will be established automatically when the
ignition switch is turned on from the next
time.
Deleting a registered device
When you have already registered three
Bluetooth devices and you want to add another one, you must first delete one of the registered devices.
p If a registered phone is deleted, all the
phone book entries and call history lists
that correspond to the phone will be also
cleared.
CAUTION
Never turn this product off while the paired
Bluetooth device is being deleted.
1 Press the HOME button to display the
Top menu screen.
2 Touch the following keys in the following order.
Registering and connecting a Bluetooth device
The “Bluetooth” screen appears.
3 Touch [Connection].
4 Touch the following key.
Deletes a paired device.
A message prompting you to delete a registered device appears.
5 Touch [Yes].
The device is deleted.
Connecting a registered
Bluetooth device manually
Connect the Bluetooth device manually in the
following cases:
! Two or more Bluetooth devices are regis-
tered, and you want to manually select the
device to be used.
! You want to reconnect a disconnected
Bluetooth device.
! Connection cannot be established automa-
tically for some reason.
If you wish to start the connection manually,
carry out the following procedure.
1 Activate the Bluetooth wireless technology on your devices.
p For some Bluetooth devices, no specific ac-
tion is necessary to activate Bluetooth wireless technology. For details, refer to the
instruction manual of your devices.
2 Press the HOME button to display the
Top menu screen.
Engb
25
Chapter
03
Registering and connecting a Bluetooth device
3 Touch the following keys in the following order.
The “Bluetooth” screen appears.
4 Touch [Connection].
5 Touch the name of the device that you
want to connect.
Switching visibility
This function sets whether or not to make this
product visible to the other device.
Initially, this function is set to on.
1 Press the HOME button to display the
Top menu screen.
2 Touch the following keys in the following order.
The “Bluetooth” screen appears.
3 Touch [Visibility] repeatedly until the
desired setting appears.
! On (default):
Turns the visibility on.
! Off:
Turns the visibility off.
2 Touch the following keys in the following order.
The “Bluetooth” screen appears.
3 Touch [PIN Code Input].
The “PIN Code” screen appears.
4 Touch [0] to [9] to input pin code (up to
8 digits).
5 Touch the following key.
Stores the PIN code in this product.
Displaying the Bluetooth
device address
This product can display its Bluetooth device
address.
1 Press the HOME button to display the
Top menu screen.
2 Touch the following keys in the following order.
Entering the PIN code for
Bluetooth wireless connection
To connect your Bluetooth device to this product via Bluetooth wireless technology, you
need to enter a PIN code on your Bluetooth
device to verify the connection.
The default code is “0000”, but you can change
it with this function.
1 Press the HOME button to display the
Top menu screen.
26
Engb
The “Bluetooth” screen appears.
3 Touch [Device Infromation].
The Bluetooth device address is displayed.
Clearing the Bluetooth
memory
p This setting is available only when you stop
your vehicle in a safe place and apply the
handbrake.
Registering and connecting a Bluetooth device
Chapter
03
CAUTION
Never turn this product off while the Bluetooth
memory is being cleared.
1 Press the HOME button to display the
Top menu screen.
2 Touch the following keys in the following order.
The “Bluetooth” screen appears.
3 Touch [Bluetooth Memory Clear].
4 Touch [Clear].
The confirmation screen appears.
5 Touch [OK].
The Bluetooth memory is cleared.
# If you do not want to clear the memory, touch
[Cancel].
Updating Bluetooth software
This function is used to update this product
with the latest Bluetooth software. For details
on Bluetooth software and updating, refer to
our website.
p The source is turned off and the Bluetooth
connection is disconnected before the process starts.
p This setting is available only when you stop
your vehicle in a safe place and apply the
handbrake.
CAUTION
Never turn this product off and never disconnect
the phone while the software is being updated.
1 Press the HOME button to display the
Top menu screen.
2 Touch the following keys in the following order.
Registering and connecting a Bluetooth device
The “Bluetooth” screen appears.
3 Touch [BT Software Update].
4 Touch [Start].
The data transfer screen is displayed.
p Follow the on-screen instructions to finish
updating the Bluetooth software.
Displaying the Bluetooth
software version
If this product fails to operate properly, you
may need to consult your dealer for repair.
In such cases, you may be asked to specify the
software version. Perform the following procedure to check the version on this unit.
1 Press the HOME button to display the
Top menu screen.
2 Touch the following keys in the following order.
The “Bluetooth” screen appears.
3 Touch [Bluetooth Version Information].
The version of this product’s Bluetooth module appears.
Engb
27
Chapter
04
Using hands-free phoning
CAUTION
For your safety, avoid talking on the phone as
much as possible while driving.
If your mobile phone features Bluetooth technology, this product can be connected to your
mobile phone wirelessly. Using this hands-free
function, you can operate this product to
make or receive phone calls. This section describes how to set up a Bluetooth connection
and how to operate a mobile phone featuring
Bluetooth technology on this product.
For details about connectivity with the devices
featuring Bluetooth wireless technology, refer
to the information on our website.
Displaying the phone menu
Use the Phone icon if you wish to connect a
mobile phone to this product for utilisation.
= For details, refer to Chapter 3.
p The Phone icon is displayed on the follow-
ing screens.
— Top menu screen
— AV operation screen
— On the App control side bar on the
AppRadio Mode and MirrorLink
screens
% Touch the following key.
Touch panel keys
6 7
1
2
3
4
5
1 Displays the preset dial screen.
2 Switches to the phone book list.
3 Switches to the missed, received and dialled
call lists.
4 Switches the mode to enter the phone num-
ber directly.
5 Switches to the voice recognition function (for
iPhone).
6 Displays the Setting menu screen.
7 Closes the screen.
8 Displays the alphabet search screen.
8
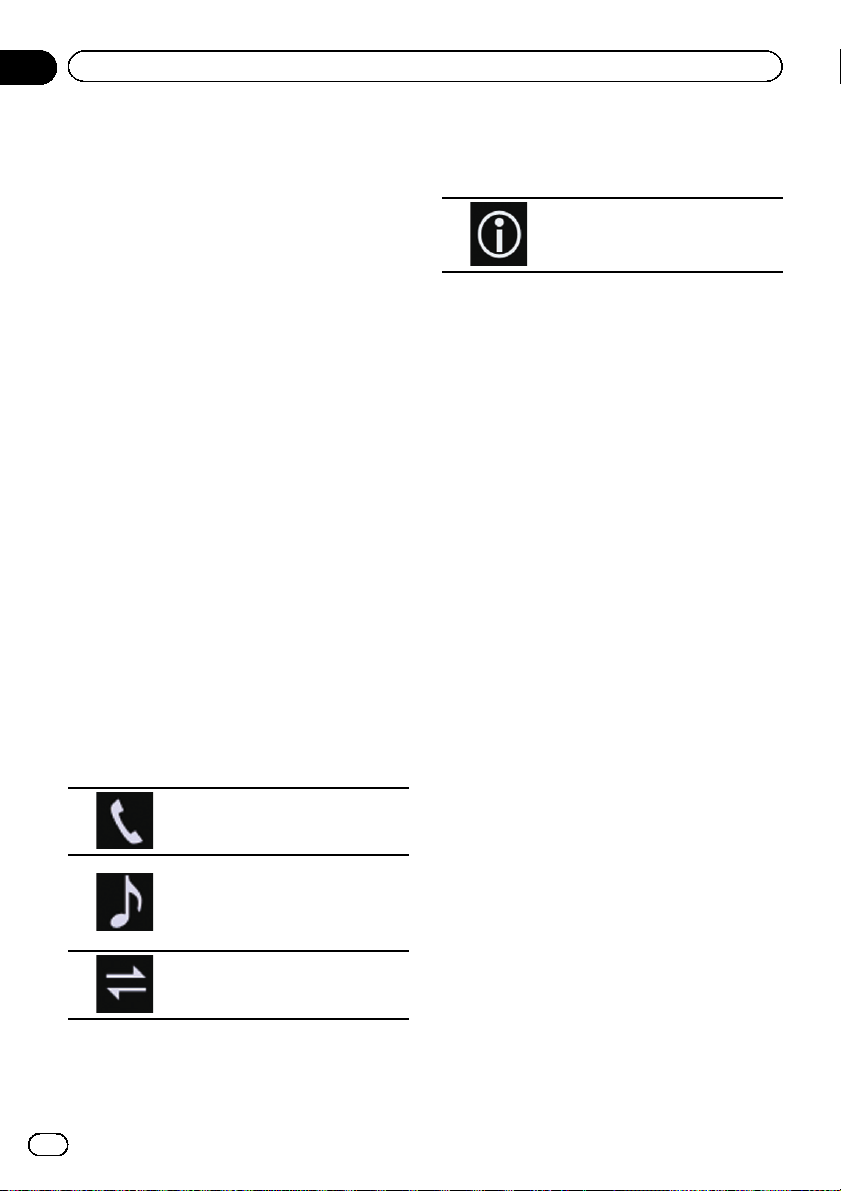
Reading the screen
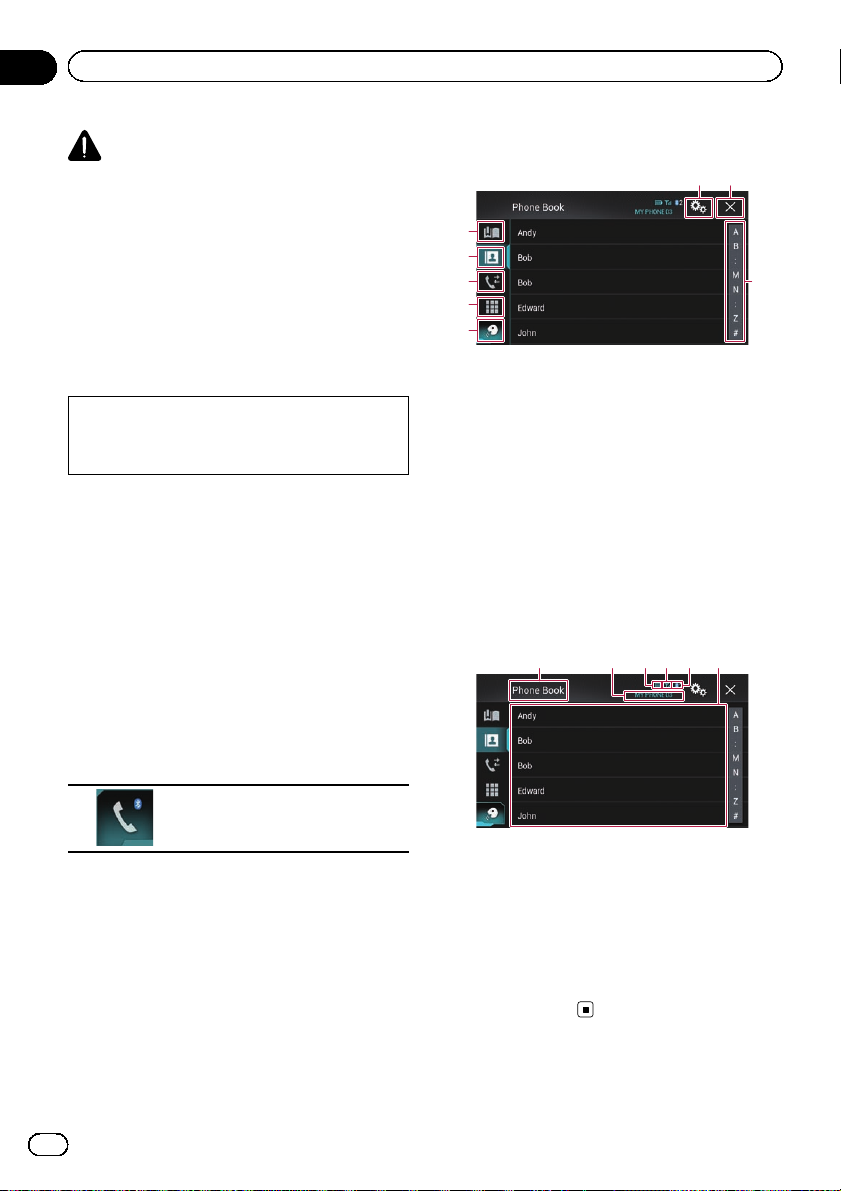
1 32456
Displays the Phone menu screen.
p The “Phone Book” screen appears when
using this function for the first time. The
screen of the last-used function appears
from the next time.
28
Engb
1 Menu title
2 Name of the connected mobile phone
3 Battery status of the mobile phone
4 Reception status of the mobile phone
5 Indicates that a Bluetooth telephone is con-
nected.
The device number of the connected device is
displayed.
6 List display area
Using hands-free phoning
Chapter
04
Making a phone call
You can make a phone call in many different
ways.
Direct dialling
1 Press the HOME button to display the
Top menu screen.
2 Touch the following keys in the following order.
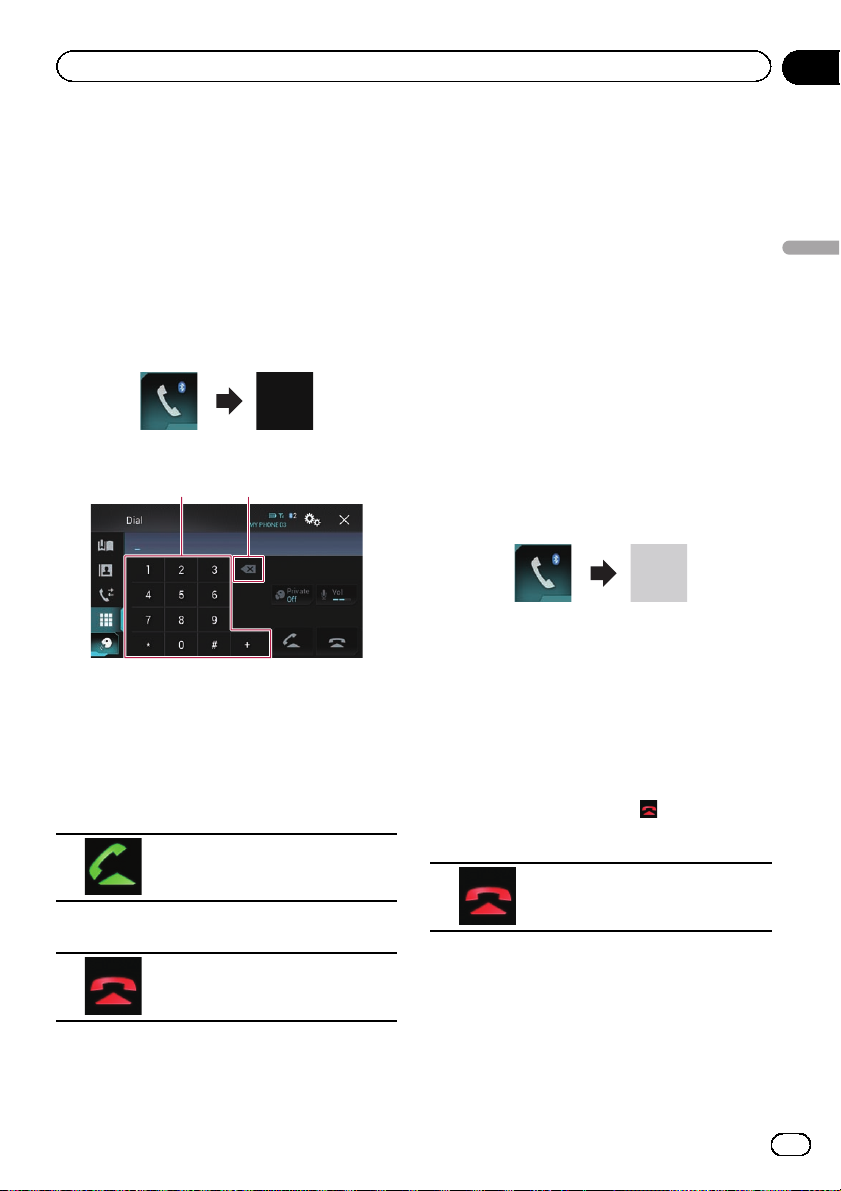
The “Dial” screen appears.
1 2
1 Dial pad
2 Deletes one digit. Touch and hold to delete
all digits.
3 Touch the number keys to enter the
phone number.
4 Touch the following key.
Makes a call.
5 Touch the following key.
Ends the call.
Calling a number in the phone
book
After finding the number you want to call in
the phone book, you can select the entry and
make the call.
p The contacts on your phone will normally
be transferred to this product automatically
when the phone is connected.
If it is not, use your phone menu to transfer
the contacts.
The visibility of this product should be on
when you use the “Bluetooth” menu.
= For details, refer to Switching visibility
on page 26.
1 Press the HOME button to display the
Top menu screen.
2 Touch the following keys in the following order.
The “Phone Book” screen appears.
3 Touch the desired name on the list.
The details screen of the phone book appears.
4 Touch the phone number you want to
dial.
The dial screen appears.
5 Dialling starts.
p To cancel the call, touch .
6 Touch the following key.
Ends the call.
The call ends.
Using hands-free phoning
The call ends.
p You may hear a noise when you hang up
the phone.
Engb
29
Chapter
04
Using hands-free phoning
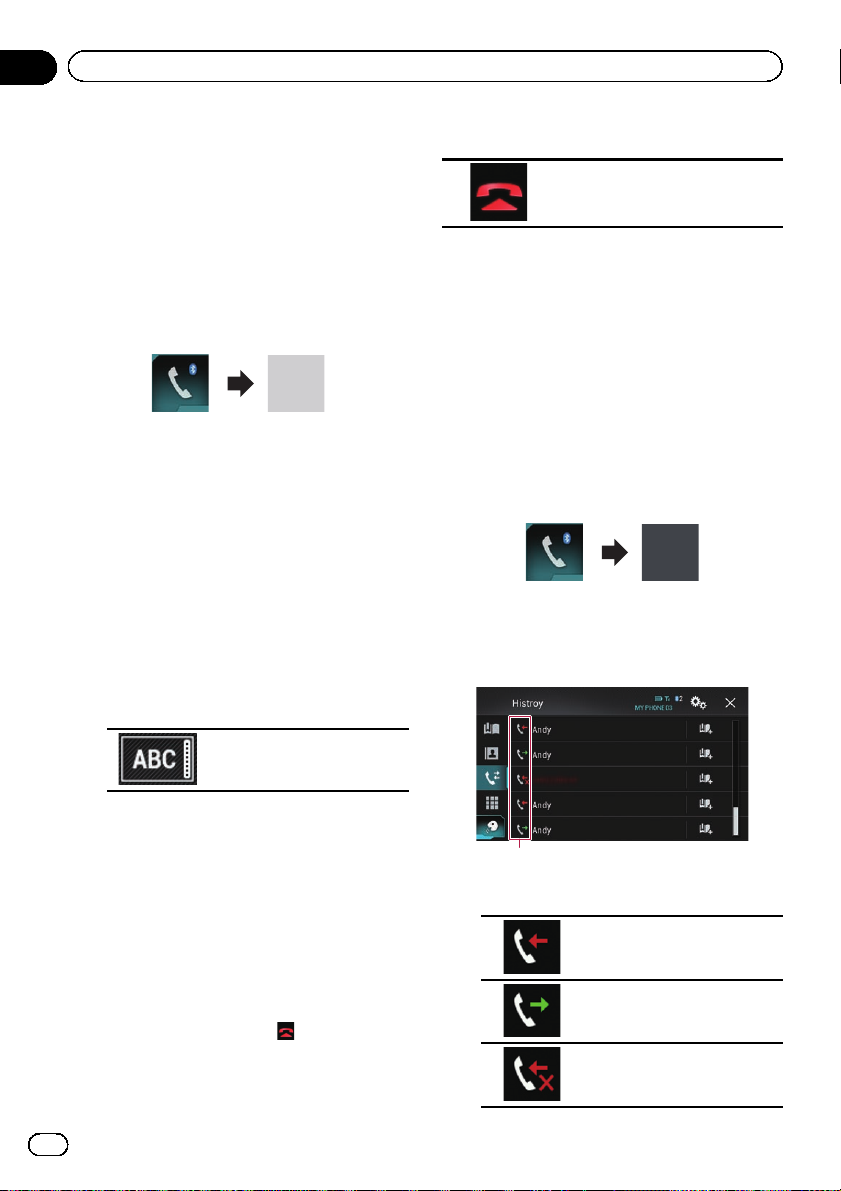
Selecting a number by alphabet
search mode
If a lot of numbers are registered in the phone
book, you can search for the phone number by
alphabet search mode.
1 Press the HOME button to display the
Top menu screen.
2 Touch the following keys in the following order.
The “Phone Book” screen appears.
3 Touch the Initial Search Bar to display
the alphabet search screen.
4 Touch the first letter of the entry you
are looking for.
The “Phone Book” entries starting with that
letter (e.g. “Ben”, “Brian” and “Burt” when “B”
is selected) will be displayed.
p When the system language is set to Rus-
sian, the following key appears. If you want
to change the character, touch the following key repeatedly until the desired character appears.
8 Touch the following key.
Ends the call.
The call ends.
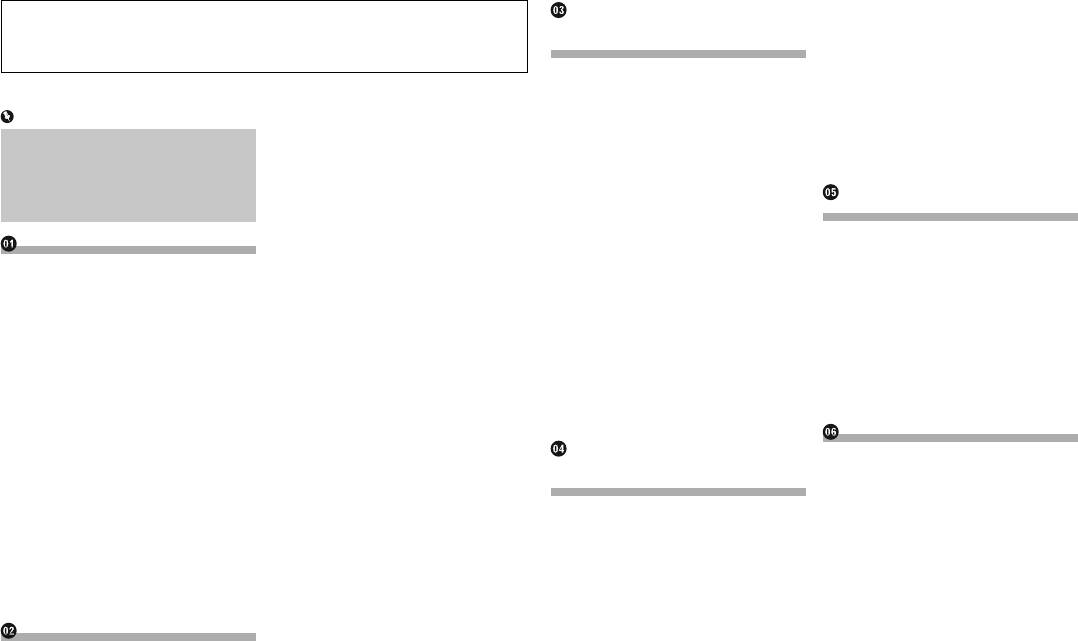
Dialling from the history
The most recent calls made (dialled, received
and missed) are stored in the call history list.
You can browse the call history list and call
numbers from it.
1 Press the HOME button to display the
Top menu screen.
2 Touch the following keys in the following order.
The “History” screen appears.
p Depending on the type of mobile phone,
some calls may not be displayed in the call
history.
Changes the character.
5 Touch the list to display the phone
number list of the selected entry.
The details screen of the phone book appears.
# If several phone numbers are included in an
entry, select one by touching the list.
6 Touch the phone number you want to
dial.
The dial screen appears.
7 Dialling starts.
p To cancel the call, touch .
30
Engb
1
1 Type of call history
Received calls.
Dialled calls.
Missed calls.
Loading…
Pioneer AVH-X8600BT Instruction Manuals and User Guides
We have 2 Instruction Manuals and User Guides for AVH-X8600BT Pioneer
Pioneer AVH-X8600BT User Manual, 156 pages
| Recognized languages: | English |
|---|---|
| Pages: | 156 |
| Size: | 6.25 MB |
Document Outline
- Outline placeholder
- bk_page_10
- bk_page_100
- bk_page_101
- bk_page_102
- bk_page_103
- bk_page_104
- bk_page_105
- bk_page_106
- bk_page_107
- bk_page_108
- bk_page_109
- bk_page_11
- bk_page_110
- bk_page_111
- bk_page_112
- bk_page_113
- bk_page_114
- bk_page_115
- bk_page_116
- bk_page_117
- bk_page_118
- bk_page_119
- bk_page_12
- bk_page_120
- bk_page_121
- bk_page_122
- bk_page_123
- bk_page_124
- bk_page_125
- bk_page_126
- bk_page_127
- bk_page_128
- bk_page_129
- bk_page_13
- bk_page_130
- bk_page_131
- bk_page_132
- bk_page_133
- bk_page_134
- bk_page_135
- bk_page_136
- bk_page_137
- bk_page_138
- bk_page_139
- bk_page_14
- bk_page_140
- bk_page_141
- bk_page_142
- bk_page_143
- bk_page_144
- bk_page_145
- bk_page_146
- bk_page_147
- bk_page_148
- bk_page_149
- bk_page_15
- bk_page_150
- bk_page_151
- bk_page_152
- bk_page_153
- bk_page_154
- bk_page_155
- bk_page_156
- bk_page_16
- bk_page_17
- bk_page_18
- bk_page_19
- bk_page_2
- bk_page_20
- bk_page_21
- bk_page_22
- bk_page_23
- bk_page_24
- bk_page_25
- bk_page_26
- bk_page_27
- bk_page_28
- bk_page_29
- bk_page_3
- bk_page_30
- bk_page_31
- bk_page_32
- bk_page_33
- bk_page_34
- bk_page_35
- bk_page_36
- bk_page_37
- bk_page_38
- bk_page_39
- bk_page_4
- bk_page_40
- bk_page_41
- bk_page_42
- bk_page_43
- bk_page_44
- bk_page_45
- bk_page_46
- bk_page_47
- bk_page_48
- bk_page_49
- bk_page_5
- bk_page_50
- bk_page_51
- bk_page_52
- bk_page_53
- bk_page_54
- bk_page_55
- bk_page_56
- bk_page_57
- bk_page_58
- bk_page_59
- bk_page_6
- bk_page_60
- bk_page_61
- bk_page_62
- bk_page_63
- bk_page_64
- bk_page_65
- bk_page_66
- bk_page_67
- bk_page_68
- bk_page_69
- bk_page_7
- bk_page_70
- bk_page_71
- bk_page_72
- bk_page_73
- bk_page_74
- bk_page_75
- bk_page_76
- bk_page_77
- bk_page_78
- bk_page_79
- bk_page_8
- bk_page_80
- bk_page_81
- bk_page_82
- bk_page_83
- bk_page_84
- bk_page_85
- bk_page_86
- bk_page_87
- bk_page_88
- bk_page_89
- bk_page_9
- bk_page_90
- bk_page_91
- bk_page_92
- bk_page_93
- bk_page_94
- bk_page_95
- bk_page_96
- bk_page_97
- bk_page_98
- bk_page_99
- engb
- Table of Contents
Read manual
ɂɡɦɟɧɟɧɢɟɩɨɪɹɞɤɚɨɬɨɛɪɚ
Ȼɥɚɝɨɞɚɪɢɦɡɚɩɨɤɭɩɤɭɞɚɧɧɨɝɨɢɡɞɟɥɢɹ3LRQHHU
Ɋɟɝɢɫɬɪɚɰɢɹɢɩɨɞ—
ɠɟɧɢɹɢɦɟɧɢɢɮɚɦɢɥɢɢɜ
ȼɧɢɦɚɬɟɥɶɧɨɩɪɨɱɢɬɚɣɬɟɷɬɢɢɧɫɬɪɭɤɰɢɢɱɬɨɛɵɧɚɞɥɟɠɚɳɢɦɨɛɪɚɡɨɦɢɫɩɨɥɶɡɨɜɚɬɶ
ɫɨɟɞɢɧɟɧɢɟɭɫɬɪɨɣ—
ɬɟɥɟɮɨɧɧɨɣɤɧɢɝɟ
ɞɚɧɧɭɸɦɨɞɟɥɶɧɚɜɢɝɚɰɢɨɧɧɨɣɫɢɫɬɟɦɵɉɨɫɥɟɨɡɧɚɤɨɦɥɟɧɢɹɫɢɧɫɬɪɭɤɰɢɹɦɢ
ɫɬɜɚ%OXHWRRWK
ɇɚɫɬɪɨɣɤɚɪɟɠɢɦɚɡɚɳɢɳɟɧ
ɫɨɯɪɚɧɹɣɬɟɞɚɧɧɵɣɞɨɤɭɦɟɧɬɞɥɹɞɚɥɶɧɟɣɲɟɝɨɨɛɪɚɳɟɧɢɹ
ɧɨɣɫɜɹɡɢ
ɉɨɞɝɨɬɨɜɤɚɫɪɟɞɫɬɜɫɜɹɡɢ
Ɋɟɝɭɥɢɪɨɜɤɚɝɪɨɦɤɨɫɬɢɩɪɢ
ɊɟɝɭɥɢɪɨɜɤɚɭɝɥɚɀɄɩɚɧɟɥɢ
Ɋɟɝɢɫɬɪɚɰɢɹɭɫɬɪɨɣɫɬɜ%OXHWRRWK
ɪɚɡɝɨɜɨɪɟ
ɋɨɞɟɪɠɚɧɢɟ
ȼɫɬɚɜɥɟɧɢɟɢɡɜɥɟɱɟɧɢɟ
ɉɨɢɫɤɧɚɯɨɞɹɳɢɯɫɹɩɨɛɥɢɡɨ
ɂɫɩɨɥɶɡɨɜɚɧɢɟɮɭɧɤɰɢɢ
ɫɬɢɭɫɬɪɨɣɫɬɜ%OXHWRRWK
ȼɚɠɧɨ
ɩɨɞɤɥɸɱɟɧɢɟɜɧɟɲɧɟɝɨ
ɋɨɩɪɹɠɟɧɢɟɫɭɫɬɪɨɣɫɬɜɚ%OXHWRRWK
ɪɚɫɩɨɡɧɚɜɚɧɢɹɪɟɱɢ
ɗɤɪɚɧɵɩɪɢɜɟɞɟɧɧɵɟɜɤɚɱɟɫɬɜɟɩɪɢ
ɧɨɫɢɬɟɥɹ
Ⱥɜɬɨɦɚɬɢɱɟɫɤɨɟɩɨɞɤɥɸɱɟɧɢɟ
ɞɥɹL3KRQH
Ɂɚɝɪɭɡɤɚɢɢɡɜɥɟɱɟɧɢɟɞɢɫɤɚ
ɦɟɪɨɜɦɨɝɭɬɨɬɥɢɱɚɬɶɫɹɨɬɪɟɚɥɶɧɵɯ
ɤɭɫɬɪɨɣɫɬɜɭ%OXHWRRWK
ɉɪɢɦɟɱɚɧɢɹɩɨɬɟɥɟɮɨɧɧɨɣ
ɍɫɬɚɧɨɜɤɚɢɢɡɜɥɟɱɟɧɢɟɤɚɪɬɵ
ɷɤɪɚɧɨɜɤɨɬɨɪɵɟɦɨɝɭɬɛɵɬɶɢɡɦɟɧɟɧɵ
ɍɞɚɥɟɧɢɟɡɚɪɟɝɢɫɬɪɢɪɨɜɚɧ
ɩɚɦɹɬɢ6′
ɫɜɹɡɢɛɟɡɫɧɹɬɢɹɬɪɭɛɤɢ
ɛɟɡɭɜɟɞɨɦɥɟɧɢɹɫɰɟɥɶɸɭɥɭɱɲɟɧɢɹ
ɧɨɝɨɭɫɬɪɨɣɫɬɜɚ
ɉɨɞɫɨɟɞɢɧɟɧɢɟɢɨɬɫɨɟɞɢɧɟ
ɯɚɪɚɤɬɟɪɢɫɬɢɤɢɮɭɧɤɰɢɨɧɚɥɶɧɵɯ
ɇɚɫɬɪɨɣɤɚL3RG
ɧɢɟL3RG
ɉɨɞɫɨɟɞɢɧɟɧɢɟɡɚɪɟɝɢɫɬɪɢ
ɜɨɡɦɨɠɧɨɫɬɟɣ
ɉɨɞɤɥɸɱɟɧɢɟɢɨɬɤɥɸɱɟɧɢɟ
ɪɨɜɚɧɧɨɝɨɭɫɬɪɨɣɫɬɜɚ
L3KRQHɢɫɦɚɪɬɮɨɧɨɜ
ɭɫɬɪɨɣɫɬɜɚɩɚɦɹɬɢ86%
%OXHWRRWKɜɪɭɱɧɭɸ
ɈɫɧɨɜɧɚɹɧɚɫɬɪɨɣɤɚL3RG
Ɇɟɪɵɩɪɟɞɨɫɬɨɪɨɠɧɨɫɬɢ
ɇɚɱɚɥɨɢɩɪɟɤɪɚɳɟɧɢɟɪɚɛɨɬɵ
ȼɤɥɸɱɟɧɢɟɮɭɧɤɰɢɢɜɨɡ
L3KRQHɢɥɢɫɦɚɪɬɮɨɧɚ
ȼɚɠɧɵɟɫɜɟɞɟɧɢɹɨɛɟɡɨɩɚɫɧɨɫɬɢ7
ɉɪɢɩɟɪɜɨɦɡɚɩɭɫɤɟ
ɦɨɠɧɨɫɬɢɨɛɧɚɪɭɠɟɧɢɹ
ɍɫɬɚɧɨɜɤɚɫɩɨɫɨɛɚɩɨɞɤɥɸ
Ȼɥɨɤɢɪɨɜɤɚɫɬɨɹɧɨɱɧɨɝɨɬɨɪɦɨɡɚ7
Ɉɛɵɱɧɵɣɡɚɩɭɫɤ
ȼɜɨɞ3,1ɤɨɞɚɞɥɹɛɟɫɩɪɨ
ɱɟɧɢɹɭɫɬɪɨɣɫɬɜɚ
Ⱦɥɹɨɛɟɫɩɟɱɟɧɢɹɛɟɡɨɩɚɫɧɨ
ȼɵɤɥɸɱɟɧɢɟɞɢɫɩɥɟɹ
ɜɨɞɧɨɝɨɫɨɟɞɢɧɟɧɢɹ%OXHWRRWK
ɋɨɜɦɟɫɬɢɦɨɫɬɶɫL3RG
ɫɬɢɞɜɢɠɟɧɢɹ
Ʉɚɤɩɨɥɶɡɨɜɚɬɶɫɹɷɤɪɚɧɚɦɢ
Ɉɬɨɛɪɚɠɟɧɢɟɚɞɪɟɫɚ
ɋɨɜɦɟɫɬɢɦɨɫɬɶɫɭɫɬɪɨɣɫɬ
ɉɪɢɢɫɩɨɥɶɡɨɜɚɧɢɢɷɤɪɚɧɚ
ɉɟɪɟɤɥɸɱɟɧɢɟɷɤɪɚɧɨɜɫ
ɭɫɬɪɨɣɫɬɜɚ%OXHWRRWK
ɜɚɦɢ$QGURLG
ɩɨɞɤɥɸɱɟɧɧɨɝɨɤ9287
ɢɫɩɨɥɶɡɨɜɚɧɢɟɦɤɥɚɜɢɲ
Ɉɱɢɫɬɤɚɩɚɦɹɬɢ%OXHWRRWK
ɋɨɜɦɟɫɬɢɦɨɫɬɶɫɭɫɬɪɨɣɫɬ
ȼɨɢɡɛɟɠɚɧɢɟɪɚɡɪɹɞɤɢ
ɫɟɧɫɨɪɧɨɣɩɚɧɟɥɢ
Ɉɛɧɨɜɥɟɧɢɟɩɪɨɝɪɚɦɦɧɨɝɨ
ɜɚɦɢ0LUURU/LQN
ɚɤɤɭɦɭɥɹɬɨɪɧɵɯɛɚɬɚɪɟɣ
ɉɟɪɟɤɥɸɱɟɧɢɟɷɤɪɚɧɨɜɫ
ɢɫɩɨɥɶɡɨɜɚɧɢɟɦɚɩɩɚɪɚɬ
ɨɛɟɫɩɟɱɟɧɢɹ%OXHWRRWK
ɂɧɮɨɪɦɚɰɢɹɨɩɨɞɤɥɸɱɟ
Ʉɚɦɟɪɚɡɚɞɧɟɝɨɜɢɞɚ
ɧɵɯɤɧɨɩɨɤ
Ɉɬɨɛɪɚɠɟɧɢɟɜɟɪɫɢɢɩɪɨ
ɧɢɢɢɮɭɧɤɰɢɹɯɨɬɞɟɥɶ
ɂɫɩɨɥɶɡɨɜɚɧɢɹɫɥɨɬɚɞɥɹ
ɋɨɜɦɟɫɬɢɦɵɟ$9ɢɫɬɨɱɧɢɤɢ
ɝɪɚɦɦɧɨɝɨɨɛɟɫɩɟɱɟɧɢɹ
ɧɵɯɭɫɬɪɨɣɫɬɜ
6’ɤɚɪɬɵ
Ɉɬɨɛɪɚɠɟɧɢɟɷɤɪɚɧɚɭɩɪɚɜ
%OXHWRRWK
ɂɫɩɨɥɶɡɨɜɚɧɢɟ86%ɪɚɡɴɟɦɚ
ɂɫɩɨɥɶɡɨɜɚɧɢɟɪɚɞɢɨ
ɥɟɧɢɹ$9ɢɫɬɨɱɧɢɤɚɦɢ
ȼɫɥɭɱɚɟɧɟɢɫɩɪɚɜɧɨɫɬɢ
ɂɫɩɨɥɶɡɨɜɚɧɢɟ
ɂɫɩɨɥɶɡɨɜɚɧɢɟɤɥɚɜɢɲ
ȼɵɛɨɪɢɫɬɨɱɧɢɤɚɞɥɹɩɟɪɟ
ɉɨɫɟɬɢɬɟɧɚɲɜɟɛɫɚɣɬ
ɞɧɟɝɨɞɢɫɩɥɟɹɧɚɷɤɪɚɧɟ
ɬɟɥɟɮɨɧɧɨɣɫɜɹɡɢ
ɫɟɧɫɨɪɧɨɣɩɚɧɟɥɢ
ɂɧɮɨɪɦɚɰɢɹɨɛɢɡɞɟɥɢɢ
ɜɵɛɨɪɚ$9ɢɫɬɨɱɧɢɤɚ
ɛɟɡɫɧɹɬɢɹɬɪɭɛɤɢ
ɑɬɟɧɢɟɷɤɪɚɧɚ
ɁɚɳɢɬɚɀɄɩɚɧɟɥɢɢɷɤɪɚɧɚ
ȼɵɛɨɪɢɫɬɨɱɧɢɤɚɞɥɹɩɟɪɟ
Ɉɬɨɛɪɚɠɟɧɢɟɦɟɧɸɬɟɥɟɮɨɧɚ
ɉɪɨɰɟɞɭɪɚɡɚɩɭɫɤɚ
ɉɪɢɦɟɱɚɧɢɹɨɬɧɨɫɢɬɟɥɶɧɨ
ɞɧɟɝɨɞɢɫɩɥɟɹɢɡɫɩɢɫɤɚ
Ʉɥɚɜɢɲɢɫɟɧɫɨɪɧɨɣɩɚɧɟɥɢ
ȼɵɛɨɪɞɢɚɩɚɡɨɧɚ
ɢɫɬɨɱɧɢɤɨɜ
ɜɧɭɬɪɟɧɧɟɣɩɚɦɹɬɢ9
ɑɬɟɧɢɟɷɤɪɚɧɚ
Ɋɭɱɧɚɹɧɚɫɬɪɨɣɤɚ
ȼɵɛɨɪɢɫɬɨɱɧɢɤɚɞɥɹɡɚɞɧɟɝɨ
ɉɟɪɟɞɨɬɤɥɸɱɟɧɢɟɦɚɤɤɭɦɭɥɹ
ɂɫɯɨɞɹɳɢɣɡɜɨɧɨɤ
ɇɚɫɬɪɨɣɤɚɫɩɨɢɫɤɨɦ
ɞɢɫɩɥɟɹ
ɬɨɪɚɚɜɬɨɦɨɛɢɥɹ9
ɉɪɹɦɨɣɧɚɛɨɪɧɨɦɟɪɚ
ȼɵɛɨɪɩɪɟɞɭɫɬɚɧɨɜɥɟɧɧɨɝɨ
Ⱦɚɧɧɵɟɩɨɞɜɟɪɝɚɸɳɢɟɫɹɭɞɚɥɟɧɢɸ9
ȼɵɤɥɸɱɟɧɢɟ$9ɢɫɬɨɱɧɢɤɚ
Ɂɜɨɧɨɤɩɨɧɨɦɟɪɭɜɬɟɥɟɮɨɧ
ɤɚɧɚɥɚɢɡɫɩɢɫɤɚ
ɉɟɪɟɡɚɩɭɫɤɦɢɤɪɨɩɪɨɰɟɫɫɨɪɚ9
ɂɡɦɟɧɟɧɢɟɩɨɪɹɞɤɚɨɬɨɛɪɚ
ɧɨɣɤɧɢɝɟ
ɋɨɯɪɚɧɟɧɢɟɱɚɫɬɨɬɪɚɞɢɨɫɬɚɧɰɢɣ
ɋɜɟɞɟɧɢɹɨɛɷɬɨɦɪɭɤɨɜɨɞɫɬɜɟ9
ɠɟɧɢɹɡɧɚɱɤɨɜɢɫɬɨɱɧɢɤɨɜ
ɇɚɛɨɪɧɨɦɟɪɚɢɡɫɩɢɫɤɚ
ɋɨɯɪɚɧɟɧɢɟɱɚɫɬɨɬɜɟɳɚ
ɂɡɦɟɧɟɧɢɟɩɨɪɹɞɤɚɨɬɨɛɪɚ
ɂɫɩɨɥɶɡɨɜɚɧɢɟɫɩɢɫɤɨɜɫɨɯɪɚ
Ɉɫɧɨɜɧɵɟɨɩɟɪɚɰɢɢ
ɧɟɧɧɵɯɧɨɦɟɪɨɜ
ɧɢɹɫɧɚɢɛɨɥɟɟɫɢɥɶ
ɠɟɧɢɹɤɥɚɜɢɲɢɫɬɨɱɧɢɤɨɜ
ɉɪɨɜɟɪɤɚɧɚɡɜɚɧɢɣɤɨɦɩɨ
ɉɪɢɟɦɜɯɨɞɹɳɟɝɨɡɜɨɧɤɚ
ɧɵɦɢɫɢɝɧɚɥɚɦɢ
ɂɫɩɨɥɶɡɨɜɚɧɢɟɫɟɧɫɨɪɧɨɣ
ɧɟɧɬɨɜɢɮɭɧɤɰɢɣ9
Ɉɬɜɟɬɧɚɜɯɨɞɹɳɢɣɡɜɨɧɨɤ
ɇɚɫɬɪɨɣɤɚɧɚɱɚɫɬɨɬɵɫ
ɩɚɧɟɥɢ
ɉɭɥɶɬɞɢɫɬɚɧɰɢɨɧɧɨɝɨ
Ʉɚɤɫɜɟɪɧɭɬɶɷɤɪɚɧɢɧɮɨɪ
ɦɨɳɧɵɦɢɫɢɝɧɚɥɚɦɢ
ɂɫɩɨɥɶɡɨɜɚɧɢɟɫɬɚɧɞɚɪɬɧɵɯ
ɭɩɪɚɜɥɟɧɢɹ9
ɤɥɚɜɢɲɫɟɧɫɨɪɧɨɣɩɚɧɟɥɢ
ɦɚɰɢɢɨɡɜɨɧɤɟ
ɉɨɥɭɱɟɧɢɟɞɨɪɨɠɧɵɯɫɨɨɛɳɟɧɢɣ
Ɂɚɳɢɬɚɢɡɞɟɥɢɹɨɬɤɪɚɠɢ9
ɂɫɩɨɥɶɡɨɜɚɧɢɟɷɤɪɚɧɨɜɫɩɢɫɤɨɜ
ɂɡɦɟɧɟɧɢɟɧɚɫɬɪɨɟɤɬɟɥɟɮɨɧɚ
ɂɫɩɨɥɶɡɨɜɚɧɢɟɩɟɪɟɪɵɜɨɜ
ɋɧɹɬɢɟɩɟɪɟɞɧɟɣɩɚɧɟɥɢ
ɂɫɩɨɥɶɡɨɜɚɧɢɟɲɤɚɥɵɜɪɟɦɟɧɢ
Ⱥɜɬɨɦɚɬɢɱɟɫɤɢɣɨɬɜɟɬɧɚ
ɧɚɧɨɜɨɫɬɧɵɟɩɪɨɝɪɚɦɦɵ
ɉɪɢɤɪɟɩɥɟɧɢɟɩɟɪɟɞɧɟɣɩɚɧɟɥɢ
Ɋɚɛɨɬɚɫɷɤɪɚɧɧɨɣɤɥɚɜɢɚɬɭɪɨɣ
ɜɯɨɞɹɳɢɣɡɜɨɧɨɤ
ɇɚɫɬɪɨɣɤɚɧɚɚɥɶɬɟɪɧɚɬɢɜ
Ɂɚɦɟɱɚɧɢɹɩɨɪɚɛɨɬɟɫ
ȼɤɥɸɱɟɧɢɟɫɢɝɧɚɥɚɜɵɡɨɜɚ
ɧɵɟɱɚɫɬɨɬɵ
ɀɄɩɚɧɟɥɶɸ
3

Ɉɝɪɚɧɢɱɟɧɢɟɫɬɚɧɰɢɣɞɥɹ
ɍɩɪɚɜɥɟɧɢɟɦɟɧɸ‘9’ɫ
ȼɨɫɩɪɨɢɡɜɟɞɟɧɢɟɦɭɡɵɤɢɫ
ȼɨɫɩɪɨɢɡɜɟɞɟɧɢɟ
ɪɟɝɢɨɧɚɥɶɧɨɝɨɩɪɨɝɪɚɦ
ɩɨɦɨɳɶɸɤɥɚɜɢɲɫɟɧ
L3RGɫɢɫɩɨɥɶɡɨɜɚɧɢɟɦ
ɫɠɚɬɵɯɮɚɣɥɨɜ
ɦɢɪɨɜɚɧɢɹ
ɫɨɪɧɨɣɩɚɧɟɥɢ
ɚɥɶɬɟɪɧɚɬɢɜɧɨɝɨɩɪɨ
ɉɟɪɟɤɥɸɱɟɧɢɟȺɜɬɨɩɨɢɫɤɚ3,
ȼɵɛɨɪɪɚɤɭɪɫɚɧɚ’9’
ɢɡɨɛɪɚɠɟɧɢɣ
ɝɪɚɦɦɧɨɝɨɨɛɟɫɩɟɱɟɧɢɹ
ȺɤɬɢɜɚɰɢɹȺɜɬɨɩɨɢɫɤɚ3,ɞɥɹ
ȼɵɛɨɪɚɭɞɢɨɜɵɯɨɞɚ
ɂɫɩɨɥɶɡɨɜɚɧɢɟɤɥɚɜɢɲ
ɂɫɩɨɥɶɡɨɜɚɧɢɟɤɥɚɜɢɲɫɟɧ
ɩɪɟɞɭɫɬɚɧɨɜɥɟɧɧɵɯɫɬɚɧɰɢɣ
ɂɫɩɨɥɶɡɨɜɚɧɢɟɚɩɩɚɪɚɬɧɵɯ
ɫɟɧɫɨɪɧɨɣɩɚɧɟɥɢ
ɫɨɪɧɨɣɩɚɧɟɥɢ
ɂɫɩɨɥɶɡɨɜɚɧɢɟɚɩɩɚɪɚɬɧɵɯ
ɑɬɟɧɢɟɷɤɪɚɧɚ
ɑɬɟɧɢɟɷɤɪɚɧɚ
ɤɧɨɩɨɤ
ɤɧɨɩɨɤ
ɉɪɨɰɟɞɭɪɚɡɚɩɭɫɤɚ
ȼɨɫɩɨɥɶɡɭɣɬɟɫɶ
ȼɨɫɩɪɨɢɡɜɟɞɟɧɢɟ
ȼɵɛɨɪɮɚɣɥɚɢɡɫɩɢɫɤɚ
ɂɫɩɨɥɶɡɨɜɚɧɢɟɌȼɬɸɧɟɪɚ
ɩɪɢɥɨɠɟɧɢɟɦɧɚ
ɫɠɚɬɵɯɚɭɞɢɨɮɚɣɥɨɜ
ɧɚɡɜɚɧɢɣɮɚɣɥɨɜ
ɂɫɩɨɥɶɡɨɜɚɧɢɟɤɥɚɜɢɲ
ɂɫɩɨɥɶɡɨɜɚɧɢɟɤɥɚɜɢɲ
ɜɚɲɟɦL3KRQHɢɥɢ
ȼɨɫɩɪɨɢɡɜɟɞɟɧɢɟɮɚɣɥɨɜɜ
ɫɟɧɫɨɪɧɨɣɩɚɧɟɥɢ
ɫɟɧɫɨɪɧɨɣɩɚɧɟɥɢ
ɫɥɭɱɚɣɧɨɦɩɨɪɹɞɤɟ
ɫɦɚɪɬɮɨɧɟ
ɑɬɟɧɢɟɷɤɪɚɧɚ
ɑɬɟɧɢɟɷɤɪɚɧɚ
ɍɫɬɚɧɨɜɤɚɞɢɚɩɚɡɨɧɚ
ɂɫɩɨɥɶɡɨɜɚɧɢɟɪɟɠɢɦɚ
ɉɪɨɰɟɞɭɪɚɡɚɩɭɫɤɚ
ɉɪɨɰɟɞɭɪɚɧɚɱɚɥɚɞɥɹɞɢɫɤɚ
ɩɨɜɬɨɪɧɨɝɨɜɨɫɩɪɨɢɡɜɟɞɟɧɢɹ
$SS5DGLR0RGH
ɋɨɯɪɚɧɟɧɢɟɫɬɚɧɰɢɣ
ɉɨɪɹɞɨɤɡɚɩɭɫɤɚɞɥɹ86%6’
ɂɫɩɨɥɶɡɨɜɚɧɢɟɤɥɚɜɢɲɫɟɧ
ɂɡɦɟɧɟɧɢɟɬɢɩɚɦɟɞɢɚɮɚɣɥɚ
ɇɚɫɬɪɨɣɤɚɜɢɞɟɨɫɢɝɧɚɥɚ
ɫɨɪɧɨɣɩɚɧɟɥɢɛɨɤɨɜɚɹ
ɉɟɪɟɤɥɸɱɟɧɢɟɪɟɠɢɦɚɩɨɢɫɤɚ
ɍɫɬɚɧɨɜɤɚɢɧɬɟɪɜɚɥɚɫɥɚɣɞɲɨɭ
ɂɫɩɨɥɶɡɨɜɚɧɢɟɚɩɩɚɪɚɬɧɵɯ
ɩɚɧɟɥɶɭɩɪɚɜɥɟɧɢɹɩɪɢɥɨ
ȼɵɛɨɪɮɚɣɥɚɢɡɫɩɢɫɤɚ
ɂɫɩɨɥɶɡɨɜɚɧɢɟɚɩɩɚɪɚɬɧɵɯ
ɤɧɨɩɨɤ
ɠɟɧɢɟɦ
ɧɚɡɜɚɧɢɣɮɚɣɥɨɜ
ɤɧɨɩɨɤ
ɉɪɨɰɟɞɭɪɚɡɚɩɭɫɤɚ
ȼɨɫɩɪɨɢɡɜɟɞɟɧɢɟɞɢɫɤɚ
ȼɵɛɨɪɮɚɣɥɚɜɫɩɢɫɤɟ
ɂɫɩɨɥɶɡɨɜɚɧɢɟɤɥɚɜɢɚɬɭɪɵ
ɂɫɩɨɥɶɡɨɜɚɧɢɟL3RG
ɂɫɩɨɥɶɡɨɜɚɧɢɟɤɥɚɜɢɲ
ɨɬɧɨɫɹɳɟɝɨɫɹɤɬɟɤɭɳɟɣ
ɇɚɫɬɪɨɣɤɚɪɚɡɦɟɪɚɢɡɨɛɪɚ
ɂɫɩɨɥɶɡɨɜɚɧɢɟɤɥɚɜɢɲ
ɤɨɦɩɨɡɢɰɢɢɤɨɧɬɟɤ
ɠɟɧɢɹɞɥɹɩɨɥɶɡɨɜɚɬɟɥɟɣ
ɫɟɧɫɨɪɧɨɣɩɚɧɟɥɢɞɥɹ
ɫɟɧɫɨɪɧɨɣɩɚɧɟɥɢɞɥɹ
ɫɦɚɪɬɮɨɧɨɜ
ɜɨɫɩɪɨɢɡɜɟɞɟɧɢɹɚɭɞɢɨ
ɫɬɧɵɣɩɨɢɫɤ
ɜɨɫɩɪɨɢɡɜɟɞɟɧɢɹɚɭɞɢɨ
Ɉɬɨɛɪɚɠɟɧɢɟɢɡɨɛɪɚɠɟɧɢɹ
ɂɫɩɨɥɶɡɨɜɚɧɢɟɤɥɚɜɢɲ
ȼɨɫɩɪɨɢɡɜɟɞɟɧɢɟɮɚɣɥɨɜɜ
ɂɫɩɨɥɶɡɨɜɚɧɢɟɤɥɚɜɢɲ
ɩɪɢɥɨɠɟɧɢɹL3KRQHɫ
ɫɟɧɫɨɪɧɨɣɩɚɧɟɥɢɞɥɹ
ɫɥɭɱɚɣɧɨɦɩɨɪɹɞɤɟ
ɲɬɵɪɶɤɨɜɵɦɪɚɡɴɟɦɨɦ
ɫɟɧɫɨɪɧɨɣɩɚɧɟɥɢɞɥɹ
ɜɨɫɩɪɨɢɡɜɟɞɟɧɢɹɜɢɞɟɨ
ɍɫɬɚɧɨɜɤɚɞɢɚɩɚɡɨɧɚ
Ɉɬɨɛɪɚɠɟɧɢɟɢɡɨɛɪɚɠɟɧɢɹ
ɜɨɫɩɪɨɢɡɜɟɞɟɧɢɹɜɢɞɟɨ
Ɉɛɨɡɧɚɱɟɧɢɹɧɚɷɤɪɚɧɟɩɪɢ
ɩɨɜɬɨɪɧɨɝɨɜɨɫɩɪɨɢɡɜɟɞɟɧɢɹ
ɜɚɲɟɝɨɩɪɢɥɨɠɟɧɢɹL3KRQH
Ɉɛɨɡɧɚɱɟɧɢɹɧɚɷɤɪɚɧɟɩɪɢ
ɫɪɚɡɴɺɦɨɦ/LJKWQLQJ
ɜɨɫɩɪɨɢɡɜɟɞɟɧɢɢɚɭɞɢɨ
ɂɡɦɟɧɟɧɢɟɬɢɩɚɦɟɞɢɚɮɚɣɥɚ
ɜɨɫɩɪɨɢɡɜɟɞɟɧɢɢɚɭɞɢɨ
Ɉɬɨɛɪɚɠɟɧɢɟɢɡɨɛɪɚɠɟɧɢɹ
Ɉɛɨɡɧɚɱɟɧɢɹɧɚɷɤɪɚɧɟɩɪɢ
ɂɫɩɨɥɶɡɨɜɚɧɢɟɚɩɩɚɪɚɬɧɵɯ
Ɉɛɨɡɧɚɱɟɧɢɹɧɚɷɤɪɚɧɟɩɪɢ
ɩɪɢɥɨɠɟɧɢɹɫɦɚɪɬɮɨɧ
ɜɨɫɩɪɨɢɡɜɟɞɟɧɢɢɜɢɞɟɨ
ɤɧɨɩɨɤ
ɜɨɫɩɪɨɢɡɜɟɞɟɧɢɢɜɢɞɟɨ
ɂɫɩɨɥɶɡɨɜɚɧɢɟɪɟɠɢɦɚ0LUURU/LQN
ɉɪɨɰɟɞɭɪɚɡɚɩɭɫɤɚ
ȼɨɫɩɪɨɢɡɜɟɞɟɧɢɟ
ɉɪɨɰɟɞɭɪɚɡɚɩɭɫɤɚ
ɂɫɩɨɥɶɡɨɜɚɧɢɟɤɥɚɜɢɲɫɟɧ
ȼɵɛɨɪɮɚɣɥɚɢɡɫɩɢɫɤɚ
ɫɨɪɧɨɣɩɚɧɟɥɢɛɨɤɨɜɚɹ
ɫɠɚɬɵɯɜɢɞɟɨɮɚɣɥɨɜ
ɇɚɫɬɪɨɣɤɚɫɥɭɱɚɣɧɨɝɨɜɨɫ
ɧɚɡɜɚɧɢɣɮɚɣɥɨɜ
ɩɚɧɟɥɶɭɩɪɚɜɥɟɧɢɹɩɪɢɥɨ
ɂɫɩɨɥɶɡɨɜɚɧɢɟɤɥɚɜɢɲ
ɩɪɨɢɡɜɟɞɟɧɢɹ
ȼɨɫɩɪɨɢɡɜɟɞɟɧɢɟɞɨɪɨɠɟɤɜ
ɠɟɧɢɟɦ
ɫɟɧɫɨɪɧɨɣɩɚɧɟɥɢ
ɍɫɬɚɧɨɜɤɚɞɢɚɩɚɡɨɧɚ
ɉɪɨɰɟɞɭɪɚɡɚɩɭɫɤɚ
ɫɥɭɱɚɣɧɨɦɩɨɪɹɞɤɟ
ɑɬɟɧɢɟɷɤɪɚɧɚ
ɩɨɜɬɨɪɧɨɝɨɜɨɫɩɪɨɢɡɜɟɞɟɧɢɹ
ɂɫɩɨɥɶɡɨɜɚɧɢɟɮɭɧɤɰɢɢ
ɍɫɬɚɧɨɜɤɚɞɢɚɩɚɡɨɧɚ
ɉɪɨɰɟɞɭɪɚɧɚɱɚɥɚɞɥɹɞɢɫɤɚ
ȼɵɛɨɪɤɨɦɩɨɡɢɰɢɣɢɥɢ
ɦɢɤɲɢɪɨɜɚɧɢɹɚɭɞɢɨ
ɩɨɜɬɨɪɧɨɝɨɜɨɫɩɪɨɢɡɜɟɞɟɧɢɹ
ɉɨɪɹɞɨɤɡɚɩɭɫɤɚɞɥɹ86%6’
ɢɫɬɨɱɧɢɤɨɜɜɢɞɟɨɫɢɝ
ɂɡɦɟɧɟɧɢɟɬɢɩɚɦɟɞɢɚɮɚɣɥɚ
ɂɫɩɨɥɶɡɨɜɚɧɢɟ$KD5DGLR
ȼɵɛɨɪɮɚɣɥɚɢɡɫɩɢɫɤɚ
ɧɚɥɚɧɚɷɤɪɚɧɟɫɩɢɫɤɨɜ
ɉɨɢɫɤɨɬɪɵɜɤɚɤɨɬɨɪɵɣ
ɂɫɩɨɥɶɡɨɜɚɧɢɟɤɥɚɜɢɲ
ɧɚɡɜɚɧɢɣɮɚɣɥɨɜ
ɜɨɫɩɪɨɢɡɜɟɞɟɧɢɹ
ɧɟɨɛɯɨɞɢɦɨɜɨɫɩɪɨɢɡɜɟɫɬɢ
ɫɟɧɫɨɪɧɨɣɩɚɧɟɥɢ
ɍɫɬɚɧɨɜɤɚɞɢɚɩɚɡɨɧɚ
ɂɫɩɨɥɶɡɨɜɚɧɢɟɮɭɧɤɰɢɣ
ɂɫɩɨɥɶɡɨɜɚɧɢɟɦɟɧɸ‘9’
ɑɬɟɧɢɟɷɤɪɚɧɚ
ɩɨɜɬɨɪɧɨɝɨɜɨɫɩɪɨɢɡɜɟɞɟɧɢɹ
L3RGɞɚɧɧɨɝɨɢɡɞɟɥɢɹɧɚL3RG
ɉɟɪɟɤɥɸɱɟɧɢɟɹɡɵɤɚɫɭɛɬɢɬɪɨɜ
ɉɪɨɰɟɞɭɪɚɡɚɩɭɫɤɚ
ɉɨɤɚɞɪɨɜɨɟɜɨɫɩɪɨɢɡɜɟɞɟɧɢɟ
ɂɡɦɟɧɟɧɢɟɫɤɨɪɨɫɬɢɜɨɫ
ɉɟɪɟɤɥɸɱɟɧɢɟɹɡɵɤɚɡɜɭɤɨ
ȾɥɹɩɨɥɶɡɨɜɚɬɟɥɟɣL3KRQHɫ
Ɂɚɦɟɞɥɟɧɧɨɟɜɨɫɩɪɨɢɡɜɟɞɟɧɢɟ
ɩɪɨɢɡɜɟɞɟɧɢɹɚɭɞɢɨɤɧɢɝɢ
ɜɨɣɞɨɪɨɠɤɢ
ɲɬɵɪɶɤɨɜɵɦɪɚɡɴɟɦɨɦ
ɂɡɦɟɧɟɧɢɟɬɢɩɚɦɟɞɢɚɮɚɣɥɚ
Ɉɬɨɛɪɚɠɟɧɢɟɫɩɢɫɤɚɨɬɧɨ
ɉɨɤɚɞɪɨɜɨɟɜɨɫɩɪɨɢɡɜɟɞɟɧɢɟ
ȾɥɹɩɨɥɶɡɨɜɚɬɟɥɟɣL3KRQHɫ
ɂɫɩɨɥɶɡɨɜɚɧɢɟɚɩɩɚɪɚɬɧɵɯ
ɫɹɳɟɝɨɫɹɤɬɟɤɭɳɟɣɤɨɦ
ɪɚɡɴɟɦɨɦ/LJKWQLQJ
Ɂɚɦɟɞɥɟɧɧɨɟɜɨɫɩɪɨɢɡɜɟɞɟɧɢɟ
ɤɧɨɩɨɤ
ɩɨɡɢɰɢɢɤɨɧɬɟɤɫɬɧɵɣɩɨɢɫɤ
Ⱦɥɹɩɨɥɶɡɨɜɚɬɟɥɟɣɫɦɚɪɬɮɨɧɨɜ
ȼɨɡɜɪɚɬɤɡɚɞɚɧɧɨɦɭɷɩɢɡɨɞɭ
ɂɫɩɨɥɶɡɨɜɚɧɢɟɚɩɩɚɪɚɬɧɵɯ
ɂɫɩɨɥɶɡɨɜɚɧɢɟɚɩɩɚɪɚɬɧɵɯ
ȼɨɡɨɛɧɨɜɥɟɧɢɟɜɨɫɩɪɨɢɡɜɟ
ɤɧɨɩɨɤ
ɤɧɨɩɨɤ
4
ɞɟɧɢɹɁɚɤɥɚɞɤɚ

ȼɵɛɨɪɩɨɥɨɠɟɧɢɹɩɪɨɫɥɭ
Ɉɬɨɛɪɚɠɟɧɢɟɤɨɞɚɨɬɦɟɧɵ
ɂɫɩɨɥɶɡɨɜɚɧɢɟ
ɋɢɫɬɟɦɧɵɟɧɚɫɬɪɨɣɤɢ
ɲɢɜɚɧɢɹ
ɪɟɝɢɫɬɪɚɰɢɢ’LY;92’
ɚɭɞɢɨɩɥɟɟɪɚ%OXHWRRWK
ɍɫɬɚɧɨɜɤɚɲɚɝɚɧɚɫɬɪɨɣɤɢ)0
Ɍɨɱɧɚɹɧɚɫɬɪɨɣɤɚɭɪɨɜɧɹ
Ⱥɜɬɨɦɚɬɢɱɟɫɤɨɟɜɨɫɩɪɨɢɡ
ɂɫɩɨɥɶɡɨɜɚɧɢɟɤɥɚɜɢɲ
Ⱥɤɬɢɜɚɰɢɹɢɫɬɨɱɧɢɤɚɚɭɞɢɨ
ɜɵɯɨɞɧɨɝɨɫɢɝɧɚɥɚɞɢɧɚɦɢɤɨɜ
ɜɟɞɟɧɢɟ‘9’
ɫɟɧɫɨɪɧɨɣɩɚɧɟɥɢ
ɫɢɝɧɚɥɚ%OXHWRRWK
Ɋɟɝɭɥɢɪɨɜɤɚɜɪɟɦɟɧɧɨɣɡɚɞɟɪɠɤɢ
ɍɫɬɚɧɨɜɤɚɜɢɞɟɨɫɢɝɧɚɥɚ
ɑɬɟɧɢɟɷɤɪɚɧɚ
ɇɚɫɬɪɨɣɤɚɩɨɫɬɨɹɧɧɨɣɩɪɨɤɪɭɬɤɢ
ɂɫɩɨɥɶɡɨɜɚɧɢɟɷɤɜɚɥɚɣɡɟɪɚ
ɤɚɦɟɪɵɡɚɞɧɟɝɨɜɢɞɚ
ɉɪɨɰɟɞɭɪɚɡɚɩɭɫɤɚ
ɇɚɫɬɪɨɣɤɚ$9ɜɯɨɞɚ
ȼɵɡɨɜɤɪɢɜɵɯɷɤɜɚɥɚɣɡɟɪɚ
ɍɫɬɚɧɨɜɤɚɮɨɪɦɚɬɚɜɵɯɨɞ
ȼɵɛɨɪɮɚɣɥɚɢɡɫɩɢɫɤɚ
ɇɚɫɬɪɨɣɤɚɤɚɦɟɪɵɡɚɞɧɟɝɨɜɢɞɚ
Ɋɟɝɭɥɢɪɨɜɤɚɤɪɢɜɵɯɷɤɜɚɥɚɣɡɟɪɚ
ɧɚɡɜɚɧɢɣɮɚɣɥɨɜ
ɇɚɫɬɪɨɣɤɚɚɤɬɢɜɚɰɢɢɤɚɦɟɪɵ
ɧɨɝɨɜɢɞɟɨɫɢɝɧɚɥɚ
ɂɫɩɨɥɶɡɨɜɚɧɢɟɷɤɜɚɥɚɣɡɟɪɚɫ
ɡɚɞɧɟɝɨɜɢɞɚ
Ɍɚɛɥɢɰɚɤɨɞɨɜɹɡɵɤɨɜɞɥɹ
ȼɨɫɩɪɨɢɡɜɟɞɟɧɢɟɮɚɣɥɨɜɜ
ɚɜɬɨɦɚɬɢɱɟɫɤɨɣɪɟɝɭɥɢɪɨɜɤɨɣ
ɍɫɬɚɧɨɜɤɚɩɨɥɹɪɧɨɫɬɢɤɚɦɟɪɵ
ɞɢɫɤɨɜ’9’
ɫɥɭɱɚɣɧɨɦɩɨɪɹɞɤɟ
Ⱥɜɬɨɦɚɬɢɱɟɫɤɚɹɪɟɝɭɥɢ
ɡɚɞɧɟɝɨɜɢɞɚ
ɍɫɬɚɧɨɜɤɚɞɢɚɩɚɡɨɧɚ
ɪɨɜɤɚɤɪɢɜɨɣɷɤɜɚɥɚɣ
Ɇɟɧɸ³ɂɡɛɪɚɧɧɨɟ´
ɇɚɫɬɪɨɣɤɚɤɚɦɟɪɵɧɚɪɟɠɢɦ
ɩɨɜɬɨɪɧɨɝɨɜɨɫɩɪɨɢɡɜɟɞɟɧɢɹ
ɡɟɪɚ$XWR(4
ȼɵɛɨɪɹɪɥɵɤɚ
ɉɨɥɟɡɪɟɧɢɹɤɚɦɟɪɵ
ɂɫɩɨɥɶɡɨɜɚɧɢɟɚɩɩɚɪɚɬɧɵɯ
ɉɟɪɟɞɜɵɩɨɥɧɟɧɢɟɦɩɪɨɰɟ
ɍɞɚɥɟɧɢɟɹɪɥɵɤɚ
Ɉɬɨɛɪɚɠɟɧɢɟɧɚɩɪɚɜɥɹɸ
ɞɭɪɵ$XWR(4
ɤɧɨɩɨɤ
ɳɢɯɞɥɹɩɨɦɨɳɢɩɪɢɩɚɪɤɨɜɤɟ
ɉɪɨɜɟɞɟɧɢɟɩɪɨɰɟɞɭɪɵ$XWR(4
Ɉɬɨɛɪɚɠɟɧɢɟɫɨɫɬɨ—
ɂɫɩɨɥɶɡɨɜɚɧɢɟ
ɍɫɬɚɧɨɜɤɚɨɬɨɛɪɚɠɟɧɢɹ
ɹɧɢɹɪɚɛɨɬɵɨɛɨɪɭ—
Ɇɟɧɸɬɟɦ
ɧɚɩɪɚɜɥɹɸɳɢɯɧɚɢɡɨ
ɢɫɬɨɱɧɢɤɚ+’0,
ɇɚɫɬɪɨɣɤɚɰɜɟɬɚɩɨɞɫɜɟɬɤɢ
ɞɨɜɚɧɢɹɚɜɬɨɦɨɛɢɥɹ
ɛɪɚɠɟɧɢɢɡɚɞɧɟɝɨɜɢɞɚ
ɂɫɩɨɥɶɡɨɜɚɧɢɟɤɥɚɜɢɲ
ȼɵɛɨɪɰɜɟɬɚɢɡɩɪɟɞɭɫɬɚɧɨɜ
Ɉɬɨɛɪɚɠɟɧɢɟɢɧɮɨɪɦɚɰɢɢ
ɇɚɫɬɪɨɣɤɚɛɟɡɨɩɚɫɧɨɝɨɪɟɠɢɦɚ
ɫɟɧɫɨɪɧɨɣɩɚɧɟɥɢ
ɥɟɧɧɵɯɰɜɟɬɨɜ
ɩɪɢɨɛɧɚɪɭɠɟɧɢɢɩɪɟɩɹɬɫɬɜɢɣ
ȼɵɤɥɸɱɟɧɢɟɞɟɦɨɧɫɬɪɚɰɢ
ɑɬɟɧɢɟɷɤɪɚɧɚ
ɋɨɡɞɚɧɢɟɩɨɥɶɡɨɜɚɬɟɥɶɫɤɨɝɨɰɜɟɬɚ
Ɉɬɨɛɪɚɠɟɧɢɟɫɨɫɬɨɹɧɢɹ
ɨɧɧɨɝɨɷɤɪɚɧɚ
ɉɪɨɰɟɞɭɪɚɡɚɩɭɫɤɚ
ȼɵɛɨɪɮɨɧɨɜɨɝɨɢɡɨɛɪɚɠɟɧɢɹ
ɪɚɛɨɬɵɩɚɧɟɥɢɤɥɢɦɚɬ
ȼɵɛɨɪɹɡɵɤɚɫɢɫɬɟɦɵ
ɉɟɪɟɤɥɸɱɟɧɢɟɧɚɮɨɧɨɜɨɟ
ɤɨɧɬɪɨɥɹ
ɂɫɩɨɥɶɡɨɜɚɧɢɟ
Ɂɚɦɟɧɚɦɟɫɬɚɦɢɢɧɞɢɤɚɰɢɢ
ɢɡɨɛɪɚɠɟɧɢɟɫɨɯɪɚɧɟɧɧɨɟ
ɢɫɬɨɱɧɢɤɚ$8;
ɫɨɫɬɨɹɧɢɹɤɥɢɦɚɬɤɨɧɬɪɨɥɹ
ɧɚɜɧɟɲɧɟɦɭɫɬɪɨɣɫɬɜɟ
ɋɬɚɧɞɚɪɬɧɵɟɨɩɟɪɚɰɢɢ
86%6’
ɂɫɩɨɥɶɡɨɜɚɧɢɟɤɥɚɜɢɲ
ɍɫɬɚɧɨɜɤɚɹɡɵɤɚɤɥɚɜɢɚ
ɍɫɬɚɧɨɜɤɚɜɪɟɦɟɧɢɢɞɚɬɵ
ȼɵɛɨɪɬɟɦɚɬɢɱɟɫɤɨɝɨɰɜɟɬɚ
ɫɟɧɫɨɪɧɨɣɩɚɧɟɥɢ
ɬɭɪɵɫɩɨɦɨɳɶɸɩɪɢɥɨ
ɇɚɫɬɪɨɣɤɚɮɭɧɤɰɢɢ³6RXQG
ȼɵɛɨɪɜɢɞɚɱɚɫɨɜ
ɑɬɟɧɢɟɷɤɪɚɧɚ
ɠɟɧɢɹɞɥɹL3KRQH
5HWULHYHU´
Ɂɚɦɟɧɚɩɪɟɞɭɫɬɚɧɨɜɥɟɧɧɨɝɨ
ɉɪɨɰɟɞɭɪɚɡɚɩɭɫɤɚ
ɍɫɬɚɧɨɜɤɚɡɜɭɤɨɜɨɝɨɫɢɝɧɚɥɚ
ɂɡɦɟɧɟɧɢɟɪɟɠɢɦɚɲɢɪɨɤɨ
ɷɤɪɚɧɚɡɚɫɬɚɜɤɢ
ɇɚɫɬɪɨɣɤɚɜɢɞɟɨɫɢɝɧɚɥɚ
Ɋɟɝɭɥɢɪɨɜɤɚɬɨɱɟɤɨɬɤɥɢɤɚ
ɮɨɪɦɚɬɧɨɝɨɷɤɪɚɧɚ
ɉɟɪɟɤɥɸɱɟɧɢɟɧɚɷɤɪɚɧ
ɉɟɪɟɤɥɸɱɟɧɢɟɷɤɪɚɧɚ
ɫɟɧɫɨɪɧɨɣɩɚɧɟɥɢɤɚɥɢ
ɡɚɫɬɚɜɤɢɫɨɯɪɚɧɟɧɧɵɣɧɚ
Ⱦɪɭɝɢɟɮɭɧɤɰɢɢ
ɭɩɪɚɜɥɟɧɢɹ
ɛɪɨɜɤɚɫɟɧɫɨɪɧɨɣɩɚɧɟɥɢ
ɜɧɟɲɧɟɦɭɫɬɪɨɣɫɬɜɟ86%6’
ȼɵɛɨɪɜɢɞɟɨɫɢɝɧɚɥɚɞɥɹ
Ɋɟɝɭɥɢɪɨɜɤɚɢɡɨɛɪɚɠɟɧɢɹ
ɂɫɩɨɥɶɡɨɜɚɧɢɟ$9ɜɯɨɞɚ
Ɋɟɩɥɢɤɚɰɢɹɧɚɫɬɪɨɟɤ
ɡɚɞɧɟɝɨɞɢɫɩɥɟɹ
ɉɪɨɫɦɨɬɪɜɟɪɫɢɢɩɪɨɲɢɜɤɢ
ɗɤɫɩɨɪɬɧɚɫɬɪɨɟɤ³Ɍɟɦɚ´
ɂɫɩɨɥɶɡɨɜɚɧɢɟɤɥɚɜɢɲ
ɇɚɫɬɪɨɣɤɚɮɭɧɤɰɢɢɡɚɳɢɬɵ
Ɉɛɧɨɜɥɟɧɢɟɩɪɨɲɢɜɤɢ
ɂɦɩɨɪɬɧɚɫɬɪɨɟɤ³Ɍɟɦɚ´
ɫɟɧɫɨɪɧɨɣɩɚɧɟɥɢ
ɨɬɤɪɚɠɢ
ɉɪɨɜɟɪɤɚɩɨɞɫɨɟɞɢɧɟɧɢɣ
ɑɬɟɧɢɟɷɤɪɚɧɚ
ɇɚɫɬɪɨɣɤɚ
ɍɫɬɚɧɨɜɤɚɩɚɪɨɥɹ
ɩɪɨɜɨɞɨɜ
ȼɜɨɞɩɚɪɨɥɹ
ɉɪɨɰɟɞɭɪɚɡɚɩɭɫɤɚ
ɜɢɞɟɨɩɪɨɢɝɪɵɜɚɬɟɥɹ
ɍɞɚɥɟɧɢɟɩɚɪɨɥɹ
ɇɚɫɬɪɨɣɤɚɜɢɞɟɨɫɢɝɧɚɥɚ
ɇɚɫɬɪɨɣɤɢɡɜɭɤɚ
ɇɚɫɬɪɨɣɤɚɩɪɢɨɪɢɬɟɬɧɵɯɹɡɵɤɨɜ
Ɂɚɛɵɬɵɣɩɚɪɨɥɶ
ɂɫɩɨɥɶɡɨɜɚɧɢɟɪɟɝɭɥɢɪɨɜɤɢ
ȼɵɛɨɪɹɡɵɤɚɫɭɛɬɢɬɪɨɜ
ɂɫɩɨɥɶɡɨɜɚɧɢɟ0,;75$;
ȼɨɫɫɬɚɧɨɜɥɟɧɢɟɧɚɫɬɪɨɟɤ
ɭɪɨɜɧɹɫɢɝɧɚɥɚɛɚɥɚɧɫɚ
ȼɵɛɨɪɹɡɵɤɚɡɜɭɤɨɜɨɣɞɨɪɨɠɤɢ
ɍɩɪɚɜɥɟɧɢɟ0,;75$;
ȼɵɛɨɪɹɡɵɤɚɦɟɧɸ
ɩɨɭɦɨɥɱɚɧɢɸɞɚɧɧɨɝɨ
ɂɫɩɨɥɶɡɨɜɚɧɢɟɪɟɝɭɥɢɪɨɜɤɢ
Ʉɥɚɜɢɲɢɫɟɧɫɨɪɧɨɣɩɚɧɟɥɢ
ɇɚɫɬɪɨɣɤɚɨɬɨɛɪɚɠɟɧɢɹ
ɢɡɞɟɥɢɹ
ɛɚɥɚɧɫɚ
ȼɵɛɨɪɷɥɟɦɟɧɬɚɞɥɹɜɨɫ
ȼɨɫɫɬɚɧɨɜɥɟɧɢɟɧɚɫɬɪɨɟɤɩɨ
ɡɧɚɱɤɚɪɚɤɭɪɫɚ
ȼɪɟɦɟɧɧɨɟɩɪɢɝɥɭɲɟɧɢɟ
ɭɦɨɥɱɚɧɢɸ
ɩɪɨɢɡɜɟɞɟɧɢɹɤɨɦɩɨɡɢɰɢɣ
ɇɚɫɬɪɨɣɤɚɫɨɨɬɧɨɲɟɧɢɹɫɬɨɪɨɧ
ɨɫɥɚɛɥɟɧɢɟɡɜɭɤɚ
ȼɵɛɨɪɤɨɦɩɨɡɢɰɢɣɤɨɬɨɪɵɟ
ɇɚɫɬɪɨɣɤɚɡɚɳɢɬɵɨɬɞɟɬɟɣ
Ɇɟɪɵɩɪɟɞɨɫɬɨɪɨɠɧɨɫɬɢ
ɇɚɫɬɪɨɣɤɚɭɪɨɜɧɟɣɢɫɬɨɱɧɢɤɨɜ
ɧɟɧɭɠɧɨɜɨɫɩɪɨɢɡɜɨɞɢɬɶ
ɍɫɬɚɧɨɜɤɚɤɨɞɚɢɭɪɨɜɧɹ
ȼɚɲɟɧɨɜɨɟɢɡɞɟɥɢɟɢɞɚɧ
Ɋɟɝɭɥɢɪɨɜɤɚɮɢɥɶɬɪɚ
Ɉɩɪɟɞɟɥɟɧɢɟɮɪɚɝɦɟɧɬɚ
Ɉɬɨɛɪɚɠɟɧɢɟɪɟɝɢɫɬɪɚɰɢɨɧ
Ɋɟɝɭɥɢɪɨɜɤɚɜɵɜɨɞɚɡɜɭɤɚɞɥɹ
ɧɨɟɪɭɤɨɜɨɞɫɬɜɨ
ɞɥɹɜɨɫɩɪɨɢɡɜɟɞɟɧɢɹ
ɩɟɪɟɞɧɢɯɢɡɚɞɧɢɯɞɢɧɚɦɢɤɨɜ
ɧɨɝɨɤɨɞɚ‘LY;92’
ȼɚɠɧɵɟɦɟɪɵɛɟɡɨɩɚɫɧɨɫɬɢ
ɇɚɫɬɪɨɣɤɚɭɡɨɪɚɫɜɟɬɨɢɧɞɢɤɚɰɢɢ
ɂɫɩɨɥɶɡɨɜɚɧɢɟɜɵɯɨɞɚɫɚɛɜɭɮɟɪɚ
5

ɍɫɬɚɧɨɜɤɚɫɩɨɦɨɳɶɸɞɟɪɠɚɬɟɥɹ
ɉɪɢɦɟɱɚɧɢɟɨɩɪɨɫɦɨɬɪɟɜɢɞɟɨ
ɉɨɞɤɥɸɱɟɧɢɟ
ɍɫɬɚɧɨɜɤɚɫɢɫɩɨɥɶɡɨɜɚɧɢɟɦ
ɉɪɢɦɟɱɚɧɢɟɨɩɪɨɫɦɨɬɪɟ
Ɇɟɪɵɩɪɟɞɨɫɬɨɪɨɠɧɨɫɬɢ
ɛɨɤɨɜɵɯɨɬɜɟɪɫɬɢɣɞɥɹ
‘9’9LGHR
ɩɟɪɟɞɩɨɞɤɥɸɱɟɧɢɟɦɫɢɫɬɟɦɵ
ɜɢɧɬɨɜɞɚɧɧɨɝɨɢɡɞɟɥɢɹ
ɉɪɢɦɟɱɚɧɢɟɨɛɢɫɩɨɥɶɡɨɜɚ
ɉɟɪɟɞɭɫɬɚɧɨɜɤɨɣɫɢɫɬɟɦɵ
ɍɫɬɚɧɨɜɤɚɦɢɤɪɨɮɨɧɚ
ɧɢɢɮɚɣɥɨɜ03
ɑɬɨɛɵɢɡɛɟɠɚɬɶɩɨɜɪɟɠɞɟɧɢɣ
ɍɫɬɚɧɨɜɤɚɧɚɫɨɥɧɰɟɡɚɳɢɬɧɵɣ
ȼɧɢɦɚɧɢɟɫɢɧɢɣɛɟɥɵɣɩɪɨɜɨɞ
ɤɨɡɵɪɟɤ
ɇɚɞɥɟɠɚɳɟɟɢɫɩɨɥɶɡɨɜɚ
ɉɨɞɤɥɸɱɟɧɢɟɫɢɥɨɜɨɝɨɲɧɭɪɚ
ɍɫɬɚɧɨɜɤɚɧɚɪɭɥɟɜɭɸɤɨɥɨɧɤɭ
ɧɢɟɀɄɷɤɪɚɧɚ
Ɋɟɝɭɥɢɪɨɜɤɚɭɝɥɚɦɢɤɪɨɮɨɧɚ
ɈɛɪɚɳɟɧɢɟɫɀɄɷɤɪɚɧɨɦ
ɉɨɞɤɥɸɱɟɧɢɟɤɨɬɞɟɥɶɧɨ
ɀɢɞɤɨɤɪɢɫɬɚɥɥɢɱɟɫɤɢɣɀɄɷɤɪɚɧ
ɩɪɢɨɛɪɟɬɟɧɧɨɦɭɭɫɢɥɢ
ɉɪɢɥɨɠɟɧɢɟ
ɍɯɨɞɡɚɀɄɷɤɪɚɧɨɦ
ɬɟɥɸɦɨɳɧɨɫɬɢ
ɉɨɢɫɤɢɭɫɬɪɚɧɟɧɢɟɧɟɢ
ɋɜɟɬɨɞɢɨɞɧɚɹɩɨɞɫɜɟɬɤɚ
ɉɪɢɤɪɟɩɥɟɧɢɟɢɞɟɧɬɢɮɢɤɚ
ɫɩɪɚɜɧɨɫɬɟɣ
ɋɟɪɢɣɧɵɣɧɨɦɟɪ
ɰɢɨɧɧɵɯɧɚɤɥɟɟɤɤ86%
ɋɨɨɛɳɟɧɢɹɨɛɨɲɢɛɤɚɯ
Ɍɟɯɧɢɱɟɫɤɢɟɯɚɪɚɤɬɟɪɢɫɬɢɤɢ
ɤɚɛɟɥɹɦ
Ɉɛɪɚɳɟɧɢɟɢɭɯɨɞɡɚɞɢɫɤɚɦɢ79
ɉɨɞɤɥɸɱɟɧɢɟL3KRQHɫɪɚɡɴ
ȼɫɬɪɨɟɧɧɵɣɩɪɢɜɨɞɢɭɯɨɞɡɚɧɢɦ79
ɺɦɨɦ/LJKWQLQJ
ɍɫɥɨɜɢɹɨɤɪɭɠɚɸɳɟɣɫɪɟɞɵ
ɉɨɞɤɥɸɱɟɧɢɟɱɟɪɟɡ86%ɩɨɪɬ
ɞɥɹɜɨɫɩɪɨɢɡɜɟɞɟɧɢɹɞɢɫɤɚ79
ɉɨɞɤɥɸɱɟɧɢɟɱɟɪɟɡ+’0,ɩɨɪɬ
ȼɨɫɩɪɨɢɡɜɨɞɢɦɵɟɞɢɫɤɢ
ɉɨɞɤɥɸɱɟɧɢɟL3KRQHɫ
‘9’9LGHRɢ&’
ɲɬɵɪɶɤɨɜɵɦɪɚɡɴɟɦɨɦ
Ⱦɢɫɤɢɡɚɩɢɫɚɧɧɵɟɜɮɨɪɦɚɬɟ
ɉɨɞɤɥɸɱɟɧɢɟɱɟɪɟɡ$8;ɜɯɨɞ
$9&+’
ɉɨɞɤɥɸɱɟɧɢɟɱɟɪɟɡ5*%ɜɯɨɞ
ȼɨɫɩɪɨɢɡɜɟɞɟɧɢɟɞɜɭɯɫɬɨɪɨɧ
ɧɟɝɨɞɢɫɤɚ
ɉɨɞɤɥɸɱɟɧɢɟɭɫɬɪɨɣɫɬɜɚ
‘ROE\’LJLWDO
$QGURLG
ɉɨɞɪɨɛɧɚɹɢɧɮɨɪɦɚɰɢɹɨ
ɉɨɞɤɥɸɱɟɧɢɟɭɫɬɪɨɣɫɬɜɚ
$QGURLGɱɟɪɟɡ+’0,ɩɨɪɬ
ɜɨɫɩɪɨɢɡɜɨɞɢɦɵɯɧɨɫɢ
ɉɨɞɤɥɸɱɟɧɢɟɭɫɬɪɨɣɫɬɜɚ
ɬɟɥɹɯɢɧɮɨɪɦɚɰɢɢ
$QGURLGɱɟɪɟɡ0+/ɩɨɪɬ
ɋɨɜɦɟɫɬɢɦɨɫɬɶ
ɉɨɞɤɥɸɱɟɧɢɟɭɫɬɪɨɣɫɬɜɚ
Ɍɚɛɥɢɰɚɫɨɜɦɟɫɬɢɦɨɫɬɢɧɨɫɢ
ɬɟɥɟɣɢɧɮɨɪɦɚɰɢɢ
0LUURU/LQN
%OXHWRRWK
Ɏɢɤɫɚɰɢɹɜɵɫɨɤɨɫɤɨɪɨɫɬ
6’+&
ɧɨɝɨɤɚɛɟɥɹ+’0,
:0$:09
ɉɨɞɤɥɸɱɟɧɢɟɤɚɦɟɪɵɡɚɞ
‘LY;
ɧɟɝɨɜɢɞɚ
$$&
ɉɨɞɤɥɸɱɟɧɢɟɜɧɟɲɧɟɝɨ
$QGURLG
ɜɢɞɟɨɤɨɦɩɨɧɟɧɬɚ
ɂɫɩɨɥɶɡɨɜɚɧɢɟ$9ɜɯɨɞɚ
0LUURU/LQN
ɂɫɩɨɥɶɡɨɜɚɧɢɟ$8;ɜɯɨɞɚ
ɉɨɞɪɨɛɧɚɹɢɧɮɨɪɦɚɰɢɹɨ
ɉɨɞɤɥɸɱɟɧɢɟɭɫɬɪɨɣɫɬɜɚ+’0,
ɩɨɞɫɨɟɞɢɧɟɧɧɵɯɭɫɬɪɨɣ
ɉɨɞɤɥɸɱɟɧɢɟɡɚɞɧɟɝɨɞɢɫɩɥɟɹ
ɫɬɜɚɯL3RG
ɉɪɢɢɫɩɨɥɶɡɨɜɚɧɢɢɡɚɞɧɟɝɨ
L3RGɢL3KRQH
ɞɢɫɩɥɟɹɩɨɞɤɥɸɱɟɧɧɨɝɨɤ
/LJKWQLQJ
ɡɚɞɧɟɦɭɜɢɞɟɨɜɵɯɨɞɭ
$SS6WRUH
L26
ɍɫɬɚɧɨɜɤɚ
L7XQHV
Ɇɟɪɵɩɪɟɞɨɫɬɨɪɨɠɧɨɫɬɢ
ɂɫɩɨɥɶɡɨɜɚɧɢɟɤɨɧɬɟɧɬɚ
ɩɟɪɟɞɭɫɬɚɧɨɜɤɨɣ
ɫɜɹɡɚɧɧɨɝɨɧɚɨɫɧɨɜɟ
ɉɟɪɟɞɭɫɬɚɧɨɜɤɨɣ
ɩɪɢɥɨɠɟɧɢɹ
ɍɫɬɚɧɨɜɤɚɞɚɧɧɨɝɨɢɡɞɟɥɢɹ
$KD5DGLR
Ɋɟɤɨɦɟɧɞɚɰɢɢɩɨɭɫɬɚɧɨɜɤɟ
+’0,
6
ɉɟɪɟɞɭɫɬɚɧɨɜɤɨɣɫɢɫɬɟɦɵ
0+/
User manual
View the manual for the Pioneer AVH-X8600BT here, for free. This manual comes under the category car radios and has been rated by 1 people with an average of a 7.8. This manual is available in the following languages: English. Do you have a question about the Pioneer AVH-X8600BT or do you need help?
Ask your question here
Pioneer AVH-X8600BT specifications
Below you will find the product specifications and the manual specifications of the Pioneer AVH-X8600BT.
The Pioneer AVH-X8600BT is a car radio with a variety of features to enhance the listening experience. It can play MP3 and CD-R audio formats as well as DVD Audio, and has a preset station memory of 24. The radio is equipped with an equalizer that provides 13 bands for optimal sound adjustment to the user’s preferences. The device also supports Radio Data System (RDS) to display additional information, such as song titles and artist names. The radio can receive signals from both AM and FM bands for greater station variety.
The built-in display is 7 inches in size and has an aspect ratio of 16:9, with a display resolution of 800 x 480 pixels. This screen allows users to view album art or video content while listening to audio. The audio decoders of the Pioneer AVH-X8600BT include Dolby Digital technology, providing a high-quality audio experience.
Overall, this car radio aims to provide a versatile and enjoyable listening experience through its advanced features, including the ability to adjust sound preferences and view additional information while listening to music. It provides a reliable and durable option for those seeking a high-quality car audio system.
Preset stations quantity
24
Compatible memory cards
SD, SDHC
General
| Brand | Pioneer |
| Model | AVH-X8600BT | AVH-X8600BT |
| Product | car radio |
| EAN | 4988028238260 |
| Language | English |
| Filetype | User manual (PDF) |
Multimedia
| MP3 playback | Yes |
| CD-R playback | Yes |
| CD-RW playback | — |
| DVD Audio playback | Yes |
| Audio decoders | Dolby Digital |
| USB direct playback | Yes |
| Audio formats supported | AAC, FLAC, MP3, WMA |
| Video formats supported | DIVX, H.264, MKV, MPEG1, MPEG2, MPEG4 |
Radio
| Preset stations quantity | 24 |
| Radio Data System (RDS) | Yes |
| Supported radio bands | AM, FM |
| FM radio | Yes |
Performance
| Equalizer | Yes |
| Equalizer bands quantity | 13 |
| Product colour | Black |
| Ready for iPod | Yes |
| Removable front panel | Yes |
| DVD region code | 2 |
| Analog signal format system | NTSC, PAL, SECAM |
| Smartphone/tablet remote support | Yes |
| Steering mounting remote control capability | Yes |
| Disc types supported | CD, DVD |
| DIN size | 2 DIN |
| iPod Direct Control | Yes |
| Audio output channels | 4.0 channels |
| Maximum power per channel | 50 W |
Display
| Built-in display | Yes |
| Display diagonal | 7 « |
| Aspect ratio | 16:9 |
| Display resolution | 800 x 480 pixels |
| Display number of colours | 210000 colours |
| Touchscreen | Yes |
| Widescreen | Yes |
| Display tilting | Yes |
| On Screen Display (OSD) | Yes |
| Rear-view camera ready | Yes |
| Number of OSD languages | 18 |
| On Screen Display (OSD) languages | CZE, DAN, DUT, ENG, ESP, FIN, FRE, GRE, HUN, ITA, NOR, POL, POR, RUS, SWE, TUR |
Ports & interfaces
| AUX in | Yes |
| Line outputs (RCA) | 3 |
| Bluetooth | Yes |
| ISO connector | Yes |
| AV input | Yes |
| Apple docking compatibility | iPhone 4, iPhone 4S, iPhone 5, iPhone 5c, iPhone 5s, iPod Touch 5 |
| USB ports quantity | 2 |
| Subwoofer out | Yes |
| Bluetooth functions | Handsfree calling |
| USB version | 2.0 |
| USB port | Yes |
Memory
| Compatible memory cards | SD, SDHC |
Packaging content
| Cables included | USB |
| Microphone included | Yes |
| Remote control included | No |
Technical details
| Output voltage | 4 V |
| Video out | 1 |
Call management
| Phonebook capacity | 1000 entries |
show more
Frequently Asked Questions
Can’t find the answer to your question in the manual? You may find the answer to your question in the FAQs about the Pioneer AVH-X8600BT below.
What is bluetooth?
Bluetooth is a way of exchanging data wirelessly between electronic devices via radio waves. The distance between the two devices that exchange data can in most cases be no more than ten metres.
My car radio does not turn on, now what?
If your car radio does not turn on, it will not receive any power. Check that the red wire is connected to the contact power supply and the yellow wire to the constant power supply.
What is the screen size of the Pioneer AVH-X8600BT?
The screen size of the Pioneer AVH-X8600BT is 7 «.
When is my volume too loud?
A volume above 80 decibels can be harmful to hearing. When the volume exceeds 120 decibels, direct damage can even occur. The chance of hearing damage depends on the listening frequency and duration.
What is the screen resolution of the display of the Pioneer AVH-X8600BT?
The screen resolution of the Pioneer AVH-X8600BT is 800 x 480 pixels.
How can I best clean my car radio?
A slightly damp cleaning cloth or soft, dust-free cloth works best to remove fingerprints. Dust in hard-to-reach places is best removed with compressed air.
What is the difference between FM and AM?
FM stands for Frequency Modulation and AM stands for Amplitude Modulation. The biggest difference between FM radio stations compared to AM radio stations is the sound quality.
Is the manual of the Pioneer AVH-X8600BT available in English?
Yes, the manual of the Pioneer AVH-X8600BT is available in English .
Is your question not listed? Ask your question here