

Operation Manual
Mode d’emploi
Manuale d’istruzioni
Manual de instrucciones
Bedienungsanleitung
Bedieningshandleiding
Руководство по эксплуатации
CD RDS RECEIVER
AUTORADIO CD RDS
SINTOLETTORE CD RDS
REPRODUCTOR DE CD CON RECEPTOR RDS
CD RDS-EMPFÄNGER
CD RDS-ONTVANGER
CD RDS ПРИЕМНИК
DEH-1200MP
DEH-1220MP
English Français Italiano Español Deutsch Nederlands
Русский

Раздел
01
Перед началом эксплуатации
Благодарим Вас
за покупку этого из-
делия компании PIONEER.
Для обеспечения правильности эксплуатации внимательно прочитайте данное руководство перед началом использования
изделия. Особенно важно, чтобы Вы прочли и соблюдали инструкции, помеченные
в данном руководстве заголовками ПРЕД-
УПРЕЖДЕНИЕ и ВНИМАНИЕ.
Держите
данное руководство под рукой для обращения к нему в будущем.
Если вы желаете утилизировать данное
изделие, не выбрасывайте его вместе с
обычным бытовым мусором. Существует
отдельная система сбора использованных
электронных изделий в соответствии с законодательством, которая предполагает соответствующее обращение, возврат и
переработку.
Частные лица в странах Евросоюза, Швейцарии и Норвегии могут бесплатно возвращать использованные электронные
изделия в специализированные пункты
приема или в магазин (при покупке аналогичного нового устройства).
Если Ваша страна не указана в приведенном выше перечне, обращайтесь в органы
местного управления за инструкциями по
правильной утилизации продукта.
Тем самым Вы обеспечите утилизацию
Вашего изделия с соблюдением обязательных процедур по обработке, утилизации и
вторичной переработке и, таким образом,
предотвратите потенциальное негативное
воздействие на окружающую среду и здоровье людей.
В случае возникновения
неполадок
При неполадках в работе этого изделия
свяжитесь с торговым представителем
компании-производителя или с ближайшим
сервисным пунктом Pioneer.
Сведения об этом устройстве
Частоты тюнера в этом устройстве распределены для использования в Западной
Европе, Азии, на Ближнем Востоке, в
Африке и Океании. При использовании в
других регионах качество приема может
быть плохим. Функция RDS (радиовещательная система передачи информации) доступна только в регионах, в которых
имеются FM-станции, передающие сигналы RDS.
ВНИМАНИЕ
! Не допускайте попадания жидкости на
данное устройство. Это может повлечь поражение электрическим током. Кроме того,
попадание жидкости в устройство может
стать причиной его выхода из строя,
перегрева и появления дыма.
! “ЛАЗЕРНЫЙ ПРОДУКТ КЛАССА 1”
Это изделие оснащено лазерным диодом
класса выше 1. В целях обеспечения полной безопасности не снимайте какие-либо
крышки и не пытайтесь проникнуть внутрь
изделия. Ремонт должен выполняться квалифицированным специалистом.
! Pioneer CarStereo-Pass предназначен для
использования только в Германии.
! Всегда сохраняйте уровень громкости до-
статочно низким, чтобы были слышны
звуки извне.
! Не допускайте воздействия влажности на
изделие.
! При отключении или разряде аккумулятор-
ной батареи память предварительных настроек будет стерта.
80
Ru
Управление данным устройством
Раздел
02
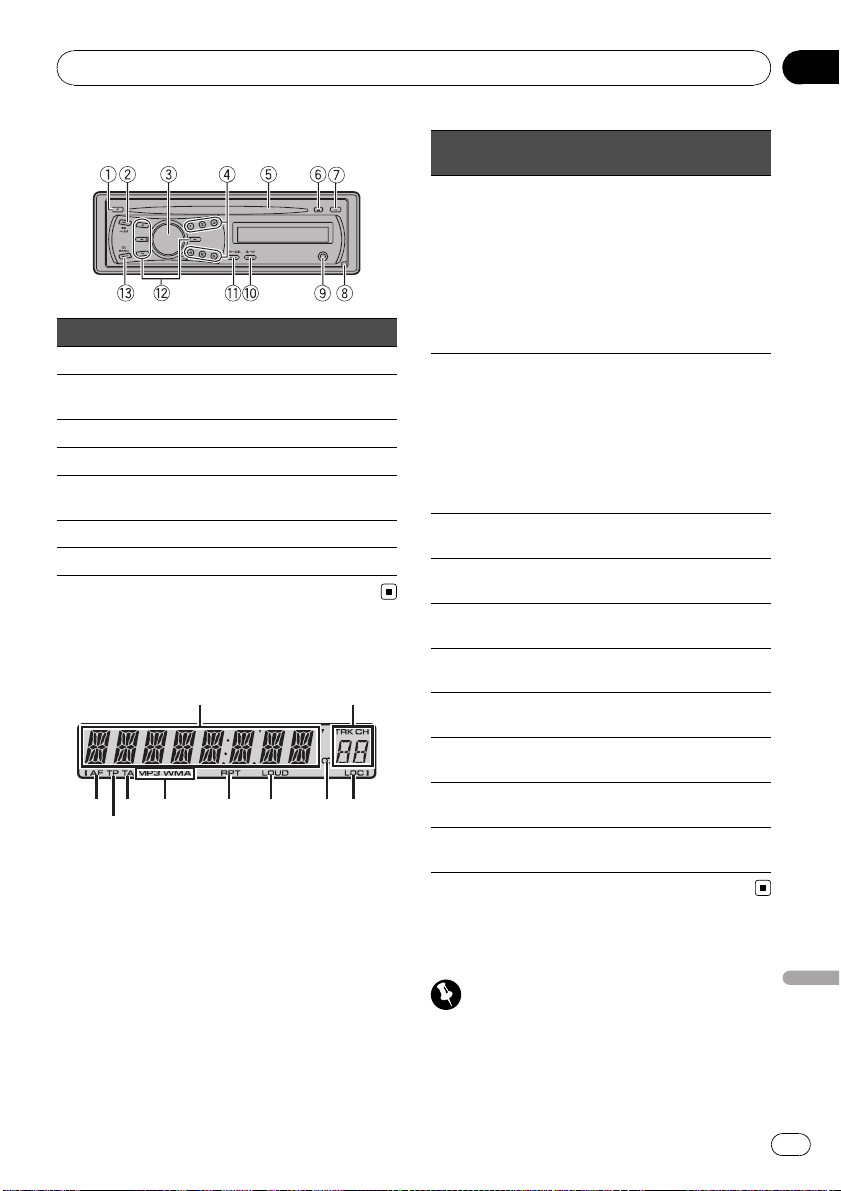
Основное устройство
Кнопка Кнопка
1 F (функция) 8 Cнятие панели
2 EQ/LOUD 9
3 SRC/OFF a TA/AF
4 от 1 до 6 b DISP/SCRL
Щель для загрузки
5
диска
6 h (извлечение) d BAND/ESC
7 A (аудио)
Вход AUX (стереоразъем 3,5 мм)
c a/b/c/d
Индикация на дисплее
1
3
4
5
6
7 8 9 a
2
Индикатор
Основной
1
сектор дисплея
Номер
предварительной
2
настройки/номер
дорожки
3 AF
4 TP
5 TA
MP3/
6
WMA
7 RPT
8 LOUD
5
9
(стерео)
a LOC
Состояние
! Тюнер: диапазон и частота
! RDS: название программы,
PTY-информация и прочая
текстовая информация
! Встроенный проигрыватель
компакт-дисков: время, прошедшее с начала воспроизведения, и текстовая
информация
! Номер дорожки или номер
предварительной настройки.
! Если выбрана дорожка с
номером от 100 и выше, с
левой стороны индикатора
номера дорожки будет отображаться символ d.
Включена функция AF (поиск
альтернативных частот).
Тюнер настроен на TP-станцию.
Включена функция приема дорожных сводок.
Тип текущего диска.
Включена функция повторного
воспроизведения.
Включена функция тонкомпенсации.
Вещание на выбранной частоте ведется в режиме стерео.
Включена настройка с местным
поиском.
Основные операции
Важно
! Соблюдайте осторожность при снятии и
установке передней панели.
! Оберегайте переднюю панель от сильных
ударов.
Ru
Русский
81
Раздел
02
Управление данным устройством
! Предохраняйте переднюю панель от воз-
действия прямого солнечного света и высоких температур.
! Прежде чем снять переднюю панель, обя—
зательно отсоедините все кабели и устройства, чтобы избежать повреждения
устройства или внутренней отделки салона.
Снятие передней панели в целях защиты от
кражи
1 Нажмите кнопку снятия панели, чтобы от—
соединить переднюю панель.
2 Потяните переднюю панель на себя и снимите
ее.
3 Поместите переднюю панель в защитный
футляр, предназначенный для безопасного
хранения.
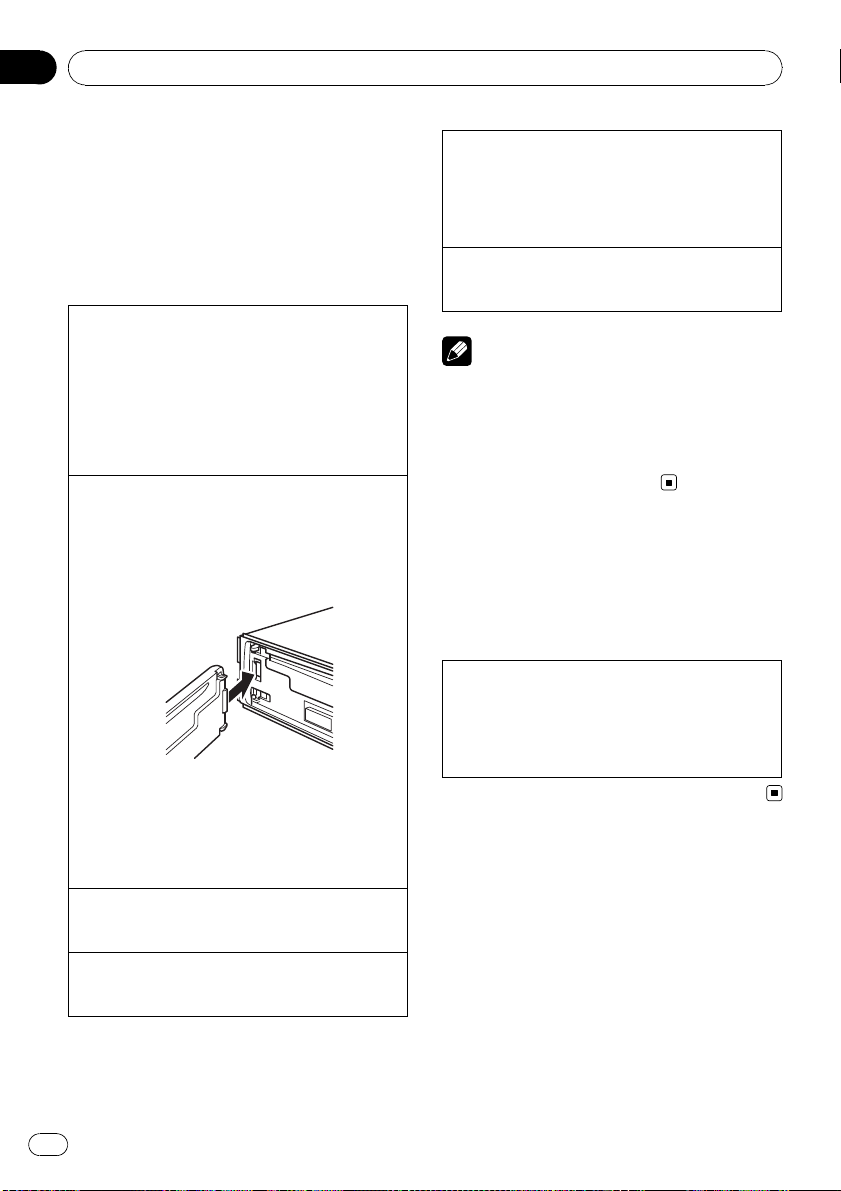
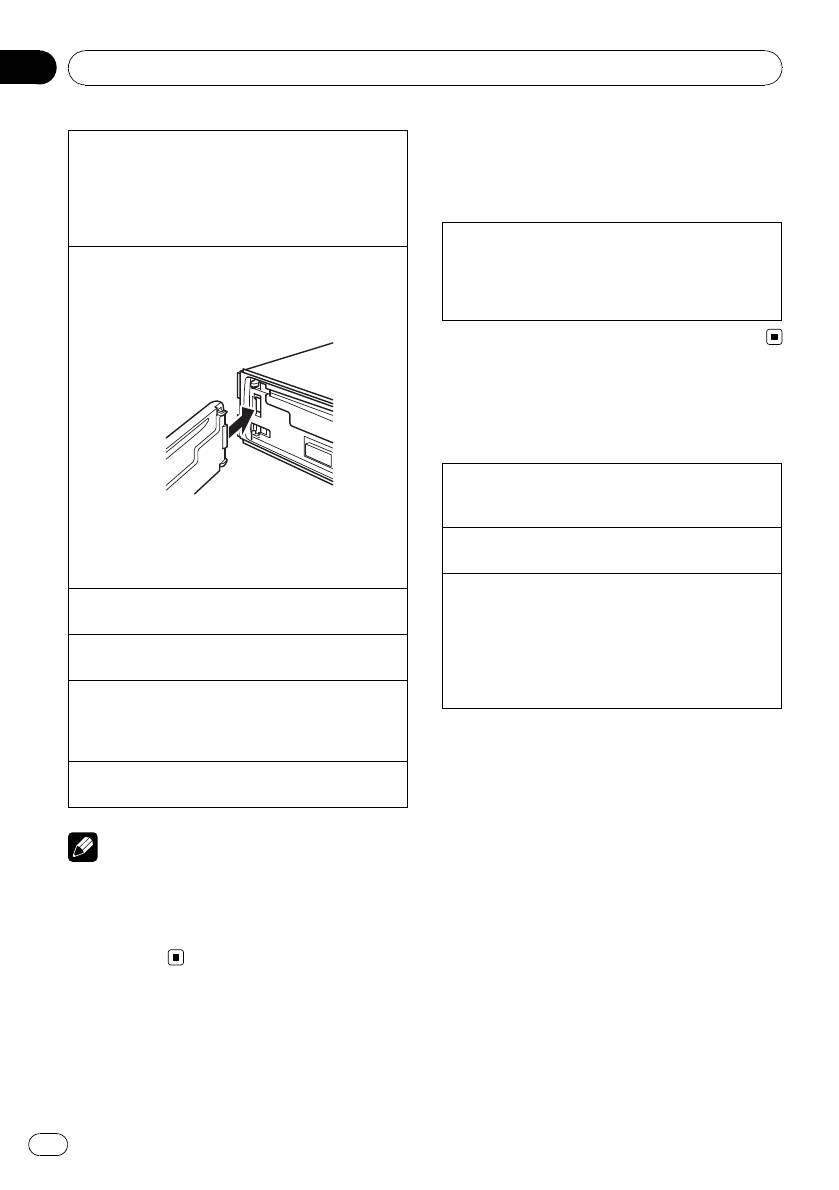
Установка передней панели
1 Переместите переднюю панель влево до
щелчка.
Передняя панель крепится к основному устройству с левой стороны. Убедитесь, что
передняя панель закреплена на основном устройстве.
2 Нажмите на правый край передней панели и
зафиксируйте ее.
Если прикрепить переднюю панель к основному устройству не удается, попробуйте еще
раз. Однако следует избегать чрезмерного
усилия, так как это можно повредить переднюю панель.
Включение устройства
1 Нажмите кнопку SRC/OFF, чтобы включить ус—
тройство.
Выключение устройства
1 Нажмите и удерживайте кнопку SRC/OFF, пока
устройство не выключится.
Выбор источника сигнала
1 Нажимайте кнопку SRC/OFF для выбора из
следующих функций:
TUNER (тюнер)—CD (встроенный проигрыватель компакт-дисков)—AUX (вспомогательное устройство (AUX))
Регулировка громкости
1 Поворачивайте SRC/OFF, чтобы отрегулиро—
вать громкость.
Примечание
Когда голубой/белый провод этого устройства
подключен к реле панели управления автомобильной антенной, антенна на автомобиле
выдвигается при включении источника сигнала этого устройства. Чтобы втянуть антенну,
выключите источник сигнала.
Элементы меню, общие
для настройки функций/
аудиопараметров/
начальных настроек
Возврат в исходный режим
Отмена вывода меню начальных настроек
1 Нажмите BAND/ESC.
Вы также можете отменить начальные настройки, удерживая кнопку SRC/OFF до тех
пор, пока устройство не выключится.
82
Ru

Управление данным устройством
Раздел
02
Тюнер
Основные операции
Выбор диапазона
1 Нажимайте BAND/ESC, пока не отобразится
нужный диапазон (F1, F2 для FM или MW/
LW).
Ручная настройка (пошаговая)
1 Нажмите кнопку c или d.
Поиск
1 Нажмите и удерживайте кнопку c или d, а
затем отпустите.
Вы можете отменить настройку с поиском
кратким нажатием c или d.
При нажатии и удерживании кнопки c или d
можно пропускать радиостанции. Настройка с
поиском начнется, как только Вы отпустите
кнопку c или d .
Запоминание и повторный
вызов радиостанций
В памяти устройства можно сохранить до
шести радиостанций для последующего
быстрого вызова.
% Чтобы сохранить в памяти нужную
радиостанцию, нажмите одну из кнопок
предварительной настройки (с 1 по 6) и
удерживайте ее, пока номер предварительной настройки не прекратит мигать.
Сохраненную частоту радиостанции можно
вызвать нажатием кнопки предварительной настройки.
# Для вызова частот радиостанций нажмите
a или b.
Переключение режима RDS
дисплея
RDS (радиовещательная система передачи информации) передает цифровую информацию, облегчающую поиск
радиостанций.
% Нажмите DISP/SCRL.
Название программы—Информация PTY
—Частота
# На дисплее на восемь секунд появится информация PTY и частота.
Список PTY
NEWS (новости), AFFAIRS (текущая информация),
INFO (информация), SPORT (спорт), WEATHER (по—
года), FINANCE (финансы), POP MUS (поп-музыка), ROCK MUS (рок-музыка), EASY MUS (легкая
музыка), OTH MUS (прочие музыкальные жанры),
JAZZ (джаз), COUNTRY (кантри), NAT MUS (национальная музыка), OLDIES (золотая коллекция),
FOLK MUS (народная музыка), L.CLASS (легкая
классическая музыка), CLASSIC (классическая музыка), EDUCATE (образовательные программы),
DRAMA (постановки), CULTURE (культура), SCIENCE (наука), VARIED (разное), CHILDREN (детские
программы), SOCIAL (социальные вопросы), RELIGION (религиозные программы), PHONE IN (токшоу), TOURING (путешествия), LEISURE (отдых),
DOCUMENT (документальные программы)
Выбор альтернативных частот
Если качество приема низкое, устройство
автоматически выполнит поиск другой
станции в той же сети.
% Нажмите и удерживайте кнопку
TA/AF, чтобы включить или выключить
функцию AF.
Использование функции Поиск PI
(по идентификатору программы)
Если подходящую станцию найти не удается или качество приема ухудшается, устройство автоматически выполнит поиск
другой станции со сходной программой. Во
время поиска отображается PI SEEK и приглушается звук.
Русский
Ru
83
Loading…

English Français Italiano Español Deutsch Nederlands
CD RDS RECEIVER
AUTORADIO CD RDS
SINTOLETTORE CD RDS
REPRODUCTOR DE CD CON RECEPTOR RDS
CD RDS-EMPFÄNGER
CD RDS-ONTVANGER
CD RDS ПРИЕМНИК
DEH-1200MP
DEH-1220MP
Operation Manual
Mode d’emploi
Manuale d’istruzioni
Manual de instrucciones
Bedienungsanleitung
Русский
Bedieningshandleiding
Руководство по эксплуатации
Section
01
Before You Start
Thank you for purchasing this PIONEER
Middle East, Africa and Oceania. Use in other
product.
areas may result in poor reception. The RDS
To ensure proper use, please read through this
(radio data system) function operates only in
manual before using this product. It is espe-
areas with FM stations broadcasting RDS sig-
cially important that you read and observe
nals.
WARNINGs and CAUTIONs in this manual.
Please keep the manual in a safe and accessible
CAUTION
place for future reference.
! Do not allow this unit to come into contact
with liquids. Electrical shock could result.
Also, damage to this unit, smoke, and over-
heating could result from contact with liquids.
! “CLASS 1 LASER PRODUCT”
This product contains a laser diode of higher
class than 1. To ensure continued safety, do
If you want to dispose this product, do not mix
not remove any covers or attempt to gain ac-
it with general household waste. There is a se-
cess to the inside of the product. Refer all ser-
parate collection system for used electronic
vicing to qualified personnel.
products in accordance with legislation that re-
! The Pioneer CarStereo-Pass is for use only in
quires proper treatment, recovery and recy-
Germany.
cling.
! Always keep the volume low enough to hear
outside sounds.
Private households in the member states of
! Avoid exposure to moisture.
the EU, in Switzerland and Norway may return
! If the battery is disconnected or discharged,
their used electronic products free of charge
any preset memory will be erased.
to designated collection facilities or to a retai-
ler (if you purchase a similar new one).
For countries not mentioned above, please
contact your local authorities for the correct
method of disposal.
By doing so you will ensure that your disposed
product undergoes the necessary treatment,
recovery and recycling and thus prevent po—
tential negative effects on the environment
and human health.
In case of trouble
Should this product fail to operate properly,
please contact your dealer or nearest author-
ized Pioneer Service Station.
About this unit
The tuner frequencies on this unit are allo—
cated for use in Western Europe, Asia, the
2
En
Section
Operating this unit
02
English
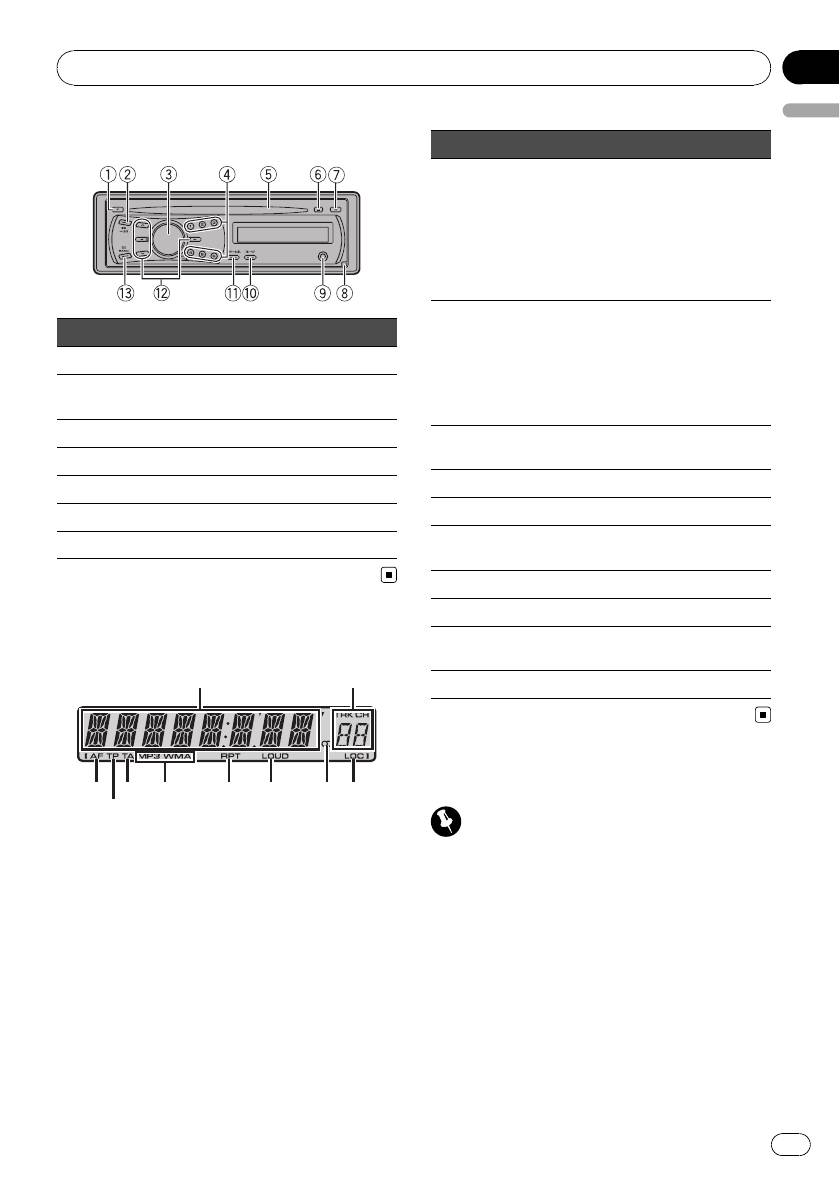
Head unit
Indicator State
! Tuner: band and frequency
! RDS: program service name,
Main dis-
PTY information and other lit-
1
play sec-
eral information
tion
! Built-in CD player: elapsed
playback time and text infor-
mation
! The track number or preset
Button Button
Preset
number.
number/
1 F (function) 8 Detach
! If a track number 100 or more
2
track num-
is selected, d on the left of
AUX input jack (3.5
ber
the track number indicator
2 EQ/LOUD 9
mm stereo jack)
will light.
3 SRC/OFF a TA/AF
AF (alternative frequencies
3 AF
search) function is on.
4 1 to 6 b DISP/SCRL
4 TP A TP station is tuned in.
5 Disc loading slot c a/b/c/d
5 TA TA function is on.
6 h (eject) d BAND/ESC
MP3/
The type of the currently playing
7 A (audio)
6
WMA
disc.
7 RPT Repeat play is turned on.
8 LOUD Loudness is on.
The selected frequency is being
Display indication
9 5 (stereo)
broadcasted in stereo.
1
2
a LOC Local seek tuning is on.
Basic Operations
3
5
6
7 8 9 a
4
Important
! Handle gently when removing or attaching
the front panel.
! Avoid subjecting the front panel to excessive
shock.
! Keep the front panel out of direct sunlight and
high temperatures.
! Remove any cables and devices attached to
this unit before detaching the front panel to
avoid damage to the device or vehicle interior.
3
En
Section
02
Operating this unit
Removing the front panel to protect your unit from
Menu operations identical
theft
for function settings/audio
1 Press detach to release the front panel.
2 Grab the front panel and remove.
adjustments/initial settings
3 Put the front panel into the provided protective
case for safe keeping.
Returning to the ordinary display
Canceling the initial setting menu
Re-attaching the front panel
1 Press BAND/ESC.
1 Slide the front panel to the left until it clicks.
You can also cancel initial settings by holding
Front panel and the head unit are connected on
down SRC/OFF until the unit turns off.
the left side. Make sure that the front panel has
been properly connected to the head unit.
Tuner
Basic Operations
Selecting a band
1 Press BAND/ESC until the desired band (F1, F2
2 Press the right side of the front panel until it is
for FM or MW/LW) is displayed.
firmly seated.
If you can’t attach the front panel to the head unit
Manual tuning (step by step)
successfully, try again. However, forcing the front
1 Press c or d.
panel into place may result in damage.
Seeking
Turning the unit on
1 Press and hold c or d, and then release.
1 Press SRC/ OFF to turn the unit on.
You can cancel seek tuning by briefly pressing c
or d.
Turning the unit off
While pressing and holding c or d, you can skip
1 Press SRC/ OFF and hold until the unit turns off.
stations. Seek tuning starts as soon as you re-
Selecting a source
lease c or d.
1 Press SRC/ OFF to cycle between:
TUNER (tuner)—CD (built-in CD player)—AUX
(AUX)
Storing and recalling stations
Adjusting the volume
You can easily store up to six stations as pre-
1 Turn SRC/OFF to adjust volume.
sets.
Note
% When you find a station that you want
to store in memory, press one of the preset
When this unit’s blue/white lead is connected to
tuning buttons (1 to 6) and hold until the
the vehicle’s auto-antenna relay control terminal,
preset number stops flashing.
the vehicle’s antenna extends when this unit’s
Stored radio station frequency can be recalled
source is turned on. To retract the antenna, turn
by pressing the preset tuning button.
the source off.
# Press a or b to recall radio station frequen-
cies.
4
En

Section
Operating this unit
02
English
Switching the RDS display
Receiving traffic announcements
RDS (radio data system) contains digital infor-
TA (traffic announcement standby) lets you re-
mation that helps search for the radio sta-
ceive traffic announcements automatically, re-
tions.
gardless of the source you are listening to.
% Press DISP/SCRL.
1 Tune in a TP or enhanced other net-
Program service name—PTY information—
work’s TP station.
Frequency
2 Press TA/AF to turn traffic announce-
# PTY information and the frequency appear on
ment standby on or off.
the display for eight seconds.
3 Turn SRC/OFF to adjust the TA volume
when a traffic announcement begins.
PTY list
The newly set volume is stored in memory and
NEWS (News), AFFAIRS (Current af fairs), INFO (Infor-
recalled for subsequent traffic announce-
mation), SPORT (Sports), WEATHER (Weather), FI-
ments.
NANCE (Finance), POP MUS (Popular music), ROCK
MUS (Rock music), EASY MUS (Easy listening), OTH
4 Press TA/AF while a traffic announce-
MUS (Other music), JAZZ (Jazz), COUNTRY (Country
ment is being received to cancel the an-
music), NAT MUS (National music), OLDIES (Oldies
nouncement.
music), FOLK MUS (Folk music), L.CLASS (Light clas-
The tuner returns to the original source but re-
sical), CLASSIC (Classical), EDUCATE (Education),
mains in the standby mode until TA/AF is
DRAMA (Drama), CULTURE (Culture), SCIENCE
(Science), VARIED (Varied), CHILD REN (Children’s),
pressed again.
SOCIAL (Social affairs), RELIGION (Religion), PHONE
IN (Phone in), TOURING (Travel), LEISURE (Leisure),
DOCUMENT (Documentaries)
Function settings
% Press F (function) to select the function.
After selecting, perform the following proce-
Selecting alternative frequencies
dures to set the function.
When the tuner cannot get a good reception,
LOCAL (local seek tuning)
the unit automatically searches for a different
station in the same network.
Local seek tuning lets you tune in only those radio sta-
tions with sufficiently strong signals for good recep-
% Press and hold TA/AF to turn AF on or
tion.
off.
1 Press a or b to turn local seek tuning on or off.
2 Press c or d to set the sensitivity.
FM: LOCAL 1—LOCAL 2—LOCAL 3—LOCAL 4
Using PI Seek
MW/LW: LOCAL 1—LOCAL 2
If the tuner cannot find a suitable station, or
Larger setting number is higher level. The highest
level setting allows reception of only the strongest
reception status deteriorates, the unit automa-
stations, while lower settings let you receive pro-
tically searches for a different station with the
gressively weaker stations.
same programming. During the search,
TA (traffic announcement standby)
PI SEEK is displayed and sound is muted.
1 Press a or b to turn traffic announcement stand-
Using Auto PI Seek for preset stations
by on or off.
When preset stations cannot be recalled, as
AF (alternative frequencies search)
when travelling long distances, the unit can
1 Press a or b to turn AF on or off.
be set to perform PI Seek during preset recall.
! The default setting for Auto PI Seek is off.
BSM (best stations memory)
Refer to A-PI (auto PI seek) on page 8.
5
En
Section
02
Operating this unit
Displaying text information
BSM (best stations memory) automatically stores the
six strongest stations in the order of their signal
strength.
Selecting the desired text information
Storing broadcast frequencies with BSM may replace
1 Press DISP/SCRL.
broadcast frequencies you have saved using 1 to 6.
CD TEXT discs: Play time—disc title—disc ar-
1 Press a to turn BSM on.
tist name—track title—track artist name
The six strongest broadcast frequencies are
WMA/MP3: Play time—folder name—file name
stored in the order of their signal strength.
—track title—artist name—album title—com-
To cancel the storage process, press b.
ment—bit rate
WAV: Play time—folder nam e—file name—sam-
REG (regional)
pling frequency
When AF is used, the regional functio n limits the se-
Scrolling the text information to the left
lection of stations broadcasting regional programs.
1 Press and hold DISP/SCRL.
1 Press a or b to turn the regional function on or
off.
Notes
! Incompatible text stored with the audio file
Note
may not be displayed or may be displayed in-
If MW/LW band is selected, only BSM or LOCAL
correctly.
is available.
! Depending on the version of iTunes used to
write MP3 files onto a disc, comment informa-
tion may be incorrectly displayed.
CD
! When playing back VBR (variable bit rate)-re-
corded WMA files, the average bit rate value is
Basic Operations
displayed.
! When playing back VBR (variable bit rate)-re-
Playing a CD/CD-R/CD-RW
corded MP3 files, VBR is displayed instead of
1 Insert the disc, label side up, into the disc loading
bit rate value.
slot.
1 If a disc has already been inserted, press SRC/
OFF to select the built-in CD player.
Function settings
Ejecting a CD/CD-R/CD-RW
1 Press h.
% Press F (function) to select the function.
After selecting, perform the following proce-
Selecting a folder
dures to set the function.
1 Press a or b.
Selecting a track
RPT (repeat play)
1 Press c or d.
1 Press c or d to select the repeat range.
Fast forwarding or reversing
DSC – Repeat all tracks
1 Press and hold c or d.
TRK – Repeat the current track
Switching between compressed audio and CD-DA
FLD – Repeat the curren t folder
1 Press BAND/ESC.
RDM (random play)
Note
1 Press a or b to turn random play on or off.
When random play is on, RDM appears in the dis-
When playing compressed audio, there is no
play.
sound during fast forward or reverse.
If you turn random play on during folder repeat,
FRDM appears in the display.
SCAN (scan play)
6
En
Section
Operating this unit
02
English
Scan play searches for a song within the selected re-
FAD (fader/balance adjustment)
peat range.
You can change the fader/balance setting.
1 Press a to turn scan play on.
1 Press a or b to adjust front/rear speaker balance.
If you turn scan play on during FLD, FSCN ap-
Adjustment range (front/rear): FAD F15 to FAD
pears in the display.
R15
2 When you find the desired track press b to turn
FAD 0 is the proper setting when only two speak-
scan play off.
ers are used.
If the display has automatically returned to the
2 Press c or d to adjust left/right speaker balance.
playback display, select SCAN again by pressing F
Adjustment range (left/right): BAL L15 to BAL
(function).
R15
After scanning of a disc (folder) is finished, nor-
mal playback of the tracks begins.
BASS/MID/TREBLE (equalizer adjustment)
PAUSE (pause)
You can adjust the bass/mid/treble level.
! Adjusted equalizer curve settings are stored in
1 Press a or b to pause or resume.
CUSTOM.
1 Press a or b to adjust the level.
COMP OFF (compression and BMX)
Adjustment range: +6 to -6
Using the COMP (compression) and BMX functions
LOUD (loudness)
let you adjust the sound playback quality of this unit.
1 Press a or b to select your favorite setting.
Loudness compensates for deficiencies in the low-
COMP OFF—COMP 1—COMP 2—COMP OFF—
and high-frequency ranges at low volume.
BMX 1—BMX 2
1 Press a or b to turn loudness on or off.
2 Press c or d to select the desired setting.
FF/REV (fast forward/reverse)
LOW (low)—HI (high)
You can switch the search method between fast for-
SLA (source level adjustment)
ward/reverse and searching every 10 tracks. Selecting
ROUGH enables you to search every 10 tracks.
SLA (Source level adjustment) lets you adjust the vo-
1 Press d to select ROUGH.
lume level of each source to prevent radical changes
FF/REV – Fast forward and reverse
in volume when switching between sources.
ROUGH – Searching every 10 tracks
! Settings are based on the FM volume level, which
To select FF/REV, press c.
remains unchanged.
2 Press BAND/ESC to return to the playback dis-
Before adjusting source levels, compare the FM
play.
volume level with the level of the source you wish
3 Press and hold c or d to search every 10 tracks
to adjust.
on a disc (folder).
! The MW/LW volume level can also be adjusted
If the rest of track number is less than 10, press
with source level adjustments.
and hold c or d recalls the first (last) one.
1 Press a or b to adjust the source volume.
Adjustment range: SLA +4 to SLA –4
Note
Audio Adjustments
You can also turn loudness on or off by pressing
and holding EQ/LOUD.
Audio Adjustments
% Press A (audio) to select the audio func-
tion.
Using the equalizer
After selecting, perform the following proce-
% Press EQ/LOUD to select the equalizer.
dures to set the audio function.
DYNAMIC—VOCAL—NATURAL—CUSTOM
—FLAT—POWERFUL
! CUSTOM allows you to create a customized
setting.
! When FLAT is selected no adjustments are
made to the sound.
7
En
Перейти к контенту
Автомагнитолы Pioneer
- Размер инструкции: 490.41 kB
- Формат файла: pdf
Если вы потеряли инструкцию от автомагнитолы Pioneer DEH-1200 MP, можете скачать файл для просмотра на компьютере или печати.
Инструкция для автомагнитолы Pioneer DEH-1200 MP на русском языке. В руководстве описаны возможности и полезные функции, а также правила эксплуатации. Перед использованием внимательно ознакомьтесь с инструкцией.
Чтобы не читать всю инструкцию вы можете выполнить поиск по содержимому внутри инструкции и быстро найти необходимую информацию. Рекомендации по использованию помогут увеличить срок службы автомагнитолы Pioneer DEH-1200 MP. Если у вас появилась проблема, то найдите раздел с описанием неисправностей и способами их решения. В нем указаны типичные поломки и способы их решения.

Operation Manual
Mode d’emploi
Manuale d’istruzioni
Manual de instrucciones
Bedienungsanleitung
Bedieningshandleiding
Руководство по эксплуатации
CD RDS RECEIVER
AUTORADIO CD RDS
SINTOLETTORE CD RDS
REPRODUCTOR DE CD CON RECEPTOR RDS
CD RDS-EMPFÄNGER
CD RDS-ONTVANGER
CD RDS ПРИЕМНИК
DEH-1200MP
DEH-1220MP
English
Français
Italiano
Español
Deutsch
Nederlands
Ру
сский