
View the manual for the Pioneer DEQ-S1000A here, for free. This user manual comes under the category receivers and has been rated by 1 people with an average of a 9.1. This manual is available in the following languages: English. Do you have a question about the Pioneer DEQ-S1000A?
Ask your question here
Frequently asked questions
Can’t find the answer to your question in the manual? You may find the answer to your question in the FAQs about the Pioneer DEQ-S1000A below.
Can bluetooth devices of different brands be connected to each other?
Yes, bluetooth is a universal method that allows different devices equipped with bluetooth to connect to each other.
What is bluetooth?
Bluetooth is a way of exchanging data wirelessly between electronic devices via radio waves. The distance between the two devices that exchange data can in most cases be no more than ten metres.
What is HDMI?
HDMI stands for High-Definition Multimedia Interface. An HDMI cable is used to transport audio and video signals between devices.
When is my volume too loud?
A volume above 80 decibels can be harmful to hearing. When the volume exceeds 120 decibels, direct damage can even occur. The chance of hearing damage depends on the listening frequency and duration.
How can I best clean my receiver?
A slightly damp cleaning cloth or soft, dust-free cloth works best to remove fingerprints. Dust in hard-to-reach places is best removed with compressed air.
Wat is Dolby Atmos?
Dolby Atmos is a technology that ensures that the sound is reflected from the ceiling to where you are listening. This makes it possible to create a 5.1 effect with only 1 speaker.
Is the manual of the Pioneer DEQ-S1000A available in English?
Yes, the manual of the Pioneer DEQ-S1000A is available in English .
Is your question not listed? Ask your question here
UNIVERSAL SOUND PROCESSOR
PROCESSEUR AUDIO UNIVERSEL
DEQ-S1000A
Instruction Manual
Mode d’emploi
5707000012570V-B
English
Before You Start
Thank you for purchasing this PIONEER product
To ensure proper use, please read through this guide before using this product.
It is especially important that you read and observe WARNINGS and CAUTIONS
in this guide. Please keep the guide in a safe and accessible place for future
reference.
PIONEER EUROPE NV
Haven 1087, Keetberglaan 1, B-9120 Melsele, Belgium/Belgique
Information for users on collection and disposal of old
equipment and used batteries
(Symbol for equipment) (Symbol examples for batteries)
These symbols on the products, packaging, and/or accompanying documents
mean that used electrical and electronic products and batteries should not
be mixed with general household waste.
For proper treatment, recovery and recycling of old products and used
batteries, please take them to applicable collection points in accordance
with your national legislation.
By disposing of these products and batteries correctly, you will help to save
valuable resources and prevent any potential negative effects on human health
and the environment which could otherwise arise from inappropriate waste
handling.
For more information about collection and recycling of old products and
batteries, please contact your local municipality, your waste disposal service or
the point of sale where you purchased the items.
These symbols are only valid in the European Union.
For countries outside the European Union:
If you wish to discard these items, please contact your local authorities or dealer
and ask for the correct method of disposal.
CAUTION
• This product is evaluated in moderate and tropical climate condition under the
Audio, video and similar electronic apparatus — Safety requirements, IEC 60065.
Connections
WARNING
Important
• When installing this unit in a vehicle without an ACC (accessory) position on
the ignition switch, failure to connect the red cable to the terminal that detects
operation of the ignition key may result in battery drain.
ACC position
• Use this unit with a 12-volt battery and negative grounding only. Failure to do so
may result in a fire or malfunction.
• To prevent a short-circuit, overheating or malfunction, be sure to follow the
directions below.
−Disconnect the negative terminal of the battery before installation.
−Secure the wiring with cable clamps or adhesive tape. Wrap adhesive tape
around wiring that comes into contact with metal parts to protect the wiring.
−Place all cables away from moving parts, such as the shift lever and seat rails.
−Place all cables away from hot places, such as near the heater outlet.
−Do not connect the yellow cable to the battery by passing it through the hole
to the engine compartment.
−Cover any disconnected cable connectors with insulating tape.
−Use a fuse of the rating prescribed.
−Never wire the negative speaker cable directly to ground.
−Never band together negative cables of multiple speakers.
• The graphical symbol
placed on the product means direct current.
No ACC position
• Check the connections of the power supply and speakers if this unit fuse blows.
Determine and resolve the cause, then replace the fuse with and identical
equivalent.
• Always install this unit on a flat surface.
Do not install this unit on a surface that is not flat or on a surface with a
protrusion. Doing so could result in malfunction.
• When installing this unit, do not allow parts such as extra screws to get caught
between this unit and the automobile.
Doing so could cause malfunction.
• Do not allow this unit to come into contact with liquids. Electrical shock could
result.
Also, damage to this unit, smoke, and overheating could result from contact with
liquids.
The surfaces of the amplifier and any attached speakers may also heat up and
cause minor burns.
• Do not attempt to disassemble or modify this unit. Doing so may result in fire,
electric shock or other malfunction.
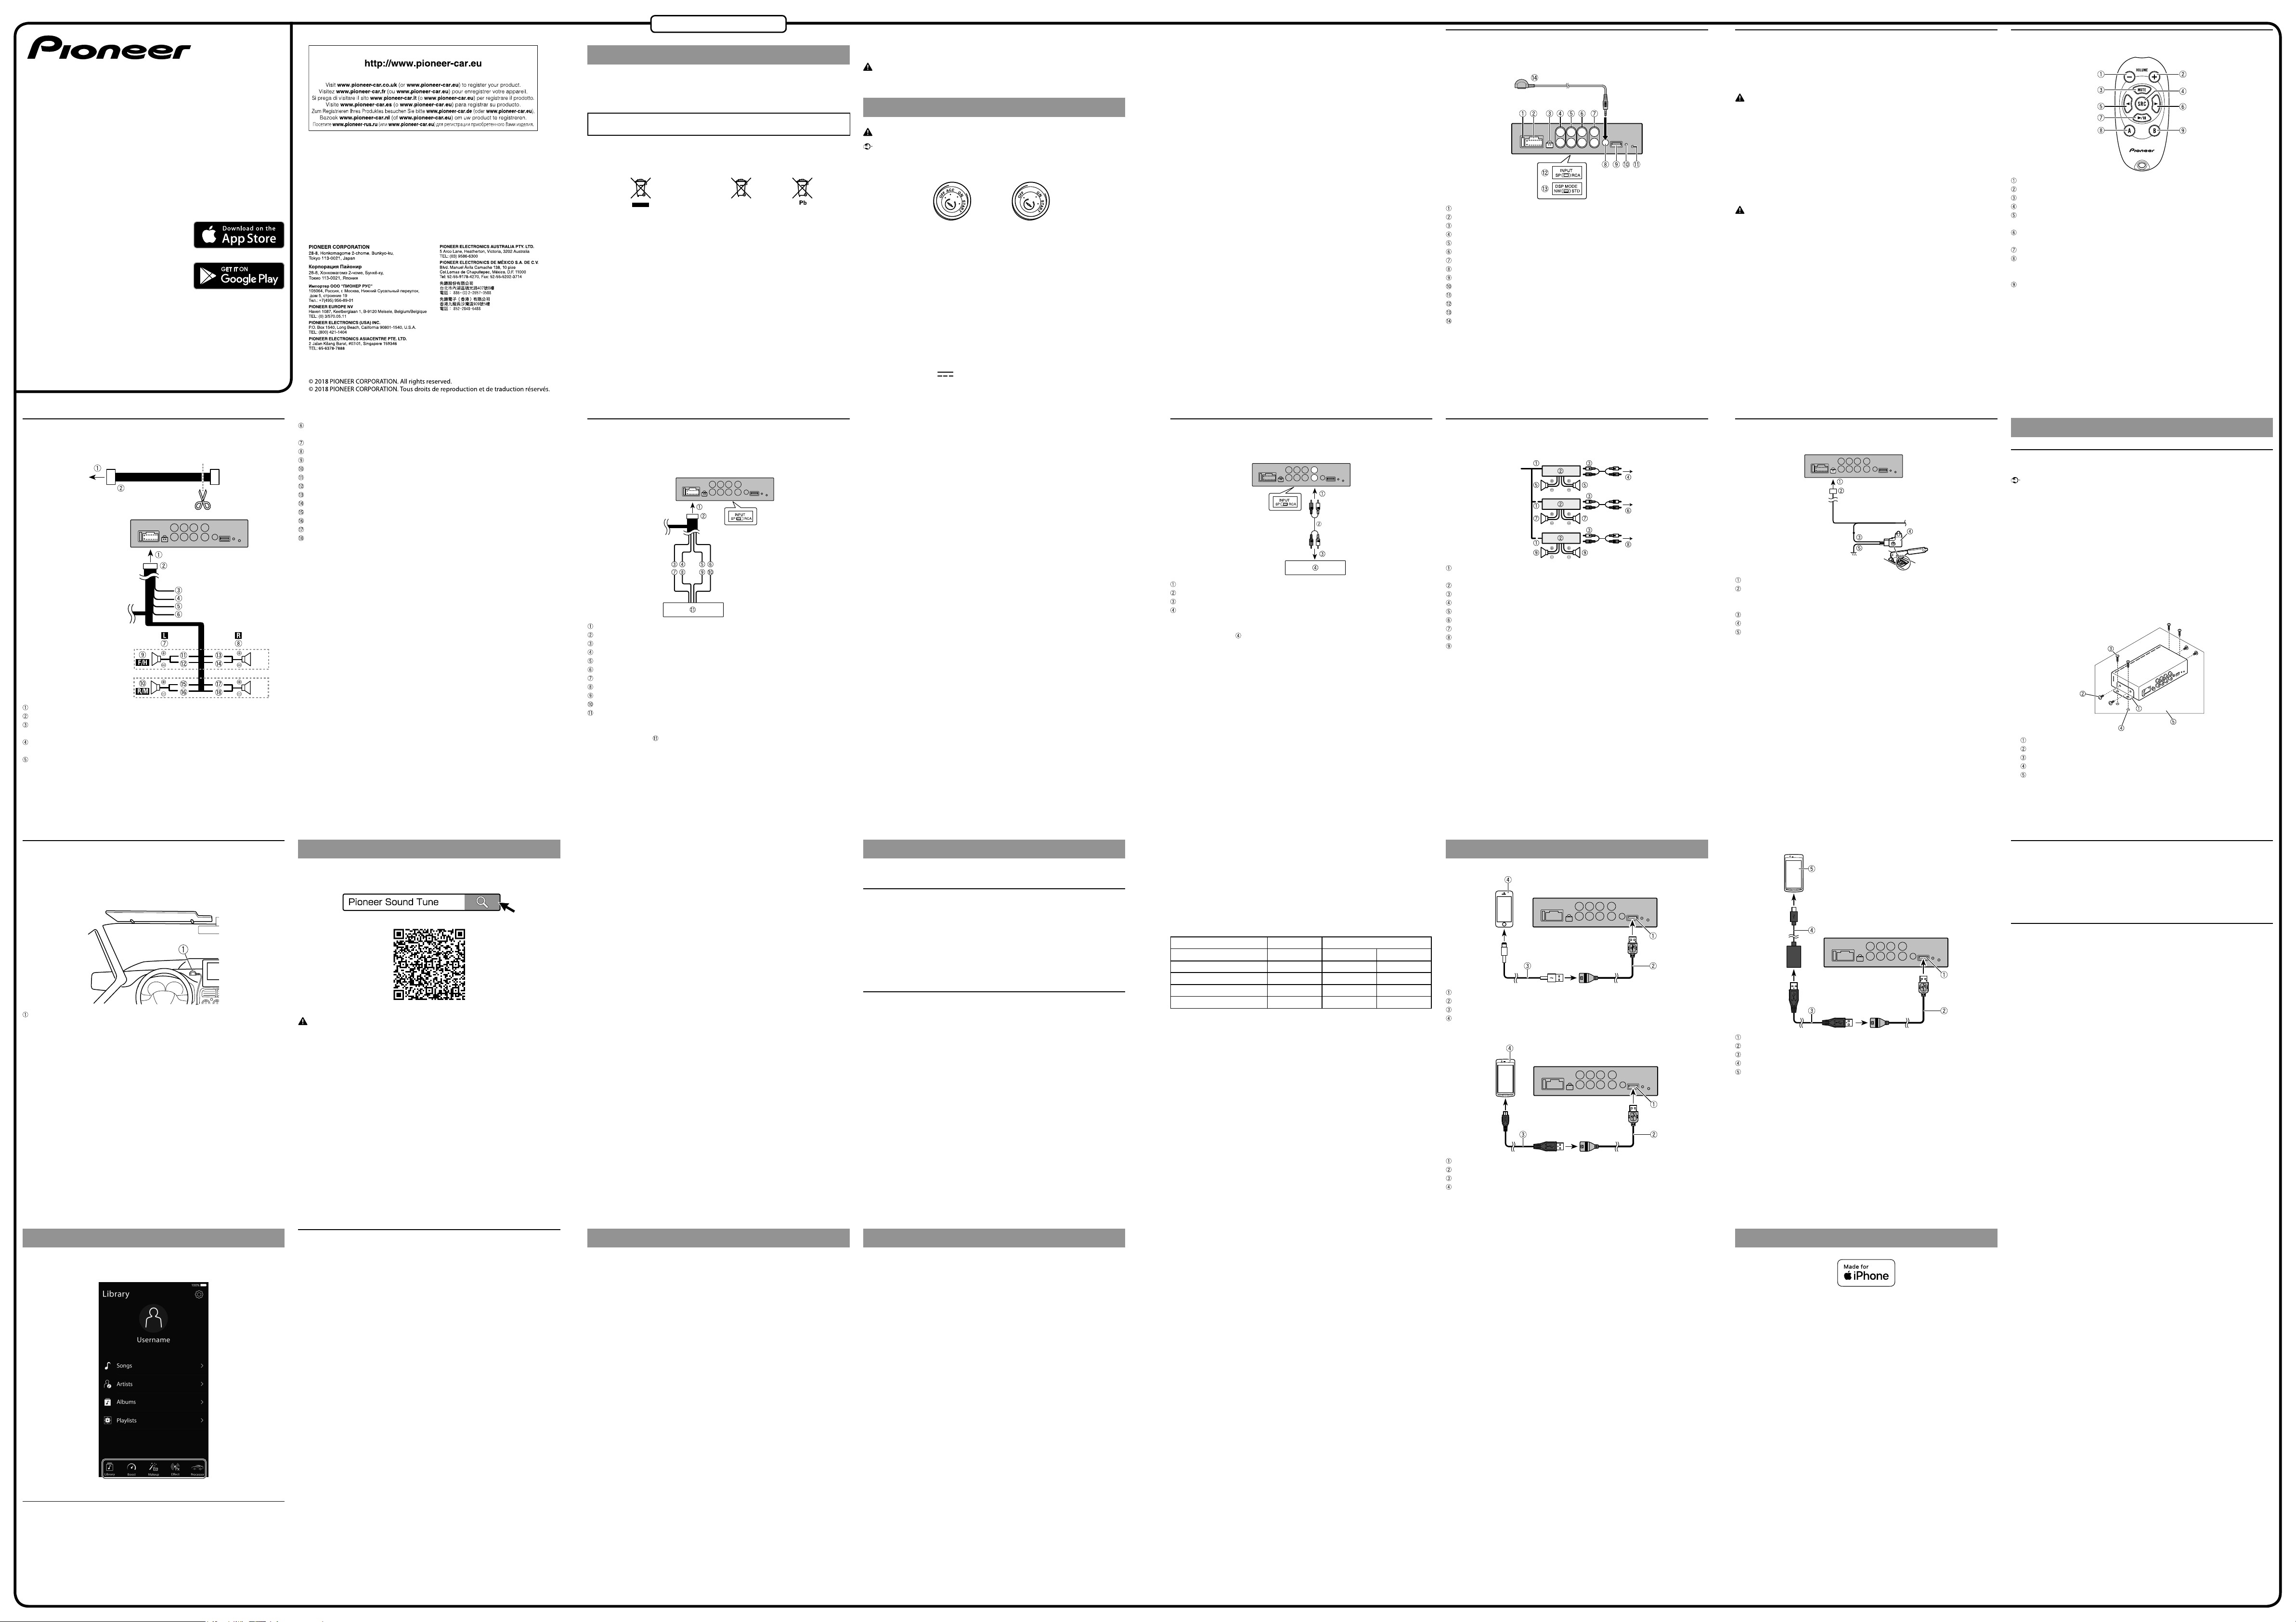
This unit
This unit provides a variety of sound effects by intuitive operation using a
smartphone.
FUSE 10A
Power cord input
Parking brake cord input
Subwoofer output
Rear output/Middle range output
Front output/High range output
RCA input
Remote control sensor input
USB por t
Reset button
Power indicator
INPUT select switch
DSP MODE select switch
Remote control sensor
Preparing the remote control
Remove the insulation sheet before use.
How to replace the battery
Insert the battery with the plus (+) and minus (–) poles orientated properly.
WARNING
• Do not ingest the battery, Chemical Burn Hazard.
(The remote control supplied with) This product contains a coin/button cell
battery. If the coin/button cell battery is swallowed, it can cause severe internal
burns in just 2 hours and can lead to death.
Keep new and used batteries away from children.
If the battery compartment does not close securely, stop using the product and
keep it away from children.
If you think batteries might have been swallowed or placed inside any part of
the body, seek immediate medical attention.
• Batteries (battery pack or batteries installed) must not be exposed to excessive
heat such as sunshine, fire or the like.
CAUTION
• There is a danger of explosion if the battery is incorrectly replaced. Replace only
with the same or equivalent type.
• When disposing of used batteries, please comply with governmental regulations
or environmental public institution’s rules that apply in your country / area.
Name of each remote control button
VOLUME –
VOLUME +
MUTE
SRC (source)
Left
Press to select the previous track / song.
Right
Press to select the next track / song.
PLAY/PAUSE
A
Press and hold to change the connection mode (for iPhone® / AOA connection
of smartphone (Android)).
B
Press and hold to change the connection mode (OTG connection of
smartphone (Android)).
Connection of power cord and speaker
Cut the attached power cord and then connect it to the vehicle.
The wiring harness kit (sold separately) is also available to connect the cord.
Refer to:
• Connections when using
the speaker input wire
• Connections when using
the RCA input jack
To power cord input
Power cord
Yellow
To terminal supplied with power, regardless of ignition switch position
Red
To electric terminal controlled by ignition switch (12 V DC) ON/OFF
Blue/white
Connect to the system control terminal of the power amp (max. 300 mA 12 V
DC).
Black (ground)
To vehicle (metal) body
Left
Right
Front speaker (STD) or high range speaker (NW)
Rear speaker (STD) or middle range speaker (NW)
White
White/black
Gray
Gray/black
Green
Green/black
Violet
Violet/black
Connections when using the speaker input
wire
Connect the car stereo speaker output wires to this unit using the power cord.
Slide the INPUT select switch to the SP position.
To power cord input
Power cord
Orange
Orange/black
Brown
Brown/black
Left +
Left −
Right +
Right −
Car stereo / navigation system
Note
• The input signal of Car stereo / navigation system is 2ch. The output signal
of this unit will not be reflected even when changing settings other than the
corresponding channel of the car stereo / navigation system.
• Connect the front speaker output of the car stereo / navigation system.
• Make sure to connect with the speaker input if your vehicle has no ACC
(accessory) position.
This unit activates with the power of the car stereo / navigation system.
This unit may not activate depending on the type of car stereo / navigation
system.
Connections when using the RCA input jack
Connect the car stereo RCA output jack and the RCA input jack of this unit.
Slide the INPUT select switch to the RCA position.
To RCA input
RCA cable (sold separately)
To RCA output
Car stereo / navigation system
Note
• The input signal of
of this unit will not be reflected even when changing settings other than the
corresponding channel of the car stereo / navigation system.
• Connect the front RCA output of the car stereo / navigation system.
• Make sure to connect with the speaker input if your vehicle has no ACC
(accessory) position.
This unit activates with the power of the car stereo / navigation system.
This unit may not activate depending on the type of car stereo / navigation
system.
Car stereo / navigation system is 2ch. The output signal
Connections when using the amplier (sold
separately)
System remote control
Connect to Blue/white cable.
Power amp (sold separately)
Connect with RCA cable (sold separately)
To front output (STD) or high range output (NW)
Front speaker (STD) / High range speaker (NW)
To rear output (STD) or middle range output (NW)
Rear speaker (STD) / Middle range speaker (NW)
To subwoofer output (STD) or low range output (NW)
Subwoofer (STD) / Low range speaker (NW)
Parking brake cable connections
Connect to the parking brake switch using the parking brake cord.
To parking brake cord input
Parking brake cord
Used to detect the ON/OFF status of the parking brake. This lead must be
connected to the power supply side of the parking brake switch.
Power supply side
Parking brake switch
Ground side
Note
When the parking brake cable is not connected, a part of the exclusive application
(Sound Tune) function is limited.
Installation
This unit
Important
• Check all connections and systems before final installation.
• Do not use unauthorized parts as this may cause malfunctions.
• Consult your dealer if installation requires drilling of holes or other modifications
to the vehicle.
• Do not install this unit where:
−it may interfere with operation of the vehicle.
−it may cause injury to a passenger as a result of a sudden stop.
• Install this unit away from hot places such as near the heater outlet.
• To enable the setting value, change the setting of the INPUT select switch or the
DSP MODE switch and turn the ACC switch OFF/ON.
1. Set the DSP MODE select switch.
2. Set the INPUT select switch.
3. Tighten the screws on each side, then fix the unit.
Bracket
Screw (Washer-faced head 4 mm × 8 mm)
Screw (Tapping screw 4 mm × 12 mm)
Hole (2 mm to 2.5 mm)
Car mat or chassis (installation example)
Remote control sensor
1. Connect the remote control sensor to the remote control sensor input .
Place the light receiving part of the remote control sensor in a place that can
receive the remote control signal.
Wire the cable so that it does not interfere with driving.
Remote control sensor
Download Sound Tune
To use this unit, download Sound Tune to the iPhone or smartphone (Android).
Enter the search term «Pioneer Sound Tune» in the search window or search from
the following QR code.
WARNING
Do not attempt to operate the application while driving. Make sure to pull off the
road and park your vehicle in a safe location before attempting to use the controls
on the application.
Sound Tune can do the following.
Playing songs saved on iPhone / smartphone (Android)
Playable song formats depend on your device. For details, please read the
instruction manual of your device.
Effect settings of iPhone / smartphone (Android) songs and the car stereo /
navigation system sound
• Super “Todoroki” Sound
• Live Simulation
Various settings of this unit
• Standard Mode (Front / Rear / Subwoofer)
• Network Mode (3 Way Network)
• Speaker Setting
−Graphics Equalizer
−Time Alignment
−Network Filter
−Speaker Level
• Fader / Balance
• Source Calibration
For details of each function, please refer to Popup Help in Sound Tune.
How to Use This Unit
Depending on the connection method of the iPhone / smartphone (Android), this
unit can be used as follows.
When using this unit alone (When not
connecting an iPhone or smartphone
(Android))
The unit outputs the sound source of the car stereo / navigation system. Only
the volume adjustment and mute functions can be operated with the supplied
remote control.
For audio adjustment, connection of an iPhone / smartphone (Android) is
necessary.
When connecting an iPhone / smartphone
(Android) to use
The unit can be used in the following four pattern modes.
When using the remote control, press the SRC button to switch the mode.
The mode switches in the order of Car Stereo mode, Through mode, Smartphone
mode, and Mix mode.
Car Stereo mode
The unit outputs the sound source of the car stereo / navigation system by
passing through the iPhone / smartphone (Android).
Smartphone mode
The unit outputs the sound source of the iPhone / smartphone (Android).
Through mode
The unit outputs the sound source of the car stereo / navigation system without
passing through the iPhone / smartphone (Android). (It is the same output as
using this unit alone)
This mode is used when video and audio are misaligned during video playback in
the Car Stereo mode.
Mix mode
The unit mixes and outputs the sound of the iPhone / smartphone (Android) and
the sound of the car stereo / navigation system.
Use this mode when you want to use the voice guidance of the car stereo /
navigation system while listening to the source of the iPhone / smartphone
(Android). In this case, turn off the source of the car stereo / navigation system
and set it so that only the voice guidance is output.
Depending on the car stereo / navigation system, this mode may not be available.
The available functions differ depending on the connection method of the iPhone
/ smartphone (Android).
Device iPhone Smartphone (Android)
Connection method — AOA*1 OTG*2
Car Stereo mode
Smartphone mode
Through mode
Mix mode
*1: AOA (Android Open Accessory) is an interface standard for using USB-loaded
products as accessories on Android terminals.
*2: OTG (On-The-Go) is an interface standard that connects USB devices and USB
devices directly. Smartphones (Android) cannot be charged using the OTG
connection. Pay attention to the battery level of the smartphone (Android).
*3: For the AOA connection, you cannot use the Car Stereo mode. The operation is
the same as Through mode.
*4: For the OTG connection, sounds from applications other than Sound Tune
cannot be output from this unit.
Note
When the iPhone / smartphone (Android) is disconnected, some functions such as
Super “Todoroki” Sound and Live Simulation cannot be used.
Also, even if the iPhone / smartphone (Android) is connected, the above functions
may not be used under the following conditions.
• When selecting Through mode
• When playing media by applications other than Sound Tune
✔
✔ ✔
✔ ✔ ✔
✔ ✔
-(*3)
✔
✔(*4)
✔(*4)
Connecting the Smartphone to This Unit
For iPhone users
USB por t
USB cable (for Type-A)
Lightning® – USB cable (genuine product or sold separately)
iPhone
For smartphone (Android) users (AOA connection)
USB por t
USB cable (for Type-A)
USB — micro USB cable (sold separately)
Smartphone (Android)
For smartphone (Android) users (OTG connection)
USB por t
USB cable (for Type-A)
USB A-A cable (sold separately)
USB OTG cable (sold separately)
Smartphone (Android)
Note
Smartphone (Android) cannot be charged using the OTG connection.
About USB devices
• For details on handling the iPhone / smartphone (Android), please read each
manual.
• Please understand that we do not assume responsibility for compensation even
if data, etc. are lost at the time of use in combination with this unit.
• Be sure to fix the iPhone / smartphone (Android) when using it in combination
with this unit.
About connection with this unit
• Do not connect devices other than the iPhone / smartphone (Android) (such as
USB fan).
• It is not compatible with connection using USB hub.
Using Sound Tune
When connecting an iPhone or smartphone (Android) to this unit, a message
is displayed on the iPhone or smartphone (Android). Sound Tune starts when
startup is allowed.
Tap the icon at the bottom of the screen to start the operation.
How to reset
Reset this unit if it does not operate properly or you want to return the setting
value to the factory default.
1. Press the reset button while the unit is in operation.
The settings are initialized when the ignition switch is turned off (ACC OFF).
The factory default setting is applied when the unit is turned on next time.
When the sound does not sound
If you cannot hear the sound after installing this unit, carry out the following.
• Make sure that the iPhone / smartphone (Android) is connected correctly with a
USB cable.
• Make sure that switching of OTG / AOA is performed correctly.
• Turn the ACC switch OFF / ON.
Please contact your dealer or service agent if improvements are not made even if
you perform the above.
About the protection function
This product has a protection function. When this product detects something
abnormal, the following functions will operate to protect the product and speaker
output.
• The power indicator will turn Red, blink Red, and then the product will power off
in the situations outlined below.
−If the speaker output terminal and speaker wire are short-circuited.
−If a DC voltage is applied to the speaker output terminal.
−If a USB power supply detects something abnormal
−If a USB line has a communication error
Please contact your dealer or service agent if improvements are not made even
after you try turning the ACC switch OFF / ON or removing/reinserting the USB.
Specications
GENERAL
POWER SOURCE 14.4V DC
(10.8-15.1V allowable)
GROUNDING SYSTEM Negative type
MAX. CURRENT CONSUMPTION 9.2A
DIMENSIONS 170(W) x 40(H) x 95(D)<mm>
FUSE 10A
WEIGHT 0.59kg
AUDIO
MAX POWER 50W x 4
50Wx2ch/4Ω + 70Wx1ch/2Ω (for SUB-WOOFER)
CONTINUOUS POWER 22W x 4
(50Hz to 15kHz, 5%THD, 4Ω LOAD, Both Channels Driven)
LOAD IMPEDANCE 4Ω
(4 — 8Ω(2Ω for 1ch) allowable)
PREOUT OUTPUT LEVEL (MAX) 4.0V
IMPEDANCE 250Ω
FREQUENCY RESPONSE 10Hz to 20kHz (+0dB , -1dB)
S/N RATIO 105dB
THD 0.01%
EQUALIZER (13BAND GRAPHIC EQUALIZER)
FREQUENCY 50Hz, 80Hz, 125Hz, 200Hz, 315Hz, 500Hz
800Hz, 1.25kHz, 2kHz, 3.15kHz, 5kHz, 8kHz, 12.5kHz
GAIN ±12dB(0.1dB step)
SPEAKER SETTING
<STANDARD MODE>
FRONT/REAR (HPF)
FREQUENCY
50Hz, 63Hz, 80Hz, 100Hz, 125Hz, 160Hz, 200Hz
SLOPE
0dB(Pass), -6dB/oct, -12dB/oct, -18dB/oct, -24dB/oct
SUB WOOFER (LPF)
FREQUENCY
50Hz, 63Hz, 80Hz, 100Hz, 125Hz, 160Hz, 200Hz
SLOPE
0dB(Pass), -6dB/oct, -12dB/oct, -18dB/oct, -24dB/oct
GAIN -24 — +10dB (1dB/Step)
PHASE NORMAL/REVERSE
SPEAKER LEVEL -24 — +10dB (1dB/Step)
TIME ALIGNMENT 0cm — 350cm (2.5cm/step)
<NETWORK MODE>
HIGH (HPF) FREQUENCY 1.25kHz, 1.6kHz, 2kHz, 2.5kHz, 3.15kHz
4kHz, 5kHz, 6.3kHz, 8kHz, 10kHz, 12.5kHz
SLOPE -6dB/oct, -12dB/oct, -18dB/oct, -24dB/oct
MID (LPF) FREQUENCY 1.25kHz, 1.6kHz, 2kHz, 2.5kHz, 3.15kHz
4kHz, 5kHz, 6.3kHz, 8kHz, 10kHz, 12.5kHz
SLOPE
0dB(Pass), -6dB/oct, -12dB/oct, -18dB/oct, -24dB/oct
MID (HPF) FREQUENCY 25Hz, 31.5Hz, 40Hz, 50Hz, 63Hz, 80Hz
100Hz, 125Hz, 160Hz, 200Hz, 250Hz
SLOPE
0dB(Pass), -6dB/oct, -12dB/oct, -18dB/oct, -24dB/oct
SUB WOOFER (LPF)
FREQUENCY 25Hz, 31.5Hz, 40Hz, 50Hz, 63Hz, 80Hz
100Hz, 125Hz, 160Hz, 200Hz, 250Hz
SLOPE 0dB(Pass), -12dB/oct, -18dB/oct
-24dB/oct, -30dB/oct, -36dB/oct
GAIN -24 — +10dB (1dB/Step)
PHASE NORMAL/REVERSE
SPEAKER LEVEL -24 — +10dB (1dB/Step)
TIME ALIGNMENT 0cm — 350cm (2.5cm/step)
USB
USB STANDARD SPEC. USB2.0 High Speed
MAX CURRENT SUPPLY 1.5A
Trademarks
iPhone, and Lightning are trademarks of Apple Inc., registered in the U.S.
and other countries.
Use of the Made for Apple badge means that an accessory has been
designed to connect specifically to the Apple product(s) identified in the
badge, and has been certified by the developer to meet Apple performance
standards.
Apple is not responsible for the operation of this device or its compliance
with safety and regulatory standards.
Please note that the use of this accessory with an Apple product may affect
wireless performance.

Français
Avant de commencer
Nous vous remercions d’avoir acheté cet appareil PIONEER
Pour garantir une utilisation correcte, lisez bien ce guide avant d’utiliser cet
appareil. Il est particulièrement important que vous lisiez et respectiez les
indications AVERTISSEMENT et ATTENTION de ce guide. Conservez-le dans un
endroit sûr et facilement accessible pour toute consultation ultérieure.
PIONEER EUROPE NV
Haven 1087, Keetberglaan 1, B-9120 Melsele, Belgium/Belgique
Information à destination des utilisateurs sur la collecte et
l’élimination des équipements et batteries usagés
(Marquage pour les
équipements)
Ces symboles qui figurent sur les produits, les emballages et/ou les documents
d’accompagnement signifient que les équipements électriques et
électroniques et batteries usagés ne doivent pas être jetés avec les déchets
ménagers et font l’objet d’une collecte sélective.
Pour assurer l’enlèvement et le traitement appropriés des produits et
batteries usagés, merci de les retourner dans les points de collecte sélective
habilités conformément à la législation locale en vigueur.
En respectant les circuits de collecte sélective mis en place pour ces produits, vous
contribuerez à économiser des ressources précieuses et à prévenir les impacts
négatifs éventuels sur la santé humaine et l’environnement qui pourraient résulter
d’une mauvaise gestion des déchets.
Pour plus d’information sur la collecte et le traitement des produits et batteries
usagés, veuillez contacter votre municipalité, votre service de gestion des déchets
ou le point de vente chez qui vous avez acheté ces produits.
Ces symboles ne sont valables que dans les pays de l’Union Européenne.
(Exemples de marquage pour les batteries)
Pour les pays n’appartenant pas à l’Union Européenne :
Si vous souhaitez jeter ces articles, veuillez contacter les autorités ou revendeurs
locaux pour connaître les méthodes d’élimination appropriées.
ATTENTION
• Ce produit est évalué sous des conditions climatiques modérées et tropicales
conformément à la norme CEI 60065 sur les Appareils audio, vidéo et appareils
électroniques analogues — Exigences de sécurité.
Raccordements
AVERTISSEMENT
Important
• Lorsque vous installez cet appareil dans un véhicule sans position ACC
(accessoire) sur le contact, si vous omettez de brancher le câble rouge à la borne
qui détecte le fonctionnement de la clé de contact, vous risquez d’entraîner une
fuite de la batterie.
Avec position ACC
• Utilisez cet appareil uniquement avec une batterie de 12volts et une mise à la
terre négative. Le non-respect de cette précaution peut entraîner un incendie ou
un dysfonctionnement.
• Pour éviter un court-circuit, une surchauffe ou un dysfonctionnement, assurezvous de suivre les instructions ci-dessous.
−Débranchez la borne négative de la batterie avant l’installation.
−Fixez les câbles au moyen de serre-câbles ou de ruban adhésif. Enroulez
du ruban adhésif autour du câblage qui entre en contact avec des pièces
métalliques afin de protéger le câblage.
−Placez tous les câbles à l’écart des pièces mobiles, comme le levier de vitesse et
les rails des sièges.
−Placez tous les câbles à l’écart des endroits chauds (ex.: la sortie du chauffage).
−Ne raccordez pas le câble jaune à la batterie en le faisant passer par le trou du
compartiment moteur.
−Recouvrez de ruban isolant tous les câbles non raccordés.
Sans position ACC
−Utilisez un fusible de la valeur indiquée.
−Ne raccordez jamais le câble de haut-parleur négatif directement à la masse.
−N’attachez jamais ensemble les câbles négatifs de plusieurs haut-parleurs.
• Le symbole graphique
• Vérifiez les raccordements de l’alimentation et des haut-parleurs si le fusible de
cet appareil saute. Déterminez et résolvez la cause, puis remplacez le fusible par
un équivalent identique.
• Installez toujours cet appareil sur une surface plane.
N’installez pas cet appareil sur une surface non plane ou sur une surface
comportant une partie saillante. Cela pourrait entraîner un dysfonctionnement.
• Lors de l’installation de cet appareil, ne laissez pas des pièces telles que des vis
supplémentaires se coincer entre cet appareil et l’automobile.
Cela pourrait provoquer un dysfonctionnement.
• Évitez tout contact de cet appareil avec des liquides. Cela pourrait provoquer
une décharge électrique.
Tout contact avec des liquides pourrait également provoquer des dommages, de
la fumée et une surchauffe de l’appareil.
Les surfaces de l’amplificateur et des haut-parleurs fixés peuvent également
chauffer et causer des brûlures mineures.
• N’essayez pas de démonter ou de modifier cet appareil. Cela pourrait entraîner
un incendie, un choc électrique ou un autre dysfonctionnement de l’appareil.
situé sur le produit représente le courant continu.
Cet appareil
Cet appareil fournit une variété d’effets sonores par fonctionnement intuitif à
l’aide d’un smartphone.
FUSIBLE 10A
Entrée du cordon d’alimentation
Entrée du cordon de frein de stationnement
Sortie du caisson de graves
Sortie du haut-parleur arrière/Sortie du haut-parleur de médiums
Sortie du haut-parleur avant/Sortie du haut-parleur d’aigus
Entrée RCA
Entrée du capteur de télécommande
Port USB
Touche de réinitialisation
Indicateur d’alimentation
Sélecteur INPUT
Sélecteur DSP MODE
Capteur de télécommande
Préparation de la télécommande
Retirez la feuille isolante avant utilisation.
Comment remplacer la pile
Insérez la pile en orientant correctement les pôles plus (+) et moins (–).
AVERTISSEMENT
• N’ingérez pas la pile, il existe un risque de brûlures chimiques.
(La télécommande fournie) Ce produit contient une pile bouton. Si la pile
bouton est avalée, cela peut entraîner de graves brûlures internes en seulement
2 heures et conduire au décès.
Tenez les piles neuves et usées hors de portée des enfants.
Si le logement de la pile se ferme mal, arrêtez d’utiliser le produit et tenez-le
éloigné des enfants.
Si vous pensez que des piles ont pu être avalées ou placées à l’intérieur d’une
partie du corps, consultez immédiatement un médecin.
• Les batteries (bloc batterie ou batteries installés) ne doivent pas être exposées à
une chaleur excessive comme la lumière directe du soleil, du feu ou similaire.
ATTENTION
• Il existe un risque d’explosion si la batterie n’est pas correctement remplacée.
Remplacez-la uniquement par une batterie du même type ou de type
équivalent.
Nom de chaque touche de la télécommande
VOLUME –
VOLUME +
MUTE
SRC (source)
Gauche
Appuyez pour sélectionner la piste ou le morceau précédent.
Droite
Appuyez pour sélectionner la piste ou le morceau suivant.
LECTURE/PAUSE
A
Maintenez enfoncé pour changer de mode de connexion (pour iPhone®/
connexion AOA d’un smartphone (Android)).
B
Maintenez enfoncé pour changer de mode de connexion (connexion OTG d’un
smartphone (Android)).
Raccordement du cordon d’alimentation et
d’un haut-parleur
Coupez le cordon d’alimentation fixé avant de le raccorder au véhicule.
Le kit de faisceau de câbles (vendu séparément) est également disponible pour
raccorder le cordon.
Reportez-vous à:
• Raccordements lors de
l’utilisation du fil d’entrée
du haut-parleur
• Raccordements lors de
l’utilisation de la prise
d’entrée RCA
Vers l’entrée du cordon d’alimentation
Cordon d’alimentation
Jaune
Vers la borne alimentée électriquement indépendamment de la position du
commutateur d’allumage
Rouge
Vers la borne électrique contrôlée par le commutateur d’allumage (12V CC) ON/
OFF
Bleu/blanc
À raccorder à la borne de commande de système de l’amplificateur de
puissance (max. 300mA 12V CC).
Noir (terre)
Vers la carrosserie (métallique) du véhicule
Gauche
Droite
Haut-parleur avant (STD) ou haut-parleur grande portée (NW)
Haut-parleur arrière (STD) ou haut-parleur moyenne portée (NW)
Blanc
Blanc/noir
Gris
Gris/noir
Ver t
Vert/noir
Violet
Violet/noir
Raccordements lors de l’utilisation du l
d’entrée du haut-parleur
Raccordez les fils de sortie du haut-parleur de l’autoradio à cet appareil à l’aide du
cordon d’alimentation.
Faites glisser le sélecteur INPUT jusqu’à la position SP.
Vers l’entrée du cordon d’alimentation
Cordon d’alimentation
Orange
Orange/noir
Marron
Marron/noir
Gauche +
Gauche −
Droite +
Droite −
Autoradio/système de navigation
Remarque
• Le signal d’entrée de l’autoradio/du système de navigation est à 2canaux. Le
signal de sortie de cet appareil n’apparaît pas, même lors du changement des
paramètres autres que le canal correspondant de l’autoradio/du système de
navigation.
• Raccordez la sortie du haut-parleur avant de l’autoradio/du système de
navigation.
• Veillez à vous brancher sur l’entrée de l’enceinte si votre véhicule ne dispose pas
de position ACC (accessoire).
Cet appareil démarre avec le système de navigation / système stéréo de la
voiture.
Cet appareil peut ne pas démarrer selon le type de système de navigation /
système stéréo de la voiture.
Raccordements lors de l’utilisation de la prise
d’entrée RCA
Raccordez la prise de sortie RCA de l’autoradio et la prise d’entrée RCA de cet
appareil.
Faites glisser le sélecteur INPUT jusqu’à la position RCA.
Vers l’entrée RCA
Câble RCA (vendu séparément)
Vers la sortie RCA
Autoradio/système de navigation
Remarque
• Le signal d’entrée de l’autoradio/du système de navigation est à 2canaux. Le
signal de sortie de cet appareil n’apparaît pas, même lors du changement des
paramètres autres que le canal correspondant de l’autoradio/du système de
navigation.
• Raccordez la sortie RCA avant de l’autoradio/du système de navigation.
• Veillez à vous brancher sur l’entrée de l’enceinte si votre véhicule ne dispose pas
de position ACC (accessoire).
Cet appareil démarre avec le système de navigation / système stéréo de la
voiture.
Cet appareil peut ne pas démarrer selon le type de système de navigation /
système stéréo de la voiture.
Raccordements lors de l’utilisation de
l’amplicateur (vendu séparément)
Télécommande du système
À raccorder au câble bleu/blanc.
Amplificateur de puissance (vendu séparément)
À raccorder au câble RCA (vendu séparément)
Vers la sortie du haut-parleur avant (STD) ou la sortie du haut-parleur d’aigus
(NW)
Haut-parleur avant (STD)/Haut-parleur grande portée (NW)
Vers la sortie du haut-parleur arrière (STD) ou la sortie du haut-parleur de
médiums (NW)
Haut-parleur arrière (STD)/Haut-parleur moyenne portée (NW)
Vers la sortie du caisson de graves (STD) ou la sortie du haut-parleur de graves
(NW)
Caisson de graves (STD)/Haut-parleur faible portée (NW)
Raccordements du câble de frein de
stationnement
À raccorder au contacteur de frein de stationnement à l’aide du câble de frein de
stationnement.
Vers l’entrée du cordon de frein de stationnement
Cordon de frein de stationnement
Ce fil permet de détecter l’état de marche/arrêt (ON/OFF) du frein de
stationnement. Ce fil doit être raccordé au côté de l’alimentation électrique du
contacteur de frein de stationnement.
Côté de l’alimentation électrique
Contacteur de frein de stationnement
Côté terre
Remarque
Lorsque le câble de frein de stationnement n’est pas raccordé, une partie de la
fonction d’application exclusive (Sound Tune) est limitée.
Installation
Cet appareil
Important
• Vérifiez tous les raccordements et les systèmes avant l’installation finale.
• N’utilisez pas de pièces non autorisées, car cela pourrait provoquer des
dysfonctionnements.
• Consultez votre revendeur si l’installation nécessite de percer des trous ou
d’apporter d’autres modifications au véhicule.
• N’installez pas cet appareil aux endroits où:
−il peut interférer avec le fonctionnement du véhicule;
−il peut causer des blessures à un passager à la suite d’un arrêt brusque.
• Installez cet appareil à l’écart des endroits chauds (ex.: la sortie du chauffage).
• Pour activer la valeur paramétrée, modifiez le réglage du bouton de sélection
INPUT ou le bouton DSP MODE et tournez le bouton ACC sur OFF/ON.
1. Réglez le sélecteur DSP MODE.
2. Réglez le sélecteur INPUT.
3. Serrez les vis de chaque côté, puis fixez l’appareil.
Support
Vis (à tête cylindrique 4mm × 8mm)
Vis (taraudeuse 4mm × 12mm)
Orifice (2mm à 2,5mm)
Tapis ou châssis du véhicule (exemple d’installation)
Capteur de télécommande
1. Raccordez le capteur de télécommande à l’entrée du capteur de
télécommande.
Placez le récepteur optique du capteur de télécommande à un emplacement
pouvant recevoir le signal de télécommande
Raccordez le câble de sorte qu’il ne vous gêne pas dans votre conduite.
Capteur de télécommande
Téléchargement de Sound Tune
Pour utiliser cet appareil, téléchargez Sound Tune sur l’iPhone ou le smartphone
(Android).
Entrez le terme de recherche «Pioneer Sound Tune» dans la fenêtre de recherche
ou scannez le code QR ci-dessous.
AVERTISSEMENT
N’essayez pas d’utiliser l’application tout en conduisant. Veillez à quitter la route
et à garer votre véhicule en lieu sûr avant d’essayer d’utiliser les commandes de
l’application.
Sound Tune peut faire ce qui suit.
Lecture de morceaux enregistrés sur un iPhone/smartphone (Android)
Les formats de morceaux lisibles dépendent de votre périphérique. Pour plus de
détails, reportez-vous au mode d’emploi de votre périphérique.
Paramètres d’effet des morceaux d’un iPhone/smartphone (Android) et du
son de l’autoradio/du système de navigation
• Son super «Todoroki»
• Simulation en direct
Réglages divers de cet appareil
• Mode Standard (avant/arrière/caisson de graves)
• Mode Réseau (réseau 3voies)
• Réglage des haut-parleurs
−Égaliseur graphique
−Alignement temporel
−Filtre réseau
−Niveau des haut-parleurs
• Fader/Balance
• Étalonnage de source
Pour plus de détails sur chaque fonction, reportez-vous aux info-bulles de Sound
Tune.
Comment utiliser cet appareil
Selon la méthode de raccordement de l’iPhone/du smartphone (Android), cet
appareil peut être utilisé comme suit.
Lors de l’utilisation de cet appareil seul
(lorsque vous ne raccordez ni un iPhone, ni un
smartphone (Android))
L’appareil émet la source sonore de l’autoradio/du système de navigation. Seules
les fonctions de réglage du volume et de sourdine peuvent être commandées
avec la télécommande fournie.
Pour le réglage audio, le raccordement d’un iPhone/smartphone (Android) est
nécessaire.
Lors du raccordement d’un iPhone/smartphone
(Android) à utiliser
L’appareil peut être utilisé dans les quatremodes suivants.
Lorsque vous utilisez la télécommande, appuyez sur la touche SRC pour changer
de mode.
Le mode bascule dans l’ordre suivant: mode Autoradio, mode Direct, mode
Smartphone et mode Mixage.
Mode Autoradio
L’appareil émet la source sonore de l’autoradio/du système de navigation du
véhicule en passant par l’iPhone/le smartphone (Android).
Mode Smartphone
L’appareil émet la source sonore de l’iPhone/du smartphone (Android).
Mode Direct
L’appareil émet la source sonore de l’autoradio/du système de navigation du
véhicule sans passer par l’iPhone/le smartphone (Android). (Il s’agit de la même
sortie que lors de l’utilisation de cet appareil seul.)
Ce mode est utilisé lorsque la vidéo et l’audio sont décalés pendant la lecture
vidéo en mode Autoradio.
Mode Mixage
L’appareil mixe et émet le son de l’iPhone/du smartphone (Android) et le son de
l’autoradio/du système de navigation.
Servez-vous de ce mode lorsque vous souhaitez utiliser le guidage vocal de
l’autoradio/du système de navigation tout en écoutant la source de l’iPhone/du
smartphone (Android). Dans ce cas, éteignez la source de l’autoradio/du système
de navigation et réglez-la de sorte que seul le guidage vocal soit émis.
Selon l’autoradio/le système de navigation, ce mode peut ne pas être disponible.
Les fonctions disponibles diffèrent selon la méthode de connexion de l’iPhone/du
smartphone (Android).
Périphérique iPhone Smartphone (Android)
Méthode de connexion — AOA*1 OTG*2
Mode Autoradio
Mode Smartphone
Mode Direct
Mode Mixage
*1: AOA (Android Open Accessory) est une norme d’interface permettant
d’utiliser des produits chargés via USB comme accessoires sur des terminaux
Android.
*2: OTG (On-The-Go) est une norme d’interface permettant de relier directement
des périphériques USB à des périphériques USB. La connexion OTG ne permet
pas de charger les smartphones (Android). Faites attention au niveau de la
batterie du smartphone (Android).
*3: pour la connexion AOA, vous ne pouvez pas utiliser le mode Autoradio. Le
fonctionnement est le même que pour le mode Direct.
*4: pour la connexion OTG, les sons provenant d’applications autres que Sound
Tune ne peuvent pas être émis par cet appareil.
Remarque
Lorsque l’iPhone/le smartphone (Android) est déconnecté, certaines fonctions
telles que le Son super « Todoroki » et la Simulation en direct ne peuvent pas être
utilisées.
Par ailleurs, même si l’iPhone/le smartphone (Android) est connecté, les fonctions
ci-dessus ne pourront peut-être pas être utilisées dans les conditions suivantes.
• Lors de la sélection du mode transversal
• Lors de la lecture de supports par des applications autres que Sound Tune
✔
✔ ✔ ✔(*4)
✔ ✔ ✔
✔ ✔ ✔(*4)
-(*3)
✔
Raccordement du smartphone à cet appareil
Pour les utilisateurs d’iPhone
Port USB
Câble USB (pour le typeA)
Câble Lightning®-USB (produit authentique ou vendu séparément)
iPhone
Pour les utilisateurs de smartphone (Android) (connexion AOA)
Port USB
Câble USB (pour le typeA)
Câble USB-micro USB (vendu séparément)
Smartphone (Android)
Pour les utilisateurs de smartphone (Android) (connexion OTG)
Port USB
Câble USB (pour le typeA)
Câble USB A-A (vendu séparément)
Câble USB OTG (vendu séparément)
Smartphone (Android)
Remarque
La connexion OTG ne permet pas de charger un smartphone (Android).
À propos des périphériques USB
• Pour plus de détails sur la manipulation de l’iPhone/du smartphone (Android),
veuillez lire chaque manuel.
• Sachez que nous n’assumons pas la responsabilité de l’indemnisation même en
cas de perte de données, etc. lors de l’utilisation en association avec cet appareil.
• Veillez à fixer l’iPhone/le smartphone (Android) avant de l’utiliser en association
avec cet appareil.
À propos du raccordement à cet appareil
• Ne raccordez pas d’autres périphériques que l’iPhone/le smartphone (Android)
(tels qu’un ventilateur USB).
• Cela n’est pas compatible avec une connexion utilisant un concentrateur USB.
Utilisation de Sound Tune
Lors du raccordement d’un iPhone ou d’un smartphone (Android) à cet appareil,
un message s’affiche sur l’iPhone ou le smartphone (Android). Sound Tune
démarre lorsque le démarrage est autorisé.
Tapez sur l’icône en bas de l’écran pour démarrer l’utilisation.
Comment procéder à la réinitialisation
Réinitialisez cet appareil s’il ne fonctionne pas correctement ou si vous souhaitez
rétablir les réglages par défaut.
1. Appuyez sur le bouton de réinitialisation pendant le fonctionnement de
l’appareil.
Les paramètres sont initialisés lorsque le bouton de démarrage est désactivé
(ACC OFF).
Les réglages d’usine par défaut s’appliqueront lors de la prochaine mise sous
tension de l’appareil.
Si aucun son n’est émis
Si vous n’entendez aucun son après l’installation de cet appareil, procédez comme
suit.
• Assurez-vous que l’iPhone/le smartphone (Android) est correctement raccordé
avec un câble USB.
• Assurez-vous que la commutation d’OTG/AOA s’effectue correctement.
• Mettez le commutateur ACC sur OFF/ON.
Veuillez contacter votre revendeur ou votre agent de maintenance si les mesures
susmentionnées n’apportent aucune amélioration.
À propos de la fonction de protection
Ce produit dispose d’une fonction de protection. Lorsque cet appareil détecte
quelque chose d’anormal, les fonctions suivantes s’activent pour protéger la
sortie de l’appareil et du haut-parleur.
• L’indicateur d’alimentation devient rouge, clignote en rouge, puis l’appareil
s’éteint dans les situations décrites ci-dessous.
−Si la borne de sortie du haut-parleur et le fil du haut-parleur subissent un
court-circuit.
−Si une tension continue est appliquée à la borne de sortie du haut-parleur.
−Si une alimentation USB détecte quelque chose d’anormal.
−Si une ligne USB a une erreur de communication.
Veuillez contacter votre revendeur ou votre agent de maintenance si le fait de
mettre le commutateur ACC sur OFF/ON ou d’insérer ou retirer l’USB n’apporte
aucune amélioration.
Caractéristiques techniques
GÉNÉRALITÉS
SOURCE D’ALIMENTATION 14,4V CC
(10,8-15,1V admissibles)
MISE À LA TERRE Pôle négatif
CONSOMMATION MAX.: 9,2A
DIMENSIONS 170 (L) x 40 (H) x 95 (P) <mm>
FUSIBLE 10A
POIDS 0,59kg
AUDIO
PUISSANCE MAX. 50W x4
50W x 2canaux/4Ω + 70W x 1 canal/2Ω (pour le CAISSON DE GRAVES)
PUISSANCE CONTINUE 22W x 4
(50Hz à 15kHz, THD 5%, CHARGE DE 4Ω, avec les deuxcanaux entraînés)
IMPÉDANCE DE CHARGE 4Ω
(4 à 8Ω (2Ω pour 1canal) admissibles)
PRÉ-SORTIE
NIVEAU DE SORTIE (MAX.) 4,0V
IMPÉDANCE 250Ω
RÉPONSE EN FRÉQUENCE 10 Hz à 20 kHz (+0dB, -1dB)
RAPPORT S/B 105dB
THD 0,01%
ÉGALISEUR (ÉGALISEUR GRAPHIQUE 13BANDES)
FRÉQUENCE 50Hz, 80Hz, 125Hz, 200Hz, 315Hz, 500Hz
800Hz, 1,25kHz, 2kHz, 3,15kHz, 5kHz, 8kHz, 12,5kHz
GAIN ±12 dB (pas de 0,1 dB)
RÉGLAGE DES HAUT-PARLEURS
<MODE STANDARD>
AVANT/ARRIÈRE (FPH)
FRÉQUENCE
50Hz, 63Hz, 80Hz, 100Hz, 125Hz, 160Hz, 200Hz
PENTE
0dB (passe), -6dB/oct, -12dB/oct, -18dB/oct, -24dB/oct
CAISSON DE GRAVES (FPB)
FRÉQUENCE
50Hz, 63Hz, 80Hz, 100Hz, 125Hz, 160Hz, 200Hz
PENTE
0dB (passe), -6dB/oct, -12dB/oct, -18dB/oct, -24dB/oct
GAIN -24 à +10dB (1dB/pas)
PHASE NORMALE/INVERSÉE
NIVEAU DES HAUT-PARLEURS -24 à +10dB (1dB/pas)
ALIGNEMENT TEMPOREL 0 cm à 350 cm (2,5 cm/pas)
<MODE RÉSEAU>
ÉLEVÉ (FPH) FRÉQUENCE 1,25kHz, 1,6kHz, 2kHz, 2,5kHz, 3,15kHz
4kHz, 5kHz, 6,3kHz, 8kHz, 10kHz, 12,5kHz
PENTE -6dB/oct, -12dB/oct, -18dB/oct, -24dB/oct
MOYEN (FPB) FRÉQUENCE 1,25kHz, 1,6kHz, 2kHz, 2,5kHz, 3,15kHz
4kHz, 5kHz, 6,3kHz, 8kHz, 10kHz, 12,5kHz
PENTE
0dB (passe), -6dB/oct, -12 dB/oct, -18dB/oct, -24dB/oct
MOYEN (FPH) FRÉQUENCE 25Hz, 31,5Hz, 40Hz, 50Hz, 63Hz, 80Hz
100Hz, 125Hz, 160Hz, 200Hz, 250Hz
PENTE
0dB (passe), -6dB/oct, -12dB/oct, -18dB/oct, -24dB/oct
CAISSON DE GRAVES (FPB)
FRÉQUENCE 25Hz, 31,5Hz, 40Hz, 50Hz, 63Hz, 80Hz
100Hz, 125Hz, 160Hz, 200Hz, 250Hz
PENTE 0dB (passe), -12dB/oct, -18dB/oct
-24dB/oct, -30dB/oct, -36dB/oct
GAIN -24 à +10dB (1dB/pas)
PHASE NORMALE/INVERSÉE
NIVEAU DES HAUT-PARLEURS -24 à +10dB (1dB/pas)
ALIGNEMENT TEMPOREL 0 cm à 350 cm (2,5 cm/pas)
USB
SPÉC. DE LA NORME USB USB2.0 Haute vitesse
ALIMENTATION ÉLECTRIQUE MAX. 1,5A
Marques commerciales
iPhone et Lightning sont des marques commerciales d’Apple Inc. déposées
aux États-Unis et dans d’autres pays.
L’usage du badge Made for Apple signifie qu’un accessoire a été conçu pour
se connecter spécialement au(x) produit(s) Apple identifié(s) sur le badge,
et qu’il a été certifié conforme aux normes de performance Apple par son
concepteur.
Apple n’est pas responsable du fonctionnement de cet appareil ni de sa
conformité aux normes de sécurité et de réglementation.
Veuillez noter que l’utilisation de cet accessoire avec un produit Apple peut
affecter les performances de communication sans fil.
English
Before You Start Thank you for purchasing this PIONEER product To ensure proper use, please read through this guide before using this product. It is especially important that you read and observe WARNINGS and CAUTIONS in this guide. Please keep the guide in a safe and accessible place for future reference.
Information to User Alteration or modifications carried out without appropriate authorization may invalidate the users right to operate the equipment.
Note This equipment has been tested and found to comply with the limits for a Class B digital device, pursuant to Part 15 of the FCC Rules. These limits are designed to provide reasonable protection against harmful interference in a residential installation. This equipment generates, uses and can radiate radio frequency energy and, if not installed and used in accordance with the instructions, may cause harmful interference to radio communications. However, there is no guarantee that interference will not occur in a particular installation. If this equipment does cause harmful interference to radio or television reception, which can be determined by turning the equipment off and on, the user is encouraged to try to correct the interference by one or more of the following measures:
Reorient or relocate the receiving antenna. Increase the separation between the equipment and receiver. Connect the equipment into an outlet on a circuit different from that to which the receiver is connected. Consult the dealer or an experienced radio/TV technician for help.
FEDERAL COMMUNICATIONS COMMISSION SUPPLIERS DECLARATION OF CONFORMITY Product Name: UNIVERSAL SOUND PROCESSOR Model Number: DEQ-S1000A Responsible Party Name: PIONEER ELECTRONICS (USA), INC. SERVICE SUPPORT DIVISION Address: 2050 W. 190TH STREET, SUITE 100 TORRANCE, CA 90504, U.S.A. Phone: 1-310-952-2915 URL: http://www.pioneerelectronics.com
The Safety of Your Ears is in Your Hands Get the most out of your equipment by playing it at a safe levela level that lets the sound come through clearly without annoying blaring or distortion and, most importantly, without affecting your sensitive hearing. Sound can be deceiving. Over time, your hearing comfort level adapts to higher volumes of sound, so what sounds normal can actually be loud and harmful to your hearing. Guard against this by setting your equipment at a safe level BEFORE your hearing adapts. ESTABLISH A SAFE LEVEL: Set your volume control at a low setting. Slowly increase the sound until you can hear it comfortably and clearly, without
distortion. Once you have established a comfortable sound level, set the dial and leave it
there. BE SURE TO OBSERVE THE FOLLOWING GUIDELINES: Do not turn up the volume so high that you cant hear whats around you. Use caution or temporarily discontinue use in potentially hazardous situations. Do not use headphones while operating a motorized vehicle; the use of
headphones may create a traffic hazard and is illegal in many areas.
WARNING This product contains chemicals known to the State of California and other
governmental entities to cause cancer and birth defects or other reproductive harm. Wash hands after handling.
CAUTION This product is evaluated in moderate and tropical climate condition under the
Audio, video and similar electronic apparatus — Safety requirements, IEC 60065.
Connections
WARNING Important
When installing this unit in a vehicle without an ACC (accessory) position on the ignition switch, failure to connect the red cable to the terminal that detects operation of the ignition key may result in battery drain.
ACC position No ACC position Use this unit with a 12-volt battery and negative grounding only. Failure to do so
may result in a fire or malfunction. To prevent a short-circuit, overheating or malfunction, be sure to follow the
directions below. Disconnect the negative terminal of the battery before installation. Secure the wiring with cable clamps or adhesive tape. Wrap adhesive tape around wiring that comes into contact with metal parts to protect the wiring. Place all cables away from moving parts, such as the shift lever and seat rails. Place all cables away from hot places, such as near the heater outlet. Do not connect the yellow cable to the battery by passing it through the hole to the engine compartment. Cover any disconnected cable connectors with insulating tape. Use a fuse of the rating prescribed. Never wire the negative speaker cable directly to ground. Never band together negative cables of multiple speakers.
The graphical symbol placed on the product means direct current. Check the connections of the power supply and speakers if this unit fuse blows.
Determine and resolve the cause, then replace the fuse with and identical equivalent.
Always install this unit on a flat surface. Do not install this unit on a surface that is not flat or on a surface with a protrusion. Doing so could result in malfunction.
When installing this unit, do not allow parts such as extra screws to get caught between this unit and the automobile. Doing so could cause malfunction.
Do not allow this unit to come into contact with liquids. Electrical shock could result. Also, damage to this unit, smoke, and overheating could result from contact with liquids. The surfaces of the amplifier and any attached speakers may also heat up and cause minor burns.
Do not attempt to disassemble or modify this unit. Doing so may result in fire, electric shock or other malfunction.
This unit This unit provides a variety of sound effects by intuitive operation using a smartphone.
FUSE 10A Power cord input Parking brake cord input Subwoofer output Rear output/Middle range output Front output/High range output RCA input Remote control sensor input USB port Reset button Power indicator INPUT select switch DSP MODE select switch Remote control sensor
Preparing the remote control Remove the insulation sheet before use.
How to replace the battery Insert the battery with the plus (+) and minus () poles orientated properly.
WARNING Do not ingest the battery, Chemical Burn Hazard.
(The remote control supplied with) This product contains a coin/button cell battery. If the coin/button cell battery is swallowed, it can cause severe internal burns in just 2 hours and can lead to death. Keep new and used batteries away from children. If the battery compartment does not close securely, stop using the product and keep it away from children. If you think batteries might have been swallowed or placed inside any part of the body, seek immediate medical attention.
Batteries (battery pack or batteries installed) must not be exposed to excessive heat such as sunshine, fire or the like.
CAUTION There is a danger of explosion if the battery is incorrectly replaced. Replace only
with the same or equivalent type. When disposing of used batteries, please comply with governmental regulations
or environmental public institutions rules that apply in your country / area. Perchlorate Material — special handling may apply.
See www.dtsc.ca.gov/hazardouswaste/perchlorate. (Applicable to California, U.S.A.)
Connection of power cord and speaker Cut the attached power cord and then connect it to the vehicle. The wiring harness kit (sold separately) is also available to connect the cord.
Refer to: Connections when using
the speaker input wire Connections when using
the RCA input jack
To power cord input Power cord Yellow To terminal supplied with power, regardless of ignition switch position Red To electric terminal controlled by ignition switch (12 V DC) ON/OFF Blue/white Connect to the system control terminal of the power amp (max. 300 mA 12 V DC).
Connections when using the RCA input jack Connect the car stereo RCA output jack and the RCA input jack of this unit. Slide the INPUT select switch to the RCA position.
To RCA input RCA cable (sold separately) To RCA output Car stereo / navigation system
Note The input signal of Car stereo / navigation system is 2ch. The output signal
of this unit will not be reflected even when changing settings other than the corresponding channel of the car stereo / navigation system.
Connect the front RCA output of the car stereo / navigation system. Make sure to connect with the speaker input if your vehicle has no ACC
(accessory) position. This unit activates with the power of the car stereo / navigation system. This unit may not activate depending on the type of car stereo / navigation system.
Connections when using the speaker input wire Connect the car stereo speaker output wires to this unit using the power cord. Slide the INPUT select switch to the SP position.
To power cord input Power cord Orange Orange/black Brown Brown/black Left + Left Right + Right Car stereo / navigation system
Note The input signal of Car stereo / navigation system is 2ch. The output signal
of this unit will not be reflected even when changing settings other than the corresponding channel of the car stereo / navigation system.
Connect the front speaker output of the car stereo / navigation system.
Parking brake cable connections Connect to the parking brake switch using the parking brake cord.
To parking brake cord input Parking brake cord Used to detect the ON/OFF status of the parking brake. This lead must be connected to the power supply side of the parking brake switch. Power supply side Parking brake switch Ground side
Note When the parking brake cable is not connected, a part of the exclusive application (Sound Tune) function is limited.
Name of each remote control button
VOLUME VOLUME + MUTE SRC (source) Left Press to select the previous track / song. Right Press to select the next track / song. PLAY/PAUSE A Press and hold to change the connection mode (for iPhone / AOA connection of smartphone (Android)). B Press and hold to change the connection mode (OTG connection of smartphone (Android)).
Black (ground) To vehicle (metal) body Left Right Front speaker (STD) or high range speaker (NW) Rear speaker (STD) or middle range speaker (NW) White White/black Gray Gray/black Green Green/black Violet Violet/black
Connections when using the amplifier (sold separately)
System remote control Connect to Blue/white cable. Power amp (sold separately) Connect with RCA cable (sold separately) To front output (STD) or high range output (NW) Front speaker (STD) / High range speaker (NW) To rear output (STD) or middle range output (NW) Rear speaker (STD) / Middle range speaker (NW) To subwoofer output (STD) or low range output (NW) Subwoofer (STD) / Low range speaker (NW)
Make sure to connect with the speaker input if your vehicle has no ACC (accessory) position. This unit activates with the power of the car stereo / navigation system. This unit may not activate depending on the type of car stereo / navigation system.
Installation
This unit
Important Check all connections and systems before final installation. Do not use unauthorized parts as this may cause malfunctions. Consult your dealer if installation requires drilling of holes or other modifications
to the vehicle. Do not install this unit where:
it may interfere with operation of the vehicle. it may cause injury to a passenger as a result of a sudden stop.
Install this unit away from hot places such as near the heater outlet. To enable the setting value, change the setting of the INPUT select switch or the
DSP MODE switch and turn the ACC switch OFF/ON.
1. Set the DSP MODE select switch.
2. Set the INPUT select switch.
3. Tighten the screws on each side, then fix the unit.
Bracket Screw (Washer-faced head 4 mm 8 mm) Screw (Tapping screw 4 mm 12 mm) Hole (2 mm to 2.5 mm) Car mat or chassis (installation example)
Download Sound Tune To use this unit, download Sound Tune to the iPhone or smartphone (Android). Enter the search term «Pioneer Sound Tune» in the search window or search from the following QR code.
WARNING Do not attempt to operate the application while driving. Make sure to pull off the road and park your vehicle in a safe location before attempting to use the controls on the application.
Sound Tune can do the following.
Playing songs saved on iPhone / smartphone (Android) Playable song formats depend on your device. For details, please read the instruction manual of your device.
Effect settings of iPhone / smartphone (Android) songs and the car stereo / navigation system sound Super Todoroki Sound Live Simulation
Various settings of this unit Standard Mode (Front / Rear / Subwoofer) Network Mode (3 Way Network) Speaker Setting
Graphics Equalizer
Remote control sensor
1. Connect the remote control sensor to the remote control sensor input . Place the light receiving part of the remote control sensor in a place that can receive the remote control signal. Wire the cable so that it does not interfere with driving.
Remote control sensor
Time Alignment Network Filter Speaker Level
Fader / Balance Source Calibration For details of each function, please refer to Popup Help in Sound Tune.
How to Use This Unit Depending on the connection method of the iPhone / smartphone (Android), this unit can be used as follows.
When using this unit alone (When not connecting an iPhone or smartphone (Android)) The unit outputs the sound source of the car stereo / navigation system. Only the volume adjustment and mute functions can be operated with the supplied remote control. For audio adjustment, connection of an iPhone / smartphone (Android) is necessary.
When connecting an iPhone / smartphone (Android) to use The unit can be used in the following four pattern modes. When using the remote control, press the SRC button to switch the mode. The mode switches in the order of Car Stereo mode, Through mode, Smartphone mode, and Mix mode.
Car Stereo mode The unit outputs the sound source of the car stereo / navigation system by passing through the iPhone / smartphone (Android).
Smartphone mode The unit outputs the sound source of the iPhone / smartphone (Android).
Through mode The unit outputs the sound source of the car stereo / navigation system without passing through the iPhone / smartphone (Android). (It is the same output as using this unit alone) This mode is used when video and audio are misaligned during video playback in the Car Stereo mode.
Mix mode The unit mixes and outputs the sound of the iPhone / smartphone (Android) and the sound of the car stereo / navigation system. Use this mode when you want to use the voice guidance of the car stereo / navigation system while listening to the source of the iPhone / smartphone (Android). In this case, turn off the source of the car stereo / navigation system and set it so that only the voice guidance is output. Depending on the car stereo / navigation system, this mode may not be available.
The available functions differ depending on the connection method of the iPhone / smartphone (Android).
Device iPhone Smartphone (Android)
Connection method — AOA*1 OTG*2
Car Stereo mode -(*3)
Smartphone mode (*4)
Through mode
Mix mode (*4)
*1: AOA (Android Open Accessory) is an interface standard for using USB-loaded products as accessories on Android terminals.
*2: OTG (On-The-Go) is an interface standard that connects USB devices and USB devices directly. Smartphones (Android) cannot be charged using the OTG connection. Pay attention to the battery level of the smartphone (Android).
*3: For the AOA connection, you cannot use the Car Stereo mode. The operation is the same as Through mode.
*4: For the OTG connection, sounds from applications other than Sound Tune cannot be output from this unit.
Note When the iPhone / smartphone (Android) is disconnected, some functions such
as Super Todoroki Sound and Live Simulation cannot be used. Also, even if the iPhone / smartphone (Android) is connected, the above functions may not be used under the following conditions.
When selecting Through mode When playing media by applications other than Sound Tune
Although this unit can be connected to smartphones (Android), it does not guarantee the availability of all terminals. Depending on the smartphone (Android), the unit may not be operated with an AOA connection. In this case, use an OTG connection. If all else fails, it might be a terminal that cannot be connected or that is out of order. Please contact your dealer or service agent.
Connecting the Smartphone to This Unit For iPhone users
USB port USB cable (for Type-A) Lightning USB cable (genuine product or sold separately) iPhone
For smartphone (Android) users (AOA connection)
USB port USB cable (for Type-A) USB — micro USB cable (sold separately) Smartphone (Android)
For smartphone (Android) users (OTG connection)
USB port USB cable (for Type-A) USB A-A cable (sold separately) USB OTG cable (sold separately) Smartphone (Android)
Note Smartphone (Android) cannot be charged using the OTG connection.
About USB devices For details on handling the iPhone / smartphone (Android), please read each
manual. Please understand that we do not assume responsibility for compensation even
if data, etc. are lost at the time of use in combination with this unit. Be sure to fix the iPhone / smartphone (Android) when using it in combination
with this unit.
About connection with this unit Do not connect devices other than the iPhone / smartphone (Android) (such as
USB fan). It is not compatible with connection using USB hub.
Using Sound Tune When connecting an iPhone or smartphone (Android) to this unit, a message is displayed on the iPhone or smartphone (Android). Sound Tune starts when startup is allowed.
Tap the icon at the bottom of the screen to start the operation.
How to reset Reset this unit if it does not operate properly or you want to return the setting value to the factory default.
1. Press the reset button while the unit is in operation. The settings are initialized when the ignition switch is turned off (ACC OFF). The factory default setting is applied when the unit is turned on next time.
When the sound does not sound If you cannot hear the sound after installing this unit, carry out the following. Make sure that the iPhone / smartphone (Android) is connected correctly with a
USB cable. Make sure that switching of OTG / AOA is performed correctly. Turn the ACC switch OFF / ON. Please contact your dealer or service agent if improvements are not made even if you perform the above.
About the protection function This product has a protection function. When this product detects something abnormal, the following functions will operate to protect the product and speaker output. The power indicator will turn Red, blink Red, and then the product will power off
in the situations outlined below. If the speaker output terminal and speaker wire are short-circuited. If a DC voltage is applied to the speaker output terminal. If a USB power supply detects something abnormal If a USB line has a communication error
Please contact your dealer or service agent if improvements are not made even after you try turning the ACC switch OFF / ON or removing/reinserting the USB.
Specifications GENERAL POWER SOURCE 14.4V DC (10.8-15.1V allowable) GROUNDING SYSTEM Negative type MAX. CURRENT CONSUMPTION 9.2A DIMENSIONS 170(W) x 40(H) x 95(D)
6-3/4(W) x 1-5/8(H) x 3-3/4(D)
FUSE 10A WEIGHT 0.59kg
AUDIO MAX POWER 50W x 4 50Wx2ch/4 + 70Wx1ch/2 (for SUB-WOOFER) CONTINUOUS POWER 22W x 4 (50Hz to 15kHz, 5%THD, 4 LOAD, Both Channels Driven)
CEA2006 POWER OUTPUT (at 4 Ohms and <= 1% THD+N) 14W RMS x4 Channels Signal to Noise Ratio (reference:1 Watt into 4 Ohms) 91dBA
LOAD IMPEDANCE 4 (4 — 8(2 for 1ch) allowable)
PREOUT OUTPUT LEVEL (MAX) 4.0V IMPEDANCE 250 FREQUENCY RESPONSE 10Hz to 20kHz (+0dB , -1dB) S/N RATIO 105dB THD 0.01%
EQUALIZER (13BAND GRAPHIC EQUALIZER) FREQUENCY 50Hz, 80Hz, 125Hz, 200Hz, 315Hz, 500Hz 800Hz, 1.25kHz, 2kHz, 3.15kHz, 5kHz, 8kHz, 12.5kHz GAIN 12dB(0.1dB step)
SPEAKER SETTING
FRONT/REAR (HPF) FREQUENCY 50Hz, 63Hz, 80Hz, 100Hz, 125Hz, 160Hz, 200Hz SLOPE 0dB(Pass), -6dB/oct, -12dB/oct, -18dB/oct, -24dB/oct SUB WOOFER (LPF) FREQUENCY 50Hz, 63Hz, 80Hz, 100Hz, 125Hz, 160Hz, 200Hz SLOPE 0dB(Pass), -6dB/oct, -12dB/oct, -18dB/oct, -24dB/oct GAIN -24 — +10dB (1dB/Step) PHASE NORMAL/REVERSE SPEAKER LEVEL -24 — +10dB (1dB/Step) TIME ALIGNMENT 0inch — 140inch (1 inch/step)
HIGH (HPF) FREQUENCY 1.25kHz, 1.6kHz, 2kHz, 2.5kHz, 3.15kHz 4kHz, 5kHz, 6.3kHz, 8kHz, 10kHz, 12.5kHz SLOPE -6dB/oct, -12dB/oct, -18dB/oct, -24dB/oct MID (LPF) FREQUENCY 1.25kHz, 1.6kHz, 2kHz, 2.5kHz, 3.15kHz 4kHz, 5kHz, 6.3kHz, 8kHz, 10kHz, 12.5kHz SLOPE 0dB(Pass), -6dB/oct, -12dB/oct, -18dB/oct, -24dB/oct MID (HPF) FREQUENCY 25Hz, 31.5Hz, 40Hz, 50Hz, 63Hz, 80Hz 100Hz, 125Hz, 160Hz, 200Hz, 250Hz SLOPE 0dB(Pass), -6dB/oct, -12dB/oct, -18dB/oct, -24dB/oct SUB WOOFER (LPF) FREQUENCY 25Hz, 31.5Hz, 40Hz, 50Hz, 63Hz, 80Hz 100Hz, 125Hz, 160Hz, 200Hz, 250Hz SLOPE 0dB(Pass), -12dB/oct, -18dB/oct -24dB/oct, -30dB/oct, -36dB/oct GAIN -24 — +10dB (1dB/Step) PHASE NORMAL/REVERSE SPEAKER LEVEL -24 — +10dB (1dB/Step) TIME ALIGNMENT 0inch — 140inch (1 inch/step)
USB USB STANDARD SPEC. USB2.0 High Speed MAX CURRENT SUPPLY 1.5A
Trademarks
iPhone, and Lightning are trademarks of Apple Inc., registered in the U.S. and other countries. Use of the Made for Apple badge means that an accessory has been designed to connect specifically to the Apple product(s) identified in the badge, and has been certified by the developer to meet Apple performance standards. Apple is not responsible for the operation of this device or its compliance with safety and regulatory standards. Please note that the use of this accessory with an Apple product may affect wireless performance.
UNIVERSAL SOUND PROCESSOR PROCESSEUR AUDIO UNIVERSEL
Instruction Manual Mode demploi
5707000012561V-A
DEQ-S1000A
Franais
Avant de commencer Nous vous remercions davoir achet cet appareil PIONEER Pour garantir une utilisation adquate, lisez bien ce guide avant dutiliser cet appareil. Il est particulirement important de lire et respecter les indications MISE EN GARDE et ATTENTION de ce guide. Conservez-le dans un endroit sr et facilement accessible pour toute consultation ultrieure. La protection de votre oue est entre vos mains Pour assurer le rendement optimal de votre matriel et plus important encore la protection de votre oue, rglez le volume un niveau raisonnable. Pour ne pas altrer votre sens de la perception, le son doit tre clair mais ne produire aucun vacarme et tre exempt de toute distorsion. Votre oue peut vous jouer des tours. Avec le temps, votre systme auditif peut en effet sadapter des volumes suprieurs, et ce qui vous semble un niveau de confort normal pourrait au contraire tre excessif et contribuer endommager votre oue de faon permanente. Le rglage de votre matriel un volume scuritaire AVANT que votre oue sadapte vous permettra de mieux vous protger. CHOISISSEZ UN VOLUME SCURITAIRE : Rglez dabord le volume un niveau infrieur. Montez progressivement le volume jusqu un niveau dcoute confortable ; le
son doit tre clair et exempt de distorsions. Une fois que le son est un niveau confortable, ne touchez plus au bouton du
volume. NOUBLIEZ PAS DE RESPECTER LES DIRECTIVES SUIVANTES : Lorsque vous montez le volume, assurez-vous de pouvoir quand mme
entendre ce qui se passe autour de vous. Faites trs attention ou cessez temporairement lutilisation dans les situations
pouvant savrer dangereuses. Nutilisez pas des couteurs ou un casque dcoute lorsque vous oprez un
vhicule motoris ; une telle utilisation peut crer des dangers sur la route et est illgale de nombreux endroits.
ATTENTION Ce produit a t valu sous des conditions climatiques tempres et tropicales,
selon la norme CEI 60065, Appareils audio, vido et appareils lectroniques analogues Exigences de scurit .
Connexions
MISE EN GARDE Important
Lors de linstallation de cet appareil dans un vhicule sans position ACC (accessoire) sur le commutateur dallumage, le fait de ne pas connecter le cble rouge la borne dtectant lutilisation de la cl de contact pourrait entraner le dchargement de la batterie.
Avec position ACC Sans position ACC
Utilisez cet appareil uniquement avec une batterie 12 volts et une mise la masse ngative. Le non-respect de cette consigne pourrait entraner un incendie ou un problme de fonctionnement.
Pour viter un court-circuit, une surchauffe ou un problme de fonctionnement, assurez-vous de respecter les instructions suivantes.
Dconnectez la borne ngative de la batterie avant linstallation. Fixez le cblage avec des serre-cbles ou du ruban adhsif. Pour protger le cblage, enroulez du ruban adhsif autour des parties du cblage en contact avec des pices mtalliques. Placez tous les cbles distance des pices mobiles, telles que le levier de vitesses et les rails des siges. Placez tous les cbles distance des endroits chauds, tels que les emplacements proximit des sorties de chauffage. Ne connectez pas le cble jaune la batterie en le faisant passer dans louverture du compartiment moteur. Recouvrez tous les connecteurs de cbles qui ne sont pas connects avec du ruban isolant. Utilisez un fusible correspondant aux caractristiques spcifies. Ne reliez jamais le cble ngatif du haut-parleur directement la masse. Ne runissez jamais les cbles ngatifs de plusieurs haut-parleurs.
Le symbole graphique plac sur le produit signifie courant continu . Vrifiez les connexions de lalimentation et des haut-parleurs si le fusible de cet
appareil est grill. Dterminez la cause et corrigez le problme, puis remplacez le fusible par un fusible identique.
Installez toujours cet appareil sur une surface plane. Ninstallez pas cet appareil sur une surface qui nest pas plane ou sur une surface prsentant une saillie. Cela pourrait entraner un problme de fonctionnement.
Lors de linstallation de cet appareil, ne laissez pas des pices telles que des vis supplmentaires se coincer entre cet appareil et lautomobile. Cela pourrait causer un problme de fonctionnement.
Ne laissez pas cet appareil entrer en contact avec des liquides. Cela pourrait provoquer une lectrocution. Tout contact avec des liquides pourrait galement provoquer des dommages, de la fume et une surchauffe de lappareil. Les surfaces de lamplificateur et des haut-parleurs connects peuvent galement chauffer et entraner des brlures mineures.
Nessayez pas de dmonter ou modifier cet appareil. Sinon, il pourrait en rsulter un incendie, une lectrocution ou tout autre problme de fonctionnement.
Cet appareil Cet appareil propose divers effets sonores commands de manire intuitive laide dun tlphone intelligent.
FUSIBLE 10 A Entre pour cordon dalimentation Entre pour cordon de frein main Sortie pour haut-parleur dextrmes graves Sortie arrire/Sortie pour mdiums Sortie avant/Sortie pour aigus Entre RCA Entre pour capteur de tlcommande Port USB Touche de rinitialisation Indicateur dalimentation Slecteur INPUT Slecteur DSP MODE Capteur de tlcommande
Prparation de la tlcommande Retirez la feuille de protection avant lutilisation.
Comment remplacer la pile Insrez la pile avec les ples plus (+) et moins () orients correctement.
MISE EN GARDE Ne pas ingrer la batterie : risque de brlure chimique
(La tlcommande qui accompagne) Ce produit contient une pile-bouton. Si la pile-bouton est avale, elle peut causer de graves brlures internes au bout d peine deux heures et peut entraner le dcs. Gardez les batteries neuves et les batteries uses lcart des enfants. Si le logement pile ne se ferme pas fermement, cessez dutiliser le produit et gardez-le lcart des enfants. Si vous croyez que les piles ont peut-tre t avales ou places lintrieur de toute partie du corps, consultez immdiatement un mdecin.
Les piles (le bloc-piles ou les piles insres) ne doivent pas tre exposes une chaleur excessive telle que celle du soleil ou dun feu.
ATTENTION Il y a risque dexplosion si la pile est mal insre. Remplacez uniquement par des
piles identiques ou de type quivalent. Lorsque vous liminez des piles uses, respectez la rglementation
gouvernementale ou les rglements des institutions publiques environnementales qui sappliquent dans votre pays/rgion.
Nom de chaque touche de tlcommande
VOLUME VOLUME + MUTE SRC (source) Gauche Appuyez pour slectionner la plage / chanson prcdente. Droite Appuyez pour slectionner la plage / chanson suivante. LECTURE/PAUSE A Appuyez de manire prolonge pour changer le mode de connexion (pour iPhone / connexion AOA dun tlphone intelligent (Android)). B Appuyez de manire prolonge pour changer le mode de connexion (connexion OTG dun tlphone intelligent (Android)).
Bleu/blanc Connectez la borne de commande du systme de lamplificateur de puissance (max. 300 mA 12 V CC). Noir (masse) la carrosserie du vhicule (mtallique) Gauche Droite Haut-parleur avant (STD) ou haut-parleur daigus (NW) Haut-parleur arrire (STD) ou haut-parleur de mdiums (NW) Blanc Blanc/noir Gris Gris/noir Vert Vert/noir Violet Violet/noir
Connexions lors de lutilisation de lamplificateur (vendu sparment)
Tlcommande de systme Connectez au cble bleu/blanc. Amplificateur de puissance (vendu sparment) Connectez laide dun cble RCA (vendu sparment) Vers la sortie avant (STD) ou sortie pour aigus (NW) Haut-parleur avant (STD) / Haut-parleur daigus (NW) Vers la sortie arrire (STD) ou sortie pour mdiums (NW) Haut-parleur arrire (STD) / Haut-parleur de mdiums (NW) Vers la sortie de haut-parleur dextrmes graves (STD) ou sortie pour graves (NW) Haut-parleur dextrmes graves (STD) / Haut-parleur de graves (NW)
Assurez-vous de connecter lentre des haut-parleurs si votre vhicule ne possde pas de position ACC (accessoire). Cet appareil est activ par lalimentation de lautoradio / du systme de navigation. Cet appareil pourrait ne pas sactiver selon le type dautoradio / de systme de navigation.
Installation
Cet appareil
Important Vrifiez toutes les connexions et tous les systmes avant linstallation finale. Nutilisez pas de pices non autorises, car il pourrait en rsulter des problmes
de fonctionnement. Consultez votre dtaillant si linstallation ncessite le perage de trous ou
dautres modifications du vhicule. Ninstallez pas cet appareil dans les endroits o :
il risque de compromettre le fonctionnement du vhicule. il pourrait blesser un passager en cas darrt soudain du vhicule.
Installez cet appareil distance des endroits chauds, tels que les emplacements proximit des sorties de chauffage.
Pour activer la valeur de rglage, changez le rglage du slecteur INPUT ou DSP MODE et tournez le commutateur ACC en position ARRT/MARCHE.
1. Rglez le slecteur DSP MODE. 2. Rglez le slecteur INPUT. 3. Vissez les vis de chaque ct, puis fixez lappareil.
Support Vis (Tte avec rondelle de 4 mm 8 mm) Vis (Vis taraudeuse de 4 mm 12 mm) Trou (2 mm 2,5 mm) Tapis ou chssis de voiture (exemple dinstallation)
Connexion du cordon dalimentation et des haut-parleurs Coupez le cordon dalimentation fix, puis connectez-le au vhicule. Lensemble de faisceau de cbles (vendu sparment) est galement disponible pour la connexion du cordon.
Reportez-vous : Connexions lors de
lutilisation du fil dentre des haut-parleurs
Connexions lors de lutilisation de la prise dentre RCA
Vers lentre pour cordon dalimentation Cordon dalimentation Jaune Vers la borne alimente, quelle que soit la position du commutateur dallumage Rouge Vers la borne contrle par le commutateur dallumage (12 V CC) MARCHE/ARRT
Connexions lors de lutilisation du fil dentre des haut-parleurs Connectez les fils de sortie des haut-parleurs de lautoradio cet appareil laide du cordon dalimentation. Glissez le slecteur INPUT la position SP.
Vers lentre pour cordon dalimentation Cordon dalimentation Orange Orange/noir Brun Brun/noir Gauche + Gauche Droite + Droite Autoradio / systme de navigation
Remarque Le signal dentre de lautoradio / du systme de navigation est 2 canaux. Le
signal de sortie de cet appareil nest pas reflt, mme lors de la modification de rglages autres que le canal correspondant de lautoradio / du systme de navigation.
Connectez la sortie de haut-parleur avant de lautoradio / du systme de navigation.
Connexions du cble de frein main Connectez au commutateur de frein main en utilisant le cordon de frein main.
Vers lentre pour cordon de frein main Cordon de frein main Permet de dtecter ltat ACTIV/DSACTIV du frein main. Ce fil doit tre connect au ct dalimentation du commutateur de frein main. Ct dalimentation Commutateur de frein main Ct de masse
Remarque Lorsque le cble de frein main nest pas connect, une partie de la fonction dapplication exclusive (Sound Tune) est limite.
Connexions lors de lutilisation de la prise dentre RCA Connectez la prise de sortie RCA de lautoradio la prise dentre RCA de cet appareil. Glissez le slecteur INPUT la position RCA.
Vers lentre RCA Cble RCA (vendu sparment) Vers la sortie RCA Autoradio / systme de navigation
Remarque Le signal dentre de lautoradio / du systme de navigation est 2 canaux. Le
signal de sortie de cet appareil nest pas reflt, mme lors de la modification de rglages autres que le canal correspondant de lautoradio / du systme de navigation.
Connectez la sortie RCA avant de lautoradio / du systme de navigation. Assurez-vous de connecter lentre des haut-parleurs si votre vhicule ne
possde pas de position ACC (accessoire). Cet appareil est activ par lalimentation de lautoradio / du systme de navigation. Cet appareil pourrait ne pas sactiver selon le type dautoradio / de systme de navigation.
Capteur de tlcommande
1. Connectez le capteur de tlcommande lentre pour capteur de tlcommande. Placez la partie rceptrice de lumire du capteur de tlcommande dans un endroit permettant de recevoir le signal de tlcommande. Reliez le cble de manire ne pas nuire la conduite.
Capteur de tlcommande
quilibreur / quilibre Calibration de source Pour les dtails sur chaque fonction, veuillez vous reporter lAide Contextuelle dans Sound Tune.
Tlchargement de Sound Tune Pour utiliser cet appareil, tlchargez Sound Tune sur le iPhone ou tlphone intelligent (Android). Entrez le terme de recherche Pioneer Sound Tune dans la fentre de recherche ou effectuez la recherche laide du code QR suivant.
MISE EN GARDE Nessayez pas de faire fonctionner lapplication pendant que vous conduisez. Veillez quitter la route et stationner votre vhicule en lieu sr avant dessayer dutiliser les commandes de lapplication.
Sound Tune permet deffectuer les oprations suivantes.
Lecture de chansons sur le iPhone / tlphone intelligent (Android) Les formats de chanson pouvant tre lus varient selon votre priphrique. Pour plus de dtails, veuillez lire le mode demploi de votre priphrique.
Rglages deffets pour les chansons du iPhone / tlphone intelligent (Android) et le son de lautoradio / du systme de navigation Super son Todoroki Simulation en direct
Divers rglages de cet appareil Mode standard (Avant / Arrire / Haut-parleur dextrmes graves) Mode rseau (Rseau 3 voies) Rglage de haut-parleurs
galiseur graphique Alignement temporel Filtre rseau Niveau de haut-parleurs
Comment utiliser cet appareil Selon la mthode de connexion du iPhone / tlphone intelligent (Android), cet appareil peut tre utilis comme suit.
Lors de lutilisation de cet appareil seul (Sans connexion dun iPhone ou tlphone intelligent (Android)) Lappareil met le son de lautoradio / du systme de navigation. Seules les fonctions de rglage de volume et de sourdine peuvent tre commandes laide de la tlcommande fournie. Pour les rglages audio, la connexion dun iPhone / tlphone intelligent (Android) est ncessaire.
Lors de la connexion dun iPhone / tlphone intelligent (Android) utiliser Lappareil peut tre utilis dans les quatre modes de modle suivants. Lors de lutilisation de la tlcommande, appuyez sur la touche SRC pour commuter le mode. Le mode est commut dans cet ordre : mode Autoradio, mode Passage, mode Tlphone intelligent et mode Mixage.
Mode Autoradio Lappareil met le son de lautoradio / du systme de navigation en passant par le iPhone / tlphone intelligent (Android).
Mode Tlphone intelligent Lappareil met le son du iPhone / tlphone intelligent (Android).
Mode Passage Lappareil met le son de lautoradio / du systme de navigation, sans passer par le iPhone / tlphone intelligent (Android). (Le son mis est le mme que lors de lutilisation de cet appareil seul) Ce mode est utilis lorsque la vido et laudio sont dsaligns pendant la lecture vido en mode Autoradio.
Mode Mixage Lappareil effectue le mixage et met le son du iPhone / tlphone intelligent (Android) et le son de lautoradio / du systme de navigation. Utilisez ce mode lorsque vous souhaitez utiliser le guidage vocal de lautoradio / du systme de navigation tout en coutant la source du iPhone / tlphone intelligent (Android). En pareil cas, dsactivez la source de lautoradio / du systme de navigation et rglez-le de manire ce que seul le guidage vocal soit mis. Selon lautoradio / le systme de navigation, ce mode pourrait ne pas tre disponible.
Les fonctions disponibles varient selon la mthode de connexion du iPhone / tlphone intelligent (Android).
Priphrique iPhone Tlphone intelligent (Android) Mthode de connexion — AOA*1 OTG*2 Mode Autoradio -(*3)
Mode Tlphone intelligent (*4) Mode Passage
Mode Mixage (*4)
*1 : AOA (Android Open Accessory) est une norme dinterface pour lutilisation de produits USB comme accessoires sur les bornes Android.
*2 : OTG (On-The-Go) est une norme dinterface permettant la connexion des priphriques USB directement aux priphriques USB. Les tlphones intelligents (Android) ne peuvent pas tre chargs pendant lutilisation de la connexion OTG. Portez attention au niveau de la batterie du tlphone intelligent (Android).
*3 : Pour la connexion AOA, vous ne pouvez pas utiliser le mode Autoradio. Le fonctionnement est le mme quen mode Passage.
*4 : Pour la connexion OTG, les sons des applications autres que Sound Tune ne peuvent pas tre mis par cet appareil.
Remarque Lorsque le iPhone / tlphone intelligent (Android) est dconnect, certaines
fonctions comme Super son Todoroki et Simulation en direct ne peuvent pas tre utilises. De plus, mme si le iPhone / tlphone intelligent (Android) est connect, les fonctions ci-dessus pourraient ne pas tre disponibles dans les conditions suivantes.
Lors de la slection du mode Passage Lors de la lecture mdia laide dapplications autres que Sound Tune
Bien que cet appareil puisse tre connect des tlphones intelligents (Android), la disponibilit de toutes les bornes nest pas garantie. Selon le tlphone intelligent (Android), lappareil pourrait ne pas fonctionner avec une connexion AOA. En pareil cas, utilisez une connexion OTG. Si aucune de ces mesures ne donne de rsultats, il est possible que la borne ne puisse pas tre connecte ou quelle soit hors dusage. Veuillez contacter votre dtaillant ou un agent de service.
Connexion du tlphone intelligent cet appareil Pour les utilisateurs de iPhone
Port USB Cble USB (pour Type-A) Cble Lightning USB (produit authentique ou vendu sparment) iPhone
Pour les utilisateurs de tlphone intelligent (Android) (connexion AOA)
Port USB Cble USB (pour Type-A) Cble USB — micro USB (vendu sparment) Tlphone intelligent (Android)
Pour les utilisateurs de tlphone intelligent (Android) (connexion OTG)
Port USB Cble USB (pour Type-A) Cble USB A-A (vendu sparment) Cble USB OTG (vendu sparment) Tlphone intelligent (Android)
Remarque Le tlphone intelligent (Android) ne peut pas tre charg pendant lutilisation de la connexion OTG.
propos des priphriques USB Pour les dtails sur la manipulation du iPhone / tlphone intelligent (Android),
veuillez lire le mode demploi de chaque priphrique. Veuillez comprendre que nous nassumons aucune responsabilit
dindemnisation mme si les donnes, etc. sont perdues au moment de lutilisation en combinaison avec cet appareil.
Assurez-vous de fixer le iPhone / tlphone intelligent (Android) lors de lutilisation en combinaison avec cet appareil.
propos de la connexion cet appareil Ne connectez pas de priphriques autres quun iPhone / tlphone intelligent
(Android) (par exemple, un ventilateur USB). Il nest pas compatible avec la connexion laide dun concentrateur USB.
Utilisation de Sound Tune Lors de la connexion dun iPhone ou tlphone intelligent (Android) cet appareil, un message saffiche sur le iPhone ou tlphone intelligent (Android). Sound Tune dmarre lorsque le dmarrage est permis.
Appuyez sur licne dans le bas de lcran pour commencer lutilisation.
Comment rinitialiser lappareil Rinitialisez cet appareil sil ne fonctionne pas correctement ou si vous souhaitez rtablir les rglages aux valeurs dusine par dfaut.
1. Appuyez sur la touche de rinitialisation pendant que lappareil fonctionne. Les rglages sont initialiss lorsque le commutateur dallumage est mis en position darrt (ACC ARRT). Le rglage dusine par dfaut est appliqu la prochaine mise en marche de lappareil.
Lorsque le son nest pas mis Si vous ne pouvez pas entendre le son aprs linstallation de cet appareil, vrifiez les points suivants. Assurez-vous que le iPhone / tlphone intelligent (Android) est connect
correctement laide dun cble USB. Assurez-vous que la commutation OTG / AOA est effectue correctement. Tournez le commutateur ACC en position ARRT / MARCHE. Veuillez contacter votre dtaillant ou un agent de service sil ny a aucune amlioration mme aprs avoir procd comme ci-dessus.
propos de la fonction de protection Ce produit est muni dune fonction de protection. Lorsque ce produit dtecte une anomalie, les fonctions suivantes sactivent pour protger le produit et la sortie de haut-parleur. Lindicateur dalimentation sallume en rouge et clignote en rouge, puis le
produit steint dans les situations dcrites ci-dessous. Si la borne de sortie de haut-parleur et le fil de haut-parleur sont court- circuits. Si une tension CC est applique la borne de sortie de haut-parleur. Si une alimentation USB dtecte une anomalie Si un cble USB prsente une erreur de communication
Veuillez contacter votre dtaillant ou un agent de service sil ny a aucune amlioration mme aprs avoir essay de tourner le commutateur ACC en position ARRT / MARCHE ou de retirer/rinsrer le cble USB.
Caractristiques techniques GNRALITS SOURCE DALIMENTATION 14,4 V CC (10,8-15,1 V acceptable) MISE LA MASSE Type ngatif CONSOMMATION DE COURANT MAX. 9,2 A DIMENSIONS 170 (L) x 40 (H) x 95 (P)
6 3/4 (L) x 1 5/8 (H) x 3 3/4 (P)
FUSIBLE 10 A POIDS 0,59 kg
AUDIO PUISSANCE MAX. 50 W x 4 50 W x 2 canaux/4 + 70 W x 1 canal/2 (pour HAUT-PARLEUR DEXTRMES GRAVES) PUISSANCE CONTINUE 22 W x 4 (50 Hz 15 kHz, 5 % de DHT, CHARGE de 4 , avec les deux canaux entrans)
CEA2006 PUISSANCE DE SORTIE ( 4 Ohms et <= 1 % de DHT+bruit) 14 W efficaces RMS x 4 canaux Rapport signal/bruit (rfrence : 1 Watt dans 4 Ohms) 91 dBA
IMPDANCE DE CHARGE 4 (4 — 8 (2 pour 1 canal) acceptable)
PRSORTIE NIVEAU DE SORTIE (MAX.) 4,0 V IMPDANCE 250 RPONSE EN FRQUENCE 10 Hz 20 kHz (+0 dB, -1 dB) RAPPORT SIGNAL/BRUIT 105 dB DHT 0,01 %
GALISEUR (GALISEUR GRAPHIQUE 13 BANDES) FRQUENCE 50 Hz, 80 Hz, 125 Hz, 200 Hz, 315 Hz, 500 Hz 800 Hz, 1,25 kHz, 2 kHz, 3,15 kHz, 5 kHz, 8 kHz, 12,5 kHz GAIN 12 dB (par incrments de 0,1 dB)
RGLAGE DE HAUT-PARLEURS
AVANT/ARRIRE (FILTRE PASSE-HAUT) FRQUENCE 50 Hz, 63 Hz, 80 Hz, 100 Hz, 125 Hz, 160 Hz, 200 Hz PENTE 0 dB (Passage), -6 dB/oct, -12 dB/oct, -18 dB/oct, -24 dB/oct HAUT-PARLEUR DEXTRMES GRAVES (FILTRE PASSE-BAS) FRQUENCE 50 Hz, 63 Hz, 80 Hz, 100 Hz, 125 Hz, 160 Hz, 200 Hz PENTE 0 dB (Passage), -6 dB/oct, -12 dB/oct, -18 dB/oct, -24 dB/oct GAIN -24 — +10 dB (1 dB/incrment) PHASE NORMALE/INVERSE NIVEAU DE HAUT-PARLEUR -24 — +10 dB (1 dB/incrment) ALIGNEMENT TEMPOREL 0 po — 140 po (1 po/incrment)
AIGUS (FILTRE PASSE-HAUT) FRQUENCE 1,25 kHz, 1,6 kHz, 2 kHz, 2,5 kHz, 3,15 kHz 4 kHz, 5 kHz, 6,3 kHz, 8 kHz, 10 kHz, 12,5 kHz PENTE -6 dB/oct, -12 dB/oct, -18 dB/oct, -24 dB/oct MDIUMS (FILTRE PASSE-BAS) FRQUENCE 1,25 kHz, 1,6 kHz, 2 kHz, 2,5 kHz, 3,15 kHz 4 kHz, 5 kHz, 6,3 kHz, 8 kHz, 10 kHz, 12,5 kHz PENTE 0 dB (Passage), -6 dB/oct, -12 dB/oct, -18 dB/oct, -24 dB/oct MDIUMS (FILTRE PASSE-HAUT) FRQUENCE 25 Hz, 31,5 Hz, 40 Hz, 50 Hz, 63 Hz, 80 Hz 100 Hz, 125 Hz, 160 Hz, 200 Hz, 250 Hz PENTE 0 dB (Passage), -6 dB/oct, -12 dB/oct, -18 dB/oct, -24 dB/oct HAUT-PARLEUR DEXTRMES GRAVES (FILTRE PASSE-BAS) FRQUENCE 25 Hz, 31,5 Hz, 40 Hz, 50 Hz, 63 Hz, 80 Hz 100 Hz, 125 Hz, 160 Hz, 200 Hz, 250 Hz PENTE 0 dB (Passage), -12 dB/oct, -18 dB/oct -24 dB/oct, -30 dB/oct, -36 dB/oct GAIN -24 — +10 dB (1 dB/incrment) PHASE NORMALE/INVERSE NIVEAU DE HAUT-PARLEUR -24 — +10 dB (1 dB/incrment) ALIGNEMENT TEMPOREL 0 po — 140 po (1 po/incrment)
USB SPC. STANDARD USB USB 2.0 haute vitesse ALIMENTATION MAX. EN COURANT 1,5 A
Marques de commerce
iPhone et Lightning sont des marques de commerce dApple Inc., dposes aux tats-Unis et dans dautres pays. Lutilisation du badge Made for Apple signifie quun accessoire a t conu pour tre connect spcifiquement un ou plusieurs produit(s) Apple identifi(s) dans le badge, et quil a t certifi par le dveloppeur comme tant conforme aux normes de performance dApple. Apple nest pas responsable du fonctionnement de cet appareil, ni de sa conformit aux normes sc
English
Before You Start
Thank you for purchasing this PIONEER product
To ensure proper use, please read through this guide before using this product.
It is especially important that you read and observe WARNINGS and CAUTIONS
in this guide. Please keep the guide in a safe and accessible place for future
reference.
PIONEER EUROPE NV
Haven 1087, Keetberglaan 1, B-9120 Melsele, Belgium/Belgique
Information for users on collection and disposal of old
equipment and used batteries
(Symbol for equipment) (Symbol examples for batteries)
These symbols on the products, packaging, and/or accompanying documents
mean that used electrical and electronic products and batteries should not
be mixed with general household waste.
For proper treatment, recovery and recycling of old products and used
batteries, please take them to applicable collection points in accordance
with your national legislation.
By disposing of these products and batteries correctly, you will help to save
valuable resources and prevent any potential negative effects on human health
and the environment which could otherwise arise from inappropriate waste
handling.
For more information about collection and recycling of old products and
batteries, please contact your local municipality, your waste disposal service or
the point of sale where you purchased the items.
These symbols are only valid in the European Union.
For countries outside the European Union:
If you wish to discard these items, please contact your local authorities or dealer
and ask for the correct method of disposal.
CAUTION
• This product is evaluated in moderate and tropical climate condition under the
Audio, video and similar electronic apparatus — Safety requirements, IEC 60065.
Connections
WARNING
Important
• When installing this unit in a vehicle without an ACC (accessory) position on
the ignition switch, failure to connect the red cable to the terminal that detects
operation of the ignition key may result in battery drain.
ACC position
No ACC position
• Use this unit with a 12-volt battery and negative grounding only. Failure to do so
may result in a fire or malfunction.
• To prevent a short—circuit, overheating or malfunction, be sure to follow the
directions below.
−Disconnect the negative terminal of the battery before installation.
−Secure the wiring with cable clamps or adhesive tape. Wrap adhesive tape
around wiring that comes into contact with metal parts to protect the wiring.
−Place all cables away from moving parts, such as the shift lever and seat rails.
−Place all cables away from hot places, such as near the heater outlet.
−Do not connect the yellow cable to the battery by passing it through the hole
to the engine compartment.
−Cover any disconnected cable connectors with insulating tape.
−Use a fuse of the rating prescribed.
−Never wire the negative speaker cable directly to ground.
−Never band together negative cables of multiple speakers.
• The graphical symbol
placed on the product means direct current.
• Check the connections of the power supply and speakers if this unit fuse blows.
Determine and resolve the cause, then replace the fuse with and identical
equivalent.
• Always install this unit on a flat surface.
Do not install this unit on a surface that is not flat or on a surface with a
protrusion. Doing so could result in malfunction.
• When installing this unit, do not allow parts such as extra screws to get caught
between this unit and the automobile.
Doing so could cause malfunction.
• Do not allow this unit to come into contact with liquids. Electrical shock could
result.
Also, damage to this unit, smoke, and overheating could result from contact with
liquids.
The surfaces of the amplifier and any attached speakers may also heat up and
cause minor burns.
• Do not attempt to disassemble or modify this unit. Doing so may result in fire,
electric shock or other malfunction.
This unit
This unit provides a variety of sound effects by intuitive operation using a
smartphone.
FUSE 10A
Power cord input
Parking brake cord input
Subwoofer output
Rear output/Middle range output
Front output/High range output
RCA input
Remote control sensor input
USB port
Reset button
Power indicator
INPUT select switch
DSP MODE select switch
Remote control sensor
Preparing the remote control
Remove the insulation sheet before use.
How to replace the battery
Insert the battery with the plus (+) and minus (–) poles orientated properly.
WARNING
• Do not ingest the battery, Chemical Burn Hazard.
(The remote control supplied with) This product contains a coin/button cell
battery. If the coin/button cell battery is swallowed, it can cause severe internal
burns in just 2 hours and can lead to death.
Keep new and used batteries away from children.
If the battery compartment does not close securely, stop using the product and
keep it away from children.
If you think batteries might have been swallowed or placed inside any part of
the body, seek immediate medical attention.
• Batteries (battery pack or batteries installed) must not be exposed to excessive
heat such as sunshine, fire or the like.
CAUTION
• There is a danger of explosion if the battery is incorrectly replaced. Replace only
with the same or equivalent type.
• When disposing of used batteries, please comply with governmental regulations
or environmental public institution’s rules that apply in your country / area.
Connection of power cord and speaker
Cut the attached power cord and then connect it to the vehicle.
The wiring harness kit (sold separately) is also available to connect the cord.
Refer to:
• Connections when using
the speaker input wire
• Connections when using
the RCA input jack
To power cord input
Power cord
Yellow
To terminal supplied with power, regardless of ignition switch position
Red
To electric terminal controlled by ignition switch (12 V DC) ON/OFF
Blue/white
Connect to the system control terminal of the power amp (max. 300 mA 12 V
DC).
Connections when using the RCA input jack
Connect the car stereo RCA output jack and the RCA input jack of this unit.
Slide the INPUT select switch to the RCA position.
To RCA input
RCA cable (sold separately)
To RCA output
Car stereo / navigation system
Note
• The input signal of
Car stereo / navigation system is 2ch. The output signal
of this unit will not be reflected even when changing settings other than the
corresponding channel of the car stereo / navigation system.
• Connect the front RCA output of the car stereo / navigation system.
• Make sure to connect with the speaker input if your vehicle has no ACC
(accessory) position.
This unit activates with the power of the car stereo / navigation system.
This unit may not activate depending on the type of car stereo / navigation
system.
Connections when using the speaker input
wire
Connect the car stereo speaker output wires to this unit using the power cord.
Slide the INPUT select switch to the SP position.
To power cord input
Power cord
Orange
Orange/black
Brown
Brown/black
Left +
Left −
Right +
Right −
Car stereo / navigation system
Note
• The input signal of Car stereo / navigation system is 2ch. The output signal
of this unit will not be reflected even when changing settings other than the
corresponding channel of the car stereo / navigation system.
• Connect the front speaker output of the car stereo / navigation system.
Parking brake cable connections
Connect to the parking brake switch using the parking brake cord.
To parking brake cord input
Parking brake cord
Used to detect the ON/OFF status of the parking brake. This lead must be
connected to the power supply side of the parking brake switch.
Power supply side
Parking brake switch
Ground side
Note
When the parking brake cable is not connected, a part of the exclusive application
(Sound Tune) function is limited.
Name of each remote control button
VOLUME –
VOLUME +
MUTE
SRC (source)
Left
Press to select the previous track / song.
Right
Press to select the next track / song.
PLAY/PAUSE
A
Press and hold to change the connection mode (for iPhone® / AOA connection
of smartphone (Android)).
B
Press and hold to change the connection mode (OTG connection of
smartphone (Android)).
Black (ground)
To vehicle (metal) body
Left
Right
Front speaker (STD) or high range speaker (NW)
Rear speaker (STD) or middle range speaker (NW)
White
White/black
Gray
Gray/black
Green
Green/black
Violet
Violet/black
Connections when using the amplier (sold
separately)
System remote control
Connect to Blue/white cable.
Power amp (sold separately)
Connect with RCA cable (sold separately)
To front output (STD) or high range output (NW)
Front speaker (STD) / High range speaker (NW)
To rear output (STD) or middle range output (NW)
Rear speaker (STD) / Middle range speaker (NW)
To subwoofer output (STD) or low range output (NW)
Subwoofer (STD) / Low range speaker (NW)
• Make sure to connect with the speaker input if your vehicle has no ACC
(accessory) position.
This unit activates with the power of the car stereo / navigation system.
This unit may not activate depending on the type of car stereo / navigation
system.
Installation
This unit
Important
• Check all connections and systems before final installation.
• Do not use unauthorized parts as this may cause malfunctions.
• Consult your dealer if installation requires drilling of holes or other modifications
to the vehicle.
• Do not install this unit where:
−it may interfere with operation of the vehicle.
−it may cause injury to a passenger as a result of a sudden stop.
• Install this unit away from hot places such as near the heater outlet.
• To enable the setting value, change the setting of the INPUT select switch or the
DSP MODE switch and turn the ACC switch OFF/ON.
1. Set the DSP MODE select switch.
2. Set the INPUT select switch.
3. Tighten the screws on each side, then fix the unit.
Bracket
Screw (Washer-faced head 4 mm × 8 mm)
Screw (Tapping screw 4 mm × 12 mm)
Hole (2 mm to 2.5 mm)
Car mat or chassis (installation example)
Download Sound Tune
To use this unit, download Sound Tune to the iPhone or smartphone (Android).
Enter the search term «Pioneer Sound Tune» in the search window or search from
the following QR code.
WARNING
Do not attempt to operate the application while driving. Make sure to pull off the
road and park your vehicle in a safe location before attempting to use the controls
on the application.
Sound Tune can do the following.
Playing songs saved on iPhone / smartphone (Android)
Playable song formats depend on your device. For details, please read the
instruction manual of your device.
Effect settings of iPhone / smartphone (Android) songs and the car stereo /
navigation system sound
• Super “Todoroki” Sound
• Live Simulation
Various settings of this unit
• Standard Mode (Front / Rear / Subwoofer)
• Network Mode (3 Way Network)
• Speaker Setting
−Graphics Equalizer
Remote control sensor
1. Connect the remote control sensor to the remote control sensor input .
Place the light receiving part of the remote control sensor in a place that can
receive the remote control signal.
Wire the cable so that it does not interfere with driving.
Remote control sensor
−Time Alignment
−Network Filter
−Speaker Level
• Fader / Balance
• Source Calibration
For details of each function, please refer to Popup Help in Sound Tune.
How to Use This Unit
Depending on the connection method of the iPhone / smartphone (Android), this
unit can be used as follows.
When using this unit alone (When not
connecting an iPhone or smartphone
(Android))
The unit outputs the sound source of the car stereo / navigation system. Only
the volume adjustment and mute functions can be operated with the supplied
remote control.
For audio adjustment, connection of an iPhone / smartphone (Android) is
necessary.
When connecting an iPhone / smartphone
(Android) to use
The unit can be used in the following four pattern modes.
When using the remote control, press the SRC button to switch the mode.
The mode switches in the order of Car Stereo mode, Through mode, Smartphone
mode, and Mix mode.
Car Stereo mode
The unit outputs the sound source of the car stereo / navigation system by
passing through the iPhone / smartphone (Android).
Smartphone mode
The unit outputs the sound source of the iPhone / smartphone (Android).
Through mode
The unit outputs the sound source of the car stereo / navigation system without
passing through the iPhone / smartphone (Android). (It is the same output as
using this unit alone)
This mode is used when video and audio are misaligned during video playback in
the Car Stereo mode.
Mix mode
The unit mixes and outputs the sound of the iPhone / smartphone (Android) and
the sound of the car stereo / navigation system.
Use this mode when you want to use the voice guidance of the car stereo /
navigation system while listening to the source of the iPhone / smartphone
(Android). In this case, turn off the source of the car stereo / navigation system
and set it so that only the voice guidance is output.
Depending on the car stereo / navigation system, this mode may not be available.
The available functions differ depending on the connection method of the iPhone
/ smartphone (Android).
Device iPhone Smartphone (Android)
Connection method — AOA*1 OTG*2
Car Stereo mode
✔
-(*3)
✔
Smartphone mode
✔ ✔
✔(*4)
Through mode
✔ ✔ ✔
Mix mode
✔ ✔
✔(*4)
*1: AOA (Android Open Accessory) is an interface standard for using USB-loaded
products as accessories on Android terminals.
*2: OTG (On-The—Go) is an interface standard that connects USB devices and USB
devices directly. Smartphones (Android) cannot be charged using the OTG
connection. Pay attention to the battery level of the smartphone (Android).
*3: For the AOA connection, you cannot use the Car Stereo mode. The operation is
the same as Through mode.
*4: For the OTG connection, sounds from applications other than Sound Tune
cannot be output from this unit.
Note
• When the iPhone / smartphone (Android) is disconnected, some functions such
as Super “Todoroki” Sound and Live Simulation cannot be used.
Also, even if the iPhone / smartphone (Android) is connected, the above
functions may not be used under the following conditions.
−When selecting Through mode
−When playing media by applications other than Sound Tune
• Although this unit can be connected to smartphones (Android), it does not
guarantee the availability of all terminals.
Depending on the smartphone (Android), the unit may not be operated with an
AOA connection. In this case, use an OTG connection.
If all else fails, it might be a terminal that cannot be connected or that is out of
order. Please contact your dealer or service agent.
Connecting the Smartphone to This Unit
For iPhone users
USB port
USB cable (for Type—A)
Lightning® – USB cable (genuine product or sold separately)
iPhone
For smartphone (Android) users (AOA connection)
USB port
USB cable (for Type—A)
USB — micro USB cable (sold separately)
Smartphone (Android)
For smartphone (Android) users (OTG connection)
USB port
USB cable (for Type—A)
USB A—A cable (sold separately)
USB OTG cable (sold separately)
Smartphone (Android)
Note
Smartphone (Android) cannot be charged using the OTG connection.
About USB devices
• For details on handling the iPhone / smartphone (Android), please read each
manual.
• Please understand that we do not assume responsibility for compensation even
if data, etc. are lost at the time of use in combination with this unit.
• Be sure to fix the iPhone / smartphone (Android) when using it in combination
with this unit.
About connection with this unit
• Do not connect devices other than the iPhone / smartphone (Android) (such as
USB fan).
• It is not compatible with connection using USB hub.
Using Sound Tune
When connecting an iPhone or smartphone (Android) to this unit, a message
is displayed on the iPhone or smartphone (Android). Sound Tune starts when
startup is allowed.
Tap the icon at the bottom of the screen to start the operation.
How to reset
Reset this unit if it does not operate properly or you want to return the setting
value to the factory default.
1. Press the reset button while the unit is in operation.
The settings are initialized when the ignition switch is turned off (ACC OFF).
The factory default setting is applied when the unit is turned on next time.
When the sound does not sound
If you cannot hear the sound after installing this unit, carry out the following.
• Make sure that the iPhone / smartphone (Android) is connected correctly with a
USB cable.
• Make sure that switching of OTG / AOA is performed correctly.
• Turn the ACC switch OFF / ON.
Please contact your dealer or service agent if improvements are not made even if
you perform the above.
About the protection function
This product has a protection function. When this product detects something
abnormal, the following functions will operate to protect the product and speaker
output.
• The power indicator will turn Red, blink Red, and then the product will power off
in the situations outlined below.
−If the speaker output terminal and speaker wire are short—circuited.
−If a DC voltage is applied to the speaker output terminal.
−If a USB power supply detects something abnormal
−If a USB line has a communication error
Please contact your dealer or service agent if improvements are not made even
after you try turning the ACC switch OFF / ON or removing/reinserting the USB.
Specications
GENERAL
POWER SOURCE 14.4V DC
(10.8-15.1V allowable)
GROUNDING SYSTEM Negative type
MAX. CURRENT CONSUMPTION 9.2A
DIMENSIONS 170(W) x 40(H) x 95(D)<mm>
FUSE 10A
WEIGHT 0.59kg
AUDIO
MAX POWER 50W x 4
50Wx2ch/4Ω + 70Wx1ch/2Ω (for SUB—WOOFER)
CONTINUOUS POWER 22W x 4
(50Hz to 15kHz, 5%THD, 4Ω LOAD, Both Channels Driven)
LOAD IMPEDANCE 4Ω
(4 — 8Ω(2Ω for 1ch) allowable)
PREOUT OUTPUT LEVEL (MAX) 4.0V
IMPEDANCE 250Ω
FREQUENCY RESPONSE 10Hz to 20kHz (+0dB , -1dB)
S/N RATIO 105dB
THD 0.01%
EQUALIZER (13BAND GRAPHIC EQUALIZER)
FREQUENCY 50Hz, 80Hz, 125Hz, 200Hz, 315Hz, 500Hz
800Hz, 1.25kHz, 2kHz, 3.15kHz, 5kHz, 8kHz, 12.5kHz
GAIN ±12dB(0.1dB step)
SPEAKER SETTING
<STANDARD MODE>
FRONT/REAR (HPF)
FREQUENCY
50Hz, 63Hz, 80Hz, 100Hz, 125Hz, 160Hz, 200Hz
SLOPE
0dB(Pass), -6dB/oct, -12dB/oct, -18dB/oct, -24dB/oct
SUB WOOFER (LPF)
FREQUENCY
50Hz, 63Hz, 80Hz, 100Hz, 125Hz, 160Hz, 200Hz
SLOPE
0dB(Pass), -6dB/oct, -12dB/oct, -18dB/oct, -24dB/oct
GAIN -24 — +10dB (1dB/Step)
PHASE NORMAL/REVERSE
SPEAKER LEVEL -24 — +10dB (1dB/Step)
TIME ALIGNMENT 0cm — 350cm (2.5cm/step)
<NETWORK MODE>
HIGH (HPF) FREQUENCY 1.25kHz, 1.6kHz, 2kHz, 2.5kHz, 3.15kHz
4kHz, 5kHz, 6.3kHz, 8kHz, 10kHz, 12.5kHz
SLOPE -6dB/oct, -12dB/oct, -18dB/oct, -24dB/oct
MID (LPF) FREQUENCY 1.25kHz, 1.6kHz, 2kHz, 2.5kHz, 3.15kHz
4kHz, 5kHz, 6.3kHz, 8kHz, 10kHz, 12.5kHz
SLOPE
0dB(Pass), -6dB/oct, -12dB/oct, -18dB/oct, -24dB/oct
MID (HPF) FREQUENCY 25Hz, 31.5Hz, 40Hz, 50Hz, 63Hz, 80Hz
100Hz, 125Hz, 160Hz, 200Hz, 250Hz
SLOPE
0dB(Pass), -6dB/oct, -12dB/oct, -18dB/oct, -24dB/oct
SUB WOOFER (LPF)
FREQUENCY 25Hz, 31.5Hz, 40Hz, 50Hz, 63Hz, 80Hz
100Hz, 125Hz, 160Hz, 200Hz, 250Hz
SLOPE 0dB(Pass), -12dB/oct, -18dB/oct
-24dB/oct, -30dB/oct, -36dB/oct
GAIN -24 — +10dB (1dB/Step)
PHASE NORMAL/REVERSE
SPEAKER LEVEL -24 — +10dB (1dB/Step)
TIME ALIGNMENT 0cm — 350cm (2.5cm/step)
USB
USB STANDARD SPEC. USB2.0 High Speed
MAX CURRENT SUPPLY 1.5A
Trademarks
iPhone, and Lightning are trademarks of Apple Inc., registered in the U.S.
and other countries.
Use of the Made for Apple badge means that an accessory has been
designed to connect specifically to the Apple product(s) identified in the
badge, and has been certified by the developer to meet Apple performance
standards.
Apple is not responsible for the operation of this device or its compliance
with safety and regulatory standards.
Please note that the use of this accessory with an Apple product may affect
wireless performance.
UNIVERSAL SOUND PROCESSOR
PROCESSEUR AUDIO UNIVERSEL
Instruction Manual
Mode d’emploi
5707000012571V-A
DEQ-S1000A
Дарим 1000 рублей на первые покупки!
Оставь свой e-mail и получи три скидочных промокода на первые покупки!
- Описание
- Доставка и оплата
- Отзывы
- Гарантия
- О производителе
Инструкция PDF
Звуковой процессор Pioneer DEQ-S1000A-ISO
Способы доставки в город
Для этого товара еще никто не оставлял отзывов.
Информация о гарантии на Звуковой процессор Pioneer DEQ-S1000A-ISO
Интернет-магазин Technosonic.ru занимается поставкой только белой техники от официальных дистрибьюторов или от проверенных поставщиков автомобильной электроники. Благодаря этому Вы можете быть уверены в качестве и долговечности приобретаемого Вами товара.
Гарантия на Звуковой процессор Pioneer DEQ-S1000A-ISO — 1 год с момента покупки. Если производителем предусмутрено вложение гарантийного талона, он будет пропечатан и отправлен вместе с заказом. Подробную информацию о возврате или обмене товара можно найти на на странице
гарантия.
Звуковой процессор Pioneer DEQ-S1000A-ISO — вы можете приобрести данный товар в интернет-магазине Technosonic.ru с гарантией и по низкой цене — 15 340 . Доставка возможна как до пункта самовывоза, так и курьером до двери. Стоимость доставки Звуковой процессор Pioneer DEQ-S1000A-ISO — от . Вы можете оформить заказ через корзину на сайте или позвонив по бесплатному телефонному номеру 8 (800) 700-63-80.