
H:\PDF-OUT\127075007251\010COV_KM686UW.fm
_127075007251_artwork.book Page 1 Thursday, November 24, 2016 10:34 AM
DIGITAL MEDIA RECEIVER
ЦИФРОВОЙ МЕДИАРЕСИВЕР
MVH-09UB
MVH-09UBG
English Русский
Owner’s Manual
Руководство пользователя
MVH-09UB/MVH-09UBG
127075007251_(B6_Horizon)
H:\PDF-OUT\127075007251\020Chapter_EN.fm
_127075007251_artwork.book Page 2 Thursday, November 24, 2016 10:34 AM
Table of Contents
Before You Start ………………………………………………………………. 2
Getting Started ……………………………………………………………….. 3
Radio ……………………………………………………………………………….. 5
USB/AUX………………………………………………………………………….. 5
Settings……………………………………………………………………………. 7
FUNCTION settings ………………………………………………………… 7
AUDIO settings……………………………………………………………….. 7
SYSTEM settings …………………………………………………………….. 8
Connections/Installation…………………………………………………. 9
Additional Information………………………………………………….. 12
• In the following instructions, a USB memory or USB audio player are referred
to as “USB device”.
Before You Start
Thank you for purchasing th is PIONEER product
To ensure proper use, please read th rough this manual before using this product. It is
especially im portant that you read a nd observe WAR NING s and CAUTIONs in this manual.
Please keep the manual in a safe and accessible place for future reference.
If you want to dispose this produc t, do not mix it wi th general househo ld waste. There is a
separate collection system for used electronic products in accordance with legislation
that requires proper treatment, recovery and recycling.
Private households in the member states of the EU, in Switzerland and Norway may return
their used electronic products free of charge to designated collection facilities or to a
retailer (if you pu rchase a similar new one).
For countries not mentioned abov e, please cont act your local authoritie s for the correct
method of di sposal.
By doing so you will ensure that your disposed product undergoes the necessary treatment,
recovery and recycling and thus prevent potential negative effects on the environment and
human health.
• Do not attempt to install or service this product by yourself. Installation or servicing
of this product by persons without training and experience in electronic equipment
and automot ive accessories may b e dangerous and cou ld expose you to the r isk of
electric shock, injury or other hazards.
• Do not attempt to operate the unit while driving. Make sure to pull off the road and park
your vehicle in a safe location before attempting to use the controls on the device.
• Do not allow this unit to come into contact with moisture and/or liquids. Electrical shock
could result. Also, damage to this unit, smoke, and overheating could result from contact
with liqui ds.
• Always keep the volume low enough to hear outside sounds.
2
En
MVH-09UB/MVH-09UBG
127075007251
H:\PDF-OUT\127075007251\020Chapter_EN.fm
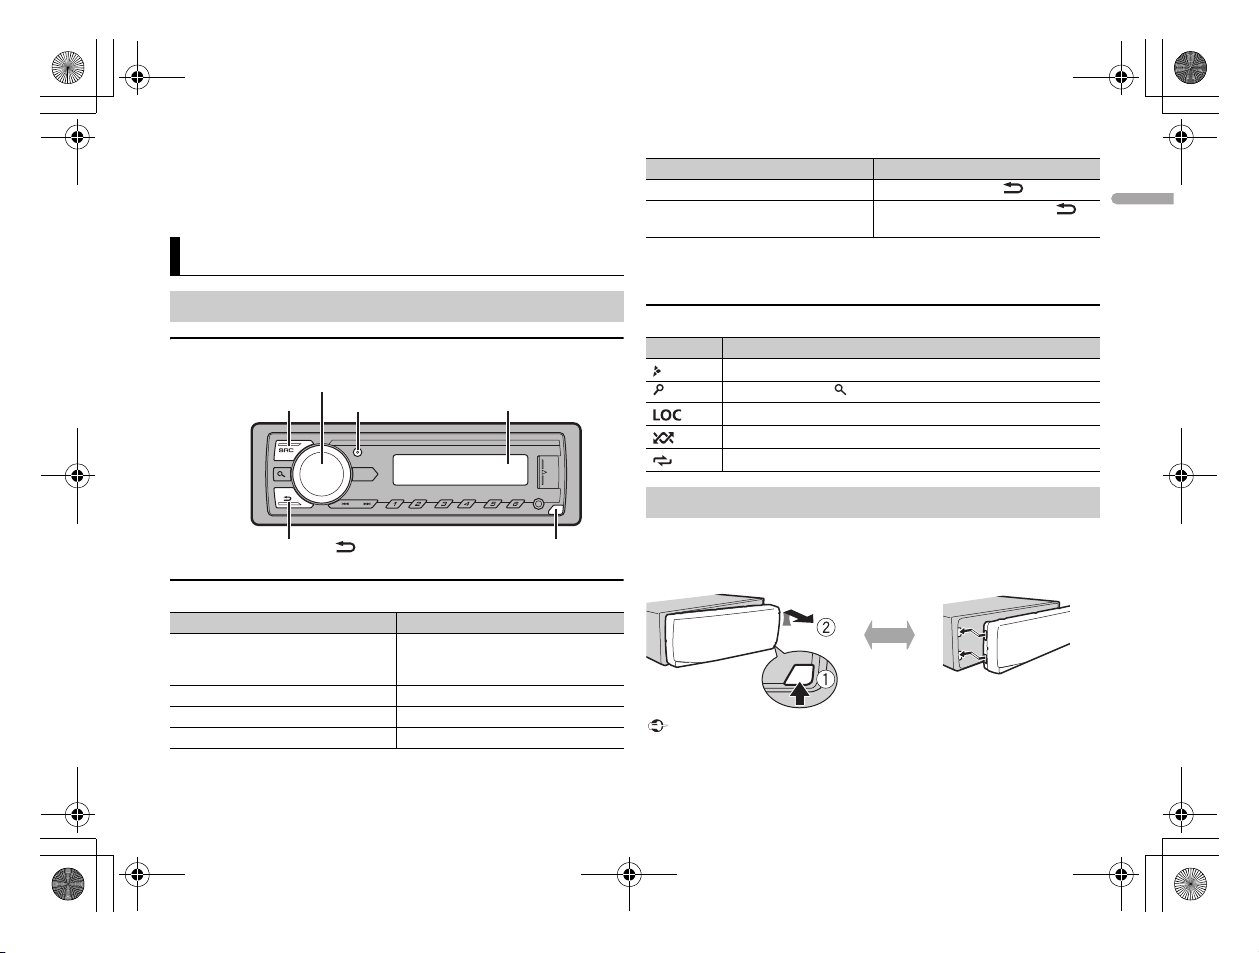
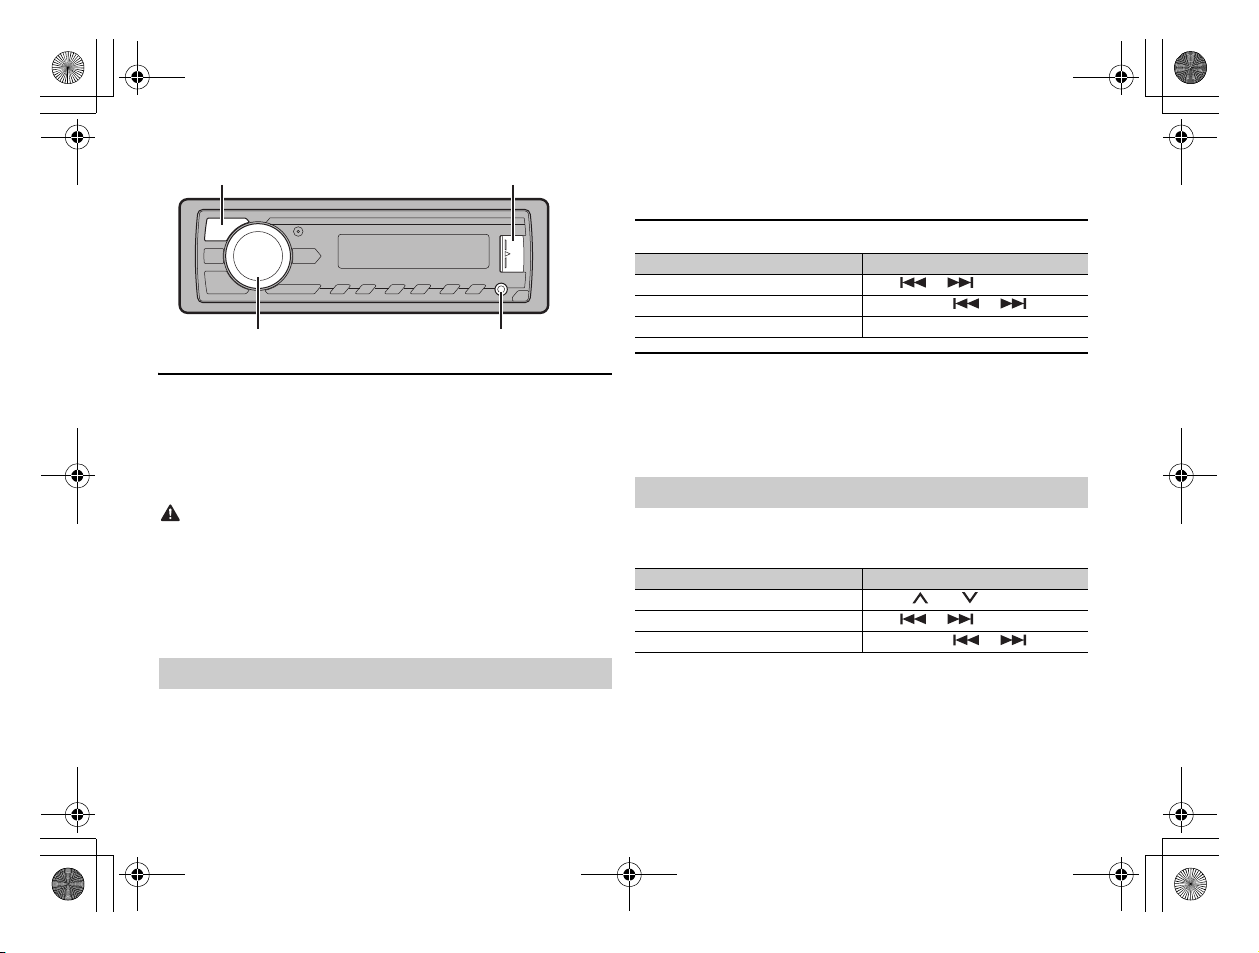
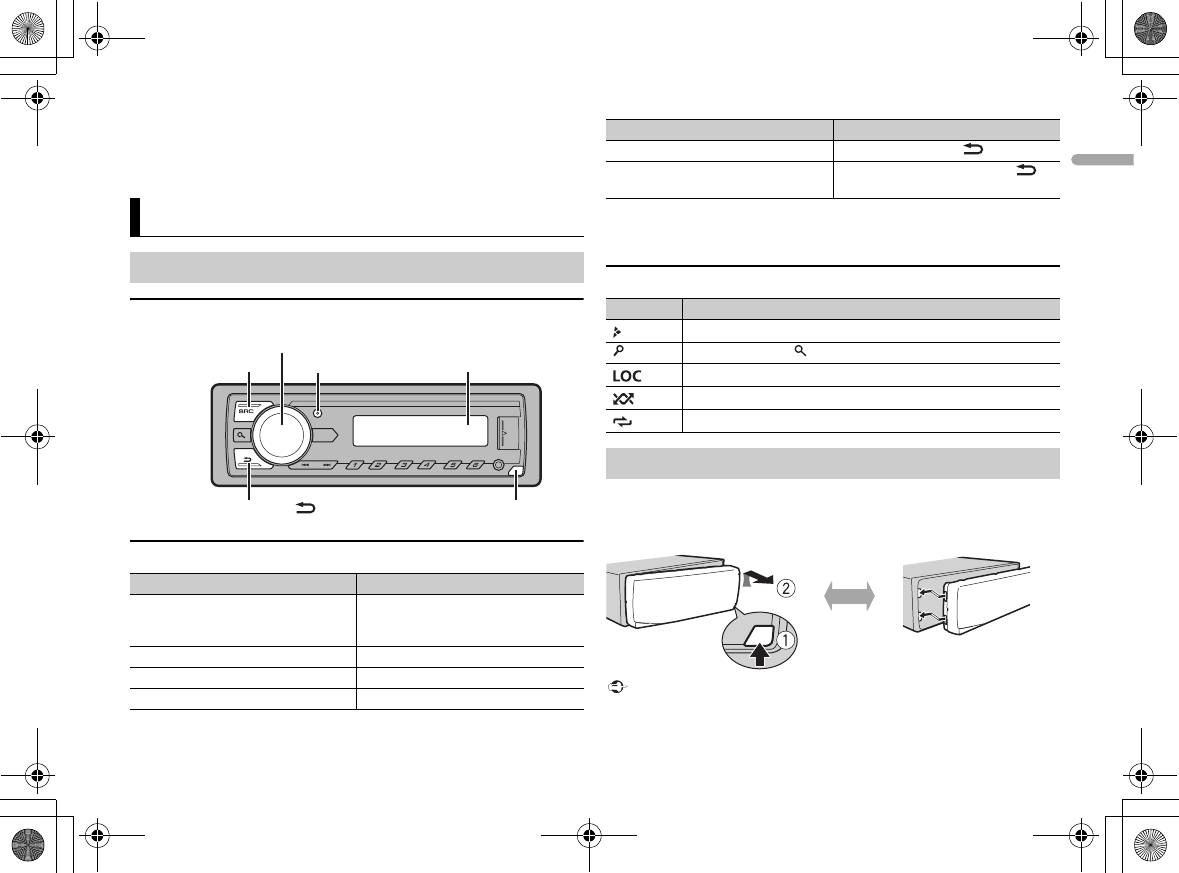
SRC (source)/OFF
Detach button
Display window
M.C. (multi-control) dial
BAND/DIMMER
DISP (display)
_127075007251_artwork.book Page 3 Thursday, November 24, 2016 10:34 AM
If you experience problems
Should this unit fail to work properly, please contact your dealer or nearest authorized
PIONEER Service Station.
Getting Started
Basic operation
MVH-09UB/09UBG
Frequently used operations
Purpose Operation
Turn on the power* Press SRC/OFF to turn on the power.
Adjust the volume Turn the M.C. dial.
Select a source Press SRC/OFF repeatedly.
Change the display information Press DISP repeatedly.
Press and hold SRC/OFF to t urn off the
power.
Purpose Operation
Return to the previous display/list Press BAND/DIMMER .
Return to the normal display from the
menu
* When this unit’s blue/white lead is connected to the vehicle’s auto-antenna relay control
terminal, the vehicle’s antenna extends when this unit’s source is turned on. To retract the
antenna, turn the source off.
Press and hold BAND/DIMMER .
Display indication
Indication Description
Appears when a lower tier of the menu or folder exists.
Appears when the button is pressed.
Appears when the local seek tun ing function is set (page 7).
Appears when random/shuffle play is set.
Appears when repeat play is set.
Detaching the front panel
Detach the front panel to prevent theft. Remove any cables and devices
attached to the front panel and turn off the unit before detaching it.
• Avoid subjectin g the front panel to excess ive shock.
En
3
MVH-09UB/MVH-09UBG
127075007251
H:\PDF-OUT\127075007251\020Chapter_EN.fm
_127075007251_artwork.book Page 4 Thursday, November 24, 2016 10:34 AM
• Keep the front panel out of direct sunli ght and high temperatures.
• Always store the detached front panel in a protective case or bag.
Setup menu
When you turn the ignition switch to ON after installation, [SET UP :YES]
appears in the display.
1 Press the M.C. dial.
The setup menu disappears after 30 seconds of no operation. If you prefer
not to set at this time, turn the M.C. dial to selec t [NO], then press to
confirm.
2 Turn the M.C. dial to select the options, then press to confirm.
To proceed to the next menu option, you need to confirm your selection.
Menu Item Description
LANGUAGE Select the language to display the text
[ENG](English),
[РУС](Russian),
[TUR](Turkish)
CLOCK SET Set the clock.
FM STE P Select the FM tuning step from 100 kHz or 50 kHz.
[100], [50]
information from a compressed audio file.
3 [QUIT :YES] appears when all the settings have been made.
To return to the first item of the setup menu, turn the M.C. dial to select
[QUIT :NO], then press to confirm.
4 Press the M.C. dial to confirm the settings.
• You can cancel the menu setting by pressing SRC/OFF.
• These settings can be made at any time from the SYSTEM settings (page  and INITIAL
settings (page 4).
Canceling the demonstration display (DEMO
OFF)
1 Press the M.C. dial to display the main menu.
2 Turn t he M.C. dial to select [SYSTEM], then press to confirm.
3 Turn t he M.C. dial to select [DEMO OFF], then press to confirm.
4 Turn t he M.C. dial to select [YES], then press to confirm.
INITIAL settings
1 Press and hold SRC/OFF until the unit turns off.
2 Press the M.C. dial to display the main menu.
3 Turn t he M.C. dial to select [INITIAL], then press to confirm.
4 Turn t he M.C. dial to select an option, then press to confirm.
The options var y depending on the unit.
Menu Item Description
FM STEP Select the FM tuning step from 100 kHz or 50 kHz.
[100], [50]
4
En
MVH-09UB/MVH-09UBG
127075007251

H:\PDF-OUT\127075007251\020Chapter_EN.fm
_127075007251_artwork.book Page 5 Thursday, November 24, 2016 10:34 AM
Menu Item Description
SP-P/O MODE Select when there is a full-range speaker connected to
[REAR/SUB.W]
[SUB.W/SUB.W] Select when there is a passive subwoofer connected
[REAR/REAR] Select when there are full-range speakers connected to
DIM SETTING Change the display brightness.
[SYNC CLOCK],
[MANUAL]
SYSTEM RESET Select [YES] to in itialize the unit settings. The unit will be
[YES], [CANCEL]
the rear speaker output leads and there is a subwoofer
connected to the RCA output.
directly to the rear speaker output leads and there is a
subwoofer connected to the RCA output.
the rear speaker output leads and RCA output. If the re is
a full-range speaker connected to the rear speaker
output leads, and the RCA output is not used, you may
select either [REAR/SUB.W ] or [REAR/REAR].
restarted automatically.
(Some of the settings may be retained even after
resetting the unit.)
Radio
The RDS (radio data system) function only works in areas that broadcast RDS
signals for FM stations.
Receiving preset stations
1 Press SRC/OFF to select [RADIO].
2 Press BAND/DIMMER to select the band from [F1], [FM2], [FM3],
[MW] or [LW].
TIP
F1 is for a dvanced FM band.
3 Press a number button (1/ to 6/).
The / buttons can be also used to select a preset station when [SEEK] is set to
[PCH] in the FUNCTION settings (page 7).
Best stations memory (BSM)
The six strongest stations are stored on the number buttons (1/ to 6/).
1 After selecting the band, press the M.C. dial to display the main menu.
2 Turn t he M.C. dial to select [FUNCTION], then press to confirm.
3 Turn t he M.C. dial to select [BSM], then press to confirm.
To seek a station manually
1
After selecting the band, press / to select a station.
Press and hold / then release to seek an available station.
Scanning stops when the unit receives a station. To cancel seek tuning,
press / .
[SEEK] n eeds to be set to [MA N] in the FUNCTI ON settings (page 7 ).
To store stations manually
1
While receiving the station you want to store, press and hold one of the
number buttons (1/ to 6/ ) until it stops flashing.
USB/AUX
Playing back
Disconnect headphones from the device before connecting it to the unit.
MVH-09UB/MVH-09UBG
127075007251
5
En
AUX input jack (3.5 mm stereo jack)
USB port
SRC (source)/OFF
M.C. (multi-control) dial
H:\PDF-OUT\127075007251\020Chapter_EN.fm
_127075007251_artwork.book Page 6 Thursday, November 24, 2016 10:34 AM
Some Android devices connected via AOA 2.0 may not work properly or emit sounds due to
their own software des ign, regardless of the OS version.
Basic operations
Purpose Operation
Select a track Press or .
Fast forward or reverse Press and hold or .
Pause/resume playback Press 4/PAUS E.
AUX
USB devices (including Android)
1
Open the USB port cover.
1
2 Press SRC /OFF to select [AUX] as the source.
2 Plug in the USB.
If [AUX] is set to [OFF] in the SYSTEM settings, [AUX] cannot be selec ted as a source (page 8).
To automatically switch to [USB] source when a USB device is conn ected to the unit, set
[USB AUTO] to [ON] in the SYSTEM settings (page 9).
Use an optional Pioneer USB cable (CD-U50E) to connect the USB device as any device
connected directly to the unit will protrude out from the unit, which could be dangerous.
Before re moving the device, stop playback .
AOA connections
A device installed with Android OS 5.0 or later can be connected to the unit via
AOA, using the cable supplied with the device.
Operations
You can make various adjustments in the FUNCTION settings (page 7).
Note that the following operations do not work for an AUX device. To operate
an AUX device, use the device itself.
Purpose Operation
Select a folder/album* Press 1/ or 2/.
Select a track/song (chapter) Press or .
Fast forward or reverse Press and hold or .
Listening to music on Android
This function is compatible with devices that have Android OS 5.0 or later
installed and also support AOA (Android Open Accessory) 2.0.
1 Press SRC/OFF to select [ANDROID].
6
En
Insert the stereo mini plug into the AUX input jack.
MVH-09UB/MVH-09UBG
127075007251
H:\PDF-OUT\127075007251\020Chapter_EN.fm
_127075007251_artwork.book Page 7 Thursday, November 24, 2016 10:34 AM
Purpose Operation
Search for a file from a list 1 Press to display the list.
View a list of the files in the selected
folde r/catego ry*
Play a song in the selected folder/
category*
Repeat play Press 6/.
Random/shuffle play Press 5/.
Pause/resume playback Press 4/PAU SE .
* Compressed audio files only
2 Tur n the M.C. dial to select the
desired file (folder) name or
category, then press to confirm.
3 Tur n the M.C. dial to select the
desired file, then press to confirm.
Playback starts.
Press the M.C. dial when a folder/
category is selected.
Press and hold the M.C. dial when a
folder/category is selected.
Settings
You can adjust various settings in the main menu.
1 Press the M.C. dial to display the main menu.
2 Turn the M.C. dial to select one of the categories below, then press to
confirm.
• FUNC TION settings (page 7)
• AUDIO settin gs (page 7)
• SYSTEM settings (page
3 Turn the M.C. dial to select the options, then press to confirm.
FUNCTION settings
The menu items vary according to the source.
Menu Item Description
BSM
Store the six strongest stations on the
number buttons (1/ to 6/)
automatically.
LOCA L
F1/FM: [OFF], [LV1], [LV2],
[LV3], [LV4]
MW/LW: [OFF], [LV1], [LV2]
SEEK
[MAN], [PCH] Assign or buttons to seek the
Restrict the tuning station according to the
signal strength.
stations one by one (manual tuning) or
select a station from the preset channels.
AUDIO settings
Menu Item Description
FAD ER *1
Adjust the front and rear speaker balance.
BALANCE
Adjust the left and right speaker balance.
7
En
MVH-09UB/MVH-09UBG
127075007251
H:\PDF-OUT\127075007251\020Chapter_EN.fm
_127075007251_artwork.book Page 8 Thursday, November 24, 2016 10:34 AM
Menu Item Description
EQ SETTING
[SUPER BASS], [POWERFUL],
[NATURAL], [VOCAL],
[CUSTOM1], [CUSTOM2],
[FLAT]
Select an equalizer band and
level for further customizing.
Equaliz er band: [80HZ],
[250HZ], [800HZ], [2.5KHZ],
[8KHZ]
Equalizer level: [+6] to [–6]
LOU DNES S
[OFF], [LOW], [MID], [HI] Compensate for clear sound at low volume.
SUB.W*2
[NOR], [REV], [OFF] Select the subwoofer phase.
SUB.W CTRL*2*3
Cut-off frequency: [50HZ],
[63HZ], [80HZ], [100HZ],
[125HZ], [160HZ], [200HZ]
Output level: [–24] to [+6]
Slope level: [–12], [–24]
BASS BOO ST
[0] to [+6] Select the bass boost level.
HPF SET TING
Cut-off frequency: [OFF],
[50HZ], [63HZ], [80HZ],
[100HZ], [125HZ], [160HZ],
[200HZ]
Slope level: [–12], [–24]
You can also switch the equalizer by
pressing repeatedly.
Only frequencies lower than those in the
selected range are output from the
subwoofer.
Only frequencies higher than the high-pa ss
filter (HPF) cutoff are output from the
speakers.
Menu Item Description
SLA
[+4] to [–4] Adjust the volume level for each source
*1 Not available when [SUB.W/SUB.W] is selected in [SP-P/O MODE] in the INITIAL settings
(page 5).
*2 Not available when [REAR/REAR] is selected in [SP-P/O MODE] in the INITIAL settings
(page 5).
*3 Not available when [OFF] is selected in [SUB.W].
except RADIO.
Each of the below combinations are set to
the same setting automatically.
• USB, APP (Android)
SYSTEM settings
You can also access to these menus when the unit is turned off.
Menu Item Description
LANGUAGE
[ENG](English),
[РУС](Russian), [TUR]( Turkish)
CLOCK SET
12H/24H
[12H], [24H] Select the time notation.
AUX
[ON], [OFF] Set to [ON] when using an auxiliary device
Select the language to display the text
information from a compressed audio file.
Set the clock (page 4).
connected to the unit.
8
En
MVH-09UB/MVH-09UBG
127075007251
H:\PDF-OUT\127075007251\020Chapter_EN.fm
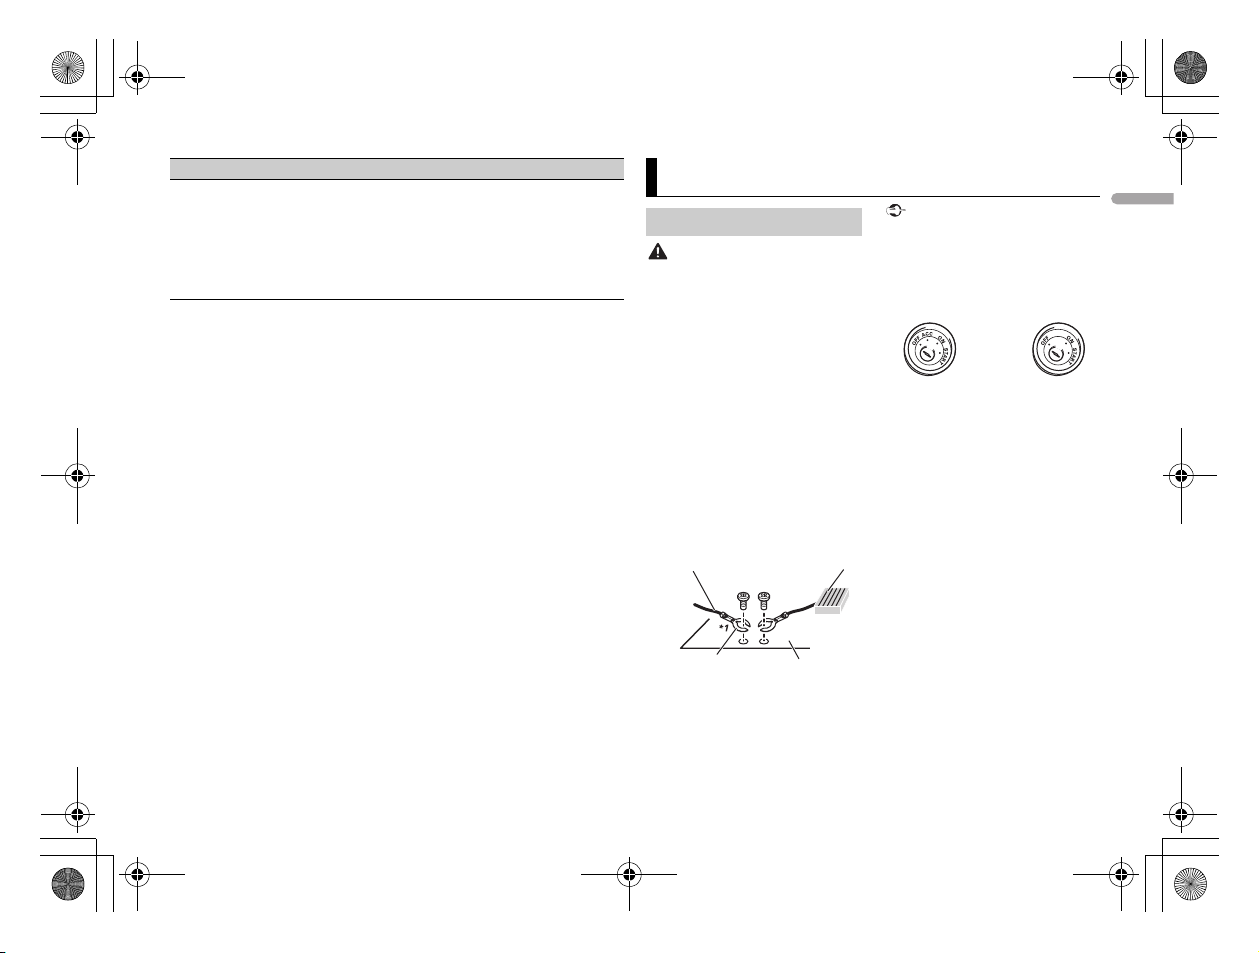
Ground wire POWER AMP
Other devices
(Another electronic
device in the car)
Metal parts o f
car’s body
*1 Not supplied for this unit
ACC posi tion No ACC p osition
_127075007251_artwork.book Page 9 Thursday, November 24, 2016 10:34 AM
Menu Item Description
USB AUTO
[ON], [ OFF] Select [ON ] to automatical ly switch to [USB ]
source when a USB device/Android is
connected to the unit.
Select [OFF] when a USB device/Android is
being connec ted to the unit just for
charging.
Connections/Installation
Connections
• Use speakers over 50 W (output
value) and between 4 Ω to 8 Ω
(impedance value). Do not use 1 Ω to
3 Ω speakers for this unit.
• The black cable is ground. When
installing this unit or power amp
(sold separately), make sure to
connect the ground wire first. Ensure
that the ground wire is properly
connected to metal par ts of the car’s
body. The ground wire of the power
amp and the one of this unit or any
other device must be connected to
the car separately with different
screws. If the screw for the ground
wire loosens or falls out, it could
result in fire, generation of smoke or
malfunction.
• When installing this unit in a vehicle
without an ACC (accessory) position
on the ignition switch, failure to
connect th e red cable to the terminal
that detects operation of the ignition
key may result in battery drain.
• Use of this unit in conditions other
than the following could result in fire
or malfunction.
– Vehicles with a 12-volt battery and
– When speaker output is used by 4
– When rear speaker output is used
• To prevent a short-c ircuit,
overheating or malfunction, be sure
to follow the directions below.
– Disconnect the negative terminal
– Secure the wiring with cable
negative grounding.
channels, use speakers over 50 W
(maximum input power) and
between 4 Ω to 8 Ω (impedance
value). Do not use 1 Ω to 3 Ω
speakers for this unit.
by 2 Ω of subwoofer, use speakers
over 70 W (maximum input power).
* Please refer to connection for a
connection method.
of the battery before installation.
clamps or adhesive tape. Wrap
MVH-09UB/MVH-09UBG
127075007251
9
En
H:\PDF-OUT\127075007251\020Chapter_EN.fm
_127075007251_artwork.book Page 10 Thursday, November 24, 2016 10:34 AM
adhesive tape around wiring that
comes into contact with metal
parts to protect the wiring.
– Place all cables away from moving
parts, such as the shift lever and
seat rails.
– Place all cables away from hot
places, such as near the heater
outlet.
– Do not connect the yellow cable to
the battery by passing it through
the hole to the engine
compar tment.
– Cover any disconnected cable
connectors with insulating tape.
– Do not shorten any cables.
– Never cut the insulation of the
power cable of this unit in order to
share the power with other devices.
The current capacity of the cable is
limited.
– Use a fuse of the rating prescribed.
– Never wire the negative speaker
cable directly to ground.
– Never band together negative
cables of multiple speakers.
• When this unit is on, control signals
are sent through the blue/white
cable. Connect this cable to the
system remote control o f an external
power amp or the vehicle’s autoantenna relay control terminal (max.
300mA 12 V DC). If the vehicle is
equipped with a glass antenna,
connect it to the antenna booster
power supply terminal.
• Never connect the blue/white cable
to the power terminal of an external
power amp. Also, never connect it to
the power terminal of the auto
antenna. Doing so may result in
battery drain or a malfunction.
• The black cable is ground. Ground
cables for this unit and other
equipment (especially, high-current
products such as power amps) must
be wired separately. If they are not,
an accidental detachment may result
in a fire or malfunction.
This unit
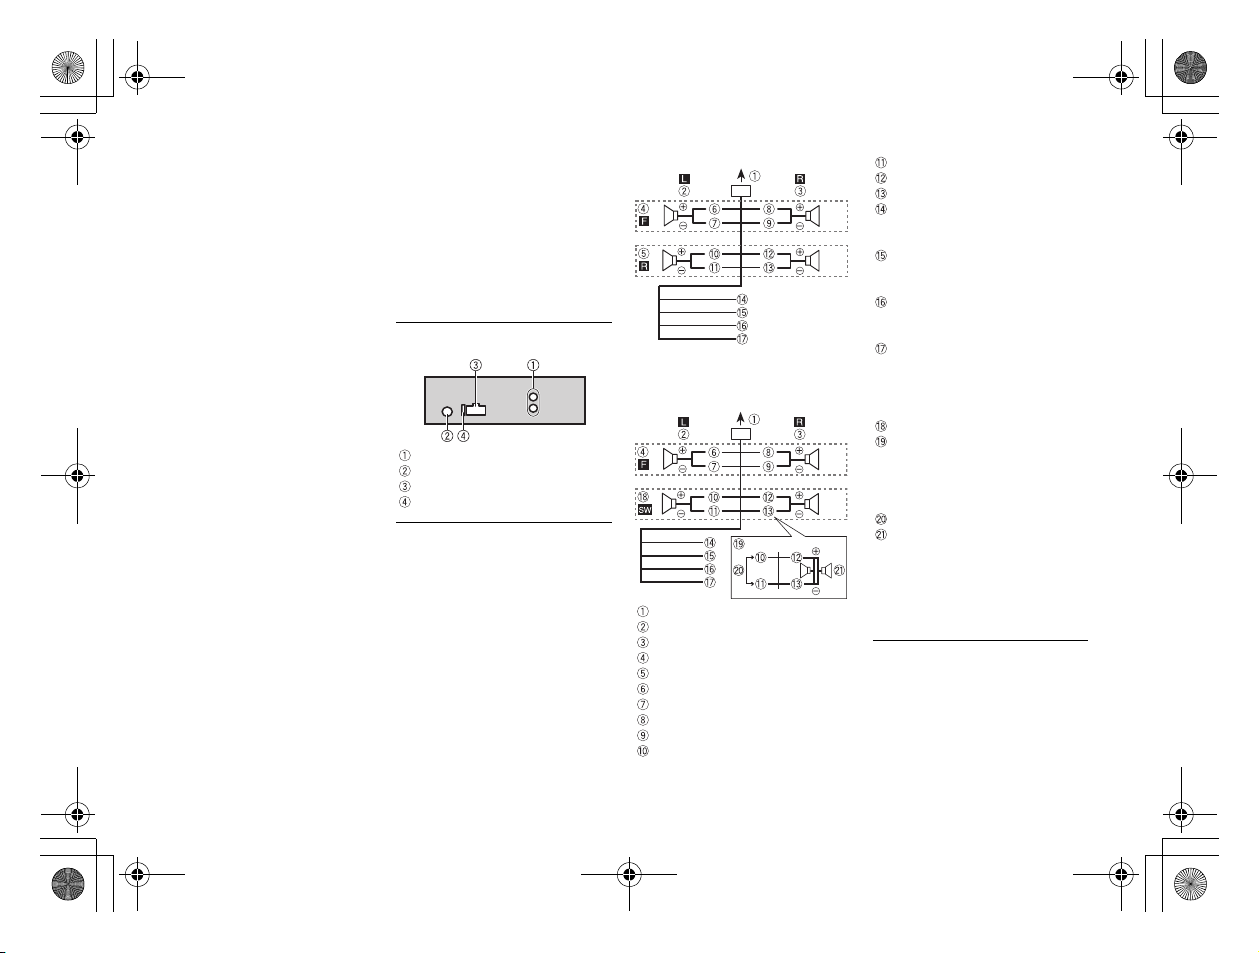
Rear output or subwoofer output
Antenna input
Power cord input
Fuse (10 A)
Power cord
Perform these connections when not
connecting a rear speaker lead to a
subwoofer.
Perform these connections when
using a subwoofer without the
optional amplifier.
To power cord input
Left
Right
Front sp eaker
Rear speaker
White
White/black
Gray
Gray/black
Green
Green/black
Violet
Violet/black
Black (chassis ground)
Connect to a clean, paint-free
metal location.
Yel l ow
Connect to the constant 12 V
supply terminal.
Red
Connect to terminal controlled by
the ignition switch (12 V DC).
Blue/white
Connect to the system control
terminal of the power amp or autoantenna relay control terminal
(max. 300 mA 12 V DC).
Subwoofer (4 Ω)
When using a subwoofer of 2 Ω, be
sure to connect the subwoofer to
the violet and violet/black leads of
this unit. Do not connect anything
to the green and green/black leads.
Not used.
Subwoofer (4 Ω) × 2
Change the initial menu of this unit.
Refer to [SP-P/O MODE] (page 5). The
subwoofer output of this unit is
monaural.
Power amp (sold separately)
Perform these connections when
using the optional amplifier.
10
En
MVH-09UB/MVH-09UBG
127075007251
H:\PDF-OUT\127075007251\020Chapter_EN.fm
Leave ample
space
5 cm
5 cm
_127075007251_artwork.book Page 11 Thursday, November 24, 2016 10:34 AM
loose cables so they are no t blocking
the vents.
System remote control
Connect to blue/white cable.
Power amp (sold separately)
Connect with RCA cables (sold
separately)
To rear output or subwoofer output
Rear speaker or subwoofer
Installation
• Chec k all connections and systems
before final installation.
• Do not use unauthorized parts as
this may cause malfunctions.
• Consult your dealer if installation
requires drilling of holes or other
modifications to the vehic le.
• Do not install this unit where:
– it may interfere with operation of
the vehicle.
– it may cause injury to a passenger
as a result of a sudden stop.
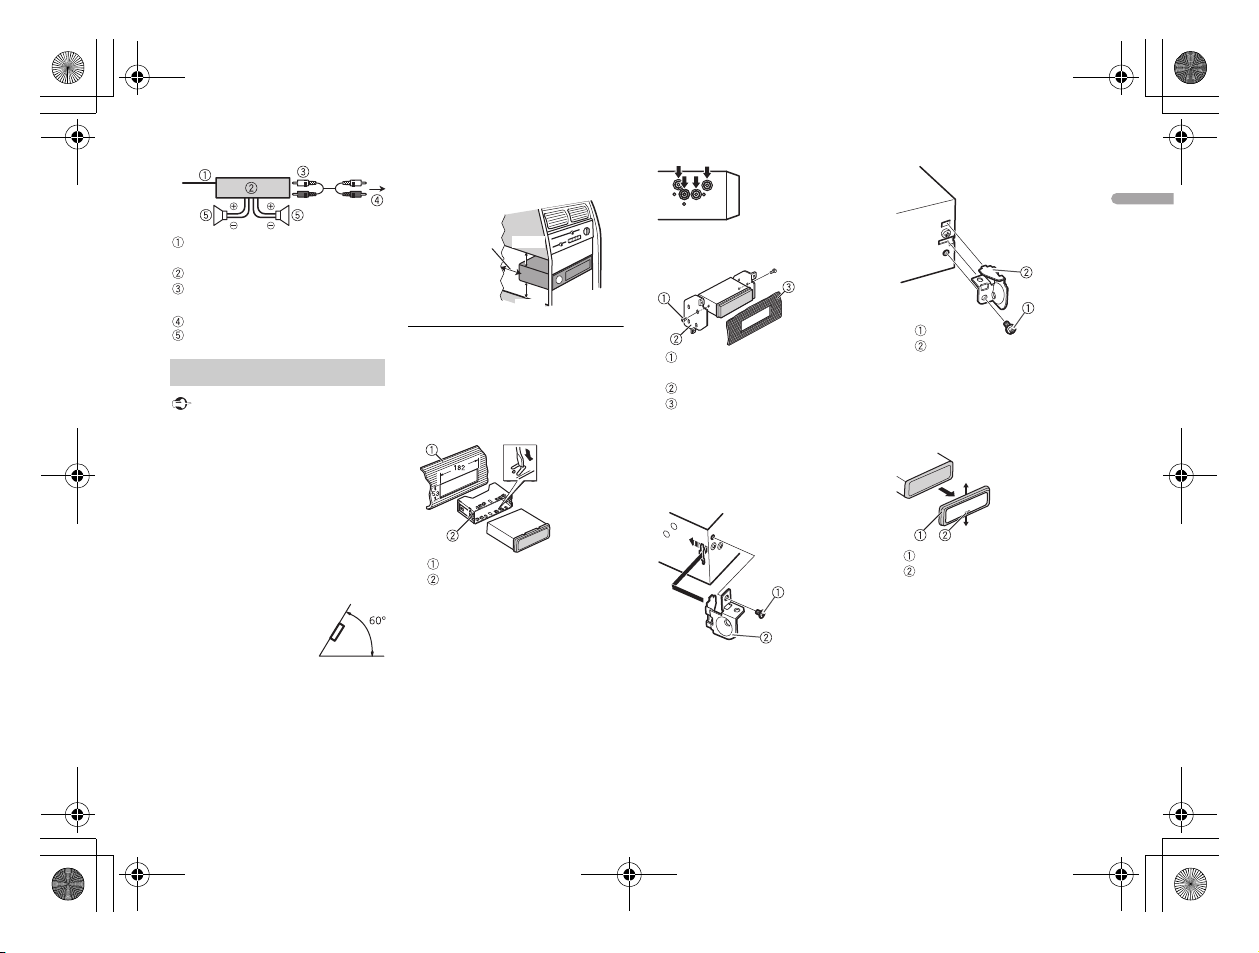
• Optimum
performance is
obtained when the
unit is installed at an
angle of less than 60°.
• When installing, to ensure proper
heat dispersal when using this unit,
make sure you leave ample space
behind the rear panel and wrap any
DIN mount installation
1 Insert the supplied mounting
sleeve into the dashboard.
2 Secure the mounting sleeve by
using a screwdriver to bend the
metal tabs (90°) into place.
Dashboard
Mounting sleeve
• Make sure that the unit is
installed securely in place. An
unstable installation may cause
skipping or other malfunctions.
When not using the supplied
mounting sleeve
1 Line up the holes on the
mounting bracket with the holes
on the sides of the unit to attach
the bracket.
2 Screw in one screw on each side to
hold the unit in place.
Tapping screw (φ5 mm × 9 mm,
not supplied with product)
Mounting bracket
Dashboard or console
Using the included bracket
Check to make sure that the included
bracket matches your particular
model of vehicle and then attach it to
the unit as shown below.
Removing the unit (installed
with the supplied mounting
sleeve)
1 Remove the trim ring.
Trim r ing
Notched tab
• Rel easing the front panel allows
easier access to the trim ring.
• When reattaching the trim ring,
point the side with the notched
tab down.
2 Insert the supplied extraction
keys into both sides of the unit
until they click into place.
3 Pull the unit out of the dashboard.
En
11
MVH-09UB/MVH-09UBG
127075007251
Loading…
Характеристики, спецификации
Зарядка устройства Android:
Да
Воспр. медиафайлов с устройства Android:
Да
Формат дисплея:
текст./символьный
Цвет светящихся символов:
белый
Футляр для съемной панели:
доп.опция
Установочный набор:
в комплекте
Воспр. медиафайлов с цифр.носителей:
Да
Текстовые сообщения RDS:
Да
Фиксированные настройки тюнера:
12 FM/6 MW/6 LW
Ном. выходная мощность:
4 x 22 Вт
Макс. выходная мощность:
4 x 50 Вт
Формат аудио:
MP3/ FLAC/ WMA/ WAV
Размер установочного места:
1 DIN
Панель управления:
съемная
Вход 3.5 мм аудио:
1 (фронтальный)
Порт USB:
1 х тип А (фронтальный)
H:\PDF-OUT\127075007251\010COV_KM686UW.fm
_127075007251_artwork.book Page 1 Thursday, November 24, 2016 10:34 AM
English Русский
DIGITAL MEDIA RECEIVER
ЦИФРОВОЙ МЕДИАРЕСИВЕР
MVH-09UB
Owner’s Manual
MVH-09UBG
Руководство пользователя
MVH-09UB/MVH-09UBG
127075007251_(B6_Horizon)
H:\PDF-OUT\127075007251\020Chapter_EN.fm
Before You Start ……….…………………………….……………………….. 2
Getting Started ……..…………………………….………………………….. 3
Radio …….………………….…………………………….……………………….. 5
USB/AUX ……….……….……………………………….……………………….. 5
Settings…………………….……………………………….…………………….. 7
FUNCTION settings ……..…….…….………..…….………..……..……. 7
AUDIO settings…..………..…….…….………..…….……..………..……. 7
SYSTEM settings ..…….………..…….…….………..……..………..……. 8
Connections/Installation……….…………….………………………….. 9
Additional Information…….………………….………………………… 12
2
En
MVH-09UB/MVH-09UBG
127075007251
About this manual:
Table of Contents
Thank you for purchasing this PIONEER product
To ensure proper use, please read through this manual before using this product. It is
especially important that you read and observe WARNINGs and CAUTIONs in this manual.
Please keep the manual in a safe and accessible place for future reference.
Private households in the member states of the EU, in Switzerland and Norway may return
their used electronic products free of charge to designated collection facilities or to a
retailer (if you purchase a similar new one).
For countries not mentioned above, please contact your local authorities for the correct
method of disposal.
By doing so you will ensure that your disposed product undergoes the necessary treatment,
recovery and recycling and thus prevent potential negative effects on the environment and
human health.
• In the following instructions, a USB memory or USB audio player are referred
to as “USB device”.
WARNING
•Do not attempt to install or service this product by yourself. Installation or servicing
of this product by persons without training and experience in electronic equipment
and automotive accessories may be dangerous and could expose you to the risk of
electric shock, injury or other hazards.
• Do not attempt to operate the unit while driving. Make sure to pull off the road and park
your vehicle in a safe location before attempting to use the controls on the device.
CAUTION
_127075007251_artwork.book Page 2 Thursday, November 24, 2016 10:34 AM
Before You Start
If you want to dispose this product, do not mix it with general household waste. There is a
separate collection system for used electronic products in accordance with legislation
that requires proper treatment, recovery and recycling.
• Do not allow this unit to come into contact with moisture and/or liquids. Electrical shock
could result. Also, damage to this unit, smoke, and overheating could result from contact
with liquids.
• Always keep the volume low enough to hear outside sounds.
H:\PDF-OUT\127075007251\020Chapter_EN.fm
En
3
MVH-09UB/MVH-09UBG
127075007251
English
If you experience problems
Should this unit fail to work properly, please contact your dealer or nearest authorized
PIONEER Service Station.
Getting Started
Basic operation
MVH-09UB/09UBG
Frequently used operations
Purpose Operation
Turn on the power* Press SRC/OFF to turn on the power.
Press and hold SRC/OFF to turn off the
power.
Adjust the volume Turn the M.C. dial.
Select a source Press SRC/OFF repeatedly.
Change the display information Press DISP repeatedly.
M.C. (multi-control) dial
SRC (source)/OFF
DISP (display)
Display window
BAND/DIMMER
Detach button
* When this unit’s blue/white lead is connected to the vehicle’s auto-antenna relay control
terminal, the vehicle’s antenna extends when this unit’s source is turned on. To retract the
antenna, turn the source off.
Display indication
Detach the front panel to prevent theft. Remove any cables and devices
attached to the front panel and turn off the unit before detaching it.
Important
Purpose Operation
Return to the previous display/list Press BAND/DIMMER .
Return to the normal display from the
Press and hold BAND/DIMMER .
menu
Indication Description
Appears when a lower tier of the menu or folder exists.
Appears when the button is pressed.
Appears when the local seek tuning function is set (page 7).
Appears when random/shuffle play is set.
Appears when repeat play is set.
Detaching the front panel
• Avoid subjecting the front panel to excessive shock.
Detach Attach
_127075007251_artwork.book Page 3 Thursday, November 24, 2016 10:34 AM
Перейти к контенту
Автомагнитолы Pioneer
- Размер инструкции: 6.26 Мб
- Формат файла: pdf
Если вы потеряли инструкцию от автомагнитолы Pioneer MVH-09UB, можете скачать файл для просмотра на компьютере или печати.
Инструкция для автомагнитолы Pioneer MVH-09UB на русском языке. В руководстве описаны возможности и полезные функции, а также правила эксплуатации. Перед использованием внимательно ознакомьтесь с инструкцией.
Чтобы не читать всю инструкцию вы можете выполнить поиск по содержимому внутри инструкции и быстро найти необходимую информацию. Рекомендации по использованию помогут увеличить срок службы автомагнитолы Pioneer MVH-09UB. Если у вас появилась проблема, то найдите раздел с описанием неисправностей и способами их решения. В нем указаны типичные поломки и способы их решения.
Юридическим лицам
Доставка
Оплата товара
Оплата кредита
Оплата рассрочки
Вопросы и ответы
Как купить товар
Доставка
Оплата
Гарантия
Защита техники
Обмен? Легко!
Покупка в кредит
Покупка в рассрочку
Советы по выбору
Наклейка пленок
О корпорации «Центр»
Контакты
Партнеры
События
Юридическим лицам
Арендодателям
Отзывы о магазине
Вакансии
Наши магазины
8-800-100-3000
Искать в kcentr
Сравнение
Избранное
Корзина
Акции
Каталог товаров
Автомобильные магнитолы
Pioneer
Код товара: 1257328


Краткие характеристики
Типоразмер
1 DIN
MP3-проигрыватель
есть
Пиковая мощность
4×50 Вт
Тип дисплея
монохромный
Входы
AUX, USB
Перейти к характеристикам
Нет в наличии
Характеристики
Описание
Отзывы
Инструкции и документация
1
Аксессуары
Все товары Pioneer
Все автомобильные магнитолы Pioneer
Инструкции Автомобильная магнитола Pioneer MVH-09UB
Автомобильная магнитола Pioneer MVH-09UB инструкция на русском языке
Адреса магазинов
С нами выгодно
Акции
С нами удобно
Сервисный центр
Установка и настройка
Оплата кредита
Оплата рассрочки
Доставка
Юридическим лицам
8-800-100-3000
8:00 — 17:00 МСК
Бесплатный звонок по России
kcentr.ru — официальный Интернет-магазин Корпорации «Центр» — российской розничной торговой сети по продаже
бытовой техники и электроники известных мировых производителей.
© 1990 — 2025, Корпорация «Центр»
Политика конфиденциальности
Информация на сайте не является публичной офертой