
Тонкости настройки магнитолы Pioneer в вашей машине
На вопрос о лидере по производству аудиоаппаратуры большинство читателей ответит, не задумываясь — конечно, Pioneer. Название этого бренда давно стало именем нарицательным для обозначения хорошей, качественной аппаратуры, при этом не только в аудиосегменте. Но на автофорумах имя этой компании очень часто звучит в варианте — как настроить магнитолу Pioneer в машине. Несмотря на разнообразие марок все такие девайсы настраиваются практически одинаково. Вот несколько примеров по настройке.
Для чего настраивать магнитолу Pioneer
Аудиосистема в машине состоит из нескольких компонентов. Первые варианты комплектовались минимумом — пара динамиков на задней полке и радиоприёмник на передней торпеде. Но прогресс не стоит на месте — приёмник заменили на магнитолу, а количество динамиков выросло в несколько раз. Если магнитола в автомобиль устанавливается на заводе — настраивать обычно ничего не надо. Но аппаратура нескольких фирм (среди которых лидер в аудиотехнике — Pioneer), как правило, покупается владельцем отдельно. В то же время и динамики в автомобиле бывают разные. Чтобы оптимально настроить качество звука, «подружить» существующие динамики с новой магнитолой, в последней нужно провести несколько настроек.
Что можно улучшить
Говоря о настройках, стоит уточнить, что Pioneer понятие магнитола расценивает не просто как устройство для прослушивания радио или записей. В этом девайсе можно увидеть дату, время и многое другое, если они настроены. Представляться информация может на нескольких языках — либо это будет японский (так как бренд — японец по происхождению), либо, что чаще встречается — английский.

Будет ли в меню русский, зависит от многих факторов, но даже английское меню разобрать проще, чем японское. Некоторые дополнительные функции — например, порты USB, также нужно будет включать через меню. Не говоря уже о вышеописанной проблеме подключения конкретных динамиков.
Настройки базовых функций на «Пионере»
Отключите «Демо»
Прежде чем вносить изменения в настройки магнитолы, отключают режим «Demo». Магнитола Pioneer и ряд других современных автомобильных аудиосистем имеют режим демонстрации функционала. Пока его не выключат, любая настройка будет сохраняться ровно до момента выключения. Если нет желания при каждом включении настраивать свои предпочтения заново — режим нужно выключить.

Главная ручка управления на магнитолах «Pioneer» c подписями главных кнопок управления
Делается это следующим образом:
- Выключают магнитолу (нажимают и удерживают клавишу SRC, пока дисплей не погаснет).
- Нажимают ту же клавишу ещё раз, удерживают её до появления стартового меню.
- Регулятором громкости выбирают в меню опцию «Система», а затем «Demo». Справа от неё будет указано положение On.
- Любой из стрелок по бокам ручки громкости переключают положение в Off.
- Для сохранения настроек нажимают клавишу Band. Режим выключен, сохранен в памяти, магнитола выключается. Можно переходить к другим настройкам.
Ручка громкости в технике этого бренда также выполняет функции джойстика — кроме вращения, её можно утапливать и двигать вверх-вниз или влево-вправо для выполнения определённых настроек.
Настройка времени
- Повторяют пункты 1–2 из вышеописанной инструкции.
- Затем вращением ручки в меню выбирают раздел «Система».
- Нажимают ручку и в новом меню выбирают настройку часов.
- Стрелкой вправо входят в настройки.
- Вращением «Громкости» против/по часовой стрелке устанавливают значение.
- Однократным нажатием на неё подтверждают.
- Стрелкой влево выходят из настройки.
Доступна установка часов, минут и секунд по отдельности. Выбранный параметр начинает мерцать.
Язык и календарь
Как и часы — эти параметры находятся в меню «Система». Принцип настройки полностью повторяет установку часов. Как и часы, календарь можно выставлять по отдельности — день, месяц, год.
Радиоприёмник в машине
Станции в магнитоле настраиваются тремя способами. В зависимости от модели можно запомнить 18 или более станций.
Для удобства примем, что приёмник уже включён — переключение на него производится однократным нажатием на кнопку Band.
Способ первый — самый простой
- Зная частоту станции, короткими нажатиями кнопок влево-вправо набирают её на дисплее.
- Затем удерживают одну из шести кнопок (1–6) под дисплеем. Набранная станция будет записана в память, о чём на экране появится соответствующее указание в виде цифры, повторяющей номер кнопки.
- Набирают следующую частоту и нажимают следующую свободную кнопку.
- Дожидаются индикации на дисплее.
Так повторяют 6 раз — для шести разных станций.
С 7 по 12 и с 13 по 18 станции сохраняют в следующих банках памяти. Переключение между ними производится однократными нажатиями Band.
Способ второй
- Находясь в режиме приёмника, удерживают кнопку вправо в течение одной секунды.
- Магнитола начнёт поиск станции.
- Найдя первую — перейдёт в режим воспроизведения.
- Если станция устраивает, сохраняют её нажатием кнопок ниже дисплея.
- Затем повторяют пункты 1–4 для выбора следующих станций
Запоминание станции и выбор банков так же, как и в первом варианте.
Способ третий
- Из главного меню переходят в меню функций.
- Листая его, находят параметр BSM.
- Выбирают нажатием стрелки вверх или вправо.
- Ждут некоторое время.
- Магнитола проверит весь диапазон, найдёт станции и выстроит их по уровню сигнала.
- Затем включит первую на воспроизведение.
- Сохранять станции можно так же, как и в других способах. Листать выбранные можно однократными короткими нажатиями кнопок под дисплеем.
В этом способе есть одно но — не все отечественные радиостанции попадают в список найденных по разным причинам. Если пройден весь список, но не нашлась желаемая станция, можно поступить следующим образом:
Можно поэкспериментировать с шагом поиска, но если станции по-прежнему нет, быстрее будет выбрать её первым из описанных способов.
Пара слов на тему банков памяти — затирать какие-то станции для освобождения ячеек не нужно. При желании заменить выбор, достаточно записать новую частоту в выбранную ячейку. Старая частота удалится автоматически.
Настройка радиоприёмника на видео
Внешние порты
- Кроме радио, магнитола может проигрывать музыку с внешних устройств или CD — дисков (более старые версии).
- Для возможности подключения внешних устройств понадобится всё то же меню «Система», описанное ранее в настройке времени.
- Переходят в меню, как описано выше.
- Листая меню, выбирают параметр AUX, USB или Bluetooth (при поддержке данной возможности).
- Стрелками по бокам (или отклонением самой) ручки переключают положение.
Доступны два варианта — включено (On), или отключено (Off). - Выбирают включить желаемый порт.
- Однократным нажатием джойстика подтверждают.
- Так же, как и в настройке времени, выходят из меню.
- Дальнейшее подключение зависит от моделей магнитолы и подключаемого устройства.
Подключение по Bluetooth
Следует помнить, что для корректной работы соединения посредством Bluetooth, как и большинству других устройств с поддержкой такой функции, потребуется сопряжение. Pin-код вводится на магнитоле и повторяется на устройстве (иногда, особенно если устройство уже соединялось посредством Bluetooth, ввести его нужно будет только на магнитоле).
Для ввода pin-кода на магнитоле делают следующие шаги:
- Выключают её.
- Удерживая клавишу включения, переходят в начальное меню.
- Вращая джойстик, находят функцию PIN CODE INPUT (появится, если BT разрешён).
- Отклоняя ручку джойстика вверх-вниз, вводят код. Если нужно перемещение между символами, осуществляют качанием ручки влево-вправо.
- Подтверждают однократным нажатием на ручку.
- Выходят из меню.
Теперь можно активировать режим на устройстве и попробовать найти магнитолу. Любители назначать понятные имена устройствам могут использовать приведённый способ, но выбрать надо не PIN CODE INPUT, а EDIT DEVICE NAME. Остальные действия идентичны.
Важно. Нажатие для подтверждения должно быть однократным. Повторное нажатие на это же меню приведёт к сбросу кода и необходимости вводить его снова.
В магнитоле, фотография которой представлена ниже, 3.5 гнездо джека AUX находится справа от кнопок управления радио, а USB — за заглушкой с фирменной эмблемой USB.
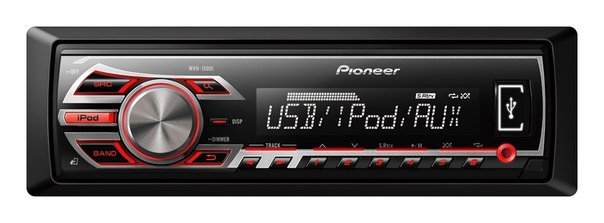
Магнитола «Pioneer» без CD, но с поддежкой USB и AUX
Аудио
Передние динамики
Настроив радиоприёмник, а также подключив источники звука, можно заняться качеством звучания.
Рекомендуемая громкость для правильной настройки составляет не более 30 единиц.
- После настройки громкости нажимают на регулятор, чтобы попасть в меню настроек.
- Здесь ищут пункт «Аудио».
- Нажав на рукоятку, входят в это меню.
- Полистав его, находят указание Fader.
Очень часто его объединяют с меню баланса, тогда искомое меню будет звучать, как Fader/Balanсe
В заводской настройке эти показатели равны нулям.
Опытным путём выведено,что здесь можно ставить 100 — 125.
Задние динамики
Передние динамики чисто работают, теперь пора задние динамики на полке перевести в режим сабвуферов — благо Pioneer и такое может.
- Выключают магнитолу.
- Нажав, удерживают кнопку включения (как будто собираются настраивать режим «демо»).
- Попав в меню, ищут надпись в виде SW Kontrol.
- Утопив рукоятку, входят в это меню.
- Вращением её выставляют параметр на SW.
- Подтверждают, нажав на рукоятку ещё раз.
- Нажимают кнопку выключения — сохранение параметров, выход из меню.
- Затем возвращаются в меню «Аудио» (нажатие на ручку громкости и выбор вращением).
- Нажав на ручку, входят в меню.
- Здесь ищут надпись SW SETTING1. Нажимают на ручку для входа.
- Из трёх вариантов, представленных в меню, выбирать нужно один из двух — Normal или Rev.
В большинстве автомобилей именно второй режим даст лучшее звучание.
Оптимальным решением будет поставить 50 HZ.
Перед тем как переходить к следующим настройкам, проверяют на разной громкости, как работают выбранные настройки. Если что-то не нравится — повторяют описанные шаги, пробуя другие значения.
Тонкомпенсация
Спрятан этот параметр в том же меню «Аудио».
- Входят в меню, находят параметр Loudness.
- Выбирают нажатием на ручку.
- Здесь предлагается три значения — High, Middle, Low (соответственно высокий, средний, низкий).
- Этот параметр отвечает за подстройки частот при низком уровне громкости.
Оптимальные установки тут тоже дать не получится — выставляют опытным путём. - Качая ручку влево, выходят в «Аудио» или из настроек — нажав Band.
Настройки эквалайзера
Для продвинутых меломанов приведём ещё несколько настроек эквалайзера. Скрыты они в том же меню «Аудио».
- Войдя в меню, вращают рукоятку для выбора параметра EQ SETTING.
- Входят в это меню (в зависимости от модели, возможно, тут будет нужно войти ещё в одно меню).
Три параметра, предлагаемых в этом меню, отвечают раздельно за настройки нижних, средних, высоких частот. - Выставляют в соответствии со своими предпочтениями. В некоторых моделях здесь можно выбрать несколько предустановленных настроек. В зависимости от динамиков и собственных предпочтений настраивают эти параметры.
Настройки тут ничем не отличаются от других — выбор нажатием, изменение вращением, выход на уровень выше — качанием ручки влево.
Где находятся разные настройки — смотреть на видео
Большинство автомобильных магнитол правильно настраиваются на заводе. Но это касается штатных магнитол. Если вы решили купить магнитолу Pioneer, то для оптимального качества звука придётся предпринять некоторые шаги. Но хорошее качество, которое способны давать модели среднего и высокого класса этого бренда, с лихвой компенсируют затраченное на настройки время.
Источник
Учимся настраивать звук колонок и сабвуфера на магнитоле Pioneer своими руками
⭐ ⭐ ⭐ ⭐ ⭐ Настройка магнитолы Pioneer в машине начинается со сброса текущих установок. В результате эквалайзер фильтры для колонок HPF и сабвуфера LPF вернётся к заводским установкам. Это можно сделать двумя способами, найти соответствующий раздел в меню автомагнитолы или отключить клемму масса от аккумулятора. Отметим что, нижеприведённая методика настройки магнитолы рассчитана на пользователя начального уровня, и в ней нет ничего сверхсложного. Но также, качество воспроизводимого звука только на 33% зависит от состава и качества компонентов аудио системы. Ещё на треть оно зависит от правильности установки оборудования, и оставшиеся 33% — от грамотности настройки аудиосистемы.
Если у вас сбрасываются настройки при выключении зажигания, проверьте схему подключения магнитолы. Скорее всего желтый провод подключен к замку зажигания а не на прямую к аккумулятору.
Эквалайзер
Эквалайзер позволяет сделать звучание более ровным – поднять или понизить басовые, средние и высокие частоты.Это довольно тонкая настройка аудиосистемы. Регулируется не весь диапазон звука сразу, как в других пунктах меню, а конкретные полосы частот. У разных моделей встречается разное их количество, в зависимости от класса оборудования. В магнитолах Pioneer их пять: 80 Гц, 250 Гц, 800 Гц, 2,5 кГц 8 кГц.
Эквалайзер находится в разделе «Аудио» меню настроек, пункт EQ. В нём можно выбрать одну из предустановленных стандартных настроек. Для тех, кого эти варианты не устраивают, предусмотрено два набора пользовательских настроек (Custom).Переключаться между ними можно как из меню, так и кнопкой EQ рядом с джойстиком.
Чтобы произвести изменения частотных параметров в пользовательской настройке, нужно выбрать её колёсиком и нажать на джойстик. Затем поворотом колеса выбрать одну из полос частот эквалайзера. Снова нажать на джойстик и выставить положение от -6 (ослабление частоты) до +6 (усиление). Действуя таким образом можно сделать одни частоты громче, другие – тише.
Универсального рецепта настройки эквалайзера на магнитоле не существует. Производится она на слух в зависимости от предпочтений потребителя. Кроме того, разные варианты регулировки подбираются под определённый жанр музыки.
Можно дать лишь приблизительные рекомендации:
- если будет воспроизводиться тяжёлая музыка, стоит усилить бас – 80 Гц (но не слишком, +2–+3 достаточно).Ударные же инструменты звучат в районе- 250 Гц;
- для музыки с вокалом нужны частоты примерно 250-800+ Гц (мужские голоса ниже, женские – выше);
- для электронной музыки понадобятся высокие частоты – 2,5-5 кГц.
Настройка эквалайзера является очень важным этапом.С помощью данного инструмента можно кратно улучшить качество звучания. Даже в случае, если акустика не является очень дорогой и качественной.
Фильтр высоких частот
Далее находим пункт HPF (High-passFilter). Это фильтр высоких частот, который обрезает частоту звука, подаваемого на динамики, ниже их граничного паспортного значения. Делается это из – за того, что,стандартным динамикам (13–16 см) из-за небольшого диаметра диафрагмы и малой мощности очень сложно воспроизводить низкие частоты. Вследствие этого звук воспроизводится с искажениями даже на небольшой громкости. Если обрезать низкие частоты, можно будет получить чистое звучание в большем диапазоне громкости.
Если у вас нет сабвуфера, то рекомендуем установить HPF фильтр на частоте 50 или 63 Гц.
Затем можно выйти из меню кнопкой возврата и проверить результат. Делать это лучше на громкости 30.
Если качество звука не устраивает, или если вы находитесь на природе, и хочется устроить громкую дискотеку, можно поднять нижнюю границу от 80–120 Гц и более. Такой же уровень граничного среза рекомендуется применить при наличии сабвуфера. Эти мероприятия позволят кратно увеличить чистоту и громкость воспроизводимого звука.
Также здесь есть регулировка крутизны затухания частот. На Pioneer она бывает в двух положениях – это 12 и 24 дБ на октаву. Советуем вам установить данный показатель на 24 дБ.
Фильтр низких частот (сабвуфер)
После того, как мы разобрались с колонками, выполним настройку магнитолы под сабвуфер. Для этого нам понадобится фильтр низких частот. С его помощью мы состыкуем частоты колонок и сабвуфера.
Ситуация выглядит следующим образом. Когда мы убрали с акустики бас (установили HPF на 80+), у нас получился громкий и качественный звук. Следующим этапом мы должны “пристыковать” к нашим колонкам сабвуфер. Для этого заходим в меню, выбираем пункт аудио, в нём находим раздел управление сабвуфером.
Здесь имеются три значения:
- Первая цифра – это частота среза сабвуфера. Здесь всё так же, как и с эквалайзером. Конкретных значений установки просто не существует, а диапазон, в котором можно “поиграться”, составляет от 63 до 100 Гц.
- Следующая цифра – это громкость нашего сабвуфера. Думаем, тут всё просто, можно сделать сабвуфер громче или тише относительно акустики, шкала от -6 до +6.
- Следующая цифра – это крутизна затухания частот. Она также, как и в HPF может быть или 12 или 24. Здесь также небольшой совет: если устанавливаете высокий срез, то сделайте крутизну спада на 24, если более низкий, то можно установить на 12 или 24.
Качество звучания зависит не только от настройки вашей аудиосистемы, но и оттого какие динамики у вас установлены. Если вы хотите заменить их, советуем ознакомиться со статьей «что необходимо знать при выборе автомобильной акустики»
Настройка радио
Даже любимая музыка, записанная на флешку или USB накопитель, со временем может надоесть. Поэтому многие автолюбители любят слушать радио во время поездки. Правильно настроить радио у магнитолы Pioneer несложно и может осуществиться буквально в несколько движений – нужно лишь выбрать диапазон, найти и сохранить станции.
Настроить радио можно тремя способами:
- Автоматический поиск станций. Для этого нужно найти пункт BSM в меню настроек и запустить поиск. Автомагнитола найдёт станцию с самой высокой частотой в радиодиапазоне и остановится — её можно сохранить, нажав кнопку с цифрой 1–6. Далее поиск станций продолжится в сторону уменьшения частоты. Если ничего не найдётся, в скрытом меню настроек можно изменить шаг поиска со 100 кГц на 50кГц.
- Полуавтоматический поиск. Находясь в режиме радио, нужно зажать кнопку «вправо». Запустится сканирование диапазона, и произойдёт поиск, такой же, как в автоматическом режиме.
- Ручная настройка. Короткими нажатиями кнопки «вправо» в режиме радио можно переключиться на определённую частоту. Затем станция сохраняется в памяти.
Когда все 6 мест для сохранённых станций заполнятся, можно переключиться на следующий раздел памяти. Всего их 3. Таким образом можно сохранить до 18 радиостанций.
Выключение режима Demo
Сразу после покупки и подключения магнитолы следует разобраться, как отключить демо-режим, предназначенный для показа устройства в магазине. Использовать магнитолу в этом режиме можно, но неудобно, так как при выключении его не гаснет подсветка, а по дисплею бегают надписи с различной информацией.
Отключение демо-режима осуществляется очень просто:
- Заходим в скрытое меню, выключив магнитолу и зажав кнопку SRC.
- В меню поворотом колеса доходим до пункта DEMO.
- Переключаем демо-режим из положения ON в OFF.
- Выходим из меню кнопкой BAND.
Также в скрытом меню можно настроить дату и время, зайдя в раздел System. Здесь переключается отображение времени (12/24-часовой режим). Затем открываем пункт «Настройка часов», и поворотами колеса настраиваем время. В разделе System также имеется настройка языка (английский/русский).
Таким образом, после покупки современной модели Pioneer, настройкой магнитолы вполне можно заняться самостоятельно. Правильно отрегулировав параметры аудио, можно добиться весьма качественного звучания даже простой аудиосистемы и получить хорошую звуковую картину при минимальных затратах.
Источник

English Français Italiano Español Deutsch Nederlands
DIGITAL MEDIA RECEIVER
RECEPTEUR NUMERIQUE MULTIMEDIA
RICEVITORE MULTIMEDIALE DIGITALE
RECEPTOR DIGITAL DE MEDIOS
DIGITALER MEDIA RECEIVER
DIGITALE MEDIA-RECEIVER
MVH-S110UI
MVH-S110UIG
MVH-S11UI
MVH-S110UB
MVH-S110UBG
MVH-S110UBA
MVH-S110UBW
Operation Manual
Mode d’emploi
Manuale d’istruzioni
Manual de instrucciones
Bedienungsanleitung
Bedieningshandleiding

— 2 —
Getting Started……………………………………….……………………………….….. 3
Radio……..……………………….………………………….………………………………... 6
USB/iPod®/AUX ……………………………………….……………………………….….. 8
App Mode ……..………….……………………………….………………………….….. 11
Spotify® …………………….………………………….……………………………….….. 12
Using Pioneer ARC APP ….……………………….………………………………... 13
Settings ……………………….……………………….…………………………………… 15
FUNCTION settings ………………..…….………..…………..………..……………. 15
AUDIO settings .…….……..………..…………..………..………………….………... 17
SYSTEM settings……………..………………….………..…………………….……… 18
ILLUMINATION settings………………..…………..……..………..…………..….. 20
Additional Information …….……………………….………………………….….. 21
• In the following instructions, a USB memory or USB audio player are referred to as
“USB device”.
• In this manual, iPod and iPhone® are referred to as “iPod”.
Table of Contents
— 3 —— 3 —
MVH-S110UI/S110UIG/S11UI/S110UB/S110UBG/S110UBA/
S110UBW
Frequently used operations
Getting Started
Basic operation
Purpose Operation
Turn on the power* Press SRC/OFF to turn on the power.
Press and hold SRC/OFF to turn off the
power.
Adjust the volume Turn the M.C. dial.
Select a source Press SRC/OFF repeatedly.
Change the display information Press DISP repeatedly.
Return to the previous display/list Press BAND/.
Return to the normal display from the menu Press and hold BAND/.
Boost the bass level Press BASS.
• You can select the bass level in [BASS
BOOST] (page 18).
SRC (source)/OFF
Detach button
Display window
M.C. (multi—control) dial
BAND/
USB port
AUX input jack (3.5 mm stereo jack)
DISP (display)
BASS
— 4 —
* When this unit’s blue/white lead is connected to the vehicle’s auto-antenna relay control terminal,
the vehicle’s antenna extends when this unit’s source is turned on. To retract the antenna, turn the
source off.
Display indication
Detach the front panel to prevent theft. Remove any cables and devices attached to the
front panel and turn off the unit before detaching it.
• Avoid subjecting the front panel to excessive shock.
• Keep the front panel out of direct sunlight and high temperatures.
• Always store the detached front panel in a protective case or bag.
When you turn the ignition switch to ON after installation, [SET UP :YES] appears in the
display.
1 Press the M.C. dial.
Indication Description
Appears when a lower tier of the menu or folder exists.
Appears when the BASS button is pressed and held.
Appears when the local seek tuning function is set (page 16).
Appears when a traffic program is received.
Appears when the TA (traffic announcements) function is set (page 16).
Appears when the sound retriever function is set (page 17).
Appears when the iPod control function is set (page 10).
Detaching the front panel
Setup menu

— 5 —— 5 —
The setup menu disappears after 30 seconds of no operation. If you prefer not to set
at this time, turn the M.C. dial to select [NO], then press to confirm.
2 Turn the M.C. dial to select the options, then press to confirm.
To proceed to the next menu option, you need to confirm your selection.
3 [QUIT :YES] appears when all the settings have been made.
To return to the first item of the setup menu, turn the M.C. dial to select [QUIT :NO],
then press to confirm.
4 Press the M.C. dial to confirm the settings.
• You can cancel the menu setting by pressing SRC/OFF.
• These settings can be made at any time from the SYSTEM settings (page 18) and INITIAL settings
(page 5).
1 Press the M.C. dial to display the main menu.
2 Turn the M.C. dial to select [SYSTEM], then press to confirm.
3 Turn the M.C. dial to select [DEMO OFF], then press to confirm.
4 Turn the M.C. dial to select [YES], then press to confirm.
1 Press and hold SRC/OFF until the unit turns off.
2 Press and hold SRC/OFF to display the main menu.
3 Turn the M.C. dial to select [INITIAL], then press to confirm.
4 Turn the M.C. dial to select an option, then press to confirm.
Menu Item Description
LANGUAGE Select the language to display the text information from a
compressed audio file.
[ENG](English),
[РУС](Russian),
[TUR](Turkish)
CLOCK SET Set the clock.
FM STEP Select the FM tuning step from 100 kHz or 50 kHz.
[100], [50]
Canceling the demonstration display (DEMO OFF)
INITIAL settings

— 6 —
The options vary depending on the unit.
The tuner frequencies on this unit are allocated for use in Western Europe, Asia, the
Middle East, Africa and Oceania. Use in other areas may result in poor reception. The RDS
(radio data system) function only works in areas that broadcast RDS signals for FM
stations.
1 Press SRC/OFF to select [RADIO].
2 Press BAND/ to select the band from [FM1], [FM2], [FM3], [MW] or [LW].
Menu Item Description
FM STEP Select the FM tuning step from 100 kHz or 50 kHz.
[100], [50]
SP-P/O MODE Select when there is a full-range speaker connected to the rear
speaker output leads and there is a subwoofer connected to the
RCA output.
[REAR/SUB.W]
[SUB.W/SUB.W] Select when there is a passive subwoofer connected directly to
the rear speaker output leads and there is a subwoofer
connected to the RCA output.
[REAR/REAR] Select when there are full-range speakers connected to the rear
speaker output leads and RCA output. If there is a full-range
speaker connected to the rear speaker output leads, and the
RCA output is not used, you may select either [REAR/SUB.W] or
[REAR/REAR].
S/W UPDATE Select to confirm the latest system information on the unit.
[SYSTEM INFO]
[SYSTEM UPDATE] Select to update the unit to the latest software and initialize the
unit settings. For details on the latest software and updating,
visit our website.
SYSTEM RESET Select [YES] to initialize the unit settings. The unit will be
restarted automatically.
(Some of the settings may be retained even after resetting the
unit.)
[YES], [NO]
Radio
Receiving preset stations

— 7 —— 7 —
3 Press a number button (1/ to 6/).
The / buttons can be also used to select a preset station when [SEEK] is set to [PCH] in the
FUNCTION settings (page 16).
The six strongest stations are stored on the number buttons (1/ to 6/).
1 After selecting the band, press the M.C. dial to display the main menu.
2 Turn the M.C. dial to select [FUNCTION], then press to confirm.
3 Turn the M.C. dial to select [BSM], then press to confirm.
To seek a station manually
1
After selecting the band, press / to select a station.
Press and hold / then release to seek an available station. Scanning stops
when the unit receives a station. To cancel seek tuning, press / .
[SEEK] needs to be set to [MAN] in the FUNCTION settings (page 16).
To store stations manually
1
While receiving the station you want to store, press and hold one of the number
buttons (1/ to 6/ ) until it stops flashing.
The unit searches for a station by PTY (program type) information.
1 Press and hold BASS during FM reception.
2 Turn the M.C. dial to select a program type from [NEWS/INFO], [POPULAR],
[CLASSICS] or [OTHERS].
3 Press the M.C. dial.
The unit begins to search for a station. When it is found, its program service name is
displayed.
• To cancel the search, press the M.C. dial.
• The program of some stations may differ from that indicated by the transmitted PTY.
Best stations memory (BSM)
Using PTY functions

— 8 —
• If no station is broadcasting the type of program you searched for, [NOT FOUND] is displayed for
about two seconds and then the tuner returns to the original station.
iPod function is not available for MVH-S110UB/S110UBG/S110UBA/S110UBW.
Disconnect headphones from the device before connecting it to the unit.
USB devices (including Android™)/iPod
1
Open the USB port cover.
2 Plug in the USB device/iPod using an appropriate cable.
To automatically switch to [USB] source when a USB device/iPod is connected to the unit, set [USB
AUTO] to [ON] in the SYSTEM settings (page 19).
Use a USB cable (sold separately) to connect the USB device as any device connected directly to the
unit will protrude out from the unit, which could be dangerous.
Before removing the device, stop playback.
AOA connections
For details on AOA connection, see page 14.
MTP connection
A device installed with Android OS 4.0 or most of later versions can be connected to the unit via MTP,
using the cable supplied with the device. However, depending on the connected device, OS version or
the numbers of the files in the device, audio files/songs may not be able to be played back via MTP.
Note that MTP connection is not compatible with WAV and FLAC file formats.
If you use an MTP connection, [ANDROID WIRED] needs to be set to [MEMORY] in the SYSTEM settings
(page 19).
AUX
1
Insert the stereo mini plug into the AUX input jack.
2 Press SRC/OFF to select [AUX] as the source.
USB/iPod®/AUX
Playing back

— 9 —— 9 —
If [AUX] is set to [OFF] in the SYSTEM settings, [AUX] cannot be selected as a source (page 19).
You can make various adjustments in the FUNCTION settings (page 15).
Note that the following operations do not work for an AUX device. To operate an AUX
device, use the device itself.
Operations
Purpose Operation
Select a folder/album*1 Press 1/ or 2/.
Select a track/song (chapter) Press or .
Fast forward or reverse*2 Press and hold or .
Search for a file from a list 1 Press and hold BASS to display the list.
2 Turn the M.C. dial to select the desired
file (folder) name or category, then press
to confirm.
3 Turn the M.C. dial to select the desired
file, then press to confirm.
Playback starts.
View a list of the files in the selected folder/
category*1
Press the M.C. dial when a folder/category
is selected.
Play a song in the selected folder/
category*1
Press and hold the M.C. dial when a folder/
category is selected.
Alphabetical search (iPod only) 1 Press and hold BASS to display the list.
2 Turn the M.C. dial to select the desired
category list, then press and hold BASS
to enter the alphabetical search mode.
(Turning the M.C. dial twice also enters
the alphabetical search mode.)
3 Turn the M.C. dial to select a letter, then
press to display the alphabetical list.
To cancel alphabetical search, press BAND/
.
Repeat play Press 6/.
Random/shuffle play Press 5/.
Shuffle all play (iPod only) Press and hold 5/.
Pause/resume playback Press 4/PAUSE.

— 10 —
*1 Compressed audio files only
*2 When you use the fast forward or reverse function while playing a VBR file, the playback time may
be not correct.
Link play mode
You can access songs based on the artist, album, or genre currently playing.
1 While listening to a song, press and hold 4/PAUSE to enter the link play mode.
2 Turn the M.C. dial to select the mode ([ARTIST], [ALBUM], [GENRE]), then press to
confirm.
The selected song/album will be played after the currently playing song.
The selected song/album may be canceled if you use functions other than those from the link play
mode (e.g. fast forward and reverse).
iPod control
You can control the unit via a connected iPod.
The following iPod models are not compatible with this function.
– iPod nano 1st generation, iPod with video
1 Press BAND/ during playback, then select the control mode.
[CONTROL iPod]: The unit’s iPod function can be operated from the connected iPod.
[CONTROL AUDIO]: The unit’s iPod function can only be operated by the buttons on
the unit or supplied remote control. In this mode, the connected iPod cannot be
turned on or off.
• Pressing iPod can also switch the control mode (only for MVH-S110UI/S11UI/S110UIG).
• Switching the control mode to [CONTROL iPod] pauses song playback. Use the connected iPod to
resume playback.
• The following operations are still accessible from the unit, even if the control mode is set to
[CONTROL iPod].
Sound retriever Press 3/S.Rtrv.
[1]: Effective for low compression rates
[2]: Effective for high compression rates
Return to root folder (USB only)*1 Press and hold 1/.
Change drives in USB device
(Devices that support the USB mass storage
device class protocol only)
Press BAND/.
Useful functions for iPod
Purpose Operation

— 11 —— 11 —
– Pause, fast forward/reverse, song/chapter selection
• The volume can only be adjusted from the unit.
(APP mode is not available for MVH-S110UB/S110UBG/S110UBA/S110UBW.)
You can enjoy listening to an application on an iPhone via the unit. In some cases, you
can control an application by using the unit.
For details on compatible devices, visit our website.
Use of third party apps may involve or require the provision of personally identifiable information,
whether through the creation of a user account or otherwise, and for certain applications, the provision
of geolocation data.
ALL THIRD PARTY APPS ARE THE SOLE RESPONSIBILITY OF THE PROVIDERS, INCLUDING WITHOUT
LIMITATION COLLECTION AND SECURITY OF USER DATA AND PRIVACY PRACTICES. BY ACCESSING
THIRD PARTY APPS, YOU AGREE TO REVIEW THE TERMS OF SERVICE AND PRIVACY POLICIES OF THE
PROVIDERS. IF YOU DO NOT AGREE WITH THE TERMS OR POLICIES OF ANY PROVIDER OR DO NOT
CONSENT TO THE USE OF GEOLOCATION DATA WHERE APPLICABLE, DO NOT USE THAT THIRD PARTY
APP.
For iPhone users
This function is compatible with iPhone and iPod touch® installed with iOS 5.0 or later.
PIONEER IS NOT LIABLE FOR ANY THIRD PARTY APPS OR CONTENT, INCLUDING WITHOUT LIMITATION
THEIR ACCURACY OR COMPLETENESS. THE CONTENT AND FUNCTIONALITY OF SUCH APPS ARE THE
SOLE RESPONSIBILITY OF THE APP PROVIDER.
1 Connect this unit with the mobile device.
• iPhone via USB (page 
2 Press SRC/OFF to select [APP].
3 Operate the mobile device to start up the application.
Basic operations
You can make various adjustments in the FUNCTION settings (page 15).
App Mode
Playback of an application via the unit
Purpose Operation
Select a track Press or .
Fast forward or reverse Press and hold or .

— 12 —
(MVH-S110UI/S11UI/S110UIG is only compatible with Spotify installed on iPhone.)
Spotify is a music streaming distribution service not affiliated with Pioneer. More
information is available at http://www.spotify.com.
The Spotify application is available for compatible smartphones, please visit https://
support.spotify.com/ for the latest compatibility information.
To enjoy Spotify as you drive, first download the Spotify app to your iPhone. You can
download it on the iTunes App Store. Choose a free account or a paid Premium account,
either in the app or at spotify.com. A Premium account gives you more features, like
offline listening.
• This product incorporates Spotify software which is subject to 3rd party licenses found here:
www.spotify.com/connect/third-party-licenses.
• For information on the countries and regions where Spotify can be used, take a look at https://
www.spotify.com/us/select-your-country/.
Update the firmware of the Spotify application to the latest version before use.
1 Connect this unit with the mobile device.
• iPhone via USB (page
2 Press SRC/OFF to select [SPOTIFY].
3 Launch the Spotify application on the mobile device and start playback.
Basic operations
You can make various adjustments in the FUNCTION settings (page 15).
The available operations may vary according to the type of contents (track/album/artist/playlist/radio)
you want to play.
Pause/resume playback Press BAND/.
Spotify®
Listening to Spotify
Purpose Operation
Skip a track Press or .
Purpose Operation

— 13 —— 13 —
Some functions of Spotify may not be operated from the unit.
(Pioneer ARC APP for iPhone is not available for MVH-S110UB/S110UBG/S110UBA/
S110UBW.)
You can operate the unit from Pioneer ARC APP installed on an iPhone/Android device.
In some cases, you can control aspects of the application, such as source selection,
pause, etc., by using the unit.
For details on what operations are available on the application, see the application’s help
section.
Do not attempt to operate the application while driving. Make sure to pull off the road and park your
vehicle in a safe location before attempting to use the controls on the application.
Search for a track from a list 1 Press and hold BASS to display the list.
2 Turn the M.C. dial to select the desired
category, then press to confirm.
3 Turn the M.C. dial to select the desired
file, then press to confirm.
Playback starts.
Pause/resume playback Press 4/PAUSE.
Thumbs Up (Only for radio) Press 1/.
Thumbs Down (Only for radio) Press 2/.
Random play (Only for track/album/artist/
playlist)
Press 5/.
Repeat play (Only for track/album/artist/
playlist)
Press 6/.
Start a radio channel based on the song
currently being played.
1 Press and hold 5/ to start a radio.
2 Press the M.C. dial.
• This function may not be available
depending on the selected song.
Store the information about the song
currently being played.
Remove the song information stored.
1 Press and hold 3/S.Rtrv.
[SAVE]/[UNSAVE] appears.
2 Press the M.C. dial.
Using Pioneer ARC APP
Purpose Operation

— 14 —
For iPhone users
This function is compatible with iPhones (iPhone 5 or later) and iPod touches installed
with iOS 8.0 or later.
You can download Pioneer ARC APP on iTunes App Store.
For Android device users
This function is compatible with devices that have Android OS 4.1 or later installed and
also support AOA (Android Open Accessory) 2.0.
You can download Pioneer ARC APP on Google Play™.
Some Android devices connected via AOA 2.0 may not work properly or emit sounds due to their own
software design, regardless of the OS version.
When making a connection with an Android device
1
Press the M.C. dial to display the main menu.
2 Turn the M.C. dial to select [SYSTEM], then press to confirm.
3 Turn the M.C. dial to select [ANDROID WIRED], then press to confirm.
4 Turn the M.C. dial to select [APP CONTROL], then press to confirm.
5 Turn the M.C. dial to select [P.APP AUTO ON], then press to confirm.
6 Turn the M.C. dial to select [ON], then press to confirm.
7 Connect this unit with the Android device via USB.
Pioneer ARC APP on the Android device starts automatically.
If Pioneer ARC APP has not been installed on your Android device yet, a message that prompts you
to install the application will appear on your Android device. Select [OFF] in [P.APP AUTO ON] to
clear the message (page 19).
When making a connection with an iPhone
1
Connect this unit with the iPhone via USB.
2 Press SRC/OFF to select any source.
3 Press and hold the M.C. dial.
Pioneer ARC APP on the iPhone starts.
If the connection fails, launch Pioneer ARC APP on the iPhone.
Making a connection with Pioneer ARC APP

— 15 —— 15 —
1 Press SRC/OFF to select [ANDROID].
Basic operations
You can adjust various settings in the main menu.
1 Press the M.C. dial to display the main menu.
2 Turn the M.C. dial to select one of the categories below, then press to confirm.
• FUNCTION settings (page 15)
• AUDIO settings (page 17)
• SYSTEM settings (page 18)
• ILLUMINATION settings (page 20)
3 Turn the M.C. dial to select the options, then press to confirm.
• iPod-related menu items in the following tables are not available for MVH-S110UB/S110UBG/
S110UBA/S110UBW.
• APP mode-related menu items in the following tables are not available for MVH-S110UB/S110UBG/
S110UBA/S110UBW.
The menu items vary according to the source.
Listening to music on Android
Purpose Operation
Select a track Press or .
Fast forward or reverse Press and hold or .
Pause/resume playback Press 4/PAUSE.
Sound retriever Press 3/S.Rtrv.
[1]: Effective for low compression rates
[2]: Effective for high compression rates
Settings
FUNCTION settings

— 16 —
Menu Item Description
FM SETTING
[TALK], [STANDARD], [MUSIC] Match the sound quality level with the broadcast
signal conditions of the FM band signal.
(Available only when FM band is selected.)
BSM
Store the six strongest stations on the number
buttons (1/ to 6/ ) automatically.
REGIONAL
[ON], [OFF] Limit the reception to the specific regional
programs when AF (alternative frequencies
search) is selected. (Available only when FM
band is selected.)
LOCAL
FM: [OFF], [LV1], [LV2], [LV3], [LV4]
MW/LW: [OFF], [LV1], [LV2]
Restrict the tuning station according to the
signal strength.
TA
[ON], [OFF] Receive current traffic information if available.
(Available only when FM band is selected.)
AF
[ON], [OFF] Allow the unit to retune to a different frequency
providing the same station. (Available only when
FM band is selected.)
NEWS
[ON], [OFF] Interrupt the currently selected source with
news programs. (Available only when FM band is
selected.)
SEEK
[MAN], [PCH] Assign or buttons to seek the stations
one by one (manual tuning) or select a station
from the preset channels.
SAVE
Store the information about the song currently
being played to your music list on Spotify.
UNSAVE
Remove the song information stored in [SAVE].

— 17 —— 17 —
S.RTRV
[1] (effective for low compression
rates),
[2] (effective for high
compression rates),
[OFF]
Enhance compressed audio and restore rich
sound.
Not available when the FLAC file is played back.
AUDIO BOOK
[FASTER], [NORMAL], [SLOWER] Change the playback speed. (Not available when
[CONTROL iPod] is selected in the control mode.)
PAUSE
Pause or resume playback.
AUDIO settings
Menu Item Description
FADER*1
Adjust the front and rear speaker balance.
BALANCE
Adjust the left and right speaker balance.
EQ SETTING
[SUPER BASS], [POWERFUL],
[DYNAMIC], [NATURAL], [VOCAL],
[VIVID], [CUSTOM1], [CUSTOM2],
[FLAT]
Select an equalizer band and
level for further customising.
Equalizer band: [80HZ], [250HZ],
[800HZ], [2.5KHZ], [8KHZ]
Equalizer level: [+6] to [–6]
Select or customise the equalizer curve.
[CUSTOM1] can be set separately for each source.
However, each of the below combinations are set
to the same setting automatically.
• USB, iPod, ANDROID, SPOTIFY, and APP
(iPhone)
[CUSTOM2] is a shared setting used for all
sources.
You can also switch the equalizer by pressing
repeatedly (Only for MVH-S110UB/
S110UBG/S110UBA/S110UBW).
LOUDNESS
[OFF], [LOW], [MID], [HI] Compensate for clear sound at low volume.
SUB.W*2
[NOR], [REV], [OFF] Select the subwoofer phase.
Menu Item Description

— 18 —
*1 Not available when [SUB.W/SUB.W] is selected in [SP-P/O MODE] in the INITIAL settings (page 6).
*2 Not available when [REAR/REAR] is selected in [SP-P/O MODE] in the INITIAL settings (page 6).
*3 Not available when [OFF] is selected in [SUB.W].
You can also access to these menus when the unit is turned off.
SUB.W CTRL*2*3
Cut-off frequency: [50HZ],
[63HZ], [80HZ], [100HZ], [125HZ],
[160HZ], [200HZ]
Output level: [–24] to [+6]
Slope level: [–12], [–24]
Only frequencies lower than those in the
selected range are output from the subwoofer.
BASS BOOST
[0] to [+6] Select the bass boost level.
HPF SETTING
Cut-off frequency: [OFF], [50HZ],
[63HZ], [80HZ], [100HZ], [125HZ],
[160HZ], [200HZ]
Slope level: [–12], [–24]
Only frequencies higher than the high-pass filter
(HPF) cutoff are output from the speakers.
SLA
[+4] to [–4] Adjust the volume level for each source except
FM.
Each of the below combinations are set to the
same setting automatically.
• USB, iPod, ANDROID, SPOTIFY, and APP
(iPhone)
SYSTEM settings
Menu Item Description
LANGUAGE
[ENG](English), [РУС](Russian),
[TUR](Turkish)
Select the language to display the text
information from a compressed audio file.
CLOCK SET
Set the clock (page 5).
12H/24H
[12H], [24H] Select the time notation.
Menu Item Description

— 19 —— 19 —
* [PW SAVE] is canceled if the vehicle battery is disconnected and will need to be turned back on once
the battery is reconnected. When [PW SAVE] is off, depending on connection methods, the unit may
continue to draw power from the battery if your vehicle’s ignition does not have an ACC (accessory)
position.
SCROLL SET
[ONCE], [LOOP], [OFF] Select the way to scroll the text in the display
window.
AUTO PI
[ON], [OFF] Search for a different station with the same
programming, even if using a preset station.
AUX
[ON], [OFF] Set to [ON] when using an auxiliary device
connected to the unit.
SPOTIFY
[ON], [OFF] Set to [ON] when using the Spotify function.
MUTE MODE (Only for MVH-S110UI/S11UI/S110UIG)
[MUTE], [20dB ATT], [10dB ATT] Mute or attenuate sound automatically when a
signal from equipment with a mute function is
received.
PW SAVE*
[ON], [OFF] Reduce the battery power consumption.
Turning on the source is the only operation
allowed when this function is on.
ANDROID WIRED
[MEMORY], [APP CONTROL] Select the appropriate connection method for an
Android device.
P. AP P AU TO O N
[ON], [OFF]
Select [ON] to automatically launch Pioneer ARC
APP when an Android device is connected to the
unit via AOA. (Not available when [MEMORY] is
selected in [ANDROID WIRED].)
USB AUTO
[ON], [OFF] Select [ON] to automatically switch to [USB]
source when a USB device/iPod is connected to
the unit.
Select [OFF] when a USB device/iPod is being
connected to the unit just for charging.
Menu Item Description

— 20 —
ILLUMINATION settings
Menu Item Description
DIM SETTING
[SYNC CLOCK], [MANUAL] Select the way to change the display brightness.
BRIGHTNESS
[1] to [10] Change the display brightness.
The available setting ranges differ depending on
[DIM SETTING].
Код: 106887
Извините, товара сейчас нет в наличии
Бесплатная доставка
по Красноярску
Извините, товара сейчас нет в наличии
Новости интернет-магазина «Лаукар»:
Дополнительная информация в категории Автомагнитола:
В интернет-магазине бытовой техники «Лаукар» Вы можете скачать инструкцию к товару Автомагнитола Pioneer MVH-S110UB совершенно бесплатно.
Все инструкции, представленные на сайте интернет-магазина бытовой техники «Лаукар», предоставляются производителем товара.
Перед началом использования товара рекомендуем Вам ознакомиться с инструкцией по применению.
Для того чтобы скачать инструкцию, Вам необходимо нажать на ссылку «скачать инструкцию», расположенную ниже, а в случае, если ссылки нет,
Вы можете попробовать обратиться к данной странице позднее,
возможно специалисты интернет-магазина бытовой техники «Лаукар» еще не успели загрузить для скачивания инструкцию к товару:
Автомагнитола Pioneer MVH-S110UB.

Фирма-производитель оставляет за собой право на внесение изменений в конструкцию, дизайн и комплектацию товара: Автомагнитола Pioneer MVH-S110UB. Пожалуйста, сверяйте информацию о товаре с информацией на
официальном сайте компании производителя.
Инструкция и руководство для
Pioneer MVH-150UB
30 страниц подробных инструкций и пользовательских руководств по эксплуатации на русском на английском
Black plate (2,1)
Thank you for purchasing this PIONEER
product
To ensure proper use, please read through this
manual before using this product. It is especially
important that you read and observe WARN-
INGs and CAUTIONs in this manual. Please
keep the manual in a safe and accessible place for
future reference.
If you want to dispose this product, do not
mix it with general household waste. There is
a separate collection system for used elec-
tronic products in accordance with legislation
that requires proper treatment, recovery and
recycling.
Private households in the member states of the
EU, in Switzerland and Norway may return their
used electronic products free of charge to desig-
nated collection facilities or to a retailer (if you
purchase a similar new one).
For countries not mentioned above, please con-
tact your local authorities for the correct method
of disposal.
By doing so you will ensure that your disposed
product undergoes the necessary treatment, re-
covery and recycling and thus prevent potential
negative effects on the environment and human
health.
About this unit
The tuner frequencies on this unit are allocated
for use in Western Europe, Asia, the Middle
East, Africa and Oceania. Use in other areas
may result in poor reception. The RDS (radio
data system) function only operates in areas
with broadcasting RDS signals for FM stations.
CAUTION
! Do not allow this unit to come into contact
with liquids. Electrical shock could result.
Also, damage to this unit, smoke, and over-
heating could result from contact with
liquids.
! The Pioneer CarStereo-Pass is for use only in
Germany.
! Always keep the volume low enough to hear
outside sounds.
! Avoid exposure to moisture.
! If the battery is disconnected or discharged,
any preset memory will be erased.
Note
Function setting operations are completed even
if the menu is canceled before the operations
are confirmed.
About this manual
! In the following instructions, USB memories
and USB audio players are collectively re-
ferred to as
“USB storage device”.
In case of trouble
Should this unit fail to operate properly, please
contact your dealer or nearest authorized
PIONEER Service Station.
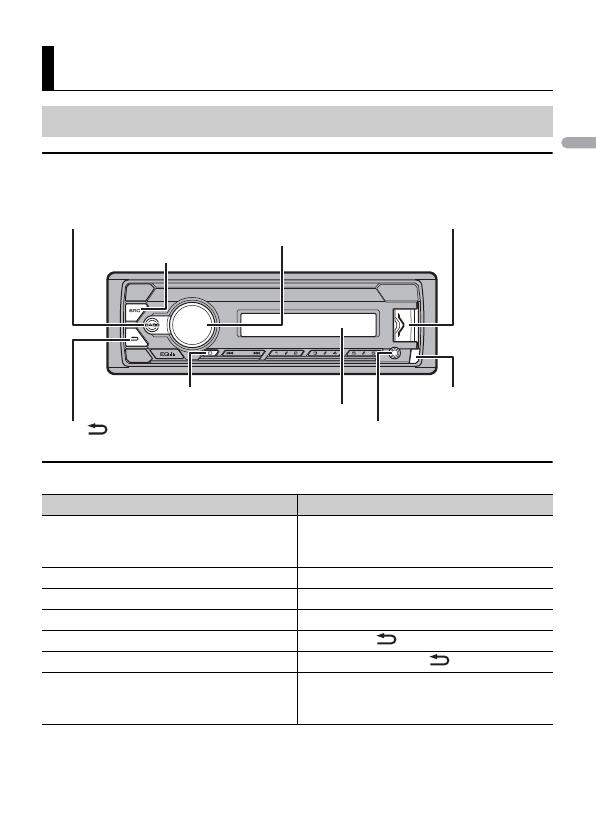
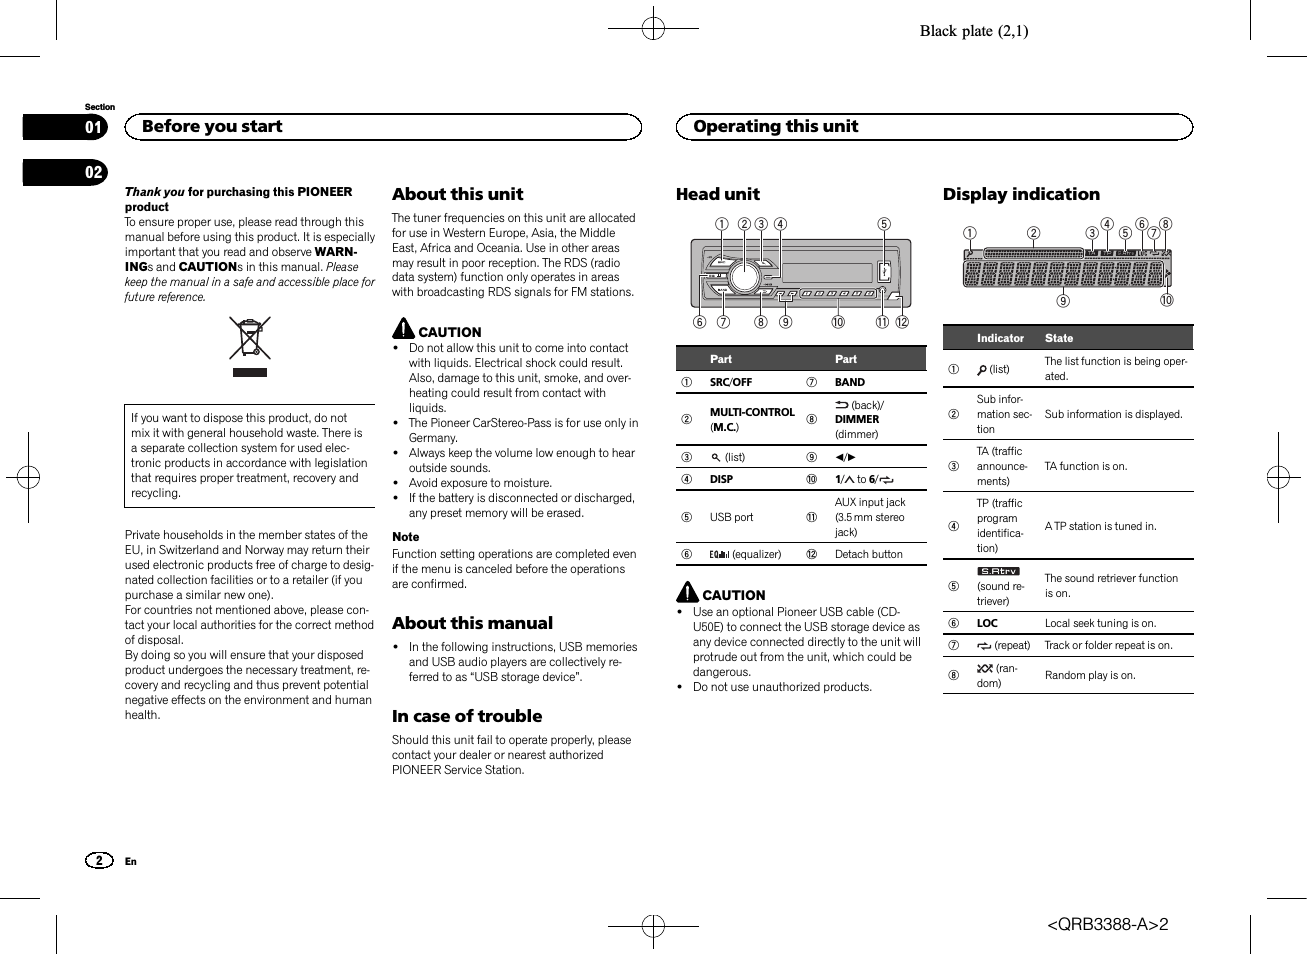
Head unit
a
b
4
7
1 2 3
5
9
8
c
6
Part
Part
1
SRC/OFF
7
BAND
2
MULTI-CONTROL
(
M.C.)
8
(back)/
DIMMER
(dimmer)
3
(list)
9
c/d
4
DISP
a
1/
to
6/
5
USB port
b
AUX input jack
(3.5 mm stereo
jack)
6
(equalizer)
c
Detach button
CAUTION
! Use an optional Pioneer USB cable (CD-
U50E) to connect the USB storage device as
any device connected directly to the unit will
protrude out from the unit, which could be
dangerous.
! Do not use unauthorized products.
Display indication
2
1
3
7
5
9
4
6 8
a
Indicator
State
1
(list)
The list function is being oper-
ated.
2
Sub infor-
mation sec-
tion
Sub information is displayed.
3
TA (traffic
announce-
ments)
TA function is on.
4
TP (traffic
program
identifica-
tion)
A TP station is tuned in.
5
(sound re-
triever)
The sound retriever function
is on.
6
LOC
Local seek tuning is on.
7
(repeat)
Track or folder repeat is on.
8
(ran-
dom)
Random play is on.
Before you start
2
Section
Operating this unit
En
01
02
<QRB3388-A>2
Black plate (3,1)
Indicator
State
9
Main infor-
mation sec-
tion
! Tuner: band and fre-
quency
! RDS: program service
name, PTY information
and other literal informa-
tion
! USB storage device:
elapsed playback time
and text information
a
Appears when a lower tier of
folder or menu exists.
Set up menu
When you turn the ignition switch to ON after in-
stallation, set up menu appears on the display.
You can set up the menu options below.
1
After installation of this unit, turn the
ignition switch to ON.
SET UP appears.
2
Turn M.C. to switch to YES.
# If you do not operate for 30 seconds, the set up
menu will not be displayed.
# If you prefer not to set up at this time, turn M.C.
to switch to
NO. Press to select.
If you select
NO, you cannot set up in the set up
menu.
3
Press M.C. to select.
4
Perform the following procedures to set
the menu.
To proceed to the next menu option, you need to
confirm your selection.
LANGUAGE (multi-language)
This unit can display the text information from a
compressed audio file even for information em-
bedded in English or Russian.
! If the embedded language and the selected
language setting are not the same, text infor-
mation may not display properly.
! Some characters may not be displayed prop-
erly.
1 Turn M.C. to select the desired setting.
ENG (English)
—РУС (Russian)
2 Press M.C. to confirm the selection.
CLOCK SET (setting the clock)
1 Turn M.C. to adjust hour.
2 Press M.C. to select minute.
3 Turn M.C. to adjust minute.
4 Press M.C. to confirm the selection.
FM STEP (FM tuning step)
Normally, the FM tuning step employed by seek
tuning is 50 kHz. When AF or TA is on, the tuning
step automatically changes to 100 kHz. It may be
preferable to set the tuning step to 50 kHz when
AF is on.
! The tuning step remains at 50 kHz during man-
ual tuning.
1 Turn M.C. to select the FM tuning step.
50 (50 kHz)
—100 (100 kHz)
2 Press M.C. to confirm the selection.
QUIT appears.
5
To finish your settings, turn M.C. to select
YES.
# If you prefer to change your setting again, turn
M.C. to switch to NO. Press to select.
6
Press M.C. to select.
Notes
! You can set up the menu options from the
system menu. For details about the settings,
refer to System menu on page 7.
! You can cancel set up menu by pressing
SRC/OFF.
Basic operations
Important
! Handle gently when removing or attaching
the front panel.
! Avoid subjecting the front panel to excessive
shock.
! Keep the front panel out of direct sunlight
and high temperatures.
! To avoid damaging the device or vehicle inte-
rior, remove any cables and devices attached
to the front panel before detaching it.
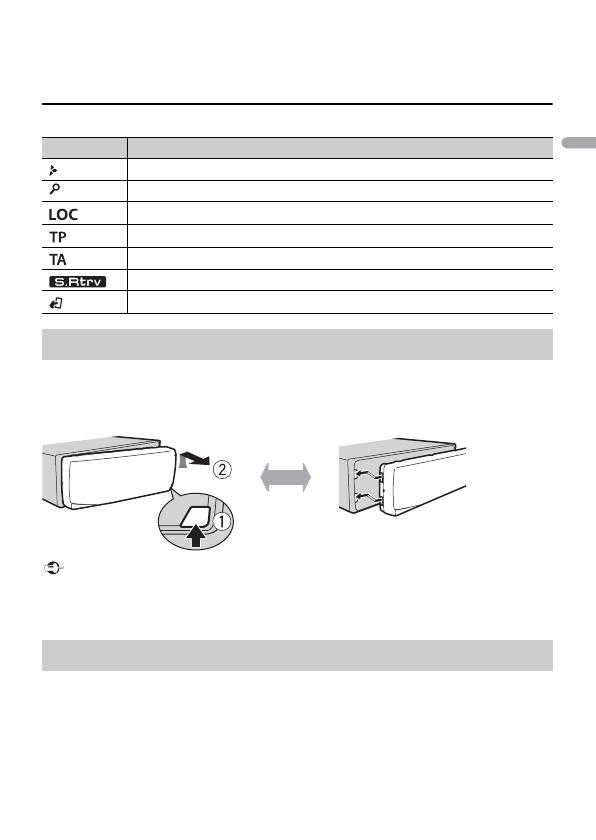
Removing the front panel to protect your unit from
theft
1 Press the detach button to release the front
panel.
2 Push the front panel upward (M) and then pull
it toward (
N) you.
3 Always keep the detached front panel in a pro-
tection device such as a protection case.
Re-attaching the front panel
1 Slide the front panel to the left.
Make sure to insert the tabs on the left side of
the head unit into the slots on the front panel.
2 Press the right side of the front panel until it is
firmly seated.
If you cannot attach the front panel to the
head unit successfully, make sure that you are
placing the front panel onto the head unit cor-
rectly. Forcing the front panel into place may
result in damage to the front panel or head
unit.
Turning the unit on
1 Press SRC/OFF to turn the unit on.
Turning the unit off
1 Press and hold SRC/OFF until the unit turns
off.
English
Operating this unit
3
Section
Operating this unit
En
02
<QRB3388-A>3

Black plate (4,1)
Selecting a source
1 Press SRC/OFF to cycle between:
TUNER (tuner)
—USB (USB)—AUX (AUX)
Adjusting the volume
1 Turn M.C. to adjust the volume.
CAUTION
For safety reasons, park your vehicle when re-
moving the front panel.
Note
When this unit
’s blue/white lead is connected to
the vehicle
’s auto-antenna relay control termi-
nal, the vehicle
’s antenna extends when this
unit
’s source is turned on. To retract the anten-
na, turn the source off.
Frequently used menu
operations
Returning to the previous display
Returning to the previous list (the folder one level
higher)
1 Press
/
DIMMER.
Returning to the ordinary display
Canceling the main menu
1 Press BAND.
Returning to the ordinary display from the list
1 Press BAND.
Tuner
Basic operations
Selecting a band
1 Press BAND until the desired band (FM1,
FM2, FM3 for FM or MW/LW) is displayed.
Switching preset stations
1 Press c or d.
! Select PCH (preset channel) under SEEK to
use this function. For details about the set-
tings, refer to
SEEK (left/right key setting) on
the next page.
Manual tuning (step by step)
1 Press c or d.
! Select MAN (manual tuning) under SEEK to
use this function. For details about the set-
tings, refer to
SEEK (left/right key setting) on
the next page.
Seeking
1 Press and hold c or d, and then release.
You can cancel seek tuning by briefly pressing
c or d.
While pressing and holding c or d, you can
skip stations. Seek tuning starts as soon as
you release c or d.
Note
This unit
’s AF (alternative frequencies search)
function can be turned on and off. AF should be
off for normal tuning operation (refer to
AF (al-
ternative frequencies search) on the next page).
Storing and recalling stations
for each band
Using preset tuning buttons
1
When you find a station that you want
to store in memory, press one of the preset
tuning buttons (1/
to 6/
) and hold until
the preset number stops flashing.
2
Press one of the preset tuning buttons
(1/
to 6/
) to select the desired station.
Switching the display
Selecting the desired text information
1 Press DISP to cycle between the following:
! FREQUENCY (program service name or
frequency)
! BRDCST INFO (program service name/PTY
information)
! CLOCK (source name and clock)
Notes
! If the program service name cannot be ac-
quired in
FREQUENCY, the broadcast fre-
quency is displayed instead. If the program
service name is detected, the program serv-
ice name will be displayed.
! BRDCST INFO text information will change
automatically.
! Depending on the band, text information can
be changed.
! Text information items that can be changed
depend on the area.
Using PTY functions
You can tune in to a station using PTY (program
type) information.
Searching for an RDS station by PTY information
You can search for general types of broadcasting
programs, such as those listed in the following
section. Refer to this page.
1 Press
(list).
2 Turn M.C. to select a program type.
NEWS/INFO
—POPULAR—CLASSICS—
OTHERS
3 Press M.C. to begin the search.
The unit searches for a station broadcasting
that type of program. When a station is found,
its program service name is displayed.
! To cancel the search, press M.C. again.
! The program of some stations may differ
from that indicated by the transmitted PTY.
! If no station is broadcasting the type of
program you searched for,
NOT FOUND is
displayed for about two seconds and then
the tuner returns to the original station.
PTY list
NEWS/INFO (news and information)
NEWS (News), AFFAIRS (Current affairs), INFO
(Information),
SPORT (Sports), WEATHER (Weath-
er),
FINANCE (Finance)
POPULAR (popular)
POP MUS (Popular music), ROCK MUS (Rock
music),
EASY MUS (Easy listening), OTH MUS
(Other music),
JAZZ (Jazz), COUNTRY (Country
music),
NAT MUS (National music), OLDIES
(Oldies music),
FOLK MUS (Folk music)
CLASSICS (classics)
L. CLASS (Light classical), CLASSIC (Classical)
Operating this unit
4
Section
Operating this unit
En
02
<QRB3388-A>4
Black plate (5,1)
OTHERS (others)
EDUCATE (Education), DRAMA (Drama), CUL-
TURE (Culture), SCIENCE (Science), VARIED (Var-
ied),
CHILDREN (Children
’s), SOCIAL (Social
affairs),
RELIGION (Religion), PHONE IN (Phone
in),
TOURING (Travel), LEISURE (Leisure), DOCU-
MENT (Documentaries)
Function settings
1
Press M.C. to display the main menu.
2
Turn M.C. to change the menu option
and press to select FUNCTION.
3
Turn M.C. to select the function.
Once selected, the following functions can be
adjusted.
# If MW/LW band is selected, only BSM, LOCAL
and
SEEK are available.
BSM (best stations memory)
BSM (best stations memory) automatically stores
the six strongest stations in the order of their sig-
nal strength.
1 Press M.C. to turn BSM on.
To cancel, press
M.C. again.
REGION (regional)
When AF is used, the regional function limits the
selection of stations to those broadcasting region-
al programs.
1 Press M.C. to turn the regional function on or
off.
LOCAL (local seek tuning)
Local seek tuning lets you tune in to only those
radio stations with sufficiently strong signals for
good reception.
1 Press M.C. to select the desired setting.
FM:
OFF
—LV1—LV2—LV3—LV4
MW/LW:
OFF
—LV1—LV2
The highest level setting allows reception of
only the strongest stations, while lower levels
allow the reception of weaker stations.
TA (traffic announcement standby)
1 Press M.C. to turn traffic announcement
standby on or off.
AF (alternative frequencies search)
1 Press M.C. to turn AF on or off.
NEWS (news program interruption)
1 Press M.C. to turn the NEWS function on or
off.
SEEK (left/right key setting)
You can assign a function to the left and right keys
of the unit.
Select
MAN (manual tuning) to tune up or down
manually or select
PCH (preset channel) to switch
between preset channels.
1 Press M.C. to select MAN or PCH.
USB storage device
Basic operations
Playing songs on a USB storage device
1 Open the USB port cover.
2 Plug in the USB storage device using a USB
cable.
Playback is performed automatically.
Stopping playback of files on a USB storage de-
vice
1 You may disconnect the USB storage device at
any time.
The unit stops playback.
Selecting a folder
1 Press 1/ or 2/ .
Selecting a track
1 Press c or d.
Fast forwarding or reversing
1 Press and hold c or d.
! When playing compressed audio, there is no
sound during fast forward or reverse.
Returning to root folder
1 Press and hold BAND.
Switching between playback memory devices
You can switch between playback memory devices
on USB storage devices with more than one Mass
Storage Device-compatible memory device.
1 Press BAND.
! You can switch between up to 32 different
memory devices.
Note
Disconnect USB storage devices from the unit
when not in use.
Switching the display
Selecting the desired text information
1 Press DISP to cycle between the following:
MP3/WMA/WAV
! TRACK INFO (track title/artist name/album
title)
! FILE INFO (file name/folder name)
! ELAPSED TIME (track number and play-
back time)
! CLOCK (source name and clock)
! SPEANA (spectrum analyzer)
Notes
! TRACK INFO and FILE INFO text information
will change automatically.
! Depending on the version of iTunes used to
write MP3 files to media file types, incompati-
ble text stored within an audio file may be
displayed incorrectly.
! Text information items that can be changed
depend on the media.
Selecting and playing files/
tracks from the name list
1
Press
to switch to the file/track name
list mode.
2
Use M.C. to select the desired file name
(or folder name).
Selecting a file or folder
1 Turn M.C.
Playing
1 When a file or track is selected, press M.C.
Viewing a list of the files (or folders) in the se-
lected folder
1 When a folder is selected, press M.C.
Playing a song in the selected folder
1 When a folder is selected, press and hold M.C.
English
Operating this unit
5
Section
Operating this unit
En
02
<QRB3388-A>5
Black plate (6,1)
Operations using special buttons
Selecting a repeat play range
1 Press 6/
to cycle between the following:
! ALL – Repeat all files
! ONE – Repeat the current file
! FLD – Repeat the current folder
Playing tracks in random order
1 Press 5/
to turn random play on or off.
Tracks in a selected repeat range are played in
random order.
! To change songs during random play, press d
to switch to the next track. Pressing c restarts
playback of the current track from the begin-
ning of the song.
Pausing playback
1 Press 4/PAUSE to pause or resume.
Enhancing compressed audio and restoring rich
sound (sound retriever)
1 Press 3/S.Rtrv to cycle between:
1
—2—OFF (off)
1 is effective for low compression rates, and 2
is effective for high compression rates.
Function settings
1
Press M.C. to display the main menu.
2
Turn M.C. to change the menu option
and press to select FUNCTION.
Once selected, the function below can be ad-
justed.
S.RTRV (sound retriever)
Automatically enhances compressed audio and
restores rich sound.
1 Press M.C. to select the desired setting.
For details, refer to Enhancing compressed
audio and restoring rich sound (sound retriever)
on this page.
Audio adjustments
1
Press M.C. to display the main menu.
2
Turn M.C. to change the menu option
and press to select AUDIO.
3
Turn M.C. to select the audio function.
Once selected, the following audio functions
can be adjusted.
! FADER is not available when SUB.W/SUB.W
is selected in
SP-P/O MODE. For details, refer
to
SP-P/O MODE (rear output and preout set-
ting) on the next page.
! SUB.W, SUB.W CTRL and HPF SETTING are
not available when
REAR/REAR is selected in
SP-P/O MODE. For details, refer to
SP-P/O MODE (rear output and preout set-
ting) on the next page.
! SUB.W CTRL and HPF SETTING are not avail-
able when
SUB.W is selected in OFF. For de-
tails, refer to
SUB.W (subwoofer on/off
setting) on this page.
FADER (fader adjustment)
1 Press M.C. to display the setting mode.
2 Turn M.C. to adjust the front/rear speaker bal-
ance.
BALANCE (balance adjustment)
1 Press M.C. to display the setting mode.
2 Turn M.C. to adjust the left/right speaker bal-
ance.
EQ SETTING (equalizer recall)
1 Press M.C. to display the setting mode.
2 Turn M.C. to select the equalizer.
POWERFUL
—NATURAL—VOCAL—CUS-
TOM1
—CUSTOM2—FLAT—SUPER BASS
The equalizer band and equalizer level can be
customized when
CUSTOM1 or CUSTOM2 is
selected.
If selecting
CUSTOM1 or CUSTOM2, complete
the procedures outlined below. If selecting
other options, press
M.C. to return to the pre-
vious display.
! CUSTOM1 can be set separately for each
source.
! CUSTOM2 is a shared setting used in com-
mon for all sources.
3 Press M.C. to display the setting mode.
4 Press M.C. to cycle between the following:
Equalizer band
—Equalizer level
5 Turn M.C. to select the desired setting.
Equalizer band:
80HZ
—250HZ—800HZ—
2.5KHZ
—8KHZ
Equalizer level:
+6 to
–6
! You can also switch the equalizer by pressing
repeatedly.
LOUDNESS (loudness)
Loudness compensates for deficiencies in the low-
frequency and high-frequency ranges at low vol-
ume.
1 Press M.C. to select the desired setting.
OFF (off)
—LOW (low)—MID (mid)—HI (high)
SUB.W (subwoofer on/off setting)
This unit is equipped with a subwoofer output
which can be turned on or off.
1 Press M.C. to select the desired setting.
NOR (normal phase)
—REV (reverse phase)—
OFF (subwoofer off)
SUB.W CTRL (subwoofer adjustment)
Only frequencies lower than those in the selected
range are outputted from the subwoofer.
1 Press M.C. to display the setting mode.
2 Press M.C. to cycle between the following:
Cut-off frequency
—Output level—Slope level
Rates that can be adjusted will flash.
3 Turn M.C. to select the desired setting.
Cut-off frequency:
50HZ
—63HZ—80HZ—
100HZ
—125HZ—160HZ—200HZ
Output level:
–24 to +6
Slope level:
–6— –12
BASS BOOST (bass boost)
1 Press M.C. to display the setting mode.
2 Turn M.C. to select a desired level.
0 to +6 is displayed as the level is increased or
decreased.
HPF SETTING (high pass filter adjustment)
When you do not want low sounds from the sub-
woofer output frequency range to play from the
front or rear speakers, turn on the HPF (high pass
filter). Only frequencies higher than those in the
selected range are output from the front or rear
speakers.
1 Press M.C. to display the setting mode.
2 Press M.C. to cycle between the following:
Cut-off frequency
—Slope level
3 Turn M.C. to select the desired setting.
Cut-off frequency:
OFF
—50HZ—63HZ—80HZ
—100HZ—125HZ—160HZ—200HZ
Slope level:
–6— –12
Operating this unit
6
Section
Operating this unit
En
02
<QRB3388-A>6
Sp-p/o mode (rear output and preout set, System menu, Switching the dimmer setting
Initial menu, Operating this unit Чат поддержки
- Изображение
- Текст
Black plate (7,1)
SLA (source level adjustment)
SLA (Source level adjustment) lets you adjust the
volume level of each source to prevent radical
changes in volume when switching between sour-
ces.
! Settings are based on the FM volume level,
which remains unchanged.
! The MW/LW volume level can also be adjusted
with this function.
! When selecting FM as the source, you cannot
switch to
SLA.
1 Press M.C. to display the setting mode.
2 Turn M.C. to adjust the source volume.
Adjustment range:
+4 to
–4
System menu
Important
PW SAVE (power saving) is canceled if the ve-
hicle battery is disconnected and will need to be
turned back on once the battery is reconnected.
When
PW SAVE (power saving) is off, depend-
ing on connection methods, the unit may con-
tinue to draw power from the battery if your
vehicle
’s ignition doesn’t have an ACC (acces-
sory) position.
1
Press M.C. to display the main menu.
2
Turn M.C. to change the menu option
and press to select SYSTEM.
3
Turn M.C. to select the system menu
function.
Once selected, the following system menu func-
tions can be adjusted.
LANGUAGE (multi-language)
This unit can display the text information from a
compressed audio file even for information em-
bedded in English or Russian.
! If the embedded language and the selected
language setting are not the same, text infor-
mation may not display properly.
! Some characters may not be displayed prop-
erly.
1 Turn M.C. to select the desired setting.
ENG (English)
—РУС (Russian)
CLOCK SET (setting the clock)
1 Press M.C. to display the setting mode.
2 Press M.C. to select the segment of the clock
display you wish to set.
Hour
—Minute
3 Turn M.C. to adjust the clock.
12H/24H (time notation)
1 Press M.C. to select the desired setting.
12H (12-hour clock)
—24H (24-hour clock)
AUTO PI (auto PI seek)
The unit can automatically search for a different
station with the same programming, even during
preset recall.
1 Press M.C. to turn Auto PI seek on or off.
AUX (auxiliary input)
Activate this setting when using an auxiliary de-
vice connected to this unit.
1 Press M.C. to turn AUX on or off.
PW SAVE (power saving)
Switching this function on enables you to reduce
the consumption of battery power.
! Turning on the source is the only operation al-
lowed when this function is on.
1 Press M.C. to turn the power save on or off.
Switching the dimmer setting
You can adjust the brightness of illumination.
1
Press M.C. to display the main menu.
2
Turn M.C. to display ILLUMI and press to
select.
3
Press M.C. to select the desired setting.
OFF (off)
—ON (on)
! You can also change the dimmer setting by
pressing and holding
/
DIMMER.
Initial menu
1
Press and hold SRC/OFF until the unit
turns off.
2
Press and hold SRC/OFF until the main
menu appears in the display.
3
Turn M.C. to change the menu option
and press to select INITIAL.
4
Turn M.C. to select the initial menu func-
tion.
Once selected, the following initial menu func-
tions can be adjusted.
FM STEP (FM tuning step)
Normally, the FM tuning step employed by seek
tuning is 50 kHz. When AF or TA is on, the tuning
step automatically changes to 100 kHz. It may be
preferable to set the tuning step to 50 kHz when
AF is on.
! The tuning step remains at 50 kHz during man-
ual tuning.
1 Press M.C. to select the FM tuning step.
50 (50 kHz)
—100 (100 kHz)
SP-P/O MODE (rear output and preout setting)
The rear speaker leads output and the RCA output
of this unit can be used to connect a full-range
speaker or subwoofer. Select a suitable option for
your connection.
1 Press M.C. to display the setting mode.
2 Turn M.C. to select the desired setting.
You can select any one of the options in the fol-
lowing list:
! REAR/SUB.W – Select when there is a full-
range speaker connected to the rear speak-
er leads output and there is a subwoofer
connected to the RCA output.
! SUB.W/SUB.W – Select when there is a
subwoofer connected directly to the rear
speaker leads output without any auxiliary
amp and there is a subwoofer connected
to the RCA output.
! REAR/REAR – Select when there is a full-
range speaker connected to the rear speak-
er leads output and the RCA output.
If there is a full-range speaker connected to
the rear speaker leads output and the RCA
output is not used, you may select either
REAR/SUB.W or REAR/REAR.
System menu
1
Press and hold SRC/OFF until the unit
turns off.
2
Press and hold SRC/OFF until the main
menu appears in the display.
3
Turn M.C. to change the menu option
and press to select SYSTEM.
4
Turn M.C. to select the system menu
function.
Once selected, the following system menu func-
tions can be adjusted.
For details, refer to System menu on this page.
English
Operating this unit
7
Section
Operating this unit
En
02
<QRB3388-A>7
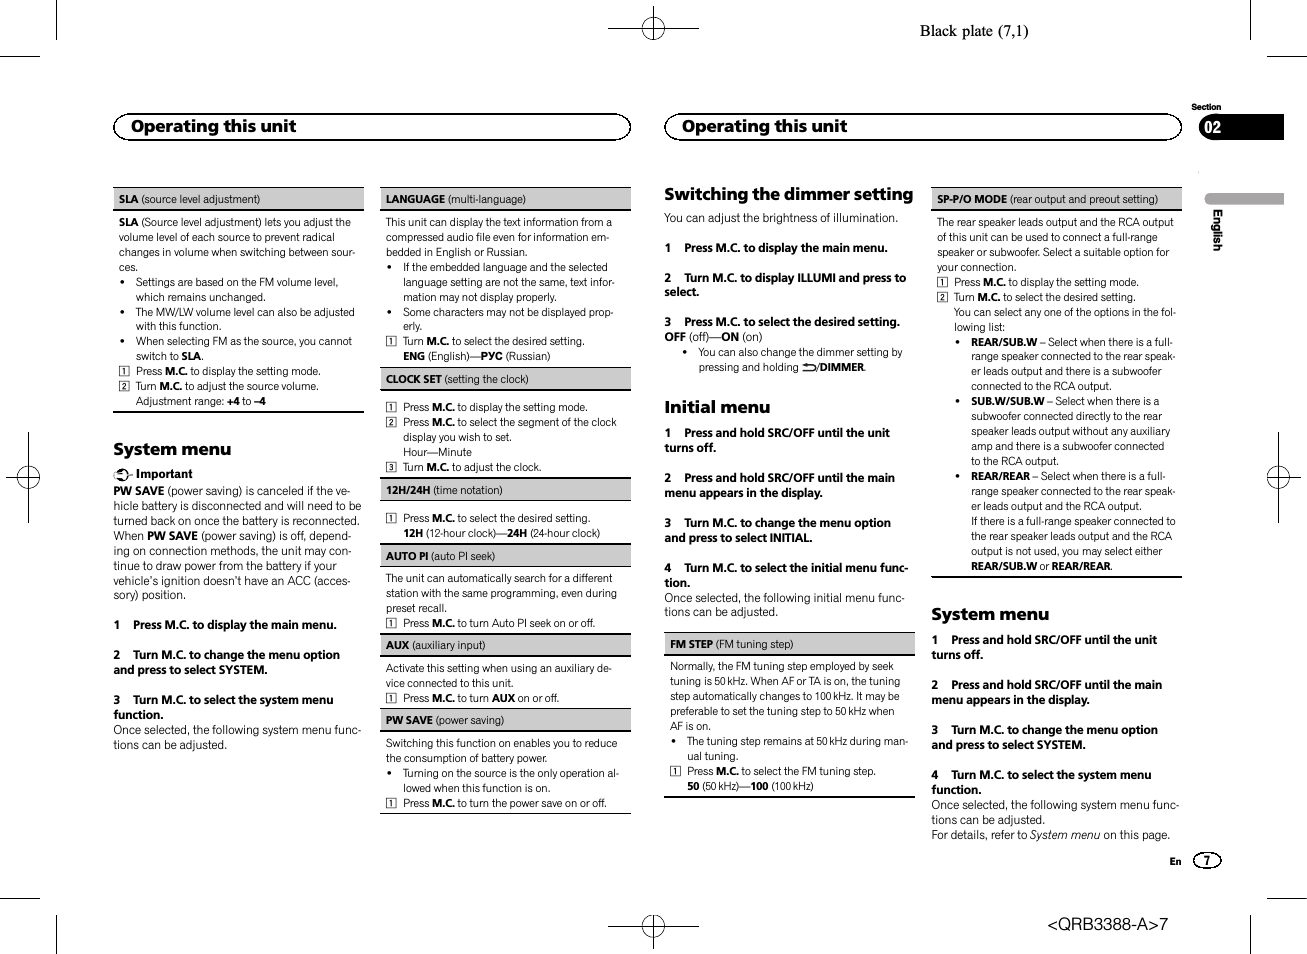
Black plate (8,1)
Using an AUX source
1
Insert the stereo mini plug into the AUX
input jack.
2
Press SRC/OFF to select AUX as the
source.
Note
AUX cannot be selected unless the auxiliary set-
ting is turned on. For more details, refer to
AUX
(auxiliary input) on the previous page.
Switching the display
Selecting the desired text information
1 Press DISP to cycle between the following:
! Source name
! Source name and clock
If an unwanted display appears
Turn off the unwanted display using the proce-
dures listed below.
1
Press M.C. to display the main menu.
2
Turn M.C. to change the menu option
and press to select SYSTEM.
3
Turn M.C. to display DEMO OFF and press
to select.
4
Turn M.C. to switch to YES.
5
Press M.C. to select.
Connections
Important
! When installing this unit in a vehicle without
an ACC (accessory) position on the ignition
switch, failure to connect the red cable to the
terminal that detects operation of the ignition
key may result in battery drain.
ON
S
T
A
R
T
O
FF
ACC position
No ACC position
! Use of this unit in conditions other than the
following could result in fire or malfunction.
— Vehicles with a 12-volt battery and negative
grounding.
— Speakers with 50 W (output value) and 4 W to
8
W (impedance value).
! To prevent a short-circuit, overheating or mal-
function, be sure to follow the directions
below.
— Disconnect the negative terminal of the bat-
tery before installation.
— Secure the wiring with cable clamps or adhe-
sive tape. Wrap adhesive tape around wiring
that comes into contact with metal parts to
protect the wiring.
— Place all cables away from moving parts,
such as the shift lever and seat rails.
— Place all cables away from hot places, such
as near the heater outlet.
— Do not connect the yellow cable to the battery
by passing it through the hole to the engine
compartment.
— Cover any disconnected cable connectors
with insulating tape.
— Do not shorten any cables.
— Never cut the insulation of the power cable of
this unit in order to share the power with
other devices. The current capacity of the
cable is limited.
— Use a fuse of the rating prescribed.
— Never wire the negative speaker cable directly
to ground.
— Never band together negative cables of multi-
ple speakers.
! When this unit is on, control signals are sent
through the blue/white cable. Connect this
cable to the system remote control of an ex-
ternal power amp or the vehicle
’s auto-anten-
na relay control terminal (max. 300 mA
12 V DC). If the vehicle is equipped with a
glass antenna, connect it to the antenna
booster power supply terminal.
! Never connect the blue/white cable to the
power terminal of an external power amp.
Also, never connect it to the power terminal
of the auto antenna. Doing so may result in
battery drain or a malfunction.
! The black cable is ground. Ground cables for
this unit and other equipment (especially,
high-current products such as power amps)
must be wired separately. If they are not, an
accidental detachment may result in a fire or
malfunction.
This unit
3
4
2
1
1 Power cord input
2 Rear output or subwoofer output
3 Antenna input
4 Fuse (10 A)
Operating this unit
8
Section
Installation
En
02
03
<QRB3388-A>8
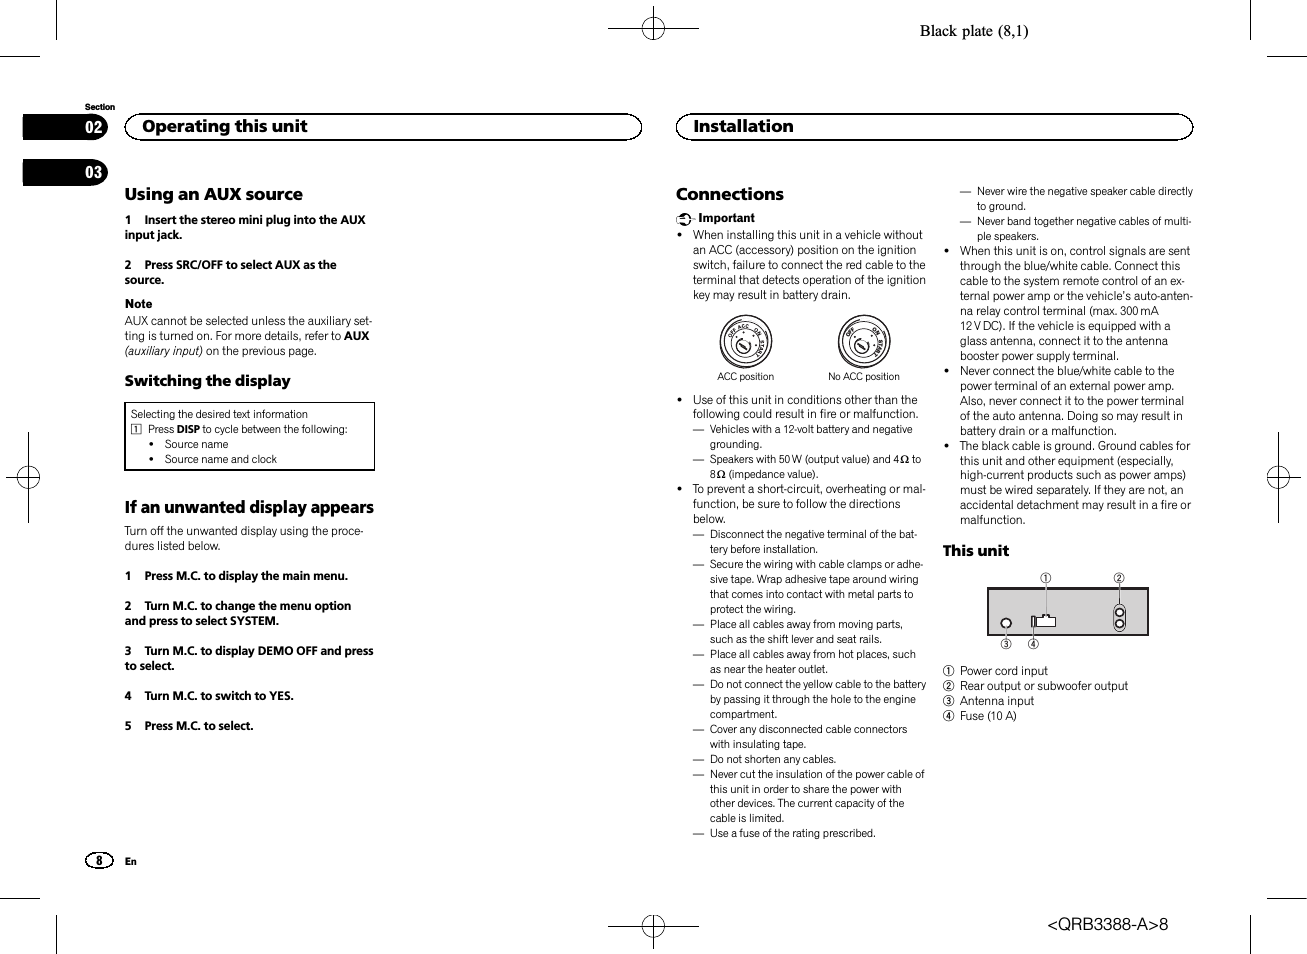
Black plate (9,1)
Power cord
1
3
3
2
4
4
5
5
6
6
b
8
9
7
a
d
c
1 To power cord input
2 Depending on the kind of vehicle, the func-
tion of
3 and 5 may be different. In this
case, be sure to connect
4 to 5 and 6 to
3.
3 Yellow
Back-up (or accessory)
4 Yellow
Connect to the constant 12 V supply termi-
nal.
5 Red
Accessory (or back-up)
6 Red
Connect to terminal controlled by ignition
switch (12 V DC).
7 Connect leads of the same color to each
other.
8 Black (chassis ground)
9 Blue/white
The pin position of the ISO connector will dif-
fer depending on the type of vehicle. Connect
9 and b when Pin 5 is an antenna control
type. In another type of vehicle, never con-
nect
9 and b.
a Blue/white
Connect to system control terminal of the
power amp (max. 300 mA 12 V DC).
b Blue/white
Connect to auto-antenna relay control termi-
nal (max. 300 mA 12 V DC).
c Speaker leads
White: Front left +
White/black: Front left *
Gray: Front right +
Gray/black: Front right *
Green: Rear left + or subwoofer +
Green/black: Rear left * or subwoofer *
Violet: Rear right + or subwoofer +
Violet/black: Rear right * or subwoofer *
d ISO connector
In some vehicles, the ISO connector may be
divided into two. In this case, be sure to con-
nect to both connectors.
Notes
! Change the initial menu of this unit. Refer to
SP-P/O MODE (rear output and preout set-
ting) on page 7.
The subwoofer output of this unit is monau-
ral.
! When using a subwoofer of 70 W (2 W), be
sure to connect the subwoofer to the violet
and violet/black leads of this unit. Do not
connect anything to the green and green/
black leads.
Power amp (sold separately)
Perform these connections when using the op-
tional amplifier.
1
3
2
4
5
5
1 System remote control
Connect to Blue/white cable.
2 Power amp (sold separately)
3 Connect with RCA cables (sold separately)
4 To Rear output or subwoofer output
5 Rear speaker or subwoofer
Installation
Important
! Check all connections and systems before
final installation.
! Do not use unauthorized parts as this may
cause malfunctions.
! Consult your dealer if installation requires
drilling of holes or other modifications to the
vehicle.
! Do not install this unit where:
— it may interfere with operation of the vehicle.
— it may cause injury to a passenger as a result
of a sudden stop.
! The semiconductor laser will be damaged if
it overheats. Install this unit away from hot
places such as near the heater outlet.
! Optimum performance is obtained when the
unit is installed at an angle of less than 60°.
60°
! When installing, to ensure proper heat dis-
persal when using this unit, make sure you
leave ample space behind the rear panel and
wrap any loose cables so they are not block-
ing the vents.
5cm
cm
Leave ample
space
5 cm
5 cm
DIN front/rear mount
This unit can be properly installed using either
front-mount or rear-mount installation.
Use commercially available parts when instal-
ling.
DIN Front-mount
1
Insert the mounting sleeve into the dash-
board.
For installation in shallow spaces, use the sup-
plied mounting sleeve. If there is enough space,
use the mounting sleeve that came with the ve-
hicle.
2
Secure the mounting sleeve by using a
screwdriver to bend the metal tabs (90°) into
place.
1
2
1 Dashboard
English
Installation
9
Section
Installation
En
03
<QRB3388-A>9
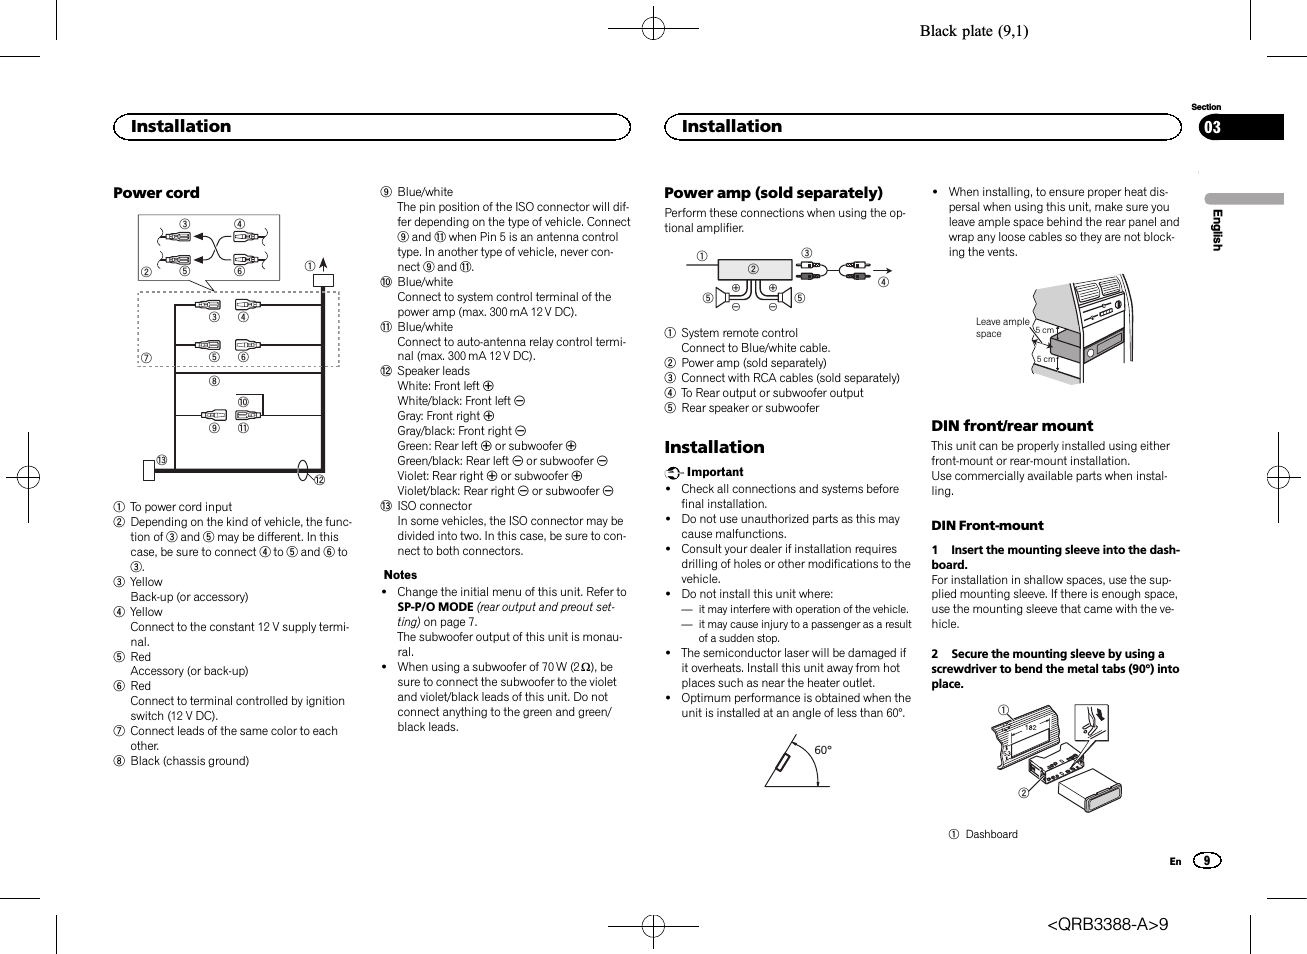
Black plate (10,1)
2 Mounting sleeve
# Make sure that the unit is installed securely in
place. An unstable installation may cause skipping
or other malfunctions.
DIN Rear-mount
1
Determine the appropriate position
where the holes on the bracket and the side
of the unit match.
2
Tighten two screws on each side.
1
2
3
1 Tapping screw (5 mm × 8 mm)
2 Mounting bracket
3 Dashboard or console
Removing the unit
1
Remove the trim ring.
1 Trim ring
2 Notched tab
! Releasing the front panel allows easier ac-
cess to the trim ring.
! When reattaching the trim ring, point the
side with the notched tab down.
2
Insert the supplied extraction keys into
both sides of the unit until they click into
place.
3
Pull the unit out of the dashboard.
Removing and re-attaching the front
panel
You can remove the front panel to protect your
unit from theft.
Press the detach button and push the front
panel upward and pull it toward you.
For details, refer to Removing the front panel to
protect your unit from theft and Re-attaching the
front panel on page 3.
Troubleshooting
Symptom
Cause
Action
The display
automatically
returns to the
ordinary dis-
play.
You did not per-
form any opera-
tion within
about 30 sec-
onds.
Perform operation
again.
The repeat
play range
changes un-
expectedly.
Depending on
the repeat play
range, the se-
lected range
may change
when another
folder or track is
being selected
or during fast
forwarding/re-
versing.
Select the repeat
play range again.
A subfolder is
not played
back.
Subfolders can-
not be played
when
FLD (fold-
er repeat) is se-
lected.
Select another re-
peat play range.
NO XXXX ap-
pears when a
display is
changed (
NO
TITLE, for ex-
ample).
There is no em-
bedded text in-
formation.
Switch the display
or play another
track/file.
The unit is
malfunction-
ing.
There is inter-
ference.
You are using a
device, such as
a cellular
phone, that
transmits elec-
tric waves near
the unit.
Move electrical
devices that may
be causing the in-
terference away
from the unit.
Error messages
When you contact your dealer or your nearest
Pioneer Service Center, be sure to note the error
message.
Common
Message
Cause
Action
AMP ERROR
Unit fails to op-
erate or speaker
connection is
incorrect; pro-
tective circuit is
activated.
Check the speak-
er connection. If
the message fails
to disappear even
after the engine is
switched off/on,
contact your deal-
er or an author-
ized Pioneer
Service Station
for assistance.
USB storage device
Message
Cause
Action
FORMAT
READ
Sometimes
there is a delay
between the
start of playback
and when you
start to hear any
sound.
Wait until the
message disap-
pears and you
hear sound.
NO AUDIO
There are no
songs.
Transfer the audio
files to the USB
storage device
and connect.
The connected
USB storage de-
vice has secur-
ity enabled.
Follow the USB
storage device in-
structions to dis-
able the security.
Installation
10
Section
Additional information
En
03
<QRB3388-A>10
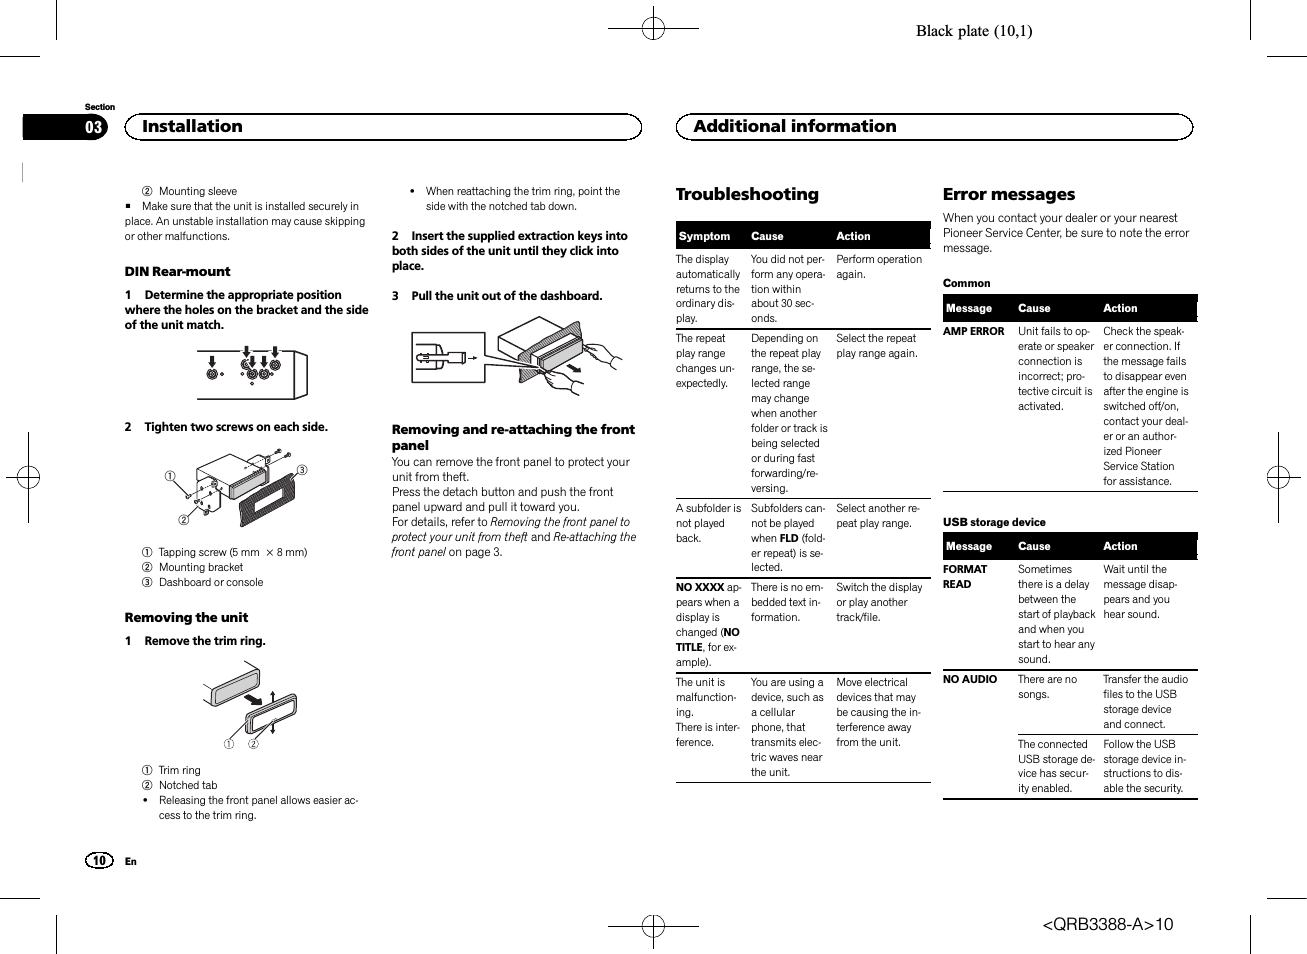
06:33
НОВИНКА! БЮДЖЕТНАЯ магнитола (Пионер) Pioneer MVH-S110. Скрытое меню.
10:02
Настройка магнитолы Pioneer. На примере Pioneer MVH-150UB
07:02
Обзор магнитолы PIONEER MVH 150UB, Клипп ГУ
03:29
Pioneer MVH 150UB обзор магнитолы
Нажмите на кнопку для помощи