

AUDIO/VIDEO MULTI-CHANNEL RECEIVER
Operating Instructions
Discover the benefits of registering your product online at http://www.pioneer.co.uk (or http://www.pioneer.eu).
VSX-826
-K
VSX-821
-K
Thank you for buying this Pioneer product. Please read through these operating instructions so you will know how to operate your model properly. After you have finished reading
WARNING
To prevent a fire hazard, do not place any naked flame
sources (such as a lighted candle) on the equipment.
D3-4-2-1-7a_A1_En
VENTILATION CAUTION
When installing this unit, make sure to leave space
around the unit for ventilation to improve heat radiation
(at least 40 cm at top, 20 cm at rear, and 20 cm at each
side).
WARNING
Slots and openings in the cabinet are provided for
ventilation to ensure reliable operation of the product,
and to protect it from overheating. To prevent fire
hazard, the openings should never be blocked or
covered with items (such as newspapers, table-cloths,
curtains) or by operating the equipment on thick carpet
or a bed.
D3-4-2-1-7b*_A1_En
Operating Environment
Operating environment temperature and humidity:
+5 °C to +35 °C (+41 °F to +95 °F); less than 85 %RH
(cooling vents not blocked)
Do not install this unit in a poorly ventilated area, or in
locations exposed to high humidity or direct sunlight (or
strong artificial light)
D3-4-2-1-7c*_A1_En
the instructions, put them away in a safe place for future reference.
IMPORTANT
The lightning flash with arrowhead symbol,
within an equilateral triangle, is intended to
alert the user to the presence of uninsulated
“dangerous voltage” within the product’s
enclosure that may be of sufficient
magnitude to constitute a risk of electric
shock to persons.
Replacement and mounting of an AC plug on the power supply cord of this unit should be performed only by qualified
service personnel.
IMPORTANT: THE MOULDED PLUG
This appliance is supplied with a moulded three pin mains plug for your safety and convenience. A 10 amp fuse is fitted in this plug.
Should the fuse need to be replaced, please ensure that the replacement fuse has a rating of 10 amps and that it is approved by ASTA or BSI
to BS1362.
Check for the ASTA mark or the BSI mark on the body of the fuse.
If the plug contains a removable fuse cover, you must ensure that it is refitted when the fuse is replaced. If you lose the fuse cover the plug
must not be used until a replacement cover is obtained. A replacement fuse cover can be obtained from your local dealer.
If the fitted moulded plug is unsuitable for your socket outlet, then the fuse shall be removed and the plug cut off and disposed of
safely. There is a danger of severe electrical shock if the cut off plug is inserted into any 13 amp socket.
If a new plug is to be fitted, please observe the wiring code as shown below. If in any doubt, please consult a qualified electrician.
IMPORTANT: The wires in this mains lead are coloured in accordance with the following code:
Blue : Neutral Brown : Live
As the colours of the wires in the mains lead of this appliance may not correspond with the coloured markings identifying the terminals in
your plug, proceed as follows;
The wire which is coloured BLUE must be connected to the terminal which is marked with the
letter N or coloured BLACK.
The wire which is coloured BROWN must be connected to the terminal which is marked with the
letter L or coloured RED.
How to replace the fuse: Open the fuse compartment with a screwdriver and replace the fuse.
2
En
CAUTION:
TO PREVENT THE RISK OF ELECTRIC
SHOCK, DO NOT REMOVE COVER (OR
BACK). NO USER-SERVICEABLE PARTS
INSIDE. REFER SERVICING TO QUALIFIED
SERVICE PERSONNEL.
CAUTION
RISK OF ELECTRIC SHOCK
DO NOT OPEN
The exclamation point within an equilateral
triangle is intended to alert the user to the
presence of important operating and
maintenance (servicing) instructions in the
literature accompanying the appliance.
D3-4-2-1-1_A1_En
D3-4-2-1-2-2*_A2_En

This product is for general household purposes. Any
failure due to use for other than household purposes
(such as long-term use for business purposes in a
restaurant or use in a car or ship) and which requires
repair will be charged for even during the warranty
period.
K041_A1_En
Information for users on collection and disposal of old equipment and used batteries
WARNING
This equipment is not waterproof. To prevent a fire or
shock hazard, do not place any container filled with
liquid near this equipment (such as a vase or flower
pot) or expose it to dripping, splashing, rain or
moisture.
D3-4-2-1-3_A1_En
WARNING
Before plugging in for the first time, read the following
section carefully.
The voltage of the available power supply differs
according to country or region. Be sure that the
power supply voltage of the area where this unit
will be used meets the required voltage (e.g., 230 V
or 120 V) written on the rear panel.
D3-4-2-1-4*_A1_En
Symbol for
equipment
Symbol examples
for batteries
Pb
These symbols on the products, packaging, and/or accompanying documents mean
that used electrical and electronic products and batteries should not be mixed with
general household waste.
For proper treatment, recovery and recycling of old products and used batteries,
please take them to applicable collection points in accordance with your national
legislation.
By disposing of these products and batteries correctly, you will help to save valuable
resources and prevent any potential negative effects on human health and the
environment which could otherwise arise from inappropriate waste handling.
For more information about collection and recycling of old products and batteries,
please contact your local municipality, your waste disposal service or the point of sale
where you purchased the items.
These symbols are only valid in the European Union.
For countries outside the European Union:
If you wish to discard these items, please contact your local authorities or dealer and
ask for the correct method of disposal.
K058a_A1_En
If the AC plug of this unit does not match the AC
outlet you want to use, the plug must be removed
and appropriate one fitted. Replacement and
mounting of an AC plug on the power supply cord of
this unit should be performed only by qualified
service personnel. If connected to an AC outlet, the
cut-off plug can cause severe electrical shock. Make
sure it is properly disposed of after removal.
The equipment should be disconnected by removing
the mains plug from the wall socket when left unused
for a long period of time (for example, when on
vacation).
D3-4-2-2-1a_A1_En
CAUTION
The STANDBY/ON switch on this unit will not
completely shut off all power from the AC outlet.
Since the power cord serves as the main disconnect
device for the unit, you will need to unplug it from the
AC outlet to shut down all power. Therefore, make
sure the unit has been installed so that the power
cord can be easily unplugged from the AC outlet in
case of an accident. To avoid fire hazard, the power
cord should also be unplugged from the AC outlet
when left unused for a long period of time (for
example, when on vacation).
D3-4-2-2-2a*_A1_En
3
En

Contents
Before you start
Checking what’s in the box . . . . . . . . . . . . . . . . . . . . . . . . 5
Installing the receiver . . . . . . . . . . . . . . . . . . . . . . . . . . . . 5
Flow of settings on the receiver
01 Controls and displays
Front panel . . . . . . . . . . . . . . . . . . . . . . . . . . . . . . . . . . . . 6
Display . . . . . . . . . . . . . . . . . . . . . . . . . . . . . . . . . . . . . . 7
Remote control . . . . . . . . . . . . . . . . . . . . . . . . . . . . . . . . . 8
Loading the batteries . . . . . . . . . . . . . . . . . . . . . . . . . . . 9
Operating range of remote control . . . . . . . . . . . . . . . . . 9
02 Connecting your equipment
Determining the speakers’ application . . . . . . . . . . . . . . 10
Some tips for improving sound quality . . . . . . . . . . . . . 10
Connecting the speakers. . . . . . . . . . . . . . . . . . . . . . . . . 11
Connect the surround back or front height speakers
(In case of VSX-826) . . . . . . . . . . . . . . . . . . . . . . . . . . . 11
Connect the surround back or front height speakers
(In case of VSX-821) . . . . . . . . . . . . . . . . . . . . . . . . . . . 11
Switching the speaker terminal . . . . . . . . . . . . . . . . . . 13
Making cable connections . . . . . . . . . . . . . . . . . . . . . . . 13
HDMI cables . . . . . . . . . . . . . . . . . . . . . . . . . . . . . . . . 13
About HDMI. . . . . . . . . . . . . . . . . . . . . . . . . . . . . . . . . 13
Analog audio cables. . . . . . . . . . . . . . . . . . . . . . . . . . . 14
Digital audio cables . . . . . . . . . . . . . . . . . . . . . . . . . . . 14
Video cables. . . . . . . . . . . . . . . . . . . . . . . . . . . . . . . . . 14
About the video converter
(VSX-826 only) . . . . . . . . . . . . . . . . . . . . . . . . . . . . . . . . . 15
About video outputs connection
(VSX-821 only) . . . . . . . . . . . . . . . . . . . . . . . . . . . . . . . . . 15
Connecting a TV and playback components . . . . . . . . . . 16
Connecting using HDMI . . . . . . . . . . . . . . . . . . . . . . . 16
Connecting your TV with no HDMI input . . . . . . . . . . . 17
Connecting your DVD player with no HDMI output
(VSX-826 only) . . . . . . . . . . . . . . . . . . . . . . . . . . . . . . . 18
Connecting a satellite receiver or other digital
set-top box. . . . . . . . . . . . . . . . . . . . . . . . . . . . . . . . . . . . 19
Connecting an HDD/DVD recorder, Blu-ray Disc
recorder and other video sources . . . . . . . . . . . . . . . . . .19
Using the component video jacks . . . . . . . . . . . . . . . . . . 20
Connecting other audio components . . . . . . . . . . . . . . . 20
Connecting optional Bluetooth
Connecting antennas . . . . . . . . . . . . . . . . . . . . . . . . . . . 21
Using external antennas . . . . . . . . . . . . . . . . . . . . . . . 21
4
En
. . . . . . . . . . . . . . . . . . . . . . . . . . . . 5
. . . . . . . . . . . . . . 5
®
ADAPTER . . . . . . . . . . . 21
Connecting to the front panel video terminal . . . . . . . . . 22
Connecting an iPod . . . . . . . . . . . . . . . . . . . . . . . . . . . . 22
Connecting a USB device . . . . . . . . . . . . . . . . . . . . . . . . 22
Plugging in the receiver . . . . . . . . . . . . . . . . . . . . . . . . . 23
03 Basic Setup
Canceling the demo display . . . . . . . . . . . . . . . . . . . . . . 24
Automatically setting up for surround sound (MCACC)
Other problems when using the Auto MCACC setup
04 Basic playback
Playing a source . . . . . . . . . . . . . . . . . . . . . . . . . . . . . . . 26
Selecting the audio input signal . . . . . . . . . . . . . . . . . 26
Playing an iPod. . . . . . . . . . . . . . . . . . . . . . . . . . . . . . . . 27
Playing back files stored on an iPod . . . . . . . . . . . . . . 28
Basic playback controls. . . . . . . . . . . . . . . . . . . . . . . . 28
Watching photos and video content . . . . . . . . . . . . . . 28
Playing a USB device . . . . . . . . . . . . . . . . . . . . . . . . . . . 28
Basic playback controls. . . . . . . . . . . . . . . . . . . . . . . . 29
Compressed audio compatibility . . . . . . . . . . . . . . . . . 29
Bluetooth® ADAPTER for Wireless Enjoyment of Music
Wireless music play . . . . . . . . . . . . . . . . . . . . . . . . . . 29
Pairing the Bluetooth ADAPTER and Bluetooth
wireless technology device . . . . . . . . . . . . . . . . . . . . . 30
Listening to Music Contents of Bluetooth wireless
technology device with Your System . . . . . . . . . . . . . . 30
Listening to the radio . . . . . . . . . . . . . . . . . . . . . . . . . . . 31
Improving FM sound . . . . . . . . . . . . . . . . . . . . . . . . . . 31
Saving station presets . . . . . . . . . . . . . . . . . . . . . . . . . 31
Listening to station presets . . . . . . . . . . . . . . . . . . . . . 31
Naming preset stations . . . . . . . . . . . . . . . . . . . . . . . . 31
An introduction to RDS . . . . . . . . . . . . . . . . . . . . . . . . . 32
Searching for RDS programs . . . . . . . . . . . . . . . . . . . 32
Displaying RDS information . . . . . . . . . . . . . . . . . . . . 32
05 Listening to your system
Choosing the listening mode . . . . . . . . . . . . . . . . . . . . . 33
Auto playback . . . . . . . . . . . . . . . . . . . . . . . . . . . . . . . 33
Listening in surround sound . . . . . . . . . . . . . . . . . . . . 33
Using the Advanced surround . . . . . . . . . . . . . . . . . . 34
Using Stream Direct . . . . . . . . . . . . . . . . . . . . . . . . . . 34
Using the Sound Retriever . . . . . . . . . . . . . . . . . . . . . . . 34
Listening with Acoustic Calibration EQ. . . . . . . . . . . . . . 34
Better sound using Phase Control . . . . . . . . . . . . . . . . . 35
Using surround back channel processing . . . . . . . . . . . 35
Setting the Up Mix function . . . . . . . . . . . . . . . . . . . . . . 35
Setting the Audio options . . . . . . . . . . . . . . . . . . . . . . . . 36
Making an audio or a video recording. . . . . . . . . . . . . . . 37
. . . 24
. . . 25
. . 29
06 The System Setup menu
Using the System Setup menu. . . . . . . . . . . . . . . . . . . . 38
Manual speaker setup . . . . . . . . . . . . . . . . . . . . . . . . . . 38
Speaker Setting . . . . . . . . . . . . . . . . . . . . . . . . . . . . . 38
Crossover Network . . . . . . . . . . . . . . . . . . . . . . . . . . . 39
Channel Level . . . . . . . . . . . . . . . . . . . . . . . . . . . . . . . 39
Speaker Distance . . . . . . . . . . . . . . . . . . . . . . . . . . . . 40
The Input Assign menu . . . . . . . . . . . . . . . . . . . . . . . . . 40
The Speaker System setting (VSX-826 only) . . . . . . . . . . 41
The Video Parameter setting (VSX-826 only) . . . . . . . . . . 41
Video Converter . . . . . . . . . . . . . . . . . . . . . . . . . . . . . 41
Resolution . . . . . . . . . . . . . . . . . . . . . . . . . . . . . . . . . 41
Aspect . . . . . . . . . . . . . . . . . . . . . . . . . . . . . . . . . . . . 42
The Pre Out Setting (VSX-821 only) . . . . . . . . . . . . . . . . 42
The Auto Power Down menu . . . . . . . . . . . . . . . . . . . . . 42
The FL Demo Mode menu . . . . . . . . . . . . . . . . . . . . . . . 42
07 Control with HDMI function
Making Control with HDMI connections . . . . . . . . . . . . 43
HDMI Setup. . . . . . . . . . . . . . . . . . . . . . . . . . . . . . . . . . 43
Before using synchronization. . . . . . . . . . . . . . . . . . . . . 44
About synchronized operations . . . . . . . . . . . . . . . . . . . 44
About connections with a product of a different brand
that supports the Control with HDMI function . . . . . . 44
Cautions on the Control with HDMI function . . . . . . . . . 44
08 Controlling the rest of your system
Setting the remote to control other components . . . . . . 45
Selecting preset codes directly . . . . . . . . . . . . . . . . . . . 45
Clearing all the remote control settings . . . . . . . . . . . . . 45
Controls for TVs . . . . . . . . . . . . . . . . . . . . . . . . . . . . . . . 46
Controls for other components . . . . . . . . . . . . . . . . . . . 46
Preset Code List . . . . . . . . . . . . . . . . . . . . . . . . . . . . . . . 46
09 Additional information
Troubleshooting. . . . . . . . . . . . . . . . . . . . . . . . . . . . . . . 52
General . . . . . . . . . . . . . . . . . . . . . . . . . . . . . . . . . . . . 52
HDMI . . . . . . . . . . . . . . . . . . . . . . . . . . . . . . . . . . . . . 53
Important information regarding the HDMI
connection . . . . . . . . . . . . . . . . . . . . . . . . . . . . . . . . . 54
iPod messages . . . . . . . . . . . . . . . . . . . . . . . . . . . . . . 54
USB messages . . . . . . . . . . . . . . . . . . . . . . . . . . . . . . 54
About iPod/iPhone/iPad. . . . . . . . . . . . . . . . . . . . . . . . . 54
Resetting the main unit . . . . . . . . . . . . . . . . . . . . . . . . . 55
Cleaning the unit . . . . . . . . . . . . . . . . . . . . . . . . . . . . . . 55
Specifications . . . . . . . . . . . . . . . . . . . . . . . . . . . . . . . . 55

Before you start
Checking what’s in the box
Please check that you’ve received the following supplied
accessories:
• Setup microphone
• Remote control
• AAA size IEC R03 dry cell batteries (to confirm system
operation) x2
• AM loop antenna
• FM wire antenna
• iPod cable
•Power cord
• Warranty card
• Quick start guide
• These operating instructions (CD-ROM)
Installing the receiver
• When installing this unit, make sure to put it on a level
and stable surface.
Don’t install it on the following places:
– on a color TV (the screen may distort)
– near a cassette deck (or close to a device that gives off a
magnetic field). This may interfere with the sound.
– in direct sunlight
– in damp or wet areas
– in extremely hot or cold areas
– in places where there is vibration or other movement
– in places that are very dusty
– in places that have hot fumes or oils (such as a kitchen)
Flow of settings on the
receiver
The unit is a full-fledged AV receiver equipped with an
abundance of functions and terminals. It can be used easily
after following the procedure below to make the connections
and settings.
The colors of the steps indicate the following:
Required setting item
Setting to be made as necessary
1
Connecting the speakers
Where you place the speakers will have a big effect on the
sound.
• Determining the speakers’ application (page 10)
• Connecting the speakers (page 11)
• Switching the speaker terminal (page 13)
2
Connecting the components
For surround sound, you’ll want to hook up using a digital
connection from the Blu-ray Disc/DVD player to the
receiver.
• About the video converter (VSX-826 only) (page 15)
• About video outputs connection (VSX-821 only)
(page 15)
• Connecting a TV and playback components (page 16)
• Connecting antennas (page 21)
• Plugging in the receiver (page 23)
3
Power On
Make sure you’ve set the video input on your TV to this
receiver. Check the manual that came with the TV if you
don’t know how to do this.
4
The Speaker System setting (VSX-826 only) (page 41)
(Specify either using the surround back or front height
speaker.)
The Pre Out Setting (VSX-821 only) (page 42)
(When connecting the front height speakers.)
The Input Assign menu (page 40)
(When using connections other than the recommended
connections.)
Using the Audio Return Channel function (page 43)
(When the connected TV supports the HDMI Audio
Return Channel function.)
5
Use the on-screen automatic MCACC setup to set up
your system
• Automatically setting up for surround sound (MCACC)
(page 24)
6
Playing a source (page 26)
• Selecting the audio input signal (page 26)
• Playing an iPod (page 27)
• Playing a USB device (page 28)
• Choosing the listening mode (page 33)
7
Adjusting the sound as desired
• Using the Sound Retriever (page 34)
• Better sound using Phase Control (page 35)
• Listening with Acoustic Calibration EQ (page 34)
• Using surround back channel processing (page 35)
• Setting the Up Mix function (page 35)
• Setting the Audio options (page 36)
• Manual speaker setup (page 38)
8
Making maximum use of the remote control
• Setting the remote to control other components
(page 45)
5
En

Controls and displays
AUDIO/VIDEO MULTI- CHANNEL RECEIVER
MASTER
VOLUME
STANDBY/ON
INPUT
SELECTOR
MCACC
SETUP MIC
L AUDIO R VIDEO
VIDEO 2 INPUT
iPod
iPhone
iPad
USB
5V 2.1
A
iPod iPhone iPad
DIRECT
CONTROL
SOUND
RETRIEVER AIR
ADVANCED
SURROUND
ALC/
STANDARD SURR
AUTO SURROUND
/
STREAM DIRECT
PHONES
SPEAKERS DIMMER DISPLAY BAND TUNER EDIT TUNE PRESET ENTER
iPod iPhone iPadHDMIMCACC
1 45
8 9 10 11 12 13 14 15
22
367
16 17 18 19 20 18
23 24 25 26 26 2827
21
22
01
01
Chapter 1:
Controls and displays
Front panel
1 INPUT SELECTOR dial
Selects an input source (page 26).
2 Indicators
MCACC – Lights when Acoustic Calibration EQ (page 34)
is on (Acoustic Calibration EQ is automatically set to on
after the Auto MCACC setup (page 24)).
HDMI – Blinks when connecting an HDMI-equipped
component; lights when the component is connected
(page 16).
iPod iPhone iPad – Lights when an iPod/iPhone/iPad is
connected and iPod USB input is selected (page 22).
3 Receiver control buttons
SPEAKERS – See Switching the speaker terminal on
page 13.
DIMMER – Dims or brightens the display. The brightness
can be controlled in four steps.
6
4 Character display
See Display on page 7.
5 Tuner control buttons
En
DISPLAY – Switches the display of this unit. The listening
mode, sound volume, Speaker System (VSX-826)/Pre Out
(VSX-821) setting or input name can be checked by
selecting an input source.
• The Speaker System/Pre Out setting may or may not be
displayed, depending on the input source you have
selected.
BAND – Switches between AM, FM ST (stereo) and FM
MONO radio bands (page 31).
TUNER EDIT – Use with TUNE /, PRESET / and
ENTER to memorize and name stations for recall
(page 31).
TUNE / – Used to find radio frequencies (page 31).
PRESET / – Use to select preset radio stations
(page 31).
6 Remote sensor
Receives the signals from the remote control (see Operating
range of remote control on page 9).
7 MASTER VOLUME dial
8
STANDBY/ON
9 PHONES jack
Use to connect headphones. When the headphones are
connected, there is no sound output from the speakers. The
listening mode when the sound is heard from the headphone
can be selected only from PHONES SURR, STEREO or
STEREO ALC mode (S.R AIR mode can be also selected with
ADAPTER input).

Controls and displays
01
01
10 Listening mode buttons
AUTO SURROUND/STREAM DIRECT – Switches
between Auto surround mode (page 33) and Stream
Direct playback (page 34).
ALC/STANDARD SURR – Press for standard decoding
and to switch between the modes of 2 Pro Logic II, 2
Pro Logic IIx, 2 Pro Logic IIz and NEO:6, and the Auto
level control stereo mode (page 33).
ADVANCED SURROUND – Switches between the
various surround modes (page 34).
11 MCACC SETUP MIC jack
Use to connect a microphone when performing Auto MCACC
setup (page 24).
12 AUDIO/VIDEO input terminal
See Connecting to the front panel video terminal on page 22.
13 iPod iPhone iPad/USB terminal
Use to connect your Apple iPod or USB mass storage device
as an audio source (page 22).
14 SOUND RETRIEVER AIR
When the button is pressed, the input switches to ADAPTER
and the listening mode is automatically set to S.R AIR
(page 30).
15 iPod iPhone iPad DIRECT CONTROL
Change the receiver’s input to the iPod and enable iPod
operations on the iPod (page 28).
Display
16 PHASE
Lights when the Phase Control is switched on (page 35).
17 AUTO
Lights when the Auto Surround feature is switched on
(page 33).
18 Tuner indicators
RDS – Lights when an RDS broadcast is received
(page 32).
ST – Lights when a stereo FM broadcast is being received
in auto stereo mode (page 31).
TUNE – Lights when a normal broadcast channel.
PRESET – Shows when a preset radio station is registered
or called.
MEM – Blinks when a radio station is registered.
kHz/MHz – Lights when the character display is showing
the currently received AM/FM broadcast frequency.
19 Speaker indicators
Indicates the speaker terminal, A and/or B, to which audio
signal output is currently set (page 13).
20 Sleep timer indicator
Lights when the receiver is in sleep mode (page 8).
21 PRESET information or input signal indicator
Shows the preset number of the tuner or the input signal
type, etc.
22 Character display
Displays various system information.
23 DTS indicators
DTS – Lights when a source with DTS encoded audio
signals is detected.
HD – Lights when a source with DTS-EXPRESS or DTS-
HD encoded audio signals is detected.
ES – Lights to indicate DTS-ES decoding.
96/24 – Lights when a source with DTS 96/24 encoded
audio signals is detected.
NEO:6 – When one of the NEO:6 modes of the receiver is
on, this lights to indicate NEO:6 processing (page 33).
24 Dolby Digital indicators
2D – Lights when a Dolby Digital encoded signal is
detected.
2D+ – Lights when a source with Dolby Digital Plus
encoded audio signals is detected.
2HD – Lights when a source with Dolby TrueHD
encoded audio signals is detected.
EX – Lights to indicate Dolby Digital EX decoding.
2PLII(x) – Lights to indicate 2 Pro Logic II/2 Pro Logic
IIx decoding. Light will go off during 2 Pro Logic IIz
decoding (see Listening in surround sound on page 33 for
more on this).
25 ADV.S.
Lights when one of the Advanced Surround modes has been
selected (see Using the Advanced surround on page 34 for
more on this).
26 SIGNAL SELECT indicators
DIGITAL – Lights when a digital audio signal is selected.
Blinks when a digital audio signal is selected and
selected audio input is not provided.
HDMI – Lights when an HDMI signal is selected. Blinks
when an HDMI signal is selected and selected HDMI
input is not provided.
27 Up Mix/DIMMER indicator
Lights when the Up Mix function is set to ON (page 35). Also,
lights when DIMMER is set to off.
28 DIR.
Lights when the DIRECT or PURE DIRECT mode is switched
on (page 34).
7
En
Controls and displays
BD DVD
INPUT SELECT
SOURCESLEEP
TV
CONTROL
DIMMER
TV
INPUT
1
4
7
MIDNIGHT
S.RETRIEVER
HDD
CH
RECEIVER
DVR/BDR
CD
CD-R
ADAPTER
iPod USB VIDEO 1
VIDEO
2
SIGNAL SEL
TUNER
BD MENU
ENTER
ALC/
STANDARD
ADV SURR
STEREO
AUTO/
DIRECT
VOL
+
10
2
5
8
SPEAKERS
LEV
LEV
SB CH
DISP
CLR
EQ
PHASE
DVD
3
6
9
0
ENTER
CH
CH
CH SELECT
VCR
SHIFT
MUTE
RETURN
AUDIO
PARAMETER
TUNER EDIT
TOOLS
MASTER
VOLUME
iPod CTRL
PTY SEARCH
BAND
MENU
HOME
MENU
SETUP
DTV/ TV
/
TRE
BASS
TOP
MENU
RECEIVER
T
U
N
E
T
U
N
E
P
R
E
S
E
T
P
R
E
S
E
T
RECEIVER
1
2
12
13
14
15
16
3
4
5
6
7
8
9
10
11
17
01
01
8
En
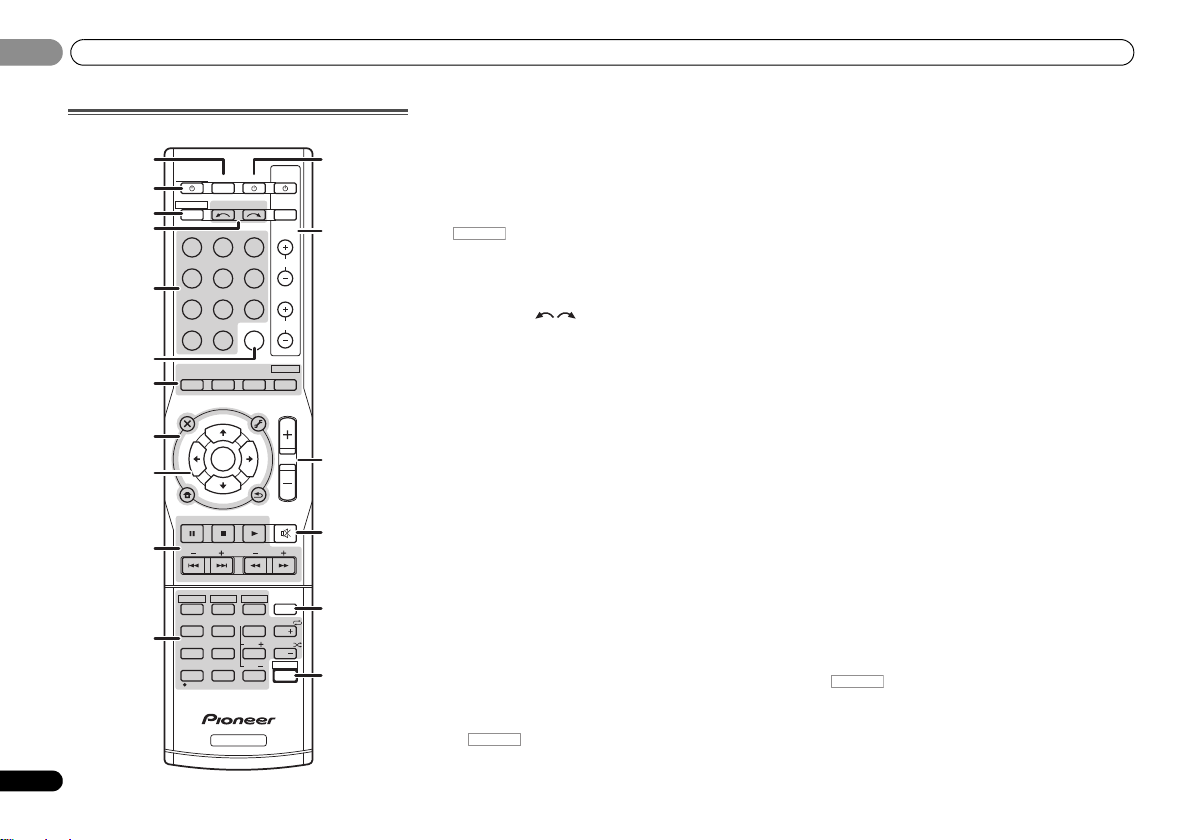
Remote control
1 SLEEP
Press to change the amount of time before the receiver
switches into standby (30 min – 60 min – 90 min – Off). You
can check the remaining sleep time at any time by pressing
SLEEP once.
2
RECEIVER
Switches the receiver between standby and on.
3
Switches the remote to control the receiver (used to select
the white commands above the number buttons
(MIDNIGHT, etc)). Also use this button to set up surround
sound (page 38) or Audio parameters (page 36).
4 INPUT SELECT
Use to select the input source (page 26).
5 Input function buttons
Use to select the input source to this receiver (page 26). This
will enable you to control other components with the remote
control (page 45).
6 SIGNAL SEL
Press to select the audio input signal of the component to
play back (page 26).
7 Listening mode buttons
AUTO/DIRECT – Switches between Auto surround mode
(page 33) and Stream Direct playback (page 34).
STEREO – Press to select stereo playback (page 33).
ALC/STANDARD SURR – Press for standard decoding
and to switch between the modes of 2 Pro Logic II, 2
Pro Logic IIx, 2 Pro Logic IIz and NEO:6, and the Auto
level control stereo mode (page 33).
ADV SURR – Switches between the various surround
modes (page 34).
Press BD first to access:
BD MENU* – Displays the disc menu of Blu-ray Discs.
8 System Setup and component control buttons
The following button controls can be accessed after you have
selected the corresponding input function button (BD, DVD,
etc.).
Press first to access:
AUDIO PARAMETER – Use to access the Audio options
(page 36).
SETUP – Press to access the System Setup menu
(page 38).
RETURN – Confirm and exit the current menu screen.
Press BD, DVD or DVR/BDR first to access:
TOP MENU – Displays the disc ‘top’ menu of a Blu-ray
Disc/DVD.
HOME MENU – Displays the HOME MENU screen.
RETURN – Confirm and exit the current menu screen.
MENU – Displays the TOOLS menu of Blu-ray Disc player.
Press TUNER first to access:
TUNER EDIT – Memorizes/names stations for recall
(page 31).
BAND – Switches between AM, FM ST (stereo) and FM
MONO radio bands (page 31).
PTY SEARCH – Use to search for RDS program types
(page 32).
Press iPod USB first to access:
iPod CTRL – Switches between the iPod controls and the
receiver controls (page 28).
9
///
Use the arrow buttons when setting up your surround sound
system (page 38). Also used to control Blu-ray Disc/DVD
menus/options.
Use TUNE / can be used to find radio frequencies and
PRESET / can be used to select preset radio stations
(page 31).
10 Component control buttons
The main buttons (, , etc.) are used to control a
component after you have selected it using the input function
buttons.
The controls above these buttons can be accessed after you
have selected the corresponding input function button (BD,
DVD, DVR/BDR and CD). These buttons also function as
described below.
(TUNE
/
, PRESET
/
), ENTER
Press first to access:
BASS –/+, TRE –/+ – Use to adjust Bass or Treble.
• These controls are disabled when the listening mode is
set to DIRECT or PURE DIRECT.
Controls and displays
01
01
• When the front speaker is set at SMALL in the Speaker
Setting (or automatically via the Auto MCACC setup)
and the Crossover Network is set above 150 Hz, the
subwoofer channel level will be adjusted by pressing
BASS –/+ (page 39).
Press TV first to access:
DTV/TV – Switches between the DTV and analog TV input
modes for Pioneer TVs.
11 Number buttons and other component controls
Use the number buttons to directly select a radio frequency
(page 31) or the tracks on a CD, etc. There are other buttons
that can be accessed after is pressed. (For
example MIDNIGHT, etc.)
HDD*, DVD*, VCR* – These buttons switch between the
hard disk, DVD and VCR controls for HDD/DVD/VCR
recorders.
S.RETRIEVER – Press to restore CD quality sound to
compressed audio sources (page 34).
SB CH – Press to select ON, AUTO or OFF the surround
back channel (page 35).
CH SELECT – Press repeatedly to select a channel, then
use LEV +/– to adjust the level (page 39).
LEV +/– – Use to adjust the channel level.
EQ – Press to switch on/off Acoustic Calibration EQ
setting (page 34).
MIDNIGHT – Switches to Midnight or Loudness listening
(page 36).
SPEAKERS – See Switching the speaker terminal on
page 13.
PHASE – Press to switch on/off Phase Control (page 35).
DIMMER – Dims or brightens the display. The brightness
can be controlled in four steps.
12
SOURCE
Press to turn on/off other components connected to the
receiver (page 46).
13 TV CONTROL buttons
These buttons are dedicated to control the TV assigned to the
TV button. Thus if you only have one TV to hook up to this
system assign it to the TV button (page 46).
– Use to turn on/off the power of the TV.
INPUT – Use to select the TV input signal.
CH +/– – Use to select channels.
VOL +/– – Use to adjust the volume on your TV.
14 MASTER VOLUME +/–
Use to set the listening volume.
15 MUTE
Mutes/unmutes the sound.
16 DISP
Switches the display of this unit. The listening mode, sound
volume, Speaker System (VSX-826)/Pre Out (VSX-821) setting
or input name can be checked by selecting an input source.
• The Speaker System/Pre Out setting may or may not be
displayed, depending on the input source you have
selected.
17 SHIFT
Press to access the ‘boxed’ commands (above the buttons)
on the remote. These buttons are marked with an asterisk (*)
in this section.
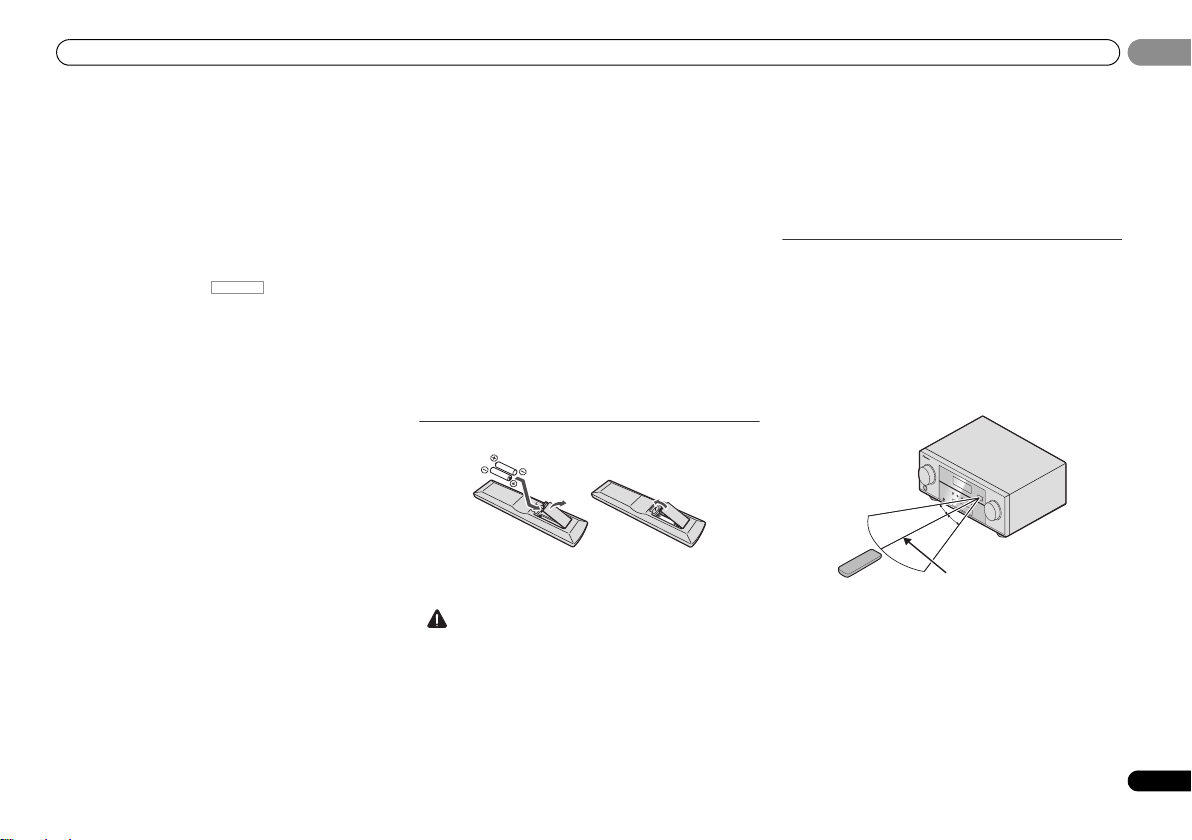
Loading the batteries
The batteries included with the unit are to check initial
operations; they may not last over a long period. We
recommend using alkaline batteries that have a longer life.
• Incorrect use of batteries may result in such hazards as
leakage and bursting. Observe the following precautions:
—
Never use new and old batteries together.
—
Insert the plus and minus sides of the batteries properly
according to the marks in the battery case.
—
Batteries with the same shape may have different
voltages. Do not use different batteries together.
—
When disposing of used batteries, please comply with
governmental regulations or environmental public
instruction’s rules that apply in your country or area.
—
Do not use or store batteries in direct sunlight or other
excessively hot place, such as inside a car or near a
heater. This can cause batteries to leak, overheat,
explode or catch fire. It can also reduce the life or
performance of batteries.
Operating range of remote control
The remote control may not work properly if:
• There are obstacles between the remote control and the
receiver’s remote sensor.
• Direct sunlight or fluorescent light is shining onto the
remote sensor.
• The receiver is located near a device that is emitting
infrared rays.
• The receiver is operated simultaneously with another
infrared remote control unit.
9
En

Connecting your equipment
SL
L
SW
C
RR
SR
SL
L
SW
C
SR
SB
5.1 channel surround
system:
6.1 channel surround
(Surround back) system:
7.1 channel surround
(Surround back) system:
7.1 channel surround
(Front height) system:
L
SW
C
FHL
SL
SBL
SBR
SB
SR
R
FHR
30 30
60
120 120
02
02
Chapter 2:
Connecting your
equipment
Determining the speakers’ application
By connecting the left and right front speakers (L/R), the
center speaker (C), the left and right surround speakers (SL/
SR), the left and right surround back speakers (SBL/SBR) (or
the left and right front height speakers (FHL/FHR)), and the
subwoofer (SW), a surround sound system up to 7.1 channel
can be enjoyed.
The 5.1 channel surround system is the most commonlyused in home theaters. To achieve the best possible surround
sound, install your speakers as shown below.
L
10
En
SW
SBL
R
C
SL
• VSX-826 only: Both the surround back speakers and the
front height speakers can be connected at the same time.
In this case, sound will be output from either the front
height speaker or the surround back speaker depending
on which one was selected in the Speaker System
setting (see The Speaker System setting (VSX-826 only) on
page 41).
• VSX-821 only: To connect the surround back or front
height speakers, an additional amplifier is required.
Connect the additional amplifier to the PRE OUT SURR
BACK/FRONT HEIGHT outputs of this unit and connect
the surround back or front height speakers to the
additional amplifier (see Connect the surround back or
front height speakers (In case of VSX-821) on page 11).
Another way, you can use the speakers connected to the B
speaker terminals to listen to stereo playback in another
room. See Switching the speaker terminal on page 13 for the
listening options with this setup.
• VSX-826 only: You will not be able to connect the B
speakers if you connect the front height speakers in
the main zone. Further, if you use the B speakers, a
5.1 ch playback will be the maximum in the main zone.
(No sound is output from the surround back speaker.)
FHR
FHL
R
L
SR
SBR
SW
C
SR
SL
Where you put your speakers in the room has a big effect on
the quality of the sound. The following guidelines should help
you to get the best sound from your system.
• It is best to angle the speakers towards the listening
position. The angle depends on the size of the room. Use
less of an angle for bigger rooms.
• Refer to the chart below for placement of speakers you
intend to connect.
—
Place the surround speakers at 120º from the center. If
you, (1) use the surround back speaker, and, (2) don’t
use the front height speakers, we recommend placing
the surround speaker right beside you.
—
If you intend to connect only one surround back
speakers, place it directly behind you.
—
If the surround speakers cannot be set directly to the
side of the listening position with a 7.1-channel system,
the surround effect can be enhanced by turning off the
Up Mix function (see Setting the Up Mix function on
page 35).
• For the best stereo effect, place the front speakers 2 m to
3 m apart, at equal distance from the TV.
• If you’re using a center speaker, place the front speakers
at a wider angle. If not, place them at a narrower angle.
• Place the center speaker above or below the TV so that the
sound of the center channel is localized at the TV screen.
Also, make sure the center speaker does not cross the
line formed by the leading edge of the front left and right
speakers.
Some tips for improving sound quality

Connecting your equipment
• Surround and surround back speakers should be
positioned 60 cm to 90 cm higher than your ears and
titled slight downward. Make sure the speakers don’t face
each other. For DVD-Audio, the speakers should be more
directly behind the listener than for home theater
playback.
• Try not to place the surround speakers farther away from
the listening position than the front and center speakers.
Doing so can weaken the surround sound effect.
• Place the left and right front height speakers at least one
meter directly above the left and right front speakers.
• If you’re going to place speakers around your CRT TV, use
shielded speakers or place the speakers at a sufficient
distance from your CRT TV.
• The subwoofer can be placed on the floor. Ideally, the
other speakers should be at about ear-level when you’re
listening to them. Putting the speakers on the floor
(except the subwoofer), or mounting them very high on a
wall is not recommended.
• When not connecting a subwoofer, connect speakers
with low frequency reproduction capabilities to the front
channel. (The subwoofer’s low frequency component is
played from the front speakers, so the speakers could be
damaged.)
• After connecting, be sure to conduct the Auto
MCACC (speaker environment setting) procedure.
See Automatically setting up for surround sound (MCACC)
on page 24.
• Make sure that all speakers are securely installed. This
not only improves sound quality, but also reduces the risk
of damage or injury resulting from speakers being
knocked over or falling in the event of external shocks
such as earthquakes.
Connecting the speakers
The receiver will work with just two stereo speakers (the front
speakers in the diagram) but using at least three speakers is
recommended, and a complete setup is best for surround
sound.
Make sure you connect the speaker on the right to the right
(R) terminal and the speaker on the left to the left (L) terminal.
Also make sure the positive and negative (+/–) terminals on
the receiver match those on the speakers.
You can use speakers with a normal impedance between 6 Ω
and 16 Ω.
• VSX-821 only: Not e tha t onl y the fron t speakers are set to a
value between 12 Ω and 16 Ω if you select SPAB in
Switching the speaker terminal on page 13.
Be sure to complete all connections before connecting this unit
to the AC power source.
Bare wire connections
1
Twist exposed wire strands together.
2
Loosen terminal and insert exposed wire.
3
Tighten terminal.
Connect the wires to the B Speakers terminals of the VSX-826
as shown below:
1
Twist exposed wire strands together.
2
Push open the tabs and insert exposed wire.
3
Release the tabs.
12 3
• These speaker terminals carry HAZARDOUS LIVE
voltage. To prevent the risk of electric shock when
connecting or disconnecting the speaker cables,
disconnect the power cord before touching any
uninsulated parts.
• Make sure that all the bare speaker wire is twisted
together and inserted fully into the speaker terminal. If
any of the bare speaker wire touches the back panel it
may cause the power to cut off as a safety measure.
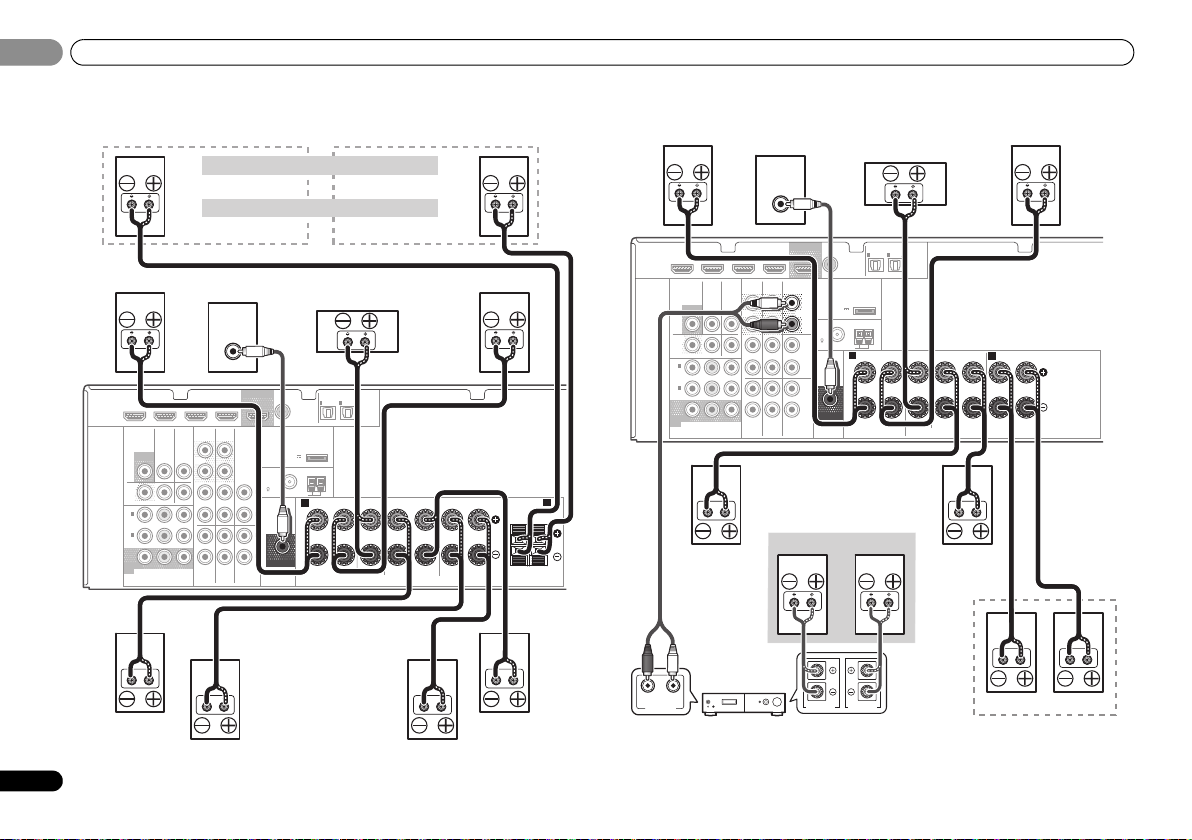
Connect the surround back or front height
speakers (In case of VSX-826)
The Speaker System setting must be set if the above
connections are performed. Select Surr.Back if the surround
back speaker is connected and Height if the front height
speaker is connected (If neither the surround back speaker
nor the front height speaker is connected, either setting will
suffice) (see The Speaker System setting (VSX-826 only) on
page 41).
• When using only one surround back speaker, connect it
to the SURROUND BACK L (Single) terminals.
Connect the surround back or front height
speakers (In case of VSX-821)
Connect the PRE OUT SURR BACK/FRONT HEIGHT outputs
of the unit and additional amplifier to add a surround back or
front height speaker.
The Pre Out setting must be set if the above connections are
performed. Select SURR.BACK if the surround back speaker
is connected and HEIGHT if the front height speaker is
connected (If neither the surround back speaker nor the front
height speaker is connected, either setting will suffice) (see
The Pre Out Setting (VSX-821 only) on page 42).
• You can use the additional amplifier on the surround back
channel pre-outs for a single speaker as well. In this case
plug the amplifier into the left (L (Single)) terminal only.
02
02
11
En
Connecting your equipment
Front height setting
Speaker B setting
Front right
Subwoofer
Center
Front left
Surround right Surround left
Surround
back right
Surround
back left
Front height right
Speaker B — right
Front height left
Speaker B — left
The front height terminals can also be used for Speaker B.
When using only one surround back speaker, connect it
to the SURROUND BACK L (Single) terminals.
Center
Surround right
Front right
Surround back or front height
channel amplifier
Front left
Subwoofer
Right
Left
Speaker B
Surround left
Right
Left
Surround back or
front height speakers
02
02
VSX-826 connection diagram VSX-821 connection diagram
)
IN
2
(
CD-R/TAPE
OPTICAL
ASSIGNABLE
)
CENTER
SURROUND
RL
SPEAKERS
SURROUND BACK FRONT HEIGHT /
(
)
Single
RL
RL
DVR/BDR IN DVD IN BD IN VIDEO 1 IN
HDMI
VIDEO
MONITOR
TV/SATINBD
OUT
DVR/
BDR
OUT IN DVD IN
1
IN
(
)
DVD
ASSIGNABLE
2
IN
(
DVR/
)
BDR
MONITOR
OUT
BPR
YP
COMPONENT VIDEO
B
DVR/BDR IN DVD IN BD IN VIDEO 1 IN
HDMI
VIDEO
MONITOR
TV/SATINBD
OUT
DVR/
BDR
OUT IN DVD IN
1
IN
(
)
DVD
ASSIGN
ABLE
2
IN
(
DVR/
)
BDR
MONITOR
OUT
BPR
YP
COMPONENT VIDEO
LINE LEVEL
INPUT
OUT
AUDIO
DVR/BDR
CD-R/TAPE
L
IN
OUT
R
CD
L
IN IN
R
L
IN
IN
R
TV/SAT
DVD
BD
COAXIAL
IN
(CD)
(
OUTPUT 5 V
0.1 A MAX
ANTENNA
FM UNBAL
75
SUBWOOFER
PRE OUT
IN
1
1
ASSIGNABLE
(
TV/SAT
ADAPTER PORT
)
AM LOOP
A
RL
FRONT
AUDIO
DVR/BDR
IN
OUT
IN IN
IN
TV/SAT
LINE LEVEL
INPUT
CD-R/TAPE
BD
OUT
SURR BACK/
FRONT HEIGHT
(
Single
PRE OUT
CD
IN
DVD
L
R
L
R
L
R
)
(
OUTPUT 5 V
0.1 A MAX
FM
UNBAL
75
SUBWOOFER
PRE OUT
COAXIAL
1
IN
(CD)
ASSIGNABLE
ADAPTER PORT
)
ANTENNA
AM LOOP
A
IN
IN
1
2
(
)
(
TV/SAT
CD-R/TAPE
FRONT
RL
OPTICAL
ASSIGNABLE
)
CENTER
SURROUND
RLRL
SPEAKERS
B
12
En
RL
ANALOG
AUDIO IN
SPEAKER RSPEAKER
L

Connecting your equipment
02
02
Switching the speaker terminal
Three speaker system settings are possible using the
SPEAKERS button.
VSX-826 only: If you selected Surr.Back in The Speaker System
setting (VSX-826 only) on page 41, you can switch between
speakers using the SPEAKERS button. If you selected
Height, the button will simply switch your main speaker
terminal on or off. The options below are for the Surr.Back
setting only.
Use the SPEAKERS button on the front panel to select a
speaker terminal setting.
Press repeatedly to choose a speaker terminal option:
• SPA – Sound is output from the speakers connected to
the A-speaker terminals and PRE OUT SURR BACK/
FRONT HEIGHT (VSX-821 only) (multichannel playback is
possible).
• SPB – Sound is output from the two speakers connected
to the B-speaker terminals (only stereo playback is
possible).
• SPAB – Sound is output from the A-speaker terminals,
the two speakers in the B-speaker terminals, and the
subwoofer. Multichannel sources are downmixed only
when the STEREO or STEREO ALC mode is selected for
stereo output from A- and B-speaker terminals.
• SP – No sound is output from the speakers.
• The subwoofer output depends on the settings you made
in Speaker Setting on page 38. However, if SPB is
selected above, no sound is heard from the subwoofer
(the LFE channel is not downmixed).
• VSX-821 only: You can use speakers with a normal
impedance between 6 Ω and 16 Ω. However, be aware
that only the front speakers are set to a value between
12 Ω and 16 Ω when you select SPAB.
• All speaker terminals (except S peaker B connections) are
switched off when headphones are connected.
Making cable connections
Make sure not to bend the cables over the top of this unit (as
shown in the illustration). If this happens, the magnetic field
produced by the transformers in this unit may cause a
humming noise from the speakers.
• Before making or changing connections, switch off the
power and disconnect the power cord from the AC outlet.
• Before unplugging the power cord, switch the power into
standby.
HDMI cables
Both video and sound signals can be transmitted
simultaneously with one cable. If connecting the player and
the TV via this receiver, for both connections, we recommend
using HDMI cables.
HDMI
Be careful to connect the terminal in the proper direction.
• Set the HDMI parameter in Setting the Audio options on
page 36 to THRU (THROUGH) and set the input signal in
Selecting the audio input signal on page 26 to HDMI, if you
want to hear HDMI audio output from your TV (no sound
will be heard from this receiver).
• If the video signal does not appear on your TV, try
adjusting the resolution settings on your component or
di sp la y. Not e t ha t s ome co mp on en ts ( su ch as vid eo ga me
units) have resolutions that may not be displayed. In this
case, use a (analog) composite connection.
• When the video signal from the HDMI is 480i, 480p, 576i
or 576p, Multi Ch PCM sound and HD sound cannot be
received.
About HDMI
The HDMI connection transfers uncompressed digital video,
as well as almost every kind of digital audio that the
connected component is compatible with, including DVDVideo, DVD-Audio, SACD, Dolby Digital Plus, Dolby TrueHD,
DTS-HD Master Audio (see below for limitations), Video CD/
Super VCD and CD.
This receiver incorporates High-Definition Multimedia
Interface (HDMI
This receiver supports the functions described below through
HDMI connections.
• Digital transfer of uncompressed video (contents
protected by HDCP (1080p/24, 1080p/60, etc.))
•3D signal transfer
• Deep Color signal transfer
• x.v.Color signal transfer
• Audio Return Channel
• Input of multi-channel linear PCM digital audio signals
(192 kHz or less) for up to 8 channels
• Input of the following digital audio formats:
– Dolby Digital, Dolby Digital Plus, DTS, High bitrate
audio (Dolby TrueHD, DTS-HD Master Audio), DVDAudio, CD, SACD (DSD 2 ch only), Video CD, Super VCD
• Synchronized operation with components using the
Control with HDMI function (see Control with HDMI
function on page 43)
• Use a High Speed HDMI® cable. If HDMI cable other than
a High Speed HDMI
properly.
• When an HDMI cable with a built-in equalizer is
connected, it may not operate properly.
®
) technology.
®
cable is used, it may not work
13
En

Connecting your equipment
Coaxial digital
audio cable
Optical cable
Green (Y)
Red (PR)
Blue (PB)
02
02
• 3D, Deep Color, x.v.Color signal transfer and Audio
Return Channel are only possible when connected to a
compatible component.
• HDMI format digital audio transmissions require a longer
time to be recognized. Due to this, interruption in the
audio may occur when switching between audio formats
or beginning playback.
• Turning on/off the device connected to this unit’s HDMI
OUT terminal during playback, or disconnecting/
connecting the HDMI cable during playback, may cause
noise or interrupted audio.
HDMI, the HDMI Logo and High-Definition Multimedia
Interface are trademarks or registered trademarks of HDMI
Licensing, LLC in the United States and other countries.
“x.v.Color” and are trademarks of Sony
Corporation.
Analog audio cables
Use stereo RCA phono cables to connect analog audio
components. These cables are typically red and white, and
you should connect the red plugs to R (right) terminals and
white plugs to L (left) terminals.
Digital audio cables
Commercially available coaxial digital audio cables or optical
cables should be used to connect digital components to this
receiver.
• When connecting optical cables, be careful when
inserting the plug not to damage the shutter protecting
the optical socket.
• When storing optical cable, coil lo osely. The cable may be
damaged if bent around sharp corners.
• You can also use a standard RCA video cable for coaxial
digital connections.
Video cables
Standard RCA video cables
These cables are the most common type of video connection
and are used to connect to the composite video terminals.
The yellow plugs distinguish them from cables for audio.
Component video cables
Use component video cables to get the best possible color
reproduction of your video source. The color signal of the TV
is divided into the luminance (Y) signal and the color (P
P
R) signals and then output. In this way, interference between
the signals is avoided.
COMPONENT VIDEO
Y
P
B
B and
P
R
14
En

Connecting your equipment
VIDEO
VIDEO
IN
IN
IN
HDMI
COMPONENT VIDEO
MONITOR
OUT
YPBP
R
MONITOR
OUT
COMPONENT VIDEO
YPBP
R
HDMI
OUT
Terminal for connection with source device
Terminal for connection with TV monitor
Playback
component
TV
Video signals can be output.
This product incorporates copyright protection technology
that is protected by U.S. patents and other intellectual
property rights. Use of this copyright protection technology
must be authorized by Rovi Corporation, and is intended for
home and other limited viewing us es only unless otherwise
authorized by Rovi Corporation. Reverse engineering or
disassembly is prohibited.
VIDEO
VIDEO
IN
IN
IN
HDMI
COMPONENT VIDEO
MONITOR
OUT
YPBP
R
MONITOR
OUT
COMPONENT VIDEO
YPBP
R
HDMI
OUT
Terminal for connection with source device
Terminal for connection with TV monitor
Playback
component
TV
The OSD will
not appear.
Video signals can be output.
02
02
About the video converter
(VSX-826 only)
The video converter ensures that all video sources are output
from HDMI OUT terminal. The only exception is HDMI: since
this resolution cannot be downsampled, you must connect
your monitor/TV to the receiver’s HDMI video outputs when
connecting this video source.
• If several video components are assigned to the same
input function, the converter gives priority to HDMI,
component, then composite (in that order).
• If the video signal does not appear on your TV, try
adjusting the resolution settings on your component or
di sp la y. Not e t ha t s ome co mp on en ts ( su ch as vid eo ga me
units) have resolutions that may not be converted. In this
case, try switching Video Converter OFF (see Video
Converter on page 41).
• The signal input resolutions that can be converted from
the component video input for the HDMI output are 480i/
576i, 480p/576p, 720p and 1080i. 1080p signal cannot be
converted.
About video outputs connection
(VSX-821 only)
This receiver is not loaded with a video converter. When you
use component video cables or HDMI cables for connecting
to the input device, the same cables should be used for
connecting to the TV.
The signals input from the analog (composite and
component) video inputs of this unit will not be output from
the HDMI OUT.
15
En

Connecting your equipment
Select one
HDMI/DVI-compatible TV
HDMI/DVI-compatible
Blu-ray Disc player
If the TV does not support
the HDMI Audio Return
Channel function, this
connection is required to
listen to the TV sound over
the receiver.
VSX-821 only: This
connection is necessary
in order to see the OSD
of the unit on the TV.
VSX-821
02
02
Connecting a TV and playback components
Connecting using HDMI
If you have an HDMI or DVI (with HDCP) equipped
component (Blu-ray Disc player, etc.), you can connect it to
this receiver using a commercially available HDMI cable.
If the TV and playback components support the Control with
HDMI feature, the convenient Control with HDMI functions
can be used (see Control with HDMI function on page 43).
• The following connection/setting is required to listen to
the sound of the TV over this receiver.
—
If the TV does not support the HDMI Audio Return
Channel function, connect the receiver and TV with
audio cables (as shown).
—
If the TV supports the HDMI Audio Return Channel
function, the sound of the TV is input to the receiver via
the HDMI terminal, so there is no need to connect an
audio cable. In this case, set ARC at HDMI Setup to ON
(see HDMI Setup on page 43).
•VSX-821 only:
—
If the receiver is connected to a TV using an HDMI cable,
the on-screen display (OSD) will not be displayed. Be
sure to use a standard RCA analog video cable to
connect. In this case, switch the TV input to analog to
see the OSD screen (for setup, etc.) on the TV.
—
When the Control with HDMI function is ON and the
receiver is connected to a compatible TV with an HDMI
cable, and you switch the input of the TV to composite
or component, the input of the receiver may
automatically switch to TV/SAT. If this happens, switch
the receiver’s input back to the original input, or turn
OFF the Control with HDMI function (see HDMI Setup
on page 43).
16
En
HDMI OUT
HDMI
DVR/BDR IN
VIDEO
MONITOR
MONITOR
OUT
OUT
DVR/
BDR
OUTINDVD IN
1
IN
(
)
DVD
ASSIGNABLE
2
IN
(
DVR/
)
BDR
MONITOR
OUT
COMPONENT VIDEO
VIDEO IN
DVD IN
TV/SATINBD
BPR
YP
BD IN
AUDI O
DVR/BDR
IN
OUT
IN IN
IN
TV/SAT
HDMI IN
VIDEO 1 IN
CD-R/TAPE
BD
OUT
SURR BACK/
FRONT HEIGHT
L
(
Single
PRE OUT
R
CD
L
R
L
IN
R
DVD
COAXIAL
1
IN
ASSIGNABLE
(CD)
ADAPTER PORT
)
(
OUTPUT 5 V
)
0.1 A MAX
ANTENNA
FM
UNBAL
75
AM LOOP
SUBWOOFER
PRE OUT
RL
IN
1
(
TV/SAT
FRONT
A
RL
DIGITAL AUDIO OUTANALOG AUDIO OUT
IN
2
)
(
CD-R/TAPE
OPTICAL
OPTICAL
ASSIGNABLE
)
CENTER

Connecting your equipment
RL
DIGITAL AUDIO OUT ANALOG AUDIO OUT
OPTICAL
RL
DIGITAL AUDIO OUTANALOG AUDIO OUT
OPTICAL COAXIAL
VIDEO IN
VIDEO OUT
HDMI OUT
Select one
TV
DVD player
Select one
This connection is
required in order to
listen to the sound of
the TV over the
receiver.
VSX-826
Connecting your TV with no HDMI input
This diagram shows connections of a TV (with no HDMI
input) and DVD player (or other playback component) to the
receiver.
• With these connections, the picture is not output to the
TV even if the DVD player is connected with an HDMI
cable. Connect the DVD player’s video signals using a
composite or component cable.
• Connect using an HDMI cable to listen to HD audio on the
receiver. Do not use an HDMI cable to input video signals.
Depending on the video component, it may not be
possible to output signals connected by HDMI and other
methods simultaneously, and it may be necessary to
make output settings. Please refer to the operating
instructions supplied with your component for more
information.
• If both TV and player has a component video jacks, you
can connect these too. See Using the component video
jacks on page 20 for more on this.
• In order to listen to the audio from the DVD player that is
connected to this receiver using an optical cable or a
coaxial cable, first, switch to the DVD input, then press
SIGNAL SEL to choose the audio signal O2 (OPTICAL2) or
C1 (COAXIAL1) (see Selecting the audio input signal on
page 26).
HDMI
DVR/BDR IN
VIDEO
MONITOR
OUT
DVR/
BDR
OUTINDVD IN
1
IN
(
)
DVD
ASSIGN
ABLE
2
IN
(
DVR/
)
BDR
MONITOR
OUT
YP
COMPONENT VIDEO
DVD IN
TV/SATINBD
BPR
VIDEO 1 IN
BD IN
AUDIO
DVR/BDR
CD-R/TAPE
IN
OUT
IN IN
IN
TV/SAT
02
02
COAXIAL
OUT
1
IN
ASSIGNABLE
(CD)
ANTENNA
FM UNBAL
75
L
R
L
IN
R
(
OUTPUT 5 V
0.1 A MAX
SUBWOOFER
PRE OUT
ADAPTER PORT
)
AM LOOP
A
L
R
CD
DVD
BD
OPTICAL
IN
IN
1
2
ASSIGNABLE
(
)
(
TV/SAT
CD-R/TAPE
FRONT
RL
)
CENTER
17
En
Loading…
Pioneer VSX-821-K
http://www.pioneerelectronics.com (US)
http://www.pioneerelectronics.ca (Canada)
http://www.pioneerelectronics.com (US)
http://www.pioneerelectronics.ca (Canada)
•
Protect your new investmentThe details of your purchase will be on file for reference in the event of aninsurance claim such as loss or theft.
•
Improve product developmentYour input helps us continue to design products that meet your needs.
•
Receive a free Pioneer newsletterRegistered customers can opt in to receive a monthly newsletter.
•
Receive free tips, updates and service bulletins on your new product
AUDIO/VIDEO MULTI-CHANNEL RECEIVER
RECEPTEUR AUDIOVISUEL A VOIES MULTI-CANAUX
RECEPTOR AUDIO-VIDEO MULTICANAL
Operating Instructions
Mode d
’emploi
Manual de instrucciones
VSX-821_UCSMXCN_En.book 1 ページ 年月日 火曜日 午後5時9分
Manual
View the manual for the Pioneer VSX-821-K here, for free. This user manual comes under the category receivers and has been rated by 20 people with an average of a 8.6. This manual is available in the following languages: English. Do you have a question about the Pioneer VSX-821-K?
Ask your question here
Index
- Before you start . . . . . . . . . . . . . . . . . . . . . . . . . . . . 5Checking what’s in the box . . . . . . . . . . . . . . . . . . . . . . . . 5Installing the receiver . . . . . . . . . . . . . . . . . . . . . . . . . . . . 5Flow of settings on the receiver. . . . . . . . . . . . . . 5
- 01 Controls and displaysFront panel . . . . . . . . . . . . . . . . . . . . . . . . . . . . . . . . . . . . 6
- Display . . . . . . . . . . . . . . . . . . . . . . . . . . . . . . . . . . . . . . 7
- Loading the batteries . . . . . . . . . . . . . . . . . . . . . . . . . . . 9Operating range of remote control . . . . . . . . . . . . . . . . . 9
- 02 Connecting your equipmentPlacing the speakers . . . . . . . . . . . . . . . . . . . . . . . . . . . . 10Hints on the speaker placement. . . . . . . . . . . . . . . . . . 10
- . . . . . . . . . . . . . . . . . . . . . . . . . 11Connect the surround back or front height speakers . . 11
- Switching the speaker system . . . . . . . . . . . . . . . . . . . 12Making cable connections . . . . . . . . . . . . . . . . . . . . . . . 12HDMI cables . . . . . . . . . . . . . . . . . . . . . . . . . . . . . . . . 12About HDMI. . . . . . . . . . . . . . . . . . . . . . . . . . . . . . . . . 12
- Analog audio cables. . . . . . . . . . . . . . . . . . . . . . . . . . . 13Digital audio cables . . . . . . . . . . . . . . . . . . . . . . . . . . . 13Video cables. . . . . . . . . . . . . . . . . . . . . . . . . . . . . . . . . 13About video outputs connection . . . . . . . . . . . . . . . . . . . 13
- Connecting a TV and playback components . . . . . . . . . . 14Connecting using HDMI . . . . . . . . . . . . . . . . . . . . . . . 14
- Connecting your component with no HDMI terminal . . 15Connecting a satellite receiver or other digitalset-top box. . . . . . . . . . . . . . . . . . . . . . . . . . . . . . . . . . . . 15
- Connecting an HDD/DVD recorder, Blu-ray Discrecorder and other video sources . . . . . . . . . . . . . . . . . . 16Using the component video jacks . . . . . . . . . . . . . . . . . . 16
- Connecting other audio components . . . . . . . . . . . . . . . 17Connecting optional Bluetooth® ADAPTER . . . . . . . . . . . 17Connecting your SiriusConnect™ Tuner . . . . . . . . . . . . . 17
- Connecting antennas . . . . . . . . . . . . . . . . . . . . . . . . . . . 18Using external antennas . . . . . . . . . . . . . . . . . . . . . . . 18Connecting to the front panel video terminal. . . . . . . . . . 18
- Connecting an iPod. . . . . . . . . . . . . . . . . . . . . . . . . . . . . 19Connecting a USB device . . . . . . . . . . . . . . . . . . . . . . . . 19
- 03 Basic SetupCanceling the demo display . . . . . . . . . . . . . . . . . . . . . . 20Automatically setting up for surround sound (MCACC). . . 20
- Other problems when using the Auto MCACC setup . . . 21
- 04 Basic playbackPlaying a source . . . . . . . . . . . . . . . . . . . . . . . . . . . . . . . 22Selecting the audio input signal . . . . . . . . . . . . . . . . . 22
- Playing an iPod. . . . . . . . . . . . . . . . . . . . . . . . . . . . . . . . 23
- Playing back files stored on an iPod . . . . . . . . . . . . . . 24Basic playback controls. . . . . . . . . . . . . . . . . . . . . . . . 24Watching photos and video content . . . . . . . . . . . . . . 24 . . . . . . . . . . . . . . . . . . . . . . . . . . . 24
- Basic playback controls. . . . . . . . . . . . . . . . . . . . . . . . 25Compressed audio compatibility . . . . . . . . . . . . . . . . . 25® ADAPTER for Wireless Enjoyment . . . . . . . . . . . . . . . . . . . . . . . . . . . . . . . . . . . . . 25Wireless music play . . . . . . . . . . . . . . . . . . . . . . . . . . 25
- Pairing the Bluetooth ADAPTER and Bluetoothwireless technology device . . . . . . . . . . . . . . . . . . . . . 26Listening to Music Contents of Bluetooth wirelesstechnology device with Your System . . . . . . . . . . . . . . 26 . . . . . . . . . . . . . . . . . . . . . . . 26
- Listening to SIRIUS Radio. . . . . . . . . . . . . . . . . . . . . . . . 27Saving channel presets . . . . . . . . . . . . . . . . . . . . . . . . 27Using the SIRIUS Menu. . . . . . . . . . . . . . . . . . . . . . . . 27
- Listening to the radio . . . . . . . . . . . . . . . . . . . . . . . . . . . 28Improving FM sound . . . . . . . . . . . . . . . . . . . . . . . . . . 28Saving station presets . . . . . . . . . . . . . . . . . . . . . . . . . 28Listening to station presets . . . . . . . . . . . . . . . . . . . . . 28Naming preset stations . . . . . . . . . . . . . . . . . . . . . . . . 28
- 05 Listening to your systemChoosing the listening mode . . . . . . . . . . . . . . . . . . . . . 29Auto playback . . . . . . . . . . . . . . . . . . . . . . . . . . . . . . . 29Listening in surround sound . . . . . . . . . . . . . . . . . . . . 29
- Using the Advanced surround . . . . . . . . . . . . . . . . . . 30Using Stream Direct . . . . . . . . . . . . . . . . . . . . . . . . . . 30 . . . . . . . . . . . . . . . . . . . . . . . 30. . . . . . . . . . . . . . 30
- Better sound using Phase Control . . . . . . . . . . . . . . . . . 31Using surround back channel processing . . . . . . . . . . . 31Setting the Up Mix function . . . . . . . . . . . . . . . . . . . . . . 31
- Setting the Audio options. . . . . . . . . . . . . . . . . . . . . . . . 32
- 06 The System Setup menuUsing the System Setup menu. . . . . . . . . . . . . . . . . . . . 34Manual speaker setup . . . . . . . . . . . . . . . . . . . . . . . . . . 34Speaker Setting . . . . . . . . . . . . . . . . . . . . . . . . . . . . . 34
- Crossover Network . . . . . . . . . . . . . . . . . . . . . . . . . . . 35Channel Level . . . . . . . . . . . . . . . . . . . . . . . . . . . . . . . 35
- Speaker Distance . . . . . . . . . . . . . . . . . . . . . . . . . . . . 36 . . . . . . . . . . . . . . . . . . . . . . . . . 36
- The Pre Out Setting . . . . . . . . . . . . . . . . . . . . . . . . . . . . 37The Auto Power Down menu . . . . . . . . . . . . . . . . . . . . . 37The FL Demo Mode menu . . . . . . . . . . . . . . . . . . . . . . . 37
- 07 Control with HDMI functionMaking Control with HDMI connections . . . . . . . . . . . . 38HDMI Setup . . . . . . . . . . . . . . . . . . . . . . . . . . . . . . . . . . 38
- Before using synchronization. . . . . . . . . . . . . . . . . . . . . 39About synchronized operations . . . . . . . . . . . . . . . . . . . 39About connections with a product of a different brandthat supports the Control with HDMI function . . . . . . 39Cautions on the Control with HDMI function . . . . . . . . . 39
- 08 Controlling the rest of your systemSetting the remote to control other components . . . . . . 40Selecting preset codes directly . . . . . . . . . . . . . . . . . . . 40Clearing all the remote control settings . . . . . . . . . . . . . 40
- Controls for TVs . . . . . . . . . . . . . . . . . . . . . . . . . . . . . . . 41Controls for other components . . . . . . . . . . . . . . . . . . . 41Preset Code List . . . . . . . . . . . . . . . . . . . . . . . . . . . . . . . 41
- 09 Additional informationTroubleshooting . . . . . . . . . . . . . . . . . . . . . . . . . . . . . . . 44General . . . . . . . . . . . . . . . . . . . . . . . . . . . . . . . . . . . . 44
- HDMI . . . . . . . . . . . . . . . . . . . . . . . . . . . . . . . . . . . . . 45Important information regarding the HDMIconnection . . . . . . . . . . . . . . . . . . . . . . . . . . . . . . . . . 45
- iPod messages . . . . . . . . . . . . . . . . . . . . . . . . . . . . . . 46USB messages . . . . . . . . . . . . . . . . . . . . . . . . . . . . . . 46SIRIUS radio messages . . . . . . . . . . . . . . . . . . . . . . . 46. . . . . . . . . . . . . . . . . . . . . . . . . 46 . . . . . . . . . . . . . . . . . . . . . . . . . 46 . . . . . . . . . . . . . . . . . . . . . . . . . . . . . . 46
- Specifications . . . . . . . . . . . . . . . . . . . . . . . . . . . . . . . . 47
- Plugging in the receiver . . . . . . . . . . . . . . . . . . . . . . . . . 19
- Préparatifs . . . . . . . . . . . . . . . . . . . . . . . . . . . . . . . . . 5Vérification des accessoires livrés avec l’appareil . . . . . . . 5Installation du récepteur . . . . . . . . . . . . . . . . . . . . . . . . . . 5Organigramme des réglages sur lerécepteur . . . . . . . . . . . . . . . . . . . . . . . . . . . . . . . . . . 5
- 01 Commandes et affichagesPanneau frontal . . . . . . . . . . . . . . . . . . . . . . . . . . . . . . . . 6
- Affichage . . . . . . . . . . . . . . . . . . . . . . . . . . . . . . . . . . . . 7
- Télécommande . . . . . . . . . . . . . . . . . . . . . . . . . . . . . . . . . 8
- Mise en place des piles . . . . . . . . . . . . . . . . . . . . . . . . . 9Portée de la télécommande . . . . . . . . . . . . . . . . . . . . . . 9
- 02 Raccordement de votre équipementInstallation des enceintes . . . . . . . . . . . . . . . . . . . . . . . . 10Conseils d’installation des enceintes . . . . . . . . . . . . . . 10
- Raccordement des enceintes . . . . . . . . . . . . . . . . . . . . . 11Connectez les enceintes surround arrière ou surroundavant-haut . . . . . . . . . . . . . . . . . . . . . . . . . . . . . . . . . . 11
- Permutation du système d’enceintes . . . . . . . . . . . . . . 12 . . . . . . . . . . . . . . . . . . . . . . . 12Câbles HDMI . . . . . . . . . . . . . . . . . . . . . . . . . . . . . . . . 12À propos de HDMI . . . . . . . . . . . . . . . . . . . . . . . . . . . . 12
- Câbles audio analogiques . . . . . . . . . . . . . . . . . . . . . . 13Câbles audio numériques . . . . . . . . . . . . . . . . . . . . . . 13Câbles vidéo. . . . . . . . . . . . . . . . . . . . . . . . . . . . . . . . . 13. . . . . . . . . . 13
- Raccordement d’un téléviseur et de périphériques delecture. . . . . . . . . . . . . . . . . . . . . . . . . . . . . . . . . . . . . . . 14Connexion au moyen de l’interface HDMI . . . . . . . . . . 14
- Raccordement d’un équipement dépourvu de borneHDMI . . . . . . . . . . . . . . . . . . . . . . . . . . . . . . . . . . . . . . 15. . . . . . . . . . . . . . . . . . . . . . . . . . . . 15
- Raccordement d’un enregistreur HDD/DVD, d’unenregistreur Blu-ray Disc et d’autres sources vidéo . . . . 16Utilisation des prises femelles vidéo en composantes. . . 16
- Raccordement d’autres appareils audio . . . . . . . . . . . . . 17Raccordement de l’ADAPTATEUR Bluetooth®optionnel . . . . . . . . . . . . . . . . . . . . . . . . . . . . . . . . . . . . . 17Raccordement à votre tuner SiriusConnect™ . . . . . . . . . 17
- Raccordement des antennes. . . . . . . . . . . . . . . . . . . . . . 18Utilisation des antennes externes . . . . . . . . . . . . . . . . 18Raccordement à la borne vidéo du panneau frontal . . . . 18
- Connexion d’un iPod . . . . . . . . . . . . . . . . . . . . . . . . . . . 19Raccordement d’un appareil USB . . . . . . . . . . . . . . . . . 19Branchement du récepteur . . . . . . . . . . . . . . . . . . . . . . 19
- 03 Configuration de baseDésactivation du mode d’affichage de démonstration . . 20Configuration automatique du son surround(MCACC) . . . . . . . . . . . . . . . . . . . . . . . . . . . . . . . . . . . . 20
- Autres problèmes lors de l’utilisation de la configurationMCACC automatique. . . . . . . . . . . . . . . . . . . . . . . . . . 21
- 04 Lecture de baseLecture d’une source . . . . . . . . . . . . . . . . . . . . . . . . . . . 22Sélection du signal d’entrée audio . . . . . . . . . . . . . . . 22
- Lecture de fichiers stockés sur un iPod . . . . . . . . . . . . 24Commandes de lecture de base . . . . . . . . . . . . . . . . . 24Visualisation de photos et de contenu vidéo . . . . . . . . 24Lecture à partir d’un périphérique USB . . . . . . . . . . . . . 24
- Commandes de lecture de base . . . . . . . . . . . . . . . . . 25Compatibilité des fichiers audio compressés . . . . . . . 25ADAPTATEUR Bluetooth® pour profiter de la musiquesans fil . . . . . . . . . . . . . . . . . . . . . . . . . . . . . . . . . . . . . . 25Lecture de musique sans fil. . . . . . . . . . . . . . . . . . . . . 25
- Appairage de l’ADAPTATEUR Bluetooth et dupériphérique à technologie sans fil Bluetooth . . . . . . . 26Écoute de contenus musicaux d’un périphérique àtechnologie sans fil Bluetooth avec votre système . . . . 26Écoute de la radio satellite . . . . . . . . . . . . . . . . . . . . . . . 26
- Écoute de SIRIUS Radio . . . . . . . . . . . . . . . . . . . . . . . . . 27Mémorisation des stations présélectionnées. . . . . . . . 27Utilisation du Menu SIRIUS. . . . . . . . . . . . . . . . . . . . . 27
- Pour écouter la radio . . . . . . . . . . . . . . . . . . . . . . . . . . . 28Amélioration du son FM . . . . . . . . . . . . . . . . . . . . . . . 28Mémorisation de stations préréglées. . . . . . . . . . . . . . 28Pour écouter les stations préréglées . . . . . . . . . . . . . . 28Attribution de noms aux stations préréglées . . . . . . . . 28
- 05 Écoute de votre systèmeChoix du mode d’écoute . . . . . . . . . . . . . . . . . . . . . . . . . 29Lecture en mode Auto . . . . . . . . . . . . . . . . . . . . . . . . 29Écoute de sonorités d’ambiance . . . . . . . . . . . . . . . . . 29
- Utilisation des effets surround avancés . . . . . . . . . . . 30Utilisation des modes Stream Direct . . . . . . . . . . . . . 30Utilisation de la fonction Sound Retriever. . . . . . . . . . . . 30Écoute avec la fonction Acoustic Calibration EQ . . . . . . 30
- Enregistrer un contenu audio ou vidéo . . . . . . . . . . . . . 33
- 06 Menu de configuration du systèmeUtilisation du menu de configuration du système . . . . . 34Réglage manuel des enceintes . . . . . . . . . . . . . . . . . . . 34Réglage des enceintes . . . . . . . . . . . . . . . . . . . . . . . . 34
- Réseau de recouvrement . . . . . . . . . . . . . . . . . . . . . . 35Niveau des canaux . . . . . . . . . . . . . . . . . . . . . . . . . . . 35
- Distance des enceintes. . . . . . . . . . . . . . . . . . . . . . . . 36Menu d’affectation d’entrée . . . . . . . . . . . . . . . . . . . . . . 36
- Configuration de l’option Pre Out. . . . . . . . . . . . . . . . . . 37Le menu Auto Power Down . . . . . . . . . . . . . . . . . . . . . . 37Le menu FL Demo Mode . . . . . . . . . . . . . . . . . . . . . . . . 37
- 07 Fonction Control HDMIConnexions pour la fonction Control HDMI . . . . . . . . . . 38Menu HDMI Setup . . . . . . . . . . . . . . . . . . . . . . . . . . . . . 38
- Avant la synchronisation . . . . . . . . . . . . . . . . . . . . . . . . 39À propos des opérations synchronisées. . . . . . . . . . . . . 39À propos des connexions avec un équipement d’uneautre marque prenant en charge la fonction ControlHDMI . . . . . . . . . . . . . . . . . . . . . . . . . . . . . . . . . . . . . 39Recommandations concernant la fonction ControlHDMI . . . . . . . . . . . . . . . . . . . . . . . . . . . . . . . . . . . . . . . 39
- 08 Commander le reste de votre systèmeConfigurer la télécommande pour commander d’autrescomposants . . . . . . . . . . . . . . . . . . . . . . . . . . . . . . . . . . 40Sélectionner directement des codes de préréglage . . . . 40Suppression de tous les réglages de latélécommande . . . . . . . . . . . . . . . . . . . . . . . . . . . . . . . . 40
- Commandes pour les téléviseurs . . . . . . . . . . . . . . . . . . 41Commandes pour autres composants . . . . . . . . . . . . . . 41Liste des codes de préréglage . . . . . . . . . . . . . . . . . . . . 41
- 09 Informations complémentairesGuide de dépannage . . . . . . . . . . . . . . . . . . . . . . . . . . . 44Généralités . . . . . . . . . . . . . . . . . . . . . . . . . . . . . . . . . 44
- HDMI . . . . . . . . . . . . . . . . . . . . . . . . . . . . . . . . . . . . . 45Information importante concernant la connexionHDMI . . . . . . . . . . . . . . . . . . . . . . . . . . . . . . . . . . . . . 45
- Messages iPod . . . . . . . . . . . . . . . . . . . . . . . . . . . . . . 46Messages USB . . . . . . . . . . . . . . . . . . . . . . . . . . . . . . 46Messages radio SIRIUS . . . . . . . . . . . . . . . . . . . . . . . 46À propos de l’iPod/iPhone/iPad . . . . . . . . . . . . . . . . . . . 46Réinitialisation de l’unité principale . . . . . . . . . . . . . . . . 46Nettoyage de l’appareil . . . . . . . . . . . . . . . . . . . . . . . . . 46
- Spécifications . . . . . . . . . . . . . . . . . . . . . . . . . . . . . . . . 47
- Antes de comenzar. . . . . . . . . . . . . . . . . . . . . . . . . . 5Comprobación del contenido de la caja . . . . . . . . . . . . . . 5Instalación del receptor. . . . . . . . . . . . . . . . . . . . . . . . . . . 5Organigrama de ajustes del receptor . . . . . . . . . 5
- 01 Controles e indicadoresPanel frontal . . . . . . . . . . . . . . . . . . . . . . . . . . . . . . . . . . . 6
- Pantalla . . . . . . . . . . . . . . . . . . . . . . . . . . . . . . . . . . . . . 7
- Mando a distancia. . . . . . . . . . . . . . . . . . . . . . . . . . . . . . . 8
- Colocación de las pilas . . . . . . . . . . . . . . . . . . . . . . . . . 9Alcance operativo del mando a distancia. . . . . . . . . . . . 9
- 02 Conexión del equipoDisposición de los altavoces . . . . . . . . . . . . . . . . . . . . . . 10Consejos sobre la colocación de los altavoces . . . . . . . 10
- Conexión de los altavoces . . . . . . . . . . . . . . . . . . . . . . . . 11Conexión de los altavoces traseros de sonidoenvolvente o de los altavoces delanteros con efectos dealtura . . . . . . . . . . . . . . . . . . . . . . . . . . . . . . . . . . . . . . 11
- Cambio del sistema de altavoces . . . . . . . . . . . . . . . . . 12 . . . . . . . . . . . . . . . . . . . . . . . . 12Cables HDMI . . . . . . . . . . . . . . . . . . . . . . . . . . . . . . . . 12Acerca de HDMI . . . . . . . . . . . . . . . . . . . . . . . . . . . . . 12
- Cables de audio analógico . . . . . . . . . . . . . . . . . . . . . . 13Cables de audio digital. . . . . . . . . . . . . . . . . . . . . . . . . 13Cables de vídeo . . . . . . . . . . . . . . . . . . . . . . . . . . . . . . 13 . . . . . . . . . . . 13
- Conexión de componentes de reproducción y de unTV . . . . . . . . . . . . . . . . . . . . . . . . . . . . . . . . . . . . . . . . . . 14Conexión mediante HDMI . . . . . . . . . . . . . . . . . . . . . . 14
- Conexión de un componente sin terminal HDMI . . . . . 15 . . . . . . . . . . . . . . . . . . . . . . . . . . . . . . . . 15
- Conexión de una grabadora HDD/DVD, una grabadoraBlu-ray Disc y otras fuentes de vídeo. . . . . . . . . . . . . . . . 16Uso de conectores de vídeo de componentes . . . . . . . . . 16
- Conexión de otros componentes de audio. . . . . . . . . . . . 17Conexión del ADAPTADOR Bluetooth® opcional . . . . . . 17Conexión de su sintonizador SiriusConnect™ . . . . . . . . . 17
- Conexión de antenas. . . . . . . . . . . . . . . . . . . . . . . . . . . . 18Uso de antenas exteriores . . . . . . . . . . . . . . . . . . . . . . 18Conexión al terminal de vídeo del panel frontal . . . . . . . . 18
- Conexión de un iPod . . . . . . . . . . . . . . . . . . . . . . . . . . . . 19Conexión de un dispositivo USB . . . . . . . . . . . . . . . . . . . 19
- 03 Configuración básicaCancelación de la pantalla demo . . . . . . . . . . . . . . . . . . 20Configuración automática para sonido envolvente(MCACC) . . . . . . . . . . . . . . . . . . . . . . . . . . . . . . . . . . . . 20
- Otros problemas al utilizar la configuración automáticaMCACC . . . . . . . . . . . . . . . . . . . . . . . . . . . . . . . . . . . . 21
- 04 Reproducción básicaReproducción de una fuente . . . . . . . . . . . . . . . . . . . . . 22Selección de la señal de entrada de audio. . . . . . . . . . 22
- Reproducción de archivos guardados en un iPod . . . . 24Controles de reproducción básica . . . . . . . . . . . . . . . . 24Visionado de fotos y vídeos . . . . . . . . . . . . . . . . . . . . . 24Reproducción de un aparato USB . . . . . . . . . . . . . . . . . 24
- Controles de reproducción básica . . . . . . . . . . . . . . . . 25Compatibilidad de sonido comprimido . . . . . . . . . . . . 25Bluetooth® ADAPTER para el disfrute inalámbrico de lamúsica . . . . . . . . . . . . . . . . . . . . . . . . . . . . . . . . . . . . . . 25Reproducción inalámbrica de música . . . . . . . . . . . . . 25
- Cómo emparejar el Bluetooth ADAPTER y el aparatode tecnología inalámbrica Bluetooth . . . . . . . . . . . . . . 26Escucha de contenidos musicales de un dispositivocon tecnología inalámbrica Bluetooth con susistema . . . . . . . . . . . . . . . . . . . . . . . . . . . . . . . . . . . . 26
- . . . . . . . . . . . . . . . . . . . . . . . 27. . . . . . . . . . . . . . . . . . . . . . . . 27Memorización de canales . . . . . . . . . . . . . . . . . . . . . . 27Uso de SIRIUS Menu. . . . . . . . . . . . . . . . . . . . . . . . . . 27
- . . . . . . . . . . . . . . . . . . . . . . . . . . . . . 28Mejora del sonido de FM . . . . . . . . . . . . . . . . . . . . . . . 28Presintonización de emisoras . . . . . . . . . . . . . . . . . . . 28Cómo sintonizar emisoras memorizadas . . . . . . . . . . . 28Asignación de nombres a las emisoras . . . . . . . . . . . . 28
- 05 Escuchar su sistemaElección del modo de escucha . . . . . . . . . . . . . . . . . . . . 29Reproducción automática . . . . . . . . . . . . . . . . . . . . . 29Reproducción con sonido envolvente . . . . . . . . . . . . . 29
- Uso de Advanced surround . . . . . . . . . . . . . . . . . . . . 30Uso de Stream Direct . . . . . . . . . . . . . . . . . . . . . . . . . 30Uso de Sound Retriever . . . . . . . . . . . . . . . . . . . . . . . . . 30Reproducción con el ecualizador de calibraciónacústica . . . . . . . . . . . . . . . . . . . . . . . . . . . . . . . . . . . . . 30
- Sonido mejorado con Phase Control . . . . . . . . . . . . . . . 31Uso del procesamiento del canal envolvente trasero . . . 31Ajuste de la función Up Mix . . . . . . . . . . . . . . . . . . . . . . 31
- Ajuste de las opciones de Audio . . . . . . . . . . . . . . . . . . 32
- 06 El menú System SetupUso del menú System Setup . . . . . . . . . . . . . . . . . . . . . 34Configuración manual de los altavoces . . . . . . . . . . . . . 34Ajuste de los altavoces . . . . . . . . . . . . . . . . . . . . . . . . 34
- Red divisora de frecuencias . . . . . . . . . . . . . . . . . . . . 35Nivel de canales . . . . . . . . . . . . . . . . . . . . . . . . . . . . . 35
- Distancia de los altavoces. . . . . . . . . . . . . . . . . . . . . . 36. . . . . . . . . . . . . . . . . . . . . . . . . . . 36
- 07 Función de Control con HDMIConexiones de Control con HDMI . . . . . . . . . . . . . . . . . 38HDMI Setup . . . . . . . . . . . . . . . . . . . . . . . . . . . . . . . . . . 38
- Antes de usar la sincronización . . . . . . . . . . . . . . . . . . . 39Acerca del funcionamiento sincronizado . . . . . . . . . . . . 39Acerca de las conexiones con un producto deuna marca diferente que soporte la función deControl con HDMI. . . . . . . . . . . . . . . . . . . . . . . . . . . . 39Advertencias para la función de Control con HDMI . . . . 39
- 08 Control de otros componentes del sistemaUso del mando a distancia para controlar otroscomponentes . . . . . . . . . . . . . . . . . . . . . . . . . . . . . . . . . 40Selección directa de códigos de preajuste . . . . . . . . . . . 40Borrado de todos los ajustes del mando a distancia . . . 40
- Controles para televisores . . . . . . . . . . . . . . . . . . . . . . . 41Controles para otros componentes . . . . . . . . . . . . . . . . 41Lista de códigos de preajuste. . . . . . . . . . . . . . . . . . . . . 41
- 09 Información adicionalSolución de problemas . . . . . . . . . . . . . . . . . . . . . . . . . 44General . . . . . . . . . . . . . . . . . . . . . . . . . . . . . . . . . . . . 44
- HDMI . . . . . . . . . . . . . . . . . . . . . . . . . . . . . . . . . . . . . 45Información importante relativa a la conexiónHDMI . . . . . . . . . . . . . . . . . . . . . . . . . . . . . . . . . . . . . 45
- Mensajes de iPod . . . . . . . . . . . . . . . . . . . . . . . . . . . . 46Mensajes USB . . . . . . . . . . . . . . . . . . . . . . . . . . . . . . 46Mensajes de radio SIRIUS . . . . . . . . . . . . . . . . . . . . . 46 . . . . . . . . . . . . . . . . . . . . . 46 . . . . . . . . . . . . . . . . . . . . . . . . . . . . . . . . . . . . . . 46 . . . . . . . . . . . . . . . . . . . . . . . . . . . . 46
Product Images (7)

Pioneer VSX-821-K specifications
Below you will find the product specifications and the manual specifications of the Pioneer VSX-821-K.
The Pioneer VSX-821-K receiver is a versatile audio device equipped with multiple features. With an RMS rated power of 550W, it offers substantial power for a robust audio experience. The Signal-to-Noise Ratio (SNR) of 79dB ensures clear and crisp sound reproduction, minimizing background noise interference. The Total Harmonic Distortion (THD) level of 0.05% guarantees accurate audio reproduction without distortion.
Featuring 5.1 audio output channels, the receiver creates immersive surround sound for an enhanced cinematic experience. It supports multichannel audio input and output, providing flexibility in connecting various audio sources. The input options include terminals for convenient connectivity, as well as two digital audio optical inputs and one digital audio coaxial input for additional compatibility.
The Pioneer VSX-821-K receiver also offers multimedia connectivity with two component video inputs, four HDMI inputs, and one USB port. This allows seamless integration with multiple devices such as gaming consoles, Blu-ray players, and other multimedia sources. Additionally, it features a component video output and one HDMI output for easy connection to compatible display devices.
With its comprehensive set of connections, this receiver enables users to enjoy high-quality audio and video content from a range of sources. Its sleek and contemporary design complements any home entertainment setup. Built with quality materials, it ensures durability and reliability for long-term use.
In summary, the Pioneer VSX-821-K receiver is a powerful and feature-rich audio device that provides immersive surround sound and easy connectivity options. Its robust power output, low distortion level, and versatile input/output options make it an excellent choice for audio enthusiasts seeking a versatile and reliable receiver for their home entertainment systems.
Audio decoders
Dolby Digital Plus, Dolby Pro Logic IIz, Dolby TrueHD, DTS Neo:6, DTS-HD
Multichannel audio input type
Terminals
Multichannel audio output type
Terminals
Connectivity technology
Wired
Audio formats supported
AAC, MP3, WMA
General
| Brand | Pioneer |
| Model | VSX-821-K | VSX-821-K |
| Product | receiver |
| EAN | 4988028133121 |
| Language | English |
| Filetype | User manual (PDF) |
Audio
| RMS rated power | 550 W |
| Signal-to-Noise Ratio (SNR) | 79 dB |
| Total Harmonic Distortion (THD) | 0.05 % |
| Audio D/A Converter (DAC) | 24-bit/192kHz |
| Audio output channels | 5.1 channels |
| Power output per channel (20-20KHz@8 Ohm) | 130 W |
| Receiver type | Surround |
Technical details
| Audio decoders | Dolby Digital Plus, Dolby Pro Logic IIz, Dolby TrueHD, DTS Neo:6, DTS-HD |
| Product colour | Black |
| Remote control included | Yes |
| Display | — |
| Equalizer | Yes |
| Sleep timer | Yes |
| On Screen Display (OSD) | Yes |
| Apple docking compatibility | Not supported |
| AirPlay | No |
Inputs
| Multichannel audio input type | Terminals |
| Digital audio optical in | 2 |
| Digital audio coaxial in | 1 |
| Component video (YPbPr/YCbCr) in | 2 |
| HDMI in | 4 |
| USB ports quantity | 1 |
Outputs
| Multichannel audio output type | Terminals |
| Component video (YPbPr/YCbCr) out | 1 |
| Number of HDMI outputs | 1 |
| Headphone outputs | 7 |
| Headphone connectivity | 3.5 mm |
Ports & interfaces
| Connectivity technology | Wired |
| Speakers connectivity type | — |
File formats
| Audio formats supported | AAC, MP3, WMA |
| Video formats supported | MPEG4 |
Radio
| Supported radio bands | AM, FM |
| AM band range | 530 — 1700 kHz |
| FM band range | 87.5 — 108 MHz |
| Preset stations quantity | 30 |
Video
Weight & dimensions
| Weight | 9200 g |
| Width | 435 mm |
| Depth | 363 mm |
| Height | 168 mm |
Network
Power
| AC input voltage | 120 V |
| AC input frequency | 60 Hz |
| Power consumption (typical) | 415 W |
| Power consumption (standby) | 0.4 W |
Optical drive
| Optical drive included | No |
Storage
show more
Frequently asked questions
Can’t find the answer to your question in the manual? You may find the answer to your question in the FAQs about the Pioneer VSX-821-K below.
How to Connect an Indoor FM Antenna to Pioneer VSX-821-K
What is the weight of the Pioneer VSX-821-K?
The Pioneer VSX-821-K has a weight of 9200 g.
Can bluetooth devices of different brands be connected to each other?
Yes, bluetooth is a universal method that allows different devices equipped with bluetooth to connect to each other.
What is the height of the Pioneer VSX-821-K?
The Pioneer VSX-821-K has a height of 168 mm.
What is the width of the Pioneer VSX-821-K?
The Pioneer VSX-821-K has a width of 435 mm.
What is bluetooth?
Bluetooth is a way of exchanging data wirelessly between electronic devices via radio waves. The distance between the two devices that exchange data can in most cases be no more than ten metres.
What is the depth of the Pioneer VSX-821-K?
The Pioneer VSX-821-K has a depth of 363 mm.
What is HDMI?
HDMI stands for High-Definition Multimedia Interface. An HDMI cable is used to transport audio and video signals between devices.
When is my volume too loud?
A volume above 80 decibels can be harmful to hearing. When the volume exceeds 120 decibels, direct damage can even occur. The chance of hearing damage depends on the listening frequency and duration.
How can I best clean my receiver?
A slightly damp cleaning cloth or soft, dust-free cloth works best to remove fingerprints. Dust in hard-to-reach places is best removed with compressed air.
Wat is Dolby Atmos?
Dolby Atmos is a technology that ensures that the sound is reflected from the ceiling to where you are listening. This makes it possible to create a 5.1 effect with only 1 speaker.
Is the manual of the Pioneer VSX-821-K available in English?
Yes, the manual of the Pioneer VSX-821-K is available in English .
Is your question not listed? Ask your question here

AUDIO/VIDEO MULTI-CHANNEL RECEIVER
RECEPTEUR AUDIOVISUEL MULTICANAL
SINTOAMPLIFICATORE AUDIO/VIDEO MULTICANALE
AUDIO/VIDEO MULTIKANAALS RECEIVER
RECEPTOR AUDIO-VIDEO MULTICANAL
AUDIO-/VIDEO- MEHRKANAL-RECEIVER
Quick Start Guide
Guide rapide
Guida di avvio rapido
Snelstartgids
Guía de inicio rápido
Kurzanleitung
Discover the benefits of registering your product online at
http://www.pioneer.co.uk
(or http://www.pioneer.eu).
Découvrez les nombreux avantages offerts en enregistrant votre produit en ligne maintenant sur
http://www.pioneer.fr
(ou http://www.pioneer.eu).
Зарегистрируйте Baшe изделие на
http://www.pioneer-rus.ru
(или http://www.pioneer.eu). Oзнакомьтесь с преимуществами
регистрации в Интернет
Registra il tuo prodotto su
http://www.pioneer.it
(o http://www.pioneer.eu) e scopri subito quali vantaggi puoi ottenere!
Ontdek nu de voordelen van online registratie! Registreer uw Pioneer product via
http://www.pioneer.nl — http://www.pioneer.be
(of http://www.pioneer.eu).
Registre su producto en
http://www.pioneer.es
(o en http://www.pioneer.eu) Descubra los beneficios de registrarse on-line:
Bitte nutzen Sie die Möglichkeit zur Registrierung Ihres Produktes unter
http://www.pioneer.de
(oder http://www.pioneer.eu)
VSX-826
-K
VSX-821
-K
VSX-821_826_SYXCN_QSG_En.book 1 ページ 2011年3月1日 火曜日 午前9時50分

VSX-826-K
VSX-821-K
Зарегистрируйте Baшe изделие на http://www.pioneer-rus.ru (или http://www.pioneer.eu).
Oзнакомьтесь с преимуществами регистрации в Интернет
Cover_821_Ru.fm 1 ページ 2011年2月9日 水曜日 午後6時15分
Благодарим вас за покупку этого изделия марки Pioneer. Полностью прочтите настоящие инструкции по эксплуатации, чтобы знать, как
правильно обращаться с этой моделью. Прочитав инструкции, сохраните их в надежном месте для использования в будущем.
CAUTION
RISK OF ELECTRIC SHOCK
DO NOT OPEN
$
&'()*+,-‘*.&/,+*-‘0
12*34/’5*$3’64&3&6-*
»#
$-‘6,74*3/893: ‘2’(,;-<<
$4*-3:!-:4/’-*$&;*/+,4$0
;*,42’./*;-,(-,5*—8*;20
/*6&-4,.&2=(&,4*2*6;20
%
&)$2:+’,-‘0&)/,4’4*$=3
3,2′>’?’/&,—&6:
$&4/:;-‘3:$*/’$-&7$2:+)8
D3-4-2-1-1_A1_Ru
D3-4-2-1-7a_A1_Ru
2
Ru
!»!#!! » «»
!! «! »!#» »!
!» »»!! «!»»
!!#!! »»!!
»»! »! «
!»! «!»#!
D3-4-2-1-3_A1_Ru
Информация для пользователей по сбору и утилизации
бывшего в эксплуатации оборудования и отработавших элементов питания
#$%&’&(%&%%&%%%&&&%$&$&($
$&’$%%$&$%%$&&%%&$’&$
$%$%&’$$&’’$&&&
$&&$&’’&$’%%&%%&$’&$$
%$%’%&&$$$%&’(&&’’&$$%%(%&%’&$
&$$%&&$$$%$’&%&(&$&
%(%&&$$$%%$(&&$$&
$%%(%$&$%$%$%%& &&$&%$
%&$$%$&(&$%&$%(&&
%&&$&&$&(%$($$&&$$$&
%&$&&
&%&&%$&%!&%%&%&&’‘&%$%%(%%
&$’&$&&’&&%%%&(&$&%$%&’$
&&$$$%$&&%$$%%(%%&$&&%%&
$&%&&%(%
Данные обозначения утверждены только для Европейского Союза.
Pb
Для стран, которые не входят в состав Европейского Союза:
«% $$%%(%&$%(%&’$%$&&$$$%$
%%%%&%%!&%%&%&&’$%%(%%
K058a_A1_Ru
()*+,()*-+**
,
!«#$%&»$%’
D3-4-2-1-4*_A1_Ru
%&'()*()*(*)(‘*
(((*)*
+$’+$)((((
&)()’*((*)
()*(*&'()*()
(*(((***)*((
) ’)!)(«!
(*)**)!*(!(#
D3-4-2-1-7c*_A1_Ru
VSX-821_826_SYXCN_Ru.book 2 ページ 2011年2月9日 水曜日 午後2時8分
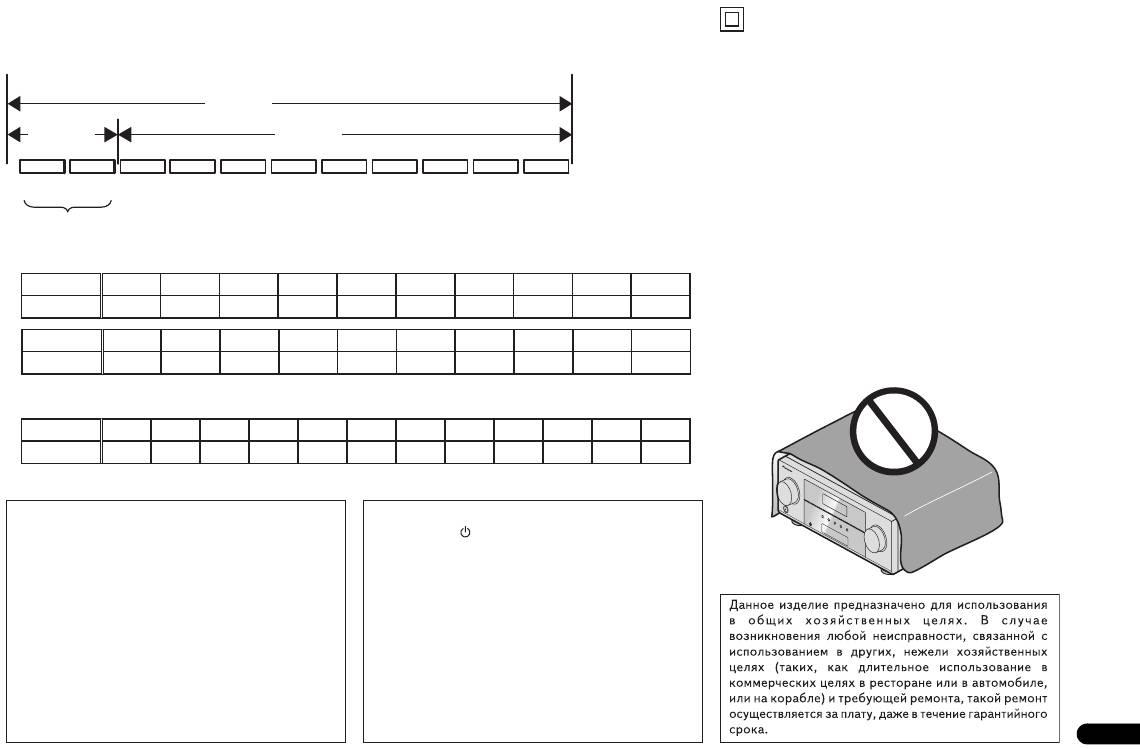
-./012/10.11/100/1/1.1
112/.
1
1
1
-./.12/10.1
!
*
«
#
$
%
&
‘
(
)
+
,
!
*
3
4
5
6
7
8
9
:
;
<
!
*
«
#
$
%
&
‘
(
)
+
,
3
4
#$%&‘&%(&&&%&
$’$’&$%((’&%(
!»#$» STANDBY/ON
$%&((
»#!«#$»!
&$'(’&%(&%&‘&$
»#!»#$
%((‘%&&&’&(
»!!«
$&(%’&%((%(
»!!»
(’‘%&
«!$ »!!«
%(&$(&($%%&’&%(&
««! !
&%&&%
$
$ «
’&$%(%%($&
»«!»!!«
&‘%(’&%((%&&&(&$%&
!»
&$%’$’&%
»$»
‘&!&$%&’’$(«
» !
D3-4-2-2-1a_A1_Ru
D3-4-2-2-2a*_A1_Ru
K041_A1_Ru
3
Ru
#$%&'(&'($‘(’('((
$'($'((%%%%%
%($(&$&($%&'($‘(
’’$&’’%%’’%
‘$
$&’&'($‘(%(‘ %%($'(%
(%%%’% %&
$(&%%% % %!($!$
%%$»(%($'(%%
‘&’&($(%%‘(
$&!%%$(%!(%’($(%%
($%%%&'(%($&%
('($%%'(%
D3-4-2-1-7b*_A1_Ru
VSX-821_826_SYXCN_Ru.book 3 ページ 2011年2月9日 水曜日 午後2時8分
VSX-821_826_SYXCN_Ru.book 4 ページ 2011年2月9日 水曜日 午後2時8分
Подключение iPod . . . . . . . . . . . . . . . . . . . . . . . . . . . . . . . . . 22
Настройка параметров звука. . . . . . . . . . . . . . . . . . . . . . . . . . 36
Содержание
Подключение устройства USB . . . . . . . . . . . . . . . . . . . . . . . . 22
Выполнение аудио или видеозаписи. . . . . . . . . . . . . . . . . . . . 37
Подключение ресивера к электророзетке. . . . . . . . . . . . . . . . . 23
06 Меню System Setup (Настройка системы)
Перед началом работы
. . . . . . . . . . . . . . . . . . . . . . 5
03 Основная настройка
Использование меню System Setup (Настройка системы) . . . . 38
Проверка комплекта поставки . . . . . . . . . . . . . . . . . . . . . . . . . 5
Отмена режима демонстрации дисплея . . . . . . . . . . . . . . . . . . 24
Ручная настройка громкоговорителей . . . . . . . . . . . . . . . . . . 38
Установка ресивера . . . . . . . . . . . . . . . . . . . . . . . . . . . . . . . . . 5
Автоматическая настройка объемного звучания (MCACC) . . . 24
Speaker Setting (Настройка громкоговорителей) . . . . . . . . . 38
Проблемы при использовании автоматической
Crossover Network (Разделительный фильтр). . . . . . . . . . . . 39
Порядок выполнения настроек на ресивере
. . . . 5
настройки MCACC . . . . . . . . . . . . . . . . . . . . . . . . . . . . . . . 25
Channel Level (Уровень канала). . . . . . . . . . . . . . . . . . . . . . 40
01 Органы управления и индикаторы
Speaker Distance (Расстояние до громкоговорителей) . . . . . 40
04 Основные операции воспроизведения
Передняя панель . . . . . . . . . . . . . . . . . . . . . . . . . . . . . . . . . . . 6
Меню назначения входов . . . . . . . . . . . . . . . . . . . . . . . . . . . . 40
Воспроизведение источника . . . . . . . . . . . . . . . . . . . . . . . . . .26
Дисплей . . . . . . . . . . . . . . . . . . . . . . . . . . . . . . . . . . . . . . . . 7
Настройка системы громкоговорителей (Speaker System)
Выбор входного аудиосигнала. . . . . . . . . . . . . . . . . . . . . . . 26
Пульт дистанционного управления . . . . . . . . . . . . . . . . . . . . . 8
(только VSX-826) . . . . . . . . . . . . . . . . . . . . . . . . . . . . . . . . . . 41
Воспроизведение iPod . . . . . . . . . . . . . . . . . . . . . . . . . . . . . . . 27
Установка батареек . . . . . . . . . . . . . . . . . . . . . . . . . . . . . . . 9
Настройка параметров видеосигнала (Video Parameter)
Воспроизведение файлов, сохраненных на iPod . . . . . . . . . . 28
Дальность действия пульта дистанционного управления . . . 9
(только VSX-826) . . . . . . . . . . . . . . . . . . . . . . . . . . . . . . . . . . 41
Основные органы управления воспроизведением . . . . . . . . 28
Преобразователь видеосигнала . . . . . . . . . . . . . . . . . . . . . . 41
02 Подключение оборудования
Просмотр фотографий и видеоконтента. . . . . . . . . . . . . . . . 28
Разрешение. . . . . . . . . . . . . . . . . . . . . . . . . . . . . . . . . . . . . 41
Выбор количества громкоговорителей . . . . . . . . . . . . . . . . . . 10
Воспроизведение устройства USB. . . . . . . . . . . . . . . . . . . . . . 28
Аспект . . . . . . . . . . . . . . . . . . . . . . . . . . . . . . . . . . . . . . . . 42
Некоторые советы по улучшению качества звучания . . . . . 10
Основные органы управления воспроизведением . . . . . . . . 29
Настройка выхода предварительного усилителя
Подключение громкоговорителей . . . . . . . . . . . . . . . . . . . . . 11
Поддержка сжатых аудиосигналов. . . . . . . . . . . . . . . . . . . . 29
®
(только VSX-821) . . . . . . . . . . . . . . . . . . . . . . . . . . . . . . . . . . 42
Подключение задних громкоговорителей объемного
АДАПТЕР Bluetooth
для прослушивания музыки без
Меню Auto Power Down (автоматическое отключение
звучания или передних верхних громкоговорителей
проводов. . . . . . . . . . . . . . . . . . . . . . . . . . . . . . . . . . . . . . . . . 29
питания). . . . . . . . . . . . . . . . . . . . . . . . . . . . . . . . . . . . . . . . . 42
(Для VSX-826) . . . . . . . . . . . . . . . . . . . . . . . . . . . . . . . . . . 11
Воспроизведение музыки по беспроводной связи . . . . . . . . 29
Меню FL Demo Mode (режим демонстрации). . . . . . . . . . . . . 42
Подключение задних громкоговорителей объемного
Соединение (спаривание) АДАПТЕРА Bluetooth и
звучания или передних верхних громкоговорителей
устройства с беспроводным интерфейсом Bluetooth. . . . . . . 30
07 Функция Управление с HDMI
(Для VSX-821) . . . . . . . . . . . . . . . . . . . . . . . . . . . . . . . . . . 11
Соединение (спаривание) АДАПТЕРА Bluetooth и у
Подключение функции Управление с HDMI . . . . . . . . . . . . . 43
Переключение терминалов громкоговорителей . . . . . . . . . 13
стройства с беспроводным интерфейсом Bluetooth. . . . . . . . 30
HDMI Setup . . . . . . . . . . . . . . . . . . . . . . . . . . . . . . . . . . . . . . 43
Подсоединение кабелей . . . . . . . . . . . . . . . . . . . . . . . . . . . . . 13
Прослушивание радиопередач . . . . . . . . . . . . . . . . . . . . . . . . 31
Перед использованием синхронизации. . . . . . . . . . . . . . . . . . 44
Кабели HDMI . . . . . . . . . . . . . . . . . . . . . . . . . . . . . . . . . . . 13
Улучшение звучания в диапазоне FM . . . . . . . . . . . . . . . . . 31
О синхронизированных операциях . . . . . . . . . . . . . . . . . . . . . 44
О HDMI . . . . . . . . . . . . . . . . . . . . . . . . . . . . . . . . . . . . . . . 13
Сохранение запрограммированных радиостанций . . . . . . . .31
О подключении к изделию другого производителя,
Аналоговые аудиокабели . . . . . . . . . . . . . . . . . . . . . . . . . . 14
Прослушивание запрограммированных радиостанций. . . . . 31
поддерживающего функцию Управление с HDMI. . . . . . . . 44
Цифровые аудиокабели . . . . . . . . . . . . . . . . . . . . . . . . . . . 14
Присваивание названий запрограммированным
Меры предосторожности по функции Управление с
Видеокабели. . . . . . . . . . . . . . . . . . . . . . . . . . . . . . . . . . . . 14
радиостанциям . . . . . . . . . . . . . . . . . . . . . . . . . . . . . . . . . . 31
HDMI. . . . . . . . . . . . . . . . . . . . . . . . . . . . . . . . . . . . . . . . . . . 44
О преобразователе видеосигнала
Введение в систему радиоданных RDS . . . . . . . . . . . . . . . . . . 32
08 Управление остальными частями системы
(только VSX-826). . . . . . . . . . . . . . . . . . . . . . . . . . . . . . . . . . 15
Поиск программ RDS . . . . . . . . . . . . . . . . . . . . . . . . . . . . . 32
Настройка пульта дистанционного управления для работы с
Подключение видеовыходов (только VSX-821) . . . . . . . . . . . 15
Отображение информации RDS . . . . . . . . . . . . . . . . . . . . . . 32
другими компонентами . . . . . . . . . . . . . . . . . . . . . . . . . . . . . 45
Подключение телевизора и компонентов
05 Прослушивание аудиозаписей
Непосредственный ввод кодов компонентов . . . . . . . . . . . . . 45
воспроизведения . . . . . . . . . . . . . . . . . . . . . . . . . . . . . . . . . . 16
Выбор режима прослушивания . . . . . . . . . . . . . . . . . . . . . . . . 33
Сброс параметров пульта дистанционного управления. . . . . . 45
Подключение с помощью HDMI. . . . . . . . . . . . . . . . . . . . . 16
Автоматическое воспроизведение . . . . . . . . . . . . . . . . . . . . 33
Органы управления телевизорами . . . . . . . . . . . . . . . . . . . . . 45
Подключение телевизора без входа HDMI . . . . . . . . . . . . . 17
Прослушивание материала с использованием объемного
Органы управления другими компонентами. . . . . . . . . . . . . . 46
Подключение проигрывателя DVD без выхода HDMI
звучания . . . . . . . . . . . . . . . . . . . . . . . . . . . . . . . . . . . . . . . 33
Список предварительно заданных кодов . . . . . . . . . . . . . . . . 46
(только VSX-826) . . . . . . . . . . . . . . . . . . . . . . . . . . . . . . . . 18
Использование дополнительного объемного звучания . . . . 34
09 Дополнительная информация
Подключение спутникового ресивера или другой цифровой
Использование функции Stream Direct (Прямое
Устранение неисправностей . . . . . . . . . . . . . . . . . . . . . . . . . . 52
приставки . . . . . . . . . . . . . . . . . . . . . . . . . . . . . . . . . . . . . . . 19
воспроизведение) . . . . . . . . . . . . . . . . . . . . . . . . . . . . . . . . 34
Общие сведения . . . . . . . . . . . . . . . . . . . . . . . . . . . . . . . . . 52
Подключение рекордера HDD/DVD, рекордера Blu-ray Disc и
Использование функции Sound Retriever (Восстановление
HDMI . . . . . . . . . . . . . . . . . . . . . . . . . . . . . . . . . . . . . . . . . 53
других источников видеосигнала . . . . . . . . . . . . . . . . . . . . . . 19
звучания) . . . . . . . . . . . . . . . . . . . . . . . . . . . . . . . . . . . . . . . . 34
Важные сведения о подключении HDMI . . . . . . . . . . . . . . . 54
Использование разъемов компонентного видео . . . . . . . . . . . 20
Прослушивание с использованием эквалайзера акустической
Сообщения iPod . . . . . . . . . . . . . . . . . . . . . . . . . . . . . . . . . 54
Подключение других аудиокомпонентов . . . . . . . . . . . . . . . . 20
калибровки . . . . . . . . . . . . . . . . . . . . . . . . . . . . . . . . . . . . . . . 35
®
Сообщения USB . . . . . . . . . . . . . . . . . . . . . . . . . . . . . . . . . 54
Подключение дополнительного АДАПТЕРА Bluetooth
. . . . 21
Улучшение качества звучания с помощью функции Phase
iPod/iPhone/iPad . . . . . . . . . . . . . . . . . . . . . . . . . . . . . . . . . . . 54
Подключение антенн . . . . . . . . . . . . . . . . . . . . . . . . . . . . . . . 21
Control (Корректировка фазы). . . . . . . . . . . . . . . . . . . . . . . . . 35
Сброс параметров ресивера (перезагрузка) . . . . . . . . . . . . . . . 54
Использование внешних антенн . . . . . . . . . . . . . . . . . . . . . 21
Использование обработки заднего тылового канала . . . . . . . . 35
Чистка устройства . . . . . . . . . . . . . . . . . . . . . . . . . . . . . . . . . 54
Подключение к видеоразъему на передней панели. . . . . . . . . 22
Настройка функции Up Mix . . . . . . . . . . . . . . . . . . . . . . . . . . 35
Спецификации . . . . . . . . . . . . . . . . . . . . . . . . . . . . . . . . . . . . 55
4
Ru

VSX-821_826_SYXCN_Ru.book 5 ページ 2011年2月9日 水曜日 午後2時8分
Перед началом работы
Порядок выполнения
4
Настройка системы громкоговорителей (Speaker
System) (только VSX-826) (стр. 41)
настроек на ресивере
(Укажите, используется задний громкоговоритель
Проверка комплекта поставки
объемного звучания или передний верхний
Аппарат является полноценным аудио—видео ресивером,
громкоговоритель.)
Проверьте наличие перечисленных ниже принадлежностей:
оборудованным множеством функций и терминалов. Он
Настройка выхода предварительного усилителя
• Установочный микрофон
может легко использоваться после выполнения процедуры
подключений и настроек, описанных ниже.
(только VSX-821) (стр. 42)
• Пульт дистанционного управления
Цвета пунктов означают следующее:
(При подключении передних верхних громкоговорителей.)
• Сухие батарейки размера AAA IEC R03 (
дл
я
питания ДУ),
2 шт.
Меню назначения входов (стр. 40)
Требуемый параметр настройки
• Рамочная антенна АМ
(При использовании подключений, кроме
рекомендуемых подключений.)
• Проволочная антенна FM
Настройка, выполняемая при необходимости
Использование функции возвратного
• Кабель iPod
аудиоканала (стр. 43)
• Кабель питания
(Если подключенный телевизор поддерживает
• Гарантийный сертификат
1
Подключение громкоговорителей
функцию возвратного аудиоканала через HDMI.)
• Краткое руководство пользователя
Места расположения громкоговорителей оказывают
• Данное руководство по эксплуатации (CD-ROM)
значительное влияние на звучание.
• Выбор количества громкоговорителей (стр.10)
5
Для настройки системы используйте экранную
Установка ресивера
• Подключение громкоговорителей (стр. 11)
автоматическую настройку MCACC
• Переключение терминалов громкоговорителей (стр. 13)
• Автоматическая настройка объемного звучания (MCACC)
• При установке данного устройства убедитесь в том, что оно
(стр. 24)
размещено на ровной и твердой поверхности.
Не устанавливайте ресивер в следующих местах:
– на цветном телевизоре (на экране могут появиться
2
Подключение компонентов
Для прослушивания объемного звука потребуется
6
Воспроизведение источника (стр. 26)
искажения)
использовать цифровое соединение от проигрывателя Blu-
• Выбор входного аудиосигнала (стр.26)
– рядом с кассетным магнитофоном (или устройством,
ray Disc/DVD к ресиверу.
• Воспроизведение iPod (стр. 27)
которое излучает магнитное поле). Это может вызвать
помехи в звучании.
• О преобразователе видеосигнала (только VSX-826)
• Воспроизведение устройства USB (стр. 28)
(стр.15)
– в местах с прямым воздействием солнечных лучей
• Выбор режима прослушивания (стр.33)
• Подключение видеовыходов (только VSX-821) (стр. 15)
– в сырых или влажных местах
• Подключение телевизора и компонентов воспроизведения
– в местах со слишком высокой или слишком низкой
(стр.16)
темп
ературой
7
Регулировка качества звучания по желанию
• Подключение антенн (стр. 21)
– в местах с повышенной вибрацией или подверженных
• Использование функции Sound Retriever (Восстановление
сотрясениям
• Подключение ресивера к электророзетке (стр. 23)
звучания) (стр. 34)
– в очень пыльных местах
• Улучшение качества звучания с помощью функции Phase
Control (Корректировка фазы) (стр. 35)
– в местах, подверженных воздействию горячего пара или
масел (например, кухня)
3
Включение питания
• Прослушивание с использованием эквалайзера
Убедитесь, что в качестве источника видеовхода
акустической калибровки (стр.35)
телевизора выбран ресивер. При возникновении
• Использование обработки заднего тылового канала (стр.35)
затруднений обратитесь к руководству, прилагаемому к
• Настройка функции Up Mix (стр. 35)
телевизору.
• Настройка параметров звука (стр. 36)
• Ручная настройка громкоговорителей (стр. 38)
8
Максимально возможное использование пульта ДУ
• Настройка пульта дистанционного управления для работы
с другими компонентами (стр. 45)
5
Ru