

Quick Start Guide
Guide rapide
Kurzanleitung
Guida di avvio rapido
Snelstartgids
Guía de inicio rápido
Краткое руководство пользователя
AV Receiver
Amplificateur AV
AV Receiver
Register your product at
http://www.pioneerelectronics.com (US)
http://www.pioneerelectronics.ca (Canada)
Sintoamplificatore AV
AV Receiver
Receptor AV
AV-ресивер
VSX-830-K/-S
English
Thank you for buying this Pioneer product. This Quick Start Guide includes instructions for basic connections and operations to
allow simple use of the receiver. For detailed descriptions of the receiver, see the “Operating Instructions” provided on the
included CD-ROM ( ).
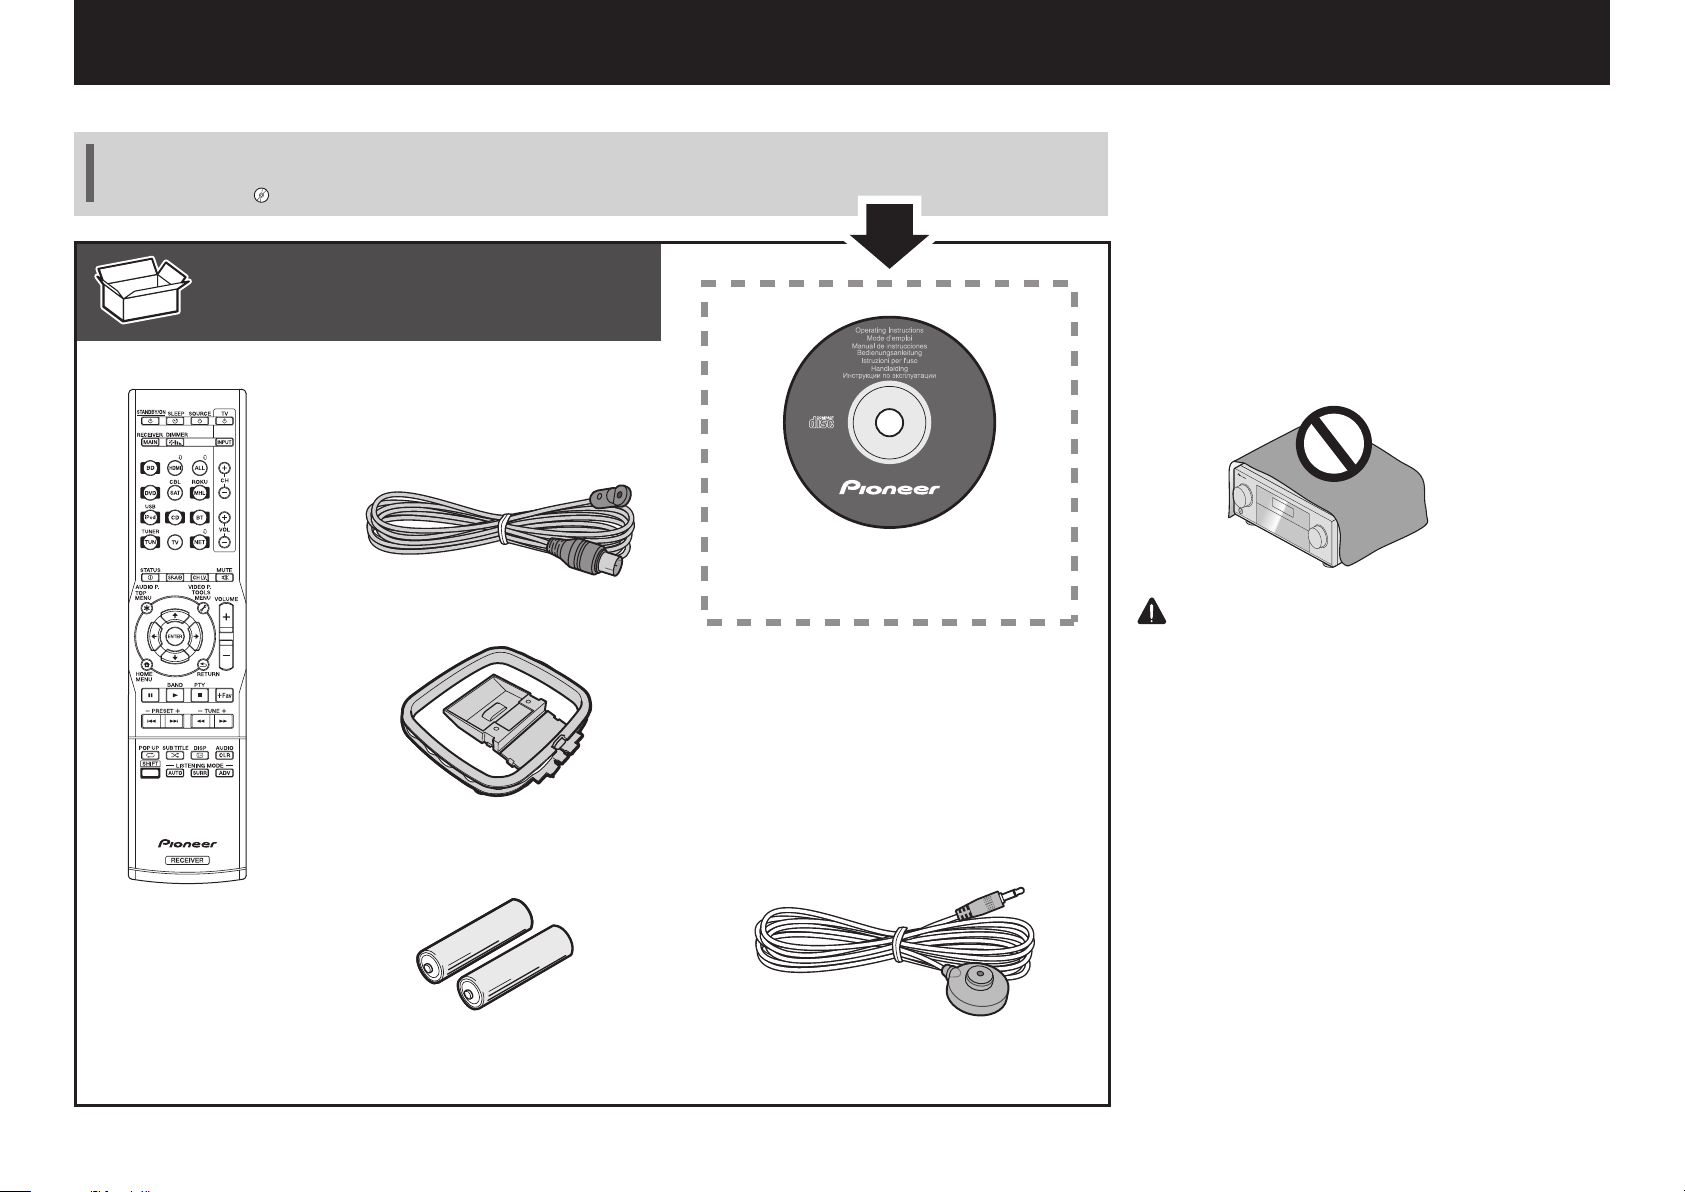
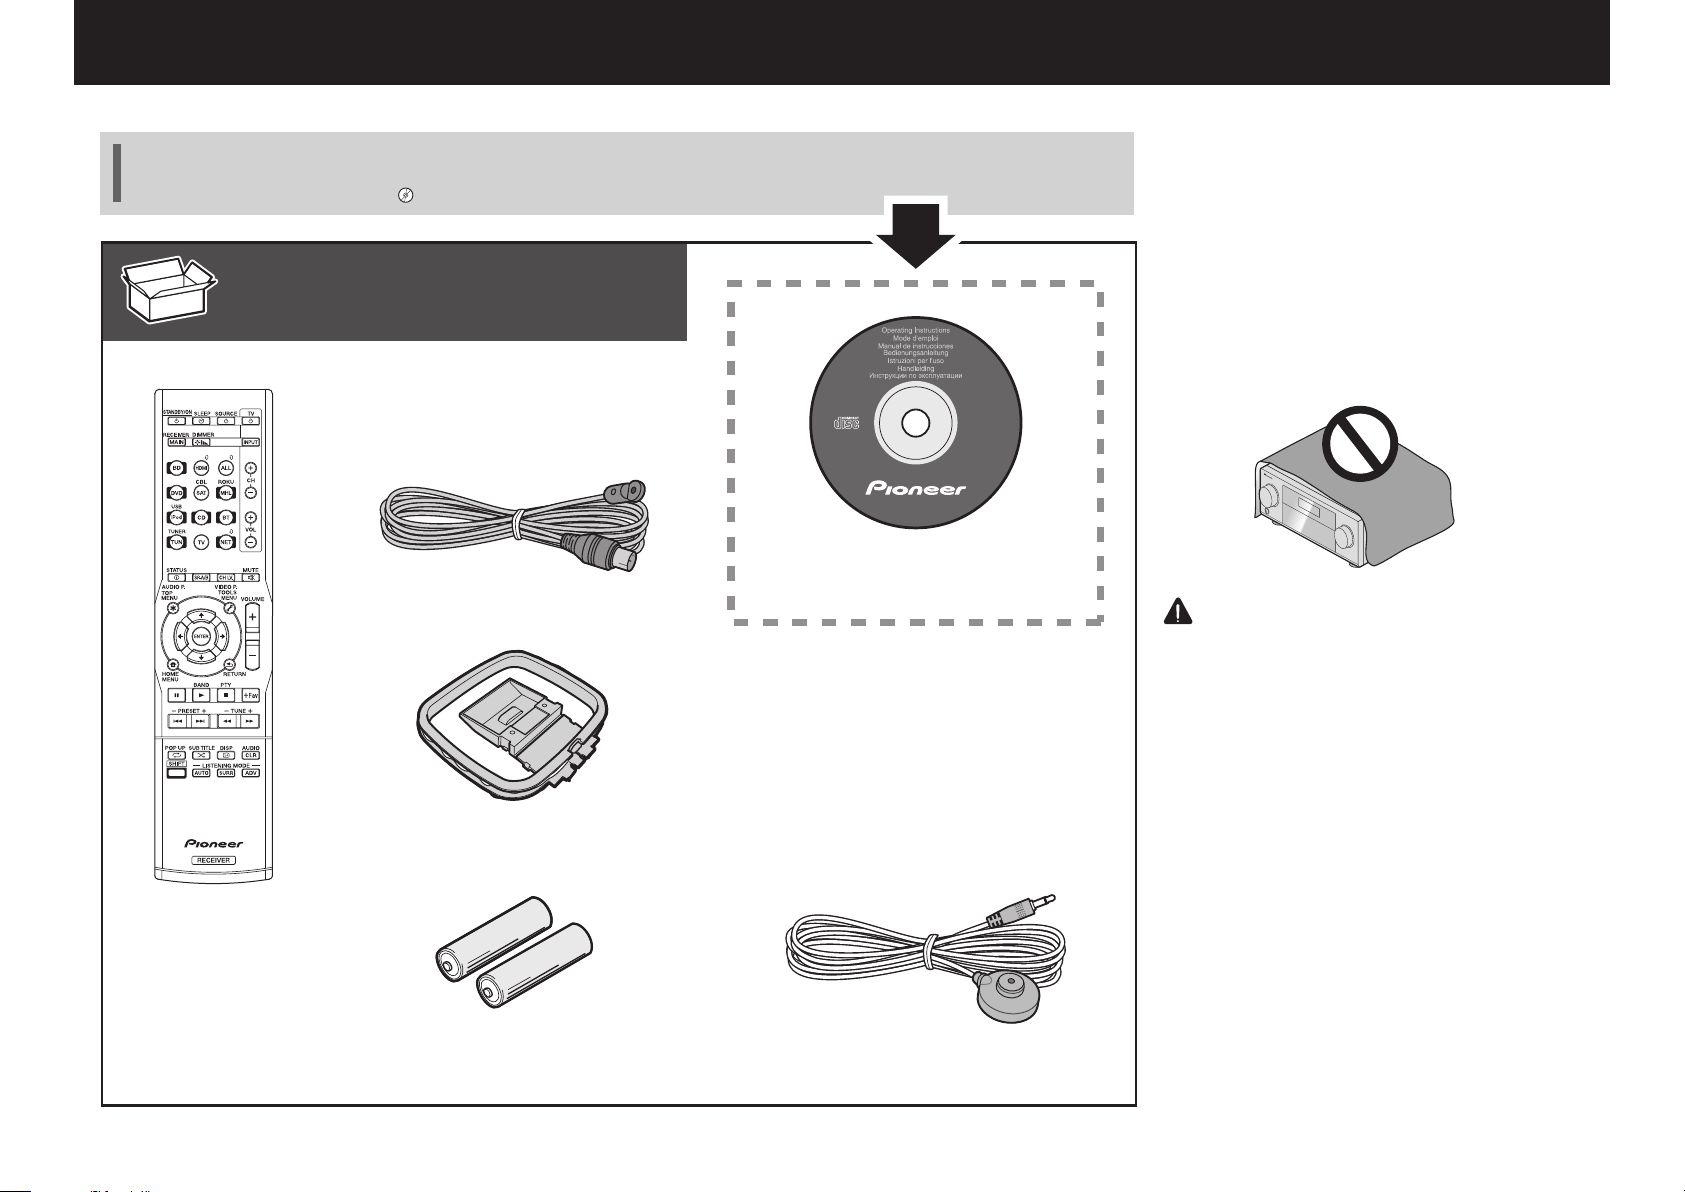
What’s in the box
Remote Control
FM wire antenna
AM loop antenna
CD-ROM
Power cord
Safety Brochure
Warranty sheet
These quick start guide
VSX-1130-K
VSX-930-K/-S
VSX-830-K/-S
VENTILATION CAUTION
When installing this unit, make sure to leave space
around the unit for ventilation to improve heat radiation
(at least 40 cm at top, 20 cm at rear, and 20 cm at each
side).
WARNING
Slots and openings in the cabinet are provided for
ventilation to ensure reliable operation of the product,
and to protect it from overheating. To prevent fire
hazard, the openings should never be blocked or
covered with items (such as newspapers, table-cloths,
curtains) or by operating the equipment on thick carpet
or a bed.
D3-4-2-1-7b*_A1_En
CAUTION
・Do not use or store batteries in direct sunlight or
otherexcessively hot place, such as inside a car
or near a heater. This can cause batteries to leak,
overheat, explode or catch fire. It can also
reduce the life or performance of batteries.
・
When disposing of used batteries, please
comply with governmental regulations or
environmental public institution’s rules that
apply in your country/area.
Setup microphoneAAA size IEC R03 dry cell batteries x2
2
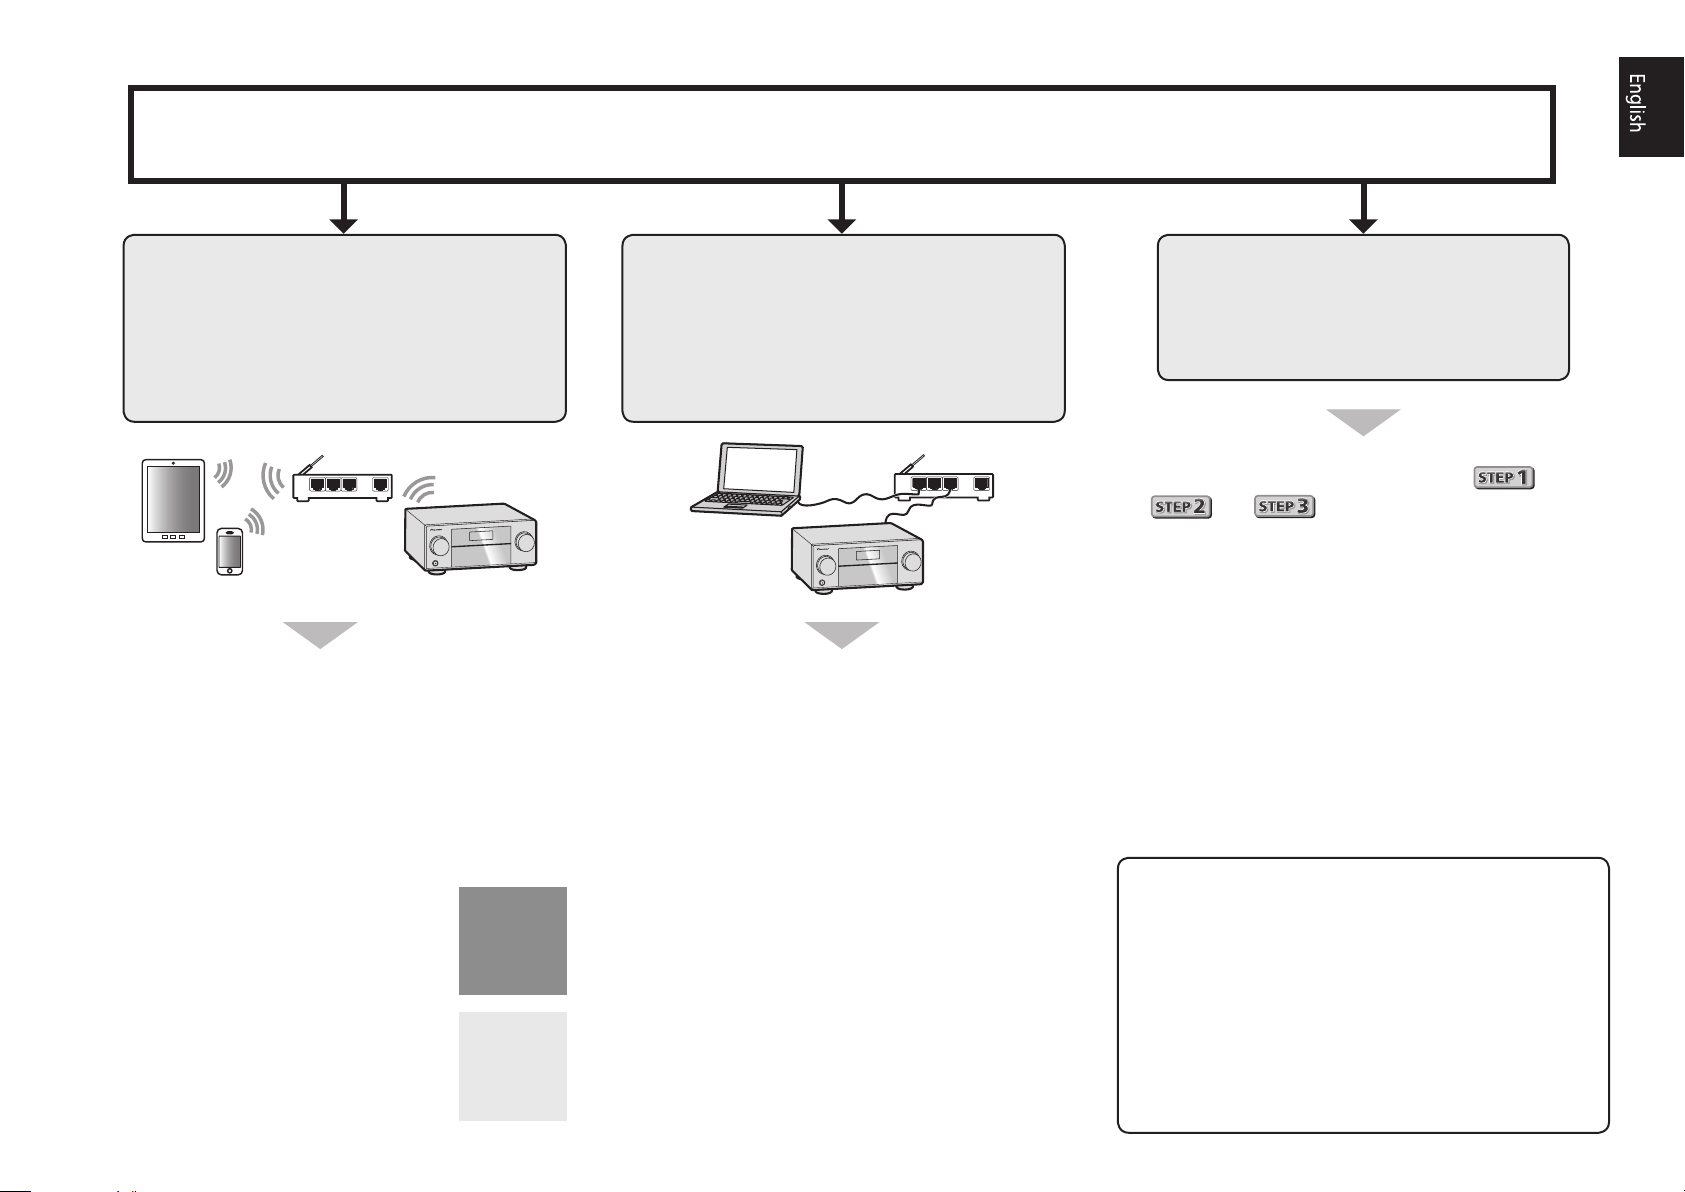
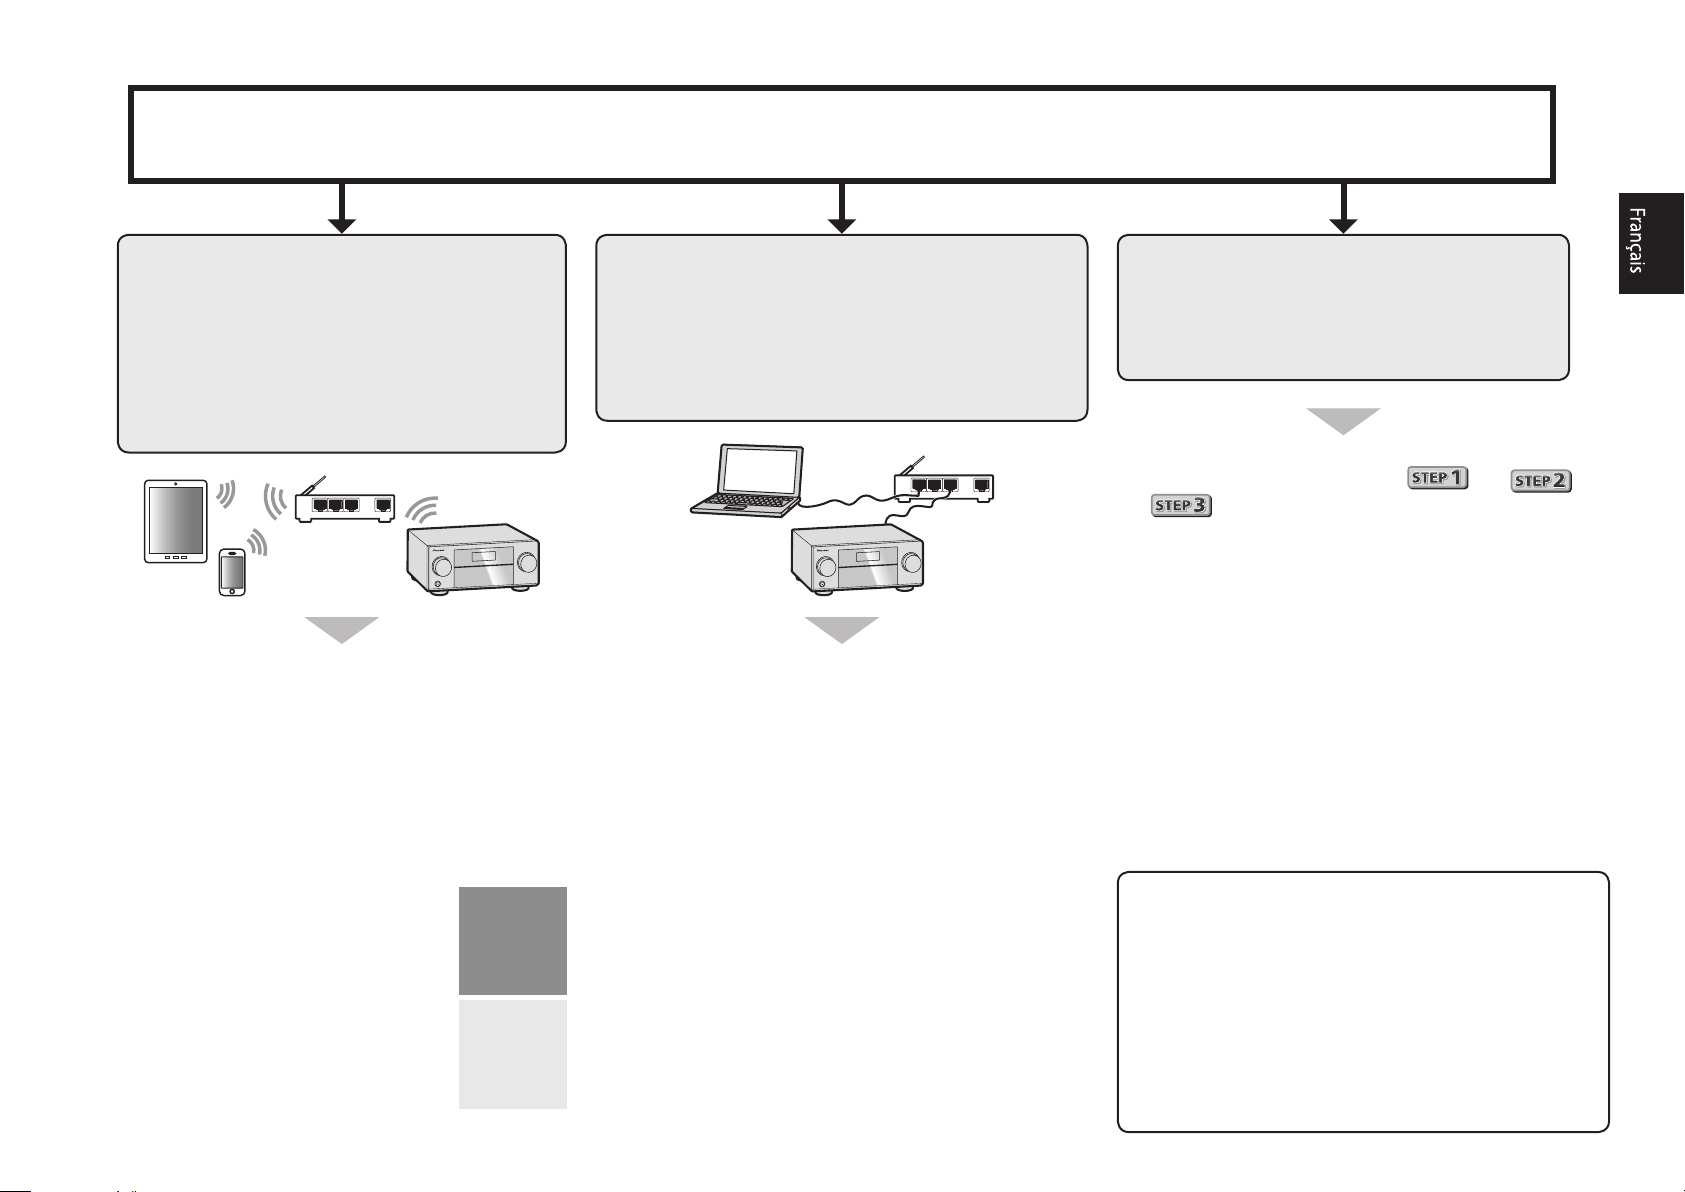
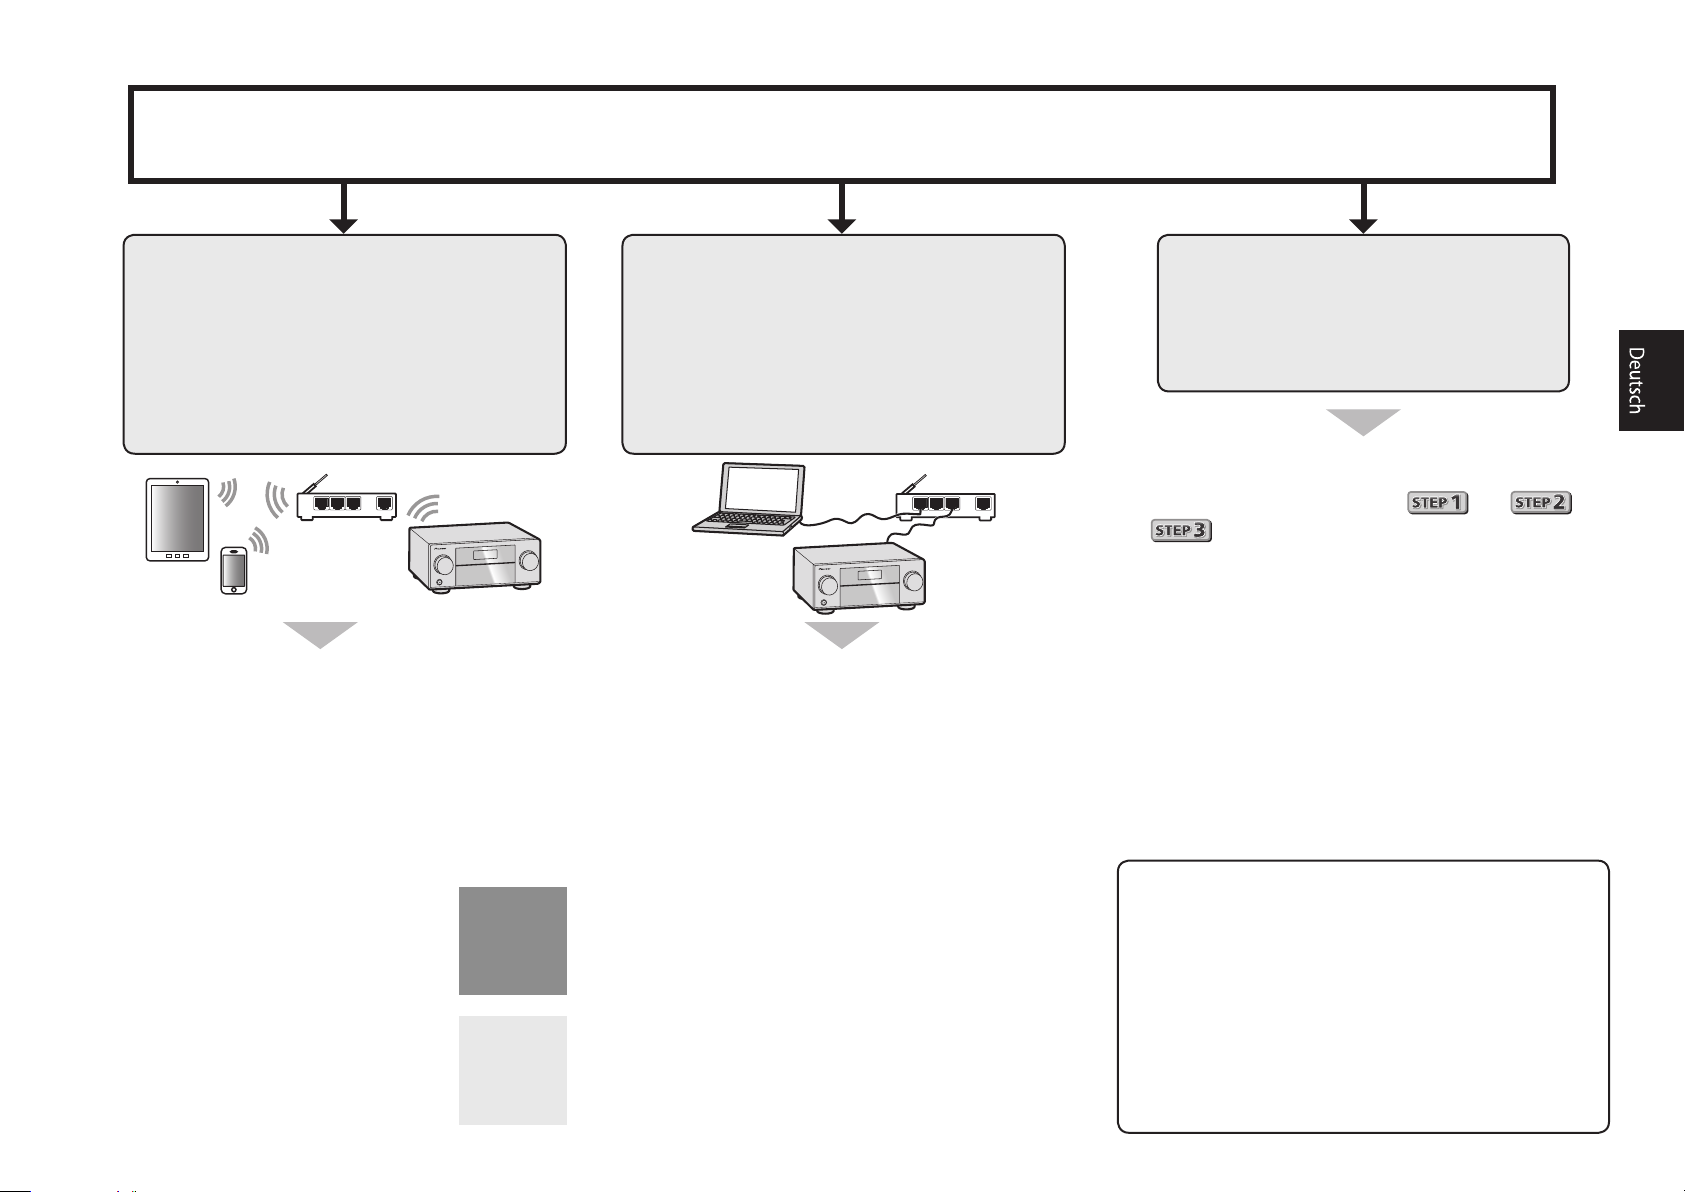
Connection and initial setup
Perform connection and initial settings in any of the ways listed below.
Use
“Start-up Navi”
app to perform
connection and initial settings
• Use a smartphone/tablet.
• Network connection is required.
LAN
Download and start “Start-up Navi” app.
1
Proceed along with the app guidance to
2
perform connection and initial settings.
Follow the guidance of the built-in
AVNavigator to perform connection
and initial settings
• Use a Mac/PC.
• Network connection is required.
LAN
Please read the booklet “If you have a Mac/
1
PC”.
Follow the guidance of the AVNavigator
2
built into the receiver to proceed with the
connection and initial settings.
Follow the instructions in the
booklet to perform connection
and initial settings
1
Read the booklet in the order of
Follow the instructions of each step to
2
proceed.
.
Download “Start-up Navi” app from here.
If you have an iPhone or iPad
Please search for “Start-up Navi” app in the App
Store.
If you have an Android device
Please search for “Start-up Navi” app in Google
Play.
Regarding WIRELESS indicator flashing
• Flashes when using WAC Mode. (Mode where network
settings can be changed by iPhone, iPad and iPod
touch, when this receiver is being used as a Wi-Fi
Access point)
When switching on the unit after network setup or a
LAN cable is connected, the WIRELESS indicator will
not flash.
• When not making a network connection, there is no
problem using it as is.
3

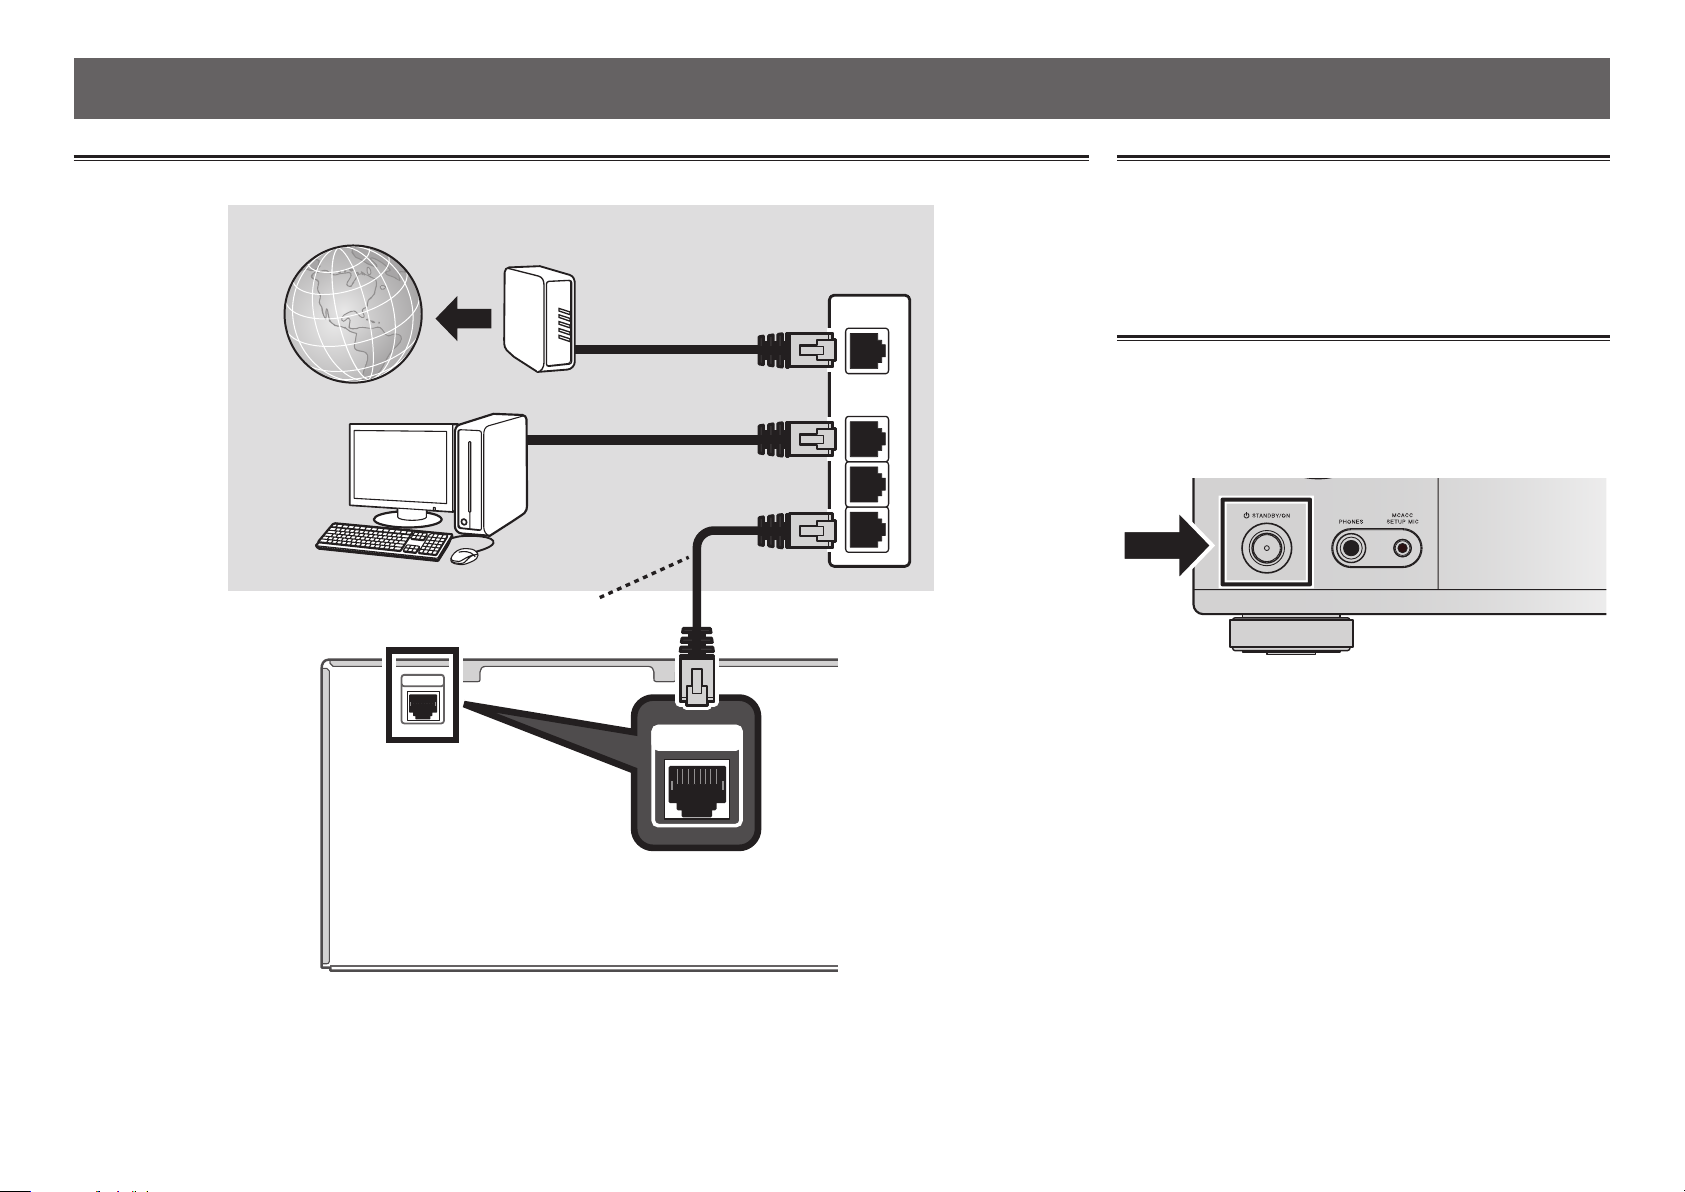
If you have a Mac/PC
Connecting to the network through LAN interface
Internet
Modem
Computer
LAN cable (sold separately)
NETWORK
1
NETWORK
Router
WAN
LAN
Plugging in the receiver
After connecting to a LAN, connect the power cord of the
receiver to a power outlet.
Plug the supplied power cord into the AC IN socket on the
1
back of the receiver.
Plug the other end into a power outlet.
2
Turning the power on
Press
computer.
1
2
3
Wait a few minutes after turning the power on before
performing the following operation.
STANDBY/ON
to switch on the receiver and your
When connecting this receiver to a wireless LAN router by Wi-Fi, refer to the “Setting network connection” in the CD-ROM’s
operating instructions.
4

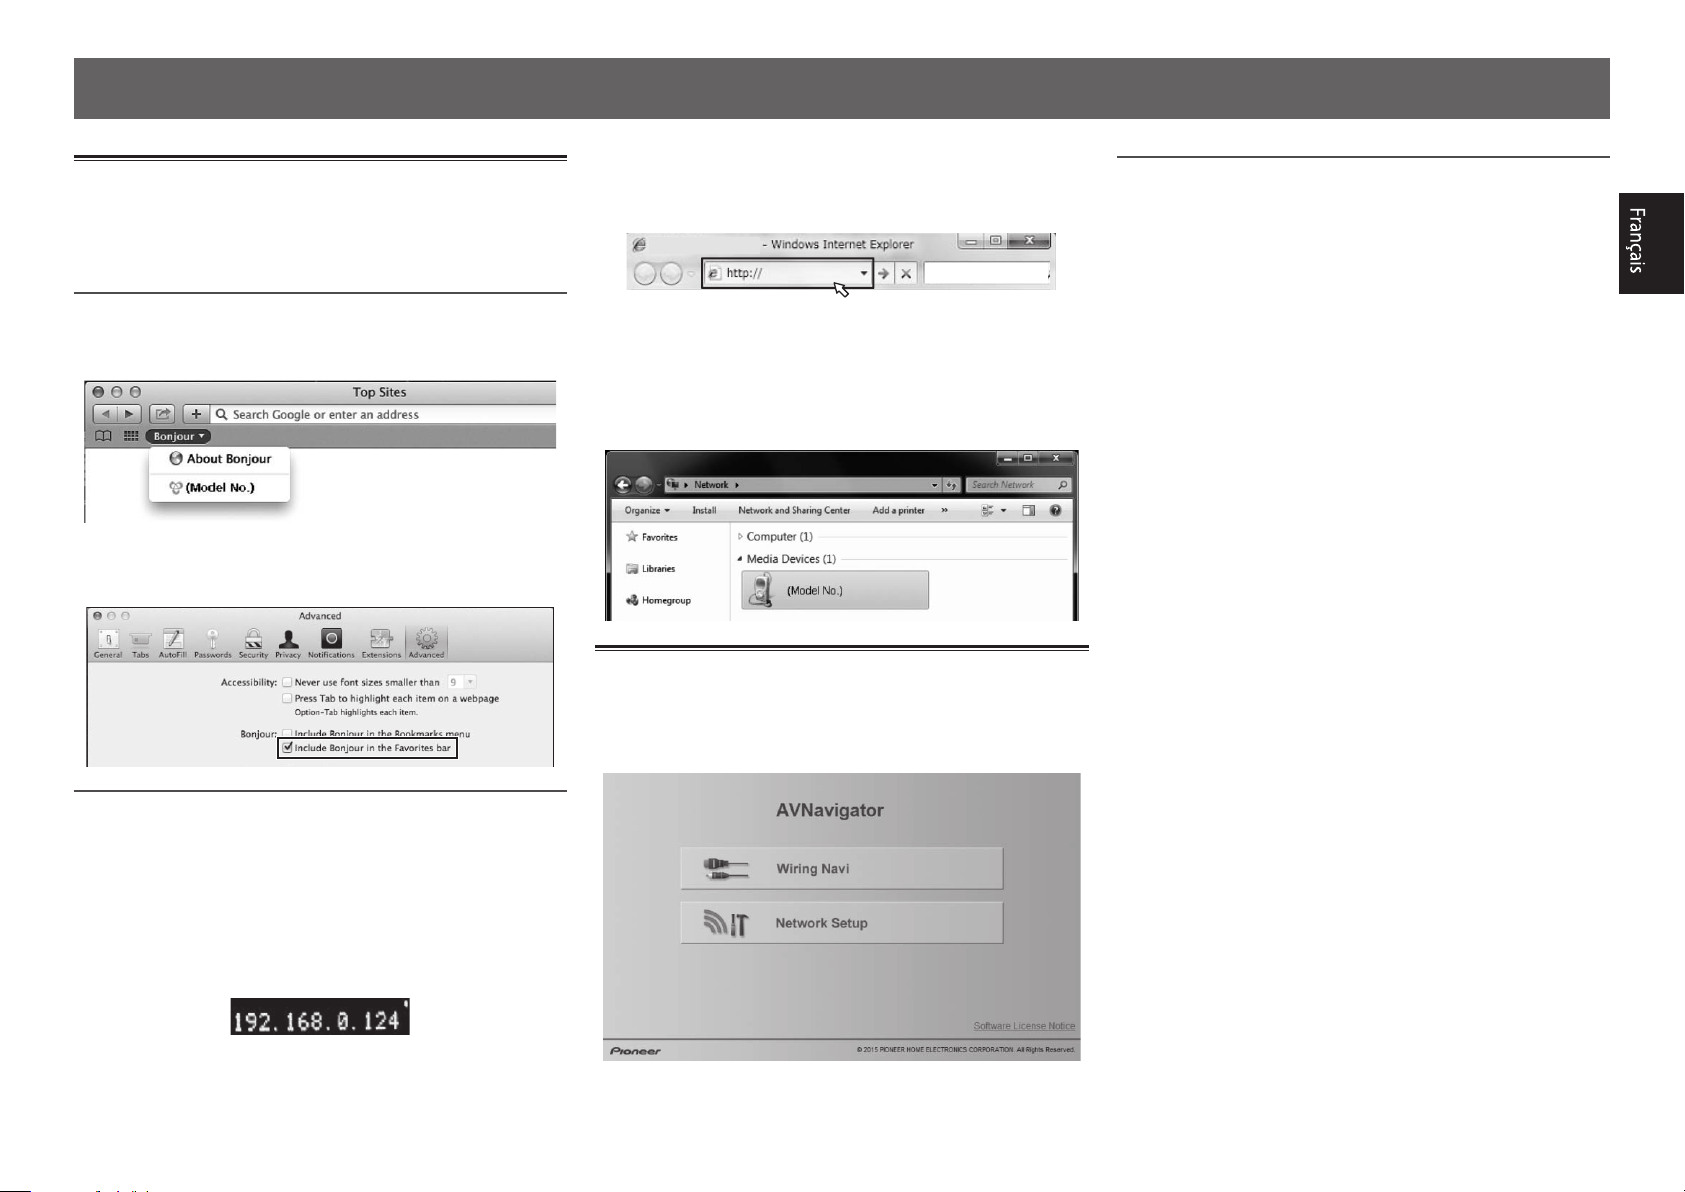
Launching the built-in AVNavigator
Operate AVNavigator by following the screen prompts of your
computer.
Using Mac
Launch Safari and click <VSX-830> displayed in ‘
the Bookmarks bar.
Bonjour
’ on
Enter number in 2 above in the field in
3
Internet Explorer shown below and then press
the ENTER key.
(Example Input Format) 192.168.0.124
• With a Windows PC, you can use the following method to
launch AVNavigator.
Launch Explorer and then right-click <VSX-830>
displayed in the ‘
webpage
’.
Network
’ folder, then click ‘
View device
Operating environment
• AVNavigator can be used in the following environments.
–Windows PC: Microsoft
Windows
–Mac: OS X v 10.9 or 10.8
• Some AVNavigator functions use an Internet browser. The
following browsers are supported:
–Windows PC: Internet Explorer
–Mac OS: Safari 6.0, 7.0
• Depending on the computer network setting or security
setting, AVNavigator may not operate.
®
8/Windows® 8.1
®
Windows Vista®/Windows® 7/
®
8, 9, 10, 11
Bonjour
• If ‘
the Favorites bar
the Safari ‘
’ is not displayed, tick the ‘
Preferences…
’ check box on the ‘
’ menu.
Include Bonjour in
Advanced
’ tab in
Using Windows PC
Start up Internet Explorer on your PC (open
1
any random Internet page).
Press STATUS on the remote control and check
2
the front panel display on the receiver (the IP
address of the receiver will appear).
(Example Text Display)
If 0.0.0.0 or 169.254.112.202 appears in the address, it
indicates that the receiver is not connected to the network.
Check to make sure that the receiver and router are
properly connected.
About using Wiring Navi
Wiring Navi starts when ‘
AVNavigator screen.
Wiring Navi
’ is pressed on the
5
Follow the booklet instructions to perform connection and initial settings
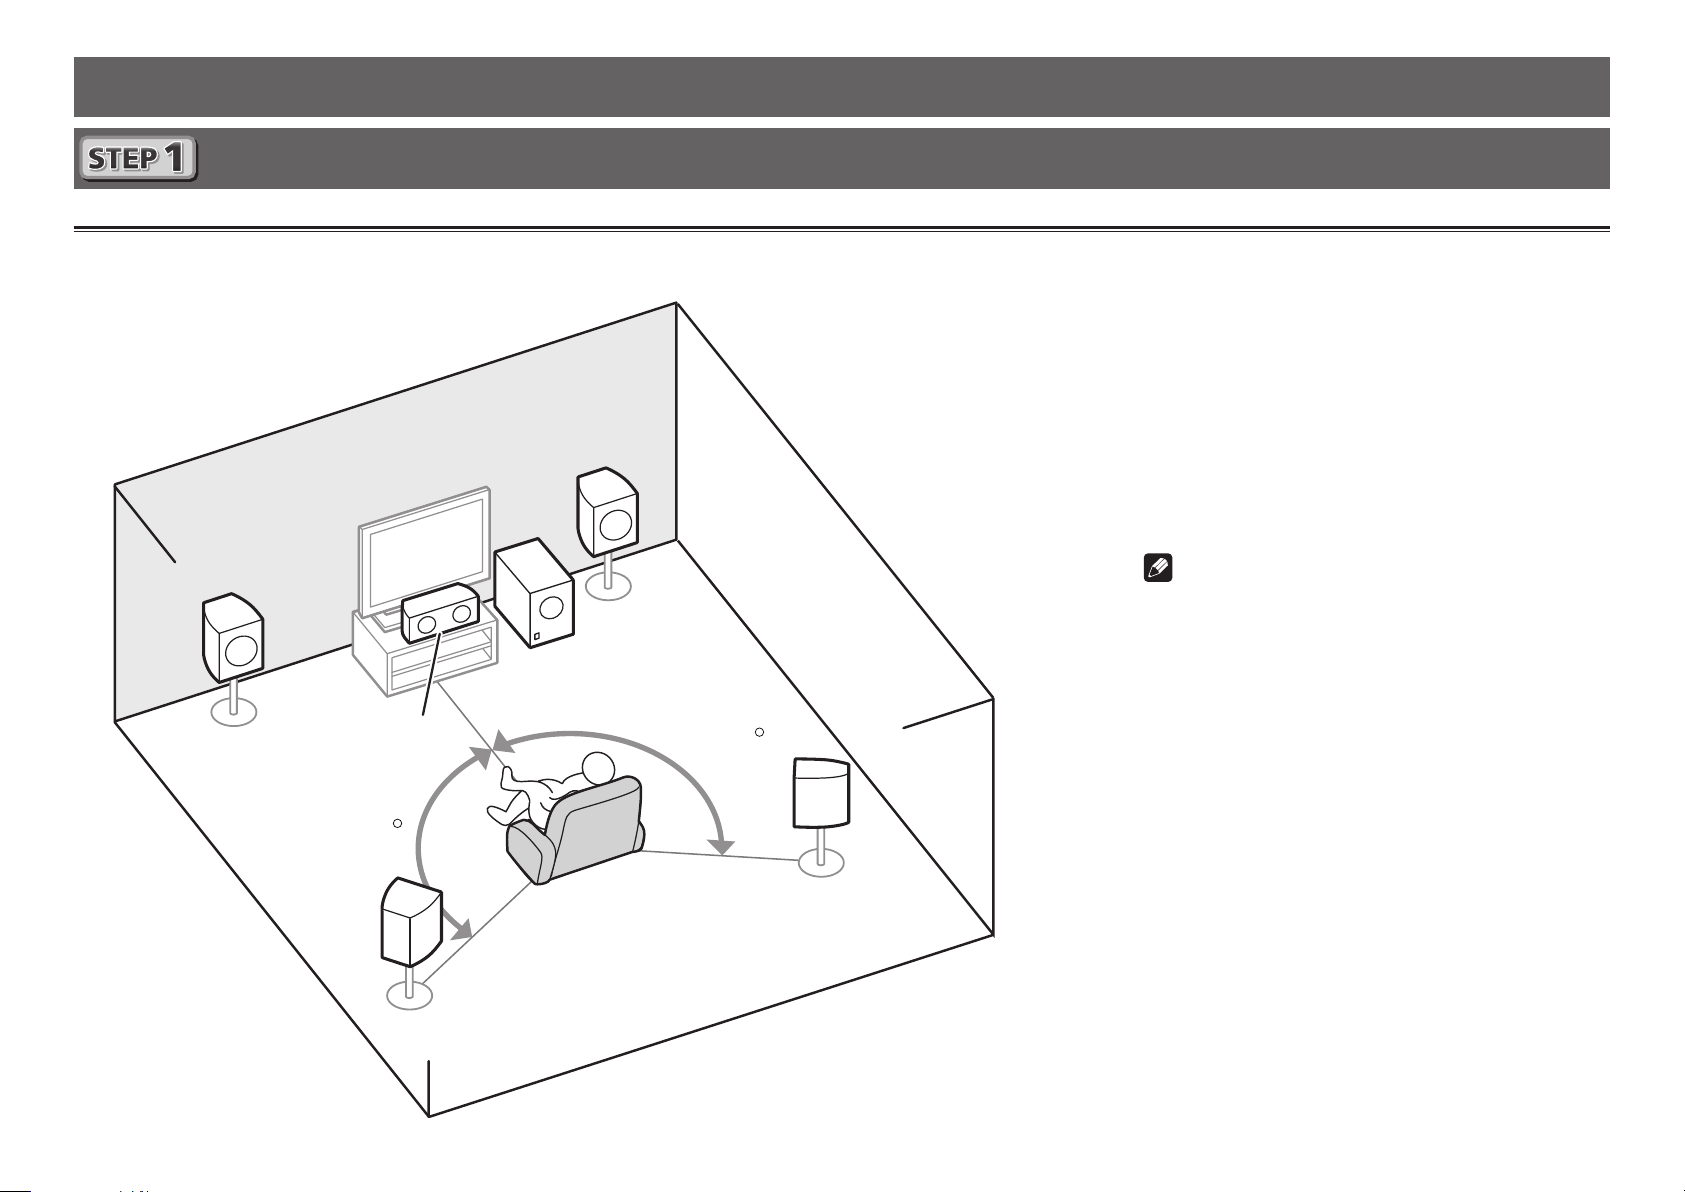
Connecting up
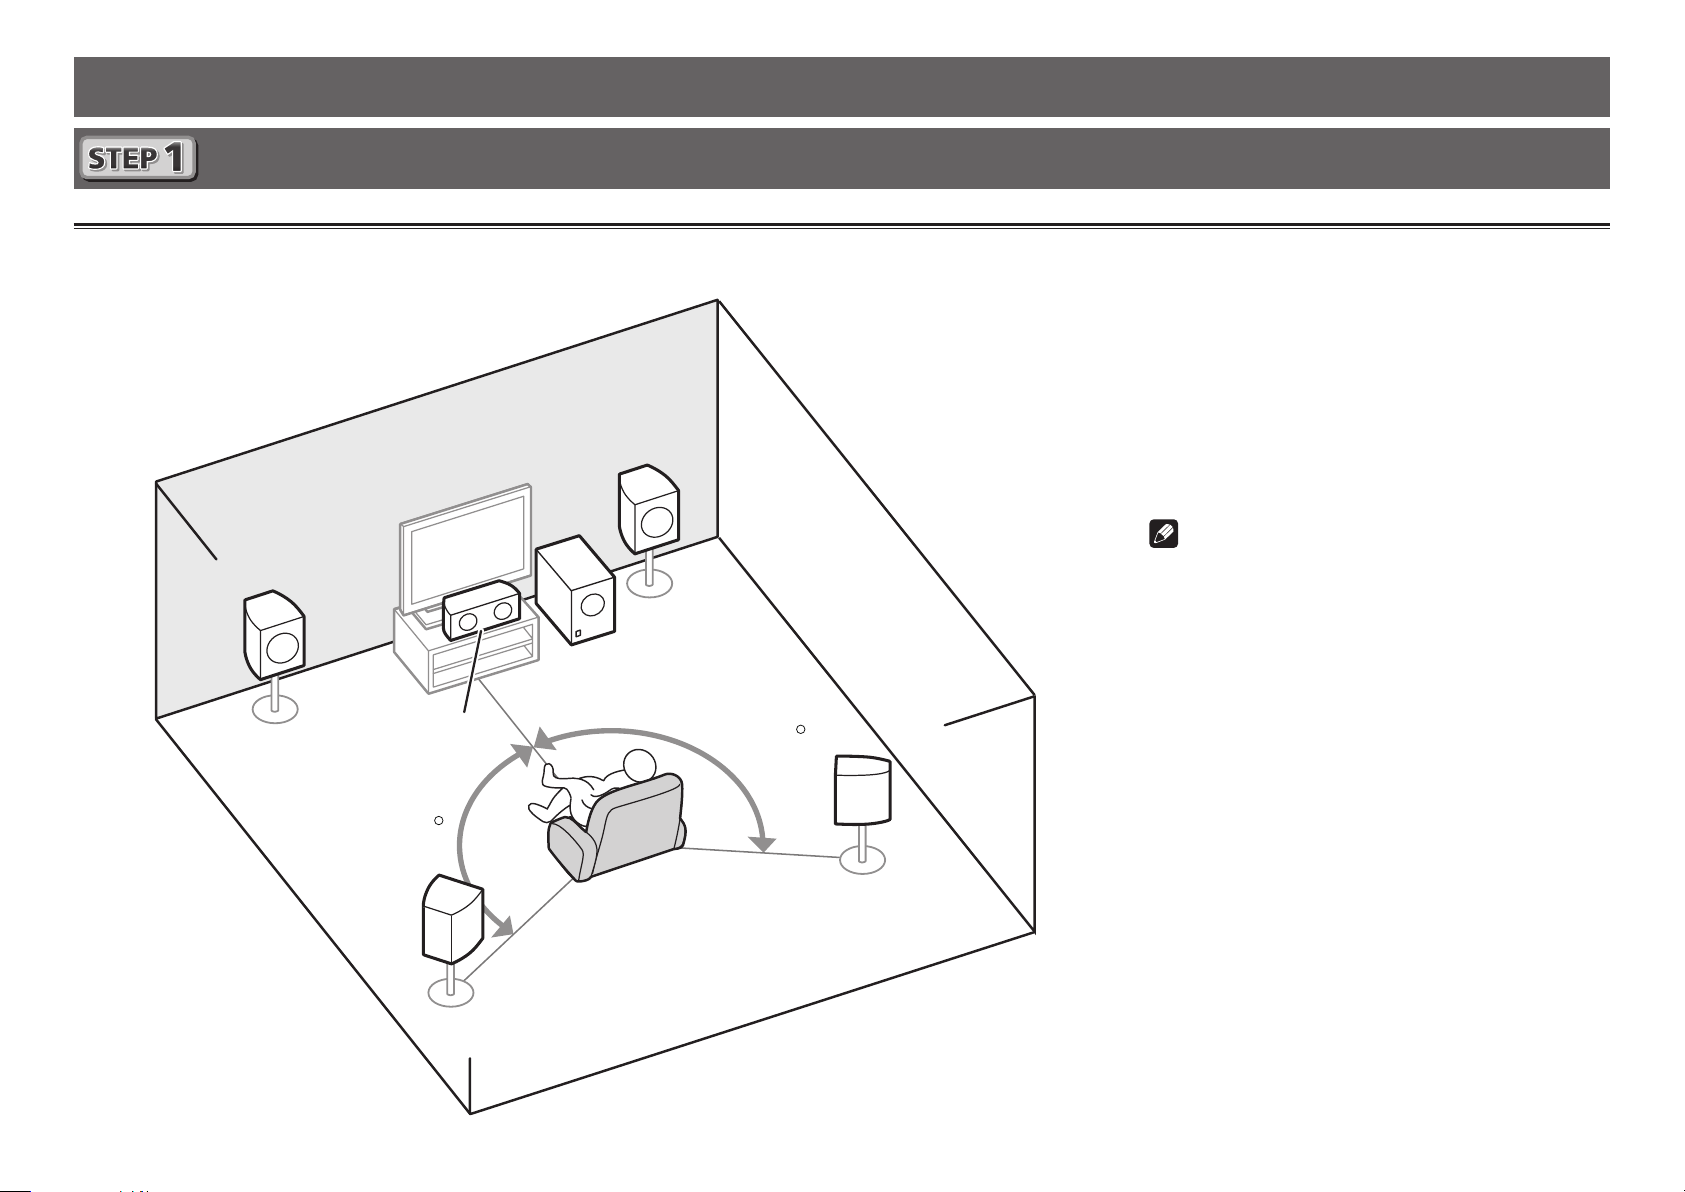
Placing the Speakers
L
– Front Left
C
– Center
R
– Front Right
SL
– Surround Left
R
L
SR
– Surround Right
SW
– Subwoofer
Note
• The front speaker can be bi-amplified.
For details, see “Connecting your
equipment” of the operating
instructions.
C
SW
120
120
SR
SL
6
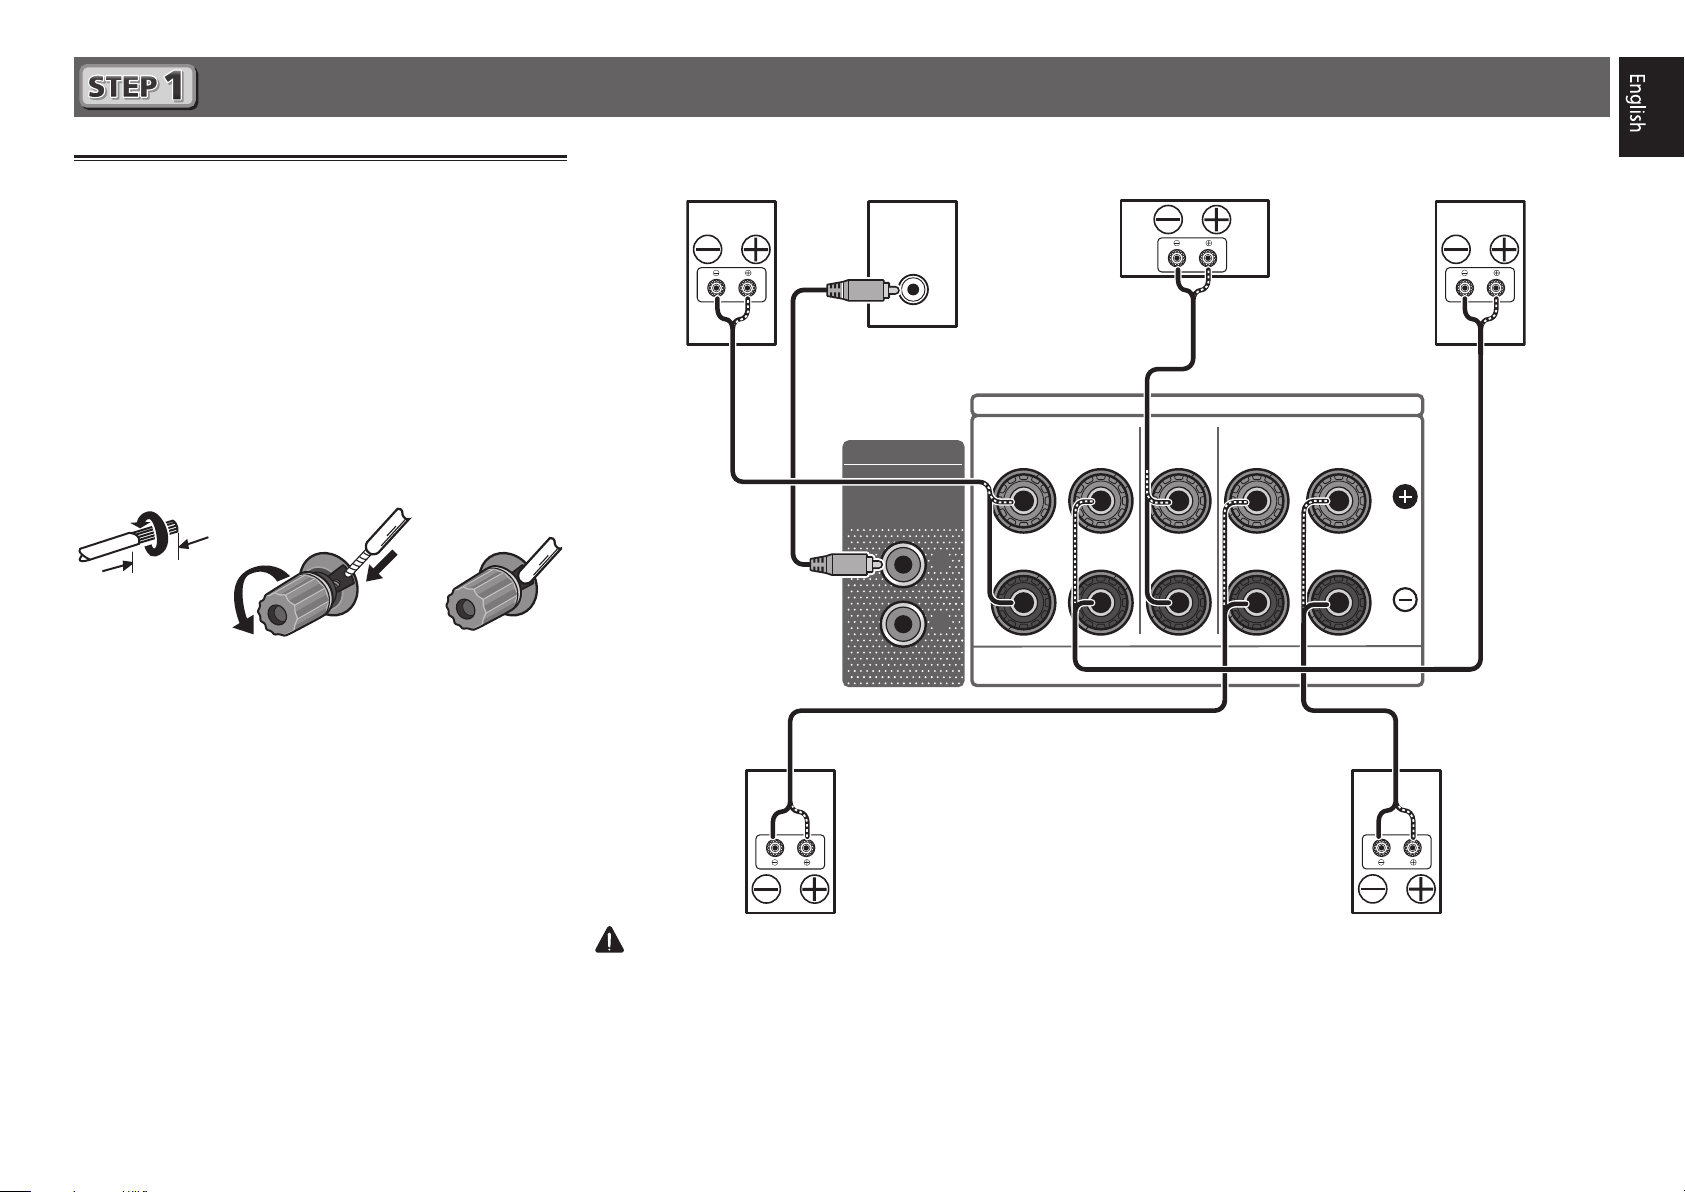
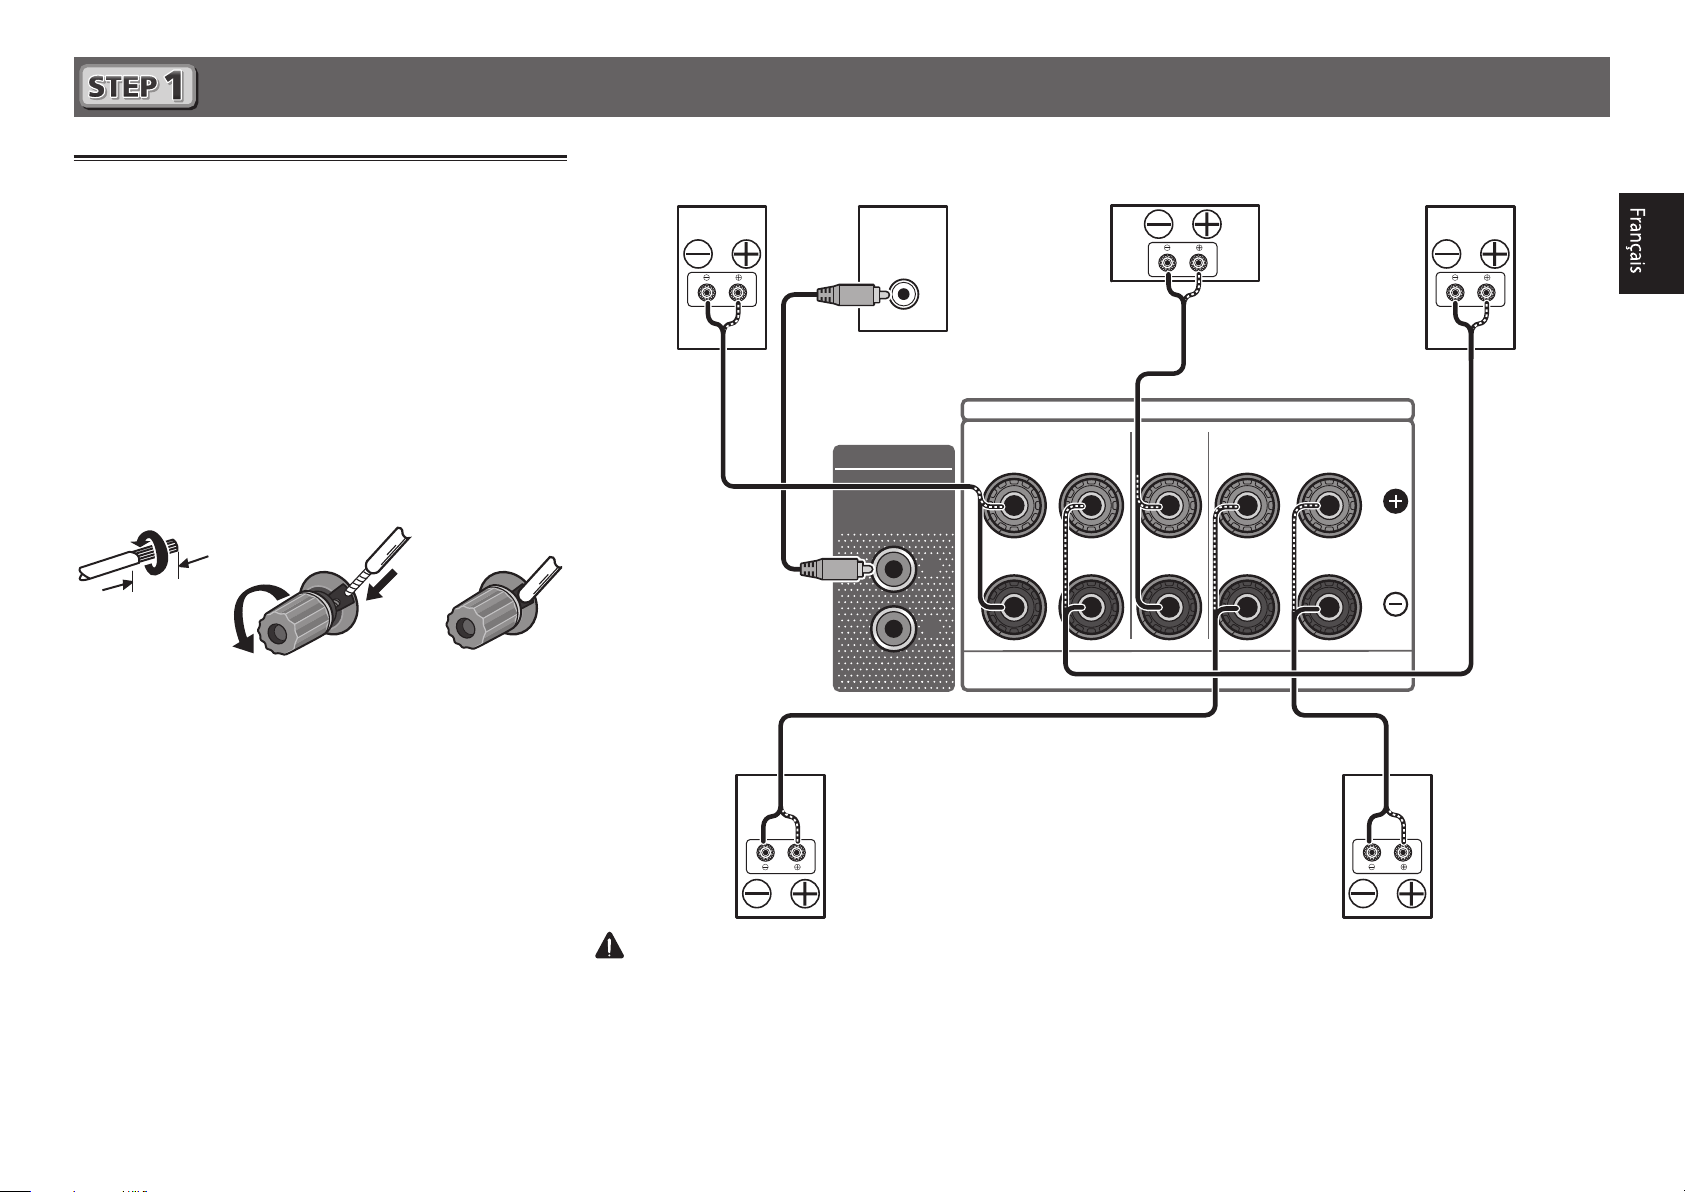
Connecting up
Connecting the speakers
Be sure to complete all connections before
1
connecting this unit to the AC power source.
You can use speakers with a nominal
2
impedance between 6 Ω and 16 Ω.
Connecting the speakers.
3
Bare wire connections
Twist exposed wire strands together.
1
Loosen terminal and insert exposed wire.
2
Tighten terminal.
3
10 mm
Front Right
(R)
Subwoofer
(SW)
LINE LEVEL
INPUT
AUDIO OUT
SUBWOOFER
PRE OUT
1
2
SPEAKER A
FRONT
RL
Center
(C)
Front Left
(L)
SURROUND / BI-AMPCENTER
RL
Surround Right
(SR)
Surround Left
(SL)
CAUTION
• These speaker terminals carry
disconnecting the speaker cables, disconnect the power cord before touching any uninsulated parts.
HAZARDOUS LIVE voltage
. To prevent the risk of electric shock when connecting or
7
Connecting up
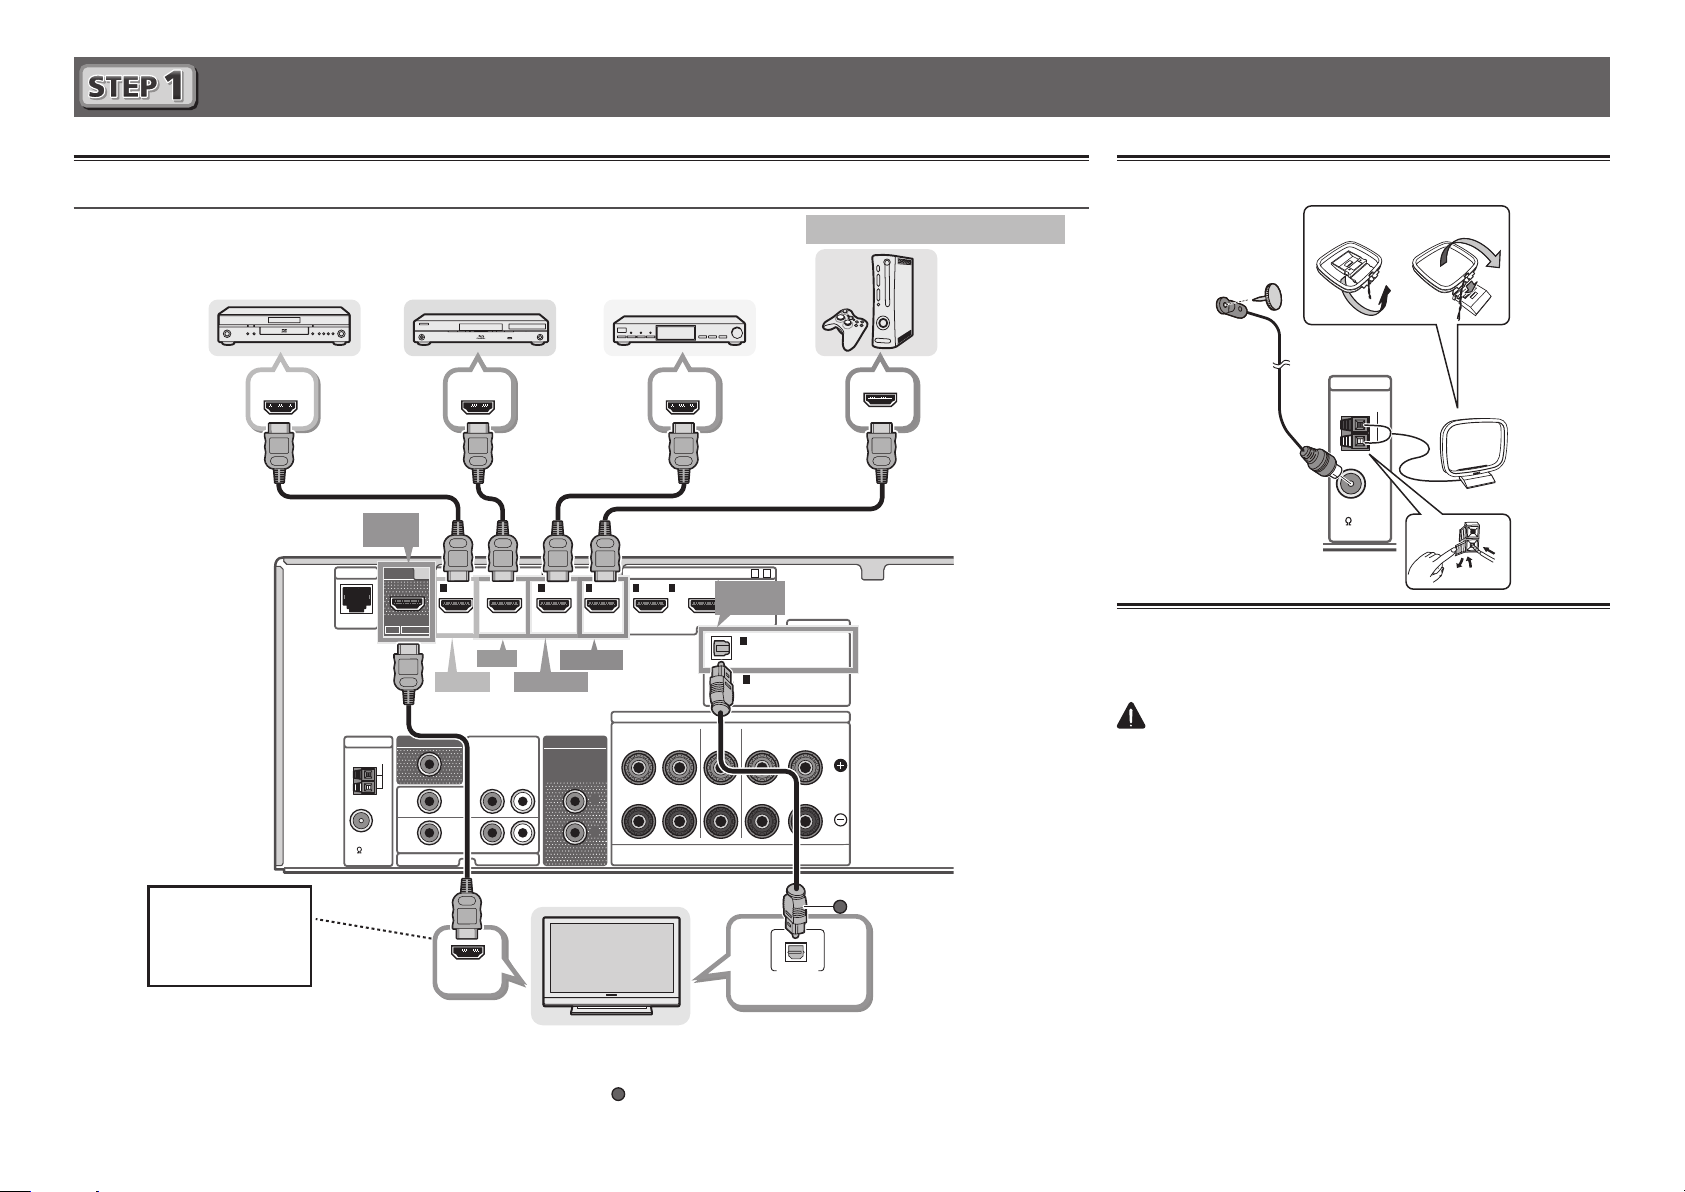
Connecting a TV and playback components
Connecting using HDMI
DVD player,
HDD/DVD recorder
HDMI OUT HDMI OUT
NETWORK
ANTENNA
AM LOOP
FM UNBAL
75
You will not be
able to view the
setting screen from
the TV unless this
cable is connected.
• If the TV supports the HDMI Audio Return Channel function, the sound of the TV is input to the receiver via the HDMI
terminal, so there is no need to connect an optical digital cable (
see “HDMI Setup” of the operating instructions.
8
• Please refer to the TV’s operation manual for directions on connections and setup for the TV.
Blu-ray Disc player,
Blu-ray Disc recorder
HDMI
OUT
OUT
(
ARC CONTROL
DVD
DVD IN
MONITOR OUT
DVD
SAT/CBL
HDMI IN
HDMI IN
)(
BD IN
AUDIO INVIDEO IN
SAT/CBL
GAME IN
SAT/CBL IN
AUDIO OUT
SUBWOOFER
PRE OUT
LR
)
HDMI/DVI-compatible TV
1
2
Set-top box
HDMI OUT
ASSIGNABLE
(
OUTPUT 5 V
5
4321
/MHLBD
OPTICAL
0.9 A MAX
IN1 (TV)
SPEAKER A
FRONT
RL
). In this case, set
15-
)
DIGITAL IN
1
OPTICAL
(TV)
ASSIGNABLE
1
COAXIAL
(CD)
ASSIGNABLE
SURROUND / BI-AMPCENTER
RL
OPTICAL
DIGITAL AUDIO OUT
ARC
HDMI/DVI-compatible components
Game console
A
HDMI Setup
at
to
ON.
For details,
Connecting antennas
21
ANTENNA
AM LOOP
AM loop antenna
FM wire antenna
FM UNBAL
75
Plugging in the receiver
Only plug in after you have connected all your components to
this receiver, including the speakers.
CAUTION
• Handle the power cord by the plug. Do not pull out the plug
by tugging the cord and never touch the power cord when
your hands are wet as this could cause a short circuit or
electric shock. Do not place the unit, a piece of furniture,
etc., on the power cord, or pinch the cord. Never make
a knot in the cord or tie it with other cords. The power
cords should be routed such that they are not likely to be
stepped on. A damaged power cord can cause a fire or give
you an electrical shock. Check the power cord once in a
while. When you find it damaged, ask your nearest Pioneer
authorized service center or your dealer for a replacement.
• The receiver should be disconnected by removing the
mains plug from the wall socket when not in regular use,
e.g., when on vacation.
Plug the supplied power cord into the AC IN socket on the
1
back of the receiver.
Plug the other end into a power outlet.
2
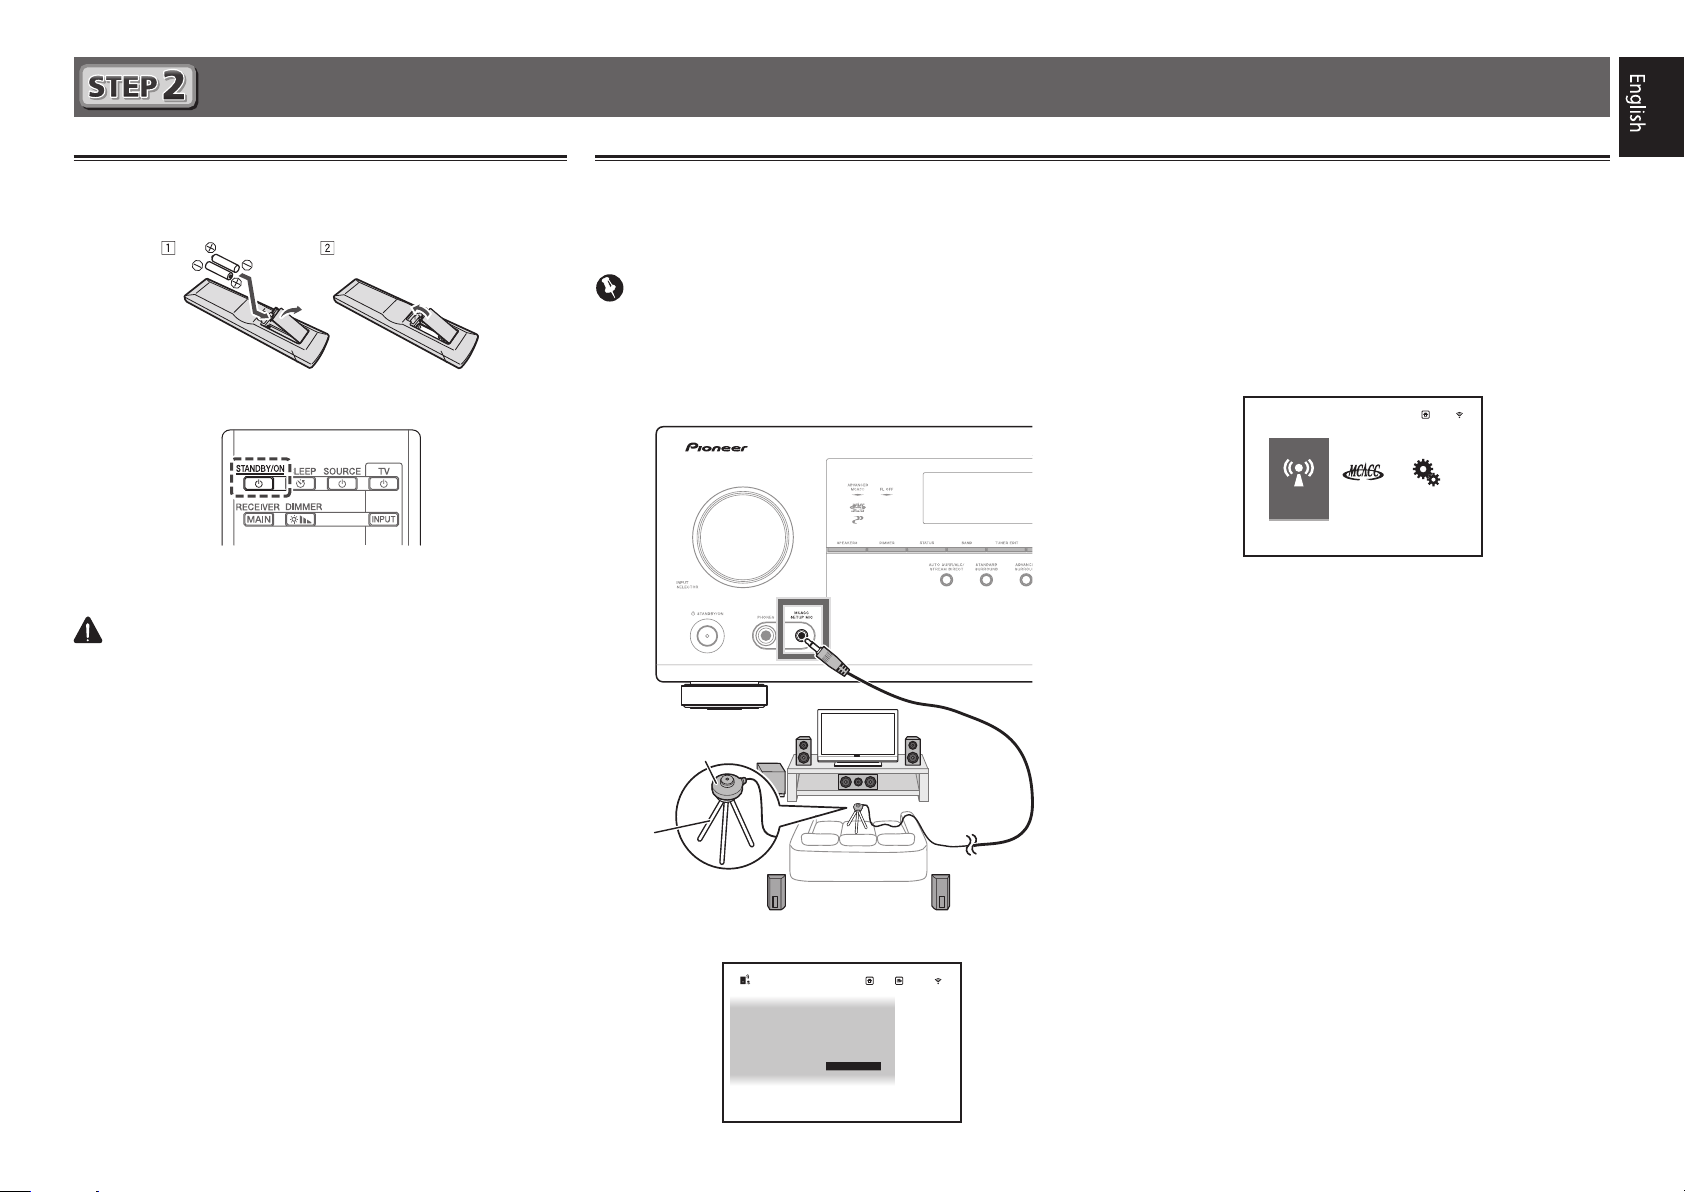
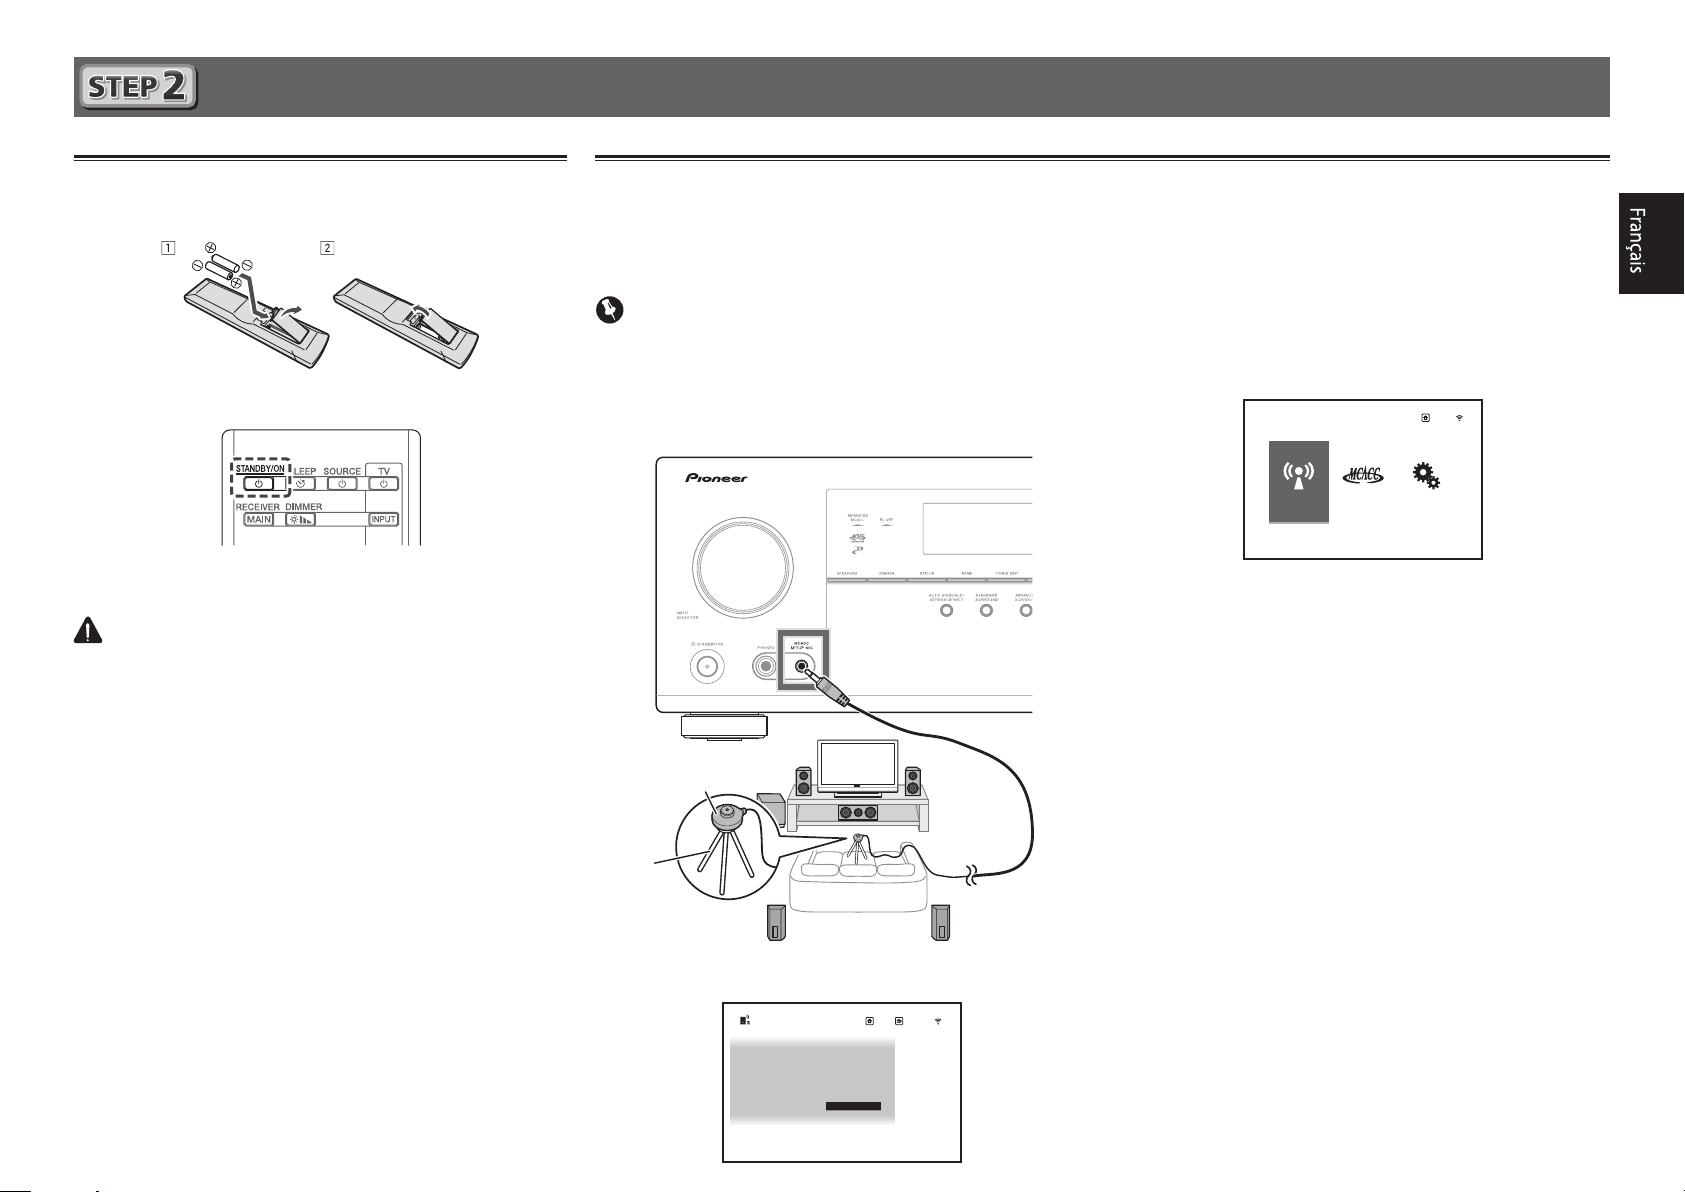
Initial Setup
Before you start
Put the batteries in the remote control.
1
Switch on the receiver and your TV.
2
Turn the subwoofer on and turn up the
3
volume.
CAUTION
• When inserting the batteries, make sure not to damage
the springs on the battery’s * terminals. This can cause
batteries to leak or overheat.
Automatically setting up for surround sound (MCACC)
Press MAIN RECEIVER on the remote control,
The Auto Multi-Channel ACoustic Calibration (MCACC) setup
uses the supplied setup microphone to measure and analyze
the test tone that is outputted by the speakers.
Important
• Measure in a quiet environment.
Connect the supplied setup microphone.
1
• Set to ear height when using a tripod etc., for the
microphone.
Setup microphone
Tripod
2
then press the ENTER button.
• Automatic measuring will start.
• Measuring will take about 3 to 12 minutes.
Follow the instructions on-screen.
3
• Automatic setting is complete when the Home Menu
screen appears.
HOME MENU
Network,
Bluetooth
Reverse Phase
• If
is displayed, the speaker’s wiring (+ and –)
may be inverted. Check the speaker connections.
Even if the connections are correct,
displayed, depending on the speakers and the surrounding
environment. This does not affect measurements, however,
so select
• If
Go Next
ERR
is displayed, check that speaker is properly connected.
.
• When the power turns off, refer to the “Frequently asked
questions” in the booklet.
Make sure the setup microphone is
4
disconnected.
Advanced
MCACC
Exit
System
Setup
Reverse Phase
may be
Full Auto MCACC
The
screen appears on your TV.
2a.Full Auto MCACC
Speaker System : 5.2.2ch
EQ Type : – – –
MCACC : M1.MEMORY 1
Measurement Type : Expert
START
Exit
Return
9
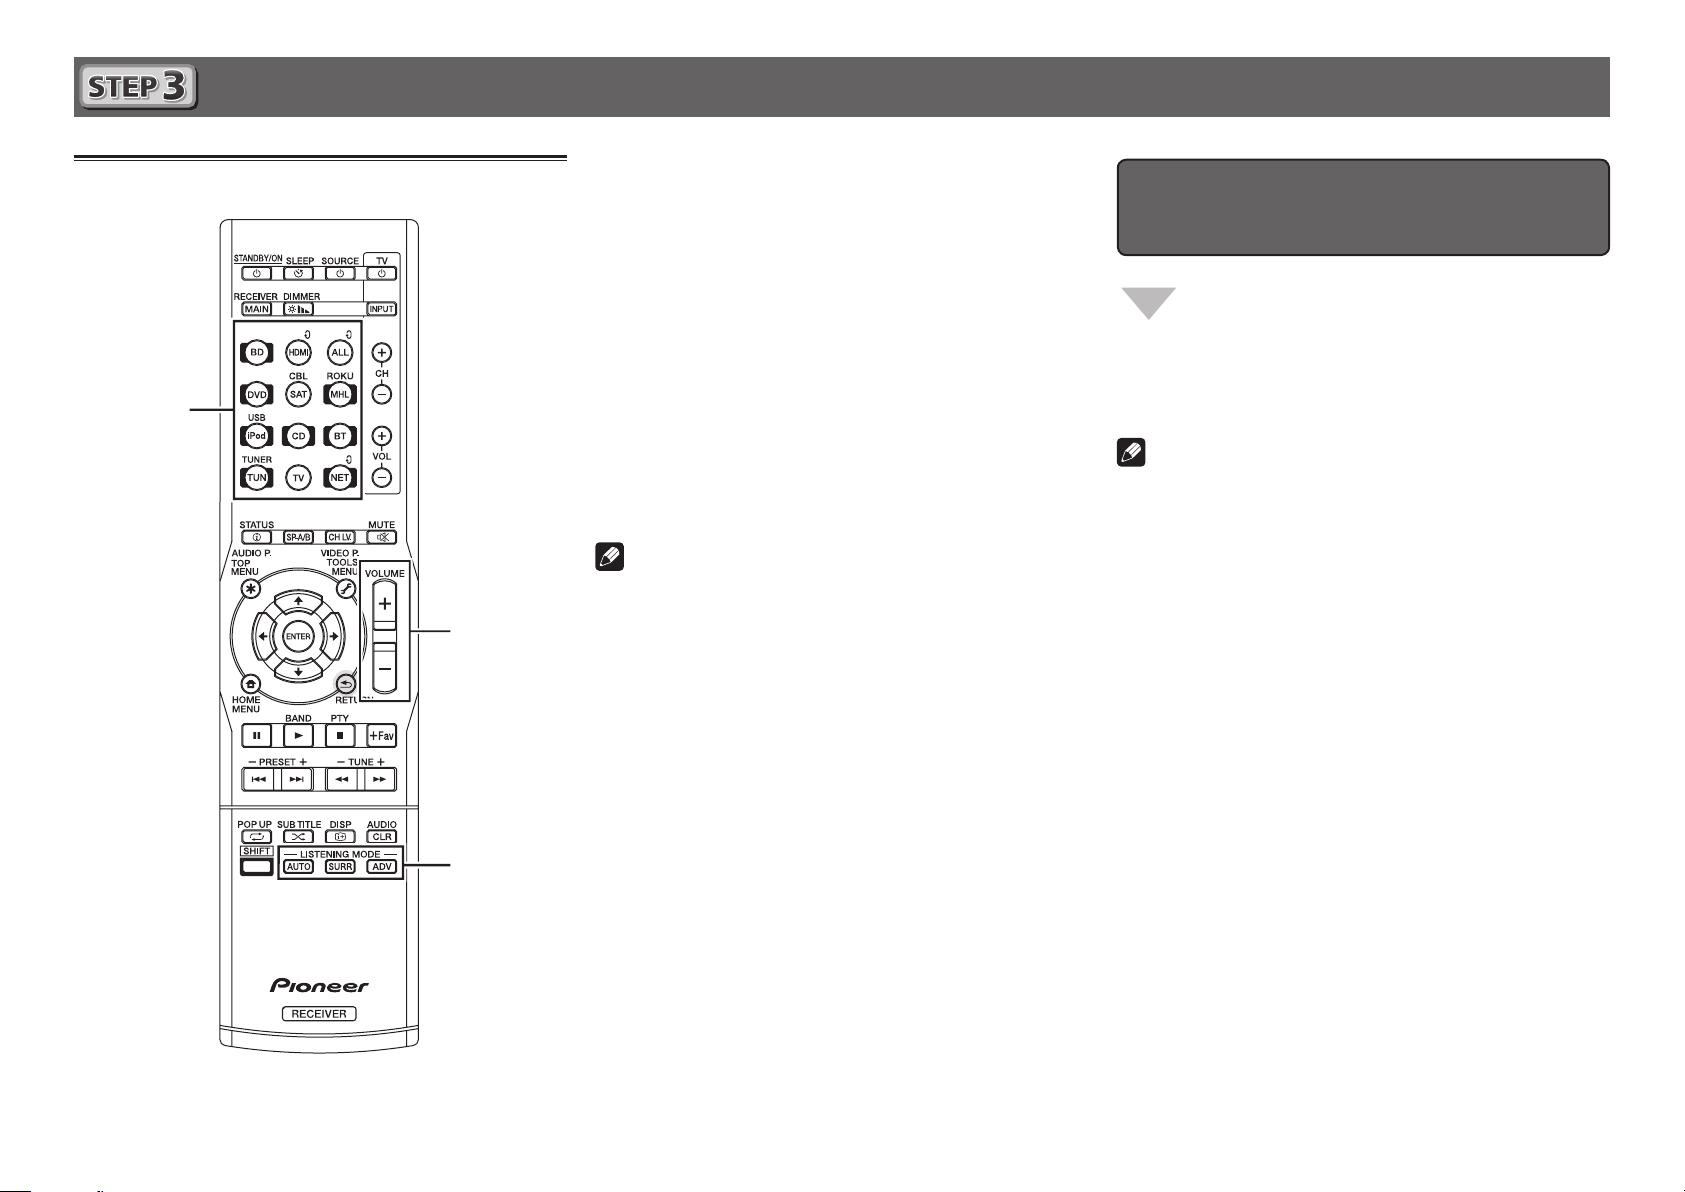
Basic playback
Switch on the playback component.
Multichannel playback
1
E.g.) Turn the Blu-ray Disc player connected to the
BD IN
terminal on.
Switch the input of the receiver.
2
E.g.) Press BD to select the BD input.
Press AUTO to select ’AUTO SURROUND’.
3
Also press
your preferred listening mode.
Start the playback component’s playback.
4
E.g.) Start playback of the Blu-ray Disc player.
Use VOLUME +/– to adjust the volume level.
5
• When no sound is emitted, increase the volume to
approximately –30 dB.
Notes
• When the sound is not produced from the center speaker,
rear speaker and subwoofer, refer to “Frequently asked
questions” in the booklet.
• When the remote control does not work, refer to the
“Frequently asked questions” in the booklet.
SURR
or
ADV
for multichannel playback. Select
HDMI
To enjoy the many functions of the
unit to the fullest extent
Load the CD-ROM into your computer and see
the “Operating Instructions” (PDF) from the
menu screen to read.
Notes
• This unit supports AirPlay. For details, see “Using AirPlay
on iPod touch, iPhone, iPad, and iTunes” of the operating
instructions and the Apple website (http://www.apple.
com).
• This unit’s software can be updated (“Software Update”
of the operating instructions). With Mac OS, it can
be updated using Safari (“Using Safari to update the
firmware” of the operating instructions).
10
Frequently asked questions
The center speaker or rear speaker does not produce sound
Cause Solution
AUTO SURROUND (mode
that outputs the number
of input channels as it is)
is selected upon 2-channel
audio input such as TV,
music, etc.
To play a stereo sound source in multichannel, press the
SURR
button or the
Example) Press the
STEREO
].
ADV
button to select your favorite mode.
SURR
button several times to select [
The subwoofer does not produce sound
Cause Solution
The front speaker is set to
LARGE.
(The low frequency
component will be produced
from the front speaker
instead of the subwoofer
when 2-channel audio input
such as TV, music, etc.)
To produce output from the subwoofer, change the speaker
setting. (There are two ways.)
Method 1
Change the front speaker to SMALL.
• The low frequency component will be produced from
the subwoofer instead of the front speaker. When the
front speaker has a high capability to play low frequency
components, we recommend not to change.
Method 2
Change the subwoofer to PLUS.
• The low frequency component of the front speaker will be
produced from both the front speaker and the subwoofer.
Therefore, the bass sound may be too powerful. In that case,
we recommend not to change or to change using Method 1.
EXT.
To produce sound from TV
Refer to page 8 of the booklet to perform connection and setting.
To play, press the TV button to switch to TV input.
The remote control does not work
Cause Solution
The operation mode of
the remote control is not
switched.
When setting initial settings for the HOME MENU and
AUDIO PARAMETER etc. and when performing replay
settings
• Start the operation after pressing the
button.
To operate functions such as network and iPod
• Start the operation after pressing the button of each function
NET, iPod
(
, etc.).
MAIN RECEIVER
The power suddenly turns off and the WIRELESS indicator flashes
Cause Solution
The conductive wire of the
speaker cord is contacting
the rear panel, or positive and
negative of the conductive
wire are contacting and
the protection circuit is
activated.
Twist the conductive wire of the speaker cord once again, and
connect it so that it will not stick out from the speaker terminal
on the amplifier or speaker side.
For the procedure to change, refer to the “Speaker Setting” in the
CD-ROM’s operating instructions.
HDMI, network, etc. operations become unresponsive
Cause Solution
The operations of this
receiver and connecting
devices are unresponsive.
Try resetting. To reset, turn off the power, and press down
STANDBY/ON
the
or more. (The power turns off in 5 seconds after the power is
turned on. The receiver’s setting will be maintained.)
Also try replugging the power cord of the connecting devices.
button on the front panel for 5 seconds
© 2015 PIONEER HOME ELECTRONICS CORPORATION.
All rights reserved.
11
Français
Merci pour l’achat de ce produit Pioneer. Ce guide rapide contient les instructions relatives aux raccordements et opérations de
base permettant une utilisation simple de ce récepteur. Pour des descriptions plus détaillées du récepteur, référez-vous au
“Mode d’emploi” sur le CD-ROM ( ) fourni.
Contenu du carton d’emballage
Télécommande
Antenne filaire FM
Antenne cadre AM
CD-ROM
Cordon d’alimentation
Brochure sur la Sécurité
Feuille de garantie
Le présent Guide rapide
VSX-1130-K
VSX-930-K/-S
VSX-830-K/-S
PRÉCAUTION DE VENTILATION
Lors de l’installation de l’appareil, veillez à laisser un
espace suffisant autour de ses parois de manière à
améliorer la dissipation de chaleur (au moins 40 cm sur
le dessus, 20 cm à l’arrière et 20 cm de chaque côté).
AVERTISSEMENT
Les fentes et ouvertures du coffret sont prévues pour la
ventilation, pour assurer un fonctionnement stable de
l’appareil et pour éviter sa surchauffe. Pour éviter les
risques d’incendie, ne bouchez jamais les ouvertures et
ne les recouvrez pas d’objets, tels que journaux, nappes
ou rideaux, et n’utilisez pas l’appareil posé sur un tapis
épais ou un lit.
D3-4-2-1-7b*_A1_Fr
ATTENTION
・N’utilisez ni ne conservez les piles sous la
lumière directe du soleil ou dans un endroit
excessivement chaud, comme une voiture ou à
proximité d’un appareil de chauffage. Les piles
risqueraient de fuir, de surchauffer, d’exploser ou
de s’enflammer. Leur durée de vie et/ou leur
performance pourrait également être réduite.
・Lorsque vous jetez des piles usagées, veuillez
vous conformer aux normes et/ou aux
règlements gouvernementaux et environnementaux en vigueur dans votre pays ou région.
Microphone de configurationPiles à anode sèche AAA IEC R03 x 2
2
Raccordement et configuration initiale
Procédez à la connexion et aux réglages initiaux selon l’une des méthodes énumérées ci-dessous.
Utilisez l’application “Start-up Navi”
pour effectuer la connexion et les
réglages initiaux
• Utilisez un smartphone ou une tablette.
• Une connexion réseau est
nécessaire.
LAN
Téléchargez et démarrez l’application “Start-up
1
Navi”.
Continuez avec les directives de l’app pour
2
procéder à la connexion et aux réglages
initiaux.
Suivez les directives du AVNavigator
intégré pour procéder à la connexion et
aux réglages initiaux
• Utilisez un Mac ou un PC.
• Une connexion réseau est nécessaire.
LAN
Lisez le livret “Si vous avez un Mac ou un PC”.
1
Suivez les directives du AVNavigator intégré
2
dans le récepteur pour procéder à la connexion
et aux réglages initiaux.
Suivez les instructions dans le livret
pour procéder à la connexion et aux
réglages initiaux
1
Lisez le livret dans l’ordre
.
Suivez les instructions de chaque étape pour
2
continuer.
Téléchargez l’application “Start-up Navi”
à partir d’ici.
Si vous avez un iPhone ou un iPad
Se il vous plaît rechercher l’application “Start-up
Navi” sur l’App Store.
Si vous avez un appareil Android
Se il vous plaît rechercher l’application “Start-up
Navi” sur Google Play.
Concernant le voyant WIRELESS clignotant
• Clignote lors de l’utilisation du Mode WAC. (Mode
selon lequel les paramètres réseau peuvent être
modifiés par iPhone, iPad et iPod touch lorsque ce
récepteur est utilisé en tant que point d’accès Wi-Fi)
Lorsque l’appareil est mis sous tension après avoir
configuré le réseau ou branché un câble LAN, le voyant
WIRELESS ne clignote pas.
• Si vous ne procédez pas à une connexion réseau,
l’utiliser en l’état ne pose pas de problème.
3
Si vous avez un Mac ou un PC
Raccordement au réseau par l’interface LAN
Internet
Ordinateur
Câble LAN (vendu séparément)
NETWORK
Modem
1
NETWORK
Routeur
WAN
LAN
Branchement du récepteur
Après la connexion à un réseau LAN, branchez le cordon
d’alimentation du récepteur à une prise électrique.
Branchez le cordon d’alimentation fourni à la prise AC IN
1
située à l’arrière du récepteur.
Branchez l’autre extrémité sur une prise électrique.
2
Mise en marche
Appuyez sur
votre ordinateur.
1
2
3
Après la mise en marche, patientez quelques minutes avant
d’effectuer l’opération suivante.
STANDBY/ON
pour allumer le récepteur et
Lors de la connexion de ce récepteur à un routeur de réseau sans fil par Wi-Fi, reportez-vous à “Réglage du raccordement au
réseau” dans le mode d’emploi du CD-ROM.
4
Lancement de l’AVNavigator
intégré
Utilisez AVNavigator en suivant les invites sur l’écran de votre
ordinateur.
Utilisation d’un Mac
Lancez Safari et cliquez sur <VSX-830> affiché dans ‘
dans la barre des signets.
Bonjour
• Si ‘
Include Bonjour in the Favorites bar
‘
Advanced
‘
’ n’apparaît pas, cochez la case à cocher
’ de l’onglet
’ dans le menu ‘
Preferences…
’ de Safari.
Bonjour
Saisissez le numéro de l’étape 2 ci-dessus
3
dans le champ d’Internet Explorer indiqué cidessous, puis appuyez sur la touche ENTER.
(Exemple de format d’entrée) 192.168.0.124
’
• Avec un PC sous Windows, vous pouvez utiliser la
méthode suivante pour lancer AVNavigator.
Lancez Explorer puis faites un clic droit sur <VSX-830>
affiché dans le dossier ‘
View device webpage
‘
Network
’.
’, cliquez ensuite sur
Environnement d’exploitation
• L’AVNavigator peut être utilisé dans les environnements
suivants.
–PC sous Windows: Microsoft
7/Windows
–Mac: OS X v 10.9 or 10.8
• Certaines fonctions de l’AVNavigator emploient un
navigateur Internet. Les navigateurs suivants sont pris en
charge :
–PC sous Windows: Internet Explorer
–Mac OS: Safari 6.0, 7.0
• AVNavigator risque de ne pas fonctionner avec certains
paramétrages du réseau informatique ou de la sécurité.
®
8/Windows® 8.1
®
Windows Vista®/Windows®
®
8, 9, 10, 11
Utilisation d’un PC sous Windows
Démarrez Internet Explorer sur votre ordinateur
1
(ouvrez n’importe quelle page Internet).
Appuyez sur STATUS de la télécommande et
2
vérifiez l’afficheur du panneau avant sur le
récepteur (l’adresse IP du récepteur apparaîtra).
(Exemple d’affichage de texte)
Si 0.0.0.0 ou 169.254.112.202 apparaît dans l’adresse,
cela signifie que le récepteur n’est pas raccordé au
réseau. Assurez-vous que le récepteur et le routeur sont
correctement raccordés.
À propos de l’utilisation de Wiring
Navi
Wiring Navi démarre lorsque vous appuyez sur ‘
sur l’écran d’AVNavigator.
Wiring Navi
’
5
Suivez les instructions dans le livret pour procéder à la connexion et aux réglages initiaux
Raccordement
Installation des enceintes
L
– Avant Gauche
C
– Centre
R
– Avant Droite
L
120
C
R
SW
120
SR
SL
– Surround Gauche
SR
– Surround Droite
SW
– Caisson de grave
Remarque
• L’enceinte avant peut être à double
amplification. Pour les détails, voir
“Raccordement de votre équipement” dans le
mode d’emploi.
SL
6
Raccordement
Raccordement des enceintes
Assurez-vous que tous les branchements ont
1
été effectués correctement avant de raccorder
cet appareil au secteur.
Vous pouvez utiliser des enceintes ayant une
2
impédance nominale comprise entre 6 Ω et 16 Ω.
Raccordement des enceintes.
3
Raccordement des ls dénudés
Torsadez les fils ensemble.
1
Dévissez la borne et insérez la partie dénudée des fils.
2
Serrez la borne.
3
10 mm
Avant Droite
(R)
Caisson de grave
(SW)
LINE LEVEL
INPUT
AUDIO OUT
SUBWOOFER
PRE OUT
1
2
SPEAKER A
FRONT
RL
Centre
(C)
Avant Gauche
(L)
SURROUND / BI-AMPCENTER
RL
Surround Droite
(SR)
Surround Gauche
(SL)
ATTENTION
• Les bornes des haut-parleurs sont sous une
lors du branchement et du débranchement des câbles de haut-parleur, débranchez le cordon d’alimentation avant de toucher
des parties non isolées.
tension ACTIVE DANGEREUSE
. Pour éviter tout risque de décharge électrique
7
Raccordement
Raccordement d’un téléviseur et de périphériques de lecture
Connexion au moyen de l’interface HDMI
Lecteur DVD,
enregistreur HDD/DVD
HDMI OUT HDMI OUT
Lecteur de Blu-ray Disc,
enregistreur de Blu-ray Disc
Boîtier décodeur
HDMI OUT
Équipements compatibles HDMI/DVI
Console de jeu
Raccordement des antennes
21
ANTENNA
AM LOOP
Antenne cadre AM
Antenne FM à fil
HDMI
OUT
NETWORK
ANTENNA
AM LOOP
FM UNBAL
75
OUT
ARC CONTROL
MONITOR OUT
(
)(
DVD
DVD IN
DVD
SAT/CBL
BD IN
AUDIO INVIDEO IN
HDMI IN
SAT/CBL
GAME IN
SAT/CBL IN
AUDIO OUT
SUBWOOFER
PRE OUT
LR
5
4321
/MHLBD
)
SPEAKER A
FRONT
RL
1
2
ll est nécessaire
de connecter ce
câble pour pouvoir
’
afficher l
configuration sur le
écran de
HDMI IN
téléviseur.
Téléviseur compatible HDMI/DVI
• Si le téléviseur prend en charge la fonction HDMI Audio Return Channel, le son du téléviseur est envoyé vers le récepteur via
la prise HDMI et il n’est alors pas nécessaire de connecter un câble optique numérique (
ARC
dans le menu de configuration
HDMI Setup
. Pour les détails, voir “Réglage de l’HDMI” dans le mode d’emploi.
• Veuillez vous reporter au Guide d’utilisation du téléviseur pour consulter les instructions concernant les connexions et la
8
configuration du téléviseur.
ASSIGNABLE
(
OUTPUT 5 V
OPTICAL
0.9 A MAX
IN1 (TV)
15-
)
DIGITAL IN
1
OPTICAL
(TV)
ASSIGNABLE
1
COAXIAL
(CD)
ASSIGNABLE
SURROUND / BI-AMPCENTER
RL
OPTICAL
DIGITAL AUDIO OUT
A
). Dans ce cas, activez (ON) l’option
Branchement du récepteur
N’effectuez le branchement qu’après avoir raccordé tous les
composants au récepteur, y compris les enceintes.
ATTENTION
• Tenir le câble d’alimentation par la fiche. Ne pas
débrancher la prise en tirant sur le câble et ne pas
toucher le câble avec les mains mouillées. Cela risque
de provoquer un court-circuit ou un choc électrique. Ne
pas poser l’appareil ou un meuble sur le câble. Ne pas
pincer le câble. Ne pas faire de noeud avec le câble ou
l’attacher à d’autres câbles. Les câbles d’alimentation
doivent être posés de façon à ne pas être écrasés. Un
câble abîmé peut provoquer un risque d’incendie ou un
choc électrique. Vérifier le câble d’alimentation de temps
en temps. Contacter le service après-vente Pioneer le plus
proche ou le revendeur pour un remplacement.
• Lorsque le récepteur n’est pas utilisé régulièrement
(pendant les vacances, par exemple), il doit être débranché
de la prise d’alimentation murale.
Branchez le cordon d’alimentation fourni à la prise AC IN
1
située à l’arrière du récepteur.
Branchez l’autre extrémité sur une prise électrique.
2
FM UNBAL
75
Configuration initiale
Préparatifs
Insérez les piles dans la télécommande.
1
Allumez le récepteur et votre téléviseur.
2
Mettez le caisson de basse sous tension et
3
augmentez le volume.
ATTENTION
• Lors de l’installation des piles, veillez à ne pas
endommager les ressorts situés en face des bornes *
des piles. Les piles risqueraient de fuir ou de surchauffer.
Confi guration automatique du son surround (MCACC)
Appuyez sur MAIN RECEIVER de la télécommande,
Le système de calibrage acoustique multicanaux (MultiChannel ACoustic Calibration, MCACC) utilise le microphone
de configuration fourni pour mesurer et analyser la tonalité de
test émise par les enceintes.
Important
• La procédure doit être effectuée dans un environnement
calme.
Raccordez le microphone de configuration fourni.
1
• Régler à hauteur d’oreille lors de l’utilisation d’un trépied,
etc. pour le microphone.
Microphone de
configuration
Trépied
2
puis appuyez sur la touche ENTER.
• La mesure automatique commence.
• La mesure dure de 3 à 12 minutes.
Suivez les instructions affichées à l’écran.
3
• Le réglage automatique est terminé lorsque la page Home
Menu apparaît.
HOME MENU
Network,
Bluetooth
Reverse Phase
• Si
(+ et –) ont peut-être été inversés. Vérifiez les liaisons des
enceintes.
Même si les liaisons sont correctes,
peut s’afficher, selon les enceintes et l’environnement
surround. Ceci n’a cependant aucun effet sur les mesures,
et vous pouvez sélectionner
ERR
• Si
s’affiche, vérifiez si l’enceinte est bien raccordée.
• Lorsque l’alimentation est coupée, reportez-vous à la “Foire
aux questions” dans le livret.
Assurez-vous de débrancher le microphone de
4
configuration.
Advanced
MCACC
s’affiche, les fils du cordon d’enceinte
System
Setup
Go Next
Exit
Reverse Phase
.
L’écran
Full Auto MCACC
2a.Full Auto MCACC
Speaker System : 5.2.2ch
EQ Type : – – –
MCACC : M1.MEMORY 1
Measurement Type : Expert
START
apparaît sur votre téléviseur.
Exit
Return
9

Lecture de base
Allumez le lecteur.
Lecture multicanaux
1
Ex.) Allumez le lecteur de disque Blu-ray raccordé à la
HDMI BD IN
prise
Sélectionnez l’entrée du récepteur.
2
Ex.) Appuyez sur BD pour sélectionner l’entrée BD.
Appuyez sur AUTO pour sélectionner ‘AUTO
3
SURROUND’.
Appuyez aussi sur
multicanaux. Sélectionnez votre mode d’écoute préférée.
Démarrez la lecture sur le lecteur.
4
Ex.) Démarrez la lecture sur le lecteur de disque Blu-ray.
Utilisez VOLUME +/– pour régler le volume.
5
• Si aucun son n’est émis, augmentez le volume à environ
–30 dB.
Remarques
• Lorsque le son ne provient pas de l’enceinte centrale, de
l’enceinte arrière et du caisson de grave, reportez-vous à la
“Foire aux questions” dans le livret.
• Lorsque la télécommande ne fonctionne pas, reportezvous à la “Foire aux questions” dans le livret.
.
SURR
ou
ADV
pour la lecture
Pour proter au maximum des
nombreuses fonctions de l’appareil
Insérez le CD-ROM dans votre ordinateur et
consultez le “Mode d’emploi” (PDF) dans l’écran
de menu.
Remarques
• Cet appareil prend en charge AirPlay. Pour les détails,
reportez-vous à la rubrique “Utilisation d’AirPlay sur un
iPod touch, iPhone, iPad et iTunes” du mode d’emploi et
au site d’Apple (http://www.apple.com).
• Le logiciel de cet appareil peut être mis à jour (“Mise à
jour du logiciel” dans le mode d’emploi). Avec Mac OS, il
peut être mis à jour avec Safari (“Utilisation de Safari pour
mettre à jour le micrologiciel” dans le mode d’emploi).
10
Foire aux questions
L’enceinte centrale ou arrière ne produit pas de son
Cause Solution
AUTO SURROUND (mode
qui émet le nombre de
canaux en entrée tel qu’il
est) est sélectionné sur
entrée audio 2 canaux
comme TV, musique, etc.
Pour lire une source de son stéréo en mode multi-canaux,
appuyez sur le bouton
mode favori.
Exemple) Appuyez sur le bouton
sélectionner [
EXT.STEREO
SURR
].
Le caisson de grave ne produit pas de son
Cause Solution
L’enceinte avant est réglée
sur LARGE.
(La composante basse
fréquence sera produite à
partir de l’enceinte avant au
lieu du caisson de grave en
mode entrée audio 2 canaux
comme TV, musique, etc.)
Pour produire une sortie du caisson de grave, modifiez le
réglage de l’enceinte. (Deux méthodes possibles.)
Méthode 1
Faites passer l’enceinte avant sur SMALL.
• La composante basse fréquence sera produite à partir
du caisson de grave au lieu de l’enceinte avant. Lorsque
l’enceinte avant a une forte capacité de diffuser les
composantes basse fréquence, nous recommandons de ne
rien changer.
Méthode 2
Faites passer le caisson de grave sur PLUS.
• La composante basse fréquence de l’enceinte avant sera
produite depuis l’enceinte avant et le caisson de grave. Par
conséquent, les graves seront trop puissantes. Dans ce cas,
nous recommandons de ne rien changer ou d’utiliser la
Méthode 1.
Pour que la procédure change, reportez-vous à “Réglage des
enceintes” dans le mode d’emploi du CD-ROM.
ou
ADV
pour sélectionner votre
SURR
plusieurs fois pour
Pour produire du son à partir du téléviseur
Reportez-vous à la page 8 du livret pour procéder à la connexion et au réglage.
Pour lire, appuyez sur le bouton TV pour passer en mode entrée TV.
La télécommande ne fonctionne pas
Cause Solution
Le mode de fonctionnement
de la télécommande n’est
pas activé.
Lors de la définition des réglages initiaux pour le HOME
MENU et AUDIO PARAMETER etc. et lors de l’exécution
des réglages de relecture
• Démarrez l’opération après avoir appuyé sur le bouton
RECEIVER
Pour utiliser des fonctions telles que réseau et iPod
• Démarrez l’opération après avoir appuyé sur le bouton de
chaque fonction (
.
NET, iPod
, etc.).
MAIN
L’alimentation est brusquement interrompue et le témoin WIRELESS clignote
Cause Solution
Le fil conducteur du cordon
de l’enceinte est en contact
avec le panneau arrière, ou
le fil conducteur positif et
négatif sont en contact et
le circuit de protection est
activé.
Tordez une fois de plus le fil conducteur du cordon de l’enceinte,
et connectez-le de sorte qu’il ne dépasse pas de le borne de
l’enceinte du côte de l’amplificateur ou de l’enceinte.
Le HDMI, le réseau, etc. ne fonctionnent plus
Cause Solution
Le récepteur et les appareils
connectés ne fonctionnent
plus.
Essayez de réinitialiser. Pour réinitialiser, coupez
l’alimentation, et appuyez sur le bouton
panneau avant pendant 5 secondes ou plus. (L’alimentation
s’interrompt 5 secondes après la mise sous tension. Les
réglages du récepteur seront conservés.)
Essayez également de rebrancher le cordon d’alimentation
des appareils connectés.
STANDBY/ON
sur le
© 2015 PIONEER HOME ELECTRONICS CORPORATION.
Tous droits de reproduction et de traduction réservés.
11

Deutsch
Vielen Dank, dass Sie sich für dieses Pioneer-Produkt entschieden haben. Die Kurzanleitung enthält Anweisungen für grundlegende Verbindungen und Bedienvorgänge, um eine einfache Bedienung des Receivers zu ermöglichen. Detaillierte Beschreibungen des Receivers finden Sie in der
„Bedienungsanleitung“ auf der mitgelieferten CD-ROM ( ).
Lieferumfang
Fernbedienung
UKW-Drahtantenne
MW-Rahmenantenne
CD-ROM
Netzkabel
Sicherheritsbroshüre
Garantieblatt
Diese Kurzanleitung
VSX-1130-K
VSX-930-K/-S
VSX-830-K/-S
VORSICHTSHINWEIS ZUR BELÜFTUNG
Bei der Aufstellung dieses Gerätes muss für einen
ausreichenden Freiraum gesorgt werden, um eine
einwandfreie Wärmeabfuhr zu gewährleisten
(mindestens 40 cm oberhalb des Gerätes, 20 cm hinter
dem Gerät und jeweils 20 cm an der Seite des Gerätes).
WARNUNG
Im Gerätegehäuse sind Ventilationsschlitze und andere
Öffnungen vorgesehen, die dazu dienen, eine
Überhitzung des Gerätes zu verhindern und einen
zuverlässigen Betrieb zu gewährleisten. Um
Brandgefahr auszuschließen, dürfen diese Öffnungen
auf keinen Fall blockiert oder mit Gegenständen (z.B.
Zeitungen, Tischdecken und Gardinen) abgedeckt
werden, und das Gerät darf beim Betrieb nicht auf
einem dicken Teppich oder Bett aufgestellt sein.
D3-4-2-1-7b*_A1_De
ACHTUNG
・Verwenden oder lagern Sie Batterien nicht in
direktem Sonnenlicht oder an sehr heißen Orten
wie im Inneren eines Fahrzeugs oder in der Nähe
von Heizkörpern. Dadurch können Batterien leck
werden, sich überhitzen oder in Brand geraten.
Außerdem kann die Lebensdauer oder Leistung
von Batterien beeinträchtigt werden.
・Beachten Sie bei der Entsorgung verbrauchter
Batterien und Akkus die gesetzlichen und
umweltrechtlichen Bestimmungen Ihres
Wohnortes.
Mikrofon für die EinstellungAAA/IEC/R03 Trockenbatterien x2
2
Anschluss und Anfangseinstellungen
Anschluss und Grundeinstellungen in der nachfolgend aufgeführten Weise vornehmen.
Verwenden Sie zum Einrichten
von Verbindung und
Grundeinstellungen die App „Startup Navi“
• Ein Smartphone/Tablet verwenden.
• Netzwerkverbindung erforderlich.
LAN
Laden Sie die App „Start-up Navi“ herunter,
1
und starten Sie die Anwendung.
Entsprechend den Anweisungen in der
2
App vorgehen, um den Anschluss und die
Grundeinstellungen vorzunehmen.
Befolgen Sie die Anweisungen
des integrierten AVNavigator,
um den Anschluss und die
Grundeinstellungen vorzunehmen
• Verwenden Sie einen Mac/PC.
• Netzwerkverbindung erforderlich.
LAN
Lesen Sie bitte das Heft „Wenn Sie einen Mac/
1
PC haben“.
Befolgen Sie die Anweisungen des im
2
Receiver eingebauten AVNavigator, um mit
dem Anschluss und der Grundeinstellungen
fortzufahren.
Befolgen Sie die Anweisungen in
der Broschüre, um den Anschluss
und die Grundeinstellungen
vorzunehmen
Lesen Sie die Anweisungen in der Broschüre
1
in folgender Reihenfolge:
.
Befolgen Sie die Anweisungen eines jeden
2
Schrittes, um fortzufahren.
Laden Sie die App „Start-up Navi“
von hier herunter.
Falls Sie ein iPhone oder einen iPad
haben
Bitte suchen Sie nach der App „Start-up Navi“ im
App Store.
Falls Sie ein Android Gerät haben
Bitte suchen Sie nach der App „Start-up Navi“ in
Google Play.
Wenn die Anzeige WIRELESS blinkt
• Blinkt im WAC-Modus. (In diesem Modus können
Netzwerkeinstellungen per iPhone, iPad und iPod
touch geändert werden, wenn der Receiver als Wi-FiZugangspunkt genutzt wird)
Wenn beim Einschalten des Geräts ein Netzwerk
eingerichtet ist oder ein LAN-Kabel verbunden ist, blinkt
die WIRELESS-Anzeige nicht.
• Wenn keine Netzwerkverbindung aufgebaut wird, kann
der Modus im bestehenden Status verwendet werden.
3
Loading…
Перейти к контенту
Ресиверы и усилители Pioneer
- Размер инструкции: 10.81 Мб
- Формат файла: pdf
Если вы потеряли инструкцию от ресивера и усилителя Pioneer VSX-830 / VSX-930 / VSX-1130, можете скачать файл для просмотра на компьютере или печати.
Инструкция для ресивера и усилителя Pioneer VSX-830 / VSX-930 / VSX-1130 на русском языке. В руководстве описаны возможности и полезные функции, а также правила эксплуатации. Перед использованием внимательно ознакомьтесь с инструкцией.
Чтобы не читать всю инструкцию вы можете выполнить поиск по содержимому внутри инструкции и быстро найти необходимую информацию. Рекомендации по использованию помогут увеличить срок службы ресивера и усилителя Pioneer VSX-830 / VSX-930 / VSX-1130. Если у вас появилась проблема, то найдите раздел с описанием неисправностей и способами их решения. В нем указаны типичные поломки и способы их решения.
Страницы и текст этой инструкции
Инструкция ресивера и усилителя Pioneer VSX-830 / VSX-930 / VSX-1130
Информация отображена на картинке
Информация отображена на картинке
Информация отображена на картинке
Информация отображена на картинке
Как использовать наш сайт инструкций OnlineManuals.ru
Наша цель состоит в том, чтобы предоставить вам быстрый доступ к содержанию инструкции для ресивера и усилителя Pioneer VSX-830 / VSX-930 / VSX-1130.
С помощью онлайн просмотра, Вы можете быстро просмотреть содержимое инструкции и найти решение проблемы с ресивера и усилителя Pioneer VSX-830 / VSX-930 / VSX-1130.
Для Вашего удобства
Если листать руководство пользователя ресивера и усилителя Pioneer VSX-830 / VSX-930 / VSX-1130 прямо на сайте, не очень удобно для Вас, есть два возможных решения:
• Просмотр в полноэкранном режиме — легко просмотреть руководство пользователя (без загрузки его на свой компьютер), Вы можете использовать режим полноэкранного просмотра.
Для просмотра инструкции пользователя ресивера и усилителя Pioneer VSX-830 / VSX-930 / VSX-1130 на полном экране, используйте кнопку «Открыть в Pdf-viewer».
• Загрузка на компьютер — Вы можете также скачать Инструкция ресивера и усилителя Pioneer VSX-830 / VSX-930 / VSX-1130 на свой компьютер и сохранить его в файлах.
Многие люди предпочитают читать документы не на экране, а в печатной версии.
Возможность печати руководства пользователя также была предусмотрена на нашем сайте,
и вы можете использовать ее, нажав на иконку «печать» в Pdf-viewer.
Нет необходимости печатать все руководство ресивера и усилителя Pioneer VSX-830 / VSX-930 / VSX-1130, можно выбрать только нужные страницы инструкции.
FAQ: Types of Manuals and Their Contents
Pioneer VSX-830-K Manuals come in various types, each serving a specific purpose to help users effectively operate and maintain their devices. Here are the common types of Pioneer VSX-830-K User Guides and the information they typically include:
- User Manuals: Provide comprehensive instructions on how to use the device, including setup, features, and operation. They often include troubleshooting tips, safety information, and maintenance guidelines.
- Service Instructions: Designed for technicians and repair professionals, these manuals offer detailed information on diagnosing and repairing issues with the device. They include schematics, parts lists, and step-by-step repair procedures.
- Installation Guides: Focus on the installation process of the device, providing detailed instructions and diagrams for proper setup. They are essential for ensuring the device is installed correctly and safely.
- Maintenance Manuals: Provide guidance on routine maintenance tasks to keep the device in optimal condition. They cover cleaning procedures, part replacements, and regular servicing tips.
- Quick Start Guides: Offer a concise overview of the essential steps needed to get the device up and running quickly. They are ideal for users who need immediate assistance with basic setup and operation.
Each type of Pioneer VSX-830-K instruction is designed to address specific needs, ensuring users have the necessary information to use, maintain, and repair their devices effectively.
Related Instructions for Pioneer VSX-830-K:
1
AVIC-F310BT
Installation manual PDF User Manual (@I4I978), Pioneer AVIC-F310BT GPS (Friday 10-01-2025)
134
1100
253
3
DEH-14UB
Owner’s manual Pioneer DEH-14UB User Manual (Owner’s manual), @JYS2ZK
44
21
5
5
WYB-GMFI SERIES
Service manual User Manual: Pioneer WYB-GMFI SERIES (1AU7AS, Upd.04.03.2025)
52
357
75
7
KEH-P4830R
Service manual Pioneer Car Receiver Service manual (File: pioneer-keh-p4830r-service-manual-49, 21st Nov 2024)
49
108
24
8
DEH20UB
Service manual Pioneer DEH20UB Manual (Service manual), @18TM17
73
988
208
9
RS-A7
Owner’s manual RS-A7 (Amplifier ePDF User Guide, #7231M7)
142
1103
166
10
VSX-52TX
Service manual Pioneer VSX-52TX User Manual (Service manual), @A96646
149
1421
228
Receiver Devices by Other Brands:
|
Onkyo HT-R558 Instruction Manual HT-R558 Instruction manual — 628BU1 En 18 Feb 2025 | 80 |
|
|
JDM TP-100RDS Installation & Operation JDM Receiver Installation & operation (File: jdm-tp-100rds-installation-operation-5, 16.02.2025) JDM® AM-FM RDS Tuner Receiver Module 16 Feb 2025 | 5 |
|
|
Philips HTR3464 Specifications PDF Manual (@9F1J35), Philips HTR3464 Stereo Receiver (Wednesday 09-04-2025) Philips 09 Apr 2025 | 2 |
|
|
Multiplex M-LINK RX-9-DR pro Operating Instructions Manual User Guide: Multiplex M-LINK RX-9-DR pro (EMWGX9, Upd.29/12/2024) MULTIPLEX Modellsport GmbH & Co. KG � Westliche Gewerbestraße 1 � D-75015 Bretten 29 Dec 2024 | 42 |
Categories:
Cd receiver
Home cinema system
Home theater audio system
Dvd drives
Farm Equipment
Navigation system