
user manual
Инструкция по
эксплуатации
Dishwasher
Посудомоечная машина
ESF2450
Electrolux. Thinking of you.
Share more of our thinking at www.electrolux.com
Contents
Safety information
2
Product description
3
Control panel
4
Use of the appliance
5
Setting the water softener
5
Use of dishwasher salt
6
Use of rinse aid
7
Loading cutlery and dishes
7
Use of detergent
8
Washing programmes
9
Setting and starting a washing programme
10
Care and cleaning
11
Technical data
12
What to do if…
12
Installation
14
Water connection
14
Electrical connection
16
Environment concerns
16
Subject to change without notice
Safety
information
For your safety and correct operation of
the appliance, read this manual carefully
before installation and use. Always keep
these instructions with the appliance
even if you move or sell it. Users must
fully know the operation and safety fea-
tures of the appliance.
Correct use
• The appliance is designed exclusively for
domestic use.
• Only use the appliance to clean household
utensils that are applicable for dishwash-
ers.
• Do not put solvents in the appliance. Risk
of explosion.
• Put the knives and all items with sharp
points in the cutlery basket with their
points down. If not, put in a horizontal po-
sition in the main basket.
• Use only branded products for dishwash-
ers (detergent, salt, rinse aid).
• If you open the door while the appliance is
in operation, hot steam can escape. Risk
of skin burns.
• Do not remove dishes from the dishwasher
before the end of the washing programme.
• When the washing programme is comple-
ted, disconnect the mains plug from the
mains socket and close the water tap.
• Only an authorised service engineer can
repair this appliance. Use only original
spare parts.
• Do not do repairs yourself to prevent injury
and damage to the appliance. Always con-
tact your local Service Force Centre.
General safety
• Persons (including children) with reduced
physical sensory, mental capabilities or
lack of experience and knowledge must
not use the appliance. They must have su-
pervision or instruction for the operation of
the appliance by a person responsible for
their safety.
• Obey the safety instructions from the man-
ufacturer of the dishwasher detergent to
prevent burns to eyes, mouth and throat.
• Do not drink the water from the dishwash-
er. Detergent residues can stay in your ap-
pliance.
• Always close the door when you do not
use the appliance to prevent injury and not
to stumble over the open door.
• Do not sit or stand on the open door.
Child safety
• Only adults can use this appliance. Chil-
dren must get supervision to make sure
that they do not play with the appliance.
• Keep all the packaging away from children.
There is a risk of suffocation.
• Keep all detergents in a safe area. Do not
let children touch the detergents.
• Keep children away from the appliance
when the door is open.
2 electrolux
Installation
• Make sure that the appliance is not dam-
aged because of transport. Do not con-
nect a damaged appliance. If necessary,
contact the supplier.
• Remove all packaging before first use.
• A qualified and competent person must do
the electrical installation.
• A qualified and competent person must do
the plumbing installation.
• Do not change the specifications or modify
this product. Risk of injury and damage to
the appliance.
• Do not use the appliance:
– if the mains cable or water hoses are
damaged,
– if the control panel, worktop or plinth
area are damaged, that you can get ac-
cess to the inner side of the appliance.
Contact your local Service Force Centre.
• Do not drill into the sides of the appliance
to prevent damage to hydraulic and elec-
trical components.
Warning! Carefully obey the
instructions for electrical and water
connections.
Product description
1
6
5
4
2
3
1
Spray arm
2
Microfilter
3
Detergent dispenser
4
Rinse aid dispenser
5
Flat filter
6
Salt container
electrolux 3

The rating label is on the back of appli-
ance.
Control panel
1
2
7
3 4
6
5
A
B
C
1
On/off button
2
Programme selection buttons
3
Save energy button /(Saver)
4
Delay start button
5
Indicator lights
6
Digital display
7
Function buttons
Indicator lights
The indicator light comes on when the washing
phase or the rinsing phase operates.
The indicator light comes on when the drying
phase operates.
The indicator light comes on when the washing
programme is completed.
1)
The indicator light comes on when it is necessary
to fill the salt container. Refer to the chapter ‘Use
of dishwasher salt’.
The salt indicator light can stay on for some hours,
but it does not have an unwanted effect on the
operation of the appliance.
4 electrolux
Indicator lights
1)
The indicator light comes on when it is necessary
to fill the rinse aid. Refer to the chapter ‘Use of
rinse aid’.
1) The indicator light is off when a washing programme operates.
Delay start button
Use the delay start button to delay the start
of the washing programme with an interval
between 1 and 19 hours. Refer to the chapter
‘Setting and starting a washing programme’.
Digital display
The display shows:
• Adjusted level of the water softener.
• Programme duration.
• Remaining time to the end of the pro-
gramme.
• End of a washing programme.
• Number of hours in delay start.
• Fault codes.
Save energy button
This function decreases the temperature in
the drying phase. Saved energy is between
10% and 25%.
If dishes at the end of the programme
are wet, keep the door ajar to let the
dishes dry naturally.
This function is available with all washing pro-
grammes. The related indicator light comes
on when you press the button.
The save energy function has no effect on
some programmes. Refer to the chapter
‘Washing programmes’ for the list of pro-
grammes where save energy has or not an
effect.
Function buttons
Use the function buttons for these opera-
tions:
• To set the water softener. Refer to the
chapter ‘Setting the water softener’.
• To cancel the washing programme in pro-
gress or a delay start in progress. Refer to
the chapter ‘Setting and starting a washing
programme’.
Setting mode
The appliance is in setting mode when all
programme indicator lights are on.
The appliance must be in setting mode for
these operations:
– To set a washing programme.
– To set the water softener level.
If a programme indicator light is on, cancel
the programme to go back to the setting
mode. Refer to the chapter «Setting and
starting a washing programme».
Use of the appliance
Refer to the following instructions for each
step of procedure:
1. Make a check if the water softener level
is correct for the water hardness in your
area. If necessary set the water softener.
2. Fill the salt container with dishwasher salt.
3. Fill the rinse aid dispenser with rinse aid.
4. Load cutlery and dishes into the dish-
washer.
5. Set the correct washing programme for
the type of load and soil.
6. Fill the detergent dispenser with the cor-
rect quantity of detergent.
7. Start the washing programme.
If you use detergent tablets, refer to the
chapter ‘Use of detergent’.
Setting the water softener
The water softener removes minerals and
salts from the water supply. Minerals and
salts can have bad effect on the operation of
the appliance.
Water hardness is measured in equivalent
scales:
• German degrees (dH°).
• French degrees (°TH).
• mmol/l (millimol per litre — international unit
for the hardness of water).
• Clarke.
electrolux 5
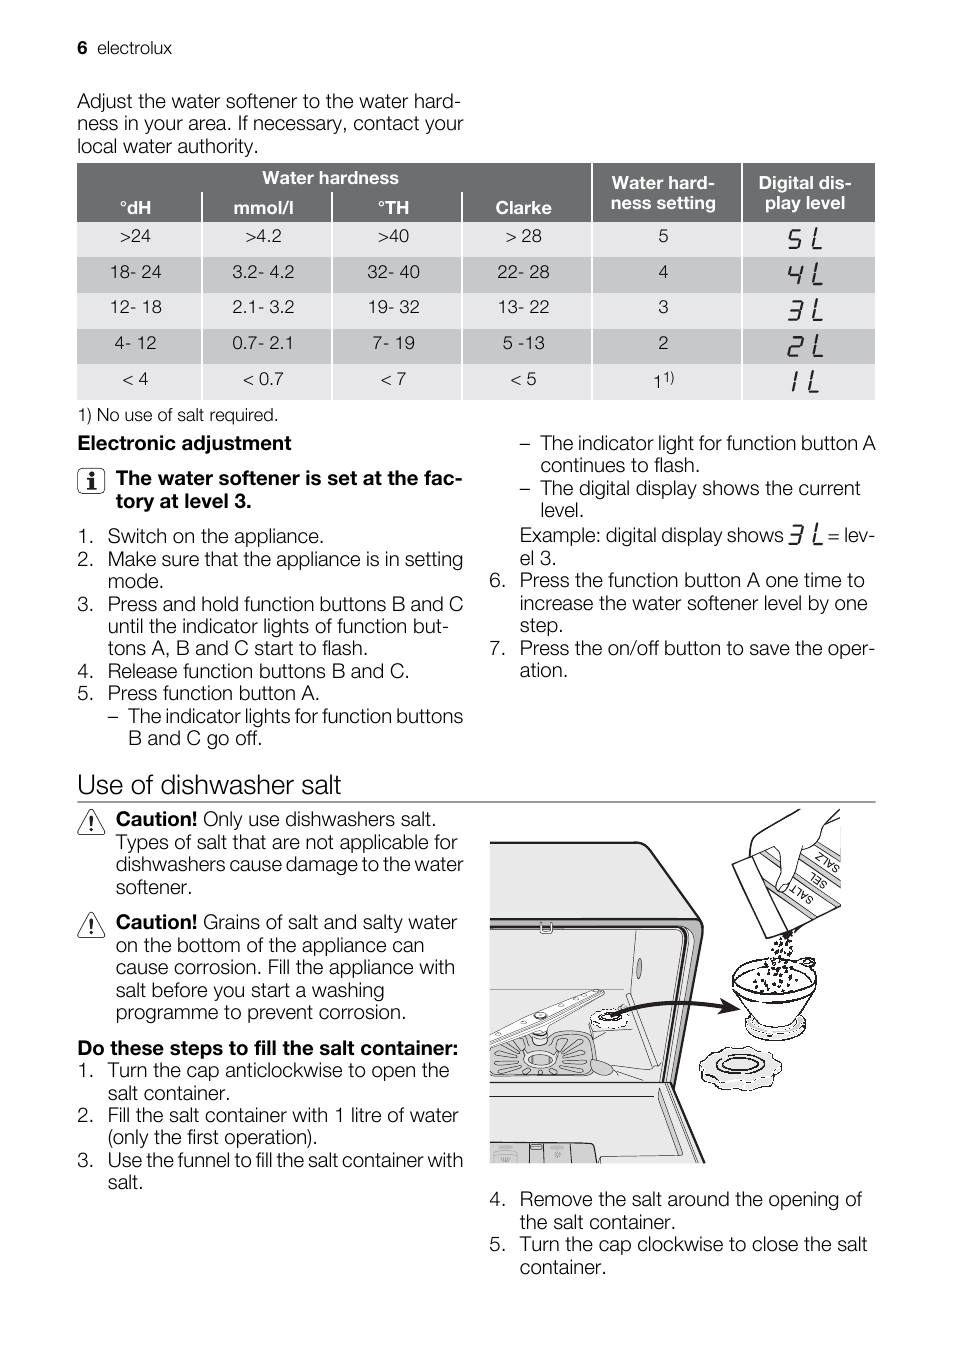
Adjust the water softener to the water hard-
ness in your area. If necessary, contact your
local water authority.
Water hardness
Water hard-
ness setting
Digital dis-
play level
°dH
mmol/l
°TH
Clarke
>24
>4.2
>40
> 28
5
18- 24
3.2- 4.2
32- 40
22- 28
4
12- 18
2.1- 3.2
19- 32
13- 22
3
4- 12
0.7- 2.1
7- 19
5 -13
2
< 4
< 0.7
< 7
< 5
1
1)
1) No use of salt required.
Electronic adjustment
The water softener is set at the fac-
tory at level 3.
1. Switch on the appliance.
2. Make sure that the appliance is in setting
mode.
3. Press and hold function buttons B and C
until the indicator lights of function but-
tons A, B and C start to flash.
4. Release function buttons B and C.
5. Press function button A.
– The indicator lights for function buttons
B and C go off.
– The indicator light for function button A
continues to flash.
– The digital display shows the current
level.
Example: digital display shows
= lev-
el 3.
6. Press the function button A one time to
increase the water softener level by one
step.
7. Press the on/off button to save the oper-
ation.
Use of dishwasher salt
Caution! Only use dishwashers salt.
Types of salt that are not applicable for
dishwashers cause damage to the water
softener.
Caution! Grains of salt and salty water
on the bottom of the appliance can
cause corrosion. Fill the appliance with
salt before you start a washing
programme to prevent corrosion.
Do these steps to fill the salt container:
1. Turn the cap anticlockwise to open the
salt container.
2. Fill the salt container with 1 litre of water
(only the first operation).
3. Use the funnel to fill the salt container with
salt.
4. Remove the salt around the opening of
the salt container.
5. Turn the cap clockwise to close the salt
container.
6 electrolux
It is normal that water overflows from the
salt container when you fill it with salt
When you set the water softener to level 1,
the salt indicator light does not stay on.
Use of rinse aid
Caution! Only use branded rinse aid for
dishwashers.
Do not fill the rinse aid dispenser with
other products (e.g. dishwasher clean-
ing agent, liquid detergent). There is a
risk of damage to the appliance.
Rinse aid makes it possible to dry the
dishes without streaks and stains.
Rinse aid is automatically added during
the last rinsing phase.
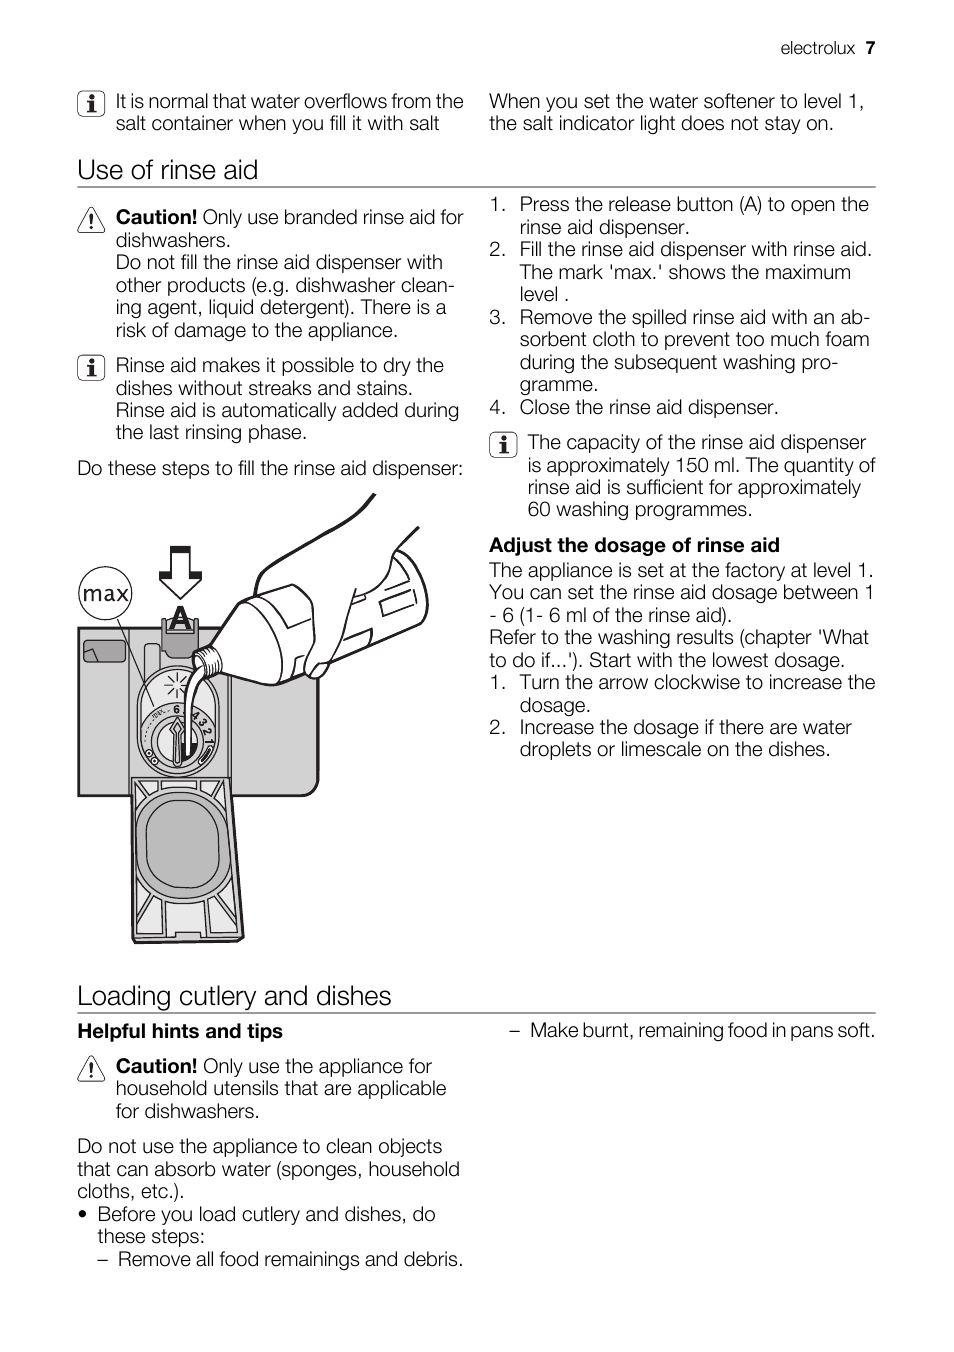
Do these steps to fill the rinse aid dispenser:
1. Press the release button (A) to open the
rinse aid dispenser.
2. Fill the rinse aid dispenser with rinse aid.
The mark ‘max.’ shows the maximum
level .
3. Remove the spilled rinse aid with an ab-
sorbent cloth to prevent too much foam
during the subsequent washing pro-
gramme.
4. Close the rinse aid dispenser.
The capacity of the rinse aid dispenser
is approximately 150 ml. The quantity of
rinse aid is sufficient for approximately
60 washing programmes.
Adjust the dosage of rinse aid
The appliance is set at the factory at level 1.
You can set the rinse aid dosage between 1
— 6 (1- 6 ml of the rinse aid).
Refer to the washing results (chapter ‘What
to do if…’). Start with the lowest dosage.
1. Turn the arrow clockwise to increase the
dosage.
2. Increase the dosage if there are water
droplets or limescale on the dishes.
Loading cutlery and dishes
Helpful hints and tips
Caution! Only use the appliance for
household utensils that are applicable
for dishwashers.
Do not use the appliance to clean objects
that can absorb water (sponges, household
cloths, etc.).
• Before you load cutlery and dishes, do
these steps:
– Remove all food remainings and debris.
– Make burnt, remaining food in pans soft.
electrolux 7
• While you load cutlery and dishes, do
these steps:
– Load hollow items (e.g. cups, glasses
and pans) with the opening down.
– Make sure that water does not collect in
the container or in a deep base.
– Make sure that cutlery and dishes do not
lie inside one another.
– Make sure that cutlery and dishes do not
cover other cutlery and dishes.
– Make sure that glasses do not touch
other glasses.
– Put small objects in the cutlery basket.
• Plastic items and pans with non-stick
coatings can keep water droplets.
• Plastic items do not dry as well as porce-
lain and steel items.
• Put light items in the main basket. Make
sure that the items do not move.
Caution! Make sure that the spray arm
can move freely before you start a
washing programme.
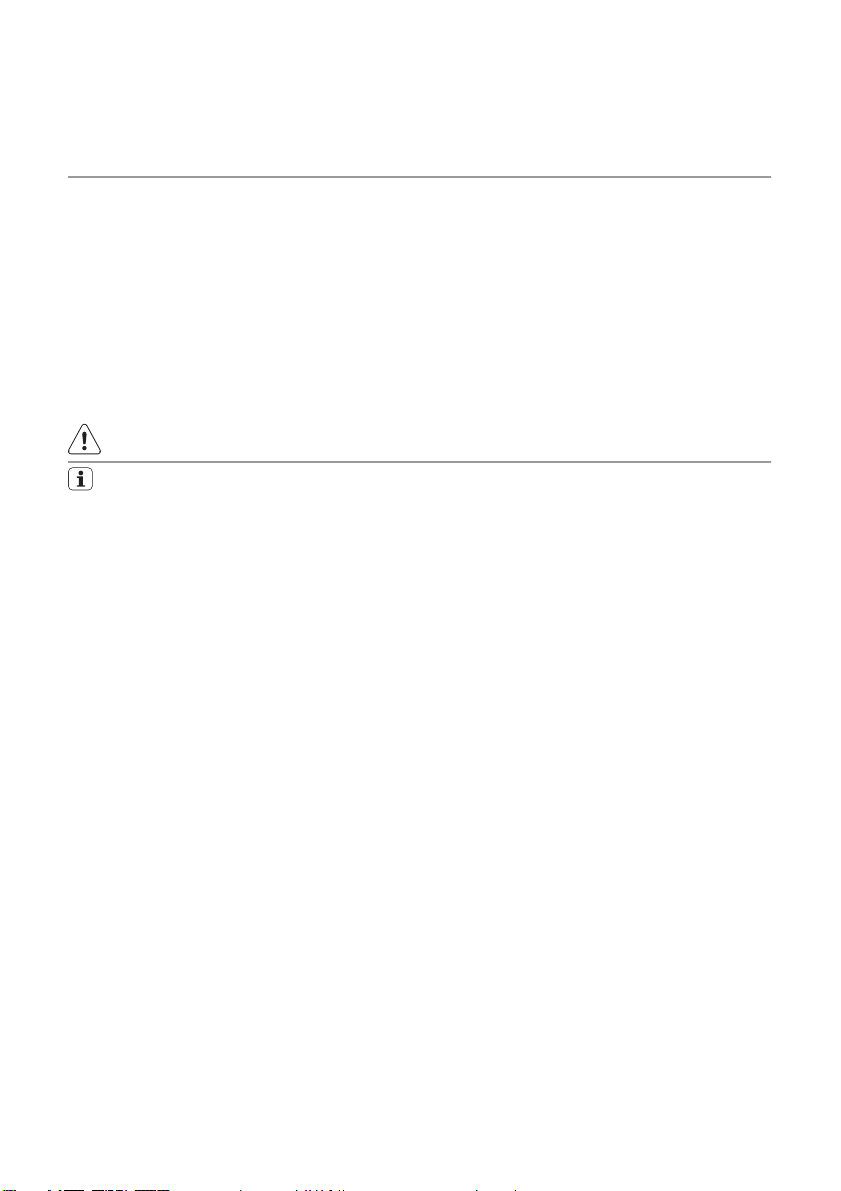
Primary basket
Arrange the deep dishes and large lids
around the edge of the basket. Arrange items
on and below the cup racks. The water must
come to all parts of the dishes.
You can fold the cup racks to clean high
items.
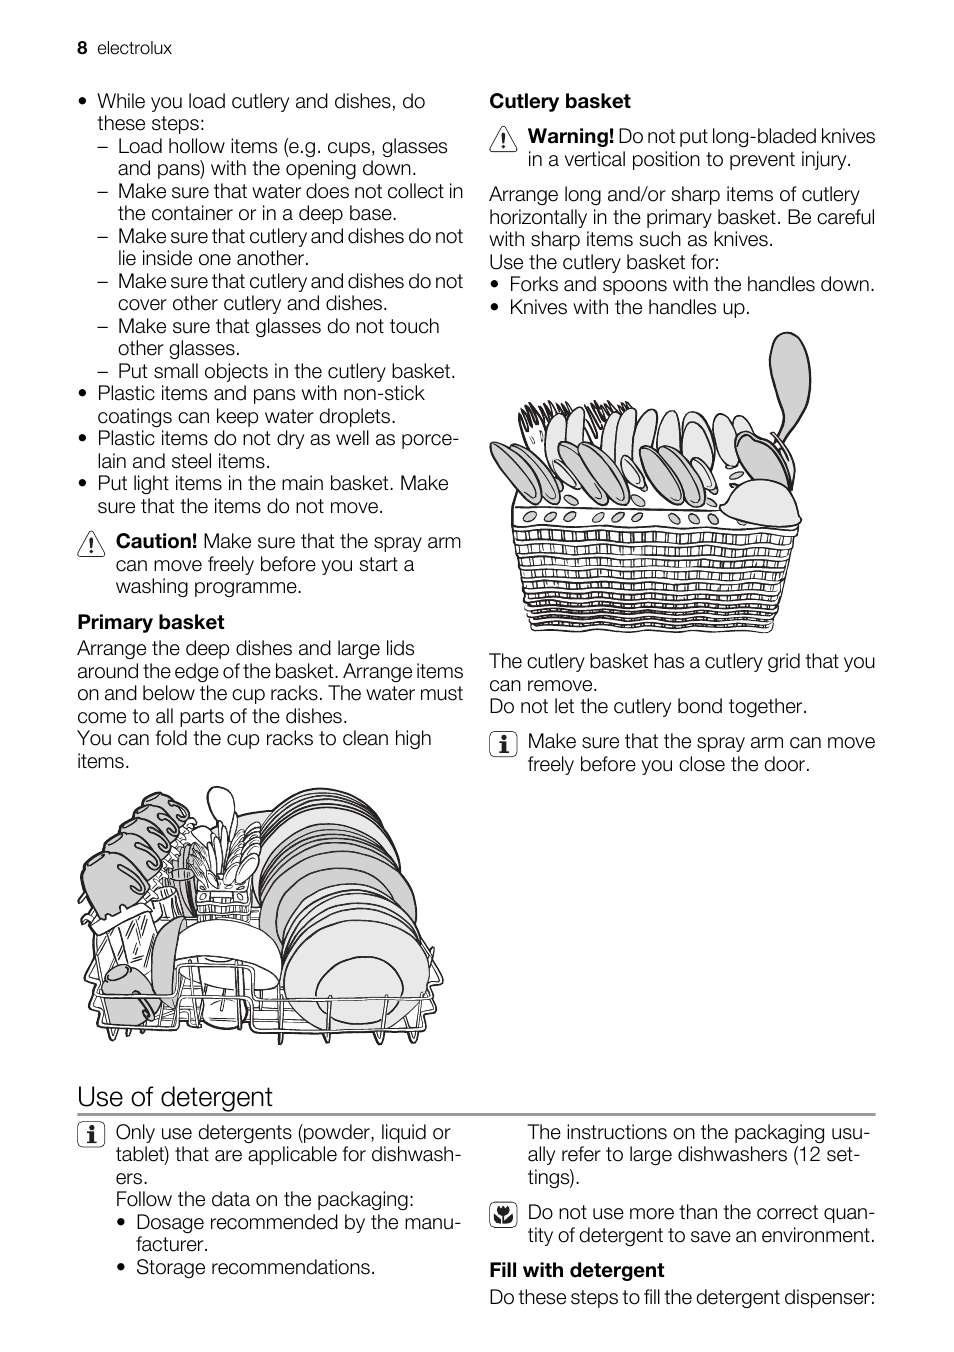
Cutlery basket
Warning! Do not put long-bladed knives
in a vertical position to prevent injury.
Arrange long and/or sharp items of cutlery
horizontally in the primary basket. Be careful
with sharp items such as knives.
Use the cutlery basket for:
• Forks and spoons with the handles down.
• Knives with the handles up.
The cutlery basket has a cutlery grid that you
can remove.
Do not let the cutlery bond together.
Make sure that the spray arm can move
freely before you close the door.
Use of detergent
Only use detergents (powder, liquid or
tablet) that are applicable for dishwash-
ers.
Follow the data on the packaging:
• Dosage recommended by the manu-
facturer.
• Storage recommendations.
The instructions on the packaging usu-
ally refer to large dishwashers (12 set-
tings).
Do not use more than the correct quan-
tity of detergent to save an environment.
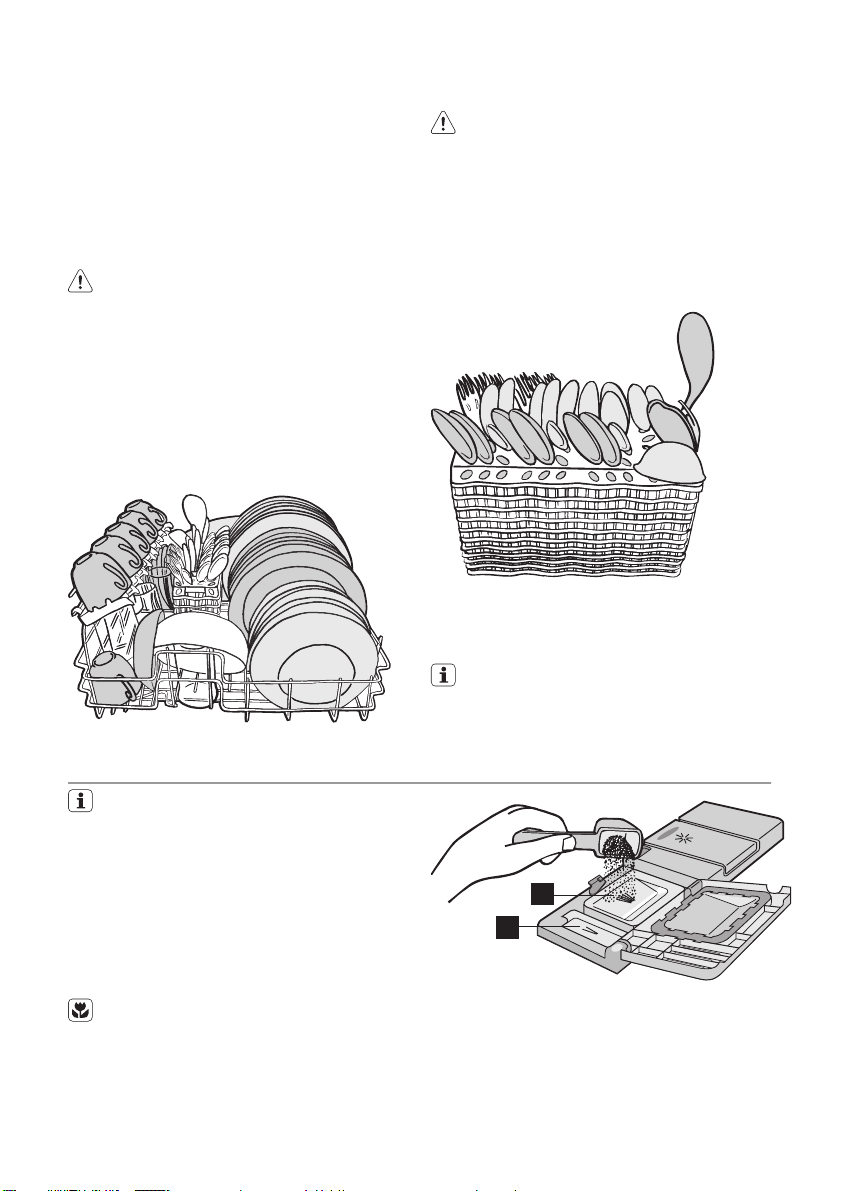
Fill with detergent
Do these steps to fill the detergent dispenser:
8 electrolux
A
B
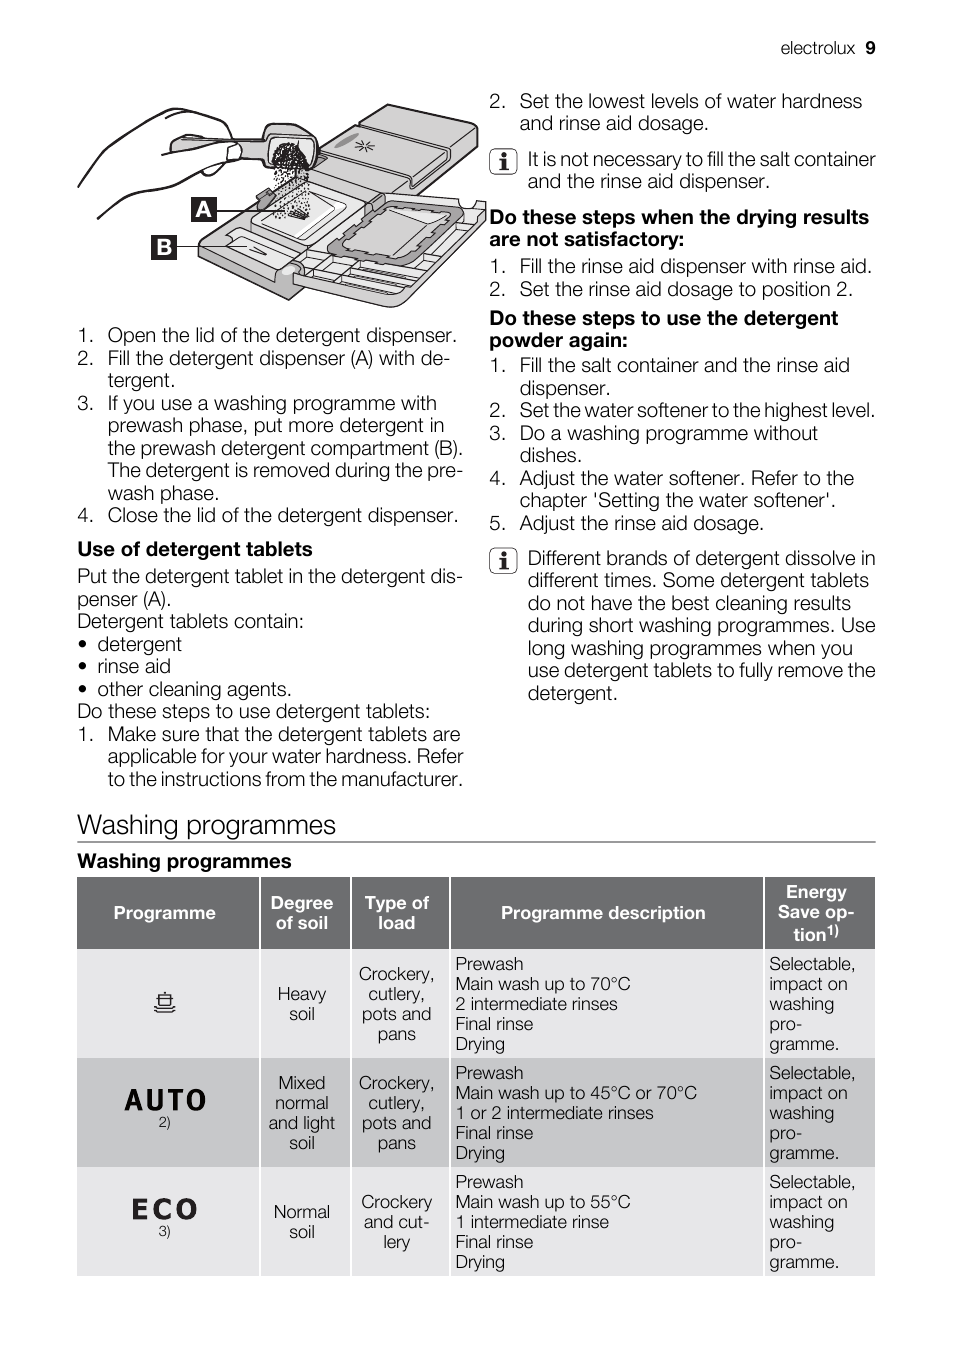
1. Open the lid of the detergent dispenser.
2. Fill the detergent dispenser (A) with de-
tergent.
3. If you use a washing programme with
prewash phase, put more detergent in
the prewash detergent compartment (B).
The detergent is removed during the pre-
wash phase.
4. Close the lid of the detergent dispenser.
Use of detergent tablets
Put the detergent tablet in the detergent dis-
penser (A).
Detergent tablets contain:
• detergent
• rinse aid
• other cleaning agents.
Do these steps to use detergent tablets:
1. Make sure that the detergent tablets are
applicable for your water hardness. Refer
to the instructions from the manufacturer.
2. Set the lowest levels of water hardness
and rinse aid dosage.
It is not necessary to fill the salt container
and the rinse aid dispenser.
Do these steps when the drying results
are not satisfactory:
1. Fill the rinse aid dispenser with rinse aid.
2. Set the rinse aid dosage to position 2.
Do these steps to use the detergent
powder again:
1. Fill the salt container and the rinse aid
dispenser.
2. Set the water softener to the highest level.
3. Do a washing programme without
dishes.
4. Adjust the water softener. Refer to the
chapter ‘Setting the water softener’.
5. Adjust the rinse aid dosage.
Different brands of detergent dissolve in
different times. Some detergent tablets
do not have the best cleaning results
during short washing programmes. Use
long washing programmes when you
use detergent tablets to fully remove the
detergent.
Washing programmes
Washing programmes
Programme
Degree
of soil
Type of
load
Programme description
Energy
Save op-
tion
1)
Heavy
soil
Crockery,
cutlery,
pots and
pans
Prewash
Main wash up to 70°C
2 intermediate rinses
Final rinse
Drying
Selectable,
impact on
washing
pro-
gramme.
2)
Mixed
normal
and light
soil
Crockery,
cutlery,
pots and
pans
Prewash
Main wash up to 45°C or 70°C
1 or 2 intermediate rinses
Final rinse
Drying
Selectable,
impact on
washing
pro-
gramme.
3)
Normal
soil
Crockery
and cut-
lery
Prewash
Main wash up to 55°C
1 intermediate rinse
Final rinse
Drying
Selectable,
impact on
washing
pro-
gramme.
electrolux 9
Programme
Degree
of soil
Type of
load
Programme description
Energy
Save op-
tion
1)
Normal
or light
soil
Crockery
and cut-
lery
Main wash up to 50°C
1 intermediate rinse
Final rinse
Selectable,
no impact
on washing
pro-
gramme.
1) For programmes where the option has an impact, the energy saving is between 10% and 25%.
2) During the ‘Auto’ washing programme the level of soiling on the dishes is determined by how cloudy
the water is. The programme duration, water and energy consumption levels can vary; this depends
upon if the appliance is fully or partially loaded and if the dishes are lightly or heavily soiled. The
temperature of the water is automatically adjusted between 45°C and 70°C.
3) Test programme for test institutes. Please refer to separate leaflet supplied, for test data.
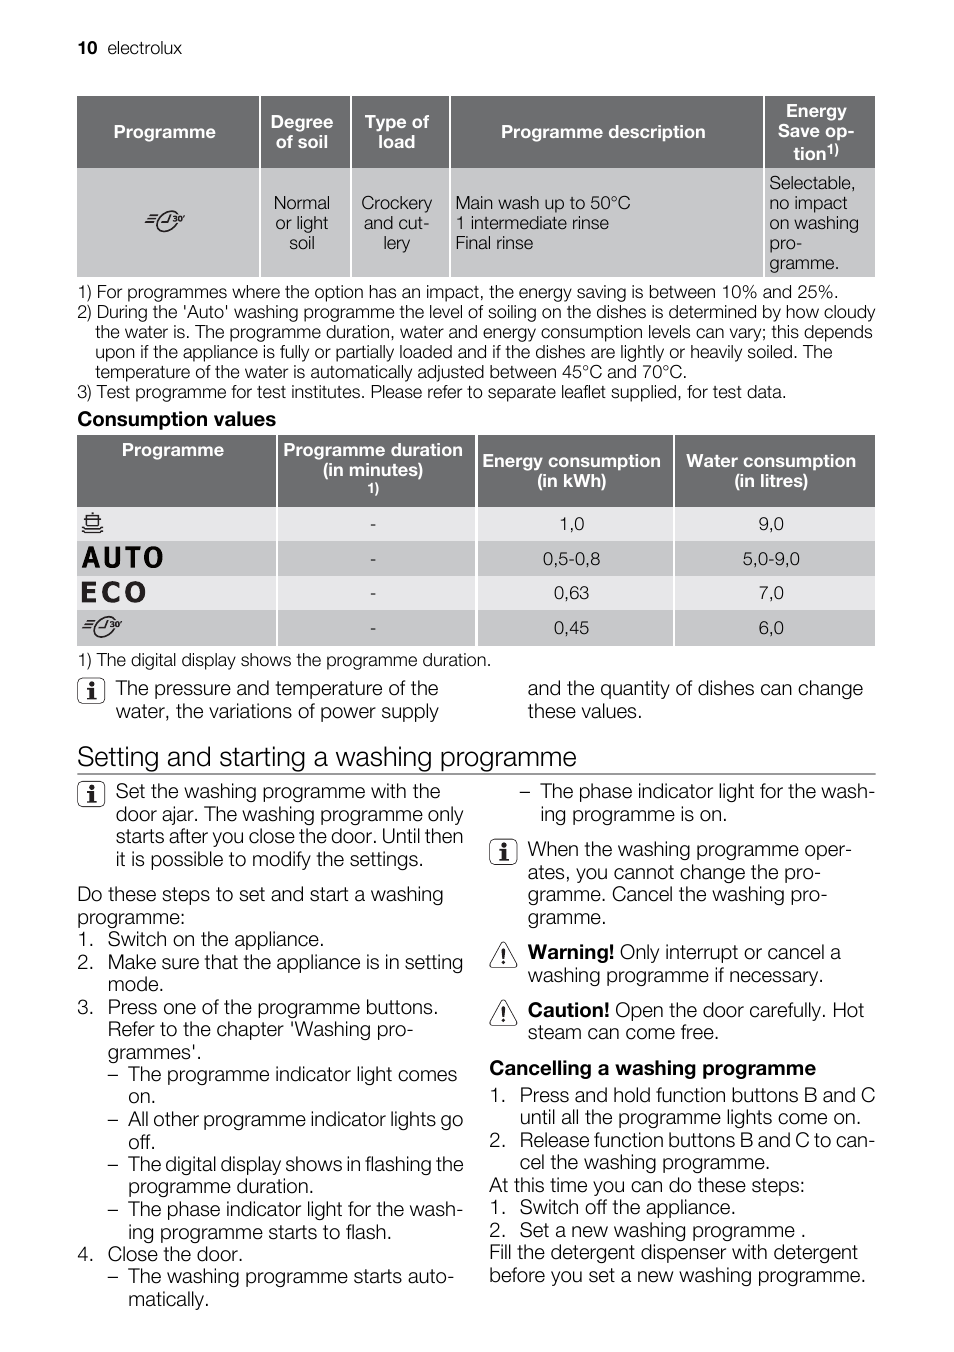
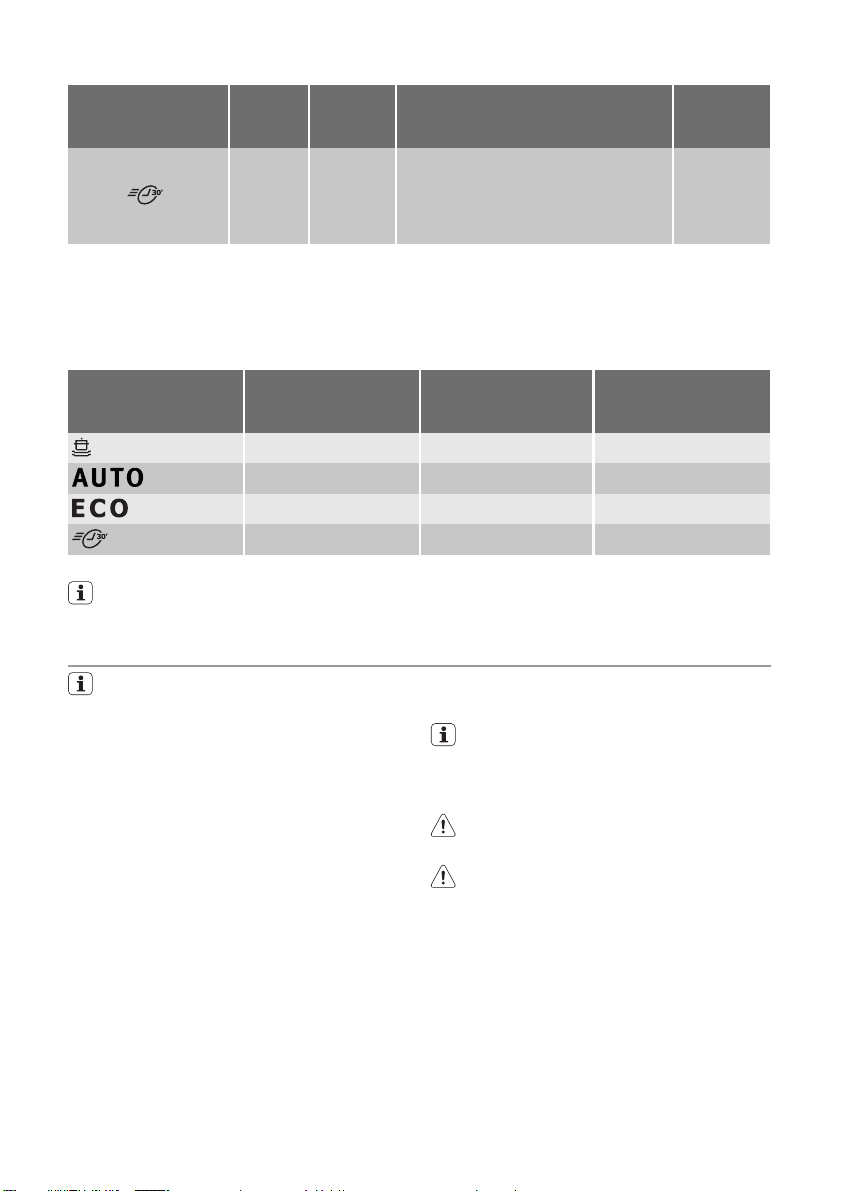
Consumption values
Programme
Programme duration
(in minutes)
1)
Energy consumption
(in kWh)
Water consumption
(in litres)
—
1,0
9,0
—
0,5-0,8
5,0-9,0
—
0,63
7,0
—
0,45
6,0
1) The digital display shows the programme duration.
The pressure and temperature of the
water, the variations of power supply
and the quantity of dishes can change
these values.
Setting and starting a washing programme
Set the washing programme with the
door ajar. The washing programme only
starts after you close the door. Until then
it is possible to modify the settings.
Do these steps to set and start a washing
programme:
1. Switch on the appliance.
2. Make sure that the appliance is in setting
mode.
3. Press one of the programme buttons.
Refer to the chapter ‘Washing pro-
grammes’.
– The programme indicator light comes
on.
– All other programme indicator lights go
off.
– The digital display shows in flashing the
programme duration.
– The phase indicator light for the wash-
ing programme starts to flash.
4. Close the door.
– The washing programme starts auto-
matically.
– The phase indicator light for the wash-
ing programme is on.
When the washing programme oper-
ates, you cannot change the pro-
gramme. Cancel the washing pro-
gramme.
Warning! Only interrupt or cancel a
washing programme if necessary.
Caution! Open the door carefully. Hot
steam can come free.
Cancelling a washing programme
1. Press and hold function buttons B and C
until all the programme lights come on.
2. Release function buttons B and C to can-
cel the washing programme.
At this time you can do these steps:
1. Switch off the appliance.
2. Set a new washing programme .
Fill the detergent dispenser with detergent
before you set a new washing programme.
10 electrolux
08:33
Обзор Electrolux ESF 2400OS из Rozetka
03:25
Посудомоечная машина Electrolux ESF 9552 LOW. Обзор и отзыв
04:40
Посудомоечная машина Electrolux ESF 9422 LOW. Обзор и отзыв
10:20
Ремонт посудомоечной машины Elecrtolux ESF 2200 DW
10:44
Посудомоечная машина ELECTROLUX ESF 2400 OK распаковка от интернет магазина ROZETKA
04:53
Ошибка i20, i30 посудомойка Электролюкс.
02:50
Electrolux ESF 2450 W mosogatógép Márkabolt
Нажмите на кнопку для помощи

user manual
Οδηγίες Χρήσης
návod na používanie
Dishwasher
Πλυντήριο πιάτων
Umývačka riadu
ESF2450
2 electrolux
Electrolux. Thinking of you.
Share more of our thinking at www.electrolux.com
CONTENTS
Safety information 2
Product description 3
Control panel 4
Use of the appliance 5
Setting the water softener 5
Use of dishwasher salt 6
Use of rinse aid 7
Loading cutlery and dishes 7
Use of detergent 8
Washing programmes 9
SAFETY INFORMATION
For your safety and correct operation
of the appliance, read this manual carefully before installation and use. Always
keep these instructions with the appliance even if you move or sell it. Users
must fully know the operation and safety features of the appliance.
Correct use
• The appliance is designed exclusively for
domestic use.
• Only use the appliance to clean household utensils that are applicable for dishwashers.
• Do not put solvents in the appliance. Risk
of explosion.
• Put the knives and all items with sharp
points in the cutlery basket with their
points down. If not, put in a horizontal position in the main basket.
• Use only branded products for dishwashers (detergent, salt, rinse aid).
• If you open the door while the appliance
is in operation, hot steam can escape.
Risk of skin burns.
• Do not remove dishes from the dishwasher before the end of the washing programme.
• When the washing programme is completed, disconnect the mains plug from the
mains socket and close the water tap.
• Only an authorised service engineer can
repair this appliance. Use only original
spare parts.
Setting and starting a washing programme
10
Care and cleaning 11
Technical data 12
What to do if… 12
Installation 14
Water connection 14
Electrical connection 16
Environment concerns 16
Subject to change without notice
• Do not do repairs yourself to prevent in-
jury and damage to the appliance. Always contact your local Service Force
Centre.
General safety
• Persons (including children) with reduced
physical sensory, mental capabilities or
lack of experience and knowledge must
not use the appliance. They must have supervision or instruction for the operation
of the appliance by a person responsible
for their safety.
• Obey the safety instructions from the man-
ufacturer of the dishwasher detergent to
prevent burns to eyes, mouth and throat.
• Do not drink the water from the dishwash-
er. Detergent residues can stay in your appliance.
• Always close the door when you do not
use the appliance to prevent injury and
not to stumble over the open door.
• Do not sit or stand on the open door.
Child safety
• Only adults can use this appliance. Chil-
dren must get supervision to make sure
that they do not play with the appliance.
• Keep all the packaging away from chil-
dren. There is a risk of suffocation.
• Keep all detergents in a safe area. Do not
let children touch the detergents.
• Keep children away from the appliance
when the door is open.

electrolux 3
Installation
• Make sure that the appliance is not damaged because of transport. Do not connect a damaged appliance. If necessary,
contact the supplier.
• Remove all packaging before first use.
• A qualified and competent person must
do the electrical installation.
• A qualified and competent person must
do the plumbing installation.
• Do not change the specifications or modify this product. Risk of injury and damage to the appliance.
• Do not use the appliance:
PRODUCT DESCRIPTION
1
– if the mains cable or water hoses are
damaged,
– if the control panel, worktop or plinth
area are damaged, that you can get access to the inner side of the appliance.
Contact your local Service Force Centre.
• Do not drill into the sides of the appliance
to prevent damage to hydraulic and electrical components.
Warning! Carefully obey the
instructions for electrical and water
connections.
6
2
3
1 Spray arm
2 Microfilter
3 Detergent dispenser
4 Rinse aid dispenser
5 Flat filter
6 Salt container
5
4

4 electrolux
The rating label is on the back of appliance.
CONTROL PANEL
6 5
1 2
1 On/off button
2 Programme selection buttons
3 Save energy button /(Saver)
4 Delay start button
5 Indicator lights
6 Digital display
7 Function buttons
1)
3 4
ABC
7
Indicator lights
The indicator light comes on when the washing
phase or the rinsing phase operates.
The indicator light comes on when the drying
phase operates.
The indicator light comes on when the washing
programme is completed.
The indicator light comes on when it is necessary to fill the salt container. Refer to the chapter
‘Use of dishwasher salt’.
The salt indicator light can stay on for some
hours, but it does not have an unwanted effect
on the operation of the appliance.

Indicator lights
The indicator light comes on when it is necessa-
1)
1) The indicator light is off when a washing programme operates.
Delay start button
Use the delay start button to delay the start
of the washing programme with an interval
between 1 and 19 hours. Refer to the chapter ‘Setting and starting a washing programme’.
Digital display
The display shows:
• Adjusted level of the water softener.
• Programme duration.
• Remaining time to the end of the pro-
ry to fill the rinse aid. Refer to the chapter ‘Use of
rinse aid’.
The save energy function has no effect on
some programmes. Refer to the chapter
‘Washing programmes’ for the list of programmes where save energy has or not an
effect.
Function buttons
Use the function buttons for these operations:
• To set the water softener. Refer to the
• To cancel the washing programme in pro-
gramme.
• End of a washing programme.
• Number of hours in delay start.
• Fault codes.
Save energy button
This function decreases the temperature in
the drying phase. Saved energy is between
10% and 25%.
If dishes at the end of the programme
are wet, keep the door ajar to let the
dishes dry naturally.
This function is available with all washing programmes. The related indicator light comes
Setting mode
The appliance is in setting mode when all
programme indicator lights are on.
The appliance must be in setting mode for
these operations:
– To set a washing programme.
– To set the water softener level.
If a programme indicator light is on, cancel
the programme to go back to the setting
mode. Refer to the chapter «Setting and
starting a washing programme».
on when you press the button.
electrolux 5
chapter ‘Setting the water softener’.
gress or a delay start in progress. Refer
to the chapter ‘Setting and starting a
washing programme’.
USE OF THE APPLIANCE
Refer to the following instructions for each
step of procedure:
1. Make a check if the water softener level
is correct for the water hardness in your
area. If necessary set the water softener.
2. Fill the salt container with dishwasher salt.
3. Fill the rinse aid dispenser with rinse aid.
4. Load cutlery and dishes into the dishwasher.
SETTING THE WATER SOFTENER
The water softener removes minerals and
salts from the water supply. Minerals and
salts can have bad effect on the operation
of the appliance.
5. Set the correct washing programme for
the type of load and soil.
6. Fill the detergent dispenser with the correct quantity of detergent.
7. Start the washing programme.
If you use detergent tablets, refer to the
chapter ‘Use of detergent’.
Water hardness is measured in equivalent
scales:
• German degrees (dH°).
• French degrees (°TH).

6 electrolux
• mmol/l (millimol per litre — international
unit for the hardness of water).
•Clarke.
Water hardness
°dH mmol/l °TH Clarke
>24 >4.2 >40 > 28 5
18- 24 3.2- 4.2 32- 40 22- 28 4
12- 18 2.1- 3.2 19- 32 13- 22 3
4- 12 0.7- 2.1 7- 19 5 -13 2
< 4 < 0.7 < 7 < 5
1) No use of salt required.
Electronic adjustment
The water softener is set at the factory at level 3.
1. Switch on the appliance.
2. Make sure that the appliance is in set-
ting mode.
3. Press and hold function buttons B and
C until the indicator lights of function buttons A, B and C start to flash.
4. Release function buttons B and C.
Adjust the water softener to the water hardness in your area. If necessary, contact
your local water authority.
– The indicator light for function button
A continues to flash.
– The digital display shows the current
level.
Example: digital display shows
el 3.
6. Press the function button A one time to
increase the water softener level by one
step.
7. Press the on/off button to save the operation.
5. Press function button A.
– The indicator lights for function but-
tons B and C go off.
Water hard-
ness setting
1)
1
Digital dis-
play level
= lev-
USE OF DISHWASHER SALT
Caution! Only use dishwashers salt.
Types of salt that are not applicable for
dishwashers cause damage to the
water softener.
Caution! Grains of salt and salty water
on the bottom of the appliance can
cause corrosion. Fill the appliance with
salt before you start a washing
programme to prevent corrosion.
Do these steps to fill the salt container:
1. Turn the cap anticlockwise to open the
salt container.
2. Fill the salt container with 1 litre of water
(only the first operation).
3. Use the funnel to fill the salt container
with salt.
4. Remove the salt around the opening of
the salt container.
5. Turn the cap clockwise to close the salt
container.

electrolux 7
It is normal that water overflows from
the salt container when you fill it with salt
USE OF RINSE AID
Caution! Only use branded rinse aid
for dishwashers.
Do not fill the rinse aid dispenser with
other products (e.g. dishwasher cleaning agent, liquid detergent). There is a
risk of damage to the appliance.
Rinse aid makes it possible to dry the
dishes without streaks and stains.
Rinse aid is automatically added during
the last rinsing phase.
Do these steps to fill the rinse aid dispenser:
When you set the water softener to level 1,
the salt indicator light does not stay on.
1. Press the release button (A) to open the
rinse aid dispenser.
2. Fill the rinse aid dispenser with rinse aid.
The mark ‘max.’ shows the maximum
level .
3. Remove the spilled rinse aid with an absorbent cloth to prevent too much foam
during the subsequent washing programme.
4. Close the rinse aid dispenser.
The capacity of the rinse aid dispenser
is approximately 150 ml. The quantity
of rinse aid is sufficient for approximately 60 washing programmes.
Adjust the dosage of rinse aid
The appliance is set at the factory at level 1.
You can set the rinse aid dosage between
1 — 6 (1- 6 ml of the rinse aid).
Refer to the washing results (chapter ‘What
to do if…’). Start with the lowest dosage.
1. Turn the arrow clockwise to increase
the dosage.
2. Increase the dosage if there are water
droplets or limescale on the dishes.
LOADING CUTLERY AND DISHES
Helpful hints and tips
Caution! Only use the appliance for
household utensils that are applicable
for dishwashers.
Do not use the appliance to clean objects
that can absorb water (sponges, household
cloths, etc.).
• Before you load cutlery and dishes, do
these steps:
– Remove all food remainings and debris.
– Make burnt, remaining food in pans soft.
• While you load cutlery and dishes, do
these steps:
– Load hollow items (e.g. cups, glasses
and pans) with the opening down.
– Make sure that water does not collect
in the container or in a deep base.
– Make sure that cutlery and dishes do
not lie inside one another.
– Make sure that cutlery and dishes do
not cover other cutlery and dishes.
8 electrolux
– Make sure that glasses do not touch
other glasses.
– Put small objects in the cutlery basket.
• Plastic items and pans with non-stick
coatings can keep water droplets.
• Plastic items do not dry as well as porcelain and steel items.
• Put light items in the main basket. Make
sure that the items do not move.
Caution! Make sure that the spray arm
can move freely before you start a
washing programme.
Primary basket
Arrange the deep dishes and large lids
around the edge of the basket. Arrange
items on and below the cup racks. The water must come to all parts of the dishes.
You can fold the cup racks to clean high
items.
Cutlery basket
Warning! Do not put long-bladed
knives in a vertical position to prevent
injury.
Arrange long and/or sharp items of cutlery
horizontally in the primary basket. Be careful with sharp items such as knives.
Use the cutlery basket for:
• Forks and spoons with the handles down.
• Knives with the handles up.
The cutlery basket has a cutlery grid that
you can remove.
Do not let the cutlery bond together.
Make sure that the spray arm can
move freely before you close the door.
USE OF DETERGENT
Only use detergents (powder, liquid or
tablet) that are applicable for dishwashers.
Follow the data on the packaging:
• Dosage recommended by the manufacturer.
• Storage recommendations.
The instructions on the packaging usually refer to large dishwashers (12 settings).
Do not use more than the correct quantity of detergent to save an environment.
Fill with detergent
Do these steps to fill the detergent dispenser:
A
B
1. Open the lid of the detergent dispenser.
2. Fill the detergent dispenser (A) with detergent.
3. If you use a washing programme with
prewash phase, put more detergent in
the prewash detergent compartment (B).
The detergent is removed during the prewash phase.

electrolux 9
4. Close the lid of the detergent dispenser.
Use of detergent tablets
Put the detergent tablet in the detergent dispenser (A).
Detergent tablets contain:
• detergent
•rinse aid
• other cleaning agents.
Do these steps to use detergent tablets:
1. Make sure that the detergent tablets are
applicable for your water hardness. Refer to the instructions from the manufacturer.
2. Set the lowest levels of water hardness
and rinse aid dosage.
It is not necessary to fill the salt container and the rinse aid dispenser.
Do these steps when the drying results
are not satisfactory:
1. Fill the rinse aid dispenser with rinse aid.
WASHING PROGRAMMES
Washing programmes
Programme
2)
3)
Degree
of soil
Heavy
soil
Mixed
normal
and light
soil
Normal
soil
Type of
load
Crockery,
cutlery,
pots and
pans
Crockery,
cutlery,
pots and
pans
Crockery
and cut-
lery
2. Set the rinse aid dosage to position 2.
Do these steps to use the detergent
powder again:
1. Fill the salt container and the rinse aid
dispenser.
2. Set the water softener to the highest level.
3. Do a washing programme without
dishes.
4. Adjust the water softener. Refer to the
chapter ‘Setting the water softener’.
5. Adjust the rinse aid dosage.
Different brands of detergent dissolve
in different times. Some detergent tablets do not have the best cleaning results during short washing programmes. Use long washing programmes when you use detergent tablets to fully remove the detergent.
Energy
Programme description
Prewash
Main wash up to 70°C
2 intermediate rinses
Final rinse
Drying
Prewash
Main wash up to 45°C or 70°C
1 or 2 intermediate rinses
Final rinse
Drying
Prewash
Main wash up to 55°C
1 intermediate rinse
Final rinse
Drying
Save op-
Selectable,
impact on
washing
programme.
Selectable,
impact on
washing
programme.
Selectable,
impact on
washing
programme.
tion
1)
10 electrolux
Programme
1) For programmes where the option has an impact, the energy saving is between 10% and 25%.
2) During the ‘Auto’ washing programme the level of soiling on the dishes is determined by how cloudy the water is.
The programme duration, water and energy consumption levels can vary; this depends upon if the appliance is
fully or partially loaded and if the dishes are lightly or heavily soiled. The temperature of the water is automatically
adjusted between 45°C and 70°C.
3) Test programme for test institutes. Please refer to separate leaflet supplied, for test data.
Degree
of soil
Normal
or light
soil
Type of
load
Crockery
and cut-
lery
Programme description
Main wash up to 50°C
1 intermediate rinse
Final rinse
Energy
Save op-
1)
tion
Selectable,
no impact
on washing
programme.
Consumption values
Programme Programme duration
1) The digital display shows the programme duration.
(in minutes)
1)
— 1,0 9,0
— 0,5-0,8 5,0-9,0
— 0,63 7,0
— 0,45 6,0
The pressure and temperature of the
water, the variations of power supply
Energy consumption
(in kWh)
Water consumption
(in litres)
and the quantity of dishes can change
these values.
SETTING AND STARTING A WASHING PROGRAMME
Set the washing programme with the
door ajar. The washing programme only starts after you close the door. Until
then it is possible to modify the settings.
Do these steps to set and start a washing
programme:
1. Switch on the appliance.
2. Make sure that the appliance is in set-
ting mode.
3. Press one of the programme buttons.
Refer to the chapter ‘Washing programmes’.
– The programme indicator light comes
on.
– All other programme indicator lights
go off.
– The digital display shows in flashing
the programme duration.
– The phase indicator light for the wash-
ing programme starts to flash.
4. Close the door.
– The washing programme starts auto-
matically.
– The phase indicator light for the wash-
ing programme is on.
When the washing programme operates, you cannot change the programme. Cancel the washing programme.
Warning! Only interrupt or cancel a
washing programme if necessary.
Caution! Open the door carefully. Hot
steam can come free.
Cancelling a washing programme
1. Press and hold function buttons B and
C until all the programme lights come on.
2. Release function buttons B and C to cancel the washing programme.
At this time you can do these steps:
1. Switch off the appliance.
2. Set a new washing programme .
Fill the detergent dispenser with detergent
before you set a new washing programme.

electrolux 11
Interrupting a washing programme
Open the door.
• The programme stops.
Close the door.
• The programme continues from the point
of interruption.
Setting and starting a washing
programme with delay start
1. Press the on/off button.
2. Set a washing programme.
3. Press the delay start button until the dis-
play shows on flashing the necessary delay start of the washing programme.
– The delay start indicator light comes
on.
4. Close the door.
– The number on the display comes on
with fixed light.
– The countdown of the delay start
starts.
– The countdown of the delay start de-
creases with steps of 1 hour.
– When the countdown is completed,
the washing programme starts automatically.
Do not open the door during the countdown to prevent interruption of the
countdown. When you close the door
again, the countdown continues from
the point of interruption.
Cancelling a delay start:
1. Press and hold function buttons B and
C until all the programme lights come on.
– When you cancel a delay start, you al-
so cancel the washing programme.
2. Set a new washing programme.
You can select the washing programme and delay start also with the
door closed. When you press a programme button you have only 3 seconds to select a different washing programme or a delay start. After these 3
seconds, the selected programme
starts automatically.
End of the washing programme
Switch off the appliance in these conditions:
• The appliance stops automatically.
• The display shows 0.
• The end-of-programme indicator light
comes on.
1. Press the on/off button.
2. Open the door.
3. For better drying results, keep the door
ajar for some minutes before you re-
move the dishes.
Let the dishes cool down before you remove them from the appliance. Hot dishes
are easily damaged.
If the save energy function is set,
dishes can be wet once the programme finished. We recommend to
leave the appliance door ajar so that
dishes can dry naturally.
Standby mode
If you do not switch off the appliance at the
end of the washing programme, the appliance automatically goes into standby
mode. The standby mode decreases energy consumption.
Three minutes after the end of the programme, all indicator lights go off and the
digital display shows one horizontal bar.
Press one of the buttons (not the on/off button), to go back to end-of-programme mode.
CARE AND CLEANING
Warning! Switch the appliance off
before you clean the filters.
Cleaning the filters
Caution! Do not use the appliance
without filters. Make sure that the
installation of the filters is correct.
Incorrect installation will cause
unsatisfactory washing results and
damage to the appliance.
The dishwasher has 2 filters:
1. microfilter
2. flat filter

12 electrolux
Do these steps to clean the filters:
1. Open the door.
2. Remove the basket.
3. Remove the filters in the bottom of the
appliance.
4. Clean the filters below running water.
5. Put the filters back.
6. Turn the microfilter clockwise to lock it.
7. Close the door.
Cleaning the spray arm
Regularly examine the spray arm. Remove
remaining food from the holes in the spray
arm.
Do these steps to remove the spray arm:
1. Turn the nut anticlockwise.
2. Remove the spray arm.
3. Fully clean the holes.
External cleaning
Clean the external surfaces of the appliance
and control panel with a damp soft cloth.
Only use neutral detergents. Do not use
abrasive products, scouring pads or solvents (acetone, trichloroethylene etc…).
Frost precautions
Caution! Do not install the appliance
where the temperature is below 0 °C.
The manufacturer is not responsible for
damage because of frost.
If not possible, empty the appliance and
close the door. Disconnect the water inlet
hose and remove water from the water inlet
hose.
TECHNICAL DATA
Dimensions Width
Electrical connection — Voltage
— Overall power — Fuse
Water supply pressure Minimum
Capacity 6 place settings
Height
Depth
Data on the electrical connection are on the rating plate on the
back of appliance.
0,8 bar (0,08 MPa)
Maximum
54,5 cm
44,7 cm
48,0-49,0 cm
10 bar (1,0 MPa)
WHAT TO DO IF…
The appliance does not start or stops during operation.
If there is a fault, first try to find a solution to
the problem yourself. If you cannot find a solution to the problem yourself, contact the
Service Force Centre.
Caution! Switch off the appliance
before you do the below suggested
corrective actions.

electrolux 13
Fault code and malfunction Possible cause and solution
•
digital display shows
The dishwasher does not fill with water
•
digital display shows
The dishwasher will not drain
• the drain pump operates continu-
ously
• all indicators lights on the control
panel go off
The anti-flood device operates
The programme does not start • The appliance door is not closed.
After the check, switch on the appliance.
The programme continues from the point of
interruption. If the malfunction shows again,
contact your Service Force Centre.
These data are necessary to help you quickly and correctly:
•Model (Mod.)
The cleaning results are not satisfactory
The dishes are not clean • The selected washing programme is not applicable for the type of
Limescales particles on the
dishes
The dishes are wet and dull • No rinse aid has been used.
There are streaks, milky
spots or a bluish coating on
glasses and dishes
• The water tap is blocked or furred with limescale.
Clean the water tap.
• The water tap is closed.
Open the water tap.
• The filter in the water inlet hose is blocked.
Clean the filter.
• The connection of the water inlet hose is not correct. The
hose can be kinked or squashed.
Make sure that the connection is correct.
• There is a blockage in the sink spigot.
Clean the sink spigot.
• The connection of the water drain hose is not correct. The
hose can be kinked or squashed.
Make sure that the connection is correct.
• Close the water tap and contact your local Service Force
Centre.
Close the door.
• Mains plug is not connected in.
Put in the mains.
• The fuse has blown out in the household fuse box.
Replace the fuse.
• Delay start is set.
Cancel the delay start to start the programme immediately.
• Product number (PNC)
• Serial number (S.N.)
For these data, refer to the rating plate.
Write the necessary data here:
Model description : ……….
Product number : ……….
Serial number : ……….
load and soil.
• The basket is loaded incorrectly so that water cannot reach all surfaces.
• Spray arm does not turn freely because of incorrect arrangement
of the load.
• The filters are dirty or not correctly installed.
• The quantity of detergent is too little or missing.
• The salt container is empty.
• The water softener is adjusted on a wrong level.
• The salt container cap is not closed correctly.
• The rinse aid dispenser is empty.
• Decrease the rinse aid dosage.

14 electrolux
The cleaning results are not satisfactory
Dry water drop signs on
glasses and dishes
• Increase rinse aid dosage.
• The detergent can be the cause.
INSTALLATION
Warning! Make sure that mains plug is
disconnected from the mains socket
during installation.
Fitting the appliance
Put the appliance adjacent to a water tap
and a drain.
When you put the appliance in place, make
sure that the water hoses are not kinked or
squashed.
Install the appliance on a kitchen sink, worktop or built-in..
Positioning
Install the dishwasher into the furniture of
the kitchen.
Make sure that the dimensions of the recess agree with the given dimensions.
Make sure that there are openings in the furniture for the inlet hose, the water drain
hose and the mains cable.
Adjusting the level of the appliance
Make sure that the appliance is level to
close and seal the door correctly. If the level
of the appliance is correct, the door does
not catch on the sides of the cabinet. If the
door does not close correctly, loosen or
tighten the adjustable feet until the appliance is level.
WATER CONNECTION
Inlet hose
The appliance has safety features to prevent that the water in the appliance goes
back into the drinking water system.
Connect the appliance to a hot (max. 60°)
or cold water supply.
If the hot water comes from alternative sources of energy that are more environmentally
friendly (e.g. solar or photovoltaic panels
and aeolian), use a hot water supply to decrease energy consumption.
It is important that a water tap or stopcock
is near the dishwasher with easy access.
Connect the inlet hose to a water tap with
an external thread of 3/4”. If it is necessary,
use the restrictor 1/2″.

If the water inlet hose is too short, replace
the water inlet hose with an applicable, longer high-pressure hose. Do not connect an
extension hose.
To suit the installation, it is possible to turn
the end of the hose that is connected to the
dishwasher. Do these steps :
1. Loosen the retaining nut.
2. Turn the hose.
3. Tighten the retaining nut.
Warning! Make sure that the retaining
nut and all other connections are tight
before you move the dishwasher into
position.
Warning! Always use a new water inlet
hose. Do not use connection hoses
from an old appliance.
Drain hose
The appliance has water safety system to
prevent water damage. If there is a malfunction, the drain pump automatically starts to
drain the remaining water out of the dishwasher.
Warning! Only if the dishwasher is
connected to the mains socket, the
water safety system operates when the
dishwasher is off.
electrolux 15
2 procedures are possible to install the water drain hose :
1. Attach the plastic curve supplied at the
end of the hose.
Put the water drain hose in the sink.
2. Connect the water drain hose to the water drain system.
The hose must be less than 75 cm
above the bottom of the dishwasher to
prevent incorrect operation of appliance.
If you connect the water drain hose to a
trap spigot under the sink, remove the plastic membrane (A). If you do not remove the
membrane, remaining food can cause a
blockage in the drain hose spigot

16 electrolux
ELECTRICAL CONNECTION
Warning! The manufacturer is not
responsible if you do not follow these
safety precautions.
This appliance needs to be earthed according to safety precautions.
Make sure that the rated voltage and
type of power on the rating plate agree
with the voltage and the power of the local power supply.
Always use a correctly installed shockproof socket.
ENVIRONMENT CONCERNS
The symbol on the product or on its
packaging indicates that this product may
not be treated as household waste. Instead
it should be taken to the appropriate
collection point for the recycling of electrical
and electronic equipment. By ensuring this
product is disposed of correctly, you will
help prevent potential negative
consequences for the environment and
human health, which could otherwise be
caused by inappropriate waste handling of
this product. For more detailed information
about recycling of this product, please
contact your local council, your household
waste disposal service or the shop where
you purchased the product.
Do not use multi-way plugs, connectors and extension cables. There is a
risk of fire.
Do not replace the mains cable yourself. Contact the Service Force Centre.
Make sure that the mains plug is accessible after installation.
Do not pull the mains cable to disconnect the appliance. Always pull the
mains plug.
The packaging materials are environmentally friendly and can be recycled. The plastic
components are identified by markings, e.g.
>PE<, >PS<, etc. Discard the packaging
materials in the applicable container at the
community waste disposal facilities.
Warning! To discard the appliance,
follow the procedure:
• Pull the mains plug out of the socket.
• Cut off the mains cable and mains
plug and discard them.
• Discard the door catch. This prevents the children to close themselves inside the appliance and endanger their lives.
Loading…
lietošanas instrukcija naudojimo instrukcija instrukcja obsługi Инструкция по эксплуатации Інструкція Trauku mazgājamā mašīna Indaplovė Zmywarka Посудомоечная машина Посудомийна машина ESF2450
2 electrolux Electrolux. Thinking of you. Dalieties ar mums savā pieredzē un pārdomās vietnē www.electrolux.com Saturs Drošības informācija Izstrādājuma apraksts Vadības panelis Ierīces lietošana Ūdens mīkstinātāja iestatīšana Trauku mazgātāja sāls izmantošana Skalošanas līdzekļa izmantošana Trauku
electrolux 3 Bērnu drošība • Šo ierīci drīkst lietot tikai pieaugušie. Neļaujiet maziem bērniem spēlēties ar ierīci. • Glabājiet iesaiņojuma materiālus bērniem nepieejamās vietās. Pastāv nosmakšanas briesmas. • Uzglabājiet mazgāšanas līdzekļus drošā vietā. Neļaujiet bērniem pieskarties mazgāšanas
4 electrolux 1 2 3 4 5 6 Smidzinātājspārns Mikrofiltrs Mazgāšanas līdzekļu dozators Skalošanas līdzekļa dozators Plakanais filtrs Specializētās sāls tvertne Tehnisko datu plāksnīte atrodas ierīces mugurpusē. Vadības panelis 6 1 2 A B 3 5 4 C 7 1 2 3 4 5 6 7 Ieslēgšanas/izslēgšanas taustiņš
electrolux 5 Indikatori Indikators iedegas tad, ja ir jāuzpilda specializētās sāls nodalījums. Skatiet sadaļu «Specializētās sāls lietošana». Specializētās sāls indikators var degt vairākas stundas, taču tas neietekmēs trauku mazgājamās mašīnas darbību. 1) Indikators iedegas arī tad, ja ir
6 electrolux Ja lietojat mazgāšanas līdzekļus tablešu veidā, skatiet sadaļu «Mazgāšanas līdzekļu lietošana». Ūdens mīkstinātāja iestatīšana Ūdens mīkstinātājs neitralizē ūdenī esošās minerālvielas un sāļus. Minerālvielas un sāļi var ietekmēt trauku mazgājamās mašīnas darbību. Ūdens cietība tiek
electrolux 7 1. pagrieziet specializētās sāls nodalījuma vāciņu pretēji pulksteņrādītāju kustības virzienam; 2. piepildiet specializētās sāls nodalījumu ar 1 litru ūdens (tikai ierīces pirmās lietošanas laikā). 3. Lai iepildītu sāli, lietojiet piltuvi. 4. Notīriet specializētās sāls iepildes vietu.
8 electrolux 2. piepildiet skalošanas līdzekļa dozatoru ar skalošanas līdzekli. Atzīme «Max» (maksimāli)norāda uz maksimālo līmeni. 3. Lai mazgāšanas programmas laikā nepieļautu liela daudzuma putu veidošanos, notīriet izlijušo skalošanas līdzekli, izmantojot absorbējošu drāniņu. 4. Aizveriet
electrolux 9 Novietojiet garus un/vai asus galda piederumus horizontāli primārajā grozā. Ievietojot asus galda piederumus, piemēram, nažus, esiet piesardzīgs. Lietojiet galda piederumu grozu, lai ievietotu: • dakšiņas un karotes ar rokturiem uz leju; • nažus ar rokturiem uz augšu. Galda piederumu
10 electrolux Specializētās sāls un skalošanas līdzekļa dozatora uzpilde nav nepieciešama. Ja žāvēšanas rezultāts ir neapmierinošs, rīkojieties šādi: 1. piepildiet skalošanas līdzekļa dozatoru ar skalošanas līdzekli; 2. iestatiet skalošanas līdzekļa dozatoru 2. pozīcijā. Ja atkal lietosiet
electrolux 11 Patēriņa vērtības Programma Programmas ilgums (minūtēs) 1) Enerģijas patēriņš (kWh) Ūdens patēriņš (litros) — 1,0 9,0 — 0,5-0,8 5,0-9,0 — 0,63 7,0 — 0,45 6,0 1) Displejā būs redzams programmas laiks. Šīs vērtības var mainīties atkarībā no ūdens spiediena un temperatūras, sprie- guma
12 electrolux – Atliktās ieslēgšanas laiks samazinās ik pa 1 stundai. – Kad laiks ir pagājis, mazgāšanas programma automātiski aktivizējas. Lai nepieļautu laika atskaites apturēšanu, neatveriet ierīces durtiņas. Aizverot durtiņas, laika atskaite atsākas no tās vietas, kur tā tika pārtraukta.
electrolux 13 3. Izņemiet ierīces apakšpusē uzstādītos filtrus. 4. Tīriet filtrus zem tekoša ūdens. 5. Ievietojiet filtrus atpakaļ tiem paredzētajās vietās. 6. Lai nofiksētu mikrofiltru, pagrieziet to pulksteņrādītāju kustības virzienā. 7. Aizveriet durtiņas. Smidzinātājspārna tīrīšana Regulāri
14 electrolux Kļūdas kods un ierīces nepareiza darbība Iespējamie iemesli un risinājums • cipardisplejā ir redzams Trauku mazgājamajā mašīna nepiepildās ar ūdeni • Ūdenskrāns ir bloķēts ar kaļķa nogulsnēm. Iztīriet ūdenskrānu. • Ūdenskrāns ir aizgriezts. Atgrieziet ūdenskrānu. • Ūdens ieplūdes
electrolux 15 Mazgāšanas rezultāti nav apmierinoši Uz glāzēm un traukiem ir izžuvušu ūdens pilienu traipi • Palieliniet skalošanas līdzekļa daudzumu. • Problēma var būt saistīta ar mazgāšanas līdzekli. Uzstādīšana Brīdinājums Ierīces uzstādīšanas laikā pārbaudiet, vai trauku amzgājamā mašīna ir
16 electrolux Ja ūdens ieplūdes šļūtene ir par īsu, nomainiet to pret atbilstoša garuma augstspiediena šļūteni. Nepievienojiet pagarinājuma šļūteni. Lai pareizi veiktu pieslēgumu, iespējams pagriezt trauku mazgājamai mašīnai pieviento šļūtenes galu. Rīkojieties šādi: 1. atslābiniet
electrolux 17 Elektrības padeves pieslēgšana Brīdinājums Ražotājs neuzņemsies atbildību par bojājumiem, kas radušies, neievērojot minētos drošības norādījumus. Iezemējiet trauku mazgājamo mašīnu atbilstoši drošības nosacījumiem. Pārliecinieties, vai ierīces nominālais spriegums un elektrības
18 electrolux Electrolux. Thinking of you. Daugiau mūsų minčių rasite www.electrolux.com Turinys Saugos informacija Gaminio aprašymas Valdymo skydelis Prietaiso naudojimas Vandens minkštintuvo nustatymas Indų plovimo druskos naudojimas Skaliklio pripildymas Stalo įrankių ir indų sudėjimas Ploviklio
electrolux 19 Įrengimas • Įsitikinkite, ar prietaisas pervežant nepažeistas. Nejunkite pažeisto prietaiso. Reikalui esant, kreipkitės į tiekėją. • Prieš pirmąjį naudojimą pašalinkite visas pakuotės dalis. • Elektrą instaliuoti turi kvalifikuotas ir kompetentingas asmuo. • Santechnikos darbus turi
20 electrolux Valdymo skydelis 6 1 2 A B 3 5 4 C 7 1 2 3 4 5 6 7 Įjungimo/išjungimo mygtukas Programų pasirinkimo mygtukai Energijos taupymo mygtukas / (Saver) Paleidimo atidėjimo mygtukas Indikacinės lemputės Skaitmeninis ekranas Funkcijų mygtukai Indikacinės lemputės Indikacinė lemputė užsidega,
electrolux 21 Atidėto paleidimo mygtukas Atidėto paleidimo mygtuką naudokite, norėdami atidėti plovimo programos pradžią nuo 1 iki 19 valandų. Žr. skyrių «Plovimo programos nustatymas ir pradėjimas». Kai kurioms programoms energijos taupymo funkcija neturi įtakos. Žr. «Indų plovimo programos»
22 electrolux Vandens kietumas Vandens kietumo nustatymas °dH mmol/l °TH Clarke >24 >4,2 >40 > 28 5 18 — 24 3,2- 4,2 32 — 40 22 — 28 4 12- 18 2,1- 3,2 19 — 32 13 — 22 3 4 — 12 0,7 — 2,1 7 — 19 5 — 13 2 <4 < 0,7 <7 <5 1 1) Lygmuo skaitmeniniame ekrane 1) Druskos naudoti nebūtina. Elektroninis
electrolux 23 Nustačius 1 vandens minkštinimo lygį, indikacinė druskos lemputė nustoja degti. Skaliklio pripildymas Atsargiai Naudokite tik indaplovėms skirtus skaliklius. Į skaliklio dalytuvą nepilkite kitų priemonių (pvz., indaplovės valiklių, skystų ploviklių). Kyla pavojus pažeisti prietaisą.
24 electrolux • Dėdami stalo įrankius ir indus, atlikite šiuos veiksmus: – Įdubusius daiktus (pvz., puodelius, stiklines ir keptuves) dėkite apverstus žemyn. – Pasirūpinkite, kad juose ar ant jų dugno nesikauptų vanduo. – Pasirūpinkite, kad stalo įrankiai ir indai nebūtų vienas kito viduje. –
electrolux 25 Tausodami aplinką, nenaudokite didesnio ploviklio kiekio negu reikia. Ploviklio pripildymas Ploviklio dalytuvo užpildymui atlikite tokius veiksmus: 1. Įsitikinkite, kad ploviklio tabletės tinka jūsų vandens kietumui. Žr. gamintojo instrukcijas. 2. Nustatykite mažiausią vandens kietumo
26 electrolux Programa 2) 3) Energijos taupymo parinktis 1) Nešvarumo laipsnis Plaunami reikmenys Įvairūs vidutiniškai ir labai užteršti Glazūruoti fajansiniai ir moliniai indai, stalo įrankiai, puodai ir keptuvės Mirkymas Pagrindinis plovimas iki 45°C arba 70°C 1 arba 2 tarpiniai skalavimai
electrolux 27 – Visos kitos programos indikacinės lemputės užges. – Skaitmeniniame ekrane blykčios programos trukmė. – Pradės mirksėti plovimo programos fazės indikacinė lemputė. 4. Uždarykite dureles. – Plovimo programa prasideda automatiškai. – Švies plovimo programos fazės indikacinė lemputė.
28 electrolux mo režimą. Veikiant laukimo režimu, sumažėja energijos sąnaudos. Praėjus trims minutėms po programos pabaigos, užges visos lemputės, o skaitmeniniame ekrane bus rodoma viena horizontali juosta. Norėdami grįžti į programos pabaigos režimą, paspauskite vieną kurį nors mygtuką (tik ne
electrolux 29 Elektros įvadas — įtampa — bend- Elektros įvado duomenys nurodyti duomenų lentelėje, esančioje roji galia — saugiklis prietaiso nugarėlėje. Tiekiamo vandens slėgis Mažiausias Didžiausias 0,8 bar (0,08 MPa) 10 bar (1,0 MPa) Našumas 6 asmenų indų rinkiniai Ką daryti, jeigu… Indaplovė
30 electrolux Nepatenkinami valymo rezultatai Nešvarūs indai • Pasirinktos plovimo programos neįmanoma pritaikyti, esant konkrečiai įkrovai ir indų nešvarumui. • Krepšys įdėtas neteisingai, todėl vanduo negali pasiekti visų paviršių. • Purkštuvas negali laisvai suktis dėl netinkamai sudėtų indų. •
electrolux 31 Vandens įvado prijungimas Vandens įvado žarna Prietaise yra apsaugos funkcijos, kurios apsaugo nuo prietaiso panaudoto vandens patekimo į vandentiekį. Prijungia prietaisą prie karšto (maks. 60°) arba šalto vandens čiaupo. Jeigu karštas vanduo tiekiamas iš alternatyvių, ekologiškų
32 electrolux nos, maisto likučiai gali užkimšti nuotekų žarnos sifoną Elektros įvado prijungimas Įspėjimas Gamintojas nėra atsakingas, jeigu jūs nesivadovaujate šiomis saugos nuorodomis. Įžeminkite prietaisą pagal saugos nuorodas. Įsitikinkite, kad nominali įtampa ir galia duomenų lentelėje
electrolux 33 Electrolux. Thinking of you. Aby dowiedzieć się więcej o naszej filozofii, odwiedź naszą stronę internetową www.electrolux.com Spis treści Informacje dotyczące bezpieczeństwa Opis urządzenia Panel sterowania Eksploatacja urządzenia Ustawianie zmiękczacza wody Wsypywanie soli do
34 electrolux • Nie siadać ani nie stawać na otwartych drzwiach. Bezpieczeństwo dzieci • Urządzenie może być użytkowane wyłącznie przez osoby dorosłe. Dzieci należy pilnować, aby mieć pewność, że nie bawią się urządzeniem. • Opakowanie przechowywać w miejscu niedostępnym dla dzieci. Istnieje ryzyko
electrolux 35 1 2 3 4 5 6 Ramię spryskujące Mikrofiltr Dozownik detergentu Dozownik płynu nabłyszczającego Filtr płaski Zbiornik soli Tabliczka znamionowa znajduje się z tyłu urządzenia. Panel sterowania 6 1 2 A B 3 5 4 C 7 1 2 3 4 5 6 7 Przycisk Wł./Wył. Przyciski wyboru programów Przycisk funkcji
36 electrolux Lampki sygnalizacyjne Ta lampka włącza się po zakończeniu programu mycia. Ta lampka włącza się, gdy należy napełnić zbiornik soli. Zapoznać się z rozdziałem «Używanie soli do zmywarek». Kontrolka soli może się świecić przez kilka godzin, ale nie ma to niepożądanego wpływu na działanie
electrolux 37 7. Uruchomić program mycia. W przypadku używania tabletek do zmywarek należy zapoznać się z rozdziałem «Używanie detergentów». Ustawianie zmiękczacza wody Zmiękczacz wody usuwa minerały i sole z doprowadzanej wody. Substancje mineralne i sole mogą mieć negatywny wpływ na działanie
38 electrolux 2. Wlać do zbiornika soli 1 litr wody (tylko za pierwszym razem). 3. Do napełnienia zbiornika solą należy użyć lejka. 4. Usunąć sól rozsypaną wokół otworu zbiornika soli. 5. Obrócić pokrywkę w kierunku zgodnym z ruchem wskazówek zegara, aby zamknąć zbiornik soli. Podczas napełniania
electrolux 39 sywnemu pienieniu podczas późniejszego programu mycia. 4. Zamknąć dozownik płynu nabłyszczającego. Pojemność dozownika płynu nabłyszczającego wynosi około 150 ml. Ilość płynu nabłyszczającego wystarcza na około 60 programów mycia. Regulacja dozowania płynu nabłyszczającego Ustawieniem
40 electrolux Długie i/lub ostre sztućce należy ułożyć poziomo w koszu głównym. Należy zachować ostrożność z ostrymi przedmiotami, takimi jak noże. Wkładanie sztućców do kosza: • widelce i łyżki — trzonkami w dół. • noże — trzonkami w górę. Kosz na sztućce posiada wyjmowaną kratkę na sztućce.
electrolux 41 Nie ma potrzeby napełniania zbiornika soli i dozownika płynu nabłyszczającego. Jeżeli efekty suszenia nie są zadowalające, wykonać poniższe czynności: 1. Napełnić dozownik płynu nabłyszczającego. 2. Ustawić dozowanie płynu nabłyszczającego w pozycji 2. Aby ponownie użyć detergentu w
42 electrolux Program Stopień zabrudzenia Rodzaj załadunku Opis programu Opcja oszczędzania energii 1) Normalne lub lekkie zabrudzenie Naczynia stołowe i sztućce Mycie zasadnicze w temperaturze do 50°C 1 płukanie pośrednie Płukanie końcowe Możliwość wyboru, nie ma wpływu na przebieg programu. 1) W
electrolux 43 Anulowanie programu mycia 1. Nacisnąć i przytrzymać przyciski funkcyjne B i C, aż do zaświecenia lampek wszystkich programów. 2. Zwolnić przyciski funkcyjne B i C, aby anulować program mycia. W tym momencie można wykonać następujące czynności: 1. Wyłączyć urządzenie. 2. Ustawić nowy
44 electrolux Konserwacja i czyszczenie Ostrzeżenie! Przed przystąpieniem do czyszczenia należy wyłączyć urządzenie. Czyszczenie filtrów Uwaga! Nie używać urządzenia bez filtrów. Upewnić się, że filtry są prawidłowo zainstalowane. Nieprawidłowa instalacja filtrów spowoduje niezadowalające wyniki
electrolux 45 Ciśnienie doprowadzanej wody Wartość minimalna Wartość maksymalna Pojemność 0,8 bara (0,08 MPa) 10 barów (1,0 MPa) 6 standardowych nakryć Co zrobić, gdy… Urządzenie nie uruchamia się lub zatrzymuje się podczas pracy. W razie wystąpienia problemów, należy najpierw spróbować
46 electrolux Efekty mycia nie są zadowalające Naczynia nie są czyste • Wybrano program mycia nieodpowiedni do rodzaju naczyń lub zabrudzenia. • Kosz jest załadowany nieprawidłowo, przez co woda nie dochodzi do wszystkich powierzchni. • Ramię spryskujące nie obraca się swobodnie w wyniku
electrolux 47 zamknąć drzwi, należy wkręcać lub wykręcać regulowane nóżki, aż urządzenie zostanie wypoziomowane. Podłączenie do sieci wodociągowej Wąż doprowadzający wodę Urządzenie ma zabezpieczenie uniemożliwiające powrót używanej w nim wody do instalacji wody pitnej. Podłączyć urządzenie do wody
48 electrolux 1. Na koniec węża założyć plastikowe kolanko dostarczone w komplecie. Włożyć końcówkę węża spustowego do umywalki. 2. Podłączyć wąż spustowy do instalacji kanalizacyjnej. Wąż musi być ułożony nie wyżej niż 75 cm ponad podstawę zmywarki, aby zapobiec nieprawidłowemu działaniu
electrolux 49 Electrolux. Thinking of you. Обменяйтесь с нами своими мыслями на www.electrolux.com Содержание Сведения по технике безопасности 49 51 52 53 53 Описание изделия Панель управления Эксплуатация изделия Установка смягчителя воды Использование соли для посудомоечных машин 54 Использование
50 electrolux • Соблюдайте инструкции по технике безопасности от производителя мою‐ щего средства для посудомоечных ма‐ шин, чтобы предотвратить ожоги глаз, рта и горла. • Не пейте воду из посудомоечной ма‐ шины. В машине могут быть остатки моющего средства. • Чтобы предотвратить травмы и не
electrolux 51 Описание изделия 1 2 3 4 5 6 1 6 2 5 3 4 Разбрызгиватель Микрофильтр Дозатор моющего средства Дозатор ополаскивателя Плоский фильтр Емкость для соли Табличка с техническими данными находится на тыльной стороне изде‐ лия.
52 electrolux Панель управления 6 1 2 A B 3 5 4 C 7 1 2 3 4 5 6 7 Кнопка Вкл/Выкл Кнопки выбора программ Кнопка энергосбережения / (Saver) Кнопка задержки пуска Индикаторы Цифровой дисплей Функциональные кнопки Индикаторы Индикатор загорается, когда выполняется стадия мойки или полоскания.
electrolux 53 Кнопка задержки пуска Используйте кнопку задержки пуска для задержки пуска программы мойки на время от 1 до 19 часов. См. раздел «Ус‐ тановка и пуск программы мойки». Цифровой дисплей Дисплей показывает: • заданную степень жесткости на ус‐ тройстве смягчения воды. • Продолжительность
54 electrolux • немецких градусах (dH°), • французских градусах (°TH), • ммоль/л (миллимолях на литр — меж‐ дународных единицах жесткости во‐ ды), • градусах по шкале Кларка. Установите на устройстве смягчения во‐ ды уровень, соответствующий жесткости воды в вашей местности. При необходи‐ мости,
electrolux 55 4. Уберите соль вокруг отверстия емко‐ сти для соли. 5. Поверните крышку по часовой стрел‐ ке, чтобы закрыть емкость для соли. То, что вода выливается из емкости для соли, когда насыпается соль, нормально. Когда на устройстве смягчения воды ус‐ тановлен уровень 1, индикатор соли не
56 electrolux Емкость дозатора ополаскивателя примерно 150 мл. Этого количества ополаскивателя достаточно пример‐ но для 60 циклов мойки. Регулировка дозировки ополаскивателя На заводе устройство для смягчения во‐ ды посудомоечной машины установлено на уровень 1. Дозировку ополаскивателя можно
electrolux 57 Будьте осторожны с острыми предмета‐ ми, такими как ножи. Укладывайте в корзинку для столовых приборов: • вилки и ложки ручками вниз. • ножи ручками вверх. В корзинке для столовых приборов имеется решетка, которую можно вы‐ нуть. Не кладите столовые приборы друг на друга. Прежде чем
58 electrolux Таблетированные моющие средства со‐ держат: • моющее средство, • ополаскиватель, • другие чистящие вещества. Чтобы использовать таблетированное моющее средство, выполните следую‐ щие действия: 1. Проверьте, чтобы таблетированное моющее средство подходило для во‐ ды с соответствующей
electrolux 59 Программа 3) Степень загряз‐ ненно‐ сти Тип за‐ грузки Обы‐ чная за‐ грязнен‐ ность Фаянс и столовые приборы Обы‐ чная или сла‐ бая за‐ грязнен‐ ность Фаянс и столовые приборы Описание программы Предварительная мойка Основная мойка при 55°C 1 промежуточное полоскание Заключительное
60 electrolux – Все остальные индикаторы про‐ грамм гаснут. – Цифровой дисплей показывает ми‐ гающими числами продолжитель‐ ность программы. – Индикатор этапа выполнения про‐ граммы мойки начнет мигать. 4. Закройте дверцу. – Программа мойки запустится авто‐ матически. – Загорается индикатор этапа
electrolux 61 Если была задана функция «Энер‐ госбережение», посуда может оста‐ ваться влажной. Мы рекомендуем слегка приоткрыть дверцу для того, чтобы посуда могла высохнуть есте‐ ственным образом. Режим готовности Если Вы не выключили машину в конце программы мойки, она автоматически переходит в
62 electrolux Меры защиты от замерзания ПРЕДУПРЕЖДЕНИЕ! Не устанавливайте машину в местах с температурой ниже 0°C. Производитель не несет ответственность за повреждения, вызванные воздействием мороза. Если это невозможно, выньте все из ма‐ шины и закройте дверцу. Отсоедините шланг для воды и слейте
electrolux 63 Код ошибки и неисправность Программа не запускается Возможная причина неисправности и ее устранение • Дверца машины не закрыта. Закройте дверцу. • Вилка сетевого шнура не вставлена в розетку. Вставьте вилку в розетку. • Перегорел предохранитель на домашнем распредели‐ тельном щите.
64 electrolux Установите машину на кухонный слив, рабочую поверхность или встройте. Размещение Установите моечную машину в кухонную мебель. Проверьте, чтобы размеры ниши отве‐ чали указанным размерам. Проверьте, чтобы в стенках ниши име‐ лись отверстия для наливного шланга, сливного шланга и кабеля
electrolux 65 ВНИМАНИЕ! Прежде чем перемещать машину на место, проверьте, чтобы стопорная гайка и другие соединения были плотно затянуты. ВНИМАНИЕ! Всегда используйте новый наливной шланг. Не используйте соединительные шланги от старого прибора. Сливной шланг Машина оснащена предохранительной
66 electrolux Заземлите машину в соответствии с требованиями техники безо‐ пасности. Проверьте, чтобы напряжение и тип электропитания, указанные на та‐ бличке с техническими характери‐ стиками, соответствовали напряже‐ нию и типу электропитания в мест‐ ной электросети. Пользуйтесь только правильно
electrolux 67 Electrolux. Thinking of you. Дізнайтеся більше про нас на сайті www.electrolux.com Зміст Інформація з техніки безпеки 67 Опис виробу 69 Панель керування 70 Використання приладу 71 Установка пом’якшувача води 71 Використання солі для посудомийних машин 72 Використання споліскувача 73
68 electrolux • Завжди закривайте дверцята, коли не користуєтеся приладом, щоб не пере‐ чепитись через відкриті дверцята і уни‐ кнути травм. • Не сідайте і не ставайте на відкриті дверцята. Безпека дітей • Користуватися приладом дозволяєть‐ ся лише дорослим. Необхідно нагля‐ дати за дітьми, щоб
electrolux 69 Опис виробу 1 2 3 4 5 6 1 6 2 5 3 4 Розприскувач Мікрофільтр Дозатор миючого засобу Дозатор ополіскувача Плаский фільтр Контейнер для солі Наклейка з технічними даними зна‐ ходиться на задній панелі приладу.
70 electrolux Панель керування 6 1 2 A B 3 5 4 C 7 1 2 3 4 5 6 7 Кнопка Увімк./Вимк. Кнопки вибору програм Кнопка енергозбереження / (Saver) Кнопка відкладеного запуску Індикатори Цифровий дисплей Кнопки функцій Індикатори Індикатор загоряється, коли виконується фа‐ за миття або полоскання.
electrolux 71 Кнопка відкладеного запуску За допомогою кнопки відкладеного за‐ пуску можна відкласти початок виконан‐ ня програми миття на строк від 1 до 19 годин. Ознайомтеся з розділом «На‐ стройка і запуск програми миття». Цифровий дисплей Дисплей показує: • Відрегульований рівень у пристрої для
72 electrolux місцевості. У разі необхідності, зверніть‐ ся до місцевих органів водопостачання. Жорсткість води Налаштування жорсткості во‐ ди °dH ммоль/л °TH Кларк >24 >4,2 >40 > 28 5 18- 24 3,2- 4,2 32- 40 22- 28 4 12- 18 2,1- 3,2 19- 32 13- 22 3 4- 12 0,7- 2,1 7- 19 5 -13 2 <4 < 0,7 <7 <5 1 1)
electrolux 73 Цілком нормально, якщо вода пере‐ ливається через край контейнера для солі при його наповненні. Якщо пристрій для пом’якшення води на‐ лаштувати на рівень 1, індикатор солі не буде горіти. Використання споліскувача Обережно! Використовуйте лише фірмовий ополіскувач для посудомийних
74 electrolux • Перш ніж завантажувати столові при‐ бори і посуд, виконайте такі дії: – Видаліть усі залишки їжі. – Розмочіть пригорілі залишки їжі у сковородах. • При завантаженні столових приборів і посуду виконайте такі дії: – Порожнисті предмети (наприклад, чашки, склянки, сковороди) заванта‐
electrolux 75 Інструкції на пакуванні дійсні, як пра‐ вило, для великих посудомийних ма‐ шин (на 12 комплектів посуду). Не перевищуйте вказану дозу мию‐ чого засобу задля збереження до‐ вкілля. Наповнення миючим засобом Щоб наповнити дозатор миючого засобу, виконайте такі дії: A B 1. Відкрийте
76 electrolux Програми миття Програми миття Програма 2) 3) Функція енергозбе‐ реження 1) Забруд‐ неність Тип зав‐ антажен‐ ня Опис програми Сильна забруд‐ неність Фаянс, столові прибори, каструлі і сковоро‐ ди Попереднє миття Основне миття при температурі до 70°C 2 проміжних полоскання Остаточне
electrolux 77 запуститься лише після того, як дверцята будуть закриті. До того ча‐ су налаштування можна змінювати. Для установки і запуску програми миття виконайте такі дії: 1. Увімкніть прилад. 2. Переконайтеся, що прилад знахо‐ диться в режимі налаштування. 3. Натисніть одну із кнопок вибору
78 electrolux • Горить індикатор завершення програ‐ ми. 1. Натисніть кнопку вмикання/вимкнен‐ ня. 2. Відкрийте дверцята. 3. Для отримання кращих результатів залиште дверцята прочиненими на кілька хвилин, перш ніж виймати пос‐ уд. Дайте посуду охолонути, перш ніж вий‐ мати його з приладу. Гарячий
electrolux 79 миючі засоби. Не застосовуйте абразив‐ ні речовини, мочалки та розчинники (ацетон, трихлоретилен тощо). Запобіжні заходи на випадок морозу Обережно! Не встановлюйте прилад там, де температура опускається нижче 0°C. Виробник не несе відповідальності за пошкодження приладу в результаті
80 electrolux Код помилки і несправність Програма не запускається Можлива причина несправності та спосіб її усунення • Дверцята приладу не закриті. Закрийте дверцята. • Вилка кабелю живлення не вставлена в розетку. Вставте вилку в розетку. • Перегорів запобіжник на домашньому електрощиті. Замініть
electrolux 81 Переконайтеся, що розміри ніші відпові‐ дають габаритами приладу. Переконайтеся, що в шафі є отвори для наливного шланга, зливного шланга і ка‐ белю живлення. Вирівнювання приладу Переконайтеся, що прилад стоїть так, що дверцята можуть безперешкодно герметично закриватися. Якщо прилад
82 electrolux Попередження! Перед встановленням посудомийної машини на призначене для неї місце переконайтеся, що стопорна гайка та всі інші з’єднання надійно закріплені. Попередження! Завжди використовуйте лише нові шланги подачі води. Не використовуйте шланги від старих приладів. Зливний шланг
electrolux 83 Заземліть прилад згідно з правила‐ ми техніки безпеки. Переконайтеся, що номінальна на‐ пруга та характеристики електроме‐ режі, зазначені в табличці з техніч‐ ними характеристиками, відповіда‐ ють параметрам місцевої електро‐ мережі. Завжди користуйтеся правильно встановленою
www.electrolux.com www.electrolux.lv www.electrolux.lt www.electrolux.pl www.electrolux.ru 156985021-00-012009
-
Инструкции по эксплуатации
1
Electrolux ESF2450S инструкция по эксплуатации
(52 страницы)
- Языки:Русский
-
Тип:
PDF -
Размер:
3.49 MB -
Описание:
Посудомоечная машина
Просмотр
На NoDevice можно скачать инструкцию по эксплуатации для Electrolux ESF2450S. Руководство пользователя необходимо для ознакомления с правилами установки и эксплуатации Electrolux ESF2450S. Инструкции по использованию помогут правильно настроить Electrolux ESF2450S, исправить ошибки и выявить неполадки.
Вы здесь
Каталог инструкций » E » Electrolux » Посудомоечные машины Electrolux » Electrolux ESF2450S » Страница инструкции 1
-
1
-
2
-
3
-
4
-
5
-
6
-
7
-
8
-
9
-
10
-
11
-
12
-
13
-
14
-
15
-
16
-
17
-
18
-
19
-
20
-
21
-
22
-
23
-
24
-
25
-
26
-
27
-
28
-
29
-
30
-
31
-
32
-
33
-
34
-
35
-
36
Распечатать
Страница 1 из
- << Предыдущая
- Следующая >>

Посудомоечные машины Electrolux в инструкции по эксплуатации Electrolux ESF2450S
user manual
Инструкция по эксплуатации
Dishwasher
Посудомоечная машина
ESF2450
- << Предыдущая
- Следующая >>