
Manuals.eu
- Manuals.eu
- HP
- Computers & Peripherals
- Printers
- Deskjet Printers
- Deskjet 3070A B611a
- Руководство пользователя
×
1
2
3
4
5
6
7
8
9
10
11
12
13
14
15
16
17
18
19
20
21
22
23
24
25
26
27
28
29
30
31
32
33
34
35
36
37
38
39
40
41
42
43
44
45
46
47
48
49
50
51
52
53
54
55
56
57
58
59
60
61
62
⟨
⟩
Copyright © Manuals.eu
Agreement
Privacy Policy
Contact us
Просмотр
Доступно к просмотру 61 страница. Рекомендуем вам скачать файл инструкции, поскольку онлайн просмотр документа может сильно отличаться от оригинала.
-
HP Deskjet 3070 B611 All-in-One
series
-
Содержание
1  Приемы работы................................................................................................................................................................3
2  Краткий обзор устройства HP All-in-One                                                              Содержание
Компоненты принтера........................................................................................................................................................5
Функции панели управления..............................................................................................................................................6
Параметры беспроводной связи.......................................................................................................................................6
Индикаторы состояния.......................................................................................................................................................7
Автоотключение..................................................................................................................................................................8
3  Печать
Печать фотографий..........................................................................................................................................................11
Печать документов...........................................................................................................................................................12
Печать с помощью функции Шаблоны...........................................................................................................................13
Печать на конвертах.........................................................................................................................................................13
Советы по успешной печати............................................................................................................................................13
4  Печать отовсюду с помощью ePrint
Печать отовсюду с помощью ePrint................................................................................................................................17
5  Основные сведения о бумаге
Типы бумаги, рекомендуемые для печати.....................................................................................................................19
Загрузка бумаги................................................................................................................................................................20
6  Копирование и сканирование
Копирование......................................................................................................................................................................25
Сканирование на компьютер...........................................................................................................................................26
Советы по успешному копированию...............................................................................................................................28
Советы по успешному копированию...............................................................................................................................28
7  Работа с картриджами
Проверка приблизительного уровня чернил..................................................................................................................31
Заказ расходных материалов..........................................................................................................................................31
Замена картриджей..........................................................................................................................................................32
Информация о гарантии на картридж.............................................................................................................................34
8  Подключение
WiFi Protected Setup (WPS, требуется маршрутизатор WPS).......................................................................................35
Обычное беспроводное подключение (требуется маршрутизатор).............................................................................36
Подключение с помощью USB-кабеля (не сетевое подключение)..............................................................................36
Переход с USB-соединения на подключение по беспроводной сети..........................................................................37
Подключение нового принтера........................................................................................................................................37
Изменение параметров сети...........................................................................................................................................37
Советы по настройке и использованию сетевого принтера.........................................................................................37
Дополнительные средства управления принтером (для сетевых принтеров)............................................................38
9  Решение проблемы
Повышение качества печати...........................................................................................................................................39
Устранение замятия бумаги............................................................................................................................................40
Принтер не печатает........................................................................................................................................................41
Сеть...................................................................................................................................................................................47
Служба поддержки HP.....................................................................................................................................................47
10 Техническая информация
Уведомление.....................................................................................................................................................................49
Информация о микросхеме картриджа...........................................................................................................................49
Технические характеристики...........................................................................................................................................50
Программа охраны окружающей среды.........................................................................................................................52
1
-
Заявления о соответствии стандартам..........................................................................................................................55
Указатель...............................................................................................................................................................................59
Содержание
2
- 1
- 2
- 3
- 4
- 61

Tout-en-un HP Deskjet 3070 série
B611


Sommaire
1 Comment faire ?……………………………………………………………………………………………………………………………………………..3
2 Apprenez à utiliser l’appareil HP Tout-en-un
Composants de l’imprimante………………………………………………………………………………………………………………………………5
Fonctions du panneau de commande………………………………………………………………………………………………………………….6
Paramètres réseau sans fil…………………………………………………………………………………………………………………………………6
Voyants d’état…………………………………………………………………………………………………………………………………………………..7
Désactivation automatique…………………………………………………………………………………………………………………………………8
3Imprimer
Impression des photos………………………………………………………………………………………………………………………………………9
Imprimer les documents…………………………………………………………………………………………………………………………………..10
Imprimer Formulaires rapides……………………………………………………………………………………………………………………………11
Impression d’enveloppes………………………………………………………………………………………………………………………………….11
Conseils pour réussir vos impressions……………………………………………………………………………………………………………….11
4 Effectuer une impression ePrint depuis n’importe où
Effectuer une impression ePrint depuis n’importe où……………………………………………………………………………………………15
5 Principes de base sur le papier
Papiers recommandés pour l’impression……………………………………………………………………………………………………………17
Chargement des supports………………………………………………………………………………………………………………………………..18
6 Copie et numérisation
Copier……………………………………………………………………………………………………………………………………………………………23
Numérisation vers un ordinateur……………………………………………………………………………………………………………………….24
Conseils pour réussir vos copies……………………………………………………………………………………………………………………….26
Conseils pour réussir vos numérisations…………………………………………………………………………………………………………….26
Sommaire
7 Utilisation des cartouches
Vérification des niveaux d’encre estimés……………………………………………………………………………………………………………29
Commande de fournitures d’encre…………………………………………………………………………………………………………………….29
Remplacement des cartouches…………………………………………………………………………………………………………………………30
Informations de garantie sur les cartouches……………………………………………………………………………………………………….32
8 Connectivité
WPS (WiFi Protected Setup – nécessite un routeur WPS)……………………………………………………………………………………33
Connexion sans fil traditionnelle (nécessite un routeur)………………………………………………………………………………………..34
Connexion USB (connexion non réseau)……………………………………………………………………………………………………………34
Pour passer d’une connexion USB à une connexion sans fil…………………………………………………………………………………34
Connecter une nouvelle imprimante…………………………………………………………………………………………………………………..35
Modifier les paramètres IP……………………………………………………………………………………………………………………………….35
Conseils pour la configuration et l’utilisation d’une imprimante en réseau……………………………………………………………….35
Outils de gestion de l’imprimante avancée (pour les imprimantes réseau)………………………………………………………………35
9 Résolution de problèmes
Amélioration de la qualité d’impression………………………………………………………………………………………………………………37
Élimination d’un bourrage papier……………………………………………………………………………………………………………………….38
Impression impossible……………………………………………………………………………………………………………………………………..39
Mise en réseau……………………………………………………………………………………………………………………………………………….45
Assistance HP………………………………………………………………………………………………………………………………………………..45
10 Renseignements techniques
Avertissement…………………………………………………………………………………………………………………………………………………47
Informations relatives au microprocesseur de cartouches…………………………………………………………………………………….47
Caractéristiques techniques……………………………………………………………………………………………………………………………..48
Programme de gestion des produits en fonction de l’environnement………………………………………………………………………50
1

Déclarations de réglementation…………………………………………………………………………………………………………………………53
Index………………………………………………………………………………………………………………………………………………………………….57
Sommaire
2

1 Comment faire ?
Apprenez à utiliser votre appareil HP Tout-en-un
• Composants de l’imprimante, page 5
• Chargement des supports, page 18
• Remplacement des cartouches, page 30
• Élimination d’un bourrage papier, page 38
Comment faire ?
Comment faire ? 3

Comment faire ?
Chapitre 1
4 Comment faire ?
2 Apprenez à utiliser l’appareil HP Tout-
en-un
• Composants de l’imprimante
Fonctions du panneau de commande
•
•
Paramètres réseau sans fil
Voyants d’état
•
•
Désactivation automatique
Composants de l’imprimante
• Vues avant et de dessus de l’appareil HP Tout-en-un
1Écran
2 Panneau de commande
3 Bac d’alimentation
4 Rallonge du bac d’alimentation (également appelée rallonge du bac)
5Vitre
6 Intérieur du capot
7 Capot
8 Porte d’accès à la cartouche
9 Zone d’accès aux cartouches
10 Porte de nettoyage
• Vue arrière de l’appareil HP Tout-en-un
Apprenez à utiliser l’appareil HP
Tout-en-un
11 Port USB arrière
12 Branchement de l’alimentation
Apprenez à utiliser l’appareil HP Tout-en-un 5
Chapitre 2
Fonctions du panneau de commande
Fonctions du panneau de commande
Apprenez à utiliser l’appareil HP
Tout-en-un
1 Retour : retourne à l’écran précédent.
2 Annuler : Met fin à l’opération en cours, restaure les paramètres par défaut.
3 Installation: ouvre le menu Installation où vous pouvez vérifier les niveaux d’encre, modifier le paramètre de
désactivation automatique, effectuer les tâches de maintenance et définir les paramètres de langue et de région.
4 Boutons Sélection : Utilisez les boutons pour sélectionner les options de menu sur l’écran de l’imprimante.
5 Bouton et voyant d’état Sans fil : Un voyant bleu indique une connexion sans fil. Appuyer sur le bouton permet d’ouvrir le
menu Sans fil. Maintenez enfoncé le bouton jusqu’à ce qu’il clignote pour commencer le mode Bouton WPS.
6 Bouton et voyant ePrint : Un voyant clair indique qu’ePrint est connecté. Appuyer sur le bouton permet d’afficher
l’adresse électronique de l’imprimante et les options du menu ePrint.
7 Bouton Marche
Paramètres réseau sans fil
Appuyez sur le menu Sans fil pour afficher l’état de liaison sans fil et les options de menu.
• Si l’imprimante est connectée au réseau sans fil, l’écran affiche Connecté et l’adresse IP de l’imprimante.
• Si l’option Sans fil est désactivée (radio sans fil éteinte) et que le réseau sans fil n’est pas disponible, l’écran
affiche Sans fil désactivé.
• Si l’option Sans fil est activée (Radio ss fil ON) et que vous ne disposez pas d’une connexion sans fil, l’écran
affiche le processus Connexion en cours ou Non connecté.
Vous pouvez utiliser l’écran de l’imprimante pour extraire des informations sur votre réseau sans fil, établir une
connexion sans fil et davantage.
Procédures Instructions
Imprimez une page de configuration du réseau.
La page de configuration du réseau affiche l’état du réseau, le nom
d’hôte, le nom du réseau et davantage.
Imprimez le rapport de test du réseau sans fil.
Le rapport de test du réseau sans fil affiche les résultats du diagnostic
pour l’état du réseau sans fil, la force du signal sans fil, les réseaux
détectés et davantage.
1. Appuyez sur le bouton Sans fil pour afficher
le menu Sans fil.
2. Dans le Menu Sans fil, sélectionnez Impr.
rapports.
3. Dans le menu Impr. rapports, sélectionnez
Configuration.
1. Appuyez sur le bouton Sans fil pour afficher
le Menu Sans fil.
2. Dans le Menu Sans fil, sélectionnez Impr.
rapports.
3. Dans le menu Impr rapports, sélectionnez
Test sans fil.
6 Apprenez à utiliser l’appareil HP Tout-en-un

(suite)
Procédures Instructions
Affichez la puissance du signal de la connexion sans fil. 1. Appuyez sur le bouton Sans fil pour afficher
Restaurez les paramètres réseaux aux paramètres par défaut. 1. Appuyez sur le bouton Sans fil pour afficher
Activez ou désactivez le paramètre Sans fil. 1. Appuyez sur le bouton Sans fil pour afficher
Etablissez une connexion WPS (Wi-Fi Protected Setup). WPS (WiFi Protected Setup – nécessite un
le Menu Sans fil.
2. Dans le Menu Sans fil, sélectionnez IP
connecté XXX.XXX.XX.XX.
3. L’écran de l’imprimante affiche la puissance
du signal de la connexion sans fil.
le Menu Sans fil.
2. Dans le Menu Sans fil, sélectionnez
Paramètres.
3. Dans le menu Paramètres, sélectionnez
Restaurer les paramètres par défaut.
4. Confirmez la sélection pour restaurer les
paramètres par défaut.
le Menu Sans fil.
2. Dans le Menu Sans fil, sélectionnez
Paramètres sans fil.
3. Dans le menu Paramètres, sélectionnez SF
actif/inactif.
4. Dans le menu SF actif/inactif, sélectionnez
Activer ou Désactiver.
routeur WPS), page 33
Voyants d’état
• Voyant d’état de liaison sans fil
•
Voyant d’état ePrint
Voyant du bouton activé
•
Voyant d’état de liaison sans fil
Comportement du voyant Solution
Désactivé La liaison sans fil est désactivée. Appuyez sur le
Clignotant jaune La liaison sans fil est activée mais n’est pas
Clignotement rapide Une erreur de liaison sans fil est survenue.
activé La connexion sans fil a été établie et vous
bouton Sans fil pour accéder au menu de liaison
sans fil sur l’écran de l’imprimante. Utilisez le
menu de liaison sans fil pour activer l’impression
sans fil.
connectée à un réseau. Si la connexion ne peut
pas être établie, assurez-vous que l’imprimante
se trouve dans la plage de détection du signal
sans fil.
Reportez-vous aux messages affichés sur l’écran
de l’imprimante.
pouvez imprimer.
Apprenez à utiliser l’appareil HP
Tout-en-un
Voyants d’état 7
Chapitre 2
Voyant d’état ePrint
Comportement du voyant Solution
Voyant du bouton activé
Apprenez à utiliser l’appareil HP
Tout-en-un
Désactivation automatique
Le paramètre Désact. auto est automatiquement activé par défaut lorsque vous activez l’imprimante. Lorsque le
paramètre Désact. auto est activé, l’imprimante s’éteint automatiquement après 2 heures d’inactivité pour vous
aider à réduire votre consommation d’énergie. Désact. auto est automatiquement désactivé lorsque l’imprimante
établit une connexion réseau sans fil ou Ethernet (si prise en charge). Vous pouvez modifier le paramètre Désact.
auto à partir du panneau de commande. Une fois que modifiez le paramètre, l’imprimante conserve le paramètre.
Le paramètre Désact. auto éteint complètement l’imprimante. De fait, vous devez utiliser le bouton
marche/arrêt pour allumer à nouveau l’imprimante.
Désactivé ePrint est désactivé. Appuyez sur le bouton
ePrint pour accéder au menu ePrint sur l’écran
de l’imprimante.
activé ePrint est activé et connecté.
Comportement du voyant Solution
Désactivé Le périphérique est hors tension.
Impulsion Indique que le périphérique est en mode Veille.
Le périphérique passe automatiquement en
mode Veille après 5 minutes d’inactivité.
Clignotement rapide Une erreur est apparue. Reportez-vous aux
messages affichés sur l’écran de l’imprimante.
activé L’imprimante est sous tension et prête à
imprimer.
Pour modifier le paramètre Désact. auto
1. Sur l’écran d’accueil du panneau de commande qui affiche Copier, Numériser et Form. rapide, appuyez sur
le bouton Installation.
Remarque Si vous ne voyez pas l’écran d’accueil, appuyez sur le bouton Retour jusqu’à ce qu’il
s’affiche.
2. Dans le menu Configurer de l’écran de l’imprimante, sélectionnez Désact. auto.
3. Dans le menu Désact. auto, sélectionnez Activé ou Désactivé, puis confirmez le paramètre.
Conseil Si vous imprimez via un réseau sans fil ou Ethernet, le paramètre Désact. auto doit être désactivé
pour vous assurer de ne pas perdre les tâches d’impression. Même lorsque le paramètre Désact. auto est
désactivé, l’imprimante passe en mode Veille après 5 minutes d’inactivité pour vous aider à réduire la
consommation d’énergie.
8 Apprenez à utiliser l’appareil HP Tout-en-un
3 Imprimer
Choisissez une tâche d’impression pour poursuivre.
Impression des photos, page 9
Imprimer les documents, page 10
Impression d’enveloppes, page 11
Imprimer Formulaires rapides, page 11
Voir Conseils pour réussir vos impressions, page 11 pour plus d’informations.
Impression des photos
Impression d’une photo sur du papier photo
1. Tirez le bac à papier.
2. Retirez tout le papier présent dans le bac à papier, puis chargez le papier photo en orientant la face à
imprimer vers le bas.
Remarque Si le papier photo utilisé est perforé, chargez-le de manière à ce que les perforations soient
situées sur la partie extérieure.
Voir Chargement des supports, page 18 pour plus d’informations.
3. Dans le menu Fichier de votre application logicielle, cliquez sur Imprimer.
4. Vérifiez que l’appareil est sélectionné en tant qu’imprimante.
5. Cliquez sur le bouton qui ouvre la boîte de dialogue Propriétés.
Selon l’application logicielle utilisée, ce bouton peut être Propriétés, Options, Configuration d’imprimante,
Imprimante ou Préférences.
6. Sélectionnez les options appropriées.
• Sous l’onglet Mise en page, sélectionnez l’orientation Portrait ou Paysage.
• Sous l’onglet Papier/Qualité, sélectionnez le type de papier et la qualité d’impression appropriés dans la
liste déroulante Support.
Imprimer
Imprimer 9

Chapitre 3
Remarque Pour une résolution ppp maximale, cliquez sur l’onglet Papier/Qualité et sélectionnez Papier
photo, Qualité optimale dans la liste déroulante Support. Cliquez ensuite sur l’onglet Avancé et
sélectionnez Oui dans la liste déroulante Imprimer en résolution max. Si vous souhaitez imprimer en
mode ppp maximal en niveaux de gris, sélectionnez Niveaux de gris haute qualité dans Imprimer en
niveaux de gris sur la liste déroulante, puis sélectionnez Imprimer en mode ppp maximal, après
sélection de Papier photo, qualité optimale.
7. Cliquez sur OK pour revenir à la boîte de dialogue Propriétés.
8. Cliquez sur OK, puis sur Imprimer ou sur OK dans la boîte de dialogue Imprimer.
Remarque Ne laissez pas de papier photo dans le bac d’alimentation si vous ne l’utilisez pas. Il risquerait de
gondoler, ce qui nuirait à la qualité des impressions. Le papier photo doit être plat avant l’impression.
Imprimer les documents
Pour imprimer depuis une application logicielle
1. Vérifiez que le bac à papier est ouvert.
2. Assurez-vous que le bac à papier contient du papier.
Voir Chargement des supports, page 18 pour plus d’informations.
Imprimer
3. Dans l’application logicielle, cliquez sur le bouton Imprimer.
4. Vérifiez que l’appareil est sélectionné en tant qu’imprimante.
5. Cliquez sur le bouton qui ouvre la boîte de dialogue Propriétés.
Selon l’application logicielle utilisée, ce bouton peut être Propriétés, Options, Configuration d’imprimante,
Imprimante ou Préférences.
6. Sélectionnez les options appropriées.
• Sous l’onglet Mise en page, sélectionnez l’orientation Portrait ou Paysage.
• Sous l’onglet Papier/Qualité, sélectionnez le type de papier et la qualité d’impression appropriés dans la
liste déroulante Support.
7. Cliquez sur OK pour fermer la boîte de dialogue Propriétés.
8. Cliquez sur Imprimer ou sur OK pour commencer l’impression.
Remarque 1 Vous pouvez imprimer votre document sur les deux côtés du papier, et non sur un seul côté.
Cliquez sur le bouton Avancé de l’onglet Papier/Qualité ou Mise en page. Dans le menu déroulant Pages à
imprimer, sélectionnez Imprimer les pages impaires uniquement. Cliquez sur OK pour imprimer. Une fois
que les pages impaires du document ont été imprimées, retirez le document du bac de sortie. Rechargez le
papier dans le bac d’alimentation en orientant la face vierge vers le haut. Revenez au menu déroulant Pages
à imprimer et sélectionnez Imprimer les pages paires uniquement. Cliquez sur OK pour imprimer.
Remarque 2 Si vos documents imprimés ne sont pas alignés dans les marges du papier, assurez-vous que
vous avez sélectionné la langue et la région appropriées. Sur l’écran de l’imprimante, sélectionnez
Configuration, puis Langue/Région. Sélectionnez votre langue, puis votre région parmi les options
proposées. La sélection des paramètres de Langue/Région corrects permet de garantir que les paramètres
de format de papier par défaut sont configurés sur l’imprimante.
10 Imprimer
Imprimer Formulaires rapides
Utilisez la fonction Form. rapides pour imprimer les formulaires de bureau, les types de papier et des jeux.
Imprimer Formulaires rapides
1. Sélectionnez Formulaires rapides dans le menu de l’écran de l’imprimante.
Conseil Si l’option Formulaires rapides n’apparaît pas sur le menu de l’écran de l’imprimante, appuyez
sur le bouton Retour jusqu’à ce que l’option Formulaires rapides apparaisse.
2. Appuyez sur les boutons de sélection pour choisir Form. Bureau, Type de papier ou Jeux. Sélectionnez
ensuite OK.
3. Après avoir sélectionné le type de Sélection que vous souhaitez imprimer, sélectionnez le nombre de copies,
puis appuyez sur OK.
Impression d’enveloppes
Vous pouvez charger une ou plusieurs enveloppes dans le bac d’alimentation de l’appareil HP Tout-en-un.
N’utilisez pas d’enveloppes brillantes avec des motifs en relief, ni d’enveloppes à fermoir ou à fenêtre.
Remarque Reportez-vous aux fichiers d’aide de votre logiciel de traitement de texte pour obtenir des détails
sur la mise en forme du texte à imprimer sur des enveloppes. Pour des résultats optimaux, utilisez des
étiquettes pour indiquer l’adresse de l’expéditeur.
Pour imprimer des enveloppes
1. Vérifiez que le bac à papier est ouvert.
2. Déplacez les guides papier vers l’extérieur.
3.êChargez les enveloppes au centre du bac. Le côté à imprimer doit être orienté vers le bas. Le rabat doit tre
placé du c té gauche.
Voir Chargement des supports, page 18 pour plus d’informations.
4. Poussez les enveloppes dans l’imprimante jusqu’à ce qu’elles soient calées.
5. Faites glisser les guides papier pour les positionner contre le bord des enveloppes.
ô
6. Cliquez sur le bouton qui ouvre la boîte de dialogue Propriétés.
Selon l’application logicielle utilisée, ce bouton peut être Propriétés, Options, Configuration d’imprimante,
Imprimante ou Préférences.
7. Sélectionnez les options appropriées.
• Sous l’onglet Papier/Qualité, sélectionnez le type de papier et la qualité d’impression appropriés dans la
liste déroulante Support.
8. Cliquez sur OK, puis sur Imprimer ou sur OK dans la boîte de dialogue Imprimer.
Conseils pour réussir vos impressions
Pour obtenir des impressions réussies, il convient que les cartouches HP contiennent suffisamment d’encre, que
le papier soit correctement chargé et que le produit soit configuré de façon appropriée.
Imprimer
Conseils pour réussir vos impressions 11

Chapitre 3
Conseils d’impression
• Utilisez des cartouches d’encre HP authentiques.
• Installez correctement les cartouches jaune, magenta, cyan et noir.
Pour plus d’informations, voir Remplacement des cartouches, page 30.
• Vérifiez les niveaux d’encre estimés dans les cartouches pour vous assurer qu’il y a de suffisamment d’encre.
Pour plus d’informations, voir Vérification des niveaux d’encre estimés, page 29.
• Pour plus d’informations, voir Amélioration de la qualité d’impression, page 37.
• Si vous voyez des traces d’encre à l’arrière des pages que vous imprimez, utilisez le menu Outils pour les
nettoyer.
◦ Sur l’écran d’accueil qui affiche Copier, Numériser et Form. rapides, appuyez sur le bouton
Installation.
Remarque Si vous ne voyez pas l’écran d’accueil, appuyez sur le bouton Retour jusqu’à ce qu’il
s’affiche.
◦ Parcourez le menu Outils afin de repérer l’option Nettoy maculage, puis sélectionnez OK.
◦ Suivez les instructions à l’écran.
Conseils de chargement du papier
• Chargez une pile de papier (et non seulement une page) Il convient que tout le papier contenu dans la pile
soit de format et de type identiques afin d’éviter tout risque de bourrage.
• Chargez le papier en orientant le côté à imprimer vers le bas.
• Assurez-vous que le papier chargé dans le bac à papier repose à plat et que les bords ne sont pas cornés ou
déchirés.
• Ajustez les guides de largeur du bac à papier pour qu’ils butent contre le papier chargé. Assurez-vous que le
guide de largeur ne courbe pas le papier chargé dans le bac d’alimentation.
• Pour plus d’informations, voir Chargement des supports, page 18.
Conseils relatifs aux paramètres de l’imprimante
• Sous l’onglet Papier/Qualité du pilote d’imprimante, sélectionnez le type de papier et la qualité d’impression
appropriés dans le menu déroulant Support.
Imprimer
• Choisissez le format de papier dans la liste déroulante Format papier de l’onglet Papier/Qualité.
• Cliquez sur l’icône HP Tout-en-un du bureau pour ouvrir le Logiciel de l’imprimante. Dans le Logiciel de
l’imprimante, cliquez sur Actions liées à l’imprimante, puis sur Définir les préférences afin d’accéder au
pilote d’imprimante.
Remarque Vous pouvez également accéder au Logiciel de l’imprimante en cliquant sur Démarrer >
Programmes > HP > HP Deskjet série 3070 B611 > HP Deskjet série 3070 B611
Remarques
• Les cartouches d’encre originales HP ont été conçues et testées avec les imprimantes et papiers HP pour
vous aider à obtenir facilement des résultats remarquables, jour après jour.
Remarque HP ne peut pas garantir la qualité ou la fiabilité des consommables non-HP. Les services ou
réparations du produit requis suite à l’utilisation d’une encre périmée ne sont pas couverts par la garantie.
Si vous pensez avoir acheté des cartouches d’encre HP authentiques, rendez-vous sur le site :
www.hp.com/go/anticounterfeit
• Les avertissements et indicateurs de niveaux d’encre fournissent des estimations à des fins de planification
uniquement.
Remarque Lorsqu’un message d’avertissement relatif à un faible niveau d’encre s’affiche, faites en sorte
d’avoir une cartouche de remplacement à portée de main afin d’éviter une perte de temps éventuelle. Le
remplacement des cartouches n’est pas nécessaire tant que la qualité d’impression n’est pas jugée
inacceptable.
12 Imprimer

• Les paramètres du logiciel sélectionnés dans le pilote d’impression s’appliquent uniquement à l’impression, et
non à la copie ou à la numérisation.
• Vous pouvez imprimer votre document sur les deux côtés du papier, et non sur un seul côté.
Remarque Cliquez sur le bouton Avancé de l’onglet Papier/Qualité ou Mise en page. Dans la liste
déroulante Pages à imprimer, sélectionnez Imprimer les pages impaires uniquement. Cliquez sur OK
pour imprimer. Une fois que les pages impaires du document ont été imprimées, retirez le document du
bac de sortie. Rechargez le papier dans le bac d’alimentation en orientant la face vierge vers le haut.
Revenez à la liste déroulante Pages à imprimer et sélectionnez Imprimer les pages paires
uniquement. Cliquez sur OK pour imprimer.
• Impression à l’aide de l’encre noire uniquement
Remarque Si vous souhaitez imprimer un document noir et blanc en utilisant seulement l’encre noire,
cliquez sur le bouton Avancé. Dans le menu déroulant Imprimer en niveaux de gris, sélectionnez Encre
noire seulement, puis cliquez sur OK.
Impression en mode ppp maximal
Utilisez le mode d’impression en nombre de points par pouce (ppp) maximal pour imprimer des images fines et
de haute qualité sur du papier photo.
Reportez-vous aux spécifications techniques pour déterminer la résolution d’impression en mode ppp maximal.
L’impression en mode ppp maximal prend plus de temps que l’impression avec d’autres paramètres et requiert un
espace disque plus important.
Pour imprimer en mode ppp maximal
1. Assurez-vous que vous avez chargé du papier photo dans le bac d’alimentation.
2. Dans le menu Fichier de votre application logicielle, cliquez sur Imprimer.
3. Vérifiez que l’appareil est sélectionné en tant qu’imprimante.
4. Cliquez sur le bouton qui ouvre la boîte de dialogue Propriétés.
Selon l’application logicielle utilisée, ce bouton peut être Propriétés, Options, Configuration d’imprimante,
Imprimante ou Préférences.
5. Cliquez sur l’onglet Papier/Qualité.
6. Dans la liste déroulante Support, cliquez sur Papier photo, Qualité optimale.
Remarque L’option Papier photo, Qualité optimale doit être sélectionnée dans la liste déroulante
Support accessible sous l’onglet Papier/Qualité pour permettre l’impression en mode ppp maximal.
7. Cliquez sur le bouton Avancé.
8. Dans la zone Caractéristiques de l’imprimante, sélectionnez Oui dans la liste Imprimer en mode ppp
maximal.
9. Sélectionnez Format du papier dans le menu déroulant Papier/Sortie.
10. Cliquez sur OK pour refermer la fenêtre d’options avancées.
11. Confirmez le paramètre Orientation sous l’onglet Mise en page, puis cliquez sur OK pour lancer
l’impression.
Imprimer
Impression en mode ppp maximal 13

Chapitre 3
Imprimer
14 Imprimer

4 Effectuer une impression ePrint depuis
n’importe où
La fonction ePrint de votre produit offre une option pratique pour imprimer depuis n’importe quel lieu. Une fois la
fonction activée, ePrint attribue une adresse électronique à votre produit. Pour effectuer l’impression, il vous
suffit d’envoyer un courrier électronique contenant votre document à cette adresse. Vous pouvez imprimer des
images, ainsi que des documents au format Word, PowerPoint ou PDF. C’est très simple !
•
Effectuer une impression ePrint depuis n’importe où
Effectuer une impression ePrint depuis n’importe où
Pour effectuer une impression ePrint depuis n’importe où
1. Recherchez votre adresse électronique ePrint.
a. Appuyez sur le bouton ePrint du panneau de commande. Vous verrez le menu Paramètres des services
Web sur l’écran de l’imprimante.
b. Sélectionnez Afficher l’adresse e-mail depuis l’écran de l’imprimante pour afficher l’adresse e-mail de
l’imprimante.
Remarque Pour utiliser l’ePrint, les services Web doivent d’abord être activés. Si les services Web n’ont
pas été activés, un message s’affichera vous orientant vers le Logiciel de l’imprimante. Ouvrez le Logiciel
de l’imprimante, sélectionnez ePrint, puis suivez les instructions à l’écran pour procéder à l’activation.
Conseil Pour imprimer l’adresse email ou l’url d’inscription, sélectionnez Imprimer la page d’infos dans
le menu Paramètres sur l’écran de l’imprimante.
2. Composez, puis envoyez votre courrier électronique.
a. Créez un courrier électronique et entrez l’adresse e-mail du produit dans le champ Destinataire.
b. Entrez le texte dans le corps du message électronique et attachez en pièces jointes les documents ou
images que vous souhaitez imprimer.
c. Envoyez le courrier électronique.
Le produit imprime votre courrier électronique.
Remarque Pour recevoir un courrier électronique, votre produit doit être connecté à Internet. Votre
courrier électronique est imprimé dès sa réception. De même que pour tout courrier électronique, le
succès et le délai de la réception ne peuvent être garantis. Lorsque vous vous enregistrez en ligne
avec ePrint, vous pouvez vérifier le statut de vos travaux.
Conseil Si vous avez activé Désact. auto, vous devrez le désactiver avant d’utiliser l’ePrint. Pour plus
d’informations, voir Désactivation automatique, page 8.
Remarque 1 Le périphérique doit être connecté sans fil et se trouver sur un réseau actif.
Remarque 2 Les documents imprimés avec ePrint peuvent apparaître différents de l’original. Le style, la
mise en forme et le défilement du texte peuvent différer par rapport au document original. Pour les documents
nécessitant une impression de plus haute qualité (tel que les documents juridiques), il est conseillé d’effectuer
l’impression à partir de l’application logicielle installée sur votre ordinateur, afin de pouvoir contrôler plus
précisément l’aspect des documents imprimés.
Cliquez ici pour consulter des informations complémentaires en ligne.
Effectuer une impression ePrint depuis n’importe où 15
Effectuer une impression ePrint
depuis n’importe où

Chapitre 4
Effectuer une impression ePrint
depuis n’importe où
16 Effectuer une impression ePrint depuis n’importe où
Loading…
HP Deskjet 3070 B611 All-in-One series
Contents
1 How Do I?……………………………………………………………………………………………………………………………………………………….3
2 Get to know the HP All-in-One Printer parts……………………………………………………………………………………………………………………………………………………..5 Control panel features……………………………………………………………………………………………………………………………………….6 Wireless Settings………………………………………………………………………………………………………………………………………………6 Status Lights…………………………………………………………………………………………………………………………………………………….7 Auto Power-Off ………………………………………………………………………………………………………………………………………………..8
3 Print Print photos……………………………………………………………………………………………………………………………………………………..9 Print documents……………………………………………………………………………………………………………………………………………..10 Print Quick Forms……………………………………………………………………………………………………………………………………………10 Print envelopes……………………………………………………………………………………………………………………………………………….11 Tips for print success……………………………………………………………………………………………………………………………………….11
4 ePrint from anywhere ePrint from anywhere………………………………………………………………………………………………………………………………………15
5 Paper basics Recommended papers for printing…………………………………………………………………………………………………………………….17 Load media…………………………………………………………………………………………………………………………………………………….18
6 Copy and scan Copy……………………………………………………………………………………………………………………………………………………………..23 Scan to a computer…………………………………………………………………………………………………………………………………………24 Tips for copy success………………………………………………………………………………………………………………………………………26 Tips for scan success………………………………………………………………………………………………………………………………………26
7 Work with cartridges Check the estimated ink levels………………………………………………………………………………………………………………………….29 Order ink supplies…………………………………………………………………………………………………………………………………………..29 Replace the cartridges…………………………………………………………………………………………………………………………………….30 Cartridge warranty information………………………………………………………………………………………………………………………….32
8 Connectivity WiFi Protected Setup (WPS requires WPS router)……………………………………………………………………………………………33 Traditional wireless connection (requires router)…………………………………………………………………………………………………33 USB Connection (non-network connection)………………………………………………………………………………………………………..34 Change from a USB connection to a wireless network…………………………………………………………………………………………34 Connect a new printer……………………………………………………………………………………………………………………………………..34 Change network settings………………………………………………………………………………………………………………………………….35 Tips for setting up and using a networked printer………………………………………………………………………………………………..35 Advanced printer management tools (for networked printers)……………………………………………………………………………….35
9 Solve a problem Improve print quality………………………………………………………………………………………………………………………………………..37 Clear a paper jam……………………………………………………………………………………………………………………………………………38 Unable to print………………………………………………………………………………………………………………………………………………..39 Networking……………………………………………………………………………………………………………………………………………………..45 HP support……………………………………………………………………………………………………………………………………………………..45
10 Technical information Notice……………………………………………………………………………………………………………………………………………………………47 Cartridge chip information………………………………………………………………………………………………………………………………..47 Specifications…………………………………………………………………………………………………………………………………………………48 Environmental product stewardship program………………………………………………………………………………………………………50
1
C on
te nt
s
Regulatory notices…………………………………………………………………………………………………………………………………………..53 Index………………………………………………………………………………………………………………………………………………………………….57
2
C ontents
1 How Do I? Learn how to use your HP All-in-One
Printer parts on page 5 Load media on page 18 Replace the cartridges on page 30 Clear a paper jam on page 38
How Do I? 3
H ow
D o
I?
Chapter 1
4 How Do I?
H ow
D o I?
2 Get to know the HP All-in-One Printer parts Control panel features Wireless Settings Status Lights Auto Power-Off
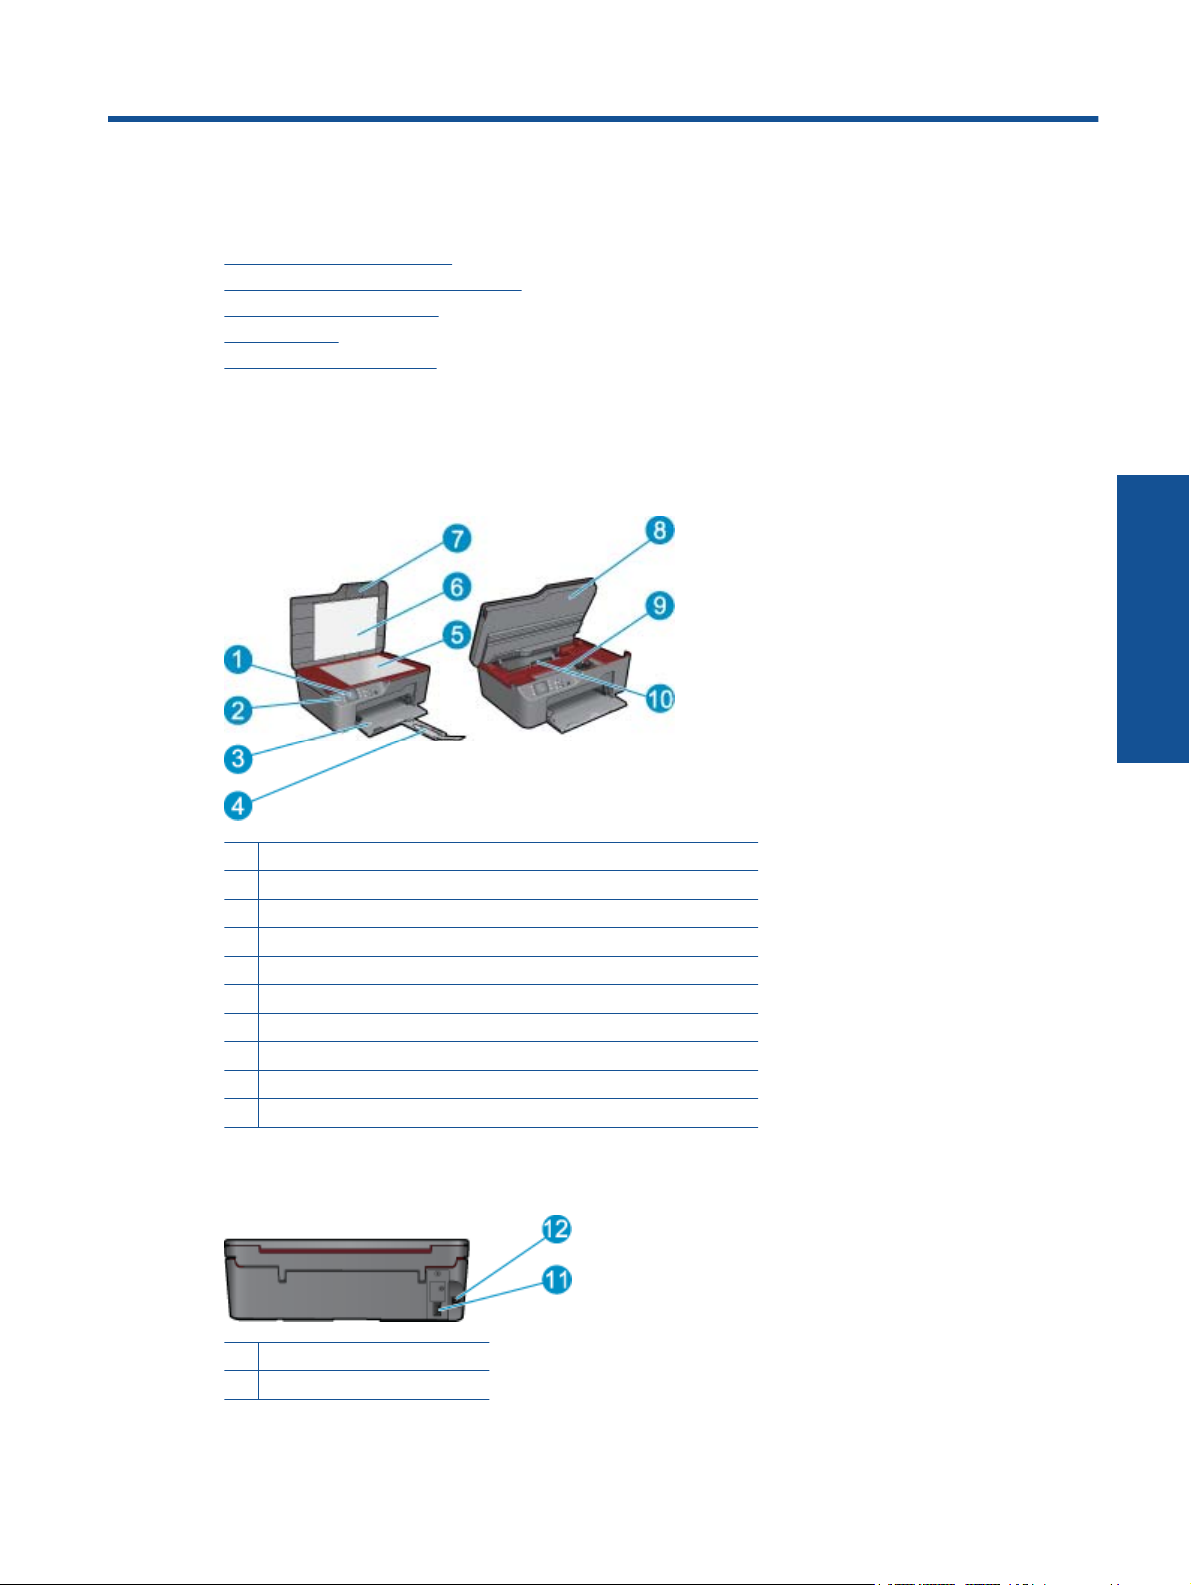
Printer parts Front and top views of the HP All-in-One
1 Display
2 Control panel
3 Paper tray
4 Paper tray extender (also referred to as the tray extender)
5 Glass
6 Lid-backing
7 Lid
8 Cartridge door
9 Cartridge access area
10 Cleanout door
Rear view of the HP All-in-One
11 Rear USB port
12 Power connection
Get to know the HP All-in-One 5
G et
to k
no w
th e
H P
A ll-
in -O
ne
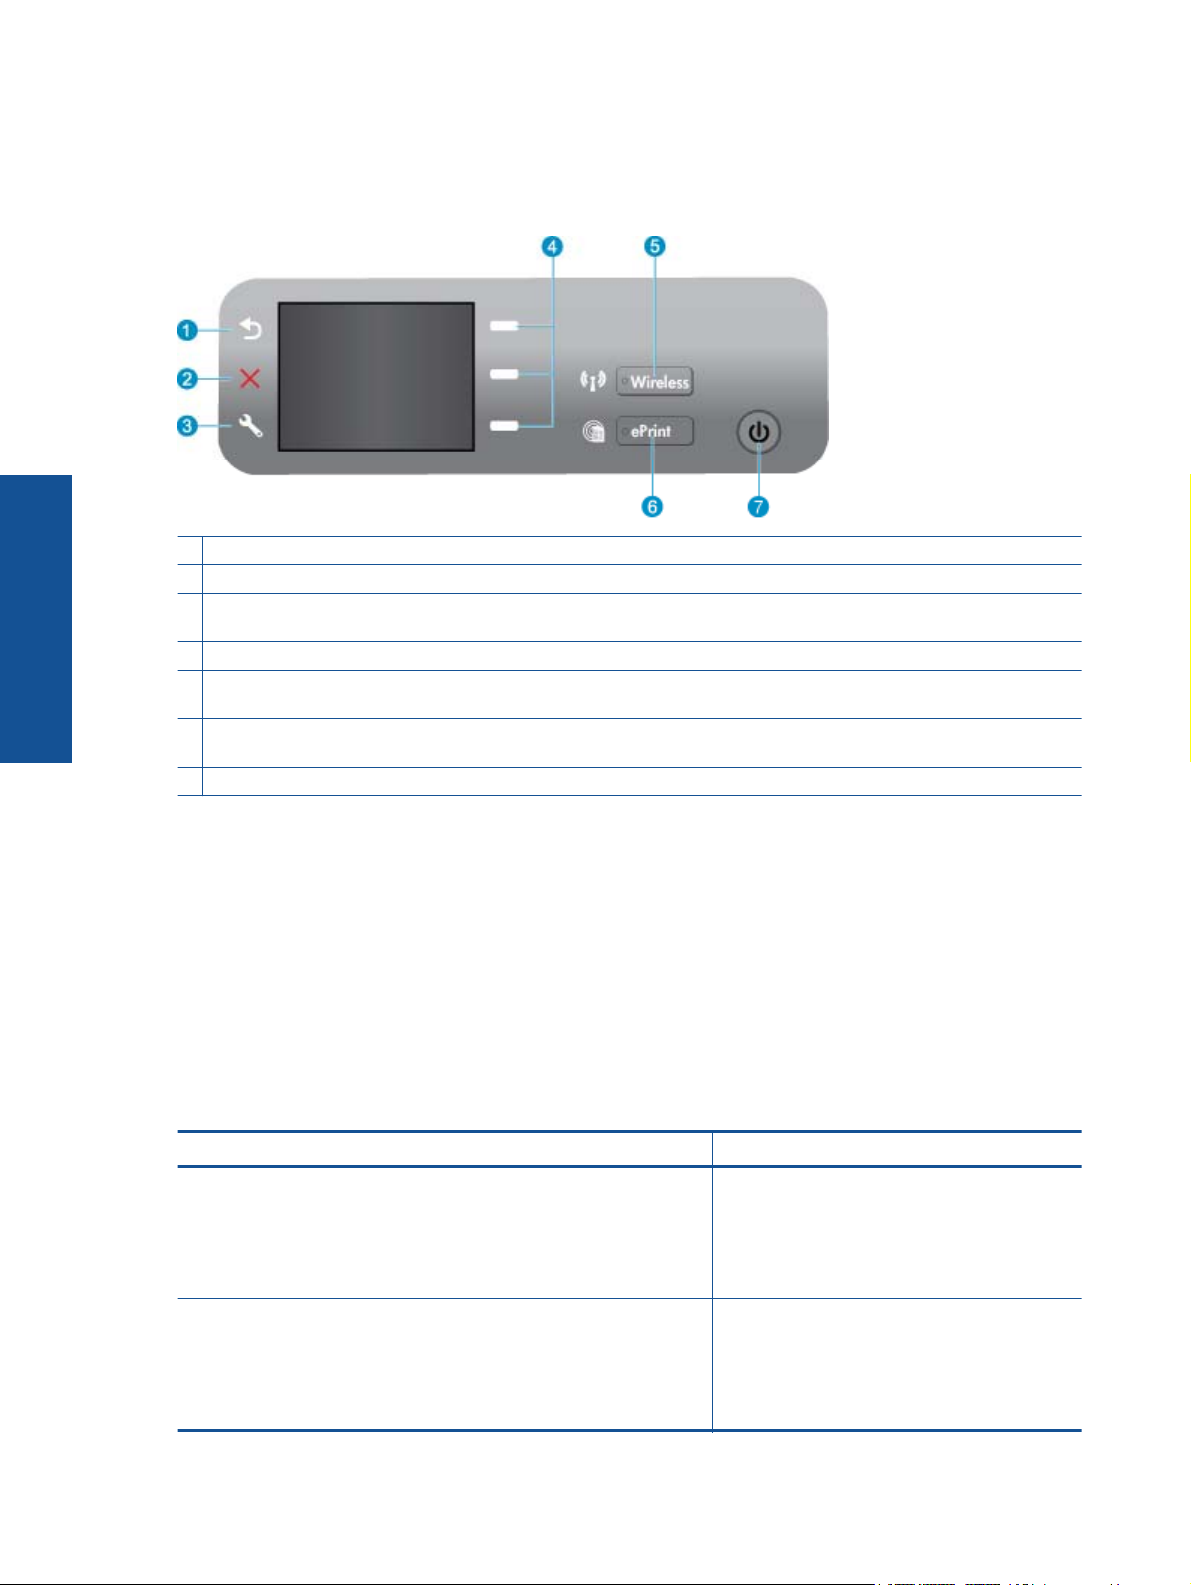
Control panel features Control panel features
1 Back: Returns to the previous screen.
2 Cancel: Stops the current operation, restores default settings.
3 Setup: Opens the Setup menu where you can check ink levels, change Auto Power-Off setting, perform maintenance tasks, and set language and region settings.
4 Selection buttons: Use buttons to select menu items on the printer display.
5 Wireless status light and button: Blue light indicates wireless connection. Pressing button opens wireless menu. Press and hold until light blinks to start WPS push button mode.
6 ePrint light and button: White light indicates ePrint is connected. Pressing button displays printer’s email address and ePrint menu options.
7 On button
Wireless Settings Press the Wireless button to view wireless status and menu options.
If the printer has an active connection to a wireless network, the printer display will show Connected and the printers IP.
If wireless is disabled (wireless radio off) and the wireless network is not available, the display screen shows Wireless Off.
If wireless is enabled (wireless radio on) and you do not have a wireless connection , the display screen shows that it is either in the process of Connecting or Not Connected.
You can use the printer display to retrieve information about your wireless network, establish a wireless connection, and more.
How do I? Instructions
Print network configuration page. The network configuration page will display the network status, hostname, network name, and more.
1. Press the Wireless button to display the Wireless Menu.
2. From the Wireless Menu, select Print Reports.
3. From the Print Reports menu select Configuration.
Chapter 2
6 Get to know the HP All-in-One
G et to know
the H P A
ll-in-O ne
How do I? Instructions
Print wireless network test report. The wireless network test report will display the diagnostics results for the status of the wireless network, wireless signal strength, detected networks, and more.
1. Press the Wireless button to display the Wireless Menu.
2. From the Wireless Menu, select Print Reports.
3. From the Print Reports menu select Wireless Test.
View signal strength of wireless connection. 1. Press the Wireless button to display the Wireless Menu.
2. From the Wireless Menu, select Connected IP XXX.XXX.XX.XX.
3. Printer display will show wireless signal strength.
Restore network settings to default settings. 1. Press the Wireless button to display the Wireless Menu.
2. From the Wireless Menu, select Settings. 3. From the Settings menu, select Restore
Defaults. 4. Confirm selection to restore defaults.
Turn wireless on or off. 1. Press the Wireless button to display the Wireless Menu.
2. From the Wireless Menu, select Wireless Settings.
3. From the Settings menu, select Wireless On/ Off.
4. From the Wireless On/Off menu select On or Off.
Establish a Wi-Fi Protected Setup (WPS) connection. WiFi Protected Setup (WPS requires WPS router) on page 33
Status Lights Wireless Status Light ePrint Status Light On Button Light
Wireless Status Light
Light behavior Solution
Off Wireless is off. Press Wireless button to access wireless menu on the printer display. Use wireless menu to enable wireless printing.
Slow blinking Wireless is on but not connected to a network. If connection cannot be established, make sure printer is within range of wireless signal.
Fast blinking Wireless error has occurred. Refer to messages on printer display.
On Wireless connection has been established and you can print.
(continued)
Status Lights 7
G et
to k
no w
th e
H P
A ll-
in -O
ne
ePrint Status Light
Light behavior Solution
Off ePrint is disabled. Press ePrint button to access ePrint menu on the printer display.
On ePrint is on and connected.
On Button Light Light behavior Solution
Off The device is powered off.
Pulsing Indicates the device is in sleep mode. The device automatically enters sleep mode after 5 minutes of inactivity.
Fast blinking Error has occurred. Refer to messages on printer display.
On Printer is on and ready to print.
Auto Power-Off Auto Power-Off is automatically enabled by default when you turn on the printer. When Auto Power-Off is enabled, the printer automatically turns off after 2 hours of inactivity to help reduce energy use. Auto Power-Off is automatically disabled when the printer establishes a wireless or Ethernet (if supported) network connection. You can change the Auto Power-Off setting from the control panel. Once you change the setting, the printer maintains the setting. Auto Power-Off turns the printer off completely, so you must use the power button to turn the printer back on.
To change Auto Power-Off setting 1. From the Control Panel home screen, which displays Copy, Scan, and Quick Forms, press the Setup button.
NOTE: If you do not see the home screen, press the Back button until you can see it.
2. From the Setup menu on the printer display, select Auto Power-Off. 3. From the Auto Power-Off menu select Enabled or Disabled, and then confirm the setting.
TIP: If you are printing over a wireless or Ethernet connected network, Auto Power-Off should be disabled to ensure that print jobs do not get lost. Even when Auto Power-Off is disabled, the printer enters Sleep mode after 5 minutes of inactivity to help reduce energy use.
Chapter 2
8 Get to know the HP All-in-One
G et to know
the H P A
ll-in-O ne
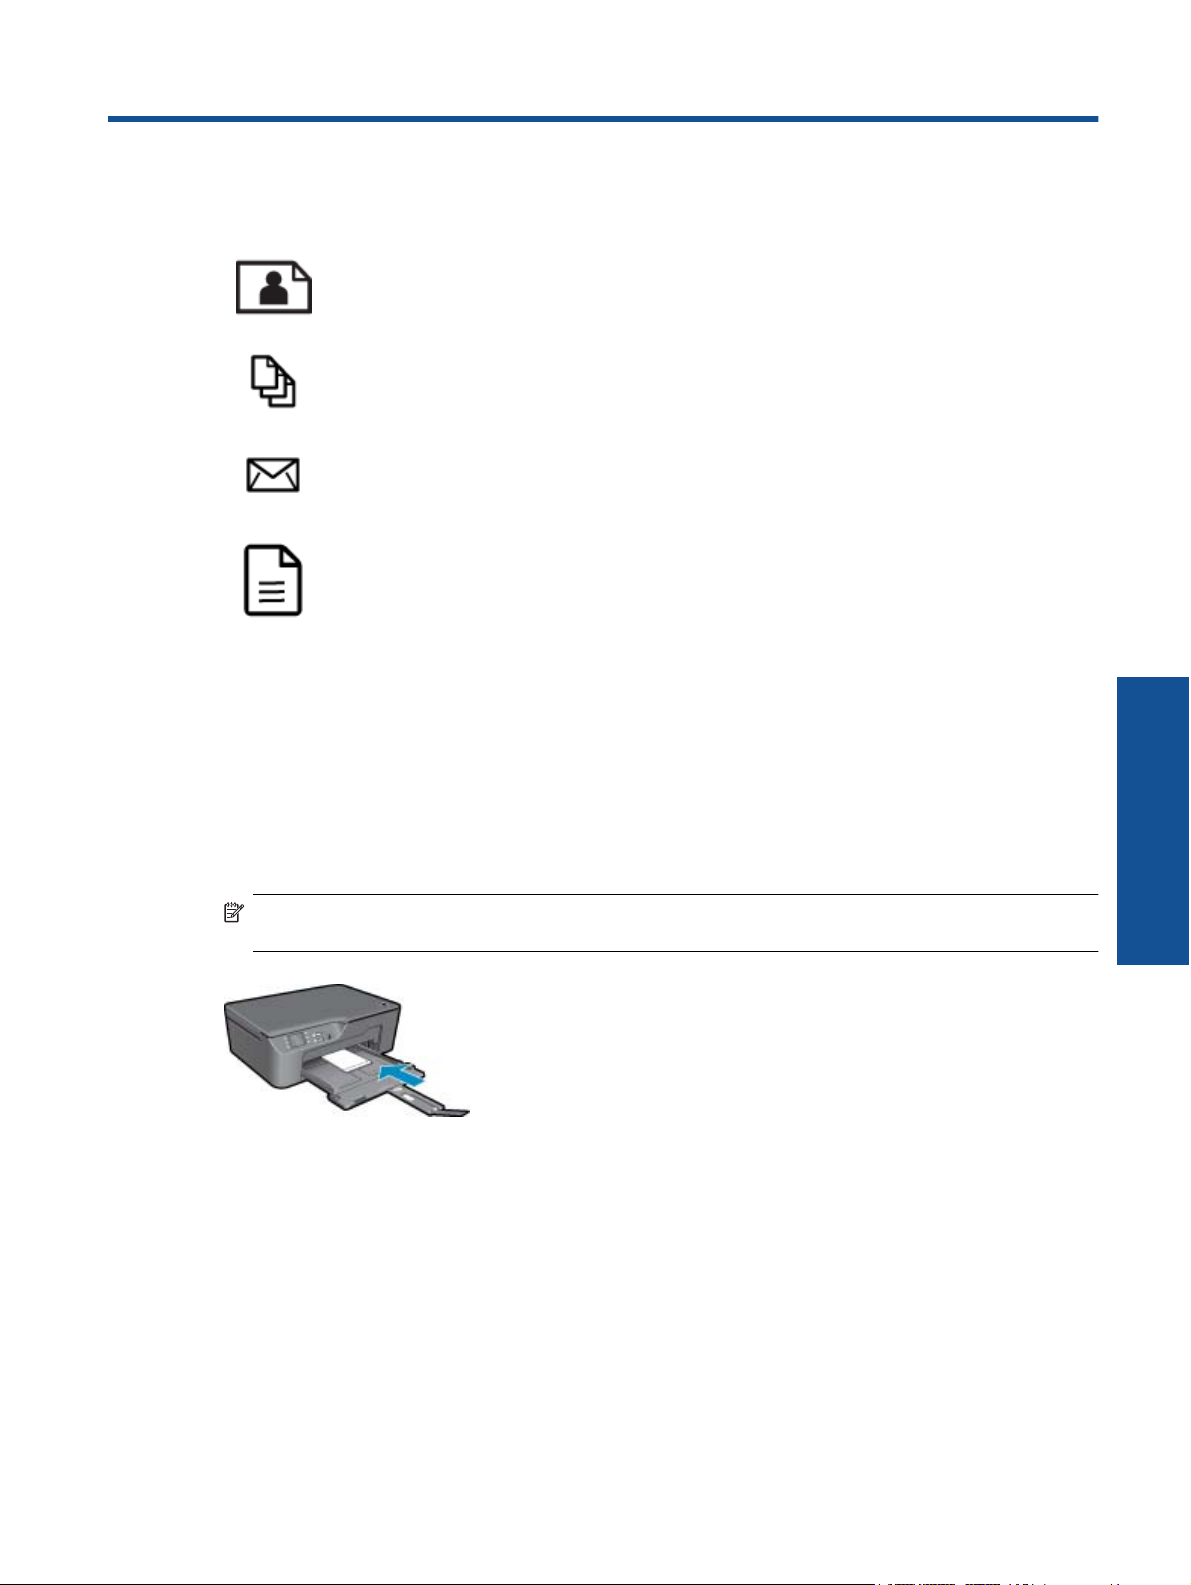
3 Print Choose a print job to continue.
Print photos on page 9
Print documents on page 10
Print envelopes on page 11
Print Quick Forms on page 10
See Tips for print success on page 11 for more information.
Print photos To print a photo on photo paper 1. Pull out the paper tray. 2. Remove all paper from the paper tray, and then load the photo paper with side to be printed on facing down.
NOTE: If the photo paper you are using has perforated tabs, load photo paper so that tabs face outward.
See Load media on page 18 for more information. 3. On the File menu in your software application, click Print. 4. Make sure the product is the selected printer. 5. Click the button that opens the Properties dialog box.
Depending on your software application, this button might be called Properties, Options, Printer Setup, Printer, or Preferences.
6. Select the appropriate options. On Layout tab select Portrait or Landscape orientation. On Paper/Quality tab select the appropriate paper type and print quality from the Media drop-down list.
Print 9
Pr in
t
NOTE: For maximum dpi resolution, go to the Paper/Quality tab and select Photo Paper, Best Quality from the Media drop-down list. Then go to the Advanced tab and select Yes from the Print in Max DPI drop-down list. If you want to print Max DPI in grayscale, select High Quality Grayscale from Print in Grayscale on the drop-down list, and then select Max DPI, after selecting Photo Paper, Best Quality.
7. Click OK to return to the Properties dialog box. 8. Click OK, and then click Print or OK in the Print dialog box.
NOTE: Do not leave unused photo paper in the input tray. The paper might start to curl, which could reduce the quality of your printout. Photo paper should be flat before printing.
Print documents To print from a software application 1. Make sure the paper tray is open. 2. Make sure you have paper loaded in the paper tray.
See Load media on page 18 for more information. 3. From your software application, click the Print button. 4. Make sure the product is the selected printer. 5. Click the button that opens the Properties dialog box.
Depending on your software application, this button might be called Properties, Options, Printer Setup, Printer, or Preferences.
6. Select the appropriate options. On Layout tab select Portrait or Landscape orientation. On Paper/Quality tab select the appropriate paper type and print quality from the Media drop-down list.
7. Click OK to close the Properties dialog box. 8. Click Print or OK to begin printing.
NOTE: 1 You can print your document on both sides of the paper, instead of just one side. Click on the Advanced button on the Paper/Quality or Layout tab. From the Pages to Print drop-down menu select Print Odd Pages Only. Click OK to print. After the odd numbered pages of the document have been printed, remove the document from the output tray. Reload the paper in the input tray with the blank side facing up. Return to the Pages to Print drop-down menu and then select Print Even Pages Only. Click OK to print.
NOTE: 2 If your printed documents are not aligned within the margins of the paper, make sure that you have selected the correct language and region. On the printer display, select Setup, then select Language/Region. Select your language, and then region from the options provided. The correct Language/Region settings ensure that the printer will have the appropriate default paper size settings.
Print Quick Forms Use Quick Forms to print Office Forms, Paper Types, and Games.
Chapter 3
10 Print
Print Quick Forms 1. Select Quick Forms from the printer display menu.
TIP: If the Quick Forms option does not appear on the printer display menu, press the Back button until the Quick Forms option appears.
2. Press the selction buttons to select Office Forms, Paper Type, or Games. Then select OK. 3. After you have selected the type of Selection that you want to print, select the number of copies, then press
OK.
Print envelopes You can load one or more envelopes into the input tray of the HP All-in-One. Do not use shiny or embossed envelopes or envelopes that have clasps or windows.
NOTE: For specific details on how to format text for printing on envelopes, consult the help files in your word processing software. For best results, consider using a label for the return address on envelopes.
To print envelopes 1. Make sure the paper tray is open. 2. Slide the paper guides outward. 3. Place the envelopes in the center of the tray. The side to be printed on should face down. The flap should be
on the left side. See Load media on page 18 for more information.
4. Push the envelopes into the printer until they stop. 5. Slide the paper guides firmly against the edges of the envelopes.
6. Click the button that opens the Properties dialog box. Depending on your software application, this button might be called Properties, Options, Printer Setup, Printer, or Preferences.
7. Select the appropriate options. On Paper/Quality tab select the appropriate paper type and print quality from the Media drop-down list.
8. Click OK, and then click Print or OK in the Print dialog box.
Tips for print success To successfully print, the HP cartridges should be functioning properly with sufficient ink, the paper should be loaded correctly, and the product should have the appropriate settings.
Ink tips Use genuine HP ink cartridges. Install the yellow, magenta, cyan, and black cartridges correctly.
For more information, see Replace the cartridges on page 30. Check the estimated ink levels in the cartridges to make sure there is sufficient ink.
For more information, see Check the estimated ink levels on page 29.
Tips for print success 11
Pr in
t
For more information, see Improve print quality on page 37. If you are seeing ink smears on the back of the pages that you printed, use the Tools menu to clean.
From the home screen, which displays Copy, Scan, and Quick Forms, press the Setup button.
NOTE: If you do not see the home screen, press the Back button until you can see it.
Scroll through the Tools menu until you see Clean Ink Smear, then select OK. Follow the onscreen instructions.
Paper loading tips Load a stack of paper (not just one page). All of the paper in the stack should be the same size and type to avoid
a paper jam. Load paper with side to be printed on facing down. Ensure that paper loaded in the paper tray lays flat and the edges are not bent or torn. Adjust the paper-width guides in the paper tray to fit snugly against all paper. Make sure the paper-width guide
does not bend the paper in the paper tray. For more information, see Load media on page 18.
Printer settings tips On the Paper/Quality tab of the print driver, select the appropriate paper type and print quality from the
Media drop-down list. Select the appropriate size from the Paper Size drop-down list on the Paper/Quality tab. Click the HP All-in-One desktop icon to open the Printer Software. In the Printer Software, click Printer
Actions and then click Set Preferences to access the print driver.
NOTE: You can also access the Printer Software by clicking Start > Programs > HP > HP Deskjet 3070 B611 series > HP Deskjet 3070 B611 series
Notes Genuine HP ink cartridges are designed and tested with HP printers and papers to help you easily produce great
results, time after time.
NOTE: HP cannot guarantee the quality or reliability of non-HP supplies. Product service or repairs required as a result of using a non-HP supply will not be covered under warranty.
If you believe you purchased genuine HP ink cartridges, go to:
www.hp.com/go/anticounterfeit
Ink level warnings and indicators provide estimates for planning purposes only.
NOTE: When you receive a low-ink warning message, consider having a replacement cartridge available to avoid possible printing delays. You do not need to replace the cartridges until print quality becomes unacceptable.
Software settings selected in the print driver only apply to printing, they do not apply to copying or scanning. You can print your document on both sides of the paper, instead of just one side.
NOTE: Click the Advanced button on the Paper/Quality or Layout tab. From the Pages to Print drop- down list select Print Odd Pages Only. Click OK to print. After the odd numbered pages of the document have been printed, remove the document from the output tray. Reload the paper in the input tray with the blank side facing up. Return to the Pages to Print drop-down list and then select Print Even Pages Only. Click OK to print.
Print using black ink only
NOTE: If you want to print a black and white document using black ink only, click the Advanced button. From the Print in Grayscale drop-down menu select Black Ink Only, then click the OK button.
Chapter 3
12 Print
Print using the maximum dpi Use maximum dots per inch (dpi) mode to print high-quality, sharp images on photo paper.
See technical specifications for the print resolution of the maximum dpi mode.
Printing in maximum dpi takes longer than printing with other settings and requires a large amount of disk space.
To print in Maximum dpi mode 1. Make sure you have photo paper loaded in the input tray. 2. On the File menu in your software application, click Print. 3. Make sure the product is the selected printer. 4. Click the button that opens the Properties dialog box.
Depending on your software application, this button might be called Properties, Options, Printer Setup, Printer, or Preferences.
5. Click the Paper/Quality tab. 6. In the Media drop-down list, click Photo Paper, Best Quality.
NOTE: Photo Paper, Best Quality must be selected from the Media drop-down list on the Paper/ Quality tab to enable printing in maximum DPI.
7. Click the Advanced button. 8. In the Printer Features area, select Yes from the Print in Max DPI drop-down list. 9. Select Paper Size from Paper/Output drop-down list. 10. Click OK to close the advanced options. 11. Confirm Orientation on Layout tab, then click OK to print.
Print using the maximum dpi 13
Pr in
t
4 ePrint from anywhere The ePrint feature on your product provides convenience printing that allows you to print from anywhere. Once enabled, ePrint assigns an email address to your product. To print, simply send an email containing your document to that address. You can print images, Word, PowerPoint, and PDF documents. It’s easy!
ePrint from anywhere
ePrint from anywhere To ePrint a document from anywhere 1. Find your ePrint email address.
a. Press the ePrint button on the control panel. You will see the web services Settings menu on the printer display.
b. Select Display Email Address from the printer display to view the printers email address.
NOTE: To use ePrint, web services must first be enabled. If web services have not been enabled, you will see a message directing you to the Printer Software. Open the Printer Software, select ePrint, then follow the onscreen instruction to enable.
TIP: To print the email address or registration url, select Print Info Sheet from the Settings menu on the printer display.
2. Compose and send email. a. Create a new email and type the product email address in the To box. b. Type text in the body of the email and attach the documents or images that you want to print. c. Send the email.
The product prints your email.
NOTE: To receive email, your product must be connected to the Internet. Your email will print as soon as it is received. As with any email, there is no guarantee when or if it will be received. When you register online with ePrint, you can check the status of your jobs.
TIP: If you have enabled Auto Power-Off, you should disable it before using ePrint. For more information, see Auto Power-Off on page 8
NOTE: 1 Device must be connected wirelessly and on an active network.
NOTE: 2 Documents printed with ePrint may appear different from the original. Style, formatting, and text flow may differ from the original document. For documents that need to be printed with a higher quality (such as legal documents), we recommend that you print from the software application on your computer, where you will have more control over what your printout looks like.
Click here to go online for more information.
ePrint from anywhere 15
eP rin
t f ro
m a
ny w
he re
Chapter 4
16 ePrint from anywhere
ePrint from anyw
here
5 Paper basics Recommended papers for printing Load media
Recommended papers for printing If you want the best print quality, HP recommends using HP papers that are specifically designed for the type of project you are printing.
Depending on your country/region, some of these papers might not be available.
ColorLok HP recommends plain papers with the ColorLok logo for printing and copying of everyday documents. All papers
with the ColorLok logo are independently tested to meet high standards of reliability and print quality, and produce documents with crisp, vivid color, bolder blacks, and dry faster than ordinary plain papers. Look for papers with the ColorLok logo in a variety of weights and sizes from major paper manufacturers.
HP Advanced Photo Paper This thick photo paper features an instant-dry finish for easy handling without smudging. It resists water, smears,
fingerprints, and humidity. Your prints have a look and feel comparable to a store-processed photo. It is available in several sizes, including A4, 8.5 x 11 inch, 10 x 15 cm (4 x 6 inch) (with or without tabs), 13 x 18 cm (5 x 7 inch), and two finishes — glossy or soft gloss (satin matte). It is acid-free for longer lasting documents.
HP Everyday Photo Paper Print colorful, everyday snapshots at a low cost, using paper designed for casual photo printing. This affordable,
photo paper dries quickly for easy handling. Get sharp, crisp images when you use this paper with any inkjet printer. It is available in semi-gloss finish in several sizes, including A4, 8.5 x 11 inch, and 10 x 15 cm (4 x 6 inch) (with or without tabs). For longer-lasting photos, it is acid-free.
HP Brochure Paper or HP Superior Inkjet Paper These papers are glossy-coated or matte-coated on both sides for two-sided use. They are the perfect choice
for near-photographic reproductions and business graphics for report covers, special presentations, brochures, mailers, and calendars.
HP Premium Presentation Paper or HP Professional Paper These papers are heavy two-sided matte papers perfect for presentation, proposals, reports, and newsletters.
They are heavyweight for an impressive look and feel.
Paper basics 17
Pa pe
r b as
ic s
HP Bright White Inkjet Paper HP Bright White Inkjet Paper delivers high-contrast colors and sharp text. It is opaque enough for two-sided
color usage with no show-through, which makes it ideal for newsletters, reports, and flyers. It features ColorLok Technology for less smearing, bolder blacks, and vivid colors.
HP Printing Paper HP Printing Paper is a high-quality multifunction paper. It produces documents that look and feel more substantial
than documents printed on standard multipurpose or copy paper. It features ColorLok Technology for less smearing, bolder blacks, and vivid colors. It is acid-free for longer lasting documents.
HP Office Paper HP Office Paper is a high-quality multifunction paper. It is suitable for copies, drafts, memos, and other everyday
documents. It features ColorLok Technology for less smearing, bolder blacks, and vivid colors. It is acid-free for longer lasting documents.
HP Iron-On Transfers HP Iron-on Transfers (for color fabrics or for light or white fabrics) are the ideal solution for creating custom T-
shirts from your digital photos.
HP Premium Inkjet Transparency Film HP Premium Inkjet Transparency Film make your color presentations vivid and even more impressive. This film
is easy to use and handle and dries quickly without smudging.
HP Photo Value Pack HP Photo Value Packs conveniently package original HP cartridges and HP Advanced Photo Paper to save you
time and take the guesswork out of printing affordable professional photos with your HP All-in-One. Original HP inks and HP Advanced Photo Paper have been designed to work together so your photos are long lasting and vivid, print after print. Great for printing out an entire vacations worth of photos or multiple prints to share.
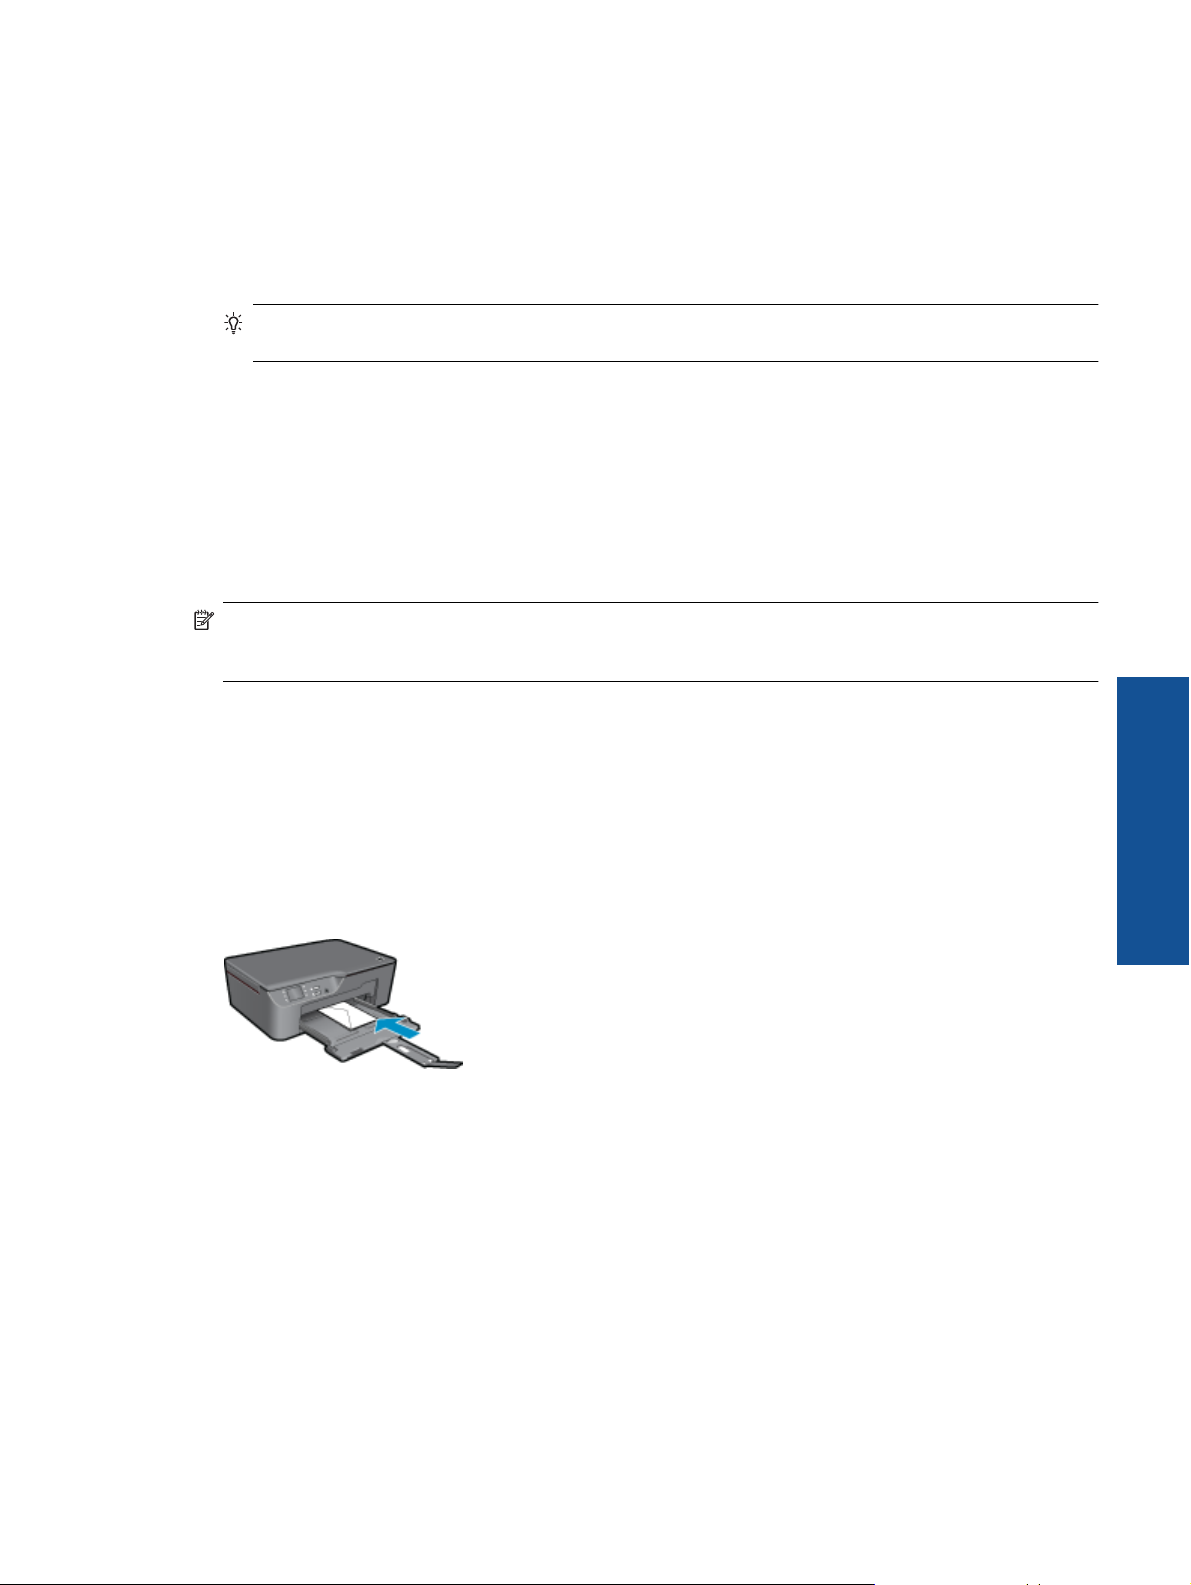
Load media Select a paper size to continue.
Load full-size paper a. Lower the paper tray.
Lower the paper tray and pull out the tray extender.
b. Slide paper-width guides outward. Slide paper-width guides outward.
Chapter 5
18 Paper basics
Paper basics
c. Load paper. Insert stack of paper into paper tray with short edge forward and print side down.
Slide stack of paper until it stops. Adjust paper-width guides so they fit against both sides of the stack of paper.
Load small-size paper a. Slide the paper tray out.
Slide the paper tray and pull out the tray extender.
b. Slide paper-width guides outward. Slide paper-width guides outward.
Load media 19
Pa pe
r b as
ic s
c. Load paper. Insert stack of photo paper with short edge down and print side down. Slide stack of paper forward until it stops.
NOTE: If the photo paper you are using has perforated tabs, load photo paper so that tabs face outward.
Adjust paper-width guides so they fit against both sides of the stack of paper.
Slide paper tray in.
Load envelopes a. Lower the paper tray
Lower the output tray and pull out the tray extender.
b. Slide paper-width guides outward. Slide paper-width guide outward.
Chapter 5
20 Paper basics
Paper basics
Remove all paper from the main input tray. c. Load envelopes.
Insert one or more envelopes in center of the input tray. The side to be printed on should face up. The flap should be on the left side and facing down.
Slide stack of envelopes down until it stops. Slide paper-width guide to the right against stack of envelopes until it stops.
Load media 21
Pa pe
r b as
ic s
Chapter 5
22 Paper basics
Paper basics
6 Copy and scan Copy Scan to a computer Tips for copy success Tips for scan success
Copy The copy menu on the printer display allows you to easily select number of copies and color or black and white
for copying on plain paper. For more advanced settings, such as changing the paper type and size, adjusting the darkness of the copy, and resizing the copy, select Settings from the Copy Menu. Click a copy type to continue.
Easy Copy a. Load paper.
Load full-size paper in the paper tray.
b. Load original. Lift lid on product.
Load original print side down on right front corner of glass.
Copy and scan 23
C op
y an
d sc
an
Close lid. c. Select Copy from the printer display menu to access the copy menu.
If you do not see Copy on the printer display, press the back button until you see Copy. From the Copy menu, press the button next to Copy. Press the button next to Copy Number to increase or decrease the number of copies. Press the button
next to OK to confirm. Press the button next to Copy Black or Copy Color to copy onto A4 or 8.5 x 11 plain paper.
More copy features While in the Copy menu, press the selection button next to Settings to access the Copy Settings menu.
Paper Size/Type: You will see menus to select paper size and paper type. A plain paper setting will print in plain paper normal print quality. A photo paper setting will print in photo paper best quality.
Resize: Actual size makes a copy that is the same as the size of the original, but the margins of the copied image may be clipped. Resize to fit makes a copy that is centered with a white border around the edges. The resized image is either enlarged or reduced to fit the size of the selected output paper. Custom Size allows you to increase the size of the image by selecting values greater than 100% or reduce the image size by selecting values less than 100%.
Lighter / Darker: Adjusts the copy settings to make copies lighter or darker.
NOTE: After two minutes of inactivity the copy options will automatically return to the default settings of plain paper A4 or 8.5 x 11 (depending on region).
Scan to a computer You can initiate a scan from the control panel of the printer or from your computer. Scan from the control panel if you want to quickly scan one page to an image file. Scan from your computer if you want to scan multiple pages into one file, define the file format of the scan, or make adjustments to the scanned image.
Prepare the scan To prepare the scan:
a. Load original. Lift lid on product.
Load original print side down on right front corner of glass.
Chapter 6
24 Copy and scan
C opy and scan
Close lid.
b. Start scan.
Scan from the printer control panel 1. Select Scan from the printer display menu. If you do not see Scan on the printer display press the Back button
until you do. 2. Select the computer that you want to scan to from the printer display.
If you do not see your computer listed on the printer display make sure that your computer is connected to the printer either wirelessly or through a USB cable. If you have a wireless connection and you have confirmed that the connection is working, you will need to enable wireless scanning in the software. a. Click the HP All-in-One desktop icon to open the Printer Software.
NOTE: You can also access the Printer Software by clicking Start > Programs > HP > HP Deskjet 3070 B611 series > HP Deskjet 3070 B611 series
b. Click the Scanner Actions icon. c. Click Manage Scan to Computer.
NOTE: You can choose to keep the Scan to Computer option always active. If this feature is always active, you will be able to select the Scan option from the printer display to scan to your wirelessly connected computers that are in use. If this feature is not always active, then you will need to first activate the Scan to Computer option in the Printer Software before you scan. This only affects the Scan button on the printer control panel. Whether Scan to Computer is active or not, you will always be able to make a scan from your computer
3. Locate the scanned image on your computer. After the scan is saved, a Windows Explorer window will open in the directory where the scan was saved.
Scan from your computer 1. Open the HP Scan application. Click Start > Programs >HP > HP Deskjet 3070 B611 series >HP Scan 2. Select the type of scan that you want from the shortcut menu and then click Scan.
NOTE: If Show Scan Preview is selected, you will be able to make adjustments to the scanned image in the preview screen.
Scan to a computer 25
C op
y an
d sc
an
3. Select Save if you want to keep the application open for another scan, or select Done to exit the application. 4. After the scan is saved, a Windows Explorer window will open in the directory where the scan was saved.
NOTE: There is a limited number of computers that can have the scan function activated at the same time. Press the Scan button on the printer and you will see the computers that are currently available for scanning.
Tips for copy success Load your original print side down on the right front corner of the glass.
Remove the printer lid to copy or scan a book.
To increase or decrease the contrast of your printed output, select Copy from the printer display and then select Settings. From the Copy Settings menu select Lighter/Darker to adjust the contrast.
To select the paper size and paper type of the printed output, select Copy from the printer diplay, then select Settings. From the Copy Settings menu select Size to Fit to choose plain or photo paper and photo paper size.
To resize the image, select Copy from the printer diplay, then select Settings. From the Copy Settings menu select Resize.
Click here to go online for more information.
Tips for scan success Load your original print side down on the right front corner of the glass.
Chapter 6
26 Copy and scan
C opy and scan
Clean the scanner glass and make sure that there are no foreign materials adhering to it. If you have a wireless connection and you have confirmed that the connection is working, you will need to enable
wireless scanning in the software to scan from the printer display. Open the Printer Software to select Scanner Actions and then select Manage Scan to Computer.
After you select Scan from the printer display, choose the computer that you want to scan to from the list of printers on the printer display.
If you have a wireless connection from your printer to your computer, and you want to always be able to quickly scan to your connected computer, choose to have Scan to Computer always active.
If you want to scan a document with several pages into one file instead of multiple files, start the scan with the Printer Software instead of selecting Scan from the control panel.
Remove the printer lid to copy or scan a book.
Click here to go online for more information.
Tips for scan success 27
C op
y an
d sc
an
Chapter 6
28 Copy and scan
C opy and scan
7 Work with cartridges Check the estimated ink levels Order ink supplies Replace the cartridges Cartridge warranty information
Check the estimated ink levels You can easily check the ink supply level to determine how soon you might need to replace a cartridge. The in