
Have a look at the manual HP Photosmart C4783 User Manual online for free. It’s possible to download the document as PDF or print. UserManuals.tech offer 1114 HP manuals and user’s guides for free. Share the user manual or guide on Facebook, Twitter or Google+.
HP Photosmart C4700 series
							Contents
1 HP Photosmart C4700 series Help..........................................................................................3
2 Finish setting up the HP Photosmart
Add the HP Photosmart to a network ........................................................................................5
Set up a USB connection ........................................................................................................10
3 Get to know the HP Photosmart
Printer parts .............................................................................................................................11
Control panel features .............................................................................................................12
4 How do I?.................................................................................................................................13
6Print
Print documents .......................................................................................................................21
Print photos .............................................................................................................................22
Print envelopes ........................................................................................................................27
Print on specialty media ..........................................................................................................28
Print a Web page .....................................................................................................................29
7Scan
Scan to a computer .................................................................................................................33
Scan to a memory card ...........................................................................................................34
8Copy
Copy text or mixed documents ................................................................................................38
9 Reprint photos........................................................................................................................43
10 Save photos............................................................................................................................45
11 Work with cartridges
Check the estimated ink levels ................................................................................................47
Replace the cartridges .............................................................................................................48
Order ink supplies ....................................................................................................................50
Cartridge warranty information ................................................................................................51
12 Solve a problem
HP support ...............................................................................................................................53
Setup troubleshooting ..............................................................................................................54
Print troubleshooting ................................................................................................................60
Print quality troubleshooting ....................................................................................................64
Memory card troubleshooting ..................................................................................................65
Copy troubleshooting ...............................................................................................................67
Scan troubleshooting ...............................................................................................................68
Errors .......................................................................................................................................69
1
Contents
							14 Technical information
Notice .....................................................................................................................................105
Specifications ........................................................................................................................105
Environmental product stewardship program ........................................................................106
Regulatory notices .................................................................................................................110
Regulatory wireless statements .............................................................................................114
Index............................................................................................................................................117
2
Contents
							1 HP Photosmart C4700 series Help
For information about the HP Photosmart, see:
•“
Finish setting up the HP Photosmart” on page 5
•“
Get to know the HP Photosmart” on page 11
•“
How do I?” on page 13
•“
Print” on page 21
•“
Scan” on page 33
•“
Copy” on page 37
•“
Reprint photos” on page 43
•“
Save photos” on page 45
•“
Work with cartridges” on page 47
•“
Technical information” on page 105
HP Photosmart C4700 series Help 3
HP Photosmart C4700 series Help
							Chapter 1
4 HP Photosmart C4700 series Help
HP Photosmart C4700 series Help
							2 Finish setting up the
HP Photosmart
•Add the HP Photosmart to a network
•
Set up a USB connection
Add the HP Photosmart to a network
•“WiFi Protected Setup (WPS)” on page 5
•“
Wireless with a router (infrastructure network)” on page 6
•“
Wireless without a router (ad hoc connection)” on page 7
WiFi Protected Setup (WPS)
To connect the HP Photosmart to a wireless network using WiFi Protected Setup (WPS),
you will need the following:
❑A wireless 802.11 network that includes a WPS-enabled wireless router or access
point.
❑A desktop computer or laptop with either wireless networking support, or a network
interface card (NIC). The computer must be connected to the wireless network that
you intend to install the HP Photosmart on.
To connect the HP Photosmart using WiFi Protected Setup (WPS)
1.Do one of the following:
Use Push Button (PBC) method
a. Set up wireless connection.
❑On the Home Screen, press button next to Scan.
❑Press button next to Wireless Menu.
❑Press button next to WPS.
❑Press button next to Push Button.
❑Press corresponding button on WPS-enabled router or other networking
device.
❑Press OK.
b. Install software.
NOTE:The product begins a timer for approximately two minutes in which the
corresponding button on the networking device needs to be pressed.
Use PIN method
a. Set up wireless connection.
❑On the Home Screen, press button next to Scan.
❑Press button next to Wireless Menu.
Finish setting up the HP Photosmart 5
Finish setting up the HP Photosmart
							❑Press button next to WPS.
❑Press button next to PIN.
The device displays a PIN.
❑Enter the PIN on WPS-enabled router or other networking device.
❑Press OK.
b. Install software.
NOTE:The product begins a timer for approximately two minutes in which the
PIN needs to be entered on the networking device.
2.View the animation for this topic.
Related topics
“
Install the software for a network connection” on page 9
Wireless with a router (infrastructure network)
The HP Photosmart Software CD and included USB setup cable provide an easy way to
connect the HP Photosmart to your wireless network.
For optimal performance and security in your wireless network, HP recommends you use
a wireless router or access point (802.11) to connect the product and the other network
elements. When network elements are connected through a wireless router or access
point, this is called an infrastructure network.
To connect the HP Photosmart to an integrated wireless WLAN 802.11 network, you will
need the following:
❑A wireless 802.11 network that includes a wireless router or access point.
❑A desktop computer or laptop with either wireless networking support, or a network
interface card (NIC). The computer must be connected to the wireless network that
you intend to install the HP Photosmart on.
❑Broadband Internet access (recommended) such as cable or DSL.
If you connect the HP Photosmart on a wireless network that has Internet access, HP
recommends that you use a wireless router (access point or base station) that uses
Dynamic Host Configuration Protocol (DHCP).
❑Network name (SSID).
❑WEP key or WPA Passphrase (if needed).
Chapter 2
6 Finish setting up the HP Photosmart
Finish setting up the HP Photosmart
							To connect the product
1.Insert the product Software CD in the computer CD-ROM drive.
2.Follow the instructions on the screen.
When you are prompted, connect the product to the computer using the USB setup
cable included in the box. The product will attempt to connect to the network. If the
connection fails, follow the prompts to correct the problem, and then try again.
3.When the setup is finished, you will be prompted to disconnect the USB cable and
test the wireless network connection. Once the product connects successfully to the
network, install the software on each computer that will use the product over the
network.
Related topics
“
Install the software for a network connection” on page 9
Wireless without a router (ad hoc connection)
Use this section if you want to connect the HP Photosmart to a wireless-capable computer
without using a wireless router or access point.
There are two methods you may use to connect the HP Photosmart to your computer
using an ad hoc wireless network connection. Once connected, you can install the
HP Photosmart software.
▲Turn on the wireless radio for the HP Photosmart and the wireless radio on your
computer. On your computer, connect to the network name (SSID) hpsetup, which
is the default ad hoc network created by the HP Photosmart.
OR
▲Use an ad hoc network profile on your computer to connect to the product. If your
computer is not currently configured with an ad hoc network profile, consult the Help
file for your computer Operating System for the proper method to create an ad hoc
profile on your computer. Once the ad hoc network profile has been created, insert
the installation CD that came with the product and install the software. Connect to the
ad hoc network profile you created on your computer.
NOTE:An ad hoc connection can be used if you do not have a wireless router or
access point but do have a wireless radio on your computer. However, an ad hoc
connection may result in a lower level of network security and possibly reduced
performance when compared to an infrastructure network connection using a wireless
router or access point.
Add the HP Photosmart to a network 7
Finish setting up the HP Photosmart
							To connect the HP Photosmart to a Windows computer with an ad hoc connection, the
computer must have a wireless network adapter and an ad hoc profile. Create a network
profile for a Windows Vista or Windows XP computer using the directions below.
NOTE:If you have an operating system other than Windows Vista or Windows XP,
HP recommends that you use the configuration program that came with your wireless
LAN card. To find the configuration program for your wireless LAN card, access your
computers list of programs.
To create a network profile
NOTE:The product comes configured with a network profile with hpsetup as the
network name (SSID). However, for security and privacy HP recommends you create
a new network profile on your computer as described here.
1.In the Control Panel, double-click Network Connections.
2.On the Network Connections window, right-click the Wireless Network
Connection. If you see Enable on the pop-up menu, select it. Otherwise, if you see
Disable on the menu, the wireless connection is already enabled.
3.Right-click the Wireless Network Connection icon, and then click Properties.
4.Click the Wireless Networks tab.
5.Select the Use Windows to configure my wireless network settings check box.
6.Click Add, and then do the following:
a.In Network name (SSID) box, type in a unique network name of your choice.
NOTE:The network name is case sensitive, so it is important to remember
any uppercase (capital) and lowercase (small) letters.
b. If there is a Network Authentication list, select Open. Otherwise, go to the next
step.
c.In the Data encryption list, select WEP.
d. Make sure that the check box is not selected next to The key is provided for me
automatically. If it is selected, click the check box to clear it.
e.In the Network key box, type a WEP key that has exactly 5 or exactly 13
alphanumeric (ASCII) characters. For example, if you enter 5 characters, you
might enter ABCDE or 12345. Or, if you enter 13 characters, you might enter
ABCDEF1234567. (12345 and ABCDE are examples only. Select a combination
of your choosing.)
Alternatively, you can use HEX (hexadecimal) characters for the WEP key. A HEX
WEP key must be 10 characters for 40 bit encryption, or 26 characters for 128 bit
encryption.
f.In the Confirm network key box, type the same WEP key you typed in the
previous step.
NOTE:You must remember the exact uppercase (capital) and lowercase
(small) letters. If you enter your WEP key incorrectly on the product, the
wireless connection will fail.
g. Write down the WEP key exactly as you typed it, including uppercase and
lowercase letters.
Chapter 2
8 Finish setting up the HP Photosmart
Finish setting up the HP Photosmart
All HP manuals
Comments (0)
Related Manuals for HP Photosmart C4783 User Manual

Рисунок 1.
HP PhotoSmart-C4783 относится к бюджетному классу принтера и МФУ, со встроенными печатающими головками (далее ПГ) в картридже. Когда пользователи приобретают печатающие устройства по относительно низкой цене, после израсходования чернил, узнают о стоимости новых расходных материалов и думают как сэкономить на печати. Одним из способов не тратить лишние деньги, является заправка картриджей HP C4783 в домашних условиях.
Чернила подходящие для принтера HP PhotoSmart-C4783 в нашем интернет магазине
В принтере находятся два картриджа, черный и цветной картриджи HP 121. На их примере мы покажем как заправить принтер HP PhotoSmart-C4783 самостоятельно. Для успешного результата заправки, необходимо убедиться в работоспособности картриджей. Самые распространенные проблемы, это засохла печатающая головка или вышла из строя электроника. В первом случае, надо прочистить ПГ специальной промывочной жидкостью, а во втором случае нужно покупать новый.
Заправка картриджа HP PhotoSmart-C4783 своими руками не сложный процесс, ниже мы покажем как это возможно сделать. В черном картридже лучше вставлять иглу в центральное отверстие. В цветном, для начала, надо определить расположение цветов. Возможны несколько вариантов, один из них представлен на рисунке 2.
Определить расположение цветов можно различными способами:
- Под наклейкой внимательно посмотреть на губку в заправочных отверстиях и увидеть следы чернил.
- Сделать отпечаток ПГ на листе (Цвет посередине отпечатка всегда находится вверху, а цвета слева и права отпечатка находятся соответственно отпечатка в картридже. (Рисунок 2)).


Рисунок 2.
- Приступаем к заправке картриджей HP C4783, набираем в шприцы краску, лучше взять 4 шприца и заправить их чернилами (Black, Magenta, Yellow, Cyan), можно использовать 10 или как в нашем случае 20 мл. шприцы.
- Аккуратно снимаем сверху наклейки, если ранее этого не сделали.
- Вставляем иглу шприца внутрь заправочного отверстия. Вводить глубоко не нужно, достаточно 10-15 мм. (Рисунок 3)
- Медленно вводите чернила до тех пор, пока чернила не появится в заправочном отверстии, нужно примерно 4 мл. для черного и 9 мл. (по 3 мл. в каждый цвет) для цветного, далее излишние чернила откачать обратно в шприц, всегда лучше не долить чернила, чем перелить. (Рисунок 3.)
- Заправляем все цвета и очищаем сухой салфеткой поверхности от чернил.
- Наклейте этикетки на место (При необходимости возможно использовать скотч).
- Делаем отпечаток печатающих головок на листе, они должны быть четкими. (Рисунок 2.)
- Устанавливаем заправленные картриджи в принтер, делаем прочистку ПГ.

Рисунок 3.
ВАЖНО!
- Обратите внимание на контакты (Рисунок 4), они должны быть сухие, если Вы установите в принтер расходный материал с мокрыми контактами, у Вас сгорит электроника.
- Если Вы заправляете первый раз, то нужно отменить слежение за расходными материалами, для этого нажмите и удерживайте кнопку «Отмена» (Красный крестик или треугольник) на принтере в течение 15 секунд. После отмены слежения, у Вас печатающее устройство будет сигнализировать что чернила закончились, но печатать будет.


Рисунок 4.
Вспомогательные товары для заправки картриджа HP PhotoSmart-C4783
Перейдя по ссылке, Вы можете посмотреть полный список чернил для принтера HP PhotoSmart-C4783 на нашем сайте.
HP Photosmart C4783 All-in-One Printer
Discover the freedom of wireless printing – print from virtually anywhere in your home
1
with
this affordable and easy-to-use all-in-one. Enjoy easy photo printing, copying and scanning
too using the colour display with HP TouchSmart frame.
The HP Photosmart C4783 All-in-One Printer, Scanner, Copier is designed for home users with wireless networks who print
everything from documents and web pages to photos – and also want to be able to scan and copy from the same easy-to-use
device.
Go wireless and enjoy the freedom to print from virtually anywhere in the home
2
.
Give yourself the freedom to print from virtually anywhere in the home with this versatile wireless all-in-one
2
. Get set-up with the
minimum hassle – simply touch one button to connect to your wireless network and share fast, reliable printing between multiple
notebooks or PCs
3
. No wonder more people have chosen HP wireless printers than any other leading brand.
Get great results with web pages, documents, photos and more using easy HP tools.
Get more done, more easily. Use the colour display with HP TouchSmart frame to view, select and print photos without a PC.
Follow the intuitive menus to make quick colour copies or to scan anything from everyday documents to favourite photos. Get
goof-proof, drag-and-drop photo printing with the HP Photo Print Gadget
4
and more efficient web page printing with HP Smart
Web Printing
5
. Be sure of impressive results whatever you print, with laser-quality text and vivid colour graphics.
Control costs – and save energy – with affordable, efficient printing.
Enjoy efficient, reliable printing with Original HP inks that are designed to work with this printer. Get up to 3x more black printed
pages and 2.5x more colour printed pages with optional high-capacity replacement ink cartridges
6
. Keep control of your energy
costs – and reduce your impact on the environment too – with this ENERGY STAR® qualified all-in-one. Save paper and money by
using the paper-saving option to print multiple pages on both sides of a sheet of paper.
1
Wireless performance is dependent upon physical environment and distance from access point.
2
Wireless performance is dependent upon physical environment and distance from access point
3
Requires a WPS router with an integrated push-button; wireless performance is dependent upon physical environment and distance from access point
4
Requires Windows Vista®
5
Requires Microsoft Internet Explorer 6.0 – 8.0
6
Compared with HP 121 Black/Colour Ink Cartridges; XL cartridges not included, please purchase separately.
HP Photosmart C4783
Windows 8/8.1/10
Размер: 145 MB
Разрядность: 32/64
Ссылка: HP Photosmart C4783-Win10
Windows Vista/XP/7 — полный пакет
Размер: 149 MB
Разрядность: 32/64
Ссылка: HP Photosmart C4783-Win7
Windows Vista/XP/7 — базовый пакет
Размер: 67 MB
Разрядность: 32/64
Ссылка: HP Photosmart C4783-Win7
Установка драйвера в Windows 10
Перед тем, как начать работать на МФУ HP Photosmart C4783 необходимо установить драйверы. Они обычно идут в комплекте с принтером. Но, если получилось так, что операционная система на персональном компьютере переустановлена, а диск с драйверами от принтера не найти, то можно скачать по следующей ссылке.
После скачивания можно приступить к установке драйвера.
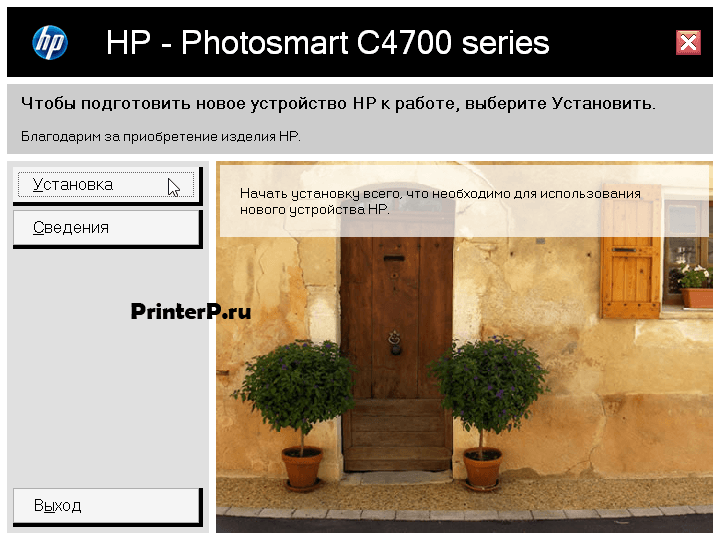
Открываем папку, куда загрузился установочный файл. Щелкнуть по нему мышкой дважды. Откроется окно, которое пользователь видит на картинке ниже. Кликнув по кнопке «Сведения», владелец узнает информацию об устройстве. Для установки драйвера нужно нажать на кнопку «Установка».
В открывшемся окне следует ознакомиться с представленной информацией и кликнуть по «Далее».

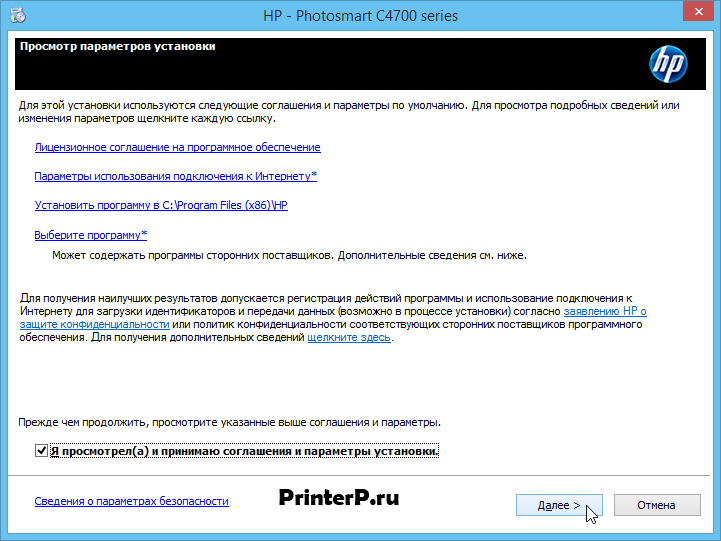
В следующем окне нужно принять условия соглашения и просмотреть параметры установки. Если нет желания тратить на это время, можно просто поставить галочку на против пункта «Я просмотрел и принимаю соглашение…». Затем нажать на кнопку «Далее».
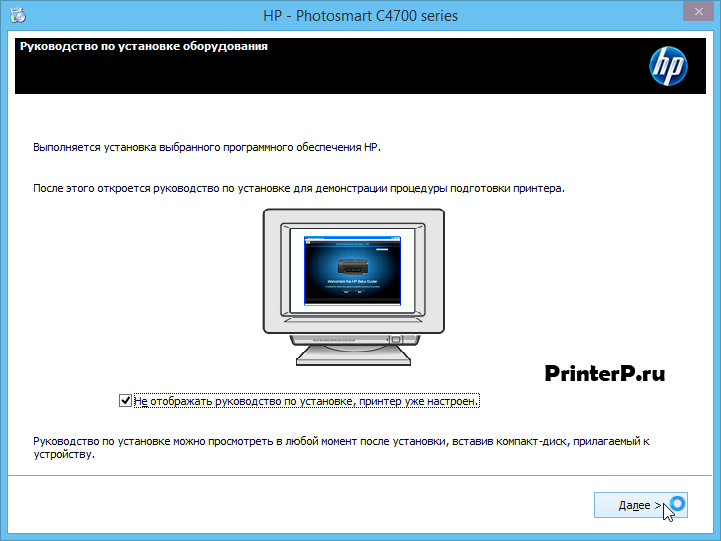
Следующее окно оповестит пользователя о том, что далее откроется окно просмотра руководства по настройке устройства. Следует отметить пункт «Не отображать руководство по установке» галочкой и кликнуть по кнопке «Далее».
В следующем поле, если принтер будет подключаться в локальную сеть по Wi-Fi, то следует выбрать пункт «Беспроводное сетевое подключение». Если же установка происходит в домашних условиях и неопытным пользователем, то рекомендуется выбрать пункт «непосредственное подключение с помощью кабеля USB». Затем нажать «Далее».

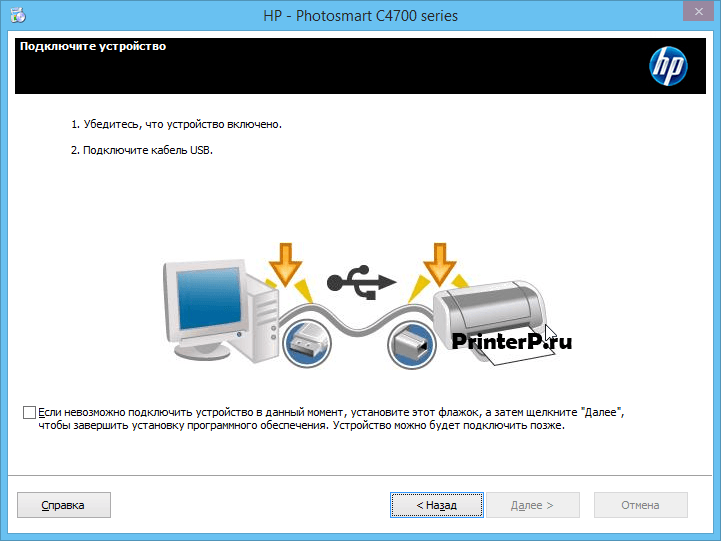
Теперь нужно подключить принтер к ПК usb-кабелем и включить его. Если по какой-то причине этого сделать нельзя, то рекомендуется пометить флажком специально разработанный для этого пункт и нажать на кнопку «Далее». Потом устройство можно будет подключить и принтер автоматически настроится.
Драйвера установлены. Теперь осталось отметить «Разместить ярлык на рабочий стол» галочкой, если ярлык нужен. Если не нужен – можно не помечать. Кликнуть по кнопке «Готово».

Принтер готов к работе. Приятного пользования!
Просим Вас оставить комментарий к этой статье, потому что нам нужно знать – помогла ли Вам статья. Спасибо большое!