
Все способы:
- Подготовка устройства и ПК
- Установка прошивок
- Способ 1: Download Only
- Способ 2: Firmware Upgrade
- Способ 3: Format All + Download
- Установка кастомного рекавери через SP Flash Tool
- Вопросы и ответы: 71
Аппаратная платформа MTK в качестве основы для построения современных смартфонов, планшетных компьютеров и других устройств получила очень широкое распространение. Вместе с разнообразием устройств, в жизнь пользователей пришла возможность выбора вариаций ОС Android – число доступных официальных и кастомных прошивок для популярных МТК-девайсов может достигать нескольких десятков! Для манипуляций с разделами памяти устройств Mediatek чаще всего используется SP Flash Tool — мощный и функциональный инструмент.
Несмотря на большое разнообразие MTK-устройств, процесс установки программного обеспечения через приложение SP FlashTool в целом одинаков и осуществляется в несколько шагов. Рассмотрим их подробно.
Все действия по прошивке устройств с помощью SP FlashTool, в том числе выполнение нижеизложенных инструкций, пользователь осуществляет на свой страх и риск! За возможное нарушение работоспособности аппарата администрация сайта и автор статьи ответственности не несут!
Подготовка устройства и ПК
Для того, чтобы процедура записи файлов-образов в разделы памяти устройств прошла беспроблемно, необходимо подготовиться соответствующим образом, проведя определенные манипуляции, как с Андроид-девайсом, так и с ПК или ноутбуком.
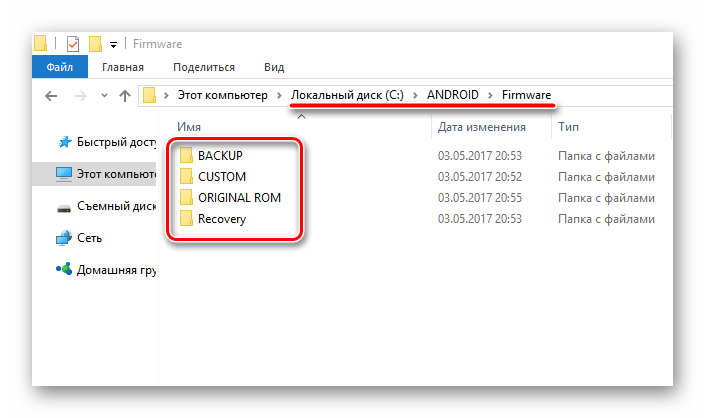
- Загружаем все необходимое, — прошивку, драйвера и само приложение. Распаковываем все архивы в отдельную папку, в идеальном варианте расположенную в корне диска С.
- Желательно, чтобы названия папок для расположения файлов приложения и прошивки не содержали русских букв и пробелов. Наименование может быть любым, но называть папки следует осознанно, чтобы впоследствии не запутаться, особенно если пользователь любит экспериментировать с различными видами ПО, загружаемого в аппарат.
- Устанавливаем драйвер. Этот пункт подготовки, а точнее его правильное выполнение во многом предопределяет беспроблемное протекание всего процесса. О том, как установить драйвер для MTK-решений, подробно рассказано в статье по ссылке ниже:
- Делаем бэкап системы. При любом исходе процедуры прошивки, пользователю практически во всех случаях придется восстанавливать собственную информацию, а в том случае, если что-то пойдет не так, данные, которые не были сохранены в резервной копии, будут безвозвратно утеряны. Поэтому крайне желательно выполнить шаги одного из способов создания бэкапа из статьи:
- Обеспечиваем бесперебойность подачи электроэнергии для ПК. В идеальном случае, компьютер, который будет использоваться для манипуляций через SP FlashTool должен быть полностью исправен и оснащен источником бесперебойного питания.

Урок: Установка драйверов для прошивки Android
Урок: Как сделать бэкап Android-устройства перед прошивкой
Установка прошивок
С помощью приложения SP FlashTool можно осуществлять практически все возможные операции с разделами памяти устройства. Установка прошивок – это основная функция и для ее выполнения в программе предусмотрено несколько режимов работы.
Способ 1: Download Only
Рассмотрим подробно процедуру загрузки ПО в Android-устройство при использовании одного из самых распространенных и часто используемых режимов прошивки через SP FlashTool — «Download Only».
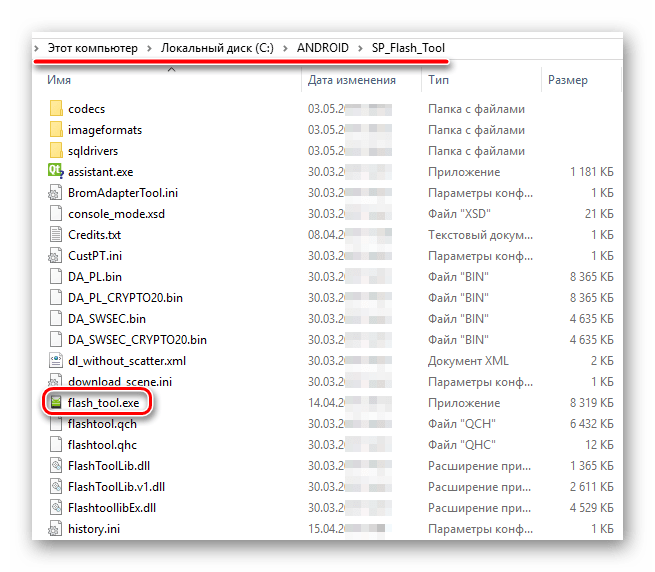
- Запускаем SP FlashTool. Программа не требует установки, поэтому для ее запуска просто дважды кликаем по файлу flash_tool.exe, расположенному в папке с приложением.
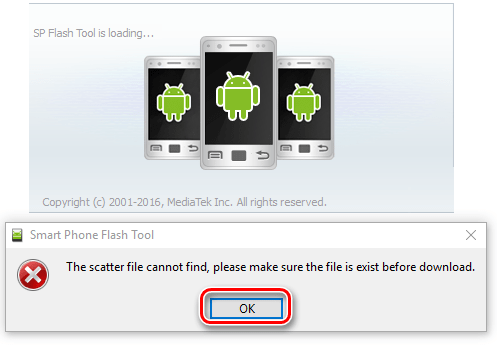
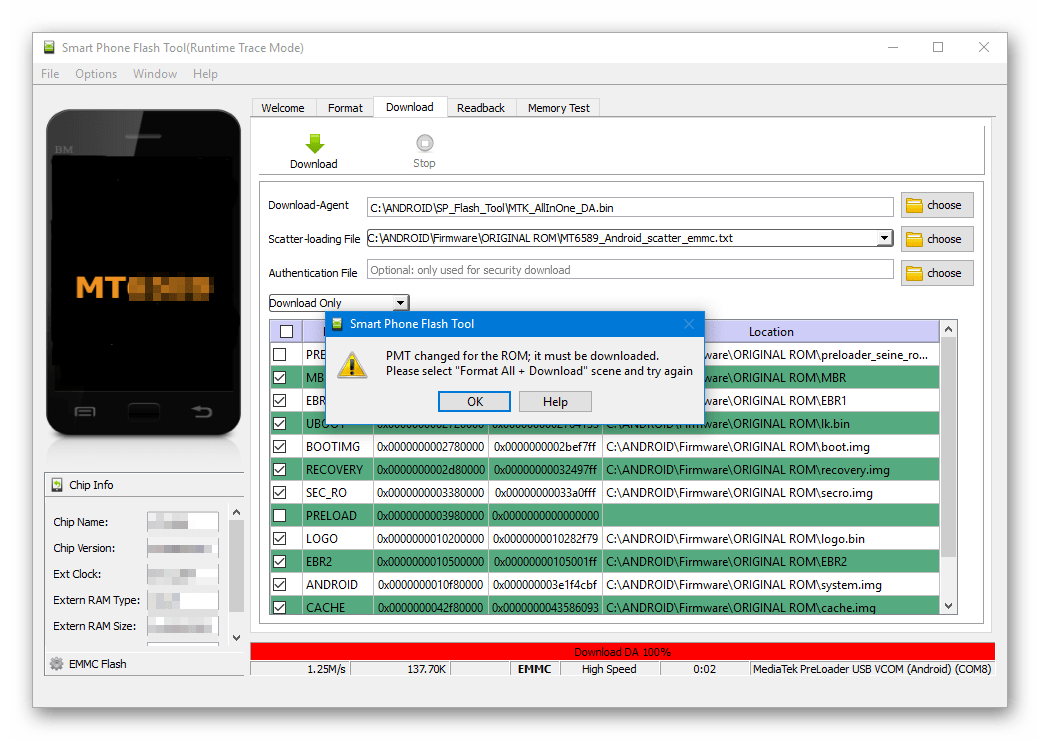
- При первом запуске программы, появляется окно с сообщением об ошибке. Этот момент не должен волновать пользователя. После того, как путь расположения необходимых файлов будет указан программе, ошибка больше не появится. Нажимаем кнопку «ОК».
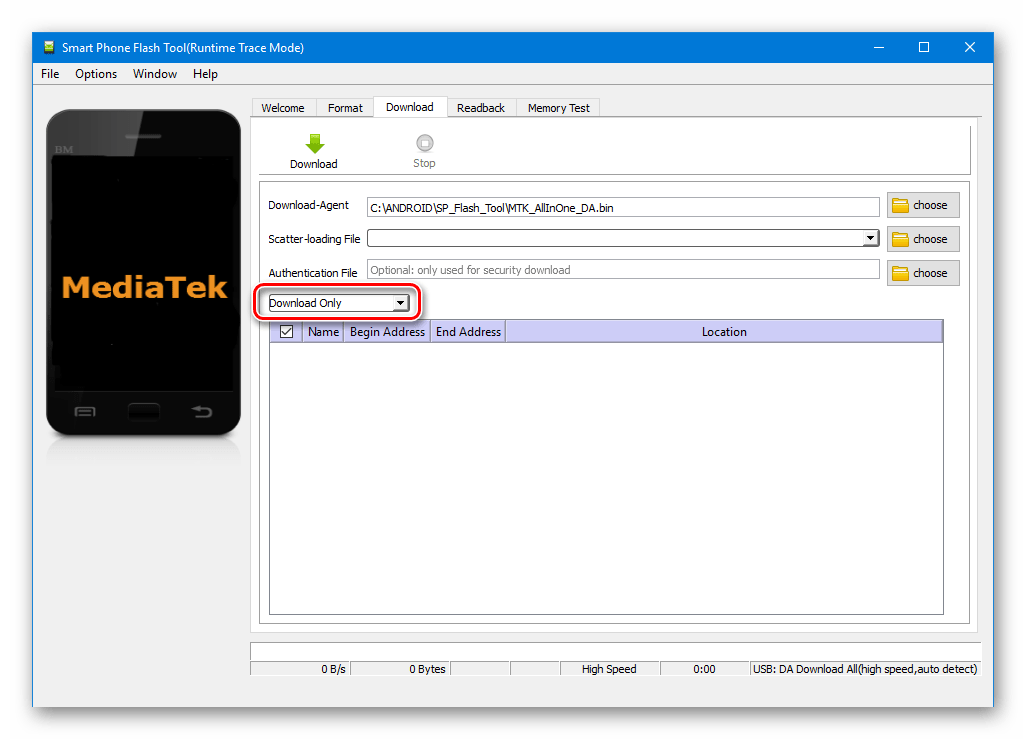
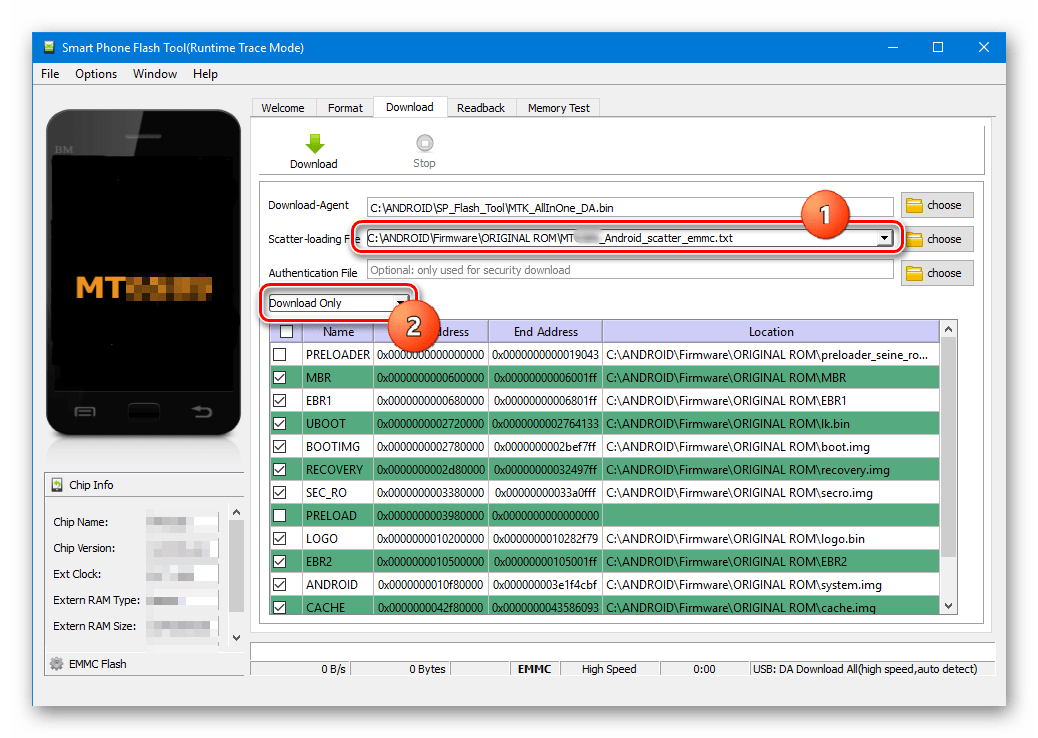
- В главном окне программы после запуска изначально выбран режим работы — «Download Only». Сразу же следует отметить, что данное решение применяется в большинстве ситуаций и является основным для практически всех прошивочных процедур. Отличия в работе при использовании других двух режимов будут описаны ниже. В общем случае оставляем «Download Only» без изменений.
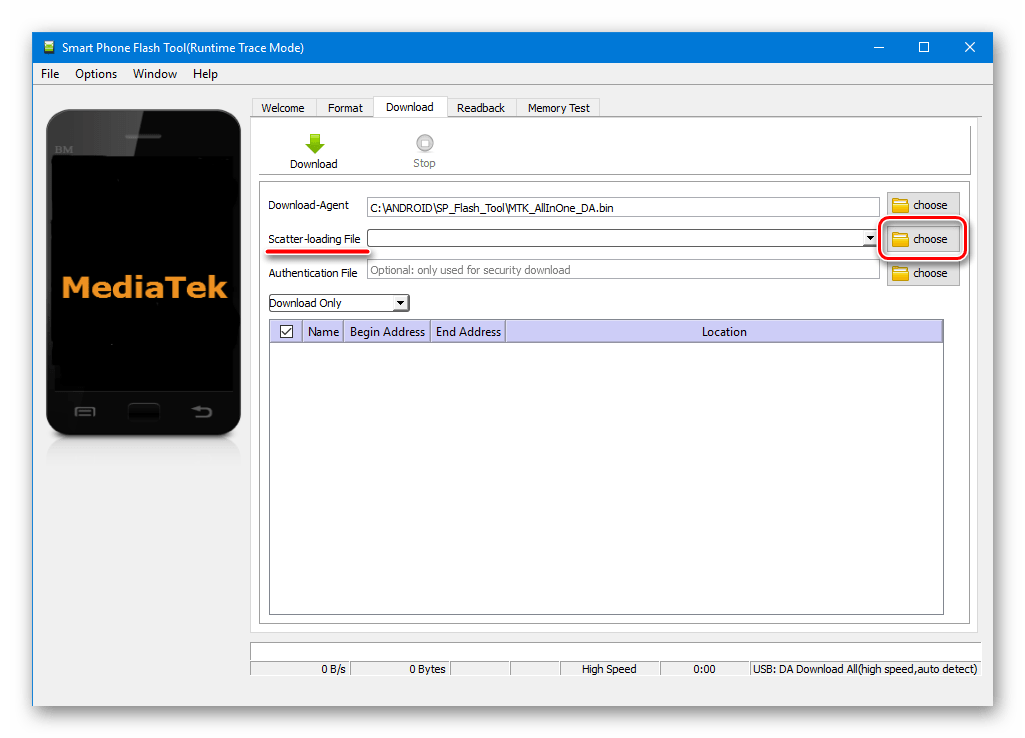
- Переходим к добавлению в программу файлов-образов для дальнейшей их записи в разделы памяти аппарата. Для некоторой автоматизации процесса в SP FlashTool используется специальный файл под названием Scatter. Этот файл является по своей сути перечнем всех разделов флеш-памяти устройства, а также адресов начальных и конечных блоков памяти Андроид-устройства для записи разделов. Чтобы добавить скаттер-файл в приложение нажимаем кнопку «choose», расположенную справа от поля «Scatter-loading file».
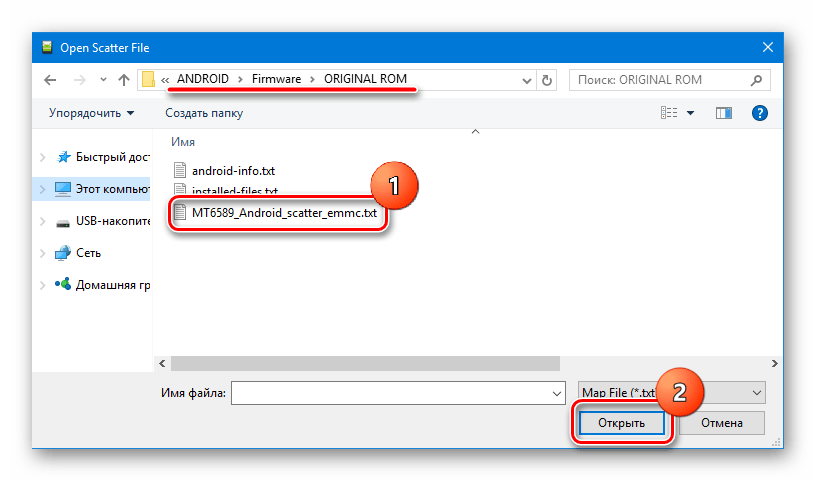
- После нажатия на кнопку выбора scatter-файла открывается окно Проводника, в котором необходимо указать путь к нужным данным. Скаттер-файл располагается в папке с распакованной прошивкой и имеет название MTxxxx_Android_scatter_yyyyy.txt, где xxxx – номер модели процессора устройства, для которого предназначены загружаемые в аппарат данные, а – yyyyy, тип памяти, используемый в девайсе. Выбираем скаттер и нажимаем кнопку «Открыть».
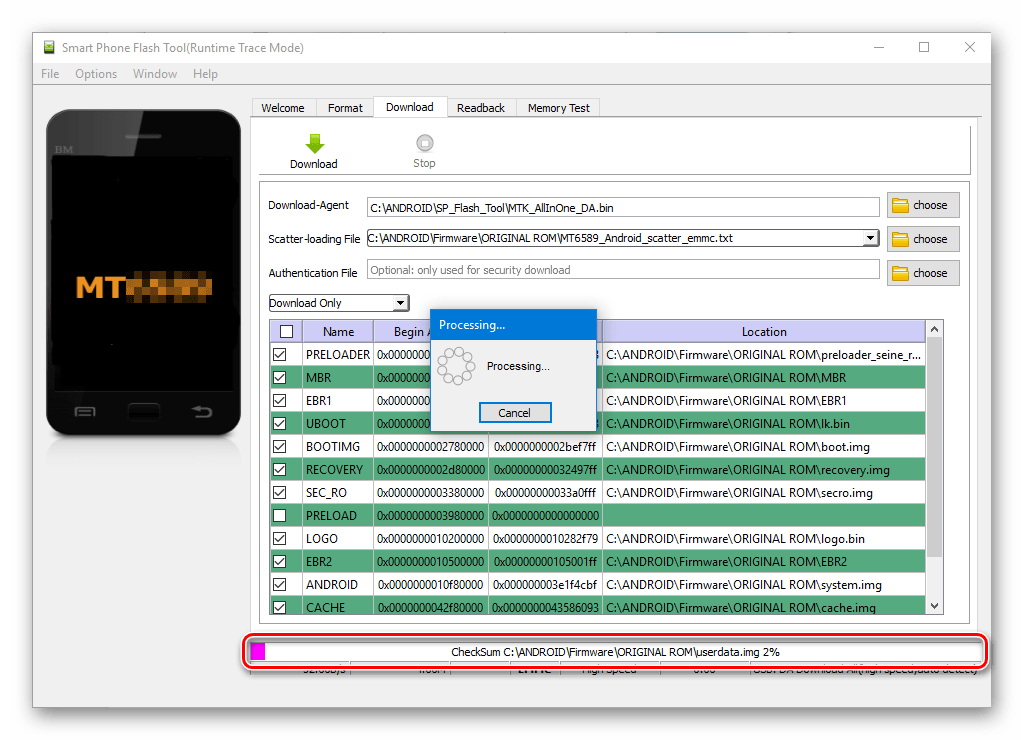
- Важно отметить, что в приложении SP FlashTool предусмотрена проверка хеш-сумм, призванная обезопасить Андроид-девайс от записи неверных или поврежденных файлов. При добавлении скаттер-файла в программу производится проверка файлов-образов, перечень которых содержится в загружаемом скаттере. Эту процедуру можно отменить в процессе проверки или отключить в настройках, но делать этого категорически не рекомендуется!
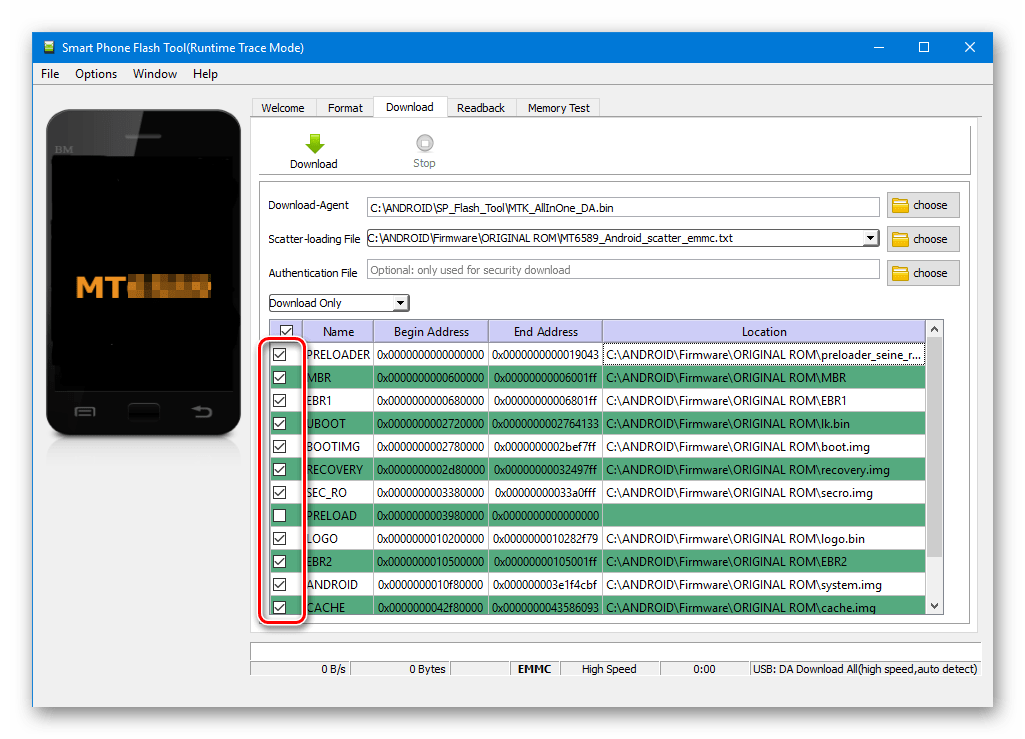
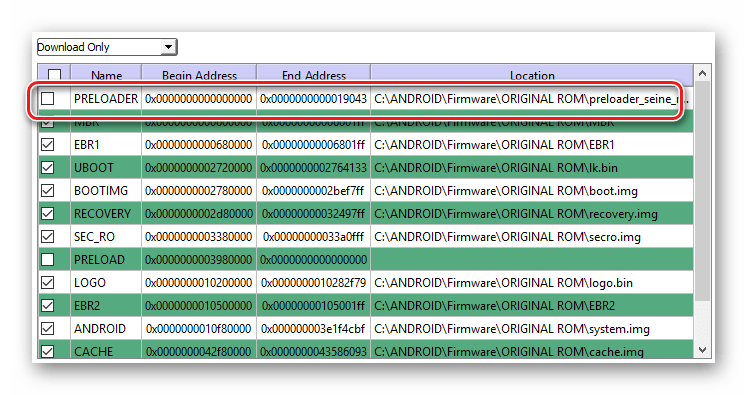
- После загрузки скаттер-файла, в автоматическом режиме добавились и компоненты прошивки. Об этом свидетельствуют заполненные поля «Name», «Begin Adress», «End Adress», «Location». Строки под заголовками содержат соответственно имя каждого раздела, начальный и конечный адреса блоков памяти для записи данных, а также путь, по которому расположены файлы-образы на диске ПК.
- Слева от наименований разделов памяти располагаются чек-боксы, позволяющие исключить или добавить определенные файл-образы, которые будут записаны в устройство.

В общем случае настоятельно рекомендуется снять галочку возле пункта с разделом «PRELOADER», это позволяет избежать очень многих проблем, особенно при использовании кастомных прошивок или файлов, полученных на сомнительных ресурсах, а также отсутствии полного бэкапа системы, созданного с помощью MTK Droid Tools.
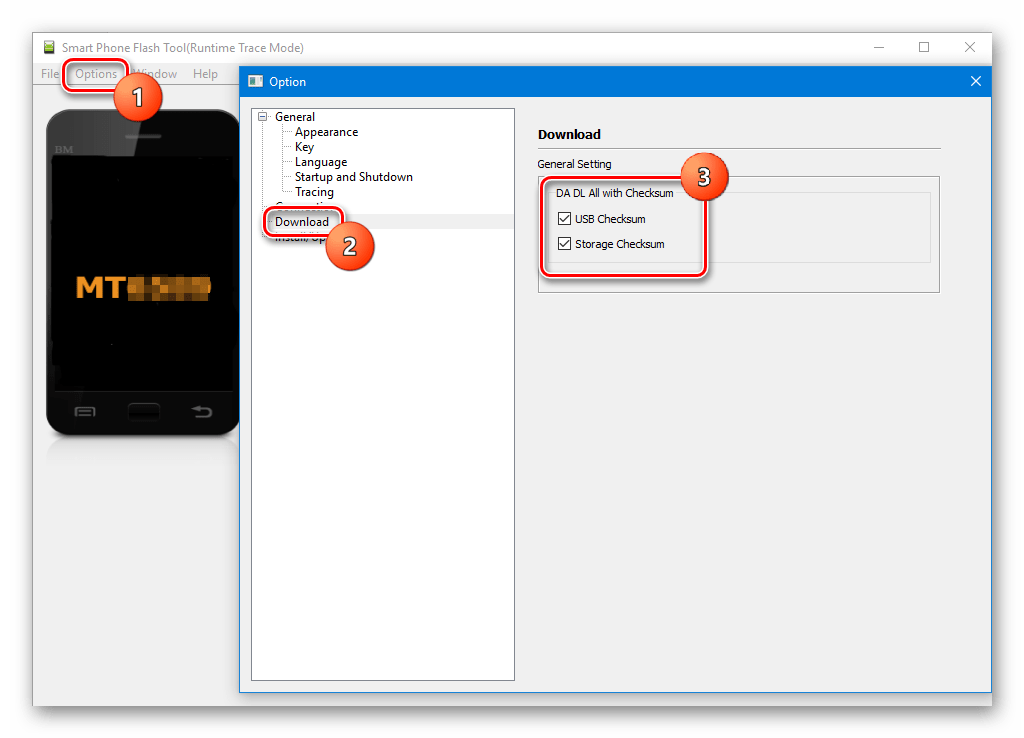
- Проверяем настройки программы. Нажимаем меню «Options» и в раскрывшемся окне переходим в раздел «Download». Отмечаем галочками пункты «USB Checksum» и «Storage Сhecksum» — это позволит проверить контрольные суммы файлов перед записью в устройство, а значит избежать прошивки испорченных образов.
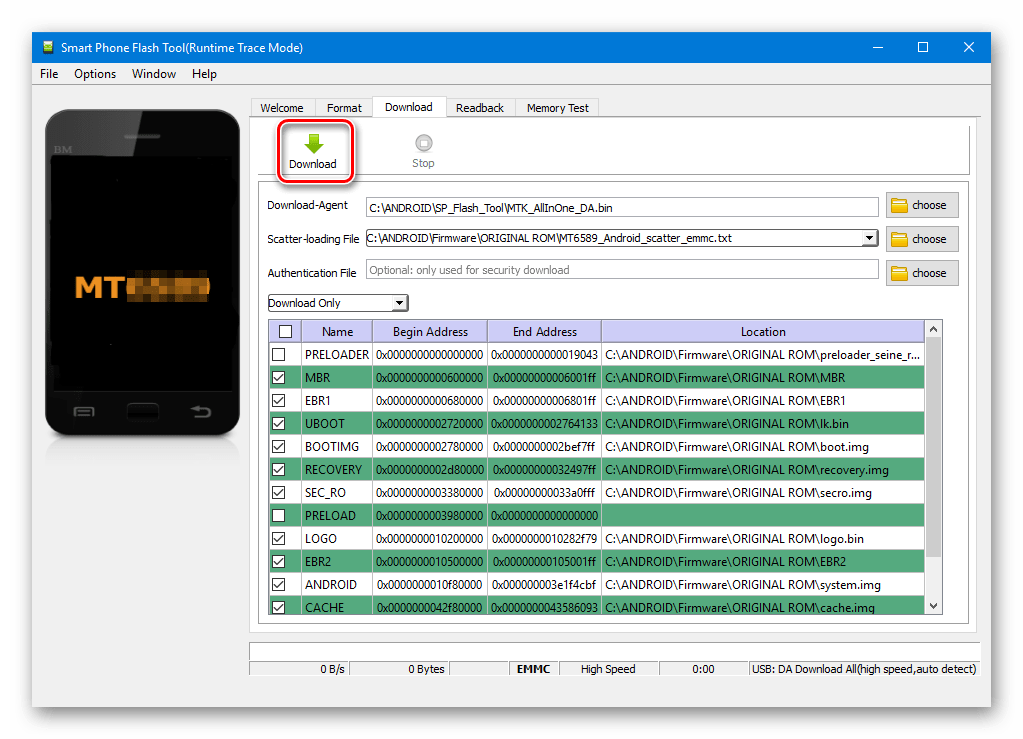
- После выполнения вышеперечисленных шагов переходим непосредственно к процедуре записи файлов-образов в соответствующие разделы памяти устройства. Проверяем, что устройство отключено от компьютера, выключаем полностью Андроид-девайс, вынимаем и вставляем обратно аккумулятор, если он съемный. Для перевода SP FlashTool в режим ожидания подключения аппарата для прошивки нажимаем кнопку «Download», обозначенную зеленой стрелкой, направленной вниз.
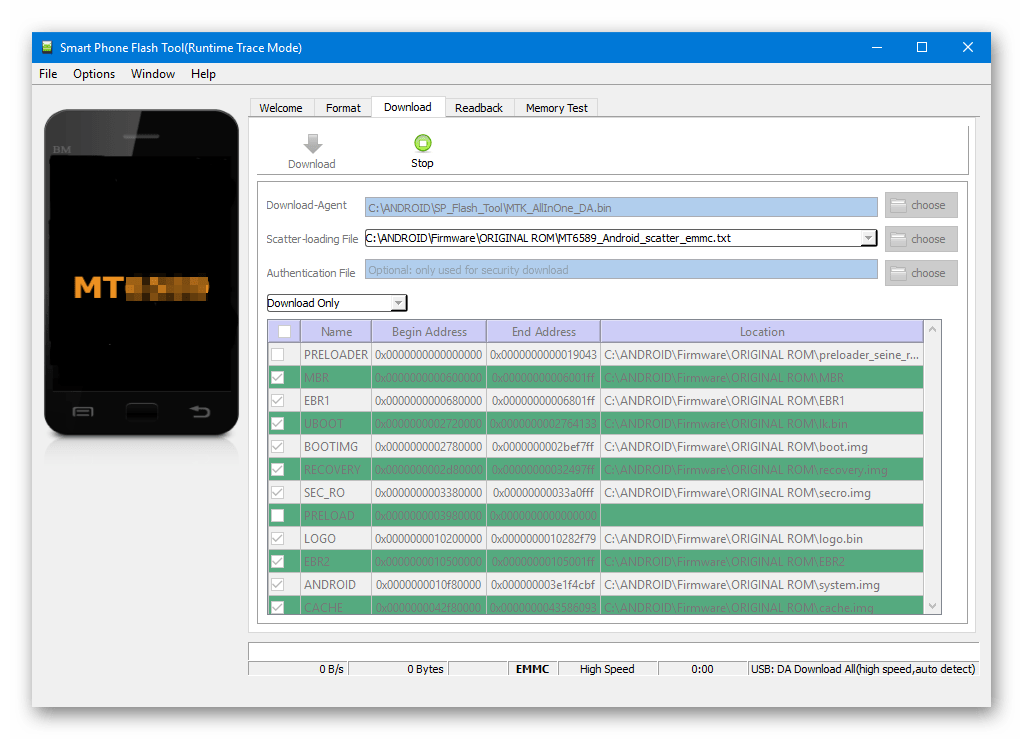
- В процессе ожидания подключения девайса, программа не дает возможности осуществлять какие либо действия. Доступна только кнопка «Stop», позволяющая прервать процедуру. Подключаем выключенный аппарат к USB-порту.
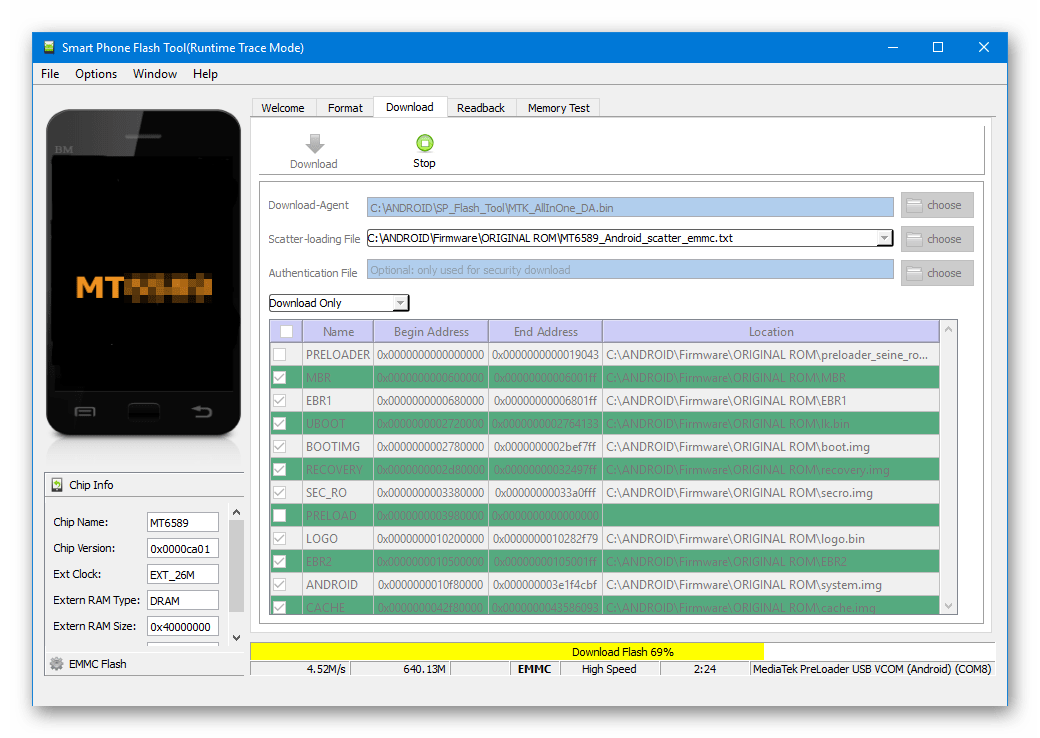
- После подключения устройства к ПК и его определения в системе начнется процесс прошивки аппарата, сопровождаемый заполнением индикатора выполнения, расположенного внизу окна.

В течение процедуры индикатор меняет свой цвет в зависимости от производимых программой действий. Для полного понимания происходящих во время прошивки процессов рассмотрим расшифровку цветов индикатора:
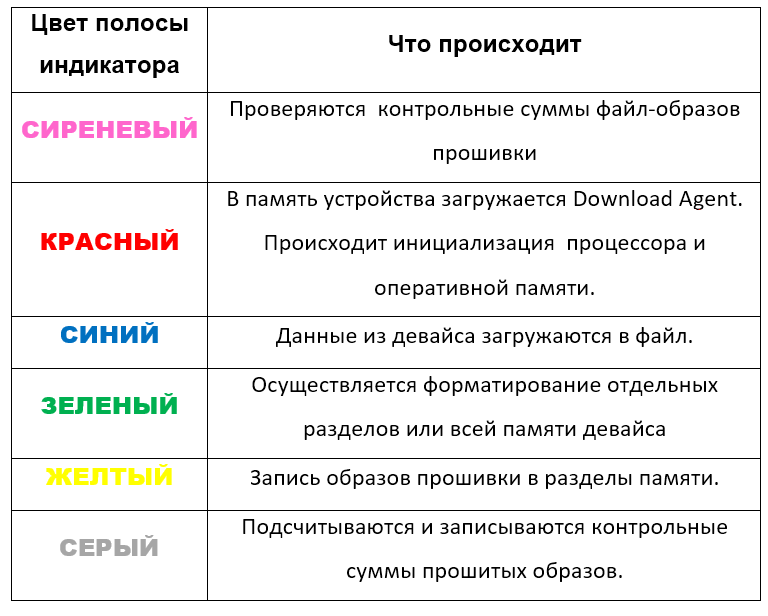
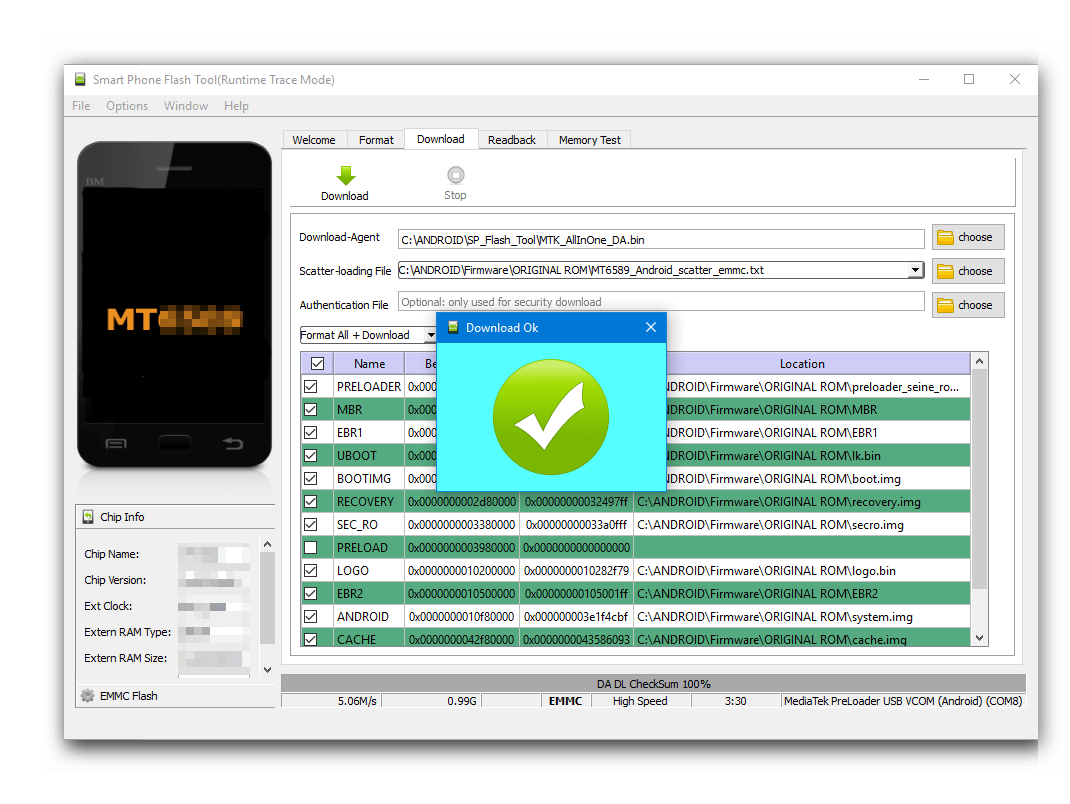
- После того, как программа выполнит все манипуляции, появляется окошко «Download OK», подтверждающее успешное завершение процесса. Отключаем девайс от ПК и запускаем его длительным нажатием клавиши «Питание». Обычно первый запуск Android после прошивки длится довольно долго, следует набраться терпения.
Внимание! Загрузка неверного скаттер-файла в SP Flash Tool и дальнейшая запись образов с использованием неправильной адресации разделов памяти может привести к повреждению устройства!

Способ 2: Firmware Upgrade
Процедура работы с MTK-устройствами под управлением Android в режиме «Firmware Upgrade» в целом аналогична вышеописанному методу «Download Only» и требует выполнения похожих действий от пользователя.
Отличием режимов является невозможность выбора отдельных образов для записи в варианте «Firmware Upgrade». Другими словами, в этом варианте память устройства будет перезаписана в полном соответствии с перечнем разделов, который содержится в скаттер-файле.
В большинстве случаев этот режим используется для обновления официальной прошивки в целом рабочего аппарата, если пользователю требуется новая версия ПО, а другие методы обновления не работают, либо неприменимы. Также может применяться при восстановлении девайсов после краха системы и в некоторых других случаях.
Внимание! Использование режима «Firmware Upgrade» предполагает полное форматирование памяти аппарата, следовательно, все данные пользователя в процессе будут уничтожены!
Процесс прошивки в режиме «Firmware Upgrade» после нажатия кнопки «Download» в SP FlashTool и подключения устройства к ПК состоит из следующих этапов:
- Создание резервной копии раздела NVRAM;
- Полное форматирование памяти девайса;
- Запись таблицы разделов памяти устройства (PMT);
- Восстановление раздела NVRAM из бэкапа;
- Запись всех разделов, файлы-образы которых содержатся в прошивке.
Действия пользователя для осуществления прошивки в режиме «Firmware Upgrade», повторяют предыдущий способ, за исключением отдельных пунктов.
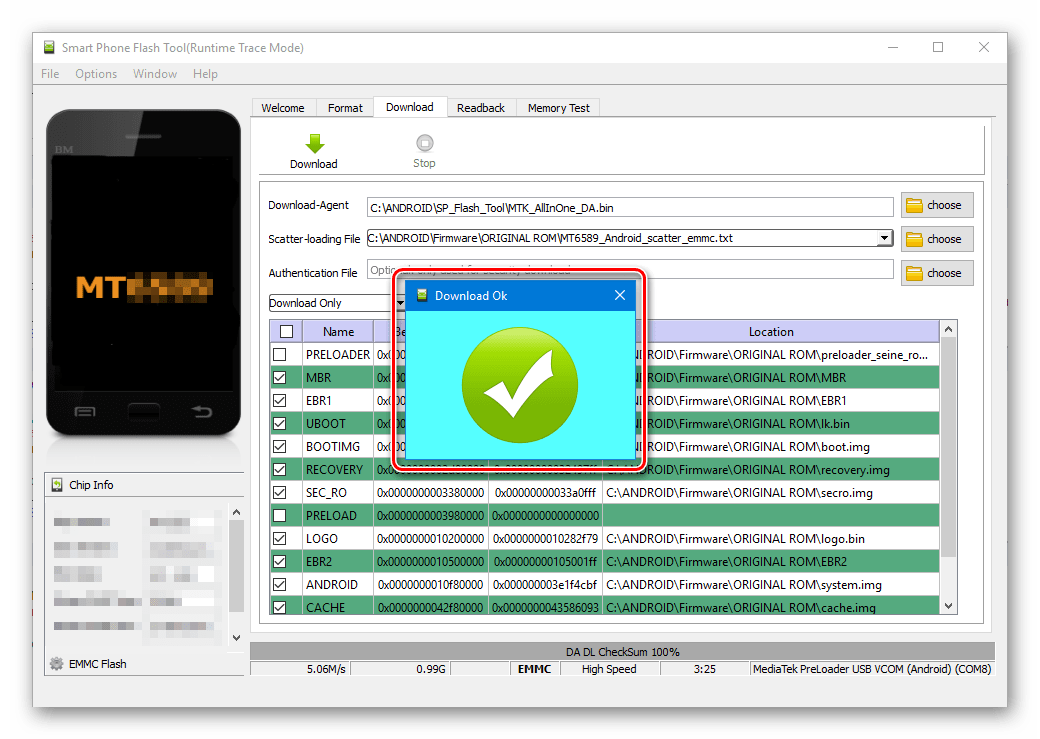
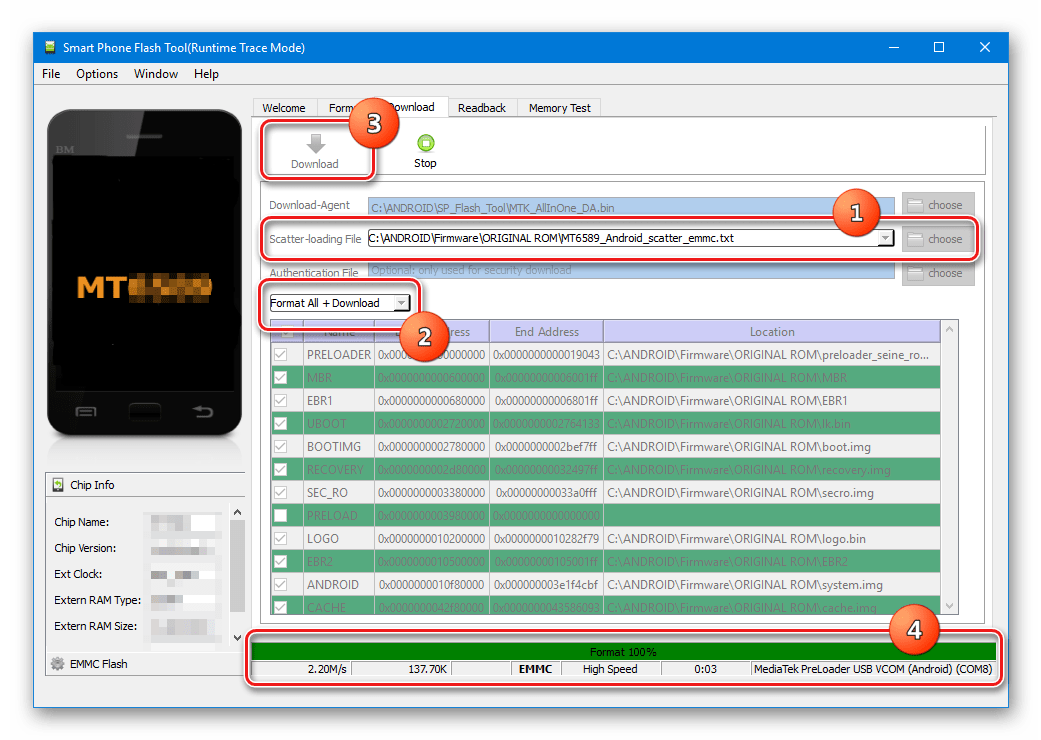
- Выбираем скаттер-файл (1), выбираем режим работы SP FlashTool в раскрывающемся перечне (2), нажимаем кнопку «Download» (3), затем подключаем выключенный аппарат к порту USB.
- По завершению процедуры, покажется окошко «Download OK».
Способ 3: Format All + Download
Режим «Format All+Download» в SP FlashTool предназначается для выполнения прошивки при восстановлении девайсов, а также используется в ситуациях, когда другие вышеописанные методы неприменимы либо не срабатывают.
Ситуации, в которых применяется «Format All+Download», многообразны. В качестве примера можно рассмотреть случай, когда в аппарате было установлено модифицированное ПО и/или выполнена переразметка памяти девайса на отличное от заводского решение, а затем понадобился переход на оригинальное ПО от производителя. В этом случае попытки записать оригинальные файлы завершаться ошибкой и программа SP FlashTool предложит использование аварийного режима в соответствующем окне-сообщении.
Этапов выполнения прошивки в рассматриваемом режиме всего три:
- Полное форматирование памяти аппарата;
- Запись таблицы разделов PMT;
- Запись всех разделов памяти устройства.
Внимание! При манипуляциях в режиме «Format All+Download» стирается раздел NVRAM, что приводит к удалению параметров сети, в частности, IMEI. Это сделает невозможным совершение звонков и подключение к сетям Wi-Fi после выполнения нижеизложенных инструкций! Восстановление раздела NVRAM при отсутствии бэкапа достаточно трудоемкая, хотя и возможная в большинстве случаев процедура!
Шаги, необходимые для проведения процедуры форматирования и записи разделов в режиме «Format All+Download» аналогичны таковым в вышеописанных методах для режимов «Download» и «Firmware Upgrade».
- Выбираем scatter-файл, определяем режим, нажимаем кнопку «Download».
- Подключаем устройство к USB-порту ПК и дожидаемся окончания процесса.
Установка кастомного рекавери через SP Flash Tool
На сегодняшний день широкое распространение получили так называемые кастомные прошивки, т.е. решения, созданные не производителем конкретного девайса, а сторонними разработчиками или рядовыми пользователями. Не углубляясь в преимущества и недостатки такого способа изменить и расширить функционал Андроид-девайса, стоит отметить, что для установки кастомов в большинстве случаев требуется наличие в аппарате модифицированной среды восстановления – TWRP Recovery либо CWM Recovery. Практически во все MTK-девайсы этот компонент системы можно установить с помощью SP FlashTool.
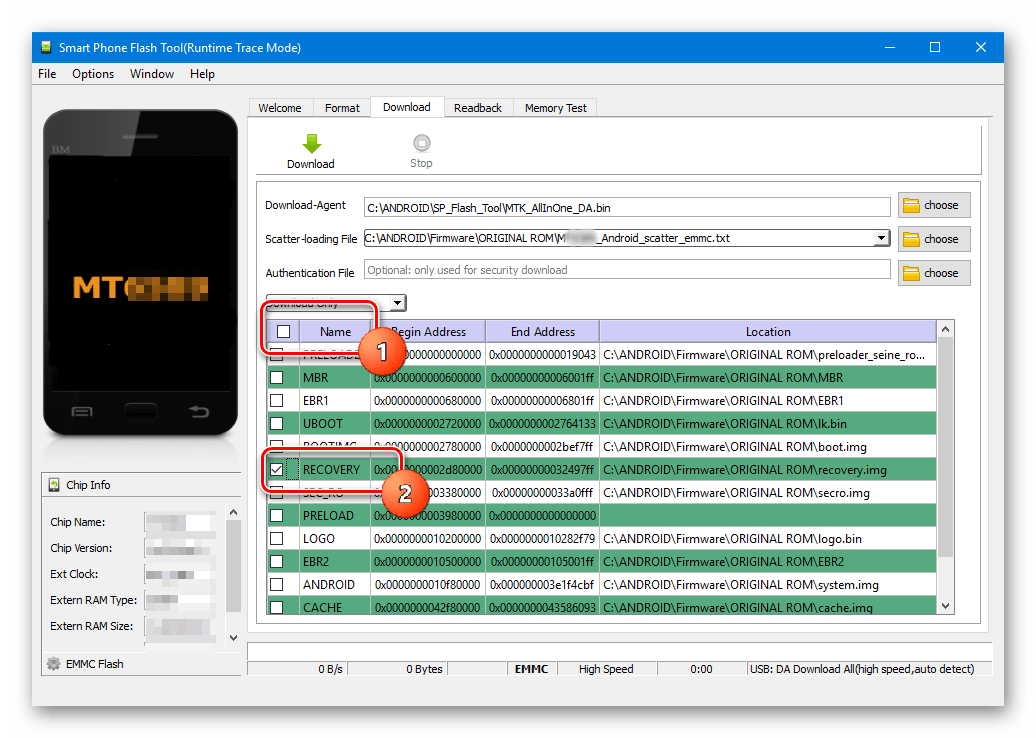
- Запускаем Флеш Тул, добавляем scatter-файл, выбираем «Download Only».
- С помощью чек-бокса в самом верху перечня разделов снимаем отметки со всех файлов-образов. Устанавливаем галочку только возле раздела «RECOVERY».
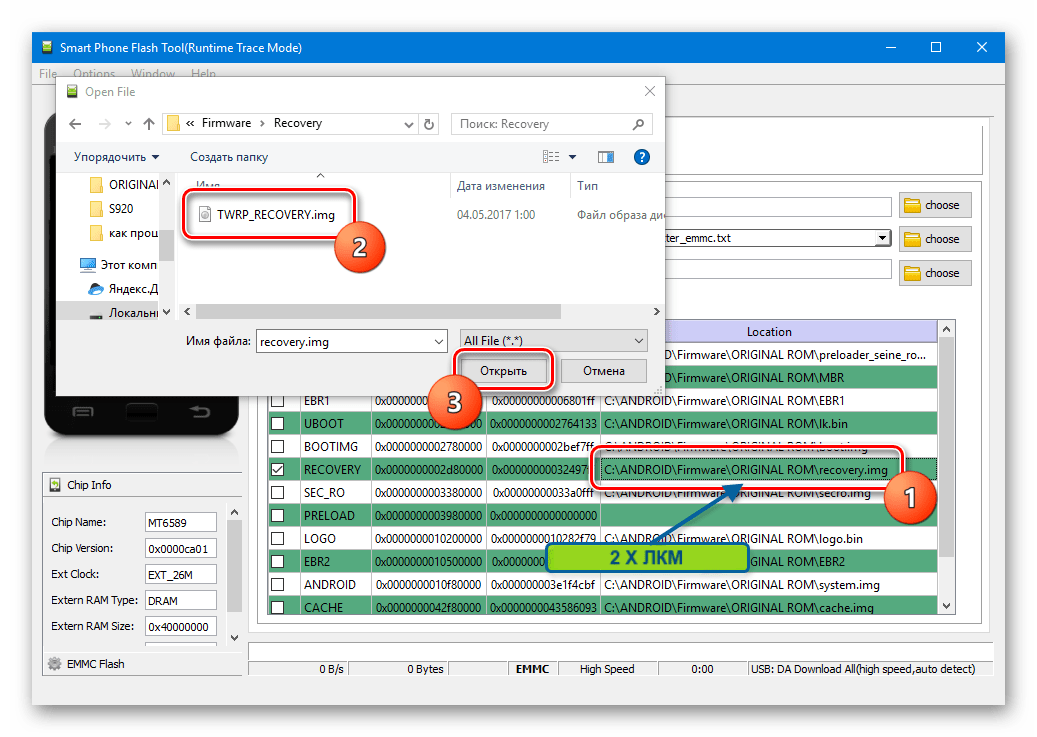
- Далее необходимо указать программе путь к файлу-образу кастомного рекавери. Для этого совершаем двойной клик по пути, прописанному в разделе «Location», и в открывшемся окне Проводника находим необходимый файл *.img. Нажимаем кнопку «Открыть».
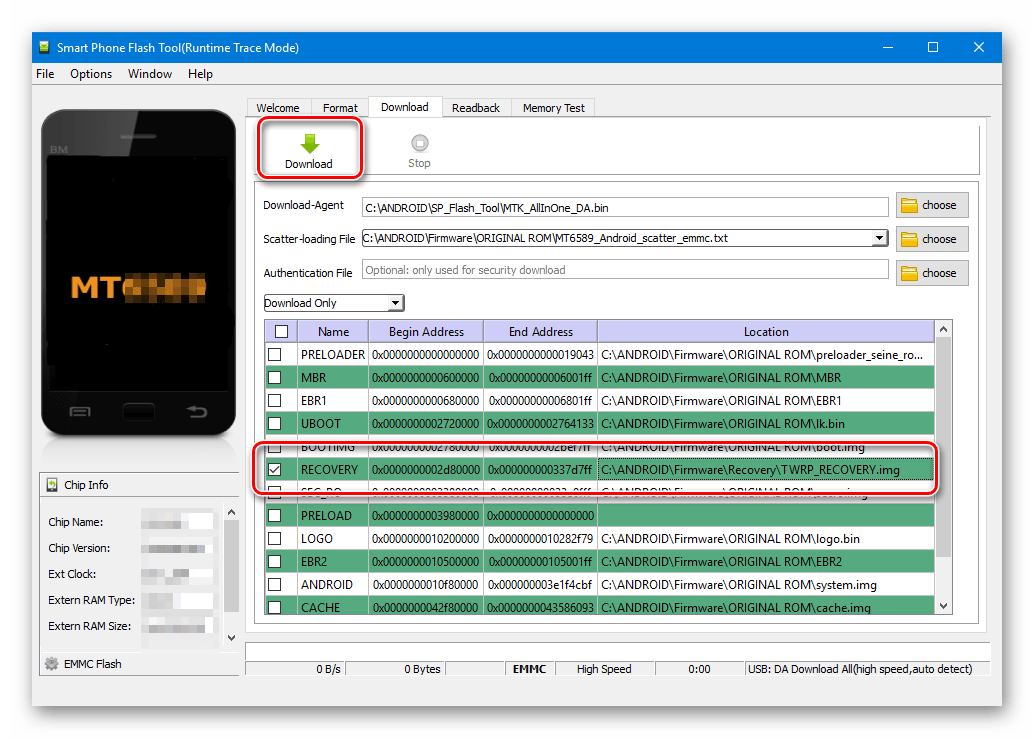
- Результатом вышеописанных манипуляций должно стать нечто похожее на скриншот ниже. Галочкой отмечен исключительно раздел «RECOVERY» в поле «Location» указан путь и сам файл-образ рекавери. Нажимаем кнопку «Download».
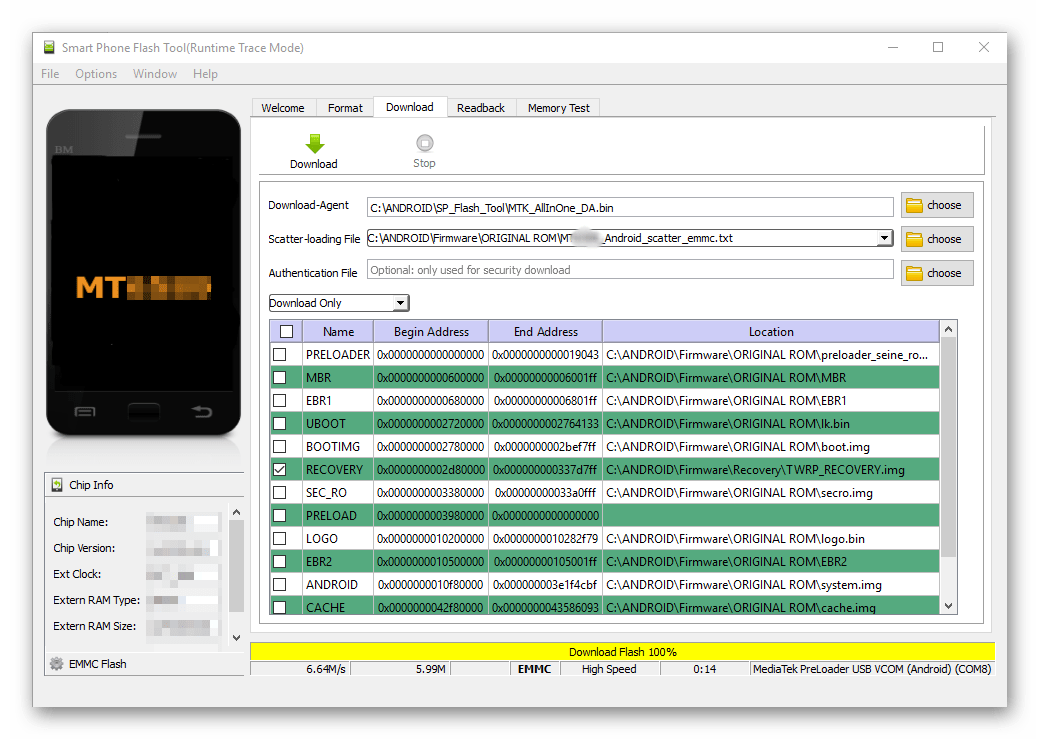
- Подключаем выключенный девайс к ПК и наблюдаем за процессом прошивки рекавери в устройство. Все происходит очень быстро.
- По окончанию процесса снова видим уже знакомое по предыдущим манипуляциям окошко «Download OK». Можно перезагружаться в модифицированную среду восстановления.
Стоит отметить, что рассматриваемый способ установки рекавери через SP FlashTool не претендует на роль абсолютно универсального решения. В отдельных случаях при загрузке образа среды восстановления в аппарат могут потребоваться дополнительные действия, в частности, редактирование scatter-файла и другие манипуляции.
Как видим, процесс прошивки MTK-девайсов на Android с помощью приложения SP Flash Tool — процедура не сложная, но требующая должной подготовки и взвешенности действий. Делаем все спокойно и обдумываем каждый шаг – успех обеспечен!
Пошаговая инструкция
Запускаешь SP_Flash_Tool. Закладка File, open Scatter-loading file. Там есть маленький файлик: MT6577_Android_scatter_emmc.txt. Открываешь его и у тебя появиться внизу программы список с галочками. Две верхние галочки: PRELOADER и DSP_BL советую снять.
После всего этого нужно подключать выключенный телефон. Должен быть слышан звук подключенного устройства. Если ничего не происходит то проверьте чтобы была нажата кнопочка «Download». Начнётся установка драйверов (если это первый раз). Должная быть разрешена установка неподписанных драйверов на винде (Перезагрузить компьютер с F8 и «разрешить установку неподписанных драйверов»). Если драйвера не успели встать, отключаешь разьем, снимаешь батарею, ставишь батарею, подключаешь разьем и так пока не встанут драйвера. Прошивка начинается автоматом. Если прошивка завершилась удачно в конце выскочит зеленый бублик.
Если восстановление было сделано без блоков cache и userdata, то может возникнуть необходимость сделать сброс на заводские настройки, через реакавери.
НУЖНО СКАЧАТЬ ДРАЙВЕРА, на usb и засунуть в папку drivers в папке с sp ft
или создать эту папку, дрова качаем с всемирной паутины
Информация взята с 4PDA
This is a step-by-step tutorial on how to flash a firmware or stock ROM to a Mediatek device using Smart Phone Flash tool. SP Flash tool is one application you could find very useful in fixing extreme cases of a bricked MTK Android (e.g Samsung, Xiaomi, Oppo, Vivo, Tecno, Gionee, Infinix, Opsson, Innjoo etc) like the phone not coming on at all or not booting into recovery mode etc. This tool will only work on Mediatek (MTK) devices.
Follow the steps below to learn how to flash stock ROM using Smart Phone Flash Tool (SP Flash Tool)
Now, You might have noticed that when trying to flash using SP Flash tool, the SP Flash tool might just remain at 0%, no flashing, nothing happening. That’s because You don’t have the VCOM drivers. Now, there’s already a video on that (I already created a video on that) so You can check the video tutorial but just to make it clearer for everybody, I’ll be going through the process of installing the VCOM drivers all over again in this tutorial so You get it from start to finish.
Now, You’ll also need the VCOM drivers so just check the description of this tutorial, You should get the download link or You go to our website [Alarm Clock] Search for how to use SP Flash tool. You should find the written version of this video tutorial and You can get the links to all these software You’ll be needing. Of course You’ll need the files You’ll be flashing which is my stock backup In this case I’m using an old OS Tecno M3. Now, I also have my Tecno M3 here with me and I’ve bricked this phone just for the purpose of this tutorial so I’ll be flashing the files to this my Tecno M3 here and I have my USB cord right here so these are the things you’ll basically need for this tutorial.
Now, I’ll briefly touch the content of the stock backup. Now, this as You see here is not the complete backup; this is just a «Files to Flash». This is just a collection of the essential files You’ll be needing for SP Flash tool. Now, most people tend to think all You need for SP Flash tool is Your scatter file. The scatter file here is just like a map, its a key. Its what tells SP Flash tool the partition table of Your phone and tells it where to flash what file. Its just a key so You can’t exactly use SP Flash tool with Your scatter file only.
Scatter file is just one out of the several components You would need but the scatter file is a very important one, it acts as your key to using SP Flash tool so that’s a scatter file there. Also, You would have to have the file you wish to flash. In a case You need to flash just one file, You’ll need Your scatter file and just that one file. In a case You need to flash many files, You’ll need scatter file and all the files You need (to flash). So basically Your scatter file is just like the key to flash and
You need other files which scatter file will be helping You to flash. Since we have all these, I’ll proceed. Now, the first thing You’ll want to do (of course) as I promised You, I will take You through the installation of Your VCOM driver. I already have my VCOM driver extracted. Alright! This is my USB [Alarm Clock] VCOM driver here Alright! Now, if You look here, all I have is Windows 7 and I’m using a Windows 8 PC but since Windows 7 and Windows 8 are very close in driver usage (or in the drivers You’ll need), I can safely install my Windows 7 drivers on my Windows 8.
So, we have the drivers ready. Now, the first thing You would want to do before You talk about using SP Flash tool at all is to install the drivers. Now, for SP Flash tool, You don’t need an internet connection so don’t worry about an internet connection. Everything can be done offline. Installing the drivers, the first thing You’ll want to do is open Device Manager so I’ll search for Device Manager here Alright! Here’s my Device Manager.
Now, what we’re basically going to be doing here is we’re going to be manually installing this VCOM driver. There’s an automatic method of installing where You use an installer but You’re going to be manually installing it just in case You don’t have access to the automatic installer. So, the first thing You’ll want to do here is to just click anything, just click any item on the list, any item at all on the list. Once You click an item, You go to Action, then Add Legacy Hardware. From here, a Wizard will popup. From here, You click Next. Now, before You proceed at this point (lest I forget), If You’re using a Windows 8 (and above) PC. Its very important You disable driver signature verification.
Now, there’s a video on that, I created a (YouTube) video on that. You can also check our website for how to disable Windows driver signature verification because If You don’t disable that, You will not be able to install an unsigned driver. Now, this driver I’m trying to install is unsigned. It doesn’t mean its not going to work It doesn’t mean its dangerous or something, its just not signed. You understand? So basically, Windows 8 (and 10) just believes that any unsigned driver must be unsafe so it doesn’t allow You to go ahead to install that. So You need to first disable signature verification If You’re using Windows 8 before You proceed with this.
Check my list of previously uploaded video tutorials or You go to our website for how to disable signature verification on Your Windows 8 (and 10). So, from here, You click «Install the hardware that I manually select from a list…» then Next You just click Next here. Now, at this point, You click «Have Disk..» Now, here I’m going to chose the driver I wish to install so I just go straight to my Hovatek folder My VCOM drivers. USB VCOM (don’t forget), Windows 7. Since I now have Windows 8, Windows 8 & 7 are close as I earlier mentioned so I can use Windows 7. Now, my PC is a 64 bit PC so I just select 64 bit.
Now, for those who don’t know how to check if theirs is 32 or 64 bit, quickly just go to My Computer, right-click on it, click on Properties and You’ll see Yours PC. Mine is the system type 64 bit, here it is. So that’s how you just check it. Right click on My Computer — Properties and that is it. Alright, lets proceed with the installation of the driver So from here, I’ve loaded the driver I wish to select (let me do that again just in case You’ve forgotten) Go straight to where the folder is, You select that for your PC (mine is 64 bit). If Yours is 32 bit, select this instead. Mine is 64 bit, I select and then (click) Open and then (click) OK.
Now, this is the warning I earlier mentioned, «This driver is not digitally signed». This is nothing to worry about. You just [Plane Overhead] have to proceed and then You click Next..and Next so we’re installing this. [Plane Overhead] Now, this is finished. Now, If (after the installation), that’s assuming You disabled the [Plane Overhead] signature verification and You were able to get to this stage, You’ll get this «This device cannot start (code 10)». Most people tend to panic at this point. This is really nothing to panic about. Now, the reason why You’re getting this code 10 basically is because You installed an unsigned driver.
Now, when You install an unsigned driver in Windows 8 (and 10), Windows tends to assume it might not work. Now, notice my language [Car Horn]. I said it might not work, doesn’t mean it will not work. It might not work because its unsigned. So the only reason why You’re getting this error is because the driver You’ve installed is unsigned. That doesn’t mean its not going to work and I can guarantee You that its most likely going to work as far as You installed the correct drivers which it is in this case. So despite the fact that I’m getting my device cannot start code 10 error is nothing to worry about.
Its just because the driver is unsigned so I just click Finish. So my driver is installed. Now, to crosscheck if my driver is installed (still under my Device Manager), I scroll down and I see my Mediatek DA USB VCOM Port and my Mediatek Preloader USB VCOM so Yes, I have it installed. Now, this yellow triangle is related to the code 10 error I earlier mentioned. Its nothing to worry about. Its just because its unsigned, that is all it is. This is for Spreadtrum here but we’re basically focusing on the MTK which are these here. So my VCOM drivers are installed and I am good to go.
Now, Straight to SP Flash tool. Now, I’ll be using SP Flash tool version 3 first so I’ll open the version 3 folder. Now, what You would want to do to use this is You right-click on Sp flash tool and You run as Administrator. Now, the reason why I’m running as Admin (click Yes to confirm) is just to avoid permission issues. When using SP Flash tool. Sometimes, If You’re not running as Admin, You might not be able to run certain files or use certain system resources, You know? things like that basically but You should be able to use it i normal mode if You’re not the Admin but if You can run as Admin, its just better You run as Admin.
So now, in SP Flash tool, there’s basically no setting You would need to run What You just need to do is to load Your scatter file. I’m using version 3 first, I’ll repeat the same procedure for version 5 so I click on Scatter-loading Now, in this Window that pops up, what You’ll want to do is to go to where You have Your files which You want to flash. Now, remember mine is the stock backup for this. So I select my scatter file here and I click Open. Now, I’m getting error initializing scatter file failed Please, check the name of scatter file which you load is legal.
Now, the reason why I’m getting this error is because the version of SP Flash tool I’m using is too low For the kind of backup I have, You understand? So for me to be able to use SP Flash tool, I need to use v5 That’s what this is telling me. So basically, I cannot use v3 to flash this phone which I’m using, I have to move to v5. but I still want to show You what version 3 is going to look like so let me just look for another file which v3 should be able to at least list for You even if You’re not flashing. I need You to at least see a list.
Tecno D3 should be able to at least have. Alright! this is basically what v3 is going to look like that is if its going to be compatible with Your phone. Its going to be the same thing as us using v5 just take note of where the following things are. Format, Firmware Upgrade, Download Those are just the basic things You need to take note of. I’ll explain these things in v5 but its basically the same thing. There’s also Read back for you to backup a phone but is beyond the scope of this (guide). There’s a (YouTube) video on how to backup a working phone using SP Flash tool
You can checkout the video or tutorial on our website but basically, this is what Your v3 is going to look like. Now, You would see this part in red. Your Preloader & DSP_BL. The reason why the two are in red is just like a warning. Its more like telling You «Do not flash these files unless You really need to or unless You’re really sure of what You’re doing». As I earlier mentioned, preloader.bin and dsp_bl are basically Your preloader files. They help Your phone to show a sign of life. If You really Do not need to flash these files Do not flash them.
If Your phone is totally dead then You can go ahead to flash them (i.e has no sign of life) but if it has a sign of life (i.e can respond to power button), do not flash preloader.bin unless You’d flashed a wrong one mistakenly or something. Just do not flash this at will. You’ll see that the rest are ticked. We have uboot, boot, recovery and the rest. You’ll see that some are ticked and some are not ticked. like this (cache) is not ticked. Now, the reason why some would be ticked and some would not be ticked is because they’re not present in that particular stock backup which You have So what that basically means is that if You load a scatter file from a folder containing Your stock rom and a particular file is not there in that same directory where the scatter file is, it will not appear here.
When I load this scatter file here, the only files its going to see are all these files here. Any that is outside this folder, this scatter file will not see it in SP Flash tool. That explains why cache is not ticked because if cache was in the same folder as the scatter file was, it would also be ticked as all these others are ticked but because its not ticked, that means its not present there. Of course, there’s a way for You to manually load a file. In a case where its not appearing here for one reason or the other. Maybe its in a different location or somehow its just not loading. There’s a way You can manually load a file. Now, for You to manually load a file, I’ll assume my boot.img was not ticked for example and we’re using (Tecno) D3 in this case.
For me to manually load my boot.img All I have to do is just tick bootimg (assuming it wasn’t ticked when I loaded the scatter file) All You have to do is just tick the item that was not automatically loaded then double-click it. Now, I need to make You see something. If You look at cache here, You’ll see that cache is not ticked. This front part is empty. That shows You that there’s no file linked to Your cache But because boot has a file linked to it, You see this. So I’m going to assume that boot.img is also empty as cache. So for You to manually load it, You tick the item that was not automatically loaded then You double-click the name.
For v3, that’s how You manually load. but for v5, this is where You click. For v5, You click here, this field here (just in case I forget to mention that in v5) For v3, You double-click the name. So I’ll double-click the name of boot.img, select and (click) Open Automatically, a path is going to appear here. That means my bot is now loaded So that’s basically how to manually load a file. Once You have Your files loaded and You’re ready to go All You have to do is just click Your Download or Firmware Upgrade (whichever one You’re doing) Now, when You click Download, You use Download when You’re flashing not all the files, just a selection of them, not everything You understand? If I’m going to flash these now, I’ll need to use Download I cannot use Firmware Upgrade because Download allows me to flash files when everything is not selected but Firmware Upgrade requires that everything on that list is selected.
Now, there’s a way You can actually modify Your scatter file to make everything get selected but I’ll not be going through that. You can just Google how to or just go to our website Search for how to modify a scatter file and You can see a guide on that. There’s also a (YouTube) video on that You can check our channel for a video on how to modify a scatter file. So, I will not be going through that. For You to use firmware upgrade, everything here has to be ticked When everything here is ticked and they all have files attached to them, You can go ahead with Firmware Upgrade but because not everything is ticked, all I can use is a Download I will not be using v3 (to flash) because I don’t have a Tecno D3 here, what I have is an M3.
Lest I forget, its very important You do not flash files for one phone model to another You don’t flash Tecno D3 files to an M3 just because they (both) have 3 in the names. As far as its not D3, You have no business flashing the files.. unless they’re very very close. Basically, If You’re not sure how close they are chipset-wise, avoid it to be on a safe side I’ll not be using version 3, I’ll close v3. [Car Horn]. So basically, You already have an idea of how v3 work I click my Download or my Firmware Upgrade depending on which You’re going to be using and then once I click my Download, it will give me this message Not all images are correctly loaded which may cause boot up issue! Do you still want to go on downloading anyway? You click Yes, its nothing to worry about since You’re not downloading all files, its just warning You that You might not have some essential files which You might need so do You still want to proceed? Of course You want to proceed.
So at this point, Stop is going to be in red and every other thing grayed out. So what You need to do now is to just remove the battery from your phone and slot it back in (just power off if inbuilt) without booting the phone. You then connect the phone to the PC via Your USB cord. Once You connect via USB cord, flashing should begin. That is v3 but I will not be using that here because v3 doesn’t support the M3 which I have here. I’ll be using v5 for that very tutorial. So, that’ll be that for v3. I’ll click Stop Alright! Now, version 5. This is what I’ll be using to flash. I’ll run as Administrator
Now, one thing You should know about version 5 is that it could take some time to load [Error: Initializing scatter file failed] Don’t worry about this, its just a normal error, at least at the initial stage. v5 takes some time to load so its very important You be patient with it. Now, one thing about SP Flash tool is that You do not interrupt it. Once its starts flashing its best You leave it till it finishes the flashing. If You interrupt it in the middle of flashing or read back The phone is just going to go dead as in totally dead. No lights, no power, zero! dead! Now, when that happens (if You accidentally interrupt SP Flash tool), its nothing to panic about.
What You basically need to do is take out the battery and slot it back in and keep charging the phone If the battery is non-removable, just connect the phone to a power source and keep charging just keep charging. The phone will eventually come up. Alright! So we’ll be using v5 of Sp Flash tool. I’ll just quickly take You through what v5 really does [Alarm Clock], the functions You have in v5 and how to use them to flash your phone. OK. in version 5, The first thing You would want to do is to load the scatter file so I click Scatter-loading.
Locate the stock backup, select the scatter file and then (click) Open. Alright! So You can see that not all items are ticked. I have my cache and userdata not ticked. Now, I already explained the reason why they’re not ticked; besides, these two files are very optional files so the phone will work fine whether or not You flash them so You don’t really need to flash them. What you basically need to do at this point is to decide whether You want to format first or download or You want to do a Firmware Upgrade. I already mentioned You do not flash preloader at any point If You don’t need it (don’t bother flashing it) but You can decide to flash or not if You want.
Now, for You to select the file You wish to flash, all You have to make sure is that the file is ticked. So what that means is that If I proceed with flashing, all these files will be flashed. If I want to exclude a particular file, all I have to do is untick that file. Alright! So If I proceed with flashing at this point, all that will be flashed are uboot, boot.img & recovery image alright? but if You want to flash more files, You can tick. Its very important that You don’t tick files that don’t have a path in front of them. As You can see, all these files that are ticked have paths in front of them That means they’re actually linked to specific files so If You go ticking these two files for example and You try to flash, You’ll get an error because they don’t have any files linked to them, they have no path So You do not tick them.
In a case where You really need to flash a file and the file is not appearing here for any reason or the other and You do have that file in the backup, what You need to do is to manually load. the file, all You have to do is just tick the file so I’ll assume my recovery was not loaded despite me having a recovery.img in the same folder as the scatter file so I just tick my recovery then double-click. It will popup a Window. All You have to do is select the recovery image and (click) Open.
So the recovery image will now have a path. That’s how to manually load a file in a case where the file does not appear loaded as in the case of cache and userdata. At this point now, I’ll proceed. You could decide to format but I’ll advise You to only format when You really need to (as I’d earlier mentioned). If You want to proceed with formatting anyway All You need to do is disconnect the phone from the PC at this point, select Auto Formatt Flash and Format whole flash except bootloader then You click Start. Now, Stop is going to be in green.
So what You just need to do at this point is to take out the battery from the phone [Car Horn] put the battery back in without switching on the phone. So the phone is off with the battery in. [Car Horn] You just connect the phone to the PC via a USB cord and watch the formatting process. Once formatting is done, You’ll get a green box saying OK. You’ll notice that after formatting Your phone will be dead; no power, no sign of life, nothing! Now, don’t panic. The reason why Your phone is dead is because You formatted the phone without replacing it with any OS so obviously, You phone is going to remain dead. For You to bring Your phone back to life, You need to flash the complete backup (rom) to it. It needs to contain preloader.bin to bring back Your phone.
So I advise You only format when You need to and have the necessary files to revive the phone after formatting. If you don’t have the files, do not format. I will not be formatting here, I will just be downloading. Now, You have the following options; Format all + Download, Firmware Upgrade and Download only Now, the Format all + Download is going to do a format first before it downloads in which case all items will need to be ticked (in most cases). For the Firmware Upgrade, all items need to be ticked. So we cannot use this option in this case because cache & userdata are not ticked so we can’t do a Firmware Upgrade, all we can do is a Download. So for this case, we select Download but if You really need to do a Firmware Upgrade, that means if You have all the files and You wish to flash everything and all items are ticked here, all You have to do is select Firmware Upgrade from here and then click Download.
You can see all files are automatically ticked but because these two don’t have a path, this is going to fail So its best we just stick to Download Only.. Now, I’m going to use Download Only What You’ll need to do next is make sure Your phone is not connected to the PC & switched off (with battery in) So just click Download. Now, to save time, I will not be flashing all files. I’ll be flashing only the boot image but its going to be the same procedure (of course) as if You’re flashing everything, it’ll just take a longer time to flash (all files). For example, I’l just be flashing boot.img but if You want to flash any file at all, all You have to do is tick that particular file to flash. Just to make it fast, I’ll be flashing only boot.img.
Once I have my boot.img selected, its ticked and has a path, [Alarm Clock] all I do is click Download Now, Stop is going to be in red (v3) or green (v5). I’ve removed the battery, put it back in, phone is switched off still with the battery inside (power off if inbuilt). All I’m going to do now is connect the phone to the PC via USB cord and flashing should begin. Its very important You give this time. Just because its staying this way doesn’t mean nothing is happening. I’m having not responding. Its very important You do not try to disconnect because if You disconnect at this point, the phone will go dead in which case You’ll have to keep charging to do anything.
Alright! So once flashing is successful, You’re going to get the prompt to confirm that. I have a Download OK so my flashing was successful. So, I’m going to flash something that will take longer so You’ll see the loading process. If You intended to flash both boot and Android, You could just tick both of them and flash it once but I just want You to see the load process this time around so I’m going to be clicking Download. My version 5 seems to be acting up, it gets that slow at times. Its important You’re patient with it Do not rush it, don’t interrupt it. The reason why I’m going with Android this time around is because I want
You to see the loading process. I’m going to connect the phone to the PC now and watch download begin. Alright! It is flashing. For the boot.img I flashed, its because the file is so light and everything just happened within a few seconds and looked like nothing really happened. This is going close to 300 Mb if not 400 Mb in size so that of course takes a longer time to flash. Now, we’re seeing the flashing procedure. At this point, do not disconnect, do not interrupt, just let it flash If You mistakenly interrupt and Your phone goes dead, do not panic. Just keep charging. Uninstall VCOM drivers, reinstall. Remove the battery if its removable, slot it back in.
Keep charging. Eventually, Your phone is going to come up and You’ll be able to flash again. So we just wait for this flashing procedure to finish. While waiting, SP Flash Tool also has a Read Back function which allows you backup your rom There’s already a video tutorial at the website, also a YouTube video so check them out. It has a Memory Test also to test for crashed Nand / Emmc and device’s state Sometimes, when people flash with SP flash tool, the phone doesn’t come up, it just remains like that. You have to make sure that your battery is actually well charged. After flashing remove the battery (if its removable), slot it back in then boot into recovery mode and do a Factory Reset if the phone doesn’t boot up normally after You’ve done the flashing.
Few devices require an SD card to boot up Alright! Flashing is complete and I have a green OK sign so my phone is going to come up. If Your phone is still stuck at logo, boot into recovery mode and do a factory reset
So basically, that’s just how to use SP Flash tool. I’ll just go ahead and close this.
It is a simple and easy method (tutorial) of Any Android Device flash and installs Stock ROM (Firmware file) using SP Flash Tool application. This is a quick guide for Firmware Flash to any MTK / MediaTek CPU based Android device / Smart-Phones.
a. Be careful Read steps by steps instructions (tutorial), then do it.
b. Make a backup of your flashing use (installing/updating ROM / Format / Root) Android devices (For backing up your all apps music file, contacts, images, videos, and others).
c. If you flashing a wrong preloader, your device will be completely dead.
d. Flash your device model, Void the warranty of your device.
e. Download latest version file
Step-by-Step guidelines to flash Stock ROM using Update SP FlashTool on your Windows XP/7/8/10 Computer/Laptop.

Step-1: Latest version SP Flash Tool Download and your Device model USB Driver Download (phone model driver).
Step-2: Install your Device USB Driver on your computer/Laptop.
Step-3: Power Off / Shutdown Your Smartphone ( if removable Battery => Remove your phone Battery).
Step-4: Firmware or Stock ROM Download (phone model driver), that you want to Flash on your Smartphone model.
Step-5: Extract Firmware/Flash File or Stock ROM zip file (it extract on your Computer/Laptop).
Step-6: After Open Flash-tool.exe application files (in SP-Flash-Tool folder).
Step-7: Once SP Flash Tool is launched your PC, Click on the left top [Download] Tab.
Step-8: After select or click on the [Scatter-loading] Tab button.
Step-9: You will find and select a scatter file in the Smartphone model Firmware folder.
Step-10: After, Click on the top middle [Download] Button to begin the Smartphone model Flashing Process.
Step-11: Next, Connect your device (without battery- if it is removable battery) to the Computer or Laptop using Original USB Cable. After connecting the Smartphone model to the PC.
Step-12: Press your Smartphone model Volume Down or Volume Up key so that your computer easily detects your smartphone device.
Step-13: After Flashing is completed, a [Green Color Ring] will appear.
Step-14: Close the SP FlashTool on your computer/laptop and disconnect your Smartphone model from the computer or laptop.
Now your MTK Smartphone model is successfully running the Firmware or ROM you have Downloaded.
See Video: How To Flash Phone From PC Using Smart Phone Flash Tool
Video tutorials for Any Android Device.
This page last update was on time 03:53pm date 24-03-2025 (UTC).
See Best Guide and Tutorials of 2025
Alternatives MTK (MediaTek) Devices Tool
1. SmartPhone Multiport Download Tool: It is also one of the best alternatives tool, that also allows you to flash your Multi MediaTek or MTK Smartphone model. click here to download.
2. MTK Droid Tools: it is also one of the best MTK tools that allows you Smart phone device to root, firmware backup and more. click here to download.
3. Android multi-tools: It is also one of the small pattern lock remover tools that allows you to unlock your any Smartphone model. click here to download.
How to Backup and Restore
Visit google play-stor and download Super Backup and Restore Apps (application) here.
Install apps your Device => open Super Backup and Restore application.
Save Backup file your sdcard.
After flash, Restore saved file from your sd-card memory.How to IMEI Rapair and Creating scatter file
Download SN Write Tool, It is also best MediaTek (MTK) Re-Write IMEI and Creat a scatter file tool, more for download page.
Credits: SP FlashTool development and MTK Android FLASHER Developer.
Smartphone flash tool is a tool designed to flash stock ROM, Recovery and other files on MediaTek (MTK) based devices. Here on this page, we are going to share a detailed guide on how to use SP Flash Tool to flash Stock ROM.
Requirements:
- The Phone, Smartwatch or any other MTK device must have at least 50% – 55% of battery to perform the flashing process.
- Download and Install Android CDC Driver and MTK USB VCOM Driver on your Windows computer. Linux systems don’t require drivers.
- Backup the entire data stored on your device to avoid data loss.
- Make a note of the IMEI number and save it in a safe place. Dial
*#06#to get the IMEI or you can find it on the back side of the device after removing back cover and battery. If the device is Dual SIM you will find two IMEI numbers, make note of both of them.
Note: Flashing ROM or Recovery is a tedious process and requires to be performed carefully, failing to do so will result in permanent damage to the device. It may also void the device warranty. Perform it at your own risk and nobody should be held liable or responsible for any damage in any form.
Step 1: Download Stock ROM or Custom ROM that you want to flash on your device and extract it on your computer.
Step 2: Depending on the platform you’re using download SP Flash Tool for Windows or Linux. After downloading, extract it on your computer.
Step 3: Open flash_tool.exe (Windows) or flash_tool.sh (linux).

Step 4: Once Smartphone Flash Tool is launched, click on Download tab.

Step 5: In the “Download” tab, click on Scatter-loading button.

Step 6: Navigate to the folder where you have extracted the firmware and load the Scatter file.

Step 7: Now, click on the Download button to begin the flashing process.

Step 8: Connect your MTK based device to PC using the USB cable and wait for SP Flash Tool to detect the device. The connecting process varies from device to device. Some devices require the battery to be removed before connecting and some require pressing Volume Down or Volume Up key after connecting to PC. Find the appropriate way by referring to the manufacturer’s website.
Step 9: Once the device is detected the flashing process should start automatically.
Step 10: The flashing process should take a few minutes or up to 20 minutes to complete. Once the flashtool is done flashing the files, a popup with Green Tick and Download Ok should appear.
At this point, the flashing process is successfully done and you can disconnect your device and close Smartphone Flash Tool.
Power On your device and check for IMEI number, if it shows correct IMEI then you are all set and start using your device. If it shows NULL IMEI or IMEI with all zeros then follow the instructions here on how to flash IMEI on MediaTek device using SN Write Tool.
This was the complete tutorial on how to use SP Flash Tool or how to flash Stock ROM using Smartphone Flash Tool.