
-5% за онлайн оплату
-13% скидка
Код товара: 82924
7 790 ₽
6 799 ₽
В наличии более 3 шт.
до окончания действия цены:
дничасыминсек
особенности товара
- Цифровой тюнер с ручным и автопоиском
- Поддержка КВ / СВ / ДВ и расширенного FM
- Высокая чувствительность на авиадиапазоне
- Цифровая обработка сигнала DSP
- Большой информативный ЖК дисплей
- Питание от аккумулятора 18650, встроенная зарядка
- Карманные размеры 15*8 см
- Поддерживает 15 дальнобойный канал трассы
- Страна-изготовитель: Китай
- Вес (в упаковке): 0.515 кг
- Размер упаковки: 6x14x20.5 см
- Гарантия: 12 месяцев
Доставка товара
Цены, указанные на
данном сайте, действуют только при условии оформления покупки через
интернет-магазин.
Информация о технических характеристиках, комплекте поставки и внешнем виде товара
носит справочный характер и может быть изменена производителем без предварительного
уведомления.
Заметили ошибку или неточность в описании?
Отзывы о магазине Вольта
[
2911
]
все отзывы
Анна29. 05. 2025.
5Отличный магазин
Отличная работа магазина. На сайте консультант быстро отвечает, помог с подбором, дал ссылки на товар. Сам заказ пришел быстро и без проблем. Все было хорошо упаковано. Заказывала амбушюры для наушников, качеством довольна. Рекомендую.
источник:
5Отличный магазин
Товар качественный, хорошо упакован. Быстрая доставка (СДЭК).
Рекомендую.
источник:
Всем привет!
Сегодня посмотрим на портативный радиоприемник с широким функционалом.
Из интересных возможностей:
- SSB и RDS
- Авиа диапазон
- Прямой ввод частоты
- Питание 18650!
Подробнее под катом.
Хоть я и далек от темы радиовещания, но побродить по эфиру иногда люблю. Порой просто интересно послушать иностранную речь.
У родителей лежит TECSUN PL-380 (в маленьком городе лучше прием) — его можно использовать как некий ориентир в сравнении.
В модели Xhdata D-808 функций побольше, чем у более известного TECSUN, но что-то реализовано хуже.
В эпоху глобального распространения интернета, радиолюбители, а скорее радиохулиганы, на коротких волнах напоминают некий реликт из прошлого. Но иногда попадаются.
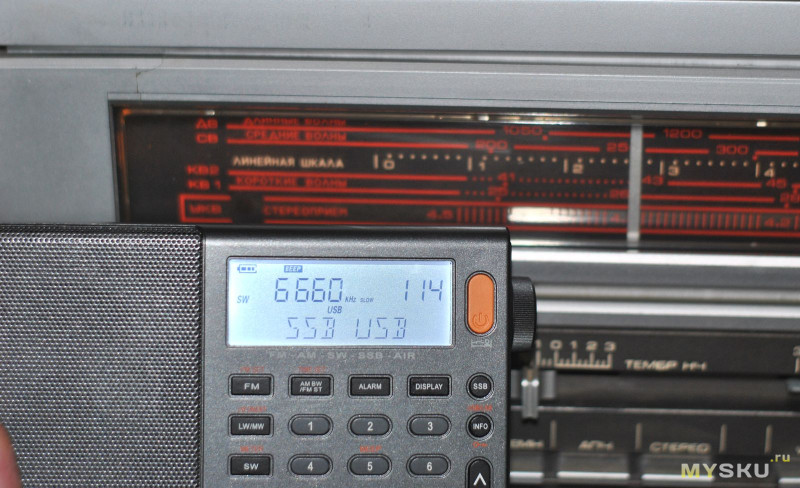
В этом приемнике есть возможность принимать станции с однополосной (SSB) модуляцией, как раз этих радиолюбителей можно и услышать.
Но обо всем по порядку…
Доставка со склада в Москве ТК IML за пару дней.
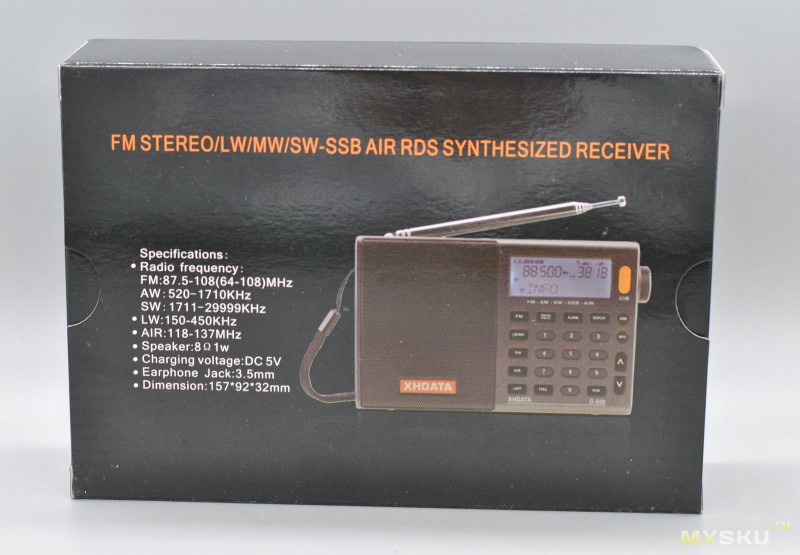
Коробка оформлена строго:

Надписи фирменного оранжевого цвета.
Сзади:
Внутри еще одна плотная картонная коробка:
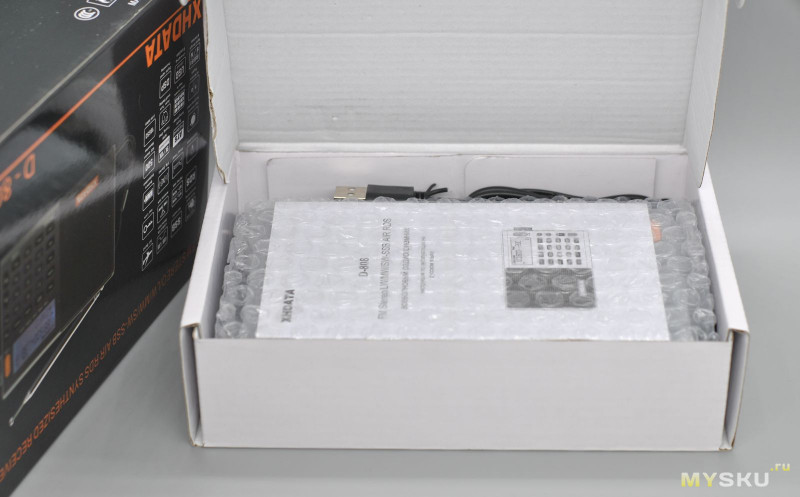
За сохранность содержимого можно не беспокоится.
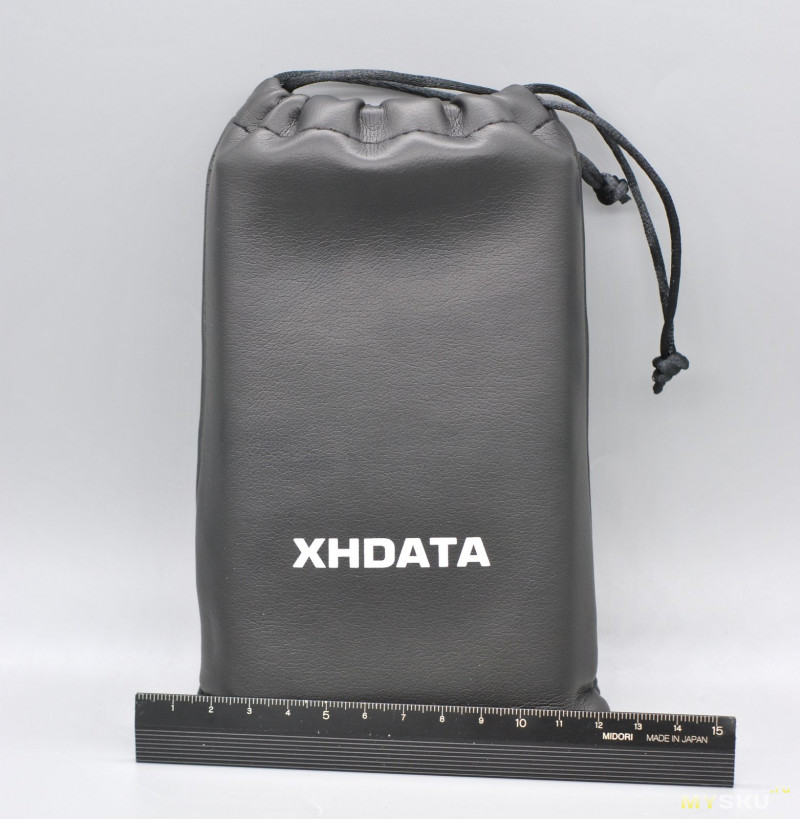
Комплектация приемника:

• XHDATA D-808
• чехол из кожзама.
• внешняя антенна 4 м
• кабель USB для зарядки
• 18650 литиевый аккумулятор
• руководство пользователя на русском языке
То что нет наушников в комплекте — это скорее плюс, комплектные у tecsun слушать без слез нельзя.
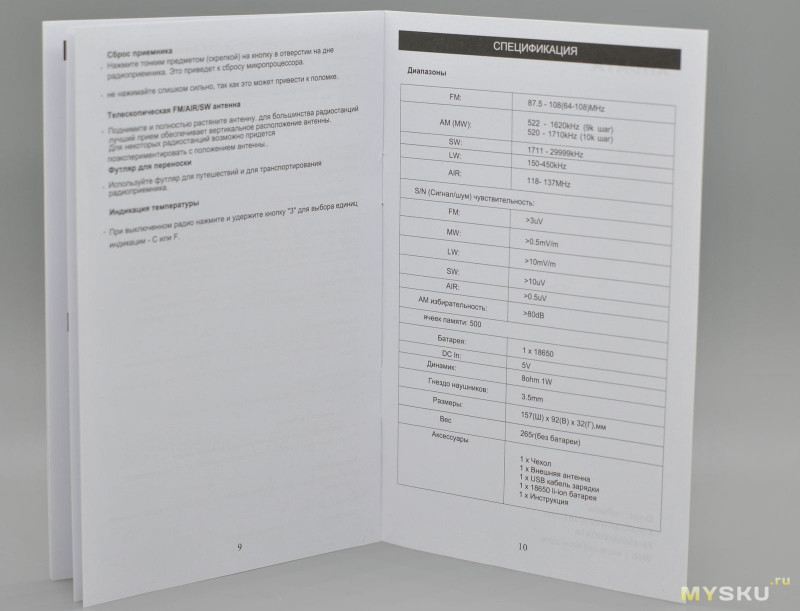
Инструкция вполне понятна новичку:
Чехол для переноски приемника:
Внешняя антенна и кабель для зарядки:
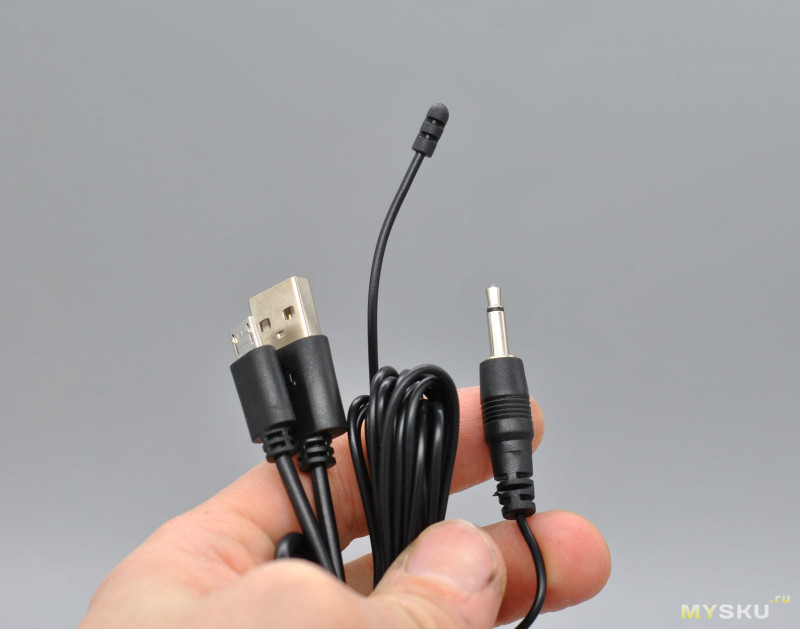
Разъем у антенны 3,5 мм, жаль нет прищепки на конце.
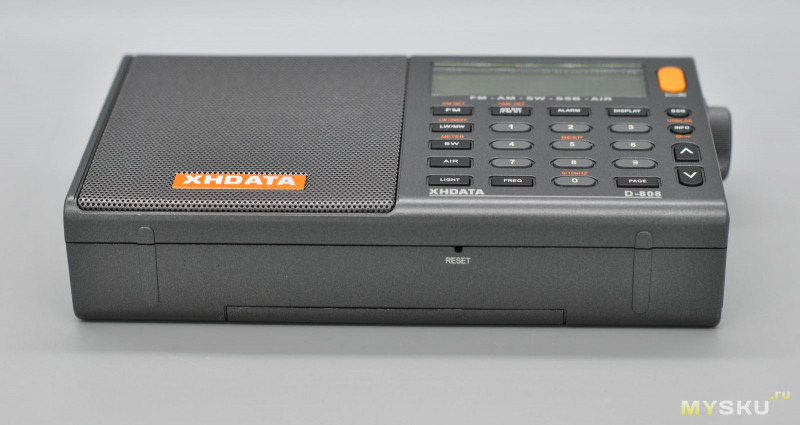
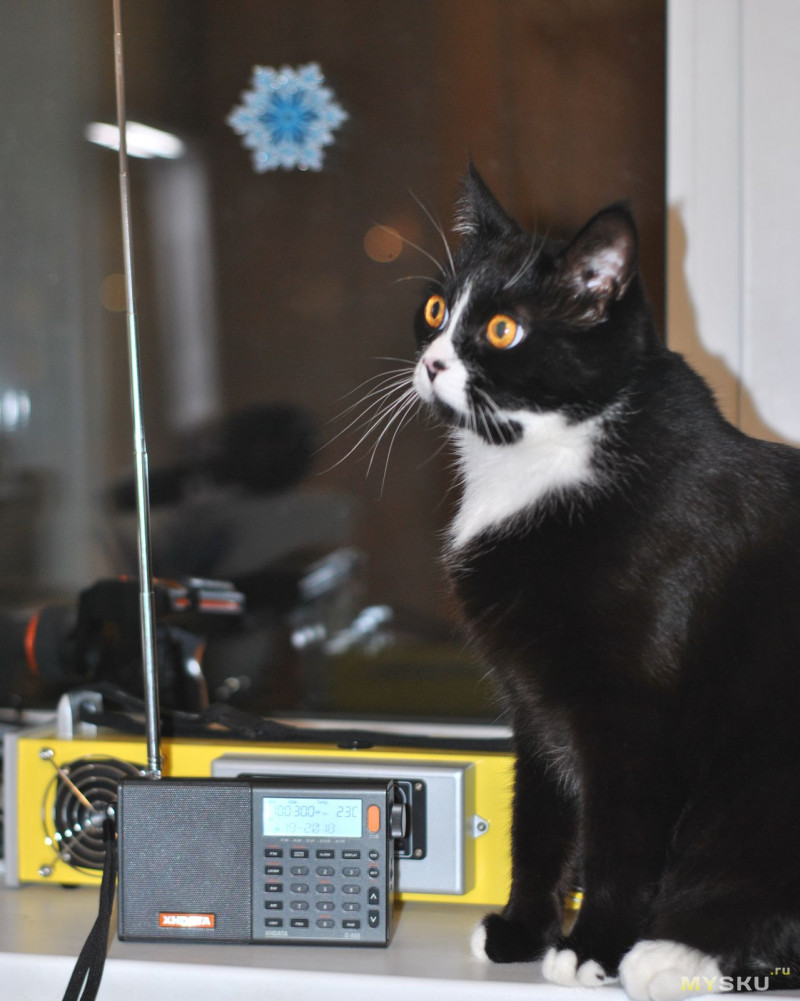
Внешний вид XHDATA D-808:

Классический дизайн цифрового карманного приемника — динамик слева, экранчик и кнопки ввода частоты справа. Напоминает Tecsun, да и более ранние модели вроде Grundig yacht boy.
Размеры вполне карманные: 14,5 x 8,7 x 2,7 см. Корпус пластиковый, крашенный. Собран ладно, держать в руках приятно.
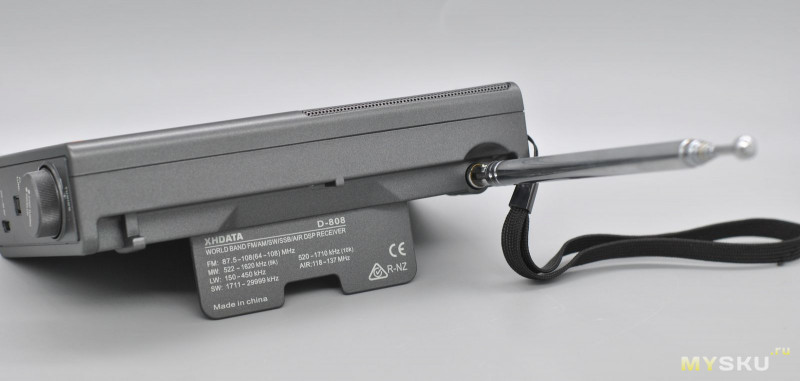
Сзади тоже все вполне традиционно:
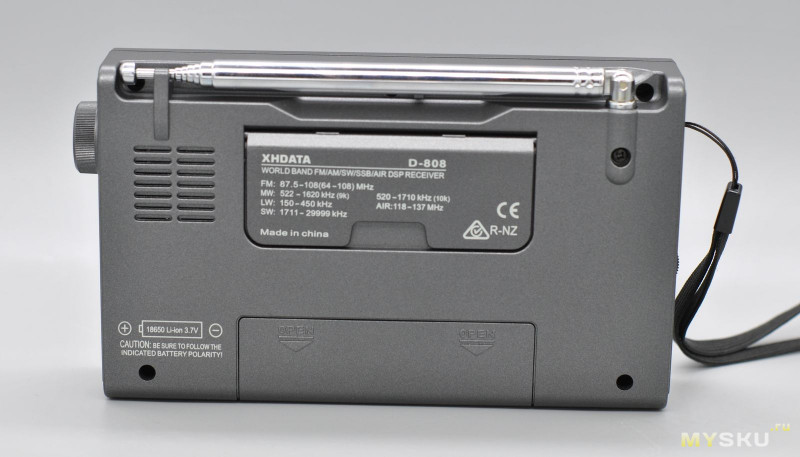
Родной «телескоп» 70 см, подставка и место элемента питания.
Откидывающаяся подставка:
Справа:

Валкодер настройки частоты тут многофункциональный: по нажатию переключаются три режима FAST-SLOW-STOP. Меняется соответственно шаг частоты.
Есть так же колесико точной подстройки частоты.
Разъем для зарядки аккумулятора — микро USB.
Слева:
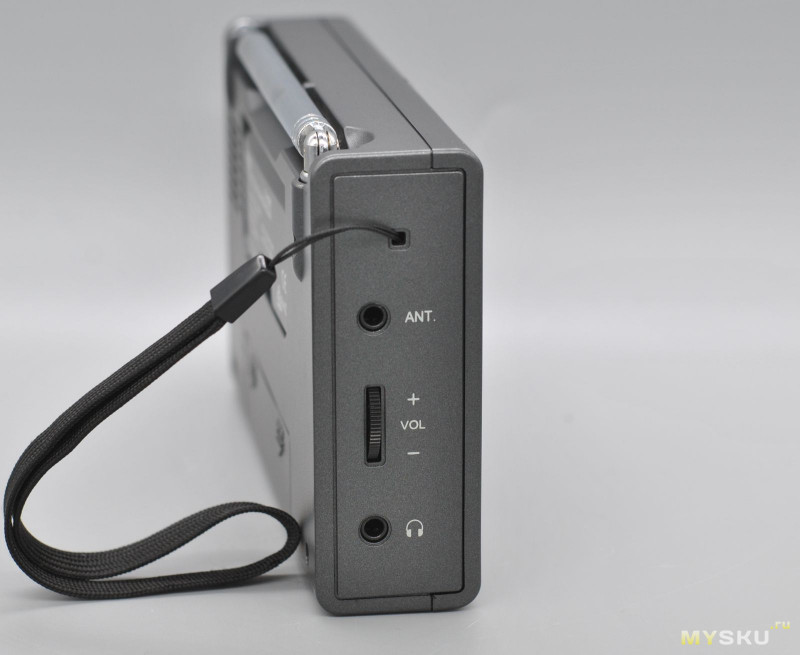
Гнездо для КВ антенны, регулятор громкости и разъем 3,5 мм для наушников. Темляк несъемный.
Флешек и прочего mp3 нет, классический приемник.
Снизу есть кнопка для перезагрузки микроконтроллера (мозгов приемника):
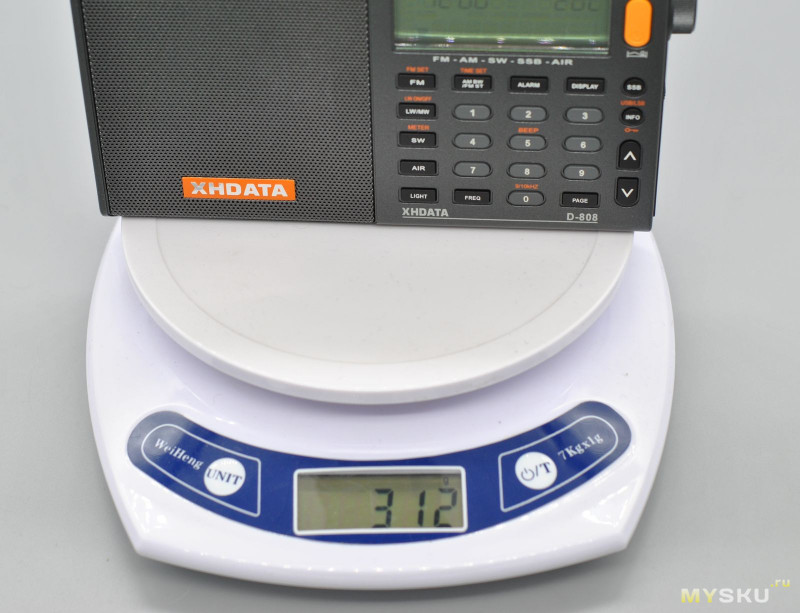
Масса устройства с элементом питания:
Теперь перейдем к питанию:
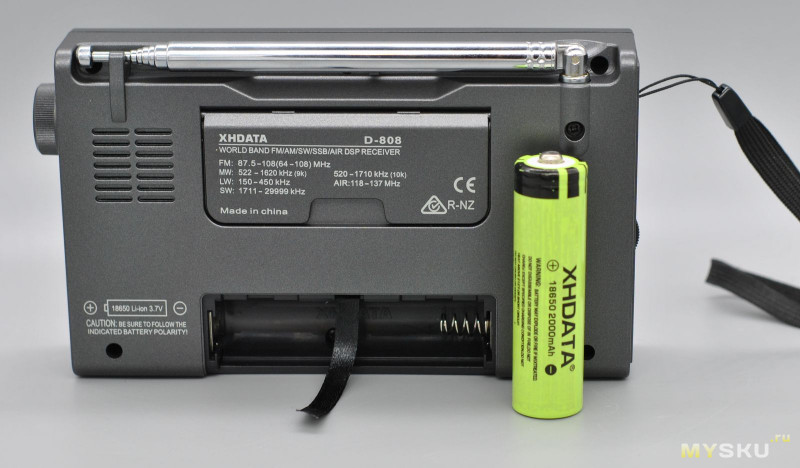
Долой батарейки! Тут реализовано питание от аккумулятора популярного формата 18650. Не нужно заморачиваться с зарядками, зарядка встроена в приемник. И на столе например, приемник может работать от порта usb, без аккумулятора.
Комплектный 18650:
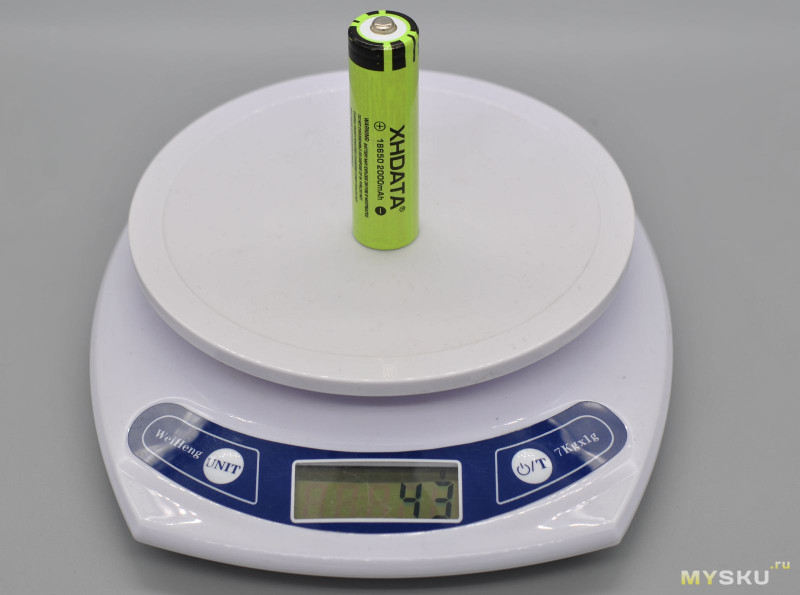
Его емкость на разряд 1706 мАч:
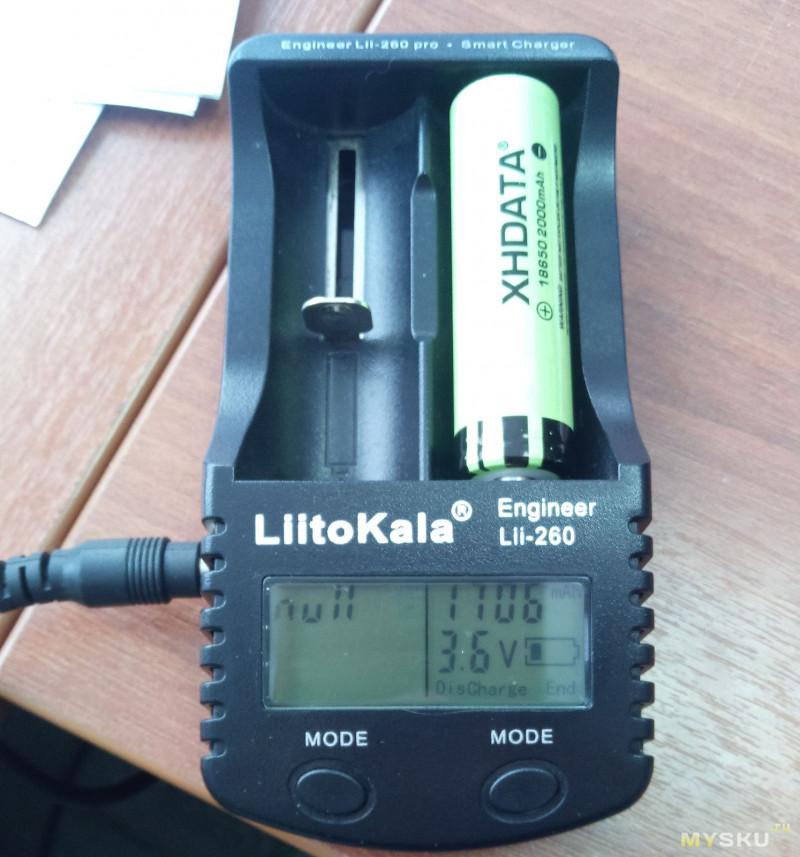
Хватает его надолго, много отзывов перечитал и сам в этом убедился.
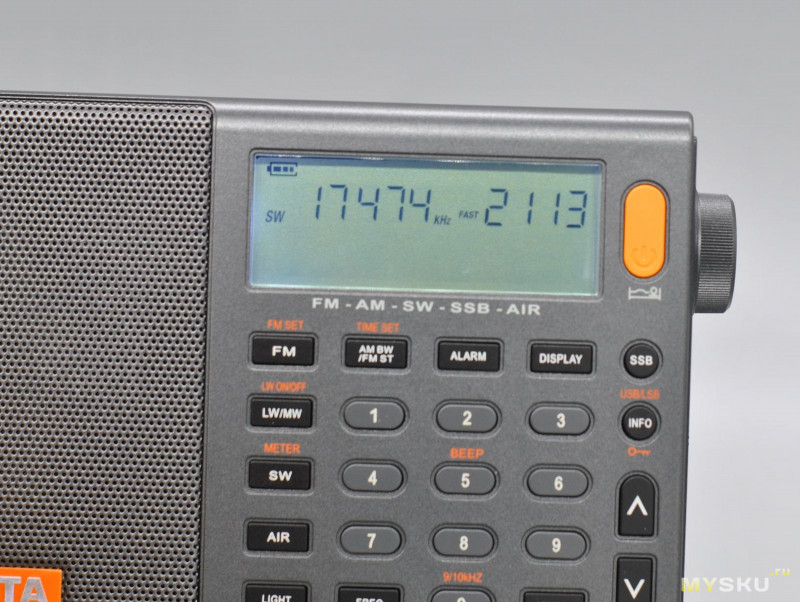
Экран XHDATA D-808:
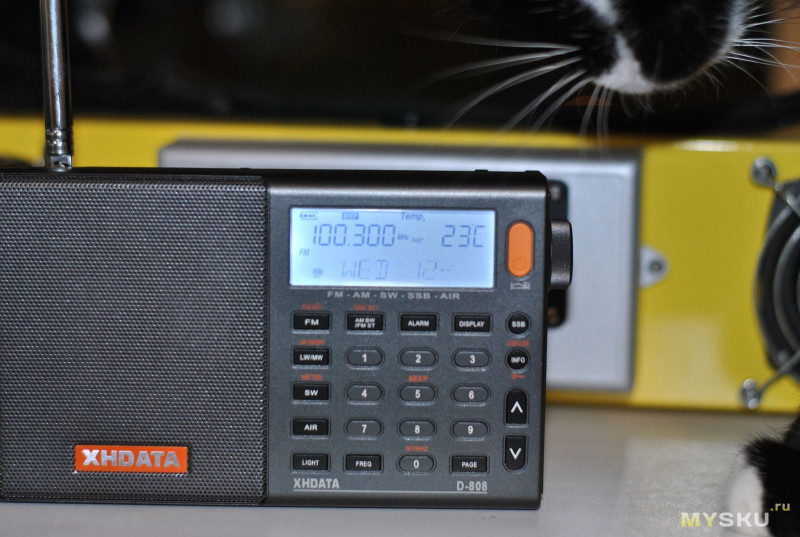
Есть отключаемая подсветка экрана, а вот на подсветку кнопок ввода частоты пожлобились.
Из полезного: блокировка клавиш, таймер сна, будильник, термометр. Часы само собой.
Приятная особенность — это наличие RDS на FM диапазоне.
Приемник поистине можно назвать всеволновым (на бытовом уровне).
Диапазон частот:
• FM: 87,5 – 108 (64-108) МГц
• LW:150 – 450 кГц
• MW: 522-1620 кГц (шаг 9k) 520-1710 кГц (шаг 10k)
• SW: 1711-29999 кГц
• AIR: 118-137 МГц
Чувствительность:
ДВ не менее 10mV/m
СВ не менее 0.5mV/m
КВ не менее 10uV
Авиа не менее 0.5uV
УКВ не менее 3uV
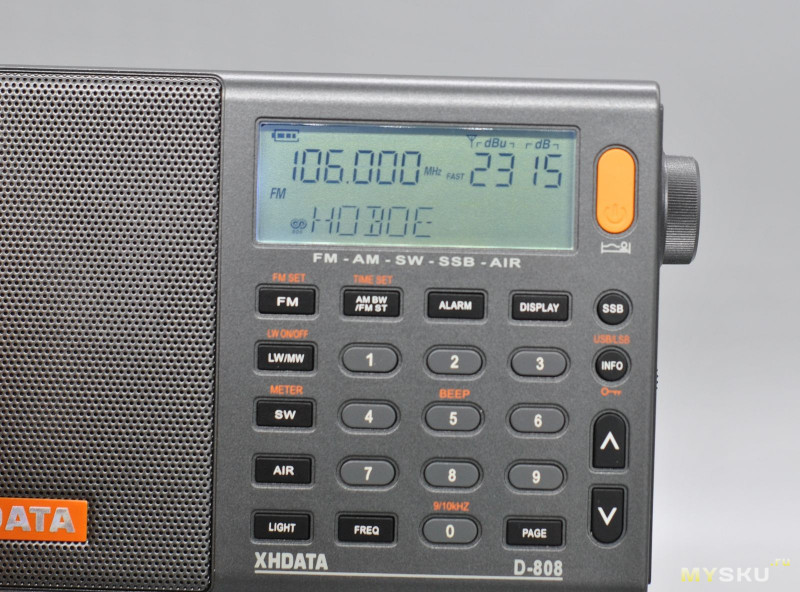
Очень приятно работать на FM диапазоне, чувствительность сказочная, даже «телескоп» можно не раскладывать.
И сам УКВ диапазон расширенный от 64 МГц.
Есть автоматический поиск (САР), ручной поиск радио частоты (в режиме показа частоты), прямой ввод цифр радиочастоты.
Нет функции ETM (как у Tecsun), очень удобный момент временного сохранения станций.
Можно сохранить до 500 радиочастот, на 50 отдельных страницах хранения. Но переключаться между ними валкодером нельзя — бесячая особенность.
Звук у приемника приятный, разборчивый, достаточно громкий. Хрипов нет. Музыку в стерео можно послушать в наушниках.
На коротких волнах хорошо помогает внешняя антенна или выезд из города.
Прямой ввод частоты и точная подстройка рулят, если известно, где искать станцию.
Субъективно чувствительность XHDATA чуть хуже, чем у Tecsun, но тут много факторов влияет, в том числе погодные условия.
На ДВ вообще пустота, Tecsun хоть что-то там находил.
Авиа диапазон хорошо бы проверить у аэропорта, но в Брянске он далеко от города.
Нам доступно 4 коротковолновых однополосных канала (SSB) с минимальным шагом в 1 кГц, с независимым приёмом верхней боковой полосы (USB) и нижней боковой полосы частот (LSB). SSB включается секунды 4.
Как раньше слушали «голоса» и как сейчас:
Где их искать.
Натыкался пару раз. Но интересного там ничего нет, интернет всех выкосил.
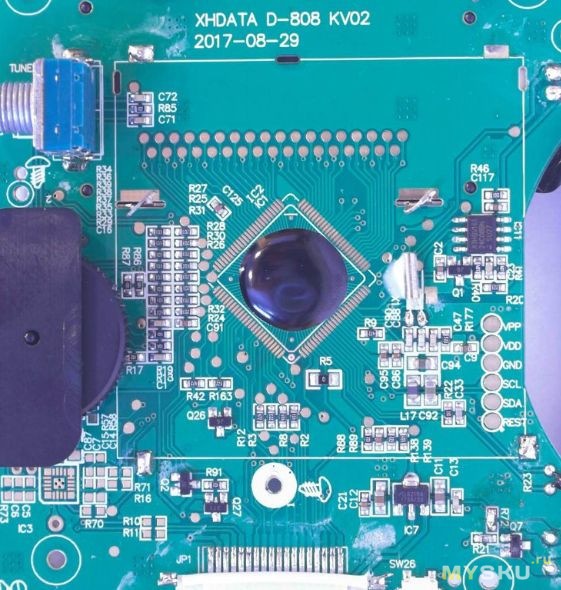
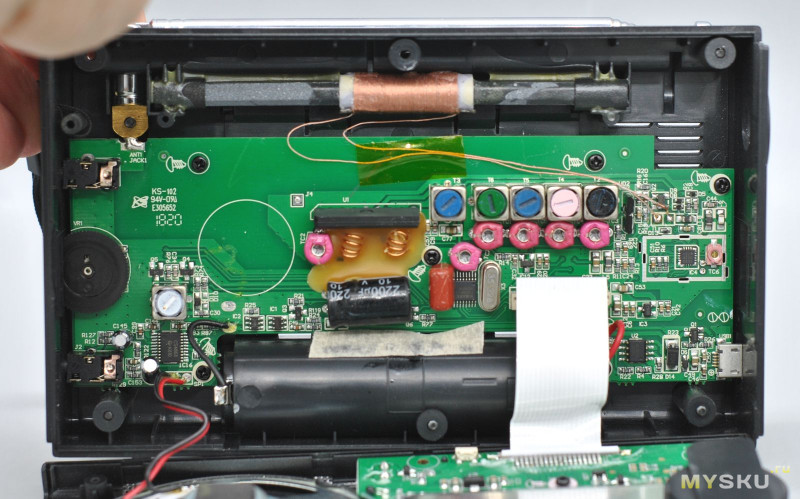
Разборка устройства:
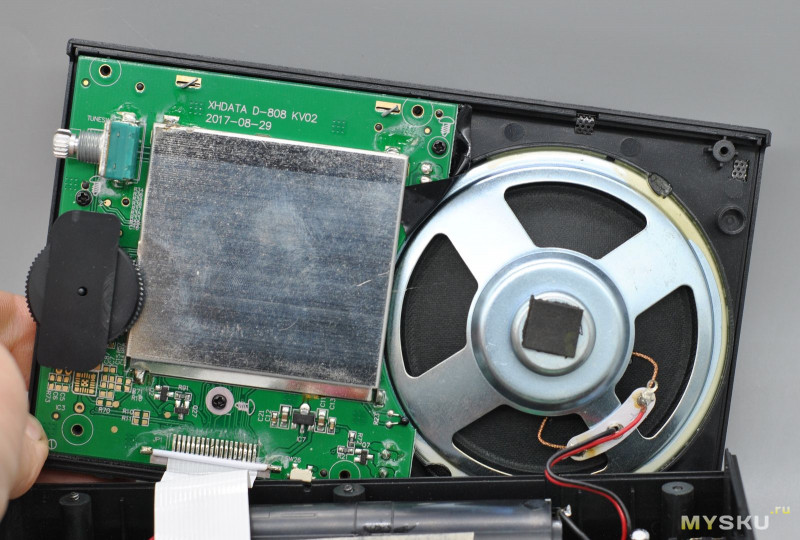
Динамик с неодимовым магнитом 8 Ом мощность 1 Вт.
DSP чип Silicon Labs SL4735
Достоинства (тут будет самое главное):
Компактные размеры и все необходимое в комплекте.
RDS на FM, да и сам приём FM (64-108 МГц) в т.ч. стерео
AIR диапазон, можно слушать переговоры летчиков и диспетчеров
КВ диапазон без разрывов (1,7…30 МГц)
SSB (LSB/USB) — радиолюбители.
Приятный звук.
Питание от 18650 и зарядка в самом аппарате.
Минусы и недочеты (куда же без них):
Нет перебора станций в памяти валкодером.
Нет подсветки кнопок.
Задержки звука при перестройке на другую частоту и включения SSB.
Цена конечно, хотелось бы подешевле (на али, кстати, дороже).
Ветка на форуме радиосканер.
В итоге: интересный приемник, для тех кто хочет большего. Больше диапазонов, больше автономности, больше функций (SSB и RDS).
Традиция:
Мы с котиком поздравляем читателей и писателей ресурса mysku с наступающим новым 2019 годом.
И желаем только удачных покупок!
Спасибо за просмотр! До встречи в новом году!
ManualsPro
XHDATA
XHDATA D808 FM Stereo Portable Digital Radio Instruction Manual
- September 16, 2024
- XHDATA
Table of Contents
- Radio- Front View
- Radio- Display
- Radio- Side Controls
- Radio-Rear
- Warning
- QUICK START GUIDE
- **FUNCTIONS & OPERATIONS EXPLAINED
- Radio operation
- Other Operations
- Specifications
- Read User Manual Online (PDF format)
- Download This Manual (PDF format)
D808 Radio Manual
FM Stereo/LW/MW/SW SSB AIR RDS
Portable Digital Radio
Radio- Front View
| FM Band Select/ATS/Set FM Range
—|—
| MW/LW Band select / ATS / Enable LW
| SW Band select / ATS / Scroll through Meter bands
| Air Band select / ATS
| Display light on/off
| AM Bandwidth/FM Stereo/ Time set
| Frequency entry follows
| Display option: Clock, Alarm, Signal strength, Temperature
| Memory page selection
| Alarm on / Alarm set
| Power / Sleep timer
| Single Sideband (SSB)
| Upper / Lower Sideband select / RDS Info / Lock
| Frequency up / Scan
| Frequency down / Scan
| Frequency / Page / Memory
| Frequency / Page / Memory
| Frequency / Page / Memory
| Frequency / Page / Memory
| Frequency / Page / Memory / Beep set
| Frequency / Page / Memory
| Frequency / Page / Memory/ MW step
| Frequency / Page / Memory/Temp scale setting
| Frequency / Page / Memory
| Frequency / Page / Memory
Radio- Display
① Battery charge indicator
② Sleep timer active
③ Key press beep active
④ Alarm on
⑤ Frequency Display is kHz or MHz
⑥ Display temperature mode
⑦ Signal strength
⑧ Noise level
⑨ Band selection
⑩ FM Stereo signal| ⑪ FM RDS available
⑫ Frequency
⑬ RDS Information
⑭ USB / LSB mode
⑮ Squelch active
⑯ Alarm active
⑰ Station Memory Mode
⑱ Not available on this radio
⑲ Radio keys locked
⑳ Tuning knob speed
—|—
Radio- Side Controls
21 External antenna jack (3.5mm)
22 Volume control
23 Headphone jack (3.5mm)
24 Main Tuning knob(push in for FAST / SLOW / STOP)
25 Fine tuning / clarify control for SSB
26 USB Charging port
27 Radio reset button access hole
Radio-Rear
28 Whip antenna used for FM, SW and AIR bands
29 Kickstand
30 Battery door (18650 battery included)
Warning
- Do not expose the radio to water, moisture or excessive humidity.
- Operating temperature range is 0°-40°C (32°-104°F).
- Remove the battery immediately if liquid has been spilled or debris have fallen into the unit.
- Clean with a dry cloth. Don’t use detergents or chemical solvents.
- Do not attempt to open the unit. This prevents damage to sensitive components.
QUICK START GUIDE
- When the battery is fully charged, the battery will power off automatically. If the screen doesn’t display, please take the battery out and install again, or charge for the radio until the screen display.
- In this manual, the terms “press” and “long press” are used. “Press” means to press the button briefly. “Long press” means to press the button and hold it for 2 seconds. When making settings, wait a few seconds after making the setting and the radio will save the setting and exit setting mode.
- Install 1 x 18650 battery in the battery compartment, taking care to align the polarity of the battery (+/-) .
- Turn on the radio by pressing the [POWER] button and then press any button to skip the sleep time setting.
- Adjust the volume by rotating the [VOLUME] knob on the left side of the radio. Rotate the small wheel up for more volume and down for less volume.
- Select band by pressing the band button —— FM, MW, SW or AIR Band.
- Rotating the [TUNING] knob on the upper right side to locate a desired station or by directly tuning to a station:
a) First, select a band — FM,MW,SW or Air Band.
b) Quick press the [FREQ] button
c) Enter the frequency on the keyboard
d) If the radio does not tune to the frequency, press [FREQ] button again to
complete the entry.
**FUNCTIONS & OPERATIONS EXPLAINED
**
Optionsand Setu
-
FM Tuning range—— [ FM ] button
The radio can be set for different tuning ranges that are convenient for FM
broadcasting in different regions of the world. With the radio off, long-press
the [FM] button. The current setting, showing the lowest frequency of the
band, is displayed.
To change the setting, press the FM button again to cycle through the four
options:
• 64.0 MHz
• 76.0 MHz
• 87.0 MHz
• 87.5 MHz -
Medium Wave Step——[ 9/10 kHz ] button
The tuning step for medium wave (MW) can be set for 9 kHz or 10 kHz. To change
the setting, turn the radio off and long-press the [9/10 kHz] button (number
- ,and then press the button again to switch the two options, the current
setting is displayed.
-
Long wave——[ LW / MW ] Button
The LW band is not enabled by default. To enable it, turn the radio off and
long press the
[LW/MW] button. The radio will display the current status of the setting, “LW
ON” or “LW OFF”.
To change the setting, press the [LW/MW] button.
When LW is enabled , pressing the [LW/ MW ] with the radio on selects either
the LW or MW band.
When it is disabled, the LW option is not available. -
Temperature——[ DISPLAY ] Button and [ number 3 ] The temperature scale for display, Fahrenheit or Centigrade, may be selected. With the radio off, repeatedly press the [DISPLAY] button until the temperature is displayed, then long-press the [number 3] to change the setting. Repeatedly press the button to toggle between °F and °C.
-
Setting the time——[ TIME SET ] Button
The radio clock supports 24-hour time display only.
To set the clock, turn the radio off and long press [TIME SET] button . The
radio will display “TIME”
Key in the 4-digit time to set. Note that time setting mode automatically
exits after about 5 seconds with no key pressed.
The radio has the option to automatically set the time from an FM broadcast
station that provides it (refer to the RDS topic for more on this). To enable
automatic setting, press the [TIME SET] button with the radio off. Use the [UP
arrow] key to switch between Auto and Manual modes.
( Note: Many FM stations do not broadcast time, and those that do may not
be accurate. You must manually tune the station with time information for the
time to be set from RDS.) -
Setting the alarm——[ ALARM ] Button
With the radio turned off, long press the [ALARM] button. Use the 0-9 keys to
directly enter the alarm time.
Quickly press the [ALARM] button, then the “ALARM” icon will flash. Press the
[Up Arrow] or [Down Arrow] button to select the way the alarm rings:
①Radio Broadcast Alarm ② Buzzer Alarm ③ Alarm off.
· Buzzer Alarm:By default, the radio will sound a buzzer when the alarm time
is reached.
· Radio Broadcast Alarm :A speaker icon will appear on the screen, indicating
that the alarm will play the last radio station tuned when the alarm time is
reached.
When the alarm goes off, press the [Power] button to turn off the alarm or
press any other button to sleep for another 10 minutes. -
Settingthesleeptimer——[POWER]Button
To use the Sleep Timer, quick press the [POWER] button. The Sleep Timer will
automatically shut off the radio after the set amount of time expires. The
display will cycle through minutes 120, 90, 60, 45, 30, 15. Setting the value
to “ON” turns off the Sleep Timer. -
Beep——[ BEEP ] button
The radio as it comes from the factory beeps after each key press. To disable
this, turn the radio off and long-press the [BEEP] button (number 5). Long
press the button to change the option. -
Display light——[ LIGHT ] button
The display is automatically illuminated for about 10 seconds when you press a
key or turn the tuning knob. Pressing the [LIGHT] button turns it on
indefinitely. When set, the light stays on even when the radio is turned off.
Press [LIGHT] button again to turn the display lighting off. -
Lock——[ INFO ] button
With the radio on or off, long press the [INFO] button to disable the other
keys on the radio. Long press again to re-enable them. This feature is useful
to prevent the radio from being turned on accidentally. -
Antennas
Antennas capture radio signals that are processed by the radio. This radio has
3 antenna options:
• Internal ferrite bar antenna used for LW/MW
• A 25.5” telescopic whip antenna for SW/FM/AIR
• A 3.5mm jack to connect an external antenna of your choice for SW/FM/AIR
Caution: Ensure that an external antenna is clearfrom power lines.
The internal ferrite bar antenna is directional. Physically turn the radio for
best reception. You may find that moving the radio to a different location,
even slightly, greatly improves reception on all bands.
Radio operation
-
Search Radio Frequency
① Manual Search
Turn the [Tuning] knob to change the frequency, Turn the [ Fine Tuning ] thumb
wheel to fine-tune the frequency in smaller steps, or press the [ Up or Down
Tuning Arrow ] to change the frequency.
Note: Tuning speed
The tuning knob has FAST, SLOW and STOP modes. Switch between them by pressing
the [ Tuning ] knob in towards the radio. The display shows the mode in small
print.
• Fast – advance 5 kHz (3 kHz on LW, 9/10 kHz on MW, 25kH on AIR and 100 kHz
on FM)
• Slow – advance 1 kHz (10 kHz on FM)
• Stop – does not advance
② Auto Search
· ATSFunction
Avoid areas with high electromagnetic interference when using the ATS function
to obtain more accurate search results. Noise, such as from desktop computers
can be confused with a radio station.
Long press a band button ([FM], [LW/MW], [SW], [AIR]) and the screen displays
“ATS _” to enter the automatic search mode. In this mode, the radio will
automatically search all frequencies in the band and store all strong signals
in the memory station.
( Note: strong signals are not necessarily generated by broadcast towers,
they may also be strong interference signals. )
·UpandDownTuningArrow
To search the frequency band starting with the current frequency:
Select the desired frequency band, then long press the [Up or Down Tuning
Arrow], the radio will start searching the selected frequency band, forward or
backward, and stop searching after locating for a strong signal. Short
pressing the [UporDown Tuning Arrow] will also stop the search.
( Note: Stations found in this search are not stored in the station
memory. )
③ Directly input the radio frequency
Press [FREQ] button to enter the keyboard input radio mode, enter the radio
station you want to search through the numeric keypad, and press [FREQ] button
again to confirm. The frequency band will jump to the frequency band you
entered.
( Note: If the entered radio frequency does not exist in this band, the screen
will display an Error symbol. ) -
Memory System
·Manual
A memory location stores the station frequency along with the stereo setting
for FM and the bandwidth for LW/MW/SW.
This radio has 500 memory locations, 100 for each band, organized into 10
pages with 10 memory locations each. Therefore, the storage location of each
radio station is “page (0-9) -code number (0-9)”, for example “P18” refers to
the 8th slot on page 1.
Select the desired band (FM, MW, LW, SW or AIR) first. Then to save or
retrieve a station in memory, first establish the current memory page by
pressing the [PAGE] button and then pressing the page number button (0-9).
Once a page is selected, a frequency is stored to a memory location within the
page by long pressing the position number button (0-9). After the station is
successfully saved, the radio will display “PAGE—SAVE”.
( NOTE: To recall a saved station, just press the number button (0-9) of
the memory position within the current page. After the station is successfully
retrieved, the radio will display “ PAGE— LOAD”. )
·Auto Tune Storage (ATS)
This radio has the capability to scan the bands and automatically store
stations into memory. It loads them sequentially by page, and by position
within the page, overwriting any previously stored stations. ATS is invoked by
first selecting the band and then with a long press of the band button, FM,
LW, MW, SW or AIR. ATS stores relatively stronger stations, and may skip some
that are barely audible.
Note that for shortwave, the radio only scans within the international
broadcast frequencies, not amateur radio or commercial bands. Refer to the SW
topic. -
Bandwidth (BW)
While radio signals are centered on one frequency, they actually occupy a
range of frequencies.
Sometimes two stations with adjacent frequencies can interfere with each
other. This problem can be lessened by reducing the frequency range
(bandwidth) the radio tunes. This feature is available on LW, MW and SW on
this radio, but typically only used on SW.
The bandwidth is selected by pressing the [ AM BW ] button. The width is shown
on the display ,and repeated presses of the button will cycle through the
values: 6, 4, 3, 2.5, 2, 1.8 and 1 kHz .The bandwidths in SSB mode are 4, 2,
2.2, 1.2, 1, and 0.5 kHz.
Generally, the higher the bandwidth, the better the audio fidelity and the
lower the bandwidth, the lower the interference and noise. -
Squelch Function
Press the [ Tuning ] knob for about 5 seconds, squelch mode will start.
Squelch Mode works on all bands.
When set, the radio remains silent until a transmission stronger than the set
level is received. To activate the feature, long press the tuning knob
inwards, and when the word “Squelch” appears in the display immediately rotate
the tuning knob to begin setting the squelch level. The values are 1-9 and
OFF. The higher the number, the stronger the signal must be to activate the
radio. The optimum level is usually the highest number without background
noise. Turning squelch off may enable reception of weak signals that would
otherwise not be heard.
( Note: If you find your radio not receiving any signals, check to make
sure the squelch is not turned on unintentionally. ) -
Display Mode
The display can be set to show different information; press the [ DISPLAY ]
button to cycle between signal strength/signal to noise ratio, time,
temperature and alarm time. Signal strength is expressed in dBu units, the
larger the number, the stronger the signal. The signal to noise radio is
expressed in dB units; the larger the number, the greater the signal quality,
with a value of 0 indicating that signal and noise are equal. The value is
also shown as 0 when there is no signal at all. -
FM Reception
To receive FM broadcasts, fully extend the whip antenna and press the [ FM ]
button.
Here are your tuning options:
1. Press [FREQ] button, enter the frequency of the station, and press [FREQ]
button again.
2. Long press the [FM] button to activate ATS to store all strong stations
into memory (see section on the Memory system for how to access them).
3. Press the [Up or down arrow] keys to go to the next frequency.
4. Long press the [Up or down arrow] to scan for the next strong station.
5. Rotate the tuning knob to tune stations.
FM STEREO
Some FM stations broadcast in stereo. In this case, STEREO appears on the
display. Listening to the two stereo channels requires stereo headphones.
Stereo can be turned off and on with the [FM ST] button. It may be
automatically disabled for a weak signal. In some situations, you may get
improved reception by turning stereo off. The stereo setting is stored in the
station memory when the frequency is saved. -
FM RDS (radio data system)
RDS is a means for FM radio stations to transmit data along with their
programming. Not all FM stations employ RDS, but the ones that do typically
transmit the station name, the station type, the song artist and title when
playing music, and occasionally the time. When RDS is present, the RDS icon on
the display is shown and the RDS data information appears at the bottom of the
display. Use the [INFO] button to cycle through the RDS data options. This
radio supports the following RDS information:
• PS-Program Service Name
• DATE-Date and Time (“NO DATE” if not present)
• PTY-Program type: News, Drama, Rock music… (“NONE” if not present)
• RT- Radio Text may contain artist and title information for music (“NO RT”
if not present)
RDS date information can be used to automatically set the radio clock. Refer
to the Clock Setting topic for additional information. -
MW (medium wave)
To receive MW broadcasts, press the [LW/MW] button.Here are your tuning
options:
1. Press [FREQ] button, enter the frequency of the station, either 3 or 4
digits.
2. Long press the [ LW/MW ] button to activate ATS and store all strong
stations into memory (see section on the Memory system for how to access
them).
3. Press the [ Up or down arrow ] to go to the next frequency.
4. Long press the [ Up or down arrow ] to scan for the next strong station.
5. Rotate the tuning knob to tune stations.
Rotate the radio for the best reception. Refer to the Antenna topic for more
information. -
LW (longwave)
Long wave reception initially defaults to ‘off’. Refer to the Settings topic
to learn how to enable it. With the radio turned off, pressing the [LW/MW]
button when long wave is enabled switches between the two bands. The display
shows the selected band.
Here are your tuning options:
1. Press FREQ, enter the frequency of the station.
2. Long press the [ LW/MW ] button to activate ATS to store all strong
stations into
memory (see Memory system topic for how to access them).
3. Press the [ Up or down arrow ] to go to the next frequency.
4. Long press the [ Up or down arrow ] to scan for the next strong station.
5. Rotate the tuning knob to tune stations.
Rotate the radio horizontally for the best reception.Refer to the Antenna
topic for more information. -
SW (shortwave)
Fully extend the whip antenna and press the [ SW] button to select the
shortwave function and tune to the previously accessed shortwave frequency.
Repeated presses of the button cycle through the 14 international shortwave
broadcast bands The display shows which meter band is selected briefly after
the button is pressed.
The bands are:
● 120m (2300 – 2695kHz)
● 90m (3200 – 3400 kHz)
● 75m (3900 – 4000 kHz)
● 60m (4750 – $060 kHz)
● 49m (5730 – 6200 kHz)
● im (7100 – 7300 kHz)
● 31m (9250 – 9900 kHz)
● 25m (11500 – 12160 kHz)
● 22m (13570 – 13870 kHz)
● 19m (15300 – 15800 kHz)
● 16m (17480 – 17900 kHz)
● 15m (12900 – 19020 kHz)
● 13m (21450 – 21850 kHz)
● 11m (25670 – 26100 kHz)
Note: The frequency range of the shortwave band is stipulated by
international organizations such as the International Tebecommunication Union
(ITU). Although these ranges are relatively fixed, they may be adjusted
according to the needs of different countries and regions.
Here are your tuning options:
1. Press [FREQ] button and enter the frequency of the station. You may need
to press (FREQ ] button again to complete.
2. Long press the [SW] button to activate ATS to store ail strong stations
into memory (see Memory System topic for how to access them). Note that anfy
the stations within the 14 international shortwave bands are scanned.
3. Press the [Upordows arrow bays) to go to the next frequency.
4. Long press the (Upor dows arruwkeys] to scan for the next strong station.
Note that only the 14 international shortwave bands are scanned.
5. Rotate the tuning knob to tune stations. Position the radio for the best
reception. Refer to the Antenna topic for more information. -
Single Side band (S58)
To decode shortwave SSB signals on this radio, first tune the station for the
strongest signal. Then press the SSB button, the display will show the side
band setting, either upper side band (USB) or lower side band {LS8}. In SSB
mode, the INFO button switches between the two side bands. LS8 is mast often
used for frequencies below 7300 kHz and USB for those over 14000 kHz, with
exceptions.
Refer to the Bandwidth topic for how to improve shortwave reception.
To exit SSB mode, press the SSB button again and the radio will display ”
NORMAL”. -
Fine Tuning
In SSB mode, use the [FINE TUNE] knob on the right side of the radio. Turn it
upward and the screen will display “FINE 1+99”; turn it downward and the
screen will display “FINE 1-99”, which is a function for fine-tuning the
frequency. The numeric value is the offset +/- from the displayed frequency.
In other band modes, rotate the [FINE TUNE] knob to make slight adjustments to
the frequency or to try to reduce interference from adjacent stations. -
AIR Band
To receive aviation transmissions, fully extend the whip antenna and press the
AIR button. Here are your tuning options:
1. Press [ FREQ ] , enter the frequency of the station, and press [ FREQ ]
again if necessary.
2. Long press the [ AIR ] button to activate ATS to store all strong stations
into memory (see section on the Memory system for how to access them).
3. Press the [ Up or down arrow ] to go to the next frequency.
4. Long press the [ Upor down arrow ] to scan for the next strong station.
5. Rotate the [ Tuning ] knob to tune stations. Air band is best received
near airports. You can look up the approach frequency for your closest
airports online and set the radio for these frequencies. -
Reset
Should the radio become inoperable, you may attempt to reset the radio by
pushing a small object such as a paperclip into the Reset hole until you feel
a click.
Take care not to press too hard and damage the radio.
Note: The reset hole is located on the bottom of the radio.
Other Operations
-
Earphone Jack
For private listening, use headphones or earbuds. -
DC Jack
You can power your radio with a correct pins and polarity of AC wall adapter
via this DC jack. Please make sure the DC volt is the same as marking on the
radio. Otherwise the radio will not work or may be damaged. -
External Antenna Jack
Connect an external antenna with this 3.5 mm phone jack to improve the
reception on FM, SW and AIR Bands. -
Back Stand
Flip the panel out to prop up your radio for easy use of control, best audio
and for viewing positioning.
Specifications
Radio bands:
FM:| 64 – 108 MHz
AM(MW):| 520 -1710 kHz
SW:| 1711 – 29999 kHz
LW:| 150 -450 kHz
AIR:| 118 -137 MHz
Sensitivity:
FM:| > 3µV
AM(MW):| 0.5 mV/m
SW:| 10 mV/m
LW:| 10 pV
AIR:| 0.5 pV
AM Selectivity:| > 80dB
Number of memories:| 500 (100 per band)
Battery:| 1 x 18650
DC input voltage:| 5V
Speaker:| 80 1 W
Earphone Jack:| 3.5mm
Dimensions:| 157(W) x 92(H) x 32(D) mm
Weight:| 265g (without battery)
Accessories:| lx Earphone
1 x storage bag
1 x external antenna
1 x Type-C charging cable, 1 x 18650 battery
1 x English user manual
Skype:radiwow
E-mail: xhdatacn@gmail.com
Facebook:XhdataRadios
Web: www.xhdata.com.cn
Read User Manual Online (PDF format)
Read User Manual Online (PDF format) >>
Download This Manual (PDF format)
Download this manual >>
Manual
View the manual for the Xhdata D-808 here, for free. This user manual comes under the category radios and has been rated by 11 people with an average of a 9. This manual is available in the following languages: English. Do you have a question about the Xhdata D-808?
Ask your question here
Frequently asked questions
Can’t find the answer to your question in the manual? You may find the answer to your question in the FAQs about the Xhdata D-808 below.
What is bluetooth?
Bluetooth is a way of exchanging data wirelessly between electronic devices via radio waves. The distance between the two devices that exchange data can in most cases be no more than ten metres.
When is my volume too loud?
A volume above 80 decibels can be harmful to hearing. When the volume exceeds 120 decibels, direct damage can even occur. The chance of hearing damage depends on the listening frequency and duration.
How can I best clean my radio?
A slightly damp cleaning cloth or soft, dust-free cloth works best to remove fingerprints. Dust in hard-to-reach places is best removed with compressed air.
What is the difference between FM and AM?
FM stands for Frequency Modulation and AM stands for Amplitude Modulation. The biggest difference between FM radio stations compared to AM radio stations is the sound quality.
Is the manual of the Xhdata D-808 available in English?
Yes, the manual of the Xhdata D-808 is available in English .
Is your question not listed? Ask your question here
Click image to download manual.
Many thanks to SWLing Post contributor, Dave Anderson, who writes:
Attached is the manual for the new XHDATA D-808. Your readers who have ordered the D-808 may be interested in downloading this:
https://www.digitalnomad.nz/downloads/XHDATA-D-808.pdf
Many thanks, Dave! I’ve ordered the D-808, so I appreciate getting a sneak peek at the manual.
I did note one thing that sets the D-808 apart from the AR-1780: the D-808 is powered by one 18650 lithium battery.
My D-808 was shipped a few days ago, but I don’t expect it to arrive for at least a couple of weeks. Anyone else order the D-808?