
Robotic vacuum
Робот-пылесос
3
11
VT-1803
cleaner
1
IM VT-1803.indd 1 7/2/19 3:20 PM
IM VT-1803.indd 2 7/2/19 3:20 PM

ROBOTIC VACUUM CLEANER VT-1803
The robotic vacuum cleaner is intended for room
cleaning in automatic mode.
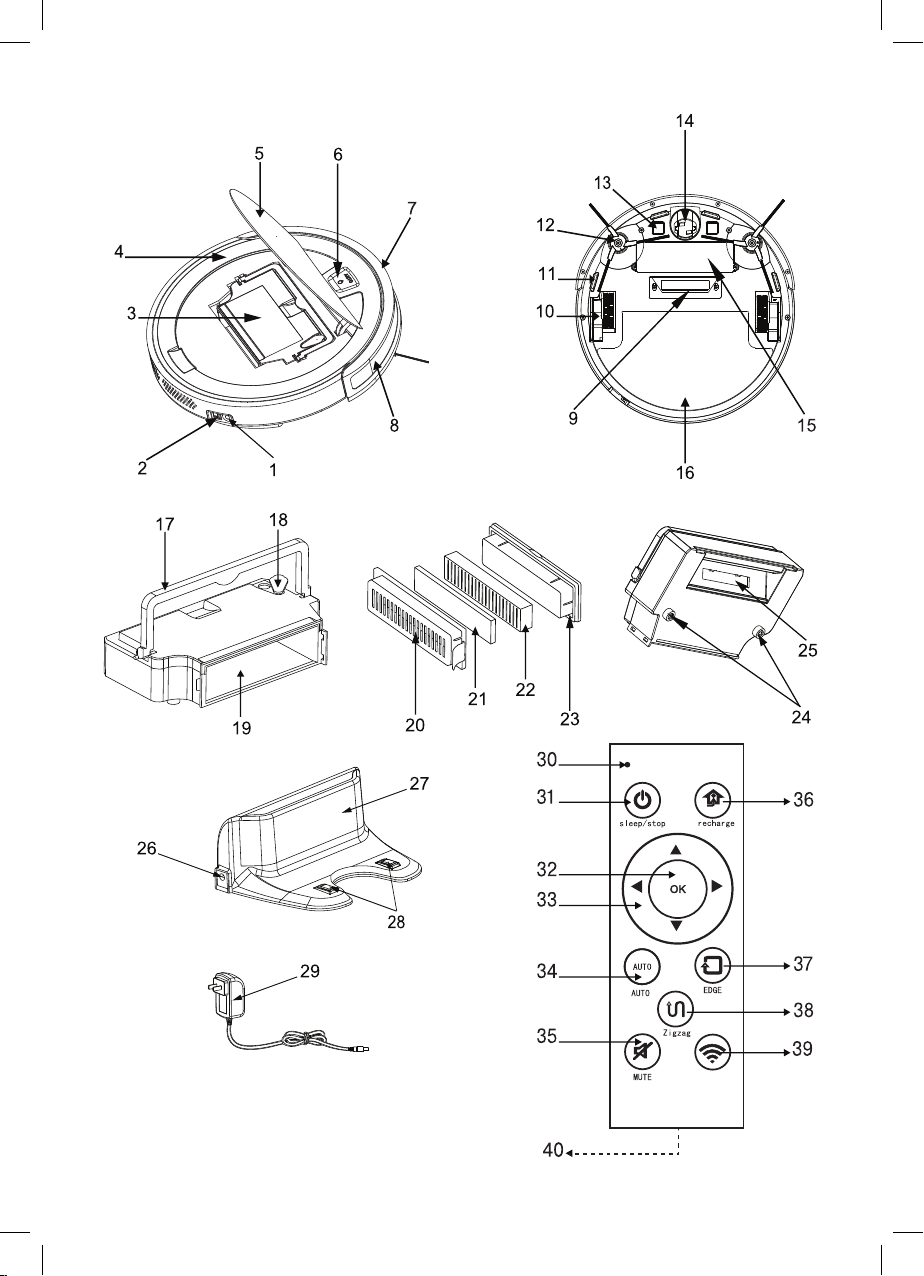
DESCRIPTION
1.
AC/DC adapter connection socket
2.
Power switch «I/0»
3.
Dust bin
4.
Body
5.
Lid
6.
Start/stop button «AUTO »
7.
Front bumper
8.
Sensor window
9.
Suction nozzle
10.
Driving wheels
11.
Anti-drop sensors
12.
Side brushes
13.
Contact points for battery charging
14.
Front wheel
15.
Rechargeable battery
16.
Floor wet cleaning attachment
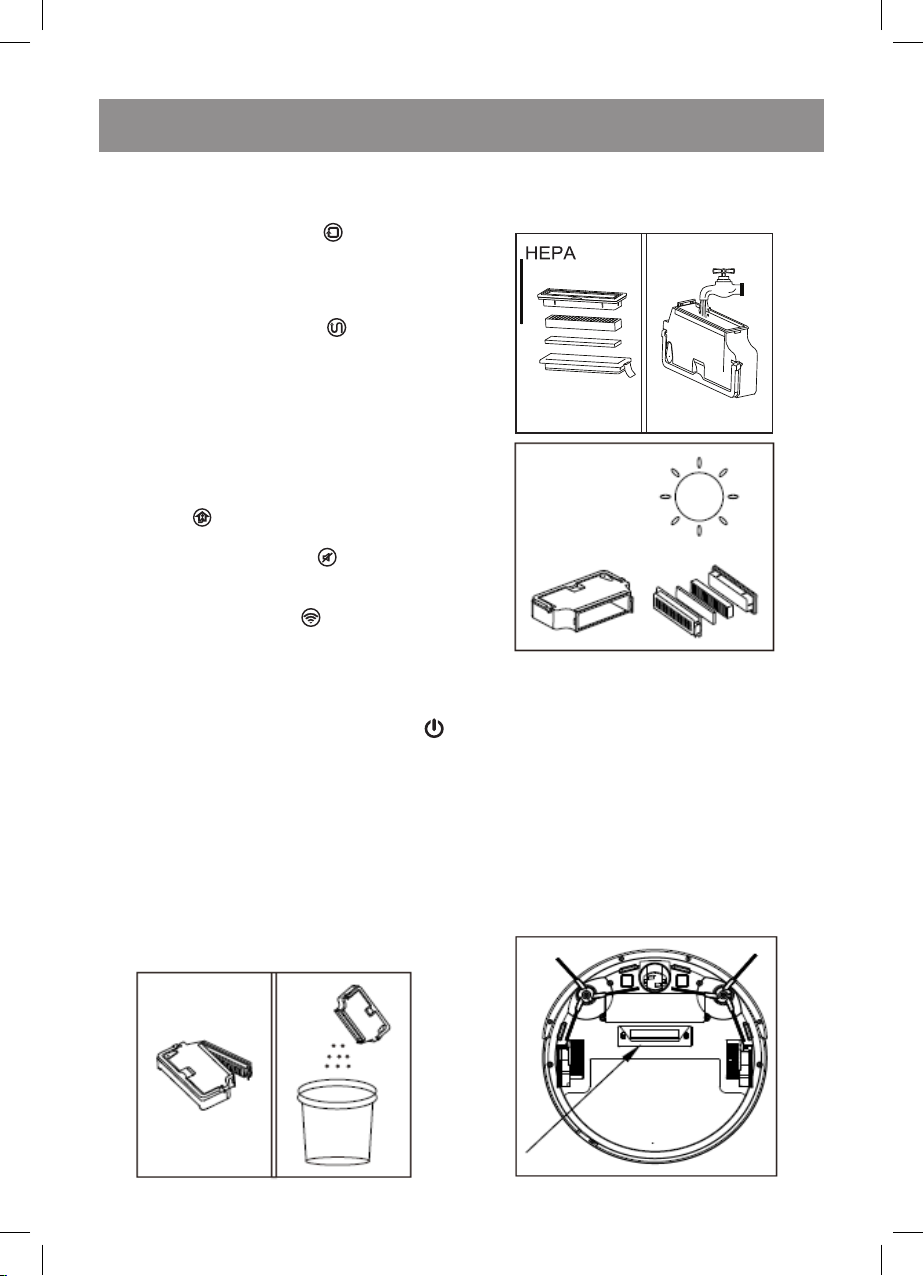
Dust bin
17.
Dust bin handle
18.
Water inlet plug
19.
Filter installation place
20.
Filter holder with lock
21.
Foam filter
22.
HEPA filter
23.
HEPA filter holder
24.
Water drop openings
25.
Garbage spill-proof lid
Charging station
26.
Power adapter connection socket
27.
Sensor panel
28.
Contact points for battery charging
29.
Power adapter
Remote control
30.
Remote control operation indicator
31.
On/standby/off button «sleep/stop »
32.
Cleaning on/off button « »
33.
Vacuum cleaner manual operation buttons
« »
34.
Auto room cleaning button «AUTO »
35.
Voice signal on/off button «MUTE »
36.
Return to the charging station button
«recharge »
37.
«Along the wall» cleaning mode button «EDGE »
38.
«Zigzag» cleaning button «Zigzag »
39.
Network connection button «WI-FI «
40.
Battery holder
SAFETY MEASURES AND OPERATION
RECOMMENDATIONS
Read this instruction manual carefully before using
the robotic vacuum cleaner and keep it for the
whole operation period. Mishandling of the unit may
lead to its breakage and cause harm to the user or
damage to his/her property.
To avoid the risk of fire, electric shock and to prevent injury, observe the following safety measures.
•
Use the unit in strict accordance with the instruction manual.
•
Use only the accessories supplied with the unit.
•
Before charging the rechargeable battery for the
first time, make sure that voltage of the mains
corresponds to the operating voltage of the
power adapter.
•
Do not charge the rechargeable battery in
places with high moisture and high temperature.
Charge the accumulator battery at the temperature from +5° C to +35° C and relative humidity no
more than 80%.
•
If you don’t use the charging station for a long
time, unplug the power adapter.
•
Do not touch the power adapter body with wet
hands.
•
Do not use the vacuum cleaner outdoors, for
cleaning wet and damp floors.
•
Do not use the vacuum cleaner in the rooms with
unsteady furniture, especially if there are fragile
interior objects or burning candles placed on it.
•
Do not place or install foreign objects on the vacuum cleaner body, make sure that there are no
pets on the vacuum cleaner body.
•
Do not switch the unit on if the air inlet is blocked
by a foreign object.
•
Keep hair, free hanging clothes and interior objects
away from the vacuum cleaner path of motion.
•
Set additional obstacles for the vacuum cleaner
when cleaning the stair landings.
•
Do not use the vacuum cleaner for collecting
such inflammable liquids as gasoline or solvents. Do not use the vacuum cleaner in places
where such liquids are stored.
•
Do not use the vacuum cleaner for collecting
burning or smoking cigarettes, matches, cinders
as well as fine dust, for example, of plaster, concrete, flour or ashes.
•
Do not use the vacuum cleaner if:
–
the dust bin is not installed;
–
the HEPA filter is not installed in the bin.
•
Do not immerse the vacuum cleaner, the power
adapter and the charging station into water or
any other liquids.
3
IM VT-1803.indd 3 7/2/19 3:20 PM

Attention! The unit contains a lithium battery.
Prevent children from swallowing the lithium battery. If your child has swallowed a battery,
immediately see your doctor.
•
Close supervision is necessary when children or people with disabilities are near the
operating unit.
•
This unit is not intended for usage by children.
•
During the operation and breaks between
operation cycles, keep the unit away from
children.
•
The unit is not intended to be used by people
with physical or mental disabilities (including
children) or by persons lacking experience or
knowledge if they are not under supervision of
a person who is responsible for their safety or
if they are not instructed by this person on the
usage of the unit.
•
Do not leave children unattended to prevent
using the unit as a toy.
•
For children safety reasons do not leave
polyethylene bags used as packaging unattended.
Attention! Do not allow children to play with polyethylene bags or packaging film. Danger of suf-
focation!
•
Do not use the connecting cord of the power
adapter to carry the charging station. Provide
that the connecting cord does not touch sharp
edges of furniture and hot surfaces. Provide
that the vacuum cleaner does not run over the
connecting cord of the power adapter.
•
Periodically check that the power adapter and
the connecting cord are not damaged.
•
Never use the unit if the power adapter or
connecting cord is damaged, if the unit
works improperly or after it was dropped.
•
Do not attempt to repair the unit. Do not disassemble the unit by yourself, if any malfunction is detected or after it was dropped,
unplug the unit and apply to any authorized
service center at the contact addresses given
in the warranty certificate and on the website
www.vitek.ru.
•
To avoid damages, transport the unit in the original packaging only.
•
Before you dispose of the vacuum cleaner,
remove the battery and apply to the corresponding center for recycling of it. Do not burn the
vacuum cleaner even if it is badly damaged
without removing the battery to avoid the battery explosion.
•
Transport the unit in the original packaging only.
•
Keep the unit in a dry cool place out of reach of
children and people with disabilities.
THE UNIT IS INTENDED FOR HOUSEHOLD USE
ONLY, ITS COMMERCIAL USAGE AND USAGE
IN PRODUCTION AREAS AND WORK SPACES IS
PROHIBITED.
BEFORE THE FIRST USE
After unit transportation or storage under cold
(winter) conditions, it is necessary to keep it
for at least three hours at room temperature
before switching on.
•
Unpack the vacuum cleaner and remove any
advertising stickers and package materials.
•
Keep the original package.
•
Check the unit for damages, do not use it in case
of damages.
•
Read the safety instructions and the operation
manual.
•
Make sure that operating voltage of the power
adapter corresponds to the voltage of your
mains.
•
The unit is intended for operation with AC system
and 50 Hz or 60 Hz frequency, the unit does not
need any additional settings for operating with
the required nominal frequency.
REMOTE CONTROL
Attention! The unit contains a lithium battery.
Prevent children from swallowing the lithium battery. If your child has swallowed a battery,
immediately see your doctor.
•
Press on the side lock of the battery holder (40)
and remove it.
•
Install the CR2025 battery into the holder (40)
strictly following the polarity.
•
Install the holder (40) in the remote control body.
Notes:
–
if there is an isolation insert in the remote control, remove the insert;
–
replace the battery in time;
–
do not recharge the battery;
–
remove the battery if you are not planning to use
the unit for a long time;
–
remove the used battery from the unit and dispose of it safely;
–
avoid short circuiting the battery clips.
BEFORE USING THE VACUUM CLEANER
Manual battery charging
It is recommended to charge the battery in manual
mode before using the vacuum cleaner.
4
IM VT-1803.indd 4 7/2/19 3:20 PM
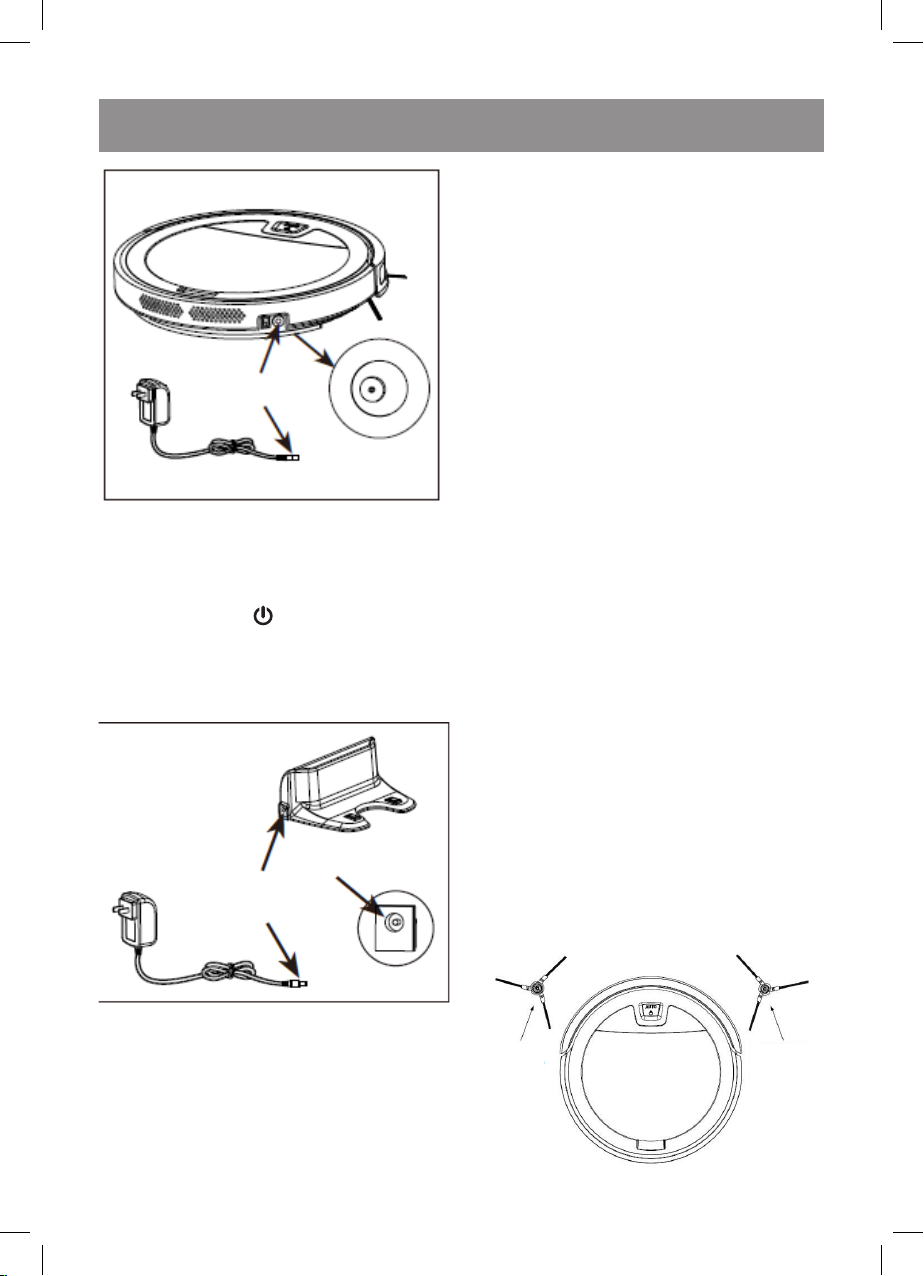
•
Connect the power adapter (29) connecting cord jack to the socket (1) on the vacuum
cleaner body.
•
Connect the power adapter (29) to the mains
socket, you will hear a voice signal and the start/
stop button «AUTO » illumination will be flashing green.
•
The duration of the first battery charging should
be at least 8 hours.
Charging station
•
Do not place the charging station next to objects
with high reflective power, such as mirrors, otherwise the vacuum cleaner’s return to the charging station will be hindered.
BEFORE USING THE VACUUM CLEANER
•
Remove all kinds of power cords, power extension cords and other similar items from the floor
that may interfere with the movement of the vacuum cleaner.
•
The vacuum cleaner is intended for operation on a smooth floor or on a carpet with low
pile (less than 1 cm). Do not use the vacuum
cleaner for cleaning the floors and carpets with
high pile.
•
Make sure that there are no tablecloths, curtains
or other furnishings hanging to the floor along
the path of motion of the vacuum cleaner.
•
The free space under the furniture should be
at least 6 centimeters, otherwise the vacuum
cleaner will simply get stuck under the furniture.
•
If the distance from the floor to the furniture is
less than 6 centimeters, it is necessary to lift
the furniture or to provide a barrier against the
vacuum cleaner getting in such places.
•
Provide additional obstacles for the vacuum
cleaner when cleaning the stair landings.
•
Arrange furniture for free movement of the vacuum
cleaner, remove foreign objects from the floor.
•
Do not use the vacuum cleaner in the rooms
with unsteady furniture, especially if there
are fragile interior objects or burning candles
placed on it.
•
Do not place or install foreign objects on the vacuum cleaner body, make sure that there are no
pets on the vacuum cleaner body.
•
Before using the vacuum cleaner make sure that
there are no narrow places in the path of motion
of the vacuum cleaner.
USING THE VACUUM CLEANER
•
Connect the power adapter (29) connecting cord
jack to the socket (26) on the charging station.
•
Place the charging station on the flat floor sur-
Left brush
(the center
is gray)
Right brush
(the center
is yellow)
face next to the wall, the charging station base
must be perpendicular to the floor.
•
There should be at least 1,5 meters of free
space in front of the charging station and at least
0,5 meter at the sides.
5
IM VT-1803.indd 5 7/2/19 3:20 PM
•
The side brushes (12) are not interchangeable.
Before using the vacuum cleaner make sure that
the brushes (12) are installed properly.
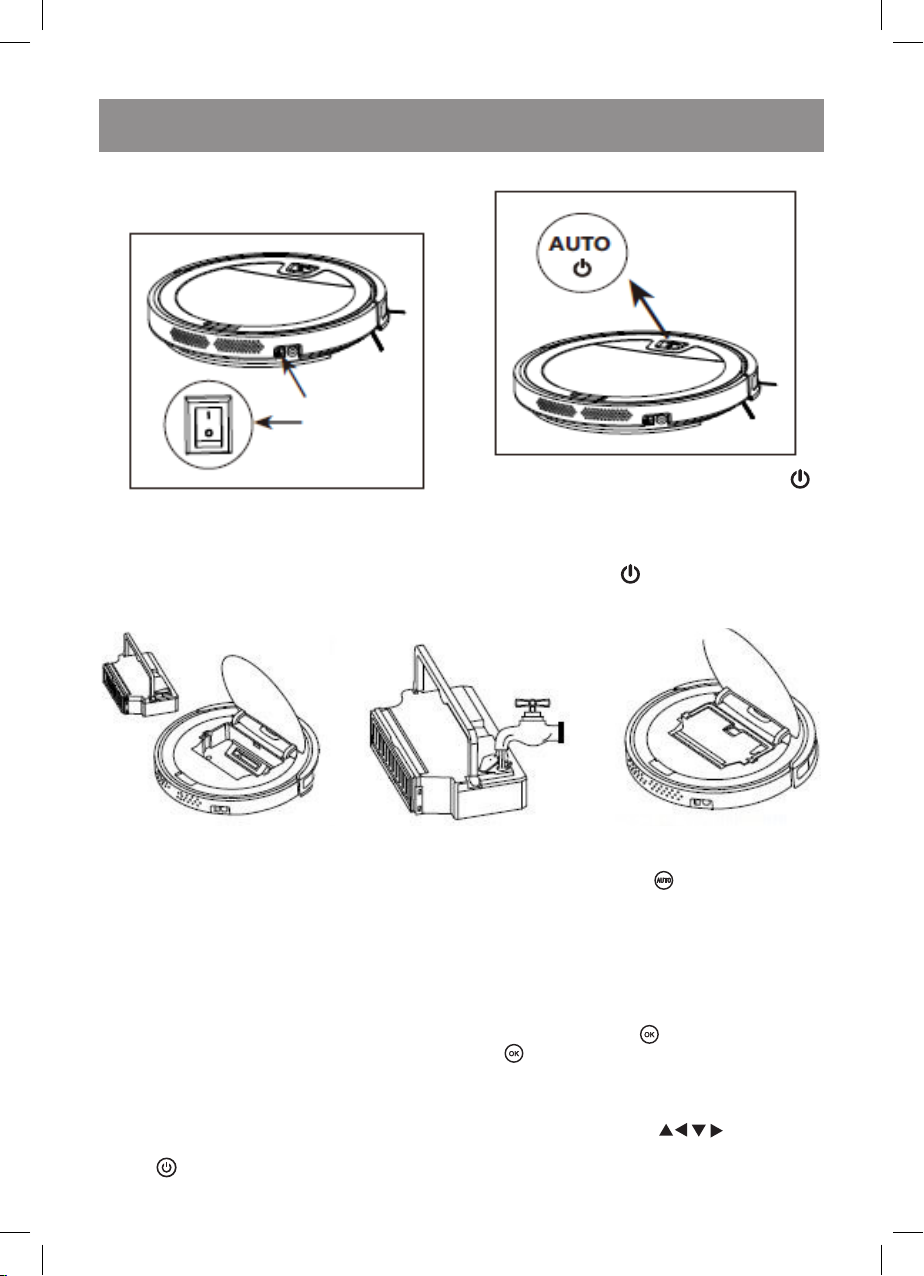
•
Switch the vacuum cleaner on, setting the power
switch (2) to the position «I/0».
•
You will hear a melody, the button (6) illumination will be glowing green, the vacuum cleaner
will switch on in the standby mode.
Wet floor cleaning
Automatic room cleaning mode
•
Press the start/stop button (6) «AUTO »,
you will hear a voice signal, the vacuum
cleaner will switch on and start cleaning in the
auto mode.
•
To stop the vacuum cleaner press the start/stop
button (6) «AUTO » again.
•
Open the lid (5), take the handle (17) and remove
the dust bin (3).
•
Open the water inlet lid (18) and fill the water
Automatic room cleaning mode
•
To switch on the auto room cleaning mode press
the button (34) «AUTO ».
tank with water, close the water inlet lid (18).
•
Install the dust bin (3) back to its place, close
the lid (5).
•
Attach the fabric attachment (16) to the vacuum
cleaner bottom with the «stickers».
Notes:
–
if you are not going to use the vacuum cleaner for
a long time, pour the water out of the water tank.
–
the water tank capacity is 100 ml.
Temporary stop of the vacuum cleaner during
cleaning
•
The automatic cleaning mode is the most commonly used, in this mode the vacuum cleaner
cleans the entire surface of the floor.
•
You can stop the vacuum cleaner by pressing the button (32) « ». Press the button (32)
« » again to switch the vacuum cleaner on and
continue cleaning.
Using of the remote control
•
You can select the required cleaning mode with
the remote control.
•
Press the on/standby/off button (31) «sleep/
stop » on the remote control.
Vacuum cleaner manual operation
•
Use the buttons (33) « » to direct the
vacuum cleaner to the necessary area for cleaning or to lead it out of places difficult for cleaning.
6
IM VT-1803.indd 6 7/2/19 3:20 PM
«Along the wall» cleaning mode
•
In this mode the vacuum cleaner cleans the room
along the walls.
•
Press the button (37) «EDGE » on the remote
control to switch the cleaning mode on.
«Zigzag» cleaning mode
•
In this cleaning mode the vacuum cleaner cleans
the room moving crablike.
•
Press the button (38) «Zigzag » on the remote
control, the vacuum cleaner will switch on and
start cleaning.
Returning the vacuum cleaner to the charging
station
•
When the vacuum cleaner battery is discharged,
the vacuum cleaner will automatically return to
the charging station.
•
You can send the vacuum cleaner to the charging station manually by pressing the button (36)
«recharge » on the remote control.
Switching voice signals on/off
•
Use the button (35) «MUTE » to switch voice
signals on/off.
Connection to WI-FI
•
Press the button (39) «WI-FI » on the remote control, the vacuum cleaner will switch to the Wi-Fi connection and setting mode. If you have «Tuya Smart»
application installed on your smartphone, you can
control the vacuum cleaner operation remotely.
•
You can connect the vacuum cleaner to WI-FI by
pressing and holding the button (6) «AUTO »
for 5 seconds.
CLEANING AND MAINTENANCE
•
It is recommended to clean the dust bin (3) and
the filters (21, 22) after every use of the vacuum
cleaner.
•
Before cleaning switch the vacuum cleaner off by
setting the power switch (2) to the position «0».
•
Disconnect the power adapter (29) from the
mains, remove the connecting cord jack from the
socket (26) on the charging station.
•
Open the lid (5), take the handle (17) and remove
the dust bin (3).
•
Take the filter holder (20) lock and remove the
filter block.
•
Remove dust and garbage from the dust bin (3).
•
Remove the HEPA filter holder (23) from the filter holder (20) and remove the HEPA filter (22),
remove the foam filter (21), clean the filter holders (20, 23) and the filters (21, 22) from dust and
garbage, wash them under a warm water jet.
•
Wash the dust bin (3).
•
Dry the filters (21, 22) thoroughly and the filter
holders (20, 23). Assemble the filter block. Before
installing the filter block to the installation place
(19) make sure that all the filter parts are dry.
Notes:
–
do not wash the filters (21, 22) and the filter holders (20, 23) in a dishwashing machine.
–
do not dry the HEPA filter (22) with a hairdryer.
7
IM VT-1803.indd 7 7/2/19 3:20 PM
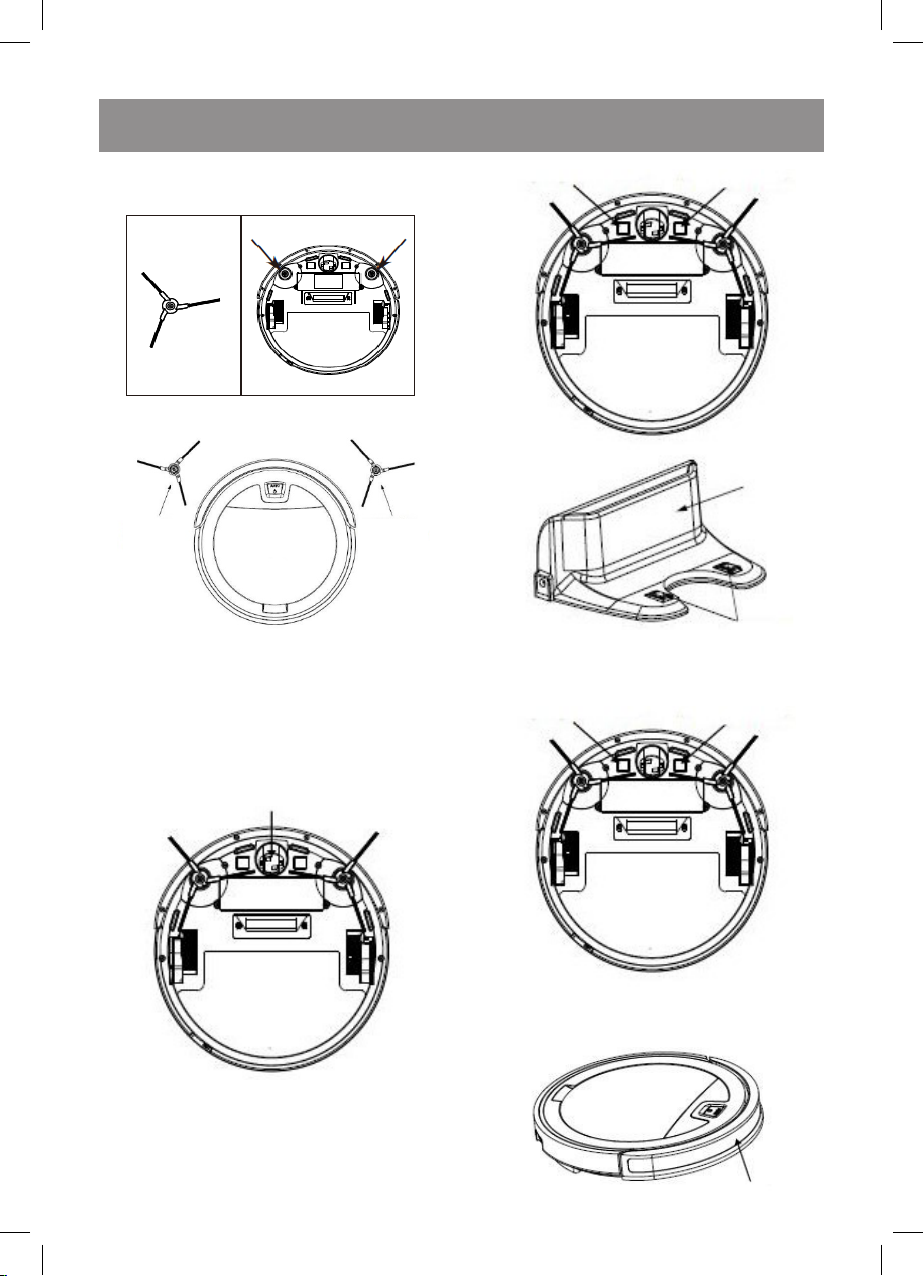
•
Clean the suction nozzle (9) on the bottom part
of the vacuum cleaner body (4).
Left brush
(the center
is gray)
•
Unscrew the fastening screws with a screwdriver (not included) and remove the side
brushes (12), wipe them with a slightly damp
cloth, clean the brush (12) installation places
from dust.
•
The side brushes (12) are not interchangeable,
before installing the brushes (12) make sure that
they are installed properly.
Right brush
(the center
is yellow)
•
Clean the contact points for battery charging (13) on the vacuum cleaner and the contact
points on the charging station (28) from dust.
•
Clean and wipe the anti-drop sensors (11)
on the bottom part on the vacuum cleaner body.
•
Clean the front wheel (14) from dust and garbage and wipe it. Remove hair, if there are any,
make sure that nothing hinders the wheel (14)
free rotation.
8
IM VT-1803.indd 8 7/2/19 3:20 PM
•
Wipe the front bumper (7).
•
Wipe the vacuum cleaner body (4) with a slightly
damp cloth and then wipe it dry.
•
Do not immerse the vacuum cleaner body (4),
the charging station, the power adapter (29)
and the connecting cord of the power adapter
into water or any other liquids. Provide that no
liquid gets inside the vacuum cleaner body (4).
•
Do not use solvents or abrasives for cleaning the
vacuum cleaner body (4), the charging station
and the power adapter (29).
Removing the battery (15)
•
Before you dispose of the vacuum cleaner,
remove the battery and apply to the corresponding center for recycling of it. Do not burn the
vacuum cleaner even if it is badly damaged
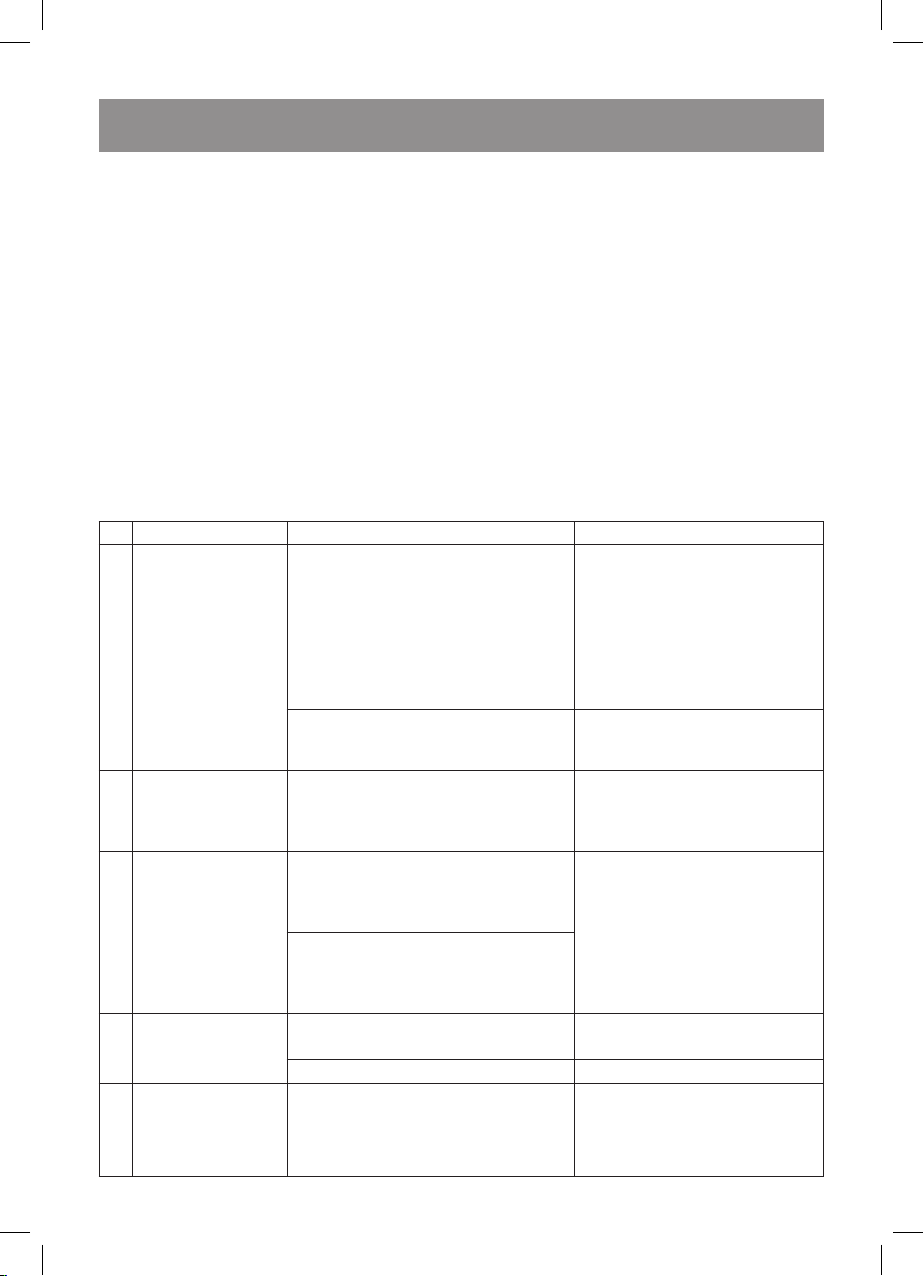
Possible troubles and troubleshooting
№ Malfunction Possible causes Solution
1 The battery doesn‘t
charge.
2 The vacuum cleaner
gives alarms,
periodically switches
on and off.
3 The vacuum cleaner
finishes cleaning
ahead of time and
spontaneously
returns to the
charging station.
4 The vacuum
cleaner doesn‘t see
obstacles
5 The vacuum cleaner
doesn‘t respond to
the remote control.
The vacuum cleaner is set improperly on
the charging station.
The charging station power adapter
is disconnected from the mains.
It is possible that foreign objects (wires,
threads, hanging curtains, etc.) have
been wound onto the driving wheels of
the vacuum cleaner.
If the battery charge is too low for the
room cleaning, the vacuum cleaner
automatically returns to the charging
station.
The operation time of the vacuum
cleaner depends on the cleaning area,
floor surface, room configuration and
the selected cleaning mode.
Anti-drop sensors are dirty. Turn over the vacuum cleaner and
The sensors on the front bumper are dirty. Wipe the front bumper.
The battery in the remote control is
discharged and has to be replaced.
without removing the battery to avoid the battery explosion.
•
It is recommended to remove the battery (15) for
long storage of the vacuum cleaner.
•
Unscrew two fastening screws of the battery lid
and remove the lid.
•
Remove the battery and remove the socket slot
on the plate.
STORAGE
•
Before taking the vacuum cleaner away for long
term storage, clean its body (4), the dust bin (3)
and the filters (21, 22).
•
Remove the battery from the remote control.
•
Use the original package for storage.
•
Keep the vacuum cleaner in a dry cool place out
of reach of children and disabled persons.
Make sure that the contact
points for battery charging on
the vacuum cleaner body and on
the charging station are clean.
If necessary, wipe the contact
points.
Slightly move the vacuum cleaner
body by hands to provide better
contact with the charging station.
Connect the charging station and
plug the power adapter to the
mains socket.
Remove the foreign objects from
the driving wheels and from the
floor.
It is normal.
Do not interfere with the vacuum
cleaner operation.
wipe the anti-drop sensors.
Remove the battery holder from
the remote control, remove the old
battery, install a new one strictly
following the polarity and install
the holder into the remote control.
9
IM VT-1803.indd 9 7/2/19 3:20 PM
№ Malfunction Possible causes Solution
5 The vacuum cleaner
doesn‘t respond to
the remote control.
Notes: — before applying to the service center try to restart the vacuum cleaner, switch it off by pressing
and holding the start/stop button (1) «AUTO » and then switch the vacuum cleaner on again. If the problem is not solved, contact the service center.
DELIVERY SET
Robotic vacuum cleaner – 1 pc.
Charging station – 1 pc.
Power adapter – 1 pc.
Side brushes – 2 pc.
Remote control – 1 pc.
Wet cleaning attachment – 1 pc.
Instruction manual – 1 pc.
TECHNICAL SPECIFICATIONS
Vacuum cleaner
Power supply: Rechargeable battery —
Li-Ion 14,8 V 2000 mAh
Battery charging time: 5 hours
Operation time: up to 2 hours
Power: 20 W
Power adapter:
Power supply: 100-240 V~50-60 Hz 0,5 A
Output voltage: 19 V 0.6 A
Charging station:
Input voltage: 19 V 0.6 A
Output voltage: 19 V 0.6 A
Remote control:
Power supply: CR2025 battery, 3 V
Dust bin capacity: 0,2 L
Water tank capacity: 0,1 l
Noise level: 65-68 dB
The manufacturer preserves the right to change
design, structure and specifications not affecting
general principles of the unit operation without a preliminary notification due to which insignificant differences between the manual and product may be
observed. If the user reveals such differences, please
report them via e-mail info@vitek.ru for receipt of an
updated manual.
The vacuum cleaner is switched off
or the vacuum cleaner battery is
discharged.
The signal from the remote control is not
transmitted, because the infrared emitter
on the remote control or the infrared
receiver on the vacuum cleaner are dirty.
There are other sources of infrared
signals in the room that affect the
operation of the vacuum cleaner.
The distance from the remote control is
more than 5 meters.
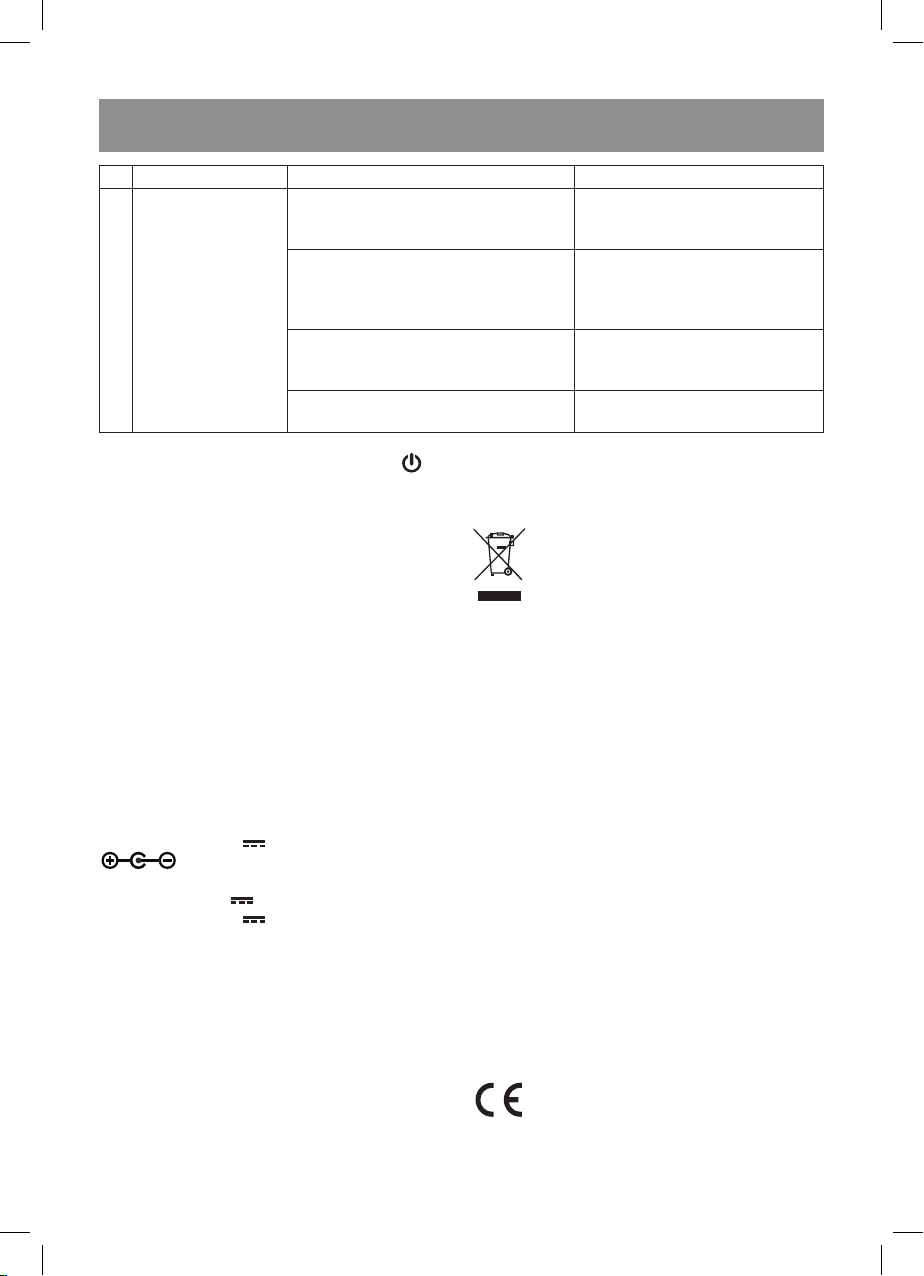
RECYCLING
For environment protection do not throw out the unit
and the batteries (if included), do not discard the
unit and the batteries with usual household waste
after the service life expiration; apply to specialized
centers for further recycling.
The waste generated during the disposal of the unit
is subject to mandatory collection and consequent
disposal in the prescribed manner.
For further information about recycling of this product apply to a local municipal administration, a disposal service or to the shop where you purchased
this product.
The unit operating life is 3 years
Guarantee
Details regarding guarantee conditions can be obtained from the dealer from whom the appliance
was purchased. The bill of sale or receipt must be
produced when making any claim under the terms
of this guarantee.
This product conforms to the EMC Directive
2014/30/EU and to the Low Voltage
Directive 2014/35/EU.
10
Make sure that the battery is fully
charged and the vacuum cleaner
is switched on.
Wipe the infrared emitter on the
remote control and the infrared
receiver on the vacuum cleaner
bumper.
Do not use other remote controls
during the vacuum cleaner
operation.
Bring the remote control closer
to the vacuum cleaner.
IM VT-1803.indd 10 7/2/19 3:20 PM
РОБОТ-ПЫЛЕСОС VT-1803
Основное назначение пылесоса-робота, это
уборка помещений в автоматическом режиме.
ОПИСАНИЕ
1. Гнездо для подключения сетевого
адаптера
2. Выключатель питания «I/0»
3. Контейнер-пылесборник
4. Корпус
5. Крышка
6. Кнопка старт/стоп «AUTO »
7. Передний бампер
8. Окно датчиков
9. Всасывающее сопло
10. Ведущие колёса
11. Датчики защиты от падения
12. Боковые щётки
13. Контакты для зарядки аккумуляторной
батареи
14. Переднее колесо
15. Аккумуляторная батарея
16. Насадка для влажной очистки пола
Контейнер для пыли и мусора
17. Ручка контейнера
18. Пробка заливочного отверстия
19. Место установки фильтров
20. Держатель фильтров с фиксатором
21. Поролоновый фильтр
22. НЕРА-фильтр
23. Держатель НЕРА-фильтра
24. Отверстия для капель воды
25. Крышка от высыпания мусора
Зарядная станция
26. Гнездо для подключения сетевого адаптера
27. Панель датчиков
28. Контакты для зарядки аккумуляторной
батареи
29. Сетевой адаптер
Пульт дистанционного управления
30. Индикатор работы пульта
31. Кнопка включения/дежурного режима/
выключения «sleep/stop »
32. Кнопка включения/выключения уборки « »
33. Кнопки ручного управления пылесосом
« »
34. Кнопка автоматической уборки
помещения «AUTO »
35. Кнопка включения/выключения голосовых
сигналов «MUTE »
36. Кнопка возврата пылесоса на зарядную
станцию «recharge »
37. Кнопка режима уборки «вдоль стены»
«EDGE »
38. Кнопка «зигзагообразной» уборки
«Zigzag »
39. Кнопка подключения к сети «WI-FI »
40. Держатель элемента питания
МЕРЫ БЕЗОПАСНОСТИ И РЕКОМЕНДАЦИИ
ПО ИСПОЛЬЗОВАНИЮ
Перед использованием робота-пылесоса
внимательно прочитайте инструкцию по эксплуатации и сохраняйте её в течение всего
срока эксплуатации. Неправильное обращение с устройством может привести к его
поломке, причинению вреда пользователю
или его имуществу.
Для снижения риска возникновения пожара,
для защиты от поражения электрическим током
и для предохранения от получения травм следуйте приведённым ниже рекомендациям.
• Используйте данное устройство только в
соответствии с инструкцией по эксплуатации.
• Используйте только те аксессуары, кото-
рые входят в комплект поставки.
• Перед первой зарядкой аккумуляторной
батареи убедитесь в том, что напряжение
в электрической сети соответствует рабочему напряжению сетевого адаптера.
• Не заряжайте аккумуляторную батарею в
местах с повышенной влажностью и высокой температурой. Производите зарядку
аккумуляторной батареи при температуре от +5°C до +35°C и при относительной
влажности не более 80%.
• Если вы не используете зарядную станцию
в течение длительного периода времени,
выньте сетевой адаптер из элек трической
розетки.
• Не прикасайтесь к корпусу сетевого адап-
тера мокрыми руками.
• Запрещается использовать пылесос вне
помещений, для уборки на влажных и
мокрых полах.
• Не используйте пылесос в помещениях с
неустойчивой мебелью, особенно если на
ней установлены хрупкие предметы интерьера или горящие свечи.
• Не кладите и не устанавливайте на корпус
пылесоса посторонние предметы, а так же
следите за тем, чтобы на корпусе пылесоса
не размещались домашние животные.
11
IM VT-1803.indd 11 7/2/19 3:20 PM
Loading…
Робот-пылесос Vitek Pro — устройство для автоматической уборки, которое экономит время и упрощает жизнь. Он делает уборку за вас и возвращается на зарядку.
Следуйте нашей инструкции для настройки робота-пылесоса Vitek Pro.
Шаг 1: Распакуйте робот-пылесос Vitek Pro и установите в зарядную станцию. Убедитесь, что устройство полностью заряжено.
Шаг 2: Подготовьте помещение для уборки. Убедитесь, что пол не забит мебелью и другими предметами. Поднимите ковры и вытолкайте стулья.
Шаг 3: Включите робот-пылесос, нажав на кнопку питания. Он начнет собирать пыль и грязь с пола.
Шаг 4: Настройте режимы работы робота-пылесоса Vitek Pro. Выберите «Автоматический» или «Зональный» режим.
Шаг 5: После уборки или разряда батареи робот-пылесос Vitek Pro сам вернется в зарядную станцию. Можно также отправить его на зарядку кнопкой «Док» на пульте.
Следуйте инструкции для быстрой настройки и использования робота-пылесоса Vitek Pro. Наслаждайтесь чистотой без лишних усилий!
Этап 1: Распаковка робота-пылесоса Vitek Pro

Перед началом настройки робота-пылесоса Vitek Pro его нужно правильно распаковать.
Инструкция, прилагаемая к роботу, содержит важные сведения об использовании. Внимательно изучите ее перед началом.
Перед началом использования робота-пылесоса рекомендуется проверить компоненты на повреждения.
Осторожно извлеките робота из упаковки, избегая резких движений и контакта с острыми предметами.
Проверьте, что все комплектующие на месте и не повреждены.
Теперь, когда вы распаковали робота-пылесоса, вы готовы к настройке устройства.
Этап 2: Зарядка

Для зарядки робота-пылесоса следуйте инструкциям:
- Поставьте зарядную базу рядом с розеткой и подключите к электричеству.
- Установите робот-пылесос Vitek Pro на зарядную базу, обратив внимание на правильную ориентацию.
- Убедитесь, что светодиодный индикатор на зарядной базе горит, указывая на процесс зарядки.
- Дайте роботу-пылесосу время для полной зарядки. Обычно это занимает около 4-6 часов.
- После полной зарядки робот-пылесос Vitek Pro готов к использованию.
Не рекомендуется использовать робот-пылесос Vitek Pro во время процесса зарядки. Убедитесь, что робот-пылесос полностью заряжен перед его использованием, чтобы обеспечить максимальную производительность и эффективность его работы.
Этап 3: Подготовка помещения для работы робота-пылесоса Vitek Pro

Перед использованием робота-пылесоса Vitek Pro необходимо подготовить помещение:
- Освободите пол и уберите все лишние предметы, чтобы робот мог свободно перемещаться.
- Проверьте, что ковры надежно прикреплены к полу, чтобы избежать заедания робота-пылесоса.
- Уберите колеблющиеся предметы с пола, такие как полотенца или занавески, чтобы избежать сбоев в работе робота.
- Проверьте, что все провода или шнуры спрятаны.
- Закройте двери комнат, где роботу-пылесосу не нужно быть.
- Установите виртуальные стены, если нужно ограничить доступ.
Подготовка помещения перед работой робота-пылесоса Vitek Pro поможет обеспечить более эффективную уборку и избежать проблем.
Этап 4: Настройка режимов работы робота-пылесоса Vitek Pro

После установки базы и загрузки батареи необходимо настроить режимы работы робота-пылесоса Vitek Pro. Выберите подходящий режим исходя из особенностей вашего дома и ваших потребностей.
1. Режим «Авто» — робот-пылесос сам определит оптимальный маршрут и время для общей уборки.
2. Режим «Точечная уборка» — фокус на уборке определенной области, хорош для очистки загрязненных участков.
3. Режим «Уборка по стене» — робот двигается вдоль стены, обеспечивая тщательную уборку вдоль периметра комнаты.
Установите дни недели и время, когда робот-пылесос будет работать.
| Выберите день недели, на котором вы хотите установить график, и нажмите на него. | |
| 5. | Установите время начала и время окончания работы робота-пылесоса, сдвигая ползунки. |
| 6. | Повторите шаги 4-5 для всех дней недели, на которых вы хотите установить график. |
| 7. | Нажмите кнопку «Сохранить» для применения установленного графика работы. |
После выполнения всех шагов ваш робот-пылесос Vitek Pro будет автоматически работать в установленное вами время каждый выбранный день недели. Вы также можете изменить или удалить установленный график работы в любое время.
Этап 6: Подключение робота-пылесоса Vitek Pro к Wi-Fi

Для подключения робота-пылесоса Vitek Pro к Wi-Fi выполните следующие шаги:
1. Убедитесь, что робот-пылесос включен и готов к работе.
2. Установите мобильное приложение Vitek на свой смартфон или планшет.
3. Откройте приложение Vitek и зарегистрируйтесь или войдите в свой аккаунт.
4. Нажмите на кнопку «Добавить устройство» или выберите «Подключить новое устройство».
5. Выберите робот-пылесос Vitek Pro из списка доступных устройств.
6. Введите пароль от Wi-Fi сети и нажмите «Подключиться».
7. Ожидайте, пока робот-пылесос установит соединение с Wi-Fi. Это может занять несколько минут.
8. После успешного подключения робота-пылесоса к Wi-Fi вы сможете управлять им через мобильное приложение, выбирать программы уборки и запускать или останавливать уборку с помощью телефона.
Для подключения робота-пылесоса к Wi-Fi необходимо иметь стабильное интернет-соединение и правильно ввести пароль от сети Wi-Fi.
| Шаг | Описание |
| 1 | Убедитесь, что робот-пылесос включен и готов к работе. |
| 2 | Установите мобильное приложение Vitek на свой смартфон или планшет. |
| 3 | Откройте приложение Vitek и зарегистрируйтесь или войдите в свой аккаунт. |
| 4 | Нажмите на кнопку «Добавить устройство» или выберите в меню «Подключить новое устройство». |
| Выберите робот-пылесос Vitek Pro из списка доступных устройств. | |
| 6 | Введите пароль от Wi-Fi сети и нажмите «Подключиться». |
| 7 | Ожидайте установления соединения робота-пылесоса с Wi-Fi. |
| 8 | После успешного подключения вы сможете управлять роботом-пылесосом через мобильное приложение. |
Этап 7: Работа робота-пылесоса Vitek Pro

После всех настроек и подготовки робот-пылесос Vitek Pro готов к работе.
Для запуска робота-пылесоса Vitek Pro нажмите на кнопку «Старт» или «Пуск» на пульте дистанционного управления или на самом роботе.
Робот-пылесос Vitek Pro автоматически начнет очищать помещение от пыли и мусора с применением алгоритма навигации для охвата каждой зоны комнаты.
Робот-пылесос Vitek Pro необходимо использовать осторожно, чтобы избежать повреждений. Не блокируйте его путь и не допускайте крупных предметов или проводов на его пути.
По окончании уборки робот-пылесос Vitek Pro сам вернется на базу для зарядки, готовый к следующему использованию.
Также можно запрограммировать робота-пылесоса Vitek Pro на работу в определенное время при помощи пульта дистанционного управления.
Вся необходимая информация по использованию Vitek Pro содержится в руководстве пользователя, поставляемом в комплекте с роботом.
Этап 8: Уход за роботом-пылесосом Vitek Pro

Не забудьте заряжать аккумулятор вашего робота-пылесоса Vitek Pro после каждого использования. Помните, что полностью разряжать или перезаряжать аккумулятор не рекомендуется.
Проверьте состояние батареи вашего робота-пылесоса. Если она разряжена, подключите робота к зарядной станции и дайте ему полностью зарядиться.
Следуя этим рекомендациям, вы продлите срок службы вашего робота-пылесоса Vitek Pro и сможете наслаждаться его безупречной чистотой в вашем доме.
3
ENGLISH
ROBOTIC VACUUM CLEANER VT-1802
The robotic vacuum cleaner is intended for room
cleaning in automatic mode.
DESCRIPTION
1.
Start/stop button «
»
2.
Anti-bump sensors
3.
Driving wheels
4.
Anti-drop sensors
5.
Rechargeable battery
6.
Front wheel
7.
Suction nozzle
8.
Side brushes
9.
Contact points for battery charging
Dust bin
10.
Dust compartment
11.
HEPA filter
12.
Motor charging contact points
13.
Motor body
14.
Container lock button
Charging station
15.
Power adapter
16.
Power adapter connection socket
17.
Contact points for battery charging
Remote control
18.
Automatic room cleaning mode button «AUTO»
19.
Direction control buttons
20.
Return to the charging station button «
»
21.
Cleaning start setting button «
»
22.
Vacuum cleaner temporary stop button «II»
23.
«Along the wall» cleaning mode button «
»
24.
«Spiral» cleaning mode button «
»
25.
Battery holder
Accessories
26.
Spare side brush
27.
Floor dry cleaning attachment
SAFETY MEASURES AND OPERATION
RECOMMENDATIONS
Read this instruction manual carefully before
using the robotic vacuum cleaner and keep it for
the whole operation period. Mishandling of the
unit may lead to its breakage and cause harm to
the user or damage to his/her property.
To avoid the risk of fire, electric shock and to pre-
vent injury, observe the following safety measures.
•
Use the unit in strict accordance with the
instruction manual.
•
Use only the accessories supplied with the
unit.
•
Before charging the rechargeable battery for
the first time, make sure that voltage of the
mains corresponds to the operating voltage
of the power adapter.
•
Do not charge the rechargeable battery in
places with high moisture and high tempera-
ture. Charge the accumulator battery at the
temperature from +5° C to +35° C and relative
humidity no more than 80%.
•
If you don’t use the charging station for a long
time, unplug the power adapter.
•
Do not touch the power adapter body with
wet hands.
•
Do not use the vacuum cleaner outdoors, for
cleaning wet and damp floors.
•
Do not use the vacuum cleaners in the rooms
with unsteady furniture, especially if there
are fragile interior objects or burning candles
placed on it.
•
Do not place or install foreign objects on the
vacuum cleaner body, make sure that there
are no pets on the vacuum cleaner body.
•
Do not switch the unit on if the air inlet is
blocked by a foreign object.
•
Keep hair, free hanging clothes and interior
objects away from the vacuum cleaner path
of motion.
•
Set additional obstacles for the vacuum
cleaner when cleaning the stair landings.
•
Do not use the vacuum cleaner for collect-
ing such inflammable liquids as gasoline or
solvents. Do not use the vacuum cleaner in
places where such liquids are stored.
•
Do not use the vacuum cleaner for collecting
burning or smoking cigarettes, matches, cin-
ders as well as fine dust, for example, of plas-
ter, concrete, flour or ashes.
•
Do not use the vacuum cleaner if:
–
the dust bin is not installed;
–
the HEPA filter is not installed in the bin.
•
Do not immerse the vacuum cleaner, the
power adapter and the charging station into
water or any other liquids.
Attention! The unit contains a lithium battery.
Prevent children from swallowing the lithium bat-
tery. If your child has swallowed a battery,
immediately see your doctor.
•
Close supervision is necessary when chil-
dren or people with disabilities are near
the operating unit.
•
This unit is not intended for usage by children.
•
During the unit operation and breaks between
operation cycles place the unit out of reach
of children.
IM VT-1802.indd 3
14.06.2019 15:07:06
| Тип аккумуляторная батарея | Li-Ion |
| Время заряда аккумулятора | 5 ч |
| Время работы от аккумулятора | 2 ч |
| Кол-во режимов работы | 3 |
| ПДУ | есть |
| Wi-Fi управление | есть |
| Автоматическая установка на зарядку | есть |
| HEPA-фильтр | есть |
| Влажная уборка | есть |
| Допустимая высота коврового покрытия | 0,8 см |
| Звуковая индикация | есть |
| Индикация степени зарядки и застревания | есть |
| Кол-во инфракрасных датчиков препятствий | 5 пар |
| Кол-во пар инфракрасных датчиков определения ступенек | 4 |
| Насадка для мытья полов | 1 |
| Объем пылесборника | 0,2 л |
| Объем резервуара для воды | 0,1 л |
| Кол-во боковых щеток | 2 |
| Кол-во запасных щеток | 2 |
| Мощность всасывания | 350 Па |
| Таймер | есть |
| Уровень шума | 65-68 |
| Корпус | пластик |
показать все характеристики
Робот-пылесос VITEK VT-1803, способный осуществлять как сухую, так и влажную уборку, станет вашим надежным помощником в борьбе за чистоту! Управлять им можно непосредственно со смартфона через специальное приложение: просто выберите любой из трех режимов работы прибора, установите таймер и настройте параметры. Особая звуковая индикация делает «общение» с пылесосом максимально приятным
VACUUM CLEANER
ПЫЛЕСОС
ИНСТРУКЦИЯ ПО ПРИМЕНЕНИЮ
OPERATION MANUAL
Mod. VT — 1802
i 1802.qxd 25.05.04 13:01 Page 1
РУССКИЙ
2
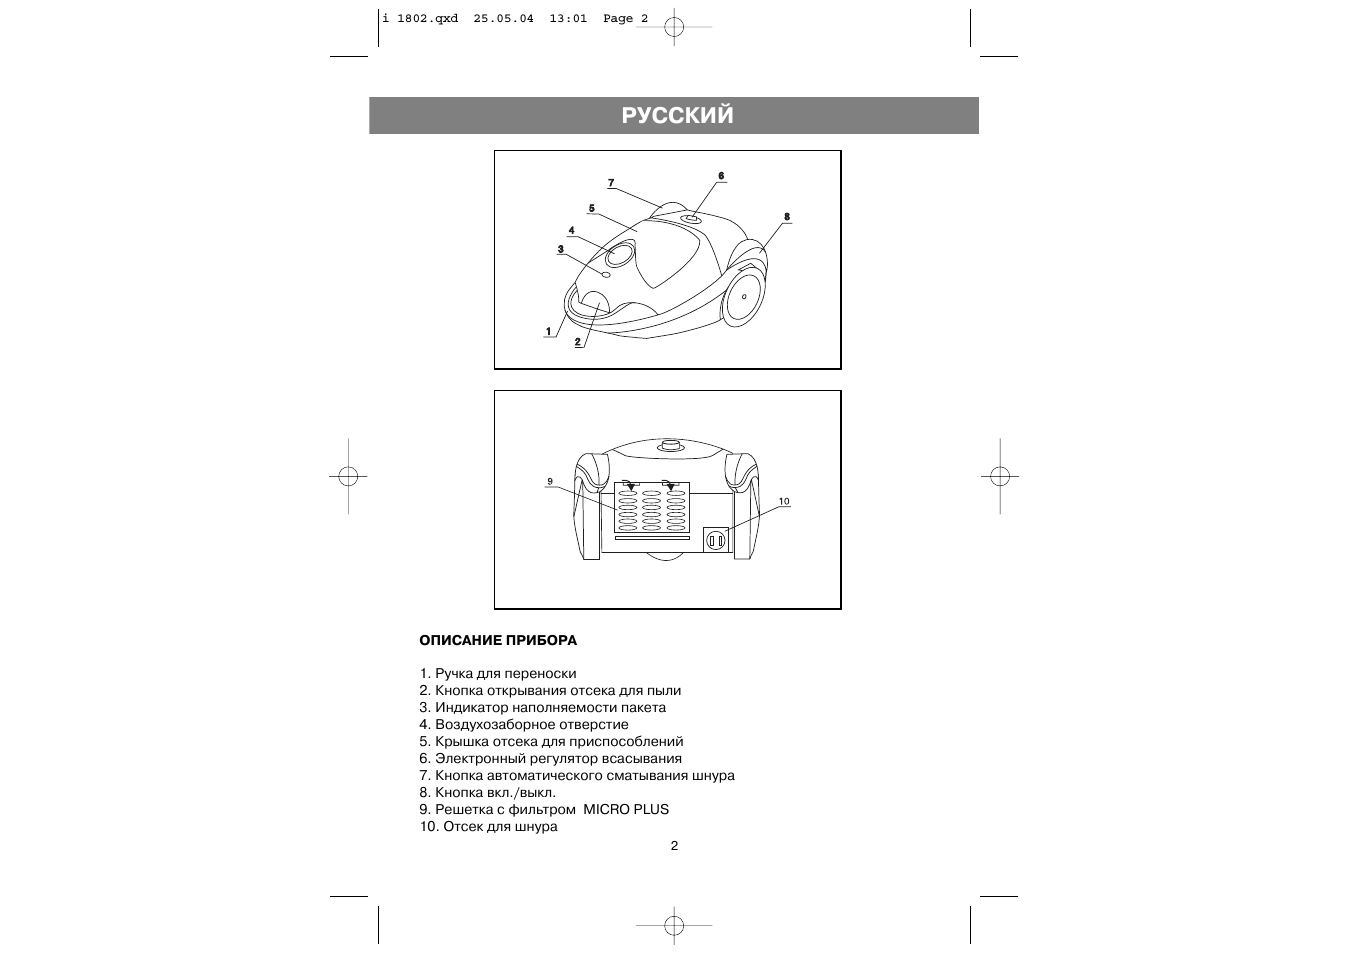
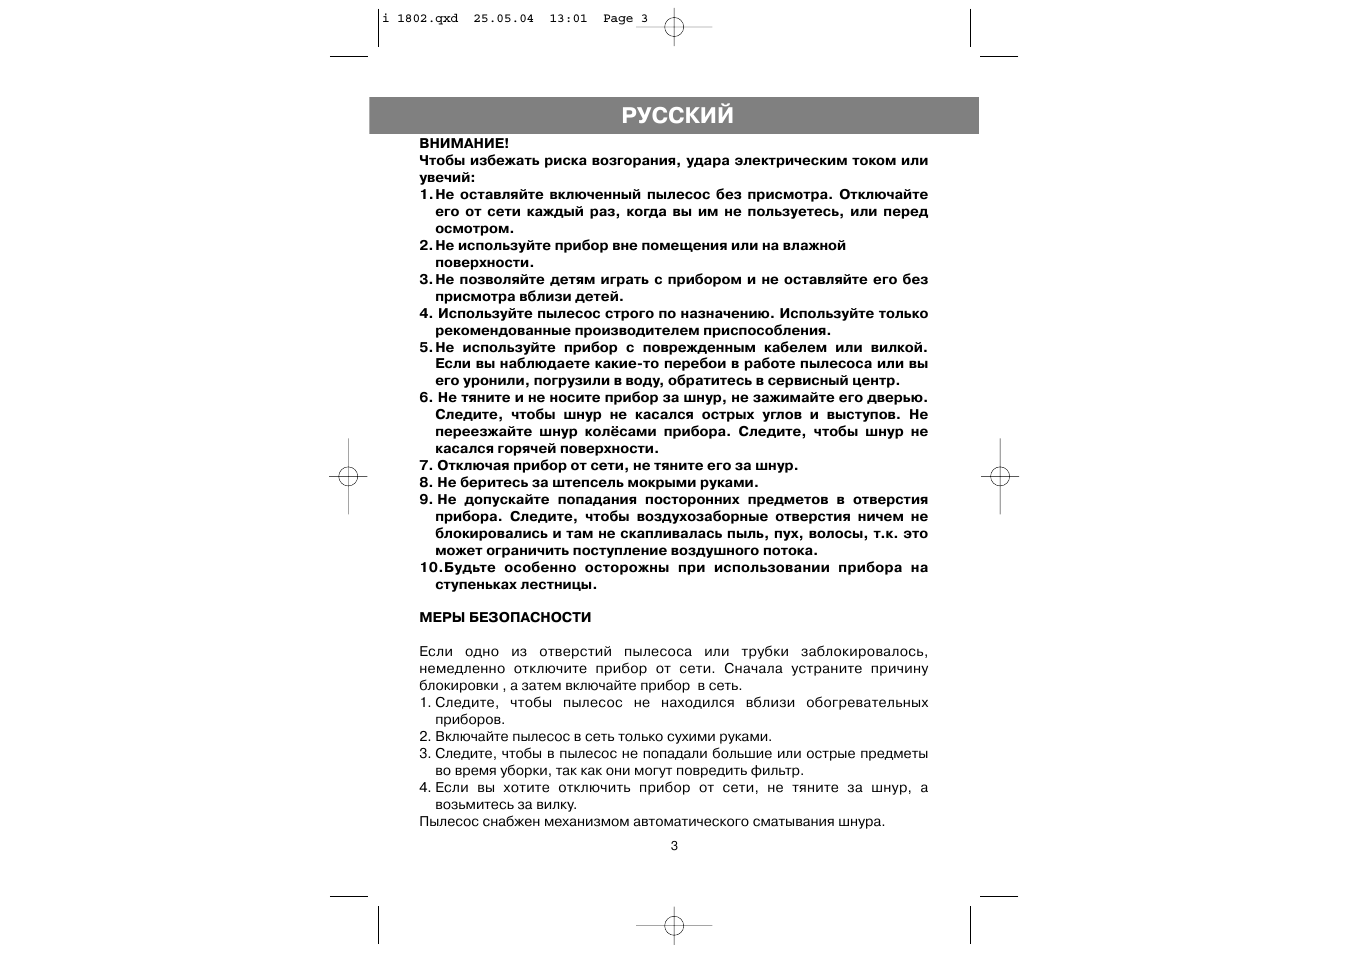
ОПИСАНИЕ ПРИБОРА
1. Ручка для переноски
2. Кнопка открывания отсека для пыли
3. Индикатор наполняемости пакета
4. Воздухозаборное отверстие
5. Крышка отсека для приспособлений
6. Электронный регулятор всасывания
7. Кнопка автоматического сматывания шнура
8. Кнопка вкл./выкл.
9. Решетка с фильтром MICRO PLUS
10. Отсек для шнура
i 1802.qxd 25.05.04 13:01 Page 2
РУССКИЙ
3
ВНИМАНИЕ!
Чтобы избежать риска возгорания, удара электрическим током или
увечий:
1.Не оставляйте включенный пылесос без присмотра. Отключайте
его от сети каждый раз, когда вы им не пользуетесь, или перед
осмотром.
2.Не используйте прибор вне помещения или на влажной
поверхности.
3.Не позволяйте детям играть с прибором и не оставляйте его без
присмотра вблизи детей.
4. Используйте пылесос строго по назначению. Используйте только
рекомендованные производителем приспособления.
5.Не используйте прибор с поврежденным кабелем или вилкой.
Если вы наблюдаете какие-то перебои в работе пылесоса или вы
его уронили, погрузили в воду, обратитесь в сервисный центр.
6. Не тяните и не носите прибор за шнур, не зажимайте его дверью.
Следите, чтобы шнур не касался острых углов и выступов. Не
переезжайте шнур кол¸сами прибора. Следите, чтобы шнур не
касался горячей поверхности.
7. Отключая прибор от сети, не тяните его за шнур.
8. Не беритесь за штепсель мокрыми руками.
9. Не допускайте попадания посторонних предметов в отверстия
прибора. Следите, чтобы воздухозаборные отверстия ничем не
блокировались и там не скапливалась пыль, пух, волосы, т.к. это
может ограничить поступление воздушного потока.
10.Будьте особенно осторожны при использовании прибора на
ступеньках лестницы.
МЕРЫ БЕЗОПАСНОСТИ
Если одно из отверстий пылесоса или трубки заблокировалось,
немедленно отключите прибор от сети. Сначала устраните причину
блокировки , а затем включайте прибор в сеть.
1. Следите, чтобы пылесос не находился вблизи обогревательных
приборов.
2. Включайте пылесос в сеть только сухими руками.
3. Следите, чтобы в пылесос не попадали большие или острые предметы
во время уборки, так как они могут повредить фильтр.
4. Если вы хотите отключить прибор от сети, не тяните за шнур, а
возьмитесь за вилку.
Пылесос снабжен механизмом автоматического сматывания шнура.
i 1802.qxd 25.05.04 13:01 Page 3
РУССКИЙ
4
СБОРКА ПЫЛЕСОСА
Перед сборкой/разборкой пылесоса убедитесь, что прибор отключен от
сети.
· Вытащите пылесос из упаковки.
· Вставьте гибкий шланг в воздухозаборное отверстие до щелчка (рис.1).
· Соедините две удлинительные трубки вместе, присоедините их к ручке
всасывающего шланга, а затем присоедините необходимую насадку (рис.
2-А).
Œ º
º
(рис. 2-В). Эта щетка идеально подходит для чистки ковров,
паласов и полов. Для чистки пола и других твердых поверхностей нажмите
на рычаг на щетке , чтобы она была выдвинута. Для чистки ковров и
ковровых покрытий нажмите на рычаг на щетке так, чтобы она была убрана.
˛ ж Œ º Łж ж Жº ŁШ.
Все другие приспособления, такие, как щетка для
очистки драпировки, щелевая насадка, очень удобно расположены в
отсеке для приспособлений.
Œ º Łæ ŒŁ
(рис.2-С). Идеально подходит для чистки драпировки,
матрацев, одежды, чехлов для сидений автомобилей.
º
æ
Œ
(ðèñ. 2-D). Идеально подходит для чистки радиаторов,
щелей, углов, плинтусов, диванных подушек.
ЭКСПЛУАТАЦИЯ ПЫЛЕСОСА
Когда вы выбрали нужную насадку и все правильно подсоединили к
пылесосу, необходимо:
· Вытянуть шнур на необходимую длину.
· Подключить прибор к электросети.
· Включить прибор нажатием на переключатель.
º Œ
ßØ ª º
ш
ж Ł ж жЯ
Ł
( º
º Ш
ж Ł ª º
)
Мощность всасывания можно регулировать при помощи
соответствующего регулятора. Вы можете отрегулировать низкую
мощность всасывания для чистки драпировки, штор и других деликатных
поверхностей, а высокую мощность — для ковров.
ı
Ł
æŒŁØ ª º
ш
ж Ł
i 1802.qxd 25.05.04 13:01 Page 4

РУССКИЙ
5
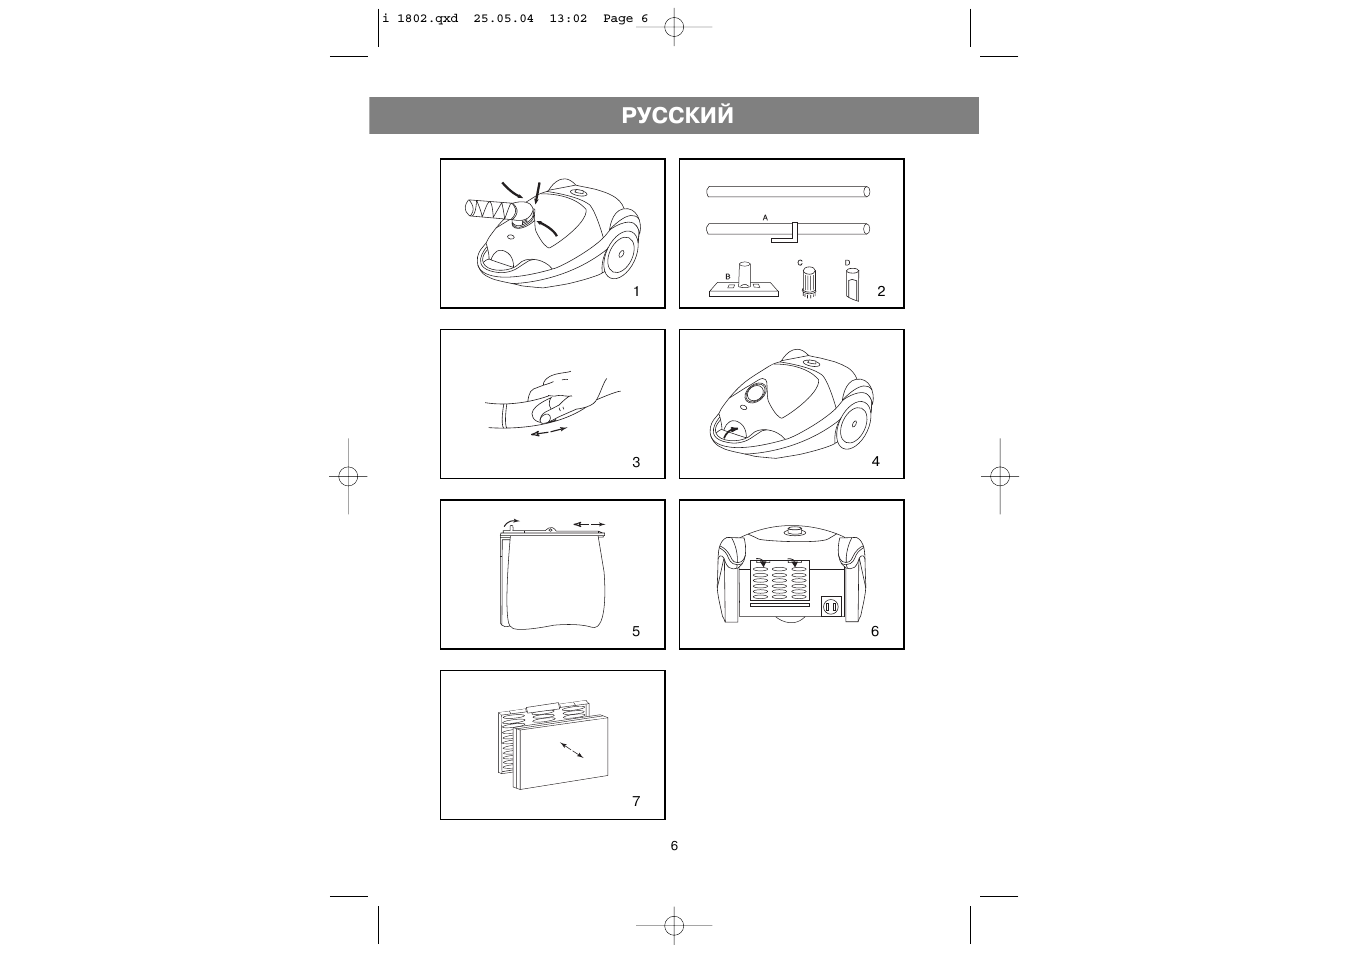
Данный регулятор вмонтирован в ручку гибкого шланга. Вы можете легко
изменить мощность, передвигая регулятор вверх и вниз (рис. 3).
ЗАМЕНА ПАКЕТА
Индикатор наполняемости пакета указывает вам, когда необходимо
заменить пакет. Для этого отключите прибор от сети. Меняйте пакет только
в том случае, когда индикатор загорается красным светом.
Откройте крышку отсека для пыли (рис.4).
Извлеките пылесборник из отсека, придерживая его за держатель, и
выбросьте его в мусорное ведро, не открывая. Откройте крышку отсека
фильтра, укрепите картонный диск нового пакета для мусора в держатель
и закройте крышку (рис.5).
· Эксплуатируйте пылесос только с установленным пакетом.
· Если вы забыли установить пакет или установили его неправильно,
крышка плотно не закроется.
ЗАМЕНА ФИЛЬТРА
Данная модель пылесоса снабжена особым фильтром MICRO PLUS,
который эффективно очищает воздух во время работы пылесоса. Но для
большей эффективности необходимо менять фильтр через определенные
промежутки времени, по крайней мере, через каждые 6 месяцев. Для этого
снимите решетку с фильтром, удалите фильтр, замените на новый и
установите решетку на прежнее место (рис. 6,7).
После окончания уборки отключите прибор от сети,а также переключатель.
Смотайте шнур, нажав на кнопку сматывания шнура.
ЧИСТКА ЛЕСТНИЦЫ ИЛИ СТУПЕНЕК
Для удобства чистки лестницы или ступенек устанавливайте пылесос в
вертикальное положение.
ЧИСТКА И УХОД
Пылесос не требует тщательной частой чистки. Очищайте
приспособления, шланг и корпус пылесоса хотя бы изредка мягкой чистой
тряпкой.
i 1802.qxd 25.05.04 13:01 Page 5
РУССКИЙ
6
1
2
4
3
6
7
5
i 1802.qxd 25.05.04 13:02 Page 6
ENGLISH
7
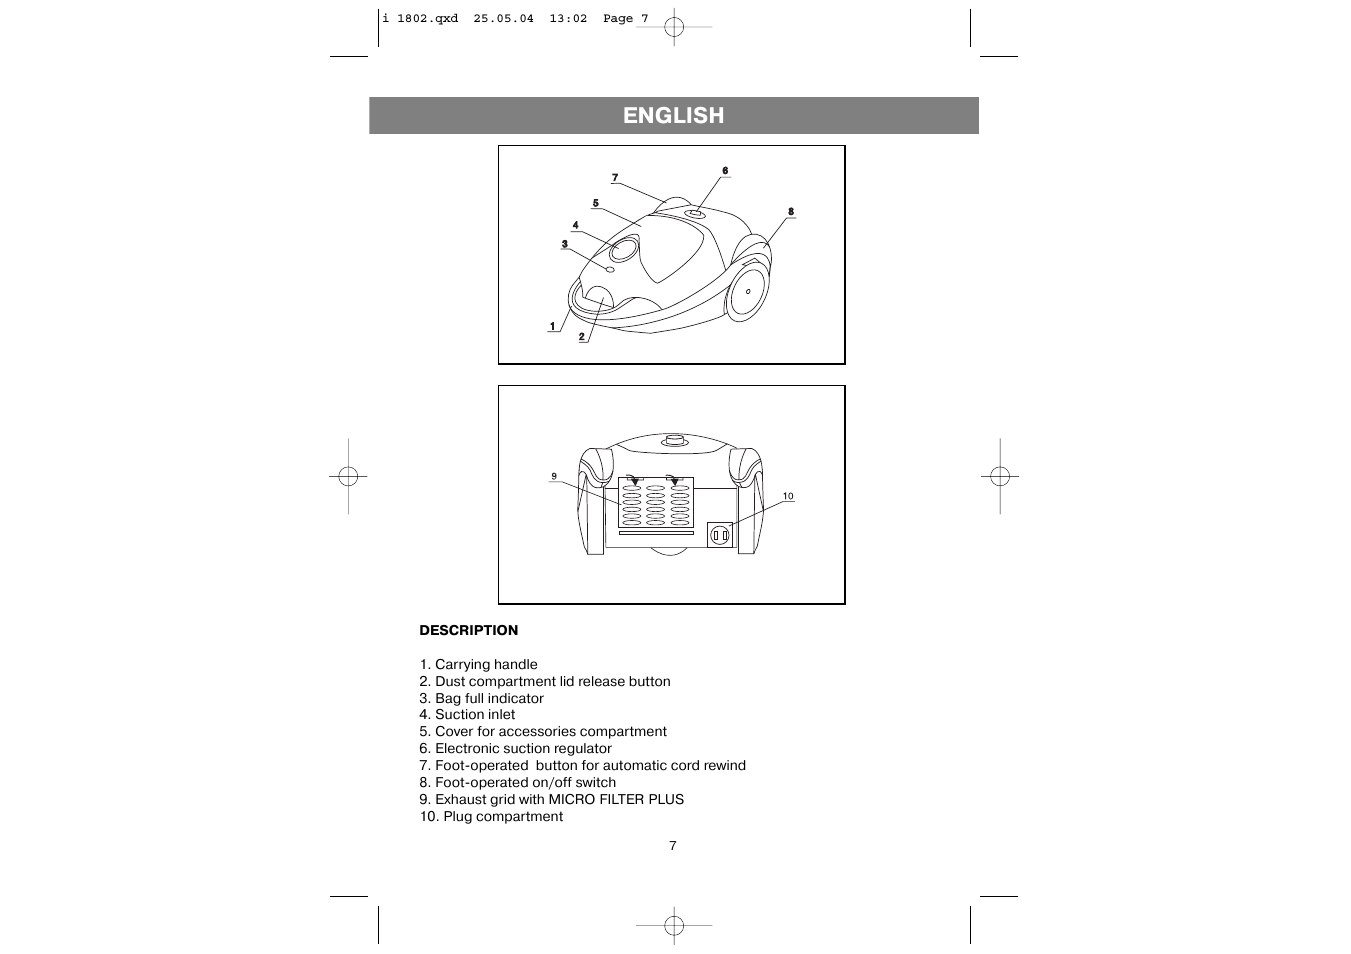
DESCRIPTION
1. Carrying handle
2. Dust compartment lid release button
3. Bag full indicator
4. Suction inlet
5. Cover for accessories compartment
6. Electronic suction regulator
7. Foot-operated button for automatic cord rewind
8. Foot-operated on/off switch
9. Exhaust grid with MICRO FILTER PLUS
10. Plug compartment
i 1802.qxd 25.05.04 13:02 Page 7
ENGLISH
8
BEFORE USE
Carefully read through the instructions for use. They contain important informa-
tion on the operation, safety and maintenance of the appliance, keep these
instructions in a safe place for future reference and show them to other users if
necessary.
When reading the instructions unfold the page showing the illustrations and refer
to the appropriate diagram.
Please read the GENERAL INFORMATION and the SAFETY POINTS TO NOTE.
Our electrical appliances satisfy the generally accepted safety and technical
standards and the appliance safety law.
This appliance complies with the EEC regulation 87/308 concerning radio and
TV interference.
GENERAL INFORMATION
Use on alternating current only. Check that the supply voltage corresponds to
that given on the rating plate of the appliance.
Do not use the appliance(disconnect from the mains supply immediately) if:
— the motor housing is damaged.
— the supply cord or the suction hose is damaged.
— you suspect it is damaged following an accident or similar.
Before vacuuming for the first time, check whether all the filters are correctly in
position.
Never vacuum without a filter!
Use only original filters and original accessories and optional extras.
When you wish to dispose of the appliance, ensure that it is made non opera-
tional (cut through the supply cord)and dispose of through the proper channels.
This is an electrical appliance, therefore, children should only be permitted to
use it under supervision.
Repairs should only be carried out by qualified personnel. Use only original
spare parts, improperly carried out repairs can be a source of great danger to
the user.
Packaging materials must be disposed of through the proper channels.
This appliance is not suitable for vacuuming hazardous substances.
No liability can be accepted for damage arising form improper use of the appli-
ance, incorrect operation or improper repairs.
SAFETY POINTS TO NOTE
Always ensure that the appliance is switched off and disconnected from the
mains supply before cleaning, maintenance, emptying, changing the filter, etc.,
as well as after use.
Extension leads may only be used if they are in perfect condition.
i 1802.qxd 25.05.04 13:02 Page 8
Always switch the appliance off immediately after use.
At all times keep nozzles and tube ands well away from eyes and ears.
To clean the appliance, simply wipe it with a damp or dry cloth.
DO NOT:
— unplug the appliance from the mains supply by pulling on the supply cord.
— allow the supply cord to become trapped or pull it over sharp edges.
— use to vacuum: smouldering or hot substances: large pieces of glass; solvents,
or corrosive liquids; acidic liquids; flammable or explosive substances/
— store the appliance out of doors.
— allow the electrical parts of the appliance e.g. supply cord, socket motor, suc-
tion hose, switch etc., to come into contact with water.
Check the suction hose regularly for damage. A damaged suction hose should
not be used.
ASSEMBLING THE APPLIANCE
Rotating suction hose connector with unlocking buttons.
Fig.1
Remove all the parts from the packaging and place them ready.
Insert the rotating connector of the suction hose into the suction inlet until it
clicks into place.
The hose may be completely removed from the body of the cleaner by pressing
the buttons on either side and pulling the connector up and out of the suction
inlet.
2 extension tubes.
Fig.2-A.
Join the two extension tubes together, connect them to the handle of the suction
hose and then attach the required nozzle the end of the tube.
GENERAL NOTES
All the suction nozzles can be connected either to the extension tubes as detail
above or directly to the suction hose. Both the tubes and the hose can be used
without a nozzle.
Easy-glide nozzle.
Fig.2-B.
The easy-glide nozzle makes it possible to vacuum carpets and uncarpeted
floors without having to change the nozzle. By simply switching the relevant lever
a brush can be extended or withdrawn to suit the floor being vacuumed. Carpets
are cleaned with the brush withdrawn and hard floors with the brush extended.
Accessories compartments.
All the other accessories such as the upholstery nozzle and the crevice tool are
conveniently stored in the accessories compartment of the appliance.
Upholstery nozzle.
Fig.2-C
ENGLISH
9
i 1802.qxd 25.05.04 13:02 Page 9
For cleaning upholstery, mattresses, clothes, carseats etc., it is advisable to use
the upholstery nozzle.
Crevice tool.
Fig.2-D
The crevice tool is ideally suited for cleaning grooves, folds, pockets and other
places which are difficult to reach.
OPERATION
When you have selected the appropriate attachments and connected them to
the vacuum cleaner:
— pull out the required length of supply cord.
— plug into the mains electrical supply.
— switch on the appliance by pressure to the foot switch marked.
Electronic suction control (PSV9981/PSV9961)
The suction power of the appliance can be set with the aid of the electronic suc-
tion control. Using this you can vary the suction power from low for upholstery,
curtains and delicate fabrics to full power for carpets.
The motor power, and with it the suction power can be infinitely varied as
required by moving the slide.
Mechanical suction control.
Fig.3
An air regulator is incorporated in the handle of the suction hose.
The suction power can be varied by moving the slide up and down, this is espe-
cially useful in situations when the suction power is too strong, e.g. when the
carpet is lifted up and sucked into the nozzle.
DUST-BAG, FILTERS AND CHANGING THE FILTERS
Filters
The filter Plus Compact range is equipped with a filtration system consisting of:
— 1 double-wall paper dust-bag.
— 1 motor protection filter(air inlet)
— 1 Micro Filter Plus to trap dust particles(air outlet).
These filters must be replaced at regular intervals in order to ensure troublefree
operation of the vacuum cleaner.
Open the dust container by pressing the release catch and lift the cover.
Paper dust-bag
Bag -full indicator
The bag full indicator lets you know that the dustbag should be changed or that
there is a blockage in the suction paths.
Changing the dust-bag
Unplug the cleaner from the mains electrical supply.
Change the dust-bag if the bag — full indicator is fully red when the nozzle is :lift-
ENGLISH
10
i 1802.qxd 25.05.04 13:02 Page 10
11:39
ТОП—7. Лучшие роботы пылесосы 2019 года. ???? Рейтинг!
19:02
НЕ ПОКУПАЙТЕ РОБОТ ПЫЛЕСОС! (НЕТ)
05:06
Электрогриль Vitek VT-2635 ST — просто и со вкусом! Проверено
14:35
Xiaomi Mijia 1C vs Vitek PRO VT-1804.Обзор роботов-пылесосов.
14:10
Ремонт пылесоса Vitek 1800w не включается
03:07
Почему робот пылесос VITEK VT-1805 стоит дороже конкурентов?
00:39
Робот-пылесос VT-1802
01:46
Робот пылесос Vitek PRO
Нажмите на кнопку для помощи