

T2190 51005001609 V02
Owner’s Manual
RoboVac L70 Hybrid
01
Thank you for purchasing RoboVac. Carefully read all instructions before
using this product, and keep this manual for future reference.
Table of Contents
02 Important Safety Instructions
06 About Your RoboVac
What’s in the Box
RoboVac Anatomy
LED Indication
Map Navigation and Management
14 Get Started
Important Tips Before Use
Preparation
Charge Your RoboVac
18 Using Your RoboVac
Turn on / o
Start cleaning
Use Your RoboVac with the EufyHome App
Select a Cleaning Mode
Use Mopping System
Use Your RoboVac with Amazon Alexa / the Google Assistant
Set Up Physical / Virtual Barriers
Reset the System
28 Cleaning and Maintenance
Clean the Dust Collector and Water Tank
Clean the Rolling Brush
Clean the Side Brush
Replace the Side Brush
Clean the Sensors and Charging Pins
Clean the Swivel Wheel
Clean the mopping module
36 Troubleshooting
Voice Alert
Wi-Fi Connection
42 Specifications
43 Consignes importantes de sécurité
48 Customer Service
02 03
Important Safety Instructions
To reduce the risk of injury or damage, read these safety
instructions carefully and keep them at hand when setting up,
using, and maintaining this device.
WARNING SYMBOLS USED
This is the safety alert symbol. This symbol alerts
you to potential hazards that could result in property
damage and/or serious bodily harm or death.
• This device can be used by children aged from 8 years and
above and persons with reduced physical, sensory or mental
capabilities or lack of experience and knowledge if they have
been given supervision or instruction concerning use of this
device in a safe way and understand the hazards involved.
• Children should be supervised to ensure they do not play
with this device.
• Cleaning and maintenance shall not be performed by
children without adult supervision.
• This device is only to be used with the power supply unit
provided.
• Before cleaning or maintaining this device, the plug must be
removed from the socket-outlet.
• The battery in this device should only be replaced by a
skilled professional.
• When removing the battery, disconnect the device from the
supply mains.
• For the purposes of recharging the battery, only use the
detachable power supply unit provided with this device.
• The battery must be removed before this device is disposed
of. To remove the battery, first unscrew the screws on the
bottom, then remove the back cover. Remove the battery by
disconnecting the quick connector.
• The used battery should be placed in a sealed plastic bag and
disposed of safely according to local environmental regulations.
• The external flexible cable or cord of the power supply unit
cannot be replaced; if the cord is damaged, the power supply
unit shall be disposed of.
• This device is for indoor use only.
• This device is not a toy. Do not sit or stand on this device.
Small children and pets should be supervised when this
device is operating.
• Store and operate this device in room temperature
environments only.
• Clean with a cloth dampened with water only.
• Do not use this device to pick up anything that is burning or
smoking.
• Do not use this device to clean up spills of bleach, paint,
chemicals, or anything wet.
• Before using this device, pick up objects like clothing and
loose paper. Lift up cords for blinds or curtains, and move
power cords and fragile objects out of the way. If this device
passes over a power cord and drags it, an object could be
pulled off a table or shelf.
• If the room to be cleaned has a balcony, a physical barrier
should be used to prevent access to the balcony and to
ensure safe operation.
• Do not place anything on top of this device.
• Be aware that this device moves around on its own. Take
care when walking in the area where this device is operating
to avoid stepping on it.
• Do not operate this device in areas with exposed electrical
outlets on the floor.
• Do not expose the electronics of this device, its battery, or
the integrated Charging Base. There are no user-serviceable
parts inside.
04 05
• Do not use this device on an unfinished, unsealed, waxed
or rough floor. It may result in damage to the floor and this
device. Use only on hard floor surfaces or low-pile carpet.
• Do not use the mopping module on carpets.
• This device has been designed to be used on floors without
scratching them. We still recommend that you test this
device on a small area of the room to be cleaned to ensure
no scratches are made before cleaning the whole room.
• Only use attachments recommended or described in this
manual.
• Do not handle the appliance or plug with wet hands.
• Ensure that the dust bag and/or filters are correctly in-place
before usage.
• Do not use a battery pack or appliance that is damaged
or modified. Damaged or modified batteries may exhibit
unpredictable behavior resulting in fire, explosion or risk of
injury.
• Do not expose the battery pack or appliance to fire or
excessive temperature. Exposure to fire or temperature
above 130°C may cause explosion.
• Do not modify or attempt to repair the appliance or the
battery pack (as applicable), except as indicated in the
instructions for use and care.
• Follow all charging instructions and do not charge the
battery pack or appliance outside of the temperature range
specified in the instructions. Charging improperly or at
temperatures outside of the specified range may damage the
battery and increase the risk of fire.
• The laser distance sensor of this device meets the standards
for Class I Laser Products in IEC 60825-1:2014 and will not
generate hazardous laser radiation.
Notice
This symbol on the device or its packaging indicates:
Do not dispose of electrical appliances as unsorted
municipal waste; use separate collection facilities.
Contact your local authority for information regarding
the collection systems available. If electrical appliances
are disposed of in landfills or dumps, hazardous
substances can leak into the groundwater and get into
the food chain, damaging your health and well-being.
When replacing old appliances with new ones, the
retailer is legally obliged to take back your old appliance
for disposal at least free of charge.
FCC Statement
This device complies with Part 15 of the FCC Rules. Operation is subject to the following two
conditions: (1) This device may not cause harmful interference, and (2) this device must
accept any interference received, including interference that may cause undesired operation.
Warning: Changes or modifications not expressly approved by the party responsible for
compliance could void the user’s authority to operate the equipment.
Note: This equipment has been tested and found to comply with the limits for a Class B
digital device, pursuant to Part 15 of the FCC Rules. These limits are designed to provide
reasonable protection against harmful interference in a residential installation.
This equipment generates, uses, and can radiate radio frequency energy and, if not
installed and used in accordance with the instructions, may cause harmful interference
to radio communications. However, there is no guarantee that interference will not occur
in a particular installation. If this equipment does cause harmful interference to radio
or television reception, which can be determined by turning the equipment off and on,
the user is encouraged to try to correct the interference by one or more of the following
measures: (1) Reorient or relocate the receiving antenna. (2) Increase the separation
between the equipment and receiver. (3) Connect the equipment into an outlet on a
circuit different from that to which the receiver is connected. (4) Consult the dealer or an
experienced radio / TV technician for help.
The FCC 15.19 statement can be found on the back of the top panel.
RF Exposure Compliance Statement
This equipment complies with FCC/IC radiation exposure limits set forth for an
uncontrolled environment. This equipment should be installed and operated with minimum
distance 20cm between the radiator and your body.
ISED Compliance Statement
This device contains licence-exempt transmitter(s)/receiver(s) that comply with
Innovation, Science and Economic Development Canada’s licence-exempt RSS(s).
Operation is subject to the following two conditions:
1. This device may not cause interference.
2. This device must accept any interference, including interference that may cause
undesired operation of the device.
06 07
Declaration of Conformity
This product complies with the radio interference requirements of the European
Community. Hereby, Anker Innovations Limited declares that the radio equipment type
T2190 is in compliance with Directive 2014/53/EU. The full text of the EU declaration of
conformity is available at the following internet address: https://www.eufylife.com/.
Maximum output power: 18 dBm (For EU)
Frequency band: 2.4G band (2.4000GHz — 2.4835GHz)
Trademark Notice
• Amazon, Echo, Alexa and all related logos are trademarks of Amazon.com, Inc. or its
affiliates.
• Apple and the Apple logo are trademarks of Apple Inc., registered in the U.S. and other
countries. App Store is a service mark of Apple Inc., registered in the U.S. and other
countries.
• Google Play and the Google Play logo are trademarks of Google Inc.
• Google Home is a trademark of Google Inc.
About Your RoboVac
What’s in the Box
Waterproof Pad Owner’s Manual &
Other Documents
Power Adapter
RoboVac
Mopping Module
(with Washable Mopping Cloth)
Charging Base
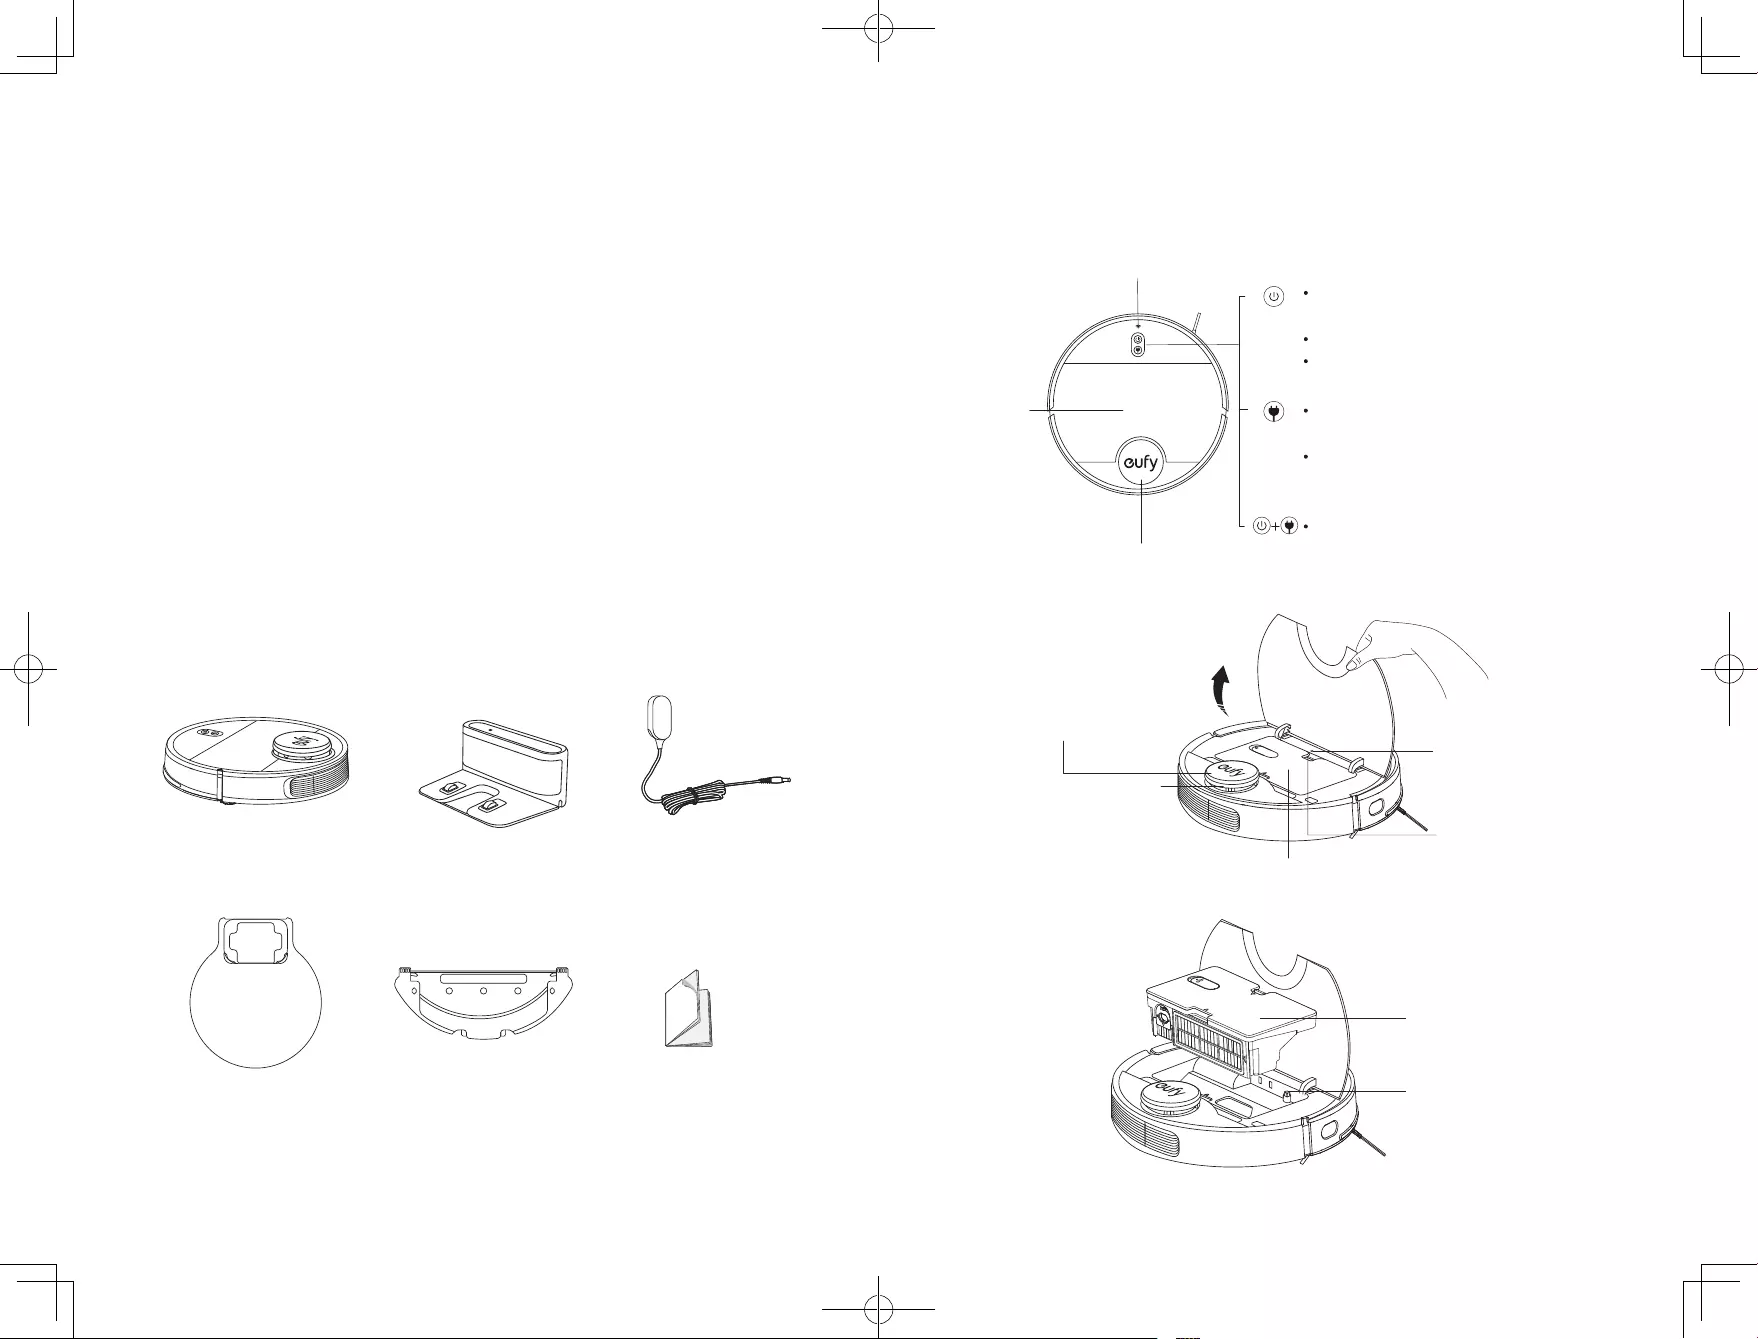
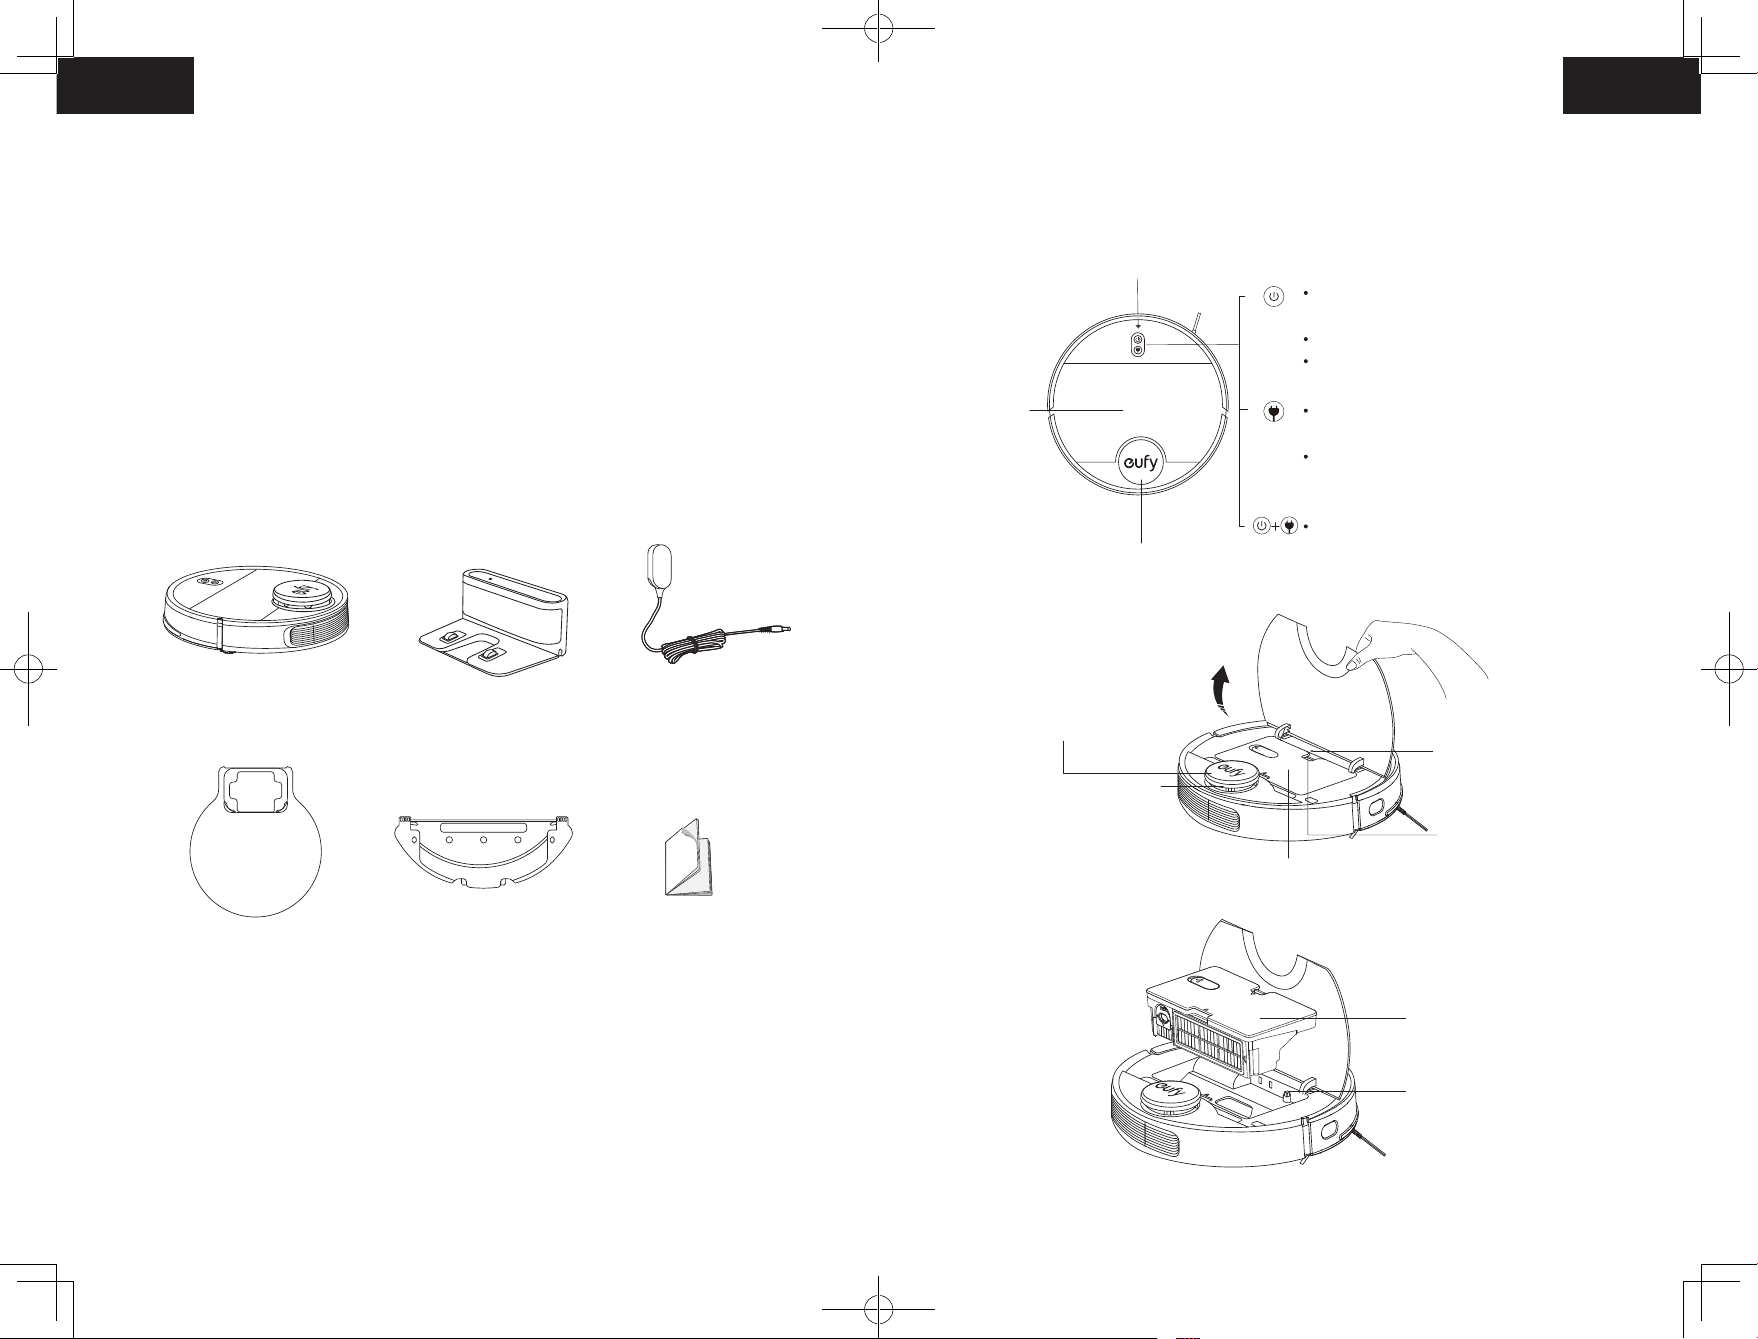
RoboVac Anatomy
A. Top
Press and hold for 3 seconds to
Press to start Auto cleaning
Press to pause the current task when working
Press to return RoboVac to the Charging Base;
press again to pause
Press and hold for 3 seconds to start Spot
cleaning
Press and hold both buttons for 3 seconds to
reset Wi-Fi connection
Laser distance sensor (LDS)
Wi-Fi status light
Top Panel
turn on or o (when not in Charging status)
LDS cover (with bumper sensor)
System reset button
Laser distance sensor (LDS)
Dust collector & water tank
Release button
Dust collector & water tank
Water pump component
08 09
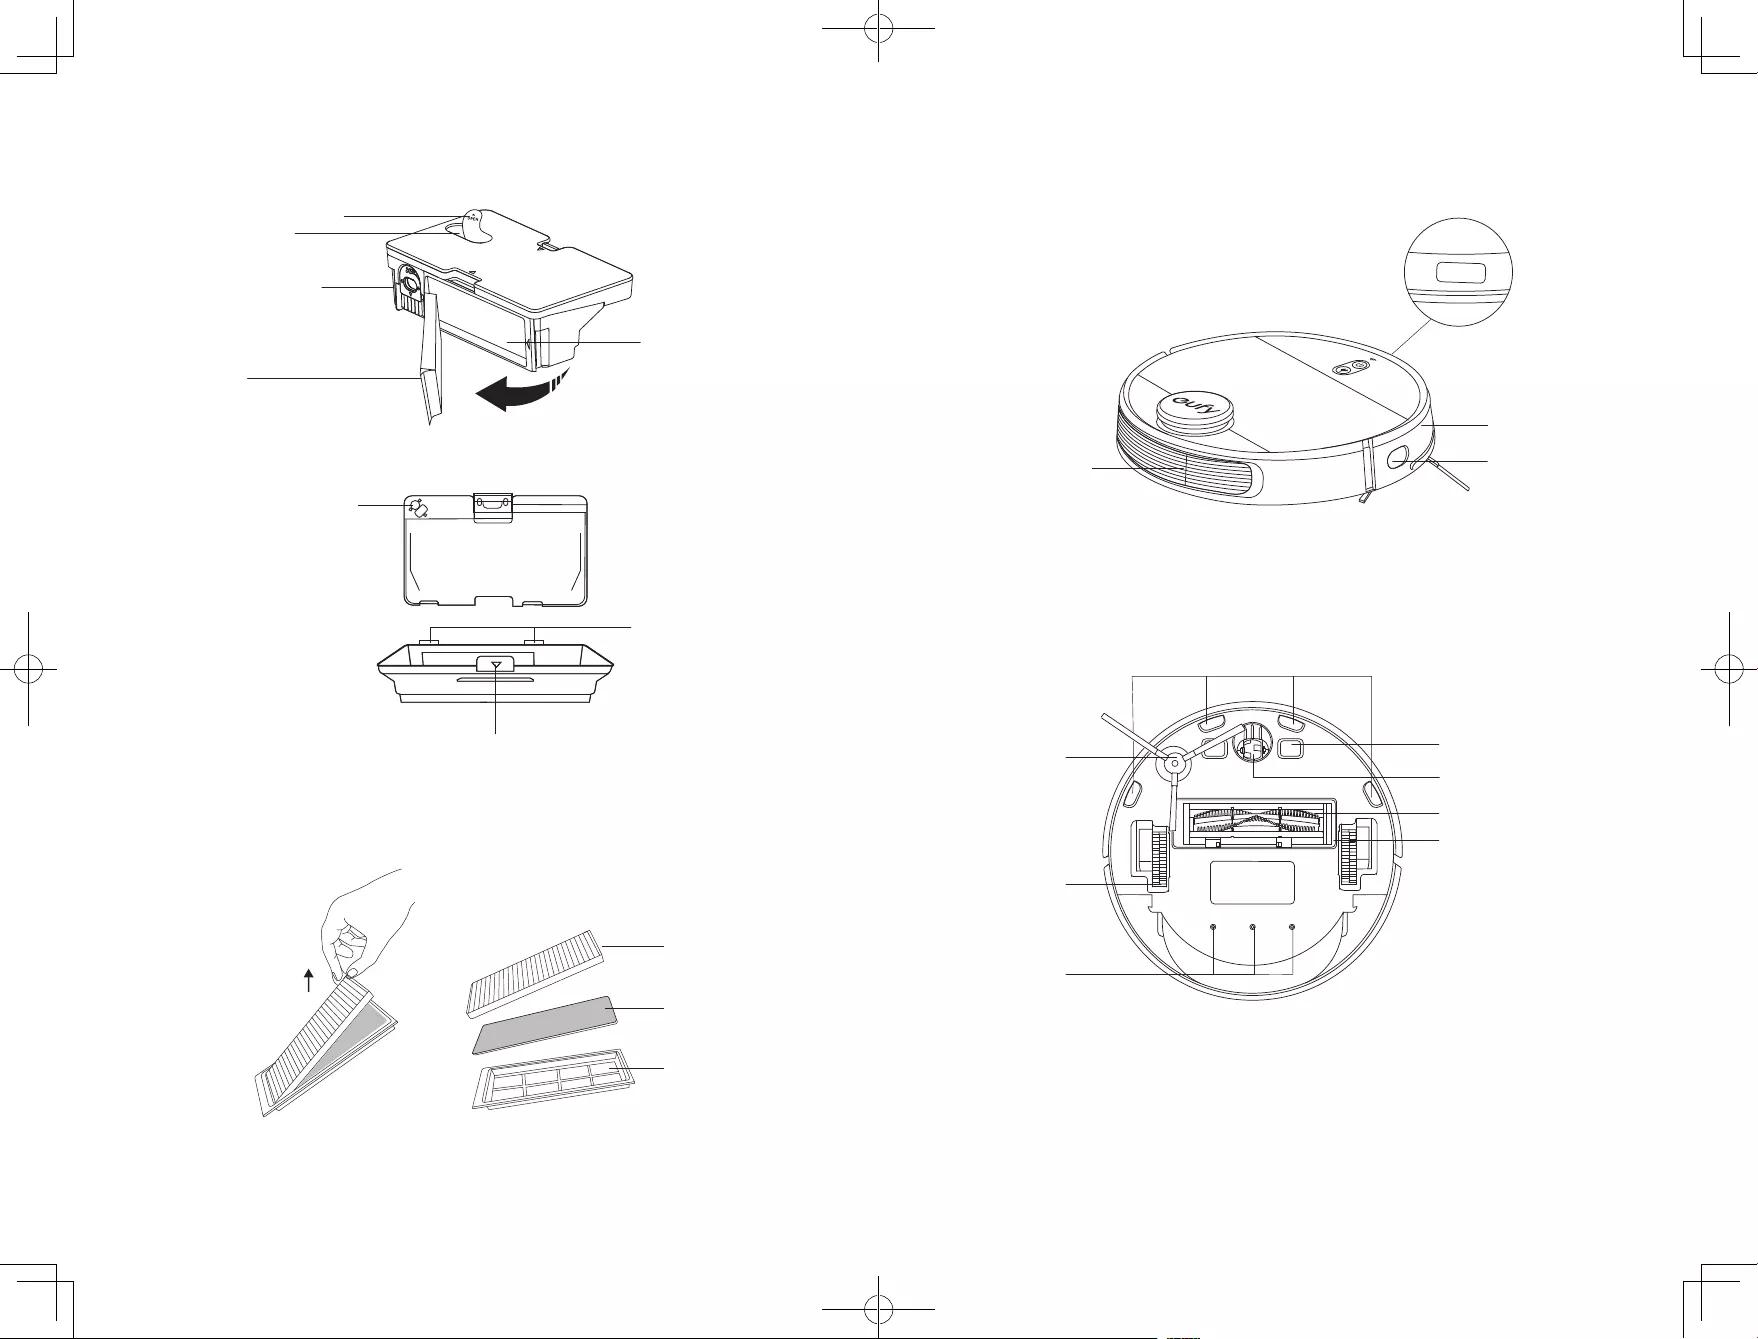
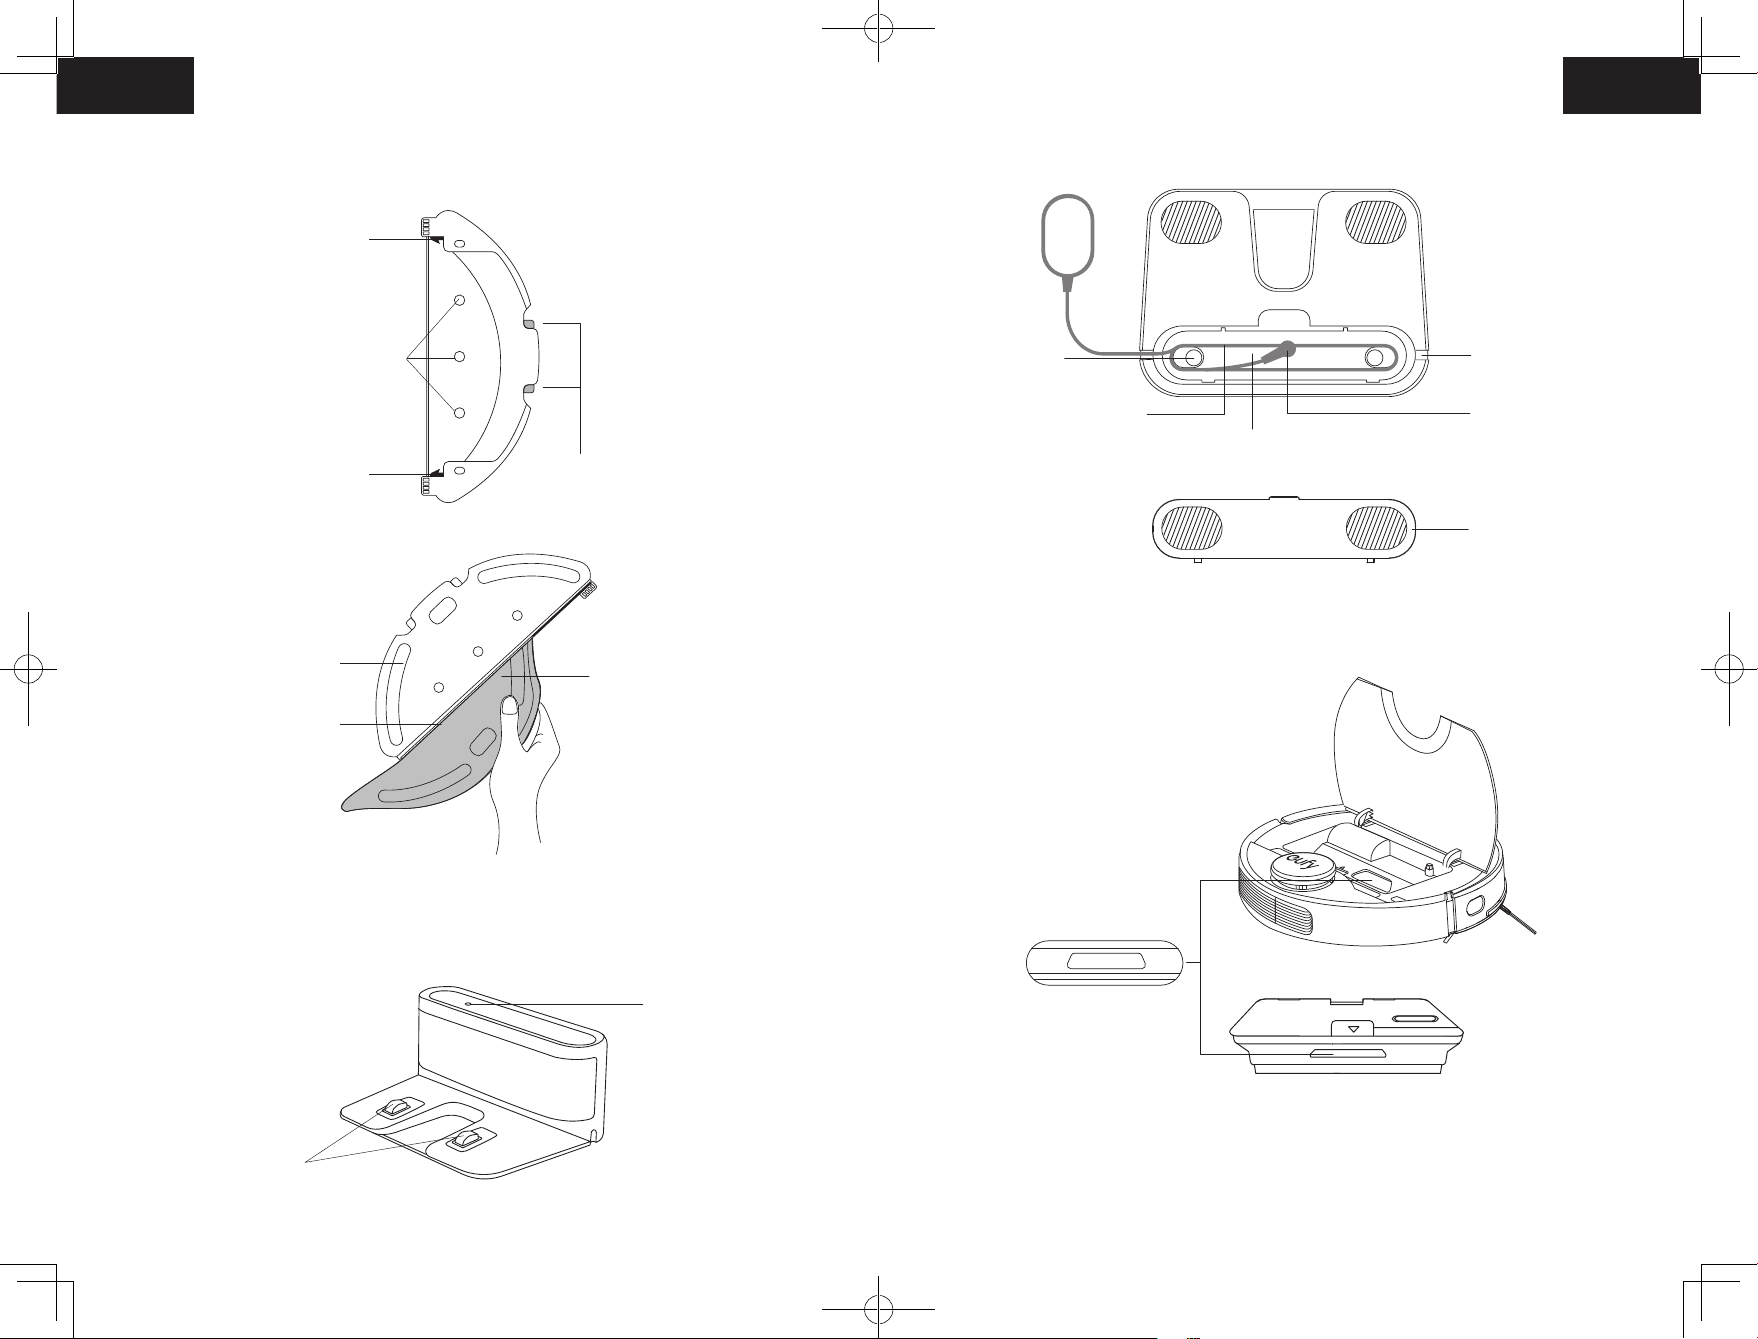
B. Dust collector & Water tank
Cleaning brush
Filter
Dust disposal outlet
Water inlet cover
Water inlet
Button for separating dust collector & water tank
Buckles
Water pump connector
Pre-filter
Foam filter
High—performance
filter
C. Side
Ventilation holes Wall sensor
Front infrared sensor
Bumper
D. Bottom
Side brush
Wheels
Brush guard
Rolling brush
Charging contact pins
Swivel wheel
Drop Sensors
Water outlets
10 11
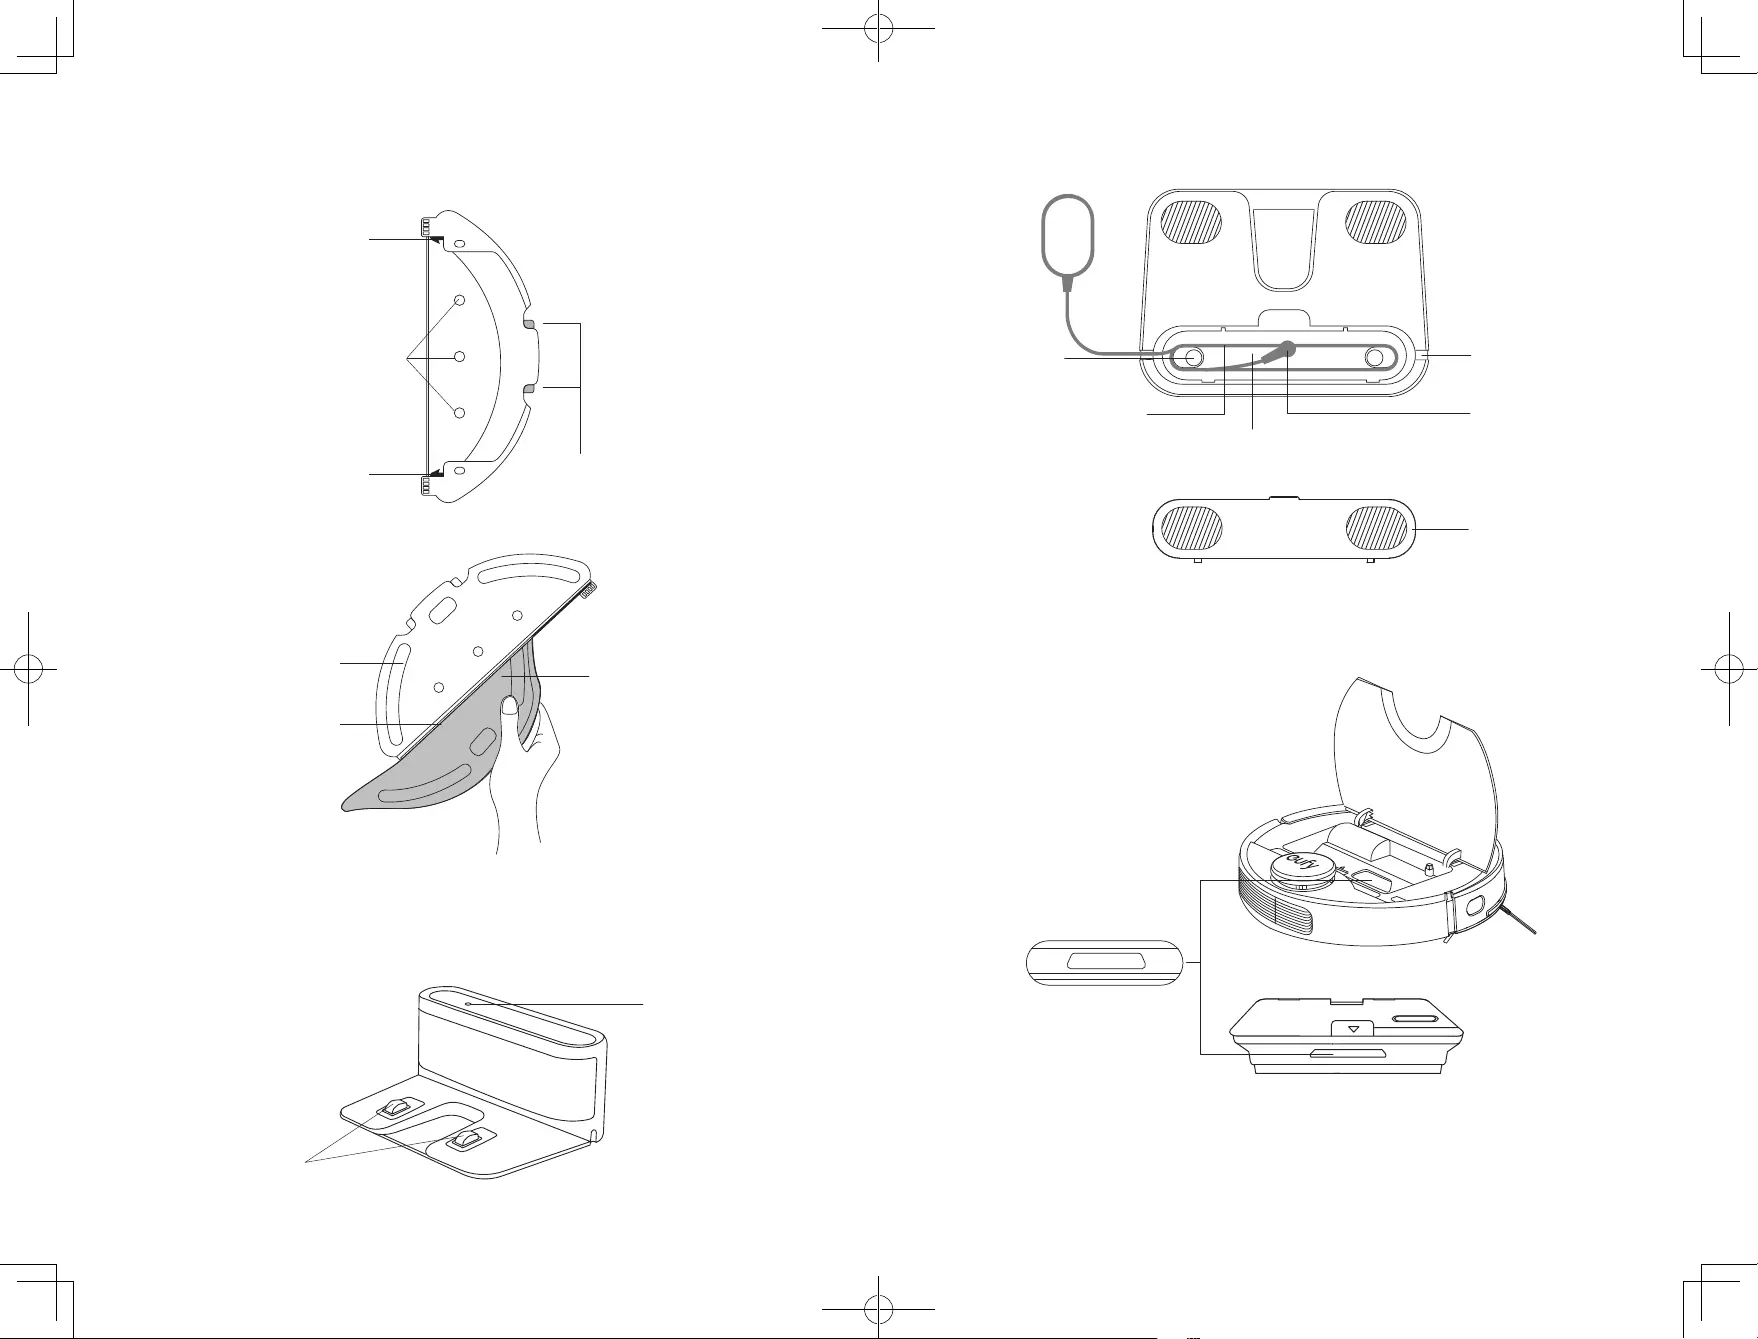
E. Mopping module
Water outlets
Buckles
Buckles Release buttons
Cloth attachment area Washable mopping cloth
Slot
F. Charging Base
External view
Status light
Charging contact pins
Internal view
Cover
Power cable
Slot winding
Power socket
Wire slot exit
Power cord storage compartment
G. Suction Inlet
Suction inlet
12 13
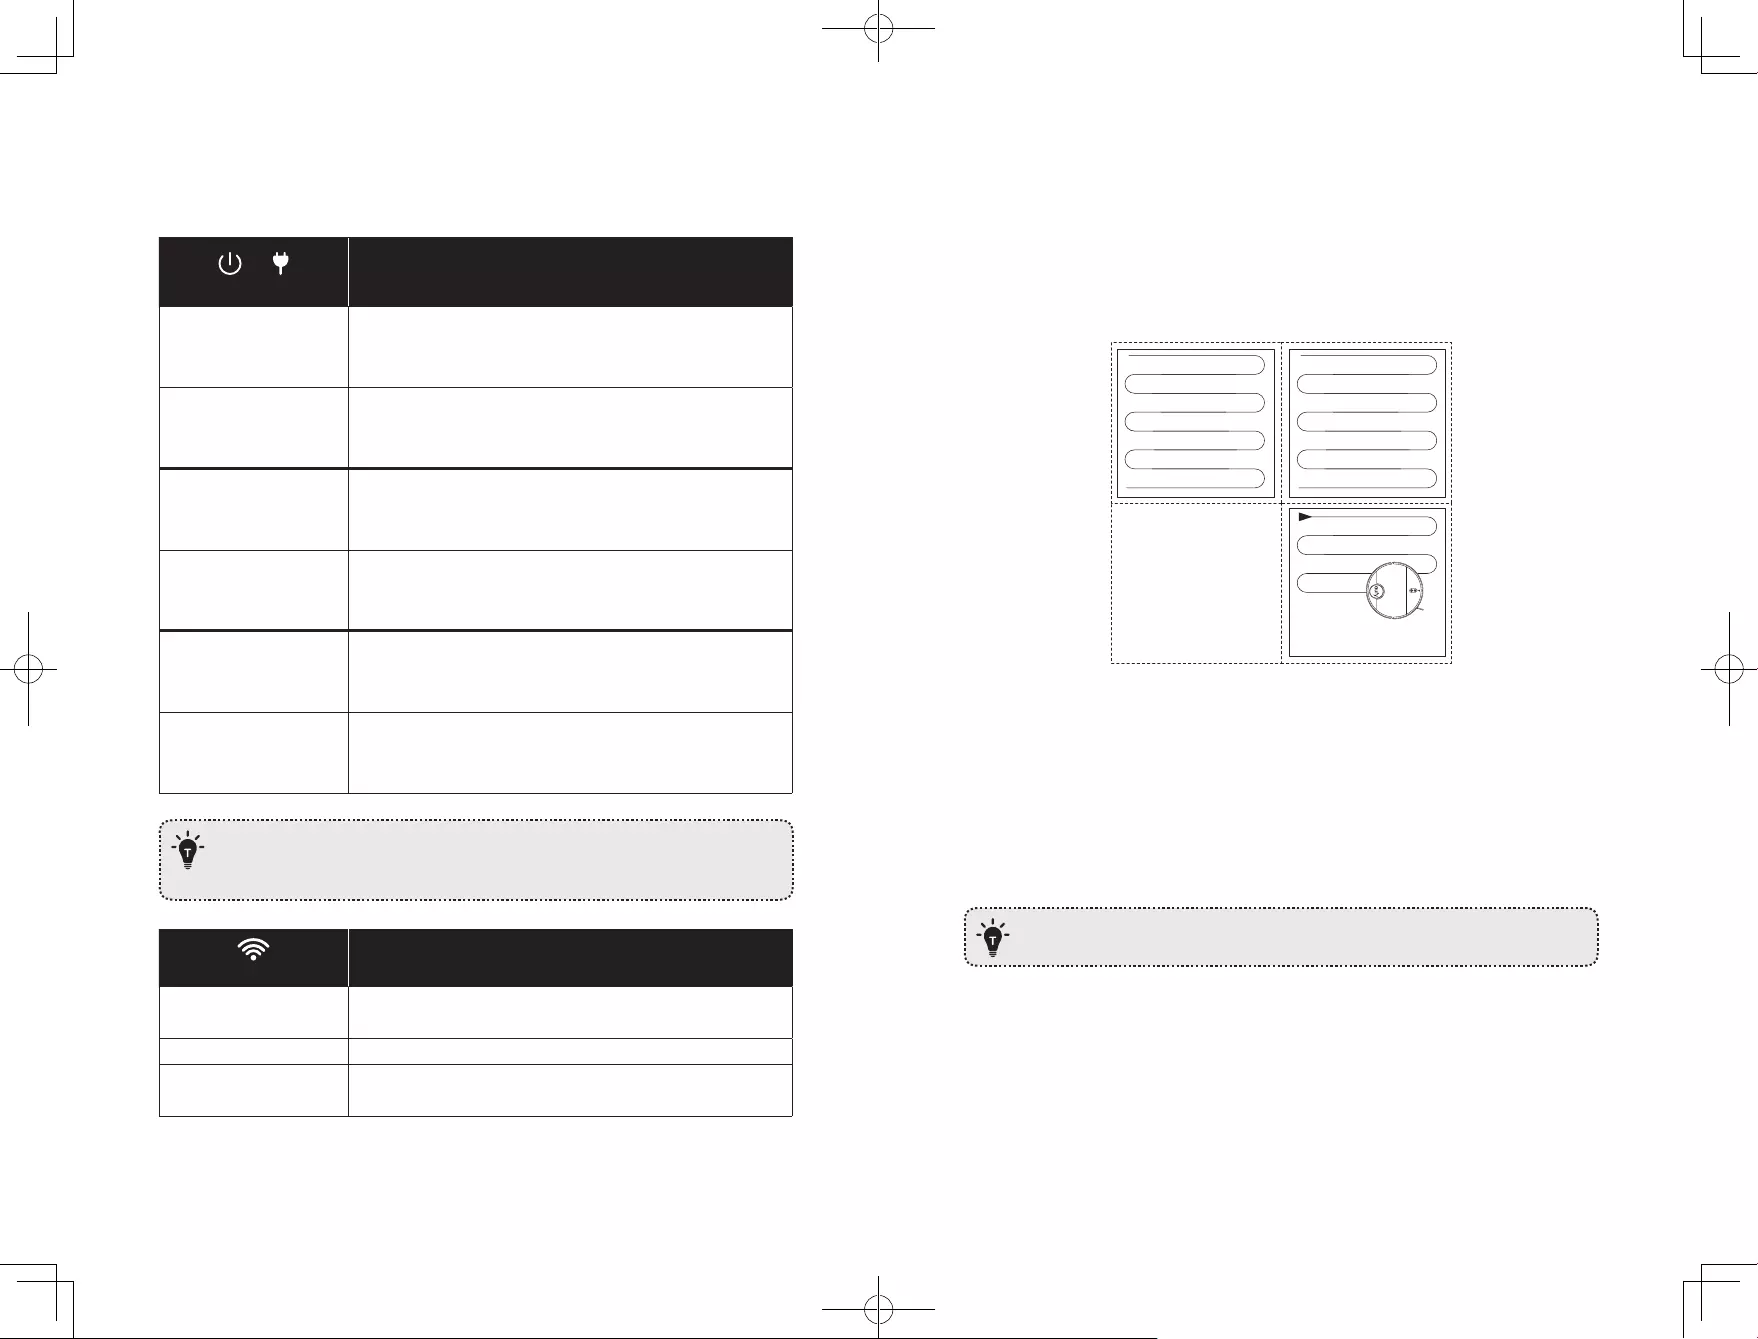
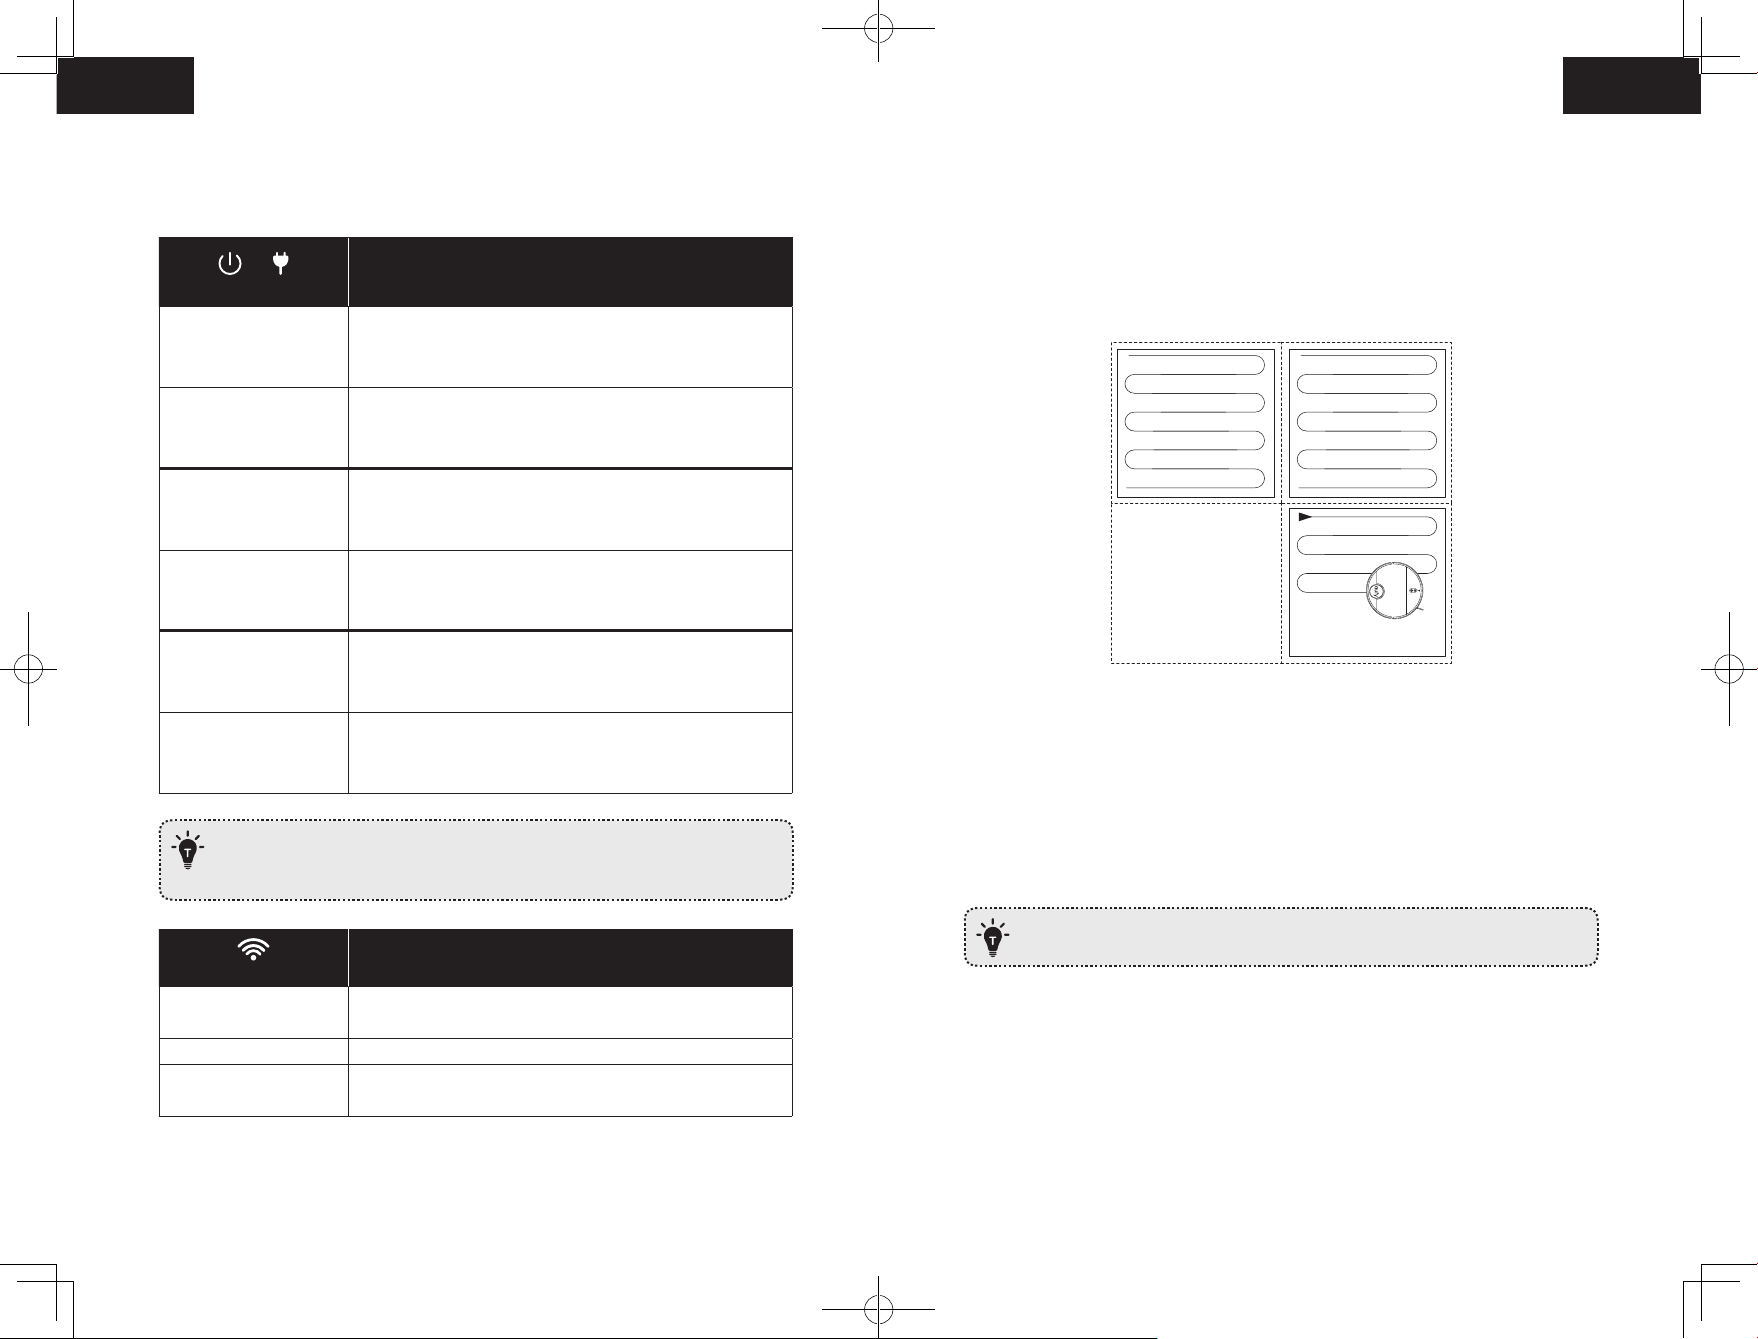
LED Indication
You can see the status of RoboVac from the LED indicators.
&
(Power Status Lights) Status
Solid blue • Standby / Cleaning (when not on Charging Base)
• Fully charged
Solid purple • Low power and returning to Charging Base
Breathing blue • Charging (power level ≥ 20%)
• Loading system
Breathing purple • Charging (power level < 20%)
Flashes blue 3 times • Status indication (along with voice prompts)
Flashing red
• Error indication (along with voice prompts)
Refer to the “Troubleshooting>Voice Alert” section in this
manual for solutions.
When RoboVac is inactive and not on the Charging Base for 10 minutes, it
automatically switches to sleep mode and the light becomes dim to conserve
power.
(Wi-Fi Status Light) Status
Slowly flashing blue Waiting for connection (RoboVac cannot connect to Wi-Fi
network in sleep mode)
Rapidly flashing blue Connecting with your wireless router
Solid blue Connected to your wireless router
Map Navigation and Management
Navigation
Once Auto cleaning starts, RoboVac moves from the Charging Base, automatically scans to
generate maps, intelligently determines its cleaning route, and divides the space into zones.
The cleaning paths are planned along the walls, following a bow-shaped cleaning method
to complete the cleaning of each zone one by one.
Real-time Mapping & Floor plan
Real-time mapping helps you know the cleaning path and environment easily. A floor plan
will be built after cleaning. The map will be updated real-time during each cleaning to
ensure normal navigation.
To create a complete floor plan:
1. open your doors for RoboVac to map each room;
2. remove any objects that may be in the way or get RoboVac stuck.
Do not remove the Charging Base after a floor plan is created.
Relocalization & Remapping
If the position of RoboVac / Charging Base is adjusted or the surroundings are changed
significantly, RoboVac will try to relocalize and may remap to match the surroundings.
• RoboVac will resume cleaning if the relocalization is successful.
• If the relocalization fails, RoboVac will remap to ensure normal navigation with a new
cleaning.
14 15
• If the original map has the virtual boundary information, RoboVac will not start a new
cleaning to avoid going across the restricted zone.
• Make sure RoboVac starts each cleaning from the Charging Base.
• During cleaning, do not move the device frequently. If moved, place RoboVac
back to the original position.
Get Started
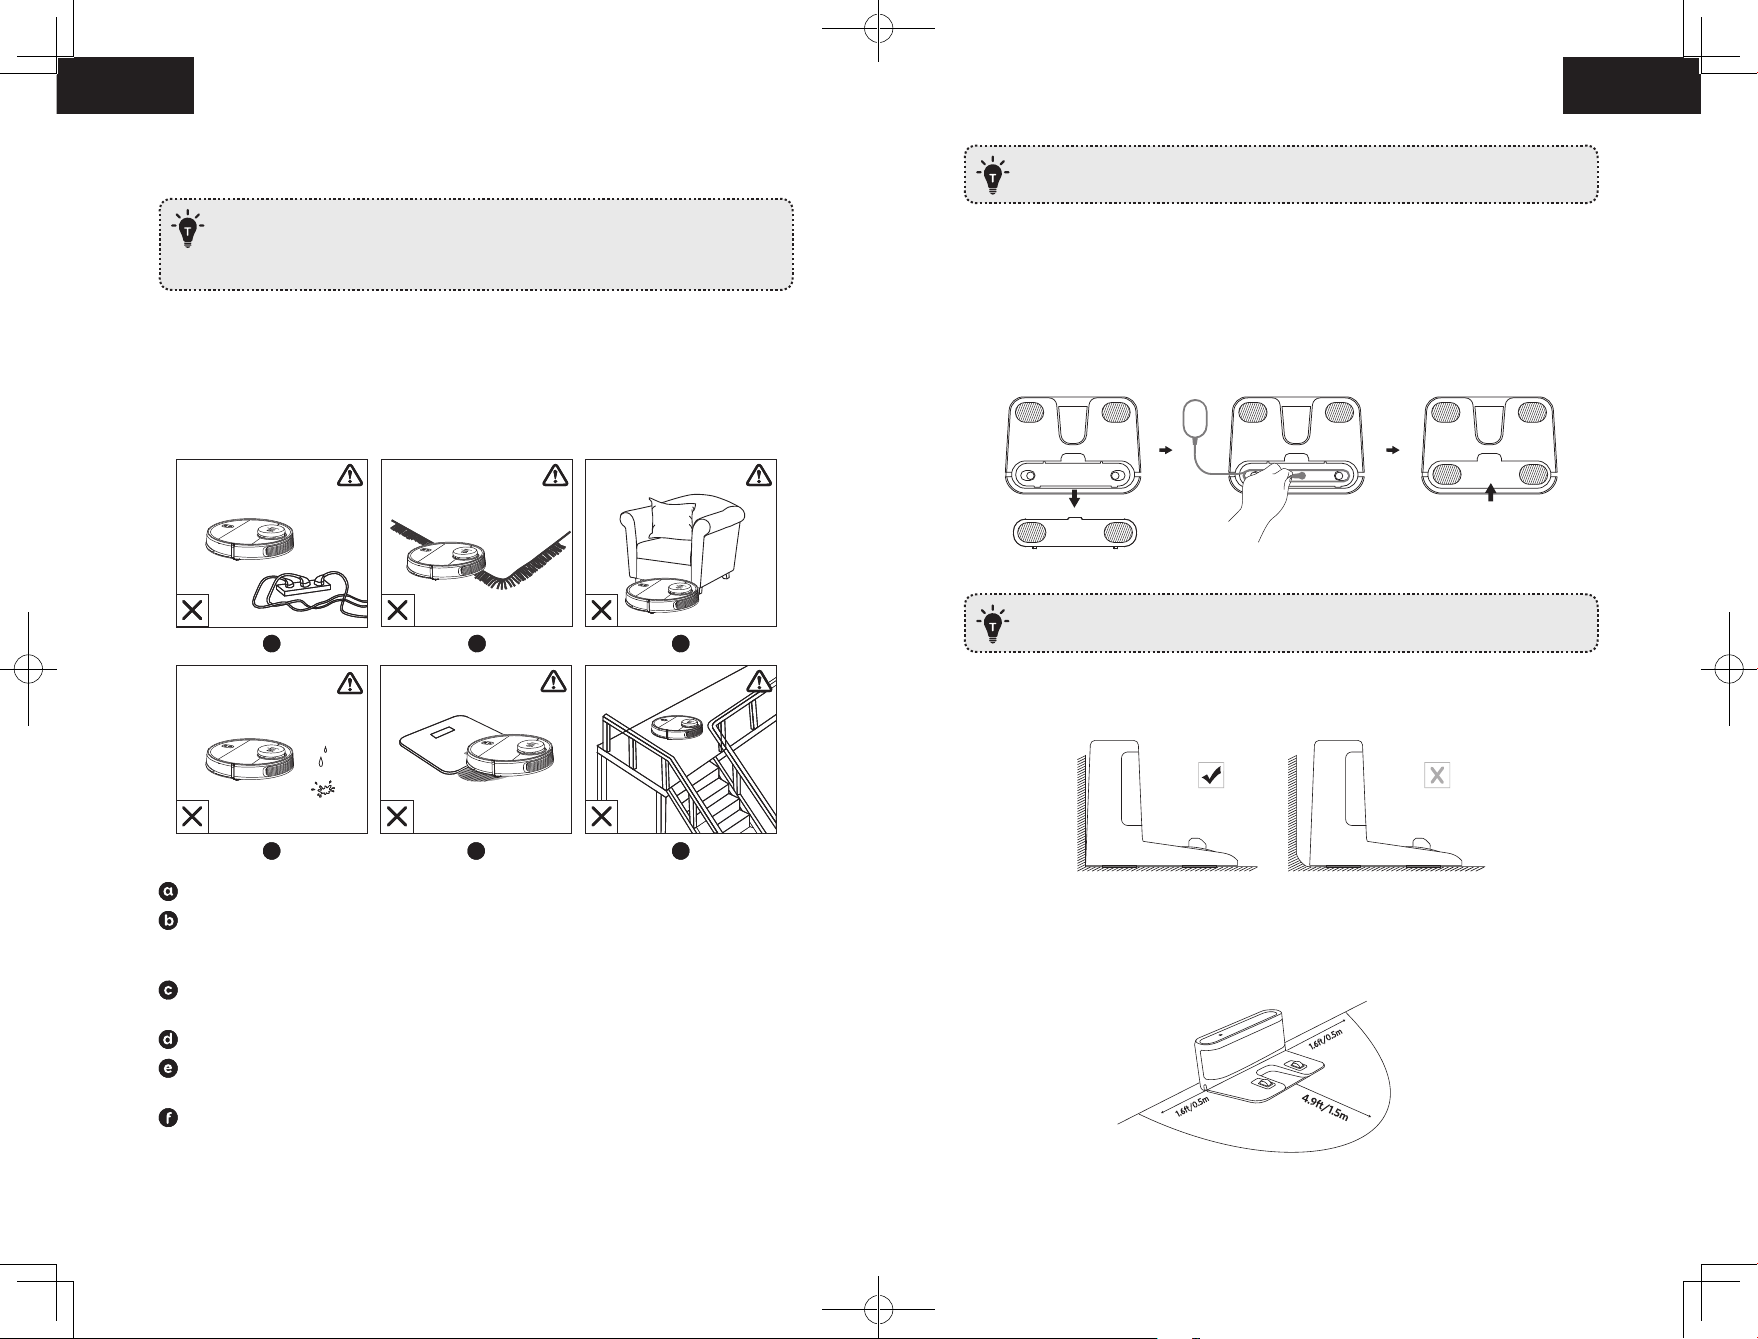
Important Tips Before Use
abc
def
abc
def
Remove power cords and small objects from the floor that may entangle RoboVac.
Fold tasseled edges of area rugs underneath to prevent tangling RoboVac. Avoid
cleaning very dark-colored high-pile rugs or rugs thicker than 1.02 in/26 mm as they
may cause RoboVac to malfunction.
Keep RoboVac away from spaces lower than 4.17 in/106 mm to prevent RoboVac from
getting stuck. If necessary, place a physical barrier to block off the problem areas.
Keep RoboVac away from wet areas during cleaning.
RoboVac may climb on top of objects less than 0.67 in/17 mm in height (the height will
be reduced if the mopping module is installed). Remove these objects if possible.
Anti-drop sensors will prevent RoboVac from tumbling down stairs and steep drops in
most cases. Sensors are less effective if dirty or used on carpeted/reflective/very dark-
colored floors. It is recommended to place physical barriers to block off areas where
RoboVac may fall.
Place physical barriers in front of fireplaces and areas that may cause damage to
RoboVac if entered.
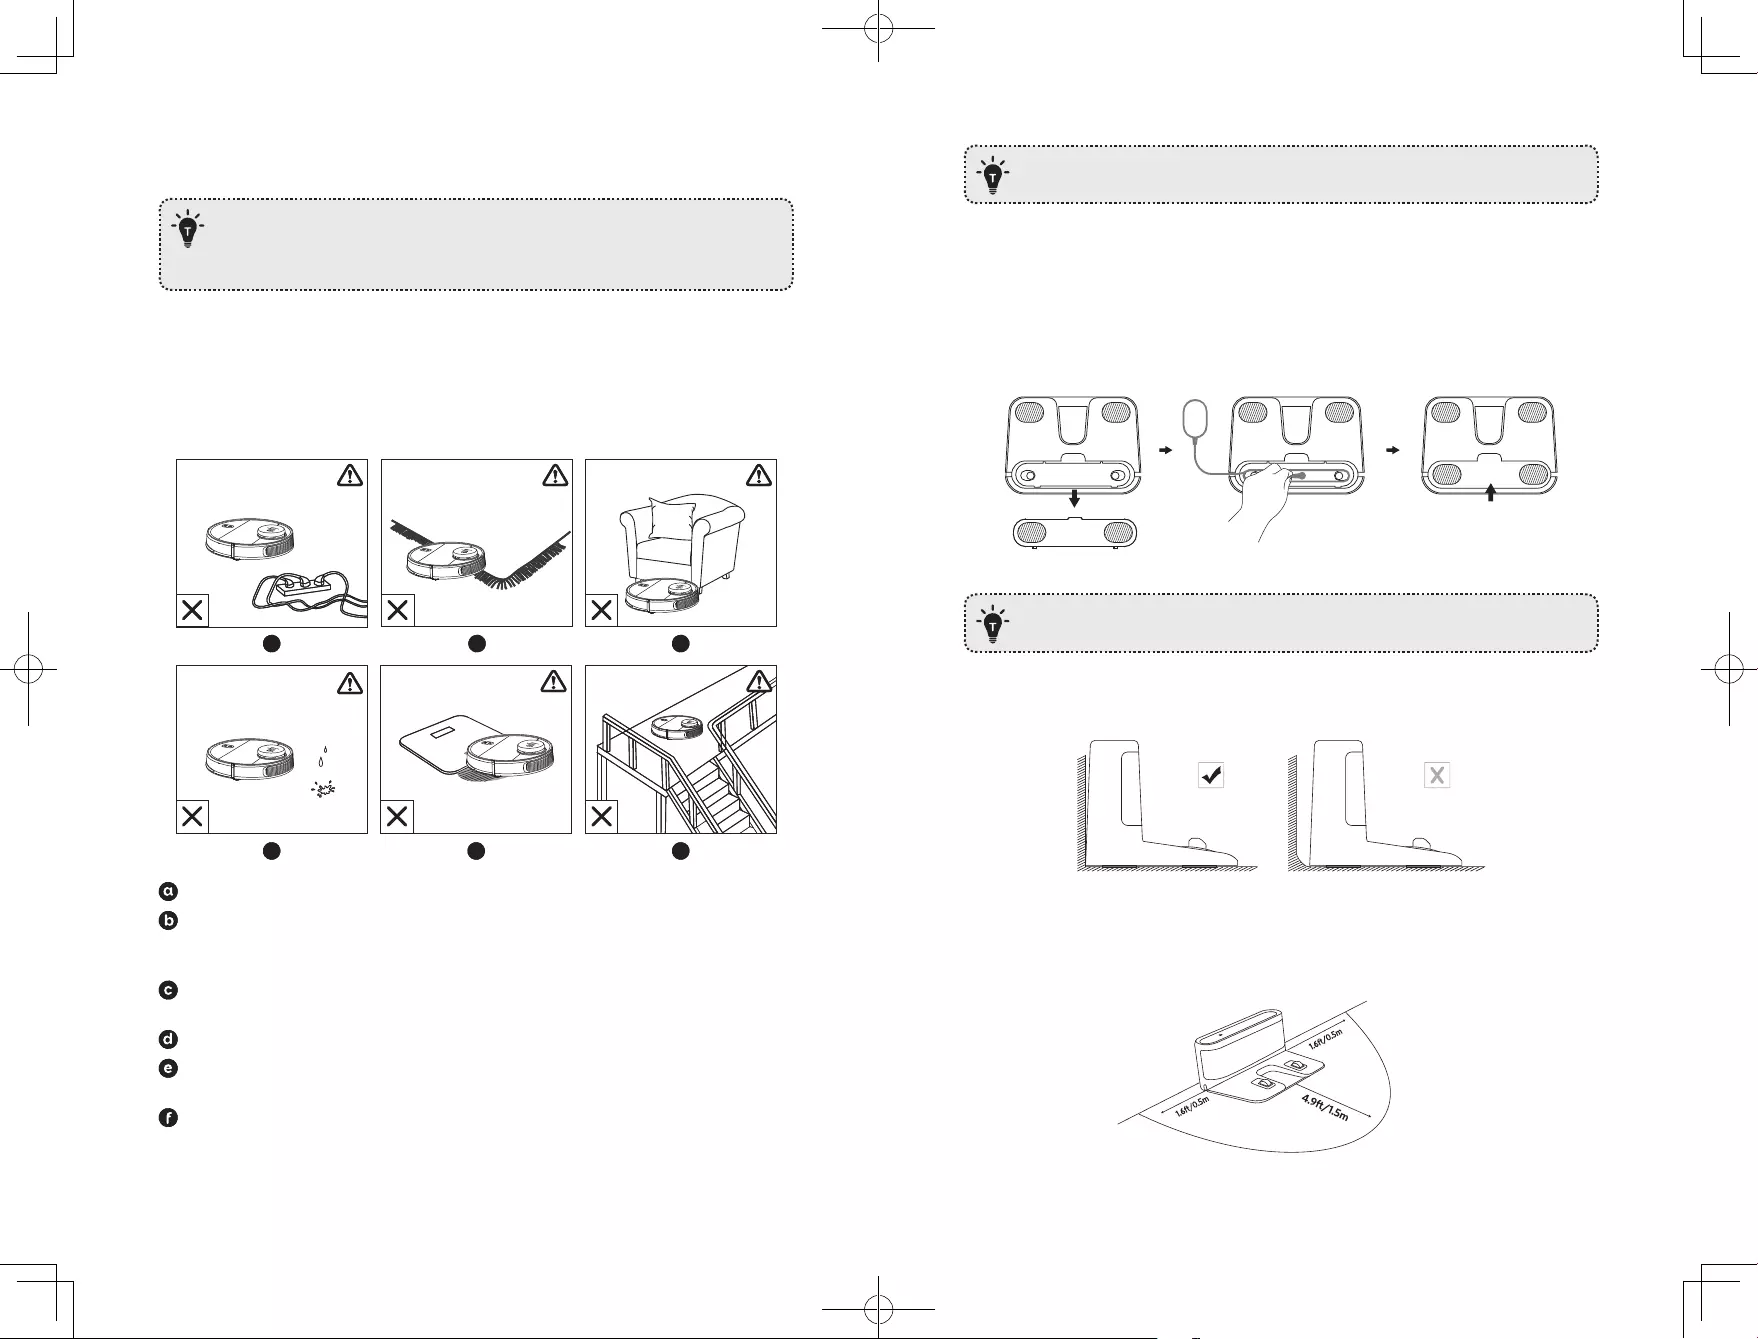
Preparation
1. Remove the foam blocks beside the bumper before use.
2. Connect the adapter to the Charging Base and put extra cable in the slot as illustrated.
Extra power cord on the ground may be pulled by the main unit to cause an
interruption of charging.
3. Place the Charging Base on a level surface and against a wall.
4. Remove objects within 1.6 ft/0.5 m of the left and right side and within 4.9 ft/1.5 m
of the front of the Charging Base. If you cannot remove the objects, check whether
RoboVac can return to the Charging Base normally; if not, contact eufy customer service
for help.
16 17
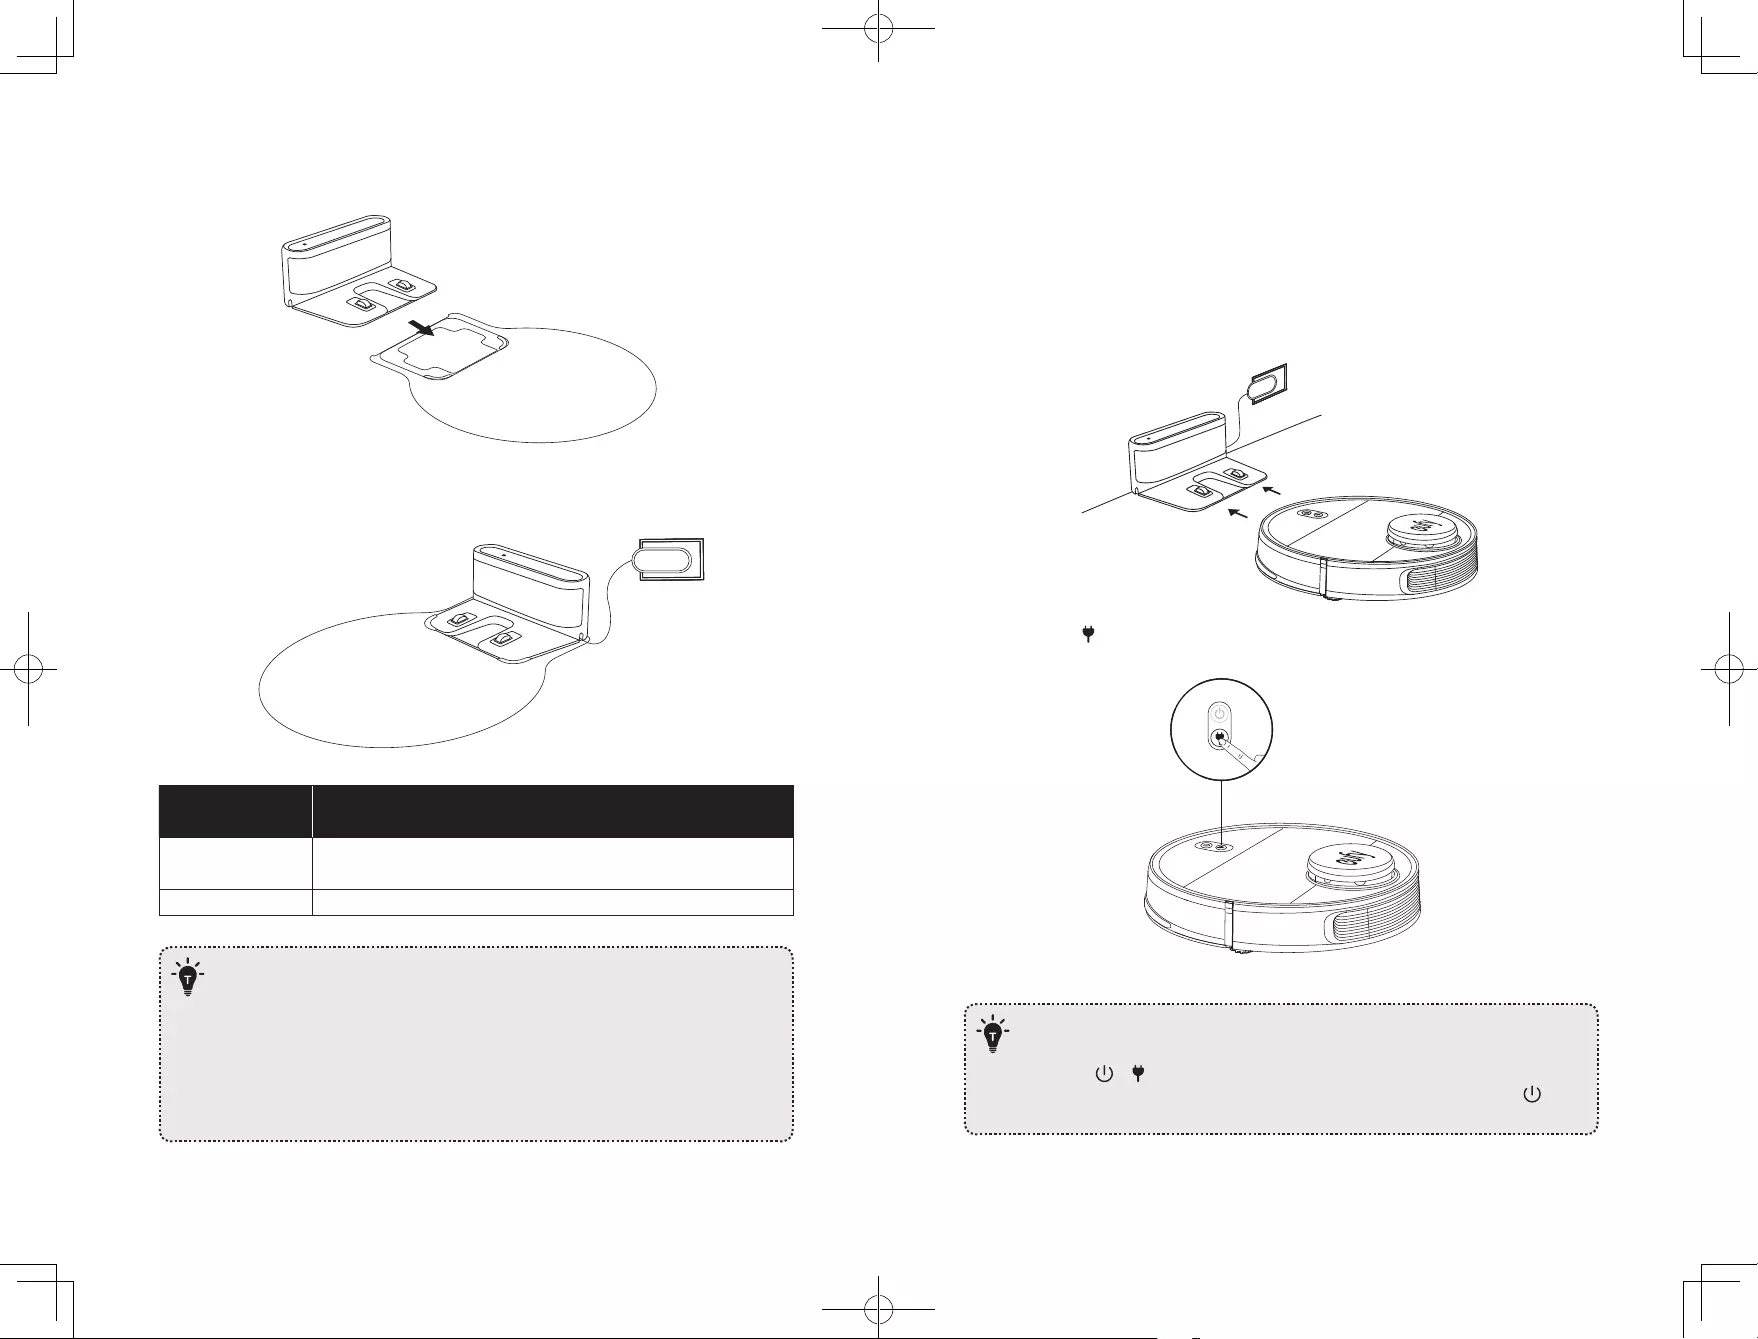
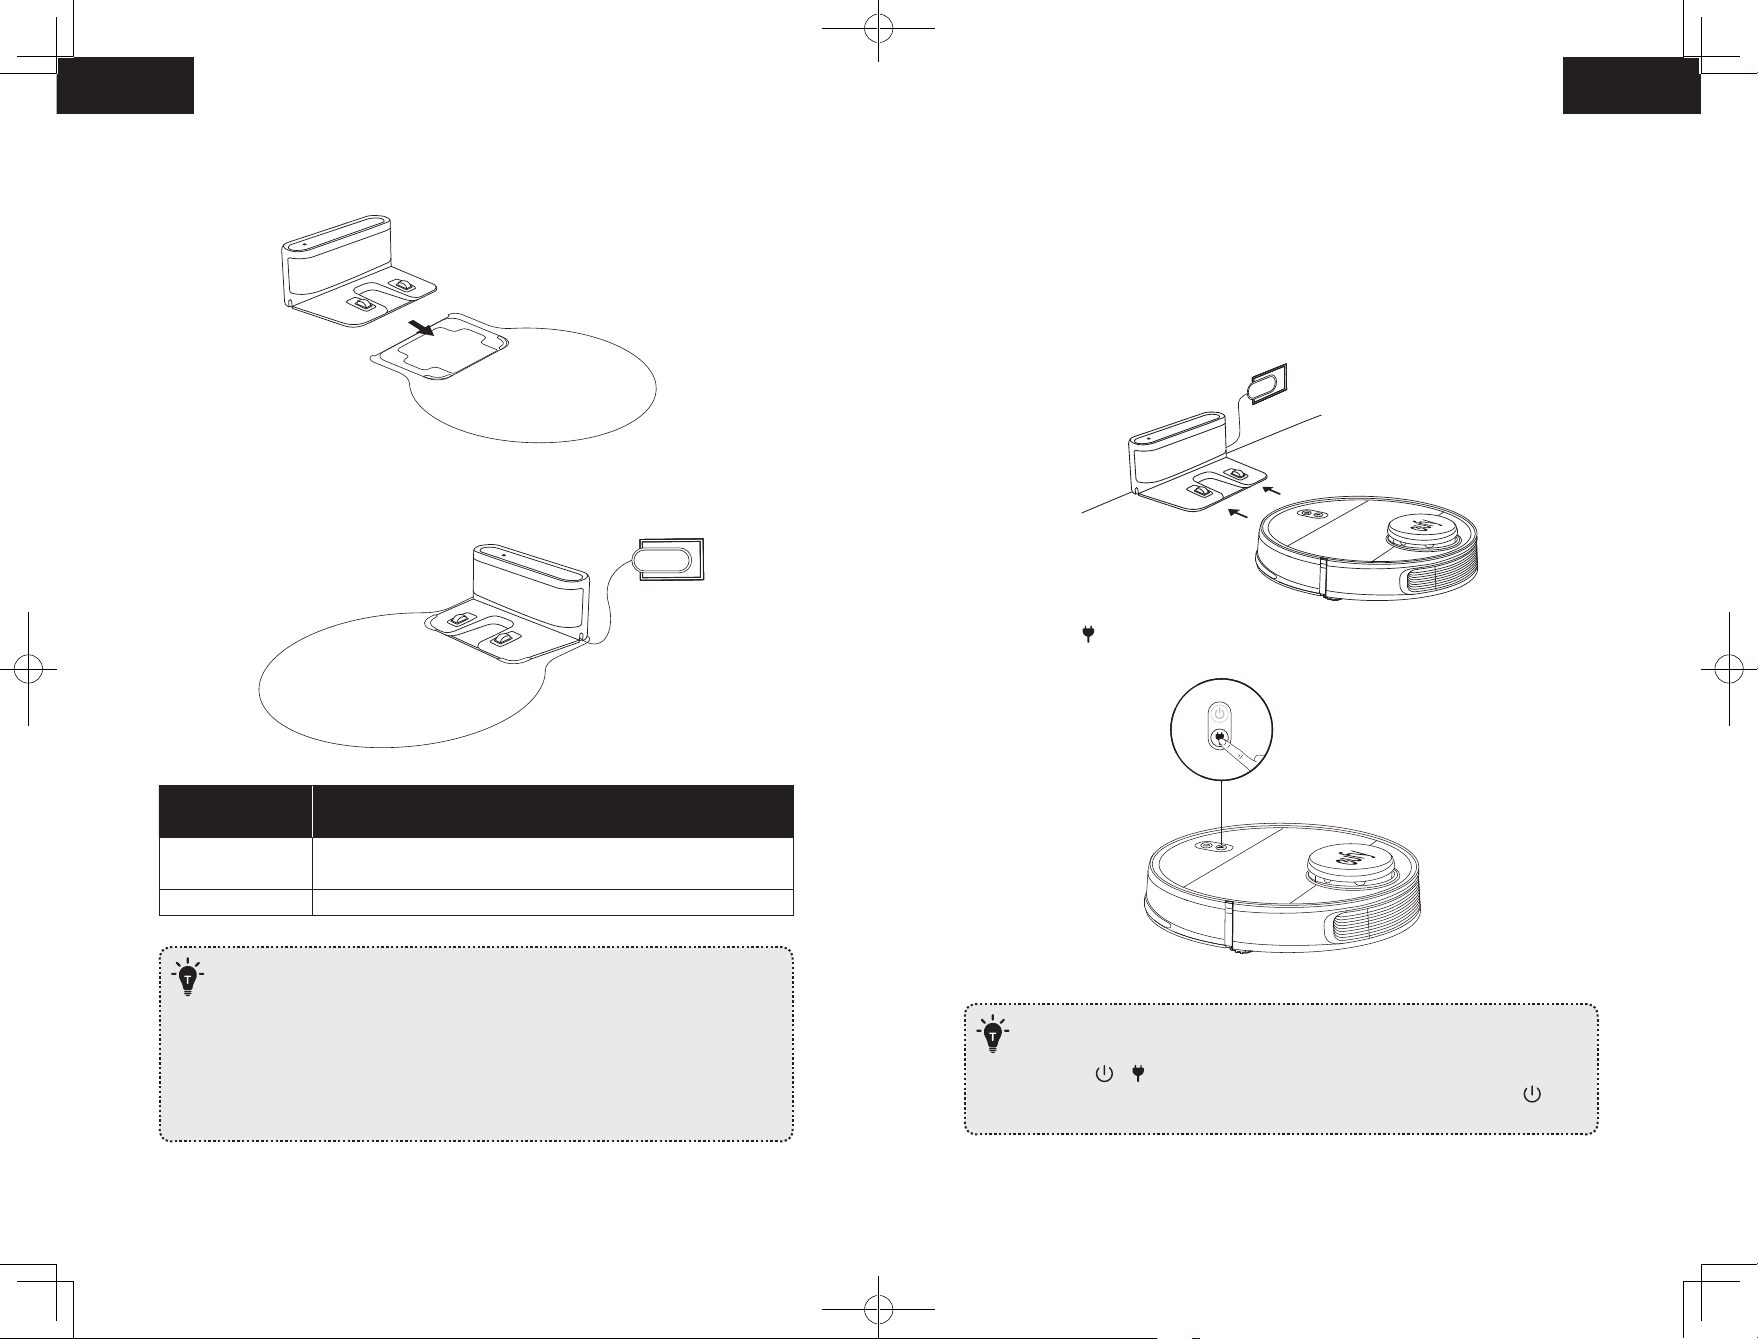
5. Insert the Charging Base into the waterproof pad to keep the floor dry. Make sure it is
firmly installed. If mopping is not needed, you can skip this step.
6. Connect the adapter to a wall outlet.
LED Indicator on
Charging Base Status
Solid white Charging Base connected to power source (When RoboVac is not
docked)
Off RoboVac properly connected to Charging Base
— Install the Charging Base in a location that RoboVac can easily access. It is
recommended to place the Charging Base against a wall, and on a hard-level
surface rather than on rugs or carpets.
— Always keep the Charging Base plugged in, otherwise RoboVac will not
automatically return to it.
— To ensure proper charging, do not frequently move the Charging Base. When
its location is changed, RoboVac may remap due to failure in relocalization
(see About Your RoboVac > Map Navigation and Management for details).
Charge Your RoboVac
• RoboVac has a pre-installed rechargeable battery that has to be fully charged before use.
• RoboVac will return to the Charging Base at the end of a cleaning cycle or when its
battery is running low.
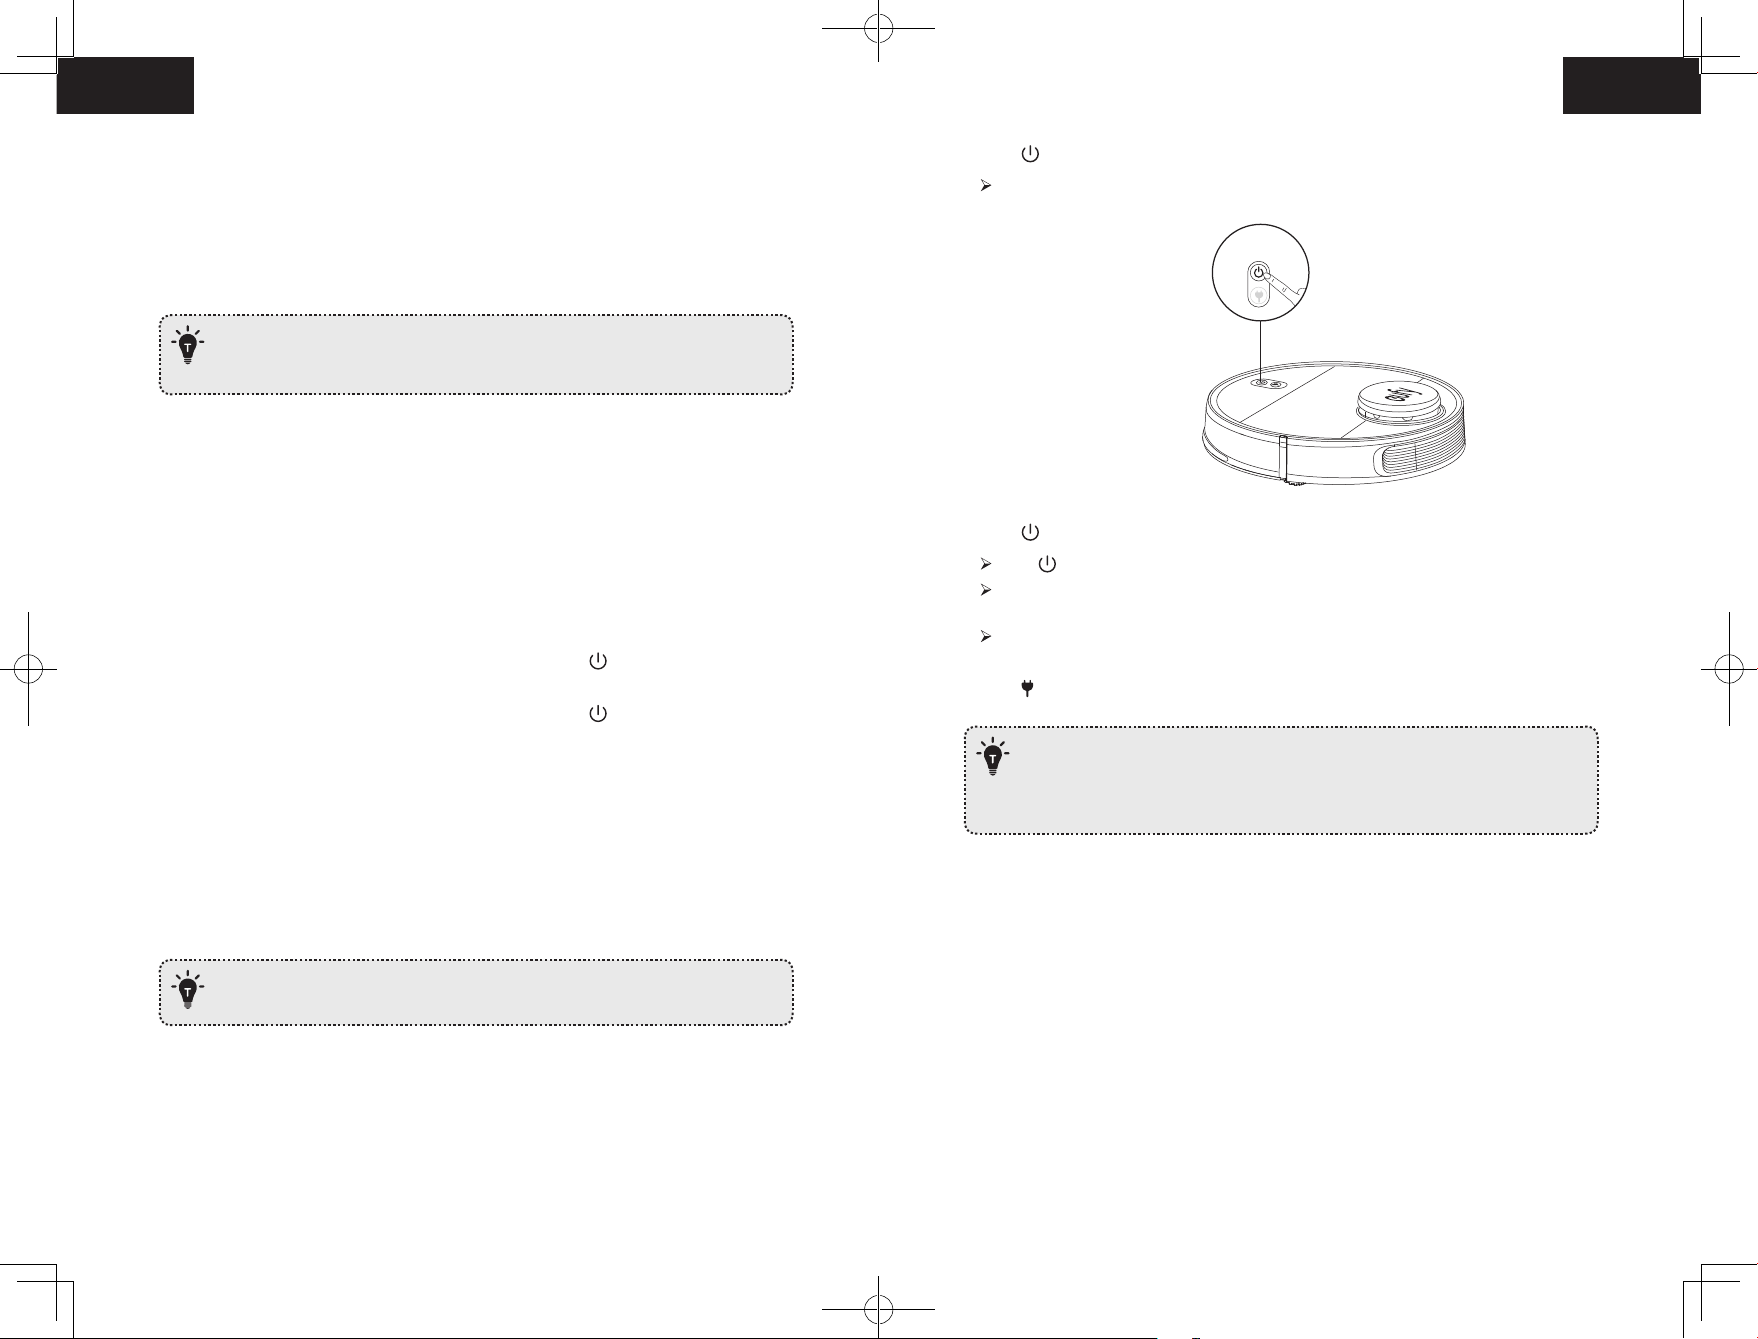
Method 1: Attach RoboVac to the Charging Base by aligning its charging pins with the
charging pins on the base.
Method 2: Press on the main unit to send RoboVac to the Charging Base.
— To preserve the battery’s lifespan, recharge at least once every 6 months.
— To enter Reduced Power Standby mode when RoboVac is being charged, press
and hold & simultaneously on RoboVac for 20 seconds until the Power
Status Lights turn off. Wi-Fi is disabled while this mode is active. Press to
exit Reduced Power Standby mode.
18 19
Auto Recharge and Resume
RoboVac returns to the Charging Base automatically to recharge when:
• RoboVac has finished cleaning;
• Cleaning is not complete and the battery level becomes low; Once recharged to 80%
battery capacity, RoboVac will resume to finish the remaining cleaning.
— Do not move the Charging Base during cleaning, otherwise RoboVac may fail
to return for recharge. If failed, you have to manually attach it to the Charging
Base.
Using Your RoboVac
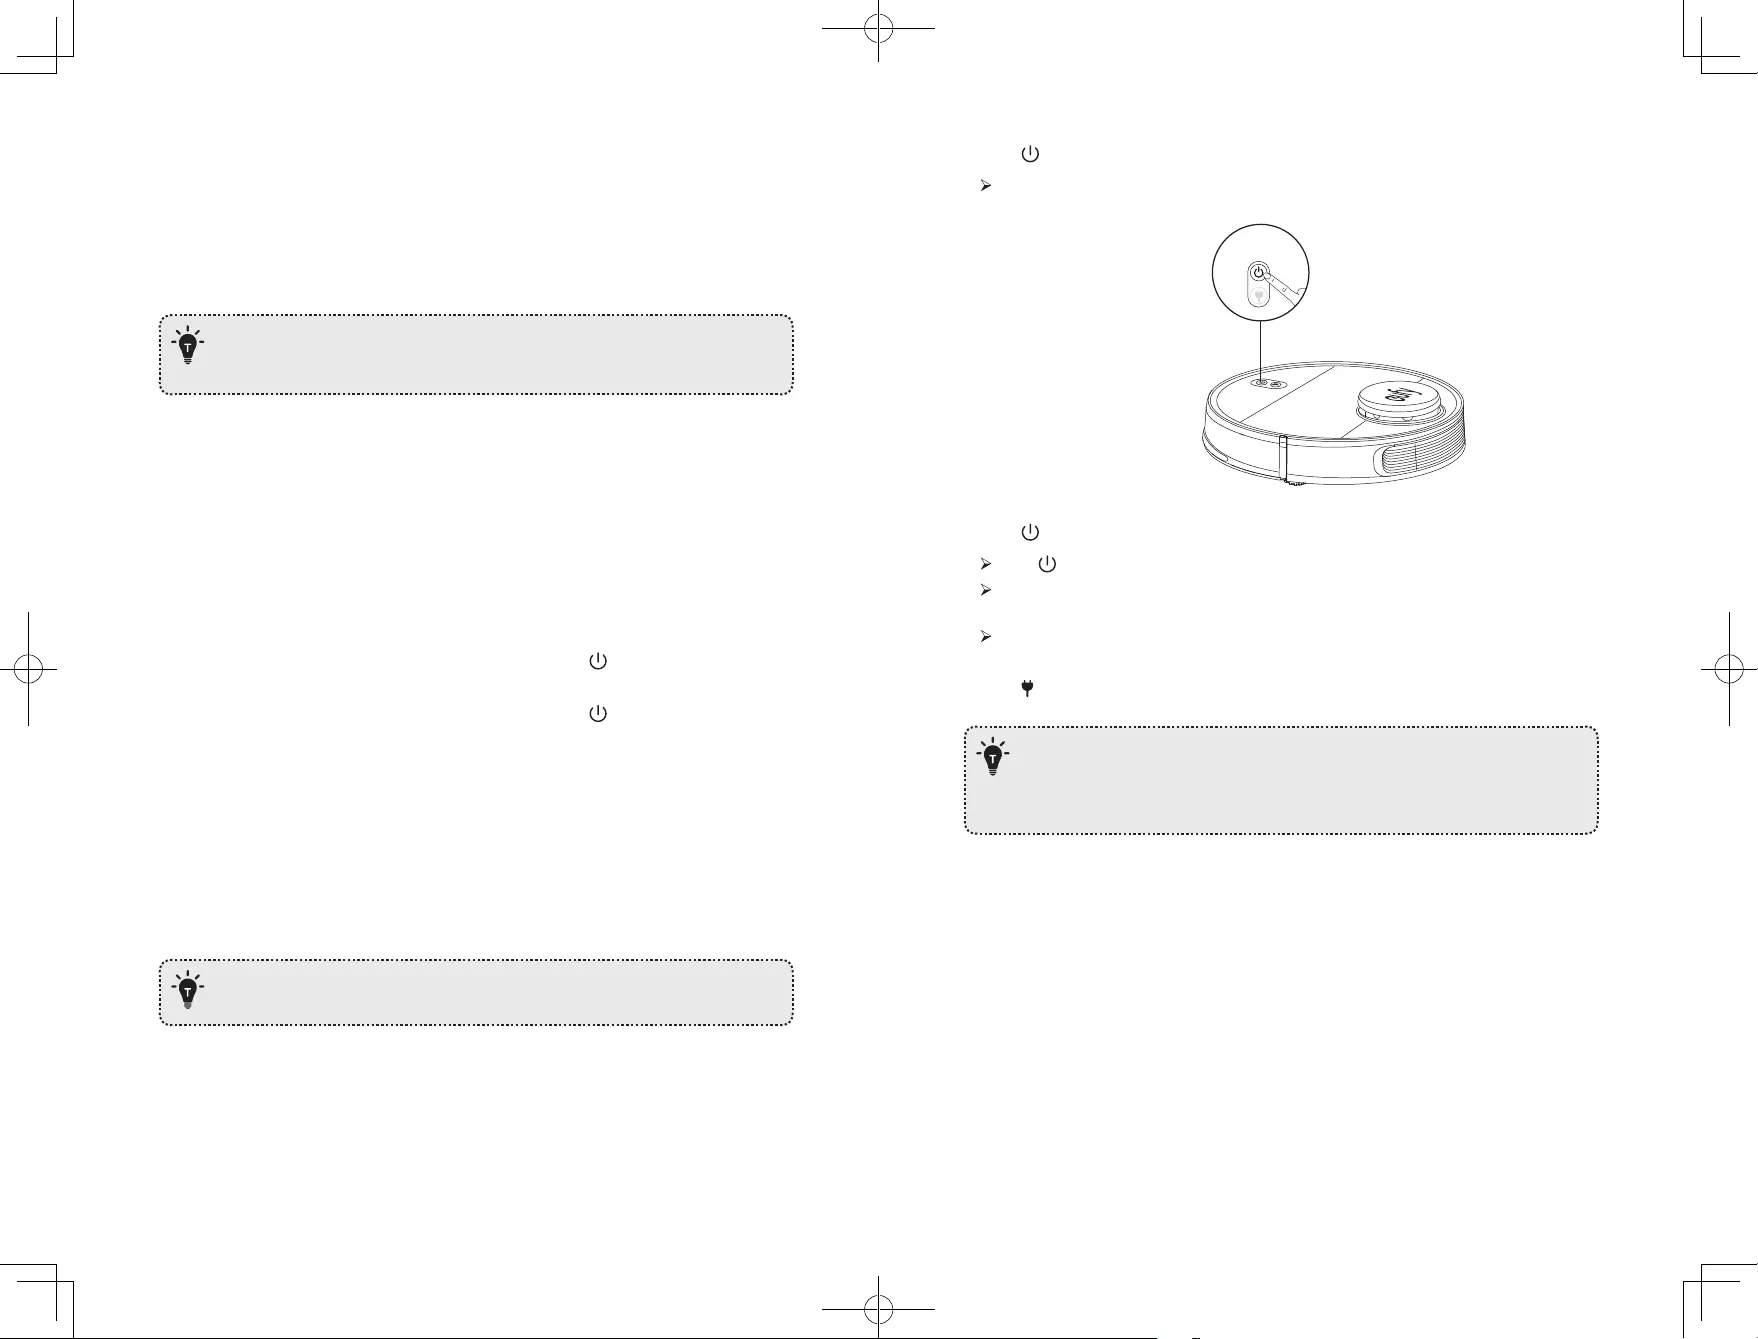
Turn on / off
• RoboVac turns on automatically when attached to the Charging Base and connected to
power.
• When RoboVac is not on the Charging Base, press and hold for 3 seconds to turn on
the main unit. Wait until the Power Status Light turns solid blue.
• When RoboVac is not on the Charging Base, press and hold for 3 seconds again to
turn off the main unit.
Switch to Sleep Mode
• When inactive and not on the Charging Base for 10 minutes, RoboVac automatically stops
cleaning and switches to sleep mode. In sleep mode, press any button to wake it up.
Start cleaning
RoboVac cannot start cleaning if the battery level is less than 20%. In this case,
recharge RoboVac first before cleaning.
1. Press to start cleaning in Auto Mode.
RoboVac moves around to scan the environment and build the map automatically.
2. Press again to pause cleaning.
Press to resume cleaning.
When cleaning is paused, docking the main unit onto the Charging Base will stop the
cleaning.
If cleaning is paused for 10 minutes, RoboVac automatically stops cleaning and
switches to sleep mode.
3. Press to stop current cleaning and return to the Charging Base.
• Before cleaning, sort out cables and cords to avoid power interruption or any
damaging caused by pulling the cord during cleaning.
• In Auto cleaning mode, RoboVac will clean twice by default if the cleaning
time is less than 10 minutes.
Use Your RoboVac with the EufyHome App
To fully enjoy all the available features, it is recommended to control your RoboVac via the
EufyHome app.
Before you start, make sure that:
• Your smartphone or tablet is connected to a Wi-Fi network.
• Your smartphone or tablet is running iOS 8.0 (or above) or Android 4.4 (or above).
• The 2.4GHz band wireless signal is enabled on your wireless router.

20 21
• The Wi-Fi status light on RoboVac is slowly flashing blue.
• RoboVac is attached to the Charging Base to ensure it has enough power during setup.
EufyHome
EufyHome
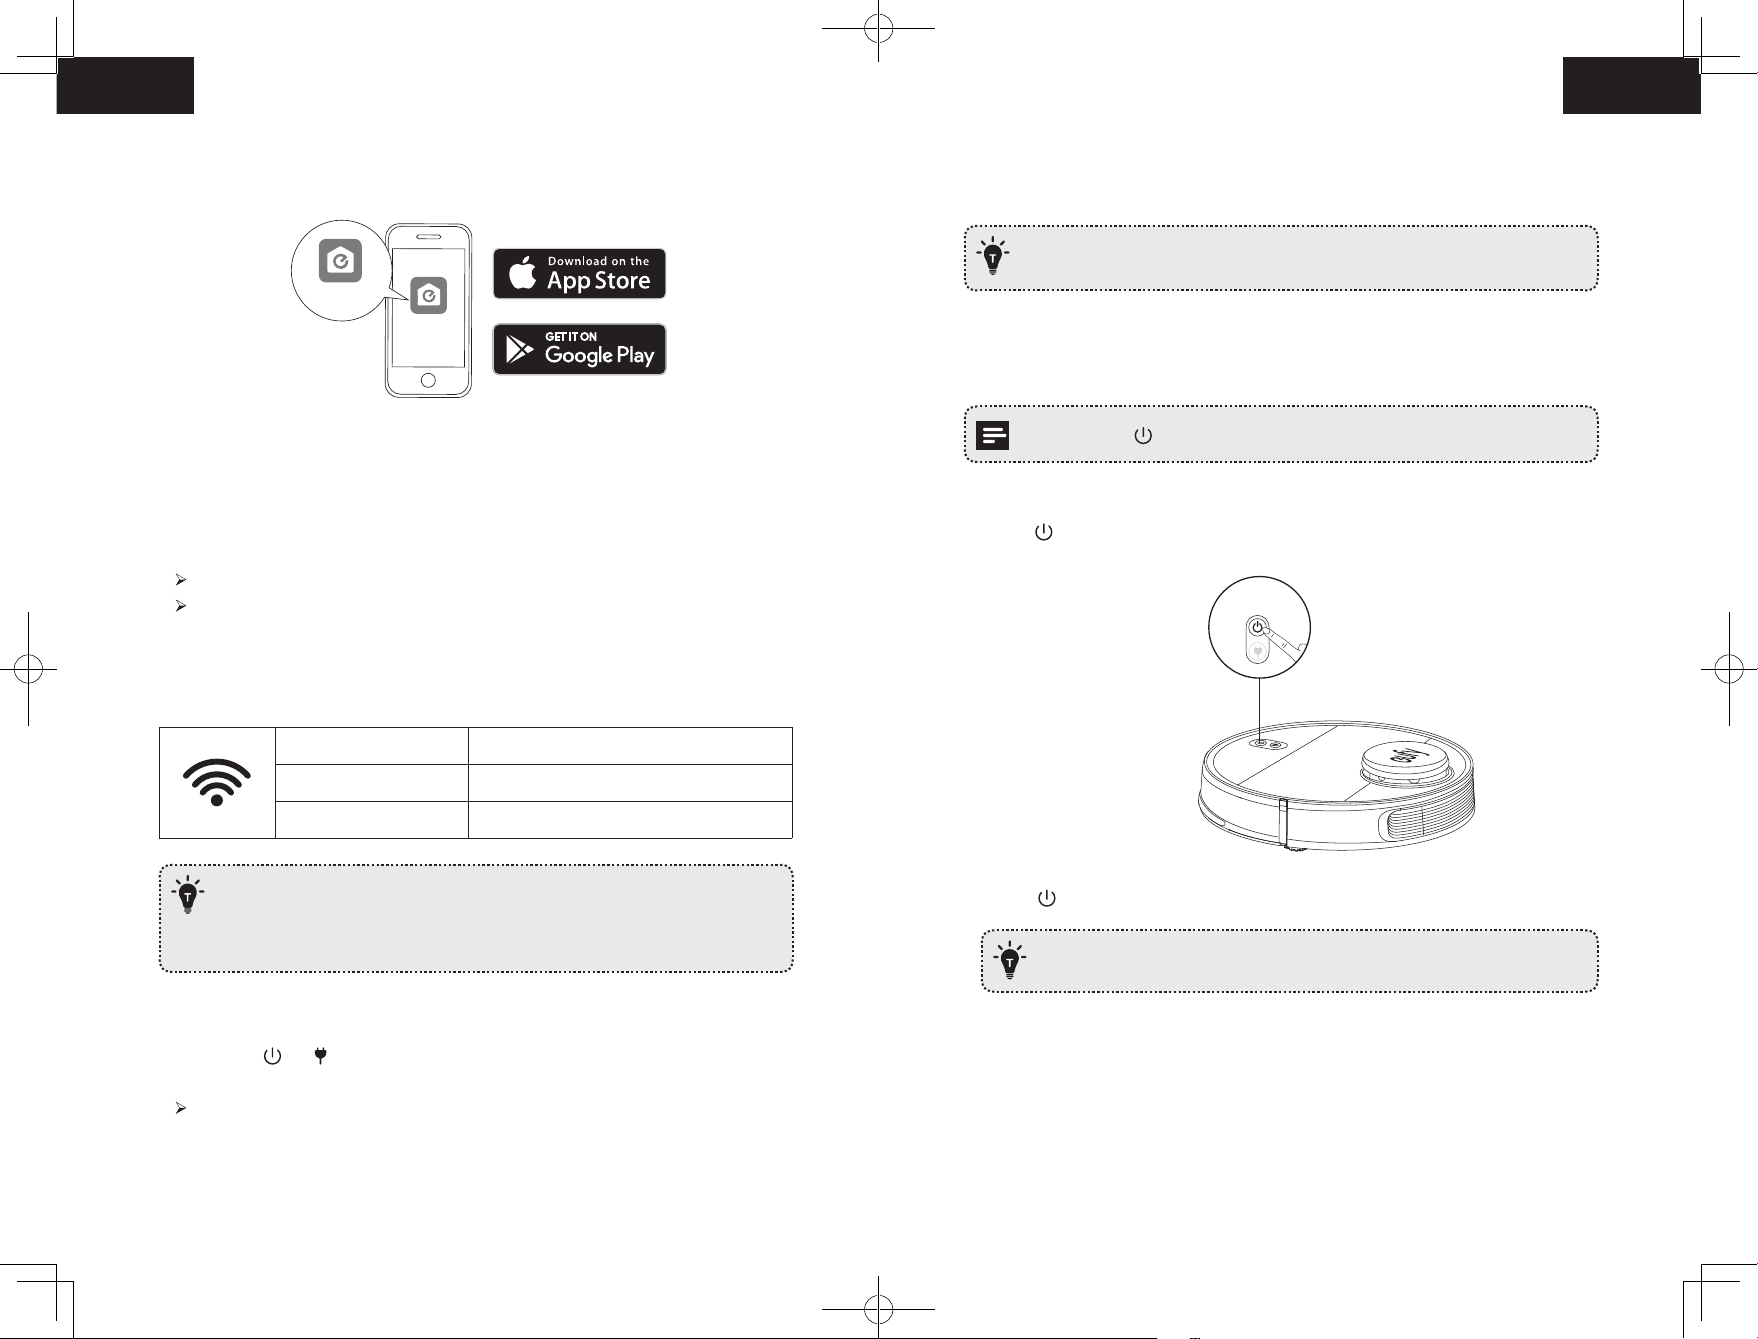
1. Download the EufyHome app from the App Store (iOS devices) or Google Play (Android
devices).
2. Open the app and create a user account.
3. Tap the “+” icon to add RoboVac to your EufyHome account.
4. Follow the instructions in the app to set up the Wi-Fi connection.
After connecting successfully, you can control RoboVac via the app.
With the app, you can select cleaning at your desired suction level, schedule cleaning,
view the cleaning map, set up “No-Mop” or “No-Go” zones, check the network
connection status, and access additional features.
Wi-Fi Status Light
Slowly flashing blue Waiting for connection
Rapidly flashing blue Connecting with your wireless router
Solid blue Connected with your wireless router
• If you have any problems during the Wi-Fi setup process, refer to the
“Troubleshooting > Wi-Fi connection” section in this Manual.
• If RoboVac gets stuck in any space, tap Find My Robot in the app to find the
machine. This function is available in the app only.
Reset the Wi-Fi Connection
Press and hold and simultaneously for 3 seconds to reset the Wi-Fi connection if
necessary.
You will hear a voice prompt when the Wi-Fi connection has been reset, and the Wi-Fi
status light will slowly flash blue. Now you can follow the Wi-Fi instructions in the
eufyHome app to set up the Wi-Fi connection.
Schedule Cleaning
With the EufyHome app, you can schedule RoboVac to start cleaning at a particular time.
• You can set the time and customize the cleaning schedules from Sunday to
Saturday on the EufyHome app. This function is available in the app only.
Select a Cleaning Mode
• You can press at any time to pause the current cleaning cycle.
1. Auto cleaning
1. Press to start cleaning in Auto Mode.
2. Press again to pause cleaning.
— By default, RoboVac starts in Auto cleaning mode when it is turned on.
22 23
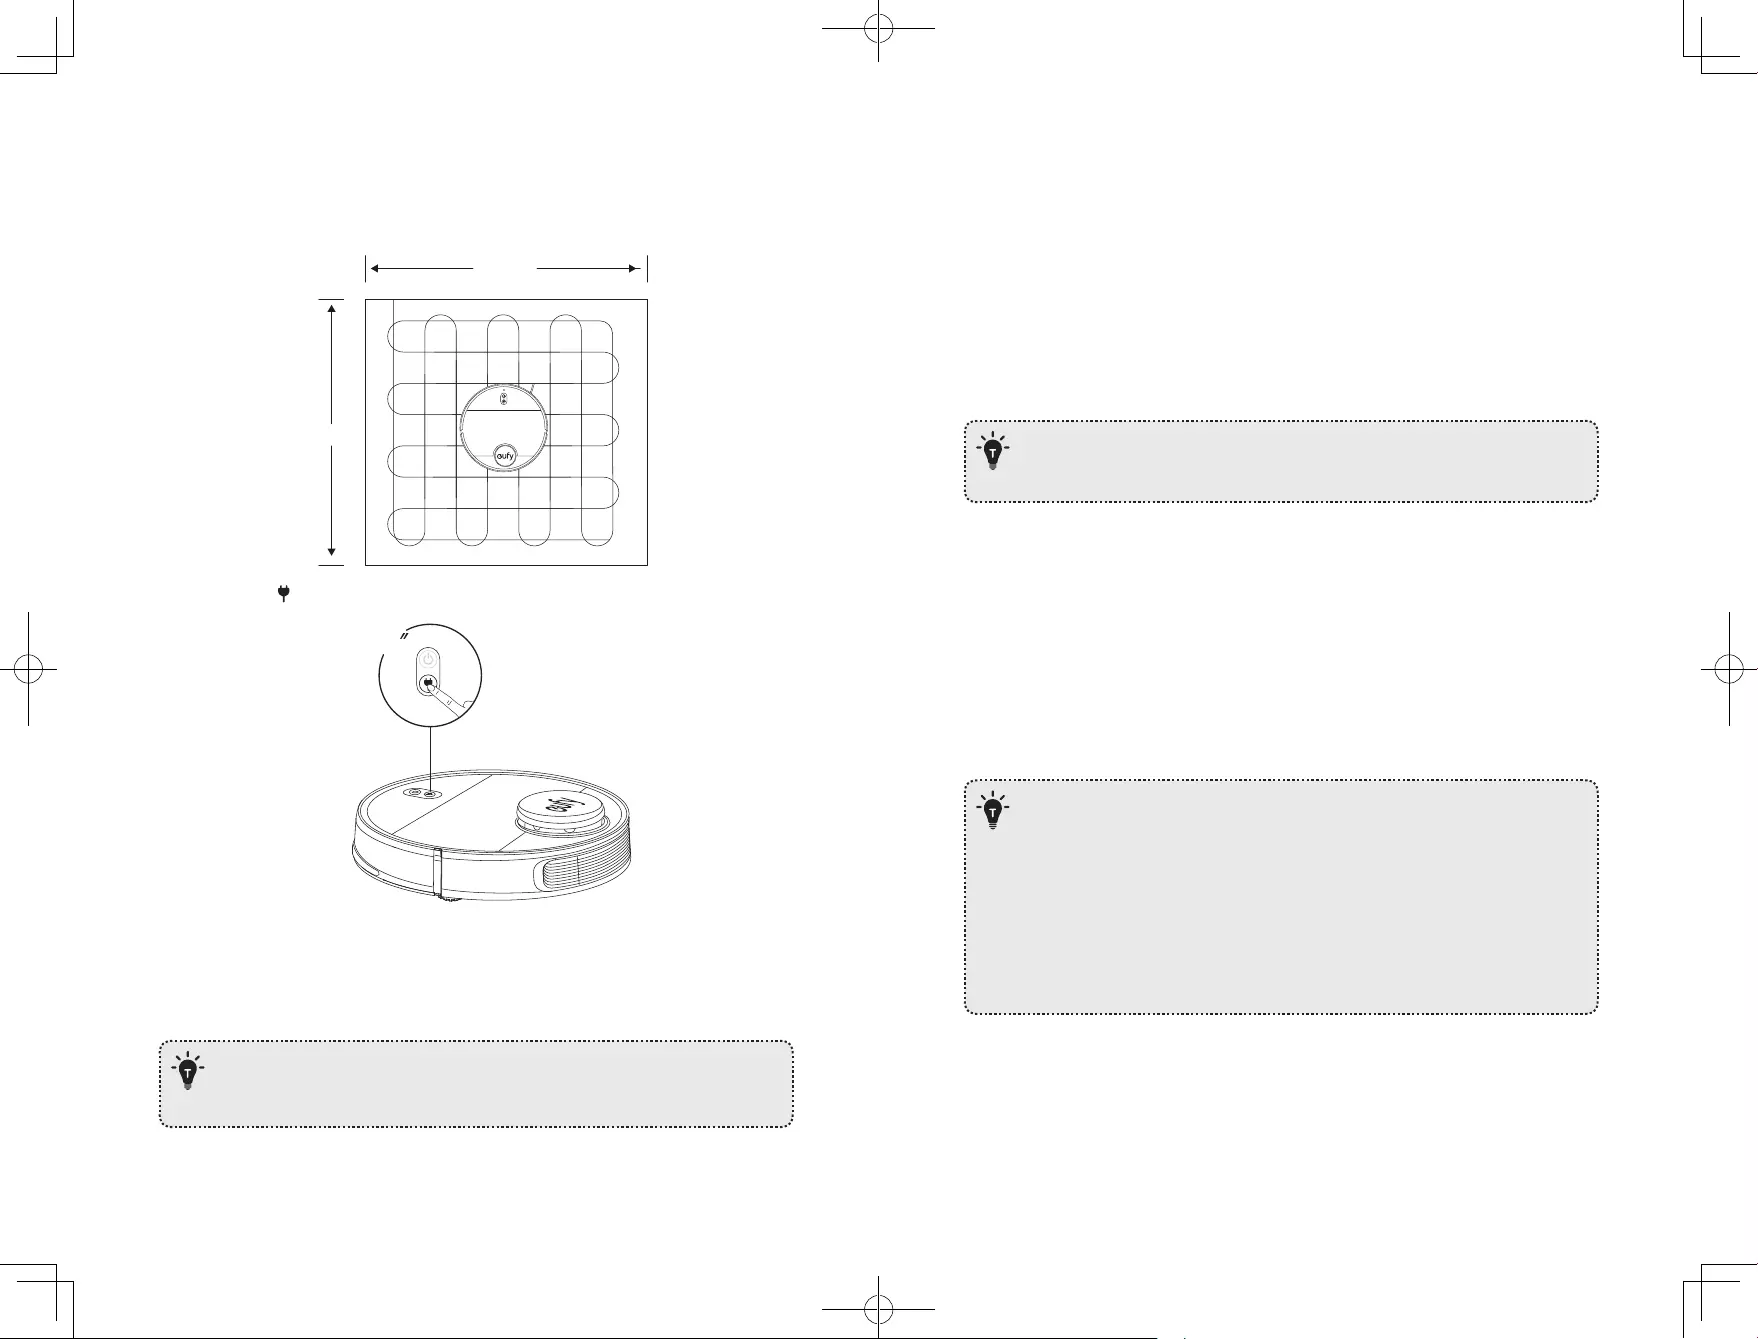
2. Spot cleaning
RoboVac intensively cleans a specific area with a size of 4.9 ft x 4.9 ft / 1.5 m x 1.5 m.
Useful if there is a concentrated area of dust or debris. When the cleaning of a certain zone
is finished, it automatically returns to the Charging Base.
4.9ft/1.5m
4.9ft/1.5m
• Press and hold for 3 seconds to start Spot cleaning.
3
3. Zone cleaning (available via the app only)
In this mode, set up a cleaning zone in the EufyHome app. RoboVac will clean this zone
only and return to the Charging Base after cleaning.
• Start Zone cleaning only after RoboVac has created the map.
• It is recommended that RoboVac moves from the Charging Base to start Zone
cleaning.
4. Manual-controlled cleaning (available via the app only)
You can direct RoboVac to clean a particular area by using manual controls in the
EufyHome app.
5. Select a Suction Power Level
In the EufyHome app, select a suction power level according to your needs:
• Quiet
• Standard (Default)
• Turbo
• Max
• You can select the “Mop-Only” suction level in mopping mode. When
mopping is finished, RoboVac will change to default suction level
automatically.
6. Select BoostIQ™ feature
In the EufyHome app, select the BoostIQ™ feature according to your needs. RoboVac will
automatically increase the suction power if it detects that stronger power is needed to
ensure the best clean. BoostIQ™ is ideal for cleaning thicker carpets and hard-to-sweep
messes, which will reduce the total cleaning time, but increase the noise level. If the
vacuuming noise caused by BoostIQ™ disturbs you, you can disable this feature.
Use Mopping System
• The mopping mode is only intended for a clean floor without stubborn stains
or liquids. To avoid staining floors, do not use the mopping function when dust
is mixed with liquids such as coffee or ink.
• Mopping System cleans best on smooth hard surfaces and may not perform so
well on uneven tiles, heavily waxed floors or rough surfaces like slate or brick,
which may snag the cleaning pad.
• The mopping mode is not recommended when no one is at home.
• Do not use the mopping mode on a carpeted floor. It is recommended to set a
“No-Mop” zone in the EufyHome app to avoid cleaning the carpeted area.
24 25
1. Take out the water tank and put it back into the main unit after filling the water.
— Do not use any other cleaning solution other than water. Cleaning solutions,
even natural ones, can clog the water release system and break down the
materials inside the device.
— To add water into the water tank or install the mopping module, pause the
cleaning first. Do not manually move the device.
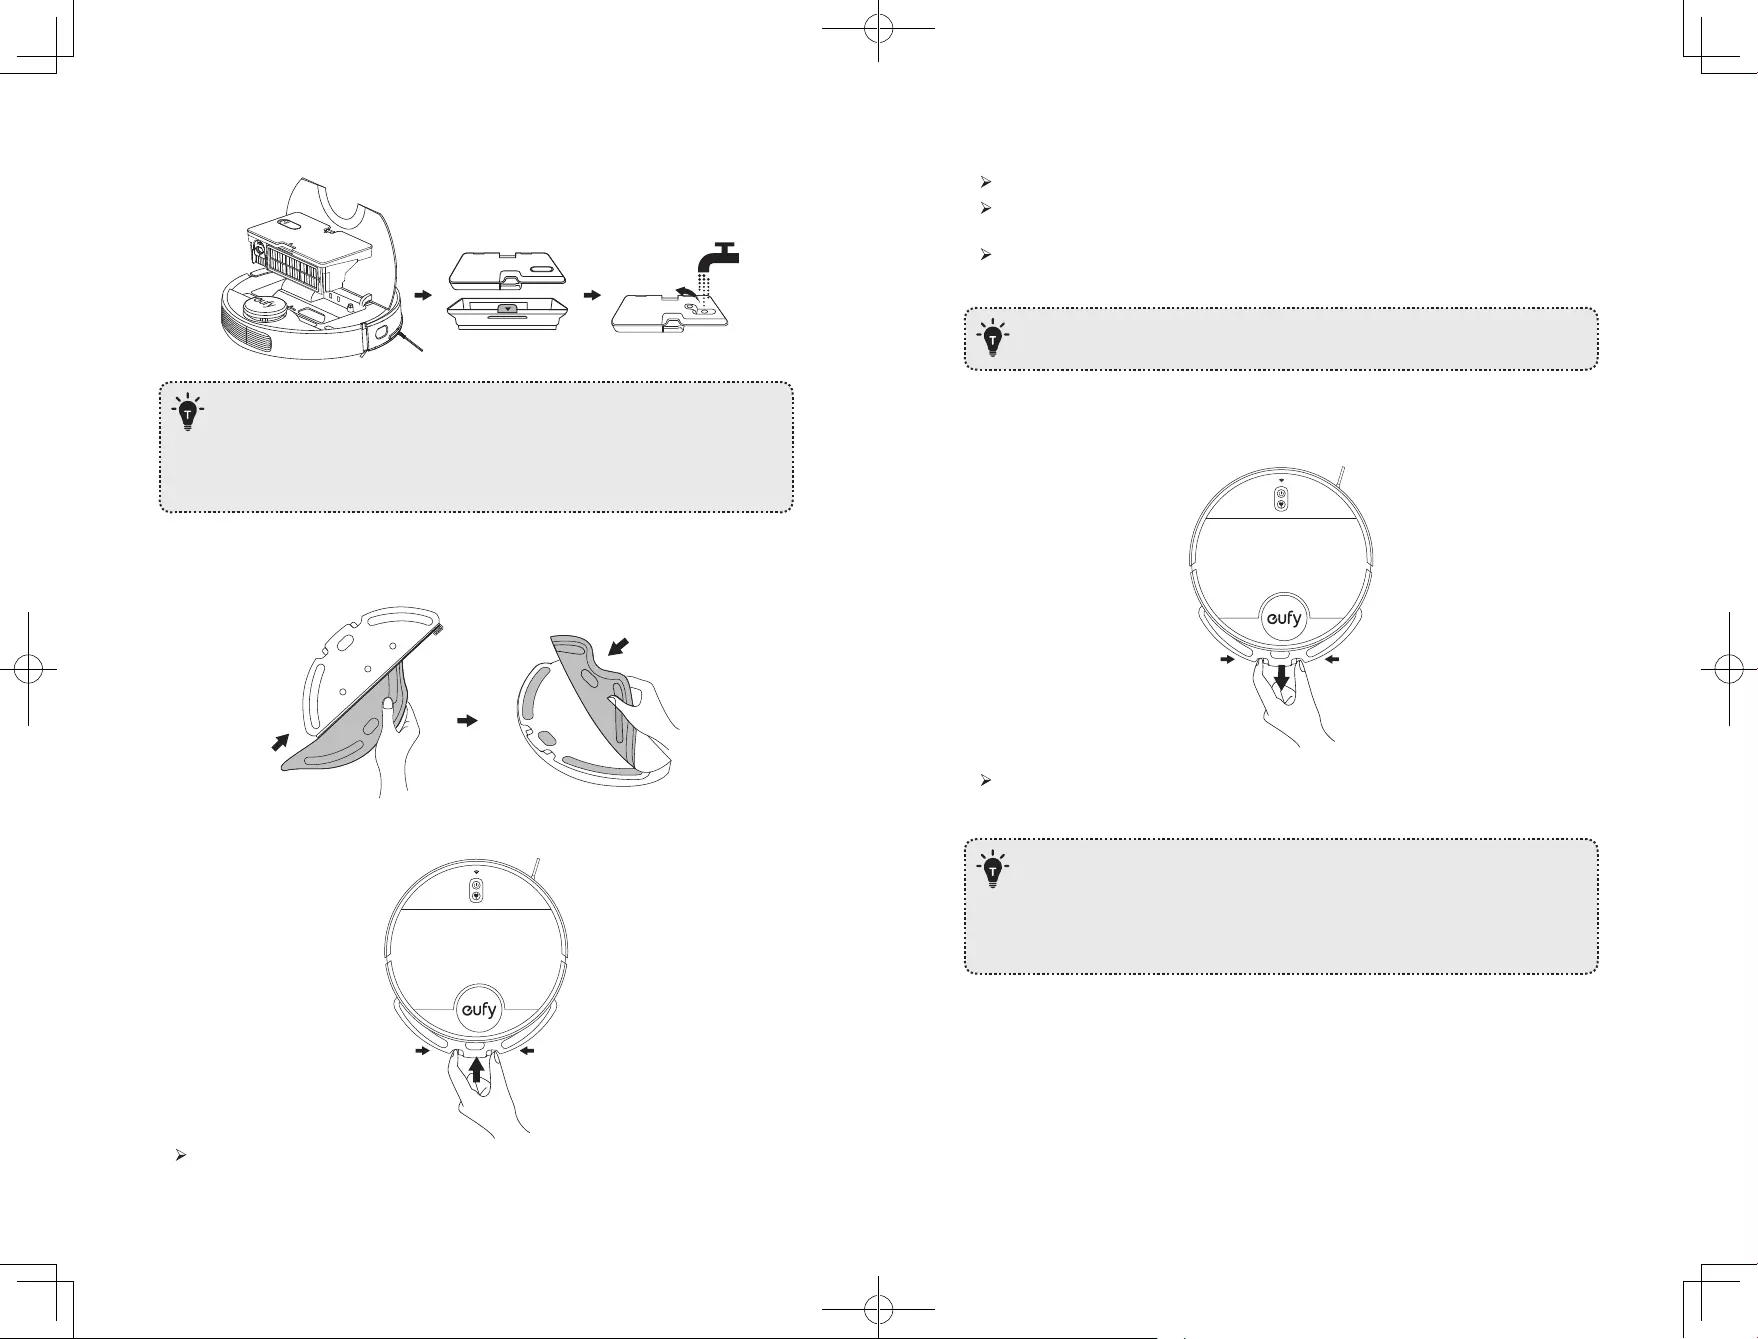
2. Wet the mopping cloth and wring it until it does not drip. Insert the cloth along the
bracket slot and stick it firmly.
3. Install the mopping module into the bottom of RoboVac until a click is heard.
When the mopping module is inserted, RoboVac automatically switches to the
mopping mode.
4. Select a cleaning mode to start cleaning.
RoboVac automatically sweeps and mops in the selected mode.
If you want RoboVac to mop without vacuuming, select “Mop-Only” mode in the
EufyHome app.
You can also select the mopping water level (3 levels) in the app according to your
needs.
• To achieve a better mopping effect, it is recommended to clean the floor with
RoboVac three times before installing the mopping module.
5. When RoboVac finishes working and returns to the Charging Base, hold the two buckles
by hand, drag backward and remove the mopping module.
When the mopping module is removed, the system automatically exits mopping
mode without water release.
• Although water release is stopped when cleaning is paused, the mopping cloth
will still be wet. Be careful not to keep RoboVac in one location for too long, as
the excessive moisture caused by the cloth can damage the floor.
• To avoid damaging wooden floors, make sure the Charging Base is attached to
the waterproof pad.

26 27
6. Empty any remaining water from the water tank. Clean the mopping cloth to avoid it
being mildewed and producing unpleasant smell.
24h
• It is recommended to clean the mopping cloth after mopping each time.
• Remove the mopping module when RoboVac is under charging or not in use.
Use Your RoboVac with Amazon Alexa / the Google
Assistant
Amazon Alexa or the Google Assistant is a smart voice control device that enables you to
control RoboVac with your voice.
Before you start, make sure that:
• RoboVac is attached to the Charging Base to ensure there is enough power.
• RoboVac is connected with the EufyHome app.
• You have an Alexa-enabled device (i.e. Amazon Echo, Echo Dot and Amazon Tap, Echo
Show, Echo Spot) or a device enabled with the Google Assistant (i.e. Google Home,
Google Home Mini). These devices are sold separately.
• The Amazon Alexa app or Google Home app is already installed on your smart device,
and you have created an account.
To control RoboVac with Amazon Alexa or the Google
Assistant
1. Open the EufyHome app and tap “Smart integrations” in the top left.
2. Follow the on-screen instructions to complete the setup.
— Currently this feature only supports English, German, French, and Spanish.
You can check regularly if more languages are supported at
https://www.eufylife.com/support/.
Set Up Physical / Virtual Barriers
Boundary Strips (Sold Separately)
Physical barriers including boundary strips can keep RoboVac away from cleaning certain
areas. RoboVac will recognize the barriers and will not cross into the blocked-off area.
1. Identify the area or item you do not want RoboVac to get close to.
2. Place the boundary strips FLAT on the floor or under an area rug.
• Make sure the boundary strips are placed on the same surface plane RoboVac
is used on.
• If the boundary strips are rolled up, remove and then re-apply on the floor with
adhesive tape. Otherwise the boundary strips may not work well.
Virtual Boundary (Available on the App Only)
In the EufyHome app, you can set up a “No-Go Zone” or “No-Mop Zone” as a restricted
area. This eliminates the need to use physical barriers, including Boundary Strips. This
feature is designed for dividing the cleaning zones, not for isolating hazardous areas.
• No-Go Zone: RoboVac will not enter the zone to vacuum or mop.
• No-Mop Zone: RoboVac will not enter the zone to mop, while vacuuming is still allowed.
• To set a virtual boundary, RoboVac must initially perform a cleaning run to
create a floor plan.
• To clean your home with virtual boundary, ensure that RoboVac is on the
Charging Base and that the Base has not been manually moved during
cleaning.
• Although a virtual boundary is set, RoboVac may still enter the restricted zone
due to such reasons as relocalization, wrong positioning or abnormal sensors.
• Moving the device or changing the environment may cause mapping failed
and rebuilt with virtual boundary lost.
28 29
Reset the System
You can reset the system if there is no response when pressing any button on RoboVac.
1. Make sure RoboVac is not on the Charging Base.
2. Use a clip to press the Reset button.
RoboVac will automatically turn off.
3. Dock RoboVac onto the Charging Base or press to turn it on.
The system is reset.
• After resetting the system, RoboVac may lose its map and the original settings
including the virtual boundary.
Cleaning and Maintenance
Before cleaning and maintaining, turn off the device and unplug the adapter.
For optimal performance, follow the instructions below to clean and maintain RoboVac
regularly. The cleaning/replacement frequency will depend on your usage habits of
RoboVac.
Recommended cleaning/replacement frequency
RoboVac Part Cleaning Frequency Replacement Frequency
Dust Collector After each use —
Filter Once every week Every 6 months
Rolling Brush Once every week Every 6-12 months
Side Brush Once every month Every 3-6 months (or when visibly worn)
Brush Guard Once every month Every 3-6 months (or when the silicone
rubber strip on the brush guard becomes
visibly worn)
RoboVac Part Cleaning Frequency Replacement Frequency
Sensors Once every month —
Charging Pins Once every month —
Swivel Wheel Once every month —
Mopping Module After each use —
Mopping Cloth After each use Every 3-6 months (or when visibly worn)
Water Tank After each use —
Clean the Dust Collector and Water Tank
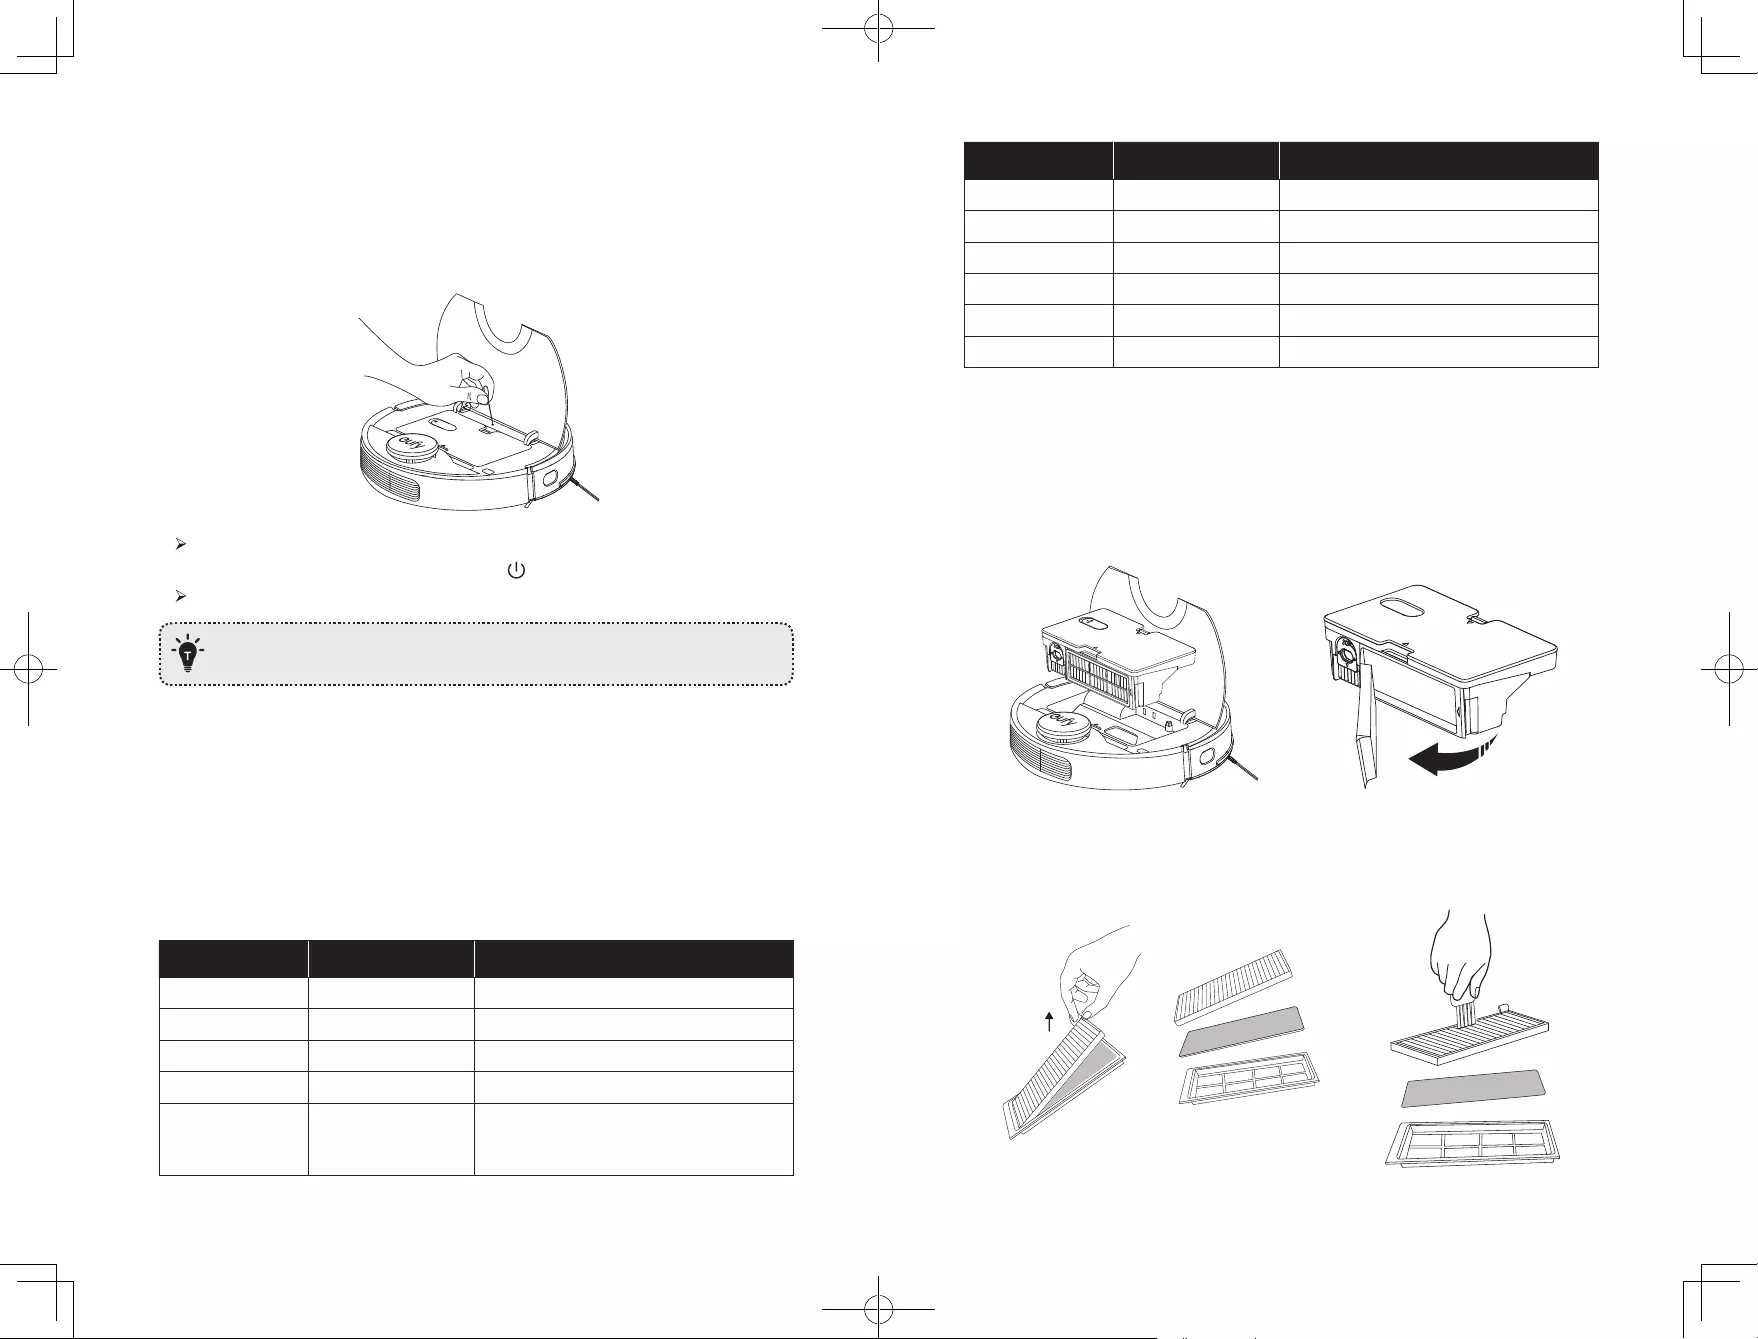
1. Open the top panel of RoboVac and press the release button to remove the dust collector
and water tank.
2. Take out the filter assembly.
3. Take out the pre-filter, foam filter, and high-performance filter.
4. Clean the filters with a vacuum cleaner or a cleaning brush. You can also wash the filters
for deep cleaning.
30 31
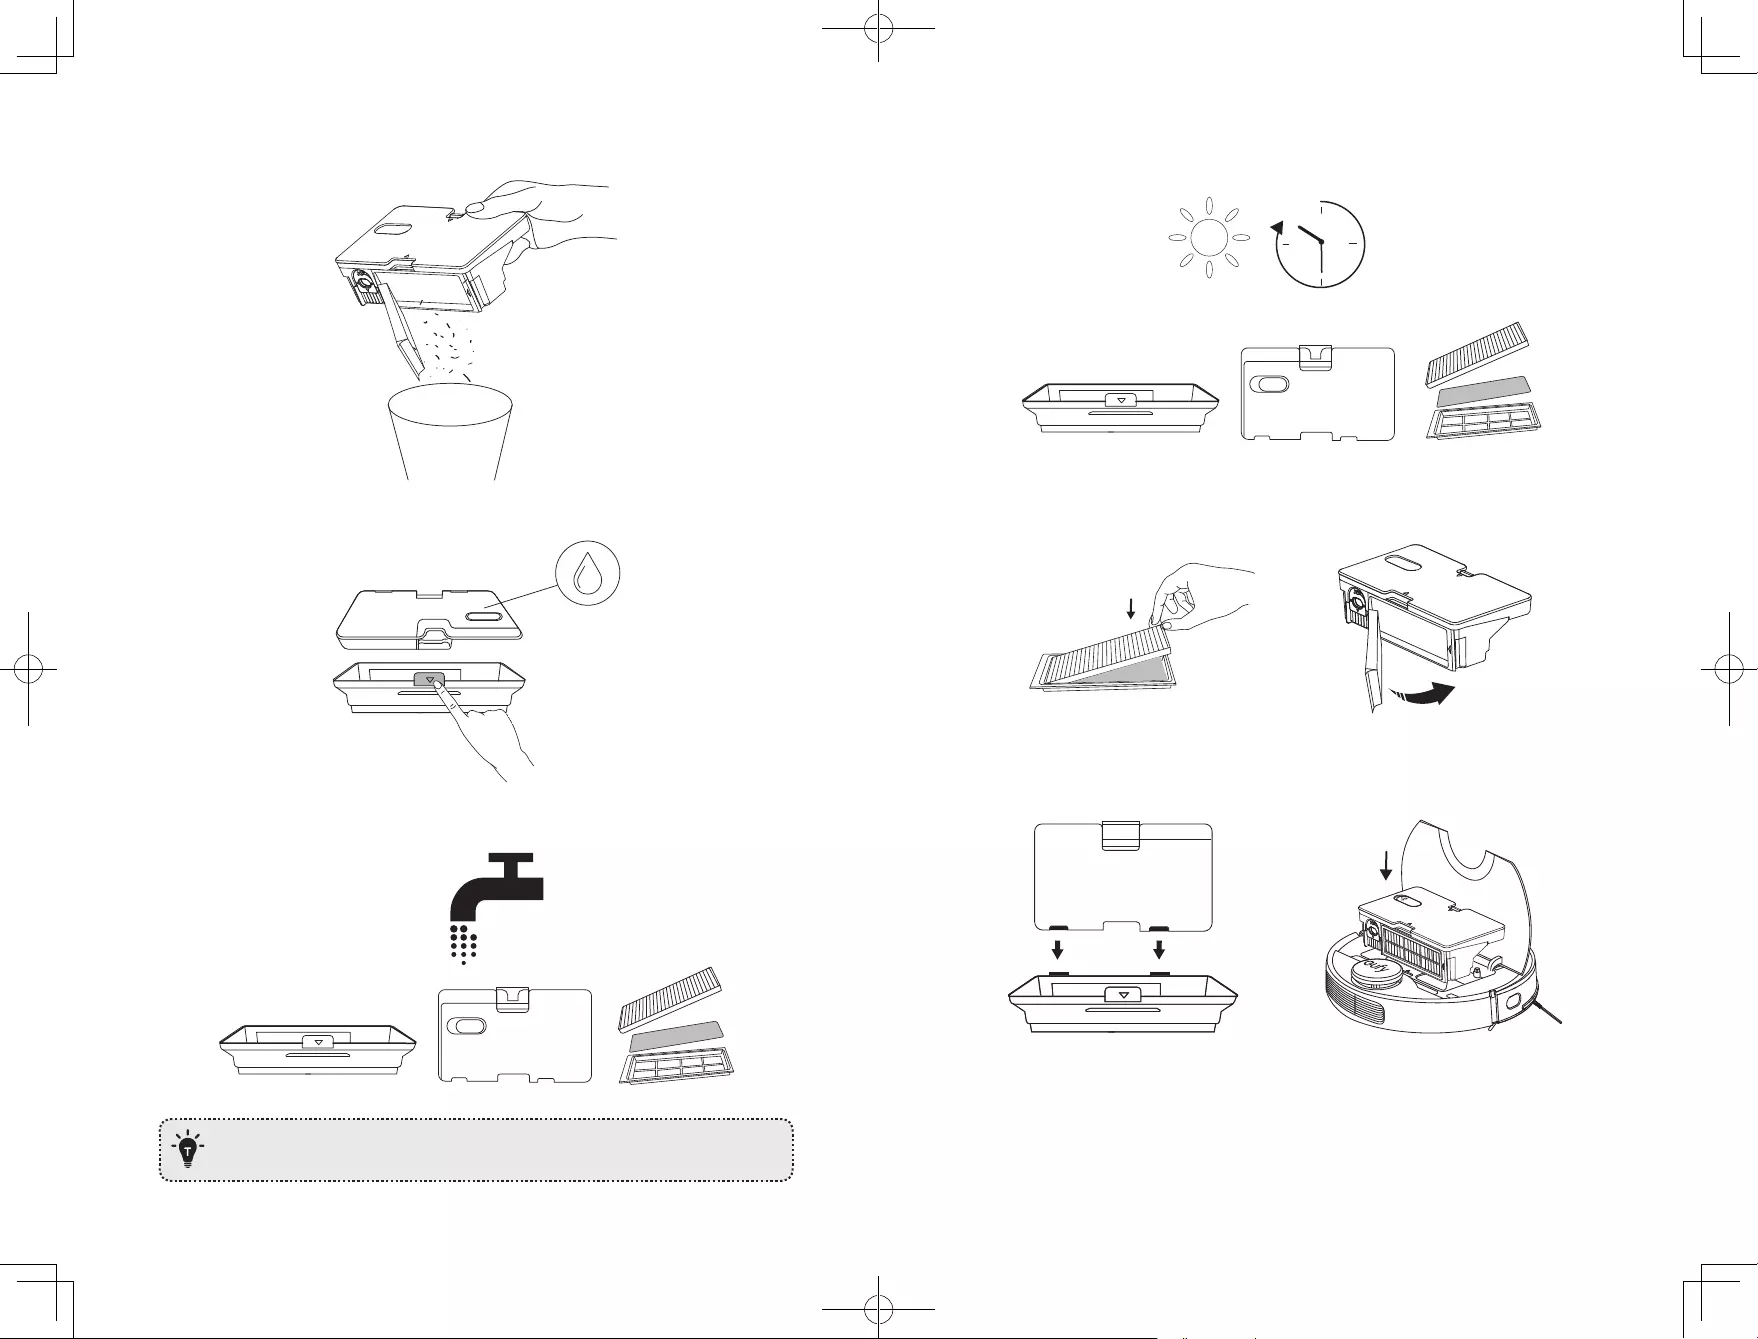
5. Empty the dust collector. Tap the dust collector to get rid of any excess dirt.
6. Press the dust collector release button to separate the dust collector from the water tank.
7. Rinse the water tank, dust collector and filter assembly thoroughly with water.
Do not use hot water, or any detergent to clean the filter assembly.
8. Air-dry the water tank, dust collector and filter assembly completely before next use.
24h
9. Replace the pre-filter, foam filter, and high-performance filter.
10. Put the filter assembly back into the dust collector.
11. Reinstall the dust collector with the water tank.
12. Push the assembly back into the main unit.
32 33
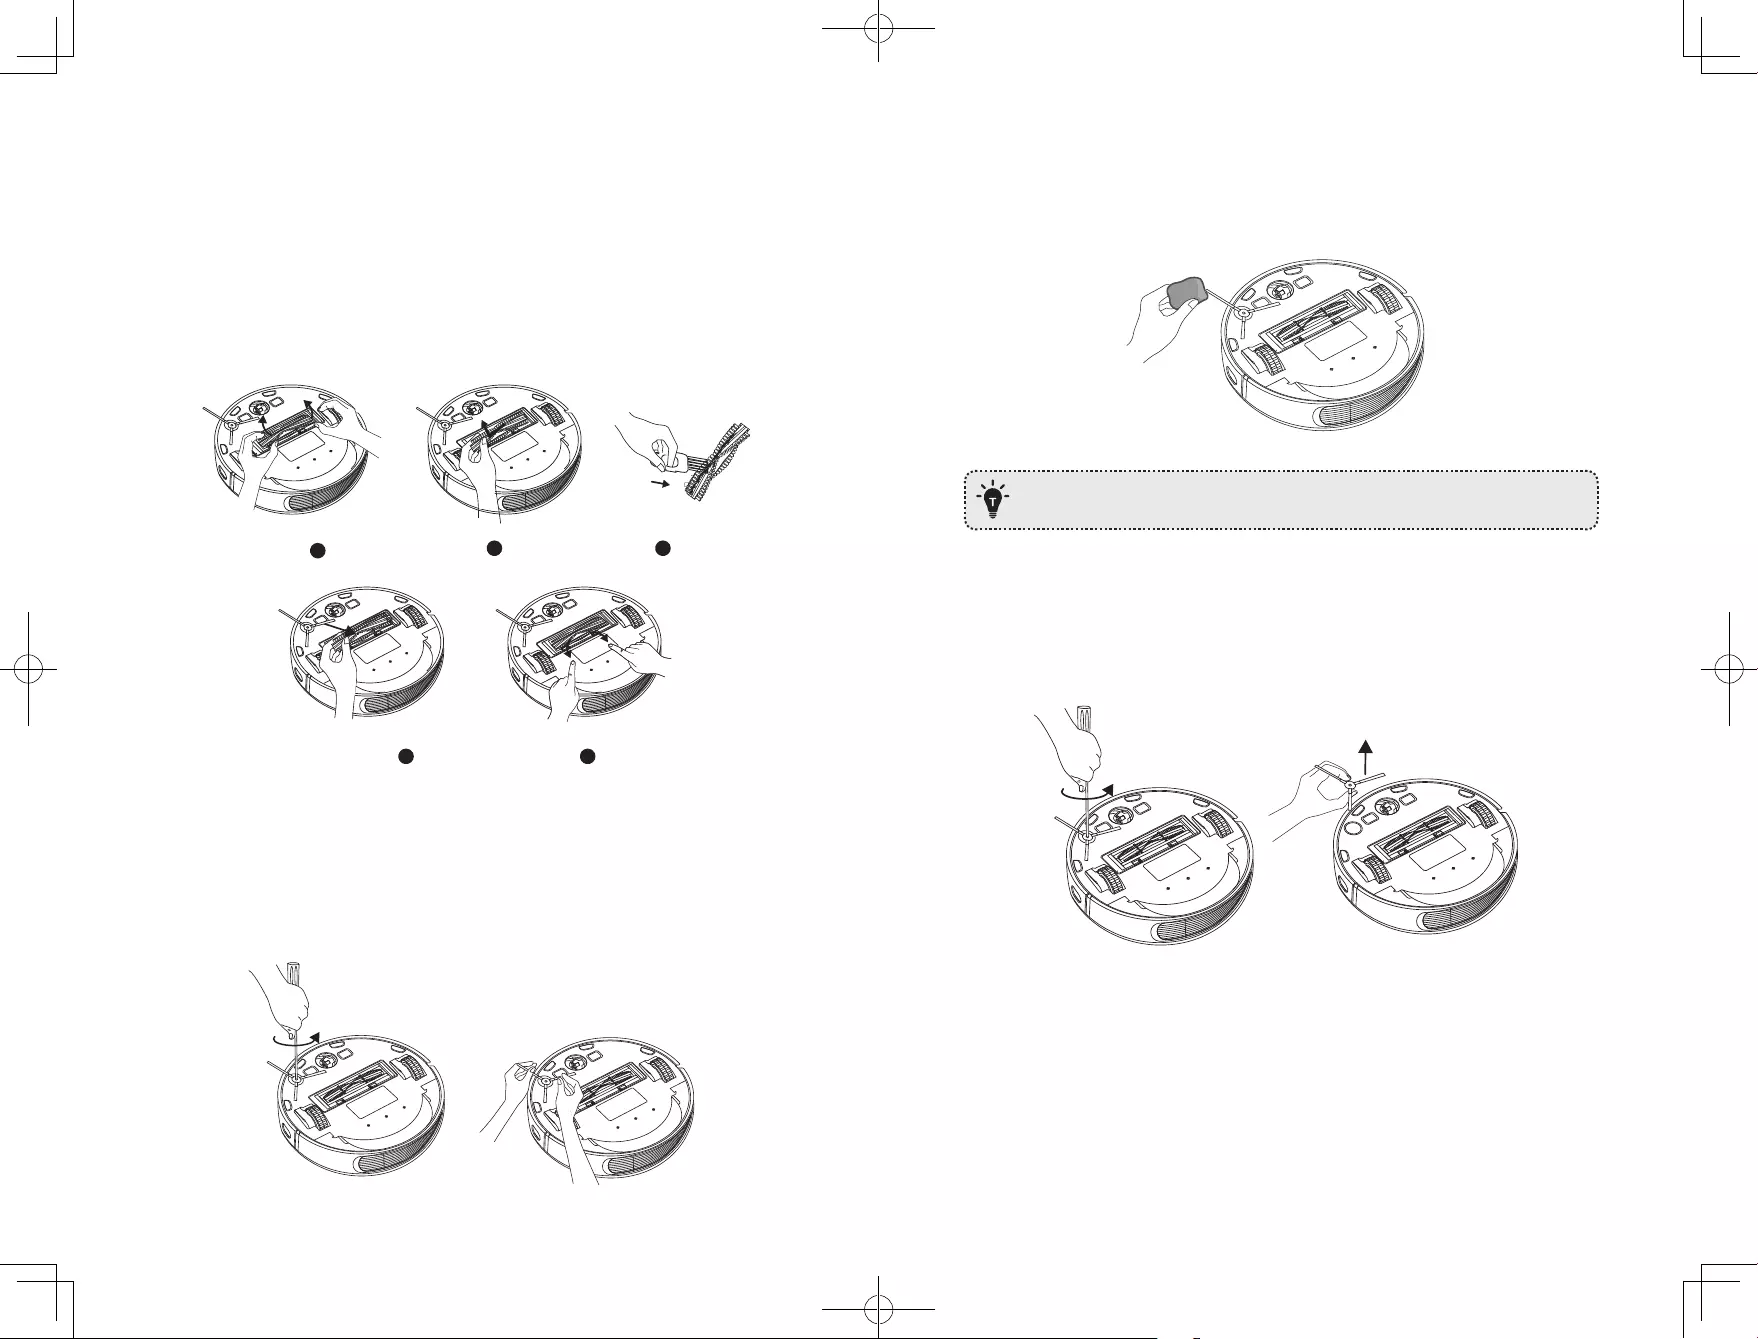
Clean the Rolling Brush
1. Pull on the release tabs to unlock the brush guard as shown.
2. Lift the rolling brush to remove.
3. Clean the rolling brush with a cleaning tool or a vacuum cleaner.
4. Reinstall the rolling brush by inserting the fixed protruding end first and then clicking into
place.
5. Press down to snap the brush guard into place.
1
4 5
2 3
Clean the Side Brush
Foreign substances, such as hair, can easily get tangled in the side brush, and dirt may
adhere to it. Be sure to clean it regularly.
1. Use a Phillips screwdriver to unscrew the screw.
2. Carefully unwind and pull off any hair or string that is wrapped between the main unit
and the side brush.
3. Use a cloth dampened with warm water to remove dust from the brush or to gently
reshape it.
Only use the side brush when it is completely dry.
Replace the Side Brush
The side brushes may become bent or damaged after being used for a period of time.
Follow the instructions below to replace it.
1. Use a Phillips screwdriver to unscrew the screw on the side brush.
2. Pull off the old side brush and snap the new one into place.
3. Screw down the screw to fasten the side brush.

34 35
Clean the Sensors and Charging Pins
To maintain the best performance, clean the drop sensors and charging pins regularly.
• Dust off the sensors and charging contact pins using a cloth or cleaning brush.
Clean the Swivel Wheel
Hair or dust particles can easily get entangled in the swivel wheel. Be sure to clean the
swivel wheel periodically and as needed.
Wheel
Axle
1. Pull out the swivel wheel.
2. Clean any hair or debris wrapped around the wheel or entangled inside the wheel cavity.
3. Reinstall the wheel and push in until it clicks into place.
• Do not clean the swivel wheel with water.
Clean the mopping module
It is recommended to clean the mopping cloth after each use.
1. Remove the mopping cloth from the module.
2. Clean the cloth with water and air-dry it completely to avoid being mildewed or
producing unpleasant smell.

36 37
Troubleshooting
Problems Solutions
RoboVac cannot be
activated.
• Make sure RoboVac is connected to a power source.
• Make sure the battery is fully charged.
• If you still have trouble, reset the RoboVac (refer to the
“Using Your RoboVac > Reset the System” section in this
manual).
RoboVac suddenly stops
working.
• Check if RoboVac is trapped or stuck on an obstacle.
• Check if the battery level is too low.
• If you still have trouble, turn off RoboVac, wait for 3
seconds, and then turn it back on.
You cannot schedule
cleanings.
• Make sure RoboVac is turned on.
• You can set the time of day and scheduled cleaning time via
the EufyHome app.
• Make sure the scheduled time has been set correctly.
• Check if RoboVac’s power is too low to start cleaning.
• RoboVac will not start a scheduled cleaning while already
performing a task.
Suction power is weak.
• Check if any obstructions are blocking the suction inlet.
• Empty the dust collector.
• Clean the filter with water.
• Check if the filter is wet due to water or other liquid on the
floor. Air-dry the filter completely before use.
RoboVac cannot be
charged.
• Check if the indicator on the Charging Base lights up (when
RoboVac is not on the Charging Base). If not, contact the
eufy service center to repair or replace the Charging Base.
• Check if the indicator on the Charging Base is off and the
light on the main unit is breathing during charging.
• Dust off the charging contact pins with a dry cloth.
RoboVac cannot return to
the Charging Base.
• Remove objects within 1.6 ft/0.5 m to the left and right side
and within 4.9 ft/1.5 m of the front of the Charging Base.
• Make sure RoboVac started cleaning from the Charging
Base and has not been moved during cleaning.
• When RoboVac is in the vicinity of the Charging Base, it
will return more quickly. However, if the Charging Base is
located far away, RoboVac will need more time to return.
Please be patient as it works its way back.
• Clean the charging contact pins.
Problems Solutions
The rolling brush does
not rotate.
• Clean the rolling brush.
• Check if the rolling brush and brush guard have been
installed properly.
RoboVac’s movements or
travel path are abnormal.
• Clean the sensors carefully with a dry cloth.
• Restart RoboVac by turning RoboVac off and on.
Water is not released
during mopping.
• Make sure there is enough water in the water tank.
• Check if the mopping module is correctly installed. Once
correctly installed, you will hear the corresponding voice
prompt.
• Check if the water outlets are blocked.
RoboVac cannot connect
to a Wi-Fi network.
• Make sure your Wi-Fi router supports the 2.4GHz and
802.11b/g/n bands; the 5GHz band is not supported. For
details, refer to the “Troubleshooting > Wi-Fi connection”
section in this manual.
You cannot control
RoboVac with Amazon
Alexa.
• Check if there are any Internet connection problems.
• Check whether you have installed the Amazon Alexa app
onto your smart device and enabled “EufyHome — RoboVac”
Skill in the Amazon Alexa app. For details, refer to the
“Smart Integrations” page in the EufyHome App.
• Make sure you have a EufyHome account and that it is
connected to RoboVac.
• Make sure you are using correct Alexa voice-commands.
You cannot control
RoboVac with the Google
Assistant.
• Check if there are any Internet connection problems.
• Check if you have installed the Google Home app onto
your smart device and initiated the “EufyHome” action
in the Google Home app. For details, refer to the “Smart
Integrations” page in the EufyHome App.
• Check if you are using the proper commands when talking
to the Google Assistant. When making your request, first
say the wake words “Ok Google”.
• Repeat your question. Speak clearly to the Google
Assistant.
38 39
Voice Alert
When RoboVac encounters a problem, the red indicator on RoboVac will be flashing and
you will hear the relevant voice prompts. Follow the voice prompts to solve the problems.
Voice Prompt Cause and Solution
Error 1: Front bumper stuck
Front bumper is stuck. Tap it repeatedly to remove any
dust;
if not, then move the device to a new position and try
again.
Error 2: Wheel stuck. Check
the wheel and move it to a new
position.
Wheel may be stuck or trapped. Clear any obstacles
in the surrounding area and check the wheel for any
trapped dust. Move the device to a new position and
try again.
Error 3: Side brush stuck Side brush may be stuck. Please clean it and try again.
Error 4: Rolling brush stuck.
Remove and clean the rolling
brush.
Remove the rolling brush, roller joint, roller brush cover,
and suction inlet to clean it. Once cleaned, place the
items back into the device and try again.
Error 5: Device trapped. Clear
the surrounding area.
Device is trapped. Clear any obstacles in the
surrounding area and try again.
Error 6: Device trapped. Place
device near the position where
the problem occurred.
Device may be suspended in air. Move it to a new
position close to the original position and try again. If
the device is still unable to start, clean the edge sensor
and try again.
Error 7: Wheel suspended.
Please move the device to a new
position.
Wheels may be suspended in air. Move the device to
a flat surface and a new position close to the original
position then try again.
Error 8: Low battery, shutting
down device. Please charge your
device.
Low Battery; system will shut down. Charge the device
and try again.
Error 9: Magnetic Boundary
Strip detected. Move device to a
different area.
Device is too close to a strong magnetic field or strip.
Move the device to a different area and try again.
Error 11: Front infrared sensor
needs cleaning.
Front infrared sensor is blocked by dust and requires
cleaning.
Error 12: Right wall sensor needs
cleaning.
Clean the right side wall sensor since it’s covered in
dust.
Error 13: Device tilted. Please
put the device on a flat surface
to start.
Device may be tilted. Put the device on a flat surface
and try again.
Voice Prompt Cause and Solution
Error 14: Please insert dust
collector and filter.
Put the dust collector and filter back in and confirm
that they are in place. Then restart the device.
Error 17: Restricted area
detected. Move device to a
different area.
Device is too close to the restricted area. Move the
device to a new position and try again.
Error 18: Laser cover may be
stuck.
Pressure sensor for laser cover is stuck. Move the
device to a new position and try again.
Error 19: Laser sensor may be
stuck.
Laser ranging sensor is covered in dust. Clean it and try
again.
Error 20: Laser sensor may be
blocked.
Laser sensor is blocked by:
• An empty environment
• Metal mirrors
• Other multi-reflection devices
Remove any obstacles and move the device to a
different area.
Error 21: Charging Base blocked
by surrounding obstacles
Charging base is blocked by obstacles, clear any
obstacles around the charging base and try again.
Error S1: Battery Error. Refer
to Owner’s Manual or App for
help.
— Open the battery compartment and check whether
the battery is connected and restart the device.
— Battery Temperature may be too high or low; wait
until the battery falls to normal temperatures before
usage (0 ° ~ 40 ° C/C 32 ° F to 104 ° F).
— If the issue persists, contact customer support for
help.
Error S2: Wheel Module Error.
Refer to Owner’s Manual or App
for help.
— Check whether the wheels are stuck or dust is
trapped inside before restarting the device.
— If the issue persists, contact customer support for
help.
Error S3: Side Brush Error. Refer
to Owner’s Manual or App for
help.
— Check whether the side brush is stuck in an unknown
object before restarting the device.
— If the issue persists, contact customer support for
help.
Error S4: Suction Fan Error. Refer
to Owner’s Manual or App for
help.
— Check whether the fan blades are stuck in an
unknown object before restarting the device.
— Clean the dust collector and filter before restarting
the device.
— If the issue persists, contact customer support for
help.

40 41
Voice Prompt Cause and Solution
Error S5: Rolling Brush Error.
Refer to Owner’s Manual or App
for help.
— Remove and clean the roller brush, roller brush
connection, roller brush cover and suction inlet before
restarting the device.
— If the issue persists, contact customer support for
help.
Error S6: Water Pump Error.
Refer to Owner’s Manual or App
for help.
— Clean the water tank, water pump connection, water
pump interface, and water outlet at the bottom of the
device before restarting the device hidden under the
cloth cover.
— If the issue persists, contact customer support for
help.
Error S7: Laser Sensor Error.
Refer to Owner’s Manual or App
for help.
— Check and clean the laser sensor for unknown objects
before restarting the device.
— If the issue persists, contact customer support for
help.
Wi-Fi Connection
Before Wi-Fi setup, make sure RoboVac and your Wi-Fi network meet the following
requirements.
Wi-Fi Setup Requirements
• RoboVac:
— RoboVac is fully charged and the main power switch on the bottom of RoboVac is
turned on.
— Wi-Fi status light slowly flashes blue.
• Wi-Fi Network:
— Use the correct password for your network.
— Do not use a VPN (Virtual Private Network) or Proxy Server.
— Your Wi-Fi router supports 802.11b/g/n and IPv4 protocol.
— You are using a 2.4GHz router or a dual-band router that is configured to support a
2.4GHz frequency band. RoboVac does not support 5GHz frequency band.
— If RoboVac cannot connect to the Wi-Fi network and you are using a 2.4/5GHz
mixed network, switch to a 2.4GHz network for Wi-Fi setup. You can switch back
once your setup is complete.
— When connecting to a hidden network, make sure you enter the correct network
name, SSID (case sensitive), and connecting to a 2.4GHz wireless network.
— When using a network extender/repeater, make sure the network name (SSID) and
password are the same as your primary network.
— The firewall and port settings of your Wi-Fi router allow RoboVac to connect with
the Eufy servers.
Network Security Requirement
— WPA and WPA2 using TKIP, PSK, AES/CCMP encryption.
Wi-Fi Channels
— The FCC requires that all wireless devices in the United States operate on the 1-11
wireless spectrum channels.
— Some countries outside North America can use spectrum channels higher than
channel 11. Refer to your local regulatory agency to determine which channels are
accessible.
— A future software release will support access to channels above 11 for users outside
North America. Until then, use channels 1-11.
If you cannot control RoboVac with your smartphone, try the solutions below to solve the
problem. If the problem persists, contact the eufy service center for help.
Wi-Fi Status Light Cause Solutions
Solid blue
RoboVac has
connected to your
router, but cannot
access the Internet.
• Check if your router is connected to the
Internet.
• Check with your Internet provider to
see if there is any Internet connection
problem.
Rapidly flashing
blue
RoboVac cannot
connect to your
wireless router.
• Check if you have modified your
network name and password.
• Reset Wi-Fi connection if necessary.
Refer to the “Use Your RoboVac with
the EufyHome App > Reset the Wi-Fi
connection” section in this manual.
Slowly flashing blue
Wi-Fi connection is
reset or has not been
set up before.
• Set up Wi-Fi connection with RoboVac.
Refer to the “Use Your RoboVac with
the EufyHome App” section in this
manual.
• Reset Wi-Fi connection if necessary.
Refer to the “Use Your RoboVac with
the EufyHome App > Reset the Wi-Fi
connection” section in this manual.
Off
RoboVac is turned off.
RoboVac’s power level
is low.
RoboVac is in Sleep
mode.
• Make sure RoboVac is turned on.
• Charge RoboVac by attaching it to the
Charging Base.
42 43
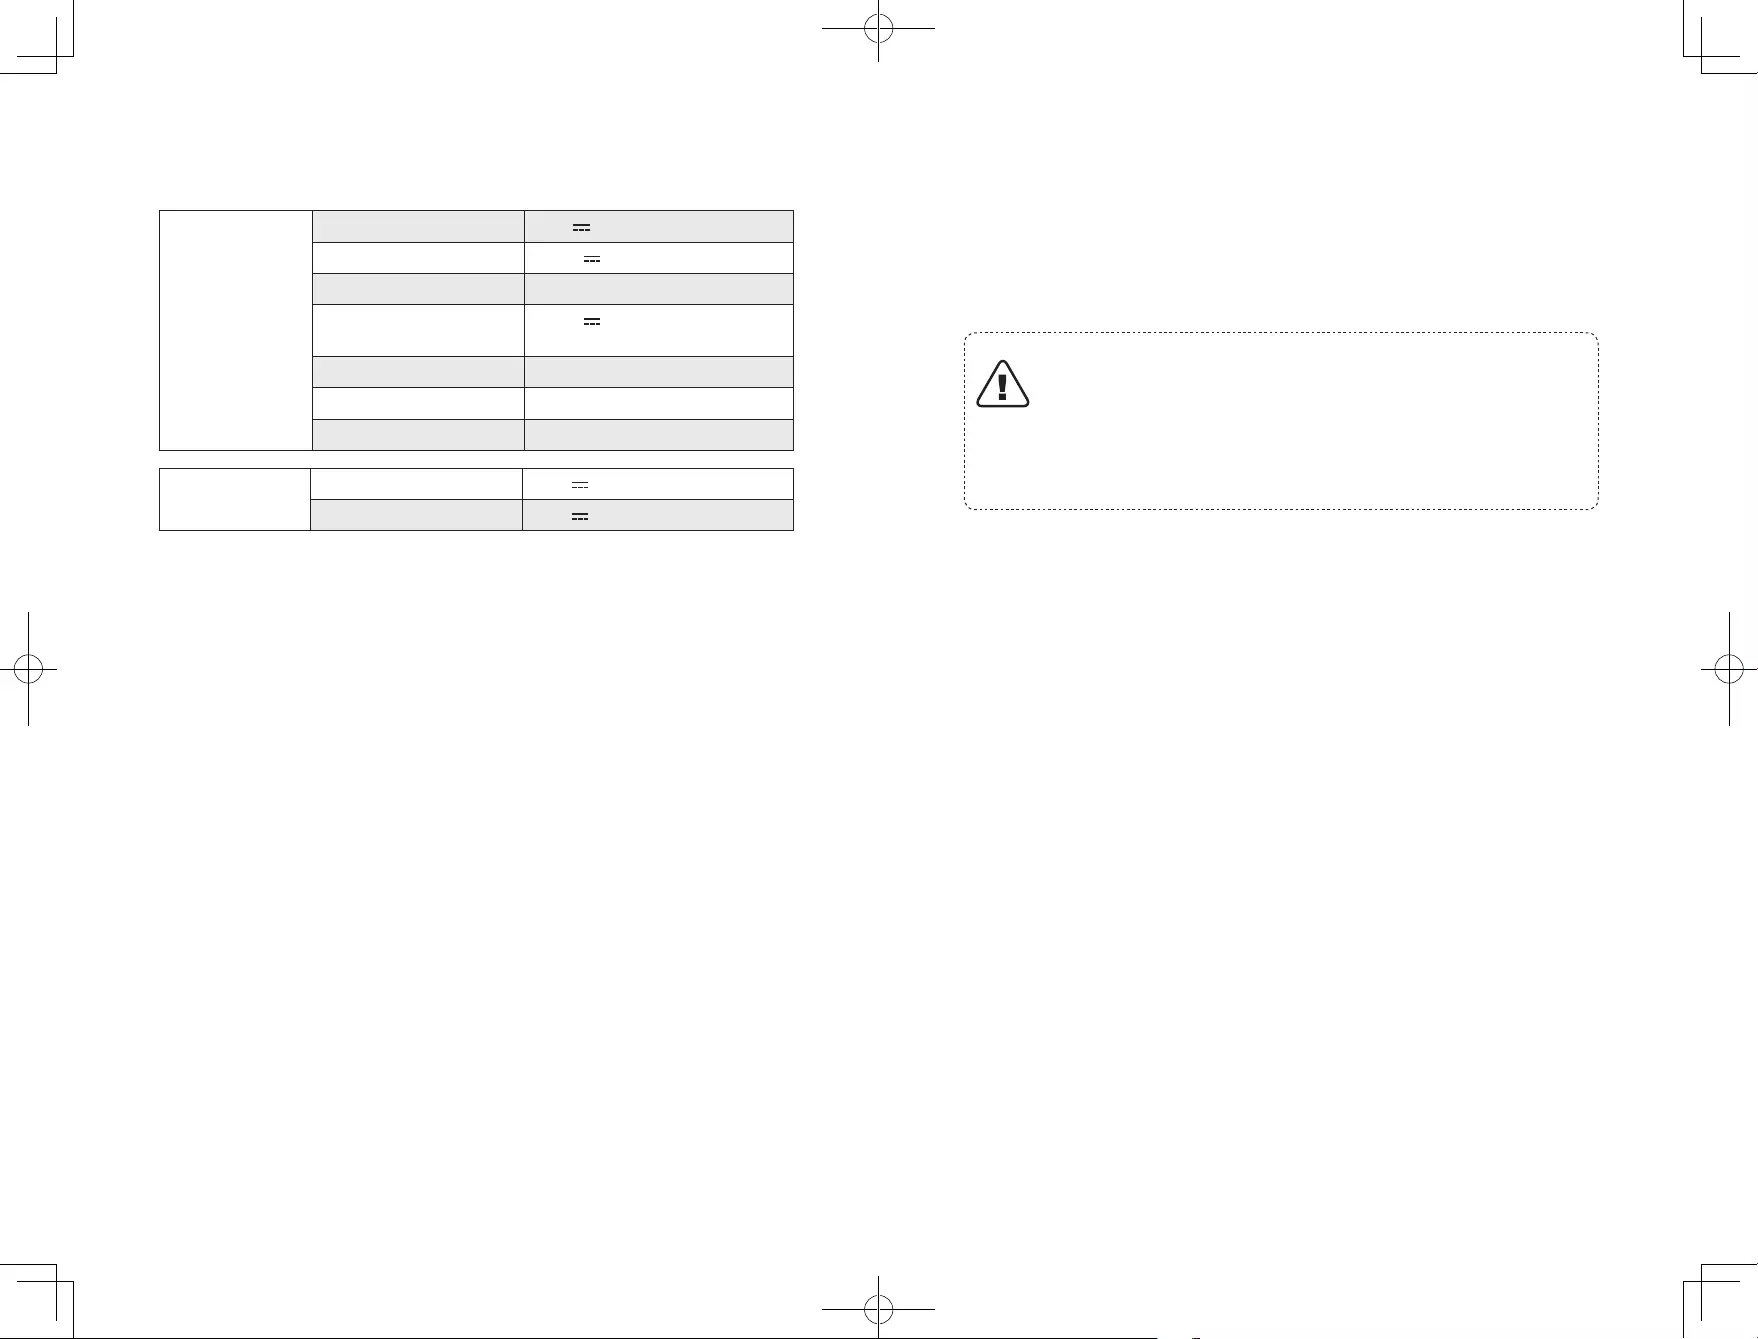
Specifications
RoboVac Input 24 V 1.5 A
Battery Voltage 14.4 V
Power Consumption 50 W
Battery Type 14.4 V
Li-ion 5200 mAh (Typical)
Dust Collector Capacity
0.45 L
Cleaning Time Max. 150 mins
Charging Time 240 — 300 mins
Charging Base Input 24 V 1.5 A
Output 24 V 1.5 A
Consignes importantes de sécurité
Pour réduire le risque de blessure ou de dommage, lisez
attentivement les consignes de sécurité et gardez-les à portée
de main lors de la configuration, l’utilisation et l’entretien de
cet appareil.
SYMBOLES D’AVERTISSEMENT UTILISÉS
Il s’agit du symbole d’avertissement de sécurité. Ce
symbole vous alerte sur les dangers potentiels qui
peuvent entraîner des dommages matériels et/ou des
lésions corporelles graves ou la mort.
• Cet appareil peut être utilisé par des enfants âgés de 8 ans
et plus, ainsi que des personnes présentant des capacités
physiques, sensorielles ou mentales réduites, ou un manque
d’expérience et de connaissances, si celles-ci sont sous
surveillance ou ont reçu les instructions d’utilisation de cet
appareil et comprennent les risques encourus, et l’utilisent
dans un endroit sûr.
• Les enfants doivent être surveillés afin de s’assurer qu’ils ne
jouent pas avec cet appareil.
• Le nettoyage et l’entretien ne doivent pas être effectués par
des enfants sans la supervision des adultes.
• Cet appareil doit uniquement être utilisé avec le bloc
d’alimentation fourni.
• Avant de nettoyer ou d’entretenir cet appareil, vous devez
débrancher la fiche de la prise de courant.
• La batterie de cet appareil ne doit être remplacée que par un
professionnel qualifié.
• Lorsque vous retirez la batterie, débranchez l’appareil du
secteur.
• Pour recharger la batterie, utilisez uniquement le cordon
amovible du bloc d’alimentation fourni avec cet appareil.
44 45
• La batterie doit être retirée de cet appareil avant de le
mettre au rebut. Pour retirer la batterie, desserrer les vis
du fond, puis retirez le capot arrière. Retirez la batterie en
débranchant le connecteur rapide.
• La batterie usagée doit être placée dans un sac en plastique
hermétique et éliminée en toute sécurité, conformément aux
réglementations environnementales locales.
• Le câble flexible externe ou le cordon du bloc d’alimentation
ne peut pas être remplacé ; si le cordon est endommagé,
l’unité d’alimentation doit être éliminée.
• Cet appareil est destiné exclusivement à une utilisation en
intérieur.
• Cet appareil n’est pas un jouet. Ne pas se tenir debout ou
assis sur cet appareil. Les jeunes enfants et les animaux de
compagnie doivent être surveillés lors du fonctionnement de
cet appareil.
• Entreposez et utilisez cet appareil dans des environnements
à température ambiante.
• Nettoyez avec un chiffon imbibé d’eau uniquement.
• Ne pas utiliser cet appareil pour ramasser tout élément en
train de brûler ou fumant.
• Ne pas utiliser cet appareil pour nettoyer des déversements
d’eau de javel, de peinture, de produits chimiques ou quoi
que ce soit de mouillé.
• Avant d’utiliser cet appareil, ramassez les objets tels que
les vêtements et les feuilles de papier. Mettez en hauteur
les cordons de stores ou de rideaux au sol et déplacez les
objets fragiles et les cordons d’alimentation hors du passage
de l’appareil. Si cet appareil passe au-dessus d’un cordon
d’alimentation et le traîne avec lui, un objet peut tomber
d’une table ou d’une étagère.
• Si la pièce à nettoyer possède un balcon, une barrière
physique doit être utilisée pour empêcher l’accès au balcon
et garantir un fonctionnement sécurisé.
• Ne rien placer sur le dessus de cet appareil.
• Gardez à l’esprit que cet appareil se déplace par ses propres
moyens. Faites attention en marchant dans la zone où cet
appareil fonctionne, afin d’éviter de marcher dessus.
• Ne pas utiliser cet appareil dans des zones avec prises
électriques exposées sur le plancher.
• Ne pas exposer l’électronique de cet appareil, de sa batterie
ou de la base de recharge intégrée. L’appareil ne contient
aucune pièce réparable par l’utilisateur.
• Ne pas utiliser cet appareil sur un sol inachevé, non vitrifié,
ciré ou rugueux. Cela peut entraîner des dommages sur le
sol et cet appareil. Utilisez-le uniquement sur des surfaces
dures ou des moquettes à poils ras.
• N’utilisez pas le module de lavage de sol sur des tapis.
• Cet appareil a été conçu pour être utilisé sur des planchers
sans le rayer. Nous vous recommandons de toujours tester
le périphérique sur une petite zone de la pièce à nettoyer,
avant de nettoyer la salle entière, pour s’assurer qu’aucune
rayure n’apparaisse.
• Utilisez uniquement les accessoires recommandés ou
décrits dans ce manuel.
• Ne manipulez pas l’appareil ou la fiche avec les mains
mouillées.
• Assurez-vous que le sac à poussière et/ou les filtres sont en
place avant utilisation.
• N’utilisez pas de batterie ou d’appareil endommagé
ou modifié. Les batteries endommagées ou modifiées
peuvent présenter un comportement imprévisible risquant
d’entraîner un incendie, une explosion ou une blessure.
• N’exposez pas la batterie ou l’appareil au feu ou à des
températures excessives. L’exposition au feu ou à une
température supérieure à 130°C peut provoquer une
explosion.

46 47
• Ne modifiez pas et n’essayez pas de réparer l’appareil ou
la batterie (si applicable), sauf si cela est indiqué dans les
instructions d’utilisation et d’entretien.
• Suivez toutes les instructions de chargement et ne chargez
pas la batterie ou l’appareil en dehors de la plage de
température spécifiée dans les instructions. Une charge
incorrecte ou à des températures hors de la plage spécifiée
peut endommager la batterie et augmenter le risque
d’incendie.
• Le capteur de distance laser de cet appareil est conforme
aux normes pour les produits laser de classe I de la norme
IEC 60825-1:2014 et ne génère pas de rayonnement laser
dangereux.
Notice
Ce symbole sur le produit ou son emballage indique :
Ne pas jeter les appareils électriques de la même
manière que les déchets municipaux non triés ; utilisez
une infrastructure de collecte séparée. Contactez
directement votre commune pour plus d’informations
concernant les systèmes de collecte disponibles. Si des
appareils électriques sont jetés dans des décharges ou
des dépotoirs, des substances dangereuses peuvent
s’infiltrer dans les eaux souterraines et entrer dans la
chaîne alimentaire, nuire à votre santé et votre bien-
être. Quand vous remplacez vos anciens appareils par
de nouveaux, le détaillant est légalement obligé de
reprendre votre ancien appareil pour son élimination, au
minimum gratuitement.
Cet équipement est conforme aux limites d’exposition aux radiations FCC/IC établies
pour un environnement non contrôlé. Cet équipement doit être installé et utilisé avec une
distance minimale de 20 cm entre le radiateur et votre corps.
L’émetteur/récepteur exempt de licence contenu dans le présent appareil est conforme
aux CNR d’Innovation, Sciences et Développement économique Canada applicables
aux appareils radio exempts de licence. L’exploitation est autorisée aux deux conditions
suivantes :
1. L’appareil ne doit pas produire de brouillage;
2. L’appareil doit accepter tout brouillage radioélectrique subi, même si le brouillage est
susceptible d’en compromettre le fonctionnement.
Déclaration de conformité
Ce produit est conforme aux exigences en matière d’interférences radio de la Communauté
européenne. Par les présentes, Anker Innovations Limited déclare que l’équipement radio
de type T2190 est conforme à la directive 2014/53/UE. Le texte complet de la déclaration
de conformité UE est disponible à l’adresse Internet suivante : https://www.eufylife.com/.
Sortie maximum 18 dBm (pour l’Europe)
Bande de fréquence : Bande 2,4 G (2,4000 GHz — 2,4835 GHz)
Avis de marque déposée
• Amazon, Echo, Alexa et tous les logos associés sont des marques commerciales
d’Amazon.com, Inc. ou de ses filiales.
• Apple et le logo Apple sont des marques déposées d’Apple Inc., enregistrées aux États-
Unis et dans d’autres pays. App Store est une marque de service d’Apple Inc., enregistrée
aux États-Unis et dans d’autres pays.
• Google Play et le logo Google Play sont des marques de Google Inc.
• Google Home est une marque de Google Inc.
48
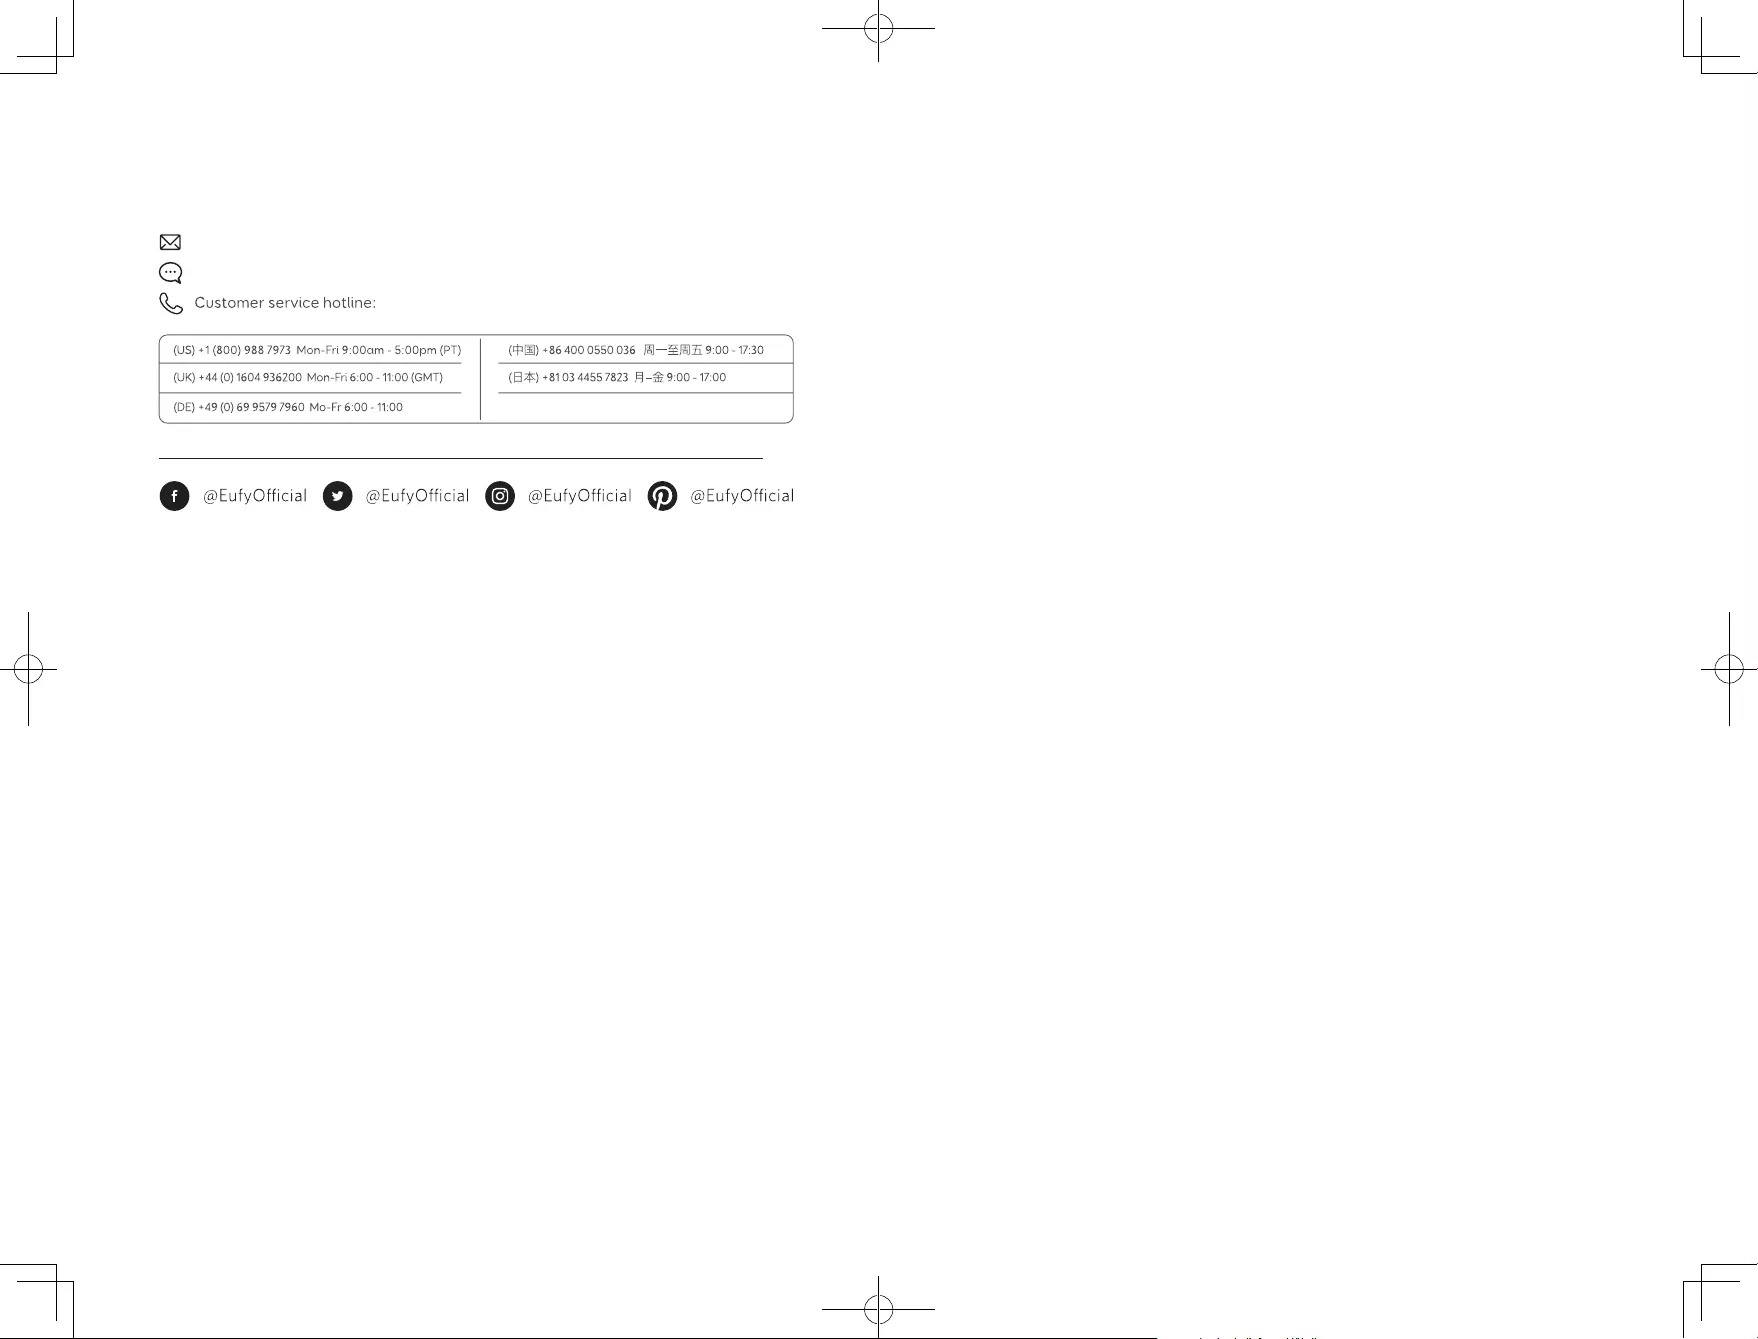
Customer Service
For FAQs and more information, please visit www.eufylife.com.
E-Mail: support@eufylife.com
Live-Chat: www.eufylife.com
Anker Innovations Limited
Room 1318-19, Hollywood Plaza, 610 Nathan Road, Mongkok, Kowloon, Hong Kong
T2190 51005001682 V01
Owner’s Manual
RoboVac L70 Hybrid
Gebrauchsanweisung | Manual del propietario
Manuel de l’utilisateur | Manuale d’uso | Handleiding
English
Deutsch
Español
Français
Italiano
Nederlands
01
43
85
127
169
211
Table of Contents
02 Important Safety Instructions
06 About Your RoboVac
What’s in the Box
RoboVac Anatomy
LED Indication
Map Navigation and Management
14 Get Started
Important Tips Before Use
Preparation
Charge Your RoboVac
18 Using Your RoboVac
Turn on / o
Start cleaning
Use Your RoboVac with the EufyHome App
Select a Cleaning Mode
Use Mopping System
Use Your RoboVac with Amazon Alexa / the Google Assistant
Set Up Physical / Virtual Barriers
Reset the System
28 Cleaning and Maintenance
Clean the Dust Collector and Water Tank
Clean the Rolling Brush
Clean the Side Brush
Replace the Side Brush
Clean the Sensors and Charging Pins
Clean the Swivel Wheel
Clean the mopping module
36 Troubleshooting
Voice Alert
Wi-Fi Connection
42 Specifications
42 Customer Service
Thank you for purchasing RoboVac. Carefully read all instructions before
using this product, and keep this manual for future reference.
01
Important Safety Instructions
• The battery must be removed before this device is disposed
of. To remove the battery, first unscrew the screws on the
To reduce the risk of injury or damage, read these safety
instructions carefully and keep them at hand when setting up,
using, and maintaining this device.
bottom, then remove the back cover. Remove the battery by
disconnecting the quick connector.
• The used battery should be placed in a sealed plastic bag and
disposed of safely according to local environmental regulations.
WARNING SYMBOLS USED
This is the safety alert symbol. This symbol alerts
you to potential hazards that could result in property
• The external flexible cable or cord of the power supply unit
cannot be replaced; if the cord is damaged, the power supply
unit shall be disposed of.
damage and/or serious bodily harm or death.
• This device is for indoor use only.
• This device can be used by children aged from 8 years and
above and persons with reduced physical, sensory or mental
capabilities or lack of experience and knowledge if they have
been given supervision or instruction concerning use of this
device in a safe way and understand the hazards involved.
• Children should be supervised to ensure they do not play
with this device.
• Cleaning and maintenance shall not be performed by
children without adult supervision.
• This device is only to be used with the power supply unit
provided.
• Before cleaning or maintaining this device, the plug must be
removed from the socket-outlet.
• The battery in this device should only be replaced by a
skilled professional.
• When removing the battery, disconnect the device from the
supply mains.
• For the purposes of recharging the battery, only use the
detachable power supply unit provided with this device.
• This device is not a toy. Do not sit or stand on this device.
Small children and pets should be supervised when this
device is operating.
• Store and operate this device in room temperature
environments only.
• Clean with a cloth dampened with water only.
• Do not use this device to pick up anything that is burning or
smoking.
• Do not use this device to clean up spills of bleach, paint,
chemicals, or anything wet.
• Before using this device, pick up objects like clothing and
loose paper. Lift up cords for blinds or curtains, and move
power cords and fragile objects out of the way. If this device
passes over a power cord and drags it, an object could be
pulled off a table or shelf.
• If the room to be cleaned has a balcony, a physical barrier
should be used to prevent access to the balcony and to
ensure safe operation.
• Do not place anything on top of this device.
02 03
• Be aware that this device moves around on its own. Take
care when walking in the area where this device is operating
to avoid stepping on it.
• Do not operate this device in areas with exposed electrical
outlets on the floor.
• Do not expose the electronics of this device, its battery, or
the integrated Charging Base. There are no user-serviceable
parts inside.
• Follow all charging instructions and do not charge the
battery pack or appliance outside of the temperature range
specified in the instructions. Charging improperly or at
temperatures outside of the specified range may damage the
battery and increase the risk of fire.
• The laser distance sensor of this device meets the standards
for Class I Laser Products in IEC 60825-1:2014 and will not
generate hazardous laser radiation.
• Do not use this device on an unfinished, unsealed, waxed
or rough floor. It may result in damage to the floor and this
device. Use only on hard floor surfaces or low-pile carpet.
Notice
• Do not use the mopping module on carpets.
• This device has been designed to be used on floors without
scratching them. We still recommend that you test this
device on a small area of the room to be cleaned to ensure
no scratches are made before cleaning the whole room.
• Only use attachments recommended or described in this
manual.
• Do not handle the appliance or plug with wet hands.
• Ensure that the dust bag and/or filters are correctly in-place
before usage.
• Do not use a battery pack or appliance that is damaged
or modified. Damaged or modified batteries may exhibit
unpredictable behavior resulting in fire, explosion or risk of
injury.
• Do not expose the battery pack or appliance to fire or
excessive temperature. Exposure to fire or temperature
above 130°C may cause explosion.
• Do not modify or attempt to repair the appliance or the
battery pack (as applicable), except as indicated in the
instructions for use and care.
This symbol on the device or its packaging indicates:
Do not dispose of electrical appliances as unsorted
municipal waste; use separate collection facilities.
Contact your local authority for information regarding
the collection systems available. If electrical appliances
are disposed of in landfills or dumps, hazardous
substances can leak into the groundwater and get into
the food chain, damaging your health and well-being.
When replacing old appliances with new ones, the
retailer is legally obliged to take back your old appliance
for disposal at least free of charge.
Declaration of Conformity
This product complies with the radio interference requirements of the European
Community. Hereby, Anker Innovations Limited declares that the radio equipment type
T2190 is in compliance with Directive 2014/53/EU. The full text of the EU declaration of
conformity is available at the following internet address: https://www.eufylife.com/.
Maximum output power: 18 dBm (For EU)
Frequency band: 2.4G band (2.4000GHz — 2.4835GHz)
04 05
Dust collector & water tank
Trademark Notice
• Amazon, Echo, Alexa and all related logos are trademarks of Amazon.com, Inc. or its
affiliates.
• Apple and the Apple logo are trademarks of Apple Inc., registered in the U.S. and other
countries. App Store is a service mark of Apple Inc., registered in the U.S. and other
countries.
• Google Play and the Google Play logo are trademarks of Google Inc.
• Google Home is a trademark of Google Inc.
RoboVac Anatomy
A. Top
Wi-Fi status light
Press and hold for 3 seconds to
turn on or o (when not in Charging status)
Press to start Auto cleaning
Press to pause the current task when working
About Your RoboVac
What’s in the Box
RoboVac
Waterproof Pad Owner’s Manual &
Charging Base
Mopping Module
(with Washable Mopping Cloth)
Power Adapter
Other Documents
Top Panel
Laser distance sensor (LDS)
LDS cover (with bumper sensor)
Laser distance sensor (LDS)
Press to return RoboVac to the Charging Base;
press again to pause
Press and hold for 3 seconds to start Spot
cleaning
Press and hold both buttons for 3 seconds to
reset Wi-Fi connection
System reset button
Release button
Dust collector & water tank
Water pump component
06 07

B. Dust collector & Water tank
Water inlet cover
Water inlet
Cleaning brush
C. Side
Filter
Water pump connector
Dust disposal outlet
Buckles
Button for separating dust collector & water tank
Ventilation holes
D. Bottom
Side brush
Wheels
Front infrared sensor
Bumper
Wall sensor
Drop Sensors
Charging contact pins
Swivel wheel
Rolling brush
Brush guard
High-performance
filter
Foam filter
Pre-filter
Water outlets
08 09
E. Mopping module
Buckles
Internal view
Water outlets
Cloth attachment area
Slot
F. Charging Base
Buckles
Release buttons
Washable mopping cloth
Slot winding
Power cable
G. Suction Inlet
Wire slot exit
Power socket
Power cord storage compartment
Cover
External view
Status light
Charging contact pins
Suction inlet
10 11
LED Indication
Map Navigation and Management
You can see the status of RoboVac from the LED indicators.
&
(Power Status Lights)
Solid blue
Solid purple • Low power and returning to Charging Base
Breathing blue
Breathing purple • Charging (power level < 20%)
Flashes blue 3 times
Flashing red
When RoboVac is inactive and not on the Charging Base for 10 minutes, it
automatically switches to sleep mode and the light becomes dim to conserve
power.
• Standby / Cleaning (when not on Charging Base)
• Fully charged
• Charging (power level ≥ 20%)
• Loading system
• Status indication (along with voice prompts)
• Error indication (along with voice prompts)
Refer to the “Troubleshooting>Voice Alert” section in this
manual for solutions.
Status
Navigation
Once Auto cleaning starts, RoboVac moves from the Charging Base, automatically scans to
generate maps, intelligently determines its cleaning route, and divides the space into zones.
The cleaning paths are planned along the walls, following a bow-shaped cleaning method
to complete the cleaning of each zone one by one.
Real-time Mapping & Floor plan
Real-time mapping helps you know the cleaning path and environment easily. A floor plan
will be built after cleaning. The map will be updated real-time during each cleaning to
ensure normal navigation.
To create a complete floor plan:
1. open your doors for RoboVac to map each room;
2. remove any objects that may be in the way or get RoboVac stuck.
Do not remove the Charging Base after a floor plan is created.
(Wi-Fi Status Light)
Slowly flashing blue
Rapidly flashing blue Connecting with your wireless router
Solid blue Connected to your wireless router
Waiting for connection (RoboVac cannot connect to Wi-Fi
network in sleep mode)
Status
Relocalization & Remapping
If the position of RoboVac / Charging Base is adjusted or the surroundings are changed
significantly, RoboVac will try to relocalize and may remap to match the surroundings.
• RoboVac will resume cleaning if the relocalization is successful.
• If the relocalization fails, RoboVac will remap to ensure normal navigation with a new
cleaning.
12 13
• If the original map has the virtual boundary information, RoboVac will not start a new
cleaning to avoid going across the restricted zone.
• Make sure RoboVac starts each cleaning from the Charging Base.
• During cleaning, do not move the device frequently. If moved, place RoboVac
back to the original position.
Get Started
Place physical barriers in front of fireplaces and areas that may cause damage to
RoboVac if entered.
Preparation
1. Remove the foam blocks beside the bumper before use.
2. Connect the adapter to the Charging Base and put extra cable in the slot as illustrated.
Important Tips Before Use
Extra power cord on the ground may be pulled by the main unit to cause an
a
a
b
b
c
c
interruption of charging.
3. Place the Charging Base on a level surface and against a wall.
e
d
d
Remove power cords and small objects from the floor that may entangle RoboVac.
Fold tasseled edges of area rugs underneath to prevent tangling RoboVac. Avoid
cleaning very dark-colored high-pile rugs or rugs thicker than 1.02 in/26 mm as they
may cause RoboVac to malfunction.
Keep RoboVac away from spaces lower than 4.17 in/106 mm to prevent RoboVac from
getting stuck. If necessary, place a physical barrier to block off the problem areas.
Keep RoboVac away from wet areas during cleaning.
RoboVac may climb on top of objects less than 0.67 in/17 mm in height (the height will
be reduced if the mopping module is installed). Remove these objects if possible.
Anti-drop sensors will prevent RoboVac from tumbling down stairs and steep drops in
most cases. Sensors are less effective if dirty or used on carpeted/reflective/very dark-
colored floors. It is recommended to place physical barriers to block off areas where
RoboVac may fall.
e
f
f
4. Remove objects within 1.6 ft/0.5 m of the left and right side and within 4.9 ft/1.5 m
of the front of the Charging Base. If you cannot remove the objects, check whether
RoboVac can return to the Charging Base normally; if not, contact eufy customer service
for help.
14 15
5. Insert the Charging Base into the waterproof pad to keep the floor dry. Make sure it is
firmly installed. If mopping is not needed, you can skip this step.
6. Connect the adapter to a wall outlet.
Charge Your RoboVac
• RoboVac has a pre-installed rechargeable battery that has to be fully charged before use.
• RoboVac will return to the Charging Base at the end of a cleaning cycle or when its
battery is running low.
Method 1: Attach RoboVac to the Charging Base by aligning its charging pins with the
charging pins on the base.
Method 2: Press on the main unit to send RoboVac to the Charging Base.
LED Indicator on
Charging Base
Solid white
Off RoboVac properly connected to Charging Base
— Install the Charging Base in a location that RoboVac can easily access. It is
recommended to place the Charging Base against a wall, and on a hard-level
surface rather than on rugs or carpets.
— Always keep the Charging Base plugged in, otherwise RoboVac will not
automatically return to it.
— To ensure proper charging, do not frequently move the Charging Base. When
its location is changed, RoboVac may remap due to failure in relocalization
(see About Your RoboVac > Map Navigation and Management for details).
Charging Base connected to power source (When RoboVac is not
docked)
Status
— To preserve the battery’s lifespan, recharge at least once every 6 months.
— To enter Reduced Power Standby mode when RoboVac is being charged, press
and hold
Status Lights turn off. Wi-Fi is disabled while this mode is active. Press to
exit Reduced Power Standby mode.
& simultaneously on RoboVac for 20 seconds until the Power
16 17
Auto Recharge and Resume
RoboVac returns to the Charging Base automatically to recharge when:
• RoboVac has finished cleaning;
• Cleaning is not complete and the battery level becomes low; Once recharged to 80%
battery capacity, RoboVac will resume to finish the remaining cleaning.
— Do not move the Charging Base during cleaning, otherwise RoboVac may fail
to return for recharge. If failed, you have to manually attach it to the Charging
Base.
1. Press to start cleaning in Auto Mode.
RoboVac moves around to scan the environment and build the map automatically.
Using Your RoboVac
2. Press again to pause cleaning.
Turn on / off
• RoboVac turns on automatically when attached to the Charging Base and connected to
power.
• When RoboVac is not on the Charging Base, press and hold for 3 seconds to turn on
the main unit. Wait until the Power Status Light turns solid blue.
• When RoboVac is not on the Charging Base, press and hold for 3 seconds again to
turn off the main unit.
Switch to Sleep Mode
• When inactive and not on the Charging Base for 10 minutes, RoboVac automatically stops
cleaning and switches to sleep mode. In sleep mode, press any button to wake it up.
Press to resume cleaning.
When cleaning is paused, docking the main unit onto the Charging Base will stop the
cleaning.
If cleaning is paused for 10 minutes, RoboVac automatically stops cleaning and
switches to sleep mode.
3. Press to stop current cleaning and return to the Charging Base.
• Before cleaning, sort out cables and cords to avoid power interruption or any
damaging caused by pulling the cord during cleaning.
• In Auto cleaning mode, RoboVac will clean twice by default if the cleaning
time is less than 10 minutes.
Start cleaning
RoboVac cannot start cleaning if the battery level is less than 20%. In this case,
recharge RoboVac first before cleaning.
Use Your RoboVac with the EufyHome App
To fully enjoy all the available features, it is recommended to control your RoboVac via the
EufyHome app.
Before you start, make sure that:
• Your smartphone or tablet is connected to a Wi-Fi network.
• Your smartphone or tablet is running iOS 8.0 (or above) or Android 4.4 (or above).
• The 2.4GHz band wireless signal is enabled on your wireless router.
18 19
• The Wi-Fi status light on RoboVac is slowly flashing blue.
• RoboVac is attached to the Charging Base to ensure it has enough power during setup.
EufyHome
EufyHome
Schedule Cleaning
With the EufyHome app, you can schedule RoboVac to start cleaning at a particular time.
• You can set the time and customize the cleaning schedules from Sunday to
Saturday on the EufyHome app. This function is available in the app only.
Select a Cleaning Mode
1. Download the EufyHome app from the App Store (iOS devices) or Google Play (Android
devices).
2. Open the app and create a user account.
3. Tap the “+” icon to add RoboVac to your EufyHome account.
4. Follow the instructions in the app to set up the Wi-Fi connection.
After connecting successfully, you can control RoboVac via the app.
With the app, you can select cleaning at your desired suction level, schedule cleaning,
view the cleaning map, set up “No-Mop” or “No-Go” zones, check the network
connection status, and access additional features.
Wi-Fi Status Light
Slowly flashing blue Waiting for connection
Rapidly flashing blue Connecting with your wireless router
Solid blue Connected with your wireless router
• If you have any problems during the Wi-Fi setup process, refer to the
“Troubleshooting > Wi-Fi connection” section in this Manual.
• If RoboVac gets stuck in any space, tap Find My Robot in the app to find the
machine. This function is available in the app only.
• You can press at any time to pause the current cleaning cycle.
1. Auto cleaning
1. Press to start cleaning in Auto Mode.
2. Press again to pause cleaning.
— By default, RoboVac starts in Auto cleaning mode when it is turned on.
Reset the Wi-Fi Connection
Press and hold and simultaneously for 3 seconds to reset the Wi-Fi connection if
necessary.
You will hear a voice prompt when the Wi-Fi connection has been reset, and the Wi-Fi
status light will slowly flash blue. Now you can follow the Wi-Fi instructions in the
eufyHome app to set up the Wi-Fi connection.
20 21
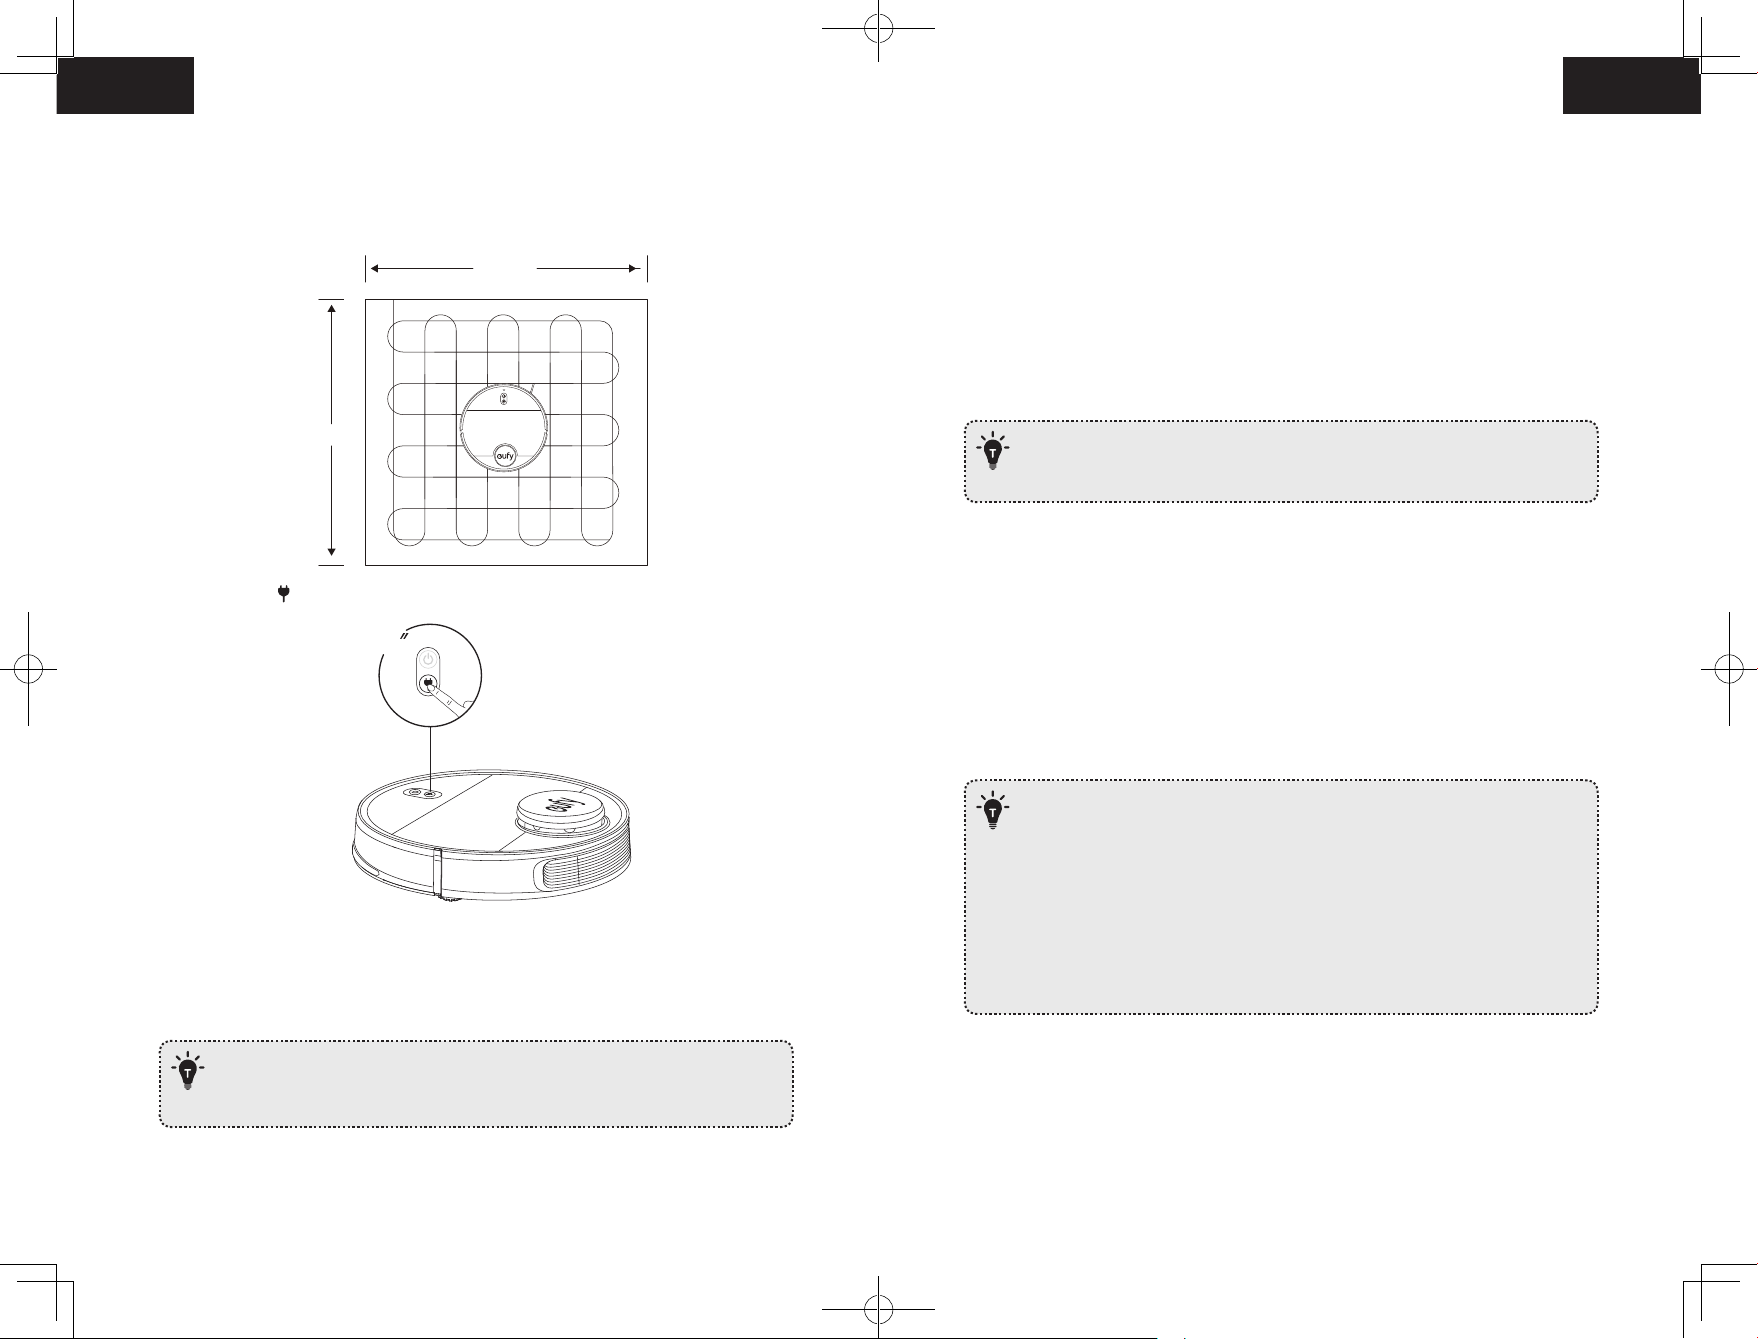
2. Spot cleaning
RoboVac intensively cleans a specific area with a size of 4.9 ft x 4.9 ft / 1.5 m x 1.5 m.
Useful if there is a concentrated area of dust or debris. When the cleaning of a certain zone
is finished, it automatically returns to the Charging Base.
4.9ft/1.5m
4. Manual-controlled cleaning (available via the app only)
You can direct RoboVac to clean a particular area by using manual controls in the
EufyHome app.
5. Select a Suction Power Level
In the EufyHome app, select a suction power level according to your needs:
• Quiet
• Standard (Default)
• Turbo
• Max
4.9ft/1.5m
• Press and hold for 3 seconds to start Spot cleaning.
3
3. Zone cleaning (available via the app only)
In this mode, set up a cleaning zone in the EufyHome app. RoboVac will clean this zone
only and return to the Charging Base after cleaning.
• You can select the “Mop-Only” suction level in mopping mode. When
mopping is finished, RoboVac will change to default suction level
automatically.
6. Select BoostIQ™ feature
In the EufyHome app, select the BoostIQ™ feature according to your needs. RoboVac will
automatically increase the suction power if it detects that stronger power is needed to
ensure the best clean. BoostIQ™ is ideal for cleaning thicker carpets and hard-to-sweep
messes, which will reduce the total cleaning time, but increase the noise level. If the
vacuuming noise caused by BoostIQ™ disturbs you, you can disable this feature.
Use Mopping System
• The mopping mode is only intended for a clean floor without stubborn stains
or liquids. To avoid staining floors, do not use the mopping function when dust
is mixed with liquids such as coffee or ink.
• Mopping System cleans best on smooth hard surfaces and may not perform so
well on uneven tiles, heavily waxed floors or rough surfaces like slate or brick,
which may snag the cleaning pad.
• The mopping mode is not recommended when no one is at home.
• Do not use the mopping mode on a carpeted floor. It is recommended to set a
“No-Mop” zone in the EufyHome app to avoid cleaning the carpeted area.
• Start Zone cleaning only after RoboVac has created the map.
• It is recommended that RoboVac moves from the Charging Base to start Zone
cleaning.
22 23
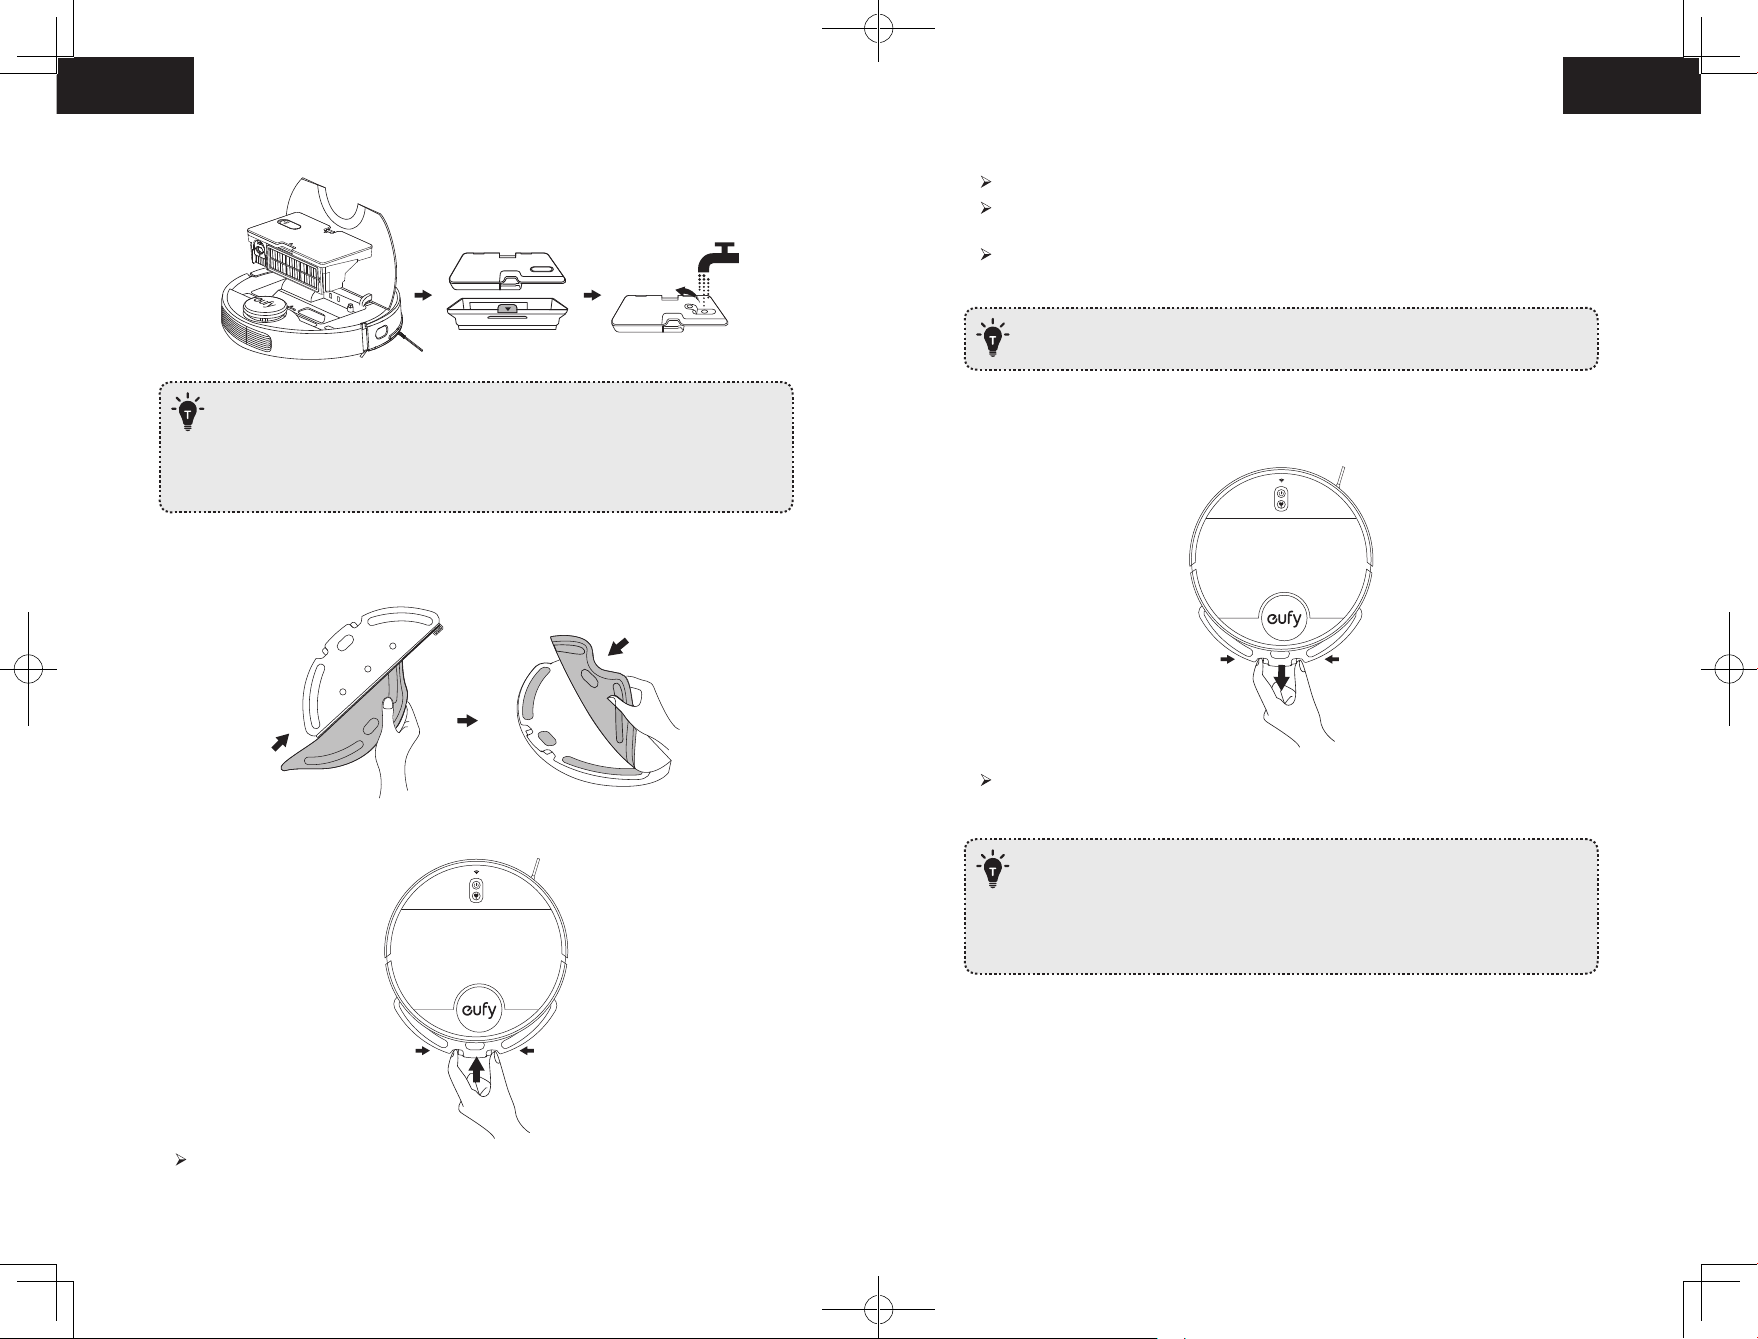
1. Take out the water tank and put it back into the main unit after filling the water.
4. Select a cleaning mode to start cleaning.
RoboVac automatically sweeps and mops in the selected mode.
If you want RoboVac to mop without vacuuming, select “Mop-Only” mode in the
EufyHome app.
You can also select the mopping water level (3 levels) in the app according to your
needs.
• To achieve a better mopping effect, it is recommended to clean the floor with
RoboVac three times before installing the mopping module.
— Do not use any other cleaning solution other than water. Cleaning solutions,
even natural ones, can clog the water release system and break down the
materials inside the device.
— To add water into the water tank or install the mopping module, pause the
cleaning first. Do not manually move the device.
2. Wet the mopping cloth and wring it until it does not drip. Insert the cloth along the
bracket slot and stick it firmly.
3. Install the mopping module into the bottom of RoboVac until a click is heard.
5. When RoboVac finishes working and returns to the Charging Base, hold the two buckles
by hand, drag backward and remove the mopping module.
When the mopping module is removed, the system automatically exits mopping
mode without water release.
• Although water release is stopped when cleaning is paused, the mopping cloth
will still be wet. Be careful not to keep RoboVac in one location for too long, as
the excessive moisture caused by the cloth can damage the floor.
• To avoid damaging wooden floors, make sure the Charging Base is attached to
the waterproof pad.
When the mopping module is inserted, RoboVac automatically switches to the
mopping mode.
24 25
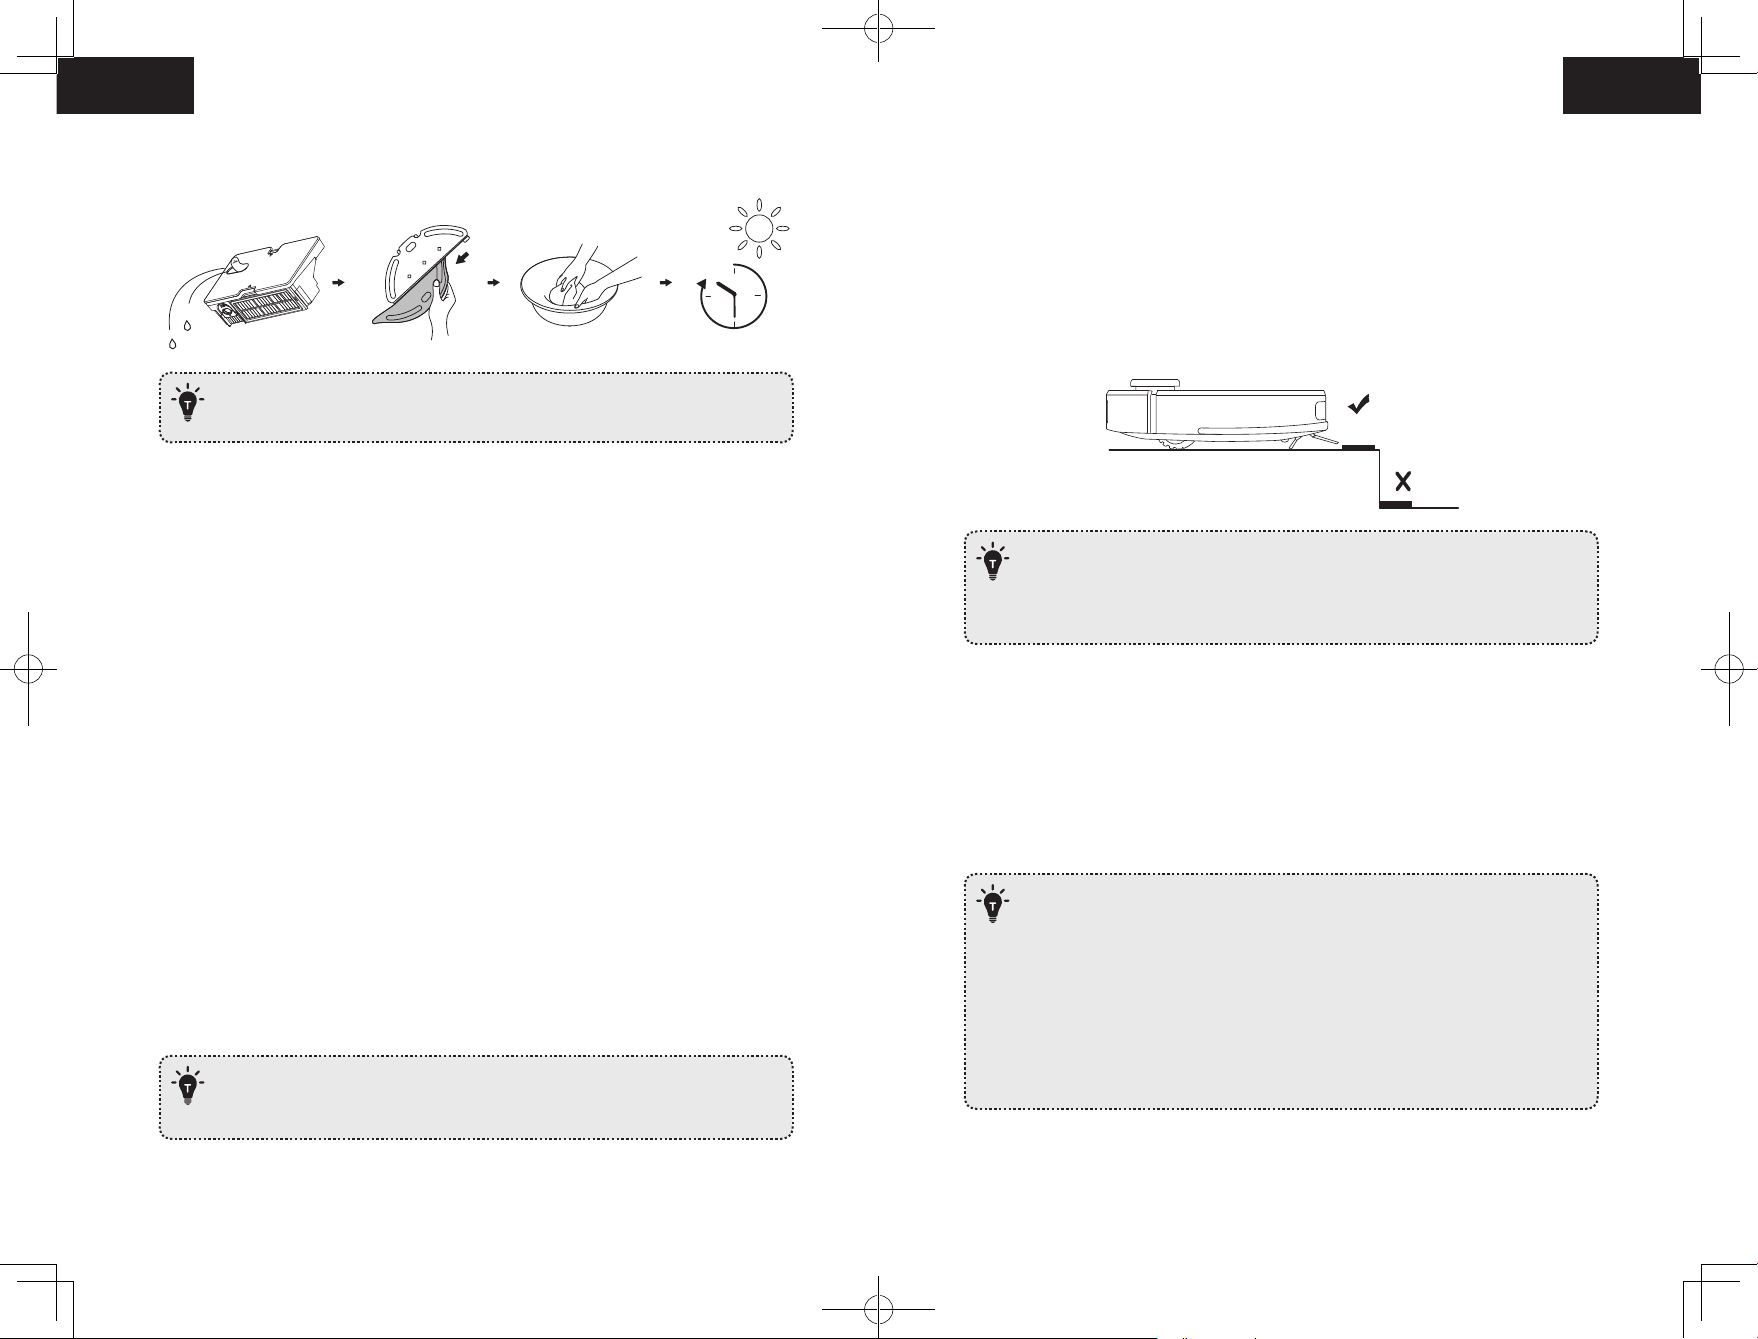
6. Empty any remaining water from the water tank. Clean the mopping cloth to avoid it
being mildewed and producing unpleasant smell.
Set Up Physical / Virtual Barriers
Boundary Strips (Sold Separately)
24h
• It is recommended to clean the mopping cloth after mopping each time.
• Remove the mopping module when RoboVac is under charging or not in use.
Use Your RoboVac with Amazon Alexa / the Google
Assistant
Amazon Alexa or the Google Assistant is a smart voice control device that enables you to
control RoboVac with your voice.
Before you start, make sure that:
• RoboVac is attached to the Charging Base to ensure there is enough power.
• RoboVac is connected with the EufyHome app.
• You have an Alexa-enabled device (i.e. Amazon Echo, Echo Dot and Amazon Tap, Echo
Show, Echo Spot) or a device enabled with the Google Assistant (i.e. Google Home,
Google Home Mini). These devices are sold separately.
• The Amazon Alexa app or Google Home app is already installed on your smart device,
and you have created an account.
To control RoboVac with Amazon Alexa or the Google
Assistant
1. Open the EufyHome app and tap “Smart integrations” in the top left.
2. Follow the on-screen instructions to complete the setup.
— Currently this feature only supports English, German, French, and Spanish.
You can check regularly if more languages are supported at
https://www.eufylife.com/support/.
Physical barriers including boundary strips can keep RoboVac away from cleaning certain
areas. RoboVac will recognize the barriers and will not cross into the blocked-off area.
1. Identify the area or item you do not want RoboVac to get close to.
2. Place the boundary strips FLAT on the floor or under an area rug.
• Make sure the boundary strips are placed on the same surface plane RoboVac
is used on.
• If the boundary strips are rolled up, remove and then re-apply on the floor with
adhesive tape. Otherwise the boundary strips may not work well.
Virtual Boundary (Available on the App Only)
In the EufyHome app, you can set up a “No-Go Zone” or “No-Mop Zone” as a restricted
area. This eliminates the need to use physical barriers, including Boundary Strips. This
feature is designed for dividing the cleaning zones, not for isolating hazardous areas.
• No-Go Zone: RoboVac will not enter the zone to vacuum or mop.
• No-Mop Zone: RoboVac will not enter the zone to mop, while vacuuming is still allowed.
• To set a virtual boundary, RoboVac must initially perform a cleaning run to
create a floor plan.
• To clean your home with virtual boundary, ensure that RoboVac is on the
Charging Base and that the Base has not been manually moved during
cleaning.
• Although a virtual boundary is set, RoboVac may still enter the restricted zone
due to such reasons as relocalization, wrong positioning or abnormal sensors.
• Moving the device or changing the environment may cause mapping failed
and rebuilt with virtual boundary lost.
26 27
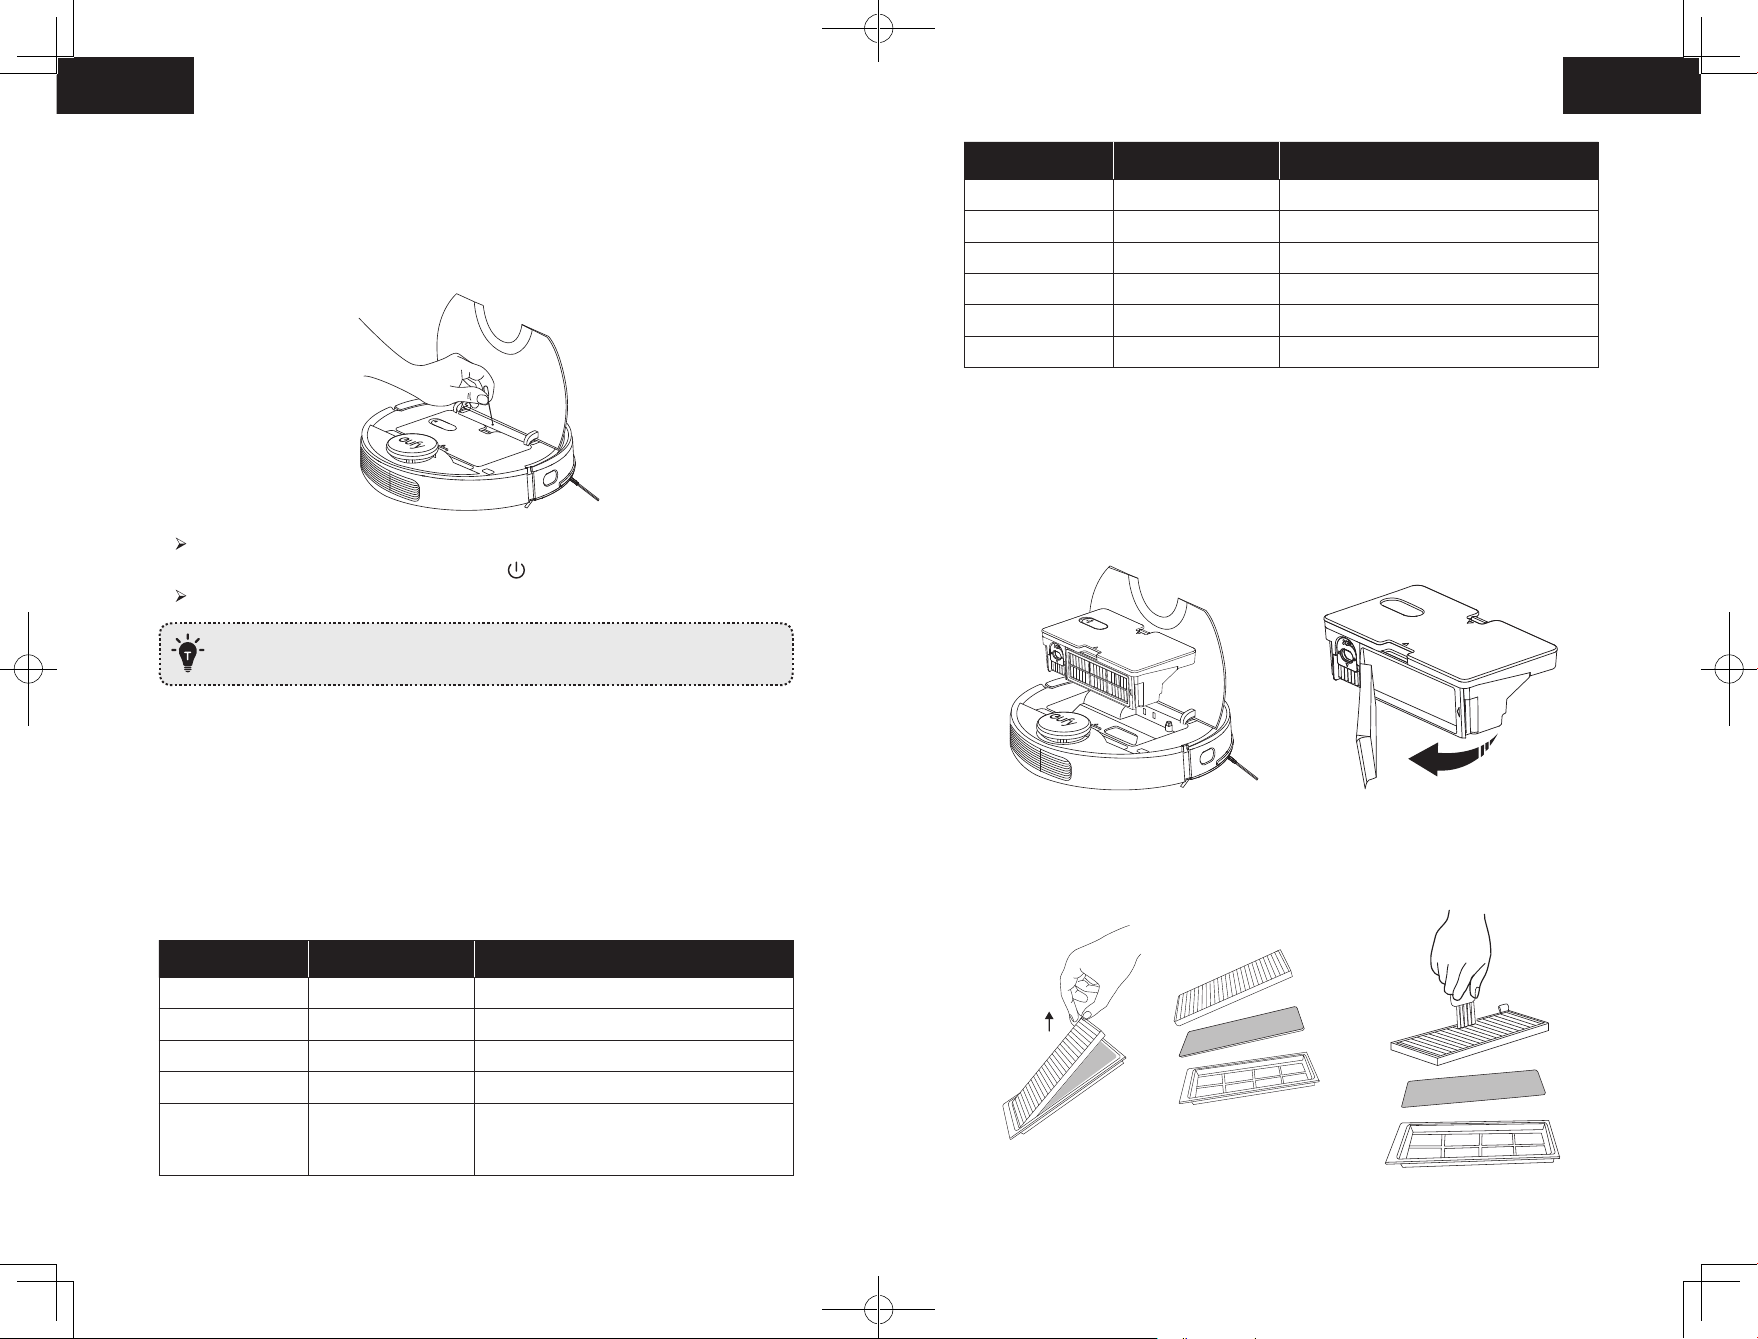
Reset the System
RoboVac Part Cleaning Frequency Replacement Frequency
You can reset the system if there is no response when pressing any button on RoboVac.
1. Make sure RoboVac is not on the Charging Base.
2. Use a clip to press the Reset button.
RoboVac will automatically turn off.
3. Dock RoboVac onto the Charging Base or press to turn it on.
The system is reset.
• After resetting the system, RoboVac may lose its map and the original settings
including the virtual boundary.
Cleaning and Maintenance
Sensors Once every month —
Charging Pins Once every month —
Swivel Wheel Once every month —
Mopping Module After each use —
Mopping Cloth After each use Every 3-6 months (or when visibly worn)
Water Tank After each use —
Clean the Dust Collector and Water Tank
1. Open the top panel of RoboVac and press the release button to remove the dust collector
and water tank.
2. Take out the filter assembly.
Before cleaning and maintaining, turn off the device and unplug the adapter.
For optimal performance, follow the instructions below to clean and maintain RoboVac
regularly. The cleaning/replacement frequency will depend on your usage habits of
RoboVac.
Recommended cleaning/replacement frequency
RoboVac Part Cleaning Frequency Replacement Frequency
Dust Collector After each use —
Filter Once every week Every 6 months
Rolling Brush Once every week Every 6-12 months
Side Brush Once every month Every 3-6 months (or when visibly worn)
Brush Guard Once every month Every 3-6 months (or when the silicone
rubber strip on the brush guard becomes
visibly worn)
3. Take out the pre-filter, foam filter, and high-performance filter.
4. Clean the filters with a vacuum cleaner or a cleaning brush. You can also wash the filters
for deep cleaning.
28 29
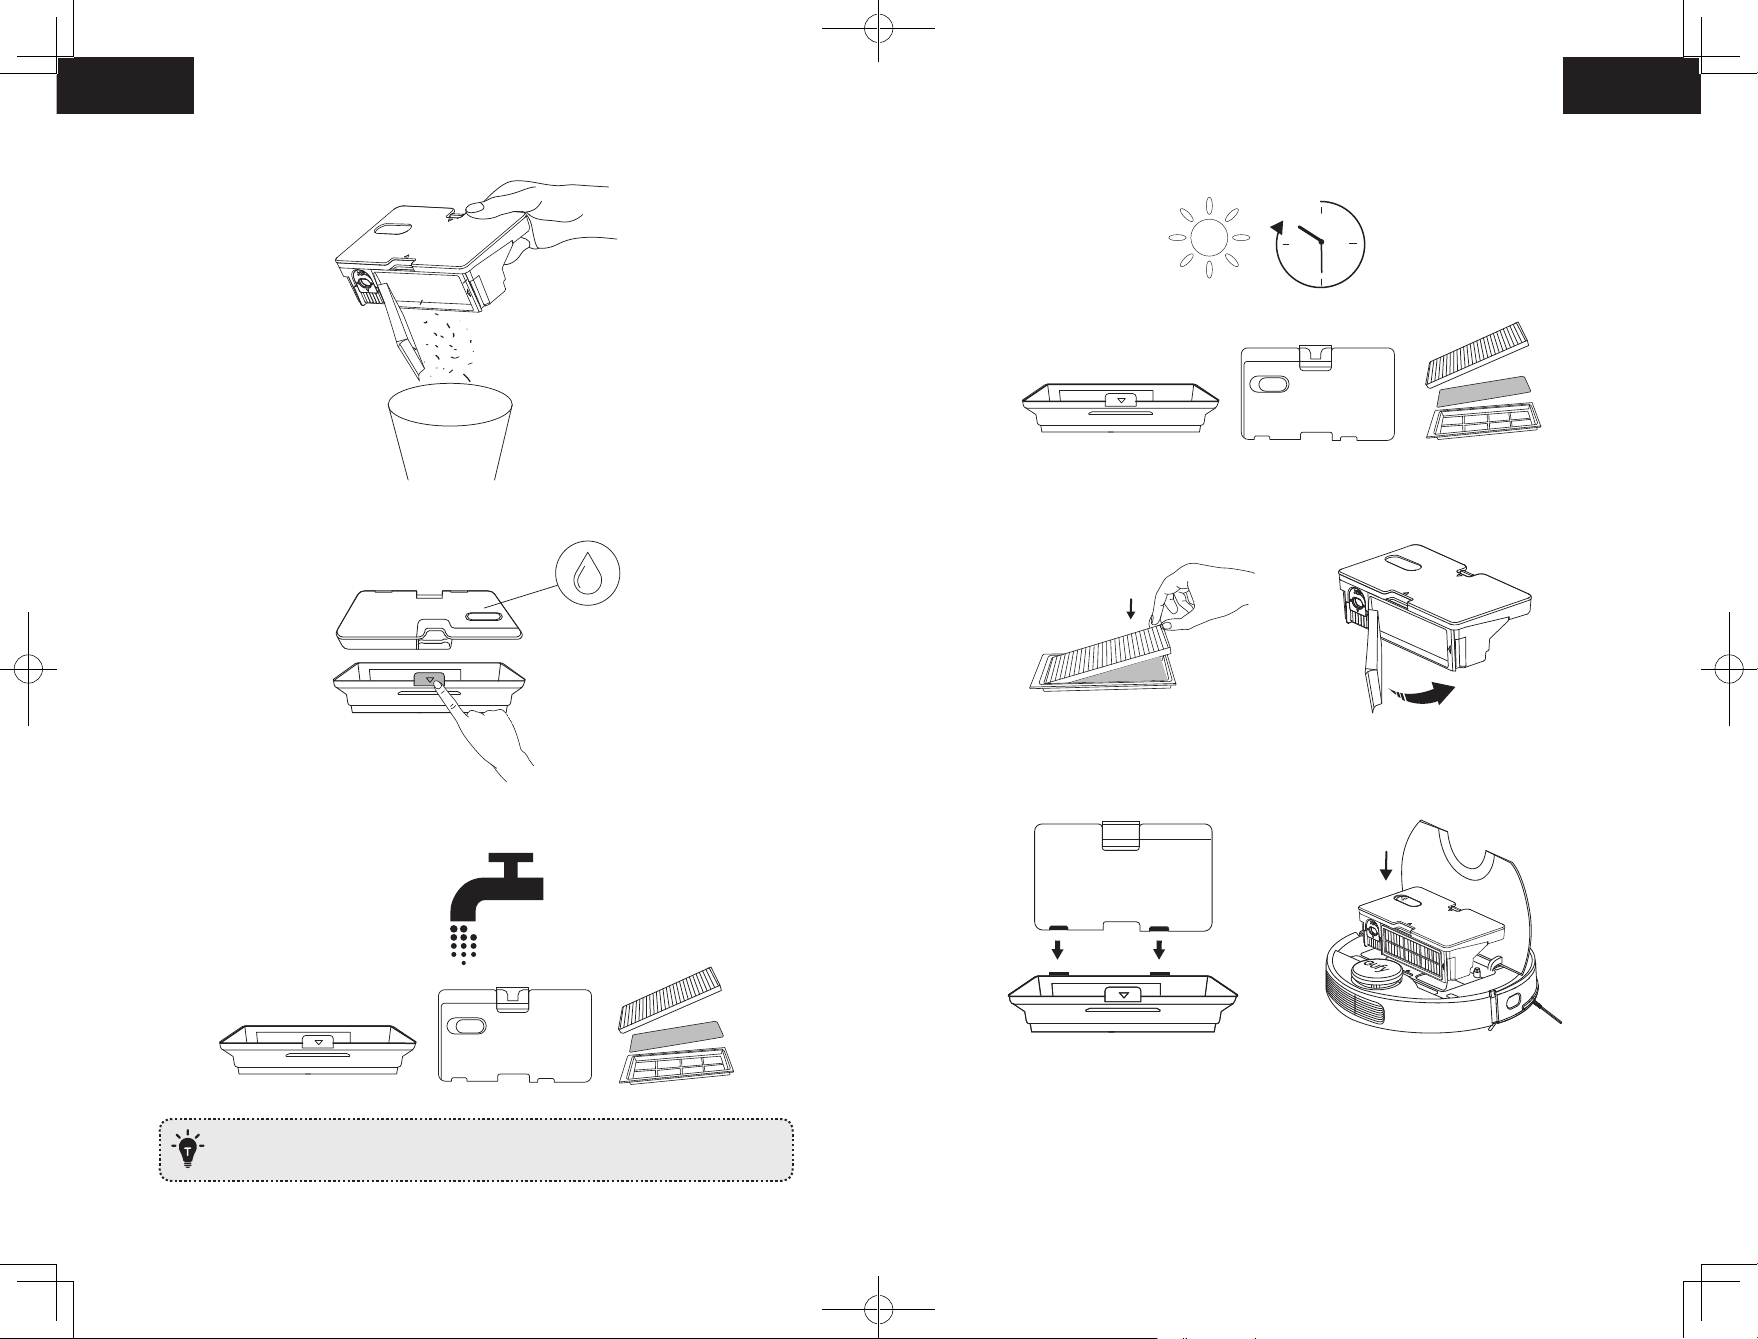
5. Empty the dust collector. Tap the dust collector to get rid of any excess dirt.
8. Air-dry the water tank, dust collector and filter assembly completely before next use.
24h
9. Replace the pre-filter, foam filter, and high-performance filter.
6. Press the dust collector release button to separate the dust collector from the water tank.
10. Put the filter assembly back into the dust collector.
11. Reinstall the dust collector with the water tank.
12. Push the assembly back into the main unit.
7. Rinse the water tank, dust collector and filter assembly thoroughly with water.
Do not use hot water, or any detergent to clean the filter assembly.
30 31
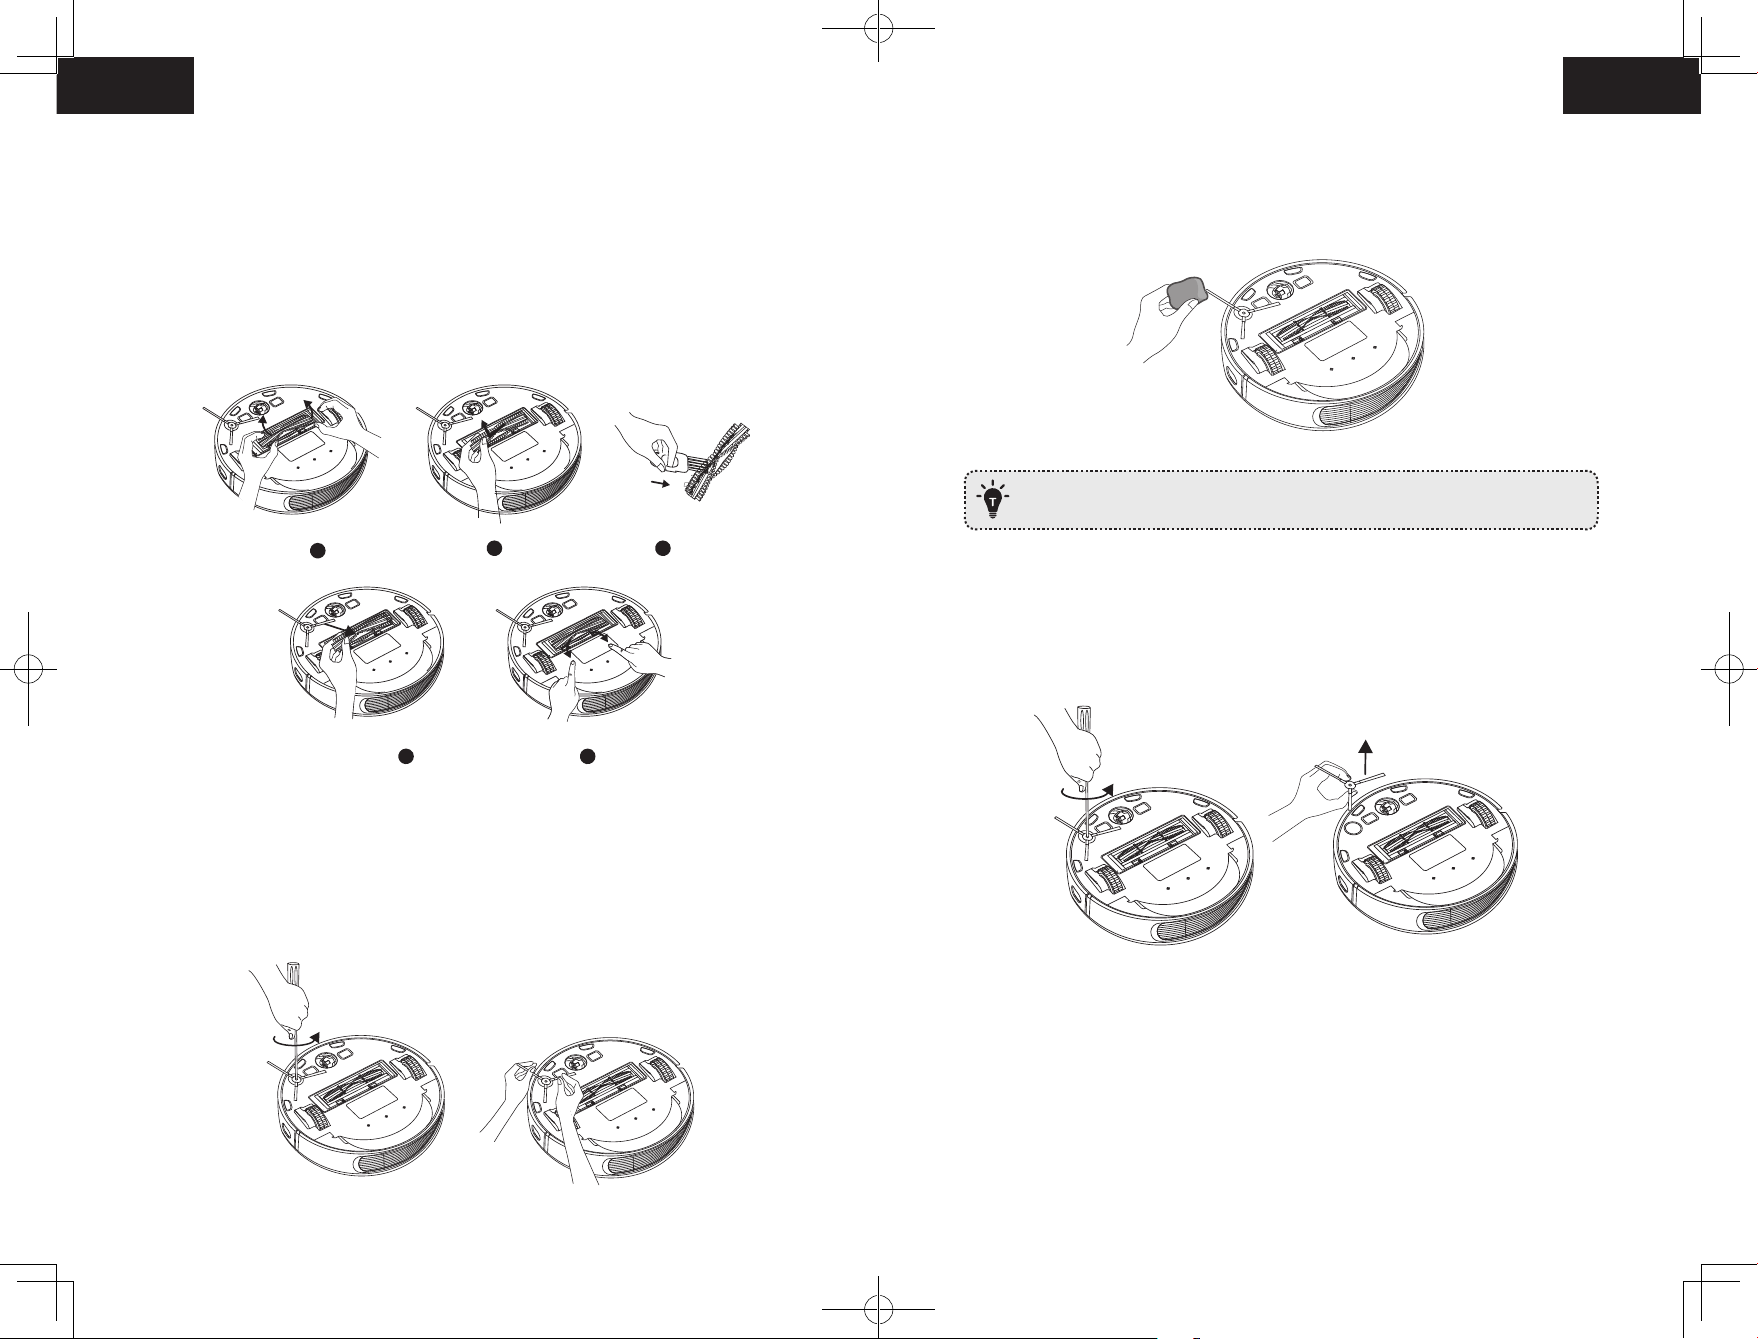
Clean the Rolling Brush
1. Pull on the release tabs to unlock the brush guard as shown.
2. Lift the rolling brush to remove.
3. Clean the rolling brush with a cleaning tool or a vacuum cleaner.
4. Reinstall the rolling brush by inserting the fixed protruding end first and then clicking into
place.
5. Press down to snap the brush guard into place.
2. Carefully unwind and pull off any hair or string that is wrapped between the main unit
and the side brush.
3. Use a cloth dampened with warm water to remove dust from the brush or to gently
reshape it.
Only use the side brush when it is completely dry.
1
4 5
2 3
Clean the Side Brush
Foreign substances, such as hair, can easily get tangled in the side brush, and dirt may
adhere to it. Be sure to clean it regularly.
1. Use a Phillips screwdriver to unscrew the screw.
Replace the Side Brush
The side brushes may become bent or damaged after being used for a period of time.
Follow the instructions below to replace it.
1. Use a Phillips screwdriver to unscrew the screw on the side brush.
2. Pull off the old side brush and snap the new one into place.
3. Screw down the screw to fasten the side brush.
32 33
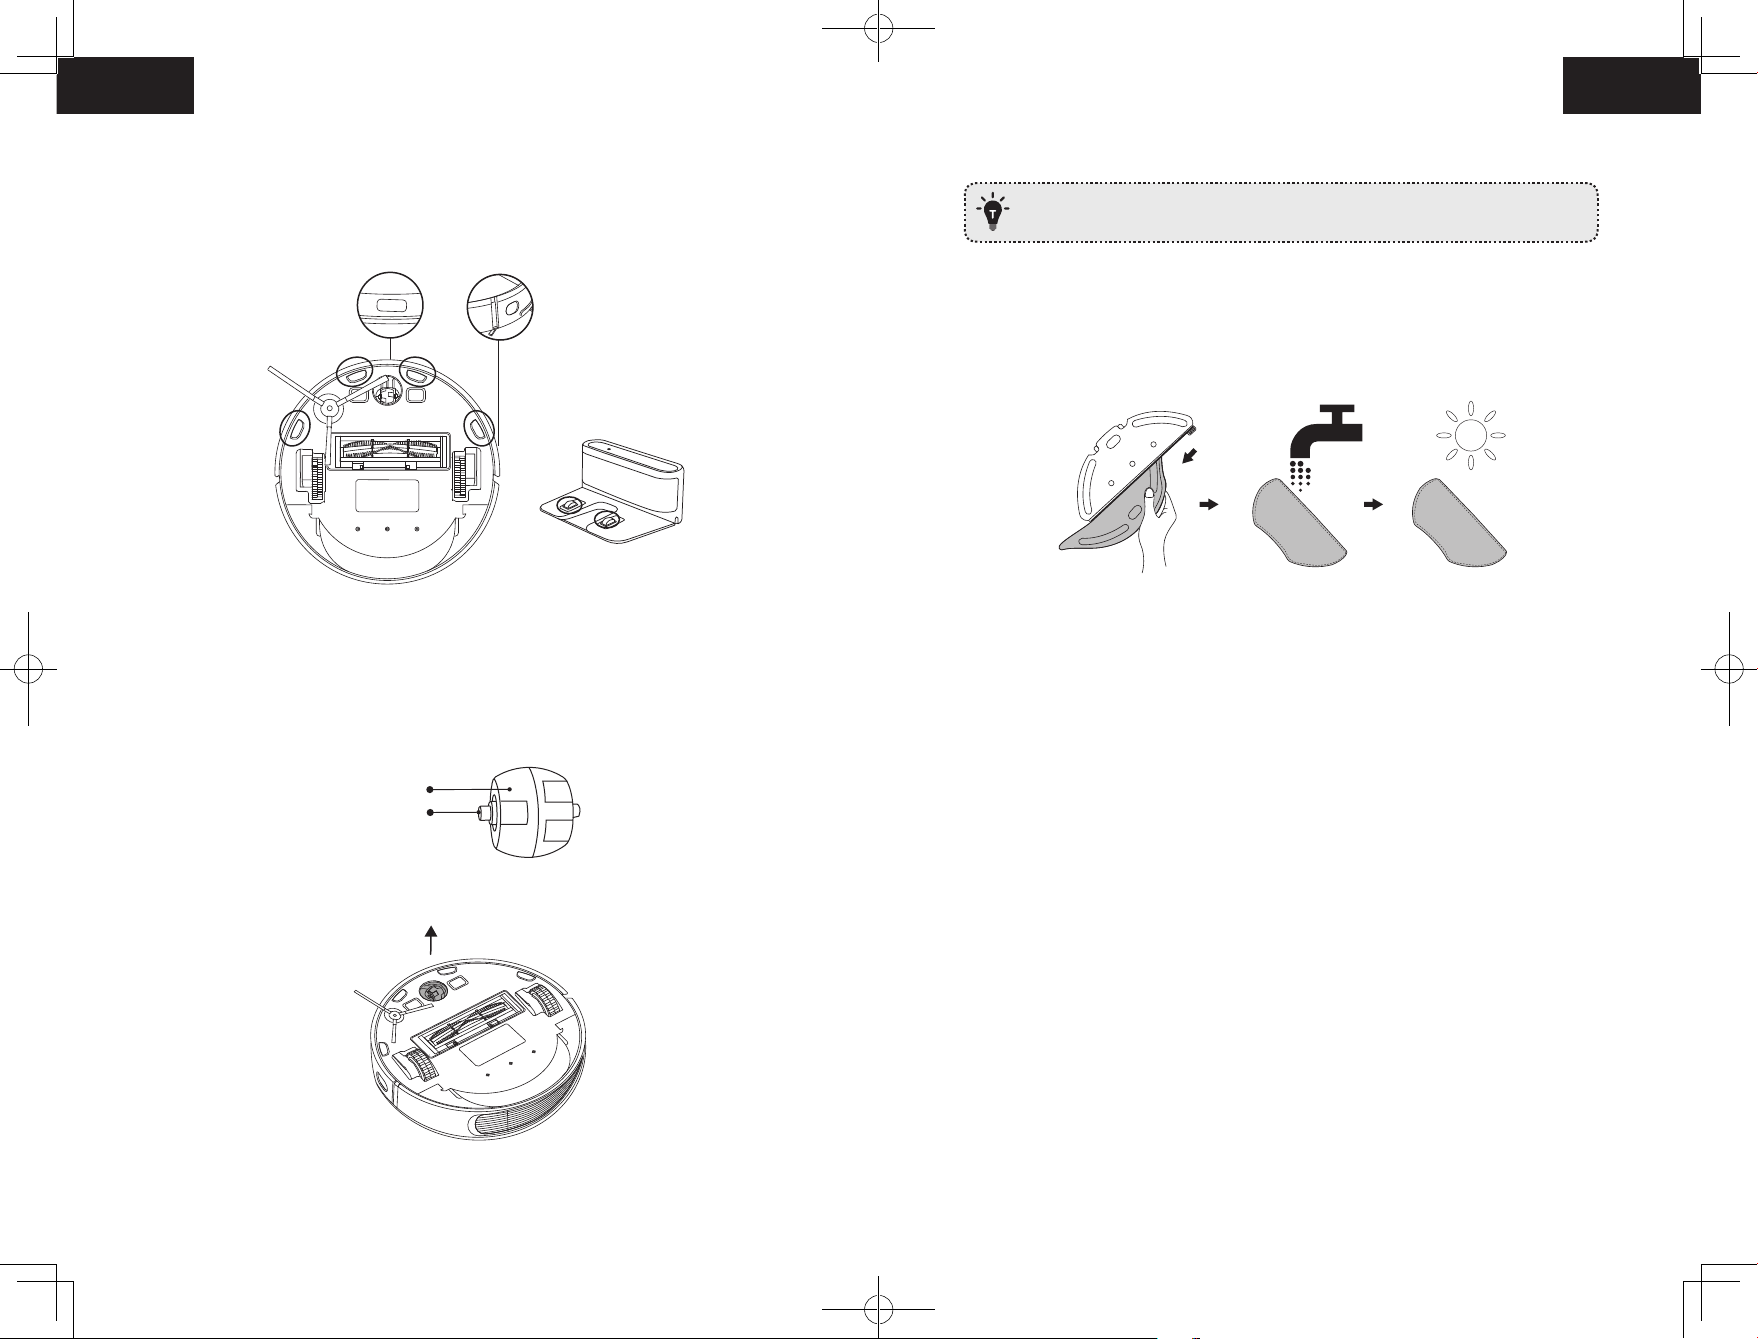
Clean the Sensors and Charging Pins
3. Reinstall the wheel and push in until it clicks into place.
To maintain the best performance, clean the drop sensors and charging pins regularly.
• Dust off the sensors and charging contact pins using a cloth or cleaning brush.
Clean the Swivel Wheel
Hair or dust particles can easily get entangled in the swivel wheel. Be sure to clean the
swivel wheel periodically and as needed.
Wheel
Axle
• Do not clean the swivel wheel with water.
Clean the mopping module
It is recommended to clean the mopping cloth after each use.
1. Remove the mopping cloth from the module.
2. Clean the cloth with water and air-dry it completely to avoid being mildewed or
producing unpleasant smell.
1. Pull out the swivel wheel.
2. Clean any hair or debris wrapped around the wheel or entangled inside the wheel cavity.
34 35
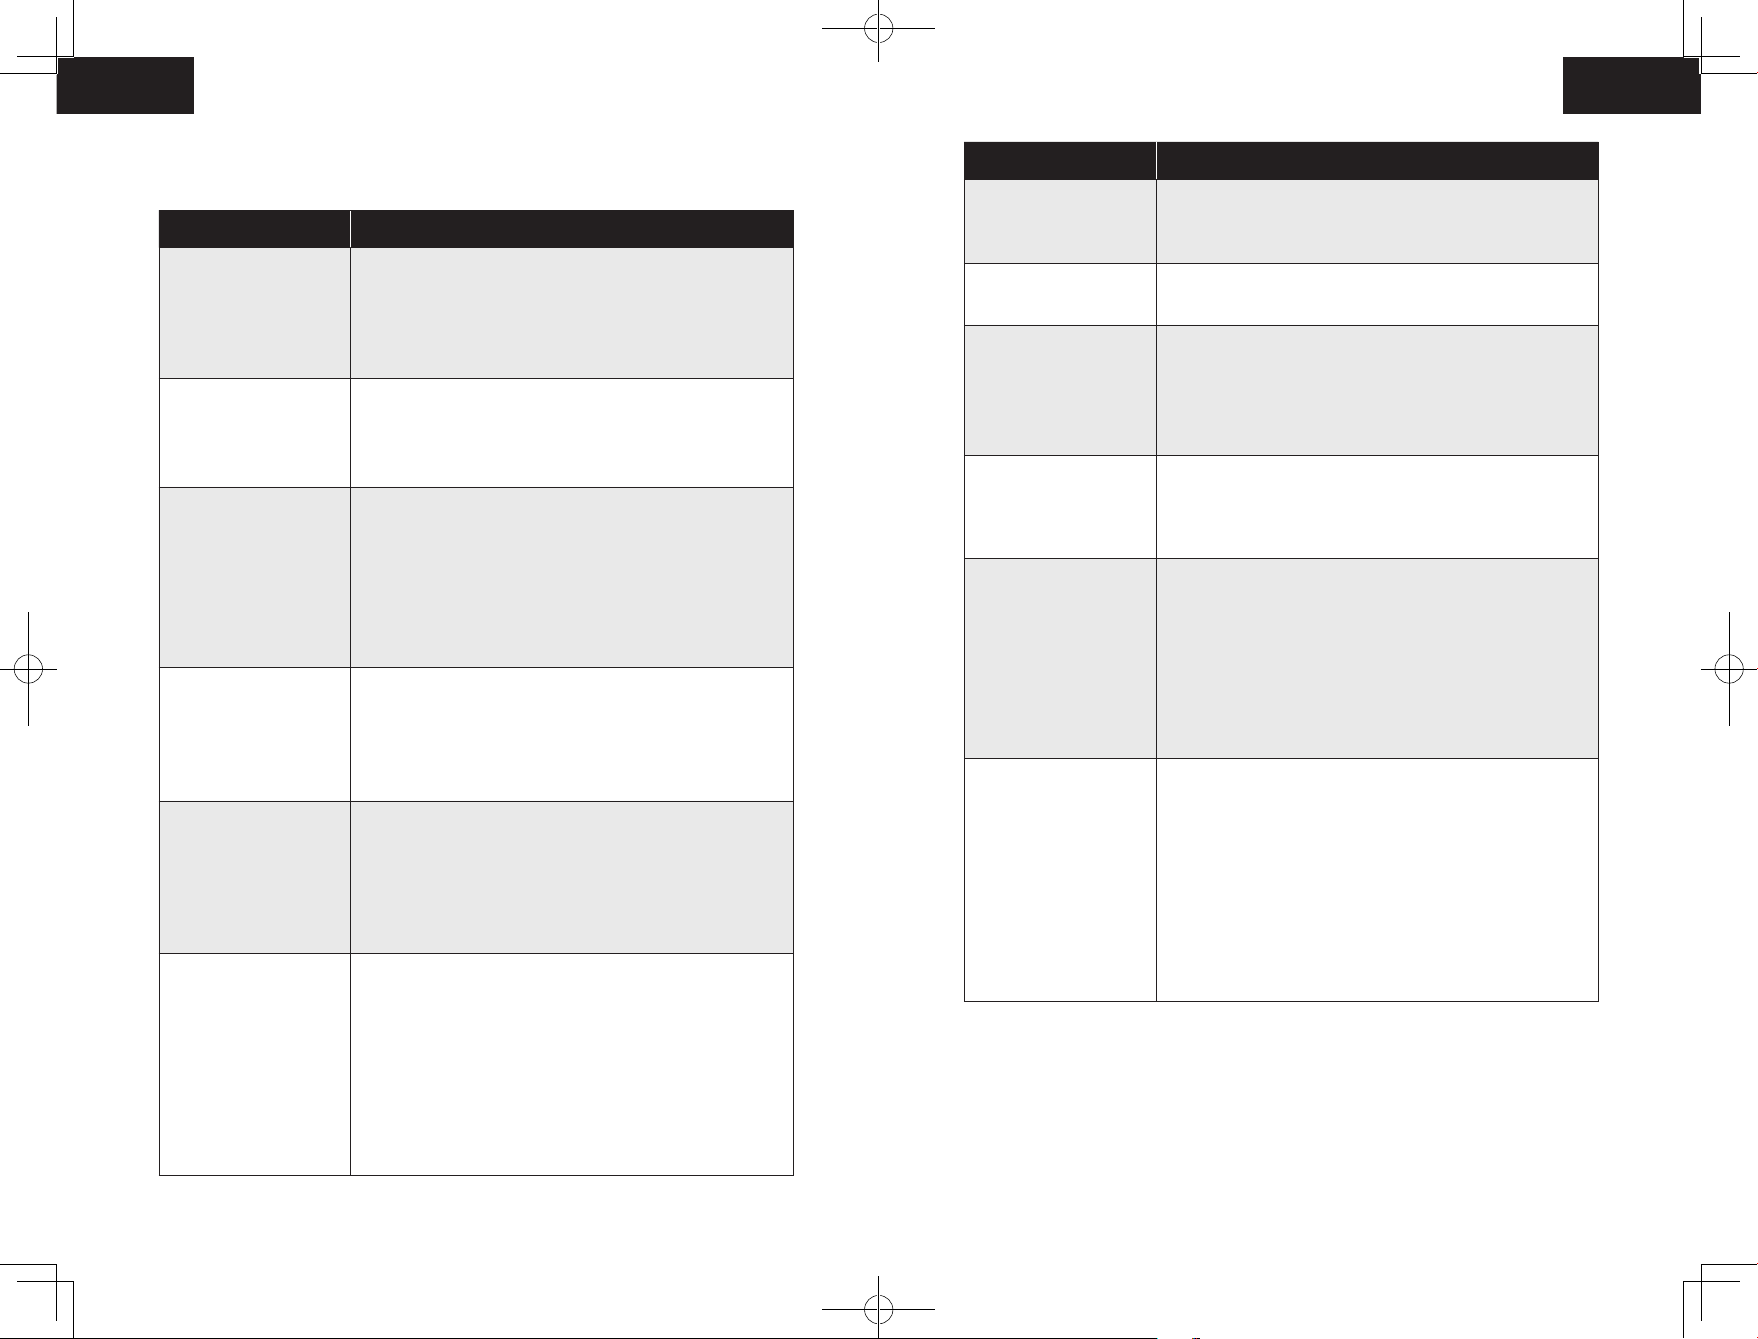
Troubleshooting
Problems Solutions
Problems Solutions
• Make sure RoboVac is connected to a power source.
RoboVac cannot be
activated.
RoboVac suddenly stops
working.
You cannot schedule
cleanings.
Suction power is weak.
RoboVac cannot be
charged.
RoboVac cannot return to
the Charging Base.
• Make sure the battery is fully charged.
• If you still have trouble, reset the RoboVac (refer to the
“Using Your RoboVac > Reset the System” section in this
manual).
• Check if RoboVac is trapped or stuck on an obstacle.
• Check if the battery level is too low.
• If you still have trouble, turn off RoboVac, wait for 3
seconds, and then turn it back on.
• Make sure RoboVac is turned on.
• You can set the time of day and scheduled cleaning time via
the EufyHome app.
• Make sure the scheduled time has been set correctly.
• Check if RoboVac’s power is too low to start cleaning.
• RoboVac will not start a scheduled cleaning while already
performing a task.
• Check if any obstructions are blocking the suction inlet.
• Empty the dust collector.
• Clean the filter with water.
• Check if the filter is wet due to water or other liquid on the
floor. Air-dry the filter completely before use.
• Check if the indicator on the Charging Base lights up (when
RoboVac is not on the Charging Base). If not, contact the
eufy service center to repair or replace the Charging Base.
• Check if the indicator on the Charging Base is off and the
light on the main unit is breathing during charging.
• Dust off the charging contact pins with a dry cloth.
• Remove objects within 1.6 ft/0.5 m to the left and right side
and within 4.9 ft/1.5 m of the front of the Charging Base.
• Make sure RoboVac started cleaning from the Charging
Base and has not been moved during cleaning.
• When RoboVac is in the vicinity of the Charging Base, it
will return more quickly. However, if the Charging Base is
located far away, RoboVac will need more time to return.
Please be patient as it works its way back.
• Clean the charging contact pins.
The rolling brush does
not rotate.
RoboVac’s movements or
travel path are abnormal.
Water is not released
during mopping.
RoboVac cannot connect
to a Wi-Fi network.
You cannot control
RoboVac with Amazon
Alexa.
You cannot control
RoboVac with the Google
Assistant.
• Clean the rolling brush.
• Check if the rolling brush and brush guard have been
installed properly.
• Clean the sensors carefully with a dry cloth.
• Restart RoboVac by turning RoboVac off and on.
• Make sure there is enough water in the water tank.
• Check if the mopping module is correctly installed. Once
correctly installed, you will hear the corresponding voice
prompt.
• Check if the water outlets are blocked.
• Make sure your Wi-Fi router supports the 2.4GHz and
802.11b/g/n bands; the 5GHz band is not supported. For
details, refer to the “Troubleshooting > Wi-Fi connection”
section in this manual.
• Check if there are any Internet connection problems.
• Check whether you have installed the Amazon Alexa app
onto your smart device and enabled “EufyHome — RoboVac”
Skill in the Amazon Alexa app. For details, refer to the
“Smart Integrations” page in the EufyHome App.
• Make sure you have a EufyHome account and that it is
connected to RoboVac.
• Make sure you are using correct Alexa voice-commands.
• Check if there are any Internet connection problems.
• Check if you have installed the Google Home app onto
your smart device and initiated the “EufyHome” action
in the Google Home app. For details, refer to the “Smart
Integrations” page in the EufyHome App.
• Check if you are using the proper commands when talking
to the Google Assistant. When making your request, first
say the wake words “Ok Google”.
• Repeat your question. Speak clearly to the Google
Assistant.
36 37

Voice Alert
Voice Prompt Cause and Solution
When RoboVac encounters a problem, the red indicator on RoboVac will be flashing and
you will hear the relevant voice prompts. Follow the voice prompts to solve the problems.
Voice Prompt Cause and Solution
Front bumper is stuck. Tap it repeatedly to remove any
Error 1: Front bumper stuck
Error 2: Wheel stuck. Check
the wheel and move it to a new
position.
Error 3: Side brush stuck Side brush may be stuck. Please clean it and try again.
Error 4: Rolling brush stuck.
Remove and clean the rolling
brush.
Error 5: Device trapped. Clear
the surrounding area.
Error 6: Device trapped. Place
device near the position where
the problem occurred.
Error 7: Wheel suspended.
Please move the device to a new
position.
Error 8: Low battery, shutting
down device. Please charge your
device.
Error 9: Magnetic Boundary
Strip detected. Move device to a
different area.
Error 11: Front infrared sensor
needs cleaning.
Error 12: Right wall sensor needs
cleaning.
Error 13: Device tilted. Please
put the device on a flat surface
to start.
dust;
if not, then move the device to a new position and try
again.
Wheel may be stuck or trapped. Clear any obstacles
in the surrounding area and check the wheel for any
trapped dust. Move the device to a new position and
try again.
Remove the rolling brush, roller joint, roller brush cover,
and suction inlet to clean it. Once cleaned, place the
items back into the device and try again.
Device is trapped. Clear any obstacles in the
surrounding area and try again.
Device may be suspended in air. Move it to a new
position close to the original position and try again. If
the device is still unable to start, clean the edge sensor
and try again.
Wheels may be suspended in air. Move the device to
a flat surface and a new position close to the original
position then try again.
Low Battery; system will shut down. Charge the device
and try again.
Device is too close to a strong magnetic field or strip.
Move the device to a different area and try again.
Front infrared sensor is blocked by dust and requires
cleaning.
Clean the right side wall sensor since it’s covered in
dust.
Device may be tilted. Put the device on a flat surface
and try again.
Error 14: Please insert dust
collector and filter.
Error 17: Restricted area
detected. Move device to a
different area.
Error 18: Laser cover may be
stuck.
Error 19: Laser sensor may be
stuck.
Error 20: Laser sensor may be
blocked.
Error 21: Charging Base blocked
by surrounding obstacles
Error S1: Battery Error. Refer
to Owner’s Manual or App for
help.
Error S2: Wheel Module Error.
Refer to Owner’s Manual or App
for help.
Error S3: Side Brush Error. Refer
to Owner’s Manual or App for
help.
Error S4: Suction Fan Error. Refer
to Owner’s Manual or App for
help.
Put the dust collector and filter back in and confirm
that they are in place. Then restart the device.
Device is too close to the restricted area. Move the
device to a new position and try again.
Pressure sensor for laser cover is stuck. Move the
device to a new position and try again.
Laser ranging sensor is covered in dust. Clean it and try
again.
Laser sensor is blocked by:
• An empty environment
• Metal mirrors
• Other multi-reflection devices
Remove any obstacles and move the device to a
different area.
Charging base is blocked by obstacles, clear any
obstacles around the charging base and try again.
— Open the battery compartment and check whether
the battery is connected and restart the device.
— Battery Temperature may be too high or low; wait
until the battery falls to normal temperatures before
usage (0 ° ~ 40 ° C/C 32 ° F to 104 ° F).
— If the issue persists, contact customer support for
help.
— Check whether the wheels are stuck or dust is
trapped inside before restarting the device.
— If the issue persists, contact customer support for
help.
— Check whether the side brush is stuck in an unknown
object before restarting the device.
— If the issue persists, contact customer support for
help.
— Check whether the fan blades are stuck in an
unknown object before restarting the device.
— Clean the dust collector and filter before restarting
the device.
— If the issue persists, contact customer support for
help.
38 39
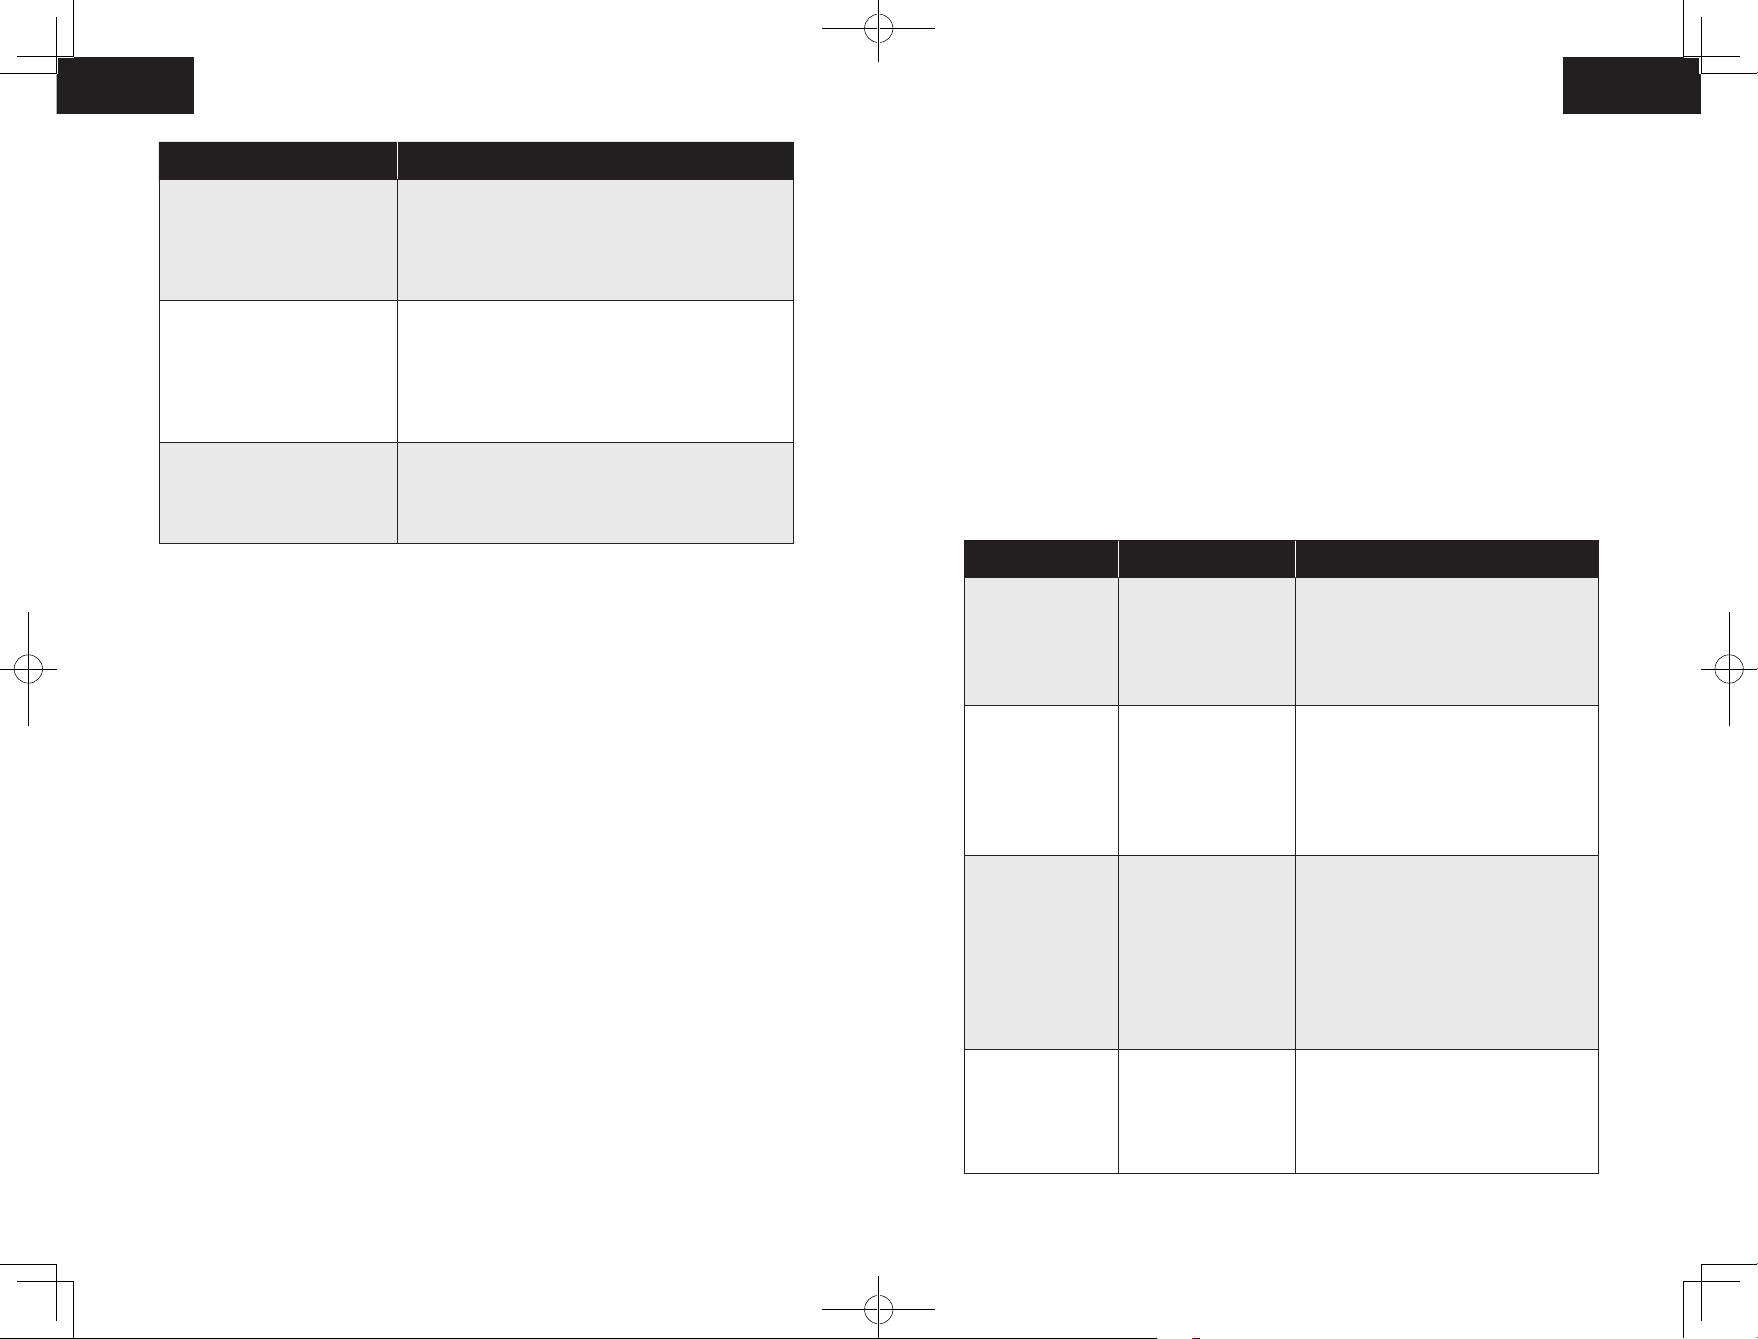
Error S5: Rolling Brush Error.
Refer to Owner’s Manual or App
for help.
Error S6: Water Pump Error.
Refer to Owner’s Manual or App
for help.
Error S7: Laser Sensor Error.
Refer to Owner’s Manual or App
for help.
Voice Prompt Cause and Solution
— Remove and clean the roller brush, roller brush
connection, roller brush cover and suction inlet before
restarting the device.
— If the issue persists, contact customer support for
help.
— Clean the water tank, water pump connection, water
pump interface, and water outlet at the bottom of the
device before restarting the device hidden under the
cloth cover.
— If the issue persists, contact customer support for
help.
— Check and clean the laser sensor for unknown objects
before restarting the device.
— If the issue persists, contact customer support for
help.
— The firewall and port settings of your Wi-Fi router allow RoboVac to connect with
the Eufy servers.
Network Security Requirement
— WPA and WPA2 using TKIP, PSK, AES/CCMP encryption.
Wi-Fi Channels
— The FCC requires that all wireless devices in the United States operate on the 1-11
wireless spectrum channels.
— Some countries outside North America can use spectrum channels higher than
channel 11. Refer to your local regulatory agency to determine which channels are
accessible.
— A future software release will support access to channels above 11 for users outside
North America. Until then, use channels 1-11.
If you cannot control RoboVac with your smartphone, try the solutions below to solve the
problem. If the problem persists, contact the eufy service center for help.
Wi-Fi Status Light Cause Solutions
Wi-Fi Connection
Before Wi-Fi setup, make sure RoboVac and your Wi-Fi network meet the following
requirements.
Wi-Fi Setup Requirements
• RoboVac:
— RoboVac is fully charged and the main power switch on the bottom of RoboVac is
turned on.
— Wi-Fi status light slowly flashes blue.
• Wi-Fi Network:
— Use the correct password for your network.
— Do not use a VPN (Virtual Private Network) or Proxy Server.
— Your Wi-Fi router supports 802.11b/g/n and IPv4 protocol.
— You are using a 2.4GHz router or a dual-band router that is configured to support a
2.4GHz frequency band. RoboVac does not support 5GHz frequency band.
— If RoboVac cannot connect to the Wi-Fi network and you are using a 2.4/5GHz
mixed network, switch to a 2.4GHz network for Wi-Fi setup. You can switch back
once your setup is complete.
— When connecting to a hidden network, make sure you enter the correct network
name, SSID (case sensitive), and connecting to a 2.4GHz wireless network.
— When using a network extender/repeater, make sure the network name (SSID) and
password are the same as your primary network.
Solid blue
Rapidly flashing
blue
Slowly flashing blue
Off
RoboVac has
connected to your
router, but cannot
access the Internet.
RoboVac cannot
connect to your
wireless router.
Wi-Fi connection is
reset or has not been
set up before.
RoboVac is turned off.
RoboVac’s power level
is low.
RoboVac is in Sleep
mode.
• Check if your router is connected to the
Internet.
• Check with your Internet provider to
see if there is any Internet connection
problem.
• Check if you have modified your
network name and password.
• Reset Wi-Fi connection if necessary.
Refer to the “Use Your RoboVac with
the EufyHome App > Reset the Wi-Fi
connection” section in this manual.
• Set up Wi-Fi connection with RoboVac.
Refer to the “Use Your RoboVac with
the EufyHome App” section in this
manual.
• Reset Wi-Fi connection if necessary.
Refer to the “Use Your RoboVac with
the EufyHome App > Reset the Wi-Fi
connection” section in this manual.
• Make sure RoboVac is turned on.
• Charge RoboVac by attaching it to the
Charging Base.
40 41
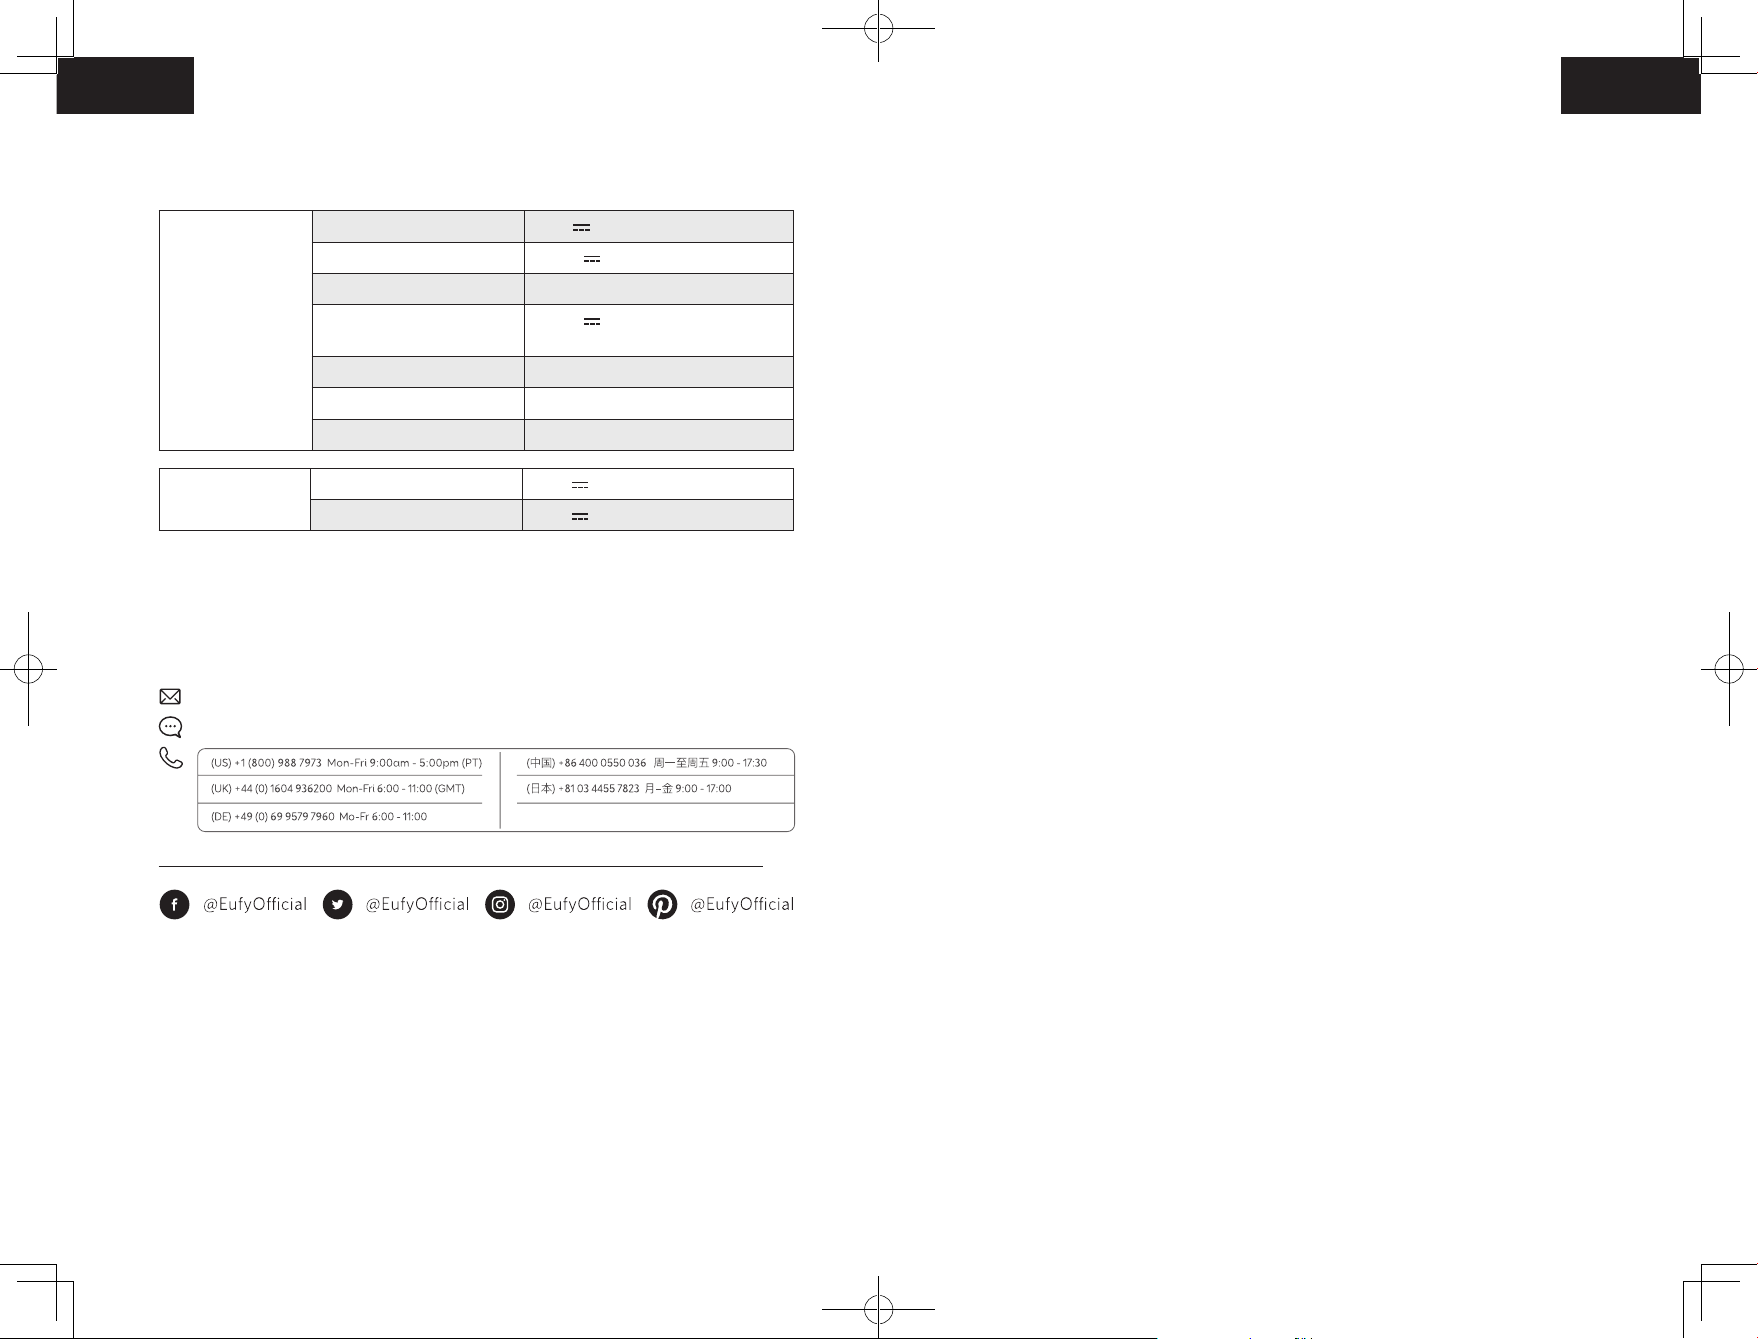
Specifications
Inhalt
RoboVac
Charging Base
Input 24 V 1.5 A
Battery Voltage 14.4 V
Power Consumption 50 W
Battery Type
Dust Collector Capacity
Cleaning Time Max. 150 mins
Charging Time 240 — 300 mins
Input 24 V 1.5 A
Output 24 V 1.5 A
14.4 V
Li-ion 5200 mAh (Typical)
0.45 L
Customer Service
For FAQs and more information, please visit www.eufylife.com.
support@eufylife.com
www.eufylife.com
Anker Innovations Limited
Room 1318-19, Hollywood Plaza, 610 Nathan Road, Mongkok, Kowloon, Hong Kong
44 Wichtige Sicherheitsinformationen
48 Über Ihren RoboVac
Im Lieferumfang
Aufbau des RoboVac
LED-Anzeige
Kartennavigation und -verwaltung
56 Erste Schritte
Wichtige Tipps vor der Verwendung
Vorbereitung
Aufladen Ihres RoboVac
60 Verwendung Ihres RoboVac
Ein- / Ausschalten
Reinigung starten
Verwenden Ihres RoboVac mit der EufyHome-App
Auswählen eines Reinigungsmodus
Verwenden des Wischsystems
Verwenden Ihres RoboVac mit Amazon Alexa / Google Assistant
Physische / virtuelle Barrieren einrichten
System zurücksetzen
70 Reinigung und Wartung
Staubbehälter und Wassertank reinigen
Reinigen der rotierenden Bürste
Reinigen der seitlichen Bürste
Auswechseln der seitlichen Bürste
Reinigen der Sensoren und Ladekontaktstifte
Reinigen des Schwenkrads
Reinigen des Wischmoduls
78 Fehlerbehebung
Sprachalarm
WLAN-Verbindung
84 Technische Daten
84 Kundenservice
42
Vielen Dank für den Kauf eines RoboVac. Lesen Sie alle Anweisungen aufmerksam
durch, bevor Sie dieses Produkt verwenden, und bewahren Sie sie gut auf.
43
Wichtige Sicherheitsinformationen
• Der Akku muss entfernt werden, bevor das Gerät entsorgt
wird. Um den Akku zu entfernen, lösen Sie zuerst die
Um das Risiko von Verletzungen oder Schäden zu verringern,
lesen Sie diese Sicherheitsinformationen sorgfältig durch und
halten Sie sie beim Einrichten, Verwenden und Warten des
Geräts griffbereit.
Schrauben an der Unterseite und nehmen Sie dann die
hintere Abdeckung ab. Entfernen Sie den Akku, indem Sie die
Schnellkupplung trennen.
• Der gebrauchte Akku muss in einem versiegelten
Plastikbeutel aufbewahrt und gemäß den örtlichen
VERWENDETE WARNSYMBOLE
Dies ist das Sicherheitswarnsymbol. Dieses
Symbol weist Sie auf mögliche Gefahren hin, die zu
Sachschäden und/oder schweren Verletzungen oder
Todesfällen führen können.
Umweltvorschriften entsorgt werden.
• Das externe flexible Kabel oder Netzkabel des Netzteils kann
nicht ausgetauscht werden. Wenn das Kabel beschädigt ist,
muss das Netzteil entsorgt werden.
• Der Adapter darf ausschließlich in Innenbereichen verwendet
werden.
• Dieses Gerät kann von Kindern ab 8 Jahren sowie von
Personen mit physischen, sensorischen, psychischen oder
geistigen Beeinträchtigungen verwendet werden, sofern
sie angemessene Überwachung oder Einweisung in die
sichere Verwendung des Geräts erhalten und die damit
einhergehenden Risiken richtig einordnen können.
• Dieses Gerät ist kein Spielzeug. Setzen oder stellen Sie sich
nicht auf das Gerät. Kleine Kinder und Haustiere sollten
beaufsichtigt werden, wenn das Gerät in Betrieb ist.
• Lagern und betreiben Sie dieses Gerät nur in Umgebungen
mit Raumtemperatur.
• Verwenden Sie zur Reinigung nur ein mit ein wenig Wasser
• Kinder sollten beaufsichtigt werden, um sicherzustellen, dass
sie nicht mit diesem Gerät spielen.
• Reinigung und Wartung dürfen nicht von Kindern ohne
Aufsicht von Erwachsenen durchgeführt werden.
• Dieses Gerät darf nur mit dem im Lieferumfang enthaltenen
Netzteil verwendet werden.
• Vor der Reinigung oder Wartung dieses Gerätes muss der
Stecker aus der Steckdose gezogen werden.
• Der Akku in diesem Gerät darf nur durch qualifiziertes
Personal ersetzt werden.
• Trennen Sie das Gerät vom Stromnetz, bevor Sie den Akku
ausbauen.
• Verwenden Sie zum Aufladen des Akkus nur das abnehmbare
Netzteil, das im Lieferumfang des Geräts enthalten ist.
angefeuchtetes Tuch.
• Saugen Sie mit diesem Gerät keine brennenden oder
rauchenden Objekte auf.
• Verwenden Sie dieses Gerät nicht zum Aufsaugen von
verschütteten Bleichmitteln, Farben, Chemikalien oder
Flüssigkeiten.
• Heben Sie vor Verwendung dieses Geräts Objekte wie Kleidung
und loses Papier vom Boden auf. Binden Sie Jalousien- oder
Vorhangkordeln hoch, und entfernen Sie Netzkabel und
zerbrechliche Gegenstände vom Boden. Wenn das Gerät über
ein Netzkabel rollt und es mitzieht, können die entsprechenden
Elektroartikel von Tischen oder Regalen gerissen werden.
• In Räumen mit Balkon sollte eine physische Barriere
verwendet werden, um den Zugang zum Balkon zu verhindern
und einen sicheren Betrieb zu gewährleisten.
4544
• Stellen Sie keine Gegenstände auf das Gerät.
• Beachten Sie, dass dieses Gerät sich eigenständig bewegt.
Gehen Sie beim Betreten des Bereichs, in dem das Gerät
betrieben wird, vorsichtig vor, damit Sie nicht versehentlich
auf das Gerät treten.
• Betreiben Sie dieses Gerät nicht in Bereichen mit frei
liegenden Bodensteckdosen.
• Legen Sie die Elektronik dieses Geräts, des Akkus oder der
integrierten Ladestation nicht frei. Keine Teile im Inneren des
Geräts können durch den Benutzer gewartet werden.
• Verwenden Sie dieses Gerät nicht auf Rohbeton oder auf
• Modifizieren oder versuchen Sie nicht, das Gerät oder
den Akku (falls zutreffend) zu reparieren, außer wie in der
Gebrauchs- und Pflegeanleitung angegeben.
• Befolgen Sie alle Ladeanweisungen und laden Sie den
Akku oder das Gerät nicht außerhalb des in der Anleitung
angegebenen Temperaturbereichs. Unsachgemäßes Laden
oder Temperaturen außerhalb des angegebenen Bereichs
können den Akku beschädigen und die Brandgefahr erhöhen.
• Der Laser-Entfernungssensor dieses Geräts erfüllt die
Anforderungen der IEC 60825-1:2014 an Laserprodukte der
Klasse I und erzeugt keine gefährliche Laserstrahlung.
unversiegeltem, gewachstem oder rauem Bodenbelag.
Andernfalls kann es zu Schäden am Boden und am Gerät
Hinweis
kommen. Verwenden Sie das Gerät nur auf Hartbelägen oder
Kurzflorteppichen.
• Verwenden Sie das Wischmodul nicht auf Teppichen.
• Dieses Gerät wurde für die kratzerfreie Verwendung auf
Böden entwickelt. Dennoch empfehlen wir, dieses Gerät in
einem kleinen Bereich des zu reinigenden Raums zu testen,
um vor dem Reinigen des ganzen Raums sicherzustellen, dass
keine Kratzer entstehen.
• Verwenden Sie nur die in diesem Handbuch empfohlenen
oder beschriebenen Anbaugeräte.
• Stecker oder Gerät nicht mit nassen Händen anfassen.
• Vergewissern Sie sich vor dem Gebrauch, dass der
Staubbeutel und/oder die Filter korrekt eingesetzt sind.
Dieses Symbol auf dem Gerät oder der Verpackung hat
die folgende Bedeutung:
Entsorgen Sie elektrische Geräte nicht im
Haushaltsabfall; geben Sie sie bei separaten
Sammelstellen ab. Wenden Sie sich an die örtliche
Kommunalverwaltung, um Informationen über
die verfügbaren Sammelstellen einzuholen. Wenn
Elektrogeräte in Mülldeponien entsorgt werden,
können Gefahrstoffe in das Grundwasser und somit
in die Nahrungskette gelangen und Ihre Gesundheit
und Ihr Wohlbefinden beeinträchtigen. Wenn Sie neue
Elektrogeräte kaufen, sind die Einzelhändler gesetzlich
verpflichtet, Ihre Altgeräte kostenlos zur Entsorgung
anzunehmen.
• Keine beschädigten oder modifizierten Akkus oder Geräte
verwenden. Beschädigte oder modifizierte Akkus können zu
unvorhersehbarem Verhalten mit der Gefahr von Bränden,
Explosionen oder Verletzungen führen.
• Akkus oder Gerät nicht Feuer oder übermäßigen
Temperaturen aussetzen. Die Einwirkung von Feuer oder
Konformitätserklärung
Dieses Produkt entspricht den EU-Bestimmungen zur Störfestigkeit. Anker Innovations
Limited erklärt hiermit, dass dieses funktechnische Gerät des Typs T2190 der Richtlinie
2014/53/EU entspricht. Der vollständige Text der EU-Konformitätserklärung ist online
unter der folgenden Adresse verfügbar: https://www.eufylife.com/.
Max. Ausgangsleistung: 18 dBm
Frequenzband: 2,4 G (2,4000 – 2,4835 GHz)
Temperaturen über 130°C kann zu Explosionen führen.
4746
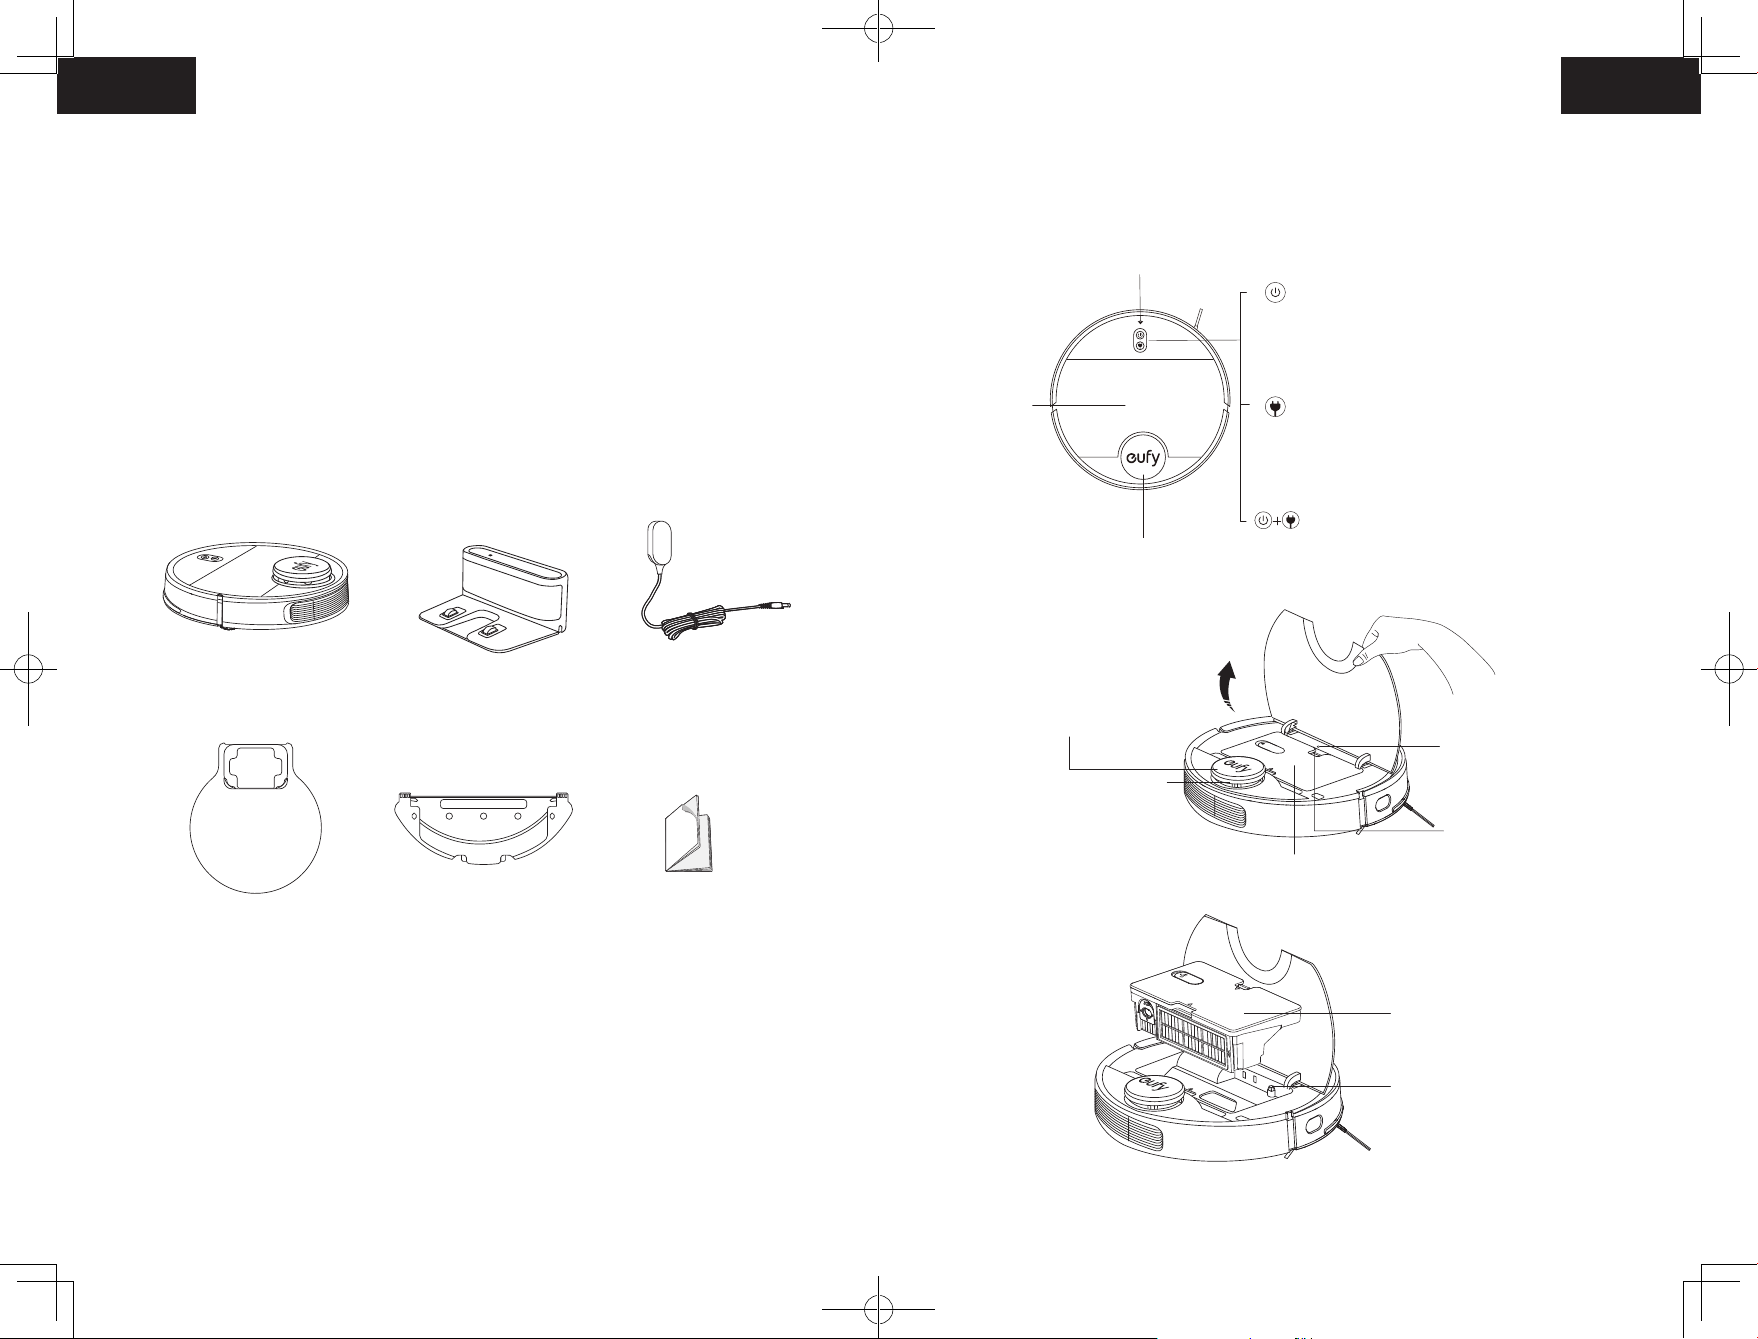
Markenhinweis
• Amazon, Echo, Alexa und alle zugehörigen Logos sind Marken von Amazon.com, Inc.
oder seinen Tochtergesellschaften.
• Apple und das Apple-Logo sind Marken von Apple Inc., die in den USA und anderen
Ländern eingetragen sind. App Store ist eine Dienstleistungsmarke von Apple Inc., die in
den USA und anderen Ländern eingetragen ist.
• Google Play und das Google Play-Logo sind Marken von Google Inc.
• Google Home ist eine Marke von Google Inc.
Über Ihren RoboVac
Im Lieferumfang
Aufbau des RoboVac
A. Oberseite
WLAN-Statusleuchte
Obere
Abdeckung
Laser-Entfernungssensor (LDS)
• 3 Sekunden lang gedrückt halten, um das Gerät
ein- und auszuschalten (außer im Ladestatus)
• Drücken, um die automatische Reinigung zu
starten
• Drücken, um die aktuelle Aufgabe während
der Arbeit anzuhalten.
• Drücken, um die RoboVac zur Ladestation
zurückzusenden; erneut drücken, um die
Reinigung zu unterbrechen
• 3 Sekunden lang gedrückt halten, um die
Fleckenreinigung zu aktivieren
• Taste 3 Sekunden lang gedrückt halten, um die
WLAN-Verbindung zurückzusetzen
RoboVac
Wasserdichte
Unterlage
Ladestation
Wischmodul
(mit waschbarem Wischtuch)
Netzteil
Gebrauchsanweisung
und andere Unterlagen
LDS-Abdeckung (mit
Stoßfängersensor)
Taste System
zurücksetzen
Laser-Entfernungssensor (LDS)
Entriegelungstaste
Staubbehälter und Wassertank
Staubbehälter und Wassertank
Wasserpumpen-Komponente
4948
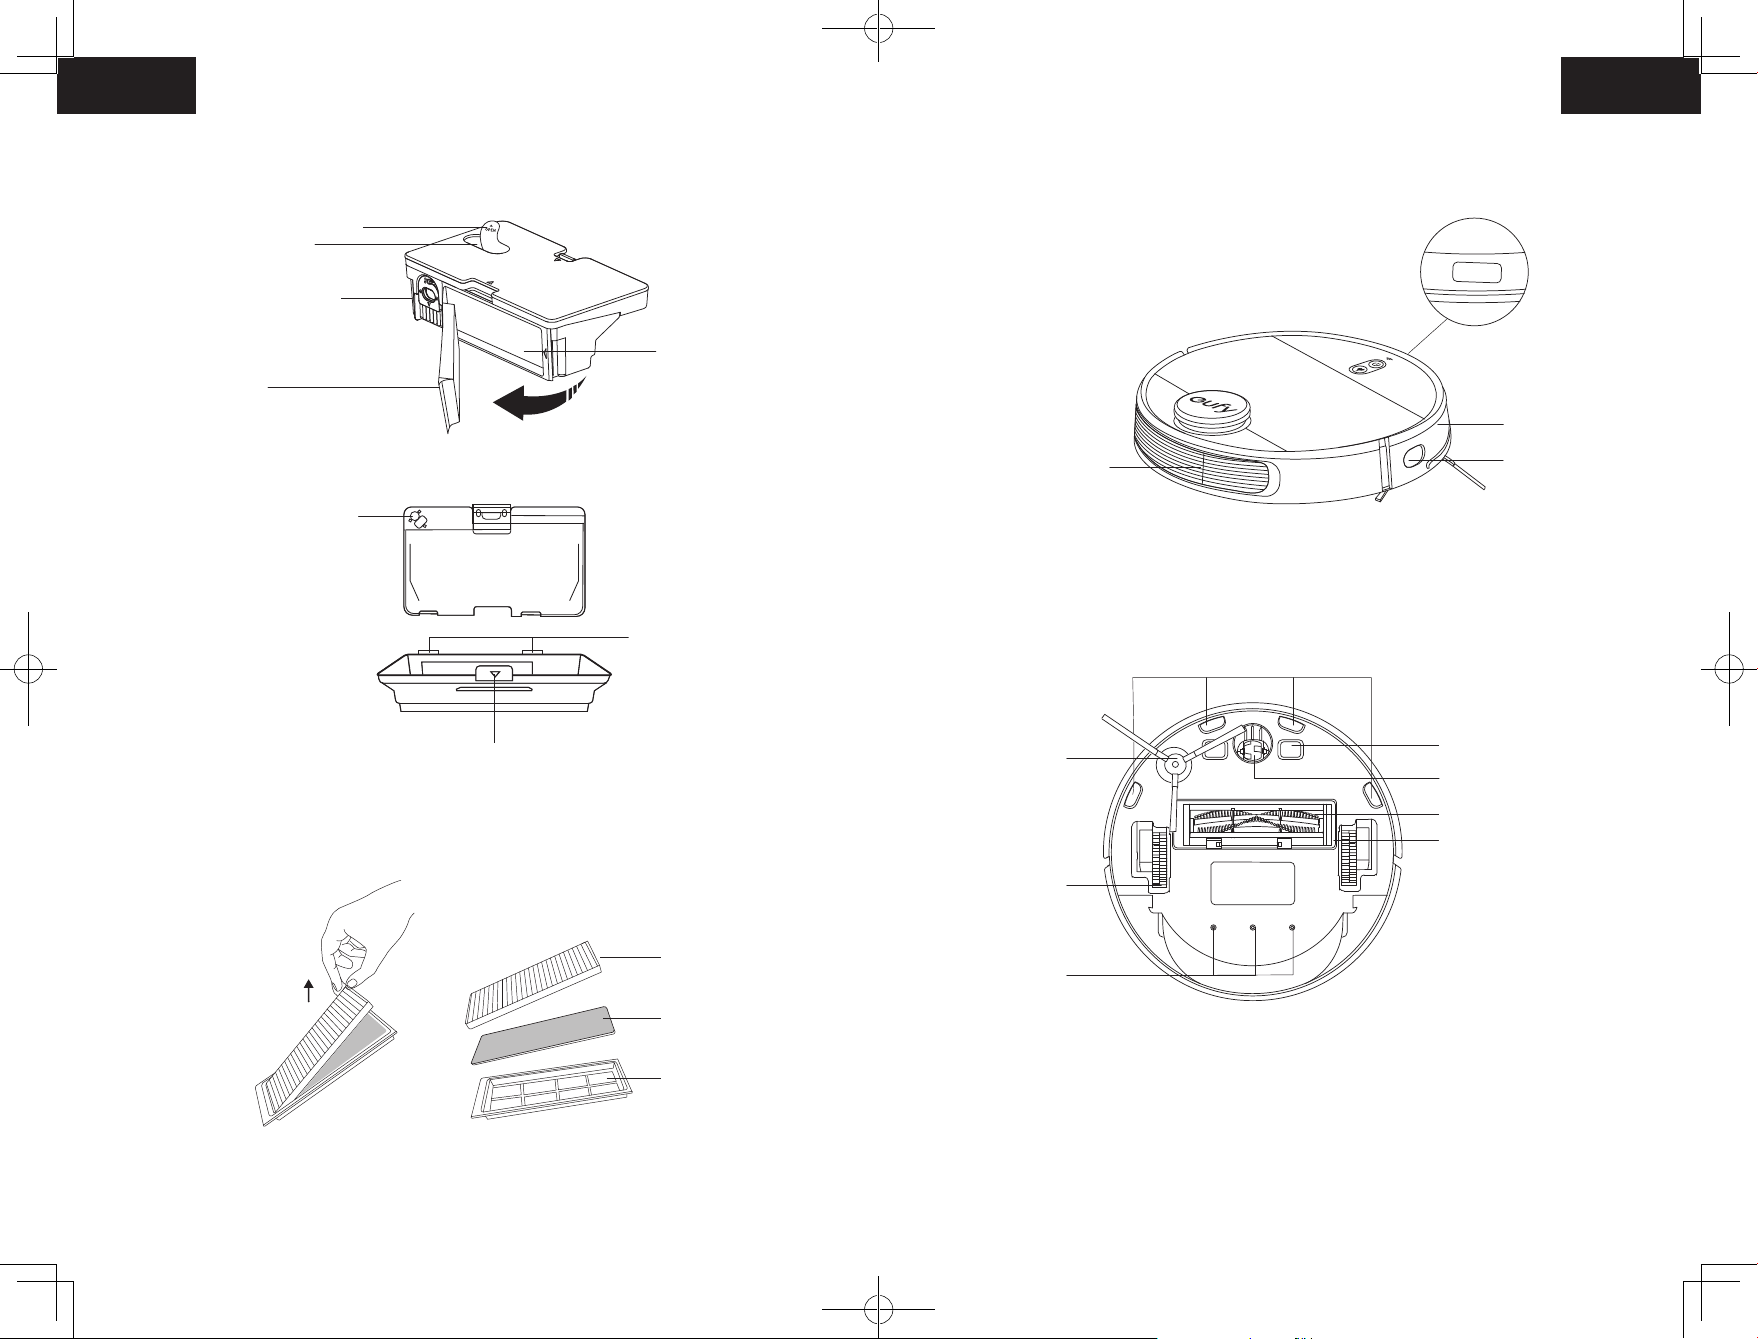
B. Staubbehälter und Wassertank
Abdeckung des Wasserzulaufs
Wassereinlass
Reinigungsbürste
C. Seite
Filter
Wasserpumpenstecker
Taste zum Trennen von Staubbehälter und Wassertank
Auslass für
Staubentsorgung
Bügel
Belüftungsbohrungen
D. Unterseite
Seitenbürste
Räder
Vorderer Infrarotsensor
Stoßfänger
Wandsensor
Sturzsensoren
Ladekontaktstifte
Schwenkrad
Rollbürste
Bürstenschutz
Hochleistungsfilter
Schaumstofilter
Vorfilter
Wasserauslass
5150
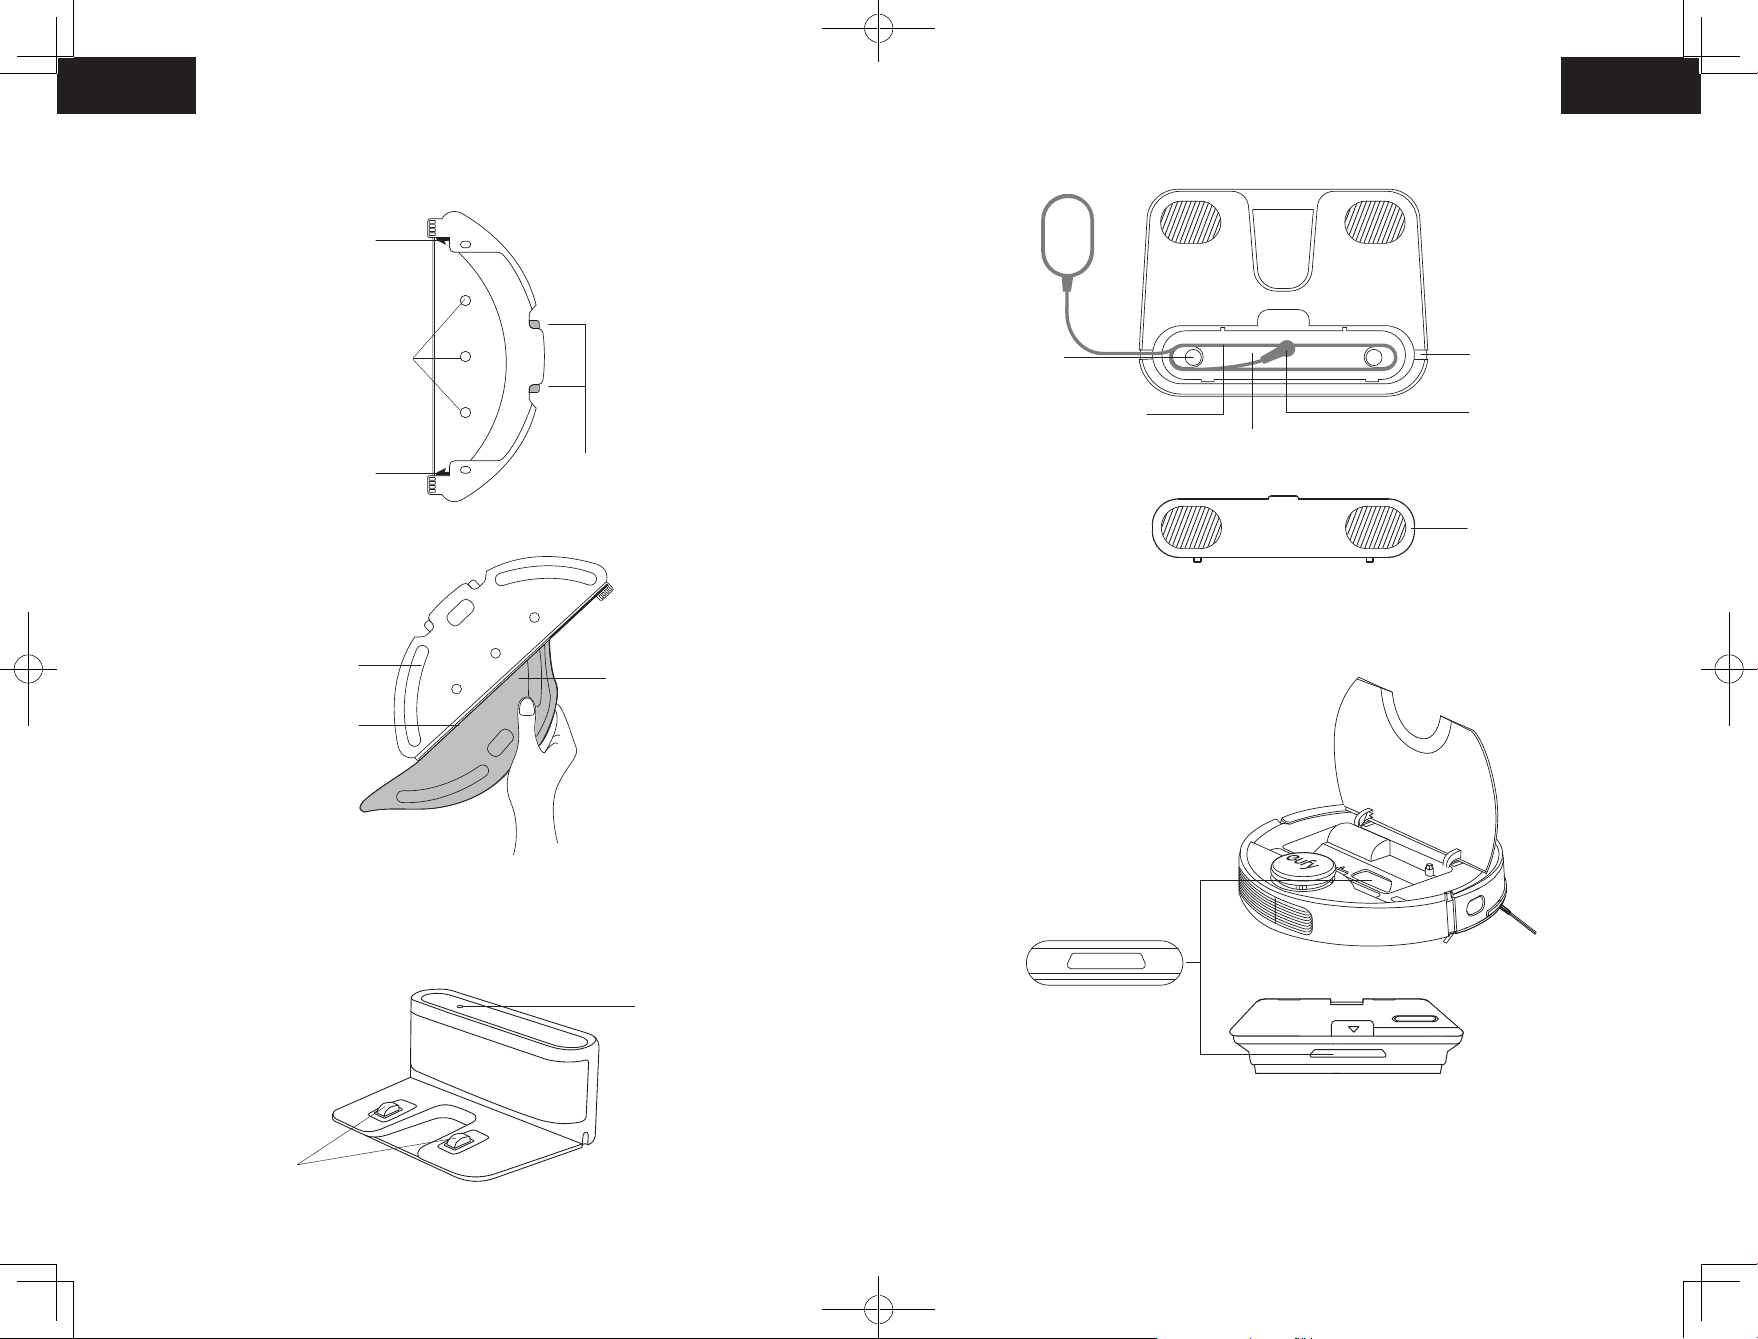
E. Wischmodul
Bügel
Innenansicht
Bereich zur Tuchbefestigung
F. Ladestation
Wasserauslass
Bügel
Schlitz
Entriegelungstasten
Waschbares Wischtuch
Kabelfach
Stromkabel
G. Ansaugeinlass
Kabelausgang
Steckdose
Aufbewahrungsfach für Netzkabel
Abdeckung
Außenansicht
Ladekontaktstifte
Statusleuchte
Ansaugeinlass
5352
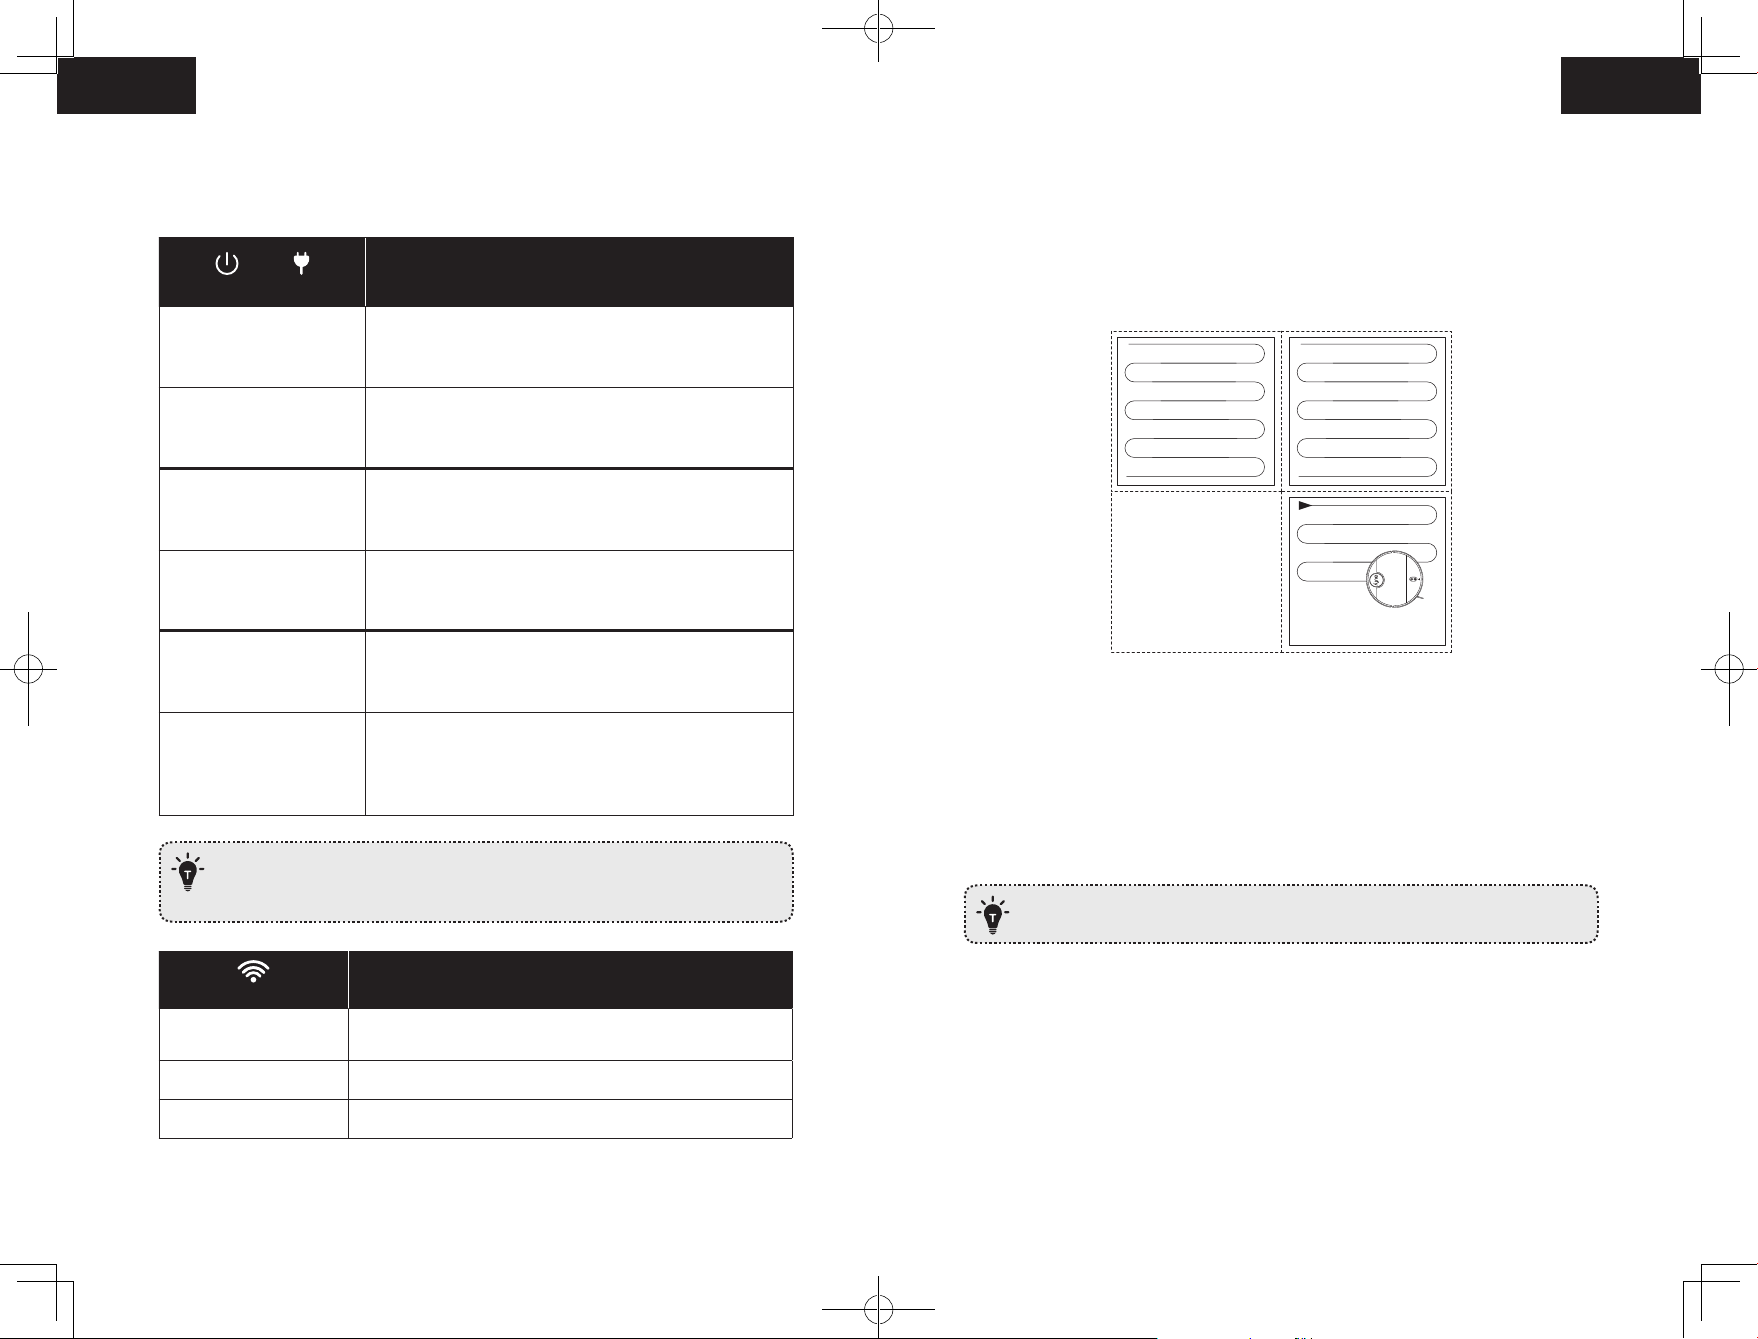
LED-Anzeige
Kartennavigation und -verwaltung
Der Status des RoboVac kann an den LEDs abgelesen werden.
und
(Betriebs-Statusleuchten)
Leuchtet blau
Leuchtet violett • Niedriger Akkustand und Rückkehr zur Ladestation
Leuchtet/verlischt langsam
in Blau
Leuchtet/verlischt langsam
in violett
Blinkt 3 Mal blau • Statusanzeige (zusammen mit Sprachausgabe)
Blinkt rot
Wenn der RoboVac inaktiv ist und sich 10 Minuten lang nicht an der Ladestation
befindet, schaltet er automatisch in den Standby-Modus und das Licht wird
abgedunkelt, um Strom zu sparen.
• Standby / Reinigung (außerhalb der Ladestation)
• Vollständig aufgeladen
• Ladevorgang (Ladestand ≥ 20%)
• System wird geladen
• Ladevorgang (Ladestand < 20%)
• Fehleranzeige (zusammen mit Sprachausgabe)
Informationen zur weiteren Vorgehensweise finden Sie
im Abschnitt „Fehlerbehebung > Sprachalarm“ dieser
Gebrauchsanweisung.
Status
Navigation
Sobald die automatische Reinigung beginnt, bewegt sich RoboVac von der Ladestation
weg, scannt automatisch, um Karten zu erstellen, bestimmt intelligent den Reinigungsweg
und teilt den Raum in Zonen ein. Die Reinigungswege werden in einer bogenförmigen
Bewegung entlang der Wände geplant, um die Reinigung jeder Zone einzeln abzuschließen.
Echtzeit-Kartierung und Grundriss
Die Echtzeit-Kartierung hilft dabei, den Reinigungsweg und die Umgebung einfach zu
lernen. Nach der Reinigung wird ein Grundriss erstellt. Die Karte wird bei jeder Reinigung in
Echtzeit aktualisiert, um eine normale Navigation zu gewährleisten.
So erstellen Sie einen kompletten Grundriss:
1. Öffnen Sie Ihre Türen für RoboVac, um jeden Raum zu kartieren;
2. entfernen Sie alle Gegenstände, die im Weg sein oder den RoboVac blockieren könnten.
Entfernen Sie die Ladestation nicht, nachdem ein Grundriss erstellt wurde.
(WLAN-Statusleuchte)
Blinkt langsam blau
Blinkt schnell blau Verbindung zum Router wird hergestellt
Leuchtet blau Verbindung zum Router hergestellt
Warten auf Verbindung (Der RoboVac kann im StandbyModus keine Verbindung mit dem Wi-Fi-Netzwerk herstellen.)
Status
Neupositionierung und Neukartierung
Bei Änderungen der Position von RoboVac / Ladestation oder bei erheblichen Änderungen der
Umgebung versucht RoboVac, sich neu zu positionieren und die Umgebung neu zu kartieren.
• RoboVac setzt die Reinigung fort, wenn die Neupositionierung erfolgreich war.
• Wenn die Neupositionierung fehlschlägt, kartiert der RoboVac die Flächen bei einer
neuen Reinigung neu, um eine normale Navigation zu gewährleisten.
• Wenn die ursprüngliche Karte virtuelle Grenzen enthält, startet RoboVac keine neue
Reinigung, um zu vermeiden, dass das Gerät in gesperrte Bereich fährt.
5554
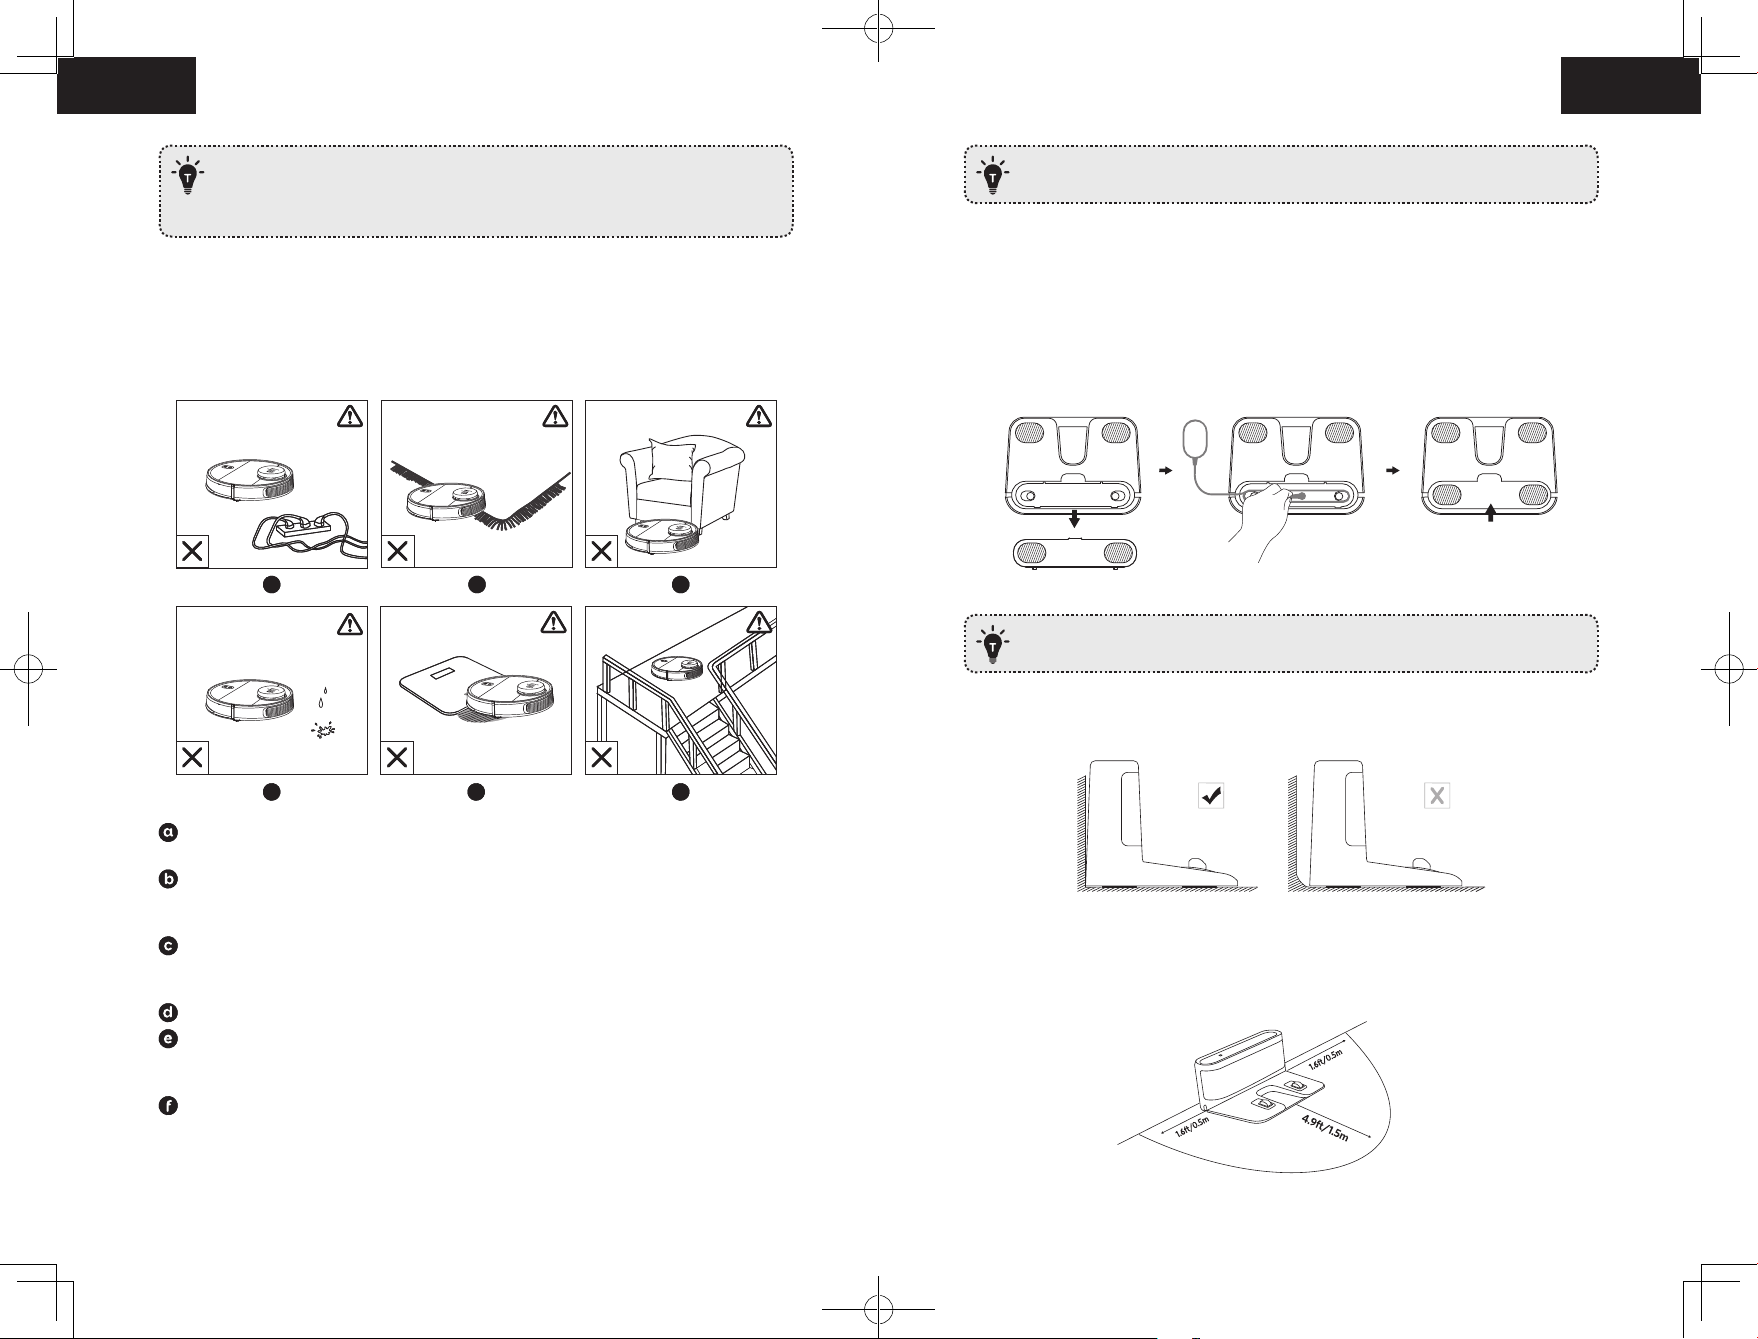
• Stellen Sie sicher, dass RoboVac jede Reinigung von der Ladestation aus startet.
• Bewegen Sie das Gerät während der Reinigung nicht häufig. Wenn Sie den
RoboVac bewegen, stellen Sie ihn wieder in die ursprüngliche Position zurück.
Legen Sie physische Barrieren vor Kamine und Bereiche, die zu Schäden am
RoboVac führen könnten.
Vorbereitung
Erste Schritte
Wichtige Tipps vor der Verwendung
a
a
d
d
Entfernen Sie Netzkabel und kleine Gegenstände, in denen der RoboVac sich verfangen
könnte, vom Fußboden.
Falten Sie Teppichfransen unter den Teppichrand, damit der RoboVac sich nicht in ihnen
verfängt. Vermeiden Sie sehr dunkle Teppiche, hochflorige Teppiche oder Teppiche von
mehr als 26 mm Dicke, denn sie können zu Fehlfunktionen des RoboVac führen.
Sorgen Sie für ausreichenden Abstand des RoboVac von Bereichen mit weniger als
106 mm Höhe, damit RoboVac sich nicht einklemmt. Sperren Sie derartige potenzielle
Problembereiche ggf. mit einer physischen Barriere ab.
Halten Sie den RoboVac während der Reinigung von feuchten Bereichen fern.
Der RoboVac kann auf Objekte bis zu einer Höhe von 17 mm klettern. (Die Höhe
verringert sich, wenn das Wischmodul installiert ist.) Entfernen Sie derartige Objekte,
sofern möglich.
Sturzsensoren können in den meisten Fällen verhindern, dass der RoboVac Treppen
und steile Stufen hinunterfällt. Sensoren können bei Verschmutzung oder stark
reflektierenden/sehr dunklen Bodenbeläge weniger effektiv sein. Wir empfehlen,
physische Barrieren zum Absperren von Bereichen zu verwenden, in denen der
RoboVac hinunterfallen könnte.
b
b
e
e
c
c
f
f
1. Entfernen Sie vor Gebrauch die Schaumstoffblöcke neben dem Stoßfänger.
2. Verbinden Sie das Netzteil mit der Ladestation und legen Sie das überschüssige Kabel in
das Fach wie abgebildet.
Überschüssiges Kabel am Boden kann vom Hauptgerät herausgezogen werden
und so eine Unterbrechung des Ladevorgangs verursachen.
3. Stellen Sie die Ladestation auf eine ebene Fläche an eine Wand.
4. Entfernen Sie alle Objekte innerhalb eines Umkreises von 0,5 m links und rechts neben
und 1,5 m vor der Ladestation vom Boden. Wenn Sie die Objekte nicht entfernen können,
überprüfen Sie, ob der RoboVac normal zur Ladestation zurückkehren kann – wenn nicht,
kontaktieren Sie den eufy-Kundenservice, um Hilfe zu erhalten.
5756
Loading…
Table of Contents
- User Manual
- Eufy RoboVac L70 Hybrid Robot Vacuum Cleaner
- Important Safety Instructions
- About Your RoboVac
- Get Started
- Using Your RoboVac
- Cleaning and Maintenance
- Troubleshooting
- Specifications
- Customer Service
- Read User Manual Online (PDF format)
- Download This Manual (PDF format)
User Manual
Eufy RoboVac L70 Hybrid Robot Vacuum Cleaner
For FAQs and more information, please visit:
www.eufylife.com
Thank you for purchasing RoboVac. Carefully read all instructions before using
this product, and keep this manual for future reference.
Important Safety Instructions
To reduce the risk of injury or damage, read these safety instructions
carefully and keep them at hand when setting up, using, and maintaining this
device.
WARNING SYMBOLS USED
This is the safety alert symbol. This symbol alerts you to potential hazards
that could result in property damage and/or serious bodily harm or death.
-
This device can be used by children aged from 8 years and above and persons with reduced physical, sensory or mental capabilities or lack of experience and knowledge if they have been given supervision or instruction concerning use of this device in a safe way and understand the hazards involved.
-
Children should be supervised to ensure they do not play with this device.
-
Cleaning and maintenance shall not be performed by children without adult supervision.
-
This device is only to be used with the power supply unit provided.
-
Before cleaning or maintaining this device, the plug must be removed from the socket outlet.
-
The battery in this device should only be replaced by a skilled professional.
-
When removing the battery, disconnect the device from the supply mains.
-
For the purposes of recharging the battery, only use the detachable power supply unit provided with this device.
-
The battery must be removed before this device is disposed of. To remove the battery, first unscrew the screws on the bottom, then remove the back cover. Remove the battery by disconnecting the quick connector.
-
The used battery should be placed in a sealed plastic bag and disposed of safely according to local environmental regulations.
-
The external flexible cable or cord of the power supply unit cannot be replaced; if the cord is damaged, the power supply unit shall be disposed of.
-
This device is for indoor use only.
-
This device is not a toy. Do not sit or stand on this device. Small children and pets should be supervised when this device is operating.
-
Store and operate this device in room temperature environments only.
-
Clean with a cloth dampened with water only.
-
Do not use this device to pick up anything that is burning or smoking.
-
Do not use this device to clean up spills of bleach, paint, chemicals, or anything wet.
-
Before using this device, pick up objects like clothing and loose paper. Lift up cords for blinds or curtains, and move power cords and fragile objects out of the way. If this device
passes over a power cord and drags it, an object could be pulled off a table
or shelf. -
If the room to be cleaned has a balcony, a physical barrier should be used to prevent access to the balcony and to ensure safe operation.
-
Do not place anything on top of this device.
-
Be aware that this device moves around on its own. Take care when walking in the area where this device is operating to avoid stepping on it.
-
Do not operate this device in areas with exposed electrical outlets on the floor.
-
Do not expose the electronics of this device, its battery, or the integrated Charging Base. There are no user-serviceable parts inside.
-
Do not use this device on an unfinished, unsealed, waxed or rough floor. It may result in damage to the floor and this device. Use only on hard floor surfaces or low-pile carpet.
-
Do not use the mopping module on carpets.
-
This device has been designed to be used on floors without scratching them. We still recommend that you test this device on a small area of the room to be cleaned to ensure no scratches are made before cleaning the whole room.
-
Only use attachments recommended or described in this manual.
-
Do not handle the appliance or plug with wet hands.
-
Ensure that the dust bag and/or filters are correctly in-place before usage.
-
Do not use a battery pack or appliance that is damaged or modified. Damaged or modified batteries may exhibit unpredictable behavior resulting in fire, explosion or risk of injury.
-
Do not expose the battery pack or appliance to fire or excessive temperature. Exposure to fire or temperature above 130°C may cause explosion.
-
Do not modify or attempt to repair the appliance or the battery pack (as applicable), except as indicated in the instructions for use and care.
-
Follow all charging instructions and do not charge the battery pack or appliance outside of the temperature range specified in the instructions. Charging improperly or at temperatures outside of the specified range may damage the battery and increase the risk of fire.
-
The laser distance sensor of this device meets the standards for Class I Laser Products in IEC 60825-1:2014 and will not generate hazardous laser radiation.
Notice
This
symbol on the device or its packaging indicates: Do not dispose of electrical
appliances as unsorted municipal waste; use separate collection facilities.
Contact your local authority for information regarding the collection systems
available. If electrical appliances are disposed of in landfills or dumps,
hazardous substances can leak into the groundwater and get into the food
chain, damaging your health and well-being.
When replacing old appliances with new ones, the retailer is legally obliged
to take back your old appliance for disposal at least free of charge.
FCC Statement
This device complies with Part 15 of the FCC Rules. Operation is subject to
the following two
conditions:
- This device may not cause harmful interference, and
- This device must accept any interference received, including interference that may cause undesired operation.
Warning: Changes or modifications not expressly approved by the party
responsible for compliance could void the user’s authority to operate the
equipment.
Note: This equipment has been tested and found to comply with the limits
for a Class B digital device, pursuant to Part 15 of the FCC Rules. These
limits are designed to provide reasonable protection against harmful
interference in a residential installation.
This equipment generates, uses, and can radiate radio frequency energy and, if
not installed and used in accordance with the instructions, may cause harmful
interference to radio communications.
However, there is no guarantee that interference will not occur in a
particular installation. If this equipment does cause harmful interference to
radio or television reception, which can be determined by turning the
equipment off and on, the user is encouraged to try to correct the
interference by one or more of the following measures:
- Reorient or relocate the receiving antenna.
- Increase the separation between the equipment and receiver.
- Connect the equipment into an outlet on a circuit different from that to which the receiver is connected.
- Consult the dealer or an experienced radio / TV technician for help.
The FCC 15.19 statement can be found on the back of the top panel.
RF Exposure Compliance Statement
This equipment complies with FCC/IC radiation exposure limits set forth for an
uncontrolled environment. This equipment should be installed and operated with
minimum distance 20cm between the radiator and your body.
ISED Compliance Statement
This device contains licence-exempt transmitter(s)/receiver(s) that comply
with Innovation, Science and Economic Development Canada’s licence-exempt
RSS(s).
Operation is subject to the following two conditions:
- This device may not cause interference.
- This device must accept any interference, including interference that may cause undesired operation of the device.
Declaration of Conformity
This product complies with the radio interference requirements of the European
Community. Hereby, Anker Innovations Limited declares that the radio equipment
type T2190 is in compliance with Directive 2014/53/EU. The full text of the EU
declaration of conformity is available at the following internet address:
https://www.eufylife.com/.
Maximum output power: 18 dBm (For EU)
Frequency band: 2.4G band (2.4000GHz – 2.4835GHz)
Trademark Notice
- Amazon, Echo, Alexa and all related logos are trademarks of Amazon.com, Inc. or its affiliates.
- Apple and the Apple logo are trademarks of Apple Inc., registered in the U.S. and other countries. App Store is a service mark of Apple Inc., registered in the U.S. and other countries.
- Google Play and the Google Play logo are trademarks of Google Inc.
- Google Home is a trademark of Google Inc.
About Your RoboVac
What’s in the Box
RoboVac Anatomy
A. Top
B. Dust collector & Water tank
C. Side
D. Bottom
E. Mopping module
F. Charging Base
External view
Internal view
G. Suction Inlet
LED Indication
You can see the status of RoboVac from the LED indicators.
When RoboVac is inactive and not on the Charging Base for 10 minutes, it
automatically switches to sleep mode and the light becomes dim to conserve
power.
Map Navigation and Management
Navigation
Once Auto cleaning starts, RoboVac moves from the Charging Base, automatically
scans to generate maps, intelligently determines its cleaning route, and
divides the space into zones. The cleaning paths are planned along the walls,
following a bow-shaped cleaning method to complete the cleaning of each zone
one by one.
Real-time Mapping & Floor plan
Real-time mapping helps you know the cleaning path and environment easily. A
floor plan will be built after cleaning. The map will be updated real-time
during each cleaning to ensure normal navigation.
To create a complete floor plan:
- Open your doors for RoboVac to map each room;
- Remove any objects that may be in the way or get RoboVac stuck.
Do not remove the Charging Base after a floor plan is created.
Relocalization & Remapping
If the position of RoboVac / Charging Base is adjusted or the surroundings are
changed
significantly, RoboVac will try to relocalize and may remap to match the
surroundings.
-
RoboVac will resume cleaning if the relocalization is successful.
-
If the relocalization fails, RoboVac will remap to ensure normal navigation with a new
cleaning. -
If the original map has the virtual boundary information, RoboVac will not start a new cleaning to avoid going across the restricted zone.
-
Make sure RoboVac starts each cleaning from the Charging Base.
-
During cleaning, do not move the device frequently. If moved, place RoboVac back to the original position.
Get Started
Important Tips Before Use
-
a. Remove power cords and small objects from the floor that may entangle RoboVac.
-
b. Fold tasseled edges of area rugs underneath to prevent tangling RoboVac. Avoid cleaning very dark-colored high-pile rugs or rugs thicker than 1.02 in/26 mm as they may cause RoboVac to malfunction.
-
c. Keep RoboVac away from spaces lower than 4.17 in/106 mm to prevent RoboVac from
getting stuck. If necessary, place a physical barrier to block off the problem
areas. -
d. Keep RoboVac away from wet areas during cleaning.
-
e. RoboVac may climb on top of objects less than 0.67 in/17 mm in height (the height will
be reduced if the mopping module is installed). Remove these objects if
possible. -
f. Anti-drop sensors will prevent RoboVac from tumbling down stairs and steep drops in
most cases. Sensors are less effective if dirty or used on
carpeted/reflective/very darkcolored floors. It is recommended to place
physical barriers to block off areas where RoboVac may fall.
Place physical barriers in front of fireplaces and areas that may cause damage
to RoboVac if entered.
Preparation
- Remove the foam blocks beside the bumper before use.
- Connect the adapter to the Charging Base and put extra cable in the slot as illustrated.
Extra power cord on the ground may be pulled by the main unit to cause an
interruption of charging.
3. Place the Charging Base on a level surface and against a wall.
4. Remove objects within 1.6 ft/0.5 m of the left and right side and within
4.9 ft/1.5 m of the front of the Charging Base. If you cannot remove the
objects, check whether RoboVac can return to the Charging Base normally; if
not, contact eufy customer service for help.
5. Insert the Charging Base into the waterproof pad to keep the floor dry.
Make sure it is firmly installed. If mopping is not needed, you can skip this
step.
6. Connect the adapter to a wall outlet.
- Install the Charging Base in a location that RoboVac can easily access. It is recommended to place the Charging Base against a wall, and on a hard-level surface rather than on rugs or carpets.
- Always keep the Charging Base plugged in, otherwise RoboVac will not automatically return to it.
- To ensure proper charging, do not frequently move the Charging Base. When its location is changed, RoboVac may remap due to failure in relocalization (see About Your RoboVac > Map Navigation and Management for details).
Charge Your RoboVac
- RoboVac has a pre-installed rechargeable battery that has to be fully charged before use.
- RoboVac will return to the Charging Base at the end of a cleaning cycle or when its battery is running low.
Method 1: Attach RoboVac to the Charging Base by aligning its charging
pins with the charging pins on the base.
Method 2: Press on the main unit to send RoboVac to the Charging Base.
- To preserve the battery’s lifespan, recharge at least once every 6 months.
- To enter Reduced Power Standby mode when RoboVac is being charged, press and hold & simultaneously on RoboVac for 20 seconds until the Power Status Lights turn off. Wi-Fi is disabled while this mode is active. Press to exit Reduced Power Standby mode.
Auto Recharge and Resume
RoboVac returns to the Charging Base automatically to recharge when:
- RoboVac has finished cleaning;
- Cleaning is not complete and the battery level becomes low; Once recharged to 80% battery capacity, RoboVac will resume to finish the remaining cleaning.
Do not move the Charging Base during cleaning, otherwise RoboVac may fail to
return for recharge. If failed, you have to manually attach it to the Charging
Base.
Using Your RoboVac
Turn on / off
- RoboVac turns on automatically when attached to the Charging Base and connected to power.
- When RoboVac is not on the Charging Base, press and hold for 3 seconds to turn on the main unit. Wait until the Power Status Light turns solid blue.
- When RoboVac is not on the Charging Base, press and hold for 3 seconds again to turn off the main unit.
Switch to Sleep Mode
- When inactive and not on the Charging Base for 10 minutes, RoboVac automatically stops cleaning and switches to sleep mode. In sleep mode, press any button to wake it up.
Start cleaning
RoboVac cannot start cleaning if the battery level is less than 20%. In this
case, recharge RoboVac first before cleaning.
-
Press to start cleaning in Auto Mode.
RoboVac moves around to scan the environment and build the map automatically. -
Press again to pause cleaning.
Press to resume cleaning.
When cleaning is paused, docking the main unit onto the Charging Base will
stop the
cleaning.
If cleaning is paused for 10 minutes, RoboVac automatically stops cleaning and
switches to sleep mode. -
Press to stop current cleaning and return to the Charging Base.
- Before cleaning, sort out cables and cords to avoid power interruption or any damaging caused by pulling the cord during cleaning.
- In Auto cleaning mode, RoboVac will clean twice by default if the cleaning time is less than 10 minutes.
Use Your RoboVac with the EufyHome App
To fully enjoy all the available features, it is recommended to control your
RoboVac via the EufyHome app.
Before you start, make sure that:
- Your smartphone or tablet is connected to a Wi-Fi network.
- Your smartphone or tablet is running iOS 8.0 (or above) or Android 4.4 (or above).
- The 2.4GHz band wireless signal is enabled on your wireless router.
- The Wi-Fi status light on RoboVac is slowly flashing blue.
- RoboVac is attached to the Charging Base to ensure it has enough power during setup.
-
Download the EufyHome app from the App Store (iOS devices) or Google Play (Android
devices). -
Open the app and create a user account.
-
Tap the “+” icon to add RoboVac to your EufyHome account.
-
Follow the instructions in the app to set up the Wi-Fi connection.
After connecting successfully, you can control RoboVac via the app.
With the app, you can select cleaning at your desired suction level, schedule
cleaning,
view the cleaning map, set up “No-Mop” or “No-Go” zones, check the network
connection status, and access additional features.
Wi-Fi Status Light
- If you have any problems during the Wi-Fi setup process, refer to the “ Troubleshooting > Wi-Fi connection” section in this Manual.
- If RoboVac gets stuck in any space, tap Find My Robot in the app to find the machine. This function is available in the app only.
Reset the Wi-Fi Connection
Press and hold and simultaneously for 3 seconds to reset the Wi-Fi connection
if necessary.
You will hear a voice prompt when the Wi-Fi connection has been reset, and the
Wi-Fi status light will slowly flash blue. Now you can follow the Wi-Fi
instructions in the eufyHome app to set up the Wi-Fi connection.
Schedule Cleaning
With the EufyHome app, you can schedule RoboVac to start cleaning at a
particular time.
You can set the time and customize the cleaning schedules from Sunday to
Saturday on the EufyHome app. This function is available in the app only.
Select a Cleaning Mode
You can press at any time to pause the current cleaning cycle.
- Auto cleaning
- Press to start cleaning in Auto Mode.
- Press again to pause cleaning.
By default, RoboVac starts in Auto cleaning mode when it is turned on.
2. Spot cleaning
RoboVac intensively cleans a specific area with a size of 4.9 ft x 4.9 ft /
1.5 m x 1.5 m. Useful if there is a concentrated area of dust or debris. When
the cleaning of a certain zone is finished, it automatically returns to the
Charging Base.
- Press and hold for 3 seconds to start Spot cleaning.
3. Zone cleaning (available via the app only)
In this mode, set up a cleaning zone in the EufyHome app. RoboVac will clean
this zone
only and return to the Charging Base after cleaning.
- Start Zone cleaning only after RoboVac has created the map.
- It is recommended that RoboVac moves from the Charging Base to start Zone
cleaning.
4. Manual-controlled cleaning (available via the app only)
You can direct RoboVac to clean a particular area by using manual controls in
the EufyHome app.
5. Select a Suction Power Level
In the EufyHome app, select a suction power level according to your needs:
- Quiet
- Standard (Default)
- Turbo
- Max
You can select the “Mop-Only” suction level in mopping mode. When mopping is
finished, RoboVac will change to default suction level automatically.
6. Select BoostIQ™ feature
In the EufyHome app, select the BoostIQ™ feature according to your needs.
RoboVac will automatically increase the suction power if it detects that
stronger power is needed to ensure the best clean. BoostIQ™ is ideal for
cleaning thicker carpets and hard-to-sweep messes, which will reduce the total
cleaning time, but increase the noise level. If the vacuuming noise caused by
BoostIQ™ disturbs you, you can disable this feature.
Use Mopping System
- The mopping mode is only intended for a clean floor without stubborn stains or liquids. To avoid staining floors, do not use the mopping function when dust is mixed with liquids such as coffee or ink.
- Mopping System cleans best on smooth hard surfaces and may not perform so well on uneven tiles, heavily waxed floors or rough surfaces like slate or brick, which may snag the cleaning pad.
- The mopping mode is not recommended when no one is at home.
- Do not use the mopping mode on a carpeted floor. It is recommended to set a “No-Mop” zone in the EufyHome app to avoid cleaning the carpeted area.
1. Take out the water tank and put it back into the main unit after
filling the water.
- Do not use any other cleaning solution other than water. Cleaning solutions, even natural ones, can clog the water release system and break down the materials inside the device.
- To add water into the water tank or install the mopping module, pause the cleaning first. Do not manually move the device.
2. Wet the mopping cloth and wring it until it does not drip. Insert the
cloth along the bracket slot and stick it firmly.
3. Install the mopping module into the bottom of RoboVac until a click is
heard.
When the mopping module is inserted, RoboVac automatically switches to the
mopping mode.
4. Select a cleaning mode to start cleaning.
- RoboVac automatically sweeps and mops in the selected mode.
- If you want RoboVac to mop without vacuuming, select “Mop-Only” mode in the EufyHome app.
- You can also select the mopping water level (3 levels) in the app according to your needs.
To achieve a better mopping effect, it is recommended to clean the floor with
RoboVac three times before installing the mopping module.
5. When RoboVac finishes working and returns to the Charging Base, hold the
two buckles
by hand, drag backward and remove the mopping module.
When the mopping module is removed, the system automatically exits mopping
mode without water release.
- Although water release is stopped when cleaning is paused, the mopping cloth will still be wet. Be careful not to keep RoboVac in one location for too long, as the excessive moisture caused by the cloth can damage the floor.
- To avoid damaging wooden floors, make sure the Charging Base is attached to the waterproof pad.
6. Empty any remaining water from the water tank. Clean the mopping cloth to
avoid it
being mildewed and producing unpleasant smell.
- It is recommended to clean the mopping cloth after mopping each time.
- Remove the mopping module when RoboVac is under charging or not in use.
Use Your RoboVac with Amazon Alexa / the Google Assistant
Amazon Alexa or the Google Assistant is a smart voice control device that
enables you to
control RoboVac with your voice.
Before you start, make sure that:
- RoboVac is attached to the Charging Base to ensure there is enough power.
- RoboVac is connected with the EufyHome app.
- You have an Alexa-enabled device (i.e. Amazon Echo, Echo Dot and Amazon Tap, Echo Show, Echo Spot) or a device enabled with the Google Assistant (i.e. Google Home, Google Home Mini). These devices are sold separately.
- The Amazon Alexa app or Google Home app is already installed on your smart device, and you have created an account.
To control RoboVac with Amazon Alexa or the Google Assistant
- Open the EufyHome app and tap “Smart integrations” in the top left.
- Follow the on-screen instructions to complete the setup.
Currently this feature only supports English, German, French, and Spanish.
You can check regularly if more languages are supported at
https://www.eufylife.com/support/.
Set Up Physical / Virtual Barriers
Boundary Strips (Sold Separately)
Physical barriers including boundary strips can keep RoboVac away from
cleaning certain areas. RoboVac will recognize the barriers and will not cross
into the blocked-off area.
- Identify the area or item you do not want RoboVac to get close to.
- Place the boundary strips FLAT on the floor or under an area rug.
- Make sure the boundary strips are placed on the same surface plane RoboVac is used on.
- If the boundary strips are rolled up, remove and then re-apply on the floor with adhesive tape. Otherwise the boundary strips may not work well.
Virtual Boundary (Available on the App Only)
In the EufyHome app, you can set up a “No-Go Zone” or “No-Mop Zone” as a
restricted
area. This eliminates the need to use physical barriers, including Boundary
Strips. This
feature is designed for dividing the cleaning zones, not for isolating
hazardous areas.
-
No-Go Zone: RoboVac will not enter the zone to vacuum or mop.
-
No-Mop Zone: RoboVac will not enter the zone to mop, while vacuuming is still allowed.
-
To set a virtual boundary, RoboVac must initially perform a cleaning run to create a floor plan.
-
To clean your home with virtual boundary, ensure that RoboVac is on the Charging Base and that the Base has not been manually moved during cleaning.
-
Although a virtual boundary is set, RoboVac may still enter the restricted zone due to such reasons as relocalization, wrong positioning or abnormal sensors.
-
Moving the device or changing the environment may cause mapping failed and rebuilt with virtual boundary lost.
Reset the System
You can reset the system if there is no response when pressing any button on
RoboVac.
- Make sure RoboVac is not on the Charging Base.
- Use a clip to press the Reset button.
RoboVac will automatically turn off.
3. Dock RoboVac onto the Charging Base or press to turn it on.
The system is reset.
After resetting the system, RoboVac may lose its map and the original settings
including the virtual boundary.
Cleaning and Maintenance
Before cleaning and maintaining, turn off the device and unplug the adapter.
For optimal performance, follow the instructions below to clean and maintain
RoboVac regularly. The cleaning/replacement frequency will depend on your
usage habits of RoboVac.
Recommended cleaning/replacement frequency
Clean the Dust Collector and Water Tank
-
Open the top panel of RoboVac and press the release button to remove the dust collector
and water tank. -
Take out the filter assembly.
3. Take out the pre-filter, foam filter, and high-performance filter.
4. Clean the filters with a vacuum cleaner or a cleaning brush. You can also
wash the filters for deep cleaning.
5. Empty the dust collector. Tap the dust collector to get rid of any excess
dirt.
6. Press the dust collector release button to separate the dust collector
from the water tank.
7. Rinse the water tank, dust collector and filter assembly thoroughly with
water.
Do not use hot water, or any detergent to clean the filter assembly.
8. Air-dry the water tank, dust collector and filter assembly completely
before next use.
9. Replace the pre-filter, foam filter, and high-performance filter.
10. Put the filter assembly back into the dust collector.
11. Reinstall the dust collector with the water tank.
12. Push the assembly back into the main unit.
Clean the Rolling Brush
-
Pull on the release tabs to unlock the brush guard as shown.
-
Lift the rolling brush to remove.
-
Clean the rolling brush with a cleaning tool or a vacuum cleaner.
-
Reinstall the rolling brush by inserting the fixed protruding end first and then clicking into
place. -
Press down to snap the brush guard into place.
Clean the Side Brush
Foreign substances, such as hair, can easily get tangled in the side brush,
and dirt may adhere to it. Be sure to clean it regularly.
- Use a Phillips screwdriver to unscrew the screw.
- Carefully unwind and pull off any hair or string that is wrapped between the main unit and the side brush.
- Use a cloth dampened with warm water to remove dust from the brush or to gently reshape it.
Only use the side brush when it is completely dry.
Replace the Side Brush
The side brushes may become bent or damaged after being used for a period of
time. Follow the instructions below to replace it.
- Use a Phillips screwdriver to unscrew the screw on the side brush.
- Pull off the old side brush and snap the new one into place.
- Screw down the screw to fasten the side brush.
Clean the Sensors and Charging Pins
To maintain the best performance, clean the drop sensors and charging pins
regularly.
- Dust off the sensors and charging contact pins using a cloth or cleaning brush.
Clean the Swivel Wheel
Hair or dust particles can easily get entangled in the swivel wheel. Be sure
to clean the swivel wheel periodically and as needed.
2. Clean any hair or debris wrapped around the wheel or entangled inside the
wheel cavity.
3. Reinstall the wheel and push in until it clicks into place.
Do not clean the swivel wheel with water.
Clean the mopping module
It is recommended to clean the mopping cloth after each use.
- Remove the mopping cloth from the module.
- Clean the cloth with water and air-dry it completely to avoid being mildewed or producing unpleasant smell.
Troubleshooting
Voice Alert
When RoboVac encounters a problem, the red indicator on RoboVac will be
flashing and you will hear the relevant voice prompts. Follow the voice
prompts to solve the problems.
Wi-Fi Connection
Before Wi-Fi setup, make sure RoboVac and your Wi-Fi network meet the
following requirements.
Wi-Fi Setup Requirements
- RoboVac:
- RoboVac is fully charged and the main power switch on the bottom of RoboVac is turned on.
- Wi-Fi status light slowly flashes blue.
2. Wi-Fi Network:
- Use the correct password for your network.
- Do not use a VPN (Virtual Private Network) or Proxy Server.
- Your Wi-Fi router supports 802.11b/g/n and IPv4 protocol.
- You are using a 2.4GHz router or a dual-band router that is configured to support a 2.4GHz frequency band. RoboVac does not support 5GHz frequency band.
- If RoboVac cannot connect to the Wi-Fi network and you are using a 2.4/5GHz mixed network, switch to a 2.4GHz network for Wi-Fi setup. You can switch back once your setup is complete.
- When connecting to a hidden network, make sure you enter the correct network name, SSID (case sensitive), and connecting to a 2.4GHz wireless network.
- When using a network extender/repeater, make sure the network name (SSID) and password are the same as your primary network.
- The firewall and port settings of your Wi-Fi router allow RoboVac to connect with the Eufy servers.
Network Security Requirement
- WPA and WPA2 using TKIP, PSK, AES/CCMP encryption.
Wi-Fi Channels
- The FCC requires that all wireless devices in the United States operate on the 1-11 wireless spectrum channels.
- Some countries outside North America can use spectrum channels higher than channel 11. Refer to your local regulatory agency to determine which channels are accessible.
- A future software release will support access to channels above 11 for users outside
North America. Until then, use channels 1-11.
If you cannot control RoboVac with your smartphone, try the solutions below to
solve the
problem. If the problem persists, contact the eufy service center for help.
Specifications
Customer Service
For FAQs and more information, please visit
www.eufylife.com.
E-Mail: support@eufylife.com
Live-Chat: www.eufylife.com
Customer service hotline:
Anker Innovations Limited
Room 1318-19, Hollywood Plaza, 610 Nathan Road, Mongkok, Kowloon, Hong Kong
Read More About This Manual & Download PDF:
Eufy RoboVac L70 Hybrid Robot Vacuum Cleaner User Manual – Download
[optimized]
Eufy RoboVac L70 Hybrid Robot Vacuum Cleaner User Manual –
Download
Questions about your Manual? Post in the comments!
Read User Manual Online (PDF format)
Read User Manual Online (PDF format) >>
Download This Manual (PDF format)
Download this manual >>
FAQ: Types of Manuals and Their Contents
EUFY RoboVac L70 Hybrid Manuals come in various types, each serving a specific purpose to help users effectively operate and maintain their devices. Here are the common types of EUFY RoboVac L70 Hybrid User Guides and the information they typically include:
- User Manuals: Provide comprehensive instructions on how to use the device, including setup, features, and operation. They often include troubleshooting tips, safety information, and maintenance guidelines.
- Service Instructions: Designed for technicians and repair professionals, these manuals offer detailed information on diagnosing and repairing issues with the device. They include schematics, parts lists, and step-by-step repair procedures.
- Installation Guides: Focus on the installation process of the device, providing detailed instructions and diagrams for proper setup. They are essential for ensuring the device is installed correctly and safely.
- Maintenance Manuals: Provide guidance on routine maintenance tasks to keep the device in optimal condition. They cover cleaning procedures, part replacements, and regular servicing tips.
- Quick Start Guides: Offer a concise overview of the essential steps needed to get the device up and running quickly. They are ideal for users who need immediate assistance with basic setup and operation.
Each type of EUFY RoboVac L70 Hybrid instruction is designed to address specific needs, ensuring users have the necessary information to use, maintain, and repair their devices effectively.
Related Instructions for EUFY RoboVac L70 Hybrid:
1
RoboVac R500
80
992
199
3
T2520
Owner’s manual PDF User Manual (@RC1183), EUFY T2520 Vacuum Cleaner (07th Nov 2024)
20
917
211
4
RoboVac 11c
Owner’s manual RoboVac 11c (Robot vacuum cleaner for home ePDF User Guide, #N67VZX)
14
469
94
5
RoboVac 35C
Quick start manual #7442Z6: RoboVac 35C Vacuum Cleaner Quick start manual
8
1455
262
6
HomeVac H11
Owner’s manual #CFV9L9: HomeVac H11 Vacuum Cleaner Owner’s manual
36
1373
206
7
BoostIQ RoboVac 15C
Manual #68D7M6: BoostIQ RoboVac 15C Vacuum Cleaner Manual
5
353
78
8
RoboVac 11+
Owner’s manual EUFY Vacuum Cleaner Owner’s manual (File: eufy-robovac-11-owner-s-manual-13, 03.12.2024)
13
570
114
9
RoboVac
Owner’s manual RoboVac (Vacuum Cleaner ePDF Guide, #GA1965)
24
193
35
10
ROBOVAC 20
Owner’s manual PDF Guide (@2X33YN), EUFY ROBOVAC 20 Vacuum Cleaner (Tuesday 29-10-2024)
27
826
157
Vacuum Cleaner Devices by Other Brands:
|
Stihl SE 61 Instruction Manual SE 61 Instruction manual — 491349 { 02 Apr 2025 | 472 |
|
|
POLTI Vaporetto Lecoaspira FAV 80 TURBO INTELLIGENCE Instruction Manual Vaporetto Lecoaspira FAV 80 TURBO INTELLIGENCE (Vacuum Cleaner ePDF User Manual, #13NG38) REGISTRA IL TUO PRODOTTO 12 May 2025 | 128 |
|
|
Gorenje VC 1411 B Instruction Manual VC 1411 B (Vacuum Cleaner ePDF Manual, #16L693) VC 1411 B 26 Feb 2025 | 46 |
|
|
Ohyama IC-SLDCP6 Operation & User’s Manual PDF User Manual (@U166N7), Ohyama IC-SLDCP6 Vacuum Cleaner (25/02/2025) Indoor For Home Use 25 Feb 2025 | 80 |
Categories:
Robot vacuum cleaner for home
Locks
Security Camera
Switch
Vacuum Cleaner
Scales