
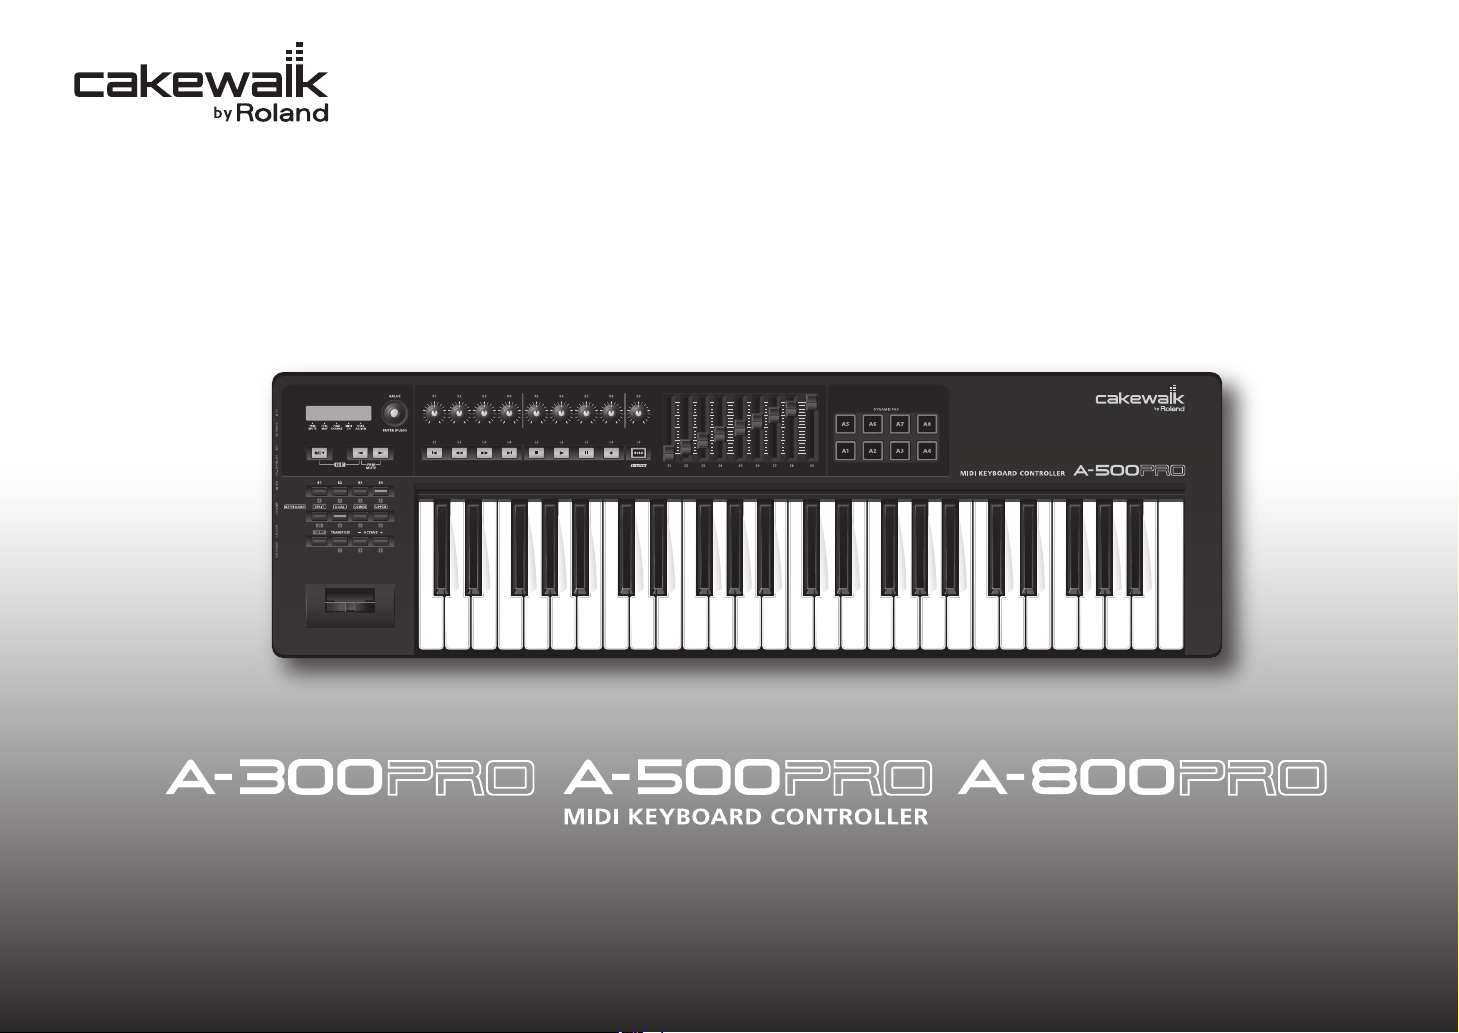
Справочник по картам назначений контроллеров
Справочник по картам назначений контроллеров
При поставке с завода A-300PRO/500PRO/800PRO (далее просто “A-PRO”) содержит 19 карт назначений контроллеров (Control Map). С их помощью можно быстро
конфигурировать A-PRO для управления соответствующим программным или аппаратным обеспечением.
Номер Control Map Соответствующая программа/оборудование
1 Cubase SOLO
2 Cubase MUTE
3 Cubase RECORD
4 Logic SOLO
5 Logic MUTE
6 Logic RECORD
7 Logic GLOBAL
8 Logic INITIALIZE
9 DP (Digital Performer) SOLO
10 DP MUTE
11 DP RECORD
12 Live SOLO
13 Live MUTE
14 Live RECORD
15 GarageBand
16 GM2
17 SD-50
18 MIDI-контроллер общего назначения
19 (*1) NO ASSIGN
(*1) В зависимости от программы, содержимое карты назначений контроллеров
может меняться.
Если в данном списке отсутствует программа или оборудование, которыми вы
пользуетесь, обратитесь на сайт Roland.
Ñàéò Roland
http://www.rolandus.com/support/
Если подходящая карта назначений контроллеров доступна, скачайте ее и загрузите в A-PRO.
См. Руководство пользователя.
Ниже описано, как переключать карты назначений контроллеров.
1 Переключитесь в режим PLAY (см. Руководство пользователя).
2 Кнопками [ ] èëè [ ] установите курсор на “CTRL MAP”.
Дисплей отобразит номер текущей карты контроллеров.
3 Колесом [VALUE] выберите нужный номер карты контроллеров.
Copyright © 2010 ROLAND CORPORATION
Все права защищены. Воспроизведение данного материала в любой форме
без письменного разрешения ROLAND CORPORATION запрещено.
3
Справочник по картам назначений контроллеров
Cubase
При использовании Cubase произведите следующие установки.
Ниже приведена процедура для Cubase 5 версии Mac OS X. Для других версий возможны некоторые изменения.
Операция с A-PRO
1 Выберите режим PLAY (см. Руководство
пользователя).
Операция с A-PRO
2 Кнопками [ ] èëè [ ] переместите кур-
ñîð íà “CTRL MAP”.
Дисплей отобразит номер текущей карты контроллеров.
Операция с A-PRO
3 Колесом [VALUE] выберите номер 1.
4 Запустите Cubase 5.
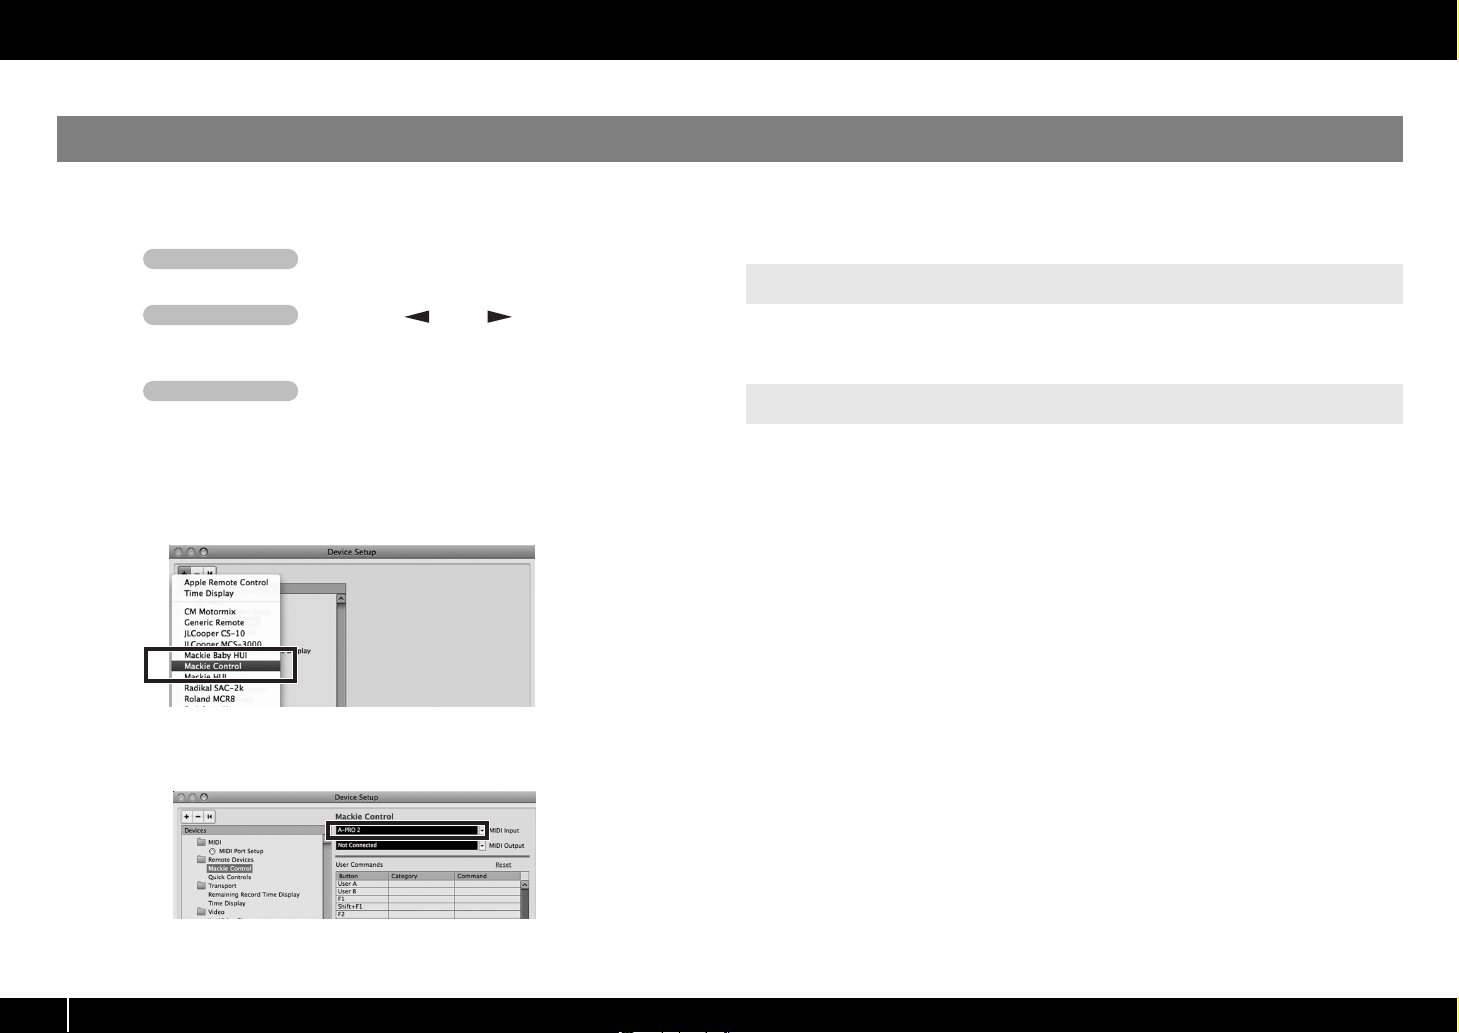
5 В меню [Devices] нажмите [Device Setup…].
6 В верхней левой части диалогового окна нажмите кнопку [+] и в
ниспадающем меню выберите [Mackie Control].
Функции, назначенные на контроллеры
Неисправности
Значения, например, панорама, меняются самопроизвольно
Доступно управление PLAY или STOP, а Volume или Pan — нет
Ñì ñòð. 9.
Убедитесь, что регуляторы [R1] – [R9] находятся в центральном положении.
На регуляторы [R1] – [R9] назначено сообщение Encoder Simulate. Если регуляторы
[R1] – [R9] не находятся в центральном положении, передача управляющих сообщений из A-PRO будет продолжаться.
Проверьте трек, назначенный на “канал 1”.
При нажатии на кнопку [B1] или [B2] треки, назначенные на слайдеры [S1] – [S8] и
регуляторы [R1] – [R8], переключаются. А на [R1] и [S1] могут быть назначены треки,
7 В качестве входа MIDI выберите [A-PRO 2] и нажмите [Apply]. За-
тем нажмите [OK].
отичные от трека 1.
4

Руководство пользователя на русском языке для продукта CAKEWALK A-800PRO, формат A4, переплёт пластиковая пружина, обложки пластиковые, 87 страниц.
-
Бесплатно
При покупке от 3000 руб
-
Телефон
8 (495) 000-00-01
-
100% безопасно
Оплата при получении
-
Горячие предложения
Скидки до 50%
- Описание
- Спецификация
- Производитель
Руководство пользователя на русском языке для продукта CAKEWALK A-800PRO.
Спецификация:
Оригинальное руководство пользователя на русском языке.
Формат листа A4.
Плотность бумаги 80 гр/м2.
Цвет печати — монохромный.
Обложки — пластиковые 2 шт.
Переплёт — пластиковая пружина.
Общее количество страниц 87 (44 листов).
* это печатное руководство пользователя мы прилагаем бесплатно к одноимённому продукту, покупаемому клиентами в нашем магазине.
Информация о технических характеристиках, комплекте поставки, стране производителе и внешнем виде
товара носит справочный характер и основан на самой последней информации, доступной на момент публикации.
-
-
#61
Интересно, кто нибудь разобрался полностью с этой клавой? Программирование крутилок. Функции клавиш слева и.т.д
Еще вопрос — насчет функции АСТ. Это у меня только или у остальных также ? То работает, то не работает,
Подозреваю, что связано это с недоработанным драйвером под Мак.
-
-
#62
К великому стыду я не разобрался( Нету времени да и ситуация пока не диктует сильно что нужно это. Фейдеры я так и не пользую хотя они и так привязаны по умолчанию к первым 8 аудио каналам. Нельзя там на них тонко выставить градацию и мышкой точнее получается. Потом, транспрт на вкл. и выкл. я по началу думал юзать но по жизни уже привык с комп. клавы пускать. Это тоже отдыхает но…правда иногда запускаю с миди клавы но это редко. Что там ешо….? У меня 61 клавиша так что транспонирование мне не нужно. Живяк я не играю и по сему все работы с делением клавы тоже мне не нужны. ОСТАЮТСЯ крутилки и там это действительно мне помогло бы но пока как и писал, нету времени.
Вот что я буду делать так это блок питания покупать и по старинке подключать ибо заипала залипание клавиш. Я может и ошибаюсь, но до этого у меня через миди разъём работал синтик под клаву и залипаний не было столько. Кстати нашёл у нас в магазине с нужными параметрами и только конец нужно перепаять, вернее отрезать старый, купить новый и поменяв полярность на концы припаять. Кстати звонил по началу в наши пару магазинов на предмет заказа оригинального но меня там культурно отшили…сказав что позвонят но так и не позвонил. Дерьмо барыги.(
-
-
#63
АСТ это чисто Сонаровская фишка, а Сонара под Мак еще не придумали. У меня АСТ работает с Сонаром стабильно. Использую в основном для прописывания в реальном времени cutoff, resonance — очень удобно. Интересно получается накручивать звук на Roland Fantom VS, можно так же в нем листать патчи ручкой Value. Транспортом не пользуюсь, т.к. консоли Sonar V-Studio700 хватает за глаза.
-
-
#64
АСТ это чисто Сонаровская фишка,
ну так это самое первое что узнал)))) ибо мануал то читал на русском языке
-
-
#66
Функция аст используется только для сонара.Прочтите мануал! Сонара для мас ос не существует.
———- Добавлено в 18:43 ———- Предыдущее сообщение было размещено в 18:39 ———-
Функция аст используется только для сонара.Прочтите мануал! Сонара для мас ос не существует.
http://www.rolandmusic.ru/assets/media/pdf/A-PRO_rus.pdf
-
-
#67
У вас это звучит как «только так и никак не иначе»,
Как же тогда я и другие включают Функцию ACT в Лоджике?
не верите, приезжайте- увидите воочию
для кого тогда драйвер под ACT для лоджика и Гараж бэнда выложен?
Еще раз ссылку даю:
Читайте внимательно и мануал. кстати тоже:
http://www.roland.com/support/article/?q=downloads&p=A-800PRO
-
-
#68
A-PRO Preset Control Map Ver.1.10 это не ACT это карты раскладки для других хостов(включая хосты MacOS). Некий заменитель ACT
Цитата из русского мануала:
«При работе с Sonar можно использовать А-PRO в качестве контроллера для Sonar. Для этого необходимо включить кнопку ACT.
Технология АСТ (Active Controller Technology) позволяет управлять SONAR от внешнего устройства, такого, как A-PRO.» Страница 21
Карта назначения контроллеров (Control Map) описывает какие контроллеры какими MIDI-установками будут управлять — эта технология и относится к другим хостам и ОС.
-
-
#69
А подскажите знающие люди! Как настроить транспортную панель этой клавы для Лоджика? Ну чтоб запись и воспроизведение например с нее запускать.
Я настроил все через Key Commands, обучил нужные кнопки миди клавиатуры. Все работало, но после перезапуска Лоджика то только Запись работала, то вообще
клавиатура переставала на все реагировать. Хотя в Controller Assignments все осталось.
Расскажите как все настроить, нужно ли ставить плагин этот для Лоджика, надо ли включать АСТ и так далее…
Буду очень признателен))))
-
-
#70
У вас это звучит как «только так и никак не иначе»,
Как же тогда я и другие включают Функцию ACT в Лоджике?
не верите, приезжайте- увидите воочию
для кого тогда драйвер под ACT для лоджика и Гараж бэнда выложен?
Еще раз ссылку даю:
Читайте внимательно и мануал. кстати тоже:
http://www.roland.com/support/article/?q=downloads&p=A-800PRO
Какие ещё драйвера ? Там есть только плагины и карты ! В сонаре идёт полная интеграция начиная от управление микшером заканчивая управлением синтезаторами и плагинами.
В лоджике для управления плагинами и синтезаторами нужно назначать всё в ручную а не как в сонаре нажав на одну кнопку.
———- Добавлено в 20:39 ———- Предыдущее сообщение было размещено в 20:22 ———-
———- Добавлено в 20:42 ———- Предыдущее сообщение было размещено в 20:39 ———-
А подскажите знающие люди! Как настроить транспортную панель этой клавы для Лоджика? Ну чтоб запись и воспроизведение например с нее запускать.
Я настроил все через Key Commands, обучил нужные кнопки миди клавиатуры. Все работало, но после перезапуска Лоджика то только Запись работала, то вообще
клавиатура переставала на все реагировать. Хотя в Controller Assignments все осталось.В настройках лоджика выбираем протокол Mackie Control в настройках клавиатуры выбираем карту для лоджика .
-
-
#71
А подскажите знающие люди! Как настроить транспортную панель этой клавы для Лоджика? Ну чтоб запись и воспроизведение например с нее запускать.
нужно ли ставить плагин этот для Лоджика, надо ли включать АСТ и так далее…
качаете отсюда http://www.roland.com/support/article/?q=downloads&p=A-800PRO
A-PRO Control Surface Plug-in for Logic and GarageBand
Устанавливаете его. Нажимаете кнопку ACT на клавиатуре. Она загорится. Потом нажмите клавишу B4 (она слева)
И все- транспорт работает
A-PRO Preset Control Map Ver.1.10 это не ACT это карты раскладки для других хостов(включая хосты MacOS). Некий заменитель ACT
Естественно никакого отношения. Control Map- это Control Map
ACT это ACT
И я говорил о Control Surface Plug для Лоджика
-
-
#72
Спасибо огромное! А где можно почитать про все эти B1, B4… ? И еще… в транспортной панели Лоджика должны все время миди-данные мигать при включенном АСТ ?
С MIDI и Лоджиком недавно начал разбираться)))
-
-
#75
Спасибо за мануал. Пока не читал. У меня небольшой затык с этими клавишами. Пытаюсь назначить контроллеры в Сэмплитуде в Learn . Постоянно валит команда FE0000. При Learn, когда я нажимаю нужный контроллер на мгновение появляется правильное сообщение и тут же возвращается к FE0000. Что же это за сигнал, может Клок? Как его проигнорировать?
-
-
#76
Спасибо за мануал. Пока не читал. У меня небольшой затык с этими клавишами. Пытаюсь назначить контроллеры в Сэмплитуде в Learn . Постоянно валит команда FE0000. При Learn, когда я нажимаю нужный контроллер на мгновение появляется правильное сообщение и тут же возвращается к FE0000. Что же это за сигнал, может Клок? Как его проигнорировать?
Так вы прочитайте ))) Там всё есть .
-
-
#77
Тут по ходу оказия приключилась…слетели пользовательские настройки куб5. Выставил по новой а вот мидиклава перестала работать как ранее. Сигнал с клавиатуры идёт на комп, ноты пишутся а вот контролёры……….Сигнал с них идёт но они ничего не цепляют то есть не работают те функции что скажем есть в первой карте Cubase Solo к примеру крутилки на панораму, фейдеры на громксть, кнопки PLAY и т.д тоже не запускаются. По моему нужно в кубе ещё что-то включать…а что не пойму или забыл или туплю. В кубе проставил Mackie Control, загрузил первую карту для куба и не гугу.
Да, ещё главный момент…с контролёров идёт сигнал но он идёт как нотное сообщение. То есть если фоно выбрано то при нажатии кнопки Play на миди клаве, она играет ноту вместо того что-бы запускать кубик. Мля..забыл по ходу наверное что-то…
В общем вопрос такой………ГДЕ ещё что нужно включить…?:dash1:
-
-
#80
Обновился. Все работает. Даже в ACT все клавиши наконец заработали как нужно. Прямо приятно стало работать.
Кому интересно — там мануальчик к драйверу Control Surfase идет. Там прописано, что при удалении старого драйвера Control Surfase помимо удаления через Uninstall, нужно еще удалить com.apple.logic.pro.cs, который находится в User/Library/Preferences/
-
-
#81
Да доработали и карты перестов в самом аппарате ))
-
-
#82
Вот блин ((( А как обновиться на Горном Льве? А то я по инструкции все стер, а UpdSMF не запускается на Горном Льве…
Извиняюсь, не увидел нужную версию UpdSMF, все обновилось)))
Может кто подскажет как прикрутить контроллеры A-300Pro к Studio One? Интересует в основном транспорт и пэды.
Буду благодарен.
Последнее редактирование:
-
-
#83
Огромаднейшая просьба к владельцам этих клавиатур (A-800ProA, A-500Pro, A-300Pro) — не могли бы вы прикрепить «схему» ровности прорисовки колеса (джойстика) — модулейшн и питчбенд! :help:
Хочу поменять свою новэйшн так как она пишет эти контроллёры «гроздьями» (сапака :mamba :
-
-
#84
Вопрос к пользователям вышеуказанных клавиатур.
Никто ещё не сталкивался с выходом из строя контактных резинок под клавишами ?
Долгое время (5 лет) использую EDIROL PCR M-50, достало периодическое пропадание контакта, или потеря чувствительности.
И резину менял, и контакты протирал, проблема решается, но хватает не надолго…
Интересно, в новых клавах эта проблема решилась, или всё по прежнему ?
-
-
#85
Ну в мае будет как 2 года…..полёт отличный! Всё работает без проблем. Может в Эдироле другая механика ибо как модель то ЭТИ клавы 2010 года выпуска, когда как твоя 2006.
-
-
#86
Добрый день,я вот перед выбором,заинтересовался данными апаратами(500/800),хотелось бы узнать мнение владельцев) Чесного говоря ни разу не пользовался миди клавой до этого и это будет первый опыт) Хотелось бы узнать какое ощущение при нажатии на клавишу(не создаёться ощущения,что нажымаешь в пустоту? Хорошо-ли работаю пады? Функции докасания и после? Впринцепи всё интересно,надеюсь поможете определиться с выбором)
-
-
#87
Добрый день,я вот перед выбором,заинтересовался данными апаратами(500/800),хотелось бы узнать мнение владельцев) Чесного говоря ни разу не пользовался миди клавой до этого и это будет первый опыт) Хотелось бы узнать какое ощущение при нажатии на клавишу(не создаёться ощущения,что нажымаешь в пустоту? Хорошо-ли работаю пады? Функции докасания и после? Впринцепи всё интересно,надеюсь поможете определиться с выбором)
Я как читал так у меня создалось впечатление что чел про первый секс пишет…вернее про прелюдию к нему)
Если ты использовал синты то это тоже самое. Здесь сам механизм клавиатуры от Роланд Фантом…а это проверенный временем бренд. Я сам под миди ранее использовал Корги и до сих пор один есть у меня так вот сравнивая плюс в пользы этой клавы. Очень хорошая пружинистость клавиши….хороший ход, не сильный и не слабый.
Если бы я был пианистом и писал более фоно то лучше другая клава подошла бы а так…
Если у тебя вообще не было клавиатуры то вопрос вопрос сразу можно закрывать. Клава супер работает у меня и не разу не подводила.
Единственный минус это…..после неё наверное трудно будет найти замену))))) По сути механизм клавиши это самый главный аргумент данных девайсов. Контролёры это так…до кучи. По большому счёту их отдельно докупают.
Последнее редактирование:
-
-
#88
Ну я синтезаторами тоже не пользовался, просто со знакомым разговаривал и он как раз посоветовал обратить внимание на данные каритерии) Ну в общем я так понимаю что это очень достойный аппарат?)
-
-
#89
Ну в общем я так понимаю что это очень достойный аппарат?)
Правильно понимаешь….тебе будет »за глаза».
-
-
#90
Vosk, вот так выглядят картинки с A-800PRO в Sonar X2
-
Page 1: Roland A-800PRO
* 5100009796 — 02 *[…]
-
Page 2: Roland A-800PRO
2 Contents of the Package The package of the A-300PRO/500PRO/800PRO (w hich we’ll subsequently refer to as the A- PRO) contains the following items. When y ou open the package, first ma ke sure that all items are included. If any are missing, contact the dealer where you purchased the A-PRO. MIDI keyboard controller A-PRO fig * The photo show the[…]
-
Page 3: Roland A-800PRO
3 USING THE UNIT SAFELY 002c • Do not open (or modify in any way) the unit or its AC adaptor. ……………………………………………………………………………………………….. 003 • Do not attempt to repair the unit, or replace parts within it (except when this manual provides specific instructions directing you to […]
-
Page 4: Roland A-800PRO
4 USING THE UNIT SAFELY 012d • Immediately turn the power off, and request servicing by your retailer, the nearest Roland Service Center, or an authorized Roland distributor, as listed on the separate sheet titled “Information” when: • If smoke or unusual odor occurs • Objects have fallen into, or liquid has been spilled onto the unit; or[…]
-
Page 5: Roland A-800PRO
5 IMPORTANT NOTES Power Supply 301 • Do not connect this unit to same electrical outlet that is being used by an electrical applia nce that is controlled by an inverter (such as a refrigerat or, washing machine, microwave oven, or air conditioner), or th at contains a motor. Depending on the way in which the electr ical appliance is used, power s[…]
-
Page 6: Roland A-800PRO
6 Contents Contents of the Package …………………………………………… 2 USING THE UNIT SAFELY …………………………………………… 3 IMPORTANT NOTES ………………………………………………….. 5 Names of Things and What They Do ………………………….. 8 Panel ……………………………[…]
-
Page 7: Roland A-800PRO
7 Contents Assigning MIDI Messages (EDIT Mode) ……………………. 48 Assigning a MIDI Message on the A- PRO Keyboard……………. ……………………….. ………… 48 Note Assignments …………………………… ……………………………………………………………. 49 Aftertouch Assignment ……………..[…]
-
Page 8: Roland A-800PRO
8 Names of Things and What They Do f i g . P a n e l — L e f t . e p s Display This shows a variety of informat ion, such as the current state. [VALUE] knob, [ENTER] button You can turn the [VALUE] knob to change the MIDI channel, switch program changes or control maps, or change the va lue of a user-specified parameter. In EDIT mode, use the [VALU[…]
-
Page 9: Roland A-800PRO
9 Names of Things and What They Do [ ] button, [ ] button You can use the [ ] [ ] buttons to move th e cursor that is sh own at CTRL MAP, PGM CHANGE, MIDI CH, or US ER ASSIGN in the display. Controllers [B1]–[B4] (button) You can assign any desired MIDI messages to these buttons. ➝ “Assigning MIDI Messages” (p. 29) [SPLIT] button, [DUAL] bu[…]
-
Page 10: Roland A-800PRO
10 Names of Things and What They Do fig.Panel-Top.eps Controllers [R1]–[R9] (knobs) You can assign the desired MI DI messages to these knobs. ➝ “Assigning MIDI Messages” (p. 29) Controllers [L1]–[L8] (button) You can assign the desired MIDI messages to these buttons. ➝ “Assigning MIDI Messages” (p. 29) [HOLD] button This button turn[…]
-
Page 11: Roland A-800PRO
11 Names of Things and What They Do fig.Panel-Side.eps DC IN jack You can connect a separately sold AC adaptor here. If yo u want to purchase an AC adaptor, contact the retailer from whom you purchased the prod uct, or the nearest Roland Service Center. [Power] switch USB connector Use this to connect the A-PRO to your computer via a USB cable. [MI[…]
-
Page 12: Roland A-800PRO
12 Installing the Driver A driver is software that transfers data be tween the A-PRO and the application software on your computer when the A-PRO is connected to your computer. The procedure for installation and checking will depend on your system. Perform the following two steps to inst all and check the driver. fig.H_install.eps Steps to be perfo[…]
-
Page 13: Roland A-800PRO
13 Installing the Driver Windows 7 users Open “Control Panel,” click “System an d Security,” and then click [System]. If the Control Panel shows th e icon view, click [System]. Windows Vista users Open “Control Panel,” click [System and Maintenance], and then click [System]. If the Control Panel shows the classic view, double-click the […]
-
Page 14: Roland A-800PRO
14 Installing the Driver 11 When the installation is completed, the “A-PRO Driver Setup” dialog box will indicate “Installation has been completed.” Click [Close] to close the “A-PRO Driver Setup” dialog box. If the “System Settings Change” dialog bo x appears, click [Yes]. Windows will automatically restart. Now let’s check to ma[…]
-
Page 15: Roland A-800PRO
15 Installing the Driver Steps to be performed on the A-PR O keyboard itself are marked by a symbol. Don’t connect the A- PRO to your computer until you are told to do so. 1 With the A-PRO disconnected, start up Windows. Disconnect all USB cables from your comp uter, with the exception of those for a USB keyboard and USB mouse (if used). 2 Close […]
-
Page 16: Roland A-800PRO
16 Installing the Driver 10 If you are asked whether you want to connect to Windows Update, choose [No, not this time] and click [Next]. fig.xpwupd-e.eps 11 Choose [Install the software automatically (Recommended)], and click [Next]. fig.xpdrv6-e.eps 12 If the “Hardware Installation” di alog box appears, click [Continue Anyway] to continue the […]
-
Page 17: Roland A-800PRO
17 Installing the Driver Steps to be performed on the A-PR O keyboard itself are marked by a symbol. Don’t connect the A- PRO to your computer until you are told to do so. * If the “Authenticate” or “Installer requires that you type your password” dialog box appears during the installation, enter an administrator password and click [OK]. […]
-
Page 18: Roland A-800PRO
18 Installing the Driver 15 Verify that [A-PRO] is shown in the “MIDI Studio” or “Audio MIDI Settings” dialog box. fig.osxaudiomidi1-e.eps If the A-PRO is not shown or is grayed -out, the A-PRO has not been recognized correctly. Try clicking [Resca n MIDI]. You can also try disconnecting the USB cable connected to the A-PRO, then re-connect[…]
-
Page 19: Roland A-800PRO
19 Installing the Driver Proceed as follows to verify that the driver was installed correctly. We will use SONAR LE as an example for Window s, and GarageBand as an example for Mac OS X. Here’s an example using a plug-in synth in cluded with SONAR LE. The procedure or screens may differ if you’re using a different version. For details on instal[…]
-
Page 20: Roland A-800PRO
20 Installing the Driver GarageBand is software that is included with Apple’s iLife. Here, the explanation assumes that you’re using GarageBand ‘09. The steps or screens may be different if you’re using a different version. 1 In the [Applications] folder, double-click [GarageBand]. 2 When GarageBand has started up, cl ick the [File] menu it[…]
-
Page 21: Roland A-800PRO
21 Look what You Can Do with the A-PRO When playing the A-PRO’s keyboard, you can se lect sounds in your sound module from the A-PRO. You can also play two sounds together (DUAL) or separately (SPLIT). For details, refer to “Per forming (Play Mode)” (p. 41). If you’re using SONAR, you can use the A- PRO as a controller for SONAR simply by p[…]
-
Page 22: Roland A-800PRO
22 Using A-PRO Editor A-PRO Editor is software that lets you crea te control maps (p. 21) for the A-PRO series on your computer, and make settings for th e keyboard. The graphical screen makes it easy to edit the values (settings). fig.editor-mainwindow-e+.eps_39 The A-PRO has a total of 44 controllers: [B1]–[ B4], [R1]–[R9], [L1]–[L9], [S1]?[…]
-
Page 23: Roland A-800PRO
23 Using A-PRO Editor In order to transfer control maps between A-PRO Editor and the A-PRO keyboard, you’ll need to specify the MIDI po rts used by A-PRO Editor. * If the A-PRO is connected via USB, the ports will be as follows. If you’re using a MIDI connection, specify the MIDI input port and MIDI output port of the MIDI device to which the A[…]
-
Page 24: Roland A-800PRO
24 Using A-PRO Editor fig.editor-mainwindow-e.eps Title You can assign a name to the control map you’re editing. Only single-byte alphanumeric characters can be entered for the control map name. The name you enter here is shown as the title of the HTML file that’s exported by the [File] menu command [Export Assign List]. Controllers Here you ca[…]
-
Page 25: Roland A-800PRO
25 Using A-PRO Editor Message assignment area Here you can specify the value of variou s parameters for the MIDI message you selected in the Assign Message selection list . For details on the parameters of each MIDI message, refer to “Message Parameters” (p. 33) Output Port This specifies the USB port from which the MIDI messages will be transm[…]
-
Page 26: Roland A-800PRO
26 Using A-PRO Editor fig.keyboarset-e.eps Octave shift Specifies the octave of the UPPER and LOWER parts. Transpose Specifies the transposit ion of the keyboard. MIDI Channel Specifies the MIDI channel of the UPPER and LOWER parts. Active Part Specifies the part(s) to which the [VALUE ] knob, BENDER, MODULATION, AFTERTOUCH, HOLD, or EXPRESSION wil[…]
-
Page 27: Roland A-800PRO
27 Using A-PRO Editor Menus File Menu Menu Explanation New Creates a new control map. The new control map will have no MI DI messages assigned to any of the controllers. Open Loads a control map that was saved in SMF format. Fo r details, refer to “Loading a Control Map that was Saved on Your Computer” (p. 32). Save Saves the control map curren[…]
-
Page 28: Roland A-800PRO
28 Using A-PRO Editor You can use the following keyboard shortcuts with A-PRO Editor. In text boxes such as the Title field of the main window, keyboa rd shortcuts for the [Edit] menu commands [Copy] and [Paste] can be used on the text. Keyboard Shortcuts Command Key (Windows) Key (Mac OS X) [File]–[New] Ctrl + N Command + N [File]–[Open] Ctrl […]
-
Page 29: Roland A-800PRO
29 Using A-PRO Editor Here’s how to assign a MIDI message to each controller. fig.editor-assign1.eps 1 In the main window, click the controller to which you want to assign a MIDI message. fig.editor-assign2.eps 2 In the message assignment window, use the Assign Message field to select the type of MIDI message you want to assign. fig.editor-assign[…]
-
Page 30: Roland A-800PRO
30 Using A-PRO Editor You can use either of the following two meth ods to check the MIDI messages that are assigned. Viewing an assignment list If you want to use your Web browser to view an assignment list of the current control map, choose the [File] menu command [View Assign List]. This is a convenient way to view all of the control map’s sett[…]
-
Page 31: Roland A-800PRO
31 Using A-PRO Editor I f y o u w a n t t o e d i t t h e c o n t r o l m a p s e t t i n g s of the A-PRO keyboard in A-PRO Editor, use the following procedure to receive control ma p data from the A-PRO keyboard so that it can be edited. fig..editor-rcv1.eps 1 From the numbers displayed in the [Control Map] dropdown list, select the number of the[…]
-
Page 32: Roland A-800PRO
32 Using A-PRO Editor Control map settings you’ve ed ited in A-PRO Editor can not only be transferred directly between the A-PRO keyboard and your comp uter, they can also be saved on your computer as an SMF format file. To save an SMF file , proceed as follows. 1 Choose the [File] menu command [Save As]. If you want to overwrite the most recent […]
-
Page 33: Roland A-800PRO
33 Using A-PRO Editor The setting items shown in the message assign window will depend on the MIDI message yo u’ve selected. This section explains the setting items for each MIDI me ssage. Values for parameters are specified in decimal. For details on the Settings field, refer to “Message Assignment Window” (p. 24). NO ASSIGN Clears any messa[…]
-
Page 34: Roland A-800PRO
34 Using A-PRO Editor Channel Message Polyphonic Key Pressure Assign a polyphonic key pressure message. fig.editor-poly.eps Specify the following parameters. Control Change Assign a control change message. fig.editor-cc.eps Specify the following parameters. Program Change Assign a program change message (with a fixed program number). fig.editor-pc.[…]
-
Page 35: Roland A-800PRO
35 Using A-PRO Editor Channel Message Program Change (Min-Max) Assign a program change message (with a variable program number). fig.editor-pcmm.eps Specify the following parameters. * The range of the program number is 1–128. Bank Select + Program Change Assign a bank select me ssage and program change message (all values fixed). fig.editor-bank[…]
-
Page 36: Roland A-800PRO
36 Using A-PRO Editor Channel Message Program Change – Inc Assign the program change increment function (PC INC). This will transmit a program change number that is one greater than the progra m change number most recently transmitted in the A-PRO’s program change mode. fig.editor-pcinc.eps RPN Assign a registered parameter number. fig.editor-r[…]
-
Page 37: Roland A-800PRO
37 Using A-PRO Editor Channel Message Encoder Simulate Assign a function that si mulates a rotary encoder. fig.editor-encsim.eps Specify the following parameters. * This can be assigned to a button, but will not do anything. System Realtime/F6 Assign a system realtime me ssage or F6 (Tune Request). fig.editor-realtime.eps For System Realtime/F6, us[…]
-
Page 38: Roland A-800PRO
38 Using A-PRO Editor System Ex. Assign a system exclusiv e message (System Ex.). You can enter up to twenty-four bytes. fig.editor-sysex.eps Specify the following parameters. Table 1: Special characters used in the message entry field Table 2: Types of data you can specify in the Data Type field Item Content Message entry field You can enter a sys[…]
-
Page 39: Roland A-800PRO
39 Using A-PRO Editor Free Message Assign a MIDI message. You can enter up to twenty-four bytes. You may assign more than one MI DI message if desired. fig.editor-freemsg.eps Specify the following parameters. Tempo Assign tempo control for transm itting MIDI CLOCK messages. fig.editor-tempo.eps There are no parameters to specify. * This will not fu[…]
-
Page 40: Roland A-800PRO
40 Using A-PRO Editor If you want to edit a keyboa rd set, use the following proc edure to load the keyboard map data from the A-PRO, so that it can be edited. fig.keyboardset1.eps 1 Use the [SPLIT]/[DUAL]/[LOWER] buttons to select the keyboard set that you want to edit. fig.keyboardsetrecv.eps 2 Click [Receive]. 3 In the confirmation box, click [C[…]
-
Page 41: Roland A-800PRO
41 Performing (Play Mode) Use Play mode when you want to play the A-PRO’s keyboard or us e its controllers to control your software or sound modules. Broadly speaking, the A-PRO has the following two modes. When you turn on the power, the A-PRO will start up in Play mode. To return from Edit mode to Play mode , you can either press the [ACT] butt[…]
-
Page 42: Roland A-800PRO
42 Performing (Play Mode) Here’s how to specify the current ch annel on which performance data from the keyboard will be transmitted. Here’s how to change the current channel (MIDI transmit channel). 1 Use the [ ] or [ ] button to move the cursor in the display to “MIDI CH.” The display will indicate the current channel. 2 Use the [VALUE] k[…]
-
Page 43: Roland A-800PRO
43 Performing (Play Mode) You can transmit program changes to select so unds on your sound module from the A-PRO. If you want to select a sound from a different bank, first use bank mode to transmit a bank select message that will swit ch the bank. Then transmit a program change message. The bank select message must be tran smitted before the progr[…]
-
Page 44: Roland A-800PRO
44 Performing (Play Mode) The A-PRO’s keyboard provides two parts, UPPER and LO WER, and you can assign a different sound to each. The entire keyboard will play the UPPER sound. fig.Upper-e.eps 1 Press the [UPPER] button so it’s lit. 2 Use the [ ] [ ] buttons to move the cursor to “PGM CHANGE” in the display. 3 Turn the [VALUE] knob. The UP[…]
-
Page 45: Roland A-800PRO
45 Performing (Play Mode) The DUAL button lets you simultaneously play both the LOWER and UPPER sounds from the entire keyboard. fig.Dual-e.eps 1 Press the [DUAL] button so it’s lit. * If the cursor is at “PGM CHANGE” in th e display, turning the [VALUE] knob will change the UPPER sound. * To change the LOWER sound, set ACTIVE PART (p. 62) to[…]
-
Page 46: Roland A-800PRO
46 Performing (Play Mode) Normally, note messages are transmitted with a velocity value that corre sponds to the force with wh ich you play the keyboard. If desired, the A-PRO can also transmit notes with a fixed velocity value, regardless of your playing dynamics. This is convenient when you want to record no tes into your DAW software at a fixed […]
-
Page 47: Roland A-800PRO
47 Performing (Play Mode) You can mute all controllers so that MIDI messages will not be transmitted when you move a controller. This is useful in situations such as when a parameter value is far away from the position of the controller; you can use the [PRM MUTE] button to mute the cont roller, and then move the controller near the pa rameter valu[…]
-
Page 48: Roland A-800PRO
48 Assigning MIDI Messages (EDIT Mode) The A-PRO allows you to assign MIDI messages to each of its 44 controllers: [B1]–[B4], [R1]–[R9], [L1]–[L9], [S1]–[S9], [A1]–[A8], HOLD (P1), EXPRESSION (P 2), BENDER, MODULATION, and AFTERTOUCH. Edit mode is used to make MIDI message assignments. This section of the manual explains how to assign MID[…]
-
Page 49: Roland A-800PRO
49 Assigning MIDI Messages (EDIT Mode) Here’s how to assign a note messa ge to a controller. In addition to their use in performance, note messages can also be used to control DAW software. 1 Press the [ACT] button and [ ] button simultaneously. 2 Slightly move the controller to which you want to assign a note message. If the controller is a butt[…]
-
Page 50: Roland A-800PRO
50 Assigning MIDI Messages (EDIT Mode) Here’s how to assign an afte rtouch message to a controller. A-PRO Editor lets you assign aftertouch me ssages for individual notes (Polyphonic Key Pressure) as well as channel aftertouch ( Channel Pressure) (p. 34). 1 Press the [ACT] button and [ ] button simultaneously. 2 Slightly move the controller to wh[…]
-
Page 51: Roland A-800PRO
51 Assigning MIDI Messages (EDIT Mode) Here’s how to assign a control change message to a controller. 1 Press the [ACT] button and [ ] button simultaneously. 2 Slightly move the controller to which you want to assign a control change message. If the controller is a button, press it. The number of the selected cont roller will blink in the display[…]
-
Page 52: Roland A-800PRO
52 Assigning MIDI Messages (EDIT Mode) Here’s how to assign a program change message to a controller. 1 Press the [ACT] button and [ ] button simultaneously. 2 Slightly move the controller to which you want to assign a control change message. If the controller is a button, press it. The number of the selected cont roller will blink in the display[…]
-
Page 53: Roland A-800PRO
53 Assigning MIDI Messages (EDIT Mode) Here’s how to assign an RP N or NRPN to a controller. 1 Press the [ACT] button and [ ] button simultaneously. 2 Slightly move the controller to which you want to assign a control change message. If the controller is a button, press it. The number of the selected cont roller will blink in the display. 3 Verif[…]
-
Page 54: Roland A-800PRO
54 Assigning MIDI Messages (EDIT Mode) You can assign the MIDI CLOCK speed (20–250) to a controller. In order to transmit MIDI CLOCK, th e MIDI CLOCK setting must be “ON.” ➝ “MIDI CLOCK ON/OFF” (p. 64) 1 Press the [ACT] button and [ ] button simultaneously. 2 Slightly move the controller to which you want to assign tempo. If the control[…]
-
Page 55: Roland A-800PRO
55 Assigning MIDI Messages (EDIT Mode) Button mode setting I n E d i t m o d e , w h e n y o u a s s i g n a m e s s a g e t o a b u t t o n a s d e s c r i b e d i n “ A s s i g n i n g a M I D I Message on the A-PRO Keyboard” (p. 48), yo u can specify how the button will operate (the “button mode”). If a button is assigned as a controller[…]
-
Page 56: Roland A-800PRO
56 Assigning MIDI Messages (EDIT Mode) By using this function, a mess age assigned to a controller ca n be copied to a different controller. For example, if you want to as sign similar messages to mult iple controllers, assign the desired MIDI message to one of the controllers, and then use this fu nction to copy that message to the assignment of t[…]
-
Page 57: Roland A-800PRO
57 System Settings (EDIT Mode) This section explains how to ma ke system settings for the A-PRO. System settings include the following items. Category Item Contents Factory setting See page LCD LCD CONTRAST Adjusts the LCD contrast. 5 p. 59 Keyboard KEYBOARD VELOCITY CURVE Specifies how velocity will ch ange in response to keyboard dynamics (veloci[…]
-
Page 58: Roland A-800PRO
58 System Settings (EDIT Mode) Other H-ACTIVITY ON/OFF Turn this on when using spec ific applications (such as Pro Tools LE). If this is On, the message “90 00 7F” will be transmitted from “A-P RO 2” at intervals of approximately 500 ms. OFF p. 69 L9 FUNCTION Specifies the function of the [HOLD] button. HOLD p. 69 OMNI If OMNI is On, all co[…]
-
Page 59: Roland A-800PRO
59 System Settings (EDIT Mode) If you find the text in the di splay difficult to read, you can adjust the contrast as follows. The brightness of the screen may be affect ed by environmental conditions such as temperature. 1 Simultaneously press the [ACT] button and the [ ] button. 2 Use the [VALUE] knob to select “LCD CONTRAST,” and press the [[…]
-
Page 60: Roland A-800PRO
60 System Settings (EDIT Mode) Here’s how to change the velocity curve, which specifies how the transmitted velocity value will correspond to your keyboard playing dynamics. 1 Simultaneously press the [ACT] button and the [ ] button. 2 Use the [VALUE] knob to select “KEYBOARD/PAD,” and press the [ENTER] button. fig.lcd-KBDVELOCURVE.eps 3 Use […]
-
Page 61: Roland A-800PRO
61 System Settings (EDIT Mode) Here’s how to specify the way that keyboard aftertouch will respond. 1 Simultaneously press the [ACT] button and the [ ] button. 2 Use the [VALUE] knob to select “KEYBOARD/PAD,” and press the [ENTER] button. fig.lcd-KBDAFTCHCURVE.eps 3 Use the [VALUE] knob to select “KBD AFTCH CURVE,” and press the [ENTER] b[…]
-
Page 62: Roland A-800PRO
62 System Settings (EDIT Mode) Here’s how to specify the pa rt that will be affected by the [VALUE] knob, BENDER, MODULATION, AFTERTOUCH, HOLD, and EXPRESSION controllers. 1 Simultaneously press the [ACT] button and the [ ] button. 2 Use the [VALUE] knob to select “KEYBOARD/PAD,” and press the [ENTER] button. fig.lcd-KBDACTIVEPART.eps 3 Use t[…]
-
Page 63: Roland A-800PRO
63 System Settings (EDIT Mode) Here’s how to specify the way in which the fo rce of your strike on the controller pads [A1]–[A8] will affect the velocity that is transmitted. 1 Simultaneously press the [ACT] button and the [ ] button. 2 Use the [VALUE] knob to select “KEYBOARD/PAD,” and press the [ENTER] button. fig.lcd-PADVELOCURVE.eps 3 U[…]
-
Page 64: Roland A-800PRO
64 System Settings (EDIT Mode) Here’s how to specify whether MIDI CLOCK will be transmitted. 1 Simultaneously press the [ACT] button and the [ ] button. 2 Use the [VALUE] knob to select “MIDI CLOCK,” and press the [ENTER] button. 3 Use the [VALUE] knob to select “MIDI CLK ON/OFF,” and press the [ENTER] button. 4 Use the [VALUE] knob to se[…]
-
Page 65: Roland A-800PRO
65 System Settings (EDIT Mode) Here’s how to turn ADVANCED DRIVER MODE on/off. We recommend that you no rmally leave this On. If you change this setting, the new setting will take force after yo u’ve turned the power off, then on again. 1 Simultaneously press the [ACT] button and the [ ] button. 2 Use the [VALUE] knob to select “USB SETTING,?[…]
-
Page 66: Roland A-800PRO
66 System Settings (EDIT Mode) This setting specifies whether the MIDI conn ectors will be used as a MIDI interface. 1 Simultaneously press the [ACT] button and the [ ] button. 2 Use the [VALUE] knob to select “MIDI SETTING,” and press the [ENTER] button. 3 Use the [VALUE] knob to select “MIDI I/F SWITCH,” and press the [ENTER] button. 4 Us[…]
-
Page 67: Roland A-800PRO
67 System Settings (EDIT Mode) The A-PRO provides a [MIDI MERGE] switch (p . 11). Here’s how to specify the port that will be merged as the MIDI MERGE DESTINAT ION when the [MIDI MERGE] switch is On. The MIDI MERGE function is convenient when an external MIDI controller other than the A-PRO is conne cted to the A-PRO’s MIDI IN connector. For ex[…]
-
Page 68: Roland A-800PRO
68 System Settings (EDIT Mode) Here you can specify which control map is to be called up when the A-PRO is powered up. 1 Simultaneously press the [ACT] button and the [ ] button. 2 Use the [VALUE] knob to select “SYSTEM SETTING,” and press the [ENTER] button. fig.lcd-STARTUPMEMORY.eps 3 Use the [VALUE] knob to select “STARTUP MEMORY,” and p[…]
-
Page 69: Roland A-800PRO
69 System Settings (EDIT Mode) Turn this On when using certain applications (such as Pro Tools LE). If this is On, the message “90 00 7F” will be transmitted to “A -PRO 2” at interval s of approximately 500 ms. 1 Simultaneously press the [ACT] button and the [ ] button. 2 Use the [VALUE] knob to select “SYSTEM SETTING,” and press the [E[…]
-
Page 70: Roland A-800PRO
70 System Settings (EDIT Mode) Refer to “What is OMNI?” (p. 42). This will return the A-PRO to its factory-set condition. 1 Simultaneously press the [ACT] button and the [ ] button. 2 Use the [VALUE] knob to select “FACTORY RESET,” and press the [ENTER] button. “SURE?” will appear, blin king, in the display. fig.lcd-RESETSURE.eps 3 If y[…]
-
Page 71: Roland A-800PRO
71 Appendices ] If the A-PRO is connected to your computer via USB, the A-PRO wi ll be able to use two MIDI outp ut ports (PORT 1 and PORT 2). Ea ch controller of the A-PRO can be assigned to send its MIDI messages to either port. For details on how to make this assignment, refer to “Using Control Maps ” (p. 29) or “Assigning a MIDI Message o[…]
-
Page 72: Roland A-800PRO
72 Appendices You can connect the A-PRO connected direct ly to a MIDI sound module, and use it to play and control the sound module. If you’re not connecting the A-PRO to yo ur computer via USB, you’ll need to us e a separately avai lable AC adaptor. You can purchase the appropriate AC adaptor from your dealer. fig.MIDI-External-e.eps 1 Use a M[…]
-
Page 73: Roland A-800PRO
73 Appendices Use this mode if you want to use the standard driver provid ed by your operating system. 1 Switch off “ADVANCED DRIVER MODE” (p. 65). 2 Close all currently running software. 3 Turn the A-PRO’s [POWER] switch off, then on again. The driver will be installed automatically. In order to use the A-PRO with your softwa re, you’ll ne[…]
-
Page 74: Roland A-800PRO
74 Troubleshooting If you experience problems, read this chapter first. It contains information that will help you solve the problem. * For help with Windows or Mac OS X op eration, refer to the documentation fo r your computer or operating system. Is the CD-ROM inserted correctly in your CD-ROM drive? Make sure that the CD-ROM is corr ectly insert[…]
-
Page 75: Roland A-800PRO
75 Troubleshooting Could the A-PRO’s ADVANCED DRIVER mode switch be OFF? Refer to “ADVANCED DRIVER MODE” (p. 65 ) and set the A-PRO’s ADVANCED DRIVER MODE to ON. Then, install the driver again. After you connect the A-PRO, it may take several tens of seconds or several minutes before it is recognized by your computer. This is not a malfunct[…]
-
Page 76: Roland A-800PRO
76 Troubleshooting Could the A-PRO be in use by other software? Close all software you currently have running. Next, switch off the A-PRO’s power, then turn it back on again. If this does not solve the pr oblem, reinstall the driver. ➝ “Reinstalling the driver” (p. 80) Is the driver installed correctly? Driver installation may have fail ed.[…]
-
Page 77: Roland A-800PRO
77 Troubleshooting Check the power management settings You may be able to eliminate clicks and pops by changing your system’s power management settings. ➝ “Power management settings” (p. 81) Try updating the driver of y our display adaptor (Windows) You may be able to eliminate clicks and po ps by updating the driver for the display adaptor[…]
-
Page 78: Roland A-800PRO
78 Troubleshooting Was the driver installed correctly? Driver installation may have failed. Reinstall the driver. ➝ “Reinstalling the driver” (p. 80) Did you make input/output device settings for your software? Refer to the owner’s manual of your software and to the following pages, and select the A-PRO as the input/output device. • Windo[…]
-
Page 79: Roland A-800PRO
79 Troubleshooting Your computer may fail to correctly recognize the A-PRO if the driver could not be installed according to the specified procedure. If so, you’ll need to delete the driver that was detected by mistake. Use the following procedu re to remove the driver, and then install the driver once again accordin g to the procedure given in ?[…]
-
Page 80: Roland A-800PRO
80 Troubleshooting If a problem occurred while installing th e driver, use the following procedure to reinstall it. 1 Uninstall the A-PRO driver as descri bed in “Removing the driver” (p. 79). 2 Install the driver once again as de scribed in “Installing the Driver” (p. 12). The A-PRO’s dedicated driver allows you to check or verify the se[…]
-
Page 81: Roland A-800PRO
81 Troubleshooting If you experience problems such as interru pted notes or dropouts in the sound, you may be able to solve the problem by chan ging your computer’s power management settings. Windows 7 users 1 Open the “Control Panel,” click [Sys tem and Security], and then click [Power Options]. If you’re using an icon display, do uble-cli[…]
-
Page 82: Roland A-800PRO
82 Troubleshooting You may be able to solve the problem by changing the “Performance” setting of the system as described below. Windows 7 users 1 Open the “Control Panel,” click [System and Security], and click [System]. If you’re using an icon display, double-click the [System] icon. 2 At the left, click [Advanced system settings]. 3 A U[…]
-
Page 83: Roland A-800PRO
83 MIDI Implementation Chart Function… Basic Channel Mode Note Number V elocity Aftertouch Pitch Bend Control Change Program Change System Ex clusive System Common System Real Time Aux Message Notes T ransmitted Recognized Remarks Default Changed Default Messages Altered : T rue Voic e Note ON Note OFF Key ’ s Ch’ s : T rue # : Song Pos : Son[…]
-
Page 84: Roland A-800PRO
84 Main Specifications A-300PRO/500PRO/800PRO: MIDI KEYBOARD CONTROLLER ● Keyboard A-300PRO: 32 keys (with velocity and channel aftertouch) A-500PRO: 49 keys (with velocity and channel aftertouch) A-800PRO: 61 keys (with velocity and channel aftertouch) ● Controllers Pads: [A1]–[A8] Buttons: [B1]–[B4], [L1]–[L9] Knobs: [R1]–[R9] Sliders[…]
-
Page 85: Roland A-800PRO
85 Index A AC Adaptor …………………………………………………………. 72 ACT ……………………………………………………………………….. 21 [ACT] Button …………………………………………………………. 8 ADVANCED DRIVER MODE ……………………………….. 65 ADVANCED DRIVER SWIT[…]
-
Page 86: Roland A-800PRO
86 Index L L9 FUNCTION ……………………………………………….. 58, 69 LATCH ……………………………………………………………. 25, 55 LCD CONTRAST ……………………………………………. 57, 59 Loading a Control Map that was Saved on Your Computer …………………………………………….[…]
-
Page 87: Roland A-800PRO
87 Index T Tempo ……………………………………………………………. 24, 39 Tempo Assignment …………………………………………… 54 Tempo control ……………………………………………………. 24 Title ………………………………………………………………………. 24 Transmission[…]
-
Page 88: Roland A-800PRO
W ARNING : IMPORT ANT : As the colours of the wires in the mains lead of this apparatus may not c orrespond with the coloured markings identifying the terminals in your plug , proceed as follo ws: The wire which is colour ed GREEN-AND- YELL OW must be connec ted to the terminal in the plug which is marked b y the letter E or by the safety earth sym[…]
-
Page 89: Roland A-800PRO
This product complies with the requirements of EMC Dir ec tive 2004/108/EC. For EU C ountries For C anada This Class B digital apparatus meets all requir ements of the Canadian I nterference-Causing Equipment Regulations. Cet appareil numérique de la classe B respecte tout es les exigences du Règlement sur le matériel brouilleur du Canada. NO TI[…]
-
Page 90: Roland A-800PRO
For EU C ountries A-300_500_800C_e.book 90 ページ 2 010年2月22日 月曜日 午後9時13分[…]
-
Page 91: Roland A-800PRO
Contents of the Package The package of the A-300PRO/500PRO/800PRO (which we’ll subsequently refer to as the A-P RO) contai ns the following items. When y ou open the package, first make sure that all items are included. If any are m issing, cont act the dealer wh ere you pu rchased the A -PRO. MIDI keyboard controller A-PRO fig * The photo show t[…]
-
Page 92: Roland A-800PRO
* 5100009796 — 02 *[…]
Наличие:
уточняйте у менеджера
Миди-клавиатура, 61 клавиша
Roland A-800PRO миди-клавиатура
Выразительная 61-клавишная MIDI-клавиатура серии A-PRO
Если вы ищите клавишный контроллер, который вы можете использовать в студии, на сцене или где-либо, где вас застало вдохновение, вот он — A-800PRO. Сочетая лучшие разработки Roland и Cakewalk, A-800PRO дает возможности и ощущения, позволяющие добиться максимума от исполнения и записи музыки.
61 клавиша, отвечающая на скорость нажатия и послекасание канала
Вдохновляющая отдача для серьезных исполнителей
45 назначаемых контроллеров: ручек, слайдеров, кнопок, управление транспортом и т.д.
8 динамических пэдов для программирования барабанов и включения сэмплов
Ручка высоты тона/модуляции с удобным нескользящим покрытием
Возможно подключение двух педалей: Sustain и Expression
Питание от шины USB — не требуется адаптер питания (адаптер в комплект не входит и может быть приобретен отдельно)
Надежная конструкция разработана и производится на заводах Roland
В комплекте — программный комплекс Cakewalk Production Plus, включающий три независимых инструмента и софт для производства
Контроллер работает с любой программной рабочей станцией на Mac или PC
Поддерживает Windows 7 и Mac OS X Lion
Клавиатура
61 клавиша отвечает на скорость нажатия и послекасание канала
Контроллеры
Динамические пэды: [A1]–[A8]
Кнопки: [B1]–[B4], [L1]–[L9]
Ручки: [R1]–[R9]
Слайдеры: [S1]–[S9]
Разъемы для педалей: HOLD (P1), EXPRESSION (P2)
Ручка высоты тона и модуляции: BENDER, MODULATION
Клавиатура: AFTERTOUCH
Ручка ввода данных [VALUE]
Управляющие Кнопки
Кнопка [ACT], кнопка [ < ], кнопка [ > ], кпнока [DUAL], кнопка [SPLIT], кнопка [UPPER], кнопка [LOWER], кнопка [SHIFT], кнопка [TRANSPOSE], кнопка OCTAVE [–] [+]
Дисплей
Жидкопристаллический дисплей с подсветкой: 2 строки по 16 символов
Боковая Панель
Выключатель питания [POWER]: (положение питания от USB; положение выключено OFF; положение питание от адаптера DC IN), включатель слияния сигналов MIDI MERGE (ON/OFF)
Коммутация
Разъем для педали HOLD (P1): разъем типа джек 1/4 дюйма
Разъем для педали EXPRESSION (P2): Разъем типа джек TRS 1/4 дюйма
Разъемы MIDI (IN, OUT), разъем USB
Разъем для адаптера питания DC IN
Питание
По USB или от адаптера питания 9 В
Потребляемый Ток
300 мА
В Комплекте
Компакт-диск A-PRO, диск DVD с пакетом Cakewalk Production Plus, кабель USB, руководство пользователя, руководство по инсталляции пакета Cakewalk Production Plus, лицензионное соглашение.
Дополнительно Можно Приобрести
Педаль Hold: Roland DP-2 или DP-10, педаль экспрессии Roland EV-5 или EV-7, адаптер питания серии PCB.
Габариты и Вес
Ширина
100,2 см
Глубина
25,1 см
Высота
9,1 см
Вес
4,5 кг
Доставка
По Москве в пределах МКАД
Заказ до 5 000 ₽ — 400 ₽
Заказ от 5 001 ₽ — БЕСПЛАТНО
От МКАД до границ Московской обл.
до 10 км — 400 ₽
10-25 км — 1 000 ₽
25-40 км — 1 500 ₽
от 40 км — 2 000 ₽
От МКАД до границ Московской обл.
По тарифам СДЭК
Или иной транспортной компании
Доставка товара до транспортной компании — БЕСПЛАТНО
Оплата
Безналичным способом для физических лиц
Вам на электронную почту будет отправлен счёт для оплаты, который Вы можете распечатать и оплатить в ближайшем отделении банка, работающего с физическими лицами.
Перед оплатой товара безналичным способом, подтвердите наличие товара у наших менеджеров по телефону 8(495)5178580
Безналичным способом для юридических лиц
После оформления заказа и получения Наших реквизитов Вашей компании, на электронный адрес ответственного лица Вашей компании будет отправлен счет для оплаты. Доставка товара осуществляется после поступления денежных средств на расчетный счет компании. При получении товара у Вас должна быть с собой доверенность от компании или печать Вашей компании для подписания документов для бухгалтерии (оригинал счета, счета-фактуры, накладная) выдаются вместе с заказом.
Срок зачисления денежных средств 1-2 рабочих дня. Срок обработки заказа начинается с момента поступления платежа.
Оплатить с помощью банковской карты
Оплачивайте любыми российскими банковскими картами
Наш магазин предоставляет все гарантии в соответствии с Гражданским Кодексом РФ и Законом РФ «О защите прав потребителей». Приобретая товар в нашем магазине, Вы получаете платежный документ, подтверждающий факт совершения покупки в нашем магазине, накладную и надлежащим образом заполненный Гарантийный талон.
На большинство товаров срок гарантии составляет 12 месяцев. Обслуживание производится в авторизованных сервис-центрах производителей. Адреса и условия приводятся в сопутствующих товару гарантийных талонах.
Уважаемые покупатели, обращаем Ваше внимание, что Постановлением Правительства РФ №55 от 19 января 1998 г. (в ред. Постановления Правительства РФ №1222 от 20 октября 1998 г.) утвержден перечень непродовольственных товаров надлежащего качества, не подлежащих возврату или обмену на аналогичный товар другого размера, формы, габарита, фасона, расцветки и комплектации. В пункте 11 этого перечня указаны технически сложные товары бытового назначения, на которые установлены гарантийные сроки, в том числе бытовая радиоэлектронная аппаратура и электромузыкальные инструменты.
Обращаем ваше внимание на то, что данный интернет-сайт носит исключительно информационный характер и ни при каких условиях не является публичной офертой, определяемой положениями Статьи 437 (2) Гражданского кодекса РФ.
Нет отзывов об этом товаре.
Похожие товары
-
-
Nektar SE61
Портативная MIDI-клавиатура
11690р
В корзину
-
-
Nux NTK-61
MIDI-клавиатура, 61 клавиша
27440р
В корзину