
Как установить время на духовом шкафу
Вы, наконец, осуществили мечту многих современных хозяек и приобрели новенький духовой шкаф от известной компании Сименс, Аристон, bosch или Электролюкс. Все замечательно, покупка была доставлена в срок и вы самостоятельно установили этот агрегат. Но, внезапно столкнулись с проблемой – духовка не работает. Такая незадача, вовсе не означает, что вы приобрели не качественный товар. Оказывается, все современные духовые шкафы не функционируют без установки времени на электронном дисплее. Для запуска агрегата нужно установить время на духовом шкафу электролюкс или любой другой марки.
Инструктаж
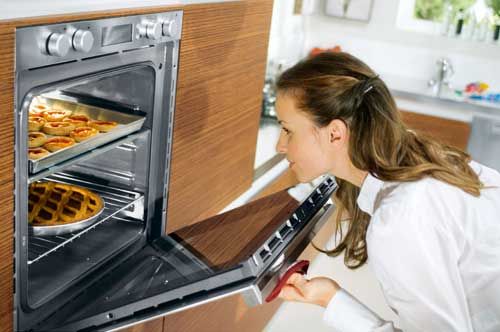
После окончательного подключения духовки к электросети, на панели управления отображается значок времени и мигающие цифры. На популярных моделях сименс, следует выбрать время суток. На духовках от компании аристон, bosch и электролюкс время суток выбирать не нужно.
На дисплее должна мигать цифра 12. Для установки точного времени, необходимо использовать специальную поворотную ручку или кнопку на дисплее. Задав точное значение, нажимаем значок, обозначающий часы и переходим к установке минут. В это время, минутные цифры будут мигать. Достигнув необходимого значения, фиксируем его при помощи той же кнопки с изображением часов.
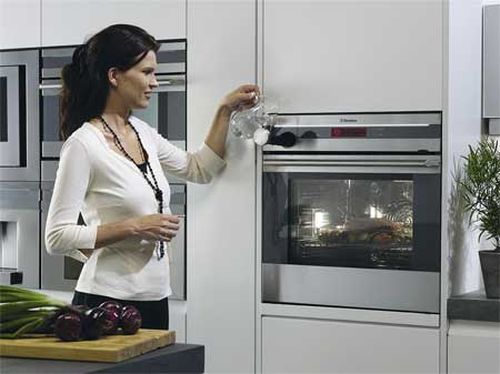
Для выставления точных цифр на разных моделях, следует использовать либо специальную ручку, переключающую значения, либо клавиши со знаками «+» и «-».

После введения нужных значений и фиксации при помощи кнопки с изображением часов, следует подождать 3-5 секунд, для занесения выбранных параметров в память устройства.
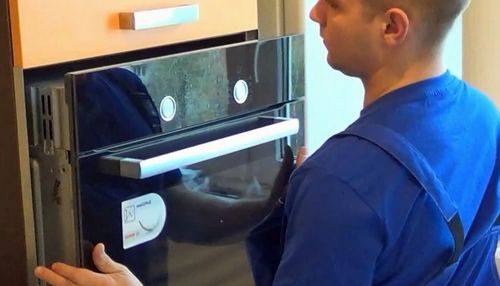
В экстренных ситуациях, при отключении электроэнергии, программа не запоминает выставленное ранее время. После устранения неполадок с подачей электричества, на дисплее духового шкафа, вы снова увидите мигающие цифры. Это означает, что для запуска агрегата необходимо вновь настроить точное время.
Таким образом, первый запуск духового шкафа не должен вызывать у вас затруднений. Главное правило, которое неизбежно нужно соблюдать для запуска оборудования – установка времени. Процесс не займет много времени, а подробная видео инструкция поможет осуществить установку быстро и без проблем. После установки значений времени на панели управления духовки, можно переходить к ее использованию по прямому назначению.
источник
Отзыв: Встраиваемая духовка Ikea «Рутинерад» — готовить просто удовольствие!
С заменой кухонного гарнитура встал вопрос и о замене техники.
Выбор духовок довольно большой, поэтому определиться как всегда трудно. После долгих поисков идеального варианта все-таки опять остановились на Икее.
Я уже писала о варочной панеле Мейлинг, от которой я просто в восторге. Вот и духовой шкаф Рутинерад меня радует уже 1,5 года. Готовлю с удовольствием!
Так встроенная духовка Рутинерад выглядит внешне. Скромная, без наворотов. И не плохо вписалась в классический гарнитур.
Люблю простоту в управлении! На панеле всего две ручки и дисплей
Ручка слева для выбора режимов духового шкафа. Достаточно плавно повернуть ручку до нужного рисунка и духовка включится на заданный режим
Несколько режимов для приготовления самых разных блюд
Подробная инструкция на русском языке прилагается
Мы испробовали почти все функции — готовили жаркое, пиццу, торты, выпекали хлеб, запекали на гриле овощи. Все получается равномерно пропеченным и не пригорает.
Ручка справа — термостат — дает возможность выбора нужной температуры. По умолчанию при включении духовки каждому режиму соответствует определенная заданная температура. Повернув ручку на «+» или «-» можно увеличить или соответственно уменьшить температуру.
Некоторое время духовка набирает нужную температуру, о чем свидетельствует мигающий индикатор нагрева. Как только температура духовки достигнет нужной величины, индикатор нагрева перестает мигать и прозвучит звуковой сигнал. Все! Духовка нагрелась. Ставим блюдо.
На таймере выставляем нужное время. В выключенном состоянии дисплей показывает текущее время.
Можно просто поставить таймер на нужное время приготовления (при помощи трех кнопочек на дисплее). После окончания времени приготовления духовка издаст звуковой сигнал, но не выключится.
А можно задать время продолжительности готовки, тогда после окончания времени умная духовка издав звуковой сигнал, погасит свет и сама выключится. Я стараюсь готовить строго по рецепту и эта функция самовыключения мне очень-очень нравится. Ведь можно не следить за процессом, а заняться другим делом.
К духовке в комплекте идет решетка и 2 эмалированных противня разной глубины.
А еще духовка Рутинерад снабжена двумя парами телескопических направляющих, которые имеют стопор на конце и выдерживают большой вес. Очень удобно!
Благодаря направляющим готовое горячее блюдо легко достать. При открытии дверцы нужно соблюдать осторожность, происходит высвобождение горячего воздуха.
Во время работы духовки работает мощный вентилятор. Благодаря ему поверхность совсем не нагревается. Она остается комнатной температуры.
Ребенок не обожжется и не откроет нечаянно включенную духовку. В духовке Рутинерад имеется замок от детей. Все предусмотрено. Ведь это же Икеа!
Внутри духовки Рутинерад антипригарное покрытие, которое легко моется
Стекло у дверцы можно полностью вытащить и поместить в посудомоечную машину. Но мы пока не снимали, его и так не трудно протереть)
В заключении хочу сказать, что я очень довольна своим выбором. Пользуемся часто.
Единственный маленький минус — у меня не получилось приготовление двух блюд одновременно. Я попыталась испечь одновременно два коржа для торта на разных уровнях. Один пропекся, другой не допекся. Наверное нужно за этим следить и через какое-то время менять их местами. Мне проще выпекать по отдельности.
Кстати, при покупке стоял выбор — Бош или Икеа. При таком же наборе функций Бош стоил на порядок дороже.
И еще один плюс в пользу Икеи — гарантия 5 лет! На всю технику Икеа дает такую длительную гарантию, и причем без всяких доплат.
Советую присмотреться. Считаю, что техника купленная в Икее очень надежная и простая в управлении. И умная! Пока писала, тортик испекся!
источник
IKEA ФРАМТИД (СВЧ) инструкция по эксплуатации онлайн — страница 43
Инструкция IKEA ФРАМТИД (СВЧ) для устройства микроволновая печь (СВЧ) содержит страницы на русском языке.
Размер файла: 6.58 MB. Состоит из 76 стр.
Вы можете скачать pdf файл этой инструкции: Скачать PDF
2. Несколько раз нажав кнопку Power (Мощность),
установите мощность на 0 Вт.
По окончании обратного отсчета времени таймера
Во время задания значений времени держите
дверцу открытой. Это дает вам возможность
произвести установку часов в течение 5 минут. В
противном случае каждый шаг установки должен
быть выполнен за 60 секунд.
1. Нажмите и не отпускайте кнопку «Стоп» 3
секунды, пока не начнет мигать цифра слева
2. Нажмите кнопки +/- для задания значения
3. Нажмите кнопку «Пуск». (При этом начнут
мигать две цифры справа (минуты)).
4. Нажимая кнопки +/-, задайте минуты.
5. Еще раз нажмите кнопку «Пуск».
Теперь часы настроены и находятся в рабочем
ПРИМЕЧАНИЕ: При первом подключении
прибора к сети и после отключения электроэнергии
дисплей остается пустым. Если время на часах не
установлено, дисплей остается пустым, пока не
будет задано время приготовления продукта.
Для отмены отображения показаний часов на
дисплее после их настройки еще раз нажмите
кнопку Stop (Стоп) на 3 секунды, а затем нажмите
Чтобы восстановить отображение показаний
часов на дисплее, выполните последовательность
Приготовление и подогрев с помощью
микроволн
Используйте этот режим для нормального
приготовления и подогрева овощей, рыбы,
1. Нажимайте кнопки +/- для установки времени.
2. Для включения прибора несколько раз
После начала процесса приготовления:
Нажимая кнопку Start (Пуск), можно легко
увеличивать значение времени с шагом в 30 секунд.
Каждое нажатие увеличивает время на 30 секунд.
Время приготовления также можно увеличить или
уменьшить с помощью кнопок +/-.
Нажимая кнопку «Мощность», можно также
изменить уровень мощности. При первом нажатии
кнопки на дисплей выводится текущий уровень
мощности. Чтобы изменить уровень мощности,
нажимайте кнопку «Мощность».
При желании пользователь может менять любые
настройки прибора даже во время приготовления
источник
Инструкция: как настроить часы на духовом шкафу
Бывает так, что после покупки новой духовки мечты все идет как надо, но вдруг возникает неожиданная проблема – духовка не включается! Рано расстраиваться, это не значит, что был приобретен бракованный товар. Дело в том, что новейшее поколение духовок не запускаются до тех пор, пока не настроить на дисплее часы.

Рано поддаваться панике, если печь не включается, возможно, просто надо выставить часы
Рано поддаваться панике, если печь не включается, возможно, просто надо выставить часы
Принцип работы электронного программатора
Электронный программатор создан для управления функциями и режимами духовки. Таймер показывает точное текущее время. После выполнения каждого режима издается звуковой сигнал, после чего духовка выключается.

Без настройки времени печь работать не будет
Программатор рассчитан на выполнение следующих функций:
Контроль изменения времени:
- Устанавливается текущее время.
- Установка времени готовки.
- Программирование времени завершения работы.
- Установка часов.
- Режим автоматического отключения.
- Блок клавиш от незапланированного переключения режимов, в частности, защита от детей.
Процесс установки настроек можно начать, нажав на функциональную клавишу. Далее в течение нескольких секунд нужно установить время при помощи кнопок «+» и «-». С помощью этих же клавиш можно поправить время, если были установлены неверные данные. Стоит учитывать, что короткое нажатие на кнопки плюс-минус регулирует часы на одну минуту, длинное ускоряет процесс.

В зависимости от модели духового шкафа, отличаются инструкции по установке времени
Когда духовку в первый раз подключили к сети, на дисплее должен появиться моргающий индикатор. Это значит, что нужно ввести текущее время.
Чтобы выбрать необходимую дополнительную функцию, рычаг настройки поставить на 0, поставить на таймере время, затем повернуть настроечную ручку на нужную функцию.
Инструктаж как установить время на духовом шкафу
После того как духовой шкаф установлен и подключен к электрической сети, загорается панель управления, обычно там отображаются мигающие цифры либо значок часов. Некоторые модели подразумевают установку времени суток, другие этого не требуют.
Чтобы установить точное время, нужно воспользоваться специальной ручкой или кнопкой в случае электронной панели. Установив нужные часы, необходимо нажать на знак времени и перейти в выставление минут. После корректировки точного времени нажимаем на значок часов. Все, время установлено.
Как правило, время выставляется либо при помощи кнопок «+» «-» или специальной поворотной ручкой. После того как время установлено и зафиксировано, нужно подождать несколько секунд.
Бывает, что случаются аварийные ситуации, когда подача тока прекращается, в таких случаях программатор не запоминает ранее установленные параметры, и после подачи электричества придется повторять процедуру заново. Иначе духовка просто не запустится, это необходимое условия для запуска прибора.
Как выставить время на разных марках духовок
Некоторые бытовые приборы не так-то просто настроить. Большинство из них имеют если не сложный, то непривычный способ программирования. Духовые шкафы в этом вопросе не исключение. Множество людей тратят массу времени и нервов на то, чтобы просто установить время на панели управления. Необходимо это потому, что без данной процедуры духовка вообще не включится. Люди читают инструкцию, делают все в соответствии с написанным, но все равно не выходит. Немаловажно, что каждая модель и марка духовки имеет свои особенности в установке. Попробуем разобраться.
- Печь фирмы Electolux не стала исключением, ее модели чуть ли не самые популярные по сложности настройки. Итак, чтобы выставить время, нужно отключить печь от сети на несколько минут. После включения на панели должна заморгать иконка часов. При помощи кнопок с изображением плюса и минуса выставляется точное время. Дождаться, пока часики перестанут мигать — время зафиксировано. Можно и не выключать из сети духовку, чтобы выставить часы, а просто нажать на значок время. Но в таком случае можно нечаянно поставить духовой шкаф на таймер, поэтому способ с отключением печи кажется более приемлемым.

С печью Electolux нужно внимательно следовать инструктажу и время лучше устанавливать при первичном включении в сеть, чтобы случайно не установить таймер

Если внимательно следовать руководству по настройке часов, ничего сложного в этом не окажется
Если следовать советам, первый запуск духового шкафа не должен вызвать затруднений. Процедура не отнимет много времени и сил, если внимательно изучить инструкцию и следовать рекомендациям. Установив время, можно смело приступать к готовке.
источник
-
Страница 1
RAFFINERAD RUTINERAD GB DE[…]
-
Страница 2
[…]
-
Страница 3
ENGLISH 4 DEUTSCH 22[…]
-
Страница 4
Contents Safety information 4 Safety instructions 5 Installation 7 Product description 7 Before first use 8 Daily use 8 Clock functions 10 Using the accessor ies 11 Additional functions 12 Helpful hints and tips 13 Care and cleaning 14 What to do if… 16 Technical data 18 Environment concerns 18 IKEA GUARANTEE 19 Subject to change without notice. […]
-
Страница 5
General Safety • Internally the appliance become s hot when in oper ation. Do not touch the heating elements th at are in the appliance. Al- ways use oven gloves to re move or put in accessor ies or ovenware. • Do not use a steam cleaner to clean the appliance. • Before maintenance cut the power supply. • Do not use harsh abrasive clea ners[…]
-
Страница 6
• Use only correct isolation devices: line protecting cut-outs, fuses (screw type fuses removed from the holder), earth leakage trips and contactors. • The electrica l installation must have an isolation device whi c h lets you disconnect the appliance from the mains at all poles. The isolation device must have a contact opening width of minimu[…]
-
Страница 7
Disposal Warning! Risk of injury or suffocation. • Disconnect the appliance from the mains supply. • Cut off the mains cable and discard it. • Remove the door catch to prevent chil- dren and pets to get closed in the appli- ance. Installation Warning! Refer to the Safety chapters. Refer to the Assembly Instructions for the installation. Elect[…]
-
Страница 8
Before first use Warning! Refer to the Safety chapters. Initial cleaning • Remove all accessories and r emovable shelf supports (if applicable ). • Clean the appliance before first use. Important! Refer to the chapter «Care and cleaning». Setting th e time of day The display shows and 12:00 . 12 flash- es. 1. Press + or — to set the c[…]
-
Страница 9
3. To deactivate the appliance, turn the knob for the oven functions to the off position. Oven functions Oven function Application Off position The appliance is off. Forced Air Cook- ing To bake on the maximum temperature on thr ee oven lev- els at the same time. When you use this function, de- crease the oven temperature by 20 — 40 °C from the st[…]
-
Страница 10
Display 1 7 2 3 4 5 6 7 1 Time and temperatur e 2 Heat-up and residual heat indicator 3 Water tank (selected models only) 4 Core temperature sensor (selected models only) 5 Door lock (selected models only) 6 Hours / minut es 7 Clock functions Buttons Button Function Description Clock To set a clock function. , Minus, plus To set the time. Heat-up a[…]
-
Страница 11
6. When the set time ends, the symbol or and the set time flash. The acous- tic signal sounds fo r two minutes. The appliance deactivate s. Press a bu tton or open the appliance door to stop the signal. If you pre ss while setting the time for Duration , the appliance switches to setting the End function. Setting the Minute Min der Used to set a co[…]
-
Страница 12
1 °C Pull out the right and left hand tele- scopic runners. 2 °C Put the wire shelf on the telescopic run- ners and carefully push them into the appliance. You can also use the telescopic runners with the trays or pans supplied with the appliance (refer to “P roduct description”). Make sure you push back the telescopic runners fully in the ap[…]
-
Страница 13
Helpful hints and tips • The appliance has four shelf levels. Count the shelf levels from the bottom of the ap- pliance floor. • The appliance has a special system which circulates the air and constantly recycles the steam. With this system you can cook in a steamy environment and keep the food soft inside and crusty outside. It de- creases the[…]
-
Страница 14
Weight (kg) Food Oven Function Level Oven tempera- ture (°C) Cooking Time (min) Instant cakes 2 160 45 — 55 1P i e s 2 160 80 — 100 Biscuits 3 140 25 — 35 2 Lasagne 2 180 45 — 60 1W h i t e B r e a d 2 190 50 — 60 1P i z z a 1 190 — 200 20 — 30 Care and cleaning Warning! Refer to the Safety chapters. • Clean the front of the appliance with a s[…]
-
Страница 15
The rounded ends of the shelf supports must point to the front. Oven lamp Warning! Be careful wh en you change the oven lamp. There is a risk of electrical shock. Before you change the oven lamp: • Deactivate the oven. • Remove the fuse s in the fuse box or deac- tivate the circuit breaker. Put a cloth on the bottom of the oven to prevent damag[…]
-
Страница 16
7 2 1 Carefully lift (step 1) and remove (step 2) the glass panels one by one. Start from the top panel. Clean the glass panels with water and soap. Dry the glass panels carefully. Installing the door and the glass panels When the cleaning is completed, install the glass panels and the oven door. Do the above steps in the opposite sequence. Make su[…]
-
Страница 17
Problem Possible cause Remedy The oven does not heat up. The display shows Demo . The demo mode is activa- ted. 1. Deactivate the appli- ance. 2. Press and hold the but- ton + . 3. When an acoustic signal sounds, turn the knob for the oven functions to the first function. Demo flashes in the display. 4. Turn the knob for the oven functions to the o[…]
-
Страница 18
Technical data Dimensions (internal) Width Height Depth 437 328 401 Usable volumes 57 l Area of baking tray 1140 cm² Top heating element 800 W Bottom heating element 1000 W Grill 1650 W Fan 2000 W Total rating 2500 W Voltage 230 V Frequency 50 Hz Number of functions 9 Energy Consumption with a standard load, Conventional (Top and Bottom Heat) 0.79[…]
-
Страница 19
IKEA GUAR ANTEE How long is th e IK EA guarantee valid? This guarantee is vali d for five (5) years from the original date of purchase of Y our appliance at IKEA, un less the appliance is named LAGAN in which case two (2) years of guarantee apply. The original sales re- ceipt is required as proof of purchase. If service work i s carried out un der […]
-
Страница 20
• Transportation damages. If a customer transports the produc t to their home or other address, IKEA is not liable for any damage that may occur during transport. However, if IKEA delivers the product to the customer’s delivery address, then damage to the product that occurs during this delivery will be covered by this guar- antee. • Cost […]
-
Страница 21
Do You need extra help? For any additional questions not related to After Sales of your appliances, please con- tact our nearest IKEA store call centre. We recommend you read the appliance d ocu- mentation carefully be fore contacting us. ENGLISH 21[…]
-
Страница 22
Inhalt Sicherheitsinformationen 22 Sicherheitshinweise 23 Montage 25 Gerätebeschreibung 26 Vor der ersten Inbetriebnahme 26 Täglicher Gebrauch 27 Uhrfunktionen 29 Verwendung des Zubehörs 30 Zusatzfunktionen 31 Praktische Tipps und Hinweise 31 Reinigung und Pflege 33 Was tun, wenn … 35 Technische Daten 37 Umwelttipps 37 IKEA Garantie 38 Änderu[…]
-
Страница 23
Allgemeine Sicherheit • Während des Betriebs wird da s Geräteinnere heiss. Berüh- ren Sie nicht die Heizelemente im Gerät. Verwenden Sie zum Anfassen des Zubehörs und der Töpfe wärmeisolierende Handschuhe. • Benutzen Sie zum Reinigen des Geräts keinen Dampfreiniger. • Unterbrechen Sie vor Wartun gsarbeiten die Stromversor- gung. • B[…]
-
Страница 24
• Achten Sie darauf, dass das Netzkabel die Gerätetür nicht be rührt, insbesondere wenn die Tür heiß ist. • Alle Teile, die gegen d irektes Berühren schützen sowie die isol ierten Teile müssen so befestigt werden, d ass sie nicht ohne Werkzeug entfernt werden können. • Stecken Sie den Netzstecker erst nach Abschluss der Monta ge in d[…]
-
Страница 25
Reinigung und Pflege Warnung! Risiko von Verletzungen, Brand oder Beschädigungen am Gerät. • Schalten Sie vor Reinigungsa rbeiten im- mer das Gerät aus und ziehen Sie den Netzstecker aus der Steckdose. • Vergewissern Si e sich, dass das G erät abgekühlt ist. Zusätzlich besteht die Ge- fahr, dass die Glasscheiben brechen. • Ersetzen Sie […]
-
Страница 26
Gerätebeschreibung 1 2 3 5 4 6 8 7 1 Backofen-Einstell knopf 2 Elektronischer Programms peicher 3 Temperaturwahlknopf 4 Lüftungsöffnungen 5 Rost 6 Backofenlampe 7 Gebläse 8 Typenschild Backofenzubehör • Gitterrost x 1 Für Kochgeschirr , Kuchenformen, Br aten. • Kuchenblech x 1 Für Kuchen und Plätzchen. • Kuchenblech hochrandig x 1 Zum[…]
-
Страница 27
4. Lassen Sie das Gerät zehn Minuten lang eingeschaltet. 5. Stellen Sie die Funktion und die Höchsttemperatur ein. 6. Lassen Sie das Gerät zehn Minuten lang eingeschaltet. Das Zubehör kann heißer werden als bei normalem Gebrauch. Das Gerät kann Ge- ruch und Rauch verströmen. Das ist normal. Sorgen Sie für eine ausreichende Belüftung. Mecha[…]
-
Страница 28
Backofenfunktion Anwendung Ober- und Un- terhitze Zum Backen und Braten auf einer Ebene. Grill Zum Grillen flacher Lebensmi ttel in der Mitte des Rostes und zum Toasten. Unterhitze Zum Backen von Kuchen mit krossen Böden und zum Ein- kochen von Lebensmitteln. Umluftgrillen Zum Braten von grösseren Fleischstücken oder Geflügel auf einer Ebene. A[…]
-
Страница 29
Taste Funktion Beschreibung , Minus, Plus Einstellen der Zeit. Aufheiz- und Restwärmeanzeige Wenn Sie eine Backofenfunktion einschal- ten, leuchten die Balken im Display nacheinander auf. Mit den Balken wird der Anstieg bzw. das Fallen der Backofentem- peratur gekennzeichnet. Wenn Sie das Gerät ausschalten, zeigt das Display die Restwärme an, we[…]
-
Страница 30
1. Drücken Sie wiederholt auf , bis und 00 im Display blinken. 2. Stellen Sie den Kurz zeitwecker mit der Taste + oder — ein. Beim ersten Einste l- len werden die Minuten und Sekunden berechnet. Ist die ei ngestellte Zeit län- ger als 60 Minuten, wird im Display das Symbol angezeigt. Das Gerät be- rechnet jetzt die Zeit in Stunden und Minuten. 3[…]
-
Страница 31
Zusatzfunktionen Kindersicherung Wenn die Kindersicherung eingeschaltet ist, kann der Backofen nicht bedient werden. Damit wird sichergestel lt, dass Kinder das Gerät nicht versehentlich einschalten. Ein- und Ausschalten der Kindersicherung: 1. Stellen Sie keine Backofenfunkti on ein. 2. Halten Sie die Tasten und + gleich- zeitig 2 Sekunden lang g[…]
-
Страница 32
Backen von Kuchen • Die Backofentür nicht öffnen, bevor 3/4 der Backzeit abgelaufen ist • Wenn Sie zwei Backblech e gleichzeitig nutzen, lassen Sie ei ne Ebene dazwischen frei. Garen von Fleisch und Fisch • Setzen Sie beim Garen von Speisen mit hohem Fettgehalt eine Brat- und Fett- pfanne ein, damit keine dauerhaften Fle- cken im Backofen v[…]
-
Страница 33
Reinigung und Pflege Warnung! Siehe Sicherheitshinweise. • Feuchten Sie ein wei ches Tuch mit war- mem Wasser und etwas Reinigungsmittel an, und reinigen Sie damit die Vordersei — te des Geräts. • Reinigen Sie die Metalloberflächen mi t einem handelsüblichen Reinigungsmittel. • Reinigen Sie den Innenraum des Back- ofens nach jedem Gebrauch[…]
-
Страница 34
1. Drehen Sie die Glasab deckung gegen den Uhrzeigersinn und nehmen Sie sie ab. 2. Reinigen Sie die Glasa bdeckung. 3. Ersetzen Sie die Backofenl ampe mit ei- ner 25 W, 230 V (50 Hz) und bis zu 300 °C hitzebeständigen Glühbirne (Sockel: E14). 4. Bringen Sie die Gl asabdeckung wieder an. Reinigung der Backofen-Tür Die Backofentür hat drei Glass[…]
-
Страница 35
7 2 1 Heben Sie eine Glasscheibe nach der anderen vor- sichtig an (Schritt 1) und entfernen Sie sie (Schritt 2). Be- ginnen Sie mit der obersten Glasschei — be. Reinigen Sie die Gl asscheiben mit Wasser und Spülmittel. Trocknen Sie di e Glasschei- ben sorgfältig ab. Einsetzen der Backofentür und der Glasscheiben Nach der Reinigung müssen die Ba[…]
-
Страница 36
Problem Mögliche Ursache Abhilfe Der Backofen heizt nicht. Die Sicherung im Siche- rungskasten hat ausgelöst. Prüfen Sie die Sicherung. Falls die Sicherung öfter als einmal auslöst, wenden Sie sich an eine Elektrofachkraft. Die Backofenlampe leuchtet nicht. Die Backofenlampe ist de- fekt. Ersetzen Sie die Backofen- lampe. Der Backofen heizt ni[…]
-
Страница 37
Wir empfehlen, hier folgende Daten zu notieren: Modell (MOD.) ……… …………. ………. ……… Produktnummer (P NC) … ………. ……….. ………… ….. Seriennummer (S.N.) ……… …………. ………. …….. . Technische Daten Abmessungen (innen) Breite Höhe Tiefe 437 328 401 Nutzvolumen 57 Liter Grösse des Kuchenble[…]
-
Страница 38
IKEA Garantie Wie lang ist die IKEA Garantie gültig? Diese Garantie ist für (5) fünf Jahre gültig ab dem Originalkaufdatum Ihres Gerätes bei IKEA; sollte das Gerät die Bezeichnung «LAGAN» tragen, gilt die Garanti e in die- sem Fall nur (2) zwei Jahre. Als Kaufnach- weis ist der Ori ginalkassenbon oder die Originalrec hnung erforderl[…]
-
Страница 39
• Beschädigung folgender Tei le: Glaskera- mik, Zubehör, Geschirr und Besteckkörbe, Zuleitungen und Drainageschläuche-/ rohre, Lampen und Lampenabdeckun- gen, Knöpfe/Wählschalter, Gehäuse und Teile des Gehäuses ; es sei denn, es kann nachgewiesen werden, dass diese Schä- den durch Produktionsfehler verursacht wurden. • Fälle, in denen[…]
-
Страница 40
Um sicherzustel len, dass wir Sie stets opti- mal unterstützen, lesen Sie bitte die Monta- geanleitung und/oder den Bedienungsan- leitungsabschnitt diese r Broschüre durch, bevor Sie sich an uns wenden. Wie können Sie uns erreichen, wenn Sie uns benötigen? Auf der letzten Seite die ser Broschüre fin- den Sie eine vollständi ge Liste mit offiz[…]
-
Страница 41
Country Phone number Call Fee Opening time België 070 24 6 0 1 6 Binnenlandse gespreksk ost en 8 tot 2 0 W eekdagen Belgique T arif des appels nationaux 8 à 20. En semaine България 0 0 3 5 9 8 8 8 1 6 4 0 8 Такса за повикване от страната От 9 до 1 8 ч в работни дни Česká r epublika 2 46 0 1 97 2[…]
-
Страница 42
42[…]
-
Страница 43
43[…]
-
Страница 44
© Inter IKEA Syst ems B.V. 2008 AA-720093-1 892954103-D- 052013[…]

GB
RAFFINERAD
RUTINERAD
DE


ENGLISH 4
DEUTSCH 22
ENGLISH 4
Contents
Safety information 4
Safety instructions 5
Installation 7
Product description 7
Before first use 8
Daily use 8
Clock functions 10
Using the accessories 11
Subject to change without notice.
Additional functions 12
Helpful hints and tips 13
Care and cleaning 14
What to do if… 16
Technical data 18
Environment concerns 18
IKEA GUARANTEE 19
Safety information
Before the installation and use of the appliance, carefully read
the supplied instructions. The manufacturer is not responsible if
an incorrect installation and use causes injuries and damages.
Always keep the instructions with the appliance for future reference.
Children and vulnerable people safety
Warning! Risk of suffocation, injury or permanent disability.
• This appliance can be used by children aged from 8 years
and above and persons with reduced physical, sensory or
mental capabilities or lack of experience and knowledge if
they are supervised by an adult or a person who is responsible for their safety.
• Do not let children play with the appliance.
• Keep all packaging away from children.
• Keep children and pets away from the appliance when it operates or when it cools down. Accessible parts are hot.
• If the appliance has a child safety device, we recommend
that you activate it.
• Cleaning and user maintenance shall not be made by children without supervision.
ENGLISH 5
General Safety
• Internally the appliance becomes hot when in operation. Do
not touch the heating elements that are in the appliance. Always use oven gloves to remove or put in accessories or
ovenware.
• Do not use a steam cleaner to clean the appliance.
• Before maintenance cut the power supply.
• Do not use harsh abrasive cleaners or sharp metal scrapers
to clean the glass door since they can scratch the surface,
which may result in shattering of the glass.
• To remove the shelf supports first pull the front of the shelf
support and then the rear end away from the side walls. Install the shelf supports in the opposite sequence.
Safety instructions
Installation
Warning! Only a qualified person must
install this appliance.
• Remove all the packaging.
• Do not install or use a damaged appli-
ance.
• Obey the installation instruction supplied
with the appliance.
•Always be careful when you move the
appliance because it is heavy. Always
wear safety gloves.
• Do not pull the appliance by the handle.
• Make sure that the appliance is installed
below and adjacent safe structures.
• The sides of the appliance must stay ad-
jacent to appliances or to units with the
same height.
Electrical connection
Warning! Risk of fire and electrical
shock.
• All electrical connections should be made
by a qualified electrician.
• The appliance must be earthed.
• Make sure that the electrical information
on the rating plate agrees with the power
supply. If not, contact an electrician.
• Always use a correctly installed shockproof socket.
• Do not use multi-plug adapters and extension cables.
• Make sure not to cause damage to the
mains plug and to the mains cable. Contact the Service or an electrician to
change a damaged mains cable.
• Do not let mains cables to come in touch
with the appliance door, specially when
the door is hot.
• The shock protection of live and insulated
parts must be fastened in such a way that
it cannot be removed without tools.
• Connect the mains plug to the mains
socket only at the end of the installation.
Make sure that there is access to the
mains plug after the installation.
• If the mains socket is loose, do not connect the mains plug.
• Do not pull the mains cable to disconnect
the appliance. Always pull the mains
plug.

ENGLISH 6
• Use only correct isolation devices: line
protecting cut-outs, fuses (screw type
fuses removed from the holder), earth
leakage trips and contactors.
• The electrical installation must have an
isolation device which lets you disconnect
the appliance from the mains at all poles.
The isolation device must have a contact
opening width of minimum 3 mm.
• This appliance complies with the E.E.C.
Directives
Use
Warning! Risk of injury, burns or
electric shock or explosion.
• Use this appliance in a household environment.
• Do not change the specification of this
appliance.
• Make sure that the ventilation openings
are not blocked.
• Do not let the appliance stay unattended
during operation.
• Deactivate the appliance after each use.
• Be careful, when you open the appliance
door while the appliance is in operation.
Hot air can release.
• Do not operate the appliance with wet
hands or when it has contact with water.
• Do not apply pressure on the open door.
• Do not use the appliance as a work surface or as a storage surface.
• Always keep the appliance door closed
when the appliance is in operation.
• Open the appliance door carefully. The
use of ingredients with alcohol can cause
a mixture of alcohol and air.
• Do not let sparks or open flames to come
in contact with the appliance when you
open the door.
• Do not put flammable products or items
that are wet with flammable products in,
near or on the appliance.
Warning! Risk of damage to the
appliance.
• To prevent damage or discoloration to
the enamel:
– do not put ovenware or other objects in
the appliance directly on the bottom.
– do not put aluminium foil directly on the
bottom of the appliance.
– do not put water directly into the hot
appliance.
– do not keep moist dishes and food in
the appliance after you finish the cooking.
– be careful when you remove or install
the accessories.
• Discoloration of the enamel has no effect
on the performance of the appliance. It is
not a defect in the sense of the warranty
law.
• Use a deep pan for moist cakes. Fruit juices cause stains that can be permanent.
Care and Cleaning
Warning! Risk of injury, fire or damage
to the appliance.
• Before maintenance, deactivate the appliance and disconnect the mains plug
from the mains socket.
• Make sure the appliance is cold. There is
the risk that the glass panels can break.
• Replace immediately the door glass panels when they are damaged. Contact the
Service.
• Be careful when you remove the door
from the appliance. The door is heavy!
• Clean regularly the appliance to prevent
the deterioration of the surface material.
• Remaining fat or food in the appliance
can cause fire.
• If you use an oven spray, obey the safety
instructions on the packaging.
Internal light
• The type of light bulb or halogen lamp
used for this appliance, is only for household appliances. Do not use it for house
lighting.
Warning! Risk of electrical shock.
• Before replacing the lamp, disconnect the
appliance from the power supply.
• Only use lamps with the same specifications.
ENGLISH 7
Disposal
Warning! Risk of injury or suffocation.
• Disconnect the appliance from the mains
supply.
Installation
Warning! Refer to the Safety chapters.
Refer to the Assembly Instructions for
the installation.
Electrical installation
Warning! Only a qualified person must
do the electrical installation.
The manufacturer is not responsible if
you do not follow the safety precau-
tions from the chapter «Safety Information».
This appliance is only supplied with a main
cable.
Cable
Cable types applicable for installation or
replacement: H07 RN-F, H05 RN-F, H05
RRF, H05 VV-F, H05 V2V2-F (T90), H05 BBF.
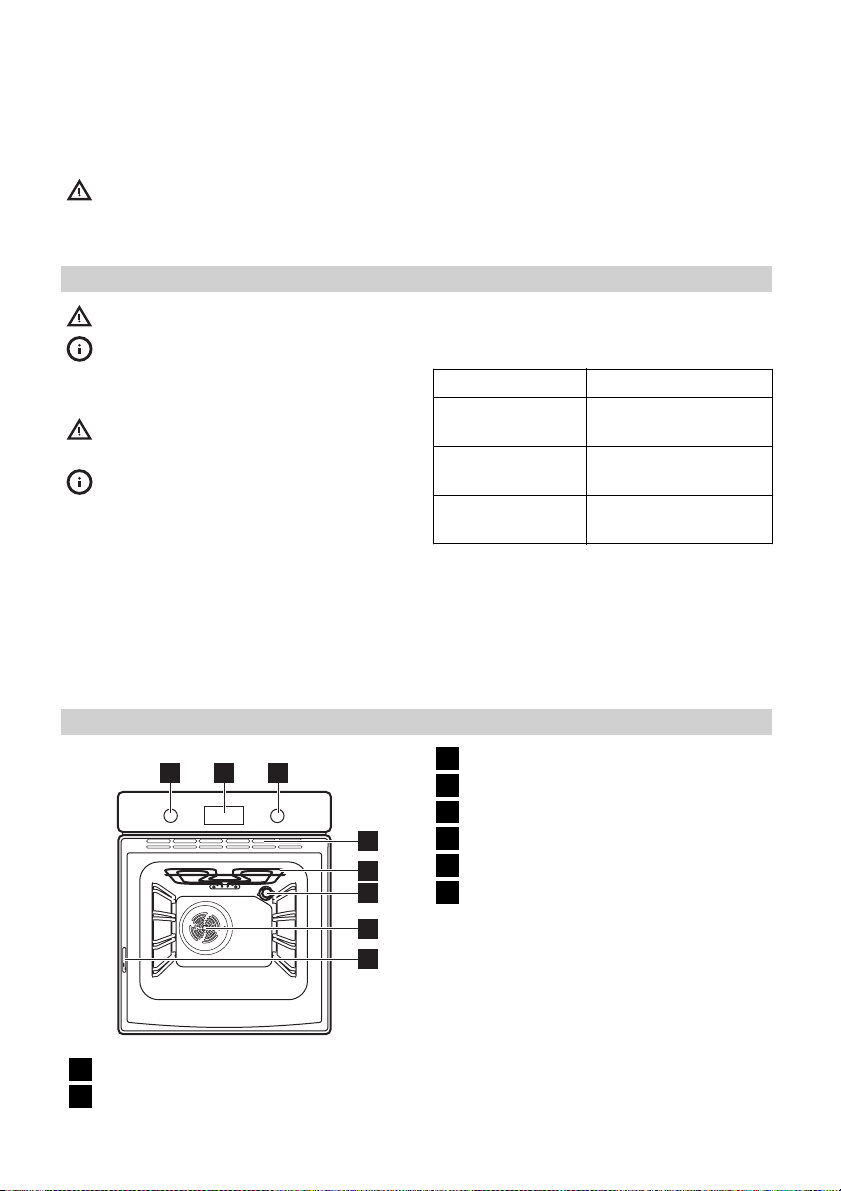
Product description
2
1
Knob for the oven functions
1
Electronic programmer
2
3
4
5
6
7
8
• Cut off the mains cable and discard it.
• Remove the door catch to prevent children and pets to get closed in the appliance.
For the section of the cable refer to the total
power (on the rating plate) and to the table:
Total power Section of the cable
maximum 1380W3 x 0.75 mm²
maximum 2300W3 x 1 mm²
maximum 3680W3 x 1.5 mm²
The earth cord (green / yellow cable) must
be 2 cm longer than phase and neutral cables (blue and brown cables).
Knob for the temperature
3
Ventilation openings
4
Grill
5
Oven lamp
6
Fan
7
Rating plate
8
Oven accessories
• Wire shelf x 1
For cookware, cake tins, roasts.
• Baking tray x 1
For cakes and biscuits.
• Grill- / Roasting pan x 1
To bake and roast or as pan to collect
fat.
• Telescopic runners x 2 sets
For shelves and trays.
ENGLISH 8
Before first use
Warning! Refer to the Safety chapters.
Initial cleaning
• Remove all accessories and removable
shelf supports (if applicable).
• Clean the appliance before first use.
Important! Refer to the chapter «Care and
cleaning».
Setting the time of day
The display shows
es.
1. Press + or — to set the correct hour.
2.
Press
only when you first set the time. Afterwards, the new time value is saved automatically after five seconds.
The display shows
hour. 00 flashes.
3. Press + or — to set the correct minutes.
4.
Press
only when you first set the time. Afterwards, the new time value is saved automatically after five seconds.
The display shows the new time.
Changing the time of day
Press
for the time of day
To set the new time, follow the procedure
given in «Setting the time of day».
Preheating
Preheat the empty appliance to burn off the
remaining grease.
1.
Set the function
temperature.
to confirm. This is necessary
to confirm. This is necessary
You can change the time of day only if
the appliance is off.
again and again until the indicator
and 12:00. 12 flash-
and the set
flashes in the display.
and the maximum
2. Let the appliance operate for one hour.
3.
Set the function
temperature.
4. Let the appliance operate for ten minutes.
5.
Set the function
temperature.
6. Let the appliance operate for ten minutes.
Accessories can become hotter than usual.
The appliance can emit an odour and
smoke. This is normal. Make sure that the
airflow is sufficient.
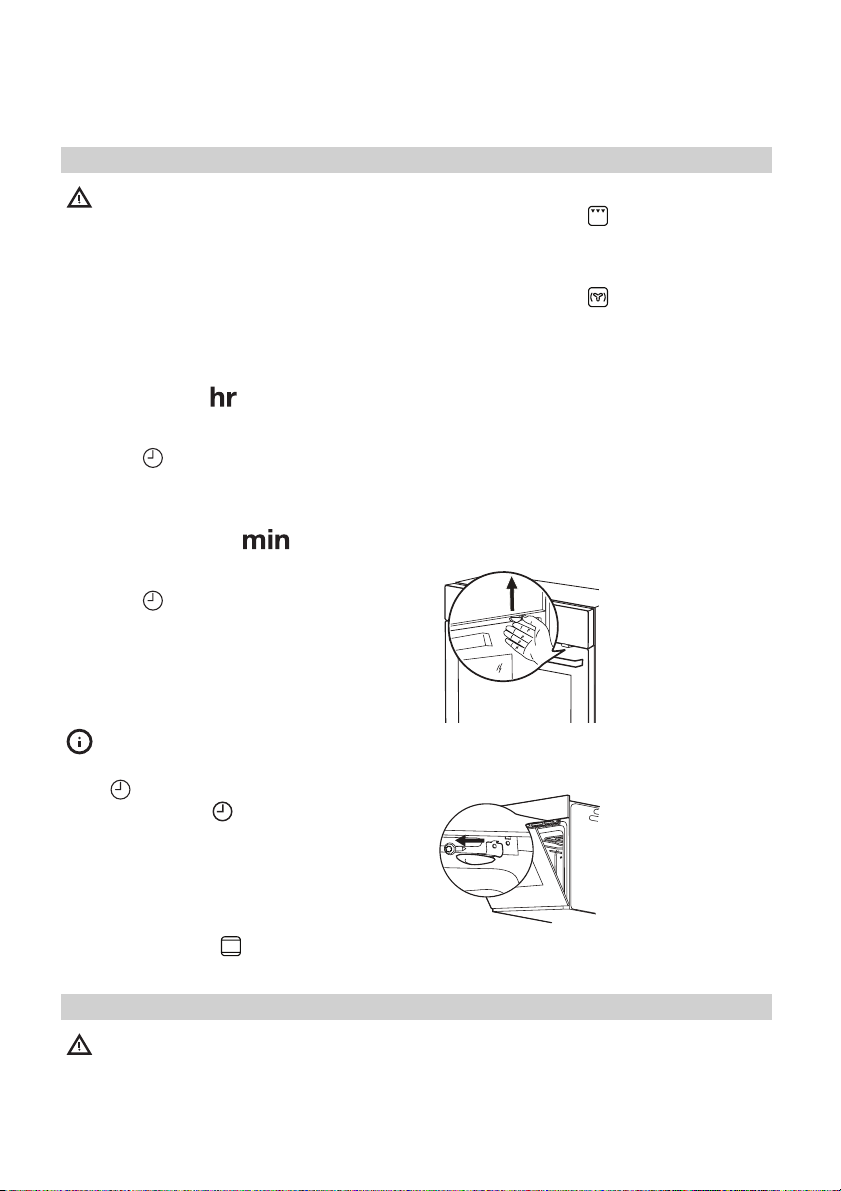
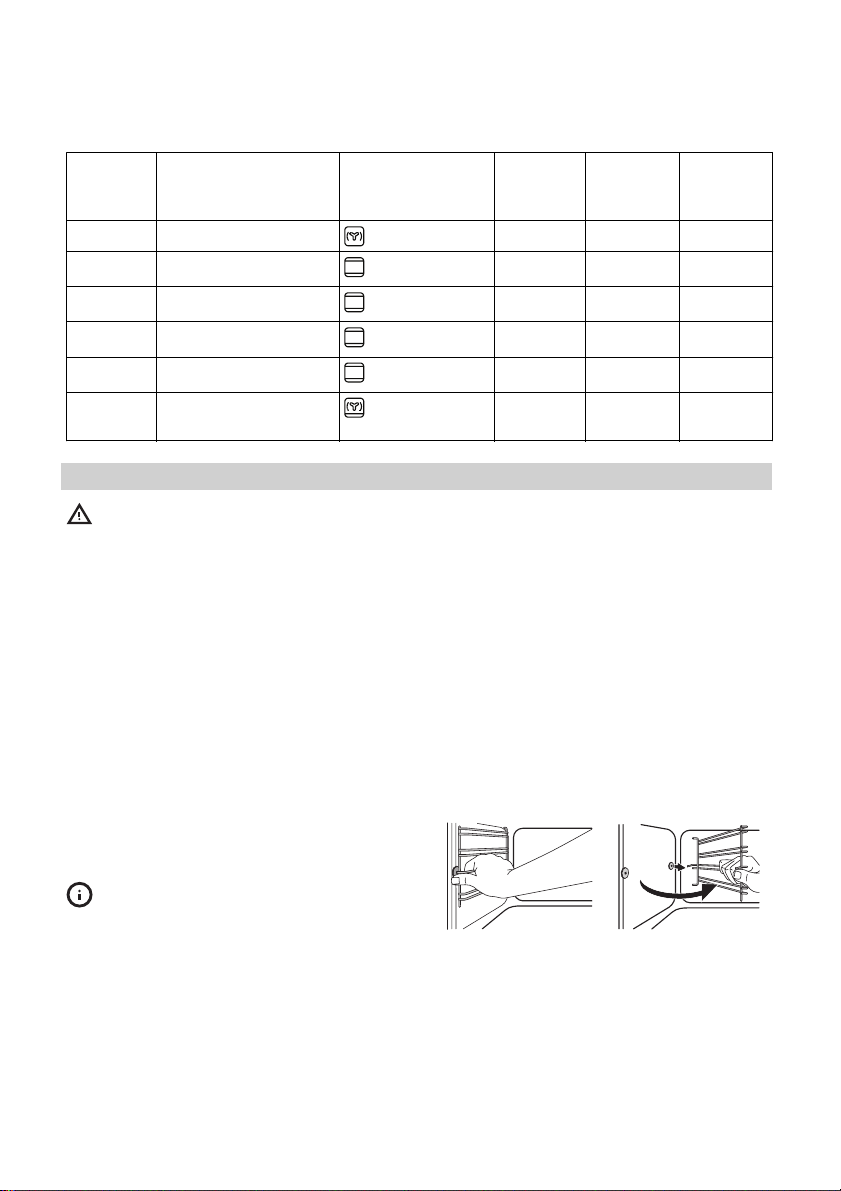
Mechanical child lock
The appliance has the child lock installed
and activated. It is below the control panel
on the right side.
and the maximum
and the maximum
To open the oven
door with the child
lock installed, pull
the child lock handle up as shown in
the picture.
Close the oven door
without pulling the
child lock.
To remove the child
lock, open the oven
door and remove
the child lock with
the torx key. The
torx key is in the
oven fitting bag.
Daily use
Warning! Refer to the Safety chapters.
Activating and deactivating the appliance
1. Turn the knob for the oven functions
clockwise to an oven function.
2. Turn the knob for the temperature to set
the temperature. The display shows the
set temperature.
ENGLISH 9
3. To deactivate the appliance, turn the
knob for the oven functions to the off
position.
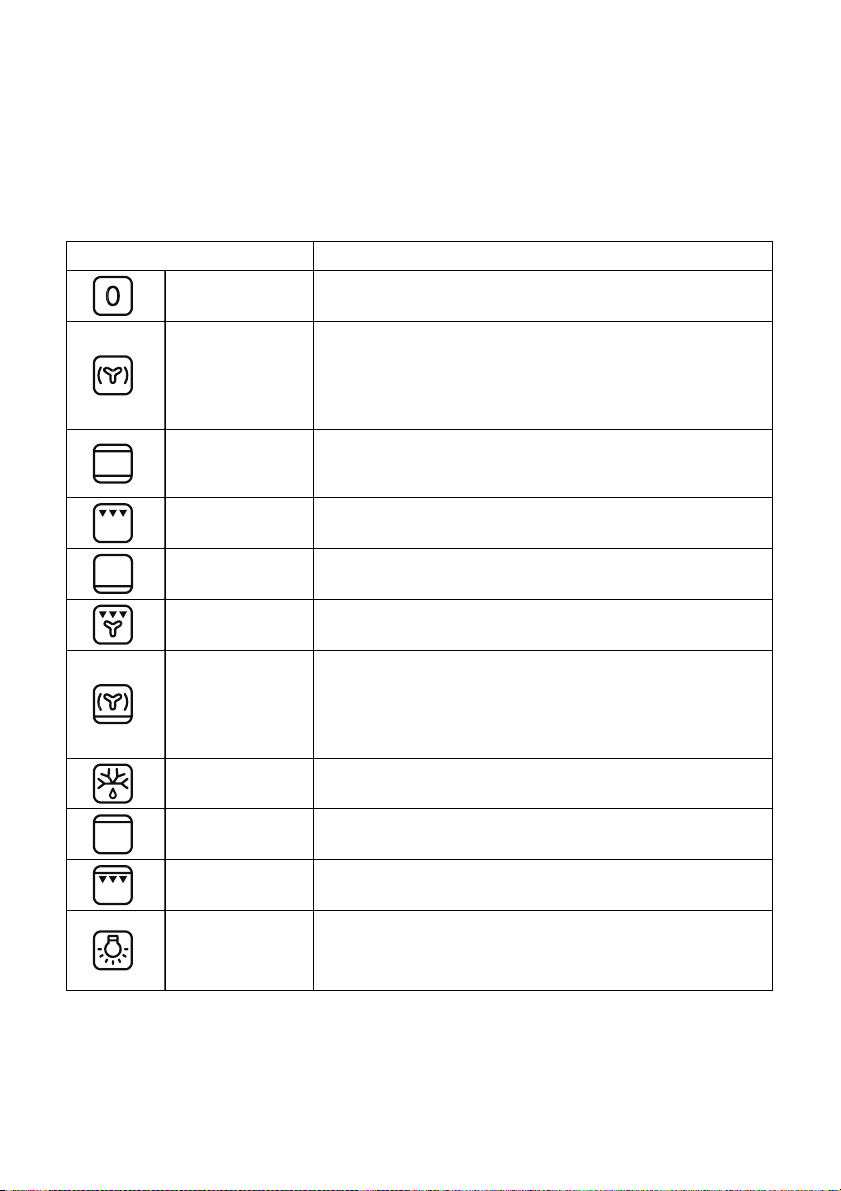
Oven functions
Oven function Application
Off position The appliance is off.
To bake on the maximum temperature on three oven lev-
Forced Air Cook-
ing
Conventional
(Top and Bottom
Heat)
Grilling To grill flat food in the middle of the grill, and to toast.
els at the same time. When you use this function, decrease the oven temperature by 20 — 40 °C from the
standard temperatures you use for Conventional Cooking. Also to dry food.
To bake and roast on one oven level.
Bottom Heat
Grilling with Fan
Bread and Pizza
Baking
Defrost
Top Heat To finish cooked dishes.
Fast Grilling To grill flat food in large quantities, and to toast.
Light
To bake cakes with crispy or crusty bottoms, and to preserve food.
To roast larger joints of meat or poultry on one level. Also to gratinate, and to brown.
To bake food on one oven level for a more intensive
browning and a crispy bottom. When you use this function, decrease the oven temperature by 20 — 40 °C from
the standard temperatures you use for Conventional
Cooking.
To defrost frozen food. The knob for the temperature
must be in the off position.
To activate the oven lamp without a cooking function.
It can be used with residual heat in final cooking phase to
save energy.
ENGLISH 10
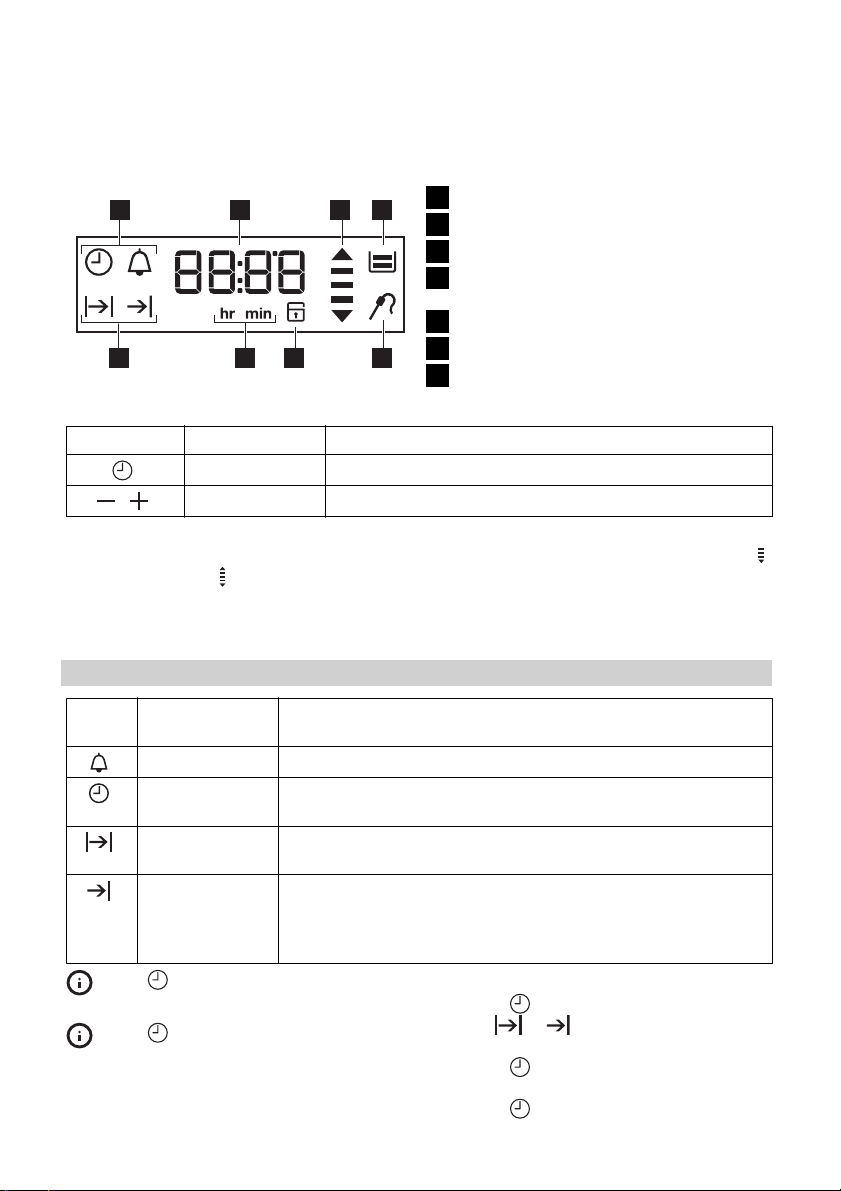
Display
Time and temperature
17 2 3
Buttons
Button Function Description
Clock To set a clock function.
,
Heat-up and residual heat indicator
When you activate an oven function, the
bars in the display
The bars show that the oven temperature
increases or decreases.
Minus, plus To set the time.
come on one by one.
1
Heat-up and residual heat indicator
2
Water tank (selected models only)
3
Core temperature sensor (selected
4
models only)
Door lock (selected models only)
5
Hours / minutes
6
4567
Clock functions
7
When you deactivate the appliance, the
display shows the residual heat indicator
if the temperature in the oven is more than
40 °C. Turn the temperature knob left or
right to show the oven temperature on the
display.
Clock functions
Sym-
bol
Press again and again to change
the clock function.
Press
clock functions, or wait 5 seconds for
the setting to be confirmed automatically.
Function Description
Minute Minder To set a countdown time.
Time of day To set, change or check the time of day. Refer to «Setting the
time of day».
Duration To set how long the appliance must operate. First set an oven
function before you set this function.
End To set when the appliance must be deactivated. First set an
oven function before you set this function. You can use Duration and End at the same time (Time Delay) to set the time
when the appliance must be activated and then deactivated.
to confirm the settings of the
Setting the Duration or End function
1.
Press
bol
2. Press + or — to set the minutes.
3.
Press
4. Press + or — to set the hour.
5.
Press
again and again until the sym-
or flashes in the display.
to confirm.
to confirm.
ENGLISH 11
6.
When the set time ends, the symbol
or and the set time flash. The acous-
tic signal sounds for two minutes. The
appliance deactivates. Press a button
or open the appliance door to stop the
signal.
If you press
for Duration
switches to setting the End
Setting the Minute Minder
Used to set a countdown time. The maximum time you can set is 2 hours 30 minutes.
This function has no effect on the operation
of the oven. You can set the Minute Minder
at any time, also if the appliance is off.
1.
Press
00 flash in the display.
2. Press + or — to set the Minute Minder. At
first the time is calculated in minutes
and seconds. When the time you set is
longer than 60 minutes, the symbol
comes on in the display. The appliance
then calculates the time in hours and
minutes.
while setting the time
, the appliance
function.
again and again until and
Using the accessories
Warning! Refer to the Safety chapters.
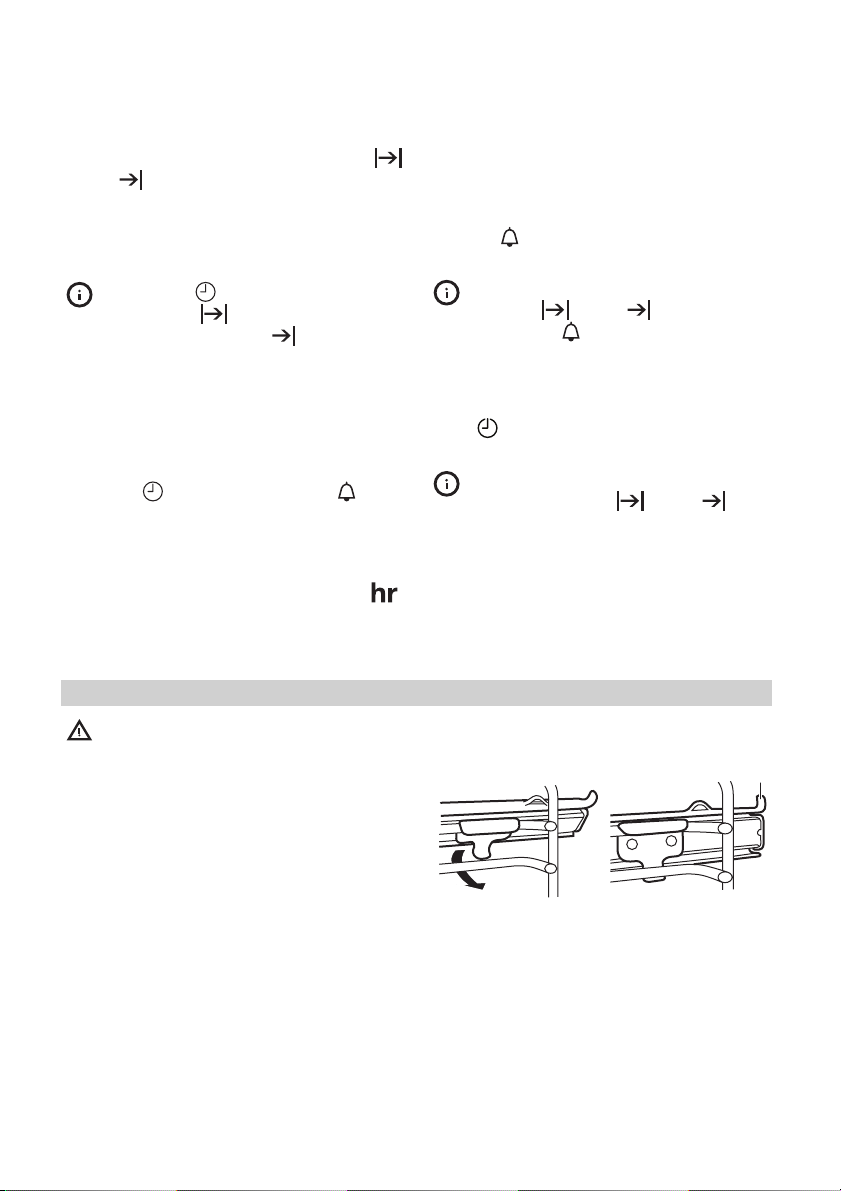
Telescopic runners
Installing the telescopic runners
You can put the telescopic runners on each
level.
Make sure that the two telescopic runners
are on the same level.
The stop element (A) that is at one end of
the telescopic runner must point up.
3. The Minute Minder starts automatically
after five seconds.
4. When the set time ends, the acoustic
signal sounds for two minutes. 00:00
flash in the display. Press a but-
and
ton to stop the signal.
If you set the Minute Minder when the
Duration
ates, the symbol
Count Up Timer
Use the Count Up Timer to monitor how
long the oven operates.
Press
shows time without clock symbols.
tion operates.
1 2
Using telescopic runners
With telescopic runners you can put in and
remove the shelves more easily.
again and again until the display
You cannot use the Count Up Timer
when the Duration
or End function oper-
comes on in the display.
or End func-
A
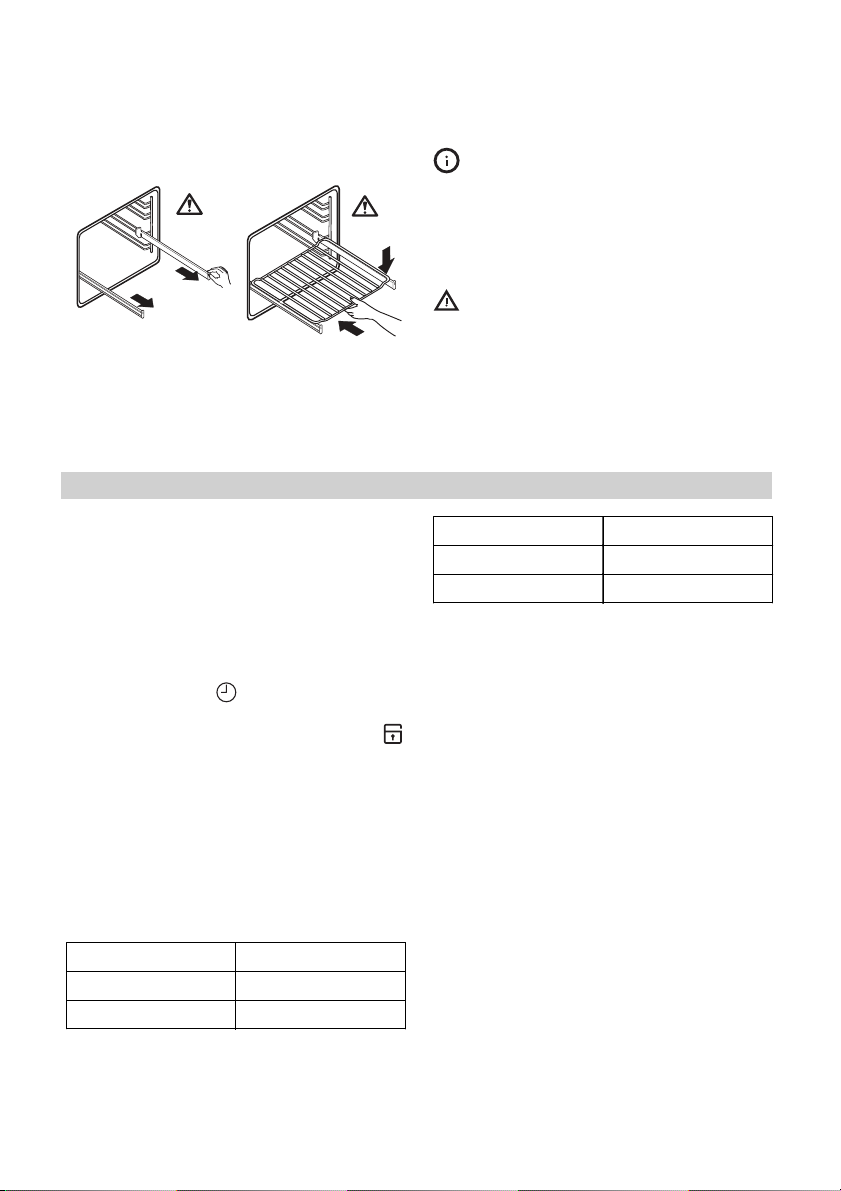
ENGLISH 12
1
Pull out the right
and left hand telescopic runners.
2
°C
Put the wire shelf on
the telescopic runners and carefully
push them into the
appliance.
Additional functions
Child Lock
When the Child Lock is on, you cannot operate the oven. This is to make sure that
children do not accidentally activate the
appliance.
Activating and deactivating the Child
Lock function:
1. Do not set an oven function.
2.
Press and hold
time for two seconds.
3.
An acoustic signal sounds. SAFE and
come on or go out in the display (when
you activate or deactivate the Child
Lock).
Automatic switch-off
For safety reasons the appliance deactivates after some time:
• If an oven function operates.
• If you do not change the oven temperature.
Oven temperature Switch-off time
30 — 115 °C 12,5 h
120 — 195 °C 8.5 h
and + at the same
You can also use the telescopic runners
with the trays or pans supplied with the
appliance (refer to “Product description”).
°C
Make sure you push back the telescopic
runners fully in the appliance before you
close the oven door.
Caution! Do not clean the telescopic
runners in the dishwasher. Do not
lubricate the telescopic runners.
Oven temperature Switch-off time
200 — 245 °C 5.5 h
250 °C 3.0 h
After an automatic switch-off, press a button to activate the appliance again.
Important! The automatic switch-off works
with all oven functions, except Light,
Duration and End.
Cooling fan
When the appliance operates, the cooling
fan activates automatically to keep the surfaces of the appliance cool. If you deactivate the appliance, the cooling fan continues to operate until the temperature in the
appliance cools down.
Safety thermostat
Incorrect operation of the appliance or defective components can cause dangerous
overheating. To prevent this, the oven has a
safety thermostat which interrupts the power supply. The oven activates again automatically when the temperature drops.

ENGLISH 13
Helpful hints and tips
• The appliance has four shelf levels. Count
the shelf levels from the bottom of the appliance floor.
• The appliance has a special system which
circulates the air and constantly recycles
the steam. With this system you can cook
in a steamy environment and keep the
food soft inside and crusty outside. It decreases the cooking time and energy
consumption to a minimum.
• Moisture can condense in the appliance
or on the door glass panels. This is normal. Always stand back from the appliance when you open the appliance door
while cooking. To decrease the condensation, operate the appliance for 10 minutes before cooking.
• Clean the moisture after each use of the
appliance.
• Do not put the objects directly on the appliance floor and do not put aluminium
foil on the components when you cook.
This can change the baking results and
cause damage to the enamel.
Baking cakes
• Do not open the oven door before 3/4 of
the set cooking time is up.
Weight
(kg)
1Pork / lamb
Food Oven Function Level Oven
• If you use two baking trays at the same
time, keep one empty level between
them.
Cooking meat and fish
• Use a deep pan for very fatty food to
prevent the oven from stains that can be
permanent.
• Leave the meat for approximately 15 minutes before carving so that the juice
does not seep out.
• To prevent too much smoke in the oven
during roasting, add some water into the
deep pan. To prevent the smoke condensation, add water each time after it dries
up.
Cooking times
Cooking times depend on the type of food,
its consistency, and volume.
Initially, monitor the performance when you
cook. Find the best settings (heat setting,
cooking time, etc.) for your cookware, recipes and quantities when you use this appliance.
temperature (°C)
2 180 100 — 110
Cooking
Time
(min)
1 Veal / Beef
1,2 Chicken/Rabbit
1,5 Duck
3Goose
4Turkey
1Fish
1 Stuffed Pepperoni
Tomatos / Roasted
Potatos
2 190 70 — 100
2 200 70 — 80
1 160 120 — 150
1 160 150 — 200
1 180 210 — 240
2 190 30 — 40
2 190 50 — 70
ENGLISH 14
Weight
(kg)
Instant cakes
1Pies
Biscuits
2 Lasagne
1White Bread
1Pizza
Food Oven Function Level Oven
Care and cleaning
Warning! Refer to the Safety chapters.
• Clean the front of the appliance with a
soft cloth with warm water and a cleaning agent.
• To clean metal surfaces use a usual
cleaning agent.
• Clean the oven interior after each use.
Then you can remove dirt more easily
and it does not burn on.
• Clean stubborn dirt with a special oven
cleaner.
• Clean all oven accessories after each use
and let them dry. Use a soft cloth with
warm water and a cleaning agent.
• If you have nonstick accessories, do not
clean them using aggressive agents,
sharp-edged objects or a dishwasher. It
can destroy nonstick coating.
Stainless steel or aluminium appliances:
Clean the oven door with a wet sponge only. Dry it with a soft cloth.
Do not use steel wool, acids or abrasive
materials, as they can cause damage to the
oven surface. Clean the oven control panel
with the same precautions.
temperature (°C)
2 160 45 — 55
2 160 80 — 100
3 140 25 — 35
2 180 45 — 60
2 190 50 — 60
1 190 —
Cleaning the door gasket
• Regularly do a check of the door gasket.
The door gasket is around the frame of
the oven cavity. Do not use the appliance
if the door gasket is damaged. Contact
the Service Centre.
• To clean the door gasket, refer to the
general information about cleaning.
Shelf supports
You can remove the shelf supports to clean
the side walls.
Removing the shelf supports
1
Pull the front of the
shelf support away
from the side wall.
Installing the shelf supports
Install the shelf supports in the opposite sequence.
200
2
Pull the rear end of
the shelf support
away from the side
wall and remove it.
Cooking
Time
(min)
20 — 30
2
1
Loading…
Русский
- Bedienungsanleitung Ikea RUTINERAD
- Ikea RUTINERAD User Manual
- Manual Usuario Ikea RUTINERAD
- Mode d’emploi Ikea RUTINERAD
- Istruzioni Ikea RUTINERAD
- инструкция Ikea RUTINERAD
- Ikea RUTINERADの取扱説明書
- Handleiding Ikea RUTINERAD
- Manual de uso Ikea RUTINERAD
Вам нужна инструкция? Мы поможем Вам ее найти и сэкономить Ваше время.
- 44 stron
- 0 mb
Изделие Ikea RUTINERAD, а также другие, которыми Вы пользуетесь ежедневно, наверняка вы получили в комплекте с инструкцией обслуживания. Из опыта наших пользователей мы знаем, что большинство из Вас не уделили этому особого внимания. Большая часть инструкций, сразу же после покупки попадает в корзину для мусора вместе с коробкой — это ошибка. Ознакомьтесь с информацией, касающейся инструкции Ikea RUTINERAD, которая поможет Вам в будущем сэкономить нервы и избежать головной боли.
Важная подсказка — не забывайте хотя бы раз прочитать инструкцию Ikea RUTINERAD
Если вы не хотите каждый раз читать информационные брошюры, касающиеся, тех или Ikea RUTINERAD иных изделий, достаточно, прочитать их раз — сразу же после покупки устройства. Вы получите основное знания, касающиеся поддержания изделия Ikea RUTINERAD в хорошем эксплуатационном состоянии, так, чтобы без проблем достигнуть его планируемого цикла работы. Затем инструкцию можно отложить на полку и вернуться к ней только в случае, если вы не уверены, правильно ли проводится техобслуживание изделия. Правильный уход является необходимым элементом Вашего удовольствия Ikea RUTINERAD.
Раз в году пересмотрите шкафчик, в котором держите инструкции для всех устройств, — выбросите те, которыми вы уже не пользуетесься. Это поможет Вам сохранять порядок в своей домашней базе инструкций обслуживания.
Summary of Contents for Ikea RUTINERAD
Что находится в инструкции Ikea RUTINERAD? Почему стоит ее прочитать?
- Гарантия и подробности, касающиеся техобслуживания изделия
Хорошей идеей будет прикрепить чек к странице инструкции. Если что-то плохое случится во время использования Ikea RUTINERAD, у вас будет комплект документов, необходимый для гарантийного ремонта. В этой части инструкции вы найдете информацию об авторизованных сервисных центрахIkea RUTINERAD а также, как самостоятельно правильно ухаживать за оборудованием — так, чтобы не потерять гарантийных прав. - Указания по монтажу и Setup
Не терять нервов и времени на самостоятельную попытку установки и первого запуска изделия. Воспользуйтесь рекомендациями производителя Ikea RUTINERAD чтобы правильно запустить изделие, без лишнего риска повреждения оборудования. - Информация, касающаяся дополнительных запчастей (входящих в комплект а также являющихся опцией)
Пересматривая эту часть документа вы сможете проверить, доставлен ли ваш Ikea RUTINERAD с полним комплектом аксессуаров. Вы также сможете узнать, какие дополнительные запчасти или аксессуары для Ikea RUTINERAD Вы сможете найти и докупить к своему устройству. - Troubleshooting
Самые частые проблемы, касающиеся Ikea RUTINERAD и методы их решения. Это очень полезная часть руководства по обслуживанию — она позволит Вам сэкономить много времени на поиск решений. 90% проблем с Ikea RUTINERAD повторяется у многих пользователей. - Требования, касающиеся питания и энергетический класс
Информация, касающаяся количества потребляемой энергии, а также рекомендации, касающиеся установки и питания Ikea RUTINERAD. Прочитайте, чтобы оптимально пользоваться Ikea RUTINERAD и не использовать большего количества ресурсов, нежели это необходимо для правильной работы изделия. - Специальные функции Ikea RUTINERAD
Здесь вы можешь узнать, как персонализировать изделие Ikea RUTINERAD. Вы узнаете, какие дополнительные функции могут помочь Вам удобно использовать продукт Ikea RUTINERAD а также, какие функции Вашего устройства оптимальны для выполнения конкретной деятельности.
Как видите в инструкции вы найдете информацию, которая реально поможет Вам в использовании Вашего изделия. Стоит с ней ознакомиться, чтобы избежать разочарований, возникающих из более короткого, нежели предусматривалось, периода исправности изделия Ikea RUTINERAD. Если все же вы не хотите копить инструкции в своем доме, наш сайт поможет Вам в этом — вы должны найти у нас руководство по обслуживанию большинства из своих устройств, а также Ikea RUTINERAD.
Комментарии (0)
Инструкция
Посмотреть инструкция для Ikea RUTINERAD бесплатно. Руководство относится к категории печи, 14 человек(а) дали ему среднюю оценку 8.4. Руководство доступно на следующих языках: русский, английский. У вас есть вопрос о Ikea RUTINERAD или вам нужна помощь?
Задайте свой вопрос здесь
Технические характеристики Ikea RUTINERAD
Ниже вы найдете технические характеристики изделия и руководства по эксплуатации Ikea RUTINERAD.
Ikea RUTINERAD — это духовой шкаф, который предназначен для использования на кухне. Он имеет три уровня, на которые можно поместить еду для приготовления. Он также оснащен встроенной функцией микроволновой печи и пылесборником, который поглощает жир и осадок в процессе готовки и легко удаляет их. RUTINERAD имеет дисплей, на котором отображается информация о времени и температуре, а также таймер, который можно установить для контроля времени приготовления. Кроме того, он может размораживать продукты быстро и эффективно благодаря своей функции автоматической разморозки. Духовой шкаф RUTINERAD имеет энергопотребление в 1100 Вт и может достигать температуры до 300 градусов Цельсия. Он выпускается в цвете из нержавеющей стали и имеет современный стильный дизайн. RUTINERAD может быть установлен в стандартный размерный проём (60 см). Однако, его необходимо подключать к электрической сети и соединять с электропитанием во время эксплуатации.
Главная
| Бренд | Ikea |
| Модель | RUTINERAD |
| Изделие | печь |
| Язык | русский, английский |
| Тип файла | Руководство пользователя (PDF) |
Часто задаваемые вопросы
Не можете найти ответ на свой вопрос в руководстве? Вы можете найти ответ на свой вопрос ниже, в разделе часто задаваемых вопросов о Ikea RUTINERAD.
Как разогреть духовку?
Для предварительного прогрева духовки вы можете нажать кнопку «Предварительный прогрев» на панели управления. Затем используйте кнопки «+» и «-» для настройки желаемой температуры. Духовка автоматически начнет разогреваться до заданной температуры.
Как я могу установить время приготовления для моего блюда?
Чтобы установить время приготовления, нажмите кнопку «Таймер» на панели управления. Используйте кнопки «+» и «-», чтобы настроить желаемую продолжительность. Таймер будет обратный отсчет и уведомит вас, когда установленное время истечет.
Как я могу переключаться между различными режимами приготовления {в печи Ikea RUTINERAD}?
Для переключения между режимами приготовления используйте кнопку «Функция» на панели управления. Каждое нажатие на кнопку будет переключать доступные режимы приготовления, такие как Конвекция, Гриль или Принудительная циркуляция воздуха. Следите за цифровым дисплеем, чтобы узнать текущий выбранный режим.
Как я могу почистить печь?
Для регулярной чистки вы можете использовать мягкое мыльное решение и мягкую ткань, чтобы удалить грязь или разливы с внутренней и наружной поверхности духового шкафа. Избегайте использования абразивных моющих средств или химических веществ. Помните, что перед чисткой духовку нужно остудить.
Что происходит при использовании функции «гриль»?
При использовании функции гриля верхний элемент духовки будет нагреваться. Режим гриля используется, чтобы придать блюдам аппетитную темную корку.
Обязательно ли предварительно разогревать духовку Ikea?
Для лучшего приготовления блюда печь всегда нужно предварительно разогревать до рекомендуемой температуры.
Правильно ли, что вентилятор продолжает работать, когда духовка уже выключена?
Это правильно. Вентилятор системы охлаждения продолжает работать пока температура духовки не упадет до необходимой.
Какой способ лучше всего подходит для очистки решетки в духовке?
Решетку духовки рекомендуется чистить под струей горячей воды при помощи губки для мытья посуды.
Как очистить духовку от пригоревшего жира?
Для удаления пригоревшего жира лучше всего подходит спрей для чистки духовки. Распылите его внутри духовки и оставьте на 30 минут. Затем вымойте духовку теплой водой.
Инструкция Ikea RUTINERAD доступно в русский?
Да, руководствоIkea RUTINERAD доступно врусский .
Не нашли свой вопрос? Задайте свой вопрос здесь