
Once you log into the SAP system, the SAP easy access will be clearly seen on your left side of the screen in a hierarchy like structure. Also called a SAP user menu, it has two folders namely SAP menu and favorites. The latter provides a storage point for your most preferred codes for transaction. Having your most used transactions in this folder will keep you from using a lot of your time to search for the codes.
The simple steps to saving your codes in this folder involve selecting the transaction code you want, clicking on the Favorites option on the menu then clicking on Add. On the other hand, if you are already familiar with the transaction code you want to save, click Favorites then select Insert Transaction on the Menu bar. Type the code into the window that pops up then press Enter. There are other ways of adding the codes inside the folder but these are some of the easiest.

SAP Business Workplace is also be accessed through the initial screen of SAP easy access. The functions of these include creating, editing and sending short messages, searching for documents and folders as well as beginning workflows.
Other activities on the Business Workplace include:
Opening an appointment calendar and maintaining it
This is done by just clicking on the Appointment Calendar option. For an employee calendar, select Environment, then Employee Calendar and after typing their name in, an appointment calendar will be created for them in a fresh session. You can also have the personal data and contact details of the employees presented.
With authorization, one can maintain the employee’s calendar as well as their office settings. One can in addition choose to save their Workplace display settings or have them discarded. The document preview can be hidden or displayed through the settings option.
There sub folders that constitute the SAP menu folder include
- Web Client Framework
- Cross Application
- Human Resource
- Information System
- Tools, office, Accounting and Logistics
Depending on the administrator’s authorization, this folder makes it possible for working on the system by users. After logging into the system, the system administrator defined user menu will be what will appear.
The Navigation Area
In instances when there is no user menu or some items are missing from it you can simply go through the Sap Standard Menu to get the general idea of the entire system. Then, find your way to the items you require using the navigation area.
The SAP easy access menu is as key a component that is necessary to do ones basic day to day assignments. Each item on the menu has a dropdown arrow on the left that will enable the user to either collapse or expand the navigation region’s menus.
On the navigation area also, there are different methods of opening the application you wish to use. The context list of options will be viewed by selecting an item of your choice and clicking the resulting mouse key. It is by opening this list of options that one can retrieve the navigation’s area significant tasks and instructions.
Click on Edit then select Execute in New Window to have the application function on a fresh session.
Customizing SAP easy access to better suite your company needs is also possible.
This is a system that is trusted and in use by numerous big companies in running their operations. SAP system can be too technical for some thus they need a tutorial that will take them through right from the basics. This includes the features of SAP and how to use the basic functions.
The tutorials may be downloadable from the internet while some are in form of books and one should pick one according to their current knowledge on the systems.
Go for tutorials or SAP online training where you can get added learning materials. A SAP easy access tutorial with video demonstrations and practical steps will be easier for you to comprehend rather than just a written document.
When looking for resources on how to operate this easy access system from the internet, you need to know how to determine the credibility of the source. A periodical or a blog written by a credited author are sites that will most likely provide reliable information. This is information that is based in facts and actually makes sense.
The sources of information need to have the author and the owner of the site indicated. You also need to get up to date information and this means looking at the date when the information was last updated.
The Basics of SAP Easy Access
The basics about this tutorial will include learning about the contents of the SAP window and the functions of its components. This knowledge is key when it comes to steering through and making optimal use of SAP easy access.
The bars on this window include the title, status and the menu bar. You will enter the transaction code in the command field. Information about the system including messages will be displayed on the status bar. The icons you need for your transactions will be contained in the status toolbar some of these include Print, for printing that screen, Back, to get back to the preceding screen, Exit, for returning to the earlier application and discarding the current one.
Save, to save your work, while Cancel allows you to leave your work without saving or you can use find and find next to do your searches. You can also scroll though the pages using the icons: first page, last page, previous page and next page.
Learning about this user menu on the other hand will not guarantee that you will not run into some obstacles while using the system. In case this happens, you can always rely on your system administrator for assistance.
With the system administrator, one can create, edit and give out tasks to different users. Having authorization, with SAP easy access, one can also have role menus called and assigned to users.

Overview
- Pre-Requisites
- Logging In
- Basic Layout (SAP Easy Access User Menu)
- Accessing a Transaction Code Screen
- Additional Information
Note that there is a different approach for those with SAP Fiori. For this post, we will focus on the standard SAP GUI.
PRE-REQUISITES: What do I need before I log on to SAP?
- Stable internet connection
- Company VPN is installed and working (*if applicable)
- SAP GUI Logon is installed
- SAP Environments are added to the SAP GUI Logon
- SAP User Credentials are active for your use
For the prerequisites, companies usually provide you with an onboarding documentation that should cover step by step instructions in line with their policies, processes, and security measures. For this post, I will be giving a general run-through of the prerequisites and the basic actions that need to be done.
Stable internet connection
You need stable internet connection to be able to proceed with SAP access. You can connect through LAN or Wifi.
Company VPN is installed and working (*if applicable)
This is only applicable if you will be working outside of the company or client’s work area. If you do not have this installed, you may ask around for the company procedures for VPN installation. For example, some companies do this through ticket requests. This type of information is usually provided in the onboarding or “new hire” documentation.
Some of you may ask the following questions:
“Why do I need a company VPN to access SAP?”
Think of it as a company’s private network. You could say that there are some security measures or details that the company wants to be done in their private network. They wouldn’t want all company transactions and access to happen over public network especially if SAP is a huge chunk in their system architecture.
“How do I know if I need to use VPN to access SAP?”
If you are within the company premises of which you want to access SAP, you do not need a VPN because you should already be connected to the company WIFI or LAN. However, if you are at home / working remotely and you are using another WIFI or LAN (for example: your own personal WIFI), you need to use and connect to the company VPN to access SAP.
If you are a consultant that wants to access the client’s SAP, you need to connect to the client’s VPN.
SAP GUI Logon is installed
The SAP GUI Logon icon looks like the images below. If you do not have this installed, you may ask around for the company procedures for SAP installation. For example, some companies also do this through ticket requests.
SAP Environments are added to the SAP GUI Logon
When you double click on the SAP GUI icon, you will first be presented with an empty SAP Logon box. In order to connect to SAP, you need to specify the SAP environments that you want to connect to.

The most basic SAP environments you need as a consultant will be the (1) Development, (2) Quality Assurance / Test, and (3) Production / Live System.

- Development (Dev) – All development or configuration changes will be done here.
- Quality Assurance (QA) – The development / configuration changes will be moved to the QA environment for testing purposes. The QA environment also serves as the environment where support consultants can try to replicate errors in production. Here they can do tweaks, investigation, and analysis to aid in their solution proposition.
- Production (Prod) – If testing goes well and user acceptance is secured, the development / configuration changes will be moved to the Prod environment. This is the Live system that is utilized by the business users.
For business users, they should have access to Production environments only. Note that business users can be given Quality Assurance environment access if they need to test some features or they have a dedicated environment for User Acceptance Testing (UAT).
In order to add SAP Environments, go to Connections and click on the New button.
You should be presented with a screen that says “Create New System Entry”. Select User Specified System and click Next

In the next screen, select the Connection Type. In this example, I chose Custom Application Server. Then fill up the details for the following: (dummy values entered for example purposes)
- Description
- Application Server
- Instance Number
- System ID
- SAProuter String (optional)

Once you are done filling up the details, click next to edit the Network Settings or click Finish.
If you want to edit the details later on, you can always go back to the SAP GUI Logon, right click on the Environment, then select Properties.
You should now have an entry under Connections.
Repeat the same steps until you are done entering all the SAP environments needed.
SAP User Credentials are active for your use
Ensure that you have valid SAP credentials for logging onto the SAP Environment. Assuming that necessary on-boarding procedures and authorizations requests have been done, SAP Authorizations team should provide you with a log on ID and initial password for the specific environment and client.
You should now be ready to Log in to SAP.
LOGGING IN SAP FOR THE FIRST TIME
From you SAP GUI Logon, double click on the SAP environment you want to access.
You should be presented with the screen below. Make sure to select the appropriate client number and enter the user credentials assigned to you.
After logging in for the first time, the system will prompt you to change / update your password for security purposes. The password provided to you earlier was just an initial password. Once you have updated your password, click on the Check button. You will then be redirected to the SAP main screen.

BASIC LAYOUT (SAP Easy Access User Menu)
This is called as the SAP Easy Access User Menu or the main screen of SAP. This is the first screen you will see upon login. We will go through the important buttons and user interface elements for your use. The image below shows the items that we will be discussing (highlighted accordingly).


- Red (upper left) – This is the Transaction Code Box. You basically enter any Transaction Code there to go to different SAP screens.
- Purple – These are the “Find” icons. As long as you see these icons, you can use them to find a certain word, number, or series of characters.
- Blue – These are the “Page Icons”. Use these to navigate through pages or spools. For example, if you end up viewing a print preview document, you can use the page icons to navigate through pages. From left to right, these are the page icon functions: Go to First Page, Go Up 1 Page, Go Down 1 Page, Go to Last Page.
- Black – This is the SAP Business Workplace icon. Treat this as you user “mail / inbox” in SAP. Not everyone uses this since it would depend on the tasks that you need to do or even monitor. An example of using this would be to see workflow related notifications assigned to your SAP user ID.
- Yellow – This is the user menu and it is divided into 2 main folders: Favorites and SAP Menu. You can add “Favorite” transaction codes by clicking on the star buttons. Some users prefer to enter all the transaction codes they need in the Favorites folder so they can just double click on what they want to access instead of typing it in the Transaction Code box (Red Highlight). If they want to drill down and see different transaction codes, they can traverse the SAP Menu.
- Red (lower right) – The small arrow on the lower right hand side is especially useful since it can provide additional information. By clicking on the small arrow, you should see this type of change (image provided below)

- Yellow Box and Orange Box – Most of the time this is ignored but you can use the yellow box as additional verification if you are in the right SAP environment.
- Black Box – The black box contains a small downward arrow to the side. If you click on that small arrow, you can select the type of information that is displayed. You should be able to view the selections as seen in the image below.
| System and Client | Can help you verify the environment you are currently accessing |
| User | Can help you verify the User ID that is currently accessing the environment. For example, if you are using Test ID’s for testing you can check to see what ID is currently accessing the environment. |
| Program | Can help you determine what SAP Program is currently being executed |
| Transaction | Can help you verify what Transaction Code was used to access the current SAP screen. This is different from a SAP Program since programs are executed through TCode SE38 or SA38 not through the Transaction Code box. |
| Response Time, Interpretation Time, and Round Trips / Flushes | Usually ignored unless they are needed to analyze performance issues |
ACCESSING A TRANSACTION CODE SCREEN
FB03
In this example, let us use transaction code FB03. From the Main Screen, enter FB03 in the Transaction Code box and press the Enter button on your keyboard.
You should now see the FB03 SAP Screen. Notice how there are additional buttons (highlighted in red).
From left to right, here are the functionalities of the 3 buttons: Back, Exit, and Cancel.

FBL3N
As additional example, let us use transaction code FBL3N.
From transaction code FB03, type in /NFBL3N in the Transaction Code box and press the Enter button on your keyboard.
Notice how the screen changed and displayed the FBL3N SAP Screen. /N in this example just means go to transaction code using the same SAP Window.
Notice how there are additional buttons as highlighted in Red above. If you see the “Clock with Check icon”, it means that the transaction code is executable. From left to right, here are the functionalities of the 5 buttons: Execute, Get Variant, Dynamic Selections, Program Documentation, Data Sources.
| Execute | Execute. You need to enter the required data/details first on the fields below before you click on Execute. In this example, FBL3N will generate the GL Account Line Item Report upon execution. |
| Get Variant | This allows you to get a variant for the SAP Screen you are accessing. Instead of entering details on the fields, you can select a Variant to populate the fields and then click on Execute. This is usually utilized when a user wants to generate a report with specific details/criteria frequently. |
| Dynamic Selections | This allows you to add more details aside from the fields that are currently present in the SAP Screen. This is usually utilized to narrow down the search criteria even more. |
| Program Documentation | By clicking on this, you will see an SAP Pop-up named “Performance Assistant” that will list down the purpose of the current SAP Screen you are accessing. It may contain descriptions and features of the current transaction code. |
| Data Sources | This will allow you to select on the data source. Example: Database or Archive. This is usually ignored and is defaulted as “Database” unless you are trying to access a very old data. |
ADDITIONAL INFORMATION
SAP Environments
SAP Environments may not be limited to Dev, QA, and Prod. Depending on the system architecture, you expect additional environments such as Staging Environment, Release Environment, Sandbox Environment etc.
Note that it is possible that you may have sets of Dev, QA, and Prod environments.
For example:
You can read more on the basic system environments here.
Helpful General TCodes for New Users With Access Issues
- SU53 – Use this whenever you encounter an error that says you are not authorized to access something. Showing this screen to the SAP Authorizations Team can help speed up your access concern.
- SU01 – Use this whenever you need to search for a User and the corresponding details such as (Email or SAP User ID).
Helpful General TCodes for New SAP Consultants
- Check out this previous post to get a list.
Update Date, Time, and Decimal Format in SAP GUI
Go to System > User Profile > Own Data

Make the necessary adjustments in the Defaults Tab then click on Save

Goodluck! 🙂
Базовое взаимодействие с сервером SAP осуществляется через графический интерфейс SAP, для которого за это время было разработано несколько версий. Последней и наиболее удобной для пользователя является версия SAP GUI 750, которую мы будем использовать в этой статье.
Если у вас еще нет SAP Access и рабочего локального клиента, установленных на вашем компьютере, посмотрите, как можно выполнить установку SAP 750, а затем добавьте сервер в SAP 750, чтобы иметь возможность входить в систему с помощью графического интерфейса SAP. Возможно, вы захотите перед этим изменить язык SAP, чтобы лучше соответствовать вашим местным требованиям.
SAP GUI — это программное обеспечение, установленное на компьютере, которое позволяет пользователю взаимодействовать с помощью клавиатуры и мыши с сервером SAP, который обычно размещается в удаленном месте, скорее всего, на удаленном сервере в центре обработки данных.
Значение SAP GUI: графический интерфейс пользователя SAP
Использование локального графического пользовательского интерфейса для взаимодействия с удаленным сервером означает, что никакая информация, поступающая из системы, не сохраняется на вашем компьютере, но все данные, кроме ваших локальных настроек, хранятся и защищаются на сервере, управляемом вашей компанией, и централизованно обновлено.
Если другой пользователь одновременно обращается к той же системе SAP и изменяет там информацию, вы сразу же увидите ее в своем локальном графическом интерфейсе.
Но давайте начнем с основной информации: с помощью меню SAP Easy Access.
Использование SAP Easy Access
SAP Easy Access — это первый экран, который вы получите после входа в SAP с использованием вашего сервера и информации о пользователе, предоставленной вашей компанией, или для ваших личных или корпоративных потребностей в обучении вы также можете использовать доступ к SAP IDES.
Он состоит из нескольких частей, некоторые из которых отображаются постоянно, независимо от вашего текущего действия в системе, а некоторые из них зависят от транзакции и будут отображаться только во время определенного действия в интерфейсе.
Компоненты экрана SAP
- В верхней части экрана находится поле ввода, в котором вы можете ввести коды транзакций, чтобы перейти непосредственно к определенной системной программе, или использовать ярлык — это поле ввода отображается всегда, независимо от того, в какой транзакции вы находитесь,
- Ссылки для конкретных транзакций, которые позволят вам либо использовать важные меню, относящиеся к текущему действию, либо переключать вкладки в транзакциях. Он всегда отображается, но меняется в зависимости от транзакции,
- А в правом верхнем углу ссылка для выхода всегда позволит вам покинуть текущую транзакцию или экран и остановить то, что вы делаете, без сохранения информации, если вы ввели ее в поля ввода,
- Основная область с данными о транзакции. Сразу после входа в систему SAP отображается меню SAP Easy Access со списком транзакций,
- Информационное окно с отображаемым сообщением, информацией и текстом ошибки, а также системной информацией, которую можно настроить в соответствии с вашими потребностями, например, текущее имя или статус сервера.
В меню SAP Easy Access или с помощью поля ввода транзакции вы можете выбрать транзакцию, которую хотите использовать в SAP. Транзакция — это специфическое для бизнеса действие, которое вы можете выполнить в системе, например просмотреть заказы на продажу или создать материал в системе.
Использование транзакции в SAP GUI
После транзакции экран изменится, чтобы отобразить специфические данные транзакции, которые обычно состоят в первую очередь из экрана выбора, для выбора информации, которую вы хотите отобразить из транзакции, или для выбора типа данных, которые вы хотите ввести. в системе и сохраните централизованно.
Используя клавишу F4 после выбора поля ввода в любом месте SAP, вы увидите отображаемый, когда он доступен для данных в системе, список возможных записей для использования в поле.
Большинство полей ограничено использованием существующих системных данных. Например, поле ввода для выбора завода, на котором вы будете вести бизнес, позволит ввести только существующий завод, так как не имеет смысла вводить какие-либо данные для завода, которого нет в компании.
Аналогичным образом, при использовании клавиши клавиатуры F1 после выбора любого поля на экране появится помощник по производительности и объяснит вам, о чем это поле, какие данные оно ожидает, и свяжется с другой важной информацией из встроенного в справке SAP.
Ввод данных о транзакции
После того как вы найдете правильные критерии, по которым вы будете выбирать данные, такие как сбытовая организация для выбора заказа на продажу, нажмите клавишу ВВОД, чтобы просмотреть данные и взаимодействовать с тем, что было ранее введено в систему SAP.
Затем вы попадете внутрь экранов конкретных транзакций, которые позволят вам взаимодействовать с системными данными так, как вы хотите, на основе информации, представленной на экране выбора.
В случае создания заказа на продажу после выбора сбытовой организации на экране выбора для этой сбытовой организации будет создан вводимый вами заказ на продажу.
Там будут отображаться все конкретные поля транзакции, а быстрые ссылки в верхней части экрана изменятся, чтобы вы могли просто взаимодействовать с созданием заказа на продажу.
Одна ссылка позволит вам перейти от создания к отображению заказа на продажу в случае, если вы использовали неправильную транзакцию, другие ссылки позволят вам переключиться с предварительного просмотра на создание данных и многое другое. Ссылки всегда зависят от транзакции.
В полях данных вы сможете ввести нужную информацию. После заполнения транзакции вашими конкретными данными вам нужно будет сохранить данные, которые вы ввели в локальный графический интерфейс SAP на удаленном центральном сервере.
При нажатии кнопки сохранения SAP GUI сверится с сервером, все ли в порядке. В случае возникновения какой-либо проблемы, например, когда пользователь ввел недопустимое значение или не работает с другими существующими данными, отобразится ошибка, а соответствующие поля будут выделены красным цветом.
Кроме того, в строке состояния в нижней части интерфейса SAP GUI будет отображаться сообщение об ошибке, по которому вы можете щелкнуть, чтобы получить дополнительную информацию, когда она будет доступна.
Вкратце об использовании SAP GUI
В целом интерфейс SAP GUI интуитивно понятен и прост в использовании, а поведение интерфейса единообразно для всех транзакций.
В основном меняются отображаемые поля и правила, лежащие в основе них, поскольку большинство полей связаны с бизнес-данными, хранящимися в системе SAP, и все они имеют разные правила.
Чтобы продолжить использование SAP GUI, мы рекомендуем вам использовать и делиться с вами онлайн-обучением, а также бесплатно получить приведенную ниже шпаргалку по базовым навыкам SAP — распечатайте ее и держите под рукой!
Часто Задаваемые Вопросы
- Каково использование SAP GUI?
- * SAP* GUI — это программное обеспечение, установленное на компьютере, которое позволяет пользователю взаимодействовать с клавиатурой и мышью с сервером* SAP*, который обычно размещается в удаленном месте, скорее всего, на удаленном сервере в центре обработки данных.
- Каковы основные шаги для начала использования графического интерфейса SAP?
- Основное использование графического интерфейса SAP включает вход в систему с учетными данными, навигация по интерфейсу и доступ к различным модулям и транзакциям SAP * SAP.
- Каковы основные сочетания клавиш для повышения эффективности в SAP GUI?
- Основные сочетания клавиш в SAP GUI включают в себя быструю навигацию, ввод данных и доступ к общим функциям.
Добавил:
Upload
Опубликованный материал нарушает ваши авторские права? Сообщите нам.
Вуз:
Предмет:
Файл:
Введение в SAP.pdf
Скачиваний:
518
Добавлен:
23.02.2015
Размер:
39.25 Mб
Скачать
Глава 2 Урок 2
Персонализация интерфейса SAP
ОБЗОР УРОКА
В этом уроке рассматриваются способы повышения эффективности работы в SAPсистеме, используя персонализацию экранов и различные возможности навигации.
Практический пример
Для эффективной работы в SAP-системе необходимо уметь пользоваться навигацией по экранам и различными возможностями настройки. В связи с этим требуются следующие знания:
●Четкое представление о структурных элементах экранов
●Умение создавать персональный список избранных транзакций
●Умение выполнять персонализацию экранов
●Умение пользоваться навигацией по экранам
●Навыки поиска справки
ЗАДАЧИ УРОКА
Пройдя этот урок, вы сможете:
●использовать интерфейс SAP
●выполнять навигацию в SAP-системе
●выполнять поиск справки на экране SAP Easy Access
Структурные элементы экрана
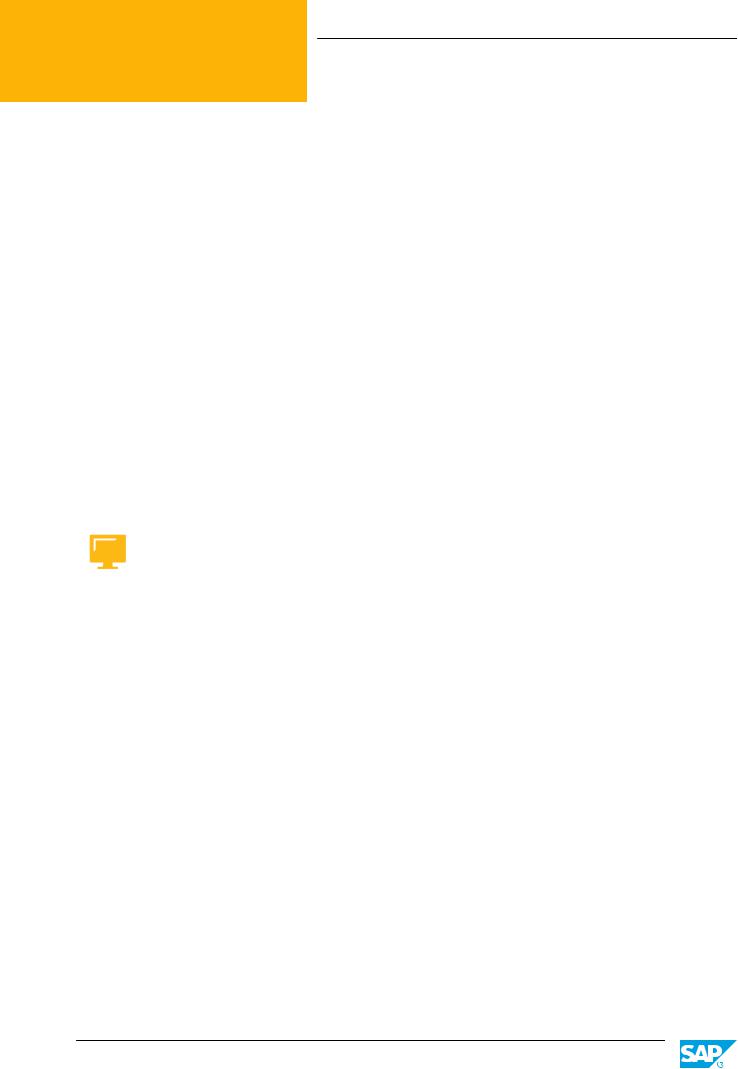
SAP Easy Access – первый экран, открываемый по умолчанию в SAР-системах.
|
© Авторское право . Все права защищены. |
25 |
De Classroom Virtual SAP in Students in Students Registered of Use ive
Глава 2: Навигация
Рисунок 11: SAP Easy Access
В левой части экрана показано иерархическое дерево доступных меню. Изображение в правой части устанавливается централизованно системным администратором и не может быть изменено отдельными пользователями. Это может быть, например, логотип компании.
Структура экрана SAP
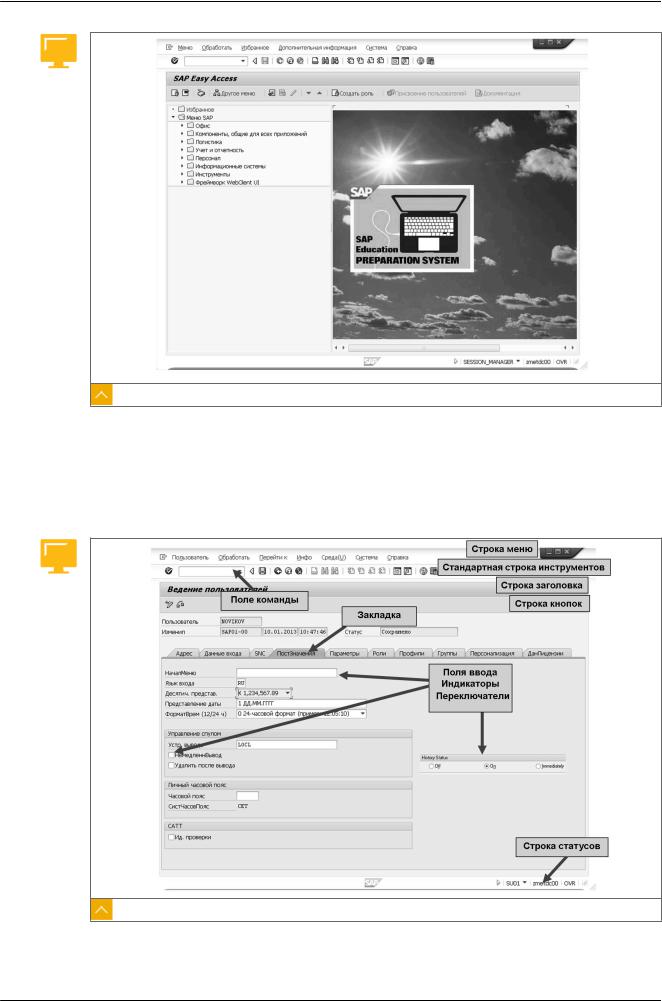
Рисунок 12: Структура экрана
Экран SAP может содержать следующие элементы:
|
26 |
© Авторское право . Все права защищены. |
De Classroom Virtual SAP in Students in Students Registered of Use ive

|
Урок: Персонализация интерфейса SAP |
|
|
Поле команды |
Приложения можно запускать непосредственно, вводя код |
|
транзакции в поле команды. Код транзакции приложения можно |
|
|
найти либо в меню Обзор на экране SAP Easy Access, в строке |
|
|
статусов, либо в самом приложении, выбрав Система → Статус . |
|
|
Строка меню |
Строка меню находится вверху каждого первичного окна SAP- |
|
системы. Состав показываемых в ней меню зависит от того, какое |
|
|
приложение используется. |
Стандартная строка Кнопки стандартной строки инструментов имеются на каждом инструментов экране SAP. Если какие-то кнопки недоступны в том или ином
приложении, они изображаются бледно-серым цветом. Если навести курсор на кнопку, появится флажок с ее именем или описанием ее назначения.
|
Строка заголовка |
В строке заголовка показано имя используемой в данный момент |
|
функции. |
|
|
Строка кнопок |
В строке кнопок содержатся кнопки, доступные в используемом |
|
в данный момент приложении. |
|
|
Независимые |
Независимые кнопки позволяют выбрать несколько опций в |
|
кнопки |
группе полей. |
|
Зависимые кнопки |
В группе зависимых кнопок может быть выбрана только одна |
|
опция. |
|
|
Закладка |
Система закладок позволяет организовать несколько экранных |
|
областей для большей наглядности и упорядочения данных. |
|
|
Строка статусов |
В строке статусов отображается информация о текущем статусе |
|
системы – например, предупреждения и сообщения об ошибках. |
|
|
Можно изменить формат изображения, чтобы показывать, |
|
|
например, код используемой в данный момент транзакции. |
|
|
Прочие элементы |
Прочие элементы включают поля ввода и кнопки. |
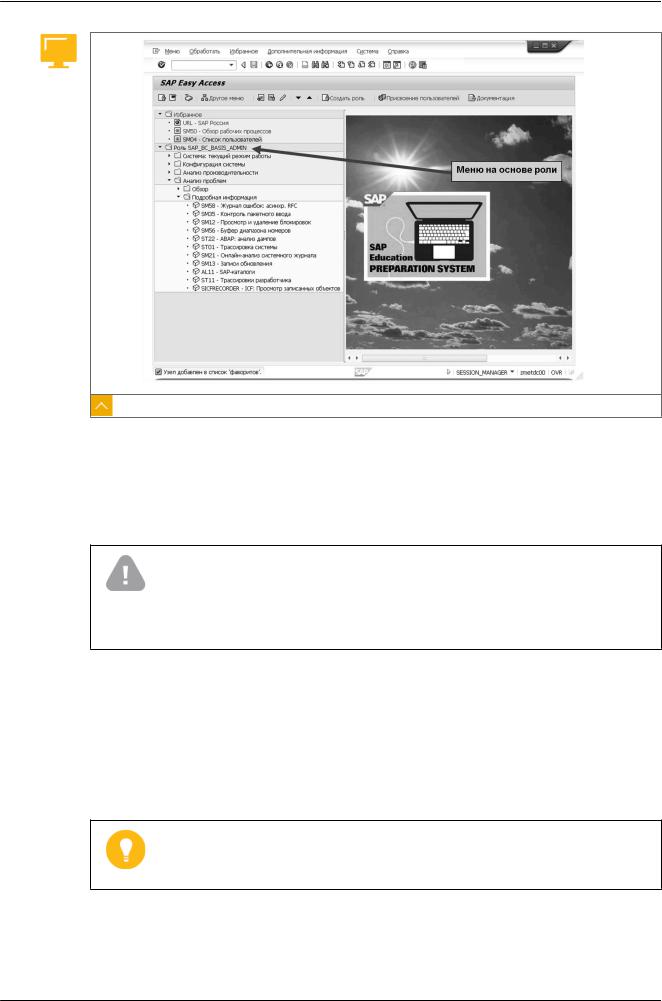
Меню пользователя, основанные на роли
В SAP используется два формата вывода меню транзакций, отчетов или вебприложений.
|
Форматы меню: |
|
|
Стандартное меню SAP |
Это меню содержит полный список всех возможных |
|
транзакций и отчетов, предлагаемых системой. |
|
|
Меню пользователя, |
Это набор операций, используемых в бизнес-сценариях. С |
|
основанное на роли |
помощью таких меню пользователи могут открывать |
|
транзакции, отчеты и веб-приложения. |
|
© Авторское право . Все права защищены. |
27 |
De Classroom Virtual SAP in Students in Students Registered of Use ive
Глава 2: Навигация
Рисунок 13: Меню пользователя, основанные на роли
Пользователям присваивается меню роли и связанные с ней полномочия. Полномочия определяют доступ к конкретным операциям, необходимым для выполнения должностных обязанностей. Системный администратор может настраивать меню, основанные на роли, в соответствии с конкретными должностными требованиями, добавляя и удаляя пункты меню.
Внимание:
Системному администратору может быть поручена настройка меню, основанных на роли, которые затем передаются на фронтэнд. Поэтому рекомендуется создавать роли как можно меньшего объема, иначе их передача на фронтэнд может занять слишком много времени.
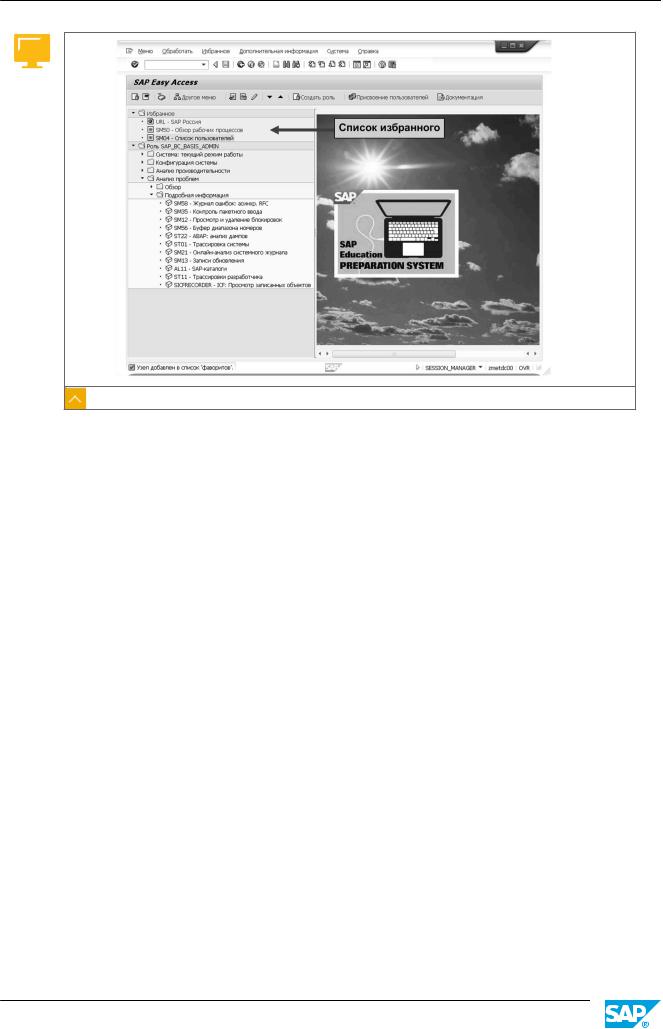
Избранное
Примеры элементов, которые можно включать в список избранного:
●Транзакции
●Ссылки на файлы
●Интернет-адреса
Рекомендация:
Избранное может быть организовано в папки. Редактирование избранного осуществляется на экране SAP Easy Access с помощью меню Избранное.
|
28 |
© Авторское право . Все права защищены. |
De Classroom Virtual SAP in Students in Students Registered of Use ive
Урок: Персонализация интерфейса SAP
Рисунок 14: Меню «Избранное»
Первоначально список избранного пуст, и пользователь может заполнять его по своему усмотрению. Только он может просматривать свой список избранного.
|
© Авторское право . Все права защищены. |
29 |
De Classroom Virtual SAP in Students in Students Registered of Use ive

© Авторское право . Все права защищены.
De Classroom Virtual SAP in Students in Students Registered of Use ive
Глава 2 Упражнение 2
Создание избранного
Практический пример
Вы часто используете определенные транзакции, файлы и веб-сайты. Для облегчения доступа к ним следует создать соответствующие элементы в папке «Избранное».
Создание избранных транзакций
Создайте несколько избранных транзакций, которые будут включены в меню «Избранное» на экране SAP Easy Access.
1.Создайте избранное для транзакции, чтобы провести входящий платеж в бухгалтерии клиентов. Код этой транзакции: F-28.
2.Создайте избранное для транзакции, чтобы отобразить клиента в Сбыте (централизованно). Код этой транзакции: XD03.
3.Создайте избранное для транзакции ведения основных данных в управлении персоналом. Код этой транзакции: PA30.
|
© Авторское право . Все права защищены. |
31 |
De Classroom Virtual SAP in Students in Students Registered of Use ive
Глава 2 Решение 2
Создание избранного
Практический пример
Вы часто используете определенные транзакции, файлы и веб-сайты. Для облегчения доступа к ним следует создать соответствующие элементы в папке «Избранное».
Создание избранных транзакций
Создайте несколько избранных транзакций, которые будут включены в меню «Избранное» на экране SAP Easy Access.
1.Создайте избранное для транзакции, чтобы провести входящий платеж в бухгалтерии клиентов. Код этой транзакции: F-28.
a)На экране SAP Easy Access выберите Учет и отчетность → Финансы → Дебиторы → Проводка.
b)Выберите Входящий платеж .
Внимание:
Не следует дважды нажимать кнопкой мыши на поле Входящий платеж. Требуется просто выделить пункт меню, а не инициировать транзакцию.
Меню находится вверху окна. Можно также использовать кнопку
Добавить в избранное .
c)Выберите Избранное → Добавить.
2.Создайте избранное для транзакции, чтобы отобразить клиента в Сбыте (централизованно). Код этой транзакции: XD03.
a)На экране SAP Easy Access выберите Логистика → Сбыт → Основные данные → Деловой партнер → Клиент → Просмотреть.
b)Выберите Всего .
Внимание:
Не следует дважды нажимать кнопкой мыши на команде Всего. Требуется просто выделить пункт меню, а не инициировать транзакцию.
c) Выберите Избранное → Добавить.
|
32 |
© Авторское право . Все права защищены. |
De Classroom Virtual SAP in Students in Students Registered of Use ive
Урок: Персонализация интерфейса SAP
Рекомендация:
Меню находится вверху окна. Можно также использовать кнопку
Добавить в избранное .
3.Создайте избранное для транзакции ведения основных данных в управлении персоналом. Код этой транзакции: PA30.
a)На экране SAP Easy Access выберите Персонал → Менеджмент персонала → Администрирование → Основная запись персонала.
b)Выберите Ведение .
Внимание:
Не следует дважды нажимать кнопкой мыши на команде Ведение. Требуется просто выделить пункт меню, а не инициировать транзакцию.
c) Выберите Избранное → Добавить.
|
© Авторское право . Все права защищены. |
33 |
De Classroom Virtual SAP in Students in Students Registered of Use ive
Соседние файлы в предмете [НЕСОРТИРОВАННОЕ]
- #
- #
- #
- #
- #
- #
- #
- #
- #
- #
- #
SAP Easy Access Screen
SAP Easy Access screen is known as SAP user menu, after logging in to SAP system through GUI, the first screen that appears on system is SAP Easy Access.
To login to SAP system, You should enter valid credential user name and password
The SAP system is designed as a client system, so you can login to sap system and operate SAP from any computer and any part of the world where the SAP GUI (Graphical User Interface) is installed and connected to the SAP database. For example, you are operating as a SAP consultant from India and visited head office located at USA. Now you want to perform a pending task from head office USA, you can perform same job right at the head office, because SAP recognizes you on the basis of your user id and password.
SAP systems is a client based system, this SAP software can runs on a windows, Unix and Apple MAC.
SAP Easy Access consists the following folders
- Tool Bar
- Favorites
- SAP Menu

- Favorites: -Favorites help you store all the list of favorite transaction codes.
- SAP Menu : – SAP menu folder enables a user to work on the SAP system according to the roles and authorization provided by the administrator. Menu folder contains eight sub folders.
- Office
- Cross-Application components
- Logistics
- Accounting
- Human Resources
- Information systems
- Tools
- WebClient UI Framework
Components of an SAP Screen as follows
- Menu Bar
- Title Bar
- Standard tool Bar
- Command bar
- Standard toolbar
- Screen header
- Application toolbar
- Screen body
- Status bar
