
К сожалению, для вашей корзины недостаточно места.
Удалить продукт
Без этого продукта нельзя активировать имеющийся купон или промокод.
Вы действительно хотите удалить этот продукт?
Политика конфиденциальности
Установите этот флажок, чтобы перейти на веб-сайт Samsung.com.
Я даю свое согласие на получение новостей, специальных предложений и другой информации о продуктах и услугах компании Samsung и ее партнеров по электронной почте, посредством SMS-сообщений и уведомлений.
Просмотреть настройки
Помогите нам составить для вас рекомендации. Для этого обновите настройки продукта.
HW-F450
Crystal Surround Air Track
(Active Speaker System)
user manual
imagine the possibilities
Thank you for purchasing this Samsung product.
To receive more complete service,
please register your product at
www.samsung.com/register
features
SoundShare
SoundShare produces TV sound on your SAT via a Bluetooth connection and controls the sound.
HDMI
HDMI transmits video and audio signals simultaneously, and provides a clearer picture.
The unit is also equipped with the ARC function which lets you listen to sound from your TV via an HDMI cable through the Crystal
Surround Air Track. This function is only available if you connect the unit to an ARC compliant TV.
3D SOUND PLUS
The 3D SOUND PLUS feature adds depth and spaciousness to your listening experience.
Wireless Subwoofer
Samsung’s wireless module does away with cables running between the main unit and the subwoofer.
Instead, the subwoofer connects to a compact wireless module that communicates with the main unit.
Special Sound mode
You can select from 7 different sound modes — MUSIC, NEWS, DRAMA, CINEMA, SPORTS, GAME, and OFF (Original Sound) depending on the type of content you want to enjoy.
Multi-function Remote Control
The supplied remote control can be used to control the TV connected to this unit. (Works only for Samsung TVs)
The remote control has a TV hotkey that enables you to perform various operations with the simple press of a button.
Active Speaker System
This unit features an Active Speaker System that provides high sound quality in a single slim unit.
This unit does not require any satellite loudspeakers or speaker cabling, which are normally associated with conventional surround
sound systems.
USB Host support
You can connect and play music files from external USB storage devices such as MP3 players,
USB flash memory, etc. using the Air Track’s USB HOST function.
Bluetooth Function
You can use connect a Bluetooth device to the SAT and enjoy music with high quality stereo sound, all without wires!
LICENSE
Manufactured under license from Dolby Laboratories. Dolby and the double-D symbol are trademarks of Dolby
Laboratories.
Manufactured under license under U.S. Patent Nos: 5,956,674; 5,974,380; 6,487,535 & other U.S. and worldwide patents
issued & pending. DTS, the Symbol, & DTS and the Symbol together are registered trademarks & DTS 2.0 Channel is a
trademark of DTS, Inc. Product includes software. © DTS, Inc. All Rights Reserved.
The terms HDMI and HDMI High-Definition Multimedia Interface, and the HDMI Logo are trademarks or
registered trademarks of HDMI Licensing LLC in the United States and other countries.
— To send inquiries and requests regarding open sources, contact Samsung via Email (oss.request@samsung.com).
2

safety information
SAFETY WARNINGS
TO REDUCE THE RISK OF ELECTRIC SHOCK, DO NOT REMOVE THE COVER(OR BACK).
NO USER-SERVICEABLE PARTS ARE INSIDE. REFER SERVICING TO QUALIFIED SERVICE PERSONNEL.
This symbol indicates “dangerous voltage”
CAUTION
RISK OF ELECTRIC SHOCK
DO NOT OPEN
WARNING : To reduce the risk of fire or electric shock, do not expose this appliance to rain or moisture.
CAUTION : TO PREVENT ELECTRIC SHOCK, MATCH WIDE BLADE OF PLUG TO WIDE SLOT, FULLY INSERT.
This apparatus shall always be connected to a AC outlet with a protective grounding connection.
•
To disconnect the apparatus from the mains, the plug must be pulled out from the mains socket, therefore the mains
•
plug shall be readily operable.
CAUTION
• Do not expose this apparatus to dripping or splashing. Do not put objects filled with liquids, such as vases on the
apparatus.
• To turn this apparatus off completely, you must pull the power plug out of the wall socket. Consequently, the power
plug must be easily and readily accessible at all times.
inside the product that presents a risk of
electric shock or personal injury.
This symbol indicates important instructions
accompanying the product.
3
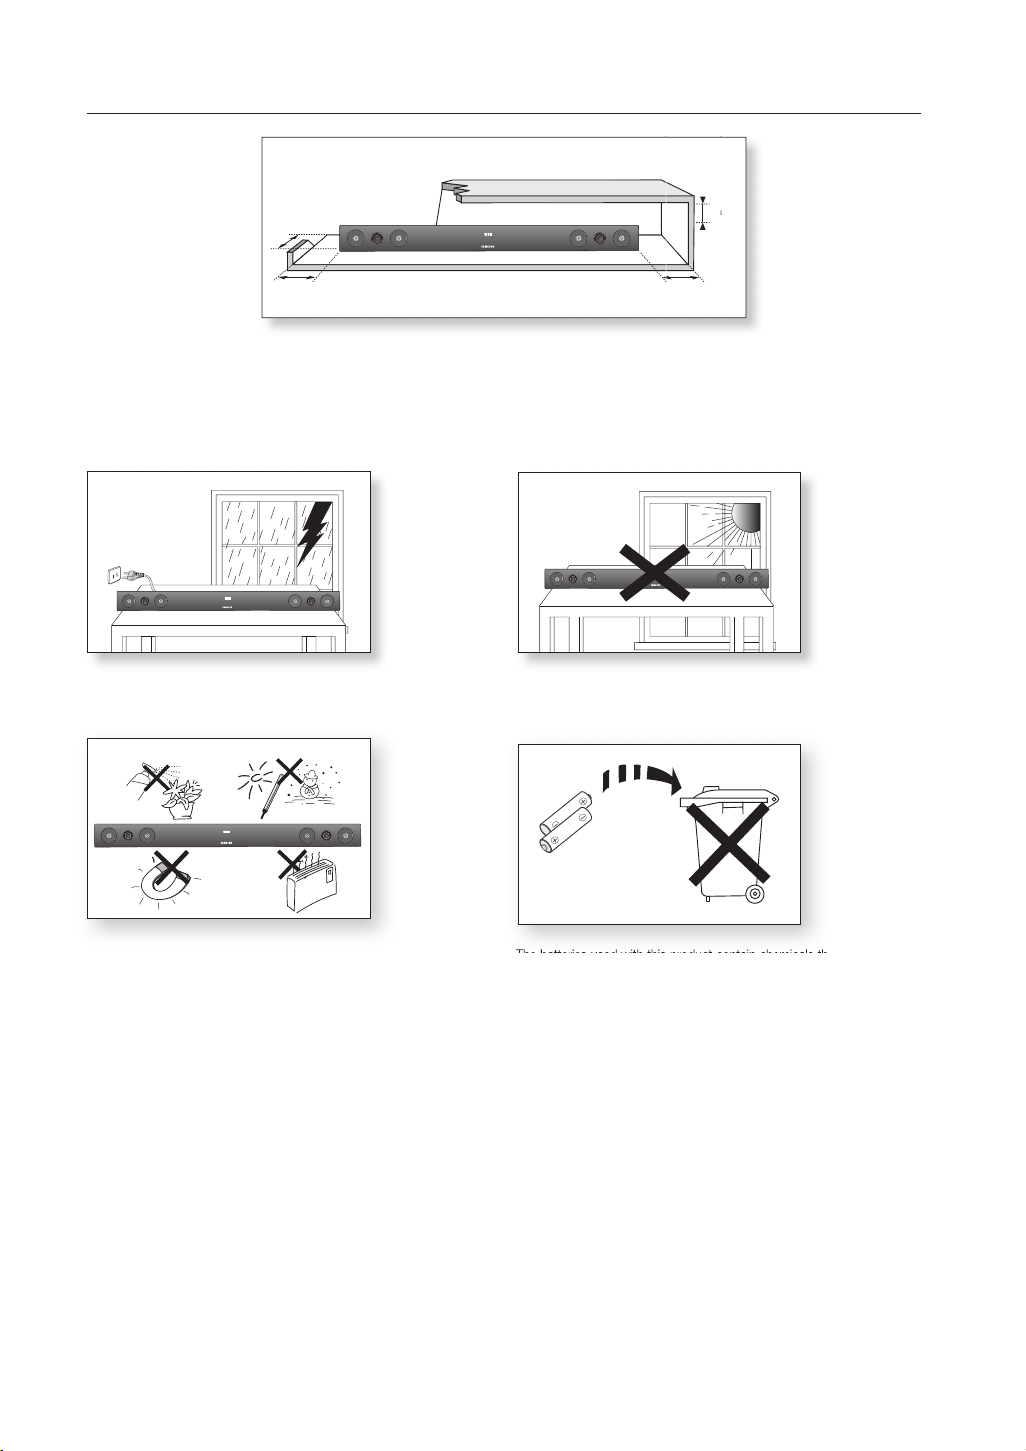
PRECAUTIONS
3.9 inch 3.9 inch
2.7 inc
h
3.9 inch
99.1mm
99.1mm
68.6mm
99.1mm
Ensure that the AC power supply in your house complies with the power requirements listed on the identification sticker located on the
back of your product. Install your product horizontally, on a suitable base (furniture), with enough space around it for ventilation (3~4 inch-
unit
es, 7~10 cm). Make sure the ventilation slots are not covered. Do not place the
unit
hot. This
is designed for continuous use. To fully turn off the unit, disconnect the AC plug from the wall outlet. Unplug the unit if you
on amplifiers or other equipment which may become
intend to leave it unused for a long period of time.
During thunderstorms, disconnect the AC plug from the
wall outlet. Voltage peaks due to lightning could damage the unit.
Do not expose the unit to direct sunlight or other heat sources.
This could lead to overheating and cause the unit to malfunction.
Phones
product
Protect the
from moisture (i.e. vases) , and excess heat (e.g.
a fireplace) or equipment creating strong magnetic or electric fields
Disconnect the power cable from the AC supply if the unit malfunctions.
product
Your
is not intended for industrial use. This product is for per-
sonal use only.
Condensation may occur if your
peratures. If transporting the
product
unit
has been stored in cold tem-
during the winter, wait approxi
mately 2
hours until the unit has reached room temperature before using.
4
The batteries used with this product contain chemicals that are harmful to
the environment.
Do not dispose of batteries in the general household trash.

contents
FEATURES
2
SAFETY INFORMATION
3
GETTING STARTED
6
DESCRIPTIONS
7
REMOTE CONTROL
8
CONNECTIONS
9
FUNCTIONS
14
2 Features
2 License
3 Safety warnings
4 Precautions
6 Before reading the User’s manual
6 What’s included
7 Front/Rear Panel
8 Tour of the remote control
9 Installing the wall mount
10 Connecting the Wireless Subwoofer
11 Attaching the Toroidal Ferrite Core to the
Power Cord of the Subwoofer
11 Looping the Power Cable around the
Toroidal Core
12 Connecting an external device using HDMI
cable
13 Connecting an external device using Audio
(Analog) cable or Optical (Digital) cable
14 Input mode
14 Bluetooth
16 SoundShare
17 USB
18 Using the remote control
21 Software Upgrade
TROUBLESHOOTING
22
APPENDIX
23
22 Troubleshooting
23 Specifications
5
getting started
BEFORE READING THE USER’S MANUAL
Note the following terms before reading the user manual.
Icons used in this manual
Icon Term Definition
Caution
Note
Indicates a situation where a function does not operate or settings may be
canceled.
Indicates tips or instructions on the page that help you operate a function.
Safety Instructions and Troubleshooting
1) Be sure to familiarize yourself with the Safety Instructions before using this product. (See page 3)
2) If a problem occurs, check Troubleshooting. (See page 22)
Copyright
©2013 Samsung Electronics Co.,Ltd.
All rights reserved; no part or whole of this user’s manual may be reproduced or copied without the prior
written permission of Samsung Electronics Co.,Ltd.
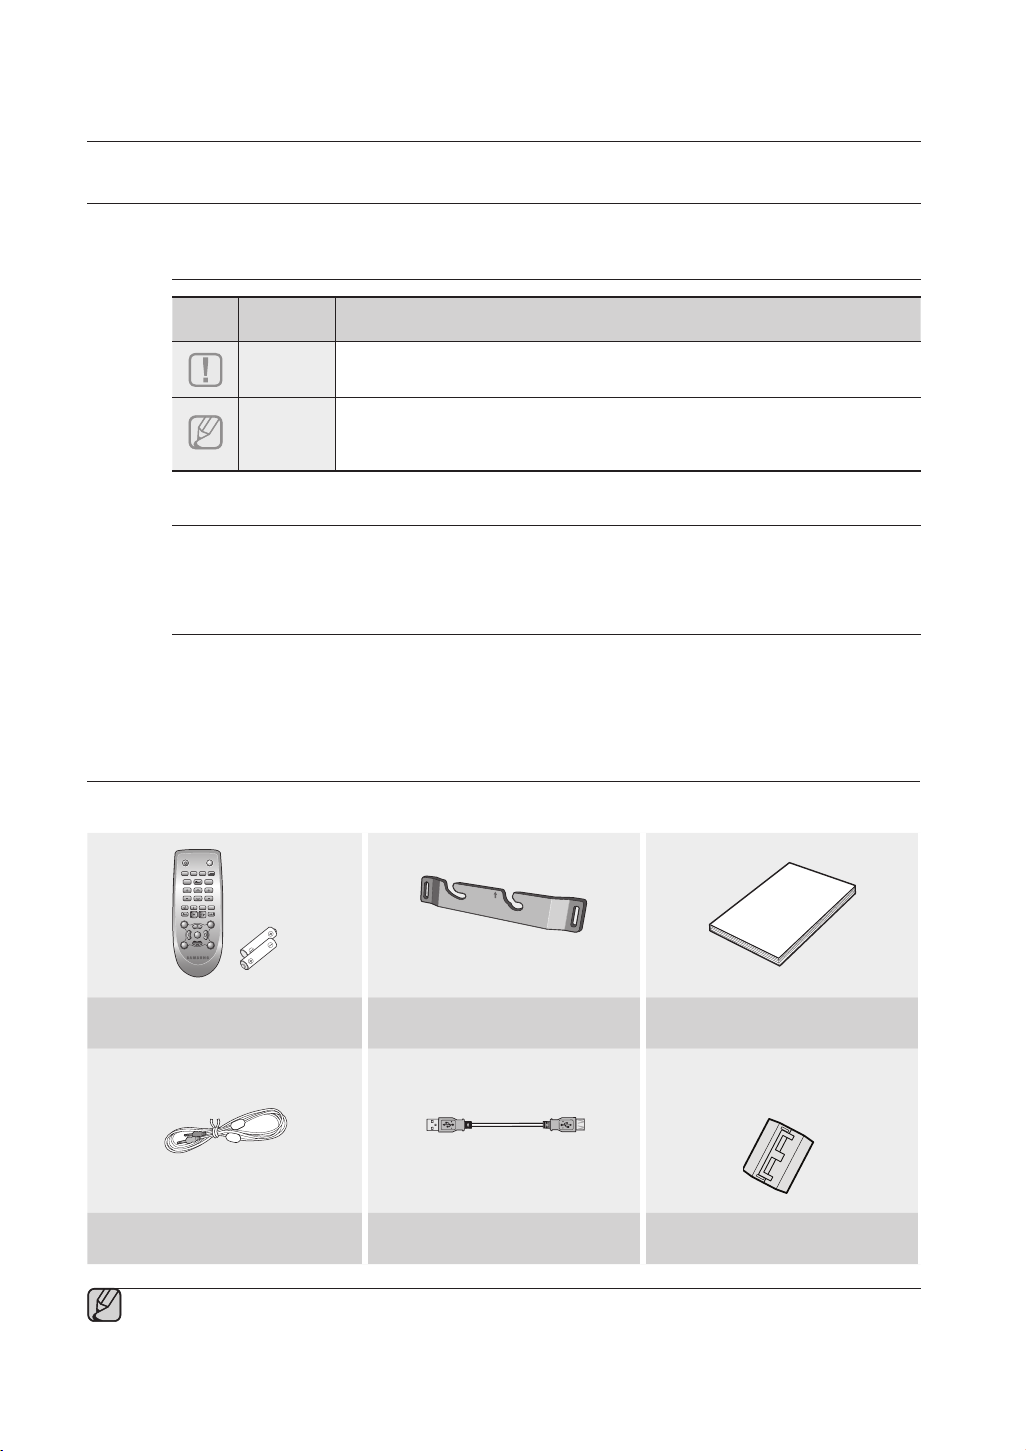
WHAT’S INCLUDED
Check for the supplied accessories shown below.
POWER
TV POWER
AUTO
SPEAKER
TV SOURCE
POWER
SOURCE
SoundShare
REPEAT
TV VOL TV CH
AUDIO SYNC
DIMMER
TV INFOTV MUTE
TV PRE-CH
SMART VOLUMESOUND EFFECT
VOL
S/W
S/W
MUTE
LEVEL
LEVEL
VOL
3D SOUND
DRC
PLUS
AH59-02547B
Remote Control / Batteries (AAA size)
Aux Cable USB Cable Toroidal ferrite core
▪ The appearance of the accessories may differ slightly from the illustrations above.
▪ Use the dedicated USB cable to connect external USB devices to the unit.
6
Bracket-Wall Mount User Manual
(For Subwoofer power cable 1EA)
descriptions
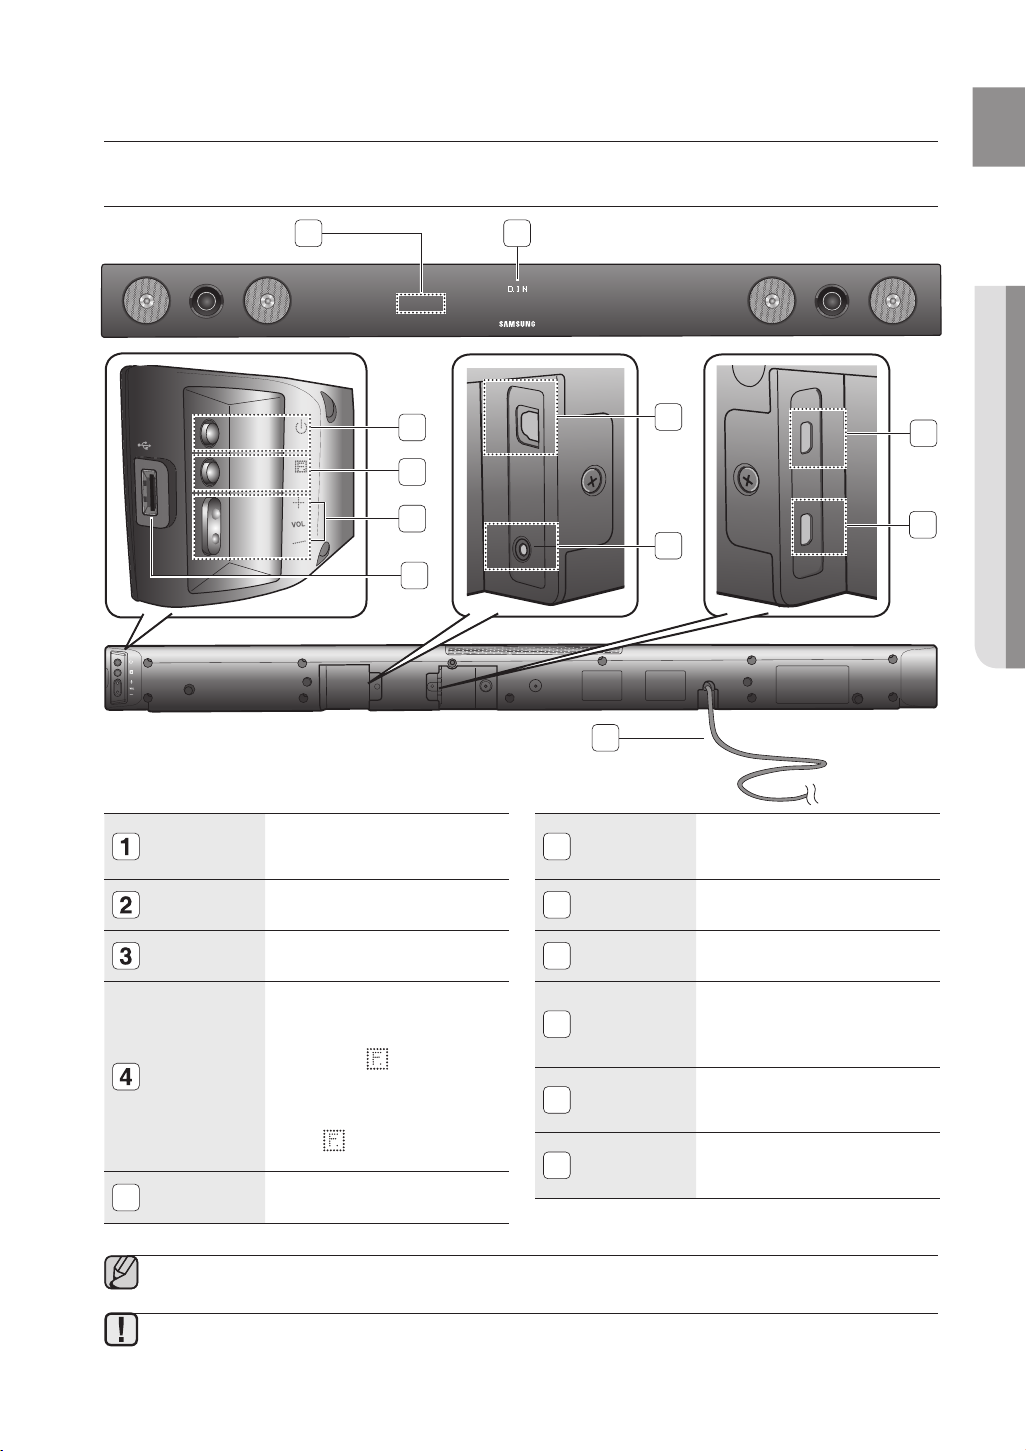
Front/rear Panel
1 2
3
5v 500mA
4
OPTICAL IN
EnG
● dEscriptions
7
HDMI IN
9
5
reMote
Control
SenSor
DISPlaY
PoWer
BUtton
FUnCtIon
BUtton
VolUMe
( +/- )
5
6
The remote control can operate
Air Tracks made by SAMSUNG
only.
Displays the current mode.
Turns the Crystal Surround Air
Track on and off.
Selects the D.IN, AUX, HDMI,
BT, TV, USB input.
While the unit is powered,
pressing the button for more
than 3 seconds sets the button
to act as MUte button. To
cancel MUte button setup,
press button for more than 3
seconds again.
Controls the volume level.
AUX IN
6
7
8
9
10
11
8
11
USB Port
oPtICal In
aUX In
HDMI In
JaCK
HDMI oUt
JaCK
PoWer
SUPPlY
CaBle
HDMI OUT
Connect USB devices such as
MP3 players here to the play
files on the devices.
Connect to the digital (optical)
output of an external device.
Connect to the Analog output
of an external device.
Receives digital video and
audio signals simultaneously
from an external source using
an HDMI cable.
Outputs digital video and audio
signals simultaneously using an
HDMI cable.
Plug the power supply cable
into the AC wall outlet.
10
▪ When you turn on this unit, there will be a 4 to 5 second delay before it produces sound.
▪ When disconnecting the power cable from the wall outlet, pull the plug. Do not pull the cable.
▪ Do not connect this unit or other components to an AC outlet until all connections between components are
complete.
7
remote control
POWER
TV POWER
AH59-02547B
REPEAT
TV VOL TV CH
AUDIO SYNC
SOURCE
AUTO
POWER
SPEAKER
TV SOURCE
TV PRE-CH
DIMMER
SMART VOLUMESOUND EFFECT
S/W
LEVEL
S/W
LEVEL
VOL
VOL
3D SOUND
PLUS
DRC
TV INFOTV MUTE
SoundShare
MUTE
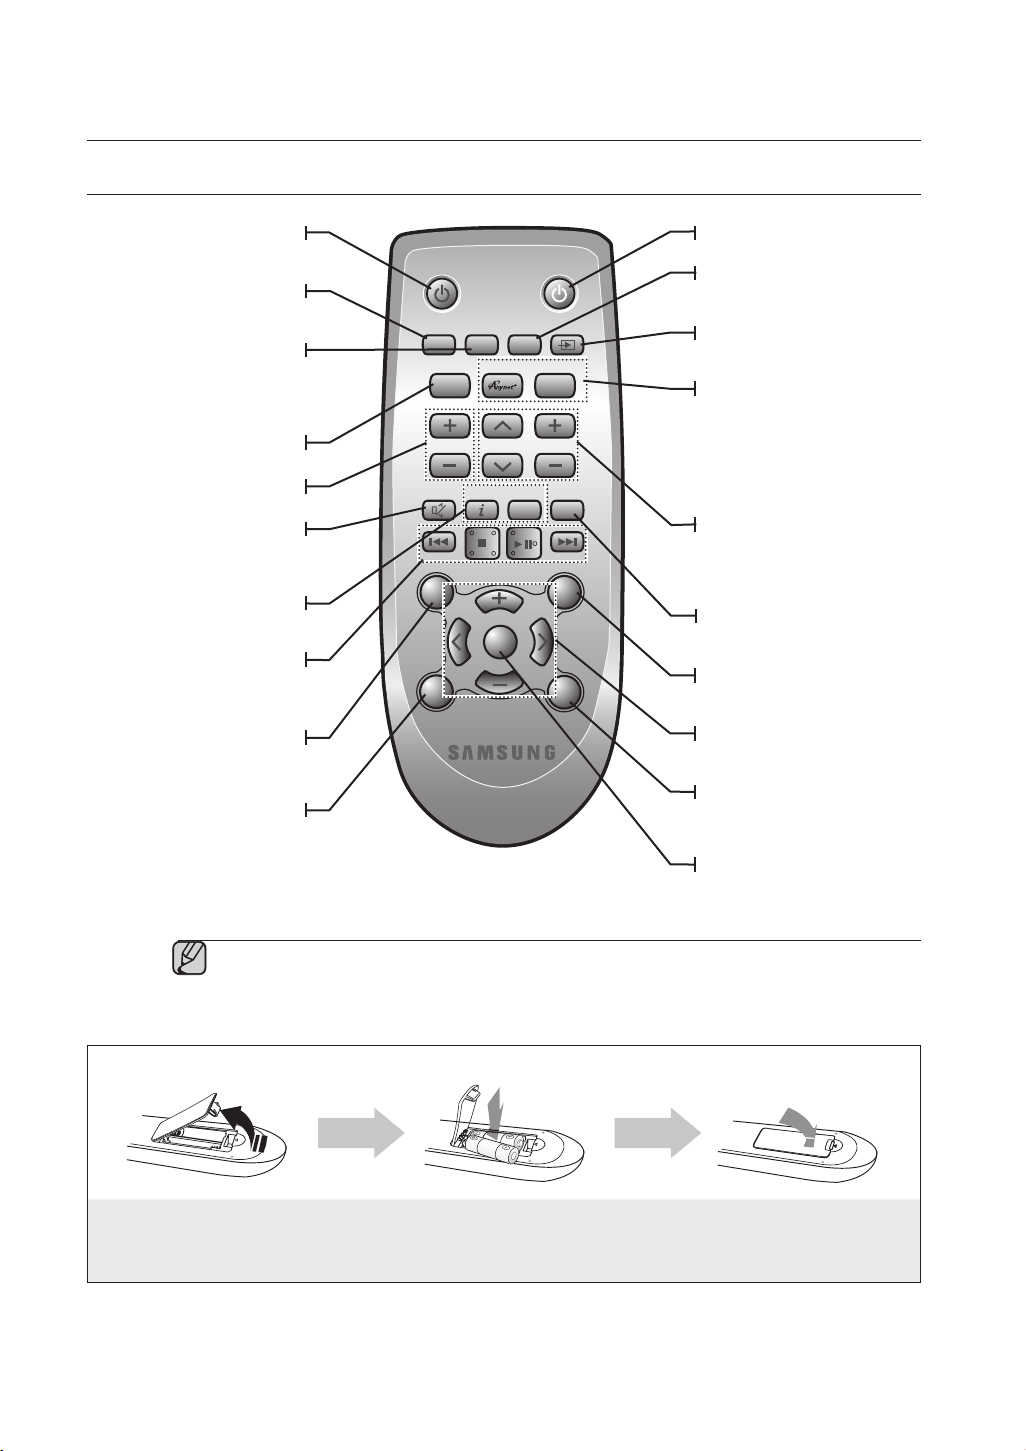
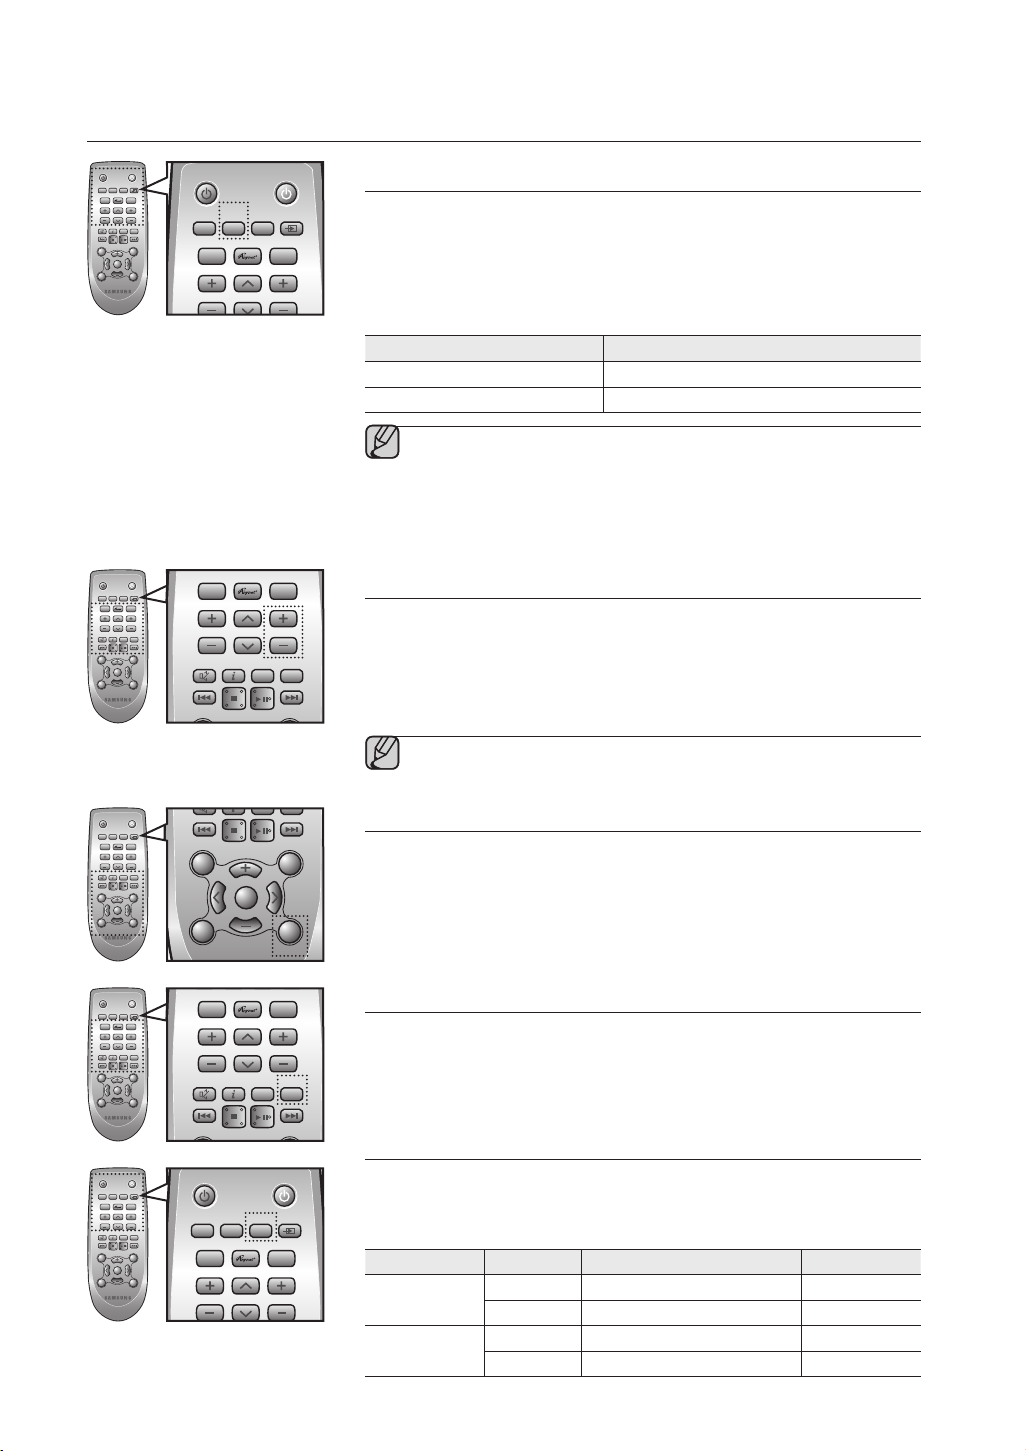
TOUR OF THE REMOTE CONTROL
POWER BUTTON
Turns the Crystal Surround Air Track
on and off.
SOURCE
Press to select a connected SAT
source. (SAT:Surround Air Track)
AUTO POWER
Synchronizes the Air Track to a
connected Optical source via the
Optical jack so it turns on automatically
when you turn on your TV.
REPEAT
Select Repeat File, All, Random.
TV VOLUME
Adjusts the TV volume level.
TV MUTE
Mutes the sound from the TV. Press
again to restore the sound to the
previous volume level.
TV INFO, TV PRE-CH
Display current TV status.
Moves to the previous TV channel.
CONTROL BUTTON
Play, pause, or stop playing
a music file, or search forwards or
backwards for a music file.
SOUND EFFECT
Selects the Sound Effect:
(MUSIC, NEWS, DRAMA, CINEMA,
SPORTS, GAME, OFF (Original Sound))
3D SOUND PLUS
This feature adds depth and
spaciousness to the sound.
▪ SAT stands for Surround Air Track, which is a Samsung’s proprietary name.
▪ The remote control can operate TVs made by SAMSUNG only.
▪ Depending on the TV you are using, you may not be able to operate your TV with this remote control. If you can’t,
operate the TV using the TV’s remote control.
Installing batteries in the Remote Control
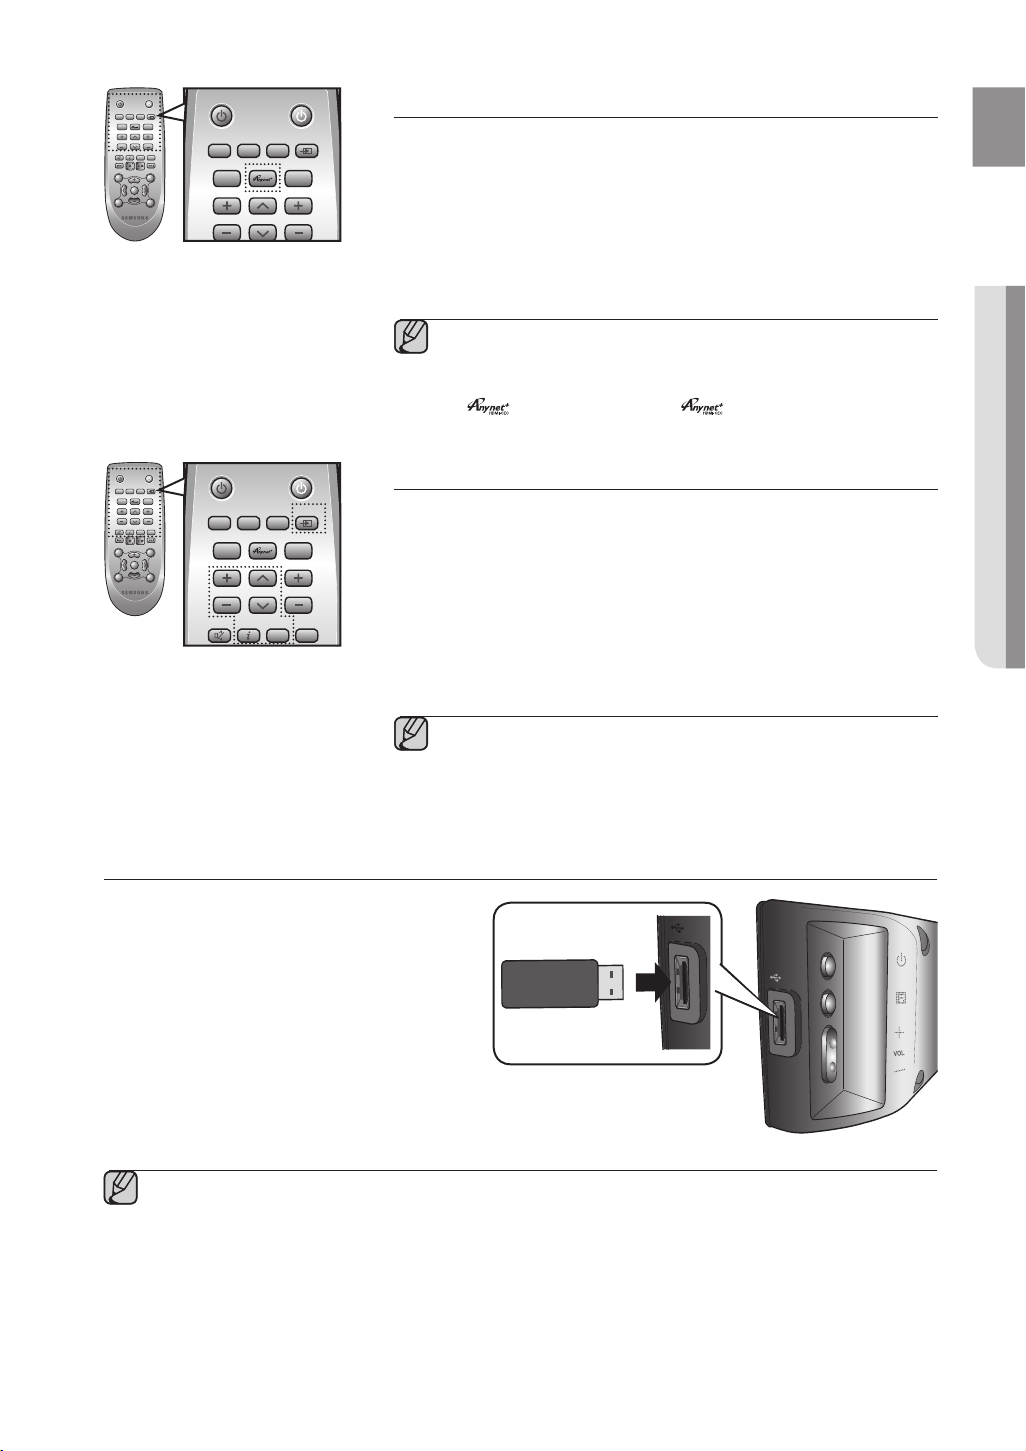
TV POWER BUTTON
Turns your Samsung TV on and off.
SPEAKER
This button allows you to choose to listen
to audio from the Air track or your TV.
TV SOURCE
Press to select a connected TV’s video
source.
Anynet+,
SoundShare
Anynet+ is a function that enables you
to control other Samsung Devices
with your Samsung TV’s remote
control.
This produces TV sound on your SAT
via a Bluetooth connection and
controls the sound.
TV CHANNEL , AUDIO SYNC
Switches between the available TV
channels.
Used to help sync video to audio
when connected to a digital TV.
DIMMER
You can control the brightness of the
Display.
SMART VOLUME
Regulates and stabilizes the volume
level against a drastic volume change.
VOLUME, S/W LEVEL
Adjusts the volume level of the unit.
Adjusts the Subwoofer level.
DRC
You can use this function to enjoy Dolby
Digital sound when watching movies at
low volume at night (Standard, MAX, MIN).
MUTE
Mutes the sound from the unit. Press
again to restore the sound to the
previous volume level.
1. Lift the cover at the back of
the remote control upward as
shown.
Operational Range of the Remote Control
Install two AAA size batteries.
2.
Make sure to match the “+” and “–” ends
of the batteries with the diagram inside the
compartment.
Replace the cover.
3.
Assuming typical TV usage,
the batteries last for about
one year.
You can use the remote control up to 23 feet (7 meters) in a straight line from the unit. You can also operate the
remote at a horizontal angle of up to 30° from the remote control sensor.
8
connections
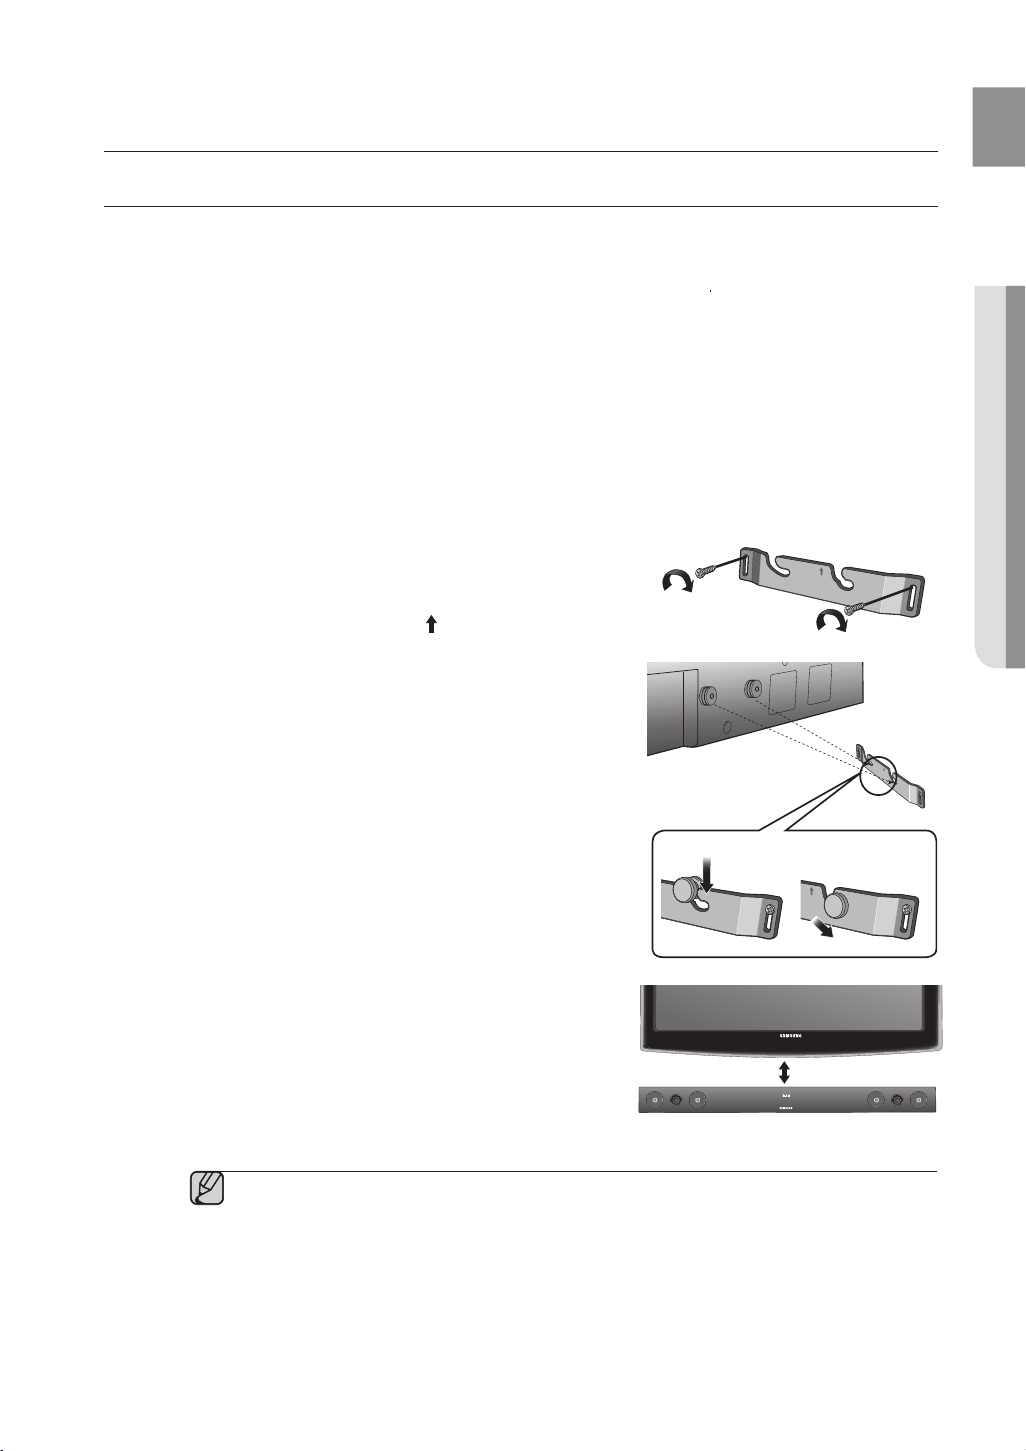
INSTAllING THE WAll MOUNT
You can use the wall mount bracket to mount this unit on a wall.
EnG
Installation Precautions
• Install on a vertical wall only.
• For the installation, avoid a location with high temperature or humidity, or a wall that cannot sustain the
weight of the set.
• Check the strength of the wall. If the wall is not strong enough to support the unit, reinforce the wall or
install the unit on different wall that can support the unit’s weight.
• Purchase and use the flxing screws or mollys appropriate for the kind of wall you have (plaster board, iron
board, wood, etc.). If possible, fix the support screws into wall studs.
• Connect cables from the unit to external devices before you install it on the wall.
• Make sure the unit is turned off and unplugged before you install it. Otherwise, it may cause an electric shock.
1. Place the wall mount bracket on a wall surface
secure it with two screws (not supplied).
If you are hanging the unit below a TV, be
wall mount bracket so that the arrow (
center of the TV.
Also make sure the unit is at least two inches (5 cm)
below the TV.
2. Fit the unit into the corresponding slots of the wall mount
bracket. For secure installation, make sure the mounting
studs slide firmly down into the bottom of the slots.
sure to install the
and then
) is placed in the
1
21
● connEctions
3. The installation is complete.
▪ Do not hang onto the installed unit and avoid any impact to the unit.
▪ Secure the unit firmly to the wall so that it does not fall off. If the unit falls off, it may cause an
injury or damage the product.
▪ When the unit is installed on a wall, please make sure that children do not pull any of the
connecting cables, as it may cause it to fall.
▪ For the optimal performance of a wall mount installation, install the speaker system at least 2
inches (5 cm) below the TV.
2 inches (5 cm) or more
9
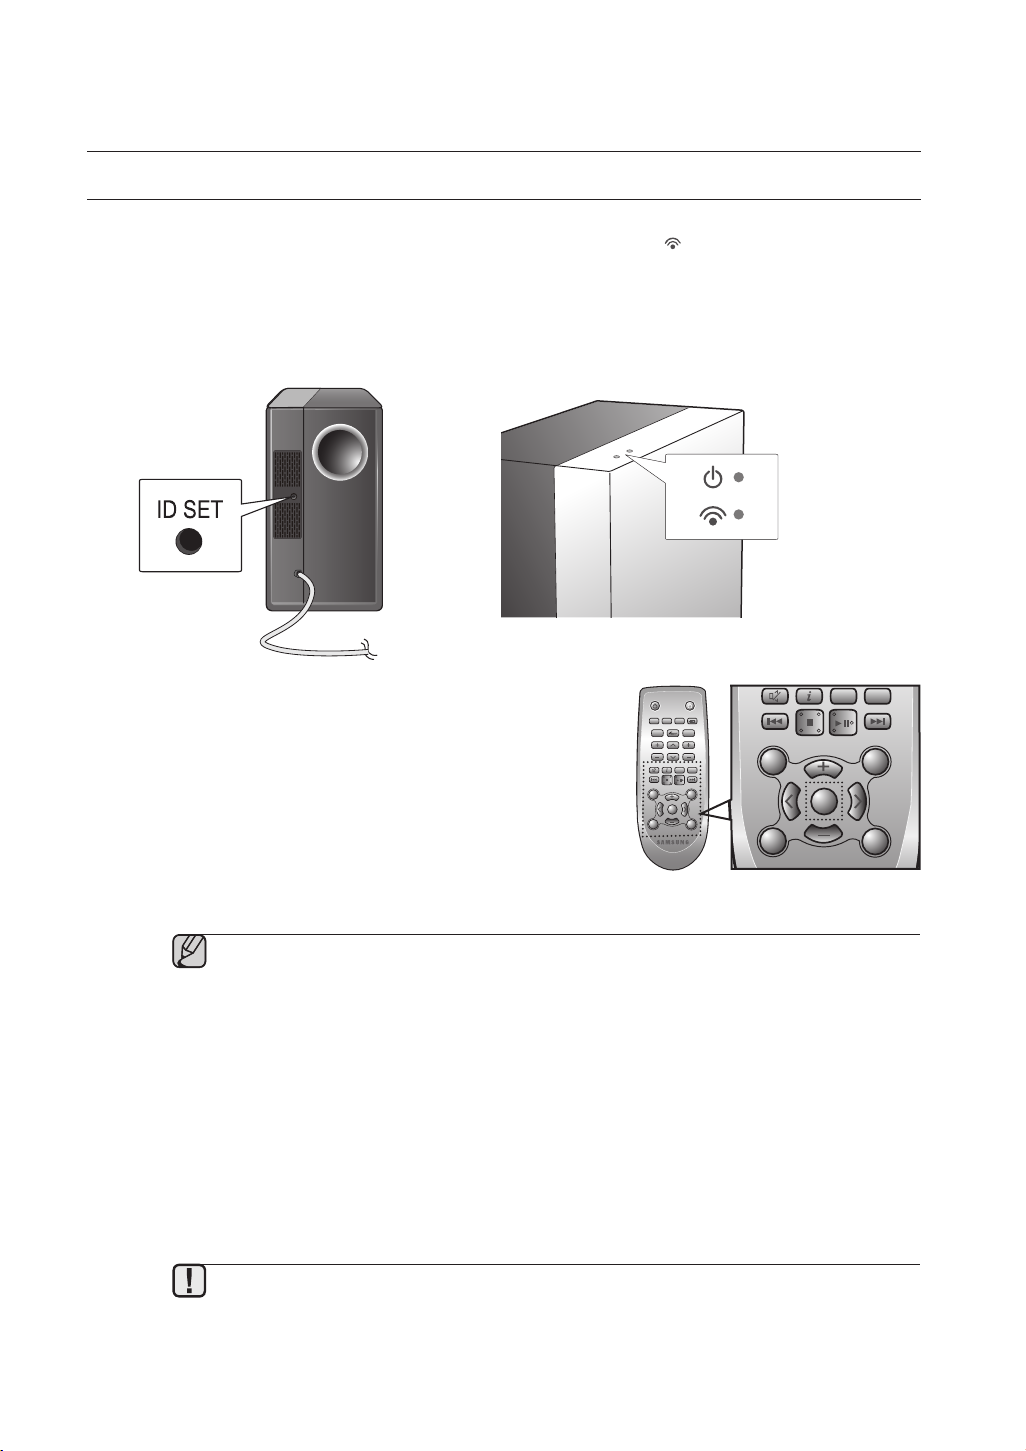
CONNECTING THE WIRELESS SUBWOOFER
POWER
TV POWER
REPEAT
TV VOL TV CH
AUDIO SYNC
SOURCE
AUTO
POWER
SPEAKER
TV SOURCE
TV PRE-CH
DIMMER
SMART VOLUMESOUND EFFECT
S/W
LEVEL
S/W
LEVEL
VOL
VOL
3D SOUND
DRC
TV INFOTV MUTE
SoundShare
MUTE
The Subwoofer’s linking ID is preset at the factory and the main unit and subwoofer should link (connect
wirelessly) automatically when the main unit is turned on. If the link indicator (
unit and subwoofer are turned on, please set the ID by following the procedure below.
1. Plug the power cords of the main unit and subwoofer into an AC wall outlet.
2. Press the ID SET button on the back of the subwoofer with a small, pointed object for 5 seconds.
• The STANDBY indicator is turned off and the LINK indicator (Blue LED) blinks quickly.
) does not light when the main
3. While the main unit is powered off (
press MUTE on the remote control for 5 seconds.
4. The ID SET message appears on the main unit’s VFD display.
5. To finalize the link, turn the main unit’s power on while the
subwoofer’s Blue LED blinks.
• The main unit and the subwoofer are now linked (connected).
• The Link indicator (blue LED) on the subwoofer is turned on.
• You can enjoy better sound from the wireless subwoofer by
selecting the sound effect. (See page 19)
▪ Before moving or installing the product, be sure to turn off the power and disconnect the power
cord.
▪ If the main unit is powered off, the wireless subwoofer will be in the standby mode and the
STANDBY LED on the upper side will come on after the Link indicator (Blue LED) blinks for 30
seconds.
▪ If you use a device that uses the same frequency (2.4GHz) near the system, interference may
cause some sound interruption.
▪ The transmission distance of the wireless signal between the main unit and sub is about 33 ft.,
but may vary depending on your operating environment. If a steel-concrete or metallic wall is
between the main unit and the wireless subwoofer, the system may not operate at all, because
the wireless signal cannot penetrate metal.
▪ If the main unit doesn’t make a wireless connection, follow steps 1-5 above to retry the
connection between the main unit and wireless subwoofer.
▪ The wireless receiving antenna is built into the wireless subwoofer. Keep the unit away from
water and moisture.
▪ For optimal listening performance, make sure that the area around the wireless subwoofer
location is clear of any obstructions.
10
STANDBY
mode),
LEVEL
3D SOUND
S/W
POWER
SOURCE
REPEAT
TV VOL TV CH
PLUS
TV POWER
AUTO
SPEAKER
TV SOURCE
POWER
SoundShare
AUDIO SYNC
DIMMER
TV INFOTV MUTE
TV PRE-CH
SMART VOLUMESOUND EFFECT
VOL
S/W
MUTE
LEVEL
VOL
DRC
AH59-02547B
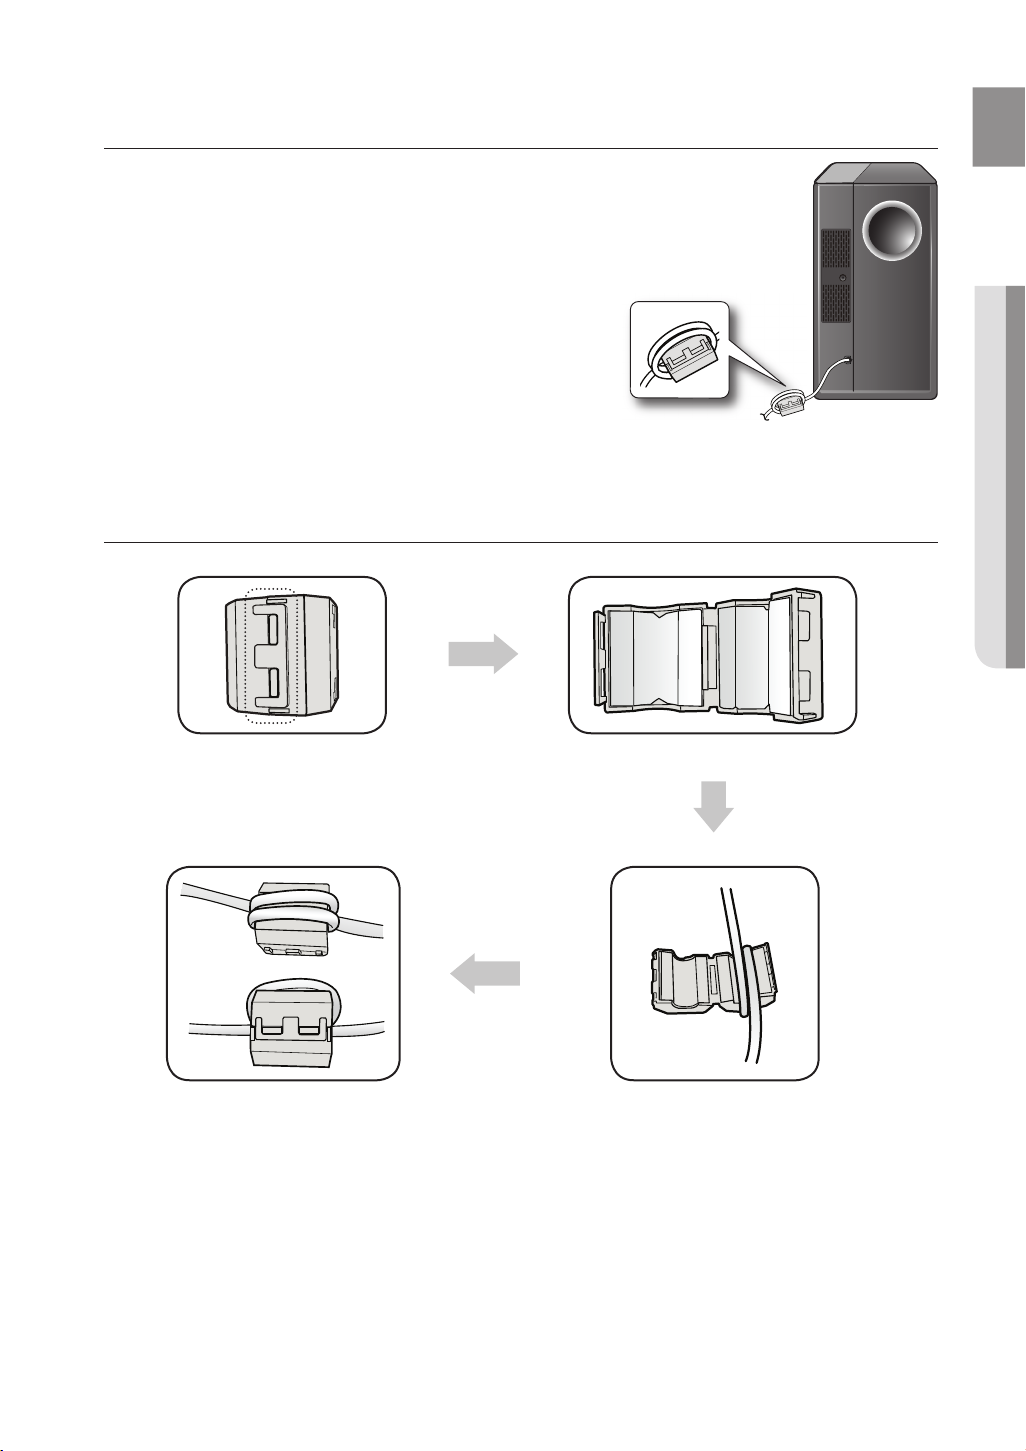
ATTACHING THE TOROIDAL FERRITE CORE TO THE POWER CORD
OF THE SUBWOOFER
Attaching the Toroidal ferrite core to the power cord of the subwoofer
helps prevent RF interference from radio signals.
1.
Pull the fixing tab of the Toroidal ferrite core to open it.
2. Make two loops around the core with the power cable of the
subwoofer.
3. Attach the Toroidal ferrite core to the Subwoofer power cord as the figure
shows and press it until it clicks.
LOOPING THE POWER CABLE AROUND THE TOROIDAL CORE
Lift up to release the lock and open the core.
Close the lock.
Make two loops around the core with the power
cable. (Start winding 5-10cm (12.75 — 25.5 in.)
away from the core).
11
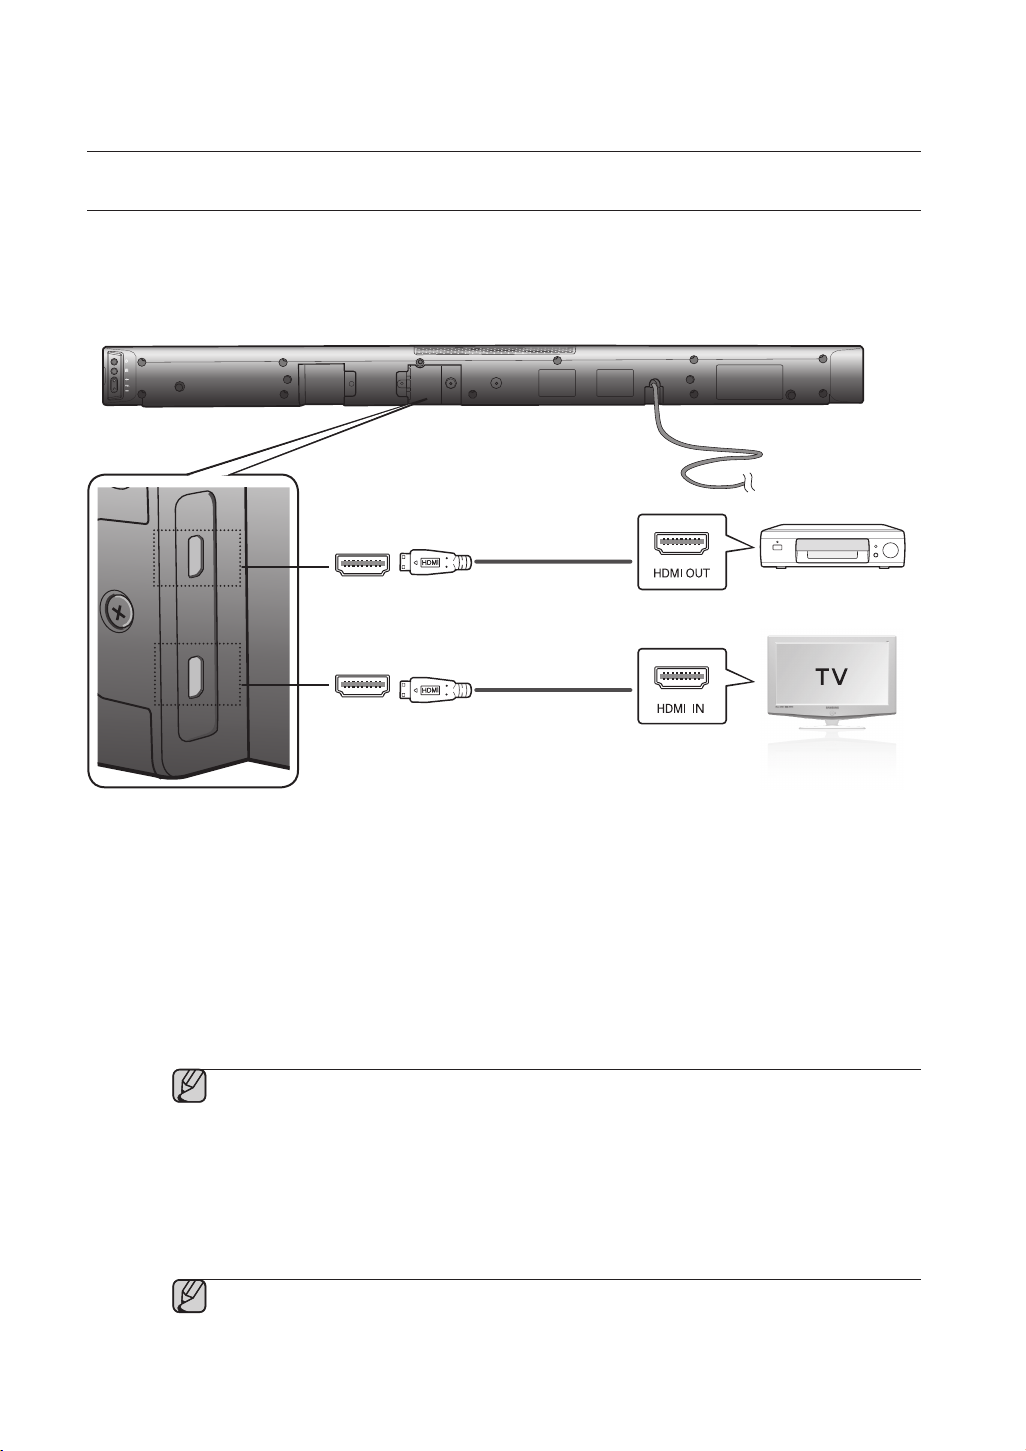
CONNECTING AN EXTERNAL DEVICE USING HDMI CABLE
HDMI is the standard digital interface for connecting to such devices as a TVs, projectors, DVD players,
Blu-ray players, set top boxes, and more.
HDMI removes any loss of signal from analog conversion, enabling you to enjoy video and audio sound quality
as it was originally created in the digital source.
HDMI IN
HDMI OUT
HDMI IN
Connect an HDMI cable (not supplied) from the HDMI IN jack on the back of the product to the HDMI OUT
jack on your digital devices.
and,
HDMI OUT (HDMI)
• Connect an HDMI cable from the HDMI OUT jack on the back of the product to the HDMI IN jack on your TV.
HDMI Cable
Digital Devices
HDMI Cable
▪ HDMI is an interface that enables the digital transmission of video and audio data with just
a single connector.
HDMI OUT (ARC)
• The ARC function allows digital audio to output via the HDMI OUT (ARC) port.
It can be enabled only when the Air Track is connected to a TV that supports the ARC function.
• Anynet+ must be turned on.
▪ This function is not available if the HDMI cable does not support ARC.
12

CONNECTING AN EXTERNAL DEVICE USING AUDIO (ANALOG)
AUX IN
AUDIO
OUT
OPTICAL IN
OPTICAL
OUT
CABLE OR OPTICAL (DIGITAL) CABLE
This unit comes equipped with one optical in digital jack and one audio analog in jack, giving you two ways to
connect it to a TV.
OPTICAL IN
Optical Cable (not supplied)
AUX IN
or
Audio Cable
OPTICAL IN
Connect the Digital Input on the main unit to the OPTICAL OUT of
or,
AUX IN
Connect AUX IN (Audio) on the main unit to the AUDIO OUT of
Be sure to match connector colors.
▪ Do not connect the power cord of this product or your TV to the wall outlet until all
connections between components are
complete.
▪ Before moving or installing this product, be sure to turn off the power and disconnect the power
cord.
the TV or Source Device
the TV or Source Device.
BD/DVD player/
Set-top box/
Game console
or
.
13
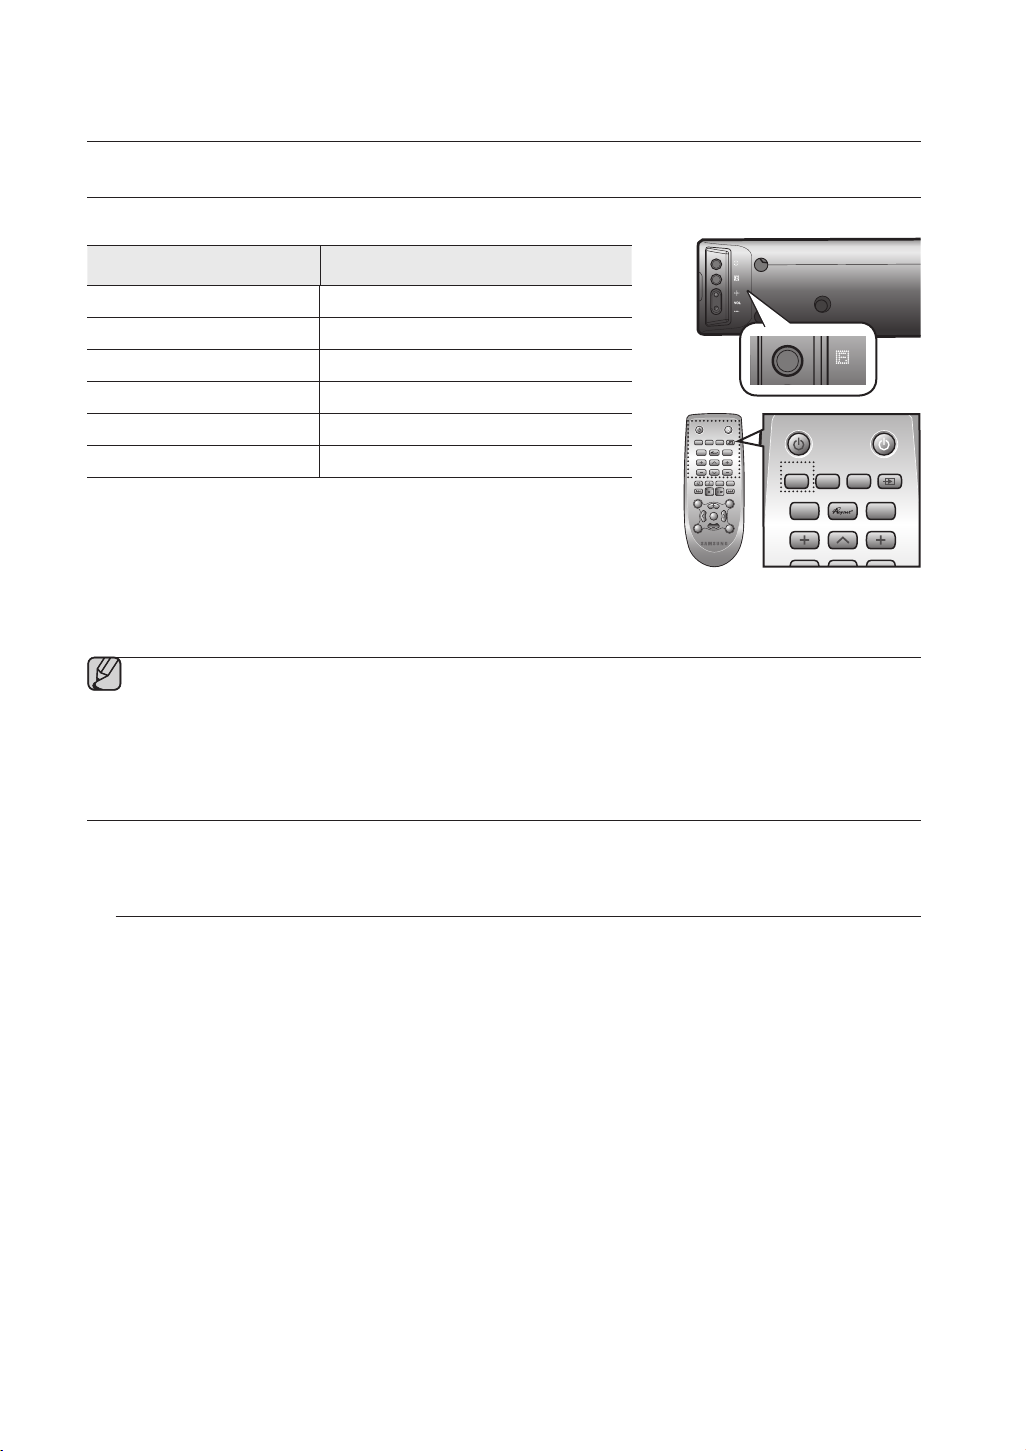
INPUT MODE
POWER
TV POWER
REPEAT
TV VOL TV CH
AUDIO SYNC
SOURCE
AUTO
POWER
SPEAKER
TV SOURCE
SoundShare
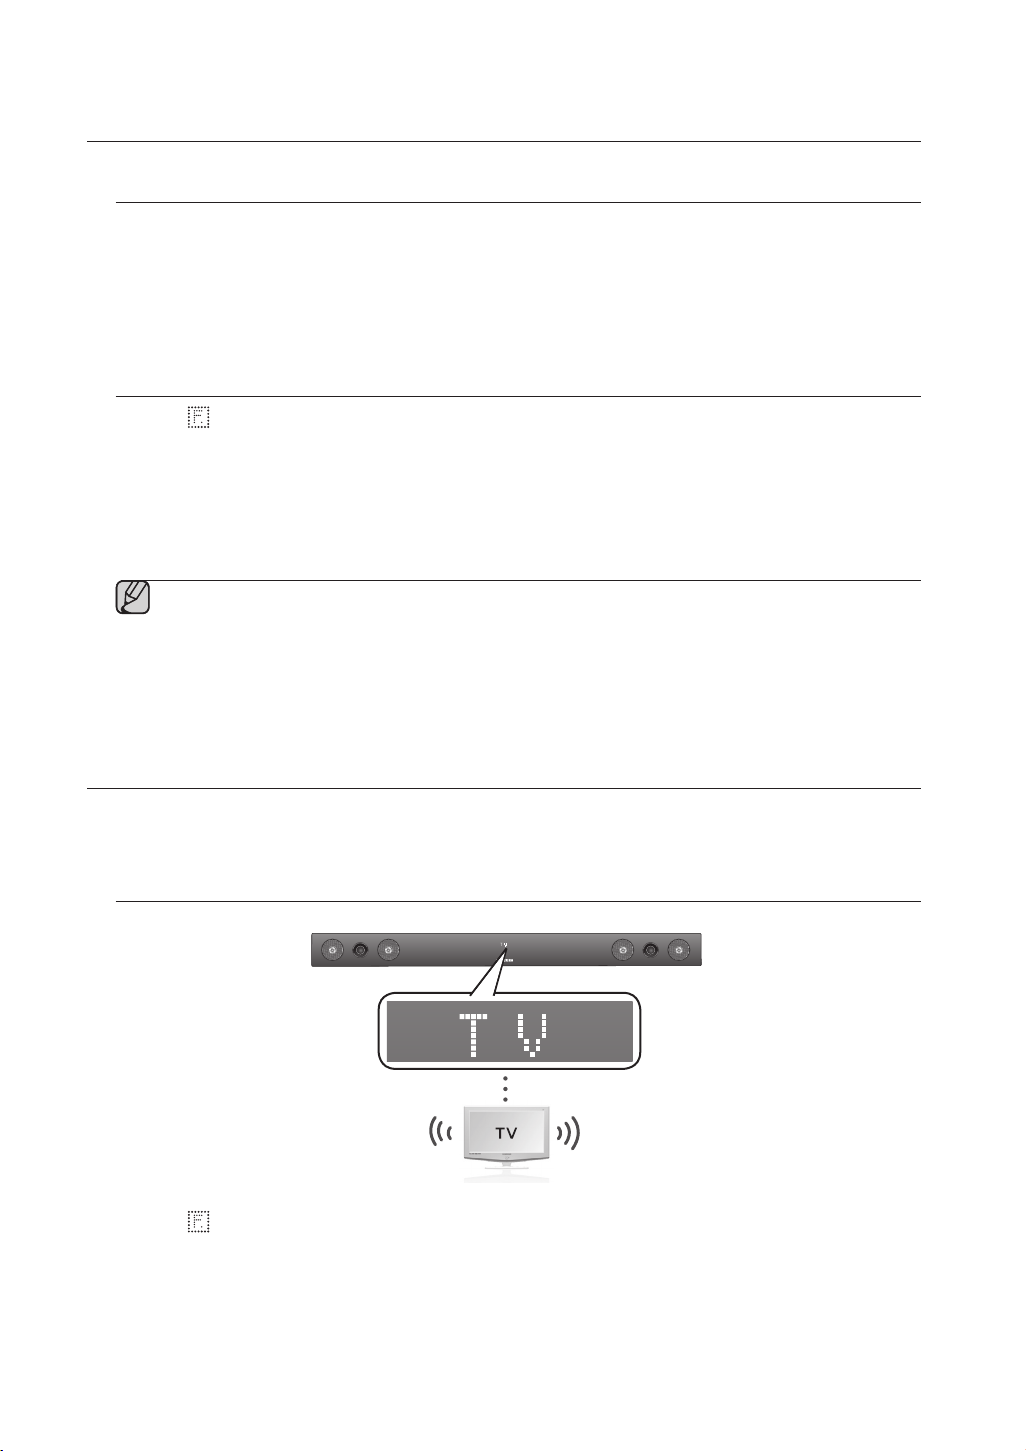
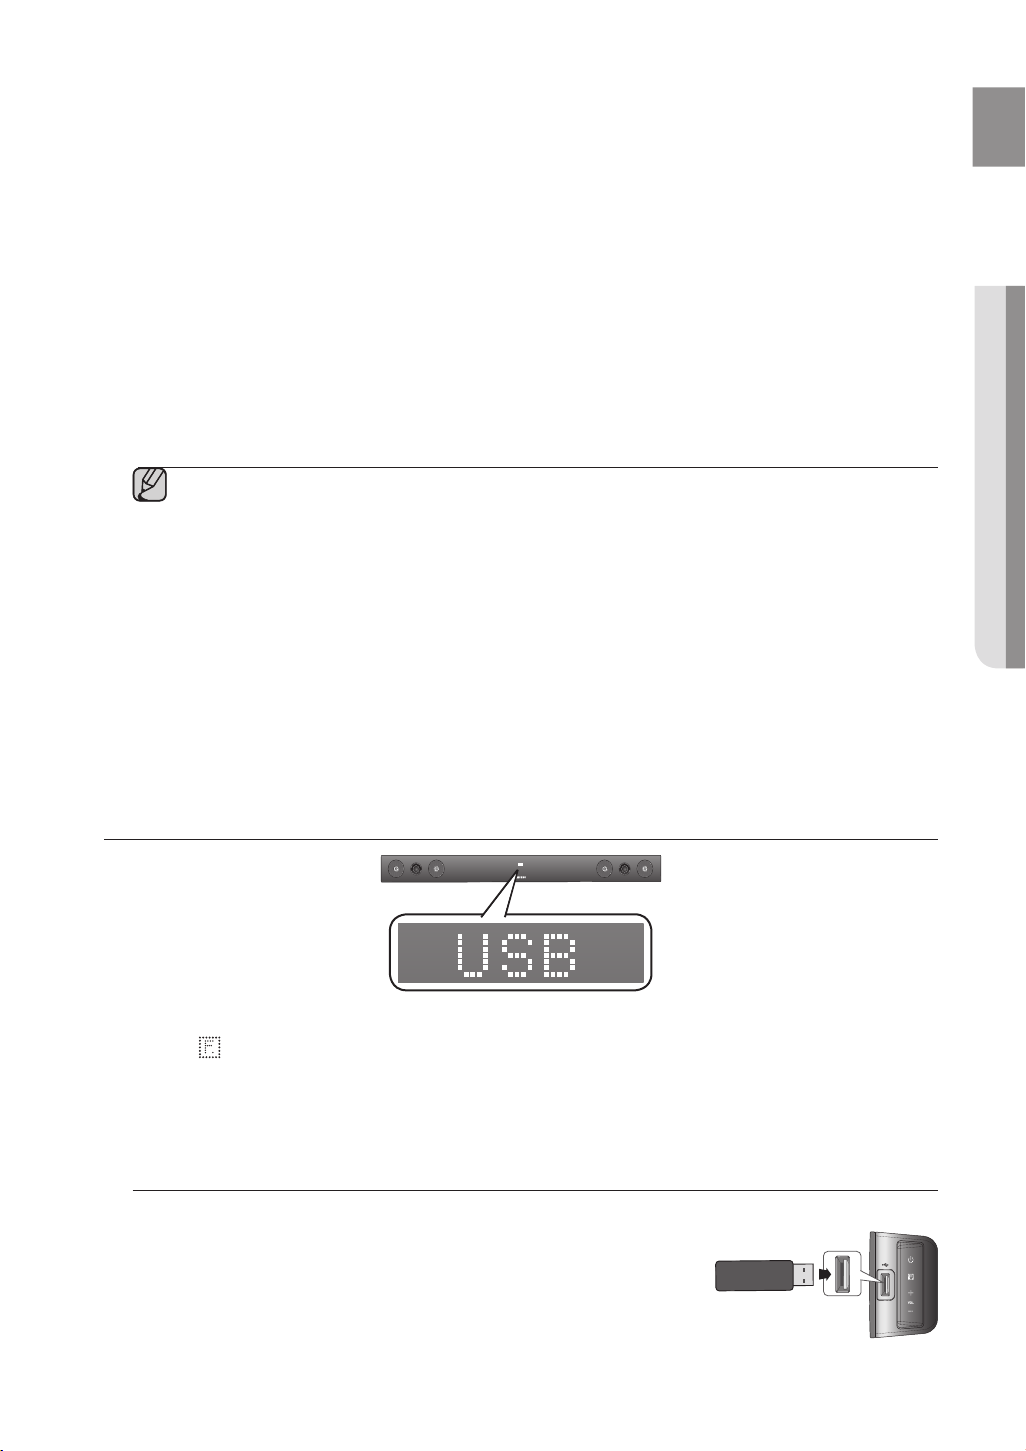
You can select D.IN, AUX, HDMI, BT, TV input or USB input.
Input mode Display
Optical Digital input
AUX input
HDMI input
BLUETOOTH mode
TV mode
USB mode
The unit turns off automatically in the following situations:
• BT/TV/USB/HDMI/ARC/D.IN MODE
— If there is no audio signal for 20 minutes.
D.IN
AUX
HDMI
BT
TV
USB
S/W
LEVEL
3D SOUND
POWER
SOURCE
PLUS
REPEAT
TV VOL TV CH
TV POWER
AUTO
SPEAKER
TV SOURCE
POWER
SoundShare
AUDIO SYNC
DIMMER
TV INFOTV MUTE
TV PRE-CH
SMART VOLUMESOUND EFFECT
VOL
S/W
MUTE
LEVEL
VOL
DRC
AH59-02547B
• AUX Mode
— If no KEY input is entered for 8 hours when the cable is connected.
— If the AUX cable is disconnected for 20 minutes.
▪ The ARC function is activated in D.IN mode if the unit is connected to an ARC supporting TV.
▪ To turn off the ARC function, turn Anynet off.
▪ Use the provided cable if a USB flash memory device cannot be connected directly to the unit.
BLUETOOTH
You can use a Bluetooth device to enjoy music with high quality stereo sound, all without wires!
What is Bluetooth?
Bluetooth is a technology that enables Bluetooth-compliant devices to interconnect easily with each other using
a short wireless connection.
• A Bluetooth device may cause noise or malfunction, depending on usage, when:
— A part of your body is in contact with the receiving/transmitting system of the Bluetooth device or the Air
Track.
— It is subject to electrical variation from obstructions caused by a wall, corner, or office partition.
— It is exposed to electrical interference from same frequency-band devices including medical equipment,
microwave ovens, and wireless LANs.
• Pair the Air Track with the Bluetooth device while they are close together.
• The further the distance is between Air Track and Bluetooth device, the worse the quality is.
If the distance exceeds the Bluetooth operational range, the connection is lost.
• In poor r
• The Bluetooth connection only works when it is close to the set. The connection will be automatically cut off if
the Bluetooth device is out of range. Even within range, the sound quality may be degraded by obstacles
such as walls or doors.
• This wireless device may cause electric interference during its operation.
14
eception-sensitivity areas, the Bluetooth connection may not work properly.
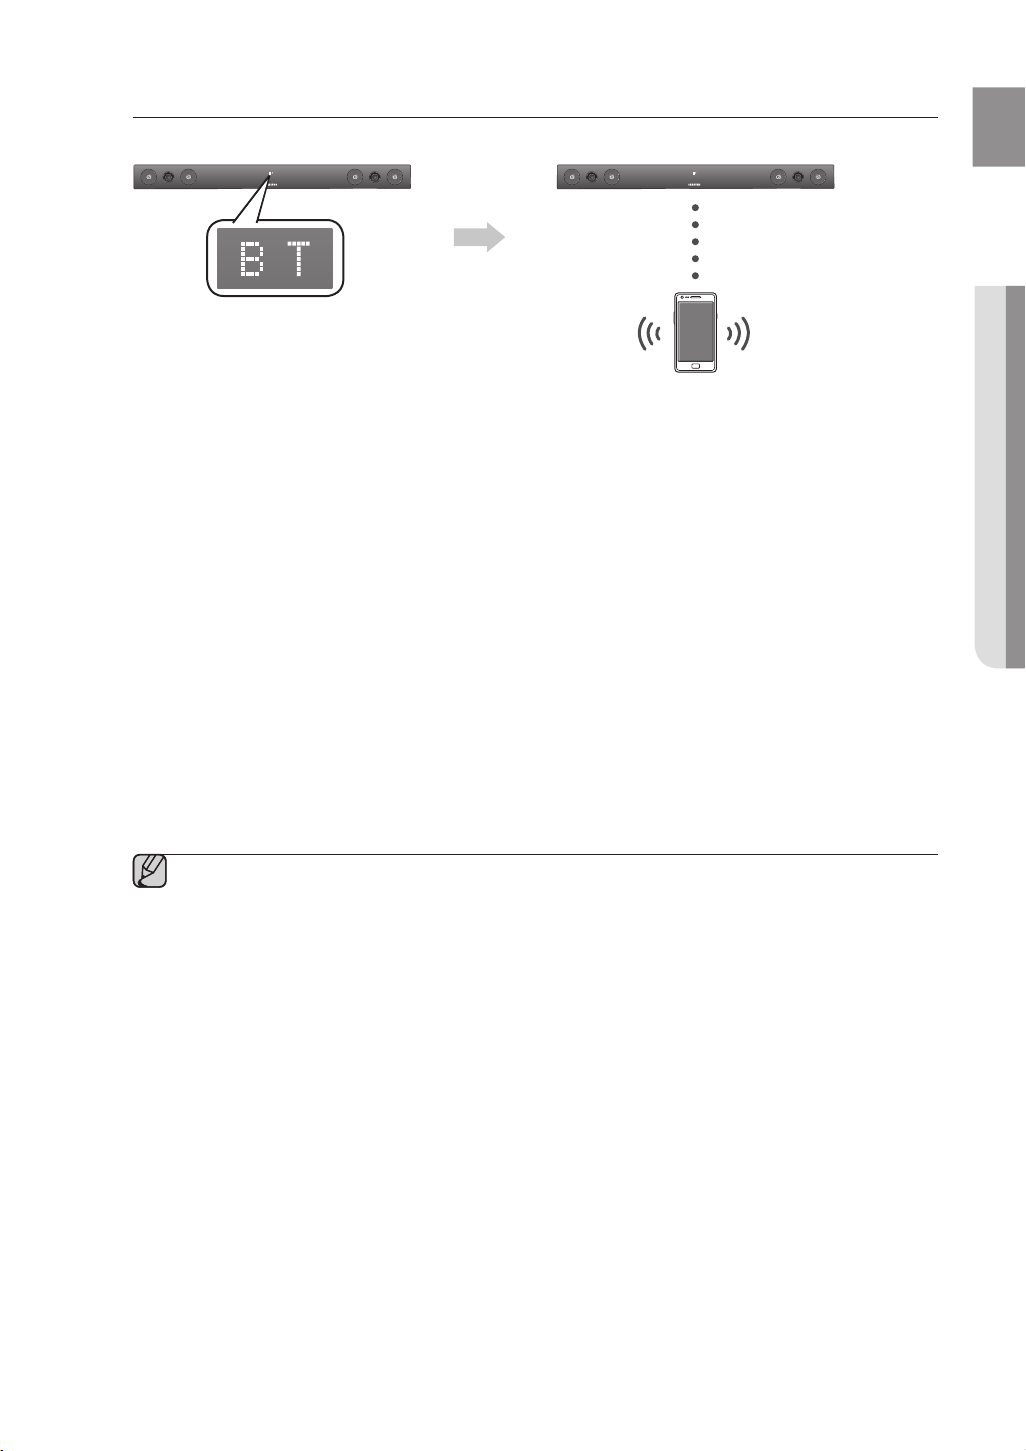
To connect the Air Track to a Bluetooth device
Check if the Bluetooth device supports the Bluetooth compliant stereo headset function.
Connect
Bluetooth device
1.
Press the SOURCE button on the remote control of the AirTrack to display the BT message.
• You will see WAIT for 4 seconds and then BT READY on the front display of the Air Track.
2.
Select the Bluetooth menu on the Bluetooth device you want to connect. (Refer to the Bluetooth
device’s user manual.)
3.
Select the Stereo headset menu on the Bluetooth device.
• You will see a list of scanned devices.
4. Select «[Samsung] AirTrack» from the list.
• When the Air Track is connected to the Bluetooth device, it will display BT CONNECTED
display.
• If the Bluetooth device has failed to pair with the Air Track, delete the previous “[Samsung] AirTrack” found
by the Bluetooth device and have it search for the Air Track again.
5. Play music on the connected device.
• You can listen to the music playing on the connected Bluetooth device over the Crystal Surround Air Track
system.
• In BT mode, Play/Repeat/Stop/Next/Prev functions are not available.
▪ You may be required to enter a PIN code (password) when connecting the Bluetooth device to
the Air Track. If the PIN code input window appears, enter <0000>.
▪ The Air Track supports SBC data (44.1kHz, 48kHz).
▪ The AVRCP feature is not supported.
▪ Connect only to a Bluetooth device that supports the A2DP (AV) function.
▪ You cannot connect to a Bluetooth device that supports only the HF (Hands Free) function.
▪ Only one Bluetooth device can be paired at a time.
▪ Once you have turned off Air Track and the pairing is disconnected, the pairing will not be
restored automatically. To reconnect, you must pair the device again.
▪ Search or connection may not be performed properly by Air Track in the following cases:
— If there is a strong electrical field around Air Track.
— If several Bluetooth devices are simultaneously paired with AirTrack
— If the Bluetooth device is turned off, not in place, or malfunctions
— Note that such devices as microwave ovens, wireless LAN adaptors, fluorescent lights, and gas
stoves use the same frequency range as the Bluetooth device, which can cause electric
interference.
➡
BT on the front
15
To disc
You can disconnect the Bluetooth device from the Air Track.
For instructions, see the Bluetooth device’s user manual.
•
The Air Track will be disconnected.
• When the Air Track is disconnected from the Bluetooth device the Air Track will display BT DISCONNECTED
on the front display.
onnect the Bluetooth device from the Air Track
To disconnect the Air Track from the Bluetooth device
Press the button on the side panel of the Air Track to switch from BT to another mode or turn off the Air
Track.
• The connected Bluetooth device will wait a certain amount of time for a response from the Air Track before
terminating the connection.
(Disconnection time may differ, depending on the Bluetooth device)
•
The currently connected device will be disconnected.
▪ In Bluetooth connection mode, the Bluetooth connection will be lost if the distance between the Air
Track and the Bluetooth device exceeds 16.25 ft. (5m).
▪ If the Bluetooth device comes back into the effective range after disconnecting, you can restart the Air
Track to restore the pairing with the Bluetooth device.
▪ The Air Track automatically turns off after 20 minutes in the Ready state.
SOUNDSHARE
This section explains how to connect the Crystal Surround Air Track to a Bluetooth compatible SAMSUNG TV.
To connect the Crystal Surround Air Track to a Bluetooth compatible
Samsung TV
Connect
Press the button to select the TV mode, and then connect the TV to the Crystal Surround Air Track.
• The unit will play the TV’s audio when it is connected to the TV.
• If you change to another mode, except the TV SoundShare mode, or turn off the Air Track, you will hear audio
from the TV again.
16
<To pair to your TV>
To produce TV sound on your Air Track via a Bluetooth connection, you need to pair your system to the Bluetooth
compliant TV first. Once the pairing is established, the pairing information is recorded and kept and no further
Bluetooth connection message will appear. Bring the Air Track and the TV close together before pairing.
1. Turn on the Samsung TV and Air Track.
• Set Add New Device in the TV’s SoundShare Setting menu to On.
2. When you change the mode of the Air Track to TV, a message asking whether to proceed with
Bluetooth pairing is displayed. «[Samsung] AirTrack» appears on the TV screen.
3. Select <Yes > on the TV screen. The pairing with the Air Track will be completed.
• Once the pairing is established, when you change the Air Track to the TV mode from other input modes, it will
automatically connect to the TV.
• Changing the Air Track from TV mode to any other mode will cancel the SoundShare connection.
• If you want to cancel the existing pairing of the SAT to a TV and pair your SAT to a different TV.
— Press the PLAY/PAUSE button on the SAT for 5 seconds in the TV input mode to cancel the existing pairing.
You can now pair it to a different TV.
• In the SoundShare mode, you can control the volume and mute using either the TV remote or the SAT remote.
▪ TV SoundShare operation range
— recommended pairing range: within 20 inches (within 50cm.)
— recommended operation range: within 16.25 ft. (5m)
▪ If the distance between the Air Track and Samsung TV is over 16.25 ft. (5m), the connection or the
sound can be cut off. If this occurs, connect to the Bluetooth device again within the operational range.
▪ Make sure the Samsung TV’s SoundShare mode is on before you use this function.
▪ The PLAY, NEXT, PREV, STOP buttons will not work in the SoundShare mode.
▪ Bluetooth Standby On function
— Air Track will be powered on automatically when you turn the TV on if you connected TV and Air Track with
SoundShare function.
— You can toggle this fucntion On/Off by pressing SOURCE button over 5 seconds when AirTrack is
powered off. If set to Off, the product turns off automatically when the TV turns off, but it does not turn on
automatically.
▪ The SoundShare function is supported by some Samsung TVs released after 2012.
Check whether your TV supports SoundShare before you begin.
(For more information, refer to the user’s guide of your TV)
USB
1.
2. Press the (
3.
Connect the USB device to the USB port on the side of the unit.
) button on the side panel of the Air Track repeatedly until USB appears.
USB appears on the display screen and then disappears.
• The Crystal Surround Air Track connection is complete.
• The SAT automatically turns off (Auto Power Off) if no USB device has been connected for more than 20
minutes.
Before you connect a USB device
Be aware of the following:
• If the file name of a folder on a USB device exceeds 10 characters, it is
not displayed on the VFD.
• This product may not be compatible with certain types of USB storage
media.
• The Air Track supports the FAT16 and FAT32 file systems.
— The NTFS file system is not supported.
17
• Connect USB devices directly to the USB port of the product. Otherwise, you may encounter a USB
POWER
TV POWER
REPEAT
TV VOL TV CH
AUDIO SYNC
SOURCE
AUTO
POWER
SPEAKER
TV SOURCE
TV PRE-CH
DIMMER
TV INFOTV MUTE
SoundShare
POWER
TV POWER
REPEAT
TV VOL TV CH
AUDIO SYNC
SOURCE
AUTO
POWER
SPEAKER
TV SOURCE
TV PRE-CH
DIMMER
TV INFOTV MUTE
SoundShare
POWER
TV POWER
REPEAT
TV VOL TV CH
AUDIO SYNC
SOURCE
AUTO
POWER
SPEAKER
TV SOURCE
SoundShare
compatibility problem.
• Do not connect multiple storage devices to the product via a multi-card reader. It may not operate
properly.
• Digital camera PTP protocols are not supported.
• Do not remove the USB device while it is being read.
• DRM-protected music files (MP3, WMA) from a commercial web site will not be played.
• External HDDs are not supported.
• Mobile phone devices are not supported.
• File Format Type Compatibility list:
Format Codec
MPEG 1 Layer2
*.mp3
MPEG 1 Layer3
MPEG 2 Layer3
*.wma
Wave_Format_MSAudio1
Wave_Format_MSAudio2
AAC
*.aac
AAC-LC
HE-AAC
*.wav
*.Ogg
*.Flac
FLAC 1.1.0, FLAC 1.2.1
—
OGG 1.1.0
※ Supporting Sampling Rate above 16KHz
USING THE REMOTE CONTROL
POWER
TV POWER
AUTO
SPEAKER
TV SOURCE
POWER
SOURCE
SoundShare
REPEAT
AUDIO SYNC
TV VOL TV CH
DIMMER
TV INFOTV MUTE
TV PRE-CH
SMART VOLUMESOUND EFFECT
VOL
S/W
S/W
MUTE
LEVEL
LEVEL
VOL
3D SOUND
DRC
PLUS
AH59-02547B
POWER
TV POWER
AUTO
SPEAKER
TV SOURCE
POWER
SOURCE
SoundShare
REPEAT
AUDIO SYNC
TV VOL TV CH
DIMMER
TV INFOTV MUTE
TV PRE-CH
SMART VOLUMESOUND EFFECT
VOL
S/W
S/W
MUTE
LEVEL
LEVEL
VOL
3D SOUND
DRC
PLUS
AH59-02547B
POWER
TV POWER
AUTO
SPEAKER
TV SOURCE
POWER
SOURCE
SoundShare
REPEAT
TV VOL TV CH
AUDIO SYNC
DIMMER
TV INFOTV MUTE
TV PRE-CH
SMART VOLUMESOUND EFFECT
VOL
S/W
S/W
MUTE
LEVEL
LEVEL
VOL
3D SOUND
DRC
PLUS
18
AH59-02547B
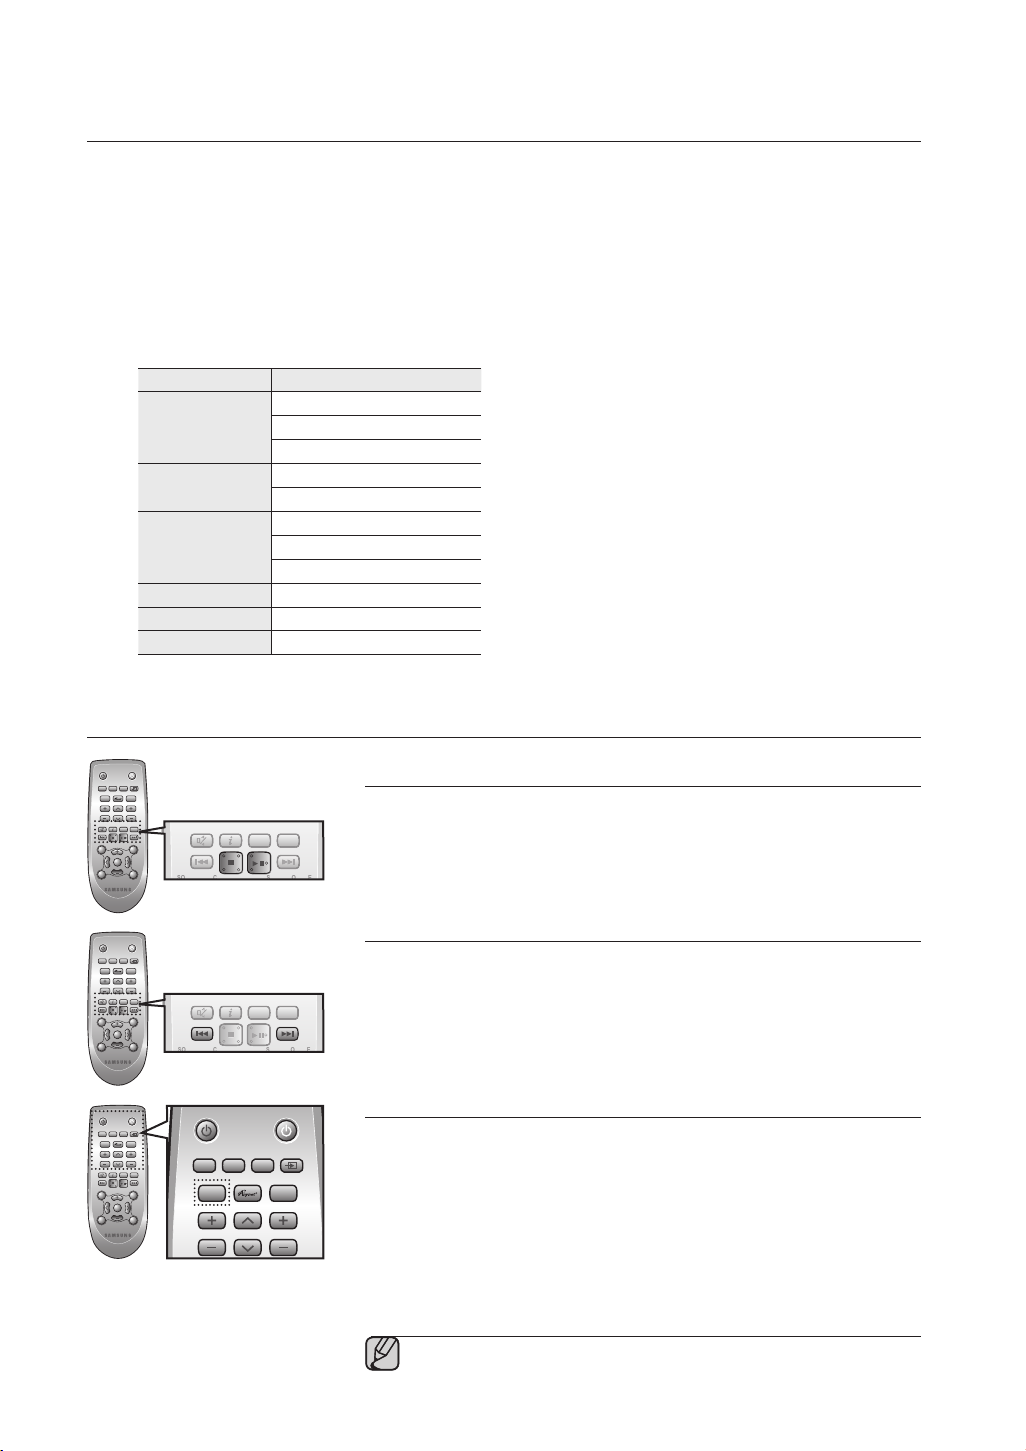
Play/Pause/Stop
During playback, press the +#,@ button.
• Press the +# button again to stop playing the file temporarily.
Press the +# button to play the selected file.
• To stop playback, press the Stop (
@
) button during playback.
Skip Forward/Back
During playback, press the [,] button.
• When there is more than one file and you press the ] button, the next file
is selected.
• When there is more than one file and you press the [ button, the
previous file is selected.
Using the REPEAT function
Repeat playback allows you to repeatedly play a file, repeat all, randomly play
files, or turn Repeat off.
Press the REPEAT button.
• REPEAT OFF : Cancels Repeat Playback.
• REPEAT FILE : Repeat playing a track.
• REPEAT ALL : Repeat playing all tracks.
• REPEAT RANDOM : Plays tracks in random order. (A track that has
already been played may be played again.)
▪ You can set the REPEAT function during the playback of music from
a USB drive.
POWER
POWER
TV POWER
REPEAT
TV VOL TV CH
AUDIO SYNC
SOURCE
AUTO
POWER
SPEAKER
TV SOURCE
TV PRE-CH
DIMMER
SMART VOLUMESOUND EFFECT
S/W
LEVEL
S/W
LEVEL
VOL
VOL
3D SOUND
PLUS
DRC
TV INFOTV MUTE
SoundShare
MUTE
POWER
TV POWER
REPEAT
TV VOL TV CH
AUDIO SYNC
SOURCE
AUTO
POWER
SPEAKER
TV SOURCE
TV PRE-CH
DIMMER
SMART VOLUMESOUND EFFECT
S/W
LEVEL
S/W
LEVEL
VOL
VOL
3D SOUND
PLUS
DRC
TV INFOTV MUTE
SoundShare
MUTE
POWER
TV POWER
REPEAT
TV VOL TV CH
AUDIO SYNC
SOURCE
AUTO
POWER
SPEAKER
TV SOURCE
TV PRE-CH
DIMMER
SMART VOLUMESOUND EFFECT
S/W
LEVEL
S/W
LEVEL
VOL
VOL
3D SOUND
PLUS
DRC
TV INFOTV MUTE
SoundShare
MUTE
POWER
TV POWER
REPEAT
TV VOL TV CH
AUDIO SYNC
SOURCE
AUTO
POWER
SPEAKER
TV SOURCE
TV PRE-CH
DIMMER
SMART VOLUMESOUND EFFECT
S/W
LEVEL
S/W
LEVEL
VOL
VOL
3D SOUND
PLUS
DRC
TV INFOTV MUTE
SoundShare
MUTE
POWER
TV POWER
REPEAT
TV VOL TV CH
AUDIO SYNC
SOURCE
AUTO
POWER
SPEAKER
TV SOURCE
TV PRE-CH
DIMMER
SMART VOLUMESOUND EFFECT
S/W
LEVEL
S/W
LEVEL
VOL
VOL
3D SOUND
PLUS
DRC
TV INFOTV MUTE
SoundShare
MUTE
TV POWER
AUTO
SPEAKER
TV SOURCE
POWER
SOURCE
SoundShare
REPEAT
AUDIO SYNC
TV VOL TV CH
DIMMER
TV INFOTV MUTE
TV PRE-CH
SMART VOLUMESOUND EFFECT
VOL
S/W
S/W
MUTE
LEVEL
LEVEL
VOL
3D SOUND
DRC
PLUS
AH59-02547B
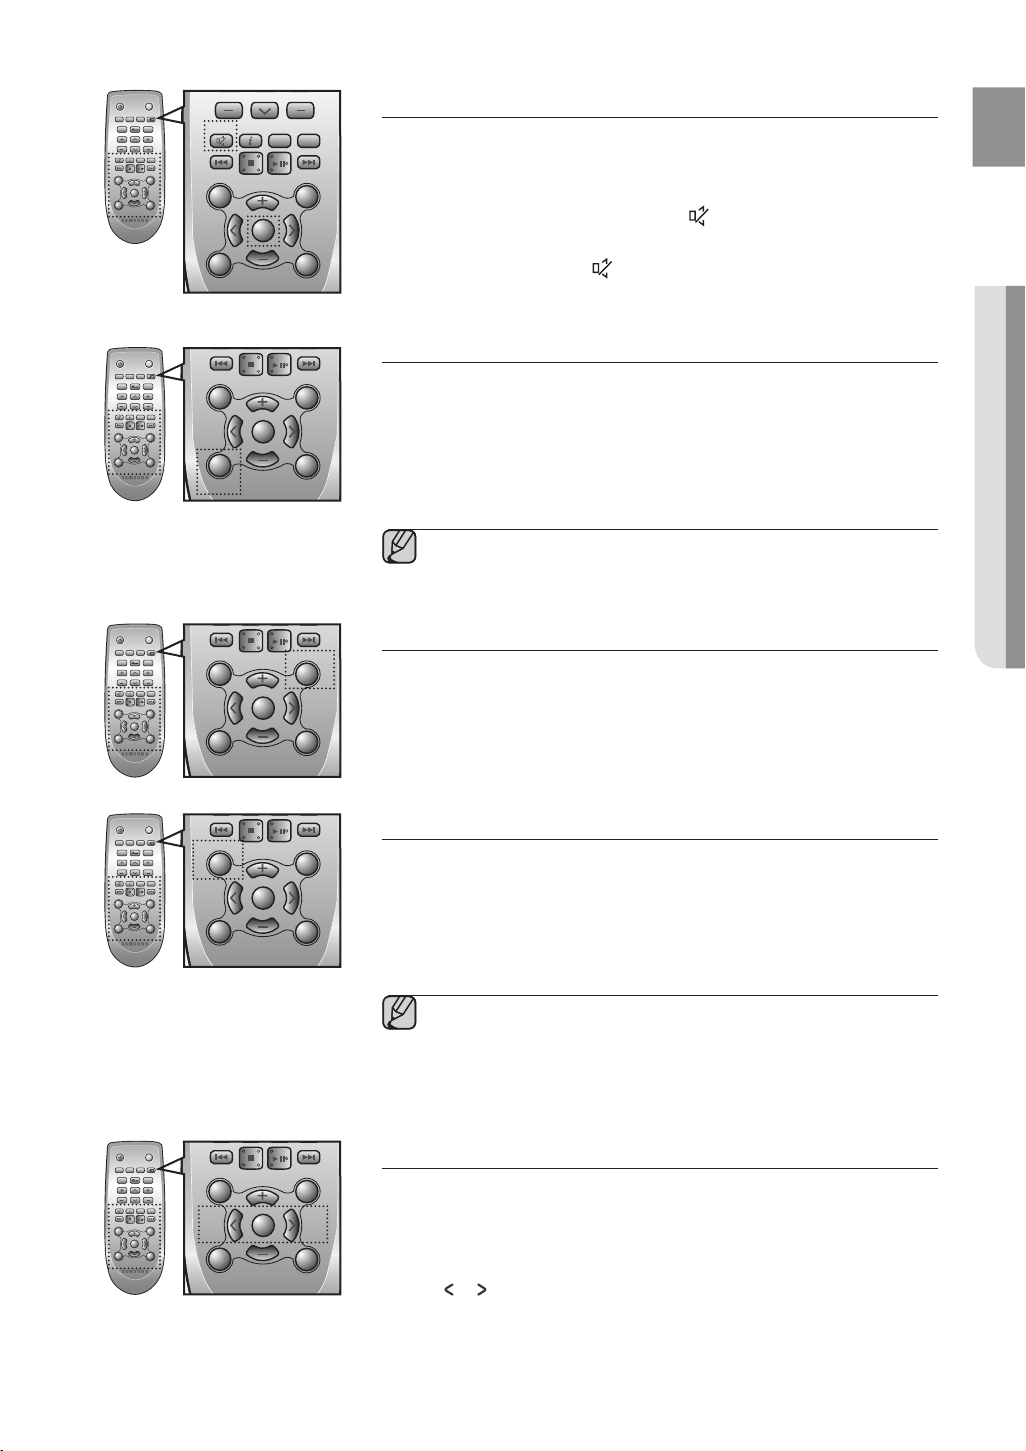
Muting the sound
This is useful when answering a doorbell or telephone call.
1.
To mute the sound of this unit, press the MUTE button on the remote
control.
2.
To mute the TV, press the
control.
TV MUTE ( )
button on the remote
3. Press MUTE/ TV MUTE ( ) on the remote control again (or press
VOLUME +/–) to restore the sound.
POWER
TV POWER
AUTO
SPEAKER
TV SOURCE
POWER
SOURCE
SoundShare
REPEAT
AUDIO SYNC
TV VOL TV CH
DIMMER
TV INFOTV MUTE
TV PRE-CH
SMART VOLUMESOUND EFFECT
VOL
S/W
S/W
MUTE
LEVEL
LEVEL
VOL
3D SOUND
DRC
PLUS
AH59-02547B
Using the 3D SOUND PLUS function
The 3D Sound Plus feature adds depth and spaciousness to the sound.
Press 3D SOUND PLUS on the remote control.
• Each time the button is pressed, the selection changes as follows :
3D SOUND PLUS OFF ➡ 3D SOUND PLUS MUSIC ➡ 3D SOUND
PLUS MOVIE
▪ When you turn on 3D Sound Plus, the Sound Effect function will
automatically change to OFF.
POWER
TV POWER
AUTO
SPEAKER
TV SOURCE
POWER
SOURCE
SoundShare
REPEAT
AUDIO SYNC
TV VOL TV CH
DIMMER
TV INFOTV MUTE
TV PRE-CH
SMART VOLUMESOUND EFFECT
VOL
S/W
S/W
MUTE
LEVEL
LEVEL
VOL
3D SOUND
DRC
PLUS
AH59-02547B
POWER
TV POWER
AUTO
SPEAKER
TV SOURCE
POWER
SOURCE
SoundShare
REPEAT
AUDIO SYNC
TV VOL TV CH
DIMMER
TV INFOTV MUTE
TV PRE-CH
SMART VOLUMESOUND EFFECT
VOL
S/W
S/W
MUTE
LEVEL
LEVEL
VOL
3D SOUND
DRC
PLUS
AH59-02547B
Using the SMART VOLUME function
This will regulate and stabilize the volume level against a drastic volume
change caused by a channel change or scene transition.
Press SMART VOLUME on the remote control.
• Each time the button is pressed, the selection changes as follows :
SMART VOLUME ON ➡ SMART VOLUME OFF
Using the Sound effect function
You can select from 7 different sound modes — MUSIC, NEWS, DRAMA,
CINEMA, SPORTS, GAME, and OFF (Original Sound) — depending on the
type of sources you want to enjoy.
Press SOUND EFFECT on the remote control.
• Select the OFF mode if you want to enjoy the original sound.
POWER
SOURCE
REPEAT
TV VOL TV CH
S/W
LEVEL
3D SOUND
PLUS
TV POWER
AUTO
SPEAKER
TV SOURCE
POWER
SoundShare
AUDIO SYNC
DIMMER
TV INFOTV MUTE
TV PRE-CH
SMART VOLUMESOUND EFFECT
VOL
S/W
MUTE
LEVEL
VOL
DRC
AH59-02547B
▪ We recommend that you select a Sound Effect based on the
source material and your personal taste.
▪ When you choose a Sound Effect mode (except OFF), 3D Sound
Plus will automatically be turned OFF.
Using the S/W LEVEL function
You can control the base volume with the S/W Level button on the remote
control.
Press the S/W LEVEL button on the remote control.
1.
2.
“SW 0” appears on the display.
3. Press or button on the LEVEL key if you want to increase or decrease
the subwoofer volume. You can set it from SW -6 to SW +6.
19
POWER
POWER
TV POWER
REPEAT
TV VOL TV CH
AUDIO SYNC
SOURCE
AUTO
POWER
SPEAKER
TV SOURCE
SoundShare
POWER
TV POWER
REPEAT
TV VOL TV CH
AUDIO SYNC
SOURCE
AUTO
POWER
SPEAKER
TV SOURCE
TV PRE-CH
DIMMER
SMART VOLUMESOUND EFFECT
TV INFOTV MUTE
SoundShare
POWER
TV POWER
REPEAT
TV VOL TV CH
AUDIO SYNC
SOURCE
AUTO
POWER
SPEAKER
TV SOURCE
TV PRE-CH
DIMMER
SMART VOLUMESOUND EFFECT
S/W
LEVEL
S/W
LEVEL
VOL
VOL
3D SOUND
PLUS
DRC
TV INFOTV MUTE
SoundShare
MUTE
POWER
TV POWER
REPEAT
TV VOL TV CH
AUDIO SYNC
SOURCE
AUTO
POWER
SPEAKER
TV SOURCE
TV PRE-CH
DIMMER
SMART VOLUMESOUND EFFECT
TV INFOTV MUTE
SoundShare
POWER
TV POWER
REPEAT
TV VOL TV CH
AUDIO SYNC
SOURCE
AUTO
POWER
SPEAKER
TV SOURCE
SoundShare
TV POWER
AUTO
SPEAKER
TV SOURCE
POWER
SOURCE
SoundShare
REPEAT
TV VOL TV CH
AUDIO SYNC
DIMMER
TV INFOTV MUTE
TV PRE-CH
SMART VOLUMESOUND EFFECT
VOL
S/W
S/W
MUTE
LEVEL
LEVEL
VOL
3D SOUND
DRC
PLUS
AH59-02547B
Using the AUTO POWER LINK function
The Crystal Surround Air Track is automatically turned on when you turn on the
TV or any device connected to the Air Track with the optical cable.
Press AUTO POWER on the remote control of this unit.
• The Auto power link function turns on and off each time you press AUTO
POWER.
AUTO POWER LINK Display
ON
OFF
POWER LINK ON
POWER LINK OFF
▪ If a TV or any device connected to Air Track with the optical cable is
off and there is no digital input, the Air Track is turned off after 20
minutes.
▪ These functions are available only when Anynet+ (HDMI-CEC) is
turned off.
POWER
TV POWER
AUTO
SPEAKER
TV SOURCE
POWER
SOURCE
SoundShare
REPEAT
AUDIO SYNC
TV VOL TV CH
DIMMER
TV INFOTV MUTE
TV PRE-CH
SMART VOLUMESOUND EFFECT
VOL
S/W
S/W
MUTE
LEVEL
LEVEL
VOL
3D SOUND
DRC
PLUS
AH59-02547B
Using the AUDIO SYNC function
Video may appear out of synch with the audio if the Air Track is connected to a
digital TV. If this occurs, adjust the audio delay time to match the video.
Press AUDIO SYNC +/–. on the remote control of this unit.
• You can use the + , — buttons to set the audio delay time between 0 ms
and 300 ms.
▪ In USB mode, TV mode or BT mode, the Audio Sync function may
not work.
POWER
TV POWER
AUTO
SPEAKER
TV SOURCE
POWER
SOURCE
SoundShare
REPEAT
AUDIO SYNC
TV VOL TV CH
DIMMER
TV INFOTV MUTE
TV PRE-CH
SMART VOLUMESOUND EFFECT
VOL
S/W
S/W
MUTE
LEVEL
LEVEL
VOL
3D SOUND
DRC
PLUS
AH59-02547B
POWER
TV POWER
AUTO
SPEAKER
TV SOURCE
POWER
SOURCE
SoundShare
REPEAT
AUDIO SYNC
TV VOL TV CH
DIMMER
TV INFOTV MUTE
TV PRE-CH
SMART VOLUMESOUND EFFECT
VOL
S/W
S/W
MUTE
LEVEL
LEVEL
VOL
3D SOUND
DRC
PLUS
POWER
SOURCE
REPEAT
S/W
LEVEL
3D SOUND
PLUS
20
AH59-02547B
AUTO
SPEAKER
POWER
TV VOL TV CH
TV INFOTV MUTE
TV PRE-CH
VOL
MUTE
VOL
AH59-02547B
TV POWER
TV SOURCE
SoundShare
AUDIO SYNC
DIMMER
SMART VOLUMESOUND EFFECT
S/W
LEVEL
DRC
Using the DRC function
This feature balances the range between the loudest and quietest sounds.
You can use this function to enjoy Dolby Digital sound when watching movies
at low volume at night.
Press DRC on the remote control of this unit.
• Each time the button is pressed, the selection changes as follows :
DRC STANDARD ➡ DRC MAX ➡ DRC MIN
Using the DIMMER function
This feature controls the brightness of the Display.
Press DIMMER on the remote control of this unit.
• Each time the button is pressed, the selection changes as follows :
DIMMER ON ➡ DIMMER OFF
SPEAKER button
If the TV and Air Track are connected via HDMI, this button lets you select
between listening to audio through your TV or through the Air Track.
Press SPEAKER on the remote control of this unit.
AUDIO MODE SPEAKER Scroll Display Display
HDMI IN
ARC
TV
ir Track
A
TV
ir Track
A
TV SPEAKER TV SPK
AVR SPEAKER HDMI
TV SPEAKER S MUTE
AVR SPEAKER TV ARC
POWER
TV POWER
REPEAT
TV VOL TV CH
AUDIO SYNC
SOURCE
AUTO
POWER
SPEAKER
TV SOURCE
TV PRE-CH
DIMMER
TV INFOTV MUTE
SoundShare
POWER
POWER
TV POWER
REPEAT
TV VOL TV CH
AUDIO SYNC
SOURCE
AUTO
POWER
SPEAKER
TV SOURCE
SoundShare
TV POWER
AUTO
SPEAKER
TV SOURCE
POWER
SOURCE
SoundShare
REPEAT
TV VOL TV CH
AUDIO SYNC
DIMMER
TV INFOTV MUTE
TV PRE-CH
SMART VOLUMESOUND EFFECT
VOL
S/W
S/W
MUTE
LEVEL
LEVEL
VOL
3D SOUND
DRC
PLUS
AH59-02547B
Using the Anynet+(HDMI-CEC) function
Anynet+ is a function that enables you to control other Samsung Devices
with your Samsung TV’s remote control.
The Anynet+ function turns on and off each time you press Anynet+.
Connect the product to a Samsung TV with an the HDMI cable.
1.
(See page 12)
2.
Set the Anynet+ function on your TV and the SAT to ON. (See the
TV instruction manual for more information.)
▪ Depending on your TV, certain HDMI output resolutions may not
work.
▪ Please refer to the user’s manual of your TV and check for the
logo (If your TV has an
Anynet+ function.)
POWER
TV POWER
AUTO
SPEAKER
TV SOURCE
POWER
SOURCE
SoundShare
REPEAT
AUDIO SYNC
TV VOL TV CH
DIMMER
TV INFOTV MUTE
TV PRE-CH
SMART VOLUMESOUND EFFECT
VOL
S/W
S/W
MUTE
LEVEL
LEVEL
VOL
3D SOUND
DRC
PLUS
AH59-02547B
Using the TV functions (with Samsung TVs only)
• Press TV SOURCE on the remote control to change the TV’s input
source.
• Press TV INFO on the remote control to display the TV channel
information.
• Press TV CH on the remote control to select the TV channel.
• Press TV VOL on the remote control to increase or decrease the volume
level.
• Use TV PRE-CH button to move to the previous TV channel in TV mode.
logo, then it supports the
▪ When you press the SoundShare button, the TV’s sound is
transmitted through the Air Track system via a Bluetooth
connection. The Air Track also controls the sound volume,
sound quality, etc.
▪ The remote control can operate TVs made by SAMSUNG only.
SOFTWARE UPGRADE
Samsung may offer upgrades for the Crystal
Surround Air Track’s system firmware in the future.
If an upgrade is offered, you can upgrade the
firmware by connecting a USB drive with the
firmware upgrade stored on it to the USB port on
your Air Track.
Note that if there are multiple upgrade files, you must
load them onto the USB drive singly and use them to
upgrade the firmware one at a time.
Please visit Samsung.com or contact the Samsung
call center to receive more information about
downloading upgrades files.
▪ Insert a USB drive containing the firmware upgrade into the USB port on the main unit.
▪ Do not disconnect the power or remove the USB drive while upgrades are being applied. The main unit will turn
off automatically after completing the firmware upgrade.
When software is upgraded, settings you have made will return to their default (factory) settings.
We recommend you write down your settings so that you can easily reset them after the upgrade.
▪ Once upgrading the product software is completed, turn off the product and then press and hold
to reset the product.
▪ If the firmware fails to upgrade, we recommend formatting the USB device in FAT16 and trying again.
▪ For upgrading purposes, do not format the USB drive in NTFS format because it is not a supported file system.
▪ Depending on the manufacturer, some USB devices may not be supported.
(@)
button for a while
21

Before requesting service, please check the following.
Symptom Check Remedy
The unit will not turn on.
A function does not work when the
button is pressed.
Sound is not produced.
The Picture does not appear on a TV
when the function is selected.
The remote control does not work.
• Is the power cord plugged into
the outlet?
• Is there static electricity in the
air?
• Is the unit properly connected
to your TV?
• Is the Mute function on?
• Is the volume set to minimum?
• Is the TV connected properly? • Connect it correctly.
• Are the batteries drained?
• Is the distance between remote
control and main unit too far?
• Connect the power plug to the
outlet.
• Disconnect the power plug and
connect it again.
• Connect it correctly.
• Press the Mute button to
cancel the function.
• Adjust the volume.
• Replace with new batteries.
• Move closer to the unit.
The sound from the left/right
channels are reversed.
The SoundShare (TV pairing) failed.
22
• Are the left/right audio output
cables from the TV connected
properly?
• Does your TV support
SoundShare?
• Is your TV firmware the latest
version?
• Does an error occur when
connecting?
• Reset the TV MODE and
connect again.
• Check the left/right channel and
connect it/them correctly.
• SoundShare is supported by
some Samsung TVs released
after 2012. Check your TV to
see if it supports SoundShare.
• Update your TV with the latest
firmware.
• Contact the call center.
• Press
to reset the product.
button for 5 seconds
appendix
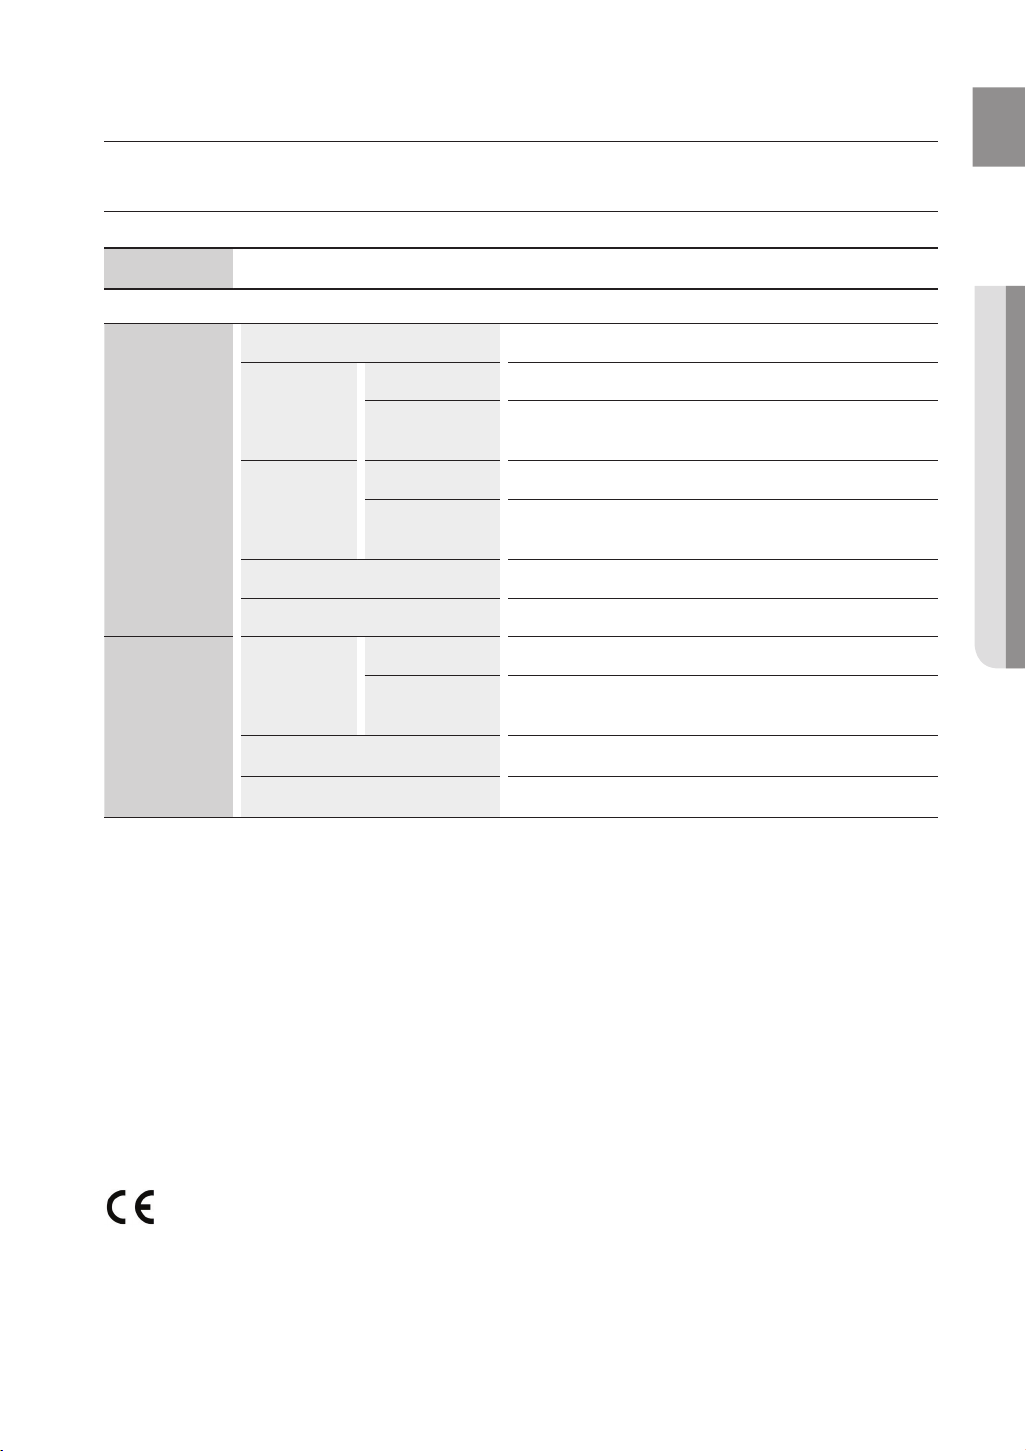
SPECIFICATIONS
Model name
GENERAL
AMPLIFIER
HW-F450
USB 5V/0.5A
Main unit 1.92 kg
Weight
Dimensions
(W x H x D)
Operating temperature range +5 °C to +35 °C
Operating humidity range 10 % to 75 %
Rated output
power
S/N ratio (analog
Separation(1kHz) 65 dB
Subwoofer
(PS-WF450)
Main unit 906 x 45 x 70 mm
Subwoofer
(PS-WF450)
Main unit 80W/CH, 4O
Subwoofer
(PS-WF450)
input)
5.4 kg
175 x 350 x 295 mm
HM,
HM,
120W, 4O
65 dB
THD = 10%, 70Hz
THD = 10%, 1kHz
* S/N ratio, distortion, separation and usable sensitivity are based on measurement using AES (Audio
Engineering Society) guidelines.
*: Nominal specification
— Samsung Electronics Co., Ltd reserves the right to change the specifications without notice.
— Weight and dimensions are approximate.
— For the power supply and Power Consumption, refer to the label attached to the product.
Hereby, Samsung Electronics, declares that this Crystal Surround Air Track is in compliance
with the essential requirements and other relevant provisions of Directive 1999/5/EC.
The official Declaration of Conformity may be found at http://www.samsung.com,
go to Support > Search Product Support and enter the model name.
This equipment may be operated in all EU countries.
23
Contact SAMSUNG WORLD WIDE
If you have any questions or comments relating to Samsung products, please contact the SAMSUNG customer
care Centre.
Area Contact Centre
AUSTRIA
0810 — SAMSUNG (7267864,
€ 0.07/min)
BELGIUM 02-201-24-18
BOSNIA 051 133 1999 www.samsung.com
BULGARIA 07001 33 11, normal tariff www.samsung.com
CROATIA 062 SAMSUNG (062 726 786) www.samsung.com
CZECH 800 — SAMSUNG (800-726786) www.samsung.com
DENMARK 70 70 19 70 www.samsung.com
FINLAND 030-6227 515 www.samsung.com
FRANCE 01 48 63 00 00 www.samsung.com/fr
0180 5 SAMSUNG bzw.
GERMANY
0180 5 7267864* (*0,14 €/Min.
aus dem dt. Festnetz, aus dem
Mobilfunk max. 0,42 €/Min.)
8009 4000 only from landline
CYPRUS
(+30) 210 6897691 from mobile
and land line
80111-SAMSUNG (80111 726
GREECE
7864) only from land line
(+30) 210 6897691 from mobile
and land line
HUNGARY 06-80-SAMSUNG(726-7864) www.samsung.com
ITALIA 800-SAMSUNG(726-7864) www.samsung.com
LUXEMBURG 261 03 710 www.samsung.com
MONTENEGRO 020 405 888 www.samsung.com
NETHERLANDS
0900-SAMSUNG (0900-
7267864) (€ 0,10/Min)
[Correct disposal of batteries in this product]
Web Site
www.samsung.com
www.samsung.com/be
(Dutch)
www.samsung.com/be_
fr (French)
www.samsung.com
www.samsung.com
www.samsung.com
www.samsung.com
Area Contact Centre
Web Site
NORWAY 815 56480 www.samsung.com
0 801-1SAMSUNG(172-678) *
lub +48 22 607-93-33 **
* (całkowity koszt połączenia
POLAND
jak za 1 impuls według taryfy
www.samsung.com/pl
operatora)
** (koszt połączenia według taryfy
operatora)
PORTUGAL
808 20-SAMSUNG (808 20
7267)
www.samsung.com
08008 SAMSUNG (08008 726
ROMANIA
7864)
www.samsung.com
TOLL FREE No.
+381 11 321 6899
SERBIA
(old number still active 0700
www.samsung.com
7267864)
SLOVAKIA
SPAIN
0800 — SAMSUNG(0800-726
786)
902 — 1 — SAMSUNG (902 172
678)
www.samsung.com
www.samsung.com
SWEDEN 0771 726 7864 (SAMSUNG) www.samsung.com
www.samsung.com/ch
Switzerland
0848 — SAMSUNG(7267864,
CHF 0.08/min)
(German)
www.samsung.com/
ch_fr (French)
U.K 0330 SAMSUNG (7267864) www.samsung.com
EIRE 0818 717100 www.samsung.com
LITHUANIA 8-800-77777 www.samsung.com/lt
LATVIA 8000-7267 www.samsung.com/lv
ESTONIA 800-7267 www.samsung.com/ee
Correct Disposal of This Product
(Waste Electrical & Electronic Equipment)
(Applicable in countries with separate collection systems)
This marking on the battery, manual or packaging indicates that the batteries in
this product should not be disposed of with other household waste at the end of
their working life. Where marked, the chemical symbols Hg, Cd or Pb indicate that
the battery contains mercury, cadmium or lead above the reference levels in EC
Directive 2006/66. If batteries are not properly disposed of, these substances can
cause harm to human health or the environment.
To protect natural resources and to promote material reuse, please separate
batteries from other types of waste and recycle them through your local, free
battery return system.
As an ENERGY STAR Partner, Samsung
has determined that this product or product
models meets the ENERGY STAR guidelines
for energy efficiency.
(Applicable in countries with separate collection systems)
This marking on the product, accessories or literature indicates that the product and
its electronic accessories (e.g. charger, headset, USB cable) should not be disposed
of with other household waste at the end of their working life. To prevent possible
harm to the environment or human health from uncontrolled waste disposal, please
separate these items from other types of waste and recycle them responsibly to
promote the sustainable reuse of material resources.
Household users should contact either the retailer where they purchased this product,
or their local government ofce, for details of where and how they can take these
items for environmentally safe recycling.
Business users should contact their supplier and check the terms and conditions
of the purchase contract. This product and its electronic accessories should not be
mixed with other commercial wastes for disposal.
AH68-02647L-00

HW-F450
Crystal Surround Air Track
(système avec enceintes actives)
Manuel d’utilisation
imaginez les possibilités
Merci d’avoir choisi un appareil Samsung.
Pour recevoir une assistance plus complète,
veuillez enregistrer votre produit sur
www.samsung.com/register
caractéristiques
SoundShare
Le SoundShare émet le son du téléviseur sur votre Ensemble Home cinéma (SAT) via une connexion Bluetooth et le son est contrôlé.
HDMI
L’interface HDMI permet la transmission simultanée des signaux audio et vidéo pour vous offrir une image plus nette.
L’appareil est également équipé de la fonction ARC qui vous permet d’écouter le son de votre téléviseur dans l’Ensemble Home
cinéma via un câble HDMI. Cette fonction est uniquement disponible si vous connectez l’appareil à un téléviseur compatible ARC.
3D SOUND PLUS
La fonctionnalité 3D SOUND PLUS ajoute de la profondeur et de la grandeur au son.
Caisson de basses sans fil
Le module sans fil de Samsung s’affranchit des câbles qui reliaient l’unité principale au caisson de basses.
En remplacement du câblage, le caisson de basses se connecte à un module sans fil compact qui communique avec l’unité principale.
Mode sonore spécial
Vous avez le choix entre sept modes de sons différents — MUSIC, NEWS, DRAMA, CINEMA, SPORTS, GAME, et OFF (son
original) — selon le type de contenu dont vous souhaitez profiter.
Télécommande multifonction
La télécommande fournie peut également être utilisée pour commander le téléviseur connecté à cet ensemble. (Fonctionne uniquement
avec les téléviseurs Samsung)
Elle est pourvue d’une touche d’accès rapide au téléviseur permettant d’activer plusieurs options d’une simple pression sur les touches.
Système avec enceintes actives
Cet ensemble est doté d’un système avec enceintes actives qui offre une haute qualité sonore dans une seule unité peu
encombrante.
Cet ensemble ne nécessite aucun haut-parleur satellite ni câbles, généralement présents dans les Home Cinémas classiques.
Prise en charge de la fonction Hôte USB
Vous pouvez connecter des périphériques de stockage USB externes (lecteur MP3, mémoire flash USB, etc.) afin d’en lire les
fichiers musicaux à l’aide de la fonction USB HOST du système Home cinéma.
Fonction Bluetooth
Vous pouvez connecter un périphérique Bluetooth à l’Ensemble Home cinéma pour écouter de la musique avec un son stéréo de
haute qualité, tout cela sans fil !
LICENCE
Fabriqué sous licence par Dolby Laboratories. Dolby et le symbole représentant deux D sont des marques de commerce de
Dolby Laboratories.
Fabriqué sous licence sous les brevets américains suivants : 5,956,674; 5,974,380; 6,487,535 et autres brevets déposés
ou en attente aux États-Unis ou dans d’autres pays. DTS, le Symbole, ainsi que DTS et le Symbole ensemble sont des
marques déposées et DTS 2.0 Channel est une marque de commerce de DTS, Inc. Le produit inclut le logiciel. © DTS, Inc.
Tous droits réservés.
Les termes HDMI et HDMI High-Definition Multimedia Interface, et le logo HDMI sont des marques de
commerce ou des marques déposées de HDMI Licensing LLC aux États-Unis et dans d’autres pays.
— Pour toute requête et demande concernant les questions sur les sources ouvertes, contactez Samsung via e-mail
(oss.request@ samsung.com).
2
informations relatives à la sécurité
AVERTISSEMENTS
POUR ÉVITER LES RISQUES DE CHOC ÉLECTRIQUE, NE DÉMONTEZ PAS LE CAPOT. L’APPAREIL NE CONTIENT PAS DE
PIÈCES RÉPARABLES PAR L’UTILISATEUR ; S’ADRESSER À UN SERVICE APRÈS-VENTE QUALIFIÉ.
Ce symbole avertit l’utilisateur de la
ATTENTION
RISQUE DE CHOC ÉLECTRIQUE.
NE PAS OUVRIR
AVERTISSEMENT : Afin de diminuer les risques d’incendie ou de choc électrique, n’exposez pas cet appareil à la pluie ou à l’
humidité.
présence d’une tension dangereuse à
l’intérieur de l’appareil.
Ce symbole avertit l’utilisateur de la
présence de directives importantes dans la
documentation accompagnant cet appareil.
MISE EN GARDE
• Cet appareil doit toujours être branché à une prise terre.
• Pour déconnecter l’appareil du circuit principal, la prise doit être débranchée de la prise principale ; il est de ce fait
nécessaire que la prise principale soit facile d’accès.
ATTENTION
• Évitez toute projection d’eau sur l’appareil. Ne posez jamais d’objet contenant un liquide (ex : un vase) dessus.
• Pour éteindre complètement l’appareil, vous devez retirer le cordon d’alimentation de la prise murale. Par conséquent,
le cordon d’alimentation doit être facilement accessible à tout moment.
: Pour prévenir les chocs électriques, branchez la fiche au fond, en prenant soin d’insérer la tige large dans la
fente large.
3

PRÉCAUTIONS
3.9 inch 3.9 inch
2.7 inc
h
3.9 inch
tionnement de l’appareil.
99.1mm
99.1mm
68.6mm
99.1mm
Assurez-vous que l’alimentation électrique de votre maison est conforme à la plaque d’identification située au dos de votre produit.
Posez votre produit à plat sur un meuble stable en veillant à laisser un espace de 7 à 10 cm autour de l’appareil afin d’assurer une ventilation correcte de celui-ci. Faites attention à ne pas obstruer les orifices de ventilation. Ne posez pas l’ensemble sur un amplificateur ou
un autre appareil susceptible de chauffer. Cet ensemble est conçu pour une utilisation en continu. Pour entièrement éteindre l’appareil,
débranchez la fiche CA de la prise murale. Débranchez l’appareil si vous envisagez de ne pas l’utiliser durant une longue période.
En cas d’orage, débranchez la fiche de l’appareil de la prise murale.
Les surtensions occasionnées par l’orage pourraient endommager votre
appareil.
N’exposez pas l’ensemble aux rayons directs du soleil ou à toute autre
source de chaleur. Ceci pourrait entraîner une surchauffe et un dysfonctionnement de l’appareil.
Phones
Protégez le produit de l’humidité (comme les vases) et d’une chaleur
excessive (comme une cheminée) ou de tout équipement capable de
créer des champs magnétiques ou électriques. Débranchez le câble
d’alimentation en cas de dysfonctionnement.
Votre produit n’est pas prévu pour un usage industriel. Ce produit ne peut
être utilisé qu’à des fins personnelles.
Une condensation peut se former si le produit ou un disque a été stocké
à basse température. Si vous devez transporter l’ensemble pendant
l’hiver, attendez environ 2 heures que l’appareil ait atteint la température
de la pièce avant de l’utiliser.
4
Les piles utilisées dans ce produit peuvent contenir des produits ch
miques dangereux pour l’environnement.
Ne jetez pas les piles dans votre poubelle habituelle.

sommaire
CARACTÉRISTIQUES
2
INFORMATIONS RELATIVES À LA
SÉCURITÉ
3
DÉMARRAGE
6
DESCRIPTIONS
7
TÉLÉCOMMANDE
8
BRANCHEMENTS
9
2 Caractéristiques
2 Licence
3 Avertissements
4 Précautions
6 Avant de lire le manuel d’utilisation
6 Contenu
7 Façade/panneau arrière
8 Présentation de la télécommande
9 Installation de la fixation murale
10
Branchement d’un caisson de graves sans fil
11 Relier le noyau torique en ferrite au cordon
d’alimentation du caisson de basse
11 Installation du noyau torique en ferrite sur le
caisson de basse
12 Connexion d’un périphérique externe à
l’aide d’un câble HDMI
13 Connexion d’un périphérique externe à
l’aide d’un câble audio (analogique) ou
optique (numérique)
FONCTIONS
14
DÉPANNAGE
22
ANNEXE
23
14 Mode d’entrée
14 Bluetooth
16 SoundShare
17 USB
18 Utilisation de la télécommande
21 Mise à jour du logiciel
22 Dépannage
23 Spécifications
5
Loading…

Crystal Surround Air Track
(Active Speaker System)
user manual
imagine
the possibilities
Thank you for purchasing this Samsung product.
To receive more complete service,
please register your product at
www.samsung.com/register
HW-F450
Скачать
Crystal Surround Air Track
(Active Speaker System)
user manual
imagine
the possibilities
Thank you for purchasing this Samsung product.
To receive more complete service,
please register your product at
www.samsung.com/register
HW-F450
Samsung HW-F450 Speakers PDF User Guides and Manuals for Free Download: Found (5) Manuals for Samsung HW-F450 Device Model (Operation & User’s Manual)
The Samsung HW-F450 is a soundbar that has garnered considerable attention from audio enthusiasts and casual listeners alike. With its sleek design and a focus on delivering rich audio, this soundbar offers an enticing solution for anyone looking to enhance their home theater experience. In this review, we will delve into the features, performance, and overall value of the HW-F450, making it clear why it stands out in a crowded market.
One of the key highlights of the Samsung HW-F450 is its design. The soundbar boasts a minimalist aesthetic that fits seamlessly into any living space. Measuring just under four inches in height, it can easily be placed in front of most televisions without obstructing the screen. The sleek black finish adds a touch of elegance, making it a fitting addition to modern home décor.
In terms of audio performance, the Samsung HW-F450 impresses with its power and clarity. Here are some features that contribute to its sound quality:
- 2.1 Channel Configuration: The system includes a dedicated subwoofer, which adds depth to the audio experience, particularly for action movies and bass-heavy music.
- Bluetooth Connectivity: Users can easily connect their smartphones or other devices wirelessly, making it simple to stream music directly to the soundbar.
- SRS Surround Sound Technology: This feature enhances the soundstage, providing a more immersive experience while watching movies or playing games.
When it comes to setup, the HW-F450 is user-friendly. The package contains all necessary cables, and the process can be completed in just a few minutes. Once connected, users have the option to fine-tune their audio settings via the remote control, providing flexibility in achieving the desired sound profile.
The remote control itself is intuitive and offers various sound modes that cater to different listening scenarios. Whether you are watching a high-octane film, enjoying a music playlist, or tuning into a sports game, the HW-F450 adapts to your needs with ease. The dialog enhancement feature is particularly useful during those critical movie moments when clarity is essential.
Despite its many strengths, the Samsung HW-F450 is not without competition. It is vital to consider its place among other soundbars in the same price range. Many users have pointed out that while the soundbar performs exceptionally well in terms of audio clarity and bass response, it may not fully match the output of higher-end models. However, for the price bracket it occupies, it delivers remarkable value.
In terms of pricing, the HW-F450 is often lauded for being budget-friendly, making it accessible to a broader audience. Users seeking a significant upgrade from built-in television speakers without breaking the bank will find this model appealing. Overall, the combination of its features, design, and performance ensures that the Samsung HW-F450 remains a popular choice among consumers.
To summarize, the Samsung HW-F450 soundbar stands out for its stylish design, impressive sound quality, and user-friendly features. It excels in delivering an enhanced audio experience appropriate for movies, music, and games. While there are more advanced models available, the HW-F450 provides excellent value for money, making it an ideal option for anyone wanting to bring their home entertainment to the next level.