
К сожалению, для вашей корзины недостаточно места.
Удалить продукт
Без этого продукта нельзя активировать имеющийся купон или промокод.
Вы действительно хотите удалить этот продукт?
Политика конфиденциальности
Установите этот флажок, чтобы перейти на веб-сайт Samsung.com.
Я даю свое согласие на получение новостей, специальных предложений и другой информации о продуктах и услугах компании Samsung и ее партнеров по электронной почте, посредством SMS-сообщений и уведомлений.
Просмотреть настройки
Помогите нам составить для вас рекомендации. Для этого обновите настройки продукта.

HW-MS550 / HW-MS551
USER MANUAL
ENG — ii ENG — iii
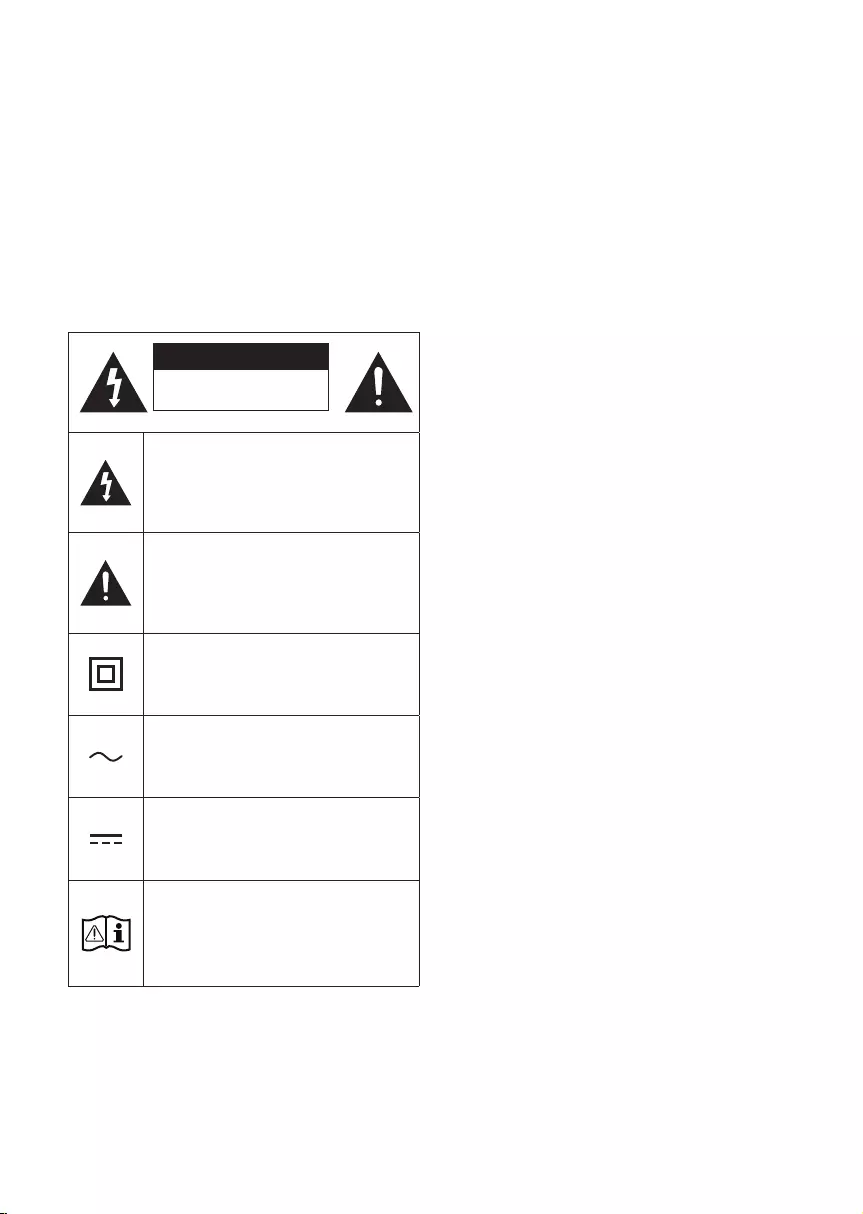
SAFETY INFORMATION
SAFETY WARNINGS
TO REDUCE THE RISK OF ELECTRIC SHOCK, DO
NOT REMOVE THE COVER (OR BACK).
NO USER-SERVICEABLE PARTS ARE INSIDE.
REFER SERVICING TO QUALIFIED SERVICE
PERSONNEL.
CAUTION
RISK OF ELECTRIC SHOCK.
DO NOT OPEN.
This symbol indicates that high voltage
is present inside. It is dangerous to make
any kind of contact with any internal
part of this product.
This symbol indicates that important
literature concerning operation and
maintenance has been included with
this product.
Class II product : This symbol indicates
that it does not require a safety
connection to electrical earth (ground).
AC voltage : This symbol indicates that
the rated voltage marked with the
symbol is AC voltage.
DC voltage : This symbol indicates that
the rated voltage marked with the
symbol is DC voltage.
Caution, Consult instructions for use :
This symbol instructs the user to consult
the user manual for further safety
related information.
WARNING
•To reduce the risk of re or electric shock, do
not expose this appliance to rain or moisture.
CAUTION
•TO PREVENT ELECTRIC SHOCK, MATCH WIDE
BLADE OF PLUG TO WIDE SLOT, FULLY
INSERT.
•This apparatus shall always be connected to a
AC outlet with a protective grounding
connection.
•To disconnect the apparatus from the mains,
the plug must be pulled out from the mains
socket, therefore the mains plug shall be
readily operable.
•Do not expose this apparatus to dripping or
splashing. Do not put objects lled with
liquids, such as vases on the apparatus.
•To turn this apparatus off completely, you
must pull the power plug out of the wall
socket. Consequently, the power plug must
be easily and readily accessible at all times.
Wiring the Main Power Supply
Plug (UK Only)
IMPORTANT NOTICE
The mains lead on this equipment is supplied with
a moulded plug incorporating a fuse. The value of
the fuse is indicated on the pin face of the plug
and if it requires replacing, a fuse approved to
BS1362 of the same rating must be used.
Never use the plug with the fuse cover removed.
If the cover is detachable and a replacement is
required, it must be of the same colour as the fuse
tted in the plug. Replacement covers are
available from your dealer. If the tted plug is not
suitable for the power points in your house or the
cable is not long enough to reach a power point,
you should obtain a suitable safety approved
extension lead or consult your dealer for assistance.
However, if there is no alternative to cutting off the
plug, remove the fuse and then safely dispose of
the plug. Do not connect the plug to a mains
socket as there is a risk of shock hazard from the
bared exible cord. Never attempt to insert bare
wires directly into a mains socket. A plug and fuse
must be used at all times.
IMPORTANT
The wires in the mains lead are coloured in
accordance with the following code:– BLUE =
NEUTRAL BROWN = LIVE As these colours may not
correspond to the coloured markings identifying
the terminals in your plug, proceed as follows:– The
wire coloured BLUE must be connected to the
terminal marked with the letter N or coloured
BLUE or BLACK. The wire coloured BROWN must
be connected to the terminal marked with the
letter L or coloured BROWN or RED.
WARNING : DO NOT CONNECT EITHER WIRE TO
THE EARTH TERMINAL WHICH IS MARKED WITH
THE LETTER E OR BY THE EARTH SYMBOL ,
OR COLOURED GREEN OR GREEN AND YELLOW.
PRECAUTIONS
1. Ensure that the AC power supply in your
house complies with the power
requirements listed on the identication
sticker located on the back of your product.
Install your product horizontally, on a
suitable base (furniture), with enough space
around it for ventilation (7~10 cm). Make sure
the ventilation slots are not covered. Do not
place the unit on ampliers or other
equipment which may become hot. This unit
is designed for continuous use. To fully turn
off the unit, disconnect the AC plug from the
wall outlet. Unplug the unit if you intend to
leave it unused for a long period of time.

ENG — ii ENG — iii
SAFETY INFORMATION
CAUTION
•TO PREVENT ELECTRIC SHOCK, MATCH WIDE
BLADE OF PLUG TO WIDE SLOT, FULLY
INSERT.
•This apparatus shall always be connected to a
AC outlet with a protective grounding
connection.
•To disconnect the apparatus from the mains,
the plug must be pulled out from the mains
socket, therefore the mains plug shall be
readily operable.
•Do not expose this apparatus to dripping or
splashing. Do not put objects lled with
liquids, such as vases on the apparatus.
•To turn this apparatus off completely, you
must pull the power plug out of the wall
socket. Consequently, the power plug must
be easily and readily accessible at all times.
Wiring the Main Power Supply
Plug (UK Only)
IMPORTANT NOTICE
The mains lead on this equipment is supplied with
a moulded plug incorporating a fuse. The value of
the fuse is indicated on the pin face of the plug
and if it requires replacing, a fuse approved to
BS1362 of the same rating must be used.
Never use the plug with the fuse cover removed.
If the cover is detachable and a replacement is
required, it must be of the same colour as the fuse
tted in the plug. Replacement covers are
available from your dealer. If the tted plug is not
suitable for the power points in your house or the
cable is not long enough to reach a power point,
you should obtain a suitable safety approved
extension lead or consult your dealer for assistance.
However, if there is no alternative to cutting off the
plug, remove the fuse and then safely dispose of
the plug. Do not connect the plug to a mains
socket as there is a risk of shock hazard from the
bared exible cord. Never attempt to insert bare
wires directly into a mains socket. A plug and fuse
must be used at all times.
IMPORTANT
The wires in the mains lead are coloured in
accordance with the following code:– BLUE =
NEUTRAL BROWN = LIVE As these colours may not
correspond to the coloured markings identifying
the terminals in your plug, proceed as follows:– The
wire coloured BLUE must be connected to the
terminal marked with the letter N or coloured
BLUE or BLACK. The wire coloured BROWN must
be connected to the terminal marked with the
letter L or coloured BROWN or RED.
WARNING : DO NOT CONNECT EITHER WIRE TO
THE EARTH TERMINAL WHICH IS MARKED WITH
THE LETTER E OR BY THE EARTH SYMBOL ,
OR COLOURED GREEN OR GREEN AND YELLOW.
PRECAUTIONS
1. Ensure that the AC power supply in your
house complies with the power
requirements listed on the identication
sticker located on the back of your product.
Install your product horizontally, on a
suitable base (furniture), with enough space
around it for ventilation (7~10 cm). Make sure
the ventilation slots are not covered. Do not
place the unit on ampliers or other
equipment which may become hot. This unit
is designed for continuous use. To fully turn
off the unit, disconnect the AC plug from the
wall outlet. Unplug the unit if you intend to
leave it unused for a long period of time.
2. During thunderstorms, disconnect the AC
plug from the wall outlet. Voltage peaks due
to lightning could damage the unit.
3. Do not expose the unit to direct sunlight or
other heat sources. This could lead to
overheating and cause the unit to
malfunction.
4. Protect the product from moisture (i.e.
vases), and excess heat (e.g. a replace) or
equipment creating strong magnetic or
electric elds. Unplug the power cable from
the AC wall socket if the unit malfunctions.
Your product is not intended for industrial
use. It is for personal use only. Condensation
may occur if your product has been stored in
cold temperatures. If transporting the unit
during the winter, wait approximately
2 hours until the unit has reached room
temperature before using.
5. The battery used with this product contains
chemicals that are harmful to the
environment. Do not dispose of the battery
in the general household trash. Do not
expose the battery to excess heat, direct
sunlight, or re. Do not short circuit,
disassemble, or overheat the battery.
Danger of explosion if the battery is replaced
incorrectly. Replace only with the same or
equivalent type.
ENG — iv ENG — v
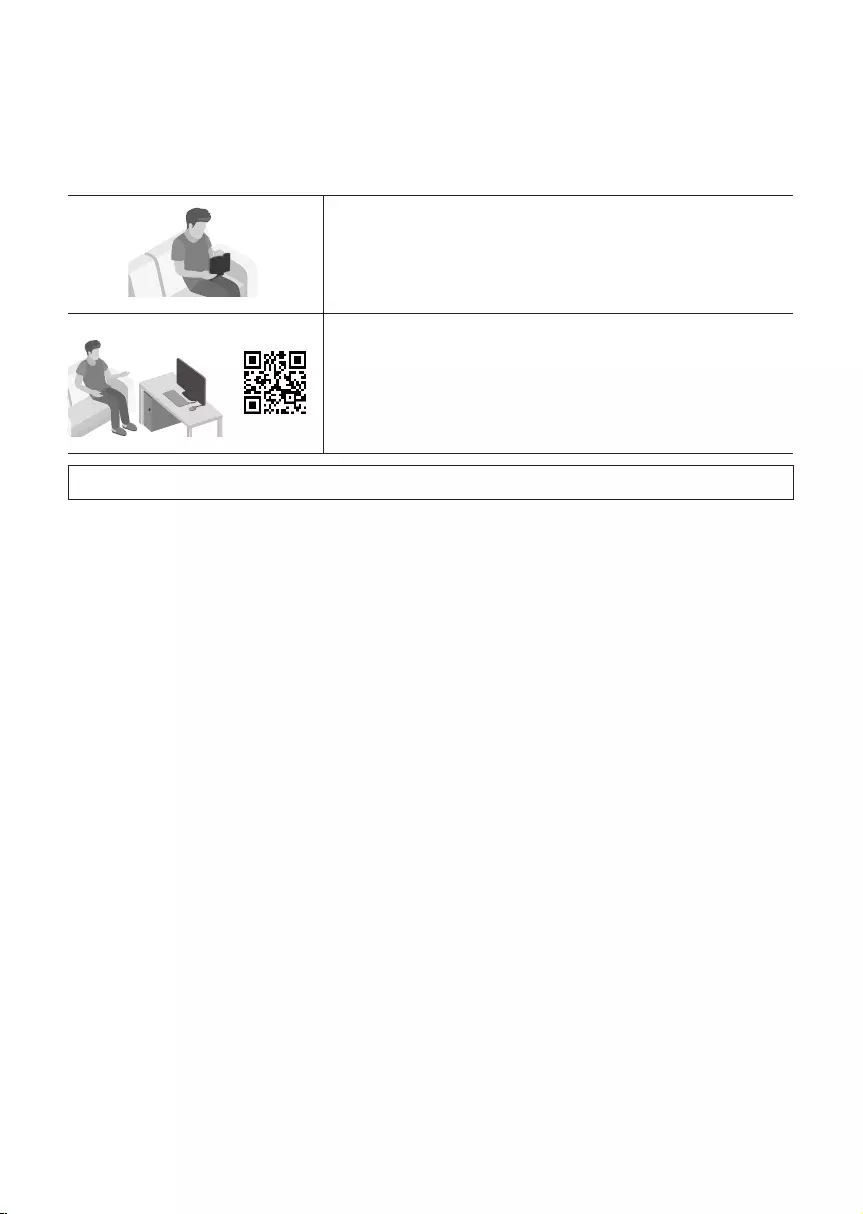
ABOUT THIS MANUAL
The user manual has two parts: this simple paper USER MANUAL and a detailed FULL MANUAL you can
download.
USER MANUAL
See this manual for safety instructions, product installation,
components, connections, and product specications.
FULL MANUAL
You can access the Full Manual on Samsung’s on-line customer
support centre by scanning the QR code. To see the manual on
your PC or mobile device, download the manual in document
format from the website. (http://www.samsung.com/support)
Design, specications and App screen are subject to change without prior notice.
CONTENTS
01 Checking the Components 2
Inserting Batteries before using the Remote Control (AA batteries X 2) ————————- 2
02 Product Overview 3
Front Panel / Right Side Panel of the Soundbar ————————- 3
Bottom Panel of the Soundbar ————————- 3
03 Connecting the Soundbar 4
Connecting Electrical Power ————————- 4
04 Connecting to your TV 5
Method 1. Connecting with a Cable ————————- 5
– Connecting a TV using an HDMI Cable ————————- 5
– Connecting using an Optical Cable ————————- 6
Method 2. Connecting Wirelessly ————————- 7
– Connecting a TV via Bluetooth ————————- 7
– Connecting via Wi—Fi ————————- 8
05 Connecting an External Device 11
Connecting using an HDMI Cable ————————- 11
Connecting using an Optical or Analogue Audio (AUX) Cable ————————- 12
06 Connecting a USB 13
07 Connecting a Mobile Device 14
Method 1. Connecting via Bluetooth ————————- 14
Method 2. Connecting via Wi—Fi (Wireless Network) ————————- 15
08 Using the Remote Control 17
How to Use the Remote Control ————————- 17
Adjusting the Soundbar volume with a TV remote control ————————- 19
09 Software Update 20
10 Installing the Wall Mount 20
Installation Precautions ————————- 20
Wallmount Components ————————- 20
Assembling the Holder—Cable ————————- 22
11 Troubleshooting 23
12 Licence 24
13 Open Source Licence Notice 24
14 Important Notes About Service 25
15 SpecicationsandGuide 25
Specications ————————- 25

ENG — iv ENG — v
ABOUT THIS MANUAL
The user manual has two parts: this simple paper USER MANUAL and a detailed FULL MANUAL you can
download.
USER MANUAL
See this manual for safety instructions, product installation,
components, connections, and product specications.
FULL MANUAL
You can access the Full Manual on Samsung’s on—line customer
support centre by scanning the QR code. To see the manual on
your PC or mobile device, download the manual in document
format from the website. (http://www.samsung.com/support)
Design, specications and App screen are subject to change without prior notice.
CONTENTS
01 Checking the Components 2
Inserting Batteries before using the Remote Control (AA batteries X 2) ————————- 2
02 Product Overview 3
Front Panel / Right Side Panel of the Soundbar ————————- 3
Bottom Panel of the Soundbar ————————- 3
03 Connecting the Soundbar 4
Connecting Electrical Power ————————- 4
04 Connecting to your TV 5
Method 1. Connecting with a Cable ————————- 5
– Connecting a TV using an HDMI Cable ————————- 5
– Connecting using an Optical Cable ————————- 6
Method 2. Connecting Wirelessly ————————- 7
– Connecting a TV via Bluetooth ————————- 7
– Connecting via Wi-Fi ————————- 8
05 Connecting an External Device 11
Connecting using an HDMI Cable ————————- 11
Connecting using an Optical or Analogue Audio (AUX) Cable ————————- 12
06 Connecting a USB 13
07 Connecting a Mobile Device 14
Method 1. Connecting via Bluetooth ————————- 14
Method 2. Connecting via Wi-Fi (Wireless Network) ————————- 15
08 Using the Remote Control 17
How to Use the Remote Control ————————- 17
Adjusting the Soundbar volume with a TV remote control ————————- 19
09 Software Update 20
10 Installing the Wall Mount 20
Installation Precautions ————————- 20
Wallmount Components ————————- 20
Assembling the Holder—Cable ————————- 22
11 Troubleshooting 23
12 Licence 24
13 Open Source Licence Notice 24
14 Important Notes About Service 25
15 SpecicationsandGuide 25
Specications ————————- 25
ENG — 2 ENG — 3
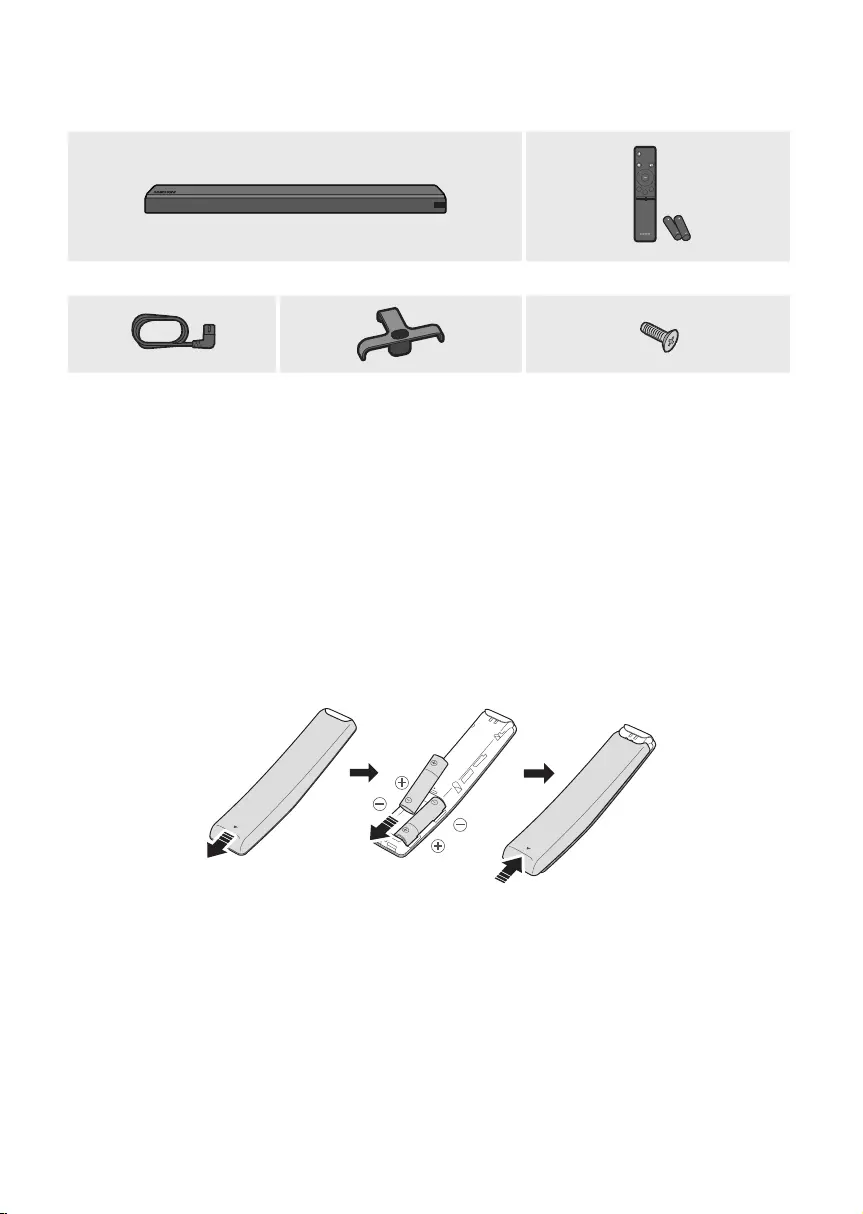
01 CHECKING THE COMPONENTS
Surround
VOL BASS
SOUNDBAR
SOUND
MODE
SMART
MODE
Soundbar Main Unit Remote Control / Batteries
Power Cord Holder-Cable Screw
•For Soundbar wall mounting components, see page 20.
•See page 22 for instructions on how to use the Holder-Cable.
•To purchase additional components or optional cables, contact a Samsung Service Centre or
Samsung Customer Care.
Inserting Batteries before using the Remote Control (AA batteries X 2)
Slide the battery cover in the direction of the arrow until it is completely removed. Insert 2 AA batteries
(1.5V) oriented so that their polarity is correct. Slide the battery cover back into position.
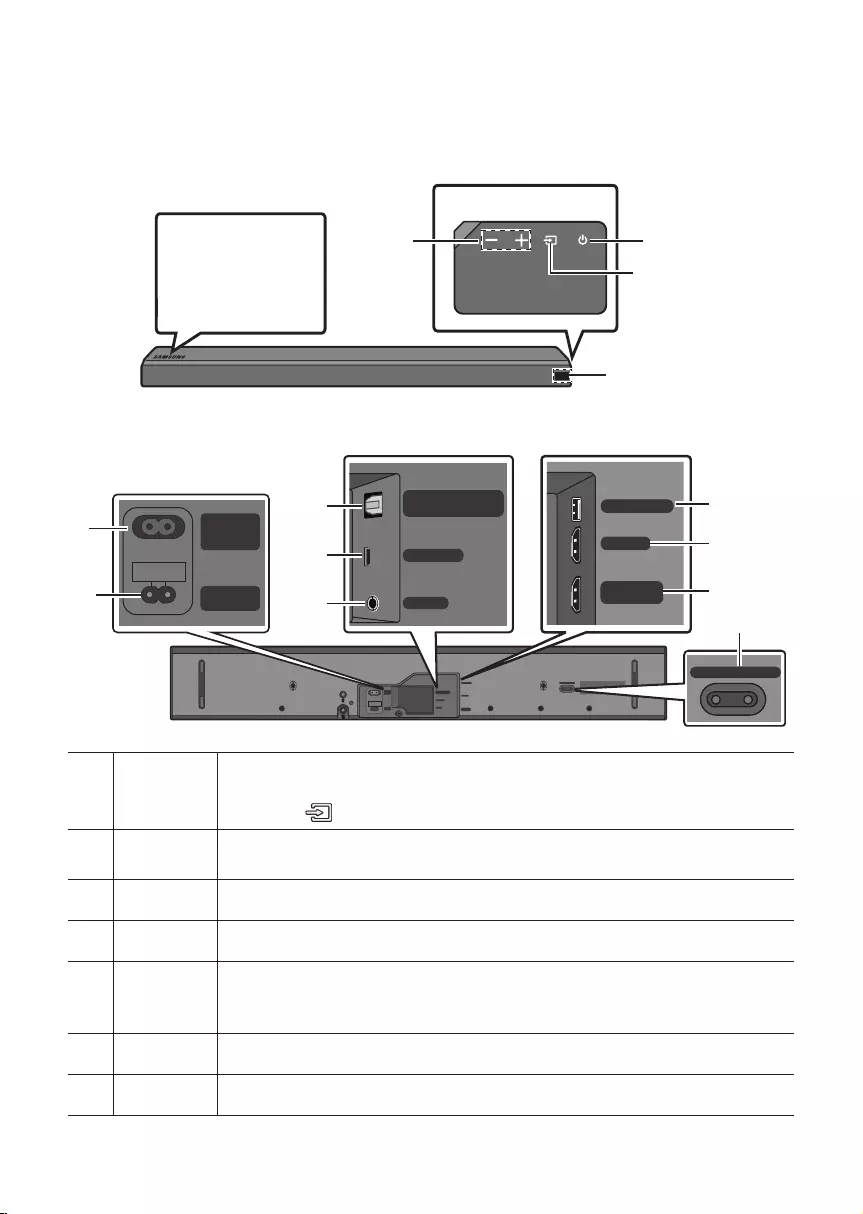
02 PRODUCT OVERVIEW
Front Panel / Right Side Panel of the Soundbar
Right Side of the Soundbar
Position the product
so that the
SAMSUNG logo is
located on the top.
Power
Volume
Display
Bottom Panel of the Soundbar
Wi-Fi SETUP SPK ADD
HDMI IN
USB (5V 0.5A)
HDMI OUT
(TV-ARC)
WIRELESS
AUX IN
DIGITAL AUDIO IN
(OPTICAL)
POWER
IN
POWER
OUT
(For TV)
WIRELESS
AUX IN
DIGITAL AUDIO IN
(OPTICAL)
HDMI IN
USB (5V 0.5A)
HDMI OUT
(TV-ARC)
Wi-Fi SETUP SPK ADD
POWER
IN
POWER
OUT
(For TV)
Source
Selects the source input mode. (D.IN / AUX / HDMI / WIFI / BT / USB)
•To turn on “BT PAIRING” mode, change the source to “BT” mode, and then press and
hold the (Source) button for more than 5 seconds.
POWER OUT
(For TV)
Connect the power cord of a Samsung TV connected to the Soundbar and mounted on
the wall using a Wall Mount Kit (WMN300SB — not supplied).
POWER IN Connect the Soundbar‘s AC power cable.
D.IN Connect to the digital (optical) output of an external device.
WIRELESS
Attach the wireless dongle that connects the Soundbar to surround speakers and a
subwoofer wirelessly. (The surround speaker, subwoofer, and wireless dongle are sold
separately.)
AUX Connect to the Analogue output of an external device.
USB Connect a USB device here to play music les on the USB device through the Soundbar.
ENG — 2 ENG — 3
01 CHECKING THE COMPONENTS
Surround
VOL BASS
SOUNDBAR
SOUND
MODE
SMART
MODE
Soundbar Main Unit Remote Control / Batteries
Power Cord Holder—Cable Screw
•For Soundbar wall mounting components, see page 20.
•See page 22 for instructions on how to use the Holder—Cable.
•To purchase additional components or optional cables, contact a Samsung Service Centre or
Samsung Customer Care.
Inserting Batteries before using the Remote Control (AA batteries X 2)
Slide the battery cover in the direction of the arrow until it is completely removed. Insert 2 AA batteries
(1.5V) oriented so that their polarity is correct. Slide the battery cover back into position.
02 PRODUCT OVERVIEW
Front Panel / Right Side Panel of the Soundbar
Right Side of the Soundbar
Position the product
so that the
SAMSUNG logo is
located on the top.
Power
Volume
Display
Bottom Panel of the Soundbar
Wi-Fi SETUP SPK ADD
HDMI IN
USB (5V 0.5A)
HDMI OUT
(TV-ARC)
WIRELESS
AUX IN
DIGITAL AUDIO IN
(OPTICAL)
POWER
IN
POWER
OUT
(For TV)
WIRELESS
AUX IN
DIGITAL AUDIO IN
(OPTICAL)
HDMI IN
USB (5V 0.5A)
HDMI OUT
(TV-ARC)
Wi-Fi SETUP SPK ADD
POWER
IN
POWER
OUT
(For TV)
Source
Selects the source input mode. (D.IN / AUX / HDMI / WIFI / BT / USB)
•To turn on “BT PAIRING” mode, change the source to “BT” mode, and then press and
hold the (Source) button for more than 5 seconds.
POWER OUT
(For TV)
Connect the power cord of a Samsung TV connected to the Soundbar and mounted on
the wall using a Wall Mount Kit (WMN300SB — not supplied).
POWER IN Connect the Soundbar’s AC power cable.
D.IN Connect to the digital (optical) output of an external device.
WIRELESS
Attach the wireless dongle that connects the Soundbar to surround speakers and a
subwoofer wirelessly. (The surround speaker, subwoofer, and wireless dongle are sold
separately.)
AUX Connect to the Analogue output of an external device.
USB Connect a USB device here to play music les on the USB device through the Soundbar.
ENG — 4 ENG — 5
HDMI IN Inputs digital video and audio signals simultaneously using an HDMI cable.
Connect to the HDMI output of an external device.
HDMI OUT Connect to the HDMI (ARC) jack on a TV.
Wi—Fi SETUP
/ SPK ADD Connect to a wireless network (Wi-Fi) via the Samsung Multiroom app.
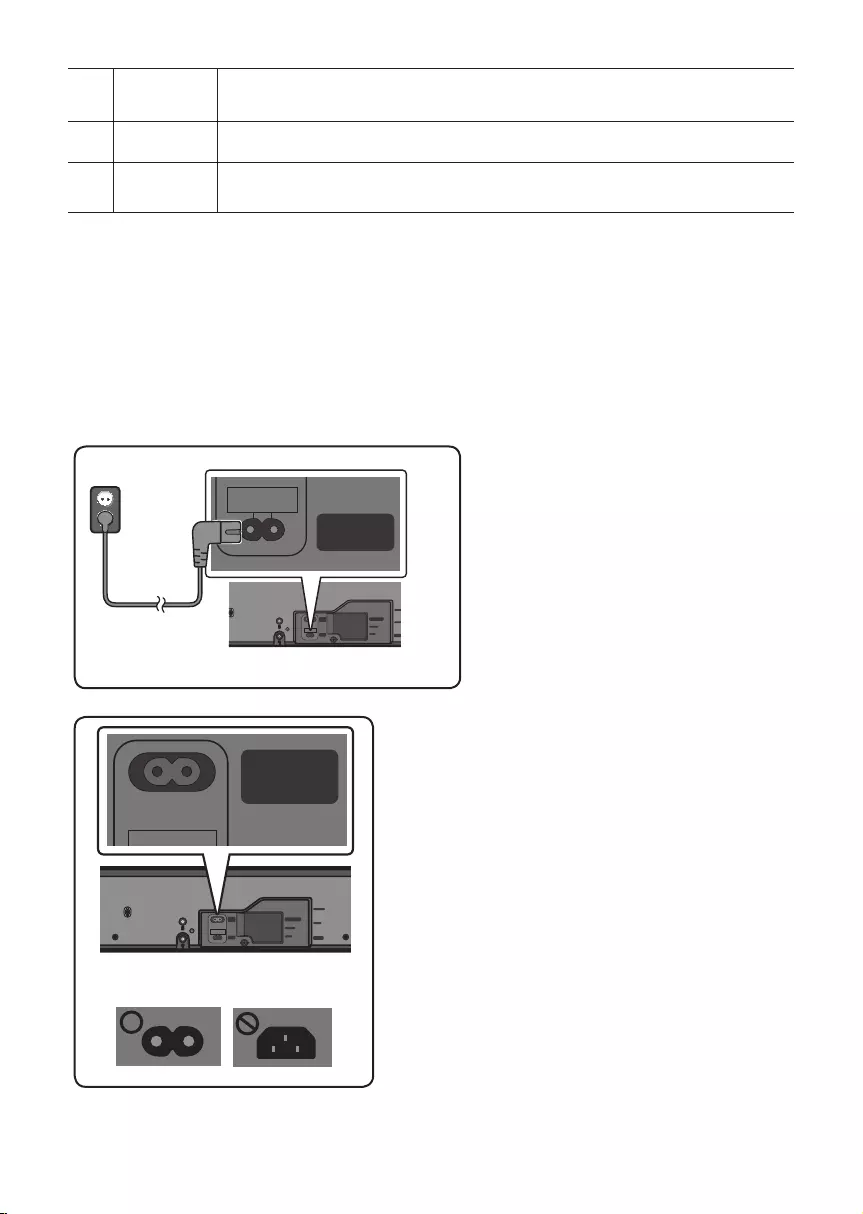
03 CONNECTING THE SOUNDBAR
Connecting Electrical Power
•For more information about the required electrical power and power consumption, refer to the
label attached to the product. (Label : Bottom of the Soundbar Main Unit)
HDMI IN
HDMI OUT
(TV-ARC)
WIRELESS
AUX IN
DIGITAL AUDIO IN
(OPTICAL)
POWER
IN
POWER
OUT
(For TV)
POWER
IN
Bottom of the Soundbar Main Unit
Power Cord
Connecting
Electrical Power
•Connect the supplied power cable to the
POWER IN jack.
HDMI IN
USB (5V 0.5A)
HDMI OUT
(TV-ARC)
WIRELESS
AUX IN
DIGITAL AUDIO IN
(OPTICAL)
POWER
IN
POWER
OUT
(For TV)
POWER
OUT
(For TV)
Bottom of the Soundbar Main Unit
•The POWER OUT jack is used to provide power to a
Samsung TV mounted on the wall using a Wall Mount
Kit (WMN300SB — not supplied).
•The POWER OUT jack can connect only to Samsung
TVs that use a 2-pin power cord and consume 400 W
or less. (Connecting the jack to a device that
consumes more than 400 W may damage the
Soundbar or cause a malfunction.)
For a list of Samsung TVs that are compatible with
the WMN300SB Wall Mount Kit and the
POWER OUT jack, see the WMN300SB
Wall Mount Kit user manual.
You can view the manual on line at
http://www.samsung.com/support.
04 CONNECTING TO YOUR TV
Hear TV sound from your Soundbar through wired or wireless connections.
•When the Soundbar is connected to a selected Samsung TVs, the Soundbar can be controlled using
the TV’s remote control.
– When using optical cable, this feature can be supported by 2017 Samsung Smart TVs that
support Bluetooth.
– This function also allows you to use the TV menu to adjust the sound eld and various settings
as well as the volume and mute.
Method 1. Connecting with a Cable
Connecting a TV using an HDMI Cable
HDMI Cable
(not supplied)
Bottom of the Soundbar
Connect to the HDMI IN
(ARC) port of your TV.
Connect to the HDMI OUT (TV—ARC)
port of the Soundbar main unit.
Right Side of the
Soundbar
TV
ARC
1. With the Soundbar and TV turned on, connect the HDMI cable (not supplied) as shown in the gure.
2. “TV ARC” appears in the display window of the Soundbar main unit and the Soundbar plays TV
sound.
•If TV sound is inaudible, press the (Source) button on the remote control or on the right side
of the Soundbar to switch to “D.IN” mode. The screen displays “D.IN” and “TV ARC” in sequence,
and TV sound is played.

ENG — 4 ENG — 5
HDMI IN Inputs digital video and audio signals simultaneously using an HDMI cable.
Connect to the HDMI output of an external device.
HDMI OUT Connect to the HDMI (ARC) jack on a TV.
Wi—Fi SETUP
/ SPK ADD Connect to a wireless network (Wi—Fi) via the Samsung Multiroom app.
03 CONNECTING THE SOUNDBAR
Connecting Electrical Power
•For more information about the required electrical power and power consumption, refer to the
label attached to the product. (Label : Bottom of the Soundbar Main Unit)
(TV—ARC)
WIRELESS
AUX IN
DIGITAL AUDIO IN
(OPTICAL)
POWER
IN
POWER
OUT
(For TV)
POWER
IN
Bottom of the Soundbar Main Unit
Power Cord
Connecting
Electrical Power
•Connect the supplied power cable to the
POWER IN jack.
HDMI IN
USB (5V 0.5A)
HDMI OUT
(TV-ARC)
WIRELESS
AUX IN
DIGITAL AUDIO IN
(OPTICAL)
POWER
IN
POWER
OUT
(For TV)
Bottom of the Soundbar Main Unit
•The POWER OUT jack is used to provide power to a
Samsung TV mounted on the wall using a Wall Mount
Kit (WMN300SB — not supplied).
•The POWER OUT jack can connect only to Samsung
TVs that use a 2—pin power cord and consume 400 W
or less. (Connecting the jack to a device that
consumes more than 400 W may damage the
Soundbar or cause a malfunction.)
For a list of Samsung TVs that are compatible with
the WMN300SB Wall Mount Kit and the
POWER OUT jack, see the WMN300SB
Wall Mount Kit user manual.
You can view the manual on line at
http://www.samsung.com/support.
04 CONNECTING TO YOUR TV
Hear TV sound from your Soundbar through wired or wireless connections.
•When the Soundbar is connected to a selected Samsung TVs, the Soundbar can be controlled using
the TV’s remote control.
– When using optical cable, this feature can be supported by 2017 Samsung Smart TVs that
support Bluetooth.
– This function also allows you to use the TV menu to adjust the sound eld and various settings
as well as the volume and mute.
Method 1. Connecting with a Cable
Connecting a TV using an HDMI Cable
HDMI IN
(ARC) HDMI Cable
(not supplied)
Bottom of the Soundbar
Connect to the HDMI IN
(ARC) port of your TV.
Connect to the HDMI OUT (TV-ARC)
port of the Soundbar main unit.
Right Side of the
Soundbar
TV
ARC
1. With the Soundbar and TV turned on, connect the HDMI cable (not supplied) as shown in the gure.
2. “TV ARC” appears in the display window of the Soundbar main unit and the Soundbar plays TV
sound.
•If TV sound is inaudible, press the (Source) button on the remote control or on the right side
of the Soundbar to switch to “D.IN” mode. The screen displays “D.IN” and “TV ARC” in sequence,
and TV sound is played.
ENG — 6 ENG — 7
•If “TV ARC” does not appear in the display window of the Soundbar main unit, conrm that the
cable is connected to the correct port.
•Use the volume buttons on the TV’s remote control to change the volume of the Soundbar.
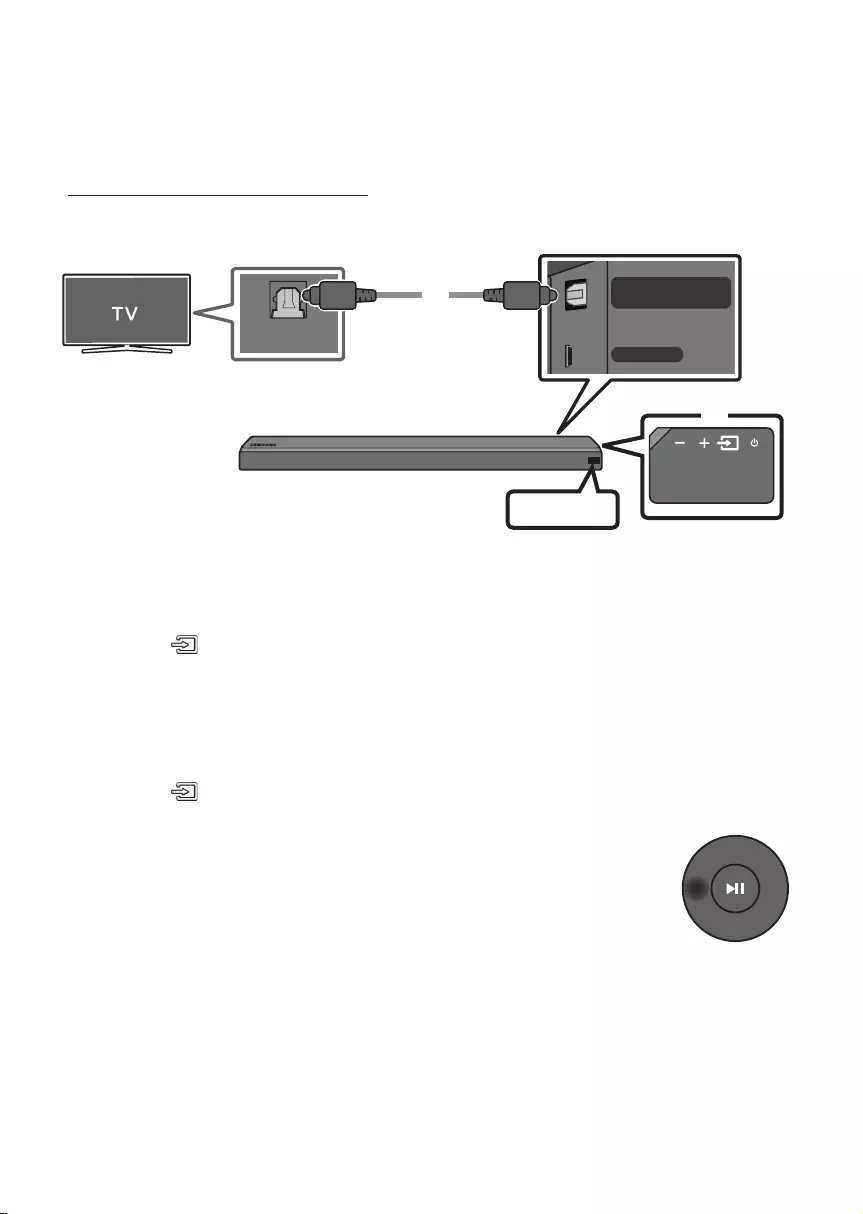
Connecting using an Optical Cable
WIRELESS
DIGITAL AUDIO IN
(OPTICAL)
OPTICAL OUT
Optical Cable
(not supplied)
Bottom of the Soundbar
D.IN
Right Side of the Soundbar
1. Connect the DIGITAL AUDIO IN (OPTICAL) jack on the Soundbar to the OPTICAL OUT jack of the TV
with a digital optical cable (not supplied).
2. Press the (Source) button on the right side panel or remote control, and then select the “D.IN”
mode.
Auto Power Link
Auto Power Link automatically turns on the Soundbar when the TV is turned on.
1. Connect the Soundbar and a TV with a digital optical cable (not supplied).
2. Press the (Source) button on the right side panel or on the remote control, and then select
“D.IN”.
3. Press the Left button on the remote control for 5 seconds to turn Auto Power
Link on or off.
•Auto Power Link is set to ON by default.
(To turn off this function, turn off Auto Power using the Soundbar.)
•Depending on the connected device, Auto Power Link may not function.
•This function is only available in the “D.IN” mode.
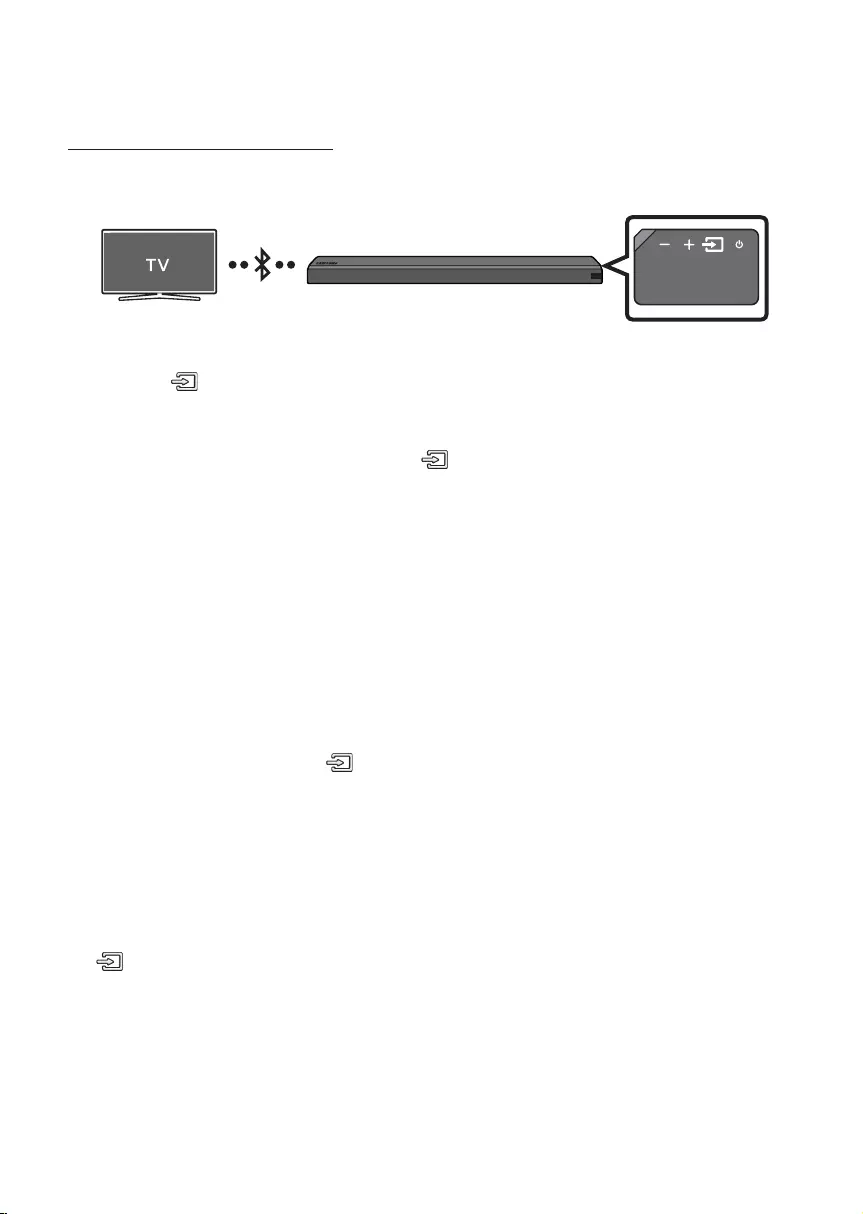
Method 2. Connecting Wirelessly
Connecting a TV via Bluetooth
When a TV is connected using Bluetooth, you can hear stereo sound without the hassle of cabling.
•Only one TV can be connected at a time.
The initial connection
1. Press the (Source) button on the right side panel or on the remote control, and then select
“BT”.
2. Change “BT” to “BT PAIRING”.
•If “BT READY” appears, press and hold the (Source) button on the right side panel of the
Soundbar or on the remote control for more than 5 seconds to display “BT PAIRING”.
3. Select Bluetooth mode on the TV. (For more information, see the TV’s manual.)
4. Select “[AV] Samsung Soundbar MSxxx” from the list on TV’s screen.
An available Soundbar is indicated with “Need Pairing” or “Paired” on the TV Bluetooth device list.
To connect to the Soundbar, select the message and establish a connection.
•When the TV is connected, [TV Name] → “BT” appears on the Soundbar’s front display.
5. You can now hear TV sound from the Soundbar.
If the device fails to connect
•If the previously connected Soundbar listing (e.g. “[AV] Samsung Soundbar MSxxx”) appears in the
list, delete it.
•In “BT” mode, press and hold the (Source) button for more than 5 seconds on the right side
panel of the Soundbar or on the remote control to switch to “BT PAIRING” mode.
Then, select “[AV] Samsung Soundbar MSxxx” from the TV’s search list.
What are the BT READY and BT PAIRING statuses?
•BT READY : In this mode, you can search for previously connected TVs or connect to the Soundbar
from a previously connected mobile device.
•BT PAIRING : In this mode, you can connect to a new device. (While in “BT” mode, press and hold the
(Source) button for more than 5 seconds on the right side of the Soundbar or on the remote
control.)
ENG — 6 ENG — 7
•If “TV ARC” does not appear in the display window of the Soundbar main unit, conrm that the
cable is connected to the correct port.
•Use the volume buttons on the TV’s remote control to change the volume of the Soundbar.
Connecting using an Optical Cable
DIGITAL AUDIO IN
(OPTICAL)
OPTICAL OUT
Optical Cable
(not supplied)
Bottom of the Soundbar
D.IN
Right Side of the Soundbar
1. Connect the DIGITAL AUDIO IN (OPTICAL) jack on the Soundbar to the OPTICAL OUT jack of the TV
with a digital optical cable (not supplied).
2. Press the (Source) button on the right side panel or remote control, and then select the “D.IN”
mode.
Auto Power Link
Auto Power Link automatically turns on the Soundbar when the TV is turned on.
1. Connect the Soundbar and a TV with a digital optical cable (not supplied).
2. Press the (Source) button on the right side panel or on the remote control, and then select
“D.IN”.
3. Press the Left button on the remote control for 5 seconds to turn Auto Power
Link on or off.
•Auto Power Link is set to ON by default.
(To turn off this function, turn off Auto Power using the Soundbar.)
•Depending on the connected device, Auto Power Link may not function.
•This function is only available in the “D.IN” mode.
Method 2. Connecting Wirelessly
Connecting a TV via Bluetooth
When a TV is connected using Bluetooth, you can hear stereo sound without the hassle of cabling.
•Only one TV can be connected at a time.
The initial connection
1. Press the (Source) button on the right side panel or on the remote control, and then select
“BT”.
2. Change “BT” to “BT PAIRING”.
•If “BT READY” appears, press and hold the (Source) button on the right side panel of the
Soundbar or on the remote control for more than 5 seconds to display “BT PAIRING”.
3. Select Bluetooth mode on the TV. (For more information, see the TV’s manual.)
4. Select “[AV] Samsung Soundbar MSxxx” from the list on TV’s screen.
An available Soundbar is indicated with “Need Pairing” or “Paired” on the TV Bluetooth device list.
To connect to the Soundbar, select the message and establish a connection.
•When the TV is connected, [TV Name] → “BT” appears on the Soundbar’s front display.
5. You can now hear TV sound from the Soundbar.
If the device fails to connect
•If the previously connected Soundbar listing (e.g. “[AV] Samsung Soundbar MSxxx”) appears in the
list, delete it.
•In “BT” mode, press and hold the (Source) button for more than 5 seconds on the right side
panel of the Soundbar or on the remote control to switch to “BT PAIRING” mode.
Then, select “[AV] Samsung Soundbar MSxxx” from the TV’s search list.
What are the BT READY and BT PAIRING statuses?
•BT READY : In this mode, you can search for previously connected TVs or connect to the Soundbar
from a previously connected mobile device.
•BT PAIRING : In this mode, you can connect to a new device. (While in “BT” mode, press and hold the
(Source) button for more than 5 seconds on the right side of the Soundbar or on the remote
control.)
ENG — 8 ENG — 9
NOTES
•If asked for a PIN code when connecting a Bluetooth device, enter <0000>.
•In Bluetooth connection mode, the Bluetooth connection will be lost if the distance between the
Soundbar and the Bluetooth device exceeds 10 meters.
•The Soundbar automatically turns off after 5 minutes in the Ready state.
•The Soundbar may not perform Bluetooth search or connection correctly under the following
circumstances:
– If there is a strong electrical eld around the Soundbar.
– If several Bluetooth devices are simultaneously paired with the Soundbar.
– If the Bluetooth device is turned off, not in place, or malfunctions.
•Electronic devices may cause radio interference. Devices that generate electromagnetic waves
must be kept away from the Soundbar main unit — e.g., microwaves, wireless LAN devices, etc.
Disconnecting the Soundbar from the TV
Press the (Source) button on the right side panel or on the remote control and switch to any mode
but “BT”.
•Disconnecting takes time because the TV must receive a response from the Soundbar.
(The time required may differ, depending on the TV model.)
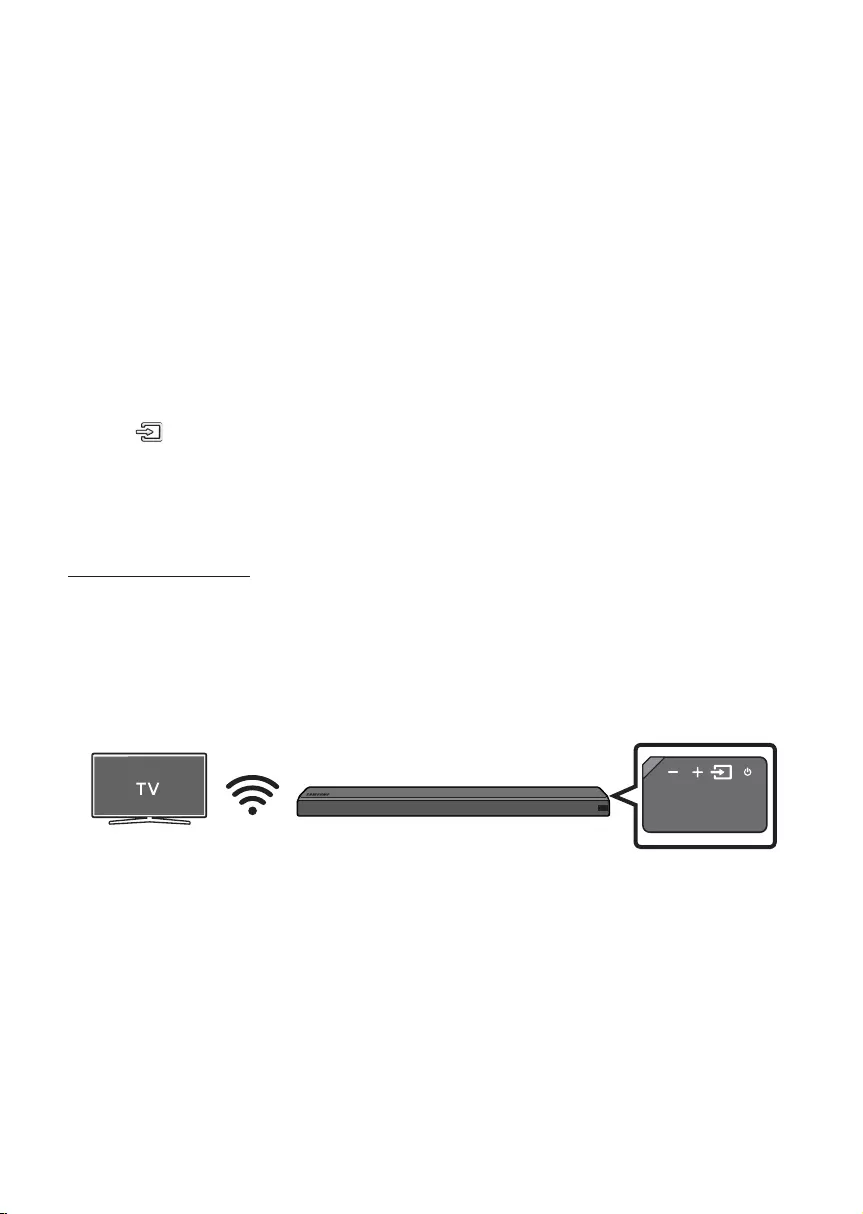
Connecting via Wi-Fi
Pre—connection Checklist
1. Conrm that your Samsung smart TV was released after 2014. This function is compatible only
with Samsung smart TVs released after 2014.
2. Make sure your Wireless router (Wi-Fi) is ready and working.
3. Make sure that the TV is connected to the Wireless router (your Wi-Fi network).
Step 1 : Connecting the Soundbar to Wi—Fi
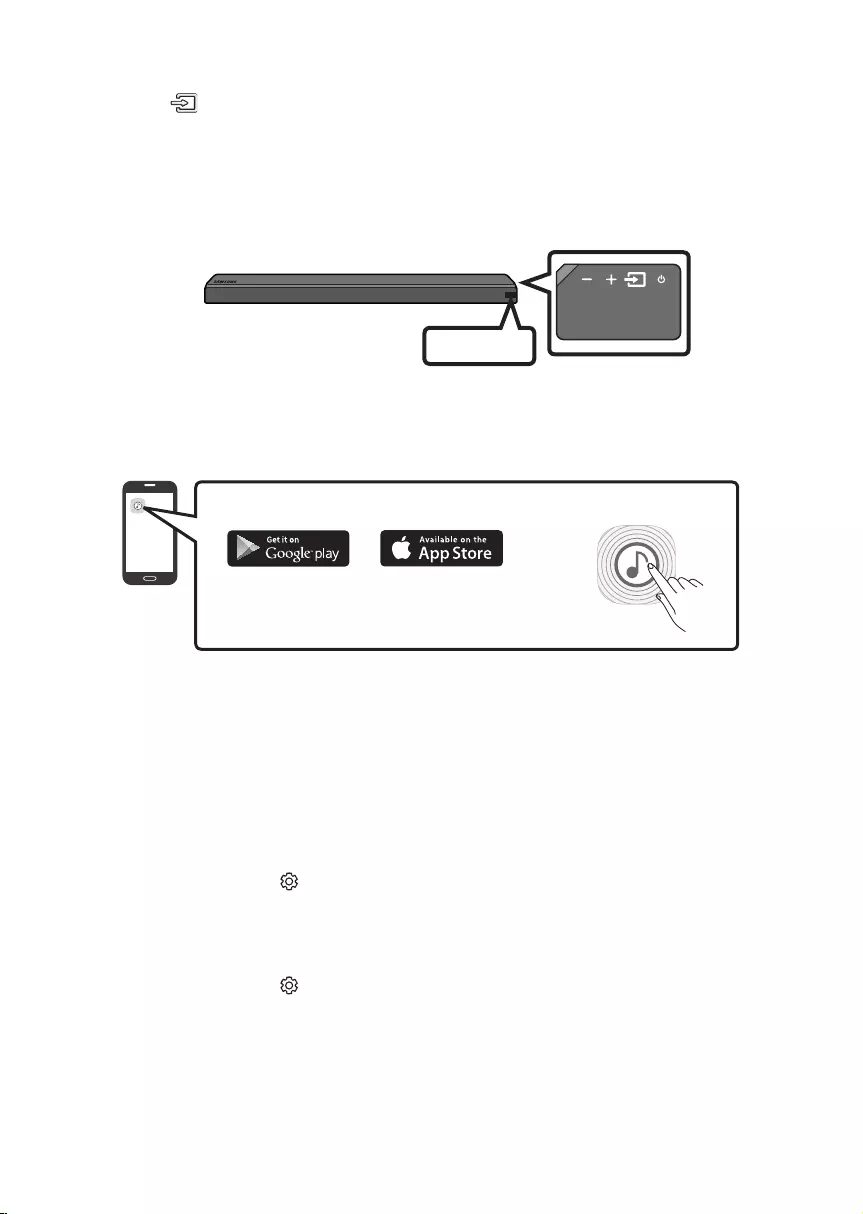
1. Press the (Source) button on the right side of the Soundbar or on the remote control to select
“WIFI” mode.
•When using selected Samsung TV (2016 or 2017 Samsung smart TVs that support Bluetooth.)
– If you select “WIFI” mode when the TV is turned on, the TV screen displays a pop—up
window providing instructions on how to automatically connect the Soundbar to a wireless
router (Wi—Fi). Refer to instructions in the pop—up window of TV.
WIFI
2. Connect your mobile device (smartphone, tablet etc.) to the Wi—Fi network the TV is connected to.
3. Install and launch the Samsung Multiroom app on your mobile device (smartphone, tablet etc.).
iOS
Android
Samsung Multiroom app
4. Follow the instructions in the app screen on the mobile device to connect the Soundbar to your
Wi—Fi network.
Step2:ConguringSettingsontheTV
•If the TV disconnects from your wireless network after you change the input source to the
Soundbar, use the TV menu to connect the TV to the network again.
For TVs released in 2017
1. Home menu Settings ( ) Sound Sound Output Select [AV] Soundbar MSxxx (Wi—Fi)
2. The Soundbar outputs TV sound.
For TVs released in 2016
1. Home menu Settings ( ) Sound Sound Output Select [AV] Samsung Soundbar MSxxx
(Wi-Fi)
2. The Soundbar outputs TV sound.
ENG — 8 ENG — 9
NOTES
•If asked for a PIN code when connecting a Bluetooth device, enter <0000>.
•In Bluetooth connection mode, the Bluetooth connection will be lost if the distance between the
Soundbar and the Bluetooth device exceeds 10 meters.
•The Soundbar automatically turns off after 5 minutes in the Ready state.
•The Soundbar may not perform Bluetooth search or connection correctly under the following
circumstances:
– If there is a strong electrical eld around the Soundbar.
– If several Bluetooth devices are simultaneously paired with the Soundbar.
– If the Bluetooth device is turned off, not in place, or malfunctions.
•Electronic devices may cause radio interference. Devices that generate electromagnetic waves
must be kept away from the Soundbar main unit — e.g., microwaves, wireless LAN devices, etc.
Disconnecting the Soundbar from the TV
Press the (Source) button on the right side panel or on the remote control and switch to any mode
but “BT”.
•Disconnecting takes time because the TV must receive a response from the Soundbar.
(The time required may differ, depending on the TV model.)
Connecting via Wi—Fi
Pre—connection Checklist
1. Conrm that your Samsung smart TV was released after 2014. This function is compatible only
with Samsung smart TVs released after 2014.
2. Make sure your Wireless router (Wi-Fi) is ready and working.
3. Make sure that the TV is connected to the Wireless router (your Wi—Fi network).
Step 1 : Connecting the Soundbar to Wi-Fi
1. Press the (Source) button on the right side of the Soundbar or on the remote control to select
“WIFI” mode.
•When using selected Samsung TV (2016 or 2017 Samsung smart TVs that support Bluetooth.)
– If you select “WIFI” mode when the TV is turned on, the TV screen displays a pop—up
window providing instructions on how to automatically connect the Soundbar to a wireless
router (Wi-Fi). Refer to instructions in the pop—up window of TV.
WIFI
2. Connect your mobile device (smartphone, tablet etc.) to the Wi-Fi network the TV is connected to.
3. Install and launch the Samsung Multiroom app on your mobile device (smartphone, tablet etc.).
iOS
Android
Samsung Multiroom app
4. Follow the instructions in the app screen on the mobile device to connect the Soundbar to your
Wi-Fi network.
Step2:ConguringSettingsontheTV
•If the TV disconnects from your wireless network after you change the input source to the
Soundbar, use the TV menu to connect the TV to the network again.
For TVs released in 2017
1. Home menu Settings ( ) Sound Sound Output Select [AV] Soundbar MSxxx (Wi-Fi)
2. The Soundbar outputs TV sound.
For TVs released in 2016
1. Home menu Settings ( ) Sound Sound Output Select [AV] Samsung Soundbar MSxxx
(Wi-Fi)
2. The Soundbar outputs TV sound.
ENG — 10 ENG — 11
For TVs released in 2015
1. Home menu Sound Speaker List Select [AV] Samsung Soundbar MSxxx (Wi-Fi)
2. The Soundbar outputs TV sound.
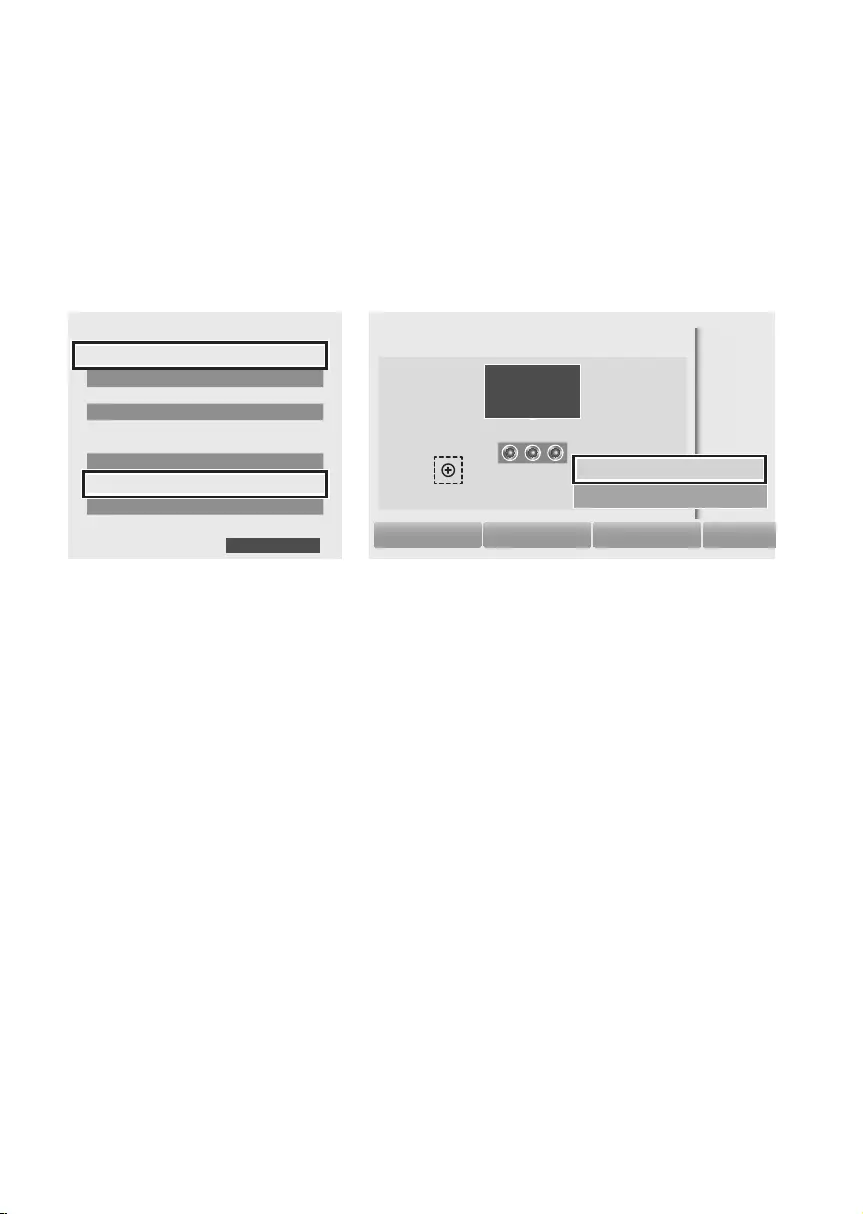
For TVs released in 2014
1. Home menu Sound Speaker Settings Select Multiroom Link — Settings
Soundbar+Surround.
2. From the Soundbar menu item, select “[AV] Samsung Soundbar MSxxx” and then select “OK”.
3. Home menu Sound Speaker Settings Select TV Sound Output Multiroom Link
TV Speaker
• TV Installation Type Stand
TV SoundConnect
• Samsung Audio Device List
• Add New Device On
Multiroom Link
• Settings Soundbar+Surround
Bluetooth Headphone
• Bluetooth Headphone List
Speaker Settings
TV Sound Output Multiroom Link
OK
Multiroom Link
OK Volume Level Speaker Test
Soundbar
[AV] Samsung Soundbar MSxxx
Soundbar+Surround
c
[AV] Samsung Soundbar MSxxx
Don’t Use
Edit Na
1
3
2
4. The Soundbar outputs TV sound.
NOTES
•The TV and Soundbar must be connected to the same wireless network (Wi-Fi).
•If your wireless router (Wi-Fi) uses a DFS channel, you will not be able to establish a Wi-Fi
connection between the TV and Soundbar. Contact your Internet service provider for details.
•If the 5GHz Wi-Fi connection is not smooth, use the 2.4GHz bandwidth.
05 CONNECTING AN EXTERNAL DEVICE
Connect to an external device via a wired or wireless network to play the external device’s sound
through the Soundbar.
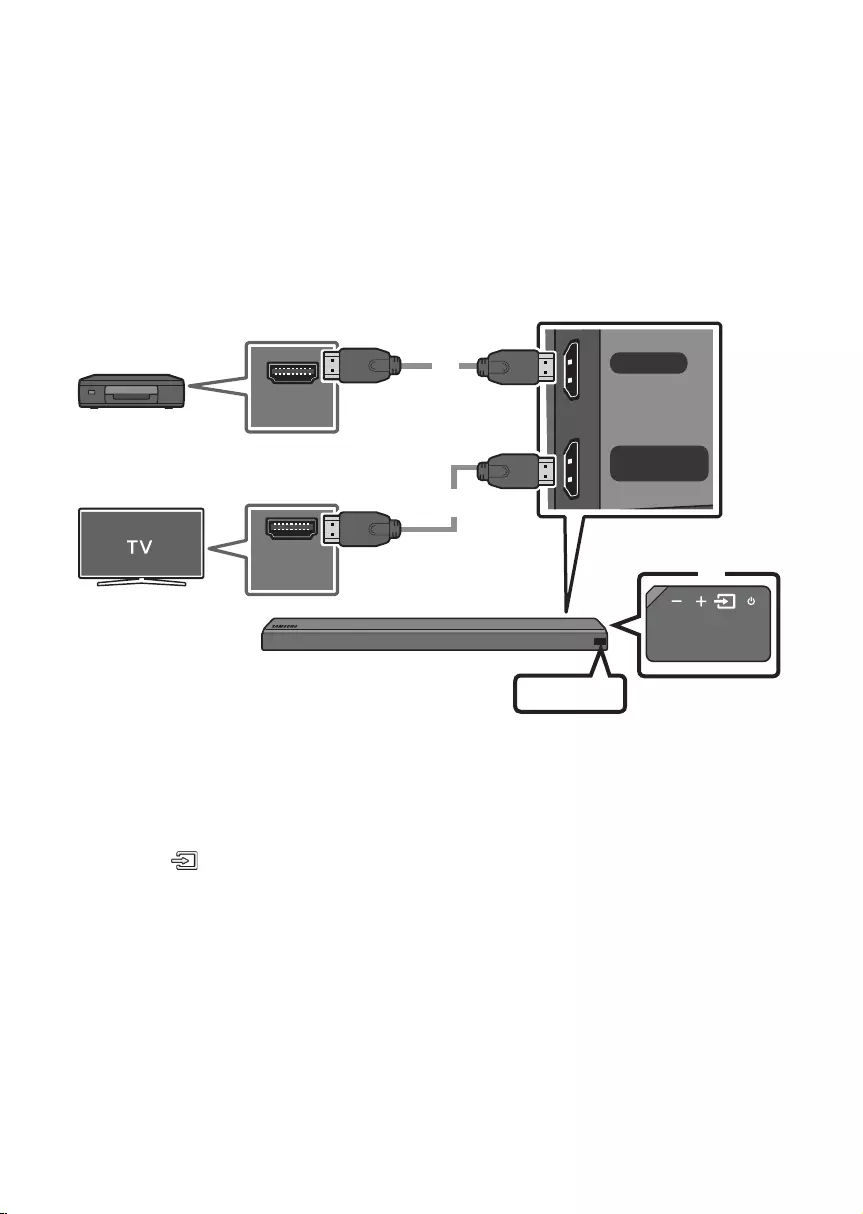
Connecting using an HDMI Cable
HDMI Cable
(not supplied)
HDMI Cable
(not supplied)
Bottom of the Soundbar
External Device
HDMI
Right Side of the
Soundbar
1. Connect an HDMI cable (not supplied) from the HDMI IN jack on the back of the product to the
HDMI OUT jack on your digital device.
2. Connect an HDMI cable (not supplied) from the HDMI OUT (TV-ARC) jack on the back of the
product to the HDMI IN jack on your TV.
3. Press the (Source) button on the right side panel or on the remote control, and then select
“HDMI”.
4. “HDMI” mode is displayed on the Soundbar display panel and sound plays.
ENG — 10 ENG — 11
For TVs released in 2015
1. Home menu Sound Speaker List Select [AV] Samsung Soundbar MSxxx (Wi—Fi)
2. The Soundbar outputs TV sound.
For TVs released in 2014
1. Home menu Sound Speaker Settings Select Multiroom Link — Settings
Soundbar+Surround.
2. From the Soundbar menu item, select “[AV] Samsung Soundbar MSxxx” and then select “OK”.
3. Home menu Sound Speaker Settings Select TV Sound Output Multiroom Link
TV Speaker
• TV Installation Type Stand
TV SoundConnect
• Samsung Audio Device List
• Add New Device On
Multiroom Link
• Settings Soundbar+Surround
Bluetooth Headphone
• Bluetooth Headphone List
Speaker Settings
TV Sound Output Multiroom Link
OK
Multiroom Link
OK Volume Level Speaker Test
Soundbar
[AV] Samsung Soundbar MSxxx
Soundbar+Surround
c
[AV] Samsung Soundbar MSxxx
Don’t Use
Edit Na
1
3
2
4. The Soundbar outputs TV sound.
NOTES
•The TV and Soundbar must be connected to the same wireless network (Wi—Fi).
•If your wireless router (Wi—Fi) uses a DFS channel, you will not be able to establish a Wi—Fi
connection between the TV and Soundbar. Contact your Internet service provider for details.
•If the 5GHz Wi—Fi connection is not smooth, use the 2.4GHz bandwidth.
05 CONNECTING AN EXTERNAL DEVICE
Connect to an external device via a wired or wireless network to play the external device’s sound
through the Soundbar.
Connecting using an HDMI Cable
HDMI OUT
HDMI IN
(ARC)
HDMI Cable
(not supplied)
HDMI Cable
(not supplied)
Bottom of the Soundbar
External Device
HDMI
Right Side of the
Soundbar
1. Connect an HDMI cable (not supplied) from the HDMI IN jack on the back of the product to the
HDMI OUT jack on your digital device.
2. Connect an HDMI cable (not supplied) from the HDMI OUT (TV-ARC) jack on the back of the
product to the HDMI IN jack on your TV.
3. Press the (Source) button on the right side panel or on the remote control, and then select
“HDMI”.
4. “HDMI” mode is displayed on the Soundbar display panel and sound plays.
ENG — 12 ENG — 13
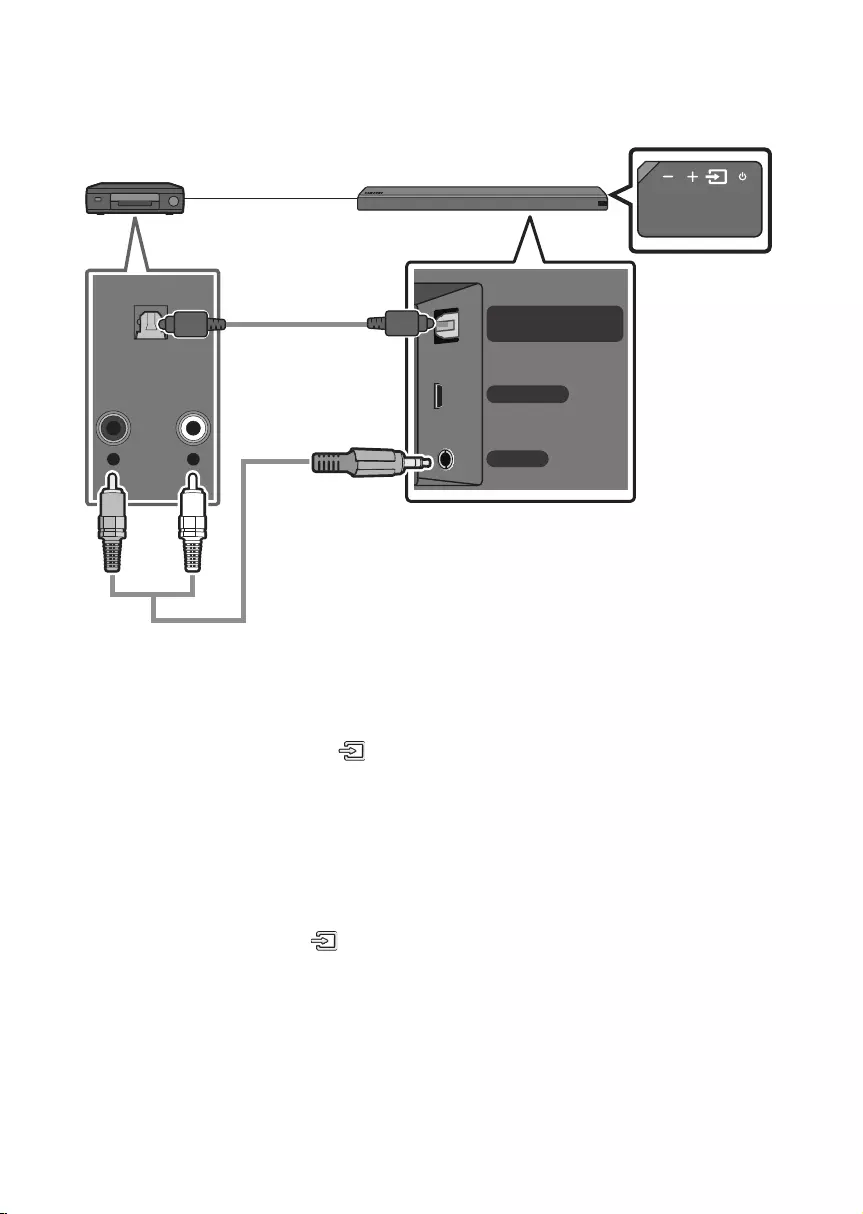
Connecting using an Optical or Analogue Audio (AUX) Cable
WIRELESS
AUX IN
DIGITAL AUDIO IN
(OPTICAL)
R L
OPTICAL OUT
— AUDIO —
Optical Cable
(not supplied)
OR
Audio (AUX) Cable
(not supplied) Bottom of the Soundbar
BD / DVD player / Set-top box /
Game console
Right Side of the Soundbar
Optical Cable
XConnect DIGITAL AUDIO IN (OPTICAL) on the main unit to the OPTICAL OUT jack of the Source
Device using a digital optical cable (not supplied).
YSelect “D.IN” mode by pressing the (Source) button on the right side panel or on the remote
control.
OR
Audio (AUX) Cable
XConnect AUX IN (Audio) on the main unit to the AUDIO OUT jack of the Source Device using an audio
cable.
YSelect “AUX” mode by pressing (Source) button on the right side panel or on the remote control.
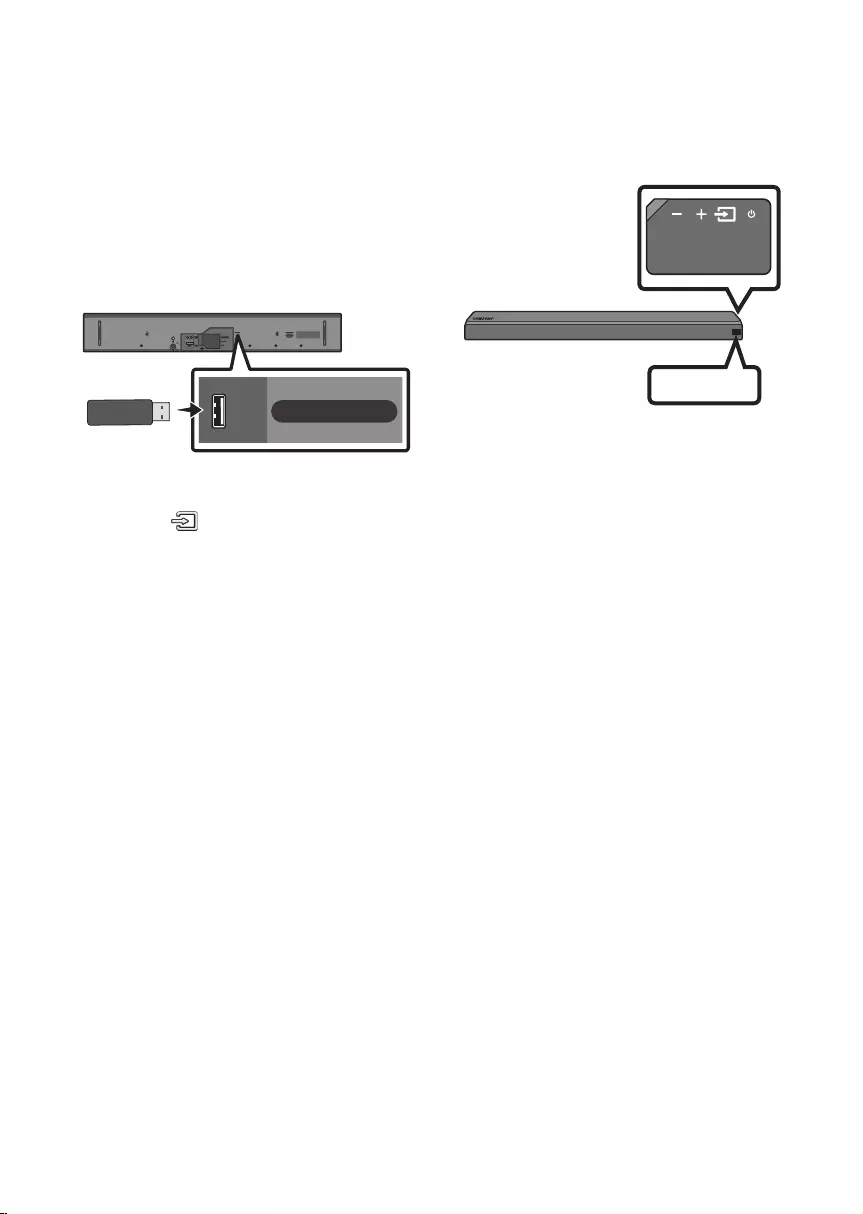
06 CONNECTING A USB
You can play music les located on USB storage devices through the Soundbar.
USB
Display
USB port
Wi-Fi SETUP SPK ADD
HDMI IN
USB (5V 0.5A)
HDMI OUT
(TV-ARC)
WIRELESS
AUX IN
DIGITAL AUDIO IN
(OPTICAL)
POWER
IN
POWER
OUT
(For TV)
USB (5V 0.5A)
1. Connect the USB device to the USB port on the back of the product.
2. Press the (Source) button on the right side panel or on the remote control, and then select
“USB”.
3. “USB” appears in the display screen.
4. Play music les from the USB storage device through the Soundbar.
•The Soundbar automatically turns off (Auto Power Off) if no USB device has been connected for
more than 5 minutes.
ENG — 12 ENG — 13
Connecting using an Optical or Analogue Audio (AUX) Cable
WIRELESS
AUX IN
DIGITAL AUDIO IN
(OPTICAL)
R L
OPTICAL OUT
— AUDIO —
Optical Cable
(not supplied)
OR
Audio (AUX) Cable
(not supplied) Bottom of the Soundbar
BD / DVD player / Set—top box /
Game console
Right Side of the Soundbar
Optical Cable
XConnect DIGITAL AUDIO IN (OPTICAL) on the main unit to the OPTICAL OUT jack of the Source
Device using a digital optical cable (not supplied).
YSelect “D.IN” mode by pressing the (Source) button on the right side panel or on the remote
control.
OR
Audio (AUX) Cable
XConnect AUX IN (Audio) on the main unit to the AUDIO OUT jack of the Source Device using an audio
cable.
YSelect “AUX” mode by pressing (Source) button on the right side panel or on the remote control.
06 CONNECTING A USB
You can play music les located on USB storage devices through the Soundbar.
USB
Display
USB port
Wi-Fi SETUP SPK ADD
HDMI IN
USB (5V 0.5A)
HDMI OUT
(TV-ARC)
WIRELESS
AUX IN
DIGITAL AUDIO IN
(OPTICAL)
POWER
IN
POWER
OUT
(For TV)
USB (5V 0.5A)
1. Connect the USB device to the USB port on the back of the product.
2. Press the (Source) button on the right side panel or on the remote control, and then select
“USB”.
3. “USB” appears in the display screen.
4. Play music les from the USB storage device through the Soundbar.
•The Soundbar automatically turns off (Auto Power Off) if no USB device has been connected for
more than 5 minutes.
ENG — 14 ENG — 15
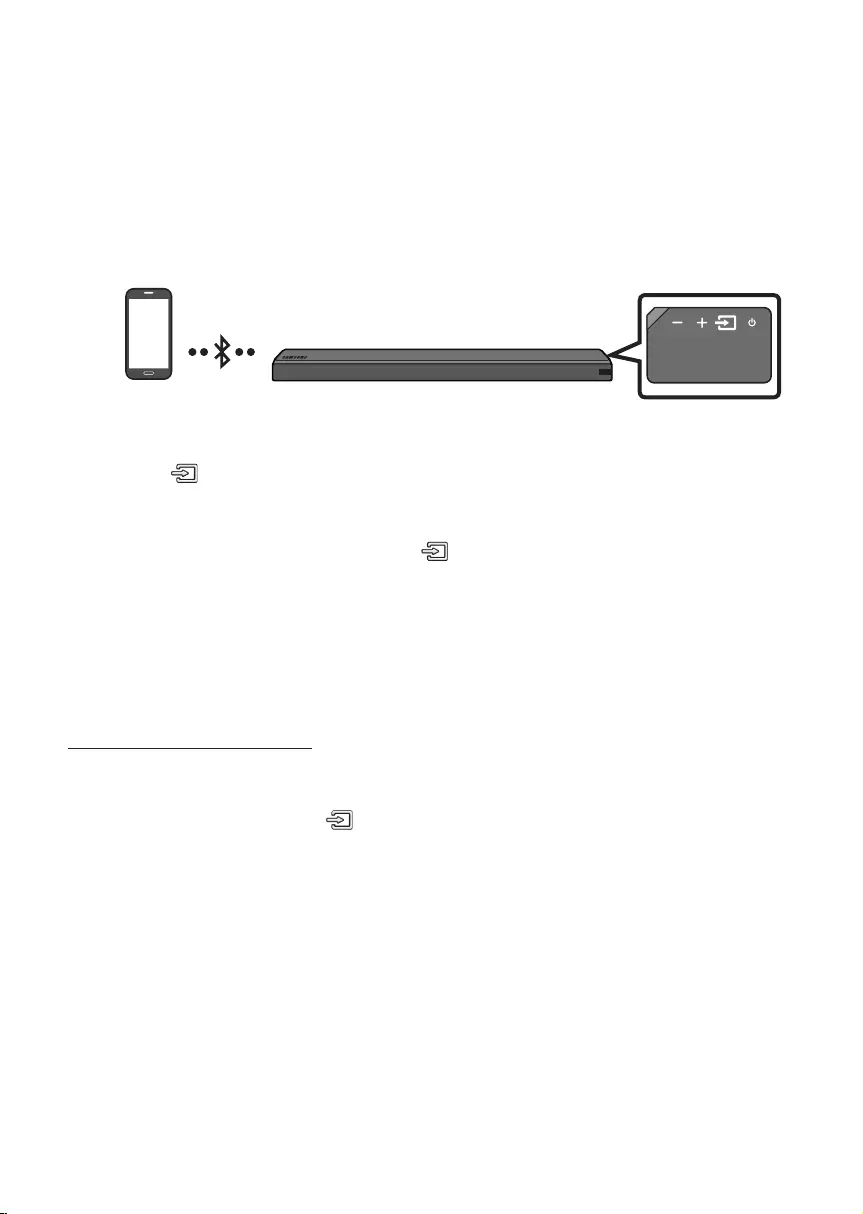
07 CONNECTING A MOBILE DEVICE
Method 1. Connecting via Bluetooth
When a mobile device is connected using Bluetooth, you can hear stereo sound without the hassle of
cabling.
•You cannot connect more than one Bluetooth device at a time.
Bluetooth device
The initial connection
1. Press the (Source) button on the right side panel or on the remote control, and then select
“BT”.
2. Change “BT” to “BT PAIRING”.
•If “BT READY” appears, press and hold the (Source) button on the right side panel of the
Soundbar or on the remote control for more than 5 seconds to display “BT PAIRING”.
3. Select “[AV] Samsung Soundbar MSxxx” from the list.
•When a Soundbar is connected to the Bluetooth device, [Bluetooth Device Name] → “BT”
appears in the front display.
4. Play music les from the device, connected via Bluetooth, through the Soundbar.
If the device fails to connect
•If the previously connected Soundbar listing (e.g. “[AV] Samsung Soundbar MSxxx”) appears in the
list, delete it.
•In “BT” mode, press and hold the (Source) button for more than 5 seconds on the right side
panel of the Soundbar or on the remote control to switch to “BT PAIRING” mode.
Then, select “[AV] Samsung Soundbar MSxxx” from the Bluetooth device search list.
For more information about Bluetooth connections, refer to “Connecting a TV via
Bluetooth” on pages 7 ~ 8.
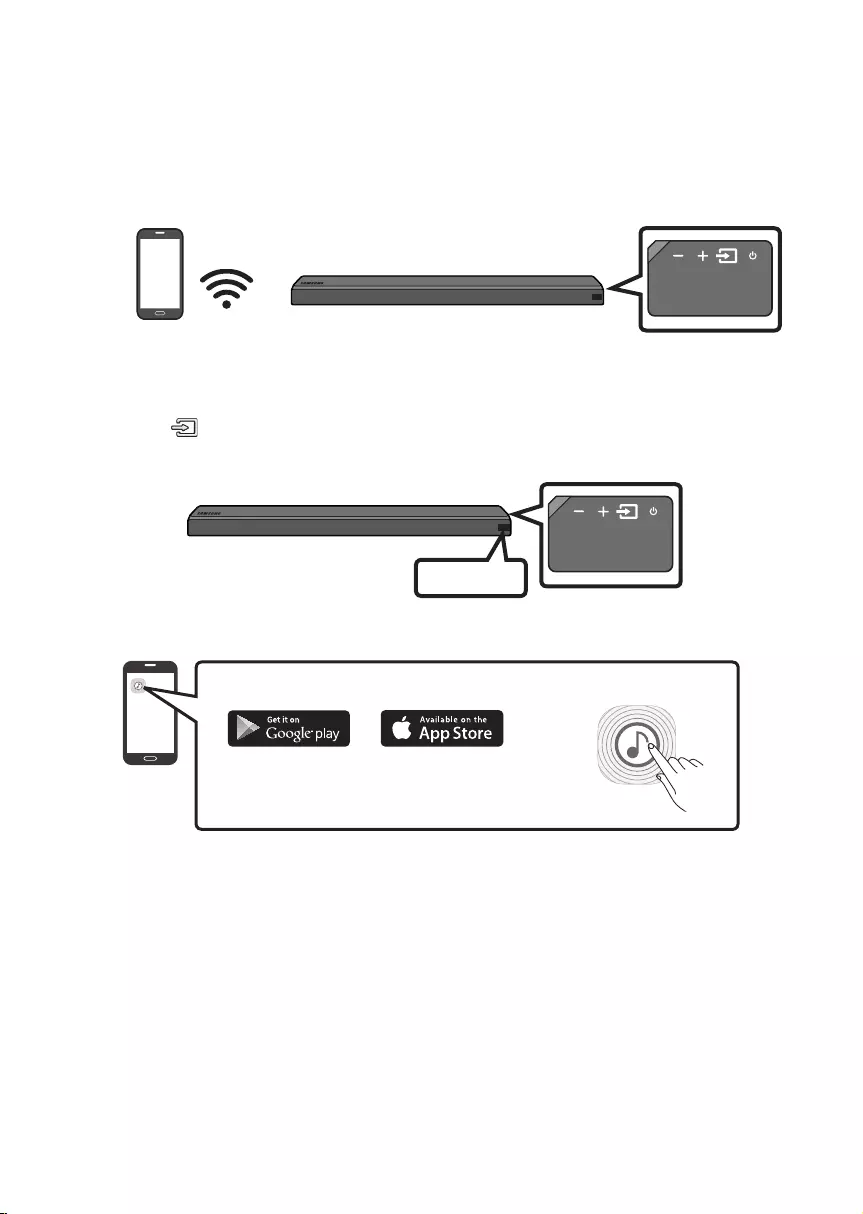
Method 2. Connecting via Wi—Fi (Wireless Network)
•Connect a single Soundbar to Wi—Fi to access a variety of music streaming services and Internet
radio. Connect multiple Soundbars to Wi—Fi to use grouped playback or stereo sound mode.
•To connect a Soundbar to a mobile device via a wireless network (Wi—Fi), the Samsung Multiroom
app is required.
Mobile device
The initial connection
1. Press the (Source) button on the right side of the Soundbar or on the remote control to select
“WIFI” mode.
WIFI
2. Install and launch the Samsung Multiroom app on your mobile device (e.g. smartphone or tablet).
iOS
Android
Samsung Multiroom app
3. Follow the instructions in the app screen on the mobile device to connect the Soundbar to Wi—Fi.
ENG — 14 ENG — 15
07 CONNECTING A MOBILE DEVICE
Method 1. Connecting via Bluetooth
When a mobile device is connected using Bluetooth, you can hear stereo sound without the hassle of
cabling.
•You cannot connect more than one Bluetooth device at a time.
Bluetooth device
The initial connection
1. Press the (Source) button on the right side panel or on the remote control, and then select
“BT”.
2. Change “BT” to “BT PAIRING”.
•If “BT READY” appears, press and hold the (Source) button on the right side panel of the
Soundbar or on the remote control for more than 5 seconds to display “BT PAIRING”.
3. Select “[AV] Samsung Soundbar MSxxx” from the list.
•When a Soundbar is connected to the Bluetooth device, [Bluetooth Device Name] → “BT”
appears in the front display.
4. Play music les from the device, connected via Bluetooth, through the Soundbar.
If the device fails to connect
•If the previously connected Soundbar listing (e.g. “[AV] Samsung Soundbar MSxxx”) appears in the
list, delete it.
•In “BT” mode, press and hold the (Source) button for more than 5 seconds on the right side
panel of the Soundbar or on the remote control to switch to “BT PAIRING” mode.
Then, select “[AV] Samsung Soundbar MSxxx” from the Bluetooth device search list.
For more information about Bluetooth connections, refer to “Connecting a TV via
Bluetooth” on pages 7 ~ 8.
Method 2. Connecting via Wi-Fi (Wireless Network)
•Connect a single Soundbar to Wi-Fi to access a variety of music streaming services and Internet
radio. Connect multiple Soundbars to Wi-Fi to use grouped playback or stereo sound mode.
•To connect a Soundbar to a mobile device via a wireless network (Wi-Fi), the Samsung Multiroom
app is required.
Mobile device
The initial connection
1. Press the (Source) button on the right side of the Soundbar or on the remote control to select
“WIFI” mode.
WIFI
2. Install and launch the Samsung Multiroom app on your mobile device (e.g. smartphone or tablet).
iOS
Android
Samsung Multiroom app
3. Follow the instructions in the app screen on the mobile device to connect the Soundbar to Wi-Fi.
ENG — 16 ENG — 17
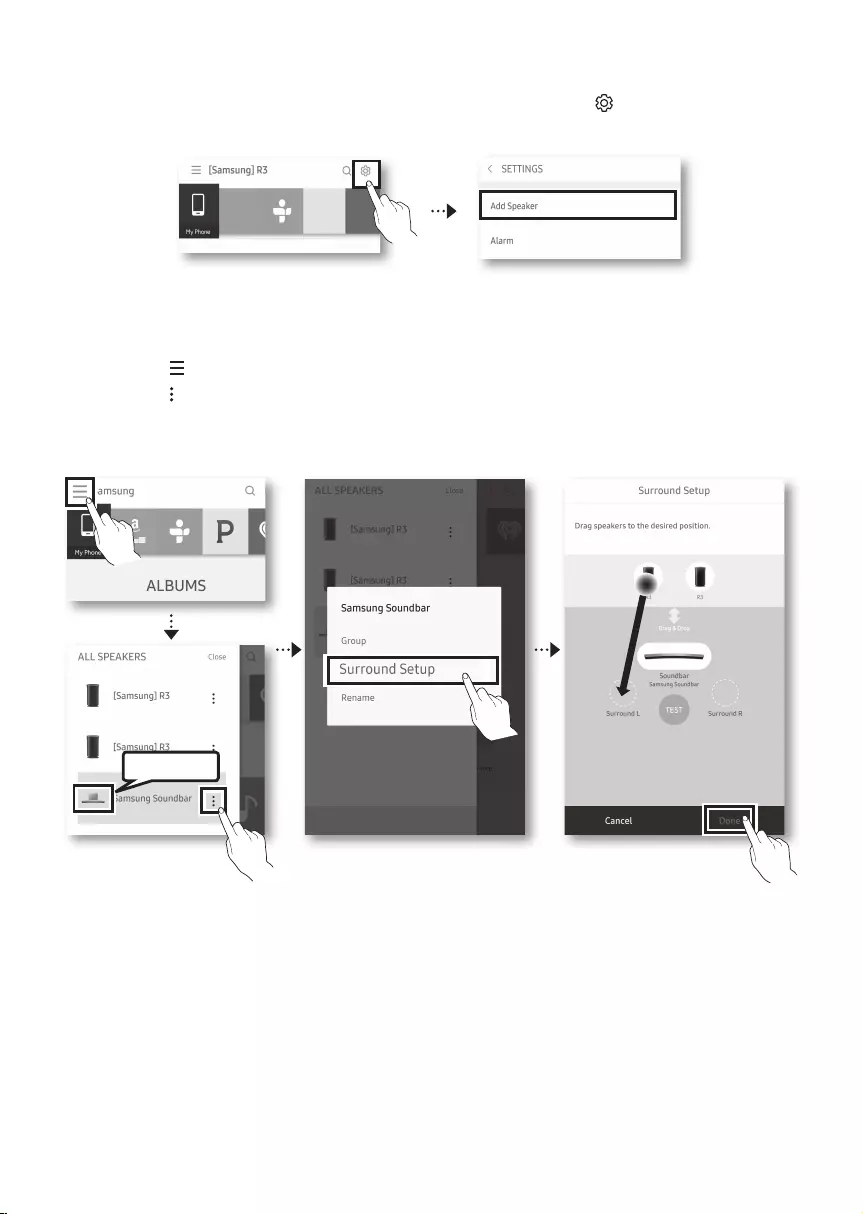
Installing an additional Soundbar when Samsung wireless speakers are already in use
1. On the Home screen of the Samsung Multiroom app, select Settings ( ) at the top, and then
select “Add Speaker”.
2. To connect the Soundbar to 2 Samsung wireless speakers and congure a surround sound system,
follow the steps shown below. (You cannot set up a surround sound system using one audio device
and one Soundbar.)
XTouch to go to the list of all speakers.
YTouch on the right of the Soundbar model name.
ZTouch Surround Setup. Select Done after dragging the speaker to the desired location.
[The Surround connection is complete.
Soundbar
NOTE
•To connect an additional SWA-9000S (not supplied), disconnect the Samsung wireless speakers
from the Soundbar to disable the surround sound system. (If connecting the surround speakers
without disconnecting SWA-9000S, sound is played via both the Samsung wireless speaker and the
Surround speaker.)
08 USING THE REMOTE CONTROL
How to Use the Remote Control
Surround
VOL BASS
SOUNDBAR
SOUND
MODE
SMART
MODE
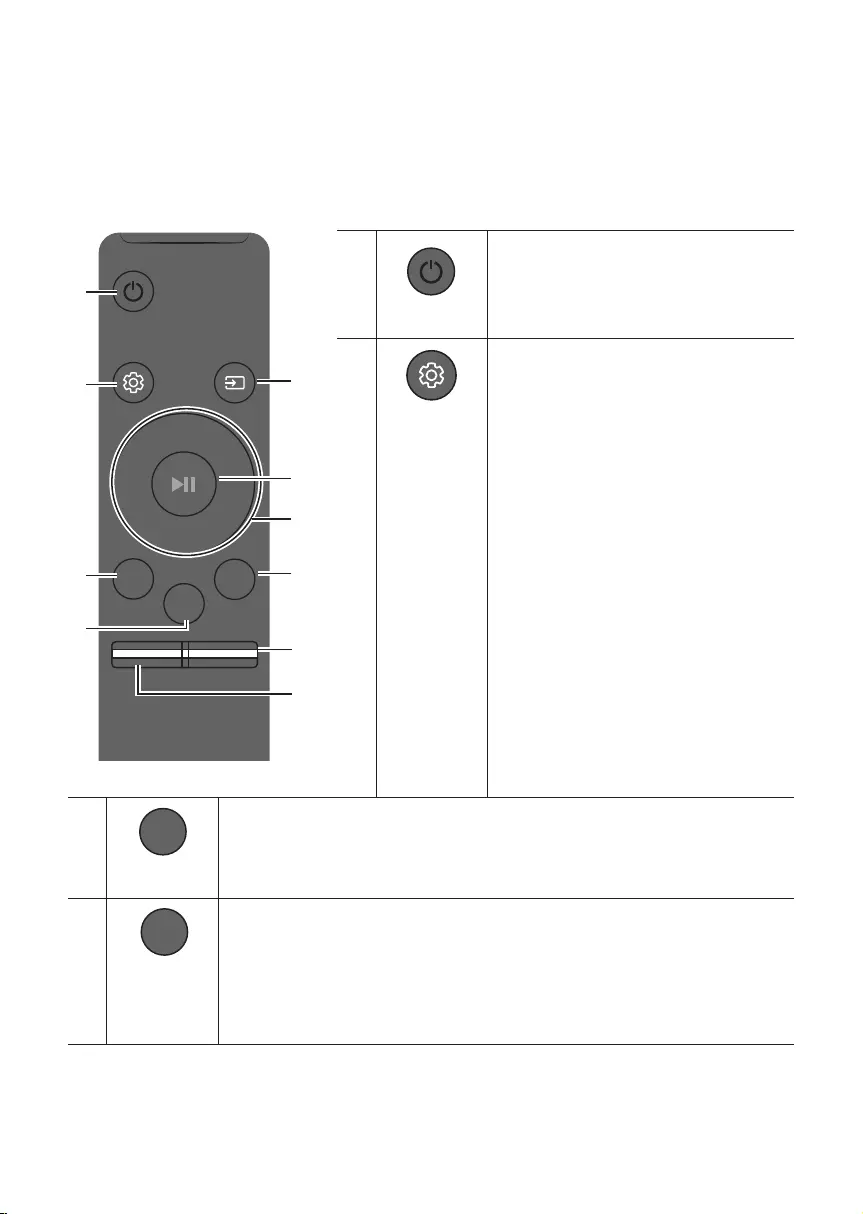
Power
Surround
VOL BASS
SOUND
MODE
SMART
MODE
Turns the Soundbar on and off.
Sound Control
Surround
VOL BASS
SOUND
MODE
SMART
MODE
You can select from TREBLE, SYNC,
REAR LEVEL, or REAR SPEAKER ON/OFF.
•To adjust the TREBLE volume, select Sound
Control TREBLE, and then use the
Up/Down buttons to adjust the volume
within the —6 to +6 range.
•If the video and audio between the TV and
your Soundbar are not synchronised, select
SYNC in Sound Control, and then set audio
delay between 0~300 milliseconds by
using the Up/Down buttons. (Except “USB”
mode)
•If surround speakers (not supplied) are
connected, select REAR LEVEL and use the
Up/Down buttons to adjust the volume
within the —6 to +6 range.
The REAR SPEAKER function can be turned
ON/OFF by using the Up/Down buttons.
•Audio Sync is only supported in some
functions.
Surround
Surround
VOL BASS
SOUND
MODE
SMART
MODE
The Surround Sound function adds depth and a sense of space to sound.
Each time you press this button, ON and OFF alternate.
•ON : Play sound over all the speakers.
•OFF : You can hear the sound of the original source channel from several speakers.
SOUND MODE
Surround
VOL BASS
SOUND
MODE
SMART
MODE
You can select the desired sound effect by choosing STANDARD, MUSIC, CLEAR VOICE,
SPORTS, or MOVIE.
•DRC (Dynamic Range Control)
Lets you apply dynamic range control to Dolby Digital tracks. If you press and hold the
SOUND MODE button while in standby mode, DRC (Dynamic Range Control) turns on
or off. With the DRC turned on, loud sound is reduced. (The sound may be distorted.)
ENG — 16 ENG — 17
Installing an additional Soundbar when Samsung wireless speakers are already in use
1. On the Home screen of the Samsung Multiroom app, select Settings ( ) at the top, and then
select “Add Speaker”.
2. To connect the Soundbar to 2 Samsung wireless speakers and congure a surround sound system,
follow the steps shown below. (You cannot set up a surround sound system using one audio device
and one Soundbar.)
XTouch to go to the list of all speakers.
YTouch on the right of the Soundbar model name.
ZTouch Surround Setup. Select Done after dragging the speaker to the desired location.
[The Surround connection is complete.
Soundbar
NOTE
•To connect an additional SWA—9000S (not supplied), disconnect the Samsung wireless speakers
from the Soundbar to disable the surround sound system. (If connecting the surround speakers
without disconnecting SWA—9000S, sound is played via both the Samsung wireless speaker and the
Surround speaker.)
08 USING THE REMOTE CONTROL
How to Use the Remote Control
Surround
VOL BASS
SOUNDBAR
SOUND
MODE
SMART
MODE
Power
Surround
VOL BASS
SOUND
MODE
SMART
MODE
Turns the Soundbar on and off.
Sound Control
Surround
VOL BASS
SOUND
MODE
SMART
MODE
You can select from TREBLE, SYNC,
REAR LEVEL, or REAR SPEAKER ON/OFF.
•To adjust the TREBLE volume, select Sound
Control TREBLE, and then use the
Up/Down buttons to adjust the volume
within the —6 to +6 range.
•If the video and audio between the TV and
your Soundbar are not synchronised, select
SYNC in Sound Control, and then set audio
delay between 0~300 milliseconds by
using the Up/Down buttons. (Except “USB”
mode)
•If surround speakers (not supplied) are
connected, select REAR LEVEL and use the
Up/Down buttons to adjust the volume
within the —6 to +6 range.
The REAR SPEAKER function can be turned
ON/OFF by using the Up/Down buttons.
•Audio Sync is only supported in some
functions.
Surround
Surround
VOL BASS
SOUND
MODE
SMART
MODE
The Surround Sound function adds depth and a sense of space to sound.
Each time you press this button, ON and OFF alternate.
•ON : Play sound over all the speakers.
•OFF : You can hear the sound of the original source channel from several speakers.
SOUND MODE
SOUND
MODE
You can select the desired sound effect by choosing STANDARD, MUSIC, CLEAR VOICE,
SPORTS, or MOVIE.
•DRC (Dynamic Range Control)
Lets you apply dynamic range control to Dolby Digital tracks. If you press and hold the
SOUND MODE button while in standby mode, DRC (Dynamic Range Control) turns on
or off. With the DRC turned on, loud sound is reduced. (The sound may be distorted.)
ENG — 18 ENG — 19
Surround
VOL BASS
SOUND
MODE
SMART
MODE
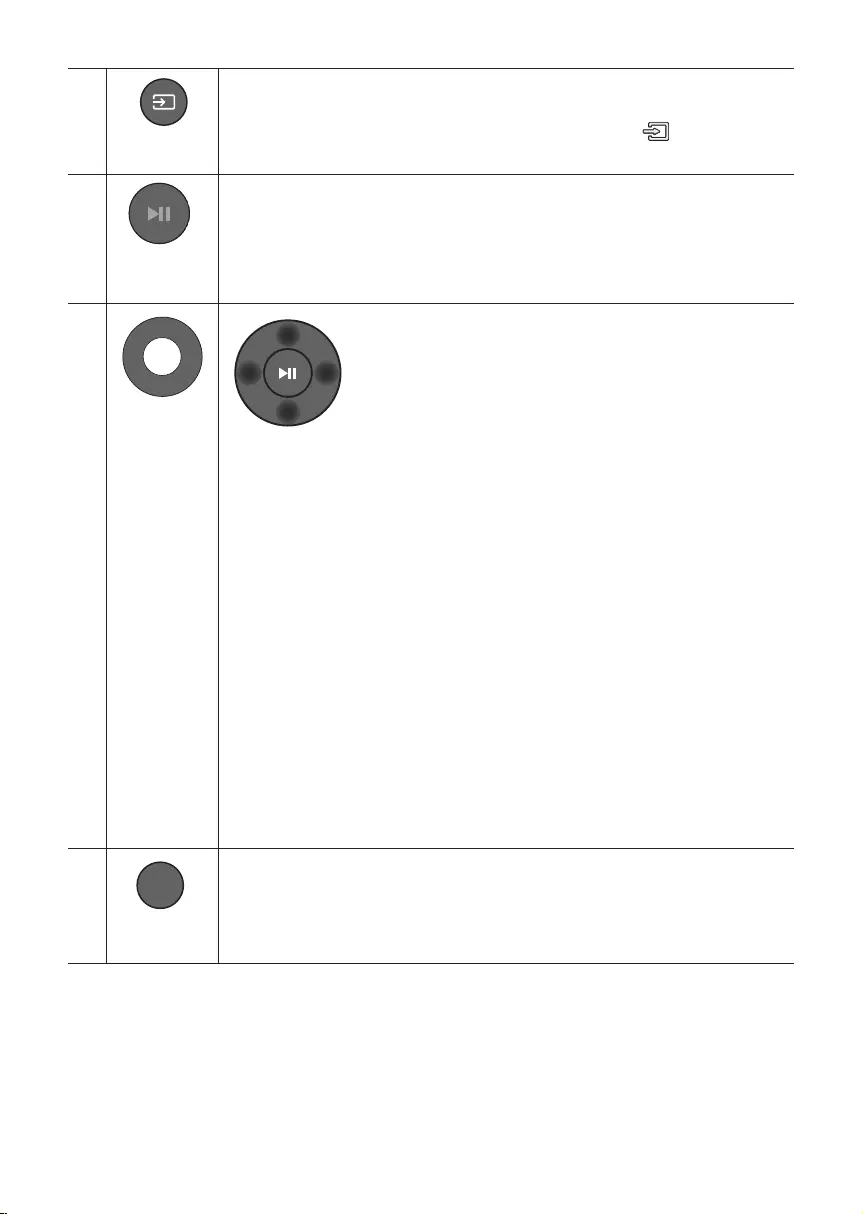
Source
Press to select a source connected to the Soundbar.
•BT PAIRING mode
To turn on “BT PAIRING” mode in “BT” mode, press and hold the (Source) button
for more than 5 seconds. See page 14 for details.
Play / Pause
(BT/Wi—Fi)
Surround
VOL BASS
SOUND
MODE
SMART
MODE
Press the p button to pause a music le temporarily.
If you press the button again, the music le plays.
Surround
VOL BASS
SOUND
MODE
SMART
MODE
Up/Down/
Left/Right
Press the indicated areas to select Up/Down/Left/Right.
Press Up/Down/Left/Right on the button to select or set functions.
•Repeat
To use the Repeat function press the Up button.
•Music Skip
Press the Right button to select the next music le. Press the Left button to select
the previous music le.
•Anynet+ / Auto Power Link
You can turn Anynet+ and Auto Power Link on or off.
Anynet+ and Auto Power Link are controlled by the Right and Left buttons
respectively.
– Anynet+ : If the Soundbar is connected to a Samsung TV through an HDMI cable,
you can control your Soundbar with the Samsung TV’s remote control.
Press and hold the Right button for 5 seconds to toggle Anynet+ ON and OFF.
– Auto Power Link : If the Soundbar is connected to your TV through a digital
optical cable, the Soundbar can automatically turn on when you turn on your TV.
Press and hold the Left button for 5 seconds to toggle Auto Power Link ON and
OFF.
– Anynet+ / Auto Power Link are set to ON by default.
Surround
VOL BASS
SOUND
MODE
SMART
MODE
SMART MODE
Automatically optimises sound effects to suit the scene currently playing.
The mode turns on or off each time the button is pressed.
Surround
VOL BASS
SOUND
MODE
SMART
MODE
BASS
Surround
SOUND
MODE
SMART
MODE
VOL BASS
SOUNDBAR
Surround
SOUND
MODE
SMART
MODE
VOL BASS
SOUNDBAR
Surround
SOUND
MODE
SMART
MODE
VOL BASS
SOUNDBAR
Surround
SOUND
MODE
SMART
MODE
VOL BASS
SOUNDBAR
Push the button up or down to adjust the BASS volume within the —6 to +6 range.
To set the BASS volume level to 0, press the button.
•When a Subwoofer (not supplied) is connected, the BASS button switches to the
Subwoofer Key. Push the button up or down to adjust the subwoofer volume either to
—12 or within the —6 to +6 range. To set the subwoofer volume level to 0, press the
button.
Surround
VOL BASS
SOUND
MODE
SMART
MODE
VOL
Surround
SOUND
MODE
SMART
MODE
VOL BASS
SOUNDBAR
Surround
SOUND
MODE
SMART
MODE
VOL BASS
SOUNDBAR
Surround
SOUND
MODE
SMART
MODE
VOL BASS
SOUNDBAR
Surround
SOUND
MODE
SMART
MODE
VOL BASS
SOUNDBAR
Push the button up or down to adjust the volume.
•Mute
Press the VOL button to mute the sound. Press it again to unmute the sound.
Adjusting the Soundbar volume with a TV remote control
Use the TV menu to set the TV speaker on a Samsung TV to external speakers.
(For more information, see the TV’s user manual.)
•After installing the Soundbar, you can adjust the Soundbar’s volume using the IR remote control
that came with a Samsung TV. (If you do not want to use this function, when the Soundbar is on,
press and hold the Surround button for 5 seconds. “OFF—TV REMOTE” appears in the Soundbar’s
display and the function turns off.) To adjust the volume using only the Samsung TV remote control,
press and hold the Surround button for more than 5 seconds until “SAMSUNG—TV REMOTE”
appears in the Soundbar display.
– Each time the Surround button is held for 5 seconds, the mode switches in the following order:
“SAMSUNG—TV REMOTE” (Default mode) → “OFF—TV REMOTE” → “ALL—TV REMOTE”.
•To adjust the Soundbar volume with the remote control that came with a TV made by a third party
manufacturer, turn the Soundbar on, press and hold the Surround button for 5 seconds
(“OFF—TV REMOTE” appears on the Soundbar’s display), release the Surround button, and then
press and hold the Surround button again for more than 5 seconds. (“ALL—TV REMOTE” appears on
the Soundbar’s display.)
– This function may not be available, depending on the remote control.
– For manufacturers that support this feature, refer to the FULL MANUAL for your Soundbar on
the Samsung web site (www.samsung.com/support).
– This volume control function works with IR TV remotes only. It does not work with Bluetooth
TV remotes (remotes that require pairing).
ENG — 18 ENG — 19
Surround
VOL BASS
SOUND
MODE
SMART
MODE
Source
Press to select a source connected to the Soundbar.
•BT PAIRING mode
To turn on “BT PAIRING” mode in “BT” mode, press and hold the (Source) button
for more than 5 seconds. See page 14 for details.
Play / Pause
(BT/Wi—Fi)
Surround
VOL BASS
SOUND
MODE
SMART
MODE
Press the p button to pause a music le temporarily.
If you press the button again, the music le plays.
Surround
VOL BASS
SOUND
MODE
SMART
MODE
Up/Down/
Left/Right
Press the indicated areas to select Up/Down/Left/Right.
Press Up/Down/Left/Right on the button to select or set functions.
•Repeat
To use the Repeat function press the Up button.
•Music Skip
Press the Right button to select the next music le. Press the Left button to select
the previous music le.
•Anynet+ / Auto Power Link
You can turn Anynet+ and Auto Power Link on or off.
Anynet+ and Auto Power Link are controlled by the Right and Left buttons
respectively.
– Anynet+ : If the Soundbar is connected to a Samsung TV through an HDMI cable,
you can control your Soundbar with the Samsung TV’s remote control.
Press and hold the Right button for 5 seconds to toggle Anynet+ ON and OFF.
– Auto Power Link : If the Soundbar is connected to your TV through a digital
optical cable, the Soundbar can automatically turn on when you turn on your TV.
Press and hold the Left button for 5 seconds to toggle Auto Power Link ON and
OFF.
– Anynet+ / Auto Power Link are set to ON by default.
Surround
VOL BASS
SOUND
MODE
SMART
MODE
SMART MODE
Automatically optimises sound effects to suit the scene currently playing.
The mode turns on or off each time the button is pressed.
Surround
VOL BASS
SOUND
MODE
SMART
MODE
BASS
Surround
SOUND
MODE
SMART
MODE
VOL BASS
Surround
SOUND
MODE
SMART
MODE
VOL BASS
Surround
SOUND
MODE
SMART
MODE
VOL BASS
SOUNDBAR
Surround
SOUND
MODE
SMART
MODE
VOL BASS
SOUNDBAR
Push the button up or down to adjust the BASS volume within the —6 to +6 range.
To set the BASS volume level to 0, press the button.
•When a Subwoofer (not supplied) is connected, the BASS button switches to the
Subwoofer Key. Push the button up or down to adjust the subwoofer volume either to
-12 or within the —6 to +6 range. To set the subwoofer volume level to 0, press the
button.
Surround
VOL BASS
SOUND
MODE
SMART
MODE
VOL
Surround
SOUND
MODE
SMART
MODE
VOL BASS
SOUNDBAR
Surround
SOUND
MODE
SMART
MODE
VOL BASS
SOUNDBAR
Surround
SOUND
MODE
SMART
MODE
VOL BASS
Surround
SOUND
MODE
SMART
MODE
VOL BASS
Push the button up or down to adjust the volume.
•Mute
Press the VOL button to mute the sound. Press it again to unmute the sound.
Adjusting the Soundbar volume with a TV remote control
Use the TV menu to set the TV speaker on a Samsung TV to external speakers.
(For more information, see the TV’s user manual.)
•After installing the Soundbar, you can adjust the Soundbar’s volume using the IR remote control
that came with a Samsung TV. (If you do not want to use this function, when the Soundbar is on,
press and hold the Surround button for 5 seconds. “OFF-TV REMOTE” appears in the Soundbar’s
display and the function turns off.) To adjust the volume using only the Samsung TV remote control,
press and hold the Surround button for more than 5 seconds until “SAMSUNG-TV REMOTE”
appears in the Soundbar display.
– Each time the Surround button is held for 5 seconds, the mode switches in the following order:
“SAMSUNG-TV REMOTE” (Default mode) → “OFF-TV REMOTE” → “ALL-TV REMOTE”.
•To adjust the Soundbar volume with the remote control that came with a TV made by a third party
manufacturer, turn the Soundbar on, press and hold the Surround button for 5 seconds
(“OFF-TV REMOTE” appears on the Soundbar’s display), release the Surround button, and then
press and hold the Surround button again for more than 5 seconds. (“ALL—TV REMOTE” appears on
the Soundbar’s display.)
– This function may not be available, depending on the remote control.
– For manufacturers that support this feature, refer to the FULL MANUAL for your Soundbar on
the Samsung web site (www.samsung.com/support).
– This volume control function works with IR TV remotes only. It does not work with Bluetooth
TV remotes (remotes that require pairing).
ENG — 20 ENG — 21
09 SOFTWARE
UPDATE
When the Soundbar is connected to the Internet,
software updates automatically occur even when
the Soundbar is turned off.
•To use the Auto Update function, the
Soundbar must be connected to the Internet.
The Wi-Fi connection to the Soundbar will be
terminated if its power cord is disconnected
or the power is cut off. If the power is cut off,
turn on the Soundbar and reconnect it.
10 INSTALLING THE
WALL MOUNT
Installation Precautions
•Install on a vertical wall only.
•Do not install in a place with high
temperature or humidity.
•Verify whether the wall is strong enough to
support the product’s weight. If not, reinforce
the wall or choose another installation point.
•Purchase and use the xing screws or
anchors appropriate for the kind of wall you
have (plaster board, iron board, wood, etc.).
If possible, x the support screws into wall
studs.
•Purchase wall mounting screws according to
the type and thickness of the wall you want to
mount the Soundbar on.
– Diameter: M5
– Length: 35 mm or longer recommended.
•Connect cables from the unit to external
devices before you install the Soundbar on
the wall.
•Make sure the unit is turned off and
unplugged before you install it. Otherwise, it
may cause an electric shock.
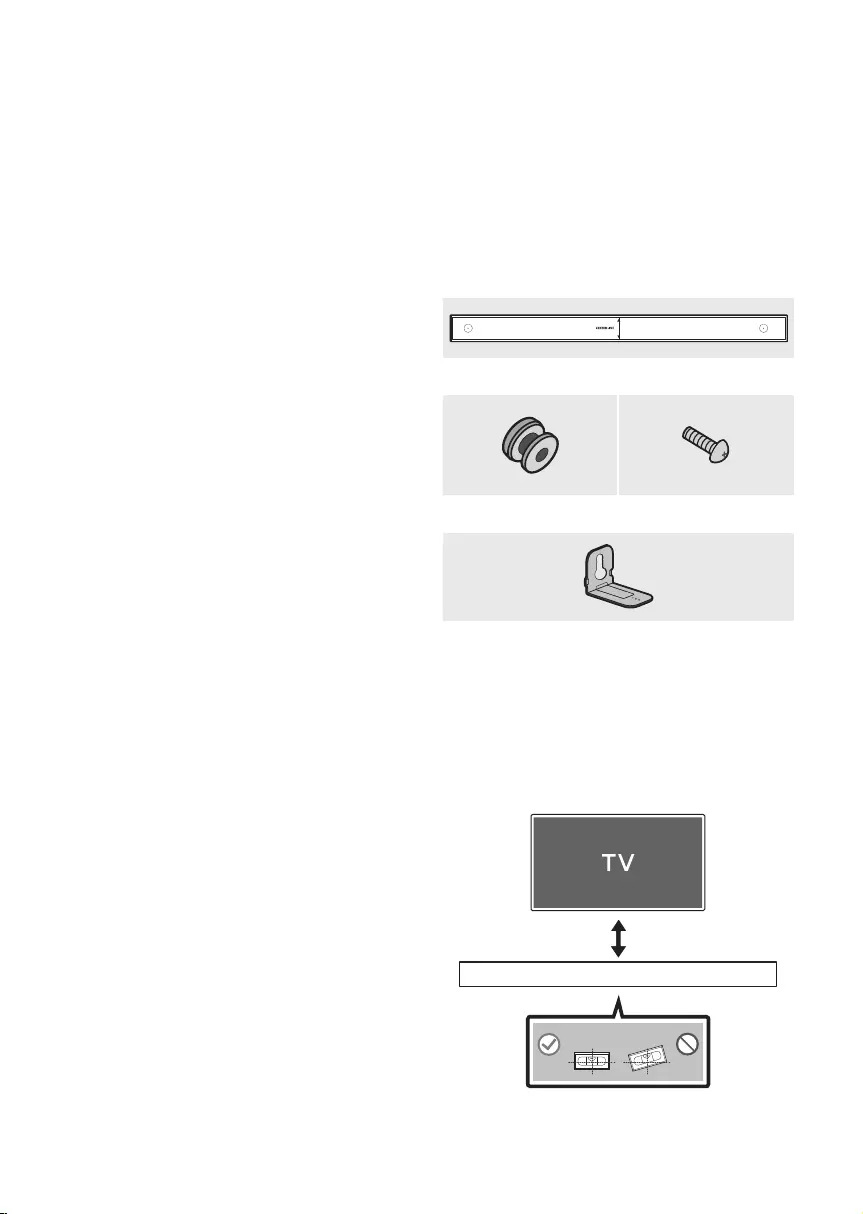
Wallmount Components
450mm
Wall Mount Guide
Holder-Screw (2 EA) Screw (2 EA)
Bracket-Wall Mount
(2 EA)
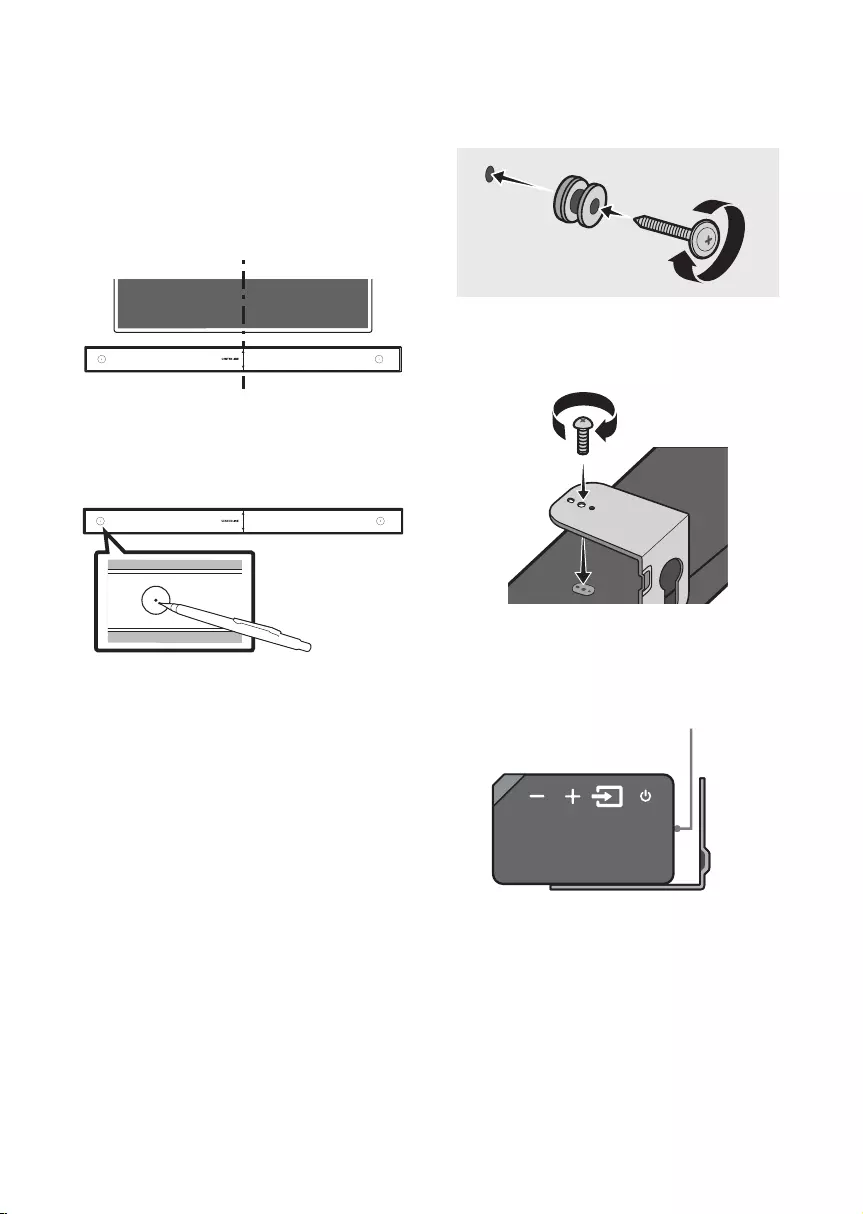
1. Place the Wall Mount Guide against the wall
surface.
•The Wall Mount Guide must be level.
•If your TV is mounted on the wall, install
the Soundbar at least 5 cm below the TV.
5 cm or more
2. Align the Paper Template’s Centre Line with
the centre of your TV (if you are mounting
the Soundbar below your TV), and then x
the Wall Mount Guide to the wall using tape.
•If you are not mounting below a TV, place
the Centre Line in the centre of the
installation area.
Centre Line
3. Use a sharp object, such as a pen or pencil, to
mark the holes’ positions, and then remove
the Wall mount Guide.
4. Using an appropriately sized drill bit, drill a
hole in the wall at each marking.
•If the markings do not correspond to the
positions of studs, make sure you insert
appropriate anchors or mollies into the
holes before you insert the support
screws. If you use anchors or mollies,
make sure the holes you drill are large
enough for the anchors or mollies you
use.
ENG — 20 ENG — 21
•Connect cables from the unit to external
devices before you install the Soundbar on
the wall.
•Make sure the unit is turned off and
unplugged before you install it. Otherwise, it
may cause an electric shock.
Wallmount Components
Wall Mount Guide
Holder—Screw (2 EA) Screw (2 EA)
Bracket—Wall Mount
(2 EA)
1. Place the Wall Mount Guide against the wall
surface.
•The Wall Mount Guide must be level.
•If your TV is mounted on the wall, install
the Soundbar at least 5 cm below the TV.
5 cm or more
2. Align the Paper Template’s Centre Line with
the centre of your TV (if you are mounting
the Soundbar below your TV), and then x
the Wall Mount Guide to the wall using tape.
•If you are not mounting below a TV, place
the Centre Line in the centre of the
installation area.
Centre Line
450mm
3. Use a sharp object, such as a pen or pencil, to
mark the holes’ positions, and then remove
the Wall mount Guide.
450mm
4. Using an appropriately sized drill bit, drill a
hole in the wall at each marking.
•If the markings do not correspond to the
positions of studs, make sure you insert
appropriate anchors or mollies into the
holes before you insert the support
screws. If you use anchors or mollies,
make sure the holes you drill are large
enough for the anchors or mollies you
use.
5. Push a screw (not supplied) through each
Holder-Screw, and then screw each screw
rmly into a support screw hole.
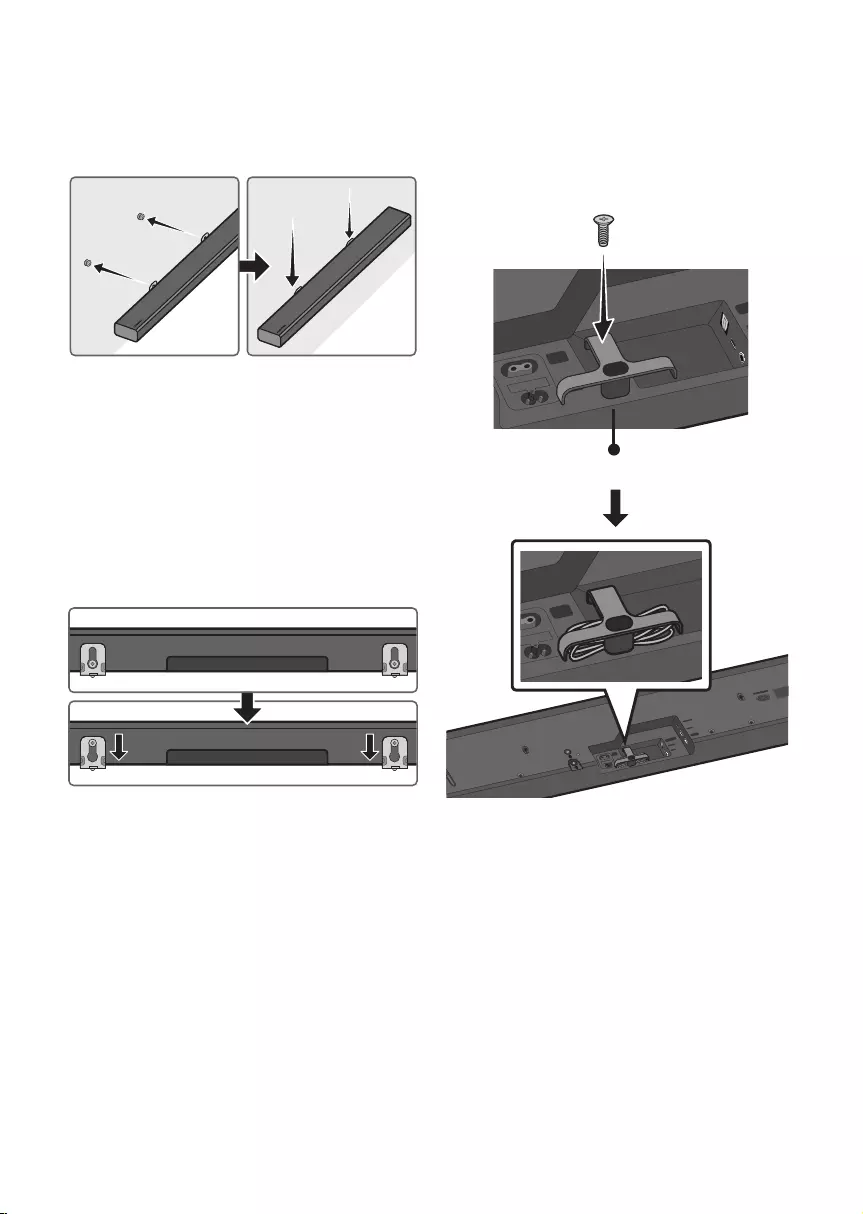
6. Install the 2 Bracket-Wall Mounts in the
correct orientation on the bottom of the
Soundbar, using 2 Screws.
•When assembling, make sure the hanger
part of the Bracket-Wall Mounts are
located behind the rear of the Soundbar.
Rear of Soundbar
Right end of Soundbar
ENG — 22 ENG — 23
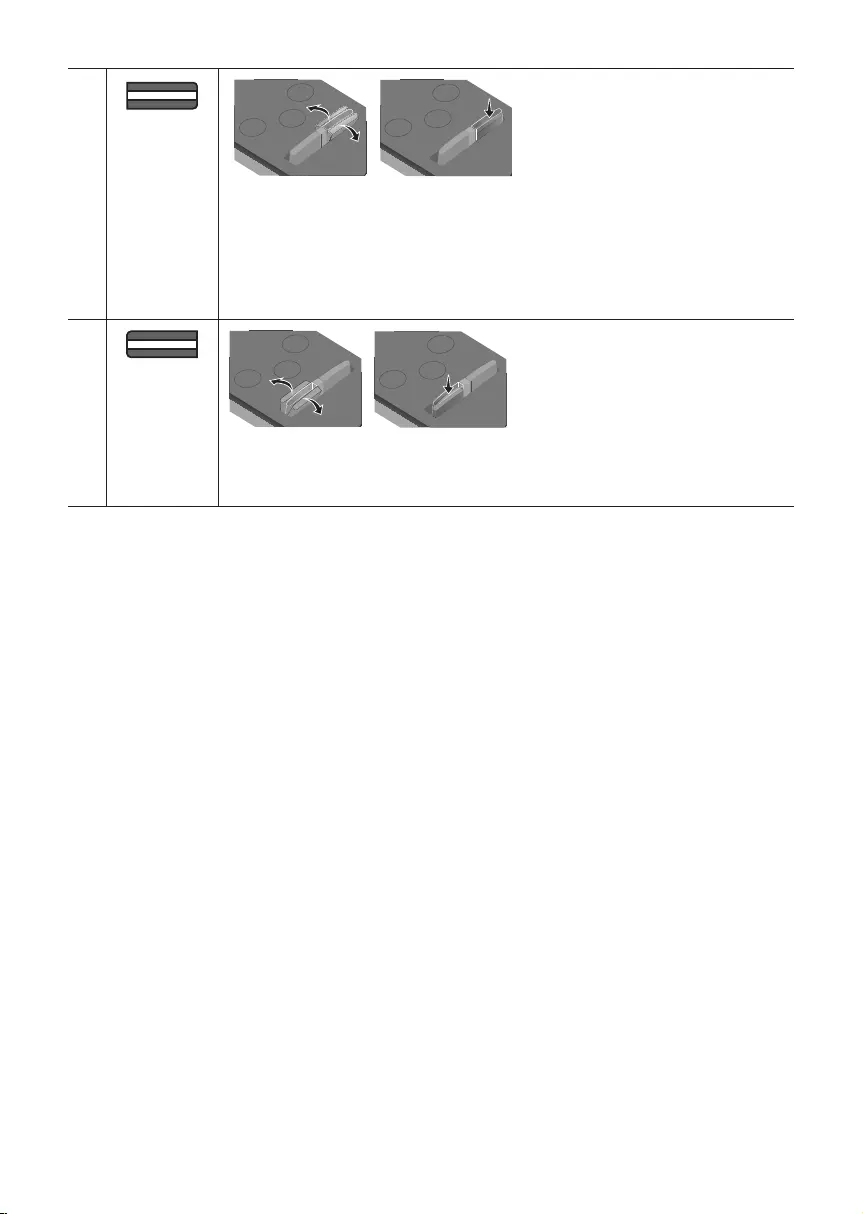
7. Install the Soundbar with the attached
Bracket-Wall Mounts by hanging the
Bracket-Wall Mounts on the Holder-Screws
on the wall.
8. Slide the Soundbar down as shown below so
that the Bracket-Wall Mounts rest securely
on the Holder-Screws.
•Insert the Holder-Screws into the wide
(bottom) part of the Bracket-Wall
Mounts, and then slide the Bracket-Wall
Mounts down so that Bracket-Wall
Mounts rest securely on the
Holder-Screws.
Assembling the Holder-Cable
As shown in the image, use the supplied Screw to
x the Holder-Cable to the Soundbar, and then
use the Holder-Cable to organise any cables.
WIRELESS
DIGITAL AUDIO IN
(OPTICAL)
POWER
IN
POWER
OUT
(For TV)
Holder-Cable
Wi-Fi SETUP SPK ADD
WIRELESS
AUX IN
DIGITAL AUDIO IN
(OPTICAL)
POWER
IN
POWER
OUT
(For TV)
HDMI IN
USB (5V 0.5A)
HDMI OUT
(TV-ARC)
WIRELESS
AUX IN
DIGITAL AUDIO IN
(OPTICAL)
POWER
IN
POWER
OUT
(For TV)
HDMI IN
USB (5V 0.5A)
HDMI OUT
(TV-ARC)
11 TROUBLESHOOTING
Before seeking assistance, check the following.
The unit will not turn on.
Is the power cord plugged into the outlet?
;Connect the power plug to the outlet.
A function does not work when the button
is pressed.
Is there static electricity in the air?
;Disconnect the power plug and connect it
again.
Sound dropouts occur in BT mode.
;See the Bluetooth connection sections on
pages 7 and 14.
Sound is not produced.
Is the Mute function on?
; Press the VOL button to cancel the
function.
Is the volume set to minimum?
;Adjust the Volume.
The remote control does not work.
Are the batteries drained?
;Replace with new batteries.
Is the distance between the remote control and
Soundbar main unit too far?
; Move the remote control closer to the
Soundbar main unit.
ENG — 22 ENG — 23
Assembling the Holder—Cable
As shown in the image, use the supplied Screw to
x the Holder—Cable to the Soundbar, and then
use the Holder—Cable to organise any cables.
WIRELESS
DIGITAL AUDIO IN
(OPTICAL)
POWER
IN
POWER
OUT
(For TV)
Holder—Cable
Wi-Fi SETUP SPK ADD
WIRELESS
AUX IN
DIGITAL AUDIO IN
(OPTICAL)
POWER
IN
POWER
OUT
(For TV)
HDMI IN
USB (5V 0.5A)
HDMI OUT
(TV-ARC)
WIRELESS
AUX IN
DIGITAL AUDIO IN
(OPTICAL)
POWER
IN
POWER
OUT
(For TV)
HDMI IN
USB (5V 0.5A)
HDMI OUT
(TV-ARC)
11 TROUBLESHOOTING
Before seeking assistance, check the following.
The unit will not turn on.
Is the power cord plugged into the outlet?
;Connect the power plug to the outlet.
A function does not work when the button
is pressed.
Is there static electricity in the air?
;Disconnect the power plug and connect it
again.
Sound dropouts occur in BT mode.
;See the Bluetooth connection sections on
pages 7 and 14.
Sound is not produced.
Is the Mute function on?
; Press the VOL button to cancel the
function.
Is the volume set to minimum?
;Adjust the Volume.
The remote control does not work.
Are the batteries drained?
;Replace with new batteries.
Is the distance between the remote control and
Soundbar main unit too far?
; Move the remote control closer to the
Soundbar main unit.
Cannot connect to the TV.
If connected via a wired network
;Check if the cable is connected correctly.
(Check the port name to make sure that
the cable is connected to the correct port.)
(See the corresponding page regarding
each connection method.)
;Press the (Source) button on the right
side of the Soundbar or on the remote
control to check if the mode is correct.
If connected via a wireless network
;Connected via Bluetooth
1. Switch the Soundbar to “BT PAIRING”
mode, and then use the TV to search
again. (See page 7 for details.)
;Connected via Wi-Fi
1. Check if the TV is a compatible model.
•Only Samsung smart TVs released
after 2014 are supported.
2. Check if the TV is connected to Wi-Fi.
•If the TV is not connected to Wi-Fi, use
the network menu on the TV to
establish a connection. (See the TV
user manual.)
ENG — 24 ENG — 25
3. Check if the Soundbar is connected to
Wi-Fi.
•When connected, the Soundbar is
found in the list of speakers when
Samsung Multiroom app is run on the
mobile device (e.g. smartphone or
tablet). (See page 15 for details.)
4. Check for a DFS channel.
•If your wireless router (Wi-Fi) is using a
DFS channel, you cannot establish a
Wi-Fi connection between the TV and
Soundbar. Contact your Internet
service provider for details.
12 LICENCE
Manufactured under licence from Dolby
Laboratories. Dolby, Dolby Audio and the
double-D symbol are trademarks of Dolby
Laboratories.
For DTS patents, see http://patents.dts.com.
Manufactured under licence from DTS
Licencing Limited. DTS, the Symbol, DTS in
combination with the Symbol, and DTS 2.0
Channel are registered trademarks or
trademarks of DTS, Inc. in the United States
and/or other countries. © DTS, Inc. All Rights
Reserved.
The terms HDMI and HDMI High-Denition
Multimedia Interface, and the HDMI Logo are
trademarks or registered trademarks of HDMI
Licencing LLC in the United States and other
countries.
•The Spotify Software is subject to third
party licences found here :
www.spotify.com/connect/third-party-
licenses.
•For more information about Spotify
Connect, please visit www.spotify.com/
connect
13 OPEN SOURCE
LICENCE NOTICE
For further information on Open Sources used in
this product, please visit the website:
http://opensource.samsung.com
14 IMPORTANT NOTES ABOUT SERVICE
•Figures and illustrations in this User Manual are provided for reference only and may differ from
actual product appearance.
•An administration fee may be charged if either
(a) an engineer is called out at your request and there is no defect with the product (i.e. where the
user manual has not been read).
(b) you bring the unit to a repair centre and there is no defect with the product (i.e. where the user
manual has not been read).
•You will be informed of the administration fee amount before a technician visits.
15 SPECIFICATIONS AND GUIDE
Specications
GENERAL
USB 5V/0.5A
Weight 5.0 kg
Dimensions
(W x H x D) 890.0 x 71.0 x 130.5 mm
Operating Temperature Range +5°C to +35°C
Operating Humidity Range 10 % ~ 75 %
Speaker Woofer x 4, Tweeter x 2, 4ohm
Supported play formats
(DTS 2.0 sound is played in DTS format.)
LPCM 2ch, Dolby Audio™ (supporting
Dolby® Digital), DTS
Wireless device
output power
Wi—Fi max transmitter power 100mW at 2.4GHz –2.4835GHz, 5.15GHz–
5.35GHz & 5.47GHz—5.725GHz
BT max transmitter power 100mW at 2.4GHz – 2.4835GHz
NOTES
•Samsung Electronics Co., Ltd reserves the right to change the specications without notice.
•Weight and dimensions are approximate.
•For more information about the power supply and power consumption, refer to the label attached
to the product. (Label : Bottom of the Soundbar Main Unit)
ENG — 24 ENG — 25
The terms HDMI and HDMI High—Denition
Multimedia Interface, and the HDMI Logo are
trademarks or registered trademarks of HDMI
Licencing LLC in the United States and other
countries.
•The Spotify Software is subject to third
party licences found here :
www.spotify.com/connect/third—party—
licenses.
•For more information about Spotify
Connect, please visit www.spotify.com/
connect
13 OPEN SOURCE
LICENCE NOTICE
For further information on Open Sources used in
this product, please visit the website:
http://opensource.samsung.com
14 IMPORTANT NOTES ABOUT SERVICE
•Figures and illustrations in this User Manual are provided for reference only and may differ from
actual product appearance.
•An administration fee may be charged if either
(a) an engineer is called out at your request and there is no defect with the product (i.e. where the
user manual has not been read).
(b) you bring the unit to a repair centre and there is no defect with the product (i.e. where the user
manual has not been read).
•You will be informed of the administration fee amount before a technician visits.
15 SPECIFICATIONS AND GUIDE
Specications
GENERAL
USB 5V/0.5A
Weight 5.0 kg
Dimensions
(W x H x D) 890.0 x 71.0 x 130.5 mm
Operating Temperature Range +5°C to +35°C
Operating Humidity Range 10 % ~ 75 %
Speaker Woofer x 4, Tweeter x 2, 4ohm
Supported play formats
(DTS 2.0 sound is played in DTS format.)
LPCM 2ch, Dolby Audio™ (supporting
Dolby® Digital), DTS
Wireless device
output power
Wi-Fi max transmitter power 100mW at 2.4GHz –2.4835GHz, 5.15GHz–
5.35GHz & 5.47GHz-5.725GHz
BT max transmitter power 100mW at 2.4GHz – 2.4835GHz
NOTES
•Samsung Electronics Co., Ltd reserves the right to change the specications without notice.
•Weight and dimensions are approximate.
•For more information about the power supply and power consumption, refer to the label attached
to the product. (Label : Bottom of the Soundbar Main Unit)

ENG — 26 ENG — 27
Precaution : The product will restart automatically if you turn on/off Wi-Fi/Ethernet.
Overall Standby Power Consumption (W)
(All the network ports are “ON” condition) 3.2W
Wi-Fi/Ethernet Port deactivation method Press Wi-Fi SETUP button on the product for
30 seconds to turn Wi-Fi/Ethernet On / Off.
Bluetooth Port deactivation method Press SPK ADD button on the product for
30 seconds to turn Bluetooth On / Off.
•Hereby, Samsung Electronics, declares that this equipment is in compliance
with Directive 2014/53/EU.
The full text of the EU declaration of conformity is available at the following
internet address: http://www.samsung.com go to Support > Search Product
Support and enter the model name.
This equipment may be operated in all EU countries.
The 5GHz WLAN(Wi-Fi or SRD) function of this equipment may only be operated
indoors.
[Correct disposal of batteries in this product]
(Applicable in countries with separate collection systems)
This marking on the battery, manual or packaging indicates that the batteries in this product should not be
disposed of with other household waste at the end of their working life. Where marked, the chemical
symbols Hg, Cd or Pb indicate that the battery contains mercury, cadmium or lead above the reference
levels in EC Directive 2006/66.
If batteries are not properly disposed of, these substances can cause harm to human health or the
environment.
To protect natural resources and to promote material reuse, please separate batteries from other types of
waste and recycle them through your local, free battery return system.
Correct Disposal of This Product
(Waste Electrical & Electronic Equipment)
(Applicable in countries with separate collection systems)
This marking on the product, accessories or literature indicates that the product and its electronic
accessories (e.g. charger, headset, USB cable) should not be disposed of with other household waste at the
end of their working life. To prevent possible harm to the environment or human health from uncontrolled
waste disposal, please separate these items from other types of waste and recycle them responsibly to
promote the sustainable reuse of material resources.
Household users should contact either the retailer where they purchased this product, or their local
government ofce, for details of where and how they can take these items for environmentally safe
recycling.
Business users should contact their supplier and check the terms and conditions of the purchase contract.
This product and its electronic accessories should not be mixed with other commercial wastes for disposal.
For information on Samsung’s environmental commitments and product specic regulatory obligations
e.g. REACH visit:
samsung.com/uk/aboutsamsung/samsungelectronics/corporatecitizenship/data_corner.html

ENG — 26 ENG — 27
Precaution : The product will restart automatically if you turn on/off Wi—Fi/Ethernet.
Overall Standby Power Consumption (W)
(All the network ports are “ON” condition) 3.2W
Wi—Fi/Ethernet Port deactivation method Press Wi—Fi SETUP button on the product for
30 seconds to turn Wi—Fi/Ethernet On / Off.
Bluetooth Port deactivation method Press SPK ADD button on the product for
30 seconds to turn Bluetooth On / Off.
•Hereby, Samsung Electronics, declares that this equipment is in compliance
with Directive 2014/53/EU.
The full text of the EU declaration of conformity is available at the following
internet address: http://www.samsung.com go to Support > Search Product
Support and enter the model name.
This equipment may be operated in all EU countries.
The 5GHz WLAN(Wi—Fi or SRD) function of this equipment may only be operated
indoors.
[Correct disposal of batteries in this product]
(Applicable in countries with separate collection systems)
This marking on the battery, manual or packaging indicates that the batteries in this product should not be
disposed of with other household waste at the end of their working life. Where marked, the chemical
symbols Hg, Cd or Pb indicate that the battery contains mercury, cadmium or lead above the reference
levels in EC Directive 2006/66.
If batteries are not properly disposed of, these substances can cause harm to human health or the
environment.
To protect natural resources and to promote material reuse, please separate batteries from other types of
waste and recycle them through your local, free battery return system.
Correct Disposal of This Product
(Waste Electrical & Electronic Equipment)
(Applicable in countries with separate collection systems)
This marking on the product, accessories or literature indicates that the product and its electronic
accessories (e.g. charger, headset, USB cable) should not be disposed of with other household waste at the
end of their working life. To prevent possible harm to the environment or human health from uncontrolled
waste disposal, please separate these items from other types of waste and recycle them responsibly to
promote the sustainable reuse of material resources.
Household users should contact either the retailer where they purchased this product, or their local
government ofce, for details of where and how they can take these items for environmentally safe
recycling.
Business users should contact their supplier and check the terms and conditions of the purchase contract.
This product and its electronic accessories should not be mixed with other commercial wastes for disposal.
For information on Samsung’s environmental commitments and product specic regulatory obligations
e.g. REACH visit:
samsung.com/uk/aboutsamsung/samsungelectronics/corporatecitizenship/data_corner.html

This Samsung product is warranted for the period of
twelve (12) months from the original date of purchase,
against defective materials and workmanship. In the
event that warranty service is required, you should return
the product to the retailer from whom it was purchased.
However, Samsung Authorised Dealers and Authorised
Service Centres in other EC Countries will comply with
the warranty on the terms issued to purchasers in the
country concerned. In case of difculty, details of our
Authorised Service Centres are available from:
Samsung Electronics U.K. Ltd
Samsung Customer Support Centre
Selectapost38,Shefeld,S973FJ
United Kingdom
United Kingdom
Tel : 0330 SAMSUNG (7267864)
www.samsung.com/uk/support
EIRE
Tel : 0818 717100
www.samsung.com/ie/support
@ WARRANTY CONDITIONS
1. The warranty is only valid if, when warranty
service is required, the warranty card is fully
and properly completed and is presented with
the original invoice or sales slip or conrmation,
and the serial number on the product has not
been defaced.
2. Samsung’s obligations are limited to the repair
or, at its discretion, replacement of the product
or the defective part.
3. Warranty repairs must be carried out by
Authorised Samsung Dealers or Authorised
Service Centres. No re-imbursement will be
made for repairs carried out by non Samsung
Dealers and, any such repair work and damage
to the products caused by such repair work will
not be covered by this warranty.
4. This product is not considered to be defective
in materials nor workmanship by reason that it
requires adaptation in order to conform to
national or local technical or safety standards
in force in any Country other than the one for
which the product was originally designed and
anufactured.
This warranty will not cover, and no
re-imbursement will be made for such adaptation
nor any damage which may result
.
5. This warranty covers none of the following:
a)
Periodic check ups, maintenance and repair or
replacement of parts due to normal wear and
tear.
b) Cost relating to transport, removal or
installation of the product.
c) Misuse, including the faiure to use this
product for its normal purposes or incorrect
installation.
d) Damage caused by Lightning, Water, Fire,
Acts of God, War, Public Disturbances,
incorrect mains voltage, improper
ventilation or any other cause beyond the
control of Samsung.
6. This warranty is valid for any person who
legally acquired possession of the product
during the warranty period.
7. The consumers statutory rights in any
applicable national legislation whether
against the retailer arising from the
purchase contract or otherwise are not
affected by this warranty. Unless there is
national legislation to the contrary, the
rights under this warranty are the
consumers sole rights and Samsung, its
subsidiaries and distributors shall not be
liable for indirect or consequential loss or
any damage to records, compact discs,
videos or audio taper or any other related
equipment or material.
SAMSUNG ELECTRONICS (U.K.) LTD.
UNITED KINGDOM
EIRE
This Samsung product is warranted for the period of twelve (12) months from the origi—
nal date of purchase, against defective materials and workmanship. In the event that
warranty service is required, you should return the product to the retailer from whom it
was purchased. However, Samsung Authorised Dealers and Authorised Service Centres
in other EC Countries will comply with the warranty on the terms issued to purchasers in
the country concerned. In case of difficulty, details of our Authorised Service Centres are
available from:
Samsung Electronics U.K. Ltd. Customer Care CentrePO Box 479
GATESHEAD NE9 9BJ United Kingdom
United Kingdom
Tel : 0330 SAMSUNG (7267864)
Fax: 03307260001
www.samsung.com
Eire
Tel : 0818 717100
Fax: +44 117 915 6736
www.samsung.com
■WARRANTY CONDITIONS
1.
The warranty is only valid if, when warranty service is required, the warranty card is fully
and properly completed and is presented with the original invoice or sales slip or confir—
mation, and the serial number on the product has not been defaced.
2.
Samsung’s obligations are limited to the repair or, at its discretion, replacement of
the product or the defective part.
3. Warranty repairs must be carried out by Authorised Samsung Dealers or
Authorised Service Centres. No re-imbursement will be made for repairs carried
out by non Samsung Dealers and, any such repair work and damage to the prod—
ucts caused by such repair work will not be covered by this warranty.
4.
This product is not considered to be defective in materials nor workmanship by
reason that it requires adaptation in order to conform to national or local technical
or safety standards in force in any Country other than the one for which the product
was originally designed and manufactured. This warranty will not cover, and no re-
imbursement will be made for such adaptation nor any damage which may result.
5. This warranty covers none of the following:
a) Periodic check ups, maintenance and repair or replacement of parts due to
normal wear and tear.
b)
Cost relating to transport, removal or installation of the product.
c)
Misuse, including the faiure to use this product for its normal
purposes or incorrect installation.
d)
Damage caused by Lightning, Water, Fire, Acts of God, War, Public
Disturbances, incorrect mains voltage, improper ventilation or any other cause
beyond the control of Samsung.
6. This warranty is valid for any person who legally acquired
possession of the product during the warranty period.
7.
The consumers statutory rights in any applicable national legislation
whether against
the retailer arising from the purchase contract or otherwise are not affected by this
warranty. Unless there is national legislation to the contrary, the rights under this
warranty are the
consumers sole rights and Samsung, its subsidiaries and distribu—
tors shall not be liable for indirect or consequential loss or any damage to records,
compact discs, videos or audio taper or any other related equipment or material
.
SAMSUNG ELECTRONICS (U.K.) LTD.
-2-
UNITED KINGDOM
EIRE
This Samsung product is warranted for the period of twelve (12) months from the origi—
nal date of purchase, against defective materials and workmanship. In the event that
warranty service is required, you should return the product to the retailer from whom it
was purchased. However, Samsung Authorised Dealers and Authorised Service Centres
in other EC Countries will comply with the warranty on the terms issued to purchasers in
the country concerned. In case of difficulty, details of our Authorised Service Centres are
available from:
Samsung Electronics U.K. Ltd. Customer Care CentrePO Box 479
GATESHEAD NE9 9BJ United Kingdom
United Kingdom
Tel : 0330 SAMSUNG (7267864)
Fax: 03307260001
www.samsung.com
Eire
Tel : 0818 717100
Fax: +44 117 915 6736
www.samsung.com
■WARRANTY CONDITIONS
1.
The warranty is only valid if, when warranty service is required, the warranty card is fully
and properly completed and is presented with the original invoice or sales slip or confir—
mation, and the serial number on the product has not been defaced.
2.
Samsung’s obligations are limited to the repair or, at its discretion, replacement of
the product or the defective part.
3. Warranty repairs must be carried out by Authorised Samsung Dealers or
Authorised Service Centres. No re-imbursement will be made for repairs carried
out by non Samsung Dealers and, any such repair work and damage to the prod—
ucts caused by such repair work will not be covered by this warranty.
4.
This product is not considered to be defective in materials nor workmanship by
reason that it requires adaptation in order to conform to national or local technical
or safety standards in force in any Country other than the one for which the product
was originally designed and manufactured. This warranty will not cover, and no re-
imbursement will be made for such adaptation nor any damage which may result.
5. This warranty covers none of the following:
a) Periodic check ups, maintenance and repair or replacement of parts due to
normal wear and tear.
b)
Cost relating to transport, removal or installation of the product.
c)
Misuse, including the faiure to use this product for its normal
purposes or incorrect installation.
d)
Damage caused by Lightning, Water, Fire, Acts of God, War, Public
Disturbances, incorrect mains voltage, improper ventilation or any other cause
beyond the control of Samsung.
6. This warranty is valid for any person who legally acquired
possession of the product during the warranty period.
7.
The consumers statutory rights in any applicable national legislation
whether against
the retailer arising from the purchase contract or otherwise are not affected by this
warranty. Unless there is national legislation to the contrary, the rights under this
warranty are the
consumers sole rights and Samsung, its subsidiaries and distribu—
tors shall not be liable for indirect or consequential loss or any damage to records,
compact discs, videos or audio taper or any other related equipment or material
.
SAMSUNG ELECTRONICS (U.K.) LTD.
© 2017 Samsung Electronics Co., Ltd. All rights reserved.
Contact SAMSUNG WORLD WIDE
If you have any questions or comments relating to Samsung products, please contact the SAMSUNG customer
care Centre.
AH68-02997B-03 AH68-02997B-03
Country Contact Centre
Web Site
`
Europe
U.K 0330 SAMSUNG (7267864) www.samsung.com/uk/
support
IRELAND (EIRE) 0818 717100 www.samsung.com/ie/
support
GERMANY 06196 9340275 www.samsung.com/de/
support
FRANCE 01 48 63 00 00 www.samsung.com/fr/
support
ITALIA 800-SAMSUNG (800.7267864) www.samsung.com/it/
support
SPAIN 34902172678 www.samsung.com/es/
support
PORTUGAL 808 20 7267 www.samsung.com/pt/
support
LUXEMBURG 261 03 710 www.samsung.com/
be_fr/support
NETHERLANDS 088-9090100 (lokaal tarief) www.samsung.com/nl/
support
BELGIUM 02-201-24-18
www.samsung.com/be/
support (Dutch)
www.samsung.com/
be_fr/support (French)
NORWAY 815 56480 www.samsung.com/no/
support
DENMARK 70 70 19 70 www.samsung.com/dk/
support
FINLAND 030—6227 515 www.samsung.com//
support
SWEDEN 0771 726 786 www.samsung.com/se/
support
POLAND
801-172-678* lub +48 22 607-93-33 *
* (koszt połączenia według taryfy
operatora)
www.samsung.com/pl/
support
HUNGARY 0680SAMSUNG (0680—726-786)
0680PREMIUM (0680—773-648)
www.samsung.com/hu/
support
Country Contact Centre
Web Site
AUSTRIA
0800-SAMSUNG (0800-7267864)
[Only for Premium HA] 0800-366661
[Only for Dealers] 0810-112233
www.samsung.com/at/
support
SWITZERLAND 0800 726 78 64 (0800-SAMSUNG)
www.samsung.com/ch/
support (German)
www.samsung.com/
ch_fr/support (French)
CZECH 800 — SAMSUNG (800-726786) www.samsung.com/cz/
support
SLOVAKIA 0800 — SAMSUNG (0800-726 786) www.samsung.com/sk/
support
CROATIA 072 726 786 www.samsung.com/hr/
support
BOSNIA 055 233 999 www.samsung.com/
support
MONTENEGRO 020 405 888 www.samsung.com/
support
SLOVENIA 080 697 267 (brezplačna številka) www.samsung.com/si
SERBIA 011 321 6899 www.samsung.com/rs/
support
BULGARIA
*3000 Цена в мрежата
0800 111 31 , Безплатна телефонна
линия
www.samsung.com/bg/
support
ROMANIA
*8000 (apel in retea)
08008-726-78-64 (08008-SAMSUNG)
Apel GRATUIT
www.samsung.com/ro/
support
CYPRUS 8009 4000 only from landline, toll free
www.samsung.com/gr/
support
GREECE
80111-SAMSUNG (80111 726 7864) only
from land line (+30) 210 6897691 from
mobile and land line
LITHUANIA 8-800-77777 www.samsung.com/lt/
support
LATVIA 8000-7267 www.samsung.com/lv/
support
ESTONIA 800-7267 www.samsung.com/ee/
support
Samsung HW-MS550 Soundbar Specification
The Samsung HW-MS550 Soundbar is engineered to deliver an enhanced audio experience with its robust features and elegant design. It features a 2.0 channel configuration, incorporating six built-in speakers that provide a wide range of sound with precise clarity. The soundbar is equipped with Samsung’s Distortion Cancelling technology, which predicts and eliminates distortion before it occurs, ensuring pure sound quality at all volume levels. It supports various audio formats including AAC, MP3, WAV, and FLAC, accommodating a diverse range of media preferences.
The HW-MS550 integrates seamlessly with Samsung’s OneRemote, allowing users to control both the TV and soundbar with a single remote for convenience. Its design is complemented by a sleek, minimalist aesthetic that fits effortlessly into any home entertainment setup. Connectivity options include Bluetooth and Wi-Fi, enabling wireless streaming from compatible devices and easy integration into a smart home ecosystem. Additionally, the soundbar supports Samsung’s Multiroom App, allowing for personalized sound settings and the ability to create a multi-room audio setup.
The soundbar is designed with a focus on simplicity and ease of use, incorporating a user-friendly interface and straightforward installation process. It can be mounted on a wall or placed on a TV stand, enhancing its versatility. Despite its compact form factor, the HW-MS550 delivers powerful sound performance, making it an ideal choice for users seeking a balance between quality, aesthetics, and functionality. As part of Samsung’s lineup, it reflects the brand’s commitment to innovation and superior sound technology.
Samsung HW-MS550 Soundbar F.A.Q.
To connect your Samsung HW-MS550 Soundbar to your TV using HDMI, use an HDMI cable to connect the HDMI OUT (TV-ARC) port on the soundbar to the HDMI ARC port on your TV. Make sure to enable HDMI-CEC settings on your TV to control the soundbar with your TV remote.
Check if the soundbar is properly connected to the TV or audio source. Ensure that the soundbar is set to the correct input source. Also, make sure that the volume is turned up and the soundbar is not on mute. If the issue persists, try a factory reset.
To pair your soundbar with a Bluetooth device, press the ‘Source’ button on the soundbar or remote until ‘BT’ appears on the display. Then, press and hold the ‘Source’ button until ‘BT PAIRING’ shows. On your Bluetooth device, search for and select ‘Samsung Soundbar MS550’.
To clean your soundbar, use a soft, dry cloth to wipe the exterior. Avoid using any liquids or cleaning sprays. Regularly check and clean the vents to prevent dust buildup, which can affect performance.
To perform a factory reset, press and hold the ‘Volume’ button on the top panel of the soundbar until ‘INIT’ appears on the display. This will reset the soundbar to its default settings.
Yes, you can control the Samsung HW-MS550 Soundbar with a universal remote. Ensure that the remote is compatible and follow the manufacturer’s instructions to program the soundbar’s functions into the remote.
To enhance the bass output, ensure that the soundbar’s firmware is updated. Use the remote to adjust the bass level by pressing the ‘Sound’ button and selecting ‘Bass’. Additionally, consider the placement of the soundbar in the room to optimize bass response.
The Samsung HW-MS550 Soundbar supports a range of audio formats including Dolby Digital 5.1, DTS 2.0, MP3, WMA, AAC, WAV, OGG, and FLAC.
To update the firmware, download the latest firmware from the Samsung website onto a USB drive. Insert the USB drive into the USB port on the soundbar and follow the on-screen instructions to complete the update.
Yes, you can add a wireless subwoofer to enhance the audio experience. Ensure the subwoofer is compatible with the soundbar model and follow the pairing instructions to connect it wirelessly.
Русский
- Bedienungsanleitung Samsung HW-MS550
- Samsung HW-MS550 User Manual
- Manual Usuario Samsung HW-MS550
- Mode d’emploi Samsung HW-MS550
- Istruzioni Samsung HW-MS550
- инструкция Samsung HW-MS550
- Samsung HW-MS550の取扱説明書
- Handleiding Samsung HW-MS550
- Manual de uso Samsung HW-MS550
Вам нужна инструкция? Мы поможем Вам ее найти и сэкономить Ваше время.
- 150 stron
- 24.99 mb
Изделие Samsung HW-MS550, а также другие, которыми Вы пользуетесь ежедневно, наверняка вы получили в комплекте с инструкцией обслуживания. Из опыта наших пользователей мы знаем, что большинство из Вас не уделили этому особого внимания. Большая часть инструкций, сразу же после покупки попадает в корзину для мусора вместе с коробкой — это ошибка. Ознакомьтесь с информацией, касающейся инструкции Samsung HW-MS550, которая поможет Вам в будущем сэкономить нервы и избежать головной боли.
Важная подсказка — не забывайте хотя бы раз прочитать инструкцию Samsung HW-MS550
Если вы не хотите каждый раз читать информационные брошюры, касающиеся, тех или Samsung HW-MS550 иных изделий, достаточно, прочитать их раз — сразу же после покупки устройства. Вы получите основное знания, касающиеся поддержания изделия Samsung HW-MS550 в хорошем эксплуатационном состоянии, так, чтобы без проблем достигнуть его планируемого цикла работы. Затем инструкцию можно отложить на полку и вернуться к ней только в случае, если вы не уверены, правильно ли проводится техобслуживание изделия. Правильный уход является необходимым элементом Вашего удовольствия Samsung HW-MS550.
Раз в году пересмотрите шкафчик, в котором держите инструкции для всех устройств, — выбросите те, которыми вы уже не пользуетесься. Это поможет Вам сохранять порядок в своей домашней базе инструкций обслуживания.
Summary of Contents for Samsung HW-MS550
Что находится в инструкции Samsung HW-MS550? Почему стоит ее прочитать?
- Гарантия и подробности, касающиеся техобслуживания изделия
Хорошей идеей будет прикрепить чек к странице инструкции. Если что-то плохое случится во время использования Samsung HW-MS550, у вас будет комплект документов, необходимый для гарантийного ремонта. В этой части инструкции вы найдете информацию об авторизованных сервисных центрахSamsung HW-MS550 а также, как самостоятельно правильно ухаживать за оборудованием — так, чтобы не потерять гарантийных прав. - Указания по монтажу и Setup
Не терять нервов и времени на самостоятельную попытку установки и первого запуска изделия. Воспользуйтесь рекомендациями производителя Samsung HW-MS550 чтобы правильно запустить изделие, без лишнего риска повреждения оборудования. - Информация, касающаяся дополнительных запчастей (входящих в комплект а также являющихся опцией)
Пересматривая эту часть документа вы сможете проверить, доставлен ли ваш Samsung HW-MS550 с полним комплектом аксессуаров. Вы также сможете узнать, какие дополнительные запчасти или аксессуары для Samsung HW-MS550 Вы сможете найти и докупить к своему устройству. - Troubleshooting
Самые частые проблемы, касающиеся Samsung HW-MS550 и методы их решения. Это очень полезная часть руководства по обслуживанию — она позволит Вам сэкономить много времени на поиск решений. 90% проблем с Samsung HW-MS550 повторяется у многих пользователей. - Требования, касающиеся питания и энергетический класс
Информация, касающаяся количества потребляемой энергии, а также рекомендации, касающиеся установки и питания Samsung HW-MS550. Прочитайте, чтобы оптимально пользоваться Samsung HW-MS550 и не использовать большего количества ресурсов, нежели это необходимо для правильной работы изделия. - Специальные функции Samsung HW-MS550
Здесь вы можешь узнать, как персонализировать изделие Samsung HW-MS550. Вы узнаете, какие дополнительные функции могут помочь Вам удобно использовать продукт Samsung HW-MS550 а также, какие функции Вашего устройства оптимальны для выполнения конкретной деятельности.
Как видите в инструкции вы найдете информацию, которая реально поможет Вам в использовании Вашего изделия. Стоит с ней ознакомиться, чтобы избежать разочарований, возникающих из более короткого, нежели предусматривалось, периода исправности изделия Samsung HW-MS550. Если все же вы не хотите копить инструкции в своем доме, наш сайт поможет Вам в этом — вы должны найти у нас руководство по обслуживанию большинства из своих устройств, а также Samsung HW-MS550.