
SEWING MACHINE
INSTRUCTION MANUAL
ШВЕЙНАЯ МАШИНКА
ИНСТРУКЦИЯ ПО
ЭКСПЛУАТАЦИИ
FA-5700-2
ENGLISH ……………… PAGE 2
РУССКИЙ ……………… СТР. 8
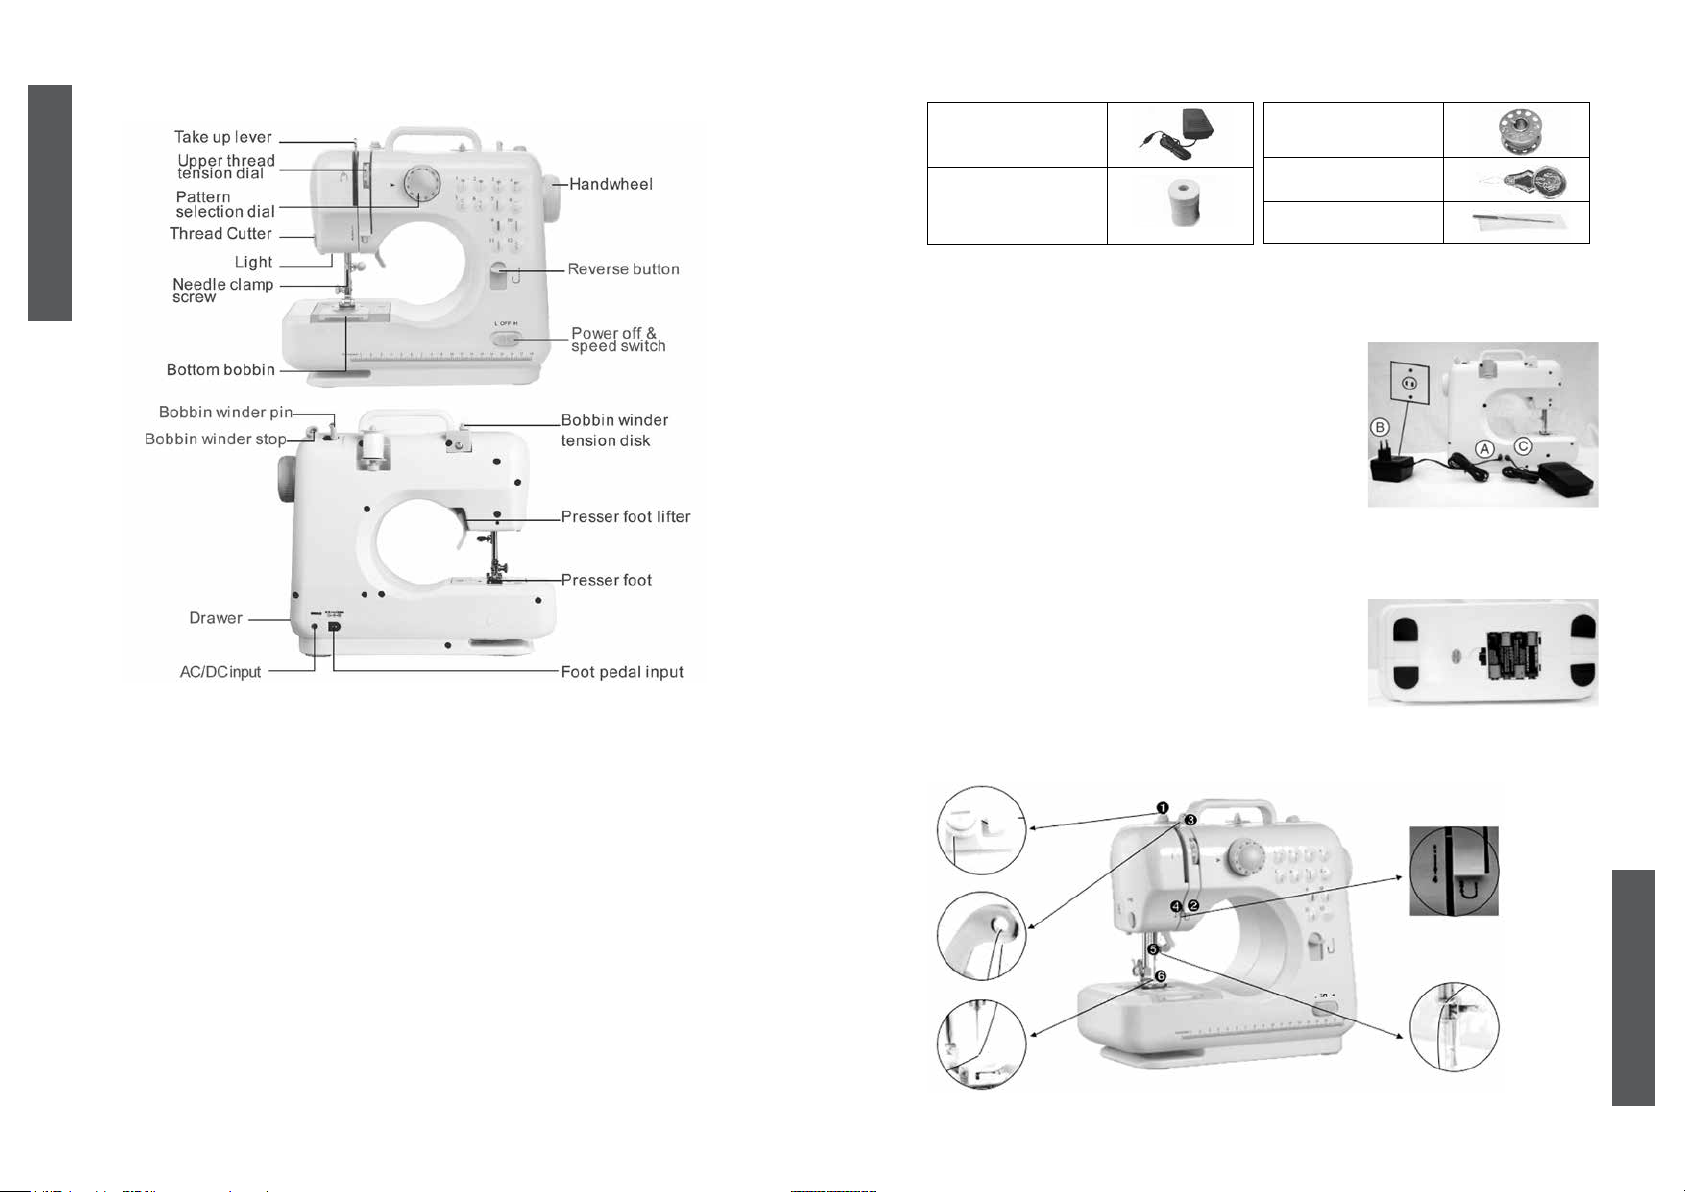
NAME OF PARTS
FRONT VIEW & BACK VIEW
Accessories
Foot controller X1
Bobbin X2
ENGLISH
• Please read the Instruction Manual carefully before operating the sewing machine.
• Please save this manual in a safe place.
• The Machine is for Household Use only.
Please read all instructions before using this appliance and keep the instructions for future
reference
Thread spool X2
Needle threader X1
Needle X1
CONNECTING THE SEWING MACHINE TO THE MAINS POWER SUPPLY
1. Make sure the „powerOFF I L & H speed switch“ is at the „OFF“ position.
2. Connect the jack Position A to the DC input socket on the back of the sewing machine, and
connect the three-pin plug Position B into the Main power supply.
3. Connect the foot pedal Position C to the sewing machine
by inserting the jack into the foot pedal, input socket on the
back of the sewing machine.
4. You can either use the foot pedal (Please keep the power/
speed switch at the off position) or the power/speed switch
(H stand for high sewing speed whilst the L stand for low
sewing speed) to operate the sewing machine.
CAUTION:
Whenever the sewing machine is not in use, make sure it is
switched off and unplugged from the Main power supply.
INSTALLING THE BATTERIES
1. Make sure the „powerOFF I L & H speed switch“ is in the „OFF“ position.
2. Turn the sewing machine over on a at surface and remove the battery compartment cover.
3. Insert 4xAA batteries into the compartment and replace the battery cover.
CAUTION:
To prevent accidental start up of the sewing machine,always
make sure that the „powerOFF I L & H speed switch“ is in the
„OFF „ position when inserting, or changing the batteries.
THREADING THE SEWING MACHINE
Threading upper thread
Caution: When threading the sewing machine make sure that the“power OFF I L & H speed switch, is
in the OFF position and follow the steps 1-6 below.
Turn hand wheel counter clockwise until the needle is in the highest position.
IMPORTANT SAFETY INSTRUCTIONS:
This sewing machine is for domestic use only.
Do not use outdoors.
Powered by an DC/AC Adapter.
The sewing machine must be switched off with the adapter unplugged when:
• Threading the needle
• Changing the needle
• Changing bottom bobbin
• Changing parts
• Cleaning the machine
• After each use
CAUTIONS
• Never leave the sewing machine unattended in the presence of children.
• When operating the sewing machine, keep your hands away from the needle, hand wheel, upper
thread tension dial and pattern selection dial.
• To clean the sewing machine, simply wipe it with a soft cloth and never use any harsh chemical
solutions.
2 3
ENGLISH
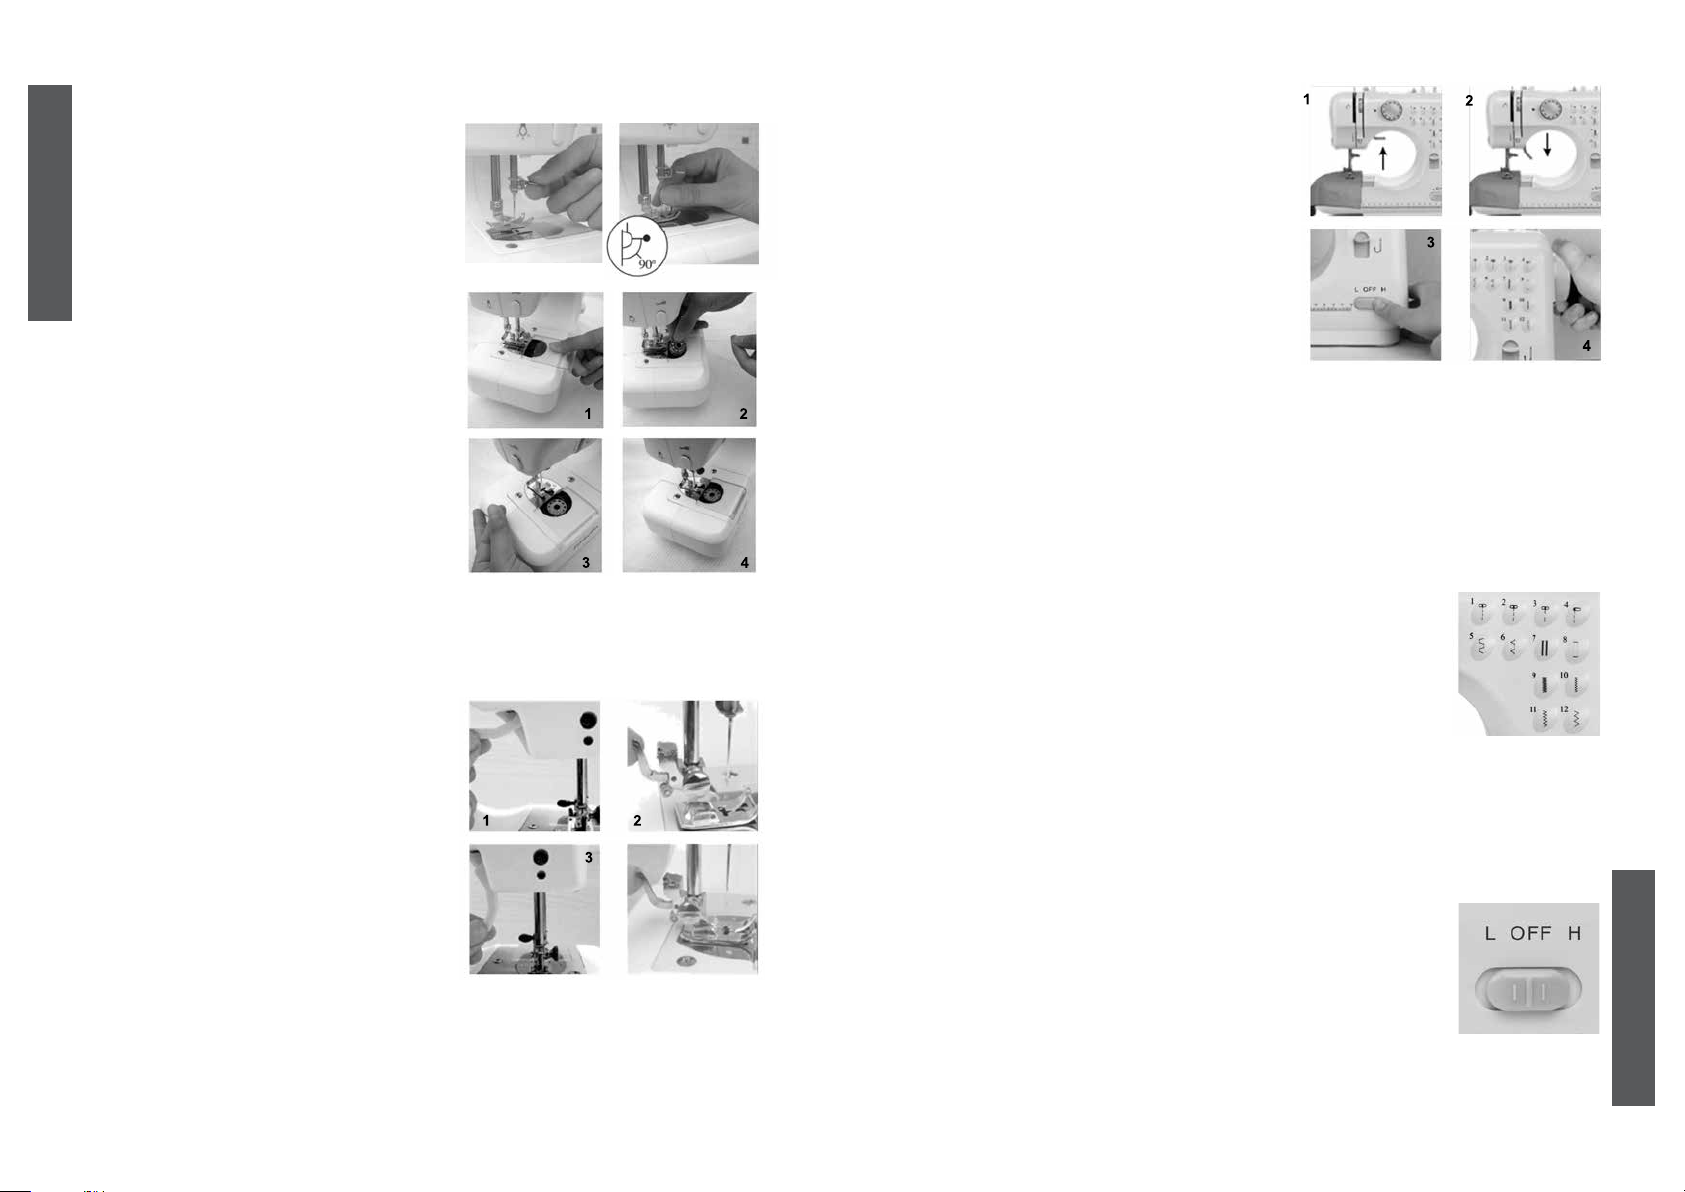
NEEDLE REPLACEMENT
CAUTION: Remove the batteries and/or disconnect the AC/DC adapter before starting to
replace the needle.
1. Turn the hand wheel to raise the needle to its
highest position.
2. Hold the old needles and loosen the needle
clamp screw. Remove the old needle and discard
responsibly.
3. Insert the new needle into the clamp with the at
side toward the right. Be sure to push the needle
clamp before tightening the needle clamp screw.
4. Tighten the needle clamp screw.
ENGLISH
REPLACING THE BOBBIN
1. Turn the hand wheel counter clockwise until the
needle is in the highest position. Raise presser foot
lifter.
2. Slide the bobbin cover button to the right and
remove the bobbin cover (Fig. 1 ).
3. Put the new bobbin in the holder, with the thread
going clockwise. Leave 10 cm of thread hanging out
(Fig. 2)
4. Hold the end of the upper thread with one hand,
and turn the hand wheel counterclockwise with the
other hand, the needle thread will pick up the bobbin
thread and pull it up through the hole under the
needle (Fig. 3).
5. Replace the bobbin cover and separate the two
threads and pull them to the back of the machine
under the presser foot, leaving about 15cm hanging there (Fig. 4).
CAUTION:
1. Always switch off the appliance, disconnect from the power supply and remove foot pedal when
replacing bottom bobbin.
2. Please use metal bobbins, otherwise the magnetic holder cannot tense the bobbin thread and
work rightly.
PRESSER FOOT REPLACEMENT
1. Removing the Presser Foot:
Turn the hand wheel counterclockwise to raise the
needle to its highest position (Fig. 1). Raise the presser
foot lifter, and press the presser foot locking lever. The
presser foot will drop off automatically from the locking
device. (Fig. 2).
2. Installing the Presser Foot:
Put the presser foot under the presser foot locking
device, lower the presser foot lifter (Fig.3), press the
presser foot locking device to reset the foot, and lift the
presser foot lifter.( (Fig. 4).
Cautions:
1. Please always switch Power off, disconnecting the
machine from the Power Adaptor and, remove the
foot pedal before replacing the Presser Foot.
2. When replace the presser foot, please place the machine on a stable platform.
3. When you put down the presser, please keep your hand or ngers away from the bottom side of
the Presser Foot to avoid injuring your ngers.
SEWING
1. Turn. the hand wheel on the side of the sewing
machine anticlockwise to raise the needle to its
highest position. Lift the presser foot and place the
fabric you wish to sew under the presser foot
(Fig. 1).
2. Lower the presser foot (Fig. 2).
3. The sewing machine can be operated in two ways:
with the foot controller or with the „power OFF I L
& H speed switch“. To operate the sewing machine
with the foot controller simply press your foot
down on the pedal and to stop sewing at any time
simply by releasing your foot from the controller.
Alternatively, when you are ready to start sewing
slide the „power OFF I L & H speed switch“ left to
the low (L) position and the sewing machine will
automatically start sewing slide switch, right to the
high position (H). In order to stop sewing slide the „power OFF I L & H speed switch“ to the „OFF“
position (Fig. 3).
4. Turn the hand wheel on the side of the sewing machine anticlockwise to raise the needle to the
highest position. Lift the presser foot and pull out the thread tension release bar, then gently
remove the fabric away from the sewing machine (Fig. 4).
5. Cut the thread using the thread cutter.
WARNING: When the sewing machine is in use do not touch the pattern selection dial..
Note: Thickness of cloth sewed by this model: ≥0.3мм.
Best to use the machine to sew double layers of cloth, thus every stitch is available. Best to use
No.6, No.7, No.8 stitch to sew soft cloth (thickness ≥ 0.3mm) or silk instead of other stitch patterns.
12 STITCH PATTERNS
1. The sewing machine has a choice of 12 different stitch PATTERNS. To
select the stitch you require, look at the diagrams numbered 1-12 on the
front of the sewing machine, choose the corresponding number on the
dial which is lined up with the arrow. For example, to select zigzag stitch
(diagram number 6), simply turn the selector dial until the number 6 on the
dial is lined up with the arrow.
2. When you wish to change a stitch pattern turn the hand wheel on the side
of the sewing machine to raise the needle to the highest point and set the
pattern selection dial to the desired stitch type in the same way as above.
REVERSE STITCH BUTTON
Reverse sewing (back stitching) is useful for reinforcing the beginning and end of seams. To use this
function proceed as follows:
1. Sew forwards as normal, and then press and hold down the reverse stitch button on the front of
the sewing machine to sew backwards.
2. To sew forwards again simply release the reverse stitch button.
SETTING THE SEWING SPEED
This sewing machine has two sewing speeds. Push the ‚OFF‘ button,into the
right,to the ‚H‘position and the sewing speed will be increased, while in the ‚L‘
position will reduce the speed.
4 5
ENGLISH
TZS First AUSTRIA FA-5700-1 user guide recommended for: SWF G Series, Apprentice Plus, 827-M, 7535, FA-5700.
The TZS First AUSTRIA FA-5700-1 Sewing Machine manual (TZS First AUSTRIA Instruction manual, 6 pages) is completely safe to download (last scan date: 08/12/2024). You can rest assured of your safety when interacting with TZS First AUSTRIA FA-5700-1 document.
2
EZ1-U2-3DLCD
115
707
177
3
Magic 8134
Instruction book User Manual: Singer Magic 8134 (9I8USY, Upd.Tue 02.2025)
76
400
60
7
SPS/E-1306 Series
54
692
160
8
A4
Manual PDF User Guide (@Q6154U), Jack A4 Sewing Machine (Sat 11.2024)
33
799
184
- June 4, 2024
- FIRST AUSTRIA
Table of Contents
- FIRST AUSTRIA FA-5700 Sewing Machine
- INTRODUCTION PARTS & ACCESSORIES
- THREADING MAIN UNIT USING THREAD SPINDLE
- BOTTOM BOBBIN PLACEMENT
- OPERATING THE MACHINE (WITHOUT THE FOOT PEDAL)
- SAFETY INFORMATION
- Read User Manual Online (PDF format)
- Download This Manual (PDF format)
FIRST AUSTRIA FA-5700 Sewing Machine

INTRODUCTION PARTS & ACCESSORIES

MAIN UNIT

(Please read the manual carefully before using the unit)
GETTING STARTED
(please refer to illustrations for the locations and configuration of
components)
AFTER REMOVING THE MACHINE FROM THE PACKING BOX
- Make certain the On/Off switch (A) Is In the Off position before Inserting batteries.
- Put 4 AA batteries Into the battery compartment (B) on the underside of the machine.
- Push switch (A) to turn it on or off. In the „On“ position switch is flush with the machine. In „Off“the position switch is extended out. The machine will start sewing immediately. Be sure the machine is properly threaded and the fabric is positioned for sewing Before you turn on the machine.
THREADING MAIN UNIT USING THREAD SPINDLE
- Raise thread spindle (C) by grasping the exposed top and pulling upward until thread spindle (C) is fully extended.
- Place thread spool (E) on the threaded spindle (C) as shown.
- Pull the thread from the thread spool (E) on the threaded spindle (C) and put it through the first thread guide (1) in the direction toward the front of the machine.
- Bring the thread across to the second thread guide (2). The thread goes over the tension-adjusting screw (Q) and must be positioned between the two washers behind the tension-adjusting screw (Q). This is what provides the lock stick tension to the thread.
- Pull the thread from the tension adjusting screw (Q) guide through thread guide (3) in the direction toward the front of the machine.
- Pull the thread through thread guide (4) on the take-up lever (D) inserting it in the direction toward the front of the machine.
- Pull the thread down to thread guide (5) and insert the thread from the top downward.
- Pull the thread down through the thread guide (6). If necessary, lower the needle (R) to reach this thread guide by turning the handwheel (K) slightly counter-clockwise (in the direction toward you) to lower the needle (R).
- Insert thread through the eye (7) of the needle from the front toward the back of the machine.(Use threader if necessary). If necessary, raise the needle (R) to reach the eye by turning the handwheel (K) slightly clockwise (In the direction away from you).
- Raise the Presser Foot (F) by lifting up on the lever at the rear of the machine (G).
- Pull about 10 inches of thread through the needle (R) and lay it on the deck under the presser foot (F) running in the direction away from you.
BOTTOM BOBBIN PLACEMENT
- Remove the cover by lifting up where it has popped up at the rear.
- Place the bobbin with a thread of your choice in the bobbin holder (J). Leaving about 10 inches of thread extended out from the bobbin holder (J).
- Place the bobbin with a thread of your choice in the bobbin holder (J). Leaving about 5 inches of thread and put into the gap (H).
- Turn the hand wheel (K) counterclockwise (toward you). Needle (R) will go down, picking up the bobbin thread. Turn the handwheel (K) until needle (R) has descended completely and then come up again to its highest raised point. Stop when needle (R) starts to go down again.
- Raise the presser foot (F) and bring the spool thread around to the front. Pull it gently up and you will see it has caught the bobbin thread. Pull the two threads toward the rear (away from you) and lay them under the presser foot (F)
- Snap the bobbin compartment (I) cover down and into place.
Note:
It is essential that the threading of both the top and bottom is done
properly. Check carefully, and do one practice stitch before beginning to sew.
Improper threading will damage the lockstitch.
The machine may have come pre-threaded from the factory. Look at this
threading carefully before removing it to replace the thread or bobbin with a
different thread. Then follow the preceding instructions to rethread.
THREADING MAIN UNIT USING SIDE BOBBIN:
(Follow steps 4-11 on the previous page with these exceptions).
- Pull the bobbin spindle (U) out from the main unit.
- Insert the bobbin spindle (U) through the center hole of the threaded bobbin.
- Insert bobbin spindle (U) (with bobbin attached) into bobbin holder (V). Make sure the bobbin spindle (U) with the bobbin is tightly secured to the main unit.
Note:
Thread the main unit with the side bobbin simultaneously with the thread spool
for a double stitch method. Side bobbin is to be used only if you’re using
this particular method of stitching.
OPERATING THE MACHINE (WITHOUT THE FOOT PEDAL)
Follow these simple steps
- Lift the needle (R) above the presser foot (F) by turning the handwheel (K) slightly in a clockwise direction (away from you)
- Raise the presser foot (F) by lifting up on the lever on the rear at the machine above the presser foot bor.
- Position fabric to be sewn under the presser foot (F) with the presser foot (F) in raised position Make certain seam direction is toward you. aligned with the presser foot (F), with a seam located directly under the needle (R).
- Lower the presser foot (F) by releasing the presser foot lever (G) downward.
- Rotate the handwheel (K) in a clockwise direction two full turns to lock and start seam stop.
- Select speed by pressing the speed button (L) on the face of the machine. At high speed, the button is extended out. Low speed, the button is in, flush with the machine. Use low speed for intricate work which requires a lot of stopping, starting, and turning fabric. Use high speed for long uninterrupted seams.
- Turn power switch (A) to the “ON“ position
- Gently guide the fabric to keep the seam straight by pressing it lightly down with your fingertips on both sides as it feeds through the presser foot (F).
- When the seam is finished. turn switch (A) of.
- Raise the needle (R) above the fabric by turning the handwheel (K) slightly in a clockwise direction.
- Raise the presser foot (F) by lifting the presser foot lever (G).
- Pull fabric toward you leaving about 5-10 inches of thread between the fabric and the machine.
- Cut the thread close to the fabric. leaving excess thread loosely lying on the sewing deck in the direction of the presser foot (F) and toward you.
- Begin the next seam in the same manner as above by following each of the operating steps.
TO USE THE FOOT PEDAL
(Follow steps 1-14 on the previous page with these exceptions)
- Make certain the machine is in the “OFF“position.
- Plug the foot pedal jack (M) into the back of the machine.
- Turn the machine on by pressing the foot pedal.
- Press gently on the foot pedal to run the machine. Let up to stop. When you are finished sewing a seam, ease your foot up and off of the foot pedal .
Note: The „on-off“switch on the machine should be in the “OFF“ position
when using the foot pedal.
ADJUSTING TENSION
- You should not adjust the tension. Tension for maximum performance has been set and adjusted at the factory. However, if you should find that stitches are too loose or too tight, you can adjust the stitch.
- Loosen stitch by turning the tension screw (N) anti-clockwise.
- Tighten the stitch by turning the tension screw (N) clockwise. Sewing heavier fabric may require loosening the stitch. Very light fabric may require tightening the stitch. Bobbin tension cannot be adjusted.
CHANGING THE NEEDLE
- Turn the handwheel (K) clockwise to raise the needle (R) to its highest position.
- Loosen the needle clamp screw (0) by turning it counterclockwise (toward you). You may need to use a short-slotted screwdriver or small players.
- Remove the needle (R), pulling it down, away from the needle clamp (P)
- Place the new needle with the flat side facing in against the needle clamp (P)
- Push it gently as far up as it will go, and against the needle clamp (P)
- Tighten the needle clamp screw (O) while holding the needle (R) in place.
Note: Needles come in various sizes designated by numbers. They designate
the left of the needle. The smaller the number, the thinner the needle. Use
smaller needles for more delicate fabrics and larger needles for heavier
fabrics.
WINDING THE BOBBIN
You can wind your own bobbins with thread from spools you purchase separately
to have a virtually unlimited thread color selection. Match your fabrics or
contrast them with the thread shades of your choice.
- Always remove the bobbin (S) from the bobbin case on the machine before you wind a new bobbin
- Place the thread spool (E) on the threaded spindle (C).
- Put the bobbin pin into the hole on the hand wheel and turn it slightly counterclockwise.
- Take an empty bobbin in one hand. Pull the thread down from the thread spool (E) and thread the loose end through the small hole on the bobbin rim from the inside.
- Leaving the loose end on the outside of the bobbin, wind the thread several turn around the INSIDE of the bobbin
- Place the bobbin on the bobbin pin, making certain that the thread Is winding onto the bobbin in a counter-clockwise direction. (This would mean the thread should be winding under the bobbin, not over it).
- Hold the thread lightly guiding it gently through your thumb and index finger.
- When the bobbin is full, switch off the machine. Insert the bobbin into the bobbin case using the instructions for threading the machine.
SEWING SLEEVES
- The machine is designed to allow you to sew sleeves easier. First, lift up the presser foot (F) and position the sleeve under the needle. Put the bobbin part of the sleeve in the gap between the platform and the base.
- Lower the presser foot and follow steps 5- 13 in the section on operating the machine on the previous page Now you can sew the sleeves easily.
SAFETY INFORMATION
- Always disconnect or remove the power supply including batteries when changing needles or threading machines.
- Never open the main motor case of the machine, The mechanism has been factory adjusted.
- Always check the threading of the Rock stitch before beginning to sew a seam. Improper threading or placement of the bobbin in this case will resuIt in damage to the machine
- Do not pull on fabric as you sew. Gently guide only. Pulling could break the needle and result in damage to the machine.
- Remove batteries when the machine is not in use for long periods, This saves battery life and protects the machine Keep extra batteries on hand so projects will not be interrupted when batteries need to be replaced.
- KEEP AWAY FROM CHILDREN: This sewing machine is not a toy and is not meant to be used by or near children.
- A sewing machine is an electrical appliance when used with an adaptor. Do not submerge the unit or any other parts in water. Do not operate the sewing machine with wet hands, without shoes, or while standing in water or on a wet surface when using the adaptor.
- Do not touch the needles before you turn off the power.
- Never use a damaged power cord or plug.
- Keep the power cord away from heated surfaces.
- Do not close door on the cord or pull around sharp edges. this could cause the cord to become punctured or damaged and could result in injury.
- Do not unplug by pulling or tugging the cord. Grasp the plug with dry hands to remove the plug from the outlet.
- Do not sew clothing while it is on your body.
- Use only the power adaptor recommended by the manufacturer, any ether adaptor may cause injury or damage to the machine
- Never leave the sewing machine unattended while plugged in. Turn the switch off and unplug the cord when not in use.
Read User Manual Online (PDF format)
Read User Manual Online (PDF format) >>
Download This Manual (PDF format)
Download this manual >>
|
Код: 106167 Извините, товара сейчас нет в наличии
Бесплатная доставка Извините, товара сейчас нет в наличии Сравнить Новости интернет-магазина «Лаукар»:23.04.2025 26.02.2025 17.02.2025 Дополнительная информация в категории Швейная машина:Швейные машины — словарь терминов Таблица Авторизованных сервисных центров по брендам. Описание Инструкция Отзывы (0) В интернет-магазине бытовой техники «Лаукар» Вы можете скачать инструкцию к товару Швейная машина First FA-5700-2 Purple совершенно бесплатно. Все инструкции, представленные на сайте интернет-магазина бытовой техники «Лаукар», предоставляются производителем товара. Для того чтобы скачать инструкцию, Вам необходимо нажать на ссылку «скачать инструкцию», расположенную ниже, а в случае, если ссылки нет, Скачать инструкцию Смотреть инструкцию 
Фирма-производитель оставляет за собой право на внесение изменений в конструкцию, дизайн и комплектацию товара: Швейная машина First FA-5700-2 Purple. Пожалуйста, сверяйте информацию о товаре с информацией на |
Представленные на нашем сайте руководства по эксплуатации швейных машин компании FIRST помогут Вам разобраться со всеми тонкостями настройки устройств.
Бумажное руководство, даже если имеется, не всегда удобно в использовании, поэтому мы собрали некоторое количество инструкций на нашем сайте. Вы можете абсолютно бесплатно скачать любую из инструкций в формате pdf или воспользоваться просмотром в браузере.
Инструкции по моделям
Вернуться
FIRST