
Pfaff
Loading…
P
- Punching Machine Hobby 350p
Q
- quilt ambition 2.0
- quilt ambition 6303
- QUILT EXPRESSION
- quilt expression 20482
- QUILT EXPRESSION 4
- QUILT EXPRESSION 4.07
- quilt expression 4.2
- quilt expression 720
- Quilt Expressions 4.02
S
- select 1502
- select 15202
- Select 1528
- select 15302
- Select 1538
- select 15402
- Select 1548
- select 2.02
- select 3.02
- Select 3.2
- Select 4.03
- select 8.0
- select line2
- SELECTLINE 15282
- SELECTLINE 15382
- selectline 1548
- SELECT LINE 2.0
- SELECT LINE 3.0
- SELECT LINE 4.0
- SELECT LINE 4.2
- selectline series
- SEQUENCING2
- Series 1180
- Series 3701
- Series 5480
- Series 580
- Sewing Machine4
- SHE 150
- SHE 150.1
- SHE 15.1
- SHE 20.1
- SHE 25
- SHE 3.1
- SHE 35
- SHE 35.1
- SHE 50.1
- SHE 5.1
- SMART 100S3
- SMART 200C3
- SMART 300E
- SMARTER
- SMARTER 130S
- Smarter 140s2
- Smarter 160s2
- SMARTER 260C2
- SMARTERÂ 140S MECANIQUE
- SMARTERÂ 160S MECANIQUE
- STITCH CREATOR2
- STITCHLINK II
- SURJETEUSE 1230 OL
- SW W-SGG
- synchromatic 1209
- Synchromatic 1215
- synchromatic 1217
- synchrotronic 1229
- SZA-645F
T
- Tipmatic 1011
- tipmatic 1014
- Tipmatic 1015
- tipmatic 10192
- TIPMATIC 1025
- Tipmatic 1035
- Tipmatic 1037
- tipmatic 1045
- tipmatic 1115
- tipmatic 1119
- tipmatic 1147
- tipmatic 1151
- Tipmatic 61102
- tipmatic 6112
- Tipmatic 61202
- tipmatic 6122
- Tipmatic 61502
- tipmatic 6152
- tipmatic tiptronic 1151
- tiptronic 1029
- tiptronic 1067
- Tiptronic 1071
- tiptronic 1151
- Tiptronic 11712
- TIPTRONIC 2020
- tiptronic 2030
- tiptronic 2040
- Tiptronic 6230
- tiptronic 6232
- tiptronic 6270
- TruStitch
U
- UL1594
V
- varimatic 6085
- varimatic 6086
Loading…
Loading…
Nothing found
SMARTER
Owners Manual
36 pgs2.27 Mb0
Table of contents
Loading…
…
Pfaff Owners Manual
Download
Specifications and Main Features
Frequently Asked Questions
User Manual


Loading…
+ 25 hidden pages
You need points to download manuals.
1 point = 1 manual.
You can buy points or you can get point for every manual you upload.
Buy points
Upload your manuals
Русский
- Bedienungsanleitung Pfaff Smarter 140S
- Pfaff Smarter 140S User Manual
- Manual Usuario Pfaff Smarter 140S
- Mode d’emploi Pfaff Smarter 140S
- Istruzioni Pfaff Smarter 140S
- инструкция Pfaff Smarter 140S
- Pfaff Smarter 140Sの取扱説明書
- Handleiding Pfaff Smarter 140S
- Manual de uso Pfaff Smarter 140S
Вам нужна инструкция? Мы поможем Вам ее найти и сэкономить Ваше время.
- 36 stron
- 2.16 mb
Изделие Pfaff Smarter 140S, а также другие, которыми Вы пользуетесь ежедневно, наверняка вы получили в комплекте с инструкцией обслуживания. Из опыта наших пользователей мы знаем, что большинство из Вас не уделили этому особого внимания. Большая часть инструкций, сразу же после покупки попадает в корзину для мусора вместе с коробкой — это ошибка. Ознакомьтесь с информацией, касающейся инструкции Pfaff Smarter 140S, которая поможет Вам в будущем сэкономить нервы и избежать головной боли.
Важная подсказка — не забывайте хотя бы раз прочитать инструкцию Pfaff Smarter 140S
Если вы не хотите каждый раз читать информационные брошюры, касающиеся, тех или Pfaff Smarter 140S иных изделий, достаточно, прочитать их раз — сразу же после покупки устройства. Вы получите основное знания, касающиеся поддержания изделия Pfaff Smarter 140S в хорошем эксплуатационном состоянии, так, чтобы без проблем достигнуть его планируемого цикла работы. Затем инструкцию можно отложить на полку и вернуться к ней только в случае, если вы не уверены, правильно ли проводится техобслуживание изделия. Правильный уход является необходимым элементом Вашего удовольствия Pfaff Smarter 140S.
Раз в году пересмотрите шкафчик, в котором держите инструкции для всех устройств, — выбросите те, которыми вы уже не пользуетесься. Это поможет Вам сохранять порядок в своей домашней базе инструкций обслуживания.
Summary of Contents for Pfaff Smarter 140S
Что находится в инструкции Pfaff Smarter 140S? Почему стоит ее прочитать?
- Гарантия и подробности, касающиеся техобслуживания изделия
Хорошей идеей будет прикрепить чек к странице инструкции. Если что-то плохое случится во время использования Pfaff Smarter 140S, у вас будет комплект документов, необходимый для гарантийного ремонта. В этой части инструкции вы найдете информацию об авторизованных сервисных центрахPfaff Smarter 140S а также, как самостоятельно правильно ухаживать за оборудованием — так, чтобы не потерять гарантийных прав. - Указания по монтажу и Setup
Не терять нервов и времени на самостоятельную попытку установки и первого запуска изделия. Воспользуйтесь рекомендациями производителя Pfaff Smarter 140S чтобы правильно запустить изделие, без лишнего риска повреждения оборудования. - Информация, касающаяся дополнительных запчастей (входящих в комплект а также являющихся опцией)
Пересматривая эту часть документа вы сможете проверить, доставлен ли ваш Pfaff Smarter 140S с полним комплектом аксессуаров. Вы также сможете узнать, какие дополнительные запчасти или аксессуары для Pfaff Smarter 140S Вы сможете найти и докупить к своему устройству. - Troubleshooting
Самые частые проблемы, касающиеся Pfaff Smarter 140S и методы их решения. Это очень полезная часть руководства по обслуживанию — она позволит Вам сэкономить много времени на поиск решений. 90% проблем с Pfaff Smarter 140S повторяется у многих пользователей. - Требования, касающиеся питания и энергетический класс
Информация, касающаяся количества потребляемой энергии, а также рекомендации, касающиеся установки и питания Pfaff Smarter 140S. Прочитайте, чтобы оптимально пользоваться Pfaff Smarter 140S и не использовать большего количества ресурсов, нежели это необходимо для правильной работы изделия. - Специальные функции Pfaff Smarter 140S
Здесь вы можешь узнать, как персонализировать изделие Pfaff Smarter 140S. Вы узнаете, какие дополнительные функции могут помочь Вам удобно использовать продукт Pfaff Smarter 140S а также, какие функции Вашего устройства оптимальны для выполнения конкретной деятельности.
Как видите в инструкции вы найдете информацию, которая реально поможет Вам в использовании Вашего изделия. Стоит с ней ознакомиться, чтобы избежать разочарований, возникающих из более короткого, нежели предусматривалось, периода исправности изделия Pfaff Smarter 140S. Если все же вы не хотите копить инструкции в своем доме, наш сайт поможет Вам в этом — вы должны найти у нас руководство по обслуживанию большинства из своих устройств, а также Pfaff Smarter 140S.
Комментарии (0)
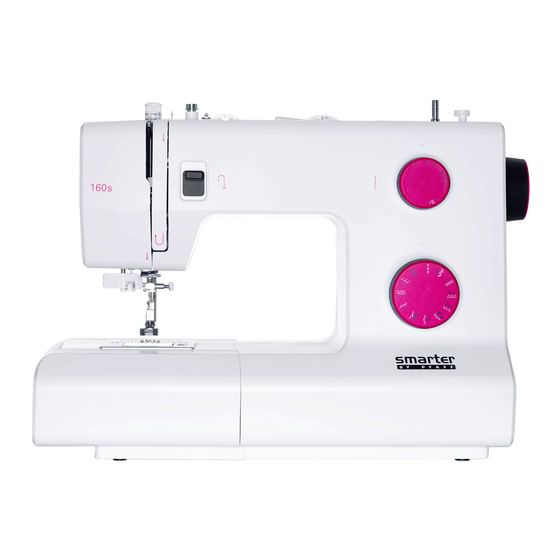
Pfaff Smarter 130s отличается интересным ярким дизайном, имеет 21 швейную операцию, включая полуавтоматическую петлю, в ней есть только все самое необходимое для занятия любимым хобби. Однако, машина прекрасно справляется со своей задачей и отличается немецким качеством, проверенным временем. Эта модель станет вам отличным помощником, если вы только решили начать заниматься шитьем и делаете свои первые шаги в этом увлекательном виде рукоделия.
Особенности:
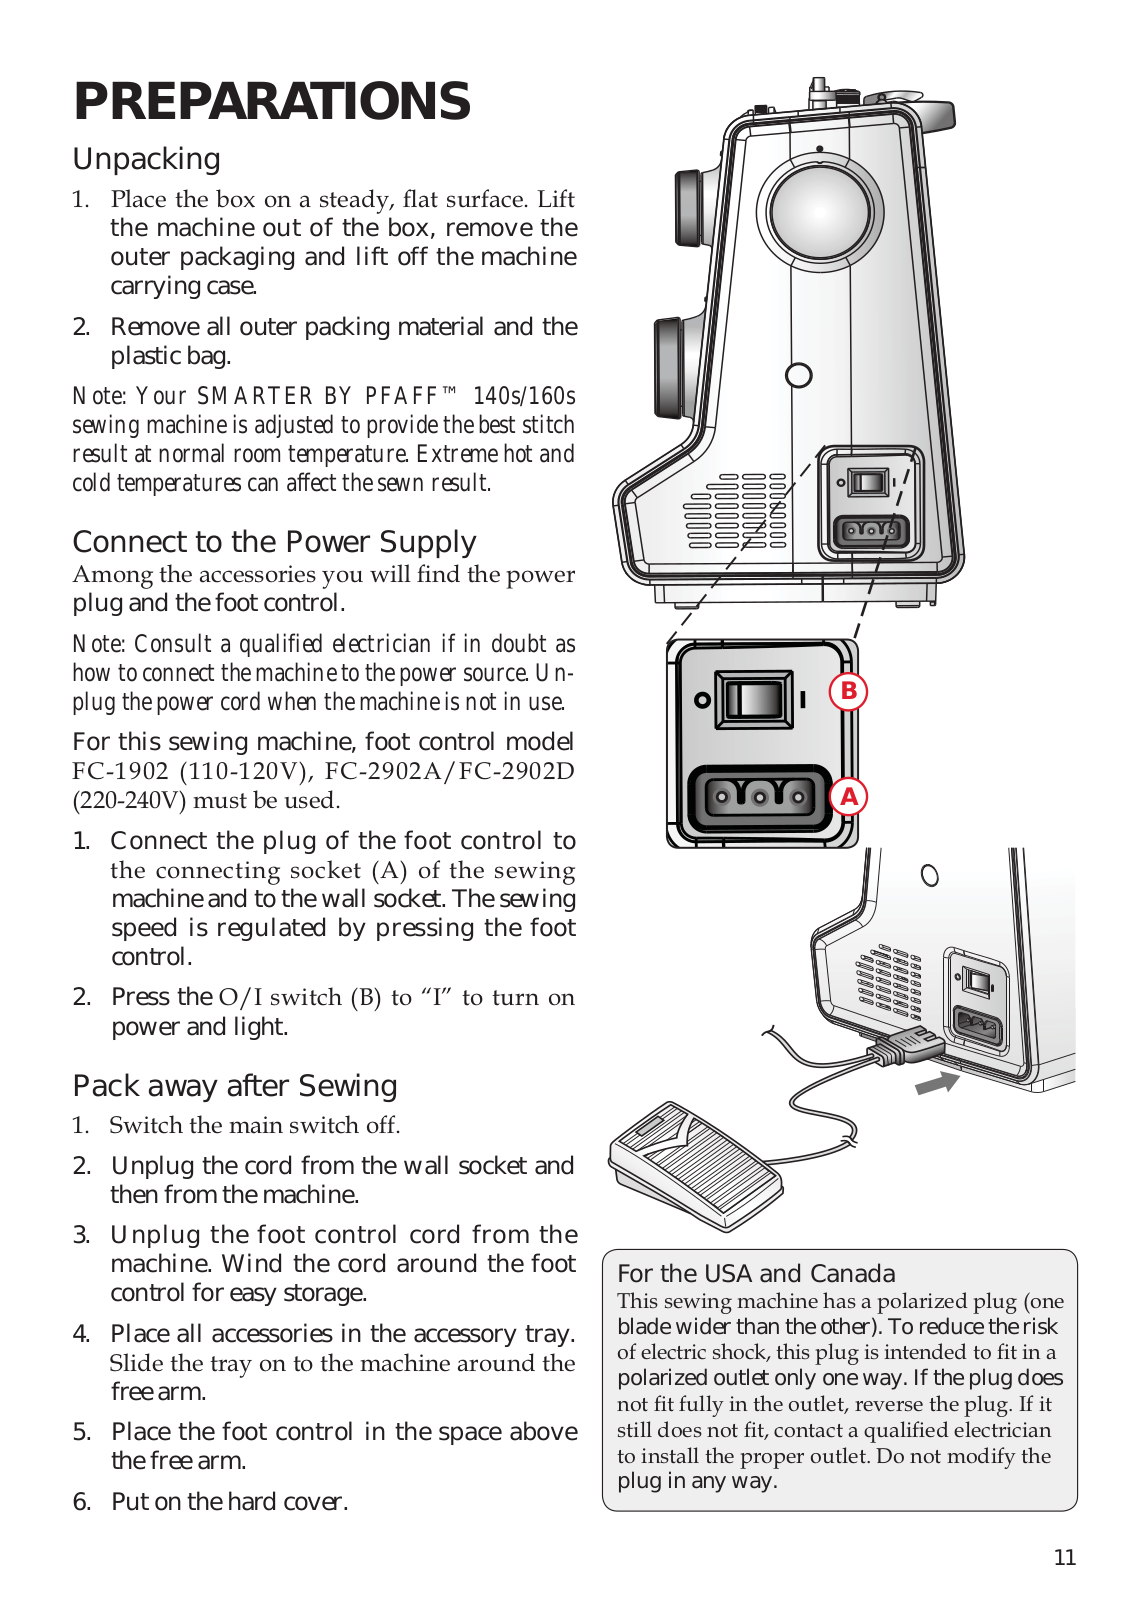
Нитевдеватель
Встроенный заправщик нити облегчит вам трудоемкий процесс. Просто возьмитесь за кончик нити, а заправщик сам протянет ее через ушко иглы.
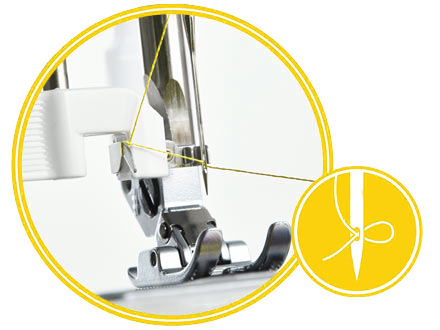
Изменение ширины строчки
Установите необходимую ширину стежка. Функция изменения его ширины особенно полезна при отстрочке по верху ткани и для других операций, требующих точное позиционирование иглы.
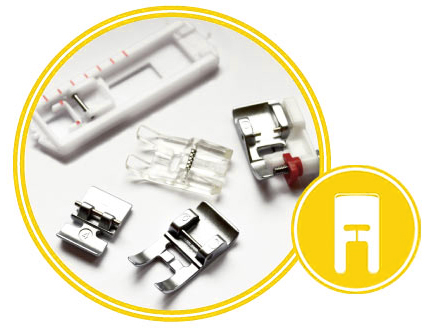
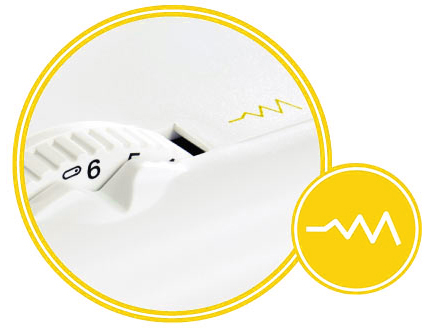
Лапки Pfaff
У вас есть возможность использовать множество дополнительных лапок PFAFF® для выполнения специальных швейных операций.
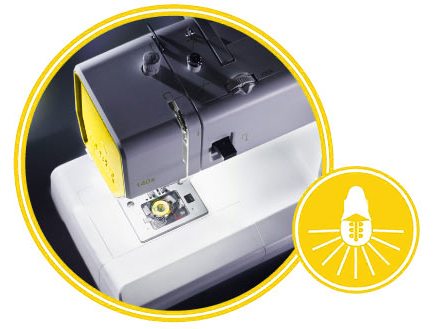
Светодиодная подсветка
Светодиодные элементы подсветки очень долговечны и прекрасно освещают рабочее пространство.
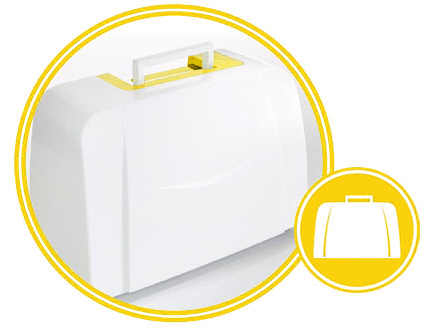
Жесткий чехол
Все модели SMARTER BY PFAFF™ комплектуются жесткими футлярами для их безопасной переноски.
Инструкции для Pfaff Smarter 130s:
Инструкция по эксплуатации Pfaff Smarter 130s (PDF, 16MB, рус)
Характеристики Pfaff Smarter 130s:
Диапазон прошиваемых материалов Очень легкие – 4
Легкие – 5
Средние и умеренно тяжелые – 5
Тяжелые – 4
Трикотаж – 3
Тип челнока Горизонтальный вращающийся челнок
Максимальная ширина строчки 6 мм
Максимальная длина стежка 4 мм
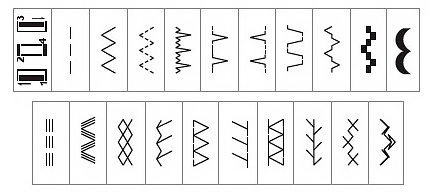
Количество строчек 21
Режим вымётывания петли Полуавтоматическое выметывание бельевой петли за 4 переключения без поворота ткани
Верхний транспортёр нет
Длина платформы 16 см
Размеры рукавной платформы (длина/обхват) 7,5/27,5 см
Ширина гребёнки транспортера 16 мм
Высота подъема лапки (нормальная/максимальная) 6/9
Электронный стабилизатор усилия прокола нет
Регулятор (ограничитель) максимальной скорости нет
Программируемая остановка иглы в верхнем/нижнем положении нет
Нитевдеватель есть
Горизонтальное расположение катушки есть
Регулятор давления лапки есть
Потребляемая мощность 70 Вт
Тип освещения Светодиодное
Органайзер нет
Автостоп при намотке нитки на шпульку есть
Линейка на корпусе нет
Чехол Жесткий
Швейный советник нет
Стандарт игл 130/705H
Страна разработки Германия
Страна производства Китай
Гарантия 3 года
Вес без упаковки 6,2 кг
Вес с упаковкой 8,9 кг
Строчки Pfaff Smarter 130s:
Комплектация
- Педаль
- Жесткий чехол
- Стандартная лапка A
- Лапка для вшивания молнии E
- Лапка для невидимой подрубки G
- Лапка для петли B
- Лапка прозрачная
- Иглы
- Кисточка
- Мягкая подкладка
- Направитель
- Распарыватель
- Отвертка
- Пластина для катушки (большая, маленькая)
- Фиксатор катушки
- Шпульки
Ваш отзыв
Внимание: HTML не поддерживается! Используйте обычный текст!
Продолжить
Хорошее руководство по эксплуатации
Законодательство обязывает продавца передать покупателю, вместе с товаром, руководство по эксплуатации Pfaff Smarter 140S. Отсутствие инструкции либо неправильная информация, переданная потребителю, составляют основание для рекламации в связи с несоответствием устройства с договором. В законодательстве допускается предоставлении руководства в другой, чем бумажная форме, что, в последнее время, часто используется, предоставляя графическую или электронную форму инструкции Pfaff Smarter 140S или обучающее видео для пользователей. Условием остается четкая и понятная форма.
Что такое руководство?
Слово происходит от латинского «instructio», тоесть привести в порядок. Следовательно в инструкции Pfaff Smarter 140S можно найти описание этапов поведения. Цель инструкции заключается в облегчении запуска, использования оборудования либо выполнения определенной деятельности. Инструкция является набором информации о предмете/услуге, подсказкой.
К сожалению немного пользователей находит время для чтения инструкций Pfaff Smarter 140S, и хорошая инструкция позволяет не только узнать ряд дополнительных функций приобретенного устройства, но и позволяет избежать возникновения большинства поломок.
Из чего должно состоять идеальное руководство по эксплуатации?
Прежде всего в инструкции Pfaff Smarter 140S должна находится:
— информация относительно технических данных устройства Pfaff Smarter 140S
— название производителя и год производства оборудования Pfaff Smarter 140S
— правила обслуживания, настройки и ухода за оборудованием Pfaff Smarter 140S
— знаки безопасности и сертификаты, подтверждающие соответствие стандартам
Почему мы не читаем инструкций?
Как правило из-за нехватки времени и уверенности в отдельных функциональностях приобретенных устройств. К сожалению само подсоединение и запуск Pfaff Smarter 140S это слишком мало. Инструкция заключает ряд отдельных указаний, касающихся функциональности, принципов безопасности, способов ухода (даже то, какие средства стоит использовать), возможных поломок Pfaff Smarter 140S и способов решения проблем, возникающих во время использования. И наконец то, в инструкции можно найти адресные данные сайта Pfaff, в случае отсутствия эффективности предлагаемых решений. Сейчас очень большой популярностью пользуются инструкции в форме интересных анимаций или видео материалов, которое лучше, чем брошюра воспринимаются пользователем. Такой вид инструкции позволяет пользователю просмотреть весь фильм, не пропуская спецификацию и сложные технические описания Pfaff Smarter 140S, как это часто бывает в случае бумажной версии.
Почему стоит читать инструкции?
Прежде всего здесь мы найдем ответы касательно конструкции, возможностей устройства Pfaff Smarter 140S, использования отдельных аксессуаров и ряд информации, позволяющей вполне использовать все функции и упрощения.
После удачной покупки оборудования/устройства стоит посвятить несколько минут для ознакомления с каждой частью инструкции Pfaff Smarter 140S. Сейчас их старательно готовят или переводят, чтобы они были не только понятными для пользователя, но и чтобы выполняли свою основную информационно-поддерживающую функцию.
Посмотреть инструкция для Pfaff Smarter by 160s бесплатно. Руководство относится к категории швейные машины, 9 человек(а) дали ему среднюю оценку 8.9. Руководство доступно на следующих языках: английский. У вас есть вопрос о Pfaff Smarter by 160s или вам нужна помощь? Задайте свой вопрос здесь
Швейная машина Pfaff Smarter by 160s — это удобное устройство для шитья дома. Она имеет портативный дизайн, что позволяет легко перемещать ее по дому. С помощью этой машины можно шить различные материалы — от легких тканей до более плотных.
Она оснащена множеством функций, которые сделают шитье более простым и быстрым. Система натяжения нити автоматически подстраивается для каждого типа шва. Машина также имеет 23 типа стежков, функцию частичной аппликации, регулировку скорости и множество других функций.
Для удобства используется панель управления и подсветка швов. Она также имеет специальную платформу для работы с рукавами и брючными швами.
Pfaff Smarter by 160s надежная и долговечная машина, выполненная из высококачественных материалов, обеспечивающих ее долговечность.
Она является идеальным выбором для начинающих швеи, которые ищут простую и удобную в использовании машину для шитья.
Главная
Не можете найти ответ на свой вопрос в руководстве? Вы можете найти ответ на свой вопрос ниже, в разделе часто задаваемых вопросов о Pfaff Smarter by 160s.
Какой размер иглы лучше всего использовать?
Наиболее подходящий размер иглы зависит от используемой толщины ткани. С плотной тканью следует использовать толстую иглу. Подходящие типы тканей указываются на упаковке с иглами.
Какой срок службы у швейной иглы?
Как правило, срок службы швейной иглы составляет от 7 до 9 часов.
Что может повредить иглу при шитье?
Причин повреждения иглы может быть несколько: — Использование неподходящей иглы для определенного типа ткани — Установка иглы слишком низко — Неправильное расположение ткани — Неправильно установленный шпульный колпачок
Инструкция Pfaff Smarter by 160s доступно в русский?
К сожалению, у нас нет руководства для Pfaff Smarter by 160s, доступного в русский. Это руководство доступно в английский.
Не нашли свой вопрос? Задайте свой вопрос здесь
- Manuals
- Brands
- Pfaff Manuals
- Sewing Machine
- Smarter
- Owner’s manual
-
Contents
-
Table of Contents
-
Troubleshooting
-
Bookmarks
Quick Links
Owner’s
Manual
160s
150s
140s
130s
SMARTER BY PFAFF
™
– inspired and developed by the premier PFAFF
sewing machine brand
®
Related Manuals for Pfaff Smarter
Summary of Contents for Pfaff Smarter
-
Page 1
Owner’s Manual 160s 150s 140s 130s SMARTER BY PFAFF ™ – inspired and developed by the premier PFAFF sewing machine brand ®… -
Page 2: Important Safety Instructions
This household sewing machine is designed to comply with IEC/ EN 60335-2-28 and UL1594. IMPORTANT SAFETY INSTRUCTIONS When using an electrical appliance, basic safety precautions should always be followed, including the following: Read all instructions before using this household sewing machine. Keep the instructions at a suitable place close to the machine.
-
Page 3
• Do not use bent needles. needle causing it to break. • Wear safety glasses. in the needle area, such as threading needle, changing needle, threading bobbin, or changing presser foot, etc. • Never drop or insert any object into any opening. •… -
Page 4
FOR EUROPE ONLY: This appliance can be used by children aged from 8 years and above and persons with reduced physical, sensory or mental capabilities or lack of experience and knowledge if they have been given supervision or instruction concerning use of the appliance in a safe way and understand the hazards involved. -
Page 5: Table Of Contents
TABLE OF CONTENTS INTRODUCTION ……… 6 ……….21 Machine Overview ……….6 ……….22 …………6 Adjustable Needle Position ……22 Top Parts …………7 ……….22 …………7 Accessories …………7 SEWING ……….23 Included Accessories not in Picture ..7 ….23 Presser Feet ………..8 ……23 ……9 ……….23 ….10 ……24 ……24…
-
Page 6: Introduction
INTRODUCTION Machine Overview Front Side 1. Threading slots 12. Needle bar 2. Thread cutter 3. LED light 4. Reverse lever 14. Bobbin cover 5. Free arm 15. Lower thread guide 6. Accessory tray 16. Needle screw 17. Presser foot lift 18.
-
Page 7: Top Parts
Top Parts 21. Presser foot pressure dial 22. Thread guides 24. Hole for auxiliary spool pin 25. Bobbin winder spindle 26. Take-up lever 27. Thread tension discs 28. Bobbin winder tension disc 29. Thread tension dial Rear Side 31. Main switch, connectors for power cord and foot control 32.
-
Page 8: Presser Feet
Presser Feet Standard Presser Foot 0 This foot is used mainly for straight stitching and zigzag stitching with a stitch length longer than 1.0 mm. Clearview Foot 1 When sewing decorative stitches or short zigzag stitches and other utility stitches with less than 1.0mm stitch length, use this smoothly over the stitches.
-
Page 9
Stitch Overview – 150s/160s Stitch Name Description 1-step Buttonhole For all straight stitching and topstitching Triple zigzag stitch For stitching on elastic band, darning tears and patches Blindhem stitch For invisible hem attachment Elastic blindhem For invisible hem attachment and simultaneous stitch * serging, also for stretch fabrics Decor stitch… -
Page 10
Stitch Overview – 130s/140s Stitch Name Description 4-step Buttonhole For all straight stitching and topstitching Triple zigzag stitch* For stitching on elastic band, darning tears and patches Elastic blindhem For invisible hem attachment and simultaneous stitch * serging, also for stretch fabrics Blindhem stitch For invisible hem attachment Greek stitch… -
Page 11: Preparations
2. Remove all outer packing material and the plastic bag. Note: Your SMARTER BY PFAFF™ 130s/140s/ 150s/160s sewing machine is adjusted to provide the best stitch result at normal room temperature. Ex- treme hot and cold temperatures can affect the sewn result.
-
Page 12: Free Arm
Pack away after Sewing Note: After switching off, residual power may still remain in the machine. This may cause the light to stay on for a few seconds while the power is consumed. This is normal behavior for an energy 2.
-
Page 13: Spool Pins
Spool Pins Your machine has two spool pins, a main spool pin and an auxiliary spool pin. The spool pins are designed for all types of thread. The main spool pin is used in a Narrow thread spool the horizontal position for normal threads and the vertical position for large spools or specialty threads.
-
Page 14: Threading The Machine
Threading the Machine Make sure that the presser foot is raised and the needle is in its highest position. 5. Thread the needle.
-
Page 15: Needle Threader
Needle Threader The integrated needle threader allows you The needle must be in its highest position to use the built-in needle threader. Turn the handwheel until the notch on the wheel is lowering the presser foot. 1. Use the handle (B) to pull the needle threader all the way down.
-
Page 16: Threading For Twin Needle
Threading for Twin Needle Replace the sewing needle with a twin needle. Make sure that the presser foot is raised and the needle is in its highest position. 1. Place the thread spool on the spool pin and fit the appropriately sized spool cap.
-
Page 17: Bobbin Winding
Bobbin Winding spool cap tightly against the spool. front to the back. Pull the thread clockwise around the inside to the outside. 4. Place the bobbin on the bobbin spindle. 5. Push the bobbin spindle to the right to activate the bobbin winding. Press the foot control to wind the bobbin.
-
Page 18: Presser Foot Pressure
Presser Foot Pressure The presser foot pressure has been pre-set to not need to adjust the presser foot pressure. very light or heavy fabric, adjusting the pres- sure can improve the result. For very light fabrics, loosen the pressure by turning the dial counterclockwise.
-
Page 19: Needles
Needles The sewing machine needle plays an important role recommend needles of system 130/705H. The needle package included with your machine contains needles Universal Needle (A) Universal needles have a slightly rounded point and come in a variety of sizes. For general sewing in a vari- ety of fabric types and weights.
-
Page 20: Lowering Feed Dogs
Lowering Feed Dogs You can lower the feed dogs by moving the switch at the back of the free arm to the wish to raise the feed dogs. Note: The feed dogs will not raise immediately when the lever is switched. Turn the handwheel one full turn or start sewing to re-engage the feed dogs.
-
Page 21: Stitch Selection
Stitch Selection desired stitch. The selected stitch is the one The stitches printed in white on the stitch Use non-stretch stitches when sewing woven fabrics, leather or vinyl and stretch Note: Always raise the needle above the fabric and presser foot before you turn the stitch selc- tion dial.
-
Page 22: Adjustable Needle Position
Stitch Width sired stitch width. The higher the number, the wider the stitch width. The stitch width can be varied wheel correspond to the stitch width in Note: Before you turn the stitch width dial, raise the needle to its highest position, other- wise it may bend or break.
-
Page 23: Sewing
SEWING stitch scribed, a chart shows the recommended set- chart to the right. Start to Sew – Straight Stitch A. Recommended stitch B. Stitch length in mm Raise the presser foot and position the fab- C. Stitch width in mm ric under it, next to a seam allowance guide line on the needle plate.
-
Page 24: Reinforced Straight Stitch
Reinforced Straight Stitch stitch This stitch is stronger than regular straight stitch, due to the fact that it is a triple and elastic stitch. The reinforced straight stitch can be used for heavy stretch fabrics, for Set for reinforced straight stitch crotch seams which are subject to consider- able strain and for topstitching heavy fabrics.
-
Page 25
Overlock Stitch stitch The open overlock stitch sews the seam and overcast the edge all at one time, perfect for stretch fabrics. This stitch is more elas- tic than normal seams, very durable and Set for overlock stitch Tip: When sewing, guide the fabric edge along the metal pin of the foot. -
Page 26: Blindhem
Blindhem stitch The blindhem stitch is used to make invisible hems on skirts, trousers and home decorating. 1. Finish the edge of the hem. Set for blindhem stitch 2. Fold and press the hem allowance to the wrong side. 3. Fold the hem back on itself so approxi- extends beyond the fold.
-
Page 27: Darning With The
Sewing on Patches or Appliqués stitch To cover large holes it is necessary to sew a new piece of fabric onto the damaged area. Baste the new piece of fabric onto the dam- aged area on the right side of the fabric. Set for three-step zigzag stitch the three-step zigzag stitch.
-
Page 28
Sewing on Buttons stitch 1. Remove the presser foot and lower the Set for button sewing 2. Mark the fabric where the button is to be located. Place the fabric and button under the ankle with the holes in the button lined up with the swing of the needle. -
Page 29
Standard Buttonhole stitch (model 150s/160s) The fabric should be interfaced and/or stabi- lized where buttonholes are to be sewn. Set for buttonhole 1. Mark the start position and buttonhole Push the button holder open by pushing Push the button holder forward until button will determine the length of the buttonhole. -
Page 30
Standard Buttonhole stitch (model 130s/140s) The fabric should be interfaced and/or stabi- lized where buttonholes are to be sewn. Set for buttonhole Prepare the Buttonhole Measure diameter and thickness of the but- tain correct buttonhole length. Mark the start position and buttonhole length on the fabric Note: Before starting to sew any buttonhole, al- ways push the the buttonhole foot fully back. -
Page 31: Stretch Fabrics
Use seam ripper and cut the buttonhole open from both ends towards the middle. The density of the buttonhole is adjusted Note: Density varies according to the fabric. Al- Carefully cut your buttonhole ways test sew a buttonhole on the fabric you are open with a seam ripper.
-
Page 32: Sewing Zippers
Sewing Zippers stitch the right or the left of the needle, making it 1.5-3 easy to sew both sides of the zipper. To sew the left side of the zipper, attach the Set for zipper To sew the right side of zipper, attach the Center Zipper Right presser foot Left presser foot…
-
Page 33: Maintenance
MAINTENANCE Cleaning the Machine To keep your sewing machine operating well, Wipe the exterior surface of your machine with a soft cloth to remove any dust or lint built up. Cleaning the Bobbin Area Note: Raise the needle, lower the feed dogs and turn off the machine.
-
Page 34: Troubleshooting
TROUBLESHOOTING ® your machine. For further information please contact your local authorized PFAFF dealer. General Problems The Seam has Uneven Stitches Fabric does not move? Is the thread tension correct? Make sure that the feed dogs are not lowered. Check needle thread tension and the threading.
-
Page 35: Intellectual Property
Bobbin Thread Breaks Did you insert the bobbin properly? Check the bobbin thread. Is the stitch plate hole damaged? Change the stitch plate. Is the bobbin area clean? Clean lint from bobbin area. Is the bobbin wound correctly? Wind a new bobbin. design.
-
Page 36
4710092-26A English © 2014 KSIN Luxembourg II, S.ar.l. All rights reserved. Printed in Germany on environmentally-friendly paper…
Посмотреть инструкция для Pfaff Smarter by 140s бесплатно. Руководство относится к категории швейные машины, 5 человек(а) дали ему среднюю оценку 8.1. Руководство доступно на следующих языках: английский. У вас есть вопрос о Pfaff Smarter by 140s или вам нужна помощь? Задайте свой вопрос здесь
Не можете найти ответ на свой вопрос в руководстве? Вы можете найти ответ на свой вопрос ниже, в разделе часто задаваемых вопросов о Pfaff Smarter by 140s.
Какой размер иглы лучше всего использовать?
Какой срок службы у швейной иглы?
Что может повредить иглу при шитье?
Инструкция Pfaff Smarter by 140s доступно в русский?
Не нашли свой вопрос? Задайте свой вопрос здесь
SMARTER BY PFAFF™ – inspired and developed by the premier PFAFF® sewing machine brand
This household sewing machine is designed to comply with IEC/ EN 60335-2-28 and UL1594.
IMPORTANT SAFETY INSTRUCTIONS
When using an electrical appliance, basic safety precautions should always be followed, including the following:
Read all instructions before using this household sewing machine. Keep the instructions at a suitable place close to the machine. Make sure to hand them over if the machine is given to a third party.
DANGER – TO REDUCE THE RISK OF ELECTRIC SHOCK:
$ VHZLQJ PDFKLQH VKRXOG QHYHU EH OHIW XQDWWHQGHG ZKHQ SOXJJHG
LQ $OZDV XQSOXJ WKLV VHZLQJ PDFKLQH IURP WKH HOHFWULF RXWOHW immediately after using and before cleaning, removing covers, relamping, lubricating or when making any other user servicing adjustments mentioned in the instruction manual.
WARNING – TO REDUCE THE RISK OF BURNS, FIRE, ELECTRIC SHOCK, OR INJURY TO PERSON:
7KLV VHZLQJ PDFKLQH LV QRW LQWHQGHG IRU XVH E SHUVRQV LQFOXGLQJ children) with reduced physical, sensory or mental capabilities,
or lack of experience and knowledge, unless they have been given supervision or instruction concerning use of the sewing machine by a person responsible for their safety.
&KLOGUHQ VKRXOG EH VXSHUYLVHG WR HQVXUH WKDW WKH GR QRW SOD with the sewing machine.
8VH WKLV VHZLQJ PDFKLQH RQO IRU LWV LQWHQGHG XVH DV GHVFULEHG in this manual. Use only attachments recommended by the manufacturer as contained in this manual.
1HYHU RSHUDWH WKLV VHZLQJ PDFKLQH LI LW KDV D GDPDJHG FRUG or plug, if it is not working properly, if it has been dropped or damaged, or dropped into water. Return the sewing machine to the nearest authorized dealer or service center for examination, repair, electrical or mechanical adjustment.
2
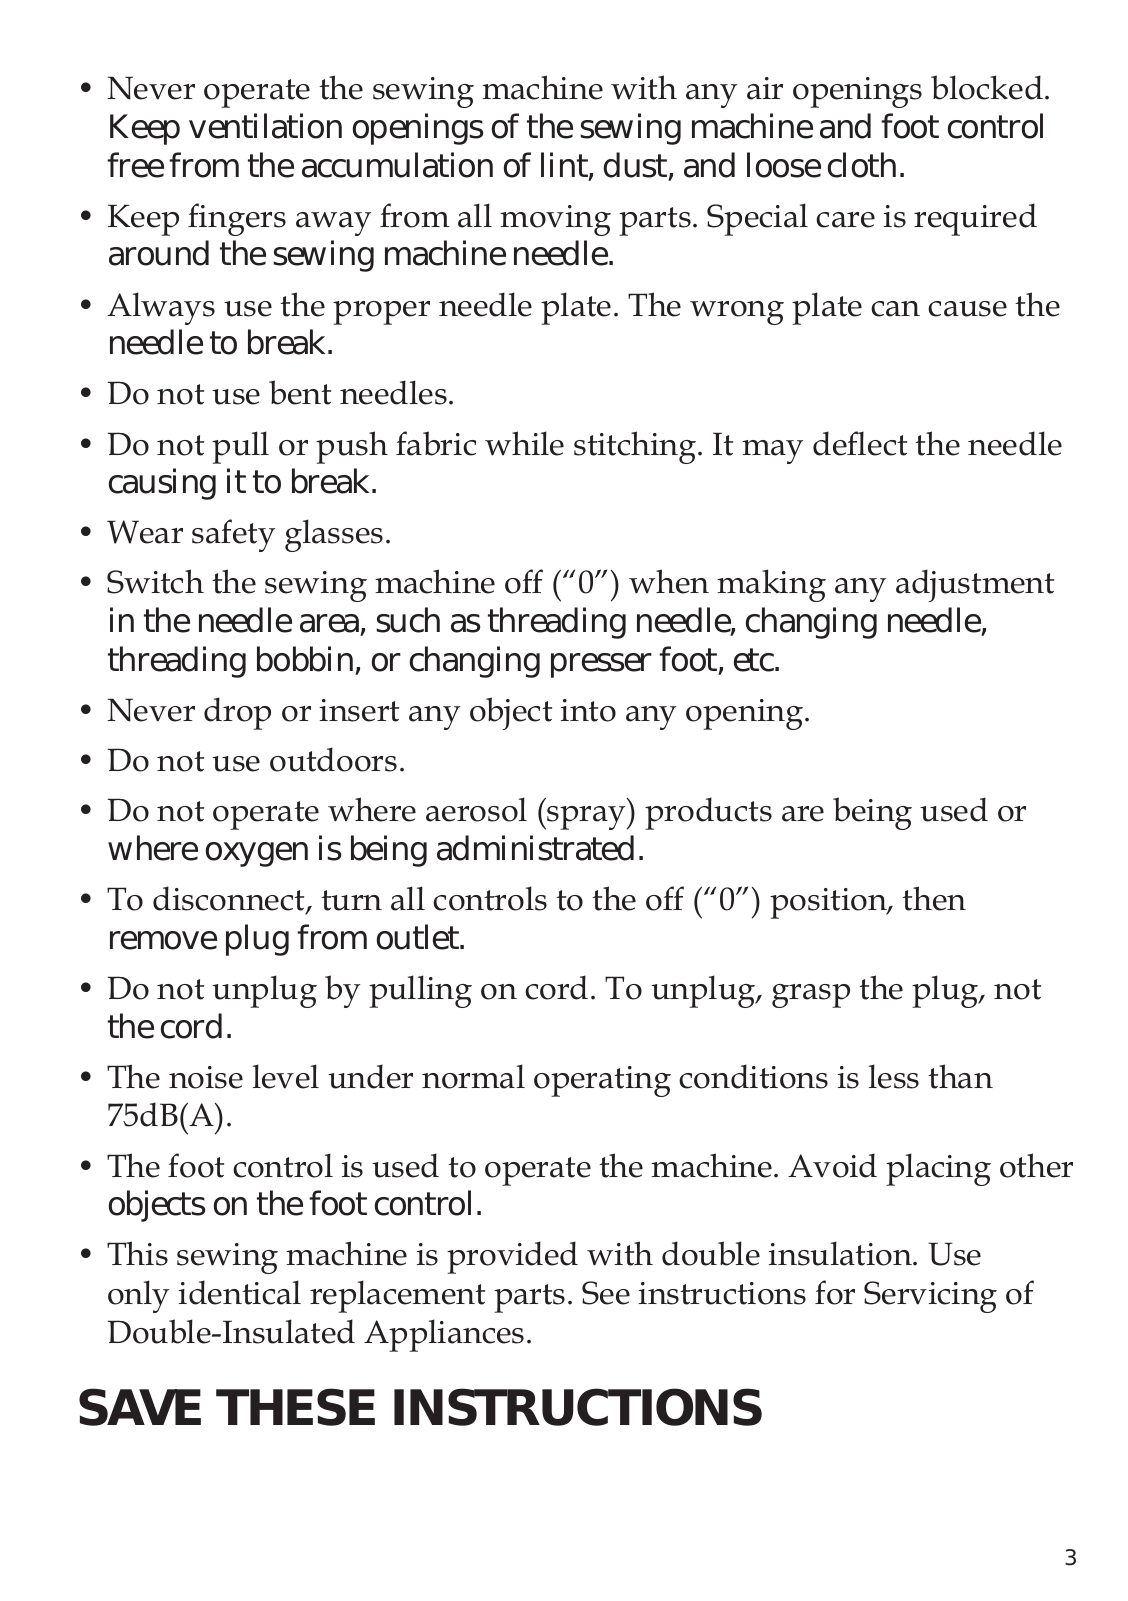
1HYHU RSHUDWH WKH VHZLQJ PDFKLQH ZLWK DQ DLU RSHQLQJV EORFNHG
Keep ventilation openings of the sewing machine and foot control free from the accumulation of lint, dust, and loose cloth.
.HHS ÀQJHUV DZD IURP DOO PRYLQJ SDUWV 6SHFLDO FDUH LV UHTXLUHG around the sewing machine needle.
$OZDV XVH WKH SURSHU QHHGOH SODWH 7KH ZURQJ SODWH FDQ FDXVH WKH needle to break.
‘R QRW XVH EHQW QHHGOHV
‘R QRW SXOO RU SXVK IDEULF ZKLOH VWLWFKLQJ ,W PD GHÁHFW WKH QHHGOH causing it to break.
HDU VDIHW JODVVHV
6ZLWFK WKH VHZLQJ PDFKLQH RII ´ µ ZKHQ PDNLQJ DQ DGMXVWPHQW in the needle area, such as threading needle, changing needle, threading bobbin, or changing presser foot, etc.
1HYHU GURS RU LQVHUW DQ REMHFW LQWR DQ RSHQLQJ
‘R QRW XVH RXWGRRUV
‘R QRW RSHUDWH ZKHUH DHURVRO VSUD SURGXFWV DUH EHLQJ XVHG RU where oxygen is being administrated.
7R GLVFRQQHFW WXUQ DOO FRQWUROV WR WKH RII ´ µ SRVLWLRQ WKHQ remove plug from outlet.
‘R QRW XQSOXJ E SXOOLQJ RQ FRUG 7R XQSOXJ JUDVS WKH SOXJ QRW the cord.
7KH QRLVH OHYHO XQGHU QRUPDO RSHUDWLQJ FRQGLWLRQV LV OHVV WKDQG% $
7KH IRRW FRQWURO LV XVHG WR RSHUDWH WKH PDFKLQH $YRLG SODFLQJ RWKHU objects on the foot control.
7KLV VHZLQJ PDFKLQH LV SURYLGHG ZLWK GRXEOH LQVXODWLRQ 8VH RQO LGHQWLFDO UHSODFHPHQW SDUWV 6HH LQVWUXFWLRQV IRU 6HUYLFLQJ RI ‘RXEOH ,QVXODWHG $SSOLDQFHV
SAVE THESE INSTRUCTIONS
3
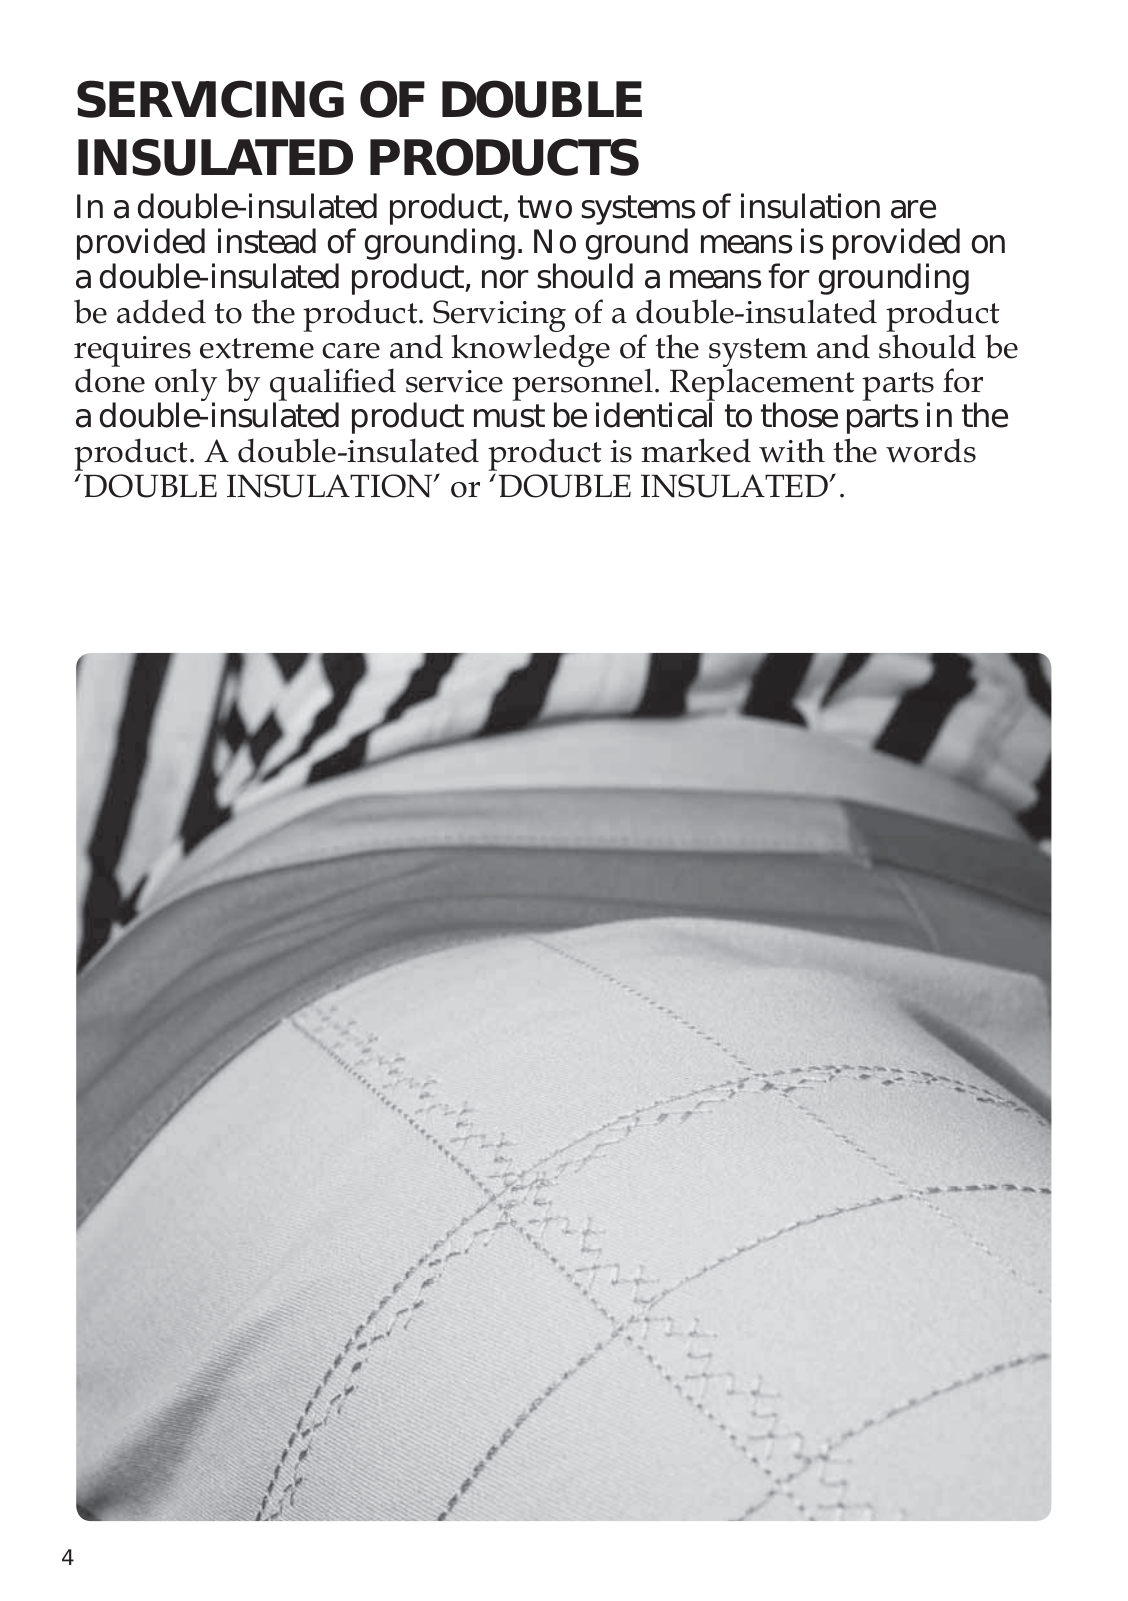
SERVICING OF DOUBLE
INSULATED PRODUCTS
In a double-insulated product, two systems of insulation are provided instead of grounding. No ground means is provided on a double-insulated product, nor should a means for grounding
EH DGGHG WR WKH SURGXFW 6HUYLFLQJ RI D GRXEOH LQVXODWHG SURGXFW UHTXLUHV H[WUHPH FDUH DQG NQRZOHGJH RI WKH VVWHP DQG VKRXOG EH
GRQH RQO E TXDOLÀHG VHUYLFH SHUVRQQHO 5HSODFHPHQW SDUWV IRU a double-insulated product must be identical to those parts in the
SURGXFW $ GRXEOH LQVXODWHG SURGXFW LV PDUNHG ZLWK WKH ZRUGV ¶’28%/( ,168/$7,21· RU ¶’28%/( ,168/$7(‘·
4
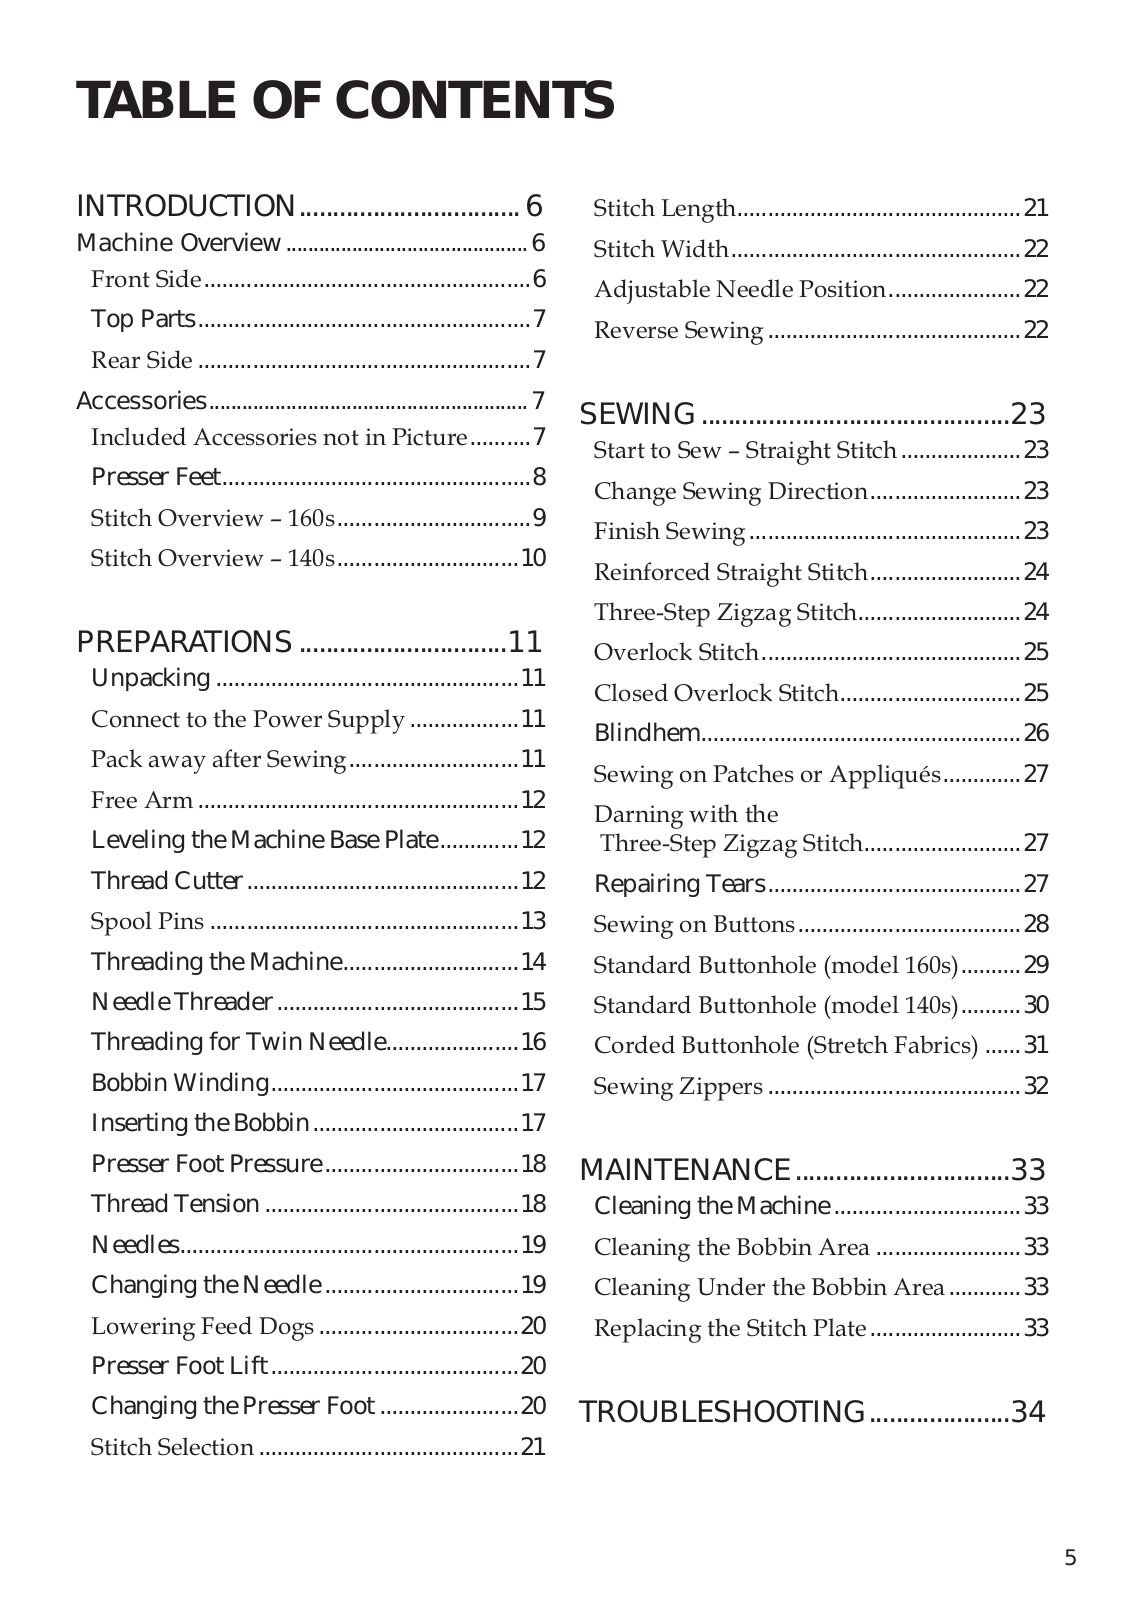
TABLE OF CONTENTS
|
INTRODUCTION…………………………… |
6 |
|
Machine Overview …………………………………….. |
6 |
|
)URQW 6LGH……………………………………………… |
6 |
|
Top Parts………………………………………………. |
7 |
|
5HDU 6LGH………………………………………………. |
7 |
|
Accessories…………………………………………………. |
7 |
|
,QFOXGHG $FFHVVRULHV QRW LQ 3LFWXUH………. |
7 |
|
Presser Feet…………………………………………… |
8 |
|
6WLWFK 2YHUYLHZ ² V………………………….. |
9 |
|
6WLWFK 2YHUYLHZ ² V………………………… |
10 |
|
PREPARATIONS …………………………. |
11 |
|
Unpacking ………………………………………….. |
11 |
|
&RQQHFW WR WKH 3RZHU 6XSSO……………… |
11 |
|
3DFN DZD DIWHU 6HZLQJ………………………. |
11 |
|
)UHH $UP…………………………………………….. |
12 |
|
Leveling the Machine Base Plate…………. |
12 |
|
Thread Cutter……………………………………… |
12 |
|
6SRRO 3LQV …………………………………………… |
13 |
|
Threading the Machine……………………….. |
14 |
|
Needle Threader …………………………………. |
15 |
|
Threading for Twin Needle…………………. |
16 |
|
Bobbin Winding………………………………….. |
17 |
|
Inserting the Bobbin ……………………………. |
17 |
|
Presser Foot Pressure ………………………….. |
18 |
|
Thread Tension …………………………………… |
18 |
|
Needles……………………………………………….. |
19 |
|
Changing the Needle ………………………….. |
19 |
|
/RZHULQJ )HHG ‘RJV…………………………… |
20 |
|
Presser Foot Lift ………………………………….. |
20 |
|
Changing the Presser Foot ………………….. |
20 |
|
6WLWFK 6HOHFWLRQ……………………………………. |
21 |
|
6WLWFK /HQJWK……………………………………….. |
21 |
|
6WLWFK LGWK………………………………………… |
22 |
|
$GMXVWDEOH 1HHGOH 3RVLWLRQ…………………. |
22 |
|
5HYHUVH 6HZLQJ…………………………………… |
22 |
|
SEWING ………………………………………. |
23 |
|
6WDUW WR 6HZ ² 6WUDLJKW 6WLWFK……………….. |
23 |
|
&KDQJH 6HZLQJ ‘LUHFWLRQ……………………. |
23 |
|
)LQLVK 6HZLQJ……………………………………… |
23 |
|
5HLQIRUFHG 6WUDLJKW 6WLWFK……………………. |
24 |
|
7KUHH 6WHS =LJ]DJ 6WLWFK……………………… |
24 |
|
2YHUORFN 6WLWFK……………………………………. |
25 |
|
&ORVHG 2YHUORFN 6WLWFK………………………… |
25 |
|
Blindhem…………………………………………….. |
26 |
|
6HZLQJ RQ 3DWFKHV RU $SSOLTXpV…………. |
27 |
|
‘DUQLQJ ZLWK WKH |
|
|
7KUHH 6WHS =LJ]DJ 6WLWFK…………………….. |
27 |
|
Repairing Tears…………………………………… |
27 |
|
6HZLQJ RQ %XWWRQV………………………………. |
28 |
|
6WDQGDUG %XWWRQKROH PRGHO V ………. |
29 |
|
6WDQGDUG %XWWRQKROH PRGHO V ………. |
30 |
|
&RUGHG %XWWRQKROH 6WUHWFK )DEULFV …… |
31 |
|
6HZLQJ =LSSHUV…………………………………… |
32 |
|
MAINTENANCE………………………….. |
33 |
|
Cleaning the Machine …………………………. |
33 |
|
&OHDQLQJ WKH %REELQ $UHD …………………… |
33 |
|
&OHDQLQJ 8QGHU WKH %REELQ $UHD………… |
33 |
|
5HSODFLQJ WKH 6WLWFK 3ODWH……………………. |
33 |
|
TROUBLESHOOTING………………… |
34 |
5
|
7 |
|||
|
1 |
8 |
||
|
2 |
5 |
4 |
6 |
|
3 |
9 |
||
|
10 |
15 |
|
|
16 |
||
|
11 |
17 |
|
|
12 |
18 |
|
|
13 |
19 |
|
|
20 |
||
|
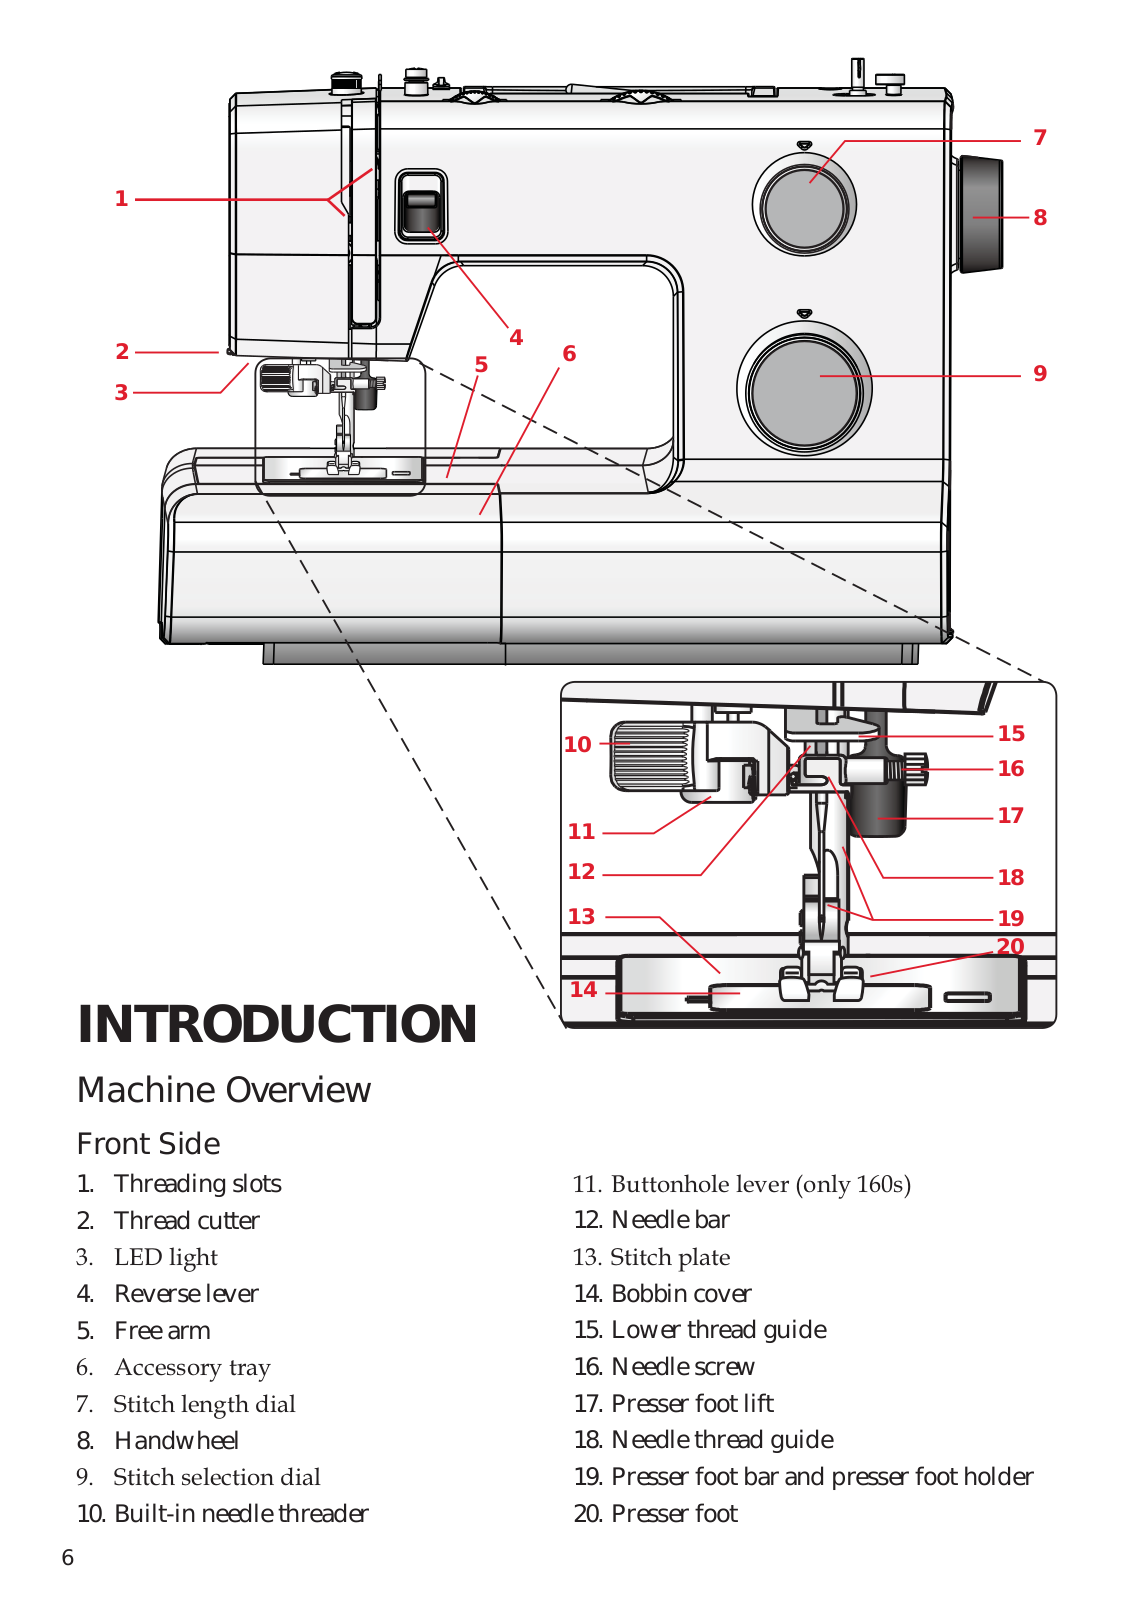
INTRODUCTION |
14 |
|
Machine Overview
Front Side
|
1. |
Threading slots |
%XWWRQKROH OHYHU RQO V |
|
|
2. |
Thread cutter |
12. |
Needle bar |
|
/(‘ OLJKW |
6WLWFK SODWH |
||
|
4. |
Reverse lever |
14. |
Bobbin cover |
|
5. |
Free arm |
15. |
Lower thread guide |
|
$FFHVVRU WUD |
16. |
Needle screw |
|
|
6WLWFK OHQJWK GLDO |
17. |
Presser foot lift |
|
|
8. |
Handwheel |
18. |
Needle thread guide |
|
6WLWFK VHOHFWLRQ GLDO |
19. |
Presser foot bar and presser foot holder |
|
|
10. |
Built-in needle threader |
20. |
Presser foot |
6
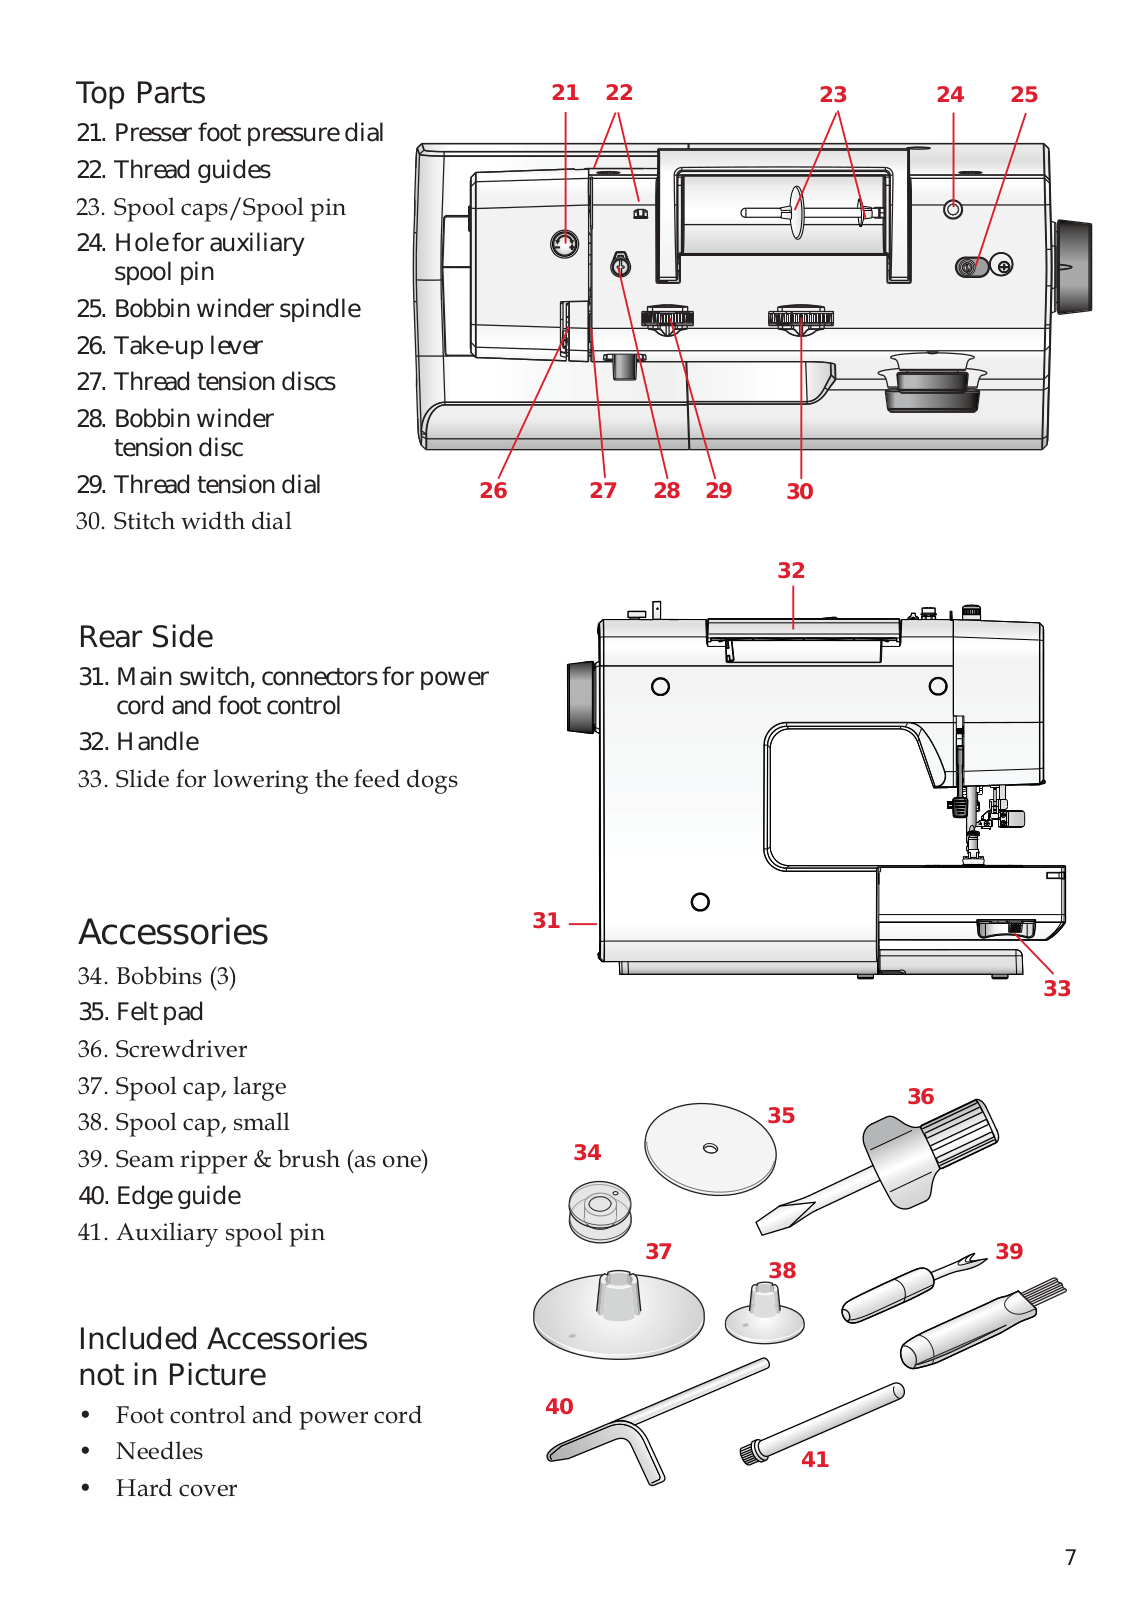
Top Parts
21.Presser foot pressure dial
22.Thread guides
6SRRO FDSV 6SRRO SLQ
24.Hole for auxiliary spool pin
25.Bobbin winder spindle
26.Take-up lever
27.Thread tension discs
28.Bobbin winder tension disc
29.Thread tension dial
6WLWFK ZLGWK GLDO
|
21 |
22 |
23 |
24 |
25 |
||
|
26 |
27 |
28 |
29 |
30 |
||
|
32 |
Rear Side
31.Main switch, connectors for power cord and foot control
32.Handle
6OLGH IRU ORZHULQJ WKH IHHG GRJV
Accessories
%REELQV
35. Felt pad
6FUHZGULYHU
6SRRO FDS ODUJH
6SRRO FDS VPDOO
6HDP ULSSHU EUXVK DV RQH
40. Edge guide
$X[LOLDU VSRRO SLQ
Included Accessories not in Picture
)RRW FRQWURO DQG SRZHU FRUG
1HHGOHV
+DUG FRYHU
7
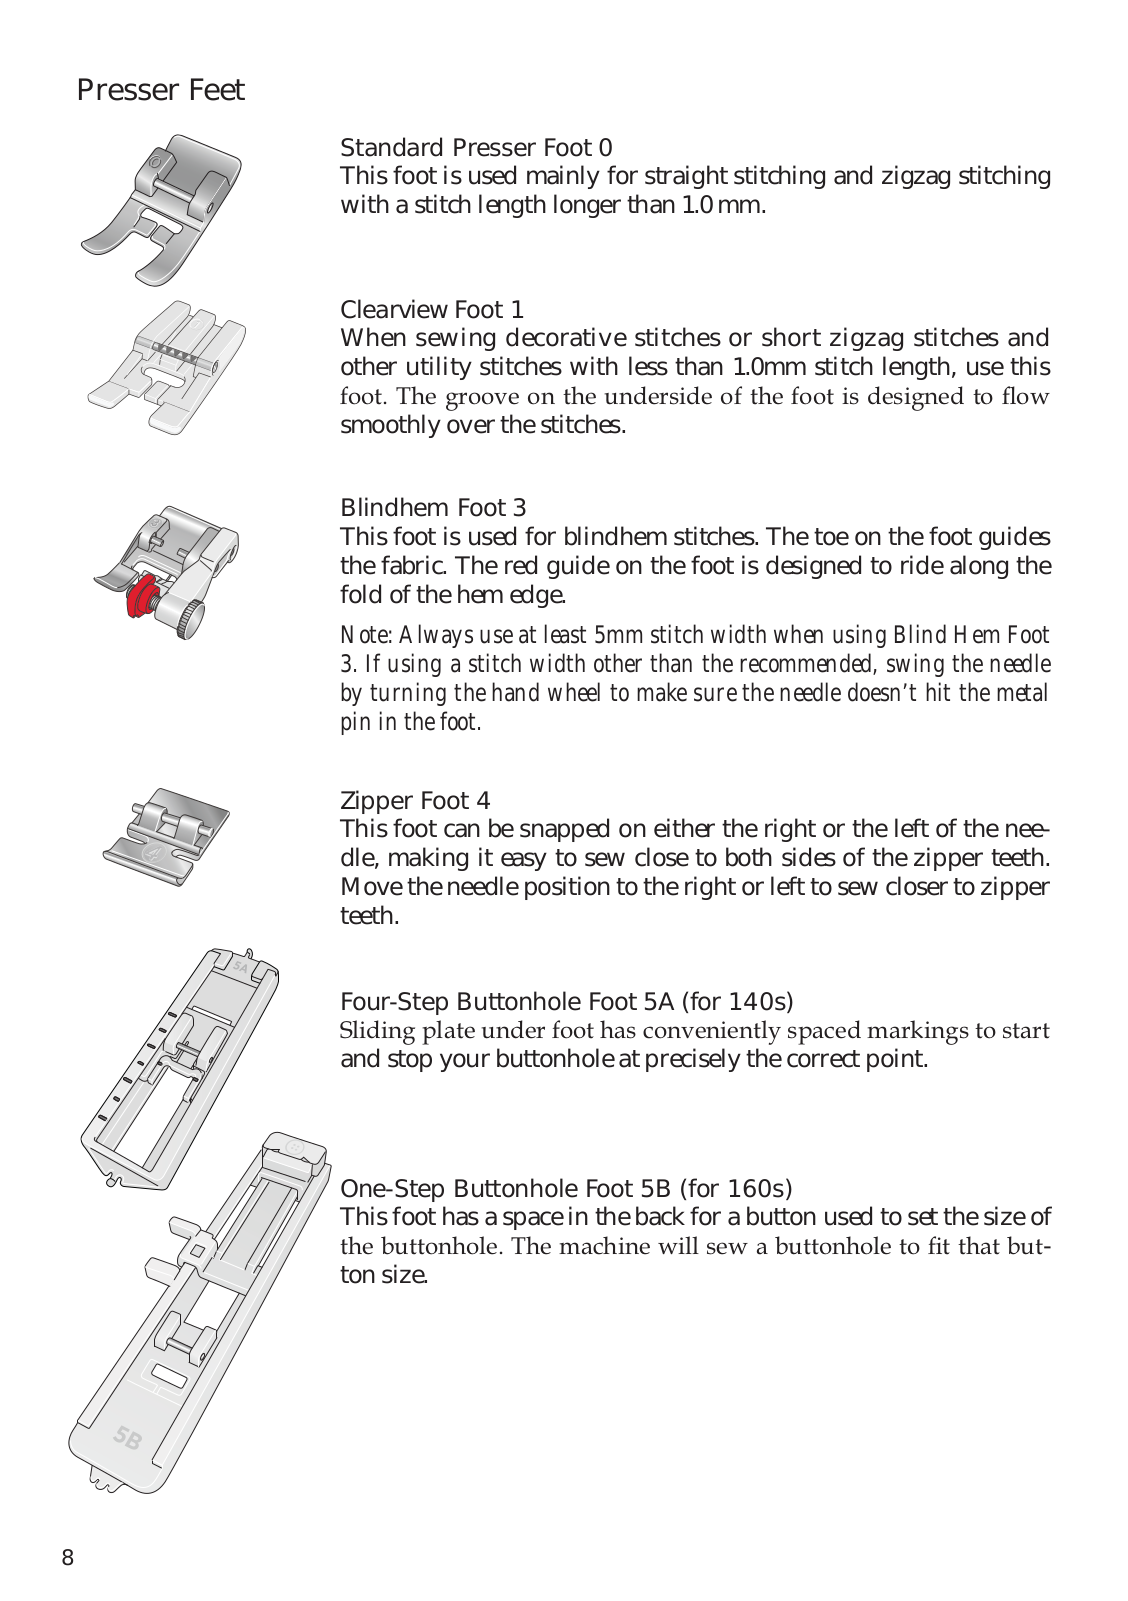
Presser Feet
Standard Presser Foot 0
This foot is used mainly for straight stitching and zigzag stitching with a stitch length longer than 1.0 mm.
Clearview Foot 1
When sewing decorative stitches or short zigzag stitches and other utility stitches with less than 1.0mm stitch length, use this
IRRW 7KH JURRYH RQ WKH XQGHUVLGH RI WKH IRRW LV GHVLJQHG WR ÁRZ smoothly over the stitches.
Blindhem Foot 3
This foot is used for blindhem stitches. The toe on the foot guides the fabric. The red guide on the foot is designed to ride along the fold of the hem edge.
Note: Always use at least 5mm stitch width when using Blind Hem Foot 3. If using a stitch width other than the recommended, swing the needle by turning the hand wheel to make sure the needle doesn’t hit the metal pin in the foot.
Zipper Foot 4
This foot can be snapped on either the right or the left of the needle, making it easy to sew close to both sides of the zipper teeth. Move the needle position to the right or left to sew closer to zipper teeth.
Four-Step Buttonhole Foot 5A (for 140s)
6OLGLQJ SODWH XQGHU IRRW KDV FRQYHQLHQWO VSDFHG PDUNLQJV WR VWDUW and stop your buttonhole at precisely the correct point.
One-Step Buttonhole Foot 5B (for 160s)
This foot has a space in the back for a button used to set the size of
WKH EXWWRQKROH 7KH PDFKLQH ZLOO VHZ D EXWWRQKROH WR ÀW WKDW EXWton size.
8
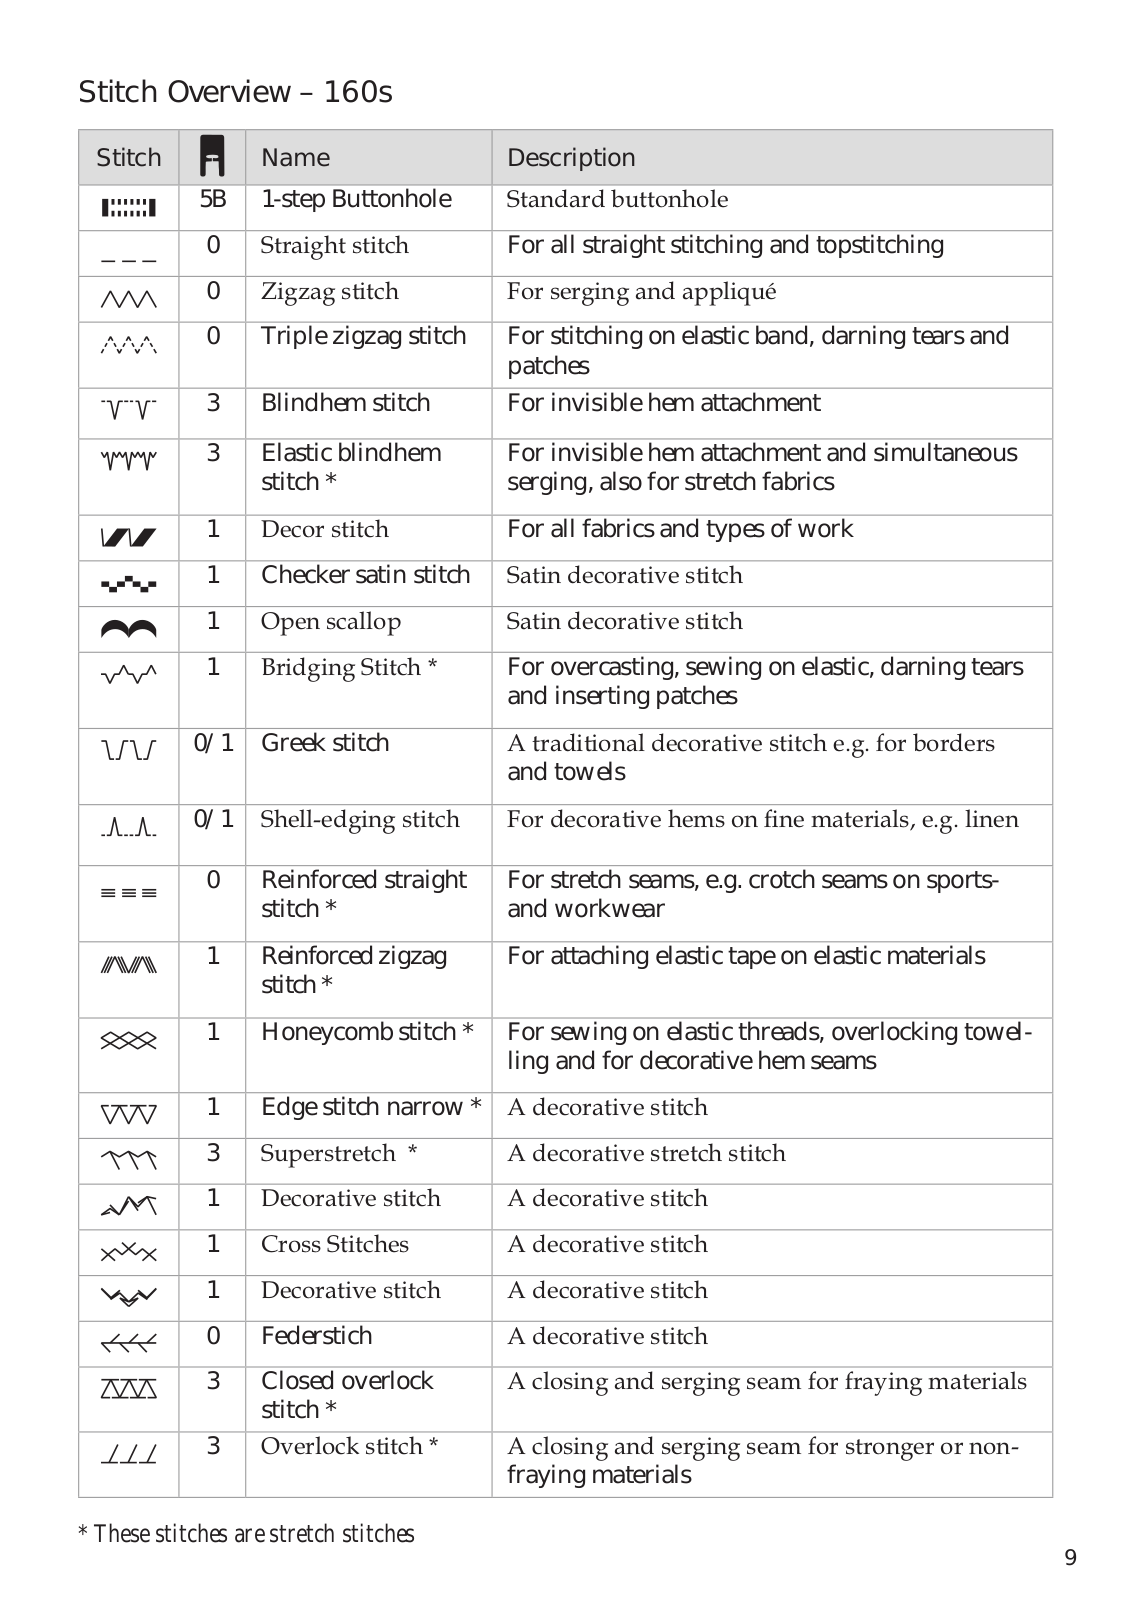
Stitch Overview – 160s
|
Stitch |
Name |
Description |
|||||||||
|
5B |
1-step Buttonhole |
6WDQGDUG EXWWRQKROH |
|||||||||
|
0 |
6WUDLJKW VWLWFK |
For all straight stitching and topstitching |
|||||||||
|
0 |
=LJ]DJ VWLWFK |
)RU VHUJLQJ DQG DSSOLTXp |
|||||||||
|
0 |
Triple zigzag stitch |
For stitching on elastic band, darning tears and |
|||||||||
|
patches |
|||||||||||
|
3 |
Blindhem stitch |
For invisible hem attachment |
|||||||||
|
3 |
Elastic blindhem |
For invisible hem attachment and simultaneous |
|||||||||
|
stitch * |
serging, also for stretch fabrics |
||||||||||
|
1 |
‘HFRU VWLWFK |
For all fabrics and types of work |
|||||||||
|
1 |
Checker satin stitch |
6DWLQ GHFRUDWLYH VWLWFK |
|||||||||
|
1 |
2SHQ VFDOORS |
6DWLQ GHFRUDWLYH VWLWFK |
|||||||||
|
1 |
%ULGJLQJ 6WLWFK |
For overcasting, sewing on elastic, darning tears |
|||||||||
|
and inserting patches |
|||||||||||
|
0/1 |
Greek stitch |
$ WUDGLWLRQDO GHFRUDWLYH VWLWFK H J IRU ERUGHUV |
|||||||||
|
and towels |
|||||||||||
|
0/1 |
6KHOO HGJLQJ VWLWFK |
)RU GHFRUDWLYH KHPV RQ ÀQH PDWHULDOV H J OLQHQ |
|||||||||
|
0 |
Reinforced straight |
For stretch seams, e.g. crotch seams on sports- |
|||||||||
|
stitch * |
and workwear |
||||||||||
|
1 |
Reinforced zigzag |
For attaching elastic tape on elastic materials |
|||||||||
|
stitch * |
|||||||||||
|
1 |
Honeycomb stitch * |
For sewing on elastic threads, overlocking towel- |
|||||||||
|
ling and for decorative hem seams |
|||||||||||
|
1 |
Edge stitch narrow * |
$ GHFRUDWLYH VWLWFK |
|||||||||
|
3 |
6XSHUVWUHWFK |
$ GHFRUDWLYH VWUHWFK VWLWFK |
|||||||||
|
1 |
‘HFRUDWLYH VWLWFK |
$ GHFRUDWLYH VWLWFK |
|||||||||
|
1 |
&URVV 6WLWFKHV |
$ GHFRUDWLYH VWLWFK |
|||||||||
|
1 |
‘HFRUDWLYH VWLWFK |
$ GHFRUDWLYH VWLWFK |
|||||||||
|
0 |
Federstich |
$ GHFRUDWLYH VWLWFK |
|||||||||
|
3 |
Closed overlock |
$ FORVLQJ DQG VHUJLQJ VHDP IRU IUDLQJ PDWHULDOV |
|||||||||
|
stitch * |
|||||||||||
|
3 |
2YHUORFN VWLWFK |
$ FORVLQJ DQG VHUJLQJ VHDP IRU VWURQJHU RU QRQ |
|||||||||
|
fraying materials |
|||||||||||
* These stitches are stretch stitches
9
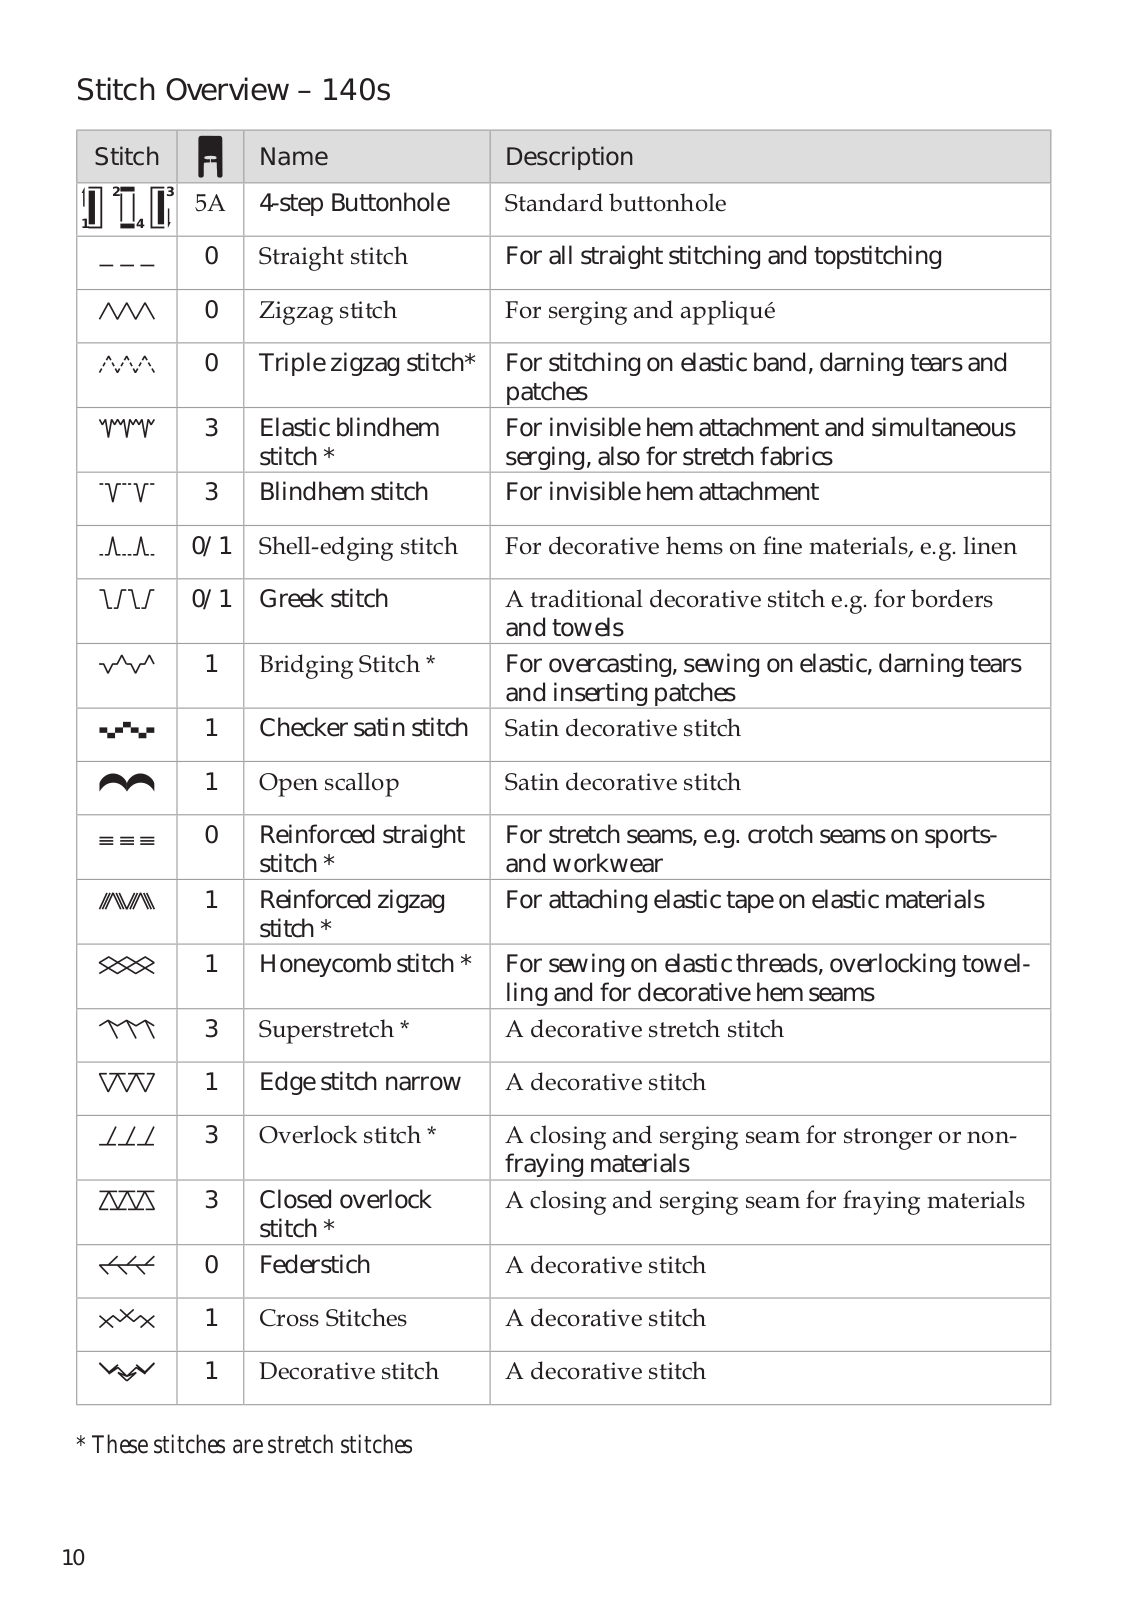
Stitch Overview – 140s
|
Stitch |
Name |
Description |
||||||||||||||
|
1 |
2 |
4 |
3 |
$ |
4-step Buttonhole |
6WDQGDUG EXWWRQKROH |
||||||||||
|
0 |
6WUDLJKW VWLWFK |
For all straight stitching and topstitching |
||||||||||||||
|
0 |
=LJ]DJ VWLWFK |
)RU VHUJLQJ DQG DSSOLTXp |
||||||||||||||
|
0 |
Triple zigzag stitch* |
For stitching on elastic band, darning tears and |
||||||||||||||
|
patches |
||||||||||||||||
|
3 |
Elastic blindhem |
For invisible hem attachment and simultaneous |
||||||||||||||
|
stitch * |
serging, also for stretch fabrics |
|||||||||||||||
|
3 |
Blindhem stitch |
For invisible hem attachment |
||||||||||||||
|
0/1 |
6KHOO HGJLQJ VWLWFK |
)RU GHFRUDWLYH KHPV RQ ÀQH PDWHULDOV H J OLQHQ |
||||||||||||||
|
0/1 |
Greek stitch |
$ WUDGLWLRQDO GHFRUDWLYH VWLWFK H J IRU ERUGHUV |
||||||||||||||
|
and towels |
||||||||||||||||
|
1 |
%ULGJLQJ 6WLWFK |
For overcasting, sewing on elastic, darning tears |
||||||||||||||
|
and inserting patches |
||||||||||||||||
|
1 |
Checker satin stitch |
6DWLQ GHFRUDWLYH VWLWFK |
||||||||||||||
|
1 |
2SHQ VFDOORS |
6DWLQ GHFRUDWLYH VWLWFK |
||||||||||||||
|
0 |
Reinforced straight |
For stretch seams, e.g. crotch seams on sports- |
||||||||||||||
|
stitch * |
and workwear |
|||||||||||||||
|
1 |
Reinforced zigzag |
For attaching elastic tape on elastic materials |
||||||||||||||
|
stitch * |
||||||||||||||||
|
1 |
Honeycomb stitch * |
For sewing on elastic threads, overlocking towel- |
||||||||||||||
|
ling and for decorative hem seams |
||||||||||||||||
|
3 |
6XSHUVWUHWFK |
$ GHFRUDWLYH VWUHWFK VWLWFK |
||||||||||||||
|
1 |
Edge stitch narrow |
$ GHFRUDWLYH VWLWFK |
||||||||||||||
|
3 |
2YHUORFN VWLWFK |
$ FORVLQJ DQG VHUJLQJ VHDP IRU VWURQJHU RU QRQ |
||||||||||||||
|
fraying materials |
||||||||||||||||
|
3 |
Closed overlock |
$ FORVLQJ DQG VHUJLQJ VHDP IRU IUDLQJ PDWHULDOV |
||||||||||||||
|
stitch * |
||||||||||||||||
|
0 |
Federstich |
$ GHFRUDWLYH VWLWFK |
||||||||||||||
|
1 |
&URVV 6WLWFKHV |
$ GHFRUDWLYH VWLWFK |
||||||||||||||
|
1 |
‘HFRUDWLYH VWLWFK |
$ GHFRUDWLYH VWLWFK |
||||||||||||||
* These stitches are stretch stitches
10
PREPARATIONS
Unpacking
3ODFH WKH ER[ RQ D VWHDG ÁDW VXUIDFH /LIW the machine out of the box, remove the outer packaging and lift off the machine carrying case.
2.Remove all outer packing material and the plastic bag.
Note: Your SMARTER BY PFAFF™ 140s/160s sewing machine is adjusted to provide the best stitch result at normal room temperature. Extreme hot and cold temperatures can affect the sewn result.
Connect to the Power Supply
$PRQJ WKH DFFHVVRULHV RX ZLOO ÀQG WKH SRZHU plug and the foot control.
Note: Consult a qualified electrician if in doubt as how to connect the machine to the power source. Unplug the power cord when the machine is not in use.
For this sewing machine, foot control model
)& 9 )& $ )& ‘9 PXVW EH XVHG
1.Connect the plug of the foot control to
WKH FRQQHFWLQJ VRFNHW $ RI WKH VHZLQJ machine and to the wall socket. The sewing speed is regulated by pressing the foot control.
2.Press the 2 , VZLWFK % WR ´,µ WR WXUQ RQ power and light.
Pack away after Sewing
6ZLWFK WKH PDLQ VZLWFK RII
2.Unplug the cord from the wall socket and then from the machine.
3.Unplug the foot control cord from the machine. Wind the cord around the foot control for easy storage.
4.Place all accessories in the accessory tray.
6OLGH WKH WUD RQ WR WKH PDFKLQH DURXQG WKH free arm.
5.Place the foot control in the space above the free arm.
6.Put on the hard cover.
B
A
For the USA and Canada
7KLV VHZLQJ PDFKLQH KDV D SRODUL]HG SOXJ RQH blade wider than the other). To reduce the risk
RI HOHFWULF VKRFN WKLV SOXJ LV LQWHQGHG WR ÀW LQ D polarized outlet only one way. If the plug does
QRW ÀW IXOO LQ WKH RXWOHW UHYHUVH WKH SOXJ ,I LW VWLOO GRHV QRW ÀW FRQWDFW D TXDOLÀHG HOHFWULFLDQ
WR LQVWDOO WKH SURSHU RXWOHW ‘R QRW PRGLI WKH plug in any way.
11
Loading…
- Page 1
Owner’s Manual 160s 150s 140s 130s SMARTER BY PFAFF ™ – inspired and developed by the premier PFAFF sewing machine brand ®… -
Page 2: Important Safety Instructions
This household sewing machine is designed to comply with IEC/ EN 60335-2-28 and UL1594. IMPORTANT SAFETY INSTRUCTIONS When using an electrical appliance, basic safety precautions should always be followed, including the following: Read all instructions before using this household sewing machine. Keep the instructions at a suitable place close to the machine.
- Page 3
• Do not use bent needles. needle causing it to break. • Wear safety glasses. in the needle area, such as threading needle, changing needle, threading bobbin, or changing presser foot, etc. • Never drop or insert any object into any opening. •… - Page 4
FOR EUROPE ONLY: This appliance can be used by children aged from 8 years and above and persons with reduced physical, sensory or mental capabilities or lack of experience and knowledge if they have been given supervision or instruction concerning use of the appliance in a safe way and understand the hazards involved. -
Page 5: Table Of Contents
TABLE OF CONTENTS INTRODUCTION ……… 6 ……….21 Machine Overview ……….6 ……….22 …………6 Adjustable Needle Position ……22 Top Parts …………7 ……….22 …………7 Accessories …………7 SEWING ……….23 Included Accessories not in Picture ..7 ….23 Presser Feet ………..8 ……23 ……9 ……….23 ….10 ……24 ……24…
-
Page 6: Introduction
INTRODUCTION Machine Overview Front Side 1. Threading slots 12. Needle bar 2. Thread cutter 3. LED light 4. Reverse lever 14. Bobbin cover 5. Free arm 15. Lower thread guide 6. Accessory tray 16. Needle screw 17. Presser foot lift 18.
-
Page 7: Top Parts
Top Parts 21. Presser foot pressure dial 22. Thread guides 24. Hole for auxiliary spool pin 25. Bobbin winder spindle 26. Take-up lever 27. Thread tension discs 28. Bobbin winder tension disc 29. Thread tension dial Rear Side 31. Main switch, connectors for power cord and foot control 32.
-
Page 8: Presser Feet
Presser Feet Standard Presser Foot 0 This foot is used mainly for straight stitching and zigzag stitching with a stitch length longer than 1.0 mm. Clearview Foot 1 When sewing decorative stitches or short zigzag stitches and other utility stitches with less than 1.0mm stitch length, use this smoothly over the stitches.
- Page 9
Stitch Overview – 150s/160s Stitch Name Description 1-step Buttonhole For all straight stitching and topstitching Triple zigzag stitch For stitching on elastic band, darning tears and patches Blindhem stitch For invisible hem attachment Elastic blindhem For invisible hem attachment and simultaneous stitch * serging, also for stretch fabrics Decor stitch… - Page 10
Stitch Overview – 130s/140s Stitch Name Description 4-step Buttonhole For all straight stitching and topstitching Triple zigzag stitch* For stitching on elastic band, darning tears and patches Elastic blindhem For invisible hem attachment and simultaneous stitch * serging, also for stretch fabrics Blindhem stitch For invisible hem attachment Greek stitch… -
Page 11: Preparations
2. Remove all outer packing material and the plastic bag. Note: Your SMARTER BY PFAFF™ 130s/140s/ 150s/160s sewing machine is adjusted to provide the best stitch result at normal room temperature. Ex- treme hot and cold temperatures can affect the sewn result.
-
Page 12: Free Arm
Pack away after Sewing Note: After switching off, residual power may still remain in the machine. This may cause the light to stay on for a few seconds while the power is consumed. This is normal behavior for an energy 2.
-
Page 13: Spool Pins
Spool Pins Your machine has two spool pins, a main spool pin and an auxiliary spool pin. The spool pins are designed for all types of thread. The main spool pin is used in a Narrow thread spool the horizontal position for normal threads and the vertical position for large spools or specialty threads.
-
Page 14: Threading The Machine
Threading the Machine Make sure that the presser foot is raised and the needle is in its highest position. 5. Thread the needle.
-
Page 15: Needle Threader
Needle Threader The integrated needle threader allows you The needle must be in its highest position to use the built-in needle threader. Turn the handwheel until the notch on the wheel is lowering the presser foot. 1. Use the handle (B) to pull the needle threader all the way down.
-
Page 16: Threading For Twin Needle
Threading for Twin Needle Replace the sewing needle with a twin needle. Make sure that the presser foot is raised and the needle is in its highest position. 1. Place the thread spool on the spool pin and fit the appropriately sized spool cap.
-
Page 17: Bobbin Winding
Bobbin Winding spool cap tightly against the spool. front to the back. Pull the thread clockwise around the inside to the outside. 4. Place the bobbin on the bobbin spindle. 5. Push the bobbin spindle to the right to activate the bobbin winding. Press the foot control to wind the bobbin.
-
Page 18: Presser Foot Pressure
Presser Foot Pressure The presser foot pressure has been pre-set to not need to adjust the presser foot pressure. very light or heavy fabric, adjusting the pres- sure can improve the result. For very light fabrics, loosen the pressure by turning the dial counterclockwise.
-
Page 19: Needles
Needles The sewing machine needle plays an important role recommend needles of system 130/705H. The needle package included with your machine contains needles Universal Needle (A) Universal needles have a slightly rounded point and come in a variety of sizes. For general sewing in a vari- ety of fabric types and weights.
-
Page 20: Lowering Feed Dogs
Lowering Feed Dogs You can lower the feed dogs by moving the switch at the back of the free arm to the wish to raise the feed dogs. Note: The feed dogs will not raise immediately when the lever is switched. Turn the handwheel one full turn or start sewing to re-engage the feed dogs.
-
Page 21: Stitch Selection
Stitch Selection desired stitch. The selected stitch is the one The stitches printed in white on the stitch Use non-stretch stitches when sewing woven fabrics, leather or vinyl and stretch Note: Always raise the needle above the fabric and presser foot before you turn the stitch selc- tion dial.
-
Page 22: Adjustable Needle Position
Stitch Width sired stitch width. The higher the number, the wider the stitch width. The stitch width can be varied wheel correspond to the stitch width in Note: Before you turn the stitch width dial, raise the needle to its highest position, other- wise it may bend or break.
-
Page 23: Sewing
SEWING stitch scribed, a chart shows the recommended set- chart to the right. Start to Sew – Straight Stitch A. Recommended stitch B. Stitch length in mm Raise the presser foot and position the fab- C. Stitch width in mm ric under it, next to a seam allowance guide line on the needle plate.
-
Page 24: Reinforced Straight Stitch
Reinforced Straight Stitch stitch This stitch is stronger than regular straight stitch, due to the fact that it is a triple and elastic stitch. The reinforced straight stitch can be used for heavy stretch fabrics, for Set for reinforced straight stitch crotch seams which are subject to consider- able strain and for topstitching heavy fabrics.
- Page 25
Overlock Stitch stitch The open overlock stitch sews the seam and overcast the edge all at one time, perfect for stretch fabrics. This stitch is more elas- tic than normal seams, very durable and Set for overlock stitch Tip: When sewing, guide the fabric edge along the metal pin of the foot. -
Page 26: Blindhem
Blindhem stitch The blindhem stitch is used to make invisible hems on skirts, trousers and home decorating. 1. Finish the edge of the hem. Set for blindhem stitch 2. Fold and press the hem allowance to the wrong side. 3. Fold the hem back on itself so approxi- extends beyond the fold.
-
Page 27: Darning With The
Sewing on Patches or Appliqués stitch To cover large holes it is necessary to sew a new piece of fabric onto the damaged area. Baste the new piece of fabric onto the dam- aged area on the right side of the fabric. Set for three-step zigzag stitch the three-step zigzag stitch.
- Page 28
Sewing on Buttons stitch 1. Remove the presser foot and lower the Set for button sewing 2. Mark the fabric where the button is to be located. Place the fabric and button under the ankle with the holes in the button lined up with the swing of the needle. - Page 29
Standard Buttonhole stitch (model 150s/160s) The fabric should be interfaced and/or stabi- lized where buttonholes are to be sewn. Set for buttonhole 1. Mark the start position and buttonhole Push the button holder open by pushing Push the button holder forward until button will determine the length of the buttonhole. - Page 30
Standard Buttonhole stitch (model 130s/140s) The fabric should be interfaced and/or stabi- lized where buttonholes are to be sewn. Set for buttonhole Prepare the Buttonhole Measure diameter and thickness of the but- tain correct buttonhole length. Mark the start position and buttonhole length on the fabric Note: Before starting to sew any buttonhole, al- ways push the the buttonhole foot fully back. -
Page 31: Stretch Fabrics
Use seam ripper and cut the buttonhole open from both ends towards the middle. The density of the buttonhole is adjusted Note: Density varies according to the fabric. Al- Carefully cut your buttonhole ways test sew a buttonhole on the fabric you are open with a seam ripper.
-
Page 32: Sewing Zippers
Sewing Zippers stitch the right or the left of the needle, making it 1.5-3 easy to sew both sides of the zipper. To sew the left side of the zipper, attach the Set for zipper To sew the right side of zipper, attach the Center Zipper Right presser foot Left presser foot…
-
Page 33: Maintenance
MAINTENANCE Cleaning the Machine To keep your sewing machine operating well, Wipe the exterior surface of your machine with a soft cloth to remove any dust or lint built up. Cleaning the Bobbin Area Note: Raise the needle, lower the feed dogs and turn off the machine.
-
Page 34: Troubleshooting
TROUBLESHOOTING ® your machine. For further information please contact your local authorized PFAFF dealer. General Problems The Seam has Uneven Stitches Fabric does not move? Is the thread tension correct? Make sure that the feed dogs are not lowered. Check needle thread tension and the threading.
-
Page 35: Intellectual Property
Bobbin Thread Breaks Did you insert the bobbin properly? Check the bobbin thread. Is the stitch plate hole damaged? Change the stitch plate. Is the bobbin area clean? Clean lint from bobbin area. Is the bobbin wound correctly? Wind a new bobbin. design.
- Page 36
4710092-26A English © 2014 KSIN Luxembourg II, S.ar.l. All rights reserved. Printed in Germany on environmentally-friendly paper…
Смотреть руководство для Pfaff Smarter by 140s ниже. Все руководства на ManualsCat.com могут просматриваться абсолютно бесплатно. Нажав кнопку «Выбор языка» вы можете изменить язык руководства, которое хотите просмотреть.
MANUALSCAT | RU
Вопросы и ответы
У вас есть вопрос о Pfaff Smarter by 140s, но вы не можете найти ответ в пользовательском руководстве? Возможно, пользователи ManualsCat.com смогут помочь вам и ответят на ваш вопрос. Заполните форму ниже — и ваш вопрос будет отображаться под руководством для Pfaff Smarter by 140s. Пожалуйста, убедитесь, что вы опишите свои трудности с Pfaff Smarter by 140s как можно более детально. Чем более детальным является ваш вопрос, тем более высоки шансы, что другой пользователь быстро ответит на него. Вам будет автоматически отправлено электронное письмо, чтобы проинформировать вас, когда кто-то из пользователей ответит на ваш вопрос.
Путаются нитки,ткань не движется,игла стоит на месте
Настя2019-09-09
ерхняя нить, наматывается на шпульке и или же комок сходит на строчку и идёт дальше с таким же темпом, или обрывает нить. как устранить этот дефект, 2 дня не шила, никто к машинке не подходил тем более не трогали.
Лариса2022-04-02
Задать вопрос о Pfaff Smarter by 140s
- Бренд:
- Pfaff
- Продукт:
- швейные машины
- Модель/название:
- Smarter by 140s
- Тип файла:
- Доступные языки:
- английский
Сопутствующие товары Pfaff Smarter by 140s
Смотреть руководство для Pfaff Smarter 160S ниже. Все руководства на ManualsCat.com могут просматриваться абсолютно бесплатно. Нажав кнопку «Выбор языка» вы можете изменить язык руководства, которое хотите просмотреть.
MANUALSCAT | RU
Вопросы и ответы
У вас есть вопрос о Pfaff Smarter 160S, но вы не можете найти ответ в пользовательском руководстве? Возможно, пользователи ManualsCat.com смогут помочь вам и ответят на ваш вопрос. Заполните форму ниже — и ваш вопрос будет отображаться под руководством для Pfaff Smarter 160S. Пожалуйста, убедитесь, что вы опишите свои трудности с Pfaff Smarter 160S как можно более детально. Чем более детальным является ваш вопрос, тем более высоки шансы, что другой пользователь быстро ответит на него. Вам будет автоматически отправлено электронное письмо, чтобы проинформировать вас, когда кто-то из пользователей ответит на ваш вопрос.
Задать вопрос о Pfaff Smarter 160S
- Бренд:
- Pfaff
- Продукт:
- швейные машины
- Модель/название:
- Smarter 160S
- Тип файла:
- Доступные языки:
- голландский
Сопутствующие товары Pfaff Smarter 160S
-
О товаре
-
Характеристики
-
Отзывы
2 -
Выбрать магазин
7
Все характеристики товара
Швейные характеристики
|
Тип управления |
электромеханическое |
|
Челнок |
горизонтальный (ротационный) |
|
Количество операций |
23 |
|
Количество петель |
1 |
|
Максимальная длина стежка, мм |
4 |
|
Максимальная ширина строчки, мм |
6 |
|
Обметка петли |
автомат |
|
Виды петель |
прямоугольная (бельевая) |
|
Регулировка усилия давления лапки на ткань |
есть |
|
Нитевдеватель |
есть |
|
Шитье двойной иглой |
есть |
|
Комплектация |
Лапка универсальная. Лапка прозрачная. Лапка для потайной строчки. Лапка для молнии. Лапка для петли. Шпульки. Войлочная подкладка. Отвертка. Пластина для катушки(большая, маленькая). Вспариватель. Кисточка. Направитель. Катушкодержатель. Иглы. Педаль. Шнур. Жесткий чехол. Инструкция на русском языке. |
Дополнительно
|
Подсветка рабочей поверхности |
светодиодная |
|
Съемная рукавная платформа |
есть |
|
Вес, кг |
6,3 |
|
Мощность, Вт |
70 |
|
Материал корпуса |
пластик |
|
Материал каркаса |
металл |
|
Размер (длина х ширина х высота), см |
— |
|
Страна сборки |
Китай |
|
Состояние товара |
новый |
А вот и еще интересные новости по теме: