

SERVICE MANUAL

SERVICE MANUAL
Edition Date Modifications
01 12/2015 First Edition
02 09/2016 Wiring diagram tank version updated
II
Ed. 02 of 09/2016

SERVICE MANUAL
MACHINE DESCRIPTION
FIRST INSTALLATION AND
PRELIMINARY OPERATIONS
REMOVAL OF THE EXTERNAL
SURFACE
INFUSION UNIT
HEATER
HYDRAULIC CIRCUIT
ELECTRIC COMPONENTS
TROUBLESHOOTING
1
2
3
4
5
6
7
8
DIAGRAMS
MAINTENANCE CHECKING
SPARE PART CATALOGUE
9
10
11
Ed. 02 of 09/2016
I

INDEX
SERVICE MANUAL
1. MACHINE DESCRIPTION ……..1.1
1.1 DESCRIPTION ……………….1.2
1.2 KEYBOARD DESCRIPTION
(Standard configuration)………..1.3
1.3 SAFETY REGULATIONS ………..1.4
1.4 MACHINE IDENTIFICATION ……..1.7
1.5 TRANSPORT ………………..1.8
1.5.1 HANDLING ………………1.8
2. FIRST INSTALLATION AND
PRELIMINARY OPERATIONS …..2.1
2.1 FIRST INSTALLATION ………….2.2
2.1.1 WEIGHT AND DIMENSIONS ….2.2
2.1.2 CONNECTION TO THE
WATERLINE AND DRAINAGE
SYSTEM ………………..2.3
2.1.3 TECHNICAL SPECIFICATIONS..2.4
2.1.4 CONNECTION TO THE POWER
LINE …………………..2.4
2.1.5 PROCEDURE OF FIRST
INSTALLATION……………2.4
2.2 ACCESSORIES BOX . . . . . . . . . . . . . . 2.5
2.2.1 FITTING THE FILTER HOLDER..2.5
2.3 PROGRAMMING DOSES ……….2.6
3. REMOVAL OF THE
EXTERNAL SURFACE ………..3.1
3.1 REMOVAL OF WATER TANK …….3.2
3.2 REMOVAL OF THE CUP
HOLDER SURFACE……………3.3
3.3 REMOVAL OF THE SIDE PANELS …3.4
3.4 REMOVAL OF THE REAR PANEL …3.4
3.5 TANK TO COLLECT WATER FILED ..3.4
3.6 REMOVAL OF THE FRONT PANEL ..3.5
3.6.1 REMOVAL OF KEYBOARD …..3.6
4. INFUSION UNIT …………….4.1
4.1 REMOVAL OF SHOWER
AND SEAL ………………4.2
4.2 COFFEE VALVE …………..4.3
4.3 EXPANSION VALVE ………..4.5
5. HEATER…………………..5.1
5.1 EMPTYING THE HEATER . . . . . . . . . . 5.2
5.2 REMOVAL OF THE HEATER ……..5.4
5.3 HEATING ELEMENT AND
HEAT PROTECTION …………..5.5
5.4 REPLACEMENT OF THE
LEVEL GAUGE ……………….5.6
5.5 ANTIVACUUM VALVE ………….5.7
5.6 SAFETY VALVE ………………5.8
6. HYDRAULIC CIRCUIT ………..6.1
6.1 PUMP DISASSEMBLY ………….6.2
6.2 REPLACING THE COFFEE VALVE …6.4
6.3 STEAM NOZZLE ……………..6.6
6.4 WATER TANK……………….6.11
6.4.1 REPLACEMENT OF
THE FLOAT……………..6.11
6.4.2 REMOVAL OF THE
MAGNETIC SENSOR………6.12
6.5 REMOVAL OF THE PRESSURE
SWITCH …………………..6.12
7. ELECTRIC COMPONENTS …….7.1
7.1 CONTROL UNIT………………7.2
8. TROUBLESHOOTING…………8.1
8.1 WATER LACK LIGHT…………..8.2
8.2 HEATING ELEMENT LIGHT ……..8.3
8.4 COFFEE DELIVERY ……………8.4
8.5 STEAM DELIVERY…………….8.4
8.6 HEATER ……………………8.5
9. DIAGRAMS ………………..9.1
9.1 HYDRAULIC DIAGRAM
TANK VERSION ………………9.2
9.2 HYDRAULIC DIAGRAM
DIRECT CONNECTION VERSION …9.3
9.3 WIRING DIAGRAM TANK VERSION..9.4
9.4 WIRING DIAGRAM DIRECT
CONNECTION VERSION………..9.5
10. MAINTENANCE CHECKING …..10.1
10.1 DAILY MAINTENANCE ………..10.2
10.2 WEEKLY MAINTENANCE ………10.2
10.3 YEARLY MAINTENANCE ………10.3
10.4 BIENNIAL MAINTENANCE ……..10.4
11. SPARE PART CATALOGUE ……11.1
11.1 CABINET PARTS …………….11.2
11.2 COMPLETE POURING UNIT ……11.3
11.3 TANK — FRAME COMPONENTS ….11.4
11.4 STOVE FILED COLLECT WATER …11.5
11.5 BOILER COMPONENTS ……….11.6
11.6 ELECTRICAL COMPONENTS …..11.7
Ed. 02 of 09/2016
III

SERVICE MANUAL
IV
Ed. 02 of 09/2016
1. MACHINE DESCRIPTION
SERVICE MANUAL
INDEX
1. MACHINE DESCRIPTION ……..1.1
1.1 DESCRIPTION ……………….1.2
1.2 KEYBOARD DESCRIPTION
(Standard configuration)………..1.3
1.3 SAFETY REGULATIONS ………..1.4
1.4 MACHINE IDENTIFICATION ……..1.7
1.5 TRANSPORT ………………..1.8
1.5.1 HANDLING ………………1.8
Ed. 02 of 09/2016
1.1
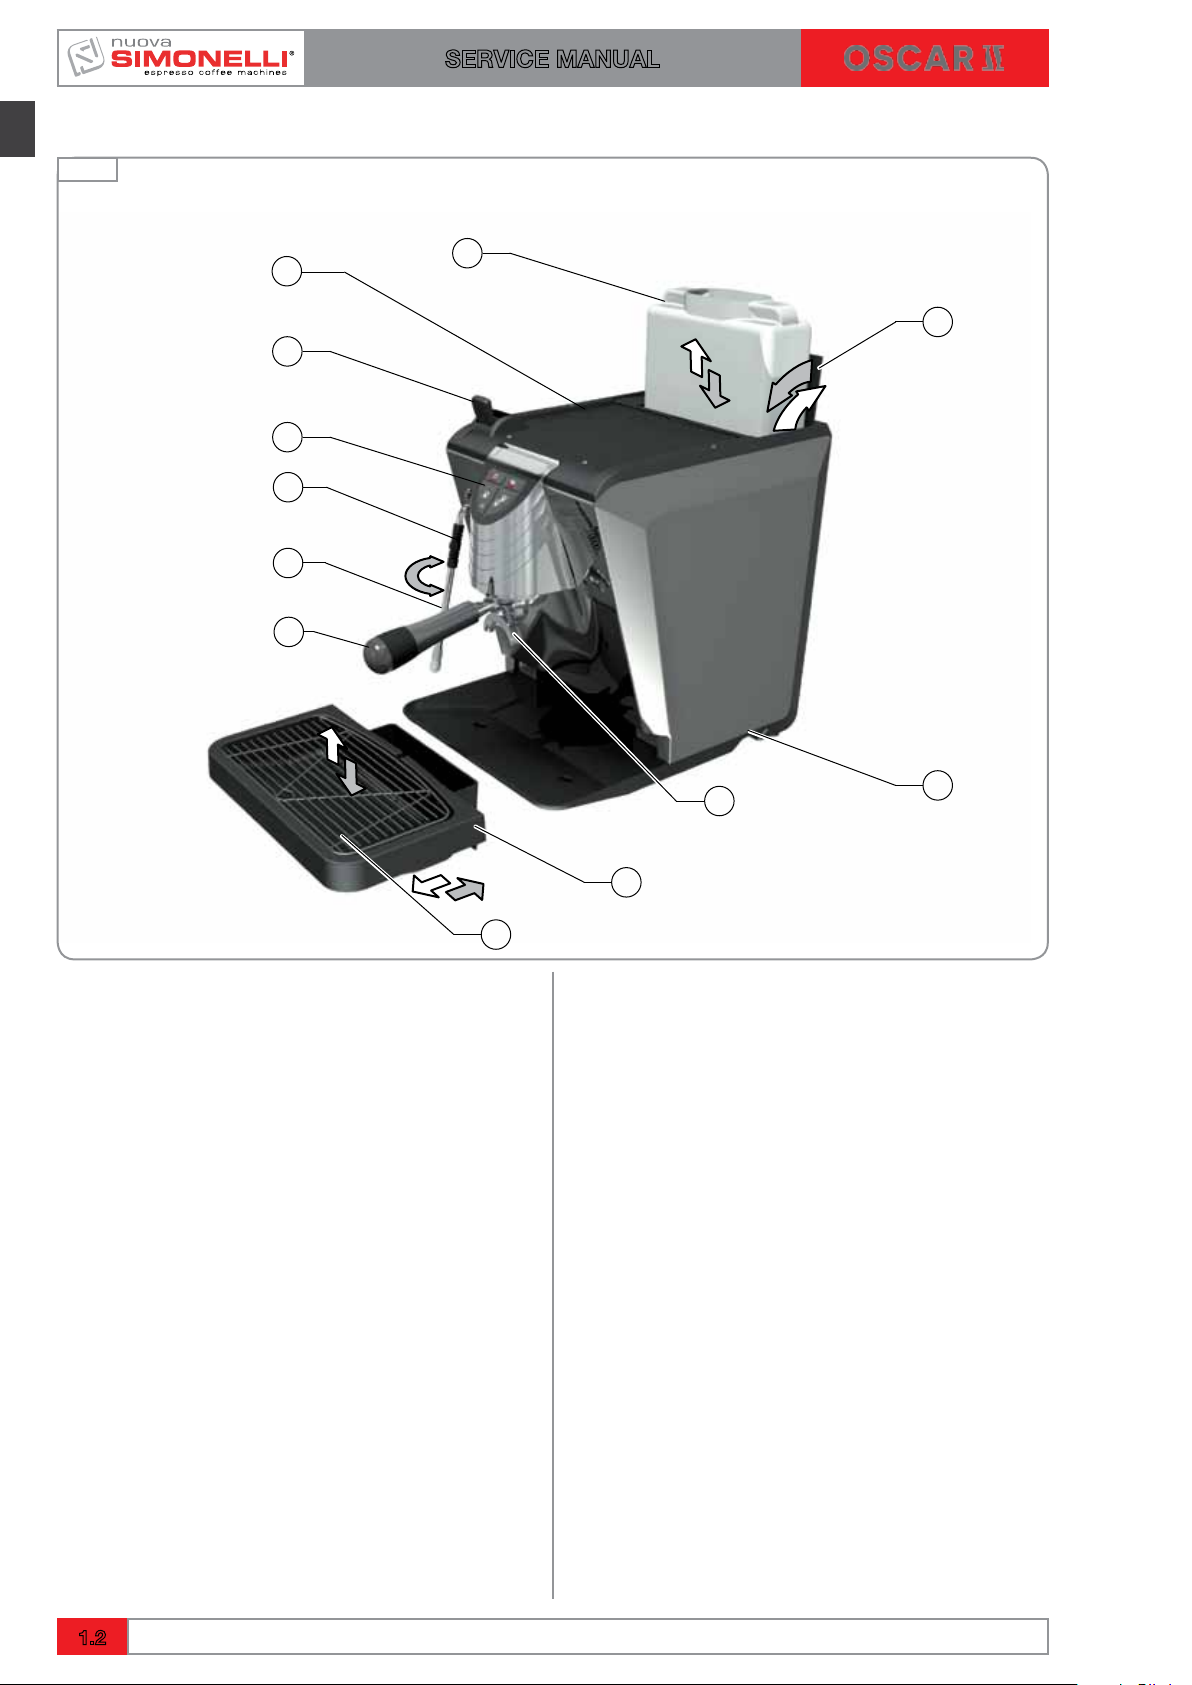
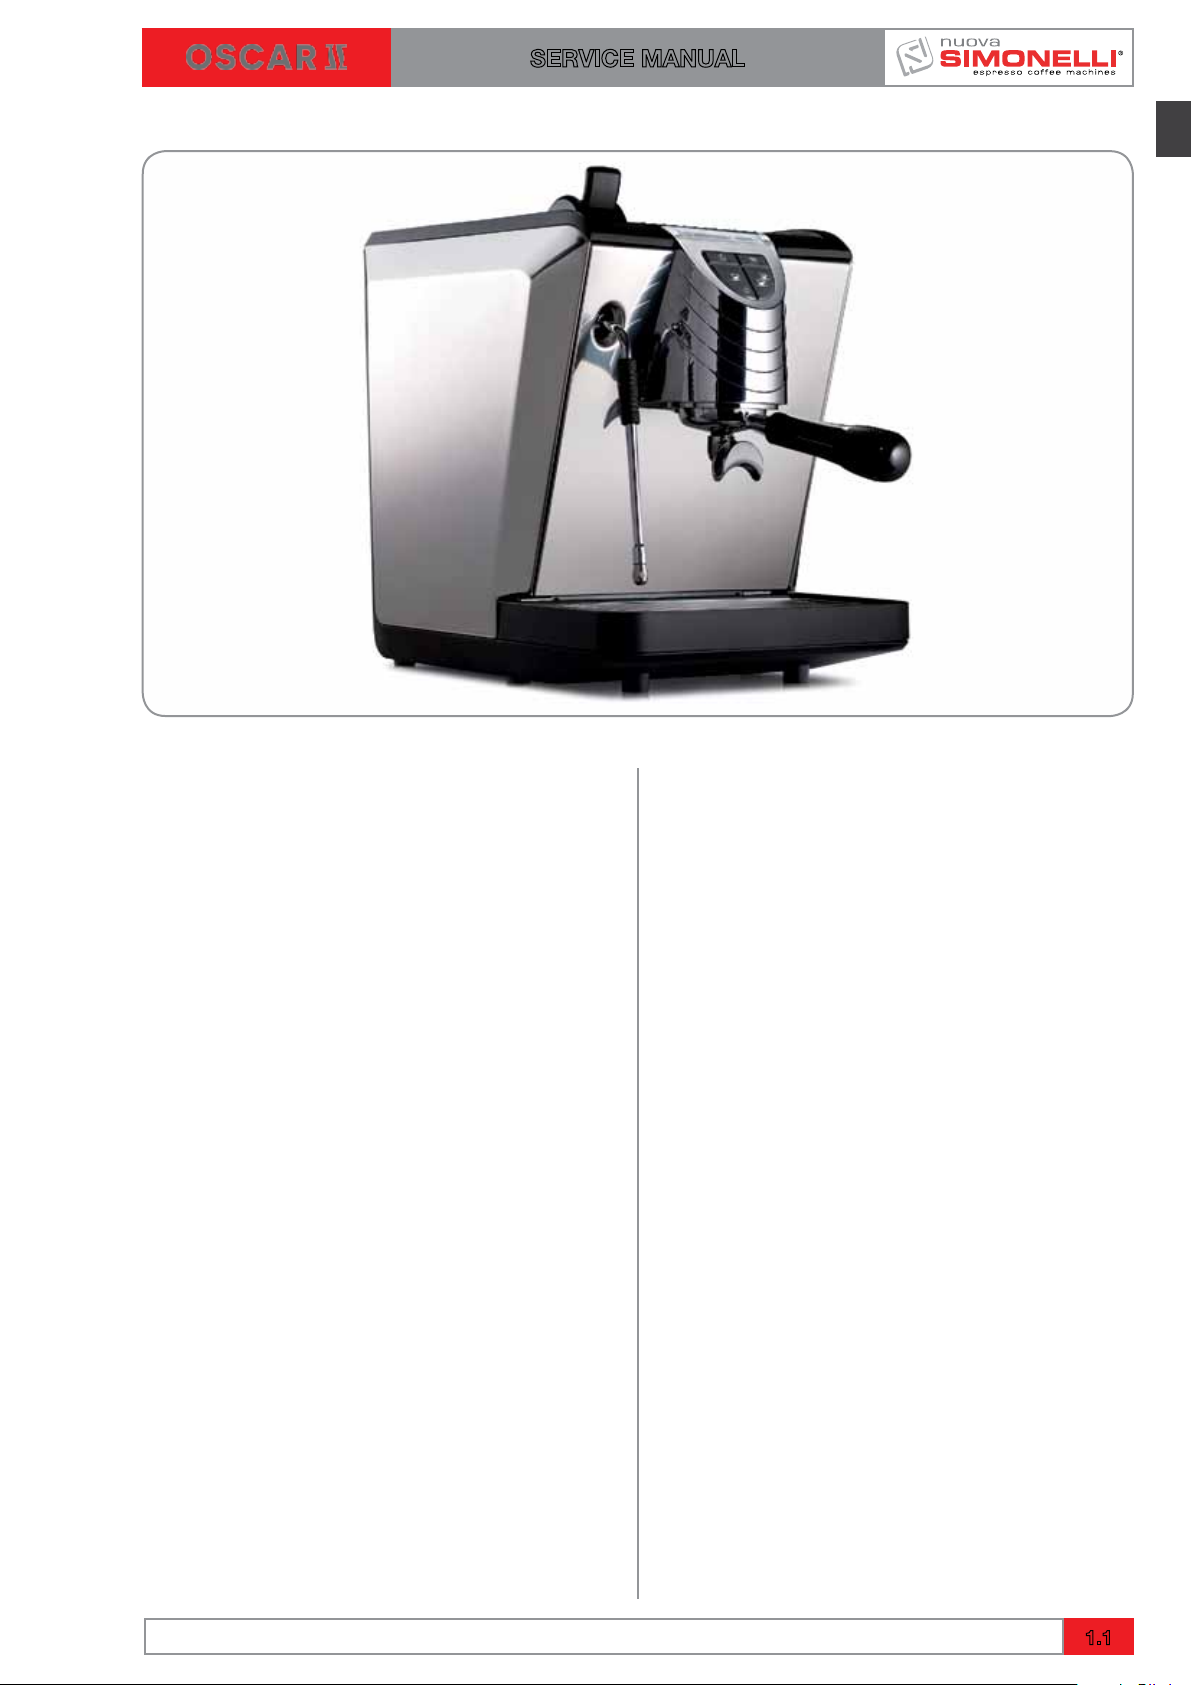
1.1 DESCRIPTION
Fig. 1
SERVICE MANUAL
12
11
10
2
1
9
3
4
6
5
LEGEND
1 Steam lever
2 Cup warming grill
3 Water reservoir
4 Water reservoir hatch
5 Main switch
6 Dispensing unit
7 Water drain tank
8 Cup support grill
9 Filter holder
10 Steam wand
11 Steam wand insulating rubber
12 Control panel
7
8
1.2
Ed. 02 of 09/2016
SERVICE MANUAL
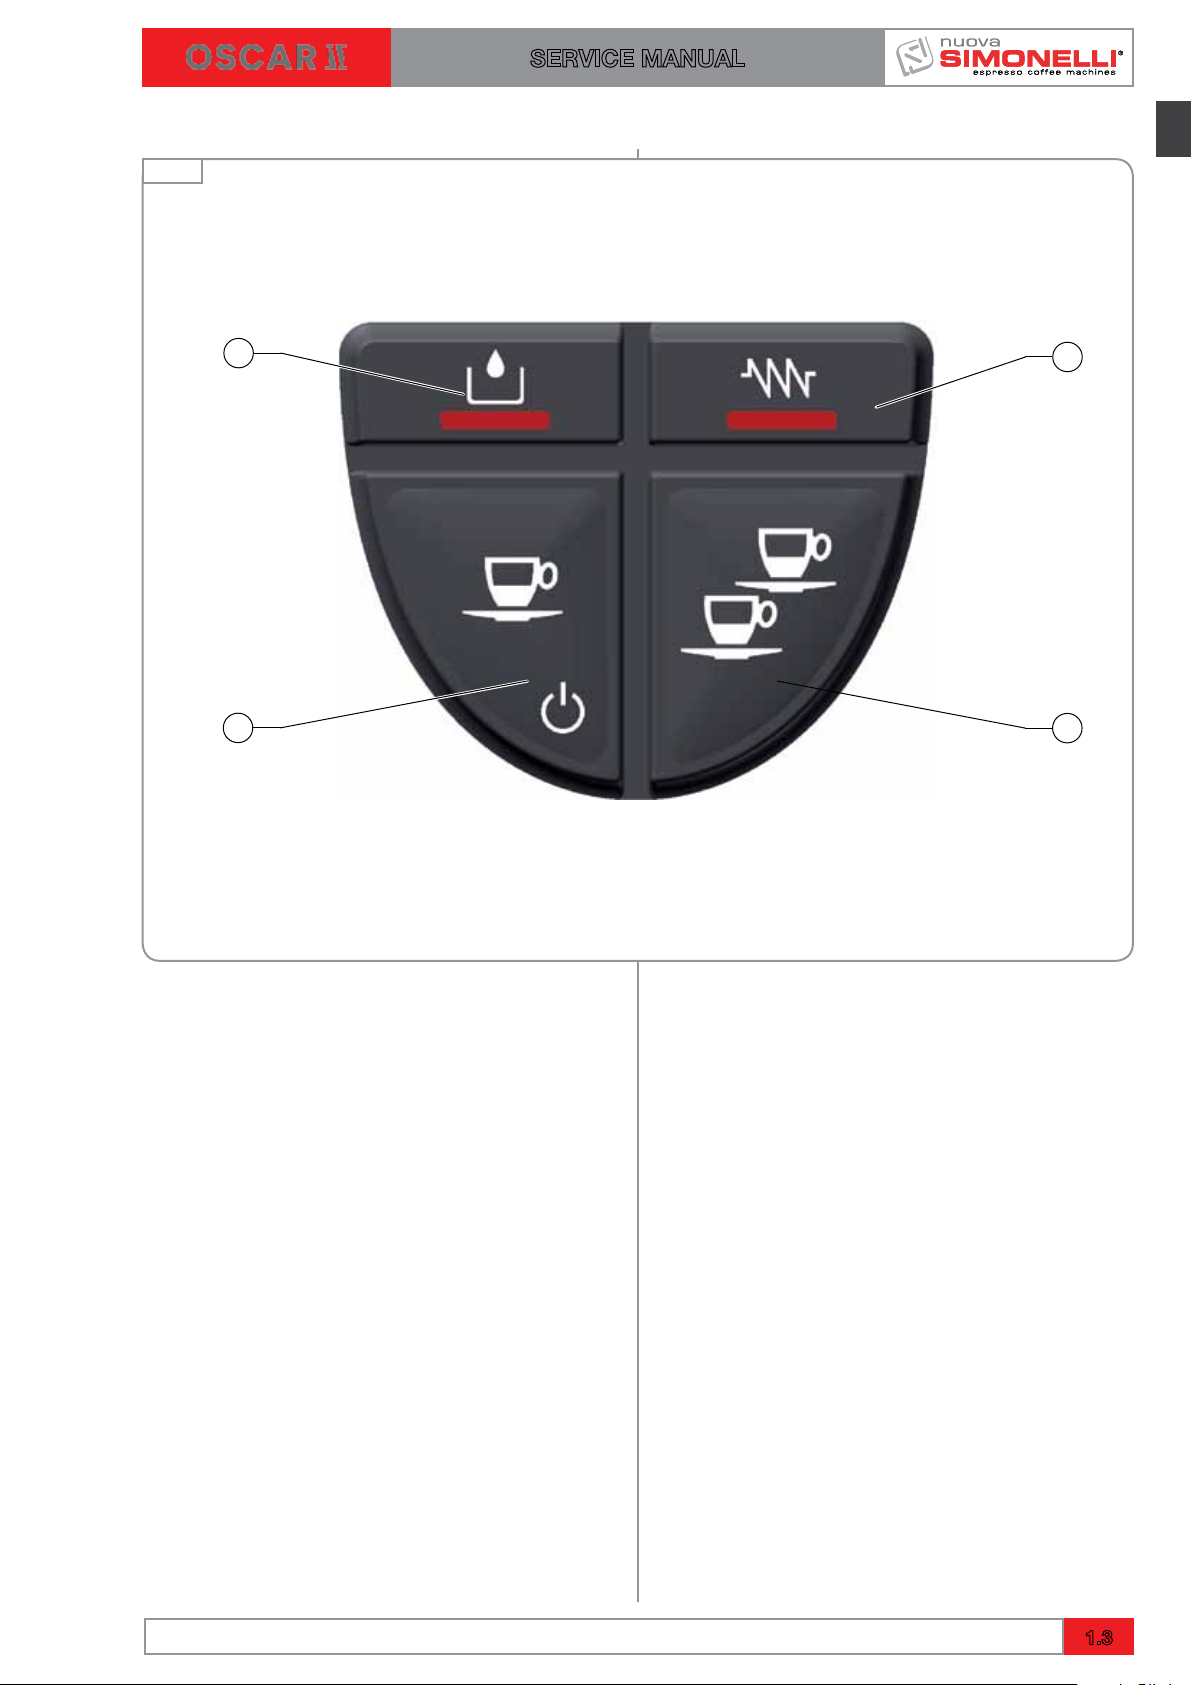
1.2 CONTROL PANEL DESCRIPTION (Configuration standard)
Fig. 2
1
4
2
3
LEGEND
1 Water level warning light
2 Heating resistance on warning light
3 Two coffee dispensing button / programming
entry
4 One coffee dispensing button / Standby
Ed. 02 of 09/2016
1.3
SERVICE MANUAL
1.3 SAFETY INDICATIONS
The present manual is an integral and essential part of the product and is to be delivered
to the user. Carefully read all warnings in
the manual as they provide important information required to install, use and maintain
the unit safely. Keep this manual in a safe
place for further consultation.
After having removed the packaging,
make certain that the unit is not damaged
in any way.
If you have any doubts, do not use the unit
and contact a professionally qualified person. Always keep all packaging (plastic
bags, polystyrene foam, nails, etc..) out of
the reach of children as they are a potential source of danger and never loiter the
environment with such materials.
DANGER OF POLLUTION
Fig. 3
The manufacturer cannot be held responsible for any damages incurred if the system is not grounded.
For electrical safety, this machine requires
a ground system. Contact a technically
certified electrician who must check that
the line electrical capacity is adequate for
the maximum capacity indicated on the
unit label.
Fig. 4
The qualified electrician must also check
that the section of the installation’s cables
is large enough for the absorbed power of
the appliance.
Never use adapters, multiple jacks or extension cords. When such items prove absolutely necessary, call in a qualified electrician.
The machine is can be installed in staff
kitchen areas in shops, offices and other
working environments, farm houses by
clients in hotels, motels and other residential type environments bed and breakfast type environments.
Before turning on the unit make certain
that the rating indicated on the label
matches the available power supply. The
nameplate can be seen inside the machine
when removing the water collection tray.
The machine must be installed according
to the applicable federal, state and local
standards (codes) in force with regard
to plumbing systems including backflow
prevention devices. For this reason, the
plumbing connections must be carried
out by a qualified technician.
The warranty expires if the characteristics
of the power supply do not correspond to
the nameplate data.
When installing the device, it is necessary
to use the parts and materials supplied with
the device itself. Should it be necessary to
use other parts, the installation engineer
needs to check their suitability for use in
contact with water for human consumption.
The installer must Make the hydraulic connections respecting the rules of hygiene
and water safety to environmental protection in force in the place of installation. So
for the hydraulic plant contact an authorized technician. Always utilise the new
hose supplied for connection to the water
supply. Old hoses must not be utilised.
The device needs to be supplied with
water that is suitable for human consumption and compliant with the regulations
in force in the place of installation. The
installation engineer needs confirmation
from the owner/manager of the system
that the water complies with the requirements and standards stated above.
This unit must only be used for the purposes described in the present manual.
The manufacturer cannot be held responsible for any damages caused by improper, mistaken and unreasonable use.
1.4
Ed. 02 of 09/2016

SERVICE MANUAL
The appliance is not to be used by children
or persons with reduced physical, sensory
or mental capabilities, or lack of experience and knowledge, unless they have
been given supervision or instruction.
Children must not play with the appliance.
Cleaning and maintenance must not be
carried out by children unless supervised.
This appliance is for professional use only.
The operating temperature must be within
the range of [+5, +35]°C.
At the end of installation, the device is
switched on and taken to rated operating
conditions, leaving it in a state in which it
is “ready for operation”.
After reaching the “ready for operation”
condition, the following dispensing operations are carried out:
• 100% of the coffee circuit through the
coffee dispenser (for more than one
dispenser, this is divided equally);
• Open the steam outlet for 1 minute.
Fig. 5
Fig. 6
At the end of installation, it is good practice to draw up a report of the operations.
CAUTION
Before using the machine, read this manual in its entirety or, at the very least, read
the safety and set up instructions.
There are some basic rules for the use of
any electrical appliance.
In particular:
• Never touch the unit with wet hands or
feet;
• Never use the unit with bare feet;
• Never use extension cords in areas
equipped with baths or showers;
• Never pull on the power supply cord to
unplug the unit;
• Never leave the unit exposed to atmospheric agents (rain, direct sunlight, etc.);
• Never let children, unauthorized personnel or anyone who has not read this
manual operate the unit.
Before performing any sort of maintenance, the authorized technician must
turn off the unit and unplug it from the
mains.
Before cleaning the unit set it in a state of
«0» energy: that is, «MACHINE SWITCHED
OFF AND UNPLUGGED». Follow the
instructions given in this manual carefully.
Refer to chapters 6 and 7 for periodical
cleaning and maintenance. The authorized technician must, before carrying out
any maintenance, disconnect the plug
after the switch off of the machine.
In case of breakdown or poor function,
turn off the unit. Never tamper with the
unit. Contact only professionally qualified
personnel.
Only the manufacturer or an authorized
service center can make repairs and only
using original spare parts.
Non compliance with the above can compromise machine safety.
On installation, the qualified electrician
must fit a circuit breaker switch as foreseen by the safety norms in force that has
a contact open distance that permits the
complete disconnection under conditions
of overload category III.
Ed. 02 of 09/2016
1.5
SERVICE MANUAL
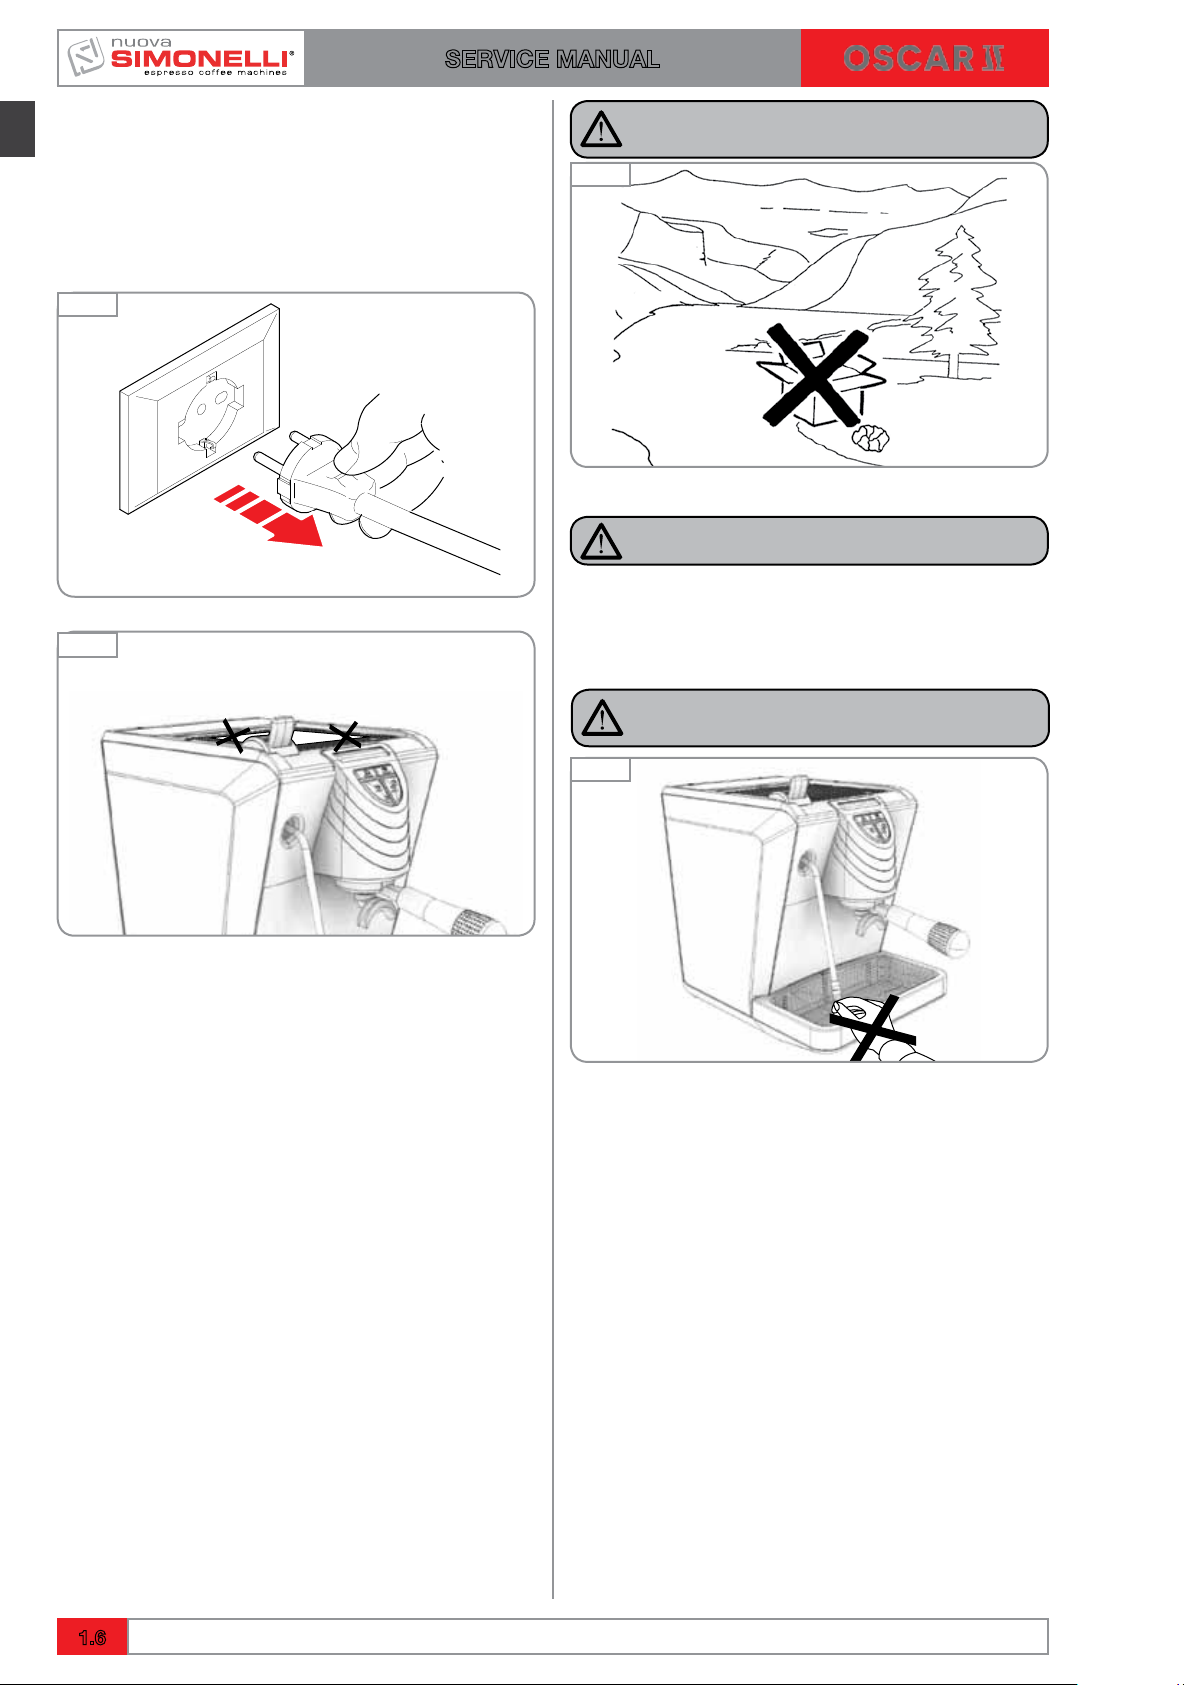
To prevent dangerous overheating, it is
advisable to fully extend the power supply
cord.
Never block the intake and/or heat dissipation grills, in particular those for the
cup warmer.
Fig. 7
OK
Fig. 8
WARNING
DANGER OF POLLUTION
Fig. 9
DANGER OF INTOXICATION
Once started the washing machine, do
not interrupt, the detergent residue may
remain inside the delivery unit.
The user must never replace the unit’s
power supply cord. If this cord is damaged, turn off the unit and have it replaced
by a professionally qualified technician.
Should it be necessary to replace the
power cord, this replacement operation
must only be performed by an authorized
service centre or by the manufacturer.
Should you decide to stop using this type
of unit, we suggest you render it inoperable by unplugging it and cutting the power
supply cord.
Do not throw the machine in nature for the
Elimination contact an authorized center or
contact the manufacturer who will provide
you the necessary information about it.
Never dispose of the machine in the environment: to dispose of the machine, contact an authorized center or contact the
manufacturer for pertinent indications.
CAUTION
DANGER OF BURNS
Fig. 10
To facilitate aeration of the unit, position
the aeration portion of the machine 15 cm
from walls or other machinery.
Be extremely careful when using the steam
nozzle. Never place your hands under the
nozzle and never touch it right after use.
Remember that to install, maintain, unload
and regulate the unit, the qualified operator must always wear work gloves and
safety shoes.
When adding the coffee, the operator must
never put his hands into the container.
The noise level of the machine is less than
70db.
1.6
Ed. 02 of 09/2016
!
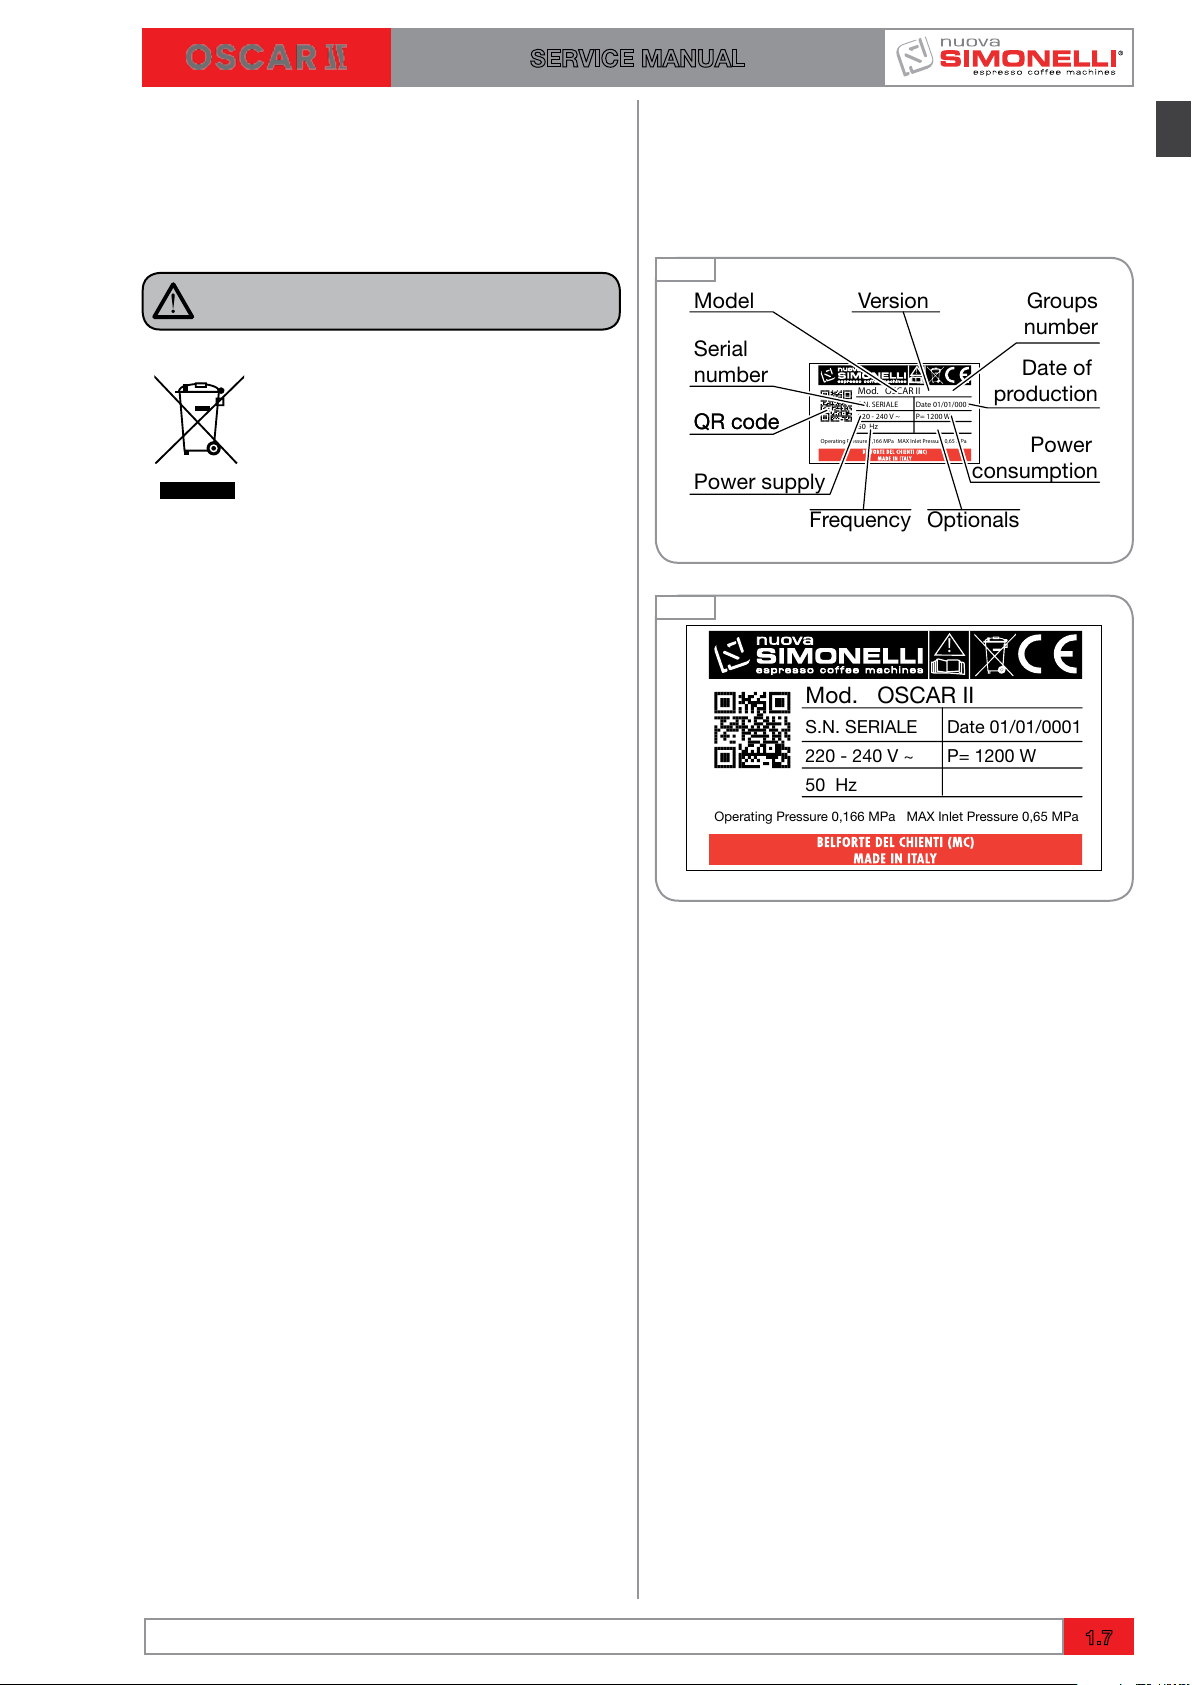
Mod. OSCAR II
S.N. SERIALE
220 — 240 V ~
50 Hz
Operating Pressure 0,166 MPa MAX Inlet Pressure 0,65 MPa
Date 01/01/0001
P= 1200 W
QR code
Version
Model
Serial
number
QR code
Power supply
Frequency Optionals
Groups
number
Date of
production
Power
consumption
!
Mod. OSCAR II
S.N. SERIALE
220 — 240 V ~
50 Hz
Operating Pressure 0,166 MPa MAX Inlet Pressure 0,65 MPa
Date 01/01/0001
P= 1200 W
SERVICE MANUAL
For machines connected to the mains
water supply, the minimum pressure must
be 2 bar and the maximum pressure
for correct machine operation must not
exceed 4 bar.
CAUTION
INFORMATION TO THE USERS
Under the senses of art. 13 of
Law Decree 25th July 2005,
n. 151 «Implementation of the
Directives/Guidelines 2002/95/
CE, 2002/96/CE and 2003/108/
CE, concerning the reduction
of the use of dangerous substances in electric and electronic equipment, as well as
the disposal of wastes».
1.4 MACHINE IDENTIFICATION
Always quote the machine serial number in all
communications to the manufacturer, Nuova
Simonelli.
Fig. 11
Fig. 12
The symbol of the crossed large rubbish container that is present on the machine points out
that the product at the end of its life cycle must
be collected separately from the other wastes.
The user for this reason will have to give the
equipment that got to its life cycle to the suitable
separate waste collection centres of electronic
and electro-technical wastes, or to give it back
to the seller or dealer when buying a new equipment of equivalent type, in terms of one to one.
The suitable separate waste collection for the
following sending of the disused equipment to
recycling, the dealing or handling and compatible environment disposal contributes to avoid
possible negative effects on the environment and
on the people’s health and helps the recycling of
the materials the machine is composed of. The
user’s illegal disposal of the product implies the
application of administrative fines as stated in
Law Decree n.22/1997” (article 50 and followings
of the Law Decree n.22/1997).
The machine internet page can be accessed
directly through the QR code.
By downloading and installing one of the apps to
read such codes on a mobile device.
Start the app and position the camera in front of
the code so that it can be clearly seen.
Wait some time while the app processes the result
and shows the internet page of the machine on
the display.
Ed. 02 of 09/2016
1.7
SERVICE MANUAL
1.5 TRANSPORT
The machine is transported on pallets which
also contain other machines — all boxed and
secured to the pallet with supports.
Before carrying out any transport or handling
operation, the operator must:
• putonworkglovesandprotectivefootwear,
as well as a set of overalls which must be
elasticated at the wrists and ankles.
The pallet must be transported using a suit-
able means for lifting (e.g., forklift).
1.5.1 HANDLING
WARNING
COLLISION OR CRUSHING HAZARD
During the entire handling operation, the operator must make sure no one or nothing is inside
the operating area.
Slowly lift the pallet to about 30 cm from the
ground and move to the loading area. After
making sure there are no obstacles, persons or
things, proceed with loading.
Once at destination, always using an adequate
lifting mechanism (e.g. fork-lift), after making
sure there is no one or nothing within the unloading area, lower the pallet to about 30 cm from the
ground and transport it to the storage area.
WARNING
COLLISION OR CRUSHING HAZARD
Before performing the following operation, make
sure the load is in place and is not likely to fall
when the straps are cut.
The operator, wearing safety gloves and footwear, must now cut the straps and store the
product. To perform this operation, check the
technical characteristics of the product to determine the weight of the machine to be stored and
take consequent precautions.
1.8
Ed. 02 of 09/2016

SERVICE MANUAL
2. FIRST INSTALLATION AND PRELIMINARY OPERATIONS
INDEX
2. FIRST INSTALLATION AND
PRELIMINARY OPERATIONS …..2.1
2.1 FIRST INSTALLATION ………….2.2
2.1.1 WEIGHT AND DIMENSIONS ….2.2
2.1.2 CONNECTION TO THE
WATERLINE AND DRAINAGE
SYSTEM ………………..2.3
2.1.3 TECHNICAL SPECIFICATIONS..2.4
2.1.4 CONNECTION TO THE POWER
LINE …………………..2.4
2.1.5 PROCEDURE OF FIRST
INSTALLATION……………2.4
2.2 ACCESSORIES BOX . . . . . . . . . . . . . . 2.5
2.2.1 FITTING THE FILTER HOLDER..2.5
2.3 PROGRAMMING DOSES ……….2.6
Ed. 02 of 09/2016
2.1
2.1
SERVICE MANUAL
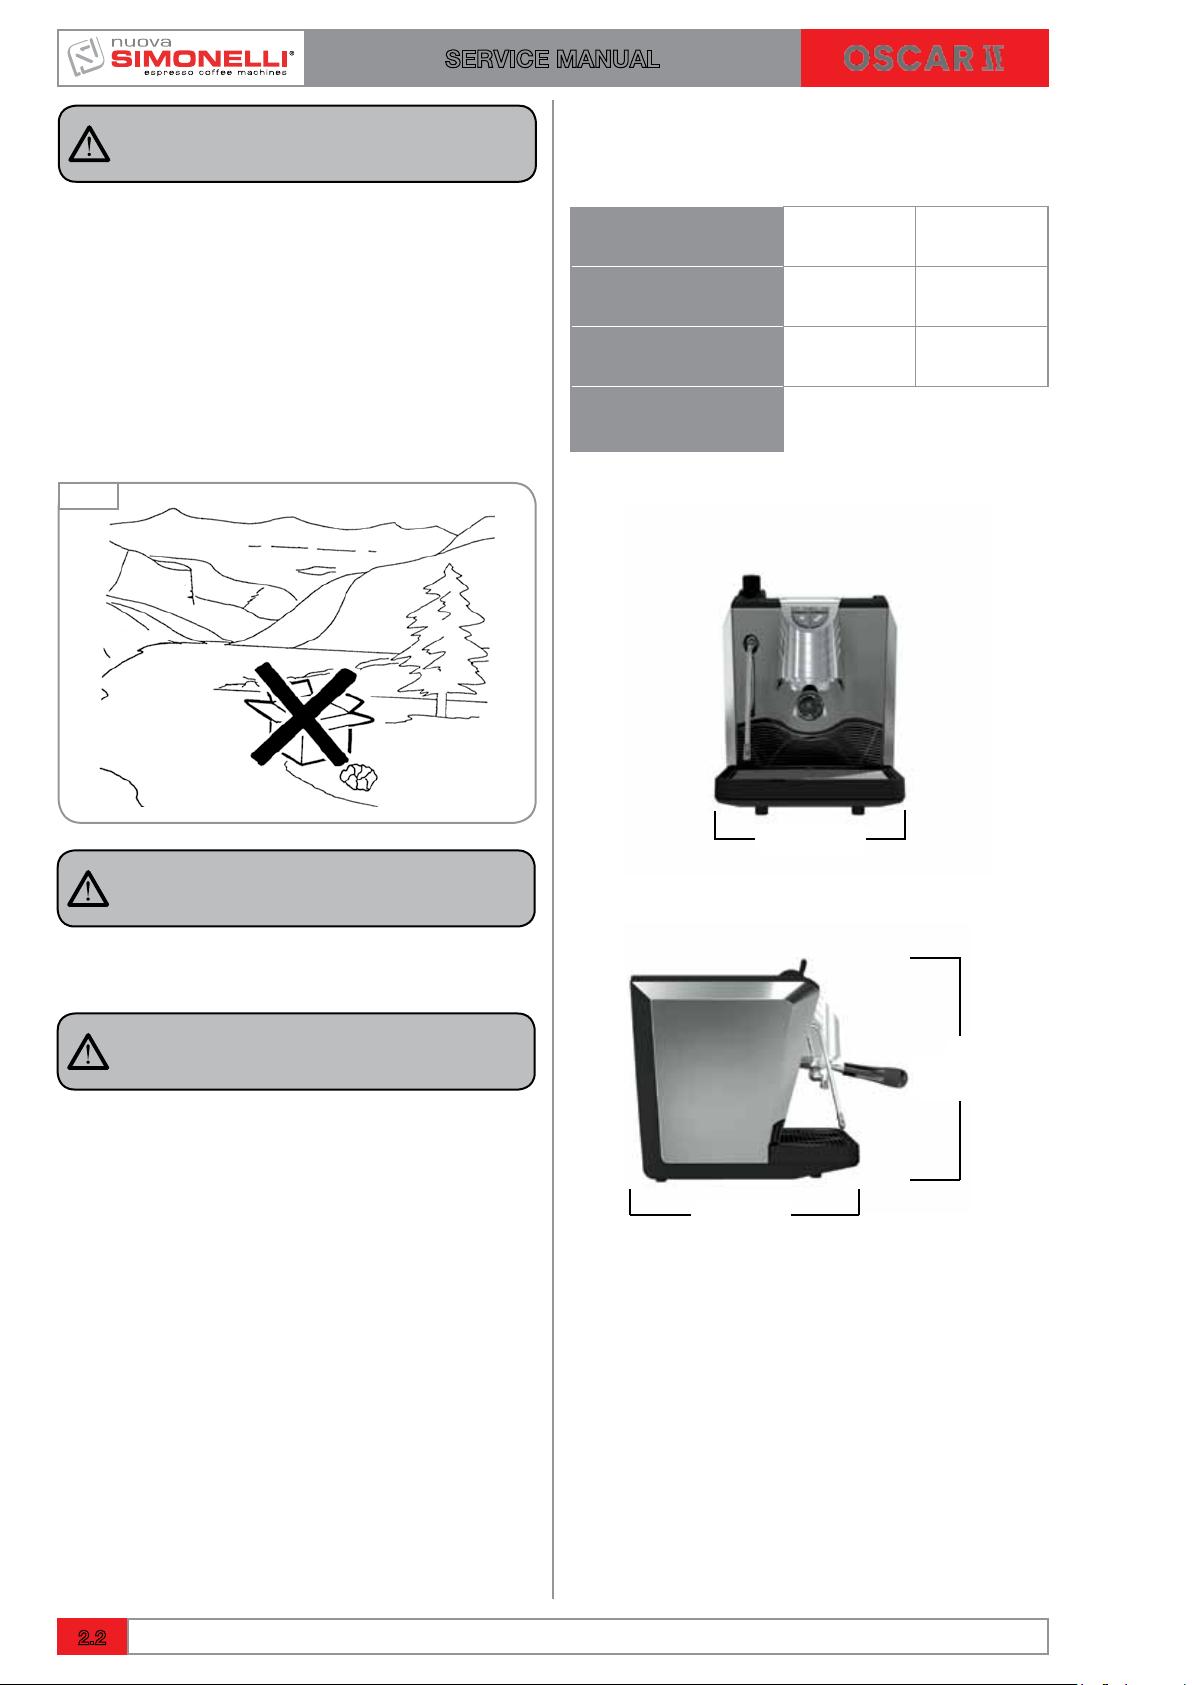
RISK OF POLLUTION
DO NOT DISPOSE PACKAGING in the environment.
2.1 FIRST INSTALLATION
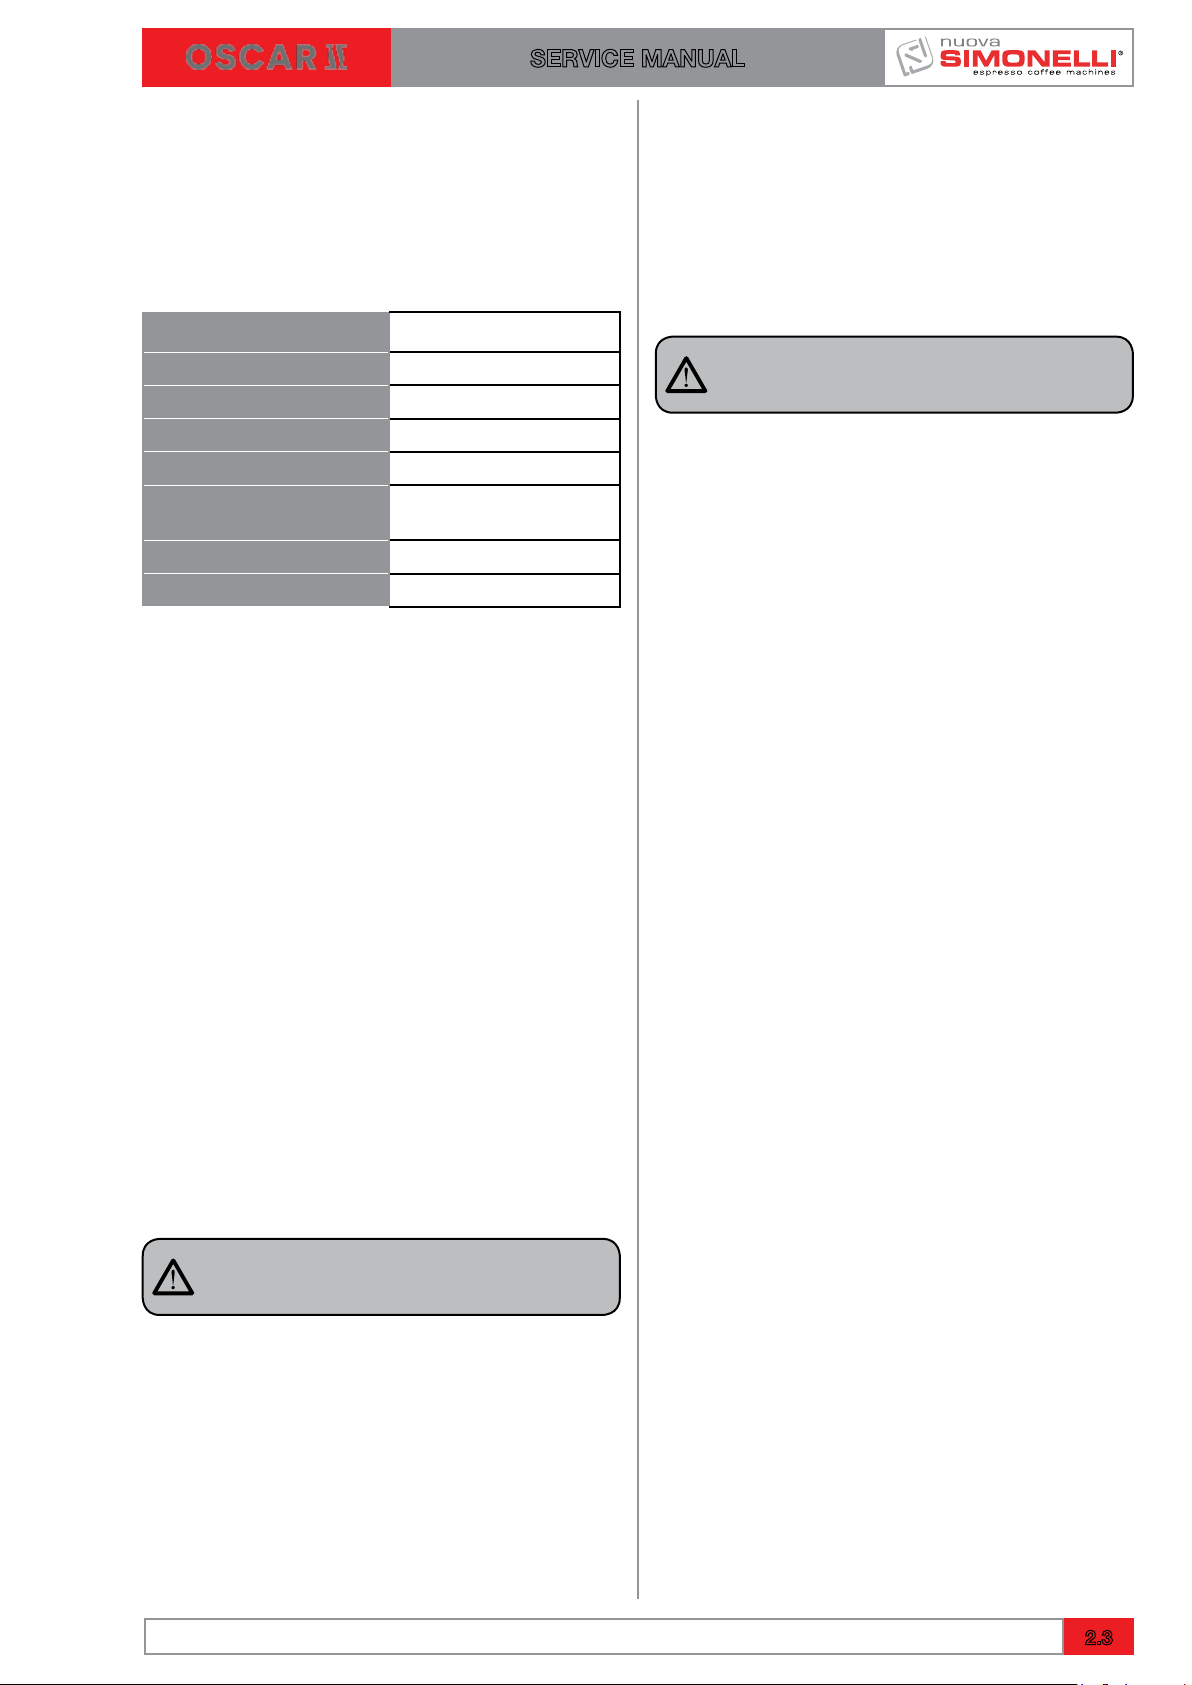
2.1.1 WEIGHT AND DIMENSIONS
NET WEIGHT 14 kg 31 lb
Prior to installation please carefully read the
safety instructions in this manual. The company
cannot be held responsible for damage to persons or property arising from non-compliance
with safety regulations, either during installation
or maintenance of the machine described in this
manual.
Fig. 13
GROSS WEIGHT 17 kg 37 lb
POWER 1200 W 1200 W
DIMENSIONS
A
300 mm 12”
WARNING
Place the machine in an area where all risks of
malfunction can be avoided.
WARNING
Never install in areas where the machine may
be subject to jets of water.
C
400 mm
15,8”
B
408 mm
16”
2.2
Ed. 02 of 09/2016
SERVICE MANUAL
2.1.2 CONNECTION TO THE WATERLINE
AND DRAINAGE SYSTEM
The machine requires stringent specifications to
prevent the formation of limescale and to ensure
quality beverages. The main features required to
achieve high standards of performance are the
following:
Total hardness
50 -60 ppm
Waterline pressure 2-4 bar, cold water
Minimum flow 200 l/hr
Filtration Less than 1.0 micron
Alkalinity
Total dissolved salts
10-150 ppm
50 -100 mg/L
(TDS)
Chloride < 0.5 mg/L
pH 6.5- 8.5
It is the task of a qualified technician to:
1 Adapt the water from the waterline to the
specifications required using filters and
water softeners;
2 Train the final user so that the equipment for
water treatment is constantly kept perfectly
operational.
The version with direct coupling is provided with
a loading tube 1,5 meters long with a 3/4 inch.
On one side is the fitting is straight and tapered,
the other angled at 90° with a gasket. The tube
is provided with tapered fittings therefore it is not
necessary to use Teflon tape on the fitting.
WARNING
If the water features do not comply, the warranty will automatically expire.
To connect the machine to the waterline, proceed as follows:
1 Remove the pipe from the upper door “A”
and connect one of its ends to fitting “B”
situated on machine base.
2 Connect the other end of the pipe to the
waterline using a 3/8 fitting.
NOTE
Dirty water drainage is carried out through the
drip tray both for version with connection to the
waterline and with tank.
Ed. 02 of 09/2016
2.3
SERVICE MANUAL
2.1.3 TECHNICAL SPECIFICATIONS
The machine is available in the following versions:
• single-phase 120 V 60 Hz (tank and waterline)
• single-phase 230 V 50 Hz (tank and waterline)
• single-phase 230 V 60 Hz (waterline)
The relative power absorbed is indicated on the
machine plate.
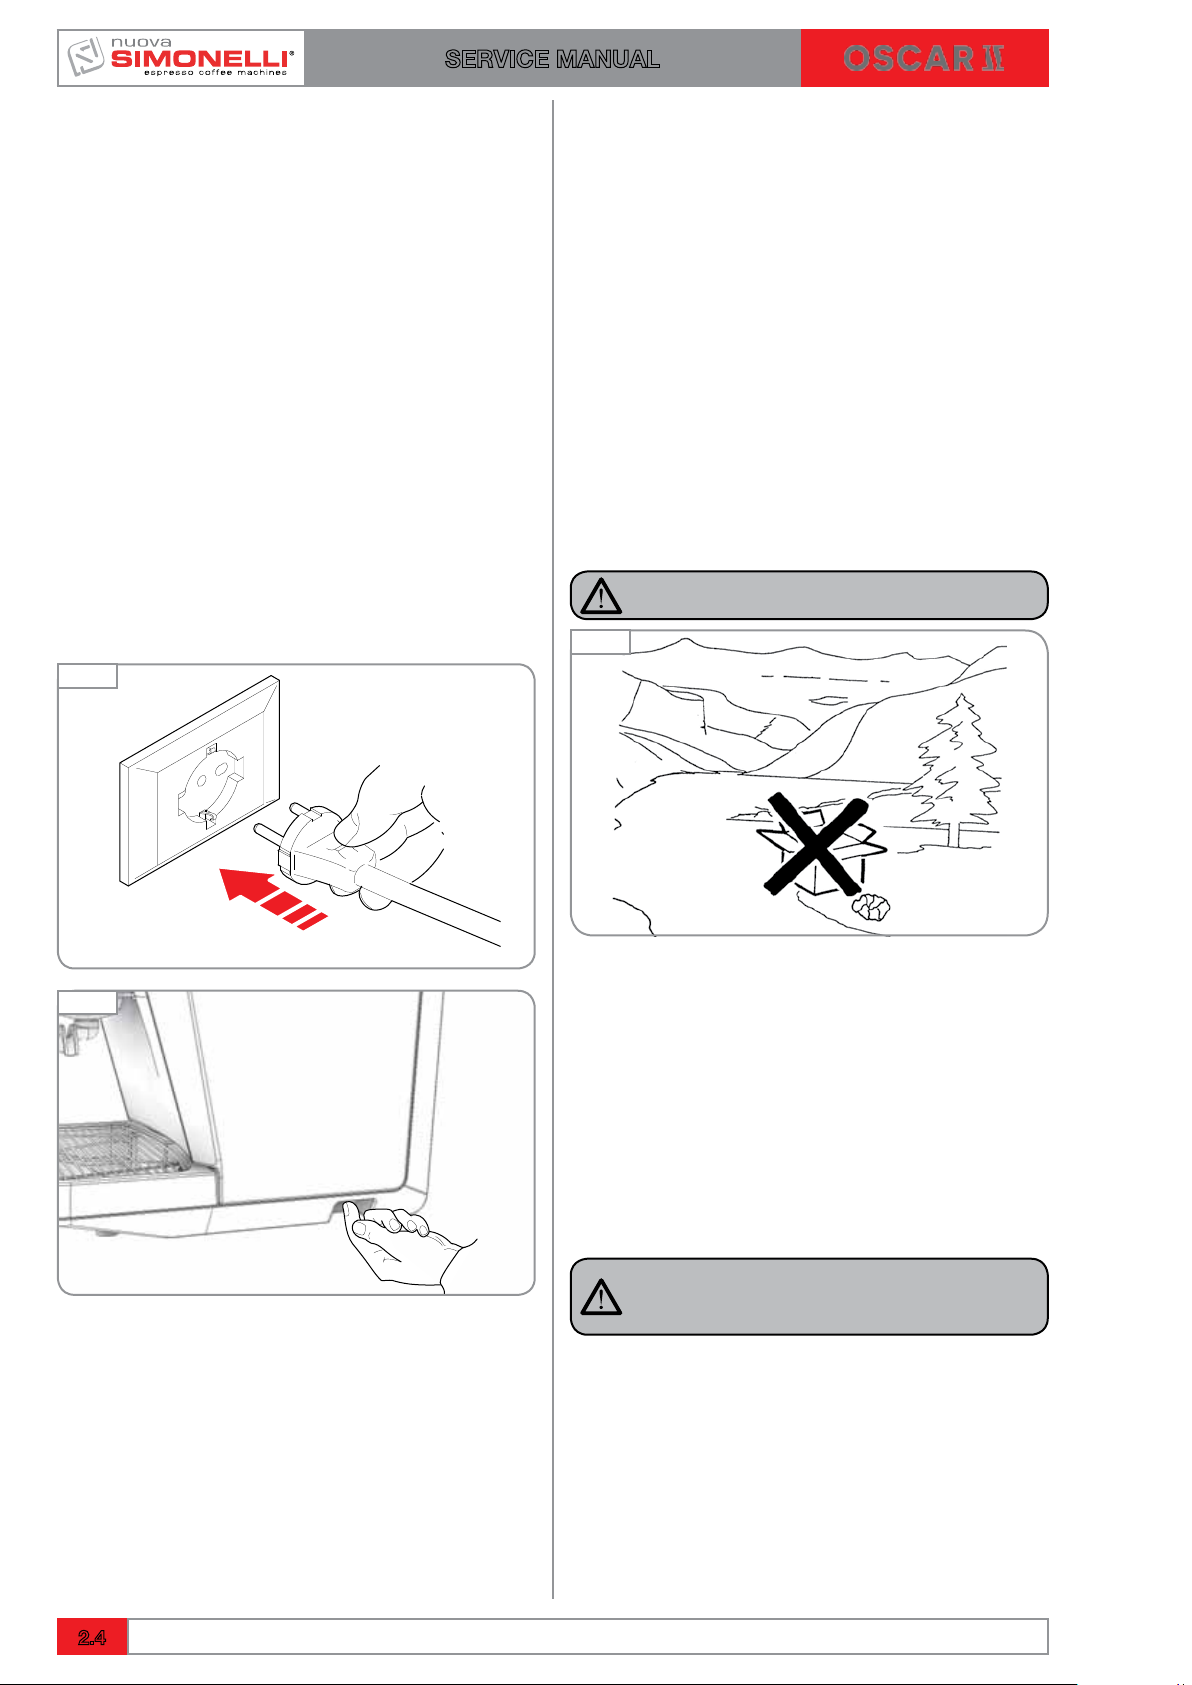
2.1.4 CONNECTION TO THE POWER LINE
Before utilising the machine, the operator must
have read and fully understood the safety instructions in this manual.
Connect the machine to the power socket.
The machine carries out the following checks.
Fig. 14
2.1.5 PROCEDURE OF FIRST
INSTALLATION
Before carrying out the installation carefully read
the safety instructions at the beginning of this
manual and particularly about how to put THE
MACHINE INTO ZERO ENERGY STATUS.
1 Once the machine has been removed from
the packaging, position it on a horizontal
surface and proceed with the installation as
illustrated in the following paragraphs.
Arrange the accessories as follows:
2 Insert the ring in its seat inside the filter
holder.
3 Insert one of the two filters.
4 Caution: danger of pollution.
DANGER OF POLLUTION
Fig. 16
Fig. 15
OK
Tank Model:
5 Open the hatch and take out the reservoir.
Especially the first time, wash the reservoir
with soap and water. Fill the reservoir with
water and make certain that the outside of
the reservoir is dry.
6 Return the reservoir to its housing and close
the hatch.
7 Make certain that the water drain tank has
been inserted.
NOTE
If the machine does not have enough water in the
tank or the pump stays on for more than 90 seconds, the machine will stop and all the buttons
flash. Getting on and off the machine: operation
of the filling boiler will run until the appropriate
level.
2.4
Ed. 02 of 09/2016

SERVICE MANUAL
NOTE
In the absence of load water at first boot:
1 Could be created air bubble between the
pump and reservoir and is preventing the
passage of water.
2 Make sure that the tank valve is working.
3 Remove and replace the tank filled with
water several times to facilitate removal of
the air bubble.
Direct attachment version:
5 Open the door of the tank and remove the
hose for direct attachment.
6 Connect the hose to the water supply and
open the tap upstream of the machine if present.
7 Make certain that the water drain tank has
been inserted.
2.2 ACCESSORIES BOX
Machine is supplied with an accessories box
consisting of:
1 Single filter
2 Double filter
3 Spring
4 Filter holder
5 Dispensing nozzle
6 Coffee doser
Fig. 17
7
6
1
2
3
4
5
Make certain that the cup support grill is positioned squarely and is level:
8 Check that the steam lever is closed.
9 Make certain that the line voltage corre-
sponds to the requirements indicated on the
label.
10 The preliminary operations have been com-
pleted and the machine is ready to be set up.
2.2.1 FITTING THE FILTER HOLDER
To properly mount the filter holder:
1 Insert the spring inside the pay slot inside
the filter holder.
2 After selecting the appropriate filter (1 or 2),
insert the filter in the filter holder until you
hear the snap with spring.
3 Screw the dispensing spout up to place it
perpendicular to the handle.
NOTE
To change the filter inserted, pry up the edge with
one of the other filters.
Ed. 02 of 09/2016
2.5
SERVICE MANUAL
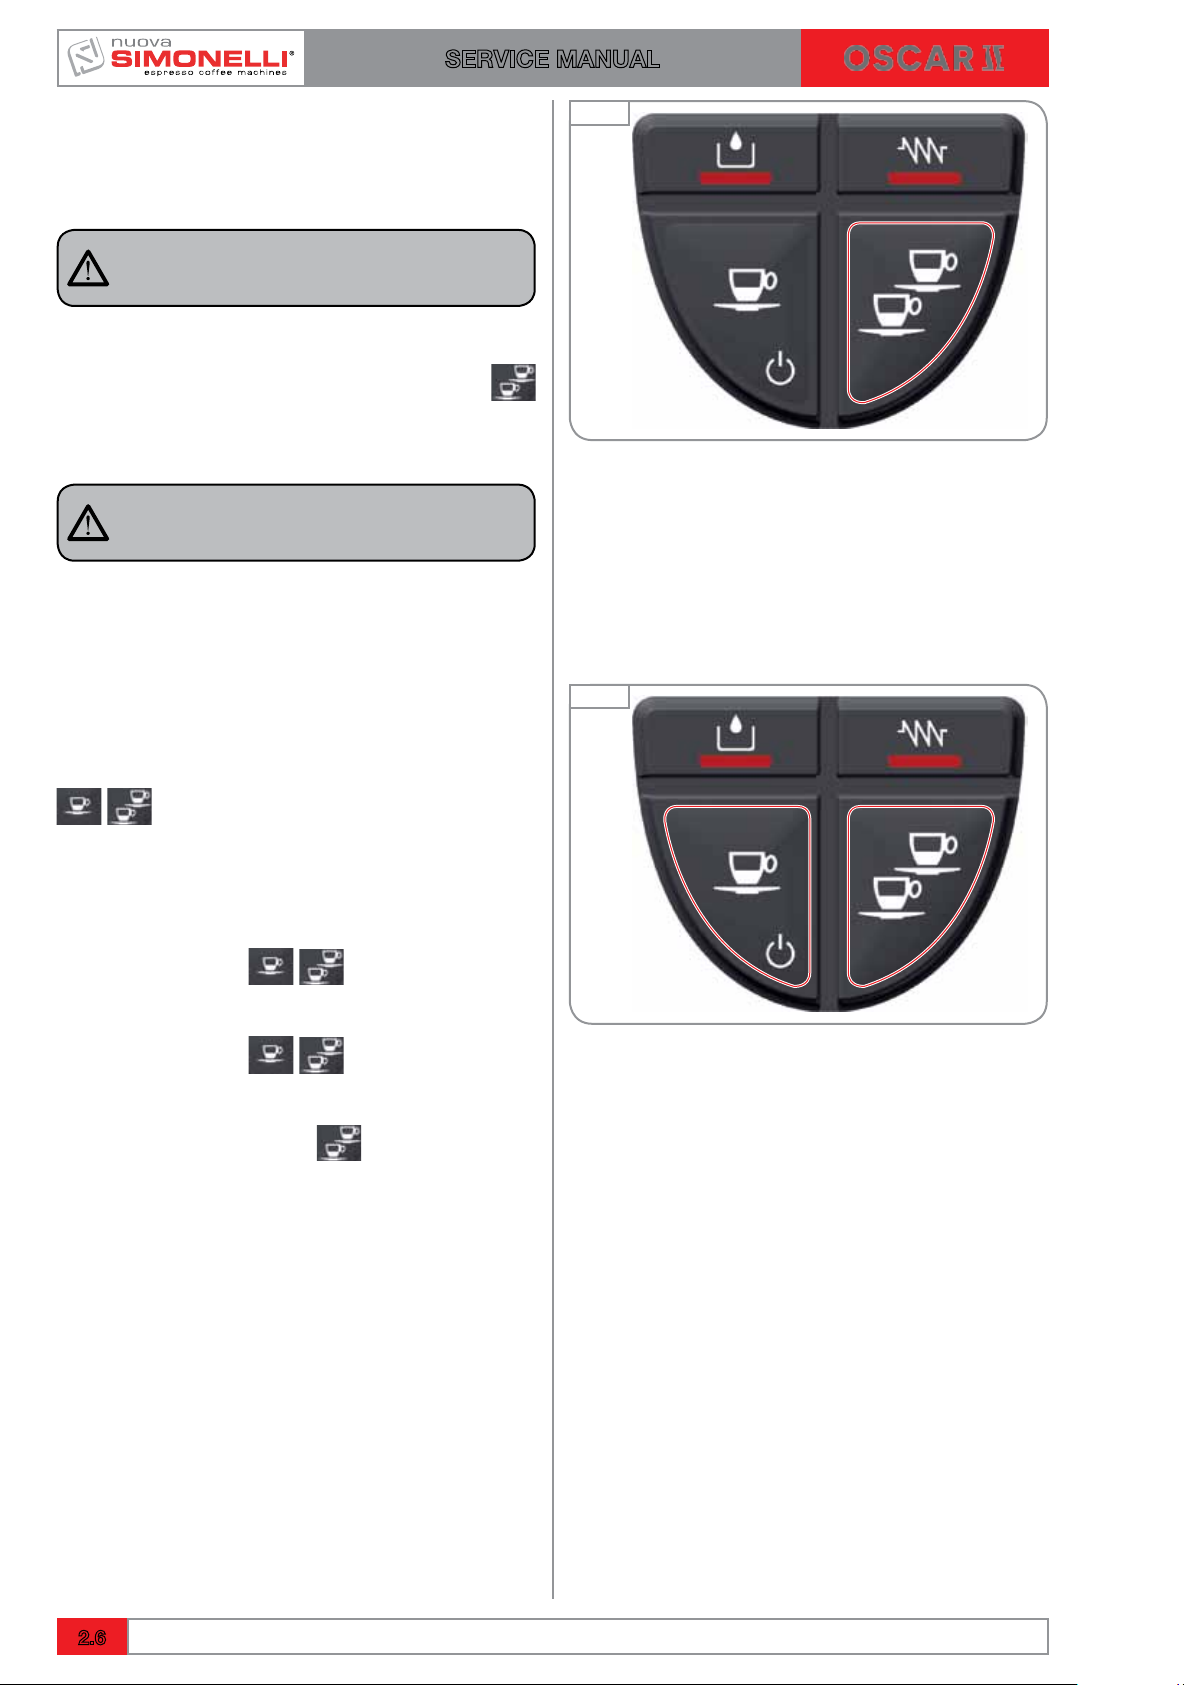
2.3 PROGRAMMING DOSES
Carry out the following operations to enter into
programming mode:
NOTE
Operation to be carried out with the machine
switched on.
To enter into programming mode, press the
two coffee dispensing button for 5 seconds.
The dispensing buttons start to flash.
NOTE
After 30 seconds of inactivity (no buttons pressed)
in programming mode, the machine returns to
normal mode and no data is memorised.
Fig. 18
PROGRAMMING COFFEE DOSES
To programme the dose of water relative to one of the
dispensing buttons, proceed as follows:
Fill the filter holder with the correct dose of coffee (the
filter holder can be single or double depending on the
button to be programmed).
Place the filter holder into the unit.
Press one of the dispensing buttons.
Dispensing starts; once the desired quantity has been
reached press the same button again.
To exit from the programming mode and memorise
the desired doses, keep the
at least 5 seconds; the buttons stop flashing.
button pressed for
Fig. 19
2.6
Ed. 02 of 09/2016
SERVICE MANUAL
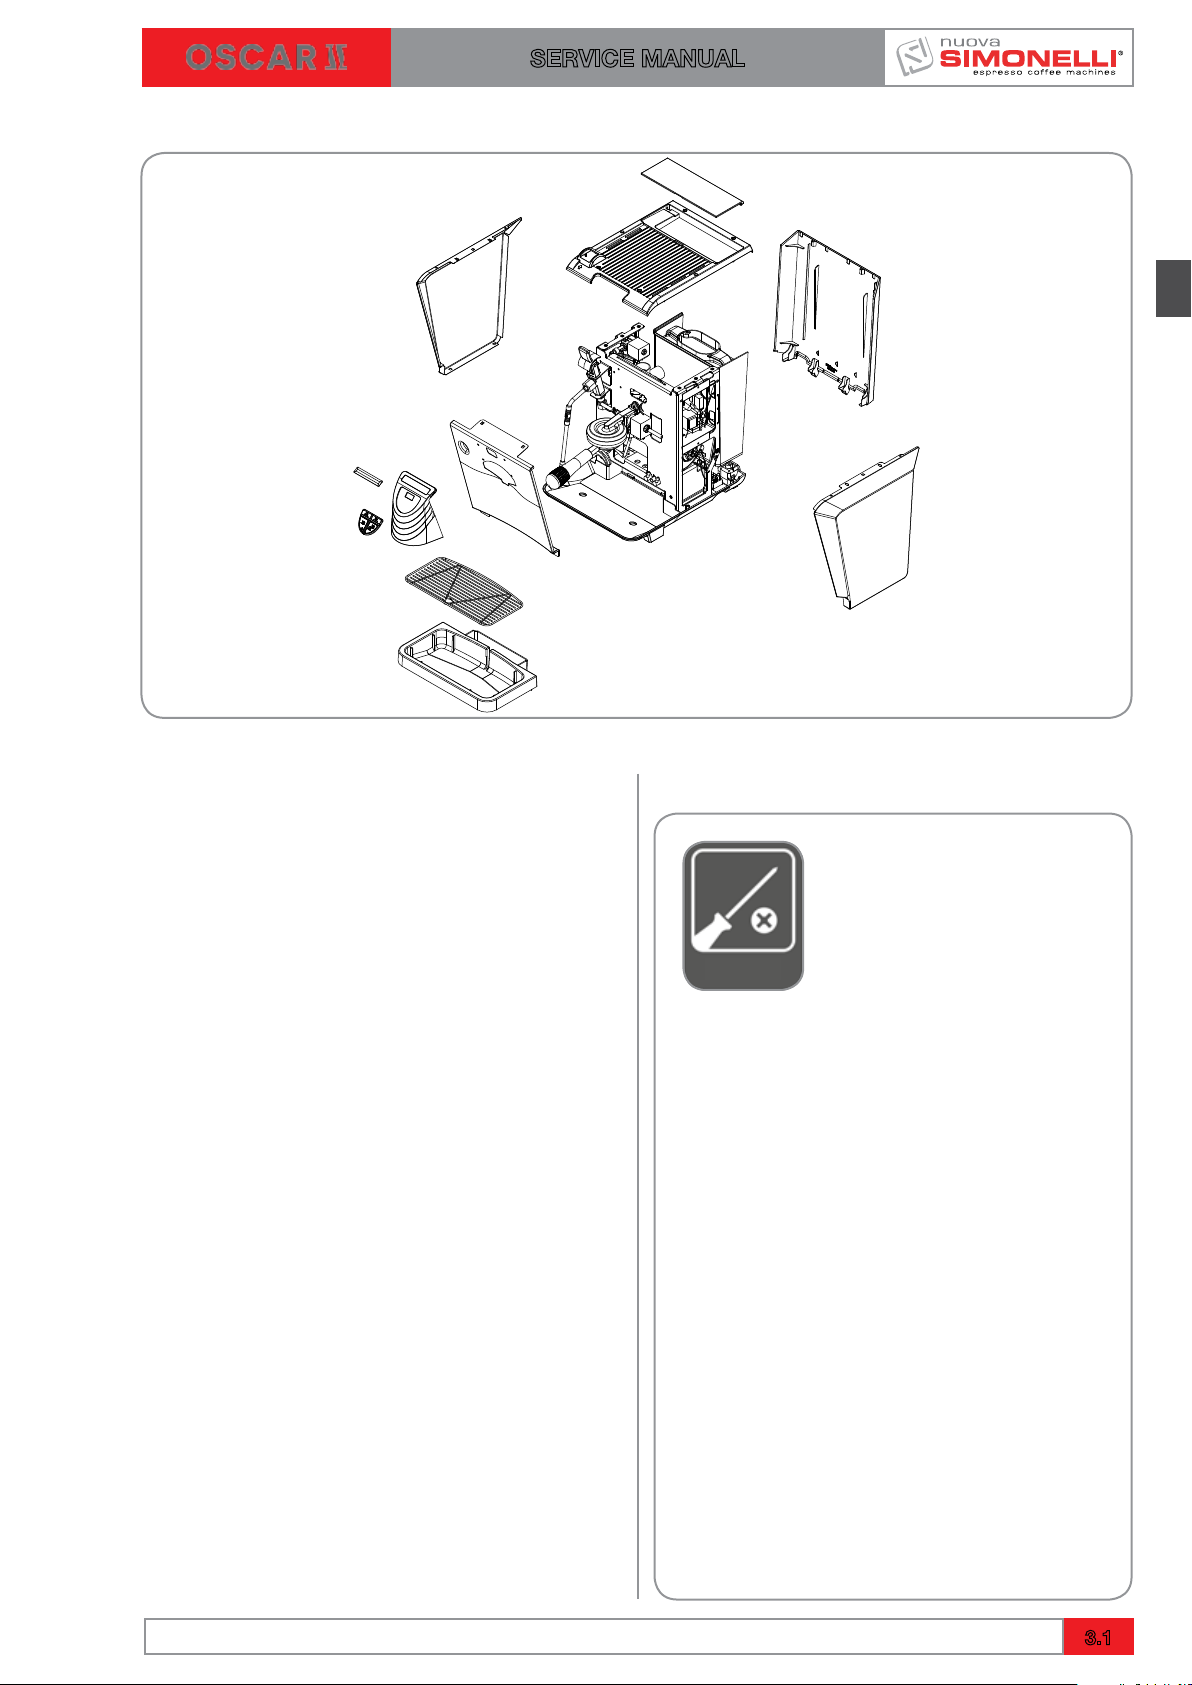
3. REMOVAL OF THE EXTERNAL SURFACE
INDEX
3. REMOVAL OF THE
EXTERNAL SURFACE ………..3.1
3.1 REMOVAL OF WATER TANK …….3.2
3.2 REMOVAL OF THE CUP
HOLDER SURFACE……………3.3
3.3 REMOVAL OF THE SIDE PANELS …3.4
3.4 REMOVAL OF THE REAR PANEL …3.4
3.5 TANK TO COLLECT WATER FILED ..3.4
3.6 REMOVAL OF THE FRONT PANEL ..3.5
3.6.1 REMOVAL OF KEYBOARD …..3.6
TOOLS NEEDED:
Ed. 02 of 09/2016
3.1
SERVICE MANUAL
DANGER
Use gloves to protect against sharp or hot
surfaces that you can bump against involuntarily during operations.
NOTE
Before proceeding with the removal of the
panels it is advisable to clean and free up
enough space where the machine parts will
rest so that they are not be unintentionally
damaged.
DANGER
Before proceeding with the operations
described in the chapter make sure that the
machine is turned off and unplugged from the
mains. Discharge any residual pressure present in the heater.
Fig. 22
Fig. 23
DANGER
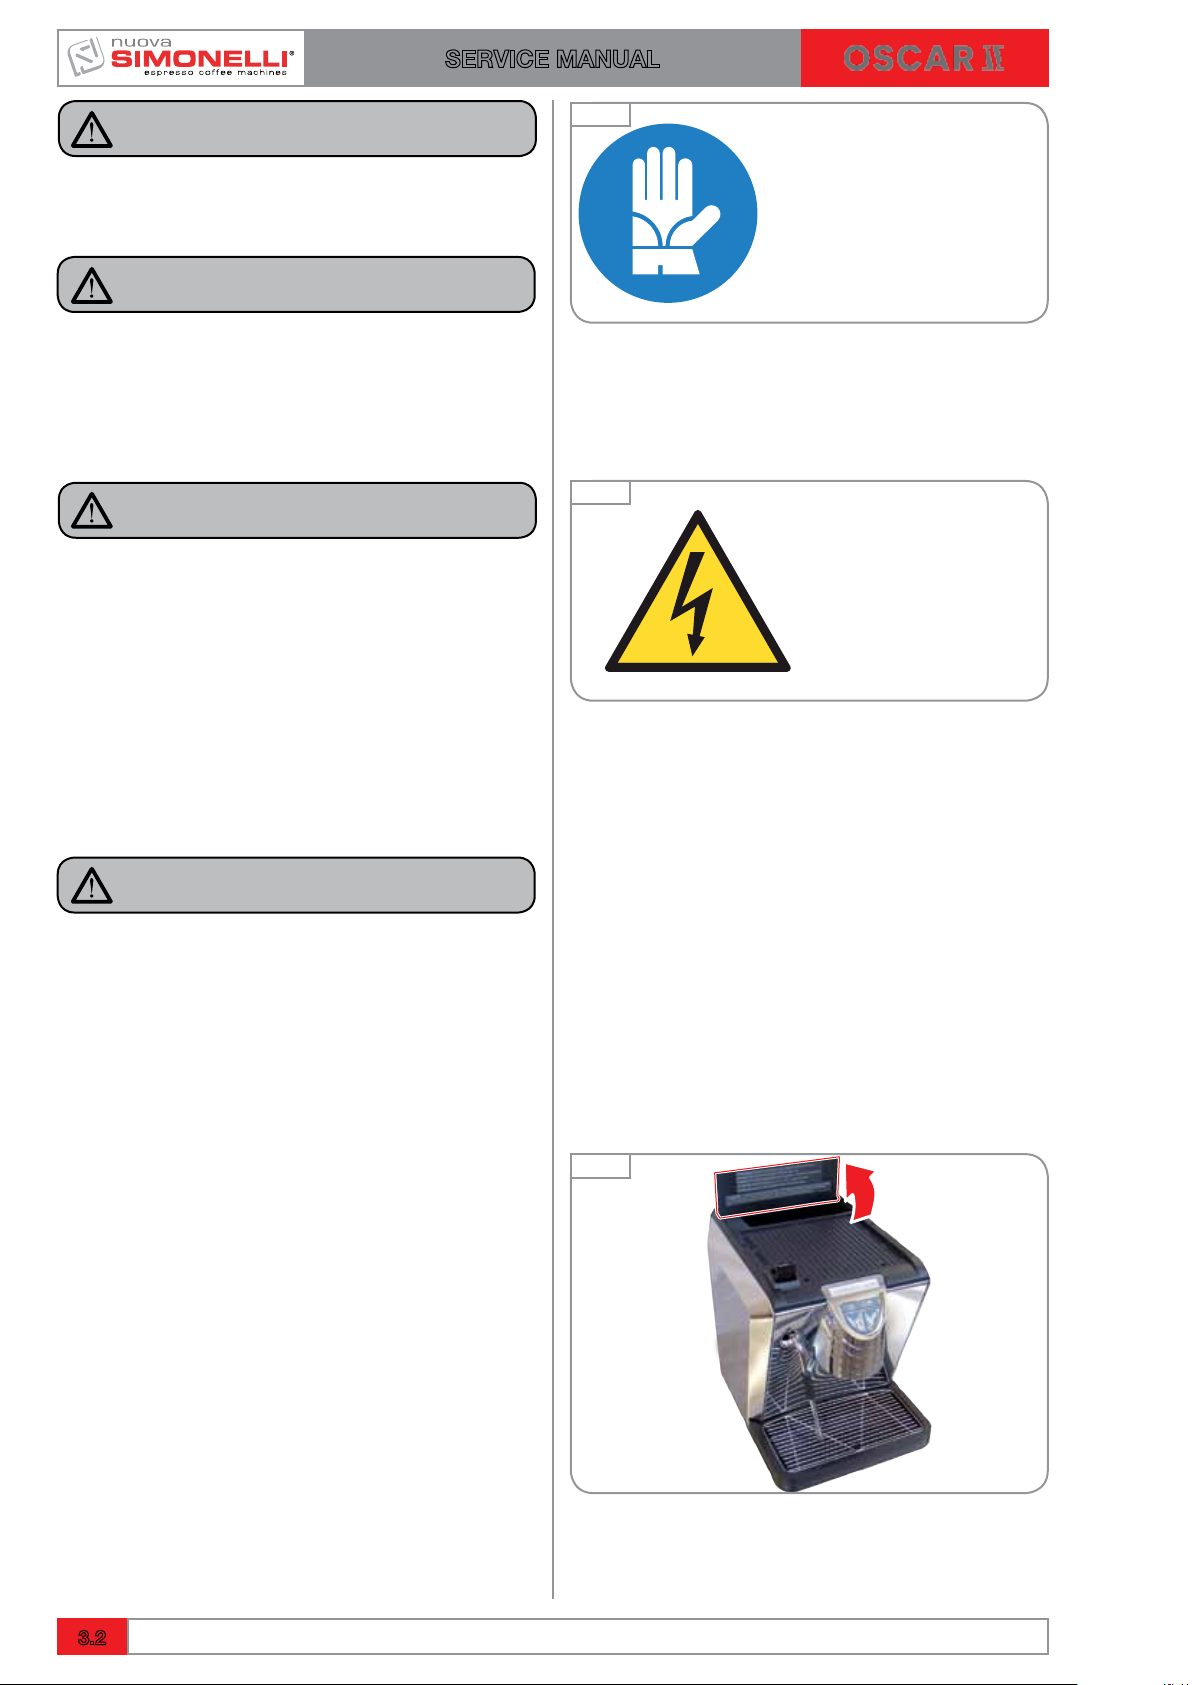
3.1 REMOVAL OF WATER TANK
To remove machine covers, take out the water
tank first:
NOTE
This operation is necessary only for the version with tank.
To remove the tank from its seat, proceed as follows:
1 Lift the water tank cap.
Fig. 22
3.2
Ed. 02 of 09/2016
SERVICE MANUAL
2 Pull the water tank upward.
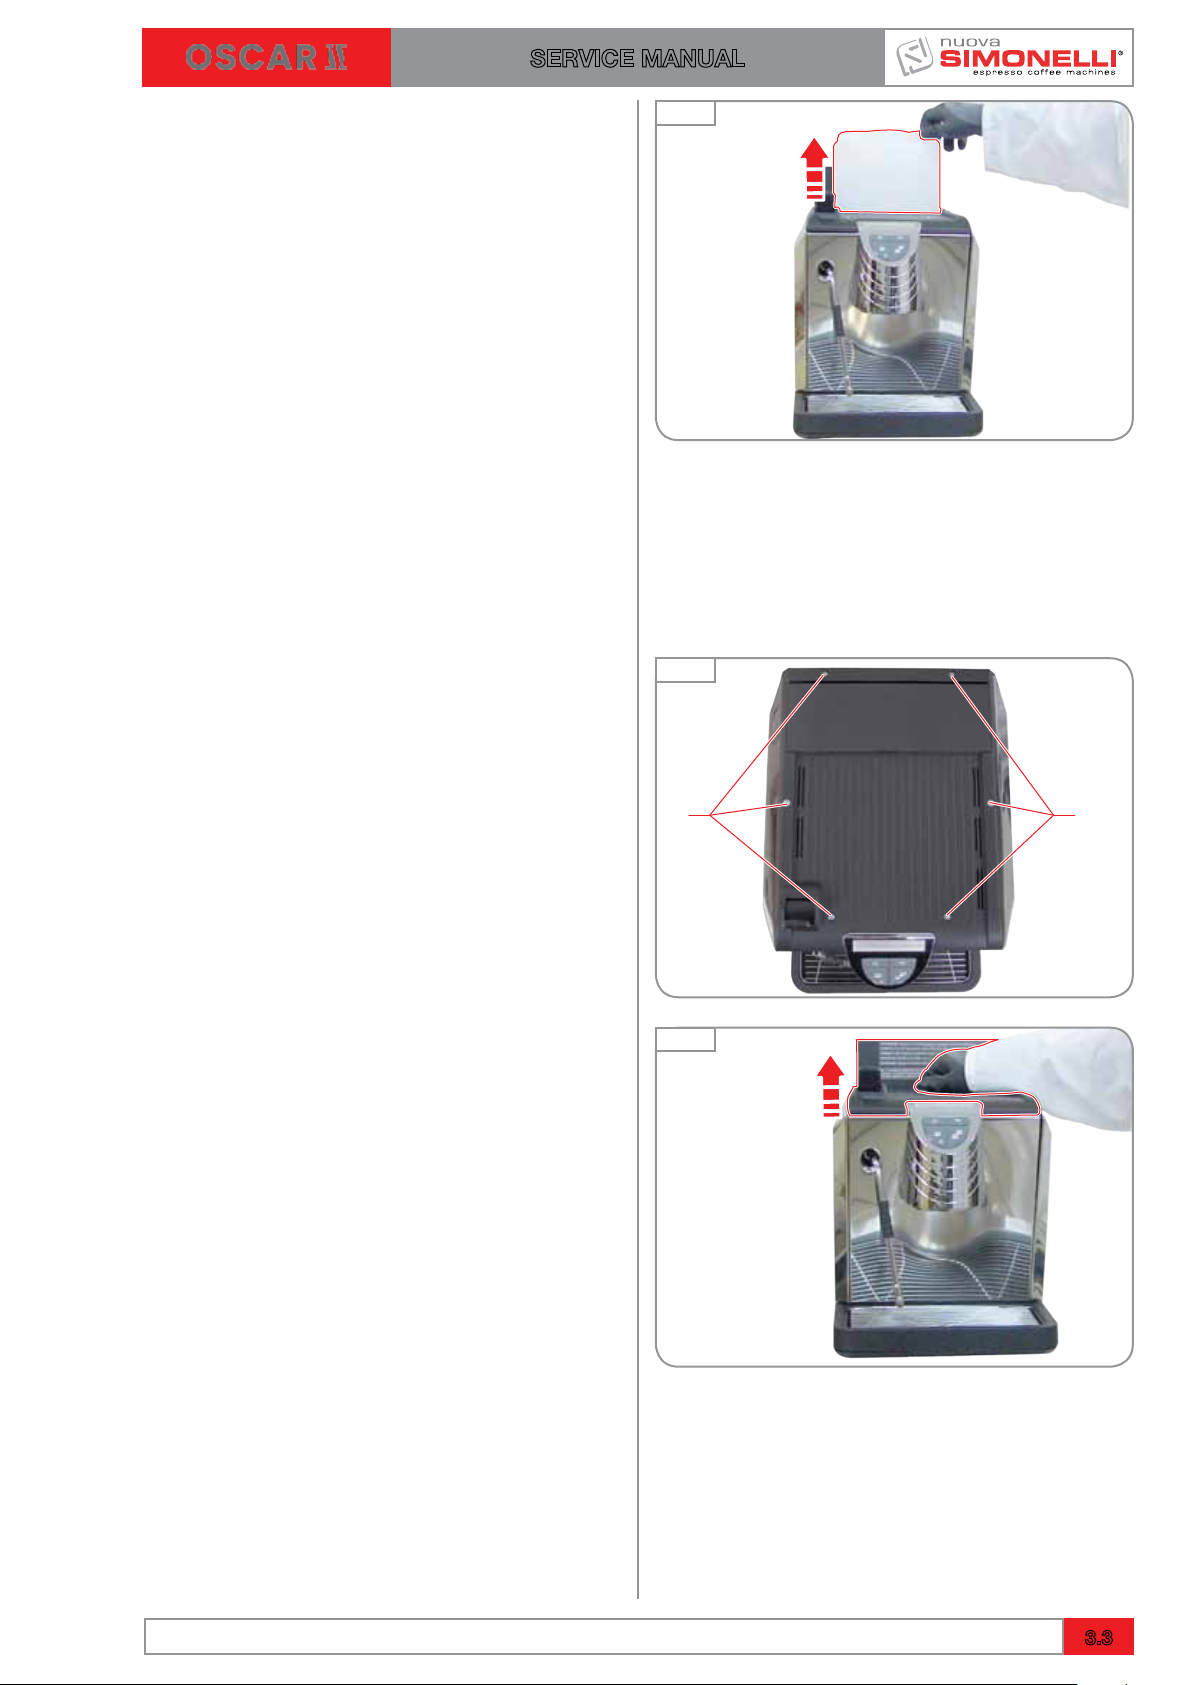
3.2 REMOVAL OF THE CUP HOLDER
SURFACE
To remove the bearing surface of the cup, proceed as follows:
1 Unscrew the screws «A» with a screwdriver.
Fig. 23
Fig. 24
2 Lift the panel and pull upwards.
Fig. 25
Ed. 02 of 09/2016
3.3
SERVICE MANUAL
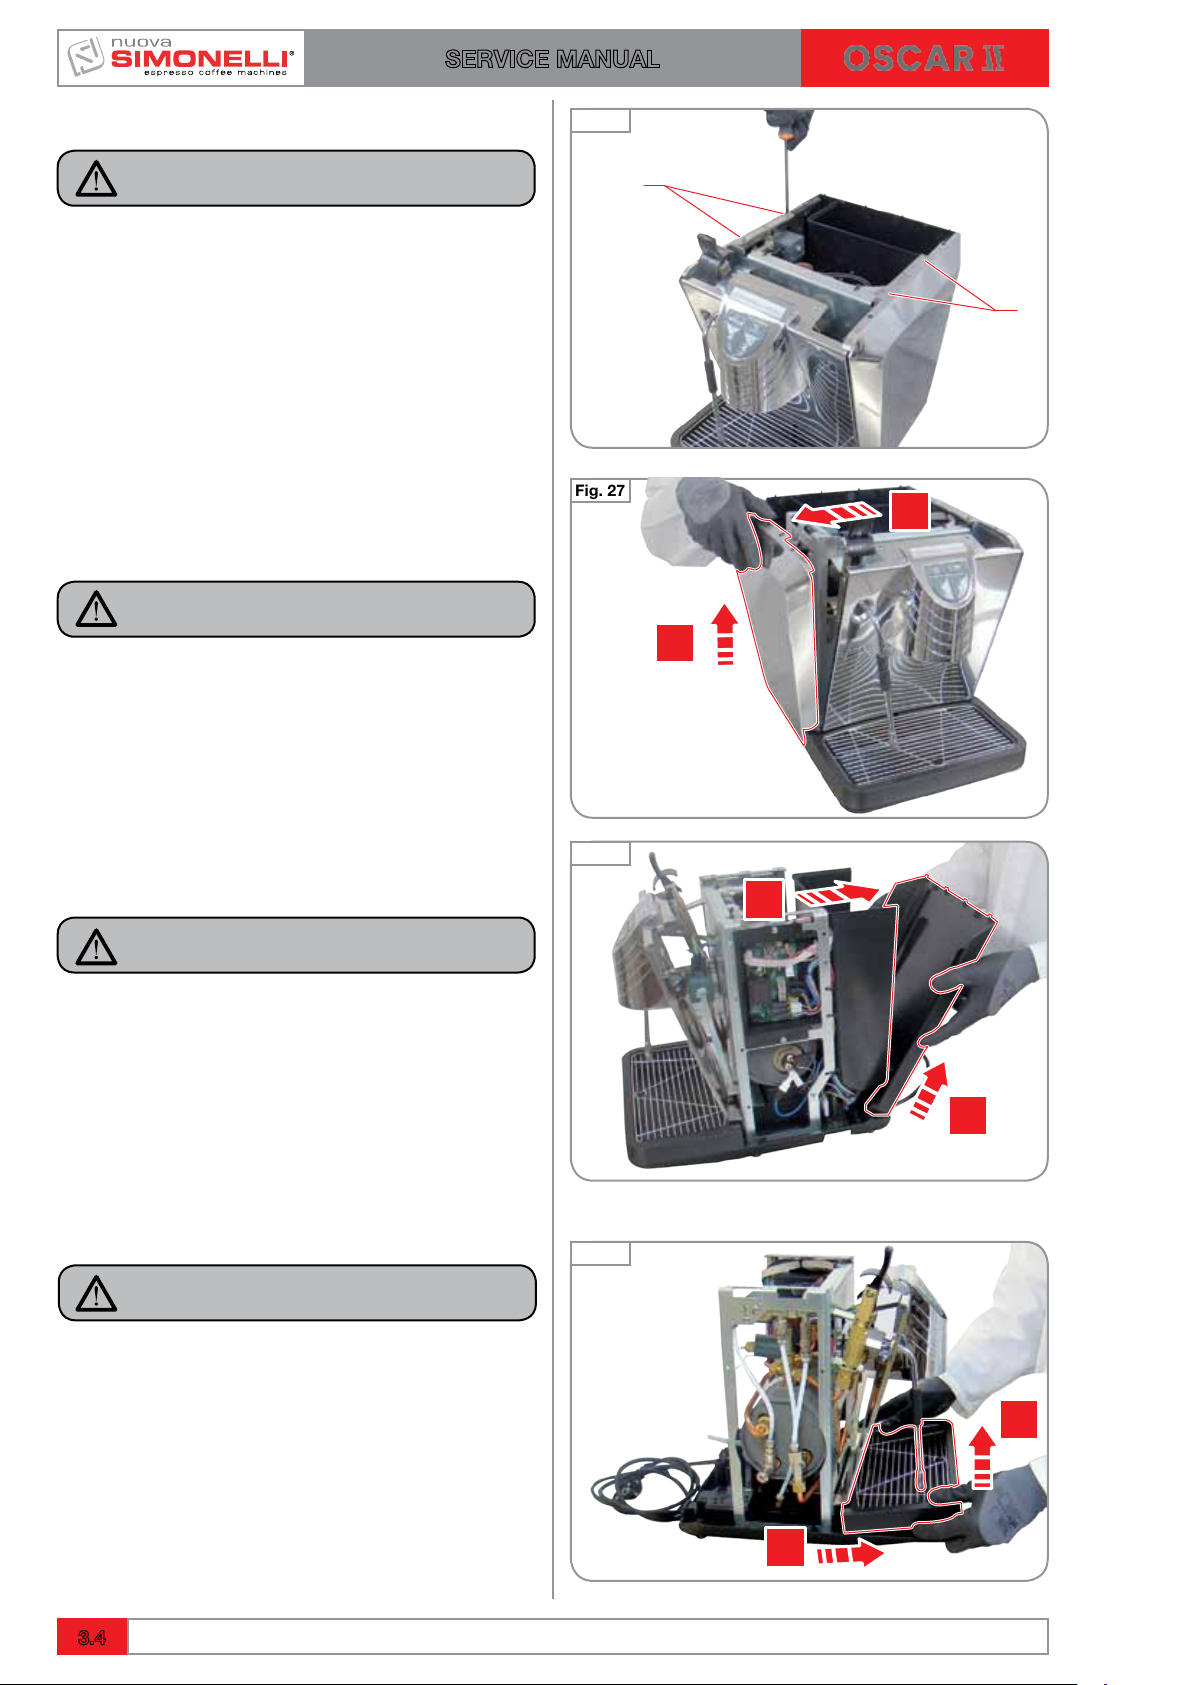
3.3 REMOVAL OF THE SIDE PANELS
NOTE
To remove the side panels, it is necessary to
remove the cup holding surface first.
1 Unscrew the «A» present on each panel
using a Phillips screwdriver.
2 Move outside the top of the panel and pull
up.
NOTE
Perform the same steps for the other side
panel.
Fig. 26
Fig. 27
3.4 REMOVAL OF THE REAR PANEL
NOTE
To remove the back panel it is necessary to
remove both side panels first.
Proceed as follows:
1 Move outside the top of the panel and pull
up.
3.5 TANK TO COLLECT WATER FILED
NOTE
To remove the tray with water you need:
1 Lift and remove the tray with water.
Fig. 28
Fig. 29
3.4
Ed. 02 of 09/2016
SERVICE MANUAL
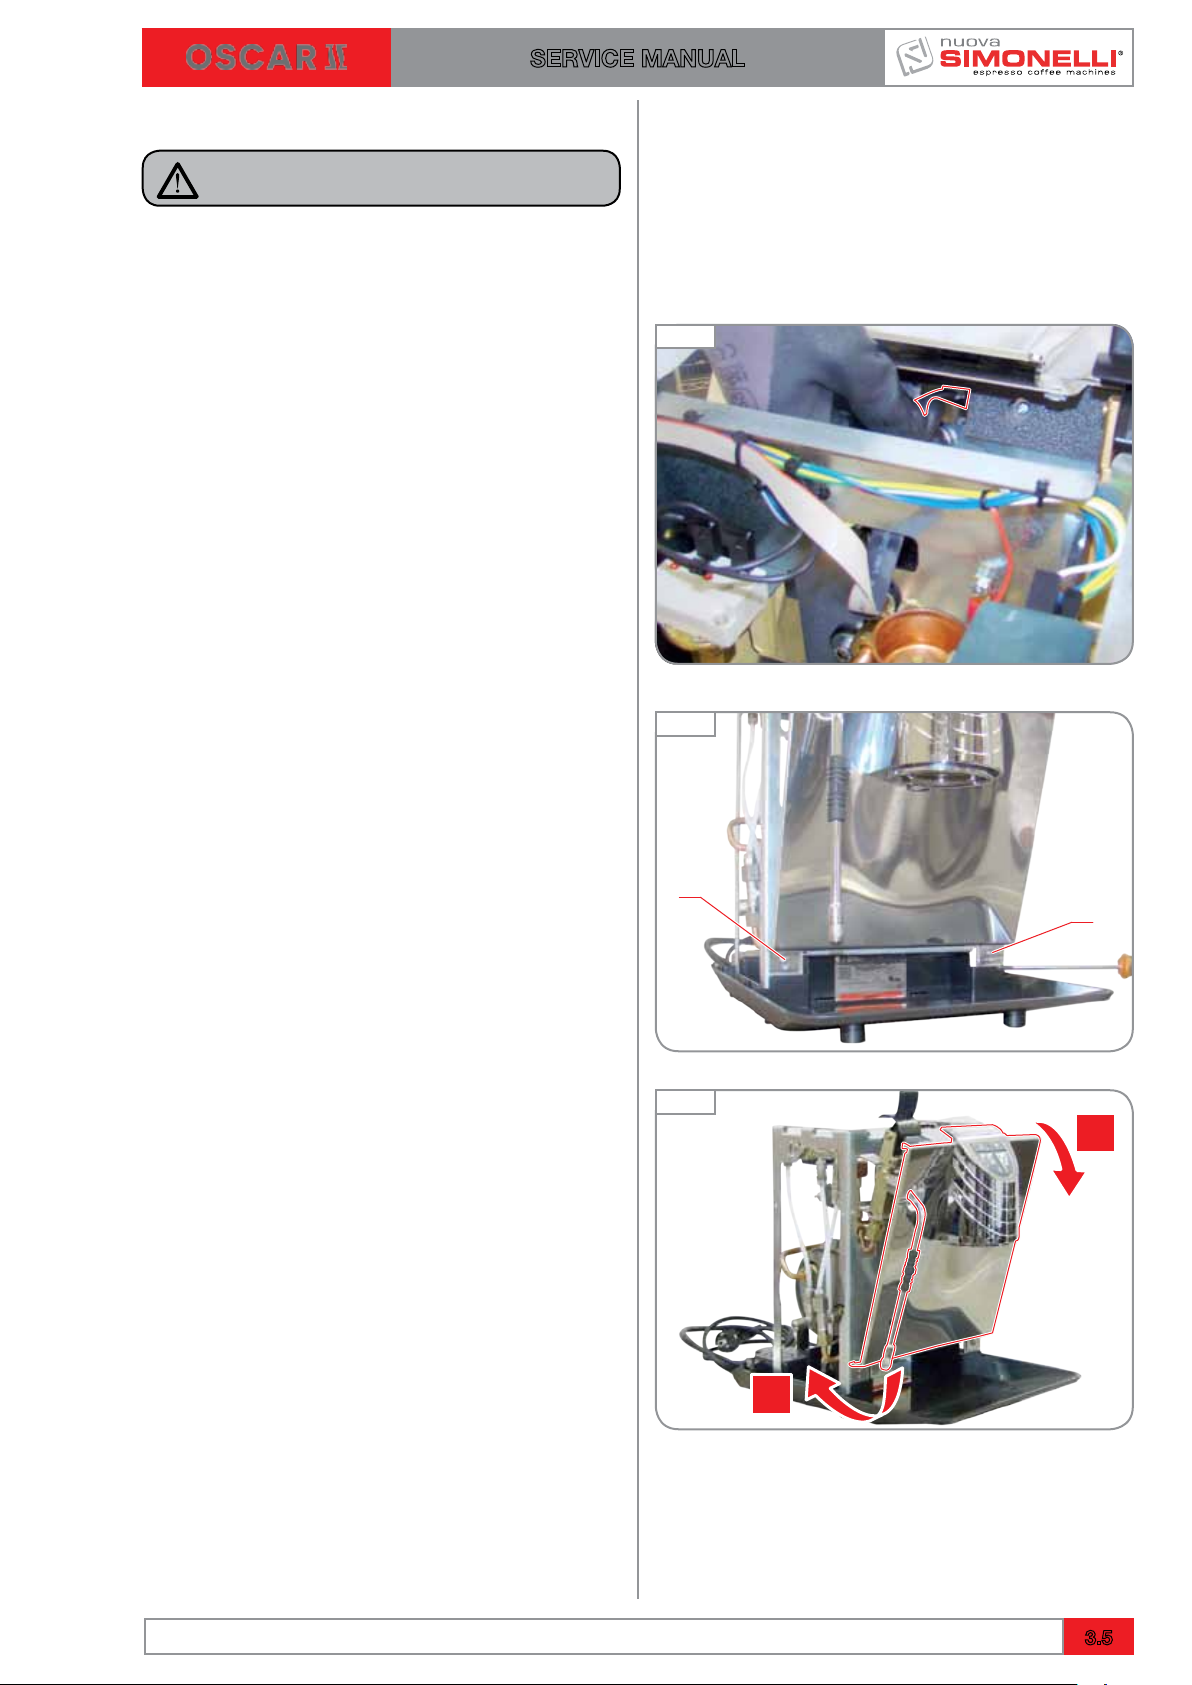
3.6 REMOVAL OF THE FRONT PANEL
NOTE
To remove the front panel, you must remove
the top panels and water from the drain pan.
1 Disconnect the connection to the panel.
2 Unscrew the screws «A» with a Phillips
screwdriver.
Fig. 30
Fig. 31
3 Slight outside the steam nozzle, then slide
the front panel to the front of the machine.
Ed. 02 of 09/2016
Fig. 32
3.5
SERVICE MANUAL
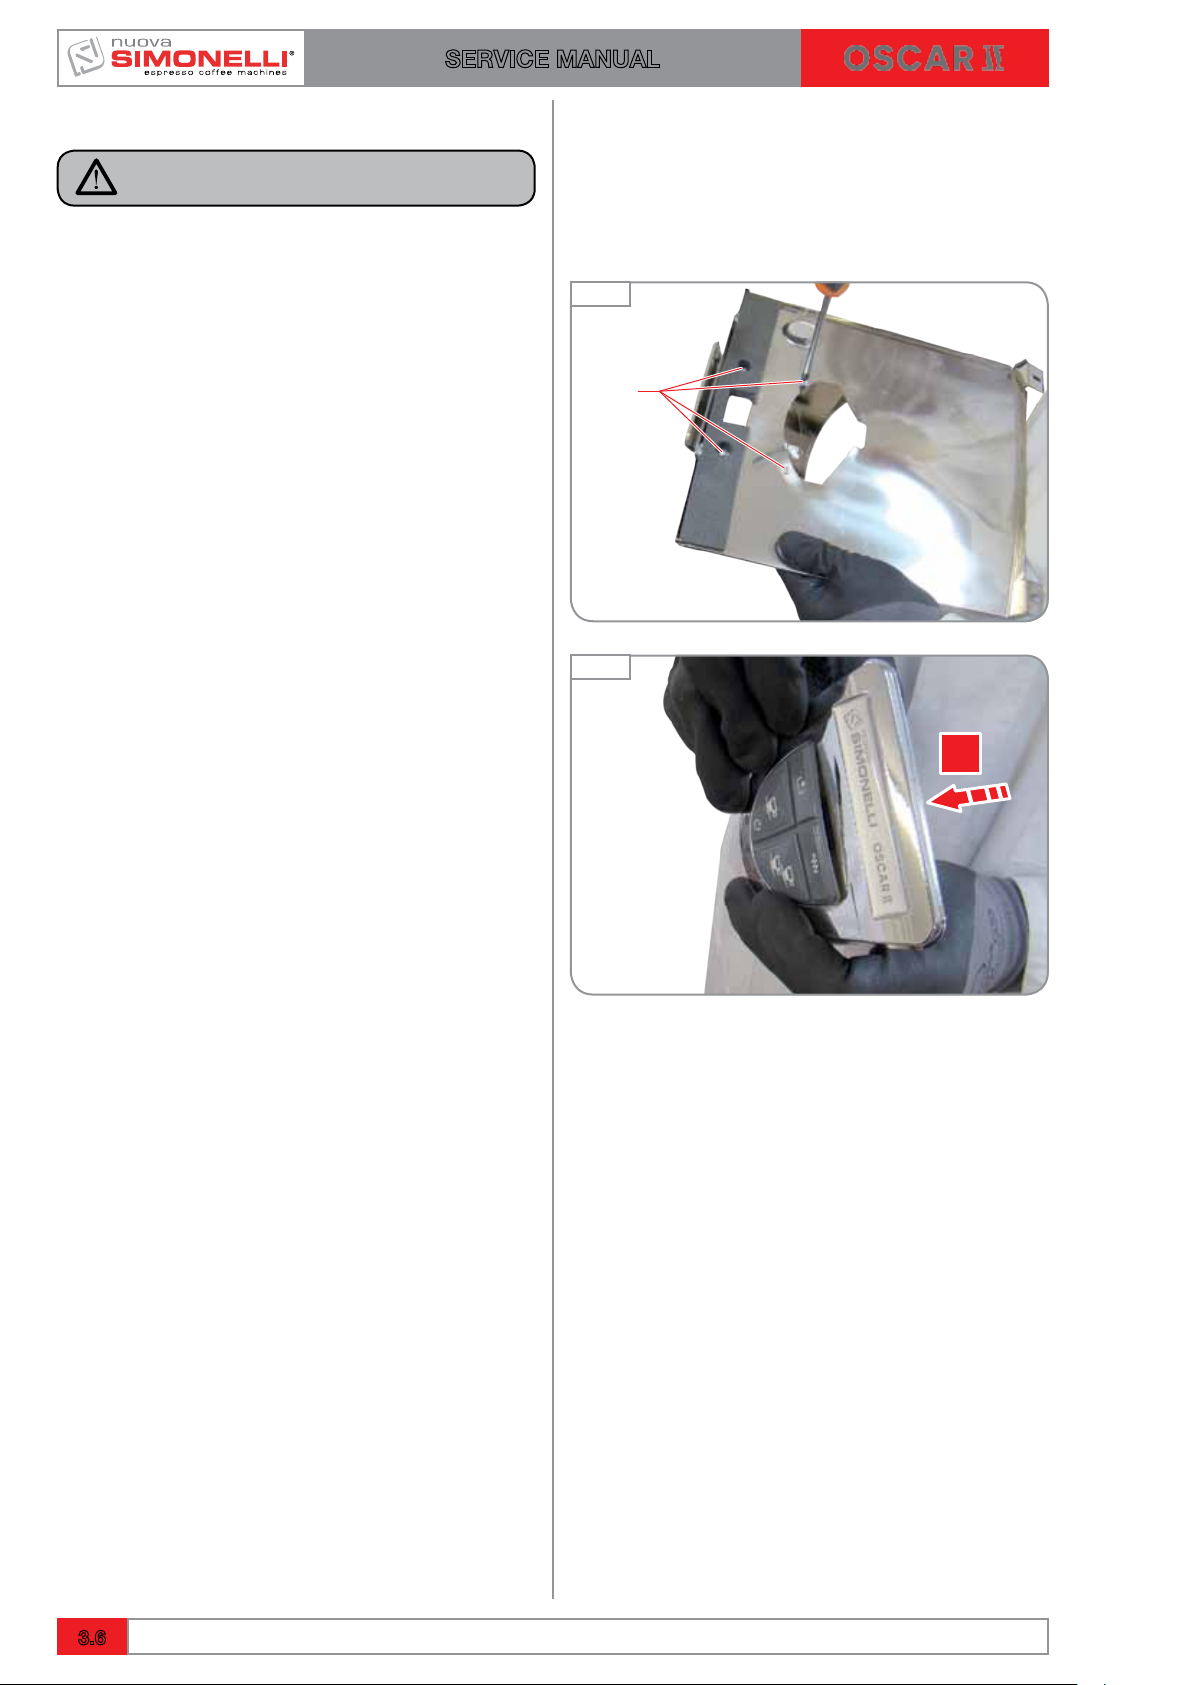
3.6.1 REMOVAL OF KEYBOARD
NOTE
Separate the cover unit from the front panel.
1 Loosen the 4 screws “A” situated on the
back of the front panel using a Phillips
screwdriver.
2 Push in the connector located inside of the
support group to detach the panel.
Fig. 33
Fig. 34
3.6
Ed. 02 of 09/2016
Loading…
View the manual for the Nuova Simonelli Oscar II here, for free. This user manual comes under the category coffee makers and has been rated by 4 people with an average of a 9. This manual is available in the following languages: English. Do you have a question about the Nuova Simonelli Oscar II?
Ask your question here
Nuova Simonelli Oscar II specifications
Below you will find the product specifications and the manual specifications of the Nuova Simonelli Oscar II.
The Nuova Simonelli Oscar II is a coffee maker that is designed to make high-quality espresso drinks. It is made from durable materials and is built to last, ensuring that it can withstand daily use in a busy cafe or restaurant. This coffee maker features a powerful heating element that can quickly heat water to the optimal temperature for brewing espresso. It also has a large, easy-to-read display that shows the temperature of the water, the brewing time, and other important information.
The Nuova Simonelli Oscar II has a large water reservoir that can be easily refilled, reducing the need for constant maintenance and allowing for efficient operation. Additionally, it has a steam wand that can be used to froth milk perfectly, giving baristas the ability to create a wide variety of espresso-based beverages. The steam wand is made from high-quality materials and is easy to clean, ensuring that it remains in top condition for years.
Overall, the Nuova Simonelli Oscar II is a high-quality coffee maker that is designed to make premium espresso drinks. Its durable construction, powerful heating element, and easy-to-use design make it an excellent choice for baristas and coffee enthusiasts alike.
General
Frequently asked questions
Can’t find the answer to your question in the manual? You may find the answer to your question in the FAQs about the Nuova Simonelli Oscar II below.
What is the best way to descale my coffee maker?
To descale the coffee maker, it is recommended to use a liquid descaling agent which is labelled as suitable for coffee machines.
How often should I descale my coffee maker?
How often a coffee machine needs to be descaled depends on how often it is used and the hardness of the water.
If hard water is used it is recommended to descale once a month, if soft water is used once a quarter is sufficient.
What does the grind say about the taste of the coffee?
How the coffee beans are ground strongly influences the taste of the coffee. If the coffee beans are very finely ground you will have a stronger taste and if the grind is coarser you will have a milder taste.
What is espresso?
Espresso is a small amount of concentrated coffee.
How long can I keep coffee beans?
The best-before date can be found on the packaging of the coffee beans. This best-before date applies as long as the bag is closed.
What is the best way to store coffee?
It is recommended to store coffee in an airtight and clean container.
Is the manual of the Nuova Simonelli Oscar II available in English?
Yes, the manual of the Nuova Simonelli Oscar II is available in English .
Is your question not listed? Ask your question here
Рожковая автоматическая кофемашина NUOVA SIMONELLI OSCAR II AD с подключением к воде предназначена для приготовления кофе эспрессо и капучино. Оснащена одной термокомпенсированной группой и паровым краном из нержавеющей стали. Бойлер изготовлен из меди, корпус – из нержавеющей стали с вставками из ABS-пластика чёрного цвета.
Данная модель рекомендуется для профессионального применения на предприятиях общественного питания с контактной барной стойкой, например, в специализированных кофейнях, ресторанах или кафе. Компактные размеры и стильный дизайн позволяют оборудованию с лёгкостью вписаться в любой интерьер.
Для продления срока службы оборудования и достижения идеального качества готовых напитков рекомендуем приобрести водоумягчитель и фильтр-систему для смягчения и очистки воды.
Рекомендации по выбору системы фильтрации
- Возможность приготовления 2 чашек одновременно
- Удобная электронная панель управления с подсветкой и мягким нажатием кнопок
- Индикаторы нагрева и нехватки воды
- Программирование времени дозирования для обеспечения стабильного результата приготовления кофе
Особенности конструкции:
- Регулируемый паровой кран легко поворачивается на 360°
- Теплообменная система внутри бойлера обеспечивает высокую производительность пара для приготовления капучино
- Контейнер для 12 чашек в верхней части корпуса
- Профессиональный портафильтр
- Приёмный резервуар объёмом 1 л
- Профессиональный энергосберегающий бойлер
- Оснащение бойлера:
- Автоматическое наполнение водой
- Предохранительный клапан
- Обратный клапан
- Профессиональный прессостат (регулирует давление в бойлере и поддерживает температуру, необходимую для приготовления кофе)
Комплектация:
- Одинарный фильтр
- Двойной фильтр
- Портафильтр
- Пружинка
- Дозатор кофе
- Носик подачи
- Пластиковый темпер
Дополнительные аксессуары (приобретаются отдельно):
- Весы электронные
- Заглушки для портафильтра
- Коврики для темпинга
- Моющие средства
- Наборы бариста
- Наборы для темпинга
- Нок-боксы
- Питчеры
- Помпы
- Портафильтры
- Профессиональный прессостат
- Разравниватели для кофе
- Салфетки
- Смазки
- Станции для темпинга
- Темперы
- Щётки для рабочей группы
FAQ: Types of Manuals and Their Contents
Nuova Simonelli Oscar II Manuals come in various types, each serving a specific purpose to help users effectively operate and maintain their devices. Here are the common types of Nuova Simonelli Oscar II User Guides and the information they typically include:
- User Manuals: Provide comprehensive instructions on how to use the device, including setup, features, and operation. They often include troubleshooting tips, safety information, and maintenance guidelines.
- Service Instructions: Designed for technicians and repair professionals, these manuals offer detailed information on diagnosing and repairing issues with the device. They include schematics, parts lists, and step-by-step repair procedures.
- Installation Guides: Focus on the installation process of the device, providing detailed instructions and diagrams for proper setup. They are essential for ensuring the device is installed correctly and safely.
- Maintenance Manuals: Provide guidance on routine maintenance tasks to keep the device in optimal condition. They cover cleaning procedures, part replacements, and regular servicing tips.
- Quick Start Guides: Offer a concise overview of the essential steps needed to get the device up and running quickly. They are ideal for users who need immediate assistance with basic setup and operation.
Each type of Nuova Simonelli Oscar II instruction is designed to address specific needs, ensuring users have the necessary information to use, maintain, and repair their devices effectively.
Related Instructions for Nuova Simonelli Oscar II:
1
PRONTOBAR
Service manual Nuova Simonelli PRONTOBAR User Manual (Service manual), @6O345G
176
33
7
5
MYTHOS 2
User handbook manual Nuova Simonelli MYTHOS 2 Guide (User handbook manual), @4FF938
66
372
86
6
Aurelia II
Manual #83T3C3: Aurelia II Coffee Maker Manual
28
193
39
8
mac 2000
User handbook manual Nuova Simonelli mac 2000 Manual (User handbook manual), @239M35
16
309
50
9
MDU
Handbook Nuova Simonelli Coffee Grinder Handbook (File: nuova-simonelli-mdu-handbook-24, Fri 12.2024)
24
1331
213
10
Aurelia II
45
1282
218
Coffee Maker Devices by Other Brands:
|
UFESA CE7141 Operating Instructions Manual PDF User Guide (@Z861FL), UFESA CE7141 Coffee Maker (Saturday 30-11-2024) INSTRUCCIONES DE USO 30 Nov 2024 | 26 |
|
|
Wega ALE Series Use And Maintenance Manual PDF User Guide (@3I9T3D), Wega ALE Series Coffee Maker (Tuesday 25-02-2025) WEGA MACCHINE PER CAFFÈ S.r.l. 25 Feb 2025 | 68 |
|
|
better chef IM-153 Use And Care Book Manual #7G8TP1: IM-153 Coffee Maker Use and care book manual ® 19 May 2025 | 14 |
|
|
Krups Intuition Preference EA873 Manual #965RSS: Intuition Preference EA873 Coffee Maker Manual 8020005263 12 Jan 2025 | 286 |
Categories:
Coffee Maker
Coffee Grinder
Commercial Food Equipment