
Start Here
•
Point de départ
•
Guía de instalación
Epson Perfection
®
V350 Photo
Read these instructions before using your product • Lisez ces instructions avant d’utiliser votre produit • Lea esta guía antes de utilizar el producto
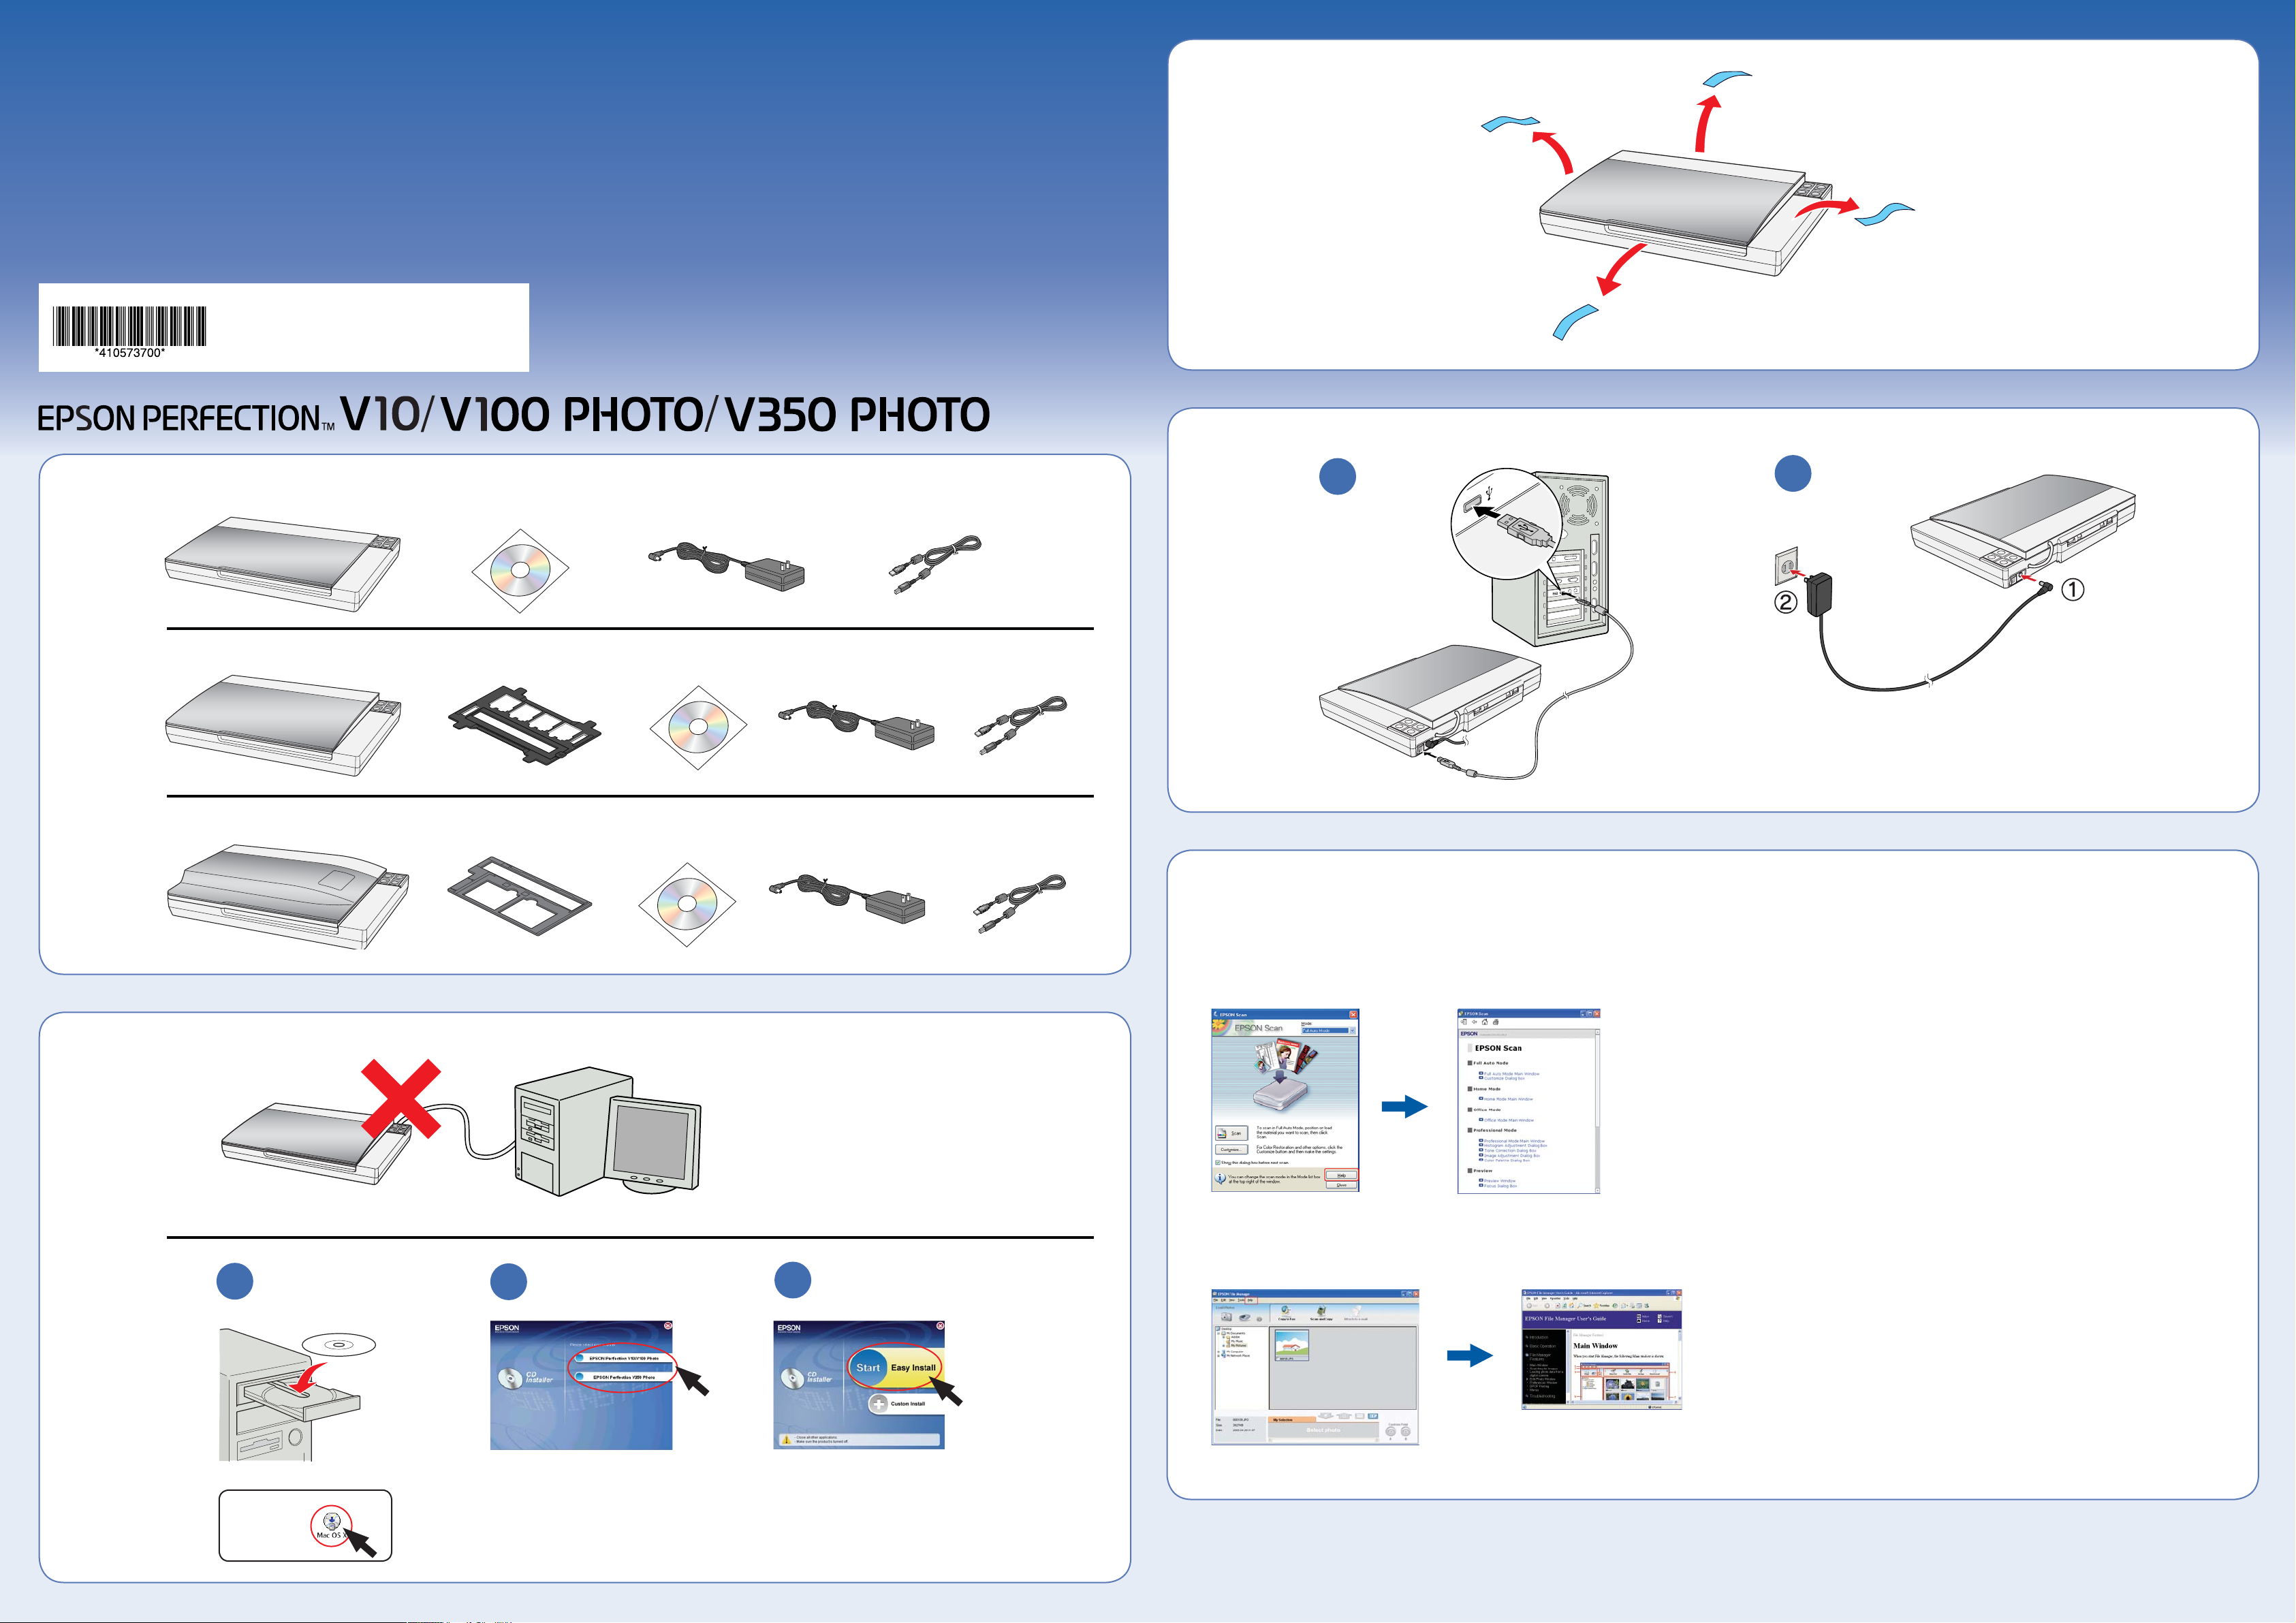
Unpack • Déballez le scanner • Desembale el producto
Install software • Installez les logiciels • Instale el software
Do not connect the USB cable yet.Ne branchez pas le câble USB tout de suite.No conecte el cable USB todavía.4109255 Rev.01-F C4109255 Rev.01-F M4109255 Rev.01-F Y4109255 Rev.01-F K
3
Remove protective tape • Retirez le ruban protecteur •
Retire la cinta adhesiva de protección
Plug the AC adapter into an electrical outlet to turn the scanner on.Branchez l’adaptateur CA dans une prise de courant pour mettre le scanner sous tension.Para encender el escáner, enchufe el adaptador de CA en una toma de corriente.
Connect and plug in • Connectez et branchez le scanner •
Conecte y enchufe el escáner
1
2
Film holderSupport de filmSoporte para película fotográfica
Scan a photo • Numérisez une photo • Escanee una foto
4
6
EPSON Scan opens and scans your photo in Full Auto Mode. Wait for your scan to finish or click Pause to change settings.Epson Scan ouvre et numérise votre photo en Mode Automatique. Attendez que la numérisation se termine ou cliquez sur Pause pour changer les paramètres.El programa Epson Scan se abre y escanea su foto en Modo Automático. Espere hasta que termine de escanear o haga clic en Pausa para cambiar los ajustes.
2 3
View your photo in Pictures (Windows Vista and Mac OS
®
X) or My Pictures (other versions of Windows).Regardez votre photo dans le dossier Images (Windows Vista ou Mac OS
®
X) ou Mes images (autres versions de Windows).Visualice su foto en la carpeta Imágenes (Windows Vista o Mac OS
®
X) o Mis imágenes (otras versiones de Windows).Click Scan.Cliquez sur Numériser.Haga clic en Escanear.
1
5
Press the Start button.Appuyez sur le bouton Démarrer.Pulse el botón .
Printed in XXXXXX XX.XX-XX XXX
Imprimé au XXXXXX
Impreso en XXXXXX
Windows Vista™: If you see the AutoPlay window, click Run Epsetup.exe. When you see the User Account Control screen, click Next. À l’écran AutoPlay, cliquez Exécuter Epsetup.exe. Cliquez Continuer à l’écran Contrôle de compte d’utilisateur.Si aparece la pantalla AutoPlay, haga clic en Ejecutar Epsetup.exe. Cuando vea la pantalla Control de cuentas de usuario, haga clic en Continuar.Macintosh
®
OS X: Double-click the CD-ROM icon on the desktop.Double-cliquez sur l’icône du CD-ROM sur le bureau.Haga doble clic en el icono de CD-ROM situado en el escritorio
1
2 4
Follow the on-screen instructions and select the default options.Remove the CD when you’re finished installing software.Suivez les instructions à l’écran et sélectionnez les options par défaut.Retirez le CD quand vous avez fini l’installation du logiciel. Siga las instrucciones en pantalla y seleccione las opciones predeterminadas. Retire el CD cuando termine de instalar el software.
3
Select Epson Perfection V350 Photo.Sélectionnez Epson Perfection V350 Photo.Seleccione Epson Perfection V350 Photo.
1
2
4
5
Start Here•Démarrez ici•Hier beginnen•
Hier beginnen•Para empezar•
Guia de Instalação•Inizia qui•Установка•
Встановлення
Printed in XXXXXX XX.XX-XX XXX
3
1
Perfection V10
Perfection V100 Photo
Perfection V350 Photo
4
1
2
2
1
2
Do not connect the USB cable yet.
Ne raccordez pas encore le câble USB.
Schließen Sie das USB-Kabel noch nicht an.
Sluit de USB-kabel nog niet aan.
No conecte todavía el cable USB.
Não ligue ainda o cabo USB.
Non collegare adesso il cavo USB.
Не подключайте USB кабель.
Не підключайте USB кабель.
3
Help•Aide•Hilfe•Help•Ayuda•Ajuda•Guida•Справка•
Довідка
EPSON Scan
Open the Help menu and select EPSON File Manager User’s Guide.
Ouvrez le menu Aide et sélectionnez Guide d’utilisation de EPSON File
EPSON File Manager
Manager.
Öffnen Sie das Menü Hilfe und wählen Sie EPSON File Manager
Benutzerhandbuch aus.
Open het menu Help en selecteer Gebruikershandleiding EPSON File Manager.
Abra el menú Ayuda y seleccione Manual de usuario de EPSON File Manager.
Abra o menu Ajuda e seleccione Guia do Utilizador do EPSON File Manager.
Aprire il menu della Guida e selezionare Guida utente di EPSON File Manager.
Откройте меню Help (Справка) и выберите EPSON File Manager User’s
Guide (Справка EPSON File Manager).
Відкрийте меню Help (Довідка) і виберіть EPSON File Manager User’s Guide
(Посібник користувача Диспетчера файлів EPSON).
Mac OS X
Maschinenlärminformations-Verordnung 3. GPSGV: Der höchste Schalldruckpegel beträgt 70 dB(A) oder weniger gemäss EN ISO 7779.
EPSON® is a registered trademark and Exceed Your Vision is a trademark of Seiko Epson Corporation. General Notice: Other product names used herein are for identification
purposes only and may be trademarks of their respective owners. Epson disclaims any and all rights in those marks. © 2006 Seiko Epson Corporation. All rights reserved.
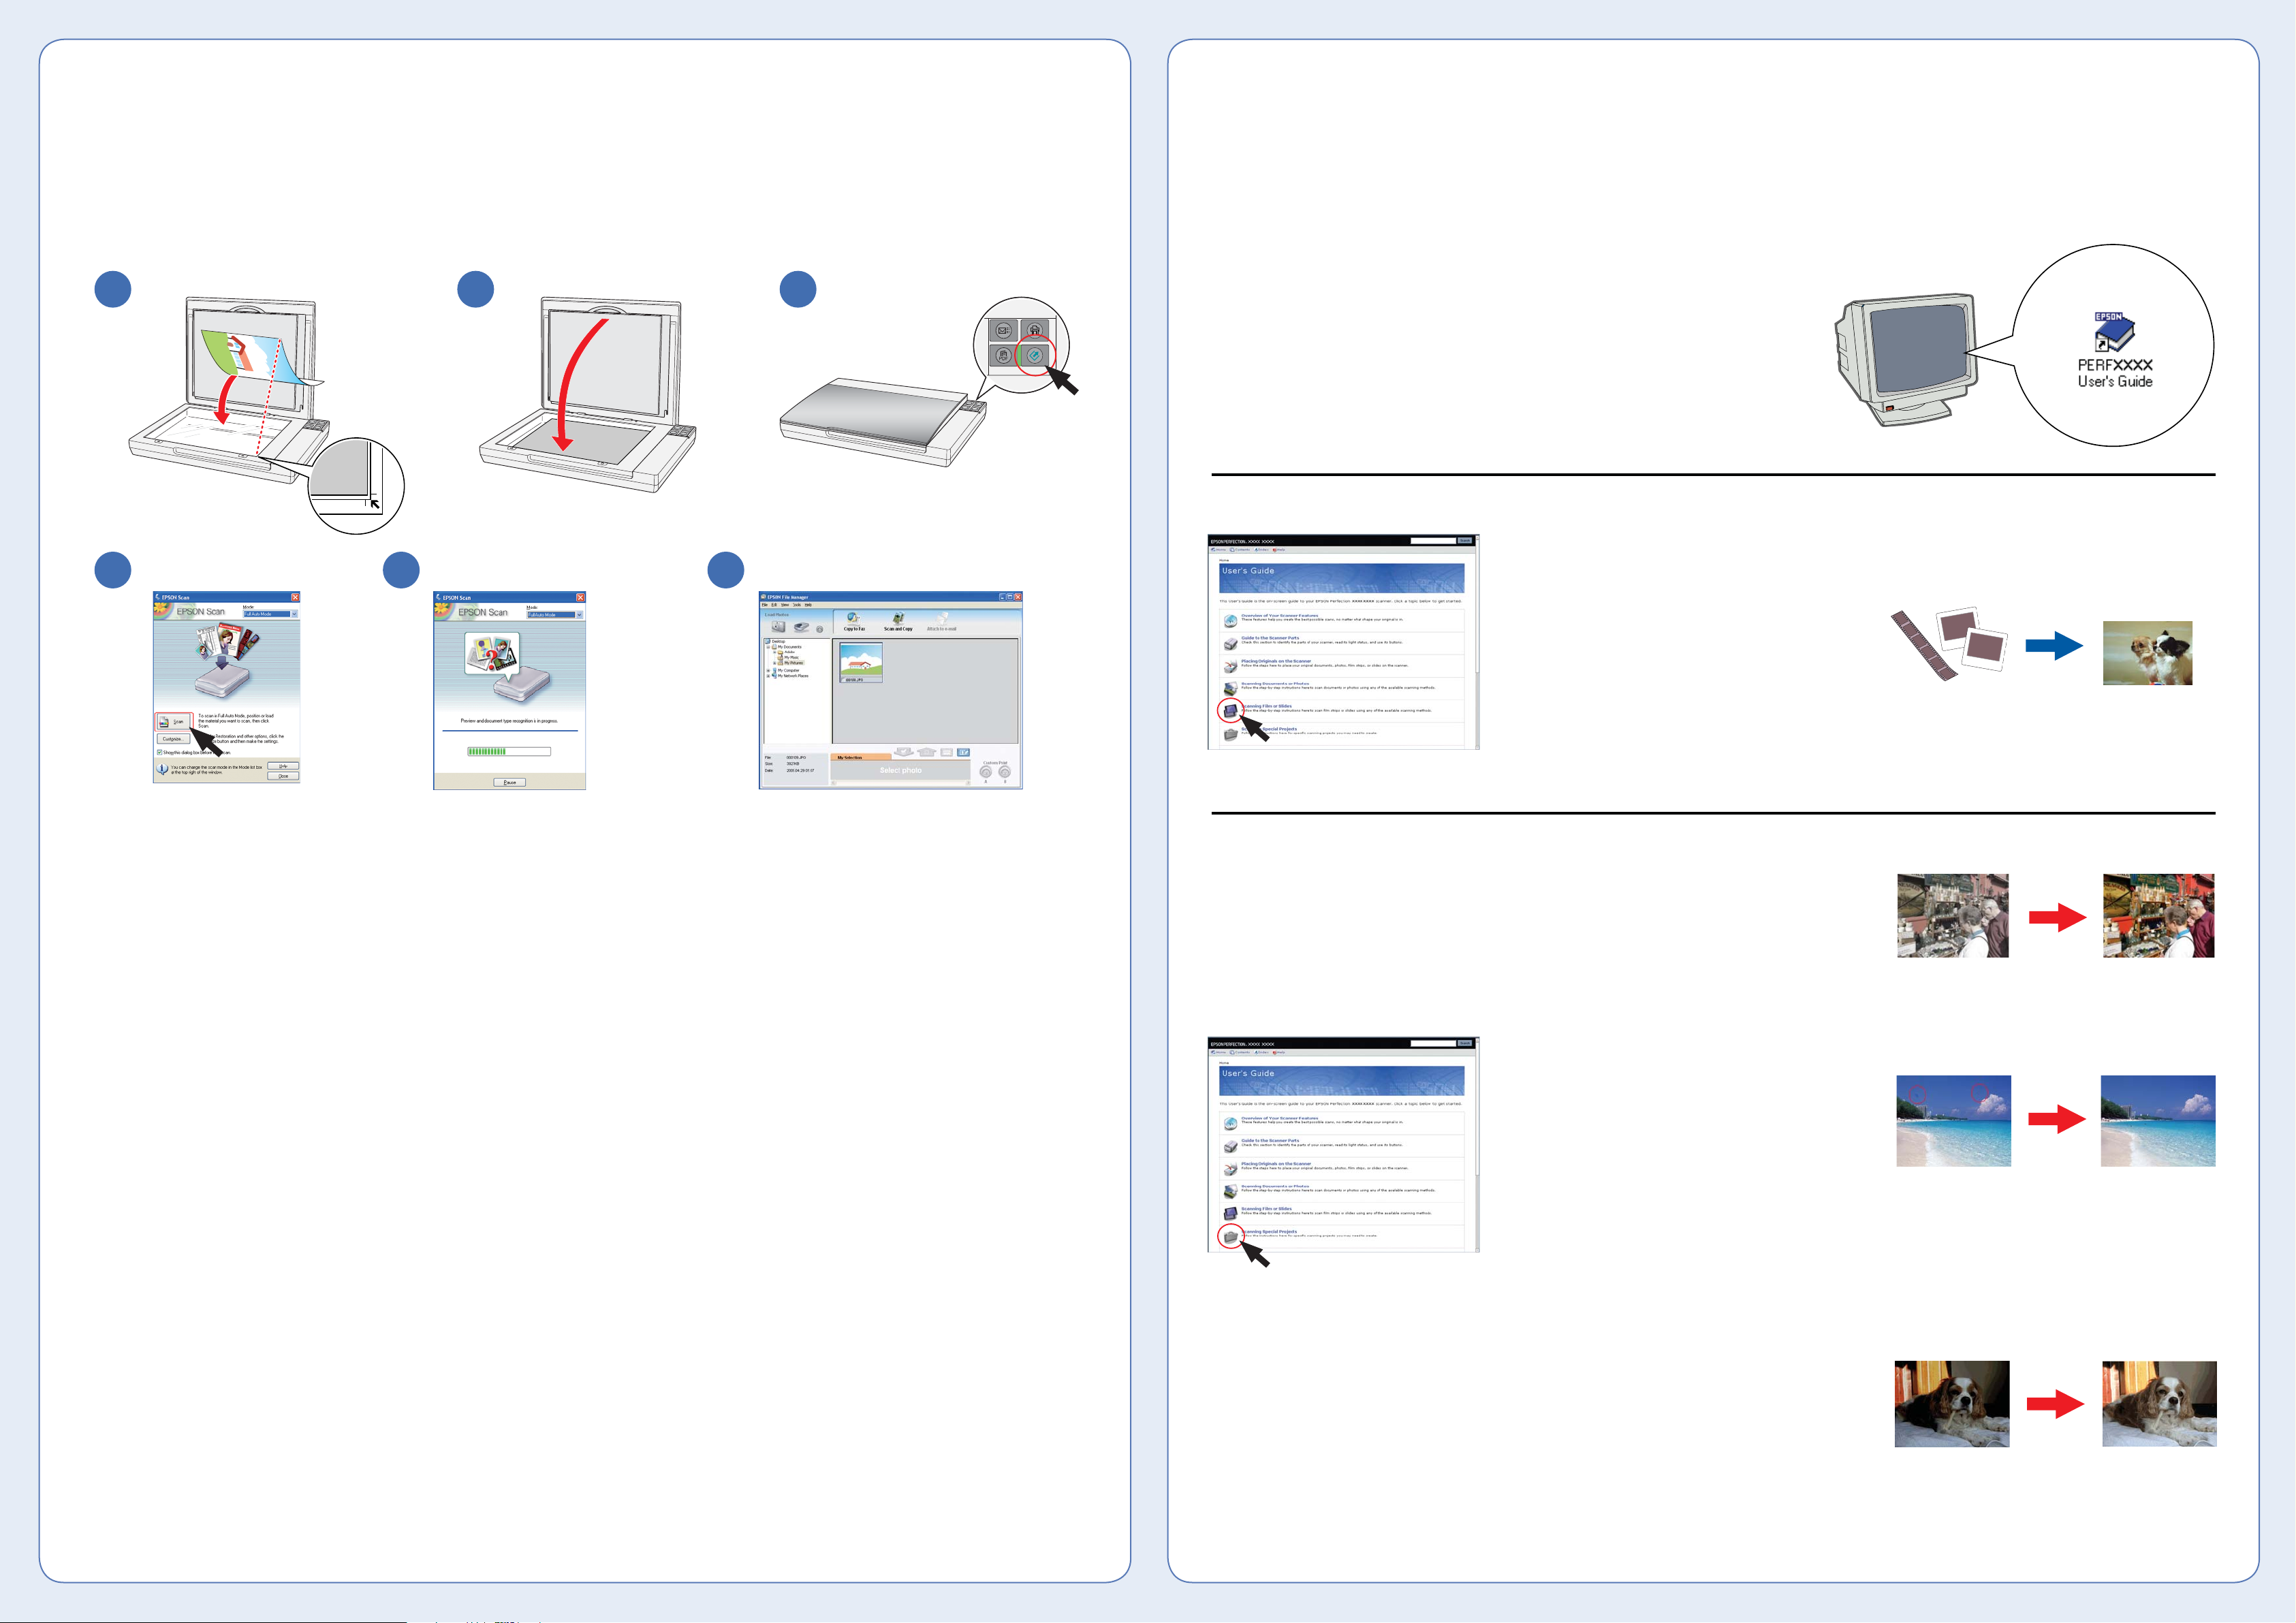
Try scanning a photo•Numérisation d’une photo•Ein Foto
Do more•Autres possibilités•Weitere Funktionen•
scannen•Foto scannen•Escanee una foto de prueba•
Tente digitalizar uma fotografia.•Scansione di una foto•
Сканирование фотографий•Спробуйте відсканувати
фотографію
1
4 5 6
EPSON Scan opens and scans your photo
in Full Auto Mode. Wait for your scan to
finish or click Pause to change settings.
EPSON Scan ouvre et numérise la photo
en Mode auto. Attendez la fin de la
numérisation ou cliquez sur Pause pour
modifier les paramètres.
EPSON Scan wird gestartet und scannt das
Foto im Vollautomatischen Modus. Warten
Sie, bis der Scanvorgang beendet ist, oder
klicken Sie auf Pause, um Einstellungen zu
ändern.
EPSON Scan wordt geopend en de foto
wordt gescand in de volautomatische
modus. Wacht tot de scan klaar is of klik op
Pauze om instellingen aan te passen.
EPSON Scan se abre y escanea su foto en
el Modo Automático. Espere a que termine
el escaneado o haga clic en Pausa para
cambiar los ajustes.
O EPSON Scan abre e digitaliza a fotografia
no Modo automático. Aguarde que a
digitalização termine ou faça clique em
Pausa para alterar definições.
EPSON Scan si apre e digitalizza la foto
nel Modo Automatico. Attendere che la
scansione termini o fare clic su Pausa per
modificare le impostazioni.
Запустится приложение EPSON Scan
и фотография будет отсканирована в
Автоматическом режиме. Дождитесь
завершения сканирования или щелкните
кнопку Pause (Пауза), чтобы изменить
настройки.
Відкриється програма EPSON Scan, і
фотографія буде відсканована в повному
автоматичному режимі. Дочекайтеся
завершення сканування або натисніть
на кнопку Pause (Пауза), щоб змінити
параметри.
2 3
EPSON File Manager opens and displays your
scanned photo.
View the on-screen User’s Guide for instructions on
using EPSON File Manager.
EPSON File Manager ouvre et affiche la photo
numérisée.
Affichez le Guide d’utilisation à l’écran pour obtenir
des instructions relatives à l’utilisation de EPSON File
Manager.
EPSON File Manager wird gestartet und zeigt das
gescannte Foto an.
Im Bildschirm-Benutzerhandbuch finden Sie
Anweisungen zum Arbeiten mit EPSON File Manager.
EPSON File Manager wordt geopend en de gescande
foto wordt weergegeven.
Raadpleeg de online-gebruikershandleiding voor
instructies voor het gebruik van EPSON File Manager.
EPSON File Manager se abre y muestra su foto
escaneada.
Consulte las instrucciones de uso de EPSON File
Manager en el Manual de usuario en pantalla.
O EPSON File Manager abre e apresenta a fotografia
digitalizada.
Para obter instruções sobre como utilizar o EPSON
File Manager, consulte o Guia do Utilizador
apresentado no ecrã.
EPSON File Manager si apre e visualizza la foto
acquisita.
Per istruzioni sull’uso di EPSON File Manager,
visualizzare la Guida utente in linea.
Приложение EPSON File Manager запустится и
отобразит отсканированную фотографию.
Подробнее об использовании приложения EPSON
File Manager см. в интерактивном Руководстве
пользователя.
EPSON File Manager відкриє та відобразить
відскановану фотографію.
З указівками щодо використання EPSON File
Manager можна ознайомитися в електронному
Посібнику користувача.
Meer mogelijkheden•Haga más•Utilizar outras funções•
Operazioni avanzate•Другие возможности•
Додаткові можливості
View the on-screen User’s Guide for instructions on using these features:
Affichez le Guide d’utilisation à l’écran pour obtenir des instructions relatives à l’utilisation
des fonctions suivantes :
Im Bildschirm-Benutzerhandbuch finden Sie Anweisungen zur Verwendung der
nachstehenden Funktionen:
Raadpleeg de online-gebruikershandleiding voor instructies voor het gebruik van deze
functies:
Consulte las instrucciones de uso de estas funciones en el Manual de usuario en pantalla:
Para obter instruções sobre como utilizar as funções seguintes, consulte o Guia do
Utilizador apresentado no ecrã.
Per istruzioni sull’uso di tali funzioni, visualizzare la Guida utente in linea:
Обратитесь к интерактивному Руководству пользователя для получения подробной
информации о следующих функциях.
В електронному Посібнику користувача можна ознайомитися зі вказівками щодо
використання наступних функцій.
Perfection V100 Photo and V350 Photo
Scan film or slides
Perfection V100 Photo et V350 Photo
Numérisation de films ou de diapositives
Perfection V100 Photo und V350 Photo
Film oder Dias scannen
Perfection V100 Photo en V350 Photo
Films of dia’s scannen
Perfection V100 Photo y V350 Photo
Escanee películas o diapositivas
Perfection V100 Photo e V350 Photo
Digitalizar películas ou diapositivos
Perfection V100 Photo e V350 Photo
Scansione di pellicola o diapositive
Сканирование пленок и слайдов с
помощью Perfection V100 Photo и V350 Photo
Сканування фотоплівок і слайдів
Perfection V100 Photo і V350 Photo
Restore color
Restauration de la couleur
Farben wiederherstellen
Kleuren opfrissen
Recupere el color
Restaurar a cor
Ripristino del colore
Восстановление цветов
Відновлення кольорів
Remove dust from originals
Suppression de la poussière présente sur les
originaux
Staub von Vorlagen entfernen
Stof verwijderen van originelen
Elimine el polvo de los originales
Remover o pó dos originais
Rimozione di polvere dagli originali
Удаление царапин с изображения
Видалення пилу з вихідних зображень
Fix photos that are too dark because of
backlighting
Correction des photos trop foncées en raison
du rétroéclairage
Fotos reparieren, die aufgrund von Gegenlicht
zu dunkel sind
Foto’s corrigeren die te donker zijn als gevolg
van tegenlicht
Arregle fotos demasiado oscuras por el
claroscuro
Corrigir fotografias demasiado escuras devido
ao efeito de contraluz
Correzione di foto troppo scure a causa di
retroilluminazione
Исправление темных фотографий, снятых
против света.
Виправлення фотографій, які виглядають
темними через задню підсвітку
- Инструкции и руководства
- Бренды
- Epson
- Perfection V350 Photo
- Справочник Пользователя

Proof sign-off:
Karen
Ms. Araki
R4CH790_EnFrDeNlEsPtItRuUk
Start Here Rev. C
PERF_V10_SH.indd A2 size
4/6/06
Start Here•Démarrez ici•Hier beginnen•
Hier beginnen•Para empezar•
Guia de Instalação•Inizia qui•Установка•
Встановлення
1
2
3
4
1
2
Do not connect the USB cable yet.
Ne raccordez pas encore le câble USB.
Schließen Sie das USB-Kabel noch nicht an.
Sluit de USB-kabel nog niet aan.
No conecte todavía el cable USB.
Não ligue ainda o cabo USB.
Non collegare adesso il cavo USB.
Не подключайте USB кабель.
Не підключайте USB кабель.
Mac OS X
Perfection V10
Perfection V100 Photo
Perfection V350 Photo
1
2
3
Maschinenlärminformations-Verordnung 3. GPSGV: Der höchste Schalldruckpegel beträgt 70 dB(A) oder weniger gemäss EN ISO 7779.
EPSON
®
is a registered trademark and Exceed Your Vision is a trademark of Seiko Epson Corporation. General Notice: Other product names used herein are for identification
purposes only and may be trademarks of their respective owners. Epson disclaims any and all rights in those marks. © 2006 Seiko Epson Corporation. All rights reserved.
Help•Aide•Hilfe•Help•Ayuda•Ajuda•Guida•Справка•
Довідка
EPSON Scan
EPSON File Manager
Open the Help menu and select EPSON File Manager User’s Guide.
Ouvrez le menu Aide et sélectionnez Guide d’utilisation de EPSON File
Manager.
Öffnen Sie das Menü Hilfe und wählen Sie EPSON File Manager
Benutzerhandbuch aus.
Open het menu Help en selecteer Gebruikershandleiding EPSON File Manager.
Abra el menú Ayuda y seleccione Manual de usuario de EPSON File Manager.
Abra o menu Ajuda e seleccione Guia do Utilizador do EPSON File Manager.
Aprire il menu della Guida e selezionare Guida utente di EPSON File Manager.
Откройте меню Help (Справка) и выберите EPSON File Manager User’s
Guide (Справка EPSON File Manager).
Відкрийте меню Help (Довідка) і виберіть EPSON File Manager User’s Guide
(Посібник користувача Диспетчера файлів EPSON).
Printed in XXXXXX XX.XX-XX XXX
PERF_V10_SH.indd 1PERF_V10_SH.indd 1 5/18/2006 10:00:23 AM5/18/2006 10:00:23 AM