
VSX-S520D VSX-S520 Language select / Sélection de la langue / Selección de idioma / Selezione lingua / Sprachauswahl / Taal selecteren / Выбор языка English Français Español Italiano Deutsch Nederlands Русский
> Before Start > Part Names > Install > Initial Setup > Playback Advanced Setup | Firmware Update | Others AV RECEIVER VSX-S520D VSX-S520 Instruction Manual Before Start What’s in the box ………………………………………………………….. 2 Part Names Front Panel
> Before Start > Part Names > Install > Initial Setup > Playback Advanced Setup | Firmware Update | Others What’s in the box Before Start E N Main unit (1) Remote controller (RC-933R) (1), batteries (AAA/R03) (2) Speaker setup microphone (1) DAB/FM antenna (1) (VSX-S520D) 2 Indoor FM antenna (1)
> Before Start > Part Names > Install > Initial Setup > Playback Advanced Setup | Firmware Update | Others Front Panel Part Names E N 1. Í STANDBY/ON button: Turns the unit on or into standby mode. 2. Display (ÄP7) 3. Remote control sensor 4. INPUT SELECTOR dial: Switches the
> Before Start > Part Names > Install > Initial Setup > Playback Advanced Setup | Firmware Update | Others Rear Panel VSX-S520D E N 90° 180° 1. ANTENNA DAB / FM jack: Connect the supplied antenna. 2. Wireless antenna: Raise for Wi-Fi connection or when using a BLUETOOTH
> Before Start > Part Names > Install > Initial Setup > Playback Advanced Setup | Firmware Update | Others VSX-S520 E N 90° 180° 1. ANTENNA FM UNBAL 75h jack: Connect the supplied antenna. 2. Wireless antenna: Raise for Wi-Fi connection or when using a BLUETOOTH enabled
> Before Start > Part Names > Install > Initial Setup > Playback Advanced Setup | Firmware Update | Others Remote Controller 1. Í button: Turns the unit on or into standby mode. 2. Input selector buttons: Switches the input to be played. 3. (AV ADJUST) button: You can perform common
> Before Start > Part Names > Install > Initial Setup > Playback Advanced Setup | Firmware Update | Others Display E N Neo:6 1. Lights in the following conditions. HDMI: HDMI signals are input and selected. ARC: Audio signals from the ARC compatible TV are input and selected. USB:
> Before Start > Part Names > Install > Initial Setup > Playback Advanced Setup | Firmware Update | Others 1. Connect the Speakers Install Install the speakers L Front speakers output front stereo sound and a center speaker outputs center sound such as dialogs and vocals. Surround speakers create
> Before Start > Part Names > Install > Initial Setup > Playback Advanced Setup | Firmware Update | Others 1 E N a 1/2˝ (12 mm) 2 a b a 3 FRONT R b a speaker cable, b subwoofer cable FRONT L CENTER Connect the speakers Refer to the illustration to connect the speaker system. Twist the wires of the
> Before Start > Part Names > Install > Initial Setup > Playback Advanced Setup | Firmware Update | Others E N Make sure the exposed wires of the speakers do not stick out of the speaker terminals when connecting. If the exposed wires of the speakers touch the rear panel or the + and – wires touch
> Before Start > Part Names > Install > Initial Setup > Playback Advanced Setup | Firmware Update | Others 2. Connect the TV To ARC TV 1 E N For a TV that supports the ARC (Audio Return Channel) (ÄP67) feature, use an HDMI cable and connect according to illustration «a». Choose an HDMI IN jack on
> Before Start > Part Names > Install > Initial Setup > Playback Advanced Setup | Firmware Update | Others 3. Connect the HDMI AV Components E N 1 a BD/DVD a Streaming media player Cable/Satellite set-top box HDMI OUT a HDMI cable 12 e.g. BD This is an example of connection with an AV component
> Before Start > Part Names > Install > Initial Setup > Playback Advanced Setup | Firmware Update | Others 4. Connect the Audio Components Connecting a CD player E N Use a digital coaxial cable to connect a CD player to the DIGITAL IN COAXIAL jack. Connecting a turntable You can also connect a
> Before Start > Part Names > Install > Initial Setup > Playback Advanced Setup | Firmware Update | Others 5. Connect Other Cables Antenna Hookup 1 (North American models) a b VSX-S520D VSX-S520 2 3 DAB/FM antenna (VSX-S520D) Connect the supplied DAB/FM antenna to the ANTENNA DAB/FM terminal. Make
> Before Start > Part Names > Install > Initial Setup > Playback Advanced Setup | Firmware Update | Others Initial Setup with Auto Start-up Wizard Initial Setup 1 2 Initial Setup starts automatically E N 1. Switch the input on the TV to that assigned to the unit. 2. Put batteries into the remote
> Before Start > Part Names > Install > Initial Setup > Playback Advanced Setup | Firmware Update | Others 1. Full Auto MCACC Place the supplied speaker setup microphone in the listening position, measure the test tones emitted by the speakers, then the unit automatically sets the optimum volume
> Before Start > Part Names > Install > Initial Setup > Playback Advanced Setup | Firmware Update | Others button on the remote controller and press ENTER, then follow the on-screen instructions. E N Wi-Fi Setup Ðáóó÷ïòä a i j k l m n o p q r s t u v w x y z 1 b 2 3 c d 4 e 5 6 f g 7 h 8 9 0 — ^ \
> Before Start > Part Names > Install > Initial Setup > Playback Advanced Setup | Firmware Update | Others AV Component Playback Playback Basic operations Play an AV component or TV connected to this unit with an HDMI cable or other cable. 1. Switch the input on the TV to that assigned to the unit.
> Before Start > Part Names > Install > Initial Setup > Playback Advanced Setup | Firmware Update | Others Internet Radio 1 a b Basic operations Pandora® (U.S. only) When this unit is connected to a network, you can listen to TuneIn or other preregistered Internet radio services. Depending on the
> Before Start > Part Names > Install > Initial Setup > Playback Advanced Setup | Firmware Update | Others (I like this track) : Give a track “thumbs-up” and Pandora will play more music like it. (I don’t like this track) : Give a track “thumbs-down” and Pandora will ban that track from the current
> Before Start > Part Names > Install > Initial Setup > Playback Advanced Setup | Firmware Update | Others Spotify Basic operations 1 2 a b 3 c d e 4 E N Spotify Connect play is possible by connecting this unit to the same network as a smart phone or tablet. To enable Spotify Connect, install the
> Before Start > Part Names > Install > Initial Setup > Playback Advanced Setup | Firmware Update | Others Music Server It is possible to stream music files stored on PCs or NAS devices connected to the same network as this unit. The network servers this unit is compatible with are those PCs with
> Before Start > Part Names > Install > Initial Setup > Playback Advanced Setup | Firmware Update | Others 0 Depending on the server and share settings, the unit may not recognize it, or may not be able to play its music files. Furthermore, the unit cannot access pictures and videos stored on
> Before Start > Part Names > Install > Initial Setup > Playback Advanced Setup | Firmware Update | Others USB Storage Device Basic play 1 Play music files on a USB storage device. 1. Switch the input on the TV to that assigned to the unit. 2. Plug your USB storage device with the music files into
> Before Start > Part Names > Install > Initial Setup > Playback Advanced Setup | Firmware Update | Others USB Storage Device Requirements 0 Note that operation is not guaranteed with all USB storage devices. 0 This unit can use USB storage devices that comply with the USB mass storage device class
> Before Start > Part Names > Install > Initial Setup > Playback Advanced Setup | Firmware Update | Others AirPlay® 1 3 4 2 5 26 Basic play You can wirelessly enjoy the music files on an iPhone®, iPod touch®, or iPad® connected to the same access point as this unit. 0 Update the OS version on your
> Before Start > Part Names > Install > Initial Setup > Playback Advanced Setup | Firmware Update | Others BLUETOOTH® Playback Pairing 1 2 Playing Back 1 2 Pairing E N 1. When you press the button on the remote controller, «Now Pairing…» is displayed on this unit’s display, and the pairing mode
> Before Start > Part Names > Install > Initial Setup > Playback Advanced Setup | Firmware Update | Others Listening to the FM/DAB Radio Listening to FM Radio 1 Tuning Automatically 1. Press TUNER on the remote controller repeatedly to select either «FM» on the display. 2. Press MODE (e) on the
> Before Start > Part Names > Install > Initial Setup > Playback Advanced Setup | Firmware Update | Others Drama Culture Science (Science and technology) Varied Pop M (Pop music) Rock M (Rock music) Easy M (Middle of the road music) Light M (Light classics) Classics (Serious classics) Other M
> Before Start > Part Names > Install > Initial Setup > Playback Advanced Setup | Firmware Update | Others Presetting a Radio Station It allows you to register up to 40 of your favorite FM/DAB stations. Registering radio stations in advance allows you to tune into your radio station of choice
> Before Start > Part Names > Install > Initial Setup > Playback Advanced Setup | Firmware Update | Others Listening Modes Selecting Listening Modes You can change the listening mode during play by pressing repeatedly «AUTO/DIRECT» or «SURR». a AUTO/DIRECT button (b) Press repeatedly and the
> Before Start > Part Names > Install > Initial Setup > Playback Advanced Setup | Firmware Update | Others Input source & volume Listening Mode Effects Listening mode Updating of listening modes We plan to provide support for the Dolby Atmos and DTS:X audio format through firmware updates for this
> Before Start > Part Names > Install > Initial Setup > Playback Advanced Setup | Firmware Update | Others maximum of 7.1ch. 0 To enable transfer of this audio format, connect via HDMI cable and set audio output on the player to bitstream output. Drama Suitable for TV shows produced in a TV studio.
> Before Start > Part Names > Install > Initial Setup > Playback Advanced Setup | Firmware Update | Others cable and set audio output on the player to bitstream output. DTS Neo:6 These listening modes allow you to expand the playback signal to 5.1 channels to suit the connected speaker
> Before Start > Part Names > Install > Initial Setup > Playback Advanced Setup | Firmware Update | Others Selectable listening modes You can select a variety of listening modes to suit the audio format of the signal being input. 0 The Stereo mode can be selected with any audio format. 0 Listening
> Before Start > Part Names > Install > Initial Setup > Playback Advanced Setup | Firmware Update | Others Input Format Listening Mode Input Format Listening Mode Input Format Listening Mode Multich PCM Stereo DSD Stereo Dolby Atmos Stereo Multich PCM½1 DSD Dolby Surround Dolby Surround Surround
> Before Start > Part Names > Install > Initial Setup > Playback Advanced Setup | Firmware Update | Others Input Format Listening Mode Input Format Listening Mode Input Format Listening Mode Dolby D Stereo Dolby D+ Stereo Dolby TrueHD Stereo Dolby D½1½2 Dolby D+½1½2½3 Dolby TrueHD½1½2 Dolby
> Before Start > Part Names > Install > Initial Setup > Playback Advanced Setup | Firmware Update | Others Input Format Listening Mode Input Format Listening Mode Input Format Listening Mode DTS Stereo DTS 96/24 Stereo DTS Express Stereo DTS½1½2 DTS 96/24½1½2 DTS Express½1½2 PL Movie½3 PL Movie½3
> Before Start > Part Names > Install > Initial Setup > Playback Advanced Setup | Firmware Update | Others Input Format Listening Mode Input Format Listening Mode Input Format Listening Mode DTS-HD HR Stereo DTS-HD MSTR Stereo DTS:X Stereo DTS-HD HR½1½2 DTS-HD MSTR½1½2 DTS:X PL Movie½3 PL Movie½3
> Before Start > Part Names > Install > Initial Setup > Playback Advanced Setup | Firmware Update | Others AV Adjust 1 By pressing the button on the remote controller during play, you can adjust frequently used settings, such as the sound quality, using on-screen menus. Note that there is no
> Before Start > Part Names > Install > Initial Setup > Playback Advanced Setup | Firmware Update | Others 48 kHz or less. The setting is not effective in the bitstream signals. 0 It cannot be set if the listening mode is Direct or Pure Direct. DRC: Make small sounds easily heard. It is useful when
> Before Start > Part Names > Install > Initial Setup > Playback Advanced Setup | Firmware Update | Others System Setup Advanced Setup 1 2 TV’s remote controller The unit allows you to configure advanced settings to provide you with an even better experience. 1. Switch the input on the TV to that
> Before Start > Part Names > Install > Initial Setup > Playback Advanced Setup | Firmware Update | Others Impose OSD Screen Saver Set whether or not to display the information on the TV when the volume is adjusted or input is changed, for example. «On (Default Value)»: OSD displayed on the TV
> Before Start > Part Names > Install > Initial Setup > Playback Advanced Setup | Firmware Update | Others TV «AUDIO 1» to «AUDIO 2»: Assign a desired AUDIO IN jack to the TV input selector. (Default Value is «——«) Center Set the low range capabilities for each channel by setting either small or
> Before Start > Part Names > Install > Initial Setup > Playback Advanced Setup | Firmware Update | Others Front Left Specify the distance between each speaker and the listening position. (Default Value is «10.0ft/3.00m») Center Specify the distance between each speaker and the listening position.
> Before Start > Part Names > Install > Initial Setup > Playback Advanced Setup | Firmware Update | Others Audio Adjust Source ∫ Dual Mono/Mono ∫ Input Volume Absorber Dual Mono Mono Input Channel Set the audio channel or language to be output when playing multiplex audio or multilingual TV
> Before Start > Part Names > Install > Initial Setup > Playback Advanced Setup | Firmware Update | Others ∫ Audio Select Select the priority for input selection when multiple audio sources are connected to one input selector, such as connections to both the «BD/DVD» HDMI IN jack and the «BD/DVD»
> Before Start > Part Names > Install > Initial Setup > Playback Advanced Setup | Firmware Update | Others HDMI Standby Through When this is set to anything other than «Off», you can play the video and audio of an HDMI connected player on the TV even if the unit is in standby mode. Only «Auto» and
> Before Start > Part Names > Install > Initial Setup > Playback Advanced Setup | Firmware Update | Others Auto Standby This setting places the unit on standby automatically after 20 minutes of inactivity without any video or audio input. (When «USB Power Out at Standby» or «Network Standby» is on,
> Before Start > Part Names > Install > Initial Setup > Playback Advanced Setup | Firmware Update | Others ∫ Firmware Update Update Notice Availability of a firmware update will be notified via network. «Enable (Default Value)»: Notify updates «Disable»: Do not notify updates Version The current
> Before Start > Part Names > Install > Initial Setup > Playback Advanced Setup | Firmware Update | Others MCACC 1 2 TV’s remote controller Setup the speakers automatically or make desired changes to the equalizer. You can also check the values set currently for each speaker setting. 1. Switch the
> Before Start > Part Names > Install > Initial Setup > Playback Advanced Setup | Firmware Update | Others in «AV Adjust» — «MCACC» — «Manual EQ Select» (ÄP40). Front Left Center Front Right 52 Surround Right After selecting the speaker frequency from between «63 Hz» and «16 kHz» with the cursors
> Before Start > Part Names > Install > Initial Setup > Playback Advanced Setup | Firmware Update | Others MCACC Data Check E N You can check the number of speaker channels connected and the content and values you have set for each of the speaker settings. ∫ Speaker Setting You can check the number
> Before Start > Part Names > Install > Initial Setup > Playback Advanced Setup | Firmware Update | Others Network/Bluetooth 1 2 TV’s remote controller Make settings related to network connections and BLUETOOTH. 1. Switch the input on the TV to that assigned to the unit. 2. Press on the remote
> Before Start > Part Names > Install > Initial Setup > Playback Advanced Setup | Firmware Update | Others MAC Address This is the MAC address of this unit. This value is specific to the component and cannot be changed. DHCP «Enable (Default Value)»: Auto configuration by DHCP «Disable»: Manual
> Before Start > Part Names > Install > Initial Setup > Playback Advanced Setup | Firmware Update | Others Bluetooth 56 Status Bluetooth Select whether or not to use the BLUETOOTH function. «On (Default Value)»: Enables connection with a BLUETOOTH enabled device by using the BLUETOOTH function.
> Before Start > Part Names > Install > Initial Setup > Playback Advanced Setup | Firmware Update | Others Firmware Update Firmware Update Update function of this unit How to update firmware Updating the Firmware via Network This unit has functionality to update the firmware (the system software)
> Before Start > Part Names > Install > Initial Setup > Playback Advanced Setup | Firmware Update | Others System Setup Input/Output Assign Speaker Hardware are still unable to connect to the Internet, the DNS server or proxy server may be temporarily down. Check the service status with your ISP
> Before Start > Part Names > Install > Initial Setup > Playback Advanced Setup | Firmware Update | Others 8. Press ENTER with «Update» selected to start update. 0 During the update, the TV screen may go black depending on the updated program. In that case, check the progress on the display of this
> Before Start > Part Names > Install > Initial Setup > Playback Advanced Setup | Firmware Update | Others Troubleshooting Others Before starting the procedure Problems may be solved by simply turning the power on/off or disconnecting/connecting the power cord, which is easier than working on the
> Before Start > Part Names > Install > Initial Setup > Playback Advanced Setup | Firmware Update | Others A speaker produces no sound 0 Make sure that the polarity of the speaker cables (_/`) is correct, and that no bare wires are in contact with the metal part of speaker terminals. 0 Make sure
> Before Start > Part Names > Install > Initial Setup > Playback Advanced Setup | Firmware Update | Others Images flicker 0 It is possible that the resolution of the player is not compatible with the TV’s resolution. If you have connected the player to this unit with an HDMI cable, try changing the
> Before Start > Part Names > Install > Initial Setup > Playback Advanced Setup | Firmware Update | Others 0 Make sure that the used router and/or modem is supported by your ISP. Cannot access the network server 0 This unit needs to be connected to the same router as the network server. 0 This unit
> Before Start > Part Names > Install > Initial Setup > Playback Advanced Setup | Firmware Update | Others outlet as this unit, this noise may be an effect from the other unit. If the symptoms improve by unplugging the power cord of the other unit, use different wall outlets for this unit and the
> Before Start > Part Names > Install > Initial Setup > Playback Advanced Setup | Firmware Update | Others General Specifications Amplifier (Audio) section Rated Output Power (FTC) (North American) With 4 ohm loads, both channels driven, from 1 kHz; rated 50 watts per channel minimum RMS power,
> Before Start > Part Names > Install > Initial Setup > Playback Advanced Setup | Firmware Update | Others 1 (BD/DVD), 2 (CBL/SAT), PHONO (designated) Audio Outputs Analog SUBWOOFER PRE OUT Speaker Outputs FRONT L/R, CENTER, SURROUND L/R, SUBWOOFER Phones PHONES (Front, Ø 3.5 mm) Others USB: 1
> Before Start > Part Names > Install > Initial Setup > Playback Advanced Setup | Firmware Update | Others About HDMI Compatible functions HDMI (High Definition Multimedia Interface) is a digital interface standard for connecting TVs, projectors, Blu-ray Disc/DVD players, set-top boxes, and other
> Before Start > Part Names > Install > Initial Setup > Playback Advanced Setup | Firmware Update | Others License and Trademark Information The Bluetooth® word mark and logos are registered trademarks owned by the Bluetooth SIG, Inc. QR Code is a registered trademark of DENSO WAVE INCORPORATED.
2-3-12 Yaesu, Chuo-ku, Tokyo 104-0028 JAPAN <U.S.A.> 18 PARK WAY, UPPER SADDLE RIVER, NEW JERSEY 07458, U.S.A. Tel: 1-201-785-2600 Tel: 1-844-679-5350 <Germany> Hanns-Martin-Schleyer-Straße 35, 47877 Willich, Germany Tel: +49(0)2154 913222 E N <UK> Anteros Building, Odyssey Business Park, West End
> Avant de démarrer > Nom des pièces > Installation > Configuration initiale > Lecture Configuration avancée | Mise à jour du micrologiciel | Autres RECEPTEUR AV VSX-S520D VSX-S520 Mode d’emploi Avant de démarrer Ce que contient la boîte …………………………………………………. 2
> Avant de démarrer > Nom des pièces > Installation > Configuration initiale > Lecture Configuration avancée | Mise à jour du micrologiciel | Autres Ce que contient la boîte Avant de démarrer F R Appareil principal (1) Télécommande (RC-933R) (1), piles (AAA/R03) (2) Microphone de configuration
> Avant de démarrer > Nom des pièces > Installation > Configuration initiale > Lecture Configuration avancée | Mise à jour du micrologiciel | Autres Panneau frontal Nom des pièces F R 1. Touche Í STANDBY/ON : Permet la mise en marche ou en veille de l’appareil. 2. Affichage
> Avant de démarrer > Nom des pièces > Installation > Configuration initiale > Lecture Configuration avancée | Mise à jour du micrologiciel | Autres Panneau arrière VSX-S520D F R 90° 180° 1. Prise ANTENNA DAB / FM : Sert à raccorder l’antenne fournie. 2. Antenne sans fil: À
> Avant de démarrer > Nom des pièces > Installation > Configuration initiale > Lecture Configuration avancée | Mise à jour du micrologiciel | Autres VSX-S520 F R 90° 180° 1. Prise ANTENNA FM UNBAL 75h: Sert à raccorder l’antenne fournie. 2. Antenne sans fil: À lever pour
> Avant de démarrer > Nom des pièces > Installation > Configuration initiale > Lecture Configuration avancée | Mise à jour du micrologiciel | Autres Télécommande 30° 6 1. Touche Í: Permet la mise en marche ou en veille de l’appareil. 2. Boutons de sélections d’entrée:
> Avant de démarrer > Nom des pièces > Installation > Configuration initiale > Lecture Configuration avancée | Mise à jour du micrologiciel | Autres Afficheur F R Neo:6 1. S’allume sous les conditions suivantes. HDMI: Les signaux HDMI entrent et sont sélectionnés. ARC: Les signaux
> Avant de démarrer > Nom des pièces > Installation > Configuration initiale > Lecture Configuration avancée | Mise à jour du micrologiciel | Autres 1. Raccorder les enceintes Installation Installer les enceintes L Les enceintes avant reproduisent le son stéréo avant et l’enceinte centrale
> Avant de démarrer > Nom des pièces > Installation > Configuration initiale > Lecture Configuration avancée | Mise à jour du micrologiciel | Autres 1 F R a 1/2˝ (12 mm) 2 a b a 3 FRONT R b a câble d’enceinte, b câble du caisson de basse FRONT L CENTER Raccorder les enceintes Référez-vous à
> Avant de démarrer > Nom des pièces > Installation > Configuration initiale > Lecture Configuration avancée | Mise à jour du micrologiciel | Autres F R Vérifiez que les fils dénudés des enceintes ne dépassent pas des bornes d’enceinte lors du raccordement. Si les fils dénudés des enceintes entrent
> Avant de démarrer > Nom des pièces > Installation > Configuration initiale > Lecture Configuration avancée | Mise à jour du micrologiciel | Autres 2. Raccorder le téléviseur Vers un téléviseur ARC 1 F R Avec un téléviseur qui prend en charge la fonctionnalité ARC (Audio Return Channel) (P67),
> Avant de démarrer > Nom des pièces > Installation > Configuration initiale > Lecture Configuration avancée | Mise à jour du micrologiciel | Autres 3. Raccorder les appareils AV HDMI F R 1 a BD/DVD a Lecteur de contenu multimédia en flux Décodeur câble/ satellite HDMI OUT a Câble HDMI 12 e.g. BD
> Avant de démarrer > Nom des pièces > Installation > Configuration initiale > Lecture Configuration avancée | Mise à jour du micrologiciel | Autres 4. Raccorder les Appareils Audio Raccordement d’un lecteur CD F R Utilisez un câble coaxial numérique pour relier un lecteur CD à la prise DIGITAL IN
> Avant de démarrer > Nom des pièces > Installation > Configuration initiale > Lecture Configuration avancée | Mise à jour du micrologiciel | Autres 5. Raccorder d’autres câbles Raccordement de l’antenne 1 (Modèles nordaméricains) a Antenne DAB/FM (VSX-S520D) : Branchez l’antenne DAB/ FM fournie à
> Avant de démarrer > Nom des pièces > Installation > Configuration initiale > Lecture Configuration avancée | Mise à jour du micrologiciel | Autres Configuration initiale avec l’assistant de démarrage automatique Configuration initiale 1 2 La Initial Setup démarre automatiquement F R 1. Réglez
> Avant de démarrer > Nom des pièces > Installation > Configuration initiale > Lecture Configuration avancée | Mise à jour du micrologiciel | Autres 1. Full Auto MCACC Positionnez le microphone de configuration d’enceinte fourni sur la position d’écoute, mesurez les tonalités de test émises par les
> Avant de démarrer > Nom des pièces > Installation > Configuration initiale > Lecture Configuration avancée | Mise à jour du micrologiciel | Autres 0 «Push Button» : Si le point d’accès est muni d’une touche de connexion automatique, vous pouvez vous connecter sans saisir de mot de passe. 0 Si le
> Avant de démarrer > Nom des pièces > Installation > Configuration initiale > Lecture Configuration avancée | Mise à jour du micrologiciel | Autres Lecture d’un appareil AV Lecture Commandes de base Lisez un appareil AV ou un téléviseur raccordé à cet appareil à l’aide d’un câble HDMI et d’un
> Avant de démarrer > Nom des pièces > Installation > Configuration initiale > Lecture Configuration avancée | Mise à jour du micrologiciel | Autres Radio Internet Commandes de base 1 Lorsque cet appareil est connecté au réseau, vous pouvez écouter TuneIn ou d’autres services de radio Internet
> Avant de démarrer > Nom des pièces > Installation > Configuration initiale > Lecture Configuration avancée | Mise à jour du micrologiciel | Autres station de radio spécialement pour vous en se basant sur les qualités musicales de ce morceau, de cet artiste ou de ce genre. À propos du menu Pandora
> Avant de démarrer > Nom des pièces > Installation > Configuration initiale > Lecture Configuration avancée | Mise à jour du micrologiciel | Autres Spotify Commandes de base 1 2 a b 3 c d e 4 F R La lecture Spotify Connect est possible en connectant cet appareil au même réseau qu’un smartphone ou
> Avant de démarrer > Nom des pièces > Installation > Configuration initiale > Lecture Configuration avancée | Mise à jour du micrologiciel | Autres Music Server Il est possible de diffuser en flux des fichiers de musique présents sur les ordinateurs ou dispositifs NAS connectés au même réseau que
> Avant de démarrer > Nom des pièces > Installation > Configuration initiale > Lecture Configuration avancée | Mise à jour du micrologiciel | Autres être imbriqués jusqu’à 16 niveaux de profondeur. Les actions suivantes sur la télécommande sont également possibles. (a) Si les listes de dossiers ou
> Avant de démarrer > Nom des pièces > Installation > Configuration initiale > Lecture Configuration avancée | Mise à jour du micrologiciel | Autres Périphérique de stockage USB Lecture de base 1 Lisez des fichiers musicaux sur un périphérique de stockage USB. 1. Réglez l’entrée du téléviseur sur
> Avant de démarrer > Nom des pièces > Installation > Configuration initiale > Lecture Configuration avancée | Mise à jour du micrologiciel | Autres Configuration requise du périphérique de stockage USB 0 Notez que cette commande n’est pas garantie avec tous les périphériques de stockage USB. 0 Cet
> Avant de démarrer > Nom des pièces > Installation > Configuration initiale > Lecture Configuration avancée | Mise à jour du micrologiciel | Autres AirPlay® 1 3 4 2 5 26 Lecture de base Vous pouvez profiter à distance des fichiers musicaux présents sur un iPhone®, iPod touch®, ou un iPad® connecté
> Avant de démarrer > Nom des pièces > Installation > Configuration initiale > Lecture Configuration avancée | Mise à jour du micrologiciel | Autres Lecture BLUETOOTH® Jumelage 1 2 Écouter 1 2 Jumelage F R 1. Lorsque vous appuyez sur la touche de la télécommande, «Now Pairing…» apparait sur
> Avant de démarrer > Nom des pièces > Installation > Configuration initiale > Lecture Configuration avancée | Mise à jour du micrologiciel | Autres Écoute de la radio FM/DAB Écoute de la radio FM 1 Syntonisation automatique 1. Appuyez plusieurs fois sur la touche TUNER de la télécommande pour
> Avant de démarrer > Nom des pièces > Installation > Configuration initiale > Lecture Configuration avancée | Mise à jour du micrologiciel | Autres télécommande pour sélectionner le type de programme que vous désirez trouver, puis appuyez sur ENTER (a) pour lancer la recherche. Les types de
> Avant de démarrer > Nom des pièces > Installation > Configuration initiale > Lecture Configuration avancée | Mise à jour du micrologiciel | Autres Présélection d’une station de radio Cela vous permet de mémoriser jusqu’à 40 de vos stations FM/DAB favorites. L’enregistrement de stations de radio à
> Avant de démarrer > Nom des pièces > Installation > Configuration initiale > Lecture Configuration avancée | Mise à jour du micrologiciel | Autres Modes d’écoute Sélection des Modes d’écoute Vous pouvez changer le mode d’écoute durant la lecture en appuyant plusieurs fois sur «AUTO/DIRECT» ou
> Avant de démarrer > Nom des pièces > Installation > Configuration initiale > Lecture Configuration avancée | Mise à jour du micrologiciel | Autres Source d’entrée & volume Mode d’écoute Format du signal L’affichage change au bout de quelques Échantillonnage de la fréquence Résolution du signal
> Avant de démarrer > Nom des pièces > Installation > Configuration initiale > Lecture Configuration avancée | Mise à jour du micrologiciel | Autres sortie bitstream. Dolby Di (Dolby Digital Plus) Ce mode reproduit fidèlement la conception du son enregistré au format audio Dolby Digital Plus. Le
> Avant de démarrer > Nom des pièces > Installation > Configuration initiale > Lecture Configuration avancée | Mise à jour du micrologiciel | Autres mais avec des canaux en plus comme par exemple le canal surround arrière ajouté pour avoir du 7.1 maximum. Il peut être enregistré à un taux
> Avant de démarrer > Nom des pièces > Installation > Configuration initiale > Lecture Configuration avancée | Mise à jour du micrologiciel | Autres Modes d’écoute sélectionnables Vous pouvez sélectionner plusieurs modes d’écoute selon le format audio du signal entrant. 0 Le mode Stereo peut être
> Avant de démarrer > Nom des pièces > Installation > Configuration initiale > Lecture Configuration avancée | Mise à jour du micrologiciel | Autres Format d’entrée Listening Mode Format d’entrée Listening Mode Format d’entrée Listening Mode Multich PCM Stereo DSD Stereo Dolby Atmos Stereo Multich
> Avant de démarrer > Nom des pièces > Installation > Configuration initiale > Lecture Configuration avancée | Mise à jour du micrologiciel | Autres Format d’entrée Listening Mode Format d’entrée Listening Mode Format d’entrée Listening Mode Dolby D Stereo Dolby D+ Stereo Dolby TrueHD Stereo Dolby
> Avant de démarrer > Nom des pièces > Installation > Configuration initiale > Lecture Configuration avancée | Mise à jour du micrologiciel | Autres Format d’entrée Listening Mode Format d’entrée Listening Mode Format d’entrée Listening Mode DTS Stereo DTS 96/24 Stereo DTS Express Stereo DTS12
> Avant de démarrer > Nom des pièces > Installation > Configuration initiale > Lecture Configuration avancée | Mise à jour du micrologiciel | Autres Format d’entrée Listening Mode Format d’entrée Listening Mode Format d’entrée Listening Mode DTS-HD HR Stereo DTS-HD MSTR Stereo DTS:X Stereo DTS-HD
> Avant de démarrer > Nom des pièces > Installation > Configuration initiale > Lecture Configuration avancée | Mise à jour du micrologiciel | Autres AV Adjust 1 En appuyant sur la touche de la télécommande durant la lecture, vous pouvez régler fréquemment les paramètres utilisés, comme la qualité
> Avant de démarrer > Nom des pièces > Installation > Configuration initiale > Lecture Configuration avancée | Mise à jour du micrologiciel | Autres Sound Retriever: Améliore la qualité du son compressé. La lecture de sons depuis des fichiers compressés avec perte tels que les MP3 peut être
> Avant de démarrer > Nom des pièces > Installation > Configuration initiale > Lecture Configuration avancée | Mise à jour du micrologiciel | Autres System Setup Configuration avancée 1 2 Télécommande du téléviseur L’appareil vous permet de configurer les paramètres avancés pour qu’ils vous
> Avant de démarrer > Nom des pièces > Installation > Configuration initiale > Lecture Configuration avancée | Mise à jour du micrologiciel | Autres Impose OSD Choisissez d’afficher ou non les informations sur le téléviseur lorsque le volume est réglé ou lorsque l’entrée est modifiée, par exemple.
> Avant de démarrer > Nom des pièces > Installation > Configuration initiale > Lecture Configuration avancée | Mise à jour du micrologiciel | Autres CBL/SAT «AUDIO 1» à «AUDIO 2» : Attribuez la prise AUDIO IN désirée au sélecteur d’entrée CBL/SAT. (La valeur par défaut est «AUDIO 2») GAME «AUDIO 1»
> Avant de démarrer > Nom des pièces > Installation > Configuration initiale > Lecture Configuration avancée | Mise à jour du micrologiciel | Autres Crossover Double Bass Lorsqu’il y a des haut-parleurs réglés sur «Small», réglez le Hz sous lequel vous souhaitez que d’autres haut-parleurs jouent la
> Avant de démarrer > Nom des pièces > Installation > Configuration initiale > Lecture Configuration avancée | Mise à jour du micrologiciel | Autres Dual Mono Mono Input Channel Réglez le canal audio ou la langue de sortie lors de l’écoute d’audio multiplex ou d’émissions de télévision multilingues
> Avant de démarrer > Nom des pièces > Installation > Configuration initiale > Lecture Configuration avancée | Mise à jour du micrologiciel | Autres pour chaque touche du sélecteur d’entrée. Sélectionnez le sélecteur d’entrée à configurer. Veuillez noter que certaines valeurs par défaut ne peuvent
> Avant de démarrer > Nom des pièces > Installation > Configuration initiale > Lecture Configuration avancée | Mise à jour du micrologiciel | Autres HDMI Standby Through Lorsque ceci est paramétré sur autre chose que «Off», il est possible de lire la vidéo et le son d’un lecteur raccordé par HDMI
> Avant de démarrer > Nom des pièces > Installation > Configuration initiale > Lecture Configuration avancée | Mise à jour du micrologiciel | Autres Sleep Timer Permet à l’appareil de se mettre automatiquement en veille une fois que la durée définie s’est écoulée. Choisissez parmi «30 minutes», «60
> Avant de démarrer > Nom des pièces > Installation > Configuration initiale > Lecture Configuration avancée | Mise à jour du micrologiciel | Autres Sélectionnez un pas de fréquence selon votre zone de résidence. Sélectionnez «0.2 MHz (valeur par défaut)» ou «0.05 MHz». 0 Lorsque ce réglage est
> Avant de démarrer > Nom des pièces > Installation > Configuration initiale > Lecture Configuration avancée | Mise à jour du micrologiciel | Autres MCACC 1 2 Télécommande du téléviseur Configurez les enceintes automatiquement ou apportez les modifications souhaitées à l’égaliseur. Vous pouvez
> Avant de démarrer > Nom des pièces > Installation > Configuration initiale > Lecture Configuration avancée | Mise à jour du micrologiciel | Autres Front Left Après avoir choisi la fréquence de l’enceinte entre «63 Hz» et «16 kHz» avec les touches du curseur /, réglez le volume de cette
> Avant de démarrer > Nom des pièces > Installation > Configuration initiale > Lecture Configuration avancée | Mise à jour du micrologiciel | Autres MCACC Data Check F R Vous pouvez vérifier le nombre de canaux d’enceinte connectés, ainsi que le contenu et les valeurs que vous avez définis pour
> Avant de démarrer > Nom des pièces > Installation > Configuration initiale > Lecture Configuration avancée | Mise à jour du micrologiciel | Autres Network/Bluetooth 1 2 Télécommande du téléviseur Effectuez les réglages relatifs aux connexions réseau et BLUETOOTH. 1. Réglez l’entrée du téléviseur
> Avant de démarrer > Nom des pièces > Installation > Configuration initiale > Lecture Configuration avancée | Mise à jour du micrologiciel | Autres MAC Address Il s’agit de l’adresse MAC de cet appareil. Cette valeur est spécifique au composant et ne peut pas être modifiée. DHCP «Enable (Valeur
> Avant de démarrer > Nom des pièces > Installation > Configuration initiale > Lecture Configuration avancée | Mise à jour du micrologiciel | Autres Bluetooth Bluetooth Auto Input Change 56 Choisissez si vous voulez ou non utiliser la fonction BLUETOOTH. «On (Valeur par défaut)» : Permet
> Avant de démarrer > Nom des pièces > Installation > Configuration initiale > Lecture Configuration avancée | Mise à jour du micrologiciel | Autres Mise à jour du micrologiciel Mise à jour du micrologiciel Fonction de mise à jour de cet appareil Comment mettre à jour le micrologiciel Cet appareil
> Avant de démarrer > Nom des pièces > Installation > Configuration initiale > Lecture Configuration avancée | Mise à jour du micrologiciel | Autres System Setup Input/Output Assign Speaker Hardware 0 Si «Firmware Update» est grisé et ne peut pas être sélectionné, attendez quelques instants jusqu’à
> Avant de démarrer > Nom des pièces > Installation > Configuration initiale > Lecture Configuration avancée | Mise à jour du micrologiciel | Autres 9. Retirez le périphérique de stockage USB de cet appareil. 10.Appuyez sur la touche Í STANDBY/ON de cet appareil pour le mettre en mode veille. Le
> Avant de démarrer > Nom des pièces > Installation > Configuration initiale > Lecture Configuration avancée | Mise à jour du micrologiciel | Autres Dépannage Autres Avant de démarrer la procédure Les problèmes peuvent être résolus simplement en allumant et en coupant l’alimentation, ou en
> Avant de démarrer > Nom des pièces > Installation > Configuration initiale > Lecture Configuration avancée | Mise à jour du micrologiciel | Autres coaxial numérique ou d’un câble audio analogique. Aucun son n’est restitué par le lecteur raccordé 0 Passez le sélecteur d’entrée de cet appareil sur
> Avant de démarrer > Nom des pièces > Installation > Configuration initiale > Lecture Configuration avancée | Mise à jour du micrologiciel | Autres est correct sur le côté du moniteur tel qu’un téléviseur. Vérifiez les points suivants si ce qui précède n’a pas réglé le problème : Il n’y a pas de
> Avant de démarrer > Nom des pièces > Installation > Configuration initiale > Lecture Configuration avancée | Mise à jour du micrologiciel | Autres périphérique compatible BLUETOOTH 0 La réception BLUETOOTH est de faible qualité. Rapprochez le périphérique compatible BLUETOOTH de l’appareil ou
> Avant de démarrer > Nom des pièces > Installation > Configuration initiale > Lecture Configuration avancée | Mise à jour du micrologiciel | Autres 0 Certains routeurs LAN sans fil vous permettent de définir plusieurs SSID pour un seul appareil. Si vous utilisez la touche de réglage automatique
> Avant de démarrer > Nom des pièces > Installation > Configuration initiale > Lecture Configuration avancée | Mise à jour du micrologiciel | Autres Caractéristiques générales Section amplificateur (Audio) Puissance de sortie nominale (FTC) (Nord-américain) Avec 4 ohms de charge, deux canaux
> Avant de démarrer > Nom des pièces > Installation > Configuration initiale > Lecture Configuration avancée | Mise à jour du micrologiciel | Autres Analogique 1 (BD/DVD), 2 (CBL/SAT), PHONO (indiqué) Sorties audio Analogique SUBWOOFER PRE OUT Sorties haut-parleurs FRONT L/R, CENTER, SURROUND L/R,
> Avant de démarrer > Nom des pièces > Installation > Configuration initiale > Lecture Configuration avancée | Mise à jour du micrologiciel | Autres À propos de l’interface HDMI Fonctions compatibles HDMI (High Definition Multimedia Interface pour Interface Multimédia Haute Définition) est une
> Avant de démarrer > Nom des pièces > Installation > Configuration initiale > Lecture Configuration avancée | Mise à jour du micrologiciel | Autres Licence et Marque commerciale The Bluetooth® word mark and logos are registered trademarks owned by the Bluetooth SIG, Inc. Manufactured under license
2-3-12 Yaesu, Chuo-ku, Tokyo 104-0028 JAPAN <U.S.A.> 18 PARK WAY, UPPER SADDLE RIVER, NEW JERSEY 07458, U.S.A. Tel: 1-201-785-2600 Tel: 1-844-679-5350 <Germany> Hanns-Martin-Schleyer-Straße 35, 47877 Willich, Germany Tel: +49(0)2154 913222 F R <UK> Anteros Building, Odyssey Business Park, West End
> Antes de empezar > Nombres de las piezas > Instalación > Configuración inicial > Reproducción Configuración avanzada | Actualización de Firmware | Otros AV RECEIVER VSX-S520D VSX-S520 Manual de instrucciones Antes de empezar Qué se encuentra en la caja
> Antes de empezar > Nombres de las piezas > Instalación > Configuración inicial > Reproducción Configuración avanzada | Actualización de Firmware | Otros Qué se encuentra en la caja Antes de empezar E S Unidad principal (1) Mando a distancia (RC-933R) (1), pilas (AAA/R03) (2) Micrófono para la
> Antes de empezar > Nombres de las piezas > Instalación > Configuración inicial > Reproducción Configuración avanzada | Actualización de Firmware | Otros Panel frontal Nombres de las piezas E S 1. Botón Í STANDBY/ON: Enciende la unidad o la configura en modo de espera. 2.
> Antes de empezar > Nombres de las piezas > Instalación > Configuración inicial > Reproducción Configuración avanzada | Actualización de Firmware | Otros Panel trasero VSX-S520D E S 90° 180° 1. Conector ANTENNA DAB / FM: Conecte la antena provista. 2. Antena inalámbrica:
> Antes de empezar > Nombres de las piezas > Instalación > Configuración inicial > Reproducción Configuración avanzada | Actualización de Firmware | Otros VSX-S520 E S 90° 180° 1. Conector ANTENNA FM UNBAL 75h: Conecte la antena provista. 2. Antena inalámbrica: Levántela
> Antes de empezar > Nombres de las piezas > Instalación > Configuración inicial > Reproducción Configuración avanzada | Actualización de Firmware | Otros Mando a distancia 1. Botón Í: Enciende la unidad o la pone en modo de espera. 2. Botones de selector de entrada: Cambia la entrada
> Antes de empezar > Nombres de las piezas > Instalación > Configuración inicial > Reproducción Configuración avanzada | Actualización de Firmware | Otros Pantalla E S Neo:6 1. Se ilumina en las siguientes condiciones. HDMI: Las señales HDMI entran y están seleccionadas. ARC: Las
> Antes de empezar > Nombres de las piezas > Instalación > Configuración inicial > Reproducción Configuración avanzada | Actualización de Firmware | Otros 1. Conexión de los altavoces Instalación Instalación de los altavoces L Los altavoces delanteros emiten sonidos delanteros en estéreo y el
> Antes de empezar > Nombres de las piezas > Instalación > Configuración inicial > Reproducción Configuración avanzada | Actualización de Firmware | Otros 1 E S a 1/2˝ (12 mm) 2 a b a 3 FRONT R b a cable de altavoz, b cable de subwoofer FRONT L CENTER Conexión de los altavoces Consulte la
> Antes de empezar > Nombres de las piezas > Instalación > Configuración inicial > Reproducción Configuración avanzada | Actualización de Firmware | Otros E S Asegúrese de que los cables expuestos de los altavoces no sobresalgan de los terminales de los altavoces al conectarlos. Si los cables
> Antes de empezar > Nombres de las piezas > Instalación > Configuración inicial > Reproducción Configuración avanzada | Actualización de Firmware | Otros 2. Conexión del TV Con un televisor compatible con ARC 1 E S Para un televisor compatible con la función ARC (Audio Return Channel) (P67),
> Antes de empezar > Nombres de las piezas > Instalación > Configuración inicial > Reproducción Configuración avanzada | Actualización de Firmware | Otros 3. Conexión de los componentes AV HDMI E S 1 a BD/DVD a Reproductor multimedia de flujo de datos continuo Decodificador de cable/satélite HDMI
> Antes de empezar > Nombres de las piezas > Instalación > Configuración inicial > Reproducción Configuración avanzada | Actualización de Firmware | Otros 4. Conexión de los componentes de audio Conexión con un reproductor CD E S Utilice un cable coaxial digital para conectar un reproductor de CD
> Antes de empezar > Nombres de las piezas > Instalación > Configuración inicial > Reproducción Configuración avanzada | Actualización de Firmware | Otros 5. Conexión de otros cables Conexión de antenas 1 (Modelos norteamericanos) a Antena DAB/FM (VSX-S520D) : Conecte la antena DAB/ FM provista al
> Antes de empezar > Nombres de las piezas > Instalación > Configuración inicial > Reproducción Configuración avanzada | Actualización de Firmware | Otros Configuración inicial con el asistente de arranque automático Configuración inicial 1 2 Initial Setup se inicia automáticamente E S 1. Cambie la
> Antes de empezar > Nombres de las piezas > Instalación > Configuración inicial > Reproducción Configuración avanzada | Actualización de Firmware | Otros 1. Full Auto MCACC Coloque el micrófono de configuración de altavoces suministrado en la posición de escucha y mida los tonos de prueba emitidos
> Antes de empezar > Nombres de las piezas > Instalación > Configuración inicial > Reproducción Configuración avanzada | Actualización de Firmware | Otros siguientes dos métodos de conexión por Wi-Fi: «Scan Networks»: Busque un punto de acceso desde esta unidad. Entérese del SSID del punto de
> Antes de empezar > Nombres de las piezas > Instalación > Configuración inicial > Reproducción Configuración avanzada | Actualización de Firmware | Otros Reproducción de componente AV Reproducción Operaciones básicas Reproduzca el contenido de un componente AV o un televisor conectado a esta
> Antes de empezar > Nombres de las piezas > Instalación > Configuración inicial > Reproducción Configuración avanzada | Actualización de Firmware | Otros Radio por Internet Operaciones básicas 1 Cuando esta unidad está conectada a una red, puede escuchar TuneIn u otros servicios de radio por
> Antes de empezar > Nombres de las piezas > Instalación > Configuración inicial > Reproducción Configuración avanzada | Actualización de Firmware | Otros radio única para usted basándose en las cualidades de esa pista musical, artista o género. Acerca del menú de Pandora: Aparecerán unos iconos
> Antes de empezar > Nombres de las piezas > Instalación > Configuración inicial > Reproducción Configuración avanzada | Actualización de Firmware | Otros Spotify Operaciones básicas 1 2 a b 3 c d e 4 E S Podrá reproducir Spotify Connect si conecta la unidad a la misma red que un smartphone o
> Antes de empezar > Nombres de las piezas > Instalación > Configuración inicial > Reproducción Configuración avanzada | Actualización de Firmware | Otros Music Server Es posible transmitir archivos de música almacenados en PC o dispositivos NAS conectados a la misma red que esta unidad. Los
> Antes de empezar > Nombres de las piezas > Instalación > Configuración inicial > Reproducción Configuración avanzada | Actualización de Firmware | Otros carpeta puede contener hasta 20.000 pistas y las carpetas se pueden anidar hasta en 16 niveles. También se pueden llevar a cabo estas
> Antes de empezar > Nombres de las piezas > Instalación > Configuración inicial > Reproducción Configuración avanzada | Actualización de Firmware | Otros Dispositivo de almacenamiento USB Reproducción básica 1 a b c d 2 e f g h 24 Reproduzca archivos de música desde un dispositivo de
> Antes de empezar > Nombres de las piezas > Instalación > Configuración inicial > Reproducción Configuración avanzada | Actualización de Firmware | Otros entre los modos de repetición. (g) Si se pulsa durante la reproducción, este botón la pausa. Si se pulsa con la reproducción en pausa, esta se
> Antes de empezar > Nombres de las piezas > Instalación > Configuración inicial > Reproducción Configuración avanzada | Actualización de Firmware | Otros AirPlay® 1 3 4 2 5 26 Reproducción básica Puede disfrutar sin cables de los archivos de música almacenados en un iPhone®, iPod touch® o iPad®
> Antes de empezar > Nombres de las piezas > Instalación > Configuración inicial > Reproducción Configuración avanzada | Actualización de Firmware | Otros BLUETOOTH® Reproducción Emparejado 1 2 Reproducción 1 2 Emparejado E S 1. Cuando pulsa el botón en el mando a distancia, en la pantalla de esta
> Antes de empezar > Nombres de las piezas > Instalación > Configuración inicial > Reproducción Configuración avanzada | Actualización de Firmware | Otros Escuchar la radio FM/DAB Escuchar la radio FM 1 Sintonización automática 1. Pulse TUNER del mando a distancia repetidamente para seleccionar
> Antes de empezar > Nombres de las piezas > Instalación > Configuración inicial > Reproducción Configuración avanzada | Actualización de Firmware | Otros buscar y pulse ENTER (a) para iniciar la búsqueda. Los tipos de programa se mostrarán de este modo: None News (Noticieros) Affairs (Asuntos de
> Antes de empezar > Nombres de las piezas > Instalación > Configuración inicial > Reproducción Configuración avanzada | Actualización de Firmware | Otros Programación de una emisora de radio Le permite registrar hasta un máximo de 40 emisoras FM/ DAB. El registro de emisoras de radio de antemano
> Antes de empezar > Nombres de las piezas > Instalación > Configuración inicial > Reproducción Configuración avanzada | Actualización de Firmware | Otros Modos de audición Selección de los modos de audición Puede modificar el modo de audición durante la reproducción si pulsa repetidamente
> Antes de empezar > Nombres de las piezas > Instalación > Configuración inicial > Reproducción Configuración avanzada | Actualización de Firmware | Otros Fuente de entrada y volumen Modo de audición Formato de señal La visualización cambiará pocos segundos Frecuencia de muestreo Resolución de la
> Antes de empezar > Nombres de las piezas > Instalación > Configuración inicial > Reproducción Configuración avanzada | Actualización de Firmware | Otros Dolby Di (Dolby Digital Plus) Este modo reproduce fielmente el diseño del sonido grabado en el formato de audio Dolby Digital Plus. El formato
> Antes de empezar > Nombres de las piezas > Instalación > Configuración inicial > Reproducción Configuración avanzada | Actualización de Firmware | Otros DTS-HD HR (DTS-HD High Resolution Audio) Este modo reproduce fielmente el diseño del sonido grabado en el formato de audio DTS-HD High
> Antes de empezar > Nombres de las piezas > Instalación > Configuración inicial > Reproducción Configuración avanzada | Actualización de Firmware | Otros Modos de audición seleccionables Puede seleccionar una serie de modos de audición que se adecuen al formato de audio de la señal transmitida. 0
> Antes de empezar > Nombres de las piezas > Instalación > Configuración inicial > Reproducción Configuración avanzada | Actualización de Firmware | Otros Formato de entrada Listening Mode Formato de entrada Listening Mode Formato de entrada Listening Mode Multich PCM Stereo DSD Stereo Dolby Atmos
> Antes de empezar > Nombres de las piezas > Instalación > Configuración inicial > Reproducción Configuración avanzada | Actualización de Firmware | Otros Formato de entrada Listening Mode Formato de entrada Listening Mode Formato de entrada Listening Mode Dolby D Stereo Dolby D+ Stereo Dolby
> Antes de empezar > Nombres de las piezas > Instalación > Configuración inicial > Reproducción Configuración avanzada | Actualización de Firmware | Otros Formato de entrada Listening Mode Formato de entrada Listening Mode Formato de entrada Listening Mode DTS Stereo DTS 96/24 Stereo DTS Express
> Antes de empezar > Nombres de las piezas > Instalación > Configuración inicial > Reproducción Configuración avanzada | Actualización de Firmware | Otros Formato de entrada Listening Mode Formato de entrada Listening Mode Formato de entrada Listening Mode DTS-HD HR Stereo DTS-HD MSTR Stereo DTS:X
> Antes de empezar > Nombres de las piezas > Instalación > Configuración inicial > Reproducción Configuración avanzada | Actualización de Firmware | Otros AV Adjust 1 Pulsando el botón en el mando a distancia durante la reproducción, puede ajustar los ajustes de uso más frecuente, como la calidad
> Antes de empezar > Nombres de las piezas > Instalación > Configuración inicial > Reproducción Configuración avanzada | Actualización de Firmware | Otros Sound Retriever: Mejora la calidad del audio comprimido. La reproducción de sonido de archivos comprimidos con pérdidas tales como MP3 será
> Antes de empezar > Nombres de las piezas > Instalación > Configuración inicial > Reproducción Configuración avanzada | Actualización de Firmware | Otros System Setup Configuración avanzada 1 2 Mando a distancia del TV La unidad le permite configurar ajustes avanzados para brindarle una
> Antes de empezar > Nombres de las piezas > Instalación > Configuración inicial > Reproducción Configuración avanzada | Actualización de Firmware | Otros Impose OSD Screen Saver Seleccione si desea o no la visualización de información en pantalla (OSD) en el televisor, por ejemplo, cuando ajuste
> Antes de empezar > Nombres de las piezas > Instalación > Configuración inicial > Reproducción Configuración avanzada | Actualización de Firmware | Otros BD/DVD «AUDIO 1» a «AUDIO 2»: Asigne el conector AUDIO IN de su elección al selector de entrada BD/DVD. (El valor predeterminado es «AUDIO 1»)
> Antes de empezar > Nombres de las piezas > Instalación > Configuración inicial > Reproducción Configuración avanzada | Actualización de Firmware | Otros Crossover Double Bass Si hay altavoces configurados como «Small», ajuste los Hz a los que le gustaría que los otros altavoces reprodujesen los
> Antes de empezar > Nombres de las piezas > Instalación > Configuración inicial > Reproducción Configuración avanzada | Actualización de Firmware | Otros Audio Adjust Headphone Level ∫ Dual Mono/Mono Dual Mono Mono Input Channel Ajuste el canal de audio o idioma como canal de emisión cuando
> Antes de empezar > Nombres de las piezas > Instalación > Configuración inicial > Reproducción Configuración avanzada | Actualización de Firmware | Otros ∫ Audio Select Seleccione la prioridad de la selección de entrada cuando haya varias fuentes de audio conectadas a un selector de entrada, por
> Antes de empezar > Nombres de las piezas > Instalación > Configuración inicial > Reproducción Configuración avanzada | Actualización de Firmware | Otros HDMI Standby Through Cuando esto se encuentra en una opción distinta a “Off”, usted puede reproducir el vídeo y el audio de un reproductor
> Antes de empezar > Nombres de las piezas > Instalación > Configuración inicial > Reproducción Configuración avanzada | Actualización de Firmware | Otros Sleep Timer Permite que la unidad entre en modo de espera automáticamente cuando pase el tiempo especificado. Seleccione entre «30 minutes», «60
> Antes de empezar > Nombres de las piezas > Instalación > Configuración inicial > Reproducción Configuración avanzada | Actualización de Firmware | Otros FM Frequency Step (Modelos norteamericanos) Seleccione un paso de frecuencia en función de su zona de residencia. Seleccione «0.2 MHz (valor
> Antes de empezar > Nombres de las piezas > Instalación > Configuración inicial > Reproducción Configuración avanzada | Actualización de Firmware | Otros MCACC 1 2 Mando a distancia del TV Configure los altavoces automáticamente o realice los cambios deseados en el ecualizador. También puede
> Antes de empezar > Nombres de las piezas > Instalación > Configuración inicial > Reproducción Configuración avanzada | Actualización de Firmware | Otros Puede establecer tres ecualizadores distintos en los ajustes Preset 1 a 3. Puede seleccionar hasta 4 bandas para el subwoofer y 9 bandas para
> Antes de empezar > Nombres de las piezas > Instalación > Configuración inicial > Reproducción Configuración avanzada | Actualización de Firmware | Otros MCACC Data Check E S Puede comprobar la cantidad de canales de los altavoces conectados, así como el contenido y los valores configurados para
> Antes de empezar > Nombres de las piezas > Instalación > Configuración inicial > Reproducción Configuración avanzada | Actualización de Firmware | Otros Network/Bluetooth 1 2 Mando a distancia del TV Realice ajustes relacionados con las conexiones de red y BLUETOOTH. 1. Cambie la entrada en la TV
> Antes de empezar > Nombres de las piezas > Instalación > Configuración inicial > Reproducción Configuración avanzada | Actualización de Firmware | Otros MAC Address Esta es la dirección MAC de esta unidad. Este valor es específico para el componente y no se puede cambiar. DHCP «Enable (Valor
> Antes de empezar > Nombres de las piezas > Instalación > Configuración inicial > Reproducción Configuración avanzada | Actualización de Firmware | Otros Bluetooth Bluetooth Auto Input Change 56 Seleccione si desea o no utilizar la función de BLUETOOTH. «On (Valor predeterminado)»: Habilita la
> Antes de empezar > Nombres de las piezas > Instalación > Configuración inicial > Reproducción Configuración avanzada | Actualización de Firmware | Otros Actualización de Firmware Actualización de Firmware Función de actualización de esta unidad Cómo actualizar el firmware La unidad dispone de una
> Antes de empezar > Nombres de las piezas > Instalación > Configuración inicial > Reproducción Configuración avanzada | Actualización de Firmware | Otros System Setup Input/Output Assign Speaker Hardware 0 Si “Firmware Update” está en gris y no se puede seleccionar, espere un momento hasta que se
> Antes de empezar > Nombres de las piezas > Instalación > Configuración inicial > Reproducción Configuración avanzada | Actualización de Firmware | Otros completado la actualización. 9. Retire el dispositivo de almacenamiento USB de esta unidad. 10.Pulse Í STANDBY/ON en esta unidad para pasar la
> Antes de empezar > Nombres de las piezas > Instalación > Configuración inicial > Reproducción Configuración avanzada | Actualización de Firmware | Otros Resolución de problemas Otros Antes de iniciar el procedimiento El problema puede solucionarse simplemente encendiendo y apagando la
> Antes de empezar > Nombres de las piezas > Instalación > Configuración inicial > Reproducción Configuración avanzada | Actualización de Firmware | Otros Un altavoz no produce sonido 0 Asegúrese de que la polaridad de los cables del altavoz (_/`) sea la correcta y que ningún cable expuesto esté en
> Antes de empezar > Nombres de las piezas > Instalación > Configuración inicial > Reproducción Configuración avanzada | Actualización de Firmware | Otros televisor mientras la unidad está en el modo de espera, necesitará activar «System Setup» — «Hardware» — «HDMI» — «HDMI Standby Through» en
> Antes de empezar > Nombres de las piezas > Instalación > Configuración inicial > Reproducción Configuración avanzada | Actualización de Firmware | Otros 0 Pruebe a conectar o desconectar el suministro de energía de esta unidad y del router e intente reiniciar el router. 0 Si el router LAN
> Antes de empezar > Nombres de las piezas > Instalación > Configuración inicial > Reproducción Configuración avanzada | Actualización de Firmware | Otros condiciones de las ondas de radio. Acorte la distancia desde el punto de acceso LAN inalámbrico o elimine cualquier obstáculo para mejorar la
> Antes de empezar > Nombres de las piezas > Instalación > Configuración inicial > Reproducción Configuración avanzada | Actualización de Firmware | Otros Especificaciones generales Sección del amplificador (Audio) Potencia de salida nominal (FTC) (Norteamericano) Con cargas de 4 ohmios, ambos
> Antes de empezar > Nombres de las piezas > Instalación > Configuración inicial > Reproducción Configuración avanzada | Actualización de Firmware | Otros COAXIAL (CD) Analógico 1 (BD/DVD), 2 (CBL/SAT), PHONO (designado) Salidas de audio Analógico PRESALIDA DE SUBWOOFER Salidas de altavoces FRONT
> Antes de empezar > Nombres de las piezas > Instalación > Configuración inicial > Reproducción Configuración avanzada | Actualización de Firmware | Otros Acerca de HDMI Funciones compatibles HDMI (Interfaz multimedia de alta definición) es un estándar de interfaz digital para conectar televisores,
> Antes de empezar > Nombres de las piezas > Instalación > Configuración inicial > Reproducción Configuración avanzada | Actualización de Firmware | Otros Información sobre licencias y marcas comerciales The Bluetooth® word mark and logos are registered trademarks owned by the Bluetooth SIG, Inc.
2-3-12 Yaesu, Chuo-ku, Tokyo 104-0028 JAPAN <U.S.A.> 18 PARK WAY, UPPER SADDLE RIVER, NEW JERSEY 07458, U.S.A. Tel: 1-201-785-2600 Tel: 1-844-679-5350 <Germany> Hanns-Martin-Schleyer-Straße 35, 47877 Willich, Germany Tel: +49(0)2154 913222 E S <UK> Anteros Building, Odyssey Business Park, West End
> Prima di iniziare > Nome dei componenti > Installazione > Initial Setup > Riproduzione Impostazioni avanzate | Aggiornamento del firmware | Altri AV RECEIVER VSX-S520D VSX-S520 Manuale di istruzioni Prima di iniziare Contenuto della confezione …………………………………………….
> Prima di iniziare > Nome dei componenti > Installazione > Initial Setup > Riproduzione Impostazioni avanzate | Aggiornamento del firmware | Altri Contenuto della confezione Prima di iniziare I T Unità principale (1) Telecomando (RC-933R) (1), batterie (AAA/R03) (2) Microfono per l’impostazione
> Prima di iniziare > Nome dei componenti > Installazione > Initial Setup > Riproduzione Impostazioni avanzate | Aggiornamento del firmware | Altri Pannello frontale Nome dei componenti I T 1. Pulsante Í STANDBY/ON: Accende l’unità o la mette in standby. 2. Display (P7) 3.
> Prima di iniziare > Nome dei componenti > Installazione > Initial Setup > Riproduzione Impostazioni avanzate | Aggiornamento del firmware | Altri Pannello posteriore VSX-S520D I T 90° 180° 1. Jack ANTENNA DAB / FM: Per il collegamento con l’antenna in dotazione 2. Antenna
> Prima di iniziare > Nome dei componenti > Installazione > Initial Setup > Riproduzione Impostazioni avanzate | Aggiornamento del firmware | Altri VSX-S520 I T 90° 180° 1. Jack ANTENNA FM UNBAL 75h: Per il collegamento con l’antenna in dotazione 2. Antenna wireless:
> Prima di iniziare > Nome dei componenti > Installazione > Initial Setup > Riproduzione Impostazioni avanzate | Aggiornamento del firmware | Altri Telecomando 30° 6 1. Pulsante Í: Accende l’unità o la mette in standby. 2. Pulsanti INPUT SELECTOR: Consente di attivare
> Prima di iniziare > Nome dei componenti > Installazione > Initial Setup > Riproduzione Impostazioni avanzate | Aggiornamento del firmware | Altri Display I T Neo:6 1. Si accende nelle seguenti condizioni. HDMI: In ingresso stanno arrivando e sono selezionati segnali HDMI. ARC: Sono
> Prima di iniziare > Nome dei componenti > Installazione > Initial Setup > Riproduzione Impostazioni avanzate | Aggiornamento del firmware | Altri 1. Collegare i diffusori Installazione Installare i diffusori L I diffusori anteriori emettono l’audio stereo centrale ed un diffusore centrale emette
> Prima di iniziare > Nome dei componenti > Installazione > Initial Setup > Riproduzione Impostazioni avanzate | Aggiornamento del firmware | Altri 1 I T a 1/2˝ (12 mm) 2 a b a 3 FRONT R b a Cavo di potenza, b Cavo subwoofer FRONT L CENTER Collegare i diffusori Per collegare il sistema di diffusori
> Prima di iniziare > Nome dei componenti > Installazione > Initial Setup > Riproduzione Impostazioni avanzate | Aggiornamento del firmware | Altri I T Nell’effettuare il collegamento, accertarsi che i conduttori spellati dei cavi dei diffusori non fuoriescano dai terminali dei diffusori. Se i
> Prima di iniziare > Nome dei componenti > Installazione > Initial Setup > Riproduzione Impostazioni avanzate | Aggiornamento del firmware | Altri 2. Collegare il televisore A televisore ARC 1 I T Per un televisore che supporta la funzione ARC (Audio Return Channel) (P67), usare un cavo HDMI e
> Prima di iniziare > Nome dei componenti > Installazione > Initial Setup > Riproduzione Impostazioni avanzate | Aggiornamento del firmware | Altri 3. Collegare i componenti HDMI AV I T 1 a BD/DVD a Streamer Decoder via cavo/satellitare HDMI OUT a Cavo HDMI 12 e.g. BD Questo è un esempio di
> Prima di iniziare > Nome dei componenti > Installazione > Initial Setup > Riproduzione Impostazioni avanzate | Aggiornamento del firmware | Altri 4. Collegare i componenti Audio Collegamento di un lettore CD I T Utilizzare un cavo digitale coassiale per collegare un lettore CD al terminale
> Prima di iniziare > Nome dei componenti > Installazione > Initial Setup > Riproduzione Impostazioni avanzate | Aggiornamento del firmware | Altri 5. Collegare gli altri cavi Collegamento dell’antenna 1 (Modelli per Nord America) a b VSX-S520D VSX-S520 2 3 Antenna FM per interni (VSX-S520) :
> Prima di iniziare > Nome dei componenti > Installazione > Initial Setup > Riproduzione Impostazioni avanzate | Aggiornamento del firmware | Altri Initial Setup con installazione guidata Initial Setup 1 2 Initial Setup inizia automaticamente I T 1. Spostare l’ingresso sul televisore a quello
> Prima di iniziare > Nome dei componenti > Installazione > Initial Setup > Riproduzione Impostazioni avanzate | Aggiornamento del firmware | Altri 1. Full Auto MCACC Collocare il microfono di configurazione dei diffusori nella posizione di ascolto e misurare i toni di prova emessi dai diffusori;
> Prima di iniziare > Nome dei componenti > Installazione > Initial Setup > Riproduzione Impostazioni avanzate | Aggiornamento del firmware | Altri tramite Wi-Fi sono i seguenti: «Scan Networks»: Ricerca di un punto di accesso da questa unità. È necessario conoscere in anticipo l’SSID del punto di
> Prima di iniziare > Nome dei componenti > Installazione > Initial Setup > Riproduzione Impostazioni avanzate | Aggiornamento del firmware | Altri Riproduzione di un componente AV Riproduzione Operazioni base Riprodurre dei contenuti su un componente AV o un televisore collegati a questa unità
> Prima di iniziare > Nome dei componenti > Installazione > Initial Setup > Riproduzione Impostazioni avanzate | Aggiornamento del firmware | Altri Internet radio Operazioni base 1 Quando questa unità è connessa a una rete, è possibile ascoltare TuneIn o altri servizi di Internet radio memorizzati.
> Prima di iniziare > Nome dei componenti > Installazione > Initial Setup > Riproduzione Impostazioni avanzate | Aggiornamento del firmware | Altri visualizzate sulla schermata durante la riproduzione di una stazione. Selezionando l’icona con / (a) sul telecomando e premendo ENTER (b), è
> Prima di iniziare > Nome dei componenti > Installazione > Initial Setup > Riproduzione Impostazioni avanzate | Aggiornamento del firmware | Altri Spotify Operazioni base 1 2 a b 3 c d e 4 I T È possibile eseguire la riproduzione con Spotify Connect collegando questa unità alla stessa rete cui
> Prima di iniziare > Nome dei componenti > Installazione > Initial Setup > Riproduzione Impostazioni avanzate | Aggiornamento del firmware | Altri Music Server È possibile eseguire lo streaming di file musicali memorizzati su PC o dispositivi NAS collegati alla stessa rete di questa unità. I
> Prima di iniziare > Nome dei componenti > Installazione > Initial Setup > Riproduzione Impostazioni avanzate | Aggiornamento del firmware | Altri È inoltre possibile eseguire le seguenti operazioni da telecomando. (a) In assenza di elenchi di cartelle o file visualizzati sullo schermo, è
> Prima di iniziare > Nome dei componenti > Installazione > Initial Setup > Riproduzione Impostazioni avanzate | Aggiornamento del firmware | Altri Dispositivo di archiviazione USB Riproduzione di base 1 a b c d 2 e f g h 24 Riproduzione di file musicali su un dispositivo di archiviazione USB. 1.
> Prima di iniziare > Nome dei componenti > Installazione > Initial Setup > Riproduzione Impostazioni avanzate | Aggiornamento del firmware | Altri elenco di cartelle o file, questo tasto consente di tornare alla schermata di riproduzione. (e) Questo tasto consente di riprodurre il brano
> Prima di iniziare > Nome dei componenti > Installazione > Initial Setup > Riproduzione Impostazioni avanzate | Aggiornamento del firmware | Altri AirPlay® 1 3 4 2 5 26 Riproduzione di base È possibile ascoltare in modalità wireless i file musicali su un iPhone®, iPod touch®, o iPad® collegati
> Prima di iniziare > Nome dei componenti > Installazione > Initial Setup > Riproduzione Impostazioni avanzate | Aggiornamento del firmware | Altri Riproduzione BLUETOOTH® Abbinamento 1 2 In riproduzione 1 2 Abbinamento I T 1. Quando si preme il tasto sul telecomando, sul display di questa unità
> Prima di iniziare > Nome dei componenti > Installazione > Initial Setup > Riproduzione Impostazioni avanzate | Aggiornamento del firmware | Altri Ascolto della radio FM/DAB Ascolto della radio FM 1 Sintonizzazione automatica 1. Premere ripetutamente TUNER sul telecomando per selezionare «FM» sul
> Prima di iniziare > Nome dei componenti > Installazione > Initial Setup > Riproduzione Impostazioni avanzate | Aggiornamento del firmware | Altri premere ENTER (a) per iniziare la ricerca. I tipi di programma visualizzati sono i seguenti: None News (notiziari) Affairs (attualità) Info
> Prima di iniziare > Nome dei componenti > Installazione > Initial Setup > Riproduzione Impostazioni avanzate | Aggiornamento del firmware | Altri Memorizzazione di una stazione radio Consente di memorizzare fino a 40 delle vostre stazioni FM/ DAB preferite. La registrazione di stazioni radio in
> Prima di iniziare > Nome dei componenti > Installazione > Initial Setup > Riproduzione Impostazioni avanzate | Aggiornamento del firmware | Altri Modalità di Ascolto Selezione delle modalità di ascolto È possibile modificare la modalità di ascolto durante la riproduzione premendo ripetutamente
> Prima di iniziare > Nome dei componenti > Installazione > Initial Setup > Riproduzione Impostazioni avanzate | Aggiornamento del firmware | Altri Sorgente ingresso e volume Effetti Modalità di ascolto Modalità di ascolto Aggiornamento delle modalità di ascolto Prevediamo di introdurre il supporto
> Prima di iniziare > Nome dei componenti > Installazione > Initial Setup > Riproduzione Impostazioni avanzate | Aggiornamento del firmware | Altri Dolby Di (Dolby Digital Plus) Questa modalità riproduce fedelmente le caratteristiche dell’audio registrato in formato Dolby Digital Plus. Il formato
> Prima di iniziare > Nome dei componenti > Installazione > Initial Setup > Riproduzione Impostazioni avanzate | Aggiornamento del firmware | Altri aggiunto per un massimo di 7.1 canali. Può essere registrato ad una frequenza di campionamento di 96 kHz con una risoluzione di 24 bit. 0 Per
> Prima di iniziare > Nome dei componenti > Installazione > Initial Setup > Riproduzione Impostazioni avanzate | Aggiornamento del firmware | Altri Modalità di ascolto selezionabili È possibile selezionare una serie di modalità di ascolto in base al formato audio del segnale in ingresso. 0 La
> Prima di iniziare > Nome dei componenti > Installazione > Initial Setup > Riproduzione Impostazioni avanzate | Aggiornamento del firmware | Altri Formato ingresso Modalità di Ascolto Formato ingresso Modalità di Ascolto Formato ingresso Modalità di Ascolto Multich PCM Stereo DSD Stereo Dolby
> Prima di iniziare > Nome dei componenti > Installazione > Initial Setup > Riproduzione Impostazioni avanzate | Aggiornamento del firmware | Altri Formato ingresso Modalità di Ascolto Formato ingresso Modalità di Ascolto Formato ingresso Modalità di Ascolto Dolby D Stereo Dolby D+ Stereo Dolby
> Prima di iniziare > Nome dei componenti > Installazione > Initial Setup > Riproduzione Impostazioni avanzate | Aggiornamento del firmware | Altri Formato ingresso Modalità di Ascolto Formato ingresso Modalità di Ascolto Formato ingresso Modalità di Ascolto DTS Stereo DTS 96/24 Stereo DTS Express
> Prima di iniziare > Nome dei componenti > Installazione > Initial Setup > Riproduzione Impostazioni avanzate | Aggiornamento del firmware | Altri Formato ingresso Modalità di Ascolto Formato ingresso Modalità di Ascolto Formato ingresso Modalità di Ascolto DTS-HD HR Stereo DTS-HD MSTR Stereo
> Prima di iniziare > Nome dei componenti > Installazione > Initial Setup > Riproduzione Impostazioni avanzate | Aggiornamento del firmware | Altri AV Adjust 1 Premendo il tasto sul telecomando durante la riproduzione è possibile regolare alcune impostazioni utilizzate con frequenza, come la
> Prima di iniziare > Nome dei componenti > Installazione > Initial Setup > Riproduzione Impostazioni avanzate | Aggiornamento del firmware | Altri Sound Retriever: Migliora la qualità dell’audio compresso. La riproduzione del suono di file compressi in modo scadente come gli MP3 sarà migliorata.
> Prima di iniziare > Nome dei componenti > Installazione > Initial Setup > Riproduzione Impostazioni avanzate | Aggiornamento del firmware | Altri System Setup Impostazioni avanzate 1 2 Telecomando del televisore Questa unità consente di configurare le impostazioni avanzate in modo da fornire
> Prima di iniziare > Nome dei componenti > Installazione > Initial Setup > Riproduzione Impostazioni avanzate | Aggiornamento del firmware | Altri Impose OSD Screen Saver Impostare se visualizzare o meno le informazioni sul televisore durante, per esempio, la regolazione del volume o la modifica
> Prima di iniziare > Nome dei componenti > Installazione > Initial Setup > Riproduzione Impostazioni avanzate | Aggiornamento del firmware | Altri Se non si assegna un jack, selezionare “——”. BD/DVD «Da «AUDIO 1» a «AUDIO 2»: Assegnare un ingresso AUDIO IN a piacere al selettore di ingresso
> Prima di iniziare > Nome dei componenti > Installazione > Initial Setup > Riproduzione Impostazioni avanzate | Aggiornamento del firmware | Altri Crossover Double Bass Quando sono presenti diffusori impostati su «Small», impostare il livello di Hz sotto il quale si desidera che gli altri
> Prima di iniziare > Nome dei componenti > Installazione > Initial Setup > Riproduzione Impostazioni avanzate | Aggiornamento del firmware | Altri Audio Adjust Source ∫ Dual Mono/Mono Dual Mono Mono Input Channel Input Volume Absorber Impostare il canale audio o la lingua da mettere in uscita
> Prima di iniziare > Nome dei componenti > Installazione > Initial Setup > Riproduzione Impostazioni avanzate | Aggiornamento del firmware | Altri Audio Select Selezionare la priorità per la selezione degli ingressi quando si collegano più sorgenti audio a un unico selettore di ingresso, come ad
> Prima di iniziare > Nome dei componenti > Installazione > Initial Setup > Riproduzione Impostazioni avanzate | Aggiornamento del firmware | Altri HDMI Standby Through 48 Quando questa impostazione è diversa da “Off”, è possibile riprodurre il video e l’audio di un lettore HDMI collegato al
> Prima di iniziare > Nome dei componenti > Installazione > Initial Setup > Riproduzione Impostazioni avanzate | Aggiornamento del firmware | Altri Power Management Sleep Timer Consente all’unità di entrare automaticamente in standby una volta trascorso il tempo specificato. Selezionare tra «30
> Prima di iniziare > Nome dei componenti > Installazione > Initial Setup > Riproduzione Impostazioni avanzate | Aggiornamento del firmware | Altri DAB Auto Scan (VSX-S520D) È possibile effettuare una scansione automatica quando vengono aggiunte nuove stazioni DAB oppure quando si cambia casa. DAB
> Prima di iniziare > Nome dei componenti > Installazione > Initial Setup > Riproduzione Impostazioni avanzate | Aggiornamento del firmware | Altri MCACC 1 2 Telecomando del televisore Consente di configurare automaticamente i diffusori o di effettuare le modifiche desiderate all’equalizzatore. È
> Prima di iniziare > Nome dei componenti > Installazione > Initial Setup > Riproduzione Impostazioni avanzate | Aggiornamento del firmware | Altri Subwoofer e 9 bande per tutti gli altri diffusori. Per usare gli effetti dell’equalizzatore impostati, selezionare il numero della preimpostazione in
> Prima di iniziare > Nome dei componenti > Installazione > Initial Setup > Riproduzione Impostazioni avanzate | Aggiornamento del firmware | Altri MCACC Data Check I T È possibile verificare il numero di canali dei diffusori collegati, il contenuto e i valori impostati per ciascun settaggio dei
> Prima di iniziare > Nome dei componenti > Installazione > Initial Setup > Riproduzione Impostazioni avanzate | Aggiornamento del firmware | Altri Network/Bluetooth 1 2 Telecomando del televisore Consente di definire le impostazioni relative a connessioni di rete e BLUETOOTH. 1. Spostare
> Prima di iniziare > Nome dei componenti > Installazione > Initial Setup > Riproduzione Impostazioni avanzate | Aggiornamento del firmware | Altri MAC Address Questo è l’indirizzo MAC di questa unità. Questo valore è specifico per il componente e non può essere modificato. DHCP «Enable (Valore
> Prima di iniziare > Nome dei componenti > Installazione > Initial Setup > Riproduzione Impostazioni avanzate | Aggiornamento del firmware | Altri Bluetooth Bluetooth Auto Input Change 56 Selezionare se usare o meno la funzione BLUETOOTH. «On (Valore predefinito)»: Consente il collegamento con un
> Prima di iniziare > Nome dei componenti > Installazione > Initial Setup > Riproduzione Impostazioni avanzate | Aggiornamento del firmware | Altri Aggiornamento del firmware Aggiornamento del fir mware Funzione aggiornamento di questa unità Procedura di aggiornamento del firmware Questa unità
> Prima di iniziare > Nome dei componenti > Installazione > Initial Setup > Riproduzione Impostazioni avanzate | Aggiornamento del firmware | Altri System Setup Input/Output Assign Speaker Hardware 0 Se “Firmware Update” viene visualizzato in grigio e non può essere selezionato, attendere alcuni
> Prima di iniziare > Nome dei componenti > Installazione > Initial Setup > Riproduzione Impostazioni avanzate | Aggiornamento del firmware | Altri 7. Selezionare «System Setup» — «Miscellaneous» «Firmware Update» — «Update via USB» con i cursori nell’ordine, quindi premere ENTER. System Setup
> Prima di iniziare > Nome dei componenti > Installazione > Initial Setup > Riproduzione Impostazioni avanzate | Aggiornamento del firmware | Altri Risoluzione dei problemi Altri Prima di iniziare la procedura I problemi potrebbero essere risolti semplicemente accendendo/spegnendo l’alimentazione o
> Prima di iniziare > Nome dei componenti > Installazione > Initial Setup > Riproduzione Impostazioni avanzate | Aggiornamento del firmware | Altri Nessuna emissione di suono da uno dei diffusori 0 Accertarsi che la polarità dei cavi dei diffusori (_/`) sia corretta e che non ci siano cavi nudi a
> Prima di iniziare > Nome dei componenti > Installazione > Initial Setup > Riproduzione Impostazioni avanzate | Aggiornamento del firmware | Altri lettore collegato mentre l’unità è in standby, è necessario abilitare «System Setup» — «Hardware» — «HDMI» — «HDMI Standby Through» in Home. Consultare
> Prima di iniziare > Nome dei componenti > Installazione > Initial Setup > Riproduzione Impostazioni avanzate | Aggiornamento del firmware | Altri nell’elenco del punto di accesso, potrebbe essere stato impostato per nascondere l’SSID oppure la connessione ANY potrebbe essere spenta. Cambiare
> Prima di iniziare > Nome dei componenti > Installazione > Initial Setup > Riproduzione Impostazioni avanzate | Aggiornamento del firmware | Altri 0 Se c’è un oggetto metallico vicino all’unità, la connessione LAN wireless potrebbe non essere possibile in quanto il metallo ha un effetto sulle onde
> Prima di iniziare > Nome dei componenti > Installazione > Initial Setup > Riproduzione Impostazioni avanzate | Aggiornamento del firmware | Altri Caratteristiche generali Sezione amplificatore (audio) Potenza nominale di uscita (FTC) (Nord America) Con carichi di 4 ohm, entrambi i canali
> Prima di iniziare > Nome dei componenti > Installazione > Initial Setup > Riproduzione Impostazioni avanzate | Aggiornamento del firmware | Altri COAXIAL (CD) Analogico 1 (BD/DVD), 2 (CBL/SAT), PHONO (designato) Output Audio Analogico SUBWOOFER PRE OUT Uscite del diffusore FRONT L/R, CENTER,
> Prima di iniziare > Nome dei componenti > Installazione > Initial Setup > Riproduzione Impostazioni avanzate | Aggiornamento del firmware | Altri Informazioni su HDMI Funzioni compatibili HDMI (High Definition Multimedia Interface) è uno standard di interfaccia digitale per la connessione di
> Prima di iniziare > Nome dei componenti > Installazione > Initial Setup > Riproduzione Impostazioni avanzate | Aggiornamento del firmware | Altri Informazioni di licenza e dei marchi The Bluetooth® word mark and logos are registered trademarks owned by the Bluetooth SIG, Inc. Manufactured under
2-3-12 Yaesu, Chuo-ku, Tokyo 104-0028 JAPAN <U.S.A.> 18 PARK WAY, UPPER SADDLE RIVER, NEW JERSEY 07458, U.S.A. Tel: 1-201-785-2600 Tel: 1-844-679-5350 <Germany> Hanns-Martin-Schleyer-Straße 35, 47877 Willich, Germany Tel: +49(0)2154 913222 I T <UK> Anteros Building, Odyssey Business Park, West End
> Vor dem Start > Teilenamen > Installation > Erste Einrichtung > Wiedergabe Erweiterte Einrichtung | Firmware-Update | Sonstiges AV RECEIVER VSX-S520D VSX-S520 Bedienungsanleitung Vor dem Start Lieferumfang ………………………………………………………………… 2 Teilenamen
> Vor dem Start > Teilenamen > Installation > Erste Einrichtung > Wiedergabe Erweiterte Einrichtung | Firmware-Update | Sonstiges Lieferumfang Vor dem Start D E Hauptgerät (1) Fernbedienung (RC-933R) (1), Batterien (AAA/R03) (2) Messmikrofon für die Lautsprechereinrichtung (1) DAB/FM-Antenne (1)
> Vor dem Start > Teilenamen > Installation > Erste Einrichtung > Wiedergabe Erweiterte Einrichtung | Firmware-Update | Sonstiges Bedienfeld Teilenamen D E 1. Í STANDBY/ON Taste: Schalten Sie das Gerät ein bzw. in den Standby-Modus. 2. Display (ÄP7) 3. Fernbedienungssensor 4.
> Vor dem Start > Teilenamen > Installation > Erste Einrichtung > Wiedergabe Erweiterte Einrichtung | Firmware-Update | Sonstiges Rückseite VSX-S520D D E 90° 180° 1. ANTENNA DAB / FM-Buchse: Hier kann die mitgelieferte Antenne angeschlossen werden. 2. Kabellose Antenne:
> Vor dem Start > Teilenamen > Installation > Erste Einrichtung > Wiedergabe Erweiterte Einrichtung | Firmware-Update | Sonstiges VSX-S520 D E 90° 180° 1. ANTENNA FM UNBAL 75h-Buchse: Hier kann die mitgelieferte Antenne angeschlossen werden. 2. Kabellose Antenne: Richten Sie
> Vor dem Start > Teilenamen > Installation > Erste Einrichtung > Wiedergabe Erweiterte Einrichtung | Firmware-Update | Sonstiges Fernbedienung 6 1. Í Taste: Hiermit wird das Gerät eingeschaltet bzw. in den Standby-Modus geschaltet. 2. Eingangsauswahltasten: Wechselt
> Vor dem Start > Teilenamen > Installation > Erste Einrichtung > Wiedergabe Erweiterte Einrichtung | Firmware-Update | Sonstiges Display D E Neo:6 1. Leuchtet unter den folgenden Bedingungen. HDMI: HDMI-Signale werden eingegeben und ausgewählt. ARC: Audiosignale vom ARC-kompatiblen
> Vor dem Start > Teilenamen > Installation > Erste Einrichtung > Wiedergabe Erweiterte Einrichtung | Firmware-Update | Sonstiges 1. Anschließen der Lautsprecher Installation Installieren der Lautsprecher L Über die Frontlautsprecher wird Front-Stereoklang ausgegeben, über einen Center-Lautsprecher
> Vor dem Start > Teilenamen > Installation > Erste Einrichtung > Wiedergabe Erweiterte Einrichtung | Firmware-Update | Sonstiges 1 D E a 1/2˝ (12 mm) 2 a b a 3 FRONT R b a Lautsprecherkabel, b Subwoofer-Kabel FRONT L CENTER Anschließen der Lautsprecher Informationen zum Anschließen des
> Vor dem Start > Teilenamen > Installation > Erste Einrichtung > Wiedergabe Erweiterte Einrichtung | Firmware-Update | Sonstiges D E Vergewissern Sie sich, dass beim Anschließen der Kabel die freiliegenden Drähte nicht aus den Lautsprecheranschlüssen herausragen. Wenn die freiliegenden
> Vor dem Start > Teilenamen > Installation > Erste Einrichtung > Wiedergabe Erweiterte Einrichtung | Firmware-Update | Sonstiges 2. Anschließen des Fernsehers An ARC-Fernseher 1 D E Verwenden Sie bei ARC-fähigen Fernsehern (Audio Return Channel) (ÄP67) ein HDMI-Kabel und nehmen Sie den Anschluss
> Vor dem Start > Teilenamen > Installation > Erste Einrichtung > Wiedergabe Erweiterte Einrichtung | Firmware-Update | Sonstiges 3. Anschließen der HDMI-AV-Komponenten D E 1 a BD/DVD a StreamingmedienPlayer Kabel-/SatellitDigitalempfänger HDMI OUT a HDMI-Kabel 12 e.g. BD Dies ist eine
> Vor dem Start > Teilenamen > Installation > Erste Einrichtung > Wiedergabe Erweiterte Einrichtung | Firmware-Update | Sonstiges 4. Anschließen der Audio-Komponenten Anschließen eines CD-Players D E Verwenden Sie ein digitales Koaxialkabel, um einen CDPlayer an die DIGITAL IN COAXIAL-Buchse
> Vor dem Start > Teilenamen > Installation > Erste Einrichtung > Wiedergabe Erweiterte Einrichtung | Firmware-Update | Sonstiges 5. Anschließen weiterer Kabel Antennenanschluss 1 (Modelle für Nordamerika) a DAB/FM-Antenne (VSX-S520D) : Verbinden Sie die mitgelieferte DAB/FM-Antenne mit dem ANTENNA
> Vor dem Start > Teilenamen > Installation > Erste Einrichtung > Wiedergabe Erweiterte Einrichtung | Firmware-Update | Sonstiges Erste Einrichtung mit dem automatischen Startup-Assistenten Erste Einrichtung 1 2 Initial Setup startet automatisch D E 1. Schalten Sie den Eingang des Fernsehers auf
> Vor dem Start > Teilenamen > Installation > Erste Einrichtung > Wiedergabe Erweiterte Einrichtung | Firmware-Update | Sonstiges 1. Full Auto MCACC Platzieren Sie das mitgelieferte Mikrofon zur Lautsprechereinstellung in Hörposition und messen Sie die von den Lautsprechern ausgegebenen Testtöne.
> Vor dem Start > Teilenamen > Installation > Erste Einrichtung > Wiedergabe Erweiterte Einrichtung | Firmware-Update | Sonstiges 3. Network Connection Richten Sie die WLAN-Verbindung mit einem Zugangspunkt wie einem WLAN-Router ein. Es gibt die folgenden beiden WLAN-Anschlussmöglichkeiten: «Scan
> Vor dem Start > Teilenamen > Installation > Erste Einrichtung > Wiedergabe Erweiterte Einrichtung | Firmware-Update | Sonstiges Wiedergabe von AV-Komponenten Wiedergabe Grundlegende Funktionen a b 18 Führen Sie die Wiedergabe einer AV-Komponente oder eines TV-Geräts aus, die/das über ein
> Vor dem Start > Teilenamen > Installation > Erste Einrichtung > Wiedergabe Erweiterte Einrichtung | Firmware-Update | Sonstiges Internetradio Grundlegende Funktionen 1 Wenn dieses Gerät mit einem Netzwerk verbunden ist, können Sie TuneIn und weitere voreingestellte Internetradio-Dienste
> Vor dem Start > Teilenamen > Installation > Erste Einrichtung > Wiedergabe Erweiterte Einrichtung | Firmware-Update | Sonstiges Neuen Sender erstellen: Geben Sie den Namen eines Titels, Künstlers oder Genres ein und Pandora erstellt anhand der musikalischen Qualitäten des Titels, Künstlers oder
> Vor dem Start > Teilenamen > Installation > Erste Einrichtung > Wiedergabe Erweiterte Einrichtung | Firmware-Update | Sonstiges Spotify Grundlegende Funktionen 1 2 a b 3 c d e 4 D E Die Wiedergabe von Spotify Connect ist möglich, wenn Sie dieses Gerät mit dem Netzwerk verbinden, mit dem auch Ihr
> Vor dem Start > Teilenamen > Installation > Erste Einrichtung > Wiedergabe Erweiterte Einrichtung | Firmware-Update | Sonstiges Music Server Das Streaming von Musikdateien, die auf PCs oder NASGeräten gespeichert sind, welche mit demselben Netzwerk wie dieses Gerät verbunden sind, ist möglich.
> Vor dem Start > Teilenamen > Installation > Erste Einrichtung > Wiedergabe Erweiterte Einrichtung | Firmware-Update | Sonstiges 7. Wählen Sie mit den Cursortasten auf der Fernbedienung die Musikdatei aus, die wiedergegeben werden soll, und drücken Sie dann ENTER (b), um die Wiedergabe zu starten.
> Vor dem Start > Teilenamen > Installation > Erste Einrichtung > Wiedergabe Erweiterte Einrichtung | Firmware-Update | Sonstiges USB-Speichergerät Grundlegende Wiedergabe 1 Sie können Musikdateien wiedergeben, die sich auf einem USB-Speichergerät befinden. 1. Schalten Sie den Eingang des
> Vor dem Start > Teilenamen > Installation > Erste Einrichtung > Wiedergabe Erweiterte Einrichtung | Firmware-Update | Sonstiges USB-Speichergerätsanforderungen 0 Beachten Sie, dass der Betrieb von USBSpeichergeräten nicht immer garantiert werden kann. 0 Dieses Gerät unterstützt
> Vor dem Start > Teilenamen > Installation > Erste Einrichtung > Wiedergabe Erweiterte Einrichtung | Firmware-Update | Sonstiges AirPlay® 1 3 4 2 5 Grundlegende Wiedergabe Es ist eine drahtlose Wiedergabe von Musikdateien auf Geräten wie iPhone®, iPod touch® oder iPad® möglich, welche mit dem
> Vor dem Start > Teilenamen > Installation > Erste Einrichtung > Wiedergabe Erweiterte Einrichtung | Firmware-Update | Sonstiges BLUETOOTH®-Wiedergabe Pairing 1 2 Wiedergabe 1 2 Pairing D E 1. Wenn Sie die -Taste auf der Fernbedienung drücken, wird «Now Pairing…» auf dem Display dieses Geräts
> Vor dem Start > Teilenamen > Installation > Erste Einrichtung > Wiedergabe Erweiterte Einrichtung | Firmware-Update | Sonstiges Wiedergabe von FM/DAB-Radio Wiedergabe von FM-Radio 1 Automatische Sendersuche 1. Drücken Sie mehrfach TUNER auf der Fernbedienung, um «FM» auf dem Display auszuwählen.
> Vor dem Start > Teilenamen > Installation > Erste Einrichtung > Wiedergabe Erweiterte Einrichtung | Firmware-Update | Sonstiges 2. Drücken Sie die w/x-Cursortasten (a) auf der Fernbedienung, um den gewünschten Programmtyp auszuwählen, und dann ENTER (a), um die Suche zu starten. Die Programmtypen
> Vor dem Start > Teilenamen > Installation > Erste Einrichtung > Wiedergabe Erweiterte Einrichtung | Firmware-Update | Sonstiges Voreinstellung eines Radiosenders Hiermit können Sie bis zu 40 bevorzugte FM/DAB-Sender registrieren. Die Registrierung von Radiosendern im Voraus ermöglicht es Ihnen,
> Vor dem Start > Teilenamen > Installation > Erste Einrichtung > Wiedergabe Erweiterte Einrichtung | Firmware-Update | Sonstiges Wiedergabemodi Auswahl von Wiedergabemodi Sie können den Wiedergabemodus während der Wiedergabe wechseln, indem Sie mehrfach «AUTO/ DIRECT» oder «SURR» drücken. a
> Vor dem Start > Teilenamen > Installation > Erste Einrichtung > Wiedergabe Erweiterte Einrichtung | Firmware-Update | Sonstiges Eingangsquelle & Lautstärke Wiedergabemodus-Effekte großen Saal. Wiedergabemodus Updates der Wiedergabemodi Mithilfe von Firmware-Updates für dieses Gerät ist eine
> Vor dem Start > Teilenamen > Installation > Erste Einrichtung > Wiedergabe Erweiterte Einrichtung | Firmware-Update | Sonstiges wiedergegeben. Beim Dolby Digital Plus-Format handelt es sich um eine Revision auf Basis von Dolby Digital mit erhöhter Kanalanzahl zum Steigern der Klangqualität durch
> Vor dem Start > Teilenamen > Installation > Erste Einrichtung > Wiedergabe Erweiterte Einrichtung | Firmware-Update | Sonstiges In diesem Modus werden im Audioformat DTS-HD High Resolution Audio aufgenommene Klangdesigns originalgetreu wiedergegeben. DTS-HD High Resolution Audio wird als
> Vor dem Start > Teilenamen > Installation > Erste Einrichtung > Wiedergabe Erweiterte Einrichtung | Firmware-Update | Sonstiges Auswählbare Wiedergabemodi Sie können aus einer Vielzahl von Wiedergabemodi je nach Audioformat des Eingangssignals auswählen. 0 Der Stereo-Modus kann bei allen
> Vor dem Start > Teilenamen > Installation > Erste Einrichtung > Wiedergabe Erweiterte Einrichtung | Firmware-Update | Sonstiges Eingangsformat Wiedergabemodus Eingangsformat Wiedergabemodus Eingangsformat Wiedergabemodus Multich PCM Stereo DSD Stereo Dolby Atmos Stereo Multich PCM½1 DSD Dolby
> Vor dem Start > Teilenamen > Installation > Erste Einrichtung > Wiedergabe Erweiterte Einrichtung | Firmware-Update | Sonstiges Eingangsformat Wiedergabemodus Eingangsformat Wiedergabemodus Eingangsformat Wiedergabemodus Dolby D Stereo Dolby D+ Stereo Dolby TrueHD Stereo Dolby D½1½2 Dolby
> Vor dem Start > Teilenamen > Installation > Erste Einrichtung > Wiedergabe Erweiterte Einrichtung | Firmware-Update | Sonstiges Eingangsformat Wiedergabemodus Eingangsformat Wiedergabemodus Eingangsformat Wiedergabemodus DTS Stereo DTS 96/24 Stereo DTS Express Stereo DTS½1½2 DTS 96/24½1½2 DTS
> Vor dem Start > Teilenamen > Installation > Erste Einrichtung > Wiedergabe Erweiterte Einrichtung | Firmware-Update | Sonstiges Eingangsformat Wiedergabemodus Eingangsformat Wiedergabemodus Eingangsformat Wiedergabemodus DTS-HD HR Stereo DTS-HD MSTR Stereo DTS:X Stereo DTS-HD HR½1½2 DTS-HD
> Vor dem Start > Teilenamen > Installation > Erste Einrichtung > Wiedergabe Erweiterte Einrichtung | Firmware-Update | Sonstiges AV Adjust 1 Wenn Sie die -Taste auf der Fernbedienung während der Wiedergabe drücken, können Sie häufig genutzte Einstellungen wie die Klangqualität mithilfe von
> Vor dem Start > Teilenamen > Installation > Erste Einrichtung > Wiedergabe Erweiterte Einrichtung | Firmware-Update | Sonstiges ∫ Other Sound Delay: Hiermit können Sie eine Audioverzögerung vornehmen, wenn die Videoausgabe im Vergleich zur Audioausgabe verzögert erfolgt. Es können für jeden
> Vor dem Start > Teilenamen > Installation > Erste Einrichtung > Wiedergabe Erweiterte Einrichtung | Firmware-Update | Sonstiges System Setup Erweiterte Einrichtung 1 2 Fernbedienung des Fernsehers Mit den erweiterten Einstellungen dieses Geräts können Sie Leistung und Bedienfreundlichkeit
> Vor dem Start > Teilenamen > Installation > Erste Einrichtung > Wiedergabe Erweiterte Einrichtung | Firmware-Update | Sonstiges Impose OSD Screen Saver Stellen Sie beispielsweise ein, ob die Informationen auf dem Fernseher angezeigt werden sollen, wenn die Lautstärke geregelt oder der Eingang
> Vor dem Start > Teilenamen > Installation > Erste Einrichtung > Wiedergabe Erweiterte Einrichtung | Firmware-Update | Sonstiges TV «COAXIAL», «OPTICAL «: Weisen Sie dem TV-Eingangsselektor die gewünschte DIGITAL IN-Buchse zu. (Der Standardwert ist «OPTICAL») 0 Unterstützte Abtastraten für
> Vor dem Start > Teilenamen > Installation > Erste Einrichtung > Wiedergabe Erweiterte Einrichtung | Firmware-Update | Sonstiges Surround Legen Sie die Eigenschaften des niederfrequenten Bereichs für jeden Kanal fest, indem Sie zwischen «small» und «large» auswählen. «Small (Standardwert)»: Für
> Vor dem Start > Teilenamen > Installation > Erste Einrichtung > Wiedergabe Erweiterte Einrichtung | Firmware-Update | Sonstiges Subwoofer Wählen Sie einen Wert zwischen «-15 dB» und «+12 dB» (in Schritten von 1 dB) aus. Ein Testton wird jedes Mal, wenn Sie den Wert verändern, ausgegeben. Wählen
> Vor dem Start > Teilenamen > Installation > Erste Einrichtung > Wiedergabe Erweiterte Einrichtung | Firmware-Update | Sonstiges ∫ Audio Select Legen Sie Prioritäten bei der Eingangsauswahl fest, wenn mehrere Audioquellen mit einem Eingangsselektor verbunden sind, z. B. bei Anschlüssen an den
> Vor dem Start > Teilenamen > Installation > Erste Einrichtung > Wiedergabe Erweiterte Einrichtung | Firmware-Update | Sonstiges HDMI Standby Through 48 Wenn diese Einstellung nicht den Wert «Off» aufweist, können Sie Video- und Audiosignale eines über HDMI angeschlossenen Players auf dem
> Vor dem Start > Teilenamen > Installation > Erste Einrichtung > Wiedergabe Erweiterte Einrichtung | Firmware-Update | Sonstiges ∫ Power Management Sleep Timer Mit dieser Funktion kann das Gerät nach Ablauf der angegebenen Zeit automatisch in den Standby-Modus schalten. Sie können zwischen «30
> Vor dem Start > Teilenamen > Installation > Erste Einrichtung > Wiedergabe Erweiterte Einrichtung | Firmware-Update | Sonstiges FM Frequency Step (Modelle für Nordamerika) Wählen Sie einen Frequenzschritt abhängig von Ihrem Wohnort. Wählen Sie «0.2 MHz (Standardwert)» oder «0.05 MHz» aus. 0 Wenn
> Vor dem Start > Teilenamen > Installation > Erste Einrichtung > Wiedergabe Erweiterte Einrichtung | Firmware-Update | Sonstiges MCACC 1 2 Fernbedienung des Fernsehers Richten Sie die Lautsprecher automatisch ein oder nehmen Sie Änderungen nach Wunsch am Equalizer vor. Sie können auch die
> Vor dem Start > Teilenamen > Installation > Erste Einrichtung > Wiedergabe Erweiterte Einrichtung | Firmware-Update | Sonstiges Lautsprecher die Lautstärke der verschiedenen Klangbereiche anpassen. Sie können drei verschiedene Equalizer unter Preset 1 bis 3 speichern. Sie können bis zu 4 Bänder
> Vor dem Start > Teilenamen > Installation > Erste Einrichtung > Wiedergabe Erweiterte Einrichtung | Firmware-Update | Sonstiges MCACC Data Check D E Sie können die Anzahl der angeschlossenen Lautsprecherkanäle und die Inhalte und Werte der jeweiligen Lautsprechereinstellungen überprüfen. ∫
> Vor dem Start > Teilenamen > Installation > Erste Einrichtung > Wiedergabe Erweiterte Einrichtung | Firmware-Update | Sonstiges Network/Bluetooth 1 2 Fernbedienung des Nehmen Sie Einstellungen im Zusammenhang mit Netzwerkverbindungen und BLUETOOTH vor. 1. Schalten Sie den Eingang des Fernsehers
> Vor dem Start > Teilenamen > Installation > Erste Einrichtung > Wiedergabe Erweiterte Einrichtung | Firmware-Update | Sonstiges MAC Address Dies ist die MAC-Adresse dieses Geräts. Dieser Wert ist speziell für die Komponente eingestellt und kann nicht geändert werden. DHCP «Enable (Standardwert)»:
> Vor dem Start > Teilenamen > Installation > Erste Einrichtung > Wiedergabe Erweiterte Einrichtung | Firmware-Update | Sonstiges Bluetooth Bluetooth Auto Input Change 56 Wählen Sie aus, ob Sie die BLUETOOTH-Funktion verwenden wollen. «On (Standardwert)»: Ermöglicht das Anschließen von
> Vor dem Start > Teilenamen > Installation > Erste Einrichtung > Wiedergabe Erweiterte Einrichtung | Firmware-Update | Sonstiges Firmware-Update Firmware-Update Update-Funktion dieses Geräts Aktualisierung der Firmware Bei diesem Gerät kann die Firmware (Systemsoftware) über ein Netzwerk oder den
> Vor dem Start > Teilenamen > Installation > Erste Einrichtung > Wiedergabe Erweiterte Einrichtung | Firmware-Update | Sonstiges System Setup Input/Output Assign Speaker Hardware 0 Wenn «Firmware Update» ausgegraut ist und nicht ausgewählt werden kann, warten Sie eine Weile, bis es verfügbar ist.
> Vor dem Start > Teilenamen > Installation > Erste Einrichtung > Wiedergabe Erweiterte Einrichtung | Firmware-Update | Sonstiges abgeschlossen ist. 9. Entfernen Sie das USB-Speichergerät von diesem Gerät. 10.Drücken Sie Í STANDBY/ON an diesem Gerät, um das Gerät in den Standby-Modus zu schalten.
> Vor dem Start > Teilenamen > Installation > Erste Einrichtung > Wiedergabe Erweiterte Einrichtung | Firmware-Update | Sonstiges Fehlerbehebung Sonstiges Bevor Sie den Vorgang starten Probleme können möglicherweise durch einfaches Aus- und wieder Einschalten oder Abtrennen und erneutes Anschließen
> Vor dem Start > Teilenamen > Installation > Erste Einrichtung > Wiedergabe Erweiterte Einrichtung | Firmware-Update | Sonstiges Von einem Lautsprecher werden keine Audiosignale wiedergegeben. 0 Stellen Sie sicher, dass die Polarität der Lautsprecherkabel (_/ `) korrekt ist und sich keine blanken
> Vor dem Start > Teilenamen > Installation > Erste Einrichtung > Wiedergabe Erweiterte Einrichtung | Firmware-Update | Sonstiges Bei einer Quelle, die an einen HDMI IN-Terminal angeschlossen ist, wird kein Bild wiedergegeben 0 Um das Videosignal des angeschlossenen Players auf dem
> Vor dem Start > Teilenamen > Installation > Erste Einrichtung > Wiedergabe Erweiterte Einrichtung | Firmware-Update | Sonstiges ggf. Hindernisse zwischen dem BLUETOOTH-fähigen Gerät und diesem Gerät. ∫ Netzwerkfunktion 0 Wenn Sie keinen Netzwerkdienst auswählen können, ist die Auswahl nach dem
> Vor dem Start > Teilenamen > Installation > Erste Einrichtung > Wiedergabe Erweiterte Einrichtung | Firmware-Update | Sonstiges Es wird eine Verbindung mit einer anderen als der ausgewählten SSID hergestellt. 0 Bei einigen WLAN-Routern ist es möglich, mehrere SSIDs für ein Gerät einzustellen.
> Vor dem Start > Teilenamen > Installation > Erste Einrichtung > Wiedergabe Erweiterte Einrichtung | Firmware-Update | Sonstiges Allgemeine technische Daten Abschnitt zum Verstärker (Audio) Ausgangsnennleistung (FTC) (Nordamerika) 4 Ohm Last, beide Kanäle angetrieben von 1 kHz; Nennleistung 50
> Vor dem Start > Teilenamen > Installation > Erste Einrichtung > Wiedergabe Erweiterte Einrichtung | Firmware-Update | Sonstiges Analog 1 (BD/DVD), 2 (CBL/SAT), PHONO (designiert) Audio-Ausgänge Analog SUBWOOFER PRE OUT Lautsprecherausgänge FRONT L/R, CENTER, SURROUND L/R, SUBWOOFER Kopfhörer
> Vor dem Start > Teilenamen > Installation > Erste Einrichtung > Wiedergabe Erweiterte Einrichtung | Firmware-Update | Sonstiges Über HDMI Kompatible Funktionen wiedergegeben werden. HDMI (High Definition Multimedia Interface) ist ein digitaler Schnittstellenstandard zum Anschließen von
> Vor dem Start > Teilenamen > Installation > Erste Einrichtung > Wiedergabe Erweiterte Einrichtung | Firmware-Update | Sonstiges Lizenz- und Warenzeicheninformationen The Bluetooth® word mark and logos are registered trademarks owned by the Bluetooth SIG, Inc. QR Code is a registered trademark of
2-3-12 Yaesu, Chuo-ku, Tokyo 104-0028 JAPAN <U.S.A.> 18 PARK WAY, UPPER SADDLE RIVER, NEW JERSEY 07458, U.S.A. Tel: 1-201-785-2600 Tel: 1-844-679-5350 <Germany> Hanns-Martin-Schleyer-Straße 35, 47877 Willich, Germany Tel: +49(0)2154 913222 D E <UK> Anteros Building, Odyssey Business Park, West End
> Vóór het starten > Namen van de onderdelen > Installeren > Begininstelling > Afspelen Geavanceerde Setup | Firmware-update | Overige AV RECEIVER VSX-S520D VSX-S520 Gebruikers handleiding Vóór het starten Wat zit er in de doos ……………………………………………………… 2 Namen
> Vóór het starten > Namen van de onderdelen > Installeren > Begininstelling > Afspelen Geavanceerde Setup | Firmware-update | Overige Wat zit er in de doos Vóór het starten N L Hoofdtoestel (1) Afstandsbediening (RC-933R) (1), batterijen (AAA/R03) (2) Microfoon voor luidsprekerinstelling (1)
> Vóór het starten > Namen van de onderdelen > Installeren > Begininstelling > Afspelen Geavanceerde Setup | Firmware-update | Overige Voorpaneel Namen van de onderdelen N L 1. Í STANDBY/ON-knop: Schakelt het toestel in of schakelt het naar de stand-by-modus. 2. Display (ÄP7) 3.
> Vóór het starten > Namen van de onderdelen > Installeren > Begininstelling > Afspelen Geavanceerde Setup | Firmware-update | Overige Achterpaneel VSX-S520D N L 90° 180° 1. ANTENNA DAB / FM-aansluiting: Verbind de bijgeleverde antenne. 2. Draadloze antenne: Overeind zetten
> Vóór het starten > Namen van de onderdelen > Installeren > Begininstelling > Afspelen Geavanceerde Setup | Firmware-update | Overige VSX-S520 N L 90° 180° 1. ANTENNA FM UNBAL 75h-aansluiting: Verbind de bijgeleverde antenne. 2. Draadloze antenne: Overeind zetten voor de
> Vóór het starten > Namen van de onderdelen > Installeren > Begininstelling > Afspelen Geavanceerde Setup | Firmware-update | Overige Afstandsbediening 1. Í-knop: Schakelt het toestel in of schakelt het naar de stand-by-modus. 2. Ingangskeuze knoppen: Schakelt de af te spelen invoer.
> Vóór het starten > Namen van de onderdelen > Installeren > Begininstelling > Afspelen Geavanceerde Setup | Firmware-update | Overige Display N L Neo:6 1. Gaat branden onder de volgende omstandigheden. HDMI: HDMI-signalen worden ingevoerd en geselecteerd. ARC: Audiosignalen
> Vóór het starten > Namen van de onderdelen > Installeren > Begininstelling > Afspelen Geavanceerde Setup | Firmware-update | Overige 1. De luidsprekers verbinden Installeren Installeer de luidsprekers L De voorluidsprekers voeren het voor-stereogeluid uit en de middenluidspreker voert het
> Vóór het starten > Namen van de onderdelen > Installeren > Begininstelling > Afspelen Geavanceerde Setup | Firmware-update | Overige N L 1 a 1/2˝ (12 mm) 2 a b a 3 FRONT R FRONT L CENTER Verbind de luidsprekers b a Luidsprekerkabel, b Subwooferkabel Raadpleeg onderstaande afbeeldingen om het
> Vóór het starten > Namen van de onderdelen > Installeren > Begininstelling > Afspelen Geavanceerde Setup | Firmware-update | Overige N L Controleer bij het verbinden of de draaduiteinden van de luidsprekers niet uit de luidsprekeraansluitingen naar buiten steken. Als de naar buiten stekende
> Vóór het starten > Namen van de onderdelen > Installeren > Begininstelling > Afspelen Geavanceerde Setup | Firmware-update | Overige 2. De TV verbinden Naar ARC TV 1 N L Gebruik voor een TV die ARC (Audio Return Channel) (ÄP67) ondersteunt een HDMI-kabel en maak de verbinding aan de hand van
> Vóór het starten > Namen van de onderdelen > Installeren > Begininstelling > Afspelen Geavanceerde Setup | Firmware-update | Overige 3. Verbind de HDMI AV-componenten N L 1 a BD/DVD a Streamen mediaspeler Kabel/Satelliet settopbox HDMI OUT a HDMI-kabel 12 e.g. BD Dit is een verbindingsvoorbeeld
> Vóór het starten > Namen van de onderdelen > Installeren > Begininstelling > Afspelen Geavanceerde Setup | Firmware-update | Overige 4. Verbind de audiocomponenten Een CD-speler verbinden N L Gebruik een digitale coaxiale kabel om verbinding te maken met een CD-speler via de DIGITAL IN
> Vóór het starten > Namen van de onderdelen > Installeren > Begininstelling > Afspelen Geavanceerde Setup | Firmware-update | Overige 5. Verbinden met andere kabels De antenne aansluiten 1 (Noord-Amerikaanse modellen) a DAB/FM-antenne (VSX-S520D) : Verbind de bijgeleverde DAB/FM-antenne met de
> Vóór het starten > Namen van de onderdelen > Installeren > Begininstelling > Afspelen Geavanceerde Setup | Firmware-update | Overige Eerste Setup met de Automatische Opstart Wizard Begininstelling 1 2 Initial Setup gaat automatisch van start N L 1. Schakel de ingang op de TV naar die is
> Vóór het starten > Namen van de onderdelen > Installeren > Begininstelling > Afspelen Geavanceerde Setup | Firmware-update | Overige 1. Full Auto MCACC Plaats de bijgeleverde luidsprekerinstellingsmicrofoon in de luisterpositie en meet de testtonen die door de luidsprekers uitgezonden worden
> Vóór het starten > Namen van de onderdelen > Installeren > Begininstelling > Afspelen Geavanceerde Setup | Firmware-update | Overige methoden kunnen gebruikt worden om verbinding via Wi-Fi te maken: «Scan Networks»: Zoek naar een toegangspunt vanuit dit toestel. Zoek van tevoren de SSID van het
> Vóór het starten > Namen van de onderdelen > Installeren > Begininstelling > Afspelen Geavanceerde Setup | Firmware-update | Overige Afspelen van een AV-component Afspelen Basisbedieningen Speel een AV-component af of een TV die met een HDMIkabel of een andere kabel met dit toestel verbonden is.
> Vóór het starten > Namen van de onderdelen > Installeren > Begininstelling > Afspelen Geavanceerde Setup | Firmware-update | Overige Internetradio Basisbedieningen 1 Als dit toestel met een netwerk verbonden is, kunt u naar TuneIn of andere vooraf geregistreerde internetradiodiensten luisteren.
> Vóór het starten > Namen van de onderdelen > Installeren > Begininstelling > Afspelen Geavanceerde Setup | Firmware-update | Overige Het Pandora-menu: De iconen worden op het scherm weergegeven terwijl een zender afgespeeld wordt. U kunt het volgende doen door de icoon te selecteren met y/z (a)
> Vóór het starten > Namen van de onderdelen > Installeren > Begininstelling > Afspelen Geavanceerde Setup | Firmware-update | Overige Spotify Basisbedieningen 1 2 a b 3 c d e 4 N L Het afspelen van Spotify Connect is mogelijk door dit toestel met hetzelfde netwerk als een smartphone of tablet te
> Vóór het starten > Namen van de onderdelen > Installeren > Begininstelling > Afspelen Geavanceerde Setup | Firmware-update | Overige Music Server Het is mogelijk muziekbestanden te streamen die opgeslagen zijn op PC’s of NAS-apparaten die met hetzelfde netwerk verbonden zijn als dit toestel. De
> Vóór het starten > Namen van de onderdelen > Installeren > Begininstelling > Afspelen Geavanceerde Setup | Firmware-update | Overige 0 Afhankelijk van de server en de gedeelde instellingen is het mogelijk dat het toestel niet wordt herkend of niet in staat is om de muziekbestanden ervan af te
> Vóór het starten > Namen van de onderdelen > Installeren > Begininstelling > Afspelen Geavanceerde Setup | Firmware-update | Overige USB-opslagapparaat Basis afspelen 1 Muziekbestanden op een USB-opslagapparaat afspelen 1. Schakel de ingang op de TV naar die is toegewezen aan de unit. 2. Steek uw
> Vóór het starten > Namen van de onderdelen > Installeren > Begininstelling > Afspelen Geavanceerde Setup | Firmware-update | Overige Vereisten USB-opslagapparaat 0 Houd er rekening mee dat de werking niet met alle USBopslagapparaten gegarandeerd wordt. 0 Dit toestel ondersteunt
> Vóór het starten > Namen van de onderdelen > Installeren > Begininstelling > Afspelen Geavanceerde Setup | Firmware-update | Overige AirPlay® 1 3 4 2 5 26 Basis afspelen U kunt draadloos van de muziekbestanden op een iPhone®, iPod touch®, of iPad® genieten die met hetzelfde toegangspunt verbonden
> Vóór het starten > Namen van de onderdelen > Installeren > Begininstelling > Afspelen Geavanceerde Setup | Firmware-update | Overige BLUETOOTH® Afspelen Koppelen 1 2 Afspelen 1 2 Koppelen N L 1. Als u op de afstandsbediening op de -knop drukt, wordt «Now Pairing…» op het display van dit toestel
> Vóór het starten > Namen van de onderdelen > Installeren > Begininstelling > Afspelen Geavanceerde Setup | Firmware-update | Overige Naar de FM/DAB-radio luisteren Naar de FM-radio luisteren 1 Automatisch tunen 1. Druk herhaaldelijk op TUNER op de afstandsbediening om «FM» op het display te
> Vóór het starten > Namen van de onderdelen > Installeren > Begininstelling > Afspelen Geavanceerde Setup | Firmware-update | Overige 2. Druk op de afstandsbediening op de w/x-cursorknoppen (a) om het programmatype te selecteren dat u wilt zoeken en druk vervolgens op ENTER (a) om het zoeken te
> Vóór het starten > Namen van de onderdelen > Installeren > Begininstelling > Afspelen Geavanceerde Setup | Firmware-update | Overige Voorkeuze van een radiozender instellen Hiermee kunt u tot maximaal 40 van uw favoriete FM/DABzenders registreren. Door van te voren radiozenders te registreren
> Vóór het starten > Namen van de onderdelen > Installeren > Begininstelling > Afspelen Geavanceerde Setup | Firmware-update | Overige Luistermodussen De luistermodussen selecteren U kunt de luistermodus tijdens het afspelen veranderen door herhaaldelijk op «AUTO/DIRECT» of «SURR» te drukken. a
> Vóór het starten > Namen van de onderdelen > Installeren > Begininstelling > Afspelen Geavanceerde Setup | Firmware-update | Overige Ingangsbron & volume Effecten van de luistermodussen Luisterstand Luistermodussen updaten Wij hebben de intentie ondersteuning te verlenen voor het Dolby Atmos en
> Vóór het starten > Namen van de onderdelen > Installeren > Begininstelling > Afspelen Geavanceerde Setup | Firmware-update | Overige Dolby Digital Plus audioformaat opgenomen is. Het Dolby Digital Plus formaat is een herziening die op Dolby Digital gebaseerd is, het aantal kanalen verhoogt en
> Vóór het starten > Namen van de onderdelen > Installeren > Begininstelling > Afspelen Geavanceerde Setup | Firmware-update | Overige DTS-HD HR (DTS-HD High Resolution Audio) Deze modus reproduceert trouw het sounddesign dat in het DTS-HD High Resolution Audio audioformaat opgenomen is. DTS-HD
> Vóór het starten > Namen van de onderdelen > Installeren > Begininstelling > Afspelen Geavanceerde Setup | Firmware-update | Overige Selecteerbare luistermodussen U kunt een verscheidenheid aan luistermodussen selecteren die passen bij het audioformaat van het ingevoerde signaal. 0 De
> Vóór het starten > Namen van de onderdelen > Installeren > Begininstelling > Afspelen Geavanceerde Setup | Firmware-update | Overige Ingangsformaat Listening Mode Ingangsformaat Listening Mode Ingangsformaat Listening Mode Multich PCM Stereo DSD Stereo Dolby Atmos Stereo Multich PCM½1 DSD Dolby
> Vóór het starten > Namen van de onderdelen > Installeren > Begininstelling > Afspelen Geavanceerde Setup | Firmware-update | Overige Ingangsformaat Listening Mode Ingangsformaat Listening Mode Ingangsformaat Listening Mode Dolby D Stereo Dolby D+ Stereo Dolby TrueHD Stereo Dolby D½1½2 Dolby
> Vóór het starten > Namen van de onderdelen > Installeren > Begininstelling > Afspelen Geavanceerde Setup | Firmware-update | Overige Ingangsformaat Listening Mode Ingangsformaat Listening Mode Ingangsformaat Listening Mode DTS Stereo DTS 96/24 Stereo DTS Express Stereo DTS½1½2 DTS 96/24½1½2 DTS
> Vóór het starten > Namen van de onderdelen > Installeren > Begininstelling > Afspelen Geavanceerde Setup | Firmware-update | Overige Ingangsformaat Listening Mode Ingangsformaat Listening Mode Ingangsformaat Listening Mode DTS-HD HR Stereo DTS-HD MSTR Stereo DTS:X Stereo DTS-HD HR½1½2 DTS-HD
> Vóór het starten > Namen van de onderdelen > Installeren > Begininstelling > Afspelen Geavanceerde Setup | Firmware-update | Overige AV Adjust 1 Door tijdens het afspelen op de afstandsbediening op de -knop te drukken, kunt u vaak gebruikte instellingen aanpassen zoals de geluidskwaliteit, het
> Vóór het starten > Namen van de onderdelen > Installeren > Begininstelling > Afspelen Geavanceerde Setup | Firmware-update | Overige de audio vertragen om de kloof te compenseren. Er kunnen voor iedere ingangskeuzeschakelaar verschillende instellingen gemaakt worden. Sound Retriever: Verbetert de
> Vóór het starten > Namen van de onderdelen > Installeren > Begininstelling > Afspelen Geavanceerde Setup | Firmware-update | Overige System Setup Geavanceerde Setup 1 2 Afstandsbediening TV Het toestel stelt u in staat geavanceerde instellingen te configureren om u een nog betere ervaring te
> Vóór het starten > Namen van de onderdelen > Installeren > Begininstelling > Afspelen Geavanceerde Setup | Firmware-update | Overige Impose OSD Stelt in om de informatie al dan niet op de TV weer te geven als het volume bijvoorbeeld geregeld wordt. «On (Standaardwaarde)»: OSD weergegeven op de TV
> Vóór het starten > Namen van de onderdelen > Installeren > Begininstelling > Afspelen Geavanceerde Setup | Firmware-update | Overige TV «COAXIAL», «OPTICAL «: Ken een gewenste DIGITAL INaansluiting toe aan de TV-ingangskeuzeschakelaar. (Standaardwaarde is «OPTICAL») 0 Ondersteunde
> Vóór het starten > Namen van de onderdelen > Installeren > Begininstelling > Afspelen Geavanceerde Setup | Firmware-update | Overige Surround Crossover Double Bass Stel het vermogen van het lage bereik voor ieder kanaal in door klein of groot in te stellen. «Small (Standaardwaarde)»: Voor kleine
> Vóór het starten > Namen van de onderdelen > Installeren > Begininstelling > Afspelen Geavanceerde Setup | Firmware-update | Overige Subwoofer Selecteer een waarde tussen «-15 dB» en «+12 dB» (met toenames van 1 dB). Telkens bij het wijzigen van de waarde wordt een testtoon uitgevoerd. Selecteer
> Vóór het starten > Namen van de onderdelen > Installeren > Begininstelling > Afspelen Geavanceerde Setup | Firmware-update | Overige Selecteert de prioriteit voor de ingangsselectie als meerdere audiobronnen met één ingangskeuzeschakelaar verbonden zijn, zoals verbindingen met zowel de «BD/DVD»
> Vóór het starten > Namen van de onderdelen > Installeren > Begininstelling > Afspelen Geavanceerde Setup | Firmware-update | Overige HDMI Standby Through 48 Als dit op iets anders dan “Off” gezet is, kunt u de video en audio van een met HDMI verbonden speler op de TV afspelen, zelfs als het
> Vóór het starten > Namen van de onderdelen > Installeren > Begininstelling > Afspelen Geavanceerde Setup | Firmware-update | Overige ∫ Power Management Sleep Timer Stelt het toestel in staat automatisch de stand-by-modus binnen te gaan als de gespecificeerde tijd verstrijkt. Selecteer uit «30
> Vóór het starten > Namen van de onderdelen > Installeren > Begininstelling > Afspelen Geavanceerde Setup | Firmware-update | Overige DAB Auto Scan (VSX-S520D) U kunt de automatische scan laten lopen wanneer er nieuwe DAB-stations toegevoegd worden of wanneer u verhuist. DAB DRC (VSX-S520D) Met de
> Vóór het starten > Namen van de onderdelen > Installeren > Begininstelling > Afspelen Geavanceerde Setup | Firmware-update | Overige MCACC 1 2 Afstandsbediening TV Stelt de luidsprekers automatisch in of maakt de gewenste veranderen in de equalizer. U kunt ook de huidige waarden controleren die
> Vóór het starten > Namen van de onderdelen > Installeren > Begininstelling > Afspelen Geavanceerde Setup | Firmware-update | Overige 4 banden voor de subwoofer en 9 banden voor alle andere luidsprekers selecteren. Om de ingestelde equalizer-effecten te gebruiken, het nummer gebruiken dat van
> Vóór het starten > Namen van de onderdelen > Installeren > Begininstelling > Afspelen Geavanceerde Setup | Firmware-update | Overige MCACC Data Check N L U kunt het aantal verbonden luidsprekerkanalen controleren en de inhoud en de waarden die u voor iedere luidsprekerinstelling uitgevoerd heeft.
> Vóór het starten > Namen van de onderdelen > Installeren > Begininstelling > Afspelen Geavanceerde Setup | Firmware-update | Overige Network/Bluetooth 1 2 Afstandsbediening TV Maak instellingen die met de netwerkverbindingen en BLUETOOTH verband houden. 1. Schakel de ingang op de TV naar die is
> Vóór het starten > Namen van de onderdelen > Installeren > Begininstelling > Afspelen Geavanceerde Setup | Firmware-update | Overige MAC Address Dit is het MAC-adres van dit toestel. Deze waarde is specifiek voor de component en kan niet worden gewijzigd. DHCP «Enable (Standaardwaarde)»:
> Vóór het starten > Namen van de onderdelen > Installeren > Begininstelling > Afspelen Geavanceerde Setup | Firmware-update | Overige Bluetooth Bluetooth Auto Input Change 56 Selecteer of u de BLUETOOTH-functie al dan niet gebruikt. «On (Standaardwaarde)»: Maakt verbinding mogelijk met een
> Vóór het starten > Namen van de onderdelen > Installeren > Begininstelling > Afspelen Geavanceerde Setup | Firmware-update | Overige Firmware-update Firmware-update De update-functie van dit toestel Updaten van de firmware De firmware bijwerken via netwerk Dit toestel heeft een functie voor het
> Vóór het starten > Namen van de onderdelen > Installeren > Begininstelling > Afspelen Geavanceerde Setup | Firmware-update | Overige System Setup Input/Output Assign Speaker Hardware 0 Als “Firmware Update” grijs wordt weergegeven en niet geselecteerd kan worden, wacht dan even tot het wordt
> Vóór het starten > Namen van de onderdelen > Installeren > Begininstelling > Afspelen Geavanceerde Setup | Firmware-update | Overige via USB» en druk vervolgens op ENTER. System Setup Input/Output Assign Speaker Hardware 0 Als “Firmware Update” grijs wordt weergegeven en niet geselecteerd kan
> Vóór het starten > Namen van de onderdelen > Installeren > Begininstelling > Afspelen Geavanceerde Setup | Firmware-update | Overige Problemen oplossen Overige Alvorens de procedure te starten Problemen kunnen worden opgelost door eenvoudig de stroom aan/uit te zetten of het netsnoer aan te
> Vóór het starten > Namen van de onderdelen > Installeren > Begininstelling > Afspelen Geavanceerde Setup | Firmware-update | Overige Een luidspreker produceert geen geluid 0 Controleer of de polariteit van de luidsprekerkabels (_/ `) correct is en of geen onbeklede draden in contact met het
> Vóór het starten > Namen van de onderdelen > Installeren > Begininstelling > Afspelen Geavanceerde Setup | Firmware-update | Overige «System Setup» — «Hardware» — «HDMI» — «HDMI Standby Through» in het Home in te schakelen. Raadpleeg (ÄP48) voor informatie over HDMI Standby Through. 0 Controleer
> Vóór het starten > Namen van de onderdelen > Installeren > Begininstelling > Afspelen Geavanceerde Setup | Firmware-update | Overige toegangspunten staat, is het misschien ingesteld om SSID te verbergen of de ANY-verbinding is mogelijk uitgeschakeld. Verander de instelling en probeer nogmaals.
> Vóór het starten > Namen van de onderdelen > Installeren > Begininstelling > Afspelen Geavanceerde Setup | Firmware-update | Overige obstakels voor een goede zichtbaarheid en probeer het opnieuw. Plaats het toestel niet in de buurt van magnetrons of andere toegangspunten. Er wordt aanbevolen de
> Vóór het starten > Namen van de onderdelen > Installeren > Begininstelling > Afspelen Geavanceerde Setup | Firmware-update | Overige Algemene specificaties Versterker (Audio) Nominaal uitgangsvermogen (FTC) (Noord-Amerikaans) Met belastingen van 4 ohm, beide kanalen aangestuurd, van 1 kHz; 50
> Vóór het starten > Namen van de onderdelen > Installeren > Begininstelling > Afspelen Geavanceerde Setup | Firmware-update | Overige COAXIAL (CD) Analoog 1 (BD/DVD), 2 (CBL/SAT), PHONO (toegewezen) Audio-uitgangen Analoog SUBWOOFER PRE OUT Luidspreker-uitgangen FRONT L/R, CENTER, SURROUND L/R,
> Vóór het starten > Namen van de onderdelen > Installeren > Begininstelling > Afspelen Geavanceerde Setup | Firmware-update | Overige HDMI Compatibele functies weergegeven worden. HDMI (High Definition Multimedia Interface) is een digitale interfacestandaard voor het verbinden van TV’s,
> Vóór het starten > Namen van de onderdelen > Installeren > Begininstelling > Afspelen Geavanceerde Setup | Firmware-update | Overige Licentie en handelsm The Bluetooth® word mark and logos are registered trademarks owned by the Bluetooth SIG, Inc. QR Code is a registered trademark of DENSO WAVE
2-3-12 Yaesu, Chuo-ku, Tokyo 104-0028 JAPAN <U.S.A.> 18 PARK WAY, UPPER SADDLE RIVER, NEW JERSEY 07458, U.S.A. Tel: 1-201-785-2600 Tel: 1-844-679-5350 <Germany> Hanns-Martin-Schleyer-Straße 35, 47877 Willich, Germany Tel: +49(0)2154 913222 N L <UK> Anteros Building, Odyssey Business Park, West End
> Перед началом > Названия частей > Установка > Начальная настройка > Воспроизведение Расширенная настройка | Обновление встроенного программного обеспечения | Другие функции AV-PЕСИВЕP VSX-S520D VSX-S520 Руководство по эксплуатации Дополнительная информация для клиентов в Российской Федерации
> Перед началом > Названия частей > Установка > Начальная настройка > Воспроизведение Расширенная настройка | Обновление встроенного программного обеспечения | Другие функции Содержимое упаковки Перед началом R U Основной аппарат (1) Пульт ДУ (RC-933R) (1), Элементы питания (AAA/R03) (2) Микрофон
> Перед началом > Названия частей > Установка > Начальная настройка > Воспроизведение Расширенная настройка | Обновление встроенного программного обеспечения | Другие функции Передняя панель Названия частей R U 1. Кнопка Í STANDBY/ON: включение аппарата или его переключение в
> Перед началом > Названия частей > Установка > Начальная настройка > Воспроизведение Расширенная настройка | Обновление встроенного программного обеспечения | Другие функции Задняя панель VSX-S520D R U 90° 180° 1. Гнездо ANTENNA DAB / FM: подключение антенны из комплекта
> Перед началом > Названия частей > Установка > Начальная настройка > Воспроизведение Расширенная настройка | Обновление встроенного программного обеспечения | Другие функции VSX-S520 R U 90° 180° 1. Гнездо ANTENNA FM UNBAL 75h: подключение антенны из комплекта поставки. 2.
> Перед началом > Названия частей > Установка > Начальная настройка > Воспроизведение Расширенная настройка | Обновление встроенного программного обеспечения | Другие функции Пульт дистанционного управления 1. Кнопка Í: включение аппарата или его переключение в режим ожидания. 2.
> Перед началом > Названия частей > Установка > Начальная настройка > Воспроизведение Расширенная настройка | Обновление встроенного программного обеспечения | Другие функции Дисплей R U Neo:6 1. Загорается при следующих условиях. HDMI: сигналы HDMI поступают и выбраны. ARC:
> Перед началом > Названия частей > Установка > Начальная настройка > Воспроизведение Расширенная настройка | Обновление встроенного программного обеспечения | Другие функции 1. Подключение АС Установка Установка АС L Фронтальные АС выводят фронтальный стереозвук, а центральная АС выводит
> Перед началом > Названия частей > Установка > Начальная настройка > Воспроизведение Расширенная настройка | Обновление встроенного программного обеспечения | Другие функции 1 R U a 1/2˝ (12 mm) 2 a b a 3 FRONT R b a Кабель для АС, b кабель для сабвуфера FRONT L CENTER Подключение АС Подключите
> Перед началом > Названия частей > Установка > Начальная настройка > Воспроизведение Расширенная настройка | Обновление встроенного программного обеспечения | Другие функции R U При подключении убедитесь, что оголенные провода АС не торчат из разъемов АС. Если оголенные провода АС коснутся задней
> Перед началом > Названия частей > Установка > Начальная настройка > Воспроизведение Расширенная настройка | Обновление встроенного программного обеспечения | Другие функции 2. Подключение телевизора Телевизор с поддержкой ARC 1 R U Для подключения телевизора с поддержкой ARC (реверсивный звуковой
> Перед началом > Названия частей > Установка > Начальная настройка > Воспроизведение Расширенная настройка | Обновление встроенного программного обеспечения | Другие функции 3. Подключение аудиовидеоустройств с поддержкой HDMI R U 1 a BD/DVD a Кабельная/ спутниковая HDMI OUT a Кабель HDMI 12 e.g.
> Перед началом > Названия частей > Установка > Начальная настройка > Воспроизведение Расширенная настройка | Обновление встроенного программного обеспечения | Другие функции 4. Подключение аудиоустройств Подключение проигрывателя компакт-дисков R U Подключите проигрыватель компакт-дисков к гнезду
> Перед началом > Названия частей > Установка > Начальная настройка > Воспроизведение Расширенная настройка | Обновление встроенного программного обеспечения | Другие функции 5. Подключение других кабелей Подключение антенны 1 (Модели для Северной Америки) a Антенна DAB/FM (VSX-S520D) : Подключите
> Перед началом > Названия частей > Установка > Начальная настройка > Воспроизведение Расширенная настройка | Обновление встроенного программного обеспечения | Другие функции Начальная настройка с использованием мастера автоматического запуска Начальная настройка 1 2 Initial Setup запускается
> Перед началом > Названия частей > Установка > Начальная настройка > Воспроизведение Расширенная настройка | Обновление встроенного программного обеспечения | Другие функции 1. Full Auto MCACC Поместите микрофон для настройки АС из комплекта поставки на место прослушивания, измерьте тестовые
> Перед началом > Названия частей > Установка > Начальная настройка > Воспроизведение Расширенная настройка | Обновление встроенного программного обеспечения | Другие функции Подключитесь через Wi-Fi к точке доступа, например к беспроводному маршрутизатору. Подключиться через Wi-Fi можно следующими
> Перед началом > Названия частей > Установка > Начальная настройка > Воспроизведение Расширенная настройка | Обновление встроенного программного обеспечения | Другие функции Воспроизведение с аудиовидеоустройства Воспроизведение Основные операции a b 18 Воспроизводите контент с
> Перед началом > Названия частей > Установка > Начальная настройка > Воспроизведение Расширенная настройка | Обновление встроенного программного обеспечения | Другие функции Интернет-радио Основные операции 1 Когда аппарат подключен к сети, можно слушать TuneIn или другие предварительно
> Перед началом > Названия частей > Установка > Начальная настройка > Воспроизведение Расширенная настройка | Обновление встроенного программного обеспечения | Другие функции воспроизведение и появляется экран воспроизведения. Создание новой станции: введите название композиции, имя исполнителя или
> Перед началом > Названия частей > Установка > Начальная настройка > Воспроизведение Расширенная настройка | Обновление встроенного программного обеспечения | Другие функции Spotify Основные операции 1 2 a b 3 c d e 4 R U Подключив аппарат к той же сети, что и смартфон или планшет, можно
> Перед началом > Названия частей > Установка > Начальная настройка > Воспроизведение Расширенная настройка | Обновление встроенного программного обеспечения | Другие функции Music Server Аппарат поддерживает потоковое воспроизведение музыкальных файлов с ПК или NAS-устройств, подключенных к той же
> Перед началом > Названия частей > Установка > Начальная настройка > Воспроизведение Расширенная настройка | Обновление встроенного программного обеспечения | Другие функции Глубина вложения папок может достигать 16 уровней. Указанные ниже операции также можно выполнить с помощью пульта ДУ. (a)
> Перед началом > Названия частей > Установка > Начальная настройка > Воспроизведение Расширенная настройка | Обновление встроенного программного обеспечения | Другие функции Устройство памяти USB Основной режим воспроизведения 1 a b c d 2 e f g h 24 Вы можете воспроизводить музыкальные файлы на
> Перед началом > Названия частей > Установка > Начальная настройка > Воспроизведение Расширенная настройка | Обновление встроенного программного обеспечения | Другие функции (f) повтор воспроизведения композиции или воспроизведение в случайном порядке. При последовательном нажатии этой кнопки
> Перед началом > Названия частей > Установка > Начальная настройка > Воспроизведение Расширенная настройка | Обновление встроенного программного обеспечения | Другие функции AirPlay® 1 3 4 2 5 Основной режим воспроизведения Аппарат позволяет воспроизводить через беспроводную сеть музыкальные
> Перед началом > Названия частей > Установка > Начальная настройка > Воспроизведение Расширенная настройка | Обновление встроенного программного обеспечения | Другие функции Воспроизведение через BLUETOOTH® Сопряжение аппарата с другими устройствами 1 2 Воспроизведение 1 2 Сопряжение аппарата с
> Перед началом > Названия частей > Установка > Начальная настройка > Воспроизведение Расширенная настройка | Обновление встроенного программного обеспечения | Другие функции Прослушивание радио FM/DAB Прослушивание радио в диапазоне FM 1 Автоматическая настройка 1. Несколько раз нажмите кнопку
> Перед началом > Названия частей > Установка > Начальная настройка > Воспроизведение Расширенная настройка | Обновление встроенного программного обеспечения | Другие функции пульте ДУ. 2. С помощью кнопок курсора / (a) на пульте ДУ выберите нужный тип передачи, а затем нажмите ENTER (a) для
> Перед началом > Названия частей > Установка > Начальная настройка > Воспроизведение Расширенная настройка | Обновление встроенного программного обеспечения | Другие функции Регистрация радиостанции Вы можете зарегистрировать до 40 радиостанций FM/ DAB. Предварительная регистрация позволяет прямо
> Перед началом > Названия частей > Установка > Начальная настройка > Воспроизведение Расширенная настройка | Обновление встроенного программного обеспечения | Другие функции Режимы прослушивания Выбор режимов прослушивания В процессе воспроизведения можно изменить режим прослушивания периодическим
> Перед началом > Названия частей > Установка > Начальная настройка > Воспроизведение Расширенная настройка | Обновление встроенного программного обеспечения | Другие функции Источник и громкость Режим прослушивания Формат сигнала Через несколько секунд изображение на Частота дискретизации
> Перед началом > Названия частей > Установка > Начальная настройка > Воспроизведение Расширенная настройка | Обновление встроенного программного обеспечения | Другие функции проигрывателя на вывод цифрового потока. Dolby Di (Dolby Digital Plus) Данный режим обеспечивает точное воспроизведение
> Перед началом > Названия частей > Установка > Начальная настройка > Воспроизведение Расширенная настройка | Обновление встроенного программного обеспечения | Другие функции на вывод цифрового потока. DTS-HD HR (DTS-HD High Resolution Audio) Данный режим обеспечивает точное воспроизведение
> Перед началом > Названия частей > Установка > Начальная настройка > Воспроизведение Расширенная настройка | Обновление встроенного программного обеспечения | Другие функции Выбираемые режимы прослушивания Вы можете выбрать из множества режимов прослушивания наиболее соответствующий аудиоформату
> Перед началом > Названия частей > Установка > Начальная настройка > Воспроизведение Расширенная настройка | Обновление встроенного программного обеспечения | Другие функции Формат входного сигнала Режим прослушивания Формат входного сигнала Режим прослушивания Формат входного сигнала Режим
> Перед началом > Названия частей > Установка > Начальная настройка > Воспроизведение Расширенная настройка | Обновление встроенного программного обеспечения | Другие функции Формат входного сигнала Режим прослушивания Формат входного сигнала Режим прослушивания Формат входного сигнала Режим
> Перед началом > Названия частей > Установка > Начальная настройка > Воспроизведение Расширенная настройка | Обновление встроенного программного обеспечения | Другие функции Формат входного сигнала Режим прослушивания Формат входного сигнала Режим прослушивания Формат входного сигнала Режим
> Перед началом > Названия частей > Установка > Начальная настройка > Воспроизведение Расширенная настройка | Обновление встроенного программного обеспечения | Другие функции Формат входного сигнала Режим прослушивания Формат входного сигнала Режим прослушивания Формат входного сигнала Режим
> Перед началом > Названия частей > Установка > Начальная настройка > Воспроизведение Расширенная настройка | Обновление встроенного программного обеспечения | Другие функции AV Adjust 1 Нажимая кнопку на пульте ДУ во время воспроизведения, с помощью экранных меню можно изменять часто используемые
> Перед началом > Названия частей > Установка > Начальная настройка > Воспроизведение Расширенная настройка | Обновление встроенного программного обеспечения | Другие функции Direct и Pure Direct. ∫ Other Sound Delay: Если видеосигнал отстает по времени от аудиосигнала, можно применить задержку
> Перед началом > Названия частей > Установка > Начальная настройка > Воспроизведение Расширенная настройка | Обновление встроенного программного обеспечения | Другие функции System Setup Расширенная настройка 1 2 Пульт ДУ телевизора В аппарате предусмотрены расширенные настройки, открывающие
> Перед началом > Названия частей > Установка > Начальная настройка > Воспроизведение Расширенная настройка | Обновление встроенного программного обеспечения | Другие функции Impose OSD Screen Saver Например, можно указать необходимость вывода информации на телевизор при регулировке громкости или
> Перед началом > Названия частей > Установка > Начальная настройка > Воспроизведение Расширенная настройка | Обновление встроенного программного обеспечения | Другие функции CBL/SAT «AUDIO 1» — «AUDIO 2»: назначьте желаемое гнездо AUDIO IN селектору входа CBL/SAT. (Значение по умолчанию: «AUDIO
> Перед началом > Названия частей > Установка > Начальная настройка > Воспроизведение Расширенная настройка | Обновление встроенного программного обеспечения | Другие функции Crossover Double Bass При наличии АС, для которых выбрано значение «Small», задайте верхние предельные частоты
> Перед началом > Названия частей > Установка > Начальная настройка > Воспроизведение Расширенная настройка | Обновление встроенного программного обеспечения | Другие функции Audio Adjust Source ∫ Dual Mono/Mono ∫ Input Volume Absorber Dual Mono Mono Input Channel Задание аудиоканала или языка,
> Перед началом > Названия частей > Установка > Начальная настройка > Воспроизведение Расширенная настройка | Обновление встроенного программного обеспечения | Другие функции HDMI IN и «BD/DVD» AUDIO IN. Этот параметр можно задать независимо для каждой кнопки селектора входов. Выберите селектор
> Перед началом > Названия частей > Установка > Начальная настройка > Воспроизведение Расширенная настройка | Обновление встроенного программного обеспечения | Другие функции HDMI Standby Through Если этот параметр имеет любое другое значение, отличное от «Off», видео и звук с подключенного
> Перед началом > Названия частей > Установка > Начальная настройка > Воспроизведение Расширенная настройка | Обновление встроенного программного обеспечения | Другие функции Sleep Timer Обеспечивает автоматический переход в ждущий режим по истечении указанного времени. Выберите из вариантов «30
> Перед началом > Названия частей > Установка > Начальная настройка > Воспроизведение Расширенная настройка | Обновление встроенного программного обеспечения | Другие функции DAB Auto Scan (VSX-S520D) Можно запустить автоматическое сканирование при добавлении новых радиостанций DAB или переезде на
> Перед началом > Названия частей > Установка > Начальная настройка > Воспроизведение Расширенная настройка | Обновление встроенного программного обеспечения | Другие функции MCACC 1 2 Пульт ДУ телевизора Автоматическая настройка АС или выполнение нужных изменений для эквалайзера. Кроме того,
> Перед началом > Названия частей > Установка > Начальная настройка > Воспроизведение Расширенная настройка | Обновление встроенного программного обеспечения | Другие функции 52 Front Left После выбора частоты АС в диапазоне от «63 Hz» до «16 kHz» кнопками курсора п/с отрегулируйте громкость для
> Перед началом > Названия частей > Установка > Начальная настройка > Воспроизведение Расширенная настройка | Обновление встроенного программного обеспечения | Другие функции MCACC Data Check R U Имеется возможность проверки количества подключенных каналов АС, содержания и значений всех
> Перед началом > Названия частей > Установка > Начальная настройка > Воспроизведение Расширенная настройка | Обновление встроенного программного обеспечения | Другие функции Network/Bluetooth 1 2 Пульт ДУ телевизора Выполните настройки сетевых соединений и соединения BLUETOOTH. 1. Переключите вход
> Перед началом > Названия частей > Установка > Начальная настройка > Воспроизведение Расширенная настройка | Обновление встроенного программного обеспечения | Другие функции MAC Address Этот параметр задает MAC-адрес аппарата. Данное значение является специально заданным для аппарата и не может
> Перед началом > Названия частей > Установка > Начальная настройка > Воспроизведение Расширенная настройка | Обновление встроенного программного обеспечения | Другие функции Bluetooth Bluetooth Auto Input Change 56 Выбор между использованием и неиспользованием функции BLUETOOTH. «On (Значение по
> Перед началом > Названия частей > Установка > Начальная настройка > Воспроизведение Расширенная настройка | Обновление встроенного программного обеспечения | Другие функции Обновление встроенного программного обеспечения Обновление встроенного программного обеспечения Функция обновления аппарата
> Перед началом > Названия частей > Установка > Начальная настройка > Воспроизведение Расширенная настройка | Обновление встроенного программного обеспечения | Другие функции System Setup Input/Output Assign Speaker Hardware 0 Если пункт «Firmware Update» отображается серым цветом и недоступен,
> Перед началом > Названия частей > Установка > Начальная настройка > Воспроизведение Расширенная настройка | Обновление встроенного программного обеспечения | Другие функции сообщение «Completed!». 9. Извлеките устройство памяти USB из аппарата. 10.Нажмите кнопку Í STANDBY/ON на аппарате для
> Перед началом > Названия частей > Установка > Начальная настройка > Воспроизведение Расширенная настройка | Обновление встроенного программного обеспечения | Другие функции Поиск и устранение неисправностей Другие функции Перед началом процедуры Проблема может быть решена простым включением/
> Перед началом > Названия частей > Установка > Начальная настройка > Воспроизведение Расширенная настройка | Обновление встроенного программного обеспечения | Другие функции положение гнезда, к которому подключен проигрыватель. 0 Проверьте настройки цифрового аудиовыхода на подключенном
> Перед началом > Названия частей > Установка > Начальная настройка > Воспроизведение Расширенная настройка | Обновление встроенного программного обеспечения | Другие функции 0 Убедитесь в том, что ни один из соединительных кабелей не пережат, не перекручен и не поврежден. 0 Размытое или нечеткое
> Перед началом > Названия частей > Установка > Начальная настройка > Воспроизведение Расширенная настройка | Обновление встроенного программного обеспечения | Другие функции функции BLUETOOTH. 0 Некоторые устройства с поддержкой функции BLUETOOTH могут быть оснащены переключателем передачи/приема.
> Перед началом > Названия частей > Установка > Начальная настройка > Воспроизведение Расширенная настройка | Обновление встроенного программного обеспечения | Другие функции 0 Маршрутизатор беспроводной локальной сети может находиться в ручном режиме. Выберите в его настройках автоматический
> Перед началом > Названия частей > Установка > Начальная настройка > Воспроизведение Расширенная настройка | Обновление встроенного программного обеспечения | Другие функции Общие характеристики Усилитель (аудиосигнала) Номинальная выходная мощность (FTC) (модели для Северной Америки) Нагрузка
> Перед началом > Названия частей > Установка > Начальная настройка > Воспроизведение Расширенная настройка | Обновление встроенного программного обеспечения | Другие функции 96/24, DTS-HD Express, DSD, PCM Максимальное разрешение видеосигнала 4k 60 Гц (YCbCr 4:4:4) Аудиовходы Цифровые OPTICAL (TV)
> Перед началом > Названия частей > Установка > Начальная настройка > Воспроизведение Расширенная настройка | Обновление встроенного программного обеспечения | Другие функции Сведения о HDMI Совместимые функции HDMI (High Definition Multimedia Interface — мультимедийный интерфейс высокой четкости)
> Перед началом > Названия частей > Установка > Начальная настройка > Воспроизведение Расширенная настройка | Обновление встроенного программного обеспечения | Другие функции Лицензии и товарные знаки The Bluetooth® word mark and logos are registered trademarks owned by the Bluetooth SIG, Inc.
2-3-12 Yaesu, Chuo-ku, Tokyo 104-0028 JAPAN <U.S.A.> 18 PARK WAY, UPPER SADDLE RIVER, NEW JERSEY 07458, U.S.A. Tel: 1-201-785-2600 Tel: 1-844-679-5350 <Germany> Hanns-Martin-Schleyer-Straße 35, 47877 Willich, Germany Tel: +49(0)2154 913222 R U <UK> Anteros Building, Odyssey Business Park, West End

VSX-S520D
VSX-S520
Language select / Sélection de la langue / Selección de idioma / Selezione lingua /
Sprachauswahl / Taal selecteren / Выбор языка

Advanced Setup | Firmware Update | Others
AV RECEIVER
VSX-S520D
VSX-S520
Instruction
Manual
Before Start
What’s in the box …………………………………………………………… 2
Part Names
Front Panel …………………………………………………………………… 3
Rear Panel …………………………………………………………………… 4
Remote Controller …………………………………………………………. 6
Display ………………………………………………………………………… 7
Install
1. Connect the Speakers ………………………………………………… 8
2. Connect the TV ……………………………………………………….. 11
3. Connect the HDMI AV Components ……………………………. 12
4. Connect the Audio Components …………………………………. 13
5. Connect Other Cables ………………………………………………. 14
Initial Setup
Initial Setup with Auto Start-up Wizard ……………………………. 15
Playback
AV Component Playback ………………………………………………. 18
Internet Radio ……………………………………………………………… 19
Spotify ……………………………………………………………………….. 21
Music Server ………………………………………………………………. 22
USB Storage Device ……………………………………………………. 24
AirPlay® ……………………………………………………………………… 26
BLUETOOTH® Playback ………………………………………………. 27
Listening to the FM/DAB Radio ……………………………………… 28
Listening Modes ………………………………………………………….. 31
AV Adjust ……………………………………………………………………. 40
Advanced Setup
System Setup ……………………………………………………………… 42
MCACC ……………………………………………………………………… 51
Network/Bluetooth ……………………………………………………….. 54
Firmware Update
Firmware Update …………………………………………………………. 57
Others
Troubleshooting ………………………………………………………….. 60
General Specifications …………………………………………………. 65
About HDMI ………………………………………………………………… 67
License and Trademark Information ……………………………….. 68
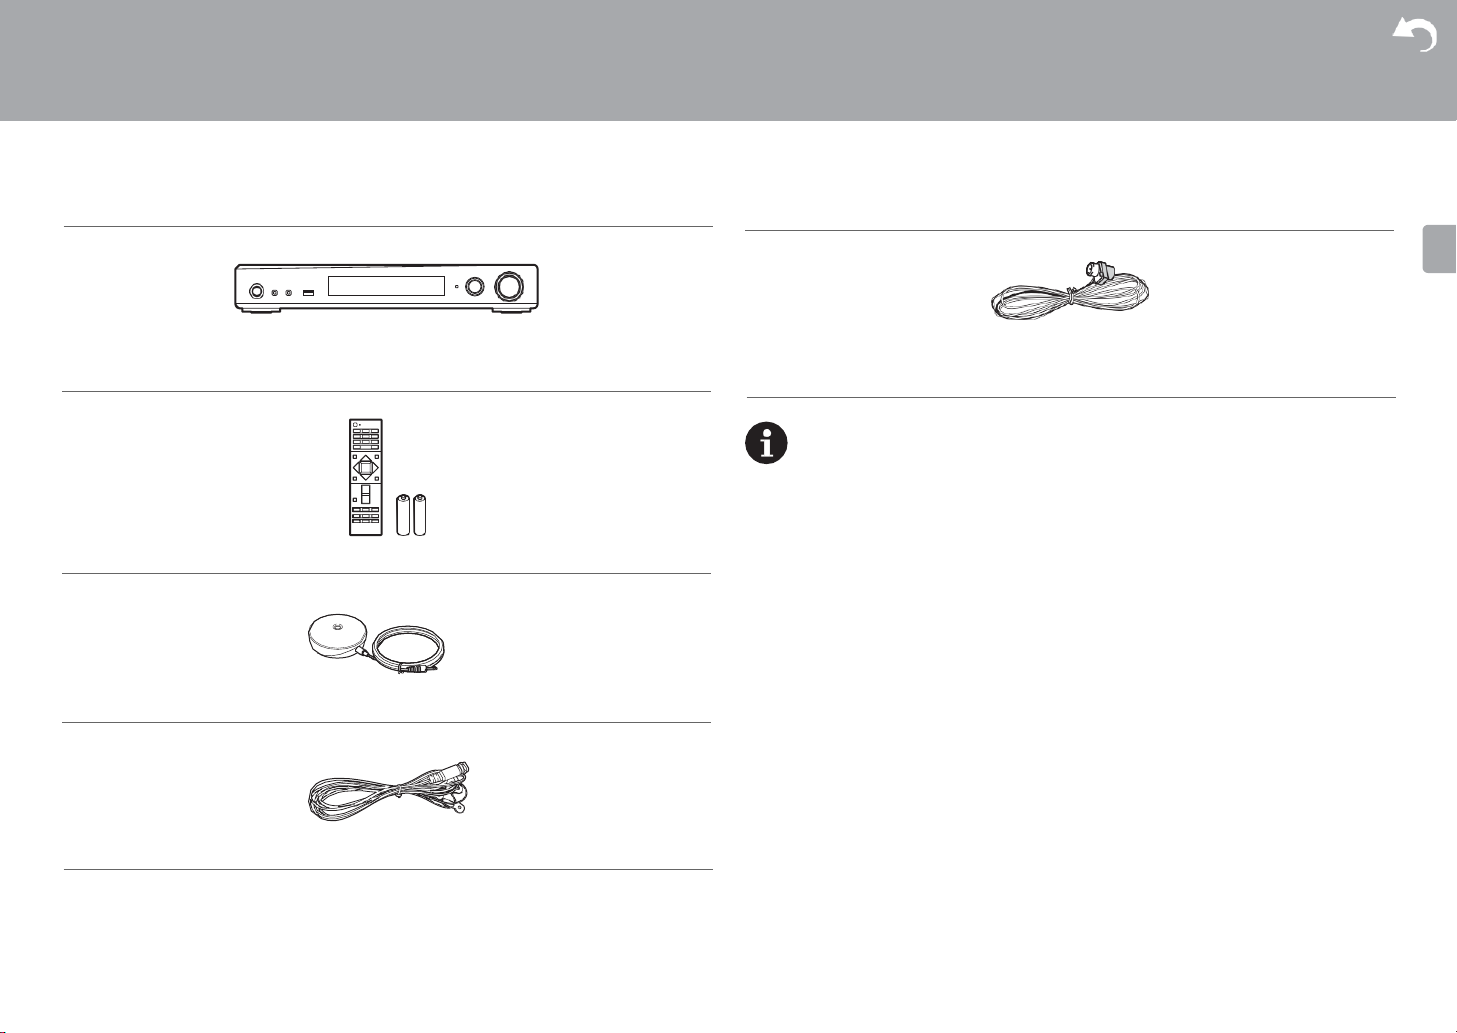
Advanced Setup | Firmware Update | Others
What’s in the box
Main unit (1)
Remote controller (RC-933R) (1), batteries (AAA/R03) (2)
Speaker setup microphone (1)
Indoor FM antenna (1) (VSX-S520)
0 Connect speakers with 4 Ω to 8 Ω impedance.
0 The power cord must be connected only after all other cable connections are completed.
0 We will not accept responsibility for damage arising from the connection of equipment
manufactured by other companies.
0 Functionality may be introduced by firmware updates and service providers may cease
services, meaning that some network services and content may become unavailable in
the future. Furthermore, available services may vary depending on your area of
residence.
0 Specifications and appearance are subject to change without prior notice.
0 We plan to provide support for the Dolby Atmos and DTS:X audio format through a
firmware update for this unit. Refer to our website for more information.
DAB/FM antenna (1) (VSX-S520D)
2
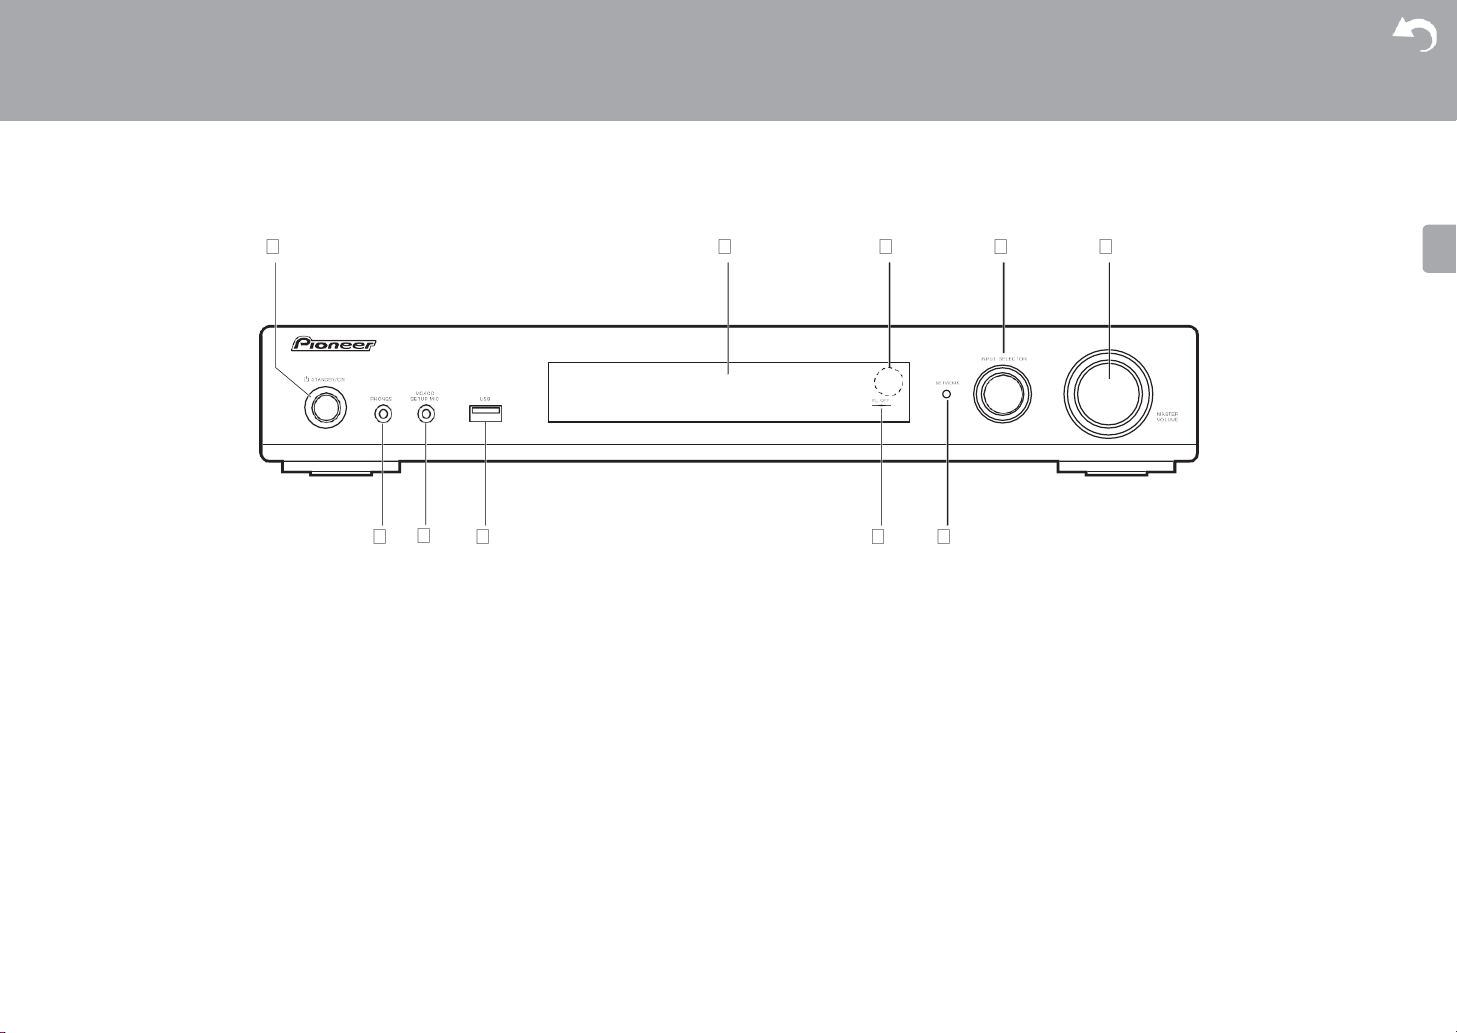
Advanced Setup | Firmware Update | Others
Front Panel
1.
Í STANDBY/ON button: Turns the unit on or into standby mode.
2.
Display (P7)
3.
Remote control sensor
4.
INPUT SELECTOR dial: Switches the input to be played. (BD/DVD / CBL/SAT / GAME /
STRM BOX / CD / TV / PHONO / DAB (VSX-S520D) / FM / NET / USB / BT AUDIO)
5.
MASTER VOLUME dial: Allows you to adjust the volume.
6.
PHONES jack: Stereo headphones with a mini plug (Ø 3.5 mm) are connected.
7.
MCACC SETUP MIC jack: The supplied speaker setup microphone is connected.
8.
USB port: A USB storage device is connected so that music files stored in it can be
played. You can also supply power (maximum 5V/1A) to USB devices with a USB cable.
9.
FL OFF indicator: This lights when you have pressed DIMMER repeatedly to turn the
display off.
10.
selected with the input selector and the unit is connected to the network. If the unit is in
standby mode, this lights when functions such as HDMI CEC and Network Standby are
enabled.
NETWORK indicator: When the power of the unit is on, this lights when «NET» is
3
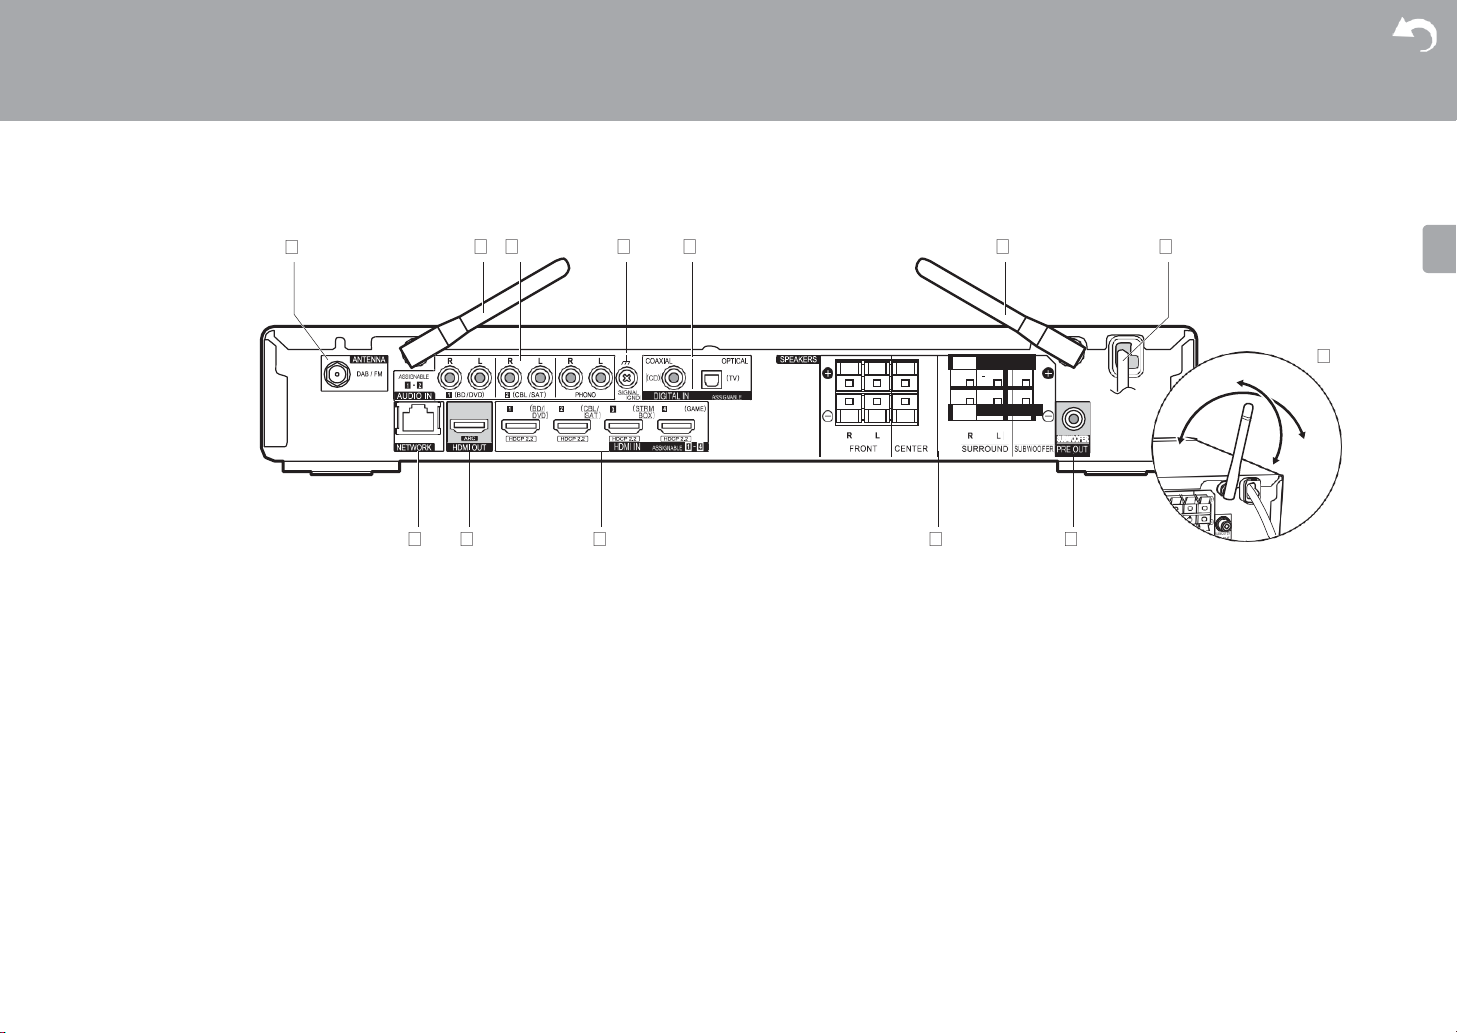
Advanced Setup | Firmware Update | Others
Rear Panel
VSX-S520D
1.
ANTENNA DAB / FM jack: Connect the supplied antenna.
2.
Wireless antenna: Raise for Wi-Fi connection or when using a BLUETOOTH enabled
device. The diagram shows the movable range for the wireless antenna. Do not try to
force it beyond this range otherwise you may break it.
3.
AUDIO IN jacks: Input AV component audio signals with an analog audio cable.
4.
SIGNAL GND terminal: The ground wire of the turntable is connected.
5.
DIGITAL IN OPTICAL/COAXIAL jacks: Input TV or AV component digital audio signals
with a digital optical cable or digital coaxial cable.
6.
Power cord
7.
NETWORK port: Connect to the network with an Ethernet cable.
8.
HDMI OUT jack: Connect a HDMI cable to transfer video signals and audio signals to a
TV.
9.
HDMI IN jacks: Input video signals and audio signals with a HDMI cable connected to an
AV component.
10.
11.
4
SPEAKERS terminals: Connect speakers or passive subwoofers with speaker cables.
SUBWOOFER PRE OUT jack: Connect a powered subwoofer with a subwoofer cable.
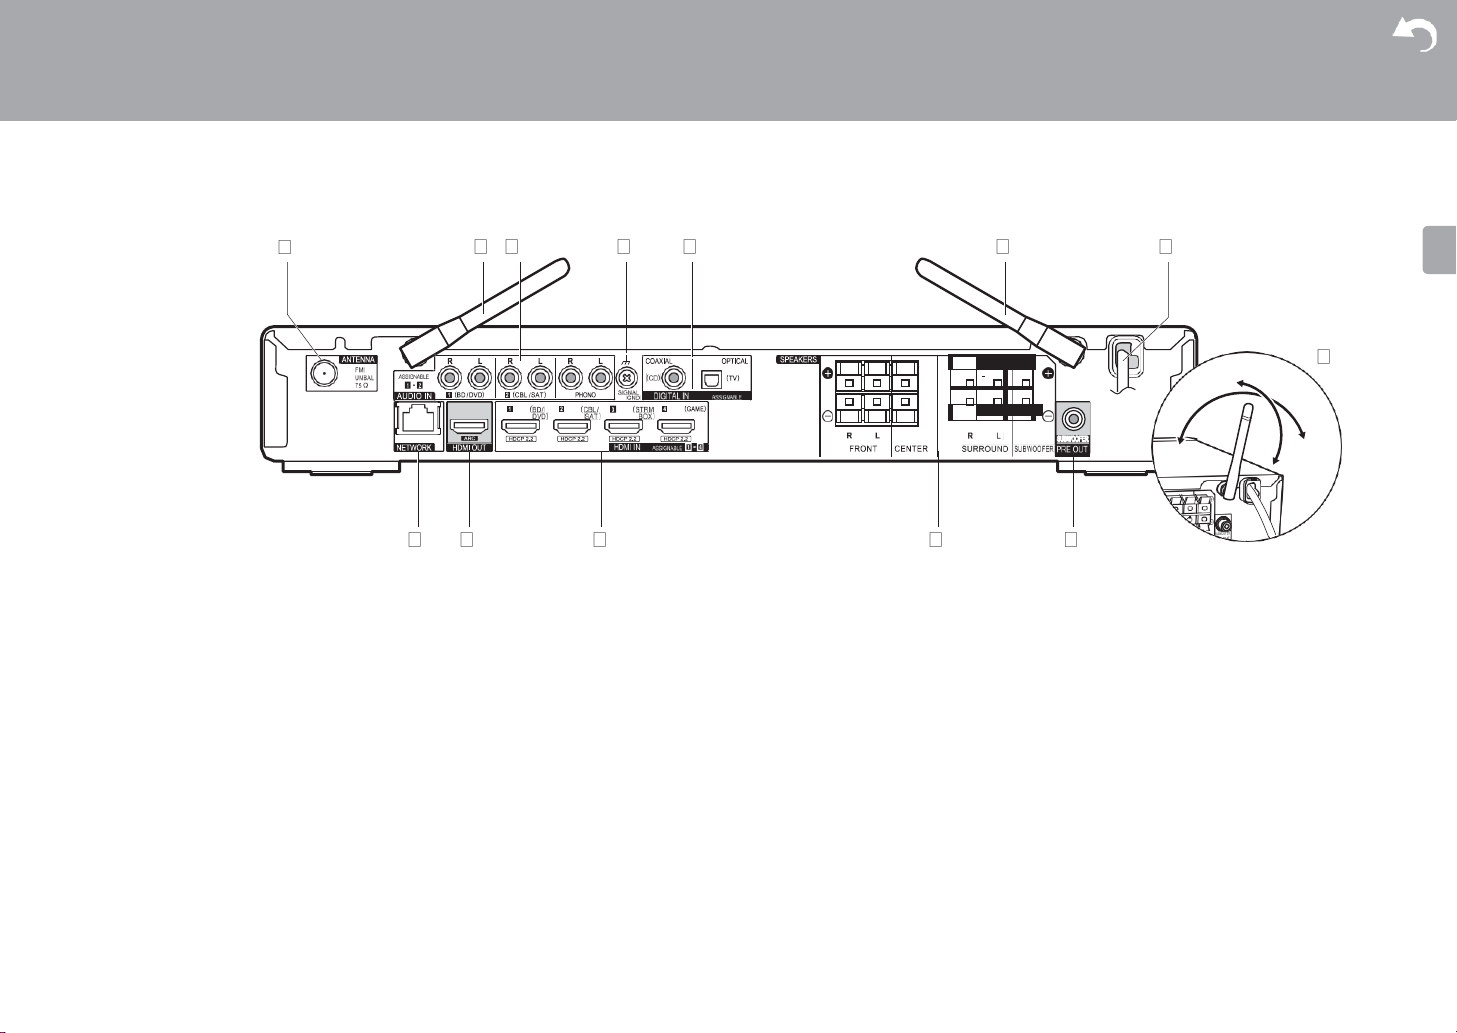
Advanced Setup | Firmware Update | Others
VSX-S520
1.
ANTENNA FM UNBAL 75h jack: Connect the supplied antenna.
2.
Wireless antenna: Raise for Wi-Fi connection or when using a BLUETOOTH enabled
device. The diagram shows the movable range for the wireless antenna. Do not try to
force it beyond this range otherwise you may break it.
3.
AUDIO IN jacks: Input AV component audio signals with an analog audio cable.
4.
SIGNAL GND terminal: The ground wire of the turntable is connected.
5.
DIGITAL IN OPTICAL/COAXIAL jacks: Input TV or AV component digital audio signals
with a digital optical cable or digital coaxial cable.
6.
Power cord
7.
NETWORK port: Connect to the network with an Ethernet cable.
8.
HDMI OUT jack: Connect a HDMI cable to transfer video signals and audio signals to a
TV.
9.
HDMI IN jacks: Input video signals and audio signals with a HDMI cable connected to an
AV component.
10.
11.
SPEAKERS terminals: Connect speakers or passive subwoofers with speaker cables.
SUBWOOFER PRE OUT jack: Connect a powered subwoofer with a subwoofer cable.
5
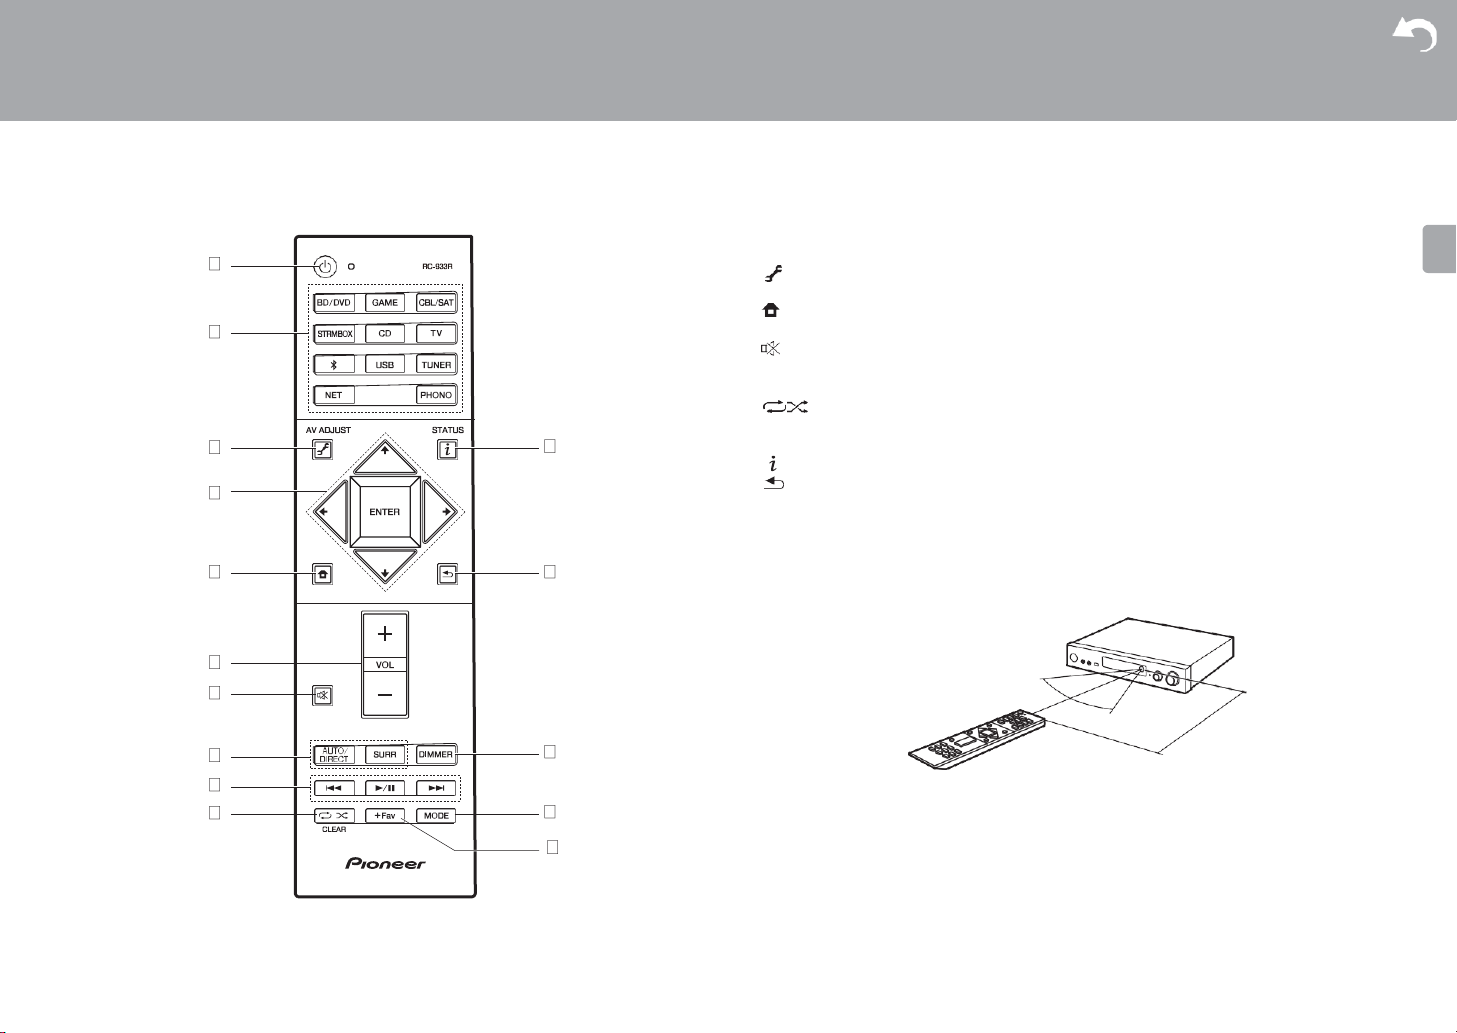
Advanced Setup | Firmware Update | Others
Remote Controller
1. Í button: Turns the unit on or into standby mode.
2.
Input selector buttons: Switches the input to be played.
3. (AV ADJUST) button: You can perform common settings on the TV screen. (P40)
4. Cursors, ENTER button: Select the item with the cursors and press ENTER to confirm.
5.
button: Displays the Home.
6. Volume buttons: Allows you to adjust the volume. This button also cancels the muting.
7.
button: Temporarily mutes audio. Press again to cancel muting.
8.
Listening mode buttons: Allows you to select the listening mode. (P31)
9.
Play buttons: You can start play of the Music Server or USB.
10. button: You can start repeat or random play of the Music Server or USB.
CLEAR button: Deletes all characters you have entered when entering text on the TV
screen.
11. (STATUS) button: Switches the information on the display.
12. button: Returns the display to the previous state during setting.
13.
DIMMER button: You can switch the display off or adjust the brightness of the display in
three steps.
14.
MODE button: Switches tuning to an FM station between automatic tuning and manual
tuning.
15.+Fav button: Used to register FM/DAB radio stations.
5 m
6
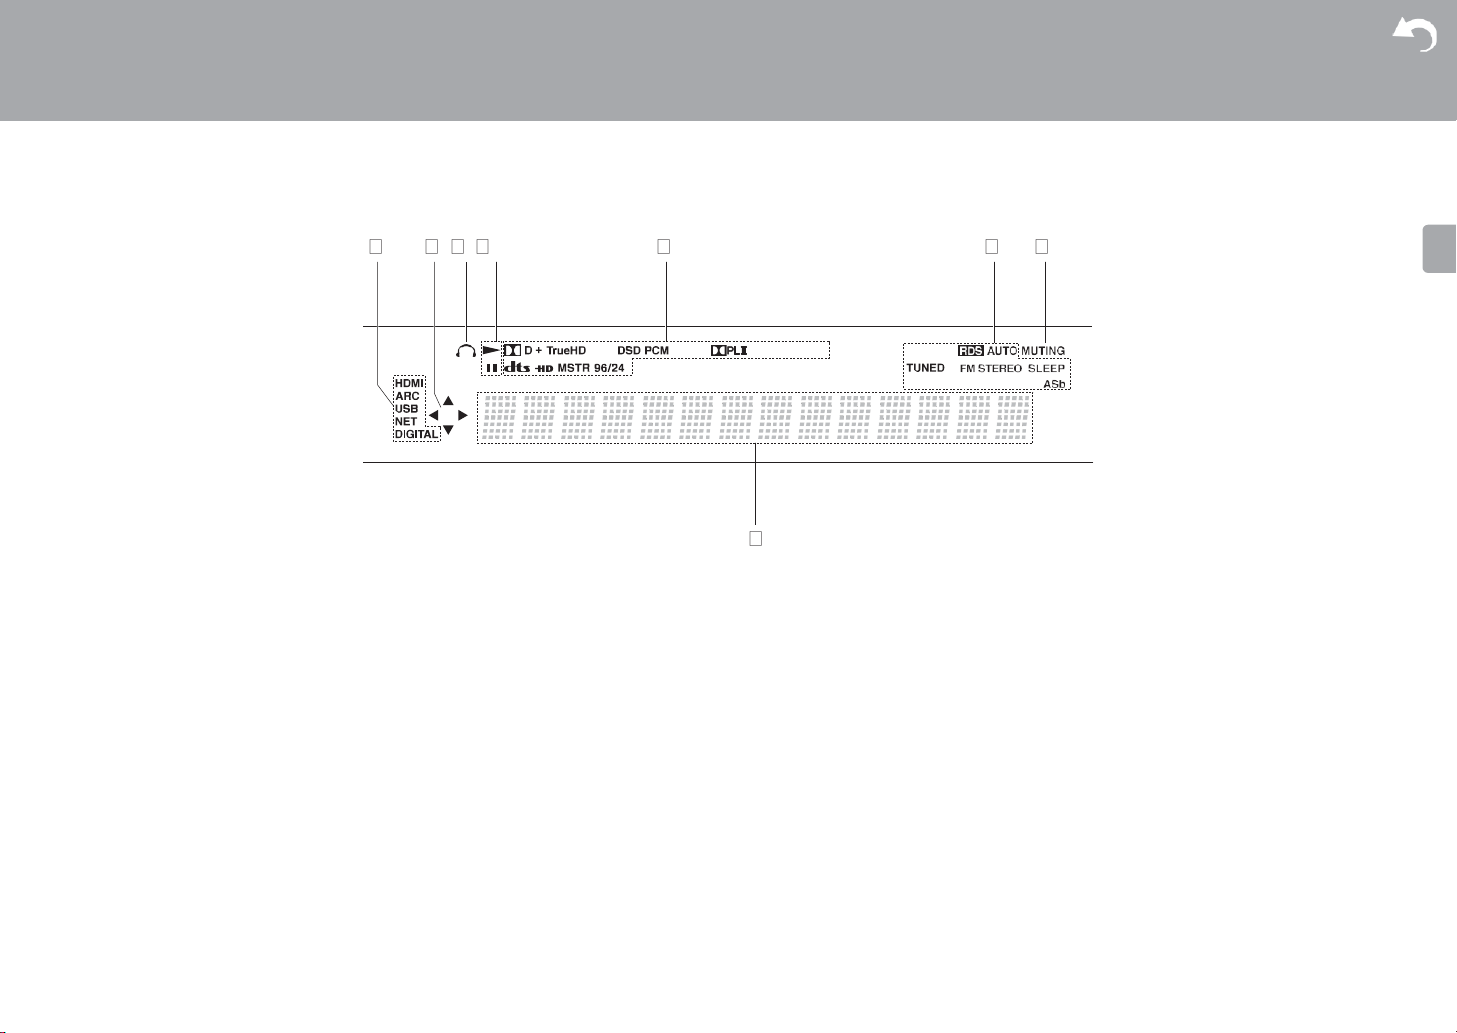
Advanced Setup | Firmware Update | Others
Display
1.
Lights in the following conditions.
HDMI: HDMI signals are input and selected.
ARC: Audio signals from the ARC compatible TV are input and selected.
USB: When «USB» is selected with the input selector and the unit is connected by USB
and the USB device is selected. Flashes if the USB is not properly connected.
NET: When «NET» is selected with the input selector and the unit is connected to the
network. It will flash if the connection to the network is not correct.
DIGITAL: Digital signals are input and the digital input selector is selected.
2.
Lights when operating the «NET» or «USB» input selector indicating remote controller
cursor operations are possible in screens showing list of tracks, for example.
3.
Lights when headphones are connected.
4.
Lights when operating the «NET» or «USB» input selector when tracks are played or
paused.
5.
Lights according to the type of input digital audio signals and the listening mode.
6.
Lights in the following conditions.
RDS (European models): Receiving RDS broadcasting.
AUTO: When FM tuning mode is auto.
TUNED: Receiving FM radio.
FM STEREO: Receiving FM stereo.
SLEEP: Sleep timer has been set.
ASb: When Auto Standby function is enabled. (P49)
7.
Flashes when muting is on.
8.
Displays various information of the input signals. Characters that cannot be displayed on
this unit are replaced with asterisks ( * ).
7
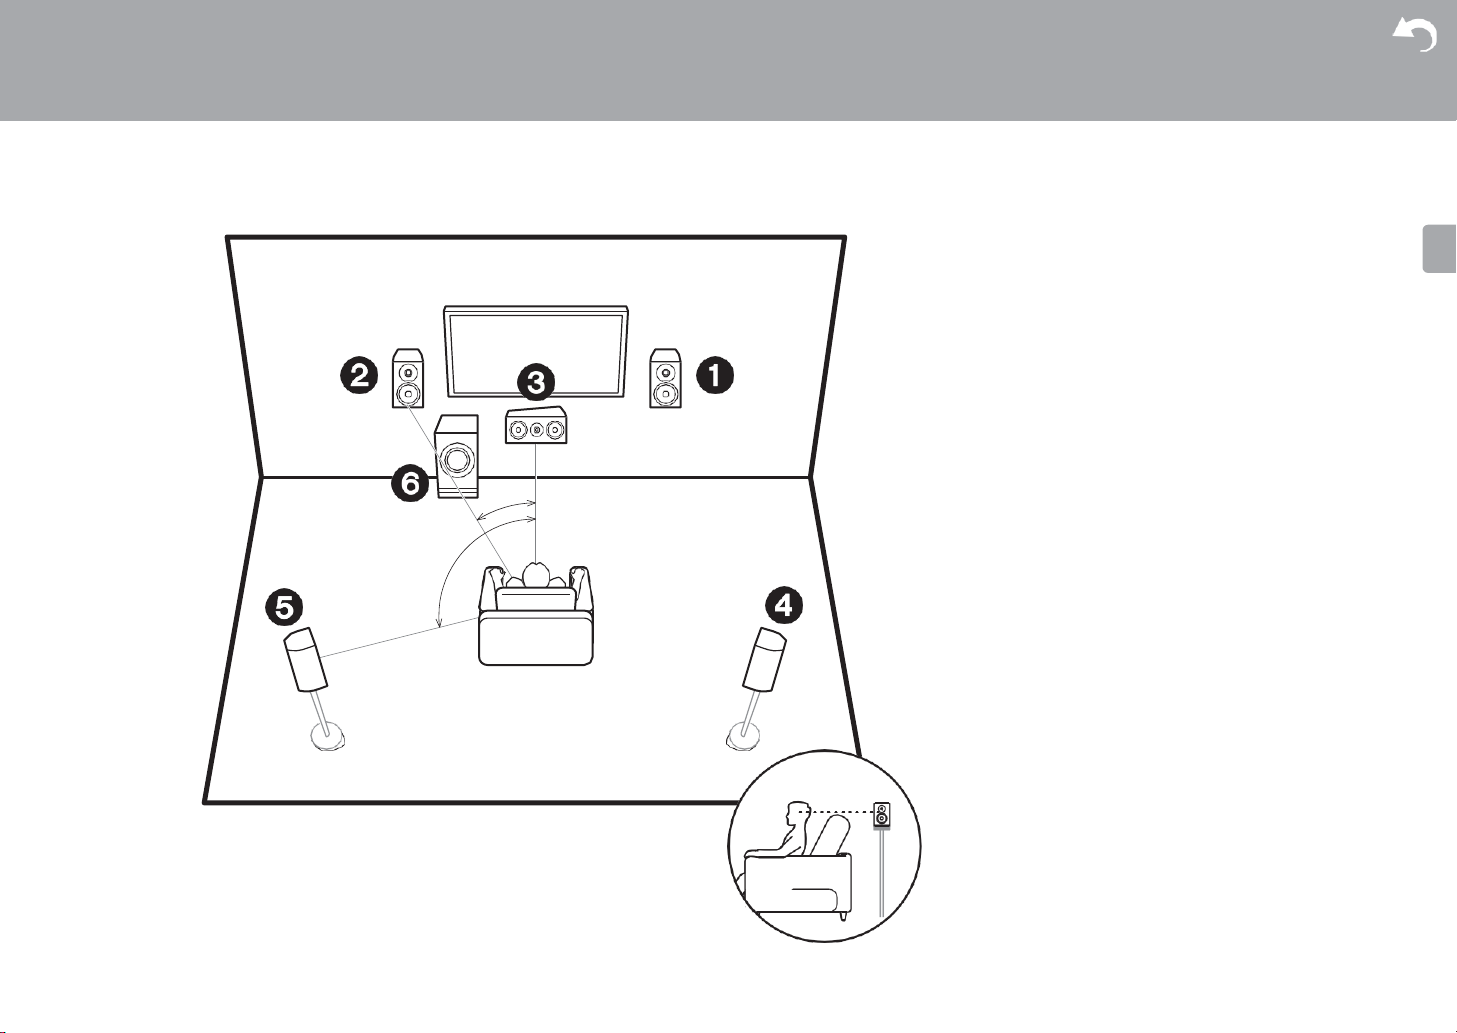
Advanced Setup | Firmware Update | Others
1. Connect the Speakers
L
Front Speakers
12
3
45
6
8
Center Speaker
Surround Speakers
Subwoofer
* 1: 22eto 30e, * 2: 120e
L R
*1
*2
Install the speakers
Front speakers output front stereo sound and a center
speaker outputs center sound such as dialogs and vocals.
Surround speakers create back sound field. Subwoofer
reproduces bass sounds and creates rich sound field.
The front speakers should be positioned at ear height, while
the surround speakers should be positioned just above ear
height. Center speaker should be set up facing the listening
position. Place the powered subwoofer towards the front.
Placing it between the center speaker and a front speaker
gives you a natural sound even when playing music.
R
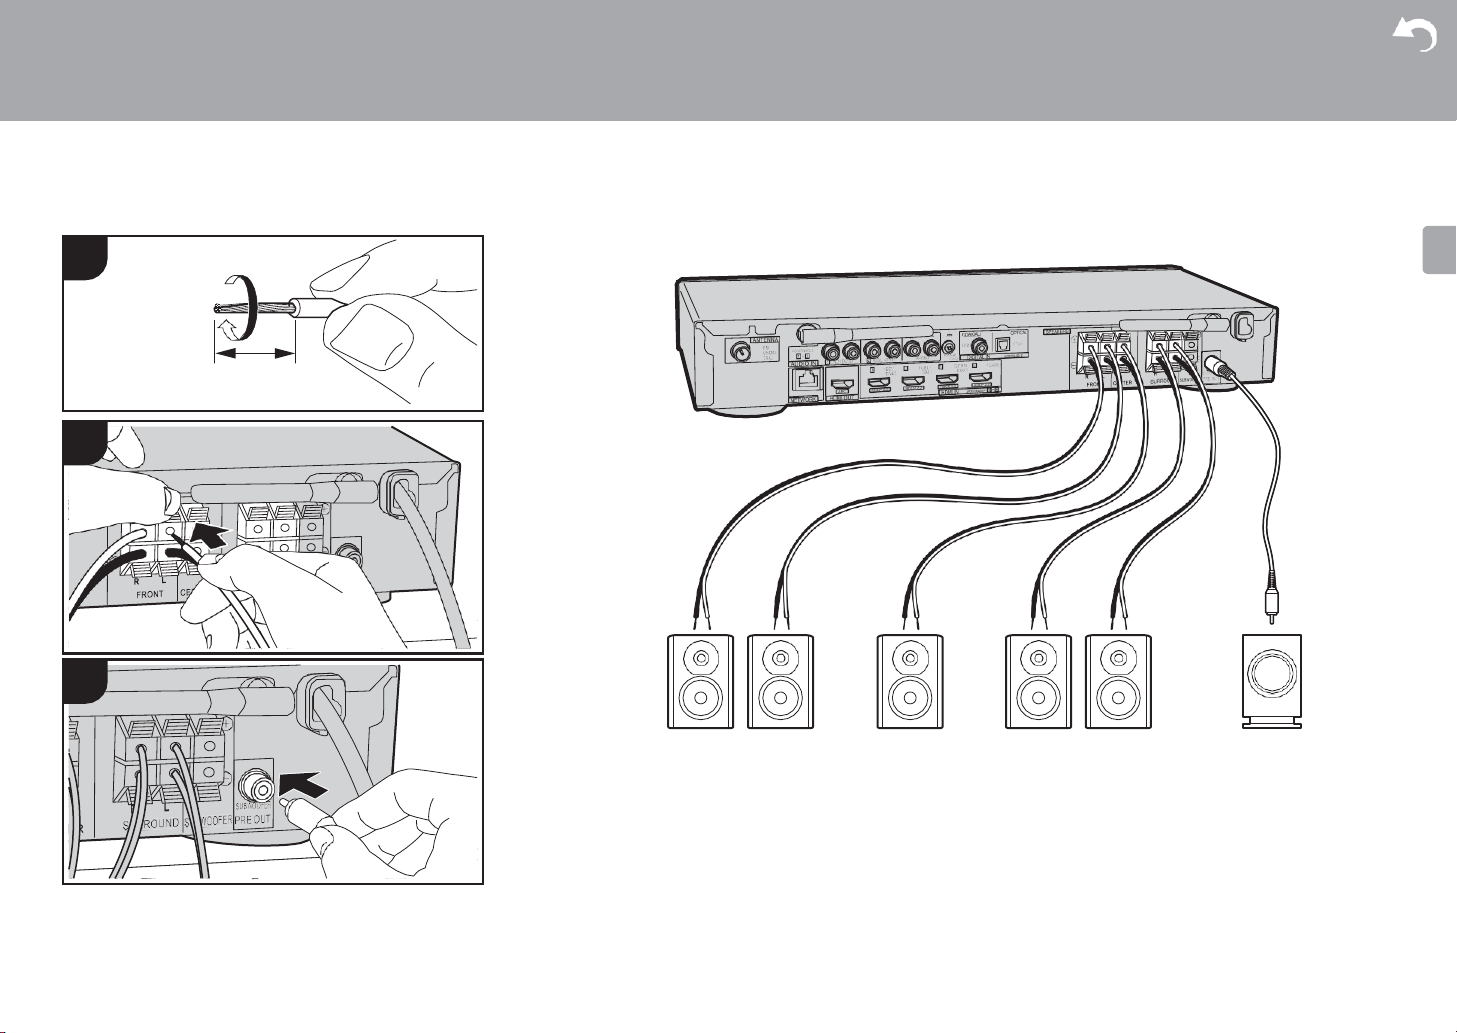
Advanced Setup | Firmware Update | Others
a speaker cable, b subwoofer cable
FRONT R FRONT
L
Connect the speakers
Refer to the illustration to connect the speaker system.
Twist the wires of the speaker cable tightly before inserting
into the terminals. Make correct connection between the
unit’s jacks and speaker’s jacks (+ to + and – to –) for each
channel. If connection is wrong, a bass sound may become
poor due to reverse phase.
Either a powered subwoofer or passive subwoofer may be
CENTER SURROUND
connected. To connect a powered subwoofer, use a
subwoofer cable and connect to the SUBWOOFER PRE
OUT jack. To connect a passive subwoofer, connect to the
SPEAKERS terminals with speaker cables as shown below.
R SURROUND
L
b
Powered
Subwoofer
9
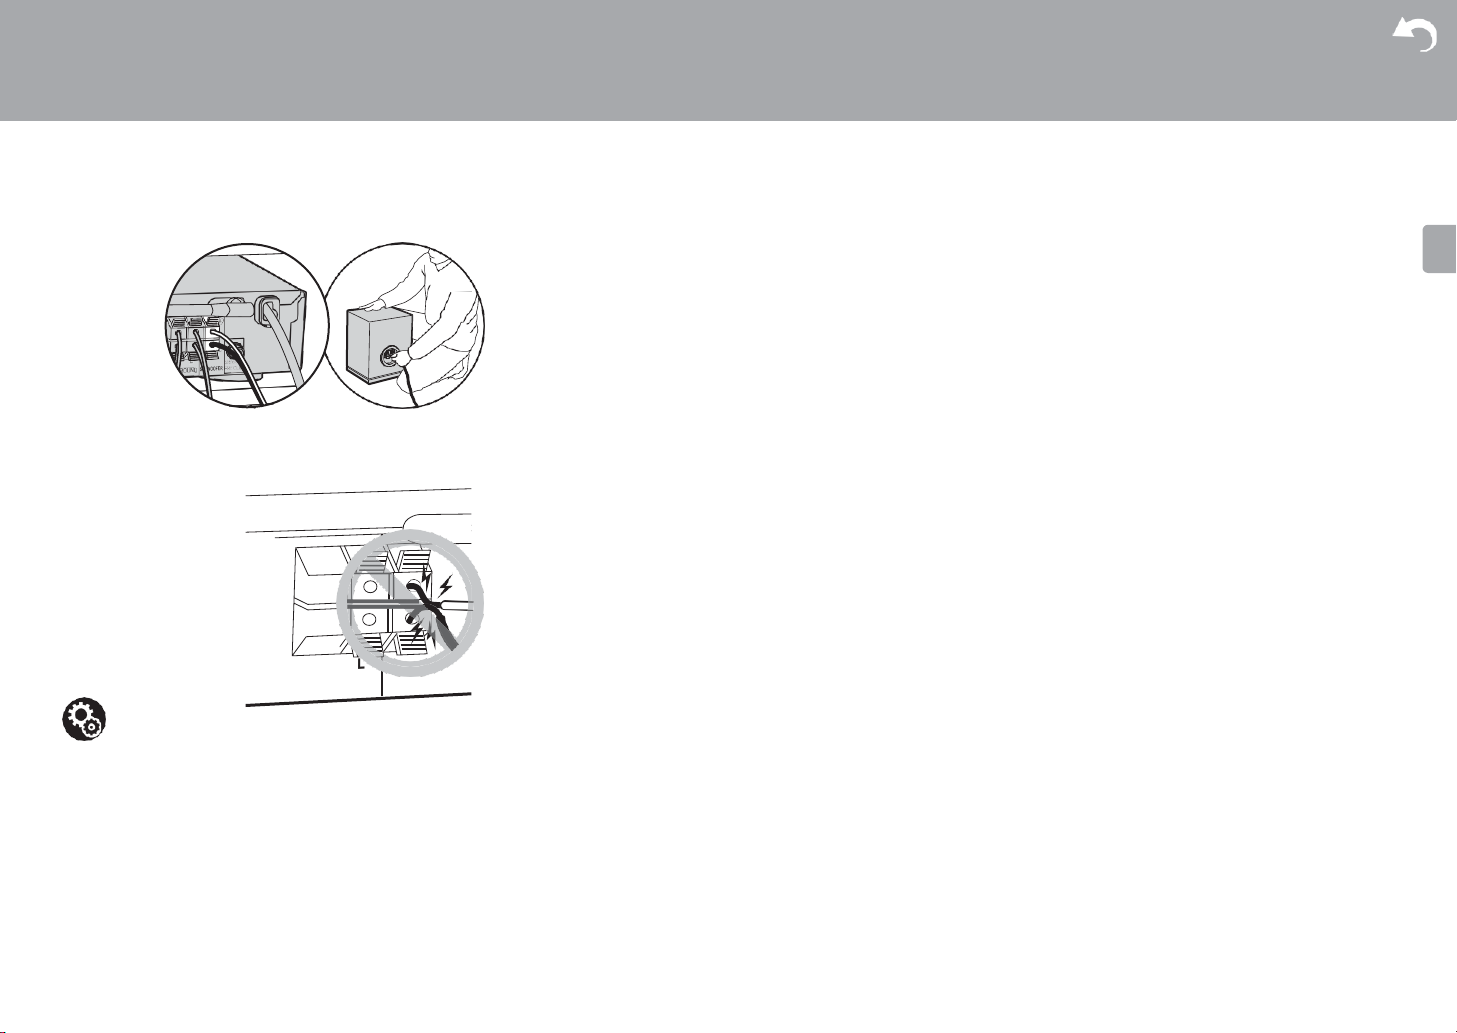
Advanced Setup | Firmware Update | Others
Make sure the exposed wires of the speakers do not stick
out of the speaker terminals when connecting. If the
exposed wires of the speakers touch the rear panel or the +
and – wires touch each other, the protection circuit will be
activated. (P60)
Setup
0 Settings for the speaker configuration you have
connected need to be made in «1. Full Auto MCACC»
(P16) in Initial Setup.
10
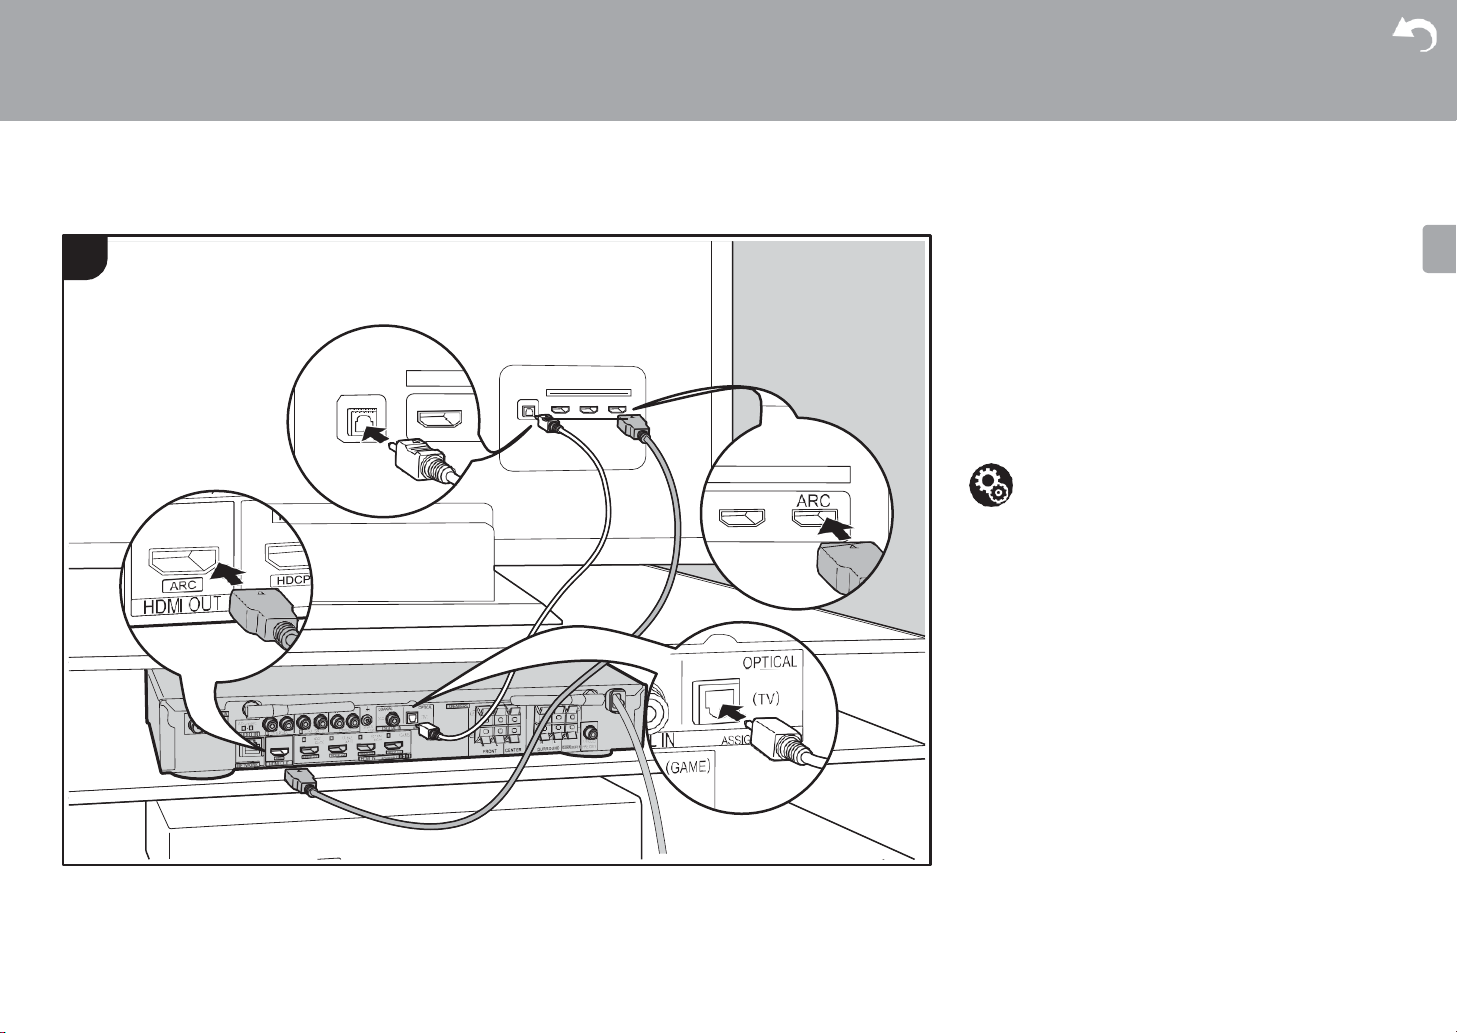
Advanced Setup | Firmware Update | Others
2. Connect the TV
a HDMI cable, b digital optical cable
To ARC TV
For a TV that supports the ARC (Audio Return Channel)
(P67) feature, use an HDMI cable and connect according to
illustration «a». Choose an HDMI IN jack on the TV that
supports ARC when connecting.
To Non-ARC TV
For a TV that does not support the ARC (Audio Return
Channel) feature, connect both the HDMI cable in illustration
«a» and the digital optical cable in «b».
Setup
0 Settings are required to use the ARC function. Select
«Yes» in «4. Audio Return Channel» (P17) in the Initial
Setup.
0 Please refer to the TV’s operation manual for directions
on connections and setup for the TV.
11
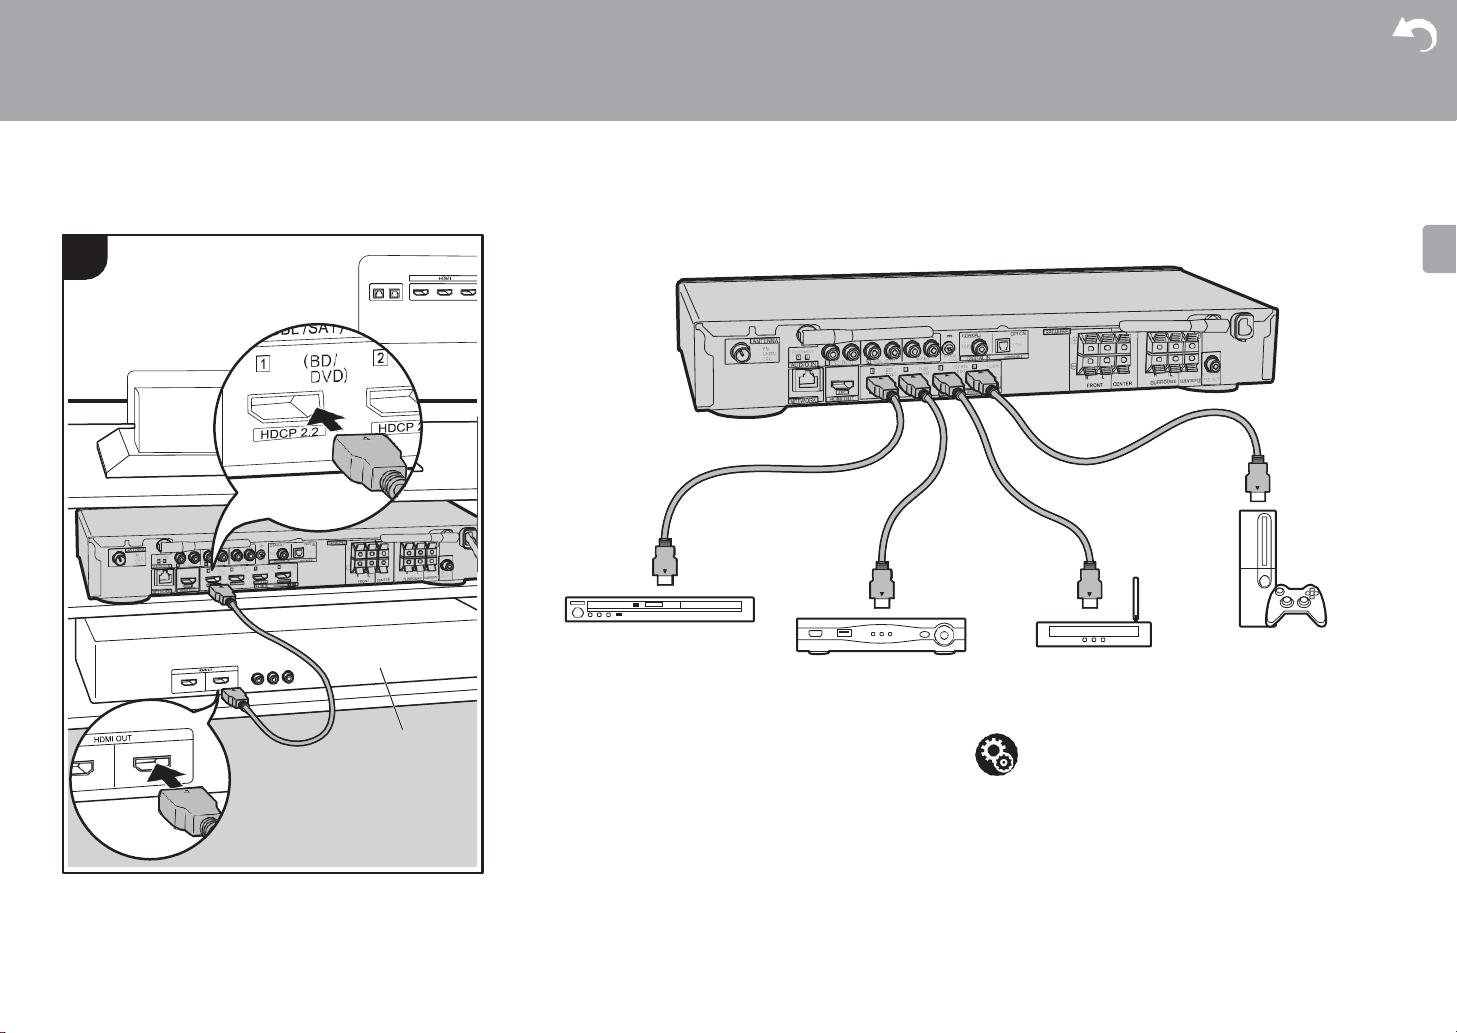
Advanced Setup | Firmware Update | Others
3. Connect the HDMI AV Components
a HDMI cable
12
Cable/Satellite
set-top box
This is an example of connection with an AV component
that has an HDMI jack. With connection to an AV
component that conforms with the CEC (Consumer
Electronics Control) standard, you can use features such as
the HDMI CEC feature that links with the input selector, and
the HDMI Standby Through feature which allows you to
play video and audio from AV components on the TV even
when this unit is in standby mode. (P67)
0 To play 4K or 1080p video, use the high speed HDMI
cable.
Streaming media
player
Setup
0 Settings are required to use the HDMI CEC and HDMI
Standby Through features. (P47, 48) Make settings
after all connections are complete.
0 To enjoy digital surround sound including Dolby Digital,
audio output should be set to «Bitstream output» on the
connected Blu-ray Disc player or other device.

Advanced Setup | Firmware Update | Others
4. Connect the Audio Components
Connecting a CD player
Use a digital coaxial cable to connect a CD player to the
DIGITAL IN COAXIAL jack.
Connecting a turntable
You can also connect a turntable that has an MM-type
cartridge to the PHONO jack.
0 If the turntable has a built-in audio equalizer, connect it to
an AUDIO IN jack other than the PHONO jack. Further, if
the turntable uses an MC type cartridge, install an audio
equalizer compatible with the MC type cartridge between
the unit and the turntable, then connect to any AUDIO IN
jack other than the PHONO jack.
Turntable
a digital coaxial cable, b analog audio cable
If the turntable has a ground wire, connect it to the SIGNAL
GND terminal of this unit.
CD
13
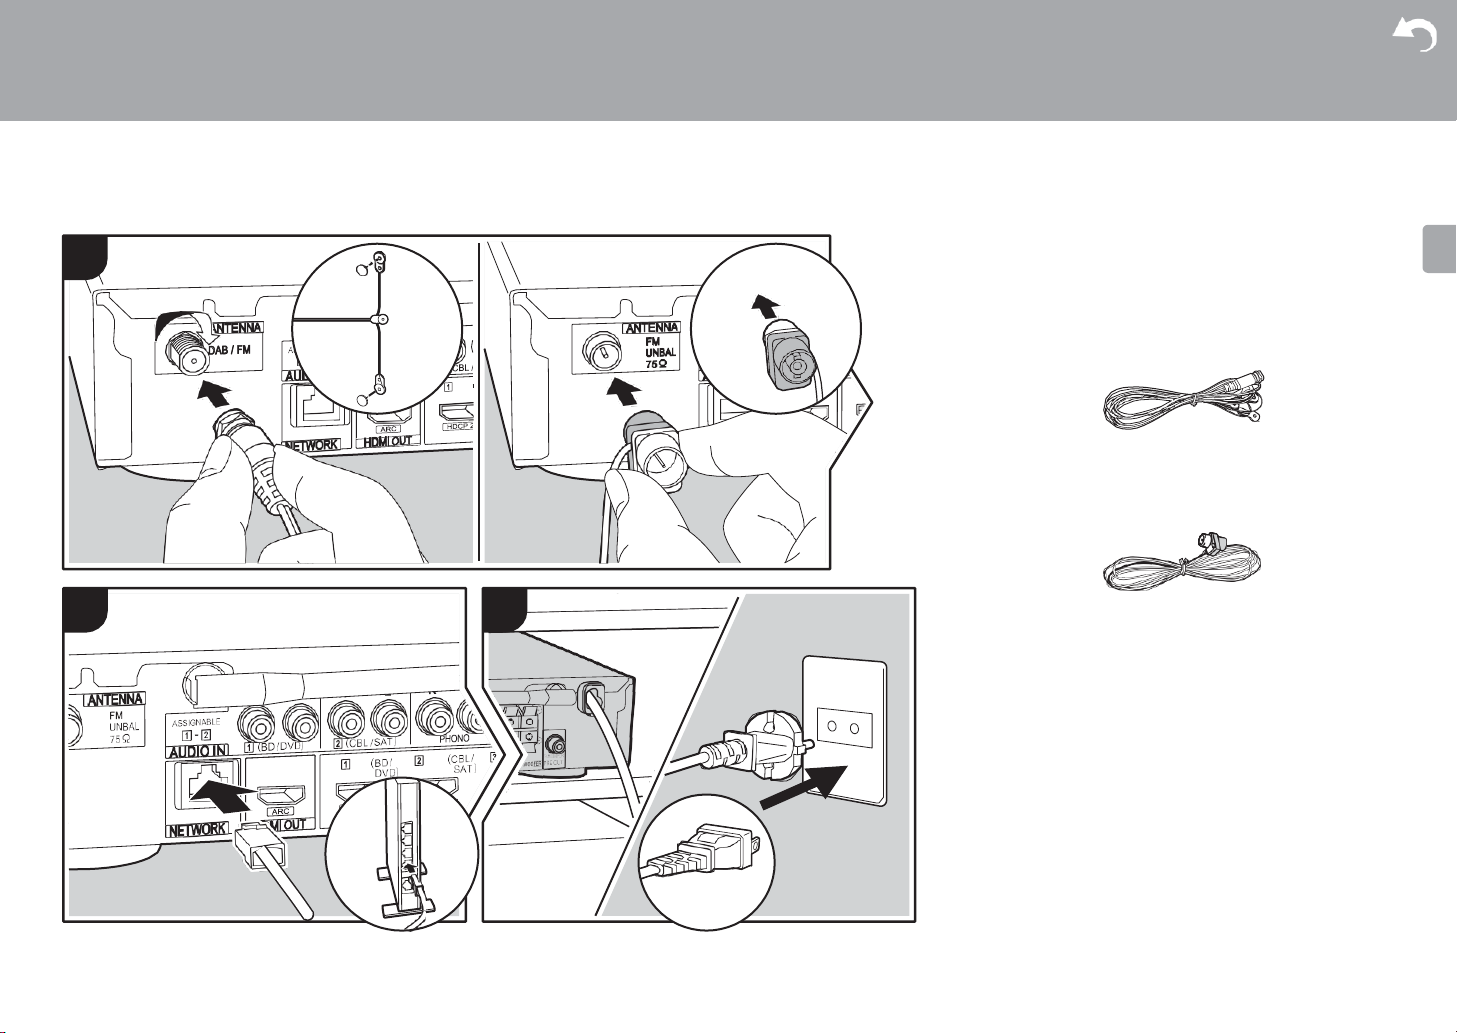
Advanced Setup | Firmware Update | Others
5. Connect Other Cables
Antenna Hookup
DAB/FM antenna (VSX-S520D) : Connect the supplied
DAB/FM antenna to the ANTENNA DAB/FM terminal. Make
sure the plug is pushed in all the way, then fix in place by
turning the nut to the right. Use a tack or similar to fix the
antenna to a wall.
FM indoor antenna (VSX-S520) : Connect the supplied FM
indoor antenna to the ANTENNA FM UNBAL 75h terminal.
Move the FM indoor antenna around while playing the radio
to find the position with the best reception.
a DAB/FM antenna, b FM indoor antenna, c Ethernet cable, d Power cord
14
Network Hookup
Connect this unit to the network using wired LAN or Wi-Fi
(wireless LAN). You can enjoy network features such as
internet radio by connecting the unit to the network. If you
connect by wired LAN, connect with an Ethernet cable to the
NETWORK port as shown in the illustration. To connect by
Wi-Fi, then after selecting «Wireless» in «3. Network
Connection» (P16) in Initial Setup, select the desired
setting method and follow the onscreen instructions to
configure the connection.
Power Cord Hookup
Connect the power cord of this unit only after all other
connections are completed.
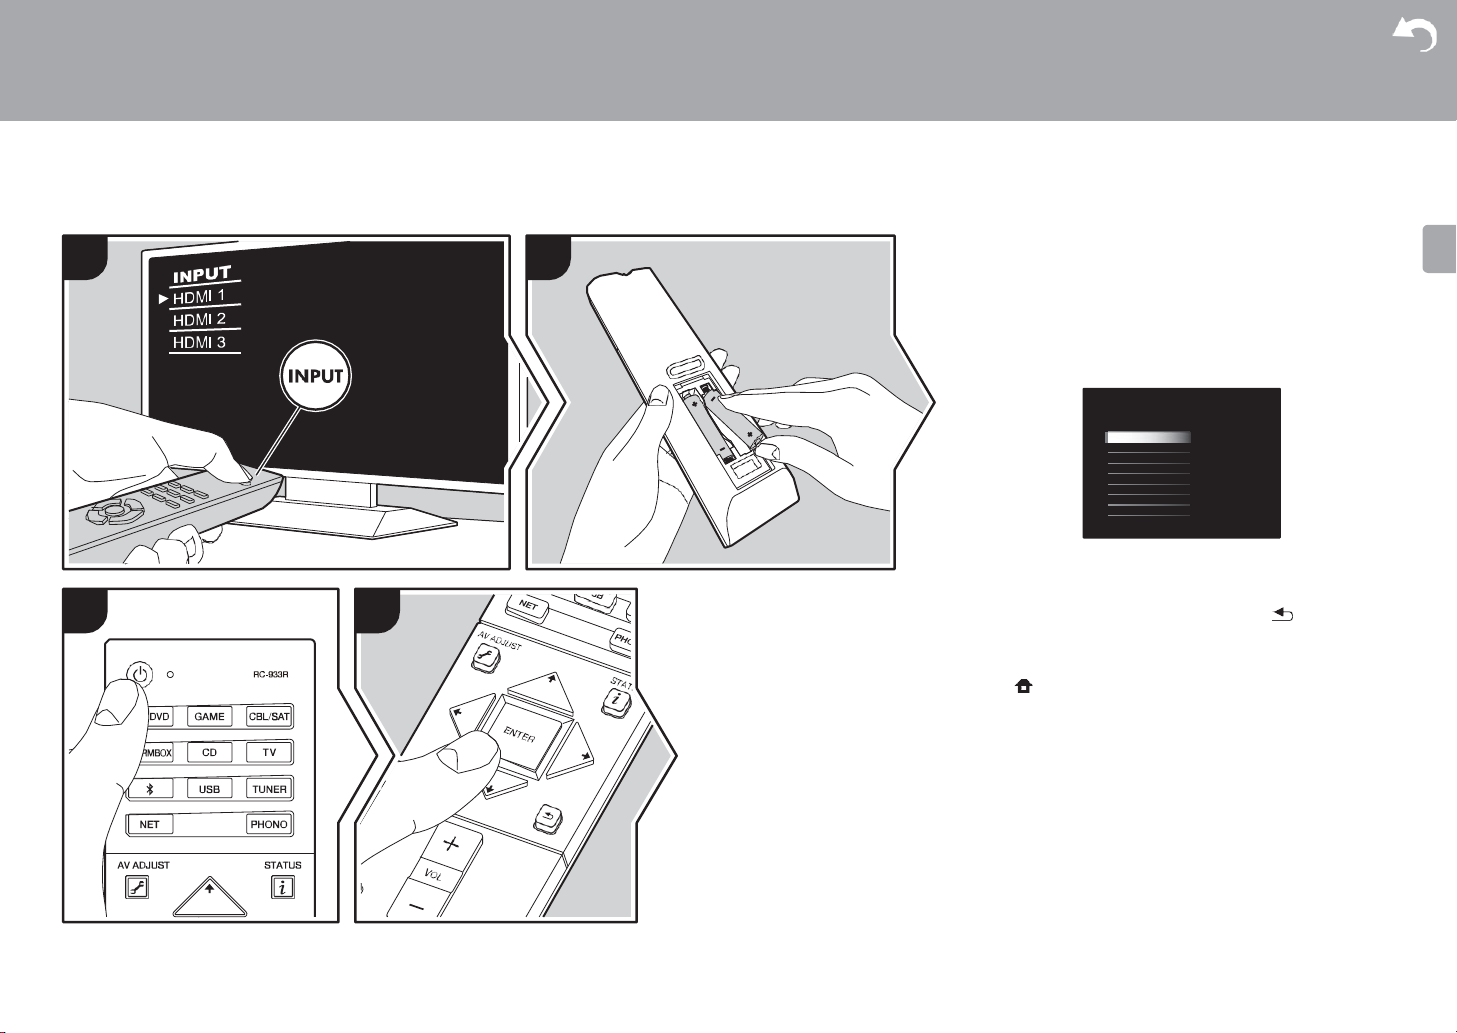
Advanced Setup | Firmware Update | Others
Initial Setup
Language Select
English
Deutsch
Français
Español
Italiano
Nederlands
Svenska
Русский язык
中文
Initial Setup with Auto Start-up Wizard
Initial Setup starts automatically
1.
Switch the input on the TV to that assigned to the unit.
2.
Put batteries into the remote controller of this unit.
3.
Press Í on the remote controller. When power turns on
for the first time, an Initial Setup screen is automatically
displayed on the TV to allow you to make settings
required for start up.
4.
Follow the on-screen instructions to select the item with
the cursors of the remote controller and press ENTER to
confirm your selection.
0 To return to the previous screen, press
To redo Initial Setup: If you terminate the procedure on the
way or want to change a setting made during Initial Setup,
press
«Initial Setup» in the System Setup menu from Home and
press ENTER. To select the language displayed again,
change «OSD Language». (P42)
on the remote controller, select «Miscellaneous» —
.
15
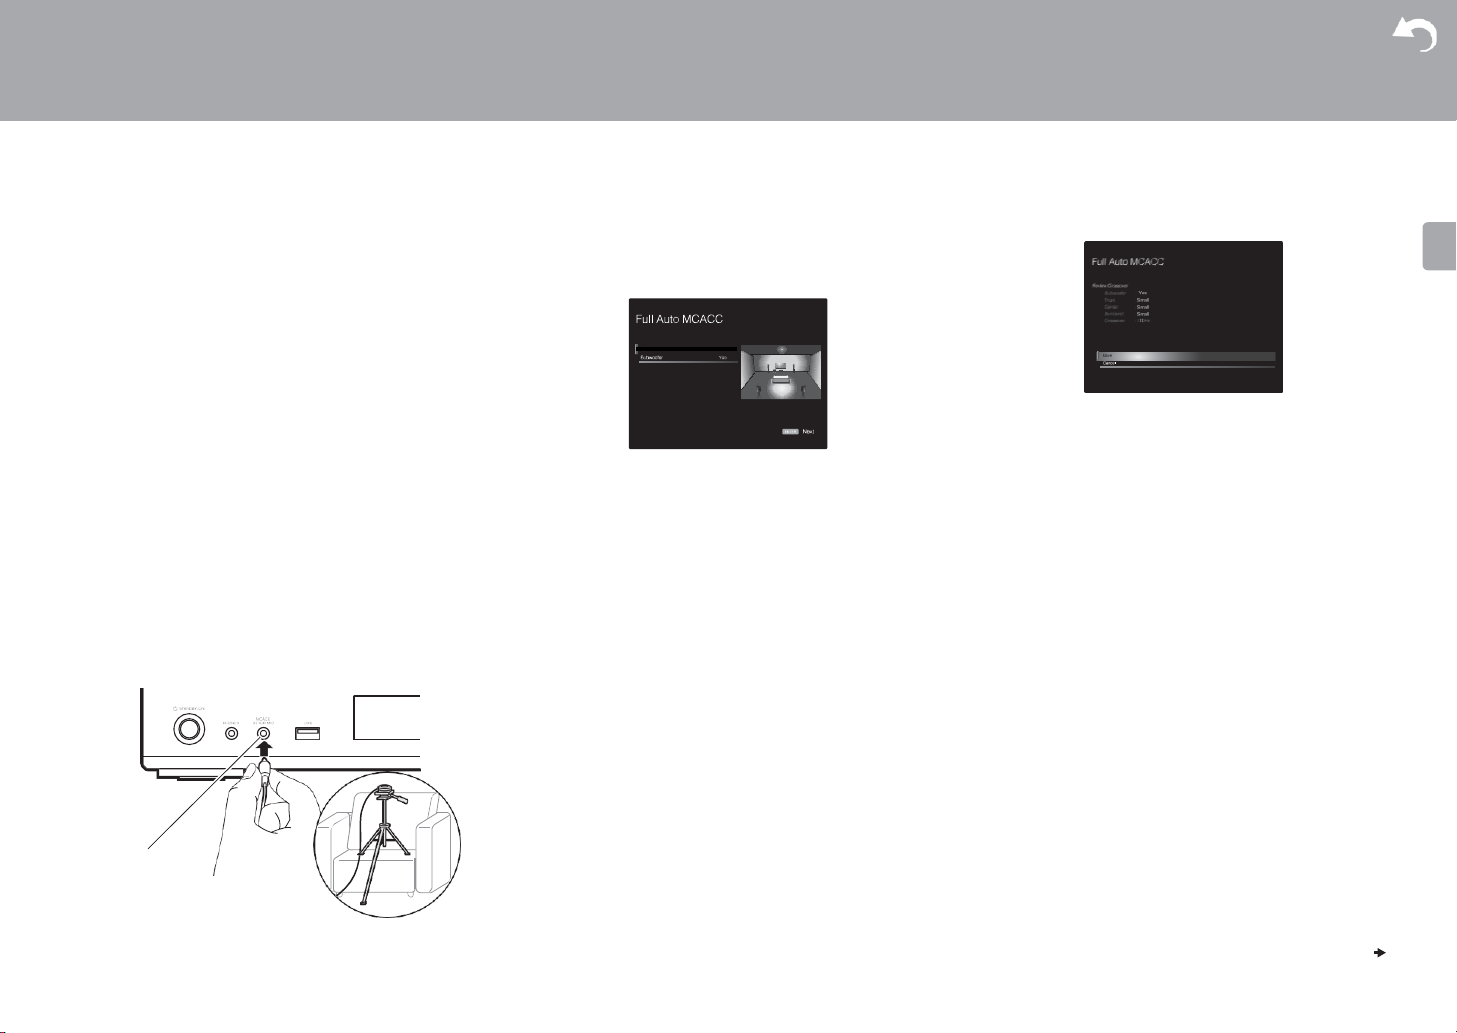
Advanced Setup | Firmware Update | Others
Select how many speakers you have.
1. Full Auto MCACC
Place the supplied speaker setup microphone in the
listening position, measure the test tones emitted by the
speakers, then the unit automatically sets the optimum
volume level for each speaker, the crossover frequencies,
and the distance from the listening position. This also
automatically adjusts the equalizers for the speakers and
enables correction of distortion caused by the acoustic
environment of the room.
0 Calibration takes between 3 to 12 minutes to be
completed. The speakers emit the test tone at high
volume during measurement, so be careful of your
surroundings. Keep the room as quiet as possible during
measurement.
0 If the power of this unit suddenly turns off, the wires in the
speaker cables may have touch the rear panel or other
wires and tripped the protection circuit. Twist the wires
again properly and make sure they do not stick out of the
speaker terminals when connecting.
1.
Place the supplied speaker setup microphone in the
listening position, and connect to the MCACC SETUP
MIC jack on the main unit.
MCACC
SETUP MIC
When putting the speaker setup microphone on a tripod,
refer to the illustration when putting it in place.
16
0 To cancel Full Auto MCACC partway through,
disconnect the speaker setup microphone.
2.
Select the connected speaker configuration.
The image on the screen changes as you choose the
number of channels in «Speaker Channels», so refer to it
when performing the settings. Also use this screen to
select whether you have connected a subwoofer.
0 If you have connected a subwoofer, check the power
and volume of the subwoofer. The low frequencies
played by the subwoofer may not be discernible, so
set its volume to at least halfway.
3.
Test tones are emitted by the speakers, and firstly the
unit detects the speakers connected and the noise in the
environment.
4.
After the results of the above measurements are
displayed, select «Next», press ENTER on the remote
controller, and the test tones are emitted again, and the
unit automatically makes settings such as the optimum
volume level and the crossover frequency.
5.
When the measurement is completed, the measurement
result is displayed.
Press the cursors / on the remote controller to check
the settings. Press ENTER when «Save» is selected to
save the settings.
6.
Disconnect the speaker setup microphone.You cannot
use any other menu options while it is connected.
2.
Source Connection
Check that each input source is connected correctly. Follow
the guidance, select the input you want to confirm, start play
of the selected player, and confirm that the images appear
on the TV and that sound is played.
3.
Network Connection
Set up Wi-Fi connection with an access point such as a
wireless LAN router. There are the following two methods of
connecting by Wi-Fi:
«Scan Networks»: Search for an access point from this
unit. Find out the SSID of the access point beforehand.
«Use iOS Device (iOS7 or later)»: Share the iOS device’s
Wi-Fi settings with this unit.
If you select «Scan Networks», there are a further two
choices of connection method. Check the following.
0 «Enter Password»: Enter the password (or key) of the
access point to connect.
0 «Push Button»: If the access point has an automatic
connection button, you can connect without entering a
password.
0 If the SSID of the access point is not displayed, then in
the screen listing the SSIDs, select «Other…» with the

Advanced Setup | Firmware Update | Others
n o p q r s t u v w x y z
5 6 7 8 9 0 — ^ \
, . / ; : @ [ ]
A/a
When finishe d, selec t the «OK » key.
All Erase
button on the remote controller and press ENTER, then
follow the on-screen instructions.
Keyboard input: To switch between upper and lower case,
select «A/a» on the screen and press ENTER. To select
whether to mask the password with «*» or display it in plain
text, press +Fav on the remote controller. Pressing CLEAR
will delete all the input characters.
Privacy policy: A confirmation screen asking you to agree
to the privacy policy is displayed during network setting.
Select «Yes» and press ENTER to indicate agreement.
4.
Audio Return Channel
If you have connected a TV that supports ARC, select
«Yes». This unit’s ARC setting turns on and you can listen to
the TV’s audio through this unit.
0 If you select «Yes», the HDMI CEC function is enabled
and power consumption increases during standby.
17
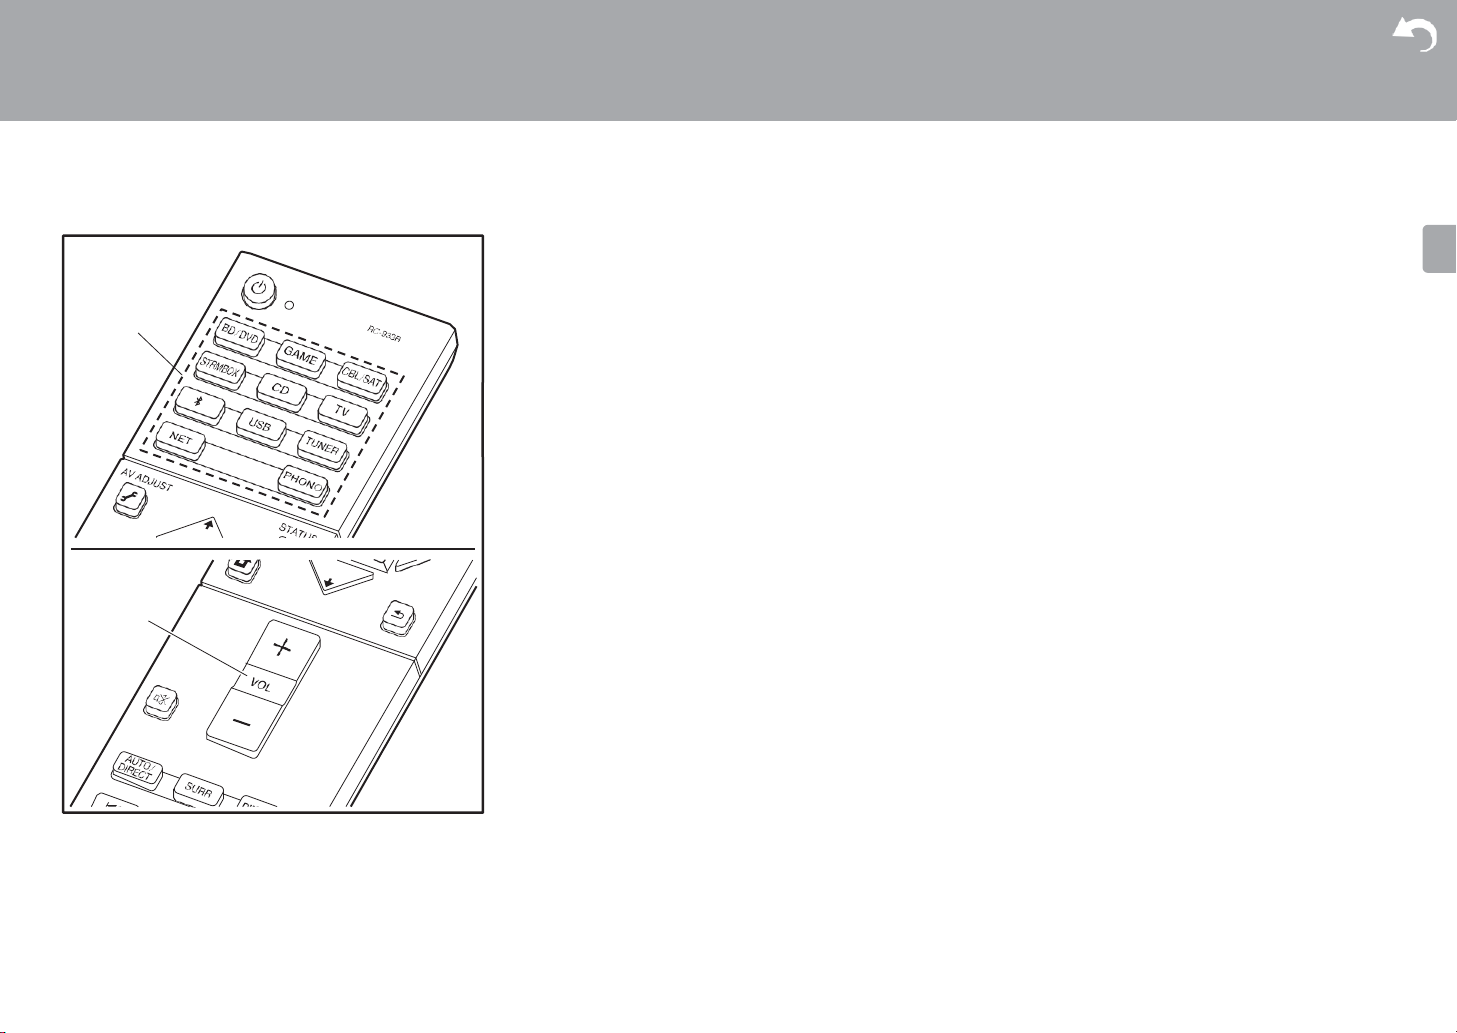
Advanced Setup | Firmware Update | Others
AV Component Playback
18
Basic operations
Play an AV component or TV connected to this unit with an
HDMI cable or other cable.
1.
Switch the input on the TV to that assigned to the unit.
2.
Press the input selector (a) on the remote controller with
the same name as the jack to which you connected the
player to switch the input.
For example, press BD/DVD to play the player connected
to the BD/DVD jack. Press TV to listen the TV’s sound.
0 Note that when the CEC link function works, the input
switches automatically when you have connected a
CEC compliant TV and player to this unit using HDMI
connection.
3.
Start play on the player.
4.
Use VOL+/– (b) to adjust the volume.
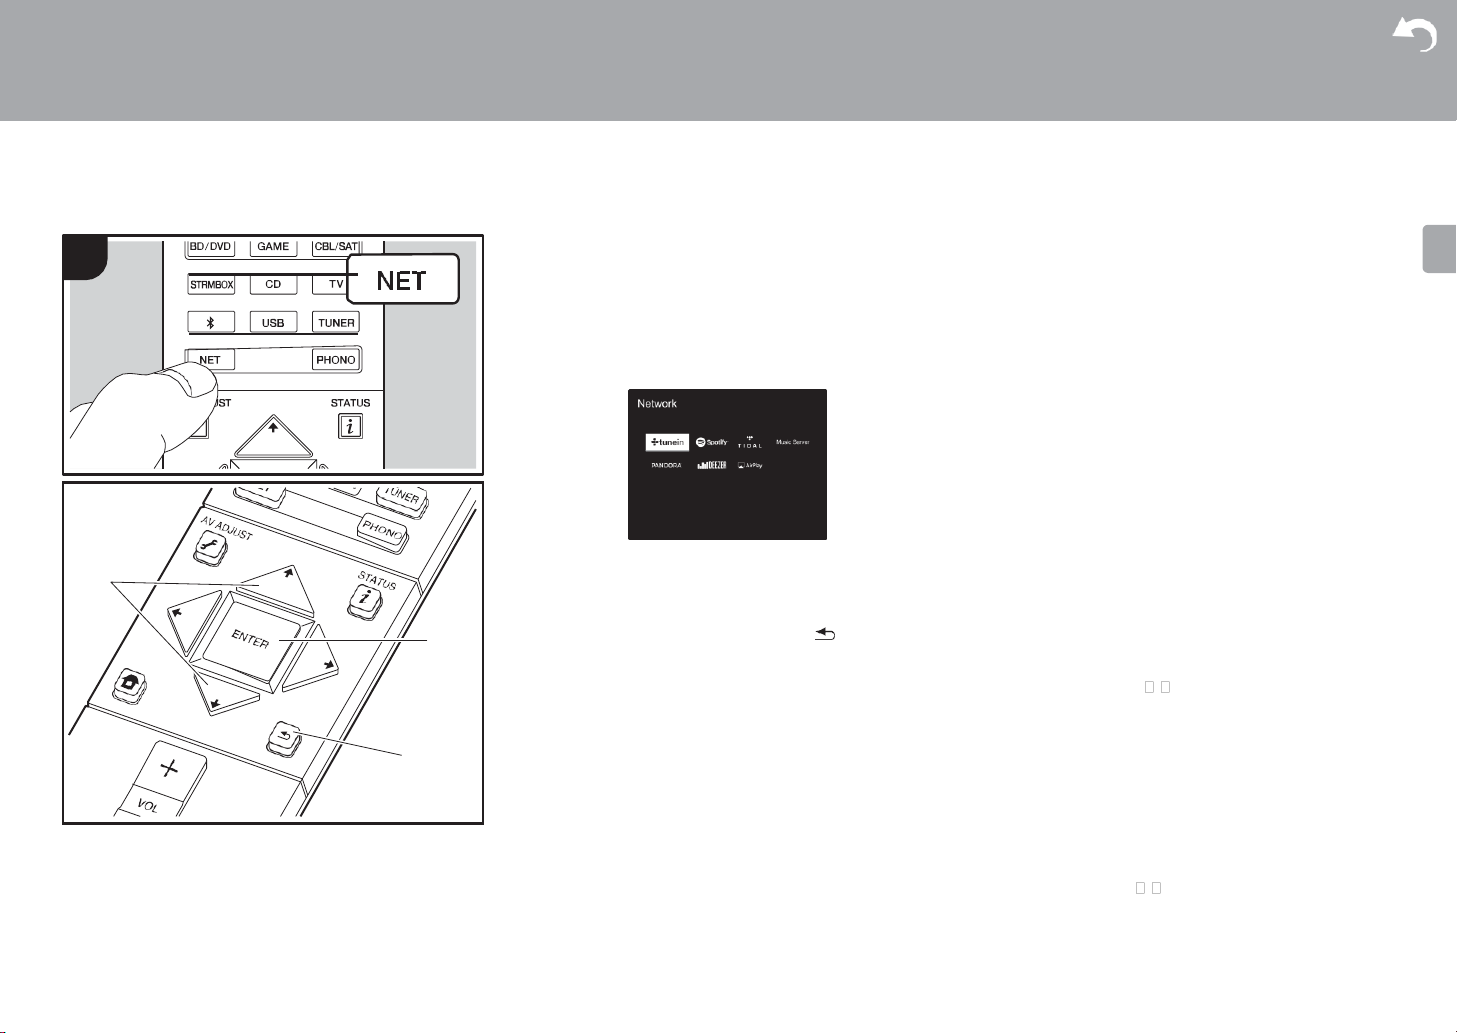
Advanced Setup | Firmware Update | Others
Internet Radio
Basic operations
When this unit is connected to a network, you can listen to
TuneIn or other preregistered Internet radio services.
Depending on the internet radio service, the user may need
to register from their computer first.
1.
Switch the input on the TV to that assigned to the unit.
2.
Press NET on the remote controller.
3.
Follow the on-screen instructions, using the cursors to
select radio stations and programs, then press ENTER
(b) to play. Play starts when 100% is displayed for
buffering.
0 To return to the previous screen, press (c).
0 If you cannot select a network service, it will become
selectable when the network function is started.
Regarding TuneIn Radio
To display the TuneIn Radio menu during play, press
ENTER (b) on the remote controller.
Add to My Presets: Registers radio stations being
broadcast and programs in «My Presets». Once registered,
«My Presets» is displayed in the level under TuneIn Radio.
To play, select the program you like from «My Presets».
Remove from My Presets: Removes a radio station or
program from «My Presets» in TuneIn Radio.
Pandora® (U.S. only)
Pandora is a free, personalized Internet radio service that
plays the music you know and helps you discover music
you’ll love. After selecting «Pandora», do the following.
1.
Use / (a) on the remote controller to select «I have a
Pandora Account» or «I’m new to Pandora» and then
press ENTER (b).
If you are new to Pandora, select «I’m new to Pandora».
You will see an activation code on your TV screen.
Please write down this code. Go to an Internet connected
computer and point your browser to www.pandora.com/
pioneer. Enter your activation code and then follow the
instructions to create your Pandora account and your
personalized Pandora stations. You can create your
stations by entering your favorite tracks and artists when
prompted. After you have created your account and
stations you can return to your receiver and press
ENTER (b) to begin listening to your personalized
Pandora.
If you have an existing Pandora account, you can add
your Pandora account to your receiver by selecting «I
have a Pandora Account» and logging in with your email
and password.
2.
To play a station, use / (a) on the remote controller to
select the station from your station list, and then press
ENTER (b). Playback starts and the playback screen
appears.
Create new station: Enter the name of a track, artist, or
genre and Pandora will create a unique radio station for you
based on the musical qualities of that track, artist, or genre.
Regarding the Pandora Menu: Icons are displayed on the
screen while playing a station. You can do the following by
selecting the icon with / (a) on the remote controller and
pressing ENTER (b).
19

Advanced Setup | Firmware Update | Others
(I like this track) :
Give a track “thumbs—up” and Pandora will play more music
like it.
(I don’t like this track) :
Give a track “thumbs—down” and Pandora will ban that track
from the current station.
:
Automatically find stations matching your preferences
based on genre, specific artists, and songs, and delete
those stations you don’t need.
20
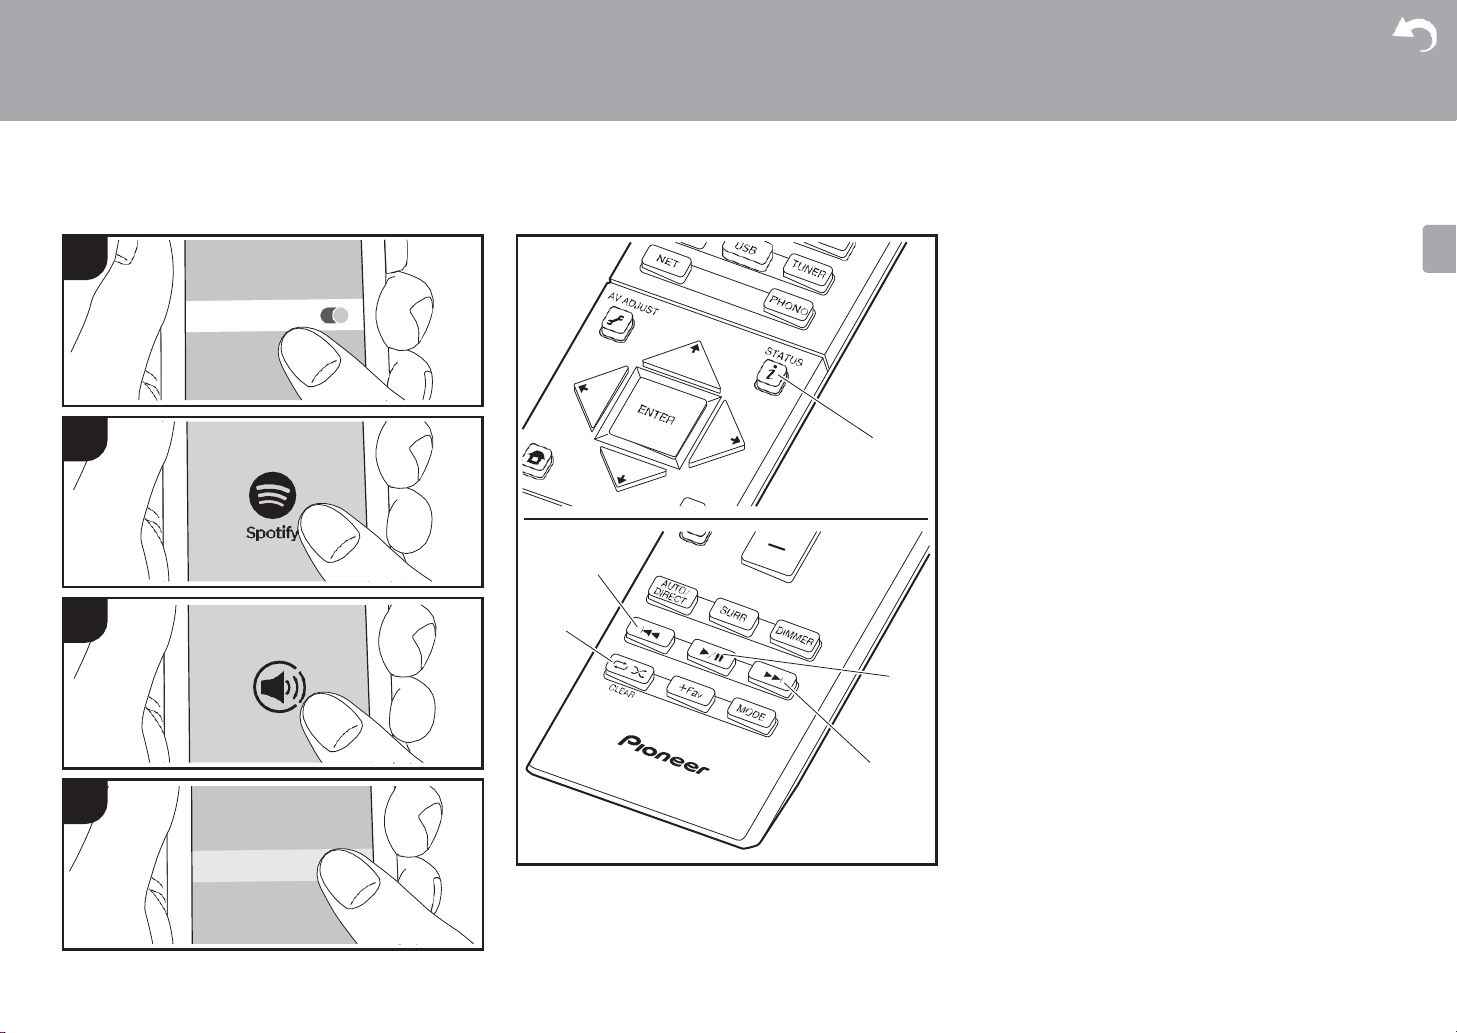
Advanced Setup | Firmware Update | Others
Spotify
Basic operations
Spotify Connect play is possible by connecting this unit to
the same network as a smart phone or tablet. To enable
Spotify Connect, install the Spotify application on your
smartphone or tablet and create a Spotify premium account.
1.
Connect the smartphone to the network that this unit is
connected to.
2.
Click the Connect icon in the track play screen of the
Spotify app.
3.
Select this unit.
4.
This unit turns on automatically and the input selector
changes to NET and streaming of Spotify starts.
0 If «Hardware» — «Power Management» — «Network
Standby» is set to «Off» in the System Setup menu from
Home, manually turn the unit on and then press NET on
the remote controller.
0 Refer to the following for Spotify settings:
www.spotify.com/connect/
0 The Spotify software is subject to third party licenses
found here:
www.spotify.com/connect/third-party-licenses
The following remote controller operations are also
possible.
(a)
Pressed during play, this button changes the displayed
track information.
(b)
This button plays the previous track.
(c)
This button lets you start repeat or random playback.
Pressing this button repeatedly cycles through the
repeat modes.
(d)
Pressed during play this button pauses playback.
Pressed while paused, and it restarts play.
(e)
This button plays the next track.
21

Advanced Setup | Firmware Update | Others
Music Server
22
It is possible to stream music files stored on PCs or NAS
devices connected to the same network as this unit. The
network servers this unit is compatible with are those PCs
with players installed that have the server functionality of
Windows Media® Player 11 or 12, or NAS that are
compatible with home network functionality. You may need
to make some settings in advance to use Windows Media
Player 11 or 12. Note that only music files registered in the
library of Windows Media® Player can be played.
®
Configuring Windows Media® Player
■
Windows Media® Player 11
1.
Turn on your PC and start Windows Media® Player 11.
2.
In the «Library» menu, select «Media Sharing» to display a
dialog box.
3.
Select the «Share my media» check box, and then click
«OK» to display the compatible devices.
4.
Select this unit, click «Allow» and put a check mark next to
the icon for this unit.
5.
Click «OK» to close the dialog.
0 Depending of the version of Windows Media® Player,
there may be differences in the names of items you can
select.
■
Windows Media® Player 12
1.
Turn on your PC and start Windows Media® Player 12.
2.
In the «Stream» menu, select «Turn on media streaming»
to display a dialog box.
0 If media streaming is already turned on, select «More
streaming options…» in the «Stream» menu to list players
in the network, and then go to step 4.
3.
Click «Turn on media streaming» to list players in the
network.
4.
Select this unit in «Media streaming options» and check
that it is set to «Allow».
5.
Click «OK» to close the dialog.
0 Depending of the version of Windows Media® Player,
there may be differences in the names of items you can
select.
Playing
1.
Start the server (Windows Media® Player 11, Windows
Media® Player 12, or NAS device) containing the music
files to play.
2.
Make sure that the PCs and/or NASs are properly
connected to the same network as this unit.
3.
Switch the input on the TV to that assigned to the unit.
4.
Press NET on the remote controller.
5.
With the cursors on the remote controller, select «Music
Server», and then press ENTER (b).
6.
Select the target server with the cursors on the remote
controller and press ENTER (b) to display the items list
screen.
7.
With the cursors on the remote controller, select the
music file to play, and then press ENTER (b) to start
playback. To return to the previous screen, press (d).
0 If «No Item.» is displayed, check whether the network is
properly connected.

Advanced Setup | Firmware Update | Others
0 Depending on the server and share settings, the unit may
not recognize it, or may not be able to play its music files.
Furthermore, the unit cannot access pictures and videos
stored on servers.
0 For music files on a server, there can be up to 20,000
tracks per folder, and folders may be nested up to 16
levels deep.
The following remote controller operations are also
possible.
(a) When the folder or file lists are not shown on one screen,
you can change the screen.
(c) Pressed during play, this button changes the displayed
track information. Pressed while a folder or file list is
displayed, this button returns you to the play screen.
(e)
This button plays the previous track.
(f)
This button lets you start repeat or random playback.
Pressing this button repeatedly cycles through the
repeat modes.
(g)
Pressed during play this button pauses playback.
Pressed while paused, and it restarts play.
(h)
This button plays the next track.
Controlling Remote Playback from a PC
You can use this unit to play music files stored on your PC
by operating the PC inside your home network. The unit
supports remote playback with Windows Media® Player 12.
1.
Turn on your PC and start Windows Media® Player 12.
2.
Open the «Stream» menu and check that «Allow remote
control of my Player…» is checked. Click «Turn on media
streaming» to list players in the network.
3.
Switch the input on the TV to that assigned to the unit.
4.
Select and right-click the music file to play with Windows
Media® Player 12. To remotely play a music file on
another server, open the target server from «Other
Libraries» and select the music file to play.
5.
Select this unit in «Play to» to open the «Play to» window
of Windows Media® Player 12 and start playback on the
unit. If your PC is running on Windows® 8.1, click «Play
to», and then select this unit.
If your PC is running on Windows® 10, click «Cast to
Device», and select this unit. Operations during remote
playback are possible from the «Play to» window on the
PC. The playback screen is displayed on the TV
connected to the HDMI output of the unit.
6.
Adjust the volume using the volume bar on the «Play to»
window.
0 Sometimes, the volume displayed on the remote
playback window may differ from that appeared on the
display of the unit. Also, when the volume is adjusted
from this unit, this is not reflected in the «Play to» window.
0 Remote playback is not possible when using a network
service or playing music files on a USB storage device.
0 Depending of the version of Windows®, there may be
differences in the names of items you can select.
Supported Audio Formats
This unit supports the following music file formats. Remote
play of FLAC, DSD, and Dolby TrueHD is not supported.
MP3 (.mp3/.MP3):
0 Supported formats: MPEG-1/MPEG-2 Audio Layer-3
0 Supported sampling rates: 44.1 kHz, 48 kHz
0 Supported bitrates: Between 8 kbps and 320 kbps and
VBR.
WMA (.wma/.WMA):
0 Supported sampling rates: 44.1 kHz, 48 kHz
0 Supported bitrates: Between 5 kbps and 320 kbps and
VBR.
0 WMA Pro/Voice/WMA Lossless formats are not
supported
WAV (.wav/.WAV):
WAV files include uncompressed PCM digital audio.
0 Supported sampling rates: 44.1 kHz, 48 kHz, 64 kHz,
88.2 kHz, 96 kHz, 176.4 kHz, 192 kHz
0 Quantization bit: 8 bit, 16 bit, 24 bit
AIFF (.aiff/.aif/.aifc/.afc/.AIFF/.AIF/.AIFC/.AFC):
AIFF files include uncompressed PCM digital audio.
0 Supported sampling rates: 44.1 kHz, 48 kHz, 64 kHz,
88.2 kHz, 96 kHz, 176.4 kHz, 192 kHz
0 Quantization bit: 8 bit, 16 bit, 24 bit
AAC (.aac/.m4a/.mp4/.3gp/.3g2/.AAC/.M4A/.MP4/.3GP/
.3G2):
0 Supported formats: MPEG-2/MPEG-4 Audio
0 Supported sampling rates: 44.1 kHz, 48 kHz, 64 kHz,
88.2 kHz, 96 kHz
0 Supported bitrates: Between 8 kbps and 320 kbps and
VBR.
FLAC (.flac/.FLAC):
0 Supported sampling rates: 44.1 kHz, 48 kHz, 64 kHz,
88.2 kHz, 96 kHz, 176.4 kHz, 192 kHz
0 Quantization bit: 8 bit, 16 bit, 24 bit
LPCM (Linear PCM):
0 Supported sampling rates: 44.1 kHz, 48 kHz
0 Quantization bit: 16 bit
Apple Lossless (.m4a/.mp4/.M4A/.MP4):
0 Supported sampling rates: 44.1 kHz, 48 kHz, 64 kHz,
88.2 kHz, 96 kHz, 176.4 kHz, 192 kHz
0 Quantization bit: 16 bit, 24 bit
DSD (.dsf/.dff/.DSF/.DFF):
0 Supported formats: DSF/DSDIFF
0 Supported sampling rates: 2.8 MHz, 5.6 MHz
0 Variable bit-rate (VBR) files are supported. However,
playback times may not be displayed correctly.
0 Remote playback does not support the gapless playback.
23
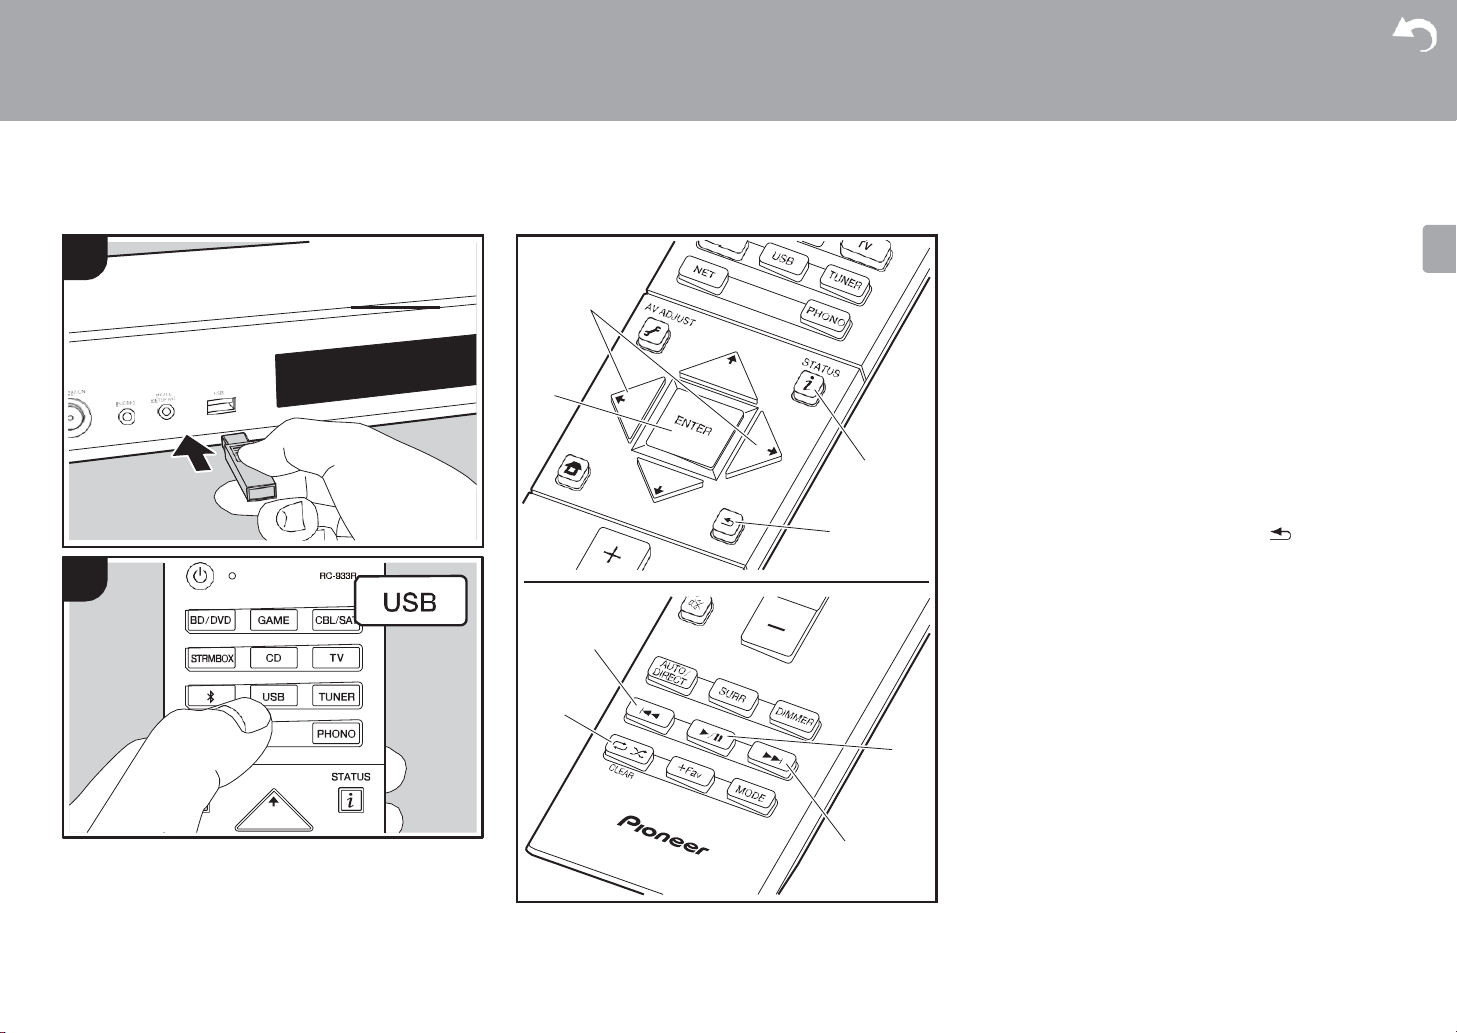
Advanced Setup | Firmware Update | Others
USB Storage Device
24
Basic play
Play music files on a USB storage device.
1.
Switch the input on the TV to that assigned to the unit.
2.
Plug your USB storage device with the music files into
the USB port on the front of this unit.
3.
Press «USB» on the remote controller.
0 If the «USB» indicator flashes on the display, check
whether the USB storage device is plugged in properly.
0 Do not unplug the USB storage device connected to this
unit while «Connecting…» is on the display. This may
cause data corruption or malfunction.
4.
Press ENTER (b) on the remote controller in the next
screen. The list of folders and music files on the USB
storage device are displayed. Select the folder with the
cursors and press ENTER (b) to confirm your selection.
0 To return to the previous screen, press (d).
5.
With the cursors on the remote controller, select the
music file, and then press ENTER (b) to start playback.
0 The USB port of this unit conforms with the USB 2.0
standard. The transfer speed may be insufficient for
some content you play, which may cause some
interruption in sound.
The following remote controller operations are also
possible.
(a) When the folder or file lists are not shown on one screen,
you can change the screen.
(c) Pressed during play, this button changes the displayed
track information. Pressed while a folder or file list is
displayed, this button returns you to the play screen.
(e)
This button plays the previous track.
(f)
This button lets you start repeat or random playback.
Pressing this button repeatedly cycles through the
repeat modes.
(g)
Pressed during play this button pauses playback.
Pressed while paused, and it restarts play.
(h)
This button plays the next track.

Advanced Setup | Firmware Update | Others
USB Storage Device Requirements
0 Note that operation is not guaranteed with all USB
storage devices.
0 This unit can use USB storage devices that comply with
the USB mass storage device class standard. The unit is
also compatible with USB storage devices using the
FAT16 or FAT32 file system formats.
0 If the USB storage device has been partitioned, each
section will be treated as an independent device.
0 Up to 20,000 tracks per folder can be displayed, and
folders may be nested up to 16 levels deep.
0 USB hubs and USB storage devices with hub functions
are not supported. Do not connect these devices to the
unit.
0 USB storage devices with security function are not
supported on this unit.
0 If you connect a USB hard disk drive to the USB port of
the unit, we recommend that you use its AC adapter to
power it.
0 Media inserted to the USB card reader may not be
available in this function. Furthermore, depending on the
USB storage device, proper reading of the contents may
not be possible.
0 We accept no responsibility whatsoever for the loss or
damage to data stored on a USB storage device when
that device is used with this unit. We recommend that you
back up your important music files beforehand.
Supported Audio Formats
For server playback and playback from a USB storage
device, this unit supports the following music file formats.
Note that sound files that are protected by copyright cannot
be played on this unit.
MP3 (.mp3/.MP3):
0 Supported formats: MPEG-1/MPEG-2 Audio Layer 3
0 Supported sampling rates: 44.1 kHz, 48 kHz
0 Supported bitrates: Between 8 kbps and 320 kbps and
VBR.
WMA (.wma/.WMA):
0 Supported sampling rates: 44.1 kHz, 48 kHz
0 Supported bitrates: Between 5 kbps and 320 kbps and
VBR.
0 WMA Pro/Voice/WMA Lossless formats are not
supported
WAV (.wav/.WAV):
WAV files include uncompressed PCM digital audio.
0 Supported sampling rates: 44.1 kHz, 48 kHz, 64 kHz,
88.2 kHz, 96 kHz, 176.4 kHz, 192 kHz
0 Quantization bit: 8 bit, 16 bit, 24 bit
AIFF (.aiff/.aif/.aifc/.afc/.AIFF/.AIF/.AIFC/.AFC):
AIFF files include uncompressed PCM digital audio.
0 Supported sampling rates: 44.1 kHz, 48 kHz, 64 kHz,
88.2 kHz, 96 kHz, 176.4 kHz, 192 kHz
0 Quantization bit: 8 bit, 16 bit, 24 bit
AAC (.aac/.m4a/.mp4/.3gp/.3g2/.AAC/.M4A/.MP4/.3GP/
.3G2):
0 Supported formats: MPEG-2/MPEG-4 Audio
0 Supported sampling rates: 44.1 kHz, 48 kHz, 64 kHz,
88.2 kHz, 96 kHz
0 Supported bitrates: Between 8 kbps and 320 kbps and
VBR.
FLAC (.flac/.FLAC):
0 Supported sampling rates: 44.1 kHz, 48 kHz, 64 kHz,
88.2 kHz, 96 kHz, 176.4 kHz, 192 kHz
0 Quantization bit: 8 bit, 16 bit, 24 bit
Apple Lossless (.m4a/.mp4/.M4A/.MP4):
0 Supported sampling rates: 44.1 kHz, 48 kHz, 64 kHz,
88.2 kHz, 96 kHz, 176.4 kHz, 192 kHz
0 Quantization bit: 16 bit, 24 bit
DSD (.dsf/.dff/.DSF/.DFF):
0 Supported formats: DSF/DSDIFF
0 Supported sampling rates: 2.8 MHz, 5.6 MHz
Dolby TrueHD (.vr/.mlp/.VR/.MLP):
0 Supported sampling rates: 44.1 kHz, 48 kHz, 64 kHz,
88.2 kHz, 96 kHz, 176.4 kHz, 192 kHz
0 Variable bit-rate (VBR) files are supported. However,
playback times may not be displayed correctly.
0 This unit supports the gapless playback of the USB
storage device in the following conditions.
When playing WAV, FLAC and Apple Lossless, and the
same format, sampling frequency, channels and
quantization bit rate are played continuously
25

Advanced Setup | Firmware Update | Others
AirPlay
®
26
Basic play
You can wirelessly enjoy the music files on an iPhone®,
iPod touch®, or iPad® connected to the same access point
as this unit.
0 Update the OS version on your iOS device to the latest
version.
1.
Connect the iOS device to the access point.
2.
Press NET.
Tap the AirPlay icon in the control center of the iOS
3.
device and select this unit from the list of devices
displayed, and tap «Done».
4.
Play the music files on the iOS device.
0 The default status is for the Network Standby feature to
be on, so when you do steps 3 and 4 above, this unit
automatically comes on and input switches to «NET». To
reduce the amount of power consumed in standby mode,
press the button on the remote controller, then in the
Home menu displayed set «System Setup» – «Hardware»
– «Power Management» – «Network Standby» to «Off».
0 Due to the characteristics of AirPlay wireless technology,
the sound produced on this unit may slightly be behind
the sound played on the AirPlay-enabled device.
You can also play back music files on the computer with
iTunes (Ver. 10.2 or later). Before operation, make sure this
unit and the PC are connected to the same network, then
press NET on this unit. Next, click the AirPlay icon in
iTunes, select this unit from the list of devices displayed,
and start play of a music file.
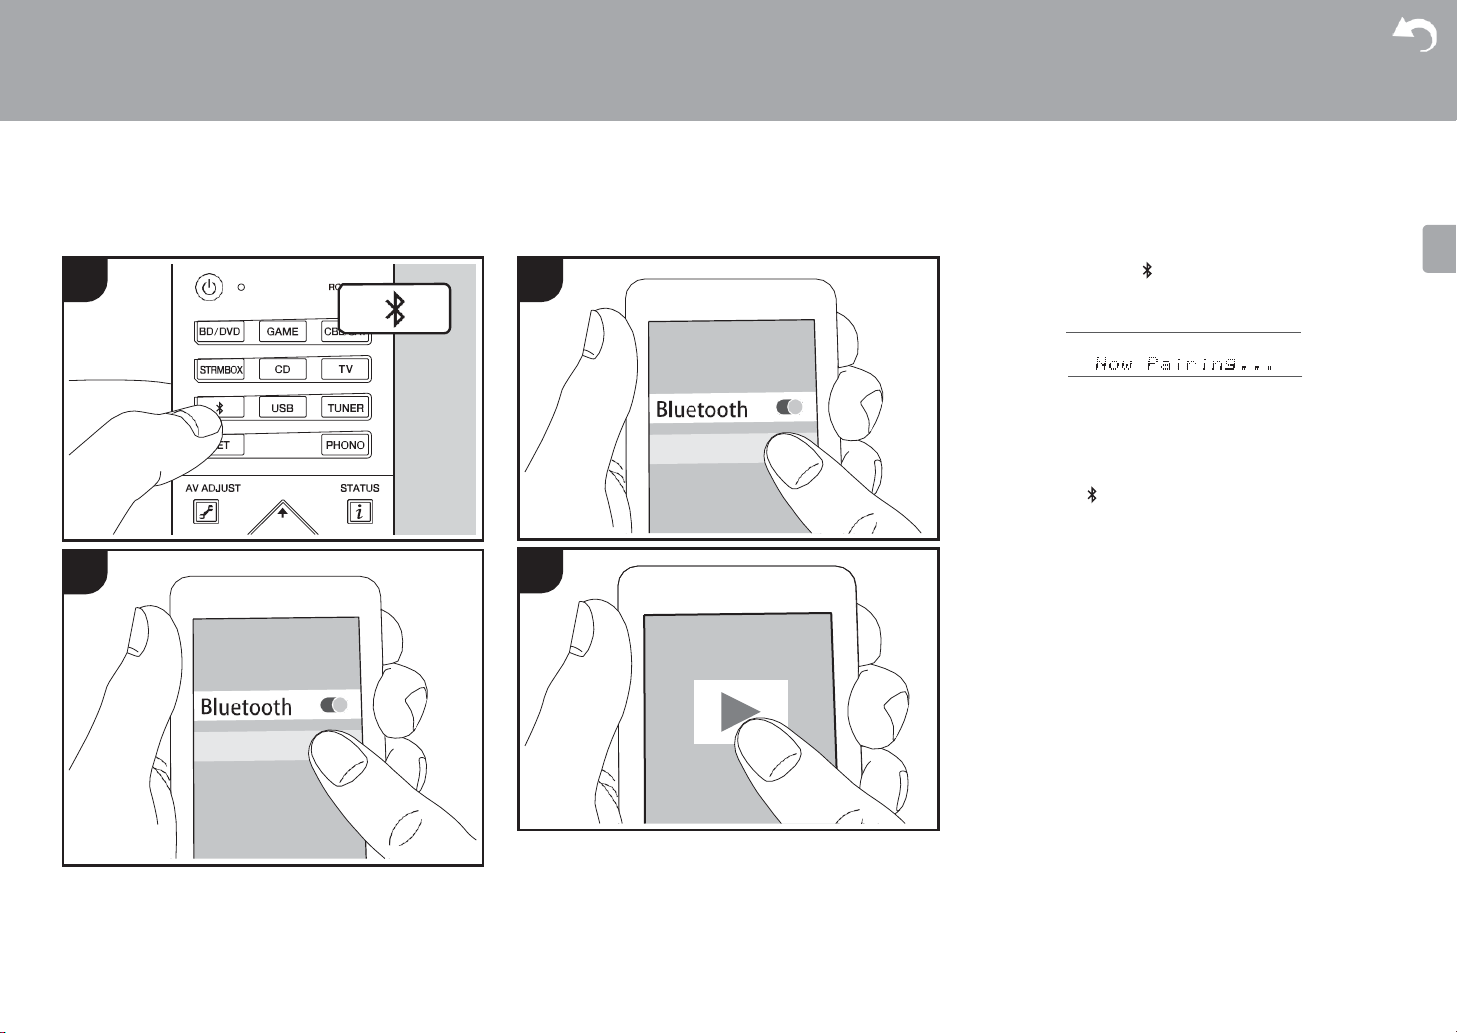
Advanced Setup | Firmware Update | Others
BLUETOOTH® Playback
Pairing Playing Back
Pairing
1.
When you press the button on the remote controller,
«Now Pairing…» is displayed on this unit’s display, and the
pairing mode is enabled.
2.
Enable (turn on) the BLUETOOTH function of the
BLUETOOTH enabled device, then select this unit from
amongst the devices displayed. If a password is
requested, enter «0000».
0 To connect another BLUETOOTH enabled device, press
and hold the button until «Now Pairing…» is displayed,
then perform step 2 above. This unit can store the data of
up to eight paired devices.
0 The coverage area is 15 meters (48 feet). Note that
connection is not always guaranteed with all
BLUETOOTH enabled devices.
Playing Back
1.
When the unit is on, perform the connection procedure
on the BLUETOOTH enabled device.
2.
The input selector on this unit automatically switches to
«BT AUDIO».
3.
Play the music files. Increase the volume of the
BLUETOOTH enabled device to an appropriate level.
0 Due to the characteristics of BLUETOOTH wireless
technology, the sound produced on this unit may slightly
be behind the sound played on the BLUETOOTH
enabled device.
27
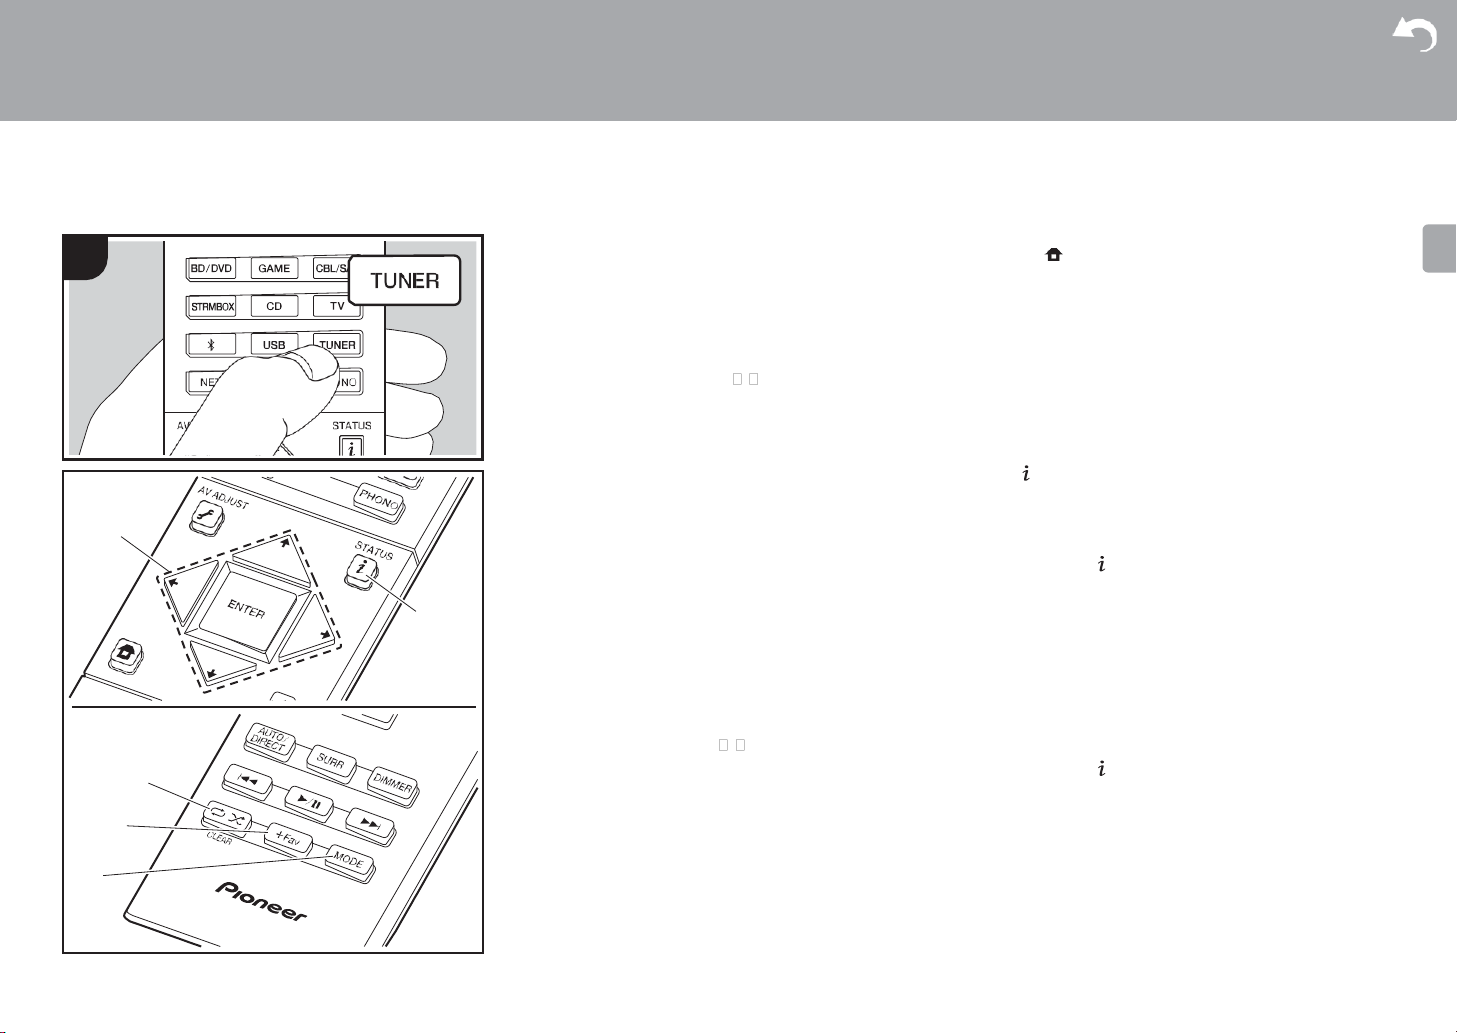
Advanced Setup | Firmware Update | Others
Listening to the FM/DAB Radio
28
Listening to FM Radio
Tuning Automatically
1.
Press TUNER on the remote controller repeatedly to
select either «FM» on the display.
2.
Press MODE (e) on the remote controller so that «AUTO»
appears on the display.
3.
When you press the cursor / buttons (a) on the
remote controller, automatic tuning starts, and searching
stops when a station is found. When tuned into a radio
station, the «TUNED» indicator on the display lights.
When tuned into a stereo FM station, the «FM STEREO»
indicator lights.
0 No sound is output while the «TUNED» indicator is off.
When FM broadcasts reception is poor
Radio waves may be weak depending on the building
structure and environmental conditions. In that case,
perform the procedure as explained below in «Tuning
Manually» to manually select the desired station.
Tuning Manually
1.
Press TUNER on the remote controller repeatedly to
select either «FM» on the display.
2.
Press MODE (e) on the remote controller to turn off
«AUTO» on the display.
3.
While pressing the cursor / buttons (a) on the remote
controller, select the desired radio station.
0 The frequency changes by 1 step each time you press
the button. The frequency changes continuously if the
button is held down and stops when the button is
released. Tune by looking at the display.
To return to the auto tuning mode
Press MODE (e) on the remote controller again so that
«AUTO» appears on the display. The unit tunes
automatically into a radio station.
Frequency step setting (North American models)
Press the button on the remote controller to select
«System Setup» – «Miscellaneous» – «Tuner» – «FM
Frequency Step» and select the frequency step for your
area. Note that when this setting is changed, all radio
presets are deleted.
Using RDS (European models)
RDS stands for Radio Data System and is a method of
transmitting data in FM radio signals. In regions using RDS,
the radio station name is displayed when you tune into a
radio station broadcasting program information. When you
press (b) on the remote controller in this state, you can
use the following functions.
Displaying text information (Radio Text)
1. While the name of the station is being displayed on the
display, press (b) on the remote controller once.
Radio Text (RT) broadcast by the station is displayed
scrolling across the display. «No Text Data» is displayed
when no text information is available.
0 Unusual characters may be displayed when the unit
receives unsupported characters. However, this is not a
malfunction. Also, if the signal from a station is weak,
information may not be displayed.
Search for stations by Program Type
1.
While the name of the station is being displayed on the
display, press (b) on the remote controller twice.
2.
Press the cursor / buttons (a) on the remote
controller to select the Program Type you want to find,
then press ENTER (a) to start the search.
The Program Types displayed are as follows:
None
News (News reports)
Affairs (Current affairs)
Info (Information)
Sport
Educate (Education)
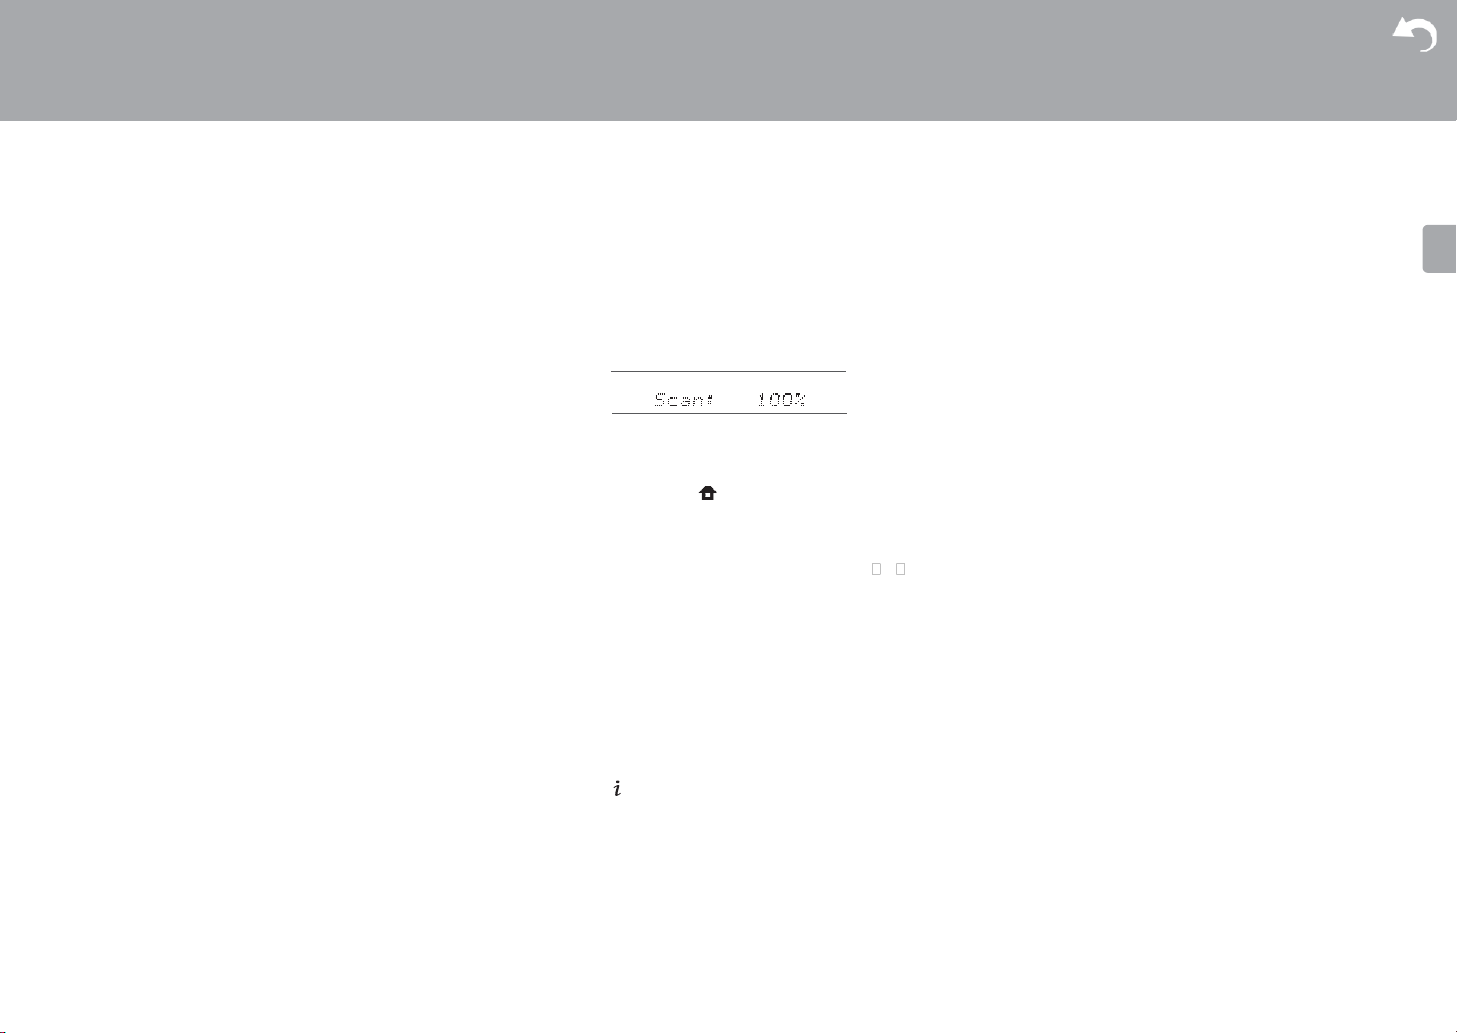
Advanced Setup | Firmware Update | Others
Drama
Culture
Science (Science and technology)
Varied
Pop M (Pop music)
Rock M (Rock music)
Easy M (Middle of the road music)
Light M (Light classics)
Classics (Serious classics)
Other M (Other music)
Weather
Finance
Children (Children’s programmes)
Social (Social affairs)
Religion
Phone In
Travel
Leisure
Jazz (Jazz music)
Country (Country music)
Nation M (National music)
Oldies (Oldies music)
Folk M (Folk music)
Document (Documentary)
0 The information displayed may sometimes not match the
content being broadcast by the station.
3.
When a station is found, the station flashes on the
display. Press ENTER (a) while this is happening to start
receiving that station. If you don’t press ENTER (a), the
unit continues to search for another station.
0 If no stations are found, the message «Not Found» is
displayed.
0 Unusual characters may be displayed when the unit
receives unsupported characters. However, this is not a
malfunction. Also, if the signal from a station is weak,
information may not be displayed.
Listening to DAB Digital Radio (VSX-S520D)
1.
Press TUNER on the remote controller repeatedly to
select either «DAB» on the display.
0 The very first time you select DAB, the Auto Tuning
function automatically scans the DAB Band 3 for the
multiplexes (i.e., stations) available in your area.
0 Once the scanning process is complete, the first
station that was detected is selected.
0 If a new DAB station is introduced, or you move to a
new area, press the button on the remote
controller, then in the Home menu displayed set
«System Setup» «Miscellaneous» – «Tuner» – «DAB
Auto Scan».
2.
Select the desired radio station with the cursors /
buttons (a) on the remote controller.
Changing the order stations are displayed
You can sort the abailable stations alphabetically or by
multiplex.
1. Press MODE (e) repeatedly to set the method for sorting
the display order from the following.
Alphabet (default setting) : Sort stations alphabetically.
Multiplex : Sort stations by multiplex.
Displaying DAB Radio Information
1. Press the button (b) repeatedly to display more
information about the selected DAB station.
DLS (Dynamic Label Segment) : When tuned to a
station that’s broadcasting DLS text data, the text will
scroll across the display.
Program Type : Displays the type of program.
Bit Rate and Audio Mode : Displays the station’s bit rate
and audio mode (Stereo, Mono).
Quality : Displays the signal quality.
0 — 59: Poor reception
60 — 79: Good reception
80 — 100: Excellent reception
Multiplex Name : Displays the name of the current
multiplex.
Multiplex Number and Frequency : Displays the
number and frequency of the current multiplex.
29
Loading…

VSX-520
-S/-K
Discover the benefits of registering your product online at
http://www.pioneer.co.uk
(or http://www.pioneer.eu).
Découvrez les nombreux avantages offerts en enregistrant votre produit en ligne
maintenant sur
http://www.pioneer.fr
(ou http://www.pioneer.eu).
Зарегистрируйте Baшe изделие на
http://www.pioneer-rus.ru
(или
http://www.pioneer.eu). Oзнакомьтесь с преимуществами регистрации в Интернет
Operating Instructions
Mode d’emploi
Инструкции по эксплуатации
VSX-520_SYXCN_En.book 1 ページ 2010年4月12日 月曜日 午後7時13分
VSX-520_SYXCN_En.book 2 ページ 2010年4月12日 月曜日 午後7時13分
IMPORTANT
CAUTION
RISK OF ELECTRIC SHOCK
DO NOT OPEN
The lightning flash with arrowhead symbol,
CAUTION:
The exclamation point within an equilateral
within an equilateral triangle, is intended to
TO PREVENT THE RISK OF ELECTRIC
triangle is intended to alert the user to the
alert the user to the presence of uninsulated
SHOCK, DO NOT REMOVE COVER (OR
presence of important operating and
“dangerous voltage” within the product’s
BACK). NO USER-SERVICEABLE PARTS
maintenance (servicing) instructions in the
enclosure that may be of sufficient
INSIDE. REFER SERVICING TO QUALIFIED
literature accompanying the appliance.
magnitude to constitute a risk of electric
SERVICE PERSONNEL.
shock to persons.
D3-4-2-1-1_A1_En
Replacement and mounting of an AC plug on the power supply cord of this unit should be performed only by qualified
service personnel.
IMPORTANT: THE MOULDED PLUG
This appliance is supplied with a moulded three pin mains plug for your safety and convenience. A 10 amp fuse is fitted in this plug. Should
the fuse need to be replaced, please ensure that the replacement fuse has a rating of 10 amps and that it is approved by ASTA or BSI to
BS1362.
Check for the ASTA mark or the BSI mark on the body of the fuse.
If the plug contains a removable fuse cover, you must ensure that it is refitted when the fuse is replaced. If you lose the fuse cover the plug
must not be used until a replacement cover is obtained. A replacement fuse cover can be obtained from your local dealer.
If the fitted moulded plug is unsuitable for your socket outlet, then the fuse shall be removed and the plug cut off and disposed of
safely. There is a danger of severe electrical shock if the cut off plug is inserted into any 13 amp socket.
If a new plug is to be fitted, please observe the wiring code as shown below. If in any doubt, please consult a qualified electrician.
IMPORTANT: The wires in this mains lead are coloured in accordance with the following code:
Blue : Neutral Brown : Live
As the colours of the wires in the mains lead of this appliance may not correspond with the coloured markings identifying the terminals in
your plug, proceed as follows;
The wire which is coloured BLUE must be connected to the terminal which is marked with the
letter N or coloured BLACK.
The wire which is coloured BROWN must be connected to the terminal which is marked with the
letter L or coloured RED.
How to replace the fuse: Open the fuse compartment with a screwdriver and replace the fuse.
D3-4-2-1-2-2*_A1_En
WARNING
VENTILATION CAUTION
This equipment is not waterproof. To prevent a fire or
When installing this unit, make sure to leave space
shock hazard, do not place any container filled with
around the unit for ventilation to improve heat radiation
liquid near this equipment (such as a vase or flower
(at least 40 cm at top, 10 cm at rear, and 20 cm at each
pot) or expose it to dripping, splashing, rain or
side).
moisture.
D3-4-2-1-3_A1_En
WARNING
Slots and openings in the cabinet are provided for
ventilation to ensure reliable operation of the product,
WARNING
and to protect it from overheating. To prevent fire
Before plugging in for the first time, read the following
hazard, the openings should never be blocked or
section carefully.
covered with items (such as newspapers, table-cloths,
The voltage of the available power supply differs
curtains) or by operating the equipment on thick carpet
according to country or region. Be sure that the
or a bed.
power supply voltage of the area where this unit
D3-4-2-1-7b*_A1_En
will be used meets the required voltage (e.g., 230 V
or 120 V) written on the rear panel.
D3-4-2-1-4*_A1_En
WARNING
To prevent a fire hazard, do not place any naked flame
sources (such as a lighted candle) on the equipment.
D3-4-2-1-7a_A1_En
VSX-520_SYXCN_En.book 3 ページ 2010年4月12日 月曜日 午後7時13分
Information for users on collection and disposal of old equipment and used batteries
Symbol for
These symbols on the products, packaging, and/or accompanying documents mean
equipment
that used electrical and electronic products and batteries should not be mixed with
general household waste.
For proper treatment, recovery and recycling of old products and used batteries,
please take them to applicable collection points in accordance with your national
legislation.
By disposing of these products and batteries correctly, you will help to save valuable
Symbol examples
resources and prevent any potential negative effects on human health and the
for batteries
environment which could otherwise arise from inappropriate waste handling.
For more information about collection and recycling of old products and batteries,
please contact your local municipality, your waste disposal service or the point of sale
where you purchased the items.
These symbols are only valid in the European Union.
For countries outside the European Union:
If you wish to discard these items, please contact your local authorities or dealer and
ask for the correct method of disposal.
Pb
K058a_A1_En
Operating Environment
This product is for general household purposes. Any
Operating environment temperature and humidity:
failure due to use for other than household purposes
+5 °C to +35 °C (+41 °F to +95 °F); less than 85 %RH
(such as long-term use for business purposes in a
(cooling vents not blocked)
restaurant or use in a car or ship) and which requires
Do not install this unit in a poorly ventilated area, or in
repair will be charged for even during the warranty
locations exposed to high humidity or direct sunlight (or
period.
strong artificial light)
K041_A1_En
D3-4-2-1-7c*_A1_En
If the AC plug of this unit does not match the AC
Manufactured under license from Dolby
outlet you want to use, the plug must be removed
Laboratories. Dolby, Pro Logic, Surround EX
and appropriate one fitted. Replacement and
and the double-D symbol are trademarks of
mounting of an AC plug on the power supply cord of
Dolby Laboratories.
this unit should be performed only by qualified
service personnel. If connected to an AC outlet, the
cut-off plug can cause severe electrical shock. Make
sure it is properly disposed of after removal.
Manufactured under license under U.S.
The equipment should be disconnected by removing
Patent #’s: 5,451,942; 5,956,674; 5,974,380;
the mains plug from the wall socket when left unused
5,978,762; 6,226,616; 6,487,535; 7,212,872;
for a long period of time (for example, when on
7,333,929; 7,392,195; 7,272,567 & other U.S.
vacation).
D3-4-2-2-1a_A1_En
and worldwide patents issued & pending.
DTS and the Symbol are registered
trademarks, & DTS-HD, DTS-HD Master
CAUTION
Audio, and the DTS logos are trademarks of
The STANDBY/ON switch on this unit will not
DTS, Inc. Product includes software. © DTS,
completely shut off all power from the AC outlet.
Inc. All Rights Reserved.
Since the power cord serves as the main disconnect
device for the unit, you will need to unplug it from the
AC outlet to shut down all power. Therefore, make
sure the unit has been installed so that the power
cord can be easily unplugged from the AC outlet in
case of an accident. To avoid fire hazard, the power
cord should also be unplugged from the AC outlet
when left unused for a long period of time (for
example, when on vacation).
D3-4-2-2-2a*_A1_En
VSX-520_SYXCN_En.book 4 ページ 2010年4月12日 月曜日 午後7時13分
Thank you for buying this Pioneer product. Please read through these operating instructions so you
will know how to operate your model properly. After you have finished reading the instructions, put
them away in a safe place for future reference.
Contents
Flow of settings on the receiver
. . . 6
04 Basic Setup
Automatically setting up for surround sound
(MCACC) . . . . . . . . . . . . . . . . . . . . . . . . . . . . 27
01 Before you start
Other problems when using the Auto
Checking what’s in the box . . . . . . . . . . . . . . . 7
MCACC Setup. . . . . . . . . . . . . . . . . . . . . . . 28
Loading the batteries . . . . . . . . . . . . . . . . . . . 7
Installing the receiver . . . . . . . . . . . . . . . . . . . 7
Ventilation . . . . . . . . . . . . . . . . . . . . . . . . . . 8
05 Listening to your system
Basic playback . . . . . . . . . . . . . . . . . . . . . . . 29
Auto playback . . . . . . . . . . . . . . . . . . . . . . . . 30
02 Controls and displays
Listening in surround sound . . . . . . . . . . . . . 30
Front panel . . . . . . . . . . . . . . . . . . . . . . . . . . . 9
Using the Advanced surround effects. . . . . 31
Operating range of remote control . . . . . . . 10
Listening in stereo. . . . . . . . . . . . . . . . . . . . . 32
Display . . . . . . . . . . . . . . . . . . . . . . . . . . . . . 11
Using Front Stage Surround Advance . . . . . . 32
Remote control . . . . . . . . . . . . . . . . . . . . . . . 13
Using Stream Direct . . . . . . . . . . . . . . . . . . . 33
Using the Sound Retriever. . . . . . . . . . . . . . . 33
03 Connecting your equipment
Better sound using Phase Control. . . . . . . . . 33
Listening with Acoustic Calibration EQ . . . . . 34
Placing the speakers. . . . . . . . . . . . . . . . . . . 16
Using surround back channel processing. . . 34
Hints on the speaker placement. . . . . . . . . 17
Setting the Up Mix function. . . . . . . . . . . . . . 35
Connecting the speakers . . . . . . . . . . . . . . . 18
Setting the Audio options . . . . . . . . . . . . . . . 35
Connect the surround back or front
Choosing the input signal . . . . . . . . . . . . . . . 38
height speakers . . . . . . . . . . . . . . . . . . . . . 19
Using the headphone . . . . . . . . . . . . . . . . . . 38
Making cable connections . . . . . . . . . . . . . . 19
HDMI cables . . . . . . . . . . . . . . . . . . . . . . . 20
About HDMI . . . . . . . . . . . . . . . . . . . . . . . . 20
06 The System Setup menu
Analog audio cables. . . . . . . . . . . . . . . . . . 20
Using the System Setup menu . . . . . . . . . . . 39
Digital audio cables . . . . . . . . . . . . . . . . . . 21
Manual speaker setup. . . . . . . . . . . . . . . . . . 39
Video cables . . . . . . . . . . . . . . . . . . . . . . . . 21
Speaker setting. . . . . . . . . . . . . . . . . . . . . . 40
About video outputs connection . . . . . . . . . . 21
Crossover network . . . . . . . . . . . . . . . . . . . 41
Connecting a TV and playback components
. . . 22
Channel level . . . . . . . . . . . . . . . . . . . . . . . 41
Connecting using HDMI. . . . . . . . . . . . . . . 22
Speaker distance . . . . . . . . . . . . . . . . . . . . 41
Connecting your component with no
The Input Assign menu . . . . . . . . . . . . . . . . . 42
HDMI terminal . . . . . . . . . . . . . . . . . . . . . . 22
The Pre Out Setting . . . . . . . . . . . . . . . . . . . . 42
Connecting a satellite receiver or other
digital set-top box . . . . . . . . . . . . . . . . . . . . . 23
Connecting an HDD/DVD recorder, VCR
07 Using the tuner
and other video sources . . . . . . . . . . . . . . . . 23
Listening to the radio. . . . . . . . . . . . . . . . . . . 43
Using the component video jacks . . . . . . . . . 24
Improving FM stereo sound . . . . . . . . . . . . 43
Connecting other audio components . . . . . . 24
Saving station presets . . . . . . . . . . . . . . . . . . 43
Connecting antennas . . . . . . . . . . . . . . . . . . 25
Listening to station presets. . . . . . . . . . . . . 44
Using external antennas. . . . . . . . . . . . . . . 25
Naming preset stations. . . . . . . . . . . . . . . . 44
Plugging in the receiver . . . . . . . . . . . . . . . . 26
An introduction to RDS . . . . . . . . . . . . . . . . . 45
Searching for RDS programs . . . . . . . . . . . 45
Displaying RDS information . . . . . . . . . . . . 46
4
En
English Italiano Français
Nederlands
EspañolDeutsch
5
En
VSX-520_SYXCN_En.book 5 ページ 2010年4月12日 月曜日 午後7時13分
08 Making recordings
Making an audio or a video recording . . . . . . 47
09 Other connections
Bluetooth® ADAPTER for Wireless
Enjoyment of Music. . . . . . . . . . . . . . . . . . . . 48
Wireless music play . . . . . . . . . . . . . . . . . . 48
Connecting Optional Bluetooth
ADAPTER . . . . . . . . . . . . . . . . . . . . . . . . . . 49
Pairing Bluetooth ADAPTER and
Bluetooth wireless technology device . . . . . 49
Listening to Music Contents of Bluetooth
wireless technology device with Your
System . . . . . . . . . . . . . . . . . . . . . . . . . . . . 50
10 Additional information
Troubleshooting . . . . . . . . . . . . . . . . . . . . . . 51
HDMI . . . . . . . . . . . . . . . . . . . . . . . . . . . . . 54
Important information regarding the
HDMI connection . . . . . . . . . . . . . . . . . . . . 55
Resetting the main unit. . . . . . . . . . . . . . . . . 55
Specifications . . . . . . . . . . . . . . . . . . . . . . . . 56
Cleaning the unit. . . . . . . . . . . . . . . . . . . . . . 56
VSX-S520D VSX-S520 Language select / Sélection de la langue / Selección de idioma / Selezione lingua / Sprachauswahl / Taal selecteren / Выбор языка English Français Español Italiano Deutsch Nederlands Русский
> Before Start > Part Names > Install > Initial Setup > Playback Advanced Setup | Firmware Update | Others AV RECEIVER VSX-S520D VSX-S520 Instruction Manual Before Start What’s in the box ………………………………………………………….. 2 Part Names Front Panel
> Before Start > Part Names > Install > Initial Setup > Playback Advanced Setup | Firmware Update | Others What’s in the box Before Start E N Main unit (1) Remote controller (RC-933R) (1), batteries (AAA/R03) (2) Speaker setup microphone (1) DAB/FM antenna (1) (VSX-S520D) 2 Indoor FM antenna (1)
> Before Start > Part Names > Install > Initial Setup > Playback Advanced Setup | Firmware Update | Others Front Panel Part Names E N 1. Í STANDBY/ON button: Turns the unit on or into standby mode. 2. Display (ÄP7) 3. Remote control sensor 4. INPUT SELECTOR dial: Switches the
> Before Start > Part Names > Install > Initial Setup > Playback Advanced Setup | Firmware Update | Others Rear Panel VSX-S520D E N 90° 180° 1. ANTENNA DAB / FM jack: Connect the supplied antenna. 2. Wireless antenna: Raise for Wi-Fi connection or when using a BLUETOOTH
> Before Start > Part Names > Install > Initial Setup > Playback Advanced Setup | Firmware Update | Others VSX-S520 E N 90° 180° 1. ANTENNA FM UNBAL 75h jack: Connect the supplied antenna. 2. Wireless antenna: Raise for Wi-Fi connection or when using a BLUETOOTH enabled
> Before Start > Part Names > Install > Initial Setup > Playback Advanced Setup | Firmware Update | Others Remote Controller 1. Í button: Turns the unit on or into standby mode. 2. Input selector buttons: Switches the input to be played. 3. (AV ADJUST) button: You can perform common
> Before Start > Part Names > Install > Initial Setup > Playback Advanced Setup | Firmware Update | Others Display E N Neo:6 1. Lights in the following conditions. HDMI: HDMI signals are input and selected. ARC: Audio signals from the ARC compatible TV are input and selected. USB:
> Before Start > Part Names > Install > Initial Setup > Playback Advanced Setup | Firmware Update | Others 1. Connect the Speakers Install Install the speakers L Front speakers output front stereo sound and a center speaker outputs center sound such as dialogs and vocals. Surround speakers create
> Before Start > Part Names > Install > Initial Setup > Playback Advanced Setup | Firmware Update | Others 1 E N a 1/2˝ (12 mm) 2 a b a 3 FRONT R b a speaker cable, b subwoofer cable FRONT L CENTER Connect the speakers Refer to the illustration to connect the speaker system. Twist the wires of the
> Before Start > Part Names > Install > Initial Setup > Playback Advanced Setup | Firmware Update | Others E N Make sure the exposed wires of the speakers do not stick out of the speaker terminals when connecting. If the exposed wires of the speakers touch the rear panel or the + and – wires touch
> Before Start > Part Names > Install > Initial Setup > Playback Advanced Setup | Firmware Update | Others 2. Connect the TV To ARC TV 1 E N For a TV that supports the ARC (Audio Return Channel) (ÄP67) feature, use an HDMI cable and connect according to illustration «a». Choose an HDMI IN jack on
> Before Start > Part Names > Install > Initial Setup > Playback Advanced Setup | Firmware Update | Others 3. Connect the HDMI AV Components E N 1 a BD/DVD a Streaming media player Cable/Satellite set-top box HDMI OUT a HDMI cable 12 e.g. BD This is an example of connection with an AV component
> Before Start > Part Names > Install > Initial Setup > Playback Advanced Setup | Firmware Update | Others 4. Connect the Audio Components Connecting a CD player E N Use a digital coaxial cable to connect a CD player to the DIGITAL IN COAXIAL jack. Connecting a turntable You can also connect a
> Before Start > Part Names > Install > Initial Setup > Playback Advanced Setup | Firmware Update | Others 5. Connect Other Cables Antenna Hookup 1 (North American models) a b VSX-S520D VSX-S520 2 3 DAB/FM antenna (VSX-S520D) Connect the supplied DAB/FM antenna to the ANTENNA DAB/FM terminal. Make
> Before Start > Part Names > Install > Initial Setup > Playback Advanced Setup | Firmware Update | Others Initial Setup with Auto Start-up Wizard Initial Setup 1 2 Initial Setup starts automatically E N 1. Switch the input on the TV to that assigned to the unit. 2. Put batteries into the remote
> Before Start > Part Names > Install > Initial Setup > Playback Advanced Setup | Firmware Update | Others 1. Full Auto MCACC Place the supplied speaker setup microphone in the listening position, measure the test tones emitted by the speakers, then the unit automatically sets the optimum volume
> Before Start > Part Names > Install > Initial Setup > Playback Advanced Setup | Firmware Update | Others button on the remote controller and press ENTER, then follow the on-screen instructions. E N Wi-Fi Setup Ðáóó÷ïòä a i j k l m n o p q r s t u v w x y z 1 b 2 3 c d 4 e 5 6 f g 7 h 8 9 0 — ^ \
> Before Start > Part Names > Install > Initial Setup > Playback Advanced Setup | Firmware Update | Others AV Component Playback Playback Basic operations Play an AV component or TV connected to this unit with an HDMI cable or other cable. 1. Switch the input on the TV to that assigned to the unit.
> Before Start > Part Names > Install > Initial Setup > Playback Advanced Setup | Firmware Update | Others Internet Radio 1 a b Basic operations Pandora® (U.S. only) When this unit is connected to a network, you can listen to TuneIn or other preregistered Internet radio services. Depending on the
> Before Start > Part Names > Install > Initial Setup > Playback Advanced Setup | Firmware Update | Others (I like this track) : Give a track “thumbs-up” and Pandora will play more music like it. (I don’t like this track) : Give a track “thumbs-down” and Pandora will ban that track from the current
> Before Start > Part Names > Install > Initial Setup > Playback Advanced Setup | Firmware Update | Others Spotify Basic operations 1 2 a b 3 c d e 4 E N Spotify Connect play is possible by connecting this unit to the same network as a smart phone or tablet. To enable Spotify Connect, install the
> Before Start > Part Names > Install > Initial Setup > Playback Advanced Setup | Firmware Update | Others Music Server It is possible to stream music files stored on PCs or NAS devices connected to the same network as this unit. The network servers this unit is compatible with are those PCs with
> Before Start > Part Names > Install > Initial Setup > Playback Advanced Setup | Firmware Update | Others 0 Depending on the server and share settings, the unit may not recognize it, or may not be able to play its music files. Furthermore, the unit cannot access pictures and videos stored on
> Before Start > Part Names > Install > Initial Setup > Playback Advanced Setup | Firmware Update | Others USB Storage Device Basic play 1 Play music files on a USB storage device. 1. Switch the input on the TV to that assigned to the unit. 2. Plug your USB storage device with the music files into
> Before Start > Part Names > Install > Initial Setup > Playback Advanced Setup | Firmware Update | Others USB Storage Device Requirements 0 Note that operation is not guaranteed with all USB storage devices. 0 This unit can use USB storage devices that comply with the USB mass storage device class
> Before Start > Part Names > Install > Initial Setup > Playback Advanced Setup | Firmware Update | Others AirPlay® 1 3 4 2 5 26 Basic play You can wirelessly enjoy the music files on an iPhone®, iPod touch®, or iPad® connected to the same access point as this unit. 0 Update the OS version on your
> Before Start > Part Names > Install > Initial Setup > Playback Advanced Setup | Firmware Update | Others BLUETOOTH® Playback Pairing 1 2 Playing Back 1 2 Pairing E N 1. When you press the button on the remote controller, «Now Pairing…» is displayed on this unit’s display, and the pairing mode
> Before Start > Part Names > Install > Initial Setup > Playback Advanced Setup | Firmware Update | Others Listening to the FM/DAB Radio Listening to FM Radio 1 Tuning Automatically 1. Press TUNER on the remote controller repeatedly to select either «FM» on the display. 2. Press MODE (e) on the
> Before Start > Part Names > Install > Initial Setup > Playback Advanced Setup | Firmware Update | Others Drama Culture Science (Science and technology) Varied Pop M (Pop music) Rock M (Rock music) Easy M (Middle of the road music) Light M (Light classics) Classics (Serious classics) Other M
> Before Start > Part Names > Install > Initial Setup > Playback Advanced Setup | Firmware Update | Others Presetting a Radio Station It allows you to register up to 40 of your favorite FM/DAB stations. Registering radio stations in advance allows you to tune into your radio station of choice
> Before Start > Part Names > Install > Initial Setup > Playback Advanced Setup | Firmware Update | Others Listening Modes Selecting Listening Modes You can change the listening mode during play by pressing repeatedly «AUTO/DIRECT» or «SURR». a AUTO/DIRECT button (b) Press repeatedly and the
> Before Start > Part Names > Install > Initial Setup > Playback Advanced Setup | Firmware Update | Others Input source & volume Listening Mode Effects Listening mode Updating of listening modes We plan to provide support for the Dolby Atmos and DTS:X audio format through firmware updates for this
> Before Start > Part Names > Install > Initial Setup > Playback Advanced Setup | Firmware Update | Others maximum of 7.1ch. 0 To enable transfer of this audio format, connect via HDMI cable and set audio output on the player to bitstream output. Drama Suitable for TV shows produced in a TV studio.
> Before Start > Part Names > Install > Initial Setup > Playback Advanced Setup | Firmware Update | Others cable and set audio output on the player to bitstream output. DTS Neo:6 These listening modes allow you to expand the playback signal to 5.1 channels to suit the connected speaker
> Before Start > Part Names > Install > Initial Setup > Playback Advanced Setup | Firmware Update | Others Selectable listening modes You can select a variety of listening modes to suit the audio format of the signal being input. 0 The Stereo mode can be selected with any audio format. 0 Listening
> Before Start > Part Names > Install > Initial Setup > Playback Advanced Setup | Firmware Update | Others Input Format Listening Mode Input Format Listening Mode Input Format Listening Mode Multich PCM Stereo DSD Stereo Dolby Atmos Stereo Multich PCM½1 DSD Dolby Surround Dolby Surround Surround
> Before Start > Part Names > Install > Initial Setup > Playback Advanced Setup | Firmware Update | Others Input Format Listening Mode Input Format Listening Mode Input Format Listening Mode Dolby D Stereo Dolby D+ Stereo Dolby TrueHD Stereo Dolby D½1½2 Dolby D+½1½2½3 Dolby TrueHD½1½2 Dolby
> Before Start > Part Names > Install > Initial Setup > Playback Advanced Setup | Firmware Update | Others Input Format Listening Mode Input Format Listening Mode Input Format Listening Mode DTS Stereo DTS 96/24 Stereo DTS Express Stereo DTS½1½2 DTS 96/24½1½2 DTS Express½1½2 PL Movie½3 PL Movie½3
> Before Start > Part Names > Install > Initial Setup > Playback Advanced Setup | Firmware Update | Others Input Format Listening Mode Input Format Listening Mode Input Format Listening Mode DTS-HD HR Stereo DTS-HD MSTR Stereo DTS:X Stereo DTS-HD HR½1½2 DTS-HD MSTR½1½2 DTS:X PL Movie½3 PL Movie½3
> Before Start > Part Names > Install > Initial Setup > Playback Advanced Setup | Firmware Update | Others AV Adjust 1 By pressing the button on the remote controller during play, you can adjust frequently used settings, such as the sound quality, using on-screen menus. Note that there is no
> Before Start > Part Names > Install > Initial Setup > Playback Advanced Setup | Firmware Update | Others 48 kHz or less. The setting is not effective in the bitstream signals. 0 It cannot be set if the listening mode is Direct or Pure Direct. DRC: Make small sounds easily heard. It is useful when
> Before Start > Part Names > Install > Initial Setup > Playback Advanced Setup | Firmware Update | Others System Setup Advanced Setup 1 2 TV’s remote controller The unit allows you to configure advanced settings to provide you with an even better experience. 1. Switch the input on the TV to that
> Before Start > Part Names > Install > Initial Setup > Playback Advanced Setup | Firmware Update | Others Impose OSD Screen Saver Set whether or not to display the information on the TV when the volume is adjusted or input is changed, for example. «On (Default Value)»: OSD displayed on the TV
> Before Start > Part Names > Install > Initial Setup > Playback Advanced Setup | Firmware Update | Others TV «AUDIO 1» to «AUDIO 2»: Assign a desired AUDIO IN jack to the TV input selector. (Default Value is «——«) Center Set the low range capabilities for each channel by setting either small or
> Before Start > Part Names > Install > Initial Setup > Playback Advanced Setup | Firmware Update | Others Front Left Specify the distance between each speaker and the listening position. (Default Value is «10.0ft/3.00m») Center Specify the distance between each speaker and the listening position.
> Before Start > Part Names > Install > Initial Setup > Playback Advanced Setup | Firmware Update | Others Audio Adjust Source ∫ Dual Mono/Mono ∫ Input Volume Absorber Dual Mono Mono Input Channel Set the audio channel or language to be output when playing multiplex audio or multilingual TV
> Before Start > Part Names > Install > Initial Setup > Playback Advanced Setup | Firmware Update | Others ∫ Audio Select Select the priority for input selection when multiple audio sources are connected to one input selector, such as connections to both the «BD/DVD» HDMI IN jack and the «BD/DVD»
> Before Start > Part Names > Install > Initial Setup > Playback Advanced Setup | Firmware Update | Others HDMI Standby Through When this is set to anything other than «Off», you can play the video and audio of an HDMI connected player on the TV even if the unit is in standby mode. Only «Auto» and
> Before Start > Part Names > Install > Initial Setup > Playback Advanced Setup | Firmware Update | Others Auto Standby This setting places the unit on standby automatically after 20 minutes of inactivity without any video or audio input. (When «USB Power Out at Standby» or «Network Standby» is on,
> Before Start > Part Names > Install > Initial Setup > Playback Advanced Setup | Firmware Update | Others ∫ Firmware Update Update Notice Availability of a firmware update will be notified via network. «Enable (Default Value)»: Notify updates «Disable»: Do not notify updates Version The current
> Before Start > Part Names > Install > Initial Setup > Playback Advanced Setup | Firmware Update | Others MCACC 1 2 TV’s remote controller Setup the speakers automatically or make desired changes to the equalizer. You can also check the values set currently for each speaker setting. 1. Switch the
> Before Start > Part Names > Install > Initial Setup > Playback Advanced Setup | Firmware Update | Others in «AV Adjust» — «MCACC» — «Manual EQ Select» (ÄP40). Front Left Center Front Right 52 Surround Right After selecting the speaker frequency from between «63 Hz» and «16 kHz» with the cursors
> Before Start > Part Names > Install > Initial Setup > Playback Advanced Setup | Firmware Update | Others MCACC Data Check E N You can check the number of speaker channels connected and the content and values you have set for each of the speaker settings. ∫ Speaker Setting You can check the number
> Before Start > Part Names > Install > Initial Setup > Playback Advanced Setup | Firmware Update | Others Network/Bluetooth 1 2 TV’s remote controller Make settings related to network connections and BLUETOOTH. 1. Switch the input on the TV to that assigned to the unit. 2. Press on the remote
> Before Start > Part Names > Install > Initial Setup > Playback Advanced Setup | Firmware Update | Others MAC Address This is the MAC address of this unit. This value is specific to the component and cannot be changed. DHCP «Enable (Default Value)»: Auto configuration by DHCP «Disable»: Manual
> Before Start > Part Names > Install > Initial Setup > Playback Advanced Setup | Firmware Update | Others Bluetooth 56 Status Bluetooth Select whether or not to use the BLUETOOTH function. «On (Default Value)»: Enables connection with a BLUETOOTH enabled device by using the BLUETOOTH function.
> Before Start > Part Names > Install > Initial Setup > Playback Advanced Setup | Firmware Update | Others Firmware Update Firmware Update Update function of this unit How to update firmware Updating the Firmware via Network This unit has functionality to update the firmware (the system software)
> Before Start > Part Names > Install > Initial Setup > Playback Advanced Setup | Firmware Update | Others System Setup Input/Output Assign Speaker Hardware are still unable to connect to the Internet, the DNS server or proxy server may be temporarily down. Check the service status with your ISP
> Before Start > Part Names > Install > Initial Setup > Playback Advanced Setup | Firmware Update | Others 8. Press ENTER with «Update» selected to start update. 0 During the update, the TV screen may go black depending on the updated program. In that case, check the progress on the display of this
> Before Start > Part Names > Install > Initial Setup > Playback Advanced Setup | Firmware Update | Others Troubleshooting Others Before starting the procedure Problems may be solved by simply turning the power on/off or disconnecting/connecting the power cord, which is easier than working on the
> Before Start > Part Names > Install > Initial Setup > Playback Advanced Setup | Firmware Update | Others A speaker produces no sound 0 Make sure that the polarity of the speaker cables (_/`) is correct, and that no bare wires are in contact with the metal part of speaker terminals. 0 Make sure
> Before Start > Part Names > Install > Initial Setup > Playback Advanced Setup | Firmware Update | Others Images flicker 0 It is possible that the resolution of the player is not compatible with the TV’s resolution. If you have connected the player to this unit with an HDMI cable, try changing the
> Before Start > Part Names > Install > Initial Setup > Playback Advanced Setup | Firmware Update | Others 0 Make sure that the used router and/or modem is supported by your ISP. Cannot access the network server 0 This unit needs to be connected to the same router as the network server. 0 This unit
> Before Start > Part Names > Install > Initial Setup > Playback Advanced Setup | Firmware Update | Others outlet as this unit, this noise may be an effect from the other unit. If the symptoms improve by unplugging the power cord of the other unit, use different wall outlets for this unit and the
> Before Start > Part Names > Install > Initial Setup > Playback Advanced Setup | Firmware Update | Others General Specifications Amplifier (Audio) section Rated Output Power (FTC) (North American) With 4 ohm loads, both channels driven, from 1 kHz; rated 50 watts per channel minimum RMS power,
> Before Start > Part Names > Install > Initial Setup > Playback Advanced Setup | Firmware Update | Others 1 (BD/DVD), 2 (CBL/SAT), PHONO (designated) Audio Outputs Analog SUBWOOFER PRE OUT Speaker Outputs FRONT L/R, CENTER, SURROUND L/R, SUBWOOFER Phones PHONES (Front, Ø 3.5 mm) Others USB: 1
> Before Start > Part Names > Install > Initial Setup > Playback Advanced Setup | Firmware Update | Others About HDMI Compatible functions HDMI (High Definition Multimedia Interface) is a digital interface standard for connecting TVs, projectors, Blu-ray Disc/DVD players, set-top boxes, and other
> Before Start > Part Names > Install > Initial Setup > Playback Advanced Setup | Firmware Update | Others License and Trademark Information The Bluetooth® word mark and logos are registered trademarks owned by the Bluetooth SIG, Inc. QR Code is a registered trademark of DENSO WAVE INCORPORATED.
2-3-12 Yaesu, Chuo-ku, Tokyo 104-0028 JAPAN <U.S.A.> 18 PARK WAY, UPPER SADDLE RIVER, NEW JERSEY 07458, U.S.A. Tel: 1-201-785-2600 Tel: 1-844-679-5350 <Germany> Hanns-Martin-Schleyer-Straße 35, 47877 Willich, Germany Tel: +49(0)2154 913222 E N <UK> Anteros Building, Odyssey Business Park, West End
> Avant de démarrer > Nom des pièces > Installation > Configuration initiale > Lecture Configuration avancée | Mise à jour du micrologiciel | Autres RECEPTEUR AV VSX-S520D VSX-S520 Mode d’emploi Avant de démarrer Ce que contient la boîte …………………………………………………. 2
> Avant de démarrer > Nom des pièces > Installation > Configuration initiale > Lecture Configuration avancée | Mise à jour du micrologiciel | Autres Ce que contient la boîte Avant de démarrer F R Appareil principal (1) Télécommande (RC-933R) (1), piles (AAA/R03) (2) Microphone de configuration
> Avant de démarrer > Nom des pièces > Installation > Configuration initiale > Lecture Configuration avancée | Mise à jour du micrologiciel | Autres Panneau frontal Nom des pièces F R 1. Touche Í STANDBY/ON : Permet la mise en marche ou en veille de l’appareil. 2. Affichage
> Avant de démarrer > Nom des pièces > Installation > Configuration initiale > Lecture Configuration avancée | Mise à jour du micrologiciel | Autres Panneau arrière VSX-S520D F R 90° 180° 1. Prise ANTENNA DAB / FM : Sert à raccorder l’antenne fournie. 2. Antenne sans fil: À
> Avant de démarrer > Nom des pièces > Installation > Configuration initiale > Lecture Configuration avancée | Mise à jour du micrologiciel | Autres VSX-S520 F R 90° 180° 1. Prise ANTENNA FM UNBAL 75h: Sert à raccorder l’antenne fournie. 2. Antenne sans fil: À lever pour
> Avant de démarrer > Nom des pièces > Installation > Configuration initiale > Lecture Configuration avancée | Mise à jour du micrologiciel | Autres Télécommande 30° 6 1. Touche Í: Permet la mise en marche ou en veille de l’appareil. 2. Boutons de sélections d’entrée:
> Avant de démarrer > Nom des pièces > Installation > Configuration initiale > Lecture Configuration avancée | Mise à jour du micrologiciel | Autres Afficheur F R Neo:6 1. S’allume sous les conditions suivantes. HDMI: Les signaux HDMI entrent et sont sélectionnés. ARC: Les signaux
> Avant de démarrer > Nom des pièces > Installation > Configuration initiale > Lecture Configuration avancée | Mise à jour du micrologiciel | Autres 1. Raccorder les enceintes Installation Installer les enceintes L Les enceintes avant reproduisent le son stéréo avant et l’enceinte centrale
> Avant de démarrer > Nom des pièces > Installation > Configuration initiale > Lecture Configuration avancée | Mise à jour du micrologiciel | Autres 1 F R a 1/2˝ (12 mm) 2 a b a 3 FRONT R b a câble d’enceinte, b câble du caisson de basse FRONT L CENTER Raccorder les enceintes Référez-vous à
> Avant de démarrer > Nom des pièces > Installation > Configuration initiale > Lecture Configuration avancée | Mise à jour du micrologiciel | Autres F R Vérifiez que les fils dénudés des enceintes ne dépassent pas des bornes d’enceinte lors du raccordement. Si les fils dénudés des enceintes entrent
> Avant de démarrer > Nom des pièces > Installation > Configuration initiale > Lecture Configuration avancée | Mise à jour du micrologiciel | Autres 2. Raccorder le téléviseur Vers un téléviseur ARC 1 F R Avec un téléviseur qui prend en charge la fonctionnalité ARC (Audio Return Channel) (P67),
> Avant de démarrer > Nom des pièces > Installation > Configuration initiale > Lecture Configuration avancée | Mise à jour du micrologiciel | Autres 3. Raccorder les appareils AV HDMI F R 1 a BD/DVD a Lecteur de contenu multimédia en flux Décodeur câble/ satellite HDMI OUT a Câble HDMI 12 e.g. BD
> Avant de démarrer > Nom des pièces > Installation > Configuration initiale > Lecture Configuration avancée | Mise à jour du micrologiciel | Autres 4. Raccorder les Appareils Audio Raccordement d’un lecteur CD F R Utilisez un câble coaxial numérique pour relier un lecteur CD à la prise DIGITAL IN
> Avant de démarrer > Nom des pièces > Installation > Configuration initiale > Lecture Configuration avancée | Mise à jour du micrologiciel | Autres 5. Raccorder d’autres câbles Raccordement de l’antenne 1 (Modèles nordaméricains) a Antenne DAB/FM (VSX-S520D) : Branchez l’antenne DAB/ FM fournie à
> Avant de démarrer > Nom des pièces > Installation > Configuration initiale > Lecture Configuration avancée | Mise à jour du micrologiciel | Autres Configuration initiale avec l’assistant de démarrage automatique Configuration initiale 1 2 La Initial Setup démarre automatiquement F R 1. Réglez
> Avant de démarrer > Nom des pièces > Installation > Configuration initiale > Lecture Configuration avancée | Mise à jour du micrologiciel | Autres 1. Full Auto MCACC Positionnez le microphone de configuration d’enceinte fourni sur la position d’écoute, mesurez les tonalités de test émises par les
> Avant de démarrer > Nom des pièces > Installation > Configuration initiale > Lecture Configuration avancée | Mise à jour du micrologiciel | Autres 0 «Push Button» : Si le point d’accès est muni d’une touche de connexion automatique, vous pouvez vous connecter sans saisir de mot de passe. 0 Si le
> Avant de démarrer > Nom des pièces > Installation > Configuration initiale > Lecture Configuration avancée | Mise à jour du micrologiciel | Autres Lecture d’un appareil AV Lecture Commandes de base Lisez un appareil AV ou un téléviseur raccordé à cet appareil à l’aide d’un câble HDMI et d’un
> Avant de démarrer > Nom des pièces > Installation > Configuration initiale > Lecture Configuration avancée | Mise à jour du micrologiciel | Autres Radio Internet Commandes de base 1 Lorsque cet appareil est connecté au réseau, vous pouvez écouter TuneIn ou d’autres services de radio Internet
> Avant de démarrer > Nom des pièces > Installation > Configuration initiale > Lecture Configuration avancée | Mise à jour du micrologiciel | Autres station de radio spécialement pour vous en se basant sur les qualités musicales de ce morceau, de cet artiste ou de ce genre. À propos du menu Pandora
> Avant de démarrer > Nom des pièces > Installation > Configuration initiale > Lecture Configuration avancée | Mise à jour du micrologiciel | Autres Spotify Commandes de base 1 2 a b 3 c d e 4 F R La lecture Spotify Connect est possible en connectant cet appareil au même réseau qu’un smartphone ou
> Avant de démarrer > Nom des pièces > Installation > Configuration initiale > Lecture Configuration avancée | Mise à jour du micrologiciel | Autres Music Server Il est possible de diffuser en flux des fichiers de musique présents sur les ordinateurs ou dispositifs NAS connectés au même réseau que
> Avant de démarrer > Nom des pièces > Installation > Configuration initiale > Lecture Configuration avancée | Mise à jour du micrologiciel | Autres être imbriqués jusqu’à 16 niveaux de profondeur. Les actions suivantes sur la télécommande sont également possibles. (a) Si les listes de dossiers ou
> Avant de démarrer > Nom des pièces > Installation > Configuration initiale > Lecture Configuration avancée | Mise à jour du micrologiciel | Autres Périphérique de stockage USB Lecture de base 1 Lisez des fichiers musicaux sur un périphérique de stockage USB. 1. Réglez l’entrée du téléviseur sur
> Avant de démarrer > Nom des pièces > Installation > Configuration initiale > Lecture Configuration avancée | Mise à jour du micrologiciel | Autres Configuration requise du périphérique de stockage USB 0 Notez que cette commande n’est pas garantie avec tous les périphériques de stockage USB. 0 Cet
> Avant de démarrer > Nom des pièces > Installation > Configuration initiale > Lecture Configuration avancée | Mise à jour du micrologiciel | Autres AirPlay® 1 3 4 2 5 26 Lecture de base Vous pouvez profiter à distance des fichiers musicaux présents sur un iPhone®, iPod touch®, ou un iPad® connecté
> Avant de démarrer > Nom des pièces > Installation > Configuration initiale > Lecture Configuration avancée | Mise à jour du micrologiciel | Autres Lecture BLUETOOTH® Jumelage 1 2 Écouter 1 2 Jumelage F R 1. Lorsque vous appuyez sur la touche de la télécommande, «Now Pairing…» apparait sur
> Avant de démarrer > Nom des pièces > Installation > Configuration initiale > Lecture Configuration avancée | Mise à jour du micrologiciel | Autres Écoute de la radio FM/DAB Écoute de la radio FM 1 Syntonisation automatique 1. Appuyez plusieurs fois sur la touche TUNER de la télécommande pour
> Avant de démarrer > Nom des pièces > Installation > Configuration initiale > Lecture Configuration avancée | Mise à jour du micrologiciel | Autres télécommande pour sélectionner le type de programme que vous désirez trouver, puis appuyez sur ENTER (a) pour lancer la recherche. Les types de
> Avant de démarrer > Nom des pièces > Installation > Configuration initiale > Lecture Configuration avancée | Mise à jour du micrologiciel | Autres Présélection d’une station de radio Cela vous permet de mémoriser jusqu’à 40 de vos stations FM/DAB favorites. L’enregistrement de stations de radio à
> Avant de démarrer > Nom des pièces > Installation > Configuration initiale > Lecture Configuration avancée | Mise à jour du micrologiciel | Autres Modes d’écoute Sélection des Modes d’écoute Vous pouvez changer le mode d’écoute durant la lecture en appuyant plusieurs fois sur «AUTO/DIRECT» ou
> Avant de démarrer > Nom des pièces > Installation > Configuration initiale > Lecture Configuration avancée | Mise à jour du micrologiciel | Autres Source d’entrée & volume Mode d’écoute Format du signal L’affichage change au bout de quelques Échantillonnage de la fréquence Résolution du signal
> Avant de démarrer > Nom des pièces > Installation > Configuration initiale > Lecture Configuration avancée | Mise à jour du micrologiciel | Autres sortie bitstream. Dolby Di (Dolby Digital Plus) Ce mode reproduit fidèlement la conception du son enregistré au format audio Dolby Digital Plus. Le
> Avant de démarrer > Nom des pièces > Installation > Configuration initiale > Lecture Configuration avancée | Mise à jour du micrologiciel | Autres mais avec des canaux en plus comme par exemple le canal surround arrière ajouté pour avoir du 7.1 maximum. Il peut être enregistré à un taux
> Avant de démarrer > Nom des pièces > Installation > Configuration initiale > Lecture Configuration avancée | Mise à jour du micrologiciel | Autres Modes d’écoute sélectionnables Vous pouvez sélectionner plusieurs modes d’écoute selon le format audio du signal entrant. 0 Le mode Stereo peut être
> Avant de démarrer > Nom des pièces > Installation > Configuration initiale > Lecture Configuration avancée | Mise à jour du micrologiciel | Autres Format d’entrée Listening Mode Format d’entrée Listening Mode Format d’entrée Listening Mode Multich PCM Stereo DSD Stereo Dolby Atmos Stereo Multich
> Avant de démarrer > Nom des pièces > Installation > Configuration initiale > Lecture Configuration avancée | Mise à jour du micrologiciel | Autres Format d’entrée Listening Mode Format d’entrée Listening Mode Format d’entrée Listening Mode Dolby D Stereo Dolby D+ Stereo Dolby TrueHD Stereo Dolby
> Avant de démarrer > Nom des pièces > Installation > Configuration initiale > Lecture Configuration avancée | Mise à jour du micrologiciel | Autres Format d’entrée Listening Mode Format d’entrée Listening Mode Format d’entrée Listening Mode DTS Stereo DTS 96/24 Stereo DTS Express Stereo DTS12
> Avant de démarrer > Nom des pièces > Installation > Configuration initiale > Lecture Configuration avancée | Mise à jour du micrologiciel | Autres Format d’entrée Listening Mode Format d’entrée Listening Mode Format d’entrée Listening Mode DTS-HD HR Stereo DTS-HD MSTR Stereo DTS:X Stereo DTS-HD
> Avant de démarrer > Nom des pièces > Installation > Configuration initiale > Lecture Configuration avancée | Mise à jour du micrologiciel | Autres AV Adjust 1 En appuyant sur la touche de la télécommande durant la lecture, vous pouvez régler fréquemment les paramètres utilisés, comme la qualité
> Avant de démarrer > Nom des pièces > Installation > Configuration initiale > Lecture Configuration avancée | Mise à jour du micrologiciel | Autres Sound Retriever: Améliore la qualité du son compressé. La lecture de sons depuis des fichiers compressés avec perte tels que les MP3 peut être
> Avant de démarrer > Nom des pièces > Installation > Configuration initiale > Lecture Configuration avancée | Mise à jour du micrologiciel | Autres System Setup Configuration avancée 1 2 Télécommande du téléviseur L’appareil vous permet de configurer les paramètres avancés pour qu’ils vous
> Avant de démarrer > Nom des pièces > Installation > Configuration initiale > Lecture Configuration avancée | Mise à jour du micrologiciel | Autres Impose OSD Choisissez d’afficher ou non les informations sur le téléviseur lorsque le volume est réglé ou lorsque l’entrée est modifiée, par exemple.
> Avant de démarrer > Nom des pièces > Installation > Configuration initiale > Lecture Configuration avancée | Mise à jour du micrologiciel | Autres CBL/SAT «AUDIO 1» à «AUDIO 2» : Attribuez la prise AUDIO IN désirée au sélecteur d’entrée CBL/SAT. (La valeur par défaut est «AUDIO 2») GAME «AUDIO 1»
> Avant de démarrer > Nom des pièces > Installation > Configuration initiale > Lecture Configuration avancée | Mise à jour du micrologiciel | Autres Crossover Double Bass Lorsqu’il y a des haut-parleurs réglés sur «Small», réglez le Hz sous lequel vous souhaitez que d’autres haut-parleurs jouent la
> Avant de démarrer > Nom des pièces > Installation > Configuration initiale > Lecture Configuration avancée | Mise à jour du micrologiciel | Autres Dual Mono Mono Input Channel Réglez le canal audio ou la langue de sortie lors de l’écoute d’audio multiplex ou d’émissions de télévision multilingues
> Avant de démarrer > Nom des pièces > Installation > Configuration initiale > Lecture Configuration avancée | Mise à jour du micrologiciel | Autres pour chaque touche du sélecteur d’entrée. Sélectionnez le sélecteur d’entrée à configurer. Veuillez noter que certaines valeurs par défaut ne peuvent
> Avant de démarrer > Nom des pièces > Installation > Configuration initiale > Lecture Configuration avancée | Mise à jour du micrologiciel | Autres HDMI Standby Through Lorsque ceci est paramétré sur autre chose que «Off», il est possible de lire la vidéo et le son d’un lecteur raccordé par HDMI
> Avant de démarrer > Nom des pièces > Installation > Configuration initiale > Lecture Configuration avancée | Mise à jour du micrologiciel | Autres Sleep Timer Permet à l’appareil de se mettre automatiquement en veille une fois que la durée définie s’est écoulée. Choisissez parmi «30 minutes», «60
> Avant de démarrer > Nom des pièces > Installation > Configuration initiale > Lecture Configuration avancée | Mise à jour du micrologiciel | Autres Sélectionnez un pas de fréquence selon votre zone de résidence. Sélectionnez «0.2 MHz (valeur par défaut)» ou «0.05 MHz». 0 Lorsque ce réglage est
> Avant de démarrer > Nom des pièces > Installation > Configuration initiale > Lecture Configuration avancée | Mise à jour du micrologiciel | Autres MCACC 1 2 Télécommande du téléviseur Configurez les enceintes automatiquement ou apportez les modifications souhaitées à l’égaliseur. Vous pouvez
> Avant de démarrer > Nom des pièces > Installation > Configuration initiale > Lecture Configuration avancée | Mise à jour du micrologiciel | Autres Front Left Après avoir choisi la fréquence de l’enceinte entre «63 Hz» et «16 kHz» avec les touches du curseur /, réglez le volume de cette
> Avant de démarrer > Nom des pièces > Installation > Configuration initiale > Lecture Configuration avancée | Mise à jour du micrologiciel | Autres MCACC Data Check F R Vous pouvez vérifier le nombre de canaux d’enceinte connectés, ainsi que le contenu et les valeurs que vous avez définis pour
> Avant de démarrer > Nom des pièces > Installation > Configuration initiale > Lecture Configuration avancée | Mise à jour du micrologiciel | Autres Network/Bluetooth 1 2 Télécommande du téléviseur Effectuez les réglages relatifs aux connexions réseau et BLUETOOTH. 1. Réglez l’entrée du téléviseur
> Avant de démarrer > Nom des pièces > Installation > Configuration initiale > Lecture Configuration avancée | Mise à jour du micrologiciel | Autres MAC Address Il s’agit de l’adresse MAC de cet appareil. Cette valeur est spécifique au composant et ne peut pas être modifiée. DHCP «Enable (Valeur
> Avant de démarrer > Nom des pièces > Installation > Configuration initiale > Lecture Configuration avancée | Mise à jour du micrologiciel | Autres Bluetooth Bluetooth Auto Input Change 56 Choisissez si vous voulez ou non utiliser la fonction BLUETOOTH. «On (Valeur par défaut)» : Permet
> Avant de démarrer > Nom des pièces > Installation > Configuration initiale > Lecture Configuration avancée | Mise à jour du micrologiciel | Autres Mise à jour du micrologiciel Mise à jour du micrologiciel Fonction de mise à jour de cet appareil Comment mettre à jour le micrologiciel Cet appareil
> Avant de démarrer > Nom des pièces > Installation > Configuration initiale > Lecture Configuration avancée | Mise à jour du micrologiciel | Autres System Setup Input/Output Assign Speaker Hardware 0 Si «Firmware Update» est grisé et ne peut pas être sélectionné, attendez quelques instants jusqu’à
> Avant de démarrer > Nom des pièces > Installation > Configuration initiale > Lecture Configuration avancée | Mise à jour du micrologiciel | Autres 9. Retirez le périphérique de stockage USB de cet appareil. 10.Appuyez sur la touche Í STANDBY/ON de cet appareil pour le mettre en mode veille. Le
> Avant de démarrer > Nom des pièces > Installation > Configuration initiale > Lecture Configuration avancée | Mise à jour du micrologiciel | Autres Dépannage Autres Avant de démarrer la procédure Les problèmes peuvent être résolus simplement en allumant et en coupant l’alimentation, ou en
> Avant de démarrer > Nom des pièces > Installation > Configuration initiale > Lecture Configuration avancée | Mise à jour du micrologiciel | Autres coaxial numérique ou d’un câble audio analogique. Aucun son n’est restitué par le lecteur raccordé 0 Passez le sélecteur d’entrée de cet appareil sur
> Avant de démarrer > Nom des pièces > Installation > Configuration initiale > Lecture Configuration avancée | Mise à jour du micrologiciel | Autres est correct sur le côté du moniteur tel qu’un téléviseur. Vérifiez les points suivants si ce qui précède n’a pas réglé le problème : Il n’y a pas de
> Avant de démarrer > Nom des pièces > Installation > Configuration initiale > Lecture Configuration avancée | Mise à jour du micrologiciel | Autres périphérique compatible BLUETOOTH 0 La réception BLUETOOTH est de faible qualité. Rapprochez le périphérique compatible BLUETOOTH de l’appareil ou
> Avant de démarrer > Nom des pièces > Installation > Configuration initiale > Lecture Configuration avancée | Mise à jour du micrologiciel | Autres 0 Certains routeurs LAN sans fil vous permettent de définir plusieurs SSID pour un seul appareil. Si vous utilisez la touche de réglage automatique
> Avant de démarrer > Nom des pièces > Installation > Configuration initiale > Lecture Configuration avancée | Mise à jour du micrologiciel | Autres Caractéristiques générales Section amplificateur (Audio) Puissance de sortie nominale (FTC) (Nord-américain) Avec 4 ohms de charge, deux canaux
> Avant de démarrer > Nom des pièces > Installation > Configuration initiale > Lecture Configuration avancée | Mise à jour du micrologiciel | Autres Analogique 1 (BD/DVD), 2 (CBL/SAT), PHONO (indiqué) Sorties audio Analogique SUBWOOFER PRE OUT Sorties haut-parleurs FRONT L/R, CENTER, SURROUND L/R,
> Avant de démarrer > Nom des pièces > Installation > Configuration initiale > Lecture Configuration avancée | Mise à jour du micrologiciel | Autres À propos de l’interface HDMI Fonctions compatibles HDMI (High Definition Multimedia Interface pour Interface Multimédia Haute Définition) est une
> Avant de démarrer > Nom des pièces > Installation > Configuration initiale > Lecture Configuration avancée | Mise à jour du micrologiciel | Autres Licence et Marque commerciale The Bluetooth® word mark and logos are registered trademarks owned by the Bluetooth SIG, Inc. Manufactured under license
2-3-12 Yaesu, Chuo-ku, Tokyo 104-0028 JAPAN <U.S.A.> 18 PARK WAY, UPPER SADDLE RIVER, NEW JERSEY 07458, U.S.A. Tel: 1-201-785-2600 Tel: 1-844-679-5350 <Germany> Hanns-Martin-Schleyer-Straße 35, 47877 Willich, Germany Tel: +49(0)2154 913222 F R <UK> Anteros Building, Odyssey Business Park, West End
> Antes de empezar > Nombres de las piezas > Instalación > Configuración inicial > Reproducción Configuración avanzada | Actualización de Firmware | Otros AV RECEIVER VSX-S520D VSX-S520 Manual de instrucciones Antes de empezar Qué se encuentra en la caja
> Antes de empezar > Nombres de las piezas > Instalación > Configuración inicial > Reproducción Configuración avanzada | Actualización de Firmware | Otros Qué se encuentra en la caja Antes de empezar E S Unidad principal (1) Mando a distancia (RC-933R) (1), pilas (AAA/R03) (2) Micrófono para la
> Antes de empezar > Nombres de las piezas > Instalación > Configuración inicial > Reproducción Configuración avanzada | Actualización de Firmware | Otros Panel frontal Nombres de las piezas E S 1. Botón Í STANDBY/ON: Enciende la unidad o la configura en modo de espera. 2.
> Antes de empezar > Nombres de las piezas > Instalación > Configuración inicial > Reproducción Configuración avanzada | Actualización de Firmware | Otros Panel trasero VSX-S520D E S 90° 180° 1. Conector ANTENNA DAB / FM: Conecte la antena provista. 2. Antena inalámbrica:
> Antes de empezar > Nombres de las piezas > Instalación > Configuración inicial > Reproducción Configuración avanzada | Actualización de Firmware | Otros VSX-S520 E S 90° 180° 1. Conector ANTENNA FM UNBAL 75h: Conecte la antena provista. 2. Antena inalámbrica: Levántela
> Antes de empezar > Nombres de las piezas > Instalación > Configuración inicial > Reproducción Configuración avanzada | Actualización de Firmware | Otros Mando a distancia 1. Botón Í: Enciende la unidad o la pone en modo de espera. 2. Botones de selector de entrada: Cambia la entrada
> Antes de empezar > Nombres de las piezas > Instalación > Configuración inicial > Reproducción Configuración avanzada | Actualización de Firmware | Otros Pantalla E S Neo:6 1. Se ilumina en las siguientes condiciones. HDMI: Las señales HDMI entran y están seleccionadas. ARC: Las
> Antes de empezar > Nombres de las piezas > Instalación > Configuración inicial > Reproducción Configuración avanzada | Actualización de Firmware | Otros 1. Conexión de los altavoces Instalación Instalación de los altavoces L Los altavoces delanteros emiten sonidos delanteros en estéreo y el
> Antes de empezar > Nombres de las piezas > Instalación > Configuración inicial > Reproducción Configuración avanzada | Actualización de Firmware | Otros 1 E S a 1/2˝ (12 mm) 2 a b a 3 FRONT R b a cable de altavoz, b cable de subwoofer FRONT L CENTER Conexión de los altavoces Consulte la
> Antes de empezar > Nombres de las piezas > Instalación > Configuración inicial > Reproducción Configuración avanzada | Actualización de Firmware | Otros E S Asegúrese de que los cables expuestos de los altavoces no sobresalgan de los terminales de los altavoces al conectarlos. Si los cables
> Antes de empezar > Nombres de las piezas > Instalación > Configuración inicial > Reproducción Configuración avanzada | Actualización de Firmware | Otros 2. Conexión del TV Con un televisor compatible con ARC 1 E S Para un televisor compatible con la función ARC (Audio Return Channel) (P67),
> Antes de empezar > Nombres de las piezas > Instalación > Configuración inicial > Reproducción Configuración avanzada | Actualización de Firmware | Otros 3. Conexión de los componentes AV HDMI E S 1 a BD/DVD a Reproductor multimedia de flujo de datos continuo Decodificador de cable/satélite HDMI
> Antes de empezar > Nombres de las piezas > Instalación > Configuración inicial > Reproducción Configuración avanzada | Actualización de Firmware | Otros 4. Conexión de los componentes de audio Conexión con un reproductor CD E S Utilice un cable coaxial digital para conectar un reproductor de CD
> Antes de empezar > Nombres de las piezas > Instalación > Configuración inicial > Reproducción Configuración avanzada | Actualización de Firmware | Otros 5. Conexión de otros cables Conexión de antenas 1 (Modelos norteamericanos) a Antena DAB/FM (VSX-S520D) : Conecte la antena DAB/ FM provista al
> Antes de empezar > Nombres de las piezas > Instalación > Configuración inicial > Reproducción Configuración avanzada | Actualización de Firmware | Otros Configuración inicial con el asistente de arranque automático Configuración inicial 1 2 Initial Setup se inicia automáticamente E S 1. Cambie la
> Antes de empezar > Nombres de las piezas > Instalación > Configuración inicial > Reproducción Configuración avanzada | Actualización de Firmware | Otros 1. Full Auto MCACC Coloque el micrófono de configuración de altavoces suministrado en la posición de escucha y mida los tonos de prueba emitidos
> Antes de empezar > Nombres de las piezas > Instalación > Configuración inicial > Reproducción Configuración avanzada | Actualización de Firmware | Otros siguientes dos métodos de conexión por Wi-Fi: «Scan Networks»: Busque un punto de acceso desde esta unidad. Entérese del SSID del punto de
> Antes de empezar > Nombres de las piezas > Instalación > Configuración inicial > Reproducción Configuración avanzada | Actualización de Firmware | Otros Reproducción de componente AV Reproducción Operaciones básicas Reproduzca el contenido de un componente AV o un televisor conectado a esta
> Antes de empezar > Nombres de las piezas > Instalación > Configuración inicial > Reproducción Configuración avanzada | Actualización de Firmware | Otros Radio por Internet Operaciones básicas 1 Cuando esta unidad está conectada a una red, puede escuchar TuneIn u otros servicios de radio por
> Antes de empezar > Nombres de las piezas > Instalación > Configuración inicial > Reproducción Configuración avanzada | Actualización de Firmware | Otros radio única para usted basándose en las cualidades de esa pista musical, artista o género. Acerca del menú de Pandora: Aparecerán unos iconos
> Antes de empezar > Nombres de las piezas > Instalación > Configuración inicial > Reproducción Configuración avanzada | Actualización de Firmware | Otros Spotify Operaciones básicas 1 2 a b 3 c d e 4 E S Podrá reproducir Spotify Connect si conecta la unidad a la misma red que un smartphone o
> Antes de empezar > Nombres de las piezas > Instalación > Configuración inicial > Reproducción Configuración avanzada | Actualización de Firmware | Otros Music Server Es posible transmitir archivos de música almacenados en PC o dispositivos NAS conectados a la misma red que esta unidad. Los
> Antes de empezar > Nombres de las piezas > Instalación > Configuración inicial > Reproducción Configuración avanzada | Actualización de Firmware | Otros carpeta puede contener hasta 20.000 pistas y las carpetas se pueden anidar hasta en 16 niveles. También se pueden llevar a cabo estas
> Antes de empezar > Nombres de las piezas > Instalación > Configuración inicial > Reproducción Configuración avanzada | Actualización de Firmware | Otros Dispositivo de almacenamiento USB Reproducción básica 1 a b c d 2 e f g h 24 Reproduzca archivos de música desde un dispositivo de
> Antes de empezar > Nombres de las piezas > Instalación > Configuración inicial > Reproducción Configuración avanzada | Actualización de Firmware | Otros entre los modos de repetición. (g) Si se pulsa durante la reproducción, este botón la pausa. Si se pulsa con la reproducción en pausa, esta se
> Antes de empezar > Nombres de las piezas > Instalación > Configuración inicial > Reproducción Configuración avanzada | Actualización de Firmware | Otros AirPlay® 1 3 4 2 5 26 Reproducción básica Puede disfrutar sin cables de los archivos de música almacenados en un iPhone®, iPod touch® o iPad®
> Antes de empezar > Nombres de las piezas > Instalación > Configuración inicial > Reproducción Configuración avanzada | Actualización de Firmware | Otros BLUETOOTH® Reproducción Emparejado 1 2 Reproducción 1 2 Emparejado E S 1. Cuando pulsa el botón en el mando a distancia, en la pantalla de esta
> Antes de empezar > Nombres de las piezas > Instalación > Configuración inicial > Reproducción Configuración avanzada | Actualización de Firmware | Otros Escuchar la radio FM/DAB Escuchar la radio FM 1 Sintonización automática 1. Pulse TUNER del mando a distancia repetidamente para seleccionar
> Antes de empezar > Nombres de las piezas > Instalación > Configuración inicial > Reproducción Configuración avanzada | Actualización de Firmware | Otros buscar y pulse ENTER (a) para iniciar la búsqueda. Los tipos de programa se mostrarán de este modo: None News (Noticieros) Affairs (Asuntos de
> Antes de empezar > Nombres de las piezas > Instalación > Configuración inicial > Reproducción Configuración avanzada | Actualización de Firmware | Otros Programación de una emisora de radio Le permite registrar hasta un máximo de 40 emisoras FM/ DAB. El registro de emisoras de radio de antemano
> Antes de empezar > Nombres de las piezas > Instalación > Configuración inicial > Reproducción Configuración avanzada | Actualización de Firmware | Otros Modos de audición Selección de los modos de audición Puede modificar el modo de audición durante la reproducción si pulsa repetidamente
> Antes de empezar > Nombres de las piezas > Instalación > Configuración inicial > Reproducción Configuración avanzada | Actualización de Firmware | Otros Fuente de entrada y volumen Modo de audición Formato de señal La visualización cambiará pocos segundos Frecuencia de muestreo Resolución de la
> Antes de empezar > Nombres de las piezas > Instalación > Configuración inicial > Reproducción Configuración avanzada | Actualización de Firmware | Otros Dolby Di (Dolby Digital Plus) Este modo reproduce fielmente el diseño del sonido grabado en el formato de audio Dolby Digital Plus. El formato
> Antes de empezar > Nombres de las piezas > Instalación > Configuración inicial > Reproducción Configuración avanzada | Actualización de Firmware | Otros DTS-HD HR (DTS-HD High Resolution Audio) Este modo reproduce fielmente el diseño del sonido grabado en el formato de audio DTS-HD High
> Antes de empezar > Nombres de las piezas > Instalación > Configuración inicial > Reproducción Configuración avanzada | Actualización de Firmware | Otros Modos de audición seleccionables Puede seleccionar una serie de modos de audición que se adecuen al formato de audio de la señal transmitida. 0
> Antes de empezar > Nombres de las piezas > Instalación > Configuración inicial > Reproducción Configuración avanzada | Actualización de Firmware | Otros Formato de entrada Listening Mode Formato de entrada Listening Mode Formato de entrada Listening Mode Multich PCM Stereo DSD Stereo Dolby Atmos
> Antes de empezar > Nombres de las piezas > Instalación > Configuración inicial > Reproducción Configuración avanzada | Actualización de Firmware | Otros Formato de entrada Listening Mode Formato de entrada Listening Mode Formato de entrada Listening Mode Dolby D Stereo Dolby D+ Stereo Dolby
> Antes de empezar > Nombres de las piezas > Instalación > Configuración inicial > Reproducción Configuración avanzada | Actualización de Firmware | Otros Formato de entrada Listening Mode Formato de entrada Listening Mode Formato de entrada Listening Mode DTS Stereo DTS 96/24 Stereo DTS Express
> Antes de empezar > Nombres de las piezas > Instalación > Configuración inicial > Reproducción Configuración avanzada | Actualización de Firmware | Otros Formato de entrada Listening Mode Formato de entrada Listening Mode Formato de entrada Listening Mode DTS-HD HR Stereo DTS-HD MSTR Stereo DTS:X
> Antes de empezar > Nombres de las piezas > Instalación > Configuración inicial > Reproducción Configuración avanzada | Actualización de Firmware | Otros AV Adjust 1 Pulsando el botón en el mando a distancia durante la reproducción, puede ajustar los ajustes de uso más frecuente, como la calidad
> Antes de empezar > Nombres de las piezas > Instalación > Configuración inicial > Reproducción Configuración avanzada | Actualización de Firmware | Otros Sound Retriever: Mejora la calidad del audio comprimido. La reproducción de sonido de archivos comprimidos con pérdidas tales como MP3 será
> Antes de empezar > Nombres de las piezas > Instalación > Configuración inicial > Reproducción Configuración avanzada | Actualización de Firmware | Otros System Setup Configuración avanzada 1 2 Mando a distancia del TV La unidad le permite configurar ajustes avanzados para brindarle una
> Antes de empezar > Nombres de las piezas > Instalación > Configuración inicial > Reproducción Configuración avanzada | Actualización de Firmware | Otros Impose OSD Screen Saver Seleccione si desea o no la visualización de información en pantalla (OSD) en el televisor, por ejemplo, cuando ajuste
> Antes de empezar > Nombres de las piezas > Instalación > Configuración inicial > Reproducción Configuración avanzada | Actualización de Firmware | Otros BD/DVD «AUDIO 1» a «AUDIO 2»: Asigne el conector AUDIO IN de su elección al selector de entrada BD/DVD. (El valor predeterminado es «AUDIO 1»)
> Antes de empezar > Nombres de las piezas > Instalación > Configuración inicial > Reproducción Configuración avanzada | Actualización de Firmware | Otros Crossover Double Bass Si hay altavoces configurados como «Small», ajuste los Hz a los que le gustaría que los otros altavoces reprodujesen los
> Antes de empezar > Nombres de las piezas > Instalación > Configuración inicial > Reproducción Configuración avanzada | Actualización de Firmware | Otros Audio Adjust Headphone Level ∫ Dual Mono/Mono Dual Mono Mono Input Channel Ajuste el canal de audio o idioma como canal de emisión cuando
> Antes de empezar > Nombres de las piezas > Instalación > Configuración inicial > Reproducción Configuración avanzada | Actualización de Firmware | Otros ∫ Audio Select Seleccione la prioridad de la selección de entrada cuando haya varias fuentes de audio conectadas a un selector de entrada, por
> Antes de empezar > Nombres de las piezas > Instalación > Configuración inicial > Reproducción Configuración avanzada | Actualización de Firmware | Otros HDMI Standby Through Cuando esto se encuentra en una opción distinta a “Off”, usted puede reproducir el vídeo y el audio de un reproductor
> Antes de empezar > Nombres de las piezas > Instalación > Configuración inicial > Reproducción Configuración avanzada | Actualización de Firmware | Otros Sleep Timer Permite que la unidad entre en modo de espera automáticamente cuando pase el tiempo especificado. Seleccione entre «30 minutes», «60
> Antes de empezar > Nombres de las piezas > Instalación > Configuración inicial > Reproducción Configuración avanzada | Actualización de Firmware | Otros FM Frequency Step (Modelos norteamericanos) Seleccione un paso de frecuencia en función de su zona de residencia. Seleccione «0.2 MHz (valor
> Antes de empezar > Nombres de las piezas > Instalación > Configuración inicial > Reproducción Configuración avanzada | Actualización de Firmware | Otros MCACC 1 2 Mando a distancia del TV Configure los altavoces automáticamente o realice los cambios deseados en el ecualizador. También puede
> Antes de empezar > Nombres de las piezas > Instalación > Configuración inicial > Reproducción Configuración avanzada | Actualización de Firmware | Otros Puede establecer tres ecualizadores distintos en los ajustes Preset 1 a 3. Puede seleccionar hasta 4 bandas para el subwoofer y 9 bandas para
> Antes de empezar > Nombres de las piezas > Instalación > Configuración inicial > Reproducción Configuración avanzada | Actualización de Firmware | Otros MCACC Data Check E S Puede comprobar la cantidad de canales de los altavoces conectados, así como el contenido y los valores configurados para
> Antes de empezar > Nombres de las piezas > Instalación > Configuración inicial > Reproducción Configuración avanzada | Actualización de Firmware | Otros Network/Bluetooth 1 2 Mando a distancia del TV Realice ajustes relacionados con las conexiones de red y BLUETOOTH. 1. Cambie la entrada en la TV
> Antes de empezar > Nombres de las piezas > Instalación > Configuración inicial > Reproducción Configuración avanzada | Actualización de Firmware | Otros MAC Address Esta es la dirección MAC de esta unidad. Este valor es específico para el componente y no se puede cambiar. DHCP «Enable (Valor
> Antes de empezar > Nombres de las piezas > Instalación > Configuración inicial > Reproducción Configuración avanzada | Actualización de Firmware | Otros Bluetooth Bluetooth Auto Input Change 56 Seleccione si desea o no utilizar la función de BLUETOOTH. «On (Valor predeterminado)»: Habilita la
> Antes de empezar > Nombres de las piezas > Instalación > Configuración inicial > Reproducción Configuración avanzada | Actualización de Firmware | Otros Actualización de Firmware Actualización de Firmware Función de actualización de esta unidad Cómo actualizar el firmware La unidad dispone de una
> Antes de empezar > Nombres de las piezas > Instalación > Configuración inicial > Reproducción Configuración avanzada | Actualización de Firmware | Otros System Setup Input/Output Assign Speaker Hardware 0 Si “Firmware Update” está en gris y no se puede seleccionar, espere un momento hasta que se
> Antes de empezar > Nombres de las piezas > Instalación > Configuración inicial > Reproducción Configuración avanzada | Actualización de Firmware | Otros completado la actualización. 9. Retire el dispositivo de almacenamiento USB de esta unidad. 10.Pulse Í STANDBY/ON en esta unidad para pasar la
> Antes de empezar > Nombres de las piezas > Instalación > Configuración inicial > Reproducción Configuración avanzada | Actualización de Firmware | Otros Resolución de problemas Otros Antes de iniciar el procedimiento El problema puede solucionarse simplemente encendiendo y apagando la
> Antes de empezar > Nombres de las piezas > Instalación > Configuración inicial > Reproducción Configuración avanzada | Actualización de Firmware | Otros Un altavoz no produce sonido 0 Asegúrese de que la polaridad de los cables del altavoz (_/`) sea la correcta y que ningún cable expuesto esté en
> Antes de empezar > Nombres de las piezas > Instalación > Configuración inicial > Reproducción Configuración avanzada | Actualización de Firmware | Otros televisor mientras la unidad está en el modo de espera, necesitará activar «System Setup» — «Hardware» — «HDMI» — «HDMI Standby Through» en
> Antes de empezar > Nombres de las piezas > Instalación > Configuración inicial > Reproducción Configuración avanzada | Actualización de Firmware | Otros 0 Pruebe a conectar o desconectar el suministro de energía de esta unidad y del router e intente reiniciar el router. 0 Si el router LAN
> Antes de empezar > Nombres de las piezas > Instalación > Configuración inicial > Reproducción Configuración avanzada | Actualización de Firmware | Otros condiciones de las ondas de radio. Acorte la distancia desde el punto de acceso LAN inalámbrico o elimine cualquier obstáculo para mejorar la
> Antes de empezar > Nombres de las piezas > Instalación > Configuración inicial > Reproducción Configuración avanzada | Actualización de Firmware | Otros Especificaciones generales Sección del amplificador (Audio) Potencia de salida nominal (FTC) (Norteamericano) Con cargas de 4 ohmios, ambos
> Antes de empezar > Nombres de las piezas > Instalación > Configuración inicial > Reproducción Configuración avanzada | Actualización de Firmware | Otros COAXIAL (CD) Analógico 1 (BD/DVD), 2 (CBL/SAT), PHONO (designado) Salidas de audio Analógico PRESALIDA DE SUBWOOFER Salidas de altavoces FRONT
> Antes de empezar > Nombres de las piezas > Instalación > Configuración inicial > Reproducción Configuración avanzada | Actualización de Firmware | Otros Acerca de HDMI Funciones compatibles HDMI (Interfaz multimedia de alta definición) es un estándar de interfaz digital para conectar televisores,
> Antes de empezar > Nombres de las piezas > Instalación > Configuración inicial > Reproducción Configuración avanzada | Actualización de Firmware | Otros Información sobre licencias y marcas comerciales The Bluetooth® word mark and logos are registered trademarks owned by the Bluetooth SIG, Inc.
2-3-12 Yaesu, Chuo-ku, Tokyo 104-0028 JAPAN <U.S.A.> 18 PARK WAY, UPPER SADDLE RIVER, NEW JERSEY 07458, U.S.A. Tel: 1-201-785-2600 Tel: 1-844-679-5350 <Germany> Hanns-Martin-Schleyer-Straße 35, 47877 Willich, Germany Tel: +49(0)2154 913222 E S <UK> Anteros Building, Odyssey Business Park, West End
> Prima di iniziare > Nome dei componenti > Installazione > Initial Setup > Riproduzione Impostazioni avanzate | Aggiornamento del firmware | Altri AV RECEIVER VSX-S520D VSX-S520 Manuale di istruzioni Prima di iniziare Contenuto della confezione …………………………………………….
> Prima di iniziare > Nome dei componenti > Installazione > Initial Setup > Riproduzione Impostazioni avanzate | Aggiornamento del firmware | Altri Contenuto della confezione Prima di iniziare I T Unità principale (1) Telecomando (RC-933R) (1), batterie (AAA/R03) (2) Microfono per l’impostazione
> Prima di iniziare > Nome dei componenti > Installazione > Initial Setup > Riproduzione Impostazioni avanzate | Aggiornamento del firmware | Altri Pannello frontale Nome dei componenti I T 1. Pulsante Í STANDBY/ON: Accende l’unità o la mette in standby. 2. Display (P7) 3.
> Prima di iniziare > Nome dei componenti > Installazione > Initial Setup > Riproduzione Impostazioni avanzate | Aggiornamento del firmware | Altri Pannello posteriore VSX-S520D I T 90° 180° 1. Jack ANTENNA DAB / FM: Per il collegamento con l’antenna in dotazione 2. Antenna
> Prima di iniziare > Nome dei componenti > Installazione > Initial Setup > Riproduzione Impostazioni avanzate | Aggiornamento del firmware | Altri VSX-S520 I T 90° 180° 1. Jack ANTENNA FM UNBAL 75h: Per il collegamento con l’antenna in dotazione 2. Antenna wireless:
> Prima di iniziare > Nome dei componenti > Installazione > Initial Setup > Riproduzione Impostazioni avanzate | Aggiornamento del firmware | Altri Telecomando 30° 6 1. Pulsante Í: Accende l’unità o la mette in standby. 2. Pulsanti INPUT SELECTOR: Consente di attivare
> Prima di iniziare > Nome dei componenti > Installazione > Initial Setup > Riproduzione Impostazioni avanzate | Aggiornamento del firmware | Altri Display I T Neo:6 1. Si accende nelle seguenti condizioni. HDMI: In ingresso stanno arrivando e sono selezionati segnali HDMI. ARC: Sono
> Prima di iniziare > Nome dei componenti > Installazione > Initial Setup > Riproduzione Impostazioni avanzate | Aggiornamento del firmware | Altri 1. Collegare i diffusori Installazione Installare i diffusori L I diffusori anteriori emettono l’audio stereo centrale ed un diffusore centrale emette
> Prima di iniziare > Nome dei componenti > Installazione > Initial Setup > Riproduzione Impostazioni avanzate | Aggiornamento del firmware | Altri 1 I T a 1/2˝ (12 mm) 2 a b a 3 FRONT R b a Cavo di potenza, b Cavo subwoofer FRONT L CENTER Collegare i diffusori Per collegare il sistema di diffusori
> Prima di iniziare > Nome dei componenti > Installazione > Initial Setup > Riproduzione Impostazioni avanzate | Aggiornamento del firmware | Altri I T Nell’effettuare il collegamento, accertarsi che i conduttori spellati dei cavi dei diffusori non fuoriescano dai terminali dei diffusori. Se i
> Prima di iniziare > Nome dei componenti > Installazione > Initial Setup > Riproduzione Impostazioni avanzate | Aggiornamento del firmware | Altri 2. Collegare il televisore A televisore ARC 1 I T Per un televisore che supporta la funzione ARC (Audio Return Channel) (P67), usare un cavo HDMI e
> Prima di iniziare > Nome dei componenti > Installazione > Initial Setup > Riproduzione Impostazioni avanzate | Aggiornamento del firmware | Altri 3. Collegare i componenti HDMI AV I T 1 a BD/DVD a Streamer Decoder via cavo/satellitare HDMI OUT a Cavo HDMI 12 e.g. BD Questo è un esempio di
> Prima di iniziare > Nome dei componenti > Installazione > Initial Setup > Riproduzione Impostazioni avanzate | Aggiornamento del firmware | Altri 4. Collegare i componenti Audio Collegamento di un lettore CD I T Utilizzare un cavo digitale coassiale per collegare un lettore CD al terminale
> Prima di iniziare > Nome dei componenti > Installazione > Initial Setup > Riproduzione Impostazioni avanzate | Aggiornamento del firmware | Altri 5. Collegare gli altri cavi Collegamento dell’antenna 1 (Modelli per Nord America) a b VSX-S520D VSX-S520 2 3 Antenna FM per interni (VSX-S520) :
> Prima di iniziare > Nome dei componenti > Installazione > Initial Setup > Riproduzione Impostazioni avanzate | Aggiornamento del firmware | Altri Initial Setup con installazione guidata Initial Setup 1 2 Initial Setup inizia automaticamente I T 1. Spostare l’ingresso sul televisore a quello
> Prima di iniziare > Nome dei componenti > Installazione > Initial Setup > Riproduzione Impostazioni avanzate | Aggiornamento del firmware | Altri 1. Full Auto MCACC Collocare il microfono di configurazione dei diffusori nella posizione di ascolto e misurare i toni di prova emessi dai diffusori;
> Prima di iniziare > Nome dei componenti > Installazione > Initial Setup > Riproduzione Impostazioni avanzate | Aggiornamento del firmware | Altri tramite Wi-Fi sono i seguenti: «Scan Networks»: Ricerca di un punto di accesso da questa unità. È necessario conoscere in anticipo l’SSID del punto di
> Prima di iniziare > Nome dei componenti > Installazione > Initial Setup > Riproduzione Impostazioni avanzate | Aggiornamento del firmware | Altri Riproduzione di un componente AV Riproduzione Operazioni base Riprodurre dei contenuti su un componente AV o un televisore collegati a questa unità
> Prima di iniziare > Nome dei componenti > Installazione > Initial Setup > Riproduzione Impostazioni avanzate | Aggiornamento del firmware | Altri Internet radio Operazioni base 1 Quando questa unità è connessa a una rete, è possibile ascoltare TuneIn o altri servizi di Internet radio memorizzati.
> Prima di iniziare > Nome dei componenti > Installazione > Initial Setup > Riproduzione Impostazioni avanzate | Aggiornamento del firmware | Altri visualizzate sulla schermata durante la riproduzione di una stazione. Selezionando l’icona con / (a) sul telecomando e premendo ENTER (b), è
> Prima di iniziare > Nome dei componenti > Installazione > Initial Setup > Riproduzione Impostazioni avanzate | Aggiornamento del firmware | Altri Spotify Operazioni base 1 2 a b 3 c d e 4 I T È possibile eseguire la riproduzione con Spotify Connect collegando questa unità alla stessa rete cui
> Prima di iniziare > Nome dei componenti > Installazione > Initial Setup > Riproduzione Impostazioni avanzate | Aggiornamento del firmware | Altri Music Server È possibile eseguire lo streaming di file musicali memorizzati su PC o dispositivi NAS collegati alla stessa rete di questa unità. I
> Prima di iniziare > Nome dei componenti > Installazione > Initial Setup > Riproduzione Impostazioni avanzate | Aggiornamento del firmware | Altri È inoltre possibile eseguire le seguenti operazioni da telecomando. (a) In assenza di elenchi di cartelle o file visualizzati sullo schermo, è
> Prima di iniziare > Nome dei componenti > Installazione > Initial Setup > Riproduzione Impostazioni avanzate | Aggiornamento del firmware | Altri Dispositivo di archiviazione USB Riproduzione di base 1 a b c d 2 e f g h 24 Riproduzione di file musicali su un dispositivo di archiviazione USB. 1.
> Prima di iniziare > Nome dei componenti > Installazione > Initial Setup > Riproduzione Impostazioni avanzate | Aggiornamento del firmware | Altri elenco di cartelle o file, questo tasto consente di tornare alla schermata di riproduzione. (e) Questo tasto consente di riprodurre il brano
> Prima di iniziare > Nome dei componenti > Installazione > Initial Setup > Riproduzione Impostazioni avanzate | Aggiornamento del firmware | Altri AirPlay® 1 3 4 2 5 26 Riproduzione di base È possibile ascoltare in modalità wireless i file musicali su un iPhone®, iPod touch®, o iPad® collegati
> Prima di iniziare > Nome dei componenti > Installazione > Initial Setup > Riproduzione Impostazioni avanzate | Aggiornamento del firmware | Altri Riproduzione BLUETOOTH® Abbinamento 1 2 In riproduzione 1 2 Abbinamento I T 1. Quando si preme il tasto sul telecomando, sul display di questa unità
> Prima di iniziare > Nome dei componenti > Installazione > Initial Setup > Riproduzione Impostazioni avanzate | Aggiornamento del firmware | Altri Ascolto della radio FM/DAB Ascolto della radio FM 1 Sintonizzazione automatica 1. Premere ripetutamente TUNER sul telecomando per selezionare «FM» sul
> Prima di iniziare > Nome dei componenti > Installazione > Initial Setup > Riproduzione Impostazioni avanzate | Aggiornamento del firmware | Altri premere ENTER (a) per iniziare la ricerca. I tipi di programma visualizzati sono i seguenti: None News (notiziari) Affairs (attualità) Info
> Prima di iniziare > Nome dei componenti > Installazione > Initial Setup > Riproduzione Impostazioni avanzate | Aggiornamento del firmware | Altri Memorizzazione di una stazione radio Consente di memorizzare fino a 40 delle vostre stazioni FM/ DAB preferite. La registrazione di stazioni radio in
> Prima di iniziare > Nome dei componenti > Installazione > Initial Setup > Riproduzione Impostazioni avanzate | Aggiornamento del firmware | Altri Modalità di Ascolto Selezione delle modalità di ascolto È possibile modificare la modalità di ascolto durante la riproduzione premendo ripetutamente
> Prima di iniziare > Nome dei componenti > Installazione > Initial Setup > Riproduzione Impostazioni avanzate | Aggiornamento del firmware | Altri Sorgente ingresso e volume Effetti Modalità di ascolto Modalità di ascolto Aggiornamento delle modalità di ascolto Prevediamo di introdurre il supporto
> Prima di iniziare > Nome dei componenti > Installazione > Initial Setup > Riproduzione Impostazioni avanzate | Aggiornamento del firmware | Altri Dolby Di (Dolby Digital Plus) Questa modalità riproduce fedelmente le caratteristiche dell’audio registrato in formato Dolby Digital Plus. Il formato
> Prima di iniziare > Nome dei componenti > Installazione > Initial Setup > Riproduzione Impostazioni avanzate | Aggiornamento del firmware | Altri aggiunto per un massimo di 7.1 canali. Può essere registrato ad una frequenza di campionamento di 96 kHz con una risoluzione di 24 bit. 0 Per
> Prima di iniziare > Nome dei componenti > Installazione > Initial Setup > Riproduzione Impostazioni avanzate | Aggiornamento del firmware | Altri Modalità di ascolto selezionabili È possibile selezionare una serie di modalità di ascolto in base al formato audio del segnale in ingresso. 0 La
> Prima di iniziare > Nome dei componenti > Installazione > Initial Setup > Riproduzione Impostazioni avanzate | Aggiornamento del firmware | Altri Formato ingresso Modalità di Ascolto Formato ingresso Modalità di Ascolto Formato ingresso Modalità di Ascolto Multich PCM Stereo DSD Stereo Dolby
> Prima di iniziare > Nome dei componenti > Installazione > Initial Setup > Riproduzione Impostazioni avanzate | Aggiornamento del firmware | Altri Formato ingresso Modalità di Ascolto Formato ingresso Modalità di Ascolto Formato ingresso Modalità di Ascolto Dolby D Stereo Dolby D+ Stereo Dolby
> Prima di iniziare > Nome dei componenti > Installazione > Initial Setup > Riproduzione Impostazioni avanzate | Aggiornamento del firmware | Altri Formato ingresso Modalità di Ascolto Formato ingresso Modalità di Ascolto Formato ingresso Modalità di Ascolto DTS Stereo DTS 96/24 Stereo DTS Express
> Prima di iniziare > Nome dei componenti > Installazione > Initial Setup > Riproduzione Impostazioni avanzate | Aggiornamento del firmware | Altri Formato ingresso Modalità di Ascolto Formato ingresso Modalità di Ascolto Formato ingresso Modalità di Ascolto DTS-HD HR Stereo DTS-HD MSTR Stereo
> Prima di iniziare > Nome dei componenti > Installazione > Initial Setup > Riproduzione Impostazioni avanzate | Aggiornamento del firmware | Altri AV Adjust 1 Premendo il tasto sul telecomando durante la riproduzione è possibile regolare alcune impostazioni utilizzate con frequenza, come la
> Prima di iniziare > Nome dei componenti > Installazione > Initial Setup > Riproduzione Impostazioni avanzate | Aggiornamento del firmware | Altri Sound Retriever: Migliora la qualità dell’audio compresso. La riproduzione del suono di file compressi in modo scadente come gli MP3 sarà migliorata.
> Prima di iniziare > Nome dei componenti > Installazione > Initial Setup > Riproduzione Impostazioni avanzate | Aggiornamento del firmware | Altri System Setup Impostazioni avanzate 1 2 Telecomando del televisore Questa unità consente di configurare le impostazioni avanzate in modo da fornire
> Prima di iniziare > Nome dei componenti > Installazione > Initial Setup > Riproduzione Impostazioni avanzate | Aggiornamento del firmware | Altri Impose OSD Screen Saver Impostare se visualizzare o meno le informazioni sul televisore durante, per esempio, la regolazione del volume o la modifica
> Prima di iniziare > Nome dei componenti > Installazione > Initial Setup > Riproduzione Impostazioni avanzate | Aggiornamento del firmware | Altri Se non si assegna un jack, selezionare “——”. BD/DVD «Da «AUDIO 1» a «AUDIO 2»: Assegnare un ingresso AUDIO IN a piacere al selettore di ingresso
> Prima di iniziare > Nome dei componenti > Installazione > Initial Setup > Riproduzione Impostazioni avanzate | Aggiornamento del firmware | Altri Crossover Double Bass Quando sono presenti diffusori impostati su «Small», impostare il livello di Hz sotto il quale si desidera che gli altri
> Prima di iniziare > Nome dei componenti > Installazione > Initial Setup > Riproduzione Impostazioni avanzate | Aggiornamento del firmware | Altri Audio Adjust Source ∫ Dual Mono/Mono Dual Mono Mono Input Channel Input Volume Absorber Impostare il canale audio o la lingua da mettere in uscita
> Prima di iniziare > Nome dei componenti > Installazione > Initial Setup > Riproduzione Impostazioni avanzate | Aggiornamento del firmware | Altri Audio Select Selezionare la priorità per la selezione degli ingressi quando si collegano più sorgenti audio a un unico selettore di ingresso, come ad
> Prima di iniziare > Nome dei componenti > Installazione > Initial Setup > Riproduzione Impostazioni avanzate | Aggiornamento del firmware | Altri HDMI Standby Through 48 Quando questa impostazione è diversa da “Off”, è possibile riprodurre il video e l’audio di un lettore HDMI collegato al
> Prima di iniziare > Nome dei componenti > Installazione > Initial Setup > Riproduzione Impostazioni avanzate | Aggiornamento del firmware | Altri Power Management Sleep Timer Consente all’unità di entrare automaticamente in standby una volta trascorso il tempo specificato. Selezionare tra «30
> Prima di iniziare > Nome dei componenti > Installazione > Initial Setup > Riproduzione Impostazioni avanzate | Aggiornamento del firmware | Altri DAB Auto Scan (VSX-S520D) È possibile effettuare una scansione automatica quando vengono aggiunte nuove stazioni DAB oppure quando si cambia casa. DAB
> Prima di iniziare > Nome dei componenti > Installazione > Initial Setup > Riproduzione Impostazioni avanzate | Aggiornamento del firmware | Altri MCACC 1 2 Telecomando del televisore Consente di configurare automaticamente i diffusori o di effettuare le modifiche desiderate all’equalizzatore. È
> Prima di iniziare > Nome dei componenti > Installazione > Initial Setup > Riproduzione Impostazioni avanzate | Aggiornamento del firmware | Altri Subwoofer e 9 bande per tutti gli altri diffusori. Per usare gli effetti dell’equalizzatore impostati, selezionare il numero della preimpostazione in
> Prima di iniziare > Nome dei componenti > Installazione > Initial Setup > Riproduzione Impostazioni avanzate | Aggiornamento del firmware | Altri MCACC Data Check I T È possibile verificare il numero di canali dei diffusori collegati, il contenuto e i valori impostati per ciascun settaggio dei
> Prima di iniziare > Nome dei componenti > Installazione > Initial Setup > Riproduzione Impostazioni avanzate | Aggiornamento del firmware | Altri Network/Bluetooth 1 2 Telecomando del televisore Consente di definire le impostazioni relative a connessioni di rete e BLUETOOTH. 1. Spostare
> Prima di iniziare > Nome dei componenti > Installazione > Initial Setup > Riproduzione Impostazioni avanzate | Aggiornamento del firmware | Altri MAC Address Questo è l’indirizzo MAC di questa unità. Questo valore è specifico per il componente e non può essere modificato. DHCP «Enable (Valore
> Prima di iniziare > Nome dei componenti > Installazione > Initial Setup > Riproduzione Impostazioni avanzate | Aggiornamento del firmware | Altri Bluetooth Bluetooth Auto Input Change 56 Selezionare se usare o meno la funzione BLUETOOTH. «On (Valore predefinito)»: Consente il collegamento con un
> Prima di iniziare > Nome dei componenti > Installazione > Initial Setup > Riproduzione Impostazioni avanzate | Aggiornamento del firmware | Altri Aggiornamento del firmware Aggiornamento del fir mware Funzione aggiornamento di questa unità Procedura di aggiornamento del firmware Questa unità
> Prima di iniziare > Nome dei componenti > Installazione > Initial Setup > Riproduzione Impostazioni avanzate | Aggiornamento del firmware | Altri System Setup Input/Output Assign Speaker Hardware 0 Se “Firmware Update” viene visualizzato in grigio e non può essere selezionato, attendere alcuni
> Prima di iniziare > Nome dei componenti > Installazione > Initial Setup > Riproduzione Impostazioni avanzate | Aggiornamento del firmware | Altri 7. Selezionare «System Setup» — «Miscellaneous» «Firmware Update» — «Update via USB» con i cursori nell’ordine, quindi premere ENTER. System Setup
> Prima di iniziare > Nome dei componenti > Installazione > Initial Setup > Riproduzione Impostazioni avanzate | Aggiornamento del firmware | Altri Risoluzione dei problemi Altri Prima di iniziare la procedura I problemi potrebbero essere risolti semplicemente accendendo/spegnendo l’alimentazione o
> Prima di iniziare > Nome dei componenti > Installazione > Initial Setup > Riproduzione Impostazioni avanzate | Aggiornamento del firmware | Altri Nessuna emissione di suono da uno dei diffusori 0 Accertarsi che la polarità dei cavi dei diffusori (_/`) sia corretta e che non ci siano cavi nudi a
> Prima di iniziare > Nome dei componenti > Installazione > Initial Setup > Riproduzione Impostazioni avanzate | Aggiornamento del firmware | Altri lettore collegato mentre l’unità è in standby, è necessario abilitare «System Setup» — «Hardware» — «HDMI» — «HDMI Standby Through» in Home. Consultare
> Prima di iniziare > Nome dei componenti > Installazione > Initial Setup > Riproduzione Impostazioni avanzate | Aggiornamento del firmware | Altri nell’elenco del punto di accesso, potrebbe essere stato impostato per nascondere l’SSID oppure la connessione ANY potrebbe essere spenta. Cambiare
> Prima di iniziare > Nome dei componenti > Installazione > Initial Setup > Riproduzione Impostazioni avanzate | Aggiornamento del firmware | Altri 0 Se c’è un oggetto metallico vicino all’unità, la connessione LAN wireless potrebbe non essere possibile in quanto il metallo ha un effetto sulle onde
> Prima di iniziare > Nome dei componenti > Installazione > Initial Setup > Riproduzione Impostazioni avanzate | Aggiornamento del firmware | Altri Caratteristiche generali Sezione amplificatore (audio) Potenza nominale di uscita (FTC) (Nord America) Con carichi di 4 ohm, entrambi i canali
> Prima di iniziare > Nome dei componenti > Installazione > Initial Setup > Riproduzione Impostazioni avanzate | Aggiornamento del firmware | Altri COAXIAL (CD) Analogico 1 (BD/DVD), 2 (CBL/SAT), PHONO (designato) Output Audio Analogico SUBWOOFER PRE OUT Uscite del diffusore FRONT L/R, CENTER,
> Prima di iniziare > Nome dei componenti > Installazione > Initial Setup > Riproduzione Impostazioni avanzate | Aggiornamento del firmware | Altri Informazioni su HDMI Funzioni compatibili HDMI (High Definition Multimedia Interface) è uno standard di interfaccia digitale per la connessione di
> Prima di iniziare > Nome dei componenti > Installazione > Initial Setup > Riproduzione Impostazioni avanzate | Aggiornamento del firmware | Altri Informazioni di licenza e dei marchi The Bluetooth® word mark and logos are registered trademarks owned by the Bluetooth SIG, Inc. Manufactured under
2-3-12 Yaesu, Chuo-ku, Tokyo 104-0028 JAPAN <U.S.A.> 18 PARK WAY, UPPER SADDLE RIVER, NEW JERSEY 07458, U.S.A. Tel: 1-201-785-2600 Tel: 1-844-679-5350 <Germany> Hanns-Martin-Schleyer-Straße 35, 47877 Willich, Germany Tel: +49(0)2154 913222 I T <UK> Anteros Building, Odyssey Business Park, West End
> Vor dem Start > Teilenamen > Installation > Erste Einrichtung > Wiedergabe Erweiterte Einrichtung | Firmware-Update | Sonstiges AV RECEIVER VSX-S520D VSX-S520 Bedienungsanleitung Vor dem Start Lieferumfang ………………………………………………………………… 2 Teilenamen
> Vor dem Start > Teilenamen > Installation > Erste Einrichtung > Wiedergabe Erweiterte Einrichtung | Firmware-Update | Sonstiges Lieferumfang Vor dem Start D E Hauptgerät (1) Fernbedienung (RC-933R) (1), Batterien (AAA/R03) (2) Messmikrofon für die Lautsprechereinrichtung (1) DAB/FM-Antenne (1)
> Vor dem Start > Teilenamen > Installation > Erste Einrichtung > Wiedergabe Erweiterte Einrichtung | Firmware-Update | Sonstiges Bedienfeld Teilenamen D E 1. Í STANDBY/ON Taste: Schalten Sie das Gerät ein bzw. in den Standby-Modus. 2. Display (ÄP7) 3. Fernbedienungssensor 4.
> Vor dem Start > Teilenamen > Installation > Erste Einrichtung > Wiedergabe Erweiterte Einrichtung | Firmware-Update | Sonstiges Rückseite VSX-S520D D E 90° 180° 1. ANTENNA DAB / FM-Buchse: Hier kann die mitgelieferte Antenne angeschlossen werden. 2. Kabellose Antenne:
> Vor dem Start > Teilenamen > Installation > Erste Einrichtung > Wiedergabe Erweiterte Einrichtung | Firmware-Update | Sonstiges VSX-S520 D E 90° 180° 1. ANTENNA FM UNBAL 75h-Buchse: Hier kann die mitgelieferte Antenne angeschlossen werden. 2. Kabellose Antenne: Richten Sie
> Vor dem Start > Teilenamen > Installation > Erste Einrichtung > Wiedergabe Erweiterte Einrichtung | Firmware-Update | Sonstiges Fernbedienung 6 1. Í Taste: Hiermit wird das Gerät eingeschaltet bzw. in den Standby-Modus geschaltet. 2. Eingangsauswahltasten: Wechselt
> Vor dem Start > Teilenamen > Installation > Erste Einrichtung > Wiedergabe Erweiterte Einrichtung | Firmware-Update | Sonstiges Display D E Neo:6 1. Leuchtet unter den folgenden Bedingungen. HDMI: HDMI-Signale werden eingegeben und ausgewählt. ARC: Audiosignale vom ARC-kompatiblen
> Vor dem Start > Teilenamen > Installation > Erste Einrichtung > Wiedergabe Erweiterte Einrichtung | Firmware-Update | Sonstiges 1. Anschließen der Lautsprecher Installation Installieren der Lautsprecher L Über die Frontlautsprecher wird Front-Stereoklang ausgegeben, über einen Center-Lautsprecher
> Vor dem Start > Teilenamen > Installation > Erste Einrichtung > Wiedergabe Erweiterte Einrichtung | Firmware-Update | Sonstiges 1 D E a 1/2˝ (12 mm) 2 a b a 3 FRONT R b a Lautsprecherkabel, b Subwoofer-Kabel FRONT L CENTER Anschließen der Lautsprecher Informationen zum Anschließen des
> Vor dem Start > Teilenamen > Installation > Erste Einrichtung > Wiedergabe Erweiterte Einrichtung | Firmware-Update | Sonstiges D E Vergewissern Sie sich, dass beim Anschließen der Kabel die freiliegenden Drähte nicht aus den Lautsprecheranschlüssen herausragen. Wenn die freiliegenden
> Vor dem Start > Teilenamen > Installation > Erste Einrichtung > Wiedergabe Erweiterte Einrichtung | Firmware-Update | Sonstiges 2. Anschließen des Fernsehers An ARC-Fernseher 1 D E Verwenden Sie bei ARC-fähigen Fernsehern (Audio Return Channel) (ÄP67) ein HDMI-Kabel und nehmen Sie den Anschluss
> Vor dem Start > Teilenamen > Installation > Erste Einrichtung > Wiedergabe Erweiterte Einrichtung | Firmware-Update | Sonstiges 3. Anschließen der HDMI-AV-Komponenten D E 1 a BD/DVD a StreamingmedienPlayer Kabel-/SatellitDigitalempfänger HDMI OUT a HDMI-Kabel 12 e.g. BD Dies ist eine
> Vor dem Start > Teilenamen > Installation > Erste Einrichtung > Wiedergabe Erweiterte Einrichtung | Firmware-Update | Sonstiges 4. Anschließen der Audio-Komponenten Anschließen eines CD-Players D E Verwenden Sie ein digitales Koaxialkabel, um einen CDPlayer an die DIGITAL IN COAXIAL-Buchse
> Vor dem Start > Teilenamen > Installation > Erste Einrichtung > Wiedergabe Erweiterte Einrichtung | Firmware-Update | Sonstiges 5. Anschließen weiterer Kabel Antennenanschluss 1 (Modelle für Nordamerika) a DAB/FM-Antenne (VSX-S520D) : Verbinden Sie die mitgelieferte DAB/FM-Antenne mit dem ANTENNA
> Vor dem Start > Teilenamen > Installation > Erste Einrichtung > Wiedergabe Erweiterte Einrichtung | Firmware-Update | Sonstiges Erste Einrichtung mit dem automatischen Startup-Assistenten Erste Einrichtung 1 2 Initial Setup startet automatisch D E 1. Schalten Sie den Eingang des Fernsehers auf
> Vor dem Start > Teilenamen > Installation > Erste Einrichtung > Wiedergabe Erweiterte Einrichtung | Firmware-Update | Sonstiges 1. Full Auto MCACC Platzieren Sie das mitgelieferte Mikrofon zur Lautsprechereinstellung in Hörposition und messen Sie die von den Lautsprechern ausgegebenen Testtöne.
> Vor dem Start > Teilenamen > Installation > Erste Einrichtung > Wiedergabe Erweiterte Einrichtung | Firmware-Update | Sonstiges 3. Network Connection Richten Sie die WLAN-Verbindung mit einem Zugangspunkt wie einem WLAN-Router ein. Es gibt die folgenden beiden WLAN-Anschlussmöglichkeiten: «Scan
> Vor dem Start > Teilenamen > Installation > Erste Einrichtung > Wiedergabe Erweiterte Einrichtung | Firmware-Update | Sonstiges Wiedergabe von AV-Komponenten Wiedergabe Grundlegende Funktionen a b 18 Führen Sie die Wiedergabe einer AV-Komponente oder eines TV-Geräts aus, die/das über ein
> Vor dem Start > Teilenamen > Installation > Erste Einrichtung > Wiedergabe Erweiterte Einrichtung | Firmware-Update | Sonstiges Internetradio Grundlegende Funktionen 1 Wenn dieses Gerät mit einem Netzwerk verbunden ist, können Sie TuneIn und weitere voreingestellte Internetradio-Dienste
> Vor dem Start > Teilenamen > Installation > Erste Einrichtung > Wiedergabe Erweiterte Einrichtung | Firmware-Update | Sonstiges Neuen Sender erstellen: Geben Sie den Namen eines Titels, Künstlers oder Genres ein und Pandora erstellt anhand der musikalischen Qualitäten des Titels, Künstlers oder
> Vor dem Start > Teilenamen > Installation > Erste Einrichtung > Wiedergabe Erweiterte Einrichtung | Firmware-Update | Sonstiges Spotify Grundlegende Funktionen 1 2 a b 3 c d e 4 D E Die Wiedergabe von Spotify Connect ist möglich, wenn Sie dieses Gerät mit dem Netzwerk verbinden, mit dem auch Ihr
> Vor dem Start > Teilenamen > Installation > Erste Einrichtung > Wiedergabe Erweiterte Einrichtung | Firmware-Update | Sonstiges Music Server Das Streaming von Musikdateien, die auf PCs oder NASGeräten gespeichert sind, welche mit demselben Netzwerk wie dieses Gerät verbunden sind, ist möglich.
> Vor dem Start > Teilenamen > Installation > Erste Einrichtung > Wiedergabe Erweiterte Einrichtung | Firmware-Update | Sonstiges 7. Wählen Sie mit den Cursortasten auf der Fernbedienung die Musikdatei aus, die wiedergegeben werden soll, und drücken Sie dann ENTER (b), um die Wiedergabe zu starten.
> Vor dem Start > Teilenamen > Installation > Erste Einrichtung > Wiedergabe Erweiterte Einrichtung | Firmware-Update | Sonstiges USB-Speichergerät Grundlegende Wiedergabe 1 Sie können Musikdateien wiedergeben, die sich auf einem USB-Speichergerät befinden. 1. Schalten Sie den Eingang des
> Vor dem Start > Teilenamen > Installation > Erste Einrichtung > Wiedergabe Erweiterte Einrichtung | Firmware-Update | Sonstiges USB-Speichergerätsanforderungen 0 Beachten Sie, dass der Betrieb von USBSpeichergeräten nicht immer garantiert werden kann. 0 Dieses Gerät unterstützt
> Vor dem Start > Teilenamen > Installation > Erste Einrichtung > Wiedergabe Erweiterte Einrichtung | Firmware-Update | Sonstiges AirPlay® 1 3 4 2 5 Grundlegende Wiedergabe Es ist eine drahtlose Wiedergabe von Musikdateien auf Geräten wie iPhone®, iPod touch® oder iPad® möglich, welche mit dem
> Vor dem Start > Teilenamen > Installation > Erste Einrichtung > Wiedergabe Erweiterte Einrichtung | Firmware-Update | Sonstiges BLUETOOTH®-Wiedergabe Pairing 1 2 Wiedergabe 1 2 Pairing D E 1. Wenn Sie die -Taste auf der Fernbedienung drücken, wird «Now Pairing…» auf dem Display dieses Geräts
> Vor dem Start > Teilenamen > Installation > Erste Einrichtung > Wiedergabe Erweiterte Einrichtung | Firmware-Update | Sonstiges Wiedergabe von FM/DAB-Radio Wiedergabe von FM-Radio 1 Automatische Sendersuche 1. Drücken Sie mehrfach TUNER auf der Fernbedienung, um «FM» auf dem Display auszuwählen.
> Vor dem Start > Teilenamen > Installation > Erste Einrichtung > Wiedergabe Erweiterte Einrichtung | Firmware-Update | Sonstiges 2. Drücken Sie die w/x-Cursortasten (a) auf der Fernbedienung, um den gewünschten Programmtyp auszuwählen, und dann ENTER (a), um die Suche zu starten. Die Programmtypen
> Vor dem Start > Teilenamen > Installation > Erste Einrichtung > Wiedergabe Erweiterte Einrichtung | Firmware-Update | Sonstiges Voreinstellung eines Radiosenders Hiermit können Sie bis zu 40 bevorzugte FM/DAB-Sender registrieren. Die Registrierung von Radiosendern im Voraus ermöglicht es Ihnen,
> Vor dem Start > Teilenamen > Installation > Erste Einrichtung > Wiedergabe Erweiterte Einrichtung | Firmware-Update | Sonstiges Wiedergabemodi Auswahl von Wiedergabemodi Sie können den Wiedergabemodus während der Wiedergabe wechseln, indem Sie mehrfach «AUTO/ DIRECT» oder «SURR» drücken. a
> Vor dem Start > Teilenamen > Installation > Erste Einrichtung > Wiedergabe Erweiterte Einrichtung | Firmware-Update | Sonstiges Eingangsquelle & Lautstärke Wiedergabemodus-Effekte großen Saal. Wiedergabemodus Updates der Wiedergabemodi Mithilfe von Firmware-Updates für dieses Gerät ist eine
> Vor dem Start > Teilenamen > Installation > Erste Einrichtung > Wiedergabe Erweiterte Einrichtung | Firmware-Update | Sonstiges wiedergegeben. Beim Dolby Digital Plus-Format handelt es sich um eine Revision auf Basis von Dolby Digital mit erhöhter Kanalanzahl zum Steigern der Klangqualität durch
> Vor dem Start > Teilenamen > Installation > Erste Einrichtung > Wiedergabe Erweiterte Einrichtung | Firmware-Update | Sonstiges In diesem Modus werden im Audioformat DTS-HD High Resolution Audio aufgenommene Klangdesigns originalgetreu wiedergegeben. DTS-HD High Resolution Audio wird als
> Vor dem Start > Teilenamen > Installation > Erste Einrichtung > Wiedergabe Erweiterte Einrichtung | Firmware-Update | Sonstiges Auswählbare Wiedergabemodi Sie können aus einer Vielzahl von Wiedergabemodi je nach Audioformat des Eingangssignals auswählen. 0 Der Stereo-Modus kann bei allen
> Vor dem Start > Teilenamen > Installation > Erste Einrichtung > Wiedergabe Erweiterte Einrichtung | Firmware-Update | Sonstiges Eingangsformat Wiedergabemodus Eingangsformat Wiedergabemodus Eingangsformat Wiedergabemodus Multich PCM Stereo DSD Stereo Dolby Atmos Stereo Multich PCM½1 DSD Dolby
> Vor dem Start > Teilenamen > Installation > Erste Einrichtung > Wiedergabe Erweiterte Einrichtung | Firmware-Update | Sonstiges Eingangsformat Wiedergabemodus Eingangsformat Wiedergabemodus Eingangsformat Wiedergabemodus Dolby D Stereo Dolby D+ Stereo Dolby TrueHD Stereo Dolby D½1½2 Dolby
> Vor dem Start > Teilenamen > Installation > Erste Einrichtung > Wiedergabe Erweiterte Einrichtung | Firmware-Update | Sonstiges Eingangsformat Wiedergabemodus Eingangsformat Wiedergabemodus Eingangsformat Wiedergabemodus DTS Stereo DTS 96/24 Stereo DTS Express Stereo DTS½1½2 DTS 96/24½1½2 DTS
> Vor dem Start > Teilenamen > Installation > Erste Einrichtung > Wiedergabe Erweiterte Einrichtung | Firmware-Update | Sonstiges Eingangsformat Wiedergabemodus Eingangsformat Wiedergabemodus Eingangsformat Wiedergabemodus DTS-HD HR Stereo DTS-HD MSTR Stereo DTS:X Stereo DTS-HD HR½1½2 DTS-HD
> Vor dem Start > Teilenamen > Installation > Erste Einrichtung > Wiedergabe Erweiterte Einrichtung | Firmware-Update | Sonstiges AV Adjust 1 Wenn Sie die -Taste auf der Fernbedienung während der Wiedergabe drücken, können Sie häufig genutzte Einstellungen wie die Klangqualität mithilfe von
> Vor dem Start > Teilenamen > Installation > Erste Einrichtung > Wiedergabe Erweiterte Einrichtung | Firmware-Update | Sonstiges ∫ Other Sound Delay: Hiermit können Sie eine Audioverzögerung vornehmen, wenn die Videoausgabe im Vergleich zur Audioausgabe verzögert erfolgt. Es können für jeden
> Vor dem Start > Teilenamen > Installation > Erste Einrichtung > Wiedergabe Erweiterte Einrichtung | Firmware-Update | Sonstiges System Setup Erweiterte Einrichtung 1 2 Fernbedienung des Fernsehers Mit den erweiterten Einstellungen dieses Geräts können Sie Leistung und Bedienfreundlichkeit
> Vor dem Start > Teilenamen > Installation > Erste Einrichtung > Wiedergabe Erweiterte Einrichtung | Firmware-Update | Sonstiges Impose OSD Screen Saver Stellen Sie beispielsweise ein, ob die Informationen auf dem Fernseher angezeigt werden sollen, wenn die Lautstärke geregelt oder der Eingang
> Vor dem Start > Teilenamen > Installation > Erste Einrichtung > Wiedergabe Erweiterte Einrichtung | Firmware-Update | Sonstiges TV «COAXIAL», «OPTICAL «: Weisen Sie dem TV-Eingangsselektor die gewünschte DIGITAL IN-Buchse zu. (Der Standardwert ist «OPTICAL») 0 Unterstützte Abtastraten für
> Vor dem Start > Teilenamen > Installation > Erste Einrichtung > Wiedergabe Erweiterte Einrichtung | Firmware-Update | Sonstiges Surround Legen Sie die Eigenschaften des niederfrequenten Bereichs für jeden Kanal fest, indem Sie zwischen «small» und «large» auswählen. «Small (Standardwert)»: Für
> Vor dem Start > Teilenamen > Installation > Erste Einrichtung > Wiedergabe Erweiterte Einrichtung | Firmware-Update | Sonstiges Subwoofer Wählen Sie einen Wert zwischen «-15 dB» und «+12 dB» (in Schritten von 1 dB) aus. Ein Testton wird jedes Mal, wenn Sie den Wert verändern, ausgegeben. Wählen
> Vor dem Start > Teilenamen > Installation > Erste Einrichtung > Wiedergabe Erweiterte Einrichtung | Firmware-Update | Sonstiges ∫ Audio Select Legen Sie Prioritäten bei der Eingangsauswahl fest, wenn mehrere Audioquellen mit einem Eingangsselektor verbunden sind, z. B. bei Anschlüssen an den
> Vor dem Start > Teilenamen > Installation > Erste Einrichtung > Wiedergabe Erweiterte Einrichtung | Firmware-Update | Sonstiges HDMI Standby Through 48 Wenn diese Einstellung nicht den Wert «Off» aufweist, können Sie Video- und Audiosignale eines über HDMI angeschlossenen Players auf dem
> Vor dem Start > Teilenamen > Installation > Erste Einrichtung > Wiedergabe Erweiterte Einrichtung | Firmware-Update | Sonstiges ∫ Power Management Sleep Timer Mit dieser Funktion kann das Gerät nach Ablauf der angegebenen Zeit automatisch in den Standby-Modus schalten. Sie können zwischen «30
> Vor dem Start > Teilenamen > Installation > Erste Einrichtung > Wiedergabe Erweiterte Einrichtung | Firmware-Update | Sonstiges FM Frequency Step (Modelle für Nordamerika) Wählen Sie einen Frequenzschritt abhängig von Ihrem Wohnort. Wählen Sie «0.2 MHz (Standardwert)» oder «0.05 MHz» aus. 0 Wenn
> Vor dem Start > Teilenamen > Installation > Erste Einrichtung > Wiedergabe Erweiterte Einrichtung | Firmware-Update | Sonstiges MCACC 1 2 Fernbedienung des Fernsehers Richten Sie die Lautsprecher automatisch ein oder nehmen Sie Änderungen nach Wunsch am Equalizer vor. Sie können auch die
> Vor dem Start > Teilenamen > Installation > Erste Einrichtung > Wiedergabe Erweiterte Einrichtung | Firmware-Update | Sonstiges Lautsprecher die Lautstärke der verschiedenen Klangbereiche anpassen. Sie können drei verschiedene Equalizer unter Preset 1 bis 3 speichern. Sie können bis zu 4 Bänder
> Vor dem Start > Teilenamen > Installation > Erste Einrichtung > Wiedergabe Erweiterte Einrichtung | Firmware-Update | Sonstiges MCACC Data Check D E Sie können die Anzahl der angeschlossenen Lautsprecherkanäle und die Inhalte und Werte der jeweiligen Lautsprechereinstellungen überprüfen. ∫
> Vor dem Start > Teilenamen > Installation > Erste Einrichtung > Wiedergabe Erweiterte Einrichtung | Firmware-Update | Sonstiges Network/Bluetooth 1 2 Fernbedienung des Nehmen Sie Einstellungen im Zusammenhang mit Netzwerkverbindungen und BLUETOOTH vor. 1. Schalten Sie den Eingang des Fernsehers
> Vor dem Start > Teilenamen > Installation > Erste Einrichtung > Wiedergabe Erweiterte Einrichtung | Firmware-Update | Sonstiges MAC Address Dies ist die MAC-Adresse dieses Geräts. Dieser Wert ist speziell für die Komponente eingestellt und kann nicht geändert werden. DHCP «Enable (Standardwert)»:
> Vor dem Start > Teilenamen > Installation > Erste Einrichtung > Wiedergabe Erweiterte Einrichtung | Firmware-Update | Sonstiges Bluetooth Bluetooth Auto Input Change 56 Wählen Sie aus, ob Sie die BLUETOOTH-Funktion verwenden wollen. «On (Standardwert)»: Ermöglicht das Anschließen von
> Vor dem Start > Teilenamen > Installation > Erste Einrichtung > Wiedergabe Erweiterte Einrichtung | Firmware-Update | Sonstiges Firmware-Update Firmware-Update Update-Funktion dieses Geräts Aktualisierung der Firmware Bei diesem Gerät kann die Firmware (Systemsoftware) über ein Netzwerk oder den
> Vor dem Start > Teilenamen > Installation > Erste Einrichtung > Wiedergabe Erweiterte Einrichtung | Firmware-Update | Sonstiges System Setup Input/Output Assign Speaker Hardware 0 Wenn «Firmware Update» ausgegraut ist und nicht ausgewählt werden kann, warten Sie eine Weile, bis es verfügbar ist.
> Vor dem Start > Teilenamen > Installation > Erste Einrichtung > Wiedergabe Erweiterte Einrichtung | Firmware-Update | Sonstiges abgeschlossen ist. 9. Entfernen Sie das USB-Speichergerät von diesem Gerät. 10.Drücken Sie Í STANDBY/ON an diesem Gerät, um das Gerät in den Standby-Modus zu schalten.
> Vor dem Start > Teilenamen > Installation > Erste Einrichtung > Wiedergabe Erweiterte Einrichtung | Firmware-Update | Sonstiges Fehlerbehebung Sonstiges Bevor Sie den Vorgang starten Probleme können möglicherweise durch einfaches Aus- und wieder Einschalten oder Abtrennen und erneutes Anschließen
> Vor dem Start > Teilenamen > Installation > Erste Einrichtung > Wiedergabe Erweiterte Einrichtung | Firmware-Update | Sonstiges Von einem Lautsprecher werden keine Audiosignale wiedergegeben. 0 Stellen Sie sicher, dass die Polarität der Lautsprecherkabel (_/ `) korrekt ist und sich keine blanken
> Vor dem Start > Teilenamen > Installation > Erste Einrichtung > Wiedergabe Erweiterte Einrichtung | Firmware-Update | Sonstiges Bei einer Quelle, die an einen HDMI IN-Terminal angeschlossen ist, wird kein Bild wiedergegeben 0 Um das Videosignal des angeschlossenen Players auf dem
> Vor dem Start > Teilenamen > Installation > Erste Einrichtung > Wiedergabe Erweiterte Einrichtung | Firmware-Update | Sonstiges ggf. Hindernisse zwischen dem BLUETOOTH-fähigen Gerät und diesem Gerät. ∫ Netzwerkfunktion 0 Wenn Sie keinen Netzwerkdienst auswählen können, ist die Auswahl nach dem
> Vor dem Start > Teilenamen > Installation > Erste Einrichtung > Wiedergabe Erweiterte Einrichtung | Firmware-Update | Sonstiges Es wird eine Verbindung mit einer anderen als der ausgewählten SSID hergestellt. 0 Bei einigen WLAN-Routern ist es möglich, mehrere SSIDs für ein Gerät einzustellen.
> Vor dem Start > Teilenamen > Installation > Erste Einrichtung > Wiedergabe Erweiterte Einrichtung | Firmware-Update | Sonstiges Allgemeine technische Daten Abschnitt zum Verstärker (Audio) Ausgangsnennleistung (FTC) (Nordamerika) 4 Ohm Last, beide Kanäle angetrieben von 1 kHz; Nennleistung 50
> Vor dem Start > Teilenamen > Installation > Erste Einrichtung > Wiedergabe Erweiterte Einrichtung | Firmware-Update | Sonstiges Analog 1 (BD/DVD), 2 (CBL/SAT), PHONO (designiert) Audio-Ausgänge Analog SUBWOOFER PRE OUT Lautsprecherausgänge FRONT L/R, CENTER, SURROUND L/R, SUBWOOFER Kopfhörer
> Vor dem Start > Teilenamen > Installation > Erste Einrichtung > Wiedergabe Erweiterte Einrichtung | Firmware-Update | Sonstiges Über HDMI Kompatible Funktionen wiedergegeben werden. HDMI (High Definition Multimedia Interface) ist ein digitaler Schnittstellenstandard zum Anschließen von
> Vor dem Start > Teilenamen > Installation > Erste Einrichtung > Wiedergabe Erweiterte Einrichtung | Firmware-Update | Sonstiges Lizenz- und Warenzeicheninformationen The Bluetooth® word mark and logos are registered trademarks owned by the Bluetooth SIG, Inc. QR Code is a registered trademark of
2-3-12 Yaesu, Chuo-ku, Tokyo 104-0028 JAPAN <U.S.A.> 18 PARK WAY, UPPER SADDLE RIVER, NEW JERSEY 07458, U.S.A. Tel: 1-201-785-2600 Tel: 1-844-679-5350 <Germany> Hanns-Martin-Schleyer-Straße 35, 47877 Willich, Germany Tel: +49(0)2154 913222 D E <UK> Anteros Building, Odyssey Business Park, West End
> Vóór het starten > Namen van de onderdelen > Installeren > Begininstelling > Afspelen Geavanceerde Setup | Firmware-update | Overige AV RECEIVER VSX-S520D VSX-S520 Gebruikers handleiding Vóór het starten Wat zit er in de doos ……………………………………………………… 2 Namen
> Vóór het starten > Namen van de onderdelen > Installeren > Begininstelling > Afspelen Geavanceerde Setup | Firmware-update | Overige Wat zit er in de doos Vóór het starten N L Hoofdtoestel (1) Afstandsbediening (RC-933R) (1), batterijen (AAA/R03) (2) Microfoon voor luidsprekerinstelling (1)
> Vóór het starten > Namen van de onderdelen > Installeren > Begininstelling > Afspelen Geavanceerde Setup | Firmware-update | Overige Voorpaneel Namen van de onderdelen N L 1. Í STANDBY/ON-knop: Schakelt het toestel in of schakelt het naar de stand-by-modus. 2. Display (ÄP7) 3.
> Vóór het starten > Namen van de onderdelen > Installeren > Begininstelling > Afspelen Geavanceerde Setup | Firmware-update | Overige Achterpaneel VSX-S520D N L 90° 180° 1. ANTENNA DAB / FM-aansluiting: Verbind de bijgeleverde antenne. 2. Draadloze antenne: Overeind zetten
> Vóór het starten > Namen van de onderdelen > Installeren > Begininstelling > Afspelen Geavanceerde Setup | Firmware-update | Overige VSX-S520 N L 90° 180° 1. ANTENNA FM UNBAL 75h-aansluiting: Verbind de bijgeleverde antenne. 2. Draadloze antenne: Overeind zetten voor de
> Vóór het starten > Namen van de onderdelen > Installeren > Begininstelling > Afspelen Geavanceerde Setup | Firmware-update | Overige Afstandsbediening 1. Í-knop: Schakelt het toestel in of schakelt het naar de stand-by-modus. 2. Ingangskeuze knoppen: Schakelt de af te spelen invoer.
> Vóór het starten > Namen van de onderdelen > Installeren > Begininstelling > Afspelen Geavanceerde Setup | Firmware-update | Overige Display N L Neo:6 1. Gaat branden onder de volgende omstandigheden. HDMI: HDMI-signalen worden ingevoerd en geselecteerd. ARC: Audiosignalen
> Vóór het starten > Namen van de onderdelen > Installeren > Begininstelling > Afspelen Geavanceerde Setup | Firmware-update | Overige 1. De luidsprekers verbinden Installeren Installeer de luidsprekers L De voorluidsprekers voeren het voor-stereogeluid uit en de middenluidspreker voert het
> Vóór het starten > Namen van de onderdelen > Installeren > Begininstelling > Afspelen Geavanceerde Setup | Firmware-update | Overige N L 1 a 1/2˝ (12 mm) 2 a b a 3 FRONT R FRONT L CENTER Verbind de luidsprekers b a Luidsprekerkabel, b Subwooferkabel Raadpleeg onderstaande afbeeldingen om het
> Vóór het starten > Namen van de onderdelen > Installeren > Begininstelling > Afspelen Geavanceerde Setup | Firmware-update | Overige N L Controleer bij het verbinden of de draaduiteinden van de luidsprekers niet uit de luidsprekeraansluitingen naar buiten steken. Als de naar buiten stekende
> Vóór het starten > Namen van de onderdelen > Installeren > Begininstelling > Afspelen Geavanceerde Setup | Firmware-update | Overige 2. De TV verbinden Naar ARC TV 1 N L Gebruik voor een TV die ARC (Audio Return Channel) (ÄP67) ondersteunt een HDMI-kabel en maak de verbinding aan de hand van
> Vóór het starten > Namen van de onderdelen > Installeren > Begininstelling > Afspelen Geavanceerde Setup | Firmware-update | Overige 3. Verbind de HDMI AV-componenten N L 1 a BD/DVD a Streamen mediaspeler Kabel/Satelliet settopbox HDMI OUT a HDMI-kabel 12 e.g. BD Dit is een verbindingsvoorbeeld
> Vóór het starten > Namen van de onderdelen > Installeren > Begininstelling > Afspelen Geavanceerde Setup | Firmware-update | Overige 4. Verbind de audiocomponenten Een CD-speler verbinden N L Gebruik een digitale coaxiale kabel om verbinding te maken met een CD-speler via de DIGITAL IN
> Vóór het starten > Namen van de onderdelen > Installeren > Begininstelling > Afspelen Geavanceerde Setup | Firmware-update | Overige 5. Verbinden met andere kabels De antenne aansluiten 1 (Noord-Amerikaanse modellen) a DAB/FM-antenne (VSX-S520D) : Verbind de bijgeleverde DAB/FM-antenne met de
> Vóór het starten > Namen van de onderdelen > Installeren > Begininstelling > Afspelen Geavanceerde Setup | Firmware-update | Overige Eerste Setup met de Automatische Opstart Wizard Begininstelling 1 2 Initial Setup gaat automatisch van start N L 1. Schakel de ingang op de TV naar die is
> Vóór het starten > Namen van de onderdelen > Installeren > Begininstelling > Afspelen Geavanceerde Setup | Firmware-update | Overige 1. Full Auto MCACC Plaats de bijgeleverde luidsprekerinstellingsmicrofoon in de luisterpositie en meet de testtonen die door de luidsprekers uitgezonden worden
> Vóór het starten > Namen van de onderdelen > Installeren > Begininstelling > Afspelen Geavanceerde Setup | Firmware-update | Overige methoden kunnen gebruikt worden om verbinding via Wi-Fi te maken: «Scan Networks»: Zoek naar een toegangspunt vanuit dit toestel. Zoek van tevoren de SSID van het
> Vóór het starten > Namen van de onderdelen > Installeren > Begininstelling > Afspelen Geavanceerde Setup | Firmware-update | Overige Afspelen van een AV-component Afspelen Basisbedieningen Speel een AV-component af of een TV die met een HDMIkabel of een andere kabel met dit toestel verbonden is.
> Vóór het starten > Namen van de onderdelen > Installeren > Begininstelling > Afspelen Geavanceerde Setup | Firmware-update | Overige Internetradio Basisbedieningen 1 Als dit toestel met een netwerk verbonden is, kunt u naar TuneIn of andere vooraf geregistreerde internetradiodiensten luisteren.
> Vóór het starten > Namen van de onderdelen > Installeren > Begininstelling > Afspelen Geavanceerde Setup | Firmware-update | Overige Het Pandora-menu: De iconen worden op het scherm weergegeven terwijl een zender afgespeeld wordt. U kunt het volgende doen door de icoon te selecteren met y/z (a)
> Vóór het starten > Namen van de onderdelen > Installeren > Begininstelling > Afspelen Geavanceerde Setup | Firmware-update | Overige Spotify Basisbedieningen 1 2 a b 3 c d e 4 N L Het afspelen van Spotify Connect is mogelijk door dit toestel met hetzelfde netwerk als een smartphone of tablet te
> Vóór het starten > Namen van de onderdelen > Installeren > Begininstelling > Afspelen Geavanceerde Setup | Firmware-update | Overige Music Server Het is mogelijk muziekbestanden te streamen die opgeslagen zijn op PC’s of NAS-apparaten die met hetzelfde netwerk verbonden zijn als dit toestel. De
> Vóór het starten > Namen van de onderdelen > Installeren > Begininstelling > Afspelen Geavanceerde Setup | Firmware-update | Overige 0 Afhankelijk van de server en de gedeelde instellingen is het mogelijk dat het toestel niet wordt herkend of niet in staat is om de muziekbestanden ervan af te
> Vóór het starten > Namen van de onderdelen > Installeren > Begininstelling > Afspelen Geavanceerde Setup | Firmware-update | Overige USB-opslagapparaat Basis afspelen 1 Muziekbestanden op een USB-opslagapparaat afspelen 1. Schakel de ingang op de TV naar die is toegewezen aan de unit. 2. Steek uw
> Vóór het starten > Namen van de onderdelen > Installeren > Begininstelling > Afspelen Geavanceerde Setup | Firmware-update | Overige Vereisten USB-opslagapparaat 0 Houd er rekening mee dat de werking niet met alle USBopslagapparaten gegarandeerd wordt. 0 Dit toestel ondersteunt
> Vóór het starten > Namen van de onderdelen > Installeren > Begininstelling > Afspelen Geavanceerde Setup | Firmware-update | Overige AirPlay® 1 3 4 2 5 26 Basis afspelen U kunt draadloos van de muziekbestanden op een iPhone®, iPod touch®, of iPad® genieten die met hetzelfde toegangspunt verbonden
> Vóór het starten > Namen van de onderdelen > Installeren > Begininstelling > Afspelen Geavanceerde Setup | Firmware-update | Overige BLUETOOTH® Afspelen Koppelen 1 2 Afspelen 1 2 Koppelen N L 1. Als u op de afstandsbediening op de -knop drukt, wordt «Now Pairing…» op het display van dit toestel
> Vóór het starten > Namen van de onderdelen > Installeren > Begininstelling > Afspelen Geavanceerde Setup | Firmware-update | Overige Naar de FM/DAB-radio luisteren Naar de FM-radio luisteren 1 Automatisch tunen 1. Druk herhaaldelijk op TUNER op de afstandsbediening om «FM» op het display te
> Vóór het starten > Namen van de onderdelen > Installeren > Begininstelling > Afspelen Geavanceerde Setup | Firmware-update | Overige 2. Druk op de afstandsbediening op de w/x-cursorknoppen (a) om het programmatype te selecteren dat u wilt zoeken en druk vervolgens op ENTER (a) om het zoeken te
> Vóór het starten > Namen van de onderdelen > Installeren > Begininstelling > Afspelen Geavanceerde Setup | Firmware-update | Overige Voorkeuze van een radiozender instellen Hiermee kunt u tot maximaal 40 van uw favoriete FM/DABzenders registreren. Door van te voren radiozenders te registreren
> Vóór het starten > Namen van de onderdelen > Installeren > Begininstelling > Afspelen Geavanceerde Setup | Firmware-update | Overige Luistermodussen De luistermodussen selecteren U kunt de luistermodus tijdens het afspelen veranderen door herhaaldelijk op «AUTO/DIRECT» of «SURR» te drukken. a
> Vóór het starten > Namen van de onderdelen > Installeren > Begininstelling > Afspelen Geavanceerde Setup | Firmware-update | Overige Ingangsbron & volume Effecten van de luistermodussen Luisterstand Luistermodussen updaten Wij hebben de intentie ondersteuning te verlenen voor het Dolby Atmos en
> Vóór het starten > Namen van de onderdelen > Installeren > Begininstelling > Afspelen Geavanceerde Setup | Firmware-update | Overige Dolby Digital Plus audioformaat opgenomen is. Het Dolby Digital Plus formaat is een herziening die op Dolby Digital gebaseerd is, het aantal kanalen verhoogt en
> Vóór het starten > Namen van de onderdelen > Installeren > Begininstelling > Afspelen Geavanceerde Setup | Firmware-update | Overige DTS-HD HR (DTS-HD High Resolution Audio) Deze modus reproduceert trouw het sounddesign dat in het DTS-HD High Resolution Audio audioformaat opgenomen is. DTS-HD
> Vóór het starten > Namen van de onderdelen > Installeren > Begininstelling > Afspelen Geavanceerde Setup | Firmware-update | Overige Selecteerbare luistermodussen U kunt een verscheidenheid aan luistermodussen selecteren die passen bij het audioformaat van het ingevoerde signaal. 0 De
> Vóór het starten > Namen van de onderdelen > Installeren > Begininstelling > Afspelen Geavanceerde Setup | Firmware-update | Overige Ingangsformaat Listening Mode Ingangsformaat Listening Mode Ingangsformaat Listening Mode Multich PCM Stereo DSD Stereo Dolby Atmos Stereo Multich PCM½1 DSD Dolby
> Vóór het starten > Namen van de onderdelen > Installeren > Begininstelling > Afspelen Geavanceerde Setup | Firmware-update | Overige Ingangsformaat Listening Mode Ingangsformaat Listening Mode Ingangsformaat Listening Mode Dolby D Stereo Dolby D+ Stereo Dolby TrueHD Stereo Dolby D½1½2 Dolby
> Vóór het starten > Namen van de onderdelen > Installeren > Begininstelling > Afspelen Geavanceerde Setup | Firmware-update | Overige Ingangsformaat Listening Mode Ingangsformaat Listening Mode Ingangsformaat Listening Mode DTS Stereo DTS 96/24 Stereo DTS Express Stereo DTS½1½2 DTS 96/24½1½2 DTS
> Vóór het starten > Namen van de onderdelen > Installeren > Begininstelling > Afspelen Geavanceerde Setup | Firmware-update | Overige Ingangsformaat Listening Mode Ingangsformaat Listening Mode Ingangsformaat Listening Mode DTS-HD HR Stereo DTS-HD MSTR Stereo DTS:X Stereo DTS-HD HR½1½2 DTS-HD
> Vóór het starten > Namen van de onderdelen > Installeren > Begininstelling > Afspelen Geavanceerde Setup | Firmware-update | Overige AV Adjust 1 Door tijdens het afspelen op de afstandsbediening op de -knop te drukken, kunt u vaak gebruikte instellingen aanpassen zoals de geluidskwaliteit, het
> Vóór het starten > Namen van de onderdelen > Installeren > Begininstelling > Afspelen Geavanceerde Setup | Firmware-update | Overige de audio vertragen om de kloof te compenseren. Er kunnen voor iedere ingangskeuzeschakelaar verschillende instellingen gemaakt worden. Sound Retriever: Verbetert de
> Vóór het starten > Namen van de onderdelen > Installeren > Begininstelling > Afspelen Geavanceerde Setup | Firmware-update | Overige System Setup Geavanceerde Setup 1 2 Afstandsbediening TV Het toestel stelt u in staat geavanceerde instellingen te configureren om u een nog betere ervaring te
> Vóór het starten > Namen van de onderdelen > Installeren > Begininstelling > Afspelen Geavanceerde Setup | Firmware-update | Overige Impose OSD Stelt in om de informatie al dan niet op de TV weer te geven als het volume bijvoorbeeld geregeld wordt. «On (Standaardwaarde)»: OSD weergegeven op de TV
> Vóór het starten > Namen van de onderdelen > Installeren > Begininstelling > Afspelen Geavanceerde Setup | Firmware-update | Overige TV «COAXIAL», «OPTICAL «: Ken een gewenste DIGITAL INaansluiting toe aan de TV-ingangskeuzeschakelaar. (Standaardwaarde is «OPTICAL») 0 Ondersteunde
> Vóór het starten > Namen van de onderdelen > Installeren > Begininstelling > Afspelen Geavanceerde Setup | Firmware-update | Overige Surround Crossover Double Bass Stel het vermogen van het lage bereik voor ieder kanaal in door klein of groot in te stellen. «Small (Standaardwaarde)»: Voor kleine
> Vóór het starten > Namen van de onderdelen > Installeren > Begininstelling > Afspelen Geavanceerde Setup | Firmware-update | Overige Subwoofer Selecteer een waarde tussen «-15 dB» en «+12 dB» (met toenames van 1 dB). Telkens bij het wijzigen van de waarde wordt een testtoon uitgevoerd. Selecteer
> Vóór het starten > Namen van de onderdelen > Installeren > Begininstelling > Afspelen Geavanceerde Setup | Firmware-update | Overige Selecteert de prioriteit voor de ingangsselectie als meerdere audiobronnen met één ingangskeuzeschakelaar verbonden zijn, zoals verbindingen met zowel de «BD/DVD»
> Vóór het starten > Namen van de onderdelen > Installeren > Begininstelling > Afspelen Geavanceerde Setup | Firmware-update | Overige HDMI Standby Through 48 Als dit op iets anders dan “Off” gezet is, kunt u de video en audio van een met HDMI verbonden speler op de TV afspelen, zelfs als het
> Vóór het starten > Namen van de onderdelen > Installeren > Begininstelling > Afspelen Geavanceerde Setup | Firmware-update | Overige ∫ Power Management Sleep Timer Stelt het toestel in staat automatisch de stand-by-modus binnen te gaan als de gespecificeerde tijd verstrijkt. Selecteer uit «30
> Vóór het starten > Namen van de onderdelen > Installeren > Begininstelling > Afspelen Geavanceerde Setup | Firmware-update | Overige DAB Auto Scan (VSX-S520D) U kunt de automatische scan laten lopen wanneer er nieuwe DAB-stations toegevoegd worden of wanneer u verhuist. DAB DRC (VSX-S520D) Met de
> Vóór het starten > Namen van de onderdelen > Installeren > Begininstelling > Afspelen Geavanceerde Setup | Firmware-update | Overige MCACC 1 2 Afstandsbediening TV Stelt de luidsprekers automatisch in of maakt de gewenste veranderen in de equalizer. U kunt ook de huidige waarden controleren die
> Vóór het starten > Namen van de onderdelen > Installeren > Begininstelling > Afspelen Geavanceerde Setup | Firmware-update | Overige 4 banden voor de subwoofer en 9 banden voor alle andere luidsprekers selecteren. Om de ingestelde equalizer-effecten te gebruiken, het nummer gebruiken dat van
> Vóór het starten > Namen van de onderdelen > Installeren > Begininstelling > Afspelen Geavanceerde Setup | Firmware-update | Overige MCACC Data Check N L U kunt het aantal verbonden luidsprekerkanalen controleren en de inhoud en de waarden die u voor iedere luidsprekerinstelling uitgevoerd heeft.
> Vóór het starten > Namen van de onderdelen > Installeren > Begininstelling > Afspelen Geavanceerde Setup | Firmware-update | Overige Network/Bluetooth 1 2 Afstandsbediening TV Maak instellingen die met de netwerkverbindingen en BLUETOOTH verband houden. 1. Schakel de ingang op de TV naar die is
> Vóór het starten > Namen van de onderdelen > Installeren > Begininstelling > Afspelen Geavanceerde Setup | Firmware-update | Overige MAC Address Dit is het MAC-adres van dit toestel. Deze waarde is specifiek voor de component en kan niet worden gewijzigd. DHCP «Enable (Standaardwaarde)»:
> Vóór het starten > Namen van de onderdelen > Installeren > Begininstelling > Afspelen Geavanceerde Setup | Firmware-update | Overige Bluetooth Bluetooth Auto Input Change 56 Selecteer of u de BLUETOOTH-functie al dan niet gebruikt. «On (Standaardwaarde)»: Maakt verbinding mogelijk met een
> Vóór het starten > Namen van de onderdelen > Installeren > Begininstelling > Afspelen Geavanceerde Setup | Firmware-update | Overige Firmware-update Firmware-update De update-functie van dit toestel Updaten van de firmware De firmware bijwerken via netwerk Dit toestel heeft een functie voor het
> Vóór het starten > Namen van de onderdelen > Installeren > Begininstelling > Afspelen Geavanceerde Setup | Firmware-update | Overige System Setup Input/Output Assign Speaker Hardware 0 Als “Firmware Update” grijs wordt weergegeven en niet geselecteerd kan worden, wacht dan even tot het wordt
> Vóór het starten > Namen van de onderdelen > Installeren > Begininstelling > Afspelen Geavanceerde Setup | Firmware-update | Overige via USB» en druk vervolgens op ENTER. System Setup Input/Output Assign Speaker Hardware 0 Als “Firmware Update” grijs wordt weergegeven en niet geselecteerd kan
> Vóór het starten > Namen van de onderdelen > Installeren > Begininstelling > Afspelen Geavanceerde Setup | Firmware-update | Overige Problemen oplossen Overige Alvorens de procedure te starten Problemen kunnen worden opgelost door eenvoudig de stroom aan/uit te zetten of het netsnoer aan te
> Vóór het starten > Namen van de onderdelen > Installeren > Begininstelling > Afspelen Geavanceerde Setup | Firmware-update | Overige Een luidspreker produceert geen geluid 0 Controleer of de polariteit van de luidsprekerkabels (_/ `) correct is en of geen onbeklede draden in contact met het
> Vóór het starten > Namen van de onderdelen > Installeren > Begininstelling > Afspelen Geavanceerde Setup | Firmware-update | Overige «System Setup» — «Hardware» — «HDMI» — «HDMI Standby Through» in het Home in te schakelen. Raadpleeg (ÄP48) voor informatie over HDMI Standby Through. 0 Controleer
> Vóór het starten > Namen van de onderdelen > Installeren > Begininstelling > Afspelen Geavanceerde Setup | Firmware-update | Overige toegangspunten staat, is het misschien ingesteld om SSID te verbergen of de ANY-verbinding is mogelijk uitgeschakeld. Verander de instelling en probeer nogmaals.
> Vóór het starten > Namen van de onderdelen > Installeren > Begininstelling > Afspelen Geavanceerde Setup | Firmware-update | Overige obstakels voor een goede zichtbaarheid en probeer het opnieuw. Plaats het toestel niet in de buurt van magnetrons of andere toegangspunten. Er wordt aanbevolen de
> Vóór het starten > Namen van de onderdelen > Installeren > Begininstelling > Afspelen Geavanceerde Setup | Firmware-update | Overige Algemene specificaties Versterker (Audio) Nominaal uitgangsvermogen (FTC) (Noord-Amerikaans) Met belastingen van 4 ohm, beide kanalen aangestuurd, van 1 kHz; 50
> Vóór het starten > Namen van de onderdelen > Installeren > Begininstelling > Afspelen Geavanceerde Setup | Firmware-update | Overige COAXIAL (CD) Analoog 1 (BD/DVD), 2 (CBL/SAT), PHONO (toegewezen) Audio-uitgangen Analoog SUBWOOFER PRE OUT Luidspreker-uitgangen FRONT L/R, CENTER, SURROUND L/R,
> Vóór het starten > Namen van de onderdelen > Installeren > Begininstelling > Afspelen Geavanceerde Setup | Firmware-update | Overige HDMI Compatibele functies weergegeven worden. HDMI (High Definition Multimedia Interface) is een digitale interfacestandaard voor het verbinden van TV’s,
> Vóór het starten > Namen van de onderdelen > Installeren > Begininstelling > Afspelen Geavanceerde Setup | Firmware-update | Overige Licentie en handelsm The Bluetooth® word mark and logos are registered trademarks owned by the Bluetooth SIG, Inc. QR Code is a registered trademark of DENSO WAVE
2-3-12 Yaesu, Chuo-ku, Tokyo 104-0028 JAPAN <U.S.A.> 18 PARK WAY, UPPER SADDLE RIVER, NEW JERSEY 07458, U.S.A. Tel: 1-201-785-2600 Tel: 1-844-679-5350 <Germany> Hanns-Martin-Schleyer-Straße 35, 47877 Willich, Germany Tel: +49(0)2154 913222 N L <UK> Anteros Building, Odyssey Business Park, West End
> Перед началом > Названия частей > Установка > Начальная настройка > Воспроизведение Расширенная настройка | Обновление встроенного программного обеспечения | Другие функции AV-PЕСИВЕP VSX-S520D VSX-S520 Руководство по эксплуатации Дополнительная информация для клиентов в Российской Федерации
> Перед началом > Названия частей > Установка > Начальная настройка > Воспроизведение Расширенная настройка | Обновление встроенного программного обеспечения | Другие функции Содержимое упаковки Перед началом R U Основной аппарат (1) Пульт ДУ (RC-933R) (1), Элементы питания (AAA/R03) (2) Микрофон
> Перед началом > Названия частей > Установка > Начальная настройка > Воспроизведение Расширенная настройка | Обновление встроенного программного обеспечения | Другие функции Передняя панель Названия частей R U 1. Кнопка Í STANDBY/ON: включение аппарата или его переключение в
> Перед началом > Названия частей > Установка > Начальная настройка > Воспроизведение Расширенная настройка | Обновление встроенного программного обеспечения | Другие функции Задняя панель VSX-S520D R U 90° 180° 1. Гнездо ANTENNA DAB / FM: подключение антенны из комплекта
> Перед началом > Названия частей > Установка > Начальная настройка > Воспроизведение Расширенная настройка | Обновление встроенного программного обеспечения | Другие функции VSX-S520 R U 90° 180° 1. Гнездо ANTENNA FM UNBAL 75h: подключение антенны из комплекта поставки. 2.
> Перед началом > Названия частей > Установка > Начальная настройка > Воспроизведение Расширенная настройка | Обновление встроенного программного обеспечения | Другие функции Пульт дистанционного управления 1. Кнопка Í: включение аппарата или его переключение в режим ожидания. 2.
> Перед началом > Названия частей > Установка > Начальная настройка > Воспроизведение Расширенная настройка | Обновление встроенного программного обеспечения | Другие функции Дисплей R U Neo:6 1. Загорается при следующих условиях. HDMI: сигналы HDMI поступают и выбраны. ARC:
> Перед началом > Названия частей > Установка > Начальная настройка > Воспроизведение Расширенная настройка | Обновление встроенного программного обеспечения | Другие функции 1. Подключение АС Установка Установка АС L Фронтальные АС выводят фронтальный стереозвук, а центральная АС выводит
> Перед началом > Названия частей > Установка > Начальная настройка > Воспроизведение Расширенная настройка | Обновление встроенного программного обеспечения | Другие функции 1 R U a 1/2˝ (12 mm) 2 a b a 3 FRONT R b a Кабель для АС, b кабель для сабвуфера FRONT L CENTER Подключение АС Подключите
> Перед началом > Названия частей > Установка > Начальная настройка > Воспроизведение Расширенная настройка | Обновление встроенного программного обеспечения | Другие функции R U При подключении убедитесь, что оголенные провода АС не торчат из разъемов АС. Если оголенные провода АС коснутся задней
> Перед началом > Названия частей > Установка > Начальная настройка > Воспроизведение Расширенная настройка | Обновление встроенного программного обеспечения | Другие функции 2. Подключение телевизора Телевизор с поддержкой ARC 1 R U Для подключения телевизора с поддержкой ARC (реверсивный звуковой
> Перед началом > Названия частей > Установка > Начальная настройка > Воспроизведение Расширенная настройка | Обновление встроенного программного обеспечения | Другие функции 3. Подключение аудиовидеоустройств с поддержкой HDMI R U 1 a BD/DVD a Кабельная/ спутниковая HDMI OUT a Кабель HDMI 12 e.g.
> Перед началом > Названия частей > Установка > Начальная настройка > Воспроизведение Расширенная настройка | Обновление встроенного программного обеспечения | Другие функции 4. Подключение аудиоустройств Подключение проигрывателя компакт-дисков R U Подключите проигрыватель компакт-дисков к гнезду
> Перед началом > Названия частей > Установка > Начальная настройка > Воспроизведение Расширенная настройка | Обновление встроенного программного обеспечения | Другие функции 5. Подключение других кабелей Подключение антенны 1 (Модели для Северной Америки) a Антенна DAB/FM (VSX-S520D) : Подключите
> Перед началом > Названия частей > Установка > Начальная настройка > Воспроизведение Расширенная настройка | Обновление встроенного программного обеспечения | Другие функции Начальная настройка с использованием мастера автоматического запуска Начальная настройка 1 2 Initial Setup запускается
> Перед началом > Названия частей > Установка > Начальная настройка > Воспроизведение Расширенная настройка | Обновление встроенного программного обеспечения | Другие функции 1. Full Auto MCACC Поместите микрофон для настройки АС из комплекта поставки на место прослушивания, измерьте тестовые
> Перед началом > Названия частей > Установка > Начальная настройка > Воспроизведение Расширенная настройка | Обновление встроенного программного обеспечения | Другие функции Подключитесь через Wi-Fi к точке доступа, например к беспроводному маршрутизатору. Подключиться через Wi-Fi можно следующими
> Перед началом > Названия частей > Установка > Начальная настройка > Воспроизведение Расширенная настройка | Обновление встроенного программного обеспечения | Другие функции Воспроизведение с аудиовидеоустройства Воспроизведение Основные операции a b 18 Воспроизводите контент с
> Перед началом > Названия частей > Установка > Начальная настройка > Воспроизведение Расширенная настройка | Обновление встроенного программного обеспечения | Другие функции Интернет-радио Основные операции 1 Когда аппарат подключен к сети, можно слушать TuneIn или другие предварительно
> Перед началом > Названия частей > Установка > Начальная настройка > Воспроизведение Расширенная настройка | Обновление встроенного программного обеспечения | Другие функции воспроизведение и появляется экран воспроизведения. Создание новой станции: введите название композиции, имя исполнителя или
> Перед началом > Названия частей > Установка > Начальная настройка > Воспроизведение Расширенная настройка | Обновление встроенного программного обеспечения | Другие функции Spotify Основные операции 1 2 a b 3 c d e 4 R U Подключив аппарат к той же сети, что и смартфон или планшет, можно
> Перед началом > Названия частей > Установка > Начальная настройка > Воспроизведение Расширенная настройка | Обновление встроенного программного обеспечения | Другие функции Music Server Аппарат поддерживает потоковое воспроизведение музыкальных файлов с ПК или NAS-устройств, подключенных к той же
> Перед началом > Названия частей > Установка > Начальная настройка > Воспроизведение Расширенная настройка | Обновление встроенного программного обеспечения | Другие функции Глубина вложения папок может достигать 16 уровней. Указанные ниже операции также можно выполнить с помощью пульта ДУ. (a)
> Перед началом > Названия частей > Установка > Начальная настройка > Воспроизведение Расширенная настройка | Обновление встроенного программного обеспечения | Другие функции Устройство памяти USB Основной режим воспроизведения 1 a b c d 2 e f g h 24 Вы можете воспроизводить музыкальные файлы на
> Перед началом > Названия частей > Установка > Начальная настройка > Воспроизведение Расширенная настройка | Обновление встроенного программного обеспечения | Другие функции (f) повтор воспроизведения композиции или воспроизведение в случайном порядке. При последовательном нажатии этой кнопки
> Перед началом > Названия частей > Установка > Начальная настройка > Воспроизведение Расширенная настройка | Обновление встроенного программного обеспечения | Другие функции AirPlay® 1 3 4 2 5 Основной режим воспроизведения Аппарат позволяет воспроизводить через беспроводную сеть музыкальные
> Перед началом > Названия частей > Установка > Начальная настройка > Воспроизведение Расширенная настройка | Обновление встроенного программного обеспечения | Другие функции Воспроизведение через BLUETOOTH® Сопряжение аппарата с другими устройствами 1 2 Воспроизведение 1 2 Сопряжение аппарата с
> Перед началом > Названия частей > Установка > Начальная настройка > Воспроизведение Расширенная настройка | Обновление встроенного программного обеспечения | Другие функции Прослушивание радио FM/DAB Прослушивание радио в диапазоне FM 1 Автоматическая настройка 1. Несколько раз нажмите кнопку
> Перед началом > Названия частей > Установка > Начальная настройка > Воспроизведение Расширенная настройка | Обновление встроенного программного обеспечения | Другие функции пульте ДУ. 2. С помощью кнопок курсора / (a) на пульте ДУ выберите нужный тип передачи, а затем нажмите ENTER (a) для
> Перед началом > Названия частей > Установка > Начальная настройка > Воспроизведение Расширенная настройка | Обновление встроенного программного обеспечения | Другие функции Регистрация радиостанции Вы можете зарегистрировать до 40 радиостанций FM/ DAB. Предварительная регистрация позволяет прямо
> Перед началом > Названия частей > Установка > Начальная настройка > Воспроизведение Расширенная настройка | Обновление встроенного программного обеспечения | Другие функции Режимы прослушивания Выбор режимов прослушивания В процессе воспроизведения можно изменить режим прослушивания периодическим
> Перед началом > Названия частей > Установка > Начальная настройка > Воспроизведение Расширенная настройка | Обновление встроенного программного обеспечения | Другие функции Источник и громкость Режим прослушивания Формат сигнала Через несколько секунд изображение на Частота дискретизации
> Перед началом > Названия частей > Установка > Начальная настройка > Воспроизведение Расширенная настройка | Обновление встроенного программного обеспечения | Другие функции проигрывателя на вывод цифрового потока. Dolby Di (Dolby Digital Plus) Данный режим обеспечивает точное воспроизведение
> Перед началом > Названия частей > Установка > Начальная настройка > Воспроизведение Расширенная настройка | Обновление встроенного программного обеспечения | Другие функции на вывод цифрового потока. DTS-HD HR (DTS-HD High Resolution Audio) Данный режим обеспечивает точное воспроизведение
> Перед началом > Названия частей > Установка > Начальная настройка > Воспроизведение Расширенная настройка | Обновление встроенного программного обеспечения | Другие функции Выбираемые режимы прослушивания Вы можете выбрать из множества режимов прослушивания наиболее соответствующий аудиоформату
> Перед началом > Названия частей > Установка > Начальная настройка > Воспроизведение Расширенная настройка | Обновление встроенного программного обеспечения | Другие функции Формат входного сигнала Режим прослушивания Формат входного сигнала Режим прослушивания Формат входного сигнала Режим
> Перед началом > Названия частей > Установка > Начальная настройка > Воспроизведение Расширенная настройка | Обновление встроенного программного обеспечения | Другие функции Формат входного сигнала Режим прослушивания Формат входного сигнала Режим прослушивания Формат входного сигнала Режим
> Перед началом > Названия частей > Установка > Начальная настройка > Воспроизведение Расширенная настройка | Обновление встроенного программного обеспечения | Другие функции Формат входного сигнала Режим прослушивания Формат входного сигнала Режим прослушивания Формат входного сигнала Режим
> Перед началом > Названия частей > Установка > Начальная настройка > Воспроизведение Расширенная настройка | Обновление встроенного программного обеспечения | Другие функции Формат входного сигнала Режим прослушивания Формат входного сигнала Режим прослушивания Формат входного сигнала Режим
> Перед началом > Названия частей > Установка > Начальная настройка > Воспроизведение Расширенная настройка | Обновление встроенного программного обеспечения | Другие функции AV Adjust 1 Нажимая кнопку на пульте ДУ во время воспроизведения, с помощью экранных меню можно изменять часто используемые
> Перед началом > Названия частей > Установка > Начальная настройка > Воспроизведение Расширенная настройка | Обновление встроенного программного обеспечения | Другие функции Direct и Pure Direct. ∫ Other Sound Delay: Если видеосигнал отстает по времени от аудиосигнала, можно применить задержку
> Перед началом > Названия частей > Установка > Начальная настройка > Воспроизведение Расширенная настройка | Обновление встроенного программного обеспечения | Другие функции System Setup Расширенная настройка 1 2 Пульт ДУ телевизора В аппарате предусмотрены расширенные настройки, открывающие
> Перед началом > Названия частей > Установка > Начальная настройка > Воспроизведение Расширенная настройка | Обновление встроенного программного обеспечения | Другие функции Impose OSD Screen Saver Например, можно указать необходимость вывода информации на телевизор при регулировке громкости или
> Перед началом > Названия частей > Установка > Начальная настройка > Воспроизведение Расширенная настройка | Обновление встроенного программного обеспечения | Другие функции CBL/SAT «AUDIO 1» — «AUDIO 2»: назначьте желаемое гнездо AUDIO IN селектору входа CBL/SAT. (Значение по умолчанию: «AUDIO
> Перед началом > Названия частей > Установка > Начальная настройка > Воспроизведение Расширенная настройка | Обновление встроенного программного обеспечения | Другие функции Crossover Double Bass При наличии АС, для которых выбрано значение «Small», задайте верхние предельные частоты
> Перед началом > Названия частей > Установка > Начальная настройка > Воспроизведение Расширенная настройка | Обновление встроенного программного обеспечения | Другие функции Audio Adjust Source ∫ Dual Mono/Mono ∫ Input Volume Absorber Dual Mono Mono Input Channel Задание аудиоканала или языка,
> Перед началом > Названия частей > Установка > Начальная настройка > Воспроизведение Расширенная настройка | Обновление встроенного программного обеспечения | Другие функции HDMI IN и «BD/DVD» AUDIO IN. Этот параметр можно задать независимо для каждой кнопки селектора входов. Выберите селектор
> Перед началом > Названия частей > Установка > Начальная настройка > Воспроизведение Расширенная настройка | Обновление встроенного программного обеспечения | Другие функции HDMI Standby Through Если этот параметр имеет любое другое значение, отличное от «Off», видео и звук с подключенного
> Перед началом > Названия частей > Установка > Начальная настройка > Воспроизведение Расширенная настройка | Обновление встроенного программного обеспечения | Другие функции Sleep Timer Обеспечивает автоматический переход в ждущий режим по истечении указанного времени. Выберите из вариантов «30
> Перед началом > Названия частей > Установка > Начальная настройка > Воспроизведение Расширенная настройка | Обновление встроенного программного обеспечения | Другие функции DAB Auto Scan (VSX-S520D) Можно запустить автоматическое сканирование при добавлении новых радиостанций DAB или переезде на
> Перед началом > Названия частей > Установка > Начальная настройка > Воспроизведение Расширенная настройка | Обновление встроенного программного обеспечения | Другие функции MCACC 1 2 Пульт ДУ телевизора Автоматическая настройка АС или выполнение нужных изменений для эквалайзера. Кроме того,
> Перед началом > Названия частей > Установка > Начальная настройка > Воспроизведение Расширенная настройка | Обновление встроенного программного обеспечения | Другие функции 52 Front Left После выбора частоты АС в диапазоне от «63 Hz» до «16 kHz» кнопками курсора п/с отрегулируйте громкость для
> Перед началом > Названия частей > Установка > Начальная настройка > Воспроизведение Расширенная настройка | Обновление встроенного программного обеспечения | Другие функции MCACC Data Check R U Имеется возможность проверки количества подключенных каналов АС, содержания и значений всех
> Перед началом > Названия частей > Установка > Начальная настройка > Воспроизведение Расширенная настройка | Обновление встроенного программного обеспечения | Другие функции Network/Bluetooth 1 2 Пульт ДУ телевизора Выполните настройки сетевых соединений и соединения BLUETOOTH. 1. Переключите вход
> Перед началом > Названия частей > Установка > Начальная настройка > Воспроизведение Расширенная настройка | Обновление встроенного программного обеспечения | Другие функции MAC Address Этот параметр задает MAC-адрес аппарата. Данное значение является специально заданным для аппарата и не может
> Перед началом > Названия частей > Установка > Начальная настройка > Воспроизведение Расширенная настройка | Обновление встроенного программного обеспечения | Другие функции Bluetooth Bluetooth Auto Input Change 56 Выбор между использованием и неиспользованием функции BLUETOOTH. «On (Значение по
> Перед началом > Названия частей > Установка > Начальная настройка > Воспроизведение Расширенная настройка | Обновление встроенного программного обеспечения | Другие функции Обновление встроенного программного обеспечения Обновление встроенного программного обеспечения Функция обновления аппарата
> Перед началом > Названия частей > Установка > Начальная настройка > Воспроизведение Расширенная настройка | Обновление встроенного программного обеспечения | Другие функции System Setup Input/Output Assign Speaker Hardware 0 Если пункт «Firmware Update» отображается серым цветом и недоступен,
> Перед началом > Названия частей > Установка > Начальная настройка > Воспроизведение Расширенная настройка | Обновление встроенного программного обеспечения | Другие функции сообщение «Completed!». 9. Извлеките устройство памяти USB из аппарата. 10.Нажмите кнопку Í STANDBY/ON на аппарате для
> Перед началом > Названия частей > Установка > Начальная настройка > Воспроизведение Расширенная настройка | Обновление встроенного программного обеспечения | Другие функции Поиск и устранение неисправностей Другие функции Перед началом процедуры Проблема может быть решена простым включением/
> Перед началом > Названия частей > Установка > Начальная настройка > Воспроизведение Расширенная настройка | Обновление встроенного программного обеспечения | Другие функции положение гнезда, к которому подключен проигрыватель. 0 Проверьте настройки цифрового аудиовыхода на подключенном
> Перед началом > Названия частей > Установка > Начальная настройка > Воспроизведение Расширенная настройка | Обновление встроенного программного обеспечения | Другие функции 0 Убедитесь в том, что ни один из соединительных кабелей не пережат, не перекручен и не поврежден. 0 Размытое или нечеткое
> Перед началом > Названия частей > Установка > Начальная настройка > Воспроизведение Расширенная настройка | Обновление встроенного программного обеспечения | Другие функции функции BLUETOOTH. 0 Некоторые устройства с поддержкой функции BLUETOOTH могут быть оснащены переключателем передачи/приема.
> Перед началом > Названия частей > Установка > Начальная настройка > Воспроизведение Расширенная настройка | Обновление встроенного программного обеспечения | Другие функции 0 Маршрутизатор беспроводной локальной сети может находиться в ручном режиме. Выберите в его настройках автоматический
> Перед началом > Названия частей > Установка > Начальная настройка > Воспроизведение Расширенная настройка | Обновление встроенного программного обеспечения | Другие функции Общие характеристики Усилитель (аудиосигнала) Номинальная выходная мощность (FTC) (модели для Северной Америки) Нагрузка
> Перед началом > Названия частей > Установка > Начальная настройка > Воспроизведение Расширенная настройка | Обновление встроенного программного обеспечения | Другие функции 96/24, DTS-HD Express, DSD, PCM Максимальное разрешение видеосигнала 4k 60 Гц (YCbCr 4:4:4) Аудиовходы Цифровые OPTICAL (TV)
> Перед началом > Названия частей > Установка > Начальная настройка > Воспроизведение Расширенная настройка | Обновление встроенного программного обеспечения | Другие функции Сведения о HDMI Совместимые функции HDMI (High Definition Multimedia Interface — мультимедийный интерфейс высокой четкости)
> Перед началом > Названия частей > Установка > Начальная настройка > Воспроизведение Расширенная настройка | Обновление встроенного программного обеспечения | Другие функции Лицензии и товарные знаки The Bluetooth® word mark and logos are registered trademarks owned by the Bluetooth SIG, Inc.
2-3-12 Yaesu, Chuo-ku, Tokyo 104-0028 JAPAN <U.S.A.> 18 PARK WAY, UPPER SADDLE RIVER, NEW JERSEY 07458, U.S.A. Tel: 1-201-785-2600 Tel: 1-844-679-5350 <Germany> Hanns-Martin-Schleyer-Straße 35, 47877 Willich, Germany Tel: +49(0)2154 913222 R U <UK> Anteros Building, Odyssey Business Park, West End
Pioneer VSX-S520 Instruction Manual
Pioneer VSX-S520 Specification
The Pioneer VSX-S520 is a compact and versatile AV receiver designed for home theater enthusiasts seeking robust audio and video capabilities within a slim profile. This model supports a 5.1 channel configuration, delivering a dynamic sound experience with a total power output of 80 watts per channel at 4 ohms. It is equipped with Dolby TrueHD and DTS-HD Master Audio decoding for high-fidelity sound reproduction. The VSX-S520 features built-in Wi-Fi and Bluetooth connectivity, allowing seamless streaming from various sources, and supports network functionalities including AirPlay, Chromecast built-in, and Spotify Connect.
The receiver is compatible with 4K/60p/4:4:4 video signal pass-through, ensuring pristine video quality with HDR10, HLG, and BT.2020 support. It includes HDCP 2.2, ensuring compatibility with the latest Ultra HD content. Equipped with multiple HDMI inputs and one output, it provides easy integration with multiple devices. The AV receiver also includes a phono input, catering to vinyl enthusiasts, and a USB port for direct playback from storage devices.
The Pioneer VSX-S520 incorporates a variety of sound calibration technologies, such as MCACC (Multi-Channel Acoustic Calibration System), which optimizes the audio output based on the room’s acoustics. It features a user-friendly interface with on-screen display and a comprehensive remote control. The slim design, measuring just 70mm in height, makes it suitable for spaces where traditional receivers may not fit, without compromising on performance and connectivity. Overall, the VSX-S520 offers a balanced mix of advanced audio technologies, connectivity options, and user-friendly features, making it an excellent choice for those looking to enhance their home entertainment system.
To connect your Pioneer VSX-S520 to a Wi-Fi network, press the ‘Home’ button on your remote control. Navigate to ‘Network’ settings and select ‘Wi-Fi’. Choose your network from the list and enter the password.
Ensure that all cables are securely connected and the correct input source is selected. Check the speaker settings and volume. If the issue persists, try resetting the receiver to factory settings.
To perform a factory reset on the Pioneer VSX-S520, turn off the unit, then press and hold the ‘Power On/Off’ button while pressing the ‘STANDBY/ON’ button. Release the buttons once ‘Reset’ appears on the display.
Connect the receiver to the internet, go to the ‘Home’ menu, select ‘System Setup’, then ‘Firmware Update’. Follow the on-screen instructions to complete the update process.
Yes, you can control the Pioneer VSX-S520 using the Pioneer Remote App available for both iOS and Android devices. Ensure your receiver and phone are on the same network.
The Pioneer VSX-S520 supports various audio formats, including Dolby Atmos, DTS:X, MP3, WMA, AAC, FLAC, and ALAC, among others.
Connect the speakers to the corresponding terminals on the back of the receiver. Use the ‘MCACC’ setup feature to calibrate and optimize sound settings for your room configuration.
To clean the Pioneer VSX-S520, use a soft, dry cloth to wipe the exterior. Avoid using abrasive cleaners or solvents. Regularly check and ensure that all ventilation openings are clear of dust.
Check that the network cable is properly connected or that the Wi-Fi settings are correct. Restart your router and the receiver. If problems persist, perform a network reset from the ‘Network’ menu.
First, check the batteries in the remote control and replace them if necessary. Ensure there are no obstacles blocking the remote sensor on the receiver. If the issue continues, try resetting the remote control.