
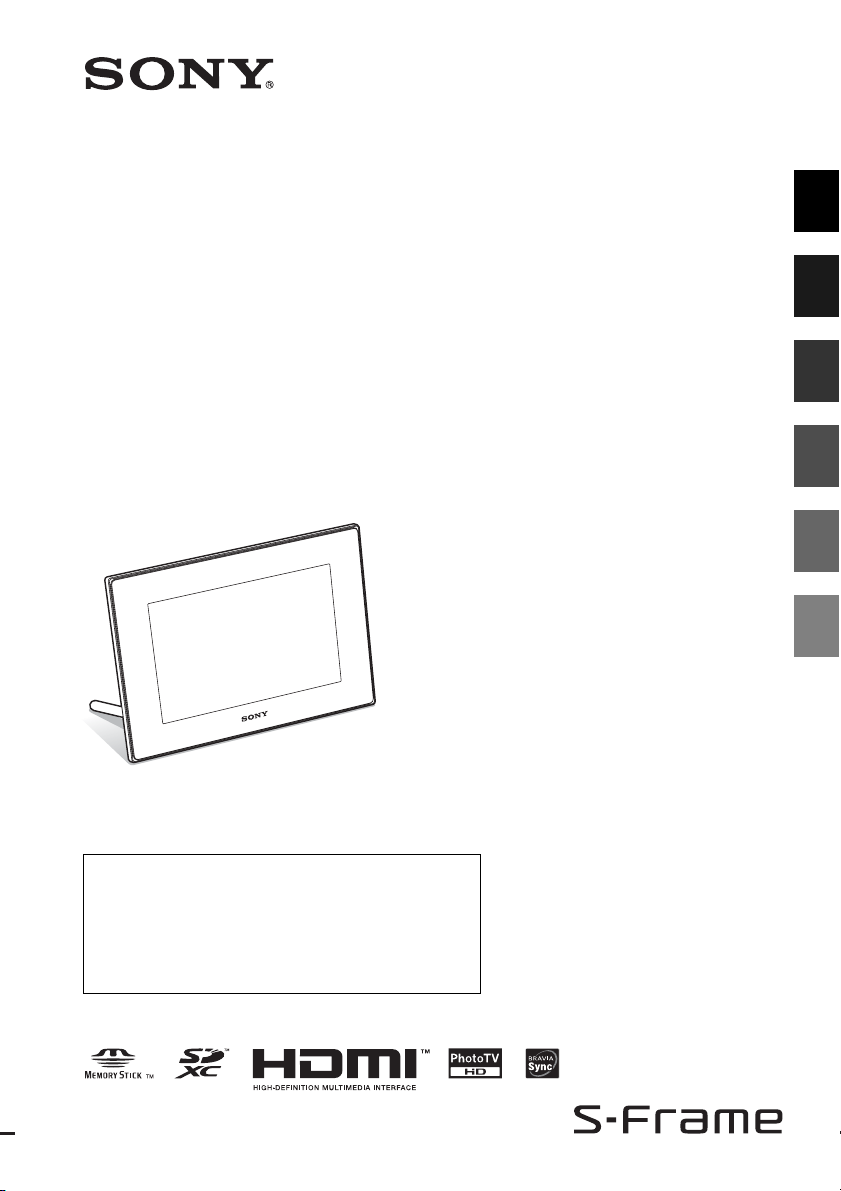
4-259-434-13 (1)
For your safety
Digital Photo
Frame
DPF-XR100/VR100
Operating Instructions
Before operating this unit, please read this manual thoroughly and
retain it for future reference.
Owner’s Record
The model and serial numbers are located at the rear.
Record the serial number in the space provided below. Refer to
these numbers whenever you call upon your Sony dealer
regarding this product.
Model No. DPF-XR100/VR100
Serial No. ________________________
Let’s get the photo
frame ready
Let’s view an image
Try using various functions
Troubleshooting
Additional information
© 2010 Sony Corporation
WARNING
To reduce fire or shock hazard, do not
expose the unit to rain or moisture.
If the shape of the plug does not fit the
power outlet, use an attachment plug
adaptor of the proper configuration for the
power outlet.
Do not expose the batteries to
excessive heat such as sunshine, fire
or the like.
CAUTION
Replace the battery with the specified
type only. Otherwise, fire or injury
may result.
Dispose of used batteries according
to the instructions.
For the customers in the U.S.A.
CAUTION
You are cautioned that any changes or modifications
not expressly approved in this manual could void
your authority to operate this equipment.
If you have any questions about this product, you may
call:
Sony Customer Information Services Center
1-800-222-SONY (7669)
The number below is for the FCC related matters
only.
Regulatory Information
Declaration of Conformity
Trade Name: SONY
Model No.: DPF-XR100
Responsible Party: Sony Electronics Inc.
Address: 16530 Via Esprillo, San Diego,
CA 92127 U.S.A.
Telephone No.: 858-942-2230
This device complies with part 15 of the FCC
Rules. Operation is subject to the following two
conditions:
(1) This device may not cause harmful
interference, and (2) this device must accept any
interference received, including interference that
may cause undesired operation.
Declaration of Conformity
Trade Name: SONY
Model No.: DPF-VR100
Responsible Party: Sony Electronics Inc.
Address: 16530 Via Esprillo, San Diego,
CA 92127 U.S.A.
Telephone No.: 858-942-2230
This device complies with part 15 of the FCC
Rules. Operation is subject to the following two
conditions:
(1) This device may not cause harmful
interference, and (2) this device must accept any
interference received, including interference that
may cause undesired operation.
Note:
This equipment has been tested and found to comply
with the limits for a Class B digital device, pursuant to
Part 15 of the FCC Rules.
These limits are designed to provide reasonable
protection against harmful interference in a residential
installation. This equipment generates, uses, and can
radiate radio frequency energy and, if not installed and
used in accordance with the instructions, may cause
harmful interference to radio communications.
However, there is no guarantee that interference will
not occur in a particular installation. If this equipment
does cause harmful interference to radio or television
reception, which can be determined by turning the
equipment off and on, the user is encouraged to try to
correct the interference by one or more of the following
measures:
– Reorient or relocate the receiving antenna.
2
GB
– Increase the separation between the equipment and
receiver.
– Connect the equipment into an outlet on a circuit
different from that to which the receiver is connected.
– Consult the dealer or an experienced radio/TV
technician for help.
For the State of California, USA
only
Perchlorate Material — special handling may apply,
See
www.dtsc.ca.gov/hazardouswaste/perchlorate
Perchlorate Material: Lithium battery contains
perchlorate.
For the Customer in Europe
This product has been tested and found compliant
with the limits set out in the EMC Directive for using
connection cables shorter than 3 meters (9.8 feet).
Attention
The electromagnetic fields at the specific frequencies
may influence the picture of this digital photo frame.
Notice
If static electricity or electromagnetism causes data
transfer to discontinue midway (fail), restart the
application or disconnect and connect the
communication cable (USB, etc) again.
Disposal of Old Electrical & Electronic
Equipment (Applicable in the European
Union and other European countries
with separate collection systems)
This symbol on the product or
on its packaging indicates that
this product shall not be treated
as household waste. Instead it
shall be handed over to the
applicable collection point for
the recycling of electrical and
electronic equipment. By
ensuring this product is disposed
of correctly, you will help
prevent potential negative
consequences for the
environment and human health, which could otherwise
be caused by inappropriate waste handling of this
product. The recycling of materials will help to conserve
natural resources. For more detailed information about
recycling of this product, please contact your local Civic
Office, your household waste disposal service or the
shop where you purchased the product.
Disposal of waste batteries
(applicable in the European Union
and other European countries with
separate collection systems)
This symbol on the battery or on the
packaging indicates that the battery
provided with this product shall not be
treated as household waste. On certain
batteries this symbol might be used in
combination with a chemical symbol.
The chemical symbols for mercury
(Hg) or lead (Pb) are added if the battery contains more
than 0.0005% mercury or 0.004% lead. By ensuring
these batteries are disposed of correctly, you will help
prevent potentially negative consequences for the
environment and human health which could otherwise
be caused by inappropriate waste handling of the
battery. The recycling of the materials will help to
conserve natural resources. In case of products that for
safety, performance or data integrity reasons require a
permanent connection with an incorporated battery, this
battery should be replaced by qualified service staff
only. To ensure that the battery will be treated properly,
hand over the product at end-of-life to the applicable
collection point for the recycling of electrical and
electronic equipment. For all other batteries, please
view the section on how to remove the battery from the
product safely. Hand the battery over to the applicable
collection point for the recycling of waste batteries.
For more detailed information about recycling of this
product or battery, please contact your local Civic
Office, your household waste disposal service or the
shop where you purchased the product.
Notice for the customers in the
countries applying EU Directives
The manufacturer of this product is Sony Corporation,
1-7-1 Konan Minato-ku Tokyo, 108-0075 Japan. The
Authorized Representative for EMC and product safety
is Sony Deutschland GmbH, Hedelfinger Strasse 61,
70327 Stuttgart, Germany. For any service or guarantee
matters please refer to the addresses given in separate
service or guarantee documents.
3
GB

Notice for users
Read this before using
Program © 2010 Sony Corporation
Documentation © 2010 Sony Corporation
All rights reserved. This manual or the software
described herein, in whole or in part, may not be
reproduced, translated or reduced to any machine
readable form without prior written approval from
Sony Corporation.
IN NO EVENT SHALL SONY CORPORATION BE
LIABLE FOR ANY INCIDENTAL,
CONSEQUENTIAL OR SPECIAL DAMAGES,
WHETHER BASED ON TORT, CONTACT, OR
OTHERWISE, ARISING OUT OF OR IN
CONNECTION WITH THIS MANUAL, THE
SOFTWARE OR OTHER INFORMATION
CONTAINED HEREIN OR THE USE THEREOF.
Sony Corporation reserves the right to make any
modification to this manual or the information
contained herein at any time without notice.
The software described herein may also be governed
by the terms of a separate user license agreement.
Any design data such as sample pictures provided in
this software cannot be modified or duplicated except
for the purpose of personal use. Any unauthorized
duplication of this software is prohibited under
copyright law.
Please note that unauthorized duplication or
modification of portraits or copyrighted work could
infringe the rights reserved by rights holders.
On the illustrations and screen
shots used in this manual
The illustrations and screen shots used in this
manual are of the DPF-XR100 unless noted
otherwise.
The illustrations and screen shots used in this
manual may not be identical to those actually
used or displayed.
Notes on playback
Connect the AC adaptor to an easily accessible AC
outlet. Should you notice an abnormality in it,
disconnect it from the AC outlet immediately.
Notes on copyrights
Duplication, edition, or printing of a CD, TV
programs, copyrighted materials such as pictures or
publications, or any other materials except for your
own recording or creation is limited to private or
domestic use only. Unless you hold copyright or have
permission of copyright holders for the materials to
be duplicated, use of those materials beyond this limit
may infringe the provisions of the copyright law and
be subject to the copyright holders claim for damages.
When using photo images with this digital photo
frame, pay special attention not to infringe the
provisions of the copyright law. Any unauthorized
use or modification of other’s portrait may also
infringe their rights.
For some demonstrations, performances, or exhibits,
photography may be forbidden.
Recording contents are not
guaranteed
Sony shall assume no responsibility for any
accidental or consequential damages or loss of the
recording contents which may be caused by use or
malfunction of the digital photo frame or memory
card.
Backup recommendations
To avoid potential risk of data loss caused by
accidental operation or malfunction of the digital
photo frame, we recommend that you save a backup
copy of your data.
Notes on LCD screen
• Do not press against the LCD screen. The screen
may be discolored and that may cause a
malfunction.
• Exposing the LCD screen to direct sunlight for a
long period may cause malfunctions.
• The LCD screen is manufactured using extremely
high-precision technology, so over 99.99% of the
pixels are operational for effective use. However,
there may be some tiny black points and/or bright
points (white, red, blue or green in color) that
constantly appear on the LCD screen. These points
are normal in the manufacturing process and do not
affect the viewing in any way.
• Images may trail across on the LCD screen in a cold
location. This is not a malfunction.
4
GB

Table of Contents
Read this before using …………………………………………………………………………. 4
For your safety
Checking included items ………………………………………………………………………. 7
Identifying the parts …………………………………………………………………………….. 8
x Digital photo frame ………………………………………………………………………………….. 8
x Remote control ……………………………………………………………………………………….. 9
Let’s get the photo frame ready
Remote control …………………………………………………………………………………. 10
Stand ……………………………………………………………………………………………….10
To display the photo frame on the wall ………………………………………………………….. 11
Turning the photo frame on ………………………………………………………………… 12
Operations in an initial state ………………………………………………………………… 13
Setting the current time ……………………………………………………………………… 13
Let’s view an image
Inserting a memory card …………………………………………………………………….. 14
Changing the display ………………………………………………………………………….. 15
Playing a video file …………………………………………………………………………….. 17
Playing a slideshow with background music ………………………………………….. 18
Importing a music file …………………………………………………………………………………. 18
Selecting a music file to play ………………………………………………………………………..18
Playing background music with a slideshow …………………………………………………..19
Try using various functions
Various functions ………………………………………………………………………………. 20
Sorting images (Filtering) …………………………………………………………………… 21
Specifying the playback device ……………………………………………………………. 22
Adjusting image size and orientation (Zoom in/Zoom out/Rotate) …………….. 22
Changing the settings of the auto power on/off function …………………………. 23
Using the alarm function …………………………………………………………………….. 24
Continued
5
GB

Changing the settings ………………………………………………………………………….25
Maintenance mode ……………………………………………………………………………..26
Activating maintenance mode ………………………………………………………………………. 26
Initializing the system …………………………………………………………………………………. 27
Connecting to a high-definition TV (DPF-XR100 only) ………………………………28
Operating an external device connected to the photo frame ………………………29
Connecting to a computer ……………………………………………………………………30
Troubleshooting
If an error message appears …………………………………………………………………31
If trouble occurs …………………………………………………………………………………32
Additional information
Precautions ……………………………………………………………………………………….34
Installation …………………………………………………………………………………………………34
Cleaning ……………………………………………………………………………………………………34
Restrictions on duplication …………………………………………………………………………..34
Disposing of the photo frame ………………………………………………………………………..34
Specifications …………………………………………………………………………………….35
On trademarks and copyrights ………………………………………………………………………37
6
GB
For your safety
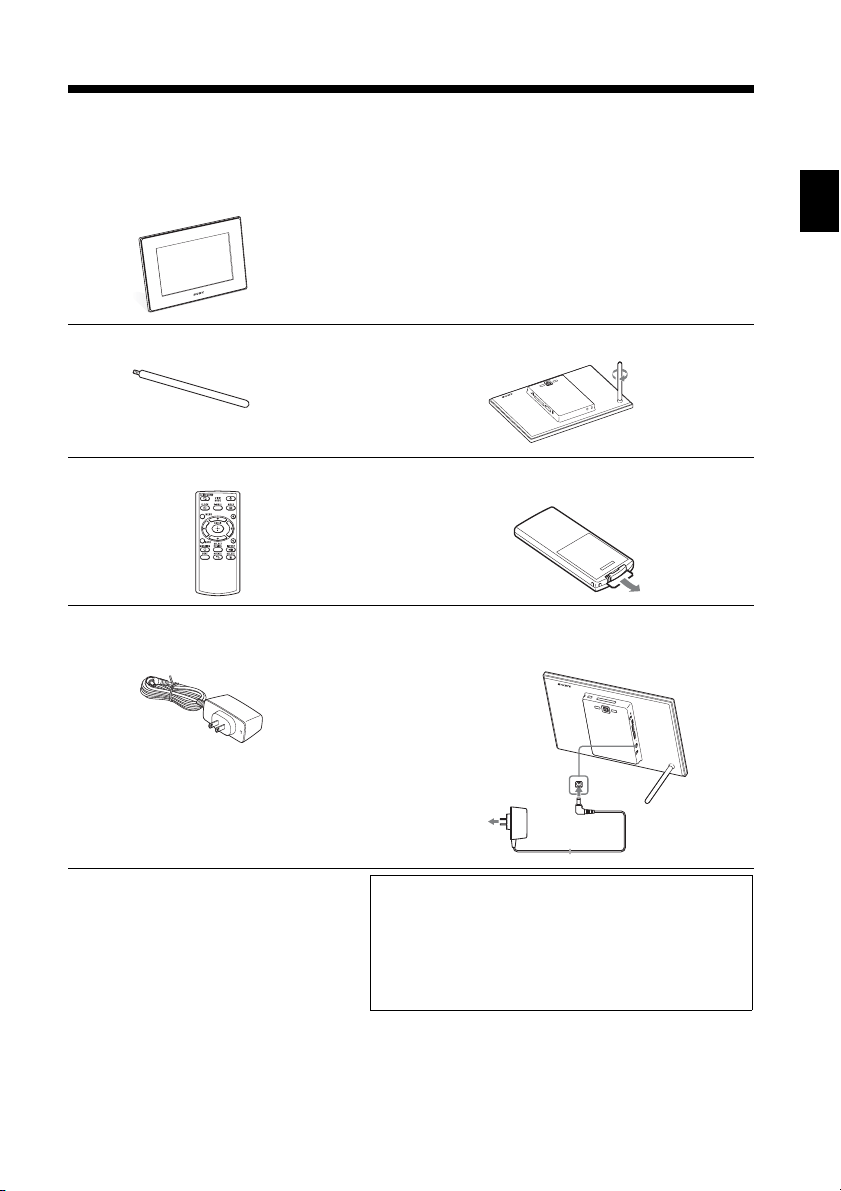
Checking included items
Make sure that the following items are included.
Digital photo frame (1)
For your safety
Stand (1)
Remote control (1)
AC adaptor (1)
Hanging unit on the wall (1)
Screws (4)
Operating Instructions (this manual) (1)
Digital Photo Frame Handbook (1)
Warranty (1)
(In some regions, the warranty is not
supplied.)
Attaching to the screw hole (page 10)
,
Removing the protective sheet
(page 10)
,
Connecting to the AC power source
(page 12)
,
The supplied CD-ROM contains the Digital Photo
Frame Handbook that explains operations and setups
of the digital photo frame in detail. To view the
handbook, insert the CD-ROM into the computer
and double-click the Handbook icon. (To display the
handbook, you need Adobe Acrobat Reader. )
7
GB
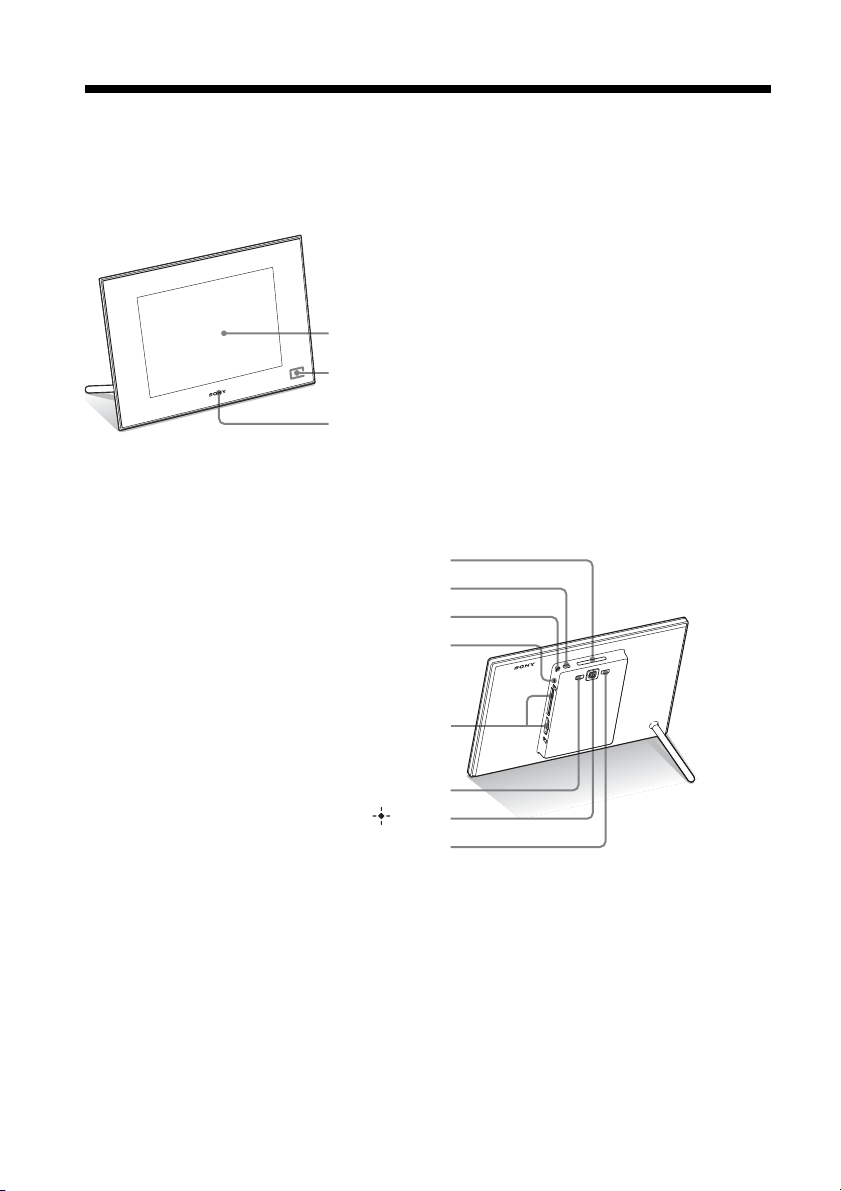
Identifying the parts
x Digital photo frame
Front
LCD screen
Remote sensor
Sony logo (page 10)
Rear
VIEW MODE button (page 15)
1 (on/standby) button
Standby indicator
Access lamp
8
Memory card slot (page 14)
MENU button
Direction (B/b/v/V) buttons, ENTER ( ) button
BACK button
GB
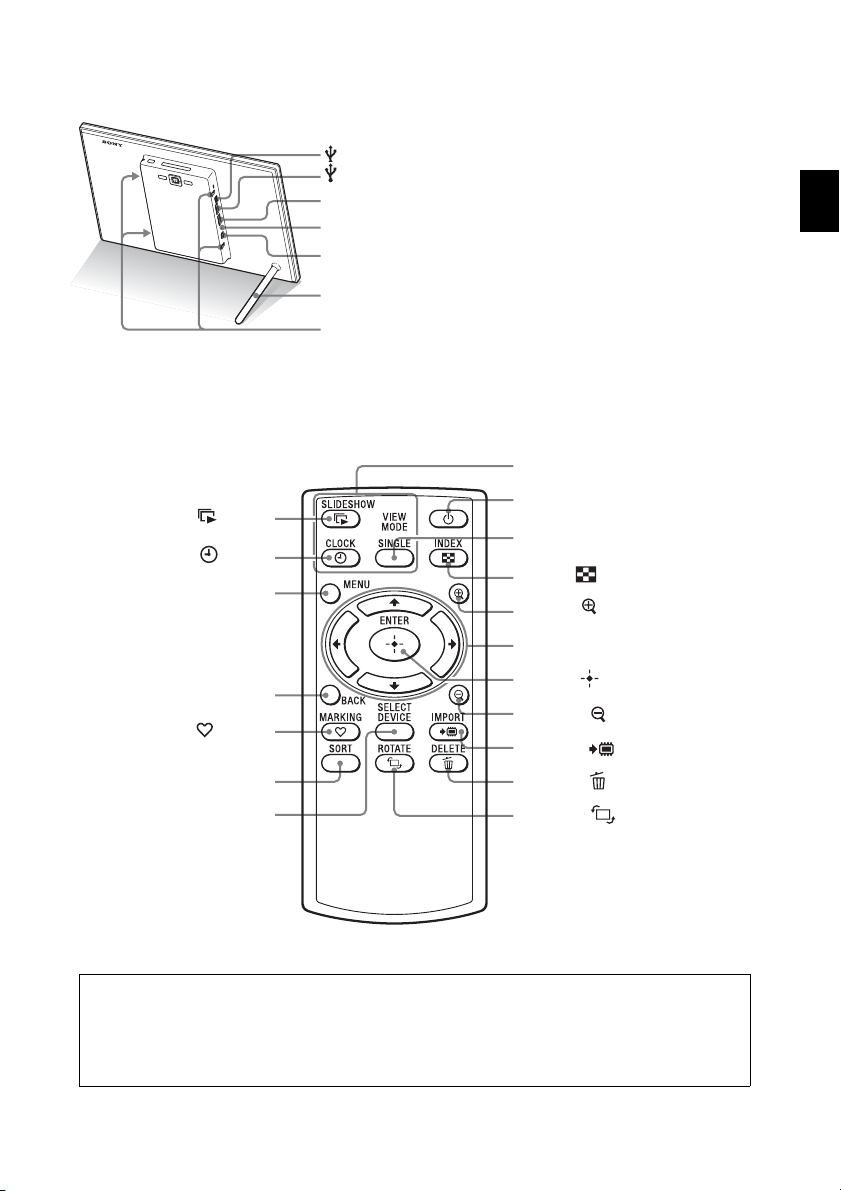
x Remote control
SLIDE-SHOW ( ) button
CLOCK ( ) button
MENU button
USB mini-B connector (page 30)
USB A connector (page 29)
HDMI OUT connector (page 28) (DPF-XR100 only)
Reset switch
DC IN 9 V jack
Stand
Holes for hanging unit on the wall
VIEW MODE buttons
1 (on/standby) button
SINGLE button
INDEX ( ) button
Zoom in ( ) button
Direction (B/b/v/V) buttons
For your safety
BACK button
MARKING ( ) button
SORT button
SELECT DEVICE button
ENTER ( ) button
Zoom out ( ) button
IMPORT ( ) button
DELETE ( ) button
ROTATE ( ) button
About descriptions in this manual
The operations described in this manual are based on remote control operation.
When an operation is performed differently, for example, with the remote control and the
buttons on the photo frame, it will be explained in a tip.
9
GB
Let’s get the photo frame ready
P Note
If the remote control stops
working:
Replace the battery (CR2025 lithium
battery) with a new one.
P WARNING
• Battery may explode if mistreated.
Do not recharge, disassemble or
dispose of in fire.
• When the lithium battery becomes
weak, the operating distance of the
remote control may shorten, or the
remote control may not function
properly. In this case, replace the
battery with a Sony CR2025
lithium battery. Use of another
battery may present a risk of fire or
explosion.
Replacing procedures:
CD-ROM (Handbook), “Preparing
the remote control”
zTips
x When the photo frame is
placed in the portrait
orientation
The display is automatically rotated
on the portrait orientation.
x Sony logo
When the photo frame is placed in
the portrait orientation or when you
turn off the power, the Sony logo
doesn’t light up.
Remote control
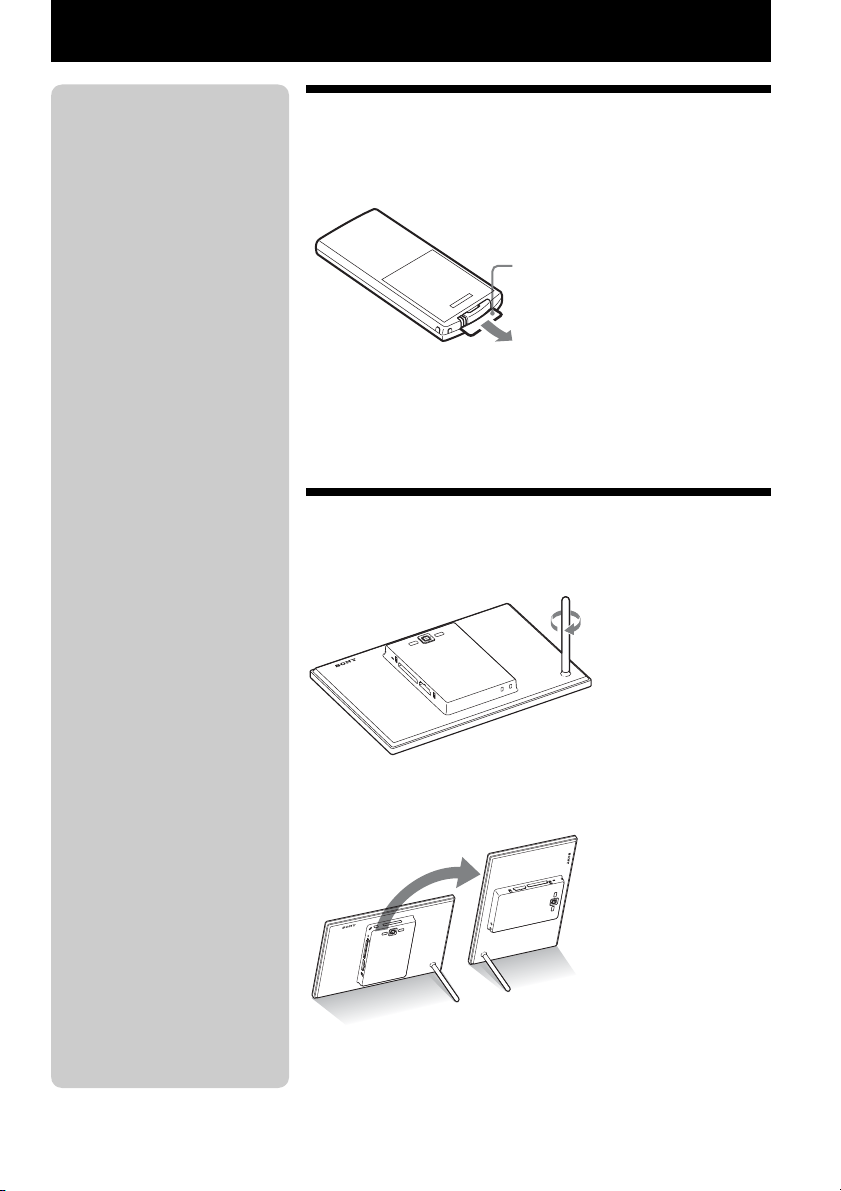
Pull out the protective sheet before use as shown in the
figure.
Protective sheet
Using the remote control
Point the top end of the remote control towards the remote sensor on
the photo frame.
Stand
Turn the stand clockwise until the stand stops turning and
is firmly attached to the stand socket on the rear panel.
You can set the photo frame to portrait or landscape orientation by
rotating it without moving the stand.
10
GB
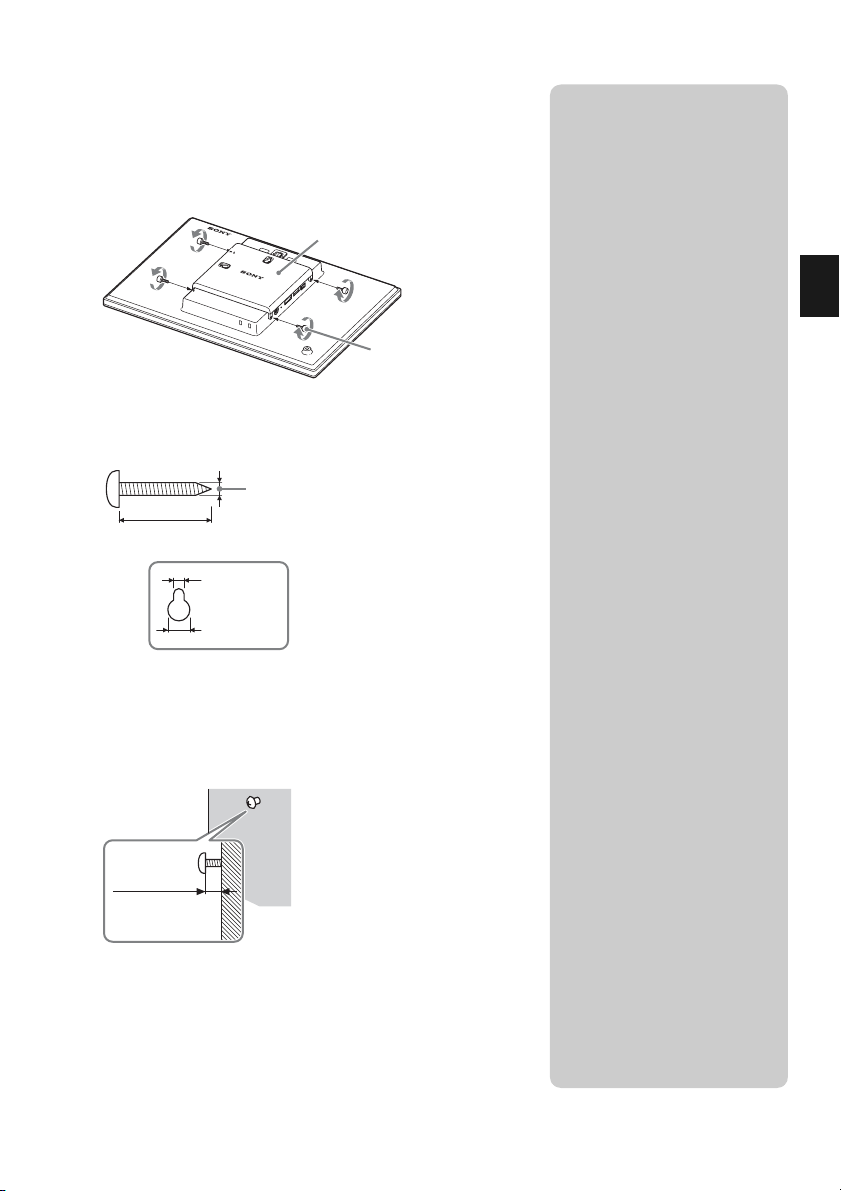
To display the photo frame on the wall
1 Attach the supplied hanging unit on the wall to the rear
panel of the photo frame with the supplied four
screws.
Hanging unit on the wall (supplied)
Screws (supplied)
2 Prepare screws (not supplied) suitable for the screw
holes on the rear panel.
4 mm (3/16 inch)
More than 25 mm (1 inch)
4.2 mm
3
(
/16 inch)
8.6 mm
11
(
/32 inch)
Holes on the rear panel
PNotes
• Use screws suitable for the quality
of the material of the wall. The
screws may be damaged,
depending on the type of material
used in the wall. Set the screws in
a pillar or stud in the wall.
• When you want to re-insert the
memory card, remove the photo
frame from the wall, then eject and
re-insert the memory card while
the photo frame is placed on a
stable surface.
• Remove the stand when you hang
the photo frame on the wall.
• Connect the DC cable of the AC
adaptor to the photo frame and
hang the photo frame on the wall.
Then connect the AC adaptor to
the wall outlet.
• We take no responsibility for any
accidents or damage caused by
defects of attachment, misuse, or
natural disasters, etc.
• Tighten the screws firmly to avoid
the photo frame from falling.
• Be careful not to step on the
screws or hanging unit.
Let’s get the photo frame ready
3 Screw the screws (not supplied) into the wall.
Be sure the screws (not supplied) protrude between 2.5 mm to
1
/8 inch) from the surface of the wall.
3 mm (
Between
2.5 mm to 3 mm
1
/8 inch)
(
4 Hang the photo frame on the wall by fitting the hole on
the rear panel to the screws on the wall.
11
GB
PNotes
• The socket outlet should be as close
as possible to the unit, and easily
accessible.
• Do not place the photo frame on an
unsteady or tilted surface.
• Connect the AC adaptor to an easily
accessible wall outlet close by. If
trouble occurs while using the
adaptor, immediately shut off the
power by disconne cting the plug
from the wall outlet.
• Do not short the plug of the AC
adaptor with a metal object. Doing
so may cause a malfunction.
• Do not use the AC adaptor placed in
a narrow space, such as between a
wall and furniture.
• After use, remove the AC adaptor
from the DC IN 9 V jack on the
photo frame, and remove the AC
adaptor from the wall outlet.
• Do not turn the photo frame off or
disconnect the AC adaptor from the
photo frame before the standby
indicator turns red. Doing so may
damage the photo frame.
• The AC plug shape may differ
depending on the region you
purchase the photo frame.
•
The supplied AC adaptor is
designed to be used with this photo
frame only. It cannot be used with
any other devices.
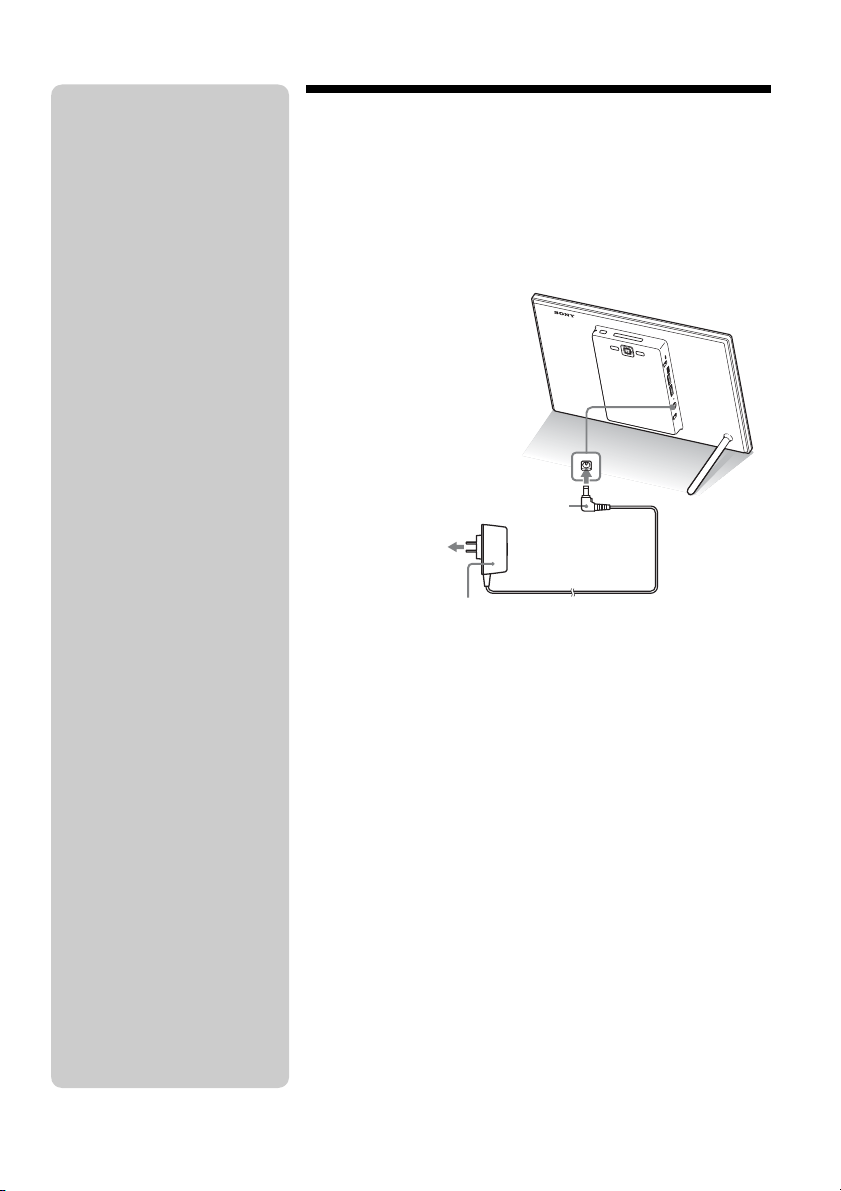
Turning the photo frame on
1 Insert the plug of the AC adaptor into the DC IN 9 V
jack on the rear of the photo frame.
2 Connect the AC adaptor to the wall outlet.
The photo frame is automatically turned on.
To the DC IN 9 V jack
DC plug
To the wall outlet
AC adaptor
12
GB
Loading…
- Topics
- manualsbase, manuals,
- Collection
- manuals_sony; manuals; additional_collections
- Language
- English
- Item Size
- 55.8M
- Addeddate
- 2020-07-17 01:47:35
- Identifier
- manualsbase-id-118227
- Identifier-ark
- ark:/13960/t5bd2xn8q
- Ocr
- ABBYY FineReader 11.0 (Extended OCR)
- Page_number_confidence
- 94.94
- Ppi
- 600
- Scanner
- Internet Archive Python library 1.9.3
plus-circle Add Review
plus-circle Add Review
comment
Reviews
There are no reviews yet. Be the first one to
write a review.
75
Views
DOWNLOAD OPTIONS
download 1 file
ABBYY GZ download
Temporarily Unavailable
DAISY
For users with print-disabilities
Temporarily Unavailable
EPUB
download 1 file
FULL TEXT download
download 1 file
ITEM TILE download
download 1 file
PAGE NUMBERS JSON download
download 1 file
PDF download
download 1 file
SINGLE PAGE PROCESSED JP2 ZIP download
download 1 file
TORRENT download
download 12 Files
download 6 Original
SHOW ALL
IN COLLECTIONS
Manuals: Sony
The Manual Library
Additional Collections
Uploaded by
chris85
on
4
RU
Перед началом работы
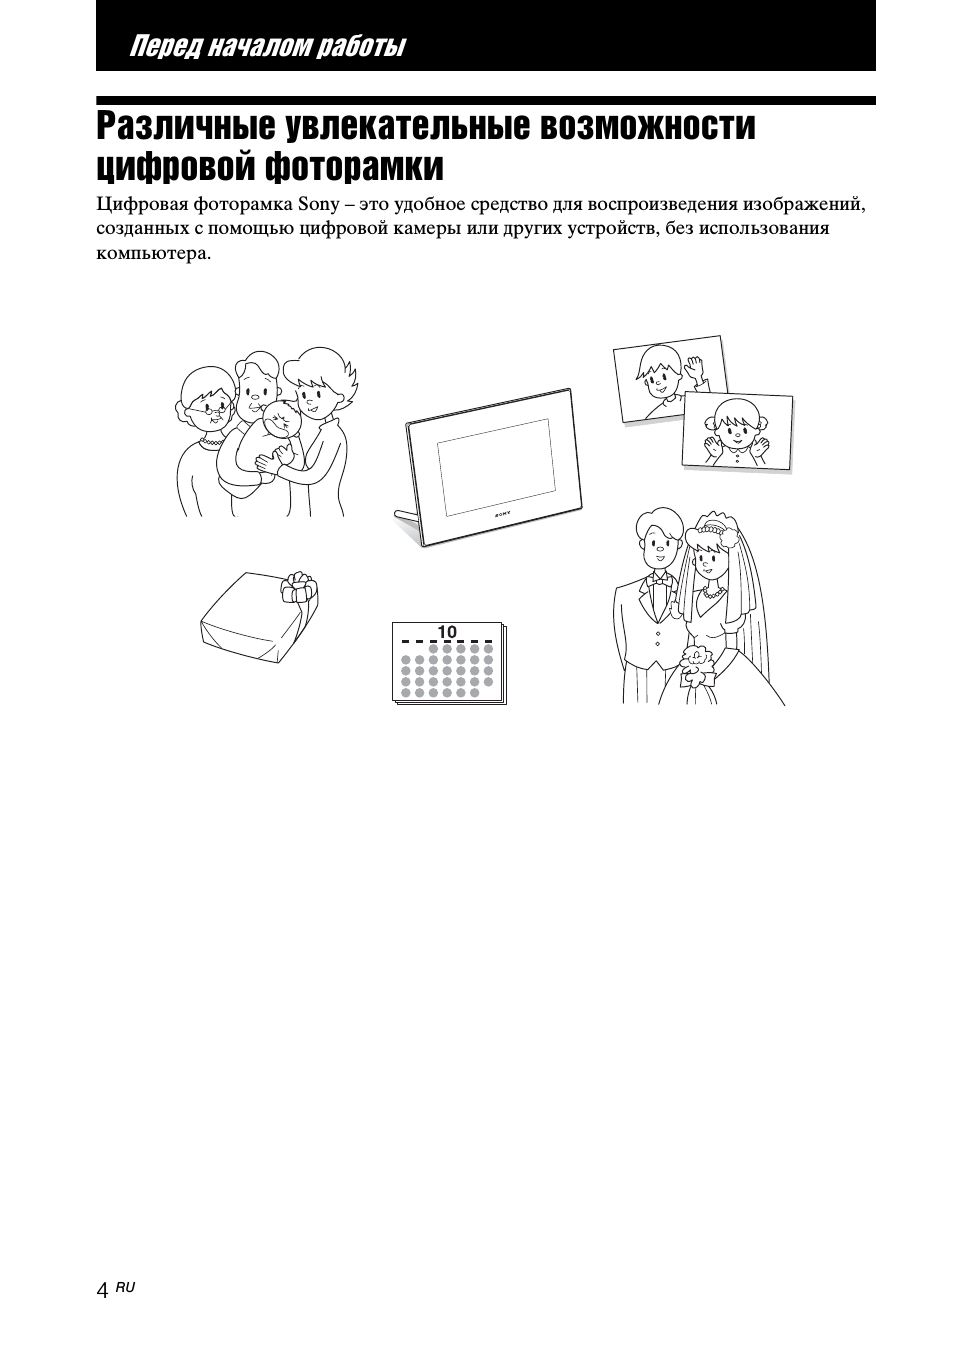
Различные увлекательные возможности
цифровой фоторамки
Цифровая фоторамка Sony – это удобное средство для воспроизведения изображений,
созданных с помощью цифровой камеры или других устройств, без использования
компьютера.
5
RU
П
е
р
е
д н
а
ч
а
лом
раб
от
ы
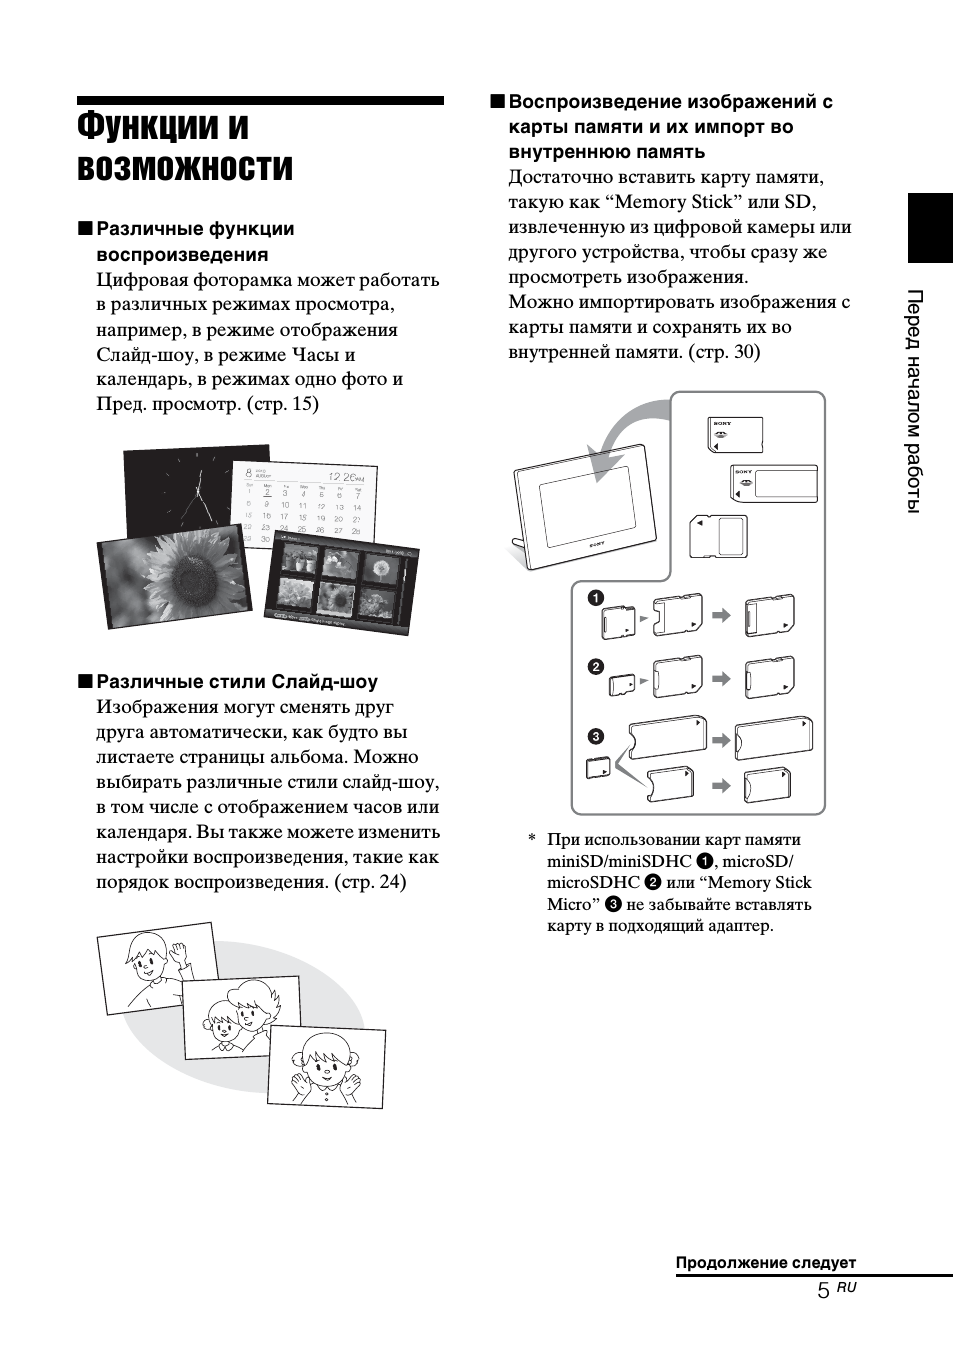
Функции и
возможности
x Различные функции
воспроизведения
Цифровая фоторамка может работать
в различных режимах просмотра,
например, в режиме отображения
Слайд-шоу, в режиме Часы и
календарь, в режимах одно фото и
Пред. просмотр. (стр. 15)
x Различные стили Слайд-шоу
Изображения могут сменять друг
друга автоматически, как будто вы
листаете страницы альбома. Можно
выбирать различные стили слайд-шоу,
в том числе с отображением часов или
календаря. Вы также можете изменить
настройки воспроизведения, такие как
порядок воспроизведения. (стр. 24)
x Воспроизведение изображений с
карты памяти и их импорт во
внутреннюю память
Достаточно вставить карту памяти,
такую как “Memory Stick” или SD,
извлеченную из цифровой камеры или
другого устройства, чтобы сразу же
просмотреть изображения.
Можно импортировать изображения с
карты памяти и сохранять их во
внутренней памяти. (стр. 30)
* При использовании карт памяти
miniSD/miniSDHC 1, microSD/
microSDHC 2 или “Memory Stick
Micro” 3 не забывайте вставлять
карту в подходящий адаптер.
Продолжение следует
6
RU
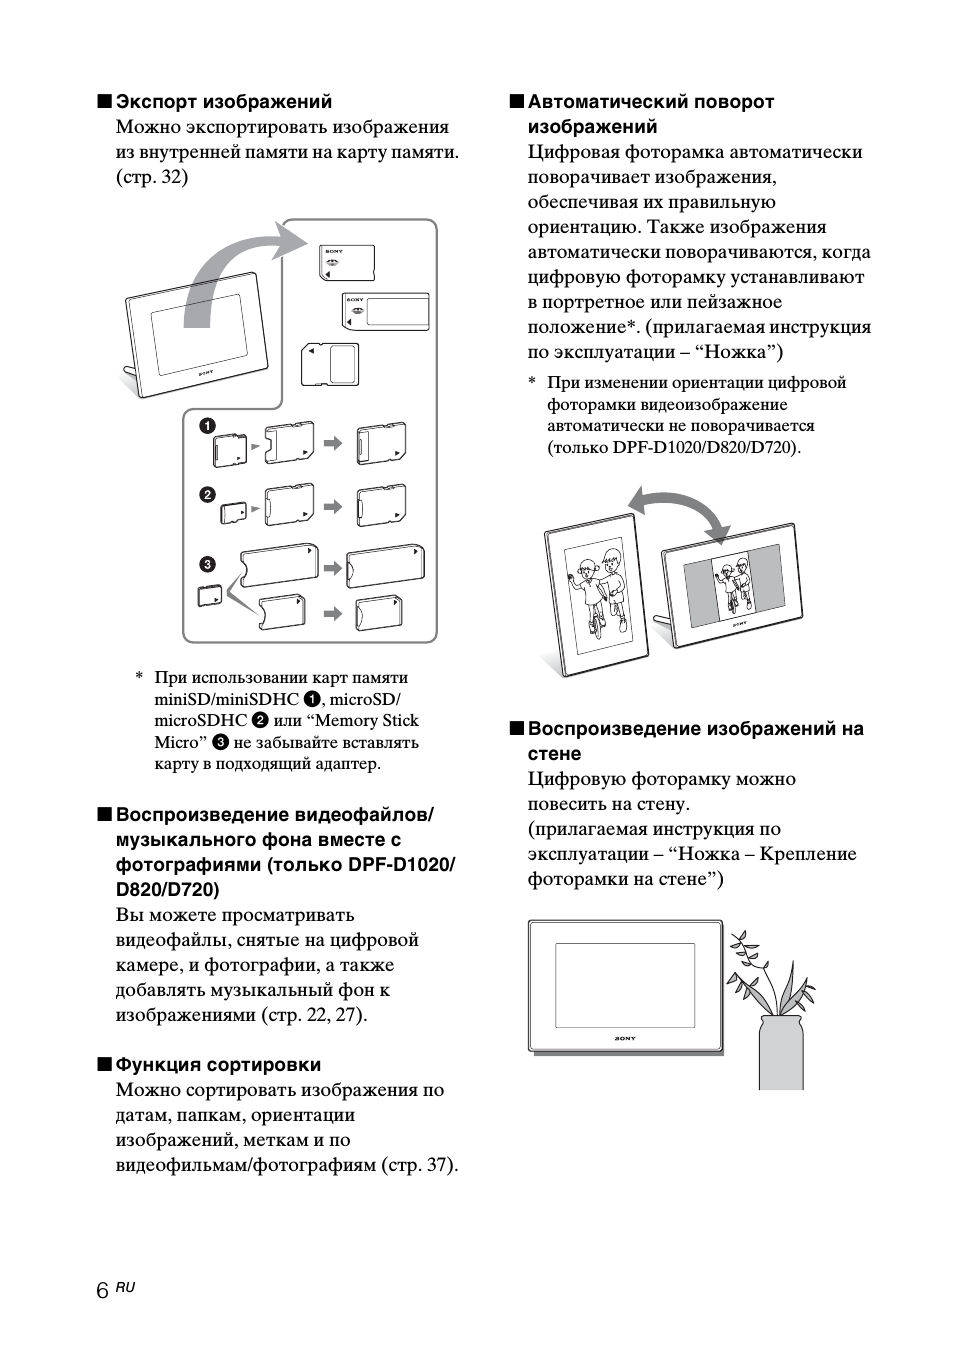
x Экспорт изображений
Можно экспортировать изображения
из внутренней памяти на карту памяти.
(стр. 32)
* При использовании карт памяти
miniSD/miniSDHC 1, microSD/
microSDHC 2 или “Memory Stick
Micro” 3 не забывайте вставлять
карту в подходящий адаптер.
x Воспроизведение видеофайлов/
музыкального фона вместе с
фотографиями (только DPF-D1020/
D820/D720)
Вы можетe просматривать
видеофайлы, снятые на цифровой
камере, и фотографии, а также
добавлять музыкальный фон к
изображениями (стр. 22, 27).
x Функция сортировки
Можно сортировать изображения по
датам, папкам, ориентации
изображений, меткам и по
видеофильмам/фотографиям (стр. 37).
x Автоматический поворот
изображений
Цифровая фоторамка автоматически
поворачивает изображения,
обеспечивая их правильную
ориентацию. Также изображения
автоматически поворачиваются, когда
цифровую фоторамку устанавливают
в портретное или пейзажное
положение*. (прилагаемая инструкция
по эксплуатации – “Ножка”)
* При изменении ориентации цифровой
фоторамки видеоизображение
автоматически не поворачивается
(только DPF-D1020/D820/D720).
x Воспроизведение изображений на
стене
Цифровую фоторамку можно
повесить на стену.
(прилагаемая инструкция по
эксплуатации – “Ножка – Крепление
фоторамки на стене”)
7
RU
П
е
р
е
д н
а
ч
а
лом
раб
от
ы
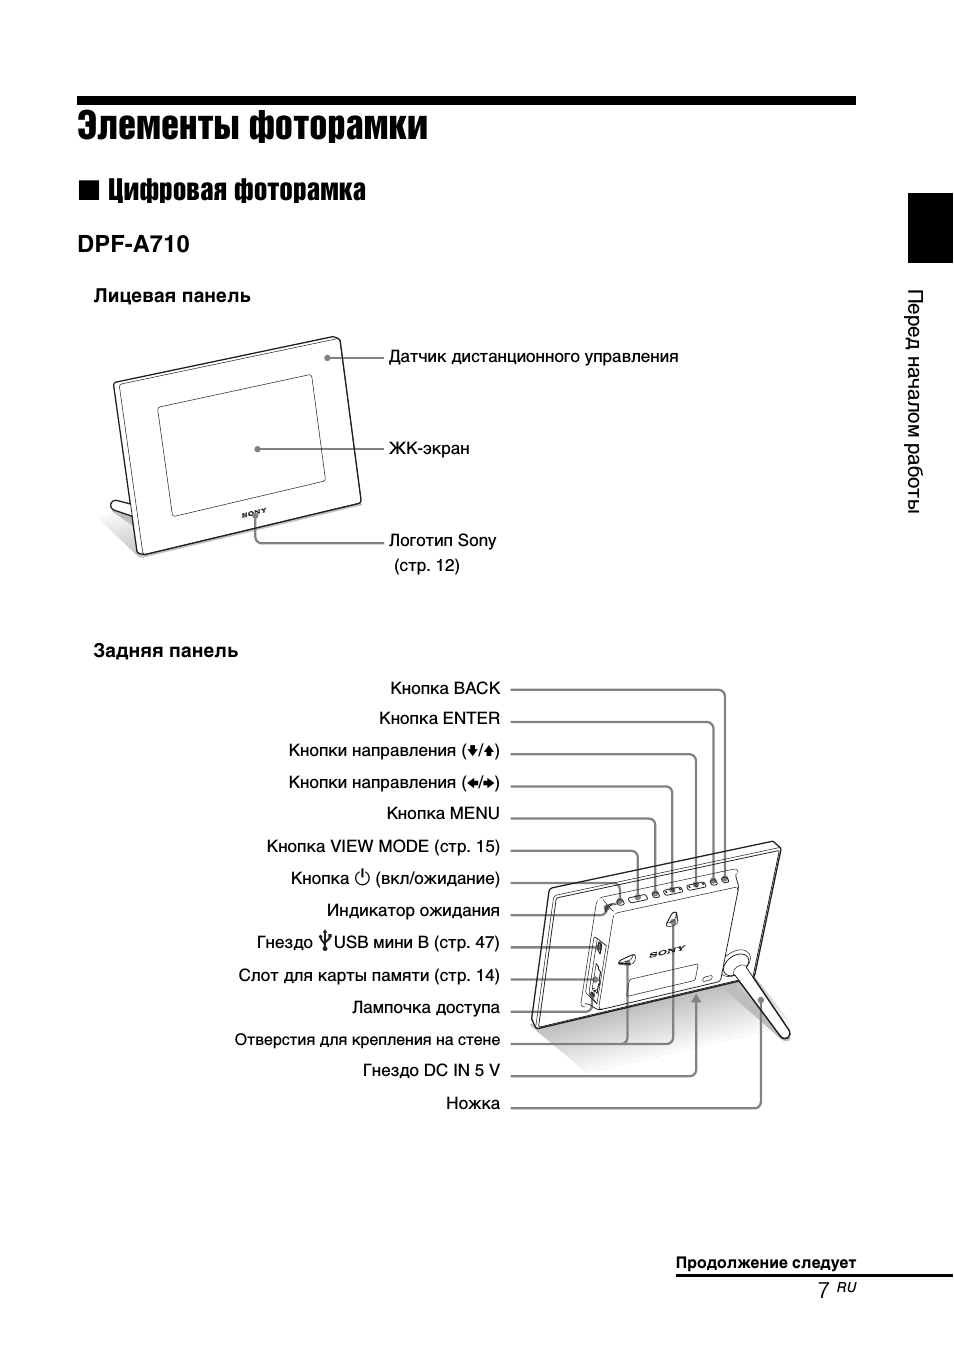
Элементы фоторамки
x
Цифровая фоторамка
DPF-A710
Лицевая панель
ЖК-экран
Датчик дистанционного управления
Логотип Sony
(стр. 12)
Задняя панель
Кнопка BACK
Кнопка ENTER
Кнопки направления (
v/V)
Кнопки направления (
B/b)
Кнопка MENU
Кнопка VIEW MODE (стр. 15)
Кнопка 1 (вкл/ожидание)
Индикатор ожидания
Гнездо
USB мини B (стр. 47)
Слот для карты памяти (стр. 14)
Лампочка доступа
Отверстия для крепления на стене
Гнездо DC IN 5 V
Ножка
Продолжение следует
8
RU
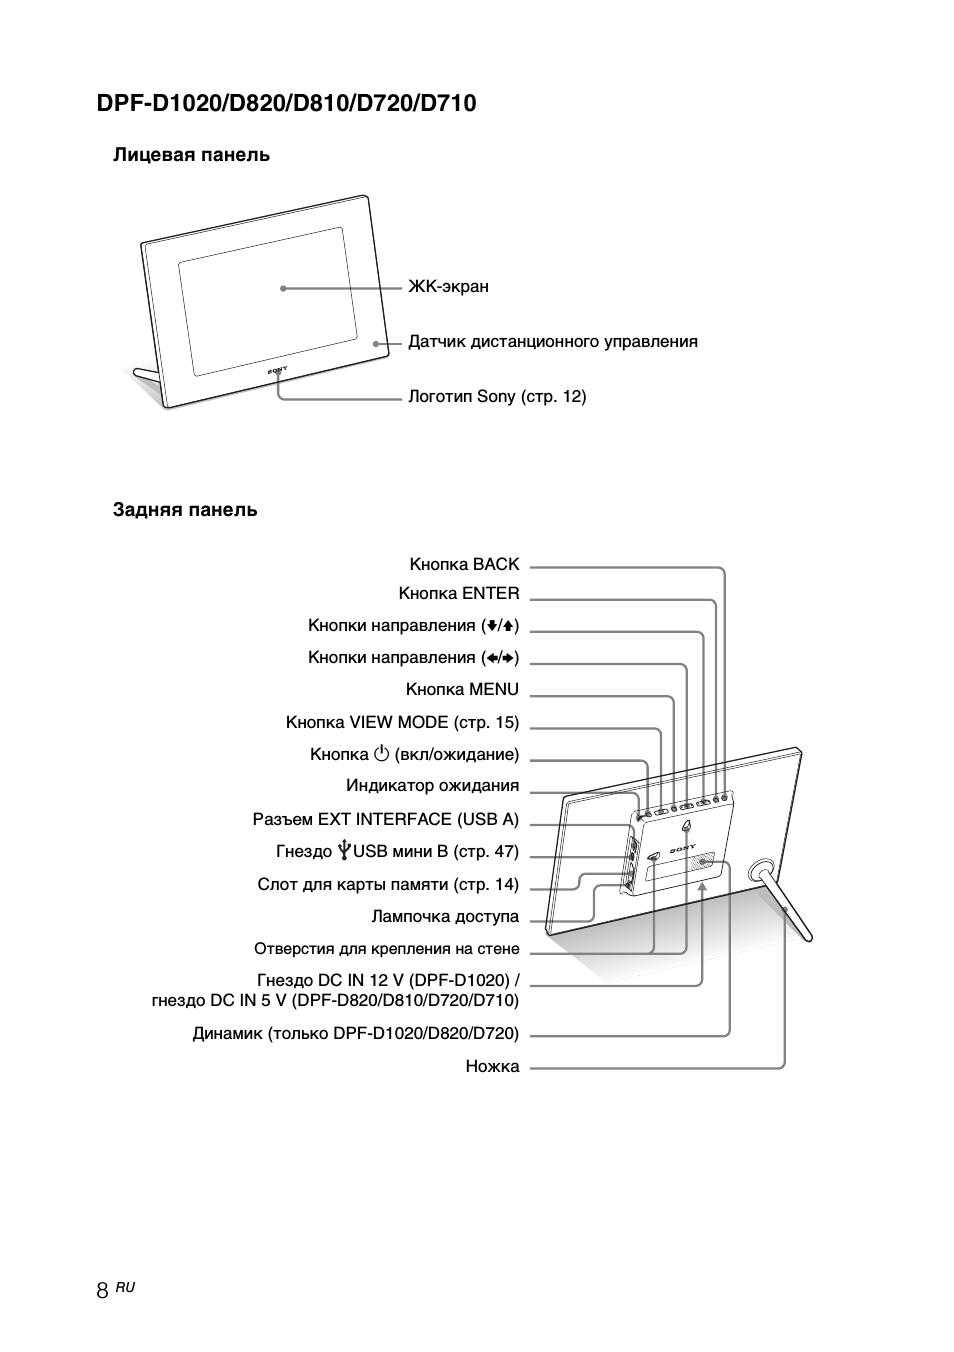
DPF-D1020/D820/D810/D720/D710
Лицевая панель
ЖК-экран
Датчик дистанционного управления
Логотип Sony (стр. 12)
Задняя панель
Кнопка BACK
Кнопка ENTER
Кнопки направления (
v/V)
Кнопки направления (
B/b)
Кнопка MENU
Кнопка VIEW MODE (стр. 15)
Кнопка 1 (вкл/ожидание)
Индикатор ожидания
Разъем EXT INTERFACE (USB A)
Гнездо
USB мини B (стр. 47)
Слот для карты памяти (стр. 14)
Лампочка доступа
Отверстия для крепления на стене
Гнездо DC IN 12 V (DPF-D1020) /
гнездо DC IN 5 V (DPF-D820/D810/D720/D710)
Динамик (только DPF-D1020/D820/D720)
Ножка
9
RU
П
е
р
е
д н
а
ч
а
лом
раб
от
ы
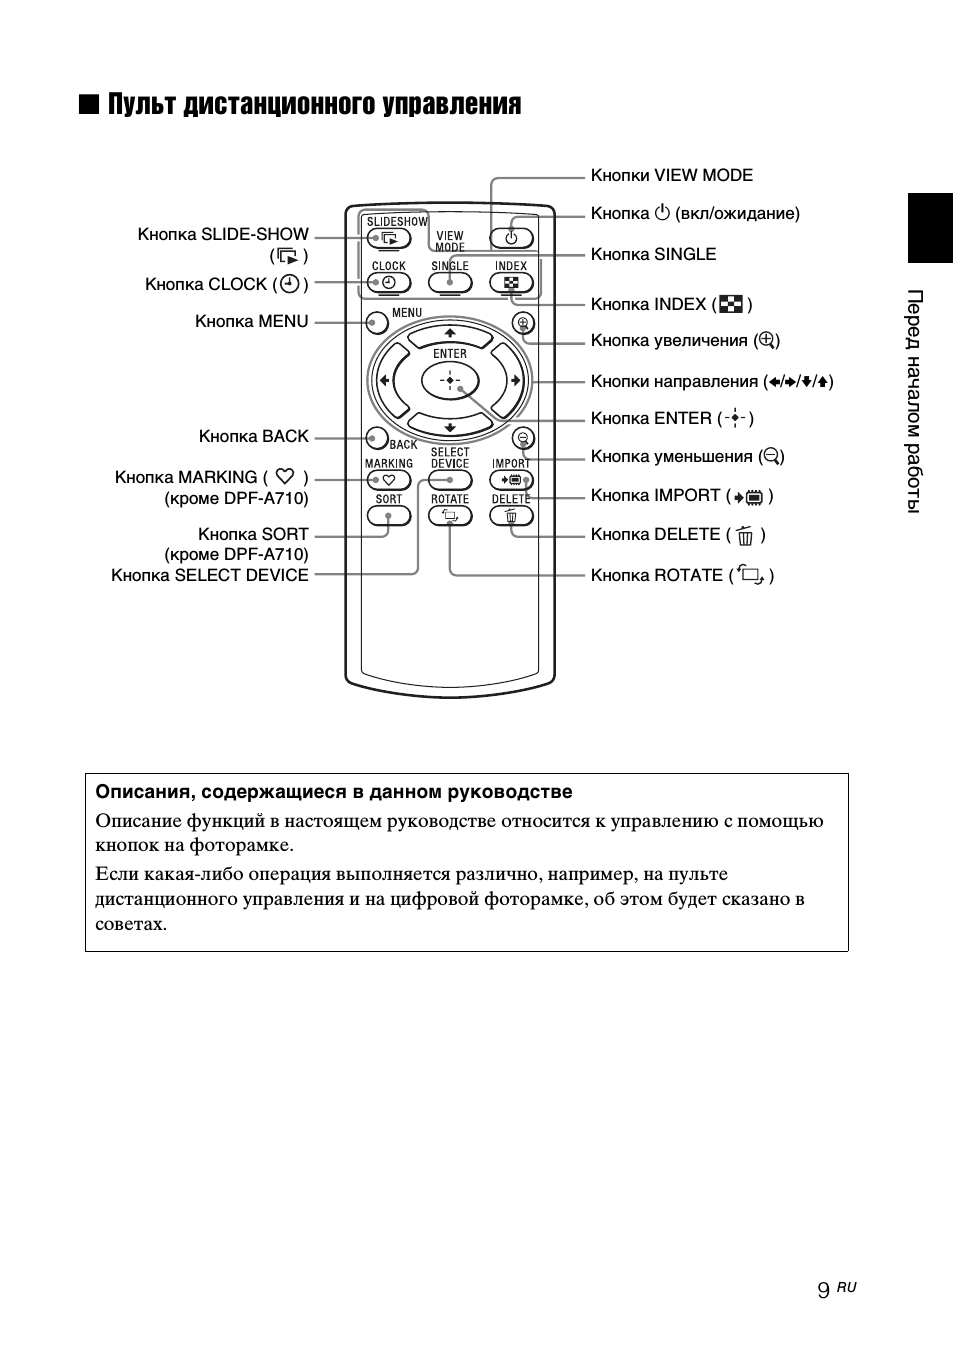
x
Пульт дистанционного управления
Кнопка SLIDE-SHOW
(
)
Кнопка CLOCK (
)
Кнопка MENU
Кнопка BACK
Кнопка MARKING (
)
(кроме DPF-A710)
Кнопка SORT
(кроме DPF-A710)
Кнопка SELECT DEVICE
Кнопки VIEW MODE
Кнопка 1 (вкл/ожидание)
Кнопка SINGLE
Кнопка INDEX (
)
Кнопка увеличения (
)
Кнопки направления (
B/b/v/V)
Кнопка ENTER (
)
Кнопка уменьшения (
)
Кнопка IMPORT (
)
Кнопка DELETE (
)
Кнопка ROTATE (
)
Описания, содержащиеся в данном руководстве
Описание функций в настоящем руководстве относится к управлению с помощью
кнопок на фоторамке.
Если какая-либо операция выполняется различно, например, на пульте
дистанционного управления и на цифровой фоторамке, об этом будет сказано в
советах.
10
RU
Основные функции
Подготовка пульта
дистанционного
управления
Пульт дистанционного управления
поставляется с установленной в нем
литиевой батарейкой (CR2025). Перед
использованием извлеките защитный
лист, как показано на рисунке.
Работа с пультом дистанционного
управления
Направьте верхний торец пульта
дистанционного управления на
расположенный на цифровой фоторамке
датчик дистанционного управления.
DPF-A710
DPF- D1020/D820/D810/D720/D710
При нажатии кнопок на цифровой
фоторамке, висящей на стене, цифровая
фоторамка может упасть. Управляя
цифровой фоторамкой, надежно
удерживайте ее от падения.
Защитный лист
Датчик
дистанционного
управления
Датчик
дистанци-
онного
управления
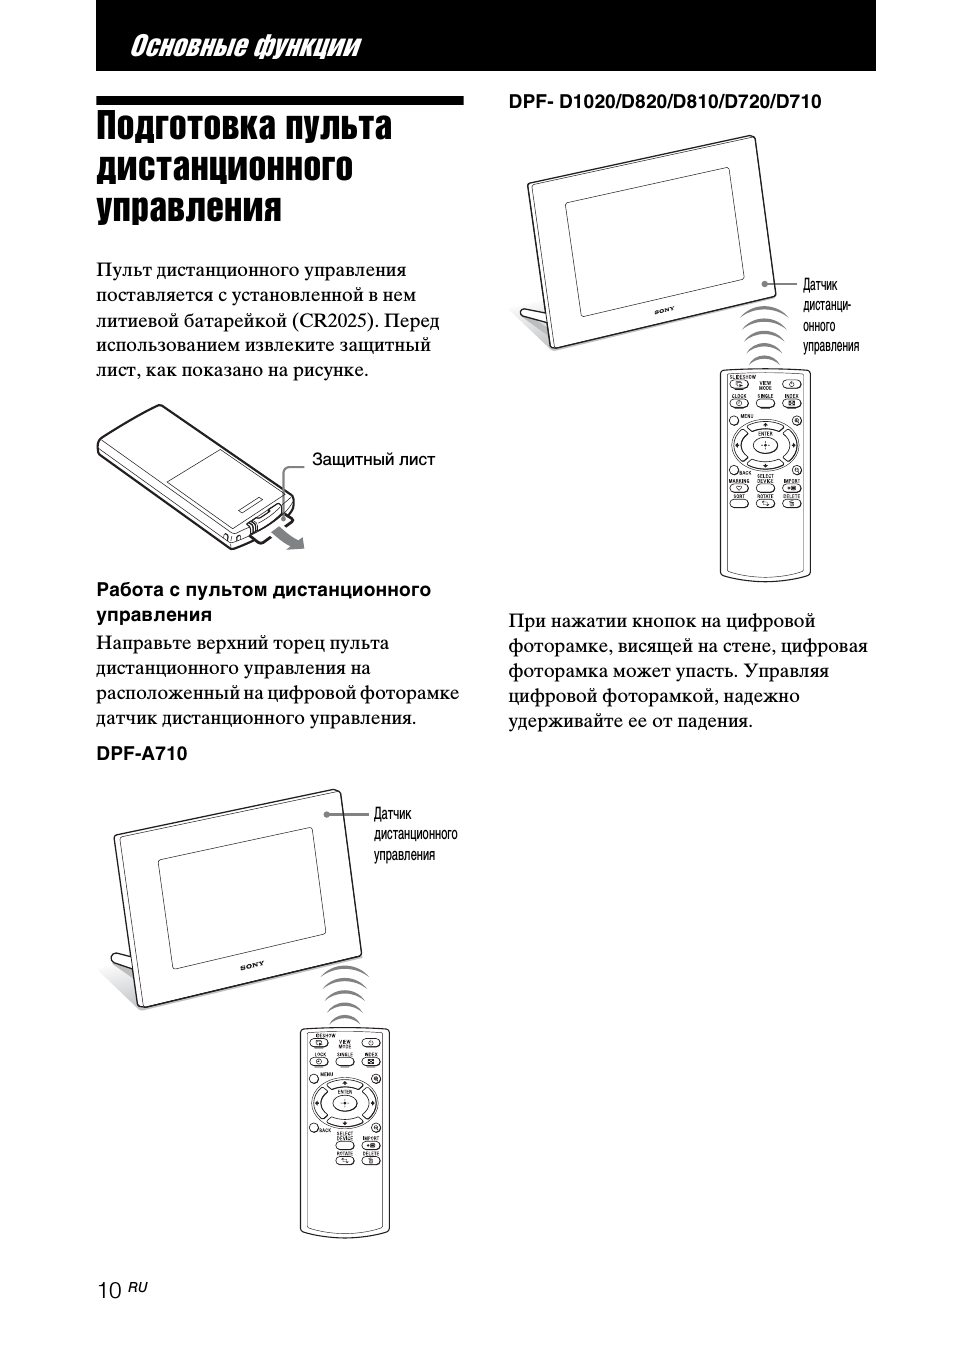
06:09
Sony DPF A710 Digital Photo Frame Review
03:26
Review Sony S-Frame DPF-A710
04:49
Cheapo Tech: Unbox/Review of Sony S-Frame DPF-C70A 7″ Photo Frame
04:33
Sony DPF-A710 photoframe unboxing
03:29
Фоторамка Sony DPF-C800 — Личное мнение
03:29
Видеообзор Sony DPF-D72N/BZ Swarovski
01:32
Фоторамка Sony DPF-XR100 — М.Видео ТВ
Нажмите на кнопку для помощи
-
Page 1: Sony S-Frame 4-262-215-12 (1)
4-262-215- 12 (1) Digital Photo Frame DPF-D830/D830L © 2010 Sony Corporation Fo r y our sa fe ty Let’s g et the pho to frame re ady Let’s vie w an image Try us ing va ri ous fu nctio ns Troublesh ooting Additional informa tion Operatin g Instru ctions Before ope rating this uni t, pleas e read this manu al thoroug hly and retain i t for futu r[…]
-
Page 2: Sony S-Frame 4-262-215-12 (1)
2 GB To reduce fire or shock haz ard, do not expose the unit to rai n or moisture. Do not expose the bat teries to excessiv e heat suc h as sunshine , fire or the like. CAUTION Replace the battery with the spe cified type only. Otherwise, fire or injury may re sult. Dispose of used batte ries acc ording to the instructions. For the cu stom ers in t[…]
-
Page 3: Sony S-Frame 4-262-215-12 (1)
3 GB Note: This e quipmen t has b een te sted a nd foun d to com ply with th e limit s for a C lass B digital device , pur suan t to Part 15 of t he FCC Rule s. These l imit s are desi gned to provid e re asonabl e protec tion ag ains t harm ful in terfere nce in a resid ential instal lation. Th is eq uipme nt gen erates, u ses, an d can radia te r[…]
-
Page 4: Sony S-Frame 4-262-215-12 (1)
4 GB The chemical symbols for m ercury (Hg) or lead (Pb) are added if the battery contains more than 0.0005% mercury or 0.004 % lead. By ensuring these batteries are disposed of correctly, you will help prevent potentially negative consequences for the environme nt and human health which could otherwise be caused by inappropriate waste handling of […]
-
Page 5: Sony S-Frame 4-262-215-12 (1)
5 GB Read this befo re u sing Notes on play back Connect t he AC ad aptor t o an eas ily acces sible AC outlet. Should you n otice an abno rmalit y in it, disco nnect it from the AC outle t imme diatel y. Notes on copy rights Duplicati on, edition , or printing of a CD, TV programs, copyright ed mate rials suc h as p ictures or publicati ons, or an[…]
-
Page 6: Sony S-Frame 4-262-215-12 (1)
6 GB Table of Cont ents Read this before u sing ……………. …………….. ……….. …………….. ……….. …………..5 For your safety Checking included items ………………. ……………. ………… …………….. ……….. ……..8 Identifying the parts ………….. ………… ……………. …………[…]
-
Page 7: Sony S-Frame 4-262-215-12 (1)
7 GB Changing the settin gs …………………….. ……….. ……….. …………….. ……….. …….. 27 Displaying an image stored in a USB memory device ………………….. …………. 28 Connecting to a co mputer ……………….. ……………. ………… …………….. ……….. .. 29 Troubleshooting If an err[…]
-
Page 8: Sony S-Frame 4-262-215-12 (1)
8 GB oy o us a e y Checking inclu ded items Make sure that t he followin g items are inclu ded. Digital photo frame (1) Remote co ntrol (1 ) , Removi ng the prot ective sheet (page 11) AC adaptor (1) , Connecting to the AC powe r source (page 13) Stand cap (1) Jacket cove r * (1) (DPF-D830 L only) Operating Instructions (this manual) (1) CD-ROM (Di[…]
-
Page 9: Sony S-Frame 4-262-215-12 (1)
9 GB For yo ur safety Ident ifying the pa rts x Digital photo frame Front Rear LCD screen Remote se nsor Sony logo VIEW MODE butt on (page 17) RESET switch MENU button B / b / v / V (Dir ection)/ (Enter) button s BACK butt on 1 (on/st andby) but ton/Sta ndby Indic ator Ac cess lamp Memory card slot (page 16) EXT I NTERFACE (USB A ) conne ctor USB m[…]
-
Page 10: Sony S-Frame 4-262-215-12 (1)
10 GB x Remote control SLIDE -SHOW ( ) butt on CLOCK ( ) butto n MENU button BACK butto n MARKIN G ( ) but ton SORT butto n SELECT D EVIC E butto n VIEW MO DE butt ons 1 (on/sta ndby) butt on SINGLE bu tton INDEX ( ) bu tton Zoom in ( ) b utton Direction ( B / b / v / V ) butto ns ENTER ( ) butto n Zoom ou t ( ) button IMPORT ( ) button DELE TE ( )[…]
-
Page 11: Sony S-Frame 4-262-215-12 (1)
11 GB Let’s get the photo fram e ready Let’s get th e photo frame re ady Remote cont rol Pull out th e prote ctive sh eet bef ore use as shown in the figure. Using the rem ote control Point the to p end of th e remote cont rol towards th e remote s ensor on the ph oto fra me. Stand 1 Push on the v mark on the stand in the dire ction of arrow A […]
-
Page 12: Sony S-Frame 4-262-215-12 (1)
12 GB You c an set th e photo fr ame to portra it or lands cape orient ation by rotating it without mo ving the st and. To at tach the stand cap Attac h the s tand cap to the st and. Y ou can set the phot o fram e in a stable po sition ei ther in port rait or landsca pe orient ation if yo u extend the stand to the limit. When usin g the A C ad apto[…]
-
Page 13: Sony S-Frame 4-262-215-12 (1)
13 GB Let’s get the photo fram e ready Turning th e phot o frame on 1 Inser t the plug of the AC adaptor int o the DC IN 12 V jack on the rea r of the ph oto fram e. 2 Connect th e AC ada ptor to t he wall outlet. The photo fra me is automatical ly turned o n. When usin g the ph oto fram e with the built-i n batte ry pack Turn on the photo frame […]
-
Page 14: Sony S-Frame 4-262-215-12 (1)
14 GB About the built-in battery pack The built-i n battery will be fully charged if the re maining b attery level is redu ced to a certai n level when ever th e AC ad aptor i s connec ted t o the phot o fram e. The st andb y in dica tor is l it i n or ange d uri ng ch argi ng a nd th e mar k is disp layed in the up per rig ht of th e scree n whe n[…]
-
Page 15: Sony S-Frame 4-262-215-12 (1)
15 GB Let’s get the photo fram e ready Operations in an initial state When the photo frame is turned on, the initia l display appears. Setting t he curre nt time 1 Press MENU , and B / b to selec t the (Settings ) tab. v / V [Date/ time Set tings] , ENTER 2 Press v / V to select [Time] , ENTER. v / V to se lect a value. , B / b (hou r, minut e, a[…]
-
Page 16: Sony S-Frame 4-262-215-12 (1)
16 GB Let’s view an image Insert ing a memo ry ca rd 1 Open the I/O cover. 2 Insert a memory card firmly into the correspond ing slot with its l abel side facin g toward yo u (when y ou are facing th e back sid e of the photo fram e). When you insert a memory ca rd The images o n the memory card are automatical ly displa yed. If you swi tch off t[…]
-
Page 17: Sony S-Frame 4-262-215-12 (1)
17 GB Let’s v iew an i mage Changing th e display 1 P ress VIEW M ODE repeatedly to selec t the vie w mode yo u want t o disp lay. The disp lay chan ges t o the sel ected view mode . Using the remot e control Press t he VIEW MODE button co rres pond ing to the vi ew mode yo u want to display . 2 Press B / b / v / V to selec t a desire d style, a […]
-
Page 18: Sony S-Frame 4-262-215-12 (1)
18 GB About the information displayed on the LCD screen The followin g informat ion is dis played. 1 Displa y type (In the Single view m ode) – Entire ima ge – Fit to screen – Entire image ( with Exif) – Fit to sc reen (with Exif) 2 Ordinal number of the displayed image/ total number of images Input media indi cation for the displa yed imag[…]
-
Page 19: Sony S-Frame 4-262-215-12 (1)
19 GB Let’s v iew an i mage Playing a vide o file 1 Select a video file. 1 Press SI NGLE. 2 Press B / b to select the desire d style a nd press ENTER . 3 Press B / b to advanc e/reve rse th e files t o sel ect a vid eo file you wan t to play. Using t he Ind ex di splay 1 Press (INDEX). 2 Press B / b / v / V to select a vi deo fil e you wan t to p[…]
-
Page 20: Sony S-Frame 4-262-215-12 (1)
20 GB Playing a slides how w ith backgrou nd music Importing a music file 1 Insert a m emory card o r connec t a USB ex ternal device that co ntains a musi c file int o the p hoto fra me. 2 Press MENU, s elect the ( Settings ) tab with B / b , then pre ss v / V to select [Slidesho w BGM Settin gs]. 3 Press v / V to s elect [Impo rt BGM] and press E[…]
-
Page 21: Sony S-Frame 4-262-215-12 (1)
21 GB Let’s v iew an i mage 5 Press M ENU. Whe n you sele ct (Slidesho w) on the view mode screen, the music file with a check mark ( ✔ ) is play ed. Playing background music with a slideshow 1 Press MENU, select th e (Setting s) tab with B / b , then pr ess v / V to select [Slidesho w BGM Settin gs]. 2 Press v / V to sel ect [BGM ON/ OFF] and […]
-
Page 22: Sony S-Frame 4-262-215-12 (1)
22 GB Try using vari ous functions Variou s func tions • Importi ng an image (to Internal me mory) • Exportin g an image (from Interna l memory) • Del etin g an imag e • Marki ng an image 1 When a de sired image is disp layed, pre ss MEN U then B / b to sel ect the (Editing) tab . 2 Press v / V to s elect the desi red menu i tem (Impo rt/ E[…]
-
Page 23: Sony S-Frame 4-262-215-12 (1)
23 GB Try u sing va riou s fu nctio ns Sorting imag es (Filtering) 1 When a d esired image is disp layed, press ME NU then B / b to se lect the (Editing) tab . 2 Press v / V to selec t [Sort] a nd press E NTER. 3 Select a sort st yle usin g v / V and press EN TER. • [Sort by date]: Filter s by the sh ooting date . • [Sort by folder]: Filters by[…]
-
Page 24: Sony S-Frame 4-262-215-12 (1)
24 GB Specifying th e playbac k device 1 Press MENU th en selec t the (Select d evice) tab with B / b . 2 Press v / V to sele ct the de vice you w ant to dis play an d press ENTER. Using th e remo te contro l Press SELECT DEV ICE. Adjusting image size and orientat ion (Zoom in/Zoom out/Rotate) Enlarg ing/Redu cing 1 Press MEN U in Singl e view mode[…]
-
Page 25: Sony S-Frame 4-262-215-12 (1)
25 GB Try u sing va riou s fu nctio ns Rotatin g 1 Press MENU in Singl e view mo de, B / b to selec t the (Editing) tab, v / V to select [Ro tate], and p ress ENTER. 2 Press v / V to sel ect the an gle of rota tion a nd press ENTER. You ca n select an angle of rotat ion from among 90 degre es, 180 degr ees an d 270 de grees cl ockwi se. Using the r[…]
-
Page 26: Sony S-Frame 4-262-215-12 (1)
26 GB 3 Press v / V to selec t [Setup method ], and press ENTER. Then , press v / V to select [ Simple ], [Advance d] or [Aut o off] and press ENTER. [Simple] 1 Press v / V to select [Time Setting] , ENTER. 2 Press v / V to se lect [P ower-ON timer] or [Power- OFF timer] , ENTER. 3 Press v / V to select [Ena ble] , ENTER. 4 [Auto ON time] / [Auto O[…]
-
Page 27: Sony S-Frame 4-262-215-12 (1)
27 GB Try u sing va riou s fu nctio ns [Auto off] 1 Press v / V to se lect [Time setting] , ENTER. 2 Press v / V to select t he des ired pe riod after wh ich you wan t to tur n off the photo fr ame automatic ally: [2 h ours], [4 hou rs], or [Dis able]. Then press EN TE R. 4 Press M ENU. Changing th e sett ings 1 Press M ENU, then B / b to select th[…]
-
Page 28: Sony S-Frame 4-262-215-12 (1)
28 GB Displaying an ima ge stored in a USB memory device 1 Connect th e AC adap tor to th e photo fram e, and to the AC power source. 2 Turn on the photo frame. 3 Open the I/O cover. 4 Connect th e USB memory device to the EXT INTERFACE (U SB A) connector o n the phot o frame. 5 Select the [USB] External Device i n Select devi ce (page 24). For det[…]
-
Page 29: Sony S-Frame 4-262-215-12 (1)
29 GB Try u sing va riou s fu nctio ns Connecting to a computer 1 Connect th e AC adap tor to the p hoto fra me, and to the AC pow er so urc e. 2 Open th e I/O cover. 3 Connect th e compu ter and photo fr ame with a comm erci ally avai labl e USB cable . 4 Turn the p hoto fra me on. 5 Operate the co mputer to excha nge imag es with the internal mem[…]
-
Page 30: Sony S-Frame 4-262-215-12 (1)
30 GB Troublesh ooting If an erro r message appear s Erro r mes sage Meaning/So lutions Canno t dele te a pr otec ted fi le. • To del ete a pr otec ted fi le, ca ncel the pr otec tion on your digital camer a or com puter. Mem ory card is pr otecte d. Remove prot ecti on t hen t ry ag ain. • The memory card is write-prot ected. Sl ide the wri te[…]
-
Page 31: Sony S-Frame 4-262-215-12 (1)
31 GB Troublesh ooting If trouble occurs Symptom Che ck item Cause/ Solutions The po wer is no t turne d on. • Is the plug of the AC adapto r conne cte d correc tly? c Conne ct the AC ad aptor co rrec tly (page 13). • I s the bui lt-in battery pack out of cha rge? Some images are not dis pl ayed. • Are the images displayed in the index vi ew?[…]
-
Page 32: Sony S-Frame 4-262-215-12 (1)
32 GB Cannot save an image. • Did you sa ve image s from a comput er to the i nterna l memory without making a folder in the interna l memory? c If you do not ma ke a folde r, you ca n only save u p to 512 i mage s. In ad diti on, the numbe r of image s may be r educ ed depe nding on t he fi le na me l engt h or chara cter ty pe. Whe n you sa ve […]
-
Page 33: Sony S-Frame 4-262-215-12 (1)
33 GB Troublesh ooting Cannot charge the built-i n battery pack. • Is the stan dby indi cator lit? c If an in ternal te mperature of th e photo frame rises ow ing to dire ct sunl ight, etc., battery chargi ng bec omes di sable d. In such a c ase, the s tand by indi cator does not light, b ut this is not a malf unction of th e photo fr ame . Sympt[…]
-
Page 34: Sony S-Frame 4-262-215-12 (1)
34 GB Additional informati on Precautio ns • Avoid placing the photo frame in a location subjec t to: – vib rati on – humidity – exce ssive dust – d irec t s unli gh t – extremely h igh or low te mperatures • Do not use el ectrica l equip ment ne ar the ph oto frame . The phot o fram e will not work pr ope rly in ele ctromag netic f i[…]
-
Page 35: Sony S-Frame 4-262-215-12 (1)
35 GB Addition al informa tion Specifi cations x Photo fra me LCD scre en LCD pane l 20.3 cm/8 inc hes, TFT active ma trix To tal n umb er of do ts : 1,440,00 0 dots (800 × 3 (RGB) × 600) do ts Effecti ve display ar ea Disp lay aspe ct ra tio 4:3 LCD s creen area: 20 cm / 7 .9 in ches To tal n umb er of do ts : 1,398,89 7 dots (789 × 3 (RGB) × […]
-
Page 36: Sony S-Frame 4-262-215-12 (1)
36 GB Inclu ded a ccess ories See “C heckin g includ ed items ” on pag e 8. x AC adaptor Power requirem ents — 100 V to 240 V, 50 H z/60 Hz, 0.4 A Rated outpu t voltage 12 V, 1.5 A Dimensions (depth/width /height) Appr ox. 64 mm × 50 mm × 30 mm (2 5 / 8 × 2 × 1 3 / 16 ) in ches (excl uding th e protrudi ng par ts) Mass Appro x. 110 g (3 7 /[…]
-
Page 37: Sony S-Frame 4-262-215-12 (1)
37 GB memo[…]
-
Page 38: Sony S-Frame 4-262-215-12 (1)
38 GB memo[…]
-
Page 39: Sony S-Frame 4-262-215-12 (1)
39 GB memo[…]
-
Page 40: Sony S-Frame 4-262-215-12 (1)
Printed using VOC (Volatile Orga nic Compound)-fre e vegetabl e oil b ased ink. Sony Corporation Printed in China[…]