

Домашняя
Аудиосистема
Инструкция по эксплуатации
Подготовка к
эксплуатации
Воспроизведение с
диска/устройства USB
Передача USB
Тюнер
BLUETOOTH
Регулировка звука
Другие операции
Дополнительная
информация
SHAKE-X70D/SHAKE-X30D/SHAKE-X10D

ПРЕДУПРЕЖДЕНИЕ
Для предотвращения возгорания
не накрывайте вентиляционное
отверстие устройства газетами,
скатертями, шторами и т. п.
Не подвергайте устройство
воздействию источников открытого
огня (например, зажженных свечей).
Для предотвращения возгорания
или поражения электрическим
током не допускайте попадания
и разбрызгивания жидкости на
устройство и не ставьте на корпус
устройства предметы, содержащие
жидкость, например, цветочные
вазы.
Так как основной штекер
используется для отсоединения
блока от сети электропитания,
подключайте блок к расположенной
в легкодоступном месте розетке
электросети. В случае нарушения
нормальной работы блока
незамедлительно отсоедините
основной штекер питания от
розетки электросети.
Не устанавливайте устройство в
тесных местах, таких как книжные
полки или встроенные шкафы.
Не подвергайте батарею или
устройства с установленной
батареей чрезмерному нагреванию,
например, не оставляйте под
солнечными лучами или рядом с
огнем.
Пока блок включен в розетку
электросети, он остается
подключенным к сети
электропитания, даже если питание
на самом блоке выключено.
Для использования только в
помещениях.
Для продуктов с
маркировкой CE
Действительность маркировки CE
ограничена только в тех странах, где
это закреплено законодательством,
в частности, в странах EEA (European
Economic Area, Европейское
экономическое пространство).
ВНИМАНИЕ
Использование оптических
приборов с данным устройством
вредно для зрения.
Данное устройство
классифицируется как ЛАЗЕРНОЕ
оборудование КЛАССА 1 в
соответствии со стандартом IEC
60825-1:2007. Эта маркировка
расположена на внешней стороне
основного блока.
Утилизация
использованных
элементов питания
и отслужившего
электрического и
электронного
оборудования
(Директива
применяется в
странах Евросоюза
и других
европейских
странах, где
действуют системы
раздельного сбора
отходов)
RU
2

Импортер на территории стран
Таможенного союза
АО «Сони Электроникс», Россия,
123103, Москва, Карамышевский
проезд, 6
Класс защиты от поражения
электрическим током II
Транспортировать в
оригинальной упаковке, во время
транспортировки не бросать,
оберегать от падений, ударов, не
подвергать излишней вибрации.
Реализацию осуществлять в
соответствии с действующими
требованиями законодательства.
Отслужившее изделие
утилизировать в соответствии с
действующими требованиями
законодательства.
Если неисправность не удается
устранить следуя данной
инструкции – обратитесь в
ближайший авторизованный SONY
центр по ремонту и обслуживанию.
Дата производства может быть
указана на самом продукте и/или
этикетке со штрихкодом на
картонной коробке.
Например: XX-XXXX
Первые две цифры означают
месяц, а последние четыре цифры
означают год.
Эта домашняя аудиосистема
предназначена для использования в
следующих целях:
• Воспроизведение источников
музыки/видео на дисках или
устройствах USB
• Передача музыки на устройства
USB
• Прослушивание радиостанций
• Прослушивание звука с
телевизора
• Воспроизведение источников
музыки на устройствах BLUETOOTH
• Прослушивание общественных
мероприятий с функцией “Party
Chain”
Для покупателей в
Казахстане
Организация, уполномоченная
принимать претензии от
потребителей на территории
Казахстана:
АО «Сони Электроникс»
Представительство в Казахстане,
050010, Республика Казахстан,
г. Алматы, пр. Достык, дом 117/7
Информация о лицензии и
торговой марке
• является торговой маркой
DVD Format/Logo Licensing
Corporation.
• Логотип “DVD+RW”, “DVD-RW”,
“DVD+R”, “DVD-R”, “DVD VIDEO”
и “CD” являются торговыми
марками.
• WALKMAN® и логотип WALKMAN®
— зарегистрированные торговые
марки Sony Corporation.
• Технология кодирования
аудиосигнала и патенты MPEG
Layer-3 используются по лицензии
Fraunhofer IIS и Thomson.
RU
3

• Windows Media является
зарегистрированной торговой
маркой или торговой маркой
Microsoft Corporation в США и/или
других странах.
• Данное изделие защищено
определенными правами
на интеллектуальную
собственность Microsoft
Corporation. Использование
или распространение такой
технологии, кроме как в данном
изделии, запрещено без
наличия лицензии корпорации
Microsoft или уполномоченного
подразделения Microsoft.
• Эта система включает в себя
Dolby* Digital.
* Произведено по лицензии Dolby
Laboratories. Dolby, Dolby Audio
и символ с двойной буквой D
являются торговыми марками
Dolby Laboratories.
• Эта система использует
технологию мультимедийного
интерфейса высокой четкости
High-Definition Multimedia
Interface (HDMI™). Термины HDMI
и HDMI High-Definition Multimedia
Interface и логотип HDMI являются
товарными знаками или
зарегистрированными товарными
знаками HDMI Licensing, LLC в
Соединенных Штатах и других
странах.
• “BRAVIA” является торговой
маркой Sony Corporation.
• LDAC™ и логотип LDAC являются
торговыми марками Sony
Corporation.
• Словесная марка и логотип
BLUETOOTH® являются
зарегистрированными торговыми
марками, принадлежащими
Bluetooth SIG, Inc., любое их
использование Sony Corporation
лицензировано. Все остальные
торговые марки и торговые
наименования являются
собственностью соответствующих
владельцев.
• N-Mark является торговой
маркой или зарегистрированной
торговой маркой NFC Forum, Inc. в
США и других странах.
• Android™ является торговой
маркой компании Google Inc.
• Google Play является торговой
маркой компании Google Inc.
• Apple, логотип Apple, iPhone
и iPod touch являются
товарными знаками Apple Inc.,
зарегистрированными в США и
других странах. App Store является
знаком обслуживания Apple Inc.
• “Made for iPod” и “Made
for iPhone” означает, что
электронное устройство было
разработано специально
для подключения к iPod или
iPhone соответственно и было
сертифицировано разработчиком
как соответствующее техническим
стандартам Apple. Компания
Apple не несет ответственность
за работу этого устройства или
его соответствие стандартам
безопасности и регулятивным
нормам. Обратите внимание,
что использование данного
аксессуара с iPod или iPhone
может повлиять на работу
беспроводного соединения.
RU
4

• СОГЛАСНО ЛИЦЕНЗИИ НА
ПОРТФЕЛЬ ПАТЕНТОВ НА
ИСПОЛЬЗОВАНИЕ ТЕХНОЛОГИИ
ВИЗУАЛИЗАЦИИ MPEG-4
РАЗРЕШАЕТСЯ ЧАСТНОЕ
И НЕКОММЕРЧЕСКОЕ
ИСПОЛЬЗОВАНИЕ ПОКУПАТЕЛЕМ
ДАННОГО ПРОДУКТА ДЛЯ
(i) КОДИРОВАНИЯ ВИДЕО
ИЗОБРАЖЕНИЯ В
СООТВЕТСТВИИ С ВИЗУАЛЬНЫМ
СТАНДАРТОМ MPEG-4 (ВИДЕО
MPEG-4)
И/ИЛИ
(ii) ДЛЯ РАСКОДИРОВАНИЯ ВИДЕО
MPEG-4, ЗАКОДИРОВАННОГО
ПОКУПАТЕЛЕМ В ЧАСТНЫХ
И НЕКОММЕРЧЕСКИХ ЦЕЛЯХ,
И/ИЛИ ПРИОБРЕТЕННОГО
У ПОСТАВЩИКА
ВИДЕОМАТЕРИАЛОВ,
ИМЕЮЩЕГО ЛИЦЕНЗИЮ НА
ПОСТАВКУ ВИДЕО MPEG-4.
ЛЮБОЕ ДРУГОЕ ИСПОЛЬЗОВАНИЕ
НЕ ПРЕДУСМОТРЕНО И НЕ
РАЗРЕШЕНО. ДОПОЛНИТЕЛЬНУЮ
ИНФОРМАЦИЮ ОТНОСИТЕЛЬНО
ИСПОЛЬЗОВАНИЯ В
РЕКЛАМНЫХ, ВНУТРЕННИХ И
КОММЕРЧЕСКИХ ЦЕЛЯХ, А ТАКЖЕ
ЛИЦЕНЗИРОВАНИЯ, МОЖНО
ПОЛУЧИТЬ У КОМПАНИИ MPEG LA,
L.L.C.
HTTP://WWW.MPEGLA.COM
• Все прочие торговые марки
являются торговыми марками
соответствующих владельцев.
• В данном руководстве символы ™
и ® не указаны.
О данном руководстве
••
В данном руководстве
приведены инструкции для
моделей SHAKE-X70D,
SHAKE-X30D и SHAKE-X10D.
В данном руководстве в
иллюстративных целях
использована модель
SHAKE-X70D, если нет оговорок.
••
В данном руководстве
содержится описание
использования пульта
дистанционного управления,
но некоторые функции могут
выполняться с помощью кнопок
на основном блоке, которые
имеют аналогичные или
похожие названия.
••
Значки, подобные ,
расположенные в верхней части
каждого пояснения, обозначают
тип носителя, который может
использоваться с описанной
функцией.
••
Некоторые иллюстрации
представлены как
концептуальные изображения
и могут отличаться от реальных
изделий.
••
Пункты, отображенные на
экране телевизора, могут
различаться в зависимости от
региона.
••
Установка по умолчанию
подчеркнута.
••
На экране телевизора
появится текст, заключенный
в квадратные скобки ([—]), а на
дисплее — текст, заключенный в
двойные кавычки (“—”).
RU
5

Оглавление
О данном руководстве ……..5
Распаковка ……………………….8
Воспроизводимые диски
или файлы на дисках/
устройстве USB ………………… 8
Веб-сайты с
совместимыми
устройствами ………………….12
Указатель компонентов и
регуляторов …………………….13
Подготовка к
эксплуатации
Безопасное подключение
устройства ………………………18
Отключение
демонстрации …………………21
Установка элементов
питания …………………………..21
Расположение
громкоговорителей …………21
Подключение
телевизора ……………………. 23
Изменение цветовой
системы …………………………. 25
Выполнение быстрой
настройки ……………………… 25
Изменение режима
отображения ………………….26
Воспроизведение с
диска/устройства USB
Действия перед
использованием
устройства USB ………………. 26
Основное
воспроизведение ………….. 26
Другие операции
воспроизведения ………….. 28
Использование режима
воспроизведения ……………31
Ограничение
воспроизведения с диска
(Родительский
контроль) ………………………. 33
Просмотр информации о
диске и устройстве USB ….. 34
Использование меню
настройки ……………………… 35
Передача USB
Действия перед
использованием
устройства USB ……………….40
Передача музыки …………… 40
Тюнер
Прослушивание
радиопередач ……………….. 44
BLUETOOTH
О беспроводной
технологии BLUETOOTH …..45
RU
6

Сопряжение этой системы
с устройством
BLUETOOTH …………………….45
Прослушивание музыки с
устройства BLUETOOTH …… 47
Подключение к
устройствам BLUETOOTH
одним касанием с
помощью NFC ………………… 48
Настройка аудиокодеков
BLUETOOTH …………………….49
Настройка режима
ожидания BLUETOOTH …….50
Включение и выключение
сигнала BLUETOOTH ……….. 50
Управление системой с
помощью смартфона или
планшета (SongPal) …………50
Устраивайте
сумасшедшие вечеринки
с приложением
“Fiestable” ………………………..51
Регулировка звука
Настройка звука …………….. 52
Выбор режима футбола
Virtual Football ………………… 53
Создание собственного
звукового эффекта …………. 53
Создание атмосферы
вечеринки (DJ Effect) ………. 54
Использование голосовых
указаний ……………………….. 62
Прослушивание звука
гитары …………………………… 62
Наслаждение музыкой с
функциями Party Light и
Speaker Light ………………….. 63
Использование таймера
отключения …………………….63
Использование
дополнительных
устройств ……………………….64
Отключение кнопок
основного блока (Запрет
детям) ……………………………. 64
Настройка функции
автоматического перехода
в режим ожидания …………65
Выполняется обновление
программного
обеспечения …………………..65
Дополнительная
информация
Поиск и устранение
неисправностей …………….. 66
Меры
предосторожности ………… 78
Технические
характеристики ……………….81
Список кодов языков ……… 85
Другие операции
Использование функции
Контроль по HDMI ………….. 55
Использование функции
Party Chain ……………………… 58
Подпевание: Караоке ………61
RU
7

Распаковка
••
Пульт дистанционного
управления (Изготовлено в
Китае) (1)
••
Батарейки типа R03 (размер
AAA)* (Изготовлено в Китае) (2)
* Рекомендованные год и месяц
истечения срока службы указаны
на каждой батарее.
••
Внешняя FM-антенна (1)
••
Шнур питания переменного
тока (Изготовлено в Китае) (1)
Τолько SHAKE-X70D
••
Основной блок: HCDSHAKEX70 (1)
••
Акустическая система:
SSSHAKEX70 (2)
Τолько SHAKE-X30D
••
Основной блок: HCDSHAKEX30(1)
••
Акустическая система:
SSSHAKEX30 (2)
Воспроизводимые
диски или файлы на
дисках/устройстве
USB
Диски, доступные для
воспроизведения
••
DVD VIDEO
••
DVD-R/DVD-RW в формате DVD
VIDEO или режиме видео
••
DVD+R/DVD+RW в формате DVD
VIDEO
••
VIDEO CD (диски версии 1.0, 1.1
и 2.0)
••
Super VCD
••
CD-R/CD-RW/CD-ROM в формате
VIDEO CD или Super VCD
••
AUDIO CD
••
CD-R/CD-RW в формате AUDIO
CD
Τолько SHAKE-X10D
••
Основной блок: HCDSHAKEX10 (1)
••
Акустическая система:
SSSHAKEX10 (2)
Примечание
Распаковка или переноска большого
и/или тяжелого громкоговорителя
должна осуществляться двумя
или более лицами. Падение
громкоговорителя может привести
к травмированию людей и/или
повреждению имущества.
RU
8
Воспроизводимые файлы на
дисках
••
Музыка:
Файлы MP3 (.mp3)*
••
Видео:
Файлы MPEG4 (.mp4/.m4v)*
1*2
2*3
файлы Xvid (.avi)
Воспроизводимые файлы на
устройстве USB
••
Музыка:
Файлы MP3 (.mp3)*
WMA (.wma)*
(.m4a/.mp4/.3gp)*
2
(.wav)*
••
Видео:
Файлы MPEG4 (.mp4/.m4v)*
1*2
2
, файлы
, файлы AAC
2
, файлы WAV
2*3
файлы Xvid (.avi)
,
,

Примечание
••
Диски должны иметь следующий
формат:
— CD-ROM/-R/-RW в формате
DATA CD, содержащий файлы
1*2
MP3*
, MPEG4*2*3 и Xvid, а также
соответствующий требованиям ISO
4
9660*
Уровня 1/Уровня 2 или Joliet
(расширенный формат).
— DVD-ROM/-R/-RW/+R/+RW
в формате DATA DVD,
включающем файловые
форматы MP3*
Xvid и соответствующие формату
UDF (Universal Disk Format —
Универсальный формат диска).
••
Система попытается
воспроизвести любые данные
с вышеперечисленными
расширениями, даже если они не
имеют поддерживаемый формат.
Воспроизведение этих данных может
привести к генерации громкого шума
и повредить вашу акустическую
систему.
1
*
MP3 (MPEG 1 Audio Layer 3) —
стандартный формат, определенный
ISO/MPEG для сжатых аудиоданных.
Файлы MP3 должны иметь формат
MPEG 1 Audio Layer 3.
2
*
Файлы с защитой авторских прав
(Управление цифровыми правами)
не могут воспроизводиться этой
системой.
3
*
Файлы MPEG4 должны быть
записаны в формате MP4.
Поддерживаются следующие видеои аудиокодеки:
— Видеокодек: Простой профиль
MPEG4 (AVC не поддерживается.)
— Аудиокодек: AAC-LC (HE-AAC не
поддерживается.)
4
*
Логический формат файлов
или папок на дисках CD-ROM,
определенный ISO (International
Organization for Standardization —
Международная организация по
стандартизации).
1*2
, MPEG4*2*3 и
Диски/файлы, которые не
могут воспроизводиться
••
Невозможно воспроизвести
следующие диски:
•—
BD (Диски Blu-ray)
•—
CD-ROM, записанные в
формате PHOTO CD
•—
Область данных на дисках
CD-Extra или Mixed Mode CD*
•—
Диски CD Graphics
•—
Диски Super Audio CD
•—
DVD Audio
•—
DATA CD/DATA DVD, созданные
в формате Packet Write
•—
DVD-RAM
•—
DATA CD/DATA DVD, которые не
были корректно закрыты
•—
Совместимые с режимом
CPRM (Content Protection for
Recordable Media — Защита
содержимого записываемых
носителей) DVD-R/-RW,
записанные в программах
Copy-Once (однократное
копирование)
•—
Диски нестандартной формы
(например, в виде сердца,
квадрата, звезды и т.п.)
•—
Диски с клейкой лентой,
бумагой или наклейками,
прикрепленными к ним
••
Невозможно воспроизвести
следующие файлы
•—
Видеофайлы, которые имеют
размер больше 720 (ширина) ×
576 (высота) пикселей.
•—
Видеофайлы с большим
соотношением высоты к
ширине.
•—
Файл WMA в формате WMA
DRM, WMA Lossless или WMA
PRO.
•—
Файл AAC в формате AAC DRM
или AAC Lossless.
•—
Файлы AAC, закодированные с
частотой 96 кГц.
RU
9

•—
Зашифрованные файлы или
защищенные паролем.
•—
Файлы с защитой авторских
прав DRM (Digital Rights
Management, Управление
цифровыми правами).
•—
Некоторые файлы формата
Xvid длительностью более
2часов.
••
Аудиофайл MP3 PRO может
воспроизводиться как файл
MP3.
••
Система может не
воспроизводить файл формата
Xvid, если файл был объединен с
двумя или более файлами Xvid.
* Mixed Mode CD: В данном формате
данные записываются на первой
дорожке, а звук (данные AUDIO CD)
на второй и последующей дорожках
в сеансе.
Примечания для CD-R/-RW и
DVD-R/-RW/+R/+RW
••
В некоторых случаях диски
CD-R/-RW и DVD-R/-RW/+R/+RW
не могут воспроизводиться в
этой системе из-за качества
записи, физического состояния
диска или характеристик
записывающего устройства
и авторского программного
обеспечения. Более
подробную информацию см. в
инструкциях по эксплуатации
записывающего устройства.
••
Некоторые функции
воспроизведения могут не
работать с частью дисков
DVD+R/+RW, даже если они
были финализированы
должным образом. В этом
случае используйте стандартное
воспроизведение.
Примечания о дисках
••
Это устройство предназначено
для воспроизведения дисков,
соответствующих требованиям
стандарта Compact Disc (CD).
••
Диски DualDisc и некоторые
музыкальные диски,
закодированные с помощью
технологии защиты авторских
прав, не соответствуют
стандарту (CD). Поэтому эти
диски не могут быть совместимы
с этим изделием.
Примечание для
многосессионных дисков
Эта система способна
воспроизводить
продолжительные сеансы на
диске, на котором они записаны
в формате, совпадающем с
форматом первого сеанса.
Однако, воспроизведение не
гарантируется.
Примечание к операциям
воспроизведения дисков DVD
VIDEO и VIDEO CD
Некоторые операции
воспроизведения дисков DVD
VIDEO или VIDEO CD могут быть
преднамеренно ограничены
производителями программного
обеспечения. Поэтому некоторые
функции воспроизведения могут
быть недоступны. Обязательно
прочитайте инструкцию по
эксплуатации к дискам DVD VIDEO
или VIDEO CD.
10
RU

Примечания к
воспроизводимым файлам
••
Запуск воспроизведения может
занять больше времени, если:
•—
DATA CD/DATA DVD/
устройство USB записаны с
использованием сложной
древовидной структуры.
•—
аудиофайлы или видеофайлы
в другой папке только что
воспроизводились.
••
Данная система может
воспроизводить диски DATA CD/
DATA DVD или устройства USB в
следующих случаях:
•—
глубина до 8 папок
•—
до 300 папок
•—
до 999 файлов на диске
•—
до 2000 файлов на устройстве
USB
•—
до 650 файлов в папке
Эти количества могут отличаться
в зависимости от конфигурации
файла или папки.
••
Папки, не содержащие
аудиофайлы или видеофайлы,
пропускаются.
••
Файлы, переданные таким
устройством, как компьютер,
могут не воспроизводиться
в порядке, в котором они
передавались.
••
Порядок воспроизведения
может не соответствовать
исходному в зависимости от
программного обеспечения,
использующегося для создания
аудиофайлов или видеофайлов.
••
Совместимость со всеми
программами кодировки/
записи поддерживаемых
форматов, устройствами записи
и носителями записей не
гарантируется.
••
В зависимости от файла Xvid,
изображение может быть
нечетким или пропадать звук.
Примечания для устройств
USB
••
Данная система не гарантирует
работу со всеми устройствами
USB.
••
Несмотря на наличие
комплексных функций
для устройств USB,
воспроизводимое содержимое
устройств USB, подключенных
к системе, представляет собой
только музыку и видеофайлы.
Для получения дополнительной
информации см. инструкцию по
эксплуатации, прилагаемую к
устройству USB.
••
При подключении устройства
USB, система считывает все
файлы на устройстве USB. Если
на устройстве USB находится
много папок или файлов,
считывание может занять много
времени.
••
Не соединяйте систему
и устройство USB через
концентратор USB.
••
При нескольких подключенных
устройствах USB, при
выполнении системой операций
может иметь место задержка.
••
Последовательность
воспроизведения системой
может отличаться от
последовательности
воспроизведения на
подключенном устройстве USB.
••
Перед использованием
устройства USB убедитесь, что
на нем отсутствуют зараженные
вирусами файлы.
11
RU

Веб-сайты с
совместимыми
устройствами
Посетите указанные ниже вебсайты с последней информацией
о совместимых устройствах USB и
BLUETOOTH.
Для покупателей в Латинской
Америке:
<http://esupport.sony.com/LA>
Для покупателей в странах
Европы и в России:
<http://www.sony.eu/support>
Для покупателей в других
странах/регионах:
<http://www.sony-asia.com/
support>
Совместимые модели iPhone/
iPod
Ниже представлены
совместимые модели iPhone/
iPod. Перед использованием
данного устройства с системой
необходимо обновить
программное обеспечение
iPhone/iPod до последней версии.
Технология BLUETOOTH
доступна для использования со
следующими устройствами:
••
iPhone 7 Plus
••
iPhone 7
••
iPhone SE
••
iPhone 6s Plus
••
iPhone 6s
••
iPhone 6 Plus
••
iPhone 6
••
iPhone 5s
••
iPhone 5c
••
iPhone 5
••
iPhone 4s
••
iPod touch (6-го поколения)
RU
12
••
iPod touch (5-го поколения)

Указатель компонентов и регуляторов
Вы можете заблокировать все клавиши, кроме (питание), на основном
блоке, чтобы предотвратить их случайное нажатие (стр. 64).
Основной блок (сверху)
Основной блок (спереди)
* Кнопка имеет тактильную точку. Используйте тактильную точку в качестве
ориентира при управлении системой.
13
RU

• (питание)
BLUETOOTH
RU
14
Включение или установка
режима ожидания системы.
(остановка)
— Прекращение
воспроизведения.
Нажмите дважды, чтобы
отменить возобновление
воспроизведения.
— Остановка передачи данных
во время передачи музыки.
— Остановка встроенной
демонстрации звука.
(воспроизведение)
Запуск воспроизведения.
Удерживайте более
2 секунд, чтобы начать
встроенную звуковую
демонстрацию. Чтобы
остановить демонстрацию,
нажмите .
PARTY LIGHT (стр. 26, 63)
LIGHT MODE (стр. 63)
Выбор функции BLUETOOTH.
Индикатор BLUETOOTH
(стр.45)
PAIRING
Нажать и удерживать для
активации сопряжения
BLUETOOTH в режиме
BLUETOOTH.
REC TO USB
Передача музыки
на устройство USB,
подключенное к порту
(USB).
MEGA BASS (стр. 52)
Индикатор MEGA BASS
Подсвечивается, когда выбран
звуковой эффект MEGA BASS.
Порт (USB) (REC/PLAY)
Используйте, чтобы
подключить устройство USB.
Этот порт может быть
использован как для
воспроизведения, так и для
передачи музыки.
FUNCTION
Выбор функции.
FLANGER (стр. 54)
ISOLATOR (стр. 54)
Ручка VOLUME/DJ CONTROL
Отрегулируйте громкость.*
Регулировка эффекта
FLANGER и ISOLATOR или
продолжительный вывод
звукового эффекта SAMPLER
(стр. 54).
* При активированном эффекте
DJ Effect регулировка громкости
этой ручкой невозможна.
(N-Mark) (стр. 48)
GUITAR (стр. 63)
Индикатор GUITAR
Загорается при включении
режима гитары.
DJ OFF (стр. 54)
SAMPLER (стр. 54)
Гнездо MIC1
Используйте для подключения
микрофона.

Гнездо MIC2/GUITAR
Используйте для подключения
микрофона или гитары.
Дисплей
VOCAL FADER (стр. 61)
MIC ECHO (стр. 61)
Подсветка фронтальной
панели
Если подсветка фронтальной
панели очень яркая, не
смотрите на данную панель.
Громкоговоритель (сзади)
Пример:
Ручка MIC/GUITAR LEVEL
(стр. 61, 63)
+/– (выбор папки)
Выбор папки на диске с
данными или устройстве USB.
S1, S2, S3, S4 (стр. 54)
(открыть/закрыть)
Открывание или закрывание
лотка для дисков.
/ (шаг вперед/
назад) (стр. 27)
TUNING+/– (стр. 44)
ENTER
Вход в настройки.
FOOTBALL (стр. 53)
FIESTA (стр. 52)
SOUND FIELD (стр. 52)
PARTY CHAIN (стр. 60)
Датчик дистанционного
управления (стр.21)
* Только для SHAKE-X70D
Party Light
Избегайте попадания в глаза
прямых лучей от подсветки,
когда включена функция Party
Light.
Рукоятка
При переноске
громкоговорителя
обязательно используйте
рукоятку.
Лоток для диска
15
RU

Пульт дистанционного
управления
• (питание)
Включение или установка
режима ожидания системы.
PLAY MODE (стр. 31, 41)
REPEAT/FM MODE (стр. 32,
44)
Номерные кнопки (0 – 9)*
— Выберите дорожку, раздел
или файл по номеру
элемента.
— Ввод номера или значения.
RU
16
1*2
SUBTITLE (стр. 29)
AUDIO*
2
(стр. 30, 35)
ANGLE (стр. 29)
SETUP (стр. 35)
MEDIA MODE (стр. 27)
Выбор носителя для
воспроизведения с диска
данных или устройства USB.
CLEAR (стр. 29)
VOCAL FADER (стр. 61)
MIC ECHO (стр. 61)
SCORE (стр. 62)
+/– (выбор папки)
Выбор папки на диске с
данными или устройстве USB.
KEY CONTROL / (стр. 61)
DVD TOP MENU
Отображение названия DVD
на экране телевизора.
DVD/TUNER MENU (стр.
28, 29, 44)
RETURN (стр. 28)
OPTIONS
Вход или выход из меню
параметров.
/ / /
Выбор пунктов меню.
(ввод)
Ввод/подтверждение
настроек.
SEARCH (стр. 27, 29)

• (громкость) +/–*
2
Регулировка уровня
громкости.
SHIFT*
1
Нажать и удерживать
для активации кнопок,
отпечатанных розовым
цветом.
•/ (ускоренная
прокрутка назад/вперед)
(стр. 28)
/ (медленная
прокрутка назад/вперед)
(стр. 28)
TUNING+/– (стр. 44)
(воспроизведение)*
Запуск воспроизведения.
/ (шаг вперед/
назад) (стр. 27)
PRESET+/– (стр. 44)
(пауза)
Приостановка
воспроизведения.
Для возобновления
воспроизведения нажмите
.
(остановка)
— Прекращение
воспроизведения.
Нажмите дважды, чтобы
отменить возобновление
воспроизведения.
— Остановка передачи данных
во время передачи музыки.
— Остановка встроенной
демонстрации звука.
FUNCTION +/–
Выбор функции.
MEGA BASS (стр. 52)
Кнопки SOUND FIELD
MUSIC (стр. 52),
VIDEO (стр. 52),
FOOTBALL (стр. 53)
PARTY LIGHT (стр. 26,
63)
LIGHT MODE (стр. 63)
DISPLAY (стр. 21, 26,
35, 44, 46)
Изменение информации,
2
отображаемой на дисплее.
DISPLAY*1 (стр. 34)
Отображение или скрытие
вывода информации на экран.
SLEEP (стр. 64)
*1 Эта кнопка отпечатана розовым
цветом. Для использования кнопки,
нажмите и удерживайте кнопку
SHIFT (), а затем нажмите эту
кнопку.
2
*
Номерная кнопка 2/AUDIO, + и
кнопки имеют тактильную точку.
Используйте тактильную точку в
качестве ориентира при управлении
системой.
17
RU

Подготовка к эксплуатации
Безопасное подключение устройства
Основной блок (задняя панель)
SHAKE-X70D
SHAKE-X30D/SHAKE-X10D
Гнездо VIDEO OUT
Используйте видеокабель (не входит в комплект) для подключения к
гнезду видеовхода телевизора или проектора (стр. 23).
Примечание
Не подключайте данную систему к телевизору через видеодеку.
Гнездо HDMI OUT (TV)
Используйте кабель HDMI (не входит в комплект) для подключения к
входному гнезду HDMI телевизора (стр. 23).
RU
18

Гнезда аудиовхода и аудиовыхода
Используйте аудиокабель (не входит в комплект) для выполнения
подключения следующим образом:
••
Гнезда AUDIO/PARTY CHAIN IN (TV) L/R
•—
Подключите к гнездам аудиовыхода телевизора иди к аудио/
видео оборудованию. Выходом данной системы является звук.
•—
Подключите к другой аудиосистеме для использования функции
Party Chain (стр. 58).
••
Гнезда AUDIO/PARTY CHAIN OUT L/R
•—
Подключите к входным аудиогнездам дополнительного
оборудования.
•—
Подключите к другой аудиосистеме для использования функции
Party Chain (стр. 58).
Разъем FM ANTENNA
Определите место и ориентацию, обеспечивающие хороший прием
при использовании антенн.
Чтобы избежать возникновения помех, держите антенну на удалении
от кабелей громкоговорителей, шнура питания переменного тока и
USB-кабеля.
Растяните провод
FM-антенны
горизонтально
Громкоговорители
••
Разъемы PARTY LIGHT L/R
Подключите соединитель Party Light громкоговорителя к
соответствующему разъему. Подсветка громкоговорителей будет
работать в соответствии с источником музыки. Можно выбрать
функции Party Light и Speaker Light в соответствии со своими
предпочтениями (стр. 63).
••
Разъемы LEFT SPEAKER и RIGHT SPEAKER
(Τолько SHAKE-X70D)
Подключите соединитель громкоговорителя к этому разъему.
••
Разъемы SPEAKERS L/R
(Τолько SHAKE-X30D и SHAKE-X10D)
Подключите соединитель громкоговорителя к этому разъему.
Подготовка к эксплуатации
19
RU

Пример:
Примечание
••
Используйте только входящие в комплект громкоговорители.
••
При подключении кабелей громкоговорителей вставьте соединители
непосредственно в разъемы.
Шнур питания переменного тока
Подключите к основному блоку шнур питания переменного тока
(входит в комплект), а затем подсоедините его к розетке.
Шнур питания
переменного
тока (входит в
комплект)
К электрической розетке
Между штекером и основным блоком остается зазор, даже если шнур
питания переменного тока подсоединен плотно. Кабель должен быть
подсоединен именно таким образом. Это не является признаком
неисправности.
После подключения шнура питания переменного тока автоматически
запустится демонстрация (стр. 26). При нажатии (питание) для
включения системы демонстрация прекратится.
20
RU

Отключение
демонстрации
Для отключения демонстрации
при выключенной системе
нажмите DISPLAY несколько раз и
выберите режим без отображения
(Режим энергосбережения)
(стр.26).
Установка элементов
питания
Управление системой с
помощью пульта
дистанционного управления
Направьте пульт дистанционного
управления на датчик
дистанционного управления
системой основного блока.
Подготовка к эксплуатации
Вставьте две входящие в комплект
батарейки типа R03 (размер AAA)
в соответствии с показанной ниже
полярностью.
Примечание
••
Не вставляйте старые элементы
питания вместе с новыми и элементы
питания разных типов.
••
Если пульт дистанционного
управления не планируется
использовать в течение длительного
времени, извлеките элементы
питания, чтобы предотвратить
возможное повреждение пульта,
вызванное утечкой внутреннего
вещества элементов питания и
коррозией.
Расположение
громкоговорителей
Для обеспечения оптимальных
характеристик системы
рекомендуется располагать
громкоговорители так, как
показано ниже.
Основной блок
Левый громкоговоритель (L)
Правый громкоговоритель (R)
Телевизор
0,3 м 0,3 м
21
RU

Примечание
••
Проверьте тип громкоговорителя в
соответствии с наклейкой (“L” или “R”)
на задней панели громкоговорителя.
••
Для обеспечения оптимальных
эффектов Party Light рекомендуется
располагать громкоговорители от
стены, как показано ниже.
45 см
22
RU

Подключение телевизора
Прежде чем подсоединять кабели, убедитесь, что шнур питания
переменного тока отсоединен от электрической розетки.
Просмотр видео
Выберите любой способ подключения в соответствии с гнездами
телевизора.
Высокое качество
2
*
Кабель HDMI*1
(не входит в комплект)
Видеокабель
(не входит в комплект)
1
Высокоскоростной кабель HDMI с Ethernet
*
2
*
Чтобы прослушать звук с телевизора через данную систему, подключите систему
к гнезду HDMI IN (ARC) телевизора. Функция Реверсивный звуковой канал (ARC)
позволяет выводить с телевизора звук на систему с интерфейсом HDMI без
необходимости выполнения аудиоподключения (подключение ниже). Для
получения сведений о настройке функции ARC см. [AUDIO RETURN CHANNEL]
(стр. 39). Чтобы проверить телевизор на совместимость с функцией ARC, см.
инструкцию по эксплуатации, поставляемую в комплекте с телевизором.
HDMI IN (ARC)
или
HDMI IN
VIDEO IN
Стандартное качество
Рекомендуемое подключение
Альтернативное подключение
Подготовка к эксплуатации
23
RU

Прослушивание звука телевизора через систему
Если не удается подключить систему к гнезду HDMI IN (ARC) телевизора,
установите данное подключение.
Аудиокабель
(не входит в комплект)
AUDIO OUT
Для прослушивания звука телевизора, нажмите несколько раз
FUNCTION+/– для выбора “TV”.
Также можно нажать несколько раз FUNCTION на основном блоке.
Советы
••
Для прослушивания звука с внешнего устройства (DVD-проигрыватель и т. д.)
через систему необходимо подключить его к гнезду AUDIO/PARTY CHAIN IN
(TV), как указано в описании подключения выше. Для получения подробной
информации см. инструкции по эксплуатации оборудования.
••
Если при подключении внешнего оборудования уровень вывода звука низок,
выполните настройку параметров аудиовыхода на подключенном оборудовании.
Это приведет к повышению уровня выходного сигнала. Для получения подробной
информации см. инструкции по эксплуатации оборудования.
Если на дисплее основного блока отображается сообщение
“CODE 01” и “SGNL ERR”
Если входной аудиосигнал не является 2-канальным линейным
сигналом PCM, на дисплее основного блока отображаются сообщения
“CODE 01” и “SGNL ERR”, означающие, что входной аудиосигнал не
поддерживается.
В данном случае на телевизоре выберите надлежащий режим
вывода аудио для вывода 2-канального линейного аудиосигнала
PCM. Подробнее см. инструкцию по эксплуатации, прилагаемую к
телевизору.
24
RU

Изменение цветовой
системы
(Кроме моделей для Латинской
Америки, стран Европы и России)
Выберите цветовую систему
PAL или NTSC в зависимости
от цветовой системы вашего
телевизора.
При каждом выполнении
описанной ниже процедуры,
цветовая система изменяется
следующим образом:
COLOR NTSC COLOR PAL
Для выполнения данной
операции используйте кнопки на
основном блоке.
1 Нажмите для включения
системы.
2 Нажмите несколько раз
FUNCTION для выбора
“DVD/CD”.
3 Нажмите и удерживайте MIC
ECHO и ENTER более 3 секунд.
На дисплее отобразится надпись
“COLOR NTSC” или “COLOR PAL”.
Выполнение быстрой
настройки
Перед использованием системы
можно выполнить минимальные
основные настройки в режиме
быстрой настройки.
1 Включите телевизор и
выберите входной сигнал в
соответствии с
подключением.
2 Нажмите для включения
системы.
3 Нажмите несколько раз
FUNCTION +/– для выбора
“DVD/CD”.
В нижней части экрана
телевизора отобразится
сообщение [Нажмите ENTER,
чтобы запустить БЫСТРУЮ
НАСТРОЙКУ.].
4 Нажмите , не вставляя диск.
На экране телевизора появится
[LANGUAGE SETUP].
Отображаемые пункты могут
отличаться в зависимости от
страны или региона.
LANGUAGE SETUP
:
OSD
MENU
:
AUDIO
:
SUBTITLE
:
ENGLISH
ENGLISH
CHINESE 2
THAI
1CHINESE
5 Нажмите несколько раз /
для выбора языка, а затем
нажмите .
На экране телевизора
отобразится [НАСТРОЙКА ВИДЕО].
6 Нажмите несколько раз /
для выбора настройки,
соответствующей типу
телевизора, а затем нажмите
.
После того, как на экране
отобразится сообщение
[БЫСТРАЯ НАСТРОЙКА
ЗАВЕРШЕНА.], система будет
готова к воспроизведению.
Для ручного изменения
настроек
См. “Использование меню
настройки” (стр. 35).
25
Подготовка к эксплуатации
RU

Выйти из режима быстрой
настройки
Нажмите SETUP.
Примечание
На экране отобразится сообщение
после первого включения или
выполнения [СБРОС] (см. “Возврат
настройки меню настройки к
значениям по умолчанию” на
стр.76).
Изменение режима
отображения
Нажмите несколько раз DISPLAY,
пока система выключится.
При каждом нажатии данной кнопки
режим отображения изменяется
следующим образом.
Демонстрационный режим
На дисплее прокручиваются
сообщения об основных функциях
системы и включается подсветка.
Для отключения подсветки
нажмите PARTY LIGHT.
Отображения нет (режим
энергосбережения)
Дисплей выключается для
сбережения электроэнергии.
Воспроизведение с
диска/устройства USB
Действия перед
использованием
устройства USB
Список совместимых устройств
USB см. в главе “Веб-сайты с
совместимыми устройствами”
(стр. 12).
(В данной системе можно
использовать устройства Apple
только через соединение
BLUETOOTH.)
Основное
воспроизведение
1 Нажмите несколько раз
FUNCTION +/– для выбора
“DVD/CD” или “USB”.
Также можно нажать несколько
раз FUNCTION на основном блоке.
2 Подготовьте источник
воспроизведения.
Для режима DVD/CD:
Нажмите на основном блоке,
чтобы открыть лоток для дисков.
Вставьте диск в лоток этикеткой
вверх.
26
RU

При воспроизведении диска
диаметром 8 см, такого как
одинарный диск CD, вставьте его
во внутренний круг лотка.
Нажмите на основном блоке,
чтобы закрыть лоток для дисков.
Не нажимайте на лоток для диска,
чтобы закрыть его, поскольку это
может привести к нарушению
работоспособности.
Для режима USB:
Подключите устройство USB к
порту
Можно использовать переходник
USB (не входит в комплект) для
подключения устройства USB к
основному блоку, если устройство
USB не может быть вставлено в порт
(USB).
Примечание
(USB).
3 (Τолько )
Несколько раз нажмите
MEDIA MODE, чтобы выбрать
необходимый тип носителя
([МУЗЫКА]/[VIDEO]).
4 Нажмите , чтобы начать
воспроизведение.
Операция Действия
Возобновление воспроизведения или
возврат к
нормальному
воспроизведению
Отмена точки
возобновления воспроизведения
Выбор
дорожки,
файла,
раздела или
сцены
Нажмите .
Нажмите дважды.
Во время
воспроизведения
нажмите •или
.
Или удерживайте
SHIFT и нажмите
номерные кнопки, а
затем —
(Операция может
быть запрещена
диском или
устройством USB.)
.
Воспроизведение от
определенного файла
1 Нажмите несколько раз MEDIA
MODE для выбора [МУЗЫКА]
или [VIDEO].
2 Нажмите SEARCH для
отображения списка папок.
Воспроизведение с диска/устройства USB
Другие операции
Операция Действия
Прекращение
воспроизведения
Приостановка
воспроизведения
Нажмите .
Нажмите .
3 Нажмите несколько раз /
для выбора необходимой
папки.
27
RU
Loading…
Sony Shake x30d Manual
- Addeddate
- 2023-09-27 03:13:29
- Collection_added
-
manuals
additional_collections
- Identifier
- shakex30d
- Identifier-ark
- ark:/13960/s274vv3d42s
- Ocr
- tesseract 5.3.0-3-g9920
- Ocr_detected_lang
- es
- Ocr_detected_lang_conf
- 1.0000
- Ocr_detected_script
- Latin
- Ocr_detected_script_conf
- 1.0000
- Ocr_module_version
- 0.0.21
- Ocr_parameters
- -l spa
- Page_number_confidence
- 91
comment
Reviews
There are no reviews yet. Be the first one to
write a review.
86
Views
DOWNLOAD OPTIONS
Temporarily Unavailable
DAISY
For users with print-disabilities
Uploaded by
mahayabang
on
Подготовка к
Домашняя
эксплуатации
Воспроизведение с
Аудиосистема
диска/устройства USB
Передача USB
Инструкция по эксплуатации
Тюнер
BLUETOOTH
Регулировка звука
Другие операции
Дополнительная
информация
SHAKE-X70D/SHAKE-X30D/SHAKE-X10D
SHAKE-X70D/SHAKE-X30D/SHAKE-X10D.RU.4-691-055—31(1)
Для продуктов с
ПРЕДУПРЕЖДЕНИЕ
маркировкой CE
Для предотвращения возгорания
Действительность маркировки CE
не накрывайте вентиляционное
ограничена только в тех странах, где
отверстие устройства газетами,
это закреплено законодательством,
скатертями, шторами и т. п.
в частности, в странах EEA (European
Не подвергайте устройство
Economic Area, Европейское
воздействию источников открытого
экономическое пространство).
огня (например, зажженных свечей).
ВНИМАНИЕ
Для предотвращения возгорания
Использование оптических
или поражения электрическим
приборов с данным устройством
током не допускайте попадания
вредно для зрения.
и разбрызгивания жидкости на
устройство и не ставьте на корпус
устройства предметы, содержащие
жидкость, например, цветочные
вазы.
Так как основной штекер
Данное устройство
используется для отсоединения
классифицируется как ЛАЗЕРНОЕ
блока от сети электропитания,
оборудование КЛАССА 1 в
подключайте блок к расположенной
соответствии со стандартом IEC
в легкодоступном месте розетке
60825-1:2007. Эта маркировка
электросети. В случае нарушения
расположена на внешней стороне
нормальной работы блока
основного блока.
незамедлительно отсоедините
основной штекер питания от
розетки электросети.
Утилизация
Не устанавливайте устройство в
использованных
тесных местах, таких как книжные
элементов питания
полки или встроенные шкафы.
и отслужившего
Не подвергайте батарею или
электрического и
устройства с установленной
электронного
батареей чрезмерному нагреванию,
оборудования
например, не оставляйте под
солнечными лучами или рядом с
(Директива
огнем.
применяется в
Пока блок включен в розетку
странах Евросоюза
электросети, он остается
и других
подключенным к сети
европейских
электропитания, даже если питание
странах, где
на самом блоке выключено.
действуют системы
Для использования только в
раздельного сбора
помещениях.
отходов)
RU
2
SHAKE-X70D/SHAKE-X30D/SHAKE-X10D.RU.4-691-055—31(1)
Транспортировать в
оригинальной упаковке, во время
транспортировки не бросать,
оберегать от падений, ударов, не
подвергать излишней вибрации.
Реализацию осуществлять в
соответствии с действующими
требованиями законодательства.
Отслужившее изделие
Импортер на территории стран
утилизировать в соответствии с
Таможенного союза
действующими требованиями
АО «Сони Электроникс», Россия,
законодательства.
123103, Москва, Карамышевский
проезд, 6
Если неисправность не удается
устранить следуя данной
Класс защиты от поражения
инструкции – обратитесь в
электрическим током II
ближайший авторизованный SONY
центр по ремонту и обслуживанию.
Дата производства может быть
Для покупателей в
указана на самом продукте и/или
Казахстане
этикетке со штрихкодом на
Организация, уполномоченная
картонной коробке.
принимать претензии от
Например: XX-XXXX
потребителей на территории
Первые две цифры означают
Казахстана:
месяц, а последние четыре цифры
АО «Сони Электроникс»
означают год.
Представительство в Казахстане,
050010, Республика Казахстан,
Эта домашняя аудиосистема
г. Алматы, пр. Достык, дом 117/7
предназначена для использования в
следующих целях:
Информация о лицензии и
• Воспроизведение источников
торговой марке
музыки/видео на дисках или
устройствах USB
• является торговой маркой
• Передача музыки на устройства
DVD Format/Logo Licensing
USB
Corporation.
• Прослушивание радиостанций
• Логотип “DVD+RW”, “DVD-RW”,
“DVD+R”, “DVD-R”, “DVD VIDEO”
• Прослушивание звука с
и “CD” являются торговыми
телевизора
марками.
• Воспроизведение источников
• WALKMAN® и логотип WALKMAN®
музыки на устройствах BLUETOOTH
— зарегистрированные торговые
• Прослушивание общественных
марки Sony Corporation.
мероприятий с функцией “Party
• Технология кодирования
Chain”
аудиосигнала и патенты MPEG
Layer-3 используются по лицензии
Fraunhofer IIS и Thomson.
RU
3
SHAKE-X70D/SHAKE-X30D/SHAKE-X10D.RU.4-691-055—31(1)
• Windows Media является
• Словесная марка и логотип
зарегистрированной торговой
BLUETOOTH® являются
маркой или торговой маркой
зарегистрированными торговыми
Microsoft Corporation в США и/или
марками, принадлежащими
других странах.
Bluetooth SIG, Inc., любое их
• Данное изделие защищено
использование Sony Corporation
определенными правами
лицензировано. Все остальные
на интеллектуальную
торговые марки и торговые
собственность Microsoft
наименования являются
Corporation. Использование
собственностью соответствующих
или распространение такой
владельцев.
технологии, кроме как в данном
• N-Mark является торговой
изделии, запрещено без
маркой или зарегистрированной
наличия лицензии корпорации
торговой маркой NFC Forum, Inc. в
Microsoft или уполномоченного
США и других странах.
подразделения Microsoft.
• Android™ является торговой
• Эта система включает в себя
маркой компании Google Inc.
Dolby* Digital.
• Google Play является торговой
* Произведено по лицензии Dolby
маркой компании Google Inc.
Laboratories. Dolby, Dolby Audio
• Apple, логотип Apple, iPhone
и символ с двойной буквой D
и iPod touch являются
являются торговыми марками
товарными знаками Apple Inc.,
Dolby Laboratories.
зарегистрированными в США и
• Эта система использует
других странах. App Store является
технологию мультимедийного
знаком обслуживания Apple Inc.
интерфейса высокой четкости
• “Made for iPod” и “Made
High-Definition Multimedia
for iPhone” означает, что
Interface (HDMI™). Термины HDMI
электронное устройство было
и HDMI High-Definition Multimedia
разработано специально
Interface и логотип HDMI являются
для подключения к iPod или
товарными знаками или
iPhone соответственно и было
зарегистрированными товарными
сертифицировано разработчиком
знаками HDMI Licensing, LLC в
как соответствующее техническим
Соединенных Штатах и других
стандартам Apple. Компания
странах.
Apple не несет ответственность
• “BRAVIA” является торговой
за работу этого устройства или
маркой Sony Corporation.
его соответствие стандартам
• LDAC™ и логотип LDAC являются
безопасности и регулятивным
торговыми марками Sony
нормам. Обратите внимание,
Corporation.
что использование данного
аксессуара с iPod или iPhone
может повлиять на работу
беспроводного соединения.
RU
4
SHAKE-X70D/SHAKE-X30D/SHAKE-X10D.RU.4-691-055—31(1)
• СОГЛАСНО ЛИЦЕНЗИИ НА
ПОРТФЕЛЬ ПАТЕНТОВ НА
О данном руководстве
ИСПОЛЬЗОВАНИЕ ТЕХНОЛОГИИ
ВИЗУАЛИЗАЦИИ MPEG-4
••
В данном руководстве
РАЗРЕШАЕТСЯ ЧАСТНОЕ
приведены инструкции для
И НЕКОММЕРЧЕСКОЕ
моделей SHAKE-X70D,
ИСПОЛЬЗОВАНИЕ ПОКУПАТЕЛЕМ
SHAKE-X30D и SHAKE-X10D.
ДАННОГО ПРОДУКТА ДЛЯ
В данном руководстве в
(i) КОДИРОВАНИЯ ВИДЕО
иллюстративных целях
ИЗОБРАЖЕНИЯ В
использована модель
СООТВЕТСТВИИ С ВИЗУАЛЬНЫМ
SHAKE-X70D, если нет оговорок.
СТАНДАРТОМ MPEG-4 (ВИДЕО
••
В данном руководстве
MPEG-4)
содержится описание
И/ИЛИ
использования пульта
(ii) ДЛЯ РАСКОДИРОВАНИЯ ВИДЕО
дистанционного управления,
MPEG-4, ЗАКОДИРОВАННОГО
но некоторые функции могут
ПОКУПАТЕЛЕМ В ЧАСТНЫХ
выполняться с помощью кнопок
И НЕКОММЕРЧЕСКИХ ЦЕЛЯХ,
на основном блоке, которые
И/ИЛИ ПРИОБРЕТЕННОГО
имеют аналогичные или
У ПОСТАВЩИКА
похожие названия.
ВИДЕОМАТЕРИАЛОВ,
••
Значки, подобные ,
ИМЕЮЩЕГО ЛИЦЕНЗИЮ НА
расположенные в верхней части
ПОСТАВКУ ВИДЕО MPEG-4.
каждого пояснения, обозначают
ЛЮБОЕ ДРУГОЕ ИСПОЛЬЗОВАНИЕ
тип носителя, который может
НЕ ПРЕДУСМОТРЕНО И НЕ
использоваться с описанной
РАЗРЕШЕНО. ДОПОЛНИТЕЛЬНУЮ
функцией.
ИНФОРМАЦИЮ ОТНОСИТЕЛЬНО
••
ИСПОЛЬЗОВАНИЯ В
Некоторые иллюстрации
РЕКЛАМНЫХ, ВНУТРЕННИХ И
представлены как
КОММЕРЧЕСКИХ ЦЕЛЯХ, А ТАКЖЕ
концептуальные изображения
ЛИЦЕНЗИРОВАНИЯ, МОЖНО
и могут отличаться от реальных
ПОЛУЧИТЬ У КОМПАНИИ MPEG LA,
изделий.
L.L.C.
••
Пункты, отображенные на
HTTP://WWW.MPEGLA.COM
экране телевизора, могут
• Все прочие торговые марки
различаться в зависимости от
являются торговыми марками
региона.
соответствующих владельцев.
••
Установка по умолчанию
• В данном руководстве символы ™
подчеркнута.
и ® не указаны.
••
На экране телевизора
появится текст, заключенный
в квадратные скобки ([—]), а на
дисплее — текст, заключенный в
двойные кавычки (“—”).
RU
5
SHAKE-X70D/SHAKE-X30D/SHAKE-X10D.RU.4-691-055—31(1)
SHAKE-X70D/SHAKE-X30D/SHAKE-X10D
SHAKE-X70D/SHAKE-X30D/SHAKE-X10D.GB.4-691-054-12(1)
Home Audio System
Operating Instructions
Getting Started
Disc/USB Playback
USB Transfer
Tuner
BLUETOOTH
Sound Adjustment
Other Operations
Additional Information
2GB
SHAKE-X70D/SHAKE-X30D/SHAKE-X10D.GB.4-691-054-12(1)
WARNING
To reduce the risk of fire, do not
cover the ventilation opening of
the appliance with newspapers,
tablecloths, curtains, etc.
Do not expose the appliance to naked
flame sources (for example, lighted
candles).
To reduce the risk of fire or electric
shock, do not expose this appliance
to dripping or splashing, and do not
place objects filled with liquids, such as
vases, on the appliance.
As the main plug is used to disconnect
the unit from the mains, connect the
unit to an easily accessible AC outlet.
Should you notice an abnormality in
the unit, disconnect the main plug
from the AC outlet immediately.
Do not install the appliance in a
confined space, such as a bookcase or
built-in cabinet.
Do not expose batteries or appliances
with battery-installed to excessive
heat, such as sunshine and fire.
The unit is not disconnected from the
mains as long as it is connected to the
AC outlet, even if the unit itself has
been turned off.
Indoor use only.
For product with CE marking
The validity of the CE marking is
restricted to only those countries
where it is legally enforced, mainly in
the countries EEA (European Economic
Area).
CAUTION
The use of optical instruments with
this product will increase eye hazard.
This appliance is classified as a CLASS 1
LASER product under IEC 60825-1:2007.
This marking is located on the rear
exterior of the unit.
For customers in Europe
Disposal of waste batteries
and electrical and electronic
equipment (applicable in the
European Union and other
European countries with
separate collection systems)
This symbol on the
product, the battery or on
the packaging indicates
that the product and the
battery shall not be
treated as household
waste. On certain batteries this symbol
might be used in combination with a
chemical symbol. The chemical
symbols for mercury (Hg) or lead (Pb)
are added if the battery contains more
than 0.0005% mercury or 0.004% lead.
By ensuring these products and
batteries are disposed of correctly, you
will help prevent potentially negative
consequences for the environment
and human health which could
otherwise be caused by inappropriate
waste handling. The recycling of the
materials will help to conserve natural
resources.

3GB
SHAKE-X70D/SHAKE-X30D/SHAKE-X10D.GB.4-691-054-12(1)
In case of products that for safety,
performance or data integrity reasons
require a permanent connection with
an incorporated battery, this battery
should be replaced by qualified service
staff only. To ensure that the battery
and the electrical and electronic
equipment will be treated properly,
hand over these products at end-of-
life to the applicable collection point
for the recycling of electrical and
electronic equipment. For all other
batteries, please view the section on
how to remove the battery from the
product safely. Hand the battery over
to the applicable collection point for
the recycling of waste batteries.
For more detailed information about
recycling of this product or battery,
please contact your local Civic Office,
your household waste disposal service
or the shop where you purchased the
product or battery.
Notice for customers: the
following information is only
applicable to equipment sold
in countries applying EU
directives.
This product has been manufactured
by or on behalf of Sony Corporation,
1-7-1 Konan Minato-ku Tokyo, 108-0075
Japan. Inquiries related to product
compliance based on European
Union legislation shall be addressed
to the authorized representative,
Sony Belgium, bijkantoor van Sony
Europe Limited, Da Vincilaan 7-D1, 1935
Zaventem, Belgium. For any service or
guarantee matters, please refer to the
addresses provided in the separate
service or guarantee documents.
Hereby, Sony Corp., declares that
this equipment is in compliance
with the essential requirements and
other relevant provisions of Directive
1999/5/EC.
For details, please access the following
URL:
http://www.compliance.sony.de/
This equipment has been tested
and found to comply with the limits
set out in the EMC regulation using
a connection cable shorter than
3meters.
This Home Audio System is designed
to be used for the following purposes:
•Playing back music/video sources
on discs or USB devices
•Transferring music to USB devices
•Listening to radio stations
•Listening to TV sound
•Playing back music sources on
BLUETOOTH devices
•Enjoying social gatherings with the
“Party Chain” function
For customers in Australia and
India
Disposal of Old
Electrical & Electronic
Equipment
(Applicable in the
European Union and
other European
countries with
separate collection
systems)

4GB
SHAKE-X70D/SHAKE-X30D/SHAKE-X10D.GB.4-691-054-12(1)
For customers in the United
Arab Emirates
License and Trademark Notice
• is a trademark of DVD Format/
Logo Licensing Corporation.
•“DVD+RW”, “DVD-RW”, “DVD+R”,
“DVD-R”, “DVD VIDEO”, and the “CD”
logos are trademarks.
•WALKMAN® and WALKMAN® logo
are registered trademarks of Sony
Corporation.
•MPEG Layer-3 audio coding
technology and patents licensed
from Fraunhofer IIS and Thomson.
•Windows Media is either a
registered trademark or trademark
of Microsoft Corporation in
the United States and/or other
countries.
•This product is protected by
certain intellectual property rights
of Microsoft Corporation. Use or
distribution of such technology
outside of this product is prohibited
without a license from Microsoft or
an authorized Microsoft subsidiary.
•This system incorporates Dolby*
Digital.
* Manufactured under license from
Dolby Laboratories. Dolby, Dolby
Audio, and the double-D symbol are
trademarks of Dolby Laboratories.
•This system incorporates High-
Definition Multimedia Interface
(HDMI™) technology. The terms
HDMI and HDMI High-Definition
Multimedia Interface, and the HDMI
Logo are trademarks or registered
trademarks of HDMI Licensing,
LLC in the United States and other
countries.
•“BRAVIA” is a trademark of Sony
Corporation.
•LDAC™ and LDAC logo are
trademarks of Sony Corporation.
•The BLUETOOTH® word mark and
logos are registered trademarks
owned by Bluetooth SIG, Inc. and
any use of such marks by Sony
Corporation is under license. Other
trademarks and trade names are
those of their respective owners.
•The N-Mark is a trademark or
registered trademark of NFC Forum,
Inc. in the United States and in other
countries.
•Android™ is a trademark of Google
Inc.
•Google Play™ is a trademark of
Google Inc.
•Apple, the Apple logo, iPhone, and
iPod touch are trademarks of Apple
Inc., registered in the U.S. and other
countries. App Store is a service
mark of Apple Inc., registered in the
U.S. and other countries.
•“Made for iPod,” and “Made for
iPhone” mean that an electronic
accessory has been designed
to connect specifically to iPod
or iPhone, respectively, and has
been certified by the developer
to meet Apple performance
standards. Apple is not responsible
for the operation of this device
or its compliance with safety and
regulatory standards. Please note
that the use of this accessory with
iPod or iPhone may affect wireless
performance.
•THIS PRODUCT IS LICENSED UNDER
THE MPEG-4 VISUAL PATENT
PORTFOLIO LICENSE FOR THE
PERSONAL AND NON-COMMERCIAL
USE OF A CONSUMER FOR
(i) ENCODING VIDEO IN
COMPLIANCE WITH THE MPEG-4
VISUAL STANDARD (“MPEG-4
VIDEO”)
5GB
SHAKE-X70D/SHAKE-X30D/SHAKE-X10D.GB.4-691-054-12(1)
AND/OR
(ii) DECODING MPEG-4 VIDEO THAT
WAS ENCODED BY A CONSUMER
ENGAGED IN A PERSONAL AND
NON-COMMERCIAL ACTIVITY
AND/OR WAS OBTAINED FROM
A VIDEO PROVIDER LICENSED TO
PROVIDE MPEG-4 VIDEO.
NO LICENSE IS GRANTED OR SHALL
BE IMPLIED FOR ANY OTHER
USE. ADDITIONAL INFORMATION
INCLUDING THAT RELATING TO
PROMOTIONAL, INTERNAL AND
COMMERCIAL USES AND LICENSING
MAY BE OBTAINED FROM MPEG LA,
L.L.C.
HTTP://WWW.MPEGLA.COM
•All other trademarks are trademarks
of their respective owners.
•In this manual, ™ and ® marks are
not specified.
About this manual
••The instructions in this manual are
for models SHAKE-X70D,
SHAKE-X30D, and SHAKE-X10D.
In this manual, the SHAKE-X70D
is used for illustration purpose
unless stated otherwise.
••This manual mainly explains
operations using the remote
control, but the same operations
can also be performed using the
buttons on the unit having the
same or similar names.
••Icons, such as , listed at the
top of each explanation indicate
the type of media that can be used
with the function being explained.
••Some illustrations are presented
as conceptual drawings, and
may be different from the actual
products.
••The items displayed on the TV
screen may vary depending on
the area.
••The default setting is underlined.
••The text enclosed in bracket ([—])
appears on the TV screen, and the
text enclosed in double quotation
mark (“—”) appears on the display.

6GB
SHAKE-X70D/SHAKE-X30D/SHAKE-X10D.GB.4-691-054-12(1)
Table of Contents
About this manual …………….. 5
Unpacking …………………………8
Playable discs or files on
discs/USB device ……………….8
Websites for compatible
devices ……………………………. 11
Guide to parts and
controls ……………………………12
Getting Started
Hooking up the system
securely …………………………… 17
Deactivating the
demonstration ………………… 20
Inserting batteries ……………20
Positioning the speakers …..20
Connecting the TV …………….21
Changing the color
system ……………………………. 23
Performing the quick
setup ……………………………… 23
Changing the display
mode ……………………………… 24
Disc/USB Playback
Before using the USB
device …………………………….. 24
Basic playback ………………… 24
Other playback
operations ………………………. 25
Using play mode ……………… 28
Restricting playback of the
disc (Parental Control) ………. 29
Viewing information of a
disc and USB device …………. 30
Using the Setup Menu ……….31
USB Transfer
Before using the USB
device …………………………….. 35
Transferring music …………… 35
Tuner
Listening to the radio ……….. 38
BLUETOOTH
About the BLUETOOTH
wireless technology …………. 39
Pairing this system with a
BLUETOOTH device …………..40
Listening to music on a
BLUETOOTH device ……………41
One Touch BLUETOOTH
Connection by NFC …………..42
Setting the BLUETOOTH
audio codecs ……………………43
Setting the BLUETOOTH
standby mode …………………. 43
Turning on or off the
BLUETOOTH signal ……………44
Controlling the system using
a smartphone or tablet
(SongPal) …………………………44
Getting frenzied parties with
the “Fiestable” app …………… 45

7GB
SHAKE-X70D/SHAKE-X30D/SHAKE-X10D.GB.4-691-054-12(1)
Sound Adjustment
Adjusting the sound …………45
Selecting the Virtual Football
mode ………………………………45
Creating your own sound
effect ……………………………… 46
Creating a party atmosphere
(DJ Effect) ………………………..46
Other Operations
Using the Control for HDMI
function ………………………….. 47
Using the Party Chain
function …………………………..50
Singing along: Karaoke …….. 53
Using the Voice Guidance ….54
Enjoying sound from a
guitar ………………………………54
Enjoying music with the
Party Light and Speaker
Light ………………………………. 55
Using the Sleep Timer ………. 55
Using optional equipment … 55
Deactivating the buttons on
the unit (Child Lock) …………. 55
Setting the automatic
standby function……………… 56
Updating the software ……… 56
Additional Information
Troubleshooting ……………… 57
Precautions …………………….. 67
Specifications …………………..69
Language code list ………….. 72

8GB
SHAKE-X70D/SHAKE-X30D/SHAKE-X10D.GB.4-691-054-12(1)
Unpacking
••Remote control (1)
••R03 (size AAA) batteries (2)
••FM lead antenna (1)
SHAKE-X70D only
••Unit: HCDSHAKEX70 (1)
••Speaker system: SSSHAKEX70 (2)
••AC power cord (mains lead)
•—Latin American, Middle East, and
African models only (2)*
•—Other models (1)
* The quantity of the AC power cord
(mains lead) supplied depends on the
area.
SHAKE-X30D only
••Unit: HCDSHAKEX30 (1)
••Speaker system: SSSHAKEX30 (2)
••AC power cord (mains lead) (1)
••AC plug adaptor (1) (supplied only
for certain areas)
The AC plug adaptor is not use in
Chile, Paraguay and Uruguay. Use
this plug adaptor in the countries
where it is necessary.
SHAKE-X10D only
••Unit: HCDSHAKEX10 (1)
••Speaker system: SSSHAKEX10 (2)
••AC power cord (mains lead) (1)
••AC plug adaptor (1) (supplied only
for certain areas)
The AC plug adaptor is not use in
Chile, Paraguay and Uruguay. Use
this plug adaptor in the countries
where it is necessary.
Note
When unpacking or handling a big
and/or heavy speaker, be sure to handle
the speaker with two or more persons.
Dropping the speaker may cause
personal injury and/or property damage.
Playable discs or files
on discs/USB device
Playable discs
••DVD VIDEO
••DVD-R/DVD-RW in DVD VIDEO
format or video mode
••DVD+R/DVD+RW in DVD VIDEO
format
••VIDEO CD (Ver. 1.0, 1.1, and 2.0
discs)
••Super VCD
••CD-R/CD-RW/CD-ROM in VIDEO
CD format or super VCD format
••AUDIO CD
••CD-R/CD-RW in AUDIO CD format
Playable files on discs
••Music:
MP3 files (.mp3)*1*2
••Video:
MPEG4 files (.mp4/.m4v)*2*3, Xvid
files (.avi)
Playable files on USB device
••Music:
MP3 files (.mp3)*1*2, WMA files
(.wma)*2, AAC files (.m4a/.mp4/
.3gp)*2, WAV files (.wav)*2
••Video:
MPEG4 files (.mp4/.m4v)*2*3, Xvid
files (.avi)
Note
••The discs must be in the following
format:
— CD-ROM/-R/-RW in DATA CD format
that contains the MP3*1*2, MPEG4*2*3
and Xvid files, and conforms to
ISO 9660*4 Level 1/Level 2 or Joliet
(extended format).
— DVD-ROM/-R/-RW/+R/+RW in
DATA DVD format that contains the
MP3*1*2, MPEG4*2*3 and Xvid files,
and conforms to UDF (Universal Disk
Format).

9GB
SHAKE-X70D/SHAKE-X30D/SHAKE-X10D.GB.4-691-054-12(1)
••The system will attempt to play back
any data with the extensions above,
even if it is not in the supported format.
Playing this data may generate a
loud noise which could damage your
speaker system.
*1 MP3 (MPEG 1 Audio Layer 3) is a
standard format defined by ISO/
MPEG for compressed audio data. MP3
files must be in MPEG 1 Audio Layer 3
format.
*2 Files with copyright protection (Digital
Rights Management) cannot be played
back by the system.
*3 MPEG4 files must be recorded in MP4
file format. Supported video codec and
audio codec are as follows:
— Video codec: MPEG4 Simple Profile
(AVC is not supported.)
— Audio codec: AAC-LC (HE-AAC is not
supported.)
*4 A logical format of files and folders
on CD-ROMs, defined by ISO
(International Organization for
Standardization).
Discs/files that cannot be played
back
••You cannot play back the
following discs
•—BDs (Blu-ray Discs)
•—CD-ROMs recorded in PHOTO CD
format
•—Data part of CD-Extra or Mixed
Mode CDs*
•—CD Graphics disc
•—Super Audio CDs
•—DVD Audio
•—DATA CD/DATA DVD that is
created in Packet Write format
•—DVD-RAM
•—DATA CD/DATA DVD which has
not been correctly finalized
•—CPRM (Content Protection for
Recordable Media) compatible
DVD-R/-RW recorded in Copy-
Once programs
•—A disc that has a non-standard
shape (e.g., heart, square, star)
•—A disc that has adhesive tape,
paper, or a sticker attached to it
••You cannot play back the
following files
•—The video files which is larger
than 720 (width) × 576 (height)
pixels.
•—The video files with a high width
to length ratio.
•—A WMA file in WMA DRM, WMA
Lossless, or WMA PRO format.
•—An AAC file in AAC DRM or AAC
Lossless format.
•—The AAC files which is encoded
at 96 kHz.
•—Files that are encrypted or
protected by passwords.
•—Files with DRM (Digital Rights
Management) copyright
protection.
•—Some Xvid files that are longer
than 2 hours.
••The MP3 PRO audio file can be
played back as MP3 file.
••The system may not play back an
Xvid file when the file has been
combined from two or more Xvid
files.
* Mixed Mode CD: This format records
data on the first track and audio (AUDIO
CD data) on the second and subsequent
tracks of a session.
Notes on CD-R/-RW and
DVD-R/-RW/+R/+RW
••In some cases, a CD-R/-RW and
DVD-R/-RW/+R/+RW cannot
be played back on this system
due to the recording quality or
physical condition of the disc, or
the characteristics of the recording
device and authoring software.
For more information, refer to
the operating instructions of the
recording device.

10GB
SHAKE-X70D/SHAKE-X30D/SHAKE-X10D.GB.4-691-054-12(1)
••Some playback functions may not
work with some DVD+Rs/+RWs,
even if they have been correctly
finalized. In this case, view the disc
by normal playback.
Notes on discs
••This product is designed to play
back discs that conform to the
Compact Disc (CD) standard.
••DualDisc and some music discs
encoded with copyright protection
technologies do not conform to
the CD standard. Therefore, these
discs may not be compatible with
this product.
Note on multisession disc
This system can play back
continuous sessions on a disc when
they are recorded in the same
format as the first session. However,
the playback is not guaranteed.
Note on DVD VIDEO and VIDEO
CD playback operations
Some playback operations for
a DVD VIDEO or VIDEO CD may
be intentionally restricted by
software producers. Therefore,
some playback features may not
be available. Be sure to read the
operating instructions of the DVD
VIDEO or VIDEO CD.
Notes on playable files
••Playback may take a longer time
to start when:
•—a DATA CD/DATA DVD/USB
device is recorded with a
complicated tree structure.
•—the audio files or video files in
another folder have just been
played back.
••The system can play back a DATA
CD/DATA DVD or a USB device in
the following conditions:
•—up to a depth of 8 folders
•—up to 300 folders
•—up to 999 files in a disc
•—up to 2,000 files in a USB device
•—up to 650 files in a folder
These numbers may vary
depending on the file or folder
configuration.
••Folders that have no audio files or
video files are skipped.
••Files transferred by a device such
as a computer may not be played
back in the order in which they
were transferred.
••The playback order may not be
applicable depending on the
software used for creating the
audio file or video file.
••Compatibility with all encoding/
writing software of the supported
formats, recording devices,
and recording media cannot be
guaranteed.
••Depending on the Xvid file, the
picture may be unclear or the
sound may skip.
Notes about USB devices
••This system is not guaranteed to
operate with all USB devices.
••Although there are a variety
of complex functions for USB
devices, the playable contents
of USB devices connected to
the system are music and video
contents only. For details, refer to
the operating instructions of the
USB device.
••When a USB device is inserted,
the system reads all the files on
the USB device. If there are many
folders or files on the USB device,
it may take a long time to finish
reading the USB device.

11GB
SHAKE-X70D/SHAKE-X30D/SHAKE-X10D.GB.4-691-054-12(1)
••Do not connect the system and
the USB device through a USB hub.
••With some connected USB
devices, there may be a delay
before an operation is performed
by this system.
••The playback order for the system
may differ from the playback order
of the connected USB device.
••Before using a USB device, make
sure that no virus-ridden files are
on the USB device.
Websites for
compatible devices
Check the websites below for the
latest information about compatible
USB and BLUETOOTH devices.
For customers in Latin America:
<http://esupport.sony.com/LA>
For customers in Europe and
Russia:
<http://www.sony.eu/support>
For customers in other countries/
regions:
<http://www.sony-asia.com/
support>
Compatible iPhone/iPod models
The compatible iPhone/iPod models
are as follows. Update your iPhone/
iPod with the latest software before
using with the system.
BLUETOOTH technology works with:
••iPhone 7 Plus
••iPhone 7
••iPhone SE
••iPhone 6s Plus
••iPhone 6s
••iPhone 6 Plus
••iPhone 6
••iPhone 5s
••iPhone 5c
••iPhone 5
••iPhone 4s
••iPod touch (6th generation)
••iPod touch (5th generation)
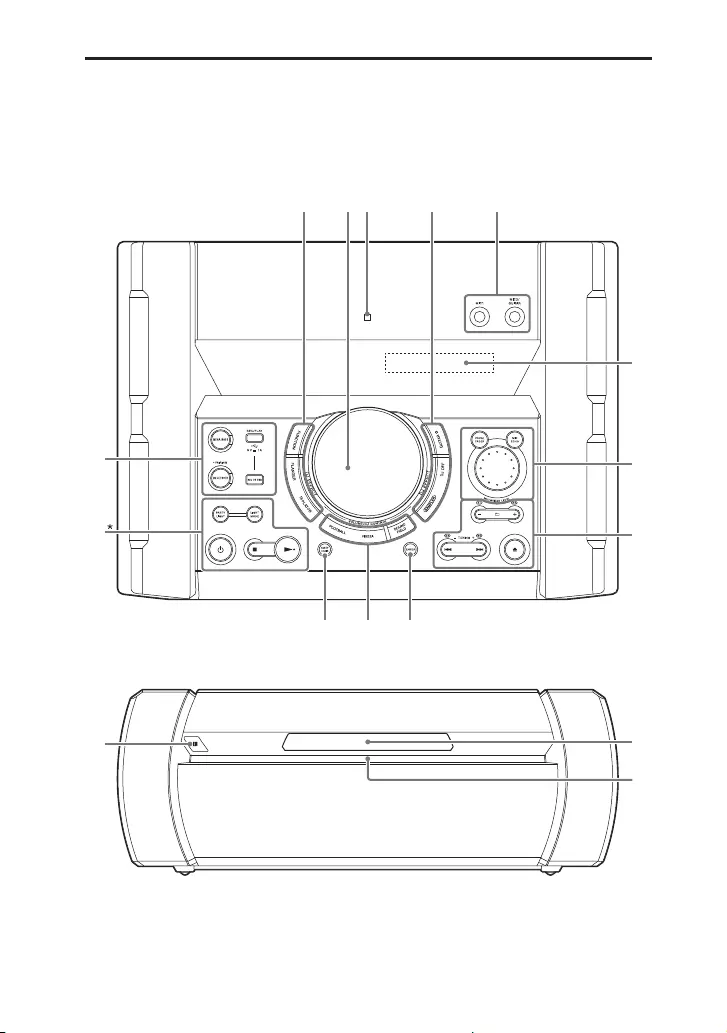
SHAKE-X70D/SHAKE-X30D/SHAKE-X10D.GB.4-691-054-12(1)
12GB
Guide to parts and controls
You can lock the keys except (power) on the unit to prevent them from
being operated by mistake (page 55).
Unit (Top)
Unit (Front)
* The button has a tactile dot. Use the tactile dot as a reference when operating the
system.

13GB
SHAKE-X70D/SHAKE-X30D/SHAKE-X10D.GB.4-691-054-12(1)
(power)
Turns on the system, or sets it to
standby mode.
(stop)
— Stops playback.
When pressed twice, resume
playback can be canceled.
— Stops transfer during music
transfer.
— Stops the built-in sound
demonstration.
(play)
Starts playback.
Hold down for more than
2 seconds, the built-in sound
demonstration will be played
back. To stop the demonstration,
press .
PARTY LIGHT (page 24, 55)
LIGHT MODE (page 55)
BLUETOOTH
Selects BLUETOOTH function.
BLUETOOTH indicator (page
39)
PAIRING
Hold down to activate
BLUETOOTH pairing during
BLUETOOTH function.
REC TO USB
Transfers music to the USB
device connected to the
(USB) port.
MEGA BASS (page 45)
MEGA BASS indicator
Lights up when MEGA BASS
sound effect is selected.
(USB) (REC/PLAY) port
Use to connect a USB device.
This port can be used for both
playback and music transfer.
FUNCTION
Selects a function.
FLANGER (page 46)
ISOLATOR (page 46)
•VOLUME/DJ CONTROL knob
Adjusts the volume.*
Adjusts the FLANGER and
ISOLATOR effect or outputs
the SAMPLER sound effect
continuously (page 46).
* You cannot use this knob to adjust
the volume when DJ Effect is
selected.
(N-Mark) (page 42)
GUITAR (page 54)
GUITAR indicator
Lights up when guitar mode is
turned on.
DJ OFF (page 47)
SAMPLER (page 46)
MIC1 jack
Use to connect the microphone.
MIC2/GUITAR jack
Use to connect the microphone
or guitar.
Display
VOCAL FADER (page 53)
MIC ECHO (page 53)

SHAKE-X70D/SHAKE-X30D/SHAKE-X10D.GB.4-691-054-12(1)
14GB
MIC/GUITAR LEVEL knob
(page 53, 54)
+/– (select folder)
Selects a folder on a data disc or
a USB device.
S1, S2, S3, S4 (page 46)
(open/close)
Opens or closes the disc tray.
/ (go backward/go
forward) (page 25)
TUNING+/– (page 38)
ENTER
Enters the settings.
FOOTBALL (page 46)
FIESTA (page 45)
SOUND FIELD (page 45)
PARTY CHAIN (page 52)
Remote control sensor
(page20)
Disc tray
Front panel lighting
If the front panel lighting is
glaring, do not look directly at it.
Speaker (Rear)
Example:
* For SHAKE-X70D only
Party Light
Do not look directly at the light
emitting part when the Party
Light is turned on.
Handle
Be sure to use the handle when
lifting the speaker.
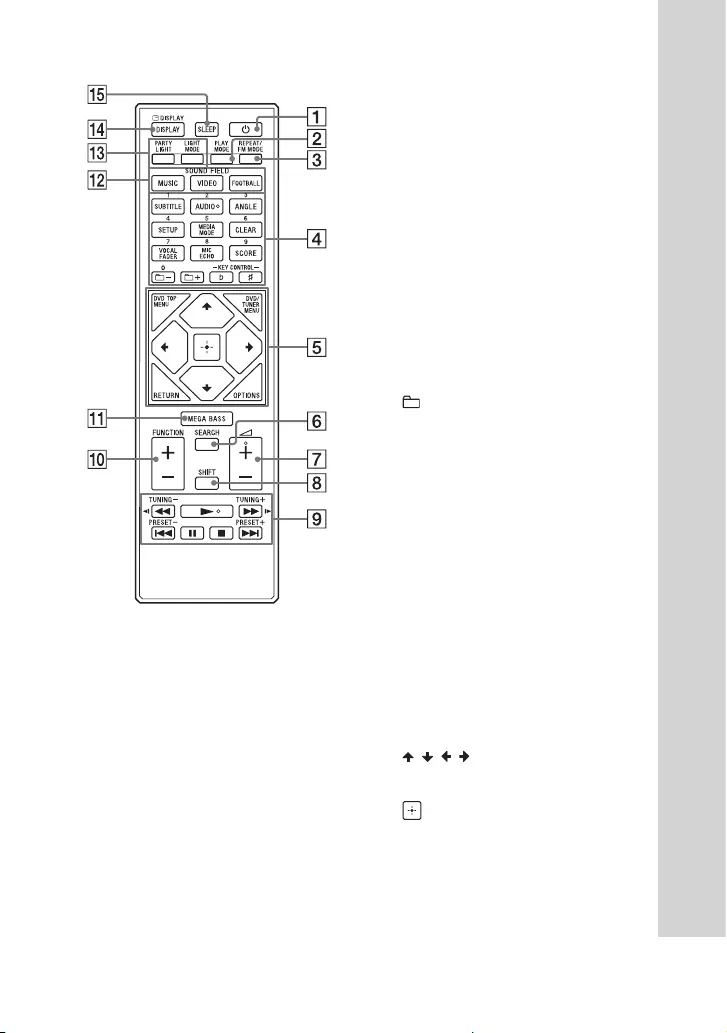
15GB
SHAKE-X70D/SHAKE-X30D/SHAKE-X10D.GB.4-691-054-12(1)
Remote control
(power)
Turns on the system, or sets it to
standby mode.
PLAY MODE (page 28,
36)
REPEAT/FM MODE (page
29, 38)
Numeric (0 – 9) buttons*1*2
— Selects a track, chapter or file
with its item number.
— Enters numbers or values.
SUBTITLE (page 27)
AUDIO*2 (page 27, 31)
ANGLE (page 27)
SETUP (page 31)
MEDIA MODE (page 25)
Selects the media to be played
back on a data disc or USB
device.
CLEAR (page 26)
VOCAL FADER (page 53)
MIC ECHO (page 53)
SCORE (page 53)
+/– (select folder)
Selects a folder on a data disc or
a USB device.
KEY CONTROL / (page
53)
DVD TOP MENU
Displays the DVD title on the TV
screen.
DVD/TUNER MENU (page
25, 26, 39)
RETURN (page 25)
OPTIONS
Enters or exits the options menu.
/ / /
Selects the menu items.
(enter)
Enters/confirms the settings.
SEARCH (page 25, 26)
(volume) +/–*2
Adjusts the volume.

SHAKE-X70D/SHAKE-X30D/SHAKE-X10D.GB.4-691-054-12(1)
16GB
SHIFT*1
Hold down to activate the
buttons printed in pink.
/ (fast reverse/fast
forward) (page 26)
/ (slow back/slow
forward) (page 26)
TUNING+/– (page 38)
(play)*2
Starts playback.
/ (go backward/go
forward) (page 25)
PRESET+/– (page 39)
(pause)
Pauses playback. To resume
playback, press .
(stop)
— Stops playback.
When pressed twice, resume
playback can be canceled.
— Stops transfer during music
transfer.
— Stops the built-in sound
demonstration.
FUNCTION +/–
Selects a function.
MEGA BASS (page 45)
SOUND FIELD buttons
MUSIC (page 45),
VIDEO (page 45),
FOOTBALL (page 46)
PARTY LIGHT (page 24,
55)
LIGHT MODE (page 55)
DISPLAY (page 20, 24,
31, 38, 40)
Changes the information on the
display.
DISPLAY*1 (page 30)
Views or hides the on-screen
display.
SLEEP (page 55)
*1 This button is printed in pink. To use
this button, hold down SHIFT (), then
press this button.
*2 The numeric button 2/AUDIO, +
and buttons have a tactile dot. Use
the tactile dot as a reference when
operating the system.
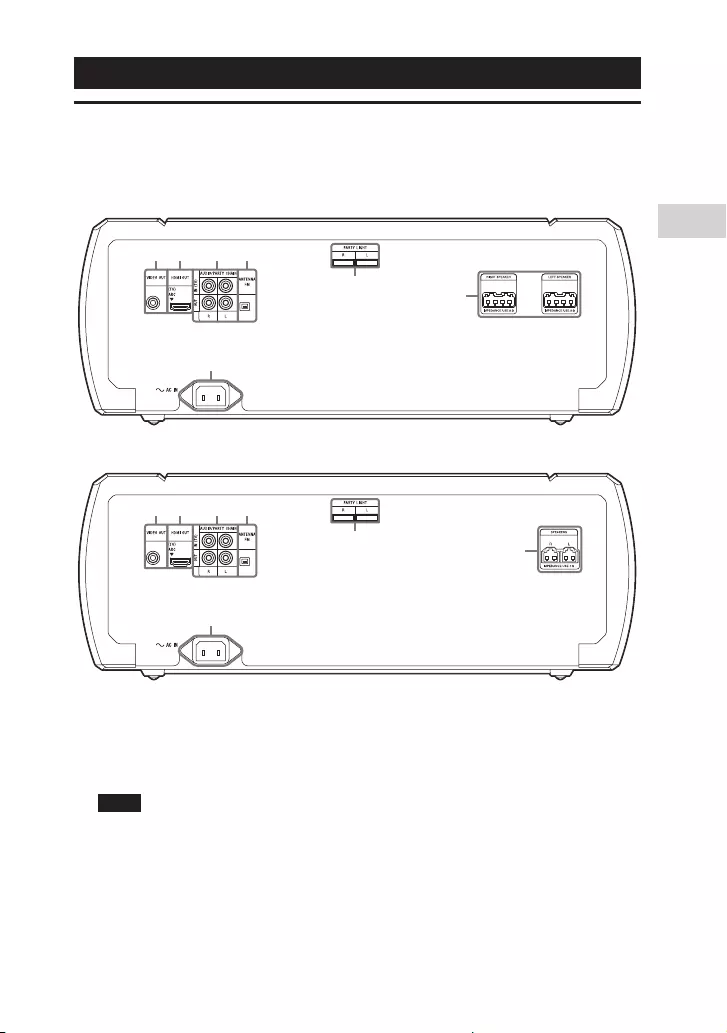
17GB
Getting Started
SHAKE-X70D/SHAKE-X30D/SHAKE-X10D.GB.4-691-054-12(1)
Getting Started
Hooking up the system securely
Unit (Rear)
SHAKE-X70D
SHAKE-X30D/SHAKE-X10D
VIDEO OUT jack
Use a video cable (not supplied) to connect to the video input jack of a TV
or projector (page 21).
Note
Do not connect this system to the TV through the video deck.
HDMI OUT (TV) jack
Use an HDMI cable (not supplied) to connect to the HDMI input jack of a TV
(page 21).
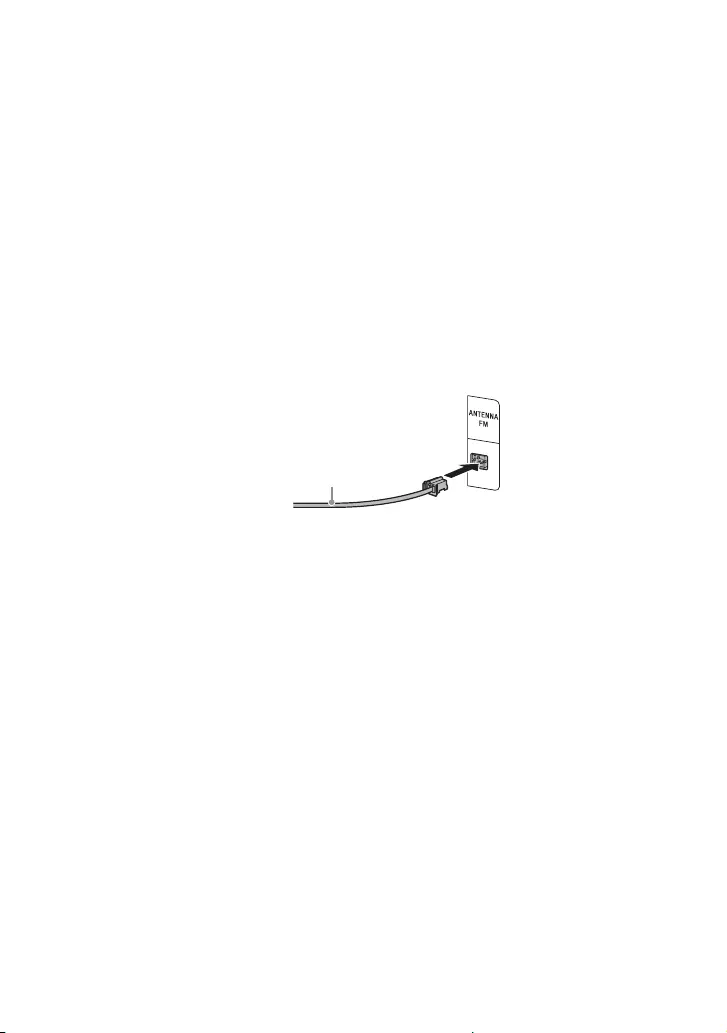
18GB
SHAKE-X70D/SHAKE-X30D/SHAKE-X10D.GB.4-691-054-12(1)
Audio input and output jacks
Use an audio cable (not supplied) to make either connection as follows:
••AUDIO/PARTY CHAIN IN (TV) L/R jacks
•—Connect to the audio output jacks of a TV or an audio/video
equipment. The sound is output through this system.
•—Connect to another audio system to enjoy the Party Chain function
(page 50).
••AUDIO/PARTY CHAIN OUT L/R jacks
•—Connect to the audio input jacks of an optional equipment.
•—Connect to another audio system to enjoy the Party Chain function
(page 50).
FM ANTENNA terminal
Find a location and an orientation that provide good reception when you
set up the antennas.
Keep the antenna away from the speaker cables, the AC power cord (mains
lead) and the USB cable to avoid picking up noise.
Extend the FM lead
antenna horizontally
Speakers
••PARTY LIGHT L/R terminals
Connect the Party Light connector of the speaker to this terminal. The
lighting on the speakers will react according to the music source. You can
select the Party Light and Speaker Light according to your preference
(page 55).
••LEFT SPEAKER and RIGHT SPEAKER terminals
(SHAKE-X70D only)
Connect the speaker connector of the speaker to this terminal.
••SPEAKERS L/R terminals
(SHAKE-X30D and SHAKE-X10D only)
Connect the speaker connector of the speaker to this terminal.

19GB
Getting Started
SHAKE-X70D/SHAKE-X30D/SHAKE-X10D.GB.4-691-054-12(1)
Example:
Note
••Be sure to use only the supplied speakers.
••When connecting speaker cables, insert the connector straight into the terminals.
AC power cord (mains lead)
Connect the AC power cord (mains lead) (supplied) to the unit, then plug it
into a wall outlet.
AC power cord
(mains lead)
(supplied)
To the wall outlet
A small space is left between the plug and the unit even when the AC
power cord (mains lead) is inserted firmly. The cord is supposed be
connected this way. This is not a malfunction.
When the AC power cord (mains lead) is connected, the demonstration
(page 24) starts automatically. If you press (power) to turn on the
system, the demonstration ends.
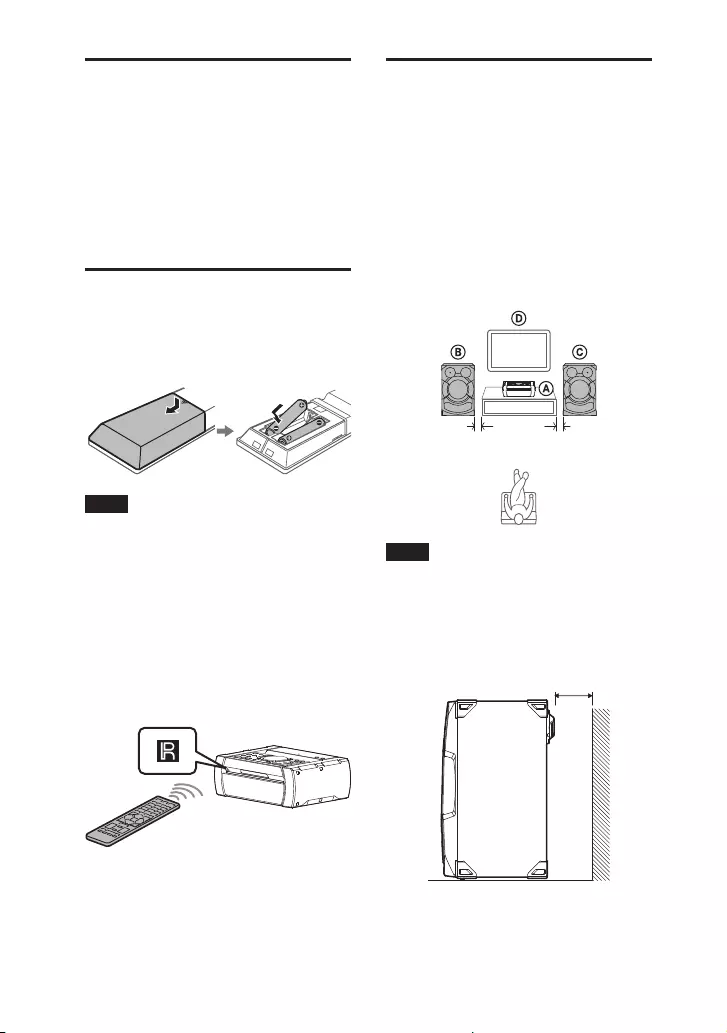
20GB
SHAKE-X70D/SHAKE-X30D/SHAKE-X10D.GB.4-691-054-12(1)
Deactivating the
demonstration
To deactivate the demonstration
while the system is turned off, press
DISPLAY repeatedly to select the no
display mode (Power Saving Mode)
(page 24).
Inserting batteries
Insert the two supplied R03 (size
AAA) batteries, matching the
polarities shown below.
Note
••Do not mix an old battery with a new
one or mix different types of batteries.
••If you do not use the remote control
for a long period of time, remove the
batteries to avoid damage from battery
leakage and corrosion.
To operate the system using the
remote control
Point the remote control at the unit’s
remote control sensor.
Positioning the
speakers
To obtain optimum performance
from the system, we recommend
you to place the speakers as shown
below.
Unit
Left speaker (L)
Right speaker (R)
TV
0.3 m 0.3 m
Note
••Check the speaker type by referring to
the speaker label (“L” or “R”) on the rear
panel of the speaker.
••To obtain optimum Party Light effects,
we recommend you to place the
speakers from the wall as shown below.
45 cm

21GB
Getting Started
SHAKE-X70D/SHAKE-X30D/SHAKE-X10D.GB.4-691-054-12(1)
Connecting the TV
Before connecting cables, be sure to disconnect the AC power cord (mains
lead).
To watch video
Select the connection methods according to the jacks on your TV.
HDMI IN (ARC)*2
HDMI IN
VIDEO IN
HDMI cable*1 (not supplied)
Video cable (not supplied)
High quality
or
Standard quality
Recommended connection
Alternative connection
*1 High Speed HDMI Cable with Ethernet
*2 You can listen to TV sound via the system if you connect the system to the TV’s HDMI
IN (ARC) jack. The Audio Return Channel (ARC) function enables the TV to output
sound through the system with an HDMI connection, without performing an audio
connection (connection below). To set the ARC function on this system, see [AUDIO
RETURN CHANNEL] (page 35). To check the compatibility of your TV’s ARC function,
refer to the operating instructions supplied with your TV.
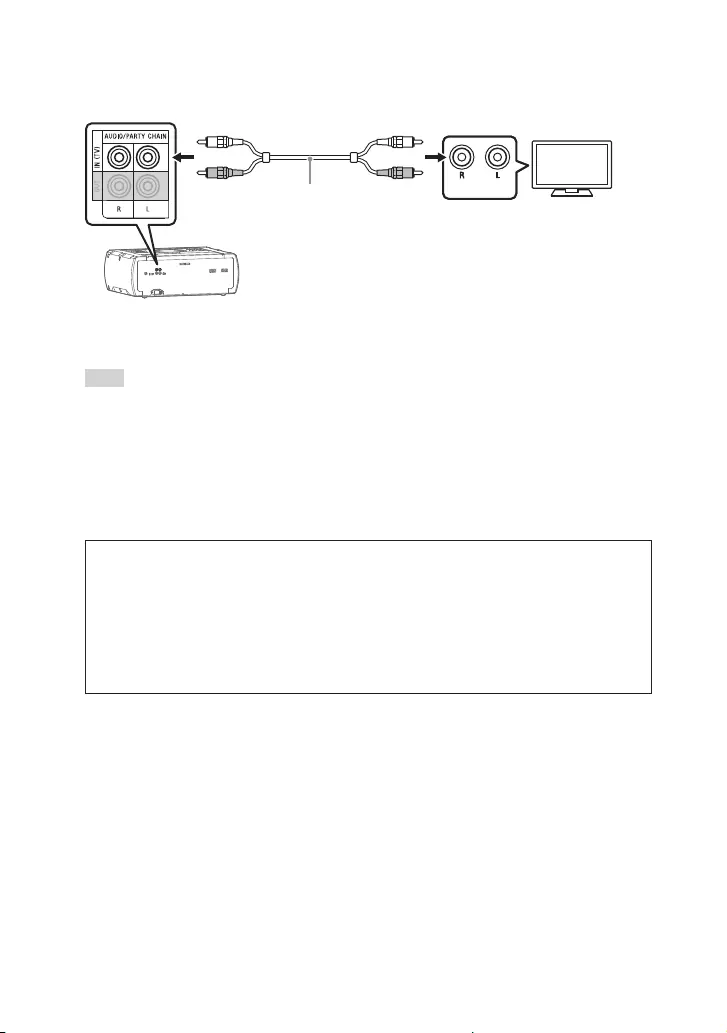
22GB
SHAKE-X70D/SHAKE-X30D/SHAKE-X10D.GB.4-691-054-12(1)
To listen to TV sound via the system
If you do not connect the system to the TV’s HDMI IN (ARC) jack, make this
connection.
AUDIO OUT
Audio cable (not supplied)
To listen to TV sound, press FUNCTION +/– repeatedly to select “TV”.
Alternatively, press FUNCTION on the unit repeatedly.
Hint
••You can also enjoy the sound of external equipment (DVD players, etc.) via the system
by connecting to the AUDIO/PARTY CHAIN IN (TV) jack as connection above. For
details, refer to the operating instructions of your equipment.
••If the audio output level from the system is low when connecting the external
equipment, try adjusting the audio output settings on the connected equipment. It
may improve the audio output level. For details, refer to the operating instructions of
your equipment.
If “CODE 01” and “SGNL ERR” appear on the display of the unit
When the audio input signals to the system are other than 2-channel
Linear PCM signals, the messages “CODE 01” and “SGNL ERR” (indicate that
the input audio signals are unsupported) appear on the display of the unit.
In this case, select the proper audio output mode on the TV in order
to output 2-channel Linear PCM audio signals. For details, refer to the
operating instructions of your TV.
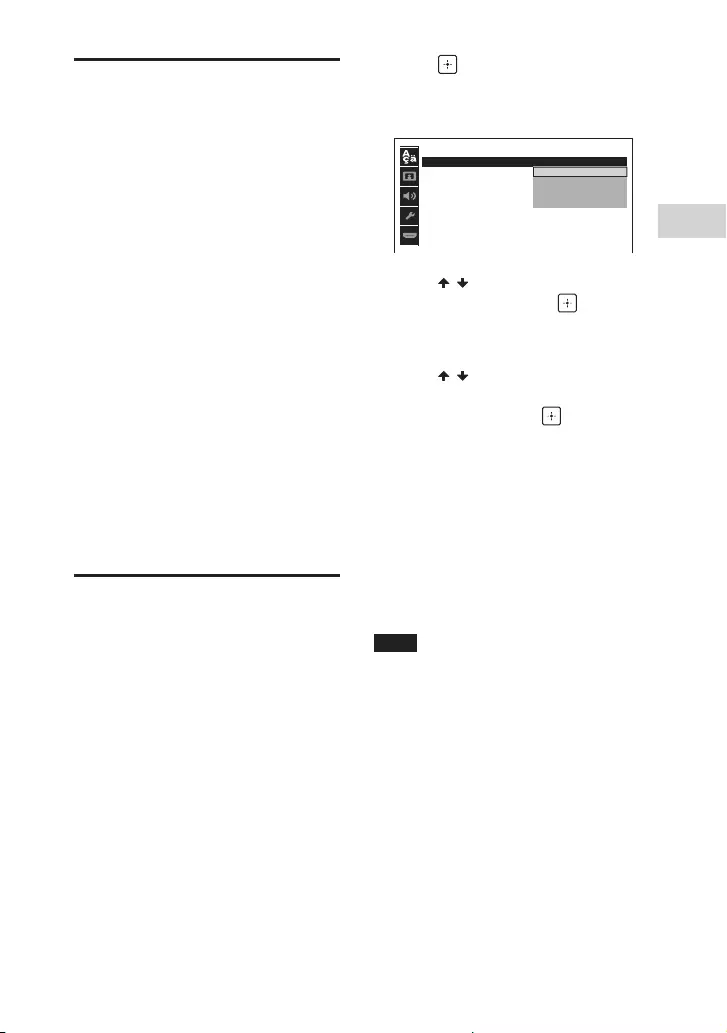
23GB
Getting Started
SHAKE-X70D/SHAKE-X30D/SHAKE-X10D.GB.4-691-054-12(1)
Changing the color
system
(Except for Latin American,
European, and Russian models)
Set the color system to PAL or NTSC
depending on the color system of
your TV.
Each time you perform the
procedure below, the color system
changes as follows:
COLOR NTSC COLOR PAL
Use the buttons on the unit to
perform this operation.
1 Press to turn on the system.
2 Press FUNCTION repeatedly to
select “DVD/CD”.
3 Hold down MIC ECHO and
ENTER for more than 3 seconds.
“COLOR NTSC” or “COLOR PAL”
appears on the display.
Performing the quick
setup
Before using the system, you
can make the minimum basic
adjustments in the quick setup.
1 Turn on your TV and select the
input according to the
connection.
2 Press to turn on the system.
3 Press FUNCTION +/– repeatedly
to select “DVD/CD”.
The guide message [Press ENTER to
run QUICK SETUP.] appears at the
bottom of the TV screen.
4 Press without loading a disc.
[LANGUAGE SETUP] appears on the
TV screen. Displayed items may vary
depending on country or region.
LANGUAGE SETUP
OSD
:
MENU
:
AUDIO
:
SUBTITLE
:
ENGLISH
ENGLISH
1CHINESE
CHINESE 2
THAI
5 Press / repeatedly to select a
language, then press .
[VIDEO SETUP] appears on the TV
screen.
6 Press / repeatedly to select
the setting that matches your
TV type, then press .
After [QUICK SETUP is complete.]
appears on the TV screen, the
system is ready for playback.
To change the setting manually
See “Using the Setup Menu”
(page 31).
To quit the quick setup
Press SETUP.
Note
The guide message appears when you
turn on the system for the first time or
after performing [RESET] (see “Returning
the setup menu settings to the default”
on page 65).
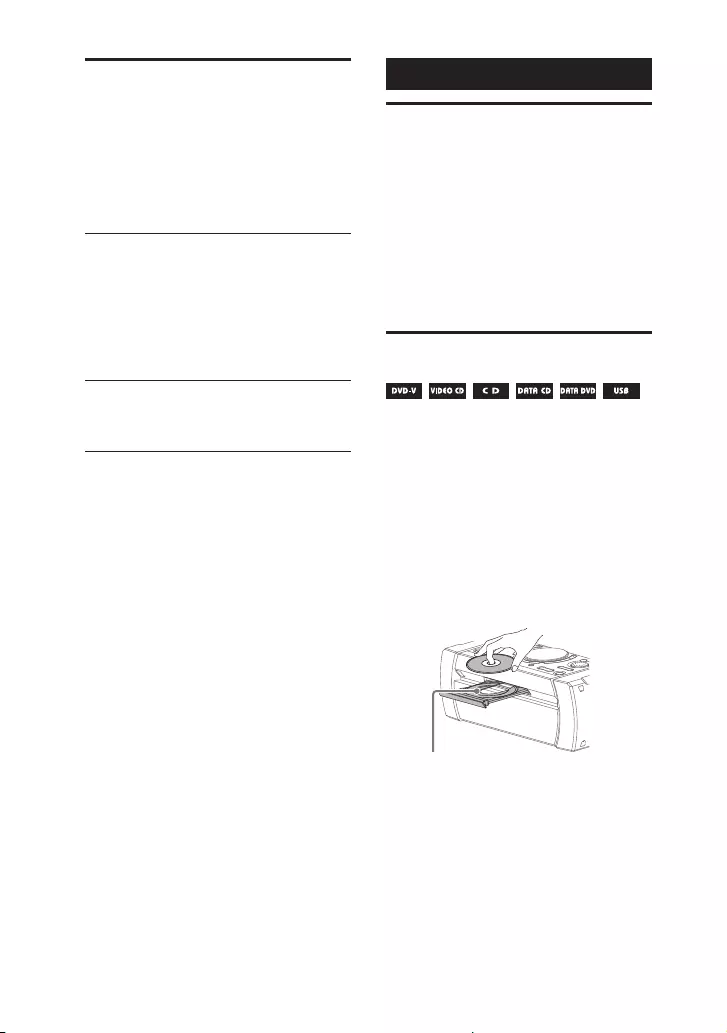
24GB
SHAKE-X70D/SHAKE-X30D/SHAKE-X10D.GB.4-691-054-12(1)
Changing the display
mode
Press DISPLAY repeatedly while
the system is turned off.
Each time you press the button, the
display mode changes as follows.
Demonstration
The messages about the main
features of this system scrolls across
the display and the illumination
turns on.
To turn off the illumination, press
PARTY LIGHT.
No display (Power Saving Mode)
The display is turned off to conserve
power.
Disc/USB Playback
Before using the USB
device
For compatible USB devices, see
“Websites for compatible devices”
(page 11).
(You can use your Apple devices
with this system via BLUETOOTH
connection only.)
Basic playback
1 Press FUNCTION +/– repeatedly
to select “DVD/CD” or “USB”.
Alternatively, press FUNCTION on
the unit repeatedly.
2 Prepare the playback source.
For DVD/CD function:
Press on the unit to open the disc
tray and load a disc with the label
facing up.
When you play back an 8 cm disc
such as a CD single, place it on
the inner circle of the tray.
Press on the unit again to close
the disc tray.
Do not forcibly push the disc tray to
close it as this may cause a
malfunction.
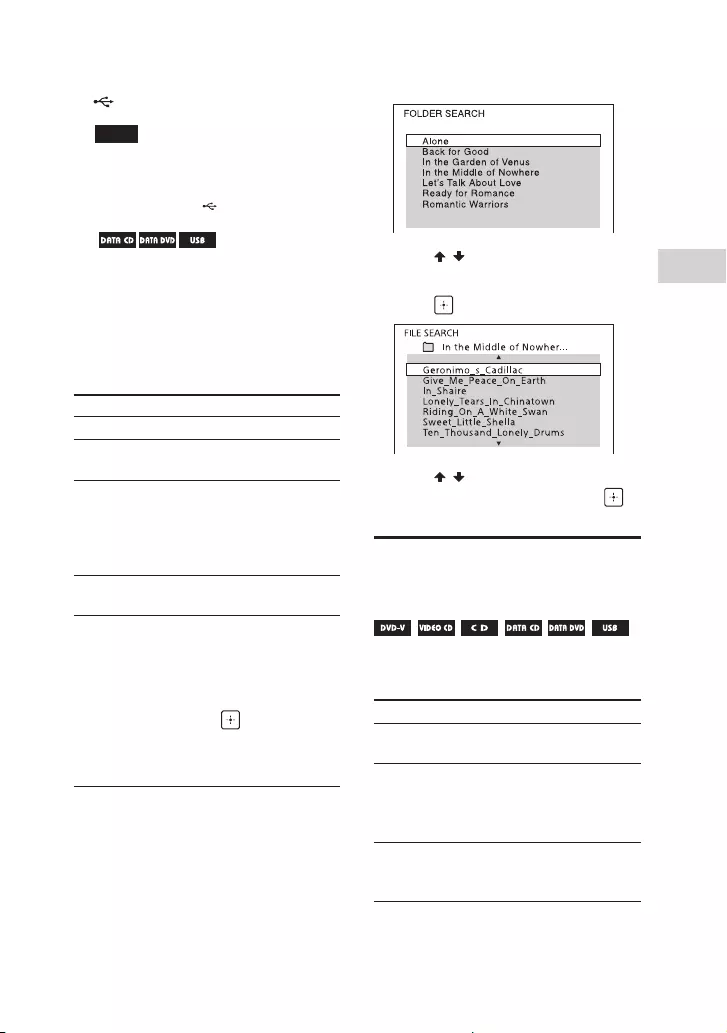
25GB
Disc/USB Playback
SHAKE-X70D/SHAKE-X30D/SHAKE-X10D.GB.4-691-054-12(1)
For USB function:
Connect a USB device to the
(USB) port.
Note
You can use a USB adaptor (not
supplied) to connect the USB device
to the unit if the USB device cannot be
plugged into the (USB) port.
3 ( only)
Press MEDIA MODE repeatedly
to select the media type
([MUSIC]/[VIDEO]) you want.
4 Press to start playback.
Other operations
To Do this
Stop playback Press .
Pause
playback
Press .
Resume
playback or
return to
normal
playback
Press .
Cancel the
resume point
Press twice.
Select a track,
file, chapter or
scene
Press or
during playback.
Or, hold down SHIFT,
press the numeric
buttons, then
press .
(Operation might be
prohibited by disc or
USB device.)
To play from a specific file
1 Press MEDIA MODE repeatedly to
select [MUSIC] or [VIDEO].
2 Press SEARCH to display the
folder list.
3 Press / repeatedly to select
the folder you want.
4 Press to display the file list.
5 Press / repeatedly to select
the file you want, then press .
Other playback
operations
Depending on the type of disc or file,
the function may not work.
To Do this
View DVD
menu
Press DVD/TUNER
MENU.
View folder list
or file list
Press SEARCH.
Press SEARCH again to
turn off the folder list
or file list.
Return to
folder list when
in file list
Press RETURN.
26GB
SHAKE-X70D/SHAKE-X30D/SHAKE-X10D.GB.4-691-054-12(1)
To Do this
Locate a point
quickly in fast
forward or fast
reverse (Lock
Search)
Press or
during playback.
Each time you press
or , the
playback speed
changes.
Watch frame
by frame
(Slow-motion
Play)
Press , then press
or .
Each time you press
or , the playback
speed changes.
Searching a specific track
Hold down SHIFT, press the
numeric buttons to select the track
you want to play back, then press
.
To search using the SEARCH
button
1 Press SEARCH to display the track
list.
2 Press / repeatedly to select
the track you want to play back,
then press .
Searching a specific title/
chapter/scene/track/index
1 Press SEARCH repeatedly during
playback to select the search
mode.
2 Hold down SHIFT, press the
numeric buttons to enter the
title, chapter, scene, track, or
index number you want, then
press .
Playback starts.
Note
••For VIDEO CD with PBC playback, press
SEARCH to search the scene.
••For VIDEO CD without PBC playback,
press SEARCH to search the track and
index.
To search for a particular point
using the time code
1 Press SEARCH repeatedly during
playback to select the time
search mode.
2 Hold down SHIFT, press the
numeric buttons to enter the
time code, then press .
Example: To find a scene at 2 hours,
10 minutes, and 20 seconds, hold
down SHIFT, then press 2, 1, 0, 2, 0
([2:10:20]).
If you make a mistake, press CLEAR
to cancel the number.
To search using the DVD menu
1 Press DVD/TUNER MENU.
2 Press / / / , or hold down
SHIFT and press the numeric
buttons, to select the title or item
you want to play back, then
press .
27GB
Disc/USB Playback
SHAKE-X70D/SHAKE-X30D/SHAKE-X10D.GB.4-691-054-12(1)
Changing the camera angles
Press ANGLE repeatedly during
playback to select the camera
angle you want.
Selecting the subtitle setting
Press SUBTITLE repeatedly during
playback to select the subtitle
language you want or turn off the
subtitle.
Changing the language/sound
Press AUDIO repeatedly during
playback to select the audio
format or mode you want.
DVD VIDEO
You can select audio format
or language when the source
contains multiple audio formats or
multilingual audio.
When 4 digits are displayed, they
indicate a language code. See
“Language code list” (page 72)
to confirm which language the
code represents. When the same
language is displayed two or more
times, the DVD VIDEO is recorded in
multiple audio formats.
VIDEO CD/AUDIO CD/audio file
You can change the sound output.
••[STEREO]: The stereo sound.
••[1/L]/[2/R]: The monaural sound
of the left or right channel.
SUPER VIDEO CD
••[1:STEREO]: The stereo sound of
audio track 1.
••[1:1/L]/[1:2/R]: The monaural
sound of the left or right channel
of audio track 1.
••[2:STEREO]: The stereo sound of
audio track 2.
••[2:1/L]/[2:2/R]: The monaural
sound of the left or right channel
of audio track 2.
Playing a VIDEO CD with PBC
functions
You can use the PBC (Playback
Control) menu to enjoy the
interactive features of VIDEO CD
(VIDEO CD Version 2.0 and Super
VCD).
1 Press to play a VIDEO CD
with PBC functions.
The PBC menu appears on the TV
screen.
2 Hold down SHIFT, press the
numeric buttons to select the
item number you want, then
press .
3 Continue playback according to
the instructions on the menu.
Note
PBC playback is canceled when Repeat
Play is activated.

28GB
SHAKE-X70D/SHAKE-X30D/SHAKE-X10D.GB.4-691-054-12(1)
To cancel PBC playback
1 Press or , or hold down
SHIFT and press the numeric
buttons, to select a track when
playback is stopped.
2 Press or .
Playback starts from the selected
track.
To return to PBC playback
Press twice, then press .
Multi-disc resume play
This system can store playback
resume points for up to 6 discs and
resumes playback when you insert
the same disc again. If you store a
playback resume point for the 7th
disc, the resume point for the first
disc will be deleted.
To activate this function,
set [MULTI-DISC RESUME]
in [SYSTEM SETUP] to [ON]
(page34).
Note
To play back from the beginning of the
disc, press twice, then press .
Using play mode
Playing in sequential order
(Normal Play)
When playback is stopped, press
PLAY MODE repeatedly.
When playing a disc
••[DISC]: plays the disc.
••[FOLDER]*: plays all playable files
in the specified folder on the disc.
* Cannot be selected for AUDIO CD.
When playing a USB device
••[ONE USB DEVICE]: plays the USB
device.
••[FOLDER]: plays all playable files
in the specified folder on the USB
device.
Note
••“FLDR” and “SHUF” light off on the
display when Normal Play is set to
[DISC] or [ONE USB DEVICE].
••“FLDR” lights up on the display when
Normal Play is set to [FOLDER].
Playing in random order
(Shuffle Play)
When playback is stopped, press
PLAY MODE repeatedly.
When playing a disc
••[DISC (SHUFFLE)]: shuffles all audio
files on the disc.
••[FOLDER (SHUFFLE)]*: shuffles all
audio files in the specified folder
on the disc.
29GB
Disc/USB Playback
SHAKE-X70D/SHAKE-X30D/SHAKE-X10D.GB.4-691-054-12(1)
* Cannot be selected for AUDIO CD.
When playing a USB device
••[ONE USB DEVICE (SHUFFLE)]:
shuffles all audio files on the USB
device.
••[FOLDER (SHUFFLE)]: shuffles all
audio files in the specified folder
on the USB device.
Note
••“SHUF” lights up on the display when
Shuffle Play is set to [DISC (SHUFFLE)] or
[ONE USB DEVICE (SHUFFLE)].
••“FLDR” and “SHUF” light up on the
display when Shuffle Play is set to
[FOLDER (SHUFFLE)].
••Shuffle Play cannot be performed for
video files.
••Shuffle Play is canceled when you:
— open the disc tray.
— perform Synchronized Transfer.
— change MEDIA MODE.
••Shuffle Play may be canceled when you
select a folder or a track to play back.
Playing repeatedly (Repeat
Play)
Press REPEAT repeatedly.
Depending on the type of disc or file,
some settings may not be available.
••[OFF]: does not play back
repeatedly.
••[ALL]: repeats all tracks or files in
the selected play mode.
••[DISC]: repeats all contents (DVD
VIDEO and VIDEO CD only).
••[TITLE]: repeats the current title
(DVD VIDEO only).
••[CHAPTER]: repeats the current
chapter (DVD VIDEO only).
••[TRACK]: repeats the current track.
••[FILE]: repeats the current video
file.
To cancel Repeat Play
Press REPEAT repeatedly to select
[OFF].
Note
••“” lights up on the display when
Repeat Play is set to [ALL] or [DISC].
••“ ” lights up on the display when
Repeat Play is set to [TITLE], [CHAPTER],
[TRACK] or [FILE].
••You cannot perform Repeat Play with
VIDEO CD during PBC playback.
••Depending on the DVD VIDEO, you
cannot perform Repeat Play.
••Repeat Play is canceled when you:
— turn off the system (DVD VIDEO and
VIDEO CD only).
— open the disc tray.
— change the function (DVD VIDEO and
VIDEO CD only).
— perform Synchronized Transfer.
— change MEDIA MODE.
Restricting playback of
the disc (Parental
Control)
You can restrict playback of
DVD VIDEOs according to a
predetermined level. Scenes may be
skipped or replaced with different
scenes.
1 When playback is stopped,
press SETUP.
2 Press / repeatedly to select
[SYSTEM SETUP], then press .
3 Press / repeatedly to select
[PARENTAL CONTROL], then
press .

30GB
SHAKE-X70D/SHAKE-X30D/SHAKE-X10D.GB.4-691-054-12(1)
4 Hold down SHIFT, press the
numeric buttons to enter or
re-enter your 4-digit password,
then press .
5 Press / repeatedly to select
[STANDARD], then press .
6 Press / repeatedly to select a
geographic area as the playback
limitation level, then press .
The area is selected.
When you select [OTHERS], enter
the area code for the geographic
area you want according to the
“Parental Control area code list”
(page 73) by holding down SHIFT,
then press the numeric buttons.
7 Press / repeatedly to select
[LEVEL], then press .
8 Press / repeatedly to select
the level you want, then press
.
The lower the value, the stricter the
limitation.
To turn off the parental control
function
Set [LEVEL] to [OFF] in step 8.
To play back a disc for which the
parental control is set
1 Load the disc and press .
The display for entering your
password appears on the TV screen.
2 Hold down SHIFT, press the
numeric buttons to enter or
re-enter your 4-digit password,
then press .
The system starts playback.
If you forget your password
Remove the disc and repeat steps 1
to 3 of “Restricting playback of the
disc (Parental Control)” (page 29).
Hold down SHIFT, press the numeric
buttons to enter a password
“199703”, then press .
Follow the on-screen instructions
and enter a new 4-digit password.
Then, reload the disc and press .
You need to enter your new
password again.
Viewing information of
a disc and USB device
Information on the TV screen
Hold down SHIFT, then press
DISPLAY repeatedly during
playback.
Playback information
Playing time and remaining time
Bit rate
Media type
Playback status
Title*1*2/track/file name*2
Album*1*2/folder name*2/
chapter/index number
31GB
Disc/USB Playback
SHAKE-X70D/SHAKE-X30D/SHAKE-X10D.GB.4-691-054-12(1)
Artist name*1*2
Appears when playing an audio
file.
*1 If an audio file has an ID3 tag, the
system will display an album name/
title name/artist name from the ID3 tag
information. The system can support
ID3 ver 1.0/1.1/2.2/2.3.
*2 If the name contains characters which
cannot be displayed, those characters
will be displayed as “_”.
Note
••Depending on the source being played,
— some information may not be
displayed.
— some characters cannot be
displayed.
••Depending on the play mode, the
information displayed may be different.
Displaying the audio format
information in DVD VIDEOs and
video files
Press AUDIO during playback.
Information on the display
Press DISPLAY repeatedly when
the system is turned on.
You can view the information as
follows:
•—playing time/remaining time of
track, title, chapter
•—scene number
•—file name, folder name
•—title, artist and album information
Note
••The disc name or track name may
not be displayed depending on the
characters.
••Playing time of audio files and video
files may not be displayed correctly.
••The elapsed playing time for an audio
file encoded using a VBR (variable bit
rate) is not displayed correctly.
Using the Setup Menu
You can make various adjustments
to items such as picture and sound.
Displayed items vary depending on
the country or region.
Note
Playback settings stored in the disc take
priority over the setup menu settings.
Therefore, some of the setup menu
settings may not be performed.
1 When playback is stopped in
DVD/CD or USB function, press
SETUP.
The setup menu appears on the TV
screen.
2 Press / repeatedly to select
[LANGUAGE SETUP],
[VIDEO SETUP], [AUDIO SETUP],
[SYSTEM SETUP] or
[HDMI SETUP], then press .
3 Press / repeatedly to select
the item you want, then press
.
4 Press / repeatedly to select
the setting you want, then press
.
The setting is selected and setup is
completed.
To exit the menu
Press SETUP.
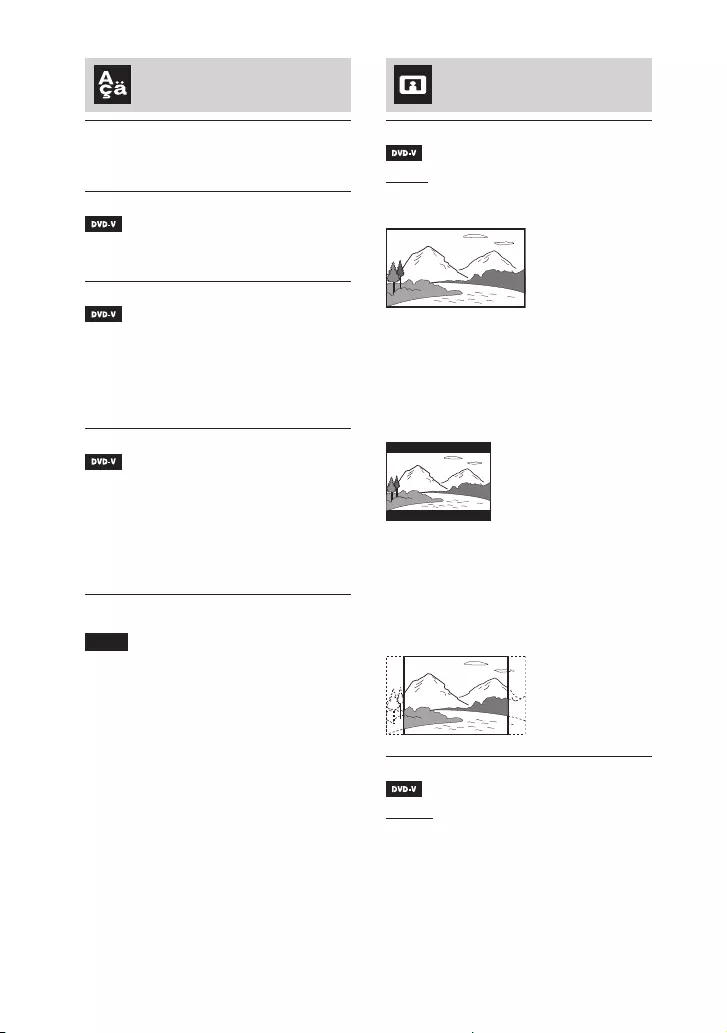
32GB
SHAKE-X70D/SHAKE-X30D/SHAKE-X10D.GB.4-691-054-12(1)
Setting the language
– [LANGUAGE SETUP]
[OSD]
Sets the language of the on-screen
display.
[MENU]
Sets the language for the DVD
menu.
[AUDIO]
Switches the language of the sound
track.
When you select [ORIGINAL], the
language given priority in the disc is
selected.
[SUBTITLE]
Switches the language of the
subtitle recorded in the DVD VIDEO.
When you select [AUDIO FOLLOW],
the language for the subtitles
changes according to the language
you selected for the sound track.
Note
If you select [OTHERS] in [MENU],
[AUDIO], and [SUBTITLE], enter a
language code from the “Language
code list” (page 72) using the numeric
buttons.
Setting the TV screen
– [VIDEO SETUP]
[TV TYPE]
[16:9]: Selects this when you
connect a wide-screen TV or a TV
with a wide-mode function.
[4:3 LETTER BOX]: Selects this
when you connect a 4:3 screen TV
that does not have a wide-mode
function. This setting displays a wide
picture with black bands on the top
and bottom.
[4:3 PAN SCAN]: Selects this
when you connect a 4:3 screen TV
that does not have a wide-mode
function. This setting displays a full-
height picture on the entire screen,
with trimmed sides.
[4:3 OUTPUT]
[FULL]: Selects this when you
connect a TV with a wide-mode
function. Displays a 4:3 screen
picture in 16:9 aspect ratio even on a
wide-screen TV.
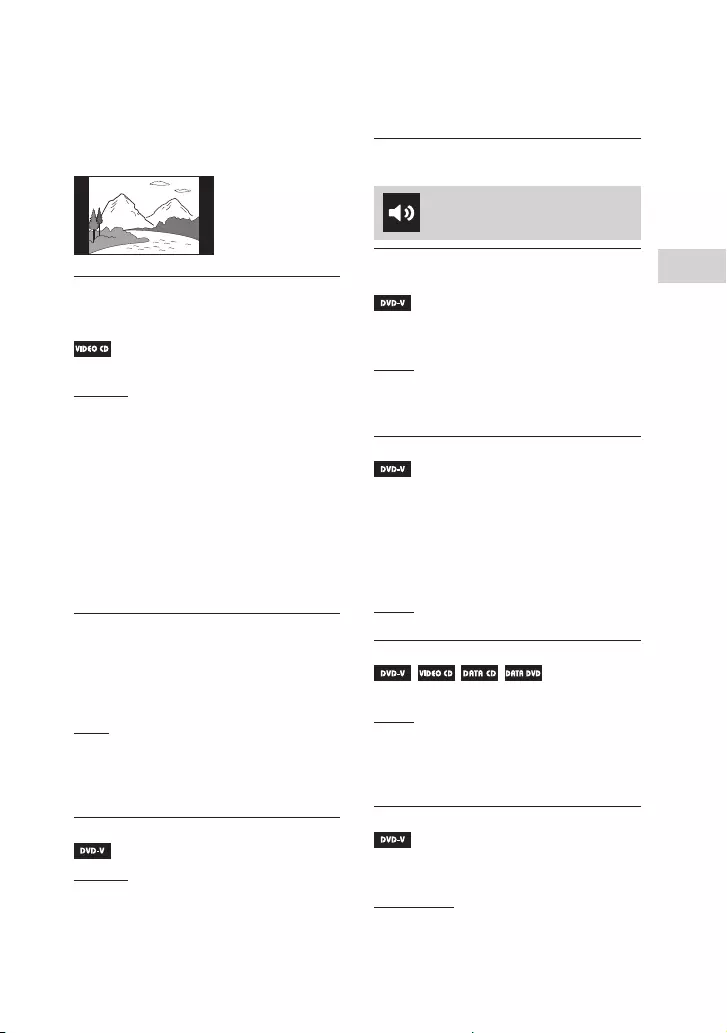
33GB
Disc/USB Playback
SHAKE-X70D/SHAKE-X30D/SHAKE-X10D.GB.4-691-054-12(1)
[NORMAL]: Changes the picture
size to fit the screen size with the
original picture aspect ratio. This
setting displays black bands on the
left and right side if you display a 4:3
screen picture.
[COLOR SYSTEM(VIDEO CD)]
(Except for Latin American,
European, and Russian models)
Sets the color system (PAL or NTSC).
[AUTO]: Outputs the video signal
according to the color system of the
disc. Select this setting if your TV
uses a DUAL system.
[PAL]: Changes the video signal of
an NTSC disc and output it in PAL
system.
[NTSC]: Changes the video signal
of a PAL disc and output it in NTSC
system.
For details, see “Changing the color
system” (page 23).
[BLACK LEVEL]
(Latin American model only)
Selects the black level (setup level)
for the video signals output from the
VIDEO OUT jack.
[ON]: Sets the black level of the
output signal to the standard level.
[OFF]: Lowers the standard black
level. Use this when the picture
becomes too white.
[PAUSE MODE]
[AUTO]: The picture, including
subjects that move dynamically, is
output with no jitter. Normally select
this setting.
[FRAME]: The picture, including
subjects that do not move
dynamically, is output in high
resolution.
Setting the audio options
– [AUDIO SETUP]
[AUDIO DRC]
(Dynamic Range Compression)
Useful for watching movies at low
volume late at night.
[OFF]: Off.
[STANDARD]: The dynamic range
is compressed as intended by the
recording engineer.
[TRACK SELECTION]
Gives priority to the sound track
which contains the highest number
of channels when you play back a
DVD VIDEO on which multiple audio
formats (PCM, MPEG audio, or Dolby
Digital) are recorded.
[OFF]: No priority given.
[AUTO]: Priority given.
[A/V SYNC]
(Video files only)
[OFF]: Does not adjust.
[ON]: Adjusts the delay between
picture and sound when the sound
does not synchronize with the
displayed picture.
[DOWNMIX]
Selects the audio output signal for
playing a multi-channel audio.
[NORMAL]: Outputs multi-channel
audio into a 2-channel stereo signal.

34GB
SHAKE-X70D/SHAKE-X30D/SHAKE-X10D.GB.4-691-054-12(1)
[DOLBY SURROUND]: Outputs
multi-channel audio into a
2-channel surround signal.
Note
This function only works for the HDMI
OUT (TV) jack.
Setting the system
– [SYSTEM SETUP]
[SCREEN SAVER]
The screen saver will help prevent
your display device from becoming
damaged (ghosting). Press +/– to
exit the screen saver.
[ON]: The screen saver image
appears if you do not operate the
system for about 15 minutes.
[OFF]: Turns off the function. The
screen saver image does not appear.
[BACKGROUND]
Selects the background color or
picture to be displayed on the TV
screen.
[JACKET PICTURE]: The jacket
picture (still picture) recorded on the
disc appears in the background.
[GRAPHICS]: A preset picture
stored in the system appears in the
background.
[BLUE]: The background color is
blue.
[BLACK]: The background color is
black.
[PARENTAL CONTROL]
Sets the playback restrictions. For
details, see “Restricting playback
of the disc (Parental Control)”
(page29).
[MULTI-DISC RESUME]
[ON]: Stores the resume playback
point in the memory for up to
6discs.
[OFF]: Playback starts at the resume
playback point only for the current
disc in the system.
[RESET]
Returns the setup menu settings to
the default settings. For details, see
“Returning the setup menu settings
to the default” (page 65).
Setting the HDMI options
– [HDMI SETUP]
[HDMI RESOLUTION]
Selects the TV output resolution
when the TV is connected via HDMI
cable.
[AUTO(1920×1080p)]: Outputs
video signals according to the
resolution of the TV.
[1920×1080i]/[1280×720p]/
[720×480p]*1/[720×480/576p]*2:
Outputs video signals according to
the selected resolution setting.
*1 For Latin American models only.
*2 For other models.
[YCBCR/RGB(HDMI)]
[YCBCR]: Outputs YCBCR video
signals.
[RGB]: Outputs RGB video signals.
[AUDIO(HDMI)]
[AUTO]: Outputs audio signals in
original format from HDMI OUT (TV)
jack.
[PCM]: Outputs 2-channel Linear
PCM signals from HDMI OUT (TV)
jack.
35GB
USB Transfer
SHAKE-X70D/SHAKE-X30D/SHAKE-X10D.GB.4-691-054-12(1)
[CONTROL FOR HDMI]
[ON]: The Control for HDMI function
is enabled. You can operate
mutually between system and TV
connected with an HDMI cable.
[OFF]: Off.
[AUDIO RETURN CHANNEL]
Set this function when the system
is connected to a TV’s HDMI IN jack
that is compatible with Audio Return
Channel. This function is available
when you set [CONTROL FOR HDMI]
to [ON].
[ON]: You can listen to TV sound
from the speakers of the system.
[OFF]: Off.
[STANDBY LINKED TO TV]
This function is available when you
set [CONTROL FOR HDMI] to [ON].
[AUTO]: When you turn off the TV,
the system turns off automatically in
the following conditions:
•—while playing video in DVD/CD or
USB function
•—when the audio playback is
stopped in DVD/CD or USB
function
•—when TV function is selected
[ON]: The system turns off
automatically when you turn off the
TV regardless of the function.
[OFF]: The system does not turn off
when you turn off the TV.
USB Transfer
Before using the USB
device
For compatible USB devices, see
“Websites for compatible devices”
(page 11).
(You can use your Apple devices
with this system via BLUETOOTH
connection only.)
Transferring music
You can transfer music from a
disc (AUDIO CD or MP3 disc only)
to a USB device connected to the
(USB) port.
The audio format of files transferred
by this system is MP3.
Note
••Do not remove the USB device during
transfer or erase operations. Doing so
may corrupt the data on the USB device
or damage the USB device itself.
••MP3 files are transferred with the same
bit rate as the original files.
••When transferring from AUDIO CD,
you may select the bit rate before
transferring.
••USB transfer and erase operations are
prohibited when the disc tray is opened.
Note on copyright-protected content
The transferred music is limited to private
use only. Use of the music beyond this
limit requires permission of the copyright
holders.
To select the bit rate
You can select a higher bit rate to
transfer music with better quality.
1 Press OPTIONS.
36GB
SHAKE-X70D/SHAKE-X30D/SHAKE-X10D.GB.4-691-054-12(1)
2 Press / repeatedly to select
“BIT RATE”, then press .
3 Press / repeatedly to select
the bit rate you want, then press
.
••“128 KBPS”: encoded MP3 files
have smaller file size and lower
audio quality.
••“256 KBPS”: encoded MP3 files
have bigger file size but higher
audio quality.
To exit the options menu, press
OPTIONS.
Transferring music from a disc
You can transfer music to a USB
device connected to (USB) port
as follows:
••Synchronized Transfer: Transfer
all tracks or MP3 files from a disc
to USB.
••REC1 Transfer: Transfer a single
track or MP3 file during playback.
Use the buttons on the unit to
perform this operation.
1 Connect a transferable USB
device to the (USB) port.
Note
You can use a USB adaptor (not
supplied) to connect the USB device
to the unit if the USB device cannot be
plugged into the (USB) port.
2 Press FUNCTION repeatedly to
select “DVD/CD”, then load a
disc.
3 Prepare the sound source.
Synchronized Transfer:
If the system starts playback
automatically, press twice to stop
the playback fully.
When playback is stopped, press
PLAY MODE on the remote control
repeatedly to select the play mode
you want.
Note
If you start transferring in Shuffle Play
or Repeat Play, the selected play mode
changes to Normal Play automatically.
REC1 Transfer:
Select the track or MP3 file you want
to transfer, then start playback.
4 Press REC TO USB.
“PUSH ENTER” appears on the
display.
5 Press ENTER.
The transfer starts, then “DO NOT
REMOVE” appears on the display.
Do not remove the USB device until
the transfer is complete.
When the transfer is complete, the
system performs as follows:
Synchronized Transfer:
The disc stops automatically.
REC1 Transfer:
The disc continues to play the next
track or file.
To stop transfer
Press .
Notes on transfer
••You cannot transfer MP3 files on a UDF
(Universal Disk Format) formatted disc
to the USB device.
••While transferring, no sound is output.
••CD-TEXT information is not transferred
to the created MP3 files.

37GB
USB Transfer
SHAKE-X70D/SHAKE-X30D/SHAKE-X10D.GB.4-691-054-12(1)
••The transfer stops automatically if:
— the USB device runs out of space
during transfer.
— the number of audio files or folders
on the USB device reaches the limit
that the system can recognize.
••If a folder or file that you are trying
to transfer already exists on the
USB device with the same name, a
sequential number is added after the
name without overwriting the original
folder or file.
••You cannot perform the following
operations during transfer:
— Eject the disc.
— Select another track or file.
— Pause playback or find a point in the
track or file.
— Change the function.
••When transferring music to a
WALKMAN® using “Media Manager for
WALKMAN”, be sure to transfer in MP3
format.
••When connecting a WALKMAN® to
the system, be sure to connect after
the display “Creating Library” or
“Creating Database” on the WALKMAN®
has disappeared.
Folder and file generation
rules
Maximum number of MP3 files
that can be generated
••298 folders
••650 files in a folder
••650 files in REC1-CD or REC1-MP3
folder.
These numbers may vary depending
on the file or folder configuration.
When transferring to a USB device,
a “MUSIC” folder is created directly
below “ROOT”. Folders and files are
generated within this “MUSIC” folder
according to the transfer method
and source as follows:
Synchronized Transfer
When transferring CD-DA tracks
from an AUDIO CD
Folder name: “CDDA0001”*
File name: “TRACK001”*
When transferring MP3 files
from a disc
Folder name: Same as the source
File name: Same as the source
REC1 Transfer
When transferring a CD-DA track
from an AUDIO CD
Folder name: “REC1-CD”
File name: “TRACK001”*
When transferring an MP3 file
from a disc
Folder name: “REC1-MP3”
File name: Same as the source
* Folder and file numbers are assigned
serially thereafter.
Erasing audio files or folders
on the USB device
1 Press FUNCTION +/– repeatedly
to select “USB”.
2 Press MEDIA MODE repeatedly
to select [MUSIC].
3 When playback is stopped,
press OPTIONS.
4 Press / repeatedly to select
“ERASE”, then press .
The folder list is displayed on the TV
screen.
38GB
SHAKE-X70D/SHAKE-X30D/SHAKE-X10D.GB.4-691-054-12(1)
5 Press / repeatedly to select a
folder, then press .
The file list is displayed on the TV
screen.
6 Press / repeatedly to select
an audio file you want to erase,
then press .
If you want to erase all the audio
files in the folder, select
[ALL TRACKS] on the list.
“FLDR ERASE” or “TRK ERASE” and
“PUSH ENTER” appear on the
display.
To cancel erase operations, press .
7 Press .
“COMPLETE” appears on the display.
To exit the options menu, press
OPTIONS.
Note
••You can erase the supported audio file,
MP4 format file, and 3GP format file
only.
••You cannot erase audio files or folders
when Shuffle Play has been selected.
Set the play mode to Normal Play
before erasing.
••Erase operation is prohibited when the
disc tray is opened.
Tuner
Listening to the radio
1 Press FUNCTION +/– repeatedly
to select “TUNER FM”.
Alternatively, press FUNCTION on
the unit repeatedly.
2 Tune to a station.
For automatic scanning:
Hold down TUNING+/– until the
frequency begins to change on the
display.
Scanning stops automatically when
a station is tuned in. “STEREO” (for
FM stereo programs only) lights up
on the display.
If scanning does not stop, press
to stop scanning. Then, perform
manual tuning (below).
For manual tuning:
Press TUNING+/– repeatedly to tune
to the station you want.
Note
When you tune to an FM station that
provides RDS services, information such
as the service name or station name is
provided by broadcasts. You can check
the RDS information by pressing DISPLAY
repeatedly.
Hint
To reduce static noise on a weak FM
stereo station, press FM MODE repeatedly
until “MONO” lights up on the display. You
will lose the stereo effect, but reception
will improve.

39GB
Tuner / BLUETOOTH
SHAKE-X70D/SHAKE-X30D/SHAKE-X10D.GB.4-691-054-12(1)
Presetting radio stations
You can store up to 20 FM stations
as your favorite stations.
1 Tune to the station you want.
2 Press DVD/TUNER MENU.
3 Press / repeatedly to select
the preset number you want,
then press .
“COMPLETE” appears on the display
and the station is stored.
If another station is already
assigned to the selected preset
number, that station is replaced by
the new one.
To listen to the preset station
Press PRESET+/– repeatedly to
select the preset number you want.
Alternatively, hold down SHIFT, press
the numeric buttons, then press .
BLUETOOTH
About the BLUETOOTH
wireless technology
BLUETOOTH wireless technology is
a short-range wireless technology
that enables wireless data
communication between digital
devices.
Supported BLUETOOTH version,
profiles and codecs
For details, see “BLUETOOTH
section” (page 70).
Compatible BLUETOOTH devices
For details, see “Websites for
compatible devices” (page 11).
About the BLUETOOTH
indicator
The BLUETOOTH indicator on the
unit lights up or flashes in blue to
show the BLUETOOTH status.
System status Indicator status
BLUETOOTH
standby
Flashes slowly
BLUETOOTH
pairing
Flashes quickly
BLUETOOTH
connection is
established
Lights up

40GB
SHAKE-X70D/SHAKE-X30D/SHAKE-X10D.GB.4-691-054-12(1)
Pairing this system
with a BLUETOOTH
device
Pairing is an operation where
BLUETOOTH devices register with
each other beforehand. Once a
pairing operation is performed, it
does not need to be performed
again.
If your device is an NFC-compatible
smartphone, the manual pairing
procedure is not necessary. (See
“One Touch BLUETOOTH Connection
by NFC” (page 42).)
1 Place the BLUETOOTH device
within 1meter from the unit.
2 Press BLUETOOTH on the unit to
select the BLUETOOTH function.
“BLUETOOTH” appears on the
display.
Hint
••When there is no pairing information
on the system (for example, when
you use the BLUETOOTH function
for the first time after purchase),
“PAIRING” flashes on the display and
the system enters the pairing mode.
Proceed to step 4.
••If the system is connected to
a BLUETOOTH device, press
BLUETOOTH on the unit to
disconnect the BLUETOOTH device.
3 Hold down PAIRING on the
unit for 2seconds or more.
“PAIRING” flashes on the display.
4 Perform the pairing procedure
on the BLUETOOTH device.
For details, refer to the operating
instructions of your BLUETOOTH
device.
5 Select the system’s name (for
example, “SHAKE-X70D”) on the
display of the BLUETOOTH
device.
Perform this step within 5 minutes,
otherwise pairing will be canceled.
In this case, repeat from step 3.
Note
If passkey is required on the
BLUETOOTH device, enter “0000”.
“Passkey” may be called “Passcode”,
“PIN code”, “PIN number”, or
“Password”.
6 Establish connection with the
BLUETOOTH device.
When pairing is completed and the
BLUETOOTH connection is
established, BLUETOOTH device
name appears on the display.
Depending on the BLUETOOTH
device, connection may start
automatically after pairing is
completed.
You can check the BLUETOOTH
device address by pressing DISPLAY
repeatedly.
Note
••You can pair up to 9 BLUETOOTH
devices. If the 10th BLUETOOTH device
is paired, the oldest paired device will
be deleted.
••If you want to pair with another
BLUETOOTH device, repeat steps 1 to 6.
To cancel the pairing operation
Hold down PAIRING on the
unit for 2seconds or more until
“BLUETOOTH” appears on the
display.

41GB
BLUETOOTH
SHAKE-X70D/SHAKE-X30D/SHAKE-X10D.GB.4-691-054-12(1)
To erase pairing information
Use the buttons on the unit to
perform this operation.
1 Press BLUETOOTH to select
BLUETOOTH function.
“BLUETOOTH” appears on the
display.
If the system is connected to a
BLUETOOTH device, the BLUETOOTH
device name appears on the display.
Press BLUETOOTH to disconnect the
BLUETOOTH device.
2 Hold down ENTER and LIGHT
MODE for about 3 seconds.
“BT HISTORY CLEAR” appears on the
display and all the pairing
information is erased.
Listening to music on a
BLUETOOTH device
You can operate a BLUETOOTH
device by connecting the system
and the BLUETOOTH device using
AVRCP.
Check the following before playing
music:
•—The BLUETOOTH function of the
BLUETOOTH device is turned on.
•—Pairing has been completed
(page40).
Once the system and the
BLUETOOTH device are connected,
you can control playback by
pressing , , , / and
/.
1 Press BLUETOOTH on the unit to
select the BLUETOOTH function.
“BLUETOOTH” appears on the
display.
2 Establish connection with the
BLUETOOTH device.
Press BLUETOOTH on the unit to
connect to the last connected
BLUETOOTH device.
Perform the BLUETOOTH connection
from the BLUETOOTH device if the
device is not connected.
Once the connection is established,
the BLUETOOTH device name
appears on the display.
3 Press to start playback.
Depending on the BLUETOOTH
device,
— you may need to press twice.
— you may need to start playing an
audio source on the BLUETOOTH
device.
4 Adjust the volume.
Adjust the volume of the
BLUETOOTH device first. If the
volume level is still too low, adjust
the volume level on the system.
Note
••When the system is not connected to
any BLUETOOTH device, the system
will connect to the last connected
BLUETOOTH device automatically when
you press BLUETOOTH or on the
unit.
••If you try to connect another
BLUETOOTH device to the system, the
current connected BLUETOOTH device
will be disconnected.
To terminate the BLUETOOTH
connection
Press BLUETOOTH on the unit.
“BLUETOOTH” appears on the
display.
Depending on the BLUETOOTH
device, the BLUETOOTH connection
may be terminated automatically
when you stop playback.
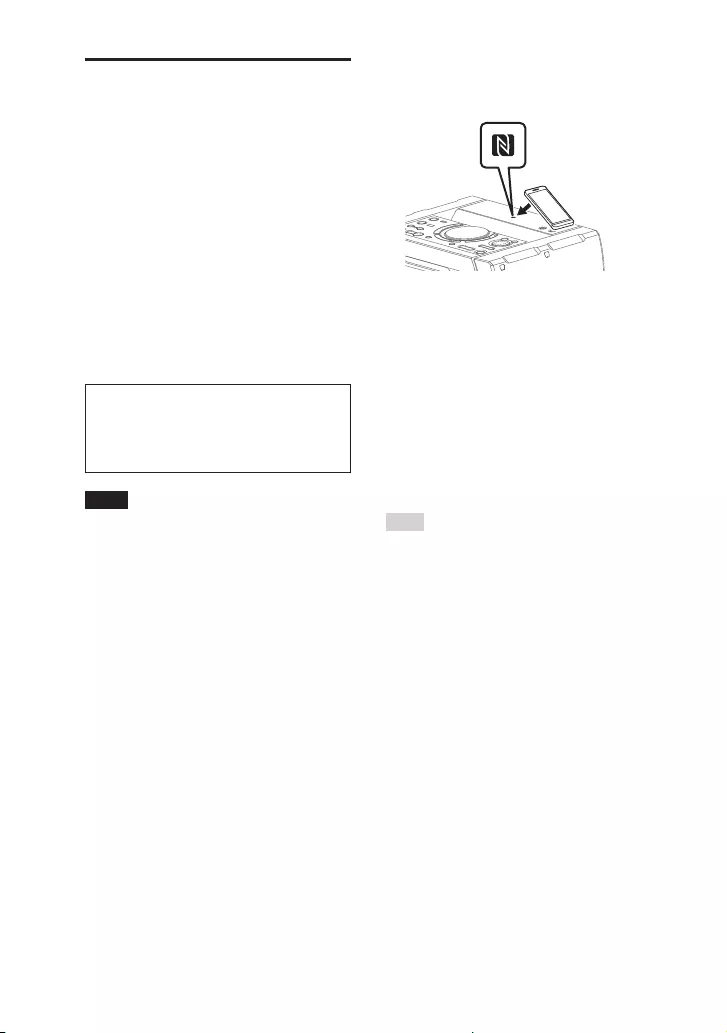
42GB
SHAKE-X70D/SHAKE-X30D/SHAKE-X10D.GB.4-691-054-12(1)
One Touch BLUETOOTH
Connection by NFC
NFC (Near Field Communication)
is a technology enabling short—
range wireless communication
between various devices, such as
smartphones and IC tags.
When you touch the system with an
NFC-compatible smartphone, the
system automatically:
•—turns on in the BLUETOOTH
function.
•—completes the pairing and
BLUETOOTH connection.
Compatible smartphones
Smartphones with a built-in NFC
function (OS: Android 2.3.3 or
later, excluding Android 3.x)
Note
••The system can only recognizes and
connects to one NFC-compatible
smartphone at a time. If you try to
connect another NFC-compatible
smartphone to the system, the currently
connected NFC-compatible smartphone
will be disconnected.
••Depending on your NFC-compatible
smartphone, you may need to perform
the following steps on your NFC—
compatible smartphone in advance.
— Turn on the NFC function. For details,
refer to the operating instructions of
the NFC-compatible smartphone.
— If your NFC-compatible smartphone
has an OS version that is older than
Android 4.1.x, download and start
the “NFC Easy Connect” application.
“NFC Easy Connect” is a free
application for Android smartphones
that can be obtained from Google
Play. (The application may not be
available in some countries/regions.)
1 Touch the smartphone to the
N-Mark on the unit until the
smartphone vibrates.
Complete the connection by
following the instructions displayed
on the smartphone.
When the BLUETOOTH connection is
established, the BLUETOOTH device
name appears on the display.
2 Start playback of an audio
source on the smartphone.
For details, refer to the operating
instructions of your BLUETOOTH
device.
Hint
If pairing and the BLUETOOTH connection
fail, do the following.
— Remove the case from the smartphone
if using a commercially available
smartphone case.
— Touch the smartphone to the N-Mark
on the unit again.
— Relaunch the “NFC Easy Connect”
application.
To terminate the BLUETOOTH
connection
Touch the smartphone to the
N-Mark on the unit again.

43GB
BLUETOOTH
SHAKE-X70D/SHAKE-X30D/SHAKE-X10D.GB.4-691-054-12(1)
Setting the BLUETOOTH
audio codecs
You can enable AAC, LDAC or SBC
codec reception from BLUETOOTH
device. AAC/LDAC can be selected
only when the BLUETOOTH device
supports AAC/LDAC.
1 Press OPTIONS.
2 Press / repeatedly to select
“BT CODEC”, then press .
3 Press / repeatedly to select
the setting, then press .
••“AUTO”: Enable reception in AAC
or LDAC codec format.
••“SBC”: Receive in SBC codec
format.
To exit the options menu, press
OPTIONS.
Note
••You can enjoy high quality sound if AAC
or LDAC is selected. If you cannot listen
to AAC or LDAC sound from your device
or the sound is interrupted, select “SBC”.
••If you change this setting while the
system is connected to a BLUETOOTH
device, the BLUETOOTH device will
be disconnected. To connect to the
BLUETOOTH device, perform the
BLUETOOTH connection again.
Hint
LDAC is an audio coding technology
developed by Sony that enables the
transmission of High-Resolution (Hi-Res)
Audio content, even over a BLUETOOTH
connection. Unlike other BLUETOOTH
compatible coding technologies
such as SBC, it operates without any
down-conversion of the Hi-Res Audio
content*1, and allows approximately
three times more data*2 than those
other technologies to be transmitted
over a BLUETOOTH wireless network
with unprecedented sound quality, by
means of efficient coding and optimized
packetization.
*1 Excluding DSD format contents.
*2 In comparison with SBC (Subband
Coding) when the bitrate of 990 kbps
(96/48 kHz) or 909 kbps (88.2/44.1 kHz)
is selected.
Setting the BLUETOOTH
standby mode
The BLUETOOTH standby mode
enables the system to turn on
automatically when you establish
a BLUETOOTH connection from a
BLUETOOTH device.
1 Press OPTIONS.
2 Press / repeatedly to select
“BT STBY”, then press .
3 Press / repeatedly to select
the setting, then press .
••“ON”: The system turns on
automatically even when the
system is in standby mode.
••“OFF”: Turns off this function.
To exit the options menu, press
OPTIONS.
44GB
SHAKE-X70D/SHAKE-X30D/SHAKE-X10D.GB.4-691-054-12(1)
Turning on or off the
BLUETOOTH signal
You can connect to the system
from a paired BLUETOOTH device
in all functions when the system’s
BLUETOOTH signal is set to on. The
BLUETOOTH signal is turned on by
default.
Hold down ENTER and on the
unit for about 3 seconds.
“BT ON” or “BT OFF” appears on the
display.
Note
••You cannot perform the following
operations when BLUETOOTH signal is
set to off:
— Pair and/or connect with BLUETOOTH
device
— Erase the pairing information
— Use “SongPal”
— Change the BLUETOOTH audio
codecs
••If you touch the N-Mark on the unit with
an NFC-compatible smartphone or set
the BLUETOOTH standby mode to on,
the BLUETOOTH signal will be set to on
automatically.
Controlling the
system using a
smartphone or
tablet (SongPal)
“SongPal” is a dedicated app for
operating “SongPal”-compatible
audio devices manufactured by
Sony using a smartphone or tablet.
Search for “SongPal” on Google Play
or App Store and download it using
your smartphone or tablet.
“SongPal” allows you to:
•—change the function of the system,
control the playback of the disc/
USB device and tune to an FM
station.
•—browse the music content of disc/
USB device.
•—view the information of disc/USB
such as playing time and title.
•—adjust the volume and change
sound setting.
1 Search for “SongPal” or scan the
two-dimensional code below.
2 Download “SongPal” app on
your device.
3 Connect the system and device
by BLUETOOTH connection
(page 39).
4 Launch “SongPal” and follow
the on-screen instructions.
Note
••We recommend you to use the latest
“SongPal” version.
••If the “SongPal” application does not
work properly, press BLUETOOTH on
the unit to terminate the BLUETOOTH
connection, then perform the
BLUETOOTH connection again so that
the BLUETOOTH connection functions
normally.
••Available operations via “SongPal” may
differ depending on the audio devices.
••For more details on “SongPal”, refer to
the following URL.
http://info.songpal.sony.net/help/
••Specifications and display design
of “SongPal” are subject to change
without notice.

45GB
Sound Adjustment
SHAKE-X70D/SHAKE-X30D/SHAKE-X10D.GB.4-691-054-12(1)
Getting frenzied
parties with the
“Fiestable” app
You can control the party features
of Sony’s Home Audio System with
intuitive and fancy user interface
with the “Fiestable” app. “Fiestable”
allows you to control features
such as DJ Effect, illumination and
Karaoke.
Even if “Fiestable” is installed, the
“Fiestable” icon is not displayed
on the smartphone or tablet home
screen. It is embedded in the
“SongPal” app as a plug-in.
1 Search and download “SongPal”
app on your device (page 44).
2 Search and download
“Fiestable” app from Google
Play or App Store using your
device.
3 Connect the system and device
by BLUETOOTH connection
(page 39).
4 Launch “SongPal” and touch the
“Fiestable” icon at the top left
corner.
Note
For more details on “SongPal”, refer to the
following URL.
http://info.songpal.sony.net/help/
Sound Adjustment
Adjusting the sound
To Do this
Reinforce bass
sound and create
more powerful
sound (MEGA
BASS)
Press MEGA BASS
on the unit to select
“BASS ON”. The
MEGA BASS
indicator lights up.
To cancel, press
MEGA BASS again
to select “BASS
OFF”.
Reproduce the
sound effect of a
party hall (Fiesta)
Press FIESTA on the
unit. “FIESTA” lights
up on the display.
To cancel, press
SOUND FIELD on the
unit repeatedly to
select “FLAT”.
Select a sound
field
Press MUSIC or
VIDEO repeatedly.
Alternatively, press
SOUND FIELD on the
unit repeatedly. To
cancel, press MUSIC
repeatedly to select
“FLAT”.
Selecting the Virtual
Football mode
You can experience the feeling of
being in the stadium when watching
a football match broadcast.
Note that you can only select Virtual
Football mode during AUDIO IN and
TV functions.

46GB
SHAKE-X70D/SHAKE-X30D/SHAKE-X10D.GB.4-691-054-12(1)
Press FOOTBALL repeatedly while
watching a football match
broadcast.
••“ON NARRATION”: You can enjoy an
immersive feeling of being in a
football stadium through enhanced
stadium cheers.
••“OFF NARRATION”: You can enjoy a
more immersive feeling of being in a
football stadium by minimizing the
volume level of narration in addition
to the enhancement of cheers.
To cancel the Virtual Football
mode
Press MUSIC repeatedly to select
“FLAT”.
Note
••We recommend that you select the
Virtual Football mode when watching a
football match broadcast.
••If you hear unnatural sounds in the
content when “OFF NARRATION”
is selected, “ON NARRATION” is
recommended.
••This feature does not support monaural
sound.
Creating your own
sound effect
You can raise or lower the levels
of specific frequency bands, then
store the setting in the memory as
“CUSTOM EQ”.
1 Press OPTIONS.
2 Press / repeatedly to select
“CUSTOM EQ”, then press .
3 Press / repeatedly to adjust
the equalizer level, then press
.
4 Repeat step 3 to adjust the level
of other frequency bands and
surround effect.
To exit the options menu, press
OPTIONS.
To select the custom equalizer
setting
Press MUSIC repeatedly to select
“CUSTOM EQ”.
Creating a party
atmosphere (DJ Effect)
Use the buttons on the unit to
perform this operation.
1 Press the following button to
select the effect type.
••FLANGER: Creates a deep flanging
effect that is similar to the roar of
a jet plane.
••ISOLATOR: Isolates a specific
frequency band by adjusting the
other frequency bands. For
example, when you want to focus
on vocals.
••SAMPLER: Provides a series of
special sound effects.
2 Change the sound effect.
For FLANGER and ISOLATOR:
Turn the VOLUME/DJ CONTROL
knob to adjust the effect level.
For SAMPLER:
Press SAMPLER repeatedly to select
the SAMPLER mode you want, then
press S1, S2, S3 or S4 to output the
SAMPLER sound effect.
To output other SAMPLER sound
effect continuously, turn the
VOLUME/DJ CONTROL knob.

47GB
Other Operations
SHAKE-X70D/SHAKE-X30D/SHAKE-X10D.GB.4-691-054-12(1)
To turn off the effect
••Press DJ OFF.
••Press the selected effect button
again (for FLANGER and ISOLATOR
only).
Note
••The DJ Effect is automatically turned off
when you:
— turn off the system.
— change the function.
— activate or deactivate the PARTY
CHAIN function.
— change sound effect.
— use the Vocal Fader.
— change the key (Key Control).
••If you activate the DJ Effect during
transferring, the sound effect will not be
transferred onto the USB device.
••You cannot use VOLUME/DJ CONTROL
knob on the unit to adjust the volume
when the DJ Effect is activated.
Press +/– on the remote control to
adjust the volume.
Other Operations
Using the Control for
HDMI function
Connecting a TV compatible with
the Control for HDMI function* by
HDMI cable (High Speed HDMI Cable
with Ethernet, not supplied) enables
you to easily operate the device by a
TV remote control.
The following functions can be used
with the Control for HDMI function.
••System Power Off function
••System Audio Control function
••Audio Return Channel
••One-Touch Play function
••Remote Easy Control
••Language Follow
* Control for HDMI is a standard used
by CEC (Consumer Electronics Control)
for allowing HDMI (High-Definition
Multimedia Interface) devices to control
each other.
Note
These functions may work with devices
other than those manufactured by Sony,
but operation is not guaranteed.
Preparing to use the Control for
HDMI function
Press SETUP, then set [HDMI
SETUP]– [CONTROL FOR HDMI] on
the system to [ON] (page35). The
default setting is [ON].
Enable the Control for HDMI function
settings for the TV connected to the
system.

48GB
SHAKE-X70D/SHAKE-X30D/SHAKE-X10D.GB.4-691-054-12(1)
Hint
If you enable the Control for HDMI
(“BRAVIA” sync) function when using a
TV manufactured by Sony, the Control
for HDMI function of the system is also
enabled automatically. When settings are
completed, “COMPLETE” appears on the
display.
System Power Off function
When you turn off the TV, the system
will turn off automatically.
Press SETUP, then set [HDMI
SETUP] – [STANDBY LINKED TO TV]
on the system to [ON] or [AUTO]
(page35). The default setting is
[AUTO].
Note
The connected device may not turn off
depending on the status of the device.
System Audio Control function
If you turn on the system while you
are watching the TV, the TV sound
will be output from the speakers
of the system. The volume of the
system can be adjusted using the
TV’s remote control.
If the TV sound was output from the
speakers of the system the previous
time you watched the TV, the system
will be turned on automatically
when you turn on the TV again.
Operations can also be made by the
TV’s menu. For details, refer to the
operating instructions of your TV.
Note
••The system’s volume level is displayed
on the TV screen depending on the TV.
It may differ from the volume level on
the display.
••Depending on the settings of the TV,
the System Audio Control function may
not be available. For details, refer to the
operating instructions of your TV.
Audio Return Channel
If the system is connected to a TV’s
HDMI IN jack compatible with Audio
Return Channel, you can listen to
TV sound from the speakers of the
system without connecting an audio
cable (not supplied).
On the system, press SETUP, then
set [HDMI SETUP] – [AUDIO RETURN
CHANNEL] to [ON] (page35). The
default setting is [ON].
Note
If the TV is not compatible with Audio
Return Channel, an audio cable (not
supplied) needs to be connected
(page22).
One-Touch Play function
When you press in DVD/CD or
USB function, the TV is turned on
automatically. The TV’s input is
switched to the HDMI input which
the system is connected.
Note
Depending on the TV, the beginning part
of content being played may not play
correctly.
Remote Easy Control
You can select the system by the
SYNC MENU button on the TV
remote control and operate the
system.
This function can be used if the TV
supports the link menu. For details,
refer to the operating instructions of
your TV.
Note
••In the TV’s link menu, the system is
recognized by the TV as “Player”.
••Some operations may not be available
with some TVs.

49GB
Other Operations
SHAKE-X70D/SHAKE-X30D/SHAKE-X10D.GB.4-691-054-12(1)
Language Follow
When you change the language
for the on-screen display of the
TV, the system’s on-screen display
language is also changed.

50GB
SHAKE-X70D/SHAKE-X30D/SHAKE-X10D.GB.4-691-054-12(1)
Using the Party Chain function
You can connect multiple audio systems in a chain to create a more
interesting party environment and to produce higher sound output.
An activated system in the chain will be the “Party Host” and share the music.
Other systems will become “Party Guests” and play the same music as that
being played by the “Party Host”.
Setting up the Party Chain
Set up a Party Chain by connecting all the systems using audio cables (not
supplied).
Before connecting cables, be sure to disconnect the AC power cord (mains
lead).
If all the systems are equipped with Party Chain function
Example: When connecting using this system as the first system
First system
Second
system
Last system
Continue the
connection until
the last system
••The last system must be connected to the first system.
••Any system can become a Party Host.

51GB
Other Operations
SHAKE-X70D/SHAKE-X30D/SHAKE-X10D.GB.4-691-054-12(1)
••You can change the Party Host to another system in the chain. For details,
see “To select a new Party Host (when all the systems are equipped with
Party Chain function)” (page 52).
If one of the systems is not equipped with Party Chain function
Example: When connecting using this system as the first system
Second
system
Last system*
Continue the
connection until
the last system
First system
* Connect the system which is not equipped with Party Chain function at the last system,
otherwise the chain will stop at that system. Be sure to select the Audio In function on
this last system.
••The last system is not connected to the first system.
••You must select the first system as Party Host so that all systems are playing
the same music when Party Chain function is activated.

52GB
SHAKE-X70D/SHAKE-X30D/SHAKE-X10D.GB.4-691-054-12(1)
Enjoying the Party Chain
1 Plug in the AC power cord
(mains lead) and turn on all the
systems.
2 Adjust the volume on each
system.
3 Activate the Party Chain
function on the system to be
used as the Party Host.
Example: When using this system
as the Party Host
Press FUNCTION repeatedly on the
unit to select the function you want
(except when the AUDIO IN function
is used in connection
(page50)). Start playing the
music, then press PARTY CHAIN on
the unit.
“PARTY CHAIN” appears on the
display. The Party Host starts the
Party Chain, and other systems
become Party Guests automatically.
All systems play the same music as
that being played by the Party Host.
Note
••Depending on the total unit of systems
you have connected, Party Guests may
take some time to start playing the
music.
••Changing the volume level and sound
effect on the Party Host will not affect
the output on the Party Guests.
••The Party Guest continues playing the
music source as Party Host even when
you change the function on Party Guest.
However, you can adjust the volume
and change the sound effect on Party
Guest.
••When you use the microphone or play
the guitar on Party Host, the sound will
not be output from Party Guests.
••When one of the systems in the chain
is performing USB transfer, wait for the
system to complete or stop the transfer
before you activate the Party Chain
function.
••For detailed operation on other
systems, refer to the operating
instructions of the systems.
To select a new Party Host (when
all the systems are equipped
with Party Chain function)
Repeat step 3 of “Enjoying the Party
Chain” on the system to be used
as a new Party Host. The current
Party Host becomes Party Guest
automatically. All systems play the
same music as that being played by
the new Party Host.
Note
••You can select another system as the
new Party Host only after the Party
Chain function of all the systems in the
Chain has been activated.
••If the selected system does not become
a new Party Host after a few seconds,
repeat step 3 under “Enjoying the Party
Chain”.
To deactivate the Party Chain
Press PARTY CHAIN on the Party
Host.
Note
If the Party Chain function is not
deactivated after a few seconds, press
PARTY CHAIN on the Party Host again.

53GB
Other Operations
SHAKE-X70D/SHAKE-X30D/SHAKE-X10D.GB.4-691-054-12(1)
Singing along: Karaoke
Preparing for Karaoke
1 Turn MIC/GUITAR LEVEL knob
on the unit anticlockwise to
reduce the microphone volume
level.
2 Press GUITAR on the unit
repeatedly until GUITAR
indicator lights off.
3 Connect an optional
microphone to MIC1 or MIC2/
GUITAR jack on the unit.
Connect another optional
microphone if you want to sing in
duet.
4 Start playing the music and
adjust the microphone volume.
Press MIC ECHO repeatedly to
adjust the echo effect.
5 Start singing along with the
music.
Note
••If howling occurs:
— move the microphone away from the
speakers.
— change the direction of the
microphone.
— turn MIC/GUITAR LEVEL knob on the
unit anticlockwise.
— press MIC ECHO repeatedly to adjust
the echo level.
••Microphone sound will not be
transferred to the USB device during
USB transfer.
••You cannot adjust the microphone
volume level using the VOLUME/DJ
CONTROL knob on the unit or +/–
button on the remote control. Turn MIC/
GUITAR LEVEL knob on the unit
clockwise or anticlockwise to adjust the
microphone volume level.
Using Vocal Fader
You can reduce the sound of the
vocal in stereo source.
Press VOCAL FADER repeatedly to
select “ON V FADER”.
To cancel Vocal Fader effect, press
VOCAL FADER repeatedly to select
“OFF”.
Changing the key (Key Control)
Press KEY CONTROL /•to suit
your vocal range.
Activating the Karaoke scoring
mode (Score Mode)
You only can use scoring function
when the microphone is connected.
Your score is calculated from a scale
of 0 to 99 by comparing your voice
with the music source.
1 Start playing the music.
2 Press SCORE before singing a
song.
3 After singing for more than a
minute, press SCORE again to
view your score.
54GB
SHAKE-X70D/SHAKE-X30D/SHAKE-X10D.GB.4-691-054-12(1)
Using the Voice
Guidance
You can hear English Voice Guidance
on the following situations via the
system.
•—When entering BLUETOOTH
pairing.
•—When a BLUETOOTH device is
connected.
•—When a BLUETOOTH device is
disconnected.
1 Press OPTIONS.
2 Press / repeatedly to select
“VOICE GUIDANCE”, then press
.
3 Press / repeatedly to select
“ON”, then press .
The Voice Guidance is activated.
To exit the options menu, press
OPTIONS.
Note
••The Voice Guidance and the SAMPLER
sound effect cannot be output at the
same time. If you select SAMPLER
sound effect while using the Voice
Guidance, the Voice Guidance will be
stopped automatically, and if you use
the Voice Guidance during SAMPLER
sound effect output, the SAMPLER
sound effect will stop automatically.
••The Voice Guidance volume level
change according to the system’s
volume level. However, in some cases,
the Voice Guidance volume level may
not change.
••In some cases, there may be a delay in
Voice Guidance output.
Enjoying sound from a
guitar
You can listen to the sound from the
guitar by connecting a guitar to the
MIC2/GUITAR jack on the unit.
You can also play the guitar and sing
along by connecting a microphone
to the MIC1 jack on the unit.
Use the buttons on the unit to
perform this operation.
1 Turn MIC/GUITAR LEVEL knob
anticlockwise to reduce the
guitar volume level.
2 Use an instrument cable (not
supplied) to connect a guitar
(not supplied) to MIC2/GUITAR
jack on the unit.
3 Press GUITAR repeatedly until
GUITAR indicator lights up.
4 Start playing the guitar and
adjust the guitar volume.
The guitar sound is output from the
system.
Note
••If the guitar sound is distorted, reduce
the guitar volume level on your guitar
until the distorted sound disappears. If
the guitar volume level is too low, turn
MIC/GUITAR LEVEL knob on the unit
clockwise to adjust the guitar volume.
••While playing the guitar, you can adjust
the echo effect by pressing MIC ECHO
repeatedly.
To turn off the guitar mode
Press GUITAR repeatedly until
GUITAR indicator lights off.
55GB
Other Operations
SHAKE-X70D/SHAKE-X30D/SHAKE-X10D.GB.4-691-054-12(1)
Enjoying music with the
Party Light and Speaker
Light
1 Press PARTY LIGHT repeatedly
to select “LED ON”.
2 Press LIGHT MODE repeatedly to
select the illumination mode
you want.
To turn off Party Light and
Speaker Light
Press PARTY LIGHT repeatedly to
select “LED OFF”.
Note
••Do not look directly at the light-emitting
part when the Party Light and Speaker
Light are turned on.
••If the illumination brightness is glaring,
switch on the room lights or turn off the
illumination.
••You can turn on or off the Party Light
and Speaker Light when demonstration
is turned on.
Using the Sleep Timer
The system turns off automatically
after the preset time.
Press SLEEP repeatedly to select
the time you want.
To cancel Sleep Timer, press SLEEP
repeatedly to select “OFF”.
Hint
To check the remaining time before the
system turns off, press SLEEP.
Using optional
equipment
1 Press – repeatedly until
“VOLUME MIN” appears on the
display.
2 Connect an optional equipment
(page 18).
3 Press FUNCTION +/– repeatedly
to select “AUDIO IN”.
4 Start playing the connected
equipment.
5 Press + repeatedly to adjust
the volume.
Note
The system may enter standby mode
automatically if the volume level of the
connected equipment is too low. Adjust
the volume level of the equipment.
To turn off automatic standby function,
see “Setting the automatic standby
function” (page 56).
Deactivating the
buttons on the unit
(Child Lock)
You can deactivate the buttons
(except ) on the unit to prevent
misoperation, such as child mischief.
Hold down on the unit for more
than 5 seconds.
“CHILD LOCK ON” appears on the
display.
You can only operate the system using
the buttons on the remote control.

56GB
SHAKE-X70D/SHAKE-X30D/SHAKE-X10D.GB.4-691-054-12(1)
To turn off the Child Lock function,
hold down on the unit for more
than 5seconds until “CHILD LOCK OFF”
appears on the display.
Note
••Child Lock function will be turned off
automatically when you disconnect the
AC power cord (mains lead).
••Child Lock function cannot be activated
when you open the disc tray.
Setting the automatic
standby function
The system enters standby mode
automatically in about 15 minutes
when there is no operation or audio
signal output.
By default, the automatic standby
function is turned on.
1 Press OPTIONS.
2 Press / repeatedly to select
“AUTO STBY”, then press .
3 Press / repeatedly to select
“ON” or “OFF”, then press .
To exit the options menu, press
OPTIONS.
Note
••“AUTO STBY” flashes on the display
about 2 minutes before entering
standby mode.
••The automatic standby function does
not work in the following cases:
— during tuner function.
— when the Sleep Timer is activated.
— when microphone or guitar is
connected.
Updating the software
The software of this system may be
updated in the future.
You can update your system’s pre-
installed software from the websites
below.
Follow the online instructions to
update the software.
For customers in Latin America:
<http://esupport.sony.com/LA>
For customers in Europe and
Russia:
<http://www.sony.eu/support>
For customers in other countries/
regions:
<http://www.sony-asia.com/
support>

57GB
Additional Information
SHAKE-X70D/SHAKE-X30D/SHAKE-X10D.GB.4-691-054-12(1)
Additional Information
Troubleshooting
Should you encounter a problem
with your system, find your problem
in the troubleshooting checklist
below and take the corrective
action.
If the problem persists, consult your
nearest Sony dealer.
Note that if the service personnel
changes some parts during repair,
these parts may be retained.
If “PROTECT XX” (X is a
number) appears on the
display
Immediately unplug the AC
power cord (mains lead), and
check the following items.
••Are you using only the supplied
speakers?
••Is anything blocking the
ventilation holes of the unit?
After you have checked and
found no problems, reconnect
the AC power cord (mains lead),
and turn on the system. If the
issue persists, contact your
nearest Sony dealer.
General
The power does not turn on.
••Check that the AC power cord
(mains lead) is connected securely.
The system has entered standby
mode.
••This is not a malfunction. The
system enters standby mode
automatically in about 15 minutes
when there is no operation or
audio signal output (page 56).
There is no sound.
••Adjust the volume.
••Check the speaker connections
(page 18).
••Check the connection of the
optional equipment, if any
(page18).
••Turn on the connected equipment.
••Unplug the AC power cord (mains
lead), then plug in the AC power
cord (mains lead) again and turn
on the system.
There is no picture/sound when
connected to the HDMI OUT (TV)
jack.
••Change the setting in [HDMI
SETUP] – [HDMI RESOLUTION]. The
problem may be solved.
••The equipment connected to
the HDMI OUT (TV) jack does
not conform to the audio signal
format. In this case, set [HDMI
SETUP] – [AUDIO(HDMI)] to [PCM]
(page 34).
••Try the following:
•—Turn the system off and on
again.
•—Turn the connected equipment
off and on again.
•—Disconnect then connect the
HDMI cable again.
There is no microphone sound.
••Adjust the microphone volume
level.
••Make sure the microphone is
connected to the MIC1 or MIC2/
GUITAR jack on the unit correctly.
••Make sure the microphone is
turned on.

58GB
SHAKE-X70D/SHAKE-X30D/SHAKE-X10D.GB.4-691-054-12(1)
No TV sound is heard from the
system. “CODE 01” and “SGNL ERR”
appear on the display.
••This system supports 2-channel
Linear PCM formats only. Check
the audio output setting on the
TV and change it to PCM output
mode if automatic mode is
selected.
••Check that the speaker output
setting on the TV is set to use
external speakers.
There is severe hum or noise.
••Move the system away from
sources of noise.
••Connect the system to a different
wall outlet.
••Install a noise filter (not supplied)
to the AC power cord (mains lead).
••Turn off surrounding electrical
equipment.
••The noise generated by the
cooling fans of the system may be
heard when the system is turned
on. This is not a malfunction.
••Move the unit away from the neon
signs or fluorescent light.
The remote control does not
function.
••Remove the obstacles between
the remote control and the unit.
••Move the remote control closer to
the unit.
••Point the remote control at the
unit’s sensor.
••Replace the batteries (R03/size
AAA).
••Move the unit away from the
fluorescent light.
There is acoustic feedback.
••Reduce the volume.
••Move the microphone and guitar
away from the system or change
the direction of the microphone.
The color irregularity on a TV
screen persists.
••Turn off the TV at once, then turn
it on after 15 to 30 minutes. If the
color irregularity still persists,
place the system farther away
from the TV.
“PLEASE CONNECT ALL SPK”
appears.
••Check that all speakers are
connected.
“CHILD LOCK” appears when you
press any button on the unit.
••Set the Child Lock function to off
(page 55).
A clicking sound is heard when
turning the power on.
••This is the operating sound and it
occurs when the power is turned
on or off, for example. This is not a
malfunction.
Speakers
Sound comes from only one
channel or the left and right
volume is unbalanced.
••Place the speakers as
symmetrically as possible.
••Check that the speakers are
connected securely and correctly.
••The source being played back is
monaural.
There is no sound from a specific
speaker.
••Check that the speaker is
connected securely and correctly.
Disc player
The disc tray does not open and
“LOCKED” appears on the display.
••Consult your nearest Sony dealer
or local authorized Sony service
facility.

59GB
Additional Information
SHAKE-X70D/SHAKE-X30D/SHAKE-X10D.GB.4-691-054-12(1)
The disc tray does not close.
••Load the disc correctly.
The disc does not eject.
••You cannot eject the disc during
Synchronized Transfer or REC1
Transfer. Press to cancel the
transfer, then press on the unit
to eject the disc.
••Consult your nearest Sony dealer.
Playback does not start.
••Wipe the disc clean (page 67).
••Reload the disc.
••Load the disc that this system can
play back (page 8).
••Remove the disc and wipe away
the moisture on the disc, then
leave the system turned on for
a few hours until the moisture
evaporates.
••The region code on the DVD VIDEO
does not match the system.
The sound skips.
••Wipe the disc clean (page 67).
••Reload the disc.
••Move the unit to a place with no
vibration.
••Move the speakers away from the
unit. When you listen to a track
with bass sounds at high volume,
the speaker vibration may cause
the sound to skip.
Playback does not start from the
first track.
••Set the play mode to Normal Play
(page 28).
••Resume Play has been selected.
Press twice. Then, press to
start playback.
You cannot perform some
functions such as Stop, Lock
Search, Slow-motion Play, Repeat
Play, or Shuffle Play.
••Depending on the disc, you may
not be able to do some of the
operations above. Refer to the
operating instructions supplied
with the disc.
The DATA CD/DATA DVD (MP3,
MPEG4, or Xvid) cannot be played
back.
••The data is not stored in the
supported format.
••Make sure you have selected
the correct Media Mode before
playback.
The folder name, track name, file
name and ID3 tag characters do
not appear properly.
••The ID3 tag is not Version 1 (1.0/1.1)
or Version 2 (2.2/2.3).
••The character codes that can be
displayed by this system are as
follows:
•—Upper cases (A to Z)
•—Numbers (0 to 9)
•—Symbols (< > * +, [ ] \ _)
Other characters appear as “_”.
The sound loses stereo effect
when you play back an AUDIO CD,
VIDEO CD, audio file, video file, or
DVD VIDEO.
••Turn off the Vocal Fader
(page53).
••Make sure the system is
connected properly.
••Check the speaker connections
(page 18).

60GB
SHAKE-X70D/SHAKE-X30D/SHAKE-X10D.GB.4-691-054-12(1)
USB device
Transferring results in an error.
••You are using an unsupported USB
device. Check the information on
the website about compatible USB
devices (page 11).
••The USB device is not formatted
correctly. Refer to the operating
instructions of the USB device on
how to format.
••Turn off the system and remove
the USB device. If the USB device
has a power switch, turn the USB
device off and on again after
removing it from the system. Then,
perform the transfer again.
••If the transfer and erase
operations are repeated multiple
times, the file structure within the
USB device becomes fragmented.
Refer to the operating instructions
of the USB device on how to deal
with this problem.
••The USB device was disconnected
or the power was turned off
during transfer. Delete the
partially-transferred file, and
perform the transfer again. If this
does not fix the problem, the USB
device may be broken. Refer to the
operating instructions of the USB
device on how to deal with this
problem.
Audio files or folders on the USB
device cannot be erased.
••Check if the USB device is write-
protected.
••The USB device was disconnected
or the power was turned off
during the erase operation. Delete
the partially-erased file. If this
does not fix the problem, the USB
device may be broken. Refer to the
operating instructions of the USB
device on how to deal with this
problem.
There is no sound.
••The USB device is not connected
correctly. Turn off the system and
reconnect the USB device, then
turn on the system and check if
“USB” appears on the display.
There is noise, skipping, or
distorted sound.
••You are using an unsupported USB
device. Check the information on
the website about compatible USB
devices (page 11).
••Turn off the system and reconnect
the USB device, then turn on the
system.
••The music data itself contains
noise, or the sound is distorted.
Noise may have entered during
the transfer process. Delete the
file, and try transfer again.
••The bit rate used in encoding an
audio file was low. Send an audio
file with higher bit rate to the USB
device.
“READING” is displayed for an
extended time, or it takes a long
time before playback starts.
••The reading process can take a
long time in the following cases.
•—There are many folders or files
on the USB device (page 10).
•—The file structure is extremely
complex.
•—The memory capacity is
excessive.

61GB
Additional Information
SHAKE-X70D/SHAKE-X30D/SHAKE-X10D.GB.4-691-054-12(1)
•—The internal memory is
fragmented.
“NO FILE” appears on the display.
••The system has entered the
software update mode, and
all buttons (except ) are
deactivated. Press on the unit to
cancel the software update.
“OVER CURRENT” appears on the
display.
••A problem has been detected
with the level of electrical current
from the (USB) port. Turn off
the system and remove the USB
device from the port. Make sure
there is no problem with the USB
device. If this display pattern
persists, contact your nearest Sony
dealer.
Erroneous display.
••The data stored in the USB
device may have been corrupted,
perform the transfer again.
••The character codes that can be
displayed by this system are as
follows:
•—Upper cases (A to Z)
•—Numbers (0 to 9)
•—Symbols (< > * +, [ ] \ _)
Other characters appear as “_”.
The USB device is not recognized.
••Turn off the system and reconnect
the USB device, then turn on the
system.
••Check the information on the
website about compatible USB
devices (page 11).
••The USB device is not working
properly. Refer to the operating
instructions of the USB device on
how to deal with this problem.
Playback does not start.
••Turn off the system and reconnect
the USB device, then turn on the
system.
••Check the information on the
website about compatible USB
devices (page 11).
Playback does not start from the
first file.
••Set the play mode to Normal Play
(page 28).
Files cannot be played back.
••Make sure you have selected
the correct Media Mode before
playback.
••USB devices formatted with file
systems other than FAT16 or FAT32
are unsupported.*
••If you use a partitioned USB
device, only files on the first
partition can be played back.
* This system supports FAT16 and FAT32,
but some USB devices may not support
all of these FAT. For details, refer to the
operating instructions of each USB
device or contact the manufacturer.
Picture
There is no picture.
••Check that the system is
connected securely.
••If the video cable or HDMI cable
is damaged, replace it with a new
one.
••Make sure you connect the unit to
the HDMI input jack or the video
input jack of your TV (page21).
••Make sure you turn on the TV and
operate the TV correctly.
••Make sure you select the input
according to the connection on
the TV so that you can view the
pictures from the system.

62GB
SHAKE-X70D/SHAKE-X30D/SHAKE-X10D.GB.4-691-054-12(1)
••(Except for Latin American,
European, and Russian models)
Make sure you set the color
system correctly, according to your
TV’s color system.
Picture noise appears.
••Wipe the disc clean (page 67).
••If video signal from your system
has to go through your VCR to
your TV, the copy-protection
applied to some DVD VIDEO
programs could affect the picture
quality.
••(Except for Latin American,
European, and Russian models)
When you play back a VIDEOCD
recorded in a different color
system from the one you set to the
system, the picture image may be
distorted (page 23, 33).
••(Except for Latin American,
European, and Russian models)
Set the color system to match your
TV (page 23, 33).
The aspect ratio of the TV screen
cannot be changed.
••The aspect ratio is fixed on your
DVD VIDEO and video file.
••Depending on the TV, you may not
change the aspect ratio.
The language for the sound track
cannot be changed.
••Multilingual tracks are not
recorded on the DVD VIDEO being
played back.
••The DVD VIDEO prohibits changing
the language for the sound track.
The subtitles language cannot be
changed.
••Multilingual subtitles are not
recorded on the DVD VIDEO being
played back.
••The DVD VIDEO prohibits changing
the subtitles.
The subtitles cannot be turned off.
••The DVD VIDEO prohibits turning
off subtitles.
The camera angles cannot be
changed.
••Multi-angles are not recorded on
the DVD VIDEO being played back.
••The DVD VIDEO prohibits changing
the angles.
Tuner*
There is severe hum or noise, or
stations cannot be received.
••Connect the antenna properly.
••Change antenna location and
its orientation to obtain good
reception.
••Turn off nearby electrical
equipment.
* Radio may not be received depending
on the radio wave conditions or the
housing environment in your area.
BLUETOOTH device
Pairing cannot be performed.
••Move the BLUETOOTH device
closer to the system.
••Pairing may not be possible if
other BLUETOOTH devices are
present around the system.
In this case, turn off the other
BLUETOOTH devices.
••Make sure to enter the correct
passkey when selecting the
system’s name (this system) on
the BLUETOOTH device.
The BLUETOOTH device cannot
detect the system, or “BT OFF”
appears on the display.
••Set the BLUETOOTH signal to “BT
ON” (page 44).

63GB
Additional Information
SHAKE-X70D/SHAKE-X30D/SHAKE-X10D.GB.4-691-054-12(1)
Connection is not possible.
••The BLUETOOTH device you
attempted to connect does not
support the A2DP profile, and
cannot be connected with the
system.
••Enable the BLUETOOTH function of
the BLUETOOTH device.
••Establish a connection from the
BLUETOOTH device.
••The pairing registration
information has been erased.
Perform the pairing operation
again.
••Erase the pairing registration
information of the BLUETOOTH
device (page 41) and perform
the pairing operation again
(page40).
The sound skips or fluctuates, or
the connection is lost.
••The system and the BLUETOOTH
device are too far apart.
••If there are obstacles between
the system and your BLUETOOTH
device, remove or avoid the
obstacles.
••If there is equipment that
generates electromagnetic
radiation, such as a wireless LAN,
other BLUETOOTH device, or a
microwave oven nearby, move
them away.
The sound of your BLUETOOTH
device cannot be heard on this
system.
••Increase the volume on your
BLUETOOTH device first, then
adjust the volume using +/–.
There is severe hum, noise, or
distorted sound.
••If there are obstacles between
the system and your BLUETOOTH
device, remove or avoid the
obstacles.
••If there is equipment that
generates electromagnetic
radiation, such as a wireless LAN,
other BLUETOOTH device, or a
microwave oven nearby, move
them away.
••Turn down the volume of the
connected BLUETOOTH device.
Control for HDMI (“BRAVIA”
Sync)
The system does not turn on even
when the TV is turned on.
••Press SETUP, then set [HDMI
SETUP] – [CONTROL FOR HDMI]
to [ON] (page 35). The TV must
support the Control for HDMI
function (page 47). For details,
refer to the operating instructions
of your TV.
••Check the speaker settings of the
TV. The system power syncs with
the speaker settings of the TV.
For details, refer to the operating
instructions of your TV.
••If the sound was output from the
TV’s speakers the previous time,
the system does not turn on even
when the TV is turned on.
The system turns off when the TV
is turned off.
••Check the setting of [HDMI
SETUP] – [STANDBY LINKED TO
TV] (page 35). When [STANDBY
LINKED TO TV] is set to [ON], the
system turns off automatically
when you turn off the TV
regardless of the input.

64GB
SHAKE-X70D/SHAKE-X30D/SHAKE-X10D.GB.4-691-054-12(1)
The system does not turn off even
when the TV is turned off.
••Check the setting of [HDMI
SETUP] – [STANDBY LINKED TO TV]
(page 35).
To turn the system off
automatically regardless of the
input when you turn off the TV, set
[STANDBY LINKED TO TV] to [ON].
The TV must support the Control
for HDMI function (page 47).
For details, refer to the operating
instructions of your TV.
No TV sound is output from the
system.
••Check the type and connection of
the HDMI cable or audio cable that
is connected to the system and
the TV (page 21).
••If your TV is compatible with
Audio Return Channel, make
sure the system is connected to
an ARC-compatible HDMI IN jack
of the TV (page 21). If sound
is still not output or if sound is
interrupted, connect an audio
cable (not supplied) and press
SETUP, then set [HDMI SETUP]–
[AUDIO RETURN CHANNEL] to
[OFF] (page 35).
••If your TV is not compatible with
Audio Return Channel, TV sound
will not be output from the system
even if the system is connected to
the TV’s HDMI IN jack. To output TV
sound from the system, connect
an audio cable (not supplied)
(page 22).
••Change the function of the system
to “TV” (page 22).
••Increase the volume on the
system.
••Depending on the order in which
you connect the TV and the
system, the system may be muted
and “MUTING” lights up on the
display of the unit. If this happens,
turn on the TV first, then the
system.
••Set the speakers setting of the TV
(BRAVIA) to Audio System. Refer to
the operating instructions of your
TV on how to set the TV.
The sound is output from both the
system and the TV.
••Mute the sound of the system or
the TV.
••Change the speaker output on the
TV to TV speaker or Audio System.
The Control for HDMI function
does not work properly.
••Check the connection with the
system (page 17).
••Enable the Control for HDMI
function on the TV. For details,
refer to the operating instructions
of your TV.
••Wait a while, then try again. If you
unplug the system, it will take
a while before operations can
be made. Wait for 15 seconds or
longer, then try again.
••Make sure the TV connected to
the system support the Control for
HDMI function.
••The type and number of devices
that can be controlled by the
Control for HDMI function is
restricted by the HDMI CEC
standard as follows:
•—Recording devices (Blu-ray Disc
recorder, DVD recorder, etc.): up
to 3 devices
•—Playback devices (Blu-ray Disc
Player, DVD player, etc.): up to
3devices (this system uses one
of them)
65GB
Additional Information
SHAKE-X70D/SHAKE-X30D/SHAKE-X10D.GB.4-691-054-12(1)
•—Tuner-related devices: up to
4devices
•—Audio system (receiver/
headphone): up to 1 device
(used by this system)
Party Chain
Party Chain function cannot be
activated.
••Check the connections
(page50).
••Make sure the audio cables are
connected correctly.
“PARTY CHAIN” is flashing on the
display.
••You cannot select AUDIO IN
function if you make connection
(page 50) during Party Chain
function. Select other function
(page 52).
••Press PARTY CHAIN on the unit.
••Restart the system.
Party Chain function does not
work properly.
••Turn off the system. Then, turn it
back on again to activate the Party
Chain function.
Resetting the system
If the system still does not operate
properly, reset the system to factory
default settings.
Use the buttons on the unit to
perform this operation.
1 Unplug the AC power cord (mains
lead), then plug it back in.
2 Press to turn on the system.
3 Hold down DJ OFF and for
about 3 seconds.
“RESET” appears on the display.
After the reset completes, the
system automatically reboots. Press
to turn on the system.
All user-configured settings, such as
preset radio stations are reset to
factory default setting (except for
some setup menu settings).
To reset all setup menu settings, see
“Returning the setup menu settings
to the default” (page 65).
Returning the setup menu
settings to the default
You can return the setup
menu settings (except for
[PARENTAL CONTROL] settings) to
the default settings.
1 Press SETUP.
The setup menu appears on the TV
screen.
2 Press / repeatedly to select
[SYSTEM SETUP], then press .
3 Press / repeatedly to select
[RESET], then press .
4 Press / repeatedly to select
[YES], then press .
It takes a few seconds to complete.
Do not press while resetting the
system.

66GB
SHAKE-X70D/SHAKE-X30D/SHAKE-X10D.GB.4-691-054-12(1)
Self-diagnosis Function
When letters/numbers appear
on the TV screen or the display
When the self-diagnosis function
is activated to prevent the system
from malfunctioning, a service
number appears. The service
number consists of an alphabet
and numerals (e.g. C 13 50). See the
following table for the cause and
corrective action.
First 3
characters of
the service
number
Cause and corrective
action
C 13 This disc is dirty.
••Clean the disc with a
soft cloth (page 67).
C 31 The disc is not inserted
correctly.
••Turn off the system,
then turn it back on
again. Then re-insert the
disc correctly.
E XX
(XX is a
number)
To prevent a
malfunction, the system
has performed the
self-diagnosis function.
••Contact your nearest
Sony dealer or local
authorized Sony service
facility and give the
5-character service
number.
Example: E 61 10
Messages
One of the following messages may
appear or flash on the display during
operation.
CANNOT PLAY
••A disc that cannot be played back
was inserted.
••A DVD VIDEO with unsupported
region code was inserted.
CODE 01/SGNL ERR
An unsupported audio signal is
input from the connected TV’s HDMI
IN (ARC) jack (page 21).
DATA ERROR
••The file is created in unsupported
format.
••The file extensions does not match
the file format.
DEVICE ERROR
The USB device could not be
recognized or an unknown device is
connected.
DEVICE FULL
The memory of the USB device is
full.
ERASE ERROR
Erase of audio files or folders on the
USB device failed.
FATAL ERROR
The USB device was removed during
transfer or erase operation, and may
have been damaged.
FOLDER FULL
You cannot transfer onto the USB
device because the number of
folders has reached its maximum.
GUEST
The system has become a Party
Guest as the Party Chain function
has been activated by a Party Host.
HOST
The system activated the Party
Chain function and has become a
Party Host.
NO DEVICE
No USB device is connected or
unsupported device is connected.

67GB
Additional Information
SHAKE-X70D/SHAKE-X30D/SHAKE-X10D.GB.4-691-054-12(1)
NO DISC
There is no disc in the unit.
NO MUSIC
No supported audio files exist in the
playback source.
NO VIDEO
No supported video files exist in the
playback source.
NOT IN USE
You tried to perform a specific
operation under conditions where
that operation is prohibited.
NOT SUPPORTED
An unsupported USB device is
connected, or the USB device is
connected through a USB hub.
OVER CURRENT
An over current from the (USB)
port was detected.
PROTECTED
The USB device is write-protected.
PUSH STOP
You tried to perform an operation
that can be performed only when
the playback is stopped.
READING
The system is reading information
of the disc or USB device. Some
operations are not available.
REC ERROR
The transfer did not start, stopped
partway, or otherwise could not be
performed.
TRACK FULL
You cannot transfer onto the USB
device because the number of files
has reached its maximum.
Precautions
When carrying the unit
To avoid damaging the disc
mechanism, perform the following
procedure before carrying the unit.
Use the buttons on the unit to
perform this operation.
1 Press to turn on the system.
2 Press FUNCTION repeatedly to
select “DVD/CD”.
3 Remove the disc.
Press to open and close the disc
tray.
Wait until “NO DISC” appears on the
display.
4 Unplug the AC power cord (mains
lead).
Notes on discs
••Before playing, wipe the disc with a
cleaning cloth from the center outward
to the edge.
••Do not clean discs with solvents, such
as benzine, thinner, or commercially
available cleaners or anti-static spray
intended for vinyl LPs.
••Do not expose discs to direct sunlight
or heat sources such as hot air ducts,
nor leave them in a car parked in direct
sunlight.
On safety
••Completely disconnect the AC power
cord (mains lead) from the wall outlet
(mains) if it is not going to be used
for an extended period of time. When
unplugging the unit, always grip the
plug. Never pull the cord itself.
••Should any solid object or liquid get
into the system, unplug the system, and
have it checked by qualified personnel
before operating it again.
••AC power cord (mains lead) must be
changed only at the qualified service
shop.

68GB
SHAKE-X70D/SHAKE-X30D/SHAKE-X10D.GB.4-691-054-12(1)
On handling the system
This system is not drip-proof or
waterproof. Make sure not to splash water
on the system or clean it with water.
On placement
••Do not place the system in an inclined
position or in locations that are
extremely hot, cold, dusty, dirty, or
humid or lacking adequate ventilation,
or subject to vibration, direct sunlight or
a bright light.
••Be careful when placing the unit or
speakers on surfaces that have been
specially treated (for example, wax, oil,
polish) as staining or discoloration of
the surface may result.
••If the system is brought directly from
a cold to a warm location or is placed
in a very damp room, moisture may
condense on the lens inside the unit,
and cause the system to malfunction.
In this situation, remove the disc, and
leave the system turned on for about an
hour until the moisture evaporates.
On heat buildup
••Heat buildup on the unit during
operation is normal and is not a cause
for alarm.
••Do not touch the cabinet if it has been
used continuously at a high volume
because the cabinet may have become
hot.
••Do not obstruct the ventilation holes.
On the speaker system
The speaker system is not magnetically
shielded, and the picture on nearby TV
sets may become magnetically distorted.
In this situation, turn off the TV, wait 15 to
30 minutes, and turn it back on. If there is
no improvement, move the speakers far
away from the TV.
IMPORTANT NOTICE
Caution: If you leave a still video
image or on-screen display image
displayed on your TV for an extended
period of time via this system, you
risk permanent damage to your TV
screen. Projection TVs are especially
susceptible to this.
Cleaning the cabinet
Clean this system with a soft cloth slightly
moistened with a mild detergent solution.
Do not use any type of abrasive pad,
scouring powder, or solvent, such as
thinner, benzine, or alcohol.
On BLUETOOTH communication
••BLUETOOTH devices should be used
within approximately 10 meters
(unobstructed distance) of each
other. The effective communication
range may become shorter under the
following conditions.
— When a person, metal object, wall
or other obstruction is between
the devices with a BLUETOOTH
connection
— Locations where a wireless LAN is
installed
— Around microwave ovens that are
in use
— Locations where other
electromagnetic waves are
generated
••BLUETOOTH devices and wireless LAN
(IEEE 802.11b/g/n) equipment use the
same frequency band (2.4GHz). When
using your BLUETOOTH device near
a device with wireless LAN capability,
electromagnetic interference may
occur. This could result in lower data
transfer rates, noise, or inability to
connect. If this happens, try the
following remedies:
— Use this system at least 10 meters
away from the wireless LAN
equipment.
— Turn off the power of the wireless
LAN equipment when using your
BLUETOOTH device within 10 meters.

69GB
Additional Information
SHAKE-X70D/SHAKE-X30D/SHAKE-X10D.GB.4-691-054-12(1)
— Use this system and BLUETOOTH
device as closer to each other as
possible.
••The radio waves broadcast by this
system may interfere with the operation
of some medical devices. Since this
interference may result in malfunction,
always turn off the power on this
system and BLUETOOTH device in the
following locations:
— In hospitals, on trains, in airplanes,
at gas stations, and any place where
flammable gases may be present
— Near automatic doors or fire alarms
••This system supports security
functions that comply with BLUETOOTH
specifications to ensure secure
connections during communication
using BLUETOOTH technology. However,
this security may be insufficient
depending on the setting contents
and other factors, so always be careful
when performing communication using
BLUETOOTH technology.
••Sony cannot be held liable in any way
for damages or other loss resulting
from information leaks during
communication using BLUETOOTH
technology.
••BLUETOOTH communication is not
necessarily guaranteed with all
BLUETOOTH devices that have the same
profile as this system.
••BLUETOOTH devices connected with
this system must comply with the
BLUETOOTH specification prescribed
by the Bluetooth SIG, Inc., and must
be certified to comply. However, even
when a device complies with the
BLUETOOTH specification, there may
be cases where the characteristics or
specifications of the BLUETOOTH device
make it impossible to connect, or may
result in different control methods,
display or operation.
••Noise may occur or the audio may
cut off depending on the BLUETOOTH
device connected with this system,
the communications environment, or
surrounding conditions.
Specifications
Inputs
AUDIO/PARTY CHAIN IN (TV) L/R:
Voltage 2 V, impedance
47kilohms
TV (ARC):
Supported audio signal:
2-channel Linear PCM
MIC1:
Sensitivity 1 mV, impedance
10kilohms
MIC2/GUITAR:
Sensitivity 1 mV, impedance
10kilohms (When guitar mode is
turned off.)
Sensitivity 200 mV, impedance
1Megaohm (When guitar mode is
turned on.)
Outputs
AUDIO/PARTY CHAIN OUT L/R:
Voltage 2 V, impedance 1kilohm
VIDEO OUT:
Max. output level 1 Vp-p,
unbalanced, Sync. negative load
impedance 75ohms
HDMI OUT (TV):
Supported audio signal:
2-channel Linear PCM (up to
48kHz), Dolby Digital
HDMI section
Connector:
Type A (19pin)
Disc player section
System:
Compact disc and digital audio
and video system

70GB
SHAKE-X70D/SHAKE-X30D/SHAKE-X10D.GB.4-691-054-12(1)
Laser Diode Properties
Emission Duration: Continuous
Laser Output*: Less than 44.6 μW
* This output is the value
measurement at a distance of
200 mm from the objective lens
surface on the Optical Pick-up
Block with 7 mm aperture.
Frequency response:
20Hz – 20kHz
Video color system format:
Latin American model:
NTSC
Other models:
NTSC and PAL
USB section
Supported USB device:
Mass Storage Class
Maximum current:
1A
(USB) port:
Type A
FM tuner section
FM stereo, FM superheterodyne tuner
Antenna:
FM lead antenna
Tuning range:
87.5MHz – 108.0MHz (50kHz
step)
BLUETOOTH section
Communication system:
BLUETOOTH Standard version 3.0
Output:
BLUETOOTH Standard Power
Class 2
Maximum communication range:
Line of sight approx. 10 m*1
Frequency band:
2.4 GHz band (2.4000 GHz –
2.4835GHz)
Modulation method:
FHSS (Freq Hopping Spread
Spectrum)
Compatible BLUETOOTH profiles*2:
A2DP (Advanced Audio
Distribution Profile)
AVRCP (Audio Video Remote
Control Profile)
SPP (Serial Port Profile)
Supported codecs:
SBC (Subband Codec)
AAC (Advanced Audio Coding)
LDAC
*1 The actual range will vary depending
on factors such as obstacles between
devices, magnetic fields around a
microwave oven, static electricity,
reception sensitivity, antenna’s
performance, operating system,
software application, etc.
*2 BLUETOOTH standard profiles
indicate the purpose of BLUETOOTH
communication between devices.
Supported audio formats
Supported bit rate and sampling
frequencies:
MP3:
32/44.1/48kHz, 32 kbps –
320kbps (VBR)
AAC:
44.1 kHz, 48 kbps – 320kbps
(CBR/VBR)
WMA:
44.1 kHz, 48 kbps – 192 kbps
(CBR/VBR)
WAV:
44.1/48 kHz (16 bit)
Supported video formats
Xvid:
Video codec: Xvid video
Bit rate: 4.854 Mbps (MAX)
Resolution/Frame rate:
720 × 480, 30 fps
720 × 576, 25 fps (except for Latin
American model)
Audio codec: MP3

71GB
Additional Information
SHAKE-X70D/SHAKE-X30D/SHAKE-X10D.GB.4-691-054-12(1)
MPEG4:
File format: MP4 File Format
Video codec: MPEG4 Simple
Profile (AVC is not compatible.)
Bit rate: 4 Mbps
Resolution/Frame rate:
720 × 480, 30 fps
720 × 576, 25 fps (except for Latin
American model)
Audio codec: AAC-LC (HE-AAC is
not compatible.)
DRM: Not compatible
Speaker System
SSSHAKEX70
Speaker system:
3-way, Sound Pressure Horn
Speaker unit:
Woofers: 150 mm, cone type
Tweeters: 25 mm, horn type
Subwoofers: 380 mm, cone type
Rated impedance:
8 ohms
Dimensions (w/h/d) (Approx.):
510 mm × 773 mm × 491 mm
Mass (Approx.):
30.6 kg
SSSHAKEX30
Speaker system:
2-way, Sound Pressure Horn
Speaker unit:
Tweeters: 25 mm, horn type
Subwoofers: 250 mm, cone type
Rated impedance:
4 ohms
Dimensions (w/h/d) (Approx.):
368 mm × 585 mm × 391 mm
Mass (Approx.):
16.1 kg
SSSHAKEX10
Speaker system:
2-way, Sound Pressure Horn
Speaker unit:
Tweeters: 25 mm, horn type
Subwoofers: 200 mm, cone type
Rated impedance:
4 ohms
Dimensions (w/h/d) (Approx.):
315 mm × 490 mm × 388 mm
Mass (Approx.):
12 kg
General
Power requirements:
AC 120 V – 240 V, 50/60 Hz
Power consumption:
SHAKE-X70D: 375 W
SHAKE-X30D/SHAKE-X10D: 220 W
Power consumption (at the Power
Saving mode):
0.5 W (When “BT STBY” is set to
“OFF” and [CONTROL FOR HDMI]
is set to [OFF].)
3 W* (When “BT STBY” is set to
“ON” and [CONTROL FOR HDMI] is
set to [ON].)
Dimensions (w/h/d) (excl. speakers)
(Approx.):
455 mm × 165 mm × 330 mm
Mass (excl. speakers) (Approx.):
SHAKE-X70D: 6.2 kg
SHAKE-X30D/SHAKE-X10D: 5.8 kg
* The power consumption of the system
will be less than 0.5 W when there is no
HDMI connection and “BT STBY” is set
to “OFF”.
Design and specifications are subject
to change without notice.

72GB
SHAKE-X70D/SHAKE-X30D/SHAKE-X10D.GB.4-691-054-12(1)
Language code list
The language spellings conform to the ISO 639:1988 (E/F) standard.
Code Language Code Language Code Language Code Language
1027 Afar 1186 Scots Gaelic 1350 Malayalam 1513 Siswati
1028 Abkhazian 1194 Galician 1352 Mongolian 1514 Sesotho
1032 Afrikaans 1196 Guarani 1353 Moldavian 1515 Sundanese
1039 Amharic 1203 Gujarati 1356 Marathi 1516 Swedish
1044 Arabic 1209 Hausa 1357 Malay 1517 Swahili
1045 Assamese 1217 Hindi 1358 Maltese 1521 Tamil
1051 Aymara 1226 Croatian 1363 Burmese 1525 Telugu
1052 Azerbaijani 1229 Hungarian 1365 Nauru 1527 Tajik
1053 Bashkir 1233 Armenian 1369 Nepali 1528 Thai
1057 Byelorussian 1235 Interlingua 1376 Dutch 1529 Tigrinya
1059 Bulgarian 1239 Interlingue 1379 Norwegian 1531 Turkmen
1060 Bihari 1245 Inupiak 1393 Occitan 1532 Tagalog
1061 Bislama 1248 Indonesian 1403 (Afan) Oromo 1534 Setswana
1066 Bengali; Bangla 1253 Icelandic 1408 Oriya 1535 Tonga
1067 Tibetan 1254 Italian 1417 Punjabi 1538 Turkish
1070 Breton 1257 Hebrew 1428 Polish 1539 Tsonga
1079 Catalan 1261 Japanese 1435 Pashto; Pushto 1540 Tatar
1093 Corsican 1269 Yiddish 1436 Portuguese 1543 Twi
1097 Czech 1283 Javanese 1463 Quechua 1557 Ukrainian
1103 Welsh 1287 Georgian 1481
Rhaeto-Romance
1564 Urdu
1105 Danish 1297 Kazakh 1482 Kirundi 1572 Uzbek
1109 German 1298 Greenlandic 1483 Romanian 1581 Vietnamese
1130 Bhutani 1299 Cambodian 1489 Russian 1587 Volapük
1142 Greek 1300 Kannada 1491 Kinyarwanda 1613 Wolof
1144 English 1301 Korean 1495 Sanskrit 1632 Xhosa
1145 Esperanto 1305 Kashmiri 1498 Sindhi 1665 Yoruba
1149 Spanish 1307 Kurdish 1501 Sangho 1684 Chinese
1150 Estonian 1311 Kirghiz 1502 Serbo-Croatian 1697 Zulu
1151 Basque 1313 Latin 1503 Singhalese 1703 Not specified
1157 Persian 1326 Lingala 1505 Slovak
1165 Finnish 1327 Laothian 1506 Slovenian
1166 Fiji 1332 Lithuanian 1507 Samoan
1171 Faroese 1334
Latvian; Lettish
1508 Shona
1174 French 1345 Malagasy 1509 Somali
1181 Frisian 1347 Maori 1511 Albanian
1183 Irish 1349 Macedonian 1512 Serbian

73GB
Additional Information
SHAKE-X70D/SHAKE-X30D/SHAKE-X10D.GB.4-691-054-12(1)
Parental Control area code list
Code Area Code Area Code Area Code Area
2044 Argentina 2165 Finland 2362 Mexico 2149 Spain
2047 Australia 2174 France 2376 Netherlands 2499 Sweden
2046 Austria 2109 Germany 2390 New Zealand 2086 Switzerland
2057 Belgium 2248 India 2379 Norway 2528 Thailand
2070 Brazil 2238 Indonesia 2427 Pakistan 2184 United Kingdom
2079 Canada 2254 Italy 2424 Philippines
2090 Chile 2276 Japan 2436 Portugal
2092 China 2304 Korea 2489 Russia
2115 Denmark 2363 Malaysia 2501 Singapore

SHAKE-X70D/SHAKE-X30D/SHAKE-X10D.GB.4-691-054-12(1)

SHAKE-X70D/SHAKE-X30D/SHAKE-X10D.GB.4-691-054-12(1)
SHAKE-X70D/SHAKE-X30D/SHAKE-X10D.GB.4-691-054-12(1)
©2017 Sony Corporation Printed in Malaysia 4-691-054-12(1)
Sony SHAKE-X30D
SHAKE-X70D/SHAKE-X30D/SHAKE-X10D
SHAKE-X70D/SHAKE-X30D/SHAKE-X10D.RU.4-691-055-34(1)
Подготовка к
эксплуатации
Воспроизведение с
диска/устройства USB
Передача USB
Тюнер
BLUETOOTH
Регулировка звука
Другие операции
Дополнительная
информация
Домашняя
Аудиосистема
Инструкция по эксплуатации
Инструкция
Посмотреть инструкция для Sony SHAKE-X30D бесплатно. Руководство относится к категории домашние кинотеатры, 9 человек(а) дали ему среднюю оценку 8.5. Руководство доступно на следующих языках: русский. У вас есть вопрос о Sony SHAKE-X30D или вам нужна помощь?
Задайте свой вопрос здесь
Содержание
- О данном руководстве
- Подготовка к эксплуатации
- Воспроизведение с диска/устройства USB
- Передача USB
- Тюнер
- BLUETOOTH
- Регулировка звука
- Другие операции
- Дополнительная информация
Изображения продукта (6)

Ниже вы найдете технические характеристики изделия и руководства по эксплуатации Sony SHAKE-X30D.
«Sony SHAKE-X30D является домашним кинотеатром, созданным компанией Sony. Он включает в себя оптический дисковод, который позволяет воспроизводить различные виды оптических дисков. Устройство не оснащено кассетным плеером. Для создания атмосферы и улучшения визуального опыта, домашний кинотеатр оснащен подсветкой, которая находится на передней панели.
Домашний кинотеатр имеет возможность воспроизведения файлов в формате MP3, что позволяет пользователю наслаждаться любимой музыкой и звуковыми записями. Устройство также имеет выключатель, который позволяет легко включать или выключать устройство.
В устройстве нет встроенного кардридера, который позволяет считывать информацию с карт памяти. Однако есть один HDMI-порт, который обеспечивает подключение других устройств и передачу видеосигнала на телевизор или другой совместимый экран.
Помимо этого, у домашнего кинотеатра есть функция Bluetooth, которая позволяет быстро и легко подключать устройство к другим совместимым беспроводным устройствам. Кроме того, он поддерживает радиоприемник FM.
Устройство имеет один выход аудио (L/R) и один вход аудио (L/R), которые обеспечивают подключение других аудиоустройств и совместное использование звука.
Sony SHAKE-X30D — это домашний кинотеатр, который обеспечивает воспроизведение различных типов оптических дисков, имеет подсветку на передней панели, функцию воспроизведения MP3 и Bluetooth-подключение. Он также поддерживает радио FM и имеет один HDMI-порт для подключения к другим устройствам.
Проигрыватель оптических дисков
Да
Расположение подсветки
Фронтальный
Поддерживаемые диапазоны радио
FM
Главная
| Бренд | Sony |
| Модель | SHAKE-X30D | SHAKEX30PN.EU |
| Изделие | домашний кинотеатр |
| EAN | 5013493353503, 5013493350465, 4548736047082 |
| Язык | русский |
| Тип файла | Руководство пользователя (PDF) |
Дизайн
| Проигрыватель оптических дисков | Да |
| Кассетная дека | Нет |
| Освещение | Да |
| Цвет товара | Черный |
| Тип | — |
| Вкл/Выкл переключатель | Да |
Прочие свойства
| Расположение подсветки | Фронтальный |
| Количество микрофонных входов | 2 |
| Профили Bluetooth | A2DP, AVRCP, SPP |
| Замок от детей | Да |
| диаметр динамика сабвуфера | 250 mm |
Производительность
| MP3-воспроизведение | Да |
| Поддерживаемые типы дисков | CD, CD-R, CD-RW, DVD, DVD+R, DVD+R DL, DVD+RW, DVD-R, DVD-RW |
| Встроенный кардридер | Нет |
| Воспроизведение с прямого порта USB | Да |
| Форматы дисков (воспроизведение) | CD audio, DVD-Video, VCD |
| Поддерживаемые форматы аудио | MP3 |
| Поддерживаемый видеоформат | MPEG4, XVID |
| Запись на | USB |
Порты и интерфейсы
| Количество HDMI портов | 1 |
| Аудио (Л/П) выход | 1 |
| Аудио вход (Л/П) | 1 |
| USB порт | Да |
| Количество портов USB 2.0 | 1 |
| Линейный вход микрофона | Да |
| Композитный видео выход | 1 |
| Док-станция для Apple | — |
| Технология NFC | Да |
Сеть
Радио
| Поддерживаемые диапазоны радио | FM |
| Поддержка RDS | Да |
| Предварительно установленное количество станций | 20 |
| FM диапазон | 87.5 — 108 MHz |
| Тип тюнера | Цифровой |
| Станции с предварительными настройками | Да |
Эргономика
| Эквалайзер | Да |
| Таймер засыпания | Да |
| Дистанционно управляемый | Да |
| CD-плеер | Да |
Мультимедиа
| Технология подъема в области нижних частот | Да |
| Аудио декодеры | Dolby Digital |
| Караоке | Да |
| диаметр верхнечастотного динамика | 25 mm |
| Сабвуфер в комплекте | Да |
| Диаметр динамика сабвуфера (английская система мер) | 9.84 « |
| Количество колонок | 2 |
| Номинальная RMS-мощность | — W |
Энергопитание
| Источник питания | Кабель переменного тока |
| Потребляемая мощность (в режим ожидания) | 0.5 W |
Содержимое упаковки
| FM антенна | Да |
| Пульт дистанционного управления | Да |
Технические характеристики
Вес и размеры
| Размеры основного блока (ШхГхВ) | 455 x 330 x 165 mm |
| Вес главной единицы | 16100 g |
| Ширина фронтальной колонки | 368 mm |
| Длина фронтальной колонки | 391 mm |
| Высота фронтальной колонки | 585 mm |
| Вес фронтальной колонки | 5800 g |
показать больше
Часто задаваемые вопросы
Не можете найти ответ на свой вопрос в руководстве? Вы можете найти ответ на свой вопрос ниже, в разделе часто задаваемых вопросов о Sony SHAKE-X30D.
Что такое HDMI?
HDMI расшифровывается как «интерфейс для мультимедиа высокой четкости». Кабель HDMI используется для передачи аудио- и видеосигналов между устройствами.
Как лучше всего выполнять чистку домашний кинотеатр?
Для удаления отпечатков пальцев лучше всего использовать слегка влажную салфетку для уборки или мягкую чистую ткань. Пыль в труднодоступных местах лучше всего удаляется потоком сжатого воздуха.
Что такое Dolby Atmos?
Dolby Atmos — это технология, которая обеспечивает отражение звука от потолка к месту нахождения слушателя. Это позволяет создать эффект 5.1 при помощи всего лишь одного динамика.
Инструкция Sony SHAKE-X30D доступно в русский?
Да, руководствоSony SHAKE-X30D доступно врусский .
Не нашли свой вопрос? Задайте свой вопрос здесь