
L:\STR-
DA5400ES\0812_STR_RU\3875810711_RU\3875810611STRDA5400ESCEL\00COV-
STRDA5400ESUC\010COV.fm
Master:
Right
3-875-810-
71(1)
STR-DA5400ES
©2008 Sony Corporation
STR-DA5400ES
3-875-810-71(1)
Инструкция по эксплуатации
Multi Channel
AV Receiver
010COV.fm Page 1 Tuesday, August 12, 2008 3:50 PM
L:\STR-DA5400ES\0812_STR_RU\3875810711_RU\3875810611STRDA5400ESCEL\00COV-
STRDA5400ESUC\120BCO.fm
masterpage: Left
STR-DA5400ES
3-875-810-
71(1)
120BCO.fm Page 154 Tuesday, August 12, 2008 3:52 PM
2
RU
Во избежание пожара или
поражения электрическим током
нельзя подвергать аппарат
воздействиям дождя и влаги.
Для уменьшения вероятности пожара не
закрывайте вентиляционные отверстия
аппарата газетами, скатертями, шторами и
т.п. Не размещайте источники открытого
пламени, например, зажженные свечи, на
аппарате.
Нельзя устанавливать аппарат в тесных
местах как в книжном шкафу или углублении
в стенке.
Для уменьшения вероятности пожара или
поражения электрическим током не
допускайте попадания капель или брызг и не
размещайте предметы с водой, такие как
вазы, на аппарате.
Так как штепсельная вилка используется для
отключения аппарата от сети, подсоедините
аппарат к легкодоступной сетевой розетке. В
случае если Вы заметите ненормальность в
аппарате, немедленно отсоедините
штепсельную вилку от сетевой розетки.
Не подвергайте батарейки или аппарат с
установленными в него батарейками
чрезмерному воздействию тепла, например
солнечного света, огня и т.п.
Аппарат не будет отключен от сети до тех
пор, пока он будет оставаться
подсоединенным к розетке переменного
тока, даже если сам он при этом будет
выключен.
Чрезмерное звуковое давление от
наушников и головных телефонов может
привести к потере слуха.
Для покупателей в Европе
Утилизация
электрического и
электронного
оборудования
(директива
применяется в
странах Евросоюза и
других европейских
странах, где
действуют системы раздельного
сбора отходов)
Утилизация
использованных
элементов питания
(применяется в
странах Евросоюза и
других европейских
странах, где
действуют системы раздельного
сбора отходов)
Уведомление для клиентов:
следующая информация относится
только к оборудованию,
продаваемому в странах, где
действуют директивы ЕС
Производителем данного устройства
является корпорация Sony Corporation, 1-7-1
Konan Minato-ku Tokyo, 108-0075 Japan.
Уполномоченным представителем по
электромагнитной совместимости (EMC) и
безопасности изделия является компания
Sony Deutschland GmbH, Hedelfinger Strasse
61, 70327 Stuttgart, Germany. По вопросам
обслуживания и гарантии обращайтесь по
адресам, указанным в соответствующих
документах.
ПРЕДУПРЕЖДЕНИЕ
Cтpaнa-пpoизвoдитeль: Малайзия
3
RU
О данном руководстве
• В данном руководстве приведены
инструкции для модели STR-DA5400ES.
Проверьте номер Вашей модели в нижнем
правом углу на передней панели.
• В данном руководстве для иллюстраций
используется модель для США/Канады,
если не указано другого. Любые отличия в
эксплуатации четко указываются в
руководстве, например, “Только
европейская модель”.
• Инструкции в данном руководстве
относятся к регуляторам на прилагаемом
пульте дистанционного управления. Вы
также можете использовать регуляторы на
ресивере, если они имеют такие же или
похожие названия, что и на пульте
дистанционного управления.
Об авторских правах
• “Neural-THX” и “neural THX”,
указываемые в Инструкции по
эксплуатации и отображаемые в окне
дисплея и на экране меню GUI, означают
Neural-THX Surround.
В этом ресивере используется Dolby* Digital
и Pro Logic Surround, а также DTS** Digital
Surround System.
* Изготовлено по лицензии компании
Dolby Laboratories.
Долби, Pro Logic, Surround EX и знак в
видe двойной буквы D являются
товарыми знаками компании Dolby
Laboratories.
** Изготовлено по лицензии следующих
патентов США: 5,451,942; 5,956,674;
5,974,380; 5,978,762; 6,226,616; 6,487,535 и
других патентов, зарегистрированных и
находящихся в стадии регистрации в США
и во всем мире. DTS является
зарегистрированным товарным знаком, и
логотипы DTS символы DTS-HD и DTS-
HD Master Audio являются товарными
знаками DTS, Inc. © 1996-2007 DTS, Inc.
Все права защищены.
В этом ресивере используется технология
High-Definition Multimedia Interface
(HDMI™).
HDMI, логотип HDMI и High-Definition
Multimedia Interface являются торговыми
марками или зарегистрированными
торговыми марками HDMI Licensing LLC.
XM Ready
®
является зарегистрированным
товарным знаком XM Satellite Radio Inc. Все
права защищены.
©2008 SIRIUS Satellite Radio Inc. “SIRIUS” и
логотип собаки SIRIUS являются
зарегистрированными товарными знаками
SIRIUS Satellite Radio Inc.
Данное изделие, использующее Neural-THX
®
Surround, изготавливается по лицензии
Neural Audio Corporation и THX Ltd. Sony
Corporation настоящим предоставляет
пользователю неэксклюзивное
непередаваемое ограниченное право на
использование данного изделия в
соответствии с действующими и
регистрируемыми патентами США и других
иностранных государств и технологий или
товарных знаков, принадлежащих Neural
Audio Corporation и THX Ltd. “Neural
Surround”, “Neural Audio”, “Neural” и “NRL”
являются товарными знаками и логотипами,
принадлежащими Neural Audio Corporation,
THX является товарным знаком THX Ltd.,
который может быть зарегистрирован в
некоторых юрисдикциях. Все права
защищены.
Тип шрифта (Shin Go R), установленный на
данном ресивере, предоставлен компанией
MORISAWA & COMPANY LTD. Эти
наименования являются торговыми марками
компании MORISAWA & COMPANY LTD., и
авторское право на шрифт также
принадлежит компании MORISAWA &
COMPANY LTD.
iPod является торговой маркой Apple Inc.,
зарегистрированной в США и в других
странах.
Все другие торговые марки и
зарегистрированные марки являются
собственностью их соответствующих
владельцев. В данном руководстве символы
™ и ® не указываются.
продолжение следует

4
RU
Название Bluetooth и логотип принадлежат
компании Bluetooth SIG, Inc., и их любое
использование компанией Sony Corporation
осуществляется по лицензии.
Другие торговые марки и торговые названия
являются собственностью их
соответствующих владельцев.
“M-crew Server” является торговой маркой
Sony Corporation.
“BRAVIA” является товарным знаком Sony
Corporation.

Оглавление, Подготовка к эксплуатации, Воспроизведение
Настройка, Наслаждение окружающим звучанием, Использование многозональных функций Чат поддержки
- Изображение
- Текст
Использование других функций, Регулировка настроек, Использование пульта дистанционного управления
Дополнительная информация Чат поддержки
- Изображение
- Текст
7
RU
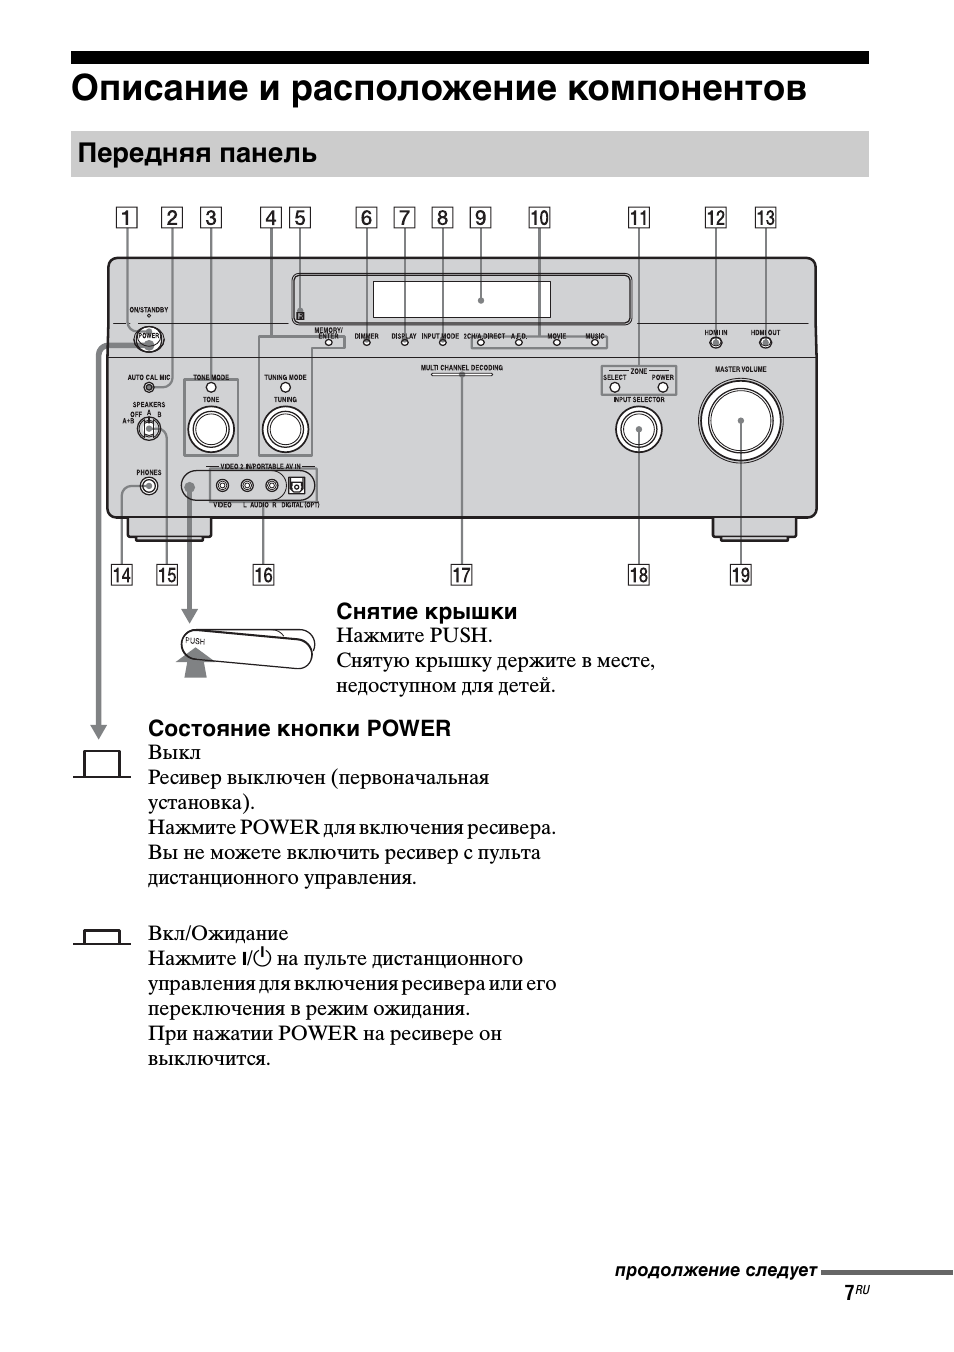
Описание и расположение компонентов
Передняя панель
Снятие крышки
Нажмите PUSH.
Снятую крышку держите в месте,
недоступном для детей.
Состояние кнопки POWER
Выкл
Ресивер выключен (первоначальная
установка).
Нажмите POWER для включения ресивера.
Вы не можете включить ресивер с пульта
дистанционного управления.
Вкл/Ожидание
Нажмите
?
/1 на пульте дистанционного
управления для включения ресивера или его
переключения в режим ожидания.
При нажатии POWER на ресивере он
выключится.
продолжение следует
8
RU
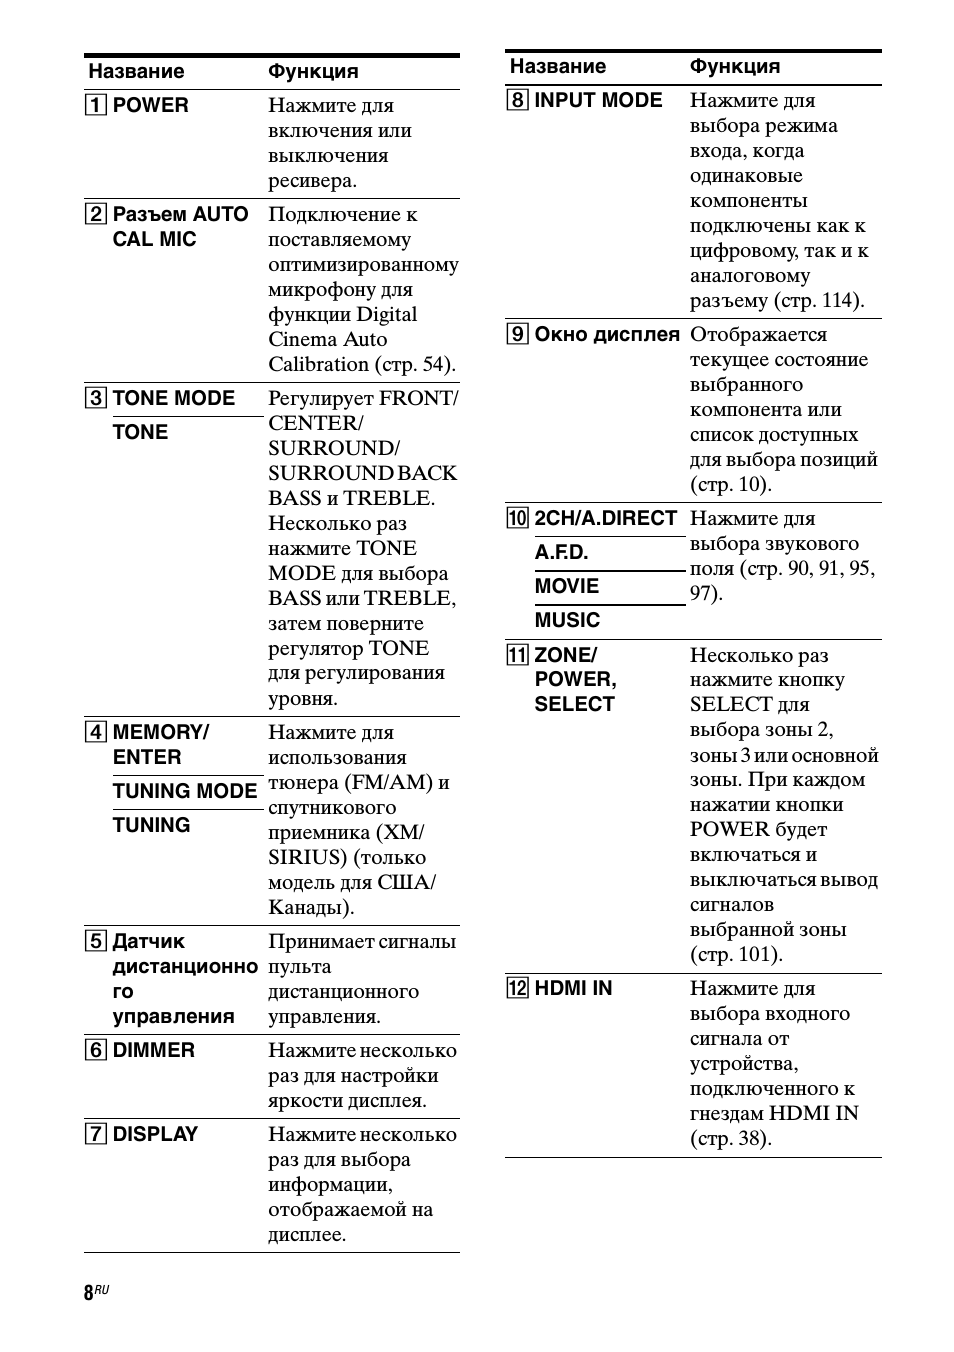
Название
Функция
A POWER
Нажмите для
включения или
выключения
ресивера.
B Разъем AUTO
CAL MIC
Подключение к
поставляемому
оптимизированному
микрофону для
функции Digital
Cinema Auto
Calibration (стр. 54).
C TONE MODE
Регулирует FRONT/
CENTER/
SURROUND/
SURROUND BACK
BASS и TREBLE.
Несколько раз
нажмите TONE
MODE для выбора
BASS или TREBLE,
затем поверните
регулятор TONE
для регулирования
уровня.
TONE
D MEMORY/
ENTER
Нажмите для
использования
тюнера (FM/AM) и
спутникового
приемника (XM/
SIRIUS) (только
модель для США/
Канады).
TUNING MODE
TUNING
E Датчик
дистанционно
го
управления
Принимает сигналы
пульта
дистанционного
управления.
F DIMMER
Нажмите несколько
раз для настройки
яркости дисплея.
G DISPLAY
Нажмите несколько
раз для выбора
информации,
отображаемой на
дисплее.
H INPUT MODE
Нажмите для
выбора режима
входа, когда
одинаковые
компоненты
подключены как к
цифровому, так и к
аналоговому
разъему (стр. 114).
I Окно дисплея Отображается
текущее состояние
выбранного
компонента или
список доступных
для выбора позиций
(стр. 10).
J 2CH/A.DIRECT Нажмите для
выбора звукового
поля (стр. 90, 91, 95,
97).
A.F.D.
MOVIE
MUSIC
K ZONE/
POWER,
SELECT
Несколько раз
нажмите кнопку
SELECT для
выбора зоны 2,
зоны 3 или основной
зоны. При каждом
нажатии кнопки
POWER будет
включаться и
выключаться вывод
сигналов
выбранной зоны
(стр. 101).
L HDMI IN
Нажмите для
выбора входного
сигнала от
устройства,
подключенного к
гнездам HDMI IN
(стр. 38).
Название
Функция
9
RU
M HDMI OUT
Нажмите для
выбора выходного
сигнала на
устройство,
подключенное к
гнездам HDMI OUT
(стр. 38).
N Разъем
PHONES
Для подключения
наушников.
O SPEAKERS
(OFF/A/B/A+B)
Переключение на
OFF, A, B, A+B
передних колонок
(стр. 53).
P Разъемы
VIDEO 2 IN/
PORTABLE AV
IN
Для подключения
портативных аудио/
видео устройств,
таких как
видеокамера или
игровая приставка.
Q Индикатор
MULTI
CHANNEL
DECODING
Светится при
декодировании
многоканальных
аудиосигналов.
Название
Функция
R INPUT
SELECTOR
Поверните для
выбора источника
входного сигнала
для
воспроизведения.
Чтобы выбрать
источник входного
сигнала для зоны 2
или зоны 3, сначала
выберите зону 2 или
зону 3 нажатиями
кнопки ZONE/
SELECT (
qa
) (на
дисплее появится
сообщение “ZONE
2 INPUT” или
“ZONE 3 INPUT”),
а затем поверните
INPUT SELECTOR
для выбора
источника входного
сигнала.
S MASTER
VOLUME
Поверните для
регулирования
уровня громкости
всех колонок
одновременно.
Название
Функция

10
RU
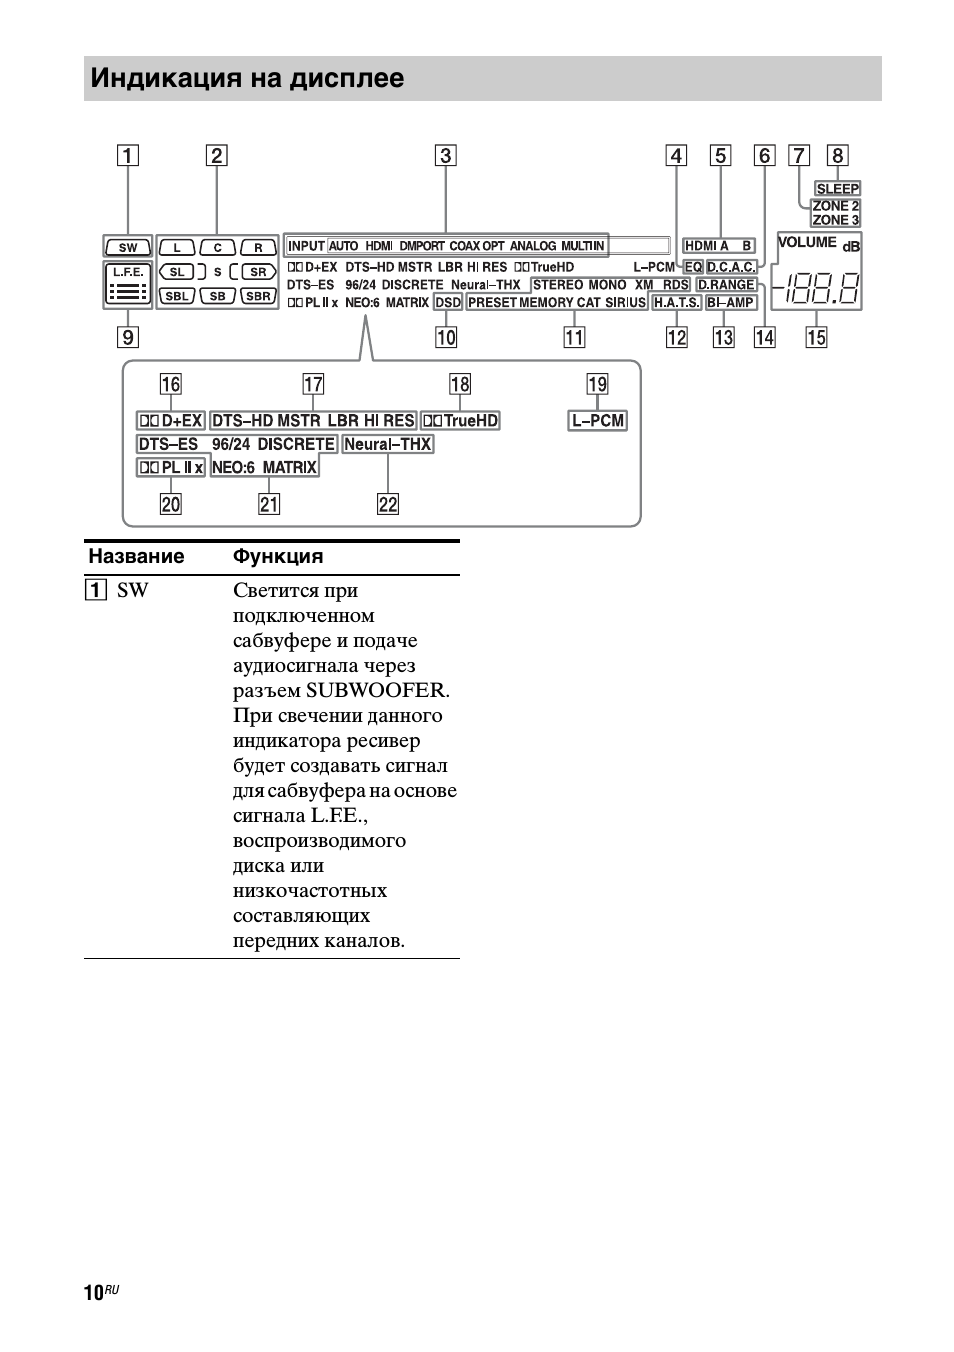
Индикация на дисплее
Название
Функция
A SW
Светится при
подключенном
сабвуфере и подаче
аудиосигнала через
разъем SUBWOOFER.
При свечении данного
индикатора ресивер
будет создавать сигнал
для сабвуфера на основе
сигнала L.F.E.,
воспроизводимого
диска или
низкочастотных
составляющих
передних каналов.
04:28
EXCLUSIVE PREVIEW: New Sony ES Receivers (AV Receivers with built-in home automation!)
04:13
Sony STR-ZA1100ES A/V Receiver Review
01:59
Sony STR DA5300ES — AV receiver — 7.1 channel
Нажмите на кнопку для помощи
3-875-811-11(1)
STR-DA5400ES
Quick Setup Guide
Guide d’installation rapide
© 2008 Sony Corporation Printed in Malaysia
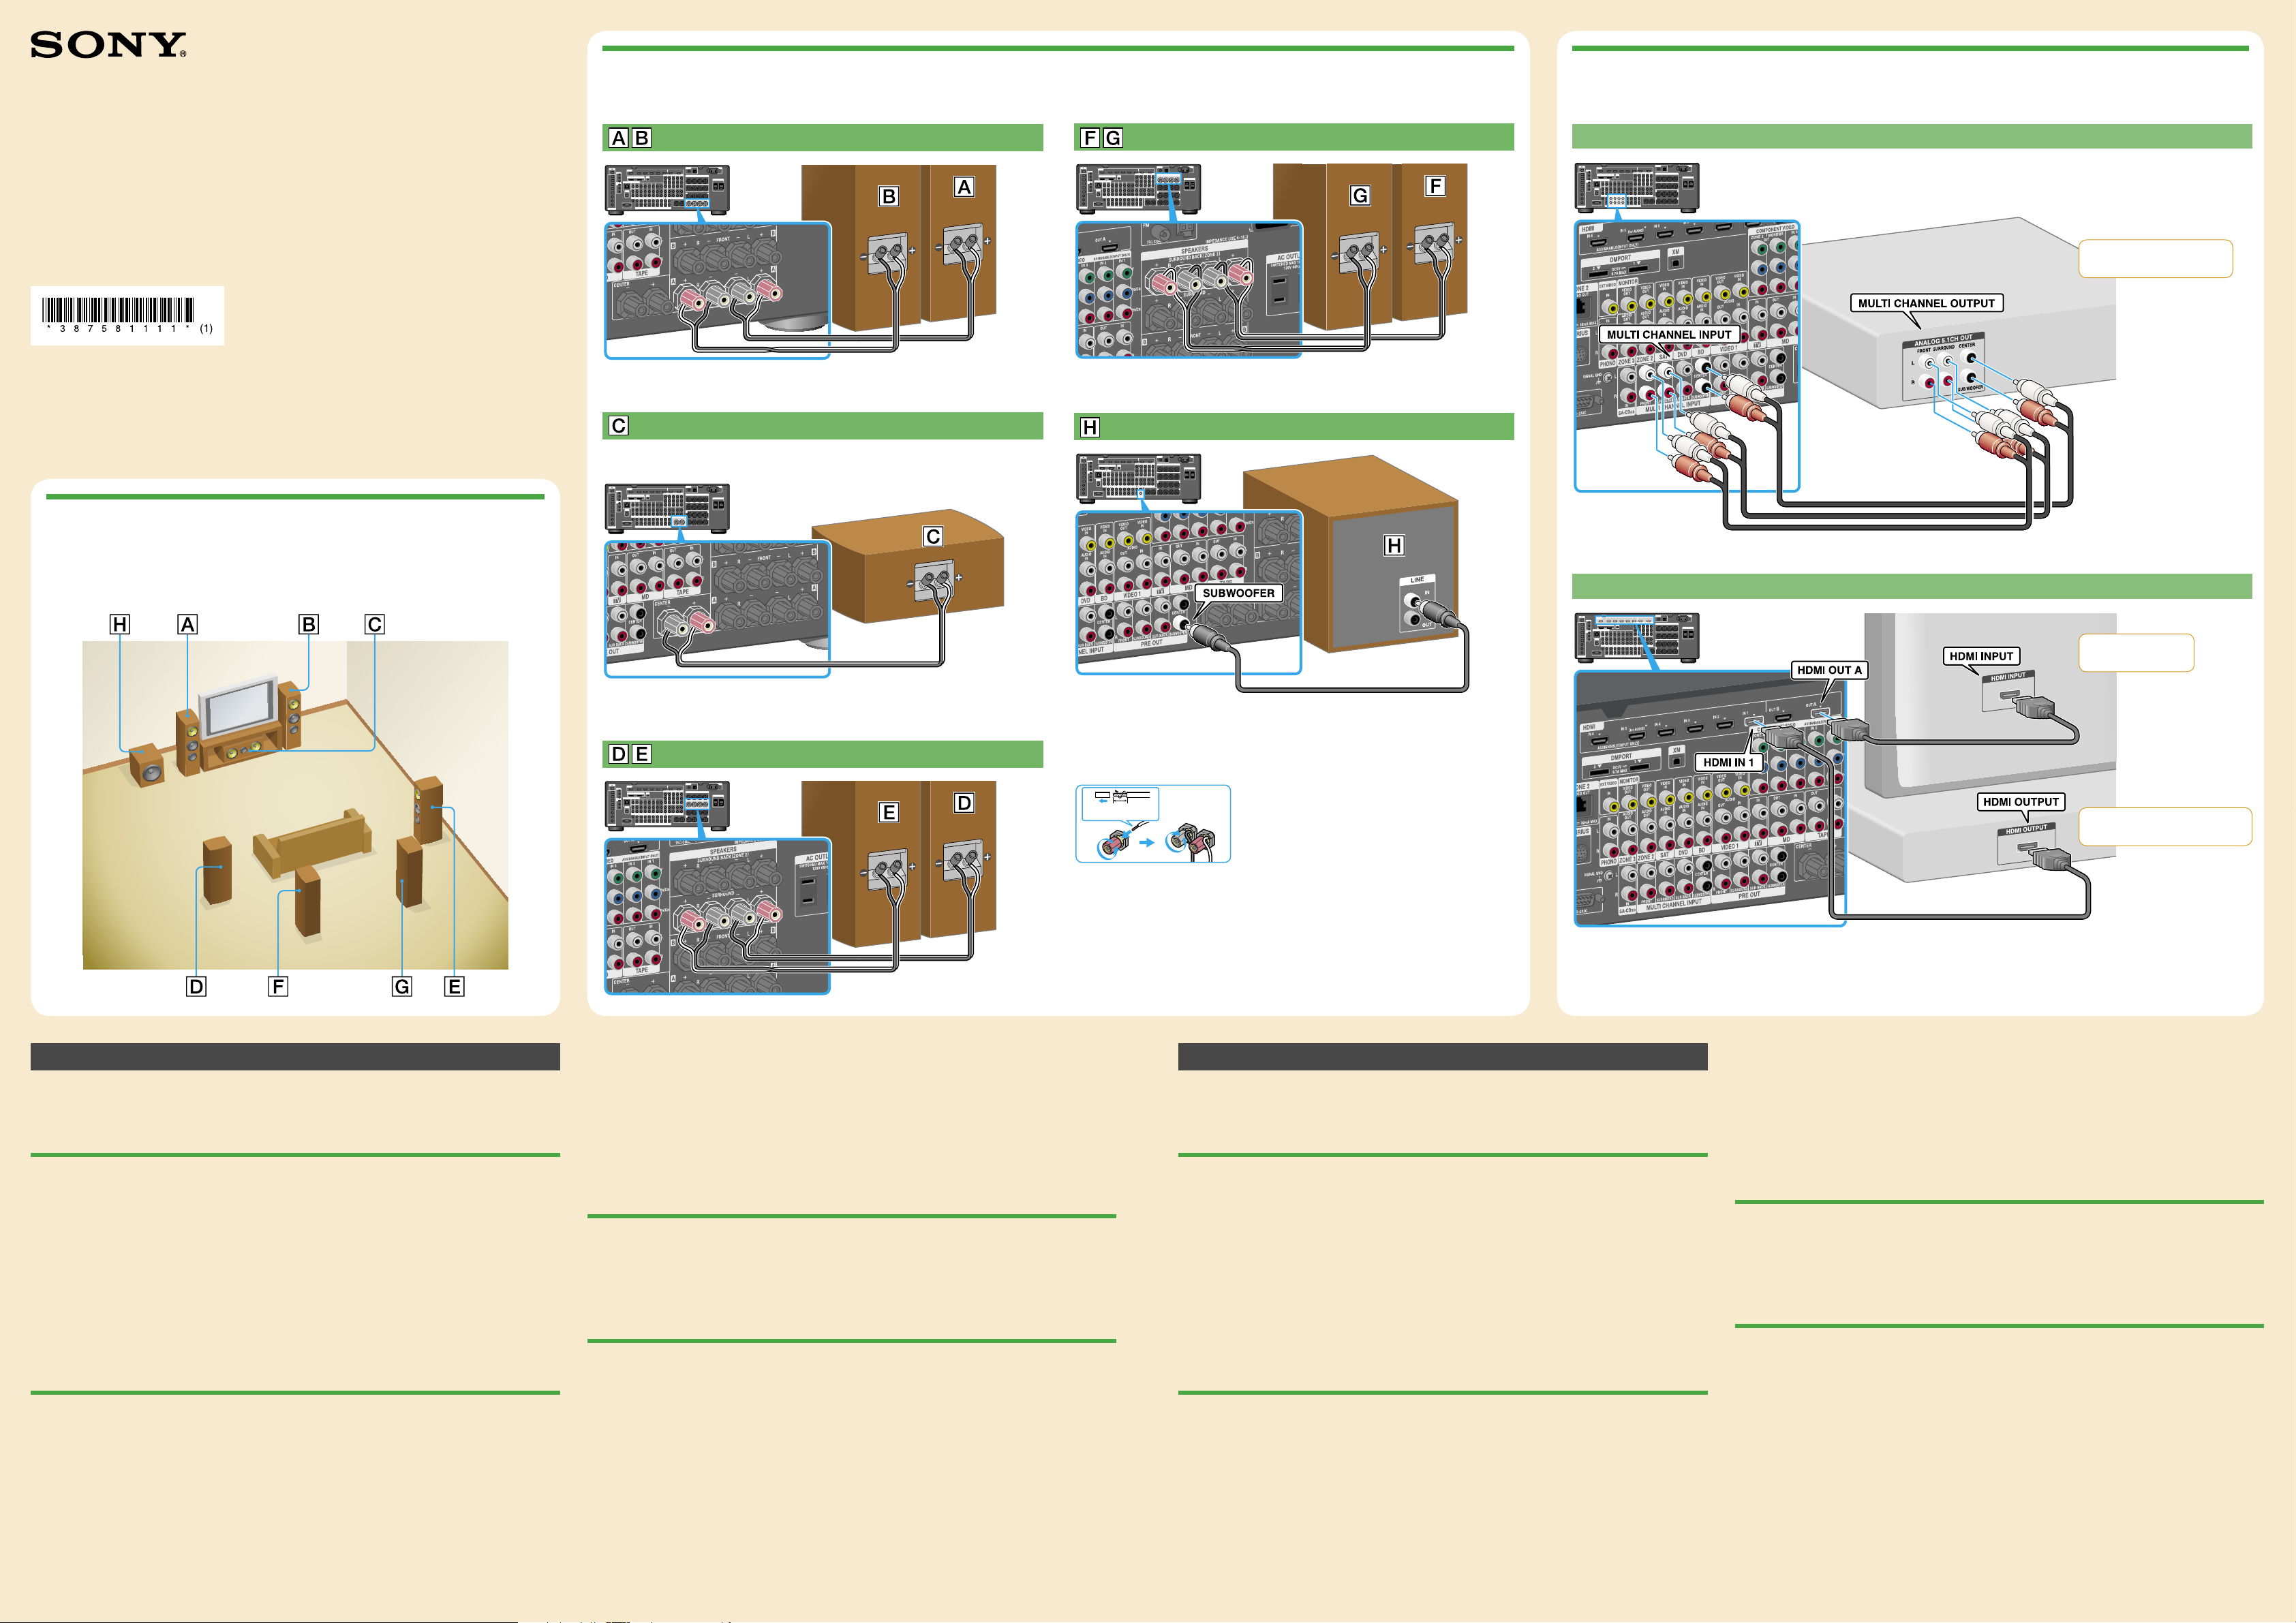
2: Connecting the speakers/
2: Raccordement des enceintes
Speaker cord (not supplied)/
Cordon d’enceinte (non fourni)
3: Connecting other components/
3: Raccordement d’autres appareils
Speaker cord (not supplied)/
Cordon d’enceinte (non fourni)
Super Audio CD player/ Lecteur Super Audio CD
Super Audio CD player/
Lecteur Super Audio CD
1: Installing speakers/
1: Installation des enceintes
Audio cord (not supplied)/
Cordon audio (non fourni)
Video components/ Appareils vidéo
TV/
Téléviseur
Speaker cord (not supplied)/
Cordon d’enceinte (non fourni)
Audio cord (not supplied)/
Cordon audio (non fourni)
10 mm (13/32″)
HDMI cable (not supplied)/
Câble HDMI (non fourni)
DVD player, Blu-ray Disc Player/
Lecteur DVD, lecteur Blu-ray Disc
English
This Quick Setup Guide describes how to connect a Super Audio CD/CD player, DVD player, Blu-ray
Disc Player, speakers, and a subwoofer so that you can enjoy multi-channel surround sound. Refer to the
operating instructions supplied with the receiver for details.
Instructions are explained with illustrations of the U.S.A./Canadian model.
1: Installing speakers
The illustrations above show an example of a 7.1 channel speaker system (seven speakers and one
subwoofer) configuration. Refer to the operating instructions supplied with the receiver and the other side
of this guide.
The illustrations in the guide designate speakers as through .
Front left speaker
Front right speaker
Center speaker
Surround left speaker
The surround back speakers (left/right) are compliant with the zone 2 operation. Refer to the operating instructions supplied
*
with the receiver.
Surround right speaker
Surround back left speaker
Surround back right speaker
Subwoofer
*
*
2: Connecting the speakers
Connect the speakers according to the number and kind of your speakers.
Speaker cord (not supplied)/
Cordon d’enceinte (non fourni)
About speaker terminals
Connect the terminals to the terminals of the receiver and connect the terminals to the
terminals of the receiver.
Refer to the illustration or the operating instructions supplied with the receiver for details of connecting
speaker cords.
Turn the locking knob until the speaker cord is connected securely.
About the SPEAKERS (OFF/A/B/A+B) switch
You can select the front speaker system. Refer to “8: Setting the speakers” in the operating instructions
supplied with the receiver for details.
3: Connecting other components
This is an example of how to connect this receiver and your components. Refer to step 4 of “Getting
Started” of the operating instructions supplied with this receiver for details on other connections and other
components.
This receiver is equipped with function for converting video signals. Refer to “4b: Connecting the video
components” in the operating instructions supplied with the receiver.
4: Connect all power cords last
Connect the supplied AC power cord (mains lead) to the AC IN terminal on the receiver, then connect the
AC power cord (mains lead) to a wall outlet.
Français
Ce guide d’installation rapide explique comment raccorder un lecteur Super Audio CD/CD, un lecteur
DVD, un lecteur Blu-ray Disc, des enceintes et un subwoofer afin que vous puissiez profiter du son
surround multicanal. Consultez le mode d’emploi fourni avec l’ampli-tuner pour plus d’informations.
Les instructions sont accompagnées d’illustrations pour le modèle américain/canadien.
1: Installation des enceintes
Les illustrations ci-dessus représentent un exemple de configuration de système d’enceintes 7.1 canaux (sept
enceintes et un subwoofer). Consultez le mode d’emploi fourni avec l’ampli-tuner et reportez-vous à l’autre
face de ce guide.
Les illustrations dans ce guide désignent les enceintes par à .
Enceinte avant gauche
Enceinte avant droite
Enceinte centrale
Enceinte surround gauche Subwoofer
Les enceintes surround arrière (gauche/droite) sont compatibles avec une opération de zone 2. Consultez le mode d’emploi
*
fourni avec l’ampli-tuner.
Enceinte surround droite
Enceinte surround arrière gauche
Enceinte surround arrière droite
*
*
2: Raccordement des enceintes
Raccordez les enceintes en fonction du nombre et type de vos enceintes.
HDMI cable (not supplied)/
Câble HDMI (non fourni)
Bornes d’enceintes
Raccordez les bornes aux bornes de l’ampli-tuner et les bornes aux bornes de l’ampli-tuner.
Pour plus d’informations sur le raccordement des cordons d’enceinte, consultez l’illustration ou le mode
d’emploi fourni avec l’ampli-tuner.
Tournez le bouton de verrouillage jusqu’à ce que le cordon d’enceinte soit solidement connecté.
Commutateur SPEAKERS (OFF/A/B/A+B)
Vous pouvez sélectionner les enceintes avant. Consultez « 8 : Réglage des enceintes » dans le mode d’emploi
fourni avec l’ampli-tuner pour plus d’informations.
3: Raccordement d’autres appareils
Ce guide donne un exemple de raccordement de cet ampli-tuner et de vos appareils. Reportez-vous à l’étape
4 de « Mise en service » du mode d’emploi fourni avec cet ampli-tuner pour plus d’informations sur d’autres
raccordements et d’autres appareils.
Cet ampli-tuner est équipé d’une fonction de conversion des signaux vidéo. Reportez-vous à « 4b:
Raccordement des appareils vidéo » dans le mode d’emploi fourni avec l’ampli-tuner.
4: Raccordez tous les cordons d’alimentation en dernier lieu
Branchez le cordon d’alimentation secteur fourni à la borne AC IN de l’ampli-tuner, puis branchez-le à une
prise électrique murale.
About speaker cords
Use speaker cords, which are appropriate for the width of the room.
By deciding on the color or mark of the speaker cord to be connected to the plus (+) or minus (–)
connector, you can always be sure of connecting the cord correctly without mistaking plus or minus.
Cordons d’enceinte
Utilisez des cordons d’enceinte qui sont adéquats pour la largeur de la pièce.
En vous basant sur la couleur ou la marque du cordon d’enceinte à raccorder au connecteur plus (+) ou
moins (–), vous êtes sûr de toujours brancher correctement le cordon sans inverser le plus et le moins.

AUTO CAL MIC
4 GUI MODE
5
/ , /
6
/ , /
10
11
Press / repeatedly to select the auto calibration
English
12
Français
type, then press .
Parameter Explanation
Calibrating the appropriate speaker settings
3
4
5-14
9
/ ,
automatically (Auto Calibration)
You can set up the speakers to obtain the desired sound from all
connected speakers automatically by using the auto calibration
function.
Before you perform the auto calibration
During the calibration, the sound that comes out of the speakers is very
loud. Pay attention to the presence of children or to the effect on your
neighborhood.
Perform the measurement in a quiet environment to avoid the effect of noise
and get a more accurate measurement.
If there are any obstacles in the path between the optimizer microphone and
the speakers, the calibration cannot be performed correctly. Remove any
obstacle from the measurement area to avoid measurement error.
Install and connect the speakers and TV.
1
For detail, see front page.
Connect the supplied optimizer microphone to
2
the AUTO CAL MIC jack.
The AUTO CAL MIC jack is used for the supplied optimizer
microphone only. Do not connect other microphones. Doing
so may damage the receiver and the microphone.
Set up the optimizer microphone.
3
Place the optimizer microphone at your seating position. Use
a stool or tripod so that the optimizer microphone remains
at the same height as your ears. Orient the L end of the
optimizer microphone toward the front left speaker and the
R end of the optimizer microphone toward the front right
speaker.
On setting up the active subwoofer
When a subwoofer is connected, turn on the subwoofer and turn
up the volume beforehand. Turn the MASTER VOLUME knob
to just before the mid-point.
If you connect a subwoofer with the crossover frequency
function, set the value to maximum.
If you connect a subwoofer with an auto standby function, set it
to off (deactivated).
Performing auto calibration
The auto calibration function allows you to measure the following:
speaker connections, polarity of speakers, speaker distance,
speaker angle, speaker size, speaker level, frequency characteristics.
Connect a TV monitor to this receiver.
1
Refer to “3: Connecting the monitor” in the operating
instructions.
Turn on the receiver and the TV.
2
Switch the input of the TV so that an image of the menu is
displayed.
Press AMP.
3
The receiver can be operated using the remote.
Press GUI MODE.
4
After “GUI MODE ON” has appeared in the display window
of the receiver, “GUI MODE” appears.
Full Flat Makes the measurement of frequency from
Engineer Sets the frequency to one that matches that
Front Reference Adjusts the characteristics of all the
OFF Sets the auto calibration EQ to off.
The measurement results are saved.
Press .
13
The exit screen appears.
Press .
14
each speaker flat.
of the Sony listening room standard.
speakers to match the characteristics of the
front speaker.
When error codes appear
When “Save auto calibration (auto speaker setup)?” appears on
the TV screen in step 10, you can select whether to confirm the
warning (“Yes”) or not (“No”). Follow the instructions of the TV
screen when you select “Yes.” For details on warning and error
codes, see “Message list after auto calibration measurement” in “9:
Calibrating the appropriate speaker settings automatically (Auto
Calibration)” in the operating instructions.
Tip
The size of a speaker (LARGE/SMALL) is determined by the low characteristics.
The measurement results may vary, depending on the position of the optimizer
microphone and speakers, and the shape of the room. It is recommended that
you follow the measurement results. However, you can change those settings
in the Speaker settings menu. Save the measurement results first, then try to
change the settings if you want.
To select the language displayed on the TV
screen
You can select the language to be used for messages on the TV
screen from 4 languages.
English
Español
Français
Deutsch
For details, see “ System settings” in the operation instructions.
Setting up other components
You should set up each component so that take out sound is
output from speakers correctly when you play back a connected
component. The following case describes Sony components. Refer
to the operating instructions supplied with each component.
Sony Super Audio CD player
Select a suitable playback area (multi-channel or 2 channel).
Sound may come out from only the front speaker left/right when 2
channel is selected.
After the setting
The receiver is now ready to use. Refer to the operating instruction
supplied with the receiver for details.
Calibrage automatique aux réglages
appropriés (Auto Calibration)
Vous pouvez régler les enceintes pour obtenir automatiquement
le son souhaité depuis toutes les enceintes raccordées à l’aide de la
fonction de calibrage automatique.
Avant de commencer le calibrage
automatique
Pendant le calibrage, le son émis par les enceintes est très fort. Veillez à ce qu’il
n’y ait pas d’enfants à proximité et à ne pas perturber le voisinage.
Effectuez la mesure dans un environnement silencieux pour éviter l’effet de
bruit et obtenir une mesure plus précise.
S’il y a des obstacles dans la trajectoire entre le microphone d’optimisation
et les enceintes, le calibrage ne s’effectuera pas correctement. Pour éviter des
erreurs de mesure, enlevez tout obstacle de la zone de mesure.
Installez et raccordez les enceintes et le téléviseur.
1
Pour plus d’informations, voir la couverture.
Raccordez le microphone d’optimisation fourni à
2
la prise AUTO CAL MIC.
La prise AUTO CAL MIC ne doit être utilisée que pour le
microphone d’optimisation fourni. Ne raccordez pas un autre
microphone. Ceci pourrait endommager l’ampli-tuner et le
microphone.
Installez le microphone d’optimisation.
3
Placez le microphone d’optimisation à votre postion d’écoute.
Utilisez un tabouret ou un trépied pour que le microphone
d’optimisation soit à la même hauteur que vos oreilles.
Orientez l’extrémité L du microphone d’optimisation vers
l’enceinte avant gauche et l’extrémité R vers l’enceinte avant
droite.
Réglage du subwoofer amplifié
Si un subwoofer est raccordé, allumez-le et augmentez le volume
au préalable. Tournez le bouton MASTER VOLUME jusqu’un
peu avant le point central.
Si le subwoofer est doté d’une fonction de sélection de la
fréquence de recouvrement, choisissez la valeur maximale.
Si le subwoofer est doté d’une fonction de mise en veille
automatique, désactivez cette fonction.
Exécution du calibrage automatique
La fonction de calibrage automatique vous permet de déterminer
ce qui suit : la connexion, la polarité, la distance, l’angle, la taille, le
niveau des enceintes, les caractéristiques de la fréquence.
Raccordez un écran de téléviseur à cet ampli-
1
tuner.
Consultez « 3 : Raccordement de l’écran » dans le mode
d’emploi.
Allumez l’ampli-tuner et le téléviseur.
2
Sélectionnez la source d’entrée du téléviseur de façon que
l’image du menu soit affichée.
Appuyez sur AMP.
3
Vous pouvez commander l’ampli-tuner à l’aide de la
télécommande.
Appuyez sur GUI MODE.
4
Lorsque « GUI MODE ON » apparaît sur l’afficheur de
l’ampli-tuner, « GUI MODE » apparaît.
Appuyez plusieurs fois sur / pour
11
sélectionner « Yes » puis appuyez sur .
L’écran de sélection du type de calibrage s’affiche.
Appuyez plusieurs fois sur / pour sélectionner
12
le type de calibrage automatique, puis appuyez
sur .
Paramètre Explication
Full Flat Rend la mesure de fréquence de chaque
Engineer Sélectionne des caractéristiques de
Front Reference Règle les caractéristiques de toutes les
OFF
Les résultats de mesure sont sauvegardés.
Appuyez sur .
13
L’écran de fin s’affiche.
Appuyez sur .
14
enceinte plane.
fréquence correspondant aux normes d’un
auditorium Sony.
enceintes sur celles des enceintes avant.
Désactive l’EQ de calibrage automatique.
Lorsque des codes d’erreur s’affichent
Lorsque « Save auto calibration (auto speaker setup)? » s’affiche sur
l’écran du téléviseur à l’étape 10, vous pouvez choisir de confirmer
(« Yes ») ou non (« No ») l’avertissement. Suivez les instructions
affichées sur l’écran du téléviseur lorsque vous sélectionnez « Yes ».
Pour plus de détails sur les codes d’avertissement et d’erreur, voir
« Liste des messages après une mesure de calibrage automatique »
de « 9 : Calibrage automatique aux réglages appropriés (Auto
Calibration) » dans le mode d’emploi.
Conseil
La taille d’une enceinte (LARGE/SMALL) est déterminée par les caractéristiques
basses. Les résultats de mesure peuvent différer selon la position du microphone
d’optimisation et des enceintes et en fonction de la forme de la pièce. Il est
recommandé de suivre les résultats de mesure. Vous pouvez toutefois changer
ces paramètres dans le menu de paramétrage des enceintes. Sauvegardez les
résultats de mesure avant de changer éventuellement les réglages.
Pour sélectionner la langue affichée sur l’écran
du téléviseur
Vous pouvez sélectionner la langue à utiliser pour les messages sur
l’écran du téléviseur parmi 4 langues.
English
Español
Français
Deutsch
Pour plus de détails, voir «
d’emploi.
Paramètres System » dans le mode
Paramétrage d’autres appareils
Vous devez paramétrer chaque appareil de sorte que le son soit
sorti correctement des enceintes lorsque vous utilisez un appareil
raccordé. Le cas suivant décrit des appareils Sony. Reportez-vous
au mode d’emploi fourni avec chaque appareil.
Lecteur Super Audio CD Sony
Sélectionnez une plage de lecture adéquate (multicanaux ou 2
canaux). Il est possible que le son ne sorte que de l’enceinte avant
gauche/droit lorsque 2 canaux est sélectionné.
Après le paramétrage
L’ampli-tuner est maintenant prêt à l’usage. Reportez-vous au mode
d’emploi fourni avec l’ampli-tuner pour plus d’informations.
7
8
/ ,
/ , ,
13
The menu is displayed on the TV screen.
Press / repeatedly to select “ Settings,” then
5
press or .
The Settings menu list appears on the TV screen.
Press / repeatedly to select “Auto Calibration,”
6
then press or .
Press / repeatedly to select “Quick Setup,” then
7
press .
The screen on which you can select the item to be measurered
appears.
Press / repeatedly and to un-check the items
8
you do not want to measure, then press .
The confirmation screen, asking whether you are ready to
start measurement, appears.
Press to select “Start.”
9
The measurement starts in five seconds.
When the measurement ends, a beep sounds and the
measurement result appears on the TV screen.
Press to select “Next.”
10
Press / repeatedly to select “Yes,” then press
11
.
The selecting screen of the calibration type appears.
Le menu s’affiche sur l’écran du téléviseur.
Appuyez plusieurs fois sur / pour sélectionner
5
« Settings », puis appuyez sur ou .
La liste du menu Settings s’affiche sur l’écran du téléviseur.
Appuyez plusieurs fois sur / pour sélectionner
6
« Auto Calibration », puis appuyez sur ou .
Appuyez plusieurs fois sur / pour sélectionner
7
« Quick Setup », puis appuyez sur .
L’écran sur lequel vous pouvez sélectionner l’option à mesurer
apparaît.
Appuyez plusieurs fois sur / et sur pour
8
décocher les options que vous ne voulez pas
mesurer, puis appuyez sur .
L’écran de confirmation, vous demandant si vous êtes prêt à
commencer la mesure, apparaît.
Appuyez sur pour sélectionner « Start ».
9
La mesure commence dans les cinq secondes.
Lorsque la mesure se termine, un bip retentit et le résultat de
mesure s’affiche sur l’écran du téléviseur.
Appuyez sur pour sélectionner « Next ».
10
Sony STR-DA5400ES
K:\GB_FR\3875810121\3875810121STRDA5400ESUC\00COV—STRDA5400ESUC\120BCO.fm masterpage: Left
STR-DA5400ES
3-875-810-13(1)
Printed in Malaysia
120BCO.fm Page 154 Tuesday, July 8, 2008 3:44 PM
K:\GB_FR\3875810121\3875810121STRDA5400ESUC\00COV—
STRDA5400ESUC\010COV.fm
Master: Right
3-875-810-13(1)
STR-DA5400ES
©2008 Sony Corporation
STR-DA5400ES
3-875-810-13(1)
Operating Instructions GB
Mode d’emploi
FR
Multi Channel
AV Receiver
010COV.fm Page 1 Tuesday, July 8, 2008 3:43 PM
View the manual for the Sony STR-DA5400ES here, for free. This manual comes under the category receivers and has been rated by 2 people with an average of a 8.4.
This manual is available in the following languages: English. Do you have a question about the Sony STR-DA5400ES or do you need help?
Ask your question here
Product Images (3)

Sony STR-DA5400ES specifications
Below you will find the product specifications and the manual specifications of the Sony STR-DA5400ES.
The Sony STR-DA5400ES is a receiver that offers a range of features for enhanced audio performance. With its 7.1 channel audio output, this receiver allows for immersive surround sound experiences. Equipped with an equalizer, it enables users to fine-tune the audio frequencies to their liking.
In terms of connectivity, the Sony STR-DA5400ES utilizes a wired connection, providing a stable and reliable connection for audio devices. The receiver also includes a remote control, allowing convenient operation from a distance.
Measuring 430 x 430 x 175 millimeters and weighing 16,500 grams, this receiver has a substantial size and weight. When packaged, it measures 549 x 497 x 317 millimeters and weighs 21,000 grams. This information is important for those considering the physical dimensions and weight for placement and transportation purposes.
The Sony STR-DA5400ES supports both AM and FM radio bands, offering users the option to enjoy their favorite radio stations. Additionally, it includes Radio Data System (RDS) functionality, providing enhanced station information such as song titles and artist names.
To power the Sony STR-DA5400ES, it requires a power supply of 230V and operates on a frequency of 50/60Hz. These power requirements ensure compatibility with standard electrical systems in different regions.
In summary, the Sony STR-DA5400ES is a wired receiver that offers 7.1 channel audio output, AM and FM radio support with RDS functionality, and an equalizer for customizable sound. With its substantial size and weight, it provides a reliable and durable audio solution for enthusiasts seeking a versatile receiver for their audio setup.
Frequency range
20 — 20000 Hz
Supported radio bands
AM, FM
Connectivity technology
Wired
Dimensions (WxDxH)
430 x 430 x 175 mm
General
| Brand | Sony |
| Model | STR-DA5400ES | STR-DA5400ESB |
| Product | receiver |
| Language | English |
| Filetype | User manual (PDF), Installation Guide (PDF) |
Technical details
| Equalizer | Yes |
| Handheld remote control | Yes |
| Product color | Black |
Audio
| Frequency range | 20 — 20000 Hz |
| Total Harmonic Distortion (THD) | 0.09 % |
| Audio output channels | 7.1 channels |
Radio
| Supported radio bands | AM, FM |
| Radio Data System (RDS) | Yes |
Ports & interfaces
| Connectivity technology | Wired |
| I/O ports | 1 x AV\n2 x DM-Port \n5 x Audio In \n2 x Audio Out \n5 x A/V In\n1 x A/V Out \n1 x S-Video\n3 x Component Video In\n1 x Component Video Out\n1 x Multi-ch In\n1 x SW\n6 x Digital In\n1 x Digital Out\n6 x HDMI In\n2 x HDMI Out\n6 x Opt. IN \n1 x Opt. Out \n3 x Coax. |
Other features
| Dimensions (WxDxH) | 430 x 430 x 175 mm |
| Power requirements | 230V, 50/60Hz |
| HDMI ports quantity | 8 |
Weight & dimensions
Packaging data
| Package dimensions (WxDxH) | 549 x 497 x 317 mm |
| Package weight | 21000 g |
Power
| Power consumption (typical) | 480 W |
| Power consumption (standby) | 0.9 W |
show more
Frequently Asked Questions
Can’t find the answer to your question in the manual? You may find the answer to your question in the FAQs about the Sony STR-DA5400ES below.
How can I access the SE message for customers in the Sony STR-DA5400ES receiver manual?
To access the SE message for customers in the Sony STR-DA5400ES receiver manual, follow these steps:
1. Open the manual and navigate to page 3.
2. Look for the section titled «SEMeddelande till kunder» (SE message for customers).
3. In this section, you will find important information specific to countries where EU directives apply.
4. The section includes details about the manufacturer, Sony Corporation, and the authorized representative for EMC and product safety, Sony Deutschland GmbH.
5. It also provides information about service and warranty matters, which you can refer to in a separate service and warranty document.
6. Additionally, the section provides instructions on how to identify the model number of your receiver, which is located in the lower right corner of the front panel.
7. Please note that the manual is available in Swedish and Polish languages, so make sure to refer to the appropriate language version for the SE message.
By following these steps, you will be able to access the SE message for customers in the Sony STR-DA5400ES receiver manual.
Does the Sony STR-DA5400ES have an equalizer?
Yes, the Sony STR-DA5400ES has an equalizer. This allows users to adjust the audio settings and customize their listening experience according to their preferences.
What is the Total Harmonic Distortion (THD) of the Sony STR-DA5400ES?
The Total Harmonic Distortion (THD) of the Sony STR-DA5400ES is 0.09%. This means that the receiver produces a very low level of distortion in the audio output, resulting in a high-quality sound reproduction for the user.
How many audio output channels does the Sony STR-DA5400ES support?
The Sony STR-DA5400ES supports 7.1 channels of audio output. This allows for a surround sound experience, immersing the user in the audio and enhancing their overall entertainment enjoyment.
Does the Sony STR-DA5400ES support AM and FM radio bands?
Yes, the Sony STR-DA5400ES supports AM and FM radio bands. This enables users to listen to their favorite radio stations and stay updated with the latest news, music, and broadcasts.
How many HDMI ports does the Sony STR-DA5400ES have?
The Sony STR-DA5400ES has 8 HDMI ports. This provides the user with ample connectivity options, allowing for the connection of multiple devices such as gaming consoles, Blu-ray players, and more, all through a single receiver.
How do I switch the command mode of the receiver and remote control in the Sony STR-DA5400ES receiver?
To switch the command mode of the Sony STR-DA5400ES receiver and remote control, follow these steps:
1. Press and hold the «2CH/A.DIRECT» button on the receiver while turning on the power.
2. The display will show «COMMAND MODE [A V2]» if the command mode is set to «A V2». If it shows «COMMAND MODE [A V1]», the command mode is set to «A V1».
3. Press the «?/1» button on the remote control while holding down the «RM SET UP» button.
4. The «AMP» and «ZONE» buttons will start blinking.
5. Press the «AMP» button. The «ZONE» button will turn off, the «AMP» button will continue blinking, and the «SHIFT» button will light up.
6. Press the number button «1» or «2» while the «AMP» button is blinking.
7. Pressing «1» will set the command mode to «A V SYSTEM 1», and pressing «2» will set it to «A V SYSTEM 2». The «AMP» button will light up.
8. Press the «ENT/MEM» button.
9. The «AMP» button will blink twice, indicating that the command mode setting is complete.
By following these steps, you can switch the command mode of the Sony STR-DA5400ES receiver and remote control.
What is the weight of the Sony STR-DA5400ES?
The Sony STR-DA5400ES has a weight of 16500 g.
Can bluetooth devices of different brands be connected to each other?
Yes, bluetooth is a universal method that allows different devices equipped with bluetooth to connect to each other.
What is bluetooth?
Bluetooth is a way of exchanging data wirelessly between electronic devices via radio waves. The distance between the two devices that exchange data can in most cases be no more than ten metres.
What is HDMI?
HDMI stands for High-Definition Multimedia Interface. An HDMI cable is used to transport audio and video signals between devices.
When is my volume too loud?
A volume above 80 decibels can be harmful to hearing. When the volume exceeds 120 decibels, direct damage can even occur. The chance of hearing damage depends on the listening frequency and duration.
How can I best clean my receiver?
A slightly damp cleaning cloth or soft, dust-free cloth works best to remove fingerprints. Dust in hard-to-reach places is best removed with compressed air.
Wat is Dolby Atmos?
Dolby Atmos is a technology that ensures that the sound is reflected from the ceiling to where you are listening. This makes it possible to create a 5.1 effect with only 1 speaker.
Is the manual of the Sony STR-DA5400ES available in English?
Yes, the manual of the Sony STR-DA5400ES is available in English .
Is your question not listed? Ask your question here
L:\STR—
DA5400ES\0812_STR_RU\3875810711_RU\3875810611STRDA5400ESCEL\00COV-
010COV.fm Page 1 Tuesday, August 12, 2008 3:50 PM
STRDA5400ESUC\010COV.fm
Master: Right
3-875-810-71(1)
Multi Channel
AV Receiver
Инструкция по эксплуатации
STR-DA5400ES
©2008 Sony Corporation
3-875-810-71(1)
STR-DA5400ES
L:\STR—DA5400ES\0812_STR_RU\3875810711_RU\3875810611STRDA5400ESCEL\00COV—
masterpage: Left
STRDA5400ESUC\120BCO.fm
120BCO.fm Page 154 Tuesday, August 12, 2008 3:52 PM
STR-DA5400ES
3-875-810-71(1)
ПРЕДУПРЕЖДЕНИЕ
Во избежание пожара или
поражения электрическим током
нельзя подвергать аппарат
воздействиям дождя и влаги.
Cтpaнa-пpoизвoдитeль: Малайзия
Для уменьшения вероятности пожара не
закрывайте вентиляционные отверстия
аппарата газетами, скатертями, шторами и
Для покупателей в Европе
т.п. Не размещайте источники открытого
Утилизация
пламени, например, зажженные свечи, на
электрического и
аппарате.
электронного
оборудования
Нельзя устанавливать аппарат в тесных
(директива
местах как в книжном шкафу или углублении
применяется в
в стенке.
странах Евросоюза и
других европейских
Для уменьшения вероятности пожара или
странах, где
поражения электрическим током не
действуют системы раздельного
допускайте попадания капель или брызг и не
сбора отходов)
размещайте предметы с водой, такие как
вазы, на аппарате.
Утилизация
использованных
Так как штепсельная вилка используется для
элементов питания
отключения аппарата от сети, подсоедините
(применяется в
аппарат к легкодоступной сетевой розетке. В
странах Евросоюза и
случае если Вы заметите ненормальность в
других европейских
аппарате, немедленно отсоедините
странах, где
штепсельную вилку от сетевой розетки.
действуют системы раздельного
сбора отходов)
Не подвергайте батарейки или аппарат с
установленными в него батарейками
Уведомление для клиентов:
чрезмерному воздействию тепла, например
следующая информация относится
солнечного света, огня и т.п.
только к оборудованию,
продаваемому в странах, где
Аппарат не будет отключен от сети до тех
действуют директивы ЕС
пор, пока он будет оставаться
Производителем данного устройства
подсоединенным к розетке переменного
является корпорация Sony Corporation, 1-7-1
тока, даже если сам он при этом будет
Konan Minato-ku Tokyo, 108-0075 Japan.
выключен.
Уполномоченным представителем по
электромагнитной совместимости (EMC) и
Чрезмерное звуковое давление от
безопасности изделия является компания
наушников и головных телефонов может
Sony Deutschland GmbH, Hedelfinger Strasse
привести к потере слуха.
61, 70327 Stuttgart, Germany. По вопросам
обслуживания и гарантии обращайтесь по
адресам, указанным в соответствующих
документах.
2
RU

HDMI, логотип HDMI и High-Definition
Multimedia Interface являются торговыми
О данном руководстве
марками или зарегистрированными
• В данном руководстве приведены
торговыми марками HDMI Licensing LLC.
инструкции для модели STR-DA5400ES.
Проверьте номер Вашей модели в нижнем
XM Ready
®
является зарегистрированным
правом углу на передней панели.
товарным знаком XM Satellite Radio Inc. Все
• В данном руководстве для иллюстраций
права защищены.
используется модель для США/Канады,
если не указано другого. Любые отличия в
©2008 SIRIUS Satellite Radio Inc. “SIRIUS” и
эксплуатации четко указываются в
логотип собаки SIRIUS являются
руководстве, например, “Только
зарегистрированными товарными знаками
европейская модель”.
SIRIUS Satellite Radio Inc.
• Инструкции в данном руководстве
Данное изделие, использующее Neural-THX
®
относятся к регуляторам на прилагаемом
пульте дистанционного управления. Вы
Surround, изготавливается по лицензии
также можете использовать регуляторы на
Neural Audio Corporation и THX Ltd. Sony
ресивере, если они имеют такие же или
Corporation настоящим предоставляет
похожие названия, что и на пульте
пользователю неэксклюзивное
дистанционного управления.
непередаваемое ограниченное право на
использование данного изделия в
Об авторских правах
соответствии с действующими и
• “Neural-THX” и “neural THX”,
регистрируемыми патентами США и других
указываемые в Инструкции по
иностранных государств и технологий или
эксплуатации и отображаемые в окне
товарных знаков, принадлежащих Neural
дисплея и на экране меню GUI, означают
Audio Corporation и THX Ltd. “Neural
Neural-THX Surround.
Surround”, “Neural Audio”, “Neural” и “NRL”
являются товарными знаками и логотипами,
В этом ресивере используется Dolby* Digital
принадлежащими Neural Audio Corporation,
и Pro Logic Surround, а также DTS** Digital
THX является товарным знаком THX Ltd.,
Surround System.
который может быть зарегистрирован в
* Изготовлено по лицензии компании
некоторых юрисдикциях. Все права
Dolby Laboratories.
защищены.
Долби, Pro Logic, Surround EX и знак в
видe двойной буквы D являются
Тип шрифта (Shin Go R), установленный на
товарыми знаками компании Dolby
данном ресивере, предоставлен компанией
Laboratories.
MORISAWA & COMPANY LTD. Эти
** Изготовлено по лицензии следующих
наименования являются торговыми марками
патентов США: 5,451,942; 5,956,674;
компании MORISAWA & COMPANY LTD., и
5,974,380; 5,978,762; 6,226,616; 6,487,535 и
авторское право на шрифт также
других патентов, зарегистрированных и
принадлежит компании MORISAWA &
находящихся в стадии регистрации в США
COMPANY LTD.
и во всем мире. DTS является
зарегистрированным товарным знаком, и
iPod является торговой маркой Apple Inc.,
логотипы DTS символы DTS-HD и DTS-
зарегистрированной в США и в других
HD Master Audio являются товарными
странах.
знаками DTS, Inc. © 1996-2007 DTS, Inc.
Все другие торговые марки и
Все права защищены.
зарегистрированные марки являются
собственностью их соответствующих
В этом ресивере используется технология
владельцев. В данном руководстве символы
High-Definition Multimedia Interface
™ и ® не указываются.
(HDMI™).
продолжение следует
3
RU
Название Bluetooth и логотип принадлежат
компании Bluetooth SIG, Inc., и их любое
использование компанией Sony Corporation
осуществляется по лицензии.
Другие торговые марки и торговые названия
являются собственностью их
соответствующих владельцев.
“M-crew Server” является торговой маркой
Sony Corporation.
“BRAVIA” является товарным знаком Sony
Corporation.
4
RU

Оглавление
Подключение тюнера спутникового
Подготовка к
радио ….…….…….…….……..…….…….…..79
эксплуатации
Подготовка к прослушиванию
спутникового радио …….…………..…..80
1: Установка колонок ………..………….... 26
Выбор канала спутникового радио ….81
2: Подключение колонок ……..…………. 28
Предварительная настройка каналов
3: Подключение монитора ……….……… 30
спутникового радио …….…………..…..83
4a: Подключение аудиоустройств …... 32
Ограничение доступа к определенным
4b: Подключение видеоустройств …… 37
каналам (Parental Lock)
5: Подключение антенн ………..……..….. 47
(SIRIUS только) ………….……………….84
6: Подготовка ресивера и пульта
дистанционного управления ……….. 48
7: Отображение меню GUI на экране
Наслаждение
телевизора ….…….…….……..…….……... 50
окружающим звучанием
8: Настройка колонок ………..…….……... 51
Воспроизведение с 2-канальным
9: Автоматическая калибровка
звучанием …………..…….…….……..……..90
настроек соответствующей колонки
(Auto Calibration) …………..…….……... 53
Воспроизведение с многоканальным
окружающим звучанием …..…….…..91
Руководство по использованию
экранного дисплея ….……..…….……... 61
Наслаждение эффектом окружающего
звучания для музыки ……………….…..95
Наслаждение эффектом окружающего
Воспроизведение
звучания для кинофильмов ………….97
Воспроизведение звука/изображений от
устройства, подключенного к
Использование
ресиверу ….……..…….…….…….……..….. 64
Воспроизведение звука/изображений от
многозональных функций
устройства, подключенного к
Что вы можете сделать с
DIGITAL MEDIA PORT ………….... 66
многозональной функцией ..…….…101
Управление TDM-iP1/iP50/TDM-NC1 с
Выполнение многозонового
использованием меню GUI
подключения ….…….……..…….…….…102
ресивера ….……..…….…….…….……..….. 68
Настройка колонок в зоне 2 …………..106
Переключение настройки зоны на
пульте дистанционного
Настройка
управления .………..…………..……..……107
Прослушивание радиопередач
Управление ресивером из другой зоны
FM/AM …………..……………………………. 72
(управление ZONE 2/ZONE 3) ….108
Предварительная настройка
радиостанций FM/AM ………….……… 75
Прослушивание передач спутникового
радиоприемника (Только модель
для США/Канады) ……..…….……..….. 77
продолжение следует
5
RU

Использование других
Использование пульта
функций
дистанционного
Использование функции “BRAVIA”
управления
Sync ……….……..……….…………………….110
Управление каждым устройством с
Включение мониторов, подающих на
помощью пульта дистанционного
выход видеосигналы HDMI ……….114
управления .……..…….…….……..…….. 150
Переключение между цифровым и
Программирование пульта
аналоговым звучанием ……………….114
дистанционного управления ……... 153
Воспроизведение звука/изображения
Последовательное автоматическое
других входов (Input Assign) ………115
выполнение нескольких команд
Использование таймера
(Выполнение макрокоманд) …….. 157
отключения ……….………..…………..…118
Настройка кодов дистанционного
Наслаждение эффектом окружающего
управления, которые не сохранены в
звучания при небольшой
памяти пульта дистанционного
громкости ……….…….……..…….…….…119
управления .……..…….…….……..…….. 159
Запись с использованием
Удаление всего содержимого памяти
ресивера ………….…….……..…….…….…120
пульта дистанционного
Переключение режима управления на
управления .……..…….…….……..…….. 161
ресивере и пульте дистанционного
управления .…….………..…………………122
Использование подключения к
Дополнительная
двухканальному усилителю ……….123
информация
Глоссарий ………….…….……..…….…….….. 163
Меры предосторожности ………..…….. 167
Регулировка настроек
Поиск и устранение
Использование меню настроек ………125
неисправностей ….……..…….…….….. 169
Auto Calibration …..…….………..…………..126
Технические характеристики ………....176
Настройки Speaker ……….…….……..……128
Алфавитный указатель …………..……...179
Настройки Surround …………..……..……133
Настройки EQ …………..……………….……134
Настройки Multi Zone ………………….…135
Настройки Audio ……………..…….…….…137
Настройки Video ………………..…………..138
Настройки HDMI …………………..……….141
Настройки System ……..……..…….…….…143
Эксплуатация без подключения к
телевизору .…….…….……..…….…….…143
6
RU
Sony STR-DA5400ES Quick Setup Guide
Quick Setup Guide
2 pages
en
fr
Operating Instructions
322 pages
en
fr
Sony STR-DA5400ES Specification
The Sony STR-DA5400ES is a high-performance A/V receiver designed for audiophiles and home theater enthusiasts, offering a seamless blend of advanced technology and robust functionality. It features a 7.1 channel configuration with a power output of 120 watts per channel, delivering immersive sound quality. The receiver supports a wide range of audio formats, including Dolby TrueHD and DTS-HD Master Audio, ensuring high-definition audio playback. Connectivity options are extensive, with six HDMI inputs and two outputs, allowing for multiple high-definition multimedia connections and easy switching between devices. The STR-DA5400ES includes an Ethernet port for network connectivity, enabling access to Internet radio and other online content. It also supports DLNA for streaming media from compatible devices. The receiver is equipped with Sony’s Digital Cinema Auto Calibration, which optimizes sound output based on room acoustics using an included microphone. For video, it offers 1080p upscaling and deep color support, enhancing picture quality for high-definition displays. The interface is user-friendly, with an intuitive on-screen menu system for easy navigation and setup. Additionally, the receiver is designed with custom installation in mind, featuring IR input, RS-232C port, and 12V triggers for integration with home automation systems. The build quality is robust, with a solid chassis that minimizes vibration and enhances sound purity. Overall, the Sony STR-DA5400ES represents a versatile, high-quality solution for sophisticated home entertainment systems, providing superior audio and video performance along with extensive connectivity and customization options.
To perform a factory reset on the Sony STR-DA5400ES, press and hold the ‘POWER’ button while pressing the ‘TONE MODE’ and ‘2CH/A.DIRECT’ buttons simultaneously. Release all buttons when ‘ALL CLEAR’ appears on the display.
First, check the speaker connections and ensure they are properly connected to the receiver. Verify that the correct input is selected and the volume is turned up. Also, ensure that the receiver is not in mute mode.
The Sony STR-DA5400ES does not have built-in Bluetooth. You would need to use an external Bluetooth adapter connected to one of the audio inputs to stream audio from Bluetooth devices.
To clean the Sony STR-DA5400ES, use a soft, dry cloth to wipe the exterior. Avoid using any liquid or aerosol cleaners. Regularly check and clean the ventilation openings to prevent dust buildup.
The Sony STR-DA5400ES does not support direct smartphone app control. However, if connected to a smart home system or network that supports remote control, you might be able to use a compatible app for basic operations.
Optimal settings can vary based on your room and speaker setup. Generally, running the auto-calibration feature (using the supplied microphone) will set the best surround sound parameters. Fine-tuning may be needed based on personal preferences.
The Sony STR-DA5400ES does not have updatable firmware via user-accessible methods. Ensure that your receiver is running its intended software version by checking with Sony support.
Check if the dimmer function is enabled and adjust it accordingly. If the display still does not work, try a power reset by unplugging the unit for a few minutes. If the problem persists, professional service may be needed.
To set up multi-zone audio, connect additional speakers to the Zone 2 or Zone 3 outputs. Configure the zones using the receiver’s setup menu to control audio distribution to different areas.
Yes, the Sony STR-DA5400ES can be integrated with a modern home theater system. Ensure all components like HDMI connections, audio outputs, and input sources are compatible and correctly configured.