
#1
OFFLINE
zhuk4038
- Пол:Мужчина
- Город:Иркутск
- Интересы:Основной интерес — работа. А в качестве нагрузки — редкая рыбалка, походы с металлоискателем, зимой катание на кайте.
- Из:Иркутск
Отправлено 18 Март 2013 — 13:39
Может быть у кого-нибудь есть полная инструкция по стойке SYNTEC? Можно на английском.
В свою очередь, готовы поделиться своими знаниями, хоть их и не много.
Прикрепленные изображения
-
0
- Наверх
#2
OFFLINE
Трофимыч
Трофимыч
- Пол:Мужчина
- Из:Екатеринбург
Отправлено 18 Март 2013 — 14:52
-
0
- Наверх
#3
OFFLINE
zhuk4038
zhuk4038
- Пол:Мужчина
- Город:Иркутск
- Интересы:Основной интерес — работа. А в качестве нагрузки — редкая рыбалка, походы с металлоискателем, зимой катание на кайте.
- Из:Иркутск
Отправлено 19 Март 2013 — 06:06
Трофимыч.
Спасибо за труд и за мануал. Правда, такой есть (более древней версии). Все равно спасибо!
А описание настроек с номерами параметров случайно нет?
-
0
- Наверх
#4
OFFLINE
zhuk4038
zhuk4038
- Пол:Мужчина
- Город:Иркутск
- Интересы:Основной интерес — работа. А в качестве нагрузки — редкая рыбалка, походы с металлоискателем, зимой катание на кайте.
- Из:Иркутск
Отправлено 20 Март 2013 — 05:38
На английском есть брошура. Там 75 страниц.
Трофимыч.
Нашел полное описание стойки SYNTEC (на английском) со всеми кодами, регистрами и т.д.
-
0
- Наверх
#5
OFFLINE
kukscha
kukscha
- Пользователи
- 5 сообщений
Абитуриент
- Из:С-Петербург
Отправлено 19 Ноябрь 2013 — 11:38
здравствуйте.
не подскажете,где можно найти мануалы на стойку на русском языке
-
0
- Наверх
#6
OFFLINE
Трофимыч
Трофимыч
- Пол:Мужчина
- Из:Екатеринбург
Отправлено 19 Ноябрь 2013 — 15:53
-
0
- Наверх
#7
OFFLINE
MiG
MiG
- Пол:Мужчина
- Из:Россия , Ковров
Отправлено 19 Ноябрь 2013 — 18:31
-
0
- Наверх
#8
OFFLINE
kserg22
kserg22
- Пользователи
- 6 сообщений
Абитуриент
- Из:Шатурторф
Отправлено 06 Май 2014 — 23:31
MiG Большое спасибо. С настройками разабрался. Можно ли глянуть краткий мануальчик, а то уменя перерывчик больше года. До этого год работал на ARTISMAN 3000 AVT.
-
0
- Наверх
#9
OFFLINE
MiG
MiG
- Пол:Мужчина
- Из:Россия , Ковров
Отправлено 13 Май 2014 — 15:35
Admin закинул несколько официальных мануалов в файловый архив форума -ссылка>>
Сообщение отредактировал MiG: 13 Май 2014 — 15:37
-
0
- Наверх
#10
OFFLINE
alex.usol-irk
alex.usol-irk
- Пользователи
- 1 сообщений
Абитуриент
- Пол:Мужчина
- Из:Иркутск
Отправлено 12 Декабрь 2016 — 11:34
Уважаемые! Есть у кого пошаговая инструкция для чайников, как управлять стойкой синтек) Как выставить рабочий ноль, калибровка фрез(6 штук), загрузка уп через сетку и с самого станка.
-
0
- Наверх
#11
OFFLINE
ИванК
ИванК
- Пользователи
- 6 сообщений
Абитуриент
- Пол:Мужчина
- Из:С-Петербурга
Отправлено 22 Июнь 2017 — 04:49
Все программы и не вся документация здесь http://vnsyntec.com….e-download.html.
Кто знает, как загрузить систему из образа типа: https://drive.google…ZU9KY1BRT0ZhQnM
Спасибо Вьетнаму.
-
0
- Наверх
#12
OFFLINE
NeoN
Отправлено 12 Февраль 2018 — 16:24
Все зависит от контроллера…
Скаченный образ распаковывается на пустую флешку.
Втыкаем в Syntec и включаем стойку, должен пойти процесс восстановления
-
0
- Наверх
#13
OFFLINE
ludoed777
ludoed777
- Пол:Мужчина
- Из:Тамбовская область, город Котовск
Отправлено 12 Апрель 2018 — 22:10
есть бета версия мануала на русском языке.
http://mir-cnc.narod…/syntec_rus.rar
-
0
- Наверх
#14
OFFLINE
mihams
Отправлено 12 Апрель 2018 — 22:28
syntec_cnc_application_manual такой последней версии есть?
-
0
- Наверх
#15
OFFLINE
ludoed777
ludoed777
- Пол:Мужчина
- Из:Тамбовская область, город Котовск
Отправлено 15 Апрель 2018 — 01:47
syntec_cnc_application_manual такой последней версии есть?
есть syntec_cnc_application_manual_v10.0.pdf на английском
еще есть синтек инструкция по программированию на русском
так же есть Общие сведения о контроллере EZ 4012, но там смесь русского и китайского-кнопки обозначаются иероглифами, а все пояснения на русском
-
0
- Наверх
#16
OFFLINE
Dozer009
Dozer009
- Пользователи
- 3 сообщений
Абитуриент
- Из:Йошкар-ола
Отправлено 26 Май 2018 — 23:30
есть syntec_cnc_application_manual_v10.0.pdf на английском
еще есть синтек инструкция по программированию на русском
так же есть Общие сведения о контроллере EZ 4012, но там смесь русского и китайского-кнопки обозначаются иероглифами, а все пояснения на русском
КАМИ мануалшина)))
-
0
- Наверх
#17
OFFLINE
Резников Дмитрий
Резников Дмитрий
- Пол:Мужчина
- Из:Кстово Нижегородская обл.
Отправлено 09 Июнь 2018 — 16:20
добра всем) а есть ли в России служба поддержки syntec?
-
0
1. 3. В графе «подпись», «интересы» и «от куда» запрещено указывать информацию, которая может относиться к рекламе.
- Наверх
#18
OFFLINE
espirantomail
Отправлено 24 Сентябрь 2018 — 14:58
-
1
- Наверх
#19
OFFLINE
Андрей Кулагин
Андрей Кулагин
- Пол:Мужчина
- Город:Ярославль
-
Интересы:По профессии я фрезеровщик — универсал 5 разряда
По образованию инженер- механик
Мое хобби ремонт станков ЧПУ - Из:Ярославля(до Москвы 3,5 часа лету)
Отправлено 22 Апрель 2020 — 21:03
Вечер добрый
Случаем никто из уважаемых не имеет мануала на этот синтек?
Конкретно ищу запуск инициализации калибровки инструмента (разница высот) стационарным датчиком
Сообщение отредактировал Андрей Кулагин: 22 Апрель 2020 — 21:05
-
0
Жизнь надо прожить так, чтобы Дьявол был доволен, а Бог особых претензий не имел.
Теперь я freelancer , кому что нужно — стучитесь в скайп ingener20092
- Наверх
#20
OFFLINE
MiG
MiG
- Пол:Мужчина
- Из:Россия , Ковров
Отправлено 22 Апрель 2020 — 21:09
Вечер добрый
Конкретно ищу запуск инициализации калибровки инструмента (разница высот) стационарным датчиком
Тесть запуск измерения инструмента? Кнопка Autotool. Активирует измерение после смены инструмента.
Сообщение отредактировал MiG: 22 Апрель 2020 — 21:10
-
0
- Наверх
1622100000
Syntec
Инструкции по Syntec собраны в сети для скачивания и ознакомления. Ознакомление с инструкциями бесплатно. Инструкции не подвергались редактированию и представлены как есть.
Прикрепленные файлы
1
Syntec Инструкция по программированию фрезеровка.pdf
Дата: 17.09.2014 Версия 1.03 (Бета) Язык: Русский
24.36 МБ
2
Руководство по применению.pdf
789.06 КБ
3
syntec_cnc_application_manual_v10.0.pdf
1.32 МБ
4
Mill Operation Manual-EN.pdf
6.4 МБ
5
PLC Editor Manual-EN V1.3.pdf
188.89 КБ
6
SYNTEC CNC Application ManualV10.0.pdf
1.28 МБ
7
MacroSyntec.doc
780.5 КБ
8
Lathe Operation Manual-EN V8.0.pdf
477.91 КБ
9
Mill Operation Manual-EN V8.0.pdf
505.91 КБ
10
Mill Programming Manual-EN V7.0.pdf
509.56 КБ
11
Lathe Programming Manual-EN V7.7.pdf
938.54 КБ
12
Mill Conversational Manual-EN V7.0.pdf
2.23 МБ
13
ftp-klient.rar
6.13 МБ
14
syntec_manual.rar
Фото инструкции
30.88 МБ
15
Стойка_Syntec_EZ.pdf
593.75 КБ
16
Syntec CNC Alarm Manual.pdf
Ошибки с стойке Syntec
2.44 МБ
-
Уже зарегистрированы? Войти
-
Регистрация
Друзья! Форум не является новостной площадкой, поэтому прошу не размещать в разговорных разделах копипасту из инета и новости из разряда «сделаноунас». То, что где-то что-то поплыло, полетело, зажужжало и, наконец, куда-то залезло, можно обсудить на соответствующих новостных и развлекательных ресурсах.
Информация о файле
Руководство оператора,программирование фрезерной обработки и Стойка Syntec EZ4 руководство.

SYNTEC
Mill Controller Manual
By: SYNTEC
(For EZ Series)
Date: 2010/9/14
Version: 1.0

Mill Operation Manual-EN FOR EZ(5Keys)
Version edit record

Contents
1 CNC MILLING CONTROLLER INTERFACE ……………………………………. 1
1.1 CNC System Configuration ……………………………………………………………………………………………. 1
1.2 Screen Sections ……………………………………………………………………………………………………………… 2
1.3 Main Menu Selections ……………………………………………………………………………………………………. 3
1.3.1 F1:Position ………………………………………………………………………………………………………….. 4
1.3.1.1 F1:Coor. Switch ………………………………………………………………………………………….. 5
1.3.1.2 F2:1/2 Coor. ……………………………………………………………………………………………….. 5
1.3.1.3 F3:Clear Coor. …………………………………………………………………………………………….. 5
1.3.1.4 F4:Clear All Relative …………………………………………………………………………………… 6
1.3.1.5 F5:Workpiece Coor. …………………………………………………………………………………….. 6
1.3.1.5.1 F1:Coor. Latched …………………………………………………………………………………….. 7
1.3.1.5.2 F2:Rel. Latched ………………………………………………………………………………………. 7
1.3.1.5.3 F3:Aux. Latched ……………………………………………………………………………………… 7
1.3.1.5.4 F5:Middle Point Func. ……………………………………………………………………………… 7
1.3.2 F2:Program …………………………………………………………………………………………………………. 8
1.3.2.1 F1:Insert Cycle ……………………………………………………………………………………………. 9
1.3.2.2 F2:Delete Line…………………………………………………………………………………………….. 9
1.3.2.3 F3:Edit Cycle ……………………………………………………………………………………………. 10
1.3.2.4 F4:Simulation ……………………………………………………………………………………………. 11
1.3.2.4.1 F1: STEP …………………………………………………………………………………………….. 11
1.3.2.4.2 F2:Continue ………………………………………………………………………………………….. 11
1.3.2.4.3 F3:Zoom ………………………………………………………………………………………………. 12
1.3.2.4.4 F4:Graph reset ………………………………………………………………………………………. 12
1.3.2.4.5 F5:Abort ………………………………………………………………………………………………. 12
1.3.2.4.6 F5:Simu. Setting ……………………………………………………………………………………. 12
1.3.2.5 F5:File Manager ………………………………………………………………………………………… 13
1.3.2.5.1 F1:New File ………………………………………………………………………………………….. 14
1.3.2.5.2 F2:Copy File …………………………………………………………………………………………. 14
1.3.2.5.3 F3:Delete File ……………………………………………………………………………………….. 14
1.3.2.5.4 F4:Import ……………………………………………………………………………………………… 15
1.3.2.5.5 F5:Export ……………………………………………………………………………………………… 16
1.3.2.5.6 F1:RS232 Import …………………………………………………………………………………… 17
1.3.2.5.7 F2 :RS232 Export …………………………………………………………………………………….. 19
1.3.2.5.8 F3:Network Import …………………………………………………………………………………… 20

1.3.2.5.9 F4:Multi Import ……………………………………………………………………………………….. 20
1.3.2.5.10 F5:Multi Export ………………………………………………………………………………………. 20
1.3.2.6 EDIT ………………………………………………………………………………………………………….. 20
1.3.2.6.1 EDIT sub function “F1 : Search” ……………………………………………………………….. 21
1.3.2.6.2 EDIT sub function “F2 : Replace” ……………………………………………………………… 22
1.3.2.6.3 EDIT sub function “F3” : Go To Line” ……………………………………………………….. 23
1.3.2.6.4 EDIT sub function “F4”: copy line”……………………………………………………………. 23
1.3.2.6.5 EDIT sub function “F5”: Insert line” ………………………………………………………….. 23
1.3.2.7 F2:Teach ………………………………………………………………………………………………….. 24
1.3.2.7.1 F1:Rapid Teach …………………………………………………………………………………….. 24
1.3.2.7.2 F2:Line Teach ………………………………………………………………………………………. 24
1.3.2.7.3 F3:Arc Teach ………………………………………………………………………………………… 24
1.3.2.7.4 F4:Cancel Middle ………………………………………………………. …………………………. 25
1.3.2.7.5 F5:Radius Teach ……………………………………………………………………………………. 25
1.3.2.7.6 F1:Delete Line ………………………………………………………………………………………. 25
1.3.2.7.7 F2:Coord Switch …………………………………………………………………………………… 25
1.3.2.7.8 F3:Point Teach ……………………………………………………………………………………… 25
1.3.3 F3:DlgInput (ONLY for 940M) ……………………………………………………………………………. 26
1.3.4 F4:Monitor ………………………………………………………………………………………………………… 26
1.3.4.1 F1:Coor ……………………………………………………………………………………………………. 26
1.3.4.2 F2:Graph Adjust ………………………………………………………………………………………… 27
1.3.4.2.1 F1:Zoom ………………………………………………………………………………………………. 27
1.3.4.2.2 F2:Graph Reset ……………………………………………………………………………………… 27
1.3.4.2.3 F5:Simu Setting …………………………………………………………………………………….. 27
1.3.4.3 F3:MDI Input ……………………………………………………………………………………………. 28
1.3.4.4 F4:SETTING …………………………………………………………………………………………….. 29
1.3.4.5 F5:Tool Setting …………………………………………………………………………………………. 30
1.3.4.6 F5:Work Record ………………………………………………………………………………………… 31
1.3.5 F5:Alarm…………………………………………………………………………………………………………… 32
1.3.5.1 F1:Actual………………………………………………………………………………………………….. 33
1.3.5.2 F2:History ………………………………………………………………………………………………… 33
1.3.5.3 F5: Save ……………………………………………………………………………………………………… 33
1.3.6 F1:Parameter ……………………………………………………………………………………………………… 34
1.3.7 F2:Diagnosis ……………………………………………………………………………………………………… 35
1.3.7.1 F1:PLC State …………………………………………………………………………………… ……….. 36
1.3.7.2 F2:System Data …………………………………………………………………………………………. 37
1.3.7.3 F3:Global Variable …………………………………………………………………………………….. 38
1.3.7.4 F4:Coord Variable ……………………………………………………………………………………… 39

1.3.7.5 F5:System Manager …………………………………………………………………………………… 40
1.3.8 F3:Guidance ……………………………………………………………………………………………………… 41
2 MACHINE OPERATION PANEL …………………………………………………… 42
2.1 2nd machine operation panel …………………………………………………………………………………………. 42
2.1.1 POWER ON ………………………………………………………………………………………………………… 42
2.1.2 POWER OFF ……………………………………………………………………………………………………….. 42
2.1.3 Emergency STOP …………………………………………………………………………………………………. 42
2.1.4 Home mode and Home function ……………………………………………………………………………… 42
2.1.5 Continues JOG (Rapid JOG) ………………………………………………………………………………….. 42
2.1.6 Incremental JOG …………………………………………………………………………………………………… 43
2.1.7 MPG JOG ……………………………………………………………………………………………………………. 43
2.1.8 AUTO mode NC file execute …………………………………………………………………………………. 43
2.1.9 MDI mode single block execute ……………………………………………………………………………… 43
2.1.10 MPG Simulation …………………………………………………………………………………………………… 44
2.1.11 Dry Run ………………………………………………………………………………………………………………. 44
2.1.12 Single block …………………………………………………………………………………………………………. 44
2.1.13 Option Stop………………………………………………………………………………………………………….. 45
2.1.14 Option Skip………………………………………………………………………………………………………….. 45
2.1.15 Spindle control …………………………………………………………………………………………………….. 45
2.1.16 Working led …………………………………………………………………………………………………………. 46
2.1.17 Working Liquid ……………………………………………………………………………………………………. 46
2.1.18 Aux table backward ………………………………………………………………………………………………. 46
2.1.19 Aux table forward …………………………………………………………………………………………………. 46
2.2 Text key description: …………………………………………………………………………………………………… 47
3 HOW TO OPERATE SYNTEC 900ME …………………………………………… 49
3.1 Manual function (JOG, INC_JOG, MPG) …………………………………………………………………….. 50
3.2 HOME ………………………………………………………………………………………………………………………… 51
3.3 Open a file (EDIT / FLOPPY / RS232) …………………………………………………………………………. 52
3.4 Tool setting (G40/G41/G42, G43/G44/G49) ………………………………………………………. ………….. 53
3.5 Tool Length measurement (G43/G44/G49) ………………………………………………………. …………… 54
3.6 Setting the Workpiece origin offset value (G54…G59)……………………………………………………. 55

3.7 Manual Data Input (MDI) ……………………………………………………………………………………………. 56
3.8 Assigned an executing NC file (AUTO) …………………………………………………………………………. 57
3.9 Graphic Simulation ……………………………………………………………………………………………………… 58
3.10 How to check NC file in SYNTEC controller…………………………………………………………….. 59
3.11 Auto Center…………………………………………………………………………………………………………….. 60
3.11.1 Manual Center ……………………………………………………………………………………………………… 60
3.11.2 Auto center operation ……………………………………………………………………………………………. 62
3.12 Z-axis Auto Tool ……………………………………………………………………………………………………… 64
3.13 RS232 FUNCTION …………………………………………………………………………………………………. 69
3.14 DNC Function …………………………………………………………………………………………………………. 71
3.15 The software of SYNTEC controller replace the software of DNC to execute RS232
function 73

1 CNC Milling Controller Interface
1.1 CNC System Configuration
-1-

1.2 Screen Sections
The screen of controller is shown as followings:
Meanings For Fields on the Display:
(1)Program Number
(2)Title
(3)Time
(4)Date
(5)Data Input
(6)Hint
(7)Status
(8)Function Key Switch
-2-

1.3 Main Menu Selections
The following diagram is the main menu selections for SNC Mill
controller. To operate SNC Milling controller, users simply make the
selections by pressing function keys, F1~F5 located on the bottom of the
screen.
-3-

1.3.1 F1:Position
This selection displays coordinate settings of current position. It can
also be used to reset the position of relative coordinate. Pressing function
key, F1, under the main menu to enter this selection (Note:This is the first
screen when the system is booted up)
Meaning of fields on the display——
X:X axis coordinate.
Y:Y axis coordinate.
Z:Z axis coordinate.
Feedrate:Feedrate of cutting tool at each machining, mm per minute (mm/min).
Spindle:RPM of spindle speed.
Machine(Relative coordinate of working platform)
The current position of cutting tool relative to working platform is shown as machine
coordinate on the display.
Relative
The current position of cutting tool relate to the previous location.
Absolute(Programming Coordinate)
The current position of the origin of user defined coordinate is shown as an absolute
position on the display.
Distance To Go:The distance of the cutting tool that need to move to the next position
show on position(+) and negative(-) direction.
-4-

Function key selections:
1.3.1.1 F1:Coor. Switch
Function:Switch Coordinate Display。
Operation:Under the Position submenu, whenever users press F1 key, the values and
coordinate on the left corner of the display will toggle among the four different
coordinates with bigger fonts as shown in the following figure:
1.3.1.2 F2:1/2 Coor.
Function: Set the center point of work piece as coordinate origin.
Operation: Under the Position submenu, when the message line shows “X Input”(or
“Y Input” or “Z Input”), press “F2 1/2 Coordinating” and the origin of the coordinate
will move to the center point of work piece.
1.3.1.3 F3:Clear Coor.
Function:Reset the value of X(or Y or Z) axis relative coordinate to zero. (No effect
on other axes)
Operation:Under the Position submenu, when the message line shows “X Input”(or
“Y Input” or “Z Input”), press F3 to reset the value of X(or Y or Z) axis relative
coordinate to zero.
-5-

1.3.1.4 F4:Clear All Relative
Function:Reset XYZ relative coordinate to zero.(No effect on other coordinates)
Operation :Under the Position submenu, pressing “F4” will reset XYZ relative
coordinate to zero.
1.3.1.5 F5:Workpiece Coor.
Function:Relative to machine coordinate setting for G54~G59.
Operation:Under the Position submenu, press «F5» key and the following screen will
show up. The users can begin to set the auto machine coordinate settings of G54~G59.
(The system needs to be in Ready Status)
1. “External Shift” : operator can set the all coordinate
G54..G59 at the same time .
2. CNC default G54 ,if user don‟t set any G54..G59 in the NC
file
-6-

1.3.1.5.1 F1:Coor. Latched
Set the current machine coordinate to the input box
1.3.1.5.2 F2:Rel. Latched
Set the current relative coordinate to the input box
1.3.1.5.3 F3:Aux. Latched
Set the current relative coordinate to the input box
1.3.1.5.4 F5:Middle Point Func.
-7-

1.3.2 F2:Program
This selection provides users with program file management and
editing. With a full screen editor, users can use arrow keys(↑、↓、←、→)
to move the cursor to anywhere on the screen for editing purpose. Press F2
under the main menu to enter this selection. The full screen editor is shown
as follows:
-8-

Program Sub menu Key Selections:
1.3.2.1 F1:Insert Cycle
Function:Insert a block or cycle by conversation
Operation:Under Program submenu, press F1 to insert a line or cycle before cursor
position.(See Graphic Input Interface(900ME) User Guide)
1.3.2.2 F2:Delete Line
Function:Delete a line at cursor position.
operation: Under Program submenu, press F2 to delete a line where the cursor is
located.
-9-

1.3.2.3 F3:Edit Cycle
Function:Edit an old block or cycle by conversation input
Operation: Under Program submenu, press F3 to edit a line where the cursor is
located.
-10-

1.3.2.4 F4:Simulation
Function: Simulating the workpiece program can prove the accuracy of the editing
program.
Operation:Under Program submenu, press F4
F4 “simulation” sub Key Selections:
1.3.2.4.1 F1: STEP
Function: To simulate NC files STEP by STEP
Operation: Under Program submenu, press F4”Simulation” and then F1”Step” .The
operator can use this function ,to check NC file STEP by STEP
1.3.2.4.2 F2:Continue
Function: To simulation NC file one time .
Operation: Under Program submenu, press F4 “Simulation” and then
F2”Continue” .The operator can use this function to check NC file whole
picture ,when push button.
-11-

1.3.2.4.3 F3:Zoom
Function: To enlarge the workpiece graph.
Operation: Under Program submenu, press F5 and then F3.The operator can use the
“←”,”↑”,”→”, ”↓” cursor to move the frame to the determined area. And use
“PageUp” “PageDn” to Enlarge this area .
1.3.2.4.4 F4:Graph reset
Function: To recover the zoomed workpiece graph.
1.3.2.4.5 F5:Abort
Function: To abort simulation action
1.3.2.4.6 F5:Simu. Setting
Function: To set simulation parameter
Operation: Under Program submenu, press and then F5.
Simulation Parameter description :
Path color : User can select cutting path color by this parameter
Cursor color : User can select cutting point color by this parameter
Drawing mode : User can select simulation plane by this parameter
Vertical / Horizontal angle : when XYZ drawing mode ,user can select 3D View angle
by these 2 parameter
Window range :
Mode (0: simulation ,1: direct draw)
-12-
0 : When operator change his main screen to F4”Monitor” ,CNC would
automatically simulation at that screen
1 : When operator change his main screen to F4”Monitor” ,CNC would not
simulation at that screen but direct drawing the cutting cursor .
Xmin/Xmax, Ymin/Ymax ,Zmin/Zmax :
When “direct draw” mode ,operator must set draw window by these
parameter ,the best way : after simulation use simulation result which is
located at the top of this screen to X,Y,Z range .
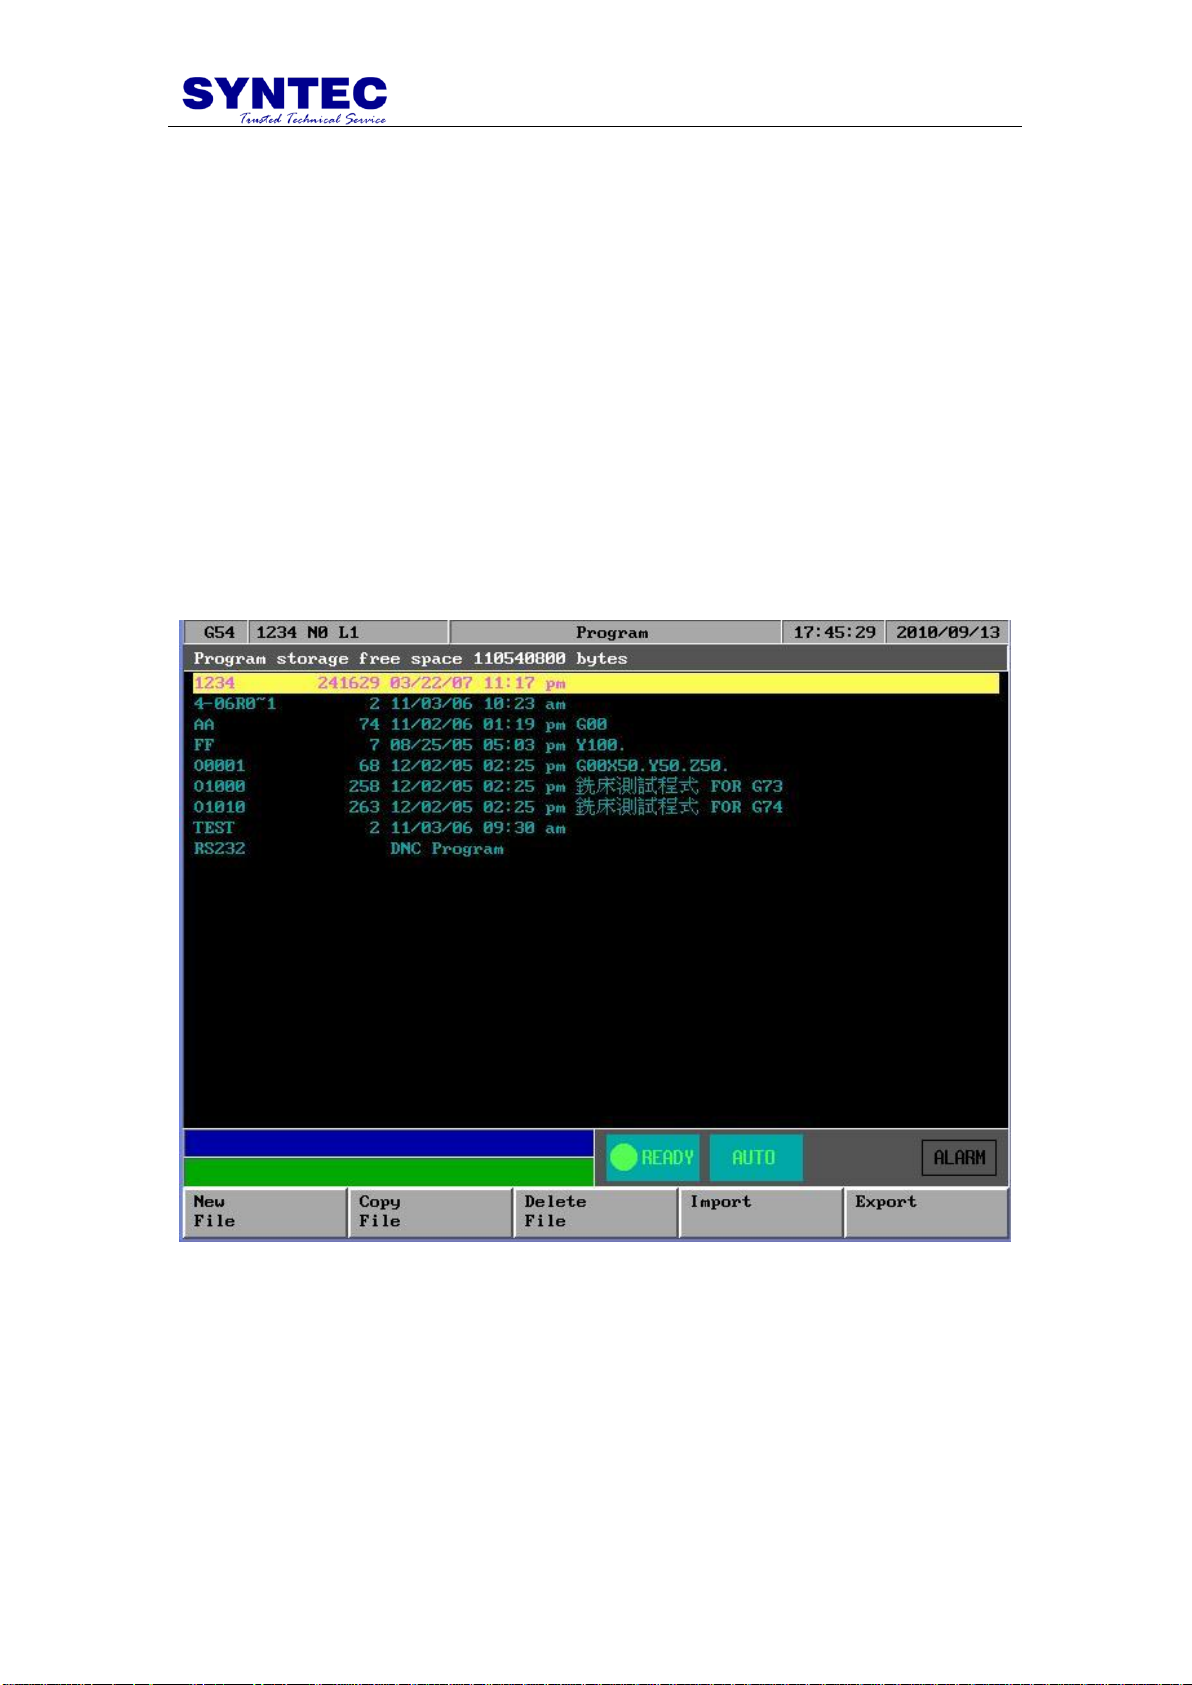
1.3.2.5 F5:File Manager
Under Program submenu, press F5 and the following diagram will
show up. Users can use arrow keys(↑、↓)to select file to be edited. After
pressing【ENTER】, content of the file will show up on the screen
-13-

Key Selections:
1.3.2.5.1 F1:New File
Operation:
Step 1: A dialog box will prompt users with “New File ”. Type in
the new file name and press 【ENTER】.
Step 2: An empty screen shows up waiting users to type in a new
program.
1.3.2.5.2 F2:Copy File
Operation: After pressing F2, a dialog box will prompt users to type in a file name and
press 【ENTER】. The current file is then copy to the hard disk with a different file
name.
1.3.2.5.3 F3:Delete File
Operation: Select a file to be delete by pressing (↑、↓). A dialog box will pop up
to confirm this operation.
-14-

1.3.2.5.4 F4:Import
Function:Input file from floppy.
Operation:Insert a disk to the floppy drive and then press F4. Select a file name by
pressing(↑、↓、←、→). Press【ENTER】to input the file from a floppy disk
.
P.S.
1. floppy disk file format is ASCI code
2. SYNTEC CNC also can accept *.zip format ,when import
from floppy disk ,cnc would unzip automatically
3. if NC file too big ,operator can use more than ONE floppy
disk to import nc FILE , separates a big file to some floppy
disks ,use the same file nmae ,then inport THIS file DISK
BY DISK ,operator choose appEnd but not overWRITE ,IT
IS VERY EASY TO INSATLL A BIG FILE
4. IF OPERATOR INSTALL EHTERNET ,IT IS MORE
EASY TO INSTALL A BIG FILE FROM NET .
-15-
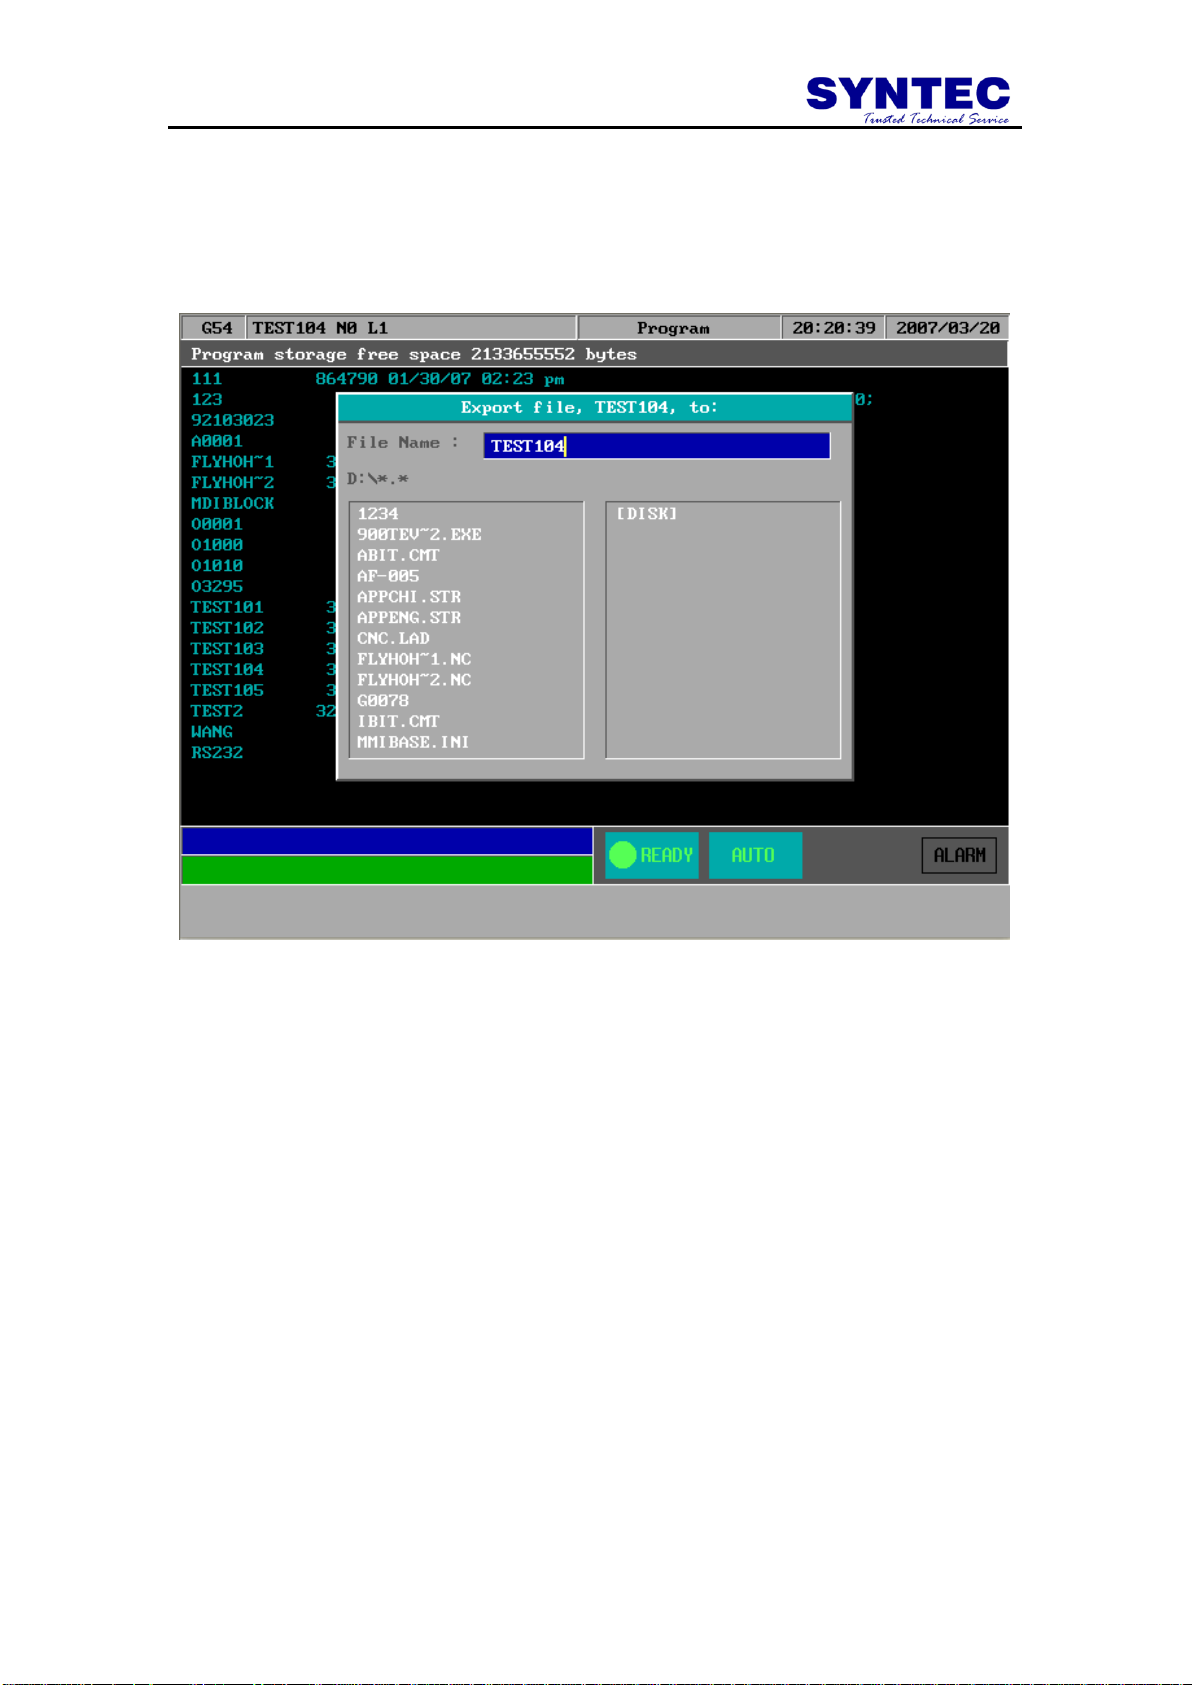
1.3.2.5.5 F5:Export
Function: Output file to floppy disk
Operation: Select a file by pressing(↑、↓、←、→)and then press F5. After following
the prompt in the dialog box, confirm this operation by pressing 【ENTER】.
-16-
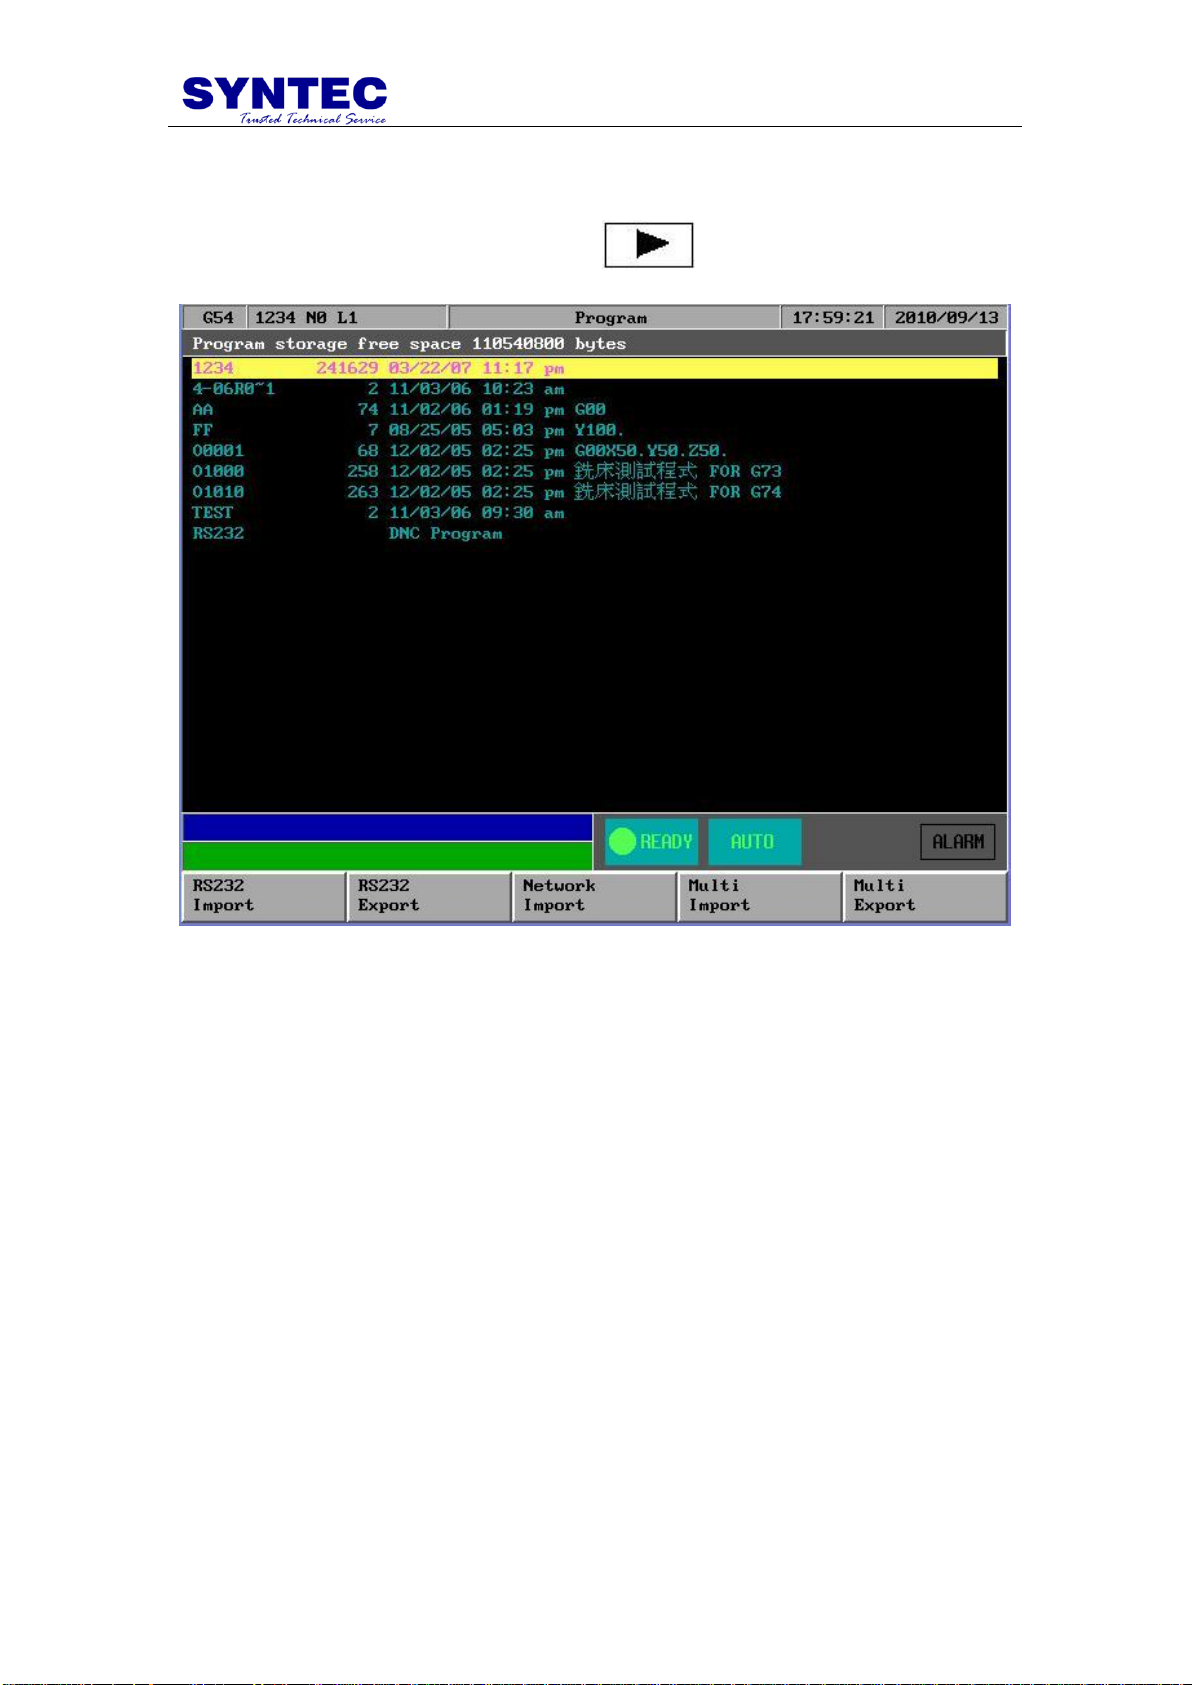
1.3.2.5.6 F1:RS232 Import
Function: use RS232 communication function to import NC files
Operation: Under Program submenu, press and then F1.Follow the
prompts in the dialog box and type in needed data.
-17-
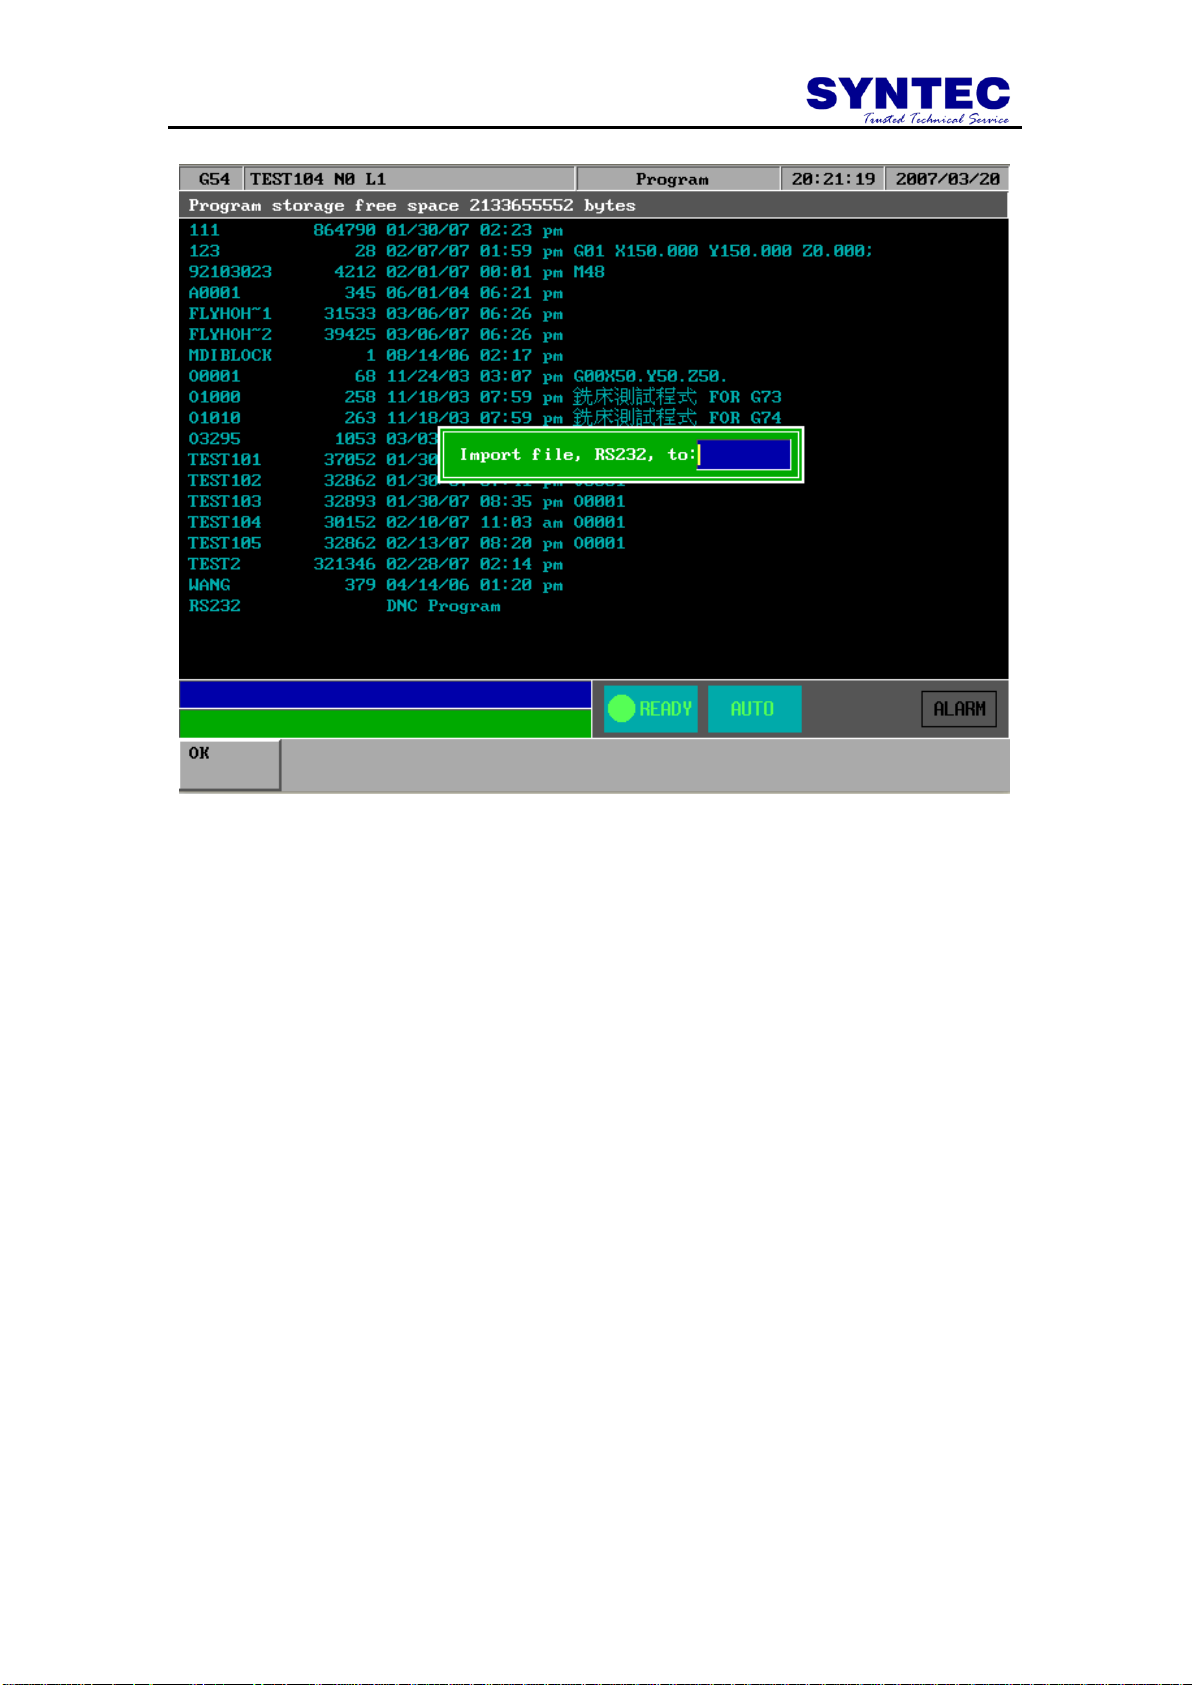
-18-
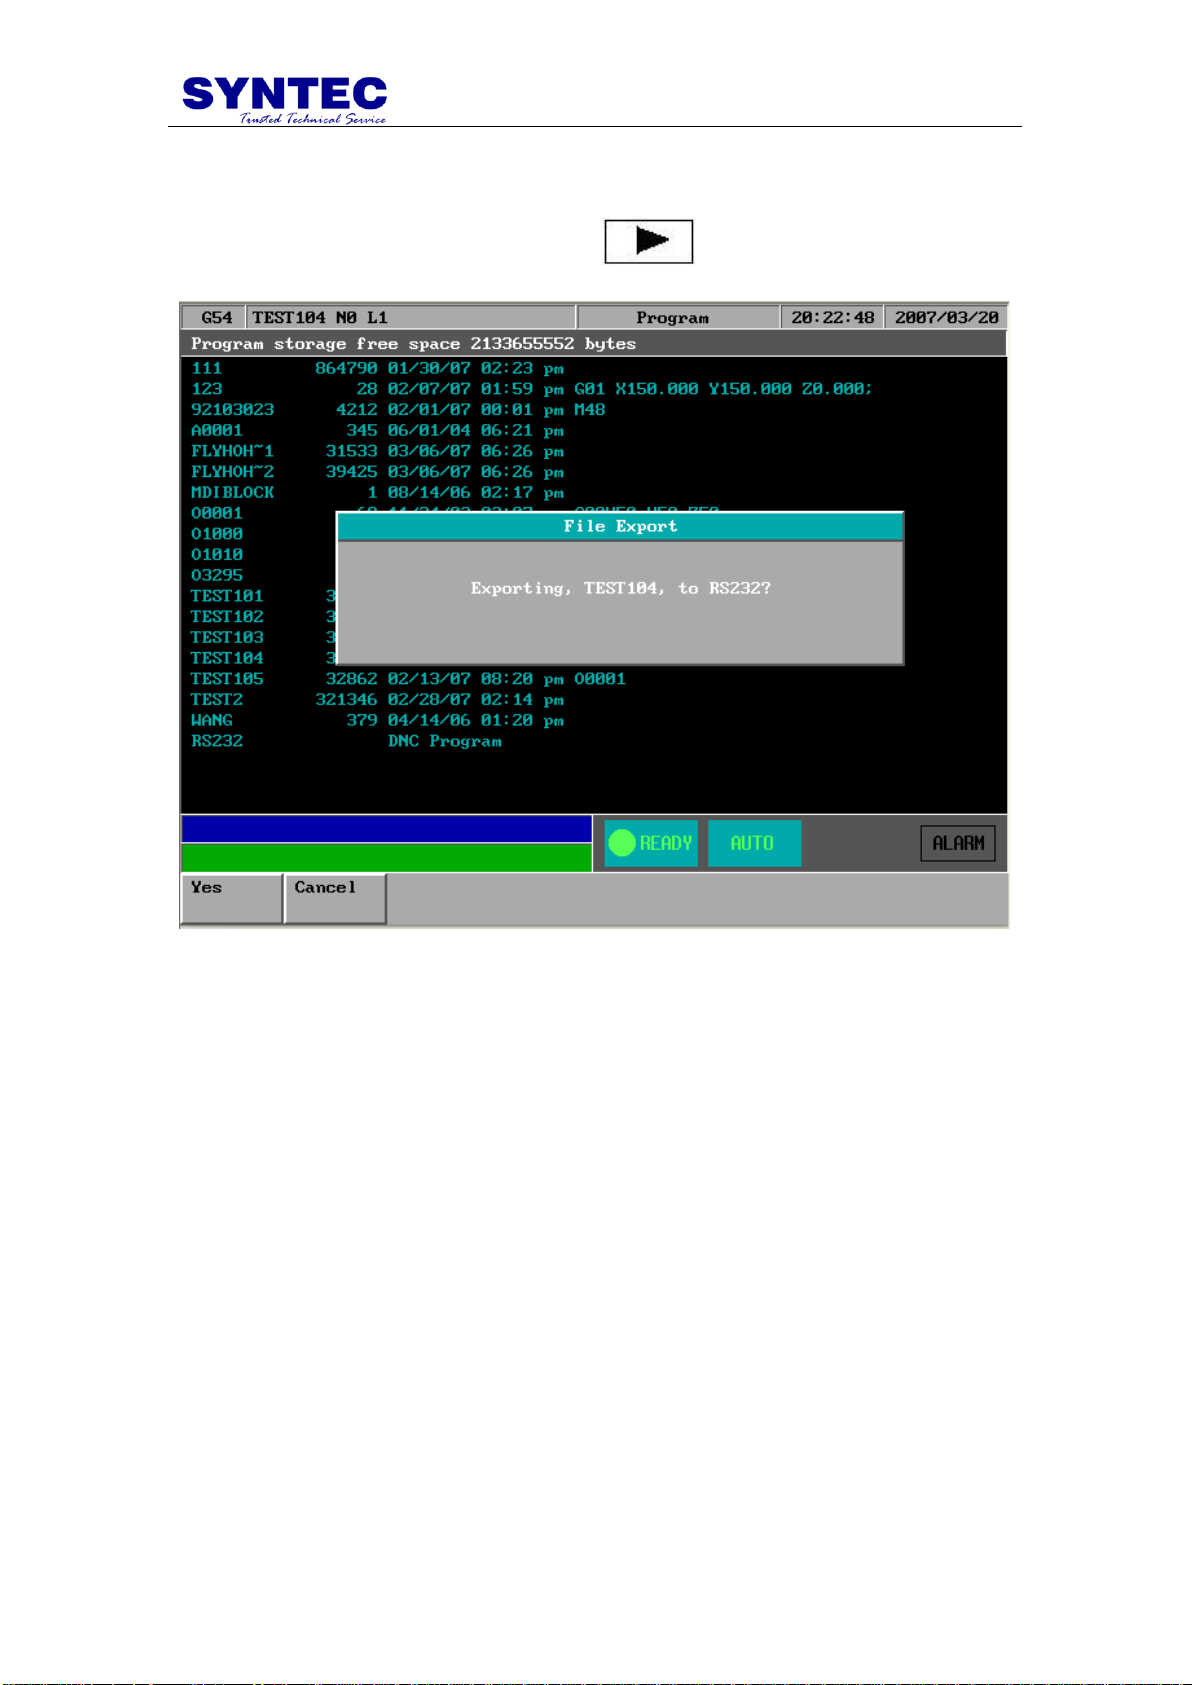
1.3.2.5.7 F2 :RS232 Export
Function: Use RS232 communication function to Export NC files
Operation: Under Program submenu, press and then F2.
-19-
Loading…
RTEX Driver Application Manual
Last modify : Nov 2022
EtherCAT Drive Application Manual
Last modify : Nov 2022
5-Axis Function Application Manual
Last modify : Nov 2022
Syntec IDE Operation Manual
Last modify : Nov 2022
PLC Editor Operation Manual
Last modify : Nov 2022
CNC and PLC Interface
Last modify : Nov 2022
Macro Variable
Last modify : Nov 2022
Macro Development Tool Guide
Last modify : Nov 2022
Syntec Driver Alarm Manual
Last modify : Nov 2022
C_CNC System Data
Last modify : Nov 2022
CNC Parameter Manual
Last modify : Nov 2022
CNC HMI Variable
Last modify : Nov 2022
G code Mill Programming Manual-EN
Last modify : Nov 2022
G code Lathe Programming Manual-EN
Last modify : Nov 2022
21 Series Mill Operation Manual-EN
Last modify : Nov 2022
21 Series Lathe Operation Manual-EN
Last modify : Nov 2022
11 Series Mill Operation Manual-EN
Last modify : Nov 2022
11Series Lathe Operation Manual
Last modify : Nov 2022
6 Series Mill Operation Manual-EN
Last modify : Nov 2022
6 Series Lathe Operation Manual-EN
Last modify : Nov 2022