
Хорошее руководство по эксплуатации
Законодательство обязывает продавца передать покупателю, вместе с товаром, руководство по эксплуатации Avaya 9608. Отсутствие инструкции либо неправильная информация, переданная потребителю, составляют основание для рекламации в связи с несоответствием устройства с договором. В законодательстве допускается предоставлении руководства в другой, чем бумажная форме, что, в последнее время, часто используется, предоставляя графическую или электронную форму инструкции Avaya 9608 или обучающее видео для пользователей. Условием остается четкая и понятная форма.
Что такое руководство?
Слово происходит от латинского «instructio», тоесть привести в порядок. Следовательно в инструкции Avaya 9608 можно найти описание этапов поведения. Цель инструкции заключается в облегчении запуска, использования оборудования либо выполнения определенной деятельности. Инструкция является набором информации о предмете/услуге, подсказкой.
К сожалению немного пользователей находит время для чтения инструкций Avaya 9608, и хорошая инструкция позволяет не только узнать ряд дополнительных функций приобретенного устройства, но и позволяет избежать возникновения большинства поломок.
Из чего должно состоять идеальное руководство по эксплуатации?
Прежде всего в инструкции Avaya 9608 должна находится:
— информация относительно технических данных устройства Avaya 9608
— название производителя и год производства оборудования Avaya 9608
— правила обслуживания, настройки и ухода за оборудованием Avaya 9608
— знаки безопасности и сертификаты, подтверждающие соответствие стандартам
Почему мы не читаем инструкций?
Как правило из-за нехватки времени и уверенности в отдельных функциональностях приобретенных устройств. К сожалению само подсоединение и запуск Avaya 9608 это слишком мало. Инструкция заключает ряд отдельных указаний, касающихся функциональности, принципов безопасности, способов ухода (даже то, какие средства стоит использовать), возможных поломок Avaya 9608 и способов решения проблем, возникающих во время использования. И наконец то, в инструкции можно найти адресные данные сайта Avaya, в случае отсутствия эффективности предлагаемых решений. Сейчас очень большой популярностью пользуются инструкции в форме интересных анимаций или видео материалов, которое лучше, чем брошюра воспринимаются пользователем. Такой вид инструкции позволяет пользователю просмотреть весь фильм, не пропуская спецификацию и сложные технические описания Avaya 9608, как это часто бывает в случае бумажной версии.
Почему стоит читать инструкции?
Прежде всего здесь мы найдем ответы касательно конструкции, возможностей устройства Avaya 9608, использования отдельных аксессуаров и ряд информации, позволяющей вполне использовать все функции и упрощения.
После удачной покупки оборудования/устройства стоит посвятить несколько минут для ознакомления с каждой частью инструкции Avaya 9608. Сейчас их старательно готовят или переводят, чтобы они были не только понятными для пользователя, но и чтобы выполняли свою основную информационно-поддерживающую функцию.

Using Avaya 9608/9608G/9611G IP
Deskphones SIP for Call Center Agents
Release 7.1.13
Issue 1
April 2021

©
2014-2021, Avaya Inc.
All Rights Reserved.
Notice
While reasonable efforts have been made to ensure that the
information in this document is complete and accurate at the time of
printing, Avaya assumes no liability for any errors. Avaya reserves
the right to make changes and corrections to the information in this
document without the obligation to notify any person or organization
of such changes.
Note
Using a cell, mobile, or GSM phone, or a two-way radio in close
proximity to an Avaya IP telephone might cause interference.
Documentation disclaimer
“Documentation” means information published in varying mediums
which may include product information, operating instructions and
performance specifications that are generally made available to users
of products. Documentation does not include marketing materials.
Avaya shall not be responsible for any modifications, additions, or
deletions to the original published version of Documentation unless
such modifications, additions, or deletions were performed by or on
the express behalf of Avaya. End User agrees to indemnify and hold
harmless Avaya, Avaya’s agents, servants and employees against all
claims, lawsuits, demands and judgments arising out of, or in
connection with, subsequent modifications, additions or deletions to
this documentation, to the extent made by End User.
Link disclaimer
Avaya is not responsible for the contents or reliability of any linked
websites referenced within this site or Documentation provided by
Avaya. Avaya is not responsible for the accuracy of any information,
statement or content provided on these sites and does not
necessarily endorse the products, services, or information described
or offered within them. Avaya does not guarantee that these links will
work all the time and has no control over the availability of the linked
pages.
Warranty
Avaya provides a limited warranty on Avaya hardware and software.
Refer to your sales agreement to establish the terms of the limited
warranty. In addition, Avaya’s standard warranty language, as well as
information regarding support for this product while under warranty is
available to Avaya customers and other parties through the Avaya
Support website:
https://support.avaya.com/helpcenter/
getGenericDetails?detailId=C20091120112456651010 under the link
“Warranty & Product Lifecycle” or such successor site as designated
by Avaya. Please note that if You acquired the product(s) from an
authorized Avaya Channel Partner outside of the United States and
Canada, the warranty is provided to You by said Avaya Channel
Partner and not by Avaya.
Licenses
THE SOFTWARE LICENSE TERMS AVAILABLE ON THE AVAYA
WEBSITE,
HTTPS://SUPPORT.AVAYA.COM/LICENSEINFO,
UNDER THE LINK “AVAYA SOFTWARE LICENSE TERMS (Avaya
Products)” OR SUCH SUCCESSOR SITE AS DESIGNATED BY
AVAYA, ARE APPLICABLE TO ANYONE WHO DOWNLOADS,
USES AND/OR INSTALLS AVAYA SOFTWARE, PURCHASED
FROM AVAYA INC., ANY AVAYA AFFILIATE, OR AN AVAYA
CHANNEL PARTNER (AS APPLICABLE) UNDER A COMMERCIAL
AGREEMENT WITH AVAYA OR AN AVAYA CHANNEL PARTNER.
UNLESS OTHERWISE AGREED TO BY AVAYA IN WRITING,
AVAYA DOES NOT EXTEND THIS LICENSE IF THE SOFTWARE
WAS OBTAINED FROM ANYONE OTHER THAN AVAYA, AN AVAYA
AFFILIATE OR AN AVAYA CHANNEL PARTNER; AVAYA
RESERVES THE RIGHT TO TAKE LEGAL ACTION AGAINST YOU
AND ANYONE ELSE USING OR SELLING THE SOFTWARE
WITHOUT A LICENSE. BY INSTALLING, DOWNLOADING OR
USING THE SOFTWARE, OR AUTHORIZING OTHERS TO DO SO,
YOU, ON BEHALF OF YOURSELF AND THE ENTITY FOR WHOM
YOU ARE INSTALLING, DOWNLOADING OR USING THE
SOFTWARE (HEREINAFTER REFERRED TO
INTERCHANGEABLY AS “YOU” AND “END USER”), AGREE TO
THESE TERMS AND CONDITIONS AND CREATE A BINDING
CONTRACT BETWEEN YOU AND AVAYA INC. OR THE
APPLICABLE AVAYA AFFILIATE (“AVAYA”).
Avaya grants You a license within the scope of the license types
described below, with the exception of Heritage Nortel Software, for
which the scope of the license is detailed below. Where the order
documentation does not expressly identify a license type, the
applicable license will be a Designated System License as set forth
below in the Designated System(s) License (DS) section as
applicable. The applicable number of licenses and units of capacity
for which the license is granted will be one (1), unless a different
number of licenses or units of capacity is specified in the
documentation or other materials available to You. “Software” means
computer programs in object code, provided by Avaya or an Avaya
Channel Partner, whether as stand-alone products, pre-installed on
hardware products, and any upgrades, updates, patches, bug fixes,
or modified versions thereto. “Designated Processor” means a single
stand-alone computing device. “Server” means a set of Designated
Processors that hosts (physically or virtually) a software application
to be accessed by multiple users. “Instance” means a single copy of
the Software executing at a particular time: (i) on one physical
machine; or (ii) on one deployed software virtual machine (“VM”) or
similar deployment.
License types
Designated System(s) License (DS). End User may install and use
each copy or an Instance of the Software only on a number of
Designated Processors up to the number indicated in the order.
Avaya may require the Designated Processor(s) to be identified in
the order by type, serial number, feature key, Instance, location or
other specific designation, or to be provided by End User to Avaya
through electronic means established by Avaya specifically for this
purpose.
Shrinkwrap License (SR). You may install and use the Software in
accordance with the terms and conditions of the applicable license
agreements, such as “shrinkwrap” or “clickthrough” license
accompanying or applicable to the Software (“Shrinkwrap License”).
Copyright
Except where expressly stated otherwise, no use should be made of
materials on this site, the Documentation, Software, Hosted Service,
or hardware provided by Avaya. All content on this site, the
documentation, Hosted Service, and the product provided by Avaya
including the selection, arrangement and design of the content is
owned either by Avaya or its licensors and is protected by copyright
and other intellectual property laws including the sui generis rights
relating to the protection of databases. You may not modify, copy,
reproduce, republish, upload, post, transmit or distribute in any way
any content, in whole or in part, including any code and software
unless expressly authorized by Avaya. Unauthorized reproduction,
transmission, dissemination, storage, and or use without the express
written consent of Avaya can be a criminal, as well as a civil offense
under the applicable law.
Third Party Components
“Third Party Components” mean certain software programs or
portions thereof included in the Software or Hosted Service may
contain software (including open source software) distributed under
third party agreements (“Third Party Components”), which contain
terms regarding the rights to use certain portions of the Software
(“Third Party Terms”). As required, information regarding distributed
Linux OS source code (for those products that have distributed Linux
OS source code) and identifying the copyright holders of the Third
Party Components and the Third Party Terms that apply is available
in the products, Documentation or on Avaya’s website at:
https://
support.avaya.com/Copyright or such successor site as designated
by Avaya. The open source software license terms provided as Third
Party Terms are consistent with the license rights granted in these
Software License Terms, and may contain additional rights benefiting
You, such as modification and distribution of the open source
software. The Third Party Terms shall take precedence over these
Software License Terms, solely with respect to the applicable Third
Party Components to the extent that these Software License Terms
impose greater restrictions on You than the applicable Third Party
Terms.
T9 Text Input and other products are covered by one or more of the
following patents: U.S. Pat. Nos. 5,187,480,5,818,437, 5,945,928,
5,953,541, 6,011,554, 6,286,064, 6,307,548, 6,307,549, and
6,636,162,6,646,573, 6,970,599; Australia Pat. Nos. 727539,
746674, 747901; Austria Pat. Nos. AT225534, AT221222; Brazil P.I.

No. 9609807-4; Canada Pat. Nos. 1,331,057, 2,227,904,2,278,549,
2,302,595; Japan Pat. Nos. 3532780, 3492981; United Kingdom Pat.
No. 2238414B; Hong Kong Standard Pat. No. HK1010924; Republic
of Singapore Pat. Nos. 51383, 66959, 71979; European Pat. Nos. 1
010 057 (98903671.0), 1 018 069 (98950708.2); Republic of Korea
Pat. Nos. KR201211B1, KR226206B1, 402252; People’s Republic of
China Pat. No. ZL96196739.0; Mexico Pat. Nos. 208141, 216023,
218409; Russian Federation Pat. Nos. 2206118, 2214620, 2221268;
additional patent applications are pending
Preventing Toll Fraud
“Toll Fraud” is the unauthorized use of your telecommunications
system by an unauthorized party (for example, a person who is not a
corporate employee, agent, subcontractor, or is not working on your
company’s behalf). Be aware that there can be a risk of Toll Fraud
associated with your system and that, if Toll Fraud occurs, it can
result in substantial additional charges for your telecommunications
services.
Avaya Toll Fraud intervention
If You suspect that You are being victimized by Toll Fraud and You
need technical assistance or support, call Technical Service Center
Toll Fraud Intervention Hotline at +1-800-643-2353 for the United
States and Canada. For additional support telephone numbers, see
the Avaya Support website:
successor site as designated by Avaya.
Trademarks
All non-Avaya trademarks are the property of their respective owners.
Downloading Documentation
For the most current versions of Documentation, see the Avaya
Support website:
as designated by Avaya.
Contact Avaya Support
See the Avaya Support website:
product or Hosted Service notices and articles, or to report a problem
with your Avaya product or Hosted Service. For a list of support
telephone numbers and contact addresses, go to the Avaya Support
website:
designated by Avaya), scroll to the bottom of the page, and select
Contact Avaya Support.
FCC/Industry Canada Radiation Exposure Statement
This device complies with the FCC’s and Industry Canada’s RF
radiation exposure limits set forth for the general population
(uncontrolled environment) and must not be co-located or operated in
conjunction with any other antenna or transmitter.
Warning
The handset receiver contains magnetic devices that can attract
small metallic objects. Care should be taken to avoid personal injury.
Power over Ethernet (PoE) warning
This equipment must be connected to PoE networks without routing
to the outside plant.
https://support.avaya.com (or such successor site as
https://support.avaya.com, or such successor site
https://support.avaya.com or such
https://support.avaya.com for

Contents
Chapter 1: Introduction to the Avaya Call Center agent phones………………………………….. 6
Differences between the H.323 and SIP deskphones……………………………………………………….. 6
About Call Center Agent phone screens………………………………………………………………………… 7
Agent work modes and states…………………………………………………………………………………….. 9
About call center-related icons…………………………………………………………………………………… 10
Agent Status line display combinations for agents………………………………………………………….. 12
Incoming calls display……………………………………………………………………………………………… 15
Message Waiting Indicator……………………………………………………………………………………….. 16
Chapter 2: Call Center Agent operations…………………………………………………………………… 17
About Call Center Agent features……………………………………………………………………………….. 17
About Reason Codes………………………………………………………………………………………………. 17
Logging in as an agent…………………………………………………………………………………………….. 17
Logging out as an agent…………………………………………………………………………………………… 19
Activating After Call Work…………………………………………………………………………………………. 19
Activating Auxiliary Work………………………………………………………………………………………….. 19
Activating Auto In…………………………………………………………………………………………………… 20
Activating Manual In……………………………………………………………………………………………….. 21
Activating Logout Override……………………………………………………………………………………….. 21
Agent Greetings…………………………………………………………………………………………………….. 22
Creating Agent Greetings……………………………………………………………………………………. 24
Recording a greeting message…………………………………………………………………………….. 26
Playing a manual greeting during an incoming call……………………………………………………. 26
Retrieving Agent greetings………………………………………………………………………………….. 27
Deleting an Agent Greeting…………………………………………………………………………………. 27
Chapter 3: Call Center Deskphone operations………………………………………………………….. 28
Answering a call…………………………………………………………………………………………………….. 28
Handling calls and conferences using Multiple Device Access………………………………………….. 29
Enabling wireless headset bidirectional signaling…………………………………………………………… 29
Viewing contact presence status………………………………………………………………………………… 30
Changing the presence status…………………………………………………………………………………… 30
Enabling SAC when DND is active……………………………………………………………………………… 30
Entering Stroke Counts……………………………………………………………………………………………. 31
Entering Call Work Codes………………………………………………………………………………………… 32
Viewing Queue Stats………………………………………………………………………………………………. 32
Viewing Vu Stats……………………………………………………………………………………………………. 33
Activating Supervisor Assist……………………………………………………………………………………… 34
Viewing ASAI UUI………………………………………………………………………………………………….. 34
Call observation…………………………………………………………………………………………………….. 35
Activating or deactivating call observation……………………………………………………………………. 36
April 2021 Using Avaya 9608/9608G/9611G IP Deskphones SIP for Call Center Agents 4
Comments on this document? infodev@avaya.com

Contents
Assisting an agent on an observed call……………………………………………………………………….. 36
April 2021 Using Avaya 9608/9608G/9611G IP Deskphones SIP for Call Center Agents 5
Comments on this document? infodev@avaya.com

Chapter 1: Introduction to the Avaya Call
Center agent phones
The 9608, 9608G, 9611G, 9621G, 9641G, 9641GS Deskphone and Avaya J100 Series IP Phones
are used in a standard office environment or with Avaya Call Center 3.0 or later releases. The
9621G, 9641G, and 9641GS deskphones are touch-based phones with a color display. The 9611G,
9608, 9608G, and Avaya J100 Series IP Phones are button-based phones. The 9611G, and J179
has a color display, J189 has two color display, and 9608, J169 has a monochrome display.
To extend call appearances or features or both you can attach up to three button modules in Avaya
9608 IP Deskphone and Avaya 9611G IP Deskphone. Avaya J169/J179 IP Phone supports three
JBM24 Button Module or Avaya J100 Expansion Module (JEM24) and Avaya J189 IP Phone
supports up to two Avaya J100 Expansion Module (JEM24).
With these deskphones you can obtain convenient features and capabilities at your fingertips,
including a Phone Screen to view and manage your calls, and icons indicating agent status, call
states, feature status, queued calls, and missed calls. Using the designated feature buttons, you can
change your agent work mode or state with one touch.
Not all functions and features described in this user guide may be available on your deskphone or
applicable to the way your call center operates. If you find that a function or feature is not available,
contact your supervisor or administrator.
Important:
This guide describes only the features and operation of the 9608 and 9611G deskphones in a
call center environment. Specific user guides address standard office deskphone operation and
features such as placing calls, reviewing call history, conference calling, and modifying
deskphone options and settings for your personal preferences. Depending on which deskphone
model you are using, see Using Avaya J169/J179 IP Phone H.323, Using Avaya189 IP Phone
H.323, Avaya one-X® Deskphone SIP for 9608 and 9611G IP Telephone User Guide or the
Avaya one-X® Deskphone SIP 9621G and 9641G User Guide for 9600 Series IP Telephones,
available on the Avaya Support Site:
http://avaya.support.com.
Differences between the H.323 and SIP deskphones
April 2021 Using Avaya 9608/9608G/9611G IP Deskphones SIP for Call Center Agents 6
Comments on this document? infodev@avaya.com
About Call Center Agent phone screens
There are differences between the H.323 deskphones and the SIP deskphones, which include:
• The Agent Greetings feature is supported by H.323 deskphones, but is currently not available
for the 96×1 SIP deskphones. The feature is supported only with phones that use the Avaya
one-X® Deskphone H.323 application.
• Call Center features, such as login and logout, function differently with SIP using the
advanced capabilities of the SIP architecture.
• If collected digits are available for a call, they appear on the Agent Status line automatically
on the SIP deskphones. No action is required on your part.
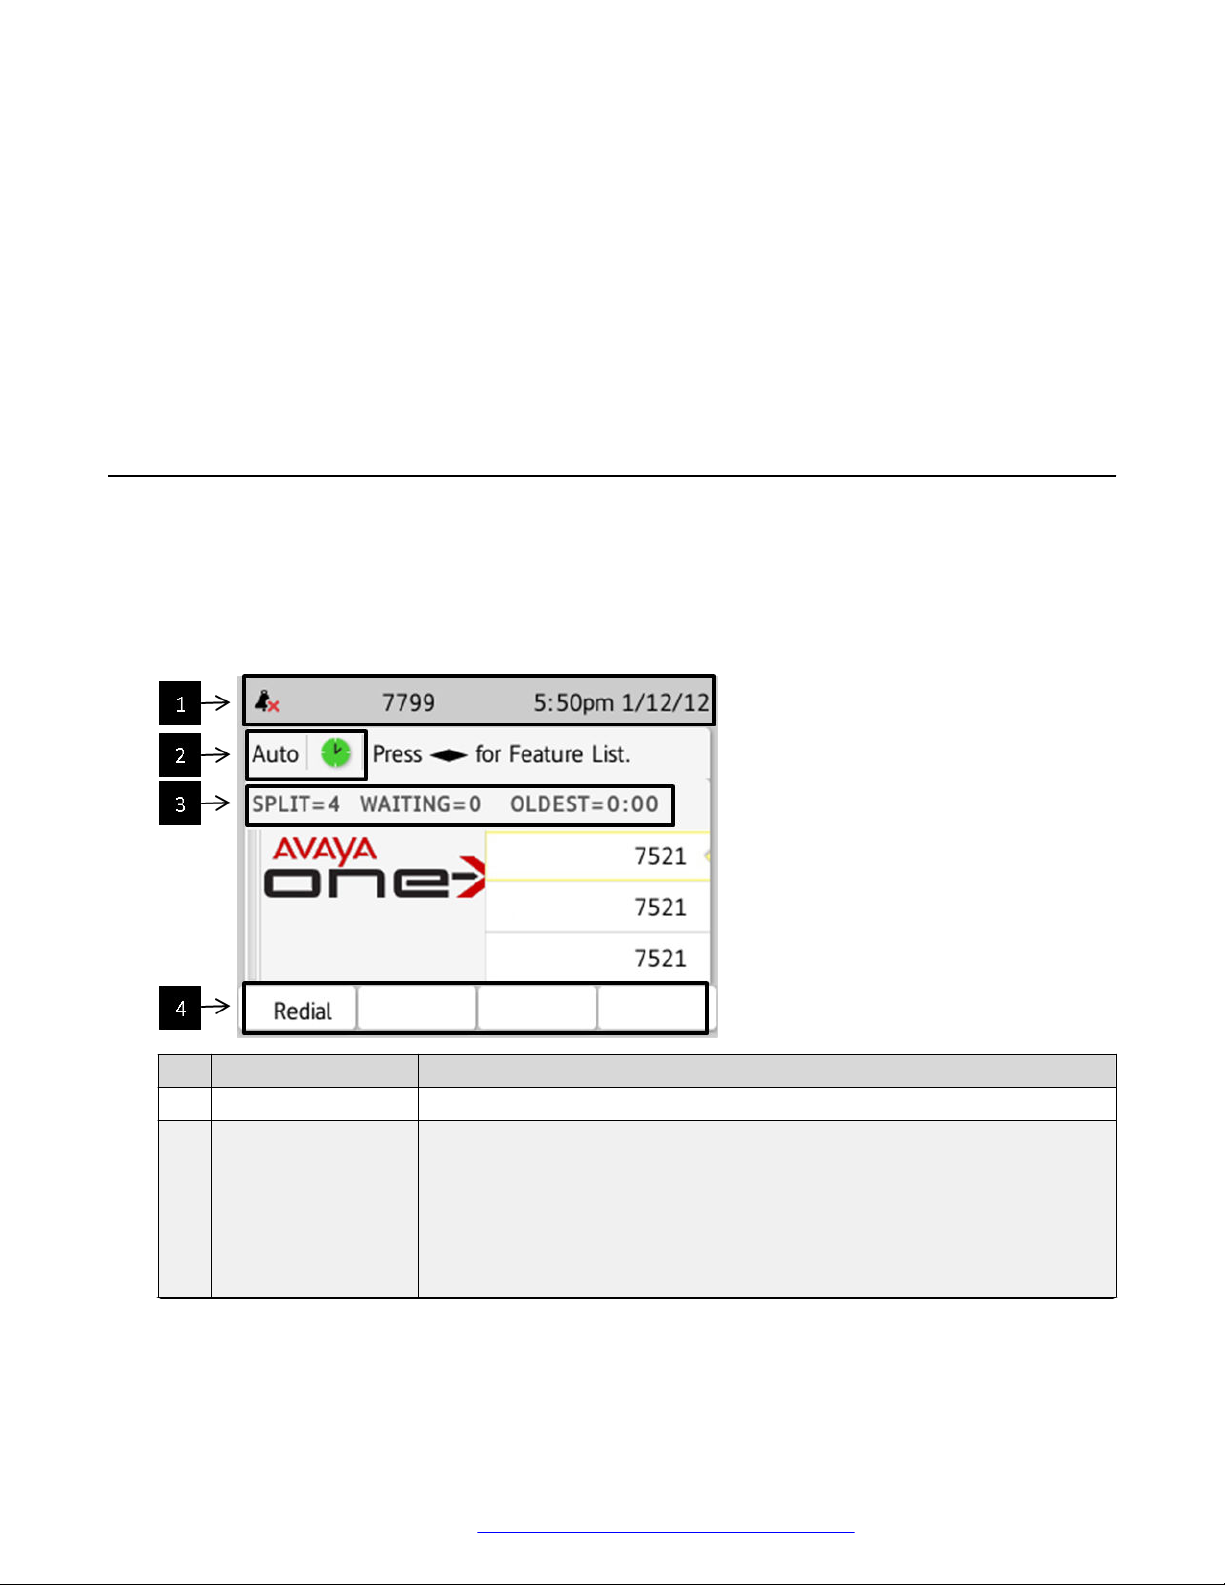
About Call Center Agent phone screens
Your Phone screen displays information about your phone and agent settings as well as
information about calls.
What is displayed on your Phone screen is dependent on the phone model and what has been
configured for your system by your system administrator.
No. Name Description
1 Top Line Display Displays date and time and set information.
2 Agent Status Line Displays agent information, such as work mode and state, and when
provided, collected digits.
If collected digits are available with the call, they are displayed without any
action on your part.
If User-to-User Information (UUI) is associated with the call, it is displayed
here when you press the UUI-Info button.
Table continues…
April 2021 Using Avaya 9608/9608G/9611G IP Deskphones SIP for Call Center Agents 7
Comments on this document? infodev@avaya.com
Introduction to the Avaya Call Center agent phones
No. Name Description
3 Agent Information
Line
4 Softkeys Press to perform that task. What is displayed here is dependent on which
Displays Vu Stats information when you press Vu Stats.
When you press Queue Stats, the Queue Stats information overrides the Vu
Stats information. If Interruptible Aux is activated, the Interruptible Aux
message is displayed.
features are active and whether you are on a call.
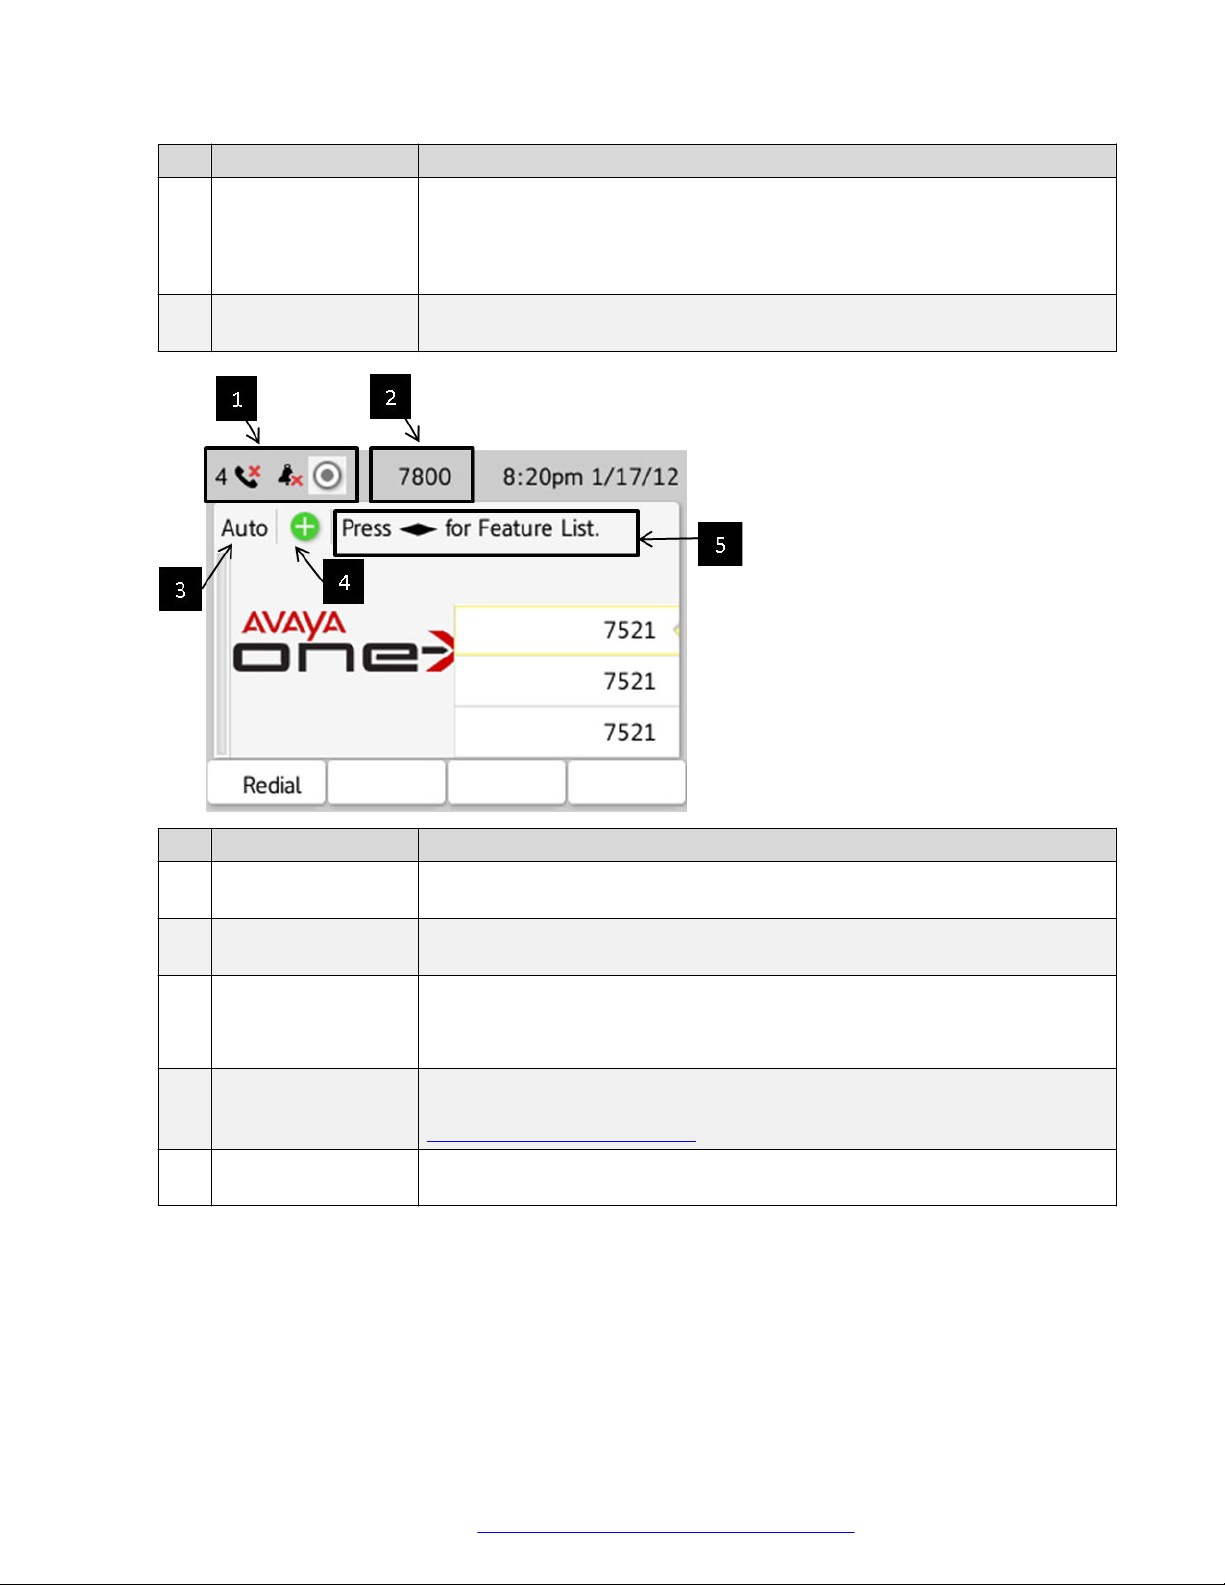
No. Name Description
1 Icon area Displays icons such as Forced Logout, Forced Logout Override, pending
state changes, and phone settings.
2 Agent ID Displays your Agent ID when you have logged in. The phone extension is
displayed when you are not logged in.
3 Agent Work Mode Displays your agent work mode: Auto or Manual.
No icon is displayed when the agent is not logged in. As well, no icon is
displayed if you are logged in but have not selected a work mode
4 Agent State Displays your agent state as a icon: Available, Auxiliary Work (with or
without Reason Code), After Call Work, or On call (ACD or non-ACD). See
About call center-related icons on page 10.
5 Features Screen Press the up or down arrow button to access the configured Call Center
Features.
The Top line display, Agent State line and Agent Information line are also visible when viewing the
Features screen.
April 2021 Using Avaya 9608/9608G/9611G IP Deskphones SIP for Call Center Agents 8
Comments on this document? infodev@avaya.com
Agent work modes and states
Agent work modes and states
The Agent Status line shows your current work mode and state.
The following table shows the possible agent states:
State Description
Available This state is automatically assigned when you are available to receive
ACD calls. With Auto In, you are returned to Available after each call is
released. With Manual In, you must press Manual In to return to the
Available state.
Aux Work You are placed in the Auxiliary Work state after agent login without a
specified work mode. You must change to Auto In or Manual In work
mode to become available to receive incoming Call Center calls and to
select your mode of operation. You can change back to Auxiliary Work to
indicate you are not available to receive Call Center calls, for example,
when you want to take a break. Depending on how your system is
administered, you might be prompted to enter a reason code when
changing to Aux Work.
Interruptible Aux Work Interruptible Aux Work mode notifies the agents in Aux work mode with an
interruptible reason code (RC) to become available. When the configured
threshold is exceeded, the phone receives a visual as well as audio
indication of a full ring cycle.
After Call Work Switch to ACW to perform after-call work, such as completing a call-
related form. The call distribution system automatically changes your
agent state to ACW if you are in Manual-In mode.
You may also enter this state automatically when you are in Auto-In mode,
if your system administrator has configured automatic ACW for a preset
time period after call completion.
On Call This state is automatically assigned when you are active on a call. The
phone displays the On-ACD Call icon when you are active on an ACD call,
else it displays the On non-ACD Call icon.
Forced Logout This state is assigned at a specified time determined by your system
administrator. The Top line displays the Forced Logout icon only if the
administrator has assigned a logout time for you. If you are not on a call,
you are logged out from ACD regardless of which agent state you are in.
Logout Override You can set this state if you want to continue working after your scheduled
logout time. The Logout Override icon is displayed on the Top line only if
you have set the status to override the administered Forced Logout before
the scheduled time.
When an ACD call is received, the work mode changes from Aux Work to Auto In or Manual In.
Pending states are assigned whenever you request a state change while active on a call. For
example, you request to change to an Aux Work state while active on a call. When the call is
released, the pending state change becomes effective immediately.
April 2021 Using Avaya 9608/9608G/9611G IP Deskphones SIP for Call Center Agents 9
Comments on this document? infodev@avaya.com
Introduction to the Avaya Call Center agent phones
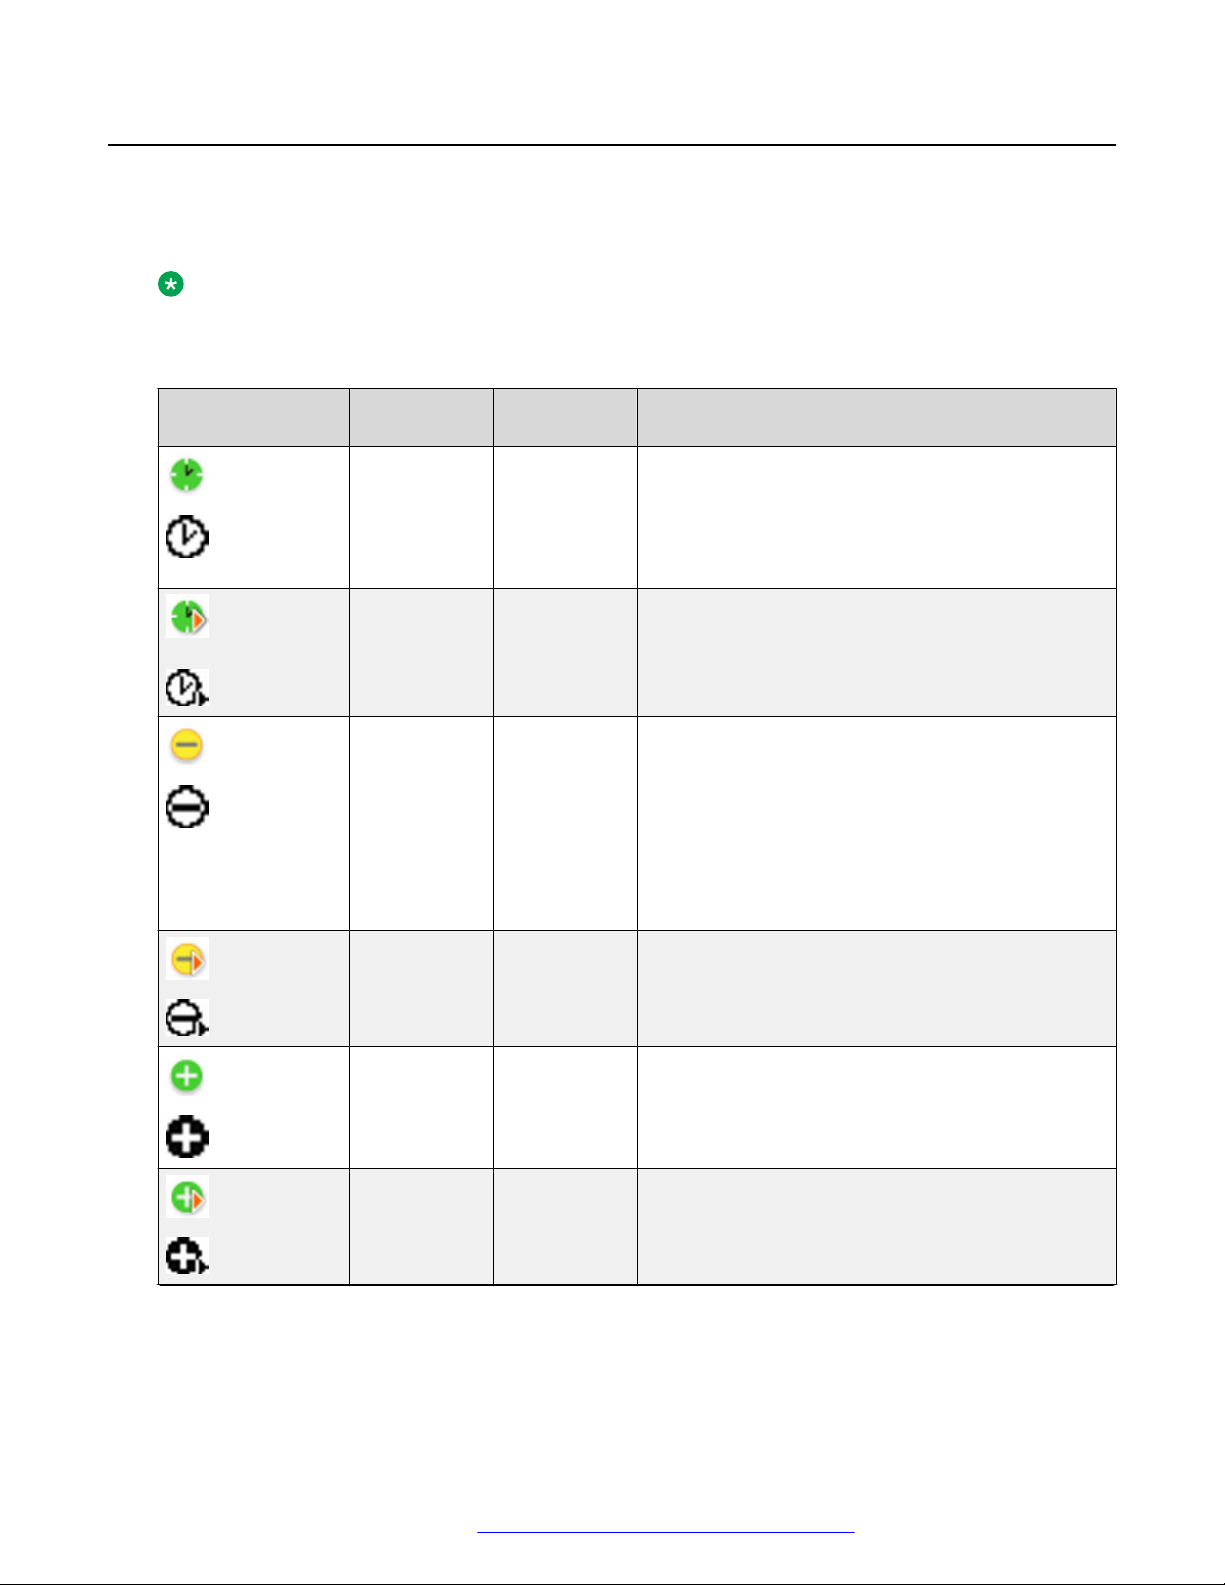
About call center-related icons
What you see on the Deskphone display depends on the features that are provisioned for your
Deskphone.
Note:
The 9611G Deskphone displays colored icons.
The 9608 Deskphone displays black and white icons.
Icon Icon name Where it
appears
After Call
Work
Pending ACW Top Line
Aux Work Agent Status
Pending Aux Top Line
Agent Status
line
display
line
display
Description
The Deskphone displays this icon when you
activate ACW.
Use this state when you are performing any after
call-related work, such as filling in paperwork after
an ACD call.
The Deskphone displays this icon when you
activate ACW when you are active on a call.
The Deskphone displays this icon when you
activate Aux Work.
Enter this state when you are performing non-ACD
activities such as taking a break, or placing an
outgoing call. You may need to enter a Reason
Code for entering the Aux Work state if this
requirement is configured by your system
administrator.
The Deskphone displays this icon when you
activate Aux Work while you are active on a call.
Available Agent Status
line
Pending
Available
April 2021 Using Avaya 9608/9608G/9611G IP Deskphones SIP for Call Center Agents 10
Top Line
display
Comments on this document? infodev@avaya.com
You are available for any incoming call.
The Deskphone displays this icon when you are not
active on a call, in ACW, or in Aux Work.
The Deskphone displays this icon when you are
changing your state to Available from Aux Work or
ACW and you are active on a call.
Table continues…
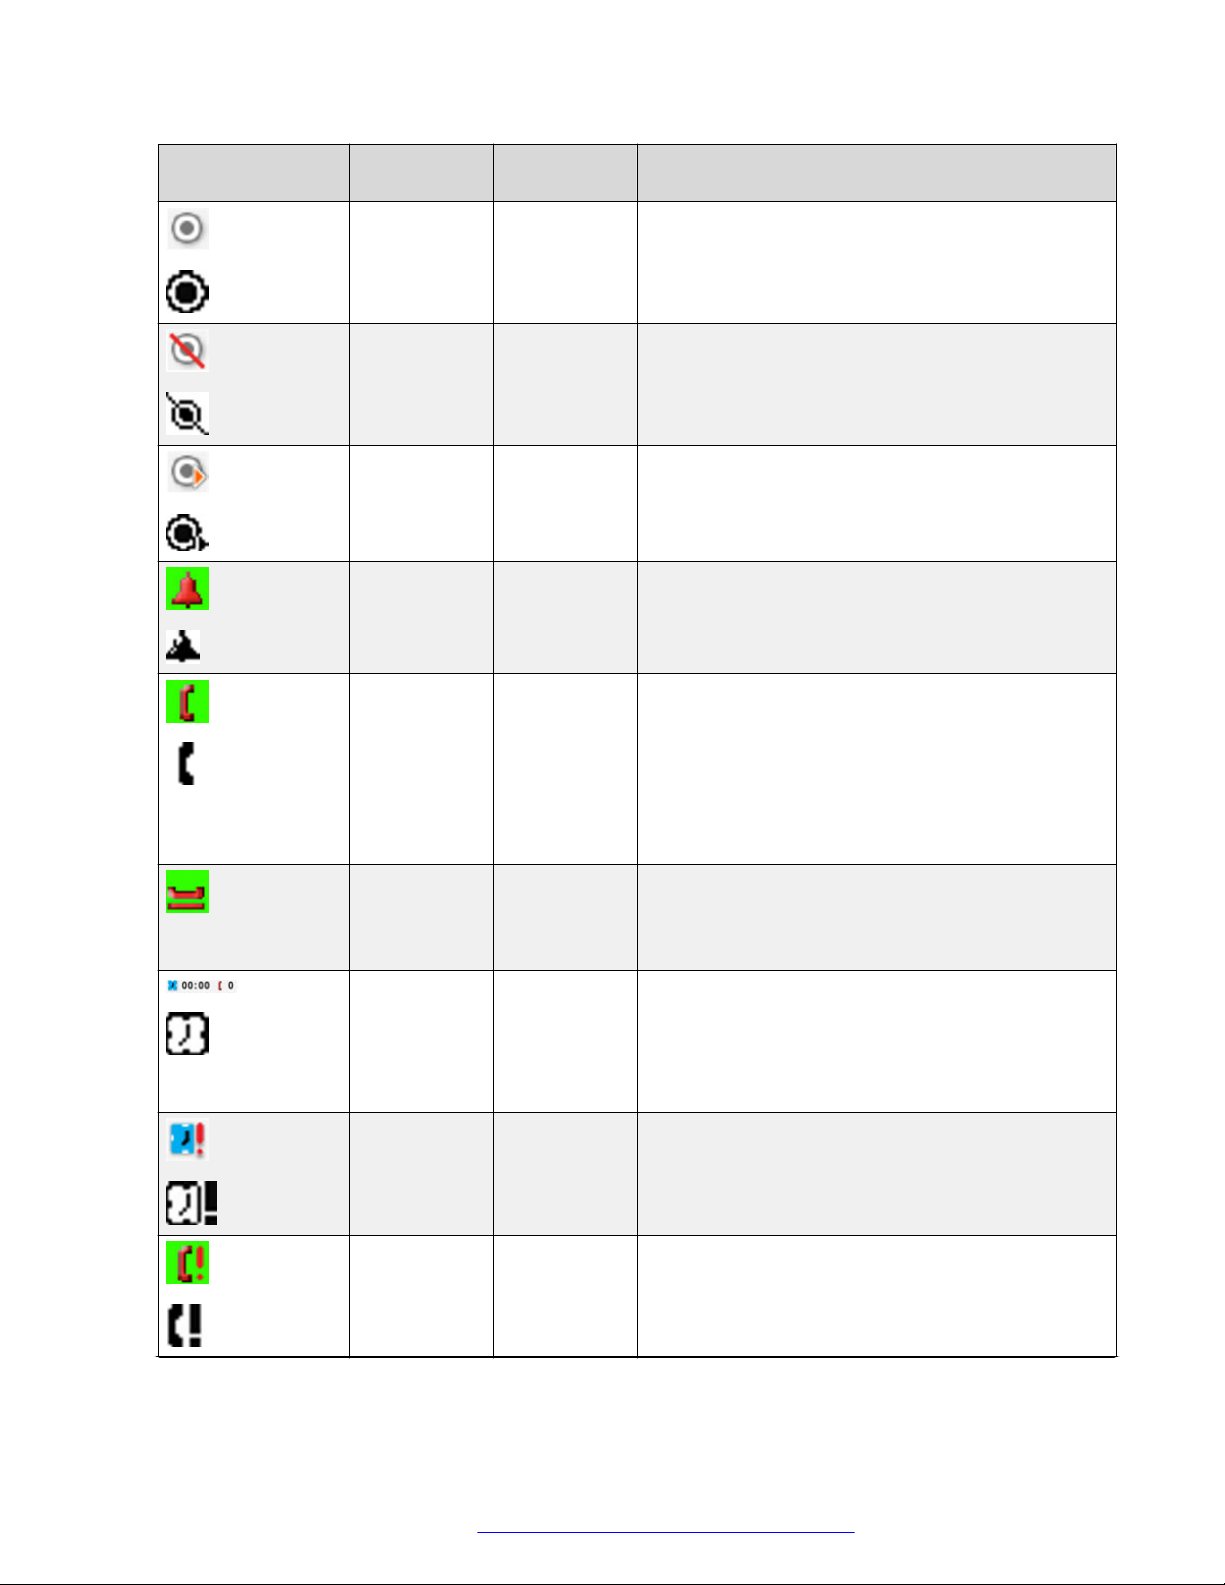
About call center-related icons
Icon Icon name Where it
appears
Forced
Logout
Forced
Logout
Top Line
display
Top Line
display
Override
Pending
Logout
Top Line
display
Alerting icon Agent Status
line
On call Agent Status
line
Description
The Deskphone displays this icon when Forced
Logout is active for your Agent ID.
The Deskphone displays this icon if you activate
Forced Logout Override.
The Deskphone displays this icon if you press the
Log Out button while you are active on a call or
when the Forced Logout time arrives and you are
active on an ACD call.
The Deskphone displays this icon when you receive
an incoming call. When you receive an ACD or DAC
call, the icon displays the respective text, ACD or
DAC, horizontally beside the bell.
The Deskphone displays this icon when you are
active on a call. When you receive an ACD or DAC
call, the icon displays the respective text, ACD or
DAC, horizontally.
Held call Agent Status
line
Queue Stats Agent
Information
line
Time in
Queue
Queue Stats
feature button
Threshold
warning
Call threshold
warning
Queue Stats
feature button
If you are active on an ACD call, the On ACD call
icon is displayed, otherwise, the On non-ACD call
icon is displayed.
The Deskphone displays this icon when you have
placed a call on hold. When you place an ACD or
DAC call on hold, the icon displays the respective
text, ACD or DAC, vertically.
The Deskphone displays this icon when you
activate Queue Stats.
The clock icon appears before the oldest call time
and the calls icon appears before the number of
calls in the queue.
The Deskphone displays this icon to indicate when
the time threshold for the oldest call in the queue
has been reached.
The Deskphone displays this icon when the number
of calls in the queue has reached the maximum
configured by your system administrator.
Table continues…
April 2021 Using Avaya 9608/9608G/9611G IP Deskphones SIP for Call Center Agents 11
Comments on this document? infodev@avaya.com
Introduction to the Avaya Call Center agent phones
Icon Icon name Where it
appears
UUI icon Agent Status
line
Collected
Digits
Information
Agent Status
line
Description
If an incoming call has UUI information, the UUI
feature button lamp is solid.
When you tap the feature, or press the button
associated with this feature, the Deskphone
displays this icon before the UUI information.
If the incoming call has collected digits information,
the Deskphone displays this icon before the digits.
Collected digits are digits that the caller entered
before reaching you.
Agent Status line display combinations for agents
What you see on the Agent Status line of the screen depends on what you are doing at the time
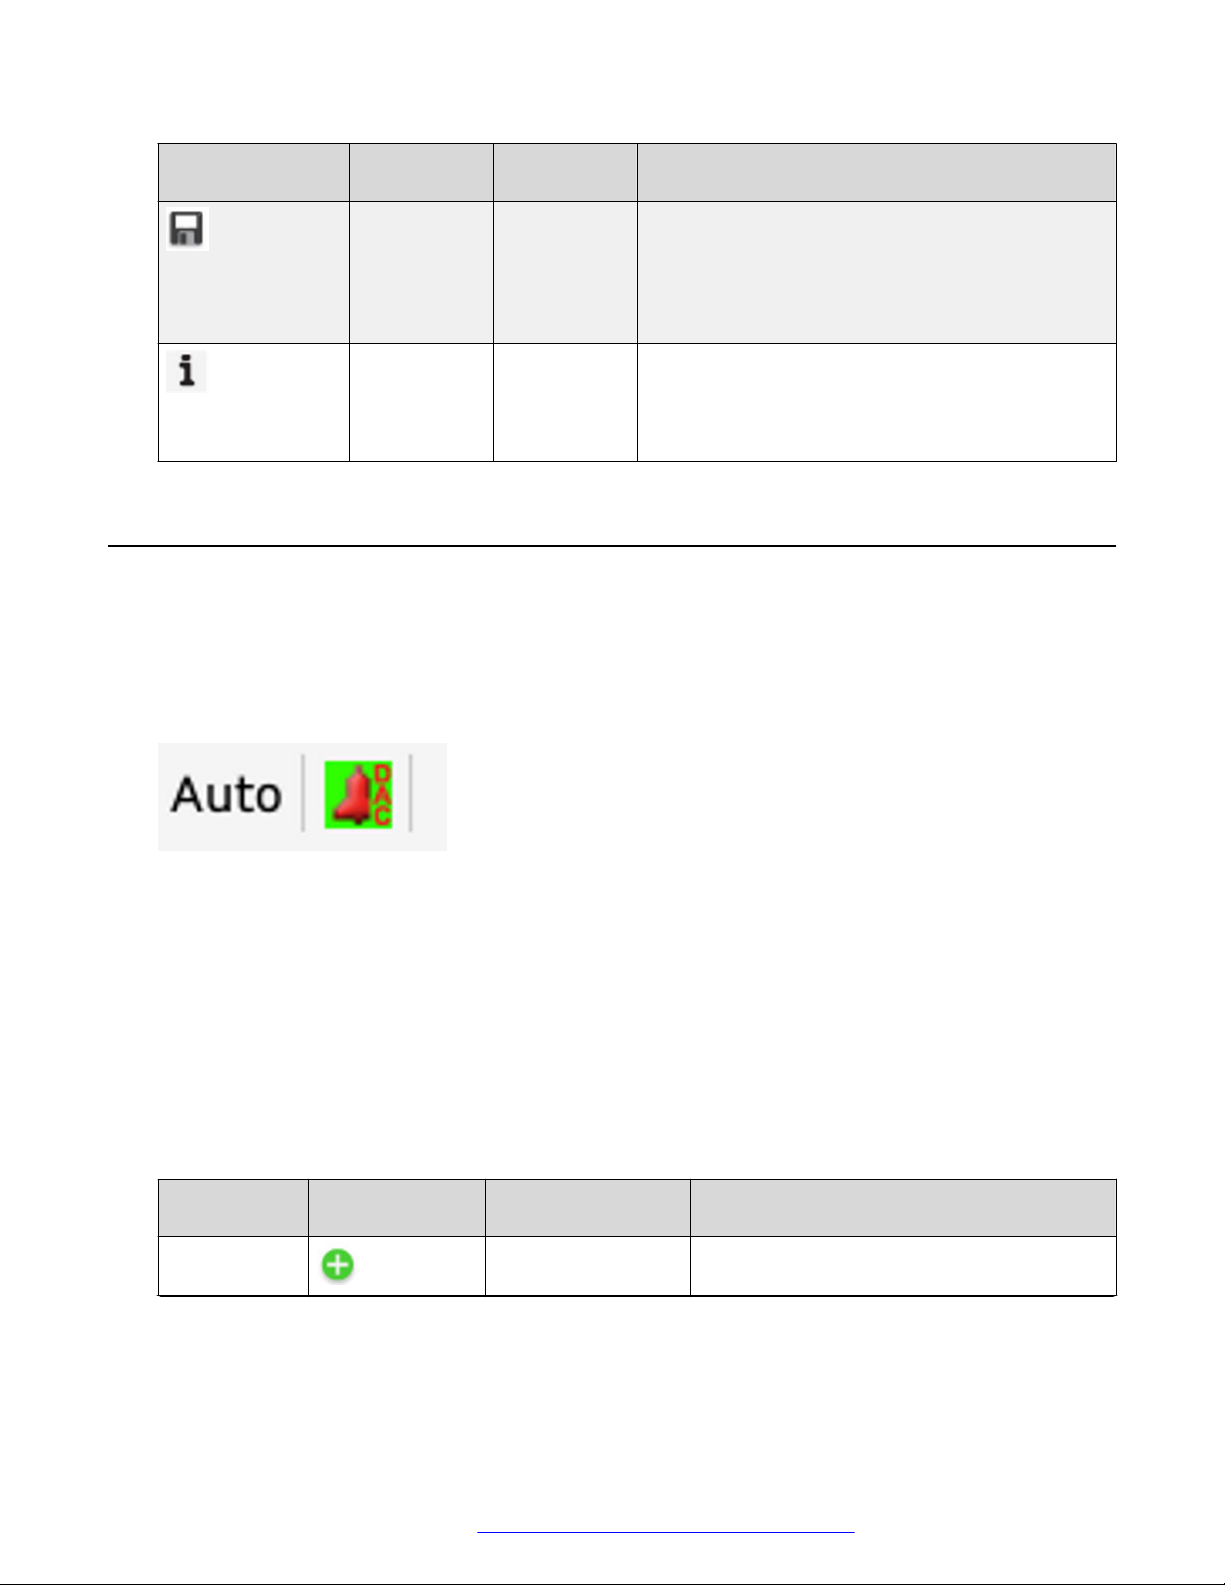
(your agent work mode) and whether you are idle or have an active, held, or incoming call.
In the following example, the Agent Status line indicates you are in Auto In mode and there is an
incoming DAC call.
Use this chart as a guide to possible agent status line display combinations.
• ACD=Automatic Call Distribution
• ACW=After Call Work
• Auto=Auto In
• Aux=Auxiliary Work state
• DAC=Direct Agent Call
• Man=Manual In
• RC=Reason Code #
Agent Work
Mode shows
Auto or Man You are ready to receive DAC or ACD calls.
Agent Status
shows
Icon area shows What this means:
Table continues…
April 2021 Using Avaya 9608/9608G/9611G IP Deskphones SIP for Call Center Agents 12
Comments on this document? infodev@avaya.com
Loading…
Оборудование
При организации связи и подключении Виртуальной АТС необходимо решить, с помощью чего сотрудники будут принимать и совершать звонки
Навигация
Выбор способа связи
Мы рассмотрели несколько вариантов:
Телефонные аппараты
Мировой лидер в области IP — телефонии, специализируется на проектировании, разработке, развертывании и администрировании корпоративных сетей связи для широкого спектра компаний от малых предприятий до крупных корпораций и правительственных учреждений.
Мы, являясь официальным партнёром AVAYA, выполняем заказы на поставку оборудования, услуг по интеграции и обслуживанию.

Мы беспокоимся о Вашем удобстве, поэтому у нас есть свой интернет-магазин для покупки оборудования
В нашем интернет-магазине можно:
-
Выбрать требующуюся конфигурацию телефонной станции и посчитать ее стоимость с помощью нашего калькулятора.
-
Сравнить модели телефонных аппаратов.
-
Получить квалифицированную помощь в выборе наиболее подходящего решения.
Для того, чтобы приобрести тот или иной товар, Вам необходимо выбрать необходимое оборудование, кликнуть на кнопку «Купить», заполнить простую форму Заказа и далее наши специалисты сами свяжутся с Вами, оформят заказ и решат все вопросы.
Инструкции и брошюры к телефонным аппаратам AVAYA
Наши партнеры
-
Российский разработчик программно-аппаратных решений в области связи. Специализация — разработка программного обеспечения, схемотехнических решений и производственно-технической документации для производства VOIP оборудования полного цикла.
Основная цель — предоставить клиентам возможность автоматизации процессов, связанных с телефонией, сделать более удобным и эффективным общение сотрудников и клиентов компании. -
Информтехника
Ведущий российский разработчик и производитель современных средств связи. Основными направлением деятельности ГК «ИНФОРМТЕХНИКА» является реализация сложных комплексных телекоммуникационных проектов.
Среди продуктов: системы абонентского радиодоступа и микросотовой связи стандарта, цифровая аппаратура связи совещаний, интеллектуальные системы распределения вызовов, системы мониторинга и администрирования сетей связи. -
САТЕЛ
Компания является генеральным подрядчиком в реализации проектов инженерной и IT-инфраструктуры. Специализация — разработка кастомного программного обеспечения в сфере корпоративных коммуникаций, а также создание современных платформенных решений для построения цифровой экосистемы промышленных предприятий. В портфеле компании – 10 продуктовых линеек, которые имеют успешные внедрения в проектах различного масштаба в РФ и за рубежом.
-
IVA Technologies
Один из лидеров российского IT-рынка, ведущий разработчик экосистемы корпоративных коммуникаций IVA. По данным Market CNews, флагманский продукт IVA Technologies — платформа видеоконференцсвязи — лидер среди российских решений для корпоративной связи. В экосистему IVA входят: корпоративный мессенджер, система управления и мониторинга, бизнес-помощник на основе ИИ и другие продукты.
-
AVAYA
Мировой лидер в области решений и услуг для построения корпоративных сетей связи. Инновационные решения данного бренда в области коммуникаций и CRM-технологии позволяют решать задачи взаимодействия различных структур и повышать эффективность экономики в различных секторах, создавать технологическую основу для дальнейшего развития электронной коммерции.
Русский
- Bedienungsanleitung Avaya 9608
- Avaya 9608 User Manual
- Manual Usuario Avaya 9608
- Mode d’emploi Avaya 9608
- Istruzioni Avaya 9608
- инструкция Avaya 9608
- Avaya 9608の取扱説明書
- Handleiding Avaya 9608
- Manual de uso Avaya 9608
Вам нужна инструкция? Мы поможем Вам ее найти и сэкономить Ваше время.
- 50 stron
- 3.18 mb
Изделие Avaya 9608, а также другие, которыми Вы пользуетесь ежедневно, наверняка вы получили в комплекте с инструкцией обслуживания. Из опыта наших пользователей мы знаем, что большинство из Вас не уделили этому особого внимания. Большая часть инструкций, сразу же после покупки попадает в корзину для мусора вместе с коробкой — это ошибка. Ознакомьтесь с информацией, касающейся инструкции Avaya 9608, которая поможет Вам в будущем сэкономить нервы и избежать головной боли.
Важная подсказка — не забывайте хотя бы раз прочитать инструкцию Avaya 9608
Если вы не хотите каждый раз читать информационные брошюры, касающиеся, тех или Avaya 9608 иных изделий, достаточно, прочитать их раз — сразу же после покупки устройства. Вы получите основное знания, касающиеся поддержания изделия Avaya 9608 в хорошем эксплуатационном состоянии, так, чтобы без проблем достигнуть его планируемого цикла работы. Затем инструкцию можно отложить на полку и вернуться к ней только в случае, если вы не уверены, правильно ли проводится техобслуживание изделия. Правильный уход является необходимым элементом Вашего удовольствия Avaya 9608.
Раз в году пересмотрите шкафчик, в котором держите инструкции для всех устройств, — выбросите те, которыми вы уже не пользуетесься. Это поможет Вам сохранять порядок в своей домашней базе инструкций обслуживания.
Summary of Contents for Avaya 9608
Что находится в инструкции Avaya 9608? Почему стоит ее прочитать?
- Гарантия и подробности, касающиеся техобслуживания изделия
Хорошей идеей будет прикрепить чек к странице инструкции. Если что-то плохое случится во время использования Avaya 9608, у вас будет комплект документов, необходимый для гарантийного ремонта. В этой части инструкции вы найдете информацию об авторизованных сервисных центрахAvaya 9608 а также, как самостоятельно правильно ухаживать за оборудованием — так, чтобы не потерять гарантийных прав. - Указания по монтажу и Setup
Не терять нервов и времени на самостоятельную попытку установки и первого запуска изделия. Воспользуйтесь рекомендациями производителя Avaya 9608 чтобы правильно запустить изделие, без лишнего риска повреждения оборудования. - Информация, касающаяся дополнительных запчастей (входящих в комплект а также являющихся опцией)
Пересматривая эту часть документа вы сможете проверить, доставлен ли ваш Avaya 9608 с полним комплектом аксессуаров. Вы также сможете узнать, какие дополнительные запчасти или аксессуары для Avaya 9608 Вы сможете найти и докупить к своему устройству. - Troubleshooting
Самые частые проблемы, касающиеся Avaya 9608 и методы их решения. Это очень полезная часть руководства по обслуживанию — она позволит Вам сэкономить много времени на поиск решений. 90% проблем с Avaya 9608 повторяется у многих пользователей. - Требования, касающиеся питания и энергетический класс
Информация, касающаяся количества потребляемой энергии, а также рекомендации, касающиеся установки и питания Avaya 9608. Прочитайте, чтобы оптимально пользоваться Avaya 9608 и не использовать большего количества ресурсов, нежели это необходимо для правильной работы изделия. - Специальные функции Avaya 9608
Здесь вы можешь узнать, как персонализировать изделие Avaya 9608. Вы узнаете, какие дополнительные функции могут помочь Вам удобно использовать продукт Avaya 9608 а также, какие функции Вашего устройства оптимальны для выполнения конкретной деятельности.
Как видите в инструкции вы найдете информацию, которая реально поможет Вам в использовании Вашего изделия. Стоит с ней ознакомиться, чтобы избежать разочарований, возникающих из более короткого, нежели предусматривалось, периода исправности изделия Avaya 9608. Если все же вы не хотите копить инструкции в своем доме, наш сайт поможет Вам в этом — вы должны найти у нас руководство по обслуживанию большинства из своих устройств, а также Avaya 9608.
Комментарии (0)
Skip to content
Настройка Avaya 9601, 9608G, 9611G, 9621G и 9641G для работы с 3CX

- Шаг 1: Сбросьте телефон Avaya в настройки по умолчанию
- Шаг 2: Добавьте DHCP option 242
- Шаг 3: Создайте резервирование DHCP
- Шаг 4: Скачайте файлы автонастройки телефона
- Шаг 5: Создайте добавочные номера
- Известные проблемы и ограничения
Шаг 1: Сбросьте телефон Avaya в настройки по умолчанию
Сбросьте телефон Avaya в настройки по умолчанию:
- Нажмите кнопку Menu и перейдите в меню «Administration …».
- Укажите пароль администратора (по умолчанию — 27238).
- Прокрутите меню и выберите пункт Clear.
- Для подтверждения нажмите кнопку Clear еще раз. Телефон сбросится и перезагрузится.
Шаг 2: Добавьте DHCP option 242
Для телефонов Avaya необходим настраиваемый DHCP-сервер, который предоставляет DHCP Option 242.
- Зайдите в настройки DHCP-сервера, нажмите правой кнопкой мыши на IPv4 и выберите «Set Predefined Options».
- Нажмите “Add”.
- Добавьте в соответствующие поля следующие параметры:
- Name — Option 242 (для примера)
- Data Type — String
- Code — 242
- Description — Avaya provisioning
- Нажмите OK, чтобы создать новую DHCP Option.
Шаг 3: Создайте резервирование DHCP
- В настройках DHCP-сервера нажмите правой кнопкой мыши на Reservations и выберите «New Reservation…».
- Укажите имя резервирования для идентификации телефона:
- Reservation Name — Avaya 9611G
- IP address — 10.172.1.232
- MAC address — b0075eb812e9
- Description — Avaya 9611G provisioning
- Нажмите кнопку «Add», чтобы добавить резервирование.
- Найдите добавленное резервирование, нажмите на нем правой кнопкой мыши и выберите пункт «Configure Options…».

- Выберите Option 242 из списка доступных опций и введите в поле String value:
HTTPDIR=/provisioning/9kb94fwiaf3t/,HTTPPORT=5000,HTTPSRVR=10.172.0.242,SIG=2
Здесь:
- «/provisioning/9kb94fwiaf3t/» — путь к папке автонастройки. Обратите внимание, что строка «9kb94fwiaf3t» отличается для каждой инсталляции 3CX.
- «5000» — HTTP-порт АТС 3CX. Телефоны Avaya не поддерживают протокол HTTPS, поэтому убедитесь, что выбран порт HTTP 80 или 5000.
- «10.172.0.242» — IP-адрес (или FQDN) сервера 3CX.
- «2» — указывает тип ПО, 2=SIP
Шаг 4: Скачайте файлы автонастройки телефона
Внимание! Телефоны Avaya не поддерживают безопасную автонастройку, поэтому следует установить локальный HTTP-сервер и передавать файлы автонастройки через него. Также телефоны можно подключить вручную.
Для автонастройки телефонов Avaya мы подготовили набор файлов, которые следует разместить в определенных местах на сервере 3CX. Вам понадобятся: (i) шаблон Avaya от 3CX, (ii) прошивка Avaya и (iii) логотип 3CX для Avaya. Для правильной подготовки окружения следуйте приведенным инструкциям.
- Скачайте шаблон Avaya отсюда и разместите его в следующем месте:
- Windows: C:\ProgramData\3CX\Instance1\Data\Http\Templates\phones
- Linux: /var/lib/3cxpbx/Instance1/Data/Http/Templates/phones
- Для телефонов Avaya требуется специальная прошивка. Загрузите ее отсюда и распакуйте содержимое в папку:
- Windows:
C:\ProgramData\3CX\Instance1\Data\Http\Interface\provisioning\secure_folder - Linux: /var/lib/3cxpbx/Instance1/Data/Http/Interface/provisioning/secure_folder
Внимание! Телефоны, работающие на прошивке H323, для подключения к 3CX должны быть переведены на прошивку SIP.
- Загрузите логотипы отсюда и распакуйте файлы в папку logos:
- Windows: C:\ProgramData\3CX\Instance1\Data\Http\Interface\provisioning\secure_folder\logo
- Linux:/var/lib/3cxpbx/Instance1/Data/Http/Interface/provisioning/secure_folder/logo
Шаг 5: Создайте добавочные номера

- Зайдите в интерфейс 3CX, раздел Extensions > Add.
- В разделе Authentication добавочного номера убедитесь, что добавочный номер и Authentication ID идентичны. Это необходимо для успешной регистрации телефонов Avaya.
- Внимание! При указывайте пароль, содержащий только цифры, например 122221. Это упростит вход в систему с экрана телефона.
- Перейдите на вкладку Phone Provisioning, выберите в списке модель Avaya и укажите MAC адрес телефона. Нажмите OK, чтобы добавить телефон, и сохраните настройки.
- Включите телефон. Он загрузится, получит параметры DHCP, скачает все необходимые файлы и зарегистрируется на 3CX.
- Когда телефон включится, появится экран авторизации в системе:
- Login — введите добавочный номер, в данном примере 014.
- Пароль — введите пароль, настроенный в интерфейсе 3CX.
Известные проблемы и ограничения
Для телефонов Avaya действуют следующие ограничения:
- Добавочный номер и Authentication ID должны быть идентичны.
- Телефон некорректно отображается в разделе «Extension» > «Phone Provisioning».
- Телефонная книга не поддерживается.
- Функции телефона Alert info, DND, BLF, Remote reboot and reprovisioning, DST — будут работать только с АТС Avaya.
- Телефоны могут работать только в локальной сети без поддержки STUN или SBC.
- Для всех моделей EOL см. Правила техподдержки.
Версия документа
Последнее обновление документа 23 сентября 2023
https://www.3cx.ru/sip-phones/avaya-ip-phone-provisioning/
Page load link