
РУКОВОДСТВО ПОЛЬЗОВАТЕЛЯ
ПОСІБНИК КОРИСТУВАЧА
www.alcatel-home.com
15
14
10
1213
Рис. 1 / Мал. 1
1617
Рис. 2 / Мал. 2
11
10
19 20 21
18
29
28
Рис. 3 / Мал. 3
Рис. 4 / Мал. 4 Рис. 5 / Мал. 5
РОССИЯ
ПРОЧТИТЕ ДАННОЕ РУКОВОДСТВО
ПОЛЬЗОВАТЕЛЯ ПЕРЕД НАЧАЛОМ
ИСПОЛЬЗОВАНИЯ ТЕЛЕФОНА
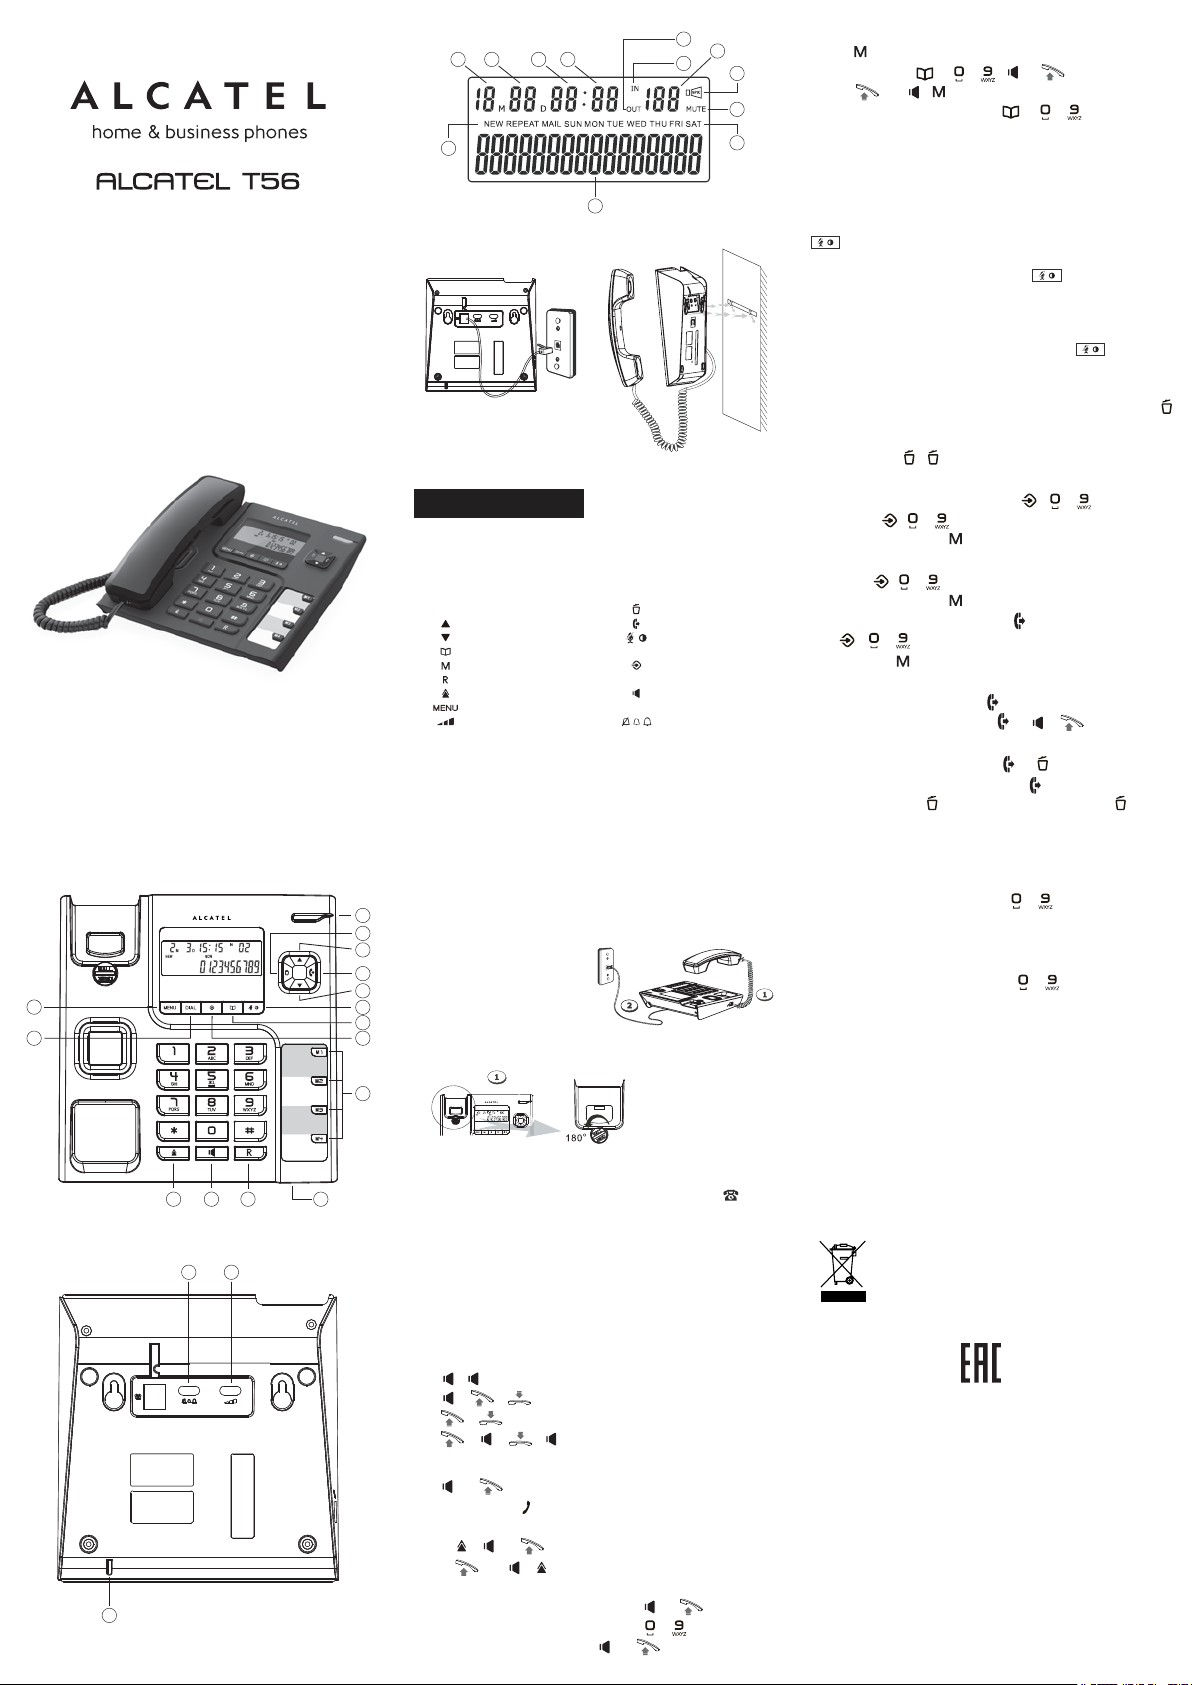
КНОПКИ ОСНОВНОЙ СТАНЦИИ:
01. Индикатор вызова
03. Кнопка «Вверх»
05. Кнопка «Вниз»
07. Кнопка «Записная книга»
09. Кнопка «Память»
11. Кнопка «Переключить»
13. Кнопка «Повторный набор»
15. Кнопка «Меню»
17. Переключатель
громкости динамика
ЗНАЧКИ ДИСПЛЕЯ:
18. Месяц
20. Часы
22. Исходящий вызов
24. Журнал номеров вызовов*
26. Выключение микрофона
28. Отображение номера телефона*
* Предоставляется по подписке и доступности услуги у оператора
телефонных линий
1
УСТАНОВКА И НАСТРОЙКА
2
Телефон должен быть установлен на ровной поверхности или
3
закреплен на стене.
УСТАНОВКА НА СТОЛ
4
1. Подключение трубки
5
2. Подключение телефонной линии
6
7
8
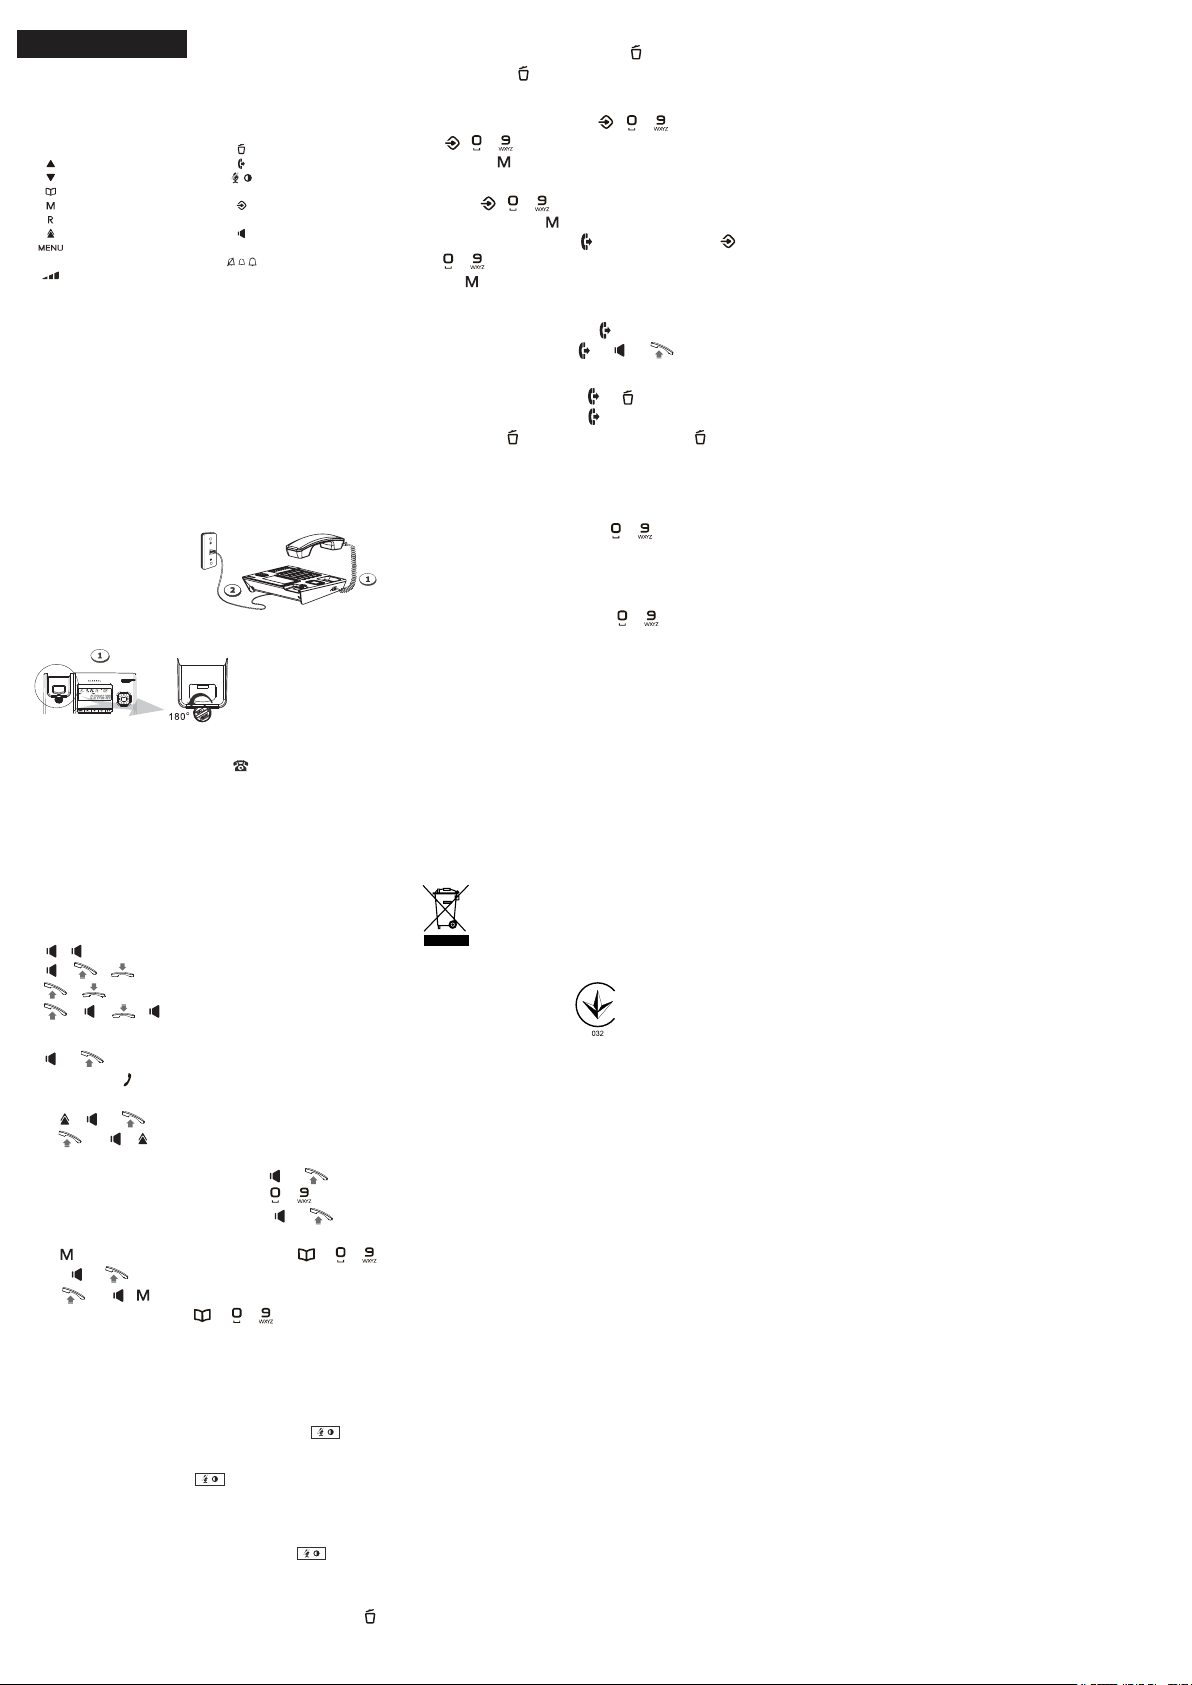
УСТАНОВКА НАСТЕННОГО КРЕПЛЕНИЯ
1. Поверните ручку крепления как показано на схеме ниже:
9
2. Установите основную станцию на стену и подключите один
конец телефонного шнура к разъему базы, а другой конец к
модульному разъему телефонной линии, помеченному .
3. Закрепите телефон на стене. (Рис. 5)
УСТАНОВКА ВРЕМЕННОГО ИНТЕРВАЛА ДОСТУПА К
ФЛЭШ-ФУНКЦИЯМ ДЛЯ КОРРЕКТНОЙ РАБОТЫ В СЕТИ:
— Выполните длительное нажатие (2с) на кнопку МЕНЮ / или
выберите УСТАНОВИТЬ ФЛЭШ 4 / МЕНЮ / или для
установки времени переключения 100 / 300 или 600 / MENU / R
ПОЛЬЗОВАНИЕ ТЕЛЕФОНОМ
ПРИЕМ И ЗАВЕРШЕНИЕ ВЫЗОВА
— /
— / /
— /
— / / /
ВЫПОЛНЕНИЕ ВЫЗОВА
— или до или после набора номера или
— набор номера /
— Из списка повторного набора:
1. / или
2. или /
— Из списка журнала вызовов*:
1. или выбрать номер абонента / или
2. или выбрать номер абонента / чтобы добавить
номер до выбора номера / или
02. Кнопка «Удалить»
04. Кнопка «Отправить»
06. Кнопка «Контрастность/
Отключить микрофон»
08. Кнопка «Программа»
10. Микрофон
12. Кнопка «Громкая связь»
14. Кнопка «Вызов»
16. Переключатель
громкости звонка
19. День
21. Минуты
23. Входящий вызов
25. Громкая связь
27. День недели
29. Новый номер абонента* /
Повтор / Голосовая почта
Данная ручка
предназначена для
того, чтобы удерживать
блок телефона на месте
в вертикальной
позиции на стене.
…
22
24
23
25
26
27
— Из непосредственной памяти:
1. для выбора позиции в электронной записной книге из
M1~M4 или / или
2. или / для выбора позиции в электронной
записной книге из M1~M4 или
— Добавление КОДА ПРЕФИКСА к номеру набора: после
получения номера набора одним из вышеописанных способов,
выполните длительное нажатие кнопки 0 в течение 2 с, и код
префикса будет добавлен к номеру набора.
+ …
+ …
ОТКЛЮЧЕНИЕ ЗВУКА МИКРОФОНА:
При снятой телефонной трубке пользователь может нажать кнопку
чтобы получить доступ к функции отключения микрофона.
После отключения микрофона на дисплее появится индикатор
МИКРОФОН ОТКЛЮЧЕН. Нажмите кнопку чтобы отключить
эту функцию и возобновить нормальный разговор.
НАСТРОЙКА КОНТРАСТНОСТИ ЖК ДИСПЛЕЯ:
Для выбора контрастности ЖК-дисплея (выбор от 1 до 5, по
умолчанию 3) пользователь может нажать кнопку , не снимая
телефонную трубку.
УДАЛЕНИЕ НОМЕРА АБОНЕНТА:
— Для удаления номера абонента: или чтобы выбрать номер /
— Для удаления всех номеров абонентов: или чтобы выбрать
номер / для подтверждения УДАЛИТЬ ВСЕ? выполните длинное
нажатие кнопки /
СОХРАНЕНИЕ НОМЕРА:
— Сохранение телефонного номера: / чтобы ввести
номер / / чтобы выбрать позицию в электронной
записной книге, или чтобы выбрать M1~M4.
— Сохранение номера входящего звонка: or чтобы выбрать
номер / чтобы выбрать позицию в электронной
записной книге, или чтобы выбрать M1~M4.
— Сохранение исходящего номера: … чтобы выбрать номер /
/ чтобы выбрать позицию в электронной записной
книге, или чтобы выбрать M1~M4.
…
…
…
…
REVIEW AND DIAL BACK AN OUTING NUMBER:
— Review an outgoing number: … .
— Dial back an outgoing number: … / or .
УДАЛЕНИЕ ИСХОДЯЩЕГО НОМЕРА:
— Удаление исходящего номера: … / .
— Удаление всех исходящих номеров: … / выполните длинное
нажатие кнопки , чтобы выбрать УДАЛИТЬ ВСЕ? / .
ОБЩИЕ НАСТРОЙКИ
УСТАНОВКА ДАТЫ И ВРЕМЕНИ:
— Выполните длительное нажатие (2с) на кнопку МЕНЮ / или
выберите SET 1 DATE / МЕНЮ / / или чтобы
ввести год, месяц, день, часы и минуты / МЕНЮ / R .
…
НАСТРОЙКА КОДА ПРЕФИКСА:
— Выполните длительное нажатие (2с) на кнопку МЕНЮ / или
выберите SET 2 PCODE / МЕНЮ / чтобы ввести код
префикса / МЕНЮ / R .
…
ВЫБОР ТОНОВОГО ИЛИ ИМПУЛЬСНОГО РЕЖИМА:
— Выполните длительное нажатие (2с) на кнопку МЕНЮ / или
выберите SET 3 T-P / МЕНЮ / или чтобы выбрать
ТОНОВЫЙ или ИМПУЛЬСНЫЙ / МЕНЮ / R .
БЕЗОПАСНОСТЬ
Не пользуйтесь телефоном, чтобы уведомить об утечке газа или
другой возможной опасности взрыва. Не разбирайте устройство во
избежание риска поражения электрическим током. Телефон должен
быть установлен в сухом месте, далеко от источников высокой
(Рис. 4)
температуры, влаги и прямого солнечного света.
ОКРУЖАЮЩАЯ СРЕДА
Этот символ означает, что ваш отработавший
электронный прибор следует утилизировать отдельно и
не смешивать с бытовыми отходами. Европейский Союз
внедрил специальную систему сбора и переработки, за
Допоможіть нам захистити навколишнє середовище, в якому
ми живемо!
ALCATEL T56RU
Декларация о соответствии средства связи №Д-БТА-1445 от
14.09.2015 г., действительна до 14.09.2025 г., декларация о
соответствии ТС №RU Д-НК.АГ03.В.69378 от 04.03.2015 г.,
действительна до 03.03.2020 г. Зарегистрирована органом по
сертификации продукции ООО «Альсена», аттестат аккредитации
РОСС RU.0001.11АГ03 .
Срок службы 5 лет.
www.alactel-home.com
© ATLINKS 2015 – воспроизведение запрещено.
Изготовитель сохраняет за собой право изменять технические
характеристики настоящего продукта с целью его технического
усовершенствования и удовлетворения новых законодательных
требований.
которую отвечают производители.
УКРАЇНСЬКИЙ
ПРОЧИТАЙТЕ ЦЕЙ КЕРІВНИЦТВО
КОРИСТУВАЧА ПЕРЕД ПОЧАТКОМ
ВИКОРИСТАННЯ ТЕЛЕФОНУ
КНОПКИ ОСНОВНОЇ СТАНЦІЇ:
01. Індикатор дзвінка
03. Кнопка «Вгору»
05. Кнопка «Вниз»
07. Кнопка «Записна книга»
09. Кнопка «Пам’ять»
11. Кнопка «Перемкнути»
13. Кнопка «Повторний набір»
15. Кнопка «Меню»
17. Перемикач гучності
динаміка
ПІКТОГРАМИ ДІСПЛЕЯ:
18. Місяць
20. Година
22. Вихідний виклик
24. Журнал номерів викликів*
26. Вимикання мікрофона
28. Відображення телефонного
номера*
* Надається за передплатою та доступності цієї послуги в оператора
телефонної лінії
ВСТАНОВЛЕННЯ ТА НАЛАШТУВАННЯ
Телефон необхідно встановити на рівній поверхні або закріпити на
стіні.
ВСТАНОВЛЕННЯ НА СТІЛ
1. Підключення слухавки
2. Підключення телефонної лінії
МОНТАЖ НА СТІНУ
1. Поверніть ручку стінного кріплення як зображено на схемі нижче:
2. Встановіть основну станцію на стіну та підключить один кінець
телефонного дроту до гнізда бази, а інший кінець до модульного
роз’єму телефонної лінії, поміченого “ ”. (Мал. 4)
3. Закріпіть телефон на стіні. (Мал. 5)
НАЛАШТУВАННЯ ІНТЕРВАЛУ ЧАСУ ДОСТУПУ ДО
ФЛЕШ-ФУНКЦІЙ ДЛЯ КОРЕКТНОЇ РОБОТИ В МЕРЕЖІ:
— Виконайте тривале натискання (2с) на кнопку МЕНЮ / або
виберіть ВСТАНОВИТИ ФЛЕШ 4 / МЕНЮ / або , щоб вибрати
час перемикання 100 / 300 або 600 / МЕНЮ / R
КОРИСТУВАННЯ ТЕЛЕФОНОМ
ПРИЙОМ І ЗАВЕРШЕННЯ ВИКЛИКУ
— /
— / /
— /
— / / /
ВИКОНАННЯ ВИКЛИКУ
— або до або після набору потрібного номера або,
— набір номеру /
— Зі списку повторного набору:
1. / або
2. або /
— From call log list*:
1. або щоб вибрати номер абонента / або
2. або щоб вибрати номер абонента / щоб
добавити номер перед вибором номеру / або
— З безпосередньої пам’яті:
1. to select memory location from M1~M4 або
/ або
2. або / щоб вибрати позицію в електронній
записній книжці M1~M4 або
— Додавання КОДУ ПРЕФИКСА для набору номера: після
отримання номера набору одним з вищеописаних способів,
виконайте тривале натискання кнопки 0 протягом 2 с, і код
префікса буде додано до номеру набору.
ВІДКЛЮЧЕННЯ МІКРОФОНА:
При знятій слухавці користувач може натиснути кнопку , щоб
отримати доступ до функції відключення мікрофону. Після
відключення мікрофона на дисплеї з’явиться індикатор МІКРОФОН
ВІДКЛЮЧЕНИЙ. Натисніть кнопку , щоб відключити цю
функцію і відновити нормальну розмову.
НАЛАШТУВАННЯ КОНТРАСТНОСТІ ДІСПЛЕЯ:
Щоб вибрати контрастність ЖК-дісплея (вибір від 1 до 5, за
промовчанням 3) користувач може натиснути кнопку , не
змінаючи телефонну слухавку.
ВИДАЛЕННЯ НОМЕРУ АБОНЕНТА:
— Для видалення номера абонента: або щоб вибрати номер /
02. Кнопка «Видалити»
04. Кнопка «Відправити»
06. Кнопка «Контрастність/
Відключити мікрофон
08. Кнопка «Програма»
10. Мікрофон
12. Кнопка «Гучний зв’язок»
14. Кнопка «Виклик»
16. Перемикач гучності
дзвінка
19. День
21. Хвилини
23. Вхідний виклик
25. Гучний зв’язок
27. День тижня
29. Новий номер абонента* /
Повтор / Голосова пошта
Ця ручка призначена для
того, щоб утримувати
блок телефону на місці у
вертикальній позиції на
стіні.
…
+ …
+ …
— Для видалення всіх номерів абонента: або щоб вибрати
номер / виконайте тривале натискання , щоб підтвердити
ВИДАЛИТИ ВСІ? /
ЗБЕРЕГИ НОМЕР:
— Зберегти телефонний номер: / щоб ввести номер /
/ щоб вибрати позицію в електронній записній
…
книзі, або , щоб вибрати M1~M4.
— Зберегти номер вхідного виклику: або щоб вибрати
номер/ / щоб вибрати позицію в електронній
записній книзі, або , щоб вибрати M1~M4.
— Зберегти вихідний номер: … щоб вибрати номер / /
…
щоб вибрати позицію в електронній записній книзі,
або , щоб вибрати M1~M4.
…
…
ПЕРЕГЛЯД І НАБІР ВИХІДНОГО НОМЕРА:
— Переглянути вихідний номер: … .
— Набрати вихідний номер: … / або .
ВИДАЛЕННЯ ВИХІДНОГО НОМЕРА:
— Delete an outgoing number: … / .
— Delete all outgoing number: … / виконайте тривале
натискання , щоб вибрати ВИДАЛИТИ ВСІ? / .
ЗАГАЛЬНІ НАЛАШТУВАННЯ
НАЛАШТУВАННЯ ДАТИ ТА ЧАСУ:
— Виконайте тривале натискання (2с) на кнопку МЕНЮ / або
виберіть SET 1 DATE / МЕНЮ / / або щоб ввести
рік, місяць, день, час та хвилини / МЕНЮ / R .
…
НАЛАШТУВАННЯ КОДУ ПРЕФИКСА:
— Виконайте тривале натискання (2с) на кнопку МЕНЮ / або
виберіть SET 2 PCODE / МЕНЮ / щоб ввести код
префіксу / МЕНЮ / R .
…
ВИБІР ТОНОВОГО АБО ІМПУЛЬСНОГО РЕЖИМУ:
— Виконайте тривале натискання (2с) на кнопку МЕНЮ / або
виберіть SET 3 T-P / МЕНЮ / або щоб вибрати ТОНОВИЙ
або ІМПУЛЬСНИЙ / МЕНЮ / R .
БЕЗПЕКА
Не користуйтеся телефоном, щоб повідомити про витік газу або іншу
можливу небезпеку вибуху. Не розбирайте пристрій, щоб запобігти
небезпеці ураження електричним струмом. Телефон повинен бути
встановлений в сухому місці, далеко від джерел високої температури,
вологи та прямого сонячного світла.
НАВКОЛИШНЄ СЕРЕДОВИЩЕ
Цей символ означає, що ваш електронний прилад, який
відпрацював, слід утилізувати окремо і не змішувати з
побутовими відходами. Європейський Союз запровадив
спеціальну систему збору та переробки, за яку
Допоможіть нам захистити навколишнє середовище, в якому
ми живемо!
www.alactel-home.com
© ATLINKS 2015 – Відтворення даних заборонено.
Виробник зберігае за собою право змінювати специфікації на свою
продукцію з метою внесення технічних удосконалень або
відповідності новим положенням.
відповідають виробники.
Model Alcatel T56-RU
A/W No.:10001397 Rev.0
Напечатано в Китае
Надруковано в Китаї
(RU/UA)
15-40
Перейти к контенту
Проводные Alcatel
- Размер инструкции: 914.94 kB
- Формат файла: pdf
Если вы потеряли инструкцию от проводного Alcatel T56, можете скачать файл для просмотра на компьютере или печати.
Инструкция для проводного Alcatel T56 на русском языке. В руководстве описаны возможности и полезные функции, а также правила эксплуатации. Перед использованием внимательно ознакомьтесь с инструкцией.
Чтобы не читать всю инструкцию вы можете выполнить поиск по содержимому внутри инструкции и быстро найти необходимую информацию. Рекомендации по использованию помогут увеличить срок службы проводного Alcatel T56. Если у вас появилась проблема, то найдите раздел с описанием неисправностей и способами их решения. В нем указаны типичные поломки и способы их решения.
1617
10
1
2
3
4
5
6
10
11
1213
14
15
7
8
9
Fig 1Fig 2Fig 3 Fig 3 Fig 4
18
19 20 21
22
23
24
25
26
27
28
29
www.alcatel-home.com
T56
USER GUIDE
GUIDE UTILISATEUR
GUÍA DEL USUARIO
MANUAL DO UTILIZADOR
INSTRUKCJA OBSŁUGI
ΟΔΗΓΟΣ ΧΡΗΣΗΣ
РЪКОВОДСТВО ЗА УПОТРЕБА
MANUAL DE UTILIZARE
NÁVOD K OBSLUZE
HASZNÁLATI ÚTMUTATÓ
KORISNIČKO UPUTSTVO
مدﺧﺗﺳﻣﻟا لﯾﻟد
ENGLISH
01. Ring indicator03. Up button05. Down button07. Phonebook button09. Memory button11. Flash button13. Redial button15. Menu button17. Speaker volume switch02. Delete button04. Out button06. Mute/Contrast button08. Programme button10. Microphone12. Speaker button14. Dial button16. Ringer volume switch18. Month20. Hour22. Outgoing call24. Call-log number*26. Mute28. Phone number display*19. Day21. Minutes23. Incoming call25. Speakerphone27. Day of the week29. New CID*/Repeat/Voice mailThe knob is designed to keep this unit in place when the telephone is vertical on the wall.Date and Time Setting.PCODE is a prefix code that user may add to the front of the number before dialing.Select the dialing mode. This is dependent of the telephone company you are connected to.Timing setting. This timing is to allow user to momentary access telephone services such as call waiting when FLASH buttong is pressed.Press and Hold 2 SecondsSelect Tone or PulseTone Pulse
OR
OR
Press and Hold 2 Seconds
OR
Press and Hold 2 SecondsEnter Year, Month, Day and Time
OR
Press and Hold 2 SecondsSelect Timing100/300/600
OR
OR
RingingAnswer CallEnd CallCASE 1RingingAnswer CallEnd CallCASE 2RingingAnswer Call End CallCASE 3RingingAnswer CallEnd CallCASE 4OR ORCASE 3Select the caller number Add number to the frontThe number shown will be dialed
OR
CASE 1Select the caller numberThe number shown will be dialedOR OR
OR
CASE 2Select the caller numberThe number shown will be dialed
OR
OR ORPress “0” key 2 seconds PCODE will be added to the front of number shownOR ORThe number shown will be dialed
OR
Select the number
OR
Dial number Memory location
OROR
Select the number Memory location
OR
Select the number Memory locationCASE 1CASE 2ORORSelect a Memory LocationMemory location
OR
OR ORSelect a Memory LocationPress and Hold 2 Seconds
OR
CASE 1
OR
CASE 2Dial numberThe number shown will be dialedDial number
OR
OR
CASE 1Last number redialThe number shown will be dialedOR ORCASE 2Reviewing Incoming Call Log
OR
DIAL BACK A CALLER ID NUMBERREVIEWING OUTGOING NUMBERSDIAL BACK AN OUTGOING NUMBERDELETING A CALLER ID NUMBER
MEMORY OPERATIONS
STORING A TELEPHONE NUMBERSTORING INCOMING CALL NUMBERSTORING OUTGOING NUMBERS INTO MEMORYDIALING A MEMORY LOCATIONDELETING A MEMORY LOCATIONSAFETY
This telephone is not designed for Emergency calls when the main power
fails. Do not use your telephone to notify a gas leak or other potential
explosion hazard. Do not open your device or its power supply to avoid
risk of electrical shock. Do not attempt to open the batteries, as they
contain hazardous chemical substances. Your telephone must be located
in a dry place away from hot, humide and direct sunlight condition. To
avoid radio signal interference, place the phone at least 1 meter away
from other electrical appliances or other phones.
ENVIRONMENT
This symbol means that your inoperative electronic
appliance must be collected separately and not mixed with
the household waste.The European Union has implemented
a specific collection and recycling system for which
producers are responsible.
Help us protect the environment in which we live!
CONFORMITY
The logo printed on the products indicates the conformity with all essential
requirements and all applicable directives. You can download the
Declaration of Conformity from our website
www.alcatel-home.com
Setting PCODE Setting TONE/PULSE Setting FLASH
PHONE OPERATION
RECEIVING A PHONE CALLMAKING A PHONE CALLCONTRAST LEVEL ADJUSTMENTIn on-hook state, press the “ ” button to adjust the display contrast level.P=>T DIAL MODEIn PULSE dialing mode, press [*] button to access TONE service.REDIALCONTRAST/MUTEIn off-hook state, user can press the “ ” button to access mute function. When CONTRAST/MUTE is on, the CONTRAST/MUTE indicator will show on the screen. Press the “ ” button to exit mute function and resume normal conversation.In on-hook state, user can press the “ ” button to select the LCD Contrast (1 ~ 5 choice, default is 3).
CALLER ID FEATURES
Caller ID (CID) is a service available from your local company. For Caller ID to work on this system, you must subscribe to Caller ID service. This unit can receive Caller ID without any setting. Your Caller ID information may include the phone number, date and time.REVIEWING INCOMING CALLS
PLEASE READ THIS USER’S GUIDE BEFORE
USING YOUR PHONE
BASE STATION KEYS:DISPLAY ICONS:* Subject to subscription and availability of the service from the fixed line operator.
INSTALLATION AND SETUP
Your phone should be placed on a level surface, such as a desk or table top, or you can mount it on a wall.DESKTOP INSTALLATION 1. Connecting the handset. 2. Connecting the telephone line.WALL MOUNT INSTALLATION 1. Rotate the wall mounting knob as shown in the following layout: 2. Install the base unit to the wall and then plug one end of line cord into junction box and the other end into modular telephone line jack marked “ ”. (Fig 3) 3. Fix the telephone on the wall. (Fig 4)
SETTING THE PHONE
There are 4 options to set: Setting DATE/TIME
VEUILLEZ LIRE CE MODE D’EMPLOI AVANT
D’UTILISER VOTRE TÉLÉPHONE
TOUCHES DE LA STATION DE BASE :ICÔNES D’AFFICHAGE :* Sous réserve d’abonnement au service mis à disposition par l’opérateur de téléphonie fixe.
INSTALLATION ET CONFIGURATION
Votre téléphone doit être placé sur une surface plane ou vous pouvez l’accrocher à un mur.INSTALLATION DU TELEPHONE 1. Brancher le combiné. 2. Brancher la ligne téléphonique.INSTALLATION MURALE 1. Faites pivoter le bouton du support mural comme indiqué sur le schéma suivant : 2. Installez la base sur le mur puis branchez un embout de la ligne téléphonique au boîtier de raccordement et l’autre embout à la prise jack modulaire de ligne téléphonique indiquée par “ ”. 3. Fixez le téléphone sur le mur comme indiqué sur le schéma suivant. (Fig 4)
RÉGLAGES DU TÉLÉPHONE
4 fonctions peuvent être réglées : Régler la DATE/HEURE Régler la P-CODE Régler la DÉCIMALE/TONALITÉS Régler la DURÉE DE RAPPEL
FONCTIONNEMENT DU TÉLÉPHONE
RECEVOIR UN APPEL
FRANÇAIS
18. Mois20. Heure22. Appel sortant24. Numéro du journal*26. Sourdine28. Affichage du numéro de téléphone*19. Jour21. Minutes23. Appel entrant25. Haut-parleur27. Jour de la semaine29. Nouvelle identification de l’appelant*/Répéter/RépondeurLe bouton permet de garder cet appareil en place lorsque le téléphone est en position verticale sur le mur.Réglage de la date et de l’heure.Un P-CODE est un code préfixe que l’utilisateur peut ajouter devant le numéro avant de le composer.Sélectionnez le mode de composition. Cela ne dépend pas de votre opérateur téléphonique.Réglage de la durée. Cette durée permet à l’utilisateur d’accéder momentanément à des services téléphoniques comme l’appel en attente lorsque la touche DURÉE DE RAPPEL est enfoncée.Restez appuyé sur la touche pendant 2 secondesSaisissez l’année, le mois, le jour et l’heure
OU
01. Voyant indiquant un sonnerie03. Touche Haut05. Touche Bas07. Touche Répertoire09. Touche Mémoire11. Touche Durée de rappel13. Touche BIS15. Touche Menu17. Speaker volume switch02. Touche Supprimer04. Touche Sortie06. Touche Sourdine/Contraste08. Touche Programme10. Micro12. Touche Haut-parleur14. Touche Composer16. Bouton du volume de la sonnerie(Fig 3)Sélectionnez Tonalités ou DécimaleTone Pulse
OU
OU
Restez appuyé sur la touche pendant 2 secondesRestez appuyé sur la touche pendant 2 secondes
OU
Restez appuyé sur la touche pendant 2 secondesSélectionnez la durée100/300/600
OU
OU
CAS 1
OU
CAS 2Composer un numéroLe numéro affiché sera composéComposer un numéro
OU
OU
CAS 1Recomposer le dernier numéroLe numéro affiché sera composéOU OUCAS 2REVOIR DES APPELS ENTRANTS
OU
EFFECTUER UN APPELRÉGLAGE DU NIVEAU DE CONTRASTEEn mode raccroché, appuyez sur la touche “ ” pour régler le niveau de contraste à l’écran.MODE DE NUMÉROTATION P=>TEn mode de numérotation DÉCIMALE, appuyez sur la touche [*] pour accéder au service TONALITÉS.
BIS
CONTRASTE/SOURDINEEn mode décroché, l’utilisateur peut appuyer sur la touche “ ” pour accéder à la fonction sourdine. Lorsque CONTRASTE/SOURDINE est activé, un voyant sera affiché à l’écran. Appuyez sur la touche“ ” pour quitter la fonction sourdine et repasser en mode de conversation normal. En mode raccroché, l’utilisateur peut appuyer sur la touche “ ” pour sélectionner le contraste de l’écran LCD (option 1 à 5 réglée sur 3 par défaut).
FONCTIONS D’IDENTIFICATION DE
L’APPELANT
L’identification de l’appelant est un service pouvant être mis à disposition par votre opérateur téléphonique local. L’identification de l’appelant peut comprendre des informations sur le numéro de téléphone, la date et l’heure.REVOIR DES APPELS ENTRANTSRAPPELER UN NUMÉRO DONT L’APPELANT A ÉTÉ IDENTIFIÉREVOIR DES NUMÉROS SORTANTSSonnerieRépondre à l’appelTerminer l’appelCAS 1SonnerieSonnerieRépondre à l’appelRépondre à l’appelRépondre à l’appelCAS 2CAS 3RingingCAS 4Terminer l’appelTerminer l’appelTerminer l’appelOU OUCAS 3Ajoutez un numéro devant
OU
CAS 1Sélectionnez le numéro de l’appelantLe numéro affiché sera composéOU OU
OU
CAS 2
OU
OU OUAppuyez sur la touche « 0 » pendant 2 secondes. Un P-CODE sera ajouté devant le numéro affichéSélectionnez le numéro de l’appelantLe numéro affiché sera composéLe numéro affiché sera composéSélectionnez le numéro de l’appelant
1
A good user manual
The rules should oblige the seller to give the purchaser an operating instrucion of Alcatel T56, along with an item. The lack of an instruction or false information given to customer shall constitute grounds to apply for a complaint because of nonconformity of goods with the contract. In accordance with the law, a customer can receive an instruction in non-paper form; lately graphic and electronic forms of the manuals, as well as instructional videos have been majorly used. A necessary precondition for this is the unmistakable, legible character of an instruction.
What is an instruction?
The term originates from the Latin word „instructio”, which means organizing. Therefore, in an instruction of Alcatel T56 one could find a process description. An instruction’s purpose is to teach, to ease the start-up and an item’s use or performance of certain activities. An instruction is a compilation of information about an item/a service, it is a clue.
Unfortunately, only a few customers devote their time to read an instruction of Alcatel T56. A good user manual introduces us to a number of additional functionalities of the purchased item, and also helps us to avoid the formation of most of the defects.
What should a perfect user manual contain?
First and foremost, an user manual of Alcatel T56 should contain:
— informations concerning technical data of Alcatel T56
— name of the manufacturer and a year of construction of the Alcatel T56 item
— rules of operation, control and maintenance of the Alcatel T56 item
— safety signs and mark certificates which confirm compatibility with appropriate standards
Why don’t we read the manuals?
Usually it results from the lack of time and certainty about functionalities of purchased items. Unfortunately, networking and start-up of Alcatel T56 alone are not enough. An instruction contains a number of clues concerning respective functionalities, safety rules, maintenance methods (what means should be used), eventual defects of Alcatel T56, and methods of problem resolution. Eventually, when one still can’t find the answer to his problems, he will be directed to the Alcatel service. Lately animated manuals and instructional videos are quite popular among customers. These kinds of user manuals are effective; they assure that a customer will familiarize himself with the whole material, and won’t skip complicated, technical information of Alcatel T56.
Why one should read the manuals?
It is mostly in the manuals where we will find the details concerning construction and possibility of the Alcatel T56 item, and its use of respective accessory, as well as information concerning all the functions and facilities.
After a successful purchase of an item one should find a moment and get to know with every part of an instruction. Currently the manuals are carefully prearranged and translated, so they could be fully understood by its users. The manuals will serve as an informational aid.
Alcatel T56 Telephone PDF User Guides and Manuals for Free Download: Found (1) Manuals for Alcatel T56 Device Model (Operation & User’s Manual)
Alcatel T56 Operation & User’s Manual
Details:
- Manufacturer: Alcatel
- Product Name/ID: Alcatel T56 / #1295886
- Category: Telephone
- File Path: alcatel/t56_1295886.pdf
- Last Updated: 07 May 2025
- Description: Discover the full potential of your Alcatel T56 with this comprehensive manual, featuring step-by-step installation guides, user interface navigation tips, and essential safety precautions.
- Document Type: User Manual
- Pages: 2
|
Pages Preview: |
Download PDF
Read Online
The Alcatel T56 is a remarkable addition to the world of home communication devices, offering a blend of aesthetic appeal, functionality, and affordability. Designed with modern users in mind, this landline phone provides a reliable solution for both personal and professional use. With its sleek design and user-friendly interface, it effortlessly fits into any home or office setting.
One of the standout features of the Alcatel T56 is its large, backlit display. The screen is easy to read, ensuring that users can quickly navigate through contacts and settings. The device allows for a storage capacity of up to 50 contacts, making it convenient for users to stay connected with friends, family, and colleagues. The phonebook saves significant time, especially in busy households or workplaces.
The call quality offered by the Alcatel T56 is impressive. With clear sound reception and good volume levels, users can engage in conversations without straining to hear or be heard. Additionally, the T56 comes equipped with a built-in speakerphone feature, allowing users to have hands-free conversations, which is a significant advantage when multitasking.
Another noteworthy aspect is the ease of use. The Alcatel T56 features a simple keypad layout, making it intuitive for users of all ages. Important functions such as call waiting, caller ID, and redial options are easily accessible. The phone also allows customization of ringtones, enabling users to personalize their experience.
Battery life is often an important factor to consider with any device, and the Alcatel T56 does not disappoint. It has a long-lasting rechargeable battery that ensures it remains operational, even during power outages. Furthermore, its eco-friendly design aligns with contemporary sustainability efforts, making it an excellent choice for environmentally conscious consumers.
In terms of aesthetics, the Alcatel T56 stands out with its sleek and modern design. Available in a variety of colors, it can complement any décor. Whether it’s placed in a kitchen, living room, or office, it’s sure to add a touch of style rather than detract from it.
For those considering the Alcatel T56, here are some key features to keep in mind:
- Large backlit display for easy readability
- 50 contact storage for quick access
- Hands-free speakerphone for convenience
- Customizable ringtones for personalization
- Rechargeable battery with long-lasting performance
- Modern design available in multiple colors
In conclusion, the Alcatel T56 is an excellent choice for anyone in need of a reliable landline phone that doesn’t compromise on features or style. Its blend of practicality, ease of use, and appealing design make it a worthy investment for both homes and offices. Overall, the T56 stands as a testament to Alcatel’s commitment to quality in the realm of telecommunications and will undoubtedly meet the needs of various users.