
Специалист техподдержки, PHP-программист, разработчик WordPress
Компания Tenda, работающая на рынке компьютерного сетевого оборудования с 1998 года, в России известна мало. Но за 20-летнюю историю она сумела зарекомендовать себя как надежный бренд с демократичными ценами. Пользователю предлагаются роутеры, точки доступа, комбинированные девайсы.
К последнему классу относится Tenda N300— роутеры с точкой доступа.
Содержание
- Модели N300 и N301 – в чем разница
- Особенности и технические характеристики
- Как подключить
- Настройка роутера
- Проверка настроек компьютера
- Настраиваем интернет
- Настраиваем wi-fi
- Как включить режим повторителя
- Перенаправление портов
- Меняем пароль
- Прошивка
- Отзывы
Модели N300 и N301 – в чем разница
Компания Tenda постоянно обновляет и расширяет ассортимент оборудования. Так, наряду с версией N300 в продаже появилась версия N301 – слегка модифицированный вариант N300. Изменения незначительны. И технические характеристики, и настройка у этих моделей совпадают. В новой версии немного изменился дизайн и оформление меню. В остальном Tenda N301 – это все та же старая добрая Tenda N300.
Все, что сказано ниже, относится сразу к двум моделям.
Особенности и технические характеристики
Несмотря на то, что роутер китайский, Tenda N300,по своим характеристикам способна потягаться с продукцией более именитых брендов. При этом стоит от 800 руб.
Пользователь получает:
- Поддержку беспроводных протоколов 802.11 b, g, n, а также нового 802.3, что позволит подключить любой планшет, смартфон, ноутбук, начиная от самых древних (большинство современной техники понимает 802.11n).
- Четыре (в некоторый редакциях три) гнезда для подключения пользовательских устройств посредством сетевого кабеля. Скорость передачи данных до 100 Мбит.
- Одно гнездо для подключения интернета. Скорость также до 100 Мбит.
- Две антенны позволят настроить устойчивый прием/передачу Wi-Fi сигнала в радиусе действия маршрутизатора (по заявлениям разработчиков — это более 150 м от места установки устройства).
- Отключаемый Wps позволит обнаружить новое устройство и автоматически настроить его для корректной работы.
Кроме этого:
- автоматический выбор канала приема/передачи;
- возможность отключения точки Wi-Fi или перевода ее в скрытый режим (все устройства пользователя подключены, а посторонние сеть просто не найдут);
- защита сети по протоколам WEP, WPA-PSK, WPA2-PSK.
N 300 имеет встроенные:
- DHCP-сервер; дает возможность получить компьютеру все необходимые настройки автоматически.
- перенаправление портов (полезная функция для пользователей торрент сетей)
- фильтрацию по MAC, IP, URL — списки доступа и запрета на определенные действия
- возможность ведения системного журнала;
- подключение по любому протоколу, используемому провайдером интернета;
- функцию подмены MAC — после её настройки совсем не обязательно сообщать техподдержке об установке роутера.
Технические характеристики (кликните, чтобы развернуть)

Физические характеристики Tenda N300: 133 мм в длину, 65 в ширину. Высота с поднятыми антеннами — 245 мм. Для питания понадобится одна розетка 220v.
Оценим роутер по основным потребительским характеристикам.
Удобство и простота настройки
9
Итого
8.4
8,4 балла из 10 возможных — отличная оценка для недорогого девайса китайского производства.
По ссылке – описание и настройка более ранней модели той же марки – Tenda F9.
Как подключить
Хоть по характеристикам и заметно, что роутер Tenda N300 оптимизирован под работу с беспроводной сетью, для первоначальных настроек всё-таки понадобится компьютер, имеющий стандартное подключение — посредством кабеля.
Кабель от провайдера вынимается из компьютера и вставляется в гнездо «Wan» на роутере. Кабелем из комплекта соединяются одно из гнёзд «Lan» и освободившееся гнездо на компьютере.
Какой из четырех разъёмов использовать, роли не играет. Они равноценны.
Правда, пользователи отмечали, что в поиске, после включения питания роутера появляется «Тенда» – одноименная незащищенная Wi-Fi сетка. Настраивать можно и через неё.
Настройка роутера
Первоначальная настройка роутера Tenda производится через его web-интерфейс. Для этого подходит любой браузер, который есть на компьютере пользователя.
Проверка настроек компьютера
Иногда, особенно если к гнезду ранее был подключен кабель провайдера, рекомендуется проверить настройки сетевой платы.
Для этого в панель управления ОС переходим в раздел «Сеть и интернет»

Вот так это выглядит в Win7.

А в Win10 можно сразу из панели управления перейти к нужному пункту

В открывшемся окне нужно выбрать нужный адаптер (проводная или беспроводная сеть) и затем открыть его свойства:
Проверить, и если надо, выставить так, как указано на картинке.

Настраиваем интернет
После этого можно возвращаться в браузер и настроить роутер. Tenda N300, как и конкуренты, разделяет окно настроек на две части. В верхнем меню — основные разделы, слева дополнительное, а в центре управление, включение, отключение, изменение параметров, настройка характеристик.
В новой вкладке/окне вводится адрес домашней страницы устройства: http://192.168.0.1. Логин, как правило, уже введён, пароль — admin. На главной странице приведен минимум настроек, но обычно их хватает для базовой настройки устройства. Нужно выбрать тип подключения, MAC- адрес, настройку безопасности. Wi-Fi лучше сделать в отдельном меню.

На главной странице роутер показывает все часто используемые варианты подключения. Но если у пользователя какой-то экзотический способ, его можно будет выбрать в разделе «Основные настройки». После выбора типа подключения нужно ввести имя, пароль пользователя, согласиться с изменениями. Статус роутера должен показать, что интернет доступен.
Имя, тип, пароль для подключения есть в бумагах, которые выдал провайдер.
Настраиваем wi-fi
Чтобы иметь возможность подключаться к новому маршрутизатору не только по кабелю, а, например, с телефона, нужно настроить Wi-Fi. Делается это на отдельной странице, которая называется «Беспроводной режим». Здесь несколько страниц, список которых представлен слева. На первой открывшейся нужно включить сеть (обычно включена сразу), чуть ниже установить имя сети SSID. То, что введено здесь, будет видно беспроводным устройствам пользователя. Остальное можно не трогать.

Теперь делают так, чтобы сеть не была доступна посторонним. Настройка этого находится на странице «Защита беспроводной сети».
Здесь нужно:
- выбрать SSID (скорее всего одна);
- версия (или тип) шифрования — WPA2-PSK;
- шифрование (алгоритм) — выставить любое;
- в поле пароль Wi-Fi — ввести пароль будущей сети. Его рекомендуют делать не менее пяти символов и чтобы он состоял из букв и цифр.

Ниже есть предупреждение, что на время настройки нужно выключить WPS. Это возможность роутера самостоятельно настроить подключение нового гаджета. Но посредством функции могут и взломать домашнюю сеть. Рекомендуется отключить и включать только на время новой настройки.
Как включить режим повторителя
Tenda N300 может работать и как репитер — усилитель сигнала. Настраивается это на той же странице, где и беспроводная сеть. Только режим работы надо переключить из «Точка доступа» в «Мост WDS»
Единственное отличие — основной будет SSID сеть, которую планируется усилить/расширить. Домашняя сеть станет гостевой.
Перенаправление портов
После установки роутера пользователь может заметить, что некоторые возможности интернета стали недоступны или перешли в ограниченный режим.
Если ранее к домашнему компьютеру можно было подключаться с работы, теперь такой возможности нет.
Объясняется это просто — маршрутизатор позволяет домашним компьютерам соединяться с любым ресурсом сети, но блокирует обратное соединение в целях безопасности.
На N 300 это решается в разделе Переадресация».

Путем настройки здесь можно указать, что определенные запросы из интернета нужно пропускать, отправляя их на определенную машину.
В каждой графе:
- в ячейке начальный-конечный указываются порты (для известных служб можно выбирать из списка ниже). Их можно продублировать.
- номер машины в домашней сети (первые три серии цифр уже введены)
- протокол соединения — в большинстве ситуаций ТСР;
- и пара флажков для включения или удаления правила.
После настройки доступ восстанавливается
Для доступа с работы, кроме настройки, нужно обзавестись постоянным IP.
Меняем пароль
В целях безопасности рекомендуется сменить пароль доступа к настройкам маршрутизатора. Делается это в разделе «Системные инструменты». Слева выбирается раздел изменения пароля.
На странице нужно ввести текущий пароль и два раза ввести новый в соответствующие поля. После нажатия кнопки «Ок» пароль будет изменён.
Прошивка
Хоть производитель постоянно выкладывает новые версии прошивок для своего оборудования — меняют ее, только если старая не устраивает по каким-то причинам. Например, у версий, купленных в заграничных интернет-магазинах, нет поддержки русского языка.
Само обновление состоит из двух этапов – скачать и обновить.
Этап первый — скачиваем прошивку:
- На официальном сайте — tendacn.com в разделе «Для дома», выбрать ссылку «маршрутизаторы».
- По картинкам найти модель своего роутера.
На странице нет N300, но есть N301 — это не важно, 301 — обновление.
- Нажатием на картинку войти в раздел.
- В верхней части страницы появится дополнительное меню — выбрать раздел «поддержка».
- Скачать файл прошивки.
- Распаковать архив.
Этап второй — обновляем ПО роутера.
План будет включать английские названия — для случая покупки маршрутизатора в зарубежных магазинах.
- Перейти в раздел «Tools», слева выбрать «Upgrade».

- В единственном поле на странице нажатием на кнопку указать положение распакованного!!! файла.
- Нажать кнопку «Upgrade».
- Дождаться завершения процесса.
- Получить русский интерфейс.
В качестве дополнительных плюшек прошивка включает в себя расширенный набор возможных подключений к интернету.
Хоть Tenda N300 и выпущен в Китае, по своим характеристикам он не уступает продуктам других именитых брендов, но при этом стоит значительно дешевле. Так как, кроме компьютера, у всех членов семьи есть мобильный, несложная настройка позволит выходить в интернет и с телефона.
Отзывы
Отзывы о Tenda N300 положительные. Пользователи отмечают низкую цену, радиус действия до 30 метров с учетом стен, возможность подключения 3G модема с помощью USB разъема, удобный и понятный интерфейс. «Бюджетный и быстрый – что еще нужно для домашнего роутера», – пишут владельцы девайса на сайте Отзовик.
ManualsPro
Tenda
Tenda A9 Wireless N300 Universal Range Extender Installation Guide
- June 6, 2024
- Tenda
Table of Contents
- Tenda A9 Wireless N300 Universal Range Extender
- Package contents
- LED indicator description
- Buttons description
- Power on the extender
- Extend your Wifi network
- Relocate the extender
- Power on the extender
- Extend your WiFi network
- Relocate the extender
- FAQ
- FCC Statement
- RECYCLING
- CE MarkWamlng
- technical support
- Read User Manual Online (PDF format)
- Download This Manual (PDF format)
Tenda A9 Wireless N300 Universal Range Extender
Package contents
- Wireless extender x 1
- GPL x 1
- Quick installation guide x 1
This quick installation guide instructs how to configure and install the
device. For product or function details, please go to www.tendacn.com to
download the user guide.
LED indicator description
- Power/Signal LED indicator
- Red
- Solid on: The extender is starting.
- Blinking : – The extender completes startup.
- Extending your existing WiFi network.
- Fails to extend to your existing WiFi network.
- Green
- Extended successfully, and the connection quality is good.
- Orange
- Extended successfully, but the extender is a little far away from your router/modem. Relocate it closer to the router/modem.
- Off
- The extender is not powered on.
Buttons description
- WPS button
- An alternative method used to extend or re-extend your existing WiFi network. See Option 2 for detailed instructions.
- Reset button
- Hold down this button using a paper clip. Release it when the O LED indicator lights red.
OPTION 1
Extend your WiFi network using web UI
Power on the extender
Plug the extender into a power outlet near the router/modem in the same room.
Wait until the O LED indicator blinks red.
Extend your Wifi network
Prerequisites
- For smart phone/Pad (Recommended): Disable its Mobile Data (if any) function.
- For desktop computer: An installed wireless adapter is required.
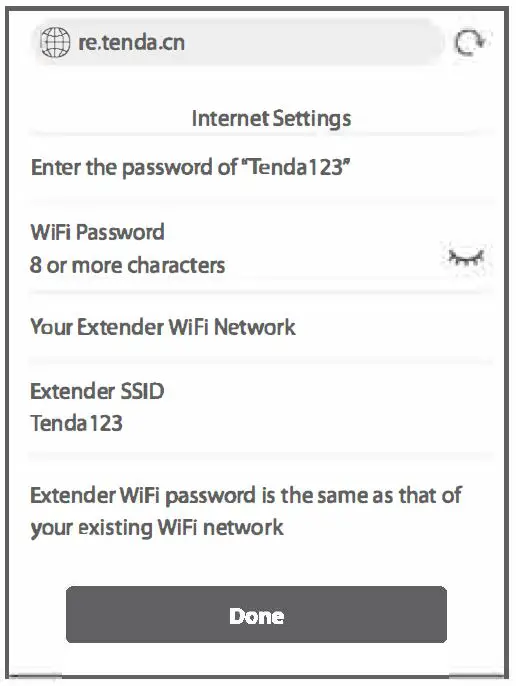
- Connect yourWiFi-enabled device to the extender’s default SSID named Tenda_EXT. By default, it has no password.

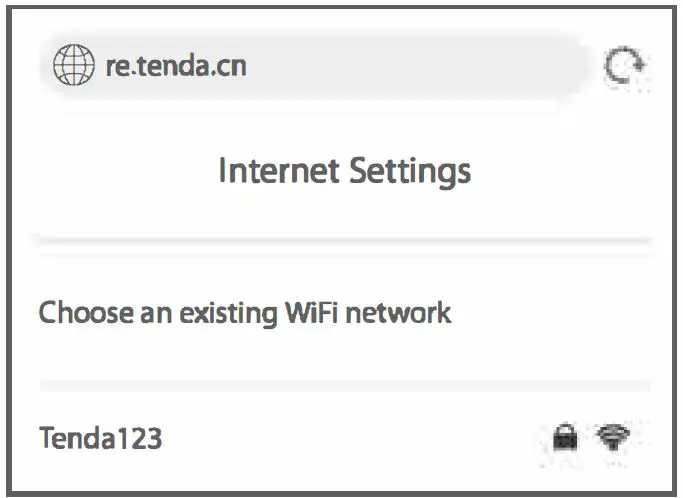
- After connecting to the extender’s SSID, you will be directed to the quick setup page. If not, start a web browser, and access re.tenda.cn or 192.168.0.254 in the address bar.
- Choose an existing WiFi network for extending.
- lf the WiFi network you chose is encrypted, enter its WIFI Password. Customize the Extender 5510. By default, the extender SSID is the same as your existing WiFi network.
- TapDone.
Wait until the Extended successfully page appears.


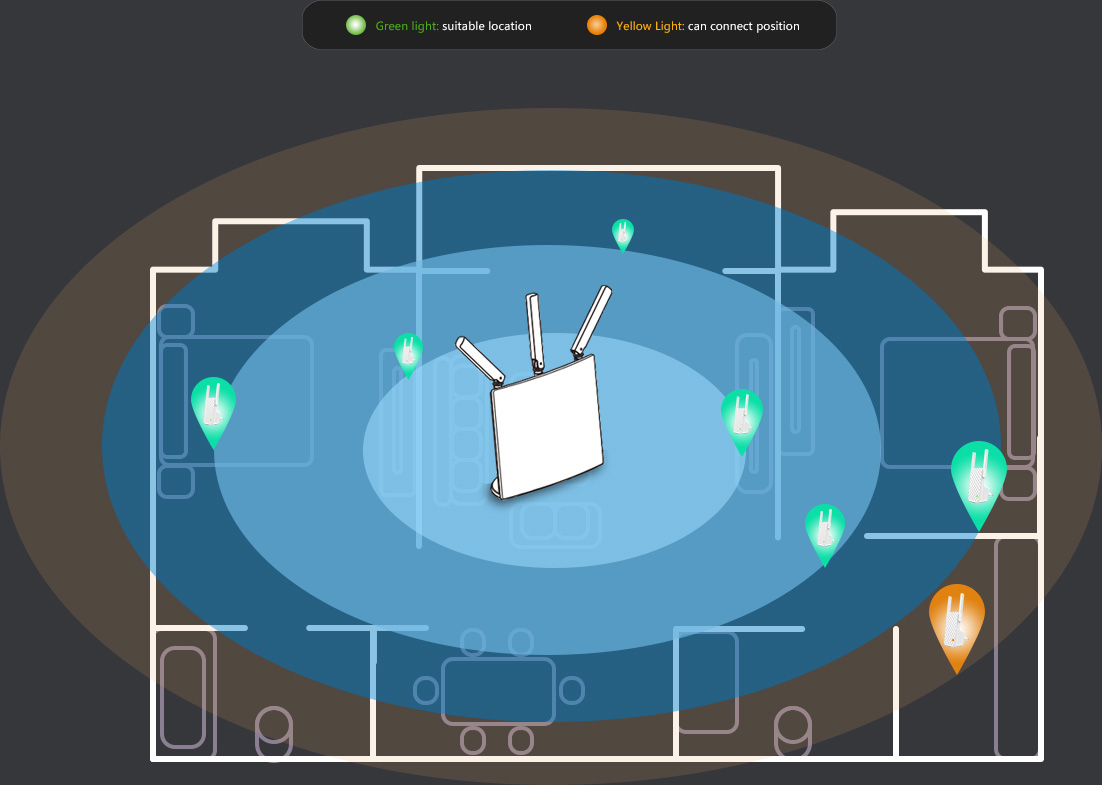
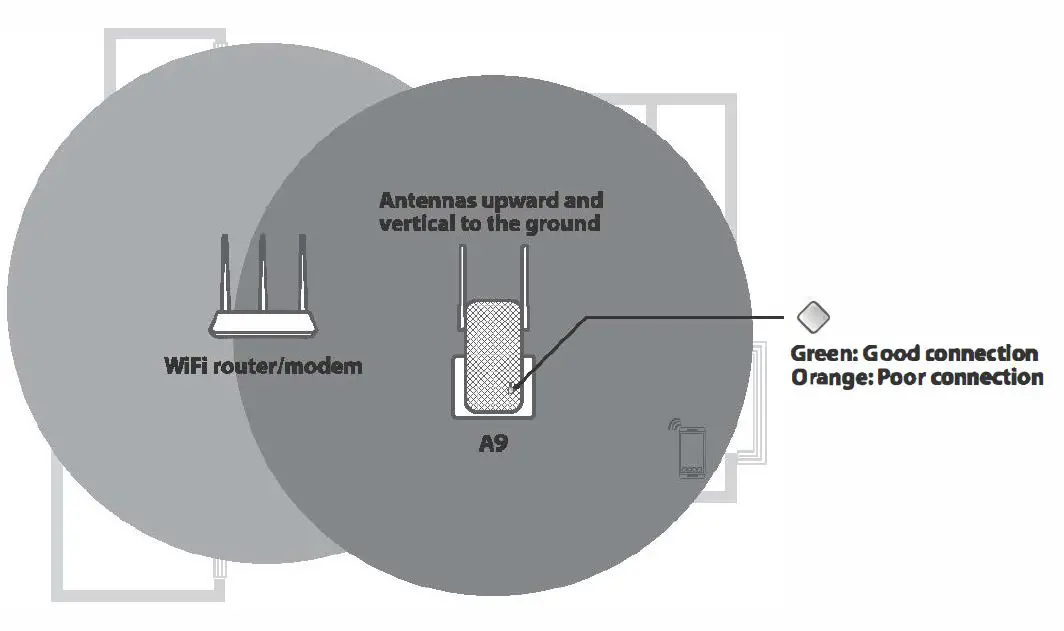
Relocate the extender
To get better connection, follow the on-screen instructions or steps below to
relocate your extender.
-
Plug the extender into an outlet halfway between the router/modem and the WiFi dead zone.
The location you choose must be within the range of your existing WiFi
network. -
Wait until the O LED indicator lights solid green. If not, relocate the extender closer to your router/modem.

Done.
To connect your WiFi-enabled devices to the extender, use the following
information: Extender 55ID: 55ID you set In step 4.
Extender password: Your existing WiFi network password.
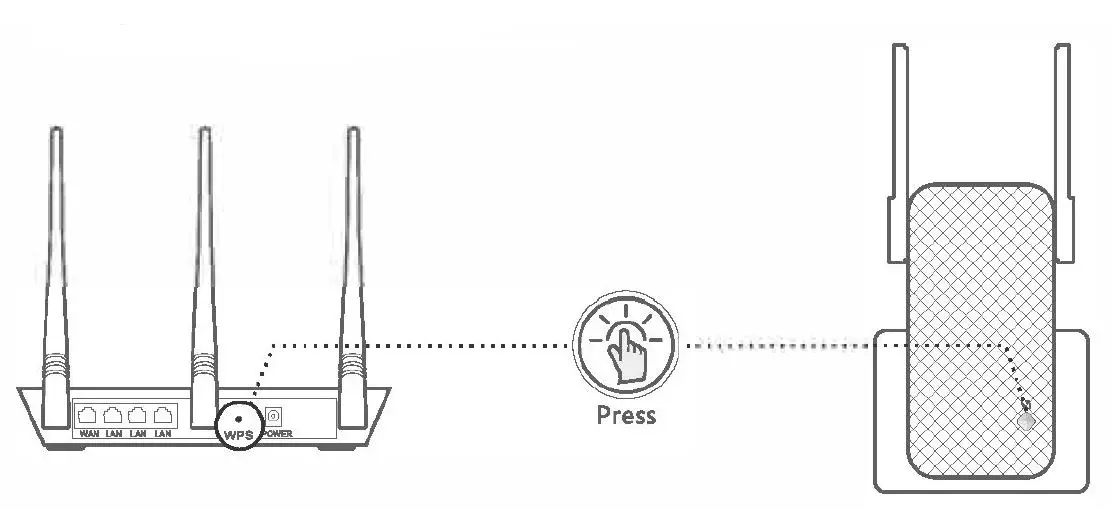
OPTION 1
Extend your WiFi network using WPS button
You can use Option 2 if your router/modem has a WPS button, which may be
indicated by , ,Otherwise, use Option 1.
Power on the extender
Plug the extender into a power outlet near the router/modem in the same room.
Wait until the O LED indicator blinks red.
Extend your WiFi network
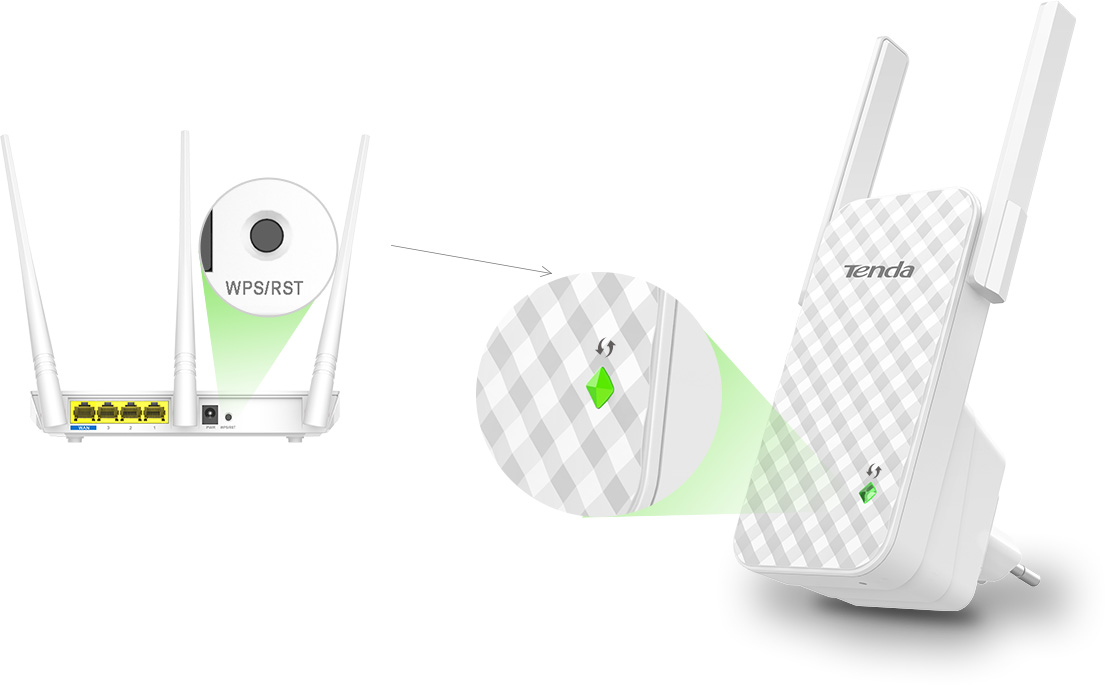
- Press the WPS button on the router/modem. Within 2 minutes, press the WPS button on the extender.
- Wait until the O LED indicator on the extender lights solid green or orange. If not, use Option 1.

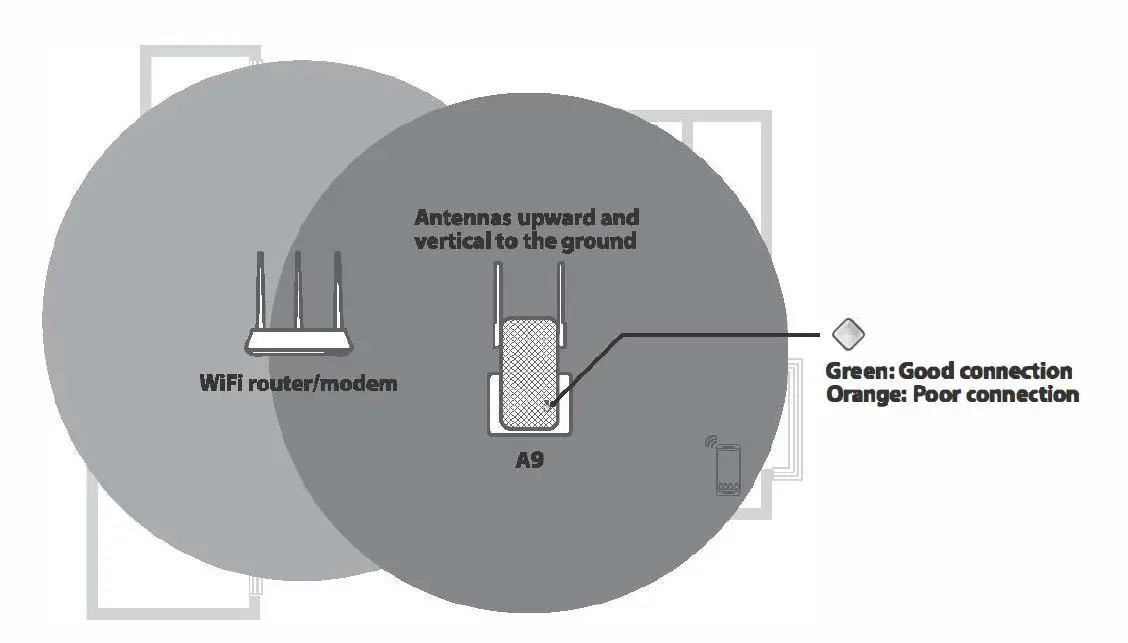
Relocate the extender
-
Plug the extender into an outlet halfway between the router/modem and the WiFi dead zone.
The location you choose must be within the range of your existing WI Fl
network. -
Wait until the O LED indicator lights solid green. If not, relocate the extender closer to your router/modem.

Done.
To connect your WiFi-enabled devices to the extender, use the following
information: Extender SSID: Your existing WiFi name (55ID).
Extender password: Your existing WiFi network password.
FAQ
Q1. I cannot log in to the web UI of the extender. What should I do?
A1. Try the following solutions:
Before extending:
- If a mobile WiFi-enabled device is used:
- Ensure that it has connected to the extender’s WiFi network named Tenda_EXT, and the Mobile Data (if any) function is disabled.
- If a laptop, or a desktop computer installed with a wireless adapter ls used:
- Ensure that it has connected to the extender’s WiFi network named Tenda_EXT, and its wireless network connection has been set to Obtain an IP address automatkally.
- Ensure that you enter re.tenda.cn or 192.168.0.254 in the address bar (not searching bar).
- If the problem persists, reset the extender, and try extending again.
After extending:
If you set your extender SSID the same as your existing WiFi name, you may
connect to your existing WiFi network. In this case, relocate your extender to
a proper position, stay nearby your extender. Dlsable the WLAN on the device
you use then enable it, and try connecting again.
Q2. How to reset the extender?
A2. With your extender powered on, press the RST button at the bottom of
the extender using a paper clip. Release it when the LED indicator lights
red. The extender is restored to the factory settings.
Q3. How to set up a login password for the management of my extender?
A3. Connect the yourWiFi-enabled device to the extender wifi network, log
in to its web Ul,and perform as follows:
-
For smart phone/Pad:
Tap ;;;;; on the homepage, tap Set Login Password, then follow the on-screen
instructions for setup. -
For laptop, or a desktop computer installed with a wireless adapter: Navigate to Administration, and follow the on-screen Instructions for setup.
Q4. The extender c;annot find the WiFi network of my router/modem, What
should I do?
A4. Try the following solutions:
- Ensure that theWiFi network of your router/modem is enabled and can be detected by your WlFl-enabled device.
- Change the channel of your router/modem, and try again.
- Change the encryption type of the router/modem to WPA-PSK or WPA2-PSK, and try again.
FCC Statement
This equipment has been tested and found to comply with the limits for a Class
B digital device, pursuant to Part 15 of the FCC Rules. These limits are
designed to provide reasonable protection against harmful interference in a
residential installation. This equipment generates, uses and can radiate radio
frequency energy and, if not installed and used in accordance with the
instructions, may cause harmful interference to radio communications. However,
there is no guarantee that interference will not occur in a particular
installation. If this equipment does cause harmful interference to radio or
television reception, which can be determined by turning the equipment off and
on, the user Is encouraged to try to correct the Interference by one or more
of the following measures:
- Reorient or relocate the receiving antenna.
- Increase the separation between the equipment and receiver.
- Connect the equipment into an outlet on a circuit different from that to which the receiver is connected.
- Consult the dealer or an experienced radio/TV technician for help.
Operation is subject to the following two conditions:
- this device may not cause harmful interference
- this device must accept any interference received, including interference that may cause undesired operation.
Radiation Exposure Statement
This device complies with FCC radiation exposure limits set forth for an
uncontrolled environment and it also complies with Part 15 of the FCC RF
Rules.
This equipment should be installed and operated with minimum distance 20cm
between the device and your body.
Caution:
Any changes or modifications not expressly approved by the party responsible
for compliance could void the user’s authority to operate this equipment.
This transmitter must not be co-located or operating in conjunction with any
other antenna or transmitter. Operating frequency: 2412-2462MHz
NOTE:
- The manufacturer is not responsible for any radio or TV interference caused by unauthorized modifications to this equipment.|
- To avoid unnecessary radiation interference, it is recommended to use a shielded RJ45 cable.
RECYCLING
This product bears the selective sorting symbol for Waste electrical and
electronic equipment (WEEE). This means that this product must be handled
pursuant to European directive 2012/19/EU in order to be recycled or
dismantled to minimize its impact on the environment.
User has the choice to give his product to a competent recycling organization
or to the retailer when he buys a new electrical or electronic equipment.
CE MarkWamlng
This Is a Class B product. In a domestic environment. this product may cause
radio Interference, In which case the user may be required to take adequate
measures.
This equipment should be installed and operated with minimum distance 20cm
between the device and your body.
The mains plug Is used as disconnect device, the disconnect device shall
remain readily operable.
NOTE:
- The manufacturer is not responsible for any radio or TV interference caused by unauthorized modifications to this equipment.
- To avoid unnecessary radiation interference, It Is recommended to use a shielded RJ45 cable.
Declaration of Conformity
Hereby, SHENZHEN TENDA TECHNOLOGY CO., LTD. declares that the radio equipment
type A9 Is In compliance with Directive 2014/53/EU.
The full text of the EU declaration of conformity is available at the
following internet address:
http://www.tendacn.com/en/service/download-cata-101.html
Operating Frequency: 2.4 GHz: EU/2412-2472MHz (CH1-CH13)
EIRP Power (Max.): 2.4 GHz 19.95dBm Software Version: V02.03.01.125
For PWGGABLE EQUIPMENT, the socket-outlet shall be Installed near the
equipment and shall be easily accessible
- Operating temperature: 0°C – 40″C
- Operating humidity: (10 – 90)% RH, non-condensing
technical support
Shenzhen Tenda Technology Co., Ltd.
6-8 Floor, Tower E3, N0.1001, Zhongshanyuan Road, Nanshan District, Shenzhen,
China. 518052
USA hotline: 1-800-570-5892 Hong Kong
hotline: 00852-81931998
Toll Free: 7 x 24 hours
Canada hotline: 1-888-998-8966
Toll Free: Mon – Fri 9 am – 6 pm PST
Copyright
Global hotline: +86 755-2765 7180 (China TI me Zone)
Website: www.tendacn.com
E-mail: support@tenda.com.cn
e 2021 Shenzhen Tenda Technology Co., Ltd. All rights reserved.
“Rmc/8 is a registered trademark legally held by Shenzhen Tenda Technology
Co., Ltd. Other brand and
product names mentioned herein are trademarks or registered trademarks of
their respective holders.
Specifications are subject to change without notice.
Read User Manual Online (PDF format)
Read User Manual Online (PDF format) >>
Download This Manual (PDF format)
Download this manual >>
Highlight all
Match case
Current View
Current View
Enter the password to open this PDF file:
File name:
—
File size:
—
Title:
—
Author:
—
Subject:
—
Keywords:
—
Creation Date:
—
Modification Date:
—
Creator:
—
PDF Producer:
—
PDF Version:
—
Page Count:
—
Preparing document for printing…
0%
Универсальный Wi-Fi повторитель
A9


Описание
A9 — универсальный повторитель беспроводного сигнала стандарта, разработанный для расширения зоны покрытия беспроводных сетей и усиления Wi-Fi сигнала. A9 прост в использовании: подключается нажатием одной кнопки, а умный светодиодный индикатор подскажет наиболее подходящее место для размещения. A9 – идеальное решение, чтобы устранить “мертвые” зоны и оптимизировать работу Вашей Wi-Fi сети.
Основные характеристики
• Скорость передачи данных до 300 Мбит/с
• Две внешние антенны с коэффициентом усиления 3 дБ позволяют расширить зону покрытия WI-Fi на площади до 200 кв.м
• Быстрое расширение сети нажатием одной кнопки
• Умный светодиодный индикатор подскажет лучшее место для размещения устройства
• Совместимость с оборудованием стандарта 802.11n
• Поддержка режима сокрытия имени сети (SSID)
Сильный сигнал и широкое покрытие
Две внешние антенны с коэффициентом усиления 3 дБ позволяют расширить зону покрытия WI-Fi на площади до 200 кв.м. За счет оптимизации программного и аппаратного обеспечения значительно улучшена помехоустойчивость. Это позволяет A9 обеспечить стабильный Wi-Fi сигнал и широкую зону охвата.


Управление одной кнопкой
A9 может мгновенно увеличить зону охвата Wi-Fi маршрутизатора: просто нажмите кнопку WPS на маршрутизаторе, а затем в течение двух минут кнопку Range Extender на A9. Проще не бывает!
Умный светодиодный индикатор
Если нужно подключить A9 к существующей Wi-Fi сети, устройство само поможет найти лучшее место: ориентируйтесь по индикатору – в таком месте светодиод будет гореть зеленым.
Полная совместимость c
Wi-Fi устройствами любых производителей
A9 может работать со всеми безпроводными маршрутизаторами и модемами
Package contents
- Wireless extender x 1
- GPL x 1
- Quick installation guide x 1
This quick installation guide instructs how to configure and install the device. For product or function details, please go to www.tendacn.com to download the user guide.
LED indicator description
- Power/Signal LED indicator
- Red
- Solid on: The extender is starting.
- Blinking: – The extender completes startup.
- Extending your existing WiFi network.
- Fails to extend to your existing WiFi network.
- Green
- Extended successfully, and the connection quality is good.
- Orange
- Extended successfully, but the extender is a little far away from your router/modem. Relocate it closer to the router/modem.
- Off
- The extender is not powered on.
Buttons description
- WPS button
- An alternative method used to extend or re-extend your existing WiFi network. See Option 2 for detailed instructions.
- Reset button
- Hold down this button using a paper clip. Release it when the O LED indicator lights red.
OPTION 1
Extend your WiFi network using web UI
Power on the extender
Plug the extender into a power outlet near the router/modem in the same room. Wait until the O LED indicator blinks red.
Extend your Wifi network
Prerequisites
- For smart phone/Pad (Recommended): Disable its Mobile Data (if any) function.
- For desktop computer: An installed wireless adapter is required.
- Connect yourWiFi-enabled device to the extender’s default SSID named Tenda_EXT. By default, it has no password.
- After connecting to the extender’s SSID, you will be directed to the quick setup page. If not, start a web browser, and access re.tenda.cn or 192.168.0.254 in the address bar.
- Choose an existing WiFi network for extending.
- lf the WiFi network you chose is encrypted, enter its WIFI Password. Customize the Extender 5510. By default, the extender SSID is the same as your existing WiFi network.
- TapDone.
Wait until the Extended successfully page appears.


Relocate the extender
To get better connection, follow the on-screen instructions or steps below to relocate your extender.
- Plug the extender into an outlet halfway between the router/modem and the WiFi dead zone.
The location you choose must be within the range of your existing WiFi network. - Wait until the O LED indicator lights solid green. If not, relocate the extender closer to your router/modem.
Done.
To connect your WiFi-enabled devices to the extender, use the following information: Extender 55ID: 55ID you set In step 4.
Extender password: Your existing WiFi network password.
OPTION 1
Extend your WiFi network using WPS button
You can use Option 2 if your router/modem has a WPS button, which may be indicated by ,,Otherwise, use Option 1.
Power on the extender
Plug the extender into a power outlet near the router/modem in the same room. Wait until the O LED indicator blinks red.
Extend your WiFi network
- Press the WPS button on the router/modem. Within 2 minutes, press the WPS button on the extender.
- Wait until the O LED indicator on the extender lights solid green or orange. If not, use Option 1.
Relocate the extender
- Plug the extender into an outlet halfway between the router/modem and the WiFi dead zone.
The location you choose must be within the range of your existing WI Fl network. - Wait until the O LED indicator lights solid green. If not, relocate the extender closer to your router/modem.
Done.
To connect your WiFi-enabled devices to the extender, use the following information: Extender SSID: Your existing WiFi name (55ID).
Extender password: Your existing WiFi network password.
FAQ
Q1. I cannot log in to the web UI of the extender. What should I do?
A1. Try the following solutions:
Before extending:
- If a mobile WiFi-enabled device is used:
- Ensure that it has connected to the extender’s WiFi network named Tenda_EXT, and the Mobile Data (if any) function is disabled.
- If a laptop, or a desktop computer installed with a wireless adapter ls used:
- Ensure that it has connected to the extender’s WiFi network named Tenda_EXT, and its wireless network connection has been set to Obtain an IP address automatkally.
- Ensure that you enter re.tenda.cn or 192.168.0.254 in the address bar (not searching bar).
- If the problem persists, reset the extender, and try extending again.
After extending:
If you set your extender SSID the same as your existing WiFi name, you may connect to your existing WiFi network. In this case, relocate your extender to a proper position, stay nearby your extender. Dlsable the WLAN on the device you use then enable it, and try connecting again.
Q2. How to reset the extender?
A2. With your extender powered on, press the RST button at the bottom of the extender using a paper clip. Release it when the LED indicator lights red. The extender is restored to the factory settings.
Q3. How to set up a login password for the management of my extender?
A3. Connect the yourWiFi-enabled device to the extender wifi network, log in to its web Ul,and perform as follows:
- For smart phone/Pad:
Tap ;;;;; on the homepage, tap Set Login Password, then follow the on-screen instructions for setup. - For laptop, or a desktop computer installed with a wireless adapter: Navigate to Administration, and follow the on-screen Instructions for setup.
Q4. The extender c;annot find the WiFi network of my router/modem, What should I do?
A4. Try the following solutions:
- Ensure that theWiFi network of your router/modem is enabled and can be detected by your WlFl-enabled device.
- Change the channel of your router/modem, and try again.
- Change the encryption type of the router/modem to WPA-PSK or WPA2-PSK, and try again.
FCC Statement
This equipment has been tested and found to comply with the limits for a Class B digital device, pursuant to Part 15 of the FCC Rules. These limits are designed to provide reasonable protection against harmful interference in a residential installation. This equipment generates, uses and can radiate radio frequency energy and, if not installed and used in accordance with the instructions, may cause harmful interference to radio communications. However, there is no guarantee that interference will not occur in a particular installation. If this equipment does cause harmful interference to radio or television reception, which can be determined by turning the equipment off and on, the user Is encouraged to try to correct the Interference by one or more of the following measures:
- Reorient or relocate the receiving antenna.
- Increase the separation between the equipment and receiver.
- Connect the equipment into an outlet on a circuit different from that to which the receiver is connected.
- Consult the dealer or an experienced radio/TV technician for help.
Operation is subject to the following two conditions:
- this device may not cause harmful interference
- this device must accept any interference received, including interference that may cause undesired operation.
Radiation Exposure Statement
This device complies with FCC radiation exposure limits set forth for an uncontrolled environment and it also complies with Part 15 of the FCC RF Rules.
This equipment should be installed and operated with minimum distance 20cm between the device and your body.
Caution:
Any changes or modifications not expressly approved by the party responsible for compliance could void the user’s authority to operate this equipment.
This transmitter must not be co-located or operating in conjunction with any other antenna or transmitter. Operating frequency: 2412-2462MHz
NOTE:
- The manufacturer is not responsible for any radio or TV interference caused by unauthorized modifications to this equipment.|
- To avoid unnecessary radiation interference, it is recommended to use a shielded RJ45 cable.
RECYCLING
This product bears the selective sorting symbol for Waste electrical and electronic equipment (WEEE). This means that this product must be handled pursuant to European directive 2012/19/EU in order to be recycled or dismantled to minimize its impact on the environment.
User has the choice to give his product to a competent recycling organization or to the retailer when he buys a new electrical or electronic equipment.
CE MarkWamlng
This Is a Class B product. In a domestic environment. this product may cause radio Interference, In which case the user may be required to take adequate measures.
This equipment should be installed and operated with minimum distance 20cm between the device and your body.
The mains plug Is used as disconnect device, the disconnect device shall remain readily operable.
NOTE:
- The manufacturer is not responsible for any radio or TV interference caused by unauthorized modifications to this equipment.
- To avoid unnecessary radiation interference, It Is recommended to use a shielded RJ45 cable.
Declaration of Conformity
Hereby, SHENZHEN TENDA TECHNOLOGY CO., LTD. declares that the radio equipment type A9 Is In compliance with Directive 2014/53/EU.
The full text of the EU declaration of conformity is available at the following internet address:
http://www.tendacn.com/en/service/download-cata-101.html
Operating Frequency: 2.4 GHz: EU/2412-2472MHz (CH1-CH13)
EIRP Power (Max.): 2.4 GHz 19.95dBm Software Version: V02.03.01.125
For PWGGABLE EQUIPMENT, the socket-outlet shall be Installed near the equipment and shall be easily accessible
- Operating temperature: 0°C – 40″C
- Operating humidity: (10 – 90)% RH, non-condensing
technical support
Shenzhen Tenda Technology Co., Ltd.
6-8 Floor, Tower E3, N0.1001, Zhongshanyuan Road, Nanshan District, Shenzhen, China. 518052
USA hotline: 1-800-570-5892 Hong Kong hotline: 00852-81931998
Toll Free: 7 x 24 hours
Canada hotline: 1-888-998-8966
Toll Free: Mon – Fri 9 am – 6 pm PST
Copyright
Global hotline: +86 755-2765 7180 (China TI me Zone)
Website: www.tendacn.com
E-mail: [email protected]
e 2021 Shenzhen Tenda Technology Co., Ltd. All rights reserved.
“Rmc/8 is a registered trademark legally held by Shenzhen Tenda Technology Co., Ltd. Other brand and
product names mentioned herein are trademarks or registered trademarks of their respective holders.
Specifications are subject to change without notice.