
Официальный дилер продукции JUNG
Официальный дилер продукции Jung.
Товар с гарантией производителя.
-
Наличие
на складе производителя -
Склад производителяот 2 недель
357 шт. -
Код магазина
KIT1330 -
Артикулы комплекта
AFTR231PLWW, FTR231U -
Серия
Eco Profi Standart
Конфигуратор розеток и выключателей
Данный товар состоит из 2 позиций:
| Цвет | Белый |
| Материал | дюропласт |
| Тип товара | Накладка на термостат |
| Производитель | Jung |
| Оттенок | белый |
| Страна | Германия |
| Монтажная коробка | 68 |
| Вес, кг | 0.026 |
| Степень защиты | IP20 |
| Способ монтажа | скрытый |
| Стиль | Современный |
| Тип изделия | Регулятор температуры |
| Ток, А | 10 |
| Материал | композит |
| Производитель | Jung |
| Способ монтажа | скрытый |
| Страна | Германия |
| Степень защиты | IP20 |
| Тип товара | Механизм термостата для теплого пола |
| Напряжение, В | 250 |
| Исполнение | для теплого пола |
| Наличие датчика | с датчиком |
| Вес, кг | 0.28 |
| Тип изделия | Регулятор температуры |
| Объем, м3 | 0.002 |
| Монтажная коробка | 68 |
Купить данный товар в Москве по цене 22467 руб. или аналогичный товар из каталога терморегуляторов вы можете в нашем интернет-магазине.
Где забрать?
-
Пункт выдачи
предоплата 100%
Доставка оплачивается отдельно в пункте выдачи при получении -
Курьером
от 350 руб. Срок и стоимость уточнит менеджер. Предоплата 100%
Доставка оплачивается отдельно при получении
Подробнее о способах доставки и оплаты
Как оплатить?
- Онлайн на сайте
- Б/н расчет (c НДС)
Table of Contents
- Jung FTR231 Floor Thermostat Instruction Manual
- 1. Safety instructions
- 2 Device components
- 3 Intended use
- 4 Product characteristics
- 5.Functional description
- Controller adaptation
- 6. Operation
- Indication of the current operating mode
- 7 Information for electrically skilled persons
- Floor thermostat
- 7.1 Commissioning
- 1Technical data
- 2 Warranty
- Read More About This Manual & Download PDF:
- References
- Read User Manual Online (PDF format)
- Download This Manual (PDF format)
Jung FTR231 Floor Thermostat Instruction Manual
1. Safety instructions
Electrical devices may only be mounted and
connected by electrically skilled persons.
Serious injuries, fire or property damage possible. Please read and follow
manual fully.
Danger of electric shock. Always disconnect before carrying out work on the
device or load. In so doing, take all the circuit breakers into account, which
support dangerous voltages to the device and or load.
Danger of electric shock. The sensor cable is connected to the mains voltage
potential. If the sensor cable is damaged, immediately disconnect the device
from the mains by switching off all associated circuit breakers.
This manual is an integral part of the product, and must remain with the end
customer.
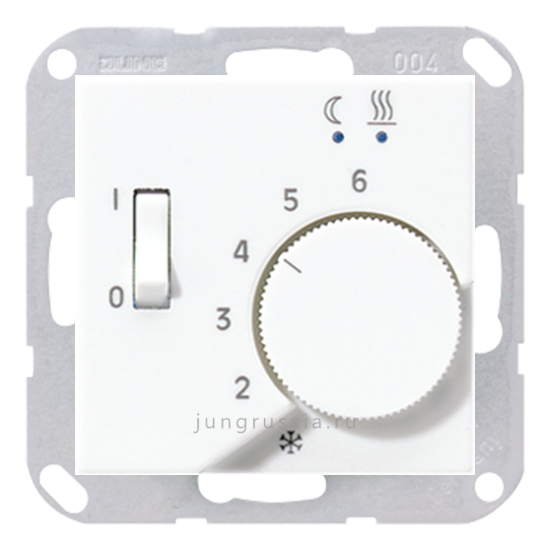
2 Device components
Image 1: Device components
- Room temperature controller insert
- Frame
- Status LED
- Central plate
- Control knob
- Adjustment rings for temperature limit
3 Intended use
- Electronic temperature controller for controlling electric underfloor heating or floor temperature conditioning systems
- Control of the floor temperature in closed rooms
- Mounting in appliance box with dimensions according to DIN 49073
4 Product characteristics
- Manually setting a comfort temperature for the floor
- Manually switching off the temperature control
- Input terminal for activation of reduction temperature (ECO) via central clock
- External temperature sensor (remote sensor)
- Frost protection function
- Controller output working method: pulse width modulation (PWM) or two-point switchable
- Interruption of heating for 5 minutes after one hour in continuous heating mode
- Permanent LED operation possible
5.Functional description
ECO operation In many areas of the building it makes sense for the temperature
to be set to a lower ECO temperature at certain times rather than to heat
permanently to the comfort tem- perature. By connecting the input terminal Ø
to 230 V, the temperature is reduced by 4 °C and the status LED lights up
green. This should be controlled by a central clock.
Controller adaptation
Depending on the heating system, the control behaviour can be adjusted.
Pulse width modulated control (factory setting): The output is not permanently
actu- ated, but for a time period (pulse width) that depends on the difference
between tar- get and actual temperature. This method brings the actual
temperature gradually closer to the target temperature.
Two-point control: The output remains switched on until the selected target
temperat- ure has been exceeded by 0.5 °C. The output will not be switched on
again until the target value is undercut by 0.5 °C. Since most heating systems
respond very slowly, this type of control can entail temperature overshooting.
6. Operation
Brief overview
| Function | Control knob | Status LED * | LED colour |
|---|---|---|---|
| Change room tem- perature | … turn right or left | maximum 2 minutes | Red = |
heating mode
green = ECO heating mode
Orange = frost protection (10 seconds)
Display operating mode| … press briefly| 10 seconds.| Red = heating mode
green = ECO heating mode Orange = frost protection
- In permanent operation, the status LED lights up continuously during the active heating phase, but with reduced Increasing or reducing the floor temperature
- Turn the control knob to the right or If the setpoint temperature is not reached, the LED lights up for a maximum of 2 minutes in the colour of the current operating mode. The indication can also take place during the entire heating process (see Activating/deactivating per- manent LED operation). In the middle position, the device regulates to approx. 30 °C target temperat- ure. The lowest target temperature is approx. 5 °C and the highest target tem- perature is approx. 50 °C
Indication of the current operating mode
- Press the control knob
The LED lights up for 10 seconds in the colour of the current operating mode.
Orange = frost protection, red = heating mode, green = ECO heating mode.
Switching off the temperature control
- Press the control knob for longer than 2 seconds until the LED lights up or-
The device has switched to frost protection. The frost protection prevents the
temperature from falling below 5 °C.
Each time the control knob is turned, the LED lights up orange for 10 seconds.
- To activate the temperature control, press the control knob again for more than two
The device switches back to heating mode. The LED lights up red for 10
seconds.
Activating/deactivating permanent LED operation
In permanent operation, the status LED lights up continuously during the
active heat- ing phase.
- Press the control knob for longer than 10 seconds until the LED lights up or flashes in the colour
LED lights up magenta = permanent operation is active
LED flashes magenta = permanent operation is inactive (default setting)
- Press the control knob briefly to switch the
- Press the control knob for more than one second to adopt the displayed After 10 seconds without actuation, the displayed mode is automatically adop- ted.
7 Information for electrically skilled persons
Remote sensor mounting instructions
The remote sensor must meet the requirements of protection class II and be
routed together with sensor cable S03VV in a protective tube. This protects
the remote sensor from humidity and allows for an easier exchange in the event
of repair.
Is the status LED (3) flashes red rapidly, there is an error at the remote
sensor. No temperature measurement, and thus no control, is possible.
If the sensor cable is interrupted or no remote sensor is connected,
continuous heating is carried out. If there is a short circuit of the sensor
cable, heating is not carried out.
DANGER!
Mortal danger of electric shock. Disconnect the device. Cover up live parts.
Connecting and fitting the device Recommended installation height: 1.50 m.
Floor thermostat

- External temperature sensor (remote sensor)
- Switching contact of central clock
- Electric underfloor heating
- Connect insert (1) according to the connection diagram (see figure 2). Ob- serve the conductor cross-sections (see figure 3).
- Optionally, connect the ECO operation input Ø via a switching contact of a central clock (8).
If 230 V is applied to the input, the target temperature is reduced by 4 °C.
- Fit device in appliance box; terminals must be at the
- Fit the frame, central plate and control
- Switch on mains
7.1 Commissioning
Setting control behaviour Factory setting: pulse width modulated control (PWM)
This setting can be used with most heating systems without adaptation.
Changing the settings
-
Press the control knob for longer than 20
The LED flashes green for PWM control and green/blue for 2-point control. -
Press the control knob briefly: The control behaviour is
-
Press the control knob for longer than one
The current control behaviour is saved and the setting mode is exited automat-
ically. After approx. 2 minutes without any operation the menu is exited
without sav- ing.
Setting the temperature limits The temperature control has a setting range
from 5 to 50 °C. The adjustment rings in the central plate can be used to
limit the temperature setting range.

Image 4: Setting the temperature limit (before/after)
- Pull the control knob off the central plate so that the adjustment rings are vis- ible
Pulling off is done by hand or with a suitable tool, e.g. vacuum lifting tool
or key cap puller.
- Turn the large blue adjustment ring clockwise to the desired minimum temper- Each notch corresponds to a change of about 2 °C.
- Turn the small red adjustment ring anticlockwise to the desired maximum tem-
The respective adjustment ring can only be turned in one direction. To return
to the original setting, continue turning to the respective position.
- Replace the control knob, observing the coding (Fig. 4, bottom) of the control knob and rotary
1Technical data
Rated voltage AC 220 … 240 V ~
Mains frequency 50 / 60 Hz
Switching current 10 A
Connected load
Ohmic load 2300 W
Standby power max. 0.15 W
Ambient temperature -5 … +45 °C
Storage/transport temperature -25 … +70 °C
Cable length inputs max. 100 m
Controller class (EU 811/2013) IV
Contribution to energy efficiency 2%
FFNTC remote sensor
Dimensions Ø×H 7.8 × 28 mm
Length connecting cable 4 m (can be extended
to 50 m) Degree of protection
IP 67
Remote sensor resistance values
Temperature
(°C)
| Resistance
(kΩ)
| | Temperature
(°C)
| Resistance
(kΩ)
—|—|—|—|—
5| 89.5| | 30| 26.2
10| 68.8| | 35| 20.9
15| 53.5| | 40| 16.7
20| 41.9| | 45| 13.5
25| 33.0| | 50| 11.0
The resistance values can only be measured if the sensor is disconnected.
2 Warranty
The warranty is provided in accordance with statutory requirements via the
specialist trade.
ALBRECHT JUNG GMBH & CO. KG
Volmestraße 1
58579 Schalksmühle GERMANY
Telefon: +49 2355 806-0
Telefax: +49 2355 806-204kundencenter@jung.de
www.jung.de
Read More About This Manual & Download PDF:
References
- JUNG — Switches and systems
Read User Manual Online (PDF format)
Read User Manual Online (PDF format) >>
Download This Manual (PDF format)
Download this manual >>
100% оригинальная продукция
Доставка от 1 дня по Москве
-
Характеристики
-
Описание
-
Доставка
-
Отзывы
Характеристики
| Бренд: | Jung |
| Серии: | A creation, AS 500, ECO Profi, Eco Profi Deco, A Flow, A 550, ECO Profi Standart, A VIVA |
| Артикул: | FTR231 + A1749BFWW |
| Материал: | пластик |
| Цвет: | белый глянцевый |
| Тип: |
Терморегуляторы теплого пола |
| Программировани: | нет |
| Вид материала: | дуропласт |
| Тип поверхности: | глянцевый |
| Отсутствие галогенов: | да |
| Лицевая накладка: | в сборе с механизмом |
| Номинальное напряжение, в: | 220-250В |
| Поле для надписи: | нет |
| Тип датчика: | датчик пола |
| Тип конструкции: | механизм с накладкой |
| Способ монтажа: | встроенный монтаж |
| Тип терморегулятора: | механический |
| Степень защиты (ip): | IP20 |
| Максимальная нагрузка, а: | 10 |
Описание
Купить
Регулятор теплого пола Jung 230В/10А с выносным датчиком FTR231 + A1749BFWW с доставкой по Москве и в другие города России вы можете, оформив заказ на сайте или посетив наш
шоу-рум. В каталоге указаны розничные цены, для оптовых клиентов предусмотрены скидки.
Доставка
Мы осуществляем адресную курьерскую доставку по Москве и Подмосковью ежедневно с
10:00 до 23:00 ч. А так же отпраляем заказы в регионы РФ через транспортные компании.
После подтверждения покупки товары по Москве и Московской области доставляются в среднем в течение 1 дня.
Так же вы можете забрать заказ самовывозом из офиса, после подтверждения менеджера о
готовности товара к самовывозу.
Более подробно с условиями доставки вы можете ознакомиться на странице
доставки.
Отзывы
У данного товара пока нет отзывов.
Подходит к сериям:
Eco Profi Deco
Выключатели от 814 ₽
Розетки от 662 ₽
Рамки от 367 ₽
Перейти к товарам
ECO Profi Standart
Выключатели от 814 ₽
Розетки от 662 ₽
Рамки от 136 ₽
Перейти к товарам
Приезжайте к нам в шоурум!
ул. Нахимовский проспект, д. 24
пн-пт: 10:00 — 19:00
сб: 11:00 — 17:00
Купить
Регулятор теплого пола Jung 230В/10А с выносным датчиком FTR231 + A1749BFWW с доставкой по Москве и в другие города России вы можете, оформив заказ на сайте или посетив наш
шоу-рум
.
В каталоге указаны розничные цены, для оптовых клиентов предусмотрены скидки.
Хорошее руководство по эксплуатации
Законодательство обязывает продавца передать покупателю, вместе с товаром, руководство по эксплуатации Jung FTR 231. Отсутствие инструкции либо неправильная информация, переданная потребителю, составляют основание для рекламации в связи с несоответствием устройства с договором. В законодательстве допускается предоставлении руководства в другой, чем бумажная форме, что, в последнее время, часто используется, предоставляя графическую или электронную форму инструкции Jung FTR 231 или обучающее видео для пользователей. Условием остается четкая и понятная форма.
Что такое руководство?
Слово происходит от латинского «instructio», тоесть привести в порядок. Следовательно в инструкции Jung FTR 231 можно найти описание этапов поведения. Цель инструкции заключается в облегчении запуска, использования оборудования либо выполнения определенной деятельности. Инструкция является набором информации о предмете/услуге, подсказкой.
К сожалению немного пользователей находит время для чтения инструкций Jung FTR 231, и хорошая инструкция позволяет не только узнать ряд дополнительных функций приобретенного устройства, но и позволяет избежать возникновения большинства поломок.
Из чего должно состоять идеальное руководство по эксплуатации?
Прежде всего в инструкции Jung FTR 231 должна находится:
— информация относительно технических данных устройства Jung FTR 231
— название производителя и год производства оборудования Jung FTR 231
— правила обслуживания, настройки и ухода за оборудованием Jung FTR 231
— знаки безопасности и сертификаты, подтверждающие соответствие стандартам
Почему мы не читаем инструкций?
Как правило из-за нехватки времени и уверенности в отдельных функциональностях приобретенных устройств. К сожалению само подсоединение и запуск Jung FTR 231 это слишком мало. Инструкция заключает ряд отдельных указаний, касающихся функциональности, принципов безопасности, способов ухода (даже то, какие средства стоит использовать), возможных поломок Jung FTR 231 и способов решения проблем, возникающих во время использования. И наконец то, в инструкции можно найти адресные данные сайта Jung, в случае отсутствия эффективности предлагаемых решений. Сейчас очень большой популярностью пользуются инструкции в форме интересных анимаций или видео материалов, которое лучше, чем брошюра воспринимаются пользователем. Такой вид инструкции позволяет пользователю просмотреть весь фильм, не пропуская спецификацию и сложные технические описания Jung FTR 231, как это часто бывает в случае бумажной версии.
Почему стоит читать инструкции?
Прежде всего здесь мы найдем ответы касательно конструкции, возможностей устройства Jung FTR 231, использования отдельных аксессуаров и ряд информации, позволяющей вполне использовать все функции и упрощения.
После удачной покупки оборудования/устройства стоит посвятить несколько минут для ознакомления с каждой частью инструкции Jung FTR 231. Сейчас их старательно готовят или переводят, чтобы они были не только понятными для пользователя, но и чтобы выполняли свою основную информационно-поддерживающую функцию.