
Для работы проектов iXBT.com нужны файлы cookie и сервисы аналитики.
Продолжая посещать сайты проектов вы соглашаетесь с нашей
Политикой в отношении файлов cookie
Здравствуйте друзья
Темой сегодняшнего обзора будет очередной устройство из многообразия экосистемы Tuya Smart — zigbee термостат MOES, модель для теплого пола, способная управлять нагрузками мощностью более 3 кВт. Мы рассмотрим его возможности, которые позволяют использовать его и без подключения к умному дому, но не упустим из виду и его работу как в штатной системе управления Tuya. Так же подробно рассмотрена интеграция в Home Assistant через zigbee2mqtt — с решением проблемы большого количества сообщений от термостата. Показана дополнительная настройка аддона File Manager.
Содержание
- Параметры
- Поставка
- Конструкция
- Подключение
- Ручные настройки
- Tuya Smart
- Автоматизации
- Тестирование
- Google Home
- Zigbee2mqtt
- Антиспам
- Home Assistant
- SLS Gateway
- Видео версия
Купить на Aliexpress — цена на момент публикации обзора $33.49
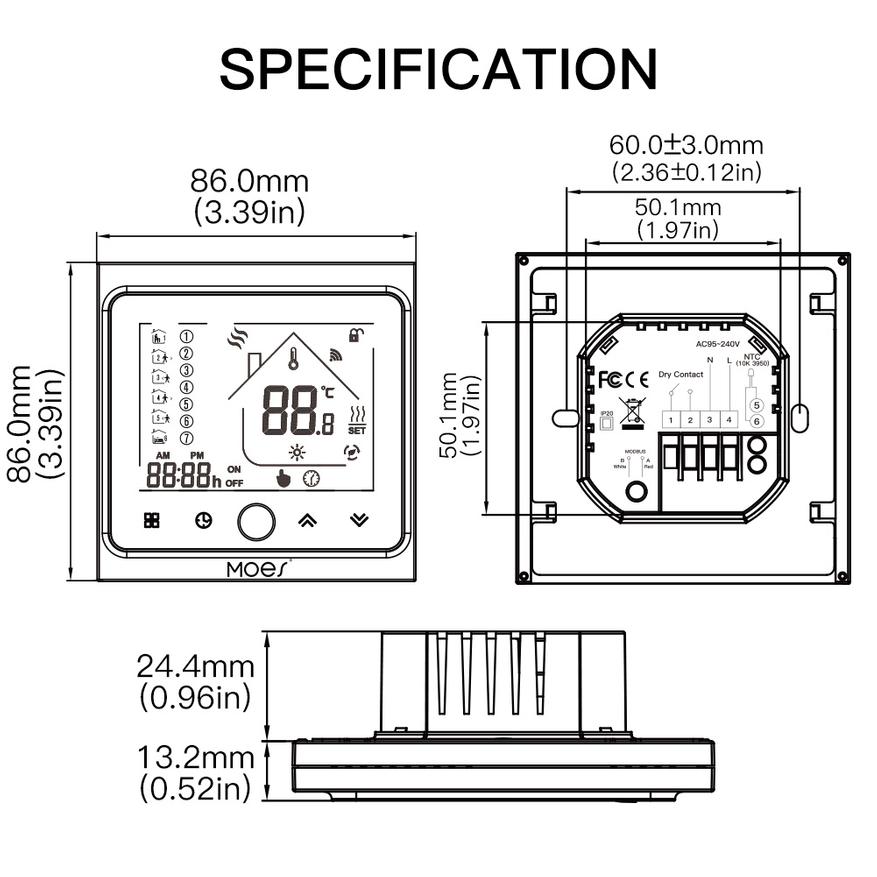
Параметры
- Модель: Moes BHT-002-GBLZB для теплого пола
- Максимальный ток нагрузки: 16 А
- Рабочее напряжение: 95 — 240 В
- Интерфейс: ZigBee
- Тип: встраиваемый в подрозетник, с нулевой линией
- Размер внешней части: 86 х 86 х 13,2 мм
- Размер внутренней части: 50 х 50 х 24,4 мм
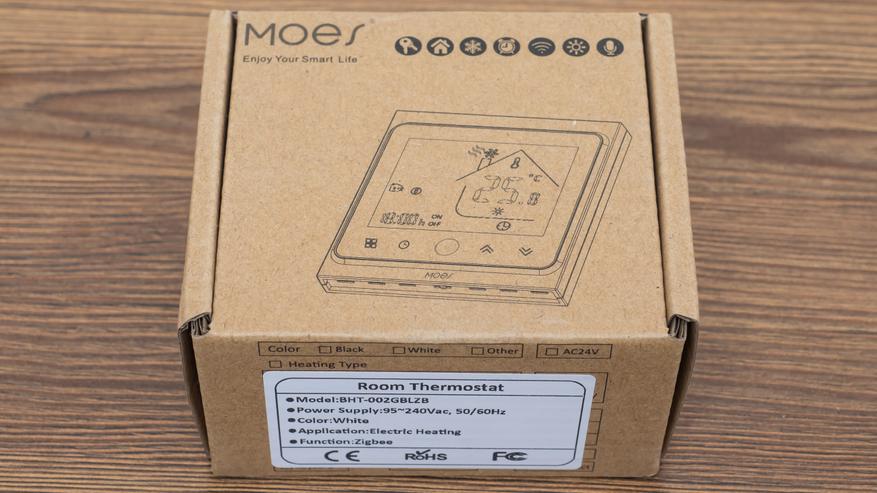
Поставка
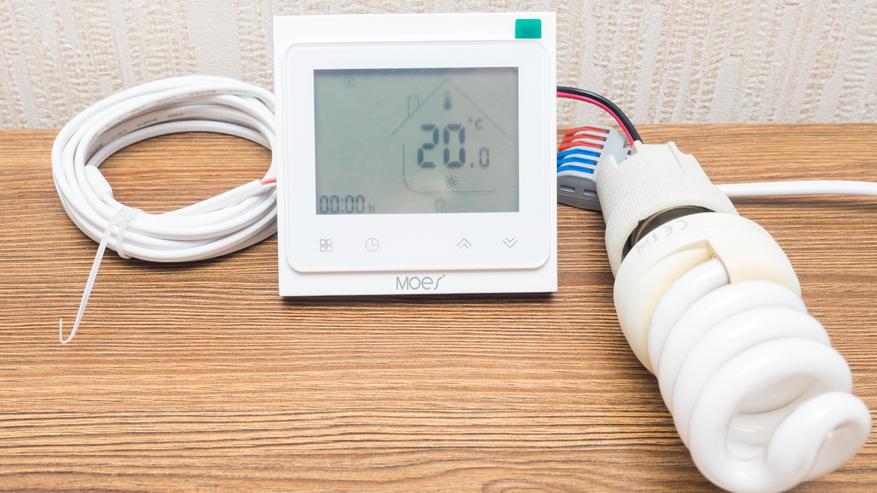
Поставляется устройство в коробке из переработанного картона, на ней нашлось место схематическому изображению устройства и логотипу производителя. На боковой части — наклейка с параметрами. Коробка довольно плотная, внутри имеется защитная вставка из противоударной пленки, поэтому все приехало в целости и сохранности.
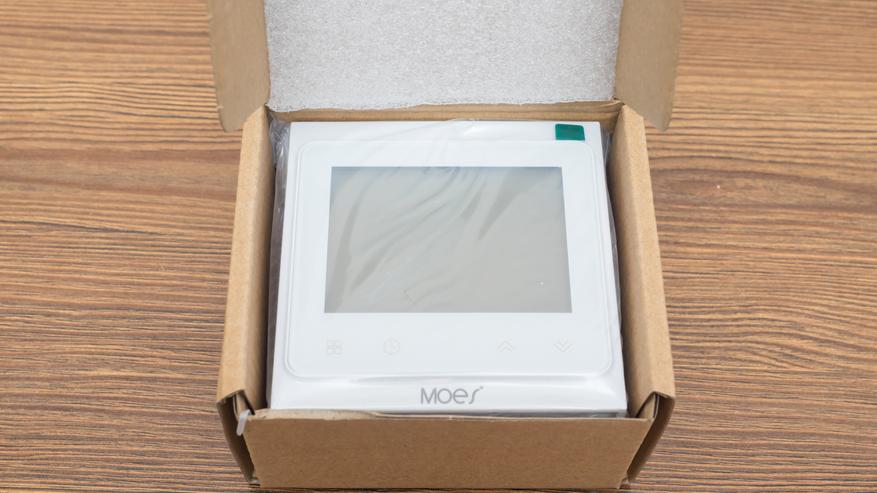
Вот все что нашлось в коробке разложенное по двум отсекам, сверху термостат — под ним все остальное.
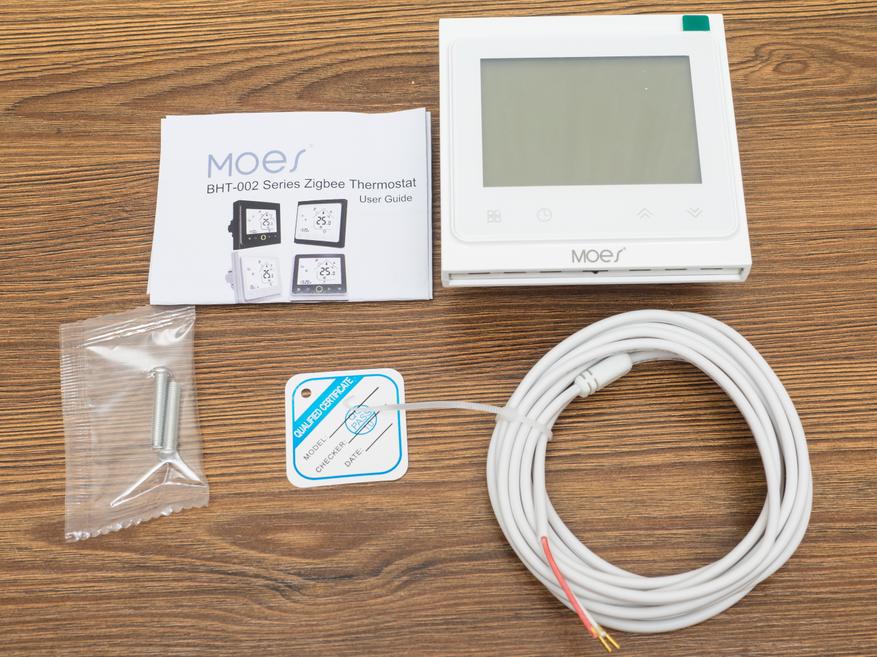
Под остальным я имею в виду —
Инструкцию, она на английском так что вполне читаема, хотя каких-то особенно сложных моментов тут нет.
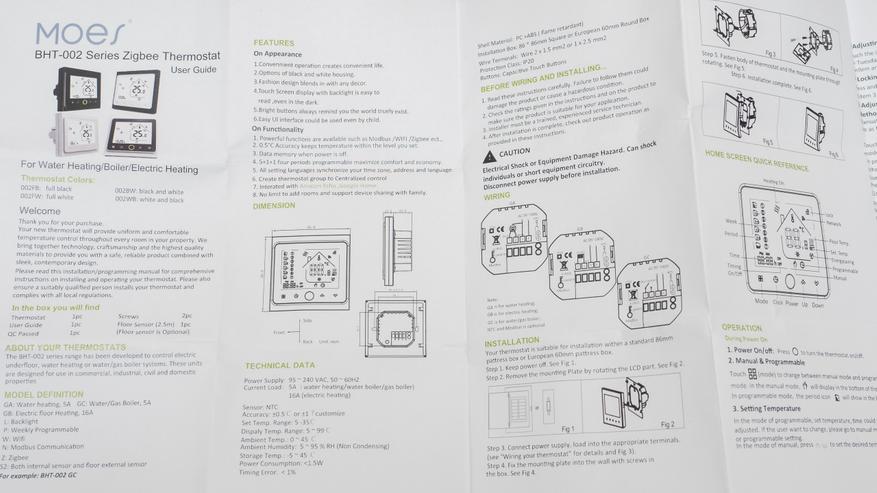
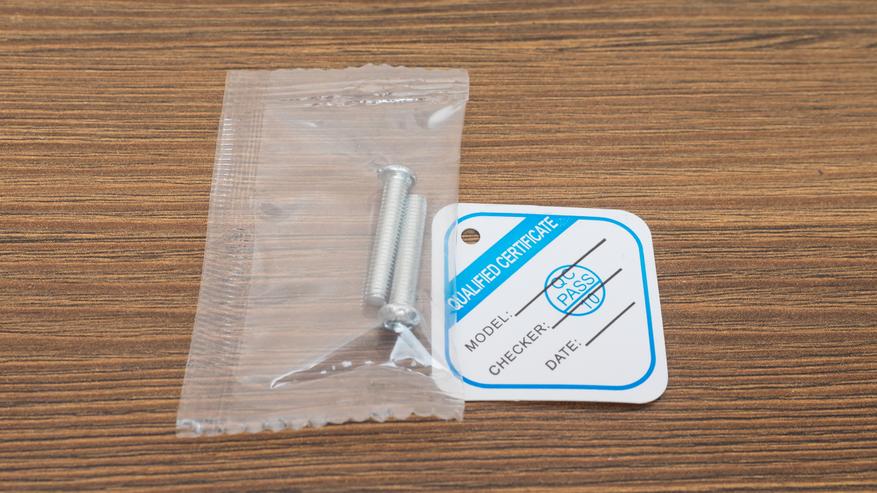
Внешний аналоговый датчик температуры на проводе длиной в 2,5 метра, сопротивлением в 10 кОм и стандартный винтовой крепеж для подрозетников и отметка о прохождении контроля отдела качества.

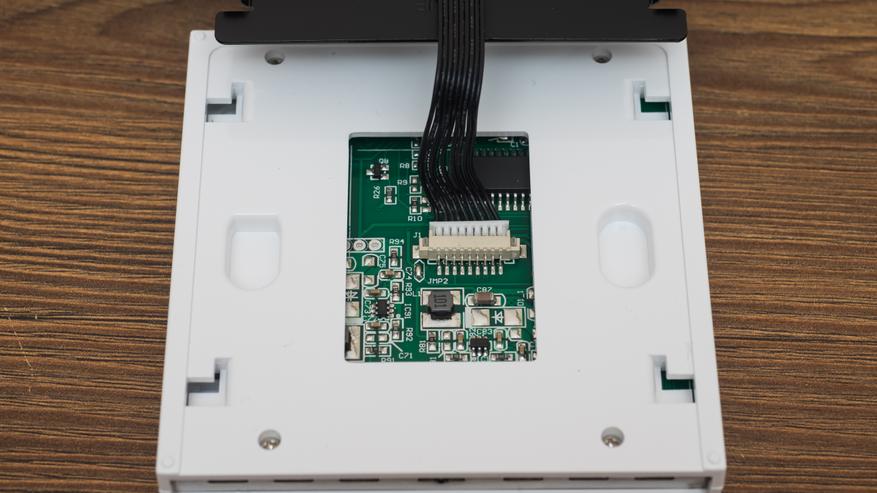
Конструкция
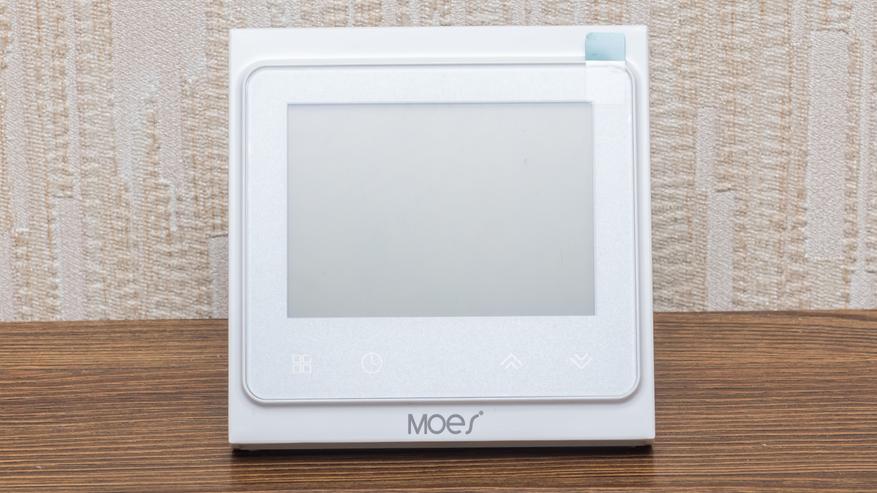
Большую часть фронтальной поверхности устройства занимает ЖК экран, под которым находятся 5 кнопок для ручной настройки и управления, слева направо — режим работы, установка времени, включение и выключение и две кнопки установки температуры.
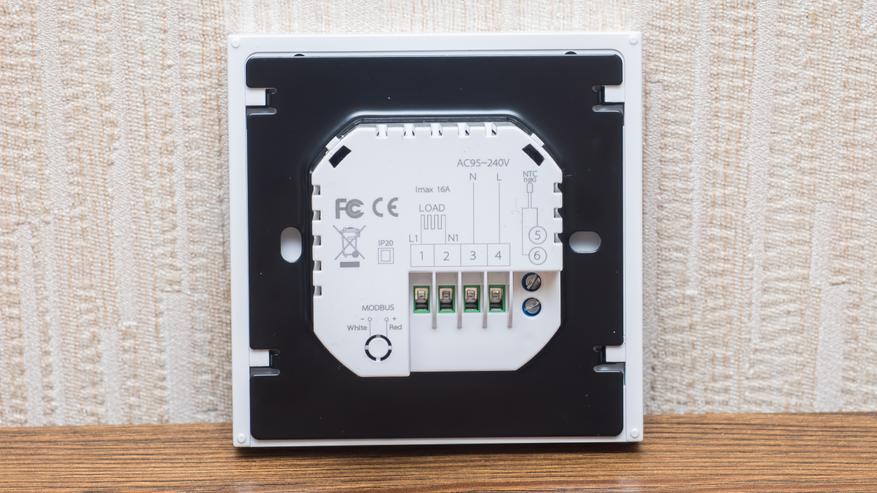
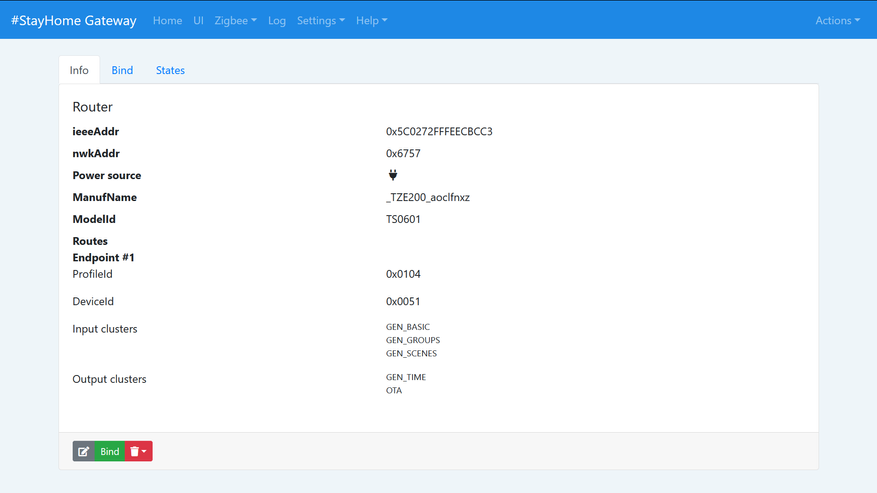
На задней части находятся разъемы для подключения внешнего датчика температуры, питания и нагрузки. Судя по разметке на корпусе — существует, либо разрабатывается версия управляемая по modbus.
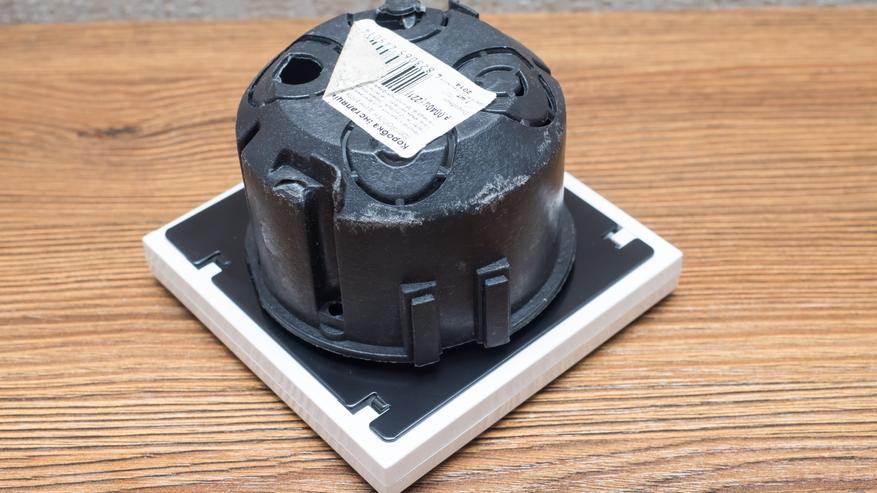
Размер задней части позволяет устанавливать термостат и в стандартный круглый подрозетник и в квадратный 86 х 86 мм. Термостат заходит плотно и полностью, хотя с учетом того, что для теплого пола нужны достаточно толстые провода — то лучше устанавливать глубокий или квадратный подрозетник.
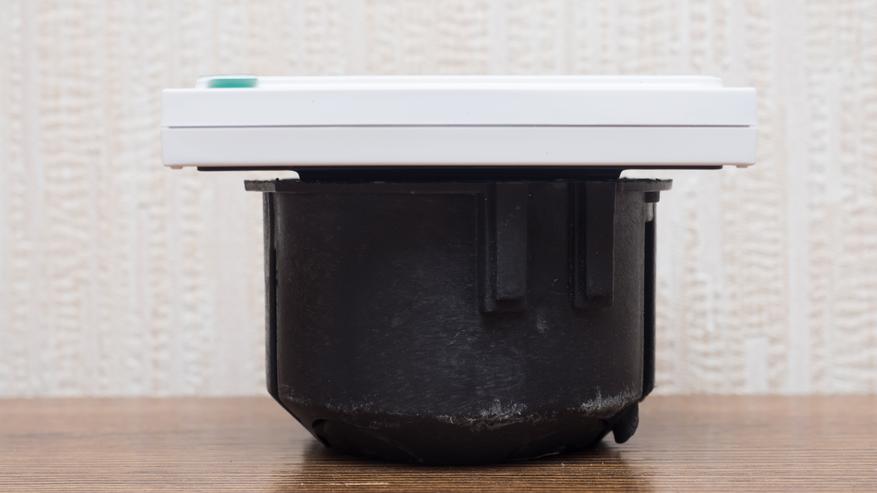
Передняя часть термостата с экраном — соединяется с задней только при помощи пазов. Это даже не защелки — экран нужно просто сдвинуть вверх и он снимется. Тем не менее и такое крепление достаточно надежное.
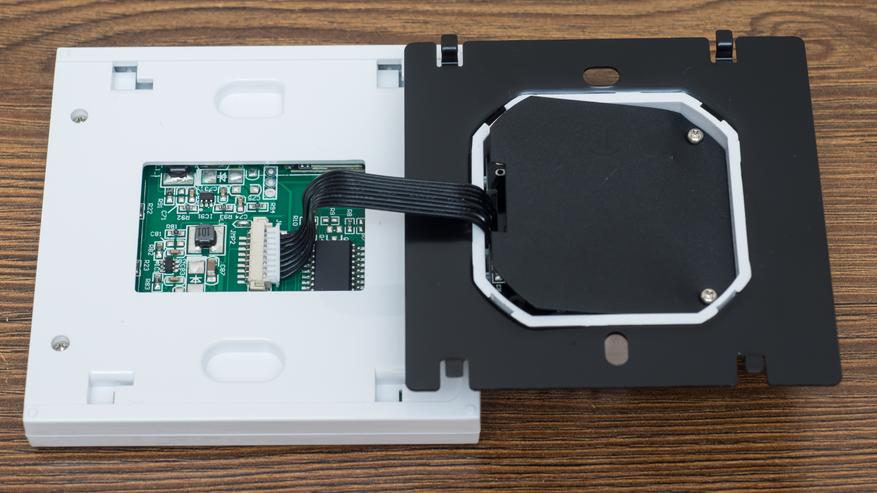
Задняя часть с силовым блоком и черной металлической рамкой — устанавливается в подрозетник и затем крепится к нему.
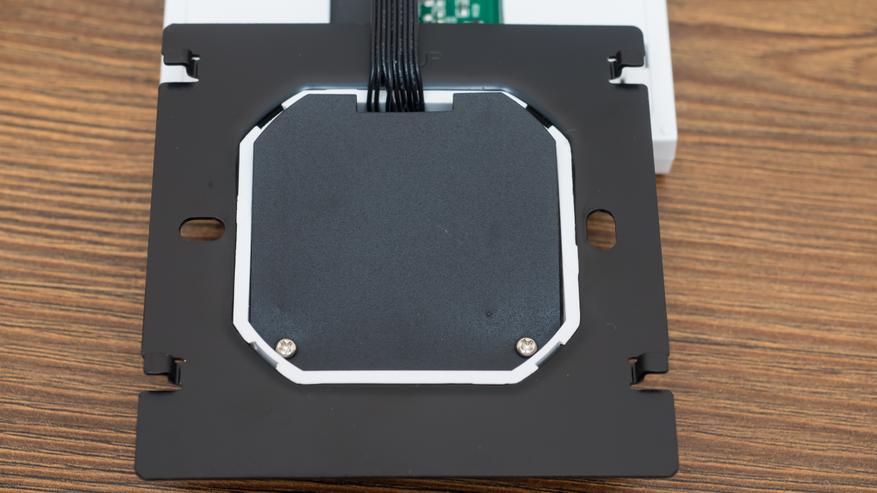
Соединение с передней частью осуществляется при помощи 9ти жильного кабеля. После закрепления в подрозетнике — экран устанавливается обратно в пазы.
Подключение
Перейдем к подключению, тут все достаточно просто так как все разъемы подписаны. Не устану напоминать — соблюдайте соответствие фаза-ноль, это несложно при помощи обычной индикаторной отвертки.
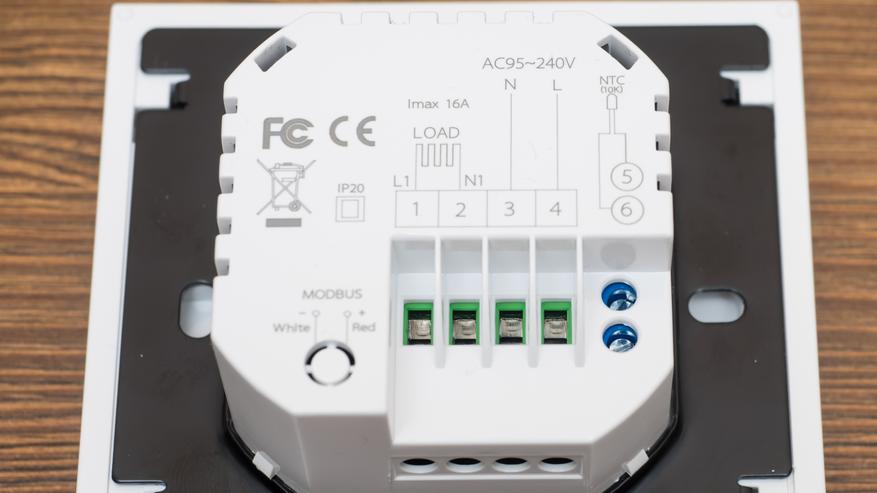
Контакты для внешнего датчика температуры находятся сбоку, напомню длина кабеля комплектного датчика — 2,5 метра.
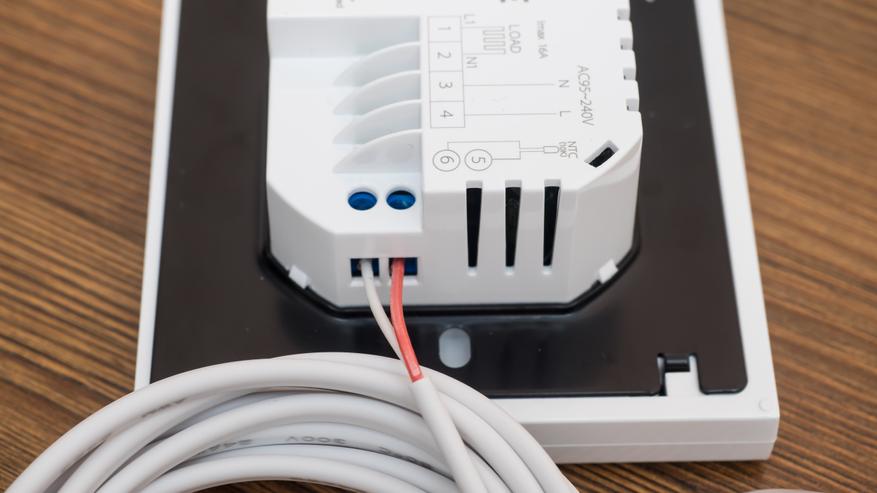
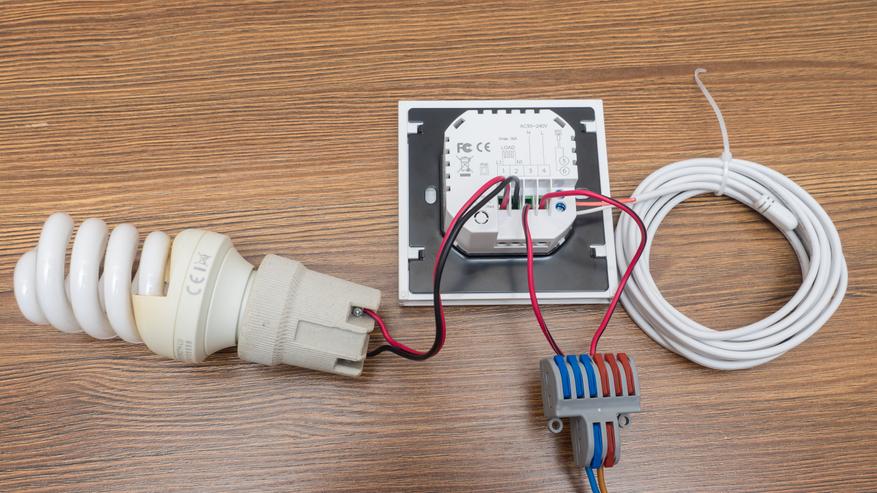
Силовая часть — на вход подаем ноль и фазу и подключаем контакты нагрузки — ее роль в моем тестовом стенде выполняет лампочка.

Еще раз крупным планом схема подключения тестового стенда с использованием внешнего датчика температуры и лампочки в качестве имитации нагревательного элемента.
После подачи питания, для включения термостата нужно нажать центральную кнопку, после этого начинает логика термостата, даже без подключения к умному дому. Начнем с ручных настроек.
Ручные настройки
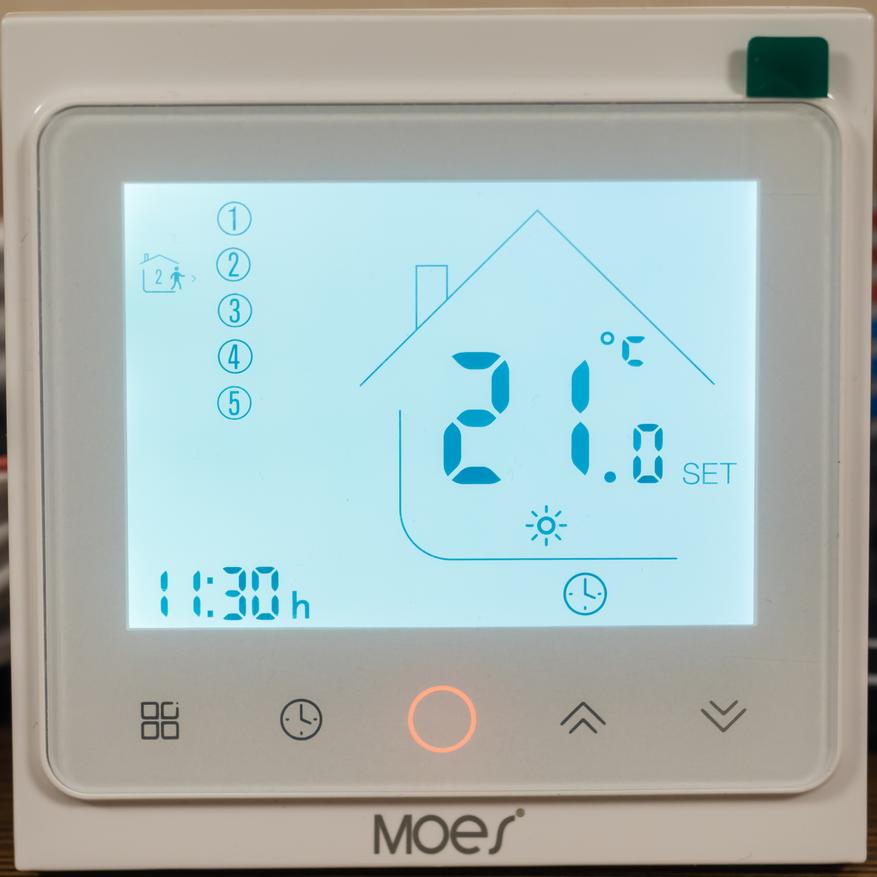
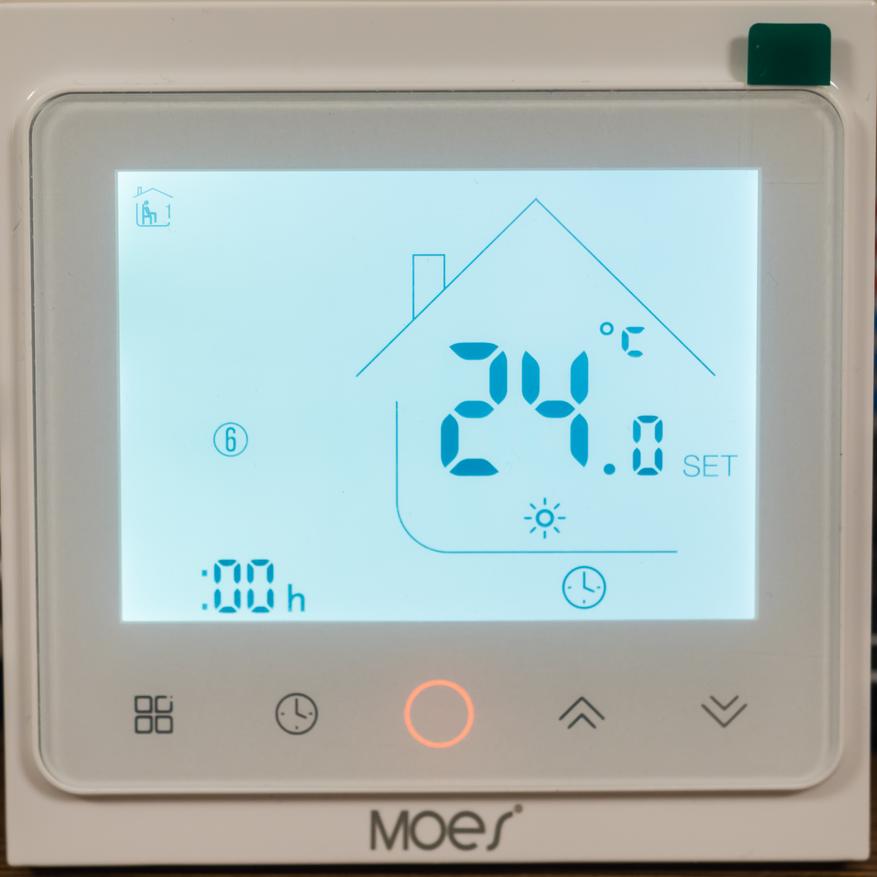
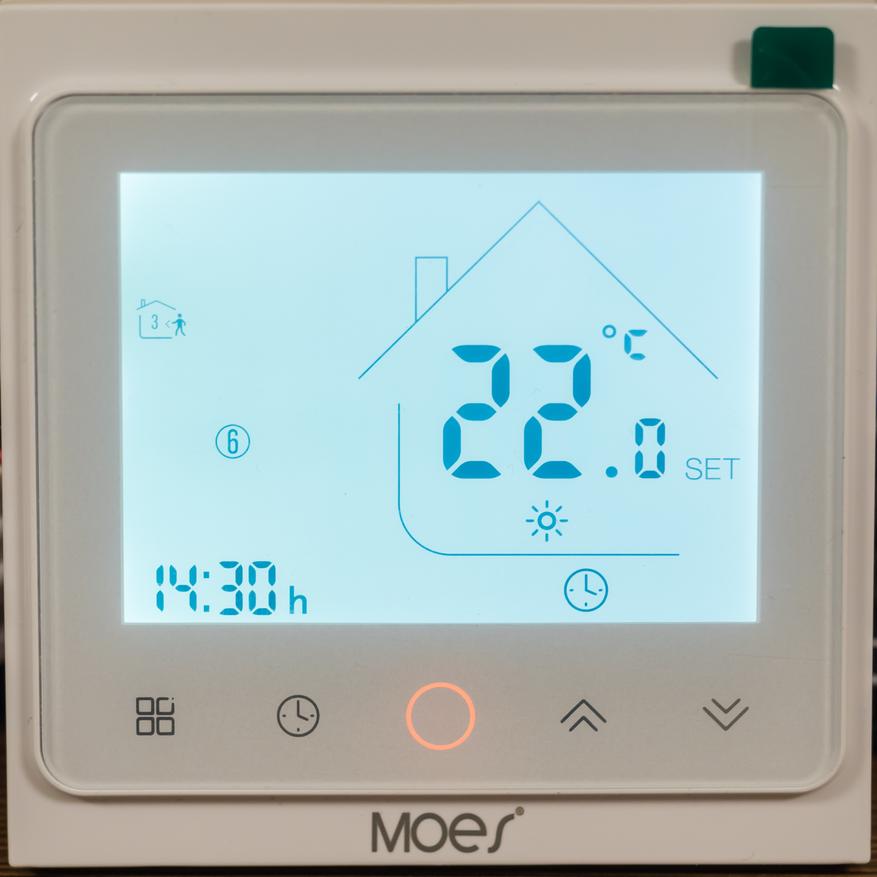
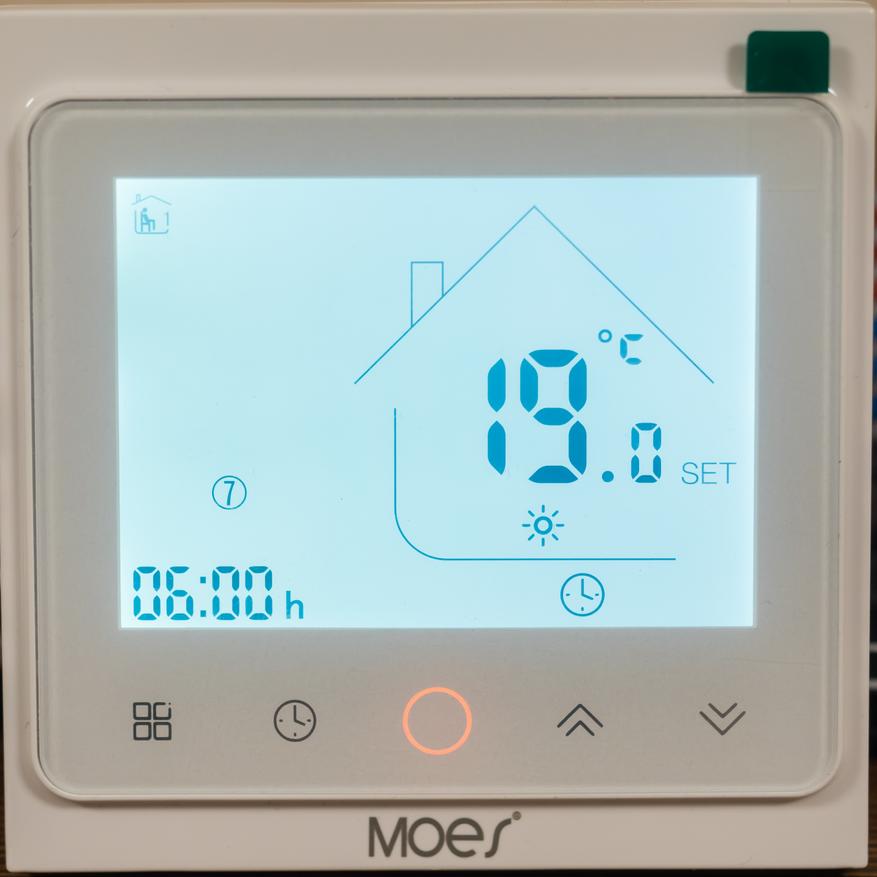
Как я и сказал — термостат способен работать и полностью автономно, причем в двух режимах — ручном и по расписанию, переключает их левая нижняя кнопка. Ручной работает от текущих установок, а расписание — в зависимости от времени и дня недели.
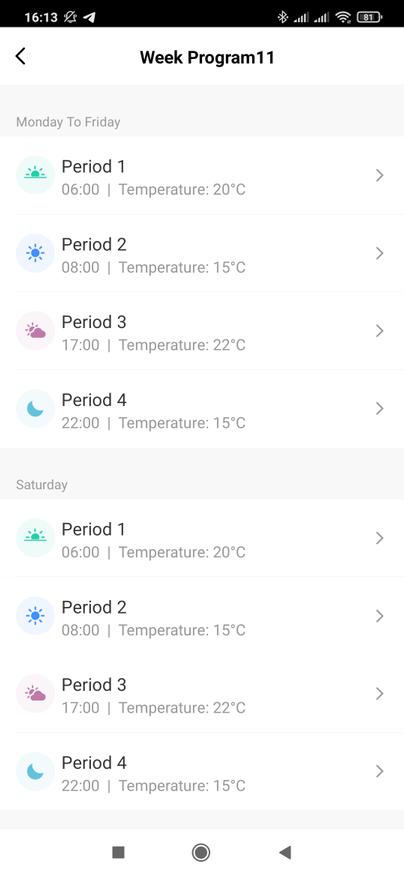
Следующая нижняя кнопка — служит для установки текущего времени, изменять которое можно клавишами со стрелками с левой стороны, затем следует день недели, в виде цифр от 1 до 7, а дальше — настройка расписания. Расписание настраивается отдельно по будним дням и выходным. Устанавливаем время начала периода, затем желаемую температуру в это время.
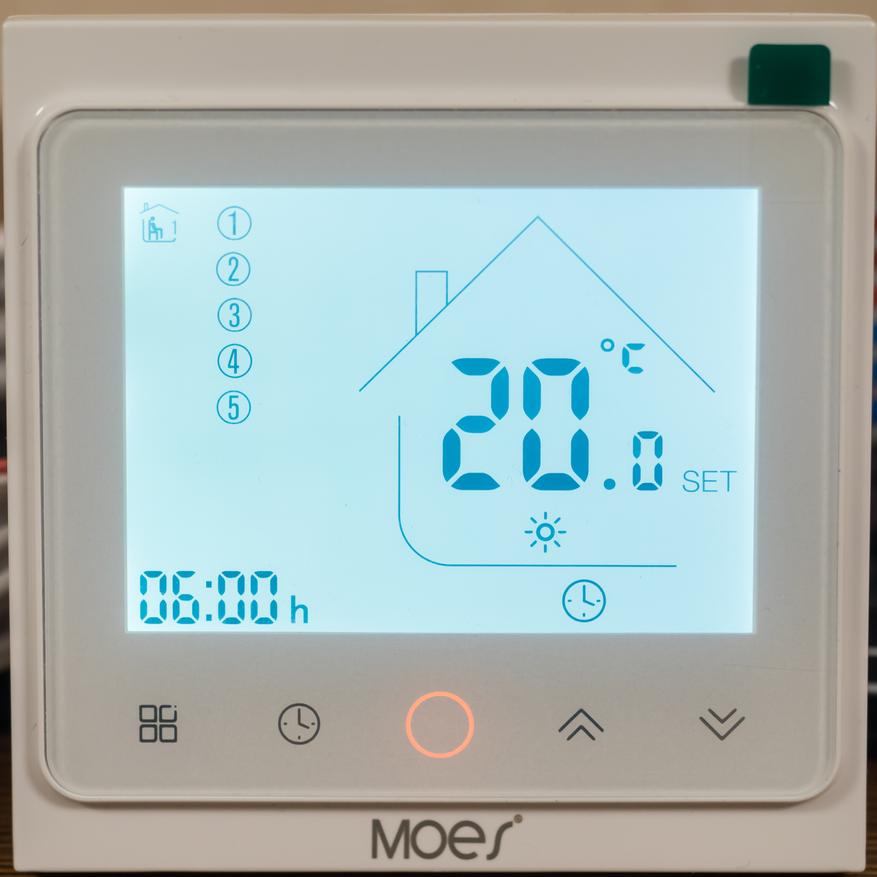
Таких временных периодов — 4, каждому настраивается своя температура — например ночью и днем прохладнее, а утром и вечером — теплее.
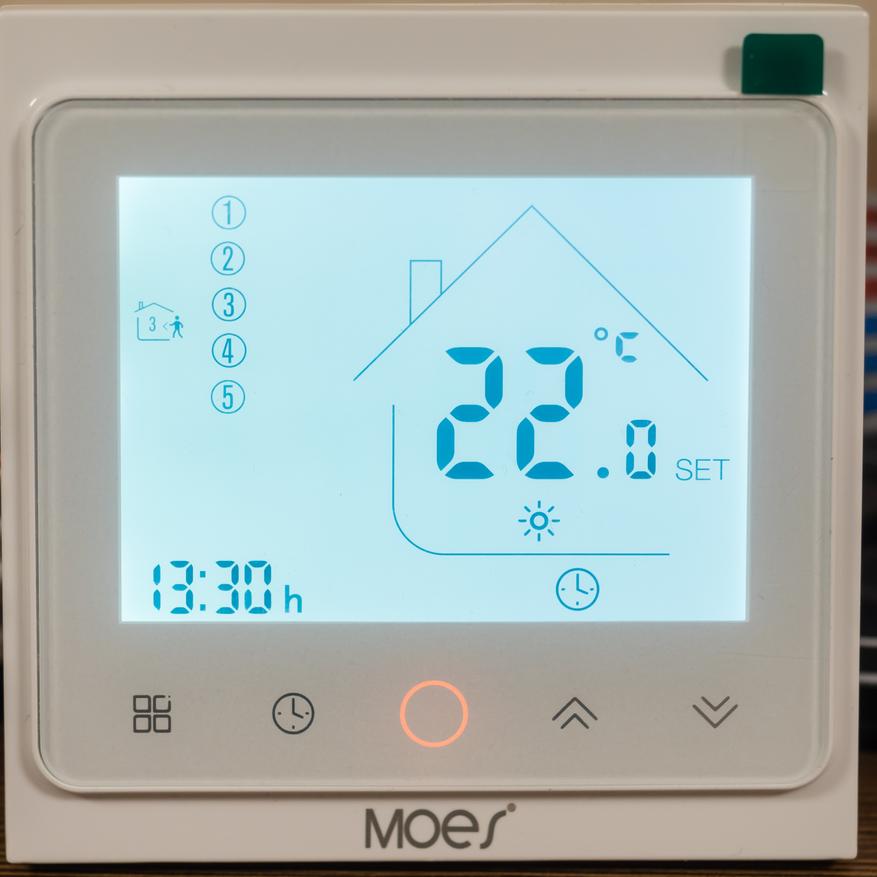
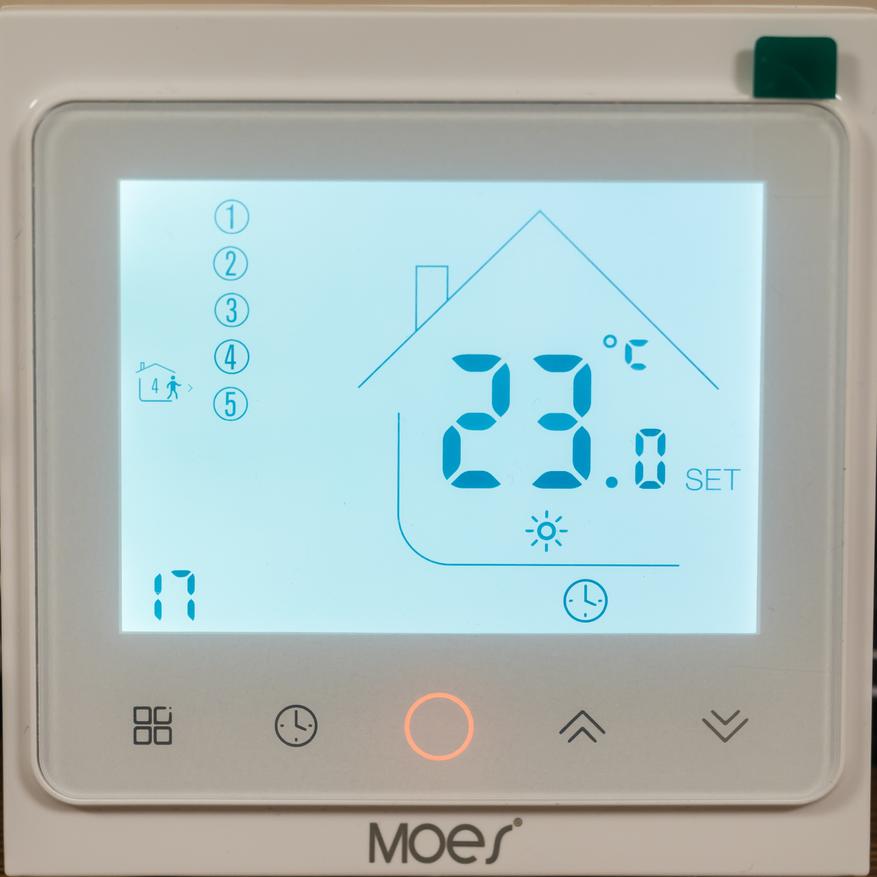
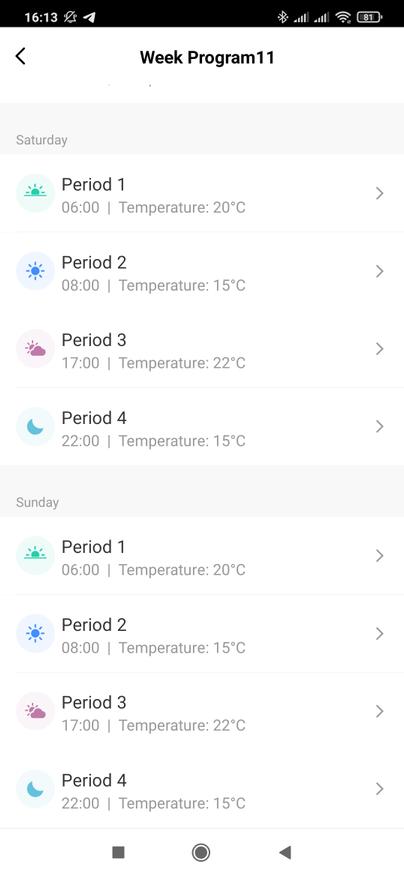
Далее, аналогично, настраиваются 4 временные зоны для субботы, ну или того дня который будет у вас идти под номером 6. И отдельно — для воскресенья, 7 дня. Всего 12 периодов, 4 для будних дней и по 4 отдельно для субботы и воскресенья
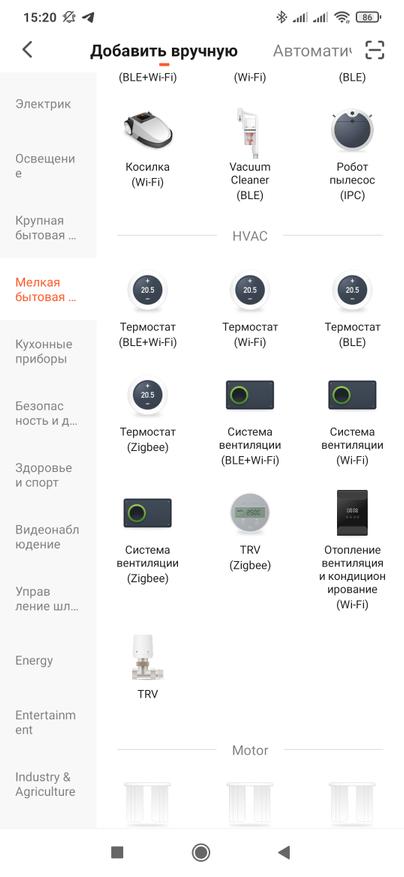
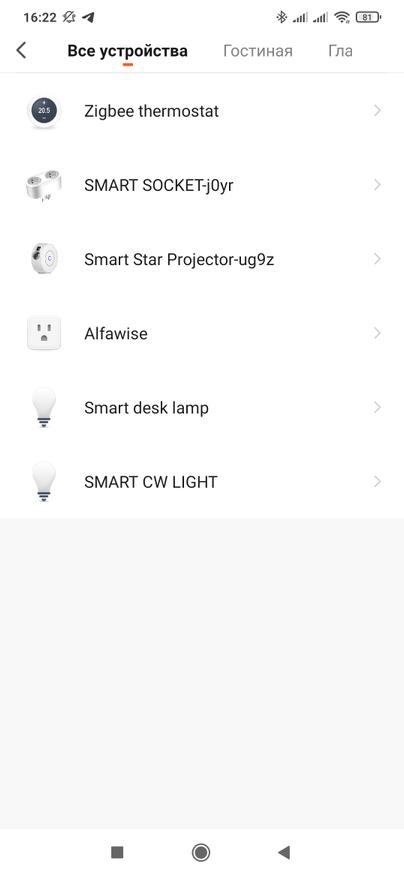
Tuya Smart
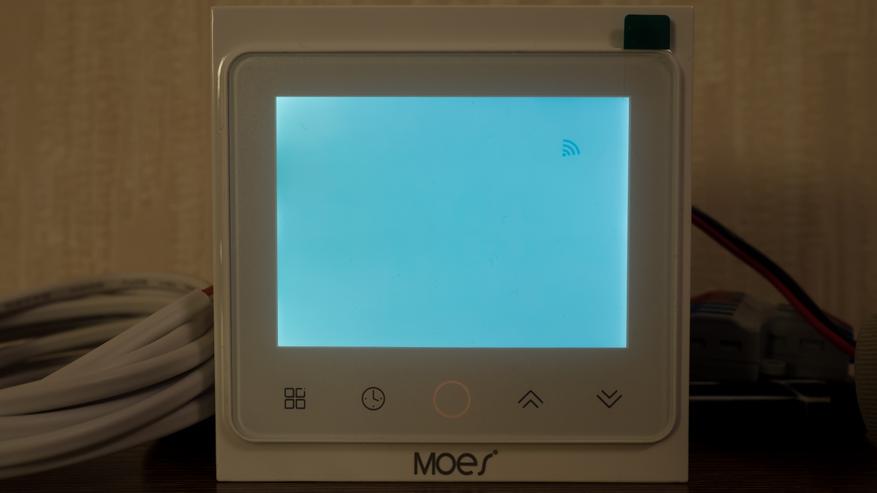
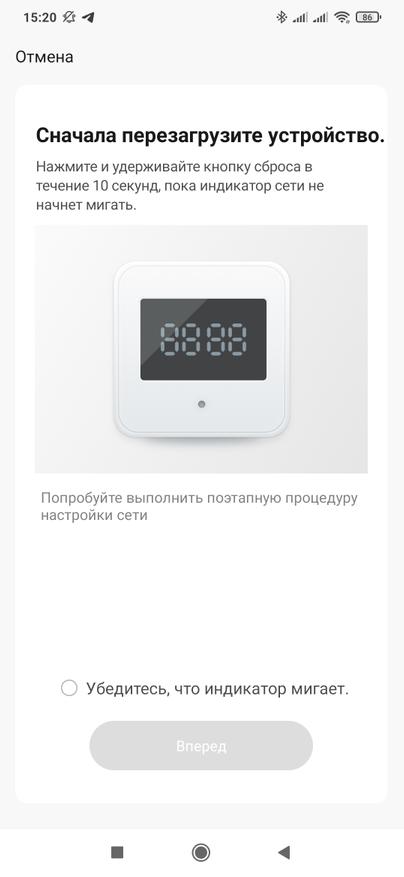
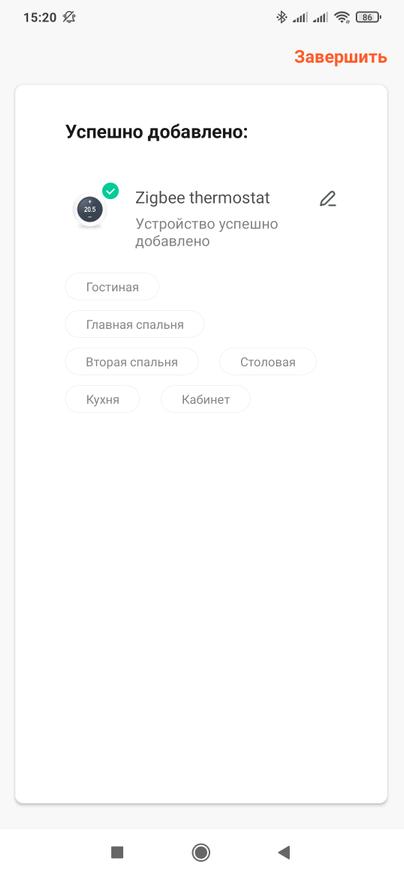
Теперь перейдем к системам управления. Начнем с родной для термостата — Tuya Smart. Для сопряжения устройство с zigbee шлюзом, подойдет любой экосистемный, нужно в выключенном состоянии зажать правую нижнюю кнопку на 8 секунд, пока экран не начнет мерцать.
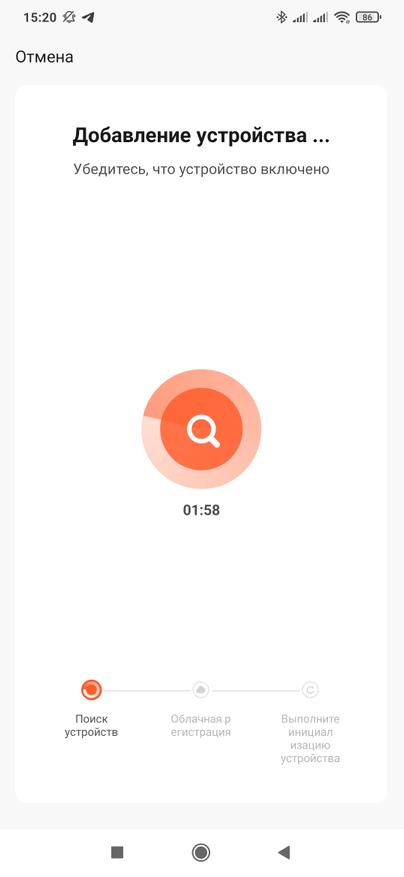
В приложении Tuya Smart, нажимаем подключить новое устройство и в разделе мелкой бытовой техники ищем zigbee термостат. Далее указываем шлюз, с которым будет соединено устройство.
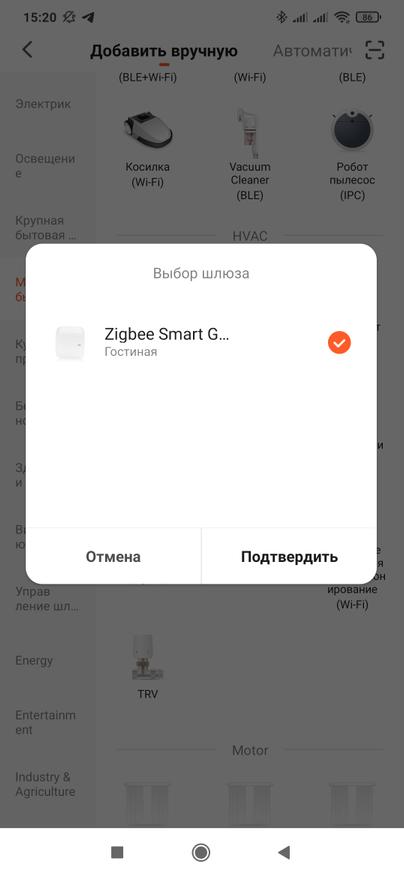
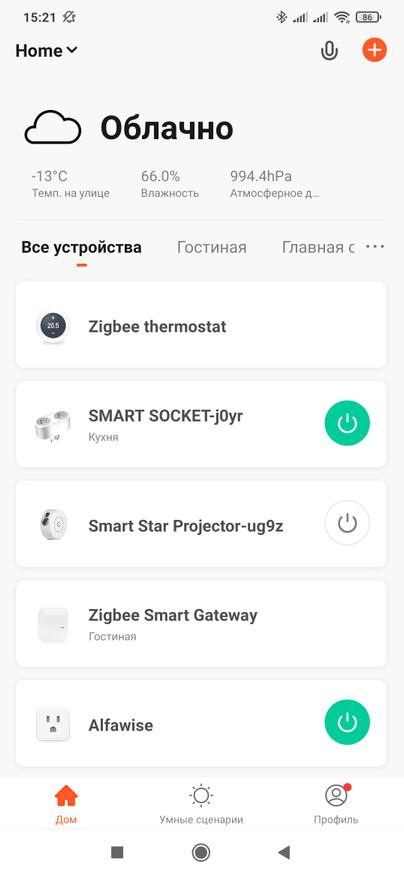
Теперь нужно немного подождать пока пройдет процесс синхронизации и термостат появится в общем списке и списке устройств того шлюза который им непосредственно управляет. После этого термостат синхронизирует время и день недели с смартфоном, время корректное — не китайское.
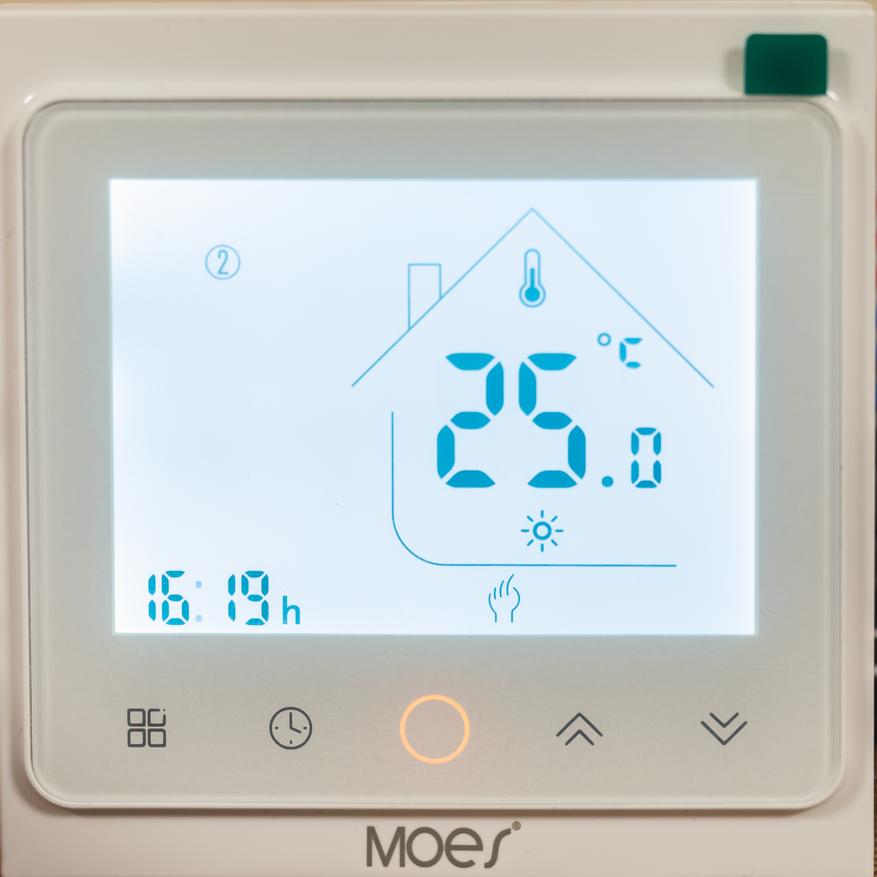
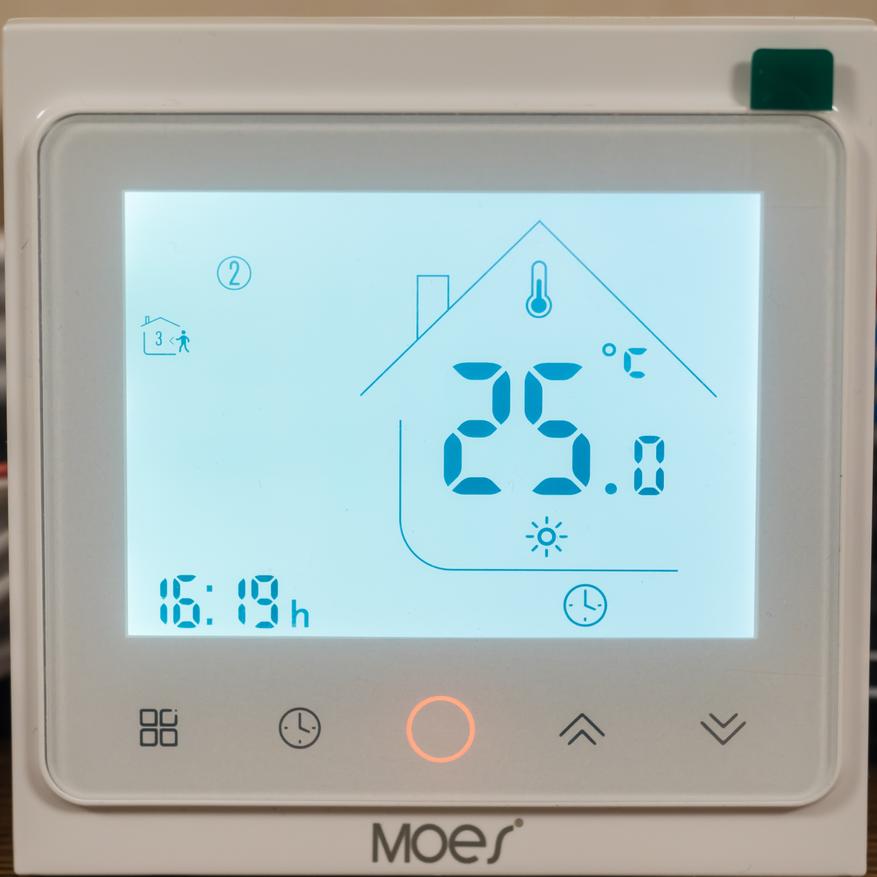
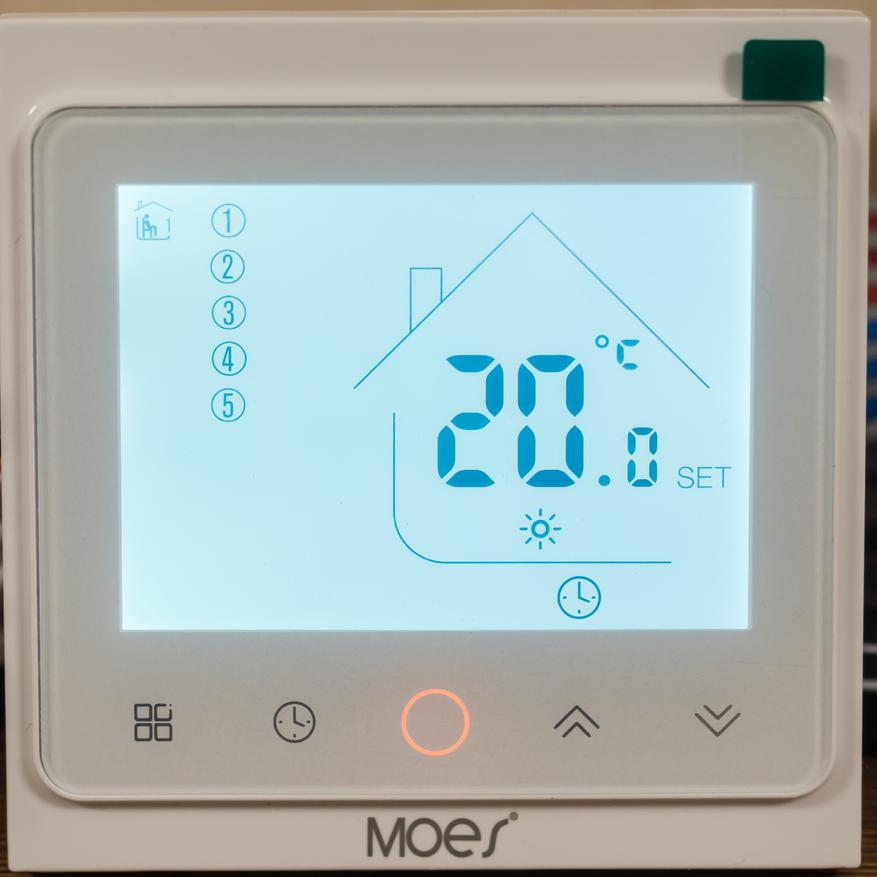
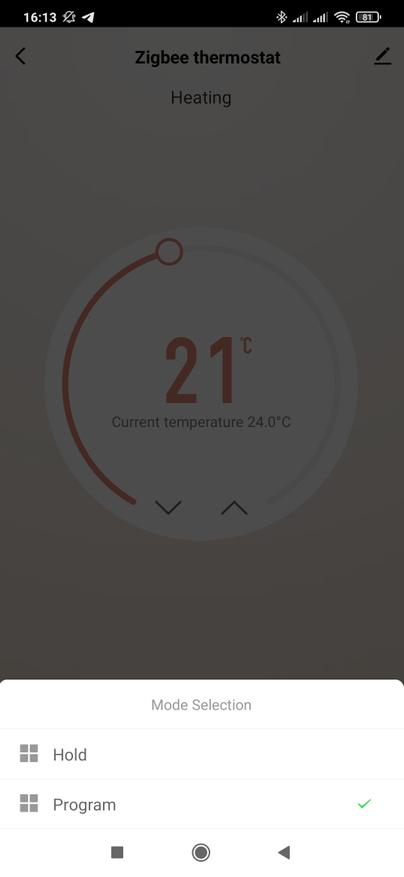
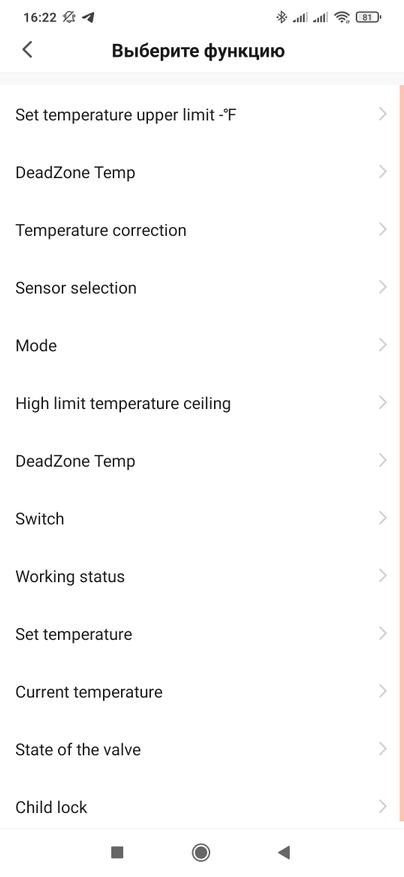
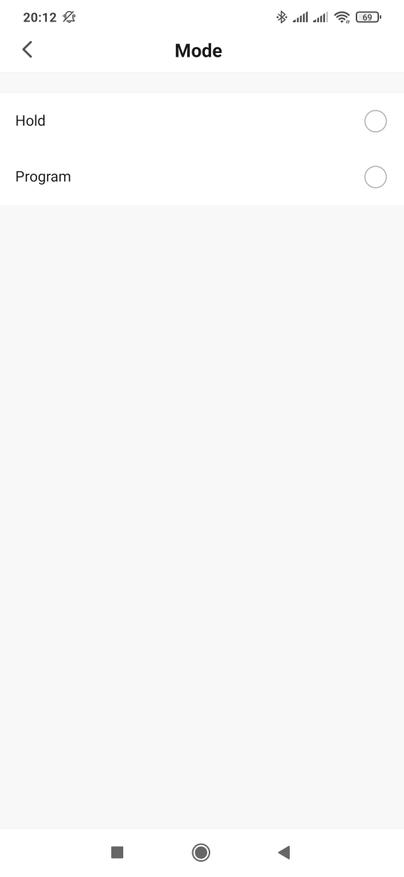
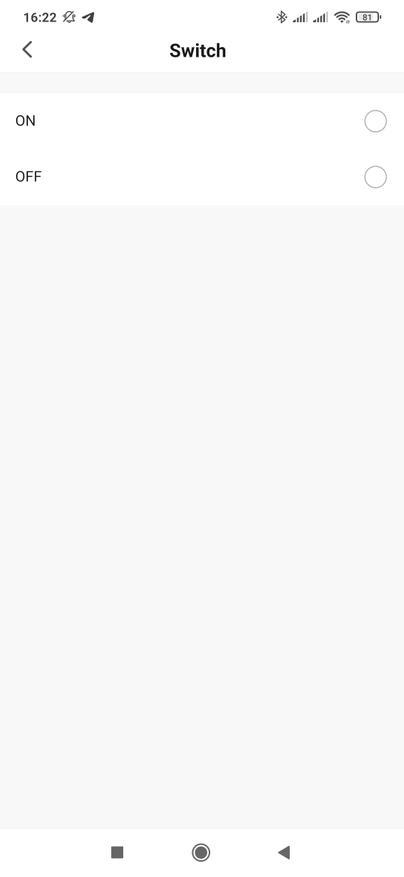
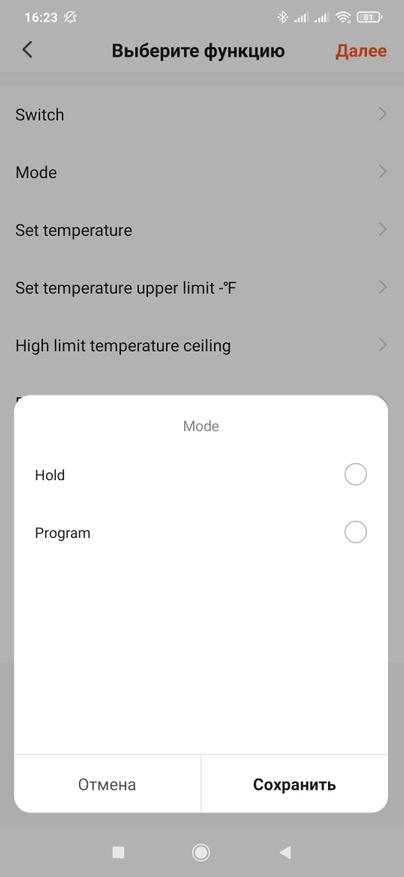
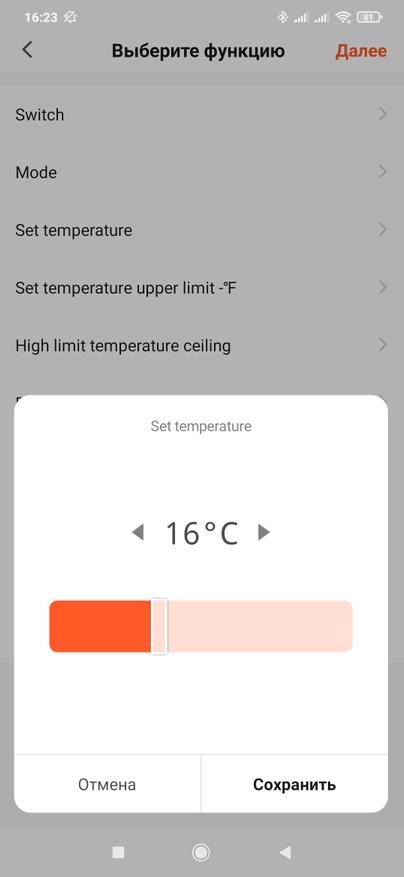
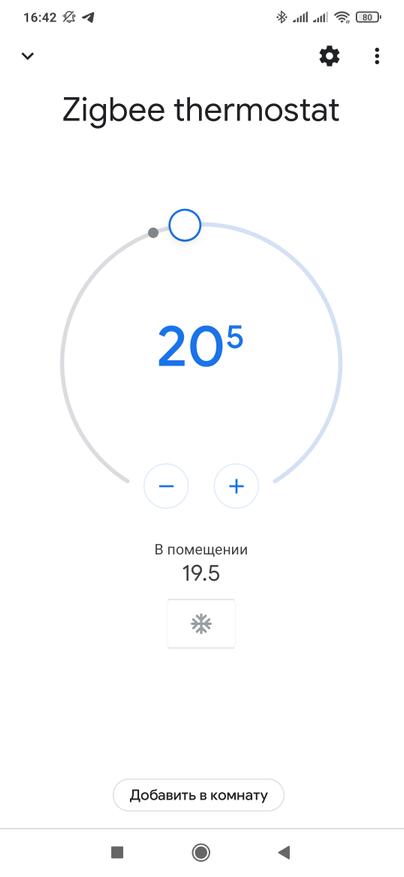
Плагин термостата стандартный — большую часть окна занимает круговой регулятор целевой температуры, в центре — текущая температура. Первая внизу кнопка — включает логику термостата делая регулятор активным. Следующая кнопка — это режимы, ручной и по расписанию, по умолчанию — ручной — hold.
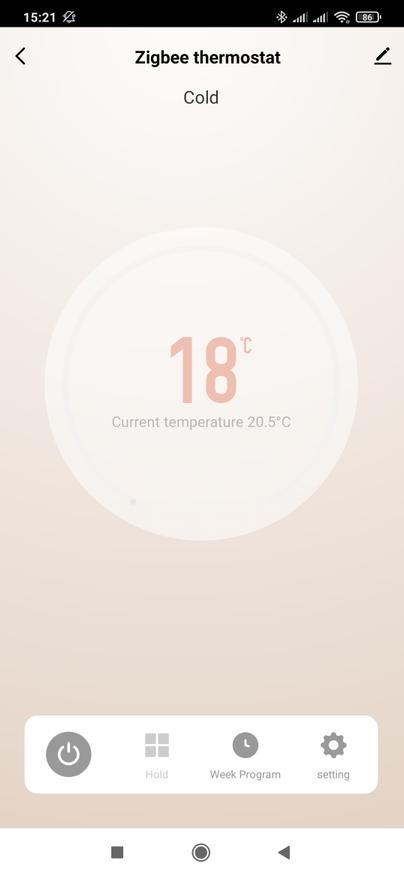
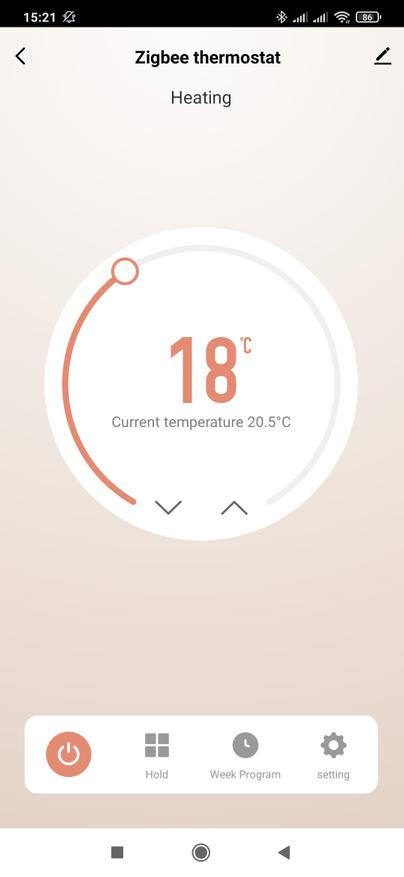
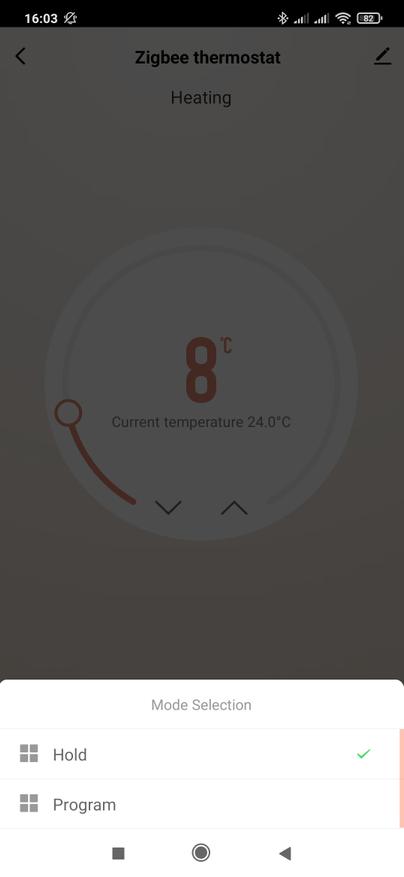
Program — это режим работы по расписанию, само же расписание настраивается третьей кнопкой, все те же 12 режимов, для будних дней субботы и воскресенья, только тут это нагляднее и удобнее.
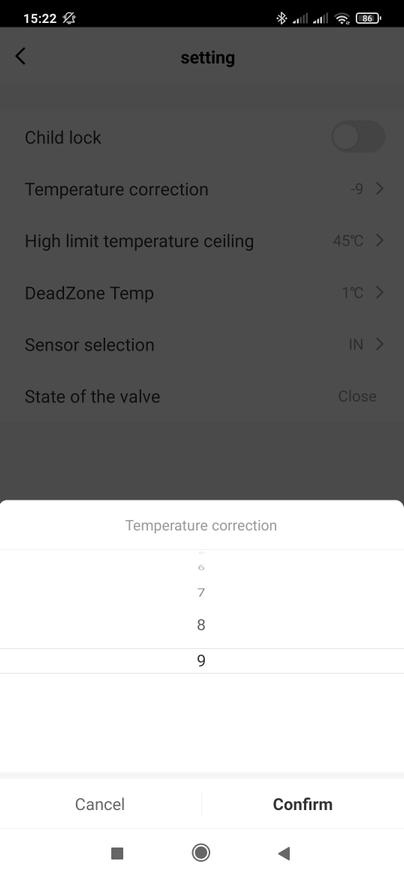
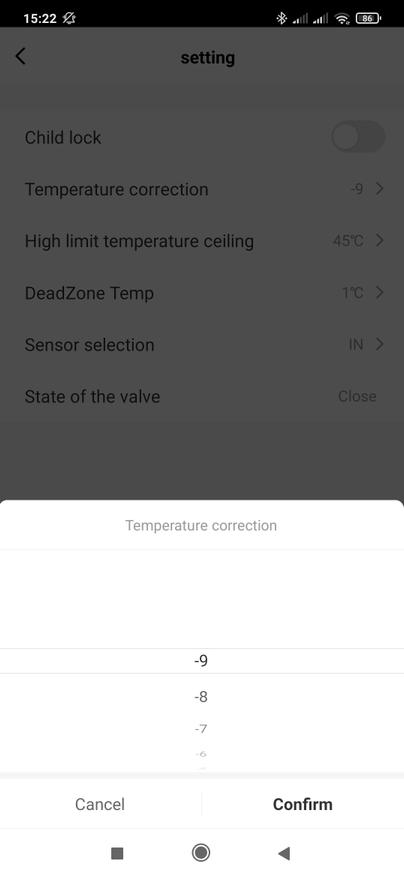
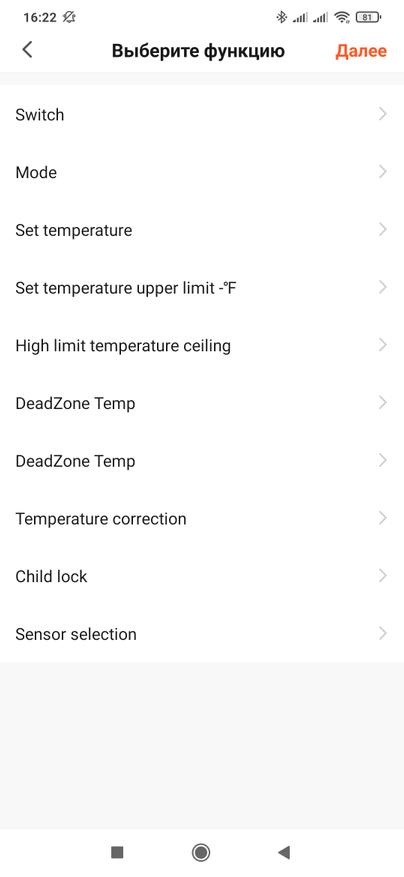
И последняя, четвертая кнопка — это меню настроек. Родители маленьких детей оценят опцию детской блокировки, отключающей физическое управление термостатом. Здесь же можно откорректировать показания текущей температуры в пределах 9 градусов в обе стороны.

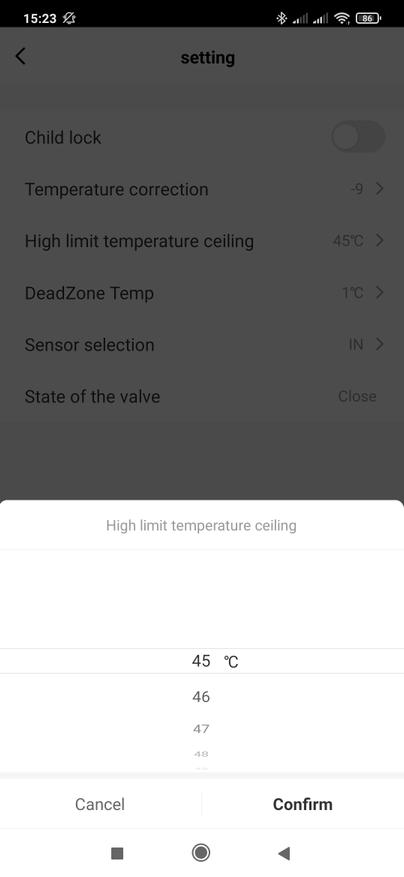
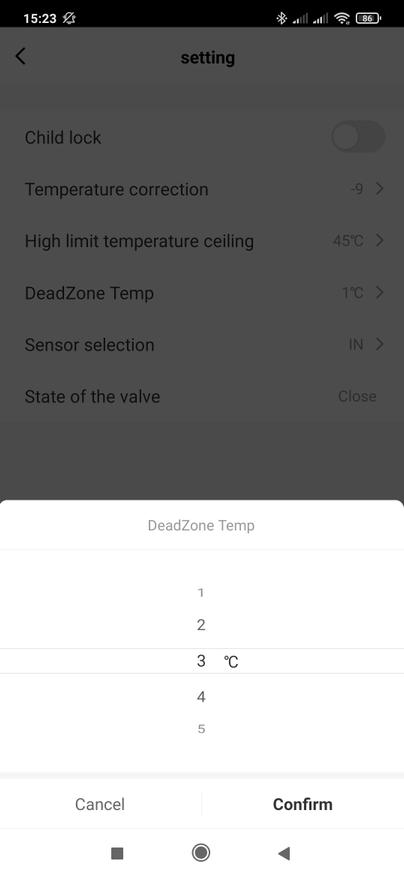
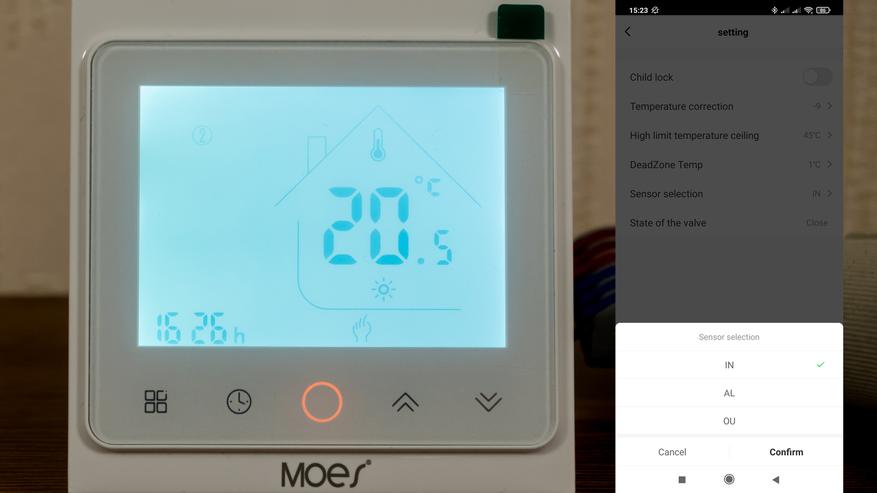
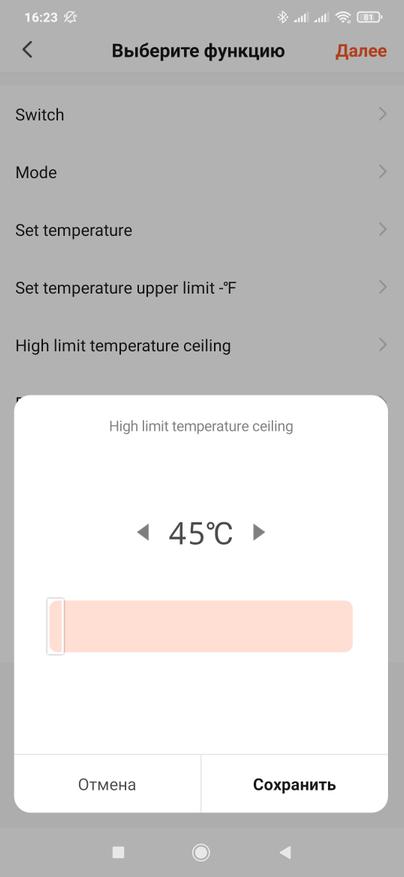
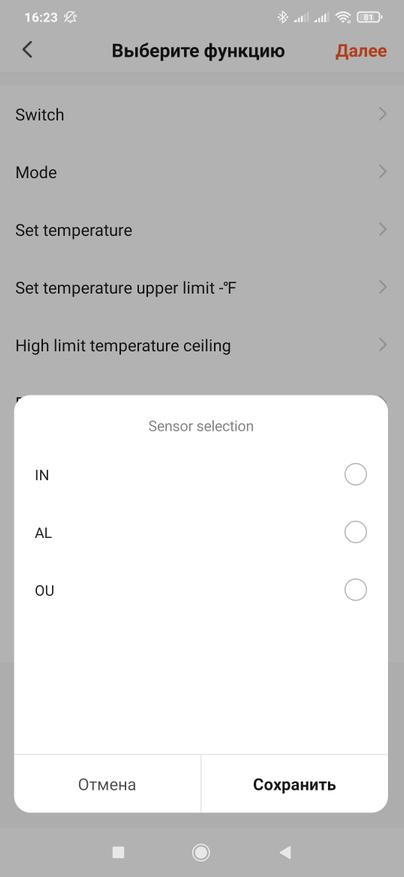
Далее идет настройка верхнего лимита температуры — максимум 45 С. Настройка DeadZone — это гистерезис, по умолчанию 1 градус, максимум 5. Это минимальная разница между текущей и целевой температурой для включения нагрузки. Например по умолчанию — целевая температуры должна быть более чем 1 градус выше текущей. Также тут есть настройка внешнего сенсора, на этом остановимся подробнее.
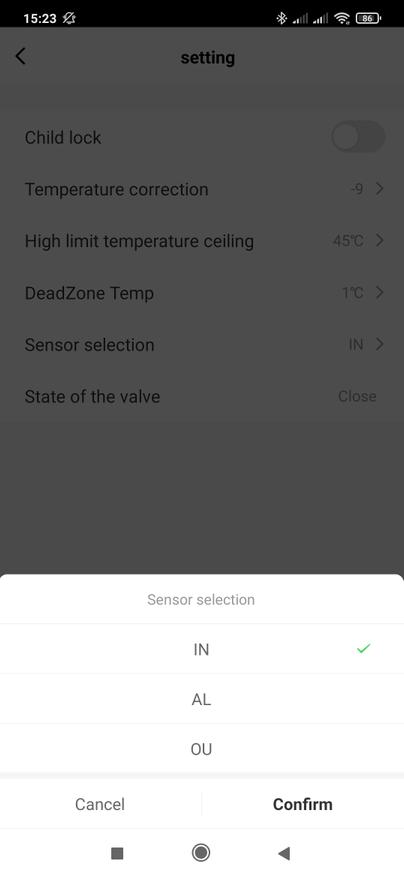
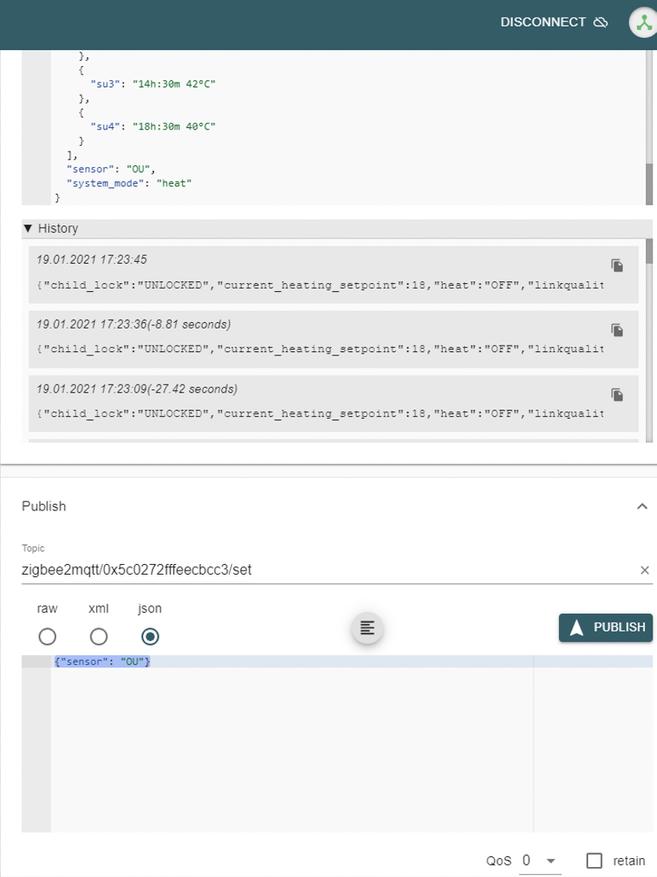
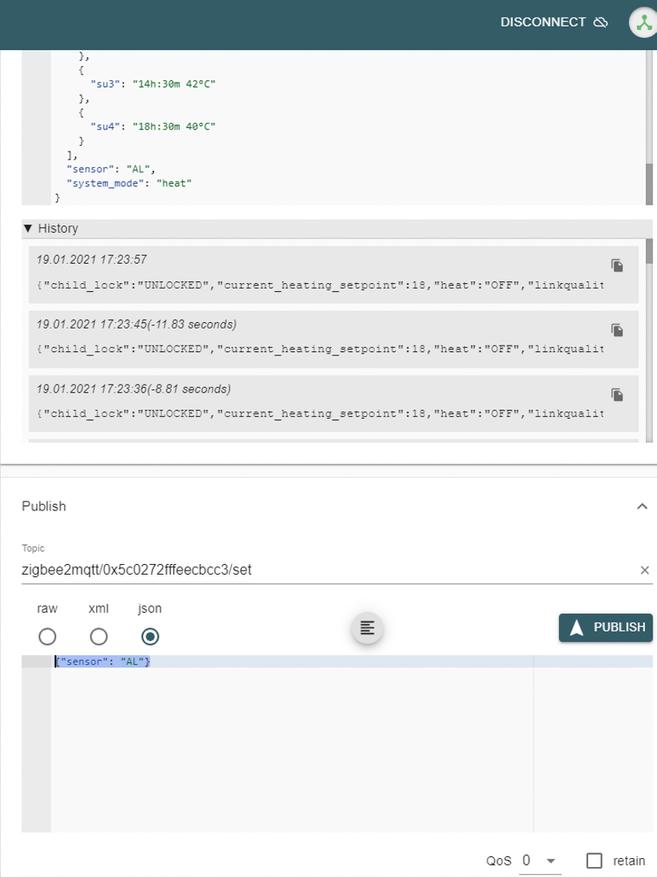
Здесь есть три опции, каждая состоит из двух букв, запомним их — они нам еще пригодятся. IN — это внутренний, встроенный в сам термостат датчик температуры. Его логично использовать для контроля температуры воздуха.
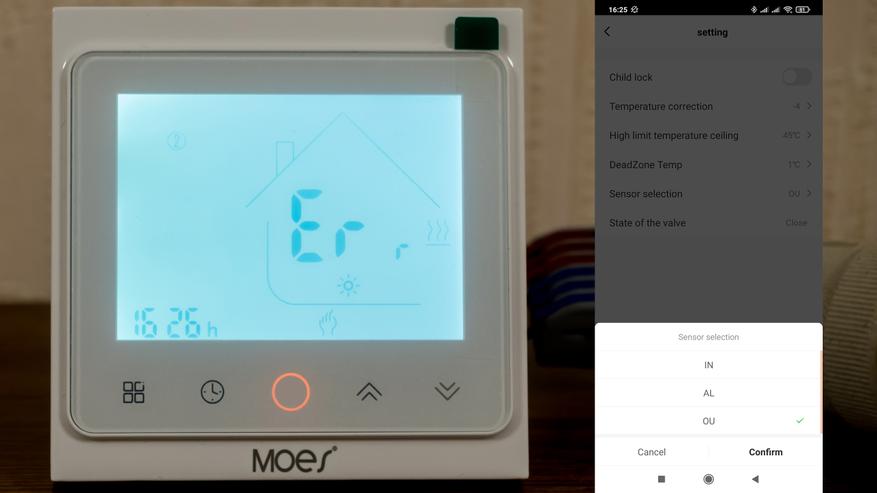
OU — внешний датчик, тот что идет в комплекте на проводе. Если его отключить от термостата в этом режиме — то на экране появится сообщения об ошибке. Такой датчик можно использовать для контроля температуры теплого пола.
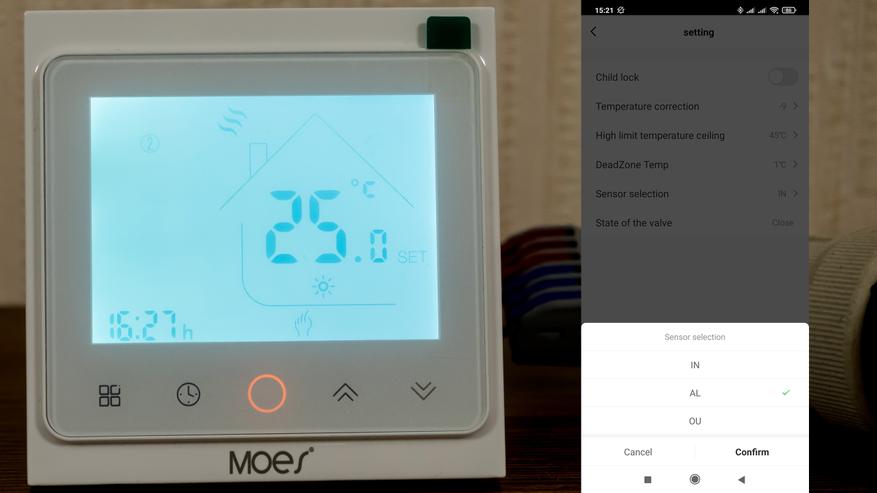
И AL — тут используется 2 датчика, показания текущей температуры — от внутреннего, а внешний используется как предохранитель, контролируя нагрев теплого пола.
Автоматизации
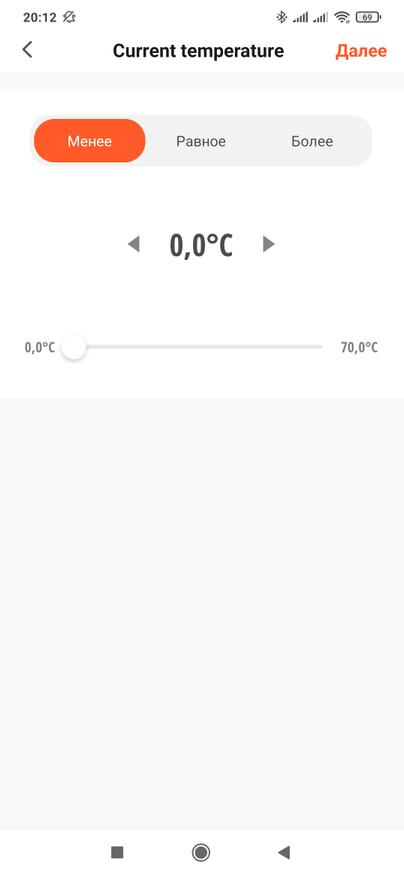
В автоматизациях, термостат, как и подавляющее большинство других устройств экосистемы, может работать как триггер или условие — например отслеживать состояние термостата, включен или выключен.

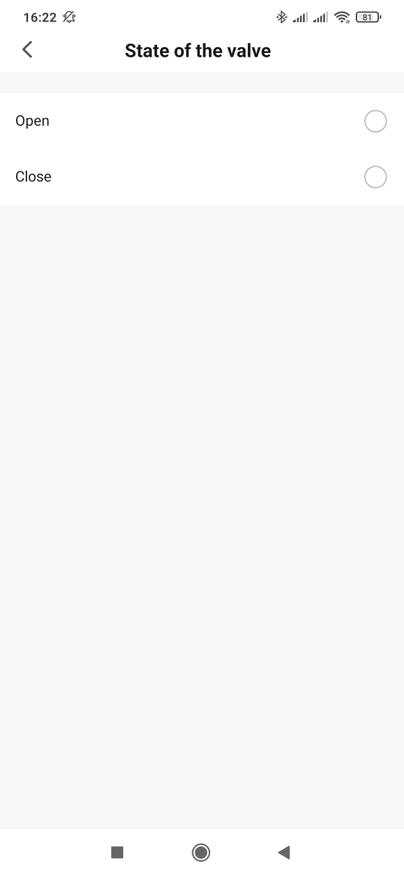
Так же как триггер или условие можно использовать состояние нагрузки, именно ее тут назвали клапаном, переключение режима и значение текущей температуры.
Кроме этого — термостат работает и как действие автоматизации, тут меньше опций, но все основные есть — включение и выключение термостата, имеется в виду именно термостат а не его нагрузка, изменение режима работы.
Также в автоматизациях можно установить и целевую температуру и лимит ее установки, можно на лету менять тип сенсора.
Тестирование
Тестирование логики термостата в режиме реального времени можно увидеть в видео версии обзора.
Тест проводился так — термостат работает от внешнего датчика, который помещен в лампочку, она выполняет роль нагрузки. Текущая температура — 22 С.
Ставим целевую температуру 25 С, что приводит к включению нагрузки — лампочка, а следом за ней и датчик, начнет нагреваться. Напомню целевая температура должна превышать текущую не меньше чем значение настройки параметра гистерезиса — DeadZone.
После того как температура на датчике сравняется с целевой — термостат отключит нагрузку.
Так же в видео версии можно увидеть скорость работы в связке приложение — термостат и термостат — приложение
Скорость работы через приложение весьма неплохая. Иногда бывают небольшие задержки, но в целом все быстро. В этом Tuya, по моему мнению, превосходит mihome.
Обратная связь — аналогично, интересно что шаг изменения целевой температуры на термостате — 0,5 градуса, а в приложении — 1 градус.
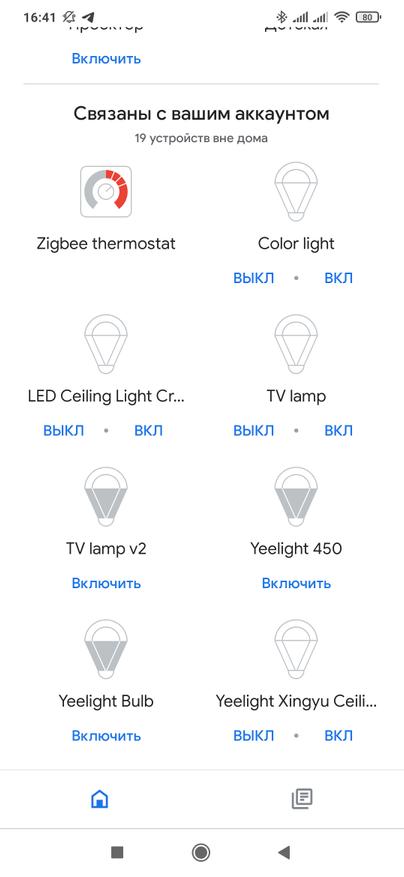
Google Home
Аккаунт Tuya Smart подключается к Google Home и устройства из него пробрасываются в него. Термостат — не исключение, так что владельцы умных колонок и мониторов от Google смогут устанавливать желаемую температуру и при помощи голосовых команд Google Assistant. Скорость отклика тоже достаточно высокая для обеспечения комфортной работы.
Zigbee2mqtt
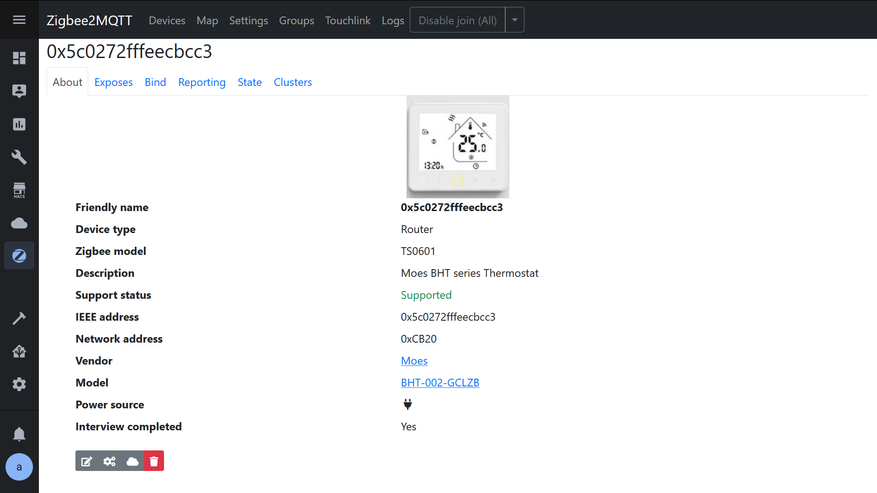
Термостат поддерживается в интеграции zigbee2mqtt, процесс подключения — стандартный, в веб интерфейсе включаем разрешение добавления новых устройств, а на выключенном термостате — зажимаем правую кнопку на 8 секунд.
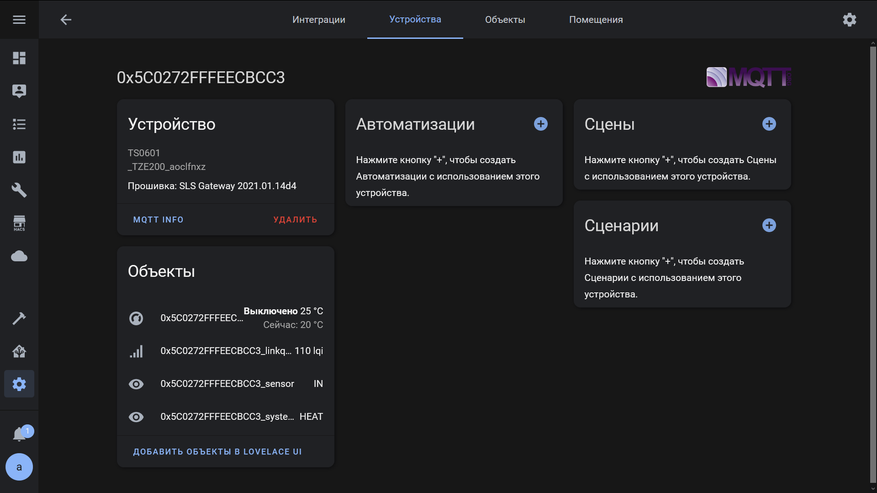
После прохождения опроса и интервью — устройство добавляется в систему и появляется в общем списке интеграции.
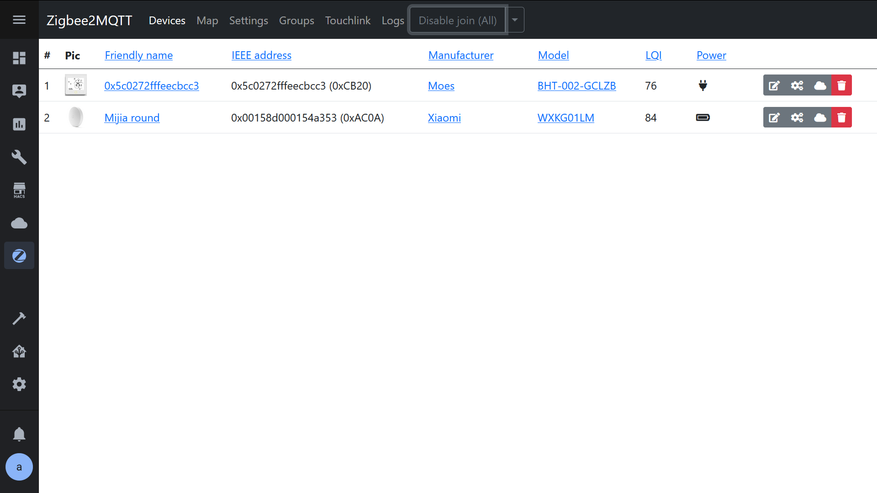
Термостат имеет стационарное питание и поэтому является роутером для других zigbee устройств — которые могут подключаться к нему, в том числе и другие роутеры. Это позволяет расширять и радиус действия сети и увеличить ее емкость по количеству подключенных устройств.
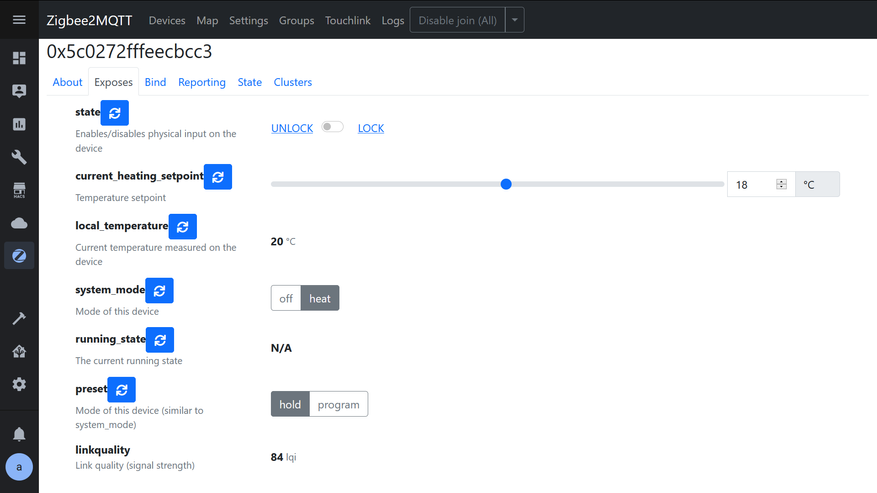
Интеграция позволяет управлять всеми необходимыми параметрами термостата — часть из которых выведена в веб интерфейсе, на странице устройства, в вкладке Exposes. Отсюда можно установить целевую температуру, включить детскую блокировку, установить режим работы.
Антиспам
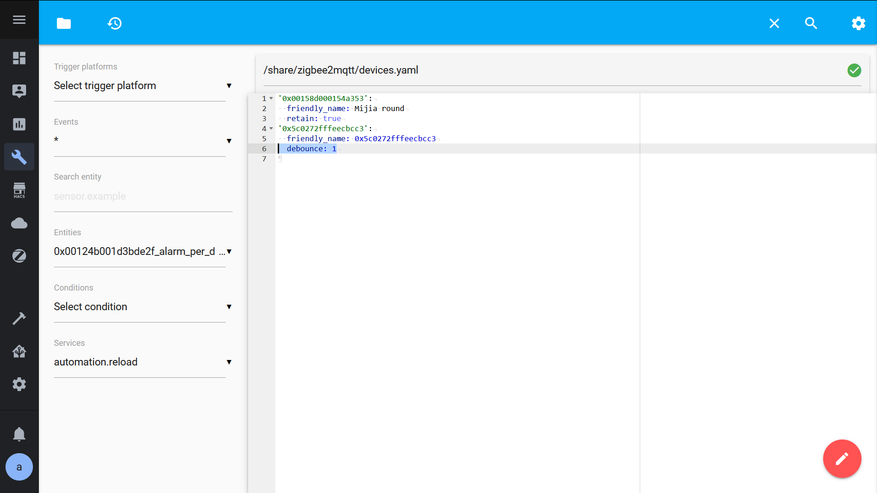
Многие слышали о проблеме связанной с этим термостатом, она заключается в том, что устройство генерирует большое количество сообщений, буквально десятки каждую минуту. Но в интеграции есть лекарство, устраняющее эту проблему.
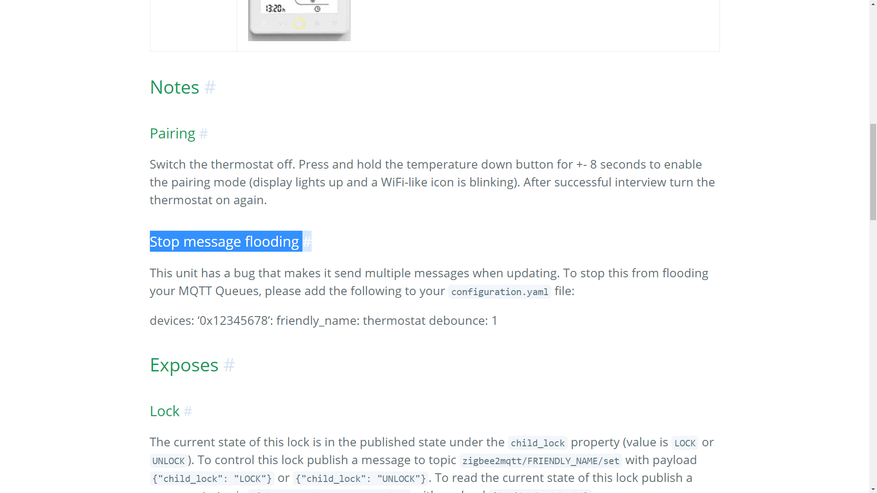
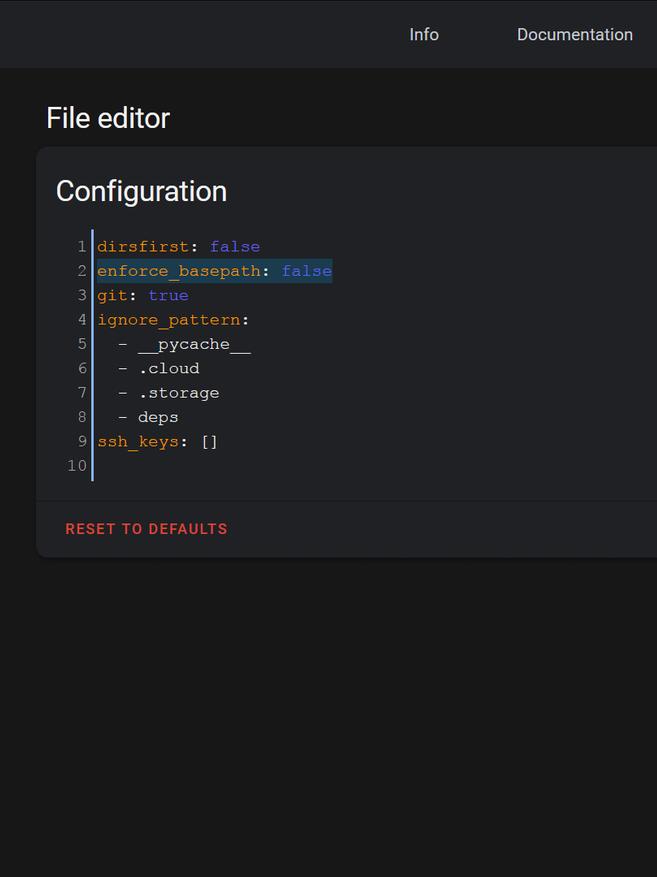
Пользуясь случаям покажу как при помощи аддона File Editor редактировать файлы которые находятся за пределами папки config — на примере правки файлов zigbee2mqtt. Для это в меню Supervisor — Dashboard, выбираем File Editor и переходим в раздел конфигурации. Там необходимо отключить опцию принудительно удерживающую аддон в корневой папке — как показано на правом слайде. После сохранения аддон нужно рестартовать.

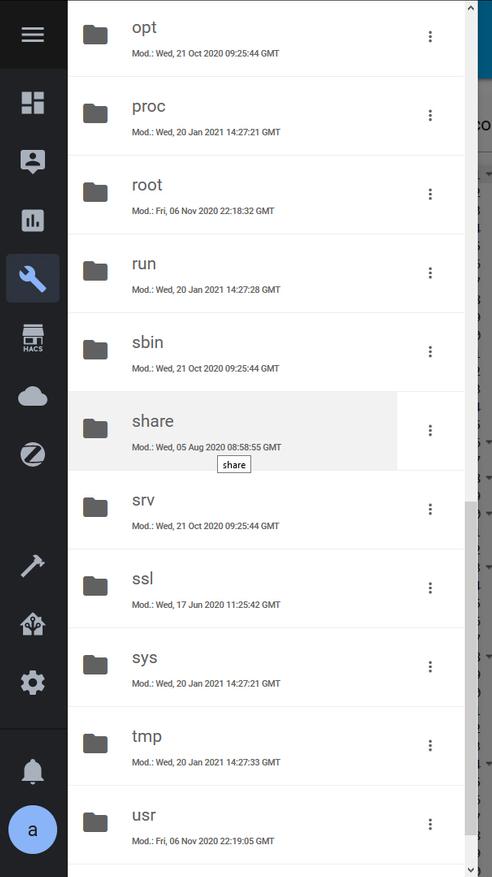
После этого, вы сможете, нажав на стрелочку влево, выйти за пределы папки config. Для наших целей нужна папка share, которая находится на одном уровне с config, а в ней — папка аддона zigbee2mqtt.
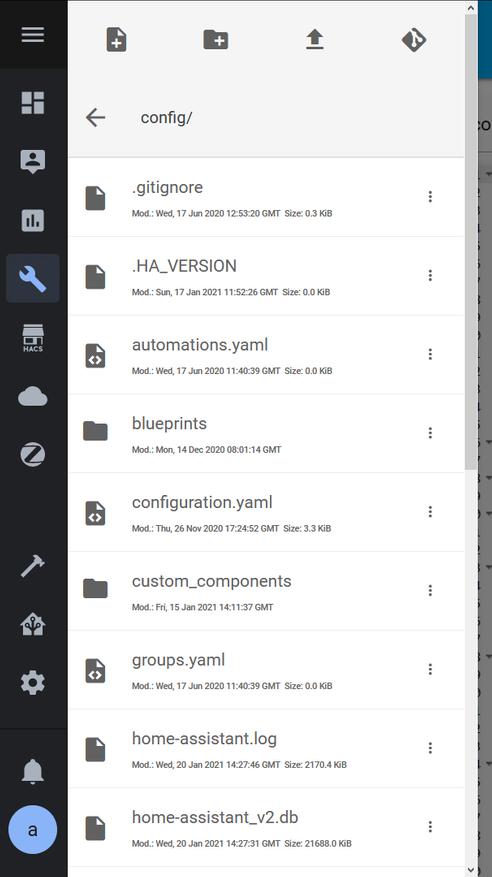
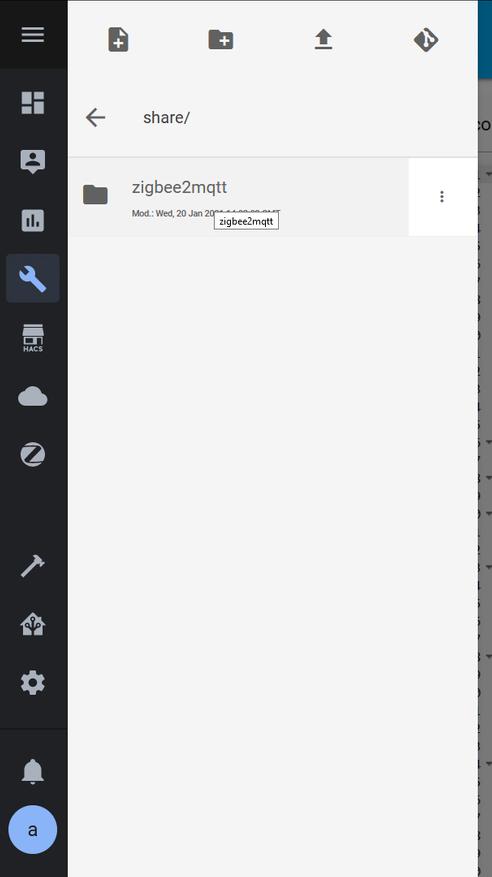
Здесь нам нужно отредактировать файл devices.yaml, который содержит перечень и настройки подключенных устройств.
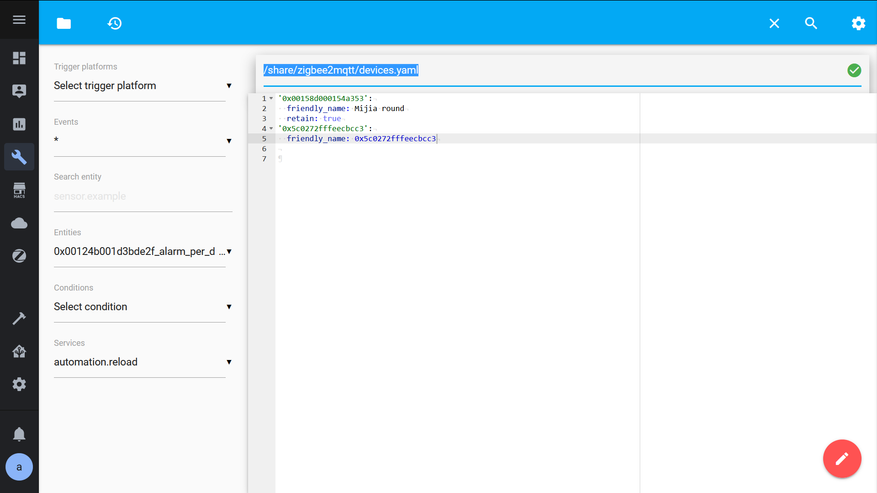
Находим подключенный термостат, он представлен двумя строчками — техническим именем и friendly — для отображения в интерфейсе.
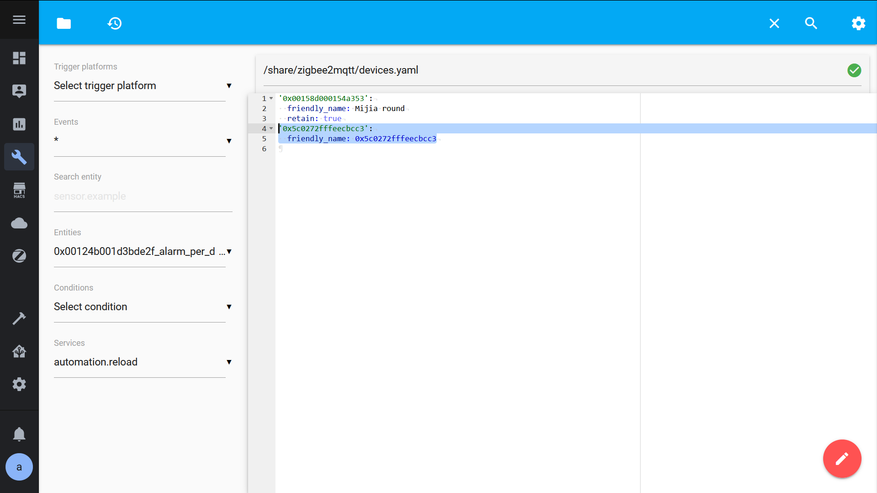
Добавляем к нему строку debounce с значением 1, после чего сохраняем измененный файл. Кстати таким же способом добавляются опции и для других устройств, описание которых есть на сайте zigbee2mqtt
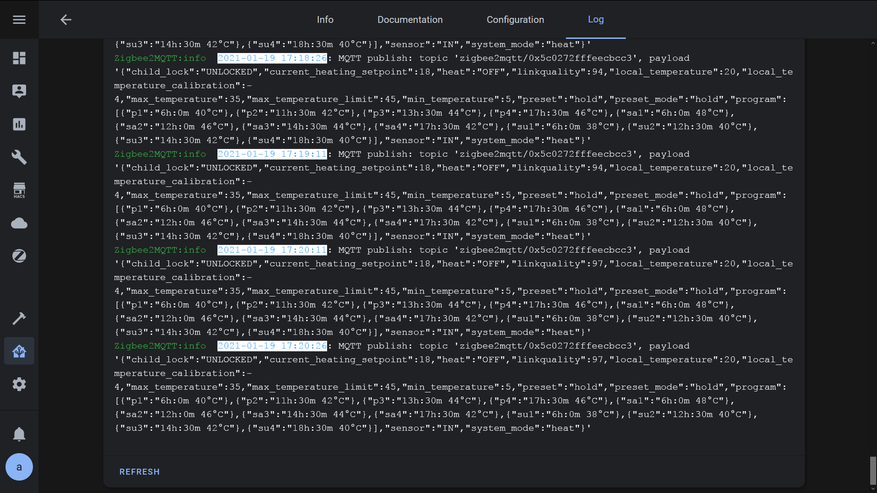
После рестарта zigbee2mqtt и применения настроек — количество сообщений значительно уменьшается то 1 — 2 в минуту, что более чем нормально для таких устройств и не создает проблем при работе.
Home Assistant
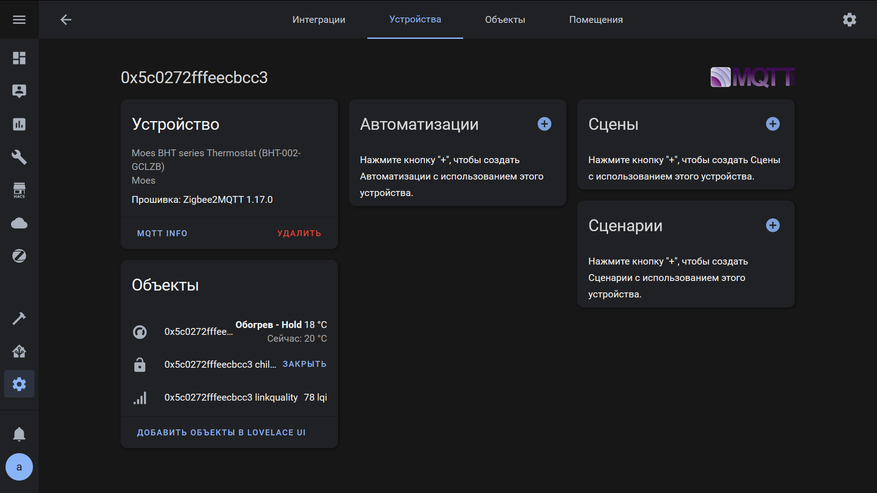
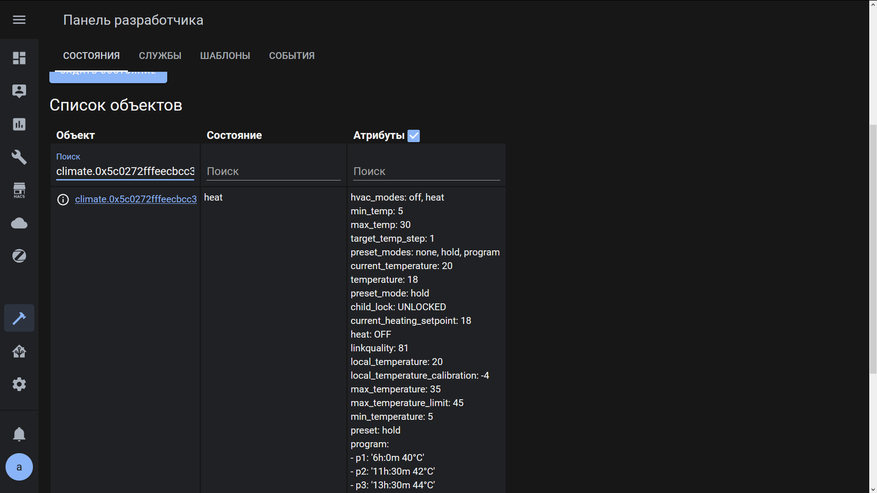
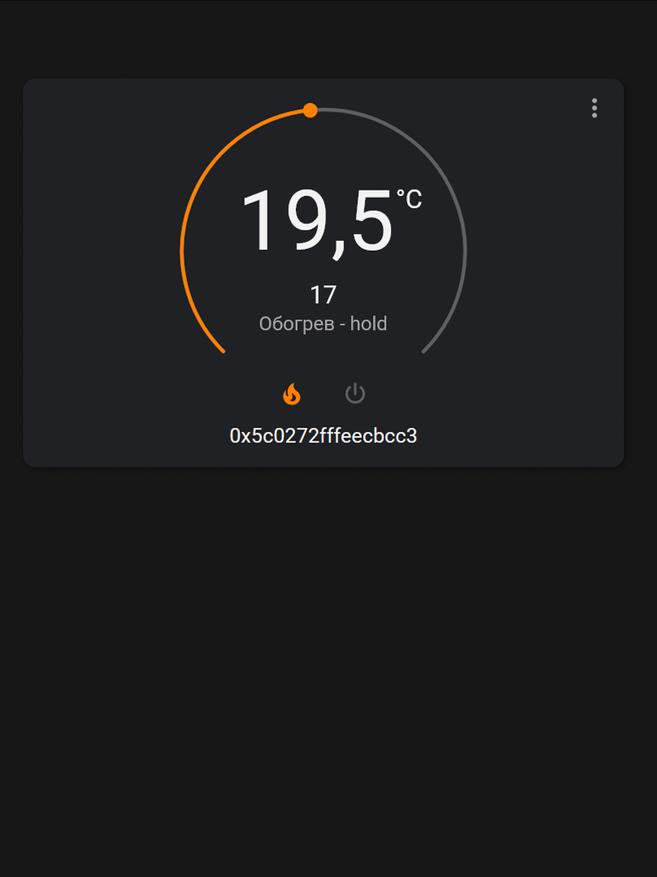
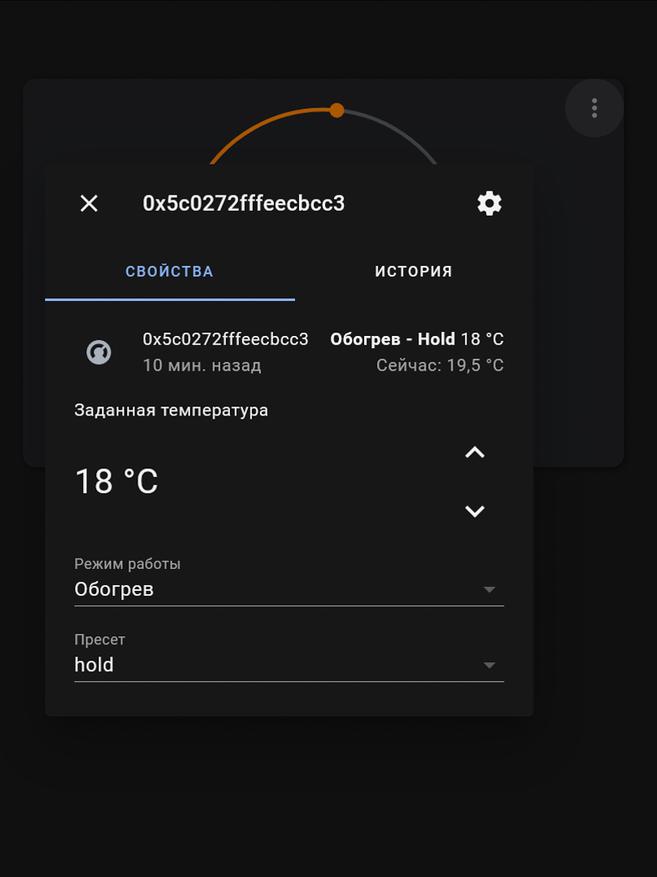
В Home Assistant устройство состоит из трех сущностей — домена климат, которая является термостатом, замок — это детская блокировка и сенсор качества сигнала.
Расширенная информация о текущих параметрах термостата — доступна в виде атрибутов которые примаплены к сущности климат.
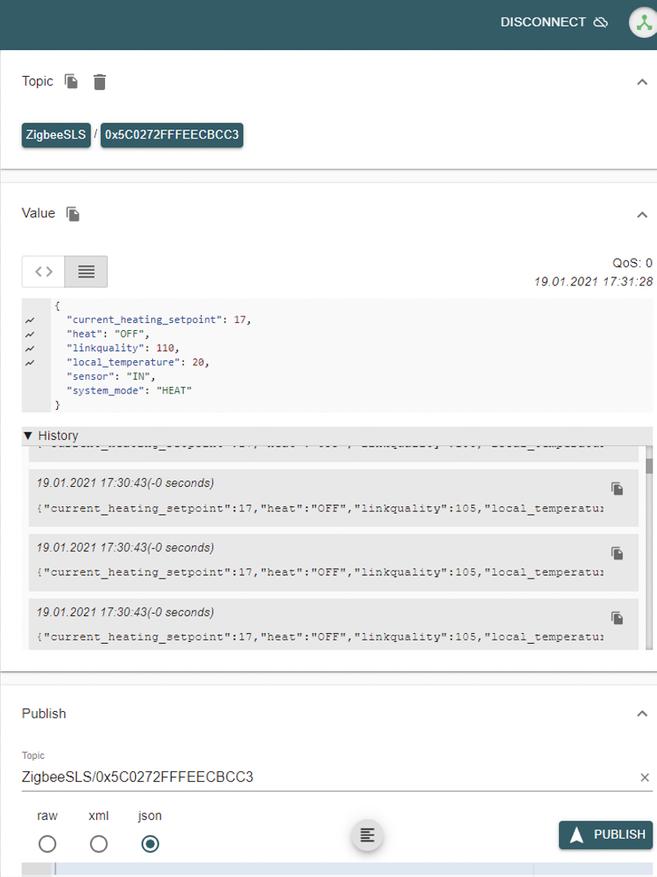
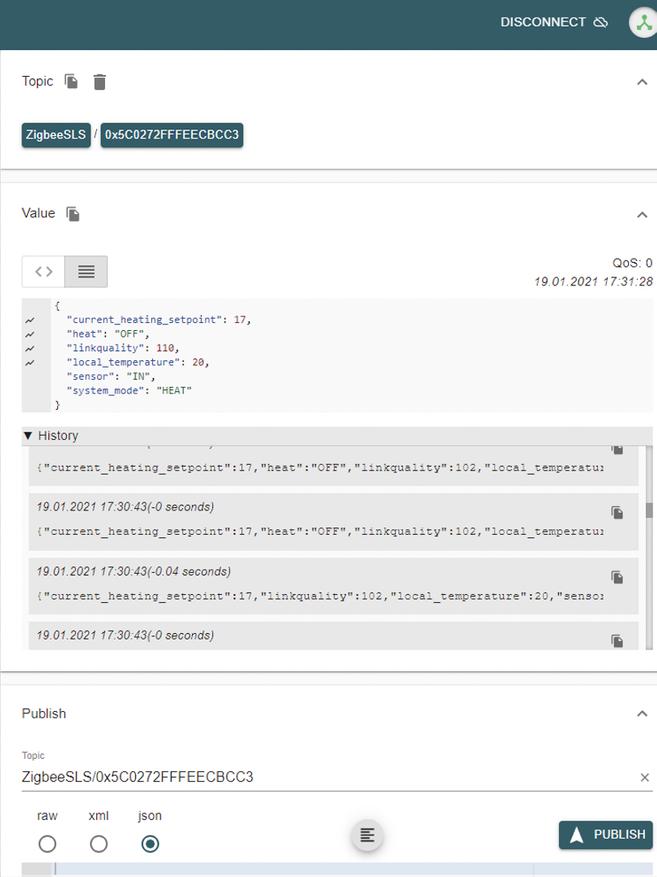
Их можно менять в том числе и через MQTT — я использую очень удобное приложение MQTT Explorer. Покажу как это происходит. В топик с именем устройства, в субтопик set — передается параметр и его значение, например это включение и выключение.
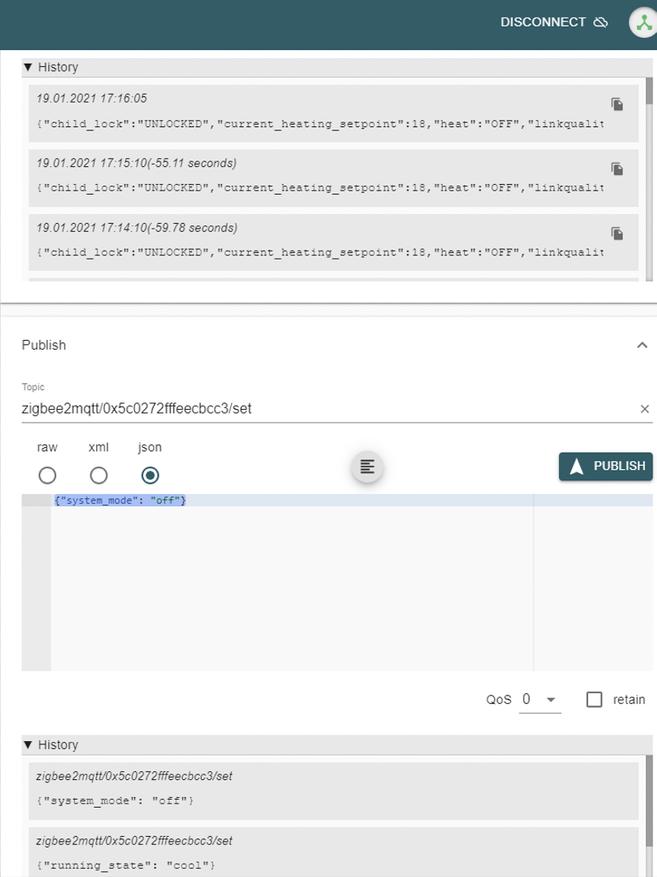
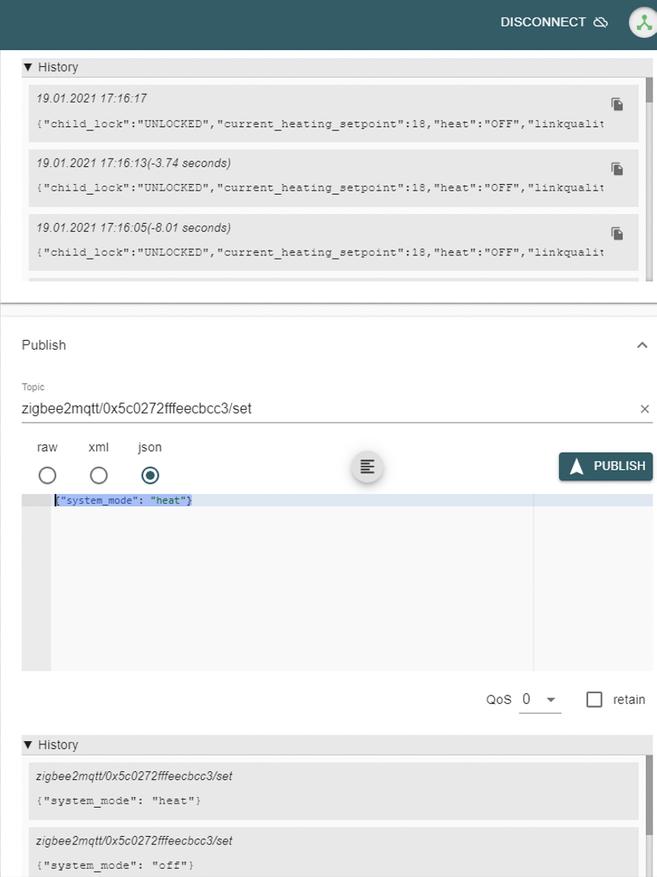
Аналогично и переключение режима работы — ручной или по расписанию. Хотя ручной наверное не самое точное название, скорее это фиксированный режим поддерживающий заданную целевую температуру.
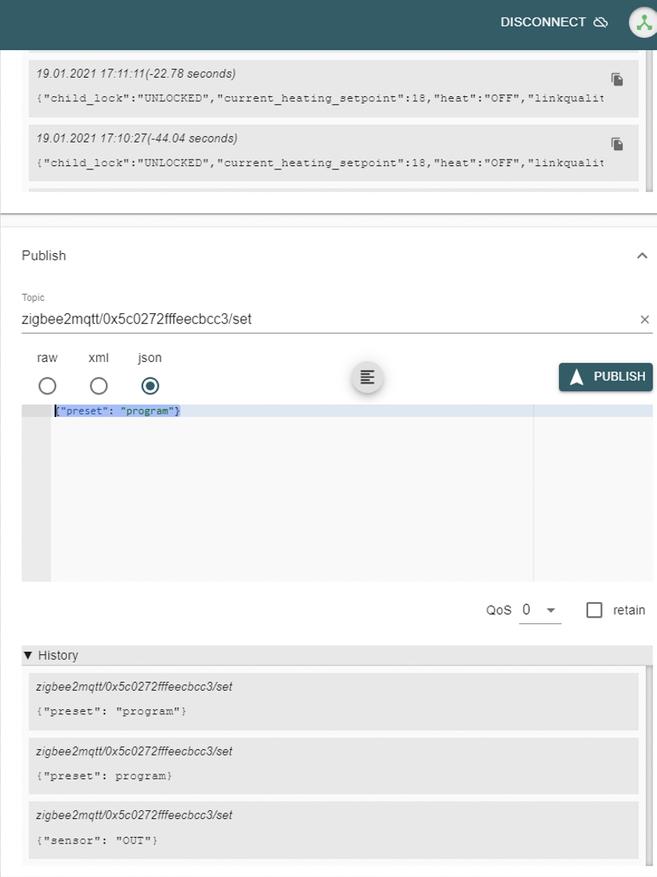
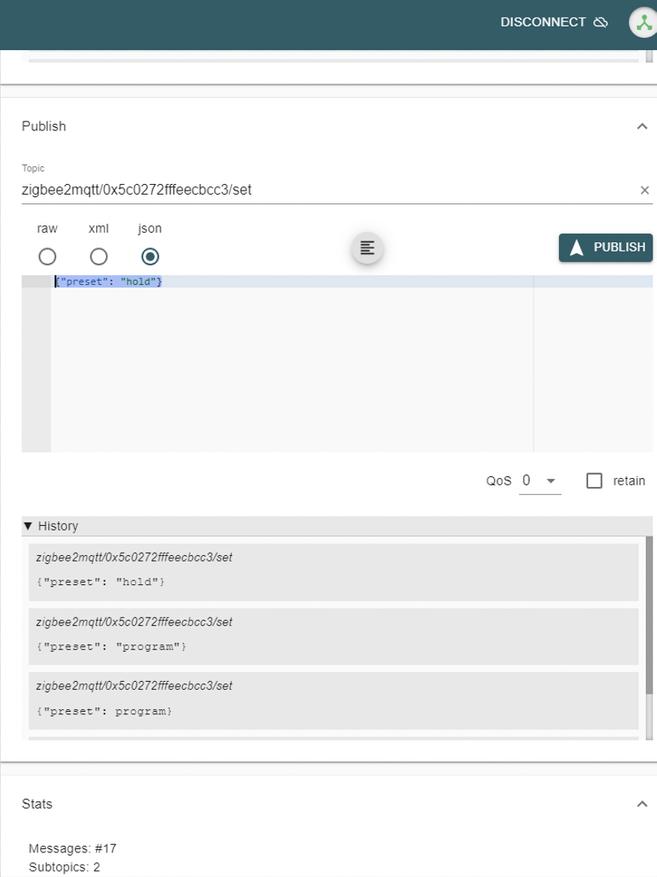
Помните, в разделе про Tuya Smart я говорил запомнить названия для установки сенсора, они состоят из двух букв — вот так можно передавать их в параметр sensor, чтобы менять источник данных по температуре. По этому образу и подобию можно задавать и остальные параметры термостата, если их нет в интерфейсе.
Потому что в интерфейсе, где кстати удобно использовать штатную карточку климата — легко поменять все основные параметры — и целевую температуру и режим, включить и выключить термостат, влазить в MQTT для этого не нужно, а вот тип сенсора — тут отсутствует.
Конечно публиковать изменения сразу в топик MQTT — не очень удобно, тем более что этот процесс можно обернуть в виде шаблонного выключателя. В этом примере — два свича, первый из которых принимает статус включено когда установлен внутренний сенсор, второй — внешний.
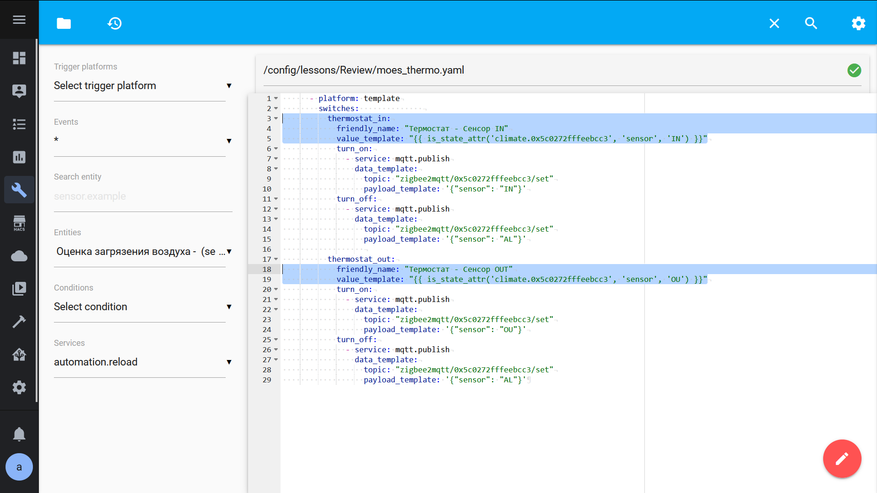
А действия этих при включении этих свичей — публикация в топике термостата уже рассмотренных нами значений для параметра сенсор.
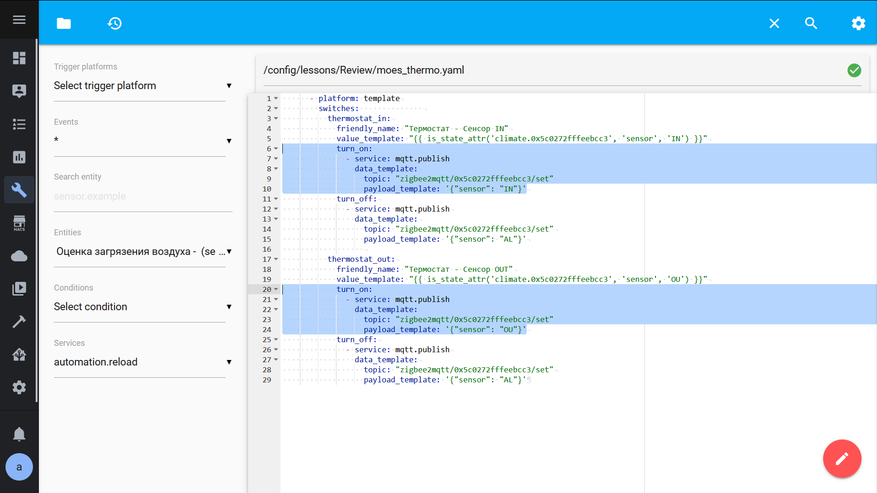
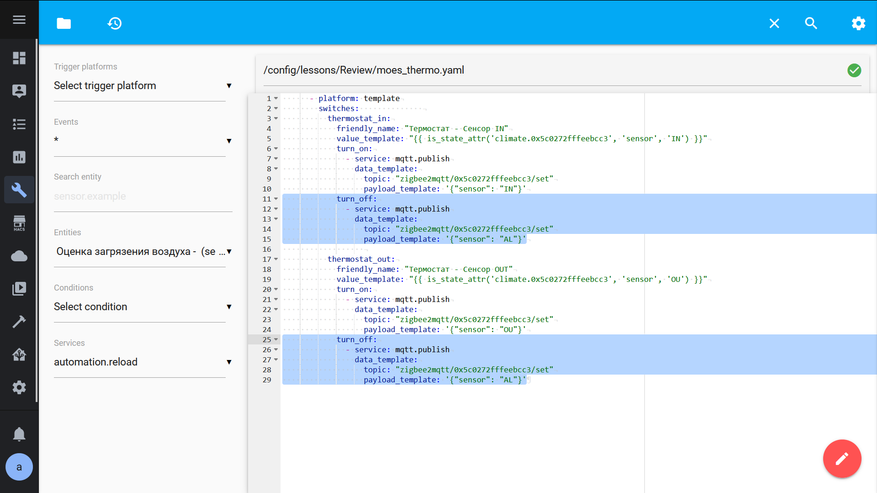
При выключении — действия одинаковы — публикация значения AL. Это дает нам нужные три варианта настроек — IN, OUT или AL — когда оба свича будут выключены. Этот код доступен в текстовом виде.
SLS Gateway
И, напоследок, пару слов оSLS шлюзе — здесь термостат тоже поддерживается, правда на момент публикации этого видео, еще не была загружена его картинка, но это никак не влияет на его функциональность.
В Home Assistant пробрасывается чуть по другому — нет сущности детского замка, зато есть сенсоры показывающие тип сенсора и режим. В остальном управление аналогично zigbee2mqtt
Кроме одной очень важной детали — здесь, по крайней мере на дату этого видео, нет решения проблемы для потока сообщений от термостата. Как видно на этих слайдах показывающих историю изменения топика устройства — они идут беспрерывным потоком. Поэтому, пока проблема не будет исправлена, его лучше использовать в zigbee2mqtt
Видео версия
Спасибо за внимание
- June 12, 2024
- MOES
Table of Contents
- Information about this manual
- Product Description
- Device Overview
- Start-up
- Before we get started
- Inserting(replacing) batteries.
- Set date and time
- Installation of the radiator thermostat
- Unscrew your existing radiator thermostat
- M30×1.5
- Danfoss RAVL Valve
- Danfoss RAV Valve
- Danfoss RA Valve
- M28x1.5mm
- Giacomini
- Caleffi
- Use the Ejector rod
- Interface screen
- Software Installation
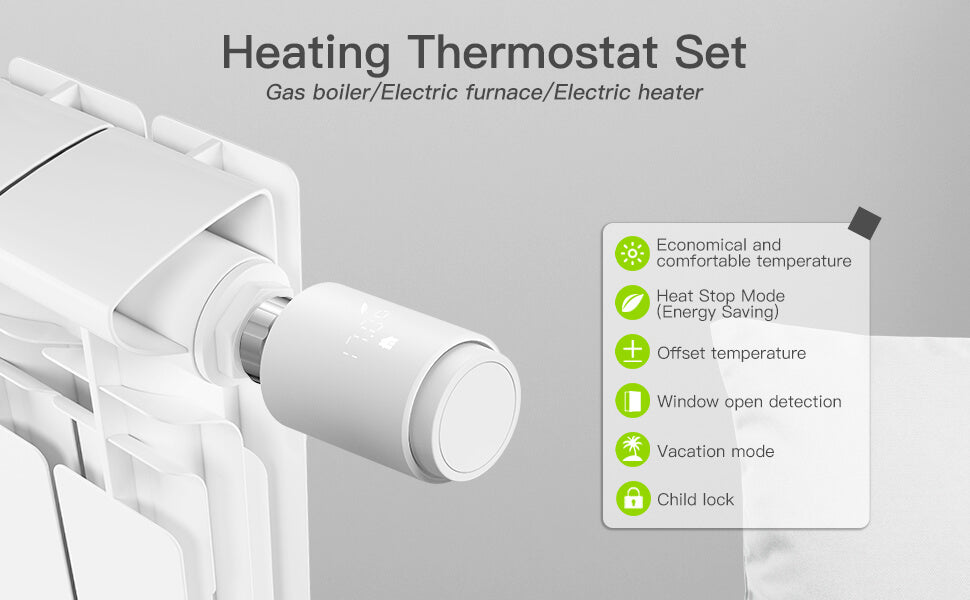
- Product features
- Auto Mode
- Manual Mode
- Holiday Mode
- Open Window Detection
- Offset Temperature
- Eco and Comfortable Temperature
- Child Lock
- Anti-Freezing Mode
- Heating stop (Power Saving) Mode
- Anti-Calcification (Descaling) Protection
- Boost
- Setting
- Date
- Week Programming Stage
- Open Window
- Comfortable Temperature
- ECO Temperature
- Offset
- Holiday Setting
- Voice Control
- Amazon Alexa
- Google Home
- Set an automation scenarios linkage
- Low Battery
- Reset
- Troubleshooting and maintenance
- Technical Data
- Package contents
- Safety Information
- Storage
- Instructions for disposal
- SERVICE
- RECYCLING INFORMATION
- WARRANTY CARD
- References
- Read User Manual Online (PDF format)
- Download This Manual (PDF format)
**MOES TV01 Zigbee Thermostat Radiator Valve User Guide
**
Information about this manual
Please read this manual completely and carefully before starting to use the
device. The manual contains important information about the intended use of
the device. Especially observe the safety notes. Keep the manual for later
consultation. If you hand over the device to other persons for use, please
hand over the operating manual as well.
Product Description
The device moves a valve to intelligently control the flow of heat to the
radiator. With the Thermostat Radiator Valve TV01 you can conveniently adjust
the room temperature between 5-30°C, and save more than 15% of energy.
The device is part of the Tuya smart home system and works with the ZigBee 3.0
protocol. All devices on the system can be configured comfortably and
individually with the Tuya smartphone app.
The temperature can be controlled individually, room by room.
The radiator thermostat fits to all common radiator valves and is easy to
mount-without having to drain any water or intervene in the heating system.
The additional boost function enables the radiator to be heated up quickly for
a brief period of time by opening the valve for 5 minutes. There will be a
pleasant room temperature right away because of the radiated heat.
Device Overview

Start-up
Before we get started
- 2×AA batteries are required for TV01 to work, please get prepared.
- A smart gateway hub is required for the TV01 to work.
- Temperature is shown in degrees Celsius.
Inserting(replacing) batteries.
- Pull off the battery compartment cover on the underside of the device.
- Insert 2 new LR6(mignon/AA) batteries in the battery compartment making sure they are the right way round.
- Reattach the battery compartment cover and latch it into place


The service life of new alkaline batteries is approximately 1.5 years. A
battery symbol( )on the display indicates that the batteries need to be
replaced. After removing the empty batteries, wait approx.1 minute before
inserting the new ones. This device does not support operation with
rechargeable batteries.
Set date and time
If batteries are inserted or replaced, the date andtime is automatically
requested after a brief display of the fimware version number.
- Set the year, month, dayhour and minute with the +/- button, and confim with Menu button. You can press the Boost button to retum to the previous menu during the setting of date and time.
- The display of ‘InS’ with the rotating ‘ ’ shows that the motor is still travelling back.
- When ‘AdA’ is shown in the display, the radiator thermostat can be installed on the valve. After installation, press the Boost button to run adaptive.
- The display of ‘AdA’ with the rotating ‘ ’ shows that an adapting run to adapt the thermostat to the valve.
If the adapting runs is initiated before installation, press Boost button and
the motor travels back to the ‘InS’position. If an error message (F1,F2,F3) is
displayed, press the Pair/Boost button and the motor similarly travels back to
the ‘InS’ position.
Installation of the radiator thermostat
The radiator thermostat is easy to install and can be done without draining
heating water or intervening in the heating system. No special tools are
required, nor does the heating have to be switched off.
The ring nut attached to the radiator thermostat can be used universally and
without accessories for all valves with a thread size of M30×1.5 from the most
popular manufacturers such as.
- Danfoss
- Heimeier
- MNG •Junkers
- Landis&Gyr(Duodyr)
- Honeywell-Braukmann
- Oventrop
- Schlösser
- Comap
- Valf Sanayi
- Mertik Maxitrol
- Watts
- Wingenroth(Wiroflex)
- R.B.M
- Tiemme
- Jaga
- Siemens
- Idmar54
By means of the adapters in the delivery, the device can be installed on
radiator valves of type Danfoss RA, Danfoss RAV and Danfoss RAVL.
Unscrew your existing radiator thermostat
No worries, water will not leak during this process.
M30×1.5
- Screw the TV01 smart radiator thermostat directly onto the radiator if the connector type is M30x 1.5(picture shown as below). You can adjust the angle to make the screen facing the viewer properly.
- Rotate the thermostat dial to the maximum value, themaxvaluemaybe6or8.
- Check the is active.
- Install the device.

Danfoss RAVL Valve
- Check the is active.
- The valve bodied have elongated notches around their circumference, which ensure that the adapter is properly seated when it snaps on: snap on the adapter completely, so that the pins inside the adapter are lined up with the notches on the valve.
- Install the adapter, Plane A is aligned with Plane B.
- Install the round tube into the device.
- Install the device.

Danfoss RAV Valve
Danfoss RA Valve
M28x1.5mm
- Select the length of the ejector rod according to the following brands or valve sizes, and the size of ejector rod is 15 / 17 / 19 / 24mm.
- To install the ejector rod with the correct size into the hole.
- To install the adapter onto M28 * 1.5 valve.
| Manufacturer | Ejector rod |
|---|---|
| Herz,MMA,Remag | 17mm |
| TA,Comap,Markaryds | 19mm |
| SAM,Slovarm | 24mm |
| Others (See list) |
| D | Ejector rod |
|---|---|
| 11.5-13mm | 15mm |
| 9.0-11.5mm | 17mm |
| 7.0-9.0mm | 19mm |
| 1.0-3.5mm | 24mm |

Giacomini
- To install the adapter onto the Giacomini valve in the correct direction;
- To install the GIA ejector rod into the hole.

Caleffi
- Open the valve flow to the maximum, as shown in pic 1;
- To install the adapter onto the Caleffi valve in the correct direction.

Use the Ejector rod
Due to the dimensional and assembly tolerance of the metal valve, it may
result in the following situations:
- When the device is failure, F2 is displayed.
- The metal valve cannot be fully closed and is kept heating all the time.
Handling method: Please use the ejector rod 1.6mm
(1) first, if the above two situations still exist, try to use the ejector rod
2.6mm (2) instead.

Interface screen
When you see the LCD screen is showing information as below, the radiator
thermostat is ready for configuration. If not, please uninstall and re install
the batteries and redo step 4.
Software Installation
MOES App is upgraded as much more compatibility than Tuya Smart/Smart
Life App, functional well for scene controlled by Siri, widget and scene
recommendations as the fully new customized service.
(Note: Tuya Smart/Smart Life App still works, but MOES App is highly
recommended)
- Open MOES App, use your phone number or email address to register and login. Tap + on the top right, choose Gateway Control->Wireless Gateway (ZigBee) and simply follow the inbuilt setup wizard for device installation and configuration.
- After the ZigBee smart gateway hub is added successfully, you can add the sub-device on the gateway hub interface.
- Long press Pair button on the radiator thermostat for 5 seconds until the ZigBee signal icon flashed, which means the device has entered the pairing mode.
- The blue LED indicator of gateway hub flashes during pairing mode.
- When the radiator thermostat is successully added, the blue LED indicator will extinguish within 1 second, the device ZigBee signal is always on.
Product features
Auto Mode
In automatic mode, the temperature is controlled in accordance with the set
heating profile. Manual changes are actived until the next point at which the
profile changes. Afterwards, the defined heating profile will be activated
again. To activate the automatic mode, please proceed as follows:
- Press the mode button to select icon.
- Default temperature: 17°C and 21°C.
- Temperature range: 5-30 °C, step: 0.5 °C.
App operation: Click the auto mode icon in the App control panel.
Manual Mode
In manual mode, the temperature is controlled in
accordance with the current temperature set via
‘+/-’ button. The temperature remains activated
until the next manual change.
To activate the manual mode, please proceed as
follows:
- Press the mode button to select icon.
- Default temperature: 20°C.
- Temperature range: 5-30°C, step: 0.5 °C.
App operation: Click the manual mode icon in the App control panel.
Holiday Mode
When you go out or go to a party, you will use the holiday mode. The holiday
mode will automatically start at the set time starting point and run the
holiday temperature. When the holiday mode is not activated, and you want to
view the holiday mode settings, please press the Mode button to view, the
holiday mode icon will flash for 5 seconds and then it will automatically
return to the auto mode.lf you want to end your holiday mode earlier, press
the Mode button to cancel.
App operation: Click the Mode icon to switch to the holiday mode in the
App control panel, and switch to any other mode to cancel the holiday mode.
Open Window Detection
The device automatically stop heating when it detects a sudden temperature
drop(5°C in 5 minutes as default).
This is usually caused by an opened window or door and the open window icon
will display( ) on the screen.
The device will resume to its previous status after detection if no actions is
implemented. Or you can manually resume the device by pressing the mode
button.
App operation: Click the open window icon in App control panel to cancel
the window opening function. *The open window detection only operates in
automatic mode and manual mode.
Offset Temperature
As the temperature is measured on the radiator thermostat, the temperature
distribution can vary throughout a room.To adjust this, a temperature offset
of +5°C can be set. If a nominal temperature of e.g. 20 °C is set but the room
presents with only 18°C an offset of -2.0°C needs to be set. An offset
temperature of 0.0°C is set in the settings. To adjust the offset temperature,
please proceed as follows.
- Long press the menu button for 5 seconds, it will enter the setting interface.
- Select “Offset” option via ‘+/-’ button, and press menu button to enter the offset temperature interface.
- Set the desired offset temperature using ‘+/-’ button and confirm with the menu button.
App operation: Click the offset icon in the App swttings screen.
Eco and Comfortable Temperature
The comfort and Eco temperature button makes switching between comfort and
Eco temperature simple and user friendly. These have been set at the factory
at 21.0°C (comfort temperature) and 17.0°C (Eco temperature). They can be
adjusted as follows:
- Press menu button to select comfortable temperature( ) or Eco temperature( ).
App operation: Click the Comfortable/Eco temperature icon in the App
control panel to select the corresponding temperature mode.
Even in auto mode, the temperature can be changed at any time using the
button. It will then remain the same until the next point at which the program
changes.
Child Lock
Operation of the device can be locked to avoid settings being changed
unintended(e.g. through involuntary touch).
To activate/deactivate the child lock, please proceed as follows:
- Long press the mode button for 5 seconds, it will show LOC symbol on the screen and the device button cannot be used.
- Long press the mode button for 5 seconds to unlock child lock.
App operation: Click the child lock icon in the App settings screen.
Anti-Freezing Mode
The device operation
- In the manual mode, when the temperature is manually adjusted to less than 5 degrees, the screen will display “AF”, and the anti-freezing function will be started to ensure that the indoor temperature is “8” degrees.
- Press any button to cancel anti-freezing function and return to automatic mode.
App operation
- Click the anti-freezing icon( ) to turn on/off the function in the App settings screen.
Note: Once this function is activated, other functions are not available
unless the function is deactivated.
Heating stop (Power Saving) Mode
Battery life can be prolonged by switching the heating off.
To achieve this, the valve is closed fully. To activate the heating stop,
please proceed as follows:
The device operation
- In manual mode, manually adjust the temperature to more than 30 degrees, display “HS” on the screen, start the heating stop function, and the device will no longer be able to adjust the temperature.
- Press any button to cancel the heating stop function and return to automatic mode.
App operation
- Click the Heating stop icon ( ) to turn on/off the function in the App settings screen.
Note: Once the function is activated, other functions are not available
unless the function is deactivated.
Anti-Calcification (Descaling) Protection
The equipment will automatically run for a period of time every week to
prevent calcification of the valve.
Boost
Sometimes people go home earlier than usual, and the rapid heating function
will make you feel the warmth of the room faster. When activated, the valve
will be fully opened for 5 minutes. The heating of a room takes longer than 5
minutes, but the heat given off by the radiator can be felt immediately.
- Press the boost button to activate the boost function.
- The remaining time for the function will be counted down in seconds(‘299’to‘000’).
- After these 5 minutes have elapsed, the actuator changes to the mode which was previously active (auto/manual) with the previously set temperature.
- The function can be deactivated at any time by pressing the boost button again.
App operation: Click the Boost icon( ) in the App control panel to cancel
the boost function.
Press the menu button for 5 seconds, enter Setting/Date Week programming
stage/Open window/Comfortable temp/ECO temp/Offset/ Holiday setting.
App operation: Click the settings icon ( ) in the App control panel.
Setting
Date
To set the date and time, please proceed as follows:
- Long press the menu button for 5 seconds, it will enter the setting interface.
- Select “Date/Time” option via ‘+/-’ button, and press menu button to enter the Date/Time setting interface.
- Select the desired year/month/day/hour/minute using the “+/-” button and confirm with the menu button. To confirm, the time flashes three times.
- Use the boost button to return.
Note: When the device is successfully paired with the phone, the divice
time is synchronized with the phone time.
Week Programming Stage
In this menu item, you can create a heating profile with heating and cooling
phases according to your personal needs. You can set up to ten stages of
temperature every day. The factory default is five stages.
- Press the menu button for 5 seconds to open the configuration menu.
- Select “Prg” using the “+/-” button and confirm with the menu button.
- In the menu item “dAy” , use the “+/-” button to select single days of the week, all weekdays, the weekend or the entire week for your heating profile and confirm with the menu button.
- Confirm the start time 00:00 pm with the menu button.
- Select the desired temperature and start time using the “+/-” button and confirm with the menu button.
- The next time is shown in the display. You can adjust the time via the “+/-” button.
- Select the desired temperature for the next time period using the “+/-” button and confirm with the menu button.
- Temperature range: 5-30°C, step: 0.5 °C.
- Repeat this procedure until temperatures are stored for the entire period between 0:00 and 24:00 h. To confirm, the time flashes three times.
- Use the boost button to return.
App operation: Click the week programming stage icon( )in the App control
panel.
Open Window
Press the menu button for 5 seconds to open the configuration menu.
- Select open window( ) via the “+/-” button in the menu.
- Confirm with the menu button.
- Select the desired temperature using the “+/-” button and confirm with the menu button. To confirm, the time flashes three times.
- Temperature range: 5-30°C, step: 0.5°C.
- Use the boost button to return.
APP operation: Click the open window icon( ) in the App settings screen.
Comfortable Temperature
- Press the menu button for 5 seconds to open the configuration menu.
- (Select comfortable temperature icon( ) via the “+/-” button in the menu.
- Confirm with the menu button.
- Select the desired temperature using the “+/-” button and confirm with the menu button. To confirm, the temperature flashes three times.
- Temperature range: 5-30°C, step: 0.5°C.
- Use the boost key to return.
APP operation: Click the comfortable temperature icon ( ) in the App
settings screen.
ECO Temperature
Press the menu button for 5 seconds to open the configuration menu.
- (Select ECO temperature icon)( ) via the “+/-” button in the menu, confirm with the menu button.
- Select the desired temperature using the “+/-” button and confirm with the menu button. To confirm, the temperature flashes three times.
- Temperature range: 5-30°C, step: 0.5°C.
- Use the boost button to return.
APP-Betrieb: Klicken Sie auf das ECOTemperatursymbol ( ) im App-
Einstellungsbildschirm.
Offset
Press the menu button for 5 seconds to open the configuration menu.
- Select offset icon( )via the “+/-” button in the menu.
- Confirm with the menu button.
- Select the desired temperature using the “+/-” button and confirm with the menu button. To confirm, the temperature flashes three times.
- Temperature range: -5~5°C, step:0.1°C.
- Use the boost button to return.
APP operation: Click the Offset temperature icon (±)in the App settings
screen.
Holiday Setting
Press the menu button for 5 seconds to open the configuration menu.
- (Select holiday mode icon)( ) via the “+/-” button in the menu.
- Confrm with the menu button.
- Select the start date using the “+/-” button and confirm with the menu button.
- Select the end date using the “+/-” button and confirm with the menu button.
- Select the desired temperature using the “+/-” button and confirm with the menu button. To confirm, the temperature flashes three times.
- Temperature range: 5-30°C, step: 0.5°C.
- Use the boost button to return.
APP operation: Click the holiday mode icon ( )in the App settings screen.
Note: if there is no operation in the setting interface within one
minute, the setting will exit automatically.
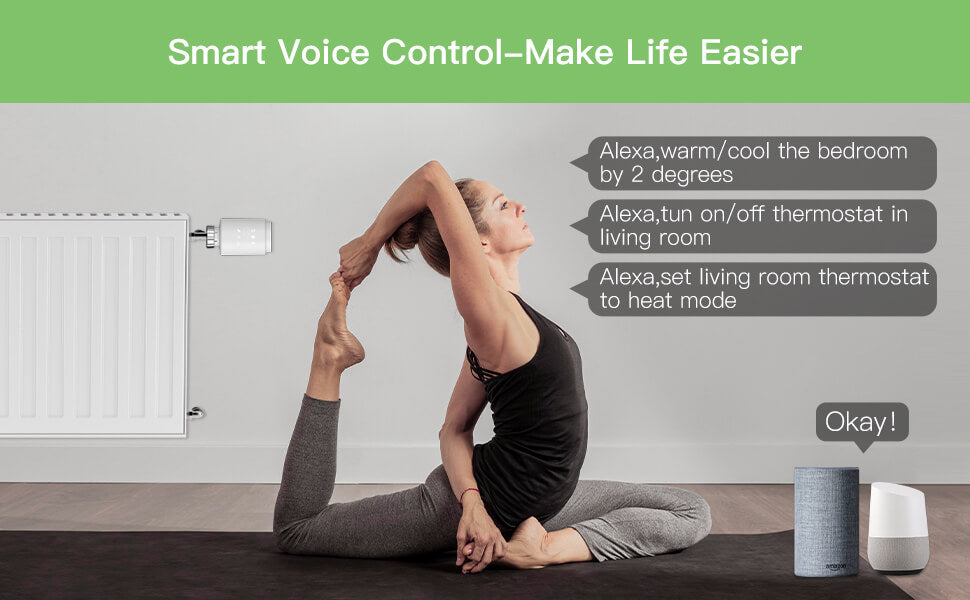
Voice Control
Amazon Alexa
Amazon Alexa is an intelligent personal assistant developed by Amazon, and is
capable of voice interaction. Smart radiator thermostat works with Alexa to
allow you to regulate the temperature of each room in your system by using a
wake-word and an instruction. The wake-work is “Alexa” followed by an
instruction such as “increase temperature.” Currently, Amazon has made
interaction and communication with Alexa only available in English.
Alexa requires explicit instructions. You must inform Alexa of the room to
which you wish to address followed by an instruction, such as “increase
temperature.” If no specific room is mentioned, Alexa will ask you which room
you want to address, and then will increase the setpoint temperature by 1°C
only based on the room reply from you. If you want the setpoint temperature to
increase by 4°C in the living room, you must explicitly state to Alexa to
“increase the temperature in the living room by 4°C.”
Note: If Alexa is asked to increase the temperature by 2°C, then Alexa
will add 2°C to your set-point. If the ambient temperature is already > 2°C
above the current set-point then the actual temperature will not change and
smart radiator thermostat will not turn the heating ON.
Example: If the current set-point is 16°C, the current room temperature
is 19°C and you ask Alexa to increase the temperature by 2°C – the current
set-point will change to 18°C but the heating will not start because the room
temperature is already higher than 18°C.
Common commands for Alexa
Listed below are common commands used with Alexa:
- Discover Devices: “Alexa, discover devices.”
- Reduce Temperature: “Alexa, decrease the DEVICE NAME by 4 degrees” / “Alexa, make it cooler in here.”
- Increase Temperature: “Alexa, increase the DEVICE NAME by 3 degrees” / “Alexa, make it warmer in here.”
- Set Temperature: “Alexa, set the DEVICE NAME to 20 degrees.”
- Get Temperature: “Alexa, what is the DEVICE NAME temperature?”
- Get Set Point: “Alexa, what is the upstairs set to?”
Note: Alexa considers the smart thermostat and room names as the devices.
Google Home
Google Home is a brand of smart speakers that work similary to Amazon Echo.
Google’s intelligent PA, Google Assistant, is equivalent to Amazon’s Alexa.
Google Home is also available on all Android devices and does not require the
use of the ‘Smart Speakers’.
The user can speak a profusion of commands to request information, or ask the
Google Assistant to perform an action such as play music, video playback,
report news, access home automation.
All of this can all be controlled from a Google Home device.
Common commands for Google Home
Listed below are common commands used with Google Home:
- Discover Devices: “Hey Google, discover devices.”
- Reduce Temperature: “Hey Google, decrease the DEVICE NAME by 4 degrees” / “Hey Google, make it cooler in here.”
- Increase Temperature: “Hey Google, increase the DEVICE NAME by 3 degrees” / “Hey Google, make it warmer in here.”
- Set Temperature: “Hey Google, set the DEVICE NAME to 20 degrees.”
- Get Temperature: “Hey Google, what is the DEVICE NAME temperature?”
- Get Set Point: “Hey Google, what is the upstairs set to?”
Note: Google home considers the smart thermostat and room names as the
devices.
Set an automation scenarios linkage
lf you have a door sensor installed in your home, then you can realize an
automation scenarios linkage between TRV and door sensor.
- Under “Automation” in the “Smart” page, click “+” on the upper right comer, you will see a page called Create Smart that will guide you through the setting.
- Here, we take When device status changes setting.
- After you click When device status changes, you will see all the devices you added to the Tuya Smart app.
- Select Smart Door Sensor->Select Function-> Smart Door Sensor->ON/OFF->Set up Task-> Run the device->TRV->Open Window Detection->ON/ OFF-> Save->Next-> Save.
- A prompt box “Automation created.Start using it?” will pop up, select “Yes”, you can see all the automation scenarios you’ve created.
When the door/window sensor is opened, the Tuya Smart app interface will pop
up a message that the door/window sensor is turned, and an ( ) icon will
appear on the TRV device interface.
When the door/window sensor is closed, the Tuya Smart app interface will pop
up a message that the door/window sensor is tumed off, and an ( ) icon will
disappear on the TRV device interface.
Low Battery
When the battery power is less than 12%, the low power prompt icon ( )will be
displayed. Please replace the battery as soon as possible, When the screen
displays( )the device is not available.
Reset
The device operation: Press the “+” and “-” buttons for 5 seconds to enter the
reset mode, and the screen will display “FAC”
- Press the menu button to confirm.
- Press the boost button to exit.
After the device runs reset, the data will not be saved, the device will
automatically connect to the gateway.
Troubleshooting and maintenance
| Error code on display | Problem | Solution |
|---|---|---|
| Battery symboly | Battery output too low | Replace batteries |
| F1 | Valve drive sluggish | Check installation, check the heating valve |
| F2 | Actuating range too wide | Please check the fastening of the radiator |
thermostat
F3| Actuating range too small| Please check whether the valve pin is stuck
Technical Data
Batteries: 2×1.5 V LR6/mignon/AA
Battery life: 1.5 years
Temperature range: 5-30°C
Degree of protection: Ip20
Display: LCD with LED
RF: ZigBee
Frequency: 2.4GHz
Maximum radiated power: 10dBm
Dimensions(W xHx D): 55.3×54×98.3 mm
Weight: 190g(ind. batteries)
Working temperature: -10°C~40°C
Working environment: Indoor
Safety: CE/ROHS
Package contents
ZigBee Radiator Thermostat AA batteries
Adapters for Danfoss(RA, RAV and RAVL)、
M28x1.5mm、Caleffi、Giacomini、Ejector rod
Screw for adapter
Operating manual
Safety Information
- Do not disassemble, reassemble, modify, or attempt to repair the product by yourself. If there iare any issues, please contact the company’s professional maintenance.
- The product’s battery should be recycled or disposed of separately from household waste according to local environmental regulations.
Storage
Products should be put in the warehouse where the temperature is between the
range -10℃ ~ +40℃,and the relative humidity ≤70%RH, indoor environment with no
acid, alkali, salt and corrosive, explosive gas, flammable matter, protected
from dust, rain and snow.
Instructions for disposal
Do not dispose of the device with regular domestic waste! Electronic equipment
must be disposed of at local collection points for waste electronic equipment
in compliance with the Waste Electrical and Electronic Equipment Directive.
The device is not a toy, do not allow children to play with it. Do not leave
packaging material lying around. Plastic films/bags, pieces of polytyrene,
etC. can be dangerous in the hands of a child.
Used batteries should not be disposed of with regular domestic waste! Instead,
take them to your local battery disposal point.
This device complies with the EN62368/ EN300328/EN301489 of the CE Rules. This
device complies with the ROHS 2.0 Rules.
SERVICE
- During the free warranty period, if the product breaks down during normal use, we will offer free maintenance for the product.
- Natural disasters/man-made equipment failures, disassembly and repair without the permission of our company, no warranty card, products beyond the free warranty period, etc., are not within the scope of free warranty
- Any commitment (oral or written) made by the third party (including the dealer/service provider) to the user beyond the warranty scope shall be executed by the third party
- Please keep this warranty card to ensure your rights
- Our company may update or change the products without notice. Please refer to the official website for the updates.
RECYCLING INFORMATION
All products marked with the symbol for separate collection of waste
electrical and electronic equipment (WEEE Directive 2012/19 / EU) must be
disposed of separately from unsorted municipal waste. To protect your health
and the environment, this equipment must be disposed of at designated
collection points for electrical and electronic equipment designated by the
government or local authorities.
Correct disposal and recycling will help prevent potential negative
consequences for the environment and human health. To find out where these
collection points are and how they work, contact the installer or your local
authority.
WARRANTY CARD
Product Information
Product Name____
Product Type____
Purchase Date____
Warranty Period____
Dealer Information____
Customer’s Name____
Customer Phone____
Customer Address____
Maintenance Records
| Failure date | Cause Of Issue | Fault Content | Principal |
|---|---|---|---|
Thank you for your support and purchase at we Moes, we are always here for
your complete satisfaction,just feel free to share your great shopping
experience with us.
If you have any other need,please do not hesitate to contact us first,we will
try to meet your demand.
@moessmart
@moes_smart
@moes_smart
MOES.Official
@moes_smart
www.moes.net
EVATOST CONSULTING LTD
Address: Suite 11, First Floor, Moy Road Business Centre, Taffs Well,
Cardiff, Wales, CF15 7QR
Tel: +44-292-1680945
Email: contact@evatmaster.com
AMZLAB GmbH
Laubenhof 23, 45326 Essen Made In China
Manufacturer:
WENZHOU NOVA NEW ENERGYCO.,LTD
Address: Power Science and Technology Innovation Center, NO.238, Wei 11 Road,
Yueqing Economic Development Zone, Yueqing, Zhejiang, China
Tel: +86-577-57186815
After-sale Service: service@moeshouse.com
References
- MOES Smart: Create Your Smart Life With Smart Home Devices
Read User Manual Online (PDF format)
Read User Manual Online (PDF format) >>
Download This Manual (PDF format)
Download this manual >>
Regular price
$56.99
Sale price
$56.99
Regular price
$0.00
Unit price
per
Save Liquid error (snippets/price line 89): Computation results in ‘-Infinity’%
Sold out
Shipping calculated at checkout.
FREE SHIPPING
We currently offer FREE&ORDINARY SHIPPING for the most countries (except remote countries/areas), for orders over $29.9.
We currently offer FREE&FAST/ FREE&DDP SHIPPING for the most countries (except remote countries/areas), for orders over $299.
3 METHODS OF SHIPPING COST
We charge a flat rate for shipping, as follows:
(*DDP ONLY supports EU regions.)
Shipping costs for different countries are adjusted according to logistics costs, which can be directly checked at checkout.
Or, you can know more shipping details here Shipping Policy, or by contacting customer service team via services@moeshouse.com.
Different delivery zone has different shipping fees based on the above form.
DELIVERY TIME
Processing time = the order preparation time may take 1-3 business days;
Shipping time = the time between when your order has been shipped and delivered to you ( 3 — 21 business days ), which depends on your delivery methods and zone.
Once your order ships, you can track your order with your tracking number. If you have trouble tracking your package, click here Track Your Order or feel free to contact MOES customer service team via services@moeshouse.com and we will check its status for you.
NOTE
Your local country’s customs may hold the shipment and request that you pay customs duties. Please note that all customs duties are the sole responsibility of the customer and we are not liable. Thank you for understanding!
View full details
Free Shipping Over $29.9
60 Days Refund | 2 Years Warranty
24/7 online support
One notable feature of this thermostat valve is its exceptional battery life – lasting up to 1.5 years on just two LR6/mignon/AA batteries. This low power consumption not only saves you money on battery replacements but also contributes to reducing energy consumption. The package includes everything you need to get started, including the MOES Radiator Thermostat, six adapter sets for compatibility with various radiator models, and a user manual for easy installation and operation. By investing in the Zigbee Smart Thermostat Radiator Valve Energy Saving 2MQTT Digital Timer Voice Remote Control TRV, you can potentially save up to 30% on heating costs while enjoying precise temperature control and energy efficiency in your home or office space. Don’t miss out on this cutting-edge technology that combines functionality with convenience!
Unlock more features with Smart Thermostat
FAQ
What do I need to do if the temperature on heating thermostat is different from the room temperature?
If you set the temperature compensation in the app before use, i.e. make the temperature calibration.
Why can’t my thermostat be controlled via Alexa or Google?
To realize voice control, you need to use this with MOES/TUYA-Gateway.
Отзывы и вопросы о товаре
-
Отзывы
4 -
Вопросы
2
-
Достоинства
Соответствует описанию. Свою функцию выполняет.Недостатки
НетКомментарий
Привязывается к шлюзу от Moes без проблем, у меня работает через Smart Life. Всё работает. -
Достоинства
Термостатическая головка Moes Temperature Controller просто удивительна. У меня были некоторые опасения по поводу установки, но она оказалась действительно легкой. Теперь я могу регулировать температуру в своей комнате с помощью приложения Smart Life на своем смартфоне. Это удобно и экономит мне энергию.Недостатки
Moes Temperature Controller хорошо выполняет свои функции.Комментарий
Хотелось бы, чтобы Moes предоставили возможность подключения головки к источнику постоянного питания, чтобы не приходилось так часто менять батарейки. -
Достоинства
Термостатическая головка Moes Temperature Controller проста в установке и использовании. Она интегрируется на удивление хорошо с моей системой умного дома. Теперь я могу легко управлять температурой и создавать графики работы радиатора, чтобы максимизировать комфорт и экономию энергии.Недостатки
У меня нет негативных отзывов о термостатической головке Moes Temperature Controller. Она хорошо выполняет свои функции.Комментарий
Единственное, что могло бы улучшить опыт использования, это предоставление большого выбора цветовых вариаций, чтобы соответствовать различным интерьерам.
Вопросы
-
Можно управлять отоплением / температурой в доме удаленно?