
Где я могу найти номер VIN для моего Toyota?
Положение номера VIN различается среди марок автомобилей и моделей. Он может быть отпечатан на кузове автомобиля или указан на табличке. Рекомендуется обратиться к руководству по эксплуатации Toyota Urban Cruiser (2012) для точной информации о месте нахождения номера VIN.
Как проверить давление в шинах моего Toyota Urban Cruiser (2012)?
Вы можете проверить давление в шинах вашего Toyota Urban Cruiser (2012) с помощью манометра для измерения давления в шинах. Рекомендуемое давление в шинах обычно указано на наклейке внутри двери водителя или в руководстве владельца.
Какое масло нужно моему Toyota Urban Cruiser?
Тип масла, необходимого вашему Toyota Urban Cruiser, зависит от типа двигателя. Обратитесь к руководству владельца для рекомендуемой вязкости и спецификации масла.
Что такое номер VIN?
Номер VIN, также известный как идентификационный номер автомобиля, служит уникальным идентификатором для каждого автомобиля. Для точного местоположения номера VIN рекомендуется обратиться к руководству по эксплуатации Toyota Urban Cruiser (2012).
Где я могу найти информацию о гарантийном покрытии моего Toyota Urban Cruiser?
Информацию о гарантийном покрытии вашего Toyota Urban Cruiser (2012) можно найти в гарантийном буклете, поставляемом с автомобилем. Обычно в нем содержится информация о сроке действия и охвате различных компонентов.
Когда мне следует запланировать техобслуживание для моего Toyota Urban Cruiser?
Регулярное техническое обслуживание необходимо для оптимальной производительности автомобиля. Подробности о частоте техобслуживания и конкретных задачах можно найти в инструкциях по техническому обслуживанию. Обычно крупное техобслуживание должно производиться каждые два года или после пробега 30 000 километров.
Как сбросить индикатор технического обслуживания на панели приборов моего Toyota Urban Cruiser?
Чтобы сбросить индикатор технического обслуживания на панели приборов вашего Toyota Urban Cruiser (2012), следуйте инструкциям, описанным в руководстве по эксплуатации. Обычно это требует нажатия определенной комбинации кнопок в определенном режиме работы автомобиля.
С каким интервалом мне следует рассмотреть замену тормозной жидкости для моего Toyota Urban Cruiser?
Рекомендуется заменять тормозную жидкость в вашем Toyota Urban Cruiser (2012) каждые два года.
Что делать, если загорается лампа контроля двигателя моего Toyota Urban Cruiser?
Если загорается лампа контроля двигателя вашего Toyota Urban Cruiser (2012), это указывает на потенциальную проблему с автомобилем. Рекомендуется обратиться к квалифицированному механику для диагностики причины проблемы.
Как часто мне следует переключать шины на моем Toyota Urban Cruiser?
Периодическая перестановка шин помогает обеспечить равномерный износ и продлить срок службы шин. Обычно рекомендуется переключать шины каждые 6 000-8 000 километров или по указаниям в руководстве владельца Toyota Urban Cruiser (2012).
Что делать, если разряжается аккумулятор моего Toyota?
Если разряжается аккумулятор вашего Toyota Urban Cruiser, вы можете запустить автомобиль, используя провода для запуска двигателя и другой автомобиль с заряженным аккумулятором. В противном случае вы можете вызвать помощь на дороге.
Что делать, если одна или несколько дверей отказываются открываться изнутри?
Если у вас возникают проблемы с открыванием дверей изнутри, вероятно, включена детская защелка. Способ отключения детской защелки зависит от марки и модели автомобиля.
Как программировать новый ключ для моего Toyota Urban Cruiser?
Для программирования нового ключа для вашего Toyota Urban Cruiser обычно требуется следовать определенным инструкциям, описанным в руководстве пользователя, или обратиться за помощью в дилерский центр или к слесарю.
Какой рекомендуемый интервал для замены воздушного фильтра в моем Toyota Urban Cruiser?
Рекомендуемый интервал для замены воздушного фильтра в вашем Toyota Urban Cruiser (2012) зависит от условий езды. Обычно рекомендуется проверять воздушный фильтр каждые 12 000-15 000 километров и заменять его при необходимости.
Доступно ли руководство для Toyota Urban Cruiser (2012) на русском языке?
Нет, руководство для Toyota Urban Cruiser (2012) доступно на английском языке.
Toyota URBAN CRUISER Automobile PDF User Guides and Manuals for Free Download: Found (3) Manuals for Toyota URBAN CRUISER Device Model (Dimensions, Brief Manual, Owner’s Manual)
The Toyota URBAN CRUISER is a compact SUV that embodies the spirit of urban exploration without compromising on comfort and efficiency. Designed for city drivers who require versatility and practicality, this vehicle ticks all the boxes for those who wish to navigate both the bustling streets and weekend getaways. At first glance, the URBAN CRUISER’s sleek lines and sporty stance make a strong impression, capturing the essence of modern-day driving needs.
One of the standout features of the Toyota URBAN CRUISER is its impressive fuel efficiency. With the increasing importance of eco-friendly transportation, this compact SUV offers excellent mileage. Powered by a dynamic engine, it delivers a seamless blend of performance and comfort, whether you are commuting to work or heading out for a weekend adventure. Key aspects of its performance include:
- Advanced engine technology that promotes fuel efficiency.
- Smooth handling and a balanced ride, ensuring comfort on various terrains.
- Responsive steering that makes city parking and tight turns a breeze.
Interior space is another essential factor for any compact SUV, and the Toyota URBAN CRUISER does not disappoint. Its cabin is designed with practicality in mind—offering ample space for passengers as well as cargo. The layout is both stylish and functional, featuring high-quality materials and an intuitive infotainment system. The URBAN CRUISER comes equipped with:
- A user-friendly touchscreen infotainment system compatible with smartphones.
- Bluetooth connectivity and multiple USB ports for easy device integration.
- Comfortable seating arrangements with generous legroom for both front and rear passengers.
Safety is paramount in any Toyota vehicle, and the URBAN CRUISER is no exception. Packed with an array of safety features, it provides peace of mind for all its occupants. The advanced safety suite includes:
- Multiple airbags strategically placed throughout the cabin.
- Anti-lock braking system (ABS) that enhances stability during sudden stops.
- Advanced traction and stability controls that add confidence on slippery roads.
In terms of aesthetics, the URBAN CRUISER’s modern design is a significant draw. Its bold front grille, sleek headlights, and dynamic profile resonate well with younger audiences seeking a vehicle that stands out. Customizable options are plentiful, allowing buyers to choose exterior colors and interior finishes that reflect their personal style.
When considering the Toyota URBAN CRUISER, it is essential to weigh not just the highlights but also the competition. While it excels in urban settings, some rivals offer more powerful engine options for those craving additional performance. However, the URBAN CRUISER makes up for this with its practicality, reliability, and distinctive look, making it an excellent choice for city dwellers.
In conclusion, the Toyota URBAN CRUISER is a smart and stylish choice for individuals seeking a compact SUV that performs well in urban environments. With its economy of fuel, comfortable interior, and robust safety options, it effectively meets the demands of modern-day driving. This vehicle embodies everything that a city car should be, making it a top contender in its class.
URBAN CRUISER
(RHD)
AIR CONDITIONING
ENGLISH
EUROPE
— 0 —
INTRODUCTION
IMPORTANT NOTICE
This manual has been designed for technicians who are qualified and educated in the proper procedures of vehicle
safety, handling and maintenance; experienced in installation of car air conditioning or who are able to carry out
installation procedures when given instructions by an experienced technician in a supervisory capacity; and are
certified to handling refrigerant.
1. Take special care to ensure that clearance between air conditioning components and other components such as
brake parts, fuel system and electric wires as specified in this manual.
2. If a problem is found with the air conditioning system due to installation, refer back to the manual to correct the
problem(s).
3. Vehicle and air conditioning kit components as well as installation procedures are subject to change without
prior notice. Refer to the latest installation manual and service information. Any changes affecting the above
items will be given in the form of a “Installation instructions for air conditioning (Supplement)” (issued by
DENSO) or a service bulletin (issued by the manufacturer).
DEFINITION OF TERMS
WARNING
CAUTION
NOTE
FRONT,REAR
:Describes precautions that should be observed in order to prevent injury or death to the user
during installation.
:Describes precautions that should be observed in order to prevent damage to the vehicle or its
components, which may occur during installation if insufficient care is taken.
:Provides additional information that facilitates installation work.
:Shows the direction when viewed from the driver’s seat.
LEFT,RIGHT
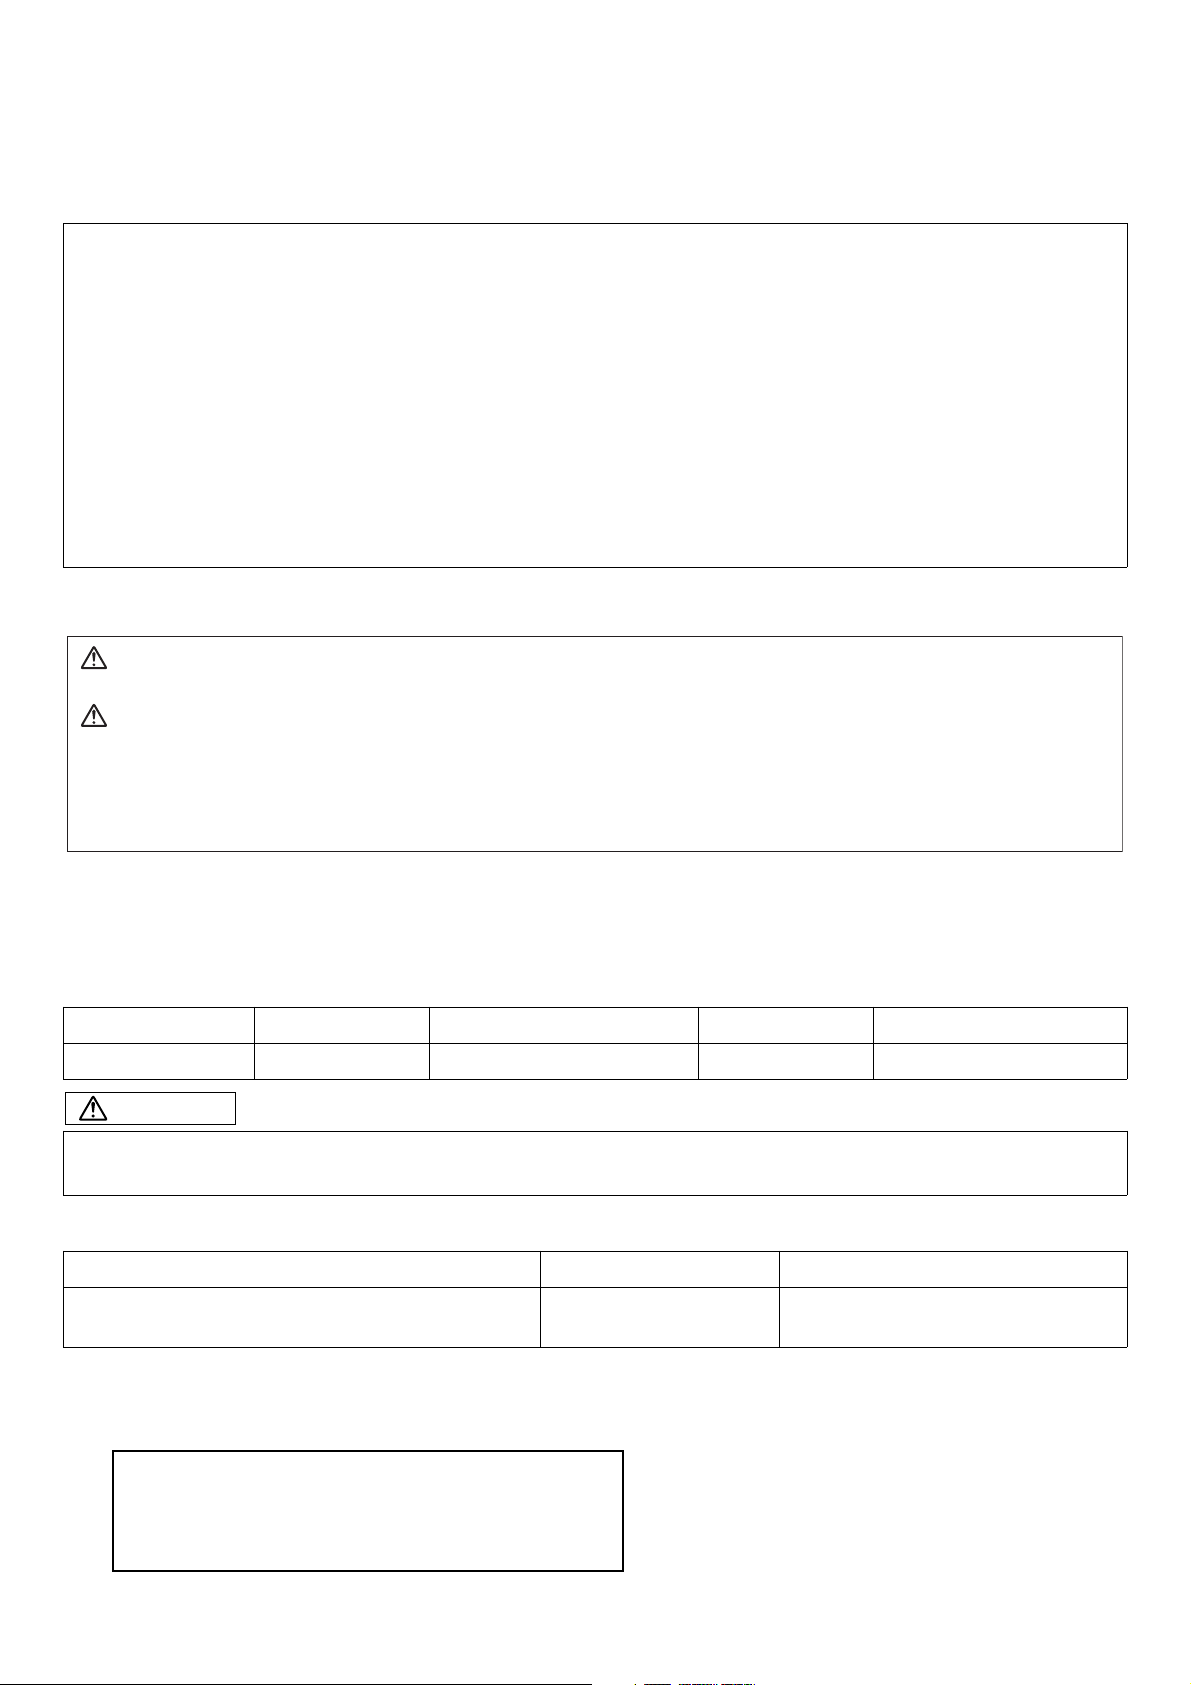
FOREWORD
This manual has been published to explain how to install the air conditioning for TOYOTA URBAN CRUISER.
When installing the air conditioning, installation should be performed as described in this manual.
[APPLICATION VEHICLE]
VEHICLE NAME MODEL CODE PRODUCTION PERIOD ENGINE TYPE STEERING POSITION
URBAN CRUISER NSP110R 2009.1~ 1NR-FE RHD
CAUTION
Carefully read the separate manual «GENERAL INFORMATION/AFTER INSTALLATION» before and after
installation.
[DOCUMENT CODE AND DOCUMENT PART NUMBER]
MANUAL NAME DOCUMENT CODE DOCUMENT PART NUMBER
GENERAL INFORMATION /
AFTER INSTALLATION
© 2009 DENSO CORPORATION
All Rights Reserved. This book may not be reproduced
or copied, in whole or in part, without the written
permission of the publisher.
00503436E* 988963-680*
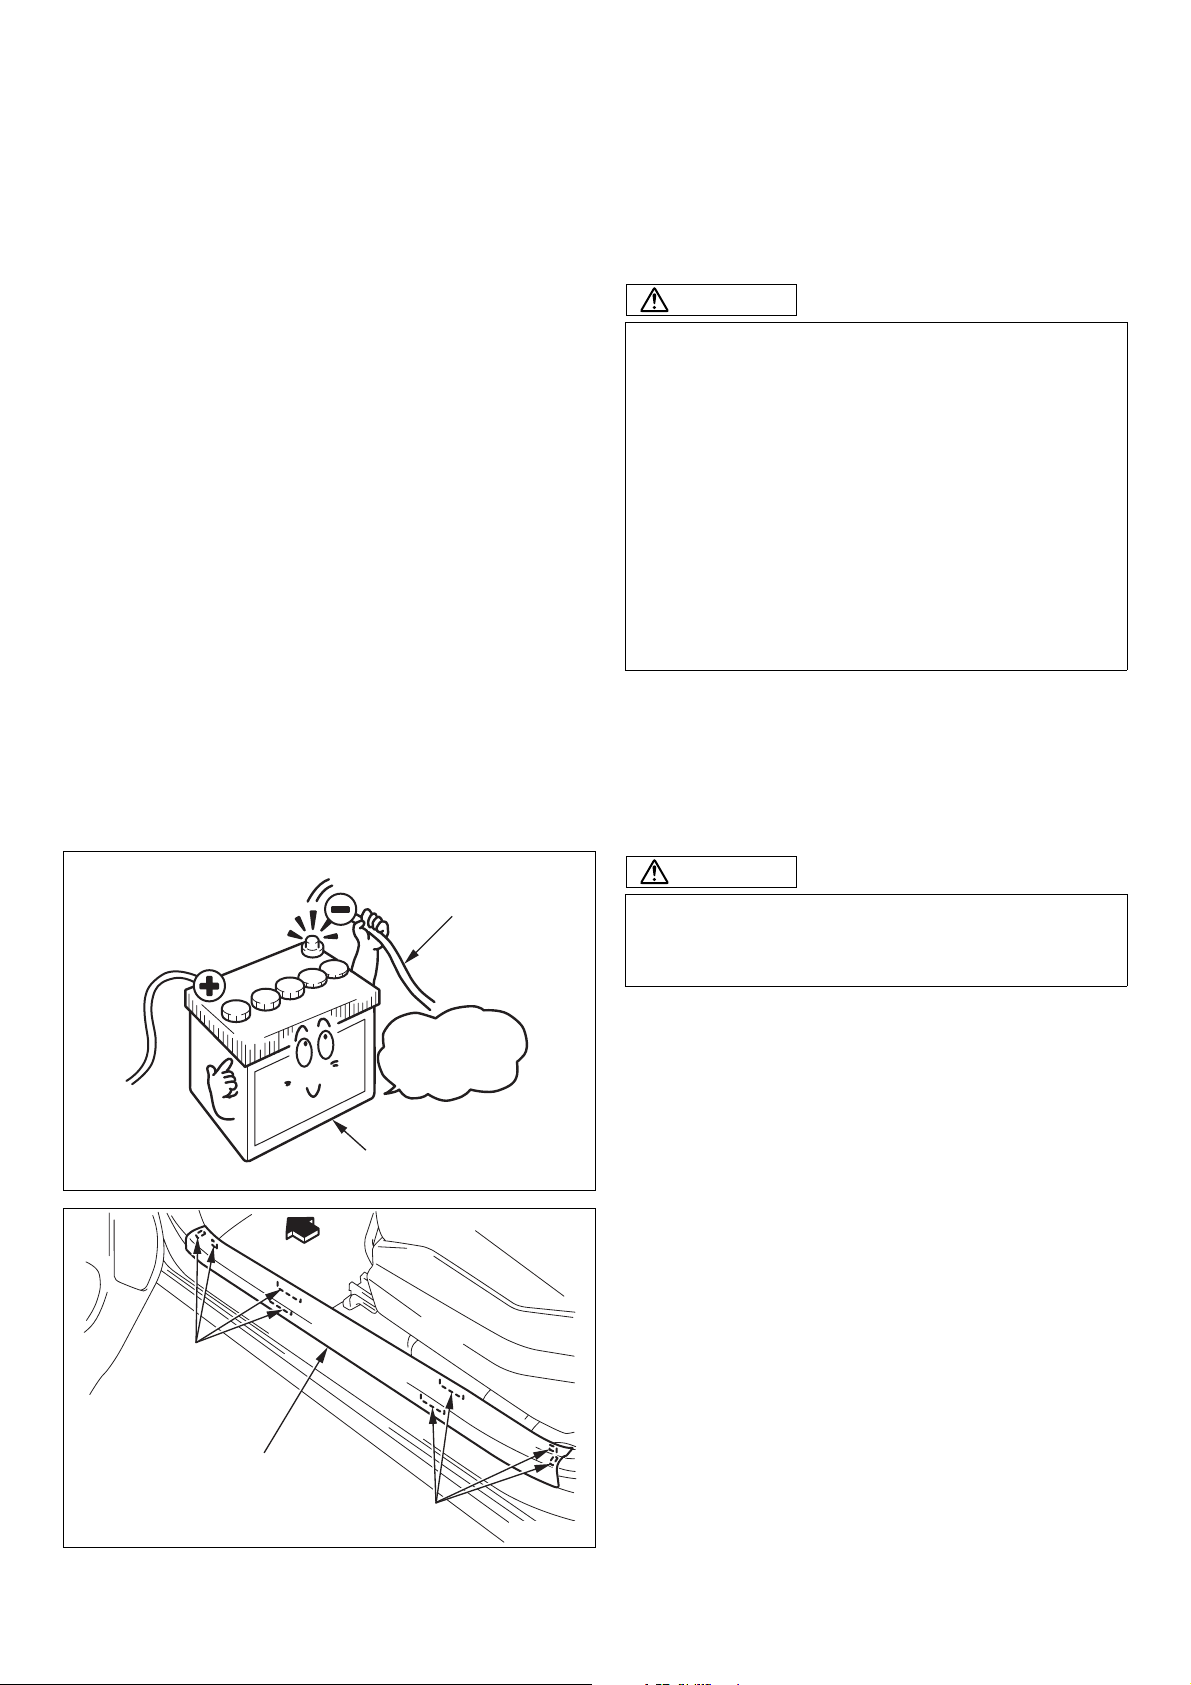
1. INSTALLATION INSIDE
PASSENGER
COMPARTMENT
CAUTION
1. Be sure to use the correct oil, refrigerant and
charging/recovery equipment.
2. Before starting installation, read all
«PRECAUTIONS FOR SAFETY
INSTALLATION» thoroughly and follow the
instructions described in it.
3. Before starting installation, remove the negative
terminal of the battery and ensure seat/floor
covers are in position.
4. Take care not to scratch any parts of the
vehicle.
5. Sort removed bolts and tapping screws into
groups so that they can be reassembled
correctly.
HOOKS
FRONT
VEHICLE HARNESS
Disconnect
the negative
terminal first.
BATTERY
CAUTION
First remove the negative terminal of the battery
and the vehicle harness connection before installing
the equipment.
A009347
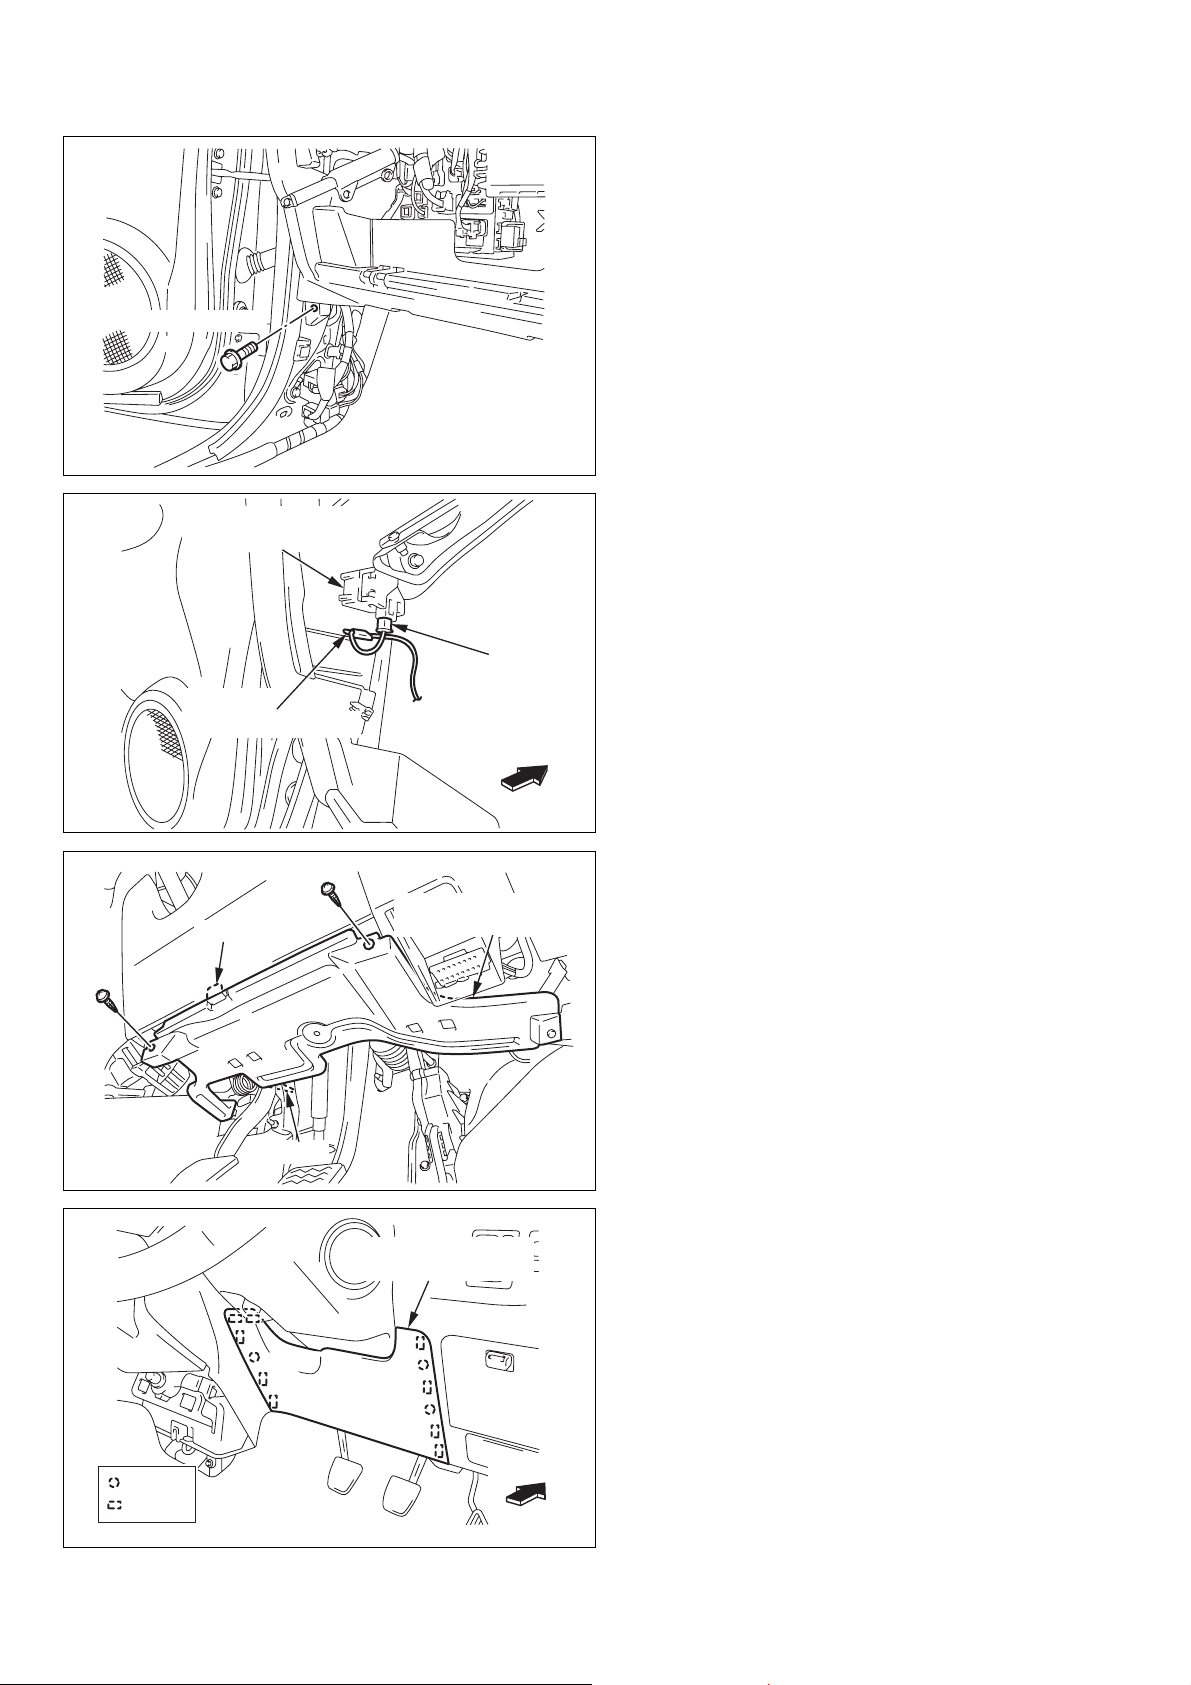
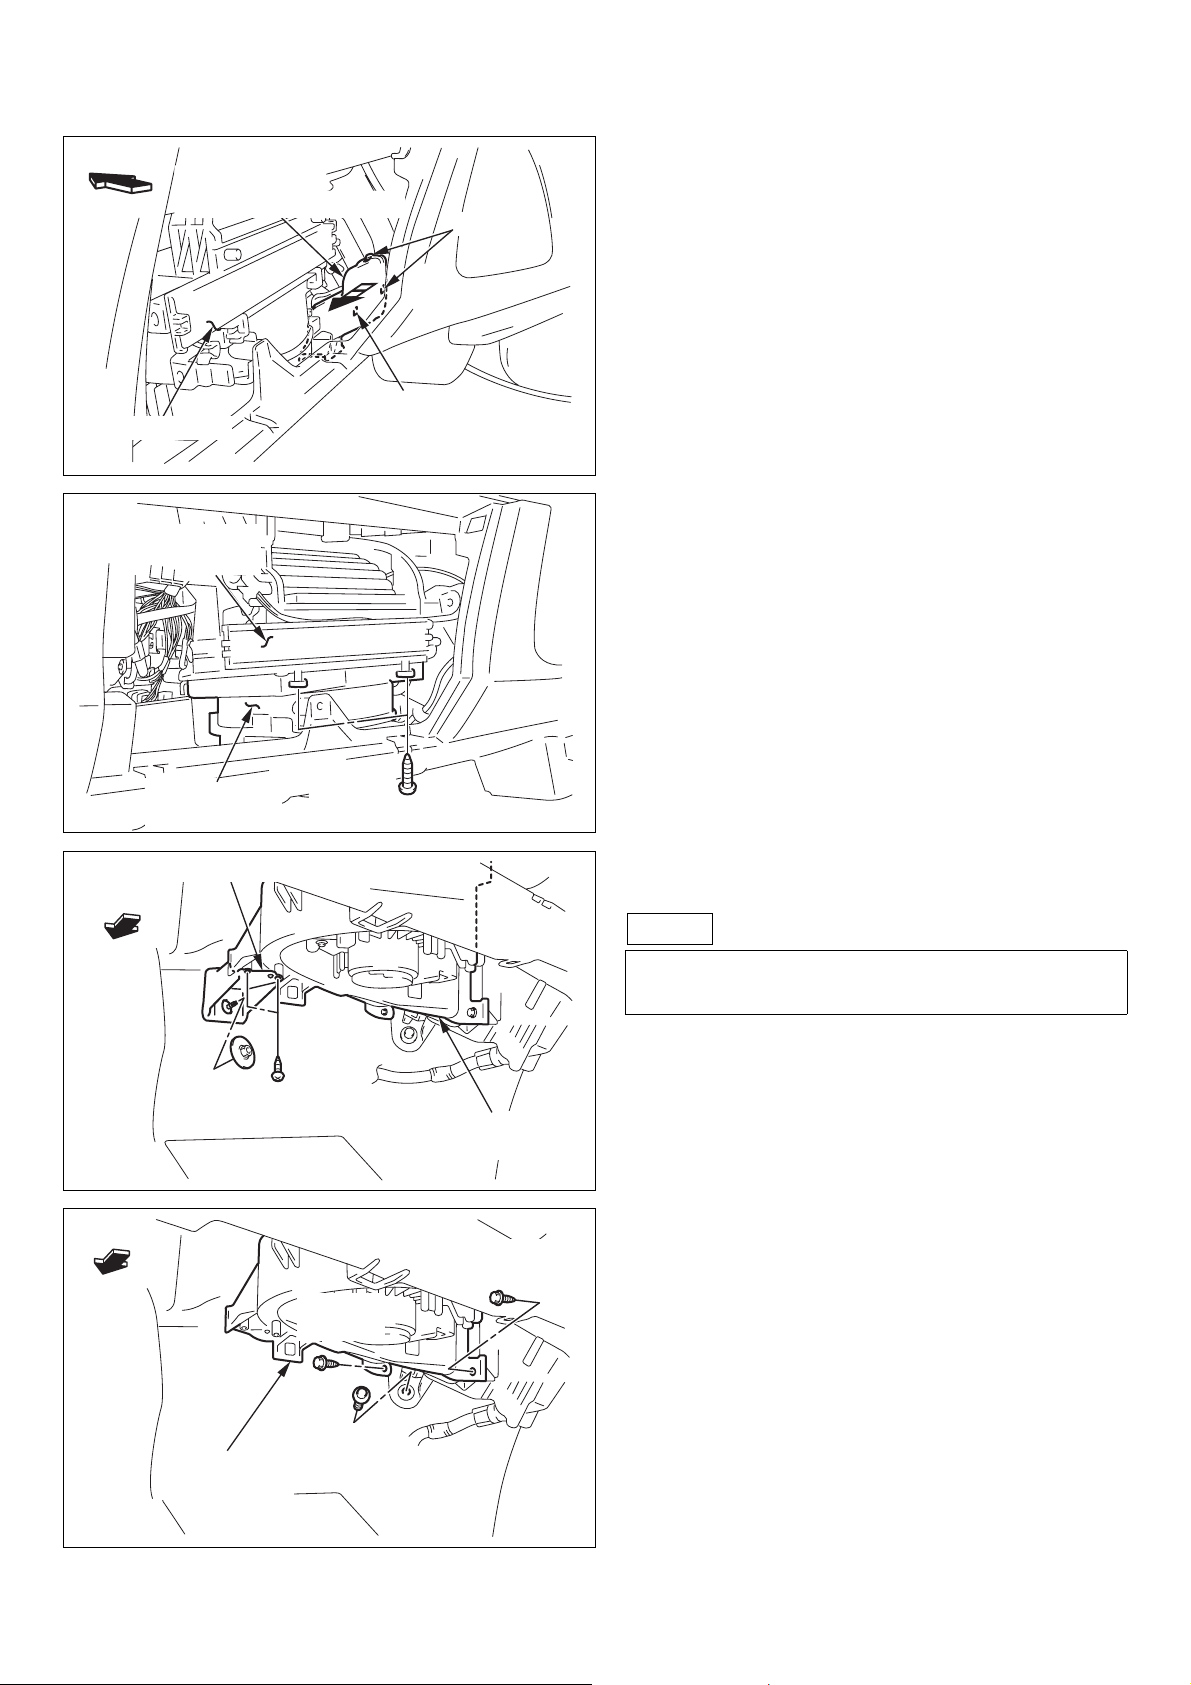
(1) REMOVAL OF ORIGINAL PARTS-1
(a) Scuff plate (LH)
SCUFF PLATE (LH)
HOOKS
A029314
— 1 —
00503437E
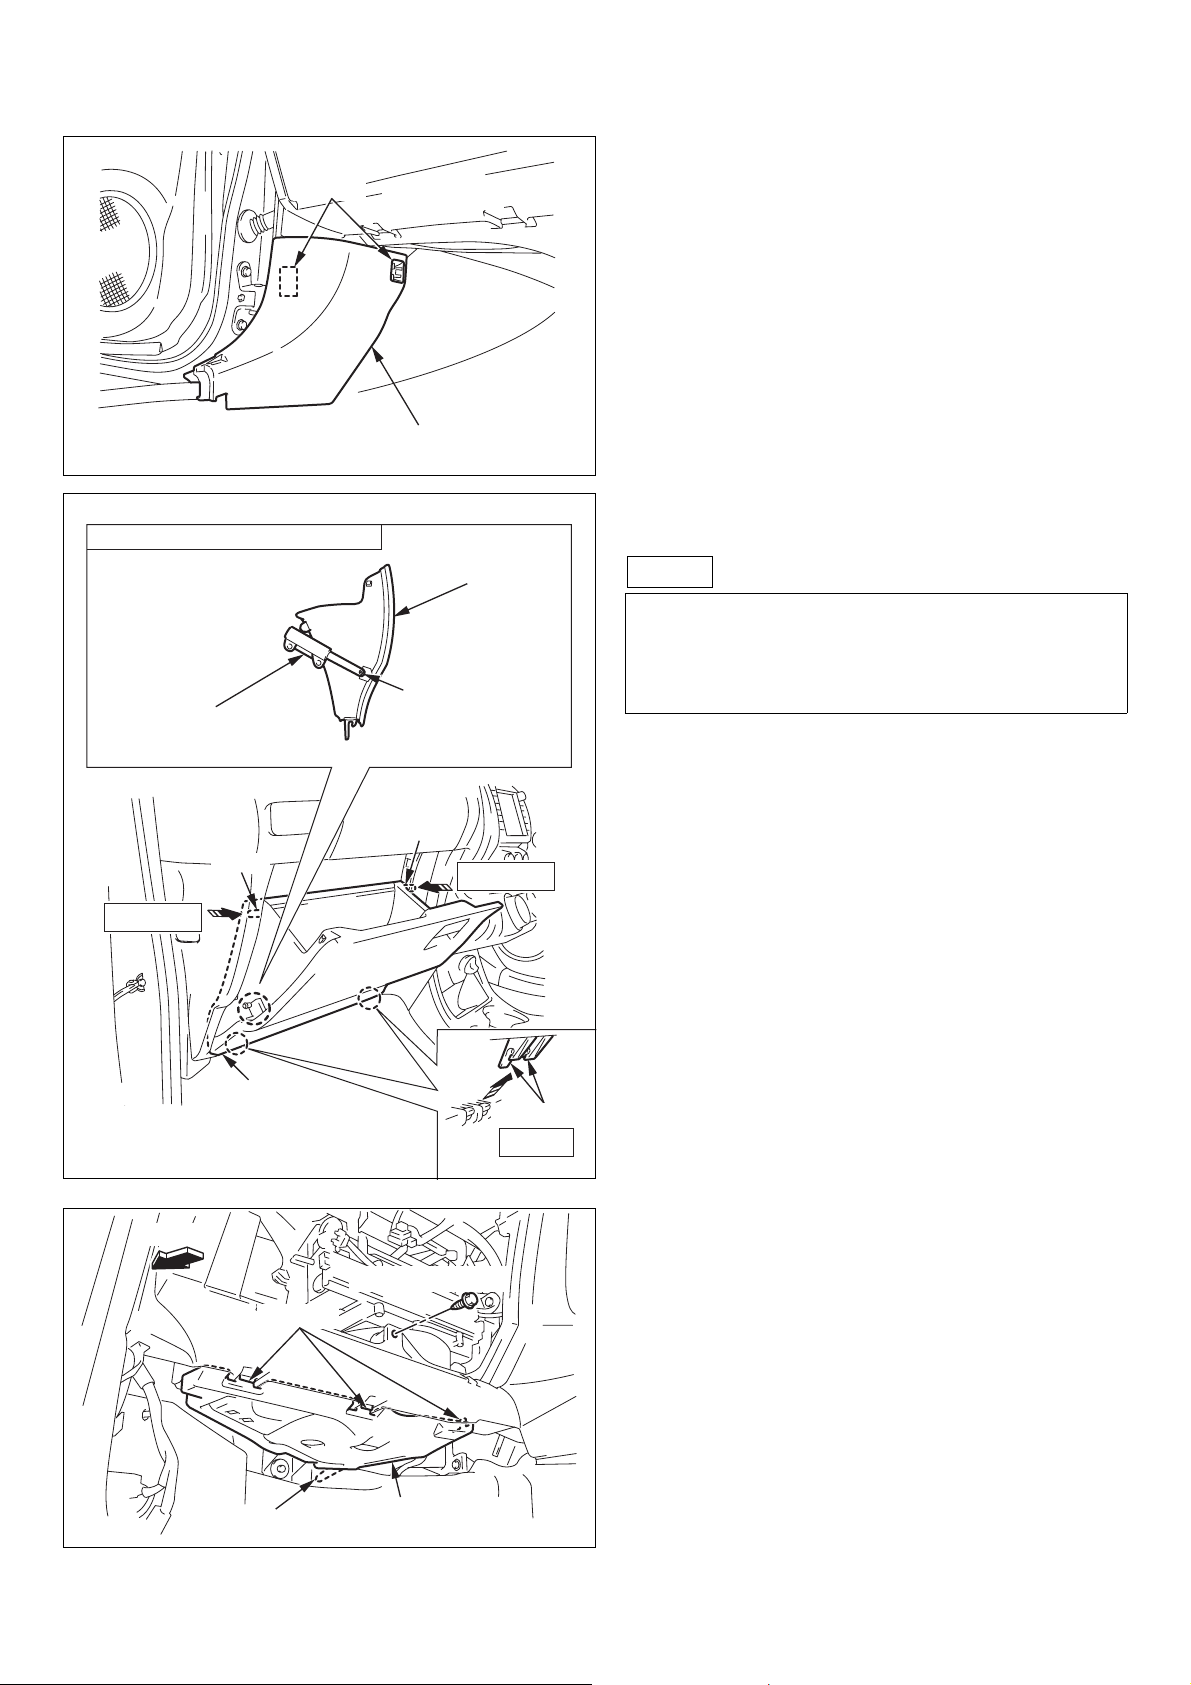
HOOKS
(b) Cowl side panel (LH)
COWL SIDE PANEL (LH)
LEFT SIDE OF THE GLOVE BOX
DAMPER PORTION
BOSS
NOTE 1, 2
GLOVE BOX
LOCK PORTION
BOSS
NOTE 1, 2
A029268
(c) Glove box
NOTE
Remove the glove box in the following order.
1. Press in the sides of the glove box.
2. Bypass the bosses.
3. Lift.
A029176
FRONT
GLOVE BOX
HOOKS
GUIDE
SCREW (REUSE)
INSTRUMENT PANEL
UNDER COVER (LH)
HOOKS
NOTE 3
VEHICLE WITH INSTRUMENT PANEL UNDER
COVER (LH) ONLY [(d)]
(d) Instrument panel under cover (LH)
(e) Screw (for instrument panel)
A029322
— 2 —
00503437E
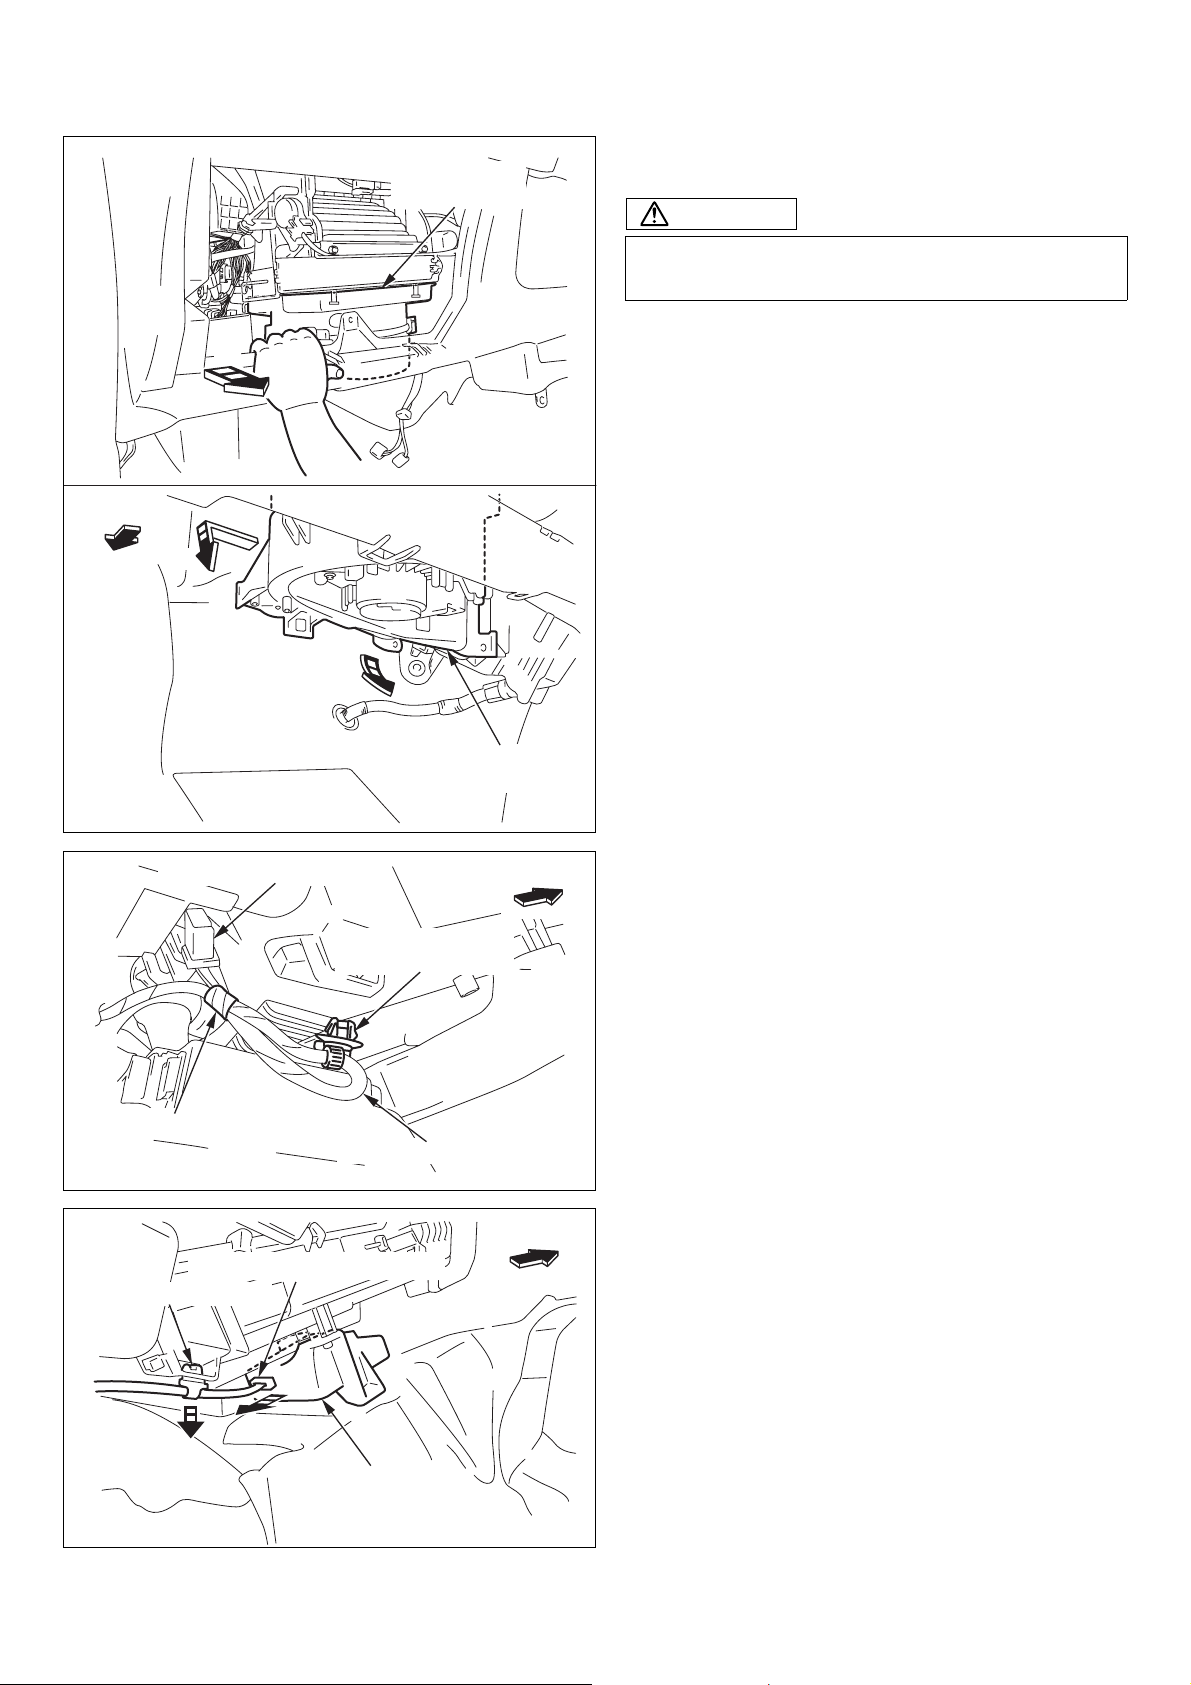
BOLT (REUSE)
(f) Bolt (for instrument panel)
A029269
PASSENGER AIRBAG
CANCEL SWITCH
AIRBAG
CONNECTOR CLIP
HOOK
AIRBAG
CONNECTOR
FRONT
A029439
INSTRUMENT PANEL
UNDER COVER (RH)
VEHICLE WITH PASSENGER AIRBAG CAN-
CEL SWITCH ONLY [(g)-(h)]
(g) Airbag connector clip
(h) Disconnect the connection of the airbag
connector.
VEHICLE WITH INSTRUMENT PANEL UNDER
COVER (RH) ONLY [(i)]
(i) Instrument panel under cover (RH)
:GUIDE
:HOOK
GUIDE
A029270
INSTRUMENT PANEL
LOWER COVER
FRONT
VEHICLE WITHOUT KNEE AIRBAG ONLY
[(j)]
(j) Instrument panel lower cover
A029326
— 3 —
00503437E
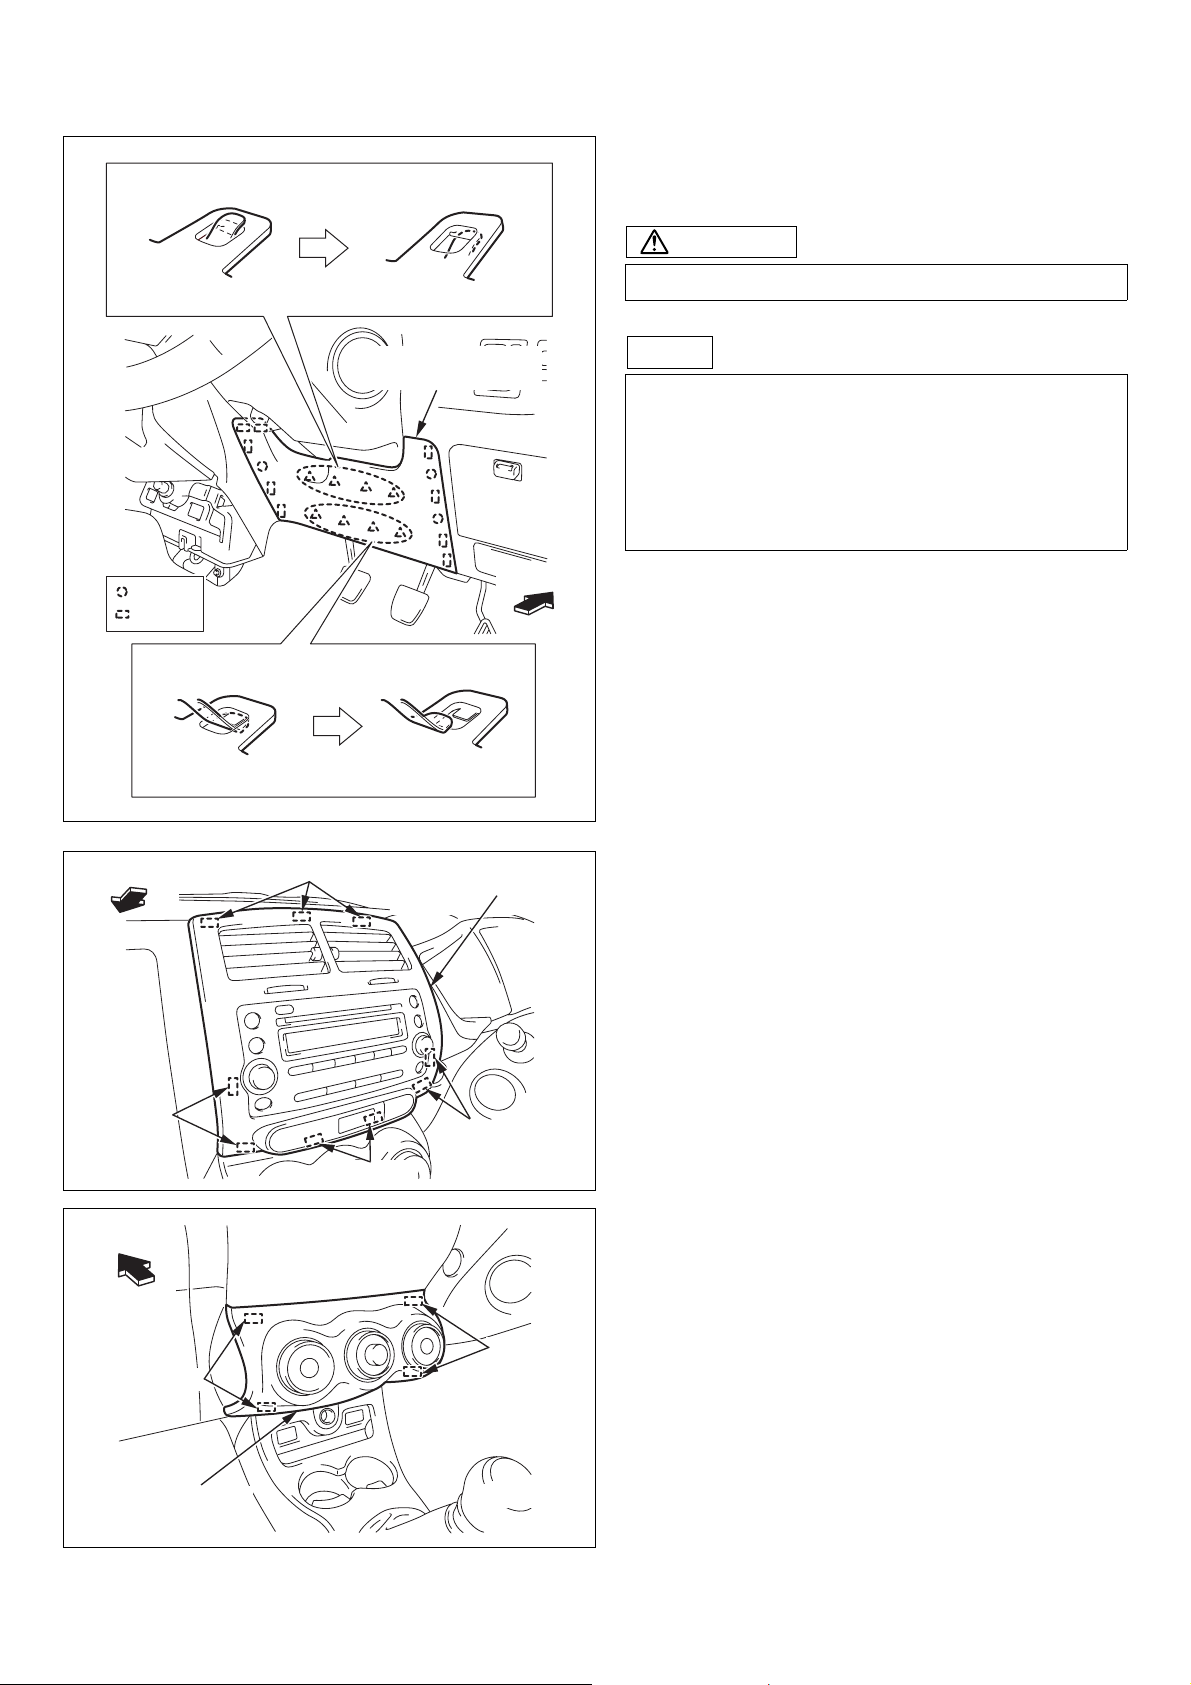
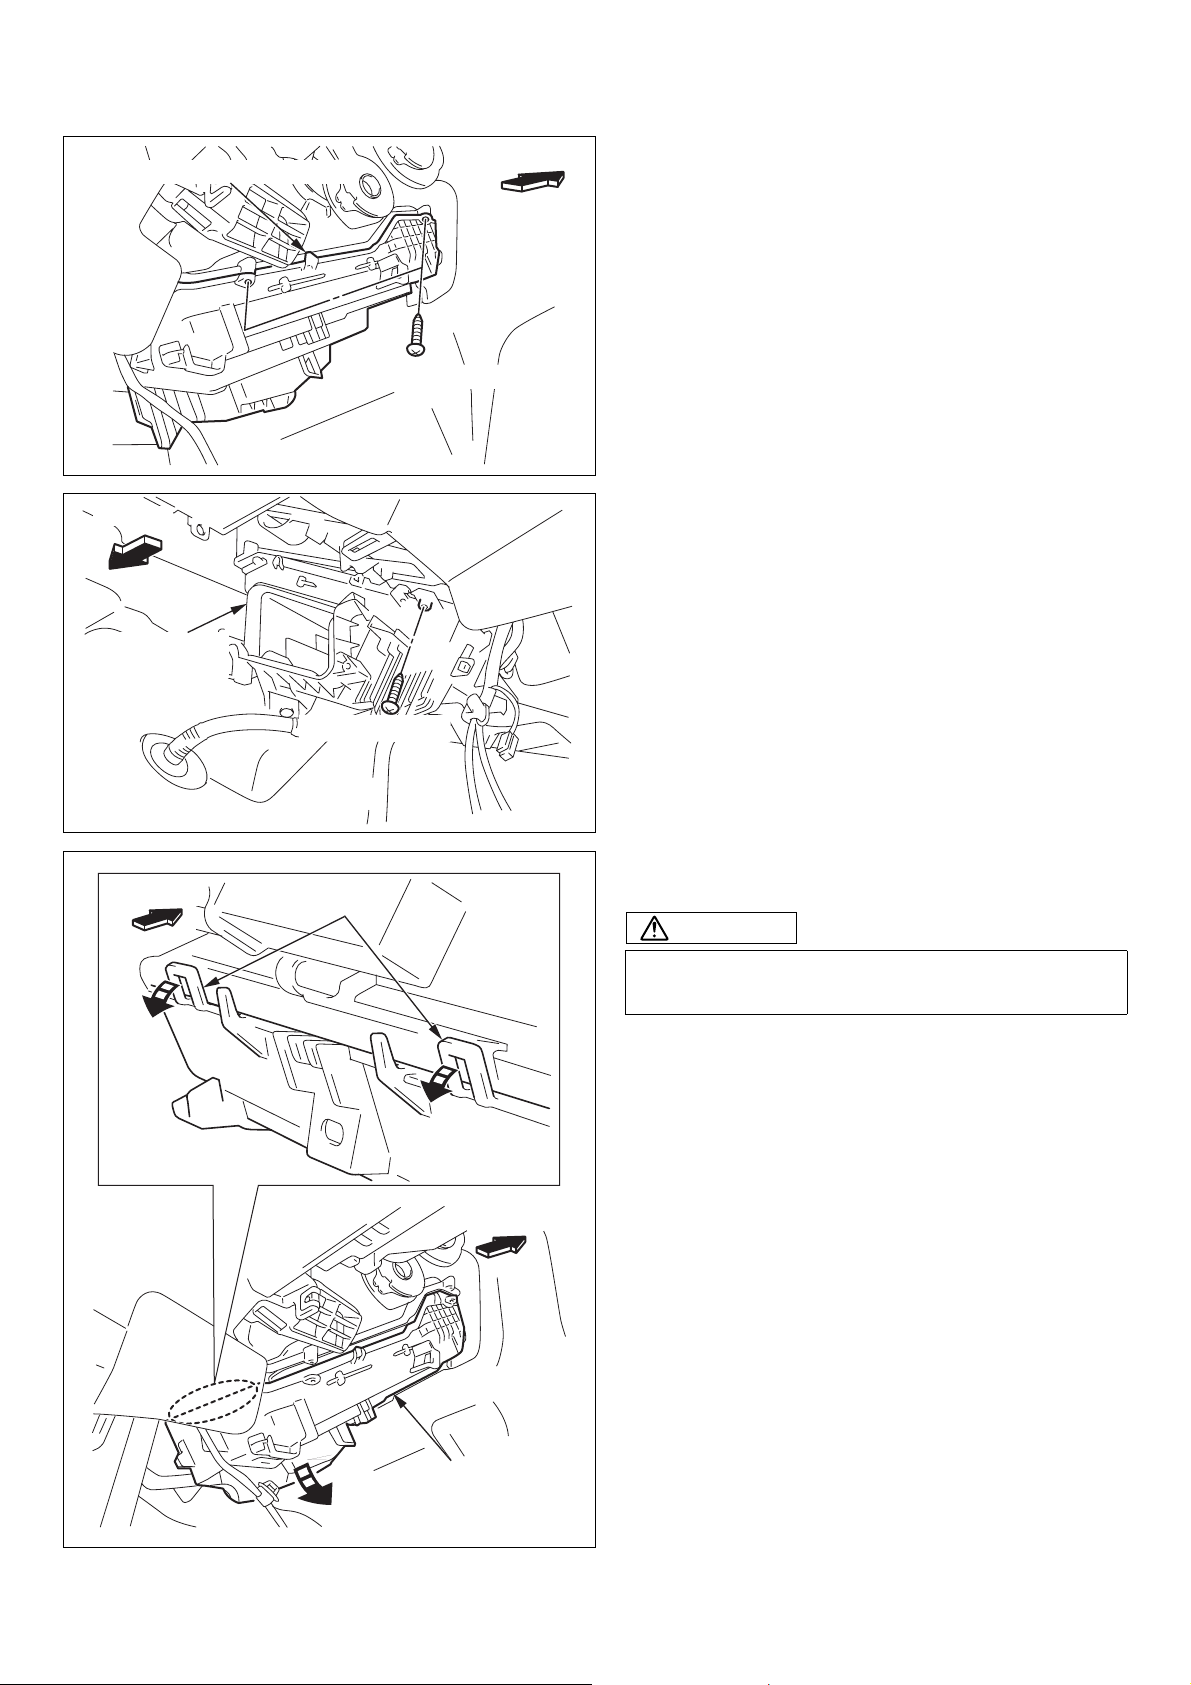
VEHICLE WITH KNEE AIRBAG ONLY [(k)]
(k) Instrument panel lower cover
CAUTION
Wear a pair of Kevlar gloves before starting work.
:GUIDE
:HOOK
FRONT
CLIPS
INSTRUMENT PANEL
LOWER COVER
FRONT
CENTER CLUSTER
PANEL
NOTE
1. To ease work, insert your hand from under the
instrument panel lower cover to the other side of
the panel and release the projections on the
upper part of the bracket from the holes on the
panel.
2. Release the projections one by one.
A029177
(l) Center cluster panel
CLIPS
FRONT
CLIPS
HEATER CONTROL
PANE L
HOOKS
CLIPS
A029178
(m) Heater control panel (lift up only)
CLIPS
A029179
— 4 —
00503437E
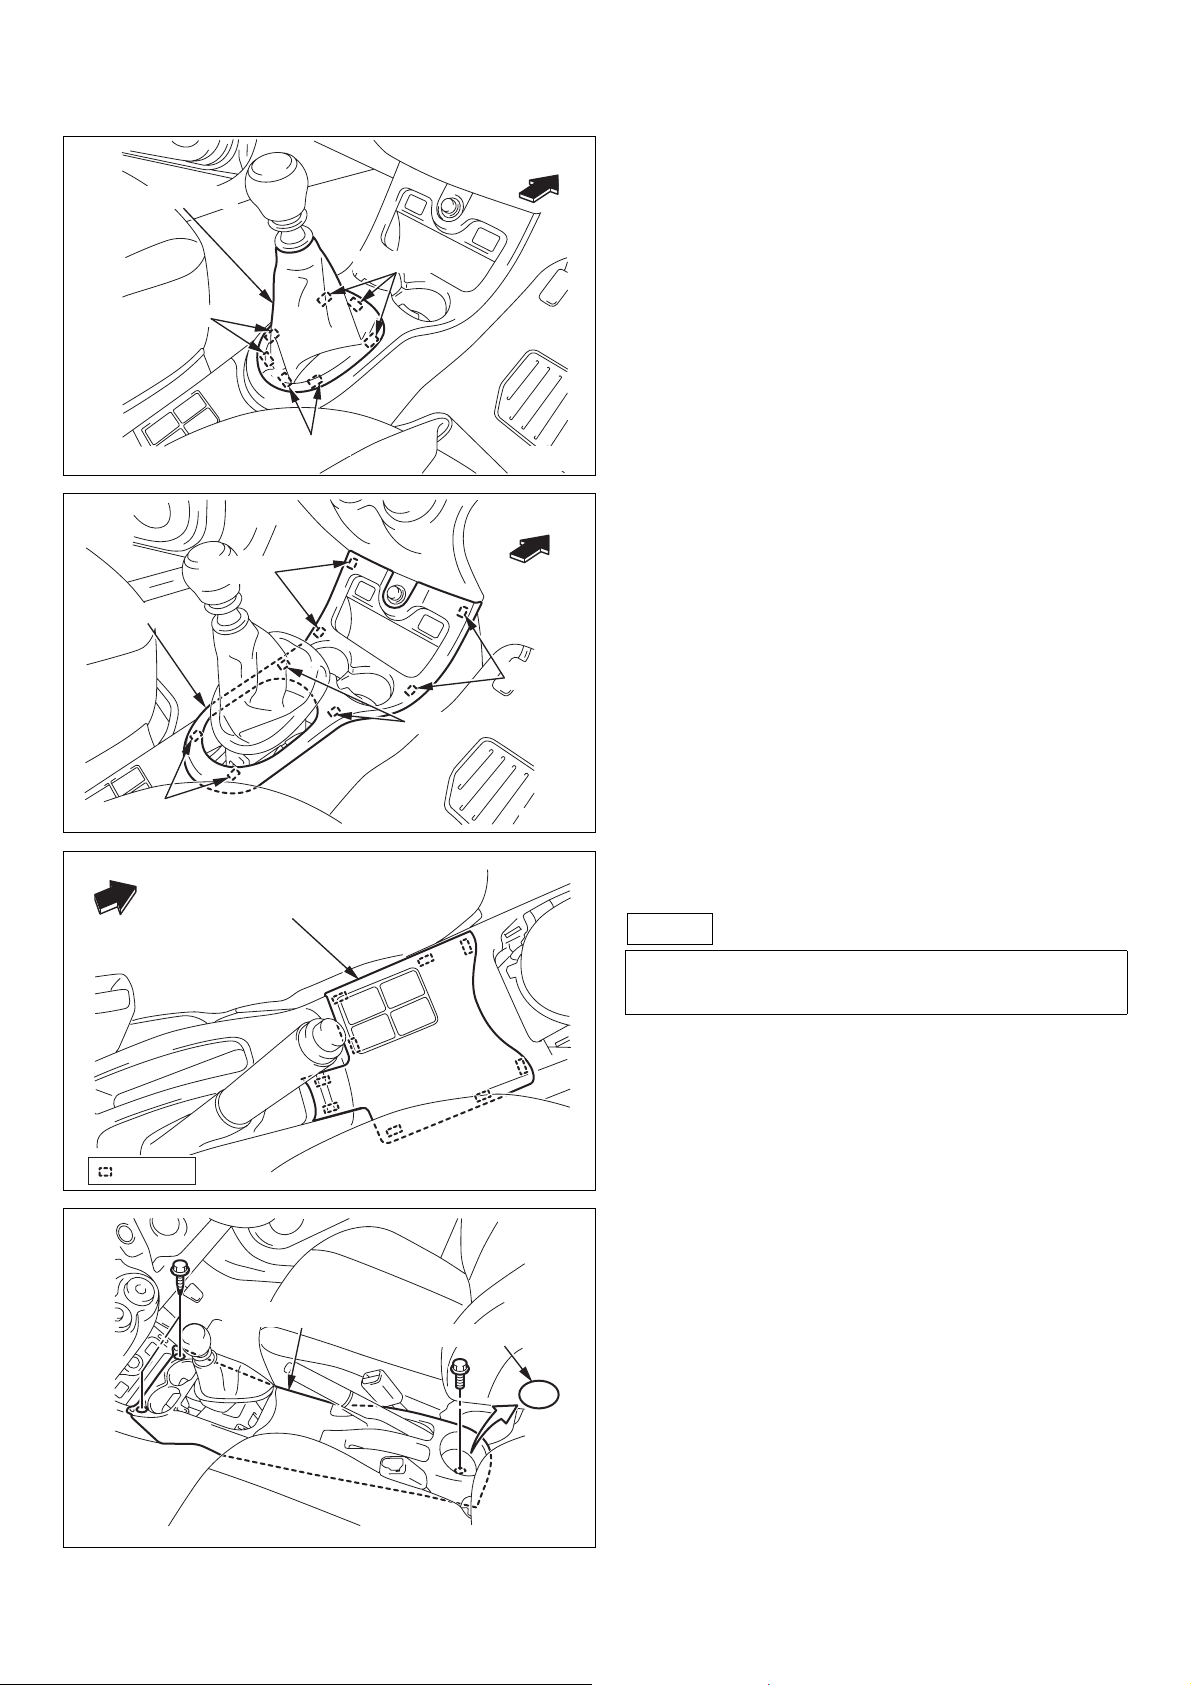
SHIFT COVER
HOOKS
FRONT
(n) Shift cover
HOOKS
SHIFT PANEL
HOOKS
FRONT
HOOKS
HOOKS
CONSOLE BOX COVER
A029180
(o) Shift panel
FRONT
HOOKS
CLIPS
A029181
(p) Console box cover
NOTE
Disconnect the connector of the console box cover
from the vehicle harness.
: HOOK
A029315
(q) Console box carpet
(r) Console box
CONSOLE BOX
CONSOLE BOX CARPET
A029182
— 5 —
00503437E

GUIDE
CENTER CLUSTER
LOWER COVER
CLIP
GUIDE
(s) Center cluster lower cover
FRONT
A029183
VEHICLE
HARNESS CLAMP
BOLT ( REUSE)
FRONT
FLOOR CARPET (LH)
FRONT
A029184
(t) Bolt (reuse)
(u) Vehicle harness clamp
(v) Floor carpet (LH)
FRONT
HOOKS
TURN OVER
A029446
SILENCER MAT (LH)
A029299
(w) Silencer mat (LH)
— 6 —
00503437E
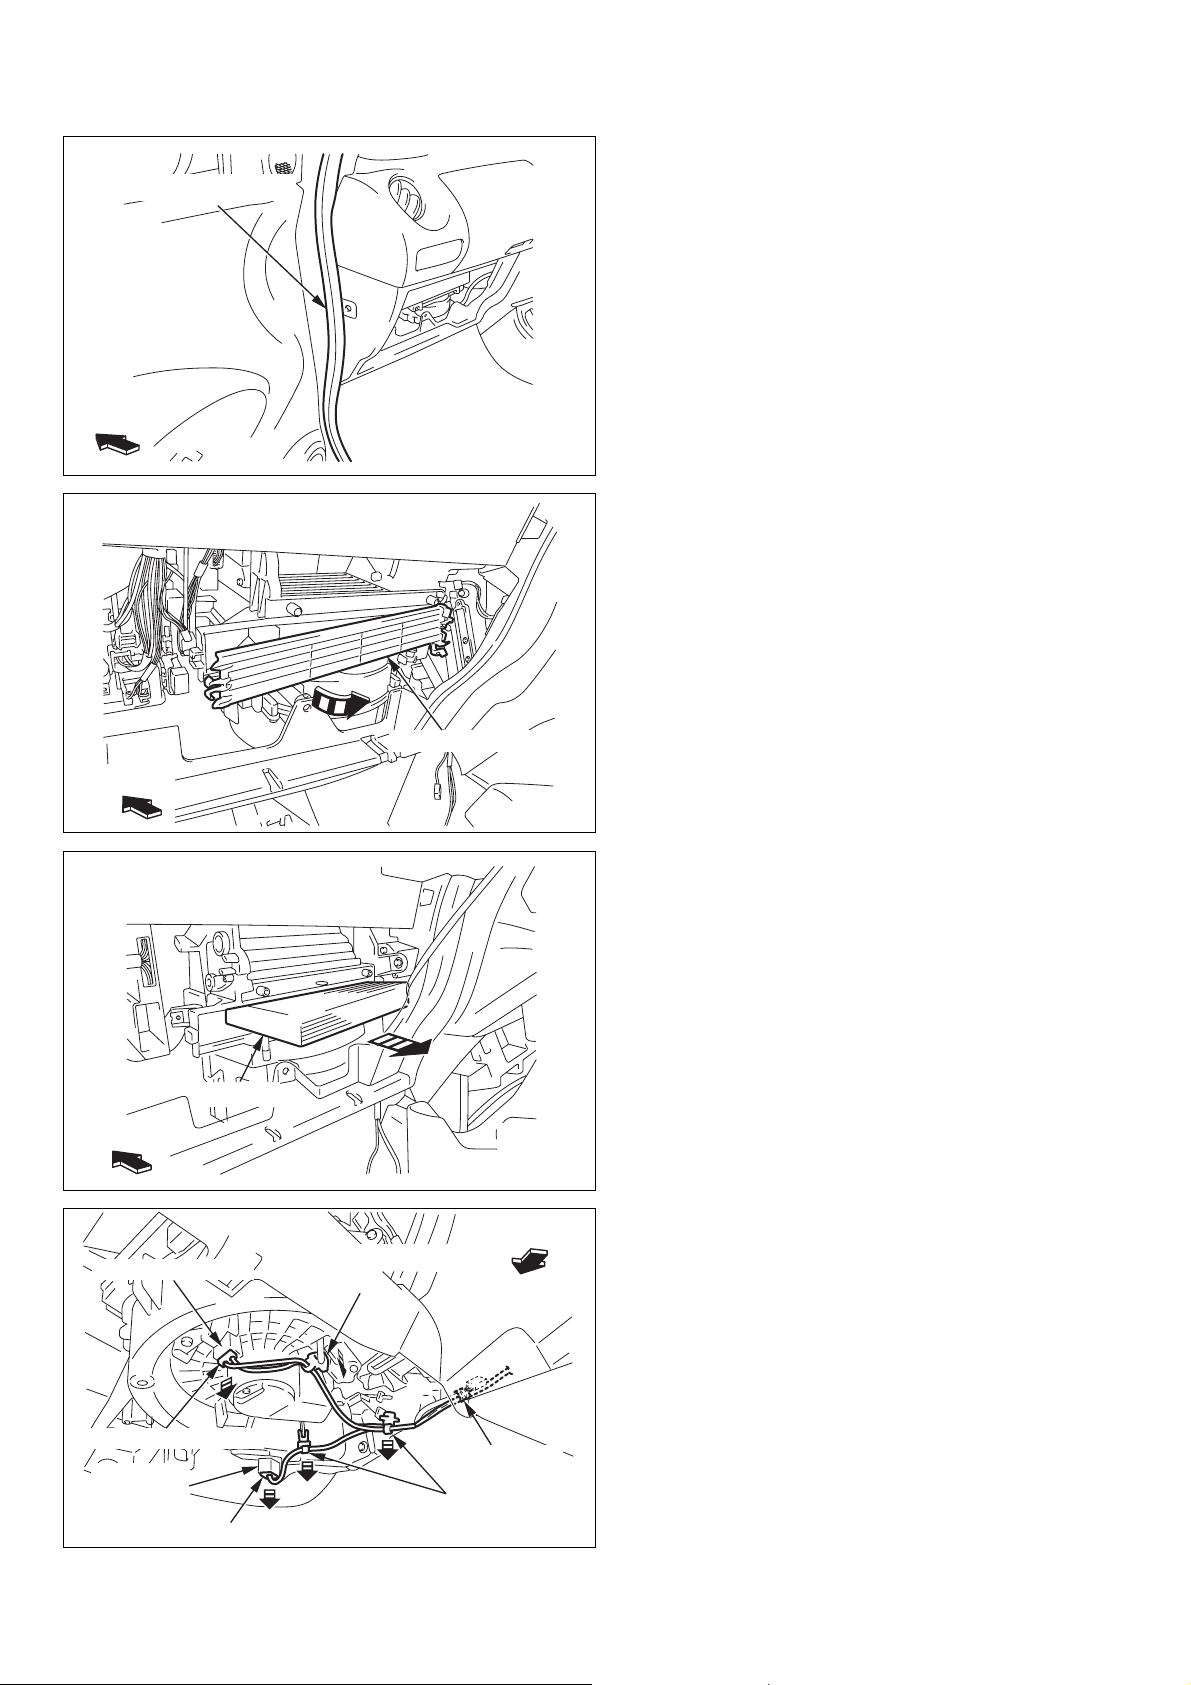
WEATHER STRIP (LH)
FRONT
(x) Weather strip (LH)
A029185
(y) Filter cover
FRONT
FILTER
FRONT
BLOWER MOTOR
FILTER COVER
VEHICLE HARNESS
CLAMP
A029186
A029187
FRONT
(z) Filter
(2) REMOVAL OF ORIGINAL PARTS-2
(a) Disconnect the vehicle harness from the blower
motor.
(b) Disconnect the vehicle harness from the blower
resistor.
(c) Three vehicle harness clamps
(d) Vinyl tape (discard)
VEHICLE HARNESS
BLOWER
RESISTOR
VEHICLE HARNESS
VINYL TAPE
(DISCARD)
VEHICLE HARNESS
CLAMPS
A009590
— 7 —
00503437E
FRONT
ORIGINAL FOOT
AIR DUCT (LH) (DISCARD)
BLOWER UNIT
BLOWER UNIT
UPPER CASE
(e) Original foot air duct (LH) (discard)
HOOKS
HOOK
A001867
(f) Two screws (for blower unit lower case)
BLOWER UNIT
LOWER CASE
BLOWER UNIT LEG
FRONT
FRONT
SCREWS
(REUSE)
SCREW
(REUSE)
A029170
BLOWER UNIT
LOWER CASE
A029437
SCREW
(REUSE)
(g) blower unit leg
NOTE
Pull the blower unit lower case toward the back of
the body and remove the blower unit leg.
(h) Two screws (for blower unit lower case)
(i) Bolt (for blower unit lower case)
BLOWER UNIT
LOWER CASE
BOLT
(REUSE)
A029317
— 8 —
00503437E
FRONT
(j) Blower unit lower case
BLOWER UNIT
LOWER CASE
CAUTION
Be careful not to damage the blower unit lower case
when removing the blower unit lower case.
[1]
[2]
[3]
VEHICLE HARNESS (16-P)
VINYL TAPE (DISCARD)
VEHICLE HARNESS (16-P)
VEHICLE HARNESS
CLAMP
BLOWER UNIT
LOWER CASE
VEHICLE
HARNESS CLAMP
VEHICLE HARNESS
A029171
FRONT
A029473
FRONT
VEHICLE WITHOUT ORIGINAL AMPLIFIER
ONLY [(k) ~ (l)]
(k) Vinyl tape (discard)
(l) Vehicle harness clamp
VEHICLE WITH ORIGINAL AMPLIFIER ONLY
[(m) ~ (n)]
(m) Disconnect the vehicle harness from the original
amplifier.
(n) Vehicle harness clamp
ORIGINAL
AMPLIFIER
A029284
— 9 —
00503437E

VIEW:A
(o) Original amplifier (discard)
FRONT
VIEW:A
ORIGINAL
AMPLIFIER
(DISCARD)
ORIGINAL
AMPLIFIER
(DISCARD)
[1]
ORIGINAL
SCREW
(DISCARD)
FRONT
[2]
AIRBAG HARNESS
AIRBAG ECU
AIRBAG ECU
ORIGINAL
BOLTS
(DISCARD)
A029283
(p) Airbag ECU
FRONT
WARNING
1. Before starting work always check the cautions
and warnings for the SRS airbag system.
2. Make sure the ignition switch is OFF (LOCK)
position.
3. Make sure the negative terminal is removed
from the battery.
4. If installing airbag sensor assy CTR without
disconnecting the negative terminal of the
battery, airbag may open if there is an impact on
it. Make sure that the negative terminal of the
battery is disconnected before installation.
5. Wait at least 90 seconds after negative terminal
is disconnected to start installation.
6. Do not disconnect the airbag harness from the
airbag ECU when removing the airbag ECU.
7. Put down the airbag ECU in a way that
minimizes the force on the airbag harness.
8. Do not subject the airbag sensor to any shocks
or force.
A029324
— 10 —
00503437E
HEATER UNIT LOWER CASE
SCREWS (REUSE)
FRONT
A001868
(q) Two screws (for heater unit lower case)
FRONT
HEATER UNIT
LOWER CASE
FRONT
[1]
SCREW (REUS
HOOKS
(r) Screw (for heater unit lower case)
E)
A029189
(s) Remove the catch of pawl.
CAUTION
Unhook the catch of pawl and keep as it is. (Do not
pull the pawl forcibly because it is easily damaged.)
[2]
[1]
FRONT
HEATER UNIT
LOWER CASE
A029447
— 11 —
00503437E
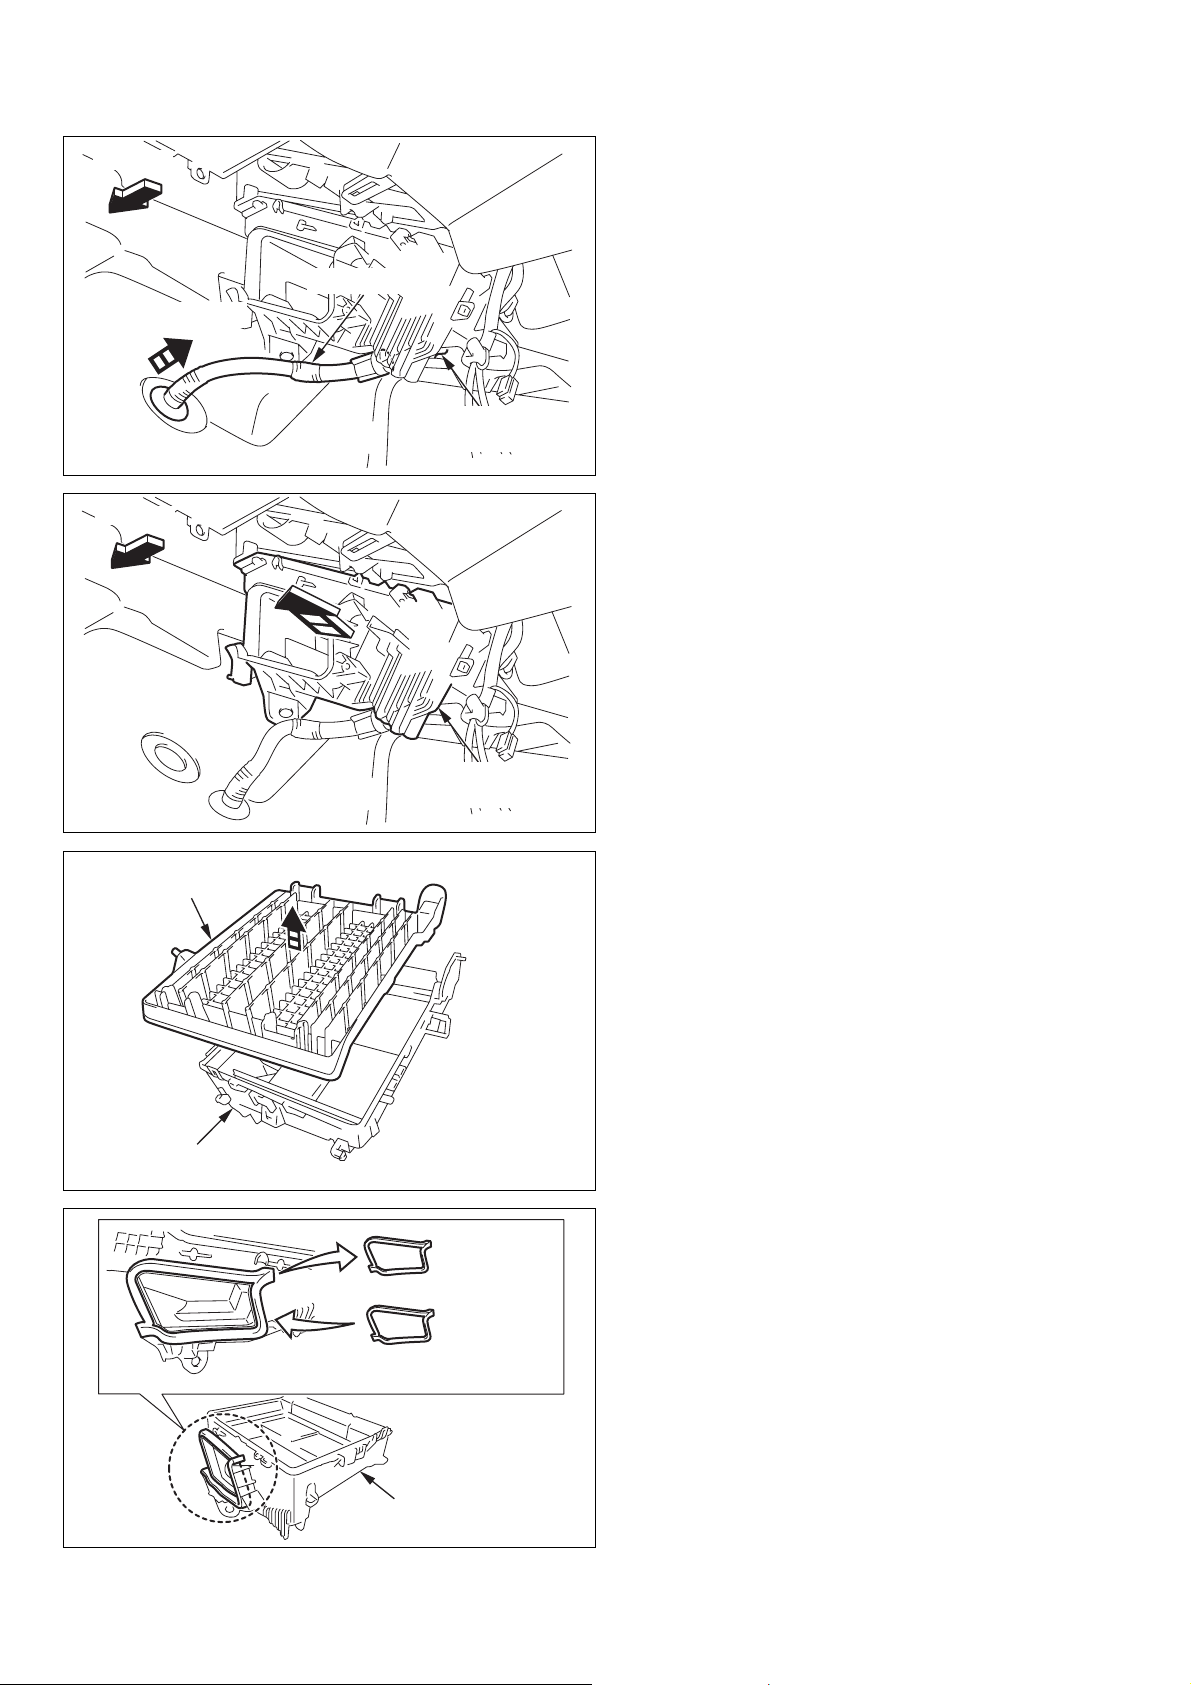
FRONT
(t) Drain hose
DRAIN HOSE
PULL OUT
HEATER UNIT
LOWER CASE
A001874
FRONT
HEATER UNIT INNER COVER
(DISCARD)
HEATER UNIT
LOWER CASE
A001875
(u) Heater unit lower case
(v) Heater unit inner cover (discard)
HEATER UNIT
LOWER CASE
A001876
ORIGINAL
PACKING
(DISCARD)
PACKING
(INCLUDED IN A/C KIT)
HEATER UNIT
LOWER CASE
A009581
(w) Remove and discard a packing from the heater
unit lower case.
(x) Attach a packing (included in A/C kit) to the
heater unit lower case.
— 12 —
00503437E
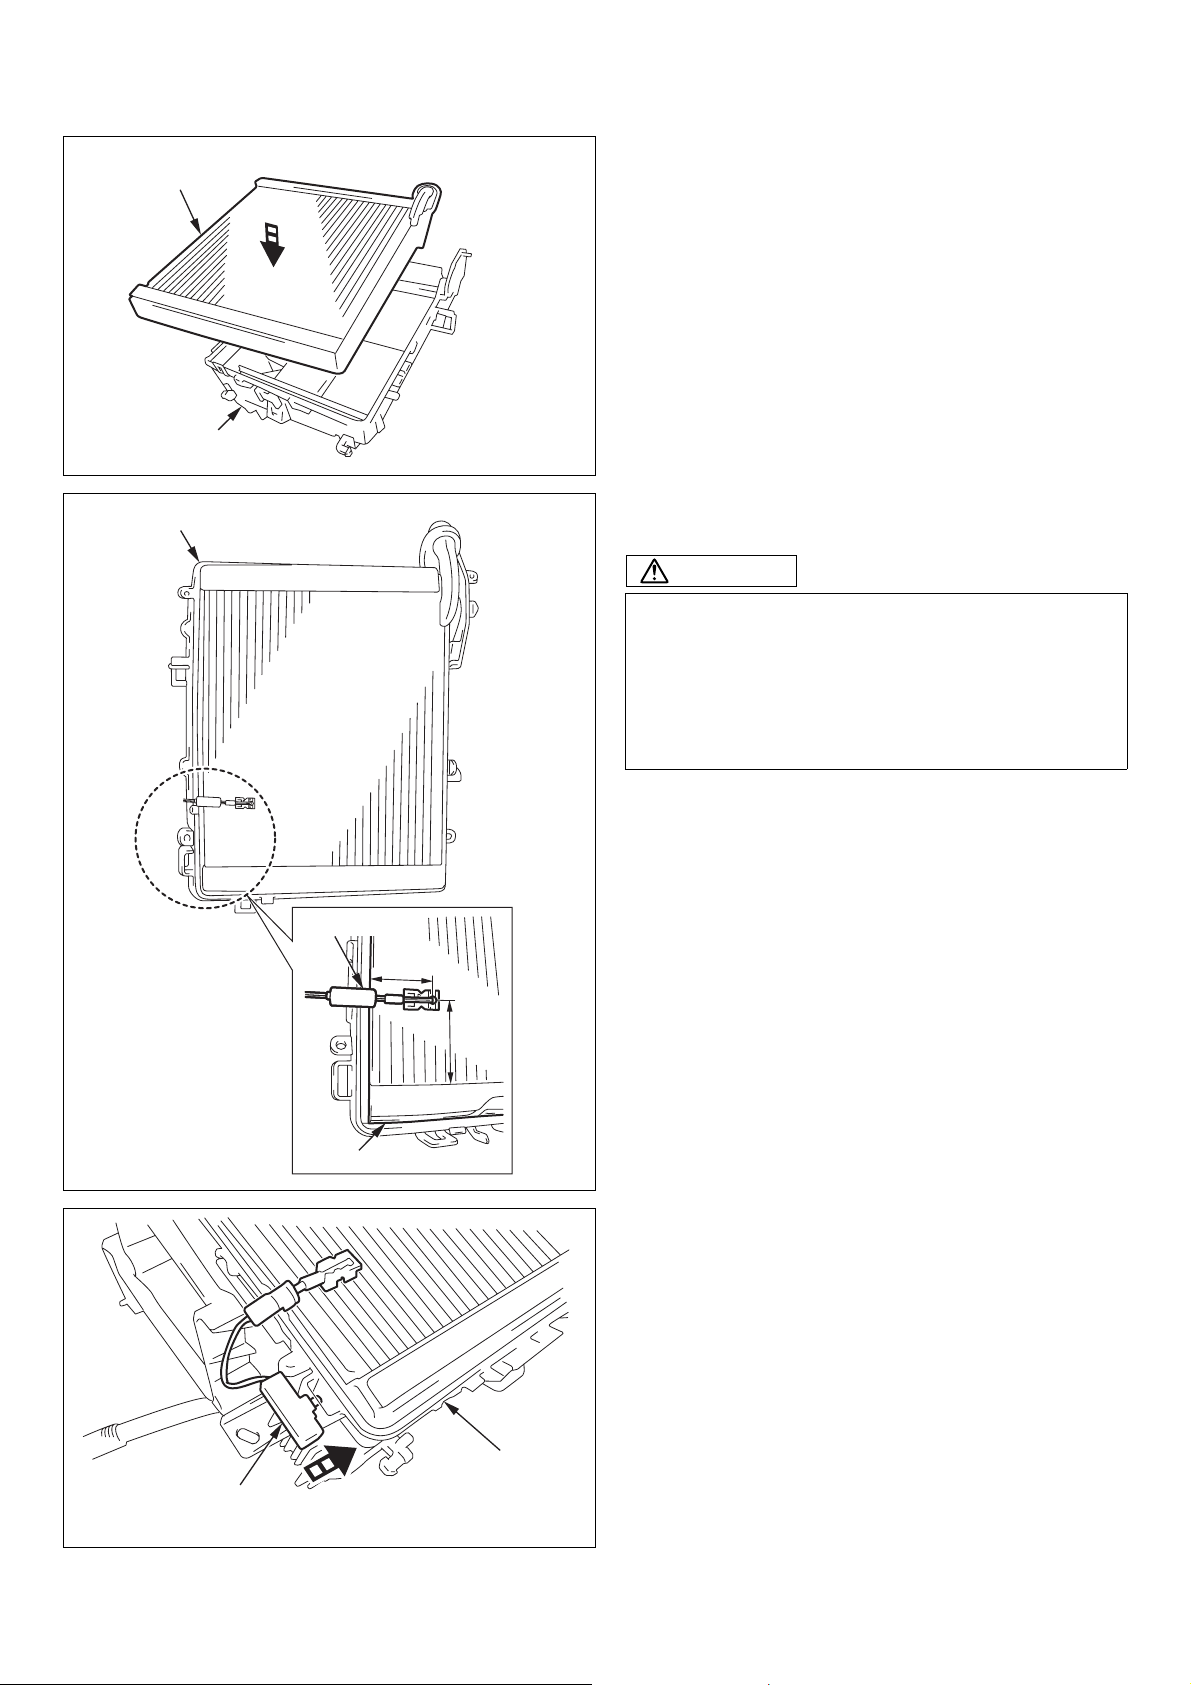
EVAPORATOR
(3) THERMISTOR
(a) Assemble the evaporator to the heater unit lower
case.
HEATER UNIT
LOWER CASE
HEATER UNIT LOWER CASE
THERMISTOR
A001877
(b) Assemble the thermistor to the evaporator.
CAUTION
1. It shall be only one time to insert the thermistor
into the evaporator.
2. When inserting the thermistor into the
evaporator again, shift the thermistor one
column from the position where one was
inserted previously.
34mm
THERMISTOR
CONNECTOR
EVAPORATOR
50mm
A009577
(c) Assemble the thermistor connector to the heater
unit lower case.
HEATER UNIT
LOWER CASE
A029474
— 13 —
00503437E
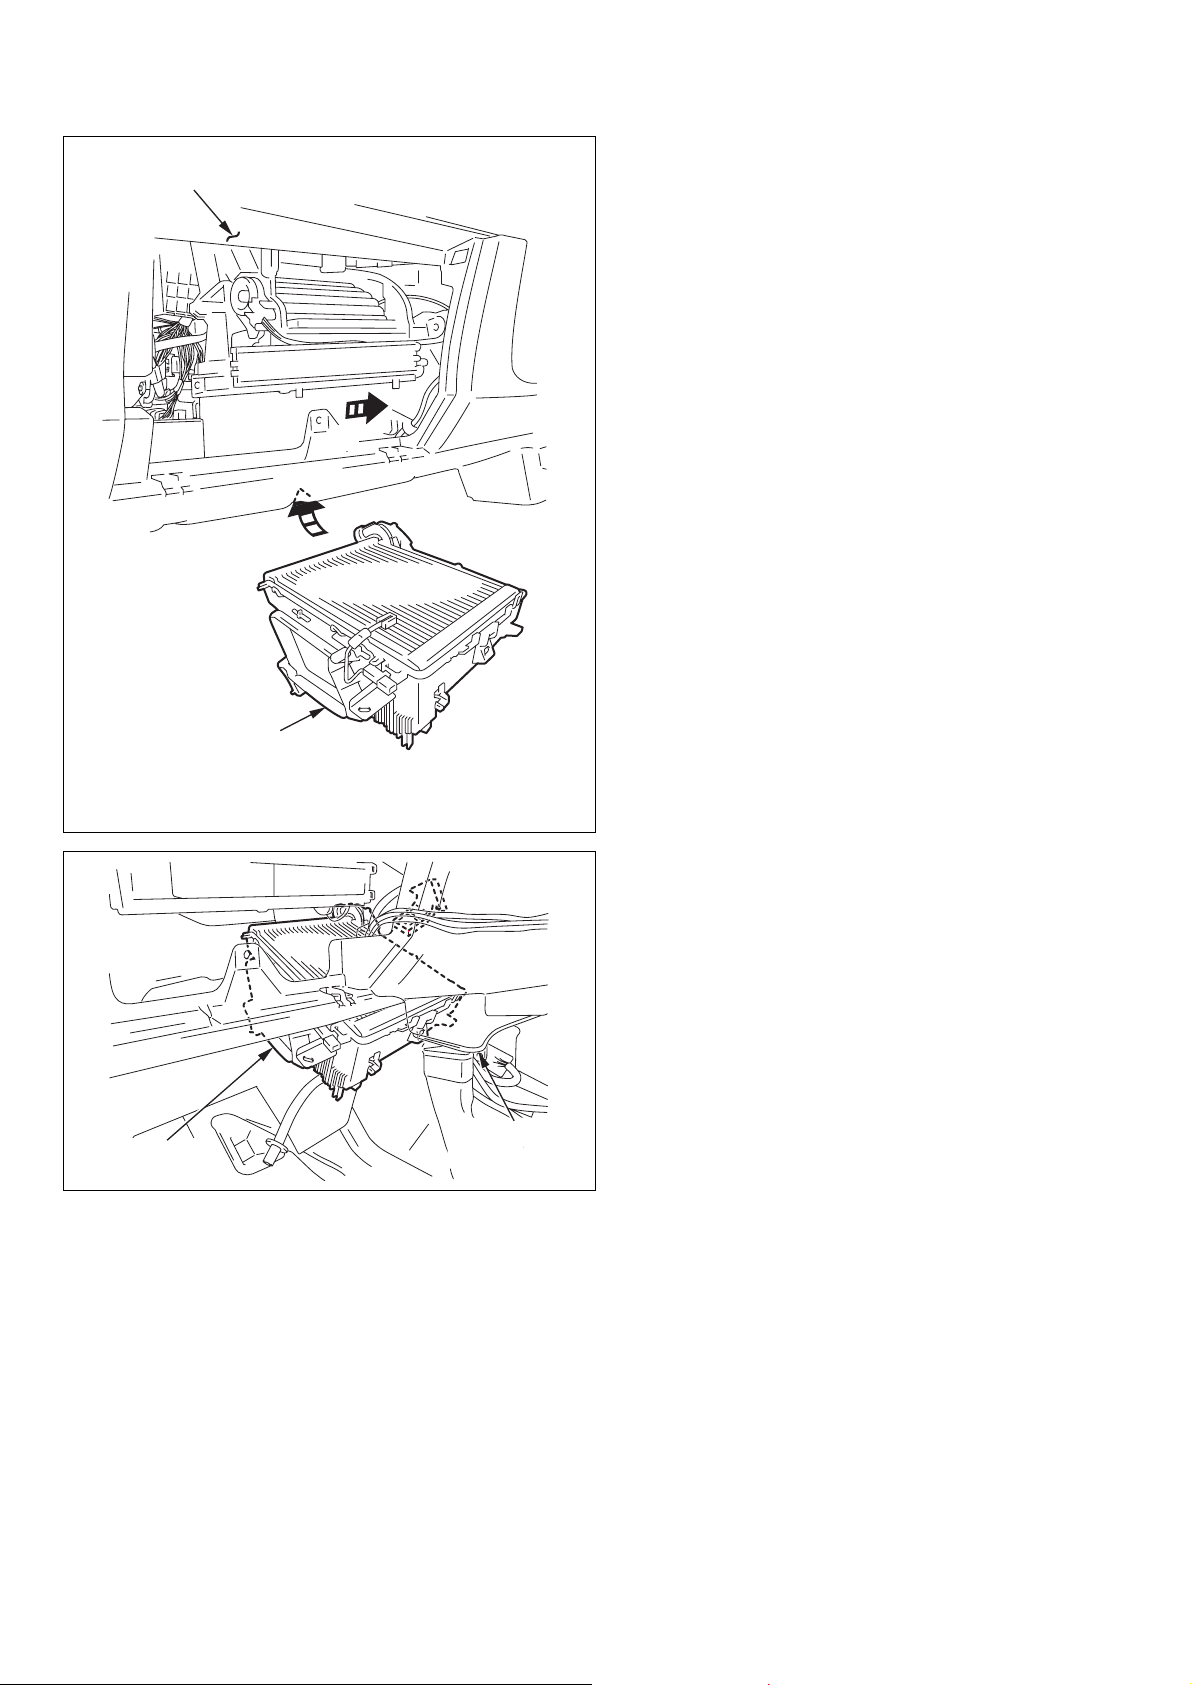
INSTRUMENT PANEL
[1]
(4) REINSTALLATION OF THE HEATER UNIT
LOWER CASE
(a) Insert the heater unit lower case into the
instrument panel.
[2]
HEATER UNIT
LOWER CASE
HEATER UNIT
LOWER CASE
A029172
(b) Insert the heater unit lower case.
INSTRUMENT
PANEL
A009585
— 14 —
00503437E
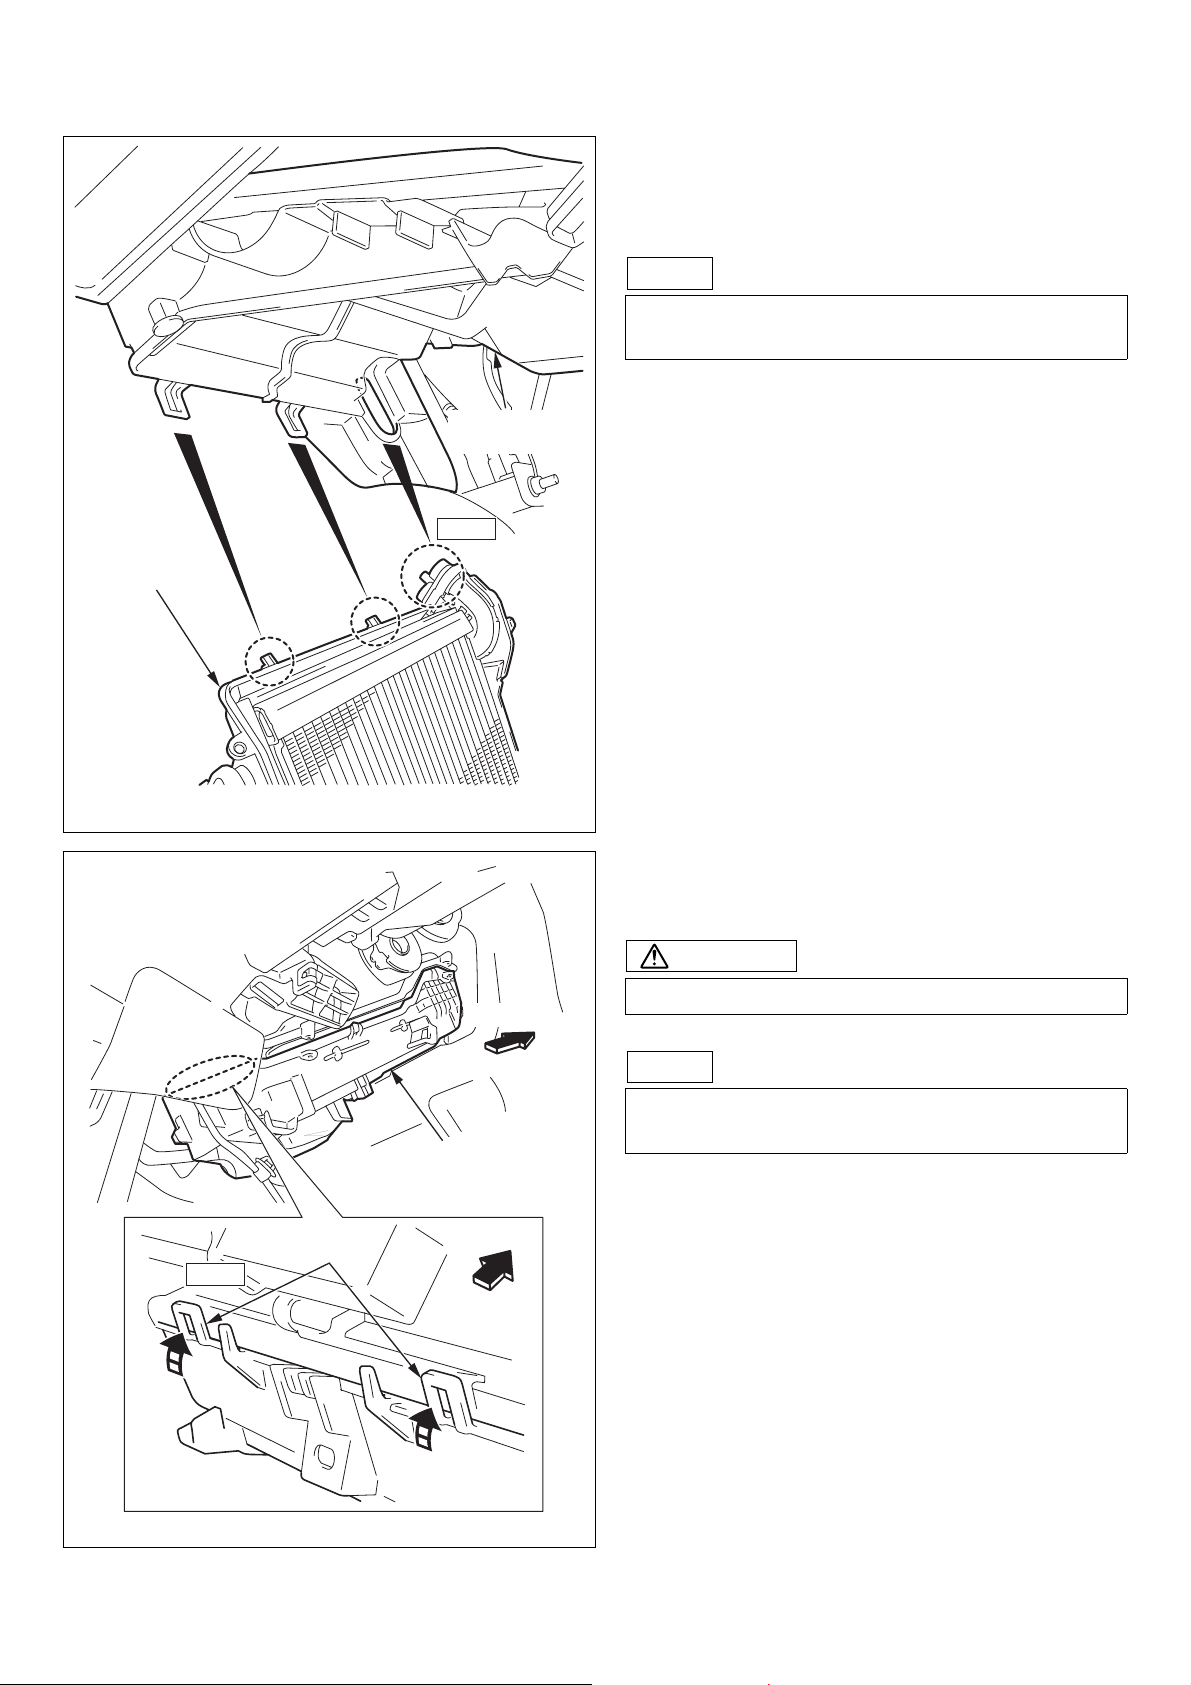
(c) Insert A and B and C on the heater unit lower
case into A and B and C on the heater unit
upper case respectively.
NOTE
Insert the piping unit of evaporator into the vehicle
hole.
A
HEATER UNIT
LOWER CASE
HEATER UNIT
B
A
C
B
UPPER CASE
NOTE
C
A029271
(d) Reinstall the heater unit lower case to the heater
unit upper case.
CAUTION
Be sure not to damage the evaporator fins.
FRONT
NOTE
HOOKS
NOTE
Be careful that the pawl at the vehicle side of a
heater unit shall not be locked.
HEATER UNIT
LOWER CASE
FRONT
A029318
— 15 —
00503437E
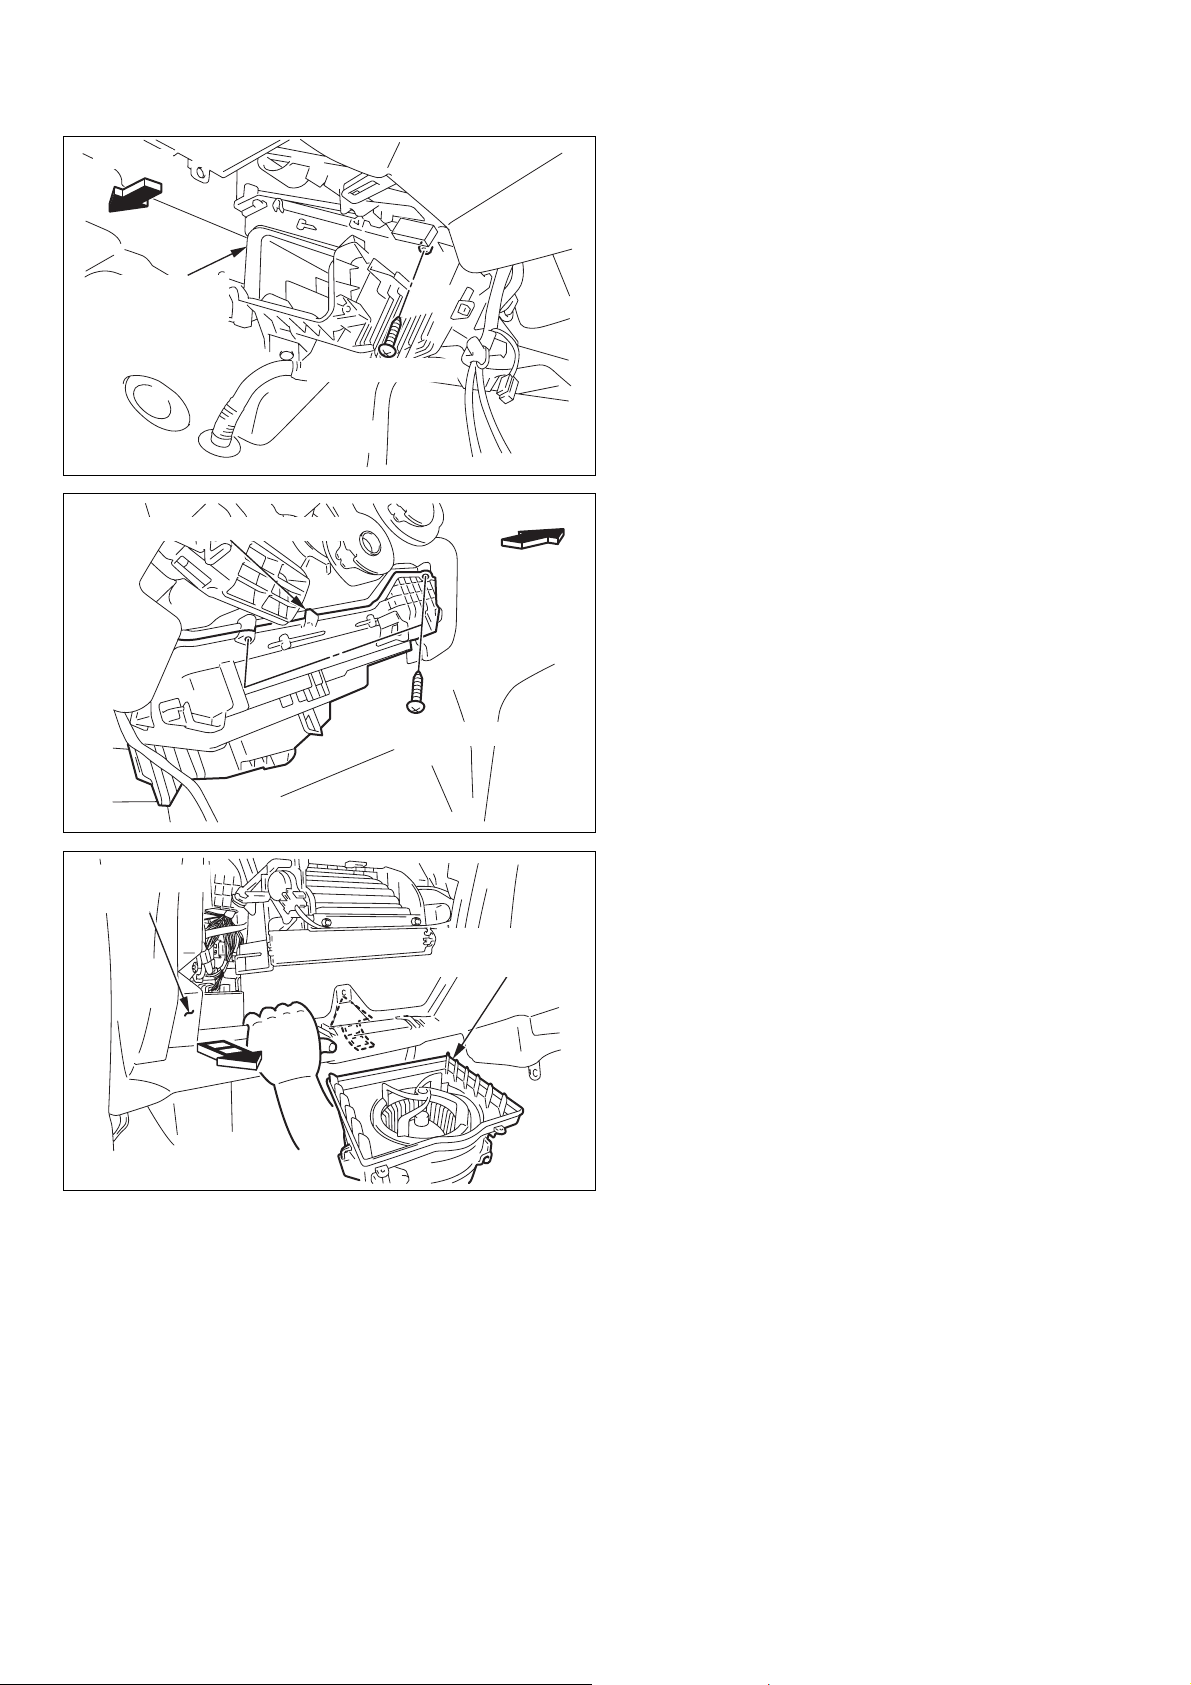
FRONT
HEATER UNIT
LOWER CASE
(e) Reinstall the screw for the heater unit lower case
of left side.
HEATER UNIT LOWER CASE
INSTRUMENT
PANEL
SCREW (REUS
SCREWS (REUSE)
[2]
E)
A029285
FRONT
A001868
BLOWER UNIT
LOWER CASE
(f) Reinstall two screws for the heater unit lower
case of right side.
(5) REINSTALLATION OF THE BLOWER UNIT
LOWER CASE
(a) Insert the blower unit lower case into the
instrument panel.
[1]
A029173
— 16 —
00503437E
Loading…
TABLE OF CONTENTS
1
URBAN CRUISER_OM_OM52C63E_(EE)
1
Before driving
Adjusting and operating features such as door locks,
mirrors, and steering column
2
When driving
Driving, stopping and safe-driving information
3
Interior features
Air conditioning and audio systems, as well as other in-
terior features for a comfortable driving experience
4
Maintenance and
care
Cleaning and protecting your vehicle, performing do-it-
yourself maintenance, and maintenance information
5
When trouble
arises
What to do if the vehicle needs to be towed, gets a flat
tire, or is involved in an accident
6
Vehicle specifi-
cations
Detailed vehicle information
Index
Alphabetical listing of information contained in this man-
ual