
Are you looking for the manual for Toyota RS series? You are in the right place. Below the document viewer for Toyota RS series manual in PDF format. To save your time, we say that the most common problems with Toyota RS series can be found in the manual in the «Troubleshooting» section. Check the appropriate page number in the table of contents, and then enter it in the page number box on the right side of the document viewer for Toyota RS series.
If you have questions about the Toyota RS series device, use the form at the bottom of the page and ask our community a question.
Remember! Reading the Toyota RS series user manual and adhering to the rules of using the device provided there, greatly help in its effective use. It is important to correctly configure Toyota RS series, it will save resources needed to use it. In case of problems, you will also find recommended companies that can properly fix Toyota RS series. One of the most important reasons why you should read the Toyota RS series user manual is that to take advantage of the warranty provided on Toyota RS series — the device must be used in accordance with the manufacturer’s recommendations presented in user manual.
If you want to download Toyota RS series manual, use the «Download» button below. You can easily view the downloaded version and print selected manual pages Toyota RS series. All manuals on our website are available in PDF format, which is the most universal format that is as easy to use as possible on all operating systems.
Русский
- Bedienungsanleitung Toyota RS series
- Toyota RS series User Manual
- Manual Usuario Toyota RS series
- Mode d’emploi Toyota RS series
- Istruzioni Toyota RS series
- инструкция Toyota RS series
- Toyota RS seriesの取扱説明書
- Handleiding Toyota RS series
- Manual de uso Toyota RS series
Вам нужна инструкция? Мы поможем Вам ее найти и сэкономить Ваше время.
- 54 stron
- 3.72 mb
Изделие Toyota RS series, а также другие, которыми Вы пользуетесь ежедневно, наверняка вы получили в комплекте с инструкцией обслуживания. Из опыта наших пользователей мы знаем, что большинство из Вас не уделили этому особого внимания. Большая часть инструкций, сразу же после покупки попадает в корзину для мусора вместе с коробкой — это ошибка. Ознакомьтесь с информацией, касающейся инструкции Toyota RS series, которая поможет Вам в будущем сэкономить нервы и избежать головной боли.
Важная подсказка — не забывайте хотя бы раз прочитать инструкцию Toyota RS series
Если вы не хотите каждый раз читать информационные брошюры, касающиеся, тех или Toyota RS series иных изделий, достаточно, прочитать их раз — сразу же после покупки устройства. Вы получите основное знания, касающиеся поддержания изделия Toyota RS series в хорошем эксплуатационном состоянии, так, чтобы без проблем достигнуть его планируемого цикла работы. Затем инструкцию можно отложить на полку и вернуться к ней только в случае, если вы не уверены, правильно ли проводится техобслуживание изделия. Правильный уход является необходимым элементом Вашего удовольствия Toyota RS series.
Раз в году пересмотрите шкафчик, в котором держите инструкции для всех устройств, — выбросите те, которыми вы уже не пользуетесься. Это поможет Вам сохранять порядок в своей домашней базе инструкций обслуживания.
Summary of Contents for Toyota RS series
Что находится в инструкции Toyota RS series? Почему стоит ее прочитать?
- Гарантия и подробности, касающиеся техобслуживания изделия
Хорошей идеей будет прикрепить чек к странице инструкции. Если что-то плохое случится во время использования Toyota RS series, у вас будет комплект документов, необходимый для гарантийного ремонта. В этой части инструкции вы найдете информацию об авторизованных сервисных центрахToyota RS series а также, как самостоятельно правильно ухаживать за оборудованием — так, чтобы не потерять гарантийных прав. - Указания по монтажу и Setup
Не терять нервов и времени на самостоятельную попытку установки и первого запуска изделия. Воспользуйтесь рекомендациями производителя Toyota RS series чтобы правильно запустить изделие, без лишнего риска повреждения оборудования. - Информация, касающаяся дополнительных запчастей (входящих в комплект а также являющихся опцией)
Пересматривая эту часть документа вы сможете проверить, доставлен ли ваш Toyota RS series с полним комплектом аксессуаров. Вы также сможете узнать, какие дополнительные запчасти или аксессуары для Toyota RS series Вы сможете найти и докупить к своему устройству. - Troubleshooting
Самые частые проблемы, касающиеся Toyota RS series и методы их решения. Это очень полезная часть руководства по обслуживанию — она позволит Вам сэкономить много времени на поиск решений. 90% проблем с Toyota RS series повторяется у многих пользователей. - Требования, касающиеся питания и энергетический класс
Информация, касающаяся количества потребляемой энергии, а также рекомендации, касающиеся установки и питания Toyota RS series. Прочитайте, чтобы оптимально пользоваться Toyota RS series и не использовать большего количества ресурсов, нежели это необходимо для правильной работы изделия. - Специальные функции Toyota RS series
Здесь вы можешь узнать, как персонализировать изделие Toyota RS series. Вы узнаете, какие дополнительные функции могут помочь Вам удобно использовать продукт Toyota RS series а также, какие функции Вашего устройства оптимальны для выполнения конкретной деятельности.
Как видите в инструкции вы найдете информацию, которая реально поможет Вам в использовании Вашего изделия. Стоит с ней ознакомиться, чтобы избежать разочарований, возникающих из более короткого, нежели предусматривалось, периода исправности изделия Toyota RS series. Если все же вы не хотите копить инструкции в своем доме, наш сайт поможет Вам в этом — вы должны найти у нас руководство по обслуживанию большинства из своих устройств, а также Toyota RS series.
Комментарии (0)


Type designation
RS series has several types.
The types are shown on the model label as follows:
MODEL/MODELE(MODEL NAME) SERIES/SERIE
RS SERIES/SERIE
RS2000 SERIES/SERIE
RS2000A SERIES/SERIE
RS2000B SERIES/SERIE
Model label
When calling for service, please note the MODEL and SERIES numbers that are inscribed on the
back of your sewing machine.
MODEL number SERIES number
1

CONTENTS
I. Before use …………………………………………………………………………………. 3
1. Important safety instructions……………………………………………………………….. 3
2. How to change the power plug ……………………………………………………………. 5
3. Part names ………………………………………………………………………………………. 6
II. Sewing preparations …………………………………………………………………. 10
1. Connecting the power………………………………………………………………………. 10
2. Taking out the bobbin ………………………………………………………………………. 12
3. Winding the lower thread………………………………………………………………….. 13
4. Threading the lower thread……………………………………………………………….. 15
5. Threading the upper thread ………………………………………………………………. 16
6. Pulling up the lower thread ……………………………………………………………….. 18
7. Main stitch pattern uses……………………………………………………………………. 19
8. Application of each stitch pattern……………………………………………………….. 20
9. Changing the presser foot ………………………………………………………………… 21
10. Changing the needle ……………………………………………………………………….. 23
11. Relationship between the needle, thread and fabric, and adjusting
the sewing machine …………………………………………………………………………. 24
III. Sewing …………………………………………………………………………………… 25
1. Straight stitching and reverse sewing…………………………………………………. 25
2. Zigzag sewing…………………………………………………………………………………. 29
3. Adjusting thread tension …………………………………………………………………… 30
4. Overcasting ……………………………………………………………………………………. 31
5. Blind hem stitching ………………………………………………………………………….. 32
6. Buttonhole ……………………………………………………………………………………… 34
7. Zipper sewing …………………………………………………………………………………. 37
8. Smocking……………………………………………………………………………………….. 39
9. Embroidery …………………………………………………………………………………….. 40
IV. Special specifications ………………………………………………………………. 42
1. Using the needle threader ………………………………………………………………… 42
2. Using the presser foot pressure adjuster…………………………………………….. 44
3. Using the drop feed …………………………………………………………………………. 45
V. Maintenance……………………………………………………………………………. 46
1. Feed dog and hook maintenance ………………………………………………………. 46
2. Hook installation ……………………………………………………………………………… 48
3. Light bulb replacement …………………………………………………………………….. 49
4. Troubleshooting………………………………………………………………………………. 50
5. Servicing double-insulated products (230 V-240 V) ……………………………… 51
VI. Others……………………………………………………………………………………. 52
1. Specifications …………………………………………………………………………………. 52
2. Recycling ……………………………………………………………………………………….. 52
2
I. Before use
Be sure to read this section before use
1. Important safety instructions
These safety instructions are designed to prevent danger or damage arising from the incorrect
operation of the machine. Read carefully and always follow the instructions.
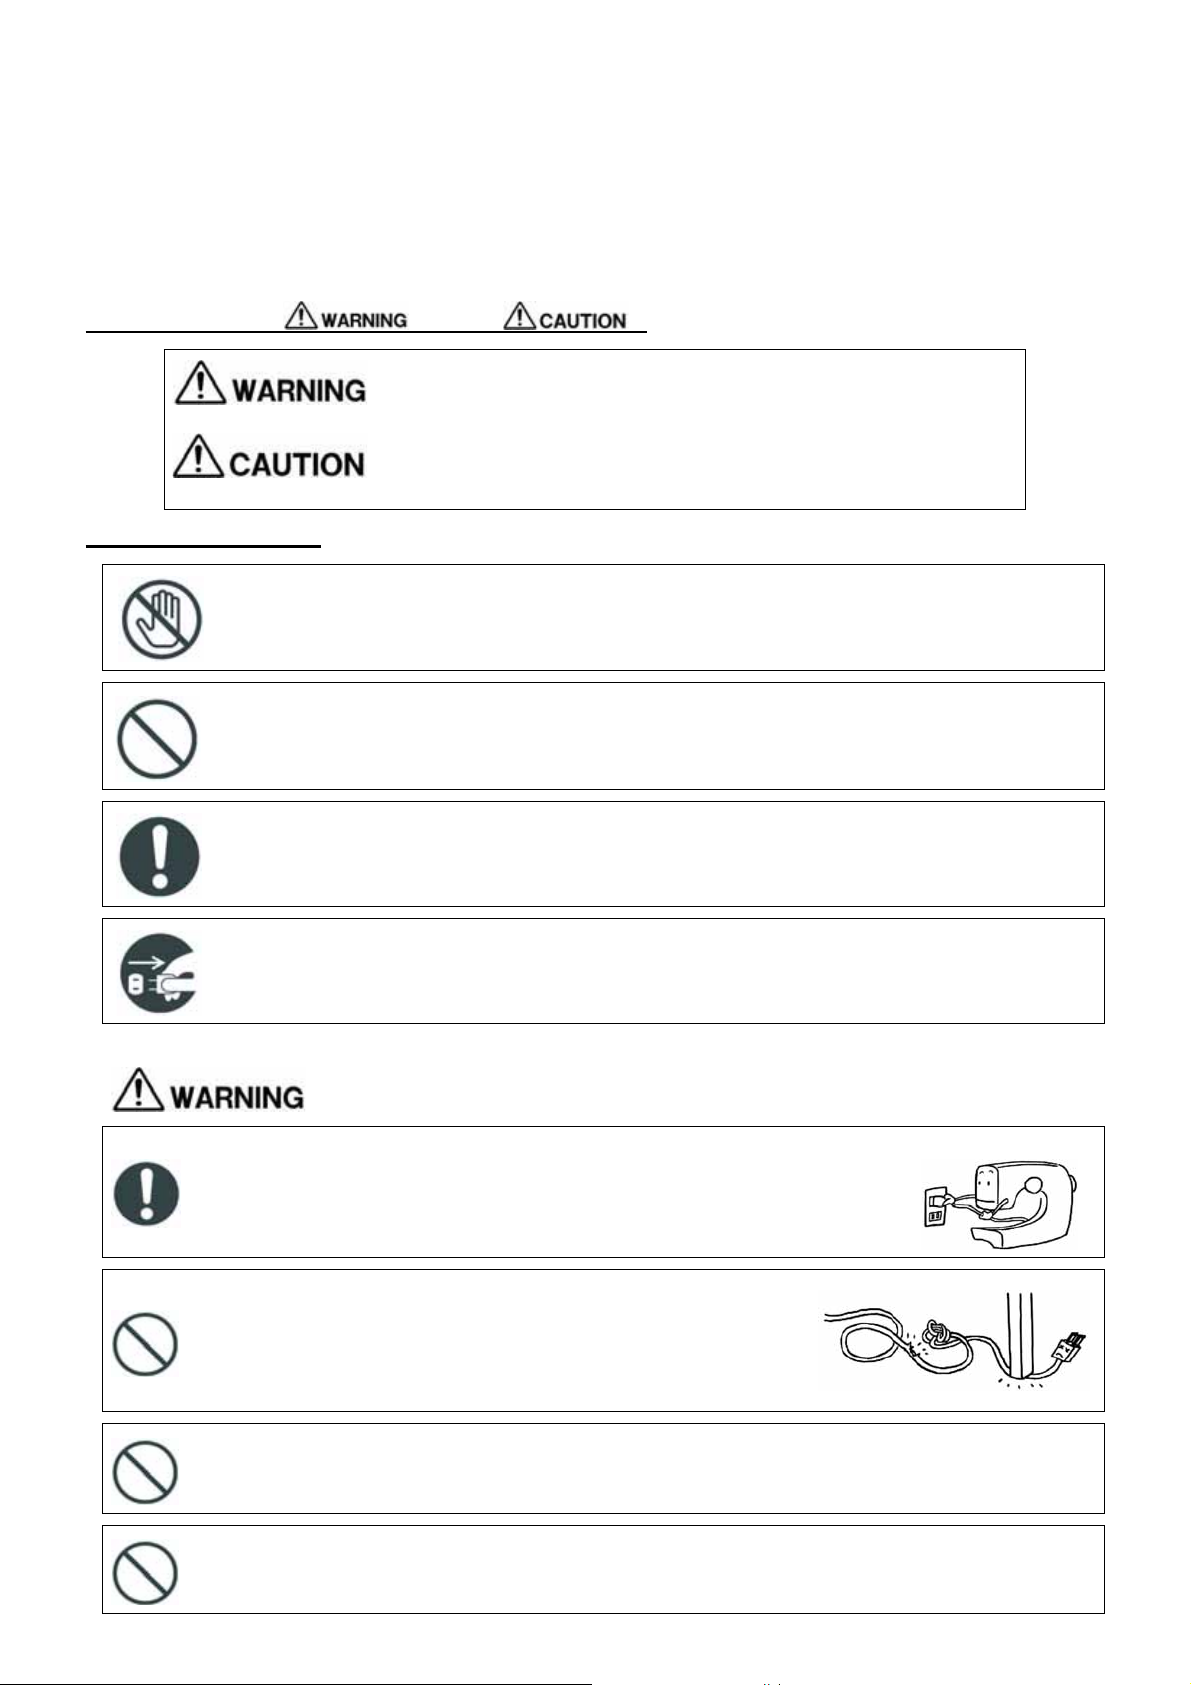
Explanation of » » and » «
An incorrect operation could result in death or serious injury.
An incorrect operation could result in an injury or damage to the machine.
Symbol explanation
Do not touch
Before use
Prohibited actions
Required actions
Remove the power plug from the outlet.
Use an AC 220 to 230 V power source.
Not doing so could cause an electric shock or a fire.
Do not damage the power cord, modify it, bend it
excessively, jerk it or twist it.
Doing so could cause an electric shock or a fire.
If the power cord is damaged, it must be replaced by the
manufacturer or its service agent.
220 to 230 V
Do not operate where aerosol ( spray ) products are being used or where oxygen is
being administered.
Doing so could cause a fire.
Do not use outdoors.
Doing so could cause an electric shock or a fire.
3
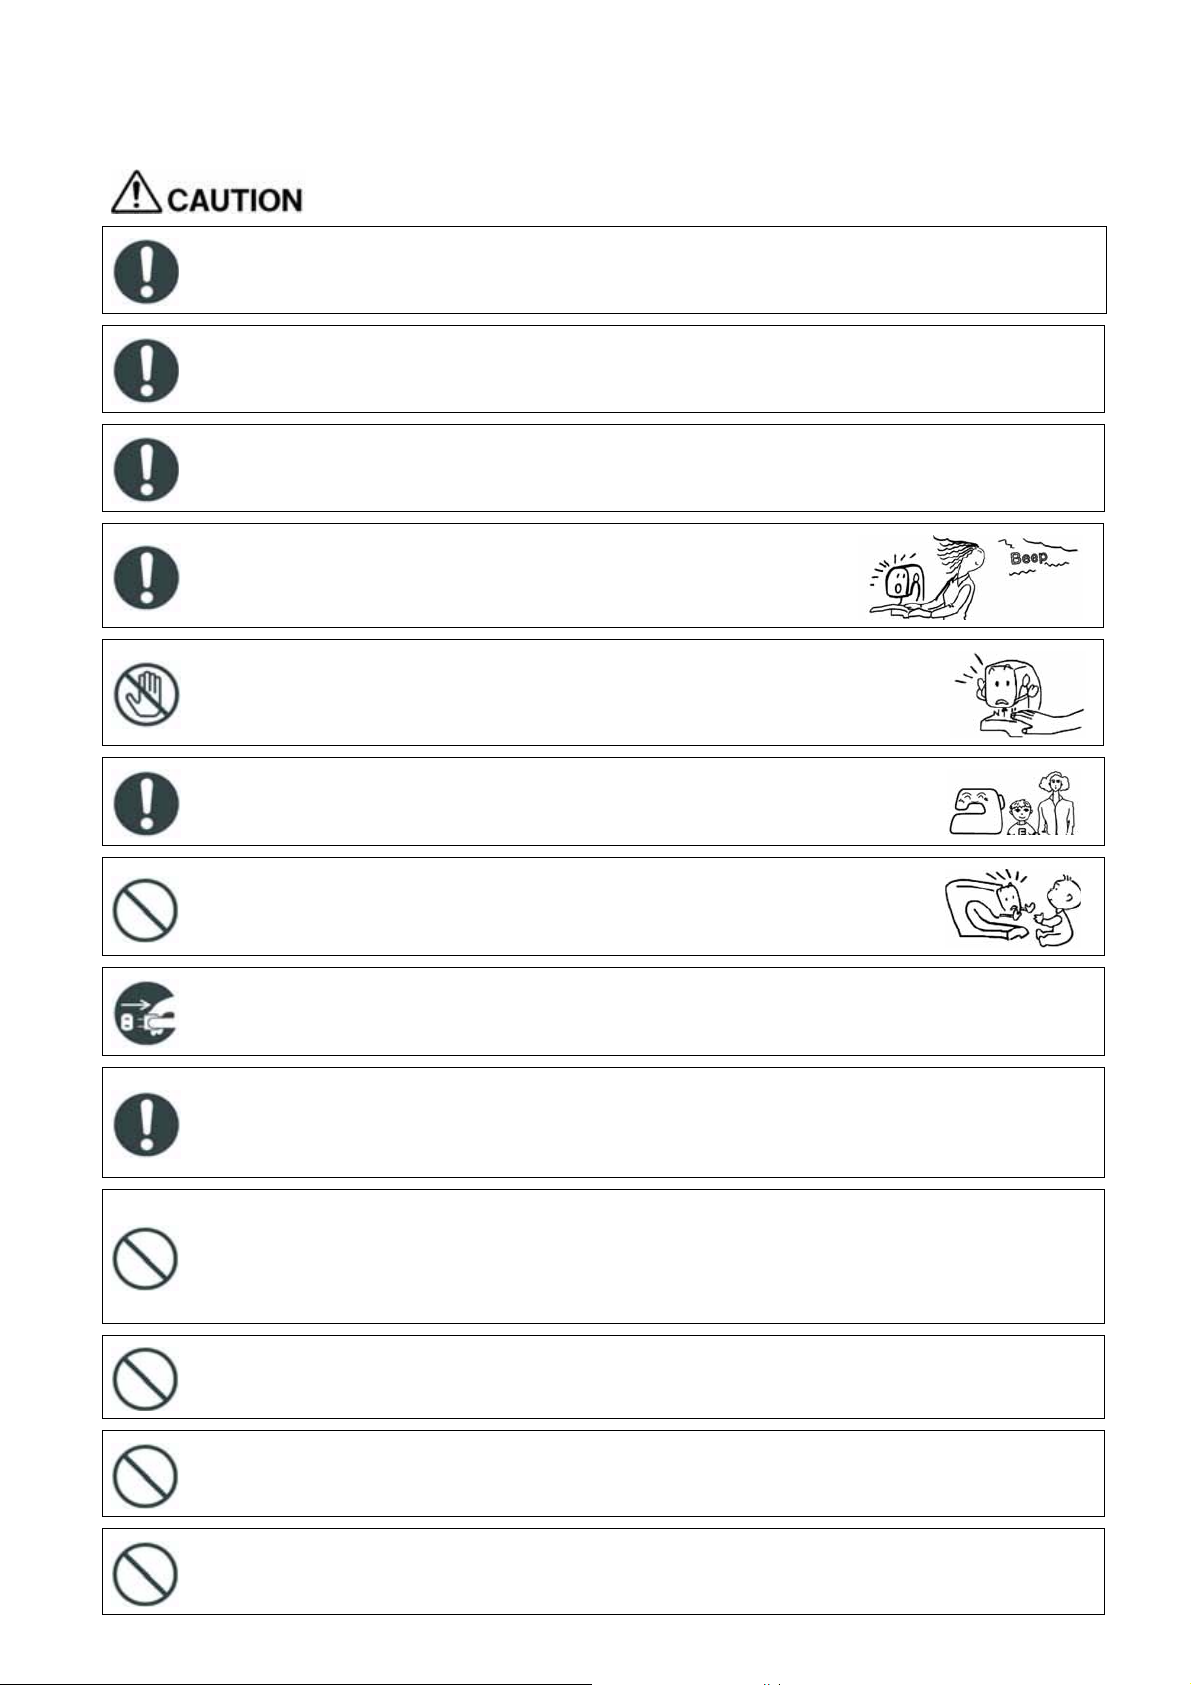
Before use
When the machine is not in use it should be stored safely, not on the floor as protruding
parts could cause injury if a person fell on the machine.
Not doing so could cause an injury.
Use with the shuttle cover closed.
Not doing so could cause an injury.
Before replacing the needle or presser foot or when threading the upper or lower thread,
remove the power plug from the outlet.
Not doing so could cause an injury.
Do not look away from the needle while operating the sewing
machine.
If the needle breaks it could cause an injury.
Do not touch moving parts such as the needle, take-up lever or
handwheel.
Doing so could cause an injury.
Children should only use the machine under the supervision of a
parent or guardian.
Otherwise they could injure themselves.
Do not use when young children are near the machine.
They could touch the needle and be injured.
Before leaving the sewing machine after using it, remove the power plug from the outlet.
Not doing so could cause an injury.
Before using the sewing machine make sure that the presser foot holder clamp screw,
needle clamp screw and needle plate screw are firmly tightened, and that the presser
foot is properly set in the presser foot holder.
Not doing so could cause an injury.
Sewing without lowering the presser foot.
Do not perform the following actions.
Doing so could cause an injury.
Sewing while the needle is incorrectly installed.
Using a bent needle.
Sewing while jerking the fabric.
Moving the pattern selection dial while sewing.
Do not operate on an unstable surface such as a sofa or a bed.
If the sewing machine falls down, it could cause an injury or damages to the machine.
Do not drop or insert any foreign objects into any openings such as opening space
when you remove the face cover and / or the outer casing space of bobbin case.
Doing so could cause an injury or damages to the machine.
Do not repair, disassemble or modify except what is mentioned in the instruction
manual.
Doing so could cause an electric shock, a fire or an injury.
4

Before use
UK ONLY IMPORTANT PLEASE READ CAREFULLY
2. How to change the power plug
When you change the power plug or cord, do not repair, disassemble or modify
except at the authorised dealeror service centre.
Doing so could cause an electric shock or a fire.
If for any reason the power plug for this product is removed it should be immediately
disposed of safety and not stored anywhere where it could be inadvertently used again.
Doing so could cause an electric shock or a fire.
The wires in this mains lead are coloured in accordance with the following code:
BLUE-NEUTRAL
As the colours of the mains lead of this appliance may not correspond with the coloured markings
identifying the terminals in your plug — PROCEED AS FOLLOWS:
The earth plug pin in unnecessary. As the machine is designed under double insulation structure,
the earth wire is removed from the machine. The wire coloured BROWN must be connected to the
terminal marked L or A or coloured RED. The wire coloured BLUE must be connected to the terminal
marked N or coloured BLACK. Neither core is to be connected to the earth terminal of a three-pin plug.
BROWN-LIVE ( OR ACTIVE )
5
Before use
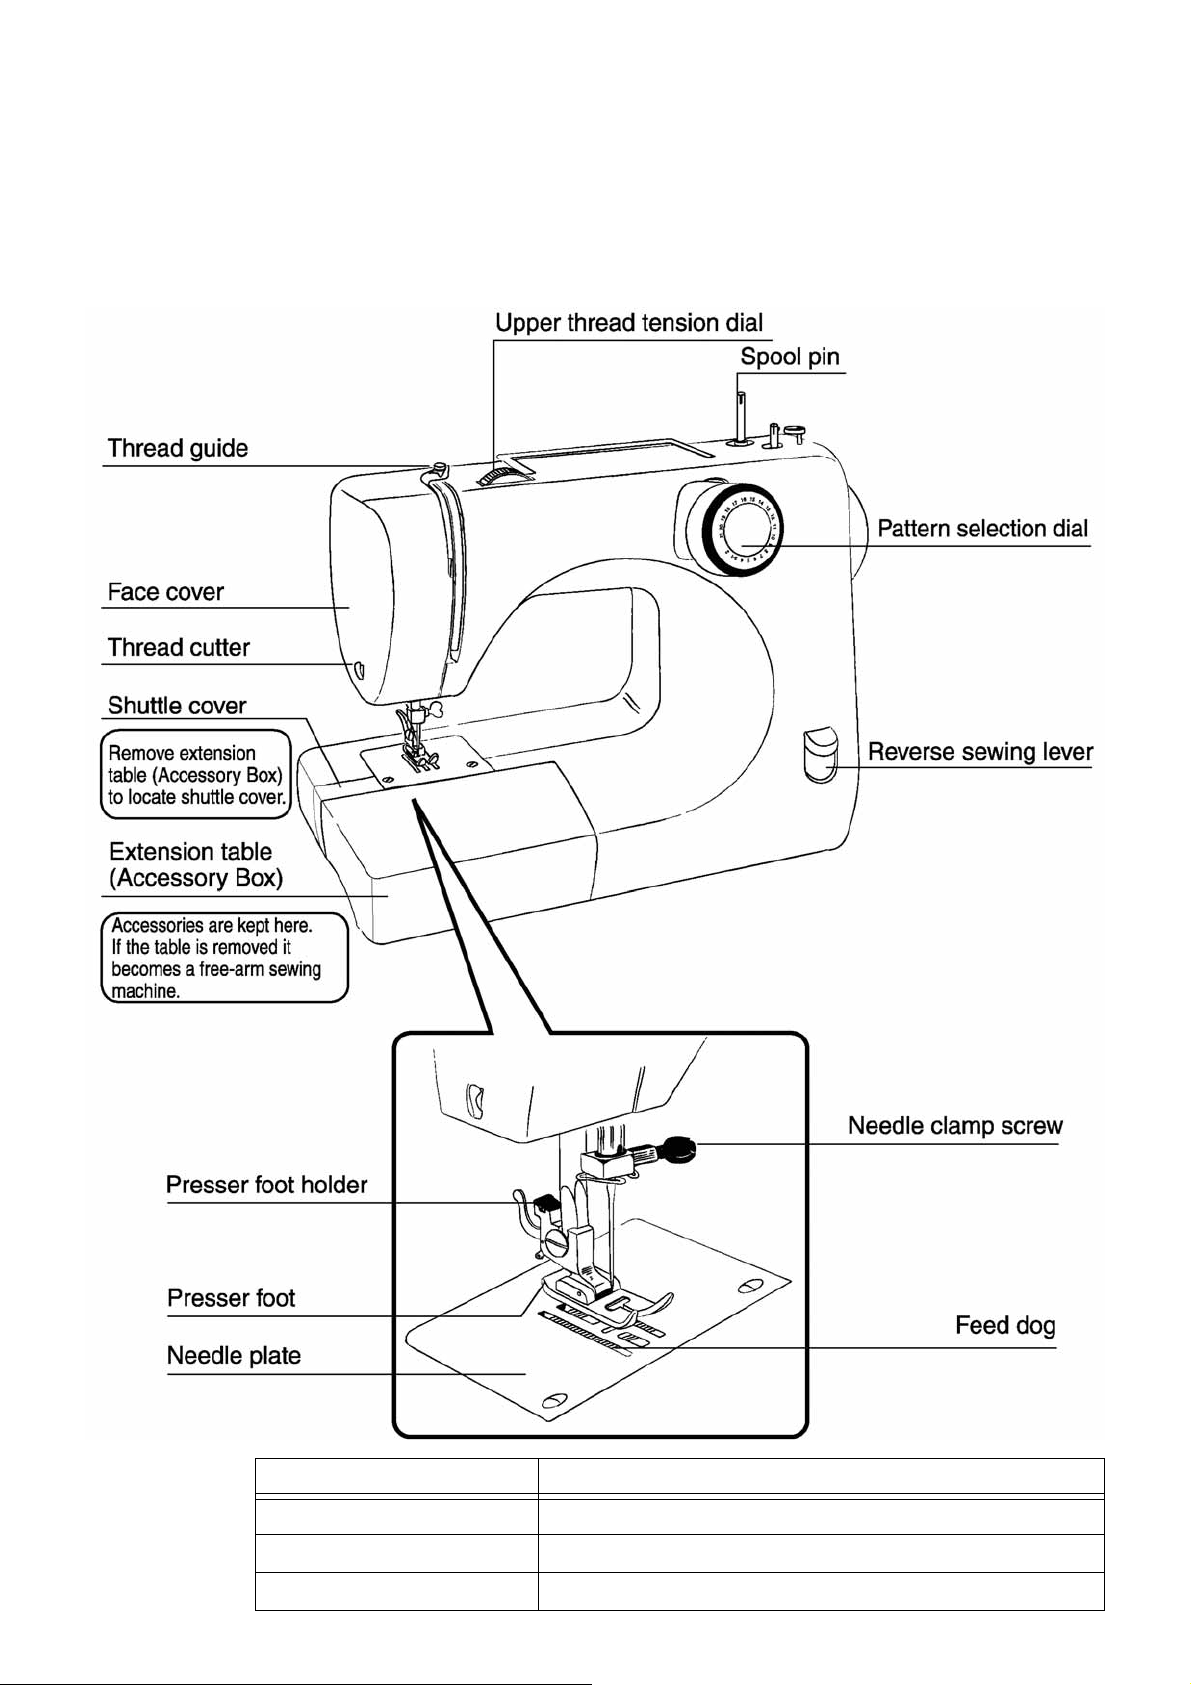
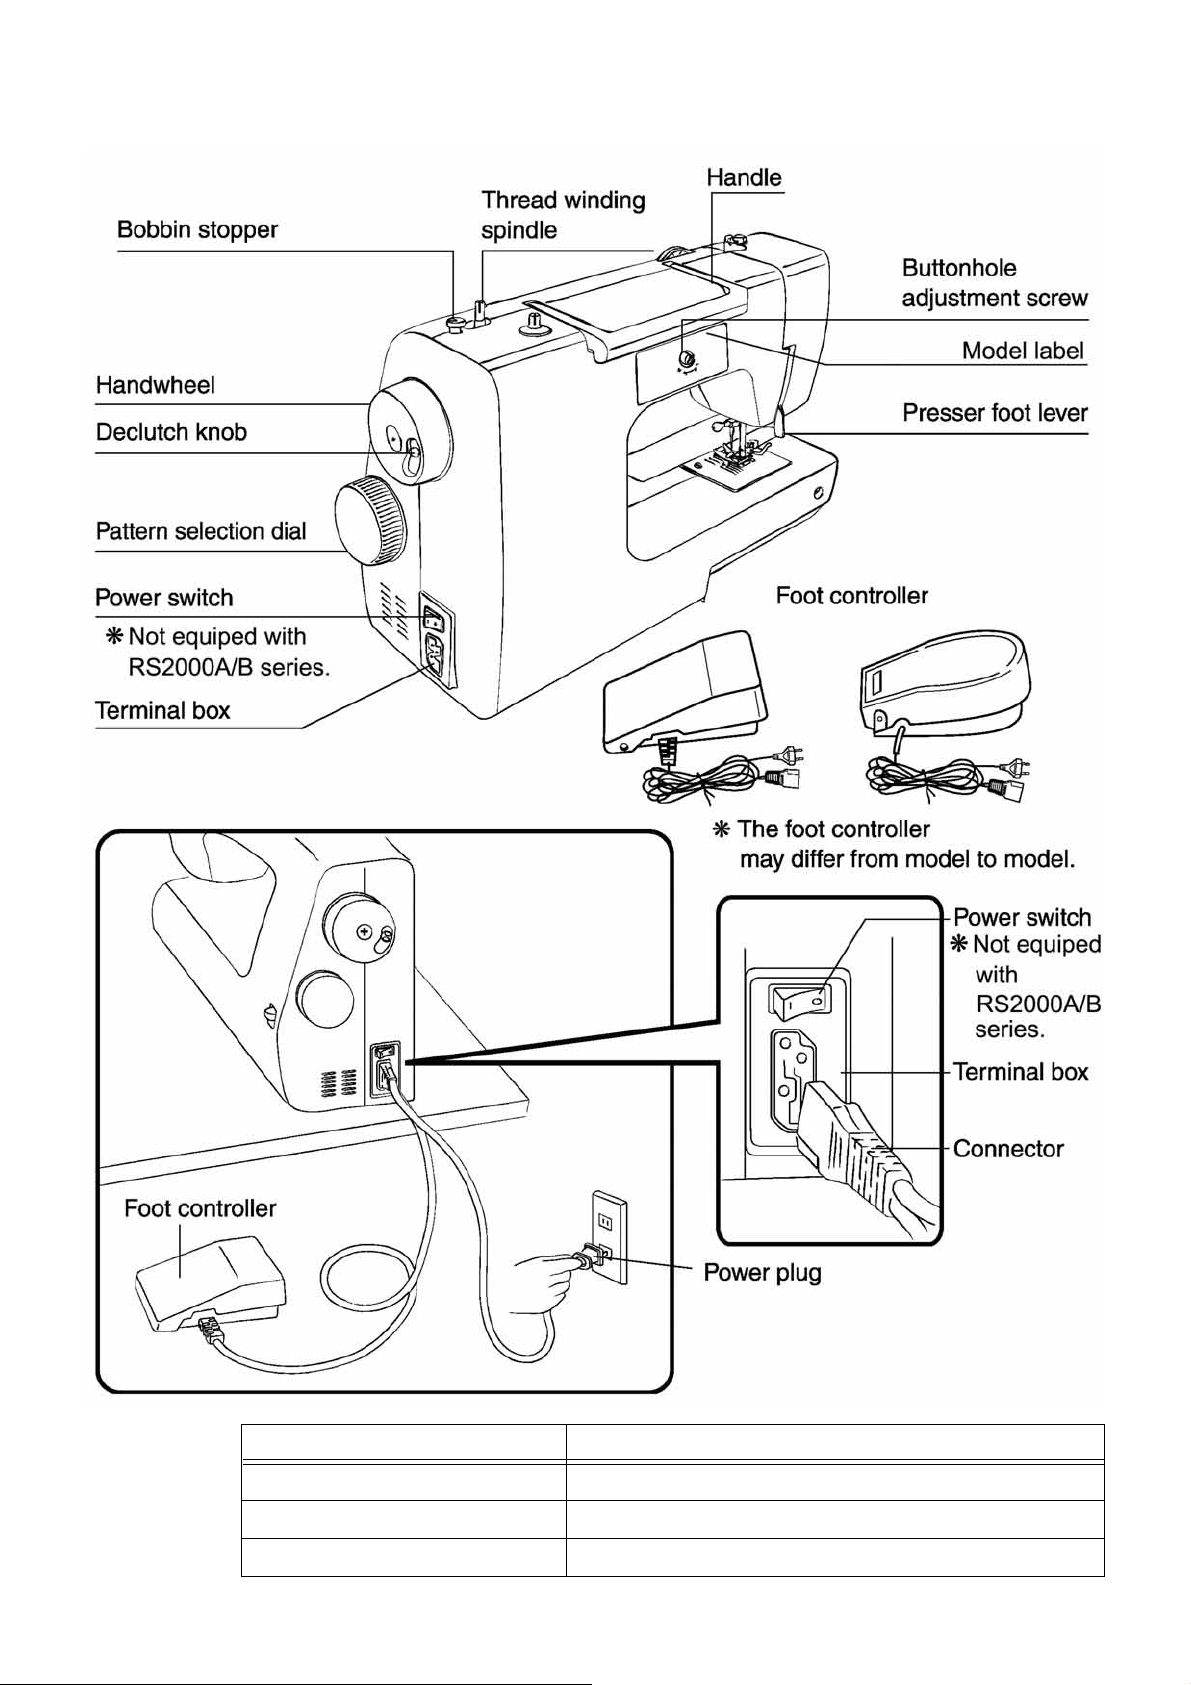
3. Part names
Some parts may not apply to your sewing machine.
The MODEL and SERIES numbers are located on the model label on the back of the sewing machine.
Front pattern selection dial type
Part name Detail by use
Upper thread tension dial Refer to P.30 [Adjusting thread tension]
Spool pin Refer to P.13 [Winding the lower thread]
Reverse sewing lever Refer to P.26 [ 侀 Reverse sewing 侀 ]
6
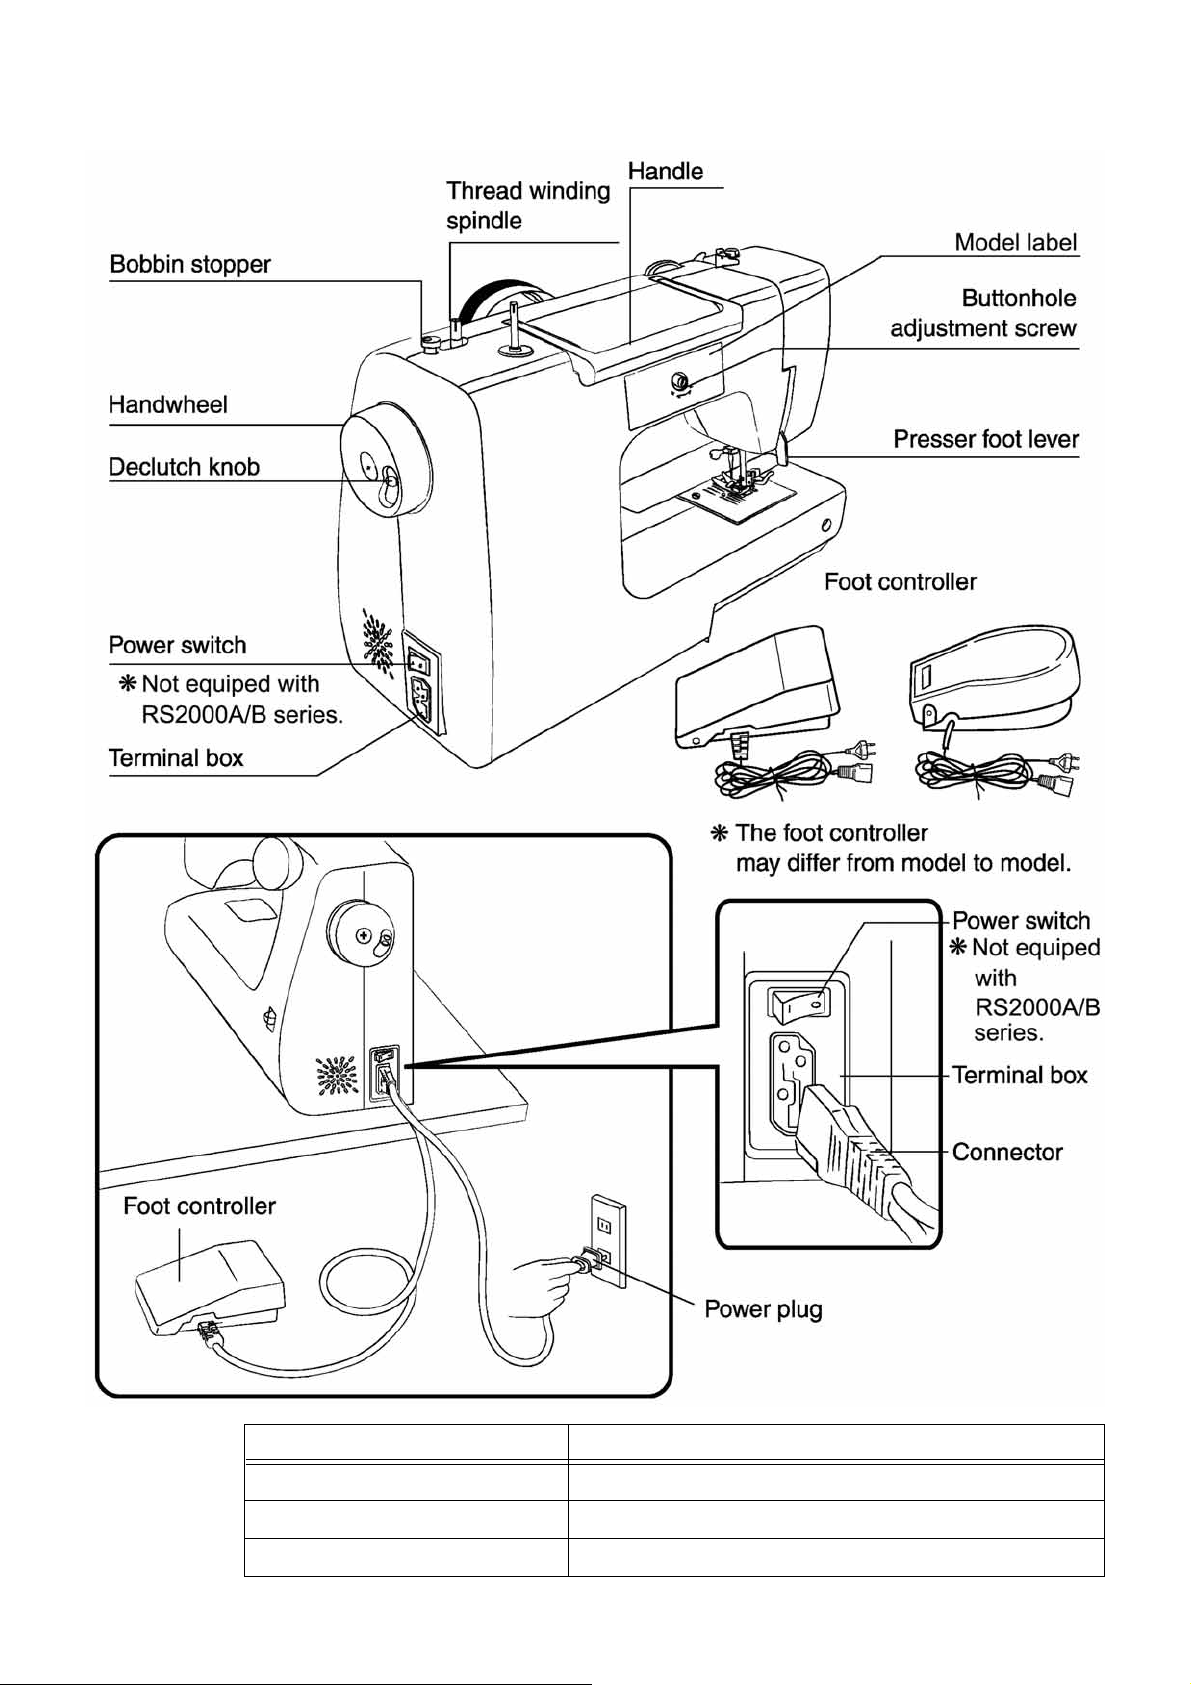
Before use
Part name Detail by use
Declutch knob Refer to P.14[Winding the lower thread] 4)
Buttonhole adjustment screw Refer to P.36 [侀Adjustment of buttonhole balance侀]
Presser foot lever Refer to P.16 [Threading the upper thread]
7

Before use
Some parts may not apply to your sewing machine.
The MODEL and SERIES numbers are located on the model label on the back of the sewing machine.
Side pattern selection dial type
Part name Detail by use
Upper thread tension dial Refer to P.30 [Adjusting thread tension]
Spool pin Refer to P.13 [Winding the lower thread]
Reverse sewing lever Refer to P.26 [ 侀 Reverse sewing 侀 ]
8
Before use
Part name Detail by use
Declutch knob Refer to P.14[Winding the lower thread] 4)
Buttonhole adjustment screw Refer to P.36 [侀 Adjustment of buttonhole balance 侀]
Presser foot lever Refer to P.16 [Threading the upper thread]
9

Sewing preparations
II. Sewing preparations
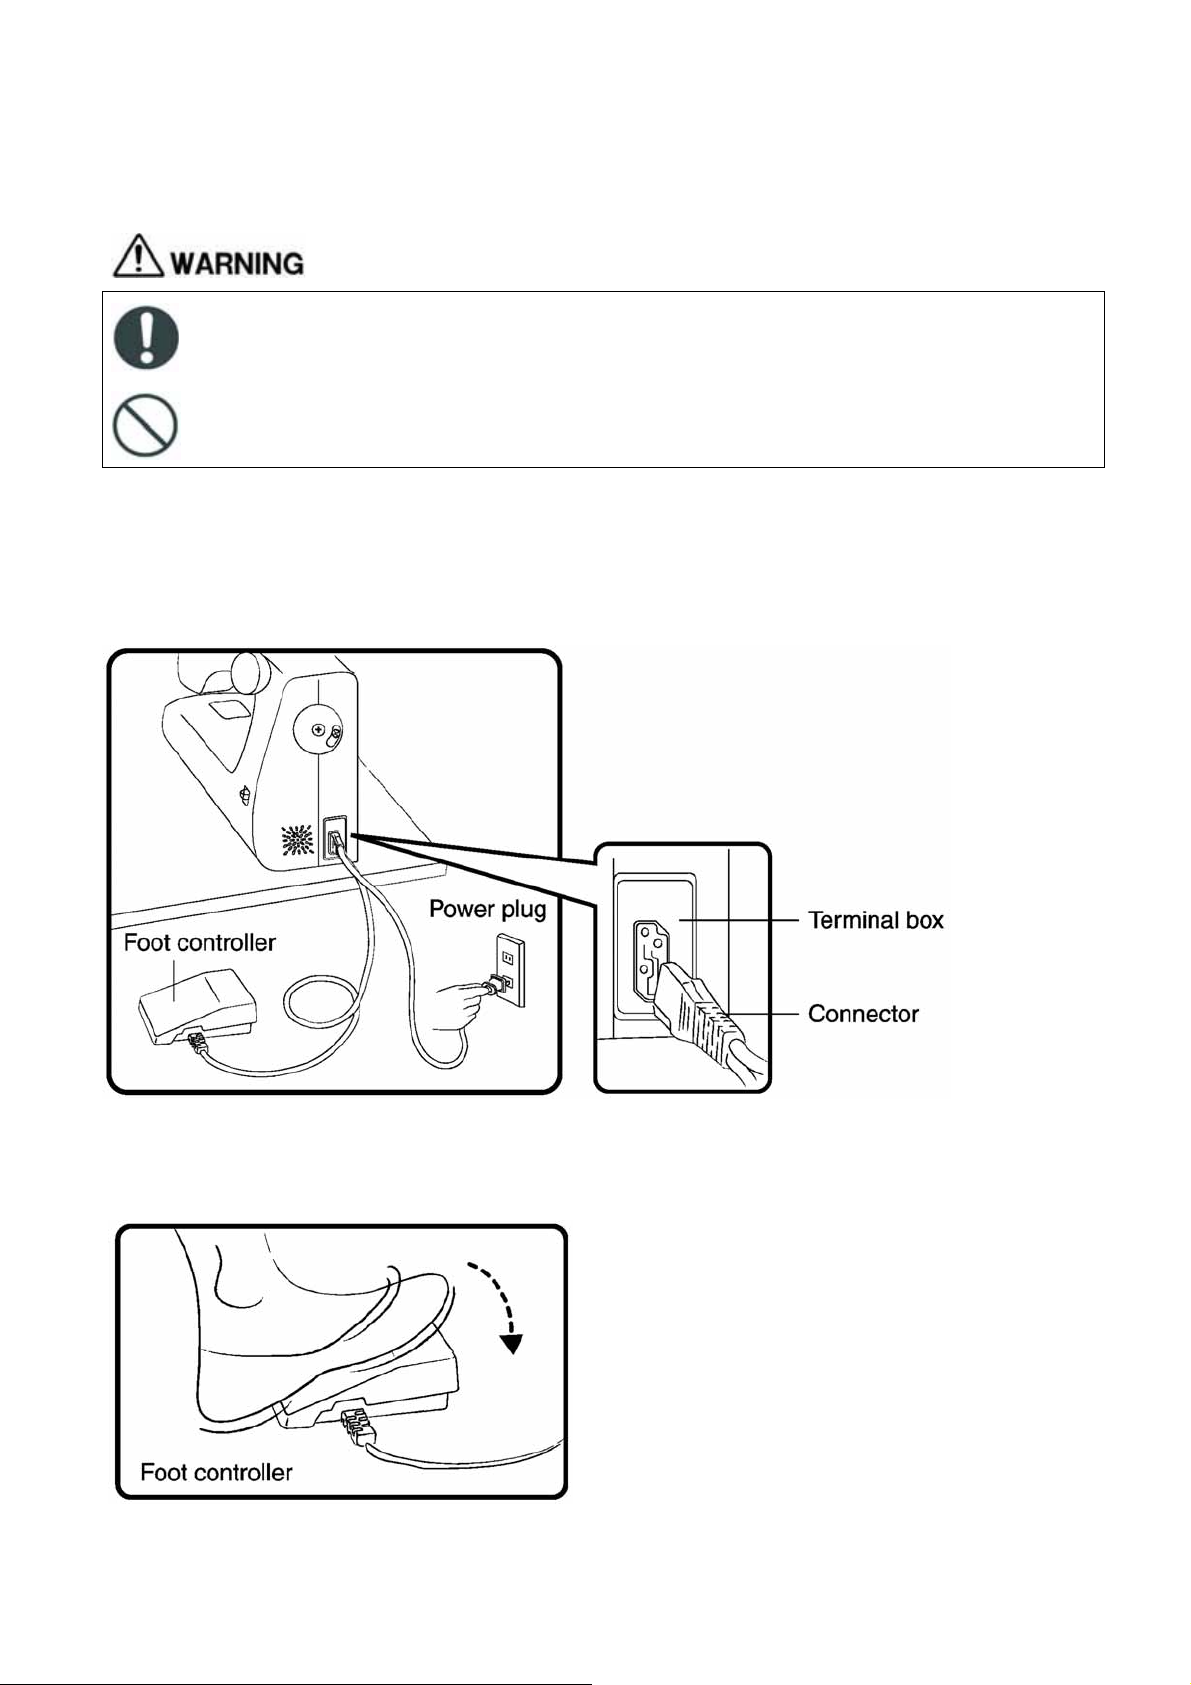
1. Connecting the power
Machine with a power switch
Turn the power switch off when inserting the power plug.
Not doing so could cause an injury.
Hold the power plug when removing it from the outlet.
Not doing so could damage the cord and cause an electric shock, fire or injury.
Do not touch the power plug with wet hands.
Doing so could cause an electric shock.
Prepare the foot controller.
Insert the power cord connector into the terminal box.
Insert the power plug into the outlet.
Press the power switch to [I] (On).
The power is turned on.
10
Sewing preparations
Machine without a power switch
RS2000 A/B series only.
Hold the power plug when removing it from the outlet.
Not doing so could damage the cord and cause an electric shock, fire or injury.
Do not touch the power plug with wet hands.
Doing so could cause an electric shock.
Prepare the foot controller.
Insert the power cord connector into the terminal box.
Insert the power plug into the outlet.
The power is turned on at the outlet.
How to operate foot controller
Step on the foot controller to operate the sewing
machine.
The more you press the foot controller, the faster
the machine runs.
Release the foot controller to stop the machine.
11
Sewing preparations
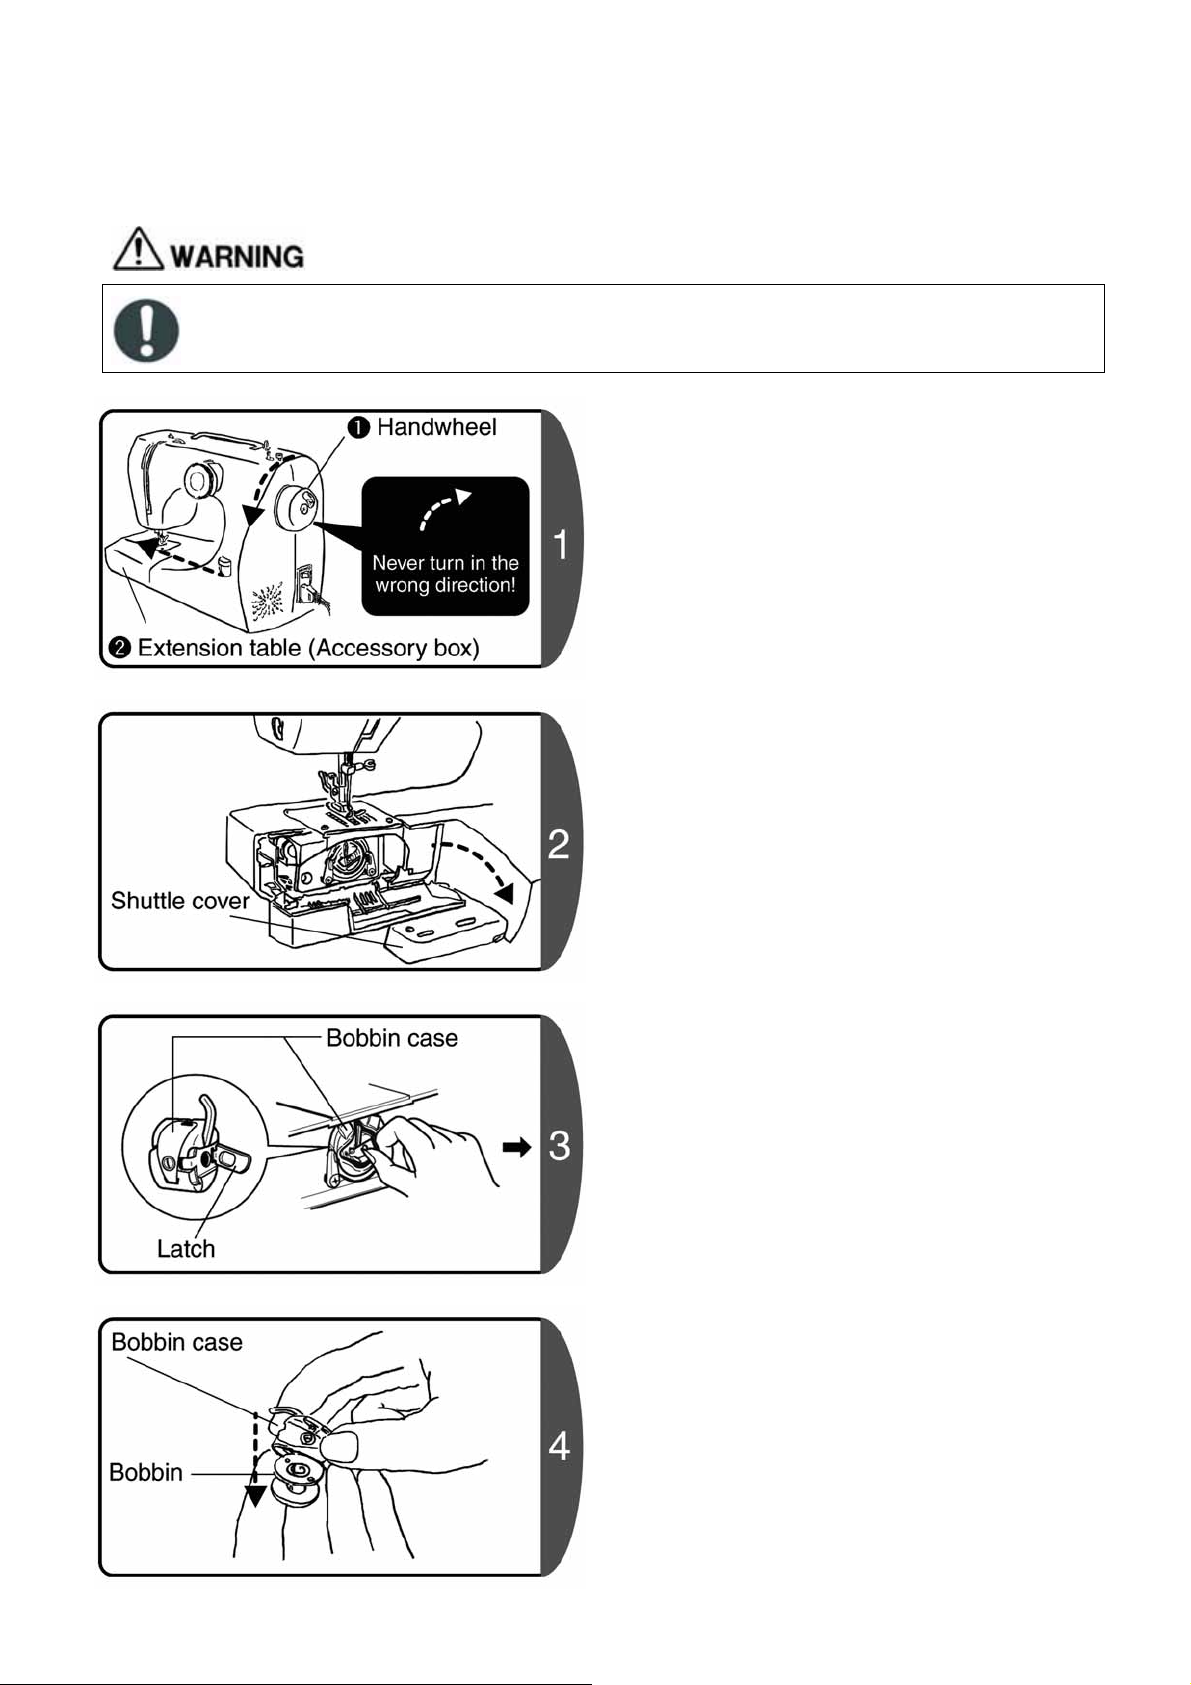
2. Taking out the bobbin
Before taking out or setting the bobbin case, remove the power plug from the outlet.
Not doing so could cause an injury.
1. Turn the handwheel to move the needle to the
highest position. Always turn the handwheel
towards yourself. (in the direction of the arrow)
2. Hold the left edge of the extension table and
pull out to the left. (in the direction of the arrow)
Open the shuttle cover.
(Open out in the direction of the arrow.)
Pull up the latch of the bobbin case, and use it to
pull out the case.
Take out the bobbin from the bobbin case.
12
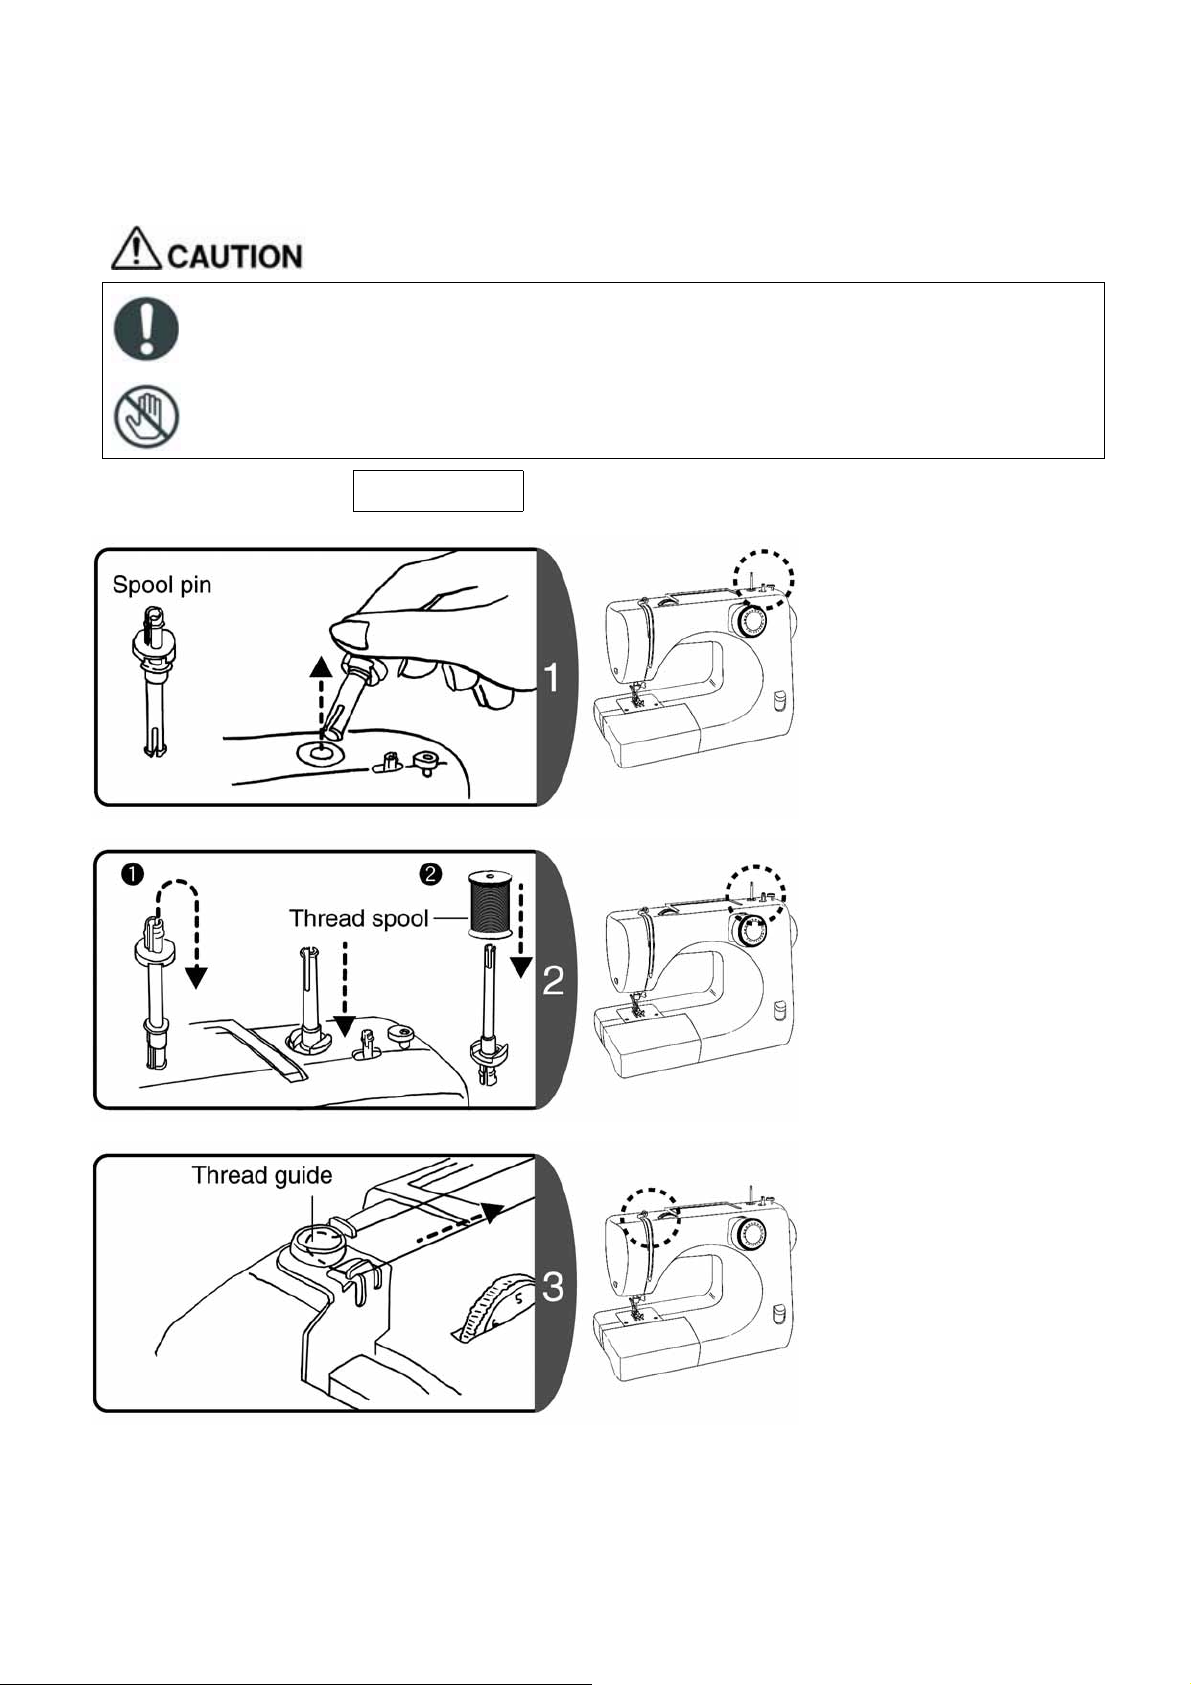
3. Winding the lower thread
Before taking out or setting the bobbin case, remove the power plug from the outlet.
Not doing so could cause an injury.
Do not touch the lower thread winding spindle when winding the lower thread.
Not doing so could cause an injury.
Sewing preparations
Attention
Use a TOYOTA-exclusive bobbin.
Remove the sticker. Pull up
the spool pin from the sewing
machine.
1. Turn the pin around and
insert.
2. Insert the thread spool.
13
Support the thread on the
sewing machine with one
hand, using the other hand
pass the thread around the
thread guide as shown in
the diagram.

Sewing preparations
1. Move the declutch latch
in the direction
(in the direction of the
arrow)
(This ensures that the
needle does not move.)
2. Pass the thread from the
inside through the bobbin
hole.
3. Set the bobbin on the
thread winding spindle
and move the spindle to
the right (in the direction
of the arrow)
1. Holding the end of the
thread, step on the foot
controller to wind the
thread.
2. After winding it a little,
stop the sewing machine
and cut the thread that
protrudes from the bobbin
hole.Then continue winding the thread.
After the winding has
finished, move the thread
winding spindle back to the
left. (in the direction of the
arrow)
1. Remove the bobbin and cut the thread.
2. Move the declutch latch in the direction
(in the direction of the arrow)
Note : If the declutch is not returned to its original
position, the sewing machine cannot move
and will not sew.
14
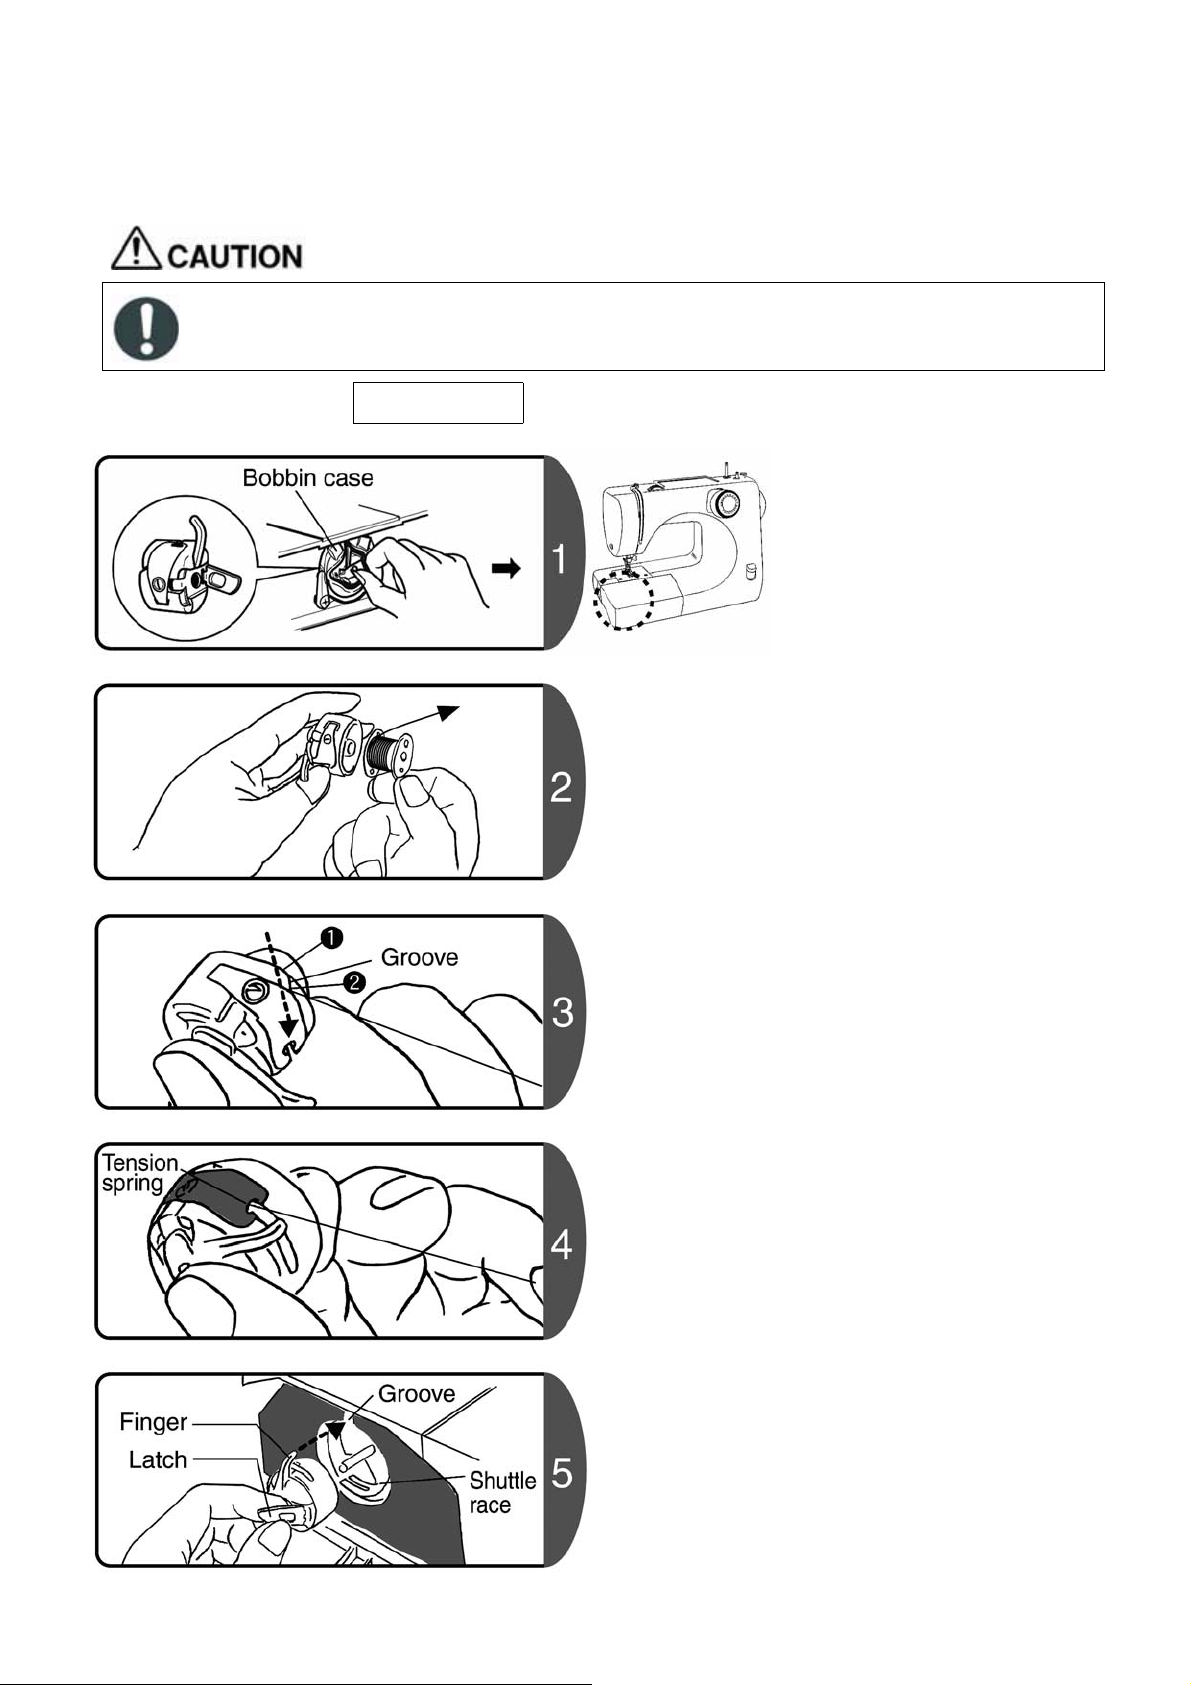
4. Threading the lower thread
Before setting the bobbin case, remove the power plug from the outlet.
Not doing so could cause an injury.
Sewing preparations
Attention
Use a TOYOTA-exclusive bobbin.
Take out the bobbin case.
(refer to P.12 [Taking out the
bobbin])
The thread must flow off the bobbin in the direction
of the arrow, and then insert the bobbin into the
bobbin case.
Hold the end of the thread in your right hand and
pass it through the groove in the bobbin case.
(Pass the thread from 1 to 2)
Press the bobbin with the finger of your left hand,
and then pass the thread through the tension spring
as shown in the diagram.
(Pull until there is a locking sound.)
Turn the handwheel to move the needle to the
highest position.
Always turn the handwheel towards yourself.
Holding the latch of the bobbin case, insert the
bobbin case into the shuttle race.
The bobbin case finger must slot into the groove.
15
Sewing preparations
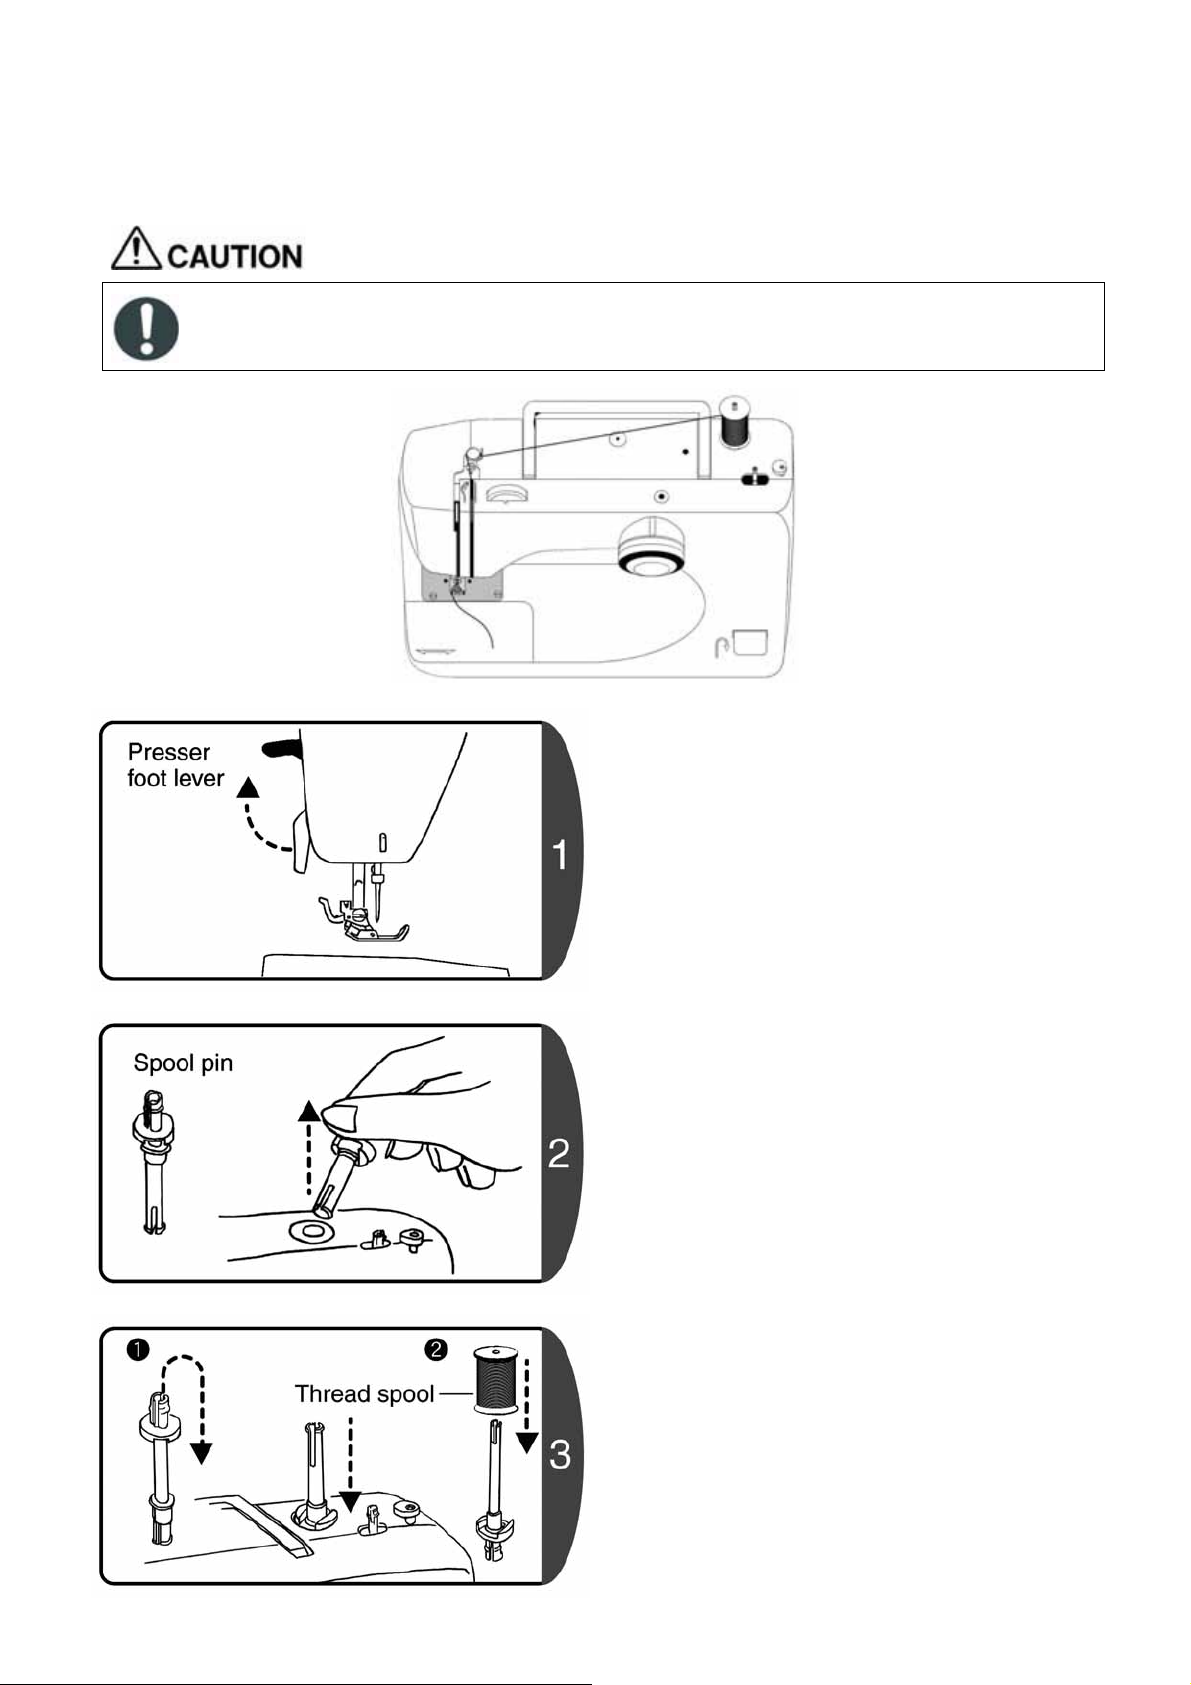
5. Threading the upper thread
Before threading the upper thread, remove the power plug from the outlet.
Not doing so could cause an injury.
Raise the presser foot lever.
Note: If the presser foot lever is not raised, the
thread cannot be set correctly.
Pull out the spool pin from the main unit.
1. Turn the spool pin over and insert.
2. Insert the thread spool.
16
Loading…
A good user manual
The rules should oblige the seller to give the purchaser an operating instrucion of Toyota RS series, along with an item. The lack of an instruction or false information given to customer shall constitute grounds to apply for a complaint because of nonconformity of goods with the contract. In accordance with the law, a customer can receive an instruction in non-paper form; lately graphic and electronic forms of the manuals, as well as instructional videos have been majorly used. A necessary precondition for this is the unmistakable, legible character of an instruction.
What is an instruction?
The term originates from the Latin word „instructio”, which means organizing. Therefore, in an instruction of Toyota RS series one could find a process description. An instruction’s purpose is to teach, to ease the start-up and an item’s use or performance of certain activities. An instruction is a compilation of information about an item/a service, it is a clue.
Unfortunately, only a few customers devote their time to read an instruction of Toyota RS series. A good user manual introduces us to a number of additional functionalities of the purchased item, and also helps us to avoid the formation of most of the defects.
What should a perfect user manual contain?
First and foremost, an user manual of Toyota RS series should contain:
— informations concerning technical data of Toyota RS series
— name of the manufacturer and a year of construction of the Toyota RS series item
— rules of operation, control and maintenance of the Toyota RS series item
— safety signs and mark certificates which confirm compatibility with appropriate standards
Why don’t we read the manuals?
Usually it results from the lack of time and certainty about functionalities of purchased items. Unfortunately, networking and start-up of Toyota RS series alone are not enough. An instruction contains a number of clues concerning respective functionalities, safety rules, maintenance methods (what means should be used), eventual defects of Toyota RS series, and methods of problem resolution. Eventually, when one still can’t find the answer to his problems, he will be directed to the Toyota service. Lately animated manuals and instructional videos are quite popular among customers. These kinds of user manuals are effective; they assure that a customer will familiarize himself with the whole material, and won’t skip complicated, technical information of Toyota RS series.
Why one should read the manuals?
It is mostly in the manuals where we will find the details concerning construction and possibility of the Toyota RS series item, and its use of respective accessory, as well as information concerning all the functions and facilities.
After a successful purchase of an item one should find a moment and get to know with every part of an instruction. Currently the manuals are carefully prearranged and translated, so they could be fully understood by its users. The manuals will serve as an informational aid.
| Language | Type | Pages | |
|---|---|---|---|
| English | User Manual | 55 | > Go to the manual |
| German | User Manual | 54 | Go to the manual |
| Dutch | User Manual | 54 | Go to the manual |
| French | User Manual | 54 | Go to the manual |
458391
Report abuse
Libble takes abuse of its services very seriously. We’re committed to dealing with such abuse according to the laws in your country of residence. When you submit a report, we’ll investigate it and take the appropriate action. We’ll get back to you only if we require additional details or have more information to share.
Product: Toyota RS series
Forumrules
To achieve meaningful questions, we apply the following rules:
- First, read the manual;
- Check if your question has been asked previously;
- Try to ask your question as clearly as possible;
- Did you already try to solve the problem? Please mention this;
- Is your problem solved by a visitor then let him/her know in this forum;
- To give a response to a question or answer, do not use this form but click on the button ‘reply to this question’;
- Your question will be posted here and emailed to our subscribers. Therefore, avoid filling in personal details.
Your question has been posted on this page
Would you like to receive an email when new answers and questions are posted? Please enter your email address.