
79754
Сегодня мы будем настраивать двухдиапазонный маршрутизатор TP-LINK Archer C7. Если вы уже приобрели этот роутер, и хотите быстрее его подключить и настроить, то переходите к следующему подзаголовку. А я напишу еще несколько слов об этом роутере для тех, кто только выбирает роутер и задумался о покупке модели Archer C7.
TP-LINK Archer C7 – это отличная модель маршрутизатора для частного дома, квартиры, и даже офиса. Когда у вас много разных устройств, вы хотите без проблем играть в онлайн игры, смотреть видео и т. д. И при этом не знать, что такое постоянные обрывы интернет-соединения, проседание пинга, падение скорости и тому подобное.
Это мощный маршрутизатор, в котором есть все современные фишки, о которых я так часто вспоминал в статье советы по выбору Wi-Fi роутера для дома, или квартиры. А именно: поддержка Wi-Fi 5 GHz (802.11ac), и два USB-порта. Этот маршрутизатор будет актуальным еще длительное время. Ну и цена для такого функционала вполне хорошая. Немного больше ста долларов.
Так как у нас здесь инструкция по настройке Archer C7 (AC1750), а не обзор и описание технических характеристик, то более подробную информацию по этой модели я напишу на отдельной странице. А сейчас мы займемся подключением этого маршрутизатора, и его настройкой.
У меня TP-LINK Archer C7 аппаратной версии v2. Поставил я последнюю прошивку, почему-то думал, что будет уже новая, голубая панель управления. Но нет, осталась зеленная. Мне кажется, что новая страница с настройками будет уже с третей аппаратной версии. Рассмотрим настройку еще на старой версии web-интерфейса. Если у вас новая прошивка, то смотрите для примера инструкцию по настройке TP-LINK Archer C8.
Если вы хотите настраивать маршрутизатор по Wi-FI с мобильного устройства (планшета), то советую делать это через приложение TP-LINK Tether. Так же, в комплекте идет диск с утилитой для быстрой настройки. Вот инструкция по настройке роутера с диска.
Как подключить роутер TP-LINK Archer C7?
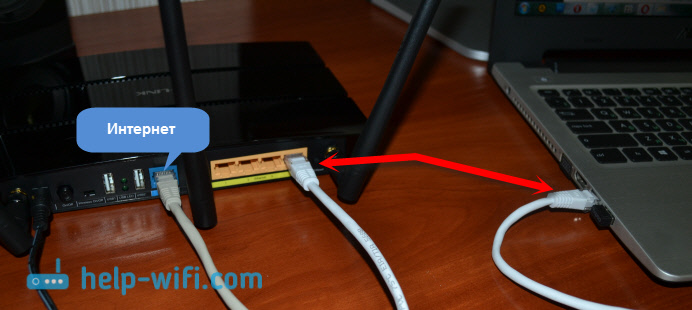
Достаточно подключить адаптер питания, в WAN-порт (он синий и подписан Ethernet) подключаем интернет, и с помощью кабеля, который вы найдете в комплекте, соединяем роутер с компьютером. Должно получится примерно так:
Включаем питание маршрутизатора, и с компьютера, к которому подключились, нужно зайти в настройки. К маршрутизатору так же можно подключится по Wi-Fi сети. Вся заводская информация (название Wi-Fi сетей, пароль к Wi-Fi, адрес для входа в настройки, стандартные имя пользователя и пароль) указаны снизу маршрутизатора, на наклейке.

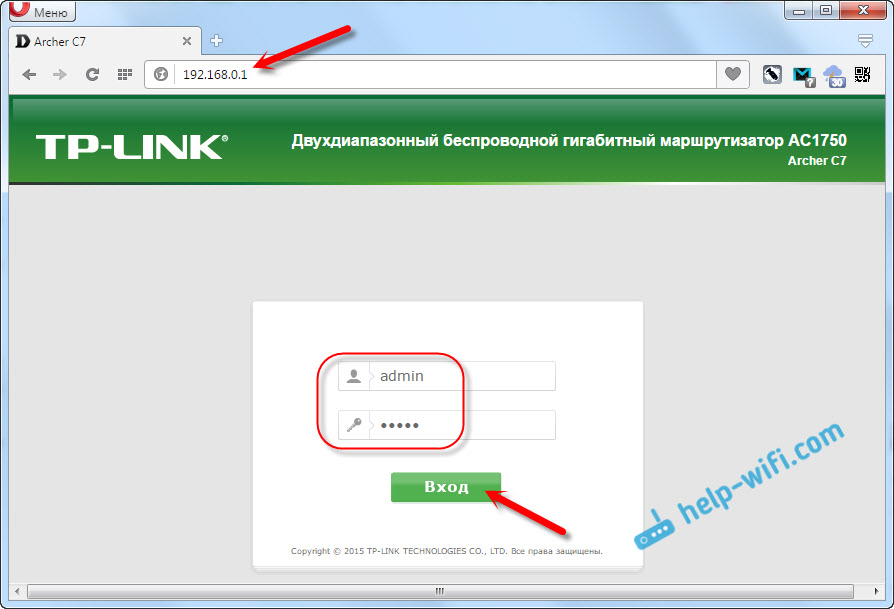
Открываем любой браузер, и переходим по адресу tplinklogin.net (192.168.0.1 так же работает). Вводим имя пользователя и пароль. По умолчанию это admin и admin.
Откроются настройки маршрутизатора, где мы сможем задать все необходимые параметры. Настроить интернет и Wi-Fi сеть.
Настройка TP-LINK Archer C7
Нам главное настроить интернет, настроить Wi-Fi сеть, и поставить пароль. Сделать это можно на разных вкладках в панели управления. А можно воспользоваться мастером быстрой настройки. Что мы и сделаем.
Слева переходим на вкладку «Быстрая настройка», и нажимаем кнопку «Далее».

Сейчас внимание! Если у вас сразу появится окно с настройкой Wi-Fi, то это значит, что подключение к интернету настроилось автоматически (скорее всего, у вас подключение «Динамический IP»). Просто прокрутите страницу немного ниже, и продолжайте настройку беспроводной сети.
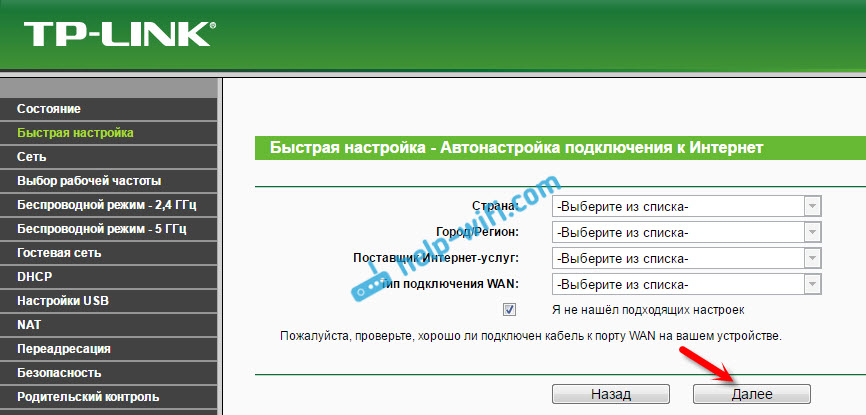
Но, скорее всего, нужно будет задать параметры для подключения к интернет провайдеру. Первый способ, выбрать свою страну, регион и интернет-провайдера из списка (такой возможности может не быть на более старых версиях прошивки). Если вы не найдете своего провайдера, то поставьте галочку возле пункта «Я не нашел подходящих настроек». И нажмите «Далее».
Нужно выделить тот тип подключения, который использует ваш интернет-провайдер (Динамический IP-адрес, Статический IP-адрес, PPPoE, L2TP, PPTP). Если не знаете, то лучше уточнить у поддержки провайдера. Так же, можно посмотреть на официальном сайте, или посмотреть в договоре о подключении. Там же должны быть указаны необходимые данные для подключения: имя пользователя, пароль (если они нужны).
Если вы выберите «Динамический IP-адрес», то нужно будет только указать, есть ли привязка по MAC-адресу, или нет. Если есть, то клонируем MAC-адрес с компьютера. Если нет, то интернет сразу заработает.
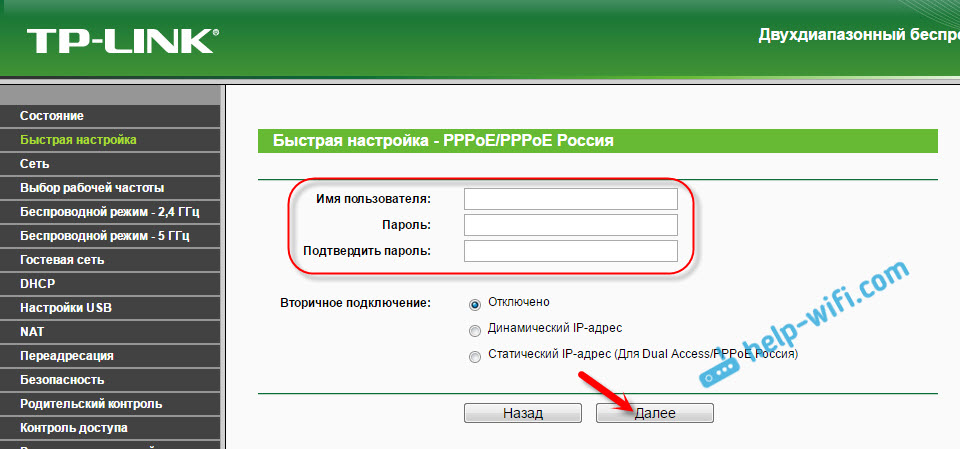
Я выбрал например PPPoE. Нажимаем «Далее» и продолжаем настройку.

Появится окно, в котором нужно указать имя пользователя и пароль (их выдает провайдер). А если у вас L2TP, или PPTP, то нужно будет еще указать сервер. Нажимаем «Далее».
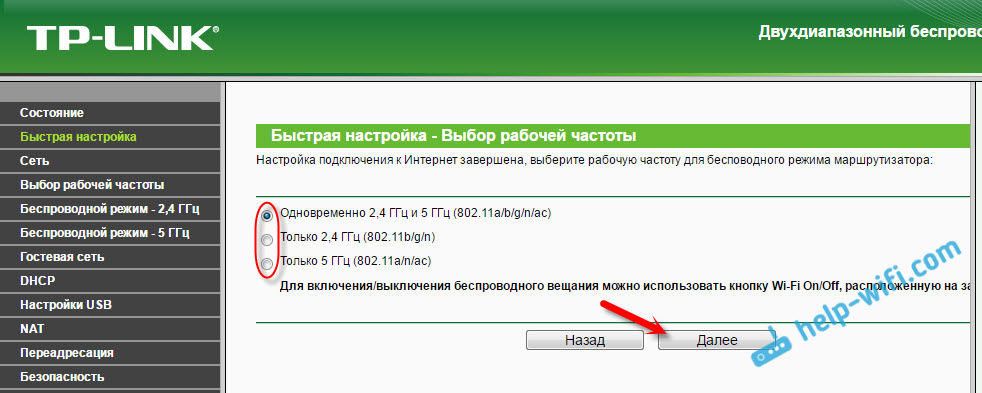
Если все правильно, то появится окно с настройкой Wi-Fi сети. Точнее, окно, в котором нужно выбрать, на какой частоте вы хотите использовать Wi-Fi сеть. Можно выбрать только 2,4 ГГц, или 5 ГГц. Или же использовать одновременно оба диапазона. Выберите нужный пункт, и нажмите «Далее». Я выбрал «Одновременно 2,4 ГГц и 5 ГГц (802.11a/b/g/n/ac)». Это значит, что роутер будет транслировать две Wi-Fi сети на разных частотах.
Дальше появится окно, в котором нужно задать имя для Wi-Fi сети, выбрать свой регион, и указать пароль, который будет использоваться для подключения к Wi-Fi. Если вы выбрали «2,4 ГГц и 5 ГГц», то появится два окна, для каждой частоты отдельно.

Ну и настройка беспроводный сети на частоте 5 ГГц.

Видим окно с сообщением, что настройка завершена, и интернет работает. Нажимаем на кнопку «Перезагрузить».

Интернет через маршрутизатор работает, название Wi-Fi сети сменили, пароль поставили. Вот и все настройки. Советую еще сменить заводской пароль admin, который используется для защиты настроек маршрутизатора.
Настройка Wi-Fi сети 5 ГГц на роутере Archer C7 (AC1750)
Так как этот маршрутизатор у нас двухдиапазонный, то он может транслировать две Wi-Fi сети на разных частотах: 2,4 ГГц и 5 ГГц. Если в процессе настройки вы например включили только одну частоту, а нужно две, или наоборот, то все это можно сменить в настройках. Так же, отдельно можно сменить название сети и пароль для каждой сети (на каждой частоте).
В панели управления перейдите на вкладку «Выбор рабочей частоты». Там можно указать, на какой частоте роутер будет транслировать беспроводную сеть.

Затем, переходим на вкладку с настройками нужной нам Wi-Fi сети. Например, на «Беспроводной режим – 5 ГГц».

Там уже можно посмотреть, либо сменить необходимые параметры. Все просто и понятно.
Если у вас остались какие-то вопросы по настройке Archer C7, то вы можете оставить их в комментариях. Я показал основные настройки, которые нужно задать для правильной работы маршрутизатора. Но, есть еще много разных функций, которые могут вам пригодится. Например: настройка IPTV, FTP сервера, гостевая сеть и т. д. У нас на сайте есть отдельные инструкции по настройке этих функций. Смотрите в разделе «TP-LINK», или воспользуйтесь поиском по сайту. Всего хорошего!
На чтение 11 мин Просмотров 14к.

Виталий Леонидович Черкасов
Системный администратор, инженер компьютерных систем.
Задать вопрос
Двухдиапазонный маршрутизатор TP-Link Archer C7 AC1750 может одновременно работать в двух частотных диапазонах 2,4 ГГц и 5 ГГц. Работу по проводной сети обеспечивают сетевые порты LAN (Local Area Network) и WAN (Wide Area Network), работающие на скорости 1 Гбит/с. Сделаем подробный обзор роутера.
Содержание
- Особенности и технические характеристики
- Индикаторы и разъемы
- Подключение
- Поддерживаемые модемы российских мобильных операторов
- Вход в настройки роутера
- Автоматическая настройка
- Ручная настройка интернета
- Через мобильное приложение
- Подключение и параметры Wi-Fi
- Настройка IP TV
- Смена пароля
- Режим повторителя
- Обновление прошивки
- Сброс настроек
- Отзывы
Особенности и технические характеристики
Основные характеристики TP-Link Archer C7 AC1750:
- стандарты сети Wi-Fi: 802.11 n/b/g (2,4 ГГЦ) и 802.11ac/n/a (5 ГГц);
- количество портов: 4xLAN (RJ45), 1х WAN (RJ45), 1хUSB 2.0 Type A;
- скорость портов: до 1 Гбит/сек;
- скорость Wi-Fi: до 450 Мбит/сек (2,4 ГГц), до 1300 Мбит/сек (5 ГГц);
- количество антенн: 3;
- цена: от 4400 до 6900 руб.
TP-Link Archer C7 – это двухдиапазонный гигабитный wi-fi роутер, изготовленный на платформе Qualcom. Его процессор QCA9558 оснащен радиоблоком, который обеспечивает беспроводную связь на частоте 2,4 ГГц. Беспроводная Wi-Fi сеть в диапазоне 5 ГГц функционирует благодаря чипу Qualcomm QCA9880. За работу LAN и WAN отвечает микрочип Atheros AR8327N.
Удобство и простота настройки
10
Индикаторы и разъемы
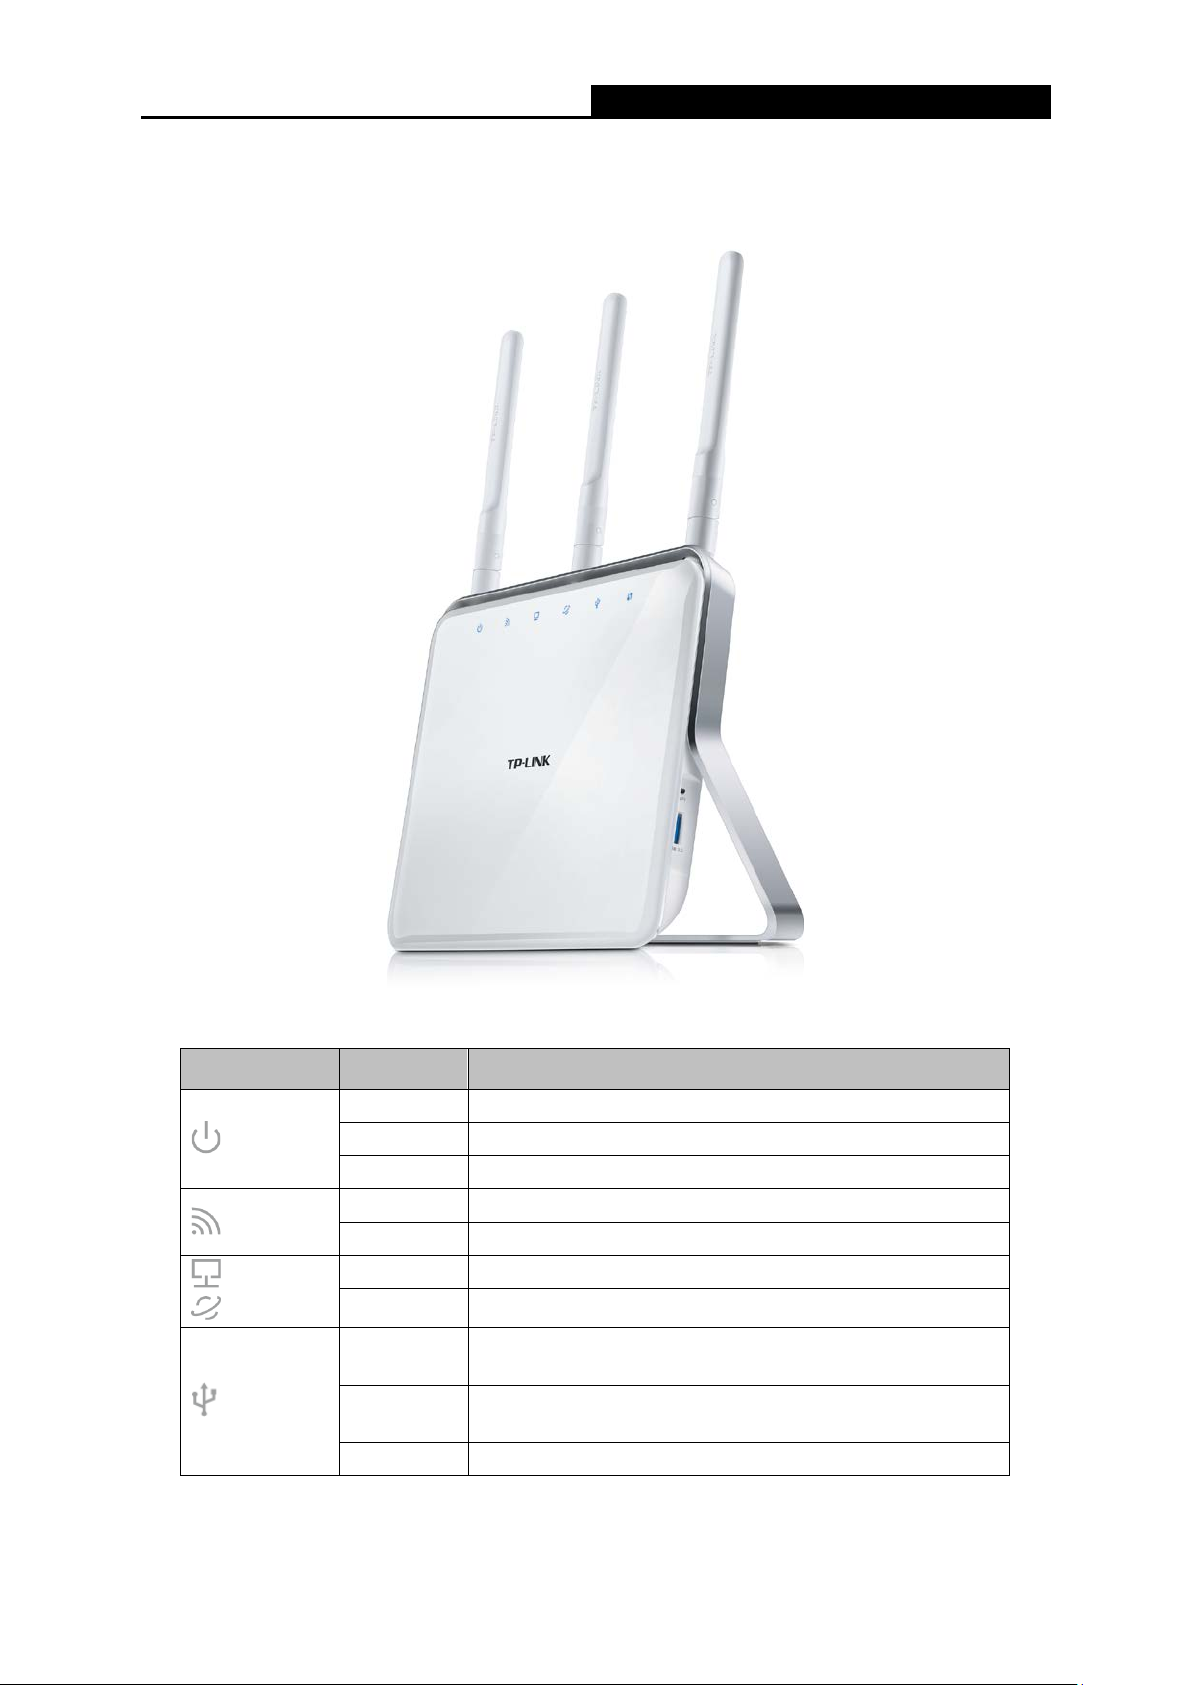
На передней панели роутера TP-Link Archer C7 присутствуют следующие индикаторы:
- Питание – горит, когда гаджет включен в электрическую сеть;
- Два индикатора Wi-Fi сети для диапазонов 2,4 и 5 ГГц, мигают при работе роутера в соответствующем диапазоне;
- 4 индикатора портов LAN и один WAN, светятся при подключении к ним сетевого кабеля, во время передачи данных мигают;
- Индикатор WPS включается при подключении гаджета к сети при помощи этой технологии, медленно мигает, когда устройство устанавливает соединение, быстро мигает, если не удалось соединится.

На задней панели находятся следующие элементы:
- гнездо POWER, используется для подключения источника питания;
- переключатель On/Off служит для включения и выключения питания;
- кнопка Reset предназначена для сброса параметров;
- гнездо USB применяется для подключения принтера или накопителей данных;
- порт Internet (WAN) требуется для подключения кабеля провайдера;
- 4 Ethtrnet порта служат для подключения кабеля локальной сети;
- выключатель WPS/Wi-Fi On/Off применяется для подсоединения гаджетов к сети Wi-Fi по протоколу WPS.

Подключение
Подключение TP-Link Archer C7 производится в таком порядке:
- подключаем кабель, идущий от провайдера, к порту Internet (WAN) точки доступа;
- соединяем компьютер с маршрутизатором Ethernet кабелем. Для этого один конец подсоединяем к порту LAN точки доступа, а второй – к гнезду RJ45 ПК;
- подсоединяем блок питания к точке доступа и включаем питание кнопкой On/Off;

Поддерживаемые модемы российских мобильных операторов
Маршрутизатор можно подключать к интернету через USB-модем мобильного оператора, который вставляется через соответствующий порт. Под спойлером – список USB-модемов, совместимых с TP-Link Archer C7.
Список поддерживаемых модемов

Вход в настройки роутера
Существуют пять программно-аппаратных модификаций роутера TP-Link Archer C7. Параметры трех старых версий V1, V2, V3 отличается от новых V4 и V5.
В маршрутизаторах трех первых версий, чтобы войти в настройки, требуется в адресной строке ввести http://tplinklogin.net. В появившемся окне в строках «Пользователь» и «Пароль» набираем слово admin.

В последних версиях роутера также вводим адрес http://tplinklogin.net или 192.168.0.1. После чего должно появиться окно. В нем нужно создать пароль.

Автоматическая настройка
Быстро настроить старые версии роутера ТП Линг Арчер можно по следующей схеме:
- после входа в панель настроек идем в меню «Быстрая настройка» и жмем кнопку «Далее»;

- в появившемся окне выбираем протокол подключения, который можно узнать у провайдера, обычно это РРРоЕ;

- при выборе РРРоЕ/РРРоЕ откроется окно, в котором требуется ввести логин, пароль и подтвердить его, эти сведения также предоставляет провайдер;

- в появившемся окне выбираем частоту Wi-Fi сети;

- в новом окне настраиваются параметры работы Wi-Fi сети в диапазоне 2,4 ГГц. По умолчанию SSID установлен TP-LINK_2.4GHz_XXXXXX, пароль тот же, что и PIN-код на этикетке, расположенной внизу роутера;

- в новом окне можно поменять настройки сети, работающей в диапазоне 5 ГГц;

- после этого появится последнее окно, в котором требуется нажать кнопку «Перезагрузить».

Чтобы настроить TP-Link Archer C7 AC1750 с последней версией программного обеспечения, нужно:
- выбрать «Быстрая настройка», расположенное вверху и установить часовой пояс;

- установить тип подключения, используемым вашим Интернет-провайдером;

- если был выбран самый распространенный тип подключения «РРРоЕ/РРРоЕ Россия», потребуется ввести логин и ключ доступа, предоставленные провайдером;

- в следующем окне нужно поставить галочки возле названия диапазонов беспроводной сети, которые вы будете использовать, и установить логин и пароль для каждого соединения;

- Жмем «Сохранить»

Ручная настройка интернета
Чтобы выполнить ручную настройку на TP-Link Archer C7, нужно ввести параметры подключения к Интернету и беспроводной Wi-Fi сети.
Для настройки на маршрутизаторах со старой версией программного обеспечения:
- в левом меню в беспроводной выбрать строку «Сеть» и подменю «WAN»;
- в появившемся окне устанавливаем тип подключения, логин и пароль.

Для настройки новой версии маршрутизатора TP-Link Archer C7 AC1750, требуется выполнить следующие действия:
- Выбрать в верхнем меню «Базовая настройка»;
- Зайти в подменю «Интернет», находящееся слева;
- Выбрать протокол соединения;
- Ввести логин и пароль, если это требуется для выбранного протокола.

Важно! Ваш провайдер может использовать другой тип подключения. В договоре с интернет провайдером должны быть все данные для настройки.
Через мобильное приложение
Компания TP-Link разработала мобильное приложение Tether. Оно может работать на смартфонах и планшеты iOS и Android. Чтобы воспользоваться им, нужно:
- открыть App Store или Google Play и найти программу по ключевому слову «TP-Link Tether»;
- после установки ПО подключите устройство к беспроводной сети;
- теперь запустите приложение Tether, выберите модель своего роутера и войдите в систему, используя пароль, который был установлен для маршрутизатора;
Теперь можно управлять своим роутером с мобильного телефона.
Подключение и параметры Wi-Fi
Настройка параметров беспроводной Wi-Fi сети для точек доступа со старой и новой панелью настроек отличаются.
Со старой версией программного обеспечения:
- находим в левом меню пункт «Выбор рабочей частоты» и выбираем, на какой частоте будет работать роутер. Можно выбрать оба диапазона;

- в меню «Настройки беспроводного режима 2.4 ГГц», расположенном слева, выбираем пункт «Беспроводный режим» и переходим в подменю. В появившемся окне можно установить имя сети;

- в окне «Защита беспроводного режима», в строке «Пароль PSK» устанавливаем пароль.

Чтобы настроить Wi-Fi сеть в TP-Link Archer C7 с новой версией ПО, нужно:
- выбрать в верхнем меню пункт «Базовая настройка»;
- в меню справа выбираем «Беспроводный режим»;
- в появившемся окне вписываем желаемое имя сети, желательно установить сложный пароль. Также можно отключить wi-fi для определенной частоты.

Настройка IP TV
Чтобы настроить IPTV на роутерах со старым программным обеспечением нужно:
- Выбрать справа строку «Сеть», подменю «IPTV»;

- Выбираем режим мост и порт для IPTV и сохраняем настройки.

Если поставщик Интернет-услуг требует настройки VLAN ID, то в выпадающем меню выбираем режим «802.1Q Tag VLAN» и вписываем все необходимые настройки из договора с поставщиком услуги.
Для точек доступа с новой версией панели, нужно:
- Зайти в «Дополнительные настройки»;
- Перейти в левое меню «Сеть»;
- Выбрать «IPTV/VLAN»;
- Установить режим «Мост».

Если нужно указать настройки VLAN ID, выбираем режим «Указать вручную» и производим настройки, которые требует от вас провайдер.

Смена пароля
Для изменения пароля в устройствах со старой версией панели нужно зайти в «Системные инструменты» и выбрать «Пароль». В появившемся окне ввести старое имя пользователя и пароль, а потом новое имя и пароль.

Для маршрутизатора TP-Link Archer C7 AC1750 с новой версией ПО нужно выбрать «Дополнительные настройки», перейти в подменю «Системные утилиты» и кликнуть по строке «Администрирование». В этом окне вводим старый пароль, новый пароль и подтверждаем его. После чего жмем кнопку «Сохранить».

Режим повторителя
Чтобы включить режим повторителя, нужно:
- В окне «Настройки беспроводного режима» поставить галочку в поле «Включить WDS»;
- Ввести SSID сети, к которой вы хотите подключиться;

- Нажать «Поиск» для поиска МАС адреса маршрутизатора, с которым вы соединяетесь;
- Выберите тип ключа, он должен совпадать с тем, который установлен на роутере-партнере;
- Введите пароль для подключения к точке доступа.

Обновление прошивки
Для обновления прошивки маршрутизатора со старой версией панели настроек нужно зайти в «Системные инструменты» и кликнуть по строке «Обновление встроенного ПО». Нажимаем кнопку «Обзор» и выбираем ранее скаченный с сайта компании производителя файл с последней версией прошивки. Жмем по кнопке «Обновить» и ждем, пока роутер перезагрузится.


Сброс настроек
Сбросить настройки до заводских можно двумя способами.
- Зажать кнопку Reset на задней панели роутера на 10-15 секунд.
- Кликнув по строке «Системные инструменты» и перейдя в подменю «Заводские настройки». Здесь нужно нажать кнопку «Восстановить».

Отзывы
Мы проанализировали отзывы реальных пользователей и выделили основные плюсы и минусы модели.
хорошая скорость и надежность для своей цены;
простая настройка;
не греется.
нет возможности тонкой настройки;
маркий глянцевый корпус.
А также рекомендуем ознакомиться с материалом tplinklogin.net
Archer C8
AC1750 Wireless Dual Band Gigabit Router

COPYRIGHT & TRADEMARKS
Specifications are subject to change without notice. is a registered trademark of
TP-LINK TECHNOLOGIES CO., LTD. Other brands and product names are trademarks or
registered trademarks of their respective holders.
No part of the specifications may be reproduced in any form or by any means or used to make any
derivative such as translation, transformation, or adaptation without permission from TP-LINK
TECHNOLOGIES CO., LTD. Copyright © 2014 TP-LINK TECHNOLOGIES CO., LTD. All rights
reserved.
http://www.tp-link.com

FCC STATEMENT
This equipment has been tested and found to comply with the limits for a Class B digital device,
pursuant to part 15 of the FCC Rules. These limits are designed to provide reasonable protection
against harmful interference in a residential installation. This equipment generates, uses and can
radiate radio frequency energy and, if not installed and used in accordance with the instructions,
may cause harmful interference to radio communications. However, there is no guarantee that
interference will not occur in a particular installation. If this equipment does cause harmful
interference to radio or television reception, which can be determined by turning the equipment off
and on, the user is encouraged to try to correct the interference by one or more of the following
measures:
• Reorient or relocate the receiving antenna.
• Increase the separation between the equipment and receiver.
• Connect the equipment into an outlet on a circuit different from that to which the receiver
is connected.
• Consult the dealer or an experienced radio/ TV technician for help.
This device complies with part 15 of the FCC Rules. Operation is subject to the following two
conditions:
1) This device may not cause harmful interference.
2) This device must accept any interference received, including interference that may cause
undesired operation.
Any changes or modifications not expressly approved by the party responsible for compliance
could void the user’s authority to operate the equipment.
Note: The manufacturer is not responsible for any radio or TV interference caused by
unauthorized modifications to this equipment. Such modifications could void the user’s authority
to operate the equipment.
FCC RF Radiation Exposure Statement:
This equipment complies with FCC RF radiation exposure limits set forth for an uncontrolled
environment. This device and its antenna must not be co-located or operating in conjunction with
any other antenna or transmitter.
“To comply with FCC RF exposure compliance requirements, this grant is applicable to only
Mobile Configurations. The antennas used for this transmitter must be installed to provide a
separation distance of at least 20 cm from all persons and must not be co-located or operating in
conjunction with any other antenna or transmitter.”

CE Mark Warning
This is a class B product. In a domestic environment, this product may cause radio interference, in
which case the user may be required to take adequate measures.
National Restrictions
This device is intended for home and office use in all EU countries (and other countries following
the EU directive 1999/5/EC) without any limitation except for the countries mentioned below:
Country Restriction Reason/remark
Bulgaria None
Outdoor use limited to
France
the band 2454-2483.5
MHz
Italy None
Luxembourg None
Norway Implemented
Russian Federation None Only for indoor applications
General authorization required for outdoor use and
public service
Military Radiolocation use. Refarming of the 2.4 GHz
band has been ongoing in recent years to allow current
relaxed regulation. Full implementation planned 2012
If used outside of own premises, general authorization is
required
General authorization required for network and service
supply(not for spectrum)
This subsection does not apply for the geographical area
within a radius of 20 km from the centre of Ny-Ålesund
5150-5250 MHz
Country Restriction Reason/remark
Bulgaria Not implemented Planned
Croatia License required
Italy
General authorization required if used outside own
premises

ization required if used outside own
Relevant+ provisions for the implementation of DFS
described in ETSI standard EN 301 893
General authorization required if used outside own
Luxembourg None
Russian Federation No info
General authorization required for network and service
supply (not for spectrum)
5250-5350 MHz
Country Restriction Reason/remark
Bulgaria
Not
implemented
Croatia License required
Italy
Luxembourg None
Russian Federation No info
Planned
General author
premises
General authorization required for network and service
supply (not for spectrum)
5470-5725 MHz
Country Restriction Reason/remark
Bulgaria
Not
implemented
France
Italy
Luxembourg None
Russian Federation No info
Turkey Not implemented Defence systems
Planned
mechanism
V1.3.1 and subsequent versions
premises
General authorization required for network and service
supply (not for spectrum)
Note: Please don’t use the product outdoors in France.

Canadian Compliance Statement
This device complies with Industry Canada license-exempt RSS standard(s). Operation is subject
to the following two conditions:
(1) This device may not cause interference, and
(2)This device must accept any interference, including interference that may cause undesired
operation of the device.
Cet appareil est conforme aux norms CNR exemptes de licence d’Industrie Canada. Le
fonctionnement est soumis aux deux conditions suivantes:
(1) cet appareil ne doit pas provoquer d’interférences et
(2) cet appareil doit accepter toute interférence, y compris celles susceptibles de provoquer un
fonctionnement non souhaité de l’appareil.
To reduce potential radio interference to other users, the antenna type and its gain should be so
chosen that the equivalent isotropically radiated power (e.i.r.p.) is not more than that permitted for
successful communication.
Industry Canada Statement
Complies with the Canadian ICES-003 Class B specifications.
Cet appareil numérique de la classe B est conforme à la norme NMB-003 du Canada.
This device complies with RSS 210 of Industry Canada. This Class B device meets all the
requirements of the Canadian interference-causing equipment regulations.
Cet appareil numérique de la Classe B respecte toutes les exigences du Règlement sur le
matériel brouilleur du Canada.
Korea Warning Statements
당해 무선설비는 운용중 전파혼신 가능성이 있음.
NCC Notice & BSMI Notice
注意!
依據 低功率電波輻射性電機管理辦法
第十二條 經型式認證合格之低功率射頻電機,非經許可,公司、商號或使用者均不得擅自變更頻率、
加大功率或變更原設計之特性或功能。
第十四條 低功率射頻電機之使用不得影響飛航安全及干擾合法通行;經發現有干擾現象時,應立即
停用,並改善至無干擾時方得繼續使用。前項合法通信,指依電信規定作業之無線電信。低功率射

頻電機需忍受合法通信或工業、科學以及醫療用電波輻射性電機設備之干擾。
減少電磁波影響,請妥適使用。
安全諮詢及注意事項
●請使用原裝電源供應器或只能按照本產品注明的電源類型使用本產品。
●清潔本產品之前請先拔掉電源線。請勿使用液體、噴霧清潔劑或濕布進行清潔。
●注意防潮,請勿將水或其他液體潑灑到本產品上。
●插槽與開口供通風使用,以確保本產品的操作可靠並防止過熱,請勿堵塞或覆蓋開口。
●請勿將本產品置放於靠近熱源的地方。除非有正常的通風,否則不可放在密閉位置中。
●請不要私自打開機殼,不要嘗試自行維修本產品,請由授權的專業人士進行此項工作。
Продукт сертифіковано згідно с правилами системи УкрСЕПРО на відповідність вимогам
нормативних документів та вимогам, що передбачені чинними законодавчими актами
України.
Safety Information
When product has power button, the power button is one of the way to shut off the product;
when there is no power button, the only way to completely shut off power is to disconnect the
product or the power adapter from the power source.
Don’t disassemble the product, or make repairs yourself. You run the risk of electric shock and
voiding the limited warranty. If you need service, please contact us.
Avoid water and wet locations.
This product can be used in the following countries:
AT BG BY CA CZ DE DK EE
ES FI FR GB GR HU IE IT
LT LV MT NL NO PL PT RO
RU SE SK TR UA US

TP-LINK TECHNOLOGIES CO., LTD
DECLARATION OF CONFORMITY
For the following equipment:
Product Description: AC1750 Wireless Dual Band Gigabit Router
Model No.: Archer C8
Trademark: TP-LINK
We declare under our own responsibility that the above products satisfy all the technical
regulations applicable to the product within the scope of Council Directives:
Directives 1999/5/EC, Directives 2004/108/EC, Directives 2006/95/EC, Directives 1999/519/EC,
Directives 2011/65/EU
The above product is in conformity with the following standards or other normative documents
EN 300 328 V1.7.1: 2006
EN 301 489-1 V1.9.2:2011& EN 301 489-17 V2.2.1:2012
EN 55022:2010
EN 55024:2010
EN 61000-3-2:2006+A1:2009+A2:2009
EN 61000-3-3:2008
EN 60950-1:2006+A11:2009+A1:2010+A12:2011
EN 62311:2008
EN 301 893
The product carries the CE Mark:
Person responsible for making this declaration:
Yang Hongliang
Product Manager of International Business
Date of issue: 2014
TP-LINK TECHNOLOGIES CO., LTD.
Building 24 (floors 1, 3, 4, 5), and 28 (floors 1-4) Central Science and Technology Park, Shennan Rd,
Nanshan, Shenzhen, China

CONTENTS
Package Contents ……………………………………………………………………………………….. 1
Chapter 1. Introduction …………………………………………………………………………….. 2
1.1 Overview of the router …………………………………………………………………………………… 2
1.2 Conventions ………………………………………………………………………………………………… 2
1.3 Main Features ……………………………………………………………………………………………… 3
1.4 Panel Layout ……………………………………………………………………………………………….. 4
1.4.1 The Front Panel …………………………………………………………………………………. 4
1.4.2 The Rear Panel …………………………………………………………………………………. 5
Chapter 2. Connecting the router ……………………………………………………………… 7
2.1 System Requirements …………………………………………………………………………………… 7
2.2 Installation Environment Requirements ……………………………………………………………. 7
2.3 Connecting the router ……………………………………………………………………………………. 7
Chapter 3. Quick Setup …………………………………………………………………………….. 9
Chapter 4. Basic …………………………………………………………………………………….. 15
4.1 Network Map ……………………………………………………………………………………………… 15
4.2 Internet ……………………………………………………………………………………………………… 15
4.3 Wireless ……………………………………………………………………………………………………. 20
4.4 USB Settings ……………………………………………………………………………………………… 20
4.4.1 File Sharing …………………………………………………………………………………….. 20
4.4.2 Print Server ……………………………………………………………………………………… 23
4.5 Guest Network …………………………………………………………………………………………… 23
Chapter 5. Advanced ……………………………………………………………………………… 25
5.1 Status ……………………………………………………………………………………………………….. 25
5.2 Network …………………………………………………………………………………………………….. 26
5.2.1 WAN ………………………………………………………………………………………………. 26
5.2.2 MAC Clone ……………………………………………………………………………………… 34
5.2.3 LAN ……………………………………………………………………………………………….. 35
5.3 Dual Band Selection ……………………………………………………………………………………. 36
5.4 Wireless 2.4GHz ………………………………………………………………………………………… 36
5.4.1 Wireless Settings ……………………………………………………………………………… 36
5.4.2 WPS ………………………………………………………………………………………………. 38
5.4.3 Wireless Security ……………………………………………………………………………… 40
5.4.4 Wireless MAC Filtering ……………………………………………………………………… 44

5.4.5 Wireless Advanced …………………………………………………………………………… 46
5.4.6 Wireless Statistics …………………………………………………………………………….. 47
5.5 Wireless 5GHz …………………………………………………………………………………………… 48
5.5.1 Wireless Settings ……………………………………………………………………………… 48
5.5.2 WPS ………………………………………………………………………………………………. 50
5.5.3 Wireless Security ……………………………………………………………………………… 51
5.5.4 Wireless MAC Filtering ……………………………………………………………………… 55
5.5.5 Wireless Advanced …………………………………………………………………………… 57
5.5.6 Wireless Statistics …………………………………………………………………………….. 58
5.6 Guest Network …………………………………………………………………………………………… 59
5.7 DHCP ……………………………………………………………………………………………………….. 60
5.7.1 DHCP Settings ………………………………………………………………………………… 61
5.7.2 DHCP Clients List …………………………………………………………………………….. 62
5.7.3 Address Reservation ………………………………………………………………………… 62
5.8 USB Settings ……………………………………………………………………………………………… 64
5.8.1 Device Settings ………………………………………………………………………………… 64
5.8.2 File Sharing …………………………………………………………………………………….. 64
5.8.3 Print Server ……………………………………………………………………………………… 67
5.9 NAT Boost …………………………………………………………………………………………………. 67
5.10 Forwarding ………………………………………………………………………………………………… 68
5.10.1 Virtual Servers …………………………………………………………………………………. 68
5.10.2 Port Triggering …………………………………………………………………………………. 70
5.10.3 DMZ ……………………………………………………………………………………………….. 72
5.10.4 UPnP ……………………………………………………………………………………………… 73
5.11 Security …………………………………………………………………………………………………….. 74
5.11.1 Basic Security ………………………………………………………………………………….. 74
5.11.2 Advanced Security ……………………………………………………………………………. 75
5.11.3 Local Management …………………………………………………………………………… 77
5.11.4 Remote Management ……………………………………………………………………….. 78
5.12 Parental Control …………………………………………………………………………………………. 79
5.13 Access Control …………………………………………………………………………………………… 81
5.13.1 Rule ……………………………………………………………………………………………….. 82
5.13.2 Host ……………………………………………………………………………………………….. 87
5.13.3 Target……………………………………………………………………………………………… 89
5.13.4 Schedule …………………………………………………………………………………………. 90
5.14 Advanced Routing ………………………………………………………………………………………. 92

5.14.1 Static Routing List …………………………………………………………………………….. 93
5.14.2 System Routing Table ……………………………………………………………………….. 94
5.15 Bandwidth Control ………………………………………………………………………………………. 94
5.15.1 Control Settings ……………………………………………………………………………….. 95
5.15.2 Rules List ………………………………………………………………………………………… 95
5.16 IP & MAC Binding ……………………………………………………………………………………….. 96
5.16.1 Binding Settings ……………………………………………………………………………….. 96
5.16.2 ARP List ………………………………………………………………………………………….. 98
5.17 Dynamic DNS …………………………………………………………………………………………….. 99
5.17.1 Comexe.cn DDNS ……………………………………………………………………………. 99
5.17.2 Dyndns.org DDNS ………………………………………………………………………….. 100
5.17.3 No-ip.com DDNS ……………………………………………………………………………. 100
5.18 IPv6 Support ……………………………………………………………………………………………. 101
5.18.1 IPv6 Status ……………………………………………………………………………………. 102
5.18.2 IPv6 Setup …………………………………………………………………………………….. 103
5.19 System Tools ……………………………………………………………………………………………. 110
5.19.1 Time Settings ………………………………………………………………………………….. 111
5.19.2 Diagnostic ……………………………………………………………………………………… 112
5.19.3 Firmware Upgrade ………………………………………………………………………….. 114
5.19.4 Factory Defaults …………………………………………………………………………….. 115
5.19.5 Backup & Restore …………………………………………………………………………… 115
5.19.6 Reboot ………………………………………………………………………………………….. 116
5.19.7 Password ………………………………………………………………………………………. 117
5.19.8 System Log ……………………………………………………………………………………. 117
5.19.9 Statistics ……………………………………………………………………………………….. 119
Appendix A: FAQ …………………………………………………………………………………….. 122
Appendix B: Configuring the PC ………………………………………………………………. 127
Appendix C: Specifications ……………………………………………………………………… 130
Appendix D: Glossary ……………………………………………………………………………… 131

AC1750 Wireless Dual Band Gigabit Router
Package Contents
The following items should be found in your package:
Archer C8 AC1750 Wireless Dual Band Gigabit Router
DC Power Adapter for Archer C8 AC1750 Wireless Dual Band Gigabit Router
Quick Installation Guide
Resource CD for Archer C8 AC1750 Wireless Dual Band Gigabit Router, including:
• This Guide
• Other Helpful Information
Note:
Make sure that the package contains the above items. If any of the listed items are damaged or
missing, please contact your distributor.
— 1 —

AC1750 Wireless Dual Band Gigabit Router
Multiple Security Protections
Chapter 1. Introduction
1.1 Overview of the router
The Archer C8 AC1750 Wireless Dual Band Gigabit Router integrates 4-port Switch, Firewall,
NAT-router and Wireless AP. Powered by 3×3 MIMO technology, the AC1750 Wireless Dual Band
Gigabit Router delivers exceptional range and speed, which can fully meet the need of Small
Office/Home Office (SOHO) networks and the users demanding higher networking performance.
Your wireless connections are radio band selectable to avoid interference in your area, and the four
built-in Gigabit ports supply high-speed connection to your wired devices.
The Archer C8 AC1750 Wireless Dual Band Gigabit Router provides up to 1750Mbps wireless
connection with other wireless clients. The incredible speed makes it ideal for handling multiple data
streams at the same time, which ensures your network stable and smooth. The performance of this
802.11ac wireless router will give you the unexpected networking experience at speed much faster
than 802.11n. It is also compatible with all IEEE 802.11n, IEEE 802.11a, IEEE 802.11b and IEEE
802.11g products.
With multiple protection measures, including SSID broadcast control and wireless LAN
64/128/152-bit WEP encryption, Wi-Fi Protected Access (WPA2- PSK, WPA- PSK), as well as
advanced Firewall protections, the Archer C8 AC1750 Wireless Dual Band Gigabit Router
provides complete data privacy.
The Archer C8 AC1750 Wireless Dual Band Gigabit Router provides flexible access control, so that
parents or network administrators can establish restricted access policies for children or staff. It also
supports Virtual Server and DMZ host for Port Triggering, and then the network administrators can
manage and monitor the network in real time with the remote management function.
Since the router is compatible with virtually all the major operating systems, it is very easy to
manage. Quick Setup Wizard is supported and detailed instructions are provided step by step in
this user guide. Before installing the router, please look through this guide to know all the router’s
functions.
1.2 Conventions
The router or Archer C8 mentioned in this guide stands for Archer C8 AC1750 Wireless Dual Band
Gigabit Router without any explanation.
— 2 —

AC1750 Wireless Dual Band Gigabit Router
1.3 Main Features
Complies with IEEE 802.11ac.
One 10/100/1000M Auto-Negotiation RJ45 Internet port, four 10/100/1000M Auto-Negotiation
RJ45 Ethernet ports, supporting Auto MDI/MDIX.
Provides a USB 3.0 port and a USB 2.0 port supporting file sharing and print server.
Provides WPA/WPA2, WPA-PSK/WPA2-PSK authentication, TKIP/AES encryption security.
Shares data and Internet access for users, supporting Dynamic IP/Static IP/PPPoE/PPTP/
L2TP Internet access.
Supports simultaneous 2.4GHz and 5GHz connections for 1750Mbps of total available
bandwidth.
Supports Virtual Server, Special Application and DMZ host.
Supports UPnP, Dynamic DNS, Static Routing.
Provides Automatic-connection and Scheduled Connection on certain time to the Internet.
Built-in NAT and DHCP server supporting static IP address distributing.
Supports Parental Control and Access Control.
Connects Internet on demand and disconnects from the Internet when idle for PPPoE.
Provides WEP encryption security and wireless LAN ACL (Access Control List).
Supports Flow Statistics.
Supports IPv6.
Supports firmware upgrade and Web management.
— 3 —
AC1750 Wireless Dual Band Gigabit Router
The wireless function is enabled.
A device is connected to the corresponding port.
1.4 Panel Layout
1.4.1 The Front Panel
The router’s LEDs are located on the front panel (View from left to right).
Name Status Indication
On The router has finished booting.
(Power)
(Wireless)
(Ethernet)
(Internet)
(USB)
Flashing The router is booting or upgrading.
Off Power is off.
Off The wireless function is disabled.
Off No device is connected to the corresponding port.
On
Flashing
Off No device or printer is connected to the router.
The router has identified the connected storage device
or printer.
The router is identifying the connected storage device or
printer.
— 4 —
AC1750 Wireless Dual Band Gigabit Router
Note:
(WPS)
On/Off
Slow Flash
Quick
It turns on when a wireless device has been
successfully connected to the network via WPS. After
about 5 minutes, the WPS LED will turn off.
A wireless device is trying to connect to the network via
WPS. This process may take up to 2 minutes.
A wireless device failed to connect to the network via
After a device is successfully added to the network by WPS function, the WPS LED will keep on
for about 5 minutes and then turn off.
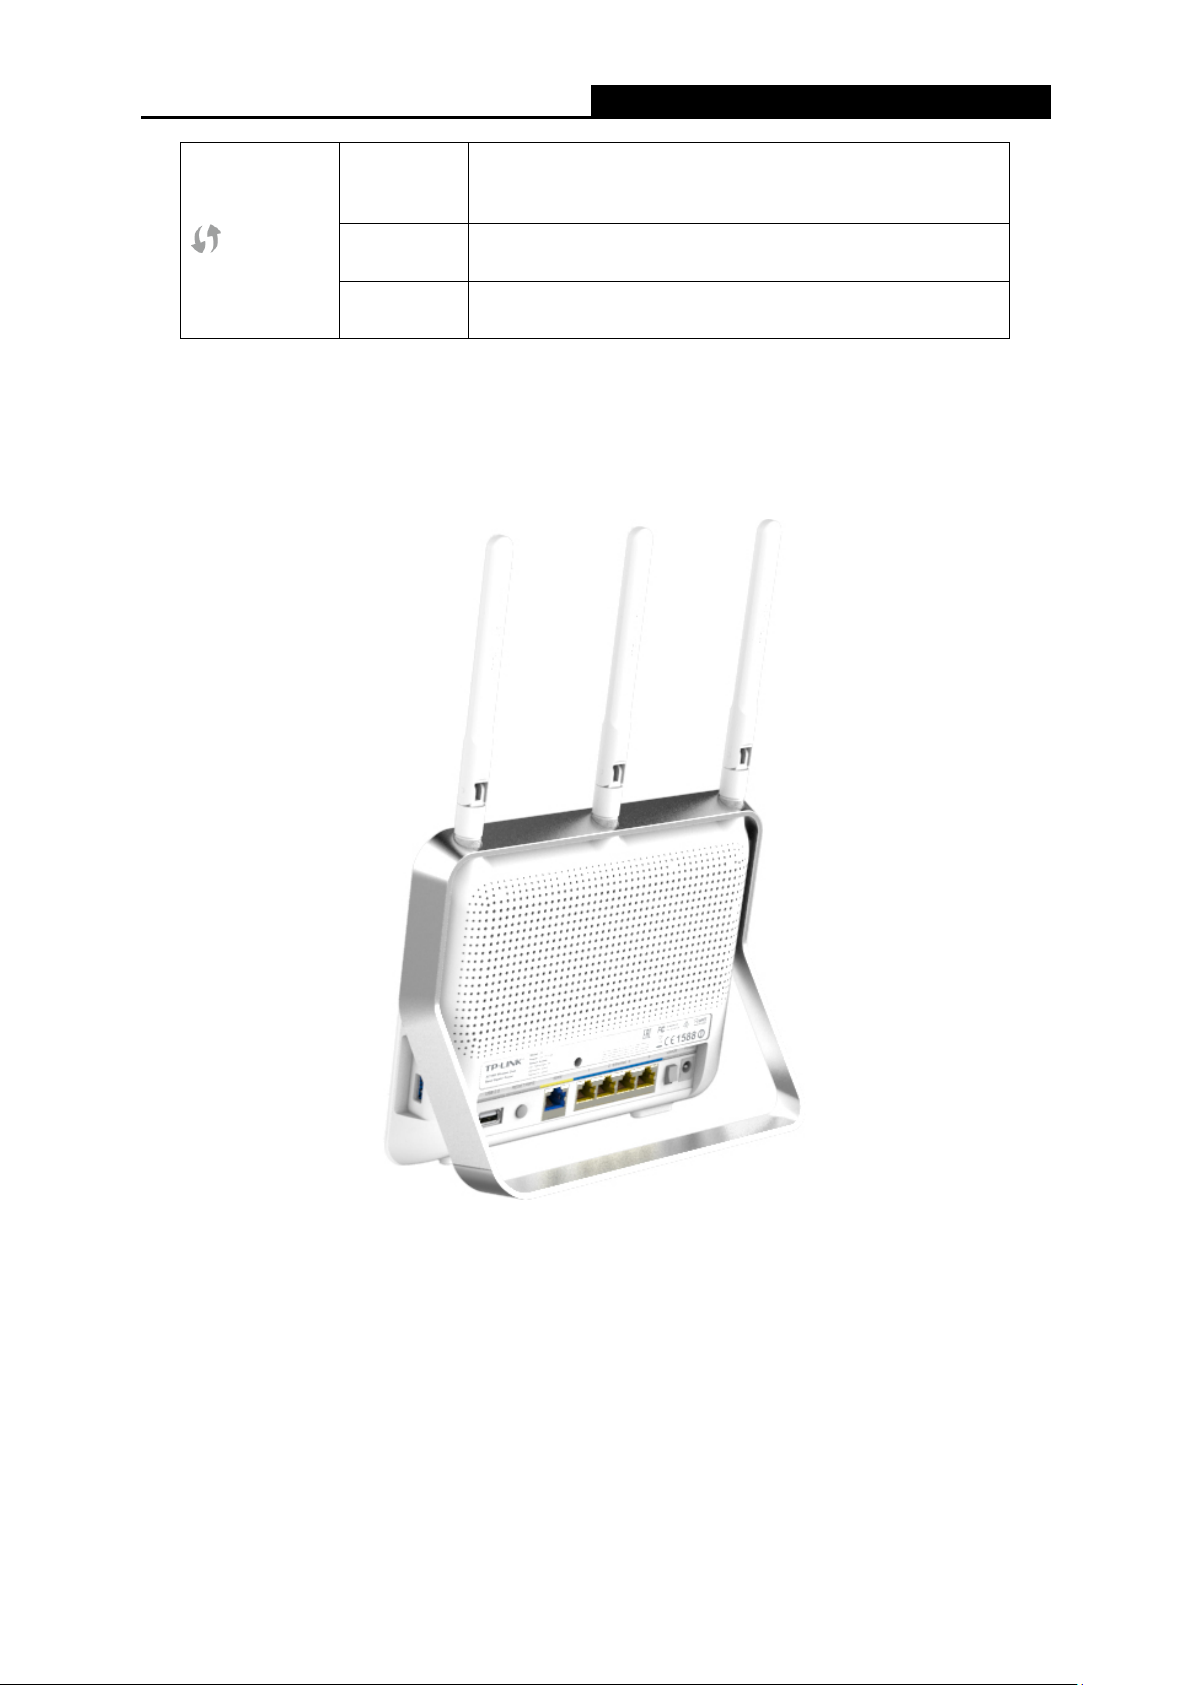
1.4.2 The Rear Panel
The following parts are located on the rear panel (View from left to right).
USB 2.0: The USB 2.0 port connects to a USB 2.0 storage device or a USB 2.0 printer.
RESET/WPS:
Pressing this button for less than 5 seconds enables the WPS function. If your client devices,
such as wireless adapters, that support Wi-Fi Protected Setup, then you can press this
button to quickly establish a connection between the router and client devices and
automatically configure wireless security for your wireless network.
Figure 1-1 Rear Panel sketch
— 5 —

AC1750 Wireless Dual Band Gigabit Router
Pressing this button for more than 5 seconds enables the Reset function. With the router
powered on, press and hold the WPS/Reset button for approximately 8 seconds. And then
release the button and wait the router to reboot to its factory default settings.
Internet: This port is where you will connect the DSL/cable Modem, or Ethernet.
Ethernet (1, 2, 3, 4): These ports (1, 2, 3, 4) connect the router to the local PC(s).
On/Off: The switch for the power.
Power: The Power socket is where you will connect the power adapter. Please use the
power adapter provided.
The following parts are located on the side panel (View from top to bottom).
Wireless On/Off: The switch for the wireless function.
USB 3.0: The USB 3.0 port connects to a USB 3.0 storage device or a USB 3.0 printer.
— 6 —

AC1750 Wireless Dual Band Gigabit Router
Chapter 2. Connecting the router
2.1 System Requirements
Broadband Internet Access Service (DSL/Cable/Ethernet)
One DSL/Cable Modem that has an RJ45 connector (which is not necessary if the router is
connected directly to the Ethernet)
PCs with a working Ethernet Adapter and an Ethernet cable with RJ45 connectors
TCP/IP protocol on each PC
Web browser, such as Microsoft Internet Explorer, Mozilla Firefox or Apple Safari
2.2 Installation Environment Requirements
Place the router in a well-ventilated place far from any heater or heating vent
Avoid direct irradiation of any strong light (such as sunlight)
Keep at least 2 inches (5 cm) of clear space around the router
Operating Temperature: 0℃~40℃ (32℉~104℉)
Operating Humidity: 10%~90%RH, Non-condensing
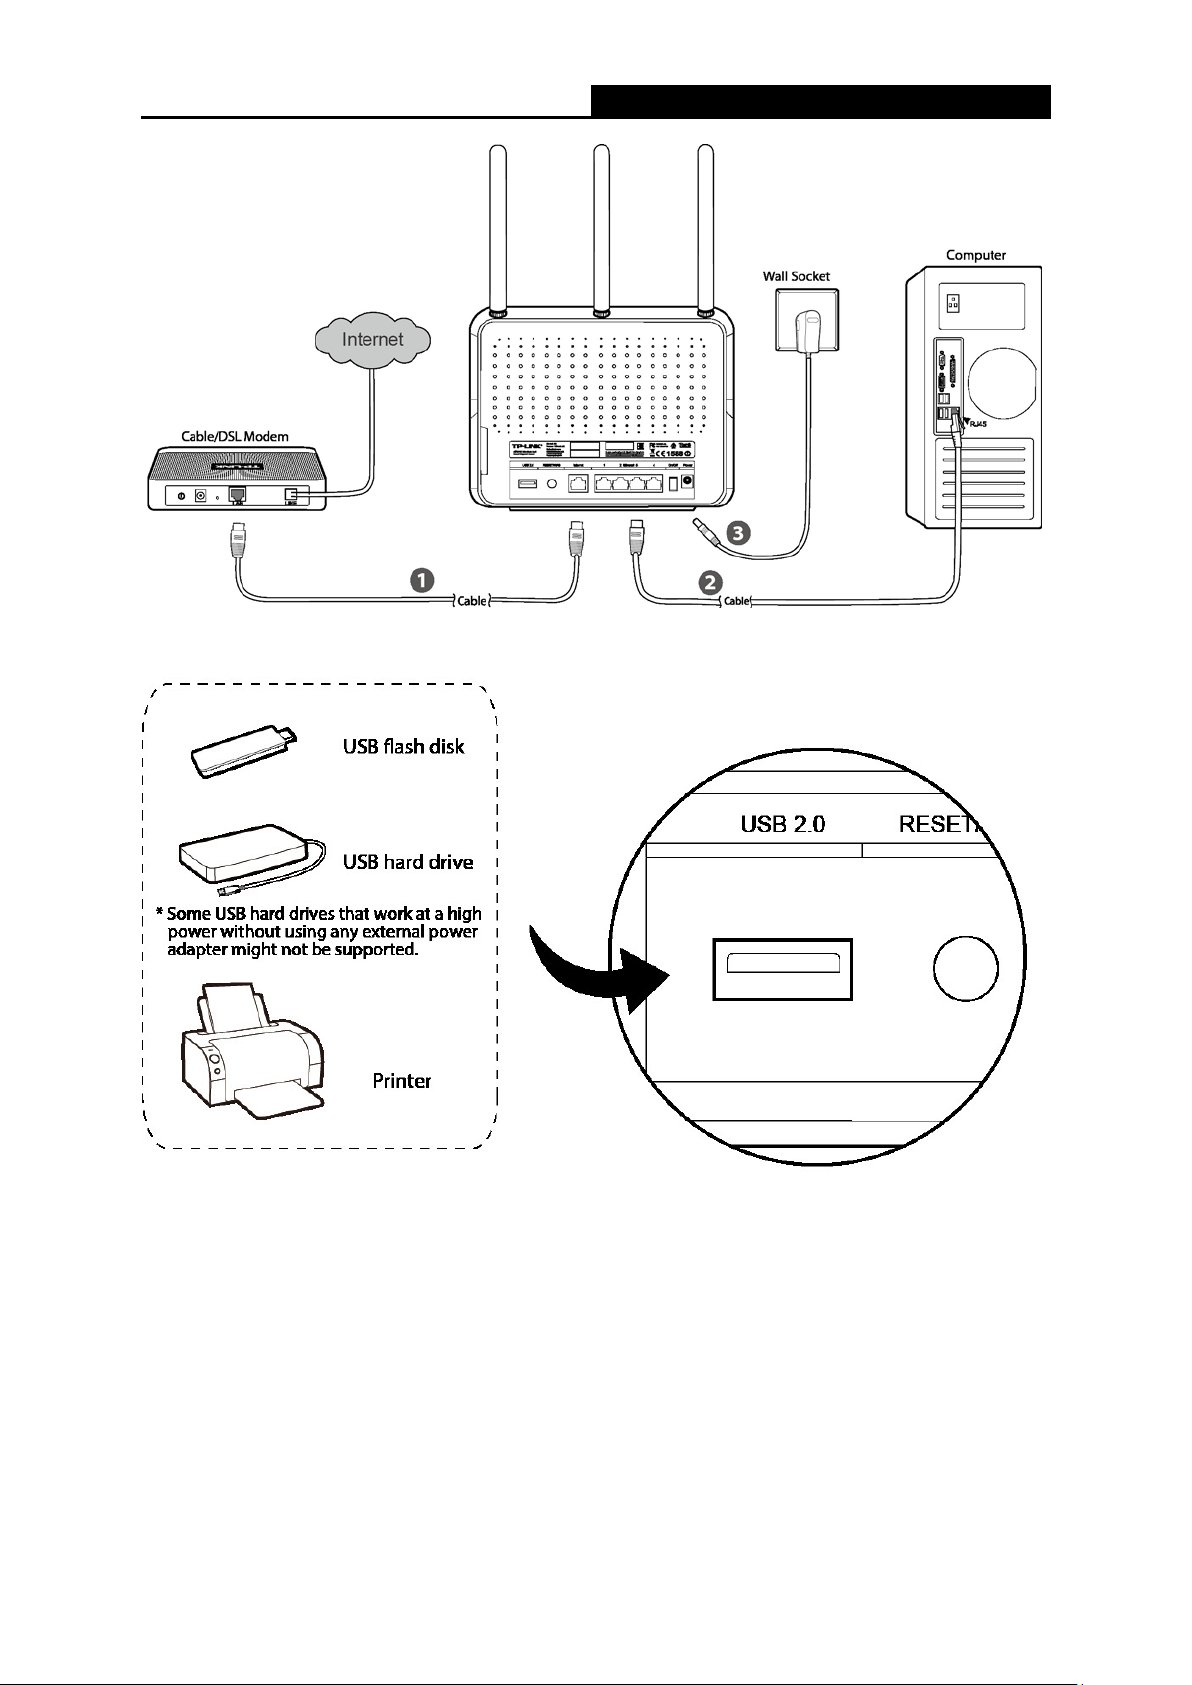
2.3 Connecting the router
Before installing the router, make sure your PC is connected to the Internet through the
broadband service successfully. If there is any problem, please contact your ISP. After that, please
install the router according to the following steps. Don’t forget to pull out the power plug and keep
your hands dry.
1. Power off your modem (if the modem has a backup battery, please remove it too.), and
disconnect your existing router if you have one.
2. Connect the Internet port on your Router to the Modem’s LAN port with an Ethernet cable.
3. Connect your computer to one of the Ethernet ports labeled 1~4 on the Router with an
Ethernet cable.
4. Power on the modem and wait for 2 minutes.
5. Make sure the Wireless On/Off switch is ON. Then plug the provided power adapter into the
Power jack and the other end to a standard electrical wall socket. Press the On/Off button to
power on the Router. (Before you power on the Router, please make sure your computer is
NOT connected to any other wireless network.)
— 7 —
AC1750 Wireless Dual Band Gigabit Router
Figure 2-1 Hardware Installation
Note:
If you want to use the router to share files or printer, plug the USB storage device to the USB port
or connect the printer to the router with a matching cable.
Figure 2-2 USB Installation
— 8 —
AC1750 Wireless Dual Band Gigabit Router
Chapter 3. Quick Setup
1. Set up the TCP/IP Protocol in «Obtain an IP address automatically» mode on your PC. If
you need instructions as to how to do this, please refer to Appendix B: Configuring the PC
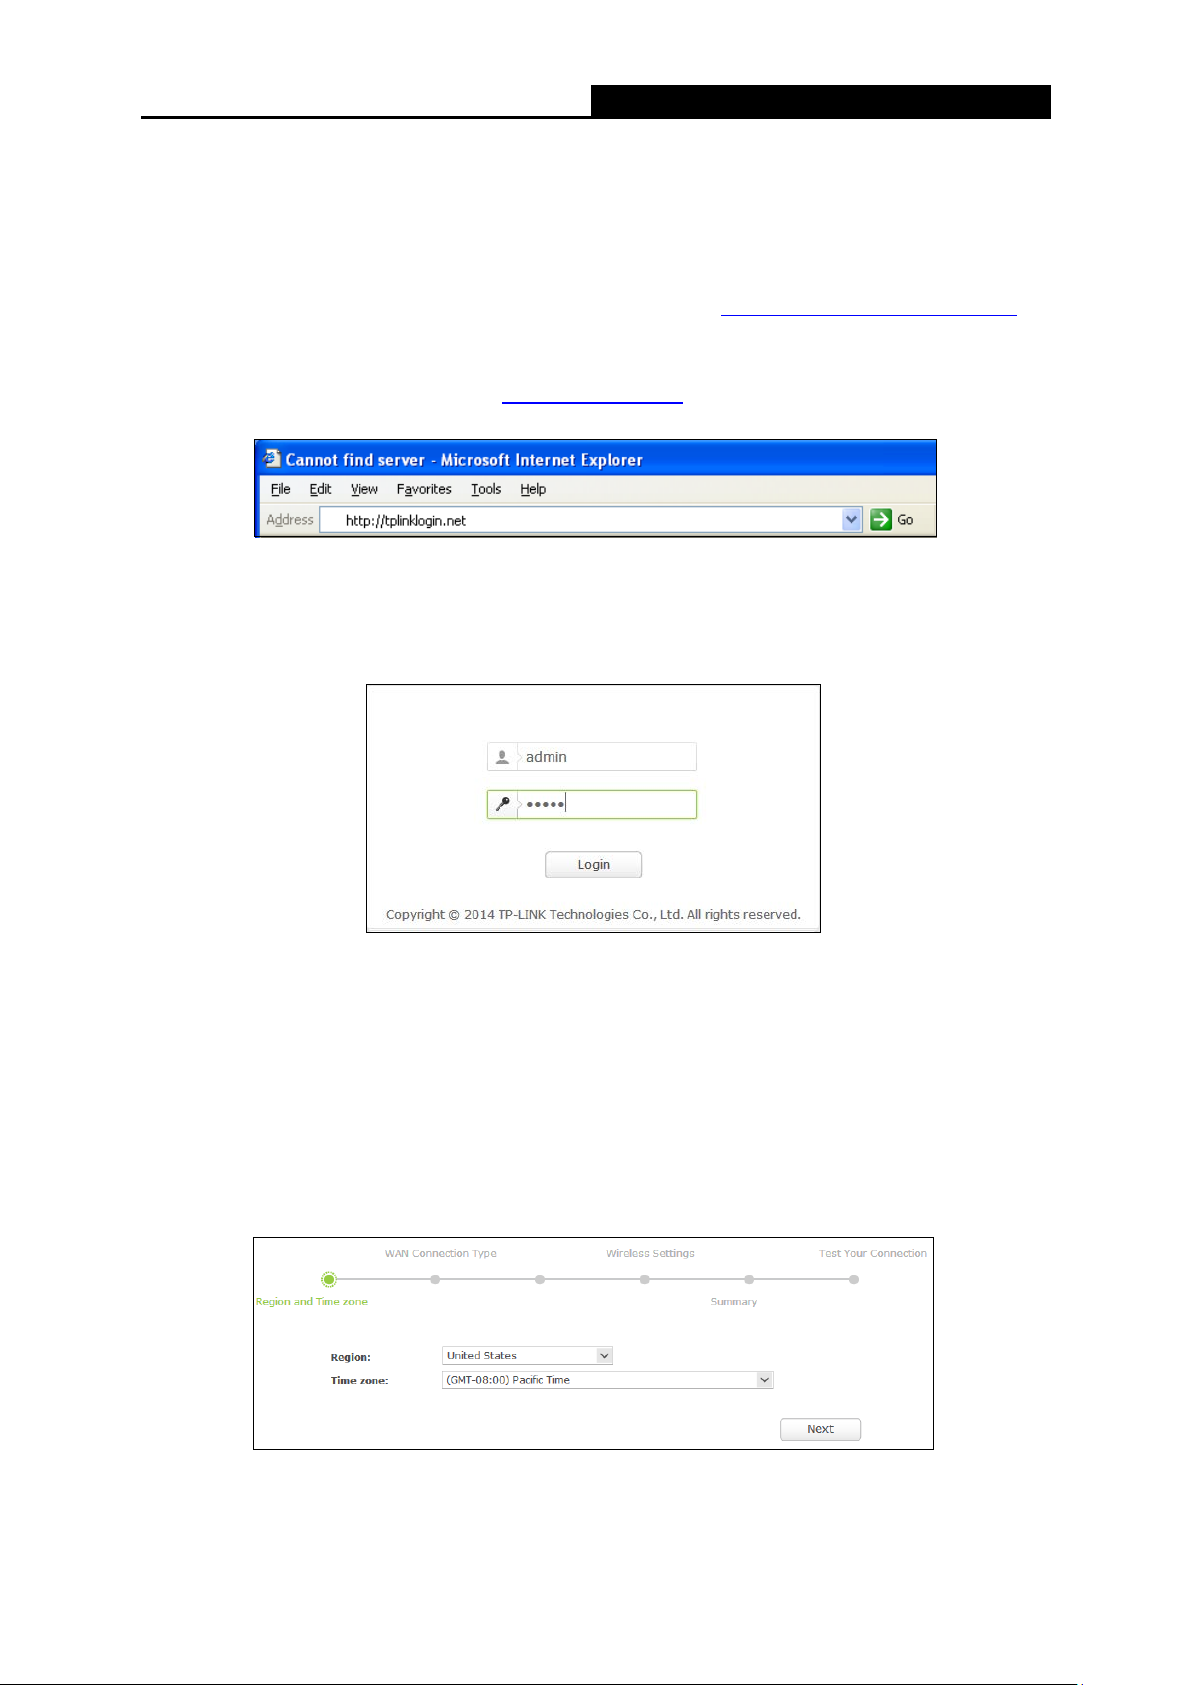
2. Open a web-browser (such as Microsoft Internet Explorer, Mozilla Firefox or Apple Safari),
and type in the default IP address http://tplinklogin.net
in the address field.
.
Figure 3-1 Log in the router
After a moment, a login window will appear. Enter admin for the User Name and Password,
both in lower case letters. Then click the Login button or press the Enter key.
Figure 3-2 Login Windows
Note:
If the above screen does not pop up, it means that your Web-browser has been set to a proxy.
Go to Tools menu>Internet Options>Connections>LAN Settings, in the screen that appears,
cancel the Using Proxy checkbox, and click OK to finish it.
3. After successful login, the Quick Setup page will appear for you to select your Region and
Time zone. After finishing the selection, click Next.
Figure 3-3 Quick Setup
— 9 —
AC1750 Wireless Dual Band Gigabit Router
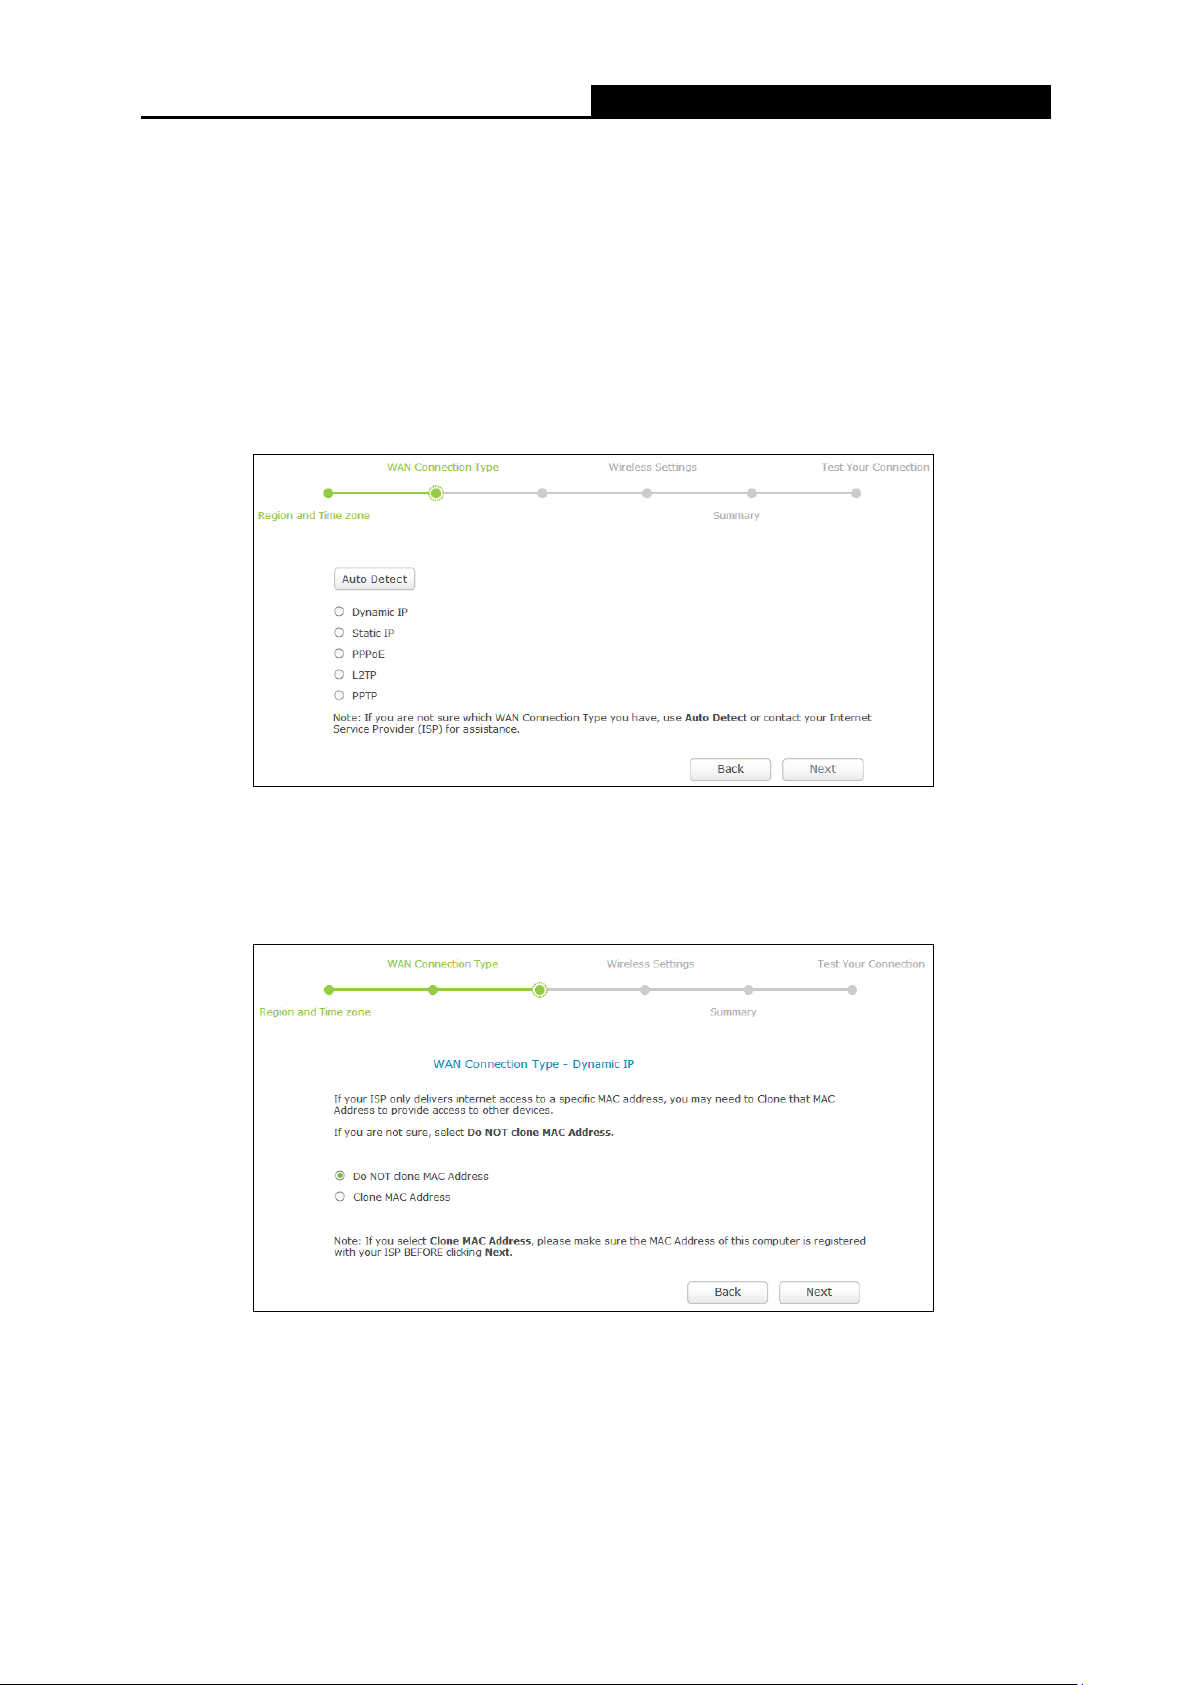
4. Then WAN Connection Type page will appear as shown below. Select your connection type
if you know what it is or click Auto Detect button; then follow the instructions to continue.
Note:
1) It’s likely that you will skip Step 3 and jump to Step 4 in some situations, which is normal.
2) Make sure the cable is securely plugged into the Internet port before using Auto-Detect.
3) Auto-Detect supports only three popular connection types, PPPoE, Dynamic IP, and
Static IP. If your connection type is L2TP or PPTP, you need to manually select the very
type and click Next to go on configuring.
Figure 3-4 WAN Connection Type
Dynamic IP
Choose to clone MAC address or not and then click Next to continue.
Figure 3-5 WAN Connection Type
— 10 —
AC1750 Wireless Dual Band Gigabit Router
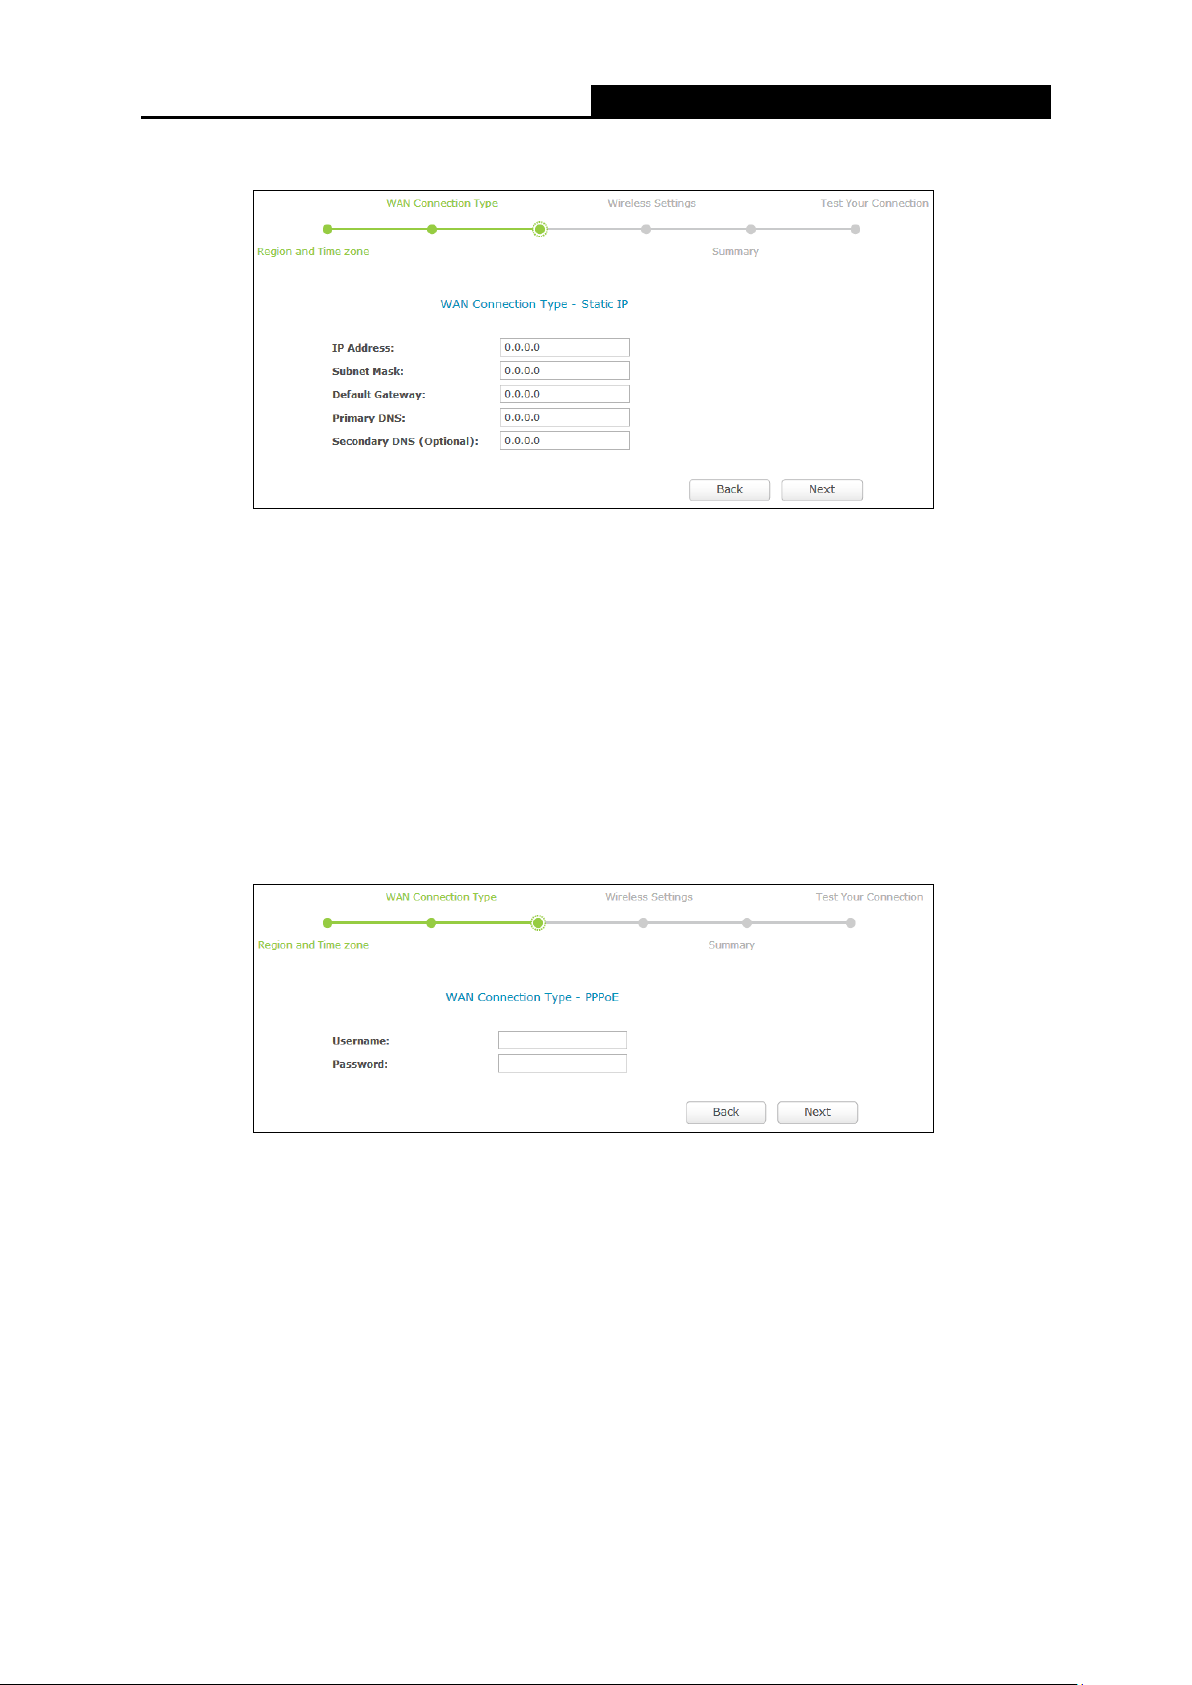
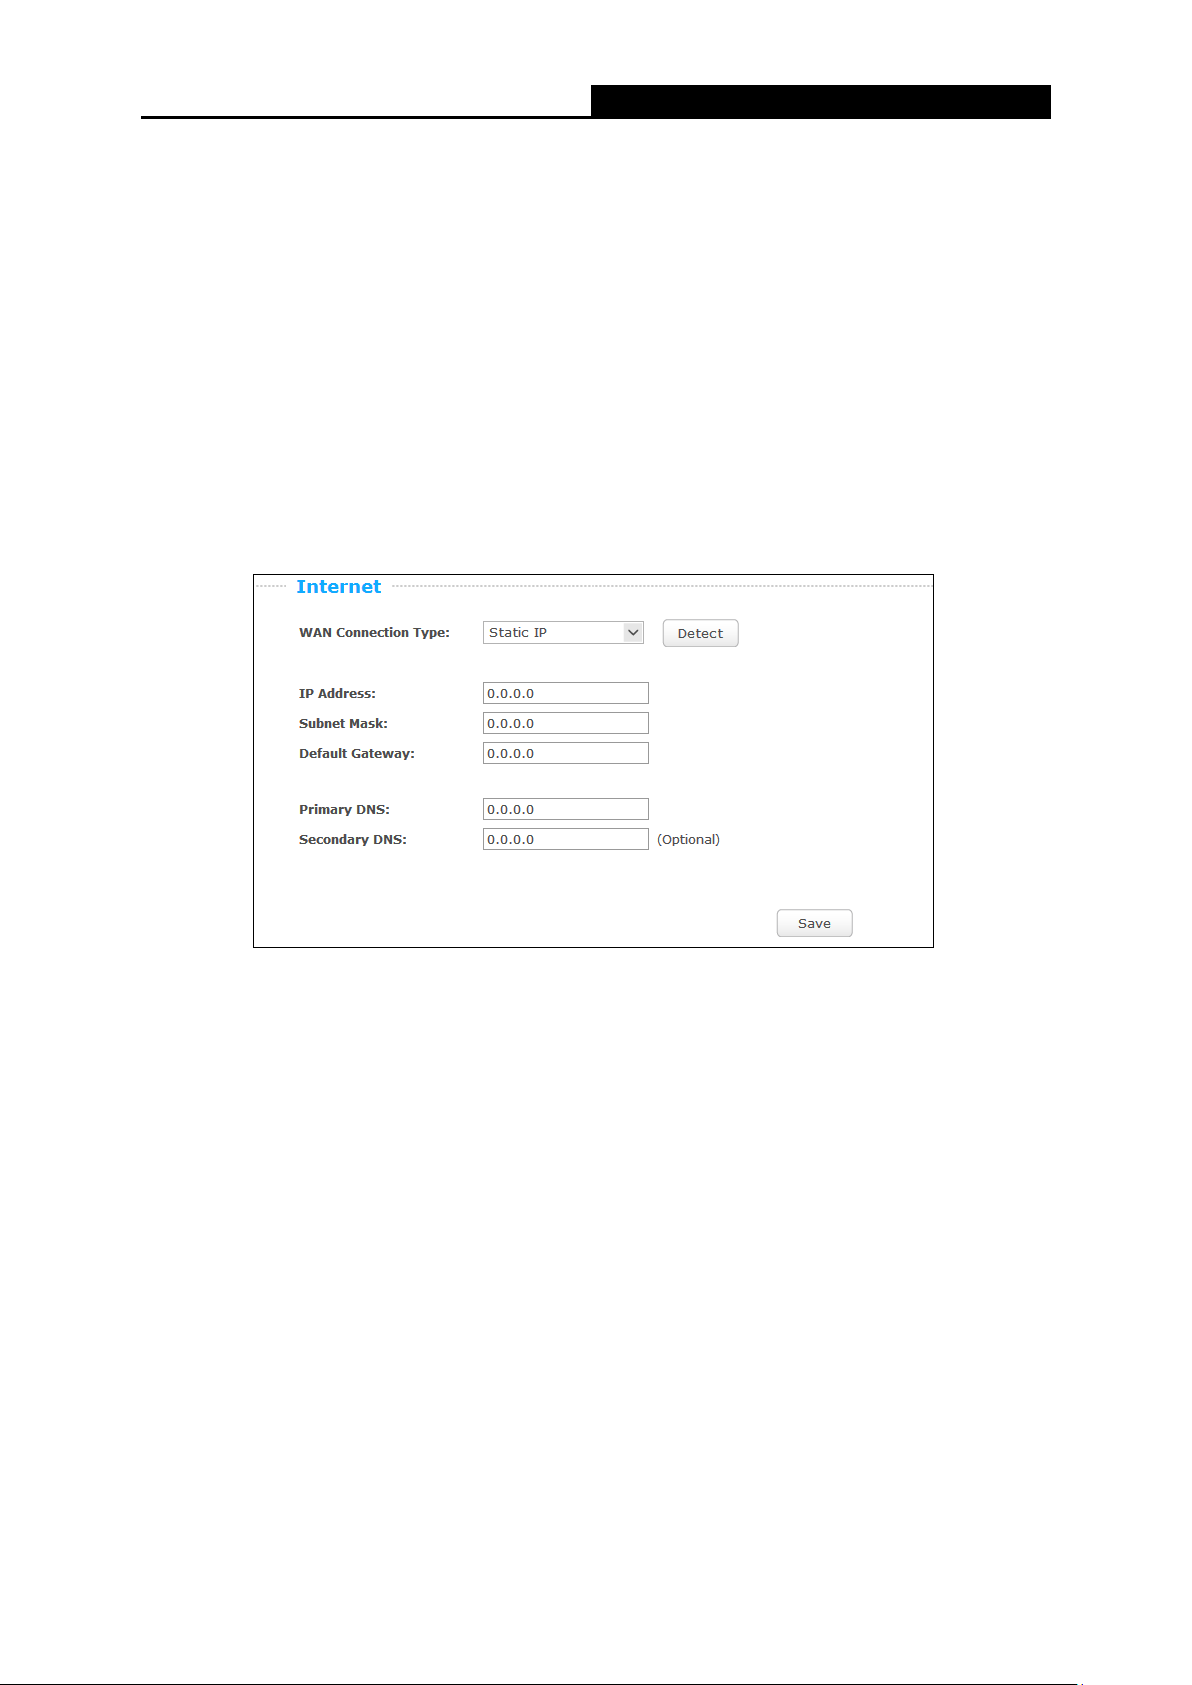
Static IP
Figure 3-6 WAN Connection Type
IP Address — Enter the IP address into this field.
Subnet Mask — Enter the subnet mask into this field. It is usually 255.255.255.0.
Default Gateway — Enter the gateway IP address into this field.
Primary DNS — Enter the DNS Server IP address into this field.
Secondary DNS (Optional) — If your ISP provides another DNS server IP address, enter it
into this field.
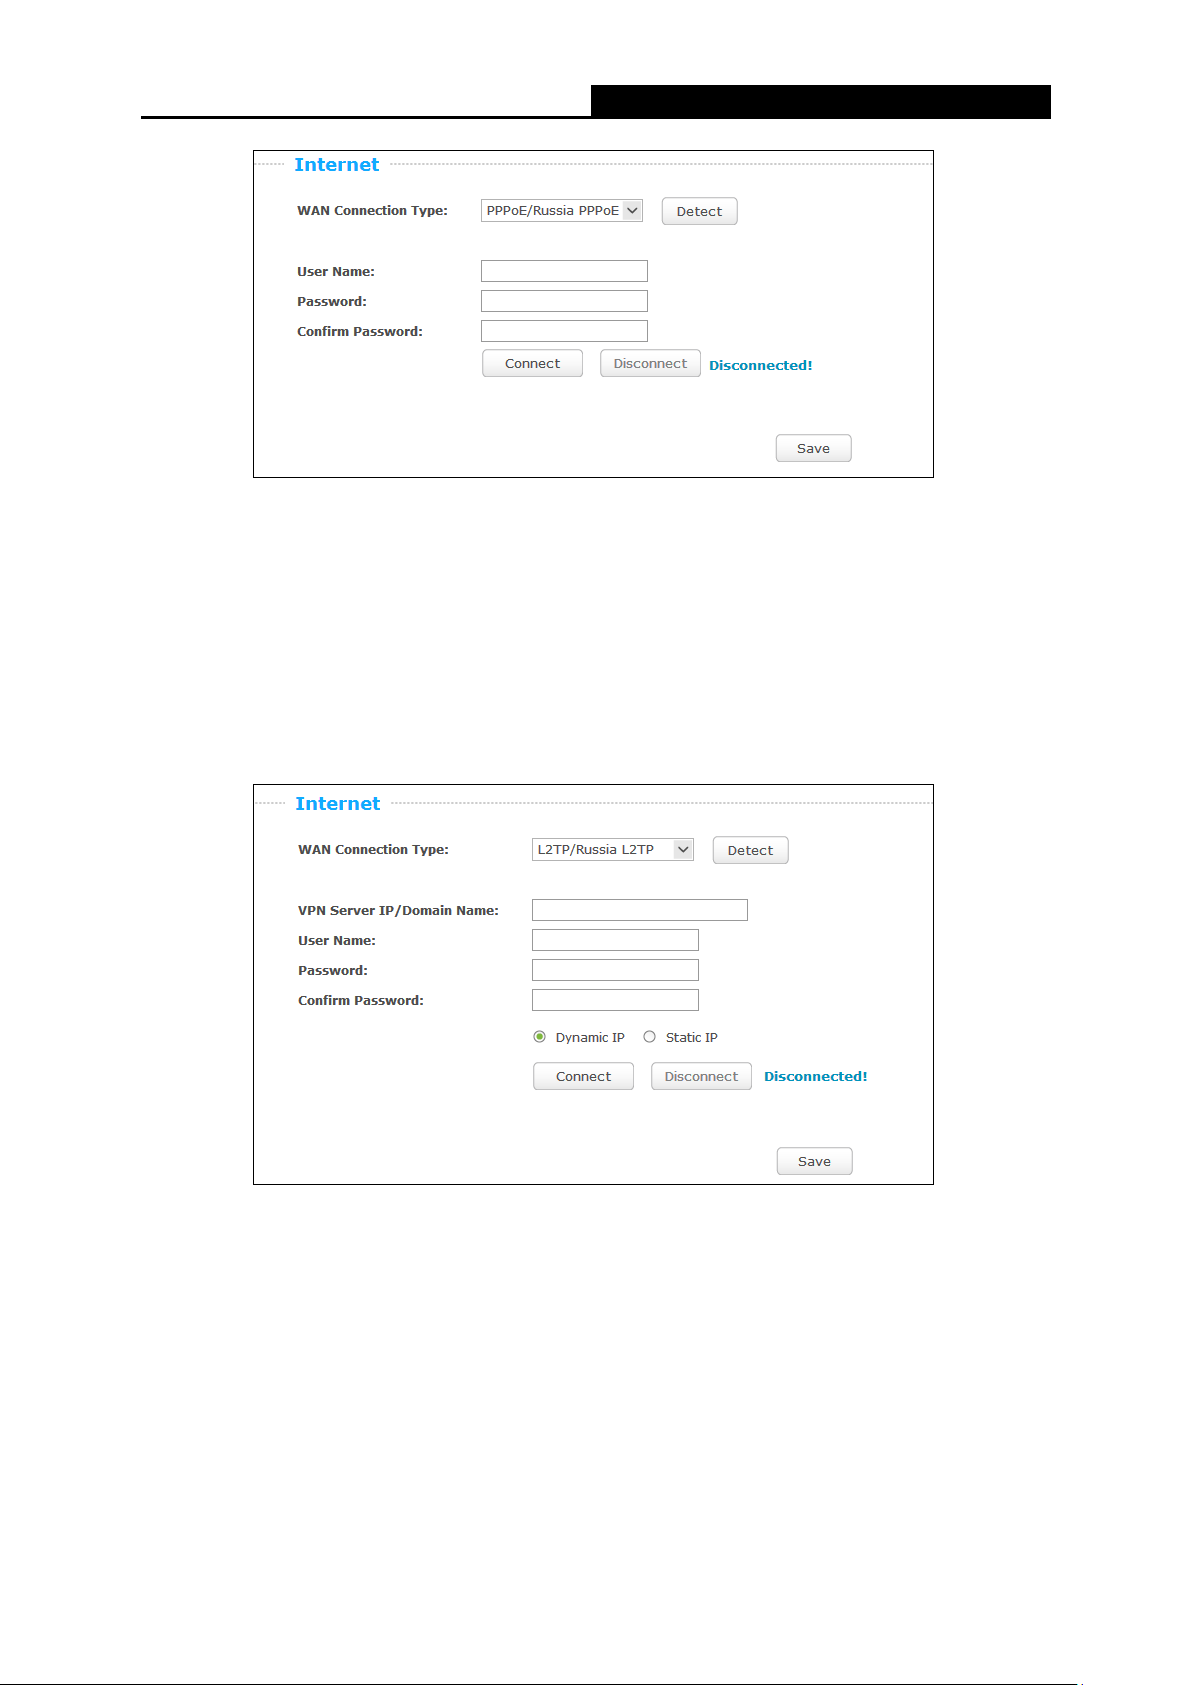
PPPoE/Russian PPPoE
Figure 3-7 WAN Connection Type
Username — Enter the username provided by your ISP. This field is case-sensitive.
Password — Enter the password provided by your ISP. This field is case-sensitive.
— 11 —
AC1750 Wireless Dual Band Gigabit Router
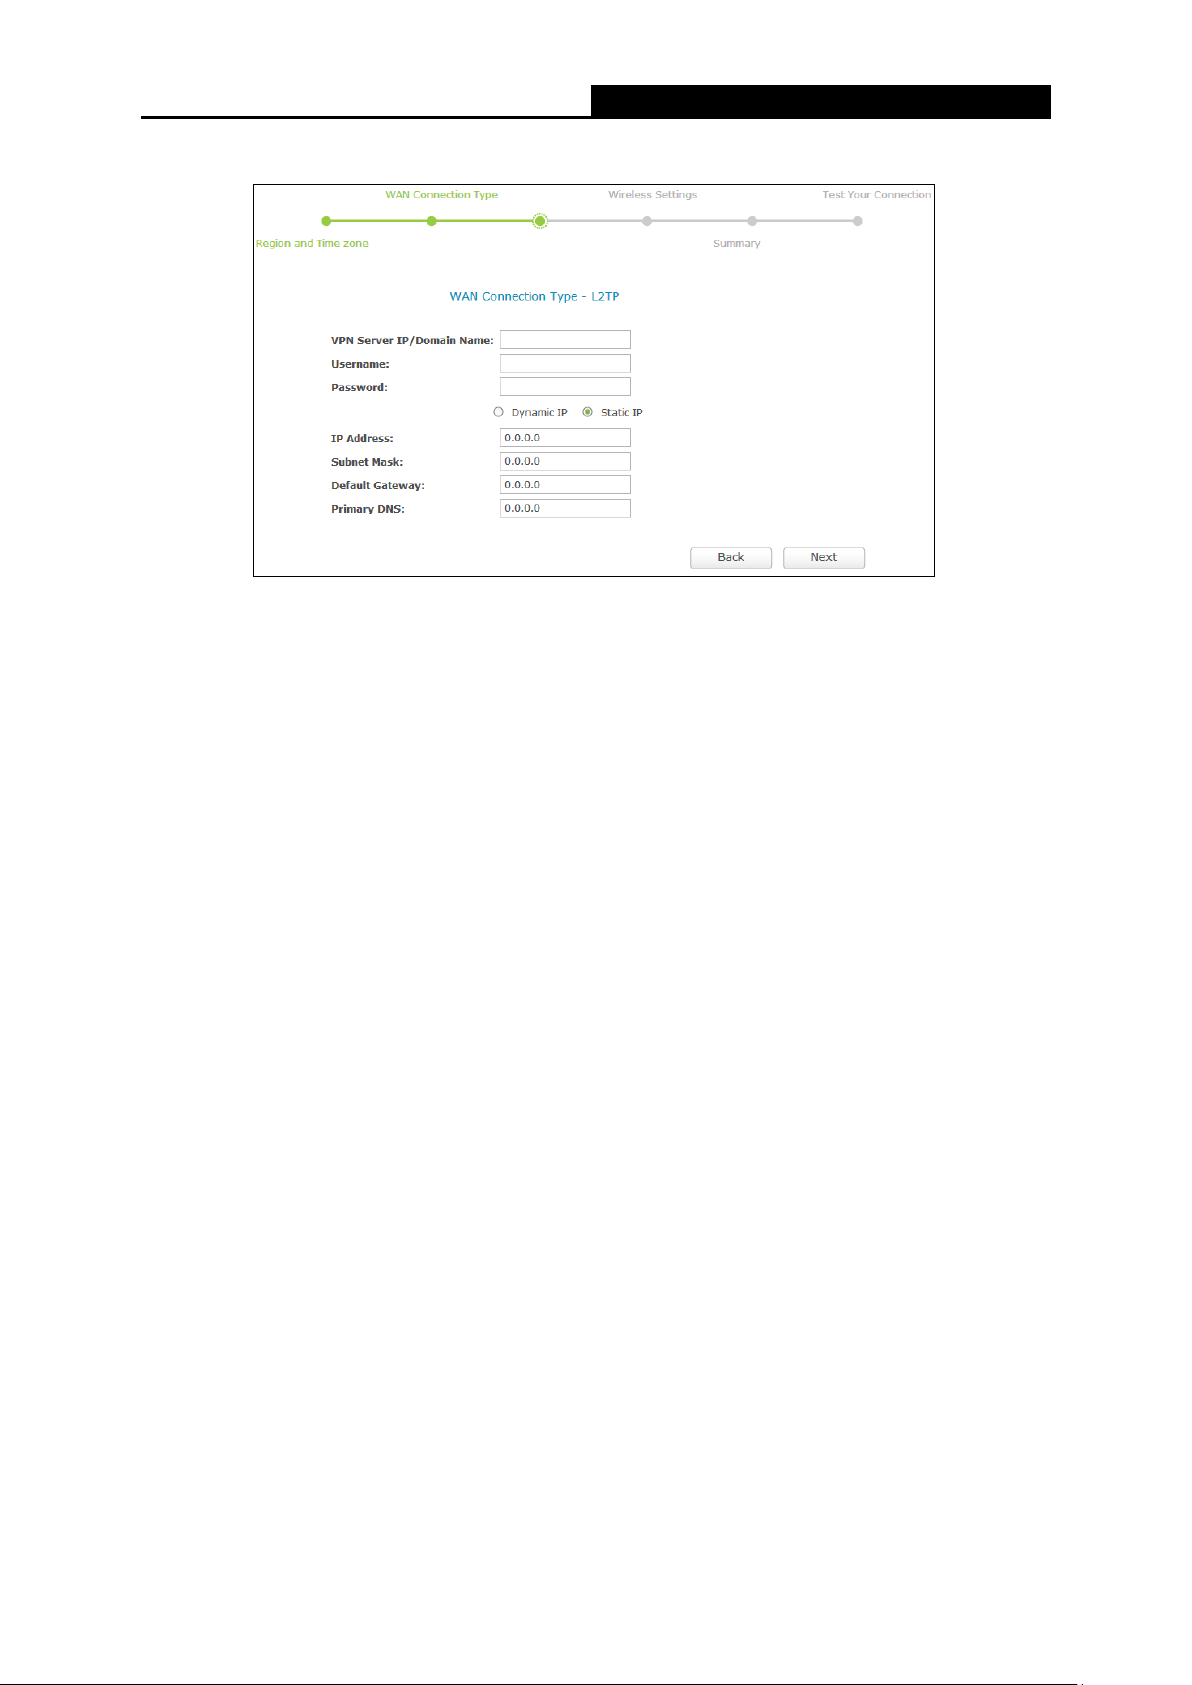
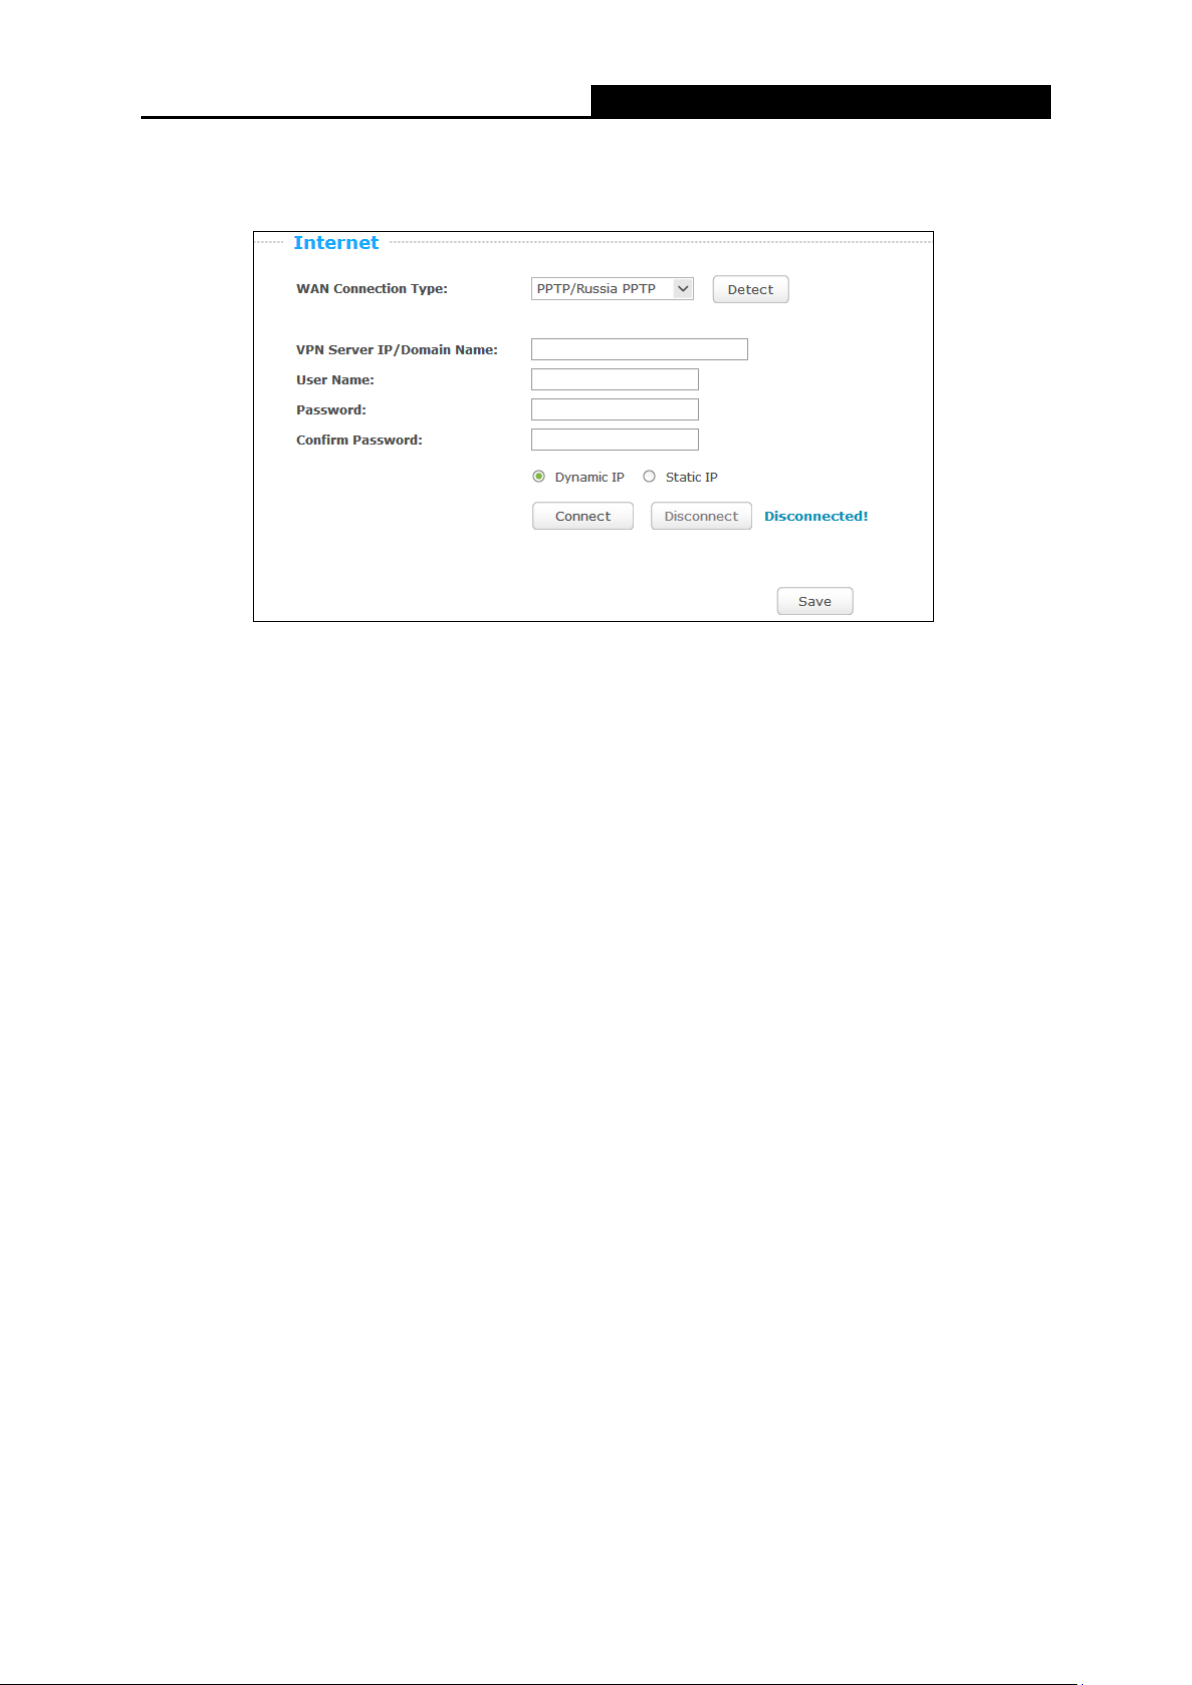
L2TP
Figure 3-8 WAN Connection Type
Server IP Address/Name — Enter the server IP address/name provided by your ISP.
User Name — Enter the username provided by your ISP. This field is case-sensitive.
Password — Enter the Password provided by your ISP. This field is case-sensitive.
Dynamic IP/Static IP — Select Static IP if the IP Address, Subnet Mask, Default Gateway,
and Primary DNS server address have been provided by your ISP. Otherwise, please select
Dynamic IP.
IP Address — Enter the IP address provided by your ISP.
Subnet Mask — Enter the subnet mask provided by your ISP.
Default Gateway- Enter the default gateway provided by your ISP.
Primary DNS — Enter the primary DNS provided by your ISP.
— 12 —
AC1750 Wireless Dual Band Gigabit Router
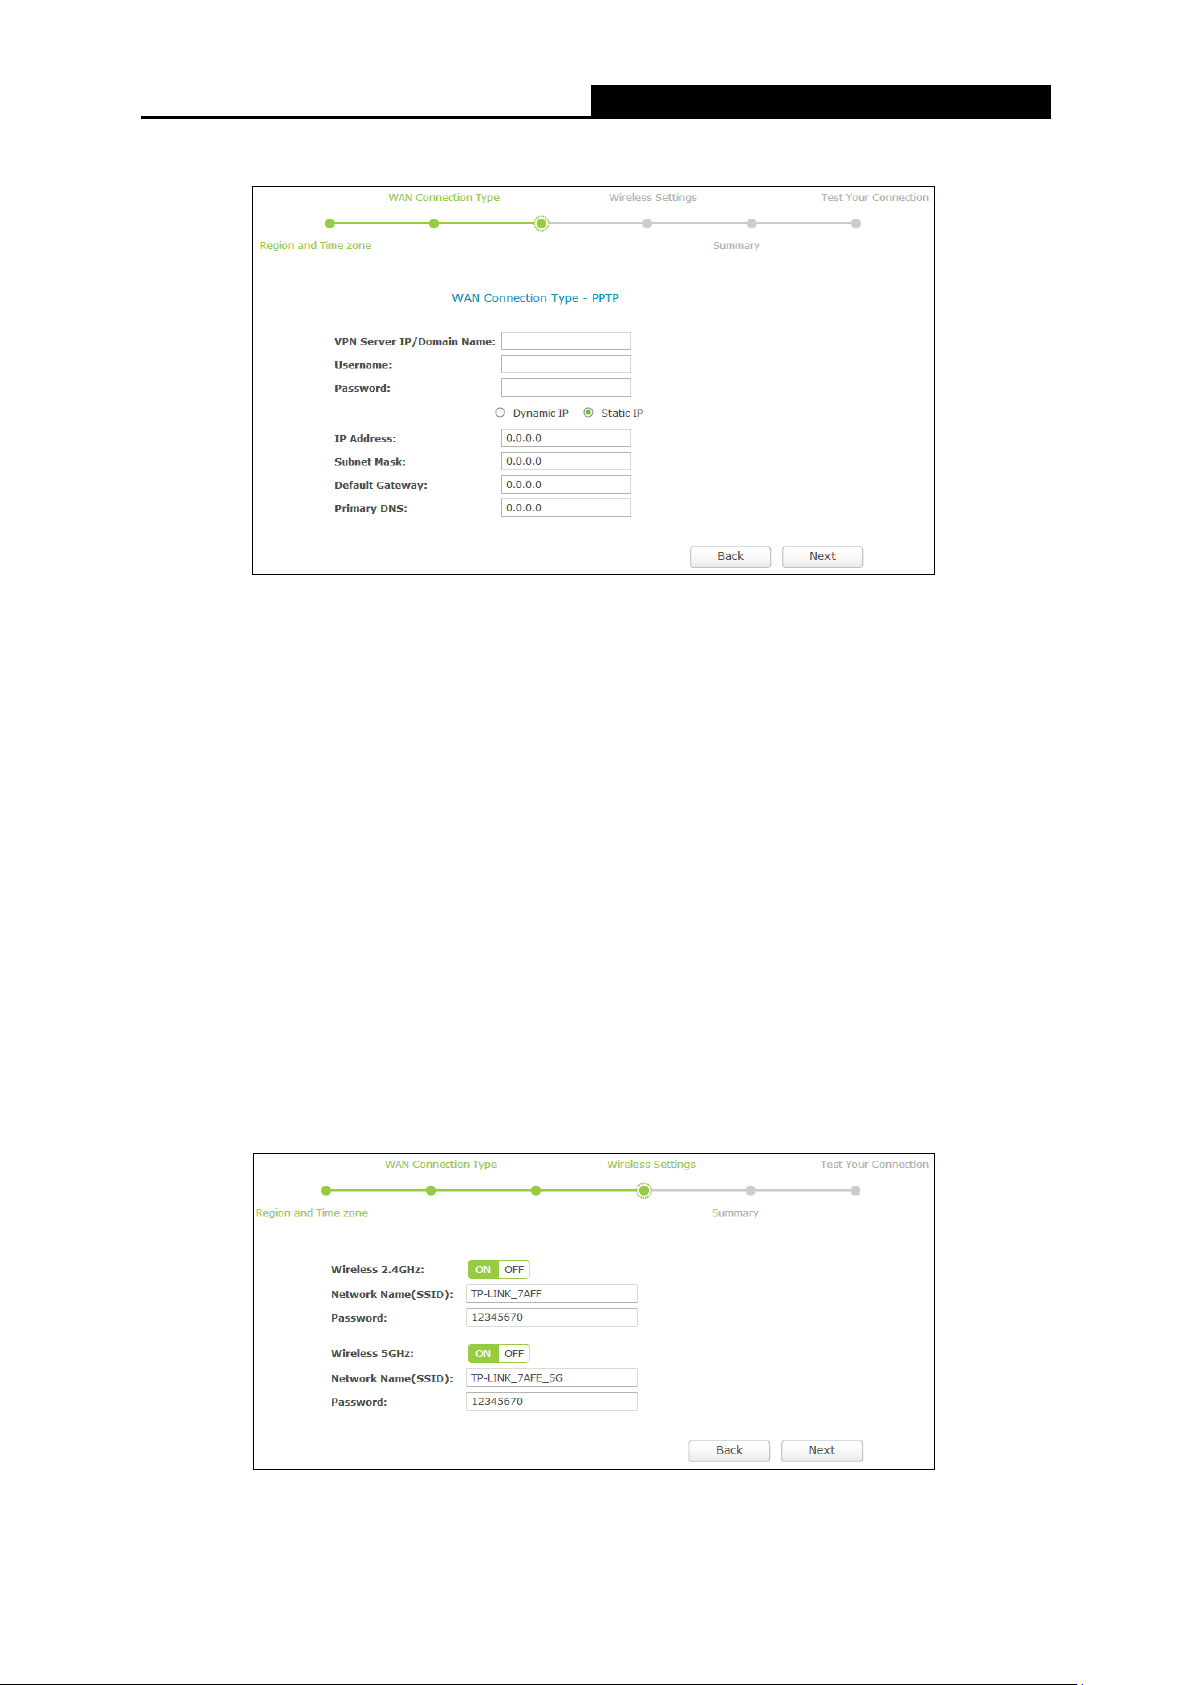
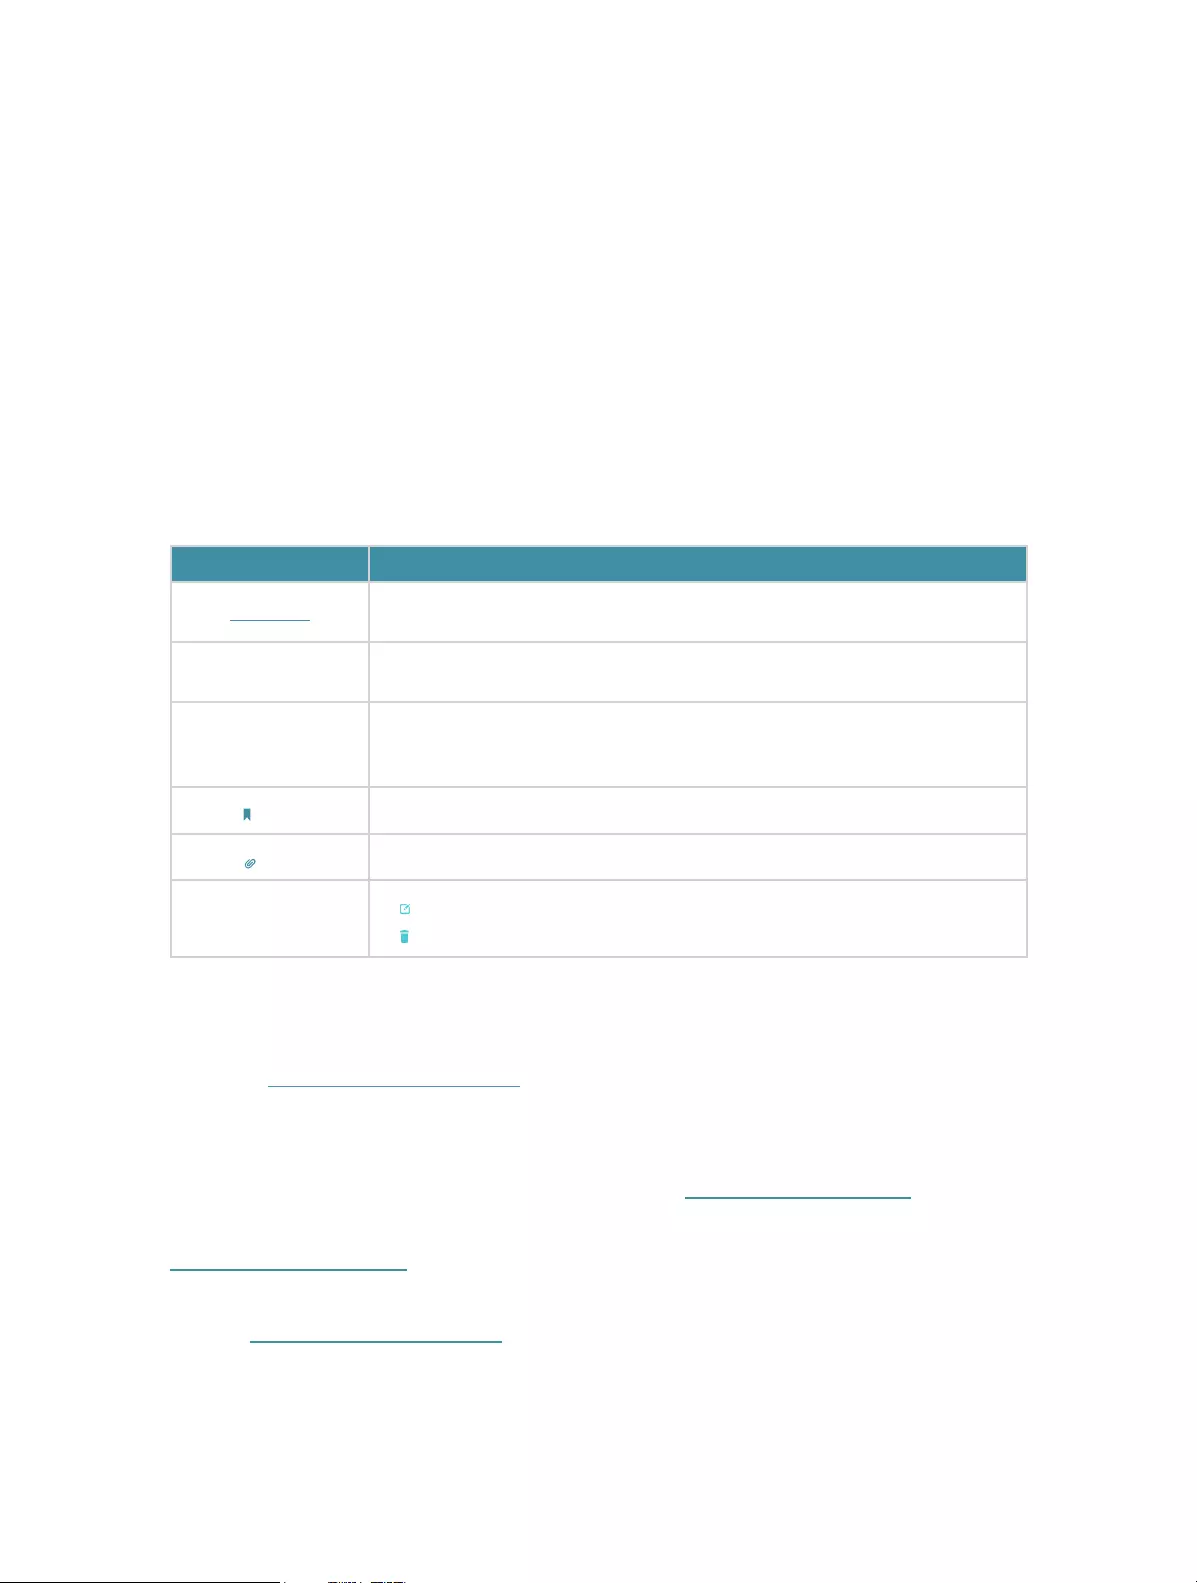
PPTP
Figure 3-9 WAN Connection Type
Server IP Address/Name — Enter the server IP address/name provided by your ISP.
User Name — Enter the username provided by your ISP. This field is case-sensitive.
Password — Enter the Password provided by your ISP. This field is case-sensitive.
Dynamic IP/Static IP — Select Static IP if the IP Address, Subnet Mask, Default Gateway,
and Primary DNS server address have been provided by your ISP. Otherwise, please select
Dynamic IP.
IP Address — Enter the IP address provided by your ISP.
Subnet Mask — Enter the subnet mask provided by your ISP.
Default Gateway- Enter the default gateway provided by your ISP.
Primary DNS — Enter the primary DNS provided by your ISP.
5. After finishing WAN Connection Type selection, you need to configure the basic parameters
for your wireless network, including 2.4GHz and 5GHz, and then click Next.
Figure 3-10 WAN Connection Type
— 13 —

AC1750 Wireless Dual Band Gigabit Router
Wireless 2.4GHz/5GHz — Displays whether the wireless function is enabled or not.
Network Name (SSID) — Also called the SSID (Service Set Identification). Enter a value of up
to 32 characters. The same name must be assigned to all wireless devices in your network.
This value is case-sensitive. For example, TEST is NOT the same as test.
Password — Create a password for your 2.4GHz and 5GHz wireless network.
— 14 —
AC1750 Wireless Dual Band Gigabit Router
Chapter 4. Basic
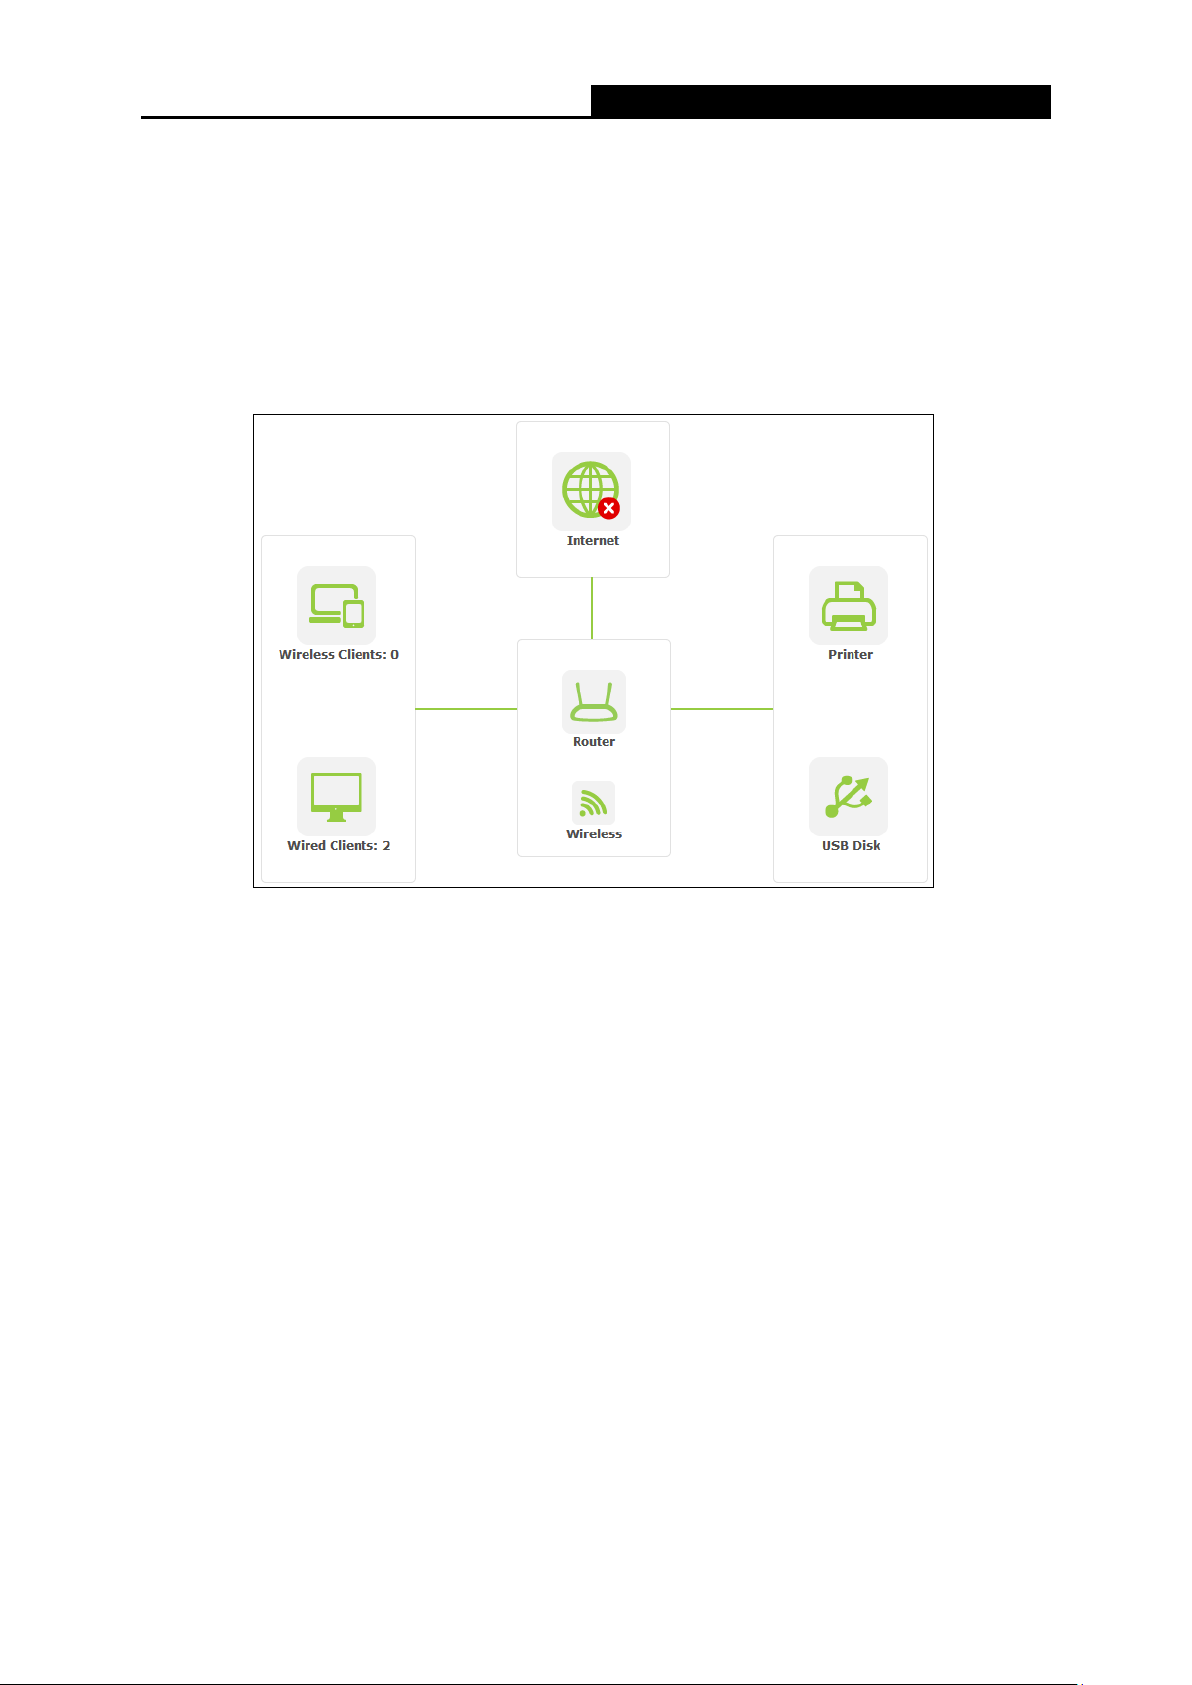
4.1 Network Map
Network Map provides a router-centered dashboard that lets you see the status of your
Internet connection and network at a glance. You can click any of the six sections of the
dashboard to view the d
etail information. All the information is read-only.
Figure 4-1 Network Map
Internet — View Check the ISP settings of your router.
Wireless Clients — Click to view the wireless devices connected to your network.
Wired Clients — Click to view the wired devices connected to your network.
Wireless — Click to view or change the wireless settings for your router.
Printer — Click to view the information of the printer connected to your network.
USB Disk — Click to view the information of the USB storage device connected to your
network.
4.2 Internet
Choose menu “Basic→Internet”, and you can view or change the basic ISP information for your
router.
— 15 —
AC1750 Wireless Dual Band Gigabit Router
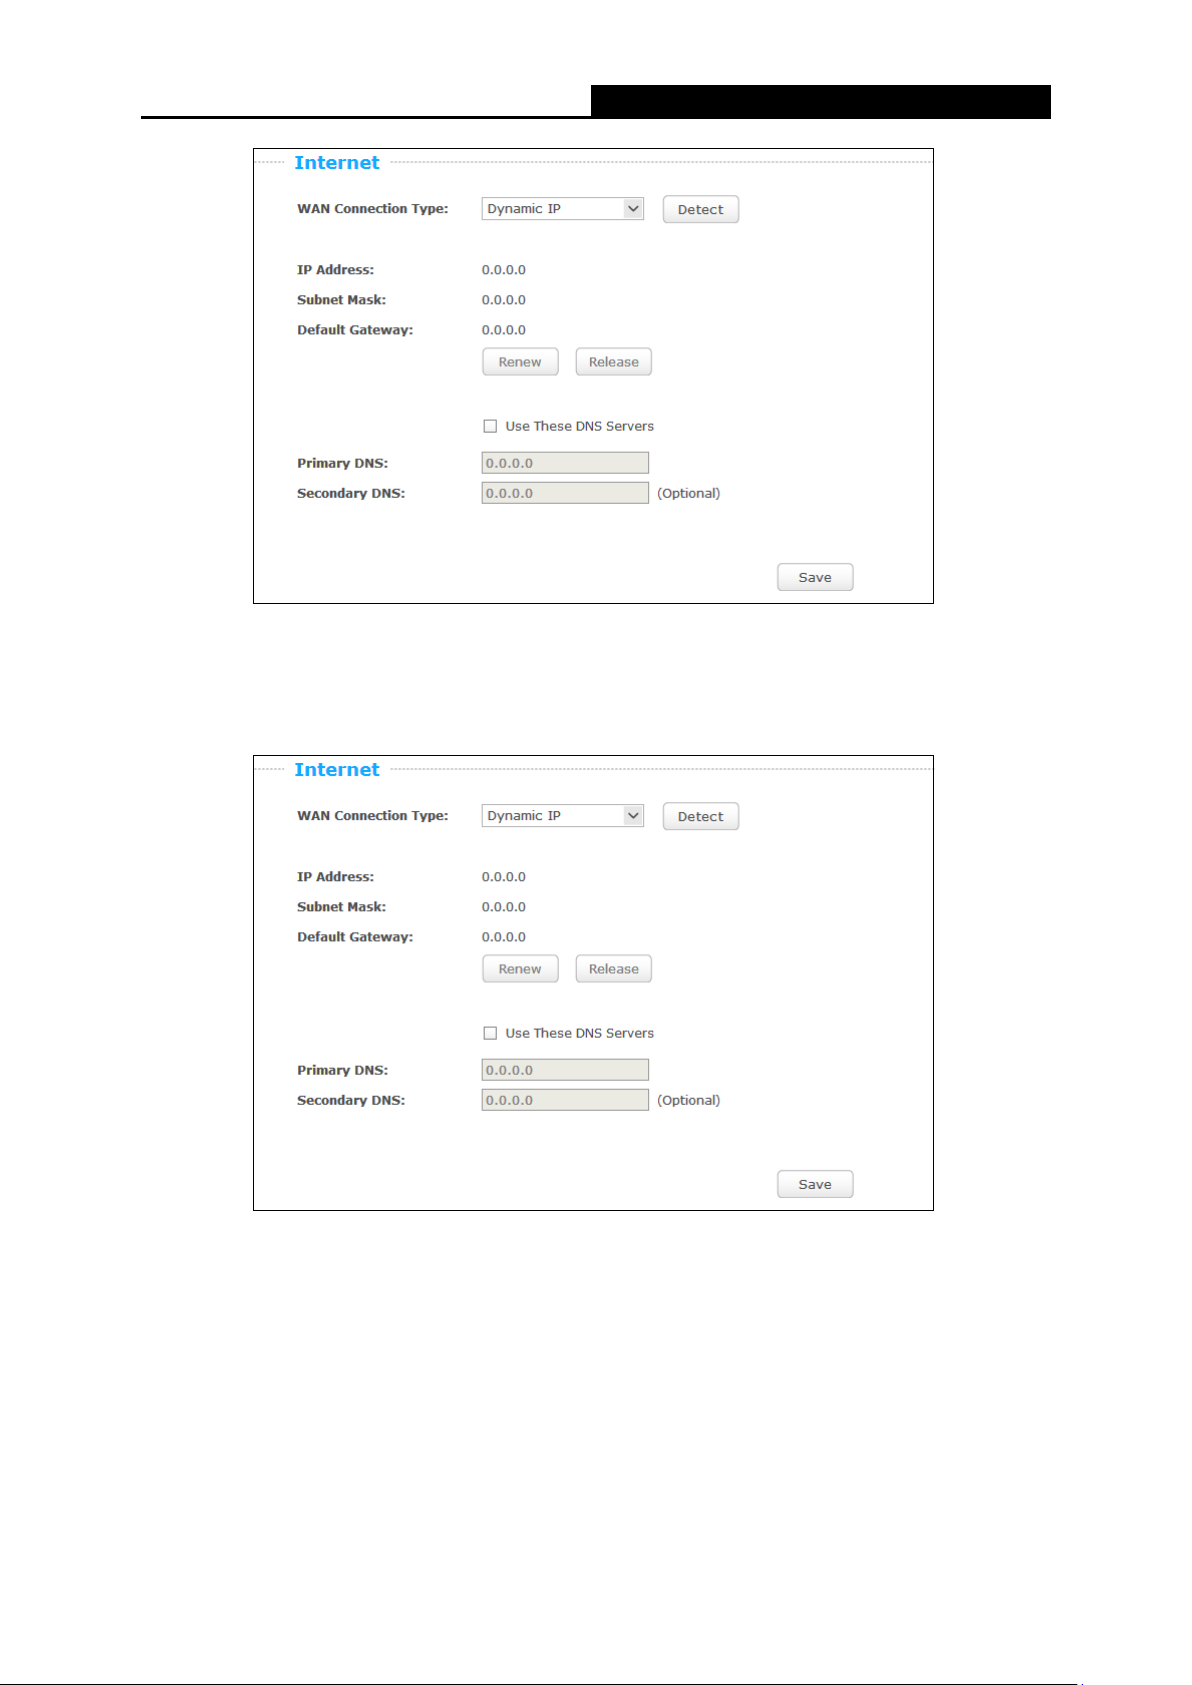
Figure 4-2 Internet
1. If your ISP provides the DHCP service, please choose Dynamic IP type, and the router will
automatically get IP parameters from your ISP. You can see the page as shown below.
Figure 4-3 Dynamic IP
IP Address — Assigned dynamically by your ISP.
Subnet Mask — Assigned dynamically by your ISP.
Default Gateway — Assigned dynamically by your ISP.
Click the Renew button to renew the IP parameters from your ISP. Click the Release button to
release the IP parameters.
— 16 —
AC1750 Wireless Dual Band Gigabit Router
Primary/Secondary DNS — If your ISP gives you one or two DNS addresses, select Use
These DNS Servers and enter the primary and secondary addresses into the correct fields.
Otherwise, the DNS servers will be assigned dynamically from your ISP.
Note:
If you find error when you go to a website after entering the DNS addresses, it is likely that
your DNS servers are set up improperly. You should contact your ISP to get DNS server
addresses.
Click the Save button to save your settings.
2. If your ISP provides a static or fixed IP Address, Subnet Mask, Gateway and DNS setting,
select Static IP. The Static IP settings page will appear as shown below.
Figure 4-4 Static IP
IP Address — Enter the IP address in dotted-decimal notation provided by your ISP.
Subnet Mask — Enter the subnet Mask in dotted-decimal notation provided by your ISP,
usually is 255.255.255.0.
Default Gateway — Enter the gateway IP address in dotted-decimal notation provided by your
ISP.
Primary/Secondary DNS — Enter one or two DNS addresses in dotted-decimal notation
provided by your ISP.
Click the Save button to save your settings.
3. If your ISP provides a PPPoE connection, select PPPoE/Russia PPPoE option. And you
should enter the following parameters in the screen below.
— 17 —
AC1750 Wireless Dual Band Gigabit Router
Figure 4-5 PPPoE
User Name/Password — Enter the User Name and Password provided by your ISP. These
fields are case-sensitive. Click the Connect button to connect immediately. Click the
Disconnect button to disconnect immediately.
Click the Save button to save your settings.
4. If your ISP provides L2TP connection, please select L2TP/Russia L2TP option. And you
should enter the following parameters in the screen below.
Figure 4-6 L2TP/Russia L2TP
VPN Server IP/Domain Name — Enter the IP address or domain name of your VPN server.
User Name/Password — Enter the User Name and Password provided by your ISP. These
fields are case-sensitive.
Dynamic IP/Static IP — Choose either as you are given by your ISP. Click the Connect button
to connect immediately. Click the Disconnect button to disconnect immediately.
Click the Save button to save your settings.
— 18 —
AC1750 Wireless Dual Band Gigabit Router
5. If your ISP provides PPTP connection, please select PPTP/Russia PPTP option. And you
should enter the following parameters (Figure 5-8).
Figure 4-7 PPTP/Russia PPTP
VPN Server IP/Domain Name — Enter the IP address or domain name of your VPN server.
User Name/Password — Enter the User Name and Password provided by your ISP. These
fields are case-sensitive.
Dynamic IP/ Static IP — Choose either as you are given by your ISP and enter the ISP’s IP
address or the domain name. If you choose static IP and enter the domain name, you should
also enter the DNS assigned by your ISP. And click the Save button. Click the Connect
button to connect immediately. Click the Disconnect button to disconnect immediately.
Click the Save button to save your settings.
Note:
If you don’t know how to choose the appropriate connection type, click the Detect button to allow
the router to automatically search your Internet connection for servers and protocols. The
connection type will be reported when an active Internet service is successfully detected by the
router. This report is for your reference only. To make sure the connection type your ISP provides,
please refer to the ISP. The various types of Internet connections that the router can detect are as
follows:
PPPoE — Connections which use PPPoE that requires a user name and password.
Dynamic IP — Connections which use dynamic IP address assignment.
Static IP — Connections which use static IP address assignment.
The router cannot detect PPTP and L2TP connections with your ISP. If your ISP uses one of
these protocols, then you must configure your connection manually.
— 19 —
Loading…
TP-Link AC1750
Archer C7
AC1750 Wireless Dual Band Gigabit Router
REV4.0.2
1910011613
View the manual for the TP-Link AC1750 here, for free. This manual comes under the category wifi repeaters and has been rated by 33 people with an average of a 8.2.
This manual is available in the following languages: English. Do you have a question about the TP-Link AC1750 or do you need help?
Ask your question here
Index
- Package Contents
- Chapter 1. Introduction
- Chapter 2. Connecting the Router
- Chapter 3. Quick Installation Guide
- Chapter 4. Configuring the Router
- Appendix A: FAQ
- Appendix B: Configuring the PC
- Appendix C: Specifications
- Appendix D: Glossary
Product Images (6)

TP-Link AC1750 specifications
Below you will find the product specifications and the manual specifications of the TP-Link AC1750.
The TP-Link AC1750 WiFi repeater is a wireless device that provides extended WiFi coverage for homes or offices. It has a host interface of PCI Express and supports WLAN interface. With a maximum data transfer rate of 1300 Mbit/s, it offers fast and reliable connectivity.
The TP-Link AC1750 complies with various networking standards including IEEE 802.11a, IEEE 802.11ac, IEEE 802.11b, IEEE 802.11g, and IEEE 802.11n, ensuring compatibility with a wide range of devices. It supports Wi-Fi connectivity and supports WLAN data transfer rates of 11, 54, 450, and 1300 Mbit/s, allowing for seamless streaming, online gaming, and file transfers.
Featuring an internal antenna, the TP-Link AC1750 offers a streamlined and compact design measuring 115.2 mm in width, 120.8 mm in depth, and 21.5 mm in height. This makes it suitable for installation in various environments without occupying excessive space.
The TP-Link AC1750 WiFi repeater is engineered with premium materials to ensure long-term reliability and durability. It effectively amplifies and extends the existing WiFi signal, eliminating dead zones and providing a strong and stable connection throughout the area.
In summary, the TP-Link AC1750 WiFi repeater is a reliable and efficient device that enhances WiFi coverage. With its multiple networking standards and support for fast data transfer rates, it provides a seamless and robust wireless connection. Its compact design and durable construction make it suitable for various installation scenarios.
Connectivity technology
Wireless
Maximum data transfer rate
1300 Mbit/s
Windows operating systems supported
Windows 7 Enterprise, Windows 7 Enterprise x64, Windows 7 Home Basic, Windows 7 Home Basic x64, Windows 7 Home Premium, Windows 7 Home Premium x64, Windows 7 Professional, Windows 7 Professional x64, Windows 7 Starter, Windows 7 Starter x64, Windows 7 Ultimate, Windows 7 Ultimate x64, Windows 8, Windows 8.1, Windows XP Home, Windows XP Home x64, Windows XP Professional, Windows XP Professional x64
Sustainability certificates
RoHS
General
| Brand | TP-Link |
| Model | AC1750 | ARCHER T8E |
| Product | wifi repeater |
| EAN | 6935364097066, 6935364080129, 6935364080136, 0845973080129 |
| Language | English |
| Filetype | User manual (PDF) |
Ports & interfaces
| Connectivity technology | Wireless |
| Host interface | PCI Express |
| Interface | WLAN |
Design
| Internal | Yes |
| Chipset | — |
| Antenna | Yes |
| Certification | CE, FCC |
Network
| Maximum data transfer rate | 1300 Mbit/s |
| Networking standards | IEEE 802.11a, IEEE 802.11ac, IEEE 802.11b, IEEE 802.11g, IEEE 802.11n |
| Wi-Fi | Yes |
| Wi-Fi standards | 802.11a, Wi-Fi 5 (802.11ac), 802.11b, 802.11g, Wi-Fi 4 (802.11n) |
| WLAN data transfer rates supported | 11,54,450,1300 Mbit/s |
| Security algorithms | 128-bit WEP, 64-bit WEP, 802.1x RADIUS, WPA-PSK, WPA2-PSK |
| Modulation | 16-QAM, 64-QAM, CCK, DBPSK, DQPSK, OFDM |
| Top Wi-Fi standard | Wi-Fi 5 (802.11ac) |
Weight & dimensions
| Width | 115.2 mm |
| Depth | 120.8 mm |
| Height | 21.5 mm |
System requirements
| Windows operating systems supported | Windows 7 Enterprise, Windows 7 Enterprise x64, Windows 7 Home Basic, Windows 7 Home Basic x64, Windows 7 Home Premium, Windows 7 Home Premium x64, Windows 7 Professional, Windows 7 Professional x64, Windows 7 Starter, Windows 7 Starter x64, Windows 7 Ultimate, Windows 7 Ultimate x64, Windows 8, Windows 8.1, Windows XP Home, Windows XP Home x64, Windows XP Professional, Windows XP Professional x64 |
Sustainability
| Sustainability certificates | RoHS |
Operational conditions
| Operating temperature (T-T) | 0 — 40 °C |
| Storage temperature (T-T) | -10 — 70 °C |
| Operating relative humidity (H-H) | 10 — 90 % |
| Storage relative humidity (H-H) | 5 — 90 % |
Other features
show more
Frequently Asked Questions
Can’t find the answer to your question in the manual? You may find the answer to your question in the FAQs about the TP-Link AC1750 below.
Why is the WiFi repeater not connecting to my existing network?
Ensure that you have entered the correct SSID (network name) and password for your existing network. Double-check the WiFi repeater’s settings to ensure it is in the correct mode (e.g., 2.4GHz or 5GHz) and the channel is not congested.
How can I improve the WiFi signal strength using the repeater?
Find an optimal location for the repeater, ideally halfway between your router and the area with weak signal. Avoid placing it near electronic devices that may cause interference. Adjust the antennas of the repeater for better signal reception or consider using a higher-gain external antenna.
Why am I experiencing slow internet speeds after setting up the repeater?
Make sure that the repeater is within a reasonable range of your router. Check if there are obstacles, such as walls or floors, that weaken the signal. Additionally, ensure that you have connected your device to the repeater’s WiFi network rather than the original network.
Can I use different WiFi names (SSIDs) for the repeater and my existing network?
Yes, it is possible to configure different SSIDs for the repeater and the existing network. This allows you to easily distinguish and connect to either network based on your requirements.
How can I secure my WiFi repeater to prevent unauthorized access?
Access the repeater’s web interface and enable encryption using WPA2-PSK (AES) as the security mode. Set a strong and unique password for the repeater’s WiFi network to ensure secure connectivity. Avoid using default login credentials to prevent unauthorized access to the repeater’s settings.
Is the TP-Link AC1750 a wireless repeater?
Yes, the TP-Link AC1750 is a wireless repeater. This means that it can extend the range and improve the signal strength of an existing Wi-Fi network.
Does the TP-Link AC1750 have internal antennas?
Yes, the TP-Link AC1750 has internal antennas. This means that the antennas are integrated into the device, providing a sleek and compact design without the need for external antennas.
What is the maximum data transfer rate of the TP-Link AC1750?
The maximum data transfer rate of the TP-Link AC1750 is 1300 Mbit/s. This is a high-speed connection that allows for fast and reliable Wi-Fi performance.
Does the TP-Link AC1750 support multiple Wi-Fi standards?
Yes, the TP-Link AC1750 supports multiple Wi-Fi standards, including IEEE 802.11a, IEEE 802.11ac, IEEE 802.11b, IEEE 802.11g, and IEEE 802.11n. This ensures compatibility with a wide range of devices and provides flexibility in connecting to different Wi-Fi networks.
Is the TP-Link AC1750 compatible with Windows operating systems?
Yes, the TP-Link AC1750 is compatible with various Windows operating systems, including Windows 7, 8, 8.1, and Windows XP. This makes it easy to install and use the repeater with different Windows devices.
What is the height of the TP-Link AC1750?
The TP-Link AC1750 has a height of 21.5 mm.
What is the width of the TP-Link AC1750?
The TP-Link AC1750 has a width of 115.2 mm.
What is the depth of the TP-Link AC1750?
The TP-Link AC1750 has a depth of 120.8 mm.
What certifications does the TP-Link AC1750 have?
The TP-Link AC1750 has the following certifications: CE, FCC.
What does the download speed on the internet depend on?
The download speed on the internet depends on the type of connection you have. If you have a 25 Mb/s connection this means that theoretically you should be able to download 25 MB per second.
What is the difference between a router and a modem?
A modem provides the internet connection via the internet provider. A router then distributes the Internet signal to the devices connected to the router.
Is WIFI radiation harmful?
WIFI is a radio frequency signal in the form of non-ionising radiation. This radiation cannot damage cells and tissues and is therefore not harmful to human health.
Is the manual of the TP-Link AC1750 available in English?
Yes, the manual of the TP-Link AC1750 is available in English .
Is your question not listed? Ask your question here
Displayed below is the user manual for AC1750 by TP-Link which is a product in the Network Extenders category.
This manual has pages.

User Guide
AC1750 Wi-Fi Range Extender
RE450
REV2.1.0 1910012322

Contents
About This Guide ……………………………………………………………………………………………1
Chapter 1. Get to Know About Your Extender . . . . . . . . . . . . . . . . . . . . . . . . .2
1. 1. Product Overview. . . . . . . . . . . . . . . . . . . . . . . . . . . . . . . . . . . . . . . . . . . . . . . . . . . . . . . . . . . . 3
1. 2. Appearance . . . . . . . . . . . . . . . . . . . . . . . . . . . . . . . . . . . . . . . . . . . . . . . . . . . . . . . . . . . . . . . . . 3
1. 2. 1. LED Explanation. . . . . . . . . . . . . . . . . . . . . . . . . . . . . . . . . . . . . . . . . . . . . . . . . . . . . . . 4
1. 2. 2. Port and Button Description . . . . . . . . . . . . . . . . . . . . . . . . . . . . . . . . . . . . . . . . . . . 4
Chapter 2. Set Up Internet Connection . . . . . . . . . . . . . . . . . . . . . . . . . . . . . . .5
2. 1. Quick Setup . . . . . . . . . . . . . . . . . . . . . . . . . . . . . . . . . . . . . . . . . . . . . . . . . . . . . . . . . . . . . . . . . 6
2. 1. 1. Method One: Via the WPS Button . . . . . . . . . . . . . . . . . . . . . . . . . . . . . . . . . . . . . . 6
2. 1. 2. Method Two: Via a Web Browser . . . . . . . . . . . . . . . . . . . . . . . . . . . . . . . . . . . . . . . 7
2. 1. 3. Method Three: Via the TP-Link Tether App . . . . . . . . . . . . . . . . . . . . . . . . . . . . 11
2. 2. Position Your Extender. . . . . . . . . . . . . . . . . . . . . . . . . . . . . . . . . . . . . . . . . . . . . . . . . . . . . . 12
Chapter 3. Customize Your Network . . . . . . . . . . . . . . . . . . . . . . . . . . . . . . . . 13
3. 1. Check Internet Status. . . . . . . . . . . . . . . . . . . . . . . . . . . . . . . . . . . . . . . . . . . . . . . . . . . . . . . 14
3. 2. Configure Wireless Network . . . . . . . . . . . . . . . . . . . . . . . . . . . . . . . . . . . . . . . . . . . . . . . . 14
3. 3. Change LAN Settings . . . . . . . . . . . . . . . . . . . . . . . . . . . . . . . . . . . . . . . . . . . . . . . . . . . . . . . 16
3. 4. Specify DHCP Server Settings . . . . . . . . . . . . . . . . . . . . . . . . . . . . . . . . . . . . . . . . . . . . . . 17
3. 5. Adjust Wi-Fi Coverage . . . . . . . . . . . . . . . . . . . . . . . . . . . . . . . . . . . . . . . . . . . . . . . . . . . . . . 18
3. 6. Set Access Control . . . . . . . . . . . . . . . . . . . . . . . . . . . . . . . . . . . . . . . . . . . . . . . . . . . . . . . . . 18
Chapter 4. More Features of Your Extender. . . . . . . . . . . . . . . . . . . . . . . . . 21
4. 1. Use Your Extender as a Wireless Adapter. . . . . . . . . . . . . . . . . . . . . . . . . . . . . . . . . . . . 22
4. 2. Transform Your Existing Wired Network to a Wireless One . . . . . . . . . . . . . . . . . . . 22
4. 2. 1. To Set Up the Extender as an Access Point . . . . . . . . . . . . . . . . . . . . . . . . . . . 22
4. 2. 2. To Connect Your Wireless Devices to the Extender via WPS. . . . . . . . . . . 24
Chapter 5. Manage Your Extender . . . . . . . . . . . . . . . . . . . . . . . . . . . . . . . . . 26
5. 1. Set Up System Time . . . . . . . . . . . . . . . . . . . . . . . . . . . . . . . . . . . . . . . . . . . . . . . . . . . . . . . . 27
5. 2. Control LEDs . . . . . . . . . . . . . . . . . . . . . . . . . . . . . . . . . . . . . . . . . . . . . . . . . . . . . . . . . . . . . . . 27
5. 3. Power Schedule . . . . . . . . . . . . . . . . . . . . . . . . . . . . . . . . . . . . . . . . . . . . . . . . . . . . . . . . . . . . 28
5. 4. Upgrade the Firmware . . . . . . . . . . . . . . . . . . . . . . . . . . . . . . . . . . . . . . . . . . . . . . . . . . . . . . 29
5. 5. Backup and Restore Configuration Settings . . . . . . . . . . . . . . . . . . . . . . . . . . . . . . . . . 29
5. 6. Change Login Password . . . . . . . . . . . . . . . . . . . . . . . . . . . . . . . . . . . . . . . . . . . . . . . . . . . . 30
5. 7. System Log. . . . . . . . . . . . . . . . . . . . . . . . . . . . . . . . . . . . . . . . . . . . . . . . . . . . . . . . . . . . . . . . . 31
FAQ ………………………………………………………………………………………………………………..32
1
About This Guide
This guide is a complement to Quick Installation Guide. The Quick Installation Guide
provides instructions for quick internet setup, while this guide contains details of each
function and demonstrates how to configure them.
When using this guide, please notice that features of the extender may vary slightly
depending on the model and software version you have, and on your location, language,
and internet service provider. All screenshots, images, parameters and descriptions
documented in this guide are used for demonstration only.
Conventions
In this guide the following conventions are used:
Convention Description
Underlined Underlined words or phrases are hyperlinks. You can click to redirect to a website or a
specific section.
Teal Contents to be emphasized and texts on the web page are in teal, including the menus,
items, buttons, and so on.
>
The menu structures to show the path to load the corresponding page. For example,
Advanced > Wireless > MAC Filtering means the MAC Filtering function page is under the
Wireless menu that is located in the Advanced tab.
Note: Ignoring this type of note might result in a malfunction or damage to the device.
Tips: Indicates important information that helps you make better use of your device.
symbols on the web
page
• click to edit the corresponding entry.
• click to delete the corresponding entry.
More Info
The latest software, management app and utility are available from the Download
Center at www.tp-link.com/support.
The Quick Installation Guide can be found where you find this guide or inside the
package of the range extender.
Specifications can be found on the product page at http://www.tp-link.com.
A Technical Support Forum is provided for you to discuss our products at
http://forum.tp-link.com.
Our Technical Support contact information can be found at Contact Technical Support
page at www.tp-link.com/support.

Chapter 1
Get to Know About Your
Extender
This chapter introduces what the extender can do and its appearance.
It contains the following sections:
• Product Overview
• Appearance

3
Chapter 1 Get to Know About Your Extender
1. 1. Product Overview
Bring Dead Zones Back to Life
Tired of Wi-Fi “dead zones”? The TP-Link extender is connected to your router
wirelessly, strengthening its signal and expanding its coverage into areas that could not
otherwise be reached. The device also reduces signal interference to ensure reliable
Wi-Fi coverage throughout your home or office.
Easy Installation & Quick Position
The extender works with any standard wireless router. Instantly connect the extender
to a router by pressing the router’s WPS button (if available) followed by the extender’s
RE/WPS button. Alternatively, follow the Quick Setup instructions on the extender’s
web management page.
Once the extender is connected to a router, you can relocate it to your preferred location
with no further configuration required. The intelligent signal light can help to find the
best location.
Easy Management with the TP-Link Tether App
Tether provides a simple, intuitive way to access and manage your extender with your
smart devices.
1. 2. Appearance
4
Chapter 1 Get to Know About Your Extender
1. 2. 1. LED Explanation
You can check the extender’s working status by following the LED Explanation table.
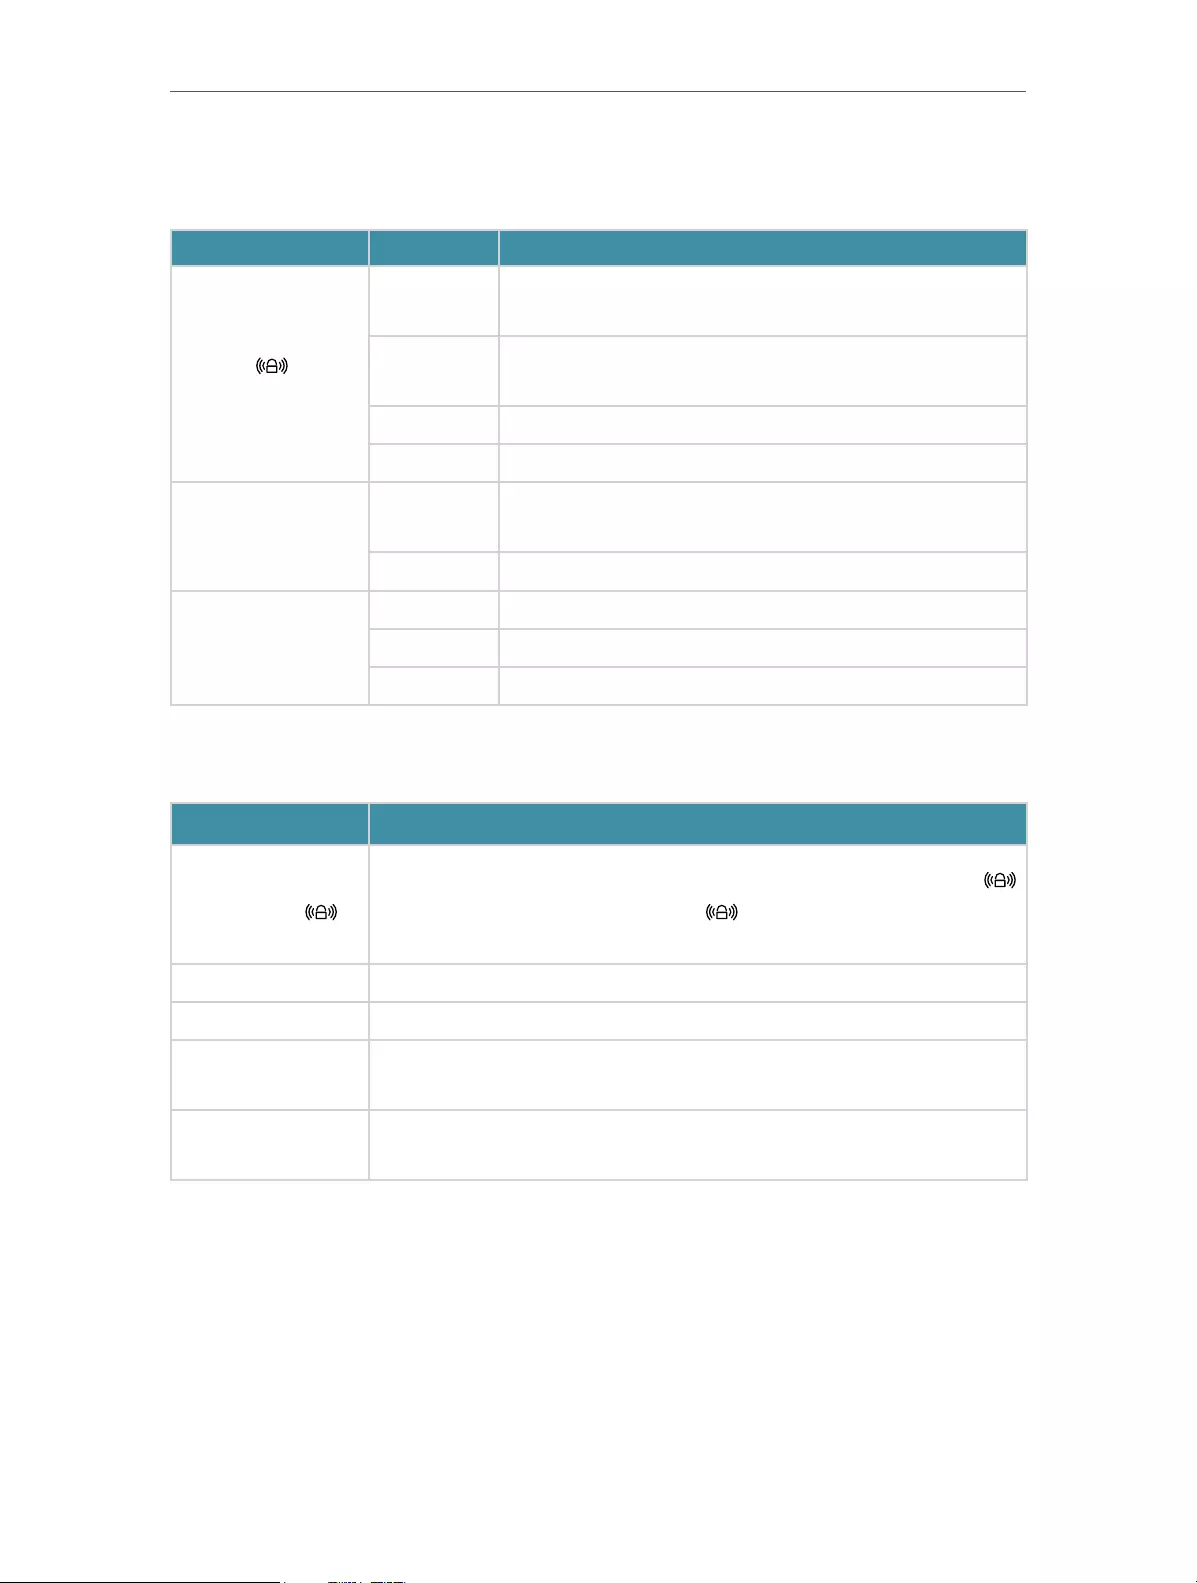
Name Status Indication
(Signal)
Solid blue The extender is connected to your router’s wireless network
and is in a suitable location.
Solid red The extender is experiencing poor signal strength. Try
relocating it closer to your router.
Flashing WPS connection is being established.
Off No wireless connection is established.
2.4GHz/5GHz
On The extender is connected to the 2.4GHz/5GHz wireless
network of your host router.
Off No wireless connection has been established.
POWER
On The extender is on.
Flashing The extender is starting up or firmware is being upgraded.
Off The extender is off.
1. 2. 2. Port and Button Description
Ports or Buttons Description
WPS Button
Press the WPS button on your host router, and immediately press the
button on the extender. The Signal LED of the extender should change to
solid blue, indicating successful WPS connection.
Power Button Press the Power button to turn on or off the extender.
LED Button Press the LED button to turn on or off all the LEDs.
Reset (Hole) Use a pin to press and hold the Reset button until all the LEDs turn on
momentarily to reset the extender.
Ethernet Port Connect your Ethernet—only device to the Ethernet port of the extender to join
the Wi-Fi network.

Chapter 2
Set Up Internet Connection
This chapter informs you how to boost your host wireless coverage. Please follow the
step-by-step instructions to set up the internet connection.
It contains the following sections:
• Quick Setup
• Position Your Extender
6
Chapter 2 Set Up Internet Connection
2. 1. Quick Setup
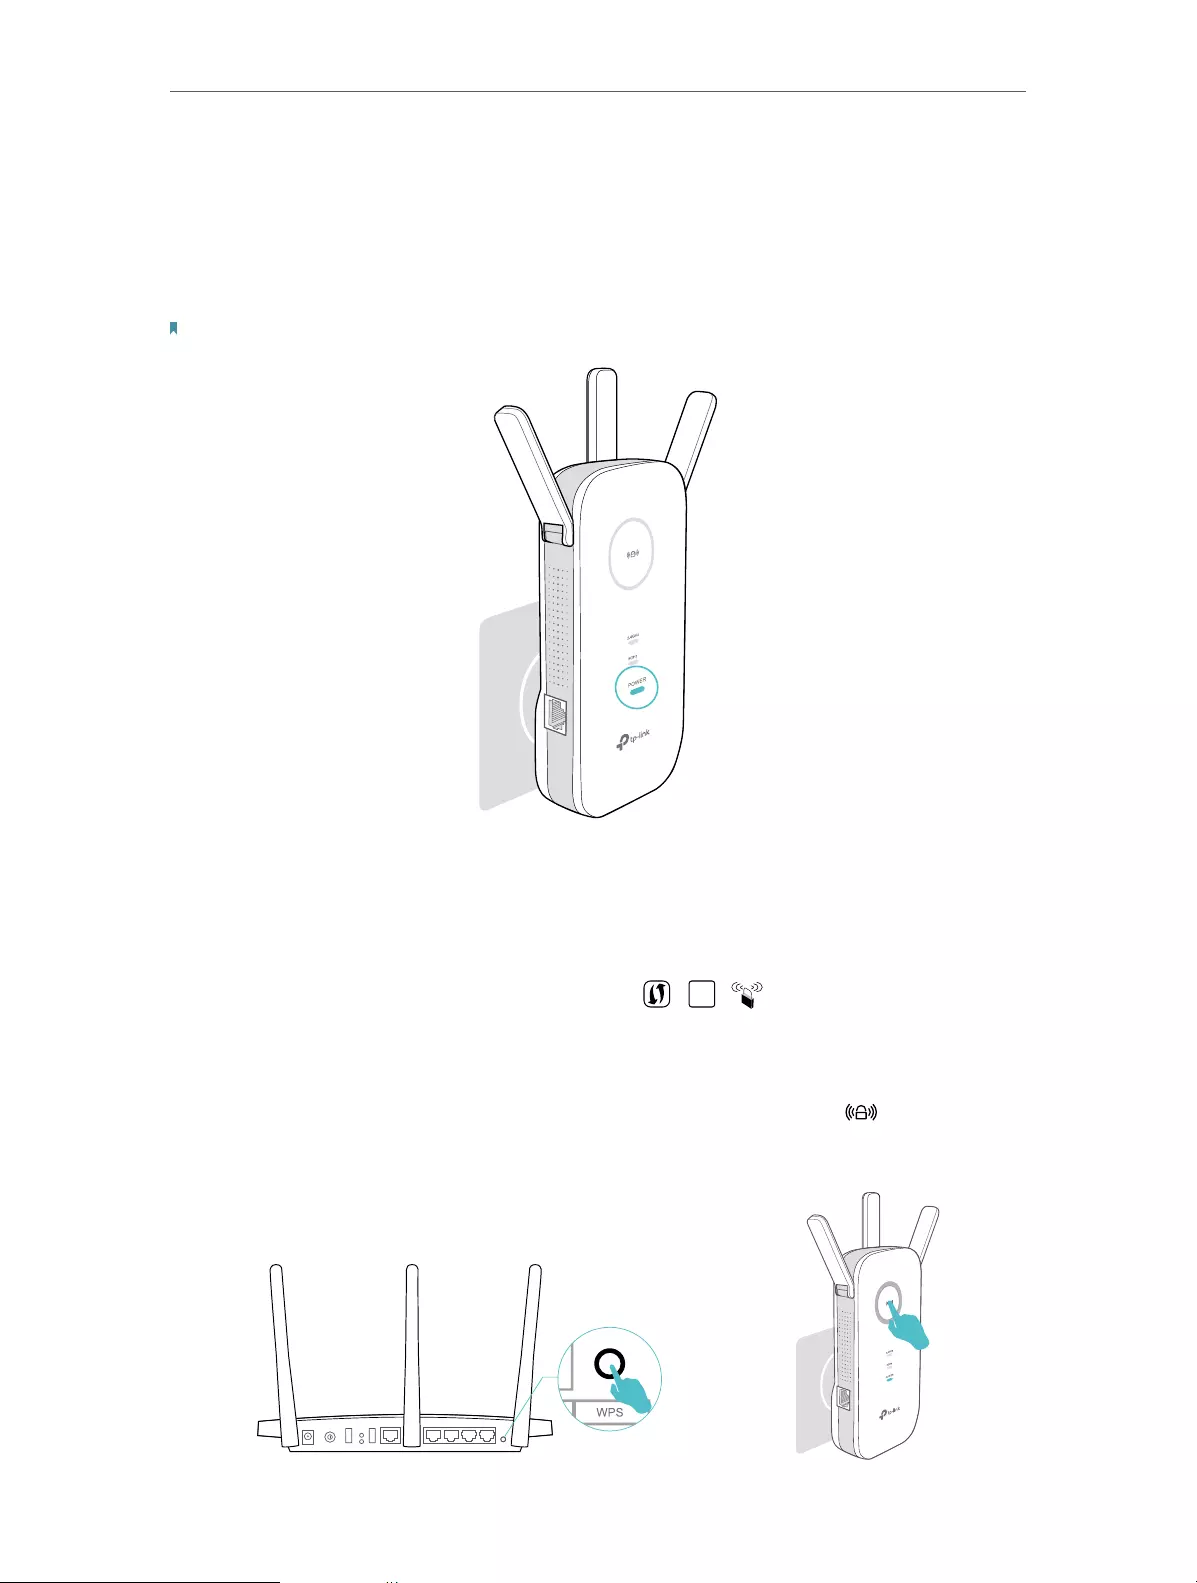
Power on
Plug the extender into an electrical outlet next to your host router, and then wait until
the POWER LED is solid on.
Note: For safety, we suggest that you plug the extender in upright directions as shown below.
Connect to the host network
There are three ways to connect to the host network: via the WPS button, via a web
browser or via the TP-Link Tether app. Using the WPS button is the easiest way to
extend your host network. We recommend you to use this way if your router has a WPS
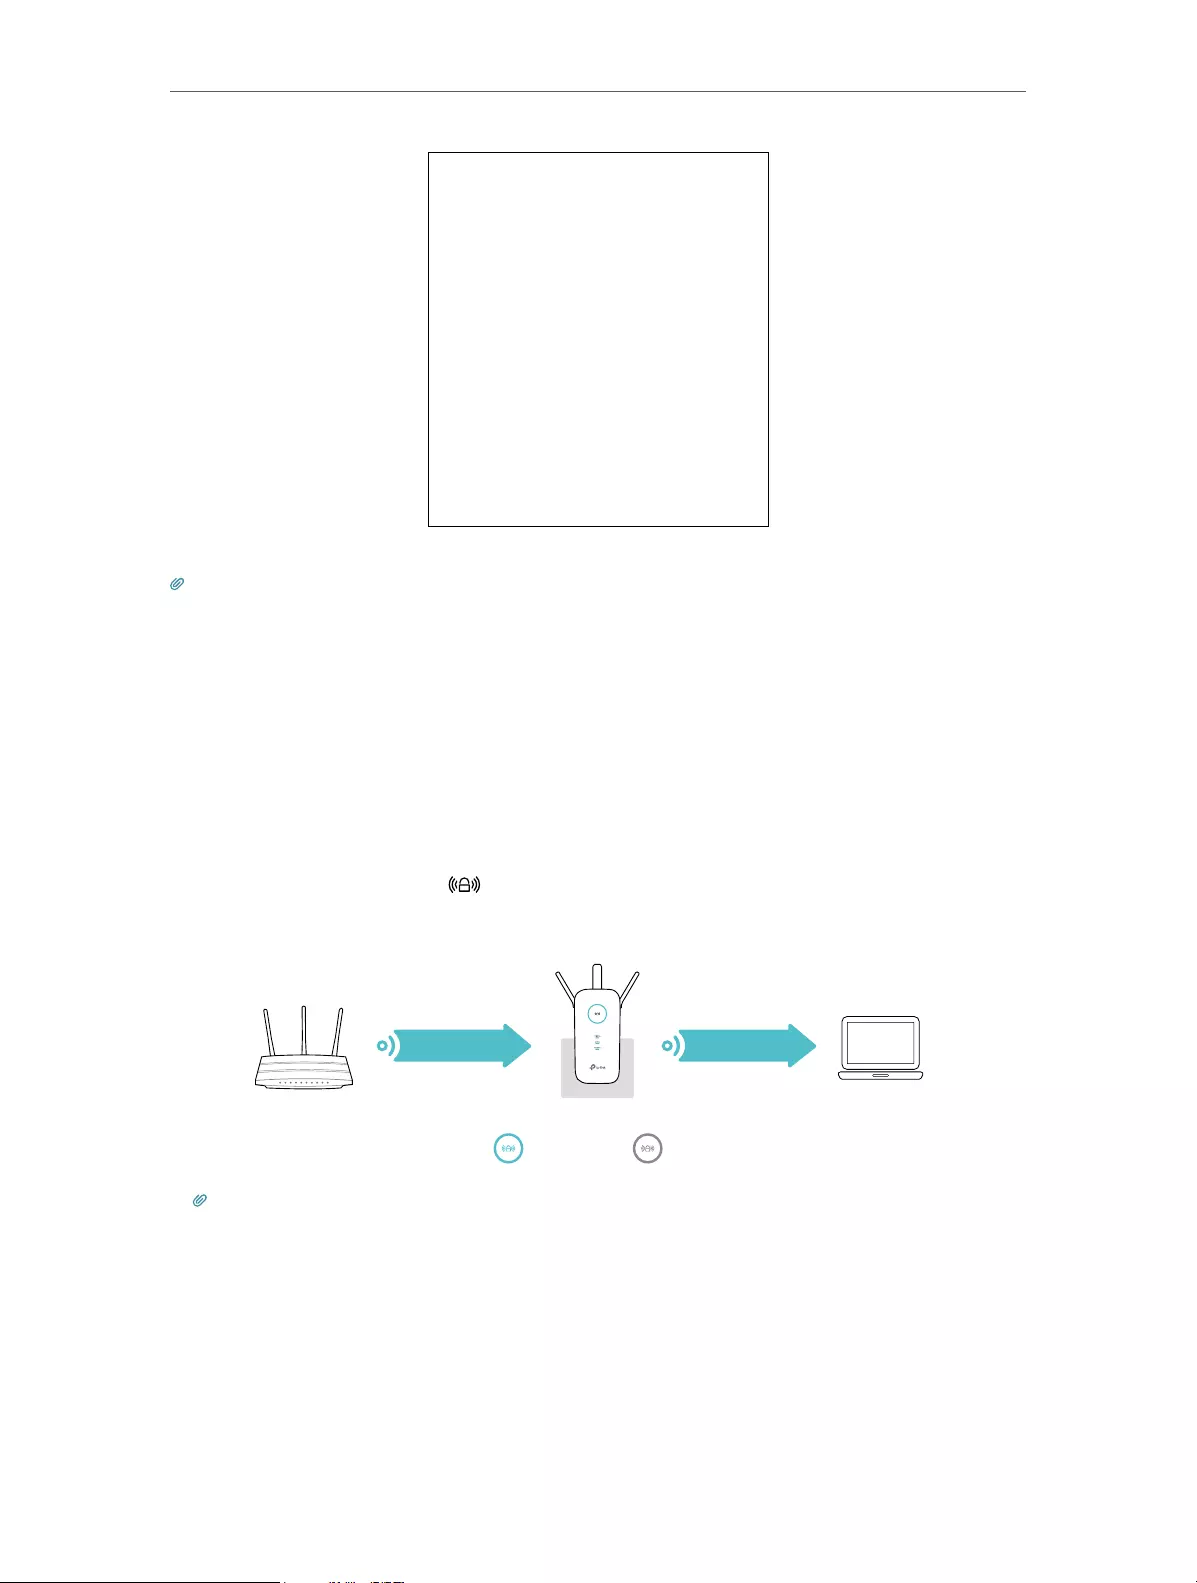
button. The button might look like one of these: | | .
2. 1. 1. Method One: Via the WPS Button
1. Press the WPS button on your host router, and then press the button on the
extender within 2 minutes.
WPS
7
Chapter 2 Set Up Internet Connection
Tips:
• Some ISP gateways disable the WPS function by default. If the WPS connection fails, please refer to
Method Two: Via a Web Browser.
• For more information about using WPS button on your host router, please refer to the router
manufacturer’s user guide.
2. Wait until the Signal LED changes to solid blue, which indicates that the WPS
connection is successful. If it doesn’t, please refer to Method Two: Via a Web Browser.
3. If you are connecting the extender to a dual-band router but only the 2.4GHz or 5GHz
LED is on, repeat Step 1 and 2 to connect to the other band.
4. Enjoy! Connect to the extended network and enjoy the internet. Both extended
networks share the same SSIDs (network names) and passwords as those of your
host networks.
Tips: Since the performance of the extended networks will be affected by the distance between the
extender and the host router, we recommend that you relocate your extender by referring to Position
Your Extender.
2. 1. 2. Method Two: Via a Web Browser
1. Connect your computer to the extender’s wireless network.
Tips: Before connecting, please find the SSID (network name) on the label of the extender.
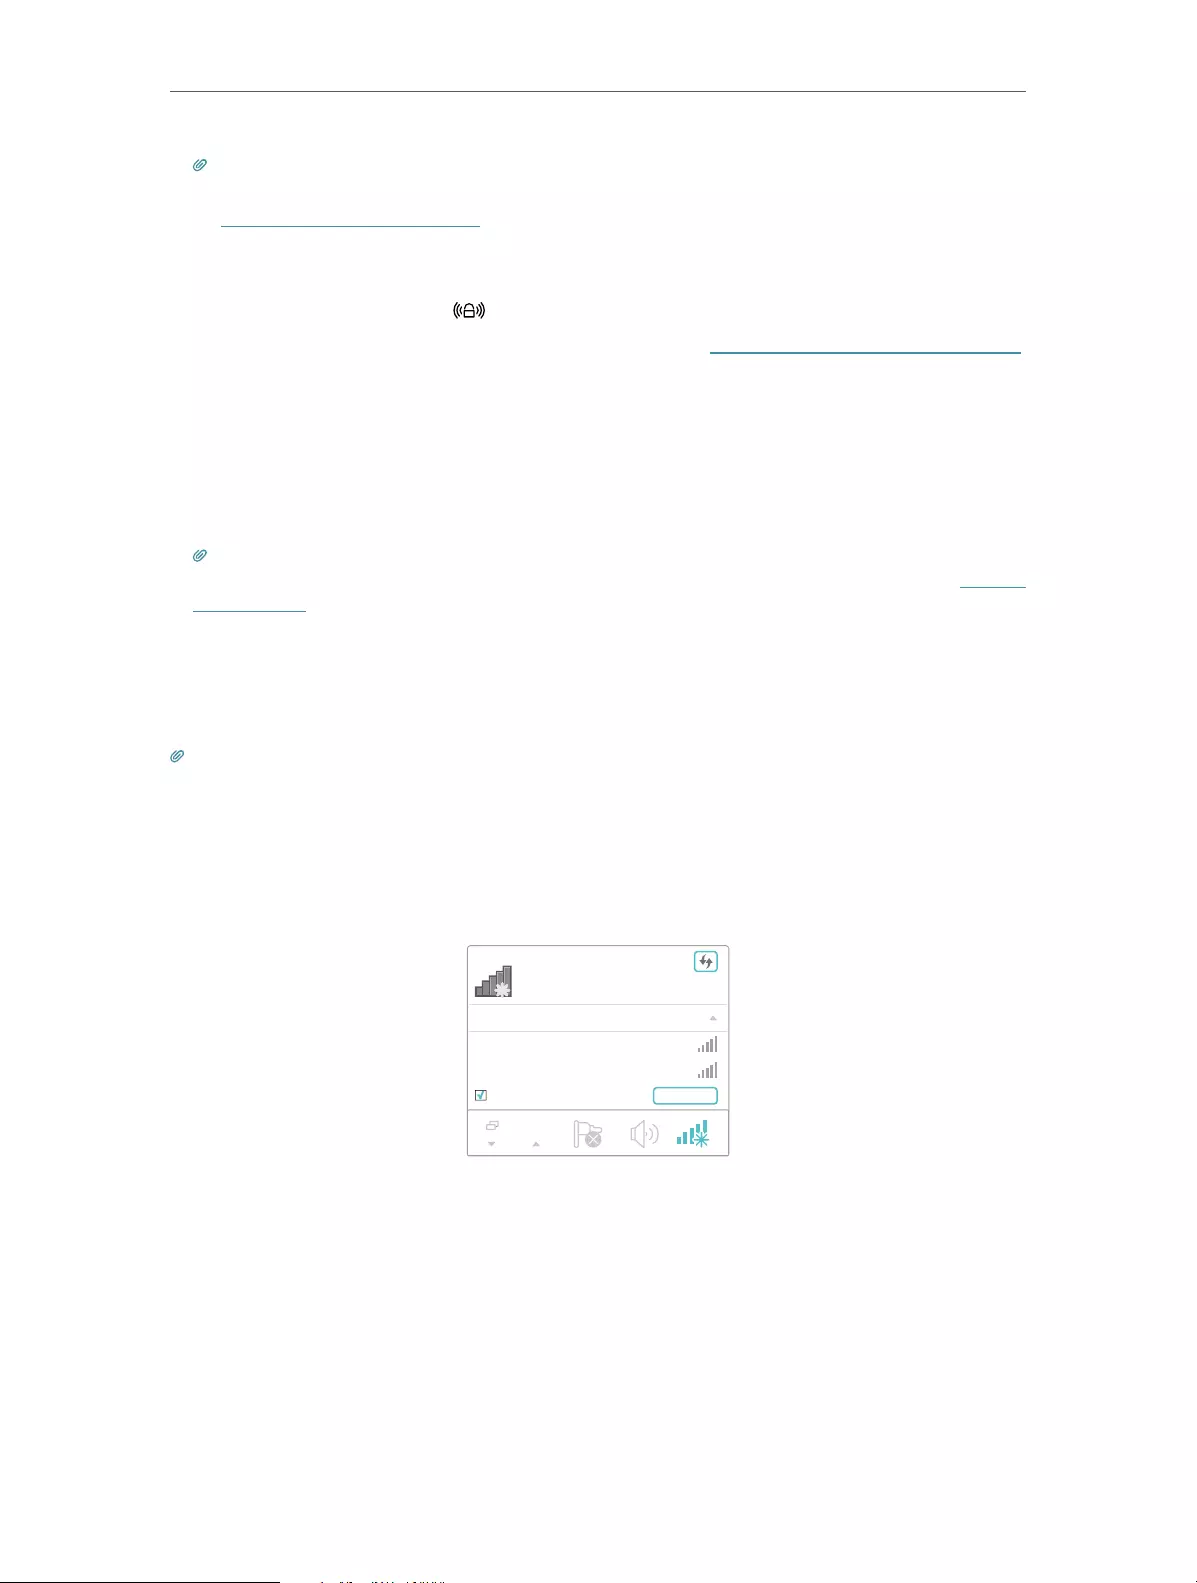
• For Windows Users
1 ) Unplug the Ethernet cable from your computer (if any).
2 ) Click the Wi-Fi icon on the taskbar and connect to the extender’s wireless
network: TP-Link_Extender_2.4GHz or TP-Link_Extender_5GHz.
onnections are available
Wireless Network
onnection
TP-Link_Extender_2.4GHz
TP-Link_Extender_5GHz
Connect automatically Connect
√
• For Mac OS X Users
1 ) Unplug the Ethernet cable from your computer (if any).
2 ) Click the Wi-Fi icon in the top right corner of the screen, and connect to the
extender’s network: TP-Link_Extender_2.4GHz or TP-Link_Extender_5GHz.

8
Chapter 2 Set Up Internet Connection
Wi-Fi: On
Tu rn Wi-Fi O
TP-Link_Extender_5GHz
Join Other Network...
Create Network...
Open Network Preferences…
TP-Link_Extender_2.4GHz
2. Follow the instructions of the Quick Setup wizard to connect the extender to your
host router.
1 ) Launch a web browser, enter http://tplinkrepeater.net or http://192.168.0.254
in the address field, and then create a password for future login attempts, and
click Start.
Tips: If the login window does not appear, please refer to FAQ.
2 ) Select your host router’s 2.4GHz SSID (network name), enter its password (NOT
the password you just created for management), and click Next.
3 ) Select your host router’s 5GHz SSID (network name), enter its password (NOT
the password you just created for management), and click Next.

9
Chapter 2 Set Up Internet Connection
Tips:
If your host router does not support 5GHz wireless network, please click Skip to continue.
4 ) Either keep the default SSIDs (network names) or customize them for the
extended networks, and then click Next.
5 ) Verify your wireless settings and click Save. The corresponding LED(s) (2.4GHz
or 5GHz) should turn on.

10
Chapter 2 Set Up Internet Connection
6 ) Enjoy! Connect to the extended network and enjoy the internet. Both extended
networks share the same wireless passwords as those of your host networks,
but may have different network names if you have customized the SSIDs during
the configuration.
11
Chapter 2 Set Up Internet Connection
Tips: Since the performance of the extended network will be affected by the distance between the
extender and the host router, we highly recommend you to relocate your extender referring to Position
Your Extender.
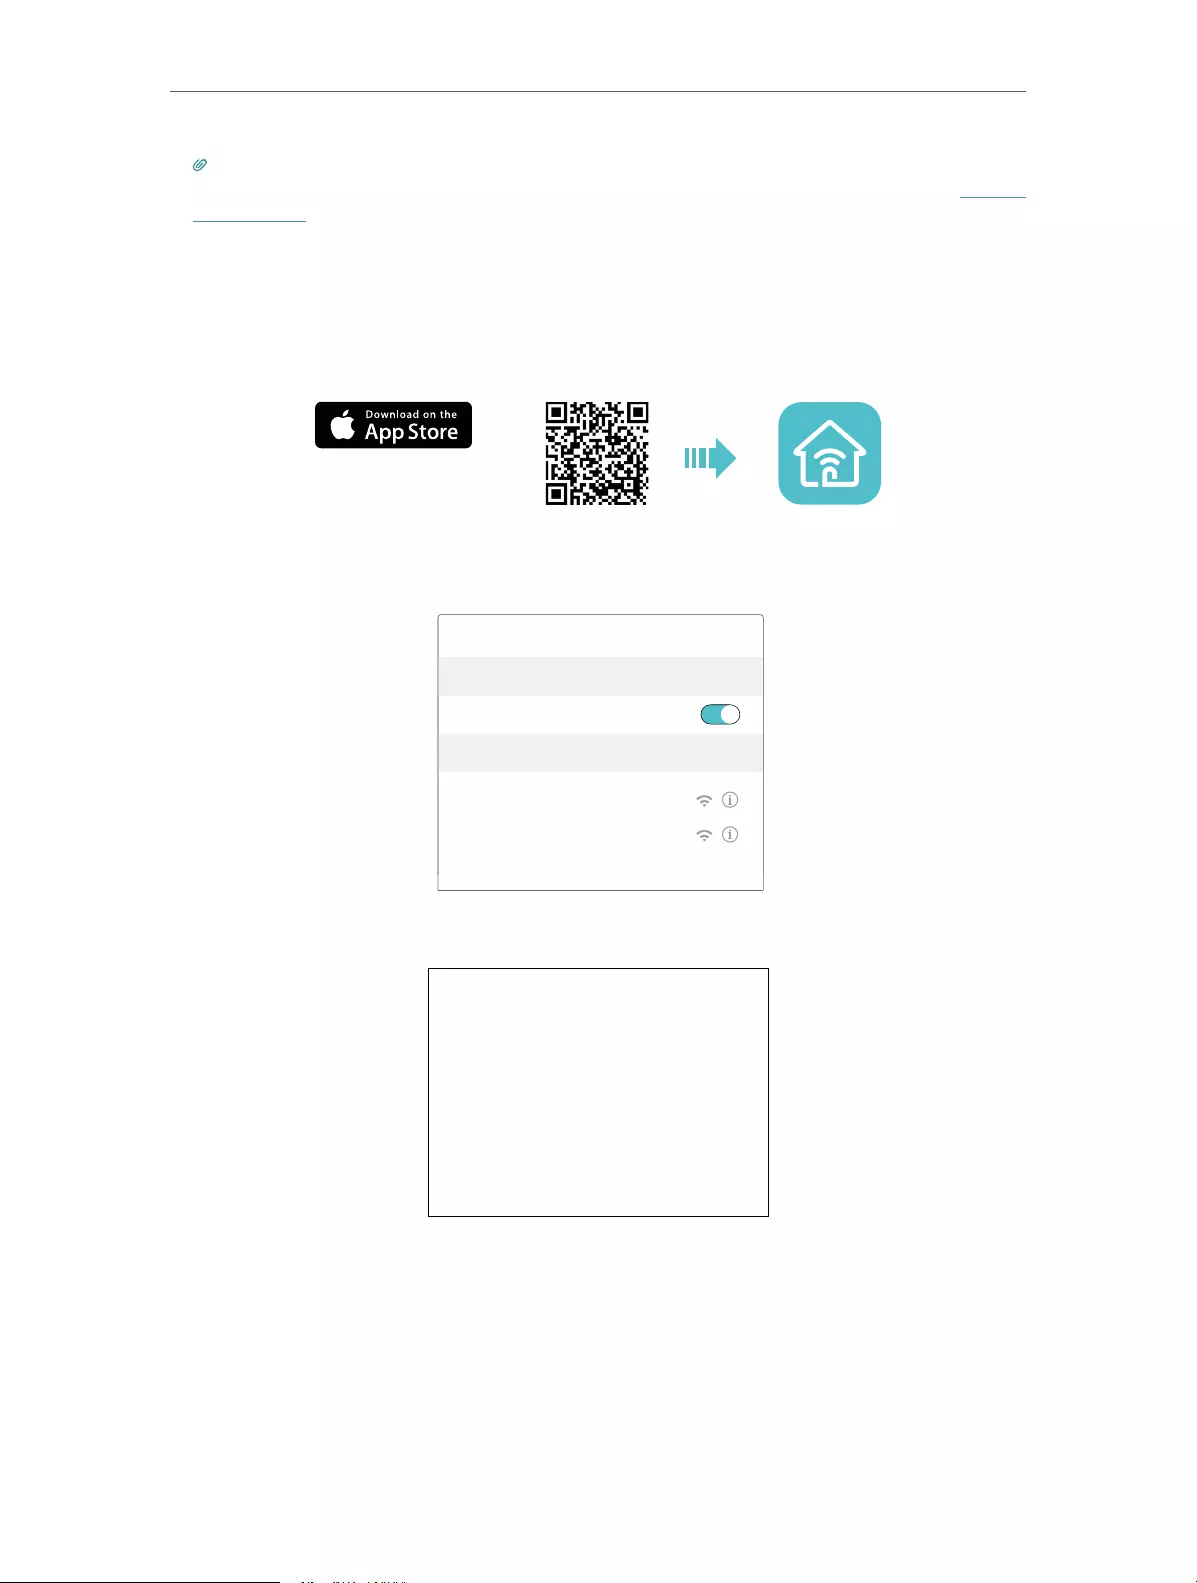
2. 1. 3. Method Three: Via the TP-Link Tether App
1. Launch the Apple App Store or Google Play Store and search TP-Link Tether or simply
scan the QR code to download and install the app.
OR
2. Go to Wi-Fi Settings and connect your device to the extender’s wireless network:
TP-Link_Extender_2.4GHz or TP-Link_Extender_5GHz.
Wi-Fi
Wi-Fi
CHOOSE A NETWORK…
Other…
< Settings
TP-Link_Extender_2.4GHz
TP-Link_Extender_5GHz
3. Launch Tether and select your extender from the Local Device list.
4. Create a password for future logins and click Create.
12
Chapter 2 Set Up Internet Connection
5. Follow the on-screen instructions to complete the configuration.
Tips: You can manage your extender via Tether, such as controlling LEDs, sharing passwords of your
networks and blocking devices.
2. 2. Position Your Extender
Please follow the instructions below to achieve optimal performance of the extender.
1. Plug the extender into an electrical outlet between your host router and the Wi-Fi
“dead“ zone. The location you choose must be within the range of your existing host
network.
2. Wait until the Signal LED is lit and solid blue. If not, relocate it closer to the host
router to achieve better signal quality.
Ideal extender PlacementRouter Device
Red
Too far away
Blue
Ideal location
Extended NetworkHost Network
Tips: To minimize signal interference, please choose a location which is far away from Bluetooth
devices and other household electronic devices, such as cordless phones, microwave ovens and baby
monitors.

Chapter 3
Customize Your Network
This chapter guides you on how to configure network settings that are available for this
extender.
It contains the following sections:
• Check Internet Status
• Configure Wireless Network
• Change LAN Settings
• Specify DHCP Server Settings
• Adjust Wi-Fi Coverage
• Set Access Control
14
Chapter 3 Customize Your Network
3. 1. Check Internet Status
You can view the internet status of your extender to check whether you have successfully
set up the extended network(s).
1. Visit http://tplinkrepeater.net, and log in with the password you set for the extender.
2. Go to Settings > Status to view the internet status of your extender.
• The extender is functioning normally.
• The extender is not connected to the host networks. Please go to Settings >
Wireless > Connect to Network to check the passwords of the host networks. If
the problem still exists, please refer to the FAQ section.
• The extender is connected to the host network, but is not transmitting data. Please
check your router’s internet connection.
• The extender is connected to the router abnormally. Please go to Settings >
Network and try setting your extender to obtain an IP address automatically.
Click the Internet/Router/Range Extender/Clients icon to view corresponding
information.
3. 2. Configure Wireless Network
If you want to extend another host network after Quick Setup, you can refer to this
section. Moreover, you can change the wireless settings for your extended networks.

15
Chapter 3 Customize Your Network
Visit http://tplinkrepeater.net, and log in with the password you set for the extender.
Note:
Here we take the configuration of the 2.4GHz network as an example. If the 5GHz network is available on
your extender, please refer to the instructions to set your 5GHz network.
¾To extend another host network:
1. Go to Settings > Wireless > Connect to Network.
2. Enable Connect to 2.4GHz Network and click Wireless Scanner to find all available
networks.
3. Select the 2.4GHz host network you want to extend.
Note:
If the network you want to extend is on but not listed, please try the following steps.
• Move the extender closer to your router, and click Rescan in the top-right corner of the list.
• You can manually enter the SSID (network name) and password of the network you want to extend, and
click Save.
4. Once a host network is selected, the SSID and security type will be automatically
filled in. If the selected network is encrypted, enter the password in the Password
field.
5. Click Save.
¾To enable or disable the extended network:
1. Go to Settings > Wireless > Extended Network.

16
Chapter 3 Customize Your Network
2. Extended networks are enabled by default. If you want to disable the wireless function
of a certain band, just clear the Enable checkbox. In this case, all the wireless settings
of this band will be invalid.
3. Click Save.
¾To change the wireless network name (SSID):
1. Go to Settings > Wireless > Extended Network.
2. Create a new SSID in Extended 2.4GHz SSID or click Copy Host SSID. The value is
case-sensitive.
3. Click Save.
Note: If you have changed the wireless settings via a wireless device, you will be disconnected after the
settings are applied. Please write down the new SSID for future use.
¾To hide the SSID of the extended network:
1. Go to Settings > Wireless > Extended Network.
2. Select Hide SSID broadcast, and the corresponding SSID will not be displayed when
wireless devices scan for local wireless networks. Devices must join the network
manually in order to connect.
3. Click Save.
3. 3. Change LAN Settings
The extender is preset with a default LAN IP 192.168.0.254, with which you can log in to
the web management page. The LAN IP address, together with the Subnet Mask, also
defines the subnet that the connected devices are on. If the IP address conflicts with
another device on your local network or your network requires a specific IP subnet, you
can change it.
1. Visit http://tplinkrepeater.net, and log in with the password you set for the extender.
2. Go to Settings > Network.
3. Select Use the following IP address.
4. Enter a new IP address as needed and leave the Subnet Mask as the default settings
and enter the gateway that is in the same subnet as the IP address. The gateway is
usually the LAN IP address of your extender.

17
Chapter 3 Customize Your Network
5. Click Save.
3. 4. Specify DHCP Server Settings
By default, the DHCP (Dynamic Host Configuration Protocol) Server is enabled and the
extender acts as a DHCP server; it dynamically assigns TCP/IP parameters to client
devices from the IP Address Pool. You can change the settings of the DHCP Server if
necessary.
1. Visit http://tplinkrepeater.net, and log in with the password you set for the extender.
2. Go to Settings > Network.
¾To specify the IP address that the extender assigns:
1. Select Auto (recommended) or On to enable the DHCP Server.
2. Enter the starting and ending IP addresses in the IP Address Pool.
3. Enter other parameters if the ISP requires them. The Default Gateway is automatically
filled in and is the same as the LAN IP address of the extender.
4. Click Save.

18
Chapter 3 Customize Your Network
¾To view the DHCP Client List:
You can view the information of the DHCP clients connected to the extender in the
DHCP Client List.
3. 5. Adjust Wi-Fi Coverage
You can set the extender’s Wi-Fi coverage depending on how large you want your Wi-Fi
area to be.
1. Visit http://tplinkrepeater.net and log in with the password you set for the extender.
2. Go to Settings > Advanced Settings > Wi-Fi Coverage.
3. Select Min, Mid or Max to adjust your Wi-Fi coverage of the extender.
4. Click Save.
3. 6. Set Access Control
Access Control allows you to permit or block specific devices from accessing the
internet for a specific period.
1. Visit http://tplinkrepeater.net and log in with the password you set for the extender.
2. Go to Settings > Advanced Settings > Access Control.

19
Chapter 3 Customize Your Network
3. Enable Access Control.
¾To block specific device(s):
Note: Devices connected to the extender via an Ethernet cable cannot be blocked.
1. Select Blacklist and click Save.
2. Select the device to be blocked in the Online Devices table by ticking the
corresponding checkbox.
3. Click Block and the selected device(s) will be added to the Devices in Blacklist table.
4. Click in the Devices in Blacklist table to set the Effective Time for a certain entry
as needed.

20
Chapter 3 Customize Your Network
5. Click OK.
¾To permit specific device(s):
1. Select Whitelist and click Save.
2. Click Add in the Devices in Whitelist table. Enter the Device Name and MAC Address.
And you can set the Effective Time for a certain entry as needed.
3. Click OK.

Chapter 4
More Features of Your
Extender
This chapter explains how to use the extender as a wireless adapter and as an access
point.
It contains the following sections:
• Use Your Extender as a Wireless Adapter
• Transform Your Existing Wired Network to a Wireless One
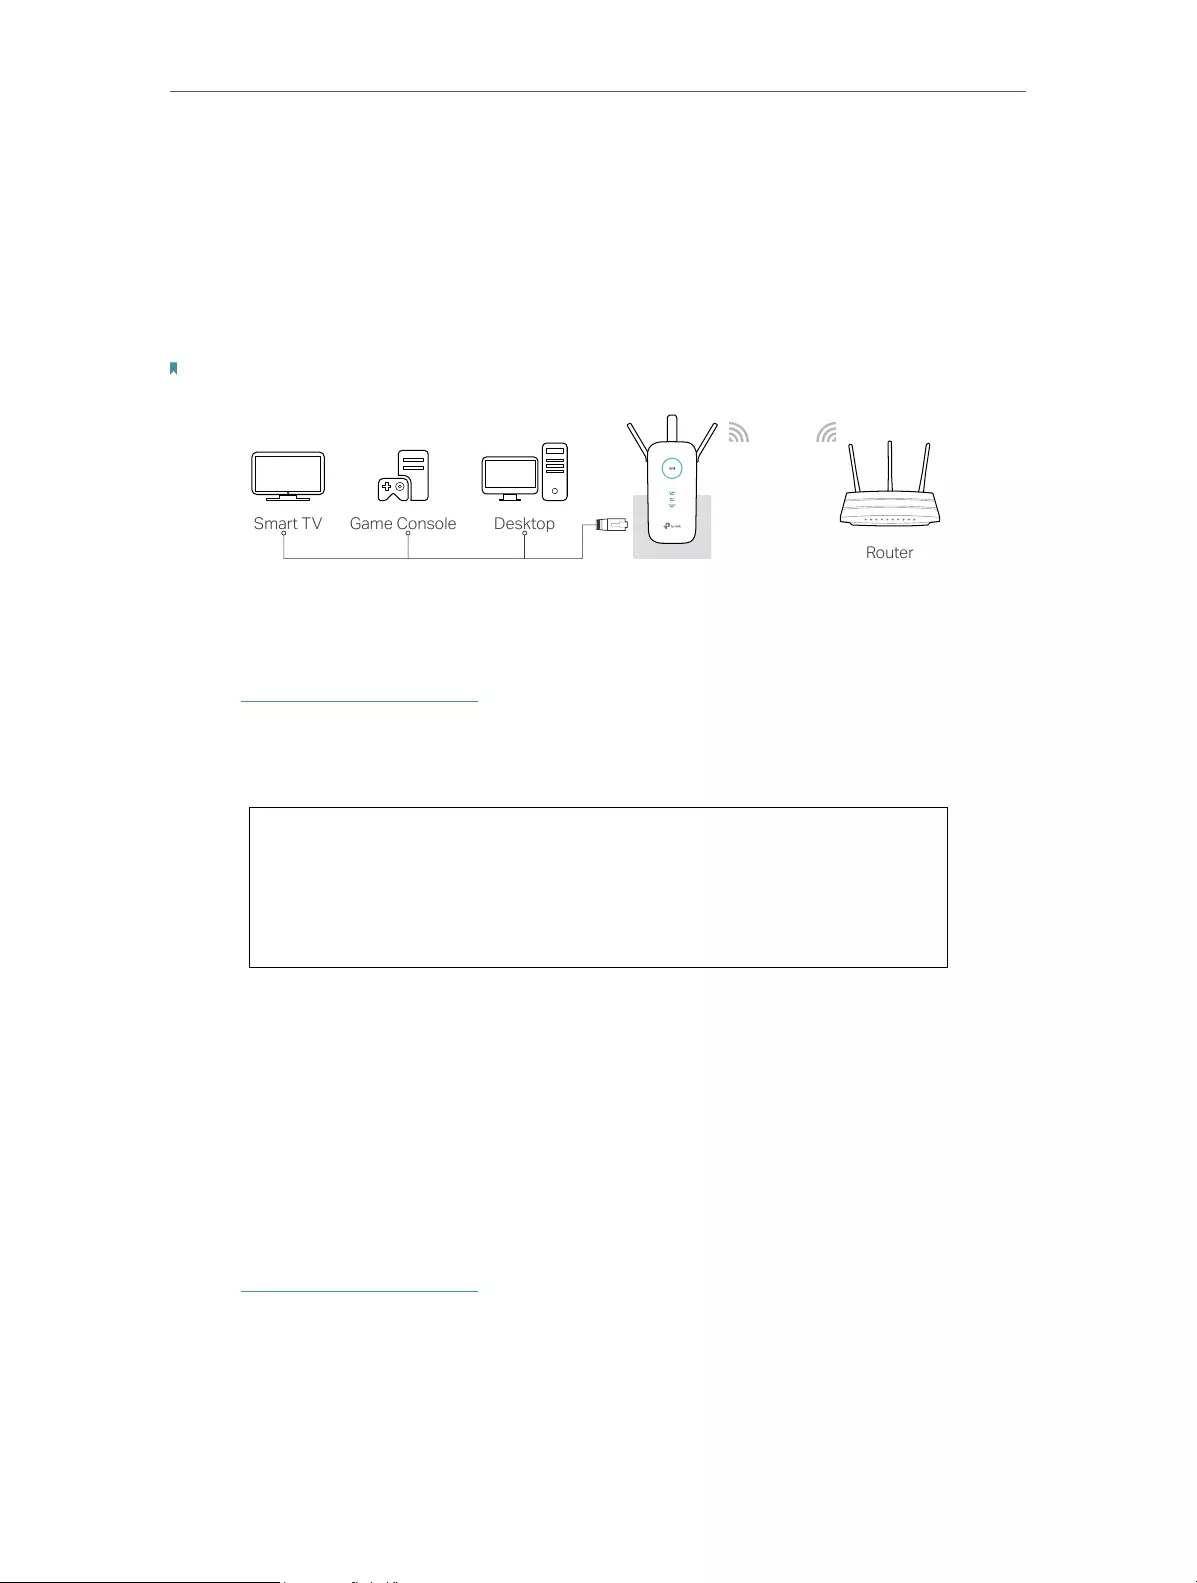
22
Chapter 4 More Features of Your Extender
4. 1. Use Your Extender as a Wireless Adapter
The extender can be used as a wireless adapter to connect any wired-only device, such
as a Blu-ray player, game console, DVR, or smart TV, to your wireless network.
After configuration, you can connect an Ethernet-enabled device to the extender via an
Ethernet cable.
Note: Extenders that have no Ethernet port do not support this feature.
By default, the Ethernet port of the extender is connected to the 5GHz wireless netwok.
¾To change the connected wireless frequency:
1. Visit http://tplinkrepeater.net, and log in with the password you set for the extender.
2. Go to Settings > Network.
3. Select 2.4GHz or 5GHz and click Save.
4. 2. Transform Your Existing Wired Network to a
Wireless One
The extender can work as an access point, transforming your existing wired network to
a wireless one.
4. 2. 1. To Set Up the Extender as an Access Point
1. Visit http://tplinkrepeater.net, and log in with the password you set for the extender.
2. Click Mode in the top right corner of the page. Select Access Point and click Save.
The extender will reboot and switch to Access Point mode.

23
Chapter 4 More Features of Your Extender
3. After rebooting, connect the extender to your modem or wired router via an Ethernet
cable.
4. Visit http://tplinkrepeater.net, and log in with the password you set for the extender.
5. Go to Quick Setup to configure your extender.
1 ) Configure your wireless settings and click Next.
2 ) Confirm the information and click Finish. Now, you can enjoy Wi-Fi.

24
Chapter 4 More Features of Your Extender
4. 2. 2. To Connect Your Wireless Devices to the Extender via WPS
Wi-Fi Protected Setup (WPS) provides an easier way to set up a secure Wi-Fi connection.
Wireless devices that support WPS, including Android phones, tablets and most USB
network cards, can be connected to your extender through this method (not supported
by iOS devices).
1. Visit http://tplinkrepeater.net, and log in with the password you set for the extender.
2. Go to Settings > Wireless > WPS.
3. Enable WPS.
4. Connect via WPS:
• AP’s PIN: Enable AP’s PIN and enter the PIN on your device. You can click Generate
to get a new PIN or click Default to restore the PIN to its factory one.
• Push Button (Recommended): Click Connect and push the WPS button on the
client device.

25
Chapter 4 More Features of Your Extender
• PIN code: Enter the client’s PIN, and click Connect.

Chapter 5
Manage Your Extender
This chapter presents how to manage and maintain your extender.
It contains the following sections:
• Set Up System Time
• Control LEDs
• Power Schedule
• Upgrade the Firmware
• Backup and Restore Configuration Settings
• Change Login Password
• System Log

27
Chapter 5 Manage Your Extender
5. 1. Set Up System Time
The System Time of the extender will be used for time-based functions such as the
Power Schedule function. If you have enabled the Daylight Saving Time feature, the
system time will be sychronized with the daylight saving time you configure.
1. Visit http://tplinkrepeater.net, and log in with the password you set for the extender.
2. Go to Settings > System Tools > Time Settings.
¾To get system time:
1. Select your local Time Zone from the drop-down list.
2. Click Save.
¾To set up Daylight Saving Time:
1. Select Enable Daylight Saving Time.
2. Select the Start and End date and time of the daylight saving time at your local time
zone.
3. Click Save.
5. 2. Control LEDs
The LEDs of the extender indicate its activities and status. You can enable the Night
Mode feature to specify a time period during which the LEDs are off.
1. Visit http://tplinkrepeater.net, and log in with the password you set for the extender.

28
Chapter 5 Manage Your Extender
2. Go to Settings > System Tools > LED Control.
¾To specify a time period when LEDs are off:
1. Select Night Mode.
2. Specify a time period in the LED Off Time field, and the LEDs will be off during this
period.
3. Click Save.
5. 3. Power Schedule
The Power Schdule feature allows you to specify a time period during which the
extender is off.
1. Visit http://tplinkrepeater.net, and log in with the password you set for the extender.
2. Go to Settings > Advanced Settings > Power Schedule.
¾To specify a time period when the extender is off:
1. Select Enable Power Schedule.
2. Specify a time period in the Power-Off Time field and days in the Day(s) field, and the
extender will be off during this period.

29
Chapter 5 Manage Your Extender
3. Click Save.
5. 4. Upgrade the Firmware
TP-Link is committed to improving product features, giving you a better network
experience. You can download the latest firmware file from the Support page at our
website www.tp-link.com and upgrade the extender to the latest firmware version.
Note:
• Make sure the latest firmware file is matched with the hardware version (as shown in the download
section of the Support page).
• Make sure that you have a stable connection between the extender and your computer. It is NOT
recommended to upgrade the firmware wirelessly.
• Backup your extender configuration.
• Do NOT power off the extender during the firmware upgrade.
1. Download the latest firmware file for the extender from our website
www.tp-link.com.
2. Visit http://tplinkrepeater.net, and log in with the password you set for the extender.
3. Go to Settings > System Tools > Firmware Upgrade.
4. Click Browse to locate the downloaded new firmware file, and then click Upgrade.
5. Wait a few minutes for the firmware upgrade to complete and the extender to reboot.
5. 5. Backup and Restore Configuration Settings
The configuration settings are stored as a configuration file in the extender. You can
backup the configuration file and restore the extender to the previous settings from the
backup file when needed. Moreover, if necessary, you can erase the current settings
and reset the extender to the default factory settings.
1. Visit http://tplinkrepeater.net, and log in with the password you set for the extender.
2. Go to Settings > System Tools > Backup & Restore.
¾To backup configuration settings:
Click Backup to save a copy of the current settings to your local computer. A ‘.bin’ file of
the current settings will be stored on your computer.
30
Chapter 5 Manage Your Extender
¾To restore configuration settings:
1. Click Browse to locate the backup configuration file stored on your computer, and
click Restore.
2. Wait a few minutes for the restore and reboot.
Note: During the restore process, do not power off or reset the extender.
¾To reset the extender to factory default settings:
1. Click Factory Restore to reset the extender.
2. Wait a few minutes for the reset and reboot.
Note:
• During the reset process, do not power off or reset the extender.
• We strongly recommend you backup the current configuration settings before resetting the extender.
5. 6. Change Login Password
The account management feature allows you to change your login password of the
management webpage.
1. Visit http://tplinkrepeater.net, and log in with the password you set for the extender.
2. Go to Settings > System Tools > Admin Account.
3. Enter the old password, then the new password twice (both case-sensitive) and click
Save.

31
Chapter 5 Manage Your Extender
4. Use the new password for future logins.
5. 7. System Log
If the extender is not working normally, you can save the system log and send it to our
technical support team.
1. Visit http://tplinkrepeater.net, and log in with the password you set for the extender.
2. Go to Settings > System Tools > System Log.
¾To save the system log locally:
1. Choose the type and level of the system log as needed.
2. Click Save Log to save the system logs to a local disk.

32
FAQ
Q1. How do I reset the extender to its factory default settings?
• With the extender powered on, use a pin to press the Reset button until all the LEDs
turn on momentarily and then release the button.
• Log in to the extender’s web management page. Go to System Tools > Restore &
Backup and click Factory Restore.
Q2. What should I do if I forget my login password?
Refer to FAQ > Q1 to reset the extender, and create a password to log in.
Note: The extender must be reconfigured after a reset to access the internet. Please note down your
login password for future use.
Q3. What should I do if I forget my wireless password?
The factory default wireless password is printed on the label of the extender.
If the password has been altered, please connect your computer to the extender using
an Ethernet cable and follow the steps below:
1. Visit http://tplinkrepeater.net, and log in with the password you set for the extender.
2. Go to Settings > Wireless > Wireless Settings to retrieve or reset your wireless
password.
Q4. What should I do if I cannot access the web management page?
This can happen for a variety of reasons. Please try the following to log in again.
• If your computer is wirelessly connected, make sure that you have connected to the
extender’s SSID.
• If your computer is connected via an Ethernet cable, please make sure that the
connection is stable.
• Make sure your computer is set to obtain an IP address and DNS server address
automatically.
• Verify that http://tplinkrepeater.net or http://192.168.0.254 is correctly entered in the
web browser and press Enter.
• Use the IP address to access the extender. The default IP is 192.168.0.254. If the
extender is connected to the router, you should go to your router’s DHCP client list to
obtain the extender’s current IP address.
• Reset the extender and try again.
Q5. I have enabled wireless MAC filter, wireless access control, or access
control list (ACL) on my router. What should I do before configuring

33
the extender?
When a device connects through the extender to your router, the MAC address of the
device shown on the router is translated to another MAC address. If your router’s MAC
filter, wireless access control, or ACL is enabled, the devices connected to the extender
cannot get an IP address from the extender and cannot access the internet.
To solve this problem, please follow the steps below:
1. Log in to your router and disable the MAC filter, wireless access control or ACL.
Note: For more information about how to disable your router’s MAC filter, wireless access control or ACL,
please refer to your router’s user guide.
2. Power on your extender, and run the Quick Setup to configure your extender.
3. Connect all of your devices to the extended network, and make sure the router’s Link
LED remains lit.
4. On your router, add all the Online Devices’ MAC addresses to your router’s MAC filter
table.
5. Enable the router’s MAC filter, wireless access control, or ACL to complete the
configuration.

34
COPYRIGHT & TRADEMARKS
Specifications are subject to change without notice. is a registered trademark
of TP-Link Technologies Co., Ltd. Other brands and product names are trademarks or
registered trademarks of their respective holders.
No part of the specifications may be reproduced in any form or by any means or used
to make any derivative such as translation, transformation, or adaptation without
permission from TP-Link Technologies Co., Ltd. Copyright © 2017 TP-Link Technologies
Co., Ltd. All rights reserved.

35
FCC STATEMENT
This equipment has been tested and found to comply with the limits for a Class B digital
device, pursuant to part 15 of the FCC Rules. These limits are designed to provide
reasonable protection against harmful interference in a residential installation. This
equipment generates, uses and can radiate radio frequency energy and, if not installed
and used in accordance with the instructions, may cause harmful interference to radio
communications. However, there is no guarantee that interference will not occur in a
particular installation. If this equipment does cause harmful interference to radio or
television reception, which can be determined by turning the equipment off and on, the
user is encouraged to try to correct the interference by one or more of the following
measures:
• Reorient or relocate the receiving antenna.
• Increase the separation between the equipment and receiver.
• Connect the equipment into an outlet on a circuit different from that to which the
receiver is connected.
• Consult the dealer or an experienced radio/ TV technician for help.
This device complies with part 15 of the FCC Rules. Operation is subject to the following
two conditions:
1. This device may not cause harmful interference.
2. This device must accept any interference received, including interference that may
cause undesired operation.
Any changes or modifications not expressly approved by the party responsible for
compliance could void the user’s authority to operate the equipment.
Note: The manufacturer is not responsible for any radio or TV interference caused by
unauthorized modifications to this equipment. Such modifications could void the user’s
authority to operate the equipment.
FCC RF Radiation Exposure Statement:
This equipment complies with FCC RF radiation exposure limits set forth for an
uncontrolled environment. This device and its antenna must not be co-located or
operating in conjunction with any other antenna or transmitter.
“To comply with FCC RF exposure compliance requirements, this grant is applicable to
only Mobile Configurations. The antennas used for this transmitter must be installed to
provide a separation distance of at least 20 cm from all persons and must not be co-
located or operating in conjunction with any other antenna or transmitter.”
CE Mark Warning

36
This is a class B product. In a domestic environment, this product may cause radio
interference, in which case the user may be required to take adequate measures.
OPERATING FREQUENCY(the maximum transmitted power)
2412MHz—2472MHz(20dBm)
5180MHz—5240MHz(23dBm)
5260MHz—5320MHz(23dBm)
5500MHz—5700MHz(30dBm)
EU declaration of conformity
TP-Link hereby declares that the device is in compliance with the essential requirements
and other relevant provisions of directives 2014/53/EU, 2009/125/EC and 2011/65/EU.
The original EU declaration of conformity may be found at http://www.tp-link.com/en/ce
RF Exposure Information
This device meets the EU requirements (2014/53/EU Article 3.1a) on the limitation of
exposure of the general public to electromagnetic fields by way of health protection.
The device complies with RF specifications when the device used at 20 cm from your
body.
Restricted to indoor use.
Canadian Compliance Statement
This device complies with Industry Canada license-exempt RSSs. Operation is subject
to the following two conditions:
1. This device may not cause interference, and
2. This device must accept any interference, including interference that may cause
undesired operation of the device.
Le présent appareil est conforme aux CNR d’Industrie Canada applicables aux appareils
radio exempts de licence. L’exploitation est autorisée aux deux conditions suivantes :
1. l’appareil ne doit pas produire de brouillage;
2. l’utilisateur de l’appareil doit accepter tout brouillage radioélectrique subi, meme si le
brouillage est susceptible d’en compromettre le fonctionnement.
Caution:
The device for operation in the band 5150–5250 MHz is only for indoor use to reduce
the potential for harmful interference to co-channel mobile satellite systems;
The high-power radars are allocated as primary users (i.e. priority users) of the bands
5250-5350 MHz and 5650-5850 MHz and that these radars could cause interference
and/or damage to LE-LAN devices.

37
DFS (Dynamic Frequency Selection) products that operate in the bands 5250- 5350
MHz, 5470-5600MHz, and 5650-5725MHz.
Avertissement:
Le dispositif fonctionnant dans la bande 5150-5250 MHz est réservé uniquement pour
une utilisation à l’intérieur afin de réduire les risques de brouillage préjudiciable aux
systèmes de satellites mobiles utilisant les mêmes canaux.
En outre, les utilisateurs devraient aussi être avisés que les utilisateurs de radars de
haute puissance sont désignés utilisateurs principaux (c.-à-d., qu’ils ont la priorité) pour
les bandes 5250-5350 MHz et 5650-5850 MHz et que ces radars pourraient causer du
brouillage et/ou des dommages aux dispositifs LAN-EL.
Radiation Exposure Statement:
This equipment complies with IC radiation exposure limits set forth for an uncontrolled
environment. This equipment should be installed and operated with minimum distance
20cm between the radiator & your body.
Déclaration d’exposition aux radiations:
Cet équipement est conforme aux limites d’exposition aux rayonnements IC établies
pour un environnement non contrôlé. Cet équipement doit être installé et utilisé avec
un minimum de 20 cm de distance entre la source de rayonnement et votre corps.
Industry Canada Statement
CAN ICES-3 (B)/NMB-3(B)
Korea Warning Statements
당해 무선설비는 운용중 전파혼신 가능성이 있음.
NCC Notice
注意!
依據 低功率電波輻射性電機管理辦法
第十二條 經型式認證合格之低功率射頻電機,非經許可,公司、商號或使用者均不得擅
自變更頻率、加大功率或變更原設計之特性或功能。
第十四條 低功率射頻電機之使用不得影響飛航安全及干擾合法通信;經發現有干擾現象
時,應立即停用,並改善至無干擾時方得繼續使用。前項合法通信,指依電信規定作業
之無線電信。低功率射頻電機需忍受合法通信或工業、科學以及醫療用電波輻射性電機
設備之干擾。
於5.25GHz至5.35GHz區域內操作之無線設備的警告聲明
工作頻率5.250~5.350GHz該頻段限於室內使用。
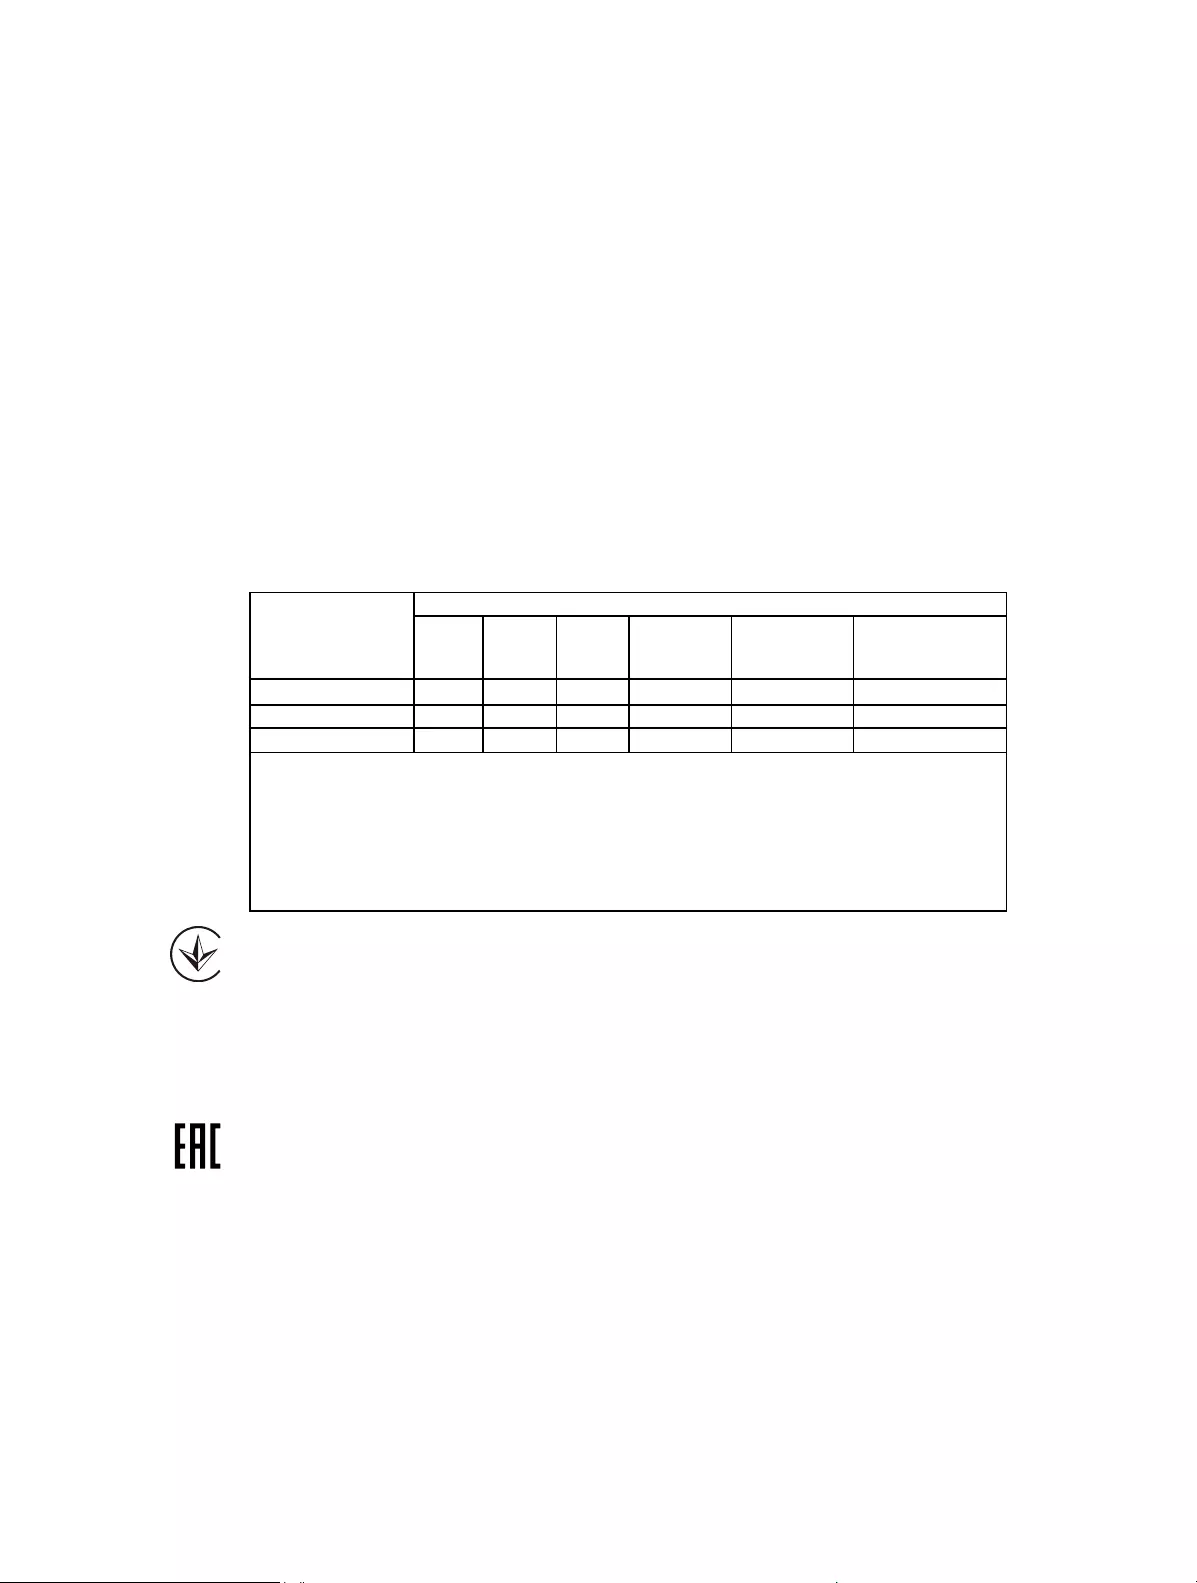
38
BSMI Notice
安全諮詢及注意事項
• 請使用原裝電源供應器或只能按照本產品注明的電源類型使用本產品。
• 清潔本產品之前請先拔掉電源線。請勿使用液體、噴霧清潔劑或濕布進行清潔。
• 注意防潮,請勿將水或其他液體潑灑到本產品上。
• 插槽與開口供通風使用,以確保本產品的操作可靠並防止過熱,請勿堵塞或覆蓋
開口。
• 請勿將本產品置放於靠近熱源的地方。除非有正常的通風,否則不可放在密閉位
置中。
• 請不要私自打開機殼,不要嘗試自行維修本產品,請由授權的專業人士進行此項
工作。
限用物質含有情況標示聲明書
產品元件名稱
限用物質及其化學符號
鉛
Pb
鎘
Cd
汞
Hg
六價鉻
CrVI
多溴聯苯
PBB
多溴二苯醚
PBDE
PCB ○ ○ ○ ○ ○ ○
外殼 ○ ○ ○ ○ ○ ○
電源供應板 −○ ○ ○ ○ ○
備考1. 超出0.1 wt %” 及 “超出0.01 wt %” 系指限用物質之百分比含量超
出百分比含量基準值。
備考2.“○”系指該項限用物質之百分比含量未超出百分比含量基準值。
備考3.“ − “ 系指該項限用物質為排除項目。
Продукт сертифіковано згідно с правилами системи УкрСЕПРО на відповідність
вимогам нормативних документів та вимогам, що передбачені чинними
законодавчими актами України.
Safety Information
• Keep the device away from water, fire, humidity or hot environments.
• Do not attempt to disassemble, repair, or modify the device.
• The socket—outlet shall be installed near the equipment and shall be easily accessible
• Do not use the device where wireless devices are not allowed.
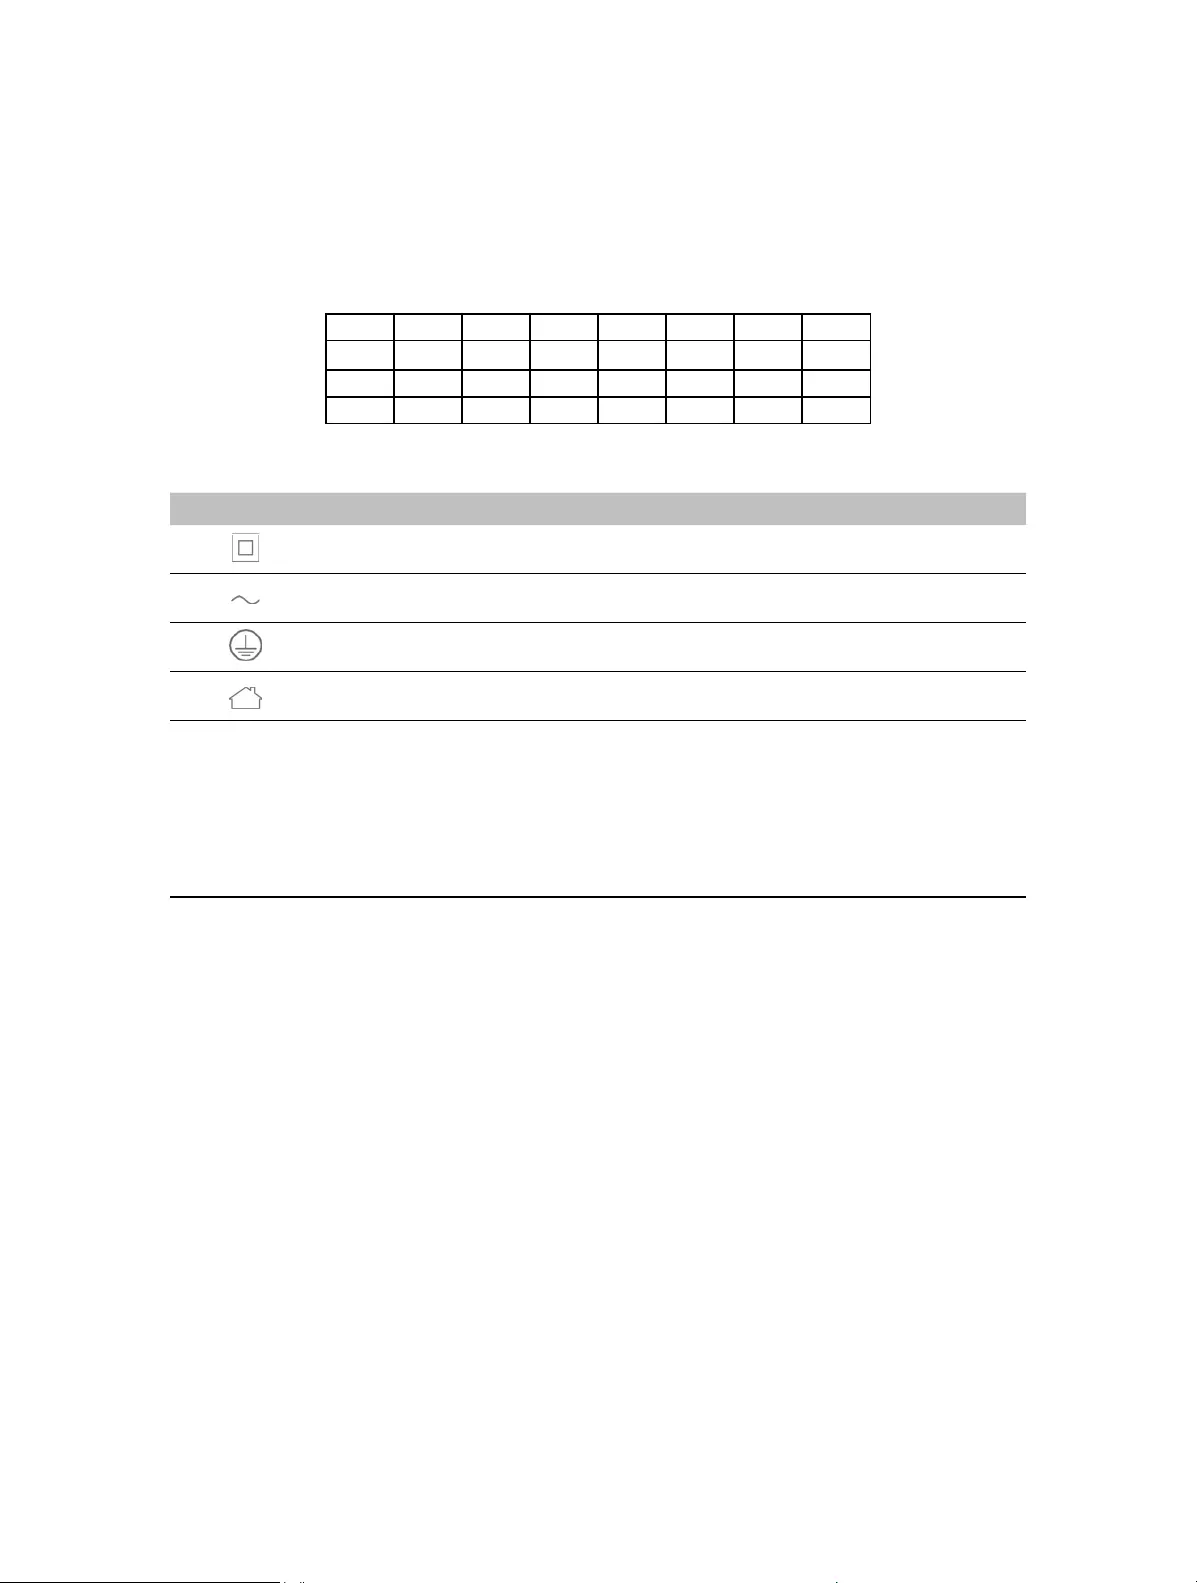
39
Please read and follow the above safety information when operating the device. We
cannot guarantee that no accidents or damage will occur due to improper use of the
device. Please use this product with care and operate at your own risk.
This product can be used in the following countries:
AT BE BG CH CY CZ DE DK
EE EL EF FI FR HR HU IE
IS IT LI LT LU LV MT NL
NO PL PT RO SE SI SK UK
Explanations of the symbols on the product label
Symbol Explanation
Class II equipment
AC voltage
Protection earth
Indoor use only
RECYCLING
This product bears the selective sorting symbol for Waste electrical and electronic
equipment (WEEE). This means that this product must be handled pursuant to European
directive 2012/19/EU in order to be recycled or dismantled to minimize its impact on
the environment.
User has the choice to give his product to a competent recycling organization or to the
retailer when he buys a new electrical or electronic equipment.