

Wi-Fi роутер TP-LINK Archer AX50 — двухдиапазонный маршрутизатор с двухъядерным процессором и 512 Мб оперативной памяти, который гарантирует максимальную производительность даже при пиковых нагрузках. Поддержка стандарта WiFi 6 обеспечивает стабильное соединение, меньшую задержку и сверхвысокую пропускную способность, что позволяет одновременно подключать несколько устройств. Модуль FEM дополнительно увеличивает мощность сигнала в зоне покрытия сети.
TP Link Archer AX3000 / AX50 — настройка
В данной статье мы представим пошаговое руководство по настройке и подключению гигабитного роутера TP-Link Archer AX50. Этот роутер является одним из последних приобретений в линейке устройств TP-Link. Archer AX50 обеспечивает работу на двух частотах — 2,4 ГГц и 5 ГГц, и имеет пять гигабитных портов. Одной из ключевых особенностей Archer AX50 является поддержка стандарта Wi-Fi 6, представляющего собой последнее поколение Wi-Fi, способное достигать максимальной скорости передачи данных до 3000 Мбит/с. Кроме того, стандарт Wi-Fi 6 позволяет подключать к роутеру вчетверо больше устройств, чем предыдущий стандарт Wi-Fi 5. Важно отметить, что для получения указанных результатов все устройства, подключенные к роутеру, также должны поддерживать стандарт Wi-Fi 6.
Подключение роутера
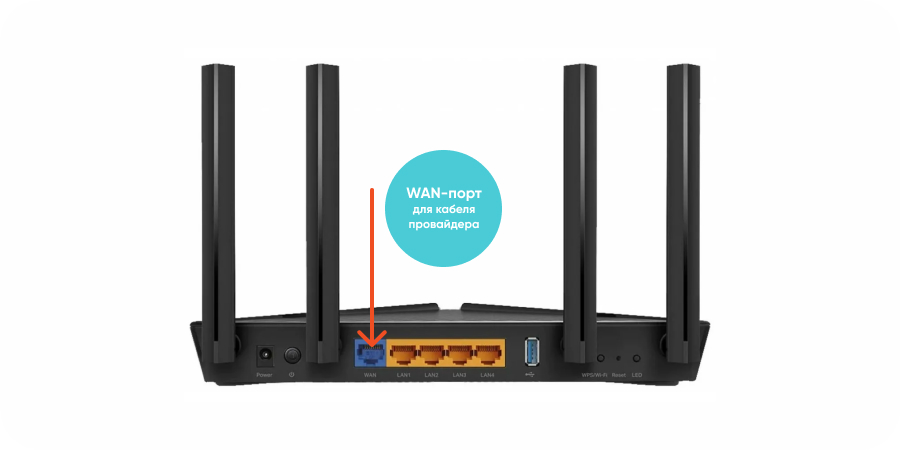
Подключите Ваш роутер TP-Link Archer AX50 к электросети. Интернет-кабель провайдера, приходящий из подъезда в квартиру, вставьте в порт WAN (порт синего цвета).
Если Ваш интернет-провайдер использует фиксацию по mac-адресу, то Вам следует обратиться в службу техподдержки для привязки mac-адреса роутера. Без этого действия интернет работать не будет.
Подключение к Wi-Fi
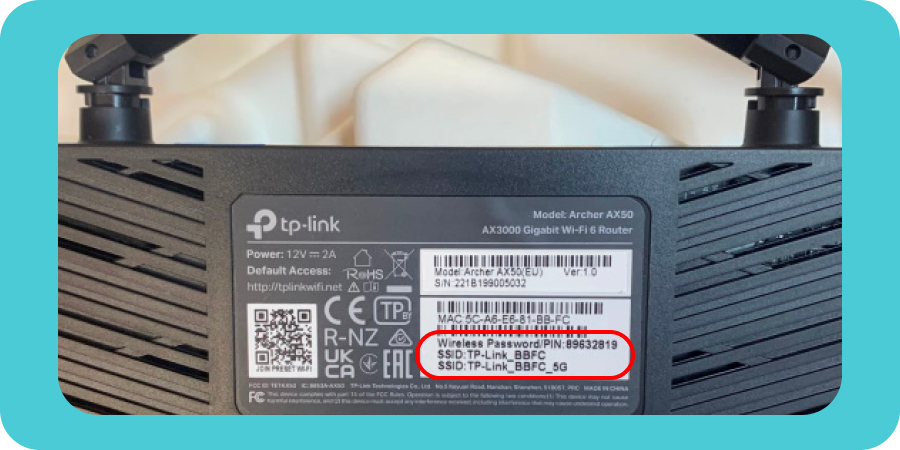
Теперь нужно подключиться к сети Wi-Fi. Данные для подключения указаны на нижней стороне роутера. SSID — это название сети Wi-Fi, Wireless Password/PIN — это пароль для входа в сеть.
Находим в списке доступных сетей Wi-Fi нужную нам сеть. Вводим пароль для подключения к сети.

Настройка беспроводной сети
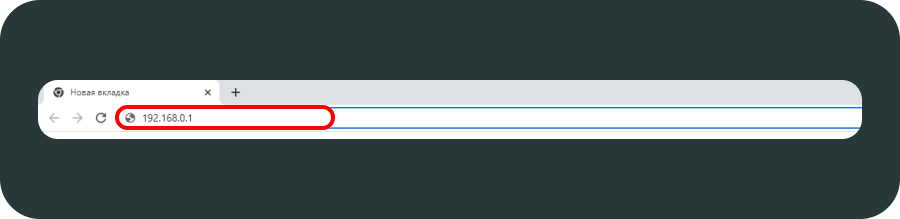
Шаг 1. Заходим в веб-интерфейс роутера. Для этого в браузере в верхней строке вводим: 192.168.0.1. или tplinkwifi.net.
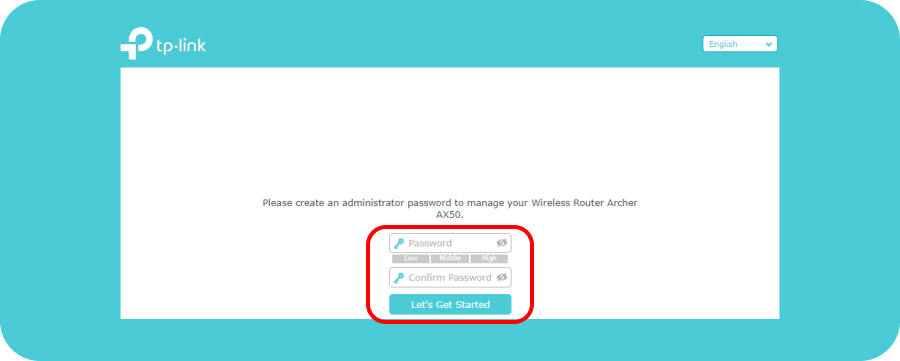
Шаг 2. В открывшемся окне меняем язык, а также создаем пароль для входа в веб-интерфейс роутера.
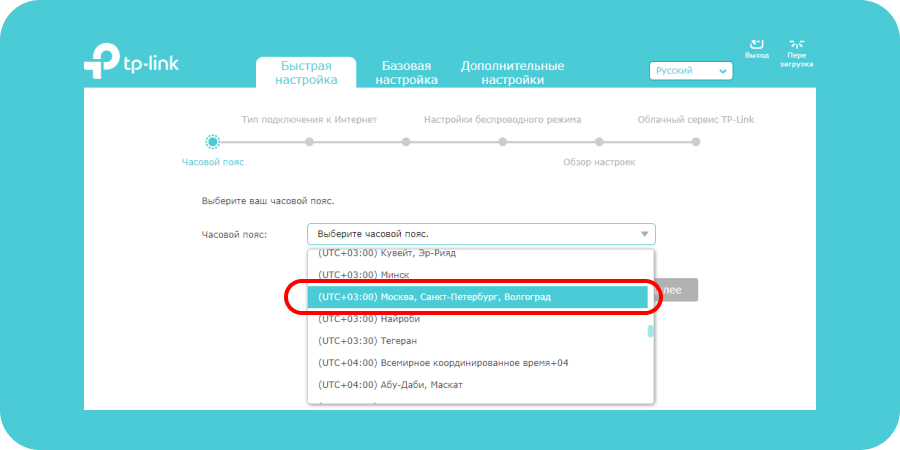
Шаг 3. Проходим на вкладку «Быстрая настройка». Выбираем из списка свой часовой пояс (Москва). Нажимаем «Далее».
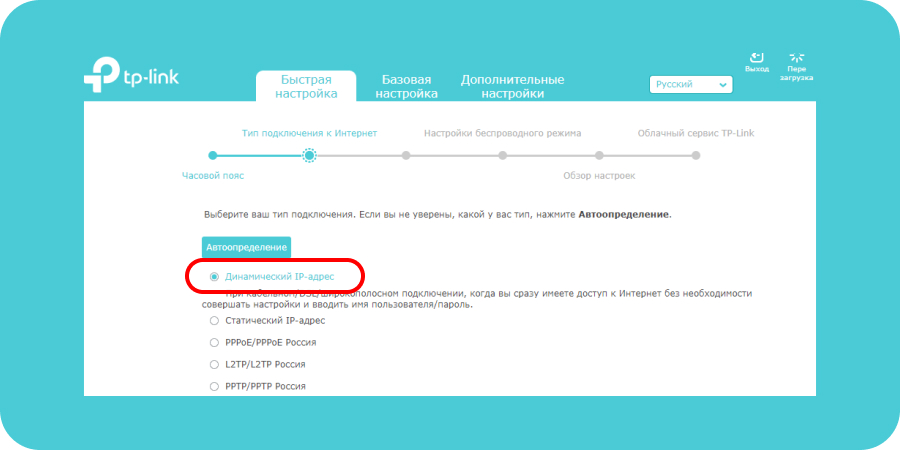
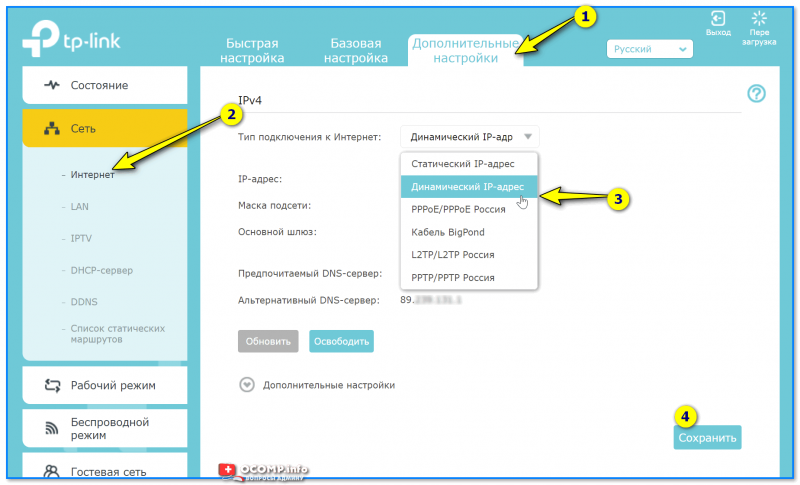
Шаг 4. Тип подключения к Интернет выбираем — «Динамический IP-адрес». Нажимаем «Далее».
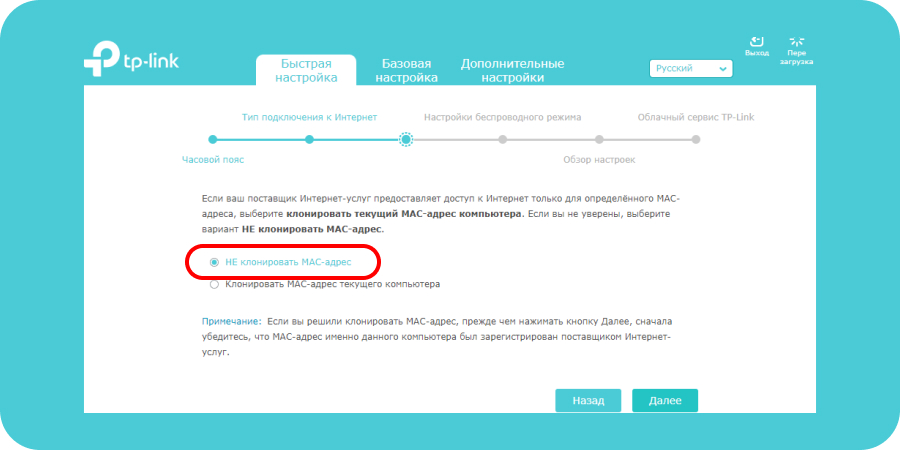
Шаг 5. MAC-адрес — ставим галочку на пункт «Не клонировать MAC-адрес». Нажимаем «Далее».
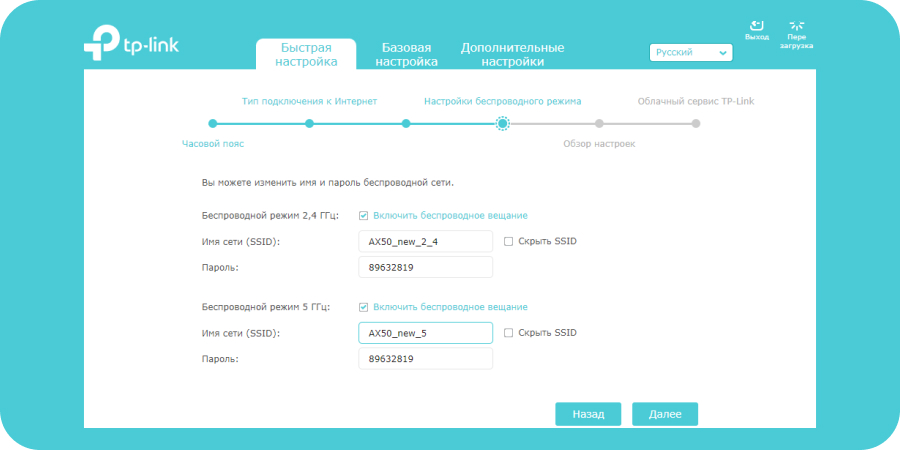
Шаг 6. Настройки беспроводного режима. В данном разделе указаны SSID (название) и пароль сетей Wi-Fi для каждой из двух частот.
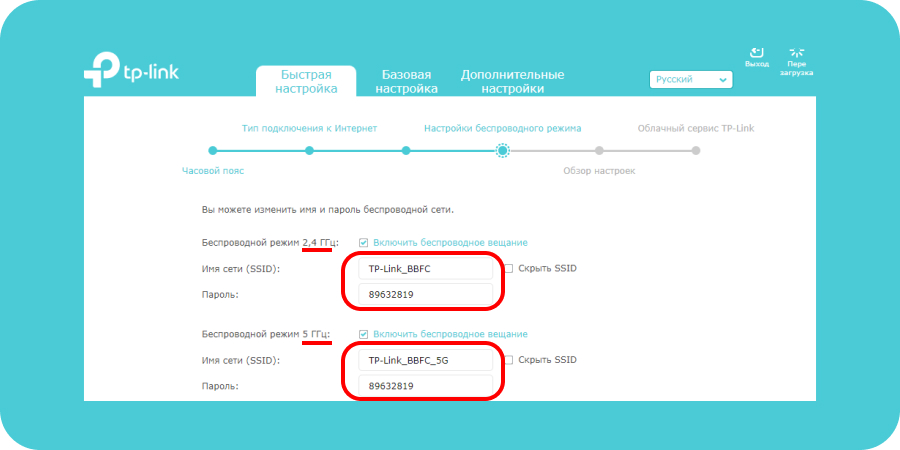
Мы можем задать свои значения для каждой сети или оставить параметры по умолчанию.
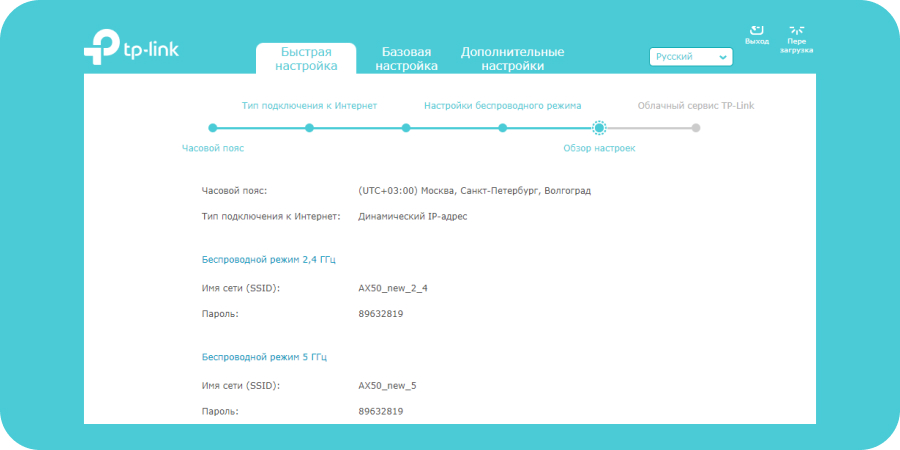
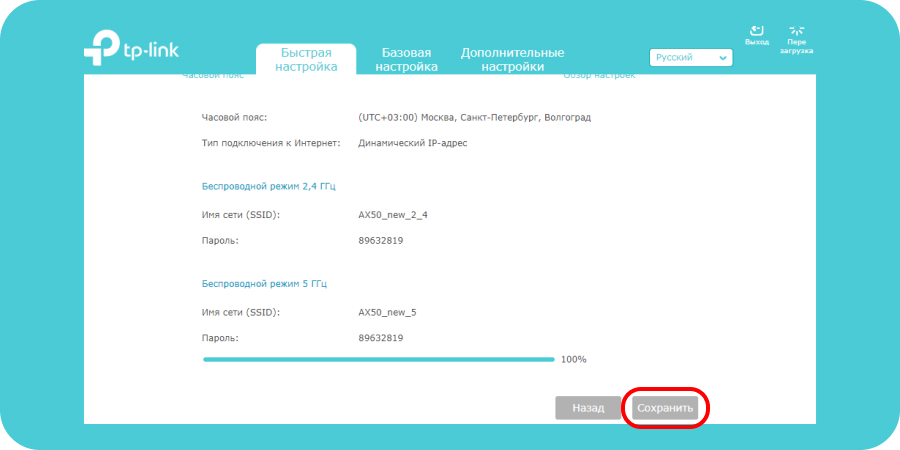
Шаг 7. Обзор настроек. Проверяем все наши введенные параметры.
Нажимаем «Сохранить».
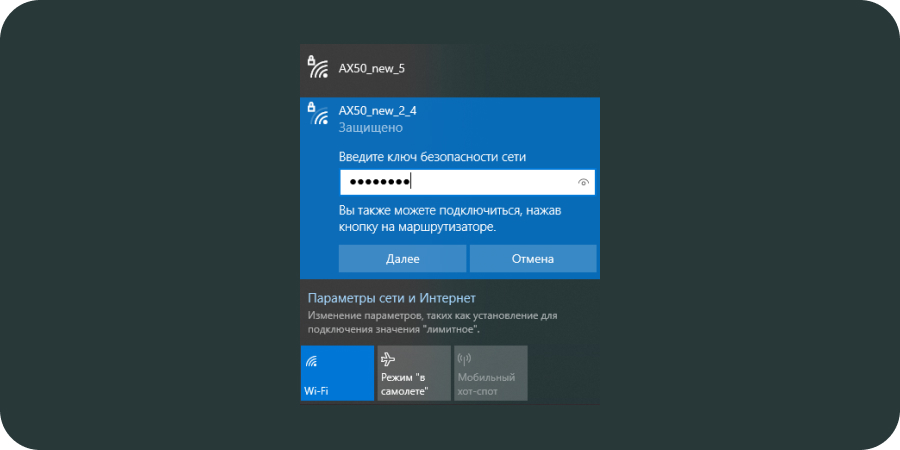
Шаг 8. Для того, чтобы измененные параметры вступили с силу, нам нужно переподключиться к новой беспроводной сети. Находим в списке доступных Wi-Fi сетей нашу новую сеть. Подключаемся к ней.
Шаг 9. Быстрая настройка роутера Archer AX50 успешно завершена.

Дополнительные настройки роутера
Шаг 10. Далее рассмотрим дополнительные настройки роутера. Проходим на вкладку «Дополнительные настройки».
Раздел Состояние
В данном разделе мы можем посмотреть состояние беспроводной сети, основной режим работы и параметры.
Беспроводные клиенты
Данная вкладка показывает, сколько и каких беспроводных устройств подключено к роутеру.
Раздел Сеть
Пройдя на данную вкладку, мы можем посмотреть и, при необходимости, изменить основные параметры беспроводной сети. Рассмотрим каждый из пунктов вкладки «Сеть» подробнее.
Интернет
Указаны параметры подключения к Интернету — тип подключения, IP-адрес, маска подсети, шлюз и DNS-сервер. Если тип подключения к Интернету — динамический IP, то все эти параметры роутер получает автоматически от провайдера.
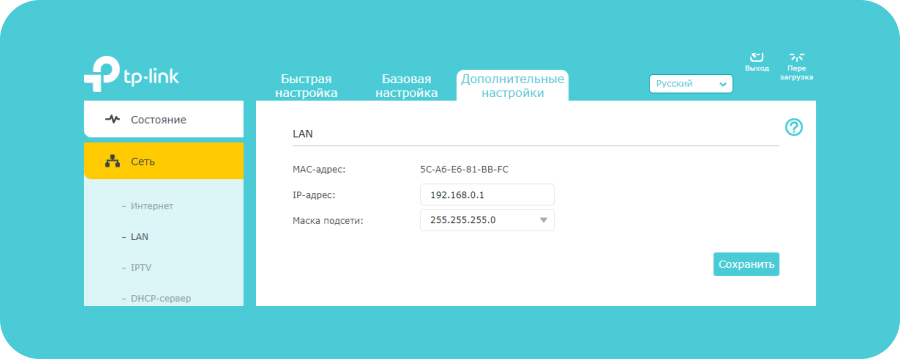
Раздел LAN
В разделе LAN мы можем посмотреть MAC-адрес роутера, а также IP-адрес. При необходимости можно изменить IP-адрес (к примеру, роутер настраивается как дополнительный для расширения покрытия Wi-Fi).
Раздел DHCP — сервер
В данном разделе указаны основные характеристики DHCP. Они выставлены по умолчанию. Для домашнего пользования данные параметры вполне оптимальны, и изменять их нет необходимости.

Раздел Рабочий режим
Данная вкладка показывает, в каком режиме работает роутер. Здесь же настраивается подключение роутера как точки доступа.
Беспроводной режим
Пройдя на данную вкладку, мы можем изменить параметры беспроводного подключения.
Настройки беспроводного режима
Проверяем, включена ли функция OFDMA. OFDMA — технология является ключевой для всех роутеров стандарта Wi-Fi 6.
Параметры шифрования, рабочий режим, характеристики канала — данные значения оставляем по умолчанию.
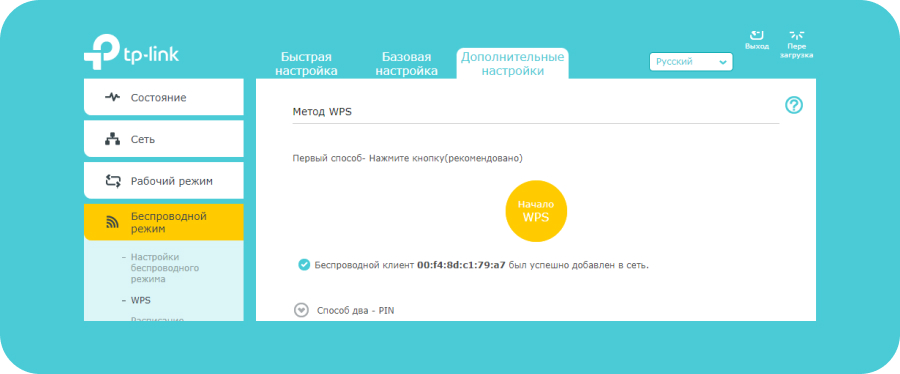
Раздел WPS
Функция WPS дает возможность подключаться к роутеру без ввода пароля Wi-Fi сети. Для этого нажимаем кнопку «Начало WPS» в пункте «WPS».
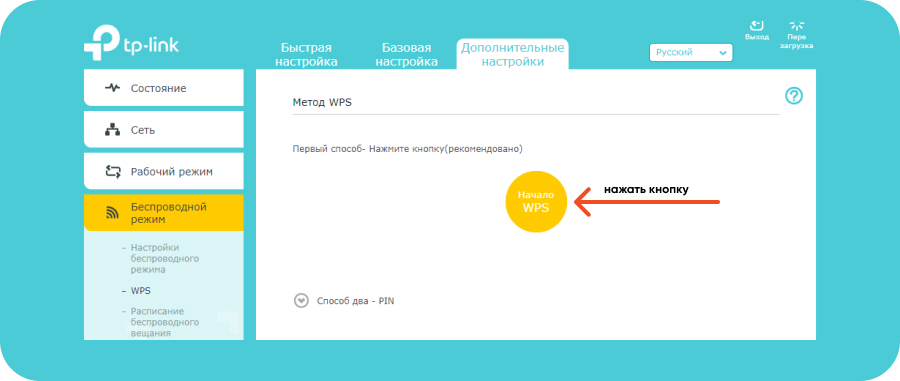
Далее в списке доступных Wi-Fi сетей на подключаемом к роутеру устройстве выбираем нужную нам сеть. Как видим, появилась надпись «Вы также можете подключиться, нажав кнопку на маршрутизаторе».

Нажимаем на роутере кнопку «WPS». После этого устройство подключится к Wi-Fi сети без ввода пароля.
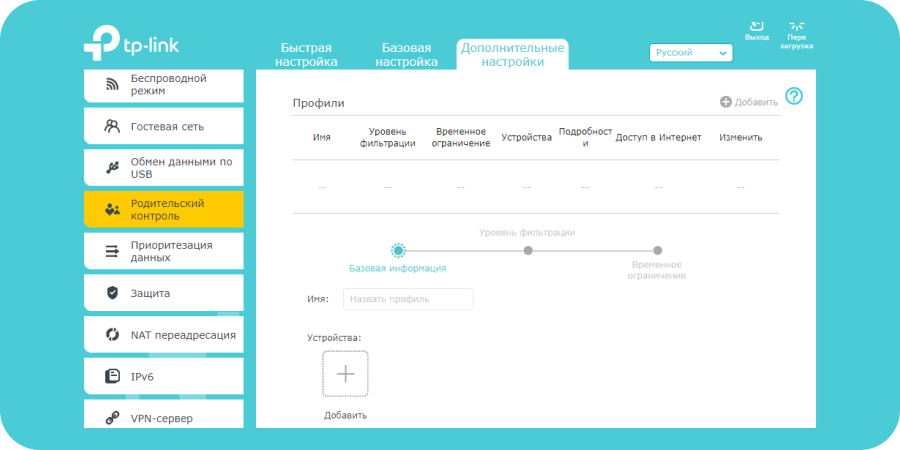
Раздел Родительский контроль
В данном разделе можно настроить ограничение доступа в Интернет для определенных устройств, запрет доступа на конкретные сайты, а также настроить расписание выхода в сеть
Настройка гигабитного Wi-Fi 6 роутера TP-Link Archer AX50 завершена.
tp-link Archer AX3000 V1 User’s Guide
tp-link Archer AX3000 Specification
The TP-Link Archer AX3000 is a dual-band Wi-Fi 6 router designed to deliver enhanced wireless performance and connectivity for home and small office networks. It supports the latest IEEE 802.11ax standard, offering a combined total bandwidth of up to 3 Gbps. This includes up to 2402 Mbps on the 5 GHz band and 574 Mbps on the 2.4 GHz band, ensuring smooth streaming, gaming, and downloading experiences. The router is powered by a 1.5 GHz quad-core CPU, which helps to manage multiple connections simultaneously with minimal latency.
The Archer AX3000 features OFDMA and MU-MIMO technologies, which increase network efficiency by allowing multiple devices to communicate simultaneously, reducing congestion, and improving overall throughput. It supports advanced security protocols, including WPA3 encryption, providing enhanced protection for user data and network privacy. Beamforming technology is incorporated to focus the Wi-Fi signal towards connected devices, optimizing the coverage and reliability of the wireless network.
Equipped with four Gigabit Ethernet ports, the Archer AX3000 facilitates robust wired connections for devices requiring stable and faster internet access. Additionally, it includes a USB 3.0 port for sharing media and files across the network. The router can be easily set up and managed via the TP-Link Tether app, which provides a user-friendly interface for configuration, parental controls, and network monitoring. The Archer AX3000 is compatible with Amazon Alexa, enabling voice control for connected devices, and supports TP-Link OneMesh, allowing users to create a seamless whole-home Wi-Fi system. The compact and modern design of the Archer AX3000 makes it an unobtrusive addition to any network setup, providing both aesthetic appeal and high-performance connectivity.
To set up your TP-Link Archer AX3000, connect the router to your modem using an Ethernet cable. Power on the router and connect your device to its Wi-Fi network. Open a web browser and go to http://tplinkwifi.net. Create a login password and follow the Quick Setup Wizard to configure your internet connection and Wi-Fi settings.
To update the firmware on your Archer AX3000, log in to the web management page at http://tplinkwifi.net. Navigate to Advanced > System Tools > Firmware Upgrade. Click on ‘Check for Upgrade’ or manually upload the downloaded firmware file. Follow the on-screen instructions to complete the update.
If your Archer AX3000 is not connecting to the internet, first check all cable connections. Restart your modem and router. Ensure your ISP settings are correct in the router’s web interface. You may also reset the router to factory settings if the problem persists.
To change the Wi-Fi password, log in to the router’s web interface at http://tplinkwifi.net. Go to Basic > Wireless. Enter your new password in the ‘Wireless Password’ field for both 2.4GHz and 5GHz networks. Save the changes to apply the new password.
Yes, you can set up a guest network. Log in to the router’s web interface and navigate to Basic > Guest Network. Enable the Guest Network feature and customize the settings as desired, including network name and security options. Save the changes to activate the guest network.
To enable parental controls, log in to the router’s web management page. Go to Advanced > Parental Controls. Add a profile and set up filters for specific devices connected to the network. You can set access times and block specific content based on categories or URLs.
To reset your Archer AX3000 to factory settings, locate the reset button on the router. Press and hold the button for about 10 seconds until the LED indicators blink. Release the button and wait for the router to reboot with factory default settings.
To improve Wi-Fi signal strength, place the router in a central location away from obstructions and interference sources. Consider adjusting the antennas for optimal coverage. You can also enable features like Beamforming and check for firmware updates for performance improvements.
Yes, you can prioritize devices using Quality of Service (QoS) settings. Log in to the router’s web interface and go to Advanced > QoS. Enable QoS and add devices to the priority list based on their MAC addresses or IP addresses. Set the desired priority level and save the settings.
Secure your Archer AX3000 by changing the default login credentials and using a strong, unique Wi-Fi password. Enable WPA3 encryption if available. Regularly update the router’s firmware and disable WPS if not needed. Consider enabling the built-in firewall and intrusion detection features.
TP-Link Archer AX3000
© 2023 TP-Link 1910013572 REV2.0.0
User Guide
AX3000 Gigabit Wi-Fi 6 Router
View the manual for the TP-Link Archer AX3000 here, for free. This manual comes under the category routers and has been rated by 6 people with an average of a 9.
This manual is available in the following languages: English. Do you have a question about the TP-Link Archer AX3000 or do you need help?
Ask your question here
Product Images (2)

TP-Link Archer AX3000 specifications
Below you will find the product specifications and the manual specifications of the TP-Link Archer AX3000.
The TP-Link Archer AX3000 is a router that offers high-speed Wi-Fi connectivity and a range of advanced features. With its dual-band technology, it is capable of delivering speeds of up to 3,000 Mbps, ensuring smooth and uninterrupted internet browsing, streaming, and online gaming.
Equipped with the latest Wi-Fi 6 technology, the Archer AX3000 provides enhanced network capacity and efficiency, allowing for a faster and more stable connection, even when multiple devices are connected simultaneously. It also supports MU-MIMO technology, enabling multiple devices to connect at the same time without any degradation in performance.
The router features four external antennas, which can be adjusted to optimize the signal strength and coverage throughout your home or office. Additionally, it includes Beamforming technology, which directs the Wi-Fi signal towards connected devices, improving overall reliability and range.
To enhance security, the Archer AX3000 utilizes advanced encryption protocols and supports WPA3, providing a secure connection for your devices. It also includes parental controls, allowing you to manage and restrict internet access for specific devices or users.
Setting up the router is made easy with TP-Link’s intuitive web interface, which guides users through the initial configuration process. The Archer AX3000 also supports easy network management through TP-Link’s Tether app, allowing you to monitor and control your network from your smartphone.
In conclusion, the TP-Link Archer AX3000 is a high-performance router that offers fast Wi-Fi speeds, advanced features, and reliable connectivity. With its range of security options and easy-to-use management interfaces, it is a suitable choice for both home and office environments.
General
| Brand | TP-Link |
| Model | Archer AX3000 | ARCHER AX3000 |
| Product | router |
| Language | English |
| Filetype | User manual (PDF) |
Frequently Asked Questions
Can’t find the answer to your question in the manual? You may find the answer to your question in the FAQs about the TP-Link Archer AX3000 below.
How to Setup VPN Client and Bridge Mode on TP-Link Archer AX3000
How do I set up my TP-Link Archer AX3000 router for the first time?
Connecting your Archer AX3000 router is easy. Start by plugging in the power adapter and connecting your modem to the router’s WAN port using an Ethernet cable. Then, access the router’s settings by entering the default gateway IP address (usually 192.168.0.1) in your web browser. Follow the on-screen instructions to complete the setup process, including configuring your wireless network name (SSID) and password.
How can I secure my TP-Link Archer AX3000’s wireless network?
To enhance the security of your wireless network, access your router’s settings through the web browser and navigate to the wireless settings section. Enable WPA2-PSK encryption and choose a strong, unique password. It is also recommended to change the default SSID to something unique (not referencing your personal information) to reduce the risk of unauthorized access.
How can I troubleshoot connectivity issues with my TP-Link Archer AX3000?
If you are experiencing connectivity issues with your Archer AX3000, start by turning off your router and modem, waiting a few seconds, and then turning them back on. Ensure that the Ethernet cables are securely connected and there are no physical obstructions blocking the wireless signal. You can also try resetting your router to its factory default settings using the reset button on the back, but note that this will erase any customized settings.
How do I update the firmware of my TP-Link Archer AX3000 router?
Regular firmware updates are crucial to ensure optimal performance and security. Check TP-Link’s official website for the latest firmware version available for your Archer AX3000 model. Download the firmware file, access the router’s settings through your web browser, navigate to the firmware upgrade section, and select the downloaded file to initiate the firmware upgrade process.
How can I manage parental controls on my TP-Link Archer AX3000?
The Archer AX3000 allows you to set up parental controls to restrict certain types of content or limit internet access for specific devices on your network. You can manage these controls by accessing the router’s settings and navigating to the parental control section. From there, you can create profiles, set schedules, and choose appropriate filtering options to ensure a safe online environment for your family.
What does the download speed on the internet depend on?
The download speed on the internet depends on the type of connection you have. If you have a 25 Mb/s connection this means that theoretically you should be able to download 25 MB per second.
What is the difference between a router and a modem?
A modem provides the internet connection via the internet provider. A router then distributes the Internet signal to the devices connected to the router.
Is WIFI radiation harmful?
WIFI is a radio frequency signal in the form of non-ionising radiation. This radiation cannot damage cells and tissues and is therefore not harmful to human health.
Is the manual of the TP-Link Archer AX3000 available in English?
Yes, the manual of the TP-Link Archer AX3000 is available in English .
Is your question not listed? Ask your question here
- June 12, 2024
- tp-link
Table of Contents
- tp-link AX3000 WiFi 6 Range Extender
- Product Information
- Product Usage Instructions
- Highlights
- AX3000 Wi-Fi Range Extender
- Features
- Specifications
- Documents / Resources
- References
- Read User Manual Online (PDF format)
- Download This Manual (PDF format)
tp-link AX3000 WiFi 6 Range Extender
Product Information
| Product Name | AX3000 Wi-Fi 6 Range Extender |
|---|---|
| Model | RE700X |
| Highlights | Extend AX3000 Wi-Fi to Your Whole Home, Works with any Wi-Fi |
router, Wider Channel Width, Connect More Devices, Easy Setup
Within Minutes
Features| OneMeshTM, Wi-Fi Dead-Zone Killer, Uninterrupted Roaming, One
Wi-Fi Name, Easy Setup and Unified Management, Secure One-touch
Connection (WPS), Smart Signal Indicator, Gigabit Ethernet
Port
Specifications| Hardware: Reset Button, WPS Button, Ethernet Port
Wireless: AX3000 Wi-Fi 6
Others: LEDs, Plug
Product Usage Instructions
- Connect the AX3000 Wi-Fi 6 Range Extender (RE700X) to a power source.
- Press the WPS button on the range extender and your Wi-Fi router to establish a secure one-touch connection.
- Use the smart signal indicator on the range extender to find the best spot for extending your Wi-Fi coverage.
- If you have wired devices, plug them into the gigabit Ethernet port on the range extender for network access.
- Download the Tether app or access the web UI to easily set up and manage your Mesh network.
- If you have a OneMeshTM router, connect the range extender to create a Mesh network for seamless whole-home coverage.
- Enjoy uninterrupted streaming, surfing, and more, even when moving around your home.
Highlights
Extend AX3000 Wi-Fi to Your Whole Home
Works with any Wi-Fi router to eliminate Wi-Fi dead zones, and blanket your
home with stable, super-fast, seamless Wi-Fi via OneMeshTM.
-
Wi-Fi Coverage Ethernet Cable
-
Faster Wi-Fi 6 Speed
-
Experience explosive Wi-Fi speeds up to 3 Gbps with the wider 160 MHz channel.†
-
Larger Capacity
-
Wi-Fi 6 builds a more efficient network that increases the average throughput by 4 times and servers more devices.△
-
Ultra-Low Latency
-
Take advantage of ultra-low latency to enjoy smoother online experience.
-
Save Clients’ Battery Power
-
Target Wake Time schedules the connection time of battery-powered devices to reduce their power consumption.*
-
Adaptive Path Selection
-
Keep your network running at top-speed by automatically choosing the fastest connection path to the router.
-
Access Point Mode
-
Create a new Wi-Fi access point to enhance your wired network with Wi-Fi capability.
-
Easy Setup Within Minutes
-
Easy setup and management via WPS button/Tether app/Web UI.
OneMeshTM
-
RE700X is more than a traditional range extender. It creates a Mesh network by connecting to a OneMeshTM router for seamless whole-home coverage.
-
Wi-Fi Dead-Zone Killer
-
Eliminate weak signal areas with Wi-Fi coverage for the whole house.
-
Uninterrupted Roaming
-
Enjoy uninterrupted streaming, surfing, and more—even when moving around your home.
-
One Wi-Fi Name
-
Stay connected to the same network name in every room.
-
Easy Setup and Unified Management
-
Push the WPS button to set up a Mesh network you can manage from the Tether app or web UI.
-
Check more info about OneMesh technology and full list of OneMesh extenders/routers at: https://www.tp-link.com/onemesh
AX3000 Wi-Fi Range Extender

Features

Ease of Use
- Intuitive Web UI– Ensures quick and simple installation without hassle
- Fast Encryption – One-touch wireless security encryption with the WPS button
- Hassle-free Management with Tether App – Network management is made easy with the TP-Link Tether App, available on any Android or iOS device
- Online Upgrade – Keeps you informed of the latest firmware and allows online updating on the web UI
Speed
- Ultimate Wireless Speed – Combined wireless speeds of up to 574 Mbps (over 2.4 GHz) and 2402 Mbps (over 5 GHz)†
- Support Wi-Fi 6 – Turbocharge your devices with wireless speeds of up to 3 Gbps
- Adaptive Path Selection – Keep your network running at top-speed by automatically choosing the fastest connection path to the router
Reliability
- Simultaneous Dual Band – Separate Wi-Fi bands enable more devices to connect to your network without a drop in performance
- Reliable Connection – Internal antennas for optimal Wi-Fi coverage and reliable wireless connections
- Ultra-Low Latency – Take advantage of ultra-low latency to enjoy smoother online experience
Specifications
Hardware
- Button: WPS Button, Reset Button
- Port: 1 Gigabit Ethernet Port
- Input Power: 100-240V~50/60Hz
- Power Consumption: 13.5W
- Dimensions (W × D × H): 3.1×1.4×5.9 in. (78×36×149 mm)
Wireless
- Wireless Standards: IEEE 802.11a/n/ac/ax 5 GHz, IEEE 802.11b/g/n/ax 2.4 GHz
- Frequency: 2.4 GHz and 5 GHz
- Signal Rate: 574 Mbps at 2.4 GHz, 2402 Mbps at 5 GHz
- Transmit Power: FCC: <24dBm{5.47GHz~5.725GHz }; <30dBm{2.4GHz &5.15GHz~5.25GHz&5.725GHz~5.825GHz }
- Reception SensitiBvity: 5GHz: 11a 6Mbps: -97dBm, 11a 54Mbps: -78dBm 11ax HE20 MCS0:-97dBm, 11ax HE20 MCS11:-66dBm 11ax HE40 MCS0:-94dBm, 11ax HE40 MCS11:-63dBm 11ax HE80 MCS0:-91dBm, 11ax HE80 MCS11:-61dBm 11ax HE160 MCS11:-59dBm 2.4GHz: 11g 6Mbps:-96dBm, 11g 54Mbps:-78dBm 11ax HE20 MCS0: -96dBm, 11ax HE20 MCS11: -65dBm 11ax HE40 MCS0: -93dBm, 11ax HE40 MCS11: -63dBm
- Wireless Function: LED Control, Access Control, Power Schedule, Wi-Fi Coverage
- Wireless Security: WEP, WPA, WPA2, WPA3
Others
Certification
-
RCM, RoHS
-
System Requirements
-
Microsoft Windows 98SE, NT, 2000, XP, Vista™ or Windows 7, 8, 8.1, 10, MAC OS, NetWare, UNIX or Linux Internet Explorer 11, Firefox 12.0, Chrome 20.0, Safari 4.0, or other Java-enabled browsers
-
Package Contents
-
Wi-Fi Range Extender RE700X
-
Quick Installation Guide
-
For more information, please visit https://www.tp-link.com/home-networking/range-extender/RE700X/or scan the QR code left
-
Maximum wireless signal rates are the physical rates derived from IEEE Standard 802.11 specifications. Actual wireless data throughput and wireless coverage per ft² are not guaranteed and will vary as a result of network conditions, client limitations, and environmental factors, including building materials, obstacles, volume and density of traffic, and client location. ‡The product may not be compatible with routers or gateways with firmware that has been altered, is based on open source programs, or is non-standard or outdated. §Uninterrupted Roaming is designed for devices that support the 802.11k/v standard. △Up to 4x Capacity refers to 4x increase in median throughput under dense environment compared to 11ac wave 2 range extender.
-
Saving clients’ battery power requires clients to also support the 802.11ax Wi-Fi standard. Actual power reduction may vary as a result of network conditions, client limitations, and environmental factors.
©2022 TP-Link -
Check more info about OneMesh technology and full list of OneMesh extenders/routers at: https://www.tp-link.com/onemesh
Documents / Resources
| tp-
link AX3000 WiFi 6 Range
Extender
[pdf] Instruction Manual
RE700X AU 1.0, AX3000 WiFi 6 Range Extender, AX3000, AX3000 WiFi 6, WiFi 6,
WiFi 6 Range Extender, Range Extender, Extender
—|—
References
- RE700X | AX3000 Mesh WiFi 6 Extender | TP-Link
- OneMesh — Flexibly Create a Whole-Home Wi-Fi | TP-Link
Read User Manual Online (PDF format)
Read User Manual Online (PDF format) >>
Download This Manual (PDF format)
Download this manual >>
Содержание статьи:
- Настройка TP-LINK Archer (AX50)
- ШАГ 1: распаковка, подкл. кабелей
- ШАГ 2: уточняем название сети и пароль для первичного подключения
- ШАГ 3: настраиваем доступ к сети интернет, Wi-Fi сеть
- ШАГ 4: доп. настройки (опционально, обзор)
- Вопросы и ответы: 1
Доброго дня!
В сегодняшней заметке хочу остановиться на настройке бюджетного роутера AX50 из популярной линейки TP-LINK Archer, позволяющим организовать дома Wi-Fi 6 (скорость до 2402 Мбит/с на 5 ГГц и до 574 Мбит/с на 2,4 ГГц // Если верить рекламе 😉).
Чем вообще интересна эта линейка роутеров (помимо Wi-Fi 6):
- несколько антенн (4-8) + технология Beamforming позволяют обеспечить достаточно неплохое покрытие (за 1-2 стенками с Wi-Fi сетью вполне себе можно работать);
- технология OFDMA — позволяет увеличить производительность работы сети, при подкл. нескольких устройств к роутеру;
- низкая задержка (пинг) — актуально для любителей онлайн-игр. Разработчики утверждают, что им удалось добиться снижения отклика до 75% по сравнению с предыдущими линейками роутеров;
- встроенный антивирус + родительский контроль (опасные ресурсы будут автоматически заблокированы роутером при вкл. соответствующих опций // На основе антивируса Trend Micro);
- двухдиапазонный: 2,4 + 5 GHz сеть работает одновременно;
- русский веб-интерфейс (личный кабинет), всё продумано и удобно. Благодаря этому настраивать роутер относительно легко и просто.
Как видите, роутер из данной линейки может стать неплохим домашним устройством для подкл. к сети Интернет (особенно, если ваш «старый» маршрутизатор стал постоянно подвисать, перезагружаться…).
Собственно, теперь подробнее о подключении и настройке…
📌Примечание!
Приобрести роутер TP-LINK Archer ax50 и др. — можно на офиц. сайте Tp-Link (там все ссылки на комп. магазины представлены: Озон, DNS, Яндекс-маркет и т.д.
*
Настройка TP-LINK Archer (AX50)
ШАГ 1: распаковка, подкл. кабелей
Упаковка и комплектация AX50 стандартны — внутри картонной коробки:
- сам роутер (с установленными 4-ю антеннами);
- блок питания;
- один LAN-кабель (в принципе, он и не нужен, если вы не собираетесь подключать стационарный ПК к роутеру);
- инструкция по эксплуатации. Пару фото ниже… 👇
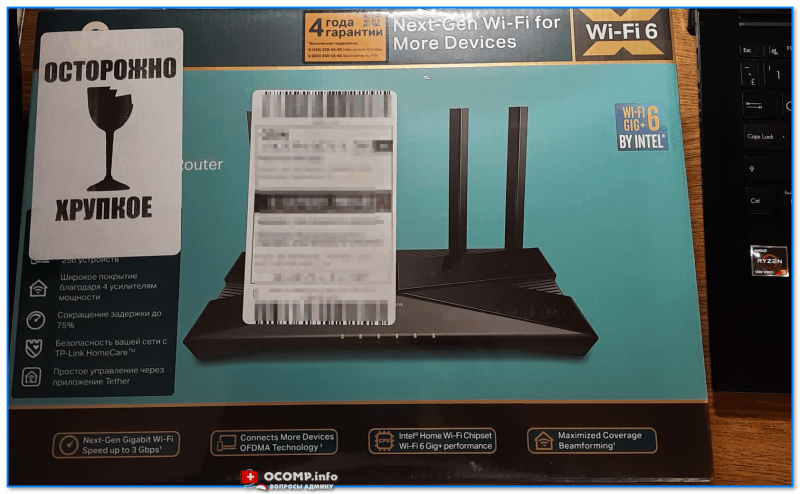
Упаковка AX50 (вид спереди)
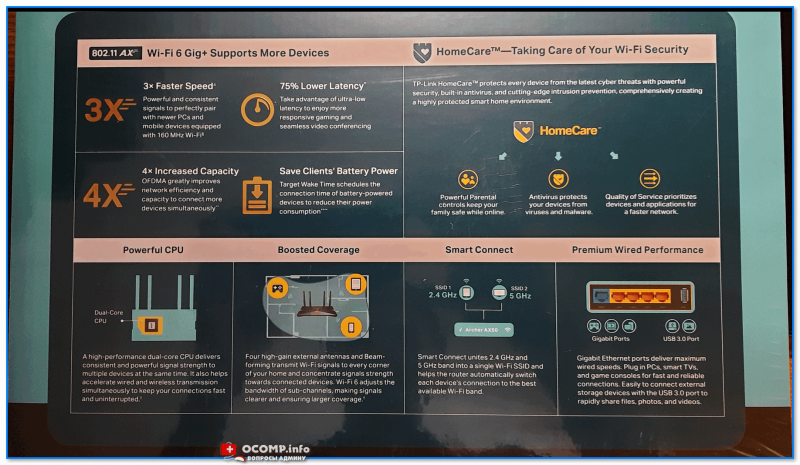
Упаковка AX50 (вид сзади)
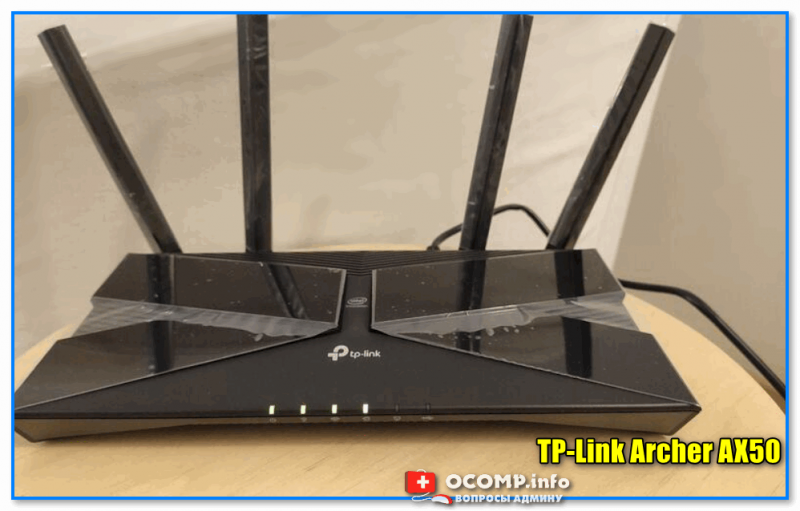
TP-Link Archer AX50
📌Что касается подключения — то здесь все стандартно:
- после того, как вынете роутер из коробки — подключите к WAN-порту кабель от Интернет-провайдера, а к порту Power — адаптер питания;
- при необходимости: к одному из LAN-портов (их здесь 4) — подключите компьютер (благо, что кабель идет в комплекте к роутеру);
- нажмите кнопку включения устройства (цифра-3 на фото ниже);
- на корпусе устройства должен загореться зеленый светодиод питания;
- Всё! Теперь понадобиться компьютер (ноутбук) для настройки устройства… См. следующий шаг.
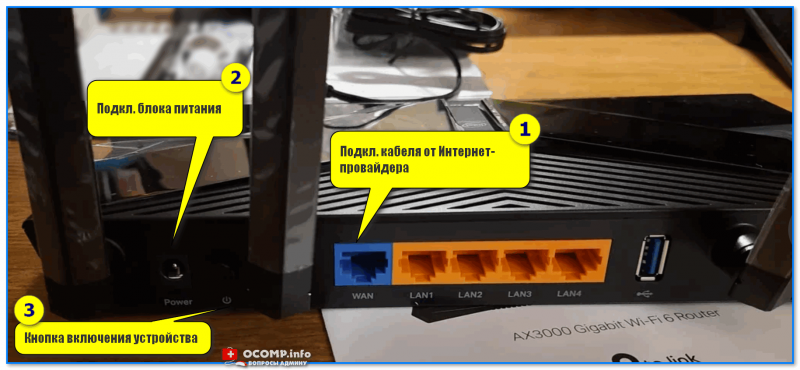
TP-Link Archer AX50 — вид сзади
*
ШАГ 2: уточняем название сети и пароль для первичного подключения
Этот шаг понадобиться в том случае, когда вы будете настраивать роутер с компьютера/ноутбука, подключившись к Wi-Fi сети (если вы подключили ПК с помощью LAN-кабеля — этот шаг можно опустить).
*
Переверните роутер — на его дне должна быть фирменная заводская наклейка с важной информацией для настройки устройства:
- название Wi-Fi сети по умолчанию (например, «TP-Link_609C»);
- пароль для подключения к этой Wi-Fi сети;
- адрес странички настроек роутера (на текущий день актуальный адрес: tplinkwifi.net).
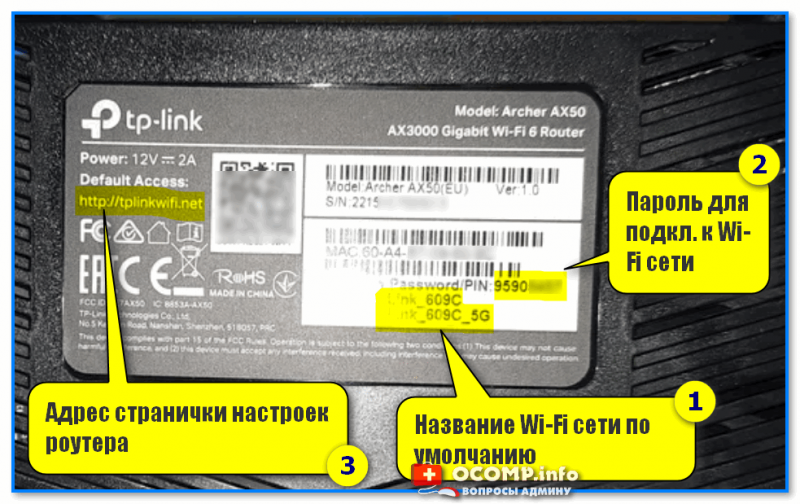
Наклейка на корпусе устройства
Теперь нужно кликнуть по значку сети в трее Windows (рядом с часами), в появившемся окне выбрать Wi-Fi сеть (название нужной вы уже должны знать 👆) и ввести пароль (который был на наклейке 👆).
Если все введено корректно — ноутбук (компьютер) должен подключиться к Wi-Fi сети (но она пока еще может быть без доступа к Интернету!).
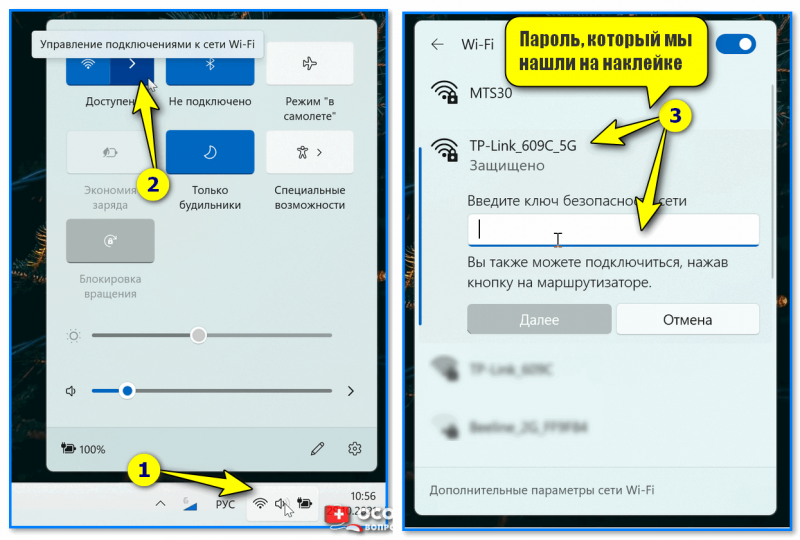
Подключаемся к Wi-Fi сети
*
ШАГ 3: настраиваем доступ к сети интернет, Wi-Fi сеть
Чтобы вы смогли войти в веб-интерфейс (личный кабинет) роутера — ваш компьютер должен быть подключен к его Wi-Fi сети (см. ШАГ 2), либо соединен с ним LAN-кабелем!
*
Теперь нужно запустить браузер (рекомендуется Edge или Chrome) и перейти по адресу:
- tplinkwifi.net (тот, который был на наклейке);
- 192.168.0.1 (работает на большинстве роутеров TP-Link. К линейке Archer подходит).
- если ни тот, ни другой адрес не откроет страницу настроек — 📌прочитайте эту заметку.
*
Если все предыдущие шаги вы выполнили правильно — перед вами появится страничка с предложением задать пароль администратора. Это нужно для того, чтобы никто, кроме вас, не мог изменять настройки как ему заблагорассудиться.
Прим.: пароль можно установить любой…
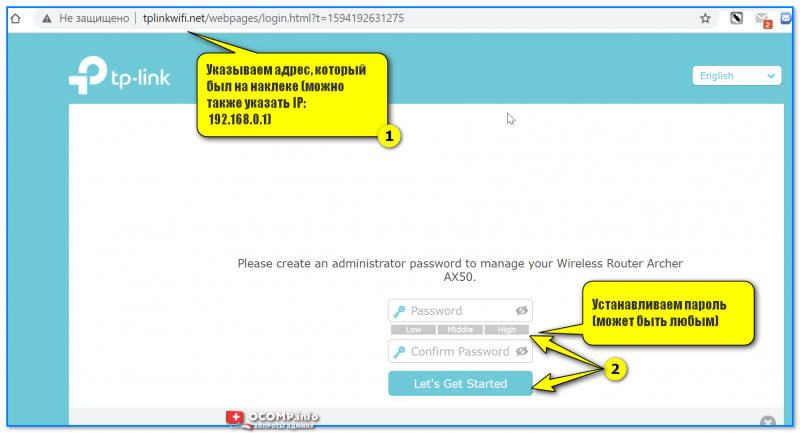
Первый вход в настройки роутера
Далее появится окно быстрой настройки (Quick Setup) — рекомендую сразу же включить русский язык (справа, в углу) и перейти в режим расширенных настроек (Advanced).
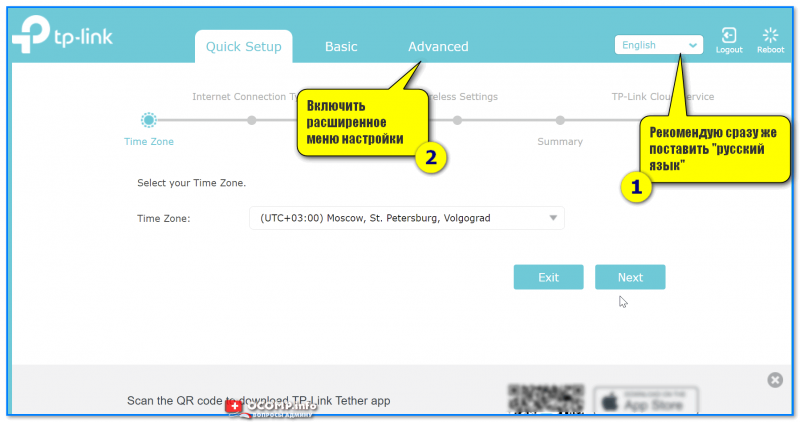
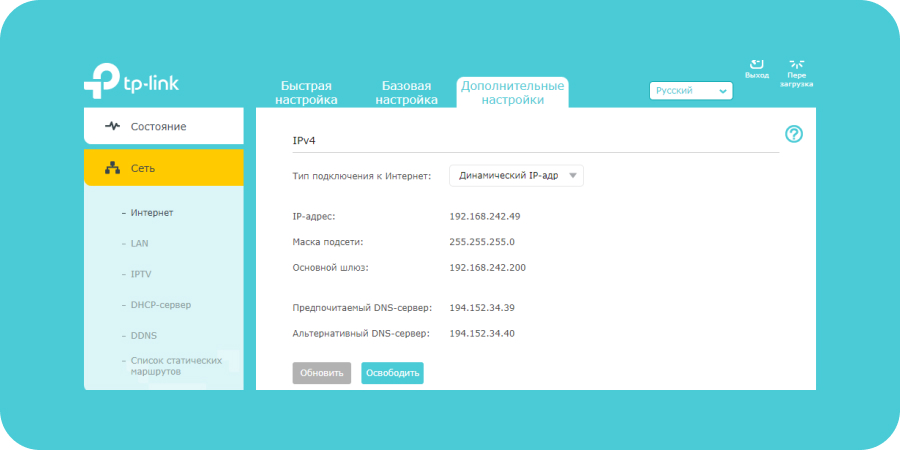
Включаем русский в меню
📌 Следующий важный момент: настройка доступ в Интернет. Для этого нужно открыть вкладку «Сеть /интернет» и:
- указать тип подключения к сети (📌возможно понадобиться указать также IP-адреса, пароли, и пр. информацию. Эти данные должен предоставить вам ваш Интернет-провайдер, обычно, они есть в договоре на оказание услуг связи!);
- нажать кнопку «Сохранить». 👇
Если все настройки введены корректно — через некоторое время на устройствах, подключенных к роутеру, должно появиться подключение к Интернету!
Настройка доступа в интернет
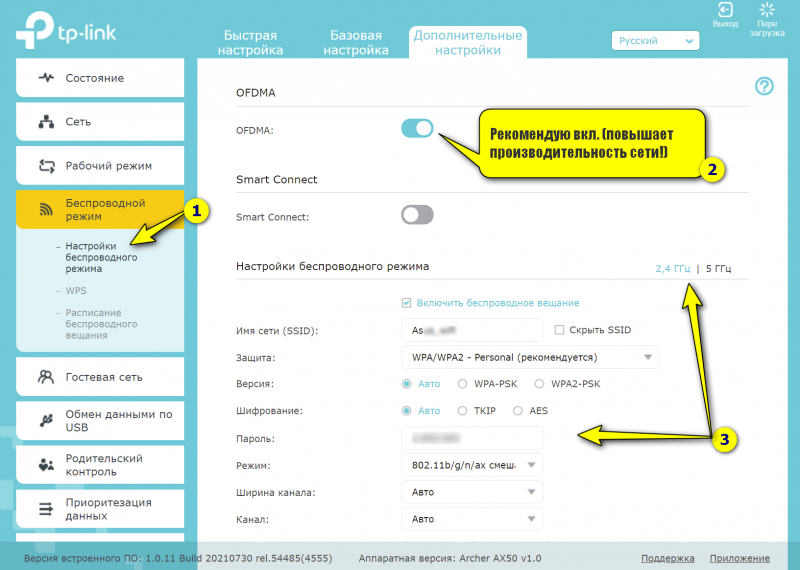
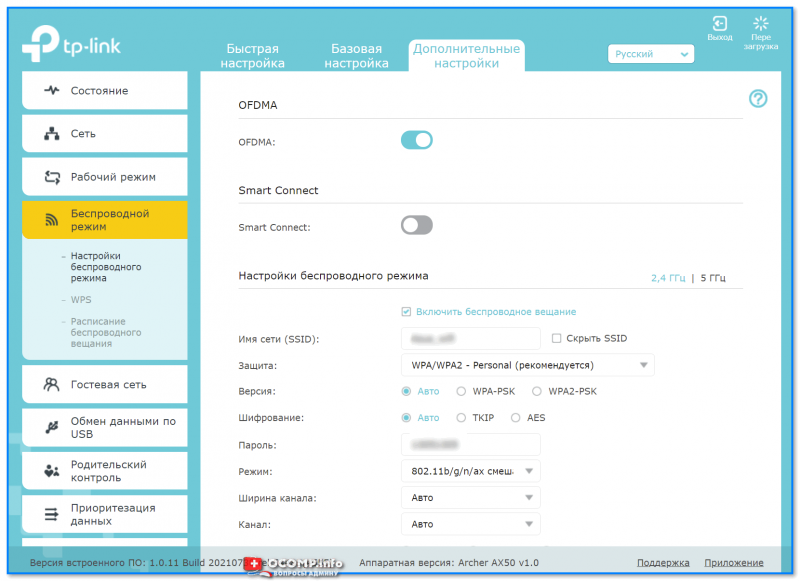
📌Еще один важный момент: поменять название Wi-Fi сети, пароль, проверить уровень сигнала и пр. Сделать это можно в разделе «Настройка беспроводного режима». См. скрин ниже. 👇
На что обратить внимание:
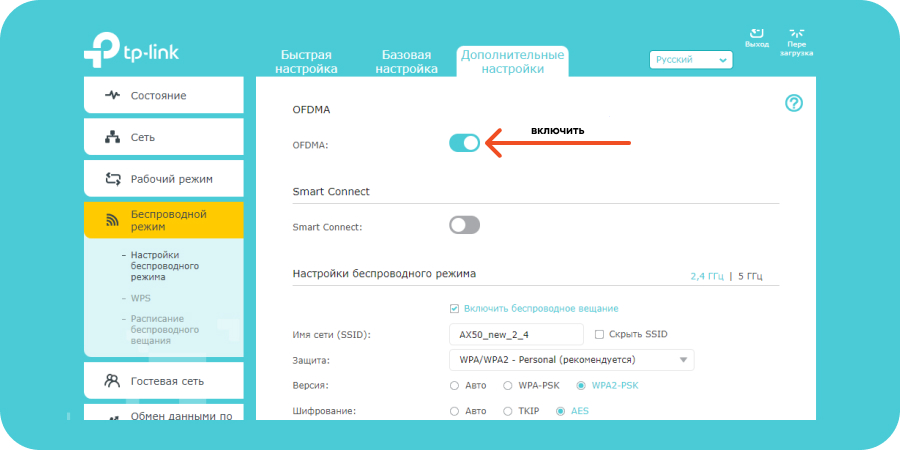
- желательно включить опцию OFDMA (В Wi-Fi 6 OFDMA — одна из важнейших функций для повышения производительности сети);
- имя сети и пароль рекомендуется изменить (не использовать те, что были на наклейке по умолчанию);
- установить нужную мощность передатчика (слабая, средняя, сильная);
- задать нужный канал (при необходимости) и пр.
Настройки беспроводного режима
Собственно, на этом базовая настройка роутера завершена. После этого у вас должен быть доступ к сети Интернет у всех устройств, которые подключены к роутеру (через Wi-Fi / или LAN-кабель).
В следующем шаге я покажу еще неск. скринов с интересными настройками роутера (однако, задавать их не обязательно, и нужно это далеко не всем!).
*
ШАГ 4: доп. настройки (опционально, обзор)
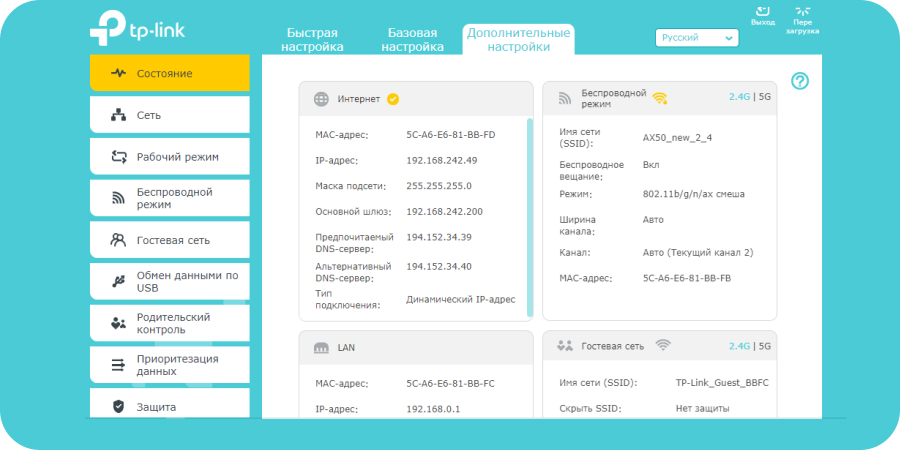
Вкладка «Состояние»
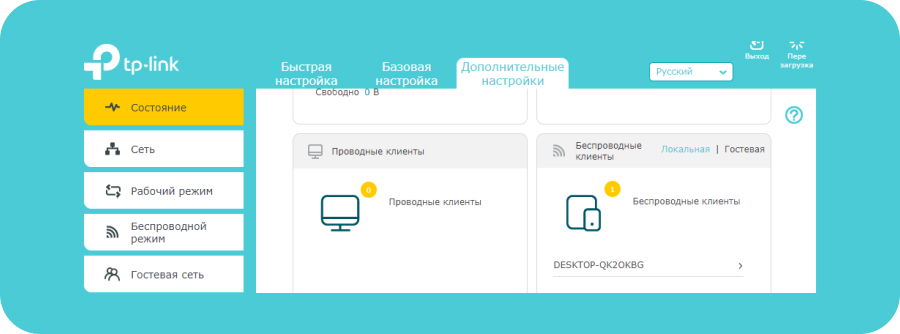
Позволяет узнать, подключен ли роутер к Интернету, посмотреть IP-адреса, нагрузку на ядра ЦП, память, сколько проводных и беспроводных устройств подключено к нему.
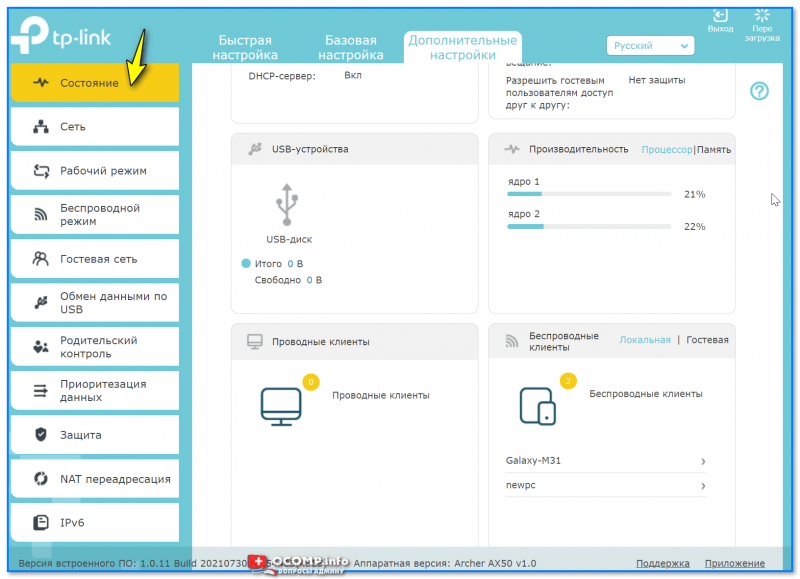
Вкладка состояния — TP-Link Archer (AX50)
*
Вкладка «Сеть»
Отвечает за настройки доступа к сети Интернет, IPTV, LAN, DHCP и пр. параметры (в общем-то, многое как и у других роутеров — почти «ничего» уникального в этой вкладке нет). См неск. скринов ниже… 👇
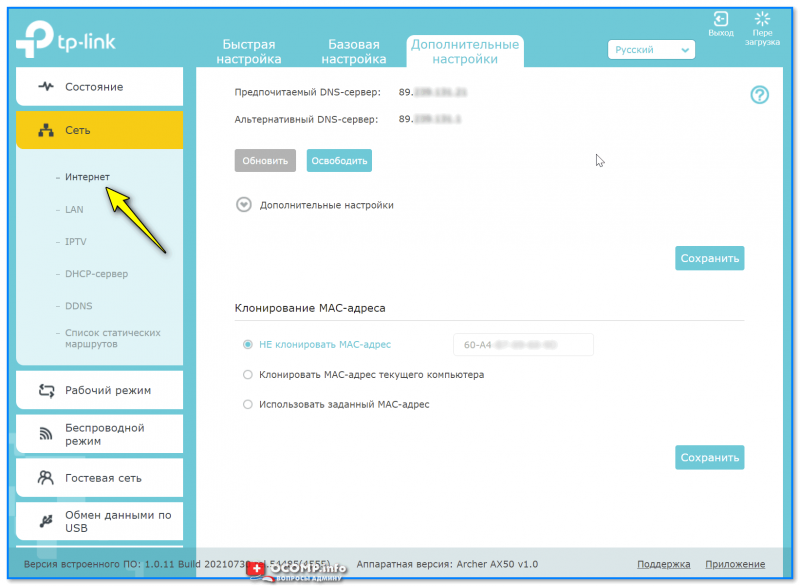
Интернет
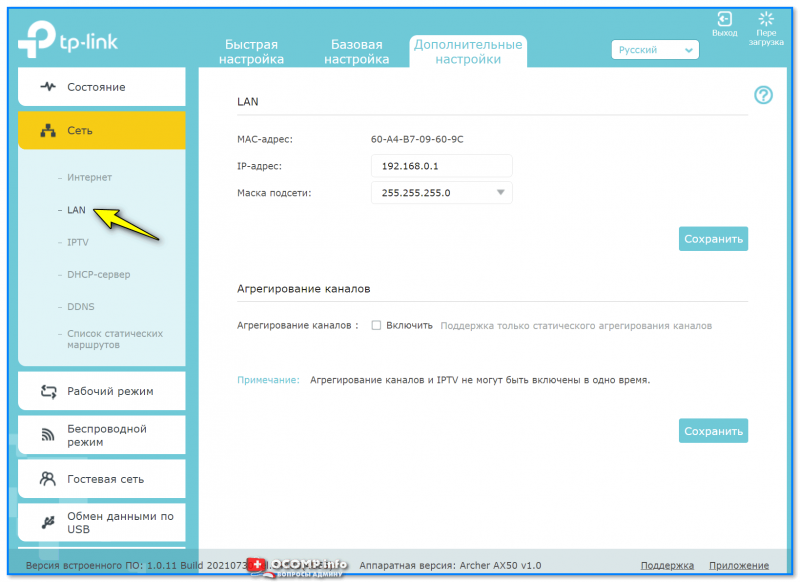
LAN
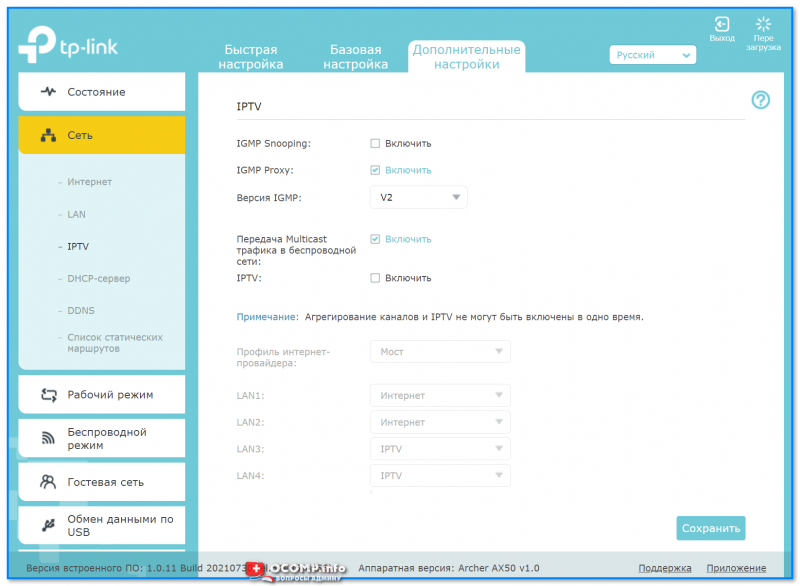
IPTV
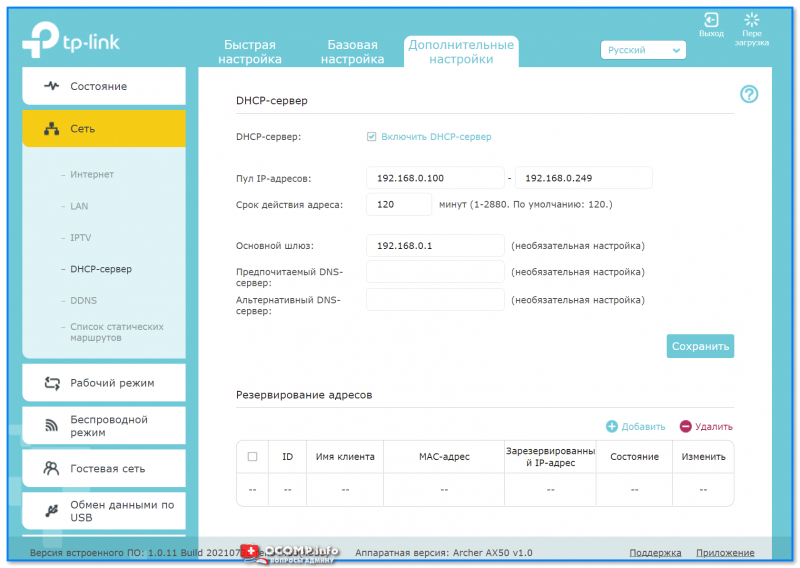
DHCP-сервер
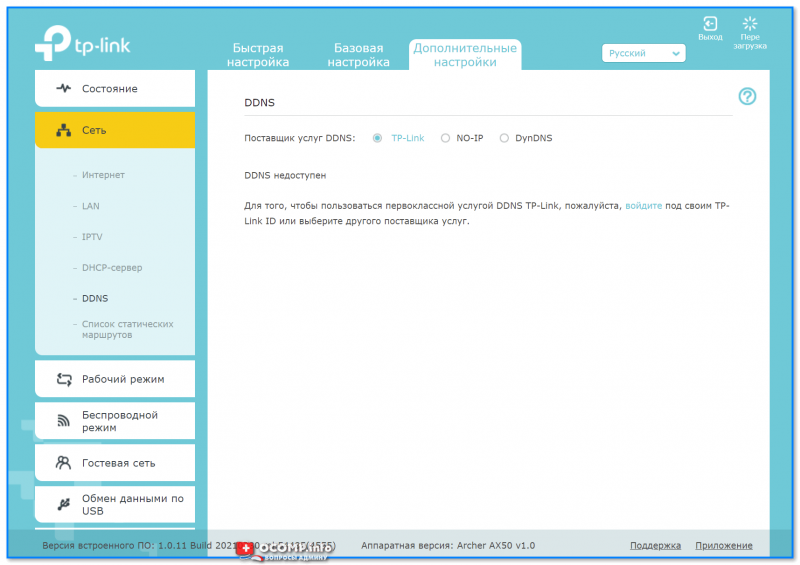
DDNS
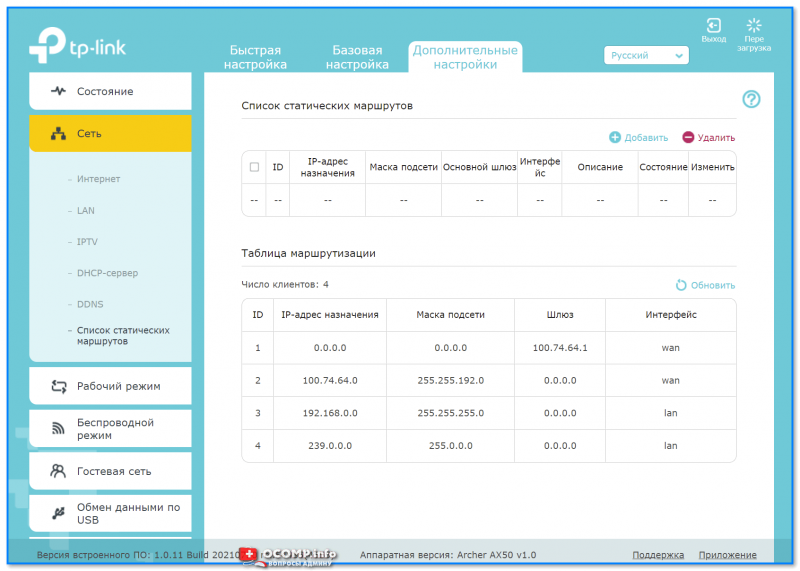
Список статических маршрутов
*
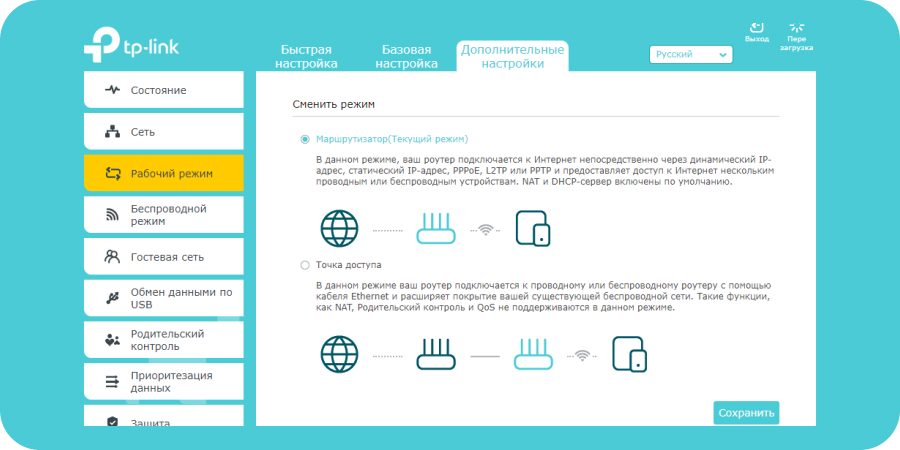
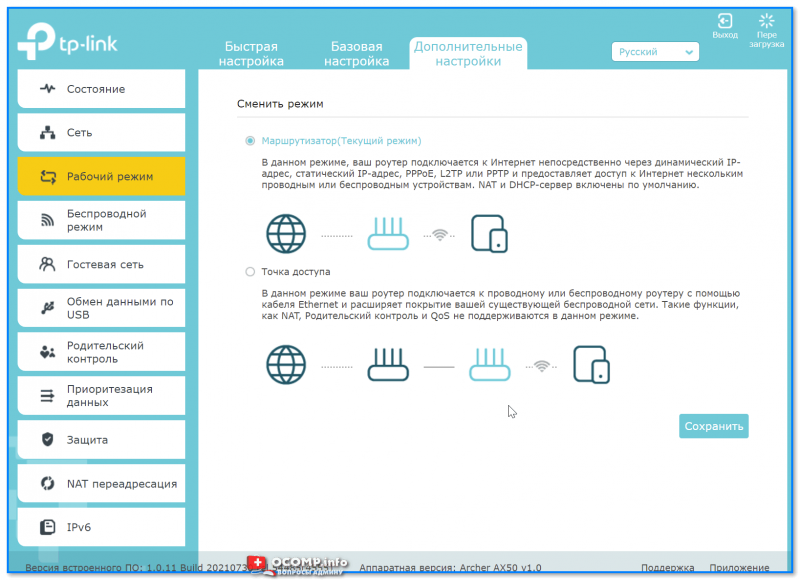
Вкладка «Рабочий режим»
Предназначена для переключения работы устройства с маршрутизатора в режим точки доступа (это может быть весьма удобно, если вам нужно расширить уже существующую Wi-Fi сеть).
Рабочий режим
*
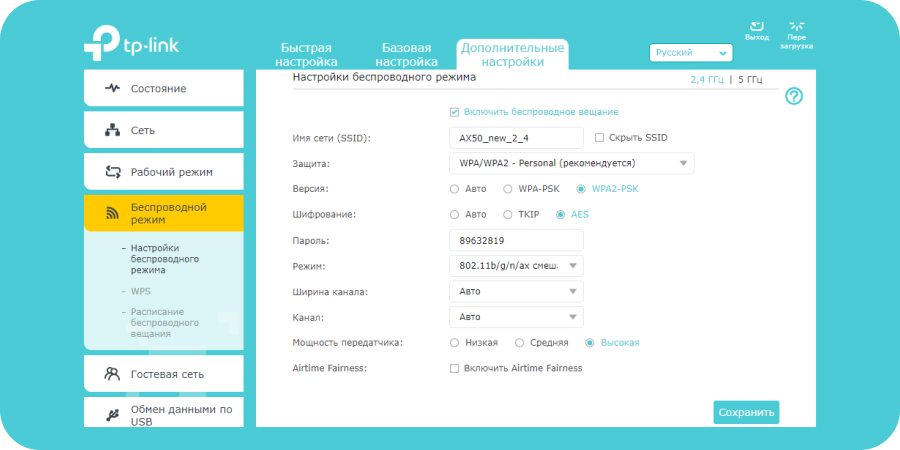
Вкладка «Беспроводной режим»
Настройка Wi-Fi сети: название, пароль, выбор канала и его ширины, уровень сигнала, расписание работы сети и т.д. (например, можно настроить работу роутера так, чтобы ночью он автоматически выключался, а днем — автоматически включался // без вашего участия 👌).
Настройки беспроводного режима

WPS
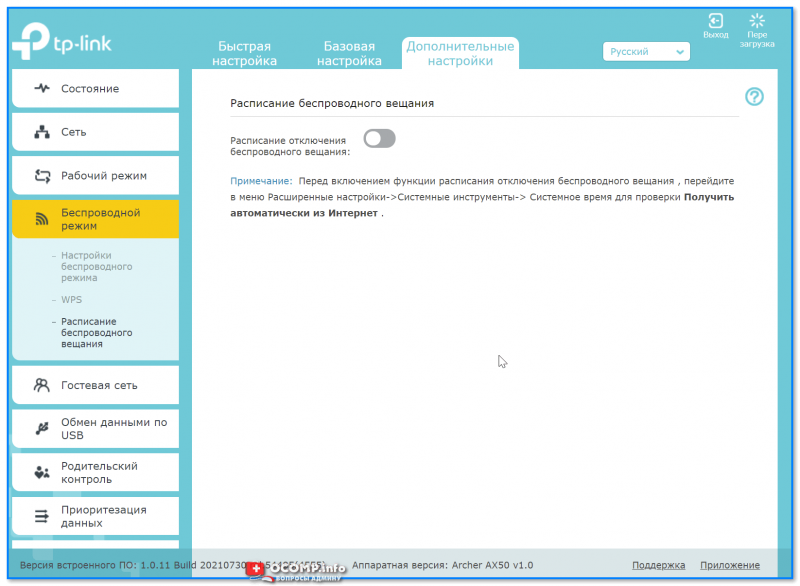
Расписание беспроводного вещания
*
Вкладка «Гостевая сеть»
Предназначена для создания доп. Wi-Fi сети, которая может использоваться для выхода в Интернет вашим гостям, посетителям, клиентам (в общем тем людям, которым вы хотите дать возможность выхода в Интернет, но при этом не доверяете доступ к своим ПК и ноутбукам, подключенным к основной сети. Прим.: при подключении к гостевой сети — нельзя увидеть устройства, подключенные к основной сети!).
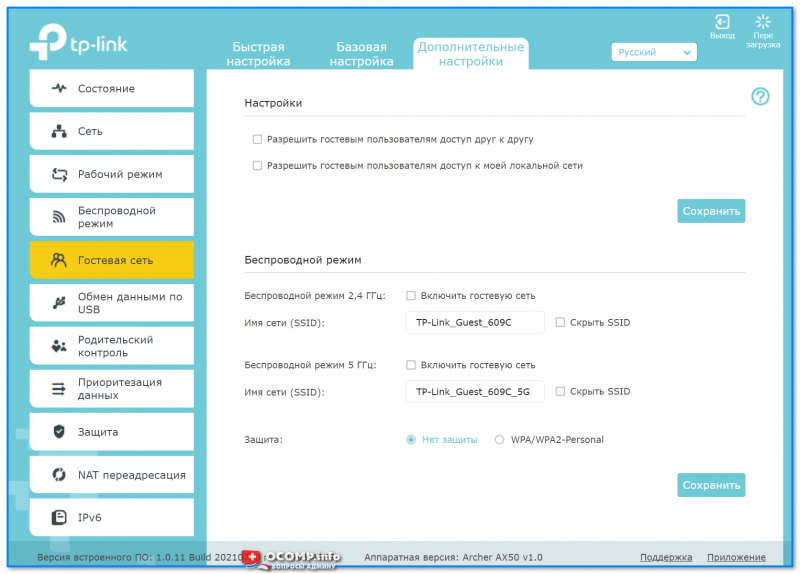
Гостевая сеть
*
Вкладка «Обмен данными по USB»
Позволяет создать FTP-сервер (общий диск) для всех пользователей, подключенных к вашему роутеру. Может быть весьма удобно, если у вас есть большой внешний диск, и вы хотите получить к нему доступ со всех домашних устройств.
Причем, есть опция для создания FTP-сервера с доступом по Интернету.
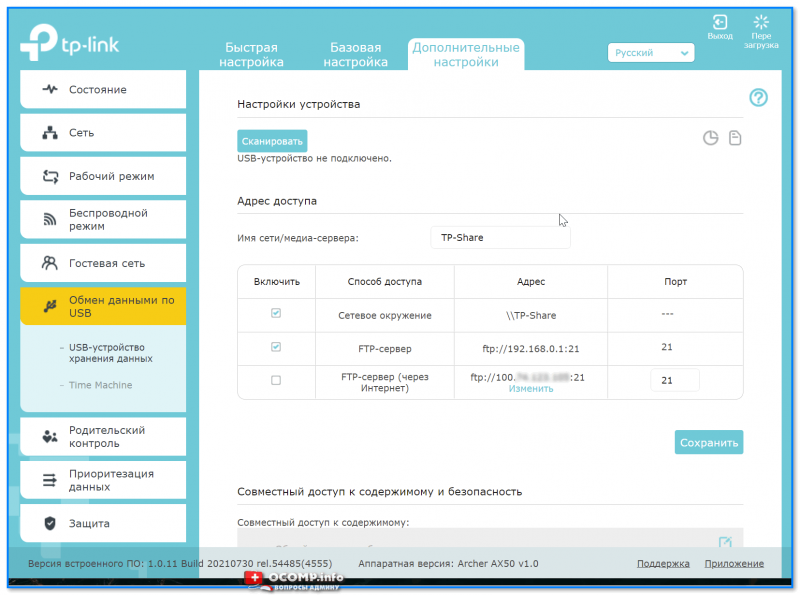
USB-устройство для хранения данных
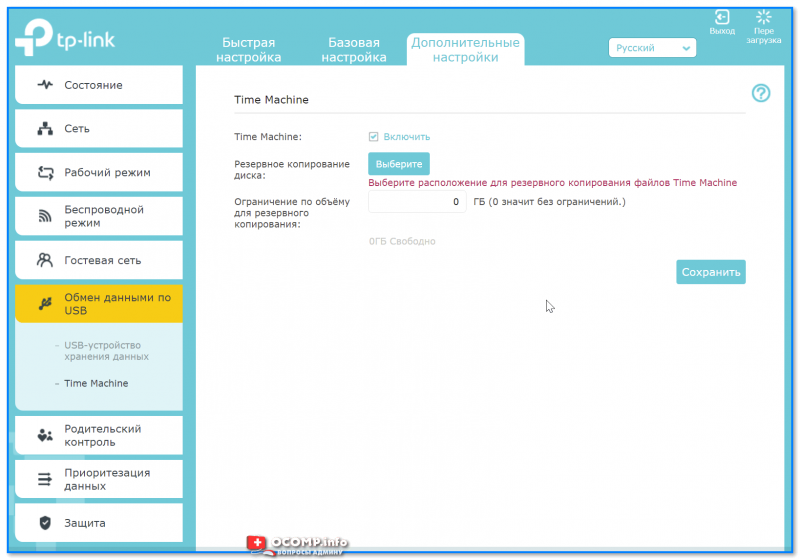
Time Machine
*
Вкладка «Родительский контроль»
Предназначена для ограничения доступа к Интернету. Например, можно запретить просматривать определенные группы сайтов (либо поставить ограничение по времени работы Интернета).
Обычно, используется для ограничения доступа «детского» ПК…
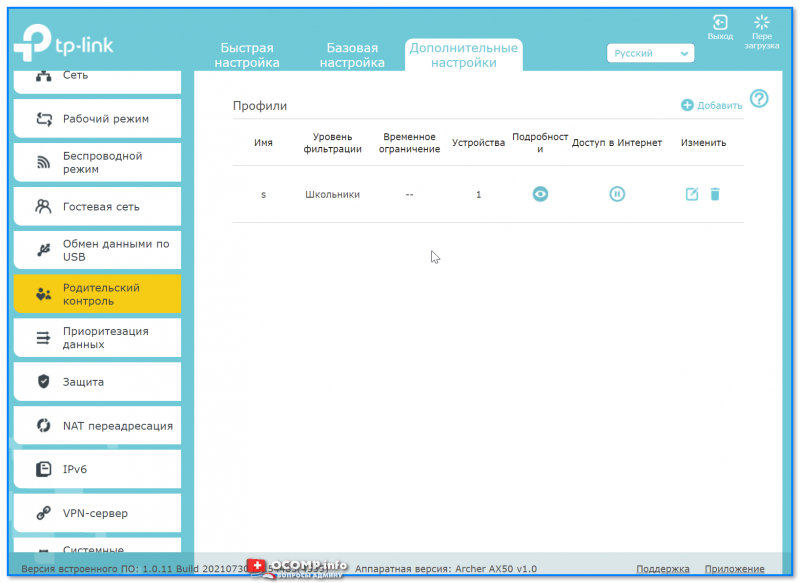
Родительский контроль
*
Вкладка «Приоритезация данных»
Эта вкладка позволяет ограничить скорость доступа определенных устройств (например, если у вас подключено 2 компьютера к сети — вы можете одному из них поставить ограничение: не более 5 Мбайт\с и тем самым, он не будет забивать весь канал связи…).
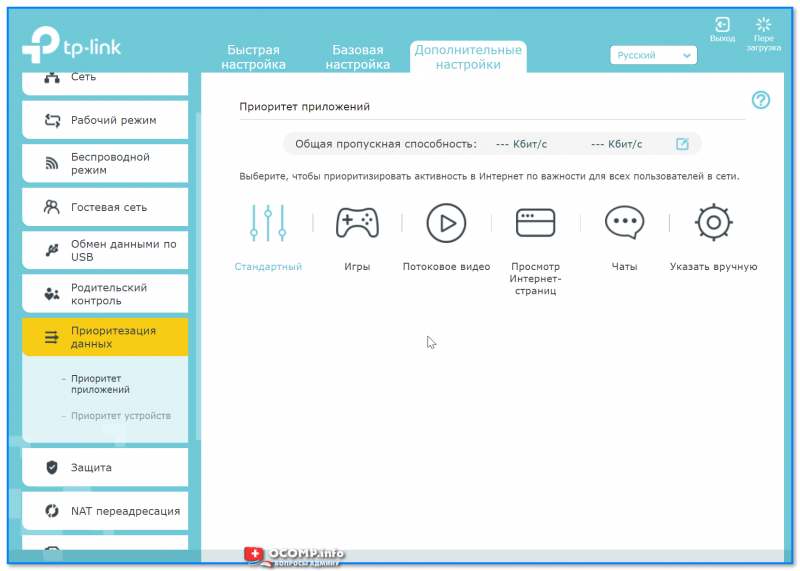
Приоритет приложений
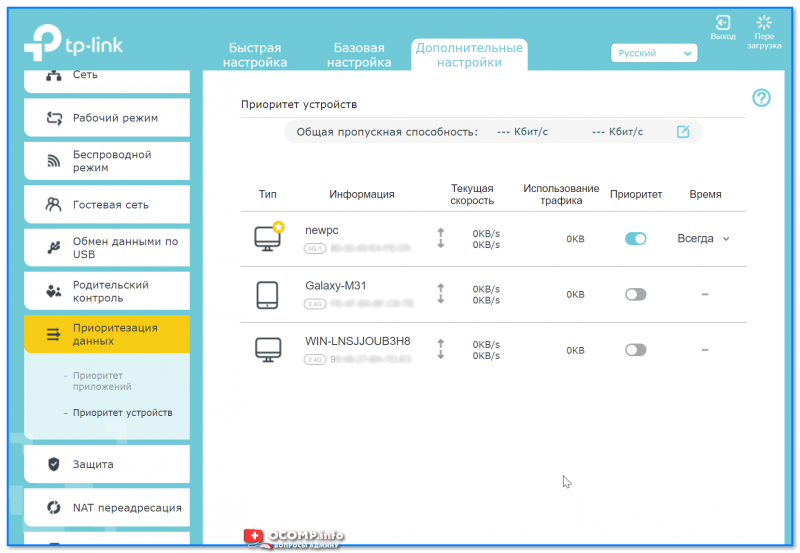
Приоритет устройств
*
Вкладка «Защита»
Предназначена для вкл. антивирусной проверки открываемых веб-страничек (Trend Micro), контроля доступа устройств (например, можно создать белый список устройств, которым разрешается подключаться к Wi-Fi сети, а всех остальных блокировать).
Также есть возможность «привязать» IP и MAC-адреса: т.е. сделать так, чтобы при каждом подключении компьютера к роутеру — ему выдавался один и тот же IP-адрес (это может быть нужно для проброски портов или для организации сетевых игр).
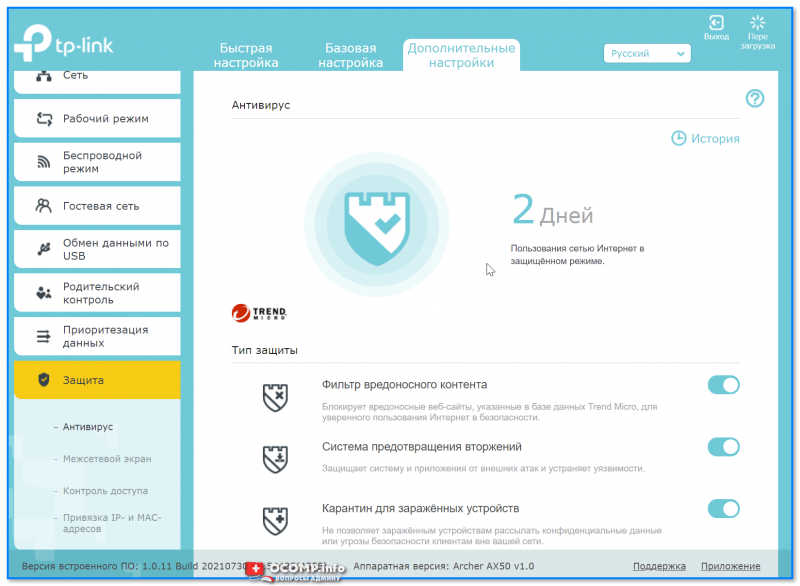
Антивирус
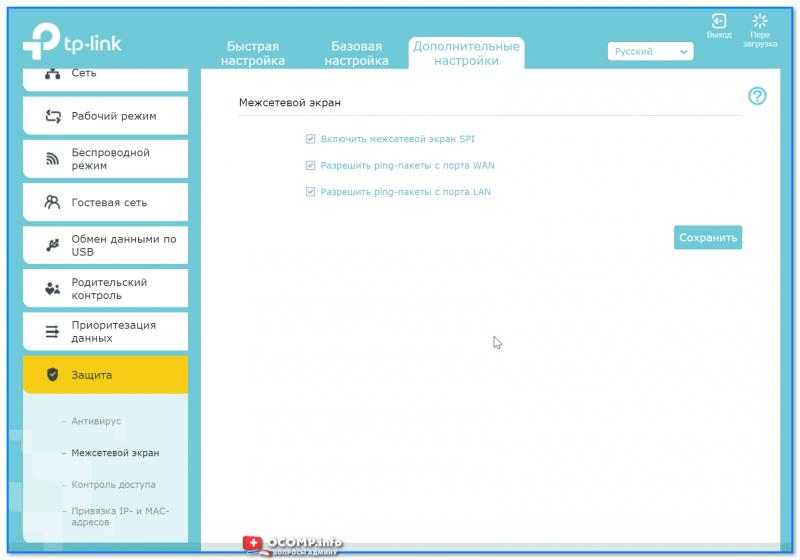
Межсетевой экран
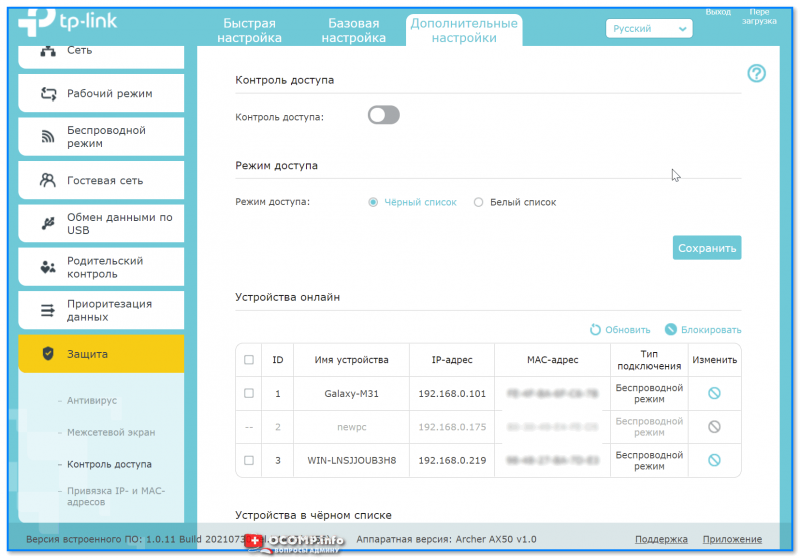
Контроль доступа
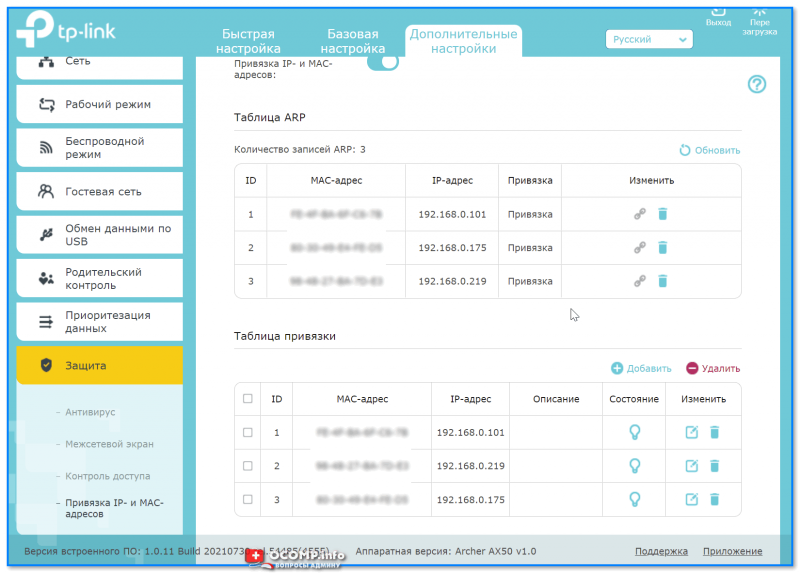
Привязка IP и MAC-адреса
*
Вкладка «NAT переадресация»
«Тонкая» настройка сети: можно создать виртуальный сервер (и разместить на нем сайт, например), пробросить порты, вкл. функцию DMZ-хост (полезна для игр, чтобы не пробрасывать «все подряд» порты) и пр.
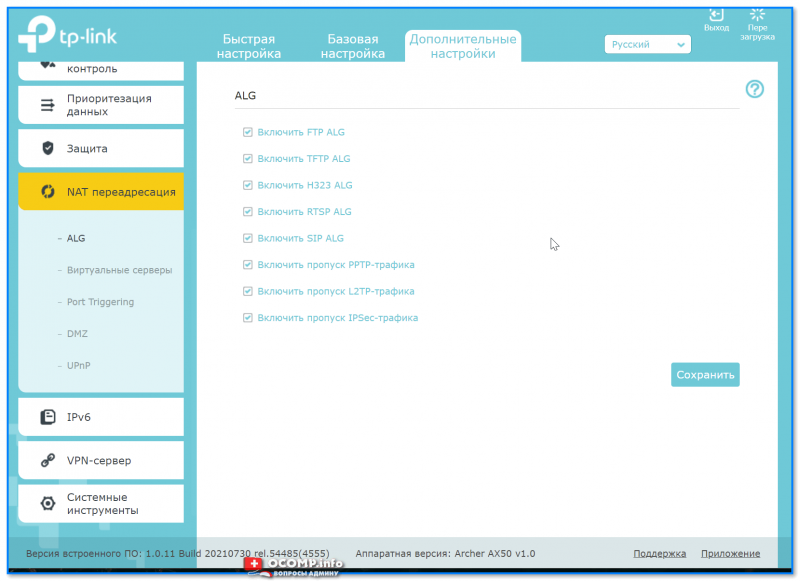
ALG
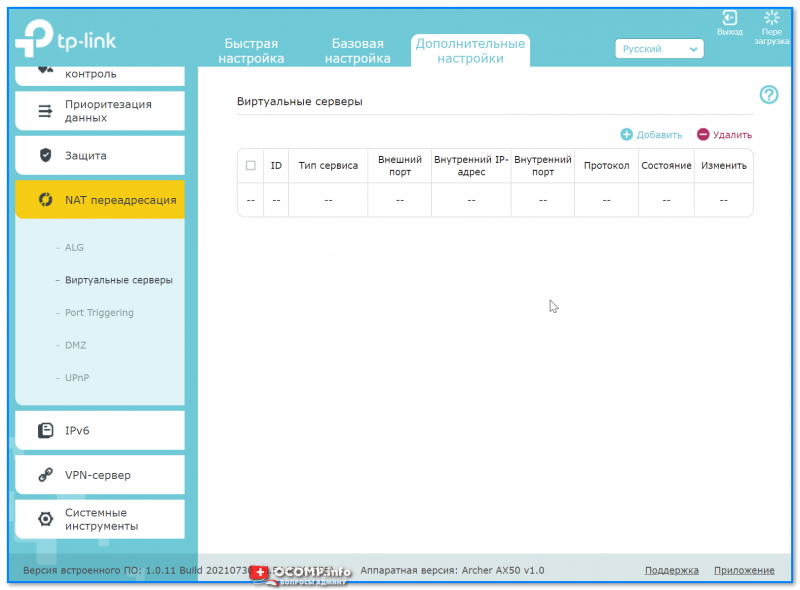
Виртуальные серверы

Port Triggering

DMZ
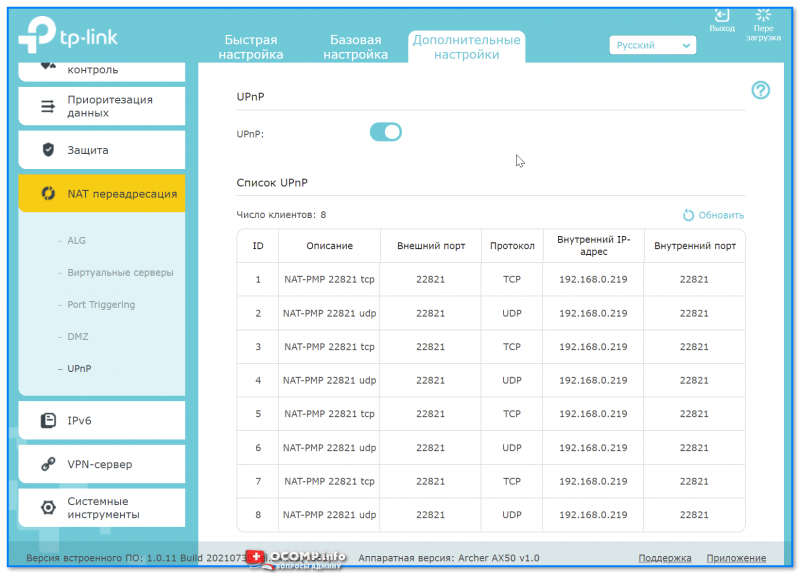
UPnP
*
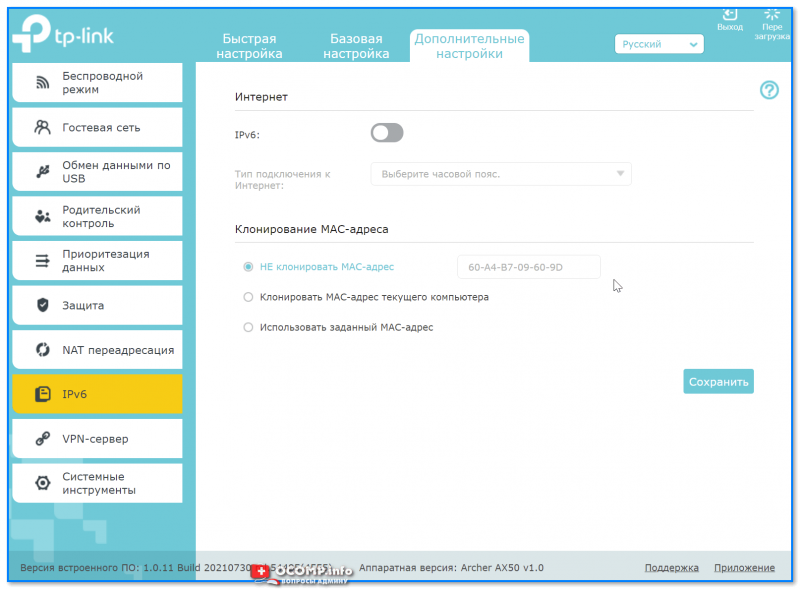
Вкладка «IPv6»
Включение и настройка протокола IPv6.
IPv6
*
Вкладка «VPN-сервер»
Предназначена для настройки VPN: причем, можно создать собственный сервер (чтобы к нему можно было подключиться издалека), так и настроить подключение к стороннему.
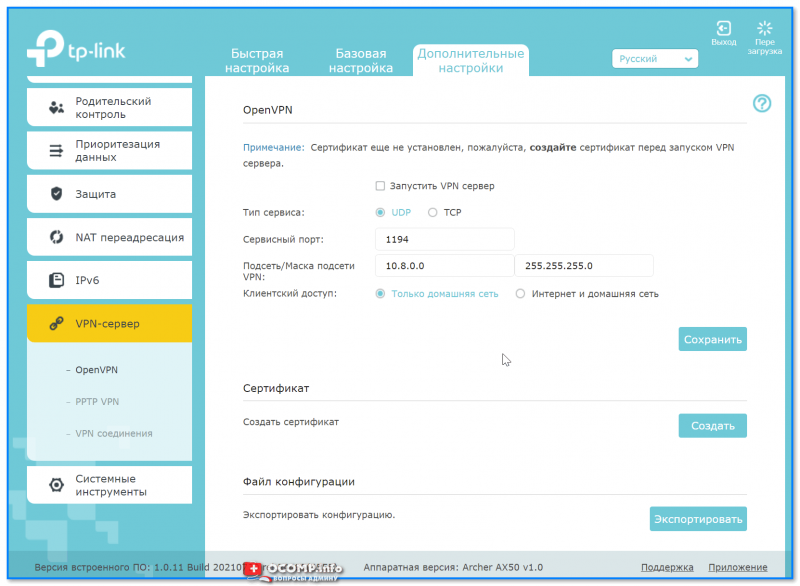
Open VPN

PPTP VPN
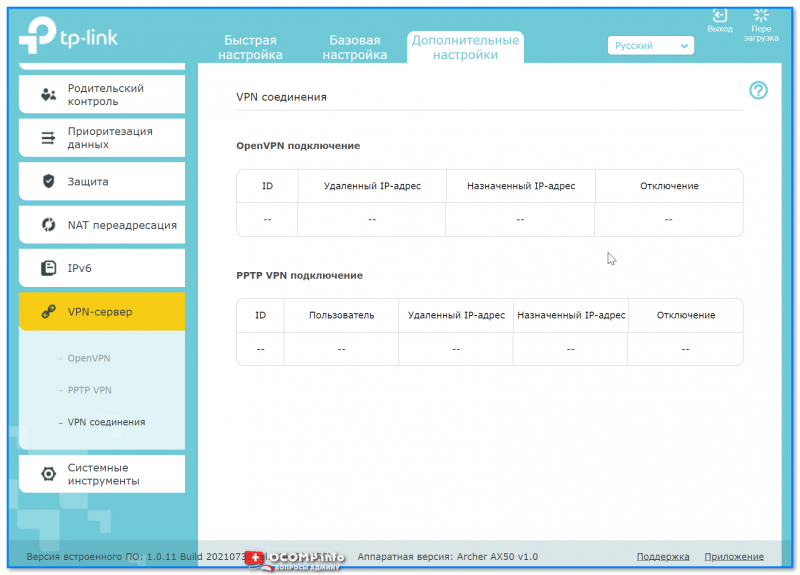
VPN соединения
*
Вкладка «Системные инструменты»
С помощью этой вкладки можно настроить системное время роутера, работу индикаторов, обновить прошивку, вкл. мониторинг трафика, проверить пинг, и др.
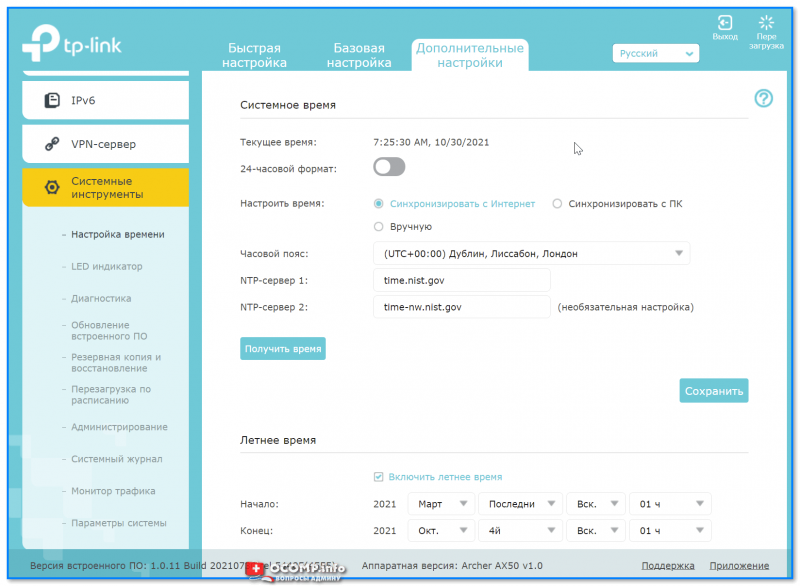
Настройка времени
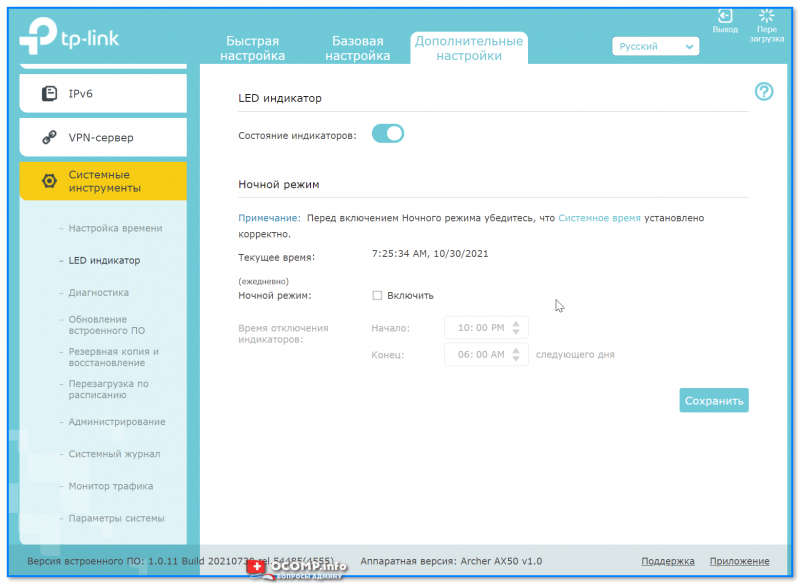
LED индикатор
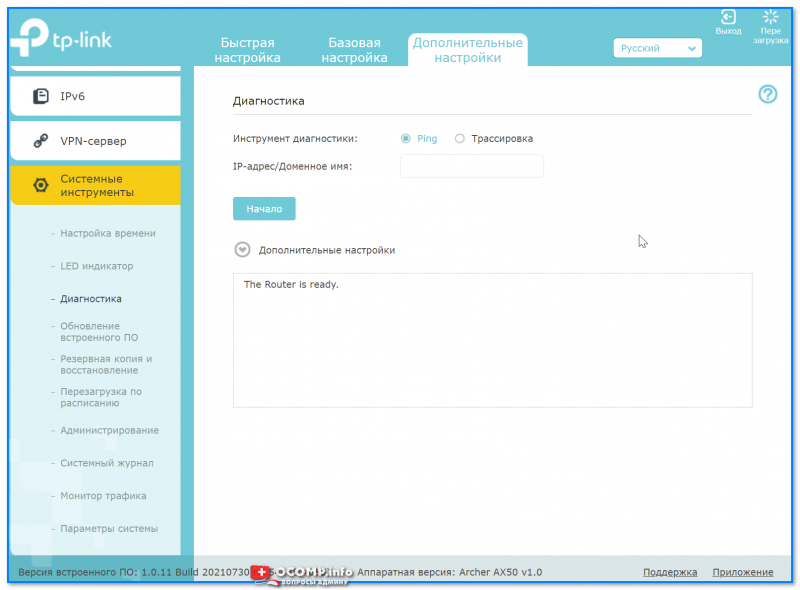
Диагностика

Монитор трафика
*
Дополнения по теме — приветствуются!
На сегодня пока все, успехов!
👋