
Manual

The information in this document is subject to change without notice and does not represent a
commitment on the part of Native Instruments GmbH. The software described by this document is subject to a License Agreement and may not be copied to other media. No part of this
publication may be copied, reproduced or otherwise transmitted or recorded, for any purpose,
without prior written permission by Native Instruments GmbH, hereinafter referred to as Native
Instruments.
“Native Instruments”, “NI” and associated logos are (registered) trademarks of Native Instruments GmbH.
Mac, Mac OS, GarageBand, Logic, iTunes and iPod are registered trademarks of Apple Inc.,
registered in the U.S. and other countries.
Windows, Windows Vista and DirectSound are registered trademarks of Microsoft Corporation
in the United States and/or other countries.
All other trade marks are the property of their respective owners and use of them does not imply any affiliation with or endorsement by them.
Document authored by: Native Instruments GmbH
Software version: 2.6.4 (09/2013)
Disclaimer
Special thanks to the Beta Test Team, who were invaluable not just in tracking down bugs, but
in making this a better product.
Germany
Native Instruments GmbH
Schlesische Str. 29-30
D-10997 Berlin
Germany
www.native-instruments.de
USA
Native Instruments North America, Inc.
6725 Sunset Boulevard
5th Floor
Los Angeles, CA 90028
USA
www.native-instruments.com
Japan
Native Instruments KK
YO Building 3F
Jingumae 6-7-15, Shibuya-ku,
Tokyo 150-0001
Japan
www.native-instruments.co.jp
Contact
© Native Instruments GmbH, 2013. All rights reserved.

Table of Contents
Table of Contents
1 Welcome to the World of TRAKTOR KONTROL S4! ………………………………………………..
1.1 What Is TRAKTOR KONTROL S4? …………………………………………………………………………………….. 11
1.2 The TRAKTOR KONTROL S4 Documentation ……………………………………………………………………… 11
1.3 System Requirements ………………………………………………………………………………………………….. 14
1.2.1 Where to Start ……………………………………………………………………………………………… 11
1.2.2 In This Manual …………………………………………………………………………………………….. 12
1.2.3 Manual Conventions …………………………………………………………………………………….. 13
2 TRAKTOR KONTROL S4 Overview ……………………………………………………………………..
3 Importing Your Music ……………………………………………………………………………………
3.1 What Is the Track Collection? ……………………………………………………………………………………….. 19
3.2 Importing Music Folders ………………………………………………………………………………………………. 20
3.3 Tracks Managed by iTunes …………………………………………………………………………………………… 21
3.3.1 Playing Tracks Managed by iTunes …………………………………………………………………. 21
3.3.2 Importing a Selection of Tracks from iTunes …………………………………………………….. 23
3.3.3 Importing iTunes Playlists …………………………………………………………………………….. 24
4 Tutorials …………………………………………………………………………………………………….
4.1 Playing Your First Track ……………………………………………………………………………………………….. 25
4.2 Mixing In a Second Track ……………………………………………………………………………………………… 30
4.1.1 Quick Loading a Track ………………………………………………………………………………….. 26
4.1.2 Playing the Track …………………………………………………………………………………………. 28
4.1.3 If You Don’t Hear the Track ……………………………………………………………………………. 29
4.2.1 Cueing a Second Track Directly from the Browser ……………………………………………… 31
4.2.2 Loading and Playing the Second Track ……………………………………………………………. 32
4.2.3 Using Headphones to Prepare the Mix …………………………………………………………….. 32
4.2.4 Synchronizing the Second Track …………………………………………………………………….. 33
4.2.5 Setting a Cue Point as Starting Point ……………………………………………………………… 34
11
16
19
25
Traktor Kontrol S4 — Manual — 4

Table of Contents
4.3 Adjusting Levels …………………………………………………………………………………………………………. 40
4.4 Looping and Cueing ……………………………………………………………………………………………………..44
4.5 Using Samples in Your Mix …………………………………………………………………………………………… 48
4.6 Adding FX ………………………………………………………………………………………………………………….. 55
4.7 Using the Loop Recorder ………………………………………………………………………………………………. 60
4.8 Synchronization ………………………………………………………………………………………………………….. 66
4.2.6 Interlude: In Case the Left Track Is Over ………………………………………………………….. 35
4.2.7 Mixing In the Track by Using the Channel EQ and Filter …………………………………….. 36
4.2.8 Doing Everything by Hand ……………………………………………………………………………… 37
4.3.1 The Theory ………………………………………………………………………………………………….. 40
4.3.2 The Practice ………………………………………………………………………………………………… 41
4.4.1 Playing with Loops ……………………………………………………………………………………….. 44
4.4.2 Using Hotcues …………………………………………………………………………………………….. 47
4.5.1 Loading a Sample from the Collection …………………………………………………………….. 50
4.5.2 Triggering the Sample ………………………………………………………………………………….. 51
4.5.3 Capturing a Sample from a Track Deck …………………………………………………………… 52
4.5.4 Unloading a Sample …………………………………………………………………………………….. 54
4.5.5 Getting More Controls over the Samples ………………………………………………………….. 54
4.6.1 Group Mode ………………………………………………………………………………………………… 56
4.6.2 Getting the FX Unit Ready ……………………………………………………………………………… 56
4.6.3 Assigning Decks to the FX Unit and Bringing In the FX ………………………………………. 57
4.6.4 Controlling the FX Unit …………………………………………………………………………………. 58
4.6.5 Single Mode ………………………………………………………………………………………………… 59
4.6.6 Storing a Snapshot ………………………………………………………………………………………. 60
4.7.1 Choosing a Source ……………………………………………………………………………………….. 62
4.7.2 Recording a Loop …………………………………………………………………………………………. 62
4.7.3 Overdubbing ……………………………………………………………………………………………….. 65
4.7.4 Further Uses of the Recorded Loop …………………………………………………………………. 65
Traktor Kontrol S4 — Manual — 5

Table of Contents
4.8.1 Introduction ………………………………………………………………………………………………… 66
4.8.2 Who’s the Master? ……………………………………………………………………………………….. 68
4.8.3 Other Useful Tools for Synching ……………………………………………………………………… 70
4.8.4 In Conclusion ………………………………………………………………………………………………. 72
5 Using the S4 with TRAKTOR DJ ………………………………………………………………………..
5.1 Key S4 Functions Using TRAKTOR DJ ………………………………………………………………………………. 73
5.2 Using the Transport Section ………………………………………………………………………………………… 83
5.3 Using FX …………………………………………………………………………………………………………………… 91
5.1.1 Browsing & Loading Tracks …………………………………………………………………………… 74
5.1.2 Quantize Functions ………………………………………………………………………………………. 75
5.1.3 Deck Volume Controls and Crossfader …………………………………………………………….. 75
5.1.4 Adjusting Channel Gain ………………………………………………………………………………… 76
5.1.5 Using EQs …………………………………………………………………………………………………… 77
5.1.6 Using the Filters ………………………………………………………………………………………….. 78
5.1.7 Headphone Cueing ………………………………………………………………………………………. 79
5.1.8 Deck Control ……………………………………………………………………………………………….. 81
5.2.1 PLAY buttons ………………………………………………………………………………………………. 84
5.2.2 CUE Buttons ……………………………………………………………………………………………….. 84
5.2.3 SYNC (MASTER) Buttons ……………………………………………………………………………….. 84
5.2.4 FLUX Buttons ………………………………………………………………………………………………. 85
5.2.5 Hotcue Buttons ……………………………………………………………………………………………. 86
5.2.6 Using Loops ………………………………………………………………………………………………… 87
5.2.7 Using the MOVE Encoders ……………………………………………………………………………… 89
5.3.1 Reveal a Deck’s Effect Display ………………………………………………………………………. 92
5.3.2 Using the S4’s FX Section ……………………………………………………………………………… 92
6 Hardware Reference ……………………………………………………………………………………..
6.1 Areas and Concepts ……………………………………………………………………………………………………..96
6.1.1 Decks …………………………………………………………………………………………………………. 96
73
96
Traktor Kontrol S4 — Manual — 6

Table of Contents
6.2 Types of Control Elements ……………………………………………………………………………………………. 104
6.3 The Decks ………………………………………………………………………………………………………………….. 108
6.4 The Mixer …………………………………………………………………………………………………………………… 131
6.1.2 Mixer ………………………………………………………………………………………………………….. 100
6.1.3 FX Units ……………………………………………………………………………………………………… 101
6.1.4 Loop Recorder ……………………………………………………………………………………………… 102
6.1.5 Front and Rear Panels ………………………………………………………………………………….. 104
6.2.1 Buttons ………………………………………………………………………………………………………. 104
6.2.2 Knobs ………………………………………………………………………………………………………… 105
6.2.3 Encoders …………………………………………………………………………………………………….. 105
6.2.4 Jog Wheels ………………………………………………………………………………………………….. 106
6.2.5 Faders ……………………………………………………………………………………………………….. 107
6.2.6 Displays, Meters and Indicators …………………………………………………………………….. 107
6.2.7 Switches …………………………………………………………………………………………………….. 108
6.2.8 Sockets ………………………………………………………………………………………………………. 108
6.3.1 Deck Flavors and Structure ……………………………………………………………………………. 109
6.3.2 SHIFT Buttons: Accessing Secondary Functions ………………………………………………… 110
6.3.3 Deck Assign Buttons: Switching Deck Focus …………………………………………………….. 111
6.3.4 Deck Display: Informed at a Glance ………………………………………………………………… 112
6.3.5 LOAD Button ……………………………………………………………………………………………….. 113
6.3.6 Jog Wheel ……………………………………………………………………………………………………. 114
6.3.7 Tempo Fader ………………………………………………………………………………………………. 115
6.3.8 Loop Section ……………………………………………………………………………………………….. 117
6.3.9 REMIX SLOTS Buttons …………………………………………………………………………………… 120
6.3.10 Hotcue Buttons ……………………………………………………………………………………………. 124
6.3.11 PLAY and CUE Buttons …………………………………………………………………………………. 128
6.3.12 SYNC Button ……………………………………………………………………………………………….. 129
6.3.13 SHIFT Button ……………………………………………………………………………………………….. 130
Traktor Kontrol S4 — Manual — 7

Table of Contents
6.5 The FX Units ………………………………………………………………………………………………………………. 143
6.6 The Loop Recorder ………………………………………………………………………………………………………. 145
6.7 Browsing, Loading and Copying ……………………………………………………………………………………. 148
6.8 The Rear Panel …………………………………………………………………………………………………………… 152
6.9 The Front Panel ……………………………………………………………………………………………………………156
6.10 TRAKTOR KONTROL S4 Modes ……………………………………………………………………………………….. 157
6.4.1 Mixer Overview …………………………………………………………………………………………….. 132
6.4.2 The Main Section …………………………………………………………………………………………. 132
6.4.3 The Channels and the Crossfader …………………………………………………………………… 133
6.4.4 The Master Display ………………………………………………………………………………………. 139
6.4.5 The BROWSE Encoder ………………………………………………………………………………….. 143
6.5.1 Single Mode and Group Mode ………………………………………………………………………… 144
6.5.2 FX Unit Reference ………………………………………………………………………………………… 144
6.6.1 DRY/WET Knob …………………………………………………………………………………………….. 146
6.6.2 SIZE Button ………………………………………………………………………………………………… 146
6.6.3 REC Button …………………………………………………………………………………………………. 147
6.6.4 UNDO Button ………………………………………………………………………………………………. 147
6.6.5 PLAY Button ………………………………………………………………………………………………… 148
6.6.6 Copying and Saving the Recorded Loop …………………………………………………………… 148
6.7.1 Browsing Tracks and Samples ……………………………………………………………………….. 149
6.7.2 Copying across the S4 ………………………………………………………………………………….. 151
6.8.1 MAIN OUT Section ………………………………………………………………………………………… 153
6.8.2 INPUT CHANNEL B Section …………………………………………………………………………….. 154
6.8.3 MIC Section ………………………………………………………………………………………………… 155
6.8.4 INPUT CHANNEL A Section …………………………………………………………………………….. 155
6.8.5 POWER Section ……………………………………………………………………………………………. 155
6.10.1 Native Traktor Mode ……………………………………………………………………………………… 157
6.10.2 MIDI Mode …………………………………………………………………………………………………… 158
Traktor Kontrol S4 — Manual — 8

Table of Contents
7 Customizing TRAKTOR KONTROL S4 ………………………………………………………………….
7.1 The Preferences Window ………………………………………………………………………………………………. 160
7.2 Settings and Preferences for the S4 Control Elements ………………………………………………………. 161
7.3 S4 Control Options ……………………………………………………………………………………………………….163
7.4 Other Settings of Interest …………………………………………………………………………………………….. 169
7.5 The Setup Wizard ………………………………………………………………………………………………………… 174
7.3.1 Restore Default ……………………………………………………………………………………………. 168
7.3.2 Calibration …………………………………………………………………………………………………. 169
7.4.1 Switching the Deck Flavors ……………………………………………………………………………. 170
7.4.2 Adjusting the Input Routing ………………………………………………………………………….. 170
7.4.3 Using Four FX Units ……………………………………………………………………………………… 173
8 The S4 Audio Interface and Control Panel ………………………………………………………….
8.1 Settings on Mac OS X ………………………………………………………………………………………………….. 177
8.2 Settings on Windows: The Control Panel …………………………………………………………………………. 178
8.3 Using the S4 Audio Interface with Other Music Applications ……………………………………………… 183
8.4 Using the S4 as your Default Audio Interface ………………………………………………………………….. 184
8.2.1 Opening the Control Panel …………………………………………………………………………….. 178
8.2.2 Audio Settings Page …………………………………………………………………………………….. 179
8.2.3 Diagnostics Page …………………………………………………………………………………………. 182
8.4.1 Windows ……………………………………………………………………………………………………. 184
8.4.2 Mac OS X ……………………………………………………………………………………………………. 184
9 Troubleshooting and Help ………………………………………………………………………………
9.1 TRAKTOR Won’t Start …………………………………………………………………………………………………… 185
9.2 Hardware-related Problems ………………………………………………………………………………………….. 185
9.2.1 Basics ……………………………………………………………………………………………………….. 185
9.2.2 USB and Driver Issues ………………………………………………………………………………….. 186
9.2.3 Update the Driver ………………………………………………………………………………………… 187
9.2.4 USB-related Power Issues ……………………………………………………………………………… 187
160
177
185
Traktor Kontrol S4 — Manual — 9

Table of Contents
9.3 Loose Jog Wheel Top Plate ……………………………………………………………………………………………. 188
9.4 TRAKTOR Crashes ……………………………………………………………………………………………………….. 189
9.5 Getting Help ………………………………………………………………………………………………………………. 189
9.6 Updates …………………………………………………………………………………………………………………….. 190
9.2.5 Using the TRAKTOR KONTROL S4 with a Laptop ………………………………………………… 188
9.5.1 Knowledge Base / Readme / Online Support …………………………………………………….. 189
9.5.2 Forum ………………………………………………………………………………………………………… 190
10 Appendix A – Common Setups …………………………………………………………………………
10.1 TRAKTOR KONTROL S4 Basic Setup ……………………………………………………………………………….. 191
10.2 Adding a Microphone …………………………………………………………………………………………………… 198
10.3 Using a Master Mixer …………………………………………………………………………………………………… 201
10.4 TRAKTOR KONTROL S4 with Turntables or CD Decks …………………………………………………………. 201
11 Appendix B – Technical Information …………………………………………………………………
11.1 Technical Specifications ………………………………………………………………………………………………. 205
12 Appendix C – Quick References ……………………………………………………………………….
12.1 Track Deck Quick Reference ………………………………………………………………………………………….. 209
12.2 Remix Deck Quick Reference …………………………………………………………………………………………. 212
12.3 Mixer Quick Reference …………………………………………………………………………………………………. 216
12.4 FX Unit Quick Reference ………………………………………………………………………………………………. 218
12.5 Loop Recorder Quick Reference ……………………………………………………………………………………… 219
12.6 Browsing, Loading and Copying Quick Reference …………………………………………………………….. 220
12.3.1 Main Section Quick Reference ……………………………………………………………………….. 216
12.3.2 Channel and Crossfader Quick Reference ………………………………………………………… 217
12.3.3 Master Display Quick Reference …………………………………………………………………….. 218
Index …………………………………………………………………………………………………………
191
205
209
221
Traktor Kontrol S4 — Manual — 10

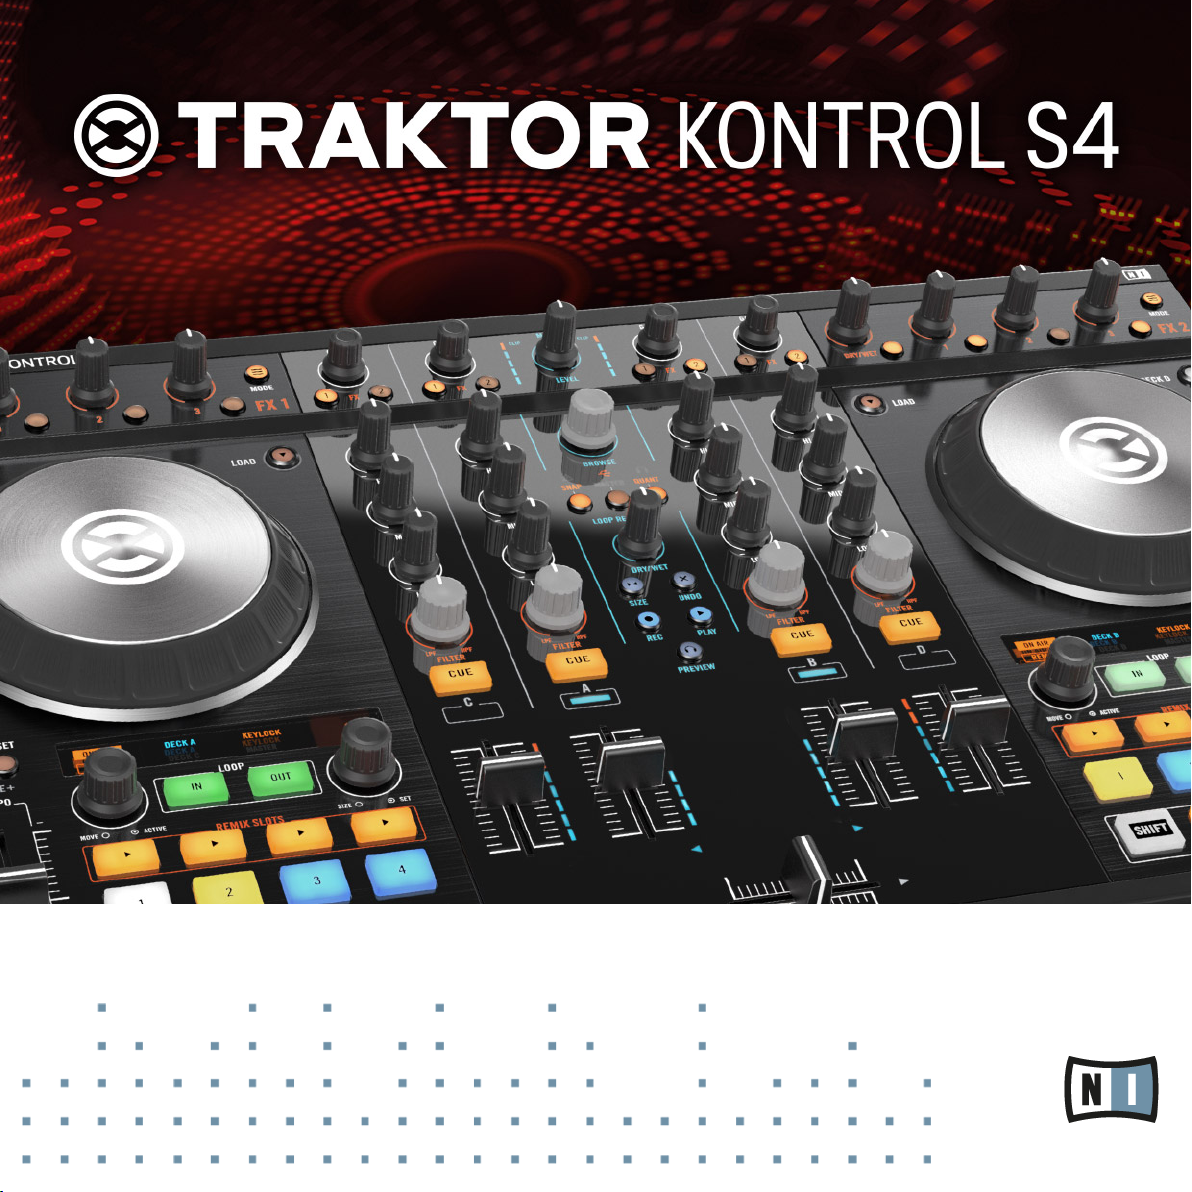
Welcome to the World of TRAKTOR KONTROL S4!
What Is TRAKTOR KONTROL S4?
1 Welcome to the World of TRAKTOR KONTROL S4!
We are delighted that you have chosen TRAKTOR KONTROL S4!
1.1 What Is TRAKTOR KONTROL S4?
TRAKTOR KONTROL S4 is a fully integrated hardware and software DJ performance system
created by the makers of TRAKTOR. TRAKTOR KONTROL S4 fuses the full-featured TRAKTOR KONTROL S4 hardware controller with the state-of-the-art TRAKTOR software.
The all-in-one TRAKTOR KONTROL S4 controller offers you an ergonomic DJ mixer, a built-in
24-bit/96 kHz audio interface, and a high-resolution control surface perfectly tailored for
TRAKTOR. All controls needed for live performances now are at your fingertips!
— The TRAKTOR team at Native Instruments.
1.2 The TRAKTOR KONTROL S4 Documentation
1.2.1 Where to Start
TRAKTOR KONTROL S4 provides you with many information sources. The main sources are
meant to be read in the following sequence:
▪ Setup Guide
▪ TRAKTOR KONTROL S4 Manual (this document) and
▪ TRAKTOR 2 Getting Started Guide
Your First Stop: the Setup Guide
This will guide you through the software and hardware installation of your TRAKTOR KONTROL S4 system, from the very beginning to the first sound coming through your speakers.
This should be your first stop in learning TRAKTOR KONTROL S4.
Traktor Kontrol S4 — Manual — 11

Welcome to the World of TRAKTOR KONTROL S4!
The TRAKTOR KONTROL S4 Documentation
First read the Setup Guide. Then proceed with this TRAKTOR KONTROL S4 Manual to get
more familiar with TRAKTOR KONTROL S4!
TRAKTOR KONTROL S4 Manual
After having read the Setup Guide and followed its instructions, your TRAKTOR KONTROL S4
system should be up and running. The next step is to read this TRAKTOR KONTROL S4 Manual. The TRAKTOR KONTROL S4 Manual first gives you a practical approach to TRAKTOR KONTROL S4. Then, it provides you with a detailed reference of your TRAKTOR KONTROL S4 hardware controller along with extra information (solving common issues, specifications, etc.). The next section will give you an overview of the manual content.
TRAKTOR PRO Getting Started Guide
The Getting Started guide gives you a practical approach to the TRAKTOR software. Here you
will learn about additional features of TRAKTOR that extend beyond the TRAKTOR KONTROL S4 controller.
TRAKTOR 2 Manual
For in-depth information on all features provided by the TRAKTOR software, please refer to the
TRAKTOR 2 Manual. It is available as a PDF file in the Documentation subfolder of the TRAK-
TOR 2 installation folder.
1.2.2
In This Manual
What you are reading now is the TRAKTOR KONTROL S4 Manual. This manual is structured as
follows:
▪ The first part is this introduction.
▪ Chapter ↑2, TRAKTOR KONTROL S4 Overview quickly introduces you to the TRAK-
TOR KONTROL S4 user interface and its main areas, both on the hardware side and software side.
▪ Chapter ↑3, Importing Your Music shows you how to import your own music into the pow-
erful Track Collection of TRAKTOR, so that you can use all TRAKTOR KONTROL S4 features with your own tracks.
Traktor Kontrol S4 — Manual — 12

Welcome to the World of TRAKTOR KONTROL S4!
The TRAKTOR KONTROL S4 Documentation
▪ Chapter ↑4, Tutorials is a selection of tutorials focused on your controller. They will let
you progressively discover how to use the various tools provided by TRAKTOR KONTROL S4. These practical examples will simplify the learning process and get you quickly
started with computer-based DJing.
▪ Chapter ↑5, Using the S4 with TRAKTOR DJ is a concise overview of using the S4 with
TRAKTOR DJ on an iOS device.
▪ Chapter ↑6, Hardware Reference is an extensive reference of all hardware control ele-
ments to be found on your TRAKTOR KONTROL S4 hardware controller. Whenever you
are unsure about the functionality of a particular control element, you will find here all
the necessary information.
▪ Chapter ↑7, Customizing TRAKTOR KONTROL S4 shows you how to customize TRAK-
TOR KONTROL S4 in order to make it fit your particular needs.
▪ Chapter ↑8, The S4 Audio Interface and Control Panel describes the on-board audio inter-
face of the TRAKTOR KONTROL S4 hardware controller.
▪ Chapter ↑9, Troubleshooting and Help provides you with a list of most common problems
and their solutions, along with info on how to get help.
▪ Finally, three appendixes provide you with useful additional information:
◦ Appendix A shows you how to integrate TRAKTOR KONTROL S4 to your studio or live
setup in various configurations.
◦ Appendix B gives you the technical specifications of the TRAKTOR KONTROL S4 con-
troller.
◦ Appendix C provides you with Quick Reference tables for all control elements on your
controller. Should you have any doubt about a particular control element, you will find
here a useful reminder!
1.2.3
Manual Conventions
This section introduces you to the signage and text highlighting used in this manual. This manual uses particular formatting to point out special facts and to warn you of potential issues.
The icons introducing these notes let you see what kind of information is to be expected:
Whenever this exclamation mark icon appears, you should read the corresponding note carefully and follow the instructions and hints given there if applicable.
Traktor Kontrol S4 — Manual — 13
Welcome to the World of TRAKTOR KONTROL S4!
System Requirements
This light bulb icon indicates that a note contains useful extra information. This information may often help you to solve a task more efficiently, but does not necessarily apply to
the setup or operating system you are using; however, it’s always worth a look.
Furthermore, the following formatting is used:
▪ Text appearing in (drop-down) menus (such as Open…, Save as… etc.) and paths to loca-
tions on your hard drive or other storage devices is printed in italics.
▪ Text appearing elsewhere (labels of buttons, controls, text next to checkboxes etc.) is
printed in blue. Whenever you see this formatting applied, you will find the same text appearing somewhere on the screen.
▪ Text referring to elements printed on hardware is formatted orange. Whenever you see this
formatting applied, you will find the same text appearing on the hardware.
▪ Important names and concepts are printed in bold.
Single instructions are introduced by this play button type arrow.
►
Results of actions are introduced by this smaller arrow.
→
Pet Names for Software and Hardware
Throughout the documentation, we will refer to the TRAKTOR KONTROL S4 hardware controller either as “TRAKTOR KONTROL S4” or simply “S4.”
Likewise, the TRAKTOR software will often be referred as “TRAKTOR PRO” or simply “TRAKTOR.”
Hence, a sentence like “TRAKTOR KONTROL S4 is a highly integrated DJ system allowing you
to control TRAKTOR from your S4” shouldn’t sound weird to you.
1.3 System Requirements
For the minimum system requirements your computer needs to meet, see the TRAKTOR specifications section of the Native Instruments website:
http://www.native-instruments.com/en/products/traktor/dj-software/traktor-pro-2/specifications/
Traktor Kontrol S4 — Manual — 14

Welcome to the World of TRAKTOR KONTROL S4!
System Requirements
To check the compatibility with several operating systems, please have a look at: http://
www.native-instruments.com/compatibility
Traktor Kontrol S4 — Manual — 15
TRAKTOR KONTROL S4 Overview
2 TRAKTOR KONTROL S4 Overview
This mini-chapter will quickly introduce you to TRAKTOR KONTROL S4’s main areas and concepts, both on your TRAKTOR KONTROL S4 hardware controller and in the TRAKTOR software.
Take the time to read these few pages, as they will familiarize you with the way TRAKTOR KONTROL S4 works and let you catch sight of the power of its design. If you’re familiar with importing music files in TRAKTOR, you can skip ↑3, Importing Your Music and start
right away with the tutorials in chapter ↑4, Tutorials after having read this chapter.
Traktor Kontrol S4 — Manual — 16
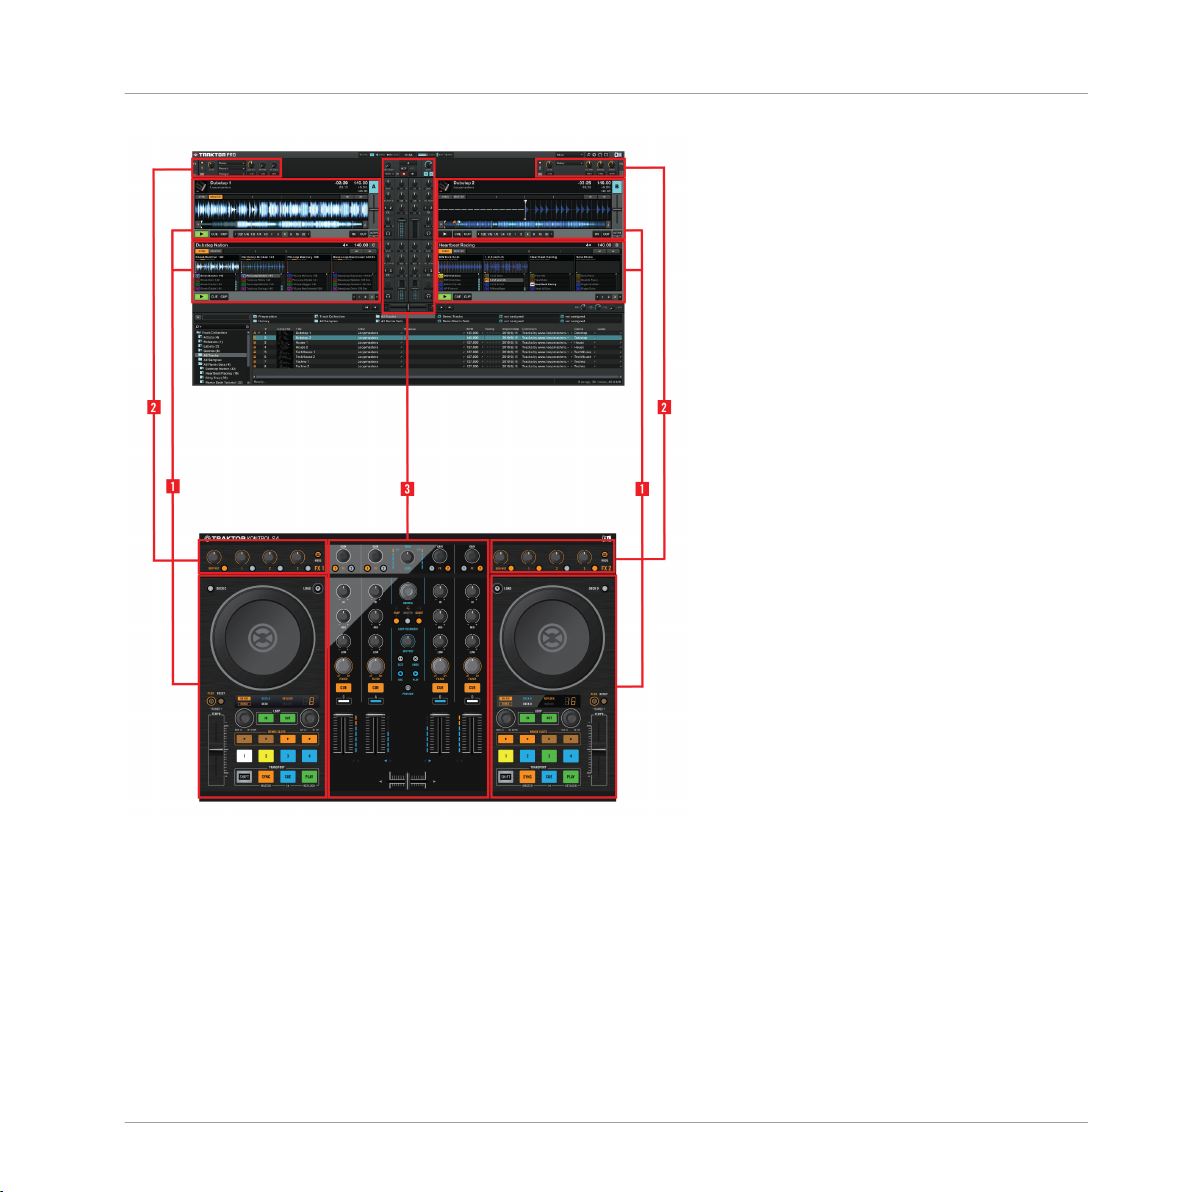
TRAKTOR KONTROL S4 Overview
Hardware controller and software side by side.
▪ (1) Decks: TRAKTOR KONTROL S4 provides you with four virtual Decks. The Decks are
the place where tracks, Samples and live input are played back. The Decks can be seen
as the virtual equivalent to the good old vinyl or CD decks—just with a bunch of powerful
additional features and the flexibility of a computer-based system. The two Decks on your
S4 hardware controller allow you to control the four software Decks (labeled A, B, C and
D) available in TRAKTOR: The left Deck on your S4 can control Decks A and C in the software. The right Deck on your S4 can control Decks B and D in the software.
Traktor Kontrol S4 — Manual — 17
TRAKTOR KONTROL S4 Overview
▪ (2) FX Units: The signals coming from the Decks can be further processed by two FX Units
located at the top of your hardware and software interface. You can even activate two additional FX Units in the software, allowing you to process each Deck individually. The FX
Units give you access to the whole collection of high-quality FX included in TRAKTOR:
The left FX Unit on your S4 can control the left FX Unit(s) in the software. The right FX Unit
on your S4 can control the right FX Unit(s) in the software.
▪ (3) Mixer: Sitting in the middle of your TRAKTOR KONTROL S4 controller and of TRAK-
TOR’s window, the Mixer receives on its four channels the audio signals coming from the
four Decks described above. There is one channel for each Deck. As any DJ mixer, the
Mixer’s purpose basically is to adjust the relative level of each channel, to control the
channels’ frequency content, possibly feeding them into the FX Units before sending the
overall result to the Main section at its top — and in the end, to generate the mix that is
sent to your audience.
You will find a more detailed presentation at the beginning of chapter ↑6, Hardware Refer-
ence, followed by a thorough description of each control element to be found on your
TRAKTOR KONTROL S4 controller. For an in-depth explanation of each and every function
provided by the TRAKTOR software, please refer to the separate TRAKTOR 2 Manual. It is
available as a PDF file in the Documentation subfolder of the TRAKTOR 2 installation folder.
Traktor Kontrol S4 — Manual — 18

Importing Your Music
What Is the Track Collection?
3 Importing Your Music
Most likely you already have a collection of music files on your computer. For those of you who
can’t wait for mixing their own tracks, this chapter is for you! You will learn here how to quickly
import your music into the powerful Track Collection of TRAKTOR.
If you prefer to start learning how to use TRAKTOR KONTROL S4 right away, skip this chapter
and go on with the tutorials in chapter ↑4, Tutorials, which make use of the demo tracks provided with TRAKTOR KONTROL S4. You can always come back here at a later point.
3.1 What Is the Track Collection?
The Track Collection (or simply “Collection”) represents the whole music that you have used,
that you are using or that you plan to use in TRAKTOR.
Based on the music files on your computer, the Track Collection is just another way to display
them. The Collection makes it easy to organize, tag, and prepare your tracks for being integrated into your mix.
Worth to note is that the Track Collection doesn’t care about the actual file structure on your
hard disk, nor will it alter this structure in any way (as long as you don’t delete your files from
within TRAKTOR).
The Track Collection is:
▪ A database storing information about your music files.
▪ A convenient way to represent and search your music files, according to many of their
characteristics (tags) like title, artist name, BPM, genre, length, etc.
▪ The place where TRAKTOR-specific information about your tracks is stored.
▪ The basis on which you can create your Playlists.
The Track Collection is not:
▪ Moving, copying nor converting any audio file to some hidden location.
▪ Modifying in any way the hierarchic structure of your files on your hard disk.
Traktor Kontrol S4 — Manual — 19
Importing Your Music
Importing Music Folders
To make use of the Track Collection, you have to populate it by importing your music files.
3.2 Importing Music Folders
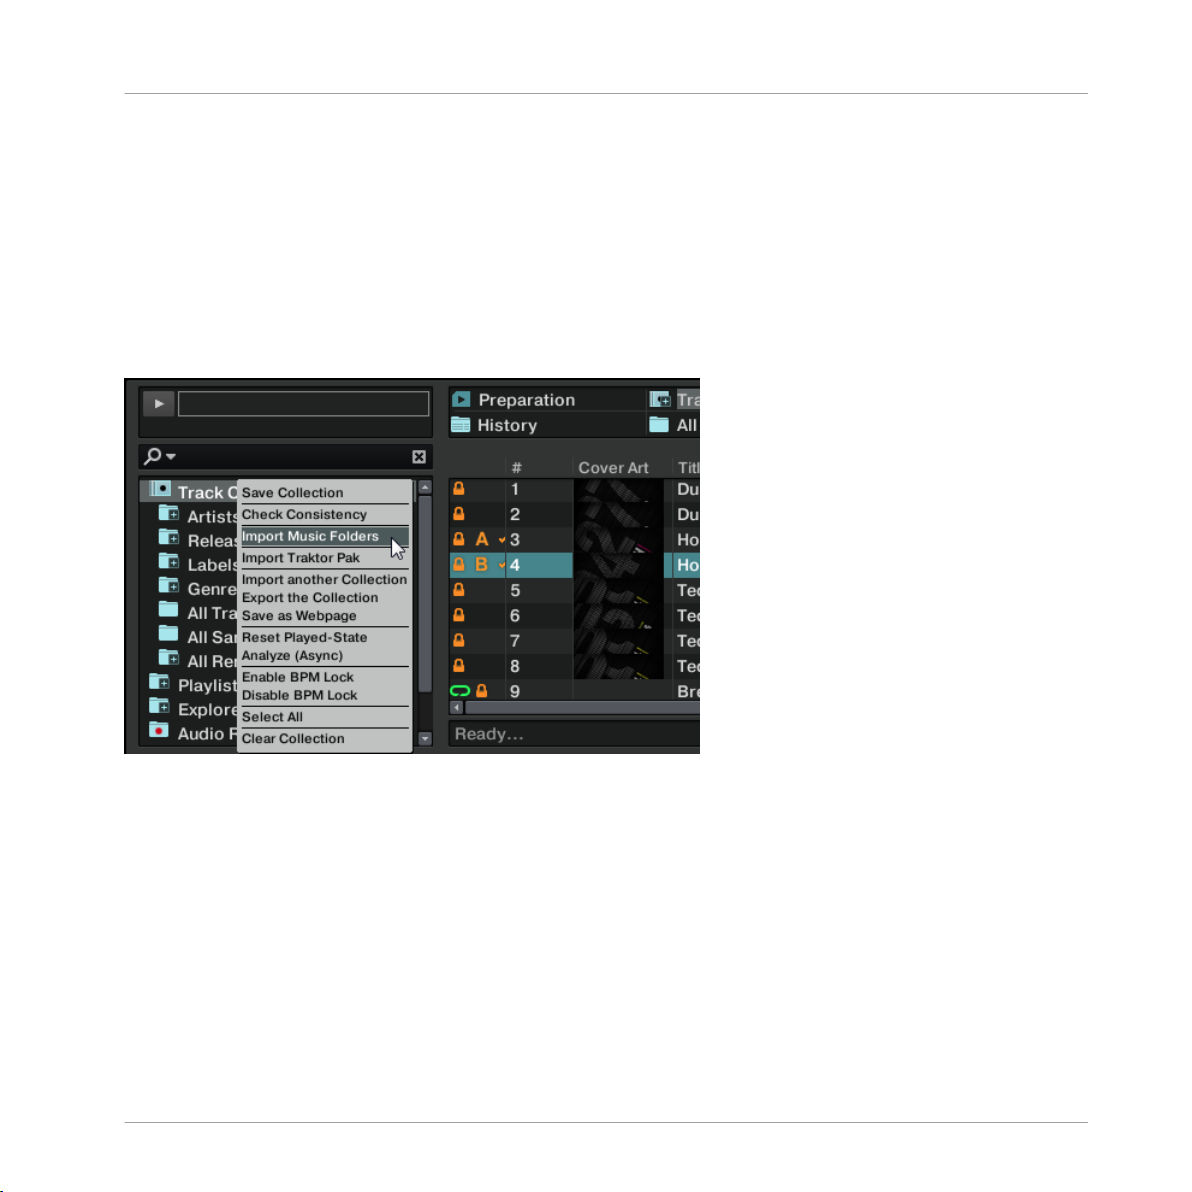
TRAKTOR offers an easy import function for tracks stored on your hard drive:
Right-click (Windows) or [Ctrl]-click (Mac OS X) on the Track Collection entry in the
►
Browser Tree and choose Import Music Folders from the menu.
The contextual menu for the Track Collection, with the Import Music Folders entry selected.
By default this process imports all music files contained in the My Music folder of your operating system.
TRAKTOR analyzes music for certain characteristics (BPM, etc.) when importing tracks for the
first time. This function takes some time to process. Be sure to prepare the tracks you want to
use in a DJ set beforehand if you want to use features such as synching or Auto Looping with
them.
If you have stored tracks in other folders or on external storage devices, you can add these
folders to the list of TRAKTOR Music Folders as follows:
1. Open Preferences > File Management.
Traktor Kontrol S4 — Manual — 20

Importing Your Music
Tracks Managed by iTunes
2. Click Add… at the bottom of the Music Folders section.
3. Navigate to a folder you want to add.
4. Confirm with OK.
Repeat to add all of your Music Folders.
Subfolders are automatically included in the scan. Hence, you don’t need to add them to this
list.
3.3 Tracks Managed by iTunes
If you have organized your music collection with iTunes, TRAKTOR KONTROL S4 offers direct
access to your iTunes Library and your iTunes playlists.
3.3.1 Playing Tracks Managed by iTunes
You can browse your iTunes Library and playlists directly from your TRAKTOR KONTROL S4.
By the way, this will be the opportunity to introduce you to browsing and loading from your
hardware controller. For this, we will use following control elements:
Traktor Kontrol S4 — Manual — 21

▪ Any of the jog wheels:
Importing Your Music
Tracks Managed by iTunes
▪ Any of the Loop MOVE encoders, located below each jog wheel:
▪ The BROWSE encoder, located beneath the MAIN knob in the center of the device.
Traktor Kontrol S4 — Manual — 22

Importing Your Music
Tracks Managed by iTunes
▪ The CUE buttons, located on each channel of the Mixer,
Please do the following:
1. Push the BROWSE button to enter Browse mode. On your computer screen, the Browser
fills up the whole TRAKTOR window.
2. Turn the Loop MOVE encoders to scroll through the Browser Tree until the iTunes icon
gets selected, then push the encoder to open that node.
3. Browse through the iTunes Library and playlists in the same manner: turn the Loop MOVE
encoder to scroll within the iTunes node and push the encoder to expand/collapse the selected node.
4. Once the desired playlist is selected in the Browser Tree, select a track from the list by
spinning the jog wheel (or turning the BROWSE encoder).
5. To load the selected track on to the left or right Deck, press the flashing CUE button on
the corresponding channel of the Mixer (A or B).
6. Repeat steps 3-5 to load a track on the other Deck.
7. When you are done, press the BROWSE button again to leave the Browse mode.
The iTunes tree node represents a read-only view on your iTunes Library and playlists. Editing
functions are not available in this view.
Software Equivalent
Of course, you can do all this from the TRAKTOR user interface too:
1. Click the iTunes icon in the Browser Tree to open that node.
2. Browse through the Library and playlists as you would do in iTunes.
3. Load a track into a Deck as you would do from a normal TRAKTOR Playlist—for example
by dragging the track onto that Deck.
3.3.2
You can import a selection of tracks from your iTunes Library into the Track Collection via the
TRAKTOR user interface:
1. Click the iTunes icon in the Browser Tree to open that node.
Importing a Selection of Tracks from iTunes
Traktor Kontrol S4 — Manual — 23

Importing Your Music
Tracks Managed by iTunes
2. Select the tracks to import into the Track Collection.
3. Drag the selection onto the Track Collection icon in the Browser Tree.
4. Alternatively right-click (Windows) or [Ctrl]-click (Mac OS X) on the selection and choose
Import to Collection in the contextual menu.
3.3.3 Importing iTunes Playlists
You can directly import iTunes playlists as TRAKTOR Playlists via the TRAKTOR user interface:
1. Click the iTunes icon in the Browser Tree to open that node.
2. Select the playlist to be imported.
3. Drag the playlist onto the Playlists icon.
4. Alternatively right-click (Windows) or [Ctrl]-click (Mac OS X) on the playlist and choose
Import to Playlists in the contextual menu.
Traktor Kontrol S4 — Manual — 24

Playing Your First Track
4 Tutorials
This chapter will guide you through the most common tasks that you will encounter during your
work with TRAKTOR KONTROL S4.
The tutorials are workflow-oriented. They start with the simplest tasks and progressively lead
you to more complex operation, helping you to get more and more familiar with your TRAKTOR KONTROL S4 system. After reading this, you should have the basic know-how allowing
you to mix with TRAKTOR KONTROL S4.
The tutorials presented here and in the following chapter make use of the included demo
tracks, which were copied to your hard disk during the TRAKTOR KONTROL S4 installation
procedure. Thus, you can follow these tutorials even if you haven’t imported your own music
yet into the Track Collection. For more info on how to import your music into the Collection,
please refer to chapter ↑3, Importing Your Music above.
4.1 Playing Your First Track
This first tutorial will show you how to load and play a track, how to check the needed audio
outputs and how to quickly troubleshoot your system if no music can be heard.
Tutorials
Prerequisites
We assume here that your TRAKTOR KONTROL S4 system is already up and running. If it’s
not the case, please follow first the instructions in the separate Setup Guide and come back
here when you’re done!
In case you already changed some settings in TRAKTOR KONTROL S4 before you start with
these tutorials, we strongly recommend you to reset your TRAKTOR KONTROL S4 system to
the factory settings by doing the following:
1. In the TRAKTOR software, click the Help menu in the menu bar at the top of your screen
(on Mac OS X) or at the top of the window (on Windows), and select Help > Start Setup
Wizard.
2. In the window that opens, click Finish at the bottom right corner without touching anything else.
Traktor Kontrol S4 — Manual — 25
Playing Your First Track
Your TRAKTOR KONTROL S4 is now reset to the factory settings.
→
The tutorials presented here assume that TRAKTOR KONTROL S4 is in its default factory
state. If it’s not the case, we cannot guarantee that you will experience what we describe here,
and you might miss important things to know!
4.1.1 Quick Loading a Track
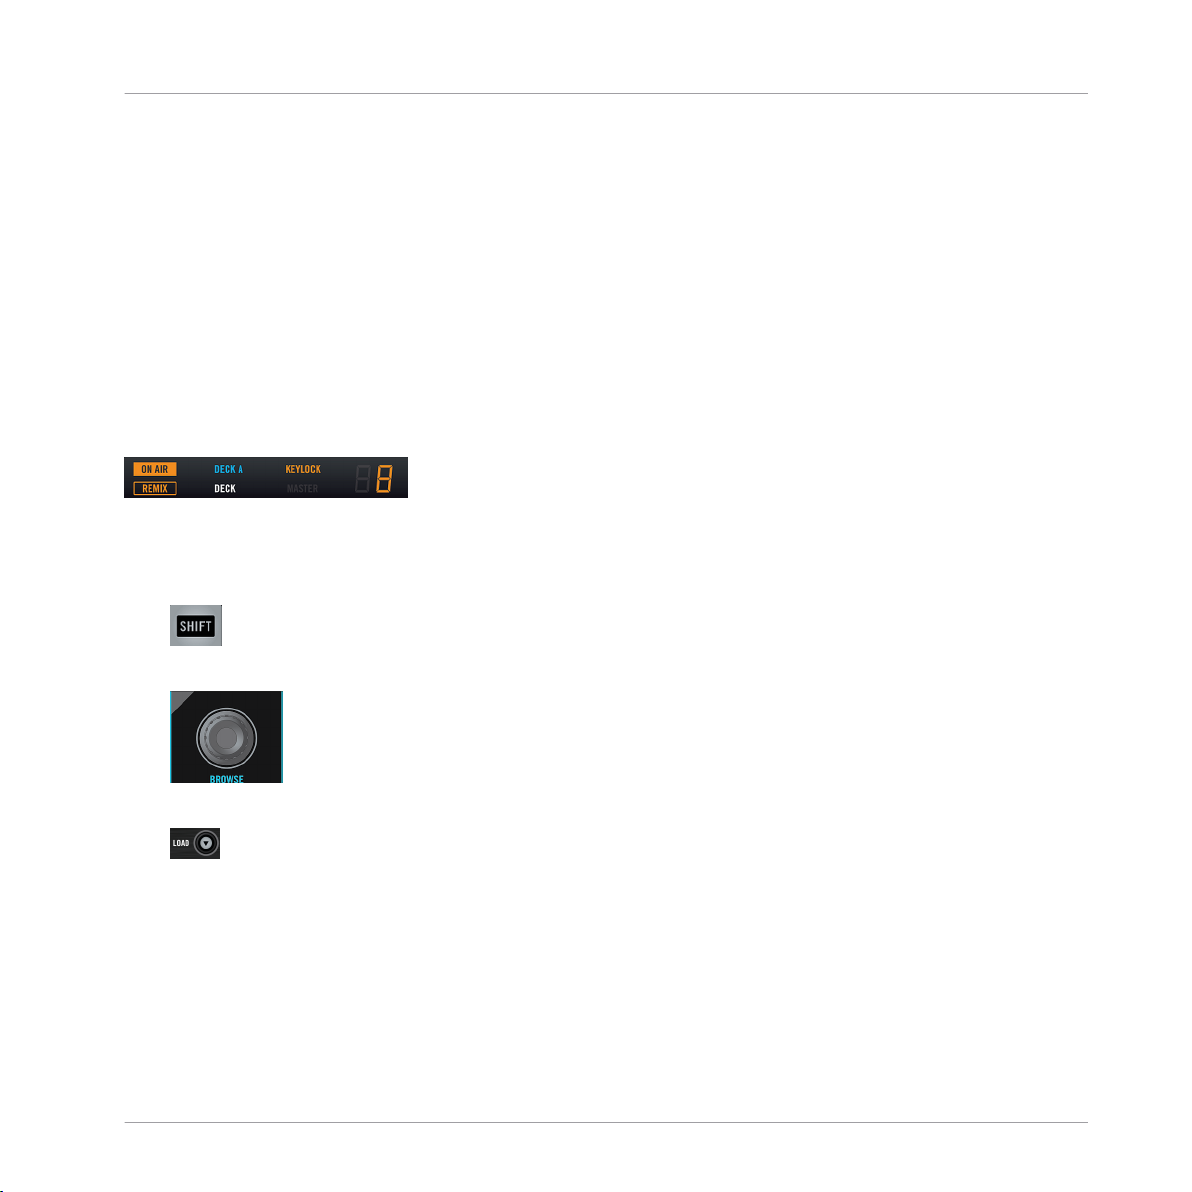
Let’s load the track “Techno 1” from the included demo tracks on to Deck A.
Since Deck A is sitting in the left part of the TRAKTOR window, we will use the left Deck on
your S4. You can check this by looking at the left Deck’s display: you should see a lit blue
indicator reading “DECK A”:
The Deck Display with a lit DECK A indicator.
To select and load the track, we will use three control elements on your S4:
▪ Any of the two SHIFT buttons (one at the bottom of each Deck):
Tutorials
▪ The BROWSE encoder (in the top center of the Mixer):
▪ The left Deck’s LOAD button (above the jog wheel):
While looking at the TRAKTOR window, do the following:
1. Hold SHIFT and turn the BROWSE encoder to select the Demo Tracks Favorite (Favorites
are customizable shortcuts sitting at the top of the Browser in TRAKTOR’s window).
The tracks of the “Demo Tracks” Playlist appear below:
Traktor Kontrol S4 — Manual — 26
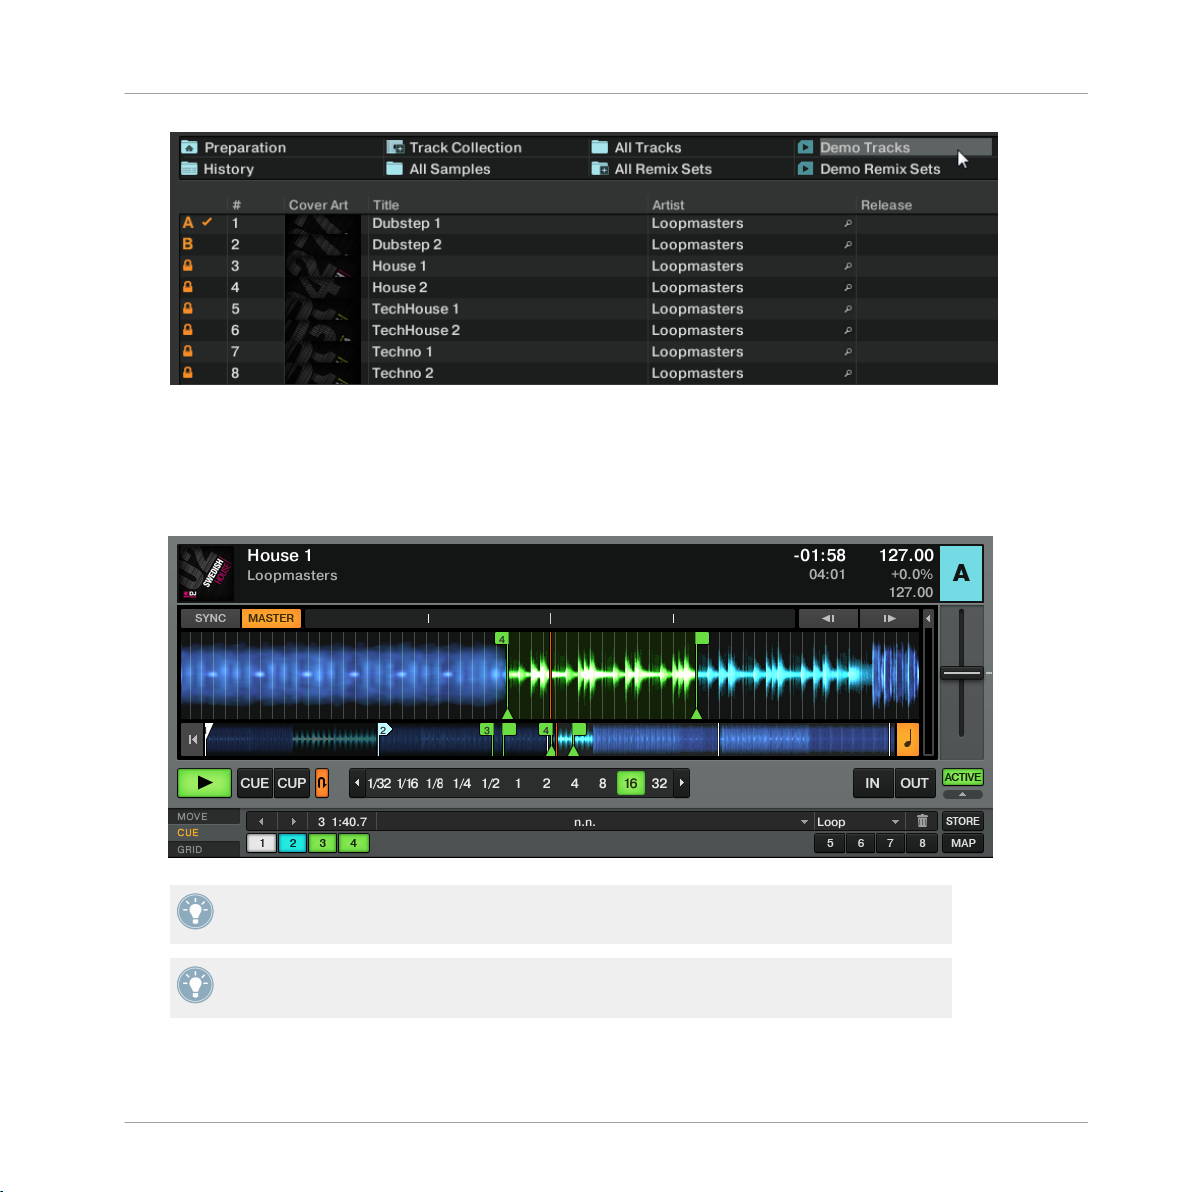
Playing Your First Track
Release SHIFT and turn the BROWSE encoder to scroll through the Playlist and navigate
to the track House 1.
2. Once the track is highlighted, press the LOAD button on the left Deck to load that track
on to Deck A.
The track is loaded. In TRAKTOR, its waveform and info appear on Deck A:
→
Tutorials
The LOAD button on the right Deck of your S4 would have loaded the track on to Deck B in
TRAKTOR.
In addition to using the S4 to load a track, you can also drag and drop tracks from the
Browser or from a folder on your computer directly into one of TRAKTOR’s Decks.
Traktor Kontrol S4 — Manual — 27

Playing Your First Track
4.1.2 Playing the Track
Once the track is loaded, simply press the PLAY button at the bottom of the left Deck:
►
The track starts playing. The PLAY button lights up and the waveform starts moving in
→
TRAKTOR.
Again, pressing the PLAY button on the right Deck would have started the playback on
Deck B.
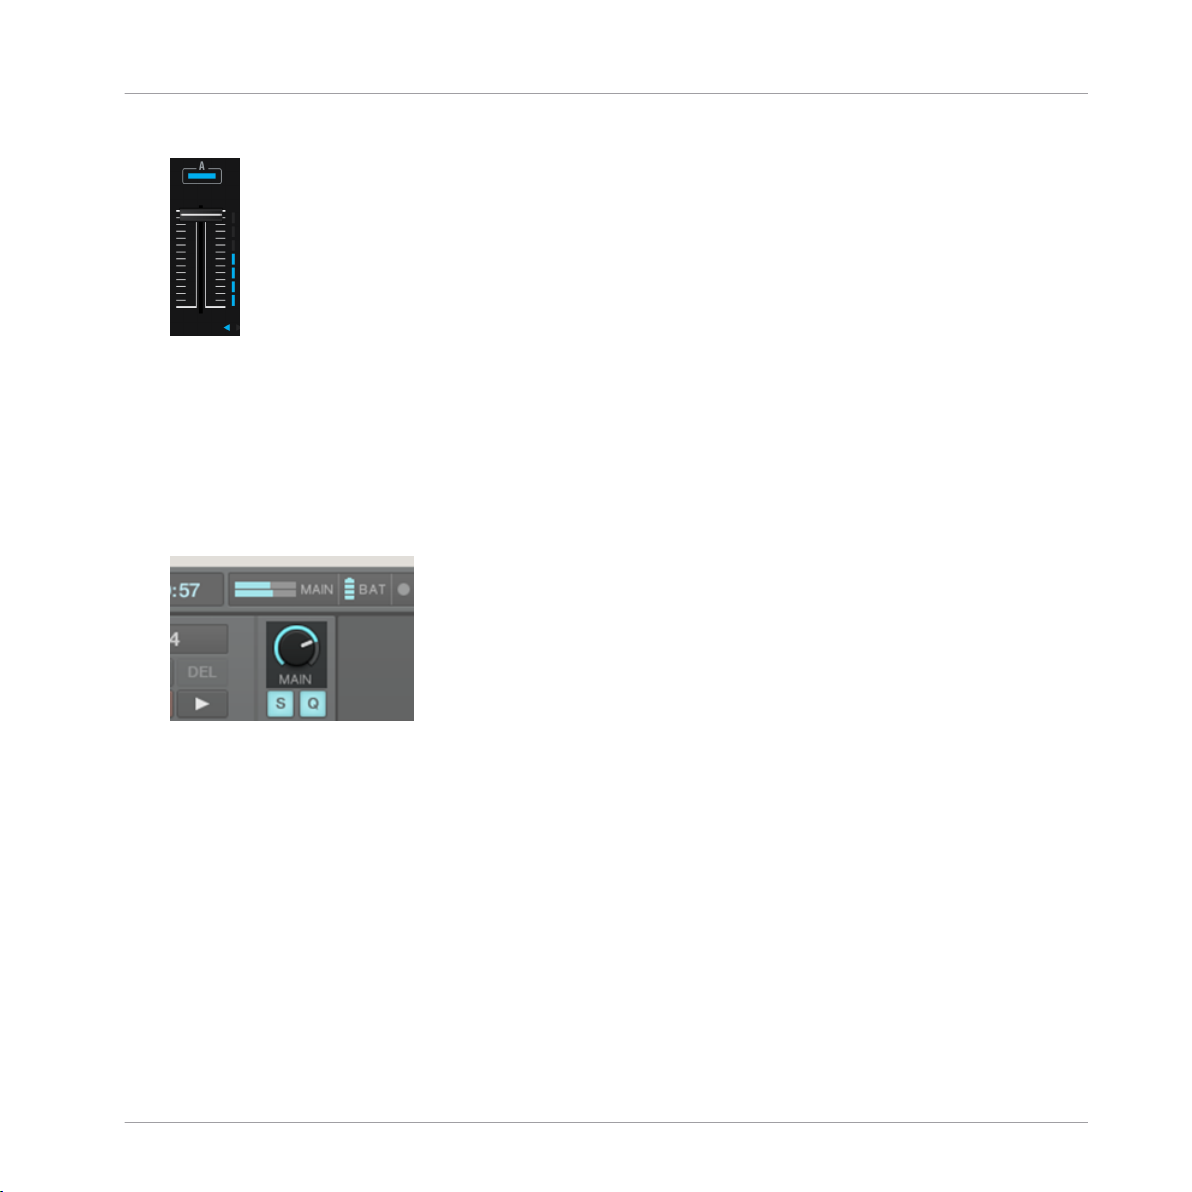
To Each Deck Its Own Channel
The audio playing on each Deck can be further shaped by the controls on the corresponding
channel of the Mixer. Since the track is loaded on Deck A, you can control its sound on channel A (showing a lit blue “A” letter):
Tutorials
Traktor Kontrol S4 — Manual — 28

Tutorials
Playing Your First Track
The Channel A.
At this point you will hear some audio coming through your speakers or PA. If not, please
check the following section.
4.1.3
If You Don’t Hear the Track
If the track is playing on the Deck but the audio coming through your amplification system is
not loud enough, or if there is no sound at all, check the following:
▪ At the bottom of your S4, verify that the crossfader is moved all the way to the left:
Traktor Kontrol S4 — Manual — 29
Mixing In a Second Track
▪ Above, the channel fader should be raised on channel A:
▪ The channel meter (the vertical bar of LEDs along the channel fader, see picture above)
should show some activity. If not, check that the HI, MID, LOW and FILTER knobs higher
up on that channel are set to center position; at the top of the channel, push the GAIN
encoder once to reset the channel’s input gain to 0 dB.
▪ At the top center of the Mixer, the MAIN LEVEL knob should be turned at least part of the
way to the right. You should see the MAIN LEVEL meters going up and down:
▪ If not, at the top center of the TRAKTOR window, check that the MAIN knob is raised:
Tutorials
If you see some activity on the MAIN LEVEL meters of your S4 but don’t hear any sound, then
double-check the connection starting with the cable going from the S4’s Main Outputs to your
PA.
4.2
Mixing In a Second Track
Now that you have learned how to quickly load and play tracks using the TRAKTOR KONTROL S4 (see the previous tutorial), let’s see how to mix in a second track. On the way, you
will learn a few basic mixing tasks that every digital DJ needs to know: how to cue tracks, synchronize tracks, start the playback at the right position, and mix the tracks together using the
crossfader.
Traktor Kontrol S4 — Manual — 30
Loading…
Warning
You’re reading the manual for Mixxx 2.4.
If you’re using another version, please select it in the sidebar.
The latest Mixxx release is version 2.5.
The Kontrol S4 MK2 is a 4 deck all-in-one controller with a sturdy build quality and integrated sound card.
The MK2 has substantial improvements over the S4 MK1, including large multicolor buttons.
The MK1 is not supported and cannot be supported because it uses a proprietary communication protocol exclusive to Traktor.
The MK2 uses the standard HID protocol (also used by keyboards & mice) to send and receive signals from a computer, so it can work with Mixxx.
The easiest way to tell the MK1 apart from the MK2 is the appearance of the jog wheel.
On the MK1, the top of the jog wheel is black plastic; on the MK2, the top of the jog wheel is shiny aluminum.
The Kontrol S4 Mk2 can run from USB power.
Using the separate power supply increases the brightness of the LEDs, which is helpful for using it in daylight, and increases the volume of the headphone output.
-
Manufacturer’s product page
Të reja në versionin 2.1.
Compatibility
Controller
The Kontrol S4 MK2 is a USB class compliant audio, HID and MIDI device, so it is compatible with Mixxx without any proprietary drivers on GNU/Linux and MacOS.
On Windows, it is recommended to install the driver from Native Instruments and select the ASIO sound API in the preferences.
With the S4 plugged in, a MIDI device is listed as an available controller in Mixxx’s Preferences.
That is the MIDI input/output ports on the back of the S4 for connecting external MIDI gear; no mapping for the S4 will appear in the menu for the MIDI device.
The controller uses HID for the knobs, buttons, and other components on the device, so the mapping can only be loaded when you select the HID device on the left side of Mixxx’s Preferences.
Timecode vinyl
The phono inputs on the S4 can be used with turntables for timecode vinyl control of Mixxx.
Mapping Description
Push and hold the SYNC button to “lock” sync on for all decks you want to remain in sync.
Push SHIFT + SYNC to enable Sync Lock for details.
Mixxx does not have remix decks, so the four remix slot buttons control the samplers.
There are some more bonus actions that can be accessed by holding SHIFT and pressing certain buttons.
Mixer
|
Control |
Description |
|---|---|
|
FILTER knob |
Controls QuickEffect superknob. This controls the Filter effect by default, but a different effect can be chosen in the Equalizer section of Mixxs’s Preferences. |
|
SNAP |
Toggles library fullscreen |
|
LOOP RECORD |
Toggles recording |
|
LOOP RECORDER PLAY |
Hold down and press FLUX button on a deck to enable autoslip mode on that deck. |
|
SHIFT + Gain |
Up/down will move the beatgrid |
|
LOOP RECORDER PLAY + GAIN |
Increase / decrease the BPM of the track by 0.5. Press the encoder to round the track the nearest whole BPM. Best done to fix tracks with the wrong BPM with the pitch fader at 0. |
|
BROWSE encoder |
Up/down will browse in the focused library pane. Pressing acts like a double click on the mouse. |
GAIN, effects routing, equalizer high/mid/low, and CUE (headphones) behave as labeled.
The Master Volume knob on the S4 controls the volume of the S4’s main output in hardware, so it does not affect the software main gain knob in Mixxx.
Peak display is only generated from software, however.
So if you see or hear clipping, lower the gain of the playing decks; adjusting the main volume knob on the S4 will not help.
Decks
|
Control |
Description |
|---|---|
|
LOAD |
Load track selected in library to the deck. |
|
SHIFT + LOAD |
Eject track |
|
Small buttons with preview icons |
Play a sampler from its cue point. If no track is loaded in the sampler, the track selected in the library will be loaded. |
|
SHIFT + small buttons with preview icons |
If sampler is playing, stop it. If sampler is not playing, the loaded track is ejected from the sampler. |
|
1-4 numbered buttons |
Set/activate hotcue |
|
SHIFT + 1-4 numbered buttons |
Clear hotcue |
|
SHIFT + Wheel nudge |
Fast search through track when not playing |
|
FLUX button |
Enable slip mode (if shift is held down this decreases the range of the BPM slider, if LOOP RECORDER PLAY is held down enter autoslip mode) |
|
RESET button |
Reset key (if shift is held down increase the range of the BPM slider |
Looping
|
Control |
Description |
|---|---|
|
Right Encoder (turn) |
Double/halve loop size. The loop size is shown on the controller. A dot on the right indicates a fractional loop size. Two dots indicates a loop size larger than 99 beats. |
|
Right Encoder (press) |
Activate loop of set size from current position |
|
SHIFT + Right Encoder (turn) |
Adjust key |
|
SHIFT + Right Encoder (press) |
Reset key |
|
Left Encoder (turn) |
Beatjump forward/backward by beatjump size (shown on screen but not on controller), or move the loop by beatjump size if there is a loop enabled |
|
Left Encoder (press) |
Re-enable a loop that has been set previously. Pressing this before a loop will keep playing until the loop is entered. |
|
SHIFT + Left Encoder (turn) |
Adjust beatjump size |
|
SHIFT + Left Encoder (press) |
Jump to loop in point, activate loop, and stop playback. This is helpful for preparing to mix a track in with a loop. |
|
IN button |
Set loop in point manually. Hold pressed while moving the jog wheel to finely adjust the loop in point. |
|
OUT button |
Set loop out point manually. Hold pressed while moving the jog wheel to finely adjust the loop out point. |
Effects
The knob on the left of each effect unit controls the mix (dry/wet) knob for all 3 effects in the unit.
The other knobs control the metaknobs of the effects.
The buttons below the metaknobs control the effect enable buttons.
When pressed with shift, they cycle through the available effects.
The button below the mix knob toggles whether the effect parameters are showing on screen.
This will be expanded in a future update to implement the Standard Effects Mapping.
The buttons at the top of each mixer column control which decks are routed to which effects units.
Mapping options
If you choose, you can edit the controller script and change the Remix Slot buttons to perform loop rolls instead.
Also by default, SHIFT + CUE rewinds the track to the beginning but you can change this to a Reverse Roll (or “Censor”) effect instead.
Making these changes is still a little awkward and we will be making controller preferences easier to change in the future.
For now you’ll have to make a small change to the mapping script file. Don’t worry, the actual edit only involves replacing a single word in a text file.
-
Open Mixxx Preferences and select the Kontrol S4 in the side list.
-
Select
Traktor-Kontrol-S4-MK2-hid-scripts.js. -
Click Open Selected File.
-
Either the file should open in an editor, or you should see a file browser window with that file selected. If you see a file browser, right click the file and select an option to edit it.
-
At the top of the file will be short instructions explaining what to do.
Native Instruments Traktor Kontrol S4 MK2
オペレーション マニュアル
View the manual for the Native Instruments Traktor Kontrol S4 MK2 here, for free. This manual comes under the category DJ gear and has been rated by 4 people with an average of a 8.1.
This manual is available in the following languages: English. Do you have a question about the Native Instruments Traktor Kontrol S4 MK2 or do you need help?
Ask your question here
Index
- タイトルページ
- 免責条項
- 連絡先
- 目次
- 1 TRAKTOR KONTROL S4 の世界へようこそ!
- 2 TRAKTOR KONTROL S4 概要
- 3 曲のインポート
- 4 チュートリアル
- 5 S4 で TRAKTOR DJ を操作する
- 6 ハードウェアリファレンス
- 7 TRAKTOR KONTROL S4 のカスタマイズ
- 8 S4 オーディオインターフェイスとコントロールパネル
- 9 トラブルシューティングとヘルプ
- 10 付録 A – 一般的な設定
- 11 付録 B – 技術情報
- 12 付録 C – クイックリファレンス
- 索引
Product Images (12)

Native Instruments Traktor Kontrol S4 MK2 specifications
Below you will find the product specifications and the manual specifications of the Native Instruments Traktor Kontrol S4 MK2.
The Native Instruments Traktor Kontrol S4 MK2 is a DJ gear that offers a Digital Vinyl System (DVS) scratcher feature, allowing users to incorporate vinyl scratching effects in their mixes. The device comes with two scratcher platters, allowing DJs to create realistic scratching sounds.
In terms of its mixer section, the Traktor Kontrol S4 MK2 offers four channels, enabling DJs to seamlessly blend and transition between different tracks. It also features a crossfader, which allows for smooth and effortless mixing.
The device includes a three-band equalizer, providing DJs with the ability to adjust the audio frequencies of their tracks. This enables them to fine-tune the sound output based on their preferences and the requirements of their performances.
The Traktor Kontrol S4 MK2 does not have a built-in optical drive, however, it does support USB direct playback. This allows DJs to directly connect a USB drive to the device and play music files in various formats, including AAC, AIFF, FLAC, MP3, OGG, WAV, and WMA.
With a sample rate of 96 kHz, the Traktor Kontrol S4 MK2 ensures high-quality audio output. Additionally, it is equipped with a USB port, offering convenient connectivity options for compatible devices.
Please note that the Traktor Kontrol S4 MK2 does not feature a built-in display.
Overall, the Native Instruments Traktor Kontrol S4 MK2 provides DJs with a comprehensive set of features for their performances. With its DVS scratcher, mixer channels, crossfader, equalizer, USB direct playback, and high sample rate, it offers versatility and high-quality sound reproduction.
Scratcher type
Digital Vinyl System (DVS) scratcher
Windows operating systems supported
Windows 7 Enterprise, Windows 7 Enterprise x64, Windows 7 Home Basic, Windows 7 Home Basic x64, Windows 7 Home Premium, Windows 7 Home Premium x64, Windows 7 Professional, Windows 7 Professional x64, Windows 7 Starter, Windows 7 Starter x64, Windows 7 Ultimate, Windows 7 Ultimate x64, Windows 8
General
| Brand | Native Instruments |
| Model | Traktor Kontrol S4 MK2 | 22400 |
| Product | DJ gear |
| EAN | 4042477224851 |
| Language | English |
| Filetype | User manual (PDF), Installation Guide (PDF) |
Technical details
| Scratcher type | Digital Vinyl System (DVS) scratcher |
| Number of scratcher platters | 2 |
| Mixer section | Yes |
| Number of mixer channels | 4 channels |
| Crossfader | Yes |
| Equalizer | Yes |
| Equalizer bands quantity | 3 |
| Built-in optical drive | No |
| USB direct playback | Yes |
| Audio formats supported | AAC, AIFF, FLAC, MP3, OGG, WAV, WMA |
| Frequency range | 20 — 20000 Hz |
| Sample rate | 96 kHz |
| Product color | Black |
| Bit rate | 24 |
Display
Ports & interfaces
| USB port | Yes |
| USB version | 2.0 |
| USB connector type | USB Type-B |
| USB ports quantity | 1 |
| Apple docking compatibility | iPad 4, iPad mini, iPhone 5, iPod Touch 5 |
| Microphone in | Yes |
| Number of microphone inputs | 1 |
| Headphone outputs | 1 |
| Audio (L/R) in | 2 |
| Audio (L/R) out | 2 |
Power
System requirements
| Windows operating systems supported | Windows 7 Enterprise, Windows 7 Enterprise x64, Windows 7 Home Basic, Windows 7 Home Basic x64, Windows 7 Home Premium, Windows 7 Home Premium x64, Windows 7 Professional, Windows 7 Professional x64, Windows 7 Starter, Windows 7 Starter x64, Windows 7 Ultimate, Windows 7 Ultimate x64, Windows 8 |
| Mac operating systems supported | Mac OS X 10.10 Yosemite, Mac OS X 10.8 Mountain Lion, Mac OS X 10.9 Mavericks |
| USB required | Yes |
Weight & dimensions
| Width | 500 mm |
| Depth | 338 mm |
| Height | 72 mm |
| Weight | 3400 g |
show more
Frequently Asked Questions
Can’t find the answer to your question in the manual? You may find the answer to your question in the FAQs about the Native Instruments Traktor Kontrol S4 MK2 below.
How do I connect my Native Instruments Traktor Kontrol S4 MK2 to my computer?
To connect the DJ gear to your computer, make sure to use the provided USB cable. Connect one end of the cable to the USB port on your computer and the other end to the USB port on the back of the Traktor Kontrol S4 MK2.
Why is the volume level low on my Traktor Kontrol S4 MK2?
If you’re experiencing low volume output, ensure that the main volume knob on the Traktor Kontrol S4 MK2 is turned up to an appropriate level. Additionally, check that the master volume level in the Traktor software is also set to a suitable level.
How do I adjust the EQ settings on the Traktor Kontrol S4 MK2?
To adjust the EQ settings, use the EQ knobs located in the middle section of the Traktor Kontrol S4 MK2. These knobs control the bass, midrange, and treble frequencies, allowing you to customize the sound according to your preferences.
Can I use the Traktor Kontrol S4 MK2 with external speakers?
Yes, you can connect external speakers to the Traktor Kontrol S4 MK2 by utilizing the master outputs located on the rear panel of the unit. Connect the speaker cables to the appropriate audio outputs and ensure that the volume levels are appropriately balanced.
How do I assign effects to the performance pads on the Traktor Kontrol S4 MK2?
To assign effects to the performance pads, open the Traktor software and access the «Effects» section. From there, choose the desired effect and click on the pad you wish to assign it to. You can then control the effect by pressing the assigned pad while mixing.
Does the Native Instruments Traktor Kontrol S4 MK2 have a built-in optical drive?
No. This means that the user will need to use external devices to play CDs or DVDs.
Does the Native Instruments Traktor Kontrol S4 MK2 have a built-in display?
No. This means that the user will need to rely on their computer screen for visual feedback.
Does the Native Instruments Traktor Kontrol S4 MK2 support USB direct playback?
Yes. This means that the user can connect USB devices directly to the controller for playback.
How many scratcher platters does the Native Instruments Traktor Kontrol S4 MK2 have?
2. This is the standard number of scratcher platters for this controller.
What is the sample rate of the Native Instruments Traktor Kontrol S4 MK2?
96 kHz. This is a high sample rate, which means that the audio quality will be very high when using this controller.
What is the weight of the Native Instruments Traktor Kontrol S4 MK2?
The Native Instruments Traktor Kontrol S4 MK2 has a weight of 3400 g.
What is the height of the Native Instruments Traktor Kontrol S4 MK2?
The Native Instruments Traktor Kontrol S4 MK2 has a height of 72 mm.
What is the width of the Native Instruments Traktor Kontrol S4 MK2?
The Native Instruments Traktor Kontrol S4 MK2 has a width of 500 mm.
What is the depth of the Native Instruments Traktor Kontrol S4 MK2?
The Native Instruments Traktor Kontrol S4 MK2 has a depth of 338 mm.
When is my volume too loud?
A volume above 80 decibels can be harmful to hearing. When the volume exceeds 120 decibels, direct damage can even occur. The chance of hearing damage depends on the listening frequency and duration.
What type of USB connection does the Native Instruments Traktor Kontrol S4 MK2 have?
The Native Instruments Traktor Kontrol S4 MK2 has a USB Type-B connection.
Is the manual of the Native Instruments Traktor Kontrol S4 MK2 available in English?
Yes, the manual of the Native Instruments Traktor Kontrol S4 MK2 is available in English .
Is your question not listed? Ask your question here
-
Страница 1
Manual[…]
-
Страница 2
The information in this document is subject to change without notice and does not represent a commitment on the part of Native Instruments GmbH. The software described by this docu- ment is subject to a License Agreement and may not be copied to other media. No part of this publication may be copied, reproduced or otherwise transmitted or recorded,[…]
-
Страница 3
Germany Native Instruments GmbH Schlesische Str. 29-30 D-10997 Berlin Germany www.native-instruments.de USA Native Instruments North America, Inc. 6725 Sunset Boulevard 5th Floor Los Angeles, CA 90028 USA www.native-instruments.com Japan Native Instruments KK YO Building 3F Jingumae 6-7-15, Shibuya-ku, Tokyo 150-0001 Japan www.native-instruments.co[…]
-
Страница 4
Table of Contents 1 Welcome to the World of TRAKTOR KONTROL S4! ……………………………………………….. 11 1.1 What Is TRAKTOR KONTROL S4? …………………………………………………………………………………….. 11 1.2 The TRAKTOR KONTROL S4 Documentation ……………………………………………[…]
-
Страница 5
4.2.6 Interlude: In Case the Left Track Is Over ………………………………………………………….. 35 4.2.7 Mixing In the Track by Using the Channel EQ and Filter …………………………………….. 36 4.2.8 Doing Everything by Hand ………………………………………………………………………………[…]
-
Страница 6
4.8.1 Introduction ………………………………………………………………………………………………… 66 4.8.2 Who’s the Master? ……………………………………………………………………………………….. 68 4.8.3 Other Useful Tools for Synching ………………………………………..[…]
-
Страница 7
6.1.2 Mixer ………………………………………………………………………………………………………….. 100 6.1.3 FX Units ……………………………………………………………………………………………………… 101 6.1.4 Loop Recorder ………………………………………………[…]
-
Страница 8
6.4.1 Mixer Overview …………………………………………………………………………………………….. 132 6.4.2 The Main Section …………………………………………………………………………………………. 132 6.4.3 The Channels and the Crossfader …………………………………………[…]
-
Страница 9
7 Customizing TRAKTOR KONTROL S4 …………………………………………………………………. 160 7.1 The Preferences Window ………………………………………………………………………………………………. 160 7.2 Settings and Preferences for the S4 Control Elements ………………………………..[…]
-
Страница 10
9.2.5 Using the TRAKTOR KONTROL S4 with a Laptop ………………………………………………… 188 9.3 Loose Jog Wheel Top Plate ……………………………………………………………………………………………. 188 9.4 TRAKTOR Crashes ……………………………………………………………………[…]
-
Страница 11
1 Welcome to the World of TRAKTOR KONTROL S4! We are delighted that you have chosen TRAKTOR KONTROL S4! 1.1 What Is TRAKTOR KONTROL S4? TRAKTOR KONTROL S4 is a fully integrated hardware and software DJ performance system created by the makers of TRAKTOR. TRAKTOR KONTROL S4 fuses the full-featured TRAK- TOR KONTROL S4 hardware controller with the st[…]
-
Страница 12
First read the Setup Guide. Then proceed with this TRAKTOR KONTROL S4 Manual to get more familiar with TRAKTOR KONTROL S4! TRAKTOR KONTROL S4 Manual After having read the Setup Guide and followed its instructions, your TRAKTOR KONTROL S4 system should be up and running. The next step is to read this TRAKTOR KONTROL S4 Man- ual. The TRAKTOR KONTROL […]
-
Страница 13
▪ Chapter ↑ 4, Tutorials is a selection of tutorials focused on your controller. They will let you progressively discover how to use the various tools provided by TRAKTOR KON- TROL S4. These practical examples will simplify the learning process and get you quickly started with computer-based DJing. ▪ Chapter ↑ 5, Using the S4 with TRAKTOR D[…]
-
Страница 14
This light bulb icon indicates that a note contains useful extra information. This informa- tion may often help you to solve a task more efficiently, but does not necessarily apply to the setup or operating system you are using; however, it’s always worth a look. Furthermore, the following formatting is used: ▪ Text appearing in (drop-down) […]
-
Страница 15
To check the compatibility with several operating systems, please have a look at: http:// www.native-instruments.com/compatibility Welcome to the World of TRAKTOR KONTROL S4! System Requirements Traktor Kontrol S4 — Manual — 15[…]
-
Страница 16
2 TRAKTOR KONTROL S4 Overview This mini-chapter will quickly introduce you to TRAKTOR KONTROL S4’s main areas and con- cepts, both on your TRAKTOR KONTROL S4 hardware controller and in the TRAKTOR soft- ware. Take the time to read these few pages, as they will familiarize you with the way TRAK- TOR KONTROL S4 works and let you catch sight of the […]
-
Страница 17
Hardware controller and software side by side. ▪ ( 1 ) Decks : TRAKTOR KONTROL S4 provides you with four virtual Decks. The Decks are the place where tracks, Samples and live input are played back. The Decks can be seen as the virtual equivalent to the good old vinyl or CD decks—just with a bunch of powerful additional features and the flexibil[…]
-
Страница 18
▪ ( 2 ) FX Units : The signals coming from the Decks can be further processed by two FX Units located at the top of your hardware and software interface. You can even activate two ad- ditional FX Units in the software, allowing you to process each Deck individually. The FX Units give you access to the whole collection of high-quality FX included […]
-
Страница 19
3 Importing Your Music Most likely you already have a collection of music files on your computer. For those of you who can’t wait for mixing their own tracks, this chapter is for you! You will learn here how to quickly import your music into the powerful Track Collection of TRAKTOR. If you prefer to start learning how to use TRAKTOR KONTROL S4 ri[…]
-
Страница 20
To make use of the Track Collection, you have to populate it by importing your music files. 3.2 Importing Music Folders TRAKTOR offers an easy import function for tracks stored on your hard drive: ► Right-click (Windows) or [Ctrl]-click (Mac OS X) on the Track Collection entry in the Browser Tree and choose Import Music Folders from the menu. The[…]
-
Страница 21
2. Click Add… at the bottom of the Music Folders section. 3. Navigate to a folder you want to add. 4. Confirm with OK . Repeat to add all of your Music Folders. Subfolders are automatically included in the scan. Hence, you don’t need to add them to this list. 3.3 Tracks Managed by iTunes If you have organized your music collection with iTunes, […]
-
Страница 22
▪ Any of the jog wheels: ▪ Any of the Loop MOVE encoders, located below each jog wheel: ▪ The BROWSE encoder, located beneath the MAIN knob in the center of the device. Importing Your Music Tracks Managed by iTunes Traktor Kontrol S4 — Manual — 22[…]
-
Страница 23
▪ The CUE buttons, located on each channel of the Mixer, Please do the following: 1. Push the BROWSE button to enter Browse mode. On your computer screen, the Browser fills up the whole TRAKTOR window. 2. Turn the Loop MOVE encoders to scroll through the Browser Tree until the iTunes icon gets selected, then push the encoder to open that node. 3.[…]
-
Страница 24
2. Select the tracks to import into the Track Collection. 3. Drag the selection onto the Track Collection icon in the Browser Tree. 4. Alternatively right-click (Windows) or [Ctrl]-click (Mac OS X) on the selection and choose Import to Collection in the contextual menu. 3.3.3 Importing iTunes Playlists You can directly import iTunes playlists as TR[…]
-
Страница 25
4 Tutorials This chapter will guide you through the most common tasks that you will encounter during your work with TRAKTOR KONTROL S4. The tutorials are workflow-oriented. They start with the simplest tasks and progressively lead you to more complex operation, helping you to get more and more familiar with your TRAK- TOR KONTROL S4 system. After r[…]
-
Страница 26
→ Your TRAKTOR KONTROL S4 is now reset to the factory settings. The tutorials presented here assume that TRAKTOR KONTROL S4 is in its default factory state. If it’s not the case, we cannot guarantee that you will experience what we describe here, and you might miss important things to know! 4.1.1 Quick Loading a Track Let’s load the track “[…]
-
Страница 27
Release SHIFT and turn the BROWSE encoder to scroll through the Playlist and navigate to the track House 1 . 2. Once the track is highlighted, press the LOAD button on the left Deck to load that track on to Deck A. → The track is loaded. In TRAKTOR, its waveform and info appear on Deck A: The LOAD button on the right Deck of your S4 would have lo[…]
-
Страница 28
4.1.2 Playing the Track ► Once the track is loaded, simply press the PLAY button at the bottom of the left Deck: → The track starts playing. The PLAY button lights up and the waveform starts moving in TRAKTOR. Again, pressing the PLAY button on the right Deck would have started the playback on Deck B. To Each Deck Its Own Channel The audio play[…]
-
Страница 29
The Channel A. At this point you will hear some audio coming through your speakers or PA. If not, please check the following section. 4.1.3 If You Don’t Hear the Track If the track is playing on the Deck but the audio coming through your amplification system is not loud enough, or if there is no sound at all, check the following: ▪ At the botto[…]
-
Страница 30
▪ Above, the channel fader should be raised on channel A: ▪ The channel meter (the vertical bar of LEDs along the channel fader, see picture above) should show some activity. If not, check that the HI , MID , LOW and FILTER knobs higher up on that channel are set to center position; at the top of the channel, push the GAIN encoder once to reset[…]
-
Страница 31
Prerequisites We assume here that you already followed the instructions in the previous tutorial (see ↑ 4.1, Playing Your First Track ). TRAKTOR KONTROL S4 now is in the following state: ▪ The track “House 1” is loaded on Deck A. The track is playing and audible. ▪ The crossfader is all the way to the left. 4.2.1 Cueing a Second Track Dir[…]
-
Страница 32
7. By turning the BROWSE encoder, you can seek through the track and cue other parts of the track. 8. To unload the track from the Preview Player, press the PREVIEW button again. → You get back to the list browsing. You can select another track for cueing or load the de- sired track on a Deck. 4.2.2 Loading and Playing the Second Track We will ch[…]
-
Страница 33
The CUE button on channel B. ► On your S4, press the CUE button on the channel B. → The button lights up, indicating that Deck B is now sent to the CUE channel, which you will hear in your headphones. At any time, use the CUE MIX knob nearby to adjust the balance between the cued track (Deck B) and the main mix (Deck A) in your headphones: turn[…]
-
Страница 34
By slowly turning the CUE MIX knob on the front panel, you will hear the second track come into the mix in sync with Deck A. Note that you should always adjust the tempo of the track that is not audible to the audience! 4.2.5 Setting a Cue Point as Starting Point You will probably want to have more control over which particular part of the track yo[…]
-
Страница 35
The SNAP button and indicator on the Master Display. With Snap mode on, any point you set in the track will snap to the closest beat, thus ensuring that you get directly to that beat next time that you jump to that point. Aligning the Tracks Aligning both tracks is straightforward: 1. Make sure that Deck B is playing (its PLAY button must be lit). […]
-
Страница 36
4.2.7 Mixing In the Track by Using the Channel EQ and Filter Now would be a great time to audition some of TRAKTOR KONTROL S4’s EQs and filters: The EQ and FILTER knobs on channel B. ► Turn any of the EQ or FILTER knobs on channel B to hear the effect on the cued track. The EQs and filters are excellent tools for making adjustments to tracks be[…]
-
Страница 37
3. When both tracks are running together and you want to bring the bass back in, gradually decrease the bass amount of channel A while simultaneously increasing that of channel B. 4. Complete the transition by gradually moving the crossfader all the way to the right. → You just did your first mix with TRAKTOR KONTROL S4! 4.2.8 Doing Everything by[…]
-
Страница 38
Adjusting the Tempo The tempo for each Deck can be manually controlled via the TEMPO fader: Use the TEMPO fader to adjust the Deck’s tempo. ► Adjust the TEMPO fader on the left Deck until the track’s BPM either “sounds right,” or directly matches the value of the other track’s BPM, which is displayed at the top of Deck B in TRAKTOR. Man[…]
-
Страница 39
Use the jog wheel to manually seek through the track. 1. On the left Deck, press and spin the jog wheel’s top plate to seek through the track. (You can also fast seek through the track by holding the SHIFT button at the bottom of the Deck while spinning the jog wheel.) 2. Once you have found an interesting point for cueing (let’s say a downbeat[…]
-
Страница 40
► On the left Deck, move the jog wheel’s outer rim in the desired direction to temporarily bend the tempo and adjust the phase in order to cancel any minor offset. → Your tracks now perfectly match. Note that this can also be useful when using TRAKTOR’s Sync feature. Indeed, in some situations, the automatic beat detection might need a slig[…]
-
Страница 41
▪ By using the full dynamic range available, you keep the noise level low relative to your mix. As a result, all the details of your music are better rendered. ▪ When a signal is clipping, it is not getting louder, just worse. The loud parts (typically the beats) are cut, which both reduces the dynamic range and introduces distortion in your mi[…]
-
Страница 42
A GAIN encoder sits at the top of each channel. ► Adjust the channel’s GAIN encoder so that the level displayed on the channel meter stays in the upper part of the blue area without reaching the orange LED. Note that the channel’s EQ and filter settings also affect the signal level, as well as the possi- ble FX Unit(s) it is assigned to. Henc[…]
-
Страница 43
The Main section on your S4. In this section, The LED meters show the actual level being output from the device. So, when the MAIN LEVEL knob is turned down, these meters will go down too. These meters do not mirror what is seen in TRAKTOR PRO, although though the clip LEDs will still light on the S4MK2 when TRAKTOR clips. Adjust the MAIN knob in T[…]
-
Страница 44
4.4 Looping and Cueing Now that you have learned the basic mixing tasks, we will focus on one of TRAKTOR KON- TROL S4’s great features: its looping facilities. Prerequisites As always, we assume here that you already followed the instructions in the previous tutorials. TRAKTOR KONTROL S4 now is in the following state: ▪ The track “House 1” […]
-
Страница 45
The loop size will correspond to the number on the Deck Display just above the Loop SIZE en- coder: The Loop SIZE Display. ► To change the size of the Loop, just turn the same Loop SIZE encoder until the display reads the number of beats you’d like the Loop to be. Note that you can adjust the loop size either before or after you’ve set the Lo[…]
-
Страница 46
Moving a Loop You can also quickly move the active Loop across your track by using the Loop MOVE encoder, at the left of the Loop section: The Loop MOVE encoder. ► To move the Loop, turn the Loop MOVE encoder. The size of the move also corresponds to the loop size that is currently set, as displayed above the Loop SIZE encoder. Turning the Loop M[…]
-
Страница 47
Deactivating Looping If you want to deactivate the current Loop, do the following: ► To deactivate looping, push either of the Loop MOVE or Loop SIZE encoder. → The playback continues after the Loop. By pushing the Loop MOVE encoder when there is no Loop currently active, you activate looping: the next Loop in the track will be activated. 4.4.2[…]
-
Страница 48
► To clear a Hotcue, hold down the SHIFT button and press the corresponding Hotcue but- ton. → You can see that the button is no longer lit. Creative Uses of Hotcues Hotcues aren’t just bookmarks to particular sections of a track—they can also be used for crea- tive techniques such as remixing parts of a song, beat juggling effects, etc. As[…]
-
Страница 49
The Remix Deck C with a Sample loaded in the upper Sample Cell of the first Sample Slot.. You can also use the Remix Decks to build new tracks on the fly, layering One-shot Samples and Loops on top of each other. Now let’s find out how to control the Remix Decks with your S4. In case you were using Sample Decks in an earlier TRAKTOR version, don&[…]
-
Страница 50
4.5.1 Loading a Sample from the Collection You can load Samples directly from your Track Collection. This will give us the opportunity to try the Browse mode on your S4 controller: this mode allows you to browse your whole comput- er for tracks and Samples. The PREVIEW button. 1. Push the BROWSE encoder in the middle of the S4 to enter Browse mode.[…]
-
Страница 51
▪ In TRAKTOR, the Remix Deck C now holds the Sample in the upper Sample Cell of the first Sample Slot. ▪ On your S4, the corresponding Sample Play button is now dimmed, indicating that the Sample Slot holds a Sample which is not audible (yet). 4.5.2 Triggering the Sample Triggering the Sample is as simple as pressing the dimmed Sample Play butt[…]
-
Страница 52
The Remix Deck C with the Advanced Panel on bottom. On the lower right you can see the cursor pointing on the Play Type button, which switches the Sample Cell from One-shot to Loop mode and vice versa. ► Click on the Play Type button in the lower right of the Advanced Panel (see screenshot above) to switch the Sample to One-shot mode if you wish.[…]
-
Страница 53
3. On the same Deck, press an unlit Sample Play button — let’s say the Sample Play button 1. → This automatically captures the current Loop playing on Track Deck B, and copies it into the upper Sample Cell of the first Sample Slot on Remix Deck D: We just exported the active Loop from Deck B to the upper Sample Cell of Deck D’s first Sam[…]
-
Страница 54
The Sample Play buttons offer you the same playback controls as described earlier (press to unmute/mute the Sample, SHIFT + press to stop it and skip to start next time it’s activated, SHIFT + press again to unload). As previously described, you can switch the Sample Play Type between Loop and One-shot mode (see ↑ 4.5.2, Triggering the Sampl[…]
-
Страница 55
▪ The jog wheel allows tempo bending (outer rim) and scratching (top plate) of the Remix Deck including all Sample Slots. ▪ The Hotcue button under each Sample Play button will also function as a Play and Cap- ture button. As a shortcut, if the Sample is already playing, the Hotcue button will retrig- ger the Sample. ▪ For any playing Sample,[…]
-
Страница 56
An FX Unit on the S4. Prerequisites As always, we assume here that you already followed the instructions in the previous tutorials. TRAKTOR KONTROL S4 now is in the following state: ▪ The track “Techno 2” is loaded on Deck B. The track is playing and audible. ▪ The Deck A is stopped (if it’s not the case, press the PLAY button on the left[…]
-
Страница 57
1. Hold the SHIFT button and press the FX On button (at the far left of the FX Unit) to load the three default effects: You now have the Delay, the Reverb, and the Filter loaded. 2. Choose which of the three loaded effects you want to activate by pressing the correspond- ing FX Buttons 1 — 3 . Of course, you can use all three effects together—sim[…]
-
Страница 58
The FX Assign buttons on each channel. Let’s assign the FX Unit 1 to Deck B: 1. Press the left FX Assign button (labeled “1”) on channel B to assign Deck B to the FX Unit 1. 2. Slowly turn the DRY/WET knob clockwise to bring in the FX. → You now hear the track on Deck B being processed by the FX Unit 1. You can assign other channels to the […]
-
Страница 59
1. Hold SHIFT and press the FX Button 1 repeatedly to scroll through all available FX until the Gater is selected in the first slot of the FX Unit 1 in TRAKTOR. 2. If the first FX slot is currently deactivated, press the FX Button 1 to activate it (the button must be lit). → You hear the Gater cutting the audio at regular intervals. You might wan[…]
-
Страница 60
4. On channel B, press the right FX Assign button (labeled “2”) to assign Deck B to this FX Unit as well. You can deactivate the left FX Assign button on that channel if you want to hear the new FX more distinctly. The FX Knobs 1 — 3 and the FX Buttons 2 and 3 will give you access to each of the advanced parameters for that FX. At any time, you[…]
-
Страница 61
The Loop Recorder on your S4. You could, for example, capture the signal from the microphone input on the S4, record your scratching in real-time, or just record a few bars of a particular track while tweaking the FX settings. Prerequisites One more time, we assume here that you already followed the instructions in the previous tuto- rials. TRAKTOR[…]
-
Страница 62
4.7.1 Choosing a Source The Loop Recorder can capture the input from several sources. In TRAKTOR, you can choose the desired source by clicking on the Source menu—the drop-down menu directly under the Loop Recorder’s DRY/WET knob: The Loop Recorder’s Source menu in TRAKTOR. In this menu, you have following choices: ▪ Main will record TRAKTO[…]
-
Страница 63
► Press the SIZE button on the S4 repeatedly to cycle through loop record sizes (in bars). You can see the current loop size in the software at the top of the Loop Recorder. For our ex- ample, we’ll choose a loop of 4 bars: The selected loop size is displayed in the software. Starting the Recording Now do the following: 1. Cut the low and mid f[…]
-
Страница 64
The Loop Recorder’s DRY/WET knob. You can stop and start again the recorded loop by using the PLAY button. By doing this, you’ll notice the following: ▪ The Loop Recorder always stays in sync with the Deck B, which is our current tempo ref- erence—we say “tempo master” (for more info on tempo references, check the tutorial in section ?[…]
-
Страница 65
4.7.3 Overdubbing You can also dub over the current recorded loop, building additional recorder layers on the fly. To do this: 1. Press the REC button while the Loop Recorder is already playing an existing loop, and press REC again to exit overdubbing. The new audio will then be added to the existing loop. 2. If you don’t like the overdub, just h[…]
-
Страница 66
4.8 Synchronization It is now time to give a closer look at the advanced synchronization features offered by TRAK- TOR. Once you will get more familiar with them, you will be able to use these powerful tools to build rich and complex mixes. 4.8.1 Introduction In the previous tutorials, we have already seen TRAKTOR’s synchronization facilities man[…]
-
Страница 67
▪ A Track Deck can provide the tempo and the beats from the track that is currently play- ing. The Beatgrid So that a Track Deck can provide reliable tempo and beats, these must be precisely deter- mined in the loaded track—if not, the “reference” wouldn’t make any sense. Therefore, tracks must first be analyzed beforehand by TRAKTOR in o[…]
-
Страница 68
4.8.2 Who’s the Master? You can build your mix using various Deck setups: you can mix with two Track Decks only, or make use of the lower Remix Decks (default setup), or even replace the Remix Decks with an- other two Track Decks. Depending on your preferred way of DJing and Deck setup, you will have different needs and perspectives for choosing […]
-
Страница 69
1. Stop any playing Deck. On the Master Display of your S4, the MASTER button and indicator light up, indicating that the Clock currently is the tempo master: 2. Load two tracks on Deck A and B. 3. Start the playback on Deck A. Deck A now is the tempo master: the MASTER indicator in the Master Display turns back off, whereas the MASTER indicator on[…]
-
Страница 70
1. In TRAKTOR’s Clock panel, deactivate the AUTO button. 2. Set the Clock as tempo master, whether by activating the MASTER button in the Clock panel, or by pressing the MASTER button on the Master Display of your S4 (in the middle of the Mixer). The Clock panel should now looks like this: The Master Display on your S4 should now look like this: […]
-
Страница 71
▪ The Snap mode ensures that any Loop or Cue Point you set in a track will snap to the closest beat. ▪ The Quantize mode ensures that any jump you make within the track will retain the phase sync—may you jump to a Loop, a Cue Point or a beat. Both Snap and Quantize modes can be enabled/disabled directly from your S4 by pressing the correspond[…]
-
Страница 72
1. Load two tracks with quite different tempos on Deck A and B. 2. Start the playback on both Decks and synchronize Deck B to Deck A. You can clearly hear how the tone of the track on Deck B changed. 3. Now press SHIFT + PLAY on the right Deck of your S4. This activates the Keylock on that Deck. → The tone of the track gets back to its original v[…]
-
Страница 73
5 Using the S4 with TRAKTOR DJ The TRAKTOR KONTROL S4 is designed to work with the TRAKTOR DJ app on iOS devices. In this section we will describe the S4’s key functions when using it with the TRAKTOR DJ app. The iOS devices referred to here are the iPad, iPhone and the iPod touch. The iPhone app is known as TRAKTOR DJ for iPhone. The S4 is cu[…]
-
Страница 74
5.1.1 Browsing & Loading Tracks Follow the below tutorial to quickly familiarize yourself with how to use the S4 to browse through your music collection in TRAKTOR DJ and load tracks accordingly. 1. Press the BROWSE encoder to reveal the music file tree in TRAKTOR DJ. Here your music will be categorized into either Songs , Playlists , Artists ,[…]
-
Страница 75
5.1.2 Quantize Functions Located in the center of the S4 device beneath the BROWSE encoder, the QUANT button al- lows you to toggle through TRAKTOR DJs Quantize Size settings. The smaller the quantize size you select relates to how quickly from pressing a HotCue button will trigger. The 1/4 beat set- ting being the smallest available size. By press[…]
-
Страница 76
The Mixer section of the S4, and the corresponding TRAKTOR DJ Equalizer section. In TRAKTOR DJ, Deck A is located at the top, and Deck B found below. In TRAKTOR DJ for the iPhone, the deck view slider indicates that Deck A is located at the top and B at the bottom. 5.1.4 Adjusting Channel Gain The channel GAIN encoders are located at the top of the[…]
-
Страница 77
5.1.5 Using EQs When you move one of the S4’s EQ knobs on either of Channels A or B , the corresponding ef- fect can be observed via TRAKTOR DJ’s Equalizer section. To reveal the Equalizer display of a TRAKTOR DJ Deck using the S4: ► Press FX button 2, located at either the top of channel A or B . → The Equalizer drawer will be reveal[…]
-
Страница 78
5.1.6 Using the Filters The S4’s FILTER encoders located on Channels A & B can be used to apply the Filter effect to a TRAKTOR DJ Deck. Moving one of these FILTER encoders from its 12 o’clock position ini- tiates the Filter function in TRAKTOR DJ. TRAKTOR DJ’s Filter engaged symbol. To reveal the Filter display of TRAKTOR DJ: ►[…]
-
Страница 79
Turning Channel A’s FILTER anti-clockwise to initiate a LPF Filter, and the corresponding Filter movement along the X Axis in TARKTOR DJ. 5.1.7 Headphone Cueing The CUE VOL knob located on the front panel of the S4 adjusts the volume levels of the head- phone output. The CUE MIX knob determines whether you hear the main mix only, the cue chann[…]
-
Страница 80
2. Click the play button on both Decks to begin playback. 3. Turn the CUE MIX knob to the center position. 4. Set the headphone volume to a comfortable level by adjusting the CUE VOL knob. 5. With the channel faders up, move the crossfader back and forth to hear one track, then the other. 6. Move the crossfader all the way to channel A so that you […]
-
Страница 81
5.1.8 Deck Control An S4 Jog Wheel. You can use the S4’s jog wheels to scratch, find cue points, manually adjust a tracks tempo, rewind, and seek or search through a track. Seek through a Track You can seek through a track playing in TRAKTOR DJ by: 1. Pressing and spinning a Jog Wheel’s top plate, you can seek through a track (to find a n[…]
-
Страница 82
Note that you can also stop the playback (by pressing the PLAY button) before you seek an in- teresting point with the Jog Wheel. Once you have found the point, you can release the Jog Wheel—since the Deck is not playing, you won’t lose the point. When a downbeat arrives in the other track, press PLAY again on the left Deck. Stripe Navigation W[…]
-
Страница 83
Using the Tempo Faders The S4 allows you to control the tempo of a track/s playing in TRAKTOR DJ by manually ad- justing the Track Deck’s tempo. Adjusting the tempo of the currently playing track’s tempo ad- justs the global tempo of TRAKTOR DJ. By default, the track playing will play at the currently selected tempo setting of the Tempo f[…]
-
Страница 84
▪ Hotcues ▪ Loop Functions ▪ Move Functions ▪ Deck Sync (& BeatGrid Mode) functions ▪ Flux mode functions This section will take you through the functions of each button in the transport section. You will also learn how the RGB buttons behave when using the TRAKTOR DJ app. 5.2.1 PLAY buttons Pressing either of the PLAY buttons will to[…]
-
Страница 85
When using TRAKTOR DJ, there are occasions when a Deck is in a Half-Sync state. This is when the BPMs of the Decks match, but the phase alignment does not. For example: ▪ With two tracks playing, scratching one of the Jog Wheels (without a FLUX button engag- ed) and releasing out of time. ▪ With two tracks playing in Sync, and using Cue points […]
-
Страница 86
5.2.5 Hotcue Buttons The Hotcue buttons are numbered 1-4 on each transport area of the S4. These RGB backlit buttons directly reflect TRAKTOR’s cue button coloring: ▪ Blue: Cue point ▪ Green: Loop ▪ Yellow: Load ▪ Orange: Fade In/Out ▪ White: Grid Marker TRAKTOR DJ will save the BeatGrid location as a Hotcue; this is why many tracks […]
-
Страница 87
5.2.6 Using Loops You can use the S4 to perform Loop functions in TRAKTOR DJ by either manually engaging the LOOP IN / OUT buttons, or by selecting a loop size with the Loop encoder and pressing to engage. Triggering a loop in TRAKTOR DJ using the Loop Encoder. Storing Loops Using the S4 When you find those perfect sections of your tracks to loop, […]
-
Страница 88
1. Trigger a loop on your chosen deck, using either the Loop encoder or manually via the LOOP IN/OUT buttons. 2. Press the MOVE encoder to engage TRAKTOR DJ’s Loop Slicer mode. → You will notice that TRAKTOR DJ now converts the selected loop into slices. Hotcue but- tons 1-4 on the corresponding S4 transport section will now be backlit green[…]
-
Страница 89
5.2.7 Using the MOVE Encoders The MOVE encoders serve a number of purposes when used with TRAKTOR DJ. The default mode of these encoders allows you Beatjump forwards or backwards in a track, according to the size of the loop display. Turning to the left moves backwards in the track, whereas to the right forward. Waveform Zoom Pressing SHIFT + rotat[…]
-
Страница 90
Freeze mode takes the currently viewed section of the track playing, and allows you to trigger individual sections as cue points. These Freeze Mode cue points can be a section of a track, or down to a smaller component such as a hi-hat. Triggering HotCue button 2 whilst in Freeze Mode. The scale of the Freeze Mode section and individual cue section[…]
-
Страница 91
Holding SHIFT + turning the MOVE encoder to adjust TRAKTOR DJ’s viewing scale. When in Freeze Mode, turning the MOVE encoder can be used to move around the assign- ments. ► Turning the MOVE encoder, will move the Freeze assignments by the group size of assign- ments. Press and rotating the MOVE encoder moves the assignments by one assignment[…]
-
Страница 92
5.3.1 Reveal a Deck’s Effect Display You can use the S4 to reveal a Deck’s Effect display in TRAKTOR DJ by: ► Pressing FX button 1, located at the top of channel section A or B. → The effects display of TRAKTOR DJ will be revealed for the corresponding Deck. You will notice that the top of this Effects display contains three effects. […]
-
Страница 93
Triggering and Controlling an Effect Pressing any of the S4’s FX buttons ( 1 — 3 ) (located in the FX 1 or FX 2 sections) will engage the corresponding TRAKTOR DJ effect. When a button is pressed, you will notice that it illumi- nates orange. Within the Effects display of TRAKTOR DJ, the corresponding FX bank will also be highlighted orange. F[…]
-
Страница 94
1. Now turn FX knob 1 all the way to the right. → You will hear the amount of the Delay Effect increasing and observe that the Effects Dis- play moves to diagonally as both the Effect parameter moves to the both along the X axis and up the Y axis. 1. Now turn both of these knobs to the left. You will hear the amount of the effect applied lessens.[…]
-
Страница 95
→ All three FX buttons are now illuminated orange, and you will now hear that the track playing is affected by 3 of TRAKTOR DJ’s effects. 1. Moving the DRY/WET knob will now control all three of the selected effect variables along TRAKTOR DJ’s Y axis. Saving a Group of Effects When using TRAKTOR DJ’s effects in your DJ sessions, if[…]
-
Страница 96
6 Hardware Reference This chapter details all you can do with your TRAKTOR KONTROL S4 controller. After a quick introduction to the main areas on your S4 and to their underlying concepts, we will give a thorough description of each and every control element on your S4. In this chapter, we describe actions on the TRAKTOR KONTROL S4. Of course, every[…]
-
Страница 97
A Deck on your TRAKTOR KONTROL S4 hardware controller. Hardware Reference Areas and Concepts Traktor Kontrol S4 — Manual — 97[…]
-
Страница 98
The equivalent control elements on a Track Deck in TRAKTOR. The two Decks on your TRAKTOR KONTROL S4 allow you to control the four software Decks (labeled A, B, C and D) available in TRAKTOR: ▪ The left Deck on your S4 can control the upper Deck A and lower Deck C in the software. ▪ The right Deck on your S4 can control the upper Deck B and low[…]
-
Страница 99
Both left and right Decks also provide a SHIFT button ( 9 ): when held depressed, this button modifies the function of many other control elements (see section ↑ 6.3.2, SHIFT Buttons: Ac- cessing Secondary Functions for more info). Many control elements on the Decks can have their function customized in order to fit your specific needs and habits[…]
-
Страница 100
6.1.2 Mixer The Mixer is sitting in the middle of your TRAKTOR KONTROL S4 controller and of TRAK- TOR’s window. The Mixer on the S4 controller and in TRAKTOR. Hardware Reference Areas and Concepts Traktor Kontrol S4 — Manual — 100[…]
-
Страница 101
The Mixer receives on its four channels ( 1 ) the audio signals coming from the four Decks de- scribed above. There is one channel for each Deck. Hence, channels are labeled from A to D according to their corresponding Deck. As any DJ mixer, the Mixer’s purpose basically is to adjust the relative level of each channel, to control the channels’ […]
-
Страница 102
The FX Unit 1 in TRAKTOR. By default, two FX Units are active. Both FX Unit 1 and FX Unit 2 can be freely assigned to any of the channels A-D. On the hardware side, the TRAKTOR KONTROL S4 also provides you with two FX Units (la- beled FX1 and FX2 on your controller), which allow you to control the corresponding FX Units in the software. You will fi[…]
-
Страница 103
The Loop Recorder on your S4. The Loop Recorder in TRAKTOR. The Loop Recorder allows you to instantly create loops whether coming from the Mixer’s mas- ter signal, from a particular Deck or from a physical audio input. As soon as the loop is record- ed, it is automatically triggered. You can then blend between the loop playing in the Loop Re- cor[…]
-
Страница 104
6.1.5 Front and Rear Panels The front and rear panel of your TRAKTOR KONTROL S4 contain controls and connectors re- lated to the physical inputs and outputs of your controller. They are extensively described in sec- tion ↑ 6.8, The Rear Panel and ↑ 6.9, The Front Panel . 6.2 Types of Control Elements Your TRAKTOR KONTROL S4 holds various types […]
-
Страница 105
The SHIFT Buttons Instead of triggering any function themselves, the SHIFT buttons (one on each Deck) modify the behavior of other control elements on your TRAKTOR KONTROL S4, giving you access to some secondary functions. For more info on the SHIFT buttons, please refer to section ↑ 6.3.2, SHIFT Buttons: Ac- cessing Secondary Functions . 6.2.2 K[…]
-
Страница 106
Additionally, encoders have a “push” action available: pushing the encoder can trigger some other function. 6.2.4 Jog Wheels A jog wheel on your S4. Functionally speaking, the two jog wheels are quite similar to the encoders described above: they have an endless rotary movement (here continuous) and an additional push action availa- ble on thei[…]
-
Страница 107
This makes the jog wheel a versatile element that gives you a very precise control, e.g. for scratching, seeking in a track, or browsing in lists. 6.2.5 Faders A fader on your S4. Faders are linear control elements with limited range. All of them set absolute values, with the possible exception of the TEMPO faders (see ↑ 6.3.7, Tempo Fader ). 6.2[…]
-
Страница 108
6.2.7 Switches A switch. Switches are only available on the rear panel. They control a few basic options needed when setting your TRAKTOR KONTROL S4 up. 6.2.8 Sockets The RCA main output sockets on the rear panel of your S4. Sockets are to be found on the rear and front panels only. They allow you to plug various types of cables (USB, audio, MIDI, […]
-
Страница 109
6.3.1 Deck Flavors and Structure As described in section ↑ 6.1.1, Decks , TRAKTOR’s software Decks can have three different Flavors, depending on the type of audio material you want them to handle: Track Deck , Remix Deck or Live Input . ▪ By default, Decks A and B are Track Decks when TRAKTOR is configured for use with TRAKTOR KONTROL S4.[…]
-
Страница 110
The Decks on Your TRAKTOR KONTROL S4 The two Decks on your TRAKTOR KONTROL S4 allow you to control all four Decks in TRAK- TOR: ▪ The left Deck on your S4 can control both Decks on the left of the TRAKTOR window: the upper Deck A and the lower Deck C. ▪ The right Deck on your S4 can control both Decks on the right of the TRAKTOR window: the upp[…]
-
Страница 111
► To access the secondary function of any control element, hold SHIFT depressed when us- ing that control element. ▪ For the Deck and FX Unit control elements, SHIFT operates locally, which means that you cannot use the SHIFT button on the opposite side of your S4 to access the secondary functions of a Deck or FX Unit. ▪ For the Mixer, the SH[…]
-
Страница 112
[…]
-
Страница 113
▪ DECK C (or DECK D) indicator : lights up in white when the Deck on your S4 is focused on the lower Deck (Deck C on the left, Deck D on the right) in TRAKTOR. ▪ KEYLOCK indicator : lights up when the Keylock is active on that Deck. Note that Keylock can be activated on Track Decks only. For more info on the Keylock feature of TRAKTOR, please r[…]
-
Страница 114
► By pressing SHIFT + LOAD , you unload the track from the Deck. You will find more info on browsing and loading in section ↑ 6.7.1, Browsing Tracks and Sam- ples . Moreover, the LOAD button lights up when you push the jog wheel’s top plate (e.g. for scratch- ing, see ↑ 6.3.6, Jog Wheel ). The LOAD button can be switched to an alternate ass[…]
-
Страница 115
▪ Tempo bending : By spinning the jog wheel’s outer rim, you temporarily raise or lower the Deck tempo. When you stop spinning the rim, the Deck tempo returns to its original val- ue. ▪ Scratch : By pressing and spinning the jog wheel’s top plate, you fully take over manual control for cueing up a beat, back spinning or for scratching. Also[…]
-
Страница 116
The TEMPO fader controls the tempo of the focused Deck: Pulling the TEMPO fader down- wards/upwards increases/decreases the tempo, respectively. By default, the range of the TEM- PO fader is ±6 %.The TEMPO fader’s range can be adjusted in two ways: To narrow the range: ► Press SHIFT + FLUX buttons → The Tempo Range is reduced to a minim o[…]
-
Страница 117
Absolute Mode By default, the TEMPO fader is in Absolute mode. In this mode, whenever you move the TEM- PO fader on your S4, its position is transmitted 1:1 to the tempo fader on the software Deck— which in the end controls the tempo of the software Deck. Therefore, the software Deck’s tempo matches the TEMPO fader position on your S4, unless y[…]
-
Страница 118
LOOP IN and LOOP OUT Buttons The LOOP IN and LOOP OUT buttons The LOOP IN and LOOP OUT buttons allow you to manually define a Floating Loop in the play- ing Track Deck / Remix Deck. Pressing the LOOP IN button sets a Floating Cue Point at the current playback position. This Floating Cue Point will serve as Loop In Point as soon as you press the LOO[…]
-
Страница 119
Loop MOVE Encoder The Loop MOVE encoder. The Loop MOVE encoder allows you to activate/deactivate looping, move the Loop and jump in the track: Loop MOVE encoder No Loop active Loop active Turn Beatjumps by the current loop size (as displayed in the Loop Size Display). Moves the Loop by the current loop size (as displayed in the Loop Size Display). […]
-
Страница 120
Loop SIZE encoder No Loop active Loop active Turn Selects a loop size (in beats) for the next Floating Loop that you will set. The se- lected loop size is displayed in the Loop Size Display above the encoder. Halves/doubles the Loop’s size. Push Sets and activates a new Floating Loop at the current playback position with the selected loop size. D[…]
-
Страница 121
If you don’t want to use Samples at all, or if you don’t want to mix Track Deck controls and Remix Deck controls, you can activate alternate functions for these Sample Play buttons in Preferences > Traktor KONTROL S4 > S4 Control Options . For example, they can be used as Beatjump buttons or as additional Hotcue buttons. Please refer to s[…]
-
Страница 122
The Remix Slot now lights up dimmed to indicate that the Sample is loaded but not audible, because it is either muted or stopped. To tell whether the Sample is stopped or muted, have a look at the TRAKTOR software: If the Sample is muted, its waveform in the Sample Slot is dimmed, while the lit/unlit Sam- ple Play button indicates whether or not th[…]
-
Страница 123
The Remix Deck C with the Advanced Panel on bottom. On the lower right you can see the cursor pointing on the Play Type button, which switches the Sample Cell from One-shot to Loop mode and vice versa. ► Click on the Play Type button in the lower right of the Advanced Panel (see screenshot above) to switch the Sample to One-shot mode if you wish.[…]
-
Страница 124
Unloading a Sample You can clear a Sample Cell by pressing SHIFT + Remix Slot button. The button’s LED turns off. More Controls over the Samples By default, the Samples are loaded and played on the lower Remix Deck — Deck C on the left and Deck D on the right. The Remix Slot buttons represent the Sample Cells inside the Sample Slot of the Remix[…]
-
Страница 125
Hotcue button Hotcue slot’s state Unlit Empty Hotcue slot. Blue Hotcue slot contains a Cue Point. Green Yellow Orange White Hotcue slot contains a Loop. Hotcue slot contains a Load Marker Hotcue slot contains a Fade-In or Fade-Out Marker. Hotcue slot contains a Grid Marker. Storing a Cue Point or a Loop into a Hotcue Slot You can directly store t[…]
-
Страница 126
Hotcue Buttons in a Remix Deck Context If the Deck in focus is a Remix Deck, the RGB Hotcue buttons function in the following way: ► Pressing a Hotcue button will trigger the Sample Cell to play. → The Hotcue button illuminates. ► Pressing a Hotcue button on a playing sample will mute the Remix Slot. → The Sample continues to play but is mu[…]
-
Страница 127
The Hotcue Buttons drop-down menu from the Preferences. The Hoctcue Buttons preference for the S4 affects the REMIX SLOTS functionality differently depending on which mode you select: ▪ Legacy Mode : In Legacy mode, the REMIX SLOTS buttons function as follows: ◦ Pressing an unlit REMIX SLOTS button will capture a Sample from the capture source […]
-
Страница 128
◦ Pressing an unlit REMIX SLOTS button will capture a Sample from the capture source Deck / start playback/ retrigger playback. ◦ Pressing SHIFT + a REMIX SLOTS button will activate the next Sample Cell in the Sample Slot. 6.3.11 PLAY and CUE Buttons The CUE and PLAY buttons. At the bottom of the Deck, the PLAY and CUE buttons are the usual tra[…]
-
Страница 129
6.3.12 SYNC Button The SYNC button. The SYNC button activates/deactivates the synchronization of the Deck to the current tempo master (another Deck or the Clock). The button is lit when synchronization is activated. Activating the synchronization disables the TEMPO fader if it is in the default Absolute mode. See section ↑ 6.3.7, Tempo Fader for […]
-
Страница 130
If you can’t match the beats with this method, most likely also the tempo of the Beatgrid has been wrongly detected. In this case proceed as follows to set a correct tempo: 1. Play the track in Deck A (turn off SYNC ). 2. Tap the SHIFT button repeatedly (at least 5 times) to the beat of the music. In this proce- dure you must try to be very preci[…]
-
Страница 131
6.4 The Mixer The Mixer, in the middle of your S4. This section describes the general handling of the Mixer on your TRAKTOR KONTROL S4. You will find in ↑ 12.2, Remix Deck Quick Reference a Quick Reference table summing up the basic functionality of each control element on the Mixer. Hardware Reference The Mixer Traktor Kontrol S4 — Manual — 131[…]
-
Страница 132
6.4.1 Mixer Overview The Mixer is equipped with four channels, each of them controlling the signal coming from one particular Deck: channel A, B, C, and D control the signals coming from Deck A, B, C, and D, respectively. Thanks to the logical layout of the channels on the Mixer, you can quickly see what goes where: ▪ Channels on the left (A and […]
-
Страница 133
Adjust the MAIN knob in TRAKTOR’s Master panel so that the values on your S4’s MAIN LEVEL meters stay in the upper part of the blue areas without reaching the orange clipping LEDs. When the orange clipping LEDs light up, turning down the MAIN LEVEL knob on your S4 is of no use: indeed, changing the level of the already distorted or shrinked sig[…]
-
Страница 134
The channels and the crossfader make up the core of the mixing scheme. Signal Flow As a rule of thumb: the signal coming from a Deck arrives at the top of the channel ( GAIN en- coder) and goes down to the bottom (channel fader). The only exception to that rule is the pair of FX Assign buttons: although they are sitting right under the GAIN encoder[…]
-
Страница 135
For the FX Unit assignment , press the left or right button to assign this channel to the FX Unit 1 or 2, respectively. The button lights up when the channel is routed to the corresponding FX Unit. When activating both buttons on the same channel, FX Unit 1 and FX Unit 2 will process the channel’s signal in series. For a description of the FX Uni[…]
-
Страница 136
Each channel boards an EQ section with the three usual knobs HI , MID and LOW for controlling high, medium and low frequency content of the signal, respectively. ► Turn each EQ knob clockwise to emphasize the corresponding frequency band, and coun- terclockwise to attenuate this band. At center detent position, the knob does not alter the signal.[…]
-
Страница 137
In Browse mode, the Headphones Cue button is used to load the selected track on to the corresponding Deck (Track Decks only). See section ↑ 6.7, Browsing, Loading and Copying for more info on the Browse mode. Deck Assignment Indicator The Deck Assignment indicator on channel A. The Deck Assignment indicator (labeled A, B, C, or D) shows which sof[…]
-
Страница 138
To correct the channel level, adjust the GAIN encoder at the very top of the channel. For more info on how to set your levels correctly, see the tutorial in section ↑ 4.3, Adjusting Levels . Crossfader Assignment Indicator The Crossfader Assignment indicator. The Crossfader Assignment indicator shows you the side of the crossfader the channel is […]
-
Страница 139
If you rather use the channel faders instead of the crossfader for mixing, you can deactivate the crossfader in order to avoid unwanted level inconsistencies between channels. To do this, deactivate all crossfader assignments by SHIFT-pressing the corresponding FX Assign buttons. You can customize the fading curve of the Crossfader in Preferences &[…]
-
Страница 140
USB Indicator The USB indicator. The USB indicator gives you information about the status of the USB connection between your S4 and your computer. The indicator should be continuously lit. If it flashes, there is no con- nection to the computer or a problem with the driver. ► Check that the USB indicator is continuously lit before going any furth[…]
-
Страница 141
While a track or Sample is loaded into the Preview Player, holding the PREVIEW button and turning the BROWSE encoder serves as seek control. You can load this track or Sample as usu- al, depending on whether you are using Quick Loading (see above) or Browse mode (see be- low). Pushing the PREVIEW button while an item is loaded into the Preview Play[…]
-
Страница 142
Clock Master Button and Indicator (MASTER) The Clock Master button and indicator. The Clock Master button allows you to set TRAKTOR’s Clock as tempo master. When the Clock is set as tempo master, both the button and the indicator light up. For more info on the whole synchronization concept in TRAKTOR KONTROL S4, please re- fer to the tutorial in […]
-
Страница 143
6.4.5 The BROWSE Encoder The BROWSE encoder. The BROWSE encoder is used to browse and copy tracks or Samples in TRAKTOR KON- TROL S4. You will find a description of these control elements in section ↑ 6.7, Browsing, Loading and Copying . 6.5 The FX Units The FX Units 1 and 2 on your S4 allow you to control the FX Units in TRAKTOR. All controls of[…]
-
Страница 144
▪ (5) FX Knob 3 ▪ (6) FX Button 1 ▪ (7) FX Button 2 ▪ (8) FX Button 3 ▪ (9) FX Mode button (MODE) 6.5.1 Single Mode and Group Mode In TRAKTOR, each FX Unit can work in two different modes: ▪ Group mode : Each FX Unit boards three different FX chained in series. Each FX can be controlled by one knob and one button. ▪ Single mode : Each[…]
-
Страница 145
Control element Single mode Group mode FX Button 1-3 FX Button 1: resets all FX parameters to their default value. FX Buttons 2 and 3: FX-dependent (lit when activated). SHIFT + button: loads a predefined FX (as set in Preferences > Traktor KON- TROL S4 > S4 Control Options > Direct FX 1-3 ). Activates/deactivates FX slot 1-3 (lit when slo[…]
-
Страница 146
The Loop Recorder on your S4. The recording source for the Loop Recorder can be selected via the Loop Recorder’s Source menu in TRAKTOR. Please refer to the TRAKTOR 2 Manual for more info. You will find in ↑ 12.4, FX Unit Quick Reference a Quick Reference table summing up the basic functionality of each control element on the Loop Recorder. 6.6[…]
-
Страница 147
► Press SIZE repeatedly to select the desired loop size. The selected loop size cannot be seen on your S4; for this, you have to look at the Loop Re- corder in the TRAKTOR window on your computer screen. 6.6.3 REC Button The REC button starts/stops recording a loop or additional overdub layers. If no loop has been recorded yet, pressing the REC b[…]
-
Страница 148
6.6.5 PLAY Button The PLAY button starts/stops the playback of the Loop Recorder—provided of course that something has been recorded into it. When playback is stopped, the playback position skips back to the loop beginning. Playback is also automatically triggered while overdubbing: the currently recorded material is played while a new layer is b[…]
-
Страница 149
You will find in ↑ 12.5, Loop Recorder Quick Reference a Quick Reference table summing up the basic functionality of each control element needed for browsing, loading and copy- ing. 6.7.1 Browsing Tracks and Samples Quick Loading Tracks and Samples You can quickly select tracks and Samples for loading via the BROWSE encoder, located at the top of[…]
-
Страница 150
► To load the selected track or Sample, press LOAD on the desired Deck: If the focus is on a Remix Deck, the Sample will be loaded into the first empty Sample Slot. Only audio with a maximum length of 48 seconds can be loaded into Sample Slots. For Samples, you can also press SHIFT + the Sample Play button of an empty Sample Slot to load the sele[…]
-
Страница 151
► Press a flashing target to load the selected track or Sample. After a target has been selected, the Browse mode stays active, allowing you to load items to other locations (Track Decks or Sample Slots). ► When you are finished, press the BROWSE Encoder again to deactivate the Browse mode. While in Browse mode, you cannot control the Decks. 6.[…]
-
Страница 152
If the Loop Recorder’s PLAY button is not selected as source, it stops flashing because it can- not be selected as target. ► Press a target to select it. → The source is copied to the target. Copying a track triggers a track duplicate so that the track is loaded on to the target Deck playing from the same position as the source Deck. After a […]
-
Страница 153
▪ (3) MAIN OUT section : Sockets for connecting the TRAKTOR KONTROL S4 to your main mixer or amplification system. See section ↑ 6.8.1, MAIN OUT Section below. ▪ (4) INPUT CHANNEL B section : See section ↑ 6.8.2, INPUT CHANNEL B Section below. ▪ (5) MIC Section : See section ↑ 6.8.3, MIC Section . ▪ (6) INPUT CHANNEL A section : See s[…]
-
Страница 154
▪ (2) Main/Booth Outputs 1/2 1/4″ sockets (1/2) : main outputs of TRAKTOR KONTROL S4 (line level, balanced). Use these sockets to connect your TRAKTOR KONTROL S4 to an amplification system (or master mixer) with balanced inputs. ▪ (3) LEVEL knob : sets an independent Booth volume level for the ¼” outputs when the MAIN/BOOTH switch is se[…]
-
Страница 155
6.8.3 MIC Section ▪ Microphone Gain knob (GAIN) : Adjust here the input gain for the connected microphone (see below). ▪ (6) Microphone socket (MIC) : Connect your microphone here. 6.8.4 INPUT CHANNEL A Section The INPUT CHANNEL A section allows you to route external signals to the TRAKTOR software. The INPUT CHANNEL C section on the rear panel[…]
-
Страница 156
The POWER section on the rear panel. ▪ (1) USB socket : Connect here your S4 to your computer with the included USB cable. ▪ (2) Power Supply connector : Connect here the power cord. ▪ (3) ON/OFF switch : Engage the switch to turn on your device. 6.9 The Front Panel This section describes all sockets and controls available on the front panel […]
-
Страница 157
The front panel of the TRAKTOR KONTROL S4. ▪ (1) Headphones socket (PHONES) : Cue channel stereo output (jack 1/4″). Connect your headphones here. ▪ (2) Headphones Volume knob (CUE VOL) : Adjusts the volume in your headphones. ▪ (3) Headphones Mix knob (CUE MIX) : Adjusts the mix between master output and cue channel in your headphones. […]
-
Страница 158
In Native Traktor mode, your TRAKTOR KONTROL S4 will communicate directly with TRAK- TOR over USB using the Native Instruments proprietary NHL protocol, which features high res- olution translation of the TRAKTOR KONTROL S4 knobs superior to MIDI. 6.10.2 MIDI Mode The MIDI mode allows you to use your TRAKTOR KONTROL S4 as a normal MIDI controller. […]
-
Страница 159
When your S4 is in MIDI Mode, the two Loop Displays will show ‘ON’. To customize the S4’s MIDI properties, such as MIDI channel or CC numbers of its individual controls, Native Instruments has included the Controller Editor. The Controller Editor should have been installed during the TRAKTOR KONTROL S4 installation procedure. If you can[…]
-
Страница 160
7 Customizing TRAKTOR KONTROL S4 TRAKTOR KONTROL S4 is a highly customizable DJ system. Many of its features can be modi- fied so that it best suits your preferred way of DJing: customizable features include audio con- figuration, Decks, Mixer, transport controls, overall software layout, FX, Browser, file manage- ment, to mention a few. Since the […]
-
Страница 161
The list of available pages at the left of the Preferences window. 1. To display a particular page of settings, click on the page name in the left column. 2. Adjust the settings according to your needs. 3. Once you have modified the desired settings, click Close at the bottom of the Preferences window to confirm your modifications or on Cancel to d[…]
-
Страница 162
For a detailed description of all settings available in the Preferences window, please refer to the TRAKTOR 2 Manual. In the Preferences window, the settings for the S4 have their dedicated page, judiciously called Traktor KONTROL S4. ► In the Preferences window, click Traktor KONTROL S4 at the bottom of the left column to display the page of set[…]
-
Страница 163
In this page, settings are grouped into four sections: S4 Control Options, Restore Default, Cali- bration and LEDs. 7.3 S4 Control Options On the Traktor KONTROL S4 page of the Preferences, the S4 Control Options section allows you to adjust the way your TRAKTOR KONTROL S4 controller reacts to your actions. The fol- lowing paragraphs thoroughly des[…]
-
Страница 164
The Direct FX 1-3 settings. Reminder: In Single mode, press SHIFT + FX Button 1, SHIFT + FX Button 2 or SHIFT + FX Button 3 to load the selected Direct FX into the corresponding FX slot. In Group mode, press SHIFT + FX On to load all three Direct FX into their respective FX slots. Sample Play Buttons The Sample Play Buttons menu lets you choose alt[…]
-
Страница 165
Hotcue Buttons The Hotcue Buttons menu lets you choose between a Legacy mode, where the Hotcue buttons behave as with TRAKTOR’s former Sample Decks, and a Remix mode, where there was new functionality added to control TRAKTOR’s Remix Decks. This setting is only relevant in a Remix Deck context, i.e., when the Deck is set to control a Remi[…]
-
Страница 166
◦ When a Loop is active, holding one of these buttons while spinning the jog wheel al- lows you to move the corresponding Loop In Point or Loop Out Point. ▪ Auto Loop : When this option is selected, the buttons have auto looping functions: ◦ When no Loop is active, the LOOP IN and LOOP OUT buttons set and activate a 4- beat and an 8-beat Floa[…]
-
Страница 167
it also allows you to go beyond this range and change the Deck tempo within ±100 % while preserving the current fader accuracy (as defined by the range set in Preferen- ces > Transport > Tempo). Obviously, beyond the range of the software tempo fader, this fader does not represent the Deck tempo anymore. By moving the software fader with you[…]
-
Страница 168
Jog Wheel The Disable Jog Wheel Push option will defeat the touch-sensitivity of the KONTROL S4 jog wheels when checked. If this option is checked, you will not be able to perform normal scratching techniques because TRAKTOR will no longer check if you’re pressing the jog wheel or not. The wheel will then behave as a pitch bend at all times (like[…]
-
Страница 169
7.3.2 Calibration The Calibration section allows you to perform the calibration for various knobs, faders, and jog wheels on your S4 in order to correct potential inaccuracies of both center position (for the knobs) and range of the control elements. The Calibration section. The calibration can be done separately for four groups of control elements[…]
-
Страница 170
7.4.1 Switching the Deck Flavors As explained in section ↑ 6.1.1, Decks , all Decks can be individually switched between differ- ent Flavors: Track Deck, Remix Deck or Live Input. This is done in the Decks page of the Preferences via the two lower menus in the Deck Flavor section: The Deck Flavor section allows you to select another Flavor for ea[…]
-
Страница 171
Using the Setup Wizard When setting up TRAKTOR KONTROL S4, the easiest way is to start the Setup Wizard. This allows you to choose from a set of basic Deck configurations and to forget about any audio routing settings—these will be automatically configured according to the selected Deck config- uration! Bear in mind, though, that the Setup Wizard[…]
-
Страница 172
Input Routing page in the Preferences panel. In this page, you can choose the physical inputs to be used for each virtual input channel in TRAKTOR. For example, let’s say that you are currently using the default Deck configuration (two Track Decks and two Remix Decks) and want to use an external audio source plugged on channel D. Here is the way […]
-
Страница 173
3. Click Close at the bottom of the window to confirm your modifications. → Your external audio source is now sent to Deck D, which acts as Live Input and forwards the signal to channel D on the Mixer. 7.4.3 Using Four FX Units TRAKTOR KONTROL S4 provides you with a total of four FX Units. By default, the first two FX Units are activated. You can[…]
-
Страница 174
Due to the different FX routing scheme, the FX Assign buttons work differently: FX Assign button Function with four FX Units FX Assign 1 Channel A: Assigns the channel to FX Unit 1. Channel B: unused. Channel C: Assigns the channel to FX Unit 3. Channel D: unused. FX Assign 2 Channel A: unused. Channel B: Assigns the channel to FX Unit 2. Channel C[…]
-
Страница 175
► Select Start Setup Wizard in the Help menu of the Application Menu Bar (to see this bar, Fullscreen mode must be deactivated). ► Or click the Setup Wizard button at the bottom left corner of the Preferences window. Setup Wizard Walk-through Let’s walk you through the S4 configuration using the Setup Wizard: 1. On the welcome screen, clic[…]
-
Страница 176
→ TRAKTOR starts with the selected settings and a matching interface layout, e.g., if you selected to use an external DJ mixer, TRAKTOR’s software mixer will be hidden. You can always change the Layout of the user interface with the Layout selection menu in TRAK- TOR’s header. To change the Deck Flavors, click on the Deck letter in a De[…]
-
Страница 177
8 The S4 Audio Interface and Control Panel Your TRAKTOR KONTROL S4 is equipped with a high-end 24-bit/96 kHz audio interface. You can adjust the audio interface settings to your needs and computer performance. Depending on whether you work on Windows or Mac OS X, you can adjust these settings in dif- ferent ways. 8.1 Settings on Mac OS X On Mac OS […]
-
Страница 178
When converting audio information to digital and vice versa, the audio driver needs to store the data in buffer packages (audio buffers) which are then sent to and processed by the CPU. The higher the buffer size, the longer it takes for a signal to finally arrive at the out- put as audio. You might experience this as late response in between hitti[…]
-
Страница 179
If you cannot find the Control Panel, the driver is most likely not installed at all. In this case, please re-install the driver as described in the separate Setup Guide. Here is what you get when opening the Control Panel: The Control Panel. On the left side, you find two tabs: Audio Settings and Diagnostics . ► Click on the tabs at the left to […]
-
Страница 180
The Control Panel with Audio Settings page opened. The Audio Settings page consists of two sections: ▪ Audio Processing : settings for the analog-to-digital/digital-to-analog conversion done by your audio interface. ▪ Device Monitor : displays information about the audio interface’s processing status and your system’s output latency. […]
-
Страница 181
▪ Process Buffer : Lower the buffer size value for a quicker response of your computer to TRAKTOR controller and software actions. When converting audio information to digital and vice versa, the audio driver needs to store the data in buffer packages (audio buffers) which are then sent to and processed by the CPU. The higher the buffer size, the[…]
-
Страница 182
8.2.3 Diagnostics Page The Diagnostics page allows for monitoring the controller’s performance and for detecting er- rors. The Control Panel with Diagnostics page opened. The information provided in the Diagnostics page might be more of interest to advanced users; however, in case of problems, you should always have a look at this page. The Diagn[…]
-
Страница 183
Drop-Out Detection Section The Drop-Out Detection section holds two displays and a button: ▪ USB I/O Errors : counts USB input/output errors. A high USB I/O Errors count points to your system being overloaded. ▪ Buffer Underruns : Buffer underruns occur when your computer isn’t able to process an audio buffer in time. Reasons for underruns ca[…]
-
Страница 184
setting in the options or preferences of your music applications allowing you to select the TRAKTOR KONTROL S4 as audio interface. For more info, please refer to the documentation of your music applications. 8.4 Using the S4 as your Default Audio Interface If you want to use the TRAKTOR KONTROL S4 for playback of all audio applications on your comp[…]
-
Страница 185
9 Troubleshooting and Help This chapter covers the most common issues. Most of what can go wrong when setting up and using TRAKTOR KONTROL S4 should be listed here along with some tried-and-tested ways to solve these issues. 9.1 TRAKTOR Won’t Start 1. Check the system requirements for TRAKTOR KONTROL S4. The minimum requirements are the very leas[…]
-
Страница 186
9.2.2 USB and Driver Issues Once your TRAKTOR KONTROL S4 is connected and turned on, wait a few seconds and give a look at the USB indicator located in the Master Display, in the middle of your device: The USB indicator in the Master Display. If the USB indicator is flashing, there is no connection to the computer or there is a problem with the dri[…]
-
Страница 187
▪ If you do not know whether or not you have previously installed the drivers of the TRAK- TOR KONTROL S4 to your computer, it is advisable to start again the stand-alone installa- tion (setup) program of the TRAKTOR KONTROL S4 available on the TRAKTOR KON- TROL S4 installation disc. If the setup program states that it will first uninstall the dr[…]
-
Страница 188
9.2.5 Using the TRAKTOR KONTROL S4 with a Laptop Please check if your computer is suited for handling real-time audio processing without drop- outs. The TRAKTOR KONTROL S4 Control Panel provides you with a useful tool to achieve this. See chapter ↑ 8.2.2, Audio Settings Page for more info. In general, it is not recommended to use laptops with sha[…]
-
Страница 189
Once the plate has clicked back into place, it should be securely fastened to the unit. If it is still loose, try running through the procedure again. Although it may not be necessary for opti- mum use, we recommend recalibrating your jog wheels after detaching and reattaching the jog wheel top plate. For further details on jog wheel calibration, p[…]
-
Страница 190
When communicating with the Native Instruments support team, keep in mind that the more details you can provide about your hardware, your operating system, the version of the software you are running, and the problem you are experiencing, the better they will be able to help you. In your description, you should mention: ▪ How to reproduce the pro[…]
-
Страница 191
10 Appendix A – Common Setups This appendix shows you how to connect your TRAKTOR KONTROL S4 with your other gears in various setups. For a reference of each socket or control element to be found on the rear and front panel of the TRAKTOR KONTROL S4, please refer to section ↑ 6.8, The Rear Panel and ↑ 6.9, The Front Panel , respectively. It g[…]
-
Страница 192
Connect the Power Supply 1. Connect the included power supply to a power outlet using the appropriate adapter for your region. 2. Connect the power cord plug to the Power Supply connector (labeled POWER) on the rear panel of your S4. Appendix A – Common Setups TRAKTOR KONTROL S4 Basic Setup Traktor Kontrol S4 — Manual — 192[…]
-
Страница 193
We strongly recommend you to use an external power supply with your S4 via the included power supply unit. Although operation is also possible when your S4 is powered via the USB connection, you then have following limitations: the headphones output level is lower, and all LEDs light darker. Moreover, your device might then be subject to USB power-[…]
-
Страница 194
► Connect one end of the included USB 2.0 cable to the USB socket on the rear panel of your S4, and the other end to an available USB 2.0 port on your computer. The TRAKTOR KONTROL S4 is a USB 2.0 device and will not work on a USB 1.0/1.1 port. If possible, do always use the USB cable provided with the S2 box to operate your unit. Longer or lower[…]
-
Страница 195
Turn Down All Volume Controls ► Before you plug any audio cable, make sure to turn down all volume controls, both on your S4 and on your amplification system. This will avoid any possible audio artifacts that could damage your speakers and your ears! Connect the Main Outputs to Your Amplification System ► On the rear panel of your S4, connect t[…]
-
Страница 196
Connect your Headphones to the PHONES Socket (Front Panel) ► On the front panel of your S4, plug your headphones into the Headphones socket (PHONES). Before putting on headphones, always make sure the headphone volume knob ( CUE VOL ) is set to minimum! To set the headphone volume to minimum, turn the CUE VOL knob counter- clockwise until it reac[…]
-
Страница 197
Turn On Your S4 ► On the rear panel of your S4, engage the ON/OFF switch to turn on the device. → Look at the top panel of your controller: after a quick LED animation, the USB indicator in the Master Display might flash for a few seconds, then it should stay lit. This confirms that your S4 is correctly recognized by your computer. If the USB i[…]
-
Страница 198
1. Open the Preferences window by clicking on the Preferences button in TRAKTOR’s Head- er: 2. Go to Preferences > Decks > Deck Flavor and select Remix Deck in the C and D menus: 3. Click Close at the bottom of the Preferences window to confirm your modifications. Notes ▪ The MAIN LEVEL knob and meters at the top middle of your S4’s top[…]
-
Страница 199
Before you proceed, please follow the steps for the basic setup described in section ↑ 10.1, TRAKTOR KONTROL S4 Basic Setup . Connect Your Microphone to the MIC Socket The MIC socket and its dedicated GAIN knob. On the rear panel of your S4, plug your microphone into the Microphone socket ( MIC ). Before you connect your microphone, make sure tha[…]
-
Страница 200
socket (MIC) on your S4 until the level meters on your screen show a satisfying level (to adjust the microphone input gain, you can follow the guidelines described in section ↑ 4.3, Adjusting Levels ). 4. When the meters show a satisfying level, click Close at the bottom of the Preferences win- dow to confirm your modifications. For more info on […]
-
Страница 201
▪ By having assigned the microphone signal to the Aux channel, you still have four internal Decks at your disposal (Track Decks or Remix Decks). 10.3 Using a Master Mixer In some situations, you might want to use other audio devices independently from the TRAK- TOR KONTROL S4 system, like an additional setup with turntables and mixer. A solution […]
-
Страница 202
Control via timecode vinyls/CDs (Scratch Control) is not available in TRAKTOR KONTROL S4 yet. ► Starting from the basic setup, we will connect the audio sources to both stereo input channels on your S4 and configure the required settings accordingly. Before you proceed, please follow the steps for the basic setup described in section ↑ 10.1, TR[…]
-
Страница 203
Set the LINE/PHONO Switch to PHONO The LINE/PHONO switch. ► On the INPUT CHANNEL B , set the LINE / PHONO switch to PHONO . Set the Input Routing and Deck Flavors in TRAKTOR Instead of setting the input routing options and Deck Flavors manually as described here, you can also use the Setup Wizard: choose 2 Track Decks + 2 Live Inputs in the menu,[…]
-
Страница 204
4. Go to Preferences > Decks > Deck Flavor and select Live Input in the A and B menus. 5. Click Close at the bottom of the Preferences window to confirm your modifications. → Deck A and B will now transmit the signals coming from your external audio sources to channel A and B on the Mixer, respectively. For more info on the input routing, s[…]
-
Страница 205
11 Appendix B – Technical Information You will find here the technical specifications and the block diagram for the audio interface of your TRAKTOR KONTROL S4. 11.1 Technical Specifications Jacks and Sockets ▪ 4 input jacks ( IN 1/2 and IN 3/4) for mono RCA plugs ▪ 1 input jack ( MIC ) for mono 6.3 mm (1/4 inch) phone plug ▪ 2 output jacks […]
-
Страница 206
Line Inputs Cross talk -111 dB Full scale level +12.4 dB DNR (a-weighted) 98.3 dBu THD+N 0.05 % Frequency response ±0.5 dB 20 Hz – 40 kHz Microphone Input Full scale level @ 1 kHz -31.3 dBu DNR (a-weighted) @ 1 kHz 85.7 dB THD+N @ 1 kHz 0.04 % Frequency response ±1.67 dBu 20 Hz – 240 kHz Phono Inputs Input impedance 47 kΩ Full scale level @[…]
-
Страница 207
Audio Outputs (D/A) Bit resolution 16, 24 Converter Cirrus Logic Line Outputs (1/4» TRS balanced) Max output level +18 dBu DNR (a-weighted) 105 dBu THD+N@1kHz 0.003 % Frequency response ±0.35 dBu 20 Hz – 40 kHz Crosstalk @ 1kHz 111 dBu Line Outputs (RCA unbalanced) Max output level +12 dBu DNR (a-weighted) 105 dBu THD+N@1kHz 0.002 % F[…]
-
Страница 208
Headphones Outputs THD+N@1kHz 0.013 % Frequency response ±1 dBu Crosstalk@1kHz 20 Hz – 240 kHz -111dB Power Supply ▪ In: 100-240V — 60/50Hz — 0.4A ▪ Out: 15V 1200mA 10.8VA Dimensions and Weight ▪ Depth: 33.8 cm ▪ Height: 7.22cm ▪ Width: 50cm ▪ Weight: 3.4kg Environmental Specifications ▪ Operating temperature : +5 to +35 °C (41 to[…]
-
Страница 209
12 Appendix C – Quick References This appendix provides you with you Quick Reference tables summing up the basic functionali- ty of each control element on your TRAKTOR KONTROL S4. This gives you a quick and con- cise overview of all basic functions of your controller. For more info on each control element, please refer to the descriptions in cha[…]
-
Страница 210
Control element Function DECK C or DECK D indicator Lit when your S4 Deck is focused on the lower Deck (Deck C or Deck D). KEYLOCK indicator Lit when Keylock is active. MASTER indicator Lit when the Deck is the tempo master. Loop Size Display Shows the loop size selected via the Loop SIZE encoder. TEMPO fader Increases/decreases Deck tempo. Hold SH[…]
-
Страница 211
Control element Function Loop SIZE encoder Push: activates/deactivates looping. Activating looping automatically sets a Floating Loop at current playback position with the selected loop size. Turn (no active Loop): selects a loop size (in beats) for the next Floating Loop that will be set. The selected loop size is displayed in the Loop SIZE Displa[…]
-
Страница 212
Control element Function CUE button Deck playing: jumps to Floating Cue Point and stops playback. Deck paused: sets a new Floating Cue Point. Track is played back from that Floating Cue Point as long as CUE is held depressed. Upon release, play- back stops and jumps back to Floating Cue Point. SHIFT + CUE : skips back to start of track (playback st[…]
-
Страница 213
Control element Function ON AIR indicator Lit when the Deck is audible on the TRAKTOR KONTROL S4 main output. REMIX indicator Lit (showing that this Deck is a Remix Deck). DECK A or DECK B indica- tor Unlit. DECK C or DECK D indica- tor Lit (showing that your S4 Deck is focused on the lower Deck C or D in TRAK- TOR). KEYLOCK indicator Not used (no […]
-
Страница 214
Control element Function Loop MOVE encoder In Remix mode Push: activates/deactivates looping. Loop active: Loop move controls. Turn to move the Loop by the selected loop size (as displayed in the Loop Size Display). SHIFT + turn to move the Loop by 1-beat steps. No Loop active: Beatjump controls. Turn to jump by the selected loop size (as displayed[…]
-
Страница 215
Control element Function REMIX SLOTS buttons Unlit: empty Sample Slot. Press to load a Sample from the capture source at current playback position (if playback is within an active Loop, the Loop is cop- ied). Press SHIFT + button to load the Sample selected in the Playlist. Dimmed: Sample loaded but stopped or muted. Lit: Sample playing. Sample in […]
-
Страница 216
Control element Function CUE button Stopped Samples: Press & hold to trigger Sample Slots. Upon release, playback stops and skips back to start. Playing Samples: Press to retrigger Samples.* SYNC button Re-synchronizes Samples in Looped mode with the current tempo master. * SHIFT button Press and hold: gives access to secondary functions of oth[…]
-
Страница 217
12.3.2 Channel and Crossfader Quick Reference Control element Function GAIN encoder Turn: adjusts input gain level for that channel. Push: resets input gain level to 0 dB. FX Assign buttons 1 and 2 Normal: assigns the channel to FX Unit 1 and 2, respectively. (For use with four FX Units, see detailed description.) SHIFT : assigns the channel to the[…]
-
Страница 218
12.3.3 Master Display Quick Reference Control element Function Alert indicator Flashes when there is something wrong: Main Volume knob or Head- phones Volume knob too low in the software, CPU load too high, laptop power supply disconnected. USB indicator Lit if the driver is up and running. Flashing if there is no connection to the computer or a pr[…]
-
Страница 219
Control element Single mode Group mode FX Button 1 — 3 FX Button 1 : resets all FX parameters to their default value. FX Buttons 2 and 3 : FX-dependent (lit when activated). SHIFT + button: loads a predefined FX (as set in Preferences > Traktor KON- TROL S4 > S4 Control Options > Direct FX 1-3 ). Activates/deactivates FX slot 1-3 (lit when[…]
-
Страница 220
12.6 Browsing, Loading and Copying Quick Reference See section ↑ 6.7, Browsing, Loading and Copying for more details on these control ele- ments. Control element Function BROWSE encoder Turn: scrolls through the Playlist. SHIFT + turn: scrolls through the Favorites. Push: loads/unloads selected item in the Preview Player. When an item is load- ed[…]
-
Страница 221
Index A Absolute (prefs) [166] Absolute mode [117] Adjusting levels [40] Alert indicator [139] Aligning tracks [35] Analysis [20] [67] Assigning FX to channels [57] [135] Audience [41] Audio input [99] [110] Audio interface [177] Audio Processing (Control Panel) [180] Audio Settings (Control Panel) [180] AUTO button [68] Auto Loop (prefs) [166] Aut[…]
-
Страница 222
C Calibration [169] CD deck [201] Changing the size of a Loop [45] Channel [18] [28] [101] [134] Crossfader Assignment indicator [138] CUE button [33] [37] [136] Deck Assignment indicator [137] fader [30] [41] [137] FILTER knob [30] [136] FX Assign buttons [58] [134] GAIN encoder [30] [41] [134] HI knob [30] [136] LOW knob [30] [136] meter [30] [41[…]
-
Страница 223
CUE MIX knob [31] [33] [37] [157] Cue Points Floating Cue Point [118] setting and storing [34] storing [125] CUE VOL knob [31] [157] Cueing [34] [44] Cueing a track in the Browser [31] [140] Customizing TRAKTOR KONTROL S4 [160] D Deactivating looping [47] Deck [17] [96] flavor [99] [109] [170] focus [110] [111] overview [108] DECK A indicator [26] […]
-
Страница 224
Displays [107] Distortion [41] [43] Documentation [11] Driver issues [186] Drop-Out Detection (Control Panel) [183] DRY/WET knob (FX Unit) [57] [60] DRY/WET knob (Loop Recorder) [62] [146] Dynamic range [40] E Effects [18] [55] [101] Encoders [105] EQs [30] [42] [136] using when mixing in a track [36] External audio input [99] [110] F Faders [107] […]
-
Страница 225
FX Knobs 1-3 [58] [60] FX On button [57] [59] FX Unit [18] [42] [55] [101] Assigning to channels [57] [135] controlling [58] DRY/WET knob [57] [60] FX Buttons 1-3 [57] [60] FX Knobs 1-3 [58] [60] FX On button [57] [59] Group mode [56] [144] MODE button [56] [59] Quick Reference [218] reference [143] Single mode [59] [144] snapshot [60] using four F[…]
-
Страница 226
I Importing music [19] Importing your music [67] Indicators [107] Information (Control Panel) [183] INPUT CHANNEL C section [155] INPUT CHANNEL D section [154] Input routing [170] iTunes [21] J Jog mode [167] Jog wheel [106] on Remix Decks [55] on Track Decks [38] [114] outer rim [39] top plate [39] K Kensington lock slot [152] Key Functions Using […]
-
Страница 227
Loop Buttons (prefs) [165] LOOP IN button on Track Decks [45] [118] Loop mode [51] Loop MOVE encoder on Track Decks [46] [47] [119] LOOP OUT button on Track Decks [45] [118] Loop Out Point [118] Loop Recorder [60] [102] adjusting the loop size [62] deleting a recorded loop [64] DRY/WET knob [62] [146] overdubbing [65] [147] PLAY button [63] [148] Q[…]
-
Страница 228
M MAIN knob (software) [30] Main level [42] MAIN LEVEL knob [30] MAIN LEVEL meters [30] MAIN OUT section [153] Main Outputs 1/2 [195] Main section [18] [42] [101] [132] Manual Looping (prefs) [165] Manually cueing [38] MASTER button and indicator [69] [70] [142] Master Display [34] [139] Alert indicator [139] MASTER button and indicator [69] [70] [[…]
-
Страница 229
O Offset manually correcting [39] ON AIR indicator [112] ON/OFF switch [156] [197] One-shot mode [51] [123] Online Support Form [189] Output Latency [181] Overdubbing [65] [147] Overview [16] P Phase offset (correcting) [39] PHONES socket [31] [157] [196] Pitch (tracks) [71] PLAY button (Deck) on Track Decks [28] [128] PLAY button (Loop Recorder) [[…]
-
Страница 230
Processing State (Control Panel) [181] Q QUANT button and indicator [35] [70] [142] Quantize mode [35] [70] [142] Quick Loading samples [122] [149] tracks [26] [149] Quick References [209] R Rear panel [152] INPUT CHANNEL C section [155] INPUT CHANNEL D section [154] MAIN OUT section [153] POWER section [155] REC button [63] [65] [147] Recalibratin[…]
-
Страница 231
Settings button (prefs) [178] Setup Guide [11] Setup Wizard [168] [174] SHIFT button [110] tapping [130] Signal flow in channels [134] Single mode [59] [144] SIZE button [63] [146] Skipping back to start of track [35] SNAP button and indicator [70] [141] SNAP indicator & button [34] Snap mode [34] [45] [53] [70] [141] Snapshot (FX Unit) [60] So[…]
-
Страница 232
T Technical Specs [205] Tempo adjusting manually [38] automatically adjusting (Sync) [33] Tempo bending on Track Decks [39] [115] TEMPO Fader [38] Absolute mode [117] Relative mode [166] Tempo Faders (prefs) [166] Tempo master [66] setting a Track Deck as [69] [70] [129] setting the Clock as [69] [70] Tempo Offset buttons (OFFSET) in Relative mode […]
- Инструкции и руководства
- Бренды
- Native Instruments
- Traktor Kontrol S4 MK2
- Техническая Спецификация