
4-549-534-11(1)
Solid-State Memory
Camcorder
Operating Guide
Table of Contents
Getting Started
Recording
Playback
Editing
Using the Menu
Connecting with another
device
Troubleshooting
Additional Information
HXR-MC2500
Read this first
Before operating this unit, please read this
manual thoroughly, and retain it for future
reference.
Notes on use
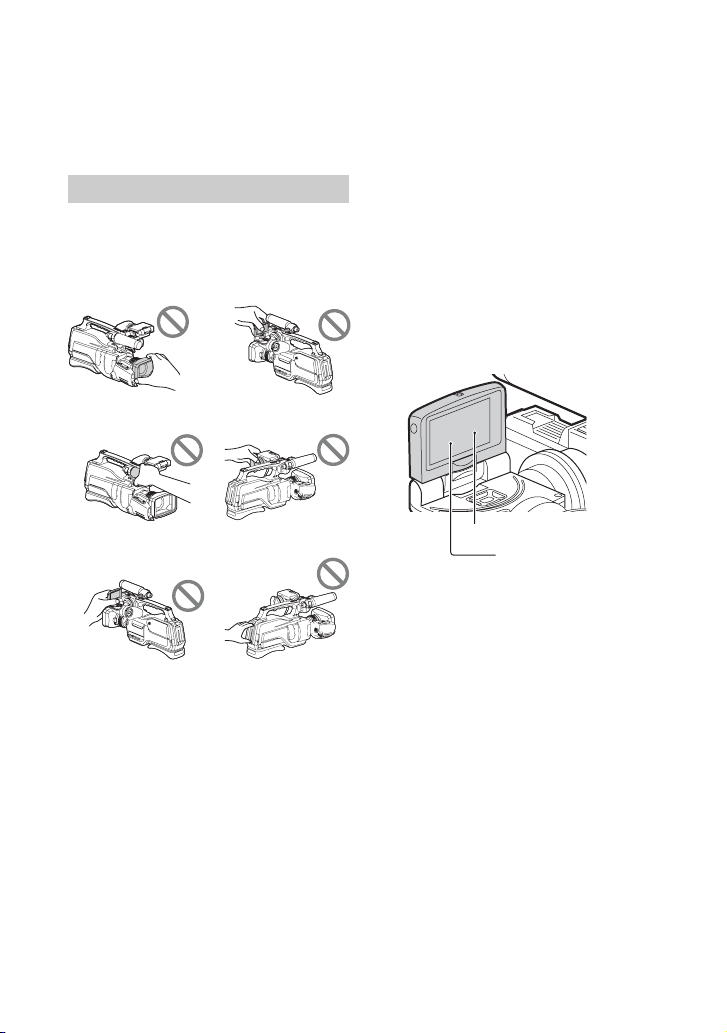
Using the camcorder
• Do not hold the camcorder by the
following parts, and also do not hold the
camcorder by the jack covers.
Lens hood
Microphone
b Notes
• The camcorder is not dustproof, dripproof or
waterproof. See “About handling of your
camcorder” (p. 100).
• When connecting the camcorder to another
device with communication cables, be sure to
insert the connector plug in the correct way.
Pushing the plug forcibly into the terminal will
damage the terminal and may result in a
malfunction of the camcorder.
• Use the camcorder in accordance with the
regulations of a place where you use it.
LCD screen
Viewfinder
Battery packPanel EVF block
On the LCD screen and lens
• A menu item that is grayed out is not
available under the current recording or
playback conditions.
• The LCD screen is manufactured using
extremely high-precision technology, so
over 99.99% of the pixels are operational
for effective use. However, there may be
some tiny black points and/or bright
points (white, red, blue, or green in color)
that appear constantly on the LCD screen.
These points are normal results of the
manufacturing process and do not affect
the recording in any way.
White, red, blue or green point
Black point
On sunlight
• Do not record the sun or leave the
camcorder under the sun for a long time.
The internal parts of the camcorder may
be damaged. If sunlight is focused on a
nearby object, it may cause a fire.
• Do not expose your camcorder’s
viewfinder, lens, or LCD screen to the sun
or strong light source for extended
periods. Doing so may cause a
malfunction of the camcorder.
• Do not attempt to record the sun directly.
Doing so may cause a malfunction of the
camcorder.
2

On the temperature of your camcorder
and battery pack
Your camcorder has a protective function
that disables recording or playback if the
temperature of your camcorder or battery
pack is beyond the safely operable range. In
this case, a message appears on the LCD
screen or in the viewfinder (p. 89).
On recording
• In order to stabilize memory card
operation, it is recommended that you
format the memory card when you use it
with your camcorder for the first time. All
data recorded on the memory card will be
erased by formatting, and cannot be
recovered. Save important data on the
memory card on other media such as a
computer, before formatting the memory
card.
• Before starting to record, test the
recording function to make sure the
picture and sound are recorded without
any problems.
• Compensation for the loss of the content
of recordings or the loss of recording
opportunities cannot be provided, even if
recording or playback is not possible due
to a malfunction of the camcorder, storage
media, etc., or even if images or sounds
are distorted due to the limits of the
capabilities of the camcorder.
• TV color systems differ depending on the
countries/regions. To view your
recordings on a TV, a TV of the
appropriate color system for the country/
region is required.
• Television programs, films, video tapes,
and other materials may be copyrighted.
Unauthorized recording of such materials
may be contrary to the copyright laws.
• Because of the way that the image device
(CMOS sensor) reads out image signals,
the following phenomena may occur.
– The subjects passing by the frame rapidly
might appear crooked depending on the
recording conditions. (This phenomenon may
be notable in displays having high motion
resolution.)
– Horizontal lines appear on the LCD screen
during recording under fluorescent lights,
sodium lamps or mercury lamps. The
phenomena can be reduced by adjusting the
shutter speed (p. 35).
Save all your recorded image data
• To prevent your image data from being
lost, save all your recorded images on
external media periodically. To save
images on an external device, see page 79.
To handle the recorded images on
your computer
Download the dedicated application
software (p. 16).
Format the recording media using
[MEDIA FORMAT] if images are not
recorded or played back properly
If you continue recording and deleting
images on recording media for a long
period of time, the files on that recording
media may be fragmented. As a result, you
may not be able to record and save images
properly. If this happens, save images on a
PC, then format the recording media
(p. 59).
Continued ,
3

Read this first (Continued)
About the operation of the camcorder
You can operate the camcorder using the
V/v/B/b/SET button (p. 61).
About this manual
• The on-screen displays in each local
language are used for illustrating the
operating procedures. Change the screen
language before using your camcorder if
necessary (p. 77).
• Design and specifications of recording
media and other accessories are subject to
change without notice.
• The screen displays used in this manual
are those of the PAL model.
See the bottom of the camcorder to
confirm whether it is NTSC or PAL
system.
4
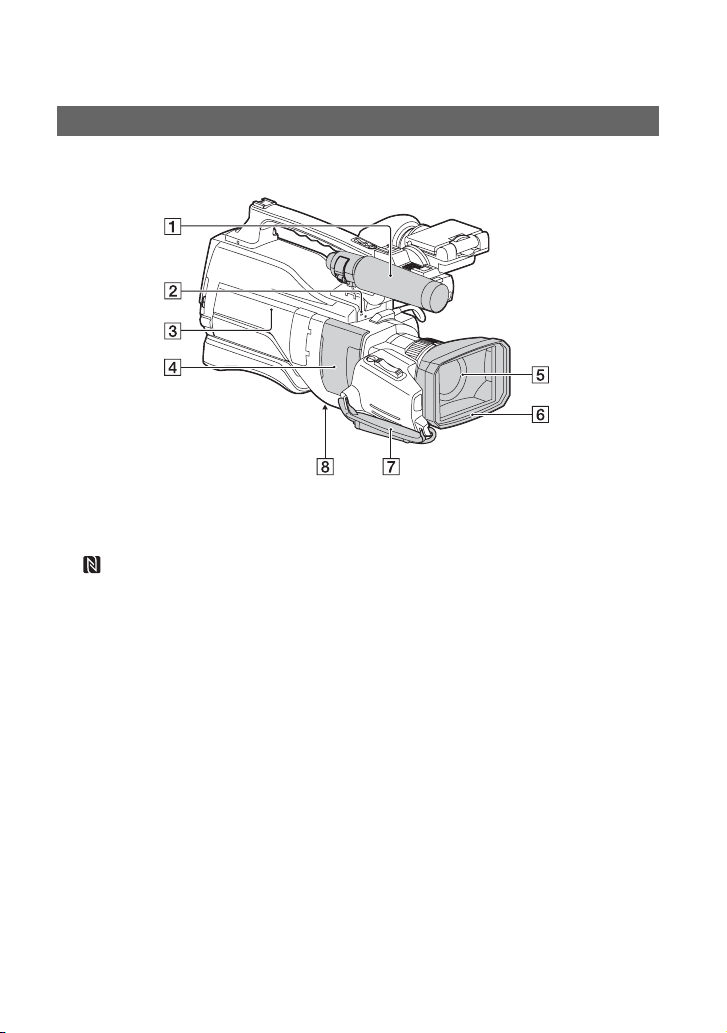
Identifying parts and controls
Body
The numbers in ( ) are reference pages.
A Microphone
B MIC jack (PLUG IN POWER) (70)
C (N mark)
• Touch an NFC-enabled smartphone to the
mark to establish a connection with the
camcorder.
• Near Field Communication (NFC) is an
international standard for short-range
wireless communication technology.
D Slide cover (22)
E Lens (G Lens)
F Lens hood
G Grip belt
H Tripod receptacle
Attach the tripod (sold separately: the
length of the screw must be less than 5.5
mm (7/32 in.)) to the tripod receptacle
using a tripod screw.
Continued ,
5
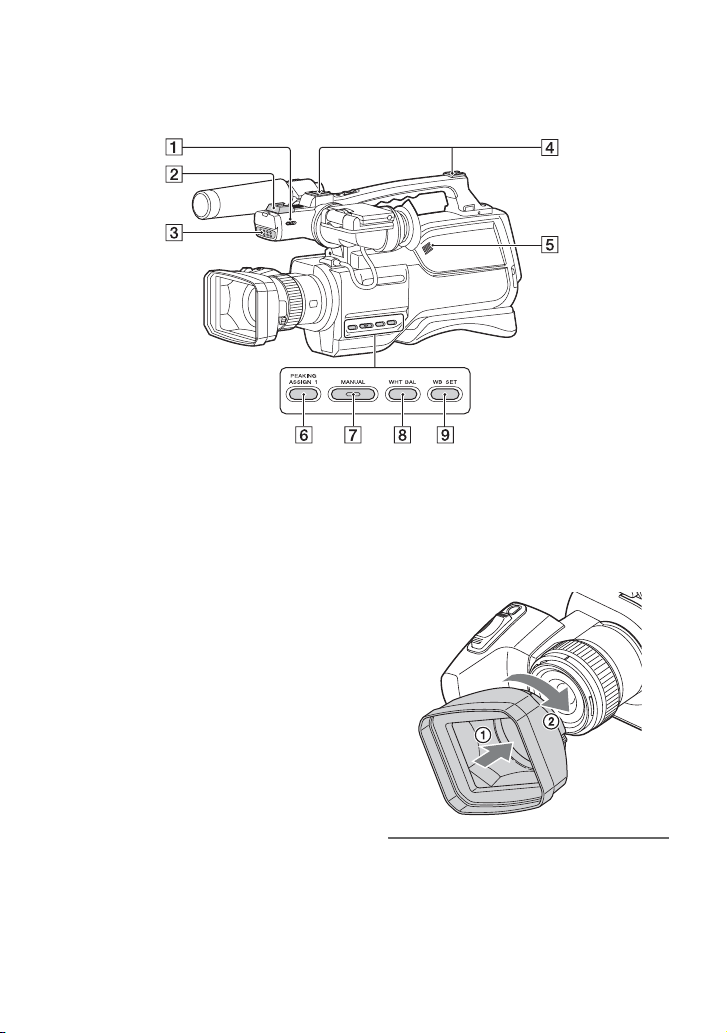
Identifying parts and controls (Continued)
A Light switch
B Multi Interface shoe (67)
C Video light (38)
D Accessory shoe
E Speaker
F ASSIGN1/PEAKING button (46, 71)
G MANUAL button (28)
H WHT BAL button (36)
I WB SET button (37)
6
Attaching the lens hood
Align the marks on the lens hood to
those on the camcorder, and turn the
lens hood in the direction of the
arrow 2 until it is locked.
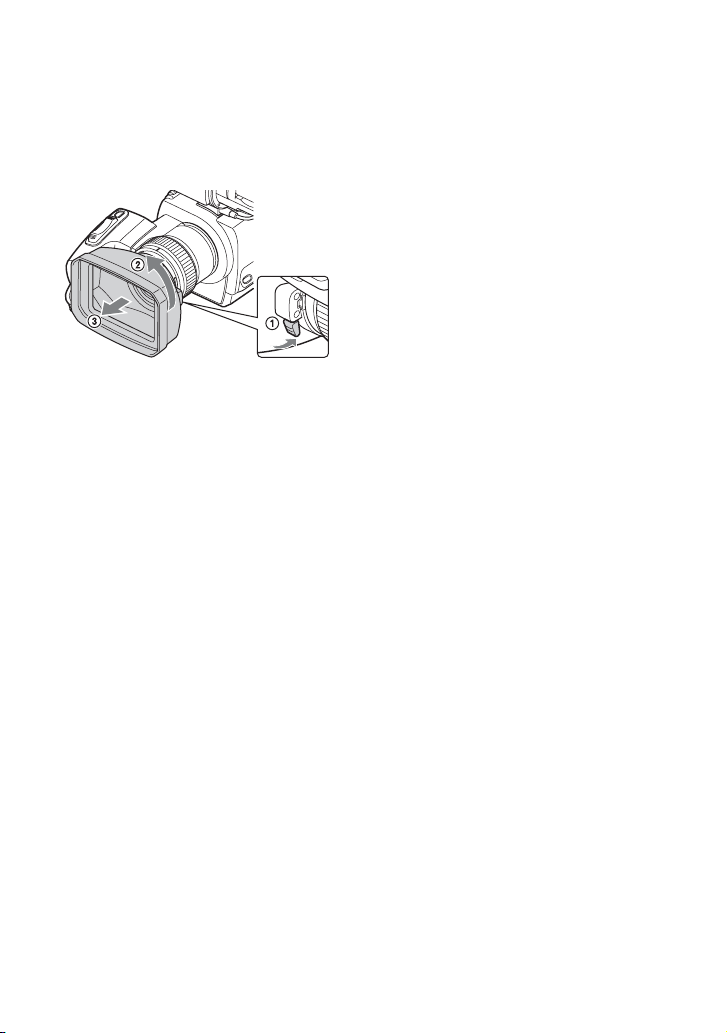
Removing the lens hood
• Turn the lens hood cover in the direction
of the arrow as illustrated while pressing
the lever on the lens hood cover.
z Tips
• If you attach or remove a 62 mm (2 1/2 in.) PL
filter or MC protector, remove the lens hood.
Continued ,
7
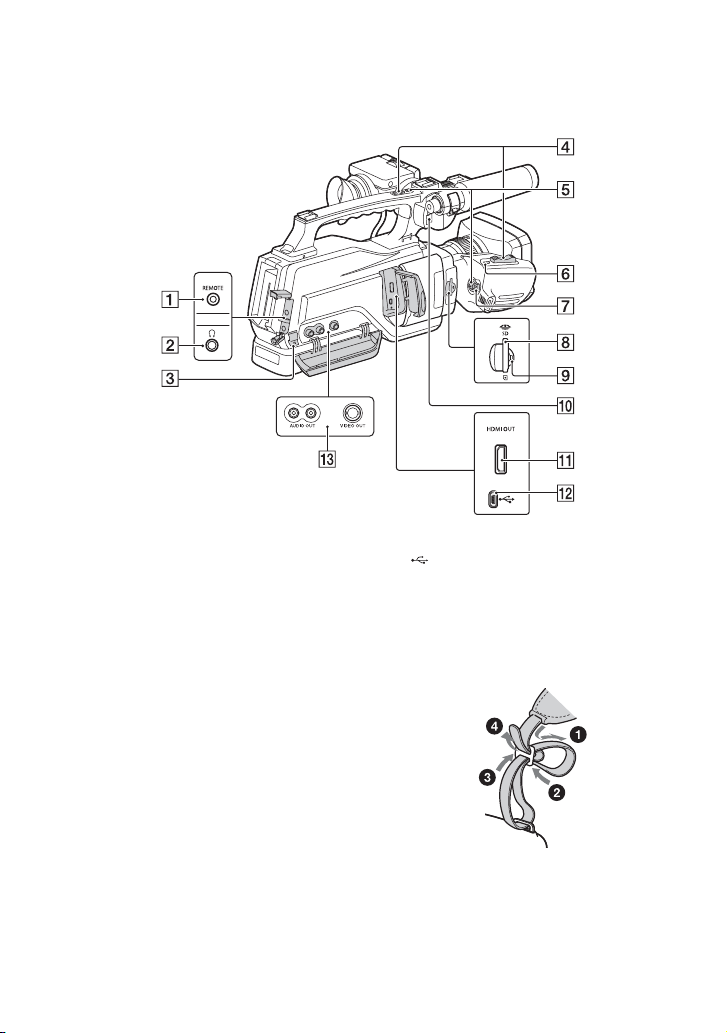
Identifying parts and controls (Continued)
A REMOTE jack
The REMOTE jack is used for
controlling the playback of video
devices and peripherals connected to it.
i (Headphone) jack
B
C Cable holder
The cable holder is used for fixing the
A/V connecting cable, etc.
D Power zoom lever (27)
E REC START/STOP button (23)
F ASSIGN 2/FOCUS MAGNIFIER
button (46)
G ON/STANDBY switch (19)
H Memory card slot (22)
I Access lamp (24)
J MIC cable holder
K HDMI OUT jack (Output only) (53)
The available video signals are read,
and the appropriate output format is
selected and output automatically.
8
L (USB) jack (mini-AB) (Output only)
M AUDIO OUT/VIDEO OUT jack (81)
To attach a shoulder strap
Attach a shoulder strap (sold separately) to
the hooks for a shoulder strap.

A Viewfinder (21)
B Eye sensor (74)
C Lens hood release lever (7)
D Eyecup (21)
E Viewfinder lens adjustment lever (21)
F Hook for the Shoulder belt
Attach the Shoulder belt (sold
separately).
G BATT (battery) RELEASE button (18)
H Battery pack (17)
I CHG (charge) lamp (17)
J DC IN jack (17)
Continued ,
9
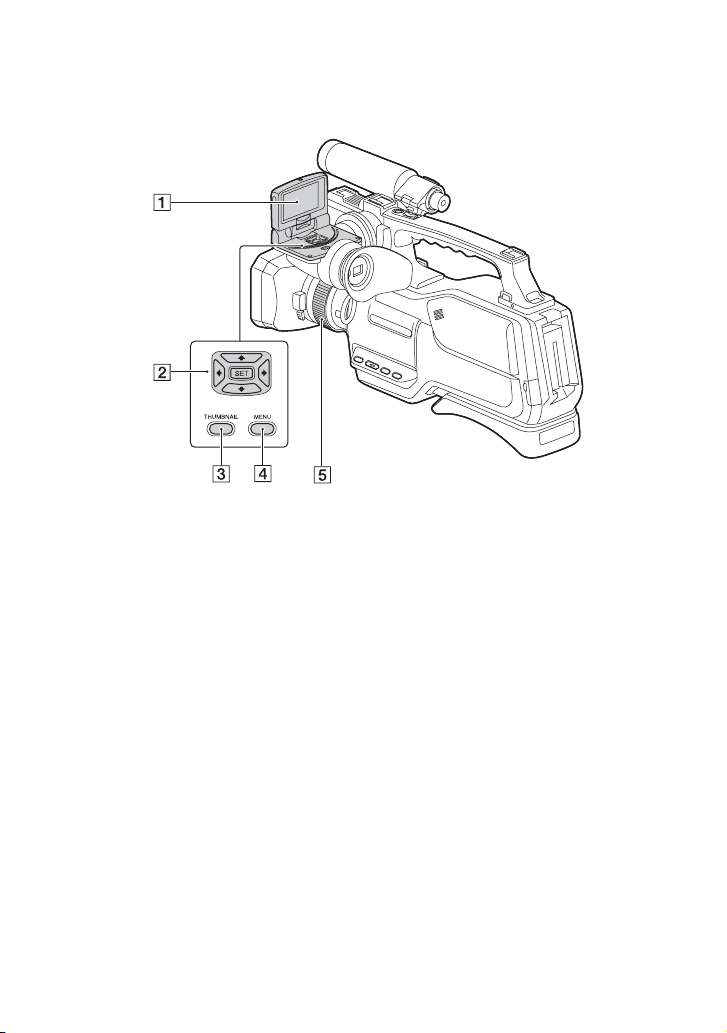
Identifying parts and controls (Continued)
A LCD screen (21)
B V/v/B/b/SET buttons
C THUMBNAIL button (48)
D MENU button
E Manual ring (33)
10
Screen indicators
Center
Upper left
Bottom
Upper right
Upper left
Indicator Meaning
100% Remaining battery
.
×1.2
×2.3
100-0001 Playback folder of
INTELLIGENT AUTO
(face detection/scene
detection/camera-shake
detection) (38)
SCENE SELECTION
(39)
REC FORMAT (31)
WIDE REC (68)
Optical zoom
Clear image zoom
Digital zoom
AIRPLANE MODE (76)
SIMUL/RELAY REC
NFC active
memory card
Zoom function is
assigned to the Manual
ring (27)
Indicator Meaning
N Playback indicator (48)
Processing
Relay recording
Upper right
Indicator Meaning
0min Estimated remaining
recording time
Recording/playback
media
00:00:00:00 Time code
(hour:minute:second:
frame)
Bottom
Indicator Meaning
Face detection [ON]
PEAKING (71)
ZEBRA (71)
STEADYSHOT (66)
9 Manual focus (28)
F3.5 Iris (34)
9dB Gain (34)
100 180° Shutter speed (35)
AVCHD AUDIO
FORMAT (69)
-2.0EV AE SHIFT (66)
Auto setting/manual
setting (72)
n A BWhite balance (36)
Center
Indicator Meaning
Recording media
REC STBY Recording status (23)
E Warning (89)
HISTOGRAM (70)
AUDIO LEVEL
DISPLAY (72)
Continued ,
11

Screen indicators (Continued)
Indicator Meaning
MI SHOE VIDEO
LIGHT (67)
REC LEVEL MODE
(69)
MIC SELECT (70)
z Tips
• Indicators may look different or appear at
different positions.
Data code during recording
The recording date, time and condition are
recorded automatically on the recording
media. They are not displayed while
recording. However, you can check them
by selecting (DISPLAY SET) t
[DATA CODE] and choosing the data that
you want to display, or by pressing the
ASSIGN button to which the DATA CODE
function is assigned, during playback
(p. 51).
12

Table of Contents
Read this first ……………………………………………………………………………….2
Identifying parts and controls ………………………………………………………….5
Screen indicators …………………………………………………………………………11
Getting Started
Body ………………………………………………………………………………………… 5
Step 1: Checking supplied accessories …………………………………………..16
Step 2: Charging the battery pack ………………………………………………….17
Step 3: Turning on the camcorder and setting the date and time ……….19
Setting the date and time………………………………………………………….. 19
Step 4: Adjusting the LCD screen and viewfinder …………………………….21
Step 5: Preparing the recording media ……………………………………………22
Recording
Recording …………………………………………………………………………………..23
Recording movies ……………………………………………………………………. 23
Changing the setting of the REC START/STOP button and handle REC
START/STOP button …………………………………………………………………. 25
Adjusting the zoom ………………………………………………………………….. 27
Adjusting the focus ………………………………………………………………………28
Using the Focus magnifier ………………………………………………………… 29
Focusing on a detected face (Face detection)…………………………….. 29
Changing the recording setting ……………………………………………………..31
Selecting the recording format ………………………………………………….. 31
Setting the DV MODE (DV mode) ………………………………………………. 31
Assigning frequently-used menu items to the Manual ring …………………33
Adjusting the brightness ……………………………………………………………….34
Adjusting the iris ……………………………………………………………………… 34
Adjusting the gain ……………………………………………………………………. 34
Adjusting the shutter speed ………………………………………………………. 35
Adjusting the exposure …………………………………………………………….. 36
Adjusting the color tone ………………………………………………………………..36
Adjusting the white balance………………………………………………………. 36
Useful functions …………………………………………………………………………..38
Recording movies in dim places (Video light) ……………………………… 38
Using the video light diffuser …………………………………………………….. 38
Selecting the suitable setting automatically for the recording situation
(AUTO MODE SET) ………………………………………………………………….. 38
What you can do with the Wi-Fi function of the camcorder ……………. 39
Downloading “Content Browser Mobile” ……………………………………… 40
Connecting the camcorder to an Android smartphone equipped with
the NFC function using One-touch …………………………………………….. 40
Continued ,
Table of Contents
13

Table of Contents (Continued)
Using a smartphone as a remote controller …………………………………. 41
Connecting without using the NFC function (Android)…………………… 42
Connecting without using the NFC function (iPhone/iPad) ……………..43
Setting time data ……………………………………………………………………… 44
Reviewing the most recently recorded scene
(LAST SCENE REVIEW)…………………………………………………………….. 45
Assigning the functions to the ASSIGN buttons ……………………………….46
Playback
Playback …………………………………………………………………………………… 48
Playing back movies ………………………………………………………………… 48
Changing/checking the settings in your camcorder ………………………….51
Changing the screen display …………………………………………………….. 51
Displaying recording data (DATA CODE) ……………………………………. 51
Connecting a monitor or a TV ……………………………………………………….53
Editing
Protecting movies (Protect) ………………………………………………………….. 56
Dividing a movie ………………………………………………………………………….57
Deleting movies ………………………………………………………………………….58
Formatting the recording media …………………………………………………….59
Deleting all data from the memory card and internal memory …………… 59
Repairing the image database file ………………………………………………… 60
Using the Menu
Operating the menu …………………………………………………………………….61
Menu items ………………………………………………………………………………..63
(CAMERA SET) menu ………………………………………………………….. 65
Settings to adjust your camcorder to the recording conditions
(STEADYSHOT, etc.)
(REC/OUT SET) menu ………………………………………………………….. 68
Recording settings, input and output settings (REC SET/VIDEO OUT, etc.)
(AUDIO SET) menu …………………………………………………………………69
Settings for the audio recording (AVCHD AUDIO FORMAT, etc.)
(DISPLAY SET) menu …………………………………………………………… 70
Display settings (MARKER/DISPLAY OUTPUT, etc.)
(TC/UB SET) menu ………………………………………………………………. 74
Time code settings (TC PRESET/UB PRESET/TC FORMAT, etc.)
14

(NETWORK SET) menu ………………………………………………………….76
Settings for the Wi-Fi function (CTRL W/SMARTPHONE, etc.)
(OTHERS) menu ……………………………………………………………………77
Settings while recording or other basic settings (AREA SET/BEEP, etc.)
Connecting with another device
Saving images on an external media device ……………………………………79
Creating a standard definition image quality (DV) disc with a recorder, etc.
……………………………………………………………………………………….81
Troubleshooting
Troubleshooting …………………………………………………………………………..83
Warning indicators and messages …………………………………………………89
Additional Information
Recording time of movies ……………………………………………………………..93
Using your camcorder abroad ……………………………………………………….95
File/folder structure on the recording media …………………………………….96
Maintenance and precautions ……………………………………………………….97
About the AVCHD format ………………………………………………………….. 97
About the memory card ……………………………………………………………. 97
About the “InfoLITHIUM” battery pack ……………………………………….. 98
About handling of your camcorder …………………………………………… 100
Specifications ……………………………………………………………………………102
Index ………………………………………………………………………………………..107
Table of Contents
15
Getting Started
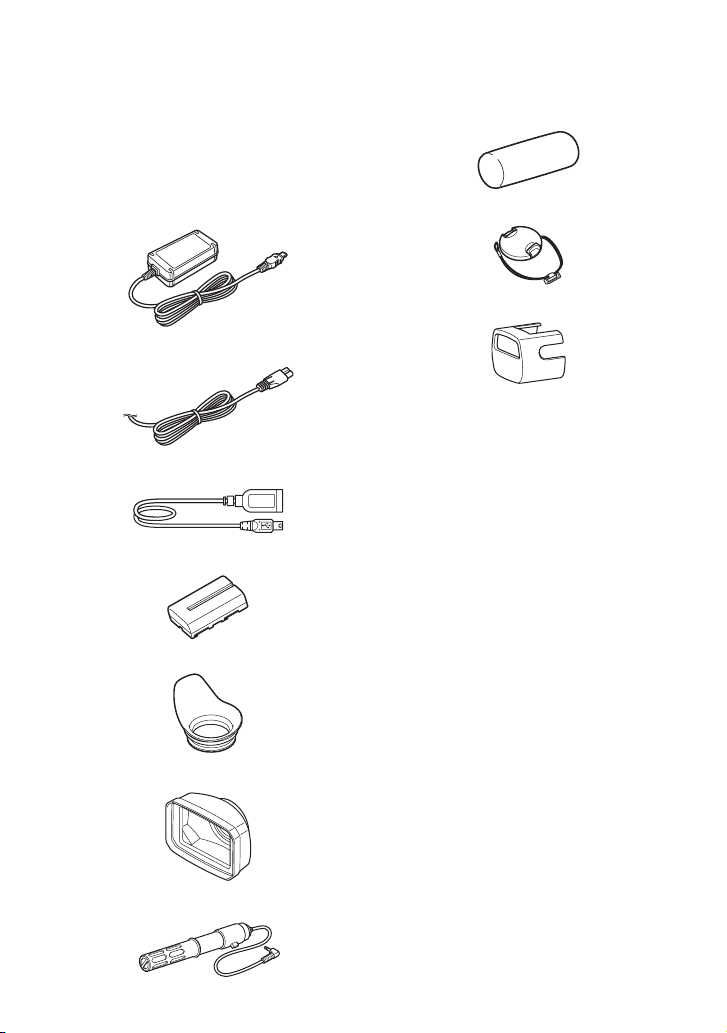
Step 1: Checking supplied accessories
Make sure that you have following items
supplied with your camcorder.
The number in the parentheses indicates the
number of that item supplied.
Recording media are sold separately.
AC Adaptor (AC-L100C) (1) (p. 17)
Power cord (mains lead) (1) (p. 17)
USB adaptor cable (1)
Rechargeable battery pack (NP-F570) (1)
Eyecup (1) (p. 21)
Lens hood (1) (p. 6)
Wind screen (1)
Lens cap (1)
Video light diffuser (1)
Shoe cap (1) (attached on the camera)
CD-ROM “Manuals for Solid-State Memory
Camcorder” (1)
Operating Guide (2)
Software Downloads
When the unit is used with a PC
connection, download device drivers, plugins, and application software, where
applicable, from the Sony Professional
products web site.
Sony Professional products web site
homepage:
U.S.A. http://pro.sony.com
Canada http://www.sonybiz.ca
Latin America http://sonypro-latin.com
Europe, Middle East and Africa
http://www.pro.sony.eu
Japan http://www.sonybsc.com
Asia Pacific http://pro.sony-asia.com
Korea http://bp.sony.co.kr
China http://pro.sony.com.cn
Microphone (1)
16
Although the data regarding recorded
materials are stored over multiple files and
folders, you can easily handle the clips
without considering its data and directory
structure, by using the dedicated application
software.

Step 2: Charging the battery pack
You can charge the “InfoLITHIUM”
battery pack (L series) with the supplied
AC Adaptor.
b Notes
• You can use a large capacity battery pack, NP970 (sold separately), with your camcorder.
3 Connect the AC Adaptor and
power cord from the camcorder
to an outlet.
1 Slide the ON/STANDBY switch to
1 (STANDBY) (default setting).
2 Attach the battery pack to your
camcorder.
Attach the battery pack by sliding it in
the direction of the arrow while pressing
it until it clicks.
Battery
DC IN jack
To the
outlet
Power cord
(mains lead)
• The CHG lamp lights up and charging
starts.
• The CHG lamp turns off when the
battery is fully charged. Disconnect
the AC Adaptor from the DC IN jack.
DC plug
AC Adaptor
Charging time
Approximate time (minute) required when
you charge a fully discharged battery pack.
Battery pack Full charge time
NP-F570 250
Getting Started
Continued ,
17
Step 2: Charging the battery pack (Continued)
Using an outside power source
You can use the AC Adaptor to obtain the
AC power. While you are using the AC
Adaptor, the battery pack will not lose its
charge even when it is attached to your
camcorder.
Follow the procedure from 1 to 2 as shown
in “Step 2: Charging the battery pack” on
page 17.
To remove the battery pack
Slide the ON/STANDBY switch to 1
(STANDBY). Push the BATT (battery)
RELEASE button (1) and remove the
battery pack (2).
BATT
(battery)
RELEASE
button
To store the battery pack
If the battery pack is not in use for a while,
run down the battery and store it (p. 99).
On the battery pack
• Turn the power off before changing the battery
pack.
• The CHG lamp flashes during charging under
the following conditions.
– The battery pack is not attached correctly.
– The battery pack is damaged.
– The battery pack is worn-out.
On the AC Adaptor
• Do not short-circuit the DC plug of the AC
Adaptor or battery terminal with any metallic
objects. This may cause a malfunction.
18
Step 3: Turning on the camcorder and setting
the date and time
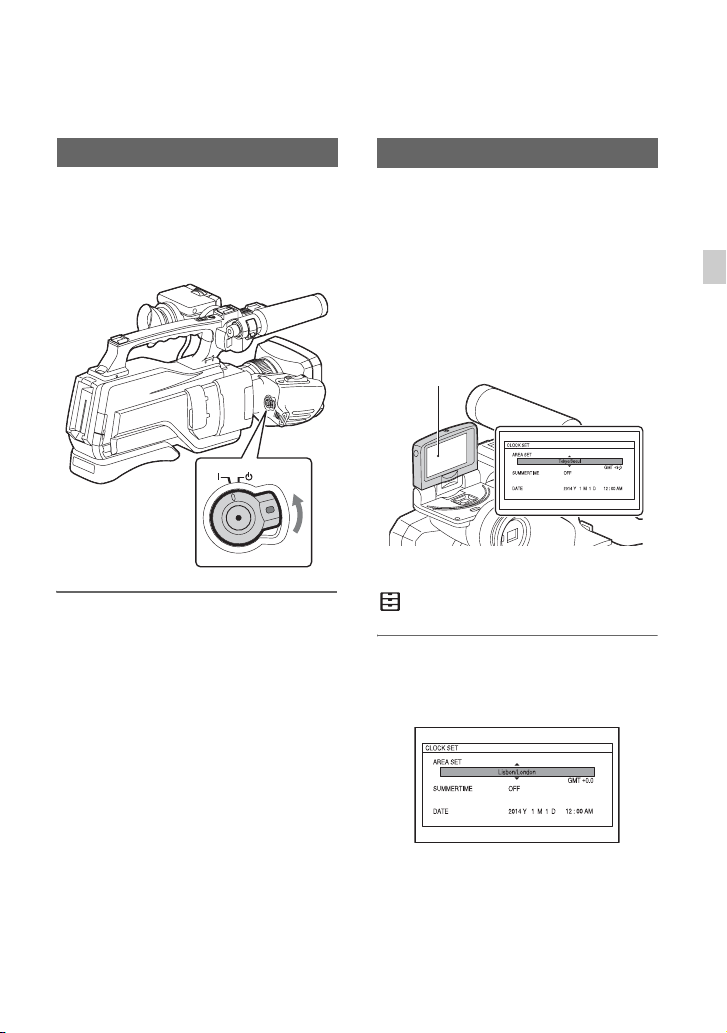
Turning on the camcorder
Slide the ON/STANDBY switch to ?
(ON) while pressing the green
button.
When you use your camcorder for the first
time, the [CLOCK SET] screen appears.
To turn off the power
Slide the ON/STANDBY switch to 1
(STANDBY).
b Notes
• If warning messages appear on the LCD screen,
follow the instructions.
Setting the date and time
Set the date and time when you use your
camcorder for the first time.
z Tips
• If you do not use your camcorder for about 3
months, the built-in rechargeable battery gets
discharged and the date and time settings may
be cleared from the memory. In that case,
charge the rechargeable battery and then set the
date and time again. See “Charging the preinstalled rechargeable battery” (p. 101).
LCD screen
When you set the date and time again, press
the MENU button, and select
(OTHERS) t [CLOCK SET].
1 Select your area by pressing the
V/v/B/b button, then press the
SET button.
Getting Started
Continued ,
19

Step 3: Turning on the camcorder and setting the date and time
(Continued)
2 Set [SUMMERTIME], [Y] (year),
[M] (month), [D] (day), hour and
minute, by pressing the V/v/B/b
button, then press the SET
button.
The clock starts.
• Set [SUMMERTIME] to [ON] to move the
time forward 1 hour.
• You can set any year up to the year 2037.
• Midnight is indicated as 12:00 AM, and
noon as 12:00 PM (NTSC model).
z Tips
• The date and time are automatically recorded on
the selected recording media, and can be
displayed during playback (DATA CODE,
p. 51).
20
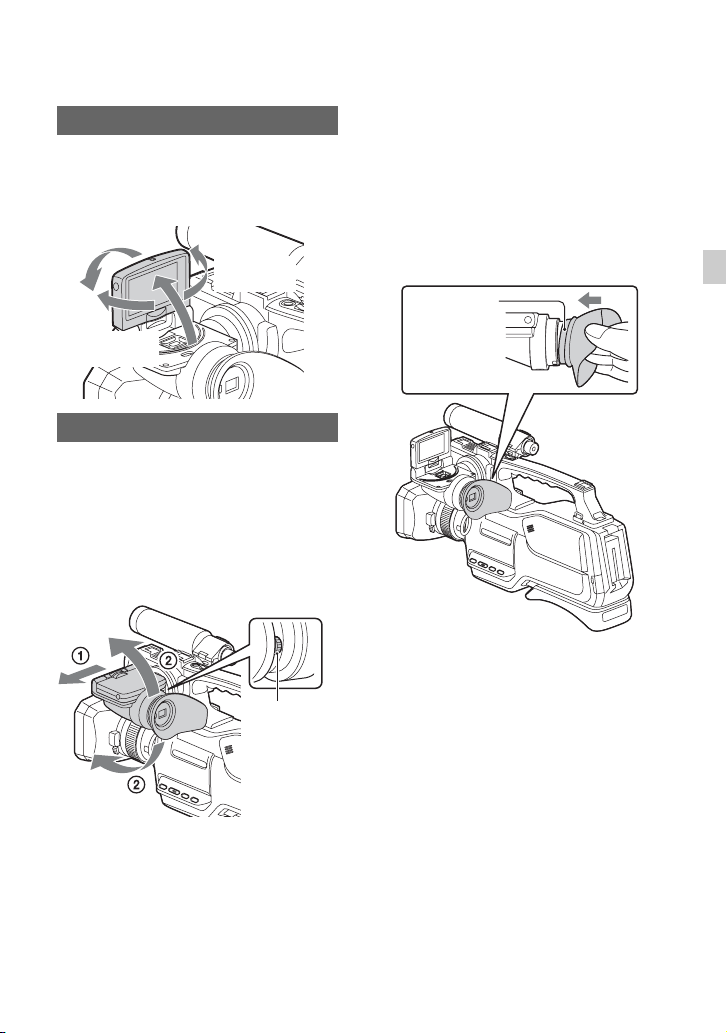
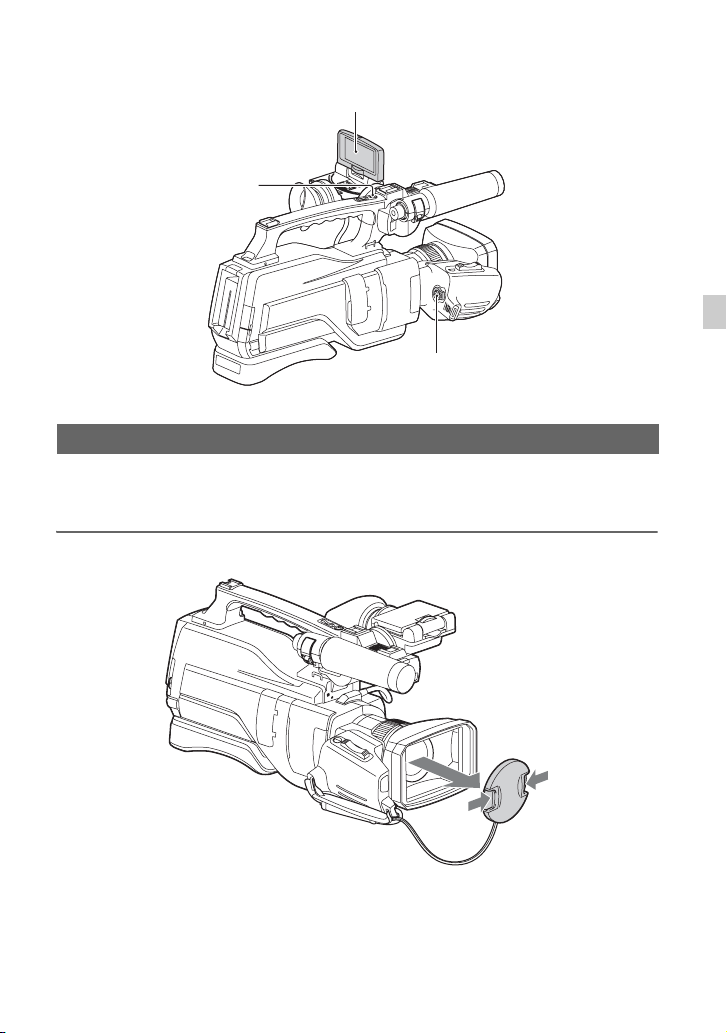
Step 4: Adjusting the LCD screen and viewfinder
Using the LCD screen
The LCD screen can be rotated in the range
as illustrated below, allowing a person other
than the camera operator to see the image.
Open 180
degrees.
90 degrees
(max.)
180 degrees
(max.)
Adjusting the viewfinder
Pull out the LCD panel block to adjust the
position (1), and rotate the viewfinder to
the best angle (2, maximum of 90
degrees).
If the viewfinder image appears blurred,
turn the viewfinder lens adjustment lever at
the right of the viewfinder until the image is
sharp.
When the picture in the viewfinder is
hard to see
If you cannot see the picture in the
viewfinder clearly under bright
circumstances, use the supplied eyecup. To
attach the eyecup, stretch it slightly and fit
it over the groove of the eyecup attached to
the camcorder. You can attach the eyecup
facing either the right or left side.
Eyecup
(supplied)
b Notes
• Do not remove the pre-attached eyecup.
Getting Started
Lens
adjustment
lever
21
Step 5: Preparing the recording media
Types of memory cards you can use in
your camcorder
Capacity (operation
verified)
“Memory Stick PRO
Duo” media (Mark2)*
“Memory Stick PROHG Duo” media*
1
32 GB
1
“Memory Stick XC-HG
Duo” media
SD memory card*
SDHC memory card*
SDXC memory card*
*1 Described as “Memory Stick PRO Duo” media
in this manual.
*2 Described as SD card in this manual.
2
2
2
64 GB
b Notes
• Operation with all memory cards is not assured.
• “Memory Stick PRO Duo” media, half the size
of “Memory Stick” media, or standard size SD
cards can be used for this camcorder.
• Use an SD card of Class 4 or faster. For standard
image quality (DV) recording, use an SD card of
Class 6 or faster, or an SD card of Class 10 or
faster.
• During the standard image quality (DV), images
cannot be recorded on “Memory Stick PRO
Duo” media.
• Do not attach a label or the like on memory card
or memory card adaptor. Doing so may cause a
malfunction.
• See page 93 for the recordable time of memory
cards.
• Movies recorded on “Memory Stick XC-HG
Duo” media or SDXC memory cards can be
imported to or played back on other equipment,
such as a computer or A/V device, by
connecting the camcorder to the equipment with
the USB cable. However, the equipment must
support the exFAT file system used for
“Memory Stick XC-HG Duo” media and SDXC
memory cards. Confirm in advance that the
connecting equipment is supporting the exFAT
file system. If you connect equipment not
supporting the exFAT file system and the
22
format screen appears, do not perform the
format. All the data recorded will be lost.
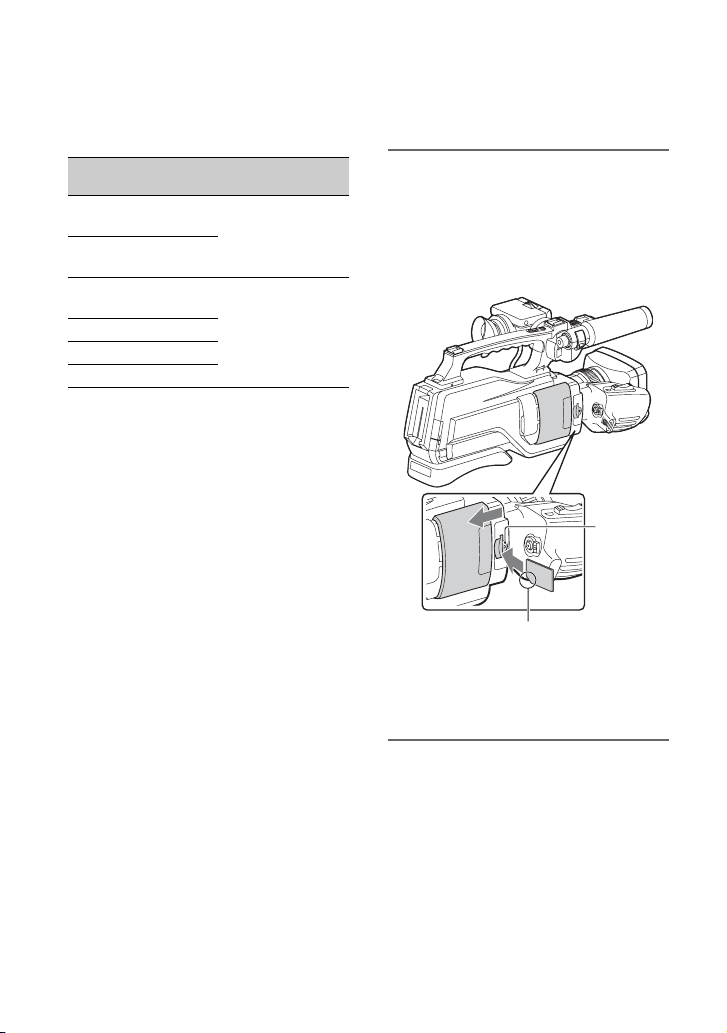
Open the cover, and insert the
memory card with the notched edge
in the direction as illustrated until it
clicks into place.
Close the cover after inserting the
memory card.
Memory
card slot
Note the direction of
the notched corner
• If you insert a memory card into the slot in the
wrong direction, the memory card, the memory
card slot, or image data may be damaged.
To eject the memory card
Open the cover and lightly push the
memory card in once.
b Notes
• If [The image database file is corrupted. The
media must be restored to use again.] appears,
format the memory card (p. 59).
• When inserting or ejecting the memory card, be
careful of the memory card popping out and
dropping.
• Do not open the cover during recording.
Recording
Recording
LCD screen
REC START/STOP button
(on the handle)
REC START/STOP button
Recording movies
Your camcorder records movies on a memory card and the internal memory. The factory
setting of recording movies is AVCHD. Do the following steps to record movies.
1 Press the latches on both sides of the lens cap and remove it.
Recording
Continued ,
23
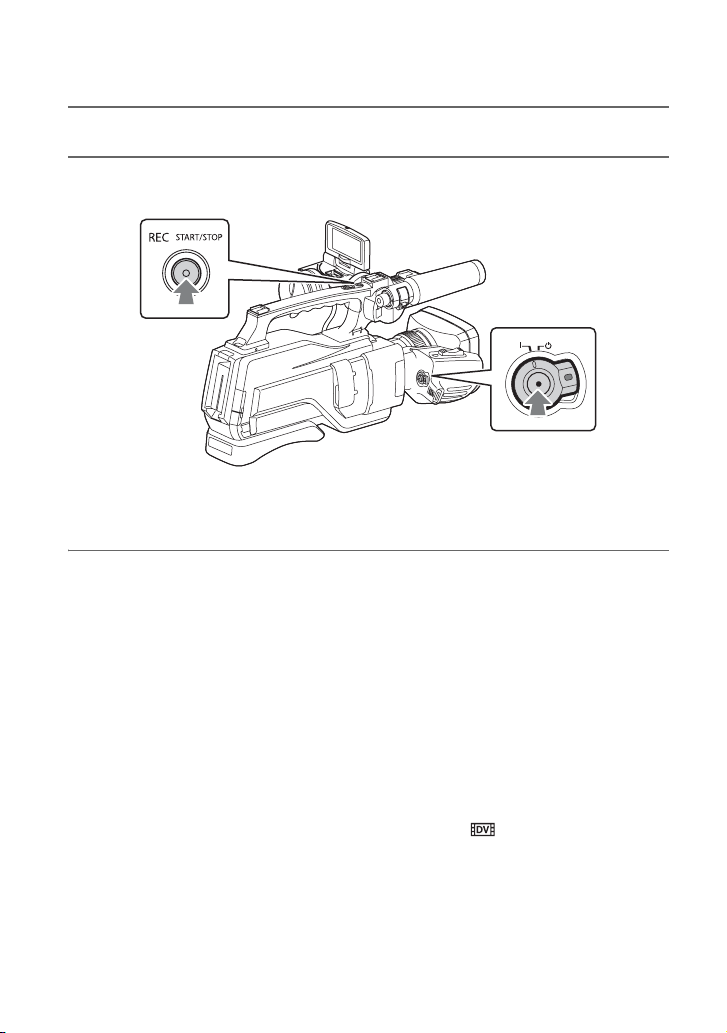
Recording (Continued)
2 Slide the ON/STANDBY switch to ? (ON) while pressing the green button.
3 Press either of the REC START/STOP button.
The recording lamps light up during recording.
To stop the movie recording, press the REC START/STOP button again.
b Notes
• When the access lamp is lit or flashing in red, your camcorder is reading or writing data on recording
media. Do not shake or apply strong force to your camcorder, do not turn the power off, and do not
remove the recording media, battery pack or the AC Adaptor. The image data may be destroyed.
• See page 93 on the recording time of movies.
• Your camcorder can record a movie for about 13 hours continuously.
• If a movie file size exceeds 2 GB while recording in DV or AVCHD format, the camcorder automatically
divides the file and creates a new one.
• The menu settings saved when you turn the camcorder off. The access lamp lights up while the settings
are being stored. If you remove the battery pack or the AC Adaptor before turning off the power, the
settings may return to the default settings.
z Tips
• When recording at a setting other than standard image quality (DV), the aspect ratio is fixed to 16:9.
When recording in DV mode, you can switch the aspect ratio to 4:3 ([ WIDE REC], p. 68).
• You can change the screen display during recording (p. 51).
• Indicators displayed on the LCD screen during recording are shown on page 11.
• The recording lamps can be set to stay off ([REC LAMP], p. 77).
24
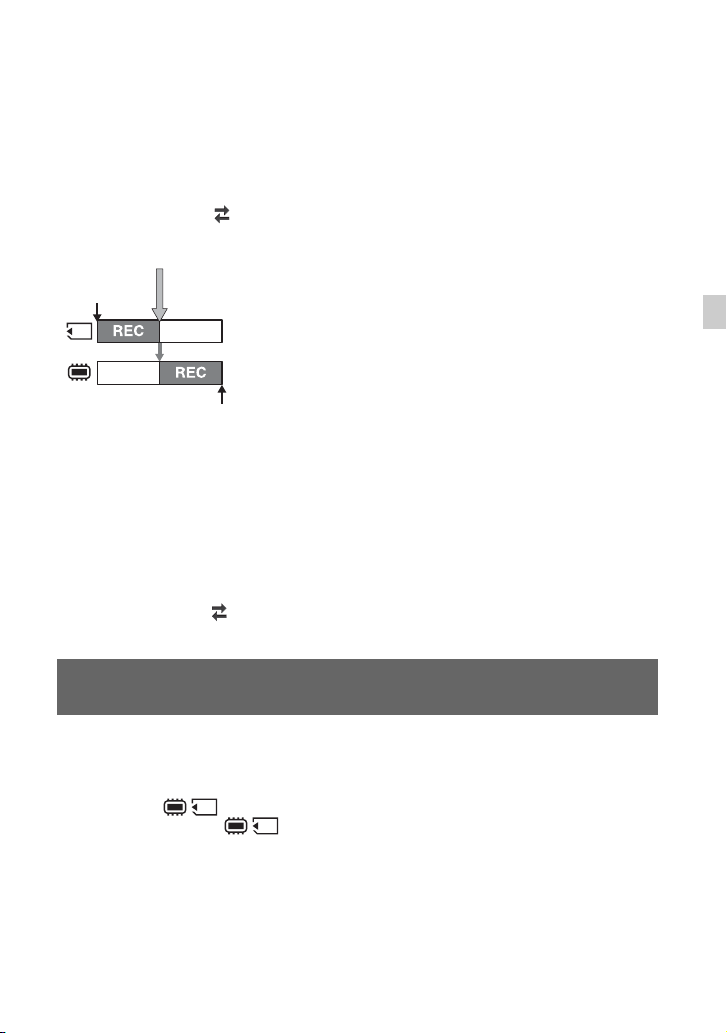
To continue recording, from a memory card to the internal memory (Relay
recording)
Insert a memory card, so the camcorder switches to the internal memory just before space on
the memory card runs out, and continues recording in the internal memory automatically
without pausing.
Press MENU t Select (REC/OUT SET) t [REC SET] t [SIMUL/RELAY REC] t
[RELAY REC] with the V/v/B/b/SET button.
Small space
Start
REC: Recording
End
b Notes
• If you start recording in the internal memory , the camcorder does not relay recording. To perform relayrecording, start recording in the memory card.
• Seamless playback of relay-recorded movies with this camcorder is not possible.
• You can re-combine relay-recorded movies using the dedicated application software (p. 16).
To record movies using both the internal memory and memory card (Simultaneous
recording)
You can record movies on both of these recording media simultaneously.
Press MENU t select (REC/OUT SET) t [REC SET] t [SIMUL/RELAY REC] t
[SIMULTANEOUS REC] with the V/v/B/b/SET button.
Changing the setting of the REC START/STOP button and handle REC
START/STOP button
You can start and stop recording in different recording media at different timing by operating
the both REC START/STOP button.
In the default setting, movies are recorded on both the internal memory and memory card at
the same time when either record button is pressed.
• REC BUTTON:
• HANDLE REC BUTTON:
Recording
Continued ,
25
Recording (Continued)
To change the setting
Press MENU t select (REC/OUT SET) t [REC SET] t [REC BUTTON SET] with
the V/v/B/b/SET button.
REC BUTTON SET Button and recording media
REC BUTTON:
HANDLE REC BUTTON:
REC BUTTON:
HANDLE REC BUTTON:
REC BUTTON:
HANDLE REC BUTTON:
Recording in both the memory card and the internal memory
starts and stops at the same time when either REC START/STOP
button is pressed.
Recording in the internal memory starts and stops when the REC
START/STOP button is pressed, and on the memory card when
the REC START/STOP button (on the handle) is pressed.
Recording in the memory card starts and stops when the REC
START/STOP button is pressed, and on the internal memory
when the REC START/STOP button (on the handle) is pressed.
26
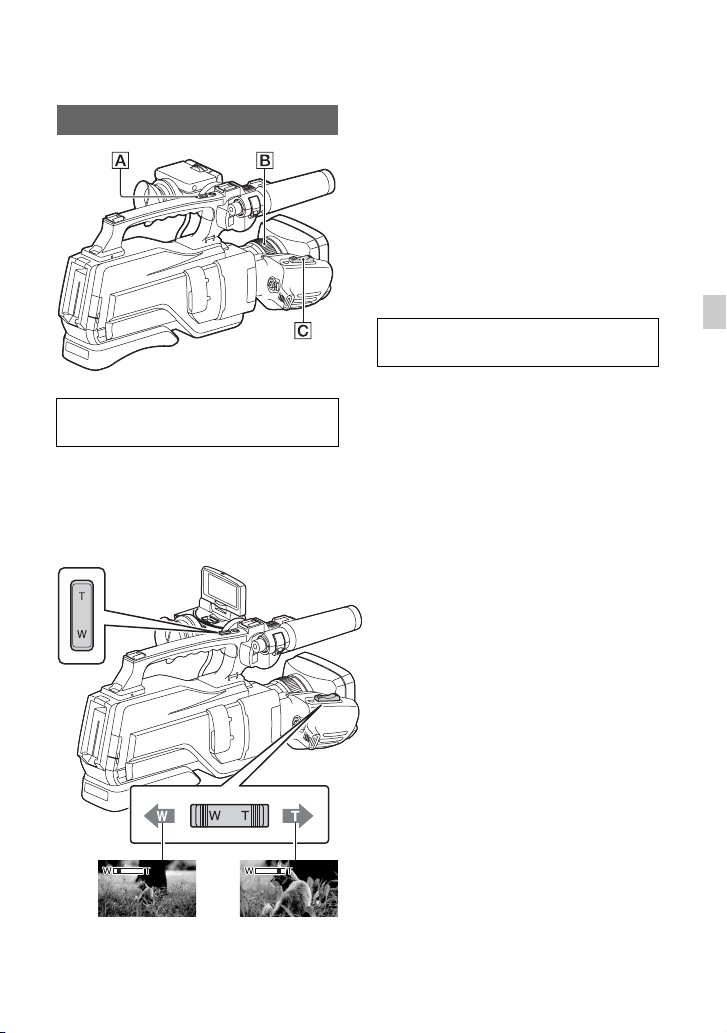
Adjusting the zoom
z Tips
• When focusing, the minimum distance required
between the camcorder and the subject is about
1 cm (about 13/32 in.) for wide angle and about
80 cm (about 2 5/8 feet) for telephoto.
• The focus may not be adjusted at certain zoom
positions if the subject is within 80 cm (about
2 5/8 feet) from your camcorder.
• Be sure to keep your finger on the power zoom
lever A/C. If you move your finger off the
power zoom lever A/C, the operation sound
of the power zoom lever may also be recorded.
Adjusting the zoom with the power
zoom lever
Press the power zoom lever A or C.
Press the power zoom lever C slightly for
a slower zoom. Press it further for a faster
zoom.
You cannot change the zoom speed of the
power zoom lever A on the handle.
Adjusting the zoom with the Manual
ring
If you set the RING SETTING to ZOOM,
you can adjust the zoom by rotateing the
Manual ring B (p. 33).
b Notes
• Turn the Manual ring B at a moderate speed. If
you turn it too fast, the zoom speed may lag
behind the Manual ring rotation speed, or the
operation sound of the zoom may also be
recorded.
Recording
Wide view:
(Wide angle)
Close view:
(Telephoto)
27
Adjusting the focus
You can adjust the focus manually for
different recording conditions.
Use this function in the following cases.
– To record a subject behind a window covered
with raindrops.
– To record horizontal stripes.
– To record a subject with little contrast between
the subject and its background.
– When you want to focus on a subject in the
background.
– To record a stationary subject using a tripod.
1 Assign the focus function to the
Manual ring A (p. 33).
2 During recording or standby,
press the MANUAL button B to
set the focus to manual.
9 appears on the LCD screen.
3 Rotate the Manual ring A to
focus on.
9 changes to when the focus
cannot be adjusted any farther.
changes to when the focus cannot be
adjusted any closer.
To restore automatic adjustment
Press the MANUAL button B to set the
focus to automatic.
9 disappears and the automatic focus
adjustment is restored.
z Tips
• The focal length information (the distance at
which the subject is in focus; for when it is dark
and hard to adjust the focus) appears for about 3
seconds in the following cases.
– When you press the MANUAL button B
to set the focus to manual and 9 appears
on the LCD screen.
– When you rotate the Manual ring A while
9 is displayed on the LCD screen.
• You can switch the focal length information
between meters and feet ([FOCUS DISPLAY],
p. 73).
9
28
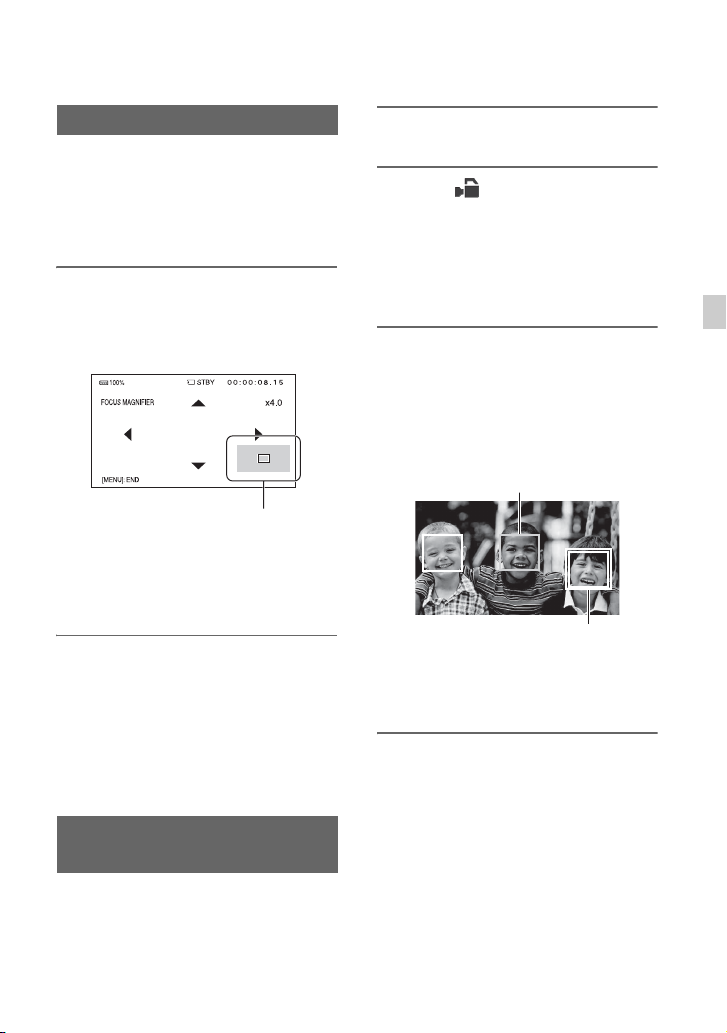
Using the Focus magnifier
The selected area on the LCD screen is
magnified and displayed. It is easier to
confirm the focus setting during manual
focusing.
[FOCUS MAGNIFIER] is assigned to the
ASSIGN 2 button (p. 46).
Press ASSIGN 2 button.
The center of the screen is magnified.
The setting changes with each press of the
button.
Enlarged display position
You can adjust the enlarged display
position with the V/v/B/b button on the
camcorder. Press the SET button to set the
enlarged display position back to the center.
b Notes
• Even though the image appears expanded on the
LCD screen, the recorded image is not
expanded.
z Tips
• You can change the magnification ratio with
[FOCUS MAG RATIO] (p. 72).
Focusing on a detected face
(Face detection)
The camcorder detects the face and focuses
on it (The default setting is [OFF]). [FACE
DETECTION] is available only with
automatic focus.
1 Press the MENU button D.
2 Select (CAMERA SET) t
[FACE DETECTION] t [ON] or
[OFF] with the V/v/B/b/SET button
C.
When the faces are detected, frames
appear on the LCD screen.
3 Press the V/v/B/b button C,
move the selection cursor
(orange colored frame) to select
the priority face, then press the
SET button again.
Selection cursor
(orange colored frame)
Priority face frame
(double frame)
The frame on the priority face changes
to a double frame.
To cancel the priority face
To move the selection cursor (orange
colored frame) onto the frame (double
frame) on the priority face, press the V /v/B/
b buttons, then press the SET button C.
b Notes
• Faces may not be detected depending on the
recording environment, the condition of the
subject or the settings.
Recording
Continued ,
29

Adjusting the focus (Continued)
• You may not be able to get the proper effect in
some recording environments. If this happens,
set [FACE DETECTION] to [OFF].
z Tips
• You can assign this function to an ASSIGN
button (p. 46).
• To make it easy to detect faces, record under the
following conditions:
– Record in a moderately bright place
– Do not obscure the face with a hat, mask,
sunglasses, etc.
– Face the front of the camera
30
Loading…

оптическое увеличение 12x
запись видео Full HD 1080p на флэш-память
матрица 6.59 МП
карты памяти SD, MS Duo
Wi-Fi
32 Гб встроенной флэш-памяти
вес 2800 г
Вариант 1: Самовывоз метро. Марьина Роща (только после подтверждения резерва)
Москва, 3-й проезд Марьиной Рощи, дом 40 с1, офис 33.
Самовывоз осуществляется ежедневно,Только после подтверждения резерва!
Стоимость доставки:
0 рублей
Вариант 2: КУРЬЕРОМ В ПРЕДЕЛАХ МКАД
Доставка курьером по Москве в пределах МКАД
Стоимость доставки:
600 рублей
Вариант 3: КУРЬЕРОМ ЗА ПРЕДЕЛЫ МКАДА
Доставка по Московской области: исходя из 80 руб/км от МКАД, но не более 3 500 руб. (точная стоимость будет рассчитана менеджером после оформления заказа)
Стоимость доставки:
3 500 рублей
- Тип носителя
- перезаписываемая память (Flash)
- Объем встроенной флэш-памяти
- 32 Гб
- Поддержка видео высокого разрешения
- Full HD 1080p
- Максимальное разрешение видеосъемки
- 1920×1080
- Широкоформатный режим видео
- есть
Матрица
- Тип матрицы
- CMOS
- Количество матриц
- 1
- Матрица
- 6.59 Мпикс
Объектив
- Фокусное расстояние объектива
- 2.9 — 34.8 мм
- Эквивалентное фокусное расстояние
- 26.8 — 321.6 мм (16:9), 32.8 — 393.6 мм (4:3)
- Zoom оптический
- 12x
- Выдержка
- 1/10000 — 1/6 сек
- Диафрагма
- F1.8 — F3.4
- Диаметр фильтра
- 37 мм
- Ручная фокусировка
- есть
Функциональные возможности
- Стабилизатор изображения
- есть
- ЖК-экран
- есть (3″, 921000 пикс.)
- Видоискатель
- есть, 1440000 пикс.
- Форматы записи
- 720p, 1080i, 1080p
- Дополнительные возможности
- запись в H.264, запись в MPEG4
Интерфейсы и носители
- Интерфейсы
- AV-выход, HDMI-выход, USB-интерфейс, выход на наушники, Wi-Fi, NFC
- Запись на карту памяти
- есть
- Поддержка карт памяти
- SD, SDHC, SDXC, MS Duo
Дополнительная информация
- Минимальная освещенность
- 1.4 люкс
- Конструкция
- встроенный осветитель
- Размеры (ШхВхГ)
- 455x235x265 мм
- Вес
- 2800 г
Отзывов ещё нет — ваш может стать первым
Про этот товар ещё никто не написал.
Быстрая доставка
Мы доставим товар по Москве и ближнему Подмосковью
Гарантия качества
На все товары предоставляется гарантия
Никаких предоплат
Оплата наличными или переводом на карту. Безналичной оплаты нет!!
Обратная связь
Консультация специалиста по техническим характеристикам товаров не предусмотрена!!
Мы проводим специальные акции для наших клиентов.
Оформите подписку и мы будем держать вас в курсе.
equalizer
Сравнение:
0
favorite
Избранное:
0
close
Ваш список сравнения пуст. Вы можете добавлять товары из каталога и сравнивать их между собой.
Ваш список избранного пуст. Вы можете добавлять товары из каталога в избранное.
local_mall
Корзина:
0
close
Корзина покупок пуста. Вы можете выбрать нужный товар из каталога.
- Обзор
-
Отзывы
0
Подробные характеристики
Общие характеристики
- Тип носителя
- перезаписываемая память (Flash)
- Объем встроенной флэш-памяти
- 32 Гб
- Поддержка видео высокого разрешения
- Full HD 1080p
- Максимальное разрешение видеосъемки
- 1920×1080
- Широкоформатный режим видео
- есть
Матрица
- Тип матрицы
- CMOS
- Количество матриц
- 1
- Матрица
- 6.59 Мпикс
Объектив
- Фокусное расстояние объектива
- 2.9 — 34.8 мм
- Эквивалентное фокусное расстояние
- 26.8 — 321.6 мм (16:9), 32.8 — 393.6 мм (4:3)
- Zoom оптический
- 12x
- Выдержка
- 1/10000 — 1/6 сек
- Диафрагма
- F1.8 — F3.4
- Диаметр фильтра
- 37 мм
- Ручная фокусировка
- есть
Функциональные возможности
- Стабилизатор изображения
- есть
- ЖК-экран
- есть (3″, 921000 пикс.)
- Видоискатель
- есть, 1440000 пикс.
- Форматы записи
- 720p, 1080i, 1080p
- Дополнительные возможности
- запись в H.264, запись в MPEG4
Интерфейсы и носители
- Интерфейсы
- AV-выход, HDMI-выход, USB-интерфейс, выход на наушники, Wi-Fi, NFC
- Запись на карту памяти
- есть
- Поддержка карт памяти
- SD, SDHC, SDXC, MS Duo
Дополнительная информация
- Минимальная освещенность
- 1.4 люкс
- Конструкция
- встроенный осветитель
- Размеры (ШхВхГ)
- 455x235x265 мм
- Вес
- 2800 г
- Комплектация
- бленда
объектива, крышка объектива, крышка башмака, наглазник для электронного
видоискателя, микрофон, ветрозащитный экран, диффузор подсветки видео,
переходной USB-кабель, аккумуляторная батарея (NP-F570), CD-ROM
(руководство по эксплуатации в формате PDF), руководство по
эксплуатации, адаптер переменного тока для AC-L100C, сетевой шнур
питания
Перед покупкой уточняйте технические характеристики и комплектацию у продавца
Руководства Sony HXR-MC2500 Размер файлов: 5161 KB, Язык: English, Формат: pdf, Платформа: Windows/Linux, Дата: 2017-04-09
На данной странице вы можете скачать руководства Sony HXR-MC2500. Мы предлагаем вам ознакомиться с руководством пользователя, инструкцией по сервисному обслуживанию и ремонту.
Также здесь вы найдете список заказных номеров на комплектующие Sony HXR-MC2500.
Все файлы предоставляются исключительно в ознакомительных целях. И не являютя руководством по ремонту, а направлены лишь на то чтобы помочь вам более детально ознакомиться с принципом построения устройства.
Содержимое представленных здесь руководств требуют от вас знания технического английского языка.
Если вы собираетесь скачать руководство по сервисному обслуживанию Sony HXR-MC2500, иными словами сервис мануал, вы дожны обладать хотя бы минимальными познаниями в области электроники и пониманием базовых принципов работы электромеханических устройств.
Для просмотра руководств вам понадобится Adobe Acrobat Reader версии 9 и выше либо другая программа для просмотра pdf файлов.
В связи с популярностью информации представленной на сайте и ее бесплатного предоставления конечному пользователю, убедительная просьба использовать специальные программные продукты для многопотокового скачивания файлов.
Руководства для Sony HXR-MC2500
- Руководство пользователя (User manual)
- Руководство по сервисному обслуживанию (Service manual)
- Руководство по ремонту (Repair manual)
- Перечень комплектующих (PartList)