
Чтобы смарт-часы правильно функционировали, их нужно настроить. Не все владеют этими знаниями и навыками. Подсказки и инструкции помогут справиться с задачей.
Установка и настройка приложения для смарт-часов
Какое нужно скачать приложение для смарт-часов? На сайте поддержки Google объясняют, что нужно скачать на телефон приложение Wear OS. С его помощью можно подключить и настроить смарт-часы не только на Android, но и iOS. Также можно попробовать приложение SmartWatch Sync Wear, позволяющее установить соединение Bluetooth с Android.
Как настроить смарт-часы с телефоном? Рассмотрим как настроить смарт-часы на примере использования приложения Wear OS:
- Через Google Play Market или App Store скачайте и установите приложение.
- Включите часы.
- Запустите приложение на телефоне и нажмите «Настроить».
- Выберите язык и примите пользовательское соглашение.
- Следуйте инструкции на экране телефона, пока не увидите название часов. Если на телефоне не видите название часов, перейдите к настройкам самих часов.
- Когда на экране часов появится надпись «Нажмите, чтобы начать», коснитесь экрана.
- Выберите язык на часах.
- Примите условия использования.
- Когда на часах появится надпись «Скачайте и запустите приложение Wear OS на мобильном устройстве», нажмите «Обновить» на телефоне.
- Кликните на название часов на телефоне.
- На смартфоне и часах появятся коды. Если они совпадают, нажмите «Подключить» на телефоне. Если коды не совпадают, перезапустите часы.
- Завершите настройку, следуя инструкциям на экране.
На некоторых телефонах перед настройкой нужно активировать передачу геоданных. Сделайте это в настройках в разделе «Местоположение», включив функцию «Использовать местоположение». После этого откройте Wear OS и обновите, чтобы обнаружить смарт-часы.

Если после всех манипуляций, телефон не может обнаружить часы, отключите их от устройства и сбросьте настройки. Сделаете это так:
- Нажмите и удерживайте кнопку питания на часах. Прокрутите экран вниз и тапните «Отключение и сброс настроек». Если такого пункта нет, выберите «Отключить от телефона».
- Подтвердите действие.
- Закройте Wear OS и сопутствующее приложение на устройствах.
- Повторите настройку с первого шага.
Когда часы подключены к устройству, в приложении Wear OS видна надпись «Подключено». В противном случае на экране часов показан значок «Отключено» в виде перечеркнутого облака.
Отладка базовых настроек
Как настроить дату и время на смарт-часах? Как правило, ничего делать не нужно, поскольку срабатывает автоопределение даты и времени. Если этого не произошло, выполните такие действия:
- Войдите в меню настроек смарт-часов.
- Перейдите в раздел «Время и дата» либо подобный.
- Укажите год, месяц, день и время.
Настраивая эти параметры учтите, что время на гаджете и телефоне должно совпадать.
Как настроить смарт-часы без телефона? Настройте дату и время, если это не произошло автоматически, выберите язык, циферблат и фон, при желании включите будильник, активируйте уведомления. Подобные настройки зависят от модели смарт-часов. Некоторые предоставляют больше возможностей, поэтому изучите в паспорте доступные функции, что еще можно установить или настроить.
В некоторых моделях можно установить SIM-карту, особенно в детских. Как правило, слот под симку располагается сбоку или под аккумулятором. Перед установкой SIM-карты в часы активируйте и протестируйте ее на телефоне.
Если часы не видят SIM-карту после установки, возможно, она недостаточно плотно вошла в разъем. Проверьте это. После успешной установки SIM-карты в течение нескольких секунд на дисплее смарт-часов должен отобразиться индикатор мобильной сети.
Синхронизация смарт-часов с телефоном
Синхронизация позволяет дублировать уведомления и звонки, которые поступают на телефон, на дисплее смарт-часов. Проще всего синхронизировать устройства через Bluetooth:
- На телефоне и смарт-часах включите Bluetooth.
- Когда телефон распознает часы, отобразится их название. Тапните по нему.
- На дисплеях обоих устройств появится код. Введите его на телефоне. Возможно, понадобится ввести PIN-код, который найдете в инструкции к часам. Иногда ничего вводить не нужно, устройства синхронизируются автоматически.
- Появится кнопка «Подключиться». Нажмите на нее.

Apple Watch подключите к iPhone так:
- Включите часы и наденьте на руку.
- Поднесите их к iPhone.
- Подождите, пока не появится уведомление, нажмите «Продолжить». Если уведомление не отображается, откройте приложение Apple Watch на iPhone и в разделе со всеми часами добавьте свои.
- Разместите iPhone над часами.
- Если это первый Apple Watch, нажмите «Настройка нового Apple Watch».
- Если ранее на этом устройстве iPhone были настроены другие часы Apple Watch, отобразится экран «Ваш новый Apple Watch». Нажмите «Программы и данные» и «Параметры», дождитесь, пока функция экспресс-настройки настроит новые часы. После этого нажмите кнопку «Продолжить». Для восстановления настроек выберите резервную копию предыдущих часов Apple Watch.
- Войдите при помощи Apple ID при появлении соответствующего запроса.
- Создайте код доступа.
- Настройте необходимые параметры на свое усмотрение.
- Настройте мобильную связь и Apple Pay.
Когда процесс создания пары будет завершен и часы будут готовы к использованию, на Apple Watch отобразится циферблат. Держите Apple Watch и iPhone рядом, чтобы устройства могли продолжать синхронизироваться. При необходимости обновите iOS и WatchOS до последней версии.
Подключение к Wi-Fi
На портале Citizenwatch указано, как подключить смарт-часы к Wi-Fi. Выполните следующие действия:
- Нажмите среднюю кнопку или проведите пальцем вниз от верхней части экрана.
- Прокрутите и нажмите «Настройки».
- Нажмите на подключение.
- Кликните на Wi-Fi и «Добавить сеть».
- Прокрутите, чтобы найти свою сеть, и нажмите.
- Включите телефон и запустите приложение Wear OS или подобное.
- Нажмите «Ввод» на телефоне, введите пароль.
Если часы сопряжены с телефоном Android и уже были подключены к Wi-Fi, часы могут автоматически подключаться к сохраненным сетям Wi-Fi при потере соединения Bluetooth с телефоном. Таким образом, можете получать уведомления и использовать голосовой поиск на часах по всему дому и на работе, даже если оставляете телефон в другой комнате.

Настройка мобильных платежей
Автор портала Engadget Черлинн Лоу пишет, что смарт-часы располагают очень удобной функцией — мобильными платежами. Это возможно в том случае, если смарт-часы поддерживают технологию NFC и соответствующий способ оплаты.
Для осуществления бесконтактных платежей при помощи смарт-часов необходимо добавить карту. Рассмотрим на примере Google Pay, как это сделать. На часах должно быть установлено Wear OS версии 2.0 и выше. Действия следующие:
- На часах откройте приложение «Google Кошелек». Если данного приложения нет на часах, установите их из Google Play.
- Нажмите «Начать».
- Настройте блокировку экрана, если этого еще не делали.
- На телефоне выполните действия по добавлению карты.
Карта сохраниться только в Google кошельке на часах. Учтите, что «Google Кошелек» не поддерживает PayPal, подарочные, скидочные и бонусные карты. При оплате часы необходимо будет просто поднести к терминалу и дождаться звукового сигнала или вибрации.
На устройствах Samsung используется приложение Samsung Gear, а на Apple Watch — приложение Wallet.
Это были основные и первоначальные действия для настройки смарт-часов. Многие модели предлагают возможность настройки различных фитнес-функций и многого другого. Все это настраивается и добавляется на свое усмотрение.
Специально для вас мы сделали подробные инструкции по настройке часов Smart Baby Watch.
Отзывы
«Добрый вечер. Получил сегодня тачскрин, установил. Все работает отлично! Спасибо за скорость и качество. Очень выручили.»
«Заказ умных gps часов для пожилого человека.»
«Заказ был отправлен в пункт выдачи Сдек по полной предоплате. 15.02.2025»
«Заказ на сенсорный экран для часов Wonlex KT15. 13.02.2025»
Оставить отзыв
Все отзывы (92)
Сертификаты
Скачайте инструкцию для своего гаджета здесь:
1. Инструкция для детских GPS часов, работающих с программой Setracker.
Инструкцию для детских GPS часов, работающих с Setracker, подходит для большинства моделей, в том числе для: Q50, Q90, Q100, Q75, G100, DF31G, W9 (GW400S), Q360. Скачиваем тут:
Инструкция для часов на SeTracker
2. Инструкция для детских GPS часов, работающих с программой AIBEILE
Инструкцию для детских GPS часов, работающих с AIBEILE (другое название программы «Find My Baby», подходит для следующих моделей: T58, D100 (A16), T100 (A19), FA23. Cкачиваем тут:
Инструкция Smart Watch AIBEILE
3. Инструкция для детских GPS часов, работающих с программой Care Escort 2
Инструкцию для детских GPS часов, работающих с Care Escort 2 (другое название программы «Забота и защита 2»), подходит для следующих моделей: X10 (V7k), K3, G98. Скачиваем тут:
Инструкция для Care Escort 2
4. Инструкция для детских GPS часов, работающих с программой Wecare
Инструкцию для детских GPS часов, работающих с WECARE, подходит для следующих моделей: Smart Baby Watch A6 (A5) скачиваем тут:
Инструкция Smart Baby Watch A6
Huawei Watch Kids 4 Pro Aslan-AL19 — детские смарт-часы с функцией точного определения местоположения, возможностью совершать видеозвонки и поддержкой тематических режимов тренировок.
Квадратный сенсорный дисплей 1.41” обеспечивает легкость управления. Модель поддерживает установку карты Nano-SIM, работу по Wi-Fi, определение местоположения по GPS и ГЛОНАСС. Водонепроницаемый корпус выдерживает давление до 5 атм.
Чувствительные датчики помогают HUAWEI Watch Kids 4 Pro считать шаги, обучать ребенка плаванию и другим тренировкам. Режим «Не беспокоить» отключает звуки во время уроков. Устройство дополнено будильником, фонариком, управлением жестами и другими функциями. Камера 5 Мп позволяет снимать фото и видео, просматривать их в галерее, отправлять на другие устройства.
Преимущества смарт-часов
- Ультраширокоугольная фронтальная камера 5 МП.
- Внутренняя память 1 ГБ (RAM) и 8 ГБ (ROM).
- Многоцветная подсветка корпуса.
- Герметичный корпус (5 Атм).
- Большой AMOLED-экран с автоматической настройкой яркости.
- Поддержка технологий Wi-Fi и Bluetooth.
- Возможность автономной работы до двух суток.
Устройство детских часов
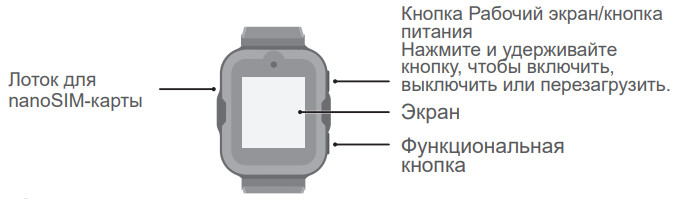
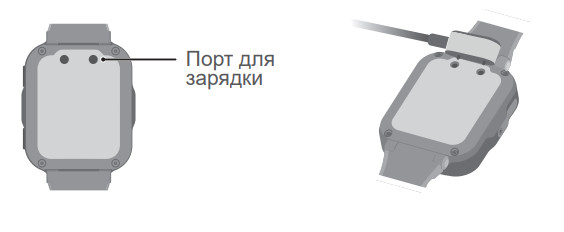
Зарядка
Совместите металлические контакты на зарядном устройстве с контактами на задней панели носимого устройства, разместите их на плоской поверхности. Подключите зарядное устройство к источнику электропитания. Экран устройства включится, на нем отобразится уровень заряда батареи.
Установка nanoSIM-карты
- С помощью прилагаемой отвертки открутите винты и извлеките лоток для nanoSIM-карты.
- Вставьте nanoSIM-карту в лоток для карты чипом вверх. Убедитесь, что скошенный уголок карты занял правильное положение в лотке.
- Вставьте лоток для карт в устройство и затяните винты.
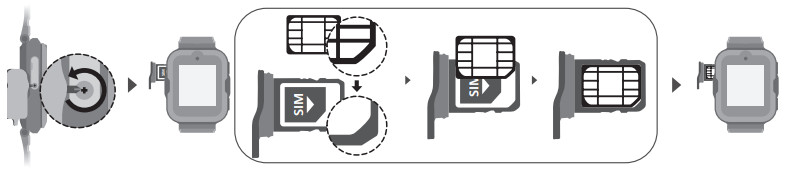
- Не используйте обрезанную вами nanoSIM-карту, так как это может повредить устройство.
- Сохраняйте винты в целости и не допускайте их потери.
- Лоток для карт имеет подвижную конструкцию. Это нормально, если лоток для карт немного сдвигается после того, как его вставили в устройство
Сопряжение с телефоном
Table of Contents
- Getting Started
- Inserting the SIM Card into Your Device
- Know Your Device
- Pairing
- Register Your Device
- Device Functions
- Types of Location Services Used by the Device
- Safety Features
- Other Functions
- FAQ
- Warranty Conditions
- References
- Read User Manual Online (PDF format)
- Download This Manual (PDF format)
Kids 4G Smart Watch
User Manual
The product user guide contains product features, how to use them, and the
operating procedure. Read the user manual carefully to get the best experience
and avoid unnecessary damage. Keep this manual for future reference. If you
have any questions or comments about the device, please contact the customer
line.
✉ www.alza.co.uk/kontakt
✆ +44 (0)203 514 4411
Importer
Alza.cz a.s., Jankovcova 1522/53, Holešovice, 170 00 Praha 7,
www.alza.cz
Getting Started
Preparation Before Putting Into Operation
Check, if you have all accessories in the package.
- Instruction manual
- Charging cable
- EU charging adaptor
- Flat plastic tool
- SIM card adapter
Prepare the SIM card according to the following instructions.
-
SIM cards must be in the NANO size (see the image below).

-
The PIN code must be deactivated. You can deactivate the PIN when you insert the SIM card into your mobile phone.
-
For the correct function of the device, internet and call services must be activated on the SIM card.

Note: Average data consumption of the device is about 100 MB per month.
Ensure that the SIM card is fully compatible with 4G network.
Warning: If there is no data plan active or enough money on your prepaid
card, the watch will rapidly discharge as it repeatedly tries to start the
corresponding connection.
Location and communication services are not available.
Fully charge your device using supplied USB cable plugged into a power
adapter. Do not use the fast charger or laptop USB port for charging! After a
few moments, the screen will turn on automatically and you will see the
charging indicator.
Before first use charges the device for at least 2 hours.
Inserting the SIM Card into Your Device
The device must be turned off before inserting the SIM card. You can turn it
off by long pressing the side button. Use the adaptor that is part of your
watch and insert the adaptor with the SIM card in the direction shown in the
picture below.
Use the supplied flat tool to push the SIM card into the device until it
clicks.
Turn on the Device
After the device is fully charged and the SIM card is inside, you can turn
on the device using the turn on/turn off button. It takes approximately three
minutes to load GSM or GPS signal. You can see the status icons in the top-
left corner of the screen. It is possible that the GPS signal will not load
inside the building. We recommend taking the device out before the first use.
Know Your Device

Pairing
Download the WowME Tracker app
Full functionality and all settings of the device are available in the WowME
Tracker app. Use the following QR code to download the app or search WowME
Tracker on App Store or Play Store.
https://www.myaqsh.com/wowmetracker.html
Register Your Device
After the first registration in the app, you will be asked to register your
device. Scan the QR code with the registration code or type in the
registration number. You can find the registration number and the QR code on
the back of the device or in the app. Then you can log into the app again and
start using all its functions.

Device Functions
All settings are available in the WowME Tracker app or also directly in the
menu of your device.
App Menu
All settings are listed below, and others can be selected in the WowME
Tracker app.

Location Services
For the first use of the GPS watch, we recommend testing the device
outdoors to ensure correct synchronization with the GPS position from
satellites and get correct local coordinates in the WowME Tracker. Device
tracking will be more accurate when you later bring it back inside.
If you control more devices in the WowME Tracker app (maximum of 50 devices on
one account), you need to log out and log in again. All settings will be
automatically updated regarding the possibilities of each device.
The device can track position in three modes:
- Normal mode (once every ten minutes)
- Saving mode (once an hour)
- Tracking mode (once a minute)
Chosen mode influences the battery consumption. For a basic overview of the
location of your loved one, we recommend using longer update frequencies to
ensure longer service of your device without charging. In saving mode, the
battery life of the device is approximately two days, while in normal mode it
lasts for about one day.
After clicking on the map on the main screen of the WowME Tracker app, you can
see the position of your watch. You can check when this position was updated
for the last time and what type of location service was used (GPS, WiFi, or
LBS).
By pressing the manual location button (green mark, as seen in the screenshot
below), you can manually refresh the real-time location. Firstly, you will get
a quick update using GPS and after less than a minute you shall get a more
accurate GPS position when available. If your device isn’t receiving a GPS
signal, only the LBS location will be displayed.

Types of Location Services Used by the Device
This device uses GPS, Wi-Fi, or LBS (localization using a GSM network) for
location service.
- GPS determines position with accuracy up to five meters. Accuracy depends on the GPS signal which can be weakened in an environment with high trees or buildings. GPS signal is usually not available when the device is indoors.
- Wi-Fi localization uses nearby Wi-Fi networks to determine its location which is based on the location listed in the public list of Wi-Fi networks.
- LBS uses a GSM network and depends on the density of signal towers of your mobile provider in your location. It is usually very inaccurate and in some areas location displayed by the WowME Tracker app can have differences varying between 200 and 500 meters.
Please see important information regarding using location services below:
- If you want to display only the accurate location of your device, you can turn off LBS usage in the WowME Tracker app. Please note that the watch will use only GPS which is not available indoors. It means that the watch will track changes of position only outside.
- If the device stops moving or shaking, the location service automatically activates standby mode to save the battery. The device will automatically update location only when the watch is in your hand, and you are moving.
- Location if Wi-Fi is dependent on data entered by an administrator of the Wi-Fi network. It can be inaccurate if the admin of the Wi-Fi network does not show correct information about their Wi-Fi location. This feature cannot be influenced by the device.
Safety Features
SOS Call
In the WowME Tracker app, you can set up three different SOS numbers. After
long pressing the red button, the device will automatically dial the numbers
in the selected order.
If nobody answers the phone, the device will try again after 30 to 40 seconds.
This way it can dial up to two times per number. You can also set an SMS alert
(see below) with information about SOS alerts.
Note: When the battery of the device is low, all functions are disabled, and
the touch button doesn’t work to save the remaining battery capacity for SOS
Call. The function of starting SOS Call with the side button is still active
in the low-power mode.
SMS Alert
After making an SOS call, the device will automatically send a text message to
chosen phone number with information about its location and time of the SOS
alert. You can also set up an SMS alert for situations when the battery is low
(below 20%).
Reject Unknown Calls
To protect device users from scammers and unrequested calls, you can set up
rejecting unknown calls. If an unknown number (meaning not saved in the
contact list of your watch) calls your device, you will receive a notification
to the WowME Tracker app.
With the function “Retrieve watch SMS”, you can also read in SMS received on
your device in the WowME Tracker app. It is useful for receiving verification
codes or other important SMS messages.
Safety Zone
You can set up safety zones on the map. The device will automatically notify
you when the user leaves the selected safe zone.
- Open “Safety Zone” on the map.
- Click on “+” in the bottom part of the screen.
- Find the map place where you want to set the safety zone and click on it.
- Type the name of the zone and set up the radius, then click on “OK”.
Note: WowME Tracker enables three safety zones for each device. Ensure
that safety zones don’t overlap with each other.
Disable Functions
If you do not want the device used to call other numbers than those saved in
the Contact list, you can turn off access to the Dial Pad. You can also
remotely turn off GPS to save the battery. The device uses only Wi-Fi network
localization or inaccurate mobile network localization.
Remote Health Check
In the “Health” tab of the WowME Tracker app, you can remotely check the
health of the device user.
You can see real-time information about physical activity (steps, calories
burnt, and distance walked). Please note that this device does not substitute
a medical device and all measured values are informative only.
Please take into account that the Steps function needs to be activated in the
WowME Tracker app first (click on “Health” → “Steps” → “Switch”). Without
activating this function, you cannot access the steps count in the app or in
your device. For the current measuring of calories or distance, please set
also other information in the “Steps” menu including weight and average Step
Length.
Other Functions
Night Power Saving
If you know that the device user doesn’t wear the watch while sleeping, you
can set automatic power saving for the night time period.
Wi-Fi settings
To save battery and data consumption, you can manually set up Wi-Fi
connections for networks where the device user often spends time in the same
ways as you would do on your smartphone. This device also automatically uses
all Wi-Fi networks to determine its location (uses all available Wi-Fi
networks, not only those that you set up in the “Watch Wi-Fi Settings”).
Do Not Disturb
You can set different periods of the day when the watch will automatically
switch into the Do Not Disturb mode (e.g., during school hours). The watch
will automatically switch to silent mode and stop incoming calls.
Activity Schedule
In the WowME Tracker app, you can set up a timetable for school or other
activities of your kids that can be displayed on the smartwatch if you want to
remind it your child.
FAQ
The battery consumption of the device is too high. How can I make the
device’s lifetime longer?
Battery consumption is mostly determined by location services. If the battery
of your device is out sooner than you want, try a longer frequency of location
updates. We recommend longer periods to save battery as you can always
manually check the location in the WowME Tracker app and other services work
without restriction (such as safety zones etc.). Battery consumption is also
lowered by Wi-Fi usage when used instead of mobile data. Please set up a Wi-Fi
connection in the WowME Tracker app or directly in the menu of your watch.
The device is offline in the WowME Tracker app.
The missing connection between the device and the WowME Tracker app can be
caused by multiple problems. Please check that your device meets the following
criteria:
- The battery of the device is charged.
• PIN code of the SIM card is deactivated.
• SIM card has an active data plan or enough money for pay-as-you-go data.
Location services are very inaccurate.
The accuracy of your device’s location services are depending on the method
that is currently used in operation. It is determined by the following
factors.
When outside, the device is using primarily GPS that is affected by the
surrounding environment. GPS has weaker signals close to high buildings,
trees, etc. If the GPS is not available or not loaded yet, the device will use
LBS which determines location from the mobile network. This is dependent on
the density of the signal towers network. You can turn off LBS localization in
the WowME Tracker to keep more precise GPS localization only.
When indoors, GPS is not available. The device primarily uses LBS location
which is very inaccurate. Location can be updated when the device connects to
a nearby WiFi. If you want more accurate location service, please turn off LBS
localization in the WowME Tracker. The device will show you the WiFi location
and in case the WiFi is not available, it will show the last update of the
outdoor GPS position.
Warranty Conditions
A new product purchased in the Alza.cz sales network is guaranteed for 2
years. If you need repair or other services during the warranty period,
contact the product seller directly, you must provide the original proof of
purchase with the date of purchase.
The following are considered to be a conflict with the warranty conditions,
for which the claimed claim may not be recognized:
- Using the product for any purpose other than that for which the product is intended or failing to follow the instructions for maintenance, operation, and service of the product.
- Damage to the product by a natural disaster, the intervention of an unauthorized person or mechanically through the fault of the buyer (e.g. during transport, cleaning by inappropriate means, etc.).
- Natural wear and aging of consumables or components during use (such as batteries, etc.).
- Exposure to adverse external influences, such as sunlight and other radiation or electromagnetic fields, fluid intrusion, object intrusion, mains overvoltage, electrostatic discharge voltage (including lightning), faulty supply or input voltage and inappropriate polarity of this voltage, chemical processes such as used power supplies, etc.
- If anyone has made modifications, modifications, alterations to the design or adaptation to change or extend the functions of the product compared to the purchased design or use of non-original components.
EU Declaration of Conformity
Identification data of the manufacturer’s / importer’s authorized
representative:
Importer: Alza.cz a.s.
Registered office: Jankovcova 1522/53, Holešovice, 170 00 Prague 7
IČO: 27082440
The subject of the declaration:
Title: GPS Tracker
Model / Type: D31
The above product has been tested in accordance with the standard(s) used to
demonstrate compliance with the essential requirements laid down in the
Directive(s):
Directive No. 2014/53/EU
Directive No. 2011/65/EU as amended 2015/863/EU
Prague, 28.7.2021
WEEE
This product must not be disposed of as normal household waste in
accordance with the EU Directive on Waste Electrical and Electronic Equipment
(WEEE – 2012/19 / EU). Instead, it shall be returned to the place of purchase
or handed over to a public collection point for the recyclable waste. By
ensuring this product is disposed of correctly, you will help prevent
potential negative consequences for the environment and human health, which
could otherwise be caused by inappropriate waste handling of this product.
Contact your local authority or the nearest collection point for further
details. Improper disposal of this type of waste may result in fines in
accordance with national regulations.
References
- Alza.cz – rychlý a pohodlný nákup odkudkoliv | Alza.cz
- alza.at
- Alza | Alza.co.uk
- Alza.cz – rychlý a pohodlný nákup odkudkoliv | Alza.cz
- Alza.cz – rychlý a pohodlný nákup odkudkoliv | Alza.cz
- Alza.cz
- alza.de
- alza.hu
- alza.sk
Read User Manual Online (PDF format)
Read User Manual Online (PDF format) >>
Download This Manual (PDF format)
Download this manual >>