

Вспышка
R
ИНСТРУКЦИЯ ПО
ЭКСПЛУАТАЦИИ
1

Введение
Canon Speedlite 470EX-AI — внешняя вспышка Speedlite, специально
предназначенная для камер EOS и совместимая с системами
автовспышки E-TTL II/E-TTL. Вспышку Speedlite можно установить на
камеру, прикрепив к горячему башмаку камеры (обычная съемка со
вспышкой), и использовать в качестве устройства-приемника в
режиме съемки с беспроводной вспышкой с оптическим
управлением. Обратите внимание, что при обычной фотосъемке со
вспышкой можно использовать вспышку Speedlite дл
вспышкой в отраженном свете.
Обязательно прочитайте перед началом съемки
Во избежание получения снимков низкого качества и возникновения
несчастных случаев сначала прочитайте «Меры предосторожности»
(стр. 8–9). Кроме того, внимательно прочитайте настоящую
инструкцию, чтобы гарантировать правильную эксплуатацию вспышки.
Ознакомьтесь с настоящей инструкцией по эксплуатации и
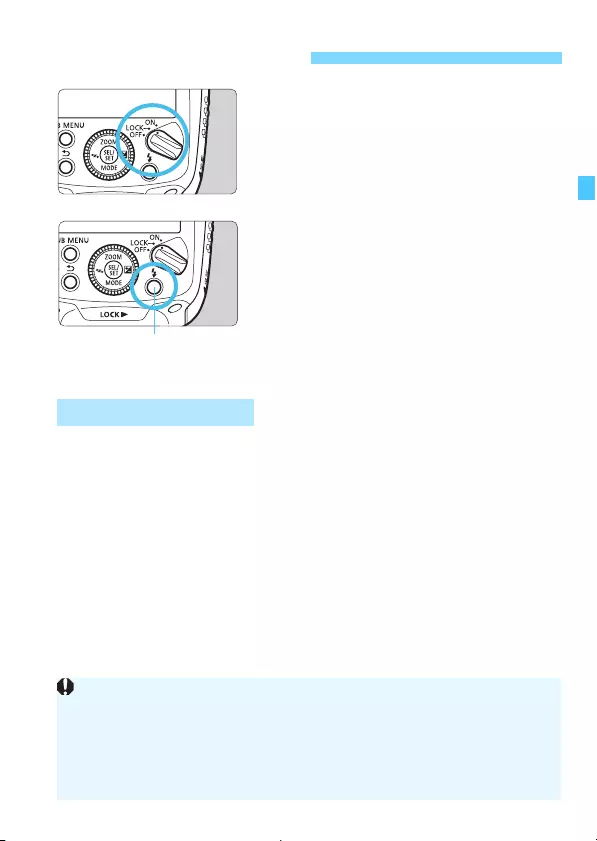
инструкцией по эксплуатации камеры
Перед началом работы со вспышкой ознакомьтесь с ее функциями по
настоящей инструкции по эксплуатации и инструкции по эксплуатации
камеры. Кроме того, храните настоящую инструкцию в безопасном
месте, чтобы при необходимости вы могли к ней обратиться.
Использование вспышки Speedlite с камерой
Использование с камерой EOS DIGITAL (камера типа A)
Данную вспышку Speedlite можно использовать для простой
съемки с автовспышкой аналогично встроенной вспышке камеры.
Использование с пленочной камерой EOS
Камера EOS с системами экспозамера E-TTL II/E-TTL
автовспышки (камера типа A)
Данную вспышку Speedlite можно использовать для простой
съемки с автовспышкой аналогично встроенной вспышке камеры.
Камера EOS с системами экспозамера TTL автовспышки
(камера типа B)
См. стр. 110.
* В настоящей инструкции по эксплуатации предполагается, что
вспышка Speedlite используется с камерой типа A.
2
я съемки AI со

Главы
Введение
Начало работы и основные операции
1
2
3
4
5
6
7
Подготовка к съемке со вспышкой и основные функции
съемки со вспышкой
Расширенные приемы съемки со вспышкой
Расширенные приемы съемки с использованием функций
вспышки
Съемка в отраженном свете
Cъемка со вспышкой с использованием функций съемки AI со
вспышкой в отраженном свете и рассеивателя для вспышки
Настройка функций вспышки с помощью
элементов управления камеры
Настройка функций вспышки с помощью экрана меню камеры
Съемка с беспроводной вспышкой: оптическое
управление
Съемка со вспышкой с беспроводным оптическим управлением (устройство-приемник)
Пользовательская настройка вспышки
Speedlite
Настройка с использованием пользовательских функций и персональных функций
Справочная информация
Состав системы, поиск и устранение неполадок,
использование с камерой типа B
2
17
29
41
65
71
81
93
3

Обозначения, используемые в настоящей инструкции
Значки, используемые в настоящей инструкции
9 : Обозначает диск выбора.
<H> <E>:<S> Обозначает курсорные клавиши вверх,
<I> <O> вниз, влево и вправо.
8 : Обозначает кнопку выбора/установки.
p/2 : Означает, что соответствующая функция
(стр. **) :
Основные допущения
Процедуры управления предполагают, что вспышка Speedlite
установлена на камере и вспышка и камера включены.
Значки, используемые в тексте для кнопок, дисков и обозначений,
соответствуют значкам на вспышке Speedlite и камере.
Действия по установке функции фактически сводятся к выбору
функции путем вращения диска <9>. Функцию также можно
выбрать с помощью клавиш вверх, вниз, влево и вправо (кнопки
<H> <E> <I> <O>) курсорной клавиши <S>.
При нажатии кнопки <0> открывается предыдущий экран.
Процедуры работы предполагают, что пользовательские функции и
персональные функции вспышки Speedlite, а также меню и
пользовательские функции камеры находятся в их значениях по
умолчанию.
Все характеристики, такие как количество вспышек, основаны на
использовании четырех щелочных элементов питания типоразмера
AA/LR6 и стандартах тестирования, принятых компанией Canon.
действует в течение примерно 12 с или 16 с
после отпускания кнопки.
Номер страницы, на которую приводится ссылка,
где можно найти подробную информацию.
: Предупреждение для предотвращения
неполадок при съемке.
: Дополнительная информация.
В данном руководстве все вхождения слов «ведущий» и «ведомый»,
которые использовались в предыдущих руководствах, заменены
словами «передатчик» и «приемник» соответственно. При
необходимости слова «передатчик» и «приемник» в данном
руководстве следует понимать в указанных выше значениях.
4

Содержание
Введение 2
Главы ………………………………………………………………………………….. 3
Обозначения, используемые в настоящей инструкции …………… 4
Содержание…………………………………………………………………………. 5
Алфавитный указатель функций …………………………………………… 7
Меры предосторожности………………………………………………………. 8
Элементы устройства и их назначение………………………………… 10
Начало работы и основные операции 17
1
Установка элементов питания …………………………………………….. 18
Установка вспышки Speedlite на камеру и ее снятие с камеры
Включение питания…………………………………………………………….. 21
a: полностью автоматическая съемка со вспышкой ……… 24
Автовспышка E-TTL II/E-TTL по режиму съемки…………………….25
Расширенные приемы съемки со вспышкой 29
2
f Компенсация экспозиции при съемке со вспышкой………….. 30
7: фиксация экспозиции вспышки…………………………………….. 31
c Высокоскоростная синхронизация……………………………………32
r Синхронизация по второй шторке………………………………….. 33
H: установка угла освечивания…………………………………….. 34
a: ручной режим вспышки ………………………………………………….36
Проверочная вспышка ………………………………………………………… 38
Сброс настроек вспышки Speedlite ……………………………………….40
…. 20
5

Содержание
Съемка в отраженном свете 41
3
X Съемка AI со вспышкой в отраженном свете ……………….. 42
W Полностью автоматическая AI.B ………………………………… 46
W Полностью автоматическая съемка AI.B …………………….. 48
V Полуавтоматическая съемка AI.B ………………………………. 56
m Ручная съемка в отраженном свете………………………………. 61
Совместное использование с рассеивателем для вспышки
q
… 63
Настройка функций вспышки с помощью элементов управления камеры
4
Управление вспышкой через экран меню камеры………………… 66
Съемка с беспроводной вспышкой: оптическое управление
5
:
Съемка со вспышкой с оптическим беспроводным управлением
Настройка беспроводного управления………………………………… 74
съемка с полностью автоматической вспышкой с беспроводным управлением
a:
A Ручной режим вспышки на устройстве—приемнике…… 79
Пользовательская настройка вспышки Speedlite 81
6
C / >:
C: настройка пользовательских функций ……………………….. 85
>: настройка персональных функций ……………………………… 88
Справочная информация 93
7
Система 470EX-AI………………………………………………………………. 94
Ограничение частоты срабатывания вспышки вследствие перегрева
f
Поиск и устранение неполадок……………………………………………. 98
Технические характеристики …………………………………………….. 105
Использование с камерой типа B………………………………………. 110
Алфавитный указатель…………………………………………………….. 113
настройка пользовательских и персональных функций
6
65
71
… 72
…. 76
…. 82
….. 96

Алфавитный указатель функций
Источник питания
Элементы питания Î стр. 18
Интервал срабатывания/
количество Î стр. 18
Включение/выключение
питания Î стр. 21
Гото вн ость вспышки Î стр. 21
Быстрая вспышка Î стр. 21
Автоотключение Î стр. 22
Эксплуатация
Установ ка и снятие вспышки
Speedlite Î стр. 20
Функция блокировки Î стр. 22
Подсветка ЖК-дисплея
Î стр. 22
Обычная съемка со
вспышкой
Автовспышка E-TTL Î стр. 24
Автовспышка по
режиму съемки Î стр. 25
Ручной режим вспышки
Измерение экспозиции при
съемке со вспышкой для ее
ручной установки Î стр. 37
Автовспышка TTL Î стр. 110
Î стр. 36
Функции
Компенсация
экспозиции вспышки Î стр. 30
Фиксация экспозиции
вспышки Î стр. 31
Высокоскоростная
синхронизация Î стр. 32
Синхронизация по
второй шторке Î стр. 33
Проверочная вспышка
Подсветка
автофокусировки Î стр. 27
Î стр. 38
Угол освещения
вспышки Î стр. 34
• Широкоугольная
панель Î стр. 35
Сброс настроек
(восстановление настроек
по умолчанию)
Настройка функций
вспышки Î стр. 65
Ограничение частоты
срабатывания вспышки
Камера типа B Î стр. 110
Î стр. 40
Î стр. 96
Съемка в отраженном свете
Полностью
автоматическая съемка
AI.B Î стр. 43
Полуавтоматическая
съемка AI.B Î стр. 45
Ручная съемка в
отраженном свете Î стр. 61
Рассеиватель для
вспышки Î стр. 63
Съемка со вспышкой с оптическим
беспроводным управлением
Автовспышка E-TTL Î стр. 76
Функция памяти Î стр. 75
Независимое устройство-
приемник Î стр. 79
Пользовательская настройка
Пользовательские
функции (C.Fn) Î стр. 85
Персональные
функции (P.Fn) Î стр. 88
Сбросить все Î стр. 84
7

Меры предосторожности
Приведенные меры предосторожности предусмотрены для предотвращения
причинения вреда или получения травм пользователем и другими лицами.
Перед использованием данного изделия убедитесь, что вы полностью
понимаете и соблюдаете описанные здесь меры предосторожности.
В случае возникновения неисправностей, проблем или
повреждения изделия обратитесь в ближ айший сервис-центр
Canon или к дилеру, у которого вы приобрели изделие.
Следуйте указаниям приведенных ниже
Предупреждения:
Во избежание пожара, выделения излишнего тепла, утечки химических веществ, взрыва или
поражения электрическим током соблюдайте следующие правила техники безопасности:
• Не вставляйте посторонние металлические объекты в электрические контакты
изделия, принадлежностей, соединительных кабелей и других устройств.
• Не используйте элементы питания, источники питания и принадлежности, не
указанные в настоящей инструкции по эксплуатации. Не используйте поврежденные
или модифицированные элементы питания или поврежденное изделие.
• Не закорачивайте, не разбирайте и не вносите модификации в изделие или
элементы питания. Не подвергайте элементы питания воздействию тепла и
не паяйте их. Не подвергайте элементы питания воздействию огня или воды.
Не подвергайте элементы питания сильным механическим ударам.
• Не вставляйте элементы питания в неправильной полярности, не
используйте новые элементы питания вм
не используйте элементы питания разных типов.
Не используйте изделие в местах, где присутствует легковоспламеняющийся
газ. Это позволит предотвратить взрывы и пожары.
Не включайте вспышку, направив ее на водителя автомобиля или другого
транспортного средства. Это может привести к аварии.
Не разбирайте и не вносите модификации в оборудование. Внутренние части, находящиеся
под высоким напряжением, могут вызвать поражение электрическим током.
Если при падении оборудования будет поврежден его корпус, вследствие чего будут видны его внутренние
части, не прикасайтесь к открытым частям. Существует риск поражения электрическим током.
Не храните изделие в пыльных или сырых местах, а также в местах с высокой концентрацией
паров масла. Это позволит предотвратить пожары и поражение электрическим током.
Перед использованием данного изделия в самолете или больнице убедитесь,
что это не запрещено. Электромагнитные волны, излучаемые изделием, могут
мешать работе приборов самолета или медицинского оборудования.
Если элемент питания протекает, изменил цвет, деформирован или испускает
дым или пары, немедленно извлеките его. Будьте осторожны, чтобы не
получить ожоги в процессе их замены. Про
привести к пожару, поражению электрическим током или ожогам.
Храните элементы питания и другие принадлежности в недоступном для детей
месте. Если ребенок проглотил элемент питания или принадлежность,
немедленно обратитесь к врачу. (Химические вещества, содержащиеся в
элементах питания, могут нанести вред желудку и кишечнику.)
Будьте осторожны, чтобы влага не попала на изделие. В случае падения изделия в воду,
попадания воды или металлических объектов внутрь изделия немедленно выньте элемент
питания. Это позволит предотвратить пожары, поражение электрическим током и ожоги.
Не накрывайте и не заворачивайте изделие тканью. Это может привести к
накоплению тепла и к деформации или возгоранию корпуса.
8
предупрежд ений. Их несоблюдение может
привести к смерти или получению тяжелых травм.
есте с ранее использовавшимися и
должение его использования может
Меры предосторожности
Храните оборудование, в том числе во время его использования, в недоступном
для детей месте. Ремни и шнуры могут привести к удушению, поражению
электрическим током или травме. Уду ше ние или получение травмы также
возможно при проглатывании ребенком детали или принадлежности. Если ребенок
проглотил деталь или принадлежность, немедленно обратитесь к врачу.
Если оборудование не используется, перед его хранением извлеките элементы
питания и отключите внешний источник питания и кабель от оборудования. Это
позволит предотвратить поражение электрическим током, накопление
излишнего тепла, возгорание и коррозию.
Не допускайте попадание жидкости, вытекшей из элемента питания, в глаза,
на кожу или на одежду. Это может привести к сл
Если жидкость, вытекшая из элемента питания, попадет в глаза, на кожу или на
одежд у, промойте пораженную область большим количеством чистой воды, не
протирая ее. Немедленно обратитесь к врачу.
Не используйте растворитель для краски, бензол или другие органические растворители для
чистки изделия. Это может привести к пожару или опасности для здоровья.
Следуйте указаниям, приведенным в
Предостережения:
Если изделие не используется в течение продолжительного времени, перед
его хранением извлеките элементы питания. Это позволит предотвратить
неисправности и коррозию.
При утилизации элементов питания изолируйте электрические контакты
изоляционной лентой. Контакт с металлическими объектами или другим
элементами питания может привести к пожару или взрыву.
Не используйте, не храните и не оставляйте из
под воздействием прямого солнечного света, в условиях высокой температуры
или вблизи объекта с высокой температурой. Изделие может нагреться и
вызвать ожоги, если до него дотронуться. Это может привести к выделению
тепла из элемента питания, его разрыву, течи и т. п.
Не включайте вспышку, когда головка вспышки прик
или другому объекту. Это может привести к ожогу или возгоранию.
Перед выполнением съемки AI со вспышкой в отраженном свете обязательно
предупредите находящихся рядом людей. Головка вспышки может
автоматически перемещаться и срабатывать без предупреждения.
Во избежание повреждения зрения не включайте вспышку вблизи глаз.
Не оставляйте изделие в ус
продолжительного времени. Изделие остынет и может привести к телесному
повреждению, если до него дотронуться.
Не прикасайтесь к частям изделия, нагретым до высокой температуры.
Продолжительный контакт с кожей может привести к низкотемпературным
ожогам.
После частых срабатываний вспышки элементы питания могут нагреться до
высокой температуры. Будьте ост
их замены. Это может привести к ожогу кожи.
предостережениях ниже. В противном случае можно
получить травму или повредить имущество.
ловиях низкой температуры в течение
орожны, чтобы не получить ожоги в процессе
епоте или повреждению кожи.
делие в транспортном средстве
асается к телу человека
9

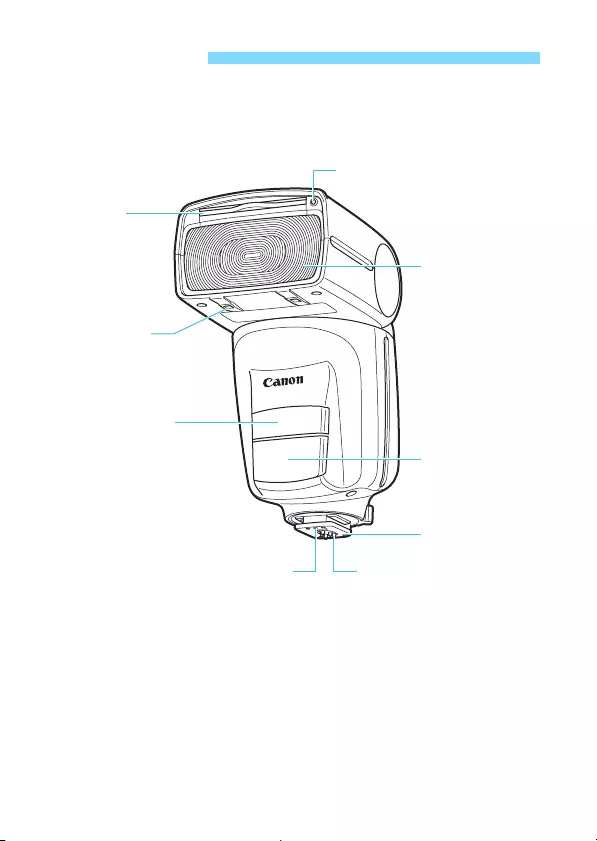
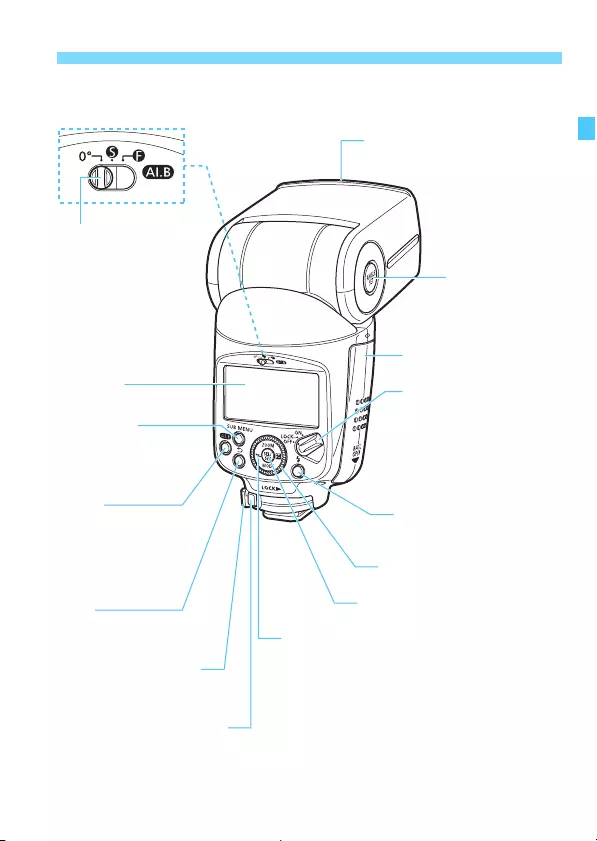
Элементы устройства и их назначение
Датчик измерения
расстояния AI.B
Широкоугольная
панель
(в задвинутом
состоянии, стр. 35)
Датчик рассеивателя
для вспышки
Датчик беспроводного
оптического управления
Фиксирующий штифт
Контакты
Головка вспышки
(светоизлучающее
устройство)
Излучатель
подсветки
автофокусировки
(стр. 27)
Уст ано в оч ная
пята (стр. 20)
10

<X> Переключатель
режима съемки в
отраженном свете (стр. 42)
<0°>:
Положение, в котором
головка вспышки
направлена прямо
вперед
<Y>:
Полуавтоматическая
съемка AI.B
<Z>:
Полностью
автоматическая
съемка AI.B
ЖК-дисплей
<1>
Кнопка подменю
(стр. 40, 75, 82)
<X>
Кнопка запуска измерения
расстояния в полностью
автоматическом режиме
AI.B/лампа AI.B
(стр. 43, 49/54, 59)
<0>
Кнопка назад
Рычаг фиксации
установочной пяты
(стр. 20)
Кнопка фиксатора (стр. 20)
Элементы устройства и их назначение
Крепление рассеивателя для
вспышки (стр. 63)
<z> Кнопка
установки угла
наклона
(стр. 45, 54, 57)
Крышка отсека элементов
питания (стр. 18)
Переключатель питания
(стр. 21)
Питание включено
<K>:
<a>:
Блокировка кнопок/
диска (питание
включено)
<J>:
Питание выключено
<Q> Лампа готовности
вспышки/кнопка тестовой
вспышки (стр. 21, 77)
<9> Диск выбора
<8> Кнопка выбора/установки
<S> Курсорные клавиши
<H> Кнопка зумирования (стр. 34)
<E> Кнопка режима вспышки
(стр. 24, 36)
<I> Кнопка настройки беспроводного
управления (стр. 74, 79)
<O> Кнопка настройки компенсации
экспозиции вспышки/установки
мощности вспышки (стр. 30/36)
11

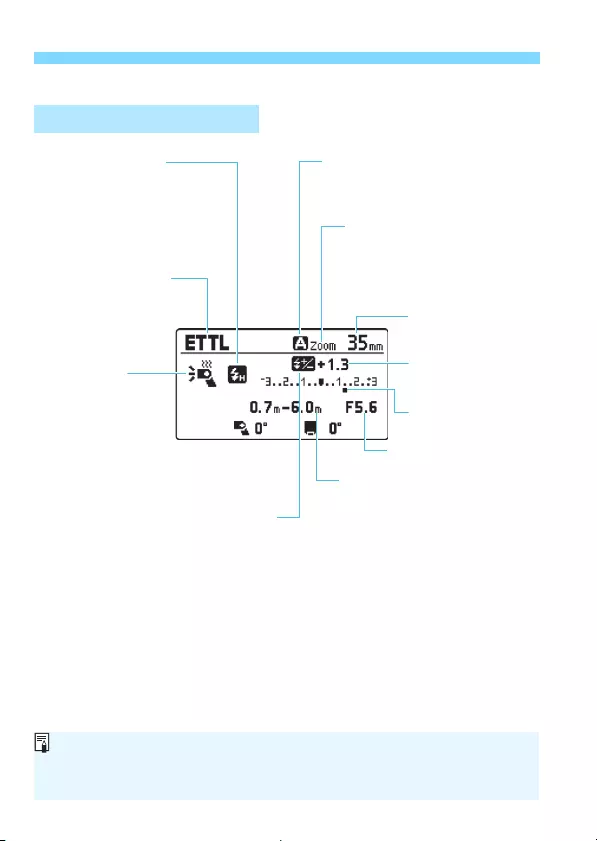
Элементы устройства и их назначение
ЖК-дисплей
Автовспышка E-TTL II/E-TTL
2
: Синхронизация по
первой шторке (обычная
съемка со вспышк ой, стр. 68)
r
: Синхронизация по второй
шторке (стр. 33, 68)
c
: Высокоскоростная
синхронизация (стр. 32, 68)
a : Автовспышка
E-TTL II/E-TTL
j : Стандартное
k : Приоритет
ведущего числа
(стр. 87)
l : Равномерное
распределение (стр. 87)
t : Перегрев (ограничение частоты
срабатывания вспышки, стр. 96)
f: Компенсация экспозиции вспышки
(стр. 30, 68)
(стр. 24)
: Индикатор зарядки (стр. 21)
G
L : Автоматическая установка
d : Ручная установка (стр. 34)
e :
Индикация зума (стр. 34)
N :
Предупреждение о
рассеивателе + съемке в
отраженном свете
O:
Предупреждение о выходе за
пределы угла освечивания
Угол освечивания
(фокальное
расстояние, стр. 34)
Уровень компенсации
экспозиции вспышки
(стр. 30)
Величина экспозиции
вспышки (стр. 30)
v : Диафрагма (стр. 36)
Эффективная дальность
экспозамера при съемке со
вспышкой/Расстояние до
объекта съемки (стр. 24/36)
R : Метры
@ : Футы
Изображения дисплеев приведены в качестве примеров. На
дисплее отображаются только настройки, используемые в текущем
режиме.
При нажатии кнопки или повороте диска ЖК-дисплей
подсвечивается (стр. 22).
12

Элементы устройства и их назначение
Ручной режим вспышки
(стр. 36)
q : Ручной режим
вспышки
Мощность вспышки
в ручном режиме
Уровень вспышки в
ручном режиме
Съемка со вспышкой с беспроводным оптическим управлением
Устр о й ство -приемник
:
: Съемка со вспышкой с
беспроводным
оптическим
управлением (стр. 74)
h
: Значок вспышки-
приемника
Групп а вспышек
(стр. 78)
* : Канал передачи
(стр. 74)
x : Настройка
устройства-приемника
(стр. 74)
( :
Независимое
устройство-приемник
(стр. 79)
(стр. 71)
13

Элементы устройства и их назначение
Съемка в отраженном свете
m : Съемка в
отраженном свете
(стр. 49, 56, 61)
H :Ус та новл ен
рассеиватель для
вспышки (стр. 63)
W : Полностью
автоматическая съемка
AI.B (стр. 48)
V : Полуавтоматическая
съемка AI.B (стр. 56)
(стр. 41)
Угол поворота
головки вспышки
Горизонтальное направление
Угол наклона головки вспышки вверх
Направление вверх
Угол поворота головки вспышки отображается с шагом 5 градусов.
Если во время полностью автоматической съемки AI.B камера
располагается горизонтально, угол наклона в вертикальном
направлении отображается до 180°.
14
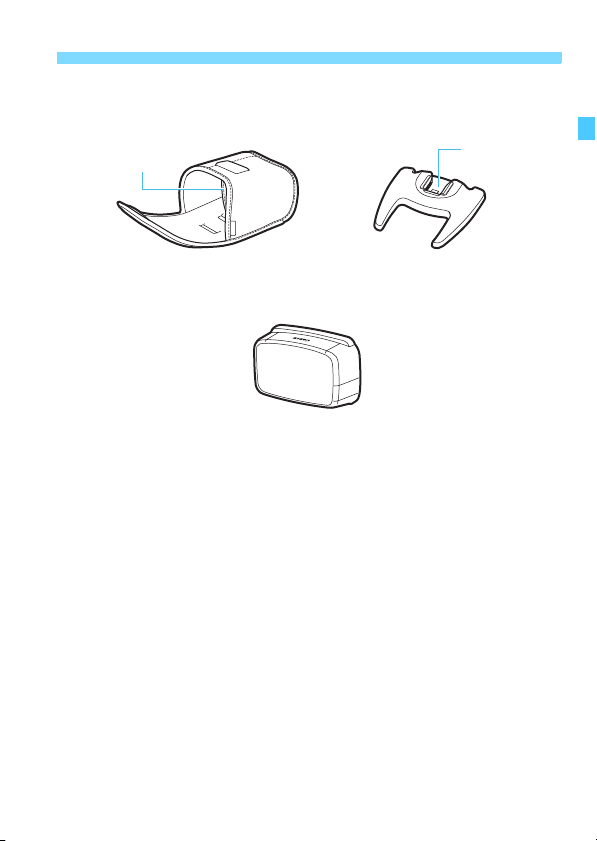
Поставляемые принадлежности
Элементы устройства и их назначение
Кармашек для
мини-подставки
Футляр для вспышки Speedlite
Рассеиватель для вспышки
SBA-E4
(стр. 63)
Крепление
Мини-подставка
(стр. 73)
15

16
1
Начало работы и
основные операции
В этой главе рассмотрены подготовка к съемке со
вспышкой и основные операции съемки со вспышкой.
Предупреждение о непрерывной серии съемки со вспышкой
Во избежание ухудшения характеристик и повреждения
головки вспышки из-за перегрева ограничьте непрерывную
серию вспышек с полной мощностью 30 вспышками. После
серии из 30 вспышек с полной мощностью дайте вспышке
остыть в течение не менее 10 мин.
Если после непрерывной серии вспышек с полной
мощностью, превышающей указанное количество вспышек,
продолжить съемку со вспышкой с короткими интервалами,
может сработать встроенная функция защиты,
ограничивающая работу вспышки. Если работа вспышки
ограничена уровнем 1, интервал срабатывания
автоматически устанавливается равным примерно 8 с. В этом
случае дайте вспышке остыть в течение не менее 40 мин.
Более подробная информация приведена в разделе
«Ограничение частоты срабатывания вспышки
вследствие перегрева» на стр.96.
При выполнении съемки не в отраженном свете установите
переключатель <X> режима съемки в отраженном свете в
положение <0°> (стр.11). Более подробная информация о
съемке в отраженном свете приведена в главе 3, «Съемка в
отраженном свете» (стр. 41).
17
Установка элементов питания
Для обеспечения питания установите четыре элемента питания
AA/R6.
Откройте крышку.
1
Сдвиньте крышку отсека элементов
питания вниз и откройте ее.
Установите элементы питания.
2
Убедитесь, что полярность
электрических контактов «+» и «–»
соответствует схеме в отсеке
элементов питания.
Канавки на боковой поверхности
внутри отсека элементов питания
обозначают «–». Они удобны при
замене элементов питания в
условиях недостаточной
освещенности.
Закройте крышку.
3
Закройте крышку отсека элементов
питания, а затем сдвиньте ее
вверх, выполняя операции шага 1 в
обратном порядке.
Интервал срабатывания и количество вспышек
Интервал срабатывания
Быстрая вспышка Обычная вспышка
Прибл. от 0,1 до 3,9 с
Данные приведены для новых щелочных элементов питания типоразмера
AA/LR6 при испытании в соответствии со стандартами тестирования,
принятыми компанией Canon.
Функция быстрой вспышки позволяет снимать, не дожидаясь полной
зарядки (стр. 21).
Прибл. от 0,1 до 5,5 с Прибл. от 115 до 800 раз
18
Количество вспы шек

Установка элементов питания
ПРЕДОСТЕРЕЖЕНИЕ
Не используйте «литиевые аккумуляторы типоразмера AA/R6».
Обратите внимание, что в редких случаях во время использования
некоторые литиевые аккумуляторы типоразмера AA/R6 могут
нагреваться до высокой температуры. Из соображений безопасности
не используйте «литиевые аккумуляторы типоразмера AA/R6».
При многократном срабатывании вспышки не прикасайтесь к ее
головке, элементам питания и области вблизи отсека элементов
питания.
При час
том срабатывании вспышки или при срабатывании
проверочной вспышки с короткими интервалами не прикасайтесь к
головке вспышки, элементам питания и области вблизи отсека
элементов питания. Голо в к а вспышки, элементы питания и область
вблизи отсека элементов питания могут нагреваться до высокой
температуры и привести к ожогам.
Не используйте вспышку Speedlite, прикасаясь одним и тем же
уч
астком тела в течение продолжительного времени.
Даже если вспышка не нагревается до высокой температуры,
продолжительный контакт с одной и той же частью корпуса может
привести к покраснению кожи и образованию волдырей вследствие
низкотемпературных ожогов. При использовании изделия в условиях
высокой температуры, а также пользователям с проблемами
кровообращения или очень чувствительной ко
использовать штатив.
При использовании элементов питания типоразмера AA/R6, отличных
от щелочных, возможен плохой электрический контакт из-за
неправильной формы клемм элементов питания.
жей рекомендуется
Если отображается <!> или ЖК-дисплей отключается во время
зарядки, замените элементы питания новыми.
Используйте комплект из четырех новых элементов питания одной
марки. При замене элементов питания заменяйте одновременно все
четыре элемента питания.
Допускается также использование элементов питания Ni-MH
типоразмера AA/HR6.
19

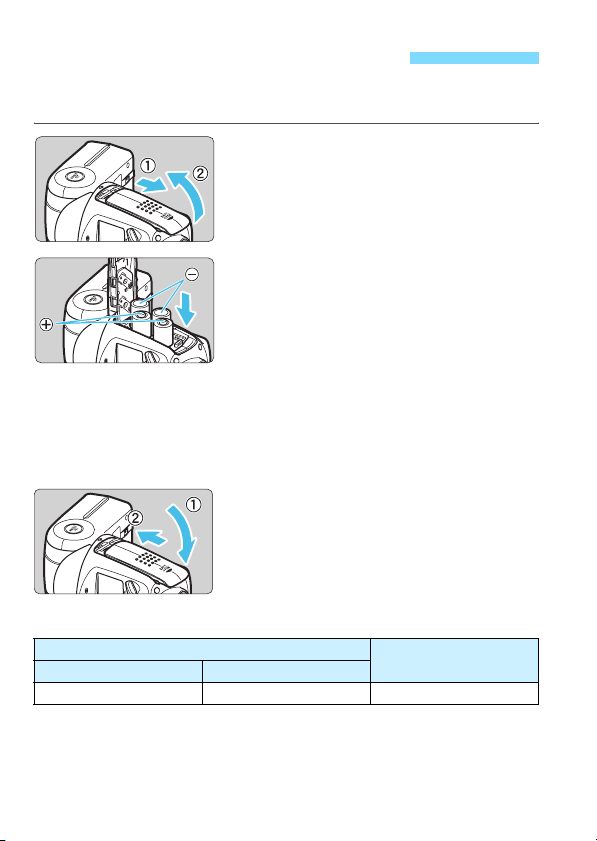
Установка вспышки Speedlite на
камеру и ее снятие с камеры
Установите вспышку Speedlite.
1
Вставьте установочную пяту
вспышки Speedlite до упора в
горячий башмак камеры.
Закрепите вспышку Speedlite.
2
Сдвиньте рычаг фиксации
установочной пяты вправо.
X После щелчка рычага в фиксаторах
он фиксируется.
Снимите вспышку Speedlite.
3
Нажав кнопку фиксатора и
удерживая ее нажатой, сдвиньте
рычаг фиксатора влево и снимите
вспышку Speedlite с камеры.
Обязательно выключайте вспышку Speedlite перед ее установкой или
снятием.
20

Включение питания
Установите переключатель
1
питания в положение <K>.
X Начнется зарядка вспышки.
X Во время зарядки на ЖК-дисплее
отображается индикация
<G>. После завершения
зарядки вспышки эта индикация
исчезает.
Убедитесь, что вспышка готова
2
к работе.
Состояние лампы готовности
вспышки изменяется в следующем
порядке: не горит, зеленый
(готова к быстрой вспышке),
Лампа готовности вспышки
(кнопка тестовой вспышки)
Функция быстрой вспышки
Функция быстрой вспышки позволяет снимать, когда индикатор
готовности вспышки горит зеленым (не дожидаясь полной зарядки).
Быстрая вспышка доступна не
перевода кадров камеры. Несмотря на то что в таком режиме
мощность вспышки составляет примерно от 1/2 до 1/6 от полной
мощности, этот режим удобен для съемки с сокращенным
интервалом съемки.
При ручной съемке со вспышкой эта функция доступна, если
мощность вспышки установлена равной от 1/4 до 1/128. Следует
иметь в виду, что фун
устройства-приемника при съемке со вспышкой с оптическим
беспроводным управлением.
кция быстрой вспышки недоступна для
красный (полностью заряжена).
Чтобы произвести тестовое
срабатывание вспышки, можно
нажать кнопку тестовой вспышки
(лампа готовности вспышки).
зависимо от настройки режима
При включении питания головка вспышки может автоматически
включаться (поворачиваться).
Включение функции быстрой вспышки при серийной съемке может
привести к недостаточной экспозиции, поскольку мощность вспышки
снижается.
Срабатывание тестовой вспышки невозможно при включенном
таймере 3/1/o/7 /2 камеры.
21

Включение питания
Функция автоотключения
Для экономии энергии элементов питания вспышка автоматически
выключается приблизительно через 90 секунд после простоя.
Чтобы снова включить вспышку Speedlite, нажмите кнопку спуска
затвора на камере наполовину или нажмите кнопку тестовой
вспышки (лампа готовности вспышки).
Если вспышка установлена в качестве устройства-приемника для
съемки со вспышкой с оптическим беспроводным управлением
(стр. 72), время до автоотключения пит
60 мин.
ания составляет около
Функция блокировки
Установив переключатель питания в положение <a>, можно
отключить управление вспышкой кнопками и диском (кроме
переключателя <X>). Эта функция удобна для предотвращения
случайного изменения установленных настроек вспышки.
При нажатии кнопки или повороте диска на ЖК-дисплее будет
отображаться <k>.
Подсветка ЖК-дисплея
При нажатии кнопки или повороте диска подсветка ЖК-ди
включается примерно на 12 с (p).
В режиме обычной съемки со вспышкой ЖК-дисплей
подсвечивается зеленым цветом. Если вспышка установлена в
качестве приемника в режиме съемки со вспышкой с оптическим
беспроводным управлением, ЖК-дисплей подсвечивается
оранжевым цветом.
сплея
22

Включение питания
Настройки вспышки сохраняются даже после выключения питания.
Для сохранения настроек при замене элементов питания заменяйте
элементы питания после перевода переключателя питания в
выключенное положение.
Когда переключатель питания установлен в положение <a>,
можно выполнить тестовое срабатывание вспышки. Кроме того, при
нажатии кнопки или повороте диска ЖК-дисплей подсвечивается.
Функция автоотключения может бы
Если вспышка установлена в качестве устройства-приемника,
время до срабатывания автоотключения устройства-приемника
можно изменить (C.Fn-10, стр. 86).
Настройку подсветки ЖК-дисплея можно изменить (C.Fn-22,
стр.87).
Цвет подсветки ЖК-дисплея можно изменить (P.Fn-02/03, стр.88).
Функцию быстрой вспышки можно отключить (P.Fn-05, стр.89).
ть отключена (C.Fn-01, стр.85).
23
a
Если в камере установлен режим съемки <d> (Программная
автоэкспозиция) или полностью автоматический режим, будет
доступна съемка в полностью автоматическом режиме E-TTL II/
E-TTL.
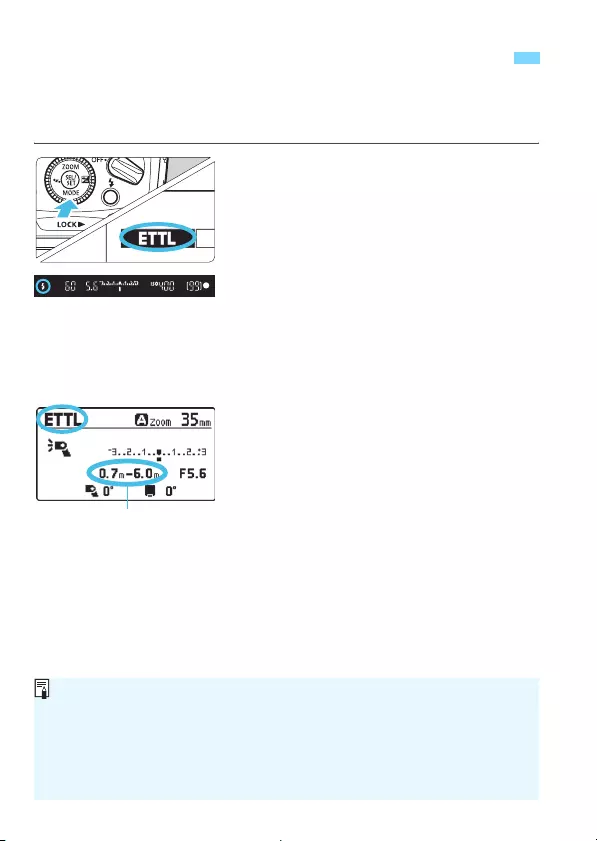
: полностью автоматическая съемка со вспышкой
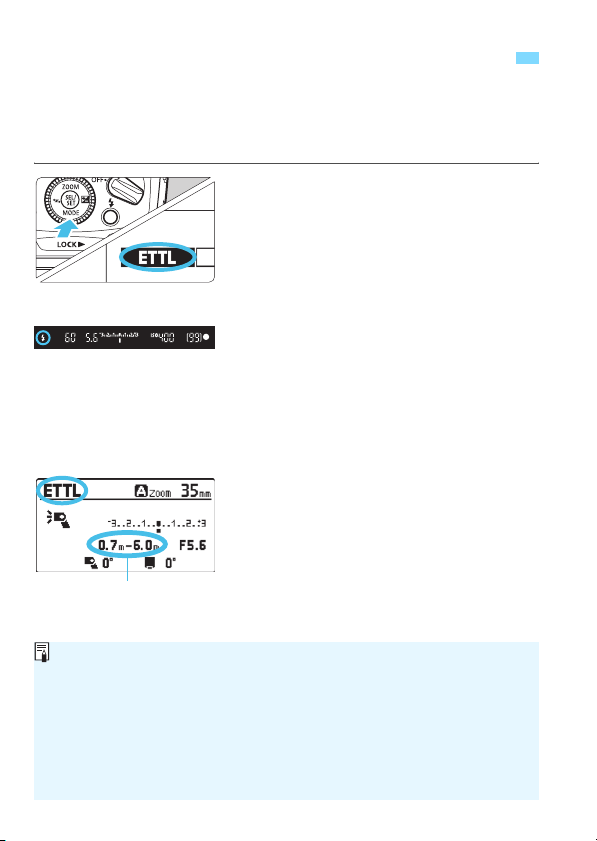
Установите режим вспышки
1
<a>.
Нажмите кнопку <E>
курсорных клавиш <S>.
Поверните диск <9>, чтобы
выбрать <Q>, а затем нажмите
кнопку <8>.
Сфокусируйтесь на объекте.
2
Для фокусировки нажмите кнопку
спуска затвора наполовину.
X Значения выдержки и диафрагмы
отображаются в видоискателе.
Убедитесь, что в видоискателе
горит значок <Q>.
Выполните съемку.
3
Убедитесь, что объект съемки
находится в пределах эффективной
дальности экспозамера при съемке
со вспышкой.
Эффективная дальность
экспозамера при съемке
со вспышкой
Если объект съемки выглядит темным (недостаточная экспозиция),
подойдите ближе к объекту и повторите съемку. При использовании
цифрового фотоаппарата также можно увеличить значение
чувствительности ISO.
«Полностью автоматическая съемка» относится к режимам съемки
<A>, <1> и <C>.
Даже если вспышка установлена на камере с поддержкой системы
автовспышки E-TTL II, на ЖК-дисплее будет отображаться
ин
дикация <a>.
При полном нажатии кнопки спуска
затвора срабатывает вспышка и
производится съемка.
24

Автовспышка E-TTL II/E-TTL по режиму съемки
Чтобы использовать режим автовспышки E-TTL II/E-TTL, подходящий
для режима съемки, просто переведите камеру в режим <
(автоэкспозиция с приоритетом выдержки), <
приоритетом диафрагмы) или <
Этот режим следует выбирать, если требуется устанавливать выдержку вручную.
Для достижения стандартной экспозиции в зависимости от режима
замера экспозиции камера автоматически устанавливает диафрагму,
соответствующую выдержке.
s
Если индикатор величины диафрагмы мигает, это означает, что фон
будет недоэкспонирован или переэкспонирован. Измените выдержку
таким образом, чтобы индикатор величины диафрагмы перестал мигать.
Этот режим следует выбирать, если требуется устанавливать диафрагму вручную.
Для достижения стандартной экспозиции в зависимости от режима замера
экспозиции камера автоматически устанавливает диафрагму,
соответствующую выдержке.
В случае сцены с низким освещением для получения стандартной
экспозиции как основного объекта съемки, так и фона используется
синхронизация вспышки при длительной выдержке. Стандартная
f
экспозиция основного объекта достигается благодаря свету вспышки, а
стандартная экспозиция фона об
Так как для съемки сюжетов с низкой освещенностью используется
длительная выдержка, рекомендуется установить камеру на штатив.
Если индикатор выдержки мигает, это означает, что фон будет
недоэкспонирован или переэкспонирован. Измените величину
диафрагмы таким образом, чтобы индикатор выдержки перестал мигать.
Этот режим следует выбирать, если требуется вручную устанавливать
как выдержку, так и величину диафрагмы.
Нормальная экспозиция основного объекта достигается благодаря
a
вспышке. Экспозиция фона изменяется в соответствии с
установленным сочетанием выдержки и величины диафрагмы.
В режиме съемки <Z> или <Y> результат будет таким же, как и в
режиме <d> (Программная автоэкспозиция).
Выдержки синхронизации вспышки и величина диафрагмы по
режимам съемки
Выдержка Диафрагма
d
s
f
a
1/X с — максимальная выдержка синхронизации вспышки, обеспечиваемая камерой.
Устанавливается автоматически
(от 1/X с до 1/60 с)
Устан авливается вручную
Устанавливается автоматически (от 1/X с до 30 с) Уста нав лива етс я вручную
(от 1/X с до 30 с)
Устан авливается вручную
(от 1/X с до 30 с, ручная выдержка)
a
> (ручной режим).
еспечивается длительной выдержкой.
f
> (автоэкспозиция с
Уста нав лива етс я вручную
s
>
Устанавливается
автоматически
Устанавливается
автоматически
25

Автовспышка E-TTL II/E-TTL по режиму съемки
Автоматическое зумирование по размеру датчика изображения
В камерах EOS DIGITAL могут устанавливаться датчики
изображения трех типоразмеров, а эффективный угол обзора
установленного объектива зависит от размера датчика
изображения. Вспышка 470EX-AI автоматически определяет
размеры датчика изображения камеры EOS DIGITAL и
автоматически устанавливает оптимальный угол освечивания в
зависимости от эффективного угла обзора объектива для
фокусного расстояния в диапазоне от 24 до 105 мм.
Передача информации о цветовой температуре
Эта функция корректирует баланс бе
цветовой температуры света вспышки путем передачи
информации о цветовой температуре при срабатывании вспышки
камере EOS DIGITAL. Если на камере для баланса белого
установлен режим <A>, <Aw> или <Q>, данная функция
включается автоматически.
Информацию о совместимости камеры с этой функцией можно
найти в технических характеристиках в инструкции по
эксплуатации ка
меры.
лого в зависимости от
Функция съемки в отраженном свете
См. главу 3, «Съемка в отраженном свете» (стр. 41–64).
Если переключатель <X> режима съемки в отраженном свете
установлен в положение <0°> и головка вспышки направлена не прямо
вперед, мигает лампа <X>. При нажатии кнопки спуска затвора
наполовину положение головки вспышки автоматически
восстанавливается, и головка вспышки направляется прямо вперед.
(Лампа <X> выключается.)
26

Автовспышка E-TTL II/E-TTL по режиму съемки
Подсветка автофокусировки
В условиях низкой освещенности или
малого контраста, когда
автоматическая фокусировка на
объекте при съемке с использованием
видоискателя затруднена, для
облегчения автофокусировки
включается инфракрасная подсветка
автофокусировки.
Подсветка автофокусировки поддерживает большинство точек
автофокусировки камер EOS. Подсветка автофокусировки
охватывает угол обзора объективов с фокусным расстоянием
28 мм и более, а ее эффективная дальность (для фокусного
расстояния 28 мм) со
видоискателя и примерно 1-5 м на периферии (точки
автофокусировки, отличные от центральной точки
автофокусировки).
При выборе периферийной точки автофокусировки или
широкоугольного или длиннофокусного объектива фокусировка может
быть затруднена, если применяется подсветка автофокусировки
внешней вспышки Speedlite, специально предназначенная для камер
EOS. В таких случаях используйте центральную точку фокусировки или
точку автофокусировки вблизи центра.
ставляет примерно 0,7-10 м по центру
При съемке с использованием ЖКД—видоискателя подсветка
автофокусировки включается, даже если установлен способ
автофокусировки [Скоростной].
Подсветку автофокусировки можно отключить (C.Fn-08, стр.86).
Может включаться тип подсветки автофокусировки, основанный на
импульсном срабатывании вспышек (серии небольших вспышек)
(P.Fn-04, стр. 89).
27

28

2
Расширенные приемы
съемки со вспышкой
В этой главе рассмотрены расширенные приемы
съемки с использованием функций вспышки.
Если на камере выбран полностью автоматический режим
съемки или режим основной зоны, операции, описанные в
этой главе, будут недоступны. Установите в камере режим
<d/s/f/a/ручн.выд.(В)> (режим Творческая зона).
При выполнении съемки не в отраженном свете
установите переключатель <X> режима съемки в
отраженном свете в по
подробная информация о съемке в отраженном свете
приведена в главе 3, «Съемка в отраженном свете»
(стр. 41).
ложение <0°> (стр.11). Более
29
f
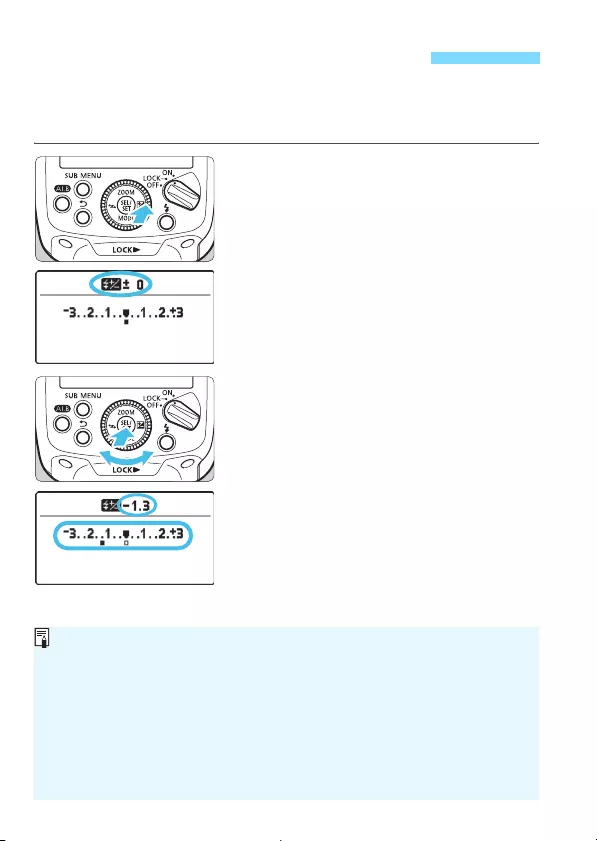
Компенсация экспозиции при съемке со вспышкой
Для регулировки мощности вспышки используется процедура,
аналогичная регулировке компенсации экспозиции. Компенсацию
экспозиции вспышки можно устанавливать в пределах ±3 ступени с
шагом 1/3 ступени.
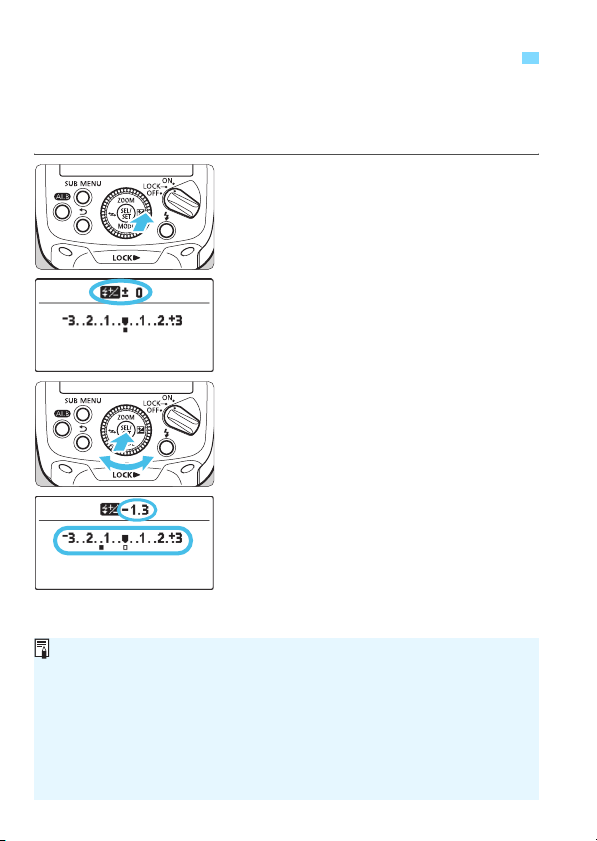
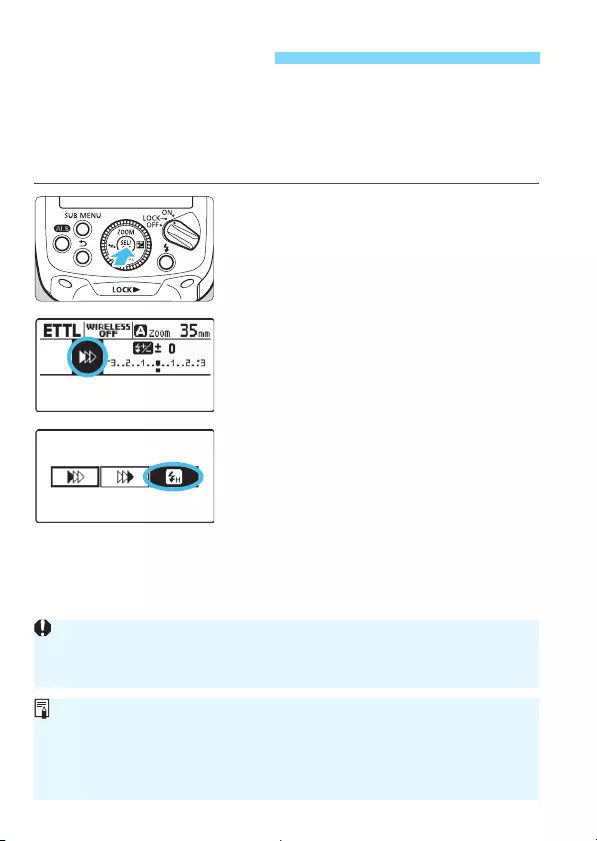
Нажмите кнопку <O>.
1
Нажмите кнопку <O> курсорных
клавиш <S>.
Компенсацию экспозиции вспышки
также можно выбрать путем
нажатия кнопки <8> и вращения
диска <9 >.
Установите значение
2
компенсации экспозиции
вспышки.
Поверните диск <9>, чтобы
установить значение компенсации
экспозиции вспышки, а затем
нажмите кнопку <8>.
X Компенсация экспозиции вспышки
установлена.
«0.3» соответствует ступени 1/3, а
«0.7» — ступени 2/3.
Чтобы отменить компенсацию
экспозиции вспышки, верните
значение компенсации в ±0.
Обычно повышенная компенсация экспозиции необходима для
светлых объектов, а пониженная — для темных объектов.
Если компенсация экспозиции камеры установлена с шагом
1/2 ступени, компенсация экспозиции вспышки также устанавливается
в пределах ±3 ступени с шагом 1/2 ступени.
Если компенсация экспозиции вспышки установлена как на вспышке,
так и на камере, настройки вспышки будут иметь приоритет.
Без нажатия кнопки <O> курсорных клавиш <S> можно
непосредственно повернуть диск <9> и установить величину
компенсации вспышки (C.Fn-13, стр.86).
30
Loading…
1
J
E
INSTRUCTION
MANUAL

2
The Canon Speedlite 470EX-AI is an EOS-dedicated external
Speedlite, compatible with E-TTL II/E-TTL autoflash systems. The
Speedlite can be used as an on-camera flash that attaches to the hot
shoe of the camera (normal flash photography), and as a receiver unit
during optical transmission wireless flash photography. Note that,
during normal flash photography, the Speedlite can be used for AI
bounce flash photography.
Before Starting to Shoot, Be Sure to Read the Following
To avoid botched pictures and accidents, first read the “Safety
Precautions” (pages 8-9). Also, read this manual carefully to ensure that
you use the product correctly.
Read This Instruction Manual while also Referring to Your
Camera’s Instruction Manual
Before using the product, read this Instruction Manual and your
camera’s Instruction Manual to familiarize yourself with their operations.
Be sure to store this manual safely, too, so that you can refer to it again
when necessary.
Using with an EOS DIGITAL camera (Type-A camera)
You can use the Speedlite for easy flash photography using
autoflash control in the same way as a camera’s built-in flash.
Using with an EOS film camera
An EOS camera with E-TTL II/E-TTL autoflash metering
system (Type-A camera)
You can use the Speedlite for easy flash photography using
autoflash control in the same way as a camera’s built-in flash.
An EOS camera with TTL autoflash metering system (Type-B
camera)
See page 110.
* This Instruction Manual assumes that the Speedlite is used with a
Type—A camera.
Introduction
Using the Speedlite with a Camera

3
Chapters
Introduction 2
Getting Started and Basic Operations
Preparing for flash photography and basic flash photography 17
Advanced Flash Photography
Advanced shooting utilizing the flash functions 29
Bounce Flash Photography
Flash photography using the AI bounce flash functions and
bounce adapter
41
Setting Flash Functions with Camera Controls
Setting the flash functions from the camera’s menu screen 65
Wireless Flash Photography: Optical Transmission
Wireless (receiver) flash photography using optical transmission 71
Customizing the Speedlite
Customizing with Custom Functions and Personal Functions 81
Reference
System map, Troubleshooting guide, Using with a type-B camera
93
1
2
3
4
5
6
7

4
Icons in this Manual
9: Indicates the Select dial.
<H> <E>:<S> Indicates the top, bottom, left, and right
<I> <O> buttons of the cross keys.
8: Indicates the Select/Set button.
p/2: Indicates that the respective function remains
active for approx. 12 sec. or 16 sec. after you let
go of the button.
(p.**) : Reference page numbers for more information.
: Warning to prevent shooting problems.
: Supplemental information.
Basic Assumptions
The operation procedures assume that the Speedlite is attached to the
camera and that both are turned on.
The icons used for buttons, dials, and symbols in the text match the icons
found on the Speedlite and the camera.
The selection operation performed when setting a function basically
describes selecting a function by turning <9>. A selection can also be
made by pressing the top, bottom, left, and right (<H> <E>
<I> <O> buttons) of the <S> cross keys.
Pressing the <0> button returns the display to the previous screen.
The operation procedures assume that the Custom Functions and
Personal Functions of the Speedlite, and the menu and Custom
Functions of the camera are at their default settings.
All figures such as the number of flashes are based on the use of four
AA/LR6 alkaline batteries and Canon’s testing standards.
Conventions Used in this Manual
In this manual, the words “master” and “slave” used in previous manuals
have all been replaced by the words “sender” and “receiver” respectively.
Read the words “sender” and “receiver” in this manual for the above
meanings as necessary.

5
2
1
Introduction 2
Chapters ……….……………………………..……………………………………….3
Conventions Used in this Manual ……………………………………………..4
Contents……………………………………………..…………………………………5
Index to Features………………………..……………………………..…………..7
Safety Precautions…………….……………………………………………………8
Nomenclature……………..……………………………………………..…………10
Getting Started and Basic Operations 17
Installing the Batteries………..………………………………………………….18
Attaching and Detaching the Speedlite to and from the Camera…. 20
Turning on the Power…………………..………………………………………..21
a: Fully Automatic Flash Photography ……………………………..24
E-TTL II/E-TTL Autoflash by Shooting Mode ………………….…………25
Advanced Flash Photography 29
f Flash Exposure Compensation ………………..……………..…………30
7: FE Lock………………….……………..……………………………………..31
c High-speed sync ……………………………..……………………………….32
r Second-curtain sync…………………………..……………………………33
H:Setting the Flash Coverage …….……………………………..…..34
a: Manual Flash………..………………………………………………………..36
Modeling Flash………………………..………………….……………..…………38
Clearing Speedlite Settings……………..………………….……………..…..40
Contents

6
Contents
3
4
5
6
7
Bounce Flash Photography 41
X AI Bounce Flash …………………..……………………………………… 42
W AI.B Full-Auto…………………………………..…………………………. 46
W AI.B Full-Auto Shooting ……..……………..………………….……… 48
V AI.B Semi-Auto Shooting ………………..……………………………. 56
m Manual Bounce Flash Photography ..……………………………….. 61
q Combined Use with the Bounce Adapter ……………………….... 63
Setting Flash Functions with Camera Controls 65
Flash Control from the Camera’s Menu Screen ……………………….. 66
Wireless Flash Photography: Optical Transmission 71
: Optical Transmission Wireless Flash Photography…………….. 72
Wireless Settings………………………………..……………………………….. 74
a: Fully Automatic Wireless Flash Photography……………….. 76
A Manual Flash Setting on a Receiver Unit …………….……… 79
Customizing the Speedlite 81
C / >: Setting Custom and Personal Functions………………. 82
C: Setting Custom Functions……………………………………………. 85
>: Setting Personal Functions………………..…………………………. 88
Reference 93
470EX-AI System …………….………………………………………………….. 94
f Flash Firing Restrictions due to Temperature Increase ..……… 96
Troubleshooting Guide …………………………………………………………. 98
Specifications .……………………………..……………………………………. 105
Using with a Type-B Camera ..…………………………………………….. 110
Index………………….…………………………………………………………….. 113

7
Power Source
Batteries Î p.18
Firing interval/count Î p.18
Power ON/OFF Î p.21
Flash ready Î p.21
Quick flash Î p.21
Auto power off Î p.22
Operations
Attaching and detaching
the Speedlite Î p.20
Lock function Î p.22
LCD panel illumination Î p.22
Normal Flash Photography
E-TTL autoflash Î p.24
Autoflash by shooting
mode Î p.25
Manual flash Î p.36
Metered manual
flash Î p.37
TTL autoflash Î p.110
Functions
Flash exposure
compensation Î p.30
FE lock Î p.31
High-speed sync Î p.32
Second-curtain sync Î p.33
Modeling flash Î p.38
AF-assist beam Î p.27
Flash coverage Î p.34
• Wide panel Î p.35
Clearing settings
(Reverting to defaults) Î p.40
Flash function settings Î p.65
Flash firing restriction Î p.96
Type—B camera Î p.110
Bounce Flash Photography
AI.B full-auto Î p.43
AI.B semi-auto Î p.45
Manual bounce Î p.61
Bounce adapter Î p.63
Optical Transmission Wireless
Flash Photography
E-TTL autoflash Î p.76
Memory function Î p.75
Individual receiver Î p.79
Customization
Custom Functions (C.Fn) Î p.85
Personal Functions (P.Fn)
Î p.88
Clear all Î p.84
Index to Features

8
The following precautions are provided to prevent harm or injury to
yourself and others. Make sure to thoroughly understand and follow
these precautions before using the product.
If you experience any malfunctions, problems, or damage to the
product, contact the nearest Canon Service Center or the dealer
from whom you purchased the product.
Safety Precautions
Warnings: Follow the warnings below. Otherwise, death or
serious injuries may result.
To prevent fire, excessive heat, chemical leakage, explosions, and electrical shock,
follow the safeguards below:
• Do not insert any foreign metallic objects into the electrical contacts of the product,
accessories, connecting cables, etc.
• Do not use any batteries, power sources, or accessories not specified in the
Instruction Manual. Do not use any deformed or modified batteries, or the product
if it is damaged.
• Do not short-circuit, disassemble, or modify the product or batteries. Do not apply
heat or solder to the batteries. Do not expose the batteries to fire or water. Do not
subject the batteries to strong physical shock.
• Do not insert any battery’s plus and minus ends incorrectly, or mix new batteries
with used ones or batteries of different type.
Do not use the product in locations where there is flammable gas. This is to prevent
an explosion or a fire.
Do not fire the flash at anyone driving a car or other vehicle. It may cause an accident.
Do not disassemble or modify the equipment. High-voltage internal parts may cause
electrical shock.
If you drop the equipment and the casing breaks open to expose the internal parts,
do not touch the exposed parts. There is a possibility of an electrical shock.
Do not store the product in dusty or humid places or location with lots of oil smoke.
This is to prevent a fire or electrical shock.
Before using this product inside an airplane or hospital, check if it is allowed.
Electromagnetic waves emitted by the product may interfere with the plane’s
instruments or the hospital’s medical equipment.
If a battery leaks, changes color, deforms, or emits smoke or fumes, remove it
immediately. Be careful not to get burned in the process. It may cause a fire,
electrical shock or burns if you keep using it.
Keep the batteries and other accessories out of the reach of children and infants. If a
child or infant swallows a battery or accessory, consult a physician immediately.
(Battery chemicals may harm the stomach and intestines.)
Be careful not to get the product wet. If you drop the product in the water or if water
or metal get inside the product, promptly remove the batteries. This is to prevent fire,
electrical shock, and burns.
Do not cover or wrap the product with a cloth. Doing so may trap heat within and
cause the casing to deform or catch fire.

9
Safety Precautions
Keep the equipment out of the reach of children and infants, including when in use.
Straps or cords may accidentally cause choking, electrical shock, or injury. Choking
or injury may also occur if a child or infant accidentally swallows a part or accessory.
If a child or infant swallows a part or accessory, consult a physician immediately.
When the equipment is not in use, make sure to remove the batteries, and
disconnect the external power source and cable from the equipment before storing.
This is to prevent electrical shock, excessive heat, fire, or corrosion.
Prevent any battery leakage from contacting your eyes, skin, and clothing. It can
cause blindness or skin problems. If the battery leakage comes in contact with your
eyes, skin, or clothing, flush the affected area with lots of clean water without rubbing
it. See a physician immediately.
Do not use paint thinner, benzene, or other organic solvents to clean the product.
Doing so may cause fire or a health hazard.
Cautions: Follow the cautions below. Otherwise physical injury
or property damage may result.
When the product is not in use for a prolonged period, make sure to remove the
batteries before storing. This is to prevent malfunction or corrosion.
When disposing of a battery, insulate the electrical contacts with tape. Contact with
other metallic objects or batteries may cause a fire or an explosion.
Do not use, store, or leave the product in a vehicle in the direct sunlight or with a
high interior temperature, or near a high-temperature object. The product may
become hot and cause burns if touched. Doing so may also cause battery heat
generation, breakage, leakage, and the like.
Do not fire the flash with the flash head (light-emitting unit) in contact with a human
body or any object. Doing so may result in the risk of burns and fire.
Before performing AI bounce flash photography, be sure to warn people nearby. The
flash head may move automatically and fire without warning.
Do not fire the flash near the eyes. It may hurt the eyes.
Do not leave the product in a low-temperature environment for an extended period of
time. The product will become cold and may cause injury when touched.
Do not directly touch any part of the product that becomes hot. Extended contact on
the skin may result in low temperature contact burns.
If you replace the batteries after continually firing, the batteries may be hot. Be
careful not to get burned in the process. It may cause a skin burn.
10
Nomenclature
AI.B distance
measurement sensor
AF-assist beam
emitter (p.27)
Contacts
Locking pin
Optical transmission
wireless sensor
Bounce adapter
detector
Wide panel
(Retracted, p.35)
Flash head
(Light-emitting unit)
Mounting foot
(p.20)
11
Nomenclature
<Q> Flash-ready lamp/
Test flash button (p.21, 77)
<X> Bounce mode
switch (p.42)
<0°> : Flash head
forward-facing
position
<Y> : AI.B semi-auto
<Z> : AI.B full-auto
Bounce adapter attachment
(p.63)
<z>
Bounce angle
setting button
(p.45, 54, 57)
Battery compartment
cover (p.18)
Power switch (p.21)
<K>:Power on
<a>: Button/Dial lock
(Power on)
<J>:Power off
<9> Select dial
<8> Select/Set button
<S> Cross keys
<H> Zoom button (p.34)
<E> Flash mode button (p.24, 36)
<I> Wireless setting button (p.74, 79)
<O> Flash exposure compensation/
Flash output setting button (p.30/36)
Lock-release button (p.20)
Mounting foot lock lever
(p.20)
<0>
Back button
<X>
AI.B full-auto distance
measurement start
button/AI.B lamp
(p.43, 49/54, 59)
<1>
Sub-menu button
(p.40, 75, 82)
LCD panel
12
Nomenclature
LCD Panel
E-TTL II/E-TTL Autoflash (p.24)
2:
First-curtain sync
(Normal flash photography,
p.68)
r: Second-curtain sync
(p.33, 68)
c: High-speed sync
(p.32, 68)
a:
E-TTL II/E-TTL
autoflash
j: Standard
k: Guide number
priority (p.87)
l: Even coverage
(p.87)
t: Temperature increase
(Flash firing restriction, p.96)
f: Flash exposure compensation
(p.30, 68)
G : Charge indicator (p.21)
L : Automatic setting
d : Manual setting (p.34)
e: Zoom display (p.34)
N: Wide panel + bounce
warning
O: Outside of flash
coverage warning
Flash coverage
(Focal length, p.34)
Flash exposure
compensation amount
(p.30)
Flash exposure level
(p.30)
v : Aperture (p.36)
Effective flash metering range/
Shooting distance (p.24/36)
R : Meters
@ : Feet
The displays shown are examples. The display will show only the
settings currently applied.
When a button or dial is operated, the LCD panel illuminates (p.22).
13
Nomenclature
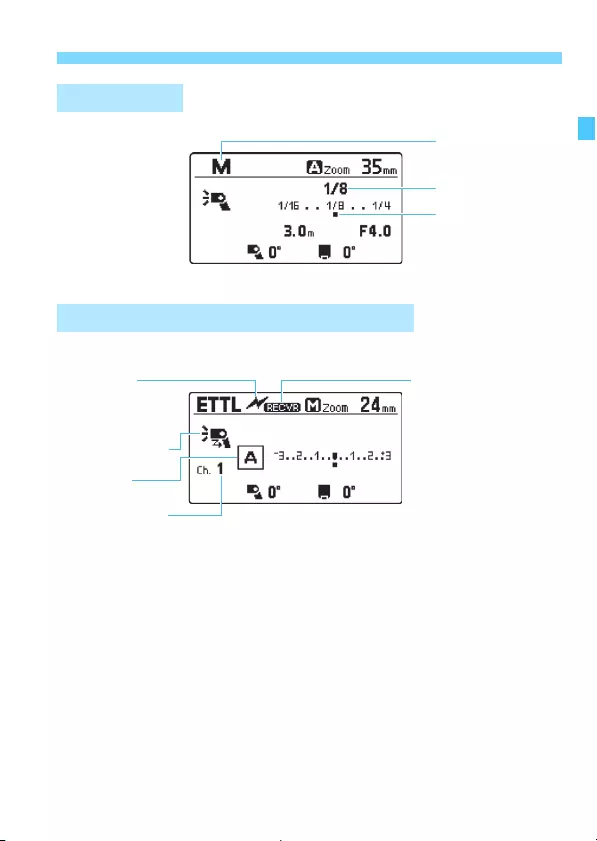
Receiver unit
Manual Flash (p.36)
Optical Transmission Wireless Shooting (p.71)
q : Manual flash
Manual flash output
Manual flash level
x : Receiver
setting (p.74)
( :
Individual receiver (p.79)
: : Optical
transmission
wireless
shooting (p.74)
h : Receiver icon
Firing group
(p.78)
* : Transmission
channel
(p.74)
14
Nomenclature
Bounce Shooting (p.41)
m: Bounce
(p.49, 56, 61)
H: Bounce adapter
attached (p.63)
W : AI.B full-auto (p.48)
V : AI.B semi-auto (p.56)
Flash head
rotation angle
Horizontal direction
Upward direction
Flash head upward angle
The rotation angle of the flash head is displayed in 5 increments.
If the camera’s orientation is horizontal during AI.B full-auto shooting, the
bounce angle in the upward direction is displayed up to 180°.

15
Nomenclature
Accessories Provided
Mini stand
Attachment
Speedlite case Mini stand
(p.73)
Bounce adapter
SBA-E4
(p.63)

16
17
1
Getting Started and
Basic Operations
This chapter describes the preparations before starting
flash photography and the basic shooting operations.
Cautions for firing continuous flash
To avoid degrading and damaging the flash head due to
overheating, limit firing the flash continuously at full output
up to 30 times. After firing the flash continuously at full
output for 30 times, allow a rest time of at least 10 min.
If you fire the flash continuously at full output for the above
listed number of times, and then fire the flash again
repeatedly at short intervals, the safety function may
activate and restrict flash firing. With flash firing restriction
level 1, the firing interval is automatically set to approx. 8
sec. If this happens, allow a rest time of at least 40 min.
For details, see “Flash Firing Restriction due to Temperature
Increase” on page 96.
When you are not performing bounce flash photography, set the
<X> bounce mode switch to the <0°> position (p.11). For more
information on bounce flash photography, see Chapter 3 “Bounce
Flash Photography” (p.41).
18
Install four AA/R6 batteries for power supply.
1Open the cover.
Slide the battery compartment cover
down, then open the battery
compartment cover.
2Install the batteries.
Make sure the “+” and “-” electrical
contacts are correctly oriented as
shown in the battery compartment.
The grooves on the side surfaces
inside the battery compartment
indicate “-”. This is convenient when
replacing the batteries in a dark
place.
3Close the cover.
Close the battery compartment cover,
then slide it up by following the
procedure of step 1 in reverse.
Firing Interval and Number of Flashes
Based on new AA/LR6 alkaline batteries and Canon’s testing standards.
The Quick flash function enables flash photography before the flash is fully
charged (p.21).
Installing the Batteries
Firing Interval Number of Flashes
Quick Flash Normal Flash
Approx. 0.1 to 3.9 seconds Approx. 0.1 to 5.5 seconds
Approx. 115 to 800 times
19
Installing the Batteries
CAUTION
Do not use “AA/R6 lithium batteries”.
Note that certain AA/R6 lithium batteries may become extremely hot in rare
cases during use. Due to safety reasons, do not use “AA/R6 lithium
batteries”.
When performing continuous flash, do not touch the flash head,
batteries, or the area near the battery compartment.
When continuous flash or modeling flash is repeatedly fired at short
intervals, do not touch the flash head, batteries, or the area near the battery
compartment. The flash head, batteries, and area near the battery
compartment may become hot, resulting in the risk of burn.
Do not use the Speedlite while touching the same part for a long
period of time.
Even if the product does not feel too hot, prolonged contact with the same
body part may cause skin redness or blistering due to low-temperature
contact burns. Using a tripod is recommended in very hot places or for
people with circulation problems or very sensitive skin.
Using AA/R6 batteries other than the alkaline type may cause contact failure
due to the irregular shape of the battery contacts.
When <!> is displayed or the LCD panel display turns off during
recharging, replace the batteries with new ones.
Use a new set of four batteries of the same brand. When replacing the
batteries, replace all four at one time.
AA/HR6 Ni-MH batteries can also be used.
20
1Attach the Speedlite.
Slip the Speedlite’s mounting foot all
the way into the camera’s hot shoe.
2Secure the Speedlite.
Slide the mounting foot lock lever to
the right.
XWhen the lock lever clicks in place, it
is locked.
3Detach the Speedlite.
While pressing the lock-release
button, slide the lock lever to the left
and detach the Speedlite from the
camera.
Attaching and Detaching the Speedlite
to and from the Camera
Be sure to turn off the Speedlite before attaching or detaching it.
21
1Set the power switch to <K>.
XThe flash recharge starts.
XDuring recharging, <G> is
displayed on the LCD panel. When
flash recharge is complete, this
indicator disappears.
2Check that the flash is ready.
The status of the flash-ready lamp
changes from off to green (Quick
flash ready) to red (fully charged).
You can press the test flash button
(flash-ready lamp) to fire a test flash.
The Quick flash function enables flash photography when the flash-
ready lamp is lit green (before the flash is fully charged). Quick flash is
available regardless of the camera’s drive mode setting. Although the
flash output will be approx. 1/2 to 1/6 of the full output, it is useful for
shooting with a shorter firing interval.
During manual flash photography, this function is available when the
flash output is set to 1/4 to 1/128. Note that you cannot use Quick flash
with the receiver unit during optical transmission wireless shooting.
Turning on the Power
Flash-ready lamp
(Test flash button)
Quick Flash Function
When the power is turned on, the flash head may automatically operate
(rotate).
When Quick flash is fired during continuous shooting, underexposure
may occur since the flash output decreases.
When the 3/1/o/7/2 timer of the camera is operating, a test
flash cannot be performed.

22
Turning on the Power
To save battery power, the power will turn off automatically after approx.
90 sec. of idle use. To turn on the Speedlite again, press the camera’s
shutter button halfway or press the test flash button (flash-ready lamp).
When set as the receiver unit for optical transmission wireless flash
shooting (p.72), the time until auto power off takes effect is approx. 60
min.
By setting the power switch to <a>, you can disable the flash’s
button and dial operations (except the <X> switch operation). It is
useful when you want to prevent the flash function settings from being
accidentally changed after you set them.
If you operate a button or dial, <k> is displayed on the LCD panel.
When a button or dial is operated, the LCD panel illuminates for approx.
12 sec. (p).
During normal flash photography, the LCD panel illuminates in green.
When set as a receiver unit during optical transmission wireless
shooting, the LCD panel illuminates in orange.
Auto Power Off Function
Lock Function
LCD Panel Illumination

23
Turning on the Power
The flash settings will remain in effect even after the power is turned off.
To retain the settings when replacing the batteries, replace the batteries
after turning off the power switch.
You can fire a test flash while the power switch is set to the <a>
position. Also, when a button or dial is operated, the LCD panel
illuminates.
Auto power off can be disabled (C.Fn-01, p.85).
When set as a receiver unit, you can change the time until the receiver
unit’s auto power off takes effect (C.Fn-10, p.86).
You can change the setting of the LCD panel illumination (C.Fn-22, p.87).
You can change the color of the LCD panel illumination (P.Fn-02/03,
p.88).
You can disable Quick flash (P.Fn-05, p.89).
24
When you set the camera’s shooting mode to <d> (Program AE) or a
fully automatic mode, you can shoot in E-TTL II/E-TTL fully automatic
flash mode.
1Set the flash mode to <a>.
Press the <E> button of the
<S> cross keys.
Turn <9> to select <Q>, then
press <8>.
2Focus on the subject.
Press the shutter button halfway to
focus.
XThe shutter speed and aperture are
displayed in the viewfinder.
Check that <Q> is lit in the viewfinder.
3Take the picture.
Check that the subject is in the
effective flash metering range.
When you press the shutter button
completely, the flash will fire and the
picture will be taken.
a:
Fully Automatic Flash Photography
Effective flash metering range
If the subject is dark (underexposed) when you check the shot image,
move closer to the subject and shoot again. You can also increase the
ISO speed when using a digital camera.
“Fully automatic” refers to <A>, <1>, and <C> shooting modes.
Even when attached to a camera that supports the E-TTL II autoflash
system, <a> is displayed on the LCD panel.

25
Simply by setting the camera’s shooting mode to <s> (shutter-priority
AE), <f> (aperture-priority AE), or <a> (manual exposure), you can
execute E-TTL II/E-TTL autoflash suitable for each shooting mode.
If you use the <Z> or <Y> shooting mode, the result will be the same as
using the <d> (Program AE) mode.
1/X sec. is the camera’s maximum flash sync speed.
E-TTL
II/E-TTL Autoflash by Shooting Mode
s
Select this mode when you want to set the shutter speed manually.
The camera will then automatically set the aperture matching the shutter
speed to obtain the standard exposure based on the metering of the camera.
If the aperture value blinks, it means that the background exposure will
be underexposed or overexposed. Adjust the shutter speed until the
aperture value stops blinking.
f
Select this mode when you want to set the aperture manually.
The camera will then automatically set the shutter speed, matching the
aperture to obtain the standard exposure based on the metering of the camera.
For low-light scenes, a slow sync speed will be used to obtain the standard
exposure for both the main subject and background. The standard exposure for
the main subject is obtained with the flash light, while the standard exposure for
the background is obtained with a long exposure using a slow shutter speed.
Since a slow shutter speed will be used for low-light scenes, using a
tripod is recommended.
If the shutter speed blinks, it means that the background exposure will
be underexposed or overexposed. Adjust the aperture until the shutter
speed stops blinking.
a
Select this mode if you want to set both the shutter speed and aperture
manually.
Standard exposure of the main subject is obtained with the flash light. The
exposure of the background changes according to the shutter speed and
aperture combination you set.
Flash Sync Speeds and Apertures by Shooting Mode
Shutter Speed Aperture
dAutomatically set (1/X sec. to 1/60 sec.) Automatically set
sManually set (1/X sec. to 30 sec.) Automatically set
fAutomatically set (1/X sec. to 30 sec.) Manually set
aManually set (1/X sec. to 30 sec., Bulb) Manually set

26
E-TTL II/E-TTL Autoflash by Shooting Mode
EOS DIGITAL cameras have three sizes of image sensors, and the
effective shooting angle of view of the attached lens varies depending
on the size of image sensor. 470EX-AI automatically recognizes the
image sensor size of the EOS DIGITAL camera and automatically sets
the flash coverage that is ideal for the effective shooting angle of view of
a lens for the focal length range of 24-105mm.
This function adjusts the white balance depending on the color
temperature of the flash light by transmitting the color temperature
information to the EOS DIGITAL camera when the flash fires. When you
set the camera’s white balance to <A>, <Aw>, or <Q>, the
function is enabled automatically.
Refer to the specifications in your camera’s Instruction Manual to find
out if it is compatible with this function.
See Chapter 3, “Bounce Flash Photography” (p.41-64).
Auto Zoom Adjustment to Image Sensor Size
Color Temperature Information Transmission
Bounce Function
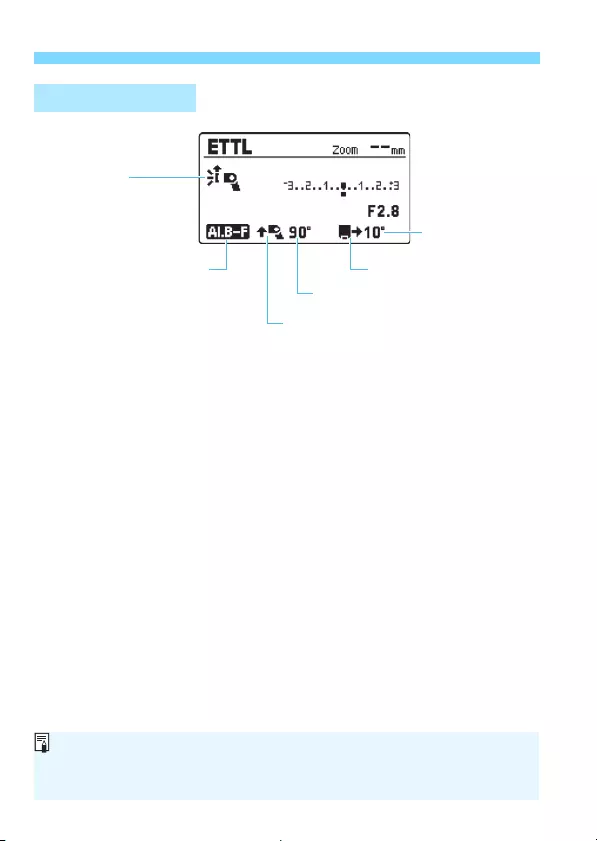
When the <X> bounce mode switch is set to the <0°> position and the
flash head is facing a direction other than straight forward, the <X> lamp
blinks. Pressing the shutter button halfway automatically returns the position
of the flash head to the forward-facing position. (The <X> lamp turns off.)

27
E-TTL II/E-TTL Autoflash by Shooting Mode
When it is difficult to autofocus on the
subject in low-light or when contrast is
low during viewfinder shooting, the
infrared AF-assist beam built into the
flash is automatically emitted to help
autofocus.
The AF-assist beam supports most of the EOS cameras’ AF points. The
AF-assist beam covers the angle of view of 28 mm or longer lens focal
length, and its effective range (at 28 mm focal length) is approx. 0.7 — 10
m/2.3 — 32.8 ft. at the center in the viewfinder and approx. 1 — 5 m/3.3 —
16.4 ft. at the periphery (AF points other than the center AF point).
AF-Assist Beam
If a peripheral AF point is selected, or a wide-angle or telephoto lens is
used, achieving focus may be difficult with an EOS-dedicated, external
Speedlite’s AF-assist beam. In such a case, use the center AF point or an
AF point close to the center.
During Live View shooting, the AF-assist beam is emitted even when the
AF method is set to [Quick mode].
AF-assist beam firing can be disabled (C.Fn-08, p.86).
The AF-assist beam type that uses intermittent flashes (a series of small
flashes) can be emitted (P.Fn-04, p.89).

28

29
2
Advanced Flash
Photography
This chapter describes advanced shooting operations
utilizing the flash functions.
When the camera’s shooting mode is set to a fully automatic
mode or a Basic Zone mode, the operations in this chapter
are not available. Set the camera’s shooting mode to <d/s/
f/a/bulb(B)> (Creative Zone mode).
When you are not performing bounce flash photography, set
the <X> bounce mode switch to the <0°> position (p.11).
For more information on bounce flash photography, see
Chapter 3 “Bounce Flash Photography” (p.41).
30
With a similar procedure as exposure compensation, you can adjust the
flash output. The flash exposure compensation amount can be set up to
±3 stops in 1/3-stop increments.
1Press the <O> button.
Press the <O> button of the <S>
cross keys.
You can also select the flash
exposure compensation by pressing
<8> and turning <9>.
2Set the flash exposure
compensation amount.
Turn <9> to set the flash exposure
compensation amount, then press
<8>.
XThe flash exposure compensation
amount is set.
“0.3” indicates 1/3 stop and “0.7”
indicates 2/3 stops.
To cancel flash exposure
compensation, return the
compensation amount to ±0.
f Flash Exposure Compensation
Generally, set an increased exposure compensation for bright subjects
and set a decreased exposure compensation for dark subjects.
If the camera’s exposure compensation is set in 1/2-stop increments, flash
exposure compensation will be up to ±3 stops in 1/2-stop increments.
When the flash exposure compensation is set on both the flash and the
camera, priority is given to the flash setting.
Without pressing the <O> button of the <S> cross keys, you can
directly turn <9> and set the amount of flash exposure compensation
(C.Fn-13, p.86).
31
The FE (Flash Exposure) lock locks the correct flash exposure setting
for any part of the subject.
With <a> displayed on the LCD panel, press the camera’s
<B> button. For cameras without a <B> button, press the
<A> (AE lock) or <7> button.
1Focus on the subject.
2Press the <B> button (8).
With the subject at the center of the
viewfinder, press the camera’s
<B> button.
XThe Speedlite will fire a preflash and
the required flash output for the
subject is retained in memory.
X“FEL” will be displayed in the
viewfinder for approx. 0.5 sec.
Each time you press the <B>
button, a preflash will be fired and the
new flash output required at that time
is retained in memory.
7: FE Lock
If a correct exposure cannot be obtained when FE lock is performed,
<Q> blinks in the viewfinder. Move closer to the subject or open the
aperture, and perform FE lock again. You can also set a higher ISO
speed and perform FE lock again when using a digital camera.
If the target subject is too small in the viewfinder, FE lock may not be
effective.
32
With high-speed sync, you can shoot with a flash even at shutter
speeds that exceed the maximum flash sync shutter speed. This is
effective when you want to shoot in the aperture-priority AE <f>
mode (open aperture) with background blur in locations such as
outdoors in daylight.
1Press <8>.
2Select the item in the illustration.
Turn <9> to select the item in the
illustration, then press <8>.
3Select <c>.
Turn <9> to select <c>, then press
<8>.
Check that <F> is lit in the
viewfinder, then take the picture.
c High-speed Sync
With high-speed sync, the faster the shutter speed, the lower the guide
number becomes. You can check the effective flash metering range on the
LCD panel.
When the shutter speed is less than or equal to the maximum flash sync
shutter speed, <F> is not displayed in the viewfinder.
To return flash firing to normal, select <2> (first-curtain sync) in step 3.
(<2> will not be displayed on the LCD panel after you perform this
setting.)
33
Shooting with a slow shutter speed and second-curtain sync captures
the trail of the light sources of a moving subject, such as car lights, in a
natural way. The flash fires right before the exposure finishes (shutter
closes).
1Press <8>.
2Select the item in the illustration.
Turn <9> to select the item in the
illustration, then press <8>.
3Select <r>.
Turn <9> to select <r>, then
press <8>.
r Second-curtain Sync
The second-curtain sync works well when the camera’s shooting mode is
set to <bulb(B)> (bulb shooting).
When the flash mode is set to <a>, the flash fires twice. The first
flash is a preflash to determine the flash output. It is not a malfunction.
Second-curtain sync is not available during wireless flash photography.
To return flash firing to normal, select <2> (first-curtain sync) in step 3.
(<2> will not be displayed on the LCD panel after you perform this
setting.)
34
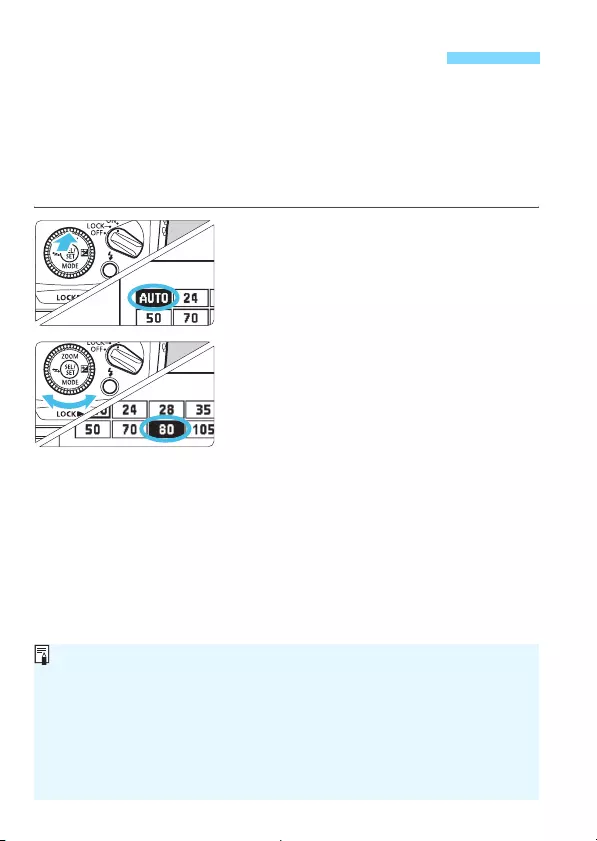
Flash coverage (the range covered by the flash light) can be set
automatically or manually. With <L> (automatic setting), the flash
coverage is adjusted automatically according to the focal length
(shooting angle of view) of the lens in use and the image sensor size
(p.26). With <d> (manual setting), you can manually set flash coverage
in the range of 24 mm to 105 mm.
1Press the <H> button.
Press the <H> button of the
<S> cross keys.
2Set the flash coverage.
To set the flash coverage
automatically, set <X>. To set the
flash coverage manually, select a
number (indicating the focal length in
mm).
Turn <9> to select the flash
coverage, then press <8>.
H:Setting the Flash Coverage
When you set the flash coverage manually, set the same or a wider
coverage than the angle of view for shooting to avoid darkening the
periphery of the picture.
When a lens with a focal length less than 24 mm is attached, the
<O> warning is displayed on the LCD panel. When using a camera
with the image sensor size smaller than full-frame, the <O>
warning is displayed when the actual shooting angle of view is wider than
the angle of view of a 24 mm lens.
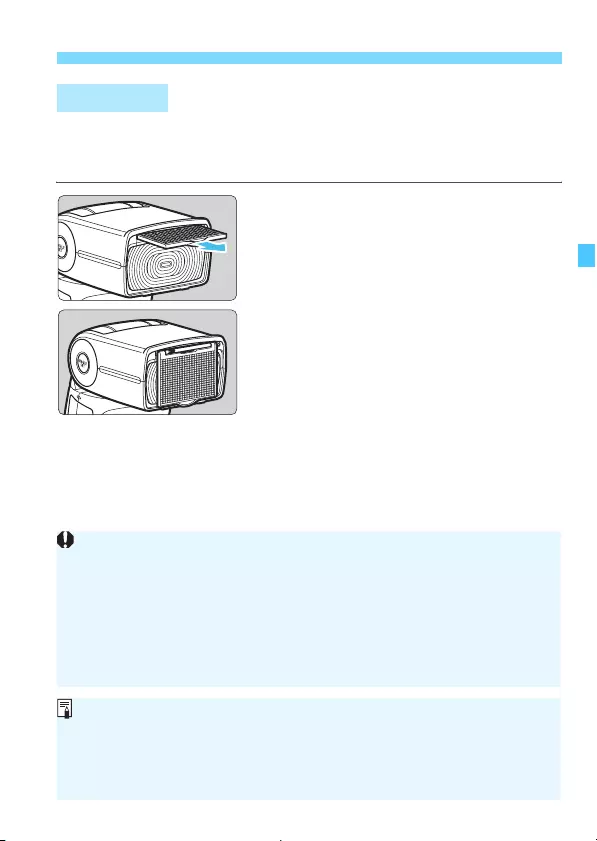
35
H:Setting the Flash Coverage
When you use the flash’s built-in wide panel together with the flash, you
can perform flash photography covering the angle of view of an ultra-
wide angle lens with a focal length as wide as 14 mm.
Pull out the wide panel.
Pull out the protruding area located in
the center of the wide panel.
Fold down the wide panel.
Wide Panel
Since underexposure may occur, the <N> warning is displayed on
the LCD panel when using the wide panel with bounce flash.
Do not pull out the wide panel with excessive force. Doing so may detach
the wide panel from the Speedlite.
Angle of view of EF15mm f/2.8 Fisheye or EF8-15mm f/4L Fisheye USM
is not supported.
When the wide panel is pulled out, AI.B full-auto shooting (p.48) is not
possible.
The flash coverage is set automatically when using the wide panel. You
cannot change the setting.
You can perform flash photography with the wide panel even when the
camera’s shooting mode is set to a fully automatic mode or a Basic Zone
mode.
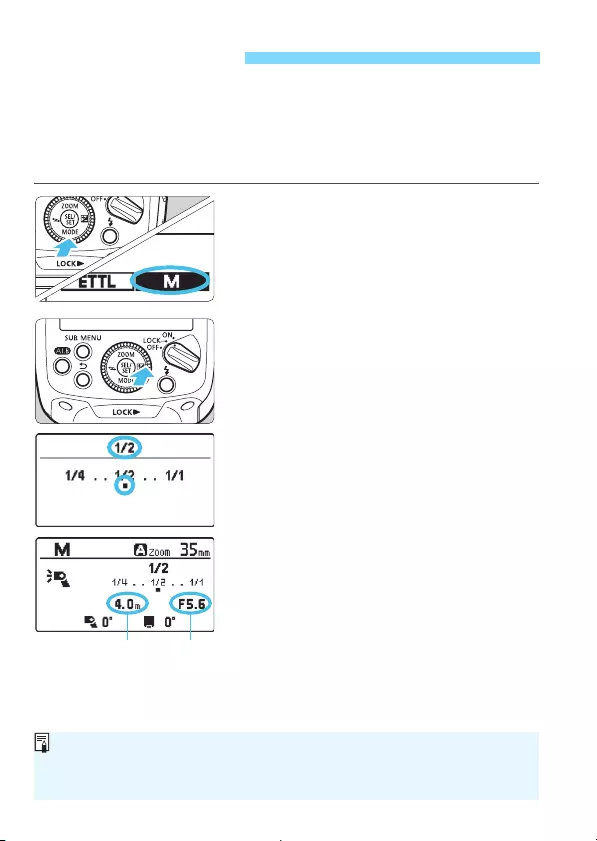
36
You can set the flash output from 1/1 full output to 1/128 power in 1/3-
step increments.
Use a flash meter (commercially-available) to determine the required
flash output to obtain a correct flash exposure. Setting the camera’s
shooting mode to <f> or <a> is recommended.
1Set the flash mode to <a>.
Press the <E> button of the
<S> cross keys.
Turn <9> to select <R>, then
press <8>.
2Set the flash output.
Press the <O> button of the <S>
cross keys.
Turn <9> to set the flash output,
then press <8>.
When you press the camera’s shutter
button halfway, an approximate
indication of the effective shooting
distance and the aperture value are
displayed.
a: Manual Flash
Shooting distance Aperture
For guide number details with manual flash, see page 109.
Without pressing the <O> button of the <S> cross keys, you can
directly turn <9> and set the flash output (C.Fn-13, p.86).
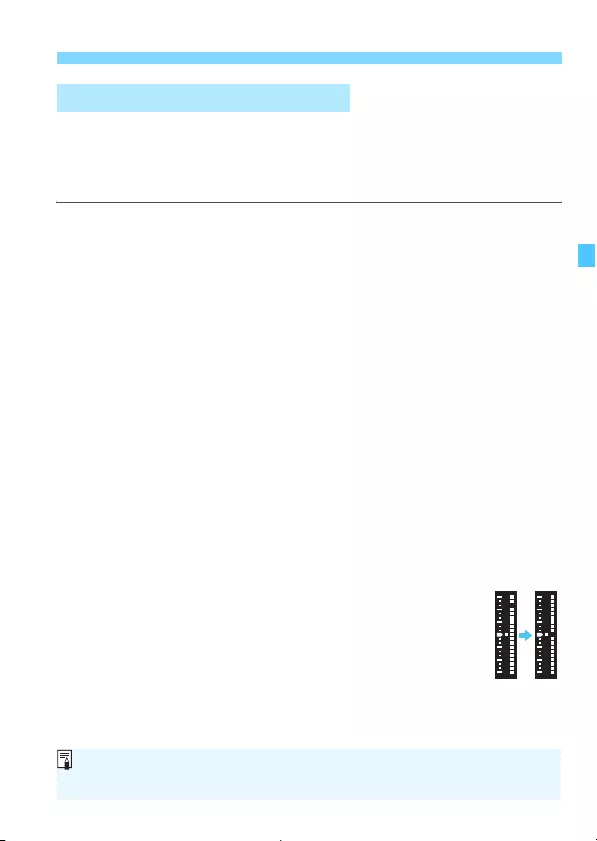
37
a: Manual Flash
When using an EOS-1D series camera, the flash exposure level can be
manually set before shooting. This is effective when you are close to the
subject. Use an 18% gray reflector (commercially available) and shoot
as follows.
1Configure the camera and Speedlite settings.
Set the camera shooting mode to <a> or <f>.
Set the Speedlite’s flash mode to <a>.
2Focus on the subject.
Focus manually.
3Set up an 18% gray reflector.
Place the gray reflector at the subject’s position.
Aim the camera so that the entire spot metering circle within the
viewfinder center is over the gray reflector.
4Press the <B>, <P>, or <7> button (8).
XThe Speedlite will fire a preflash and the required flash output for
the correct flash exposure is retained in memory.
XOn the right side of the viewfinder, the exposure level indicator
will show the flash exposure level against the standard exposure.
5Set the flash exposure level.
Adjust the Speedlite’s manual flash output and the
aperture so that the flash exposure level aligns with
the standard exposure index.
6 Take the picture.
Remove the gray reflector and take the picture.
Metered Manual Flash Exposure
Metered manual flash exposure is available only with EOS-1D series
cameras.

38
When the camera’s depth-of-field preview button is pressed, the flash
fires continuously for approx. 1 sec. This feature is called “modeling
flash”. This is useful for checking shadows cast on the subject by the
flash light.
Press the depth-of-field preview
button on the camera.
XThe flash fires continuously for
approx. 1 sec.
When an EOS DIGITAL camera released in or after the second half of
2017 (excluding some cameras, p.46) is used and the <X> switch is
set to <Z> full auto, the camera’s depth-of-field preview button
functions as an AI.B full-auto distance measurement start button.
With this setting, you can fire a modeling flash using the test flash
button on the flash in AI.B full-auto shooting if the Custom function
C.Fn-02 is set to 1 or 2 (p.85).
Modeling Flash
Modeling Flash in AI.B Full-Auto Mode

39
Modeling Flash
To avoid degrading and damaging the flash head due to overheating,
limit firing the modeling flash up to 20 times. After firing modeling flash
for 20 times, allow a rest time of at least 10 min.
If you fire the modeling flash for the above listed number of times, and
then fire the flash again repeatedly at short intervals, the safety function
may activate and restrict flash firing. With flash firing restriction level 1,
the firing interval is automatically set to approx. 8 sec. If this happens,
allow a rest time of at least 40 min.
During Live View shooting, firing modeling flash (by operating the
camera) is not possible.
Modeling flash (by operating the camera) is disabled when using the
flash with EOS M6, EOS M5, EOS M3, EOS M2, EOS M, EOS Elan II/
Elan II E/50/50E, EOS REBEL 2000/300, EOS REBEL G/500N, EOS
REBEL K2/3000V, EOS REBEL XS N/REBEL G II/3000N/66, EOS IX, or
EOS IX Lite/IX7. Set C.Fn-02 to 1 or 2 (p.85), and then fire modeling
flash using the test flash button. (When using the EOS M series cameras
listed above, the test flash button functions when the camera’s metering
timer is not active.)
You can use the test flash button to fire the modeling flash (C.Fn-02, p.85).
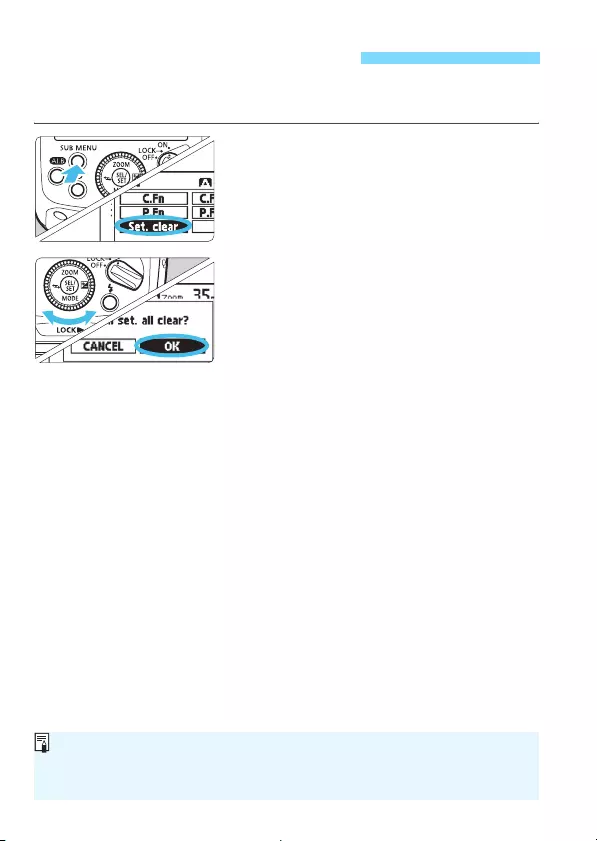
40
You can revert the settings of the Speedlite shooting functions and
wireless shooting settings to their defaults.
1Display the Clear Settings screen.
Press the <1> button.
Turn <9> to select <B>, then
press <8>.
XA confirmation screen is displayed.
2Clear the settings.
Turn <9> to select <;>, then
press <8>.
XThe Speedlite settings are cleared,
and normal flash photography with
<a> flash mode will be set.
Clearing Speedlite Settings
Even when the settings have been cleared, the transmission channel for
optical transmission wireless receiver unit as well as the settings of the
Custom Functions (C.Fn) and Personal Functions (P.Fn) will not be cleared.
41
3
Bounce Flash
Photography
This chapter describes functions related to the bounce
flash function, such as flash photography that uses the
AI.B full-auto function, AI.B semi-auto function, manual
bounce, and bounce adapter.
Cautions for the AI Bounce Flash Function
During AI.B full-auto and AI.B semi-auto shooting, the flash
head moves and fires automatically. The flash head may fire in
an unintended direction. Before performing AI bounce flash
photography, be sure to warn those around you. Additionally,
when you want to perform AI bounce flash photography, follow
the precautions below.
• Make sure your eyes are not close to the flash head.
• The flash head may come in contact with objects. Make sure
your face, head, and the like are not close to the flash head.
• The flash head moves. Be sure to hold the camera securely.
• Do not allow your hair or the like to get entangled with the
flash head.
• Be careful of the orientation of the flash head in low angle
shooting.
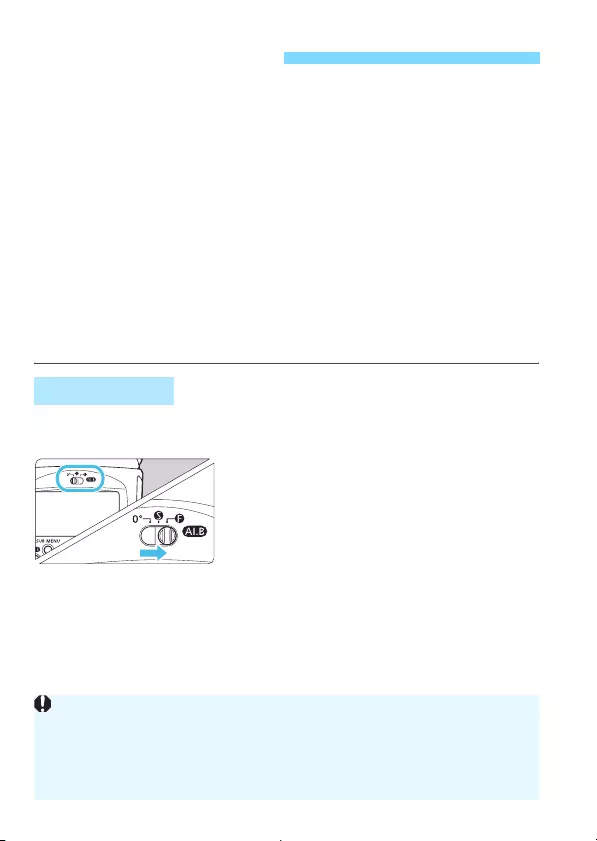
42
By pointing the flash head toward a ceiling, you can utilize the reflection
of the flash light off the surface for flash photography, making it possible
to soften the shadows of the subject for a more natural-looking shot.
This shooting technique is called “Bounce flash photography”.
Bounce flash photography allows you to get a more natural-looking shot
compared to techniques that light the subject directly with the flash light.
Shooting with the appropriate exposure, however, may require some
knowledge and experience.
This Speedlite comes with an “AI bounce (AI.B) flash function” that
enables you to perform bounce flash photography automatically. There
are two AI bounce flash modes: “AI.B full-auto mode” and “AI.B semi-
auto mode”. With AI.B full-auto function, the camera performs the
bounce flash photography automatically, requiring only simple
operations.
Slide the <X> bounce mode switch to switch the AI bounce flash
mode.
0° : Set when performing normal flash
photography (not bounce flash
photography).
Y: Allows you to perform “AI.B semi-
auto shooting” (p.45, 56).
Z: Allows you to perform “AI.B full-
auto shooting” (p.43, 46, 48).
X
AI Bounce Flash
Bounce Mode
When the bounce mode is switched, the flash head automatically moves
to the forward-facing position.
When the flash head is moving, do not touch it.
When you are to perform manual bounce flash photography, set P.Fn-09
to 1 (p.92) and set the switch to the <0°> position.
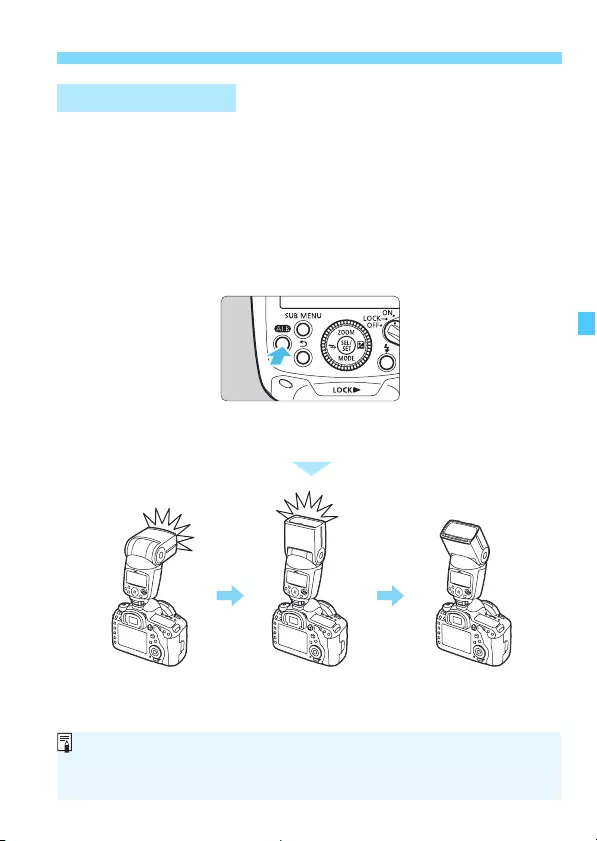
43
X AI Bounce Flash
This mode is geared for beginners. In this mode, the camera performs
the bounce flash photography automatically, requiring only simple
operations. When the <X> AI.B full-auto distance measurement start
button is pressed, the flash fires briefly (preflash) to measure the
distance to the subject and the distance to the ceiling for bouncing the
flash light. Based on the result of distance measurement, the orientation
(bounce angle) of the flash head is automatically set.
For AI.B full-auto shooting, see pages 46-55.
W AI.B Full-Auto
Press the <X> button to
perform the following operations automatically.
1. Fires the flash
toward the subject.
2. Fires the flash
toward the ceiling.
3. Sets the bounce
angle automatically.
When using an EOS DIGITAL camera released in or after the second half of
2017 (p.46), you can perform the same distance measurement operation as
described above using the camera’s depth-of-field preview button.
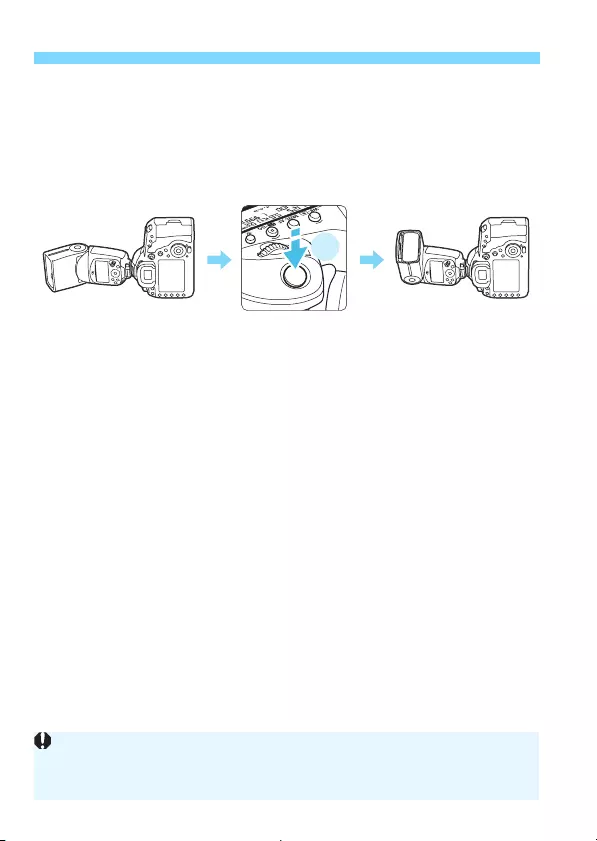
44
X AI Bounce Flash
Note if you change the orientation (position) of the camera, double-
clicking the camera’s shutter button (pressing the shutter button halfway
two times in a row within a short period) makes the flash head move
automatically, resetting the bounce angle to substantially the same
angle as before you changed the orientaion of the camera.
x2
Change the orientation
(position) from state 3
on previous page.
Resets the bounce
angle to substantially
the same as that in 3.
Depending on the camera used, AI.B full-auto shooting may not be
available. Additionally, even if the camera supports AI.B full-auto shooting,
some operations may be limited. See page 46 for details.
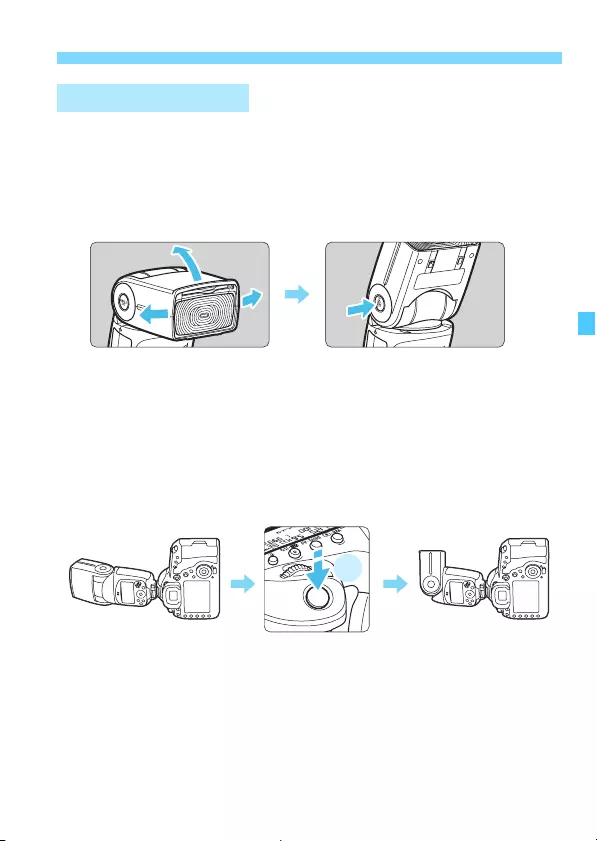
45
X AI Bounce Flash
This mode is geared for intermediate and advanced photographers.
You can store (register) the bounce angle in the Speedlite by pressing
the <z> button after setting the orientation (bounce angle) of the
Speedlite’s flash head as desired.
For AI.B semi-auto shooting, see pages 56-59.
Note if you change the orientation (position) of the camera, double-
clicking the camera’s shutter button (pressing the shutter button halfway
two times in a row within a short period) makes the flash head move
automatically, resetting the bounce angle to substantially the same
angle as before you changed the orientaion of the camera.
V AI.B Semi-Auto
1. Set the bounce angle as desired. 2. Press the <z> button.
x2
Change the orientation
(position) from state 2.
Resets the bounce
angle to substantially
the same as that in 2.

46
Depending on the camera used, AI.B (AI bounce flash) full-auto mode
compatibility and some of the operations to start AI.B full-auto shooting
vary (EOS cameras released up to the first half of 2014 do not
support AI.B full-auto shooting).
During AI.B full-auto shooting, the flash fires briefly (preflash) before the
image is shot to measure the distance to the subject and the distance to
the ceiling for bouncing the flash light. This operation automatically sets
an appropriate bounce angle for the subject.
You can perform this operation using one of the following two methods.
The operating procedure differs according to the camera used.
1. Use the Speedlite’s <
X
> AI.B full-auto distance measurement
start button.
2. Use the camera’s depth-of-field preview button.
EOS DIGITAL cameras released in and after the second half
of 2017
You can start distance measurement for AI.B full-auto shooting using
either operation 1 or 2 described above.
* While EOS REBEL T7/2000D/1500D and EOS REBEL T100/3000D/4000D,
were released in or after the second half of 2017, the cameras provide the
same compatibility as “EOS cameras released up to the first half of 2014” on
the next page. AI.B full-auto shooting cannot be performed.
W AI.B Full-Auto
AI.B Full-Auto Compatible Cameras and Operation Restrictions
For information on the latest cameras supporting the AI.B full-auto
function, refer to the Canon Web site.
When using an EOS DIGITAL camera released in or after the second
half of 2017 not equipped with the depth-of-field preview button, you can
assign the depth-of-field preview function to a button with the camera’s
customization features and start distance measurement for AI.B full-auto
shooting (perform the same operation as 2) by pressing the button
(except for the certain buttons).

47
W AI.B Full-Auto
EOS DIGITAL cameras released from the second half of
2014 up to the first half of 2017
When using EOS-1D X Mark II, EOS 5DS/5DS R, EOS 5D Mark IV,
EOS 7D Mark II, EOS 80D, EOS 77D, EOS REBEL T6S/760D, EOS
REBEL T7i/800D, or EOS REBEL T6i/750D, you can perform full-
auto bounce flash photography by performing operation 1. You
cannot start distance measurement operation of the AI.B full-
auto shooting by operation 2.
* While EOS REBEL T6/1300D, EOS M6, EOS M5 and EOS M3 were
released in or after the second half of 2014, the cameras provide the same
compatibility as “EOS cameras released up to the first half of 2014”. AI.B full-
auto shooting cannot be performed.
EOS DIGITAL cameras released up to the first half of 2014
AI.B full-auto shooting cannot be performed. Perform AI.B semi-
auto shooting (p.56) or manual bounce flash photography (p.61).
Do not press the <X> button and then fully press the shutter button
(take a shot) during the AI.B full-auto distance measurement operation.
The Speedlite may be fired at full output, and accurate distance
measurement operation may not be performed.
When the camera’s shooting mode is set to a mode in which the flash is
not fired, or when [Flash firing] in [External Speedlite control] or
[Flash control] mode (p.66) is set to [Disabled], distance measurement
is not performed during AI.B full-auto shooting even if the camera’s
depth-of-field preview button is pressed when using an EOS DIGITAL
camera released in or after the second half of 2017.
When using an EOS DIGITAL camera released in or after the second
half of 2017 and after pressing the depth-of-field button, a shot cannot be
taken during distance measurement operation even when you press the
shutter button completely (release lock). Perform shooting after the
distance measurement operation is complete.
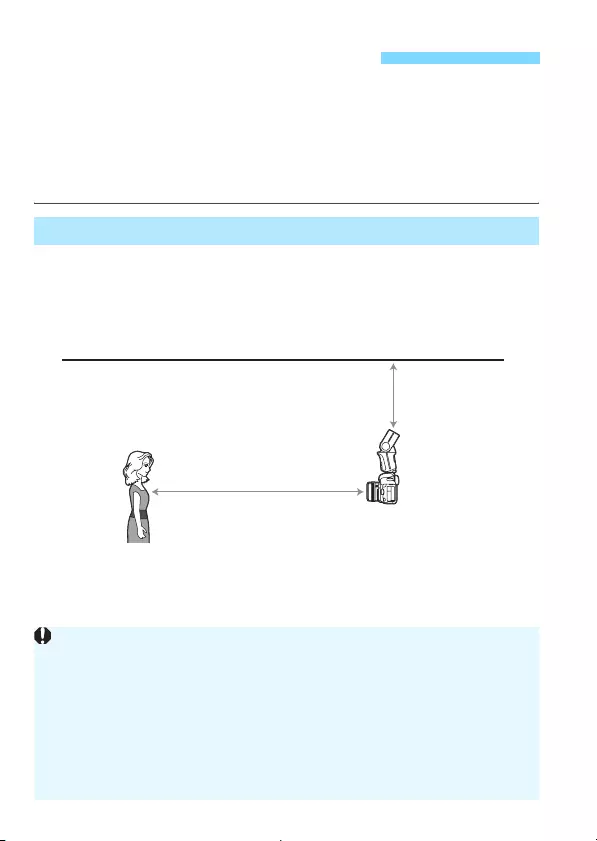
48
Before performing AI.B (AI bounce flash) full-auto shooting, check if the
camera used supports full-auto bounce flash photography (p.46).
For an overview of AI.B full-auto shooting, see page 43. Additionally,
before performing AI.B full-auto shooting, review the “Safety
Precautions” (p.8), “General Cautions for AI.B Full-Auto Shooting and
AI.B Semi-Auto Shooting” (p.60), and the like.
When performing AI.B full-auto shooting, perform bounce flash
photography using the figure below as reference. Additionally, with the
subject positioned in the center of the screen, press the <X> button
(to start distance measurement operation).
W AI.B Full-Auto Shooting
Guidelines for Shooting Conditions in AI.B Full-Auto Mode
Distance to ceiling
Approx. 1 — 3 m /
3.3 — 9.8 ft.
Shooting distance
Approx. 1 — 5 m / 3.3 — 16.4 ft.
Under conditions such as when the subject is far away, the ceiling is far
away, the ceiling is a dark color, the ceiling is stepped or uneven, the
camera’s ISO speed setting is low, or a large aperture value is set,
underexposure (insufficient exposure) is prone to occur.
When the distance to the ceiling is approx. 7 m / 23 ft. or greater
(estimate), or when the shooting angle exceeds approx. 60° upward or
approx. 60° downward, the flash head automatically moves to the
forward-facing position and normal flash shooting is performed without a
bounce flash.
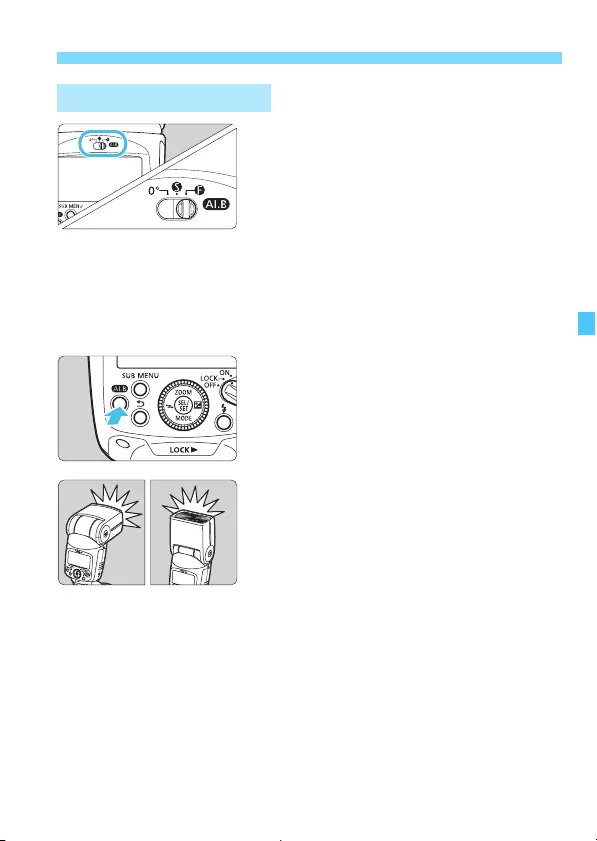
49
W AI.B Full-Auto Shooting
1Set the <X> switch to the <Z>
position (p.42).
With the Speedlite attached to the
camera, check that both the camera
and the Speedlite are turned on.
Set the <X> bounce mode switch
to the <Z> position.
XWhen the flash head is not in the
forward-facing position, the flash
head moves and is automatically set
to face forward.
2Press the <X> button.
Check that the <&> flash-ready lamp
is lit.
With the subject positioned in the
screen center, press the <X>
button.
The distance to the subject and the
distance to the ceiling for bouncing
the flash light are measured (distance
measurement operation). Note that
the flash fires briefly twice (preflash)
during the operation.
You can also start the distance
measurement using the depth-of-field
preview button, depending on the
camera used (p.46).
XWhen the distance measurement
completes, the bounce angle is
automatically set.
XThe Speedlite icon on the LCD panel
changes to <m>.
AI.B Full-Auto Shooting
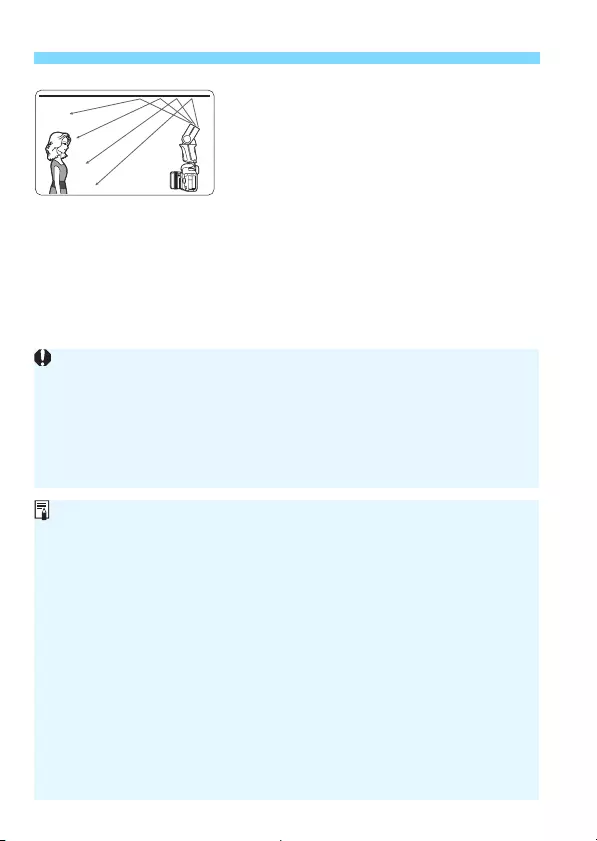
50
W AI.B Full-Auto Shooting
3Take the picture.
Focus on the subject and take the
picture in the same way as with
normal flash photography.
XThe flash fires at the automatically set
bounce angle and the picture is
taken.
Play back the image, then check the
result.
When the camera is equipped with a flash mode that disables flash firing,
set the mode to one that does not disable flash firing.
During AI.B full-auto shooting, the flash coverage is automatically set.
You cannot manually change the setting.
Even if [Flash firing] in the camera’s menu function [External Speedlite
control] or [Flash control] is set to [Disabled], when you press the
<X> button, the preflash will be fired to measure the distance.
When the distance to the subject is short, the bounce angle may be set
to 90° or greater. This is a normal operation. By relaxing the angle in
which the flash light hits the subject (making the incident angle
shallower), you can suppress the shadow on the subject (example: the
shadow beneath the face when taking a picture of a person).
During bounce photography, the flash coverage is set to 50 mm and <
—
>
is displayed.
With the position of the flash head moved (inadvertently) after the
distance measurement operation by pressing the <X> button or the
like (with the AI.B lamp blinking), if you press the shutter button halfway
or press any other button on the camera, automatic correction may be
performed to set the bounce angle to the position at the time when it was
automatically set by the distance measurement operation. Note that
when you press the shutter button completely with the AI.B lamp
blinking, the Speedlite will not fire until the flash head is moved to the
appropriate position.

51
W AI.B Full-Auto Shooting
Note that if you change the orientation
(position) of the camera after pressing
the <X> button, etc. and executing
AI.B full-auto distance measurement,
double-clicking the camera’s shutter
button (pressing the shutter button
halfway two times in a row within a short
period) activates the flash head to move
automatically, resetting (automatically
correcting) the bounce angle to
substantially the same angle as before
you changed the orientation (position).
This function is convenient when the
camera’s horizontal or vertical orientation
has changed.
What To Do When You Change the Camera Orientation
(Position)
x2
When a picture is taken during automatic correction of the bounce angle,
the flash does not fire.
When shooting conditions (subject, distance from subject, distance to
ceiling, etc.) change, press the <X> button once again to repeat the
distance measurement (p.49).
You can select the method to perform the automatic bounce angle
correction (P.Fn-08, p.91).
52
W AI.B Full-Auto Shooting
When the shooting distance to the subject changes
Press the <X> button or the like (p.49) and re-measure the
shooting distance to the subject.
When a warning appears on the Speedlite LCD panel
FAQ
Warning Solution
AI.B[ Attach the Speedlite to the camera, then press the
<X> button.
RETRY
An obstacle has come into contact with the flash
head preventing the appropriate operation.
Remove the obstacle and perform the same
operation once again.
AI.B ERROR
The same operation was performed three times,
but the appropriate operation could not be
completed. Turn the power off and on again,
temporarily set the <X> switch to the <0°>
position, or do the like.
The camera is not compatible with AI.B full-auto
mode. Perform AI.B semi-auto shooting (p.56) or
manual bounce flash photography (p.61).
CAMERA POWER
IS OFF
The camera power is not turned on. Turn on the
camera power, then press the <X> button.
AI.B-F Flash coverage angle cannot be manually set
during AI.B full-auto shooting.
WIDE PANEL The wide panel cannot be used during AI.B
full-auto shooting. Retract the wide panel.
BOUNCE ADAPTER When the bounce adapter is used, the flash
coverage cannot be set manually.
WIDE PANEL +
BOUNCE ADAPTER
With the wide panel pulled out, the bounce
adapter is attached. The flash coverage cannot be
set manually.

53
W AI.B Full-Auto Shooting
The flash head does not move when the camera’s depth-of-field
preview button is pressed.
To check whether or not the camera’s depth-of-field preview button
can be used to start distance measurement in AI.B full-auto mode
(checking if the camera is compatible), see page 46.
The bounce angle is not automatically corrected even when the
orientation (position) of the camera is changed.
Double-clicking the camera’s shutter button (pressing the shutter
button halfway two times in a row within a short period) activates the
flash head to move automatically, resetting the bounce angle to
substantially the same angle as before you changed the orientation
(position) of the camera.
Pictures are underexposed (insufficiently exposed).
During bounce flash photography, less light reaches the subject and
thus underexposure (insufficient exposure) is prone to occur. Take
the action such as taking the picture as close to the subject as
possible, increasing the camera’s ISO speed, or opening the
aperture of the lens before shooting.
Further, when the ceiling or wall for bouncing the flash light on is too
far away, the ceiling is a dark color, or the ceiling is stepped or
uneven, shooting with the appropriate exposure may not be possible
since not enough light may reach the subject.
The color of the subject is not right.
If the surface for bouncing the flash light is not white, a color cast
may result in the picture or shooting with the appropriate exposure
may not be possible since the bounced flash light may not reach the
subject. Select a ceiling or wall that is close to a white color for
bouncing the flash light off for high reflectance.
If the battery is not installed in the camera, the warning on the Speedlite may
not be correctly displayed when the <X> button is pressed.
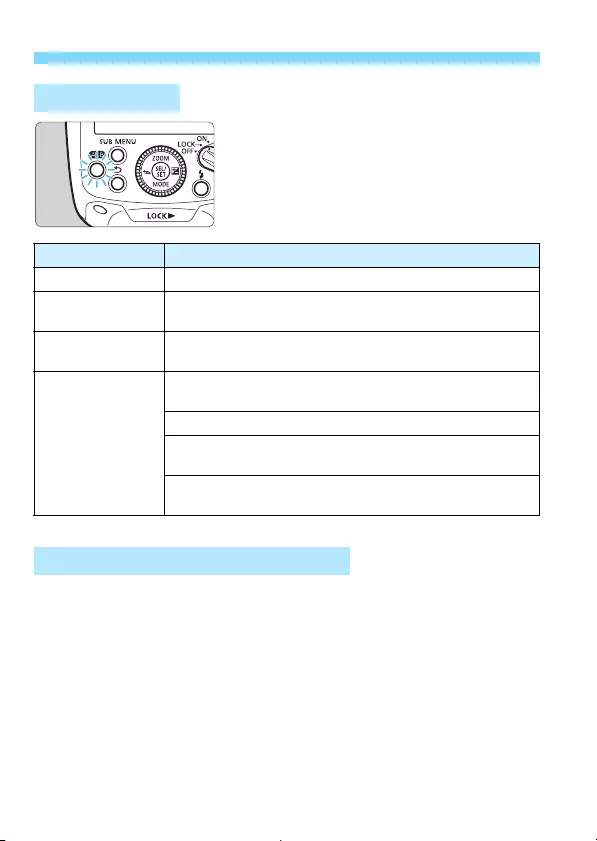
54
W AI.B Full-Auto Shooting
Depending on the state of the flash head
during AI.B full-auto shooting, the display
(lit/blinking) of the blue <X> lamp
changes.
When the <z> button is pressed during AI.B full-auto shooting, the
bounce angle is stored (registered) in the Speedlite, and AI.B semi-auto
shooting can be performed. For AI.B semi-auto shooting, see pages 56-
59.
X AI.B Lamp
Lamp Status
Off Before AI.B full-auto shooting is started
High-speed
blinking
AI.B full-auto distance measurement in progress or bounce
angle correction in progress
Lit Distance measurement is complete (AI.B full-auto shooting
possible)
Low-speed
blinking
When bounce angle changed after distance measurement
operation is complete
Error in AI.B full-auto mode
When the bounce angle changed after registration (with
<z> set)
When the flash head is not in the forward-facing position
(before shooting in AI.B full-auto mode)
z: Bounce Angle Setting Button

55
W AI.B Full-Auto Shooting
General Cautions for AI.B full-auto Shooting
When the <X> is switched to another mode or when the power switch
is set to <J>, the bounce angle stored (registered) in the Speedlite is
cleared.
When using the FE lock or self-timer, double-click the shutter button, and
once the flash head is reset (automatic correction) to the stored
(registered) position, perform the FE lock operation or shooting.
When a picture is taken with the camera oriented downward or upward,
the appropriate bounce angle may not be automatically set. If this
happens, take the picture using the following technique.
• Perform AI.B semi-auto shooting (p.56)
•Set the <X> switch to the <0°> position so that the flash head is
facing forward (p.42).
• Manual bounce flash photography (p.61)
When the <X> button is pressed during movie shooting, although
AI.B full-auto distance measurement operation (preflash) is performed,
flash photography cannot be performed.
When you turn the flash head, turn it slowly. While it may make a sound
when you turn the flash head, it is not a malfunction. However, it may
result in a mechanical failure if you continuously turn the flash head fast.
During AI.B full-auto shooting, you can fire the flash at the desired bounce
angle as in manual bounce flash photography by pressing the <z>
button after determining the orientation (position) of the camera and
adjusting the flash head.
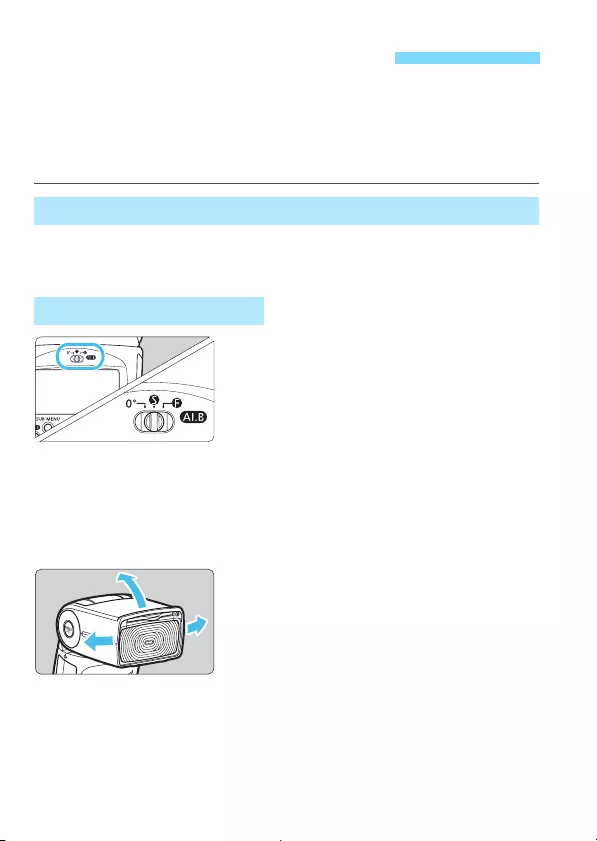
56
For an overview of AI.B (AI bounce flash) semi-auto mode, see page 45.
AI.B semi-auto shooting can be performed with all the EOS cameras.
Before performing AI.B semi-auto shooting, review the “Safety
Precautions” (p.8), “General Cautions for AI.B Full-Auto Shooting and
AI.B Semi-Auto Shooting” (p.60), and the like.
See “Guidelines for Shooting Conditions in AI.B Full-Auto Mode” on
page 48.
1Set the <X> switch to the <Y>
position (p.42).
With the Speedlite attached to the
camera, check that both the camera
and the Speedlite are turned on.
Set the <X> bounce mode switch
to the <Y> position.
XWhen the flash head is not in the
forward-facing position, the flash
head moves and is automatically set
to the forward-facing position.
2Set the bounce angle as desired.
Determine the orientation (position) of
the camera when taking a picture,
and then perform steps 2 and 3.
Taking into consideration factors such
as the distance to the subject and the
distance to the ceiling, manually
move the flash head and set the
bounce angle.
XThe Speedlite icon on the LCD panel
changes to <m>.
V AI.B Semi-Auto Shooting
Guidelines for Shooting Conditions in AI.B Semi-Auto Mode
AI.B Semi-Auto Shooting
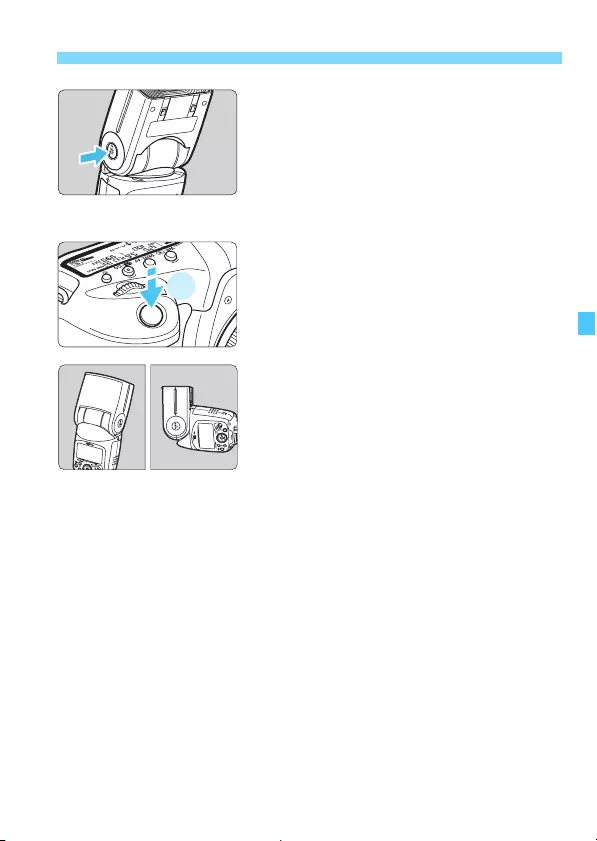
57
V AI.B Semi-Auto Shooting
3Press the <z> button.
After you determine the bounce angle
in step 2, press the <z> button to
store (register) the bounce angle in
the Speedlite.
To re-register the bounce angle,
perform steps 2 and 3 again.
4Take the picture.
When the orientation (position) of the
camera changes after the bounce
angle is stored (registered) in the
Speedlite in step 3, double-click the
camera’s shutter button (press the
shutter button halfway two times in a
row within a short period).
XThe flash head automatically moves
and resets to make the bounce angle
substantially the same as when
stored (registered).
Focus on the subject and take the
picture in the same way as with
normal flash photography.
Play back the image, then check the
result.
x2

58
V AI.B Semi-Auto Shooting
When the shooting distance to the subject changes, adjust (reset) the
bounce angle. When you want to re-register the adjusted bounce angle,
press the <z> button once again. Note that when the shutter button
is pressed halfway without pressing the <z> button once again, the
bounce angle is set to the original value.
If the position of the flash head is moved (inadvertently) after the bounce
angle is stored (registered) in the Speedlite (with the AI.B lamp blinking),
when you press the shutter button halfway, the flash head automatically
moves and is set in the position at the time of registration. (The bounce
angle is automatically corrected.)
When a picture is taken during automatic correction of the bounce angle,
the flash does not fire.
When using the FE lock or self-timer, double-click the shutter button, and
once the flash head is reset (automatic correction) to the stored
(registered) position, perform the FE lock operation or shooting.
When the <X> is switched to another mode or when the power switch
is set to <J>, the bounce angle stored (registered) in the Speedlite is
cleared.
When you turn the flash head, turn it slowly. While it may make a sound
when you turn the flash head, it is not a malfunction. However, it may
result in a mechanical failure if you continuously turn the flash head fast.
When the Speedlite’s LCD panel displays a warning, see page 52.
During AI.B semi-auto shooting, you can fire the flash at the desired
bounce angle as in manual bounce flash photography by pressing the
<z> button after determining the orientation (position) of the camera
and adjusting the flash head.
You can select the method to perform the automatic bounce angle
correction (P.Fn-08, p.91).
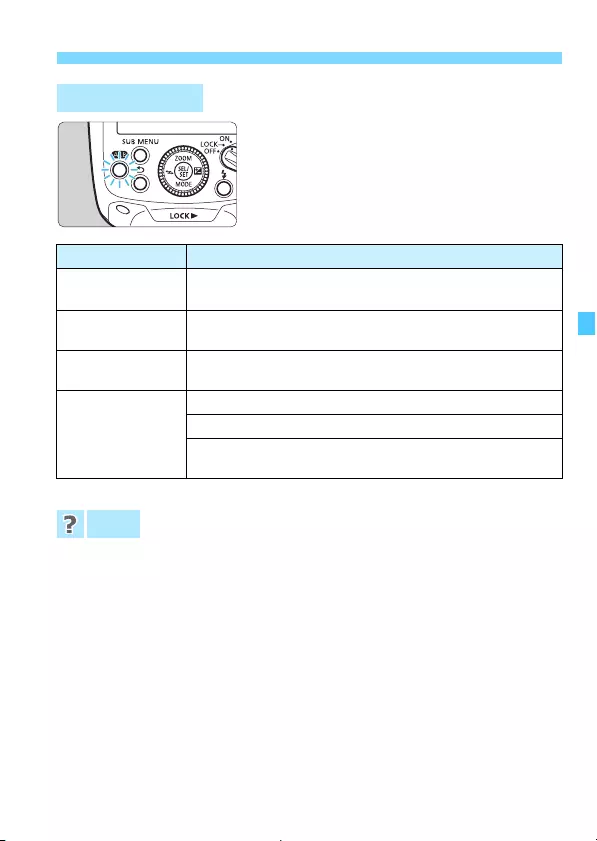
59
V AI.B Semi-Auto Shooting
Depending on the state of the flash head
during AI.B semi-auto shooting, the
display (lit/blinking) of the blue <X>
lamp changes.
When bounce angle automatic correction is not performed even when
the orientation (position) of the camera is changed, underexposure
(insufficient exposure) occurs, or the color of the subject is not right, see
page 53.
X AI.B Lamp
Lamp Status
Off Bounce angle not registered (before AI.B semi-auto
shooting is started)
High-speed
blinking
AI.B semi-auto operation in progress or bounce angle
correction in progress
Lit Bounce angle registration is complete (AI.B semi-auto
shooting possible)
Low-speed
blinking
When the bounce angle changes after registration
Error in AI.B semi-auto mode
When the flash head is not in the forward-facing position
(before shooting in AI.B semi-auto mode)
FAQ

60
General Cautions for AI.B Full-Auto Shooting and AI.B Semi-Auto
Shooting
If the camera is held at too steep an angle after a change of orientation
(position), automatic bounce angle correction may not be performed. In
addition, automatic bounce angle correction will not be performed when
the change of orientation makes it impossible to reset to the stored
bounce angle.
Since the turning angle of the flash head is indicated in 5° increments,
the angle may be displayed with a margin of error to an extent of 5°
(before and after the automatic correction) such as when the bounce
angle is automatically corrected.
When the flash settings are cleared during AI.B full-auto shooting or AI.B
semi-auto shooting (p.40), the bounce angle stored (registered) in the
Speedlite is cleared. Therefore, pressing the shutter button halfway
returns the flash head to the forward-facing position.
AI bounce flash photography cannot be performed with the release
button on a remote controller or the touch operation of the camera (not
supported).
Notes for AI.B Full-Auto Shooting and AI.B Semi-Auto Shooting
When using an EOS DIGITAL camera released in and after the second half
of 2017 (p.46), “AI_b” is displayed on the camera’s viewfinder as well as the
LCD panel, and [AI BOUNCE] is displayed on the LCD monitor if the flash
head moves in the following three cases, 1, 2, or 3.
1. When the <X> button or the like is pressed for distance measurement
operation during AI.B full-auto shooting (with the camera’s metering timer
active).
2. When bounce angle correction is performed by double-clicking the
shutter button during AI.B full-auto shooting or AI.B semi-auto shooting.
3. When the position of the flash head is (inadvertently) moved by pressing
the shutter button halfway to automatically correct the bounce angle after
distance measurement operation during AI.B full-auto shooting or after
the bounce angle was stored (registered) in the Speedlite during AI.B
semi-auto shooting.
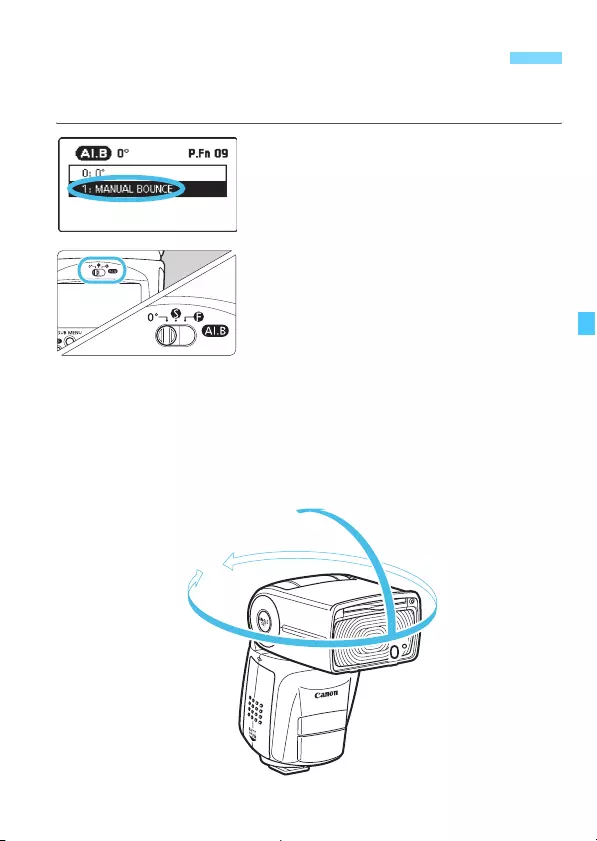
61
When you want to perform manual bounce flash photography, perform
the following settings and then adjust the orientation of the flash head.
1Set to P.Fn-09-1.
See page 92, then set the Personal
function P.Fn-09 (manual bounce
setting) to 1.
2Set the <X> switch to <0°>.
3Set the bounce angle manually.
Adjust the orientation of the flash
head manually.
You can check the bounce angle in
the upward direction and horizontal
direction using the LCD panel.
XThe Speedlite icon on the LCD panel
changes to <m>.
m Manual Bounce Flash Photography
180°
120°

62
m Manual Bounce Flash Photography
When P.Fn-09 is set to 0 (p.92), you cannot manually set the bounce
angle (the flash head automatically returns to the 0° position when the
shutter button is pressed halfway even when you manually set the
bounce angle).
If the ceiling or wall for bouncing the flash light on is too far away,
shooting with the appropriate exposure may not be possible since the
bounced flash light may not reach the subject.
If the picture appears dark, use a larger aperture opening (smaller f/
number) and try again. You can also increase the ISO speed when using
a digital camera.
Select a ceiling or wall that is close to a white color for bouncing the flash
light off for high reflectance. If the bounce surface is not white, a color
cast may result in the picture or shooting with the appropriate exposure
may not be possible since the bounced flash light may not reach the
subject.
When Quick flash is fired with bounce flash, underexposure may occur
since the flash output decreases.
When you turn the flash head, turn it slowly. While it may make a sound
when you turn the flash head, it is not a malfunction. However, it may
result in a mechanical failure if you turn the flash head fast.
When the flash head is turned while the flash coverage is set to <L>
(automatic setting), the flash coverage is set at 50 mm and <—> is
displayed.
You can also manually set the flash coverage (p.34).
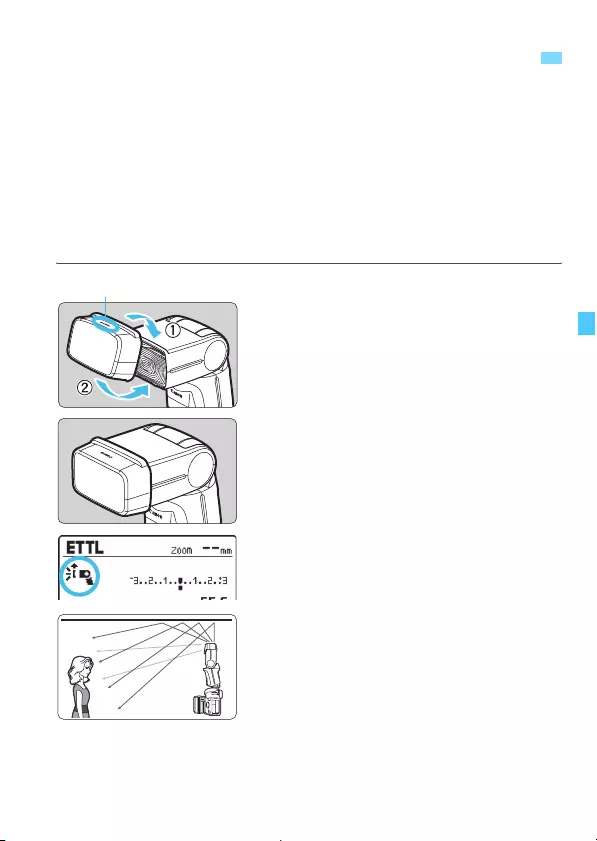
63
If you attach the provided bounce adapter to the Speedlite and bounce
the flash light on the ceiling or wall, etc., you can spread the flash light
across a larger area and suppress the shadows on the subject.
Also, if the bounce angle is set to 90
°
to bounce the flash light on the
ceiling, etc., the diffused flash light emitted from the sides of the bounce
adapter falls on the front of the subject (shooting distance guidance:
within approx. 1.5 m/4.9 ft., at ISO 100 with f/2.8), further suppressing
the shadow on the subject. When shooting portraits, the catchlight effect
can also be obtained.
1Attach the bounce adapter.
Attach the adapter securely to the
flash head until it clicks in place, as
shown.
Check that the display changes to
<H>.
When removing the adapter, follow
the procedure in reverse order. Raise
the removal tab on the lower side of
the adapter, then remove the adapter
from the flash head.
2Take the picture.
During AI.B full-auto shooting (p.48),
pressing the <X> button
automatically sets the bounce angle
so that the flash head is facing toward
the ceiling.
Take the picture with the flash light
bouncing off the ceiling, walls, or the
like.
q
Combined Use with the Bounce Adapter
“Canon” logo

64
q Combined Use with the Bounce Adapter
When the bounce adapter is attached, or when the bounce adapter and
the wide panel are used together, underexposure may result since the
flash output decreases. Take necessary countermeasures such as
increasing the ISO speed on the camera or applying flash exposure
compensation (p.30).
Since the flash guide number decreases when the bounce adapter is
attached, focusing with AF-assist beam using a series of small flashes
may not be possible. Using infrared AF-assist beam is recommended
(P.Fn-04-0, p.89).
When Quick flash (p.21) is fired with the bounce adapter attached, taking
the picture after the flash-ready lamp is lit in red is recommended since
the flash output may not be sufficient.
The flash coverage is set automatically when the bounce adapter is
attached. You cannot change the setting.
If you attach the bounce adapter to the flash when using an EOS
DIGITAL camera released up to 2004, set the white balance to <A>. If
you shoot with <Q>, appropriate white balance may not be obtained.
The flash light is further softened when the wide panel (p.35) is used
together with the bounce adapter.
If the subject is dark (underexposed) when you check the shot image,
perform flash exposure compensation (p.30). You can also increase the
ISO speed when using a digital camera.
During AI.B full-auto shooting and AI.B semi-auto shooting, you can
press the <z> button to store (register) the bounce angle in the
Speedlite even when the bounce adapter is mounted.

65
4
Setting Flash Functions
with Camera Controls
This chapter describes how to set the flash functions
from the camera’s menu screen.
When the camera’s shooting mode is set to a fully automatic
mode or a Basic Zone mode, the operations in this chapter are
not available. Set the camera’s shooting mode to <d/s/f/
a/bulb(B)> (Creative Zone mode).

66
When using EOS DIGITAL cameras released in and after 2007, you can
set flash functions or Custom Functions from the camera’s menu
screen.
For camera operations, refer to the camera’s Instruction Manual.
1Select [External Speedlite
control].
Select [External Speedlite control]
or [Flash control].
2Select [Flash function settings].
Select [Flash function settings] or
[External flash func. setting].
XThe setting screen is displayed.
3Set the function.
The setting screen and items
displayed vary depending on the
camera.
Select an item and set the function.
Flash Control from the Camera’s Menu Screen
Flash Function Settings
Example 1 Example 2
67
Flash Control from the Camera’s Menu Screen
EOS DIGITAL cameras released in and after 2007
On the camera’s [Flash function settings] or [External flash func.
setting] screen, you can configure normal flash photography
settings.
The settable functions are as follows. The settings available vary by the
camera used, and flash mode, etc.
Settings Available on the Flash Function Settings Screen
Functions
Flash firing Enable / Disable
E-TTL II flash metering Evaluative / Average
Flash synchronization speed in Av mode
Flash mode E-TTL II (autoflash) / Manual flash
Shutter sync settings 1st curtain / 2nd curtain / High-speed
Flash exposure compensation
Zoom (flash coverage)
Clear settings

68
Flash Control from the Camera’s Menu Screen
Flash firing
To perform flash photography, set to [Enable]. To use the flash’s AF-
assist beam only, set to [Disable].
E-TTL II flash metering
For normal exposures, set it to [Evaluative]. If [Average] is set, the
flash exposure will be averaged for the entire scene metered by the
camera. Flash exposure compensation may be necessary
depending on the scene. This setting is for advanced users.
Flash synchronization speed in Av mode
You can set the flash synchronization speed when shooting in
<f> aperture-priority AE mode with flash.
Flash mode
You can select [E-TTL II] or [Manual flash] according to your
photographic objectives.
Shutter sync settings
You can select the flash firing timing/method from [1st curtain], [2nd
curtain], or [High-speed synchronization]. To perform normal flash
photography, set [1st curtain].
Flash exposure compensation
With a similar procedure as exposure compensation, you can adjust
the flash output. The flash exposure compensation amount can be
set up to ±3 stops in 1/3-stop increments.

69
Flash Control from the Camera’s Menu Screen
Zoom (flash coverage)
You can set the Speedlite flash coverage. When [Auto] is selected,
the flash coverage is set automatically according to the focal length
of the shooting lens and the image sensor size of the camera (p.26).
Clear settings
When [Clear flash settings] or [Clear external flash set.] is
selected, you can revert the settings of Speedlite to their default
settings.
[Flash firing] and [E-TTL II flash metering] are displayed in step 2 or
step 3 on page 66. (Display layouts and procedures vary by camera
model.)
When [Flash sync. speed in Av mode] is not displayed, it can be set
with the camera’s Custom Functions.
When the flash exposure compensation is set on the flash, flash
exposure compensation cannot be performed from the camera. If both
are set at the same time, priority is given to the setting on the flash.
If the flash coverage is automatically set such as when the bounce adapter
is attached or the wide panel is used, or when the <X> switch is set to
the <Z> position, setting [Zoom] (flash coverage) is not possible.
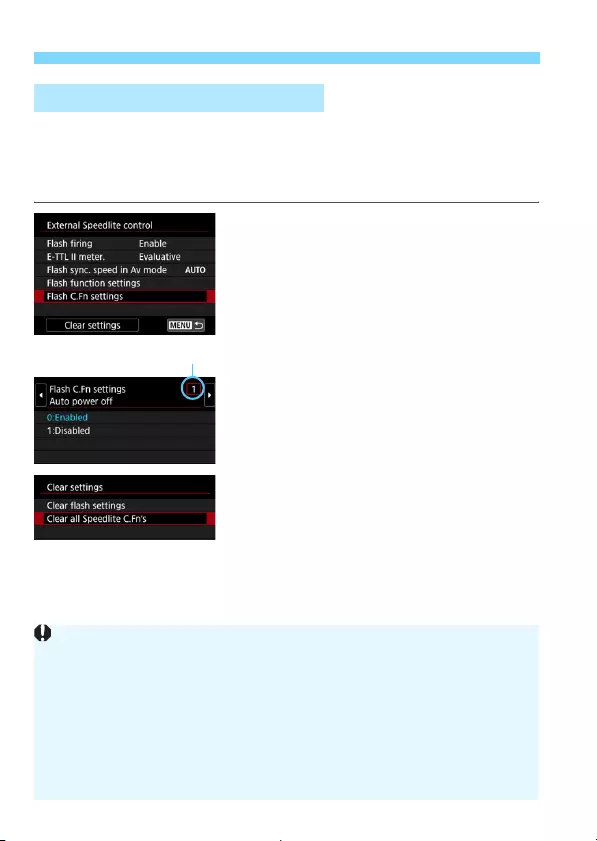
70
Flash Control from the Camera’s Menu Screen
You can set Custom Functions for the Speedlite from the camera’s
menu screen. The details displayed vary by the camera. If C.Fn-21 to
23 are not displayed, set them by operating the Speedlite. For the
Custom Functions, see pages 82-87.
1Select [Flash C.Fn settings].
Select [Flash C.Fn settings] or
[External flash C.Fn setting].
XThe flash Custom Function settings
screen is displayed.
2Set the Custom Function.
Select the Custom Function number.
Select an item and set the function.
To clear all the Custom Function
settings, select [Clear settings] in
step 1, then [Clear all Speedlite
C.Fn’s] or [Clear ext. flash C.Fn
set.].
Flash Custom Function Settings
Custom Function number
When using a camera released in 2011 or earlier, or with EOS REBEL
T7/2000D/1500D, EOS REBEL T100/3000D/4000D, EOS REBEL T6/
1300D and EOS REBEL T5/1200D, the C.Fn-21 to 23 settings are not
cleared even if [Clear all Speedlite C.Fn’s] or [Clear ext. flash C.Fn
set] is selected. When the procedure to clear all the Custom Functions
described on page 84 is performed, all the Custom Functions (except
C.Fn-00) are cleared.
Personal Functions (P.Fn, p.88) cannot be set or all cleared at once from
the camera’s menu screen. Set them by operating the Speedlite.

71
5
Wireless Flash Photography:
Optical Transmission
This chapter describes wireless flash photography
using the optical transmission wireless receiver
function.
For the accessories required for optical transmission
wireless shooting, see the system map (p.94).
When the camera’s shooting mode is set to a fully automatic
mode or a Basic Zone mode, the operations in this chapter are
not available. Set the camera’s shooting mode to <d/s/f/
a/bulb(B)> (Creative Zone mode).
You can wirelessly control a 470EX-AI set as an optical
transmission wireless receiver unit using a device equipped
with the optical transmission wireless sender function (p.94).
The device equipped with the optical transmission wireless
sender function is called the “sender”, and a 470EX-AI that is
controlled wirelessly is called a “receiver”.
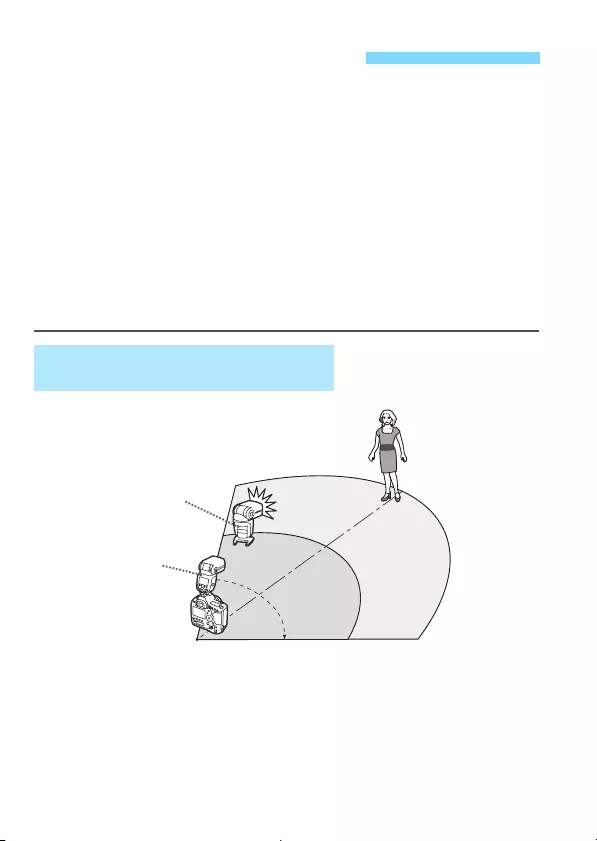
72
Using a Canon device equipped with an optical transmission wireless
sender function and 470EX-AI set as a receiver unit, you can easily
take pictures with wireless multiple flash lighting in the same way as
normal E-TTL II/E-TTL autoflash photography.
The system is designed so that the settings of the sender unit are
automatically applied to the wirelessly controlled 470EX-AI (receiver).
Therefore, you do not need to operate the receiver unit during shooting
(except when set as the individual receiver, p.79).
For details on how to perform optical transmission wireless flash
photography, refer to the Instruction Manual of the device equipped with
the sender function.
: Optical Transmission
Wireless Flash Photography
Positioning and Operation Range (Wireless flash
photography examples)
x
Indoors
Outdoors
Device with optical
transmission wireless
sender function
470EX-AI
Approx. 80°
Approx.
10 m/32.8 ft.
Approx.
15 m/49.2 ft.
Approx.
12 m/39.4 ft.
Approx.
8 m/26.2 ft.
Transmission distance
(Sender: With 600EX II-RT)

73
: Optical Transmission Wireless Flash Photography
To avoid interfering with transmission, do not place any obstacles
between the sender unit and receiver unit.
The transmission distance differs according to the sender unit used.
Refer to the Instruction Manual of the device that is equipped with the
sender function.
Before shooting, perform a test flash (p.21) and test shooting.
Place the wireless sensor of the receiver unit facing the sender unit.
Position the receiver unit, using the provided mini stand (p.15).
For details on the sender flash setting procedure, refer to the Instruction
Manual of the device equipped with the optical transmission wireless
sender function.
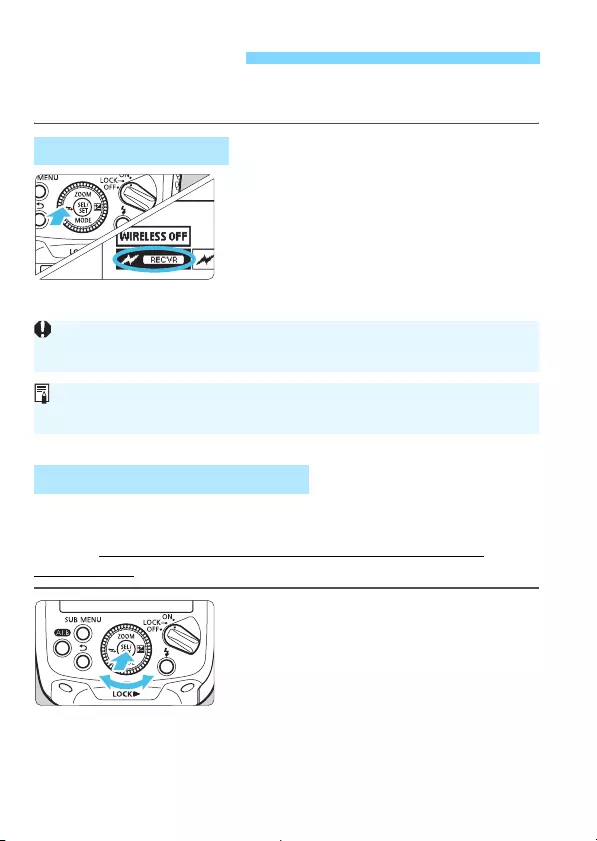
74
To perform flash photography using the optical transmission wireless
receiver function, configure the settings as follows.
Set to <  >.
>.
Operate and set the flash you want to
set as the receiver unit.
Press the <I> button of the <S>
cross keys.
Turn <9> to select < >,
then press <8>.
To avoid interference with optical transmission wireless flash systems
used by other photographers, you can change the transmission
channel. Set the same channel for both the sender unit and
receiver unit.
Set a transmission channel.
Press <8>.
Turn <9> to select the channel
symbol, then press <8>.
Wireless Settings
Receiver Unit Setting
Transmission Channel Setting
To perform normal flash photography, select <F> to clear the
wireless (receiver) settings.
When the flash is set as a receiver, the flash does not function even if the
<X> switch is set to the <Z> or <Y> position.
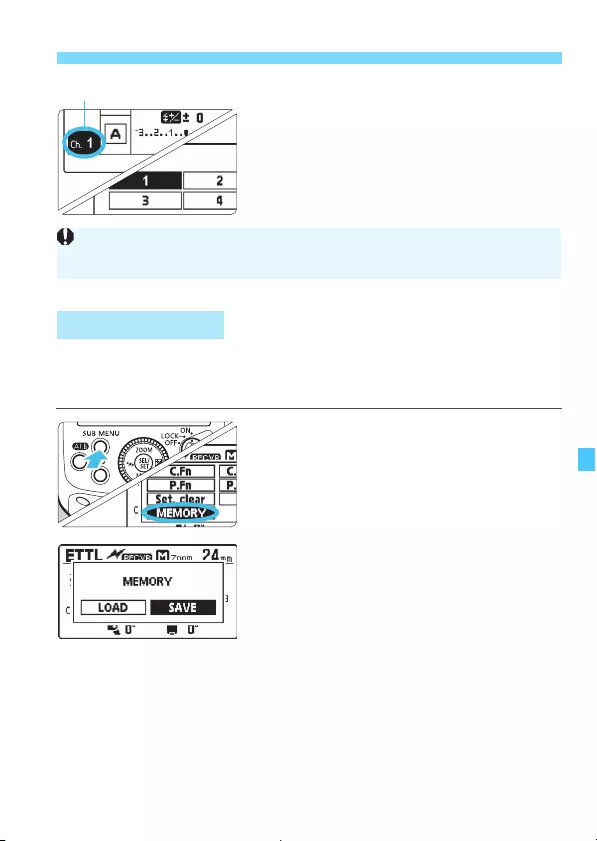
75
Wireless Settings
Turn <9> to select a channel from
Ch. “Y” to “[”, then press
<8>.
You can save the wireless settings to the receiver unit and recall the
settings later. Operate each receiver unit individually as you desire to
save or recall its settings.
1Select <L>.
Press the <1> button.
Turn <9> to select <L>, then
press <8>.
2Save or load the settings.
Turn <9> to select <V> (save)
or <J> (load), then press <8>.
Select <;>.
XWhen you select <V>, the
settings are saved (stored in
memory).
XWhen you select <J>, the
settings that were saved are set.
Transmission channel
Memory Function
If the transmission channels of the sender unit and receiver unit are
different, the receiver unit will not fire. Set both to the same number.

76
This section describes basic fully automatic wireless shooting when
using a device (sender) equipped with the optical transmission wireless
sender function and a 470EX-AI set as a receiver unit.
For details on optical transmission wireless flash shooting and sender unit
operation procedure, refer to the Instruction Manual of the sender device.
1Set the sender unit.
Set the device with the sender
function as the optical transmission
wireless sender unit.
2Set the receiver unit.
Set the 470EX-AI to be controlled
wirelessly from the sender unit as the
receiver unit (p.74).
A, B, or C can be set as the firing
group.
3Check the channel.
If the channels of the sender unit and
receiver unit are different, set them to
the same number (p.74).
4Position the camera and the
flash.
Position them within the range shown
on page 72.
5Set the flash mode to <a>.
Set the flash mode of the sender unit
to <a>.
The receiver unit is set automatically
to <a> during shooting,
controlled by the sender unit.
Check that the firing group control is
set to <8> (no flash ratio control is
set: <_>).
a
: Fully Automatic Wireless Flash Photography

77
a: Fully Automatic Wireless Flash Photography
6Check that the flash is ready.
When the receiver unit is ready, the
AF-assist beam emitter blinks at
approx. 1-second intervals.
Check that the sender unit’s flash-
ready lamp is lit.
7Check the performance.
Fire a test flash from the sender unit.
XThe receiver unit fires. If it does not
fire, check that it is placed within the
transmission range (p.72).
8Take the picture.
Set the camera and take the picture
in the same way as with normal flash
photography.
If there is a fluorescent light or computer monitor near a receiver unit, the
presence of the light source may cause the receiver unit to malfunction and
fire inadvertently.
The receiver unit’s flash coverage is set to 24 mm. You can also set the
flash coverage manually.
If the receiver unit’s auto power off takes effect, press the sender unit’s
test flash button to turn on the receiver unit. Note that the test flash
cannot be performed while the camera’s metering timer, etc. is operating.
You can change the time until the receiver unit’s auto power off takes
effect (C.Fn-10, p.86).
You can disable the blinking of the AF-assist beam emitter when
recharge is complete for the receiver unit (C.Fn-23, p.87).
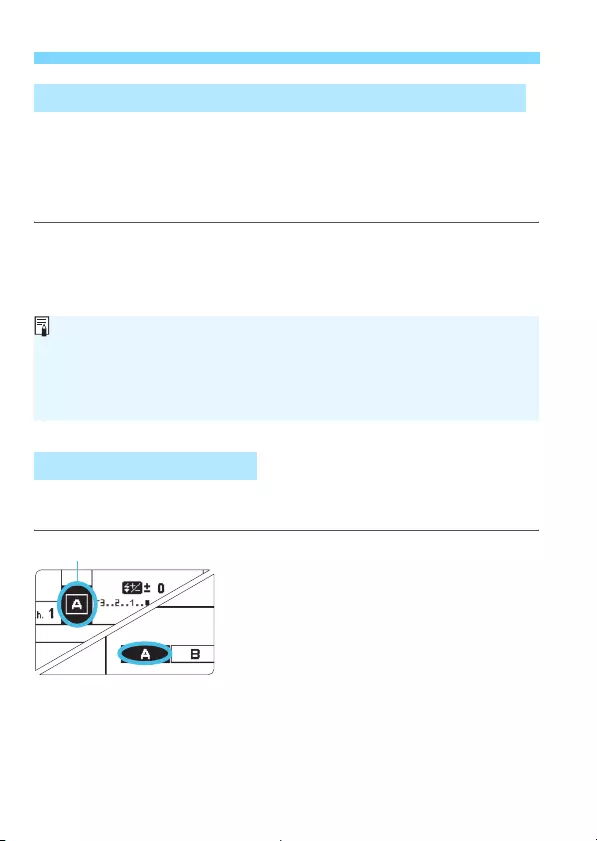
78
a: Fully Automatic Wireless Flash Photography
Since the following functions set on the sender unit will be set
automatically to the receiver units on this wireless system, you do not
need to operate the receiver unit(s). For this reason, you can perform
wireless flash photography in the same way as normal flash
photography.
Set the firing group when performing two-group (A, B) or three-group
(A, B, C) wireless shooting using 470EX-AI set as the receiver units.
Set the firing group of the
receiver units.
Operate and set the receiver units one
by one.
Press <8>.
Turn <9> to select the firing group,
then press <8>.
Turn <9> to select <a>, <b>,
or <c>, then press <8>.
Advanced Shooting with Fully Automatic Wireless Flash
• Flash exposure compensation
(f, p.30)
• High-speed sync
(c, p.32)
•FE lock (p.31) • Manual flash (p.36)
Setting the Firing Group
You can also directly operate the receiver unit to individually set flash
exposure compensation and flash coverage on each receiver unit (p.79).
You can also perform FEB shooting and stroboscopic flash using the
470EX-AI set as a receiver unit with a sender unit equipped with FEB
and stroboscopic flash functions.
Firing group
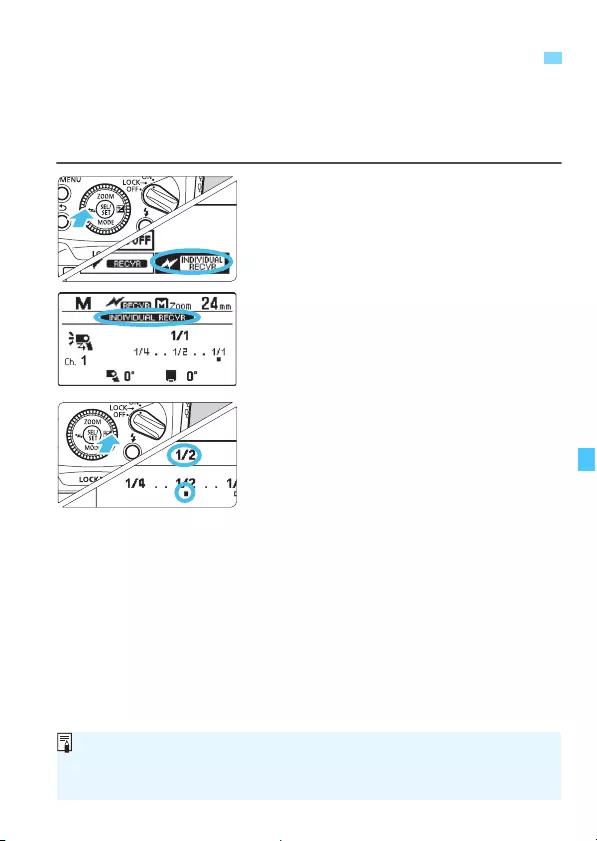
79
You can directly operate the receiver unit to manually set the manual
flash. This function is called individual receiver. This is useful when, for
example, you use the Speedlite Transmitter ST-E2 (sold separately) to
perform wireless manual flash.
1Set the individual receiver.
Press the <I> button of the <S>
cross keys.
Turn <9> to select <:A>,
then press <8>.
X<(> appears on
the LCD panel.
XThe flash mode is set to <q>.
2Set the flash output.
Press the <O> button of the <S>
cross keys.
Turn <9> to set the flash output,
then press <8>.
A
Manual Flash Setting on a Receiver Unit
A receiver unit that is set as an individual receiver cannot receive flash
mode control from the sender unit. The receiver unit always fires at the set
flash output.

80

81
6
Customizing the
Speedlite
This chapter describes how to customize the Speedlite
with the Custom Functions (C.Fn) and Personal
Functions (P.Fn).
When the camera’s shooting mode is set to a fully automatic
mode or a Basic Zone mode, the operations in this chapter are
not available. Set the camera’s shooting mode to <d/s/f/
a/bulb(B)> (Creative Zone mode).

82
You can make precise adjustments to various flash functions to suit
your picture-taking preferences. The functions used to do this are called
the Custom Functions and Personal Functions. The Personal Functions
are customizable functions unique to the 470EX-AI.
1
Display the Custom Functions screen.
Press the <1> button.
Turn <9> to select <=>, then
press <8>.
XThe Custom Functions screen is
displayed.
2Select an item to set.
Turn <9> to select an item
(number) to be set.
3Change the setting.
Press <8>.
XThe setting is displayed.
Turn <9> to select your desired
setting, then press <8>.
1
Display the Personal Functions screen.
Select <<> in the same way as
step 1 for the Custom Functions, then
press <8>.
X
The Personal Functions screen is displayed.
2Set the function.
Set the Personal Functions in the
same way as steps 2 and 3 for the
Custom Functions.
C
/
>
: Setting Custom and Personal Functions
C: Custom Functions
>: Personal Functions
83
C / >: Setting Custom and Personal Functions
Custom Function List
Number Function Page
C.Fn-00 «Distance indicator display
p.85C.Fn-01 #Auto power off
C.Fn-02 $Modeling flash
C.Fn-08 —AF-assist beam firing
p.86
C.Fn-10 /Receiver auto power off timer
C.Fn-11 0Receiver auto power off cancel
C.Fn-13 6Flash exposure compensation setting
C.Fn-21 ;Light distribution
p.87C.Fn-22 <LCD panel illumination
C.Fn-23 ?Receiver flash charge check
Personal Function List
Number Function Page
P. F n — 0 1 @LCD panel display contrast
p.88P. F n — 0 2 ALCD panel illumination color: Normal
flash photography
P. F n — 0 3 CLCD panel illumination color: Receiver
P. F n — 0 4 ]AF-assist beam emission method p.89
P. F n — 0 5 +Quick flash
P. F n — 0 6 ^Dial setting changes p.90
P. F n — 0 7 RMaximum bounce angle
P. F n — 0 8 UAutomatic bounce angle correction p.91
P. F n — 0 9 X0°
Manual bounce
setting p.92
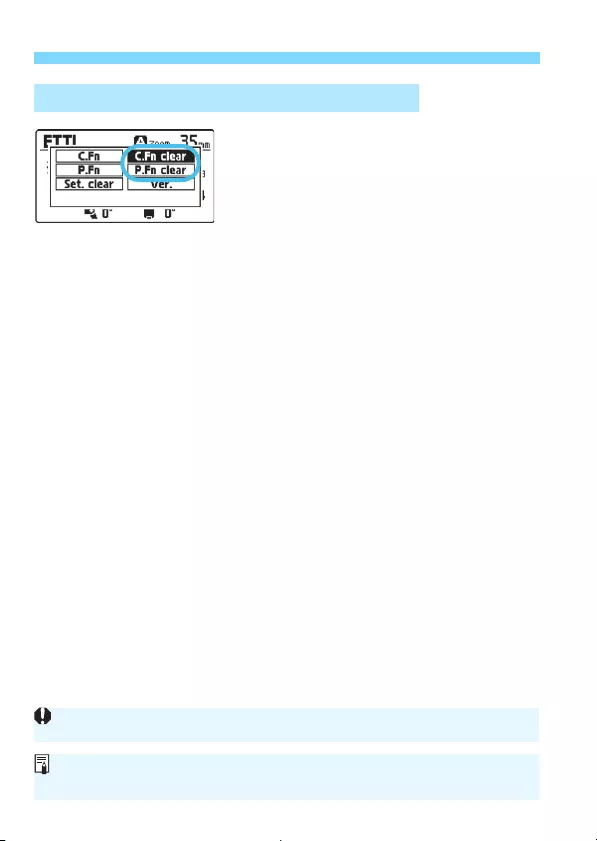
84
C / >: Setting Custom and Personal Functions
You can clear all Custom Functions or
Personal Functions by selecting
<C> or <D> on the screen on
the left, then selecting <;>.
Clearing All the Custom/Personal Functions
Even if you clear all Custom Functions, C.Fn-00 will not be cleared.
You can set or clear all Custom Functions of the Speedlite on the camera’s
menu screen (p.70).

85
C: Setting Custom Functions
C.Fn-00: « (Distance indicator display)
You can select meters or feet for the distance indicator display on the LCD
panel.
0: m (Meters (m))
1: ft (Feet (ft))
C.Fn-01: # (Auto power off)
When the Speedlite is not operated for approx. 90 seconds, the power turns
off automatically to save energy. You can disable this function.
0: ON (Enabled)
1: OFF (Disabled)
C.Fn-02: $ (Modeling flash)
0: % (Enabled (Depth-of-field preview button))
Press the camera’s depth-of-field preview button to fire the modeling
flash.
1: & (Enabled (Test firing button))
Press the Speedlite’s test flash button to fire the modeling flash.
2: %/& (Enabled (with both buttons))
Press the camera’s depth-of-field preview button or the Speedlite’s test
flash button to fire the modeling flash.
3: OFF (Disabled)
Disables the modeling flash.
When the <X> switch is set to the <Z> position, the modeling flash
may not fire when the camera’s depth-of-field preview button is pressed.
When you want to fire the modeling flash during AI.B full-auto shooting,
setting C.Fn-02 to 1 or 2 and firing the modeling flash using the
Speedlite’s test flash button is recommended.
With the depth-of-field preview function assigned to a button on the
camera using the camera’s customization features, you can fire the
modeling flash using the assigned button when C.Fn-02 is set to 0 or 2
(except for EOS M series camras).

86
C: Setting Custom Functions
C.Fn-08: — (AF-assist beam firing)
0: ON (Enabled)
1: OFF (Disabled)
This disables the emission of the AF-assist beam from the Speedlite.
C.Fn-10: / (Receiver auto power off timer)
When set as an optical transmission wireless receiver unit, the time until
auto power off takes effect can be changed. Note that when the receiver
unit’s auto power off takes effect, </> is displayed on the LCD panel. Set
this function on each receiver unit.
0: 60min (60 minutes)
1: 10min (10 minutes)
C.Fn-11: 0 (Receiver auto power off cancel)
In optical transmission wireless flash photography, when you press the test
flash button on the sender unit, you can turn on the receiver units that are in
the auto power off state. You can change the time for the receiver units in
the auto power off state to accept this function. Set this function on each
receiver unit.
0: 8h (Within 8 hours)
1: 1h (Within 1 hour)
C.Fn-13: 6 (Flash exposure compensation setting)
0: 4 (Speedlite button and dial)
1: 5 (Speedlite dial only)
You can directly set the flash exposure compensation amount and
flash output by turning <9> without pressing the <O> button of the
<S> cross keys.
The flash icon displayed when C.Fn-08 is set changes according to the
P.Fn-04 (AF-assist beam emission method, p.89) setting.

87
C: Setting Custom Functions
C.Fn-21: ; (Light distribution)
You can change the flash light distribution (flash coverage) of the Speedlite
in relation to the shooting angle of view when the flash coverage is set to
<L> (automatic setting).
0: j (Standard)
The optimum flash coverage for the shooting angle of view is set
automatically.
1: k (Guide number priority)
Although the periphery of the picture is slightly darker than the 0
setting, this is effective when you want to give priority to the flash
output. The flash coverage is set automatically to a slightly more
telephoto position than the actual shooting angle of view. The display
changes to <k>.
2: l (Even coverage)
Although the possible flash photography distance becomes slightly
shorter than the 0 setting, this is effective when you want to minimize
light falloff at the periphery of the picture. The flash coverage is set
automatically to a slightly wider position than the actual shooting angle
of view. The display changes to <l>.
C.Fn-22: < (LCD panel illumination)
When a button or dial is operated, the LCD panel illuminates. You can
change this illumination setting.
0: 12sec (On for 12 sec.)
1: OFF (Disable panel illumination)
2: ON (Illumination always on)
C.Fn-23: ? (Receiver flash charge check)
When recharge is complete for the receiver unit during optical transmission
wireless shooting, its AF-assist beam emitter blinks. You can disable this
blinking. Set this function on each receiver unit.
0: = (AF-assist beam, Q lamp)
1: > (Q lamp)
88
>: Setting Personal Functions
P. F n — 0 1 : @ (LCD panel display contrast)
You can adjust the contrast of the LCD panel
in 5 levels.
P. F n — 0 2 : A
(
LCD panel illumination color: Normal
flash photography)
You can set the color of the LCD panel illumination for normal flash
photography (on-camera flash photography).
0: GREEN (Green)
1: ORANGE (Orange)
P. F n — 0 3 : C (LCD panel illumination color: Receiver)
You can select the color of the LCD panel illumination for the Speedlite set
as the receiver unit in optical transmission wireless flash photography.
0: ORANGE (Orange)
1: GREEN (Green)

89
>: Setting Personal Functions
P. F n — 0 4 : ]
(AF-assist beam emission method)
You can select the AF-assist beam emission method.
0: K (Infrared)
An infrared AF-assist beam is emitted (p.27). Focusing on the subject
with the subject positioned at the viewfinder center is recommended.
1: J (A series of small flashes)
AF-assist beam, which uses intermittent flashes (a series of small
flashes), is emitted.
P. F n — 0 5 : + (Quick flash)
You can set whether or not to fire the flash (fire the Quick flash) when the
flash-ready lamp is lit in green (before the flash is fully charged) to shorten
the charge waiting time. Quick flash also takes effect during continuous
shooting.
0: ON (Enabled)
1: OFF (Disabled)
The AF-assist beam, which uses a series of small flashes, is emitted when
470EX-AI is attached to an EOS DIGITAL camera equipped with a function
for controlling external flashes from the camera’s menu screen. Note that,
depending on the camera model, the camera’s firmware may need to be
updated.
When Quick flash is fired during continuous shooting, underexposure may
occur since the flash output decreases.
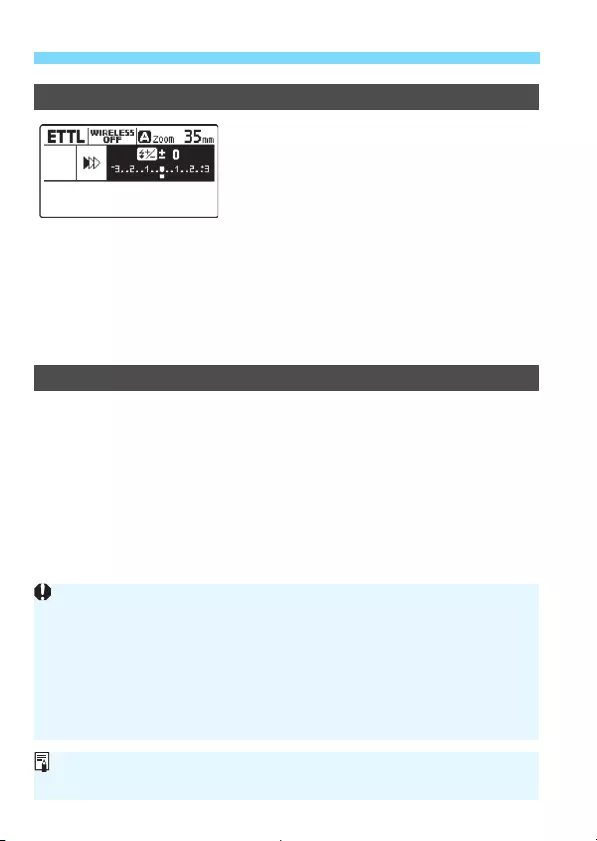
90
>: Setting Personal Functions
P. F n — 0 6 : ^ (Dial setting changes)
When <8> is pressed and the screen
displays the settings as shown on the left, you
can set whether or not the following functions
can be directly set by simply turning <9>.
0: OFF (Disabled)
Set the function using the normal operation procedure.
1: ON (Enabled)
You can directly set the function by selecting “Flash exposure
compensation amount” and “Manual flash output” using the <S>
cross keys, then simply by turning <9>.
P. F n — 0 7 : R (Maximum bounce angle)
You can set the maximum bounce angle in the upward direction during AI.B
full-auto shooting. When you want to limit the maximum bounce angle so that
the flash head does not turn toward the photographer, set to 2.
0: 120°
1: 140°
2: 90°
When a bounce angle that exceeds 120° is automatically set with this
setting set to 1, the angle may be set after the flash head rotates 180°.
With “1” set, be careful of the direction of the flash head since the flash
head may fire toward the photographer.
P.Fn-07 takes effect only during AI.B full-auto shooting. Note that the
settings set by P.Fn-07 do not function when <z> is pressed and the
bounce angle is stored (registered) in Speedlite during AI.B semi-auto
shooting or AI.B full-auto shooting.
If P.Fn-07 setting is changed, perform the distance measurement
operation (p.49) again.

91
>: Setting Personal Functions
P. F n — 0 8 : U
(Automatic bounce angle correction
)
You can set how the bounce angle is to be automatically corrected when
the orientation (position) of the camera changes during <W> AI.B full-
auto shooting or <V> AI.B semi-auto shooting.
0: Q
When the shutter button is double-clicked (pressed halfway two times
in a row within a short period), bounce angle correction is performed.
1: AUTO
When the camera’s metering timer is active, bounce angle correction is
automatically performed (without pressing the shutter button halfway).
2: T
When the shutter button is pressed halfway, bounce angle correction is
performed.
When set to 1 or 2, bounce angle correction may take effect, not only when
the shutter button is pressed but also when any other button on the camera
is pressed.

92
>: Setting Personal Functions
P.Fn-09: 0° (Manual bounce setting)
When the <X> bounce mode switch is set to <0°>, you can set whether
or not the bounce angle can be set manually.
0: 0°
Manual bounce shooting (setting the bounce angle manually) cannot
be performed. After the bounce angle has been manually set, pressing
the shutter button halfway returns the flash head to the forward-facing
position.
1: MANUAL BOUNCE
Set to this when performing manual bounce flash photography
(manually setting the bounce angle).
In AI.B full-auto shooting mode or AI.B semi-auto shooting mode, bounce
angle correction is performed when the orientation (position) of the camera
changes, even when set to 1.

93
7
Reference
This chapter provides a system map and
troubleshooting guide, and describes the use of the
Speedlite with Type-B cameras.
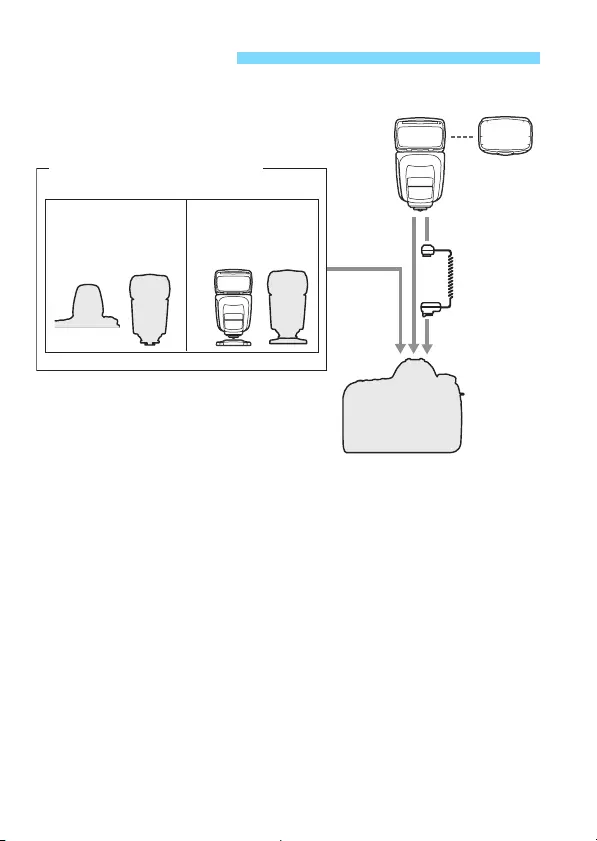
94
«Speedlite 470EX-AI
#Bounce adapter SBA-E4 (provided with 470EX-AI)
$Mini stand (provided with 470EX-AI)
%Device equipped with optical transmission wireless sender
function
600EX II-RT, 600EX-RT, 600EX, 580EX II, 580EX, 550EX, 90EX,
MT-26EX-RT, MT-24EX, MR-14EX II, MR-14EX, ST-E2, and EOS
DIGITAL cameras with optical transmission wireless sender function
by built-in flash
470EX-AI System
&«
%
%
$
«
‘
#
Camera/Speedlite/
Transmitter equipped
with sender function
Speedlite equipped
with receiver function
Wireless Flash Photography
Optical transmission

95
470EX-AI System
&Speedlite equipped with optical transmission wireless
receiver function
600EX II-RT, 600EX-RT, 600EX, 580EX II, 580EX, 550EX, 430EX
III-RT, 430EX III, 430EX II, 430EX, 420EX, 320EX, 270EX II
‘Off-Camera Shoe Cord OC-E3
Enables the 470EX-AI to be connected to the camera up to approx.
60 cm / 2 ft. away.
When using a Speedlite without a function for switching the firing groups
(A, B, C) in &, you can use the Speedlite as a receiver in firing group A
during optical transmission wireless shooting (you cannot use it as a
receiver in firing group B or C).
During AI.B full-auto shooting, do not use the Off-Camera Shoe Cord
OC-E3 (an appropriate bounce angle is not automatically set).
Do not use 470EX-AI, attaching it to the Speedlite Bracket SB-E2 (sold
separately) or the like. 470EX-AI does not fit securely to the bracket and
will be somewhat unstable, possibly causing the flash head to come into
contact with the bracket section during AI bounce flash.

96
When continuous flash or modeling flash is repeatedly fired in short
intervals, the temperature of the flash head, batteries, and the area near
the battery compartment may increase.
When you perform firing repeatedly, the firing interval increases in
steps to avoid degrading or damaging the flash head due to
overheating. When you perform firing repeatedly even more in this
state, flash firing is restricted automatically.
Furthermore, when flash firing is restricted, a warning icon is
displayed to indicate the increase in temperature, and the firing
interval (with which the flash photography can be performed) will be
automatically set to approx. 8 sec. (level 1) or approx. 20 sec. (level 2).
As the internal temperature of the Speedlite increases, the warning is
displayed in two levels. When you perform continuous firing repeatedly
even more in the state in level 1, the state changes to level 2.
The following table shows the number of continuous flashes until the
warning (level 1) is displayed, and the necessary rest time (guideline)
until normal flash photography can be performed.
f
Flash Firing Restrictions due to Temperature Increase
Temperature Increase Warning
Display Level 1
(Firing interval: Approx. 8 sec.)
Level 2
(Firing interval: Approx. 20 sec.)
Icon e f
LCD panel illumination Red (lit) Red (blinking)
Number of Continuous Flashes and Rest Time
Function
Number of Continuous Flashes to Reach
Level 1 Warning (Guideline)
Necessary
Interval
Time
(Guideline)
Flash Coverage
14mm 24mm 28mm
35mm
or more
Continuous full
output flash (p.17) 45 times or more 40 min.
or longer
Modeling flash
(p.38) 35 times or more 40 times or more

97
f Flash Firing Restrictions due to Temperature Increase
CAUTION
When performing continuous flash, do not touch the flash head,
batteries, or the area near the battery compartment.
When continuous flash or modeling flash is repeatedly fired at short intervals,
do not touch the flash head, batteries, or the area near the battery
compartment. The flash head, batteries, and area near the battery
compartment may become hot, resulting in the risk of burn.
Do not open or close the battery compartment cover while flash firing is
being restricted. Doing so is very dangerous since the flash firing
restriction is canceled.
Even when level 1 warning is not displayed, the firing interval will be
extended as the flash head begins to heat up.
If level 2 warning is displayed, allow a rest time for at least 40 min.
Even if you stop flash firing after level 1 warning is displayed, level 2
warning may be displayed.
If flash photography is performed in high temperatures, the firing
restrictions may be activated before the number of flashes listed in the
table on the preceding page is fired.
For cautions on the number of flash firings, see page 17 (continuous
flashes) or page 39 (modeling flash).
The Speedlite may not fire in rare cases due to environmental factors
such as temperature rise.
When the bounce adapter is used, the number of continuous flashes
until the warning is displayed becomes slightly fewer.
When C.Fn-22-1 is set (p.87), the warning with red illumination of the
LCD panel will not be displayed even if the temperature of the flash head
rises.

98
If a problem occurs with the flash, first refer to this Troubleshooting
Guide. If this Troubleshooting Guide does not resolve the problem,
contact your dealer or nearest Canon Service Center.
Normal Flash Photography
Make sure the batteries are installed in the correct orientation (p.18).
Make sure the battery compartment cover is closed (p.18).
Replace the batteries with new ones.
Insert the mounting foot into the camera’s hot shoe all the way, slide
the lock lever to the right, and secure the Speedlite to the camera
(p.20).
If the <G> indication remains displayed for approx. 30 sec. or
longer, replace the batteries (p.18).
If the electrical contacts of the Speedlite or camera are dirty, wipe
the contacts (p.10) with a dry cloth, etc.
When you perform continuous firing repeatedly over a short period
of time, causing the temperature of the flash head to rise and flash
firing to be restricted, the firing interval increases (p.96).
The Speedlite’s auto power off has been activated (p.22). Press the
camera’s shutter button halfway or press the Speedlite’s test flash
button (p.21).
Troubleshooting Guide
The power does not turn on.
The Speedlite does not fire.
The power turns off by itself.

99
Troubleshooting Guide
If the main subject looks very dark or very bright, set flash exposure
compensation (p.30).
If there is a highly reflective object in the picture, use FE lock (p.31).
With high-speed sync, the faster the shutter speed, the lower the
guide number becomes. Move closer to the subject (p.32).
Move at least 0.7 m/2.3 ft. away from the subject.
Remove the lens hood if attached.
Set the flash coverage to <L> (automatic setting, p.34).
When manually setting the flash coverage, set a flash coverage
wider than the shooting angle of view (p.34).
Make sure C.Fn-21-1 is not set (p.87).
When the shooting mode is set to the <f> aperture-priority AE
mode and the scene is dark, slow sync is enabled automatically (the
shutter speed becomes slower). Use a tripod, or set the shooting
mode to the <d> program AE or fully automatic mode (p.25). Note
that you can also set the sync speed in [Flash sync. speed in Av
mode] (p.68).
Pictures are underexposed or overexposed.
The bottom of the picture looks dark.
The picture periphery looks dark.
The picture is very blurred.

100
Troubleshooting Guide
Set the flash coverage to <L> (automatic setting, p.34).
Insert the mounting foot into the camera’s hot shoe all the way, slide
the lock lever to the right, and secure the Speedlite to the camera
(p.20).
Remove the bounce adapter (p.63).
Retract the wide panel (p.35).
Flash coverage angle cannot be manually set during AI.B full-auto
shooting (p.52).
Set the camera’s shooting mode to <d/s/f/a/bulb(B)>
(Creative Zone mode).
Set the Speedlite’s power switch to <K> instead of <a>
(p.21).
When the Speedlite continuously fires after focusing with AF, check if
the Speedlite is set to P.Fn-04-1 (p.89).
The flash coverage is not set automatically.
The flash coverage cannot be set manually.
Functions cannot be set.
The Speedlite fires continuously.

101
Troubleshooting Guide
Bounce Flash Photography
When Speedlite is first started and the shutter button on the camera
is pressed halfway with the flash head in a position other than the
forward-facing (0°) position, the flash head automatically moves to
the forward-facing (0°) position.
The AI bounce flash function is activated. When you do not want to
use the AI bounce flash function, set the <X> switch to the <0°>
position (p.42).
When the position of the flash head changes after you press the
<z> button and store (register) the bounce angle in the
Speedlite, pressing the camera’s shutter button halfway returns the
flash head to the registered position.
When Speedlite is not attached to the camera, the “AI.B[”
animation is displayed and the flash head’s AI bounce flash
operation is not performed.
When the orientation (position) of the camera has changed, double-
clicking the shutter button (pressing the shutter button halfway two
times in a row within a short period) activates the bounce angle
correction.
Check whether or not the camera’s depth-of-field preview button
functions as an AI.B full-auto distance measurement start button (p.46).
Check whether or not the camera’s depth-of-field preview button
functions as an AI.B full-auto distance measurement start button
(p.38, 46, 85).
The flash head moves on its own.
“AI.B[” is displayed. / The flash head does not move.
In AI.B full-auto mode, the flash head does not move even
when I press the camera’s depth-of-field preview button.
The modeling flash fires when the camera’s
depth-of-field preview button is pressed.

102
Troubleshooting Guide
For warning displays, see page 52.
The flash coverage cannot be manually set in AI.B full-auto
shooting, with the bounce adapter attached, or with wide panel used.
When you want to perform manual bounce flash photography, see
page 61.
During bounce flash photography, less light reaches the subject and
thus underexposure (insufficient exposure) is prone to occur. Take
the action such as taking the picture as close to the subject as
possible, increasing the camera’s ISO speed, or opening the
aperture of the lens before shooting.
When the ceiling or wall for bouncing the flash light on is too far
away, the ceiling is dark, or the ceiling is stepped or uneven,
shooting with the appropriate exposure may not be possible since
not enough light may reach the subject.
If the surface for bouncing the flash light is not white, a color cast
may result in the picture or shooting with the appropriate exposure
may not be possible since the bounced flash light may not reach the
subject. Select a ceiling or wall that is close to a white color for
bouncing the flash light off for high reflectance.
A warning is displayed.
The flash coverage cannot be set manually.
The bounce angle cannot be set manually.
Pictures are underexposed.
The color of the subject is not right.

103
Troubleshooting Guide
Depending on the camera used, the camera’s depth-of-field preview
button may function as the <X> full-auto distance measurement
start button. For details, see pages 46 and 85.
Modeling flash does not work.

104
Troubleshooting Guide
Optical Transmission Wireless Flash Photography
Set the receiver unit to < > (p.74).
Set the transmission channels of the sender unit and receiver unit to
the same numbers (p.74).
Make sure the receiver unit is within the transmission range of the
sender unit (p.72).
Point the wireless sensor of the receiver unit toward the sender unit
(p.72).
Position the receiver unit at a location with the clearest possible view
of the sender unit.
If the sender unit and receiver unit are too close, the transmission
may not take effect properly.
When using the camera’s built-in flash as the sender unit, raise the
camera’s built-in flash, and set [Wireless func.] on the camera’s
[Built-in flash func. setting] screen.
The receiver unit does not fire.

105
Type
Type: E-TTL II/E-TTL autoflash
Shoe-mount Speedlite
Compatible cameras: Type-A EOS cameras (E-TTL II/E-TTL autoflash)
* Autoflash is not possible when using Type-B EOS
cameras.
Flash Head (Light-emitting unit)
Guide No.: Approx. 47/154.2 (at 105 mm flash coverage, ISO 100,
in meters/feet)
* Without bounce adapter
Flash coverage: Supports a shooting angle of view with a lens focal
length of 24-105 mm (with wide panel use: 14 mm)
• Automatic setting
(Automatically sets the flash coverage depending on
the shooting angle of view and the image sensor size.)
• Manual setting
Bounce mode: AI.B full-auto (AI.B-F), AI.B semi-auto (AI.B-S), manual
Bounce angle: 120° up, 180° left, 180° right
Bounce adapter: Provided
Flash duration
(During normal flash):
1/1 flash: Approx. 1/950 sec.
1/2 flash: Approx. 1/1210 sec.
1/4 flash: Approx. 1/1700 sec.
1/8 flash: Approx. 1/2100 sec.
1/16 flash: Approx. 1/2240 sec.
1/32 flash: Approx. 1/2400 sec.
1/64 flash: Approx. 1/2690 sec.
1/128 flash: Approx. 1/2700 sec.
Color temperature
information
transmission:
Flash light color temperature information transmitted to
camera when flash is fired
Specifications

106
Specifications
Exposure Control
Exposure control
system:
E-TTL II/E-TTL autoflash, Manual flash
Effective flash metering
range:
(with EF50mm f/1.4 lens
at ISO 100)
Normal flash: Approx. 0.7 — 23.5 m / 2.3 — 77.1 ft.
Quick flash: Approx. 0.7 — 14.4 m / 2.3 — 47.2 ft.
(at Guide No. 20.2 / 66.3, in meters/feet)
High-speed sync: Approx. 0.7 — 12.5 m / 2.3 — 41.0 ft.
(at 1/250 sec.)
Flash exposure
compensation:
±3 stops in 1/3- or 1/2-stop increments
FE lock: Possible with the camera’s Multi-function button or FE
lock/AE lock button
High-speed sync: Possible
Manual flash: 1/1 — 1/128 power (1/3-step increments)
Modeling flash: Fired with camera’s depth-of-field preview button or
Speedlite’s test flash button
Flash Recharge
Firing interval
(Recharge time):
Normal flash: Approx. 0.1 — 5.5 sec.,
Quick flash: Approx. 0.1 — 3.9 sec.
* When using AA/LR6 alkaline batteries
Flash-ready lamp: Lights up in red: Normal flash available
Lights up in green: Quick flash available
AF-Assist Beam
Method: Switchable in Personal Functions between Infrared
assist beam and Intermittent flashes (a series of small
flashes)
Compatible AF system: TTL second image formation phase-difference AF
1 — 19 AF points (Infrared assist beam / 28 mm or longer
lens focal length)
Supported for viewfinder shooting, and Quick mode for
Live View shooting or movie shooting
Effective distance: At center: Approx. 0.7 — 10 m / 2.3 — 32.8 ft.,
At periphery: Approx. 1 — 5 m / 3.3 — 16.4 ft.

107
Specifications
Optical Transmission Wireless Receiver Function
Communication
method:
Optical pulse
Wireless settings: Receiver
Transmission
channel:
Ch. 1 — 4
Receiver unit
setting:
Firing groups A, B, C
Reception angle: Approx. ±45° horizontally, approx. ±25° upward, and
approx. ±20° downward, facing the sender unit
Charge
confirmation:
Flash-ready lamp lights up and the AF-assist beam emitter
blinks when fully charged
Customization Features
Custom Functions: 10 types
Personal
Functions:
9 types
Power Source
Speedlite power
source:
Four AA/LR6 alkaline batteries
* AA/HR6 Ni-MH batteries can be used
Number of flashes: Approx. 115 — 800 times
* When using AA/LR6 alkaline batteries
Auto power off: Power off after approx. 90 sec. of idle operation
* When set as receiver unit: approx. 60 min.
Dimensions and Weight
Dimensions
(W x H x D):
Approx. 74.6 x 130.4 x 105.1 mm / 2.94 x 5.13 x 4.14 in.
Weight: Approx. 385 g / 13.6 oz. (Speedlite only, excluding batteries)
Operation Environment
Working
temperature range:
0°C — 45°C / 32°F — 113°F
Working humidity: 85% or less
All specifications above are based on Canon’s testing standards.
Product specifications and the exterior are subject to change without notice.

108
109
Specifications
Guide Number (ISO 100, in approx. meters/feet)
Normal Flash (Full Output)/Quick Flash
Flash Coverage (mm) 14 24 28 35
Normal Flash (Full Output) 14.0 / 45.9 25.0 / 82.0 26.0 / 85.3 29.0 / 95.1
Quick Flash Equivalent to approx. 1/2 — 1/6 of full output
Flash Coverage (mm) 50 70 80 105
Normal Flash (Full Output)
33.0 / 108.3 40.0 / 131.2 42.0 / 137.8 47.0 / 154.2
Quick Flash Equivalent to approx. 1/2 — 1/6 of full output
Manual Flash
Flash Output Flash Coverage (mm)
14 24 28 35
1/1 14.0 / 45.9 25.0 / 82.0 26.0 / 85.3 29.0 / 95.1
1/2 9.9 / 32.5 17.7 / 58.1 18.4 / 60.4 20.5 / 67.3
1/4 7.0 / 23.0 12.5 / 41.0 13.0 / 42.7 14.5 / 47.6
1/8 4.9 / 16.1 8.8 / 28.9 9.2 / 30.2 10.3 / 33.8
1/16 3.5 / 11.5 6.3 / 20.7 6.5 / 21.3 7.3 / 24.0
1/32 2.5 / 8.2 4.4 / 14.4 4.6 / 15.1 5.1 / 16.7
1/64 1.8 / 5.9 3.1 / 10.2 3.3 / 10.8 3.6 / 11.8
1/128 1.2 / 3.9 2.2 / 7.2 2.3 / 7.5 2.6 / 8.5
Flash Output Flash Coverage (mm)
50 70 80 105
1/1 33.0 / 108.3 40.0 / 131.2 42.0 / 137.8 47.0 / 154.2
1/2 23.3 / 76.4 28.3 / 92.8 29.7 / 97.4 33.2 / 108.9
1/4 16.5 / 54.1 20.0 / 65.6 21.0 / 68.9 23.5 / 77.1
1/8 11.7 / 38.4 14.1 / 46.3 14.8 / 48.6 16.6 / 54.5
1/16 8.3 / 27.2 10.0 / 32.8 10.5 / 34.4 11.8 / 38.7
1/32 5.8 / 19.0 7.1 / 23.3 7.4 / 24.3 8.3 / 27.2
1/64 4.1 / 13.5 5.0 / 16.4 5.3 / 17.4 5.9 / 19.4
1/128 2.9 / 9.5 3.5 / 11.5 3.7 / 12.1 4.2 / 13.8

110
This section describes the available and unavailable functions when
using the Speedlite 470EX-AI with a Type-B camera (EOS film camera
supporting A-TTL/TTL autoflash).
When the Speedlite is attached to a Type-B camera, <a> is
displayed on the LCD panel of the flash. Autoflash metering
cannot be performed.
Functions available with Type-B cameras
Manual flash
Second-curtain sync
AI.B semi-auto
Functions not available with Type-B cameras
E-TTL II/E-TTL/TTL autoflash
Flash exposure compensation
FE lock
High-speed sync
Quick flash
Modeling flash
AI.B full-auto
Using with a Type-B Camera

111
This device complies with Part 15 of the FCC Rules. Operation is subject to the
following two conditions: (1) This device may not cause harmful interference,
and (2) this device must accept any interference received, including
interference that may cause undesired operation.
Do not make any changes or modifications to the equipment unless otherwise
specified in the manual. If such changes or modifications should be made, you
could be required to stop operation of the equipment.
NOTE: This equipment has been tested and found to comply with the limits for
a Class B digital device, pursuant to part 15 of the FCC Rules. These
limits are designed to provide reasonable protection against harmful
interference in a residential installation.
This equipment generates, uses and can radiate radio frequency
energy and, if not installed and used in accordance with the
instructions, may cause harmful interference to radio communications.
However, there is no guarantee that interference will not occur in a
particular installation. If this equipment does cause harmful interference
to radio or television reception, which can be determined by turning the
equipment off and on, the user is encouraged to try to correct the
interference by one or more of the following measures:
— Reorient or relocate the receiving antenna.
— Increase the separation between the equipment and receiver.
— Connect the equipment into an outlet on a circuit different from that
to which the receiver is connected.
—
Consult the dealer or an experienced radio/TV technician for help.
112
Graphical symbols placed on the equipment
Direct current
DISPOSE OF USED BATTERIES ACCORDING TO LOCAL
REGULATIONS.
CAN ICES-3 (B) / NMB-3 (B)
The apparatus shall not be exposed to dripping or splashing.
Batteries shall not be exposed to excessive heat such as sunshine, fire, or the
like.
Dry batteries shall not be subjected to charging.
Only for European Union and EEA (Norway, Iceland and
Liechtenstein)
This symbol indicates that this product is not to be disposed of with
your household waste, according to the WEEE Directive (2012/19/
EU) and national legislation. This product should be handed over to
a designated collection point, e.g., on an authorized one-for-one
basis when you buy a new similar product or to an authorized
collection site for recycling waste electrical and electronic
equipment (EEE). Improper handling of this type of waste could
have a possible negative impact on the environment and human
health due to potentially hazardous substances that are generally
associated with EEE. At the same time, your cooperation in the
correct disposal of this product will contribute to the effective usage
of natural resources. For more information about where you can
drop off your waste equipment for recycling, please contact your
local city office, waste authority, approved WEEE scheme or your
household waste disposal service. For more information regarding
return and recycling of WEEE products, please visit
www.canon-europe.com/weee.

113
Numerics
12 sec., 16 sec. timer.……….………….4
18% gray reflector……..………..……..37
A
Accessory ..………….………..……….…15
AF-assist beam ..………..27, 86, 87, 89
AI bounce flash ………….…………41, 42
AI.B full-auto ……………..42, 43, 46, 48
AI.B lamp …………………………....54, 59
AI.B semi-auto ………….…….42, 45, 56
ANGLE SET….………..………45, 54, 57
Auto power off………………...22, 85, 86
Auto zoom adjustment to image
sensor size……………….………..……..26
Av (Aperture-priority AE)……………..25
B
Batteries……..……….………..……….…18
Bounce……….………….……….…..14, 41
Adapter ..……….………..……….15, 63
Distance measurement
start button…….………..….43, 46, 49
Full-auto………..………42, 43, 46, 48
Manual……..………..……….…..61, 92
Semi-auto …………..………42, 45, 56
Bounce angle………….……….………..61
Compensation ……….44, 45, 51, 91
Horizontal direction…..………….…14
Maximum angle ..………….………..90
Setting button ……………..45, 54, 57
Upward direction….………….……..14
C
C.Fn…………..……….………... 82, 83, 85
Case ……….………….………..…………. 15
Clear all ……..……….………..……. 70, 84
Clearing settings (Reverting to
defaults)……….………..……….….. 40, 69
Color temperature information
transmission .………….………….…….. 26
Creative Zone…………… 29, 65, 71, 81
Custom Functions (C.Fn) … 82, 83, 85
D
Distance indicator display… 24, 36, 85
Distance measurement
start button ………..……….…. 43, 46, 49
Double-click…….………….…. 51, 57, 91
E
Effective flash metering range.. 12, 24
E-TTL II flash metering……..……….. 68
E-TTL II/E-TTL autoflash………. 24, 25
F
FE lock (FEL) ………………….……….. 31
Firing groups ……….………..……. 76, 78
Firing interval………….…………... 18, 96
First-curtain sync ….………….……….. 68
Flash control………..………….……….. 66
Flash coverage……………………. 34, 87
Flash exposure
compensation …….……….…. 30, 68, 78
Index

114
Index
Flash exposure level………..12, 30, 37
Flash firing restriction…….……….…..96
Flash function settings ………………..65
Flash head (Light-emitting unit) ……10
Flash metering ……………..…………...68
Flash mode ………….12, 13, 24, 36, 68
Flash output ……….………….…………. 36
Flash positioning……..…………..…….72
Flash sync speed……….………… 25, 68
Flash synchronization speed in Av
mode………..……….………..……….…..68
Flash-ready lamp……….21, 49, 77, 89
Full-auto (AI.B-F) ..……..42, 43, 46, 48
Fully automatic flash photography..24
G
Guide number …..……….………..…..109
H
High-speed sync……………..……32, 78
Hot shoe ……….……….…………..…….20
I
INDIVIDUAL RECEIVER ……….13, 79
Individual receiver………………….…..79
L
LCD panel………..………….……….…..12
Contrast….………….………..………. 88
Illumination ..………….………...22, 87
Illumination color …………..……….88
Light distribution….………..…………...87
LOCK …….………….………..…………... 22
Lock function …………..……….………. 22
M
M (Manual exposure) ………..………. 25
M (Manual flash) ……….………..……. 36
Manual bounce………..……….…. 61, 92
Manual flash ………………..……… 36, 79
Memory function.……….………..……. 75
Metered manual flash………………… 37
Modeling flash ……………..…………... 38
N
Nomenclature………….………….……. 10
Normal flash .………..…………... 18, 109
Number of flashes ………….…………. 18
O
Optical transmission wireless flash
shooting…………….………..……….….. 71
Orientation (position)…. 44, 45, 51, 91
P
P (Program AE)……….……….………. 24
P.Fn …….………….……….…… 82, 83, 88
Personal Functions (P.Fn).. 82, 83, 88
Power switch …………..……….………. 21
Q
Quick flash ………………….… 18, 21, 89
R
Receiver unit ……………….……… 13, 71
Charge confirmation ………… 77, 87
Receiver unit setting …..……….... 74

115
Index
Recharging.……….…………..……….…21
S
Safety precautions …..……….………….8
Second-curtain sync ………………..…33
Semi-auto (AI.B-S)..………...42, 45, 56
Shooting distance ……………36, 48, 63
Shutter speed…………………………….25
Shutter sync settings……….……….…68
Stand…..……….………..……….………..15
Sync speed ……….………..……….25, 68
System map..……….………….………..94
T
Temperature increase ..………….……96
Test flash.………..……….………….21, 77
Transmission channel ……….………..74
Transmission distance .………..……..72
Transmitter….………….……….………..94
TTL autoflash ……….………..………..110
Tv (Shutter-priority AE) ………….……25
Type-A camera………..……….………….2
Type-B camera………..……….………110
V
Vertical position……….…44, 45, 51, 91
W
Warning.……….………..……….…..52, 96
Wide panel ………..………..……….……35
Wireless button ……….………11, 74, 79
Wireless operation range ……..……..72
Wireless settings ..………….…………. 74
Wireless shooting …………..…………. 71
Z
Zoom ………………..……….………..….. 34

CPA-E324-000 © CANON INC. 2017
The descriptions in this Instruction Manual are current as of December 2017.
For information on the compatibility with any products introduced after this date,
contact any Canon Service Center. For the latest version Instruction Manual,
refer to the Canon Web site.
- Canon
- Canon EOS
- Canon PowerShot
- Canon IXUS
- Объективы Canon
- Canon аксессуары
- Nikon
- Nikon 1
- Nikon COOLPIX
- Nikon зеркальные камеры
- Nikon аксессуары
- Объективы Nikon
- Fujifilm
- Инструкции Fujifilm X
- Инструкции Fujifilm FinePix
- Инструкции Fujifilm аксессуары
- Инструкции объективы Fujifilm
- Olympus
- Olympus OM-D
- Olympus PEN
- Olympus STYLUS
- Olympus зеркальные камеры
- Объективы Olympus
- Lumix
- Samsung
- Samsung GALAXY Camera
- Samsung Компактные Smart-камеры
- Samsung Smart-камеры NX
- Samsung GX (зеркальная камера)
- Samsung Digimax
- Sony
- Sony Cyber-shot
- Sony α Камеры
- Объективы Sony
- Sony аксессуары
- Pentax
Инструкции для фотоаппаратов, пультов для фотоаппаратов, инструкции для вспышек
© 2014 —
Инструкции для фотоаппаратов и других устройств
Canon Speedlite 470EX-AI Instruction Manual
Canon Speedlite 470EX-AI Specification
The Canon Speedlite 470EX-AI is an innovative camera flash unit designed to enhance photographic lighting with its groundbreaking Auto Intelligent Bounce feature. This feature automatically calculates and adjusts the optimal bounce angle, making it easier for photographers to achieve professional-quality lighting without extensive manual adjustments. The flash unit is equipped with a motorized head that can rotate 180 degrees in both directions and tilt upwards to 120 degrees, providing versatile lighting options and accommodating various shooting environments.
With a guide number of 47 meters at ISO 100, the 470EX-AI offers substantial power for both indoor and outdoor photography. It supports E-TTL/E-TTL II metering for accurate flash exposure and is compatible with Canon’s range of EOS cameras. The flash has a comprehensive zoom range of 24-105mm, which can be extended to 14mm with the built-in wide panel, ensuring coverage for different lens focal lengths.
The Speedlite 470EX-AI also features a dot matrix LCD panel for clear and intuitive navigation through settings and modes. It includes both full and semi-auto bounce settings, allowing photographers to tailor the flash behavior to their specific needs. The unit is powered by four AA batteries, providing convenient and accessible power options, while the energy-efficient design offers a fast recycle time ranging from 0.1 to 5.5 seconds depending on the battery type and condition.
Overall, the Canon Speedlite 470EX-AI is a sophisticated tool for photographers seeking to enhance their lighting techniques with minimal effort, offering advanced automation alongside manual controls to accommodate a wide range of photographic styles and requirements.
To enable the AI Bounce feature, power on the Speedlite and press the AI.B button. You can then select either the Full-Auto or Semi-Auto setting using the function button.
First, ensure the flash is securely attached to the camera’s hot shoe. Check the batteries to ensure they are charged and correctly installed. Also, verify that the flash settings are configured properly in the camera menu.
To reset the Speedlite 470EX-AI, press and hold the MODE button and the power button simultaneously until the display blinks, indicating that the reset is complete.
The Canon Speedlite 470EX-AI has a guide number of 47 meters (154 feet) at ISO 100. This indicates the flash’s power and how far its light can reach.
No, the Canon Speedlite 470EX-AI cannot be used as a master flash. It can only function as a slave unit in a wireless flash setup.
The Speedlite 470EX-AI automatically adjusts the flash coverage angle based on the focal length of the lens in use. You can also manually adjust it by pressing the ZOOM button and selecting the desired focal length.
Regularly clean the flash head with a soft, dry cloth to remove dust and fingerprints. Check the battery compartment for corrosion and replace batteries as needed. Store the flash in a dry, cool place when not in use.
Canon Speedlite 470EX-AI does not support user-upgradable firmware. Please check with Canon support for any updates that may require professional servicing.
The modeling flash function emits a stroboscopic burst of light, allowing you to preview the lighting effect on the subject before taking a photo. Activate it by pressing the depth-of-field preview button on the camera.
To adjust the flash exposure compensation, press the +/− button on the Speedlite and turn the select dial to increase or decrease the flash output as needed.
Русский
- Bedienungsanleitung Canon SPEEDLITE 470EX-AI
- Canon SPEEDLITE 470EX-AI User Manual
- Manual Usuario Canon SPEEDLITE 470EX-AI
- Mode d’emploi Canon SPEEDLITE 470EX-AI
- Istruzioni Canon SPEEDLITE 470EX-AI
- инструкция Canon SPEEDLITE 470EX-AI
- Canon SPEEDLITE 470EX-AIの取扱説明書
- Handleiding Canon SPEEDLITE 470EX-AI
- Manual de uso Canon SPEEDLITE 470EX-AI
Вам нужна инструкция? Мы поможем Вам ее найти и сэкономить Ваше время.
- 116 stron
- 5.16 mb
Изделие Canon SPEEDLITE 470EX-AI, а также другие, которыми Вы пользуетесь ежедневно, наверняка вы получили в комплекте с инструкцией обслуживания. Из опыта наших пользователей мы знаем, что большинство из Вас не уделили этому особого внимания. Большая часть инструкций, сразу же после покупки попадает в корзину для мусора вместе с коробкой — это ошибка. Ознакомьтесь с информацией, касающейся инструкции Canon SPEEDLITE 470EX-AI, которая поможет Вам в будущем сэкономить нервы и избежать головной боли.
Важная подсказка — не забывайте хотя бы раз прочитать инструкцию Canon SPEEDLITE 470EX-AI
Если вы не хотите каждый раз читать информационные брошюры, касающиеся, тех или Canon SPEEDLITE 470EX-AI иных изделий, достаточно, прочитать их раз — сразу же после покупки устройства. Вы получите основное знания, касающиеся поддержания изделия Canon SPEEDLITE 470EX-AI в хорошем эксплуатационном состоянии, так, чтобы без проблем достигнуть его планируемого цикла работы. Затем инструкцию можно отложить на полку и вернуться к ней только в случае, если вы не уверены, правильно ли проводится техобслуживание изделия. Правильный уход является необходимым элементом Вашего удовольствия Canon SPEEDLITE 470EX-AI.
Раз в году пересмотрите шкафчик, в котором держите инструкции для всех устройств, — выбросите те, которыми вы уже не пользуетесься. Это поможет Вам сохранять порядок в своей домашней базе инструкций обслуживания.
Summary of Contents for Canon SPEEDLITE 470EX-AI
Что находится в инструкции Canon SPEEDLITE 470EX-AI? Почему стоит ее прочитать?
- Гарантия и подробности, касающиеся техобслуживания изделия
Хорошей идеей будет прикрепить чек к странице инструкции. Если что-то плохое случится во время использования Canon SPEEDLITE 470EX-AI, у вас будет комплект документов, необходимый для гарантийного ремонта. В этой части инструкции вы найдете информацию об авторизованных сервисных центрахCanon SPEEDLITE 470EX-AI а также, как самостоятельно правильно ухаживать за оборудованием — так, чтобы не потерять гарантийных прав. - Указания по монтажу и Setup
Не терять нервов и времени на самостоятельную попытку установки и первого запуска изделия. Воспользуйтесь рекомендациями производителя Canon SPEEDLITE 470EX-AI чтобы правильно запустить изделие, без лишнего риска повреждения оборудования. - Информация, касающаяся дополнительных запчастей (входящих в комплект а также являющихся опцией)
Пересматривая эту часть документа вы сможете проверить, доставлен ли ваш Canon SPEEDLITE 470EX-AI с полним комплектом аксессуаров. Вы также сможете узнать, какие дополнительные запчасти или аксессуары для Canon SPEEDLITE 470EX-AI Вы сможете найти и докупить к своему устройству. - Troubleshooting
Самые частые проблемы, касающиеся Canon SPEEDLITE 470EX-AI и методы их решения. Это очень полезная часть руководства по обслуживанию — она позволит Вам сэкономить много времени на поиск решений. 90% проблем с Canon SPEEDLITE 470EX-AI повторяется у многих пользователей. - Требования, касающиеся питания и энергетический класс
Информация, касающаяся количества потребляемой энергии, а также рекомендации, касающиеся установки и питания Canon SPEEDLITE 470EX-AI. Прочитайте, чтобы оптимально пользоваться Canon SPEEDLITE 470EX-AI и не использовать большего количества ресурсов, нежели это необходимо для правильной работы изделия. - Специальные функции Canon SPEEDLITE 470EX-AI
Здесь вы можешь узнать, как персонализировать изделие Canon SPEEDLITE 470EX-AI. Вы узнаете, какие дополнительные функции могут помочь Вам удобно использовать продукт Canon SPEEDLITE 470EX-AI а также, какие функции Вашего устройства оптимальны для выполнения конкретной деятельности.
Как видите в инструкции вы найдете информацию, которая реально поможет Вам в использовании Вашего изделия. Стоит с ней ознакомиться, чтобы избежать разочарований, возникающих из более короткого, нежели предусматривалось, периода исправности изделия Canon SPEEDLITE 470EX-AI. Если все же вы не хотите копить инструкции в своем доме, наш сайт поможет Вам в этом — вы должны найти у нас руководство по обслуживанию большинства из своих устройств, а также Canon SPEEDLITE 470EX-AI.