
Накамерная вспышка
Инструкция по эксплуатации
Перед использованием вспышки внимательно прочтите данное
руководство и тщательно ознакомьтесь с содержащейся в нем
информацией. Сохраните это руководство для использования
в будущем.

Предисловие
Благодарим Вас за выбор вспышки компании Godox.
Вспышка Thinklite TT600 поддерживает возможность
беспроводной передачи сигнала на частоте 2,4 ГГц и
совместима со вспышками AD360II-C, AD360II-N, TT685C,
TT685N, X1T-C, X1T-N и другими.
Эта модель предназначена для работы с цифровыми
зеркальными фотоаппаратами любой марки: Canon, Nikon,
Sony и т.д.
Особенности вспышки Godox Thinklite TT600:
џ Ведущее число 60 (ISO 100, @200 мм). Диапазон
возможных значений фокусного расстояния — от 1/1 до
1/128 с шагом 1/3
џ Встроенный передатчик, обеспечивающий возможность
приема и передачи сигнала на частоте 2,4 ГГц
џ Высокоскоростная синхронизация, беспроводное
управление, подсветка автофокуса
џ Стабильная выходная мощность и цветовая температура
при хорошем равномерном освещении
џ Дружественный ЖК-дисплей и панель управления
— 1 —

Меры безопасности
Во избежание возгорания или поражения электрическим
током не пользуйтесь вспышкой в условиях дождя, тумана
или повышенной влажности воздуха.
В состав вспышки входят высоковольтные электронные
составляющие. Не разбирайте и не ремонтируйте вспышку
самостоятельно. Возможно поражение электрическим
разрядом, накопленным в высоковольтной цепи. Ремонт
вспышки должны проводить только специалисты службы
технического обслуживания.
Прекратите пользоваться вспышкой, если целостность
корпуса была нарушена в результате падения или удара.
В противном случае при контакте с электронными
составляющими устройства возможно поражение
электрическим разрядом.
Не направляйте вспышку прямо в глаза (особенно детям)
в случае съемки на небольшом расстоянии. Это может
привести к повреждению сетчатки глаза. При съемке детей
вспышку необходимо использовать на расстоянии не менее
одного метра от них. Кроме того, для уменьшения
мощности вспышки рекомендуется снимать в режиме
отраженного света.
Не используйте вспышку вблизи легковоспламеняющихся,
химических и других подобных материалов. При
определенных обстоятельствах эти материалы могут
подвергнуться воздействию яркого света вспышки, что
может привести к возгоранию или возникновению
электромагнитного излучения.
Избегайте температур свыше 50°C, например, не держите
вспышку в закрытой машине. В противном случае это
может привести к повреждению электронных составляющих.
Электронная накамерная вспышка
— 2 —
Условные обозначения
џ В рамках данного руководства предполагается, что и вспышка,
и камера включены.
џ Ссылки на страницы руководства приводятся в виде «стр. «.
:
џ В руководстве используются следующие символы
предупреждений
Символом «Внимание» обозначается справочная информация.
Символ «Примечание» используется для обозначения
предупреждений о возникновении возможных проблемах со
съемкой.
— 3 —
Предисловие
1
Меры безопасности
2
Названия компонентов
5
Корпус
Панель управления
ЖК-дисплей
Комплектация вспышки TT600
Дополнительное оборудование
8
Установка на камеру
Работа со вспышкой
8
Включение/выключение
Мощность вспышки
Зум: Настройка угла освещения
Ручной режим вспышки
Режим стробоскопической вспышки
Режим оптической ведомой вспышки S1
Режим оптической ведомой вспышки S2
Режим высокоскоростной синхронизации
Расширенные настройки/Индикатор подсветки
автофокуса
Звуковой сигнал
Беспроводное управление вспышкой: передача
радиосигнала (частота 2,4 ГГц)
Дистанционное управление вспышкой
Синхронный запуск
Расширенная настройка — Спящий режим
C.Fn: Расширенные пользовательские настройки
Система защиты
16
Другие функции
17
19
Технические характеристики
Эксплуатация вспышки
19
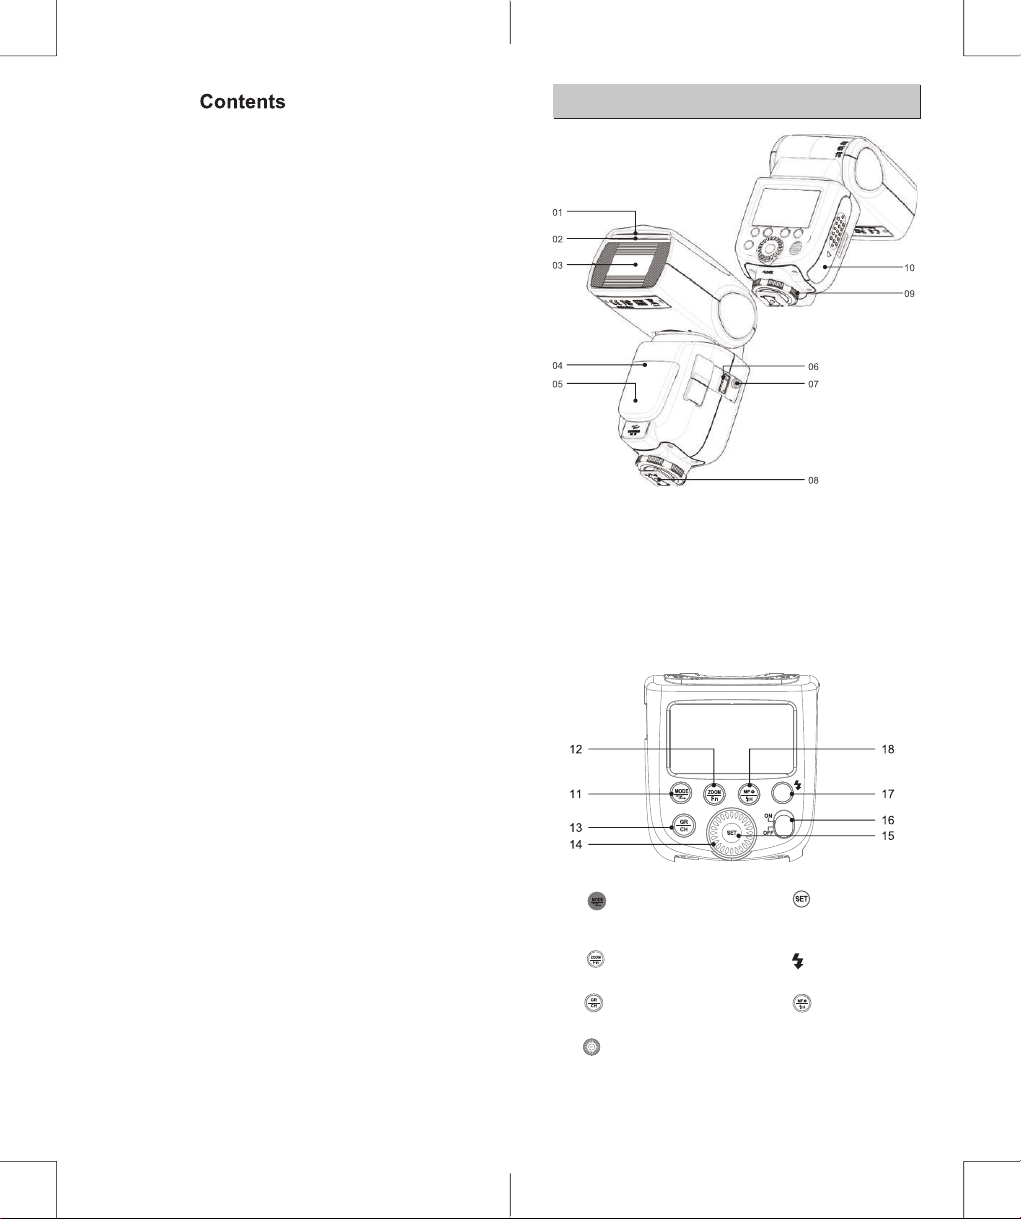
Названия компонентов
Корпус
01. Отражатель
02. Встроенная широкоугольная рассеивающая панель
03. Головка вспышки
04. Датчик оптического управления
05. Подсветка автофокуса
06. Разъем для беспроводного управления
07. Гнездо для кабеля синхронизации
08. “Горячий башмак”
09. Фиксирующее кольцо
10. Отсек для батареек
11. Кнопка выбора
режима работы/режима
беспроводного управления
(Удержание нажатой)
12. Зум/Расширенные
настройки (Удержание
нажатой)
13. Кнопка настройки
группы/канала (Удержание
нажатой)
14. Дисковый регулятор
15. Кнопка сохранения
выбранных значений
16. Кнопка включения/
выключения
17. Кнопка тестовой
вспышки/индикатор
готовности вспышки к работе
18. Подсветка автофокуса/
Кнопка режима
высокоскоростной
синхронизации (Удержание
нажатой)
— 4 —
— 5 —
Loading…
View the manual for the Godox TT600 here, for free. This manual comes under the category flash units and has been rated by 26 people with an average of a 8.4. This manual is available in the following languages: English. Do you have a question about the Godox TT600 or do you need help?
Ask your question here
Godox TT600 specifications
Below you will find the product specifications and the manual specifications of the Godox TT600.
The godox tt600 flash unit is a slave flash that provides a color temperature of 5600 K, making it ideal for capturing natural-looking images. Its approximate recycling time is 2.6 seconds, allowing for quick and efficient use while shooting. With a shooting distance of 100 meters and a lighting angle horizontal of 360° and vertical of 97°, it offers complete flexibility in capturing the perfect shot.
This flash unit also boasts a flash guide number of 60 m and offers 32 different channels, allowing for a wide range of options in wireless connection. The built-in display provides easy navigation with its LCD display type, and the TTL brand specific flash systems ensure accurate exposure in various lighting conditions.
With a width of 64 millimeters, this flash unit is compact and easy to carry around. The godox tt600 flash unit is a reliable and durable product that is suitable for both professional and amateur photographers who require high-quality lighting and consistent results.
General
| Brand | Godox |
| Model | TT600 | TT600 |
| Product | flash unit |
| EAN | 0611864739175, 0662578904595, 0710825047684, 0714757580783, 6952344209806, 6953400383775 |
| Language | English |
| Filetype | User manual (PDF) |
Features
| Type | Slave flash |
| Product colour | Black |
| Colour temperature | 5600 K |
| Approximate recycling time | 2.6 s |
| Shooting distance | 100 m |
| Lighting angle (horizontal) | 360 ° |
| Lighting angle (vertical) | 97 ° |
| Flash guide number | 60 m |
| Channels quantity | 32 channels |
| Wireless connection | Yes |
| Camera brands compatibility | — |
| Built-in display | Yes |
| Display type | LCD |
| Brand specific flash systems | TTL |
Weight & dimensions
| Width | 64 mm |
| Depth | 76 mm |
| Height | 190 mm |
| Weight | 500 g |
show more
Questions & answers
Can’t find the answer to your question in the manual? You may find the answer to your question in the FAQs about the Godox TT600 below.
What is the weight of the Godox TT600?
The Godox TT600 has a weight of 500 g.
What is the height of the Godox TT600?
The Godox TT600 has a height of 190 mm.
What is the width of the Godox TT600?
The Godox TT600 has a width of 64 mm.
What is the depth of the Godox TT600?
The Godox TT600 has a depth of 76 mm.
Is the manual of the Godox TT600 available in English?
Yes, the manual of the Godox TT600 is available in English .
Is your question not listed? Ask your question here
- June 15, 2024
- Godox
Table of Contents
- Godox TT600 Camera Flash Speedlite
- Product Information
- Name of Parts
- What’s in the Box of TT600
- Using the Flash
- Custom Function—-Sleep Functi
- C.Fn Setting Custom Functions
- Protection Function
- Advanced Application
- Technical Data
- Product Usage Instructions
- Maintenance **
- FCC Statement
- Warranty
- Troubleshooting **
- Frequently Asked Questions
- Read User Manual Online (PDF format)
- Download This Manual (PDF format)
Godox TT600 Camera Flash Speedlite
Before using this product:
Please read this user manual carefully in order to ensure your safety and the
proper operation of this product. Keep for future reference.
Foreword
Thank you for purchasing a GODOX product.
TT600 camera flash adopts Godox wireless X system and 2.4G ratio transmission,
which is compatible with AD36011-C.. AD36011-N. TT685C, TT685N.. xn-c. X1T-N,
etc. Fit all DSLR camera brands e.g. Canon. Nikon, Sony, etc.
This TT600 camera flash features:
- GN60 (m ISO 100. @200mm). Adjust from 1/1 to 1/128 in 113rd stops
- Built-in 2.4G wireless transmission to support transmitting and receiving
- High speed sync, wireless remote control, multi flash and manual focus assist
- Stable consistency and color temperature with good even lighting
- User-friendly LCD display & control panel
Product Information
Warning
- Always keep this product dry. Do not use in rain or in damp conditions.
- Do not disassemble. Should repairs become necessary, this product must be sent to an authorized maintenance center.
- Keep out of reach of children.
- Stop using this product if it breaks open due to extrusion, falling or strong hit. Otherwise, electric shock may occur if you touch the electronic parts inside it.
- Do not fire the flash directly into the eyes (especially those of babies) within short distances. Otherwise visual impainnent may occur.
- Do not use the flash unit in the presence of flammable gases, chemicals and other similar materials. In certain circumstance, these materials may be sensitive to the strong light emitting from this flash unit and fire or electromagnetic interference may result.
- Do not leave or store the flash unit if the ambient temperature reads over 50″C . Otherwise the electronic parts may be damaged.
- Tum off the flash unit immediately in the event of malfunction.
Name of Parts

Body
-
Catchlight Panel
-
Built-In Wide Panel (Retracted)
-
Flash Head
-
Optic Control Sensor
-
Focus Assist Beam
-
Wireless Control Port
-
Sync Cord Jack
-
Hot shoe
-
Lock Ring
-
Battery Compartment

Control Panel
-
Mode Selection Button/ Wireless Mode Selection (Long Keypress)
-
Zoom I Function Custom Button (Long Keypress)
-
Group/ Channel Setting (Long Keypress)
-
select Dial
-
Set Button
-
ON/OFF Power Switch
-
Test Button / Flash Ready Indicator
-
Focus Assist Beam I High Speed Sync Button (Long Keypress)
LCD Pa
- < M>Manual Flash Mode
-
S1 Slave Flash Triggering
- S2 Slave Flash Triggering
- Multi/Stroboscopic Flash Mode
-
< >High Speed Sync Triggering
- < > Battery Level Indication
- < > Sound Beep Indication
-
< >Sleep Status
- < >Overtemperature Indication
-
< >Wireless Signal Transmission
-
< >Focus Assist Beam Indicator
-
Channel
-
Group


What’s in the Box of TT600
- Flash unit
- Mini stand
- Protection case
- Instruction manual
Separately Sold Accessories
The product can be used in combination with the following accessories sold
separately, so as to achieve best photography effects: Cells II high speed
trigger, FT-16S power & trigger control, Car charger, Mini soft box, White &
Silver Reflector, Honeycomb, Color gels, Snoot, etc.

Attaching to a Camera
-
Attach the Camera Flash.
Slip the camera flash’s mounting foot into the camera’s hot shoe all the way. -
Secure the Camera Flash.
Rotate the locking screw on the mounting foot until it locks up. -
Detach the Camera Flash.
Rotate the locking screw on the mounting foot until it is loosened.
Using the Flash
Power Management
Use ON/OFF Power Switch to power the flash unit on or off. Turn off if it will
not be used for an extended period of time. This flash unit has Sleep Function
and will enter into sleep status when there is no operation for a long time.
For Sleep Function setting, see the following instruction.
Flash Output
- Flash output can be varied from 11128th power to 1/1 full power in 1/3 stop increments. To obtain a correct flash exposure, use a hand-held flash meter to determine the required flash output.
- Adjust the power output by rotating Select Dial . The following table makes it easier to see how the stop changes in terms off/ stop when you increase or decrease the flash output:
Figures displayed when reducing flash output level

Figures displayed when increasing flash output level
- When “OF” is shown on the LCD display, it means no flash output and flash firing is turned off.
ZOOM: Setting the Flash Coverage
The flash coverage can be set to match the lens focal length from 24 mm to 200
mm. Press< > button and rotate Select Dial < > to change the flash coverage.
When setting the flash coverage, make sure it covers the lens focal length so
that the picture will not have a dark periphery.
M Mode: Manual Mod
Press MODE Selection Button < > to enter M mode. In this mode, you can set the
flash unit onto your camera hot shoe or your trigger hot shoe for firing.
Before shooting, adjust the flash power output. When the camera’s shutter is
pressed, the flash will fire synchronously. Slave triggering mode is not
available in M mode.
Multi Mode: Stroboscopic Flash
Press Mode Selection Button < > to enter Multi mode (Stroboscopic flash).
With stroboscopic flash, a rapid series of flashes is fired. It can be used to
capture multiple images of a moving subject in a single photograph. You can
set the firing frequency (number of flashes per sec. expressed as Hz), the
number of flashes, and the flash output. For setting procedures, see the
following:
- Press the Mode Selection Button < > so that “Multi” is displayed.
- Press Set Button < >to select the item to be set. The item blinks.
- Rotate Select Dial < > to set a desired number.

Calculating the Shutter Speed
During stroboscopic flash, the shutter remains open until the firing stops.
Use the provided formula to calculate the shutter speed required to capture
the full sequence of flashes:
Number of flashes/ Firing frequency = Shutter speed
For example, if the number of flashes is 10 and the firing frequency is 5 Hz,
the shutter speed should be at least 2 sec.
Note:
- Stroboscopic flash Is most effective with a highly reflective subject against a dark background.
- Using a tripod and a remote switch Is recommended.
- A flash output of 1/1 or 1/2 cannot be set for stroboscopic flash.
- Stroboscopic flash can be used with “bulb”.
Maximum Stroboscopic Flashes
Hz / Fl a sh O u tpu t| | 2| 3| 4| 5| 6-7|
8-9
—|—|—|—|—|—|—|—
1/4| 7| 6| 5| 4| 4| 3| 3
1/8| 14| 14| 12| 10| 8| 6| 5
1/16| 30| 30| 30| 20| 20| 20| 10
1/32| 60| 60| 60| 50| 50| 40| 30
1/64| 90| 90| 90| 80| 80| 70| 60
1/128| 100| | 100| | 100| |
Hz/Flas h **Output| 10| 11| 12-14| 15-19| 20-50| 60-199
—|—|—|—|—|—|—
1/4| 2| 2| 2| 2| 2| 2
1/8| 4| 4| 4| 4| 4| 4
1/16| 8| 8| 8| 8| 8| 8
1/32| 20| 20| 20| 18| 16| 12
1/64| 50| 40| 40| 35| 30| 20
1/128| 70| 70| 60| 50| 40| **
A To avoid overheating and deteriorating the flash head during stroboscopic
flash, do not use stroboscopic flash more than 10 times in succession.
S1 Mode: S1 Slave Triggering Mode
- long Press< > button for 2 seconds to enter the custom menu and press < > Button to choose OS. Then, turn the Select Dial to choose OFFIS1/S2.
- In S1 mode, the flash unit can function as a slave flash for creating multiple lighting effects. It is respectively applicable to manual flash environment.
- In S1 mode, the flash unit will fire synchronously when the master flash fires, the same effect as that by the use of radio triggers.
S2 Mode: S2 Slave Triggering Mode
Long Press< > button for 2 seconds to enter the custom menu and press <
Button to choose OS. Then, turn the Select Dial to choose OFFIS1/S2.
- In S2 mode, the flash unit can function as a slave flash for creating multiple lighting effects. It is applicable when using a TTL master flash.
- In S2 mode, the flash unit will ignore a single “preflash” from the master flash and will only fire in response to the second, actual flash from the master.
Hi-Speed Sync Triggering

- To enter mode, long press < > button and hold for 2 seconds.
- To exit mode, press Mode Selection Button or long press < > button and hold for 2 seconds again.
- In < > hi-speed sync triggering mode, you can use a hi-speed sync trigger to have your flash unit synchronized with all shutter speeds of cameras (max. 1/8000 second, up to your camera). This is convenient when you want to use aperture priority for fill-flash portraits.
Note:
Hi-speed sync triggering mode is effective only when the flash unit is used
together with the following flash triggers.
- Hi-speed sync trigger, e.g., Godox Cells II transceiver.
- TTL wireless flash trigger X1 C
- TTL wireless flash trigger X1 N
Hi-speed sync triggering mode is not available when TT600 is mounted onto the
camera.
Godox Cells II transceiver (Optional)
TTL wireless flash trigger XlC /XlN (Optional)
- To avoid overheating or deteriorating the flash head during high speed sync flash, the over-temperature protection function will be activated automatically after 10 continuous high-speed flashes and the ecycle time becomes 1 O seconds longer.
Custom Function–Focus Assist Lamp
- Under poorly-lit or low-contrast conditions, you can press < > button to tum on the focus assist beam in order to make it easier to autofocus.
- The beam will automatically put out certain seconds after the last pop is fired. The time between the last fire and the auto shutdown of focus assist beam is called No-Flash Time. The time is user adjustable and set to 10 seconds by default.
- Press< > button and hold for 2 seconds to enter Custom Function. Then press “SET” button to enter “FC” mode. The LCD panel displays “FC” (Auto shutdown of focus assist lamp) and “No-Flash Time”. Rotate Select Dial to set a desired time for the flash. Press< > button to return.
| No-Flash Time | Meaning |
|---|---|
| 10 seconds | 10 seconds after the last fire, focus assist lamp will |
automatically get out.
20 seconds| 20 seconds after the last fire, focus assist lamp will
automatically get out.
30 seconds| 30 seconds after the last fire, focus assist lamp will
automatically get out.
Buzz Functi
- To turn the buzz function on or off, press < > button and hold for 2 seconds to enter Custom Function.
- Then press “SET” button to enter “bp” mode. The LCD displays” ON” means buzz is turned on while “OF” means buzz is turned off.
- When the buzzer is turned on, < >is shown on the LCD display.
Wireless Flash Shooting: Ratio (2.4G) Transmission
- TT600 has 2.4G ratio transmission (Master/Slave)
- Wireless mode setting: Long press< > button and hold for 2 seconds until< > icon is blinking. Turn the Select Dial to set from OFF/Master(M)/Slave(S) mode.
- Channel setting: Long press< > button and hold for 2 seconds until the figure besides the CH is blinking. Turn the Select Dial to choose the channel from 1-32.
- Group setting: Short press< > button to select group. In Master mode, groups can be selected from M/A/B/C/D/E; while in Slave mode, groups can be selected from A/B/C/D/E.
- As TT600 adopts Godox wireless X system, it is compatible with AD360II-G AD360II-N TT685C, TT685N, X1T-C, X1T-N wireless control, etc.
- See the picture below:

Wireless Control Function
-
The flash unit is built in with a Wireless Control Port (6) so that you can wirelessly adjust the power level of the flash and control the on-or-off of your flash, focus assist beam and buzzer, as well as trigger the flash.
-
To control the flash wirelessly, you need a Godox FT series remote control set (on-camera and on-flash). Insert its receive end into the Wireless Control Port (6) on the flash and insert the transmit end into the camera hot shoe. Settings made on the hot shoe-mounted transmit and receive ends will be wirelessly communicated to the flash. Then you can press the camera shutter release button to trigger the flash. You can also hold the transmit end at hand to control your off-camera flash.
-
For full instructions on the use of FT series remote control, see its user manual.
Sync Triggering
The Sync Cord Jack (7) is aΦ3.5mm plug. Insert a trigger plug here and the
flash will be fired synchronously with the camera shutter.
Custom Function—-Sleep Functi
- This product is equipped with Sleep Function to avoid battery drain when the flash unit is idle.
- Press < > button and hold for 2 seconds to enter the sleep Function Mode. The LCD panel displays “SL” (Sleep) and “Sleeping Time”. Idle time before entering Sleep Mode is 10 minutes by default. Rotate Select Dial , to set a desired time for the flash or to turn off Sleep Function. Press < > button to return.
| Idle Time | Meaning |
|---|---|
| OF | Sleep Function is turned off. The flash unit will not automatically enter |
sleep mode.
3| Idle time before entering Sleep Mode is set to 3 minutes.
10| Idle time before entering Sleep Mode is set to 10 minutes.
30| Idle time before entering Sleep Mode is set to 30 minutes.
60| Idle time before entering Sleep Mode is set to 60 minutes.
- When the flash enters sleep mode, the LCD panel displays a “zv• icon.
- To wake up the flash unit, press any button on the flash unit, or press the camera release button, or press the trigger TEST button.
Note:
The idle time before entering Sleep Mode is recommended to sat short. This can
ensure a longer battery life.
C.Fn Setting Custom Functions

Protection Function
Over-Temperature Protecti
- To avoid overheating and deteriorating the flash head, do not fire more than 30 continuous flashes in fast succession at 1/1 full power. After 30 continuous flashes, allow a rest time of at least 10 minutes.
- If you fire more than 30 continuous flashes and then fire more flashes in short intervals, the inner over-temperature protection function may be activated and make the recycling time about 10 to 15 seconds. If this occurs, allow a rest time of about 10 minutes, and the flash unit will then return to normal.
- When the over-temperature protection is started, is shown on the LCD display.
Number of flashes that will activate over-temperature protection:
| Power Output Level | Number of Flashes |
|---|---|
| 1/1 | 30 |
| 1/2 +0.7 | 40 |
| 1/2 +0.3 | 50 |
| 1/2 | 60 |
| 1/4 (+0.3,+0 7) | 100 |
| 1/8 (+0.3,+0.7) | 200 |
| 1/16 (+0.3,+0.7) | 300 |
| 1/32 (+0.3,+0.7) | 500 |
| 1/64 (+0.3,+0 7) | 1000 |
1/128 (+0.3,+0.7)
Number of flashes that will activate over-temperature protection In high-
speed sync mode:
Power Output Level| Number of Flashes
1/1| 15
1/2 (+0.3,+0.7)| 20
1/4 (+0.3,+0.7)| 30
1/8 (+0.3,+0.7)
1/16 (+0.3,+0 7)| 40
1/32 (+0.3,+0.7)
1/64 (+0.3,+0.7)| **** 50
1/128 (+0.3,+0.7)
Other Protections
The system provides real-time protection to secure the device and your safety.
The following lists prompts for your reference:
| Prompts on LCD Panel | Meaning |
|---|---|
| E0 | A failure occurs on the temperature sensor. Please send this kit to a |
maintenance center.
E1| A failure occurs on the recycling system so that the flash cannot fire.
Please restart the flash unit. If the problem still exists, please send this
product to a maintenance center.
E2| The system gets excessive heat. Please allow a rest time of 10 minutes.
E3| The voltage on two outlets of the flash tube is too high. Please send this
product to a maintenance center.
Advanced Application
Bounce Flas
By pointing the flash head toward a wall or ceiling, the flash will bounce
off the surface before illuminating the subject. This can soften shadows
behind the subject for a more natural-looking shot. This is called bounce
flash.
To set the bounce direction, hold the flash head and turn it to a satisfying
angle.
- If the wall or ceiling is too far away, the bounced flash might be too weak and result in underexposure.
- The wall or ceiling should be a plain, white color for high reflectance. If the bounce surface is not white, a color cast may appear in the picture.
Creating a Catchligh
With the catchlight panel, you can create a catchlight in the subject’ eyes
to add life to the facial expression.
- Point the flash head upward by 90°.
- Pull out the wide panel. The catchlight panel will come out at the same time.
- Push the wide panel back in.
- Push in only the wide panel.
- Follow the same procedures as for bounce flash.
Point the flash head straight ahead and then upward by 90°. The catchlight
will not appear if you swing the flash head left or right. For best
catchlight effect, stay 1.5m/4.9ft away from the subject.
Using the Wide Panel
Pull out the built-in wide panel to enlarge the flash lighting range, so as
to get more softened and natural lighting effect.
Pull out the wide panel and place it over the flash head as shown. The flash
coverage will then be extended to 14 mm.
- The catchlight panel will come out at the same time. Push the catchlight panel back in.
Technical Data
| Product Model | TT600 |
|---|---|
| Guide No. (1/1 power@ 200mm) | GN 60 (m ISO 100) |
| Vertical Rotation Angle | -7°-90° |
| Horizontal Rotation Angle | 0-360° |
| Power Supply | Ni-MH batteries (recommended) or 4’LR6 alkaline batteries |
| Full Power Flashes | Approx. 230 (2500mA Ni-MH batteries) |
| Recycle Time | Approx. 0.1-2.6 seconds (eneloop Ni **MH batteries of |
Panasonic). Red LED indicator will light up when the flash is ready.
Flash Duration
1/300s – 1/20000s
|
Color Temperature| 5600K±200K
Wireless Flash Function| Master, Slave, Off
Controllable slave groups| 5(A, B, C, D, E)
Transmission Range (approx.)| 100m
Channel| 1~32
Dimension| 64’76’190 mm
Weight without Battery| 400g
Weight with Battery| 500g
2.4G Frequency Range| 2413.0MHz – 2465.0MHz
Max. Transmitting Power| 5dbm**
Specifications:
- Operating Frequency: 2412.99MHz – 2464.49MHz
- Maximum EIRP Power: 3.53dBm
Declaration of Conformity:
GODOX Photo Equipment Co.,Ltd. hereby declares that this equipment is in
compliance with the essential requirements and other relevant provisions of
Directive 2014/53/EU. In accordance with Article 10(2) and Article 10(10),
this product is allowed to be used in all EU member states. For more
information on the Declaration of Conformity, please click this web link. The
device complies with RF specifications when the device is used at 0mm from
your body.
Product Usage Instructions
Safety Precautions:
Before using the product, please read and understand the following
safety precautions:
- Do not expose the product to water or other liquids.
- Avoid using the product near flammable materials.
- Keep the product away from high temperatures or direct sunlight.
- Do not disassemble or modify the product.
- Only use the product with compatible devices and accessories.
Installation:
To install the product, follow these steps:
- Ensure that your compatible device is turned off.
- Connect the product to your device using the provided cables.
- Securely attach the product to your device according to the manufacturer’s instructions.
- Turn on your device and ensure that the product is recognized.
Operation:
To operate the product, follow these steps:
- Ensure that the product is fully charged or connected to a power source.
- Power on your compatible device.
- Follow the instructions provided with your device to access and utilize the product’s features.
- Adjust settings and parameters as desired using the controls on your device.
Maintenance **
**
To maintain the product’s performance and longevity, please adhere to
the following guidelines:
- Regularly clean the product using a soft, dry cloth.
- Avoid exposing the product to extreme temperatures or humidity.
- Store the product in a cool, dry place when not in use.
- Do not use harsh chemicals or solvents when cleaning the product.
- Shut down the device immediately should abnormal operation be detected.
- Avoid sudden impacts and the lamp should be dedusted regularly.
- It is normal for the flash tube to be warm when in use. Avoid continuous flashes if unnecessary.
- Maintenance of the flash must be performed by our authorized maintenance department which can provide original accessories.
- This product, except consumables e.g. flash tube, is supported with a one-year warranty.
- Unauthorized service will void the warranty.
- If the product had failures or was wetted, do not use it until it is repaired by professionals.
- Changes made to the specifications or designs may not be reflected in this manual.
FCC Statement
This device complies with part 15 of the FCC Rules. Operation is subject to
the following two conditions:
- This device may not cause harmful interference, and
- this device must accept any interference received, including interference that may cause undesired operation.
Any Changes or modifications not expressly approved by the party responsible
for compliance could void the users authority to operate the equipment.
Note: This equipment has been tested and found to comply with the limits
for a Class B digital device, pursuant to part 15 of the FCC Rules. These
limits are designed to provide reasonable protection against harmful
interference in a residential installation. This equipment generates uses and
can radiate radio frequency energy and, if not installed and used in
accordance with the instructions, may cause harmful interference to radio
communications. However, there is no guarantee that interference will not
occur in a particular installation. If this equipment does cause harmful
interference to radio or television reception, which can be determined by
turning the equipment off and on, the user is encouraged to try to correct the
interference by one or more of the following measures:
- Reorient or relocate the receiving antenna.
- Increase the separation between the equipment and receiver.
- Connect the equipment into an outlet on a circuit different from that to which the receiver is connected.
- Consult the dealer or an experienced radio/TV technician for help.
The device has been evaluated to meet general RF exposure requirement. The
device can be used in portable exposure condition without restriction.
Warning
Operating frequency :2412.99MHz-2464.49MHz
Maximum EIRP Power: 3.53dBm
Warranty
Dear customers, as this warranty card is an important certificate to apply for
our maintenance service, please fill in the following form in coordination
with the seller and safekeep it. Thank you!

Note: This form shall be sealed by the seller.
Applicable Products
The document applies to the products listed on the Product Maintenance
Information (see below for further information). Other products or accessories
(e.g. promotional items, giveaways and additional accessories attached,etc.)
are not included in this warranty scope.
Warranty Period
The warranty period of products and accessories is implemented according to
the relevant Product Maintenance Information. The warranty period is
calculated from the day(purchase date) when the product is bought for the
first time, And the purchase date is considered as the date registered on the
warranty card when buying the product.
How to Get the Maintenance Service
If maintenance service is needed, you can directly contact the product
distributor or authorized service institutions. You can also contact the Godox
after-sale service call and we will offer you service. When applying for
maintenance service, you should provide valid warranty card. If you cannot
provide valid warranty card, we may offer you maintenance service once
confinned that the product or accessory is involved in the maintenance scope,
but that shall not be considered as our obligation.
Inapplicable Cases
The guarantee and service offered by this document are not applicable in the
following cases: 1. The product or accessory has expired its warranty period;
2. Breakage or damage caused by inappropriate usage, maintenance or
preservation, such as improper packing, improper usage, improper plugging
in/out external equipment, falling off or squeezing by external force,
contacting or exposing to the improper temperature, solvent, acid, base,
flooding and damp environments, etc; 3. Breakage or damage caused by non-
authorized institution or staff in the process of installation, maintenance,
alternation, addition and detachment; . The original identifying information
of product or accessory is modified, alternated, or removed; 5. No valid
warranty card; 6. Breakage or damage caused by using illegally authorized,
nonstandard or non-public released software; *. Breakage or damage caused by
force majeure or accident; 8. Breakage or damage that could not be attributed
to the product itself. Once met these situations above, you should seek
solutions from the related responsible parties and Godox assumes no
responsibility. The damage caused by parts, accessories and software that
beyond the warranty period or scope is not included in our maintenance scope.
The normal discoloration, abrasion and consumption are not the breakage within
the maintenance scope.
Maintenance and Service Support Information
The warranty period and service types of products are implemented according to
the following Product Maintenance Information:
| Product Type | Name | Maintenance Period(month) | Warranty Service Type |
|---|---|---|---|
| Parts | Circuit Board | 12 | Customer sends the product to designated site |
| Battery | Customer sends the product to designated site | ||
| Electrical parts e.g. battery charger, power cord, sync cable, etc. | 12 |
Customer sends the product to designated site
Other Items| Flash tube, modeling lamp, lamp body, lamp cover , locking
device, package , etc| No| Without warranty
Godox After-sale Service Call 0755-29li09320-8062
Troubleshooting **
**
If you encounter any issues with the product, please consult the
troubleshooting section in the user manual. If the problem persists, contact
our customer support for assistance.
Frequently Asked Questions
-
Q: Is the product waterproof?
A: No, the product is not waterproof. Avoid exposing it to water or
other liquids. -
Q: Can I use the product with devices from other manufacturers?
A: The product is designed to be compatible with a wide range of
devices. However, it is recommended to use it with devices from the same
manufacturer for optimal performance. -
Q: How long does the product battery last?
A: The battery life may vary depending on usage and settings. Please
refer to the user manual for specific battery life information.
Read User Manual Online (PDF format)
Read User Manual Online (PDF format) >>
Download This Manual (PDF format)
Download this manual >>
GODOX PHOTO EQUIPMENT CO.LTD
Camera Flash
TT600
Foreword
Before using this product
Please read this user manual carefully in order to ensure your safety and the proper operation of
this product. Keep for future reference.
Thank you for purchasing a GODOX product.
TT600 camera flash adopts Godox wireless X system and 2.4G ratio transmission, which is
compatible with AD360II-C、AD360II-N、TT685C、TT685N、X1T-C、X1T-N, etc. Fit all DSLR camera
brands e.g. Canon, Nikon, Sony, etc.
This TT600 camera flash features:
z
GN60 (m ISO 100, @200mm). Adjust from 1/1 to 1/128 in 1/3rd stops
z
Built-in 2.4G wireless transmission to support transmitting and receiving
z
High speed sync, wireless remote control, multi flash and manual focus assist
z
Stable consistency and color temperature with good even lighting
z User-friendly LCD display & control panel
Document Download |
‹
›
Godox TT600 Manual Online:
4.55,
2108
votes
Godox TT600 User Manual
Godox TT600 User Guide
Godox TT600 Online Manual
Text of Godox TT600 User Guide:
More Instructions:
|
Godox TT600 Operation & user’s manual
|
DOWNLOAD | |
|
Godox TT600 Instruction manual
|
DOWNLOAD |
Related Products and Documents (Camera Flash):
-
Godox A1 Camera Flash Instruction manual
A1
godox/a1.pdf, 10 -
Godox thinkLite TT680-C Camera Flash Instruction manual
thinkLite TT680-C
godox/thinklite-tt680-c.pdf, 10 -
Godox V860II Camera Flash Manual
V860II
godox/v860ii.pdf, 14 -
Godox Ving V860 Camera Flash Instruction manual
Ving V860
godox/ving-v860.pdf, 28 -
Godox TT685 Camera Flash Instruction manual
TT685
godox/tt685.pdf, 18 -
Godox V860IIS Camera Flash Instruction manual
V860IIS
godox/v860iis.pdf, 16 -
Godox Gemini GS series Camera Flash Instruction manual
Gemini GS series
godox/gemini-gs-series.pdf, 5 -
Godox Mini Pioneer 120 Camera Flash Instruction manual
Mini Pioneer 120
godox/mini-pioneer-120.pdf, 4
Comparable Devices:
| # | Manufacturer | Model | Document Type | File | Updated | Pages | Size |
|---|---|---|---|---|---|---|---|
| 1 | Allegro MicroSystems | A1301 | Features and benefits | allegro-microsystems/a1301-Z15.pdf | 22 Sep 2024 | 8 | 0.29 Mb |
| 2 | SEAL | 44/62 Ultra Plus | Operation & user’s manual | seal/44-62-ultra-plus-RJO.pdf | 05 Mar 2024 | 35 | 0.86 Mb |
| 3 | Philips | PD7030/77 | Guía de inicio rápido | philips/pd7030-77-X41.pdf | 28 Oct 2023 | 2 | 1.37 Mb |
| 4 | Amcor | PVMB 9KEH-410 | English instruction manual | amcor/pvmb-9keh-410-I81.pdf | 17 Oct 2023 | 12 | 4.13 Mb |
| 5 | Daewoo | DPC-7600 | Service manual | daewoo/dpc-7600-5P7.pdf | 27 Jan 2024 | 46 | |
| 6 | HP | ProCurve 8206zl | Install manual | hp/procurve-8206zl-1FM.pdf | 03 Jul 2024 | 2 |
Similar Resources:
Camera Flash Instructions:
-
Ambiano Cookers EA-1295 Professional
#Y2N1Q7 EA-1295 Professional: Ambiano Cookers Owner Documentation
EA-1295 Professional, 4
-
Blaupunkt Hob 5IB.4 Series
Hob Instruction manual (Blaupunkt 5IB.4 Series)
5IB.4 Series, 24
-
Makita Impact Driver DTD129
#572MG4: DTD129 Impact Driver Instruction manual
DTD129, 44
-
Frigidaire Refrigerator FRT17HB3C
Factory parts catalog for Frigidaire FRT17HB3C Refrigerator
FRT17HB3C, 11
-
HP Tablet Tablet
Tablet #289444
Tablet, 8
-
Bissell Vacuum Cleaner Power Steamer Deluxe 1631-1
Bissell Vacuum Cleaner Owner’s manual (File: bissell-power-steamer-deluxe-1631-1-owner-s-manual-10, 08.03.2025)
Power Steamer Deluxe 1631-1, 10
-
BabyBjorn Baby Carrier Original
BabyBjorn Baby Carrier Original Owner’s manual
Original, 58
-
Archos Media Player 35 vision 501608
Archos 35 vision 501608 Media Player Specifications
35 vision 501608, 3
-
Hitachi Nail Gun N 5008AC
User Guide: Hitachi N 5008AC (61OOR9, Upd.Mon 11.2024)
N 5008AC, 44
-
Multitech Network Hardware MT56DSU2
Multitech Product User Guide: MT56DSU2 PDF Documentation update — 4E52GE
MT56DSU2, 1
-
Osaka Controller COMPACT
Osaka COMPACT Guide (Operating instructions manual), @7821V7
COMPACT, 12
-
AirScape Fan ventura 2.7
AirScape ventura 2.7 User Manual (Installation and operation manual), @J2546G
ventura 2.7, 16