
How to add yi iot wifi camera
Warm Tips:
- The camera supports 2.4G wifi only, which can be set from your router.
- It’s better to use the camera under strong wifi signal environment.
- And it’s normal for IP camera if it is affected by network and delayed.
- APP Account: It supports email only.
- If it is offline or wifi cannot be connected, please reset and connect it again. When resetting, there will be a short sound which means reset successfully. When connecting, make the camera close to your router.
- When turn off the ‘Motion Tracking’, the camera would turn itself, then stop.
- Try to keep away from the metal space.Avoid it being blocked by furniture, microwave oven.
- Avoid the space where the audio, video and data lines are wound, and keep the space away from them as large as possible.Ensure that as close as possible to the coverage of wireless Wi-Fi signals.
How to Reset Camera
Reset Button Press and hold Reset for about 5 seconds. When the horn sounds short voice, the reset is successful.
ADD Camera
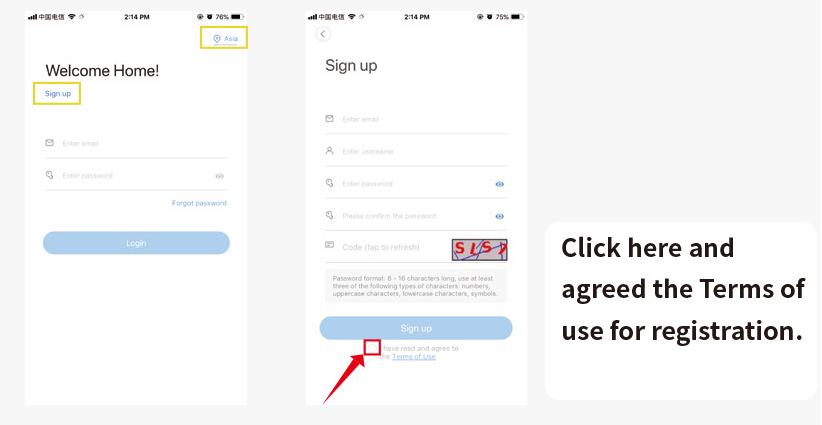
1.Register and log into the APP

2.Click ‘+’ > I heard’Waiting to connect’

3. Enter your wifi password, and then make the camera lens face to the QR code directly. After there is voice prompt from the camera, click ‘Next’ and wait for connecting.


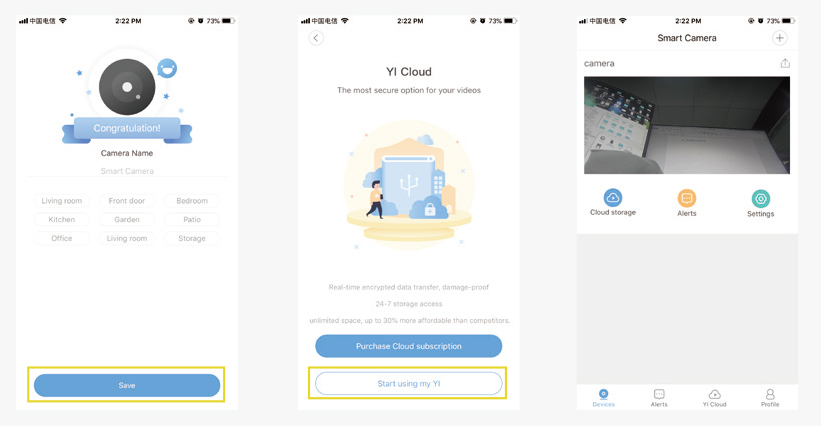
4. After connected successfully, named your camera, and it will complete.
Finally, there will be a prompt that if you need cloud storage or not. If there is no need, just click ‘Start using my YI’ and it is ok.

5GHz wifi cannot be supported, it supports 2.4GHz only.
The hidden wifi cannot be supported.
The special characteristics cannot be supported.
The settings on the router cannot be started, such as AP isolation, anti rubbing network to restrict wifi access.
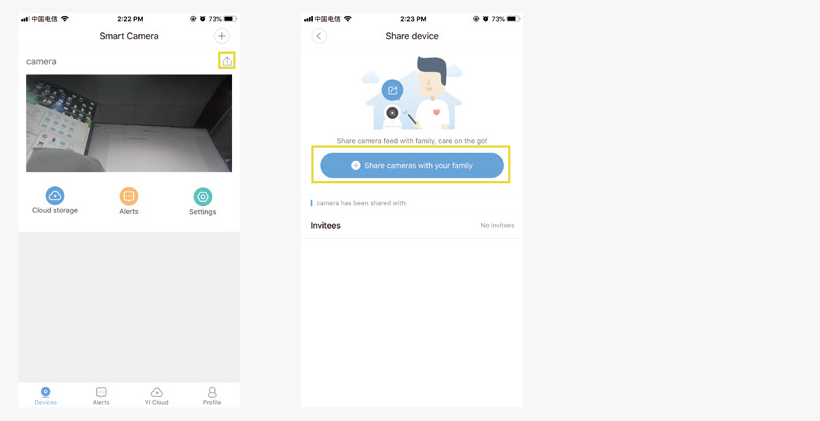
Camera Sharing
Click ‘Share Icon’ > Share cameras with your family.
Others also need to download the APP, and then register an account to login.

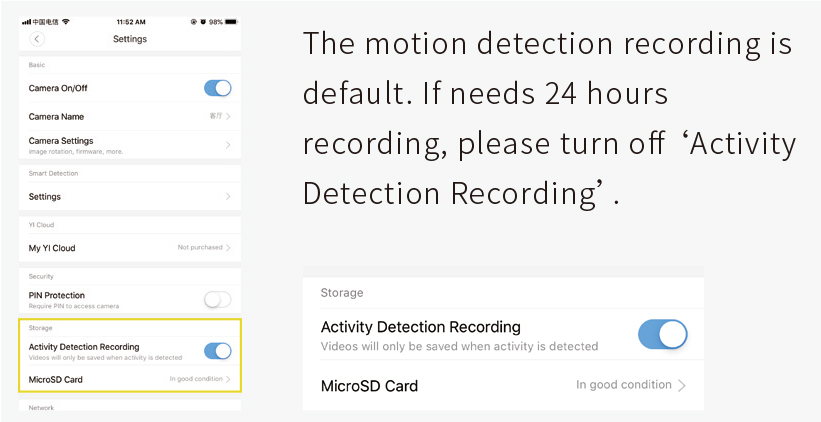
Recording Setting
Insert the SD card first, and then the SD card setting will show on.
When insert the SD card, the camera will re-start automatically, which needs to wait for a while.

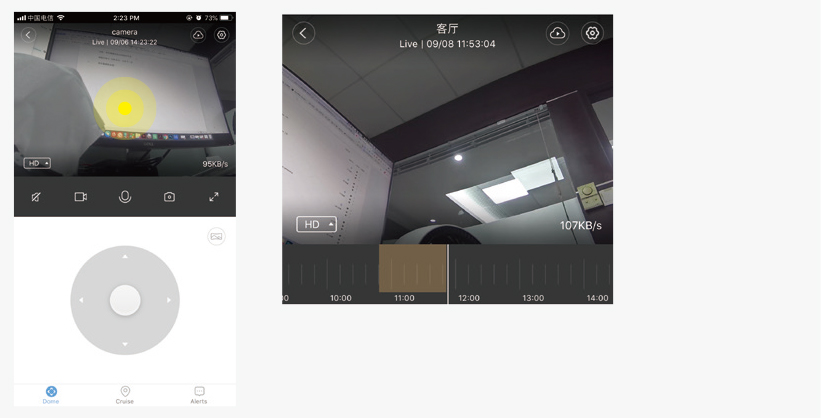
View Video Playback
Click the video footage, switch to playback mode.
Time slot in color means there is recording, and time bar can be slided to view video.

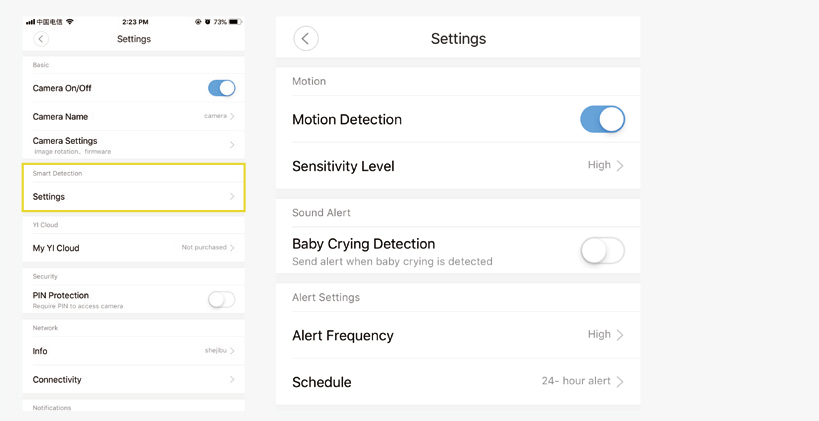
Motion Detection Setting
Turn on the Motion Detection and it is ok.

Baby Crying Detection:
Turn on Baby Crying Detection to alert you when the camera detects your baby crying.
Note: this feature should not be used as a substitute for child care.
Alert Frequency:
Set alert notifification intervals to low (5 minutes), medium(3 minutes), or high (1 minutes).
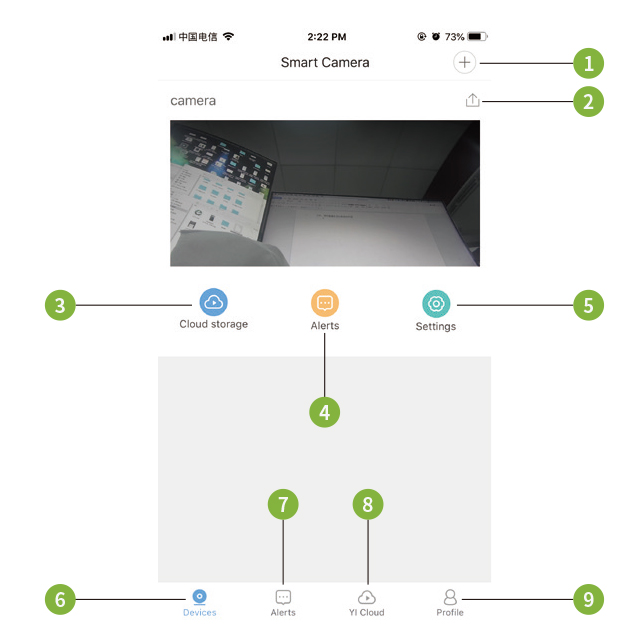
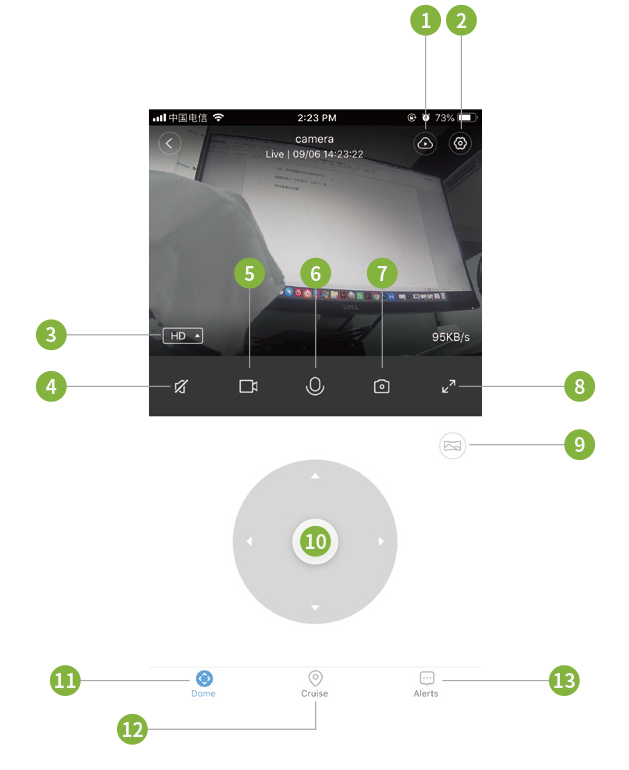
APP Interface Introduction

- Add camera
- Share camera
- Cloud storage
- Alarm
- Settings
- Devices
- Alarm message
- Cloud storage
- Account settings

- Cloud storage
- settings
- Definition switching
- Sound
- Local video
- Voice
- Take photos
- Enlarge
- Panorama shooting
- Control Rotation
- Control Rotation
- Motion tracking
- Alarm message
Yi ior Manual
This article contains all the contents of YI IoT, multiple ways to add, settings of YI IoT camera functions, how to use the computer, and will be continuously updated.
Before you start you need to download YI IoT APP and register your account.
Applicable to: Cameras with YI IoT APP or any other brand cameras using YI IoT. YI IoT Light bulb camera is also applicable to this guide
YI IoT and YI Home are different apps, if you are looking for a guide to YI Home, check out: How To SetUp YI Home or Kami Camera
Due to the update of yi iot, some of the interfaces of this guide will be different and will be updated in the future.
YI IoT APP download
YI IoT supports Android and iPhone, you can download it from google play or app store.
Register your account and login
YI IoT only supports email registration, or you can sign in with Facebook.

Connect YI IOT Camera
Connect power
Before add YI IoT camera, please connect YI IoT camera to the power supply first.
After the device is successfully started, wait for about 20s, and you can start scanning when you hear a beeping sound.
Add camera
There are 3 ways to add a YI IoT camera, we recommend using ‘WiFi connection’ to add a YI IoT camera.
Click the ‘+’ icon, then click ‘Scan code binbing’, scan the QR code on YI IoT camera, the APP will show the recommended way to add.
Follow the instructions on the APP to add a YI IoT camera.

Can’t find the QR code on the YI IoT camera? You don’t need to scan the QR code, you can add the camera manually.
Add camera: WiFi connection
1. Select WiFi connection, make sure YI IoT camera is beeping, click ‘l heard the beep‘ > Next.
Note: Only when YI IoT camera beeps ‘drop-drop’, you can add YI IoT camera, no beep please reset YI IoT camera.

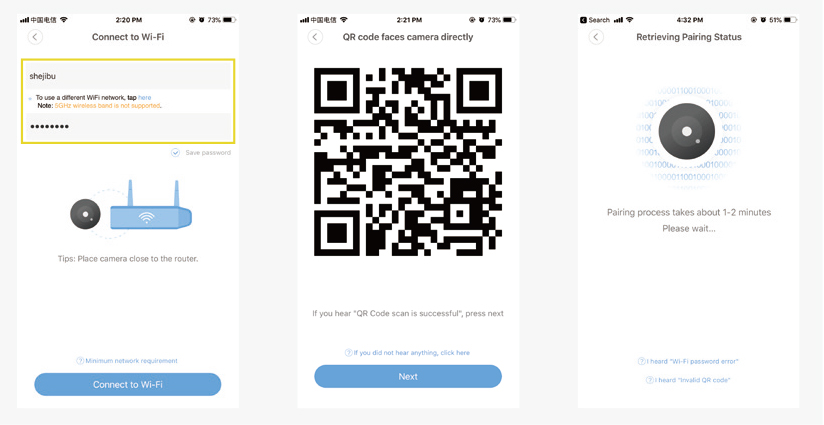
2. Enter your WiFi password, then click next.
If the app does not show your wifi, please make sure your phone is connected to wifi.

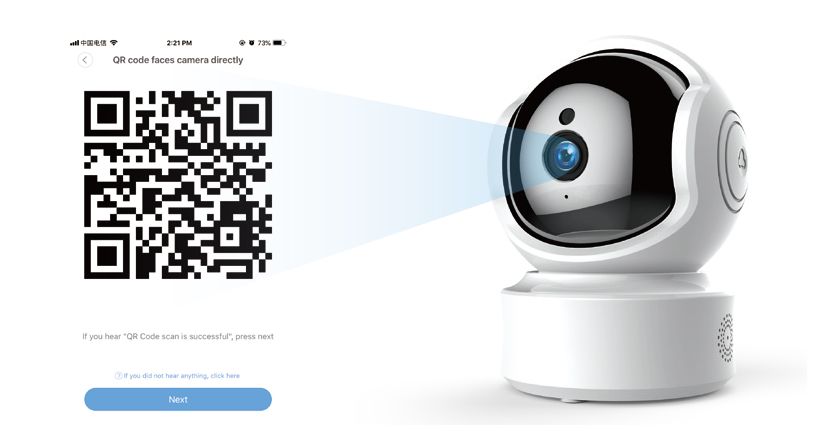
3. The app shows the QR code to YI IoT camera to scan, phone is 4-8 inches away from the camera, camera will issue a voice prompt for a successful scan.
After the camera issued voice prompts click “I heard Waiting to connect“, then enter the next step

You can turn on ‘try sonic binding’, to improve the connection success rate.

4. Wait for YI IoT camera to connect to wifi, set the camera name after successful connection.
The new YI IoT camera comes with free cloud storage, or click ‘<‘ to cancel.

Add camera: Hotspot config to wifi
1. Select ‘Hotspot config to wifi‘,make sure YI IoT camera is beeping, click ‘l heard the beep‘ > Next.
Note: Only when YI IoT camera beeps ‘drop-drop’, you can add the camera, no beep please reset the camera.

2. Enter your wifi password, then connect the phone WiFi to the network with”CAM_ “the default password is: 12345678 and return to the APP

3.Back to YI IoT APP, wait for YI IoT camera to connect to wifi, set the camera name after successful connection.

How to use YI IoT Camera without Internet?
If you don’t have wifi, or use YI IoT camera without internet, you can use Hotspot direct connect.
But you can’t watch YI IoT camera remotely, you can’t receive alarm notifications, you can only use the simplest functions.
1. Select Hotspot direct connect, then connect the phone WiFi to the network with”CAM_ “the default password is: 12345678 and return to the APP

2. Go back to the app, click on to connect, and now you can use the camera.
Note: This mode can only be used if you connect to the camera’s hotspot wifi.

YI IoT Important Function Settings
Sharing the camera allows multiple phones to use the camera.
1. Click on the share icon > Share cameras with your family,You can choose QR Code or YI loT account to share.
Note: The other party needs to have a YI IoT account to add a camera.

1. Select QR Code, Select the permissions available to share, and then tap Share.

2. Ask invitee to open the app and press the account icon in the lower right corner of the page.
Press the QR Code icon in the upper right corner and have your friend scan.

1. Select YI IoT account, select shareable permissions, enter the invitee’s YI IoT email address, and click Share.
2. YI IoT APP will send a notification to your invitee. Your invitee needs to confirm invitation in the App.

Recording Settings
The camera will only be displayed when the SD card is inserted SD card recording settings, inserting the SD card will, the camera will restart.
By default, the camera is activated with Event recordi, after activating motion detection, the camera will automatically record when it detects motion.
You can set the recording mode in SD card recording.
All time recording: The camera will record all the time and will not stop.
Event recording: Only record when an alarm event is detected
All-day Recording: 24-hour operation
Custom: You can set the time to start recording, (up to 3)

View Camera Recording
Click on the Activity to enter the interface, ‘‘ is the cloud storage video, ‘‘ is the SD card video.
The blue time indicates the time when there is video recording.

Motion Detection Settings
After turning on motion detection, the camera detects motion and the app will push an alarm notification.
The motion detection recording is set in the SD card recording.
You can set the detection sensitivity and notification frequency in Smart Detection, and you can also activate the alarm sound.
Motion Detection: Motion detection switch
Sensitivity Level – High:The camera will generate an alert and video when detecting the object slightly shaking.
Sensitivity Level – Medium:The camera will generate an alert and video when detecting the object moving at an moderate.
Sensitivity Level – LOW:The camera will generate an alert and video when detecting the object moving significantly.
Alert Frequency: Low – 10 minute,Medium – 5 minute, High – 1 minute
Schedule: Set alarm notification working time
Camera alarm sound: When activated, the camera will sound an alarm when it detects motion.

Motion tracking Settings
Motion tracking is activated in Camera Settings.
Motion tracking allows you to track moving objects, and the camera will follow the movement of the object.
YI IoT Light bulb camera Setup
YI IoT Light bulb camera has the same function as a normal camera, the main feature is that it can be mounted on a light stand.
If your YI IoT camera supports Light, you can see the ‘‘ icon in the live screen. By clicking the ‘‘ icon, you can select the Light working mode.
Auto: When in night vision mode, the camera detects the movement of objects, the camera will start Light.
Manual switch: You can choose Open or Close to switch the Light manually.

YI IoT APP Interface Description
1. Watch 4 cameras at the same time 2. Add cameras
3. switch camera display 4. Share cameras
5. Cloud storage 6. Camera settings 7. alarm information
8. alarm information 9. cloud storage
10. personal information 11.Cloud Storage
12. Flip video screen 13. camera settings
14. save the video on the phone 15. voice intercom
16. sound switch 17. Screenshot
18. Full screen zoom 19. alarm message
20. view camera video 22. Control camera movement

Video Tutorials
YI IoT For PC
YI IoT supports Windows computers, and you can download the software here.
How To Add YI IoT Camera To Your Computer?
If you have added a camera to the YI IoT APP, you can use the camera on your computer by simply logging into your account.
1. Login to software, no account please register first.

2. Click ‘+’ , make sure your camera is beeping, click ‘I heard “Waiting to connect”‘.
Note: Only when the camera beeps ‘drop-drop’, you can add the camera, no beep please reset the camera.

3. Enter your wifi name and password, then click Please choose Wi-Fi
Note: The name and password are case-sensitive

4. Let the camera scan the QR code, If you hear “QR Code scan is successful”, please click Next.

5. Wait for the camera to connect to the wifi, click Save after successful connection.


7. Double-click the camera to watch the video.

YI IoT For PC Interface Description
- Enlarge the video
- alarm message
- camera settings
- downloaded cloud storage video
- BUG FEEDBACK
- set save folder
- add camera
- camera
- cloud storage video
- memory card video
- camera switch
- Pause video
- control camera movement
- switch resolution
- Sound switch
- full-screen viewing

Why add YI IoT camera failed?
Please check the following issues, then reset the camera and add it again.
- Ensure camera is powered up and waiting for networking;
- Ensure camera has successfully identified the QR code and heard “QR code scanned successfully”,
- Ensure Wi-Fi name and password are correct;
- Try to restart the router or modem and make sure the camera is as close to the router as possible;
- Check if Wi-Fi is 2.4G (some cameras support 5G)
I heard “wifi connection failed” or “wifi password error”
Weak WiFi signal, please move device or cell phone closer to WiFi router, or try rebooting WiFi router.
Make sure the wifi password is correct
I heard “Pairing has timed out”
Reset the camera and then re-add it.
What to do if I did not hear “QR Code scan is successful”?
- The plastic cover on the new camera has to be removed and make sure that the lens on an old camera is clean.
- The QR code cannot be read if the display resolution of your mobile phone is too low, too dark or it is too far from the camera lens.
- please reset your camera.
How to reset YI IoT camera?
The camera can be reset only after the camera is started, Press and hold the reset button for 5 seconds.
Can YI IoT Camera connect to YI Home or Kami Home APP?
No, YI IoT can only connect to YI IoT camera.
Why some YI IoT camera features I don’t have?
- YI IoT camera and APP will be updated all the time, you may be using the old version.
- Different models of YI IoT camera may have some differences
- It is recommended to contact your camera seller
Why do YI IoT cameras offline?
YI IoT camera keeps going offline, usually because it can’t connect to wifi.
1. wifi signal is weak, put the YI IoT camera close to the router
2. restart YI IoT camera, the camera will reconnect to wifi
3. Reset the camera and reconnect the YI IoT camera
4. Still keep offline, maybe the wifi module of YI IoT camera is faulty, we suggest contacting your camera seller
Why are YI IoT cameras often offline?
YI IoT cameras are often offline, usually for the following reasons
1. The wifi signal of the location where you put the YI IoT camera is too weak, you can strengthen your wifi signal or put the camera close to the router.
2. Memory card problems cause YI IoT camera offline, you can take out the memory card, and then see if the camera can work properly.
3. The above attempts are not working properly, it is possible that the wifi module of YI IoT camera is faulty, we suggest contacting your camera seller
Why can’t I control the YI IoT camera pan and tilt?
Please make sure your YI IoT camera supports pan and tilt
If you can’t respond to the control button, or can only control part of the pan and tilt, it means the camera is malfunctioning internally, please contact your camera seller
Why do YI IoT cameras often restart automatically?
The automatic reboot may be a problem with the power supply, power cable and memory card.
You can replace them in order to troubleshoot the problem, if it cannot be solved, then it may be a YI IoT camera hardware problem, please contact your camera seller.
I can’t find YI IoT APP in app store and google play?
YI IoT APP was deleted from app store and google play, you need to wait for YI IoT APP to be re-listed.
How can I connect the camera when the QR code on the YI IoT camera is damaged?
The two-dimensional code is not required, you can manually select the mode to connect the YI IoT camera.
Why does the YI IoT camera move in the opposite direction when tracking?
You need to contact your YI IoT camera seller in order to resolve this issue.
1. Ask for a replacement camera
2. You can solve the problem by upgrading the camera firmware, contact your camera seller to push the firmware.
How to solve the glass will reflect the night vision?
YI IoT camera can’t turn off the night vision light manually, so it can’t be solved, please keep the camera away from windows, glass, etc.
Forgot the PIN password of YI IoT camera
PIN password is set by the user,there is no way to retrieve PIN password.
If you forget the password, you can only reset the camera and reconnect the YI IoT camera.
Note: After resetting the camera, you can’t view the previous VIDEO.
What sd card does YI IoT camera support?
YI IoT camera supports Micro SD Card, minimum 8GB, class10 memory card.
We recommend using a SanDisk or Samsung Micro SD Card.
How do I return it?
Please contact your camera seller, camapp365.com does not sell cameras and is not a YI IoT person
Can camapp365.com solve my problem?
There are too many comments for me to reply to every question, but I will check and update the FAQ uniformly.
More FAQ & Troubleshooting
Update history
- 23/03/06 Updated Light function description
- 23/02/24 Added FAQ
Warm Tips
- The camera supports 2.4G wifi only, which can be set from your router.(Some cameras support 2.4 and 5G wifi)
- It’s better to use the camera under strong wifi signal environment.
- And it’s normal for IP camera if it is affected by network and delayed.
- APP Account: It supports email only.
- If it is offline or wifi cannot be connected, please reset and connect it again. When resetting, there will be a short sound which means reset successfully. When connecting, make the camera close to your router.
- When turn off the ‘Motion Tracking’, the camera would turn itself, then stop.
- Try to keep away from the metal space.Avoid it being blocked by furniture, microwave oven.
- Avoid the space where the audio, video and data lines are wound, and keep the space away from them as large as possible.Ensure that as close as possible to the coverage of wireless Wi-Fi signals.
1. Register and log into the APP
2. Click ‘+’ > I heard’Waiting to connect’

3. Enter your wifi password, and then make the camera lens face to the QR code directly. After there is voice prompt from the camera, click ‘Next’ and wait for connecting.
4. After connected successfully, named your camera, and it will complete.
Finally, there will be a prompt that if you need cloud storage or not. If there is no need, just click ‘Start using my YI’ and it is ok.
The hidden wifi cannot be supported.
The special characteristics cannot be supported.
The settings on the router cannot be started, such as AP isolation, anti rubbing network to restrict wifi access.
Click ‘Share Icon’ > Share cameras with your family.
Others also need to download the APP, and then register an account to login.
Setting Recording
Insert the SD card first, and then the SD card setting will show on.
When insert the SD card, the camera will re-start automatically, which needs to wait for a while.
View YI IoT camera recording
Click the video footage, switch to playback mode.
Time slot in color means there is recording, and time bar can be sliced to view video.
Setting Motion Detection
Turn on the Motion Detection and it is ok.
YI IoT APP Interface Introduction
- Add camera
- Share camera
- Cloud storage
- Alarm
- Settings
- Devices
- Alarm message
- Cloud storage
- Account settings
- Cloud storage
- settings
- Definition switching
- Sound
- Local video
- Voice
- Take photos
- Enlarge
- Panorama shooting
- Control Rotation
- Control Rotation
- Motion tracking
- Alarm message
How to Reset YI IoT Camera
Reset Button Press and hold Reset for about 5 seconds. When the horn sounds short voice, the reset is successful.
Внимание! Камера работает только с приложением своего производителя!
Не нужно пытаться подключить камеру к другому приложению!
Для подключения камеры необходимо скачать приложение указанное на коробке и в описании на мобильное устройство через «AppStore» или «Google Play» (предпочтительно) или отсканировав QR-код на коробке. Необходима регистрация!
С помощью идущего в комплекте адаптера питания подключите камеру к сети. ВАЖНО! Дождитесь сообщения камеры «wait to be configured».
При первом запуске программы появится меню: Выбираете пункт «Войти», затем «Зарегистрировать» и, следуя пошаговой инструкции, создайте свой аккаунт. Для получения кода активации аккаунта нужно будет указать e-mail. Далее появится основное меню программы, где будет располагаться список камер.
Для добавления камеры в программу нужно расположить мобильное устройство рядом с камерой и нажать «+» в правом верхнем углу экрана и нажать «развернуть» Затем выбрать пункт «добавить по WiFi». Далее, в соответствии с сообщением на экране нажать «Следующий шаг» Далее подтвердить выбранную WiFi сеть, в которой планируется эксплуатация камеры. Выберите нужную WiFi сеть и введите пароль доступа к данной сети.
Откроется радар с цифровым обозначением. В случае успешной конфигурации камеры появится предложение задать пароль. Далее — назначаете сложный пароль к камере, название камеры (при необходимости). После этого камера появится в списке.
Для того, чтобы в той же сети добавить ту же камеру на другое мобильное устройство, устанавливаете программу, выбирайте на нѐм пункт «Добавить камеру в LAN» (с красной меткой): Чтобы добавить камеру на мобильное устройство НЕ находящееся в одной сети с камерой, необходимо в списке устройств камеру, кликнуть на «Добавить по ID» и вставить ссылку, заранее скопированную в буфер в поле ID (ссылку отправляет владелец камеры — администратор) и нажать «Добавить камеру» ВАЖНО! При необходимости подключится к другой сети Wi-Fi, нужно нажать и удерживать кнопку «Reset» до тех пор, пока не услышите «wait to be configured» и далее повторить настройку в соответствии с инструкцией.
Пример подключения камеры в приложении V380 pro
Приложение просит зарегистрировать аккаунт. Регистрируемся по адресу электронной почты, регион выбираем «Европа». Если не видите в почте сообщения с 6-значным кодом, проверьте папку «Спам».
После входа нажимаем «+» для добавления камеры. Игнорируем открывшийся сканер и нажимаем синюю клавишу посреди экрана, далее прописываем камеру:
Выбираем: «Подключение к точке доступа»
Прописываем доступ к вашей WiFi сети (имя сети и пароль)
Нажимаем «Подключить точку доступа» и ищем в списке сеть с MV + серийный номер камеры
На этом примере: MV51284527
После выбора сети MV получаем уведомление о подключении
Здесь камера говорит, что производится подключение, просто ждём
Выбираем имя подключения или пишем своё
При первом нажатии на окно изображения с камеры вас попросят установить пароль на неё
Нажимаем на открывшееся окно и получаем картинку с камеры. Далее переходим к настройкам в меню
Пример подключения камеры в приложении TSCloud
Приложение просит зарегистрировать аккаунт. Регистрируемся по адресу электронной почты, регион выбираем «Россия». Если не видите в почте сообщения с 6-значным кодом, проверьте папку «Спам».
После входа нажимаем «+» для добавления камеры. Игнорируем открывшийся сканер и нажимаем синюю клавишу посреди экрана, далее прописываем камеру:
Выбираем: «Wi-Fi соединение с помощью Soft-AP»
Камера должна быть включена и издавать звуковой сигнал. Переходим далее.
Нажимаем «Перейти к настройкам»
Находим точку доступа с именем начинающимся на TSC, кликаем на неё
Предоставляем доступ к сети, вводим пароль от Wi-Fi
Здесь камера говорит, что производится подключение, просто ждём
Выбираем имя подключения или пишем своё
После нажатия ОК попадаем в интерфейс управления камерой
Проверяем управление и выполняем пользовательские настройки
Выбираем: «Интеллектуальная видеокамера»
Выбираем: «Отсканируйте код, чтобы добавить»
Ставим галочку «Устройство включено» и нажимаем «Следующий шаг»
Необходимо выбрать вашу Wi-Fi сеть и прописать пароль доступа к ней.
(!) Важно! Должна быть выбрана сеть в диапазоне 4G. В сетях 5G камера не работает
Получаете на экране смартфона QR-код с настройками доступа в вашу сеть
Необходимо считать код объективом камеры с расстояния 15-20 см. Сообщение «Connecting to the server» говорит о том, что код считан успешно и происходит подключение камеры. Нужно немного подождать
Подключение завершено. Нужно ввести имя подключения и нажать «Начать просмотр»
Нажав на изображение с камеры, попадаем в консоль управления. PTZ управление производится нажатием на синий круг внизу. Открывается панель как на фото.
Пример подключения камеры в приложении YI IoT
Для добавления камеры нажимаем +
Выбираем: «Соединение Wi-Fi», слышим из камеры двухтональный сигнал «динь-дон»
Ставим галочку «Я слышал последовательность» и нажимаем «Следующий шаг»
Необходимо выбрать вашу Wi-Fi сеть и прописать пароль доступа к ней.
(!) Важно! Должна быть выбрана сеть в диапазоне 4G. В сетях 5G камера не работает
Получаете на экране смартфона QR-код с настройками доступа в вашу сеть
Необходимо считать код объективом камеры с расстояния 15-20 см. Сообщение «Connecting to the server» говорит о том, что код считан успешно и происходит подключение камеры. После этого нажимаем «Следующий»
Подключение завершено. Нужно ввести имя подключения и нажать «Закончить». Далее, если не планируете использовать платное облачное хранилище нажмите «Приступить к использованию камеры»
Нажав на изображение с камеры, попадаем в консоль управления. PTZ управление производится нажатием на круг-манипулятор внизу. Открывается панель как на фото.