
XEROX
МНОГОФУНКЦИОНАЛЬНОСТЬ (4 в 1)
Руководство пользователя МФУ
WorkCentre PE16
Об этом руководстве пользователя
с аппаратом поставляется три руководства пользователя.
В этом Руководстве пользователя лазерного МФУ содержатся сведения, необходимые для
настройки аппарата и установки программного обеспечения. В руководстве даны подробные
инструкции по использованию аппарат в качестве принтера, сканера и копира, а также
рекомендации по обслуживанию и устранению неполадок в работе аппарата.
В Руководстве пользователя лазерного факса содержатся сведения по использованию
устройства в качестве факсимильного аппарата. Здесь можно узнать о том, как отправлять и
принимать факс и как настраивать параметры факса.
Настоящее руководство поставляется только в информационных целях. Вся информация,
включенная в руководство, может быть изменена без уведомления. Компания Xerox Corporation
не несет ответственности за любой ущерб, прямой или косвенный, явившийся результатом или
связанный с использованием этого руководства.
© 2003 Xerox Corporation. Все права защищены.
WorkCentre PE16 и логотип Xerox являются товарными знаками Xerox Corporation.
Centronics является товарным знаком Centronics Data Computer Corporation.
IBM и IBM PC являются товарными знаками International Business Machines Corporation.
Microsoft, Windows, Windows 9x, Windows Me, Windows 2000, Windows NT 4.0 и
Windows XP являются зарегистрированными товарными знаками Microsoft Corporation.
Все прочие марки и наименования продуктов являются товарными знаками
соответствующих компаний и организаций.
Важная информация по мерам предосторожности и
безопасности
При эксплуатации данного аппарата необходимо соблюдать основные меры
предосторожности для уменьшения риска пожара, электрошока и получения травм:
1. Внимательно прочитайте все инструкции.
2. При эксплуатации электроприборов соблюдайте осторожность.
3. Соблюдайте все предупреждения и инструкции, находящиеся на аппарате, а также
указанные в документации.
4. Если руководство по эксплуатации пdgfdfdsfsdfsd информации по безопасности,
следуйте инструкциям по безопасности. Возможно, вы не поняли инструкции по
эксплуатации. Если вы не можете разрешить противоречие, обратитесь за помощью
к представителю по торговле или обслуживанию.
5. Отсоединяйте аппарат от стенной розетки переменного тока и/или от телефонной
розетки до начала чистки. Не применяйте жидкие или аэрозольные очистители.
Чистите аппарат только влажной тряпкой.
6. Не ставьте аппарат не неустойчивую тележку, на стойку или на стол. Он может упасть
и вызвать серьезные повреждения.
7. Аппарат ни в коем случае нельзя устанавливать рядом с радиаторами парового
отопления, нагревателями, кондиционерами воздуха или вентиляционными
каналами или же на них.
8. Ничего не кладите на сетевой шнур аппарата. Не располагайте аппарат в таких
местах, где на его шнуры могут наступить.
9. Не допускайте перегрузки стенных розеток и удлинителей. Это может ухудшить
работу аппарата и привести к пожару или к электрошоку.
10. Не позволяйте домашним животным грызть сетевой шнур, телефон или
интерфейсные шнуры ПК.
11. Не проталкивайте какие-либо объекты внутрь аппарата через отверстия в корпусе
или в панелях. Они могут коснуться точек с высоким напряжением и создать
опасность пожара или электрошока. Не допускайте попадания какой-либо жидкости
внутрь аппарата или на него.
12. Аппарат может быть оборудован тяжелой крышкой для создания оптимального
давления на документ, что обеспечивает качественное сканирование и/или отправку
факсов (обычно в аппаратах планшетного типа). В этом случае поместите документ
на стекло сканера и закрывайте крышку, придерживая и медленно опуская ее, пока
она не встанет на место.
13. Во избежание электрошока не разбирайте аппарат. При необходимости ремонта
обратитесь к квалифицированному технику по обслуживанию. Открывая или снимая
крышки, вы подвергаетесь опасности высокого напряжения. Неправильная сборка
может привести к электрошоку при последующей эксплуатации.
14. Отсоедините аппарат от телефонной розетки, разъемов ПК и от стенной розетки
переменного тока и обратитесь к квалифицированному персоналу по обслуживанию
при следующих условиях:
• Если любая часть сетевого шнура, вилка или соединительный кабель повреждены
или износились.
• Если внутрь аппарата попала жидкость.
VI
• Если аппарат попал под дождь или в воду.
• Если аппарат работает неправильно при соблюдении всех инструкций.
• Если аппарат упал, или его корпус физически поврежден.
• Если в работе аппарата возникли неожиданные и заметные изменения.
15. Используйте для регулировки только указанные в инструкциях органы управления.
Неправильные настройки органов управления могут вызвать повреждение и
потребовать длительного ремонта квалифицированным персоналом для
восстановления нормальной работы аппарата.
16. Избегайте использовать аппарата во время грозы. Существует опасность поражения
электрическим током от удара молнии. При возможности отсоединяйте сетевой шнур
переменного тока и телефонный шнур во время грозы.
17. СОХРАНИТЕ ЭТИ ИНСТРУКЦИИ.
Заявление о безопасности лазера
Принтер сертифицирован в США на соответствие требованиям DHHS 21 CFR, глава 1,
подраздел “J”, для лазерных устройства Класса 1(1). Во всех прочих странах принтер
сертифицирован как лазерное устройство Класса I, соответствующее требованиям
IEC 825.
Лазерные устройства Класса I считаются безопасными. Лазерная система и принтер
устроены таким образом, что при обычной эксплуатации, обслуживании пользователем
или же во время предусмотренного ремонта человек никогда не подвергается
воздействию лазерной радиации выше уровня Класса I.
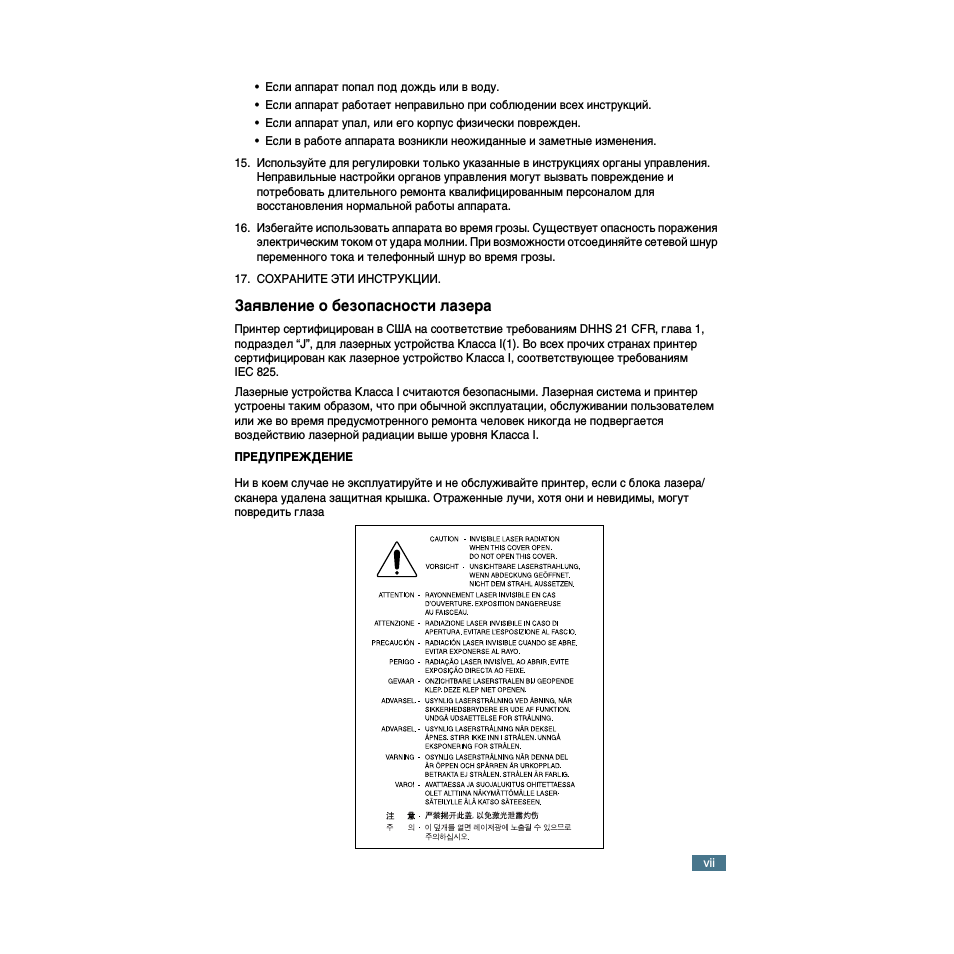
ПРЕДУПРЕЖДЕНИЕ
Ни в коем случае не эксплуатируйте и не обслуживайте принтер, если с блока лазера/
сканера удалена защитная крышка. Отраженные лучи, хотя они и невидимы, могут
повредить глаза
ATTENTION —
ATTENZIONE —
PRECAUCIÓN —
PERICO —
GEVAAR —
ADVARSEL-
ADVARSEL —
VARNING —
CAUTION — INVISIBLE LASER RADIATION
WHEN THIS COVER OPEN.
DO NOT OPEN THIS COVER.
VORSICHT — UNSICHTBARE LASERSTRAHLUNG,
WENN ABDECKUNG GEÖFFNET.
NICHT DEM STRAHL AUSSETZEN.
RAYONNEMENT LASER INVISIBLE EN CAS
D’OUVERTURE. EXPOSITION DANGEREUSE
AU FAISCEAU.
RADIAZIONE LASER INVISIBILE IN CASO Dl
APERTURA. EVITARE LESPOSIZIONE AL FASCIO.
RADIACIÓN LASER INVISIBLE CUANDO SE ABRE.
EVITAR EXPONERSE AL RAYO.
RADIAÇÂO LASER INVISÍVEL AO ABRIR. EVITE
EXPOSIÇAO DIRECTA AO FEIXE.
ONZICHTBARE LASERSTRALEN BU GEOPENDE
KLEP. DEZE KLEP NIET OPENEN.
USYNLIG LASERSTRALNINGVED ÂBNING, NAR
SIKKERHEDSBRYDERE ER UDE AF FUNKTION.
UNDGÂ UDSAETTELSE FOR STRÂLNING.
USYNLIG LASERSTRALNING NAR DEKSEL
A
pnes
. STIRR IKKE INN I
str
A
len
.
unng
A
eksponering
for
str
A
len
.
OSYNLIG LASERSTRALNING NAR DENNA DEL
ÄR ÔPPEN OCH SPARREN ÄR URKOPPLAD.
BETRAKTA EJ STRALEN. STRALEN AR FARLIG.
ROI — AVATTAESSAJASUOJALUKITUSOHITETTAESSA
OLET ALTTIINA NAKYMATTÔMALLE LASER-
SÄTEILYLLE ÄLÄ KATSO SATEESEEN.
9
\ —
o| ü7[is Bi|o|x-i^iHi ^
vil
Озоновая безопасность
0^
При обычной работе данный аппарат выделяет озон. Выделенный
озон не представляет опасности для оператора. Однако аппарат
рекомендуется эксплуатировать в хорошо проветриваемом
помещении.
При необходимости дополнительной информации об отправьте
запрос ближайшему дилеру компании Xerox.
Энергосбережение
в этом аппарате применяется современная технология
энергосбережения, позволяющее сократить потребление
энергии, когда аппарат не используется активно.
Если аппарат не получает данных длительное время,
потребление энергии автоматически снижается.
Символ “energy star” не является свидетельством одобрения
EPA какого-либо аппарата или сервиса.
Радиочастотное излучение
Сведения FCC для пользователя
Данное оборудование проверено и найдено соответствующим ограничениям для
цифровых устройств Класса В согласно Части 15 Норм FCC. Эти ограничения
обеспечивают разумную защиту от вредного излучения при установке оборудования в
жилых помещениях. Данное оборудование генерирует, использует и может излучать
радиочастотную энергию, и при установке и использовании не в соответствии с
инструкциями может вызывать вредные помехи для радиосвязи. Однако нет гарантии,
что подобные помехи не будут возникать при какой-либо конкретной установке. Если
данное оборудование все же вызывает помехи при радио- и телевизионном приеме (что
можно определить, выключив и вновь включив оборудование), пользователь может
попытаться устранить помехи одним из следующих способов:
•
перенаправить или переместить принимающую антенну;
•
увеличить расстояние между оборудованием и приемником;
•
подключить данное оборудование к сетевой розетке в другой электрической цепи
(отличной от цепи, к которой подключен приемник);
•
Проконсультируйтесь с дилером или опытным радиотехником.
Осторожно: Изменения или модификации, прямо не одобренные изготовителем,
отвечающим за соответствие, могут привести к отмене права пользователя на эксплуатацию
оборудования.
vili

Правила по радиопомехам для Канады
Это цифровое устройство не превышает ограничений Класса B для радиопомех,
вызываемых цифровыми устройствами, как это определено в стандарте по
оборудованию, вызывающему помехи, “Цифровые устройства” ICES-003,
Промышленность и наука Канады.
Cet appareil numérique respecte les limites de bruits radioélectriques applicables aux
appareils numériques de Classe B prescrites dans la norme sur le matériel brouilleur:
«Appareils Numériques», ICES-003 édictée par l’Industrie et Sciences Canada.
Маркирование факса
в соответствии с “Актом о защите пользователей услуг телефонии” от 1991 г.
использование любым лицом компьютера или другого электронного устройства для
отправки любых сообщений по телефонному факсимильному аппарату является
незаконным, если подобное сообщение не содержит в верхнем или нижнем поле каждой
переданной страницы или же на первой странице следующих данных:
(1) дата и время передачи;
(2) указание деятельности, организации или лица, отправляющего сообщение;
(3) телефонного номера отправляющего аппарата, сферы деятельности, организации или
лица.
Инструкции о вводе этой информации в память аппарата можно найти в руководстве
пользователя факсимильного аппарата.
Телефонная компания может вносить изменения в свои средства связи, действие
оборудования или процедуры, когда подобные изменения необходимы для ведения
бизнеса и не находятся в противоречии с правилами и нормами FCC, Часть 68. Если
подобные изменения приводят к какой-либо несовместимости оконечного оборудования
заказчика с оборудованием телефонной компании или же требуют модификации или
изменения подобного оконечного оборудования, или же оказывают какое-либо иное
материальное воздействие на его использование или действие, заказчик получает
соответствующее уведомление в письменном виде, что дает возможность заказчику
получать бесперебойного обслуживания.
Номер эквивалентности звонка
Номер эквивалентности звонка и Регистрационный номер FCC для данного аппарата
находятся на бирке, находящейся на дне или на задней стенке аппарата. В некоторых
случаях вы должны предоставить эти номера телефонной компании.
Номер эквивалентности звонка (REN) представляет собой меру электрической нагрузки
на телефонную линию и полезен для определения того, когда вы “перегрузили” линию.
Установка оборудования различных типов оборудования на одной и той же телефонной
линии может вызвать неполадки при отправке и получении вызовов, особенно во время
звонка при вызове линии. Для обеспечения должного обслуживания телефонной
компании сумма всех номеров эквивалентности звонка оборудования на вашей
телефонной линии должна быть меньше пяти. В некоторых случаях сумма пять не может
использоваться на вашей линии. Если любое телефонное оборудование работает
неправильно, вы должны немедленно отключить его от телефонной линии, поскольку оно
может повредить телефонную сеть.
x
12:06
Заправка Samsung ML-1510 1520 1710 SCX-4100 4016 4116 4216, SF-560 750 Xerox PE16 PE114 3116 3120
12:20
#95 МФУ Xerox WorkCentre 3220 \ 3210 | Samsung SCX-4824 | Полная разборка и чистка | Как разобрать
05:36
Vídeo Recarga do Toner Xerox PE16 | WorkCentre PE16 — Vídeo Aula Valejet.com
02:46
Тестирование Xerox WorkCentre PE16
01:46
Xerox WorkCentre PE16e — Multifuncional — Impressora Copiadora Scanner
03:56
Recarga Toner Xerox Workcentre PE16 | 113R00667 — Vídeo Aula Toner Vale
Нажмите на кнопку для помощи
SERVICE
WorkCentre PE16
Manual
WorkCentre PE16 CONTENTS
1. Precautions
2. Reference Information
3. Specifications
4. Summary of product
5. Disassembly and Reassembly
6. Alignment and Adjustments
7. Troubleshooting
8. Exploded Views and Parts List
9. Block Diagram
10. Connection Diagram
XXX-XXXX-XX

1-1
Precautions
Service Manual
WorkCentre PE16 July 2003
1. Precautions
Product Terms
Caution: A personal injury hazard exists that may not be apparent. For example, a panel may cover the hazardous area.
Danger: A personal injury hazard exists in the area where you see the sign.
Symbols Marked on the Product
Hot surface on or in the printer. Use caution to avoid personal
injury.
Use caution (or draws attention to a particular component).
Refer to the manual(s) for information.
1-2
Precautions
Service Manual
July 2003 WorkCentre PE16
Laser Safety Statement
The Printer is certified in the U.S. to conform to the requirements of DHHS 21 CFR, chapter 1 Subchapter J
for Class 1(1) laser products, and elsewhere, it is certified as a Class I laser product conforming to the
requirements of IEC 60825. Class I laser products are not considered to be hazardous. The laser system and
printer are designed so there is never any human access to laser radiation above a Class I level during normal operation, user maintenance, or prescribed service condition.
Warning >> Never operate or service the printer with the protective cover removed from Laser/Scanner assembly. The reflected
beam, although invisible, can damage your eyes. When using this product, these basic safety precautions should
always be followed to reduce risk of fire, electric shock, and injury to persons.
CAUTION — INVISIBLE LASER RADIATION
WHEN THIS COVER OPEN.
DO NOT OPEN THIS COVER.
VORSICHT — UNSICHTBARE LASERSTRAHLUNG,
WENN ABDECKUNG GE FFNET .
NICHT DEM STRAHL AUSSETZEN.
ATTENTION — RAYONNEMENT LASER INVISIBLE EN CAS
D OUVERTURE. EXPOSITION DANGEREUSE
AU FAISCEAU.
ATTENZIONE — RADIAZIONE LASER INVISIBILE IN CASO DI
APERTURA. EVITARE LESPOSIZIONE AL
FASCIO.
PRECAUCION — RADIACION LASER IVISIBLE CUANDO SE ABRE.
EVITAR EXPONERSE AL RAYO.
ADVARSEL. — USYNLIG LASERSTR LNING VED BNING, N R
SIKKERHEDSBRYDERE ER UDE AF FUNKTION.
UNDG UDSAETTELSE FOR STR LNING.
ADVARSEL. — USYNLIG LASERSTR LNING N R DEKSEL
PNES. STIRR IKKE INN I STR LEN.
UNNG EKSPONERING FOR STR LEN.
VARNING — OSYNLIG LASERSTR LNING N R DENNA DEL
R PPNAD OCH SP RREN R URKOPPLAD.
BETRAKTA EJ STR LEN. STR LEN R FARLIG.
VARO! — AVATTAESSA JA SUOJALUKITUS OHITETTAESSA
OLET ALTTIINA N KYM TT M LLE LASERS TEILYLLE L KATSO S TEESEEN.

1-3
Precautions
Service Manual
WorkCentre PE16 July 2003
Power Safety Precautions
Power Source
For 110 VAC units, do not apply more than 140 volts RMS between the supply conductors or between either supply
conductor and ground. Use only the specified power cord and connector. For 220 VAC units, do not apply more
than 264 volts RMS between the supply conductors or between either supply conductor and ground.
Use only the specified power cord. This manual assumes that the reader is a qualified service technician.
Plug the three-wire power cord (with grounding prong) into a grounded AC outlet only. If necessary, contact a licensed
electrician to install a properly grounded outlet. If the product loses its ground connection, contact with conductive
parts may cause an electrical shock.
Disconnecting Power
Turning the power off using the On/Off switch does not completely de-engergize the equipment. You must also disconnect
the unit power cord from the AC outlet. Position the power cord so that it is easily accessible during servicing
so that you may power down the unit during an emergency.
Disconnect the power plug by pulling the plug, not the cord.
Disconnect the power cord in the following cases:
■ if the power cord or plug is frayed or otherwise damaged,
■ if any liquid or foreign material is spilled into the case,
■ if the equipment is exposed to any excess moisture,
■ if the equipment is dropped or damaged,
■ if you suspect that the product needs servicing or repair,
■ whenever you clean the product.

1-4
Precautions
Service Manual
July 2003 WorkCentre PE16
Electrostatic Discharge (ESD) Precautions
Some semiconductor components, and the respective sub-assemblies that contain
them, are vulnerable to damage by Electrostatic discharge (ESD). These components
include Integrated Circuits (ICs), Large-Scale Integrated circuits (LSIs), field-effect
transistors and other semiconductor chip components. The following techniques will
reduce the occurrence of component damage caused by static electricity.
Be sure the power to the chassis or circuit board is off, and observe all other safety
precautions.
■ Before handling any semiconductor components assemblies, drain the
electrostatic charge from your body. This can be accomplished by touching an
earth ground source or by wearing a wrist strap device connected to an earth
ground source. W earing a wrist strap will also prevent accumulation of additional
bodily static charges. Be sure to remove the wrist strap before applying power to
the unit to avoid potential shock.
■ After removing a static sensitive assembly from its anti-static bag, place it on a
grounded conductive surface. If the anti-static bag is conductiv e, you may ground
the bag and use it as a conductive surface.
■ Do not us e freon-propelled chemicals, as they can generate electrical charges that
may damage some devices.
■ Do not remove a static sensitive replacement component or electrical sub-
assembly from its protective package until you are ready to install it.
■ Before removing the protective material from the leads of a replacement device,
touch the protective material to the chassis or circuit assembly into which the
device will be installed.
■ Minimize body motions when handling unpackaged replacement devices. Simple
motions such as your clothes brushing together or lifting a foot from a carpeted
floor can generate enough static electricity to damage a static sensitive device
■ Handle IC’s and EPROM’s carefully to avoid bending pins.
■ Pay attention to the direction of parts when mounting or inserting them on
Printed Circuit Boards (PCB’s).

1-5
Precautions
Service Manual
WorkCentre PE16 July 2003
Service Safety Summary
General Guidelines
The material presented here is intended as a safety reminder for qualified servi ce
personnel. Refer also to the preceding Power Safety Precautions.
Avoid servicing alone: Do not perform internal service or adjustment of this
product unless another person capable of rendering first aid or resuscitation is present.
Use care when servicing with power: Dangerous voltages may exist at several
points in this product. T o av oid personal injury, do not touch exposed connections and
components while power is on. Disconnect power before removing the power supply
shield or replacing components.
Do not wear jewelry: Remove jewelry prior to servicing. Rings, necklaces and
other metallic objects could come into contact with dangerous voltages and currents.
Power source: This product is intended to operate from a power source that will
not apply more then 264 volts rms for a 220 volt AC outlet or 140 volts rms for a 110
volt AC outlet between the supply conductors or between either supply conductor and
ground. A protective ground connection by way of the grounding conductor in the
power cord is essential for safe operation.
Warning Labels
Read and obey all posted warning labels. Warning labels are displayed on potentially
dangerous printer components. As you service the printer, check to make certain that
all warning labels remain in place.
Safety Interlocks
Make sure all covers and the products’s front panel are in place and all interlock
switches are functioning correctly after you have completed a unit service call. If
you bypass an interlock switch during a service call, use extreme caution when
working on or around the product.
1-6
Precautions
Service Manual
July 2003 WorkCentre PE16
Servicing Electrical Components
Before starting any service procedure, switch off the product power and unplug the
power cord from the wall outlet. If you must service the unit with power applied,
be aware of the potential for electrical shock.
Turning the power off by using the On/Off switch does not completely de-energize
the unit. You must also disconnect the unit’s power cord from the AC outlet.
Position the power cord so that it is easily accessible during servicing.
Do not touch any electrical component unless you are instructed to do so by a
service procedure.
S7300-0
Servicing Mechanical Components
When servicing mechanical components within the unit, manually rotate drive
assemblies, rollers, and gears.
Do not try to manually rotate or manually stop the drive assemblies while any
unit drive motor is running.
S7300-0
Servicing Fuser Components
This product uses heat to fuse the toner image to media. The Fuser Assembly is
VERY HOT. Turn the unit power off and wait at least 5 minutes for the Fuser
to cool before you attempt to service the Fuser Assembly or adjacent components.
2
2
2-1
Reference Information
Service Manual
WorkCentre PE16 July 2003
2. Reference Information
This chapter provides reference information for this service manual consisting of the tool list, a list
of acronyms and abbreviations, and examples of test patterns.
2.1 Tool for Troubleshooting
The following tools are recommended for perfomance of the troubleshooting functions described in this service manual.
DVM(Digital Volt Meter)
Standard: Indicates more than 3 digits.
1
T weezers
Standard: For general home use, small
type.
2
Software(Driver) installation CD
ROM
6
Cotton Swab
Standard : For general home use, for
medical service.
4
Cleaning Equipment IPA
(Isopropyl Alcohol) dry cloth or a
liquid neutral detergent.
5
Driver
Standard : «-» type, «+» type (M3 long, M3
short, M2 long, M2 short).
3

2-2
Reference Information
Service Manual
July 2003 WorkCentre PE16
2.2 Acronyms and Abbreviations
The table below explains the acronyms and abbreviations used in this service manual.
These are used throughout the text of this service manual. Please refer to the table.
AC Alternating Current
ADF Automatic Document Feeder
ASIC Application Specific Integrated Circuit
ASSY assembly
BIOS Basic Input Output System
CCD Charge Coupled Device
CMOS Complementary Metal Oxide Semiconductor
CN connector
CON connector
CPU Central Processing Unit
dB decibel
dbA decibelampere
dBM decibel milliwatt
DC direct current
DCU Diagnostic Control Unit
DPI Dot Per Inch
DRAM Dynamic Random Access Memory
DVM Digital Voltmeter
ECP Enhanced Capability Port
EEPROM Electronically Erasable Programmable Read
Only Memory
EMI Electro Magnetic Interference
EP electrophotographic
EPP Enhanced Parallel Port
F/W firmware
GDI graphics device interface
GND ground
HBP Host Based Printing
HDD Hard Disk Drive
HV high voltage
HVPS High Voltage Power Supply
I/F interface
I/O Input and Output
IC integrated circuit
IDE Intelligent Drive electronics or Imbedded
Drive Electronics
IEEE Institute of Electrical and Electronics
Engineers. Inc
IPA Isopropy Alcohol
IPM Images Per Minute
Kg Kilogram
LAN local area network
lb pound(s)
LBP Laser Beam Printer
LCD Liquid Crystal Display
LED Light Emitting Diode
LSU Laser Scanning Unit
MB Megabyte
MHz Megahertz
NVRAM Nonvolatile random access memory
OPC Organic Photo Conductor
PBA Printed Board Assembly
PCL Printer Command Language , Printer Control
Language
PDL Page Discription Language
PPM Page Per Minute
PTL Pre-Transfer Lamp
Q’ty Quantity
RAM Random Access Memory
ROM Read Only Memory
SCF Second Cassette Feeder
SMPS Switching Mode Power Supply
SPGP Samsung Printer Graphic Processor
SPL Samsung Printer Language
Spool Simultaneous Peripheral Operation Online
SW Switch
Sync Synchronous or synchronization
USB Universal Serial Bus
2-3
Reference Information
Service Manual
WorkCentre PE16 July 2003
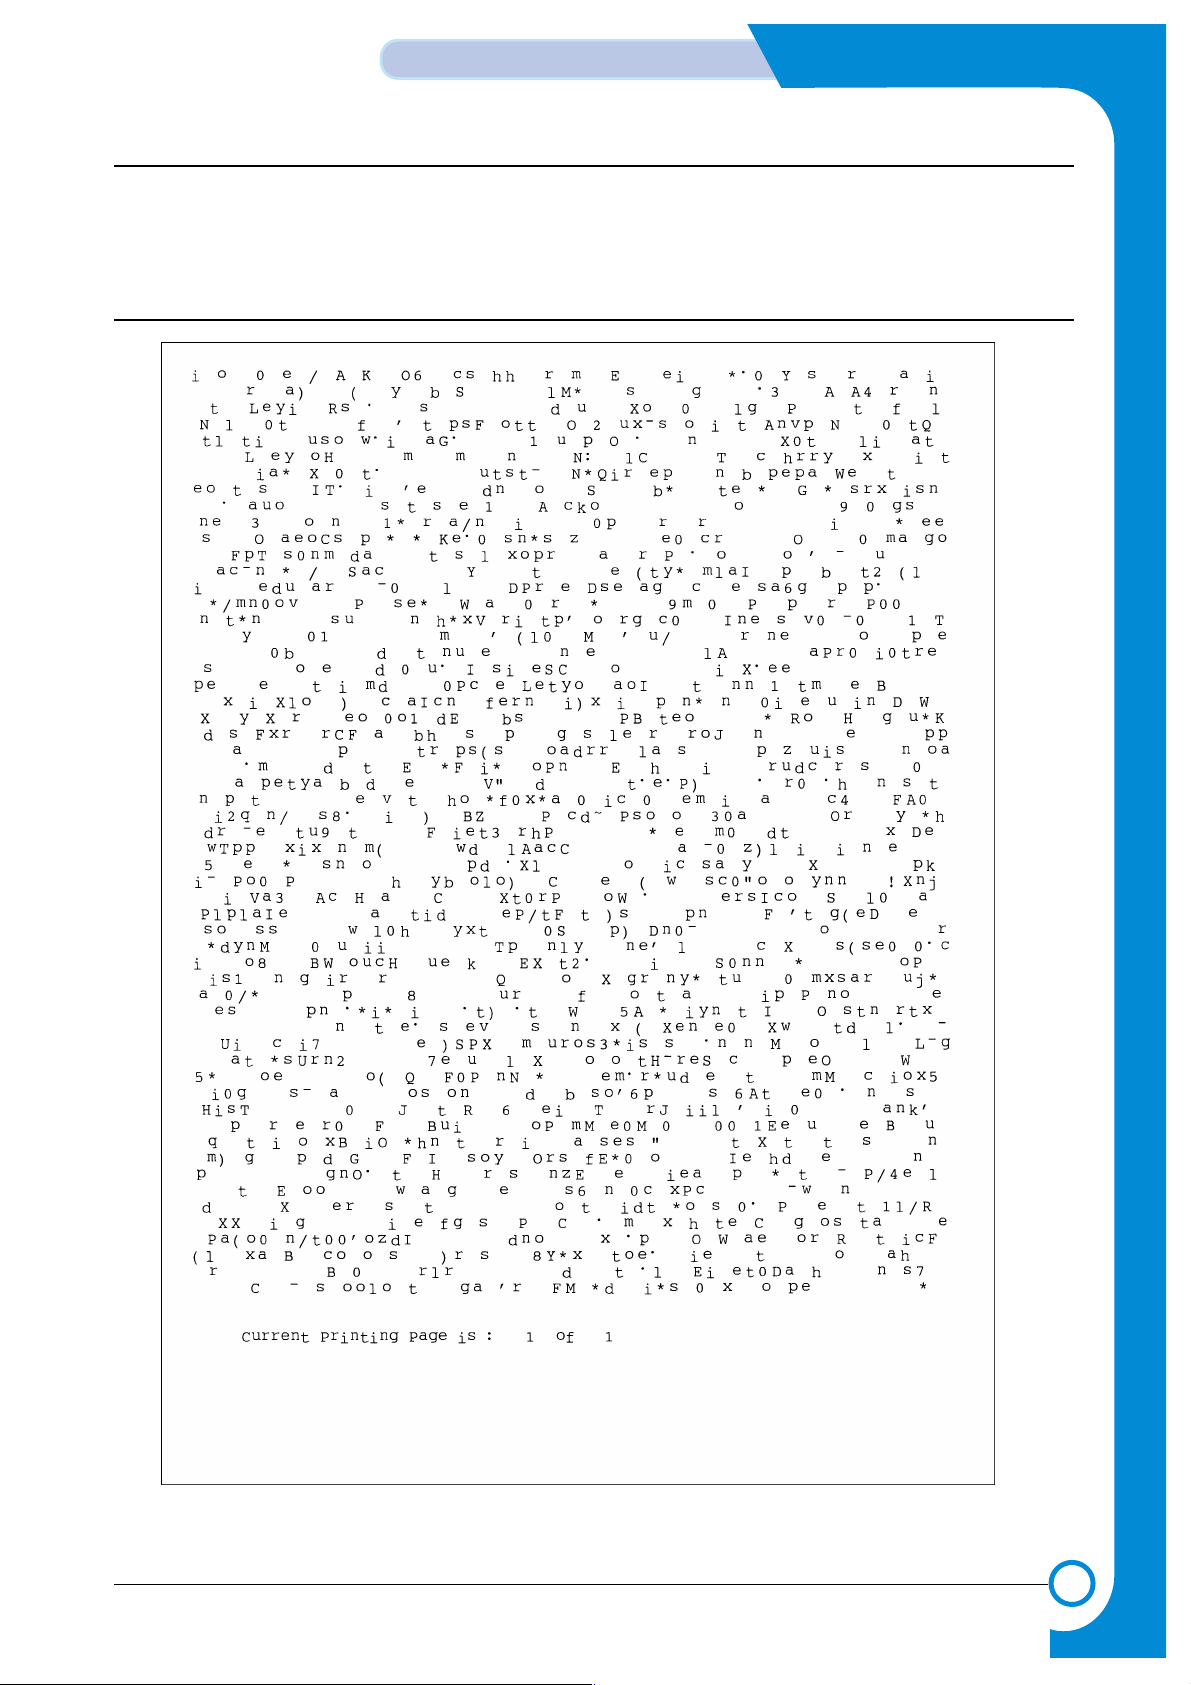
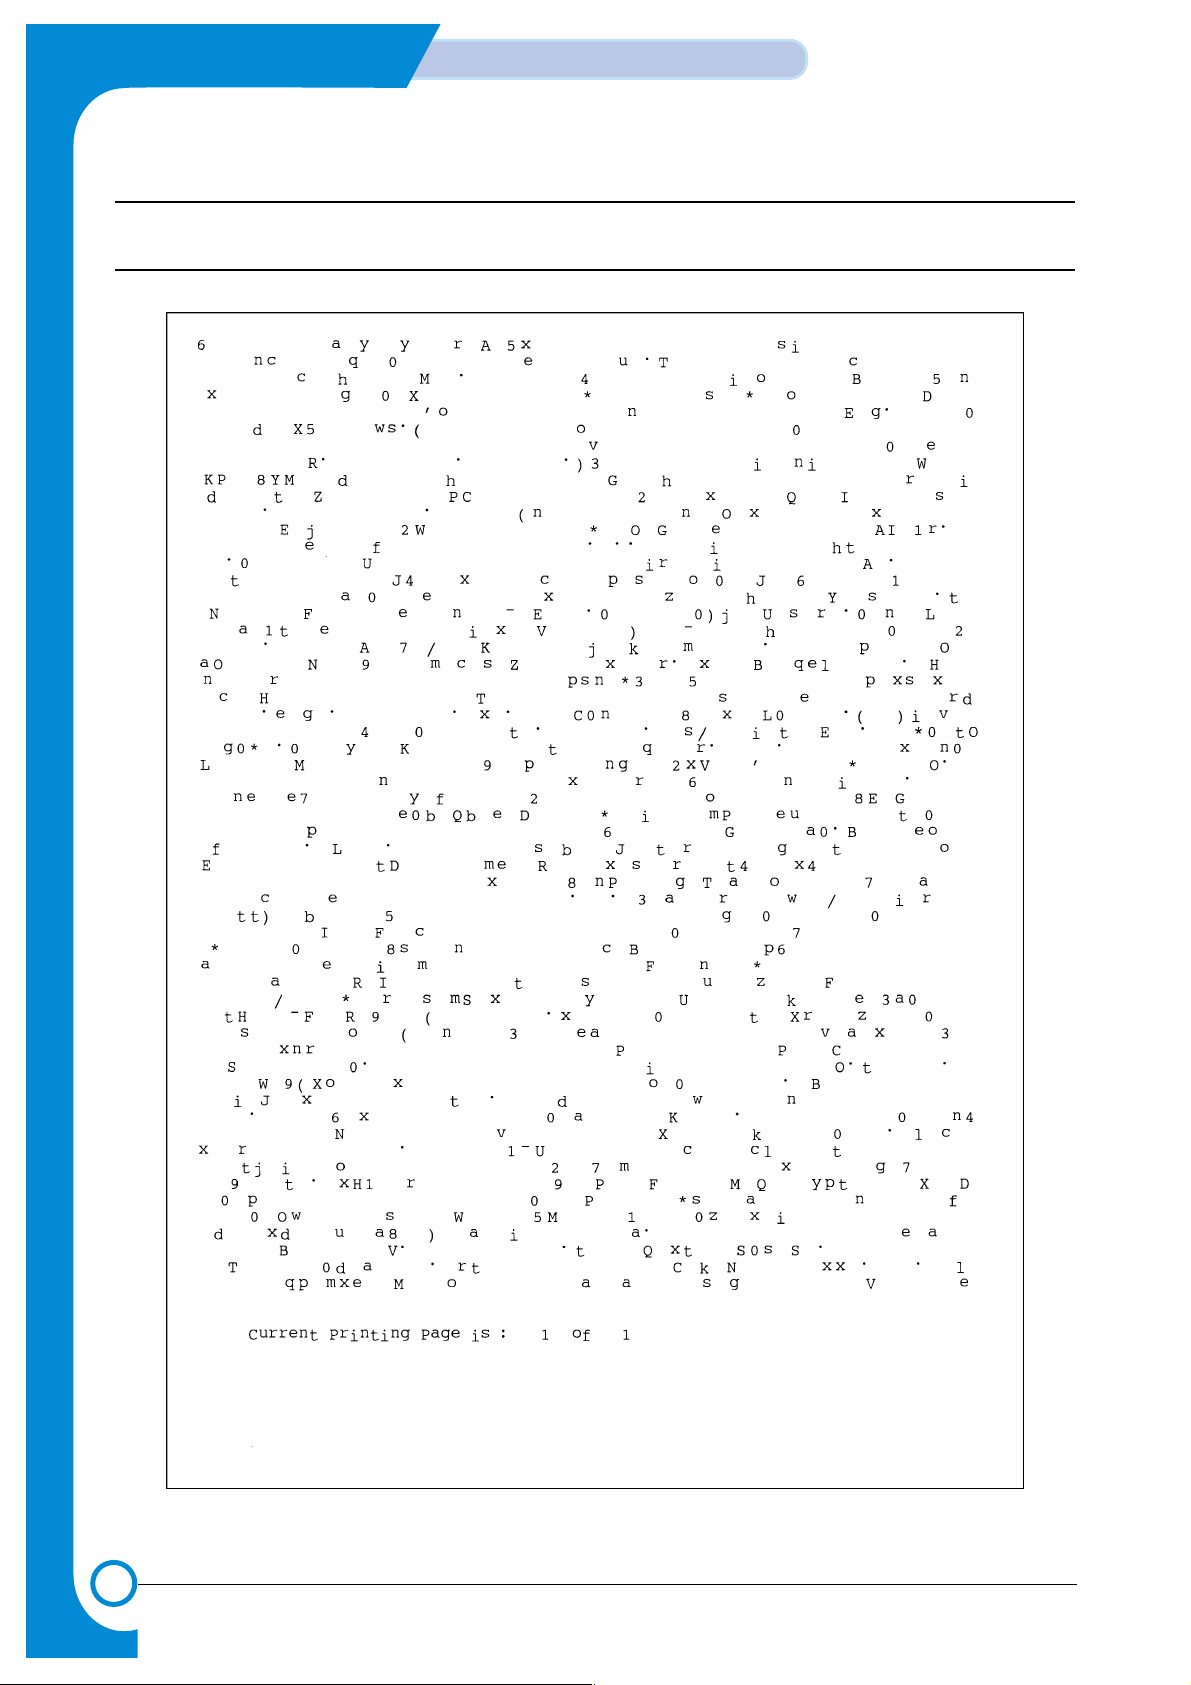
2.3 The Sample Test Patterns
The following test patterns are the standard patterns used to test the product in the factory.
Cartridge life span and printing speed are measured with the patterns shown below.
(The picture in the manual is 70% size of the actual A4 size.)
2.3.1 A4 5% Pattern
2-4
Reference Information
Service Manual
July 2003 WorkCentre PE16
2.3.2 A4 2% Pattern
2-5
Reference Information
Service Manual
WorkCentre PE16 July 2003
2.3.3 A4 IDC 5% Pattern

2-6
Reference Information
Service Manual
July 2003 WorkCentre PE16
3
3
3-1
Specifications
Service Manual
WorkCentre PE16 June 2003
3. Specifications
Specifications are correct at the time of printing. Product specifications are subject to change without notice.
See below for product specifications.
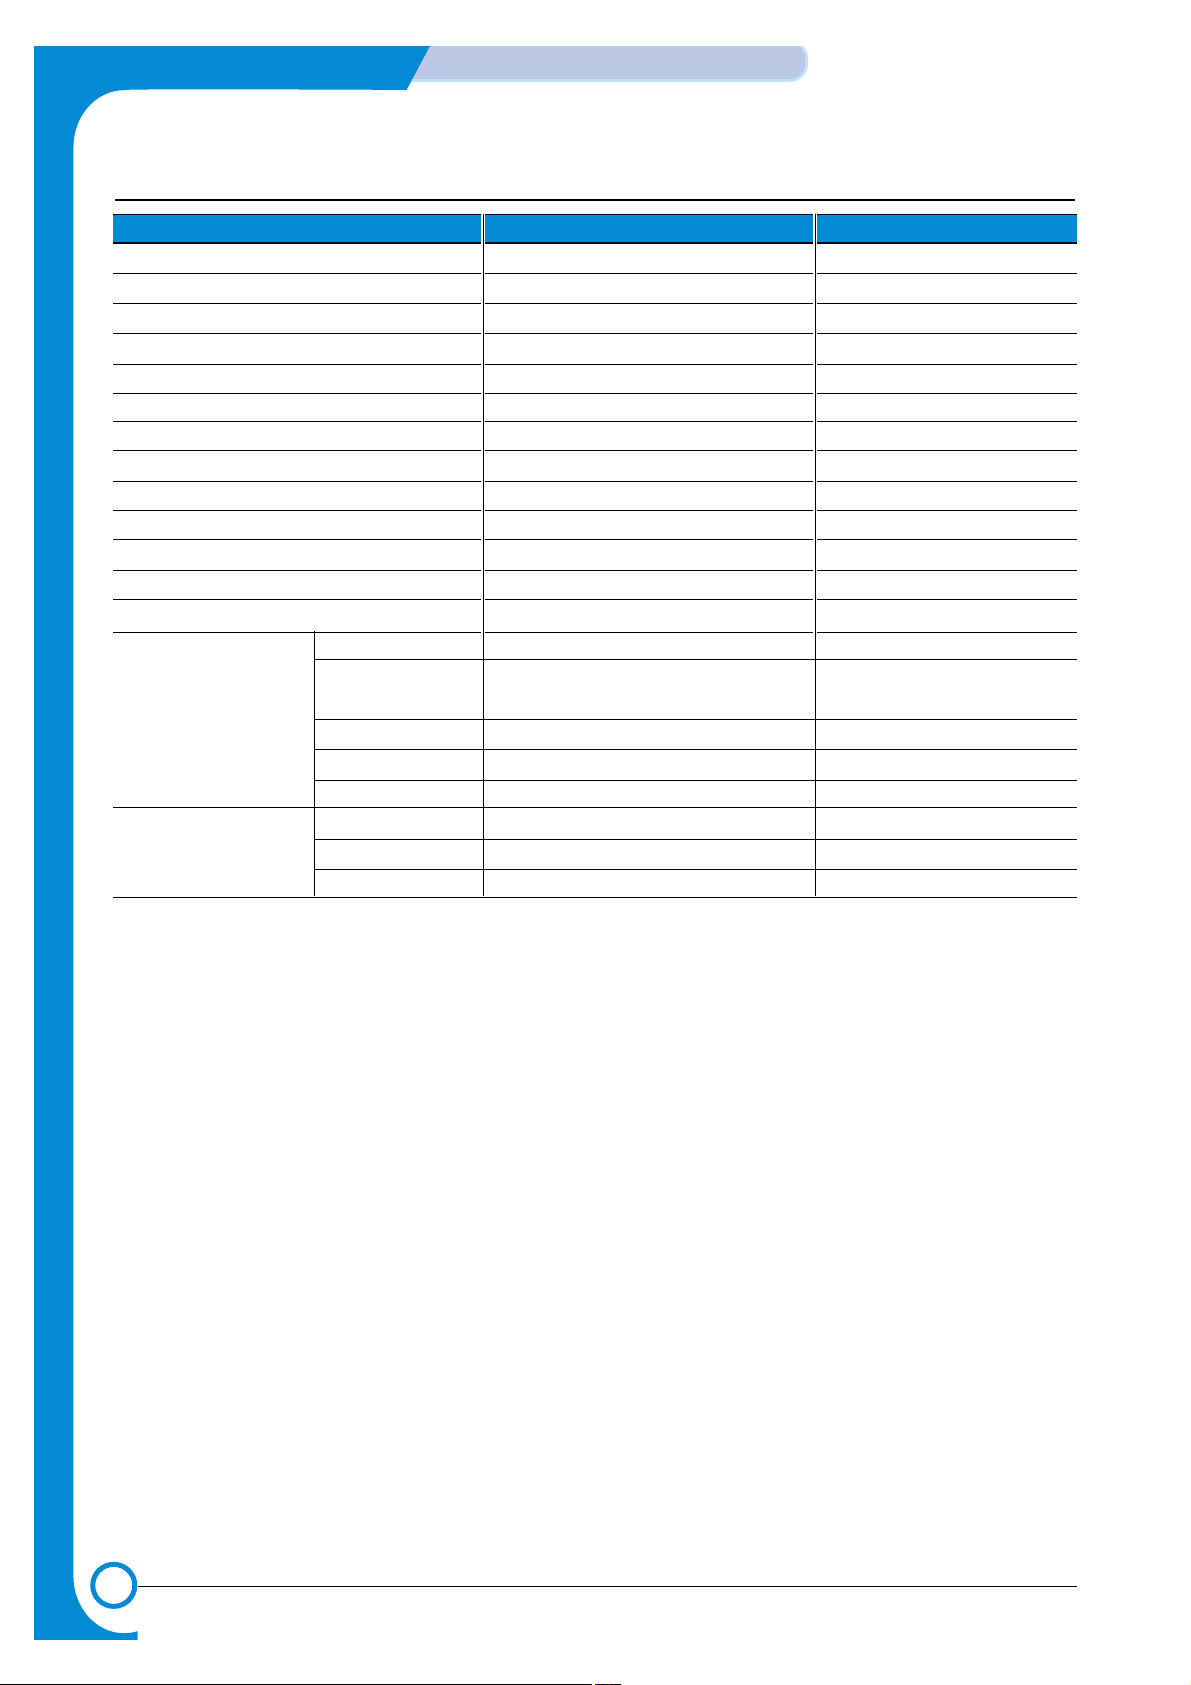
3.1 General Specifications
Items Descriptions Remarks
Major Features Copier, Print, Scan, Fax With ADF
Size (W*D*H) 474 X 436 X 417 mm w/o Hand Set
Weight 13 Kg (28.8 lbs) With Toner Cartridge
LCD 16*2 Char
I/O Interface USB1.1 & IEEE1284
Power Consumption Printing 350W
Sleep Mode 20W
Power Switch Yes
Noise Operating 55 dBA
Standby 35 dBA
Warm Up Less than 42 seconds
Approval Class B
Device Memory 16 MB
(Printer : 8M, Fax : 4M,
Scan : 2M, System : 2M)
Internal N/W Connectivity N/A
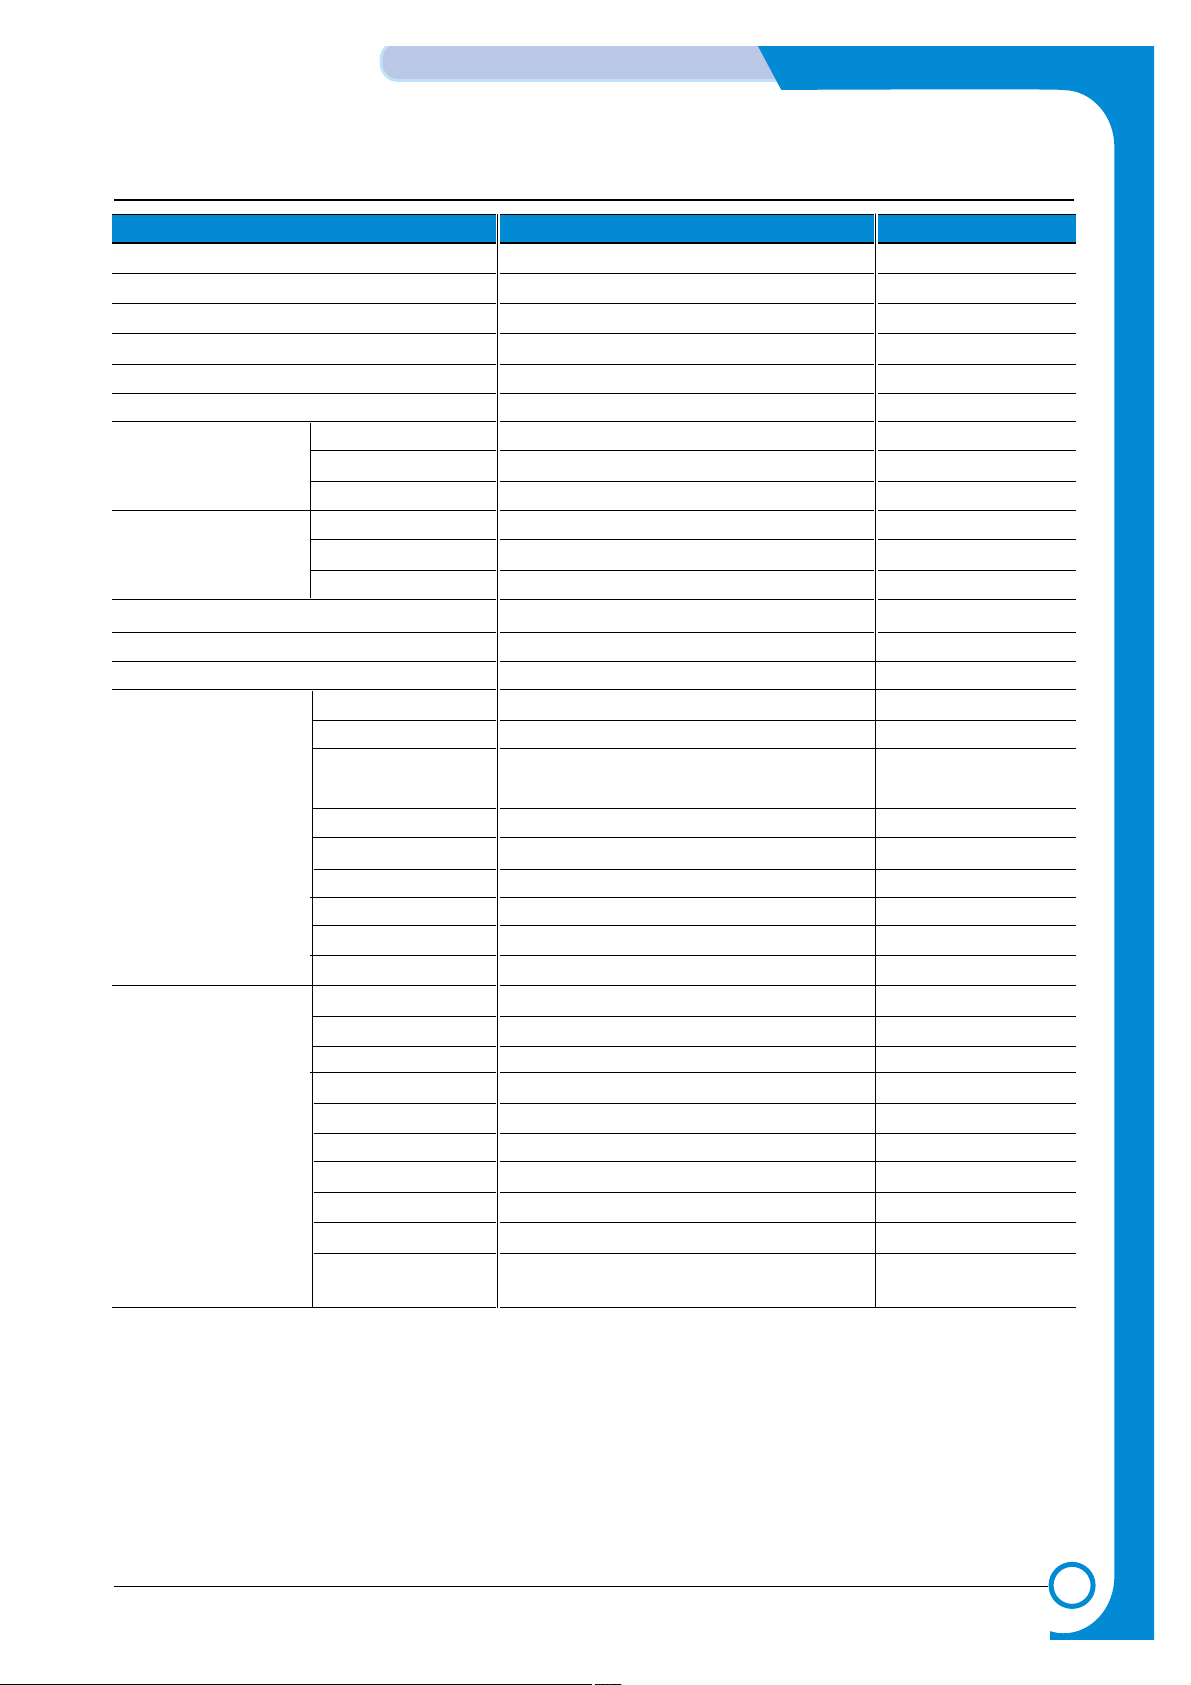
3.2 Print Specification
Items Descriptions Remarks
Print Speed 17ppm(Letter) 5% Character
16pp,(A4) Pattern
Print Method Laser Scanning Unit + Electro Photography
Print Language SPL
Power Save Yes(5/10/15/30/45min.)
Resolution Normal 600 *600dpi
RET No
Toner Save Yes
Memory 8 MB
FPOT Stand by Approx. 12 seconds
Power Save Less than 54 seconds
Printable Area 208 X 271 mm (Letter)
202 X 289 mm (A4)
Toner Save Yes
3-2
Specifications
Service Manual
June 2003 WorkCentre PE16
3.3 Scan Specification
Items Descriptions Remarks
Halftone(Gray Scale) 256 level
Scan Method Color CCD ITU-T #1 Chart
Scan Speed ADF Letter : 25 sec, A4 : 28 sec Text/Mixed Mode :
(seconds/scan) Platen Letter : 25 sec, A4 : 28 sec B/W & 300dpi. (USB)
ADF Letter : 55 sec, A4 : 60 sec Photo Mode : Gray
Platen Letter : 55 sec, A4 : 60 sec & 300dpi. (USB)
ADF Letter : 125 sec, A4 : 130 sec Photo Mode : Color
Platen Letter : 125 sec, A4 : 130 sec & 300dpi.(USB)
Resolution Optical 600 dpi
Enhanced 4800 dpi
Halftone 256 level
Scan Width Width Max.216mm (8.5″)
Length(Adf) Max. 356mm (14.0″)
Length(Platen) Max. 297mm (11.7″)
Scan-to E-mail, Image, OCR, FAX, WEB From SmarThru3
3-3
Specifications
Service Manual
WorkCentre PE16 June 2003
3.4 Copy Specification
Items Descriptions Remarks
Copy Quality Selection Text 600x300dpi
or Original Image type Auto 600x300dpi
selection Mode Photo 600x600dpi for Platen / 600x300dpi for ADF
Other —
FCOT Platen Power Save Approx. 54 seconds
Stand by Approx. 12 seconds
ADF Power Save Approx. 54 seconds
Stand by Approx. 17 seconds
Copy Speed Text Mixed SDMC 16 cpm/A4, 17 cpm/LTR
MDMC 7 cpm/A4, 7 cpm/LTR
Photo SDMC 16 cpm/A4, 17 cpm/LTR
MDMC 7 cpm/A4, 7 cpm/LTR
Resolution Scan 600*600dpi
Print 600*600dpi
Zoom Range 25% to 400 % for platen, 25% to 100% for ADF
Multi Copy 1~99
Preset Yes
Contrast Control 3 level(by LED)
Copy Mode TEXT/MIXED/PHOTO
Collation Copy Yes(300dpi only)
Auto return to default mode Yes(after 1 minute)
N-up copy 2-up, 4-up ADF Only
AutoFit Copy Yes Platen Only
Clone Yes Platen Only
Poster Yes Platen Only
3-4
Specifications
Service Manual
June 2003 WorkCentre PE16
3.5 Telephone Specification
Items Descriptions Remarks
Handset No
On hook Dial Yes
Search Yes (Phone Book) by using Phone Book Button
1-Touch Dial 10EA(3*4 Numeric Key)
Auto dial 100 locations (Using 3*4 buttons)
TAD I/F No
Tone/Pulse Selectable in Tech Mode
Pause Y es
Auto Redial Yes
Last Number Redial Yes
Distinctive Ring No
Caller ID No
External Phone Interface No
Report & List Print out Tx/Rx Journal Yes
Confirmation 2 types available
(with Image TCR, w/o image TCR)
Help List No
Auto Dial List Yes
System Data List List all user setting
Sound Control Ring Volume Yes(Off,Low,MED,HIGH)
Key Volume Yes(On,Off)
Speaker Yes(On,Off)
3-5
Specifications
Service Manual
WorkCentre PE16 June 2003
3.6 Fax Specification
Items Descriptions Remarks
Compatibility ITU-T G3
Communication System PSTN/PABX
Modem Speed 33.6 Kbps
TX Speed Approx. 3 sec
Compression MH/MR/MMR/JPEG
ECM Y es
Resolution Std 203 x 98 dpi
Fine 203 x 196 dpi
S.Fine 300 x 300 dpi
Scan Speed(ADF) Std Approx. 5sec/LTR (6 sec/A4)
Fine Approx.7.5sec/L TR (8 sec/A4)
S.Fine Approx.7.5sec/LTR (8 sec/A4)
Rx fax duplex print out No
Multiple page scan speed Approx. 7 ppm/LTR (7.5 ppm/A4)
Receive Mode Fax, TEL
Memory Capacity 4 MB (320 pages)
Optional Memory No
Max locations to 99 locations
store to 1 Group Dial
Fax Forward Yes (On/Off)
Broadcasting Up to 99 locations
Forced Memory TX
No
Cover page No
Delayed fax Yes
Memory RX Yes
Functions Voice Request No
TTI Y es
RTI Yes
Polling No
Earth/Recall No
Auto Reduction Yes
RDC No
Junk Fax barrier Yes
Security Mode Yes
Battery Backup Yes (Min. 15 minutes) Not Battery
(Using Super Cap.)
3-6
Specifications
Service Manual
June 2003 WorkCentre PE16
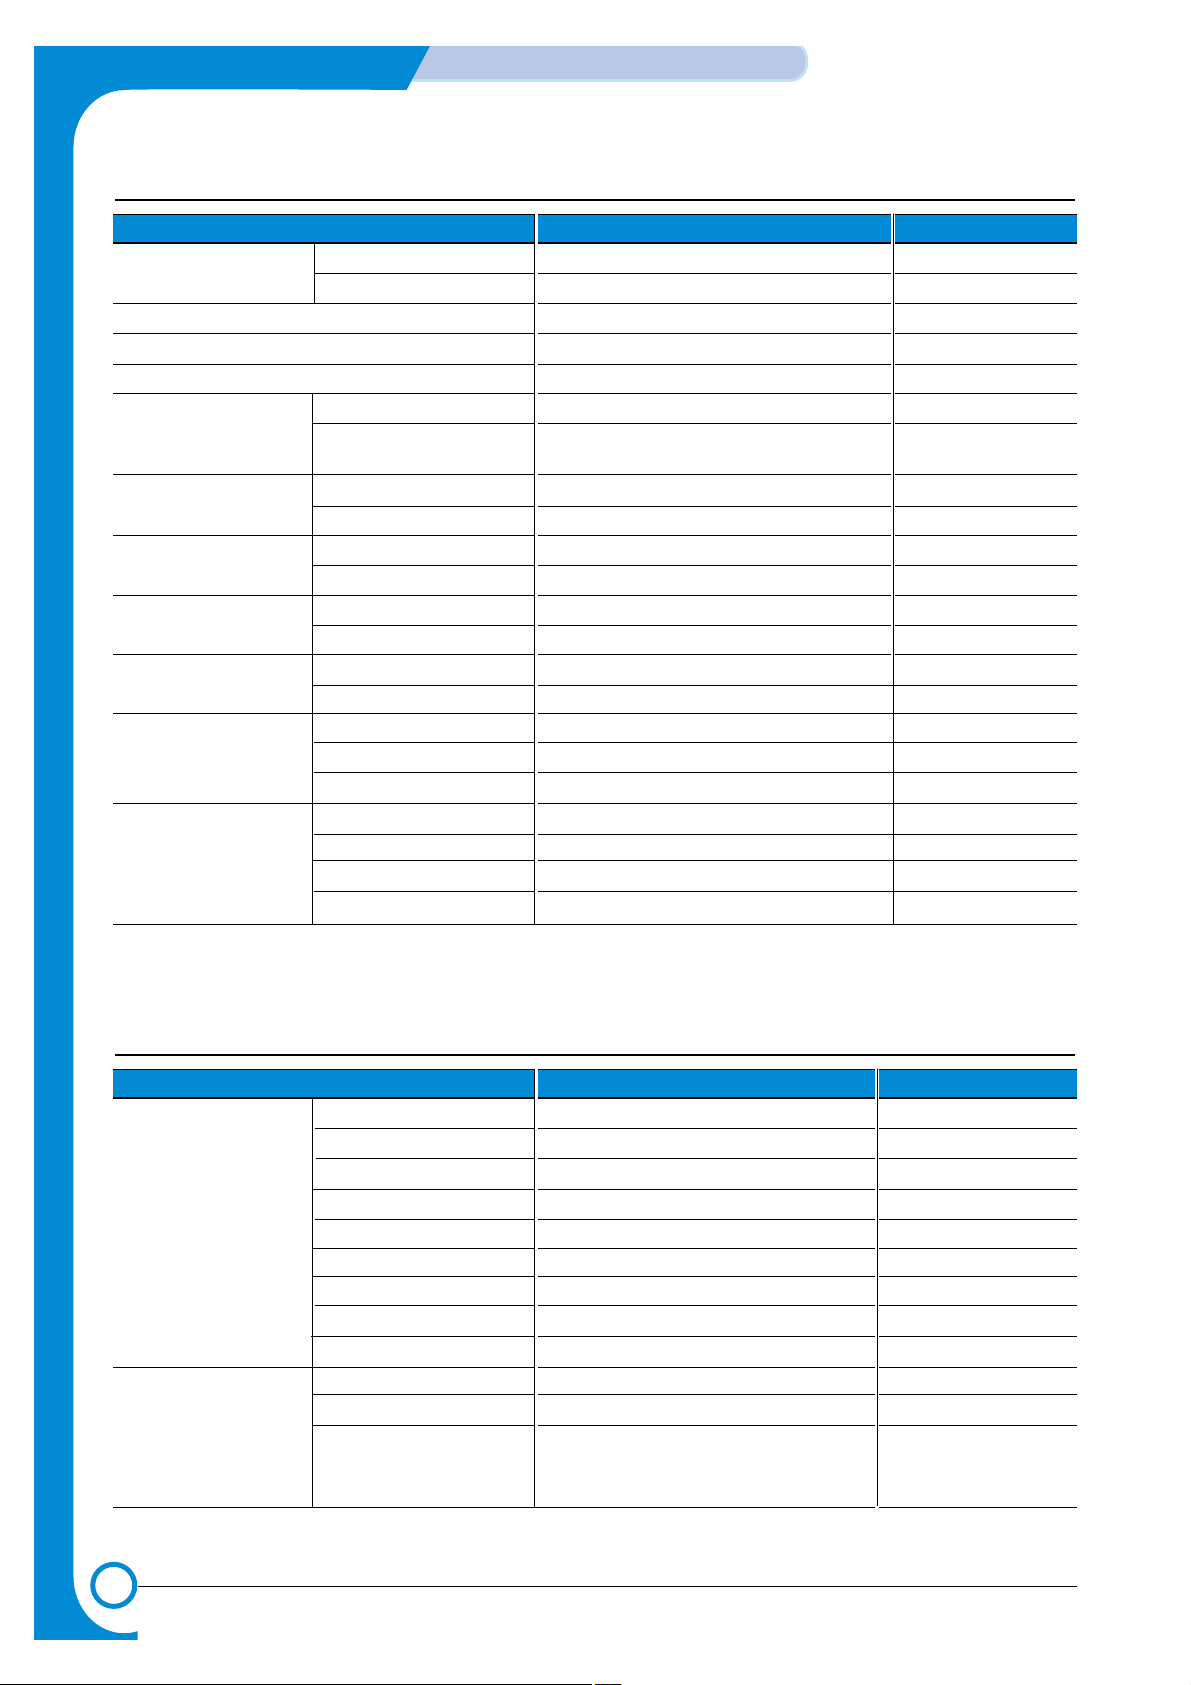
3.7 Paper Handling
3.8 Software
Items Descriptions Remarks
Capacity Main Tray 250sheets
(20lbs) Bypass Single Sheet
Optional Cassette No
Output Capacity 150Sheets/20lb, 1Sheet/Face up
Output Control Face down/Face up
Paper Size Main Tray
CST : A4,Letter,Legal, Folio,Executive,B5
Bypass Bypass : Envelope6 3/4,7 3/4, #9, #10,
DL,C5,B5
Paper Weight Main Tray 60 ~ 90 GSM / 16 ~ 24 lb.
Bypass 60 ~ 150 GSM / 16 ~ 40 lb.
Paper Path Standard output Bottom to Middle Front (FIFO)
Straight Through Face up, Single Sheet
Paper Size Max 216 x 356mm(8.5″x14″)
Min 76 x 127mm(3″x5″)
Output Stacker Paper Extension
Document Fixed
Input Guide Bypass Tray Adjustable
Main Tray Universal
Document Adjustable
ADF Paper Weight 60 ~ 105 GSM / 12.5~28lb
Capacity 30 sheets(80 GSM / 20lb)
Document Size Width 148mm — 216mm(5.8″ — 8.5″)
Document Size Length 127 mm — 356mm(5″ — 14.0″)
Items Descriptions Remarks
Compatibility DOS No
Win 3.x No
Win 95 Yes
Win 98&WinME Yes
Win NT 4.0 Yes
Win 2000 Yes
Win XP Yes WHQL for Printer Only
Mac Yes Mac Printer Only
Linux No
Driver Printer SPL(GDI)
TWAIN Yes
PC-FAX No PC Fax is only avail-
able through PC
Modem

3-7
Specifications
Service Manual
WorkCentre PE16 June 2003
3.9 Consumables
Items Descriptions Remarks
Type Single Cartridge
How to install Front door open and front loading
Toner Life Initial 2,000 sheets IDC 5%
running 3,500 sheets character printing
Level Sensor No
Toner Count Yes

3-8
Specifications
Service Manual
June 2003 WorkCentre PE16
4-1
WorkCentre PE16 July 2003
Summary of product
Service Manual
4
4
4. Summary of Product
This chapter describes the functions and operating principals of the main components.
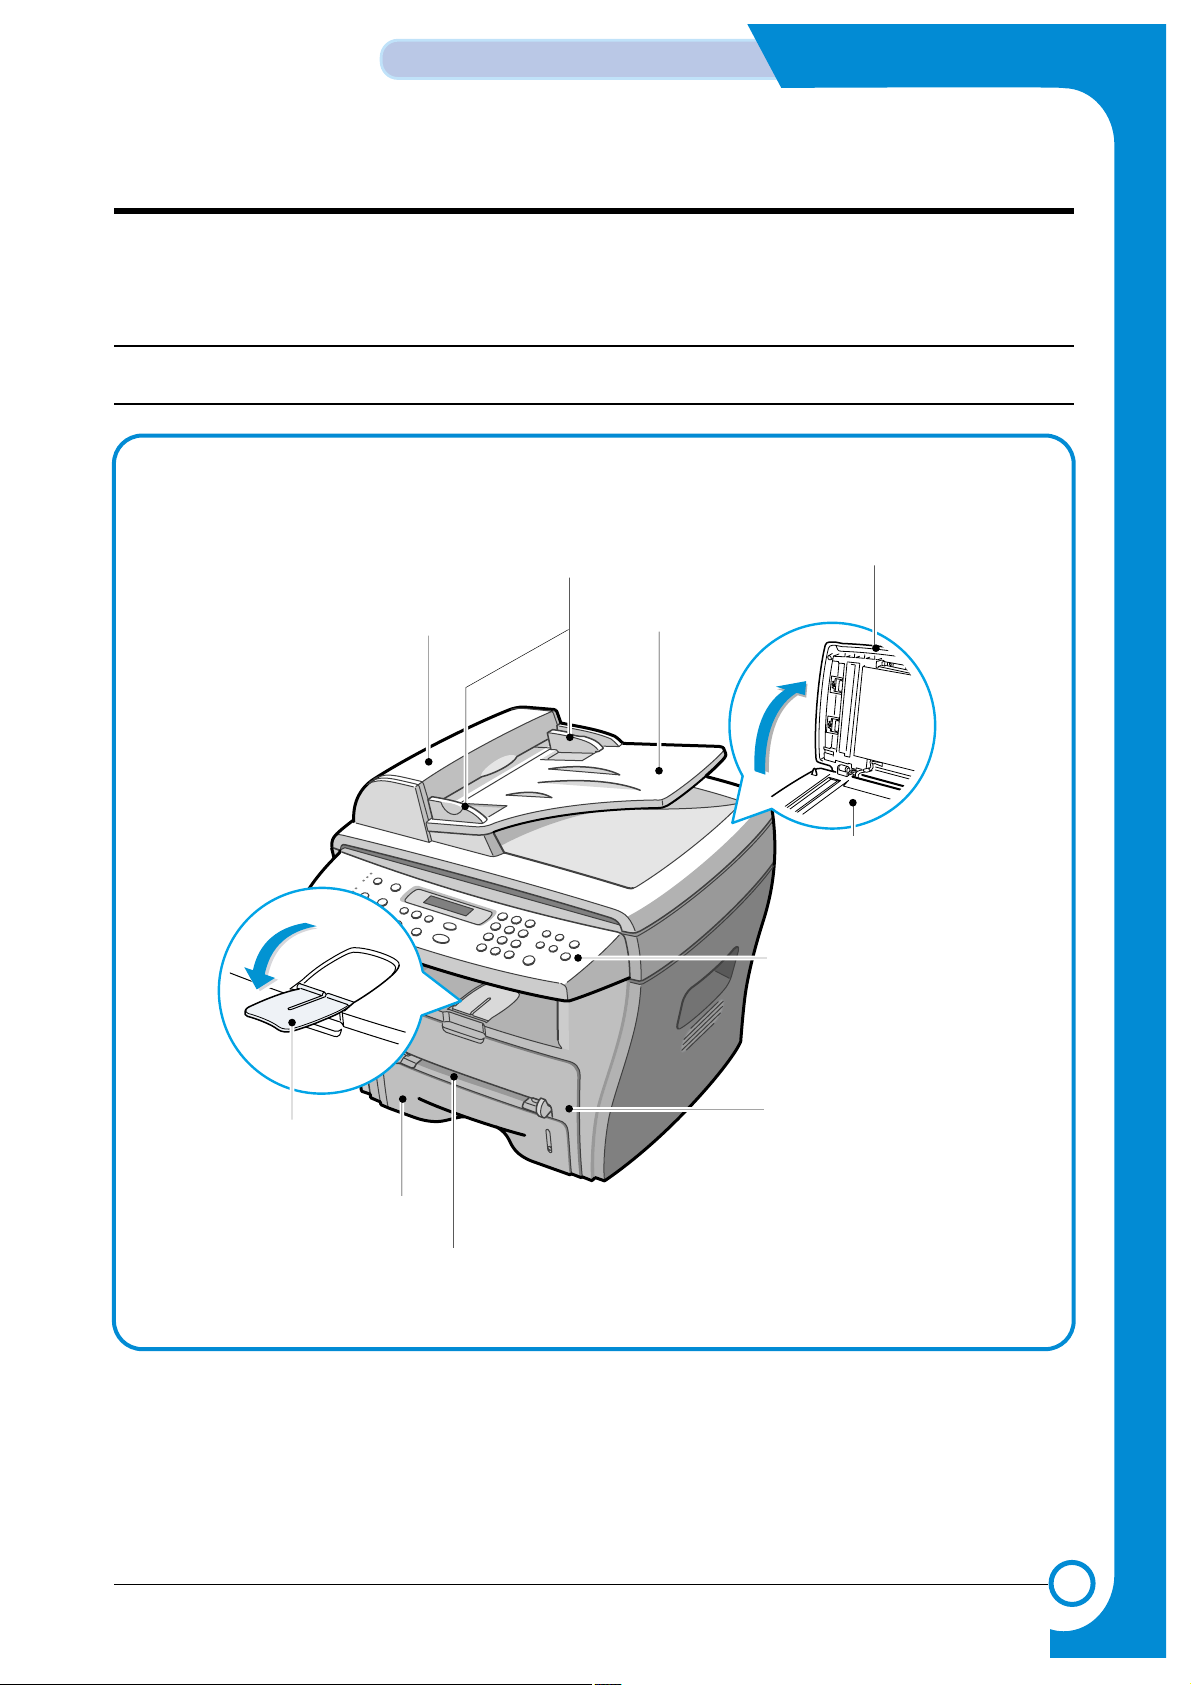
4.1 Printer Components
4.1.1 Front View
Document
Guides
Document
Input Tray
Document
Output Tray
Control Panel
Paper Tray
Front Cover
Paper Level
Indicator
Bypass Tray
Paper Output
Extension
Automatic
Document Feeder
Document
Cover
Document Glass

4-2
Summary of Product
WorkCentre PE16July 2003
Service Manual
4.1.2 Rear View
AC Power Cord
Connector
Parallel
Connector
Power Switch
USB
Connector
Telephone Line
Connector
Rear Output Slot
(Face up)
Rear Cover
4-3
WorkCentre PE16 July 2003
Summary of product
Service Manual
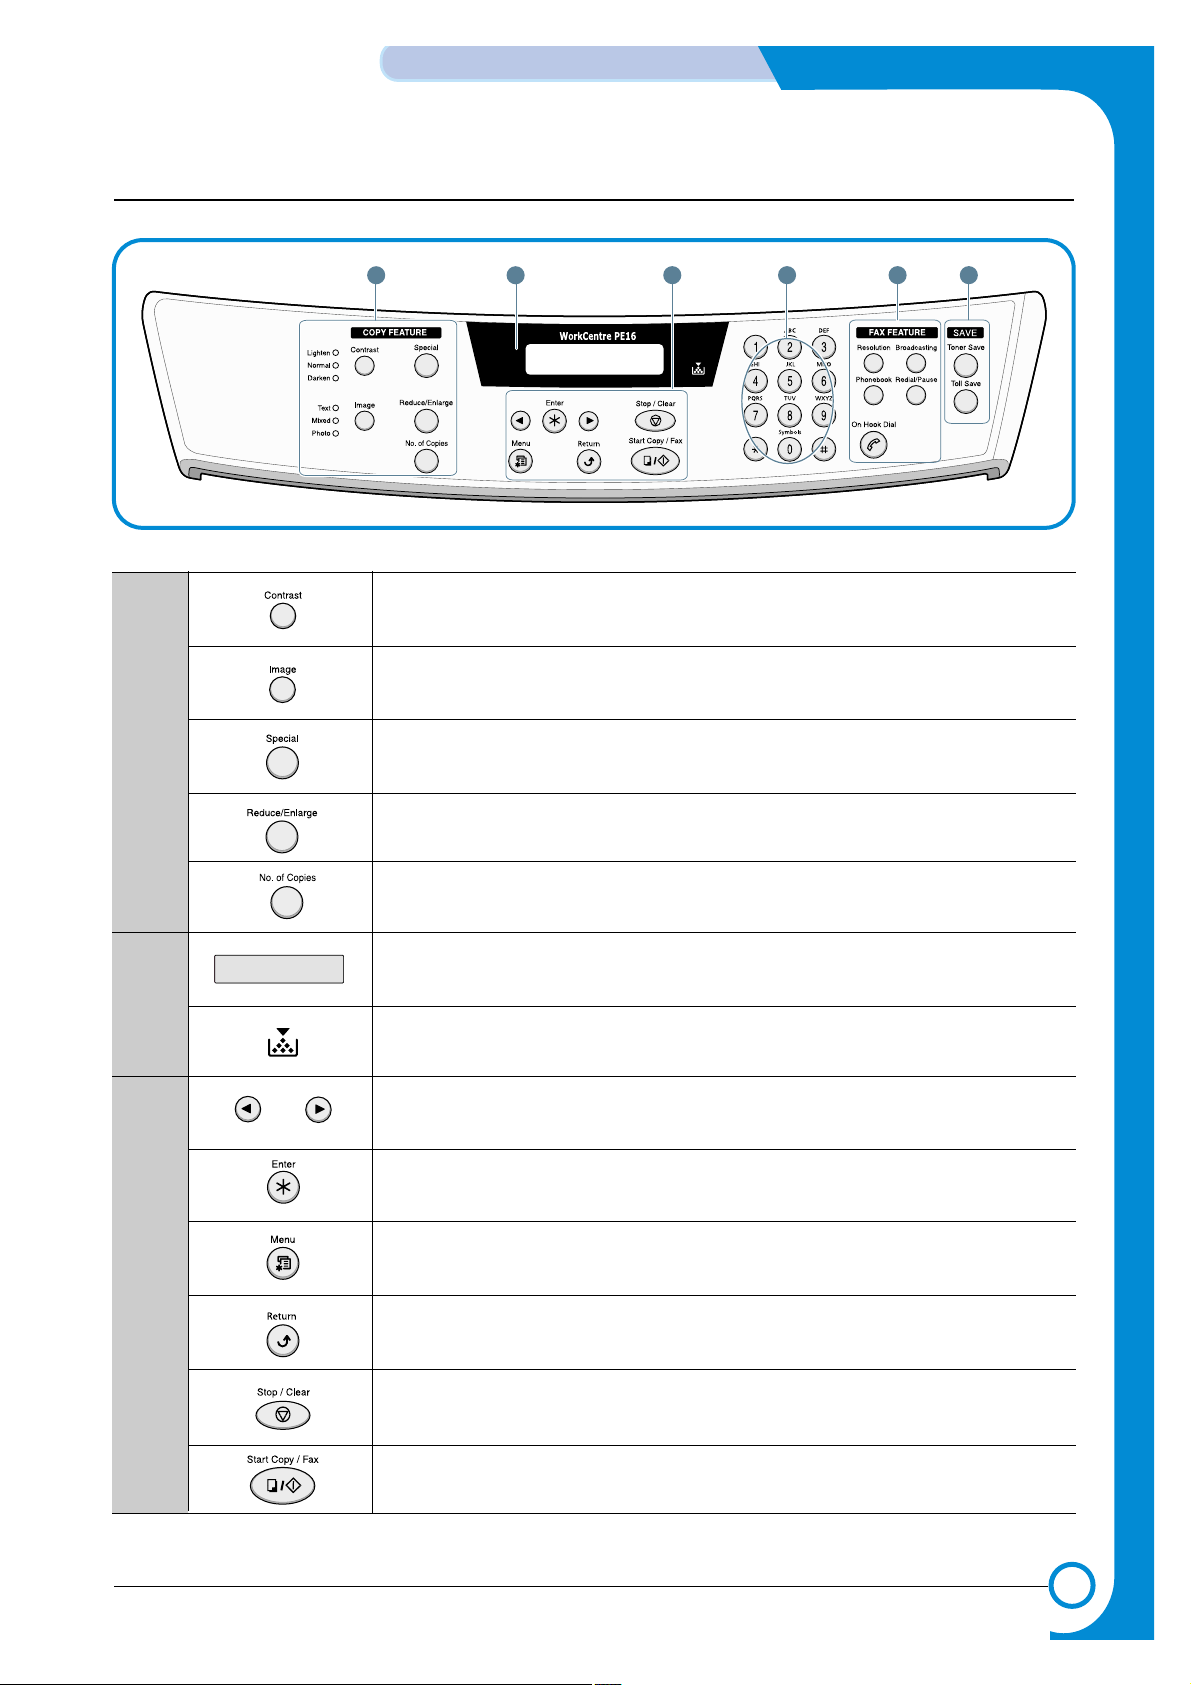
4.1.3 Control Panel
1
C
O
P
Y
2
3
Adjusts the brightness of the documents for the current copy job.
Selects the document type for the current copy job.
Allows you to use special copy features, such as Clone, Collation, Auto fit, 2-side,
N-up (multiple pages on a sheet) and Poster copying.
Makes a copy smaller or larger than the original.
Selects the number of copies.
Displays the current status and prompts during an operation.
Turns on when the toner cartridge is empty.
Scrolls through the options available for the selected menu item.
Confirms the selection on the display.
Enters Menu Mode and scrolls through the menus available.
Sends you back to the upper menu level.
Stops an operation at any time.
In Standby Mode, clears/cancels the copy options, such as the contrast, the
image setting, the copy size and the number of copies.
Starts a job.
4-4
Summary of Product
WorkCentre PE16July 2003
Service Manual
4
5
F
A
X
6
S
A
V
E
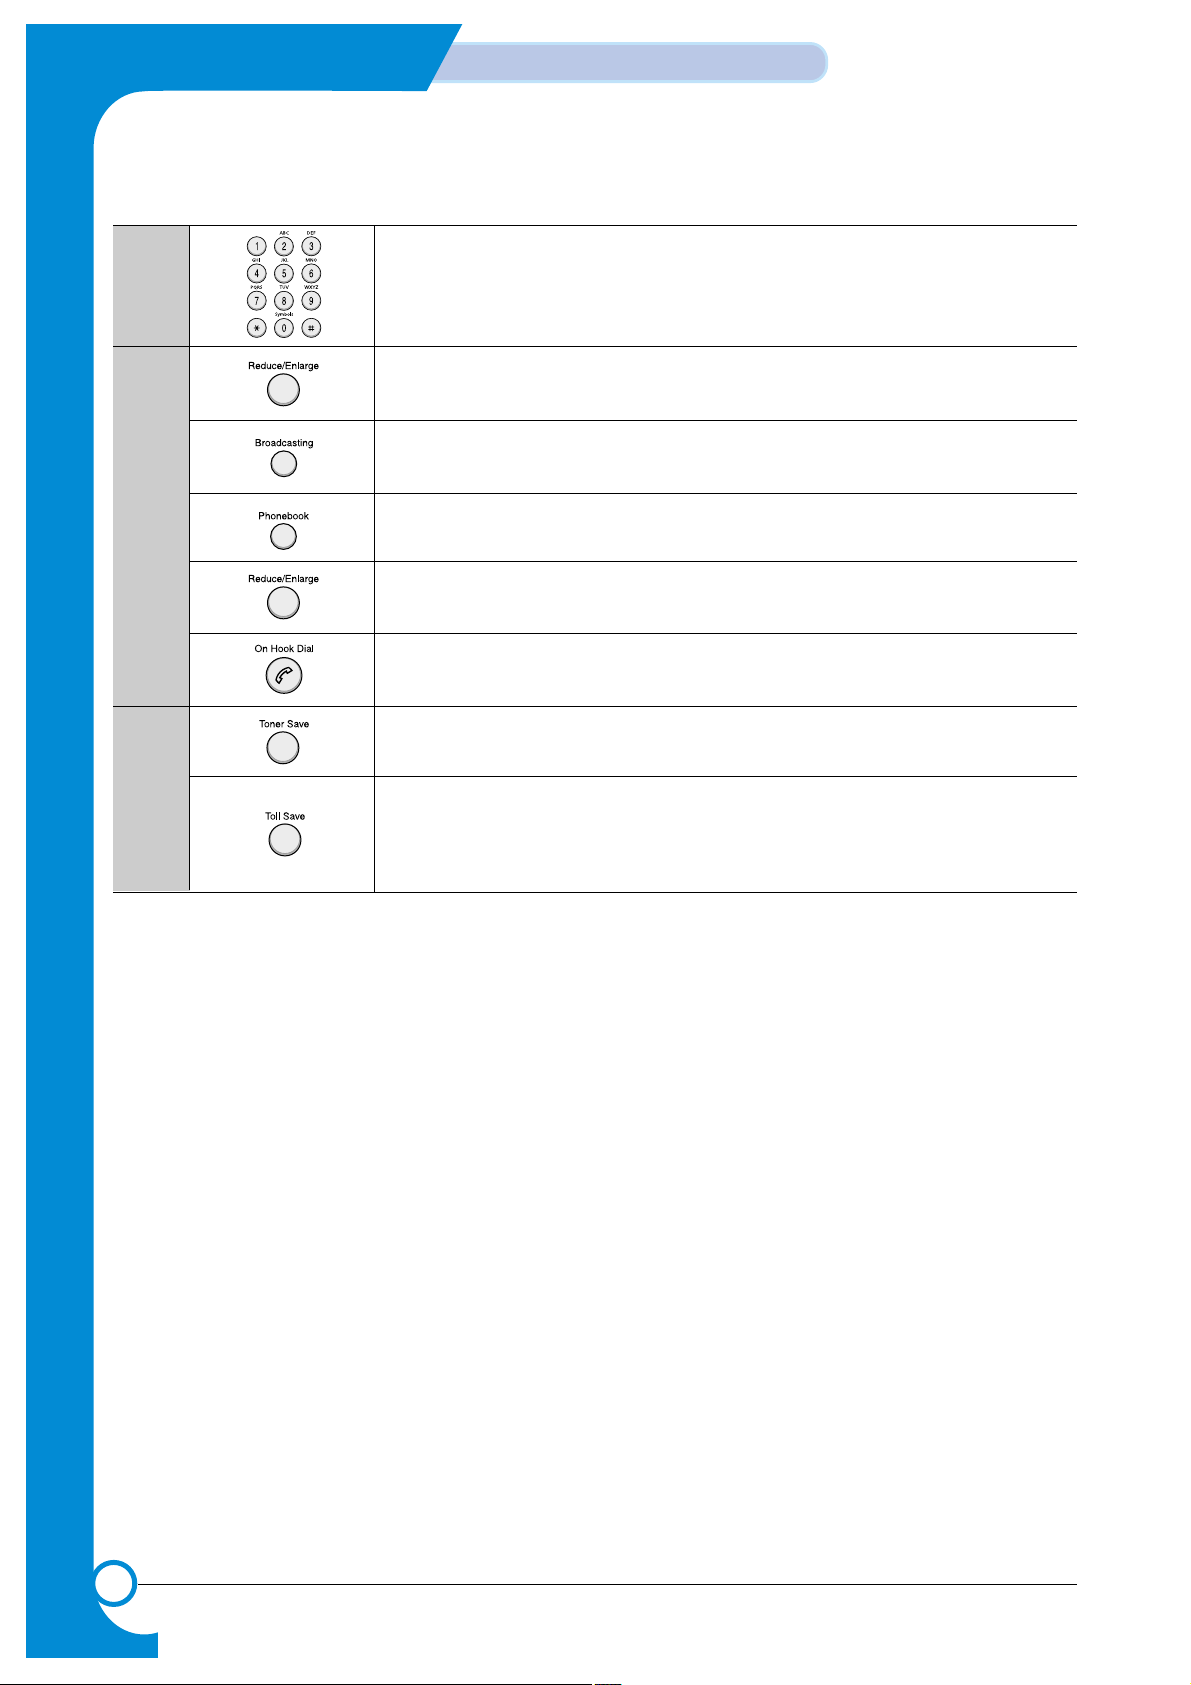
Dials a number or enters alphanumeric characters.
Adjusts the resolution of the documents for the current fax job.
Allows you to send a fax to multiple destinations.
Allows you to store frequently-dialed fax numbers using a one or two-digit speed
dial or group number for automatic dialing and edits the stored numbers.
Allows you to print a Phonebook list. Redials the last number in Standby Mode or
inserts a pause into a fax number in edit mode.
Engages the telephone line.
Allows you to save on toner by using less toner to print a document.
Allows you to save on call costs by sending a fax at a preset toll-saving time.
Using this feature, you can take advantage of lower long distance rates at night,
for example.

4-5
WorkCentre PE16 July 2003
Summary of product
Service Manual
4.2 System Layout
4.2.1 Feeding section
Paper for the machine is supplied from a universal cassette or from the manual feeder, for single sheet
feeding. The cassette contains a friction pad, to separate the paper and prevent multi-sheet feeding.
There is a sensor to detect the presence of paper in the cassette.
— Feeding Method: Universal Cassette Type
— Feeding Standard: Center Loading
— Feeding Capacity: Cassette-250 sheets (80g/m2, 20lb paper standard)
Manual 1 sheet (Paper, OHP, Envelope, etc.)
— Paper detecting sensor: Photo sensor
— Paper size sensor: None
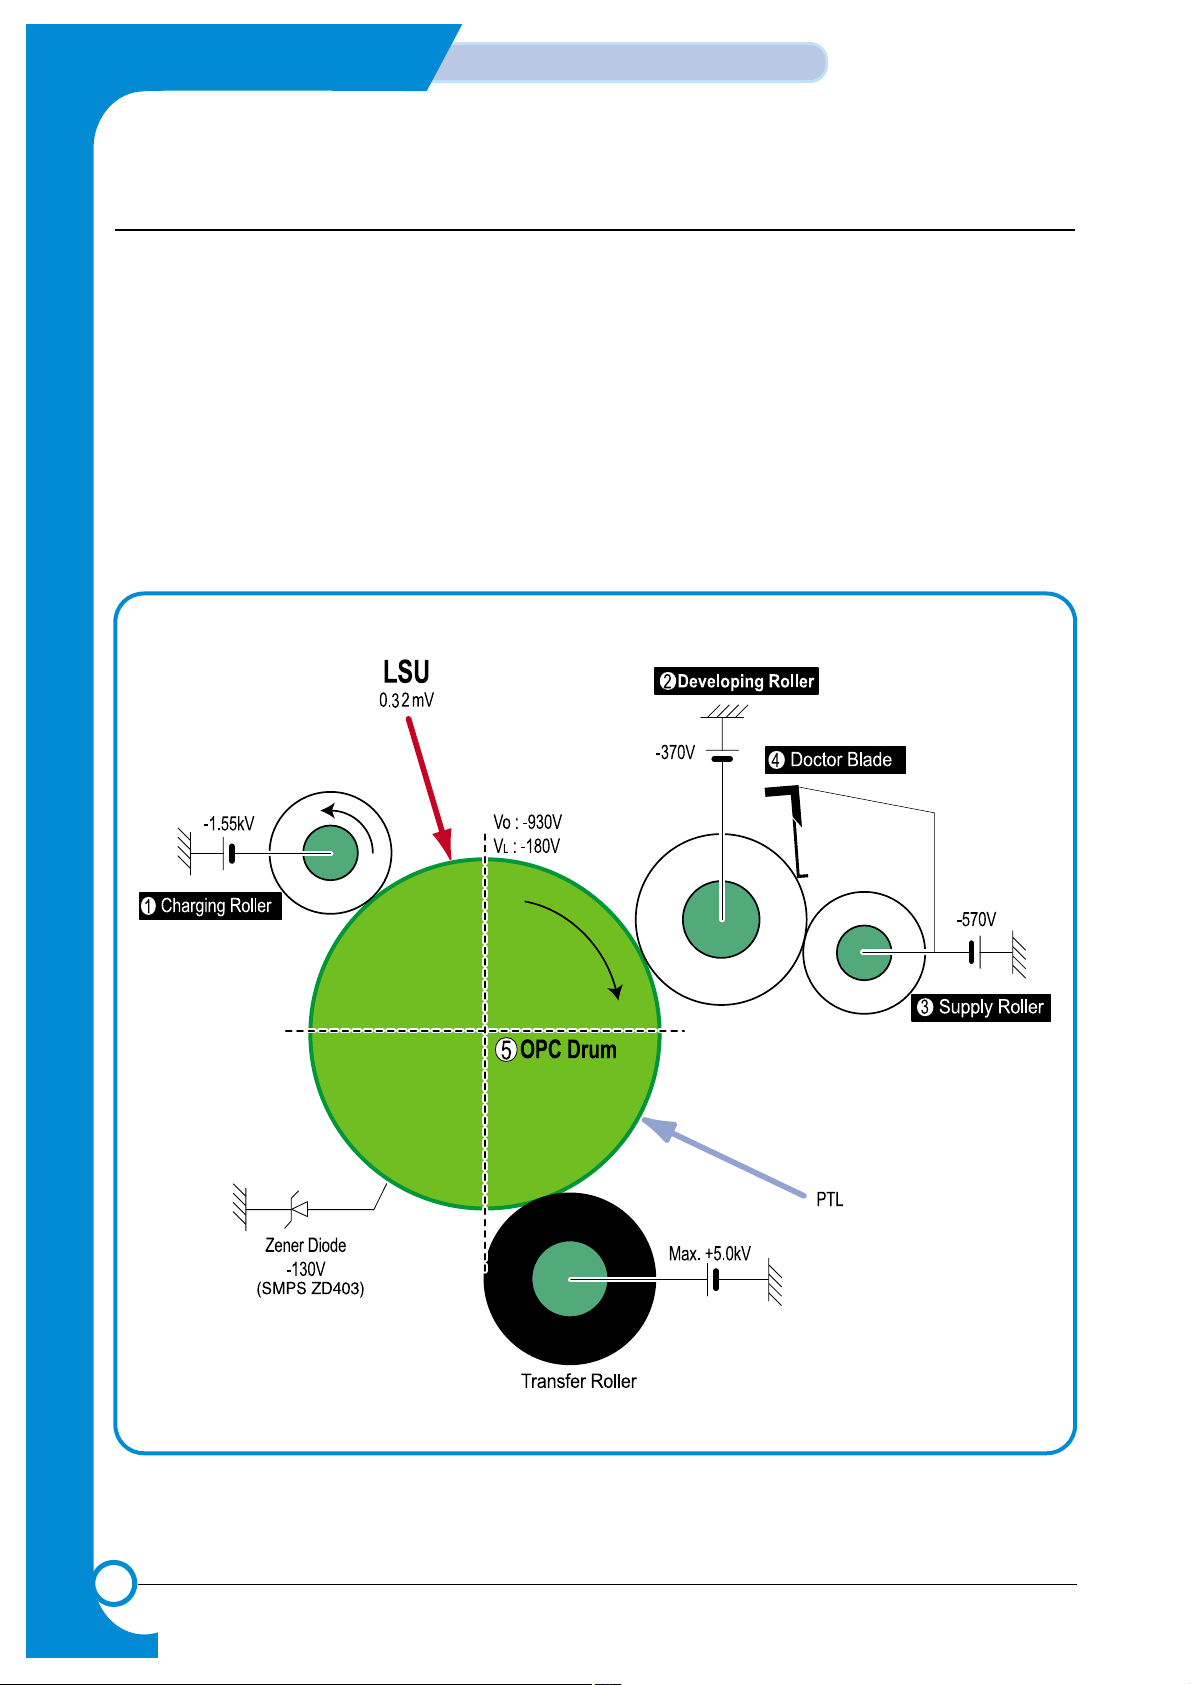
4.2.2 Transfer Ass’y
The Transfer Ass’y consists of the PTL (pre-transfer lamp), OPC Drum, and the Transfer Roller. The PTL
lights the surface of the OPC Drum, reducing the charge on the drum surface to improve transfer efficiency.
The Transfer Roller transfers toner from the OPC Drum surface to the paper.
— Life span: 60,000 sheets (in 15~30°C)
4.2.3 Drive Ass’y
The Drive Ass’y is a motor driven gear unit, that drives the paper feed, the Fuser, and the distributing unit.
4.2.4 Fuser
The Fuser consists of the Heat Lamp, Heat Roller, Pressure Roller, Thermistor, and Thermostat. It melts
the toner to the paper using pressure and heat to complete the printing job.
4.2.4.1 Thermostat
The thermostat is a temperature-sensing device, that cuts off the power to prevent overheating or a fire
when the heat lamp or the heat coil of the heat roller becomes too hot.
4.2.4.2 Thermistor
The Thermistor detects the surface temperature of the heat roller. The information from the Thermistor
provides the on/off control that maintains the selected temperature of the heat roller.
4.2.4.3 Heat Roller
The heat roller transfers the heat from the heat lamp coil to the surface of the paper.
The melted toner cannot stick to the Teflon coated heat roller.
4.2.4.4 Pressure roller
The pressure roller mounted right under the heat roller is made of the silicon resin. The toner fuses onto
the paper when it passes between the heat roller and the pressure roller.

4-6
Summary of Product
WorkCentre PE16July 2003
Service Manual
4.2.4.5 Safety Relevant Facts
• Protecting device when overheating
— 1st protecting device: H/W cuts off when an overheat condition is detected.
— 2nd protecting device: S/W cuts off when an overheat condition is detected.
— 3rd protecting device: Thermostat cuts off the power.
• Safety device
— The power to the fuser is cut off when the front cover is open.
— The overheating safety device for customer safety.
— Maintains the surface temperature of the Fuser Cover below 80°C. A customer caution label is
attached on the inside of the rear cover.
4.2.5 Scanner
Uses a photosensitive device to read an image. The Scanner consists of a CCD module, Connection board,
ADF board, AFE (Analog Front End), Image Processor (located in the CPU), platen glass, and ADF.
• CCD Module Specification
1.Resolution: 600dpi/A4
2.Maximum scan wide: 8.5”
3.Color filter: Red, Green, Blue
4.Output channel: 3 channels (R, G, B)
5.Effective pixel: 5,400 pixel *3
6.Voltage: 24V & 5V
7.Pre-heating time: Maximum 30 seconds (70% of light reach to it)
8.The life span of a lamp: 30,000 hours (25oC)
• Image Processor Specification
1.Operating frequency: 66 MHz
2.Image sensor interface: 200/300/600 dpi CIS or CCD
3.Line time: Copy, FAX, Binary (Lineart, Halftone) PC Scan: 1.5ms/Line Color PC Scan (Grey, 256
Color, True Color): 4.5ms/Line
4.A/D conversion: 10bit conversion
4-7
WorkCentre PE16 July 2003
Summary of product
Service Manual
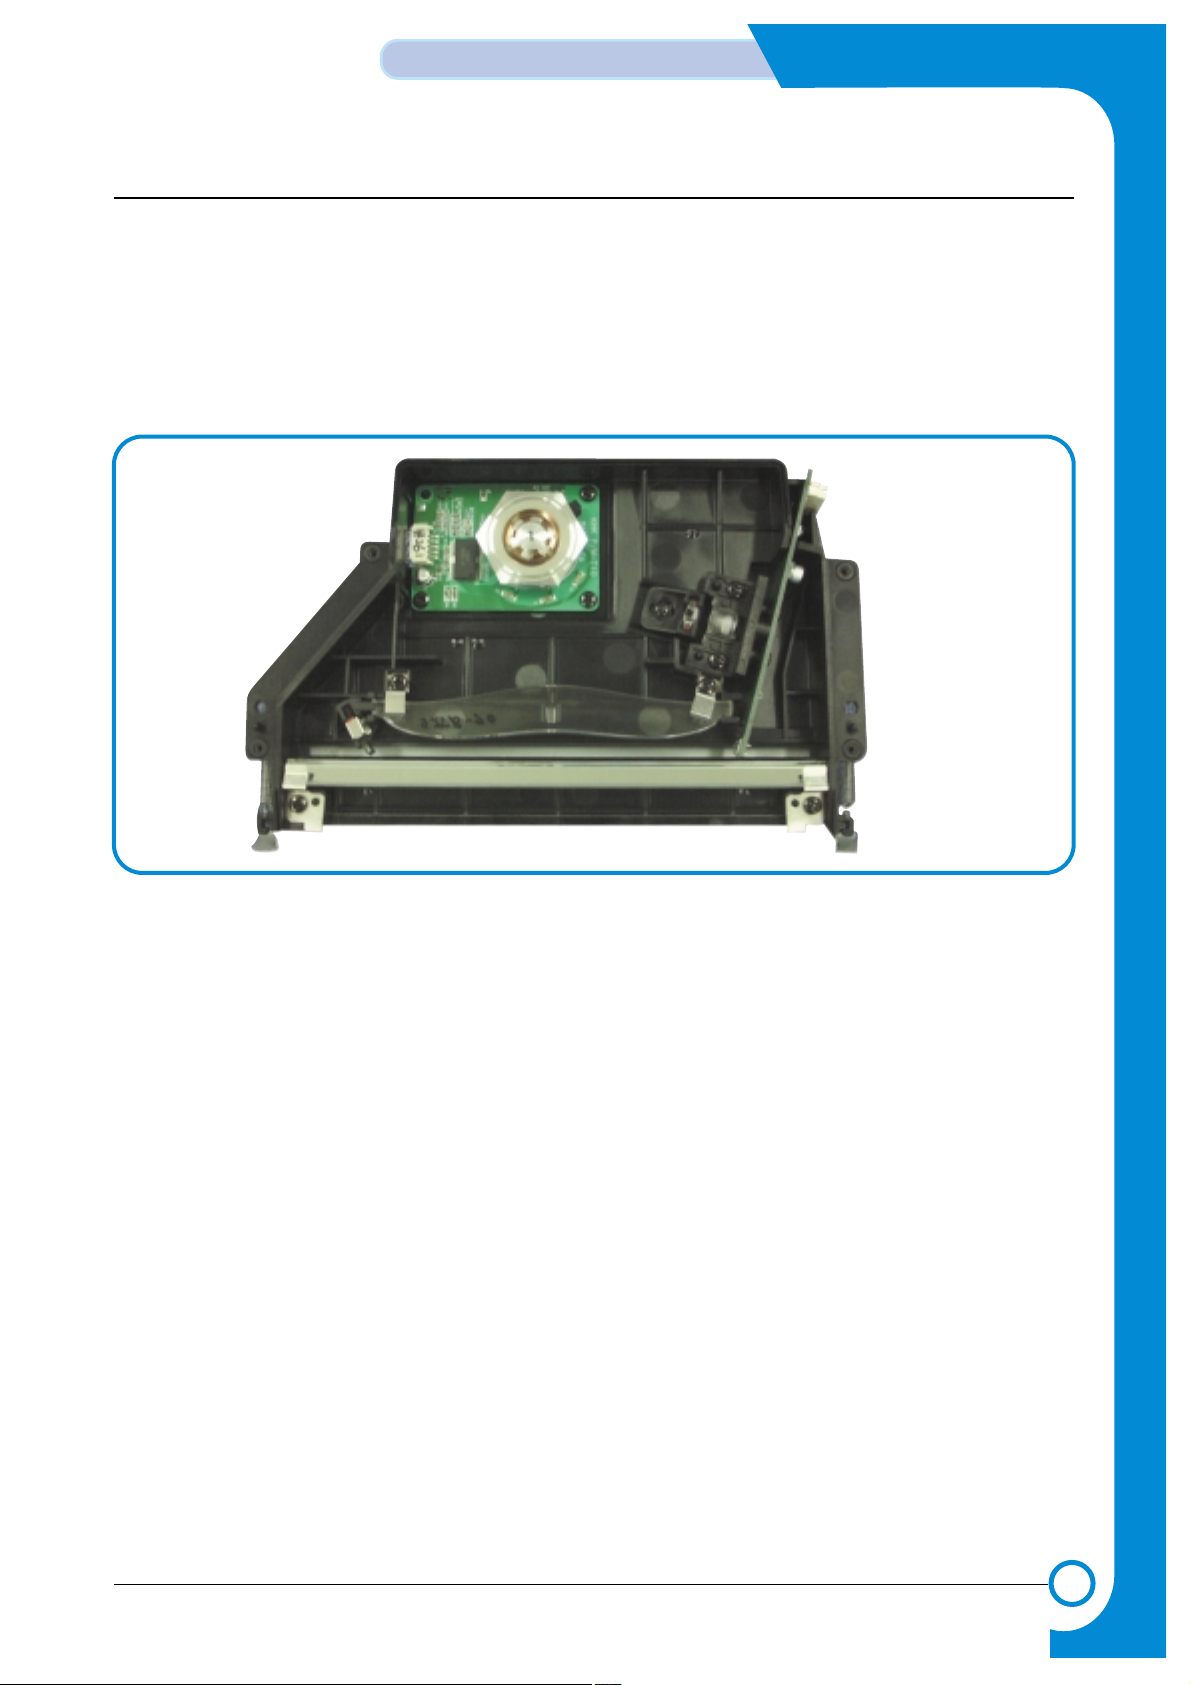
4.2.6 LSU (Laser Scanner Unit)
The LSU is controlled by the video controller. It converts the received video data to pulsed laser light that
is scanned onto the surface the OPC drum using a rotating polygon mirror. This creates the latent image on
the drum surface. The OPC drum rotates at the same speed as the paper is fed. When the edge of the polygon mirror is detected, the LSU generates the /HSYNC signal. The CPU syncs the left margin of the image
to this signal. After detecting the /HSYNC signal, the image data is sent to the LSU to begin transfer of the
image left margin to the paper.
Each surface of the polygon mirror provides one line for scanning.
4-8
Summary of Product
WorkCentre PE16July 2003
Service Manual
4.2.7 Toner Cartridge
The xerographic process creates a visual image from the latent image. The Toner Cartridge contains the OPC
Drum, developer, and toner components in one unit. The OPC unit contains the OPC drum and charging roller.
The developer unit contains toner, toner cartridge, supply roller, developing roller, and blade (Doctor blade).
— Developing Method: Non magnetic 1 element contacting method
— Toner: Non magnetic 1 element shatter type toner
— The life span of toner: 3,000 sheets (IDC Pattern/A4 standard)
— Toner remaining amount detecting sensor: None
— OPC Cleaning: Collect the toner by using electric charge + FILM OPC
— Management of excess toner: Collect the toner by using electric charge (Cleanerless Type- No
excess toner)
— OPC Drum protecting Shutter: None
— Classifying device for toner cartridge: ID is classified by interruption of the frame channel.
Loading…
Скачать
WorkCentre PE16
LASER MULTIFUNCTION (4 IN 1)
MFP User’s Guide
-
Страница 1
W orkCentre PE16 LASER MULTIFUNCTION (4 IN 1) MFP User’s Guide[…]
-
Страница 2
About the User’s Guides Your machine comes with the three user’s guides: This Laser MFP User’s Guide provides information you need for setting up y our machine and installing the supplied software. It also pro vides all of the detailed instructions for using your machine as a printer , a scanner and a copier and information for maintaining an[…]
-
Страница 3
ii C ONTENTS Chapter 1: G ETTING S TARTED Unpacking …………………………………………………. 1.2 Understanding the Component Location ……………… 1.5 Front View …………………………………………….. 1.5 Rear View ……………………………………………… 1.6 Control Panel Functions ………….[…]
-
Страница 4
iii Chapter 3: P APER H ANDLING Selecting Print Materials ………………………………… 3.2 Size, Input Sources and Capacities ……………….. 3.2 Guidelines for Paper and Special Materials ………. 3.3 Selecting an Output Location …………………………… 3.4 Printing to the Front Output Tray (Face down) …. 3.5 Printing[…]
-
Страница 5
iv Chapter 5: P RINTING Printing a Document …………………………………….. 5.2 Cancelling a Print Job ……………………………….. 5.5 Using a Favorite Setting ……………………………. 5.6 Using Help …………………………………………….. 5.6 Setting Paper Properties ……………………………[…]
-
Страница 6
v Chapter 7: M AINTENANCE Clearing the Memory …………………………………….. 7.2 Cleaning Your Machine ………………………………….. 7.3 Cleaning the Outside ………………………………… 7.3 Cleaning the Inside ………………………………….. 7.3 Cleaning the Scan Unit ……………………………[…]
-
Страница 7
vi Chapter A: S PECIFICATIONS General Specifications …………………………………… A.2 Scanner and Copier Specifications …………………….. A.3 Printer Specifications …………………………………….. A.4 Facsimile Specifications …………………………………. A.5 Paper Specifications ………………….[…]
-
Страница 8
vii Important Precautions and Safety Information When using this machine, these basic safet y precautions should always be followed to reduce risk of fire, electric shock, and injury to people: 1. R ead and understand all instructions. 2. Use common sense whenev er operating electrical appliances. 3. Follow all w arnings and instructions marked on […]
-
Страница 9
viii • If the machine has been exposed to r ain or water . • If the machine does not oper ate properly after instructions have been followed. • If the machine has been dropped, or the cabinet appears damaged. • If the machine exhibits a sudden and distinct change in performance. 15. Adjust only those controls cov ered by the operating instr[…]
-
Страница 10
ix Ozone Safety During normal oper ation, this machine produces ozone. The ozone produced does not present a hazard to the oper ator . However , it is advisable that the machine be operated in a well ventilated area. If you need additional information about oz one, please request your nearest X erox dealer . Power Saver This machine contains adv an[…]
-
Страница 11
x Radio Frequency Emissions FCC Information to the User This equipment has been tested and found to comply with the limits for a Class B digital device, pursuant to P art 15 of the FCC Rules. These limits are designed to provide reasonable protection against harmful interference in a residential installation. This equipment gener ates, uses and can[…]
-
Страница 12
xi R efer to the F acsimile User’ s Guide for instructions on how to enter this information into your machine’ s memory . The T elephone Company ma y make changes in its communications facilities, equipment oper ations, or procedures where such action is reasonably required in the operation of its business and is not inconsistent with the rules[…]
-
Страница 13
xii You should also know that: •Y our machine is not designed to be connected to a digital PBX system. • If you intend to use a computer modem or fax modem on the same phone line as your machine, y ou may experience transmission and reception problems with all the equipment. It is recommended that no other equipment, ex cept for a regular telep[…]
-
Страница 14
xiii Declaration of Conformity (European Countries) Approvals and Certifications The CE marking applied to this product symbolises X erox Electronics Co. , Ltd. Declaration of Conformit y with the following applicable 93/ 68/EEC Directives of the European Union as of the dates indicated: January 1, 1995 : Council Directiv e 73/23/EEC Approximation […]
-
Страница 15
xiv Replacing the Fitted Plug (for UK Only) I MPORTANT The mains lead for this machine is fitted with a standard (BS 1363) 13 amp plug and has a 13 amp fuse. When y ou change or examine the fuse, you must re-fit the correct 13 amp fuse. Y ou then need to replace the fuse cov er . If you have lost the fuse co ver , do not use the plug until y ou hav[…]
-
Страница 16
xv[…]
-
Страница 17
xvi Differences Between British and American English British English American English (Re)dialling (R e)dialing Colour Color Emphasise Emphasize Recognise Recogniz e Organise Organize Authorise Authorize Cancelling Canceling Customise Customize[…]
-
Страница 18
1 G ETTING S TARTED Thank you for purchasing this X erox multifunctional product. Y our machine provides printing, copying, scanning, and faxing functions! This chapter gives you step-by -step instructions for setting up your machine. This chapter includes: • Unpacking • Understanding the Component Location • Installing the Toner Cartridge ?[…]
-
Страница 19
G ETTING S TARTED 1 . 2 Unpacking 1 Remo ve the machine and all accessories from the packing carton. Make sure that the machine has been pack ed with the following items: N OTES : • The appearance of the power cord and the telephone line cord may differ according to your country’ s specifications. • The CD-ROM contains software, the user’s […]
-
Страница 20
G ETTING S TARTED 1 . 3 1 2 Remo ve the packing tape from the front, back and sides of the machine. T ape[…]
-
Страница 21
G ETTING S TARTED 1 . 4 Selecting a Location Select a level, stable place with adequate space for air circulation. Allow extr a space for opening covers and tr ays. The area should be well- ventilated and awa y from direct sunlight or sources of heat, cold and humidit y . Do not set the printer close to the edge of your desk or table. Clearance Spa[…]
-
Страница 22
G ETTING S TARTED 1 . 5 1 Understanding the Component Location These are the main components of y our machine: Front View Document Guides Document Input Tray Document Output Tray Control Panel (see page 1.7 Paper Tray Front Cover Paper Level Indicator Bypass Tray Automatic Document Feeder Document Cover Paper Output Extension Document Glass Front O[…]
-
Страница 23
G ETTING S TARTED 1 . 6 Rear View AC Power Cord Connector Parallel Connector Power Switch USB Connector Telephone Connector Rear Output Slot (Face up) Rear Cover[…]
-
Страница 24
G ETTING S TARTED 1 . 7 1 Control Panel Functions WorkCentre PE16 1 4 6 5 2 3 1 C O P Y Adjusts the brightness of the documents for the current copy job. Selects the document type for the current copy job. Allows you to use special copy features, such as Clone, Collation, Auto fit, 2-side, N-up (multiple pages on a sheet) and Poster copying. Makes […]
-
Страница 25
G ETTING S TARTED 1 . 8 3 Sends you back to the upper menu level. Stops an operation at an y time. In Standby Mode, clears/cancels the copy options, such as the contrast, the image setting, the copy size and the number of copies. Starts a job. 4 Dials a number or enters alphanumeric characters. 5 F A X Adjusts the resolution of the documents for th[…]
-
Страница 26
G ETTING S TARTED 1 . 9 1 Installing the Toner Cartridge 1 Open the front cov er . 2 R emo ve the starter toner cartridge from its bag. Gently roll the cartridge to distribute the toner . Thoroughly rolling the cartridge will assure the maximum copies per cartridge. 3 Slide the toner cartridge into the machine until it locks into place completely .[…]
-
Страница 27
G ETTING S TARTED 1 . 10 4 Close the front cov er . N OTE : When the toner cartridge needs to be replaced, the indicator turns on and the “T oner Empty” message appears on the display . T o replace the toner cartridge, see page 7.8.[…]
-
Страница 28
G ETTING S TARTED 1 . 11 1 Loading Paper The paper tr ay can hold a maximum of 250 sheets of 20 lb plain paper . F or copying or faxing, you can use A4-, Letter -, or Legal-sized paper only . F or printing a PC file, you can use many different sizes of paper . The paper tray is preset for using Letter — sized paper . To load a stack of Letter-sized[…]
-
Страница 29
G ETTING S TARTED 1 . 12 4 Insert the paper stack into the paper tr ay . If you want to load a different siz ed paper , you need to adjust the paper guides. F or details, see page 1.13. 5 Pa y attention to the paper limit mark on the left inside w all of the tra y . Paper o verloading may cause paper jams. 6 Slide the paper tr ay back in. After you[…]
-
Страница 30
G ETTING S TARTED 1 . 13 1 Changing the Paper Size in the Paper Tray To load longer sizes of paper , such as A4 or Legal-sized paper , you need to adjust the paper guides to extend the paper tr ay . 1 Pressing and unlatching the guide lock, slide the paper length guide out completely to extend the paper tr ay to its full length. 2 After inserting p[…]
-
Страница 31
G ETTING S TARTED 1 . 14 N OTES : • Do not push the paper width guide far enough to cause the materials to warp. • If you do not adjust the paper width guide, it may cause paper jams. Making Connections 1 Plug the supplied telephone line cord into the LINE jack and the other end into the w all jack.[…]
-
Страница 32
G ETTING S TARTED 1 . 15 1 2 If you want to use a parallel printer cable, purchase only IEEE-1284 compliant par allel cable and connect it to the parallel connector on y our machine. Push the metal clips down to fit inside the notches on the cable plug. Connecting the printer to the USB port of the computer requires a certified USB cable. Connect t[…]
-
Страница 33
G ETTING S TARTED 1 . 16 Turning the Machine On 1 Plug one end of the supplied three-pronged electrical t ype cord into the AC socket on the machine and the other end into a properly grounded AC outlet. 2 Press the power switch to turn the machine on. “ W arming Up Please W ait ” appears on the display indicating that the machine is now on. To […]
-
Страница 34
G ETTING S TARTED 1 . 17 1 Changing the Display Language and Country Setting Language To change the language that displays on the display of the control panel, follow these steps: 1 Press Menu until “Machine Setup” appears on the top line of the display . 2 Press the scroll button ( ¦ or ) until “Language” appears on the bottom line of[…]
-
Страница 35
G ETTING S TARTED 1 . 18 Setting the Paper Type and Size After loading paper in the paper tr ay , you need to set the paper t ype and size using the control panel buttons. These settings will apply to copy mode. F or PC-printing, y ou need to select the paper type and size in the application progr am you use. 1 Press Menu . The display shows “P a[…]
-
Страница 36
G ETTING S TARTED 1 . 19 1 Using the Save Modes Toner Save Mode The toner sav e mode allows your machine to use less toner on each page. Activ ating this mode extends the life of the toner cartridge longer than the normal mode, but it reduces the print quality . To turn the toner save mode on or off , press Toner Save . • If the button backlight […]
-
Страница 37
G ETTING S TARTED 1 . 20 CCD Power Save Mode The scan lamp under the document glass automatically turns off when it is not in actual use to reduce power consumption and extend the lamp life. The lamp automatically w akes up after some warm-up time when y ou start scanning. Y ou can set the length of time for which the scan lamp w aits after a scan […]
-
Страница 38
2 I NSTALLING S OFTWARE This chapter gives y ou information for installing the supplied software. Y ou must install the software to use your machine as a printer and a scanner . This chapter includes: • Printer Driver Features • System Requirements • Installing Software[…]
-
Страница 39
I NSTALLING S OFTWARE 2 . 2 Printer Driver Features Y our printer drivers will support the following standard features: • P aper source selection • P aper size, orientation and media type • number of copies T able below lists a gener al overview of features supported b y your printer driv ers. Feature Printer Driver Win9x/Me Win2000/XP NT4.0 […]
-
Страница 40
I NSTALLING S OFTWARE 2 . 3 2 System Requirements Before you begin, ensure that y our system meets the minimum requirements. Supported Operating System •W indows 95 OSR2 •W indows 98/Windows 98 SE •W indows Me •W indows NT 4 W orkstation or Server with Service P ack 3 •W indows 2000 Professional or Advanced Serv er •W indows XP Home edi[…]
-
Страница 41
I NSTALLING S OFTWARE 2 . 4 Installing Software Installing the drivers and other softw are will enable PC printing. Ensure the W orkCentre PE16 is plugged in and connected to the computer’ s parallel or USB port before installing softw are from the CD . N OTE : Windows 95 and Windows NT 4.0 do not support USB connection. 1 Switch on the PC and st[…]
-
Страница 42
I NSTALLING S OFTWARE 2 . 5 2 6 Select [ OK ]. 7 F ollow the on-screen instructions to complete the softw are installation. N OTE : Fo r more information about printing refer to the “ Printing” chapter of this Guide. 8 F or Windows 95/98 eject the CD after re-start. 9 After installing the softw are reboot the PC.[…]
-
Страница 43
I NSTALLING S OFTWARE 2 . 6 N OTES :[…]
-
Страница 44
3 P APER H ANDLING This chapter introduces you to the basics of selecting print materials and loading them into y our machine. This chapter includes: • Selecting Print Materials • Selecting an Output Location • Loading Paper in the Paper Tray • Using the Bypass Tray[…]
-
Страница 45
P APER H ANDLING 3 . 2 Selecting Print Materials Always use print materials that meet the guidelines for use with this machine. Using print materials that are not recommended may cause paper jams or print qualit y problems. Size, Input Sources and Capacities Size (mm/in.) Input Source/Capacity * Paper Tray Bypass Tray Plain paper Letter (215.9 x 27[…]
-
Страница 46
P APER H ANDLING 3 . 3 3 Guidelines for Paper and Special Materials When selecting or loading paper , envelopes, or other special materials, keep these guidelines in mind: •A ttempting to print on damp , curled, wrinkled, or torn paper can cause paper jams and the poor print qualit y . • Use only high quality copier gr ade paper . Av oid paper […]
-
Страница 47
P APER H ANDLING 3 . 4 • Make sure that there is no exposed adhesiv e material between labels. Exposed areas can cause labels to peel off during printing, which can cause paper jams. Exposed adhesive can also cause damage to machine components. • Do not load a sheet of labels through the machine more than once. The adhesive backing is designed […]
-
Страница 48
P APER H ANDLING 3 . 5 3 Printing to the Front Output Tray (Face down) The front output tr ay collects printed paper face-down, in correct order . The tr ay should be used for most print jobs. Printing to the Rear Output Slot (Face up) Using the rear output slot, paper comes out of the machine face up. Printing from the Bypass tr ay to the rear out[…]
-
Страница 49
P APER H ANDLING 3 . 6 To use the rear output slot: 1 Open the rear cov er by pulling it upward. C AUTION : The fusing area at the rear part of the inside of your machine is hot when powered. Be careful not to be burned when yo u access this area. 2 If you do not w ant to stack the printed pages on the rear output slot, close the rear co ver . The […]
-
Страница 50
P APER H ANDLING 3 . 7 3 The paper level indicator on the front of the paper tr ay shows the amount of paper currently left in the tr ay . When the tray is empty , the indicator of the bar is lowered. To load paper , pull open the paper tray and load paper with the print side face down. Y ou can load letterhead paper with the design side face down.[…]
-
Страница 51
P APER H ANDLING 3 . 8 N OTES : • If you experience problems with paper feed, place the paper in the Bypass tray . •Y ou can load up to 150 sheets of previously printed paper . The printed side should be facing up with an uncurled edge at the top side. If you experience problems with paper feed, turn the paper around. Note that the print qualit[…]
-
Страница 52
P APER H ANDLING 3 . 9 3 F or transparencies, hold the tr ansparencies by the edges and avoid touching the print side. Oils from y our fingers that are deposited on them can cause print qualit y problems. C AUTION : Make sure to open the rear output slot when you print on transparencies. If not, they may tear while exiting the machine. F or envelop[…]
-
Страница 53
P APER H ANDLING 3 . 10 3 Open the rear cov er to use the rear output slot. 4 After printing, close the rear co ver . Setting the Paper Type and Size for the Bypass Tray After loading paper in the Bypass tr ay , you need to set the correct paper type and siz e using the control panel buttons. These settings will apply to copy mode. F or PC -printin[…]
-
Страница 54
4 C OPYING This chapter gives y ou step-by-step instructions for cop ying documents. This chapter includes: • Loading Paper for Copying • Making Copies on the Document Glass • Making Copies from the Automatic Document Feeder • Setting Copy Options • Using Special Copy Features • Changing the Default Settings • Setting the Time Out Opt[…]
-
Страница 55
C OPYING 4 . 2 Loading Paper for Copying Y ou can copy a document to A4-, Letter- or Legal-siz ed paper . The instructions for loading print materials are the same whether you are printing, faxing or cop ying. For further details, see page 1.11 for loading in the paper tr ay and page 3.8 for loading in the Bypass tr ay . Making Copies on the Docume[…]
-
Страница 56
C OPYING 4 . 3 4 N OTE : Make sure that no other documents are in the ADF (Automatic Document Feeder). If a document is detected in the ADF , it has priority over the document on the document glass. 3 Close the document cov er . N OTES : • Leaving the cover open while copying may affect the copy quality and toner consumption. • If you are copyi[…]
-
Страница 57
C OPYING 4 . 4 Making Copies from the Automatic Document Feeder Using the ADF (Automatic Document F eeder), you can load up to 30 documents (75 g/m 2 , 20lb) in one job. When you use the ADF : • Do not load documents smaller than 142 x 148 mm or larger than 216 x 356 mm. • Do not attempt to feed the following types of documents: — carbon-paper […]
-
Страница 58
C OPYING 4 . 5 4 2 Make sure that the bottom of the document stack matches the paper size mark ed on the document tray . 3 Customise the copy settings including number of copies, copy size, contr ast and image type by using the control panel buttons. See “Setting Copy Options ” on page 4.6. To clear the settings, use the Stop/Clear button. 4 If[…]
-
Страница 59
C OPYING 4 . 6 Setting Copy Options The buttons on the control panel let y ou make all the basic copy options; contr ast, image type, copy size and number of copies. Set the following options for the current cop y job before pressing Start Copy/Fax to mak e copies. N OTE : If you press Stop/Clear while you set the copy options, all of the options y[…]
-
Страница 60
C OPYING 4 . 7 4 Reduced/Enlarged Copy Using the Reduce/Enlarge button, you can reduce or enlarge the size of a copied image, from 25% to 400% when y ou copy original documents from the document glass or from 25% to 100% from the ADF . Note that the zoom rate a vailable is different depending on the document loading method. To select from the prede[…]
-
Страница 61
C OPYING 4 . 8 Number of Copies Using the No. of Copies button, y ou can select the number of copies from 1 to 99. 1 Press No. of Copies . 2 Press the scroll button ( ¦ or ) until the number you w ant appears on the display . Pressing and holding the button allows y ou to quickly scroll to the number you w ant. you can enter the v alue using t[…]
-
Страница 62
C OPYING 4 . 9 4 Auto Fit Copying This special copy mode can be applied when y ou load document only using the document glass. If a document is detected in the ADF , the Auto Fit does not work. 1 Load the document to be copied on the document glass, and close the cov er . 2 Press Special . 3 Press Special or the scroll button ( ¦ or ) until ?[…]
-
Страница 63
C OPYING 4 . 10 N OTE : Y ou cannot adjust the cop y size using the Reduce/ Enlarge button while making a clone copy . 6 Press Start Copy or Start Copy/Fax to begin copying. Collation Copying The Collation copying feature is a vailable only when you load documents in the ADF . 1 Load the documents to be copied in the ADF . 2 Press Special . 3 Press[…]
-
Страница 64
C OPYING 4 . 11 4 2-side Copying Y ou can copy a 2-sided document on one page of A4, Letter or Legal-sized paper . When you copy using this feature, the machine prints one side on the upper half of the paper and the other side on the lower half without reducing the original. This feature is helpful for copying a small-sized document, such as a name[…]
-
Страница 65
C OPYING 4 . 12 2-up or 4-up Copying The 2 or 4-up copying feature is a vailable only when you load documents in the ADF . 1 Load the documents to be copied in the ADF . 2 Press Special . 3 Press Special or the scroll button ( ¦ or ) until “2-Up” or “4-Up” displays on the bottom line. 4 Press Enter to sav e the selection. 5 If necessar[…]
-
Страница 66
C OPYING 4 . 13 4 5 If necessary , customise the copy settings including number of copies, contr ast and image type by using the control panel buttons. See “Setting Copy Options ” on page 4.6. N OTE : Y ou cannot adjust the cop y size using the Reduce/ Enlarge button for making a poster . 6 Press Start Copy/Fax to begin cop ying. Y our original[…]
-
Страница 67
C OPYING 4 . 14 6 Press Enter to sav e the selection. 7 Repeat steps 3 through 6, as needed. 8 To return to Standby Mode, press Stop/Clear . N OTES : While you set copy options, pressing Stop/Clear cancels the changed settings and restores their default status. Setting the Time Out Option Y ou can set the time the machine waits before it restores t[…]
-
Страница 68
5 P RINTING This chapter explains how to print y our documents in Windows and how to use the print settings. This chapter includes: • Printing a Document • Setting Paper Properties • Printing Multiple Pages on One Sheet of Paper (N-Up Printing) • Printing a Reduced or Enlarged Document • Fitting Your Document to a Selected Paper Size • […]
-
Страница 69
P RINTING 5 . 2 Printing a Document The following procedure describes the gener al steps required for printing from v arious Windows applications. The exact steps for printing a document may v ary depending on the application program y ou are using. Refer to y our software application’ s user’s guide for the exact printing procedure. 1 Open the[…]
-
Страница 70
P RINTING 5 . 3 5 The Layout tab first displa ys. If necessary , select the Orientation option. The Orientation option allows you to select the direction in which information is printed on a page. • Portrait prints across the width of the page, letter style. • Landscape prints across the length of the page, spreadsheet style. • If you want to[…]
-
Страница 71
P RINTING 5 . 4 • Reverse All Pages : Y our machine prints all of the pages in reverse. This setting is helpful when y ou are using the rear output slot. • Print Odd Pages : Y our machine prints only the odd pages of the document. • Print Even Pages : Y our machine prints only the even pages of the document. 7 Click other tabs on the top of t[…]
-
Страница 72
P RINTING 5 . 5 5 Cancelling a Print Job There are two wa ys to cancel a print job: To stop a print job from the control panel: Press the Stop/Clear button. Y our machine finishes printing the page that is moving through the machine and delete the rest of the print job. Pressing the button cancels only the current job. If more than one print job is[…]
-
Страница 73
P RINTING 5 . 6 Using a Favorite Setting The Favorites option, which is visible on each properties tab , allows you to sa ve the current properties settings for future use. To save a F avorites item: 1 Change the settings on each tab , as needed. 2 Enter a name for the item in the Favorites input box. 3 Click Save . To use a saved setting, select i[…]
-
Страница 74
P RINTING 5 . 7 5 Setting Paper Properties Use the following options to set the paper handling needs when y ou access the printer properties. See page 5.2 for more information about accessing printer properties. Click the Paper tab to access man y paper properties. Property Description Copies Copies allows you to choose the number of copies to be p[…]
-
Страница 75
P RINTING 5 . 8 Printing Multiple Pages on One Sheet of Paper (N-Up Printing) Y ou can select the number of pages to print on a single sheet of paper . T o print more than one page per sheet, the pages will appear decreased in size and arr anged on the sheet. Y ou can print up to 16 pages on one sheet. 1 To change the print settings from your softw[…]
-
Страница 76
P RINTING 5 . 9 5 3 Select the number of pages y ou want to print per sheet (1, 2, 4, 9 or 16) on the Pages per Side drop-down list. 4 Select the page order on the Page Order drop-down list, if necessary . Check Print Page Border to print a border around each page on the sheet. Print Page Border is enabled only , if the pages per sheet is 2, 4, 9 o[…]
-
Страница 77
P RINTING 5 . 10 Printing a Reduced or Enlarged Document Y ou can scale your print job on a page. 1 When you change the print settings from y our software application, access the printer properties. See page 5.2. 2 From the Layout tab , select Reduce/Enlarge on the Type drop-down list. 3 Enter the scaling r ate in the Persentage input box. Y ou can[…]
-
Страница 78
P RINTING 5 . 11 5 Fitting Your Document to a Selected Paper Size Y ou can scale your print job to any selected paper siz e regardless of the digital document siz e. This can be useful when you want to check fine details on a small document. 1 When you change the print settings from y our software application, access the printer properties. See pag[…]
-
Страница 79
P RINTING 5 . 12 Printing Posters Y ou can print a single-page document onto 4, 9 or 16 sheets of paper , for the purpose of pasting the sheets together to form one poster-size document. 1 When you change the print settings from y our software application, access the printer properties. See page 5.2. 2 From the Layout tab , select Poster on the Typ[…]
-
Страница 80
P RINTING 5 . 13 5 Specify an ov erlap in millimeters or inches to make it easier to reconstruct the resulting poster . 4 Click the Paper tab and select the paper source, siz e and type. 5 Click OK and print the document. Y ou can complete the poster by reconstructing the results. Using Watermarks The W atermark option allows y ou to print text ove[…]
-
Страница 81
P RINTING 5 . 14 Creating a Watermark 1 When you change the print settings from y our software application, access the printer properties. See page 5.2. 2 Click the Extras tab and click the Edit button in the Watermark section. The Edit W atermarks window appears. 3 Enter the text message you w ant to print in the Watermark Message bo x. The messag[…]
-
Страница 82
P RINTING 5 . 15 5 Editing a Watermark 1 When you change the print settings from y our software application, access the printer properties. See page 5.2. 2 Click the Extras tab and click the Edit button in the Watermark section. The Edit W atermarks window appears. 3 Select the watermark y ou want to edit on the Current Watermarks list, and change […]
-
Страница 83
P RINTING 5 . 16 Using Overlays What is an Overlay? An overla y is text and/or images stored in the computer hard disk drive (HDD) as a special file format that can be printed on any document. Ov erlays are often used to take the place of preprinted forms and letterhead paper . Rather than using preprinted letterhead, you can create an o verlay con[…]
-
Страница 84
P RINTING 5 . 17 5 4 In the Edit Overla ys window, click Create Overlay . 5 In the Create Overla y window, t ype a name of up to eight characters in the File name box. Select the destination path, if necessary . (The default is C:F ormover). 6 Click Save . Y ou can see the name on the Overlay List . 7 Click OK or Yes until you complete creating. T[…]
-
Страница 85
P RINTING 5 . 18 Using a Page Overlay After an overla y has been created, it is ready to be printed with your document. T o print an overlay with a document: 1 Create or open the document y ou want to print. 2 When you change the print settings from y our software application, access the printer properties. See page 5.2. 3 Click the Extras tab. 4 S[…]
-
Страница 86
P RINTING 5 . 19 5 6 If necessary , click Confirm Page Overlay When Printing . When this box is check ed, a message window appears each time you submit a document for printing, asking you to confirm y our wish to print an overlay on y our document. Answering Yes to the window means that the selected ov erlay will be printed with y our document. Ans[…]
-
Страница 87
P RINTING 5 . 20 Setting Graphic Properties Use the following gr aphic options to adjust the print quality for y our specific printing needs. See page 5.2 for more information about accessing printer properties. Click the Graphics tab to displa y the properties shown below . Property Description Resolution Y ou can select the printing resolution by[…]
-
Страница 88
P RINTING 5 . 21 5 Advanced Options Y ou can set advanced settings by clicking the Advanced Options button. Property Description 3 Darkness Use this option to lighten or darken the image appearance in y our print. • Normal : This setting is for normal documents. • Light : This setting is for bolder line widths or darker gr ay scale images. • […]
-
Страница 89
P RINTING 5 . 22 Setting Up the Locally Shared Printer Y ou can connect the machine directly to a selected computer , which is called “host computer , ” on the network. Y our machine can be shared by other users on the network through a Windows 9x, Me, 2000, XP or NT 4.0 network printer connection. In Windows 9x/Me Setting Up the Host Computer […]
-
Страница 90
P RINTING 5 . 23 5 4 Click Start and select Printers from Settings . Double- click your printer name. 5 Select Properties in the Printer menu. 6 Click the Sharing tab and check the Shared As box. Fill in the Shared Name field and then click OK . Setting Up the Client Computer 1 Right-click Start and select Explorer . 2 Open your network folder in t[…]
-
Страница 91
P RINTING 5 . 24 5 F or Windows NT 4.0, check the Shared box. F or Windows 2000, check the Shared As box. F or Windows XP , check the Share this printer box. 6 F or Windows NT 4.0, fill in the Share Name field and click OK . F or Windows 2000/XP , fill in the Shared Name field and click OK . Setting Up the Client Computer 1 Right-click Start and se[…]
-
Страница 92
6 S CANNING This chapter includes: • TWAIN Scanner Program • Scanning Procedure[…]
-
Страница 93
S CANNING 6 . 2 TWAIN Scanner Program The W orkCentre PE16 TW AIN Scanner program is used to scan images, graphics, photogr aphs, and printed text. Documents can be fed from the Automatic Document F eeder(ADF) or placed on the Document Glass. There are two methods for scanning images from a PC, both of which require the installation of a scanner pr[…]
-
Страница 94
S CANNING 6 . 3 6 Scanning Procedure These instructions explain adv anced scanning with a TW AIN compliant application progr am. N OTES : Refer to the documentation provided by the application manufacturer to learn how to scan and access an image. Load the Originals Automatic Document Feeder (ADF): 1 Remo ve all staples and paper clips prior to loa[…]
-
Страница 95
S CANNING 6 . 4 Document Glass: N OTES : When using the Document Glass, ensure there are no documents in the ADF . On completion of the job, ensure the Document Feeder is closed. 1 Raise the ADF or co ver and position the original face down on the Document Glass. Align with the registr ation arrow in the rear left corner . 2 Lower the ADF or cov er[…]
-
Страница 96
7 M AINTENANCE This chapter provides information for maintaining y our machine and the toner cartridge. This chapter includes: • Clearing the Memory • Cleaning Your Machine • Maintaining the Toner Cartridge • Consumables and Replacement Parts[…]
-
Страница 97
M AINTENANCE 7 . 2 Clearing the Memory Y ou can selectively clear information stored in y our machine’s memory . 1 Press Menu on the control panel until “Maintenance” appears on the top line of the displa y . 2 Press the scroll button ( ¦ or ) until you see “Clear Memory” on the bottom line and press Enter . The first av ailable menu[…]
-
Страница 98
M AINTENANCE 7 . 3 7 OR To return to Standby Mode, press Stop/Clear . Cleaning Your Machine To maintain the print quality , follow the cleaning procedures below each time the toner cartridge is replaced or if print qualit y problems occur . N OTE : While cleaning the inside of the printer , be careful not to touch the transfer roller (located under[…]
-
Страница 99
M AINTENANCE 7 . 4 2 Open the front cov er and pull the toner cartridge out, lightly pushing it down. 3 With a dry and lint -free cloth, wipe away an y dust and spilled toner from the toner cartridge area and the toner cartridge cavity . C AUTION : T o prevent damage to the toner cartridge, do not expose it to light for more than a few minute. Cove[…]
-
Страница 100
M AINTENANCE 7 . 5 7 Cleaning the Scan Unit K eeping the scan unit clean helps ensure the best possible copies. W e suggest that you clean the scan unit at the start of each day and during the da y , as needed. 1 Slightly dampen a soft lint -free cloth or paper towel with water . 2 Open the document cov er . 3 Wipe the surface of the document glass[…]
-
Страница 101
M AINTENANCE 7 . 6 Maintaining the Toner Cartridge Toner cartridge storage To get the most from the toner cartridge, keep the following guidelines in mind: • Do not remov e the toner cartridge from its package until ready for use. • Do not refill the toner cartridge. The machine warranty does not cover damage caused by using a refilled cartridg[…]
-
Страница 102
M AINTENANCE 7 . 7 7 Redistributing Toner When the toner cartridge is near the end of its life, white streaks or light print occurs. The L CD displays the warning message, “T oner Low . ” Y ou can temporarily reestablish the print qualit y by redistributing the remaining toner in the cartridge. 1 Open the front cov er . 2 Pull the toner cartrid[…]
-
Страница 103
M AINTENANCE 7 . 8 Replacing the Toner Cartridge When the toner eventually runs out, only blank pages print when a print job is sent or when a fax is receiv ed. At this stage, the toner cartridge needs to be replaced. The displa y shows the warning message, “T oner Empty , ” and the indicator on the control panel turns on. 1 Open the front cov […]
-
Страница 104
M AINTENANCE 7 . 9 7 3 Unpack the new toner cartridge and gently shak e it horizontally four or fiv e times to distribute the toner evenly inside the cartridge. Save the bo x and the cover for shipping. 4 Slide the new toner cartridge in until it locks into place. 5 Close the front cov er .[…]
-
Страница 105
M AINTENANCE 7 . 10 Setting the Notify Toner Option If you hav e set the Notify T oner menu option to “On” , your machine automatically sends a fax to y our service company or the dealer to notify them that y our machine requires a new toner cartridge when the toner cartridge needs to be replaced. The fax number is preset by y our dealer when y[…]
-
Страница 106
M AINTENANCE 7 . 11 7 Consumables and Replacement Parts From time to time, you needs to replace the toner cartridge, roller , and fuser unit to maintain top performance and to a void print quality problems and paper feed problems resulting from worn parts. The following items should be replaced after y ou have printed a specified number of pages: T[…]
-
Страница 107
M AINTENANCE 7 . 12 M EMO[…]
-
Страница 108
8 T ROUBLESHOOTING This chapter gives helpful information for what to do if you encounter an error . This chapter includes: • Clearing Document Jams • Clearing Paper Jams • Clearing LCD Error Messages • Solving Problems[…]
-
Страница 109
T ROUBLESHOOTING 8 . 2 Clearing Document Jams When a document jams while it passes through the ADF (Automatic Document F eeder), “Document Jam” appears on the display . Input Misfeed 1 Remo ve the remaining documents from the ADF . 2 Open the ADF cov er . 3 R otate the bushing on one end of the ADF roller tow ard the ADF ( ) and remove the roll[…]
-
Страница 110
T ROUBLESHOOTING 8 . 3 8 Exit Misfeed 1 Remo ve the remaining documents from the ADF . 2 Open the document cov er and turn the release knob to remove the misfed documents from the document output tra y . 3 Close the document cov er . Then load the documents back into the ADF . Roller Misfeed 1 Remo ve the remaining documents from the ADF . 2 Open t[…]
-
Страница 111
T ROUBLESHOOTING 8 . 4 Clearing Paper Jams When a paper jam occurs, “P aper Jam” appears on the display . Refer to the table below to locate and clear the paper jam. To avoid tearing the paper , pull the jammed paper out gently and slowly . Follow the steps below to clear the jam. In the Paper Feed Area 1 Open and close the front co ver . The j[…]
-
Страница 112
T ROUBLESHOOTING 8 . 5 8 3 R emo ve the jammed paper by gently pulling it str aight out. If there is any resistance and the paper does not mo ve when you pull or if y ou cannot see the paper in this area, skip to the fuser area around the toner cartridge. See page 8.7. 4 Insert the paper tr ay into the machine until it snaps into place. 5 Open and […]
-
Страница 113
T ROUBLESHOOTING 8 . 6 2 Gently pull the paper out of the front output tr ay . Skip to Step 6. 3 If there is any resistance and the paper does not mo ve when you pull or if y ou cannot see the paper in the front output tra y , open the rear cover . 4 R emo ve the jammed paper by gently pulling it str aight out.[…]
-
Страница 114
T ROUBLESHOOTING 8 . 7 8 5 Close the rear cov er . 6 Open and close the front co ver to resume printing. In the Fuser Area or Around the Toner Cartridge N OTE : The fuser area is hot. T ake care when removing paper from the machine. 1 Open the front cov er and pull the toner cartridge out, lightly pushing it down. 2 R emo ve the jammed paper by gen[…]
-
Страница 115
T ROUBLESHOOTING 8 . 8 3 Replace the toner cartridge and close the front co ver . Printing automatically resumes. In the Bypass Tray “P aper Jam 0” , “P aper Jam 1” appears on the display when y ou try to print using the Bypass tr ay and the machine does not detect paper , due to no paper or improper paper loading. “P aper Jam 0” , “P[…]
-
Страница 116
T ROUBLESHOOTING 8 . 9 8 Tips for Avoiding Paper Jams When Printing on the A5-sized Paper If paper jams frequently occur when y ou print on the A5-sized paper: 1 Open the input tr ay and load paper into the tra y as shown below . 2 Open the X erox W orkCentre PE16 Properties window , set the paper size to A5(5.8×8.3 in.) from the Paper tab. 3 From […]
-
Страница 117
T ROUBLESHOOTING 8 . 10 Tips for Avoiding Paper Jams By selecting the correct paper t ypes, most paper jams can be av oided. When a paper jam occurs, follow the steps outlined in “Clearing P aper Jams” on page 8.4. • F ollow the procedures in “Loading Paper” on page 1.11. Ensure that the adjustable guides are positioned correctly . • Do[…]
-
Страница 118
T ROUBLESHOOTING 8 . 11 8 Clearing LCD Error Messages Display Meaning Suggested solutions Cancel ? 1:Yes 2:No Y our machine’s memory is full during the machine stores the document into the memory . To cancel the fax job, press the 1 button to accept “Y es. ” If you want to send the pages were stored, press the 2 button to accept “No. ” Y […]
-
Страница 119
T ROUBLESHOOTING 8 . 12 Line Busy The remote party did not answer or the line is already engaged. T ry again after a few minutes. Line Error Y our machine cannot connect with the remote machine or has lost contact because of a problem with the phone line. T ry again. If the problem persists, wait an hour or so for the line to clear and try again. O[…]
-
Страница 120
T ROUBLESHOOTING 8 . 13 8 Paper Jam 0 Paper has jammed in the feeding area of the paper tra y . Y our machine detects non feeding from the Bypass tra y . Clear the jam. See page 8.4. Load paper in the Bypass tr ay . Or remove the jammed paper from the Bypass tra y . Paper Jam 1 Paper has jammed in the paper exit area. Y our machine detects non feed[…]
-
Страница 121
T ROUBLESHOOTING 8 . 14 Solving Problems The following chart lists some conditions that ma y occur and the recommended solutions. F ollow the suggested solutions until the problem is corrected. If the problem persists, please call for service. Paper Feeding Problems Condition Suggested solutions Paper is jammed during printing. Clear the paper jam.[…]
-
Страница 122
T ROUBLESHOOTING 8 . 15 8 Printing Problems Condition Possible cause Suggested solutions The machine does not print. The machine is not receiving power . Check the power cord connections. Check the power switch and the power source. The machine is not selected as the default printer . Select Xerox WorkCentre PE16 as y our default printer in your Wi[…]
-
Страница 123
T ROUBLESHOOTING 8 . 16 A print job is extremely slow . The job may be very complex. Reduce the complexit y of the page or try adjusting the print quality settings. The maximum print speed of your machine is 17 PPM for Letter-sized paper . If you are using Windows 9x/Me, the Spooling Setting may be set incorrectly . From the Start menu, choose Sett[…]
-
Страница 124
T ROUBLESHOOTING 8 . 17 8 The machine prints, but the text is wrong, garbled, or incomplete. The printer cable is loose or defective. Disconnect the printer cable and reconnect. T ry a print job that you have already printed successfully . If possible, attach the cable and the machine to another computer and try a print job that you know works. Fin[…]
-
Страница 125
T ROUBLESHOOTING 8 . 18 Printing Quality Problems The dirty inside of the machine or improper paper loading ma y reduce the print quality . See the table below to clear the problem. Condition Suggested solutions Light or faded print If a vertical white streak or faded area appears on the page: • The toner supply is low . Y ou may be able to tempo[…]
-
Страница 126
T ROUBLESHOOTING 8 . 19 8 Vertical lines If black vertical streaks appear on the page: • The drum inside the toner cartridge has probably been scratched. Install a new toner cartridge. See “Installing the T oner Cartridge” on page 1.9. Gray background If the amount of background shading becomes unacceptable: • Change to a lighter weight pag[…]
-
Страница 127
T ROUBLESHOOTING 8 . 20 Background scatter Background scatter results from bits of toner distributed on the printed page. • The paper may be too damp . T ry printing with a different batch of paper . Do not open packages of paper until necessary so that the paper does not absorb too much moisture. • If background scatter occurs on an en velope,[…]
-
Страница 128
T ROUBLESHOOTING 8 . 21 8 Wrinkles or creases • Ensure that the paper is loaded properly . • Check the paper type and quality . See “Paper Specifications ” on page A.6. •T urn over the stack of paper in the paper tr ay . Also try rotating the paper 180° in the tr ay . Back of printouts are dirty Check for leaking toner . Clean the inside[…]
-
Страница 129
T ROUBLESHOOTING 8 . 22 Fax Problems Horizontal stripes If horizontally aligned black streaks or smears appear: • The toner cartridge may be installed improperly . R emove the cartridge and reinsert. • The toner cartridge may be defectiv e. Install a new toner cartridge. See “Installing the T oner Cartridge” on page 1.9. • If the problem […]
-
Страница 130
T ROUBLESHOOTING 8 . 23 8 The numbers stored in the memory do not dial correctly . Make sure that the numbers are stored in the memory correctly . Print a Phonebook list, referring to the F acsimile User’s Guide. The document does not feed into the machine. • Make sure that the document is not wrinkled and y ou are putting it in correctly . Che[…]
-
Страница 131
T ROUBLESHOOTING 8 . 24 Copying Problems Condition Suggested solutions Copies are too light or too dark. Use the Contrast button to darken or lighten the background of the copies. Smears, lines, marks or spots appears on copies. • If defects are on the original, press the Contrast button to lighten the background of your copies. • If no defects[…]
-
Страница 132
T ROUBLESHOOTING 8 . 25 8 Scanning Problems Fewer copies from the toner cartridge than expected prints out. •Y our originals may contain pictures, solids or hea vy lines. F or example, your originals may be forms, newsletters, books or other documents that use more toner . • The machine may be turned frequently on and off . • The document cov[…]
-
Страница 133
T ROUBLESHOOTING 8 . 26 Message appears on your computer screen: • “Device can’t be set to the H/W mode you want. ” •“ P ort is being used by another program. ” •“ P ort is Disabled. • “Scanner is busy receiving or printing data. When the current job is completed, try again. ” • “Inv alid handle. ” • “Scanning h[…]
-
Страница 134
A S PECIFICATIONS This chapter includes: • General Specifications • Scanner and Copier Specifications • Printer Specifications • Facsimile Specifications • Paper Specifications[…]
-
Страница 135
S PECIFICATIONS A . 2 General Specifications Item Description Automatic document feeder Up to 30 sheets (20 lb, 75 g/m 2 ) ADF Document size Width: 142 to 216 mm (5.6 to 8.5 inches) Length: 148 to 356 mm (5.8 to 14 inches) P aper input capacity Paper tr ay: 250 sheets (weight: 75 g/m 2 , 20 lb) Bypass tra y: 1 sheets (weight: 75 g/m 2 , 20 lb) P ap[…]
-
Страница 136
S PECIFICATIONS A . 3 A Scanner and Copier Specifications W eight Net: 13 Kg (including consumables) Gross: 17 Kg (including consumables, accessories and package) Package W eight P aper: 2.7 Kg Plastic: 0.7 Kg Item Description Compatibility TWAIN standard Scanning method ADF and Flat-bed CCD (Charge Coupled Device) module Resolution Optical: 600 dp[…]
-
Страница 137
S PECIFICATIONS A . 4 Printer Specifications Multiple copies 99 pages Gra y scale 256 levels Item Description Printing method Laser Beam Printing Printing speed Letter: 17 copies per minute A4: 16 copies per minute Paper siz e Paper tr ay: Letter , A4, Legal, Folio , A5, A6 Bypass tra y: Letter , Legal, A4, Folio , Executive, A5, A6, A6 card, Post […]
-
Страница 138
S PECIFICATIONS A . 5 A Facsimile Specifications Item Description Compatibility ITU- T Group 3, ECM Applicable line Public Switched T elephone Network (PSTN) or behind PABX Data coding MH/MR/MMR (ECM Mode) and JPEG for colour fax transmission Modem speed 33600/31200/28800/26400/24000/21600/19200/ 16800/14400/12000/9600/7200/4800/2400 bps with fall […]
-
Страница 139
S PECIFICATIONS A . 6 Paper Specifications Overview Y our machine accepts a variet y of print materials, such as cut -sheet paper (including up to 100% recycled fiber content paper), en velopes, labels, tr ansparencies and custom-size paper . Properties, such as weight, composition, gr ain and moisture content, are important factors affecting the m[…]
-
Страница 140
S PECIFICATIONS A . 7 A N OTE : Y ou may experience jams when using print materials with a length of less than 127 mm (5 in.). For optimum performance, ensure that you are storing and handling the paper correctly . Please refer to “Printer and Paper Storage En vironment ” on page A.9. Guidelines for Using Paper F or the best result, use con ven[…]
-
Страница 141
S PECIFICATIONS A . 8 N OTES : • Do not use letterhead paper printed with low-temperature inks, such as those used in some types of thermography . • Do not use raised or embossed letterhead. • The printer uses heat and pressure to fuse toner to the paper . Insure that any coloured paper or preprinted forms use inks that are compatible with th[…]
-
Страница 142
S PECIFICATIONS A . 9 A Printer and Paper Storage Environment P aper storage en vironmental conditions directly affect the feed oper ation. Ideally , the machine and paper storage en vironment should be at or near room temperature, and not too dry or humid. R emember that paper is hygroscopic; it absorbs and loses moisture r apidly . Heat works wit[…]
-
Страница 143
I NDEX Numerics 2/4-up, special copy 4.12 2-side, special copy 4.11 A ADF, load 4.4 auto fit, special copy 4.9 B bypass tray, use 3.8 C cancel copy 4.3 print 5.5 CCD power save mode, use 1.20 clone, special copy 4.9 collation, special copy 4.10 connection AC power 1.16 parallel 1.15 telephone line cord 1.14 USB 1.15 consumables 7.11 contrast, copy […]
-
Страница 144
paper 8.4 M memory, clear 7.2 N network printer, set 5.22 n-up (multiple pages per sheet) copy 4.12 print 5.8 O orientation, print 5.3 output location, select 3.4 overlay, use 5.16 P paper guidelines 3.3 paper jam, clear 8.4 paper level indicator 3.7 paper load in bypass tray 3.8 in paper tray 1.11 paper load capacity 3.2 paper properties, set 5.7 […]
-
Страница 145
redistribute 7.7 replace 7.8 toner save mode, use 1.19 U USB connect 1.15 mode, change 8.17 W watermarks, use 5.13 Z zoom rate, copy 4.7[…]
-
Страница 146
W orkCentre PE16 LASER MULTIFUNCTION (4 IN 1) FAX User’s Guide[…]
-
Страница 147
CONTENTS i C ONTENTS Chapter 1: G ETTING S TARTED Control Panel Functions ………………………………… 1.2 Setting the Machine ID ………………………………….. 1.4 Entering Characters Using the Number Keypad … 1.5 Setting the Date and Time ……………………………… 1.7 Changing the Clock Mode ………………..[…]
-
Страница 148
CONTENTS ii Chapter 3: A UTOMATIC D IALLING Speed Dialling …………………………………………….. 3.2 Storing a Number for Speed Dialling ……………… 3.2 Sending a Fax using a Speed Number ……………. 3.3 Group Dialling …………………………………………….. 3.4 Setting Group Dial ……………………..[…]
-
Страница 149
1 G ETTING S TARTED The following topics are included: • Control Panel Functions • Setting the Machine ID • Setting the Date and Time • Setting Sounds • Setting the Dial Mode • Using the Toll Save Mode • Setting up the Fax System[…]
-
Страница 150
G ETTING S TARTED 1 . 2 Control Panel Functions 1 4 6 5 2 3 1 C O P Y * Adjusts the brightness of the documents for the current copy job. Selects the document type for the current copy job. Allows you to use special copy features, such as Clone, Collation, Auto fit, 2-side, N-up (multiple pages on a sheet) and Poster copying. Makes a copy smaller o[…]
-
Страница 151
G ETTING S TARTED 1 . 3 1 3 Sends you back to the upper menu level. Stops an operation at an y time. In Standby Mode, clears/cancels the copy options, such as the contrast, the image setting, the copy size and the number of copies. Starts a job. 4 Dials a number or enters alphanumeric characters. 5 F A X Adjusts the resolution of the documents for […]
-
Страница 152
G ETTING S TARTED 1 . 4 Setting the Machine ID In some countries, you are required b y law to indicate your fax number on any fax y ou send. The Machine ID, containing y our telephone number and name (or compan y name), will be printed at the top of each page sent from y our machine. 1 Press Menu until “Machine Setup” appears on the top line of[…]
-
Страница 153
G ETTING S TARTED 1 . 5 1 6 Press Enter when the name on the displa y is correct. 7 Press Stop/Clear to return to Standb y Mode. Entering Characters Using the Number Keypad As you perform v arious tasks, you need to enter names and numbers. F or example, when you set up your machine, y ou enter your name (or y our company’ s name) and telephone n[…]
-
Страница 154
G ETTING S TARTED 1 . 6 Keypad Letters and Numbers Changing Numbers or Names If you mak e a mistake while entering a number or name, press the ¦ button to delete the last digit or char acter . Then enter the correct numbers or char acters. Inserting a Pause With some telephone systems, y ou must dial an access code (9, for example) and listen for […]
-
Страница 155
G ETTING S TARTED 1 . 7 1 Setting the Date and Time All of your fax es will have the date and time printed on them. N OTE : If power to the machine is cut off , you need to reset the correct time and date once the power is restored. 1 Press Menu until “Machine Setup” appears on the top line of the display . 2 Press the scroll button ( ¦ or […]
-
Страница 156
G ETTING S TARTED 1 . 8 5 Press Enter when the time and date on the displa y is correct. When you enter a wrong number , the machine beeps and does not proceed to the next step . If this happens, just reenter the correct number . Changing the Clock Mode Y ou can set your machine to display the current time using either a 12-hour or 24-hour format. […]
-
Страница 157
G ETTING S TARTED 1 . 9 1 Speaker, Ringer, Key Sound and Alarm Sound 1 Press Menu until “Sound/V olume” appears on the top line of the display . 2 Press the scroll button ( ¦ or ) to scroll through the options. Press Enter when y ou see the desired sound option. 3 Press the scroll button ( ¦ or ) to display the desired status or loudn[…]
-
Страница 158
G ETTING S TARTED 1 . 10 Setting the Dial Mode Y ou can select the type of the telephone dial system where y our machine is connected. N OTE : The Dial Mode setting may be unavailable depending on your country . 1 Press Menu until “Machine Setup” appears on the top line of the display . 2 Press the scroll button ( ¦ or ) until you see “D[…]
-
Страница 159
G ETTING S TARTED 1 . 11 1 To turn the toll save mode on: 1 Press Toll Save . The button backlight turns on. 2 Press Enter when “Start Time” displays on the bottom line. 3 Enter the time when your machine starts sending toll sa ve faxes, using the number k eypad. To select “ Am” or “Pm” for 12-hour format, press the or button. 4 Press E[…]
-
Страница 160
G ETTING S TARTED 1 . 12 Setting up the Fax System From the Fax Setup menu, you can configure man y settings for the fax system. Changing the Fax Setup options 1 Press Menu until “F ax Setup” appears on the top line of the display . The first av ailable menu item, “Receiv e Mode, ” displays on the bottom line. 2 Press the scroll button ( ¦[…]
-
Страница 161
G ETTING S TARTED 1 . 13 1 Contrast Y ou can select the default contrast mode to fax your documents lighter or darker . • Lighten works well with dark print. • Normal works well with standard typed or printed documents. • Darken works well with light print or faint pencil markings. Redial T erm Y our machine can automatically redial a remote […]
-
Страница 162
G ETTING S TARTED 1 . 14 Discard Size When receiving a document as long as longer than the paper installed in your machine, you can set the machine to discard any excess at the bottom of the page. If the received page is outside the margin you set, it will print on two sheets of paper at the actual size. When the document is within the margin and t[…]
-
Страница 163
2 G ENERAL F AX F UNCTIONS The following topics are included: • Sending a Fax • Receiving a Fax[…]
-
Страница 164
G ENERAL F AX F UNCTIONS 2 . 2 Sending a Fax Preparing Documents for Faxing Use the following guidelines to prepare y our documents for faxing: • Do not load documents smaller than 142 x 148 mm or larger than 216 x 356 mm in the Automatic Document F eeder (ADF). • Do not attempt to load the following t ypes of documents into the ADF : — carbon-[…]
-
Страница 165
G ENERAL F AX F UNCTIONS 2 . 3 2 2 Adjust the document guide on the ADF to match the width of the document. To fax a document from the document glass: 1 Open the document cov er . 2 Place the document face down on the document glass and align it with the registr ation guide on the top left corner of the glass. 3 Close the document cov er .[…]
-
Страница 166
G ENERAL F AX F UNCTIONS 2 . 4 N OTES : • If you are copying a page from a book or magazine, lift the cover until its hinges are caught by the stopper and then close the cover . If the book or magazine is thicker than 30 mm, start copying with the cover open. • Make sure that no document is in the ADF . If any document is detected in the ADF , […]
-
Страница 167
G ENERAL F AX F UNCTIONS 2 . 5 2 N OTES : •F or the memory transmission, the super fine mode is not av ailable. The resolution setting is automatically changed to Fine. •W hen your machine is set to Super Fine resolution and the remote fax machine does not support the Super Fine resolution, the machine transmits using the highest resolution mod[…]
-
Страница 168
G ENERAL F AX F UNCTIONS 2 . 6 6 The number is dialed and then the machine begins sending the fax when the remote fax machine is ready . N OTE : When you want to cancel the fax job, press Stop/Clear at any time while sending the fax. Sending a Fax Manually 1 Load the document(s) face up into the ADF . OR Place a single document face down on the doc[…]
-
Страница 169
G ENERAL F AX F UNCTIONS 2 . 7 2 Automatic Redialling If the number you ha ve dialed is busy or there is no answer when you send a fax, the machine will automatically redial the number every three minutes up to sev en times by the factory default settings. When the display shows “R etry R edial ?, ” press Enter to redial the number without wait[…]
-
Страница 170
G ENERAL F AX F UNCTIONS 2 . 8 details about loading paper and setting the paper siz e in the tra y , refer to the MFP User’s Guide. Receiving Automatically in the Fax Mode Y our machine is preset to the fax mode at the factory . When you receiv e a fax, the machine answers the call on a specified number of rings and automatically receiv es the f[…]
-
Страница 171
G ENERAL F AX F UNCTIONS 2 . 9 2[…]
-
Страница 172
G ENERAL F AX F UNCTIONS 2 . 10[…]
-
Страница 173
3 A UTOMATIC D IALLING The following topics are included: • Speed Dialling • Group Dialling • Searching for a Number in the Memory • Printing a Phonebook List[…]
-
Страница 174
A UTOMATIC D IALLING 3 . 2 Speed Dialling Y ou can store up to 100 frequently dialed numbers in one or two-digit speed dial locations (0-99). Storing a Number for Speed Dialling 1 Press Phonebook on the control panel. 2 Press Phonebook or the scroll button ( ¦ or ) to display “Store/Edit” on the bottom line of the displa y . Press Enter . […]
-
Страница 175
A UTOMATIC D IALLING 3 . 3 3 Sending a Fax using a Speed Number 1 F eed the document(s) face up into the ADF . Or Place a single document face down on the document glass. F or details about loading a document, see page 2.2. 2 Adjust the document resolution to suit y our fax needs (see page 2.4). If you need to change the contr ast, see page 1.13. 3[…]
-
Страница 176
A UTOMATIC D IALLING 3 . 4 Group Dialling If you frequently send the same document to sev eral destinations, you can create a group of these destinations and set them under a one or two-digit group dial location. This enables you to use a group dial number setting to send the same document to all the destinations in the group . Setting Group Dial 1[…]
-
Страница 177
A UTOMATIC D IALLING 3 . 5 3 10 Press Enter when the name appears correctly or without entering a name. 11 If you want to assign another group , repeat from Step 4. OR To return to Standby Mode, press Stop/Clear . N OTE : Y ou cannot include one group dial number in another group dial number . Editing Group Dial Numbers Y ou can delete a specific s[…]
-
Страница 178
A UTOMATIC D IALLING 3 . 6 Sending a Fax Using Group Dialling (Multi-address Transmission) Y ou can use group dialling for Broadcasting or Delay ed transmissions. F ollow the procedure of the desired oper ation (Broadcasting transmission; see page 4.2, Delayed transmission; see page 4.3). When you come to a step in which the displa y asks you to en[…]
-
Страница 179
A UTOMATIC D IALLING 3 . 7 3 Searching for a Number in the Memory There are two wa ys to search for a number in the memory . Y ou can either scan from A to Z sequentially , or you can search using the first letter of the name associated with the number . Searching Sequentially through the Memory 1 Press Phonebook . 2 Press Enter when “Search/Dial[…]
-
Страница 180
A UTOMATIC D IALLING 3 . 8 Printing a Phonebook List Y ou can check your automatic dial setting by printing a Phonebook list. 1 Press Phonebook . 2 Press Phonebook or the scroll button ( ¦ or ) until “Print” appears on the bottom line and press Enter . A list showing your speed dial and group dial entries prints out.[…]
-
Страница 181
4 O THER W AYS TO F AX The following topics are included: • Redialling • Sending Broadcasting Faxes • Sending a Delayed Fax • Sending a Priority Fax • Adding Documents To a Scheduled Fax • Cancelling a Scheduled Fax[…]
-
Страница 182
O THER W AYS TO F AX 4 . 2 Redialling To redial the number you last called: Press Redial/Pause . When a document is loaded in the ADF (A utomatic Document F eeder; see page 2.2), the machine automatically begins to send. F or the document loaded on the document glass, the displa y asks if you w ant to load another page. Select “1.Y es” to add. […]
-
Страница 183
O THER W AYS TO F AX 4 . 3 4 5 Press Enter to confirm the number . The display asks you to enter another fax number to send the document. N OTE : Y our machine can send one broadcasting fax to multiple destinations. The “Enter Number ” prompt does not appear if a broadcast is set up and not completed. Y ou must wait until the current broadcast […]
-
Страница 184
O THER W AYS TO F AX 4 . 4 3 Press Menu until “F ax Feature” appears on the top line of the display . The first av ailable menu item, “Delay F ax, ” displays on the bottom line. 4 Press Enter . 5 Enter the number of the remote machine using the number keypad. To enter the number , you can use one or two-digit speed dial or group dial number[…]
-
Страница 185
O THER W AYS TO F AX 4 . 5 4 12 The machine returns to Standby Mode. The displa y reminds y ou that you are in Standb y Mode and that a delayed fax is set. N OTE : If you want to cancel the delayed tr ansmission, see “Cancelling a Scheduled F ax” on page 4.8. Sending a Priority Fax Using the Priority F ax feature, a high priority document can b[…]
-
Страница 186
O THER W AYS TO F AX 4 . 6 6 Press Enter to confirm the number . The display asks you to enter a name. 7 If you want to assign a name to the tr ansmission, enter the name. If not, skip this step . F or details on how to enter a name using the number k eypad, see “Entering Char acters Using the Number K eypad” on page 1.5. 8 Press Enter . The do[…]
-
Страница 187
O THER W AYS TO F AX 4 . 7 4 Adding Documents To a Scheduled Fax Y ou can add documents to the delayed tr ansmission previously reserved in y our machine’s memory . 1 Load the document(s) face up into the ADF . OR Place a single document face down on the document glass. F or details about loading a document, see page 2.2. 2 Adjust the document re[…]
-
Страница 188
O THER W AYS TO F AX 4 . 8 Cancelling a Scheduled Fax 1 Press Menu until “F ax Feature” appears on the top line of the display . 2 Press the scroll button ( ¦ or ) to display “ Add/Cancel” on the bottom line and press Enter . 3 Press the scroll button ( ¦ or ) to display “Cancel Job” and press Enter . The display shows the las[…]
-
Страница 189
5 A DDITIONAL F EATURES The following topics are included: • Using the Secure Receiving Mode • Printing Reports • Using Advanced Fax Settings • Using the ControlCentre[…]
-
Страница 190
A DDITIONAL F EATURES 5 . 2 Using the Secure Receiving Mode Y ou may need to prevent your receiv ed faxes from being accessed by unauthorised people. Y ou can turn on the secure fax mode using the Secure R eceive option to restrict printing out all of the received fax es when the machine is unattended. In the secure fax mode, all incoming fax es wi[…]
-
Страница 191
A DDITIONAL F EATURES 5 . 3 5 To turn the secure receiving mode off: 1 Access the Secure Receive menu by following steps 1 and 2 in “T o turn the secure receiving mode on:” on page 5.2. 2 Press the scroll button ( ¦ or ) to display “Off” on the bottom line and press Enter . 3 Enter the four-digit passcode and press Enter. The mode is d[…]
-
Страница 192
A DDITIONAL F EATURES 5 . 4 Scheduled Job Information This list shows the document currently stored for Dela yed faxes or T oll Save fax es. The list shows the starting time and type of operation. Message Confirmation This report shows the fax number , the number of pages, the elapsed time of the job , the communication mode, and the communication […]
-
Страница 193
A DDITIONAL F EATURES 5 . 5 5 • Sent R eport: Sent fax report • RCV R eport: Received fax report •S ystem Data: S ystem data list • Scheduled Jobs: Scheduled job information • MSG Confirm: Message confirmation • Junk F ax List: Junk fax number list 3 Press Enter . The selected information prints out. Using Advanced Fax Settings Y our ma[…]
-
Страница 194
A DDITIONAL F EATURES 5 . 6 Advanced Fax Setting Options Option Description Send Forw ard Y ou can set the machine to always forward all of the outgoing faxes to the specified destination besides the fax numbers you entered. Select Off to turn this feature off . Select On to turn this feature on. Y ou can set the number of the remote fax machine to[…]
-
Страница 195
A DDITIONAL F EATURES 5 . 7 5 Using the ControlCentre Using the ControlCentre, y ou can set up fax system data options, create and edit Phonebook entries or view information of your machine on the desktop window of y our computer . When you install the X erox softw are, the ControlCentre program is automatically installed. F or information about in[…]
-
Страница 196
A DDITIONAL F EATURES 5 . 8 3 From Programs , select Xerox WorkCentre PE16 and then ControlCentre . Then the ControlCentre progr am opens. 4 The W orkCentre PE16 ControlCentre window pro vides five tabs; Settings , Advanced , Phonebook , Information , and Firmware Update . To exit, click the Exit button at the bottom of each tab. F or further detai[…]
-
Страница 197
A DDITIONAL F EATURES 5 . 9 5 The Advanced Tab Click the Advanced tab to configure adv anced fax system settings. The Phonebook Tab Click the Phonebook tab to create and edit Phonebook entries. Reads the current settings in your machine and refreshes the ControlCentre with them. Downloads the settings made in ControlCentre to your machine. Reads th[…]
-
Страница 198
A DDITIONAL F EATURES 5 . 10 The Information Tab Click the Information tab to view the softw are version information and many counters which allow y ou to check how many scanning, printing, and jamming are made in y our machine. The Firmware Update Tab Click the Firmware Update tab to update the firmware of y our machine. This feature should be use[…]
-
Страница 199
I NDEX A add documents 4.7 ADF, load 2.2 automatic dialling group 3.4 speed 3.2 automatic redialling 2.7 B broadcasting faxes 4.2 C cancelling fax 2.6 scheduled faxes 4.8 characters, enter 1.5 contrast, set 1.13 control panel 1.2 ControlCentre 5.7 D date and time, set 1.7 delayed fax 4.3 document load ADF 2.2 document glass 2.3 prepare 2.2 document[…]
-
Страница 200
T toll save mode 1.10 V volume, adjust ringer 1.9[…]
-
Страница 201
www.Xerox.com[…]