
Yamaha PSR-EW310 – это портативный цифровой синтезатор, отличающийся мощным звуковым генератором, формирующим огромное количество высококачественных тембров, а также современной технической реализацией, позволяющей комфортно использовать инструмент в самых разных инсталляциях.
Модель отлично проявит себя как для обучения, так и для полноценных выступлений на сцене, обеспечивая насыщенный звук, удобное управление и легкую транспортировку.
Для точного исполнения всех партий здесь используется полноразмерная 76-клавишная клавиатура органного типа, оснащенная 4 уровнями чувствительности к силе нажатия (Soft, Medium, Hard и Fixed). Фирменный тон-генератор AWM Stereo Sampling обеспечивает полифонию до 48 голосов и 622 вариации звучания, в число которых входят 241 основной звук, 22 набора ударных инструментов/спецэффектов, 20 арпеджио и 339 тембров XGlite. Присутствуют возможности наложения нескольких пресетов друг на друга для создания новых необычных звуковых текстур, а также разделение клавиатуры для использования разных пресетов в нескольких регистрах. Для обогащения звучания и создания объема в наличии есть множество эффектов реверберации, модуляции и DSP-обработки. Имеются и алгоритмы общей коррекции партий, а также несколько типов гармонайзера.
Для эффективных занятий в памяти устройства находятся несколько обучающих функций, среди которых есть Touch Tutor (обучение силе нажатия), Chord Study (изучение аккордов), Chord Progression (изучение последовательностей аккордов), Phrase Repeat (повтор фраз), A-B Repeat (повтор А-B), Chord Dictionary (словарь аккордов) и алгоритм KEYS TO SUCCESS. Также в наличии есть 205 различных стилей автоаккомпанемента, с помощью которых можно продуктивно репетировать и учиться. Также имеются такие основополагающие возможности, как режим дуэта, метроном, транспортирование, запись в формате MIDI и настройка опорного тона.
Для обмена MIDI-данными и для записи аудио в формате WAV (16 бит/44. кГц) есть USB-аудиоинтерфейс, представленный портом USB-B. Для подключения опциональной педали сустейна или футсвича есть вход на разъеме 1/4″ Jack TRS. На таком же разъеме выполнен и выход для наушников, способный работать как общий выход для подключения к микшеру или внешней звуковой карте. Для коммутации с плеером или смартфоном предусмотрен вход AUX, реализованный на разъеме 1/8″ Jack TRS. Инструмент оснащен встроенной акустической системой с 2 динамиками по 12 см, на каждый из которых приходится 2.5 Вт выходной мощности. Энергообеспечение может осуществляться от адаптера на 12 V DC или же от 6 батареек типа АА (LR6, R6 или HR6). Наконец, здесь имеется настраиваемый режим автоматического отключения питания.
Цифровой синтезатор Yamaha PSR-EW310 представляет собой доступный и универсальный инструмент, на котором можно эффективно заниматься и учиться азам, а также полноценно репетировать, выступать и записывать тембр. Модель отличается простым интерфейсом с удобным ЖК-дисплеем по центру, наличием всех необходимых в работе функций, а также современным техническим воплощением, посредством которого достигается реалистичное и насыщенное звучание. Комплектация включает в себя адаптер питания PA-130 и пюпитр. Опционально можно приобрести стойку для клавишных L-2C, наушники HPH-50 и ножной контроллер FC4A или FC5.
Особенности синтезатора Yamaha PSR-EW310
- Портативный цифровой синтезатор
- Полноразмерная органная клавиатура с 76 клавишами
- 4 уровня чувствительности к силе нажатия
- 622 встроенных тембра, включая наборы ударных и спецэффектов, арпеджио и тембры XGlite
- Эффекты модуляции и реверберации, DSP-обработка, общая коррекция, гармонайзер
- 205 стилей автоаккомпанемента
- Наложение тембров, разделение клавиатуры, режим дуэт
- Запись в формате WAV (16 бит/44.1 кГц)
- 2-полосная акустическая система общей мощностью 5 Вт
- Вход AUX, вход для педали сустейна или футсвича
- Питание от адаптера или от батареек
- Функция автоматического отключения питания
Характеристики синтезатора Yamaha PSR-EW310
| Общие данные | |
| Тип | цифровой синтезатор |
| Обучение | Touch Tutor (обучение силе нажатия), Chord Study (изучение аккордов), Chord Progression (изучение последовательностей аккордов), Phrase Repeat (повтор фраз), A-B Repeat (повтор А-B), Chord Dictionary (словарь аккордов), функция KEYS TO SUCCESS |
| Аксессуары в комплекте | адаптер питания PA-130, пюпитр |
| Аксессуары (приобретаются отдельно) | стойка для инструмента L-2C, наушники HPH-50, ножные контроллеры FC4A или FC5 |
| Клавиатура | |
| Количество клавиш | 76 |
| Размер клавиш | полноразмерные |
| Тип клавиатуры | органная |
| Чувствительность к силе нажатия | есть, 4 типа |
| Разделение клавиатуры | есть |
| Функции | |
| Тон-генератор | AWM Stereo Sampling |
| Полифония | 48 голосов |
| Тембры | 622 (241 основных тембра, 22 наборов ударных инструментов/спецэффектов, 20 арпеджио, 339 тембров XGlite) |
| Наложение тембров | есть |
| Типы эффектов | реверберация (12 типов), хорус (5 типов), DSP-процессор (38 типов), общая коррекция (6 типов), гармонайзер (26 типов) |
| Автоаккомпанемент | 205 стилей |
| Встроенные композиции | 154 |
| Запись | 5 композиций, 2 трека (прибл. 10 000 нот) |
| Аудиорекордер | 16 бит/44.1 кГц, формат WAV |
| Метроном | 11 – 280 ударов в минуту |
| Транспортирование | +/-12 полутонов |
| Настройка опорного тона | 427 – 453 Гц (шаг 0.2 Гц) |
| Разъемы и интерфейсы | |
| Входы | 1 x 1/4″ Jack TRS sustain pedal in, 1 x 1/8″ Jack TRS aux in |
| Выходы | 1 x 1/4″ Jack TRS phones/main out |
| USB-интерфейс | 1 x USB-B |
| Конструкция | |
| Встроенная акустическая система | есть |
| Усилители | 2 x 2.5 Вт |
| Динамики | 2 x 12 см |
| Дисплей | есть, ЖК |
| Питание | адаптер питания 12 V DC (PA-130, PA-3C или эквивалентный) или 6 батареек типа АА (LR6, R6 или HR6) |
| Потребляемая мощность | 5 Вт |
| Автоматическое отключение питания | есть (настраиваемое) |
| Габариты | 1151 x 118 x 369 мм |
| Вес | 5.4 кг |
Setting UpReferenceAppendix
Before using the instrument, be sure to read
“PRECAUTIONS” on pages 5-7.
1

1. IMPORTANT NOTICE: DO NOT MODIFY THIS UNIT!
FCC INFORMATION (U.S.A.)
This product, when installed as indicated in the instructions
contained in this manual, meets FCC requirements. Modifications not expressly approved by Yamaha may void your authority, granted by the FCC, to use the product.
2. IMPORTANT: When connecting this product to accessories
and/or another product use only high quality shielded cables.
Cable/s supplied with this product MUST be used. Follow all
installation instructions. Failure to follow instructions could void
your FCC authorization to use this product in the USA.
3. NOTE: This product has been tested and found to comply
with the requirements listed in FCC Regulations, Part 15 for
Class “B” digital devices. Compliance with these requirements
provides a reasonable level of assurance that your use of this
product in a residential environment will not result in harmful
interference with other electronic devices. This equipment generates/uses radio frequencies and, if not installed and used
according to the instructions found in the users manual, may
cause interference harmful to the operation of other electronic
devices. Compliance with FCC regulations does not guarantee
* This applies only to products distributed by Yamaha Corporation of America.
COMPLIANCE INFORMATION STATEMENT
(Supplier’s declaration of conformity procedure)
Responsible Party : Yamaha Corporation of America
Address : 6600 Orangethorpe Ave., Buena Park, Calif. 90620
Telephone : 714-522-9011
Type of Equipment : Digital Keyboard
Model Name : PSR-E373, PSR-EW310, YPT-370
This device complies with Part 15 of the FCC Rules.
Operation is subject to the following two conditions:
1) this device may not cause harmful interference, and
2) this device must accept any interference received including interference that may
cause undesired operation.
* This applies only to products distributed by Yamaha Corporation of America. (FCC SDoC)
that interference will not occur in all installations. If this product
is found to be the source of interference, which can be determined by turning the unit “OFF” and “ON”, please try to eliminate the problem by using one of the following measures:
Relocate either this product or the device that is being affected
by the interference.
Utilize power outlets that are on different branch (circuit
breaker or fuse) circuits or install AC line filter/s.
In the case of radio or TV interference, relocate/reorient the
antenna. If the antenna lead-in is 300 ohm ribbon lead, change
the lead-in to co-axial type cable.
If these corrective measures do not produce satisfactory
results, please contact the local retailer authorized to distribute
this type of product. If you can not locate the appropriate
retailer, please contact Yamaha Corporation of America, Electronic Service Division, 6600 Orangethorpe Ave, Buena Park,
CA90620
The above statements apply ONLY to those products distributed by Yamaha Corporation of America or its subsidiaries.
(class B)
3

For the AC adaptor
CAUTION: TO REDUCE THE RISK OF
ELECTRIC SHOCK, DO NOT REMOVE
COVER (OR BACK). NO USER-SERVICEABLE
PARTS INSIDE. REFER SERVICING TO
QUALIFIED SERVICE PERSONNEL.
CAUTION
RISK OF ELECTRIC SHOCK
DO NOT OPEN
The model number, serial number, power requirements, etc., may be found on or near the name
plate, which is at the bottom of the unit. You should
note this serial number in the space provided below
and retain this manual as a permanent record of
your purchase to aid identification in the event of
theft.
Model No.
Serial No.
(bottom_en_01)
Explanation of Graphical Symbols
The lightning flash with arrowhead symbol
within an equilateral triangle is intended to
alert the user to the presence of uninsulated
“dangerous voltage” within the product’s
enclosure that may be of sufficient magnitude to constitute a risk of electric shock to
persons.
The exclamation point within an equilateral
triangle is intended to alert the user to the
presence of important operating and maintenance (servicing) instructions in the literature accompanying the product.
IMPORTANT SAFETY INSTRUCTIONS
1 Read these instructions.
2 Keep these instructions.
3 Heed all warnings.
4 Follow all instructions.
5 Do not use this apparatus near water.
6 Clean only with dry cloth.
7 Do not block any ventilation openings. Install in accor-
dance with the manufacturer’s instructions.
8 Do not install near any heat sources such as radiators,
heat registers, stoves, or other apparatus (including
amplifiers) that produce heat.
9 Do not defeat the safety purpose of the polarized or
grounding-type plug. A polarized plug has two blades
with one wider than the other. A grounding type plug
has two blades and a third grounding prong. The wide
blade or the third prong are provided for your safety. If
the provided plug does not fit into your outlet, consult
an electrician for replacement of the obsolete outlet.
10 Protect the power cord from being walked on or
pinched particularly at plugs, convenience receptacles, and the point where they exit from the apparatus.
11 Only use attachments/accessories specified by the
manufacturer.
12 Use only with the cart , stand, tri-
pod, bracket, or table specified
by the manufacturer, or sold with
the apparatus. When a cart is
used, use caution when moving
the cart/apparatus combination
to avoid injury from tip-over.
13 Unplug this apparatus during
lightning storms or when unused for long periods of
time.
14 Refer all servicing to qualified service personnel. Ser-
vicing is required when the apparatus has been damaged in any way, such as power-supply cord or plug is
damaged, liquid has been spilled or objects have
fallen into the apparatus, the apparatus has been
exposed to rain or moisture, does not operate normally, or has been dropped.
WARNING
TO REDUCE THE RISK OF FIRE OR ELECTRIC SHOCK, DO NOT EXPOSE THIS APPARATUS TO RAIN OR MOISTURE.
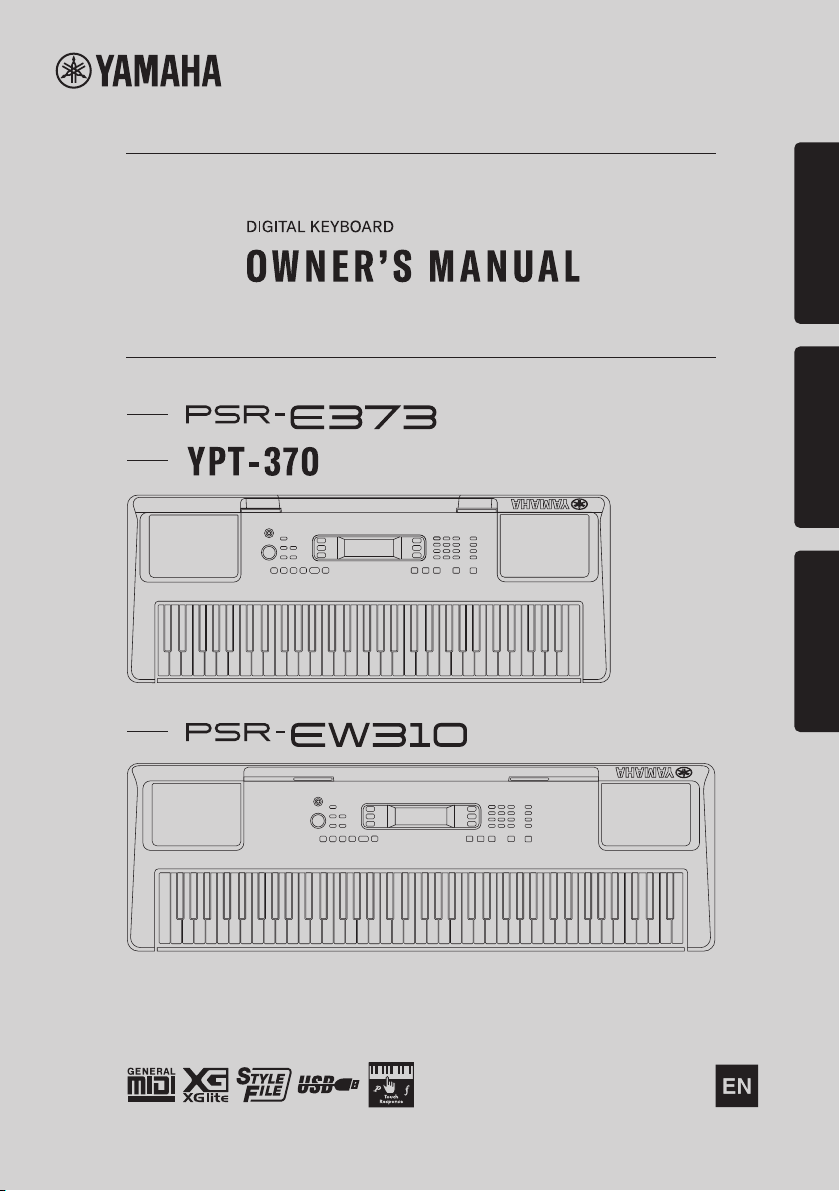
PSR-E373, PSR-EW310, YPT-370 Owner’s Manual
4
(UL60065_03)
PRECAUTIONS
PLEASE READ CAREFULLY BEFORE PROCEEDING
Please keep this manual in a safe and handy place for future reference.
For the AC adaptor
WARNING
• This AC adaptor is designed for use with only Yamaha electronic
instruments. Do not use for any other purpose.
• Indoor use only. Do not use in any wet environments.
CAUTION
• When setting up, make sure that the AC outlet is easily
accessible. If some trouble or malfunction occurs, immediately
turn off the power switch of the instrument and disconnect the AC
adaptor from the outlet. When the AC adaptor is connected to the
AC outlet, keep in mind that electricity is flowing at the minimum
level, even if the power switch is turned off. When you are not
using the instrument for a long time, make sure to unplug the
power cord from the wall AC outlet.
For the instrument
WARNING
Always follow the basic precautions listed below to avoid the possibility of serious injury or
even death from electrical shock, short-circuiting, damages, fire or other hazards. These
precautions include, but are not limited to, the following:
• Do not place the power cord near heat sources such as heaters or
radiators. Also, do not excessively bend or otherwise damage the
cord, or place heavy objects on it.
• Only use the voltage specified as correct for the instrument. The
required voltage is printed on the name plate of the instrument.
• Use the specified adaptor (page 85) only. Using the wrong
adaptor can result in damage to the instrument or overheating.
• Check the electric plug periodically and remove any dirt or dust
which may have accumulated on it.
• Do not expose the instrument to rain, use it near water or in damp
or wet conditions, or place on it any containers (such as vases,
bottles or glasses) containing liquids which might spill into any
openings. If any liquid such as water seeps into the instrument,
turn off the power immediately and unplug the power cord from
the AC outlet. Then have the instrument inspected by qualified
Yamaha service personnel.
• Never insert or remove an electric plug with wet hands.
• This instrument contains no user-serviceable parts. Do not open
the instrument or attempt to disassemble or modify the internal
components in any way. If it should appear to be malfunctioning,
discontinue use immediately and have it inspected by qualified
Yamaha service personnel.
• Do not put burning items, such as candles, on the unit. A burning
item may fall over and cause a fire.
• Follow the precautions below. Failure to do so might result in
explosion, fire, overheating or battery fluid leakage.
— Do not tamper with or disassemble batteries.
— Do not dispose of batteries in fire.
DMI-7 1/3
PSR-E373, PSR-EW310, YPT-370 Owner’s Manual
5

— Do not attempt to recharge batteries that are not designed to be
If you notice any abnormality
charged.
— Keep the batteries separate from metallic objects such as
necklaces, hairpins, coins, and keys.
— Use the specified battery type (page 85) only.
— Use new batteries, all of which are the same type, same model,
and made by the same manufacturer.
— Always make sure all batteries are inserted in conformity with
the +/- polarity markings.
— When the batteries run out, or if the instrument is not to be
used for a long time, remove the batteries from the instrument.
— When using Ni-MH batteries, follow the instructions that came
with the batteries. Use only the specified charger device when
charging.
• Keep batteries away from small children who might accidentally
swallow them.
• If the batteries do leak, avoid contact with the leaked fluid. If the
battery fluid should come in contact with your eyes, mouth, or
skin, wash immediately with water and consult a doctor. Battery
fluid is corrosive and may possibly cause loss of sight or
chemical burns.
• When one of the following problems occur, immediately turn off
the power switch and disconnect the electric plug from the outlet.
(If you are using batteries, remove all batteries from the
instrument.) Then have the device inspected by Yamaha service
personnel.
— The power cord or plug becomes frayed or damaged.
— It emits unusual smells or smoke.
— Some object has been dropped into the instrument.
— There is a sudden loss of sound during use of the instrument.
— If any cracks or breakages exist on the instrument.
CAUTION
Always follow the basic precautions listed below to avoid the possibility of physical injury to you
or others, or damage to the instrument or other property. These precautions include, but are not
limited to, the following:
• Use only the stand specified for the instrument. When attaching it,
use the provided screws only. Failure to do so could cause
• Do not connect the instrument to an electrical outlet using a
multipleconnector. Doing so can result in lower sound quality, or
possibly cause overheating in the outlet.
• When removing the electric plug from the instrument or an outlet,
always hold the plug itself and not the cord. Pulling by the cord
can damage it.
• Remove the electric plug from the outlet when the instrument is
not to be used for extended periods of time, or during electrical
storms.
damage to the internal components or result in the instrument
falling over.
• Before connecting the instrument to other electronic components,
turn off the power for all components. Before turning the power on
or off for all components, set all volume levels to minimum.
• Be sure to set the volumes of all components at their minimum
levels and gradually raise the volume controls while playing the
instrument to set the desired listening level.
• Do not place the instrument in an unstable position where it might
accidentally fall over.
• Before moving the instrument, remove all connected cables, to
prevent damage to the cables or injury to anyone who might trip
over them.
• When setting up the product, make sure that the AC outlet you are
using is easily accessible. If some trouble or malfunction occurs,
immediately turn off the power switch and disconnect the plug
from the outlet. Even when the power switch is turned off,
electricity is still flowing to the product at the minimum level.
When you are not using the product for a long time, make sure to
unplug the power cord from the wall AC outlet.
PSR-E373, PSR-EW310, YPT-370 Owner’s Manual
6
• Do not insert a finger or hand in any gaps on the instrument.
• Never insert or drop paper, metallic, or other objects into the gaps
on the panel. This could cause physical injury to you or others,
damage to the instrument or other property, or operational failure.
• Do not rest your weight on, or place heavy objects on the
instrument, and do not use excessive force on the buttons,
switches or connectors.
• Do not use the instrument/d evice or headphones for a long period
of time at a high or uncomfortable volume level, since this can
cause permanent hearing loss. If you experience any hearing loss
or ringing in the ears, consult a physician.
DMI-7 2/3

Yamaha cannot be held responsible for damage caused by improper use or modifications to the instrument, or data that is lost or destroyed.
Always turn the power off when the instrument is not in use.
Even when the [ ] (Standby/On) switch is in standby status (display is off), electricity is still flowing to the instrument at the minimum level.
When you are not using the instrument for a long time, make sure you unplug the power cord from the wall AC outlet.
Make sure to discard used batteries according to local regulations.
NOTICE
To avoid the possibility of malfunction/ damage
to the product, damage to data, or damage to
other property, follow the notices below.
Handling
• Do not use the instrument in the vicinity of a TV, radio,
stereo equipment, mobile phone, or other electric
devices. Otherwise, the instrument, TV, or radio may
generate noise. When you use the instrument along with
an application on your smart device such as a
smartphone or tablet, we recommend that you set
“Airplane Mode” to on on that device in order to avoid
noise caused by communication.
• Depending on the condition of surrounding radio waves,
the instrument may possibly malfunction.
• Do not expose the instrument to excessive dust or
vibrations, or extreme cold or heat (such as in direct
sunlight, near a heater, or in a car during the day) to
prevent the possibility of panel disfiguration, damage to
the internal components or unstable operation. (Verified
operating temperature range: 5° – 40°C, or 41° – 104°F.)
• Do not place vinyl, plastic or rubber objects on the
instrument, since this might discolor the panel or
keyboard.
• Do not press the LCD screen with your finger because it
is a sensitive, precision-made part. Doing so might cause
an appearance abnormality, such as a stripe on the LCD,
although this abnormality should disappear again within
a short time.
Maintenance
• When cleaning the instrument, use a soft cloth. Do not
use paint thinners, solvents, alcohol, cleaning fluids, or
chemical-impregnated wiping cloths.
Saving data
• Some of the data of this instrument (page 51) are retained
when the power is turned off. However, the saved data
may be lost due to some failure, an operation mistake,
etc. Save your important data onto an external device
such as a computer (page 50).
Information
About copyrights
• Copying of the commercially available musical data
including but not limited to MIDI data and/or audio data
is strictly prohibited except for your personal use.
• This product incorporates and bundles contents in which
Yamaha owns copyrights or with respect to which
Yamaha has license to use others’ copyrights. Due to
copyright laws and other relevant laws, you are NOT
allowed to distribute media in which these contents are
saved or recorded and remain virtually the same or very
similar to those in the product.
* The contents described above include a computer
program, Accompaniment Style data, MIDI data, WAVE
data, voice recording data, a score, score data, etc.
* You are allowed to distribute medium in which your
performance or music production using these contents
is recorded, and the permission of Yamaha Corporation
is not required in such cases.
About functions/data bundled with the
instrument
• Some of the preset songs have been edited for length or
arrangement, and may not be exactly the same as the
original.
• The bitmap fonts used in this instrument have been
provided by and are the property of Ricoh Co., Ltd.
About this manual
• The illustrations and LCD screens as shown in this
manual are for instructional purposes only, and may
appear somewhat different from those on your
instrument.
• iPhone, iPad are trademarks of Apple Inc., registered in
the U.S. and other countries.
• The company names and product names in this manual
are the trademarks or registered trademarks of their
respective companies.
DMI-7 3/3
PSR-E373, PSR-EW310, YPT-370 Owner’s Manual
7

About the Manuals
In addition to this Owner’s Manual, the following Online materials (PDF files) are available.
Drum Kit List
This contains detailed information of the Drum Kit Voices (Voice No. 242-263; page 70). When you
select these Voices, various drum, percussion and SFX sounds listed here are assigned to each
key.
MIDI Reference
This contains MIDI-related information, such as the MIDI Implementation Chart.
Computer-related Operations
This contains instructions about computer-related functions.
Smart Device Connection Manual
This explains how to connect the instrument to smart devices, such as smartphones, tablet
devices, etc.
To obtain these manuals, access the Yamaha Downloads, and then enter the model name for searching
the desired files.
Yamaha Downloads https://download.yamaha.com/
NOTE
• For a general overview of MIDI and how you can effectively use it,search for “MIDI Basics” (only in English, German,
French and Spanish) on the website above.
Song Book (only in English, French, German and Spanish)
This contains music scores for the preset Songs (excluding the Demo Songs) of this instrument.
To obtain this SONG BOOK, access the Yamaha website and download it from the product web page.
Yamaha Global Site https://www.yamaha.com
Included Accessories
• Owner’s Manual (this book)
• AC adaptor
• Music rest
• Online Member Product Registration
*
Formats and functions
GM System Level 1
“GM System Level 1” is an addition to the MIDI
standard which ensures that any GM-compatible music data can be accurately played by any
GM-compatible tone generator, regardless of
manufacturer. The GM mark is affixed to all
software and hardware products that support
GM System Level.
XGlite
As its name implies, “XGlite” is a simplified version of Yamaha’s high-quality XG tone generation format. Naturally, you can play back any
XG song data using an XGlite tone generator.
However, keep in mind that some songs may
play back differently compared to the original
data, due to the reduced set of control parameters and effects.
PSR-E373, PSR-EW310, YPT-370 Owner’s Manual
8
* May not be included depending on your particular locale. Check
with your Yamaha dealer.
Style File Format (SFF)
The Style File Format combines all of
Yamaha’s auto accompaniment know-how
into a single unified format.
USB
USB is an abbreviation for Universal Serial
Bus. It is a serial interface for connecting a
computer with peripheral devices. It allows
“hot swapping” (connecting peripheral
devices while the power to the computer is
on).
Touch Response
The exceptionally natural Touch Response
feature gives you maximum expressive control over the level of the Voices.

Thank you for purchasing this Yamaha Digital Keyboard!
This instrument is loaded with various sounds, preset Songs and may convenient functions—
so that even beginners can enjoy playing it right away.
We recommend that you read this manual carefully so that you can fully take advantage of the
advanced and convenient functions of the instrument.
We also recommend that you keep this manual in a safe and handy place for future reference.
Contents
About the Manuals………………………………………… 8
Included Accessories…………………………………….. 8
Formats and functions …………………………………… 8
Setting Up
Panel Controls and Terminals 10
Setting Up 12
Power Requirements …………………………………… 12
Turning the Power On………………………………….. 13
Setting the Auto Power Off function……………….. 13
Adjusting the Master Volume………………………… 14
Connecting Headphones or External Speaker … 14
Using a Pedal …………………………………………….. 14
Using the music rest ……………………………………. 14
Display Items and Basic Operations 15
Display Items ……………………………………………… 15
Basic Operations ………………………………………… 15
Reference
Playing a Variety of Instrument Voices 16
Selecting a Main Voice ………………………………… 16
Playing the “Grand Piano” ……………………………. 16
Using the Metronome ………………………………….. 16
Layering a Dual Voice………………………………….. 17
Playing a Split Voice in the Left Hand area …….. 17
Changing the Touch Response of the Keyboard
Applying Effects to the Sound……………………….. 18
Adding Harmony or Arpeggio ……………………….. 20
Playing the keyboard with two persons (Duo mode)
Playing Rhythm and Accompaniment (Style)
Fingering Type……………………………………………. 23
Setting the Fingering Type……………………………. 23
Setting the Smart Chord Key………………………… 23
Playing Styles …………………………………………….. 24
Style Variations…………………………………………… 25
Chord Types for Style Playback ……………………. 26
Chords Heard When Smart Chord is Selected… 27
Looking Up Chords Using the Chord Dictionary
Using the Music Database……………………………. 29
Registering a Style File………………………………… 29
Changing the Tempo …………………………………… 30
Playing Songs31
Listening to a Demo Song ……………………………. 31
Selecting and Playing Back a Song……………….. 31
BGM Playback……………………………………………. 32
Song Fast Forward, Fast Reverse, and Pause… 32
Changing the Melody Voice………………………….. 32
A-B Repeat ………………………………………………… 33
Turning Each Part On/Off …………………………….. 33
Playing songs loaded from a computer
to this instrument…………………………………….. 33
…. 18
… 28
Using the Song Lesson Feature 34
Keys To Success………………………………………….35
Phrase Repeat……………………………………………..37
Listening, Timing and Waiting ………………………..38
Learning How to Use “Touch” Control (Touch Tutor)
Hearing and Experiencing the Sound of
the Chords (Chord Study) 41
Hear and experience a sound of a single chord..41
Hear and experience basic chord progressions ..41
Playing Chords along with
Chord Progressions of a Song 42
Play the chords in combination with
“Waiting” of the Lesson function …………………42
Recording Your Performance 43
Track Structure of a Song………………………………43
Quick Recording …………………………………………..43
Recording to a Specified Track ………………………44
Clearing a User Song ……………………………………44
Memorizing Your Favorite Panel Settings45
Recalling Panel Settings from the Registration Memory
Memorizing Panel Settings to the Registration Memory
Deleting the Registration Memory …………………..46
Disabling Recall of Specific Items (Freeze)………46
Selecting an EQ Setting for your Favorite Sound
Playing an Device with the Built-in Speakers
Lowering the volume of a melody part
22
23
(Melody Suppressor function)…………………….49
Using with a Computer or Smart Device 50
Connecting to a computer ……………………………..50
Connecting a Smart Device……………………………50
Backup and Initialization 51
Backup Parameters ………………………………………51
Initialization………………………………………………….51
The Functions 52
Appendix
Troubleshooting ………………………………………56
Song Book Sample…………………………………..58
Voice List ………………………………………………..68
Standard Kit 1 List……………………………………74
Song List …………………………………………………75
Style List …………………………………………………76
Music Database List…………………………………78
Effect Type List………………………………………..80
Specifications………………………………………….84
Index ……………………………………………………….86
PSR-E373, PSR-EW310, YPT-370 Owner’s Manual
40
..45
…46
47
48
Setting UpAppendix Reference
9

Setting Up
q
w
e
r
u
i
o
t
y
!1 !2 !3 !4 !5
!0
!6
!7
!8
@1 @2 @3
!9
@5
@6
@7
@8
@9
C1 C2 C3 C4 C5 C6
@4
@0
Panel Controls and Terminals
Setting Up
Front Panel
Style List
(page 76)
NOTE
• The illustrations and displays as shown in this manual are based on the PSR-E373.
• Please note that the PSR-EW310, PSR-E373 and YPT-370 have different numbers of keys:
the PSR-EW310 has 76 keys, and the PSR-E373 and YPT-370 have 61 keys.
Song List
(page 75)
Display
(page 15)
Voice List
(page 68)
Music
Database List
(page 78)
As illustrated, each note of the keyboard
has a specific note number and name (e.g.,
036/C1), which is used in making various
settings, such as Split Point (page 24).
PSR-E373, YPT-370: 036 (C1) – 096 (C6)
PSR-EW310: 028 (E0) – 103 (G6)
PSR-E373, PSR-EW310, YPT-370 Owner’s Manual
10
q [ ] (Standby/On) switch ………………..page 13
w [MASTER VOLUME] dial …………………. page 14
e [DEMO] button………………………………..page 31
r [METRONOME] button…………………….page 16
t [TEMPO/TAP] button ……………………….page 30
Panel Controls and Terminals
In the Lesson mode
y PA RT
In the Recording mode
y [REC TRACK 2] button…………………….page 43
u [KEYS TO SUCCESS] button…………… page 35
i [PHRASE REPEAT] button……………….page 37
o [1 LISTENING 2 TIMING 3 WAITING] button
In the Song mode
!0 [A-B REPEAT] button ………………………page 33
!1 [REW] button ………………………………….page 32
!2 [FF] button ……………………………………..page 32
!3 [PAUSE] button……………………………….page 32
In the Style mode
!0 [ACMP ON/OFF] button……………………page 24
!1 [INTRO/ENDING/rit.] button……………..page 25
!2 [MAIN/AUTO FILL] button ………………..page 25
!3 [SYNC START] button ……………………..page 24
!4 [START/STOP] button………………………page 31
!5 [REC] button…………………………………..page 43
!6 [VOICE] button………………………………..page 16
!7 [SONG] button………………………………..page 31
!8 [STYLE] button ……………………………….page 24
!9
@0 [PORTABLE GRAND] button…………… page 16
@1 [DSP] button …………………………………..page 18
@2 [ARTICULATION] button………………….page 19
@3 [REGIST MEMORY] button ……………… page 45
@4 [FUNCTION] button…………………………page 52
@5 [MUSIC DATABASE] button……………..page 29
@6 [DUAL] button…………………………………page 17
@7 [SPLIT] button ……………………………….. page 17
@8 [HARMONY/ARPEGGIO] button……….page 20
@9 Drum illustrations for the Drum Kit….page 16
[L] button ……………………………………….page 38
[R] button ……………………………………….page 38
[REC TRACK 1] button…………………….page 43
………………………………………………………page 38
Number buttons [0]–[9], [+/YES], [-/NO]
….page 15
Each of these indicates the drum or percussion instrument
assigned to the corresponding key for “Standard Kit 1.”
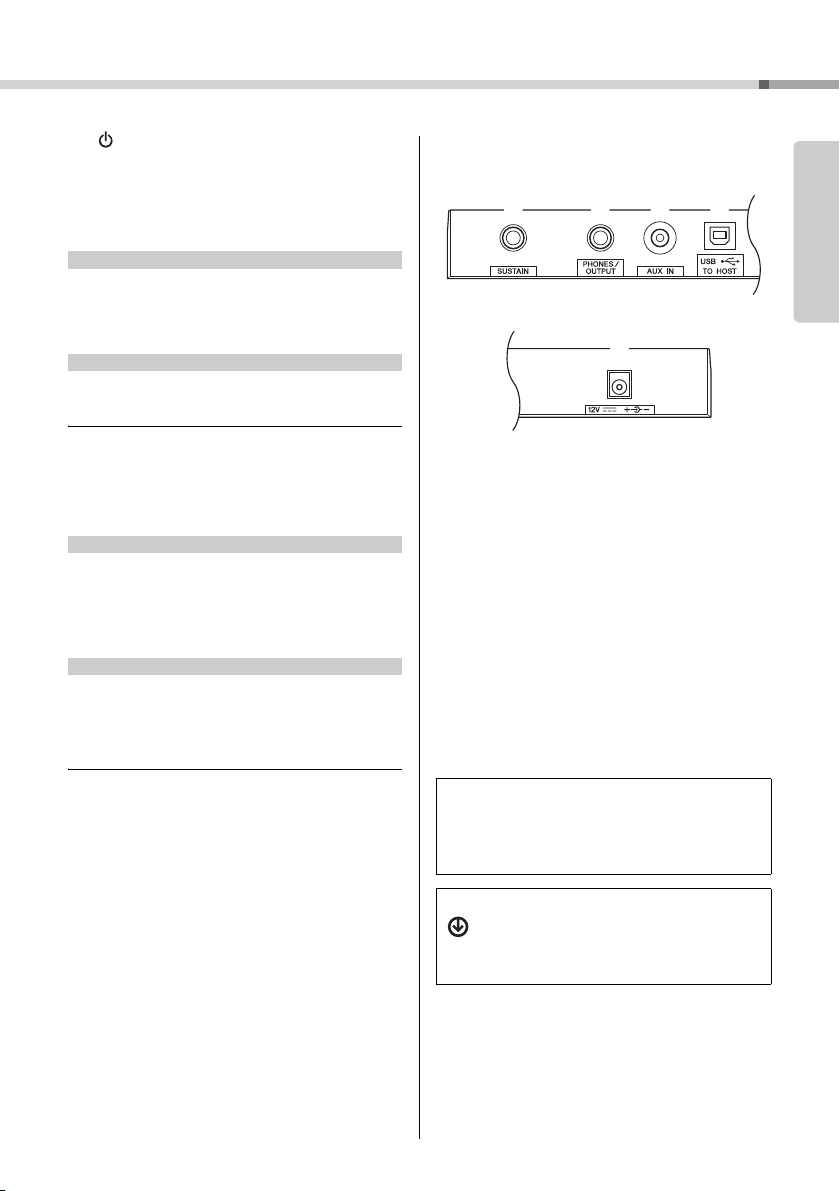
#0 [SUSTAIN] jack ……………………………….page 14
#1 [PHONES/OUTPUT] jack…………………. page 14
#2 [AUX IN] jack…………………………………..page 48
#3 [USB TO HOST] terminal* ………………..page 50
* For connecting to a computer. For details, refer to “Com-
puter-related Operations” (page  on the website. When
connecting, use an AB type USB cable of less than 3
meters. USB 3.0 cables cannot be used.
#4 DC IN jack ………………………………………page 12
Panel Setup (Panel Settings)
By using the controls on the panel, you can make various
settings as described here. These settings of the instrument are together referred to as “panel setup” or “panel
settings” in this manual.
The “Press and hold” Symbol
Buttons having this indication can be used to call
up an alternate function when the relevant button
is pressed and held. Hold down this button until
the function is called up.
Setting Up
PSR-E373, PSR-EW310, YPT-370 Owner’s Manual
11

Setting Up
2
1
DC IN jack
(page 11)
AC outle t
AC
adaptor
Plug
The shape of the plug differs depending on
your area.
Slide the plug as
indicated.
Power Requirements
Although the instrument will run either from an AC
Setting Up
adaptor or batteries, Yamaha recommends use of an
AC adaptor whenever possible. An AC adaptor is
more environmentally friendly than batteries and
does not deplete resources.
Using an AC Adaptor
Connect the AC adaptor in the order shown in the
illustration.
• Use the specified AC adaptor (page 85) only. Using the
wrong AC adaptor can result in damage to the instrument
or overheating.
• When using the AC adaptor with a removable plug, make
sure to keep the plug attached to the AC adaptor. Using the
plug alone can cause electric shock or fire.
• If the plug is accidentally removed from the AC adaptor,
slide it back in until it clicks into place, t aking care to
avoid touching any internal metal parts. To avoid electric
shock, short circuit or damage, also be careful that there
is no dust between the AC adaptor and plug.
Using Batteries
This instrument requires six “AA” size, Alkaline (LR6)/
Manganese (R6) batteries, or rechargeable nickelmetal hydride batteries (rechargeable Ni-MH batteries). The Alkaline batteries or rechargeable Ni-MH
batteries are recommended for this instrument, since
other types may result in poorer battery performance.
• When the batteries run out, or if the instrument is not to be
used for a long time, remove the batteries from the instrument.
1 Make sure that the power of the instrument is off.
2 Open the battery compartment cover located on
the instrument’s bottom panel.
3 Insert the six new batteries, being careful to follow
the polarity markings on the inside of the compartment.
• When setting up the product, make sure that the AC outlet
you are using is easily accessible. If some trouble or malfunction occurs, immediately turn the power off and disconnect the plug from the outlet.
• Follow the order shown above in reverse when disconnecting
the AC adaptor.
PSR-E373, PSR-EW310, YPT-370 Owner’s Manual
12
4 Replace the compartment cover, making sure that
it locks firmly in place.
Make sure to set the battery type correctly (page 13).
• Connecting or disconnecting the AC adaptor with batteries installed may turn the power off, resulting in loss of
data being recorded or transferred at the time.
• When battery power becomes too low for proper operation, the volume may be reduced, the sound may be distorted, and other problems may occur. When this happens,
make sure to replace all batteries with new ones or already
recharged ones.
Setting Up
PSR-EW310
PSR-E373, YPT-370
The lowest key
• This instrument cannot charge the batteries. Use only the
specified charger device when charging.
• Power will be automatically drawn from the AC adaptor if an
AC adaptor is connected while batteries are installed in the
instrument.
Setting the battery type
Depending on the battery type to be used, you may
need to change the battery type setting on this instrument. Alkaline (and manganese) batteries are chosen by default. After installing new batteries and
turning the power on, make sure to set the Battery
Type appropriately (rechargeable or not) via Function
number 061 (page 55).
• Failure to set the battery type may shorten the amount of
the battery life. Make sure to set the battery type correctly.
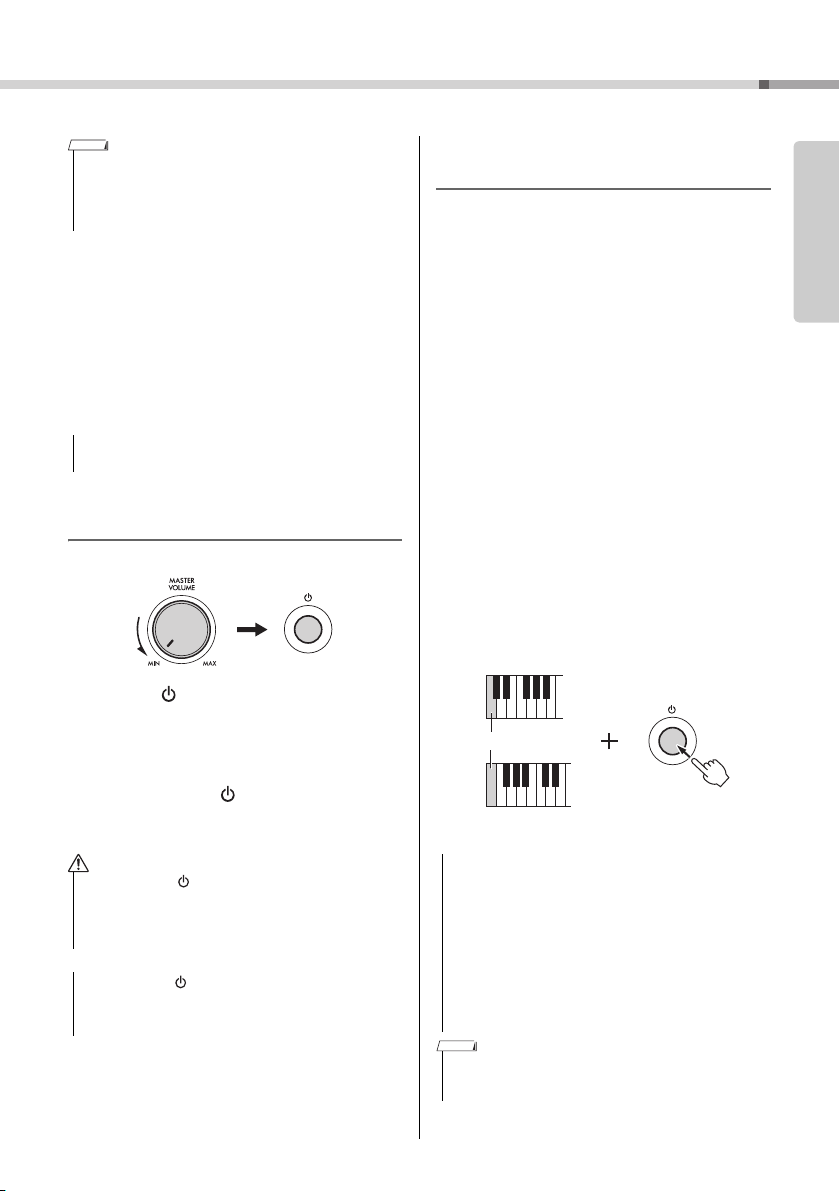
Turning the Power On
1 Turn down the [MASTER VOLUME] dial to “MIN.”
2 Press the [ ] (Standby/On) switch to turn the
power on.
The Voice name appears on the display. Adjust
the volume as desired while playing the keyboard.
3 Press and hold the [ ] (Standby/On) switch for
about a second to set the instrument to standby
mode.
• Even when the [ ] (Standby/On) switch is in standby status, electricity is still flowing to the product at the minimum level. Remove the electric plug from the outlet when
the instrument is not to be used for extended periods of
time, or during electrical storms.
• Press only the [ ] (Standby/On) switch when turning the
power on. Any other operations such as pressing the pedal
are not allowed. Doing so may cause the instrument to
malfunction.
Setting the Auto Power Off
function
To prevent unnecessary power consumption, this
instrument features an Auto Power Off function that
automatically turns the power off if the instrument is
not operated for a specified period of time. The
amount of time that elapses before the power is
automatically turned off is 30 minutes by default;
however, you can change the setting.
To set the time that elapses before
Auto Power Off is executed:
Press the [FUNCTION] button several times until
“AutoOff” (Function 060; page 55) appears, then use
the [+/YES] or [-/NO] button to select the desired
value.
Settings: OFF, 5, 10, 15, 30, 60, 120 (minutes)
Default value: 30 (minutes)
To disable the Auto Power Off function:
Turn the power on while holding down the lowest key
on the keyboard. A message “oFF AutoOff” appears
briefly, then the instrument starts up with the Auto
Power Off function disabled. The Auto Power Off
function also can be disabled by selecting Off in
Function number 060 (page 55).
• Depending on the instrument status, the power may not
turn off automatically, even after the elapse of the specified
period of time. Always turn off the power manually when
the instrument is not in use.
• When the instrument is not operated for a specified period
of time while connected to an external device such as an
amplifier, speaker or computer, make sure to follow the
instructions in the Owner’s Manual to turn off the power to
the instrument and the connected devices, in order to protect the devices from damage. If you do not want the
power to turn off automatically when a device is connected, disable Auto Power Off.
Setting Up
• Generally, the data and settings are maintained even when
the power is turned off with the Auto Power Off function. For
details, see page 51.
PSR-E373, PSR-EW310, YPT-370 Owner’s Manual
13
Setting Up
Standard stereo
phone plug
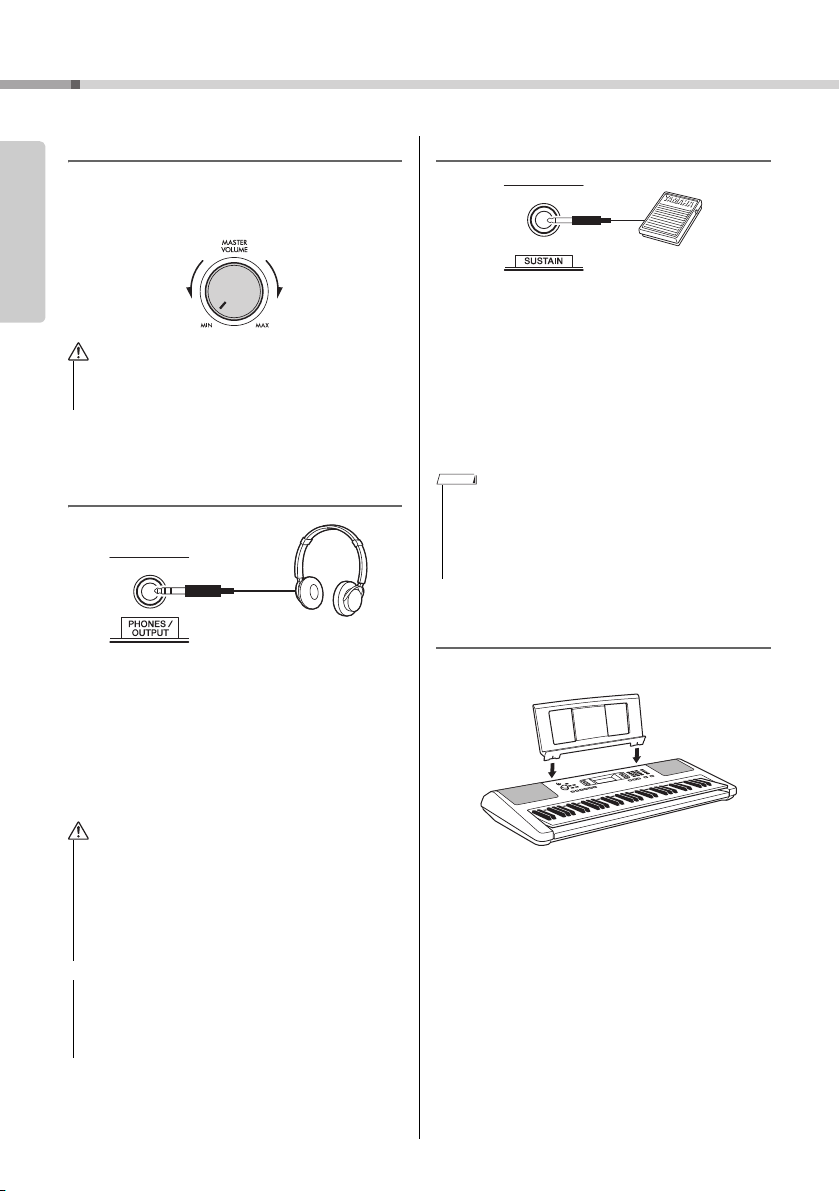
Adjusting the Master Volume
To adjust the volume of the entire keyboard sound,
Setting Up
use the [MASTER VOLUME] dial while playing the
keyboard.
• Do not use the instrument for a long period of time at a
high or uncomfortable volume level, since this can cause
permanent hearing loss.
Connecting Headphones or
External Speaker
Connect a pair of headphones to the [PHONES/
OUTPUT] jack. This jack also functions as an external output. By connecting to a computer, keyboard
amplifier, recorder, or other audio device, you can
output the audio signal of this instrument to that
external device. The speakers of this instrument are
automatically shut off when a plug is inserted into
this jack.
Using a Pedal
You can control three functions: Sustain, Articulation
(page 19), and Arpeggio (page 21) as you play by
pressing a footswitch (FC5 or FC4A; sold separately)
plugged into the [SUSTAIN] jack. By default, Sustain
is assigned, so that the sound can be heard for a
long time even if you take your finger off the keyboard
while pressing the foot switch, like a damper pedal
on a piano. To use a function other than Sustain, use
the function settings (Function 029; page 53).
• Plug or unplug the footswitch while the power is off. Also, do
not press the footswitch when turning the power on. Doing so
changes the polarity of the footswitch, resulting in reversed
operation.
• The sustain function does not affect split voices (page 17) and
style (automatic accompaniment; page 23).
Using the music rest
Insert the music rest into the slots as shown.
• Do not use the instrument or headphones for a long period
of time at a high or uncomfortable volume level, since this
can cause permanent hearing loss.
• Before connecting the instrument to other electronic components, turn off the power of all the components. Also,
before turning any components on or off, make sure to set
all volume levels to minimum. Otherwise, damage to the
components or electrical shock may occur.
• To avoid possible damage to the external device, first turn
on the power to the instrument, then to the external
device. When turning off the power, do so in reverse order:
first turn off the power to the external device, then to the
instrument.
PSR-E373, PSR-EW310, YPT-370 Owner’s Manual
14
Display Items and Basic Operations
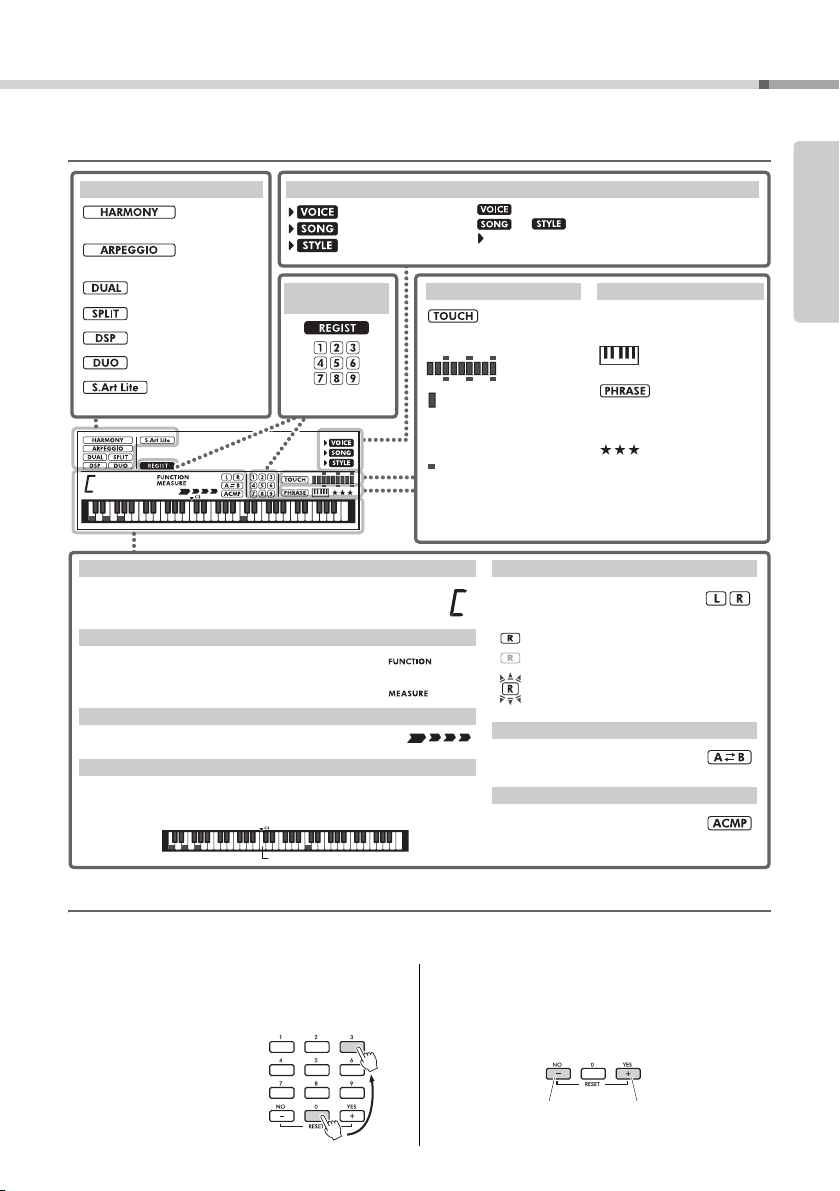
Voice/Song/Style
This area indicates the Lesson
related status is on.
Keys To Success
(page 35)
Phrase Repeat (page 37)
Chord Progression (page 42)
Indicates the Passing Status (page
36) of the Keys To Success lesson.
Lesson Indication
Harmony
(
page 20
)
Arpeggio
(
page 20
)
Dual (
page 17
)
Split (
page 17
)
DSP (
page 18
)
Duo (
page 22
)
Articulation (page 19)
Function status
Indicates the chord which is played on the Auto Accompaniment range (page 24) of the keyboard, or specified via
Song playback.
Normally indicates the current measure number of the current Style or Song. When the [FUNCTION] button (page 52)
is in use, this indicates the Function number.
Indicates the current beat of playback.
Indicates notes currently being played. Indicates the melody and chord notes of
a Song when the Song lesson function is in use. Also indicates the notes of a
chord—either when playing a chord or when using the Dictionary function.
Chord
Measure or Function
Beat
Keyboard Display
Indicates the on/off status of Song
playback or target Track of Song
recording (pages 33, 44).
Lit: Track contains data
Unlit: Track is muted or contains no data
Flashing: Track is selected as recording track
Appears when the A-B Repeat function is active. (page 33)
Appears when the Auto Accompaniment function is on. (page 24)
Song Track status
A-B Repeat
Auto Accompaniment
The illustration is of the PSR-E373.
(page 45)
Registration
Memory
Touch Response (page 18)
Strength Meter
is a meter that lights up according to the strength with which you
play the keyboard.
(pages 18,
40)
represents the target
strength when practicing with
songs in the “Touch Tutor” category. (page 40)
Touch Indication
Voice selection mode
Song mode
Style mode
is not displayed alone. It is always displayed with
or .
appears for functions whose settings can be changed
with the numeric buttons and [+/YES] / [-/NO] buttons.
Press number buttons [0], [0], [3], or
simply press [3].
Example: Selecting Voice 003,
Bright Piano.
Press briefly to
increase.
Press briefly to
decrease.
Display Items
Setting Up
Basic Operations
Before operating the instrument, it may be helpful to familiarize yourself with the basic controls below that are
used to select items and change values.
Number buttons
Use the Number buttons to directly enter an item or
value. For numbers that start with one or two zeroes,
the first zeroes can be omitted.
[-/NO] and [+/YES] buttons
Press the [+/YES] button briefly to increase the value by 1,
or press the [-/NO] button briefly to decrease the value by 1.
Press and hold either button to continuously increase or
decrease the value in the corresponding direction.
PSR-E373, PSR-EW310, YPT-370 Owner’s Manual
15
Playing a Variety of Instrument Voices
Voice name
The Voice shown here
becomes the Main
Voice for the instrument.
Voice number
Always
appears on
the display.
Select the Voice you want to play
Referenc e
In addition to piano, organ, and other “standard” keyboard instruments, this instrument
has a large range of Voices that includes guitar, bass, strings, sax, trumpet, drums and
percussion, and even sound effects—giving you a wide variety of musical sounds.
Selecting a Main Voice
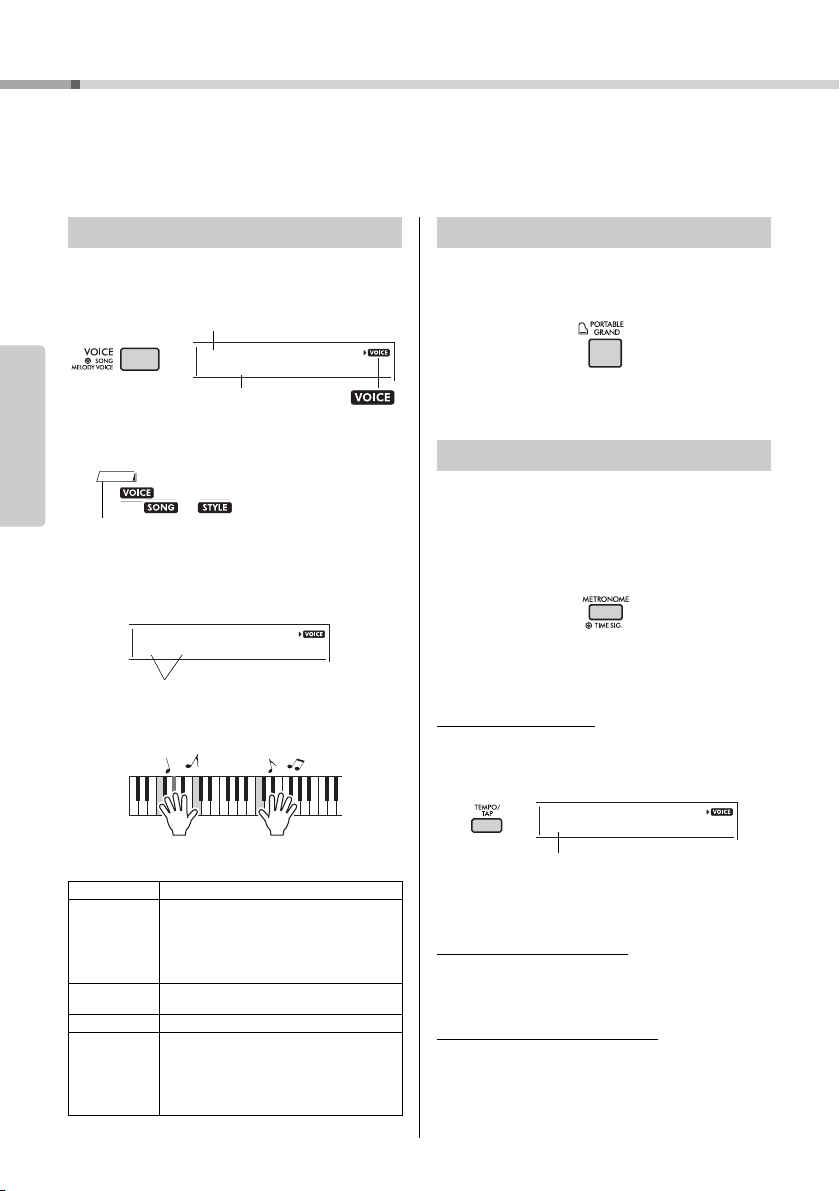
Press the [VOICE] button.
1
The Voice number and name will be shown.
Reference
Playing the “Grand Piano”
When you want to reset various settings to default
and simply play a Piano sound, press the [PORTABLE GRAND] button.
The Voice “001 Live!ConcertGrandPiano” will automatically be selected as the Main Voice.
Using the Metronome
• is not displayed alone. It is always displayed
with or . Refer to page 15.
Use the number buttons [0]–[9], [+/YES],
2
[-/NO] buttons to select the desired
Vo ic e.
Refer to the Voice List on page 68.
Play the keyboard.
3
The instrument features a built-in metronome (a
device that keeps an accurate tempo), convenient for
practicing.
Press the [METRONOME] button to start
1
the metronome.
Press the [METRONOME] button again to
2
stop the metronome.
To c h a n ge the tempo:
Press the [TEMPO/TAP] button to call up the Tempo
value, then use the number buttons [0]–[9], [+/YES],
[-/NO].
Preset Voice Types
001–241 Instrument Voices (including sound effects).
242–263
(Drum Kit)
264–283
284–622 XGlite Voices (page 71)
000
PSR-E373, PSR-EW310, YPT-370 Owner’s Manual
16
Various drum and percussion sounds are
assigned to individual keys, from which they can
be played. Details on the instrume nts and key
assignments of each Drum Kit can be found in
the Standard Kit 1 List on page 74 and “Drum
Kit List” on the website (page 8).
Arpeggios are automatically reproduced by
simply playing the keyboard (page 20).
One Touch Setting
The One Touch Setting feature automatically
selects the most suitable Voice when you
select a Style or Song (excepting the Song
inputted from the [AUX IN] jack). Simply select
Voice number “000” to activate this feature.
Press the [+/YES] and [-/NO] buttons simultaneously
to instantly reset the value to the default tempo.
To set the Time Signature:
Press and hold the [METRONOME] button to call up
“TimeSigN” (Functions 030; page 54), then use the
number buttons, [+/YES] and [-/NO] buttons.
To set the Metronome Volume:
This can be set via Function number 032 (page 54).
Playing a Variety of Instrument Voices
Two Voices will
sound at the same
time.
Split Voice
Main Voice and Dual Voice
Split Point … default setting: 054 (F#2)
036
(C1)
048
(C2)
060
(C3)
072
(C4)
084
(C5)
096
(C6)
Left hand area
Right hand area
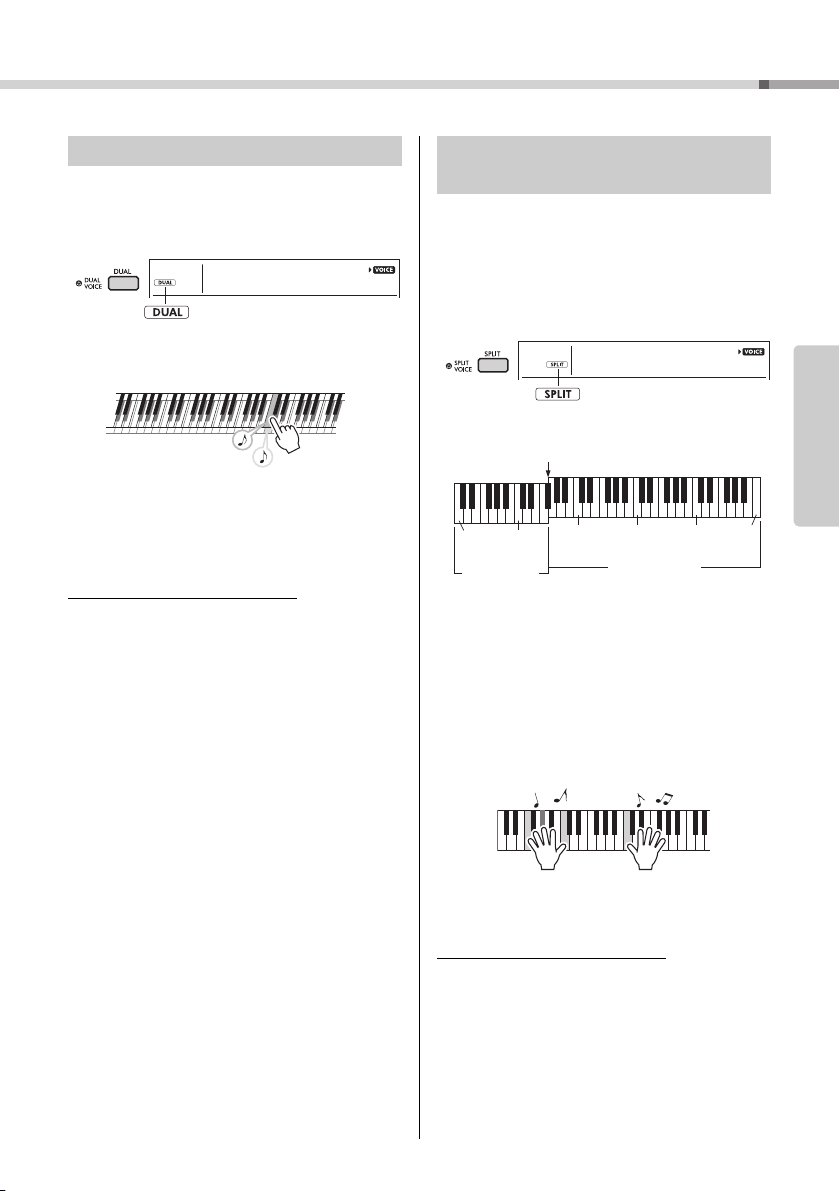
Layering a Dual Voice
In addition to the Main Voice, you can layer a different Voice over the entire keyboard as a “Dual Voice.”
Press the [DUAL] button to turn Dual on.
1
Play the keyboard.
2
Press the [DUAL] button again to exit
3
from Dual.
To select a different Dual Voice:
Although turning on Dual will select a Dual Voice
suitable for the current Main Voice, you can easily
select a different Dual Voice by pressing and holding
the [DUAL] button to call up “D.Voice” (Function 008;
page 53), then using the number buttons [0]–[9], [+/
YES], [-/NO].
Playing a Split Voice in the Left
Hand area
By dividing the keyboard into the two separate areas,
you can play a different Voice between the Left hand
and Right hand areas.
Press the [SPLIT] button to turn on Split.
1
The keyboard is divided into the Left hand and
Right hand areas.
You can play a “Split Voice” on the Left hand area
of the keyboard while playing a Main Voice and
Dual Voice on the Right hand area of the keyboard.
The highest key for the Left hand area is referred
to as the “Split Point” (Function 003;
which can be changed from the default F#2 key.
Play the keyboard.
2
page 52
)
Reference
Press the [SPLIT] button again to exit
3
from Split.
To select a different Split Voice:
Press and hold the [SPLIT] button to call up “S.Voice”
(Function 012; page 53), then use the number buttons [0]–[9], [+/YES], [-/NO].
PSR-E373, PSR-EW310, YPT-370 Owner’s Manual
17
Playing a Variety of Instrument Voices
TouchRes
004
Medium
2
004
Appears when the Touch
Response is not “Fixed.”
When you play softly.
When you play at
medium strength.
When you play strongly.
Appears when
the DSP is on.
DSPType
023
EnsDet
32
023
Current DSP type
Hold for longer
than a second.
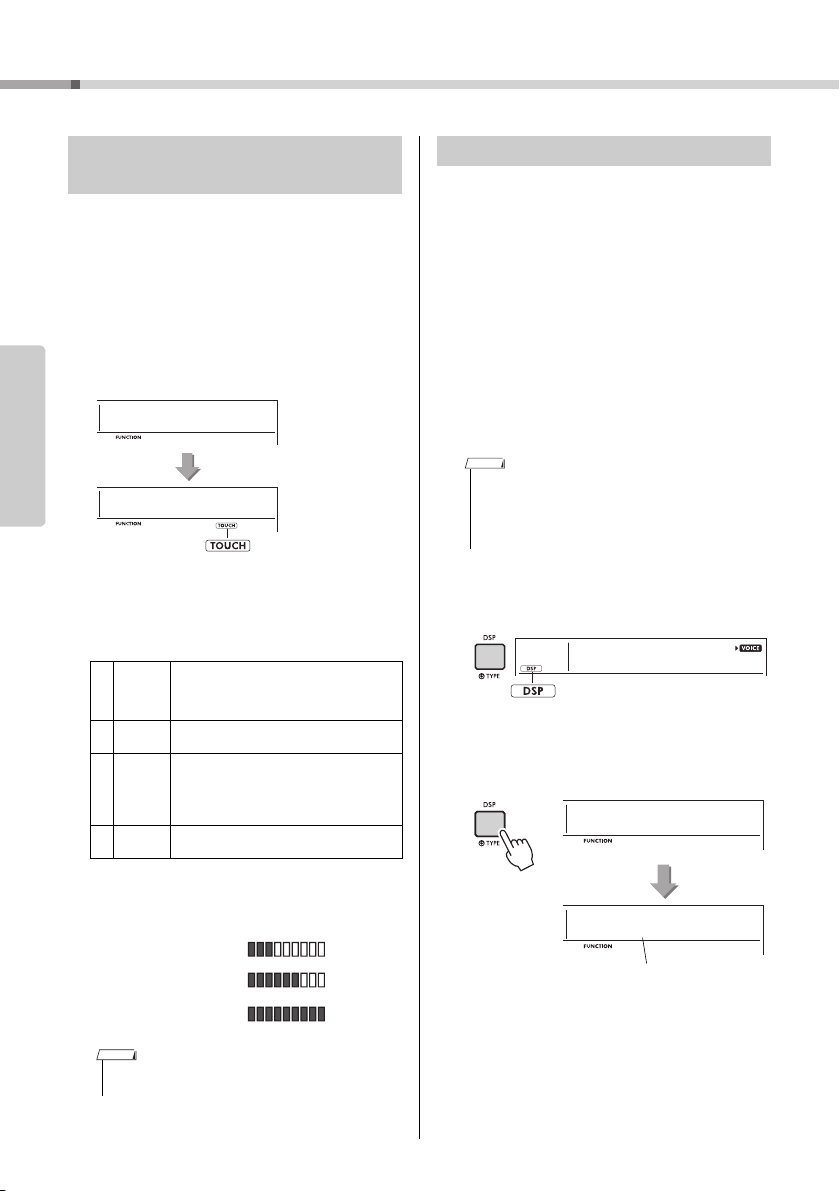
Changing the Touch Response of
the Keyboard
The keyboard of this instrument is equipped with a
Touch Response feature that lets you dynamically
and expressively control the level of the Voices
according to your playing strength.
Press the [FUNCTION] button several
1
times until “TouchRes” (Function 004;
page 52) appears.
After a few seconds, the current Touch Response
Reference
appears.
Use the number buttons [1]–[4], [+/YES],
2
[-/NO] buttons to select a Touch
Response setting between 1 and 4.
Touch Response
1Soft
2Medium
3Hard
4Fixed
Play the keyboard.
3
The strength meter will light according to the
strength with which you play the keyboard.
Produces relatively high volume even with
light playing strength. Best for players with a
light touch who want to maintain a consistent, relatively loud volume.
Produces a fairly “standard” keyboard
response.
The keys must be played very strongly to
generate loud volume. This setting is best
for a wide dynamic range and optimum
expressive control of the sound, from pianissimo to forti ssimo.
All notes are produced at the same volume
no matter how hard the keyboard is played.
Applying Effects to the Sound
This instrument can apply various Effects as listed
below to the instrument’s sound.
DSP
The DSP (digital signal processor) is an effect in
which digital signal processing is applied to the
sound to change it.
When a Voice or Song that features a recommended
DSP processing is selected, the DSP effect is
applied to the Main Voice and Song part. DSP effect
has effect variations, called DSP types. Please refer
to page 82.
You can also turn the DSP on / off and change the
DSP type using the following procedure.
1 Press the [DSP] button to turn on the DSP.
• The DSP effect is only applied to the main voice. The
DSP effect is not applied to voices added by the Dual
function or voices in the left hand area that have been
split.
• The DSP cannot be turned on during lessons.
When the DSP is turned on, the DSP type (page
82) appropriate for the current panel setting is
automatically selected, but you can also select it
yourself.
001
CncertGP
2 Hold down the [DSP] button for longer than a sec-
ond. After a few seconds, the current DSP type
appears.
PSR-E373, PSR-EW310, YPT-370 Owner’s Manual
18
• When the Touch Response is [Fixed], the strength meter
is at fixed medium strength.
3 Use the number buttons [0]–[9], [+/YES], [-/NO]
buttons to select the desired type.
4 Play the keyboard.
5 Press the [DSP] button again to turn off the DSP.

Playing a Variety of Instrument Voices
Appears when the
S.Art Lite Voice is selected
Articulation
Articulation is an effect that reproduces the sounds
of playing methods that are unique to specific acoustic instruments.
The Articulation effect is applied to the sound only
while holding down the [ARTICULATION] button. The
Articulation effect is enabled only for S.Art Lite
Voices (Super Articulation Lite Voices). The S.Art
Lite Voices are indicated by “***” in Voice List (page
68).
Examples of the Articulation effect
If you select a guitar voice, you can realistically
reproduce the following guitar-specific playing techniques.
Example: Voice number 044 “S.Art Lite Nylon
Guitar Harmonics”
If you play the keyboard while holding down the
[ARTICULATION] button, a harmonics sound is produced.
Example: Voice number 048 “S.Art Lite Distortion
Guitar”
If you press the [ARTICULATION] button, a scratching noise is produced.
When S.Art Lite Voices are selected, the appropriate
articulation effect is automatically selected.
When other Voices are selected, the modulation
effect is automatically selected.
1 Press the [ARTICULATION] button while playing
the keyboard.
Adding the Articulation effect by using the pedal
If you assign the Articulation function to the pedal
(foot switch) with “PdlFunc” (Function 029; page 53),
you can apply the effect by pressing on the pedal.
• The Articulation effect is applied only to a Main Voice.
• S.Art Lite Voices sound differently depending on the keyboard
range, velocity, touch, etc. Hence, if you turn on a Keyboard
Harmony effect, and then change the transpose setting or
change the Voice Settings, unexpected or undesired sounds
may result.
Reverb
Adds the ambience of a club or concert hall to the
sound. Although the best-suited Reverb type is
called up by selecting a Song or Style, you can
select another one via Function number 020 (page
53). When you select “oFF,” the Reverb effect is
turned off. And you can also set the Reverb depth via
Function number 021 (page 53).
Chorus
Makes the Voice sound richer, warmer and more
spacious. Although the best-suited Chorus type is
called up by selecting a Song or Style, you can
select another one via Function number 022 (page
53). When you select “oFF,” the Chorus effect is
turned off. You can also set the Chorus depth for
Voices via Function numbers 007 (page 52), 011, 015
(page 53).
The Chorus depth cannot be applied to the Styles or
Songs.
Sustain
By turning on the Sustain parameter of Function
number 024 (page 53), you can add a fixed, automatic sustain to the Main/Dual Voices played on the
keyboard. Or, you can produce a natural sustain as
desired with the footswitch (sold separately; page
14).
Reference
2 Release the [ARTICULATION] button to turn
Articulation off.
• Even if you turn on Sustain, there are some Voices to which
sustain is not applied.
PSR-E373, PSR-EW310, YPT-370 Owner’s Manual
19
Playing a Variety of Instrument Voices
Appears when the Harmony is turned on.
Appears when the
Arpeggio is turned on.
or
Harm/Arp
026
Trio
002
026
Current type
Hold for longer
than a second.
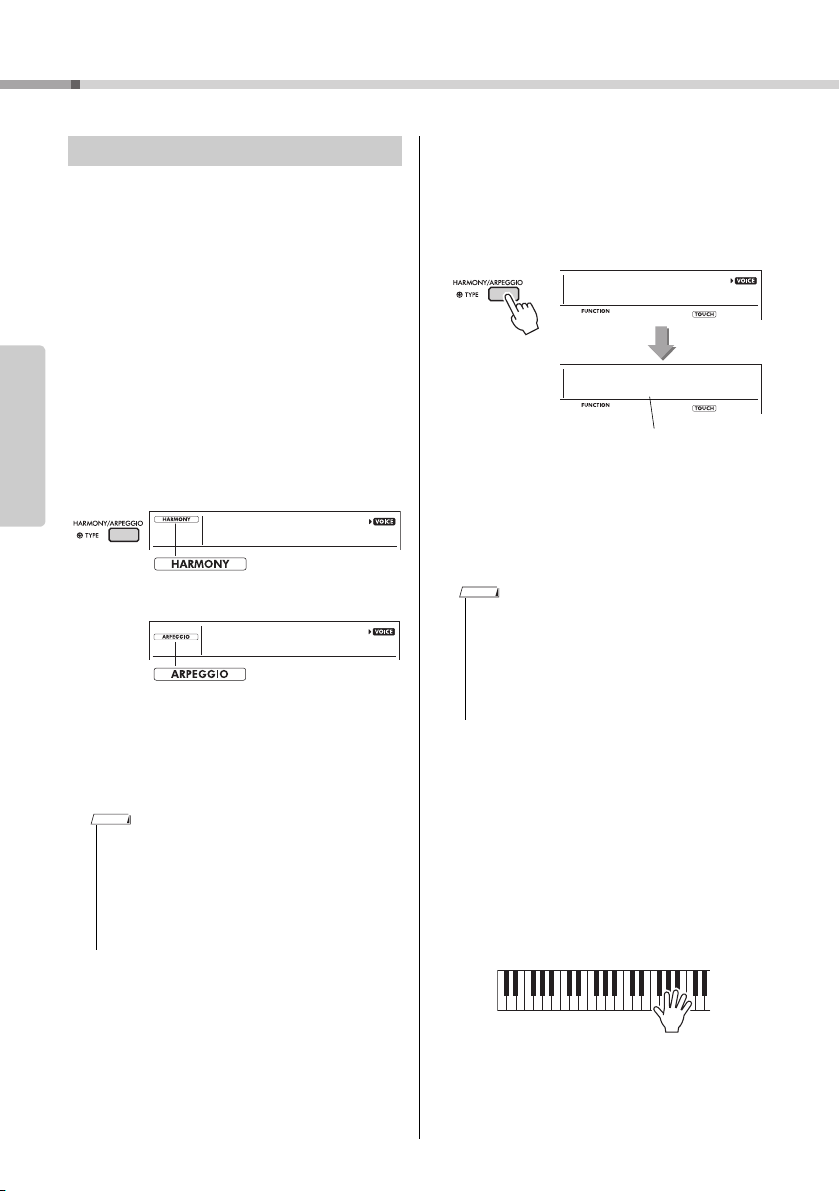
Adding Harmony or Arpeggio
You can add harmony or arpeggio notes to the Voice
played on the keyboard.
By specifying the Harmony Type, you can apply harmony parts, such as duet or trio, or add tremolo or
echo effects to the played sound of the Main Voice.
Also, when the Arpeggio Type is selected, arpeggios
(broken chords) are automatically played back when
you simply play the appropriate notes on the keyboard. For example, you could play the notes of a
triad—the root, third, and fifth—and the Arpeggio
function will automatically create a variety of interesting phrases. This feature can be used creatively in
Reference
music production as well as performance.
Press the [HARMONY/ARPEGGIO] but-
1
ton to turn on the Harmony or Arpeggio
function.
When the Harmony or the Arpeggio is turned on,
the most suitable one will be selected for the current Main Voice.
If you want to select a specific type, select it by
the operation steps 2 and 3 below.
• The Harmony effect can be added to only the Main Voice.
• When selecting a Voice number between 264 and 283,
the Arpeggio function will automatically be turned on.
• When selecting a Harmony Type between 001 and 005,
the harmony effect will only be added to your right-hand
melody play if you turn on the Style (page 24) and press
chords in the auto accompaniment range of the keyboard.
Hold down the [HARMONY/ARPEGGIO]
2
button for longer than a second so that
“Harm/Arp” (Functions 026; page 53)
appears on the display.
After “Harm/Arp” is shown for a few seconds, the
current type appears.
Use the number buttons [0]–[9], [+/YES],
3
[-/NO] buttons to select the desired type.
When you want to specify a Harmony Type, refer
to the Harmony Type list on page 80; to specify
an Arpeggio Type, refer to the Arpeggio Type list
on page 81.
• When playing one of the Arpeggio Types 143 to 176,
select the corresponding Voice below as the Main Voice.
143–173: Select a Drum Kit (Voice No.242–252).
174 (China): Select “StdKit1 + Chinese Perc.” (Voice
No.253).
175 (Indian): Select “Indian Kit 1” (Voice No.254) or
“Indian Kit 2” (Voice No.255).
176 (Arabic): Select “Arabic Kit” (Voice No.259).
Press a note or notes on the keyboard to
4
trigger the Harmony or Arpeggio.
When a Harmony Type is selected, a harmony
part (for example, duet or trio) or an effect (for
example, tremolo or echo) can be added to the
played sound of the Main Voice.
Also, when an Arpeggio Type is selected, arpeggios (broken chords) are automatically played
back when you simply play the appropriate notes
on the keyboard. The particular arpeggio phrase
differs depending on the number of pressed
notes and the area of the keyboard.
PSR-E373, PSR-EW310, YPT-370 Owner’s Manual
20
To turn the Harmony or Arpeggio off,
5
press the [HARMONY/ARPEGGIO] button again.
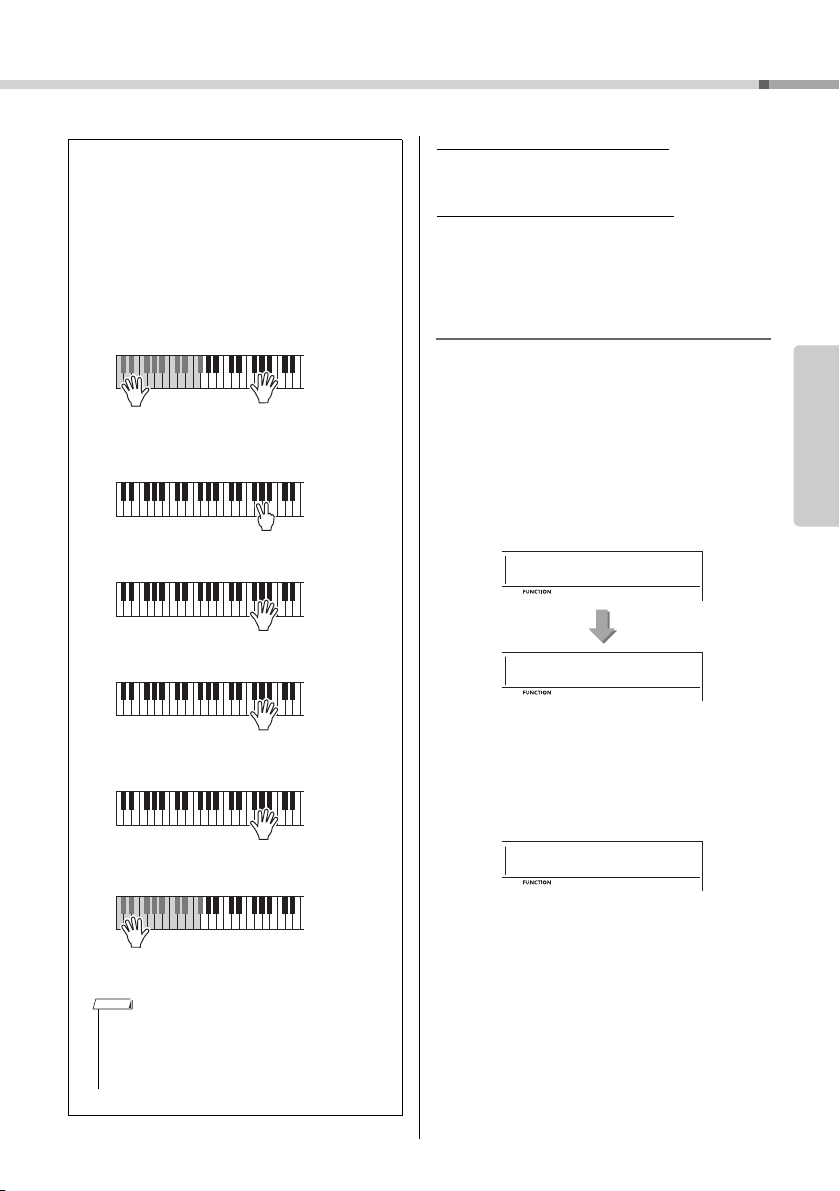
How to play the various Types
• Harmony Type 001 to 005
Press the right-hand keys while playing chords in the
auto accompaniment range of the keyboard when
Auto Accompaniment is on (page 24).
• Harmony Type 006 to 012 (Trill)
Hold down two keys.
• Harmony Type 013 to 019 (Tremolo)
Keep holding
down the keys.
• Harmony Type 020 to 026 (Echo)
Play the keys.
• Arpeggio Type 027 to 176
Arpeggio function applies to the Main Voice
and the Dual Voice.
Arpeggio function applies only to the split
Voi ce.
When Split is off:
When Split is on:
• Arpeggio cannot be applied to the Split and Main/
Dual Voices simultaneously.
• Selecting a Voice number between 274 and 283 as
the Main Voice will turn on Arpeggio and Split automatically.
The method of sounding the Harmony effect (01–26)
differs depending on the selected type. For Types
01–05, turn the Auto Accompaniment on and play it by
pressing a chord in the auto accompaniment section of
the keyboard, then play some keys in the right-hand
side to produce the Harmony effect. For Types 06–26,
turning auto accompaniment on or off has no effect.
However, it is necessary to play two notes simultaneously for Types 06–12.
PdlFunc
029
Sustain
1
029
Playing a Variety of Instrument Voices
To adjust the Harmony Volume:
This can be adjusted via Function number 027 (page
53).
To adjust the Arpeggio Velocity:
This can be adjusted via Function number 028 (page
53).
Holding the Arpeggio Playback via the
Footswitch (Hold)
You can set the instrument so that Arpeggio playback continues even after the note has been
released, by pressing the footswitch connected to the
[SUSTAIN] jack.
Press a [FUNCTION] button a number of
1
times until the “PdlFunc” (Function 029;
page 53) item appears on the display.
After “PdlFunc” is shown for a few seconds, the
current setting is shown.
Reference
NOTE
Use the number buttons [1]–[3], [+/YES],
2
[-/NO] buttons to select “Arp Hold.”
If you want to restore the footswitch function to
sustain, select “Sustain.” If you want to use both
hold and sustain functions, select “Sus+ArpH.”
Try play i n g the keyboard with Arpeggio
3
playback using the footswitch.
Even if you release the notes, Arpeggio playback
will continue. To stop Arpeggio playback, release
the footswitch.
PSR-E373, PSR-EW310, YPT-370 Owner’s Manual
21
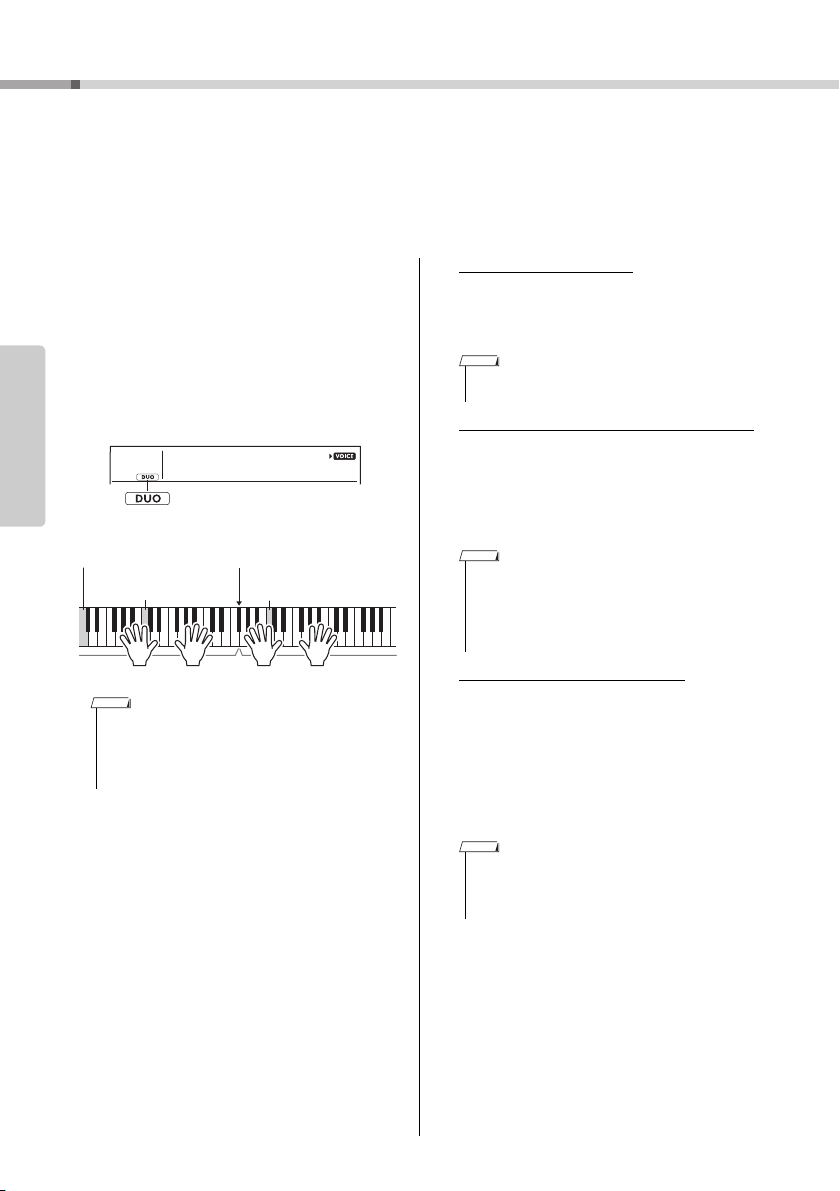
Playing the keyboard with two persons (Duo mode)
Appears when the
Duo is turned on.
Equivalent to C3
Duo Split Point
default setting: 066 (F#3)
Left Voice
Equivalent to C3
(PSR-E373, YPT-370)
Right Voice
Equivalent to C3
(PSR-EW310)
When the Duo mode is activated on this instrument, two different players can play the
instrument simultaneously, with the same sound, over the same octave range—one person on the left and the other on the right. This is useful for learning applications, in
which one person (a teacher, for example) plays a model performance and the other
person watches and practices while sitting at the first person’s side.
Press a [FUNCTION] button several
1
times until the “DuoMode” (Function
048; page 55) item appears on the display.
Use the [+/YES] button to select “on.”
2
Reference
The F#3 key becomes the Duo Split Point and the
keyboard is divided into two sections: one for the
left Voice and one for the right Voice.
001
CncertGP
Changing the Left Voice
To change only the Left Voice, select the desired
Left Voice with “DuoLVc” (Function 049; page 55).
If the Left Voice is different from the Right Voice,
the Right Voice is shown on the display.
• Certain functions such as Lesson, Harmony/Arpeggio
and Dual cannot be used in the Duo mode.
How sounds are output in the Duo mode
The performance sound of the left Voice will
sound from the left speaker, and the performance
sound of the right Voice will sound from the right
speaker, in the initial Duo mode setting. This output setting can be changed from the “DuoType”
setting (Function 055; page 55).
• In the Duo mode, the pan, volume and tonal characteristics of the stereo sound may differ from those in the normal mode, due to the setting of DuoType = “Separate”
(page 55). Particularly with Drum Kits, the difference may
be more obvious, since each key of a Drum Kit features a
different stereo pan position.
Using sustain in the Duo mode
Sustain can be applied to the left and right Voice
• The right Voice section and the left Voice section of the
keyboard are both set to the same Voice (Main Voice).
• The Duo Split Point can be changed via Function number
050 (page 55) by holding down the [ACMP ON/OFF] button for longer than a second.
One person should play the left Voice
3
section of the keyboard while the other
plays the right Voice section.
To exit from Duo mode, select “oFF” via
4
“DuoMode” (Function 048; page 55) by
sections in Duo mode just as it normally is by
using one of the following methods in the Duo
mode like the usual mode.
• Press the foot switch (page 14) connected to
the [SUSTAIN] jack.
• Set “Sustain” (Function 024; page 53) to on.
Sustain is applied to all notes.
• Sustain cannot be applied independently to the left Voice
section and the right Voice section.
• While Sustain is on, the setting of hold is maintained even
when the power is turned off.
executing steps 1 and 2.
22
PSR-E373, PSR-EW310, YPT-370 Owner’s Manual
Playing Rhythm and Accompaniment (Style)
FingType
017
SmartChd
1
017
This instrument includes an Auto Accompaniment feature that automatically plays
appropriate “Styles” (rhythm + bass + chord accompaniment), controlled simply by
playing root notes or chords with your left hand.
You can select how you want to play the chords from two ways: “SmartChord,” which
lets you play chords by playing a key with only one finger, and “Multi,” which lets you
play them normally, with all the constituent notes.
Press the [Style] button to exit from the
Fingering Type
When playing the Styles, specify how to play chords
in the Auto Accompaniment range via “FingType”
(“Fingering Type” Function 017; page 53). With this
instrument, you can choose from t wo fingering types.
“SmartChord” (Default setting)
You can play the Style by playing only the root
note of a chord.
“Multi”
This is a way to play the Style by playing all notes
of a chord. However, major, minor, seventh, and
minor sevenths can also be easily played by
pressing one to three keys.
For information about chords, refer to “Chord Types
for Style Playback” (page 26) or use the Chord Dictionary function (page 28).
3
Fingering Type settings.
Setting the Smart Chord Key
If “SmartChd” is selected in the “FingType,” you need to
set the keys of the Songs you want to play in advance.
The specified key is called the Smart Chord Key.
Press the [FUNCTION] button until
1
“S.ChdKey” (Function 018; page 53)
appears.
The current Smart Chord Key appears.
Reference
Setting the Fingering Type
Press the [FUNCTION] button several
1
times until “FingType” (Function 017;
page 53) appears.
“FingType” is shown in the display for a few seconds, followed by the current Fingering Type.
Use the number buttons [0]-[9] or
2
[+/YES] and [-/NO] buttons to select
“SmartChd” or “Multi.”
If “SmartChd” is selected, perform steps 3 and 4
below. If “Multi” is selected, skip steps 3 and 4.
Press the [+/YES] and [-/NO] buttons to
2
select the smart chord key that matches
the score.
For example, when you want to play the music
score below, you need to set the Smart Chord
Key to “FL2” (2 flats) (page 27).
Press the [Style] button to exit from the
3
Smart Chord Key settings.
PSR-E373, PSR-EW310, YPT-370 Owner’s Manual
23
Playing Rhythm and Accompaniment (Style)
Style Name
Style Number
Appears when
Style mode is
active.
This icon appears when automatic
accompaniment is on.
Split Point … default setting: 054 (F#2)
Auto
Accompaniment
range
036
(C1)
048
(C2)
060
(C3)
072
(C4)
084
(C5)
096
(C6)
Flashes when sync start is on.
• Since the Pianist category Styles (197–205) have no
rhythm parts, no sound will be produced if you start
rhythm-only playback. When playing these Styles, make
sure to carry out Steps 2–4 on this page.
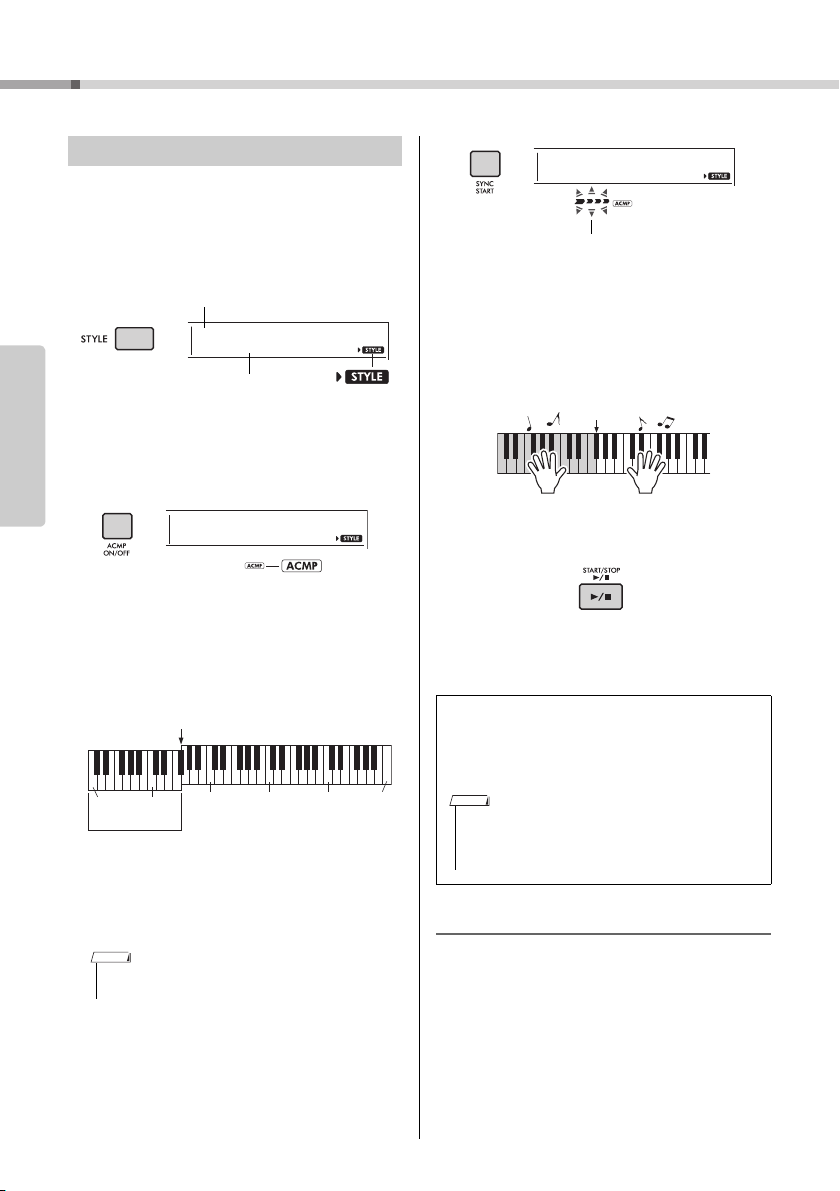
Playing Styles
Press the [STYLE] button, then use the
1
number buttons [0]–[9], [+/YES], [-/NO]
022
16Beat
to select the desired Style.
The Style List is provided on the front panel, or in
the Style List (page 76).
Reference
Press the [ACMP ON/OFF] button to turn
2
on the Auto Accompaniment.
Play a key in the Auto Accompaniment
4
range to start playback.
If “SmartChd” is selected, play the root note of a
chord with your left hand. If “Multi” is selected,
refer to page 26 for instructions on how to play.
Play a melody with the right hand and chords with
the left hand.
Press the [START/STOP] button to stop
5
playback.
With this operation, the area of the keyboard to
the left of the Split Point (054: F#2) becomes the
“Auto Accompaniment range” and is used only for
specifying the chords.
You can add intro, ending and rhythm variations
to Style playback by using “Sections.” For details,
refer to page 25.
To play back the rhythm part only
If you press the [START/STOP] button (without pressing
the [ACMP ON/OFF] button in step 2), only the rhythm
part can be played back, and you can play a melody
performance using the entire keyboard range.
NOTE
You can change the Split Point via Function number 003 (page 52) by holding down the [ACMP
ON/OFF] button for longer than a second.
• The strength meter (page 18) does not resp ond to playing in the Auto Accompaniment range.
Press the [SYNC START] button to turn
3
Synchro Start on.
This puts the Style playback in “standby” and
Style starts playing back when you play the key-
24
board.
PSR-E373, PSR-EW310, YPT-370 Owner’s Manual
Adjusting the Style Volume
To adjust the volume balance between Style playback and keyboard, you can adjust the Style Volume.
This can be set via Function number 016 (page 53).

Style Variations
Split Point … default setting: 054 (F#2)
Auto Ac comp a-
niment range
Each Style consists of «Sections» that allow you to
vary the arrangement of the accompaniment to
match the song you are playing.
INTRO
This is used for the beginning of the Song. When the
Intro finishes, Style playback shifts to the Main section. The length of the Intro (in measures) differs
depending on the selected Style.
MAIN
This is used for playing the main part of the Song.
Playback of the Main section repeats indefinitely until
another Section’s button is pressed. There are two
variations (A and B), and the Style playback sound
changes harmonically in response on the chords you
play with your left hand.
AUTO FILL
This is automatically added before changing to Main
A or B.
ENDING
This is used for the ending of the Song. When the
Ending finishes, the Style playback stops automatically. The length of the Ending (in measures) differs
depending on the selected Style.
Playing Rhythm and Accompaniment (Style)
Play a chord with your left hand to start
6
playback of the Intro.
For example, play a C major chord.
If “SmartChd” is selected via “FingType” (Function 017; page 53), refer to page 27.
If “Multi” is selected via “FingType”, refer to page
26.
After the Intro finishes, play the key-
7
board according to the progression of
the Song you are playing.
Play chords with your left hand while playing melodies with your right hand, and press the [MAIN/
AUTO FILL] button as necessary. The Section will
change to Fill-in then Main A or B.
Press the [INTRO/ENDING/rit.] button.
8
ENDING
Reference
1–3
Same as Steps 1–3 in page 24.
Press the [MAIN/AUTO FILL] button to
4
select Main A or Main B.
Press the [INTRO/ENDING/rit.] button.
5
Now, you’re ready to start Style playback from the
Intro section.
The Section switches to the Ending. When the
Ending is finished, Style playback stops automatically. You can have the Ending gradually slow
down (ritardando) by pressing the [INTRO/ENDING/rit.] button again while the Ending is playing
back.
PSR-E373, PSR-EW310, YPT-370 Owner’s Manual
25
Playing Rhythm and Accompaniment (Style)
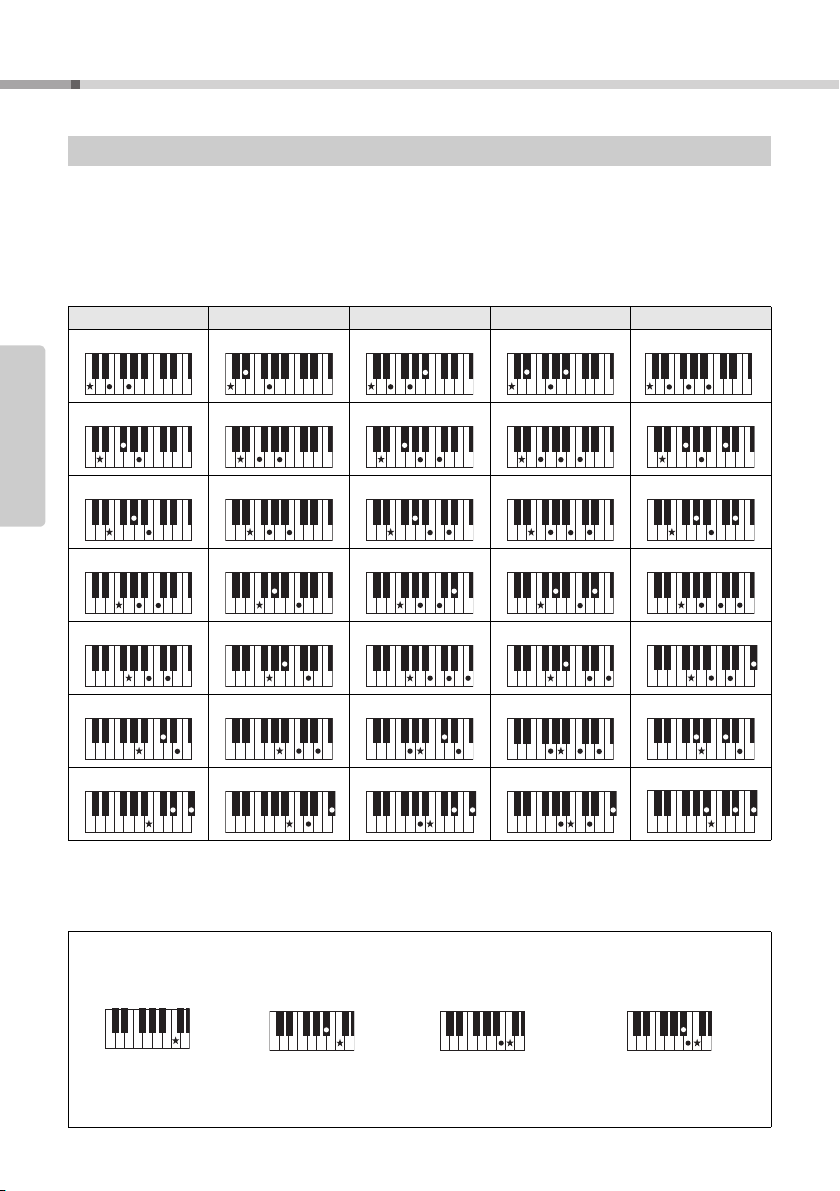
Chord Types for Style Playback
For users who are new to chords, this chart conveniently shows how to play common chords in the Auto Accompaniment range of the keyboard. Since there are many useful chords and many different ways to use them musically, refer to commercially available chord books for further details.
When Multi is selected, play the notes that make up the chord in the automatic accompaniment range. When
Smart Chord is selected, play the root note “” in the automatic accompaniment range.
indicates the root note.
Major Minor Seventh Minor Seventh Major Seventh
Cm
Reference
Dm
C
7
D
7
E
7
CM
7
Fm
F
7
Gm
Am
• Inversions can be used as well as in “root” position—with the following exceptions:
• Inversions of the 7sus4 chords are not recognized if the notes are omitted.
• When playing a chord which cannot be recognized by this instrument, nothing is shown on the display. In such a case, only a specific
26
b
5, m7(11), 6, m6, sus4, aug, dim7, 7b5, 6(9), sus2
m7, m7
part, such as the rhythm, will be played.
When “Multi” is selected, major, minor, seventh, and minor sevenths can also be easily played by pressing one to three keys.
Easy Chords for root “C”
To play a major chord
Press the root note ()
of the chord.
PSR-E373, PSR-EW310, YPT-370 Owner’s Manual
To play a minor chord
Press the root note
together with the nearest
black key to the left of it.
A
7
C
To play a seventh chord
Press the root note
together with the nearest
white key to the left of it.
Bm
7
7
Cm
To play a minor seventh chord
Press the root note together with the
nearest white and black keys to the
left of it (three keys altogether).
GM
7
7

Playing Rhythm and Accompaniment (Style)
Chords Heard When Smart Chord is Selected
When you select Smart Chord and set Smart Chord Key based on the composition of the score (page 23), play
the root note in the automatic accompaniment range. This lets you hear the respective chords below.
Key
Signature on
the music
score
No key signature
Smart
Chord Key
(Display)
FL7 C dim
FL6 C dim
FL5
FL4 C 1+5
FL3 C m
FL2 C m
FL1 C 7
SP0
(Default)
SP1 C
SP2 C
SP3
SP4 C
SP5 C dim
SP6 C dim
SP7
Root Note
Db Eb F# G# Bb
CDEFG AB
D
dim7
Eb
1+5
Db m
Db 7DEb mE
C m7
Db D dim Eb m
b5
Db D dim Eb 7E F mF#
D m7
Db
Db
dim7
Eb E dim F m
b5
Eb E dim F 7 F# G m G#
D 1+5
Db D m Eb
C
C
dim7
Db
dim
Db
dim
Db m7
b5
Db
1+5
Db mD
Db m
D m
D 7
D
D
D
dim7
Eb
dim7
Eb E m F
Eb
dim
Eb
dim
Eb m7
b5
Eb
1+5
Db 7DEb mE
C m7
Db D dim Eb m
b5
EF dim
E
dim7
E m7
b5
E 1+5 F
E m
E 7 F
EF dim
EF dim
E
dim7
F# 7GG# mA
F m7
F# G dim G# m
b5
F 1+5 F# G dim G# 7ABb mB
G m7
G# A dim Bb m
b5
F#
G 1+5
G# A dim Bb 7B
G#
G m
dim7
G# A m Bb
G 7
G#
G
dim
G#
G
dim
G# m7
b5
G
G#
dim7
1+5
F
F
dim7
dim7
F#
dim
F#
dim
F# m7
b5
F#
1+5
F# mG
F# m
F# 7GG# mA
F m7
F# G dim G# m
b5
F 1+5
F# G dim G# 7ABb mB
A
dim7
A m7
b5
A 1+5
A m
A 7
A
A
A
dim7
Bb m7
b5
Bb
1+5
Bb B dim
Bb B dim
Bb
dim7
Bb B m
Bb
dim
Bb
dim
Bb m7
b5
Bb
1+5
B
B
B
dim7
B m7
b5
B 1+5
B m
B 7
B
B
Reference
• The “1+5” chord indication on the instrument’s display is the same as that of a major chord.
PSR-E373, PSR-EW310, YPT-370 Owner’s Manual
27
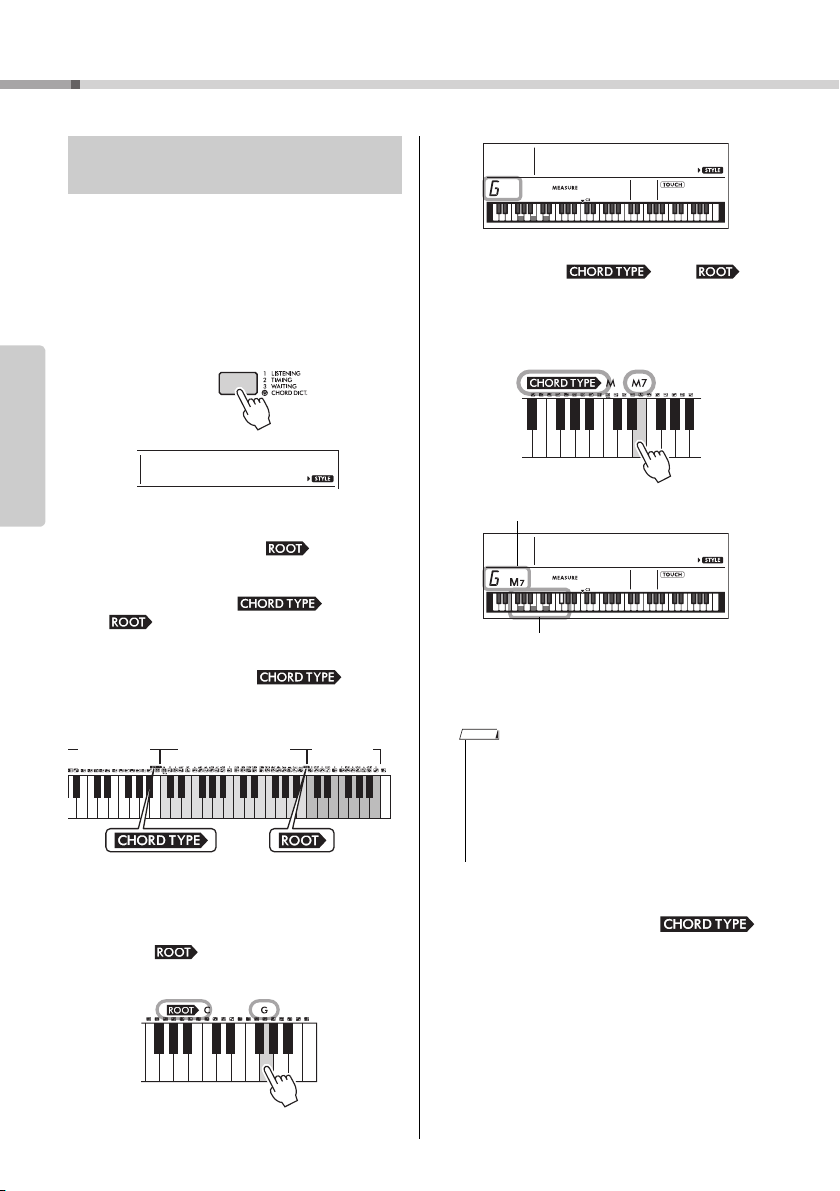
Playing Rhythm and Accompaniment (Style)
Hold for longer
than a second.
Chord Type range Root range Keyboa rd
playing range
Chord name (root and type)
Individual notes of chord
(keyboard)
Looking Up Chords Using the
Chord Dictionary
The Dictionary function is useful when you know the
name of a certain chord and want to quickly learn
how to play it.
Press and hold the [1 LISTENING
1
2 TIMING 3 WAITING] button for longer
than a second to call up “Dict.”
“Dict.” will appear in the display.
Reference
This operation will divide the entire keyboard into
the three ranges as illustrated below.
• The range to the right of “ ”:
Lets you specify the Chord Root, but produces
no sound.
• The range between “ ” and
“”:
Lets you specify the Chord Type, but produces
no sound.
• The range to the left of “ ”:
Lets you play and confirm the Chord specified
in the above two ranges.
Press the key labeled “M7” in the section
2-2.
between “ ” and “ .”
The notes you should play for the specified
chord (root note and chord type) are conveniently shown in the display, both as
notation and in the keyboard diagram.
Dict.
001
To call up possible inversions of the chord, press
the [+/YES]/[-/NO] buttons.
As an example, learn how to play a GM7
2
(G major seventh) chord.
2-1.
PSR-E373, PSR-EW310, YPT-370 Owner’s Manual
28
Press the “G” key in the section to the right
of “ ” so that the “G” is shown as the
root note.
• About major chords: Simple major chords are usually
indicated only by the root note. For example, “C” refers to
C major. However, when specifying major chords here,
make sure to select “M” (major) after pressing the root
note.
• These chords are not shown in the Chord Dictionary function: 6(9), M7(9), M7(
mM7(9), mM7
Following the notation and keyboard dia-
3
b
5, 7b
#
11) , b
5, sus2
5, M7b
5, M7aug, m7(11),
gram in the display, try playing a chord
in the range to the left of “ .”
When you’ve played the chord properly, a bell
sound signals your success and the chord name
in the display flashes.
To exit from the Chord Dictionary mode,
4
press one of these buttons; [VOICE],
[SONG] or [STYLE].
Loading…
View the manual for the Yamaha PSR-EW310 here, for free. This user manual comes under the category keyboards and has been rated by 8 people with an average of a 8.6. This manual is available in the following languages: English. Do you have a question about the Yamaha PSR-EW310?
Ask your question here
Frequently asked questions
Can’t find the answer to your question in the manual? You may find the answer to your question in the FAQs about the Yamaha PSR-EW310 below.
How to Maximize MIDI Functionality on Yamaha PSR-EW310
How can I best clean my keyboard?
A slightly damp cleaning cloth or soft, dust-free cloth works best to remove fingerprints. Dust in hard-to-reach places is best removed with compressed air.
Is the manual of the Yamaha PSR-EW310 available in English?
Yes, the manual of the Yamaha PSR-EW310 is available in English .
Is your question not listed? Ask your question here
Доставка
Доставка по Санкт-петербургу и ленинградской области
Бесплатная доставка по Санкт-Петербургу в пределах КАД осуществляется при стоимости заказа свыше 10 000 рублей. При стоимости заказа до 10 000 рублей, стоимость доставки составит 500 рублей. Доставка товара по Санкт-Петербургу осуществляется в срок 1-2 дня с момента оформления заказа, в согласованное с покупателем время. Внимание! Бесплатная доставка действует на Юго-западе СПб до границ ул. Пионерстроя, на Севере СПб до пересечения КАД с Приморским шоссе. Доставка по Ленинградской области осуществляется из расчета 30 рублей за каждый километр от границы Санкт-Петербурга.Специалисты отдела доставки доставят и поднимут товар к Вам в квартиру и поставят там, где Вы скажете.
Подъем товара в Санкт-петербурге
Подъем товара до 10кг осуществляется бесплатно до квартиры
Подъем товара на лифте от 10кг до 30кг составляет 300р
Подъем товара по лестнице от 10кг до 30кг составляет 300р (занос) + 100р этаж
Подъем товара свыше 30кг рассчитывается индивидуально
Доставка по России
Доставка по России осуществляется до терминала транспортной компании в Вашем городе при стоимости заказа выше 10 000 рублей. Стоимость доставки транспортной компанией до терминала в Вашем городе рассчитывается исходя из тарифов транспортной компании и оплачивается покупателем при получении.
Доставка товара на терминал транспортной компании в Санкт-Петербурге осуществляется в срок 1-2 дня с момента оплаты заказа (по безналичному расчету). Сроки доставки до вашего города, Вы можете уточнить у наших менеджеров.Интернет-магазин MuzPlanet.com осуществляет доставку товаров по всей территории России. Мы уже много лет успешно сотрудничаем с самыми крупными и надежными в России транспортными компаниями, поэтому все заказы приходят точно в срок. Заказать звуковое оборудование и музыкальные иструменты в интернет-магазине MuzPlanet.com намного выгоднее, чем покупать в региональном магазине! Зачем переплачивать посредникам? Мы продаем товар напрямую от мировых производителей и предлагаем нашим клиентам безупречное качество по самым низким ценам!
Рекомендуемые нами ТК:
- Возовоз — www.vozovoz.ru;
- Деловые Линии — www.dellin.ru;
- КИТ — www.tk-kit.ru;
- ПЭК — www.pecom.ru;
- ЖелДорЭкспедиция — www.jde.ru;
- Автотрейдинг — www.ae5000.ru.
Оплата
Оплата в Санкт-петербурге
1. Оплата наличными при получении.
Данный способ оплаты подразумевает, что оплата будет произведена наличными деньгами при получении курьеру.
2. Оплата картой visa, mastercard или maestro при получении.
Данный способ оплаты подразумевает, что оплата будет произведена банковской картой через терминал при получении курьеру. На сегодня данный способ оплаты доступен только при выборе способов доставки: «Курьерская доставка по Санкт-Петербургу».
3. Предоплата по счету на физическое лицо через банк.
Данный способ оплаты подразумевает, что оплата будет произведена безналичным перечислением денежных средств на расчетный cчет компании (для юридических лиц). На сегодня данный способ оплаты доступен только при выборе способов доставки: «Доставка до Транспортной компании (для других городов)».
4. Безналичный расчет.
Данный способ оплаты подразумевает, что оплата будет произведена безналичным перечислением денежных средств на расчетный cчет компании (для юридических лиц).
5. Оплата через сайт по карте visa, mastercard или maestro или Яндекс.Деньги.
Данный способ оплаты подразумевает, что вы оставляете заявку (на сайте, по телефону или по e-mail), после чего наш менеджер высылает по электронной почте номер Вашего заказа и ссылку на страницу оплаты:
- Для оплаты банковской картой Вы будете перенаправлены на защищенную платежную страницу процессинговой компании PayKeeper . Страница оплаты отвечает последним международным требованиям безопасности платежных систем Visa и MasterCard.
- В процессе оплаты банковской картой введите ее номер, срок действия, код CVV, указанный на обороте, а также имя и фамилию владельца и контактные данные владельца карты.
- Убедитесь, что Вы ввели корректные данные, а затем нажмите на кнопку «Оплатить».
- Если ваша банковская карта поддерживает технологию 3D Secure, Вы автоматически перейдете на сайт своего банка, где Вас попросят ввести секретный код активации, который будет отправлен Вам на телефон.
- Если реквизиты карты введены верно и на счете достаточно денег, Вы увидите подтверждение оплаты заказа. После чего Вам будет предложено вернуться на страницу магазина.
Стереофонический оптимизатор для комфортных занятий в наушниках
При использовании наушников функция стереофонической оптимизации обеспечивает рассеивание звука — так, как это слышит пианист, играющий на акустическом рояле. При этом звуки, созданные на основе сэмплов реального фортепиано, исходят словно из корпуса инструмента, а не из наушников.